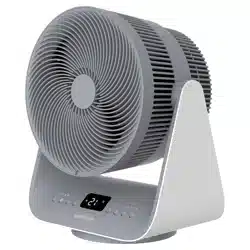
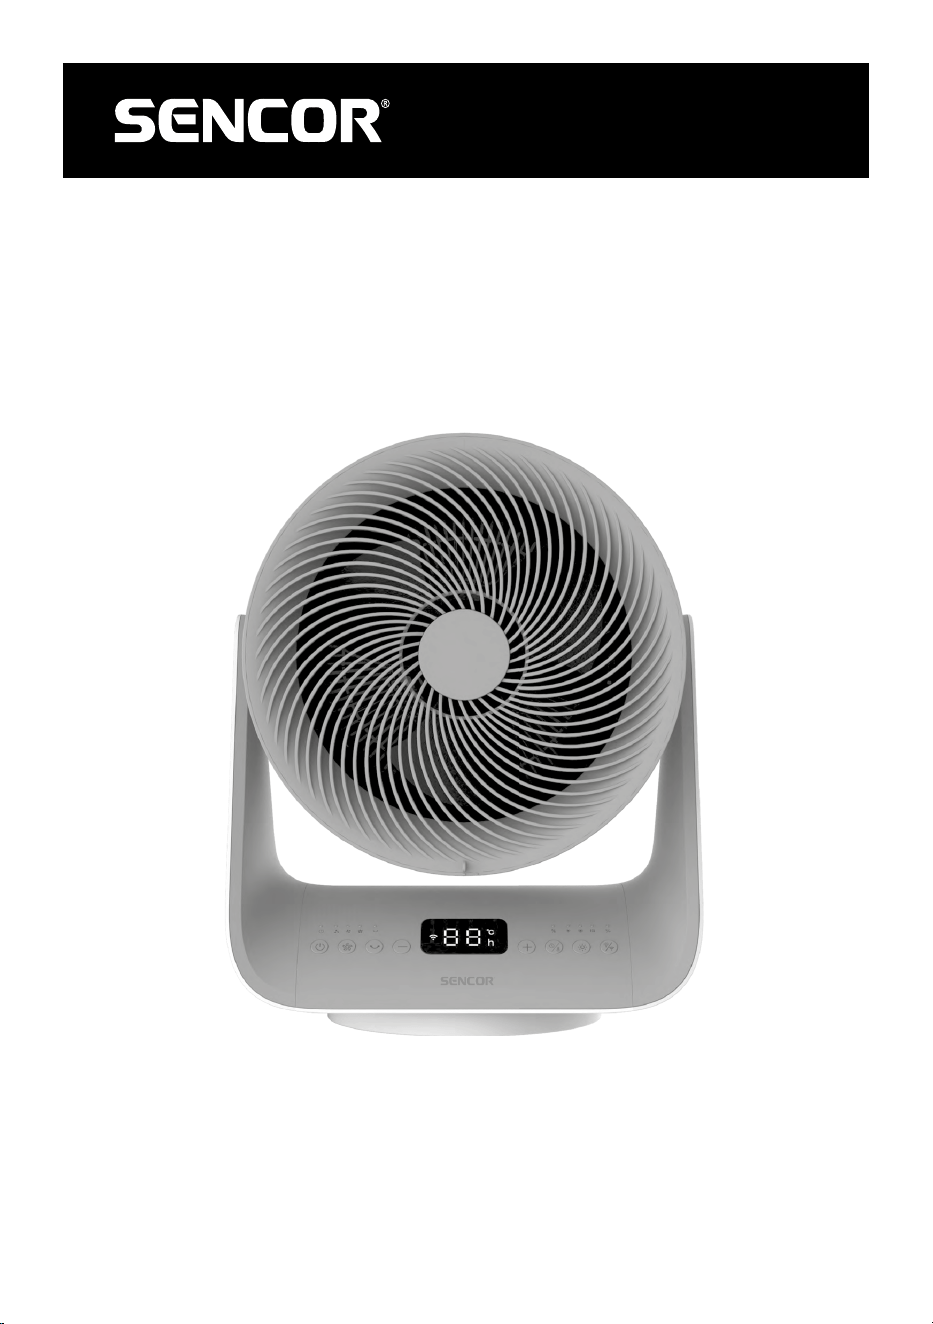
SFH 9200GY
EN
HEATING AIR CIRCULATOR WI-FI
Translation of the original manual
This product is only suitable for well-insulated areas or occasional use! This product is not suitable as
amain heat source for heating. Information regarding electric local space heaters as required by EU
Commission Regulation 2024/1103 is provided in the Annex to this manual.
SFH 9200GY
A
1
2
3
4
5
6
7
B
1 2 3 4 6 7 8 95
C
1
2
3
4
5
6
7
8
D1 D2
E
1
2
F
h
- 1 -
06/2025
2025, .
EN
Heating Air Circulator Wi-Fi
User Manual
IMPORTANT SAFETY INSTRUCTIONS
READ CAREFULLY AND STORE FOR FUTURE USE.
• This appliance may be used by children 8 years of age
and older and by persons with physical, sensory or mental
impairments or by inexperienced persons, if they are
properly supervised or have been informed about how to
use of the product in asafe manner and understand the
potential dangers.
• Children must not play with the appliance. Cleaning and
maintenance must not be performed by children without
supervision.
• If the power cord is damaged, have it replaced in
aprofessional service centre in order to prevent
adangerous situation. Never use the appliance if the
power cord is damaged.
• Children younger than 3 years of age should be prevented
from accessing the appliance unless they are under
constant supervision.
• Children between the ages of 3 and 8 may only turn
this appliance on/off if it has been placed or installed in
its intended normal operating position and if they are
supervised or have been instructed in the safe use of the
appliance and understand the potential hazards. Children
between the ages of 3 and 8 must not insert the plug into
the socket, regulate or clean the appliance or carry out
maintenance by the user.
HEATING AIR CIRCULATOR WI-FI
Translation of the original manual
This product is only suitable for well-insulated areas or occasional use! This product is not suitable as amain heat source for heating.
Information regarding electric local space heaters as required by EU Commission Regulation 2024/1103 is provided in the Annex to this
manual.
- 2 -
06/2025
2025, .
CAUTION:
Certain parts of this product may become very hot
and cause burns. Special attention should be paid
when children and handicapped people are present.
DO NOT COVER!
WARNING:
To prevent overheating, do not cover the heater.
• The heater must not be located just below the power
socket.
• Do not use the heater in the near vicinity of abath, shower
or swimming pool.
• Do not use this heater if it has been dropped.
• Do not use this heater if there are visible signs of damage
to the heater.
• Use this heater only on flat and stable surface.
WARNING:
Do not use this heater in small rooms when they
are occupied by persons not capableof leaving the
room on their own, unless constant supervision is
provided.
WARNING:
To reduce the risk of fire, keep textiles, curtains, or
any other flammable material aminimum distance
of 1 m from the air outlet.
- 3 -
06/2025
2025, .
CAUTION:
Do not use this appliance with aprogrammer,
time switch, remote control system, or any other
component that would automatically switch the
appliance on, as there is arisk of fire if the appliance
is covered or improperly positioned.
. . . . . . . . . . . . . . . . . . . . . . . . . . . . . . . . . . . . . . . . . . . . . . . . . . . . . . . . . . . . . . . . . . . . . . . . . . . . . . . . . . . . . . . . . . . . . . . . . . . . . . . . . . . . . . . . . . . . . . . . . . . . . . . . . . . . . . . . . . . .
Additional important safety instructions foruse of the appliance
• Before connecting the appliance to the mains socket, check that the nominal voltage on the appliance'srating label matches the electrical voltage in
the socket.
• Do not connect the appliance to an extension cord or multiple outlets.
• The appliance is designed for use in households, offices and similar types of areas.
• Do not use the appliance in very dusty or humid rooms such as laundries or bathrooms, in areas where chemicals are stored, in industrial
surroundings or outdoors.
• This appliance is not intended to be mounted on awall.
• When the appliance is inoperation, it must not be located on an unstable surface, such as asofa, acarpet withdense long fibres, etc. The appliance
must be located on aeven, dry andstable surface.
• Use the appliance in avertical position.
• Do not use the appliance inrooms smaller than 4 m
2
.
• During operation, aclear space of at least 1 m in front of the appliance and 50 cm behind it must be left to ensure sufficient air circulation. Do not use
the appliance in close proximity to curtains, drapes or other flammable materials.
Caution:
The appliance is not equipped with adevice to control the room temperature. Do not use the appliance in small spaces unless there
are persons who are unable to leave the room alone and supervision is provided at all times.
• Do not subject people or animals to the direct flow of hot or cold air for an extended period of time. It may negatively affect their health.
• Do not push any objects through the front air outlet grille or the rear air inlet grille. This could cause an electrical short circuit or damage the
appliance.
• To avoid possible electric shock, do not immerse any part of this appliance in water or other liquid.
• When the appliance is connected to the mains socket, do not touch it with wet or damp hands.
• Do not leave the appliance unattended while it is switched on and plugged into the mains socket. Do not leave the appliance running while you
sleep.
• Always turn off the appliance and disconnect it from the power socket if you will not be using it or before cleaning.
• Keep the appliance in aclean condition.
• Do not bend or twist the power cord to prevent damage. Make sure it does not come into contact with hot surfaces or sharp objects.
• Do not disconnect the appliance from the mains socket by pulling the power cord. This could damage the power cord or the power socket. Do not
disconnect the cord from the power socket by pulling the power cord fork.
• Do not use the appliance if it is not working correctly, if it has been damaged or has been submerged in water. To avoid the danger of injury by
electrical shock, do not repair the appliance yourself or make any adjustments to it. Have all repairs or adjustments of the appliance performed at
an authorised service centre. Tampering with the appliance may result in the loss of your legal rights regarding faulty performance or warranty for
quality.
• The manufacturer is not responsible for any damages caused by the incorrect use of this appliance.
. . . . . . . . . . . . . . . . . . . . . . . . . . . . . . . . . . . . . . . . . . . . . . . . . . . . . . . . . . . . . . . . . . . . . . . . . . . . . . . . . . . . . . . . . . . . . . . . . . . . . . . . . . . . . . . . . . . . . . . . . . . . . . . . . . . . . . . . . . . .
- 4 -
06/2025
2025, .
EXPLANATION OF SYMBOLS PLACED ON THE PRODUCT OR INTHE ACCOMPANYING DOCUMENTATION
The product meets all the basic requirements of the applicable EU directives.
This symbol on products or original documents means that used electric or electronic products must not be added to ordinary municipal
waste.
Safety Class for Electric Shock Protection:
Class II – Electric shock protection is provided by double or heavy-duty insulation.
. . . . . . . . . . . . . . . . . . . . . . . . . . . . . . . . . . . . . . . . . . . . . . . . . . . . . . . . . . . . . . . . . . . . . . . . . . . . . . . . . . . . . . . . . . . . . . . . . . . . . . . . . . . . . . . . . . . . . . . . . . . . . . . . . . . . . . . . . . . .
- 5 -
06/2025
2025, .
• Thank you for purchasing our SENCOR product; we hope it will serve
to your satisfaction.
• Prior to using this appliance, please read the user manual thoroughly,
even in cases when you are already familiar with the use of similar
types of appliances. Use the appliance only as described in this
user manual. Keep the manual for future reference. If you pass the
appliance on to another person, ensure that this user manual is
included.
• Carefully unpack the appliance and make sure not to discard any part
of the packaging material until you have removed all the components.
It is recommended that you keep the original packaging, packing
material, receipt and confirmation of the extent of the seller'sliability
or warranty certificate at least for the duration of the legal right to
file adefect claim or the quality warranty. When transporting the
appliance, we recommend repackaging it in the original box provided
by the manufacturer.
. . . . . . . . . . . . . . . . . . . . . . . . . . . . . . . . . . . . . . . . . . . . . . . . . . . . . . . . . . . . . . . . . . . .
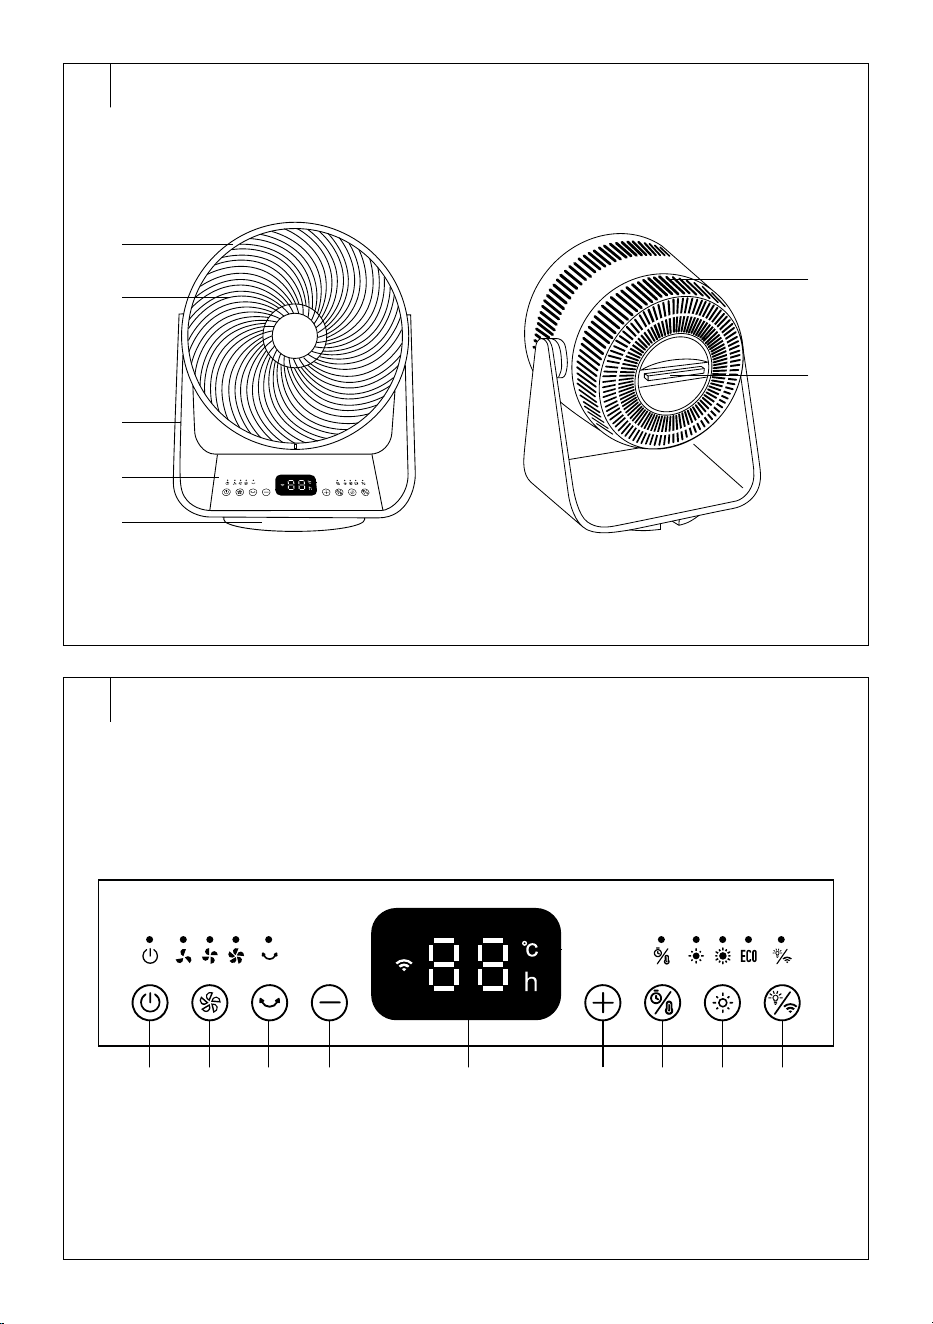
DESCRIPTION OF THE HEATING AIR CIRCULATOR
A1 Front air outlet protective grille
A2 Fan
A3 Circulator design arms
A4 Control panel
A5 Base
A6 Rear air inlet protective grille
A7 Handle with remote control
storage
. . . . . . . . . . . . . . . . . . . . . . . . . . . . . . . . . . . . . . . . . . . . . . . . . . . . . . . . . . . . . . . . . . . .
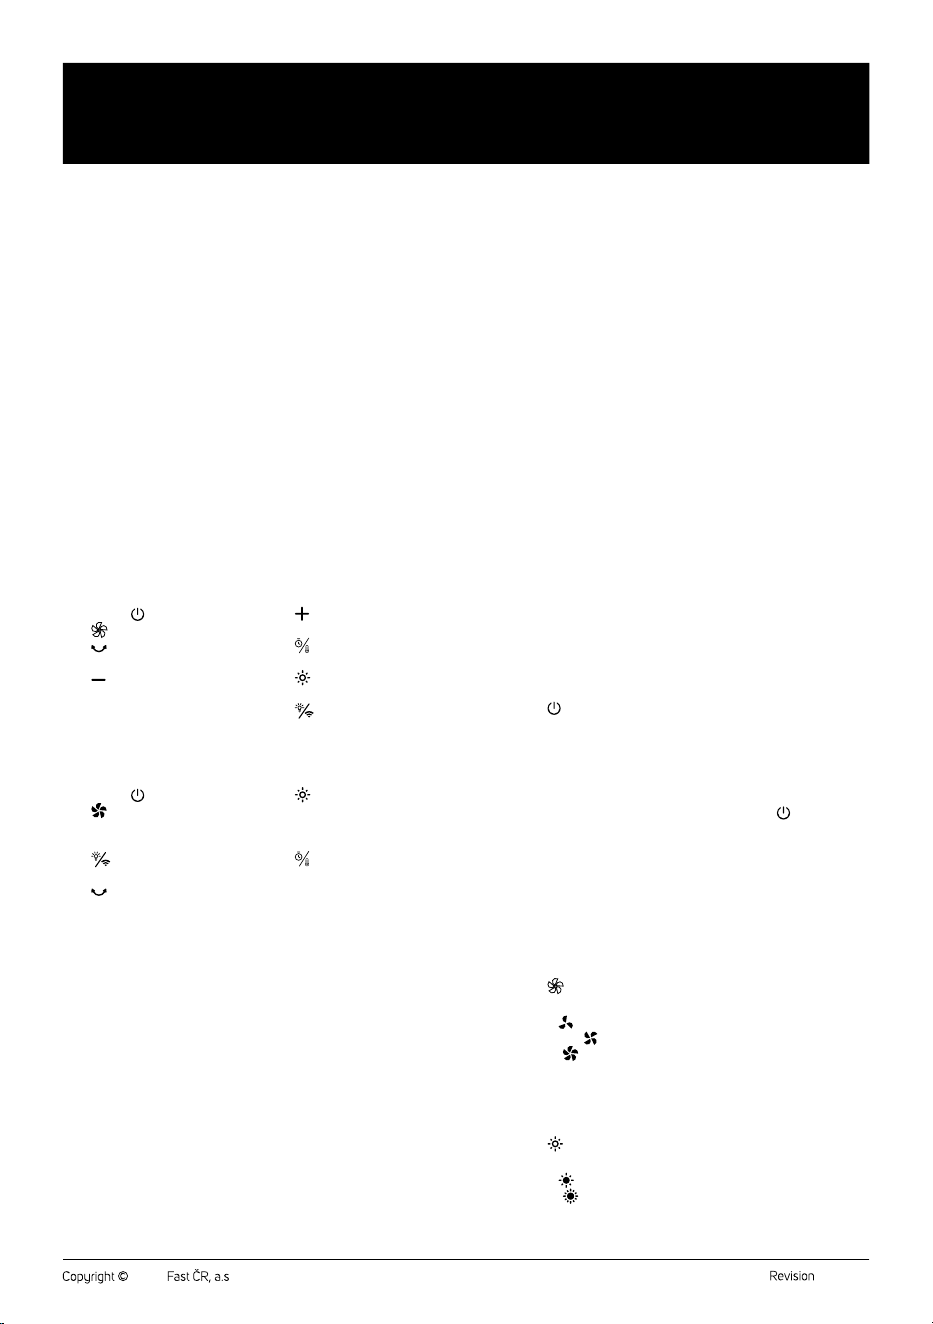
DESCRIPTION OF THE CONTROL PANEL
B1 On/Off button
B2 button to adjust fan speed
B3 button to switch oscillation
on/off
B4 button to set temperature
or timer time
B5 Display
B6 button to set temperature
or timer time
B7 button to select
temperature or timer setting
B8 button toset the power of
the heating element
B9 button toswitch the
backlight on/off / reset Wi-Fi
. . . . . . . . . . . . . . . . . . . . . . . . . . . . . . . . . . . . . . . . . . . . . . . . . . . . . . . . . . . . . . . . . . . .
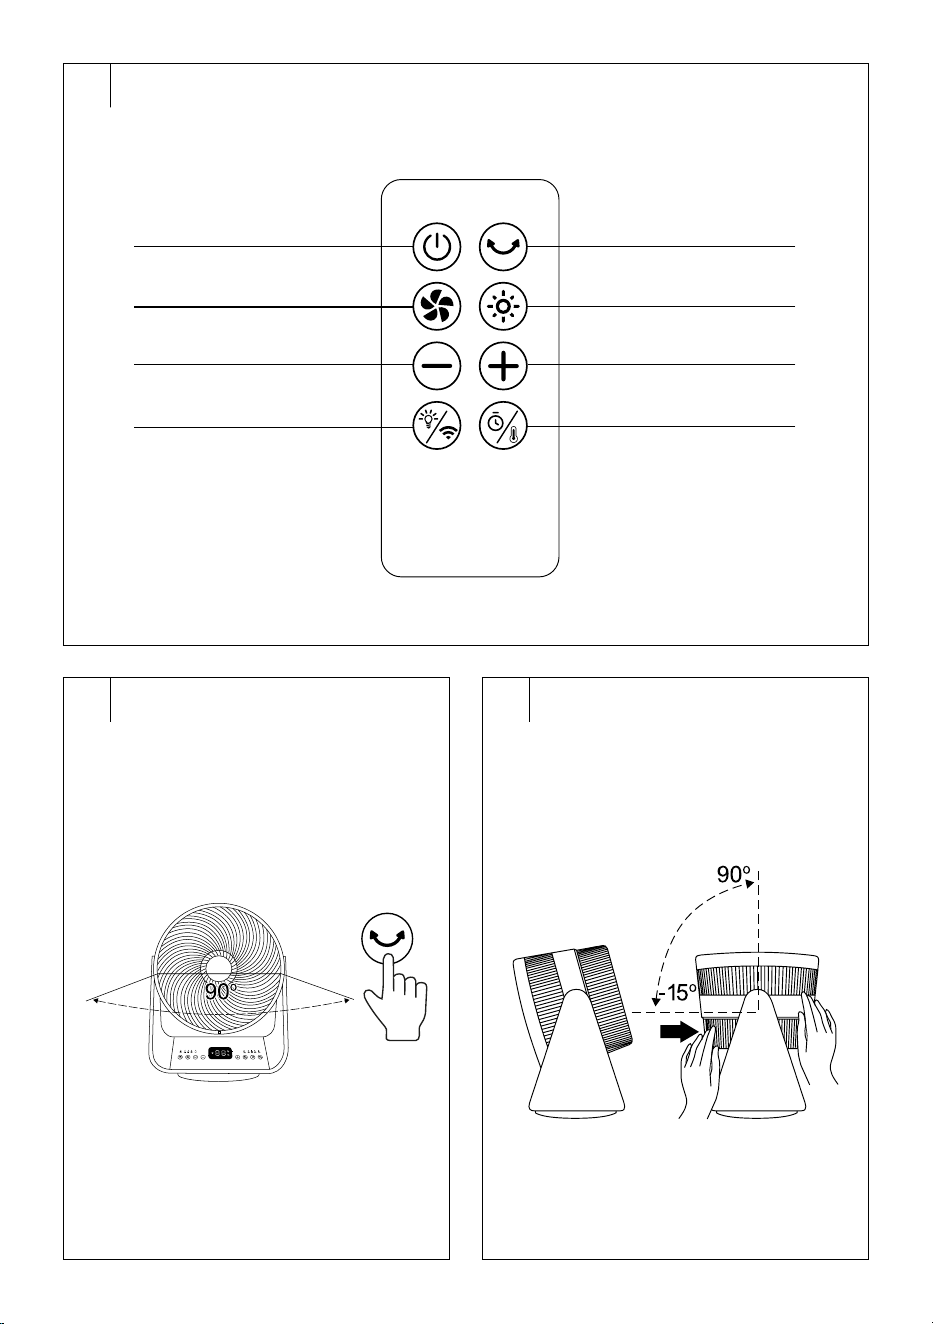
REMOTE CONTROL DESCRIPTION
C1 On/Off button
C2 button to adjust fan speed
C3 − button to set temperature or
timer time
C4 button toswitch the
backlight on/off / reset Wi-Fi
C5 button to switch oscillation
on/off
C6 button toset the power of
the heating element
C7 + button to set temperature or
timer time
C8 button to select
temperature or timer setting
. . . . . . . . . . . . . . . . . . . . . . . . . . . . . . . . . . . . . . . . . . . . . . . . . . . . . . . . . . . . . . . . . . . .
INTENDED USE
• The heating air circulator withWi-Fi is equipped with both heating
and cooling functions, and is therefore suitable for maintaining
apleasant indoor temperature all year round. Onhot days, it ensures
an efficient flow of cool air, while inwinter it offers the possibility of
rapid overheating. Thanks to its compact design and the possibility of
directing airflow, it is suitable for any home or smaller areas.
• The heating air circulator can also be controlled via the Sencor
HOME mobile application, which allows, among others, setting the
temperature, operating mode andtimer remotely. This combination
of functions brings comfort, energy savings andmore flexibility for
everyday use.
. . . . . . . . . . . . . . . . . . . . . . . . . . . . . . . . . . . . . . . . . . . . . . . . . . . . . . . . . . . . . . . . . . . .
BEFORE USING
• Remove the circulator and all accessories from the packaging. Check
that you have removed all parts.
• Check that the circulator or its accessories are not damaged.
• The circulator is supplied assembled and does not need to be
reassembled.
• Remove the protective foil and advertising labels from the circulator.
. . . . . . . . . . . . . . . . . . . . . . . . . . . . . . . . . . . . . . . . . . . . . . . . . . . . . . . . . . . . . . . . . . . .
PLACEMENT
• Place the circulator on aflat, dry and firm surface well away from the
mains socket.
• Use the circulator in an upright position.
• Do not place the circulator on an unstable surface such as asofa,
carpet, etc., or place it on atable, desk top, etc.
• During operation, aclear space of at least 1 m in front of the appliance
and 50 cm behind it must be left to ensure sufficient air circulation. Do
not use the appliance in close proximity to curtains, drapes or other
flammable materials.
• Do not bend or twist the power cord to prevent damage. Make sure it
does not come into contact with hot surfaces or sharp objects.
• Guide it in such away that it is not tripped over or stepped over. Do not
place it under acarpet or furniture.
. . . . . . . . . . . . . . . . . . . . . . . . . . . . . . . . . . . . . . . . . . . . . . . . . . . . . . . . . . . . . . . . . . . .
COMMISSIONING
• Fully unwind the power cord and plug the power cord plug into
aproperly grounded power socket.
• Two short beeps will sound and the control panel will briefly light up. It
will then go out. The circulator switches to standby mode.
. . . . . . . . . . . . . . . . . . . . . . . . . . . . . . . . . . . . . . . . . . . . . . . . . . . . . . . . . . . . . . . . . . . .
POWER ON/OFF
• Press the button to switch on the circulator.
• If you turn on the circulator for the first time, it will start at alow fan
speed. The power on light and low speed light will light up. The display
will be off and other functions will be disabled.
• The next time you turn it on, the circulator will start at the setting it was
previously off, except for the timer.
• When you are finished using the circulator, press the button to turn
off the circulator. The circulator switches to standby mode.
• To turn off completely, disconnect the power cord plug from the power
socket.
• However, if you wish to control the circulator via the mobile
application, it is important that the mains plug remains plugged into
the mains socket.
. . . . . . . . . . . . . . . . . . . . . . . . . . . . . . . . . . . . . . . . . . . . . . . . . . . . . . . . . . . . . . . . . . . .
FAN SPEED SETTING (cooling mode)
• Press the button repeatedly and adjust the fan speed in the
following order:
– low (the indicator light will turn on)
– medium (the indicator light will turn on)
– high (the indicator light will turn on).
. . . . . . . . . . . . . . . . . . . . . . . . . . . . . . . . . . . . . . . . . . . . . . . . . . . . . . . . . . . . . . . . . . . .
SETTING THE POWER OF THE HEATING ELEMENT
(heating mode)
• Press the button repeatedly andset the heating element power in
thefollowing order:
– low (the indicator light will turn on)
– high (the indicator light will turn on)
– ECO mode (the ECO indicator light will turn on).
EN
Heating Air Circulator Wi-Fi
User Manual
- 6 -
06/2025
2025, .
• If necessary, set therequired temperature. Follow the instructions in
the chapter “SETTING THE TEMPERATURE”. The temperature can
be set for low andhigh power of the heating element.
Note:
When high power is selected, the heating element will
switch to high power after approximately 10seconds. This
is normal.
ECO Mode
• Inthis mode, the heating element of the circulator regularly switches
on andoff depending on the ambient temperature. It is not possible to
set the temperature in this mode.
• The limit temperatures in theEco mode are 18°C and25°C.
• If the temperature sensor detects an ambient temperature below 18°C,
the heating element will switch on at high power.
• If the temperature sensor detects an ambient temperature in the range
from 18 to 25°C, the heating element is switched on at low power.
• If the temperature sensor detects an ambient temperature above
25°C, the heating element will stop heating and the fan will stop after
approximately 10seconds.
• When the temperature sensor detects adecrease in ambient
temperature of2°C, the heating element and the fan will restart.
Note:
After the low or high power is switched off, the fan will be
inoperation and the low speed indicator will be on.
When the ECO mode is switched off, the fan will not run.
. . . . . . . . . . . . . . . . . . . . . . . . . . . . . . . . . . . . . . . . . . . . . . . . . . . . . . . . . . . . . . . . . . . .
SETTING THE TEMPERATURE
• The temperature can be adjusted only when the low or high power of
the heating element is set.
• Press the button, repeatedly until “°C” lights up on the display. The
temperature reading on the display will start flashing.
• Use the +/− buttons to adjust the temperature between 15 and 35°C.
• Wait approximately 5seconds or press any button except and
until the set temperature is stored in memory. The temperature
display stops flashing and lights up.
• When the temperature sensor detects the ambient temperature equal
to the set temperature, the heating element stops heating and the fan
stops after about 10seconds.
• When the temperature sensor detects adecrease in the ambient
temperature of2°C below the set temperature, the heating element
and the fan will restart.
Note:
If you have enabled the oscillation function, it will stop or
start again together with the heating element and the fan.
Note:
When the temperature is set for the first time, the display
will flash at 35°C.
. . . . . . . . . . . . . . . . . . . . . . . . . . . . . . . . . . . . . . . . . . . . . . . . . . . . . . . . . . . . . . . . . . . .
TIMER SETTING
• The circulator is equipped with two timers: the ON timer (the circulator
turns on after the set time has elapsed) and the OFF timer (the
circulator turns off after the set time has elapsed).
On timer
• In Standby mode, press the button. The timer reading will flash on
the display.
• Use the +/− buttons to set the time after which the circulator will
automatically switch on.
• Wait approximately 5seconds, or press any button except and ,
until the set time is stored in memory. The time reading on the display
will stop flashing and light up.
• When the set time has elapsed, the circulator will automatically
switch on.
• If you need to turn the timer off earlier, set the timer time to "0 h" or
press the button.
Sleep timer
• When the circulator is on, repeatedly press the button until “h”
lights up on the display. The timer reading will flash on the display.
• Use the +/− buttons to set the time after which the circulator
automatically switches off.
• Wait approximately 5seconds, or press any button except and ,
until the set time is stored in memory. The time reading on the display
will stop flashing and light up.
• When the set time has elapsed, the circulator automatically switches off.
• If you need to turn the timer off earlier, set the timer time to "0 h" or
press the button.
Note:
If you set the sleep timer and the heating element
temperature at the same time, the display will alternately
show the timer and temperature reading atan interval of
10seconds.
. . . . . . . . . . . . . . . . . . . . . . . . . . . . . . . . . . . . . . . . . . . . . . . . . . . . . . . . . . . . . . . . . . . .
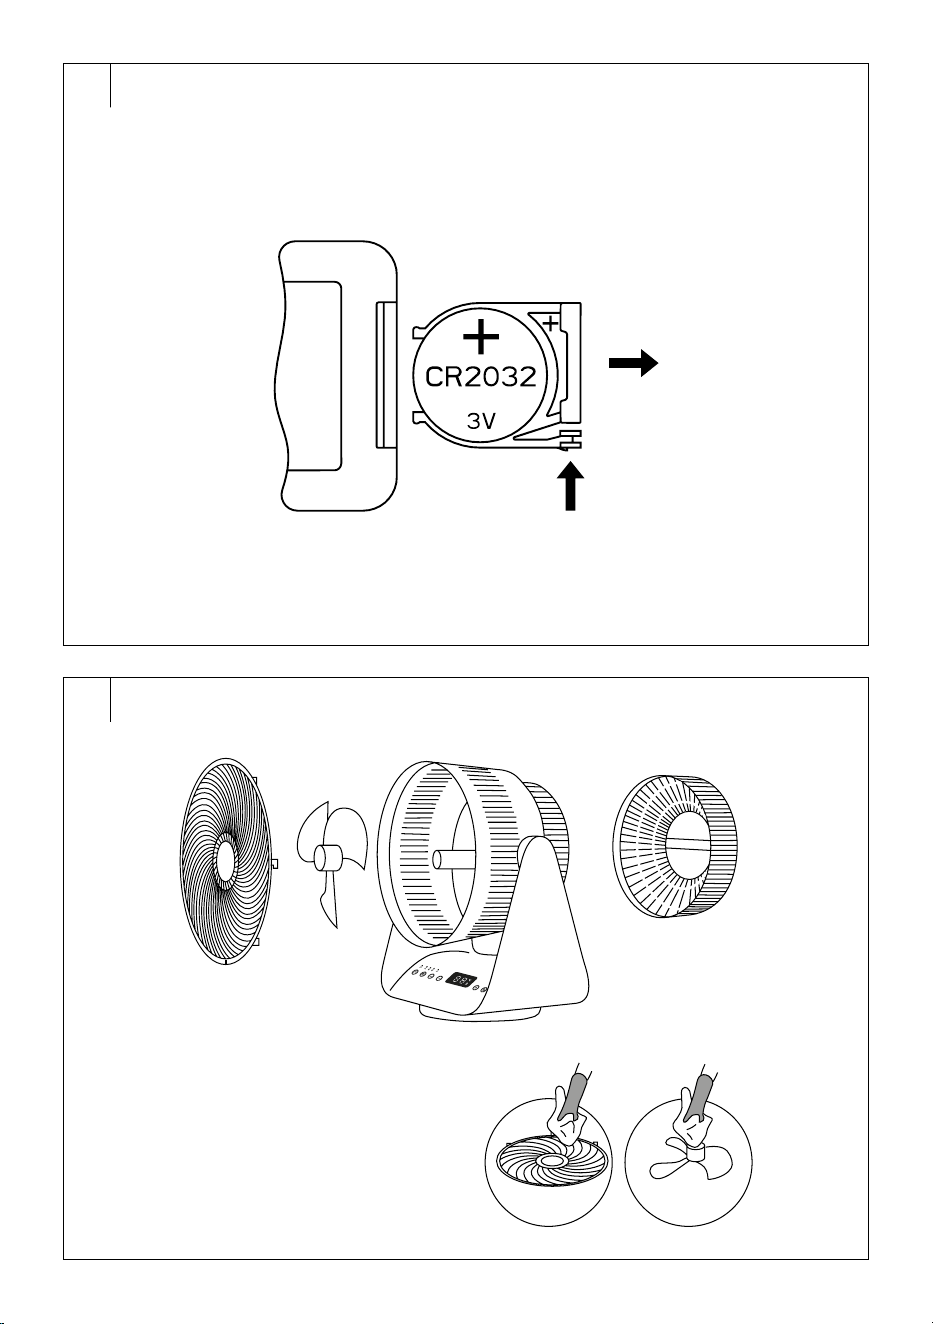
ADJUSTMENT OF THE ANGLE OF THE
CIRCULATOR HEAD
Horizontal oscillation (Fig. D1)
• Press the button to switch on horizontal oscillation. The circulator
will start to rotate from side to side at amaximum angle of 90°.
• Press the button again to switch off the horizontal oscillation.
Adjusting the vertical angle of the oscillation head (Fig. D2)
• The vertical angle can be adjusted by hand. Grasp the head of the
oscillator with both hands and turn the head up and down to the
desired angle.
• The vertical angle can be adjusted from −15° to 90°.
. . . . . . . . . . . . . . . . . . . . . . . . . . . . . . . . . . . . . . . . . . . . . . . . . . . . . . . . . . . . . . . . . . . .
TURNING OFF THE DISPLAY
• Press the button to turn off the display and control panel lights.
• Press the button again to turn the display and the lights on again.
. . . . . . . . . . . . . . . . . . . . . . . . . . . . . . . . . . . . . . . . . . . . . . . . . . . . . . . . . . . . . . . . . . . .
OTHER FUNCTIONS
Tip-over protection
• The circulator automatically turns off if it tips over. It will enter the
standby mode when it is brought to the operating position. Press the
button to turn on the circulator.
Memory functions
• The circulator will start in thesetting in which it was last turned off
andswitched to stand-by mode, exceptfor the timer.
Turning off the device – cooling and heating modes
• If you turn off the circulator within 10 seconds of turning off the heating
element, or if you turn off the circulator directly while the heating
element is running, the fan will continue to run for approximately
10seconds and then turn off.
• If you turn off the heating element and it has not been running for
more than 10 seconds, the fan will continue to run for approximately
10 seconds and then turn off.
• If you turn off the circulator in cooling mode and it has been in
operation for more than 10 seconds, the circulator will turn off
immediately.
. . . . . . . . . . . . . . . . . . . . . . . . . . . . . . . . . . . . . . . . . . . . . . . . . . . . . . . . . . . . . . . . . . . .
- 7 -
06/2025
2025, .
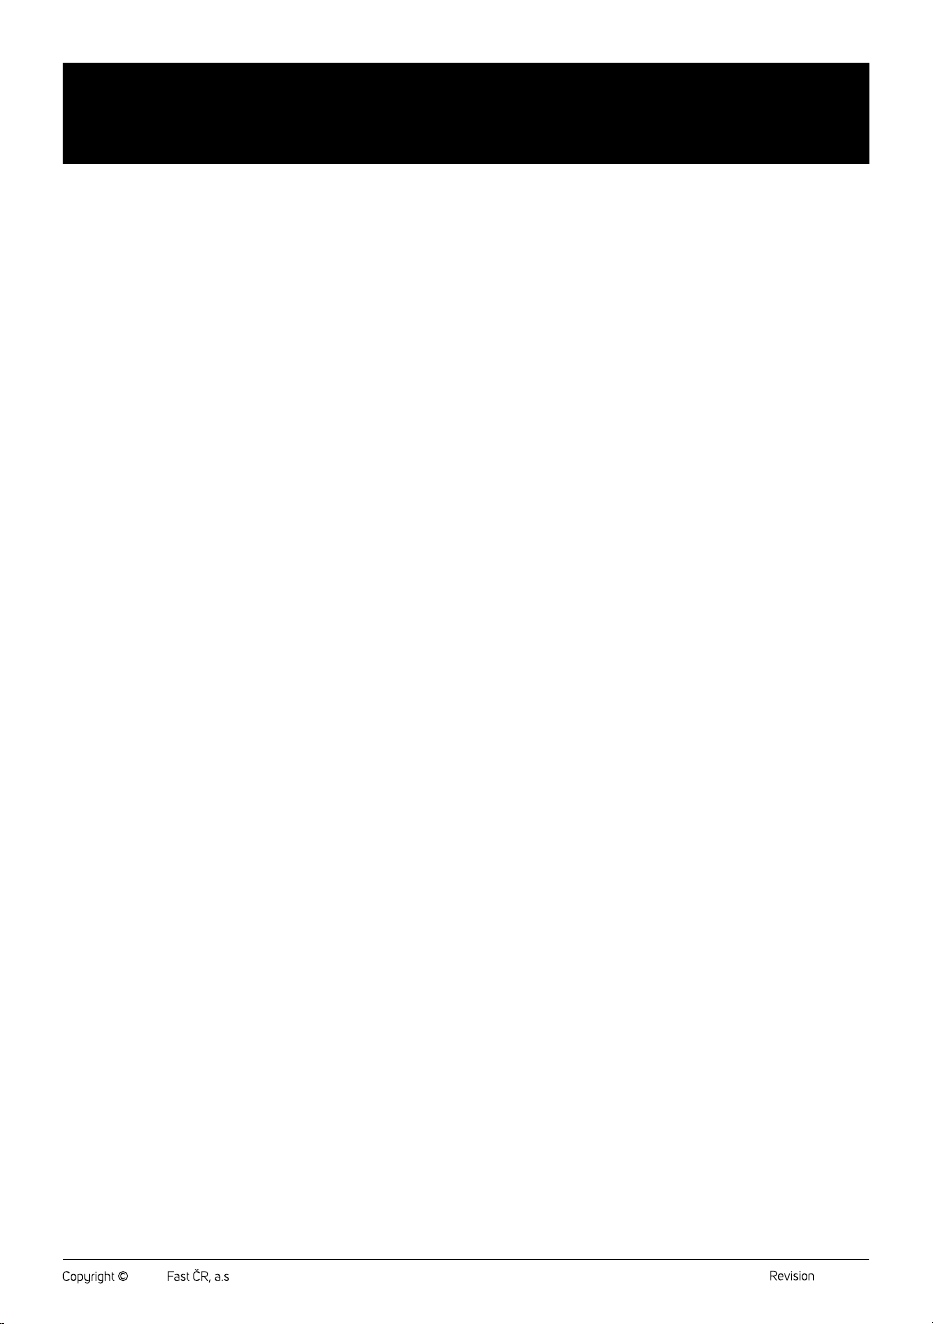
REMOTE CONTROL
• At thefactory, the battery is already inserted inthe remote control. To
use it, pull the protective tape out ofthe battery compartment.
Inserting/changing the battery
If the efficiency of the remote control decreases or the buttons of the
remote control do not respond to being pressed, it is necessary to replace
the battery.
1. Press the battery holder fuse andpull it out of theremote control.
2. Remove the discharged battery fromthe holder andinsert one new
CR2032 battery into it. When inserting, ensure correct polarity – see
Fig. E.
3. Insert the battery holder back into the remote control. Push gently so
that the holder fits in. The holder fuse will snap in its place.
Note:
If you will not be using the remote control for longer than
2months, remove the batteries.
Caution:
Dispose of used batteries in accordance with local
regulations. Do not throw the battery into mixed
household waste. Do not throw the batteries into
afire. They might explode or electrolyte might leak.
Using the remote control
• The principle of controlling the circulator via the remote control is the
same as described above.
• In order for the remote control to function properly, ensure that the
maximum control distance from the circulator does not exceed 8 m
and that there is no obstacle between the control and the circulator
that could prevent thetransmission of the signal.
• Point the remote control directly at the circulator control panel.
• Do not expose the remote control to direct sunlight or high
temperatures. Otherwise the signal may not be transmitted.
. . . . . . . . . . . . . . . . . . . . . . . . . . . . . . . . . . . . . . . . . . . . . . . . . . . . . . . . . . . . . . . . . . . .
OPERATION USING THE MOBILE APPLICATION
• The circulator can be controlled via the Sencor HOME application.
• Download the application to your smart phone, register yourself and
control the circulator via the application.
• If the application is already installed, add the circulator to your devices.
It is necessary that the location services for the Bluetooth function on
the mobile phone are turned on.
Adding acirculator to the device list via Bluetooth
You can add acirculator to your Sencor HOME application by pairing it
via Bluetooth.
1. Switch on the Bluetooth function on your mobile phone.
2. Turn on the circulator.
3. Reset Wi-Fi. Press and hold the button for 5 seconds until the
Wi-Fi light starts flashing.
4. Open the application and click the “+” icon on the application'shome
page, then click “Add Device”.
5. The application itself will offer the device you are looking for.
6. Click on “Add Device” and the application will automatically guide you
through adding it.
Note:
If the Bluetooth connection fails or is not possible, make
sure there are no solid obstacles between your phone and
the circulator and that the two devices are close together.
Adding the circulator to the device list via QR code
You can also add your circulator to the Sencor HOME application via the
QR code below.
1. On the home screen of the application, click on the “+” icon and on the
Add device screen, click on the [−] icon in the top right corner.
2. You will be prompted toreset the device. Press and hold the
button for 5 seconds until the Wi-Fi light starts flashing. This means
that the circulator is ready to be paired. Instructions can also be found
on the application screen.
3. Inthe application, confirm that the (Wi-Fi) light is blinking, then click
“Next”.
4. On the next screen, you will be prompted toselect aWi-Fi network.
Select the network, enter your password andclick “Next”.
5. The process of adding the device starts. Wait until the circulator is
paired.
6. In the device list on the main screen, click on the circulator icon to
enter its control.
Manual adding of the circulator to the device list
1. On the main screen, click on “Add Device” or the “+” in the top right
corner, and then click on “Add Device”.
2. Ascreen with appliance categories and alist of appliances will appear.
3. Click “Circulator” and select the circulator model from the list of
products.
4. You will be prompted toreset the device. Press and hold the
button for 5 seconds until the Wi-Fi light starts flashing. This means
that the circulator is ready to be paired. Instructions can also be found
on the application screen.
5. Inthe application, confirm that the (Wi-Fi) light is blinking, then click
“Next”.
6. On the next screen, you will be prompted toselect aWi-Fi network.
Select the network, enter your password andclick “Next”.
7. The process of adding the device starts. Wait until the circulator is
paired.
8. In the device list on the main screen, click on the circulator icon to
enter its control.
Wi-Fi reset
• Press and hold the button for 5 seconds. The Wi-Fi indicator light
blinks.
Note:
Always connect the circulator to the 2.4 GHz network. If
you are using a5 GHz Wi-Fi network, switch to a2.4 GHz
network.
. . . . . . . . . . . . . . . . . . . . . . . . . . . . . . . . . . . . . . . . . . . . . . . . . . . . . . . . . . . . . . . . . . . .
CLEANING AND MAINTENANCE
• Before cleaning, turn off the circulator and disconnect the power cord
from the power socket.
• Regularly remove dust from the front and rear grilles. Neglecting
cleaning and maintenance can adversely affect the operation of the
circulator and lead to areduction in performance.
Warning:
To avoid the risk of electric shock, do not immerse the
circulator, power cord or plug in water or other liquid.
Caution:
Never use abrasive cleaning agents, solvents, etc.
for cleaning.
- 8 -
06/2025
2025, .
Cleaning the outer surface and remote control
• Wipe the outer surface of the circulator and remote control with adry,
soft cloth.
• To remove dust from the front and rear grille, you can use avacuum
cleaner with the brush nozzle attached and the suction power set to
low.
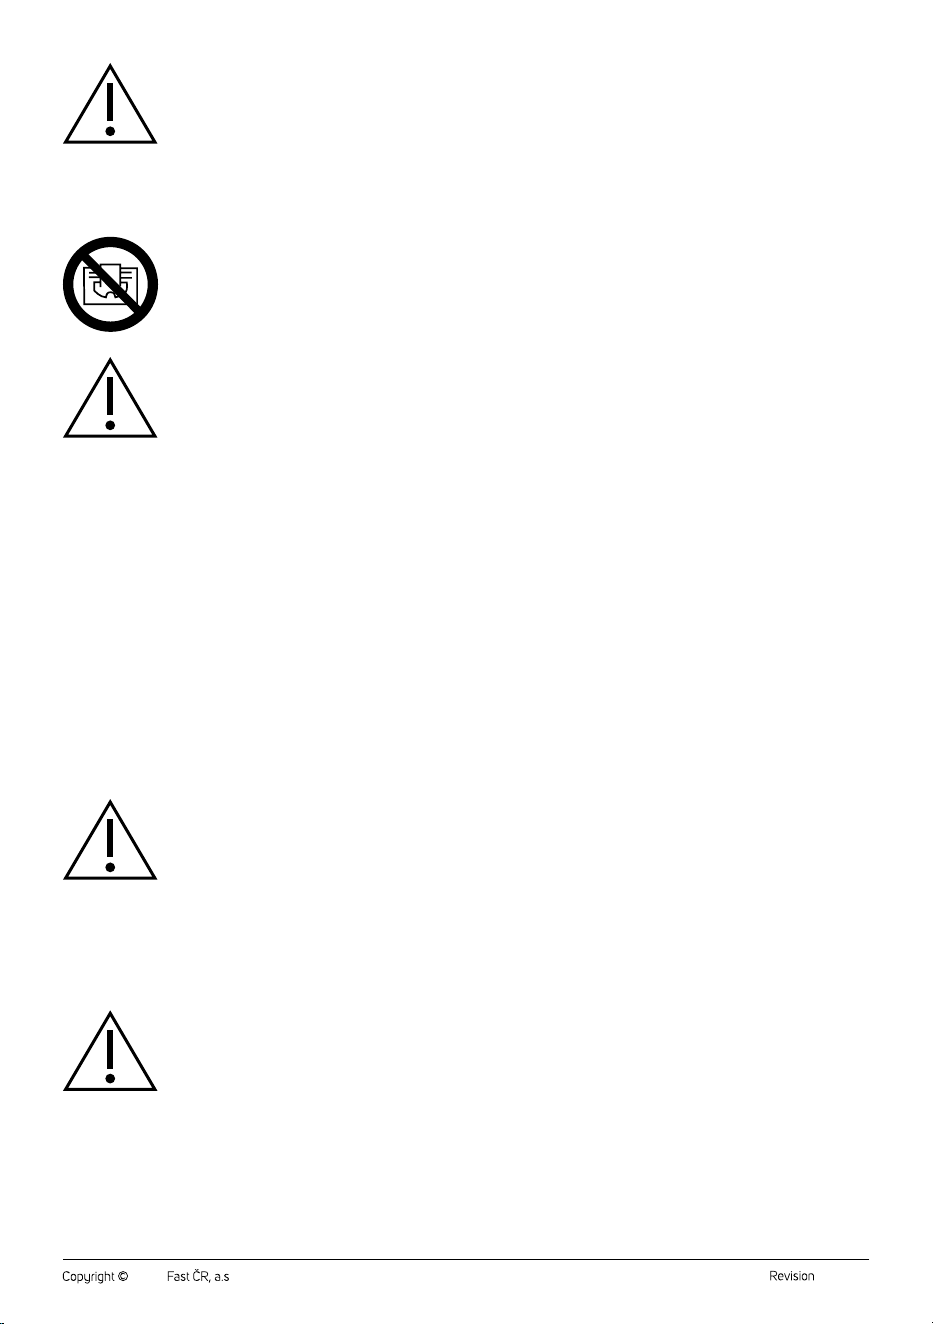
Cleaning the front grille, rear grille and fan blades (Fig. F)
To thoroughly clean the front and rear grille and fan blades, the circulator
must be disassembled. Therefore, make sure that the circulator is
disconnected from the mains socket.
1. Turn the front grille counterclockwise to loosen it and remove it.
2. Unscrew the fan from the shaft.
3. Turn the rear grille counterclockwise to loosen it and remove it.
4. Wipe all loose parts (front and rear grille, fan) with asoft and slightly
damp cloth. Wipe with aclean cloth until dry. All parts must be dry
before reassembly.
5. Wipe the inner area where the fan is located and the back of the
circulator with adry and soft cloth. If necessary, you can use
avacuum cleaner with the brush nozzle fitted and the suction power
set to low.
6. Attach the rear grille to the rear of the circulator so that the tabs around
the inside perimeter of the rear grille fit into the cutouts in the rear. Turn
the rear grille clockwise until you feel resistance.
7. Screw the fan onto the shaft and tighten securely. Make sure the fan
rotates freely and is not loose from the shaft.
8. Attach the front grille to the front of the circulator so that the tabs
around the inside perimeter of the front grille fit into the cutouts in the
front. Turn the front grille clockwise until you feel resistance.
Warning:
Never clean the inside of the circulator or the rear
of the circulator with adamp or slightly damp cloth.
Water could enter the interior and cause ashort
circuit.
Note:
To achieve optimal balancing of the fan blades, a balancing
sticker may be affixed to the fan. Do not remove it! Improper
balancing of the blades would result in inferior acoustic
properties of the device (it would be noisier).
. . . . . . . . . . . . . . . . . . . . . . . . . . . . . . . . . . . . . . . . . . . . . . . . . . . . . . . . . . . . . . . . . . . .
STORAGE
• If you will not be using the circulator, clean it according to the
instructions above.
• Remove the battery from the remote control if you will not be using it
for more than 2 months.
• There is space in the handle (A7) tostore the remote control.
• Place the circulator in its original packaging or other suitable
packaging material and store it in adry and well-ventilated place out
of the reach of children or pets.
. . . . . . . . . . . . . . . . . . . . . . . . . . . . . . . . . . . . . . . . . . . . . . . . . . . . . . . . . . . . . . . . . . . .
TECHNICAL SPECIFICATIONS
Rated voltage..........................................................................................220–240 V~
Rated frequency ...................................................................................................50 Hz
Rated power input ..........................................................................................2,000 W
Cooling power consumption ..............................................................................35 W
Heating power consumption .............. 1,050 W/ 2,000 W(low/high power)
Dimensions ........................................................................296 × 200 × 370.5mm
Weight .........................................................................................................................4 kg
Operating conditions .............................................................. < 90% (RH, at 25°C)
. . . . . . . . . . . . . . . . . . . . . . . . . . . . . . . . . . . . . . . . . . . . . . . . . . . . . . . . . . . . . . . . . . . .
Values provided according to Commission Regulation EU
206/2012
Model SFH 9200GY
Description Marking Value Unit
Maximum fan flow
rate
F 13.2 m
3
/min
Fan input power P 33.8 W
Operational value SV 0.4 (m
3
/min) / W
Power consumption in
Standby mode
P
SB
0.3 W
Fan acoustic power
level
L
WA
59.3 dB (A)
Maximum operating
value measurement
speed
c 4.7 m/s
Standard for
measuring operating
value
(EU) No 206/2012 + (EU) No 2016/2282
EN IEC 60879:2019
EN 50564:2011
EN 60704-1:2010 + A11:2012/EN IEC
60704-1:2021
EN IEC 60704-2-7:2020
Contact information FAST ČR, a.s., USanitasu 1621, 251 01
Říčany, Czechia
. . . . . . . . . . . . . . . . . . . . . . . . . . . . . . . . . . . . . . . . . . . . . . . . . . . . . . . . . . . . . . . . . . . .
INSTRUCTIONS AND INFORMATION ON DISPOSAL
OF USED PACKAGING MATERIAL
Dispose of used packaging material at the designated municipal waste
disposal site.
. . . . . . . . . . . . . . . . . . . . . . . . . . . . . . . . . . . . . . . . . . . . . . . . . . . . . . . . . . . . . . . . . . . .
DISPOSAL OF USED ELECTRICAL AND ELECTRONIC
EQUIPMENT
Used electrical andelectronic products must not be disposed of in
ordinary municipal waste. To enable the proper disposal and recycling
of these products, deliver them to the designated collection points.
Alternatively, in some European Union states or other European
countries the products can be returned to the local retailer when buying
an equivalent new product. By properly disposing this product, you
help preserve valuable natural resources and help to prevent potential
damage to the environment and human health resulting from improper
waste disposal. For more details, contact your local authority or nearest
collection point. Fines may be imposed for improper disposal of this type
of waste as per national regulations.
For business entities in European Union States
To dispose of electric or electronic equipment, request the necessary
information from your retailer or supplier.
Disposal in other countries outside the European Union
To dispose of this product elsewhere, request the necessary information
on the correct disposal method from local authorities or your retailer.
. . . . . . . . . . . . . . . . . . . . . . . . . . . . . . . . . . . . . . . . . . . . . . . . . . . . . . . . . . . . . . . . . . . .
Changes to text and technical parameters are reserved.
- 1 -
05/2025
2025, .
SFH 9200GY
EN • Attachment to the user’smanual for the following product:
CZ • Příloha knávodu kobsluze kníže uvedenému výrobku:
SK • Príloha knávodu na použitie pre nasledovný prístroj:
HU • Az alább feltüntetett termék használati útmutatójának amelléklete:
PL • Aneks do instrukcji obsługi dla poniżej podanego wyrobu:
HR • Dodatak korisničkom priručniku za dolje opisani proizvod:
GR • Συνημμένο αρχείο του παρόντος εγχειριδίου χρήσης για το
προϊόν το οποίο περιγράφεται παρακάτω:
SFH 9200GY
EN • Information requirements for electric local space heaters
CZ • Požadavky na informace týkající se elektrických lokálních topidel
SK • Požiadavky na informácie pre elektrické lokálne ohrievače priestoru
HU • Az elektromos egyedi helyiségfűtő berendezések termékinformációs
követelményei
PL • Wymogi wzakresie informacji dotyczące elektrycznych miejscowych
ogrzewaczy pomieszczeń
HR • Zahtjevi za informacije za električne grijalice za lokalno grijanje
prostora
GR • Απαιτήσεις πληροφόρησης για ηλεκτρικούς τοπικούς
θερμαντήρες χώρου
- 2 -
05/2025
2025, .
EN • Contact details / CZ • Kontaktní údaje / SK • Kontaktné údaje / HU • Kapcsolatfelvételi adatok /
PL • Dane teleadresowe / HR • Podaci za kontakt / GR • Στοιχεία επικοινωνίας
FAST ČR, a.s, USanitasu 1621, 251 01 Říčany, Czechia
EN • Model identifier: / CZ • Identifikační značka modelu: / SK • Identifikačný (-é) kód (-y) modelu: / HU • Modellazonosító: / PL
• Identyfikator(-y) modelu: / HR • Identifikacijska(-e) oznaka(-e) modela: / GR • Αναγνωριστικό(-ά) μοντέλου:
SFH 9200GY
EN • Item / CZ • Údaj / SK
• Položka / HU • Jellemző / PL
• Parametr / HR • Značajka /
GR • Χαρακτηριστικό
EN •Symbol /
CZ •Značka /
SK •Symbol /
HU •Jel / PL
•Oznaczenie /
HR •Simbol /
GR •Σύμβολο/
EN •Value /
CZ •Hodnota /
SK •Hodnota /
HU •Érték /
PL •Wartość /
HR •Vrijednost
/ GR •Αριθμη-
τική τιμή
EN •Unit /
CZ •Jednotka /
SK •Jednotka /
HU •Mértéke-
gység / PL
•Jednostka /
HR •Jedinica /
GR •Μονάδα
EN •Item / CZ •Údaj / SK •Položka /
HU •Jellemző / PL •Parametr / HR
•Značajka / GR •Χαρακτηριστικό
EN •Unit /
CZ •Jednotka /
SK •Jednotka /
HU •Mértéke-
gység / PL
•Jednostka /
HR •Jedinica /
GR •Μονάδα
EN • Heat output / CZ •Tepelný výkon / SK •Tepelný výkon / HU •Hőteljesítmény /
PL •Moc cieplna / HR •Toplinska snaga / GR •Θερμική ισχύς
EN •Type of heat output / room temperature control (select
one) / CZ •Typ výdeje tepla / regulace teploty (vyberte
jeden) / SK •Druh ovládania tepelného výkonu / izbovej
teploty (vyberte jeden) / HU •Ateljesítmény, illetve abeltéri
hőmérséklet szabályozásának típusa (egyet kell megjelölni)
/ PL •Rodzaj mocy cieplnej / regulacja temperatury
wpomieszczeniu (należy wybrać jedną opcję) / HR •Vrsta
izlazne topline / regulacija sobne temperature (odabrati jednu)
/ GR •Είδος θερμικής ισχύος / ρυθμιστή θερμοκρασίας
δωματίου (να επιλεχθεί μια δυνατότητα)
EN •Nominal heat output /
CZ •Jmenovitý tepelný výkon /
SK •Menovitý tepelný výkon /
HU •Névleges hőteljesítmény /
PL •Nominalna moc cieplna /
HR •Nazivna toplinska snaga /
GR •Όνομαστική θερμική ισχύς
Pnom
2.0 kW
EN •Single stage heat output and no
room temperature control / CZ •Jeden
stupeň tepelného výkonu, bez regulace
teploty vmístnosti / SK •Jednoúrovňový
tepelný výkon bez ovládania izbovej
teploty / HU •Egyetlen állás, beltéri
hőmérsékletszabályozás nélkül / PL
•Jednostopniowa moc cieplna bez
regulacji temperatury wpomieszczeniu
/ HR •Jednostupanjska predaja topline
ibez regulacije sobne temperature / GR
•μονοβάθμια θερμική ισχύς και χωρίς
ρυθμιστή θερμοκρασίας δωματίου
no / ne / nie / nem
/ nie / ne / όχι
EN •Minimum heat output
(indicative) / CZ •Minimální
tepelný výkon (orientační) /
SK •Minimálny tepelný výkon
(orientačne) / HU •Minimális
hőteljesítmény (indikatív) /
PL •Minimalna moc cieplna
(orientacyjna) / HR •Minimalna
toplinska snaga (referentna) /
GR •Ελάχιστη θερμική ισχύς
(ενδεικτική)
Pmin 1.05 kW
EN •Two or more manual stages, no
room temperature control / CZ •Dva nebo
více ručních stupňů, bez regulace teploty
vmístnosti / SK •Dve alebo viac manuálnych
úrovní bez ovládania izbovej teploty / HU
•Két vagy több kézi szabályozású állás,
beltéri hőmérséklet-szabályozás nélkül /
PL •Co najmniej dwa ręczne stopnie bez
regulacji temperatury wpomieszczeniu / HR
•Dva ili više ručna stupnja, bez regulacije
sobne temperature / GR •δύο ή περισσότερες
χειροκίνητες βαθμίδες χωρίς ρυθμιστή
θερμοκρασίας δωματίου
no / ne / nie / nem
/ nie / ne / όχι
EN •Maximum continuous heat
output / CZ •Maximální trvalý
tepelný výkon / SK •Maximálny
priebežný tepelný výkon /
HU •Maximális folyamatos
hőteljesítmény / PL •Maksymalna
stała moc cieplna /
HR •Maksimalna kontinuirana
toplinska snaga / GR •Μέγιστη
συνεχής θερμική ισχύς
Pmax,c 2.0 kW
EN •With mechanic thermostat room
temperature control / CZ •Smechanickým
termostatem pro regulaci teploty
vmístnosti / SK •Sovládaním izbovej
teploty mechanickým termostatom /
HU •Mechanikus termosztátos beltéri
hőmérséklet-szabályozás / PL •Mechaniczna
regulacja temperatury wpomieszczeniu za
pomocą termostatu / HR •Sregulacijom
sobne temperature mehaničkim termostatom
/ GR •με μηχανικό θερμοστατικό ρυθμιστή
θερμοκρασίας δωματίου
no / ne / nie / nem
/ nie / ne / όχι
EN •Power consumption / CZ •Spotřeba elektrické energie / SK •Spotreba
elektrickej energie / HU •Villamosenergia-fogyasztás / PL •Zużycie energii
elektrycznej / HR •Potrošnja električne energije / GR •Kατανάλωση ηλεκτρικής
ενέργειας
EN •With electronic room temperature
control / CZ •Selektronickou regulací teploty
vmístnosti / SK •Selektronickým ovládáním
izbovej teploty / HU •Elektronikus beltéri
hőmérséklet-szabályozás / PL •Elektroniczna
regulacja temperatury wpomieszczeniu /
HR •Selektroničkom regulacijom sobne
temperature / GR •με ηλεκτρονικό ρυθμιστή
θερμοκρασίας δωματίου
yes / ano / áno /
igen / tak / da / ναι
- 3 -
05/2025
2025, .
EN •In off-mode/ CZ •Ve
vypnutém stavu / SK •Vrežime
vypnutia / HU •Kikapcsolt
üzemmódban / PL •Wtrybie
wyłączenia / HR •Ustanju
isključenosti / GR •Σε κατάσταση
εκτός λειτουργίας
Po 0.00 W
EN •Electronic room temperature control
plus day timer / CZ •Selektronickou regulací
teploty vmístnosti adenním programem /
SK •Elektronické ovládanie izbovej teploty
adenný časovač / HU •Elektronikus beltéri
hőmérséklet-szabályozás és napszak
szerinti szabályozás / PL •Elektroniczna
regulacja temperatury wpomieszczeniu ze
sterownikiem dobowym / HR •Elektronička
regulacija sobne temperature idnevni
uklopni sat / GR •με ηλεκτρονικό ρυθμιστή
θερμοκρασίας δωματίου και χρονοδιακόπτη
ημέρας
no / ne / nie / nem
/ nie / ne / όχι
EN •In standby mode / CZ
•Vpohotovostním režimu / SK
•Vpohotovostnom režime / HU
•Készenléti üzemmódban /
PL •Wtrybie czuwania / HR
•Ustanju pripravnosti / GR •Σε
κατάσταση αναμονής
Psm 0.26 W
EN •Electronic room temperature control
plus week timer / CZ •Selektronickou
regulací teploty vmístnosti atýdenním
programem / SK •Elektronické ovládanie
izbovej teploty atýždenný časovač /
HU •Elektronikus beltéri hőmérséklet-
szabályozás és heti szabá- lyozás / PL
•Elektroniczna regulacja temperatury
wpomieszczeniu ze sterownikiem
tygodniowym / HR •Elektronička regulacija
sobne temperature itjedni uklopni sat / GR
•Με ηλεκτρονικό ρυθμιστή θερμοκρασίας
δωματίου και χρονοδιακόπτη εβδομάδας
no / ne / nie / nem
/ nie / ne / όχι
EN •In idle mode/ CZ •Vklidovém
režimu / SK •Vrežime nečinnosti /
HU •Tétlen üzemmódban / PL
•Wtrybie bezczynności / HR
•Ustanju mirovanja / GR •Σε
κατάσταση αδράνειας
Pidle 0.62 W
EN •Other control options (multiple selections possible) /
CZ •Další možnosti regulace (lze vybrat více možností) / SK
•Ďalšie možnosti ovládania (možnosť viacnásobného výberu) /
HU •Más szabályozási lehetőségek (több is megjelölhető) /
PL •Inne opcje regulacji (można wybrać kilka) / HR •Druge
mogućnosti regulacije (moguć odabir više opcija) / GR • Άλλες
δυνατότητες ρύθμισης (επιτρέπονται πολλές επιλογές)
EN •In network standby mode /
CZ •při připojení na síť / SK
•pri pripojení na sieť / HU
•Hálózatvezérelt készenléti
üzemmódban / PL •Wtrybie
czuwania przy podłaczeniu do
sieci / HR •Uumreženom stanju
pripravnosti / GR •Σε κατάσταση
αναμονής δικτύου
Pnsm 0.61 W
EN •Room temperature control, with presence
detection / CZ •Regulace teploty vmístnosti
sdetekcí přítomnosti osob / SK •Ovládanie
izbovej teploty sdetekciou prítomnosti / HU
•Beltéri hőmérsékletszabályozás jelenlét-
érzékeléssel / PL •Regulacja temperatury
wpomieszczeniu zwykrywaniem obecności /
HR •Regulacija sobne temperature
sprepoznavanjem prisutnosti / GR
•ρυθμιστής θερμοκρασίας δωματίου με
ανιχνευτή παρουσίας
no / ne / nie / nem
/ nie / ne / όχι
EN •Standby mode with display of information or status / CZ
•Pohotovostní režim se zobrazením informací nebo stavu / SK
Pohotovostný režim so zobrazením informácií alebo stavu / HU
•Készenléti üzemmódban információ-vagy állapotkijelzéssel / PL
•Tryb czuwania zwyświetlaniem informacji lub statusu / HR •Stanje
pripravnosti sprikazom informacija ili statusa / GR •Λειτουργία αναμονής
με εμφάνιση πληροφοριών ή κατάστασης
no / ne / nie /
nem / nie / ne
/ όχι
EN •Room temperature control, with open
window detection / CZ •Regulace teploty
vmístnosti sdetekcí otevřeného okna / SK
•Ovládanie izbovej teploty sdetekciou
otvoreného okna / HU •Beltéri
hőmérsékletszabályozás nyitottablak-
érzékeléssel / PL •Regulacja temperatury
wpomieszczeniu zwykrywaniem otwartego
okna / HR •Regulacija sobne temperature
sprepoznavanjem otvorenog prozora / GR
•ρυθμιστής θερμοκρασίας δωματίου με
ανιχνευτή ανοιχτού παραθύρου
no / ne / nie / nem
/ nie / ne / όχι
EN • Seasonal space heating
energy efficiency in active mode /
CZ •Sezónní energetická účinnost
vytápění vaktivním režimu / SK
• Sezónna energetická účinnosť
vykurovania priestoru vaktívnom
režime / HU •Szezonális
helyiségfűtési hatásfok aktív
üzemmódban / PL •Sezonowa
efektywność energetyczna
orgzewania pomieszczeń wtrybie
aktywnym / HR •Energetska
učinokovitost sezonskog grijanja
prostora uaktivnom stanju / GR
•Εποχιακή ενεργειακή απόδοση
θέρμανσης χώρου σε ενεργή
λειτουργία
ŋs,on
91.5 %
EN •With distance control option / CZ
•Sdálkovým ovládáním / SK •Smožnosťou
diaľkového ovládania / HU •Távszabályozási
lehetőség / PL •Zregulacją na odległość / HR
•Smogućnošću regulacije na daljinu / GR •με
δυνατότητα ρύθμισης εξ αποστάσεως
yes / ano / áno /
igen / tak / da / ναι
EN •With adaptive start control /
CZ •Sadaptivně řízeným spouštěním /
SK •Sprispôsobivým ovládaním spustenia/
HU •Adaptív bekapcsolásszabályozás /
PL •Zadaptacyjną regulacją startu /
HR •Sprilagodljivim pokretanjem regulacije/
GR •με ρυθμιστή προσαρμοζόμενης
εκκίνησης
no / ne / nie / nem
/ nie / ne / όχι
EN •With working time limitation /
CZ •Somezením doby činnosti /
SK •Sobmedzením času prevádzky /
HU •Működési idő korlátozása /
PL •Zograniczeniem czasu pracy /
HR •Sograničenjem vremena rada /
GR • με περιορισμό διάρκειας λειτουργίας
yes / ano / áno /
igen / tak / da / ναι
- 4 -
05/2025
2025, .
EN •With black bulb sensor / CZ •Sčerným
kulovým čidlem / SK •So snímačom čiernej
žiarovky / HU •Feketegömbérzékelővel
ellátva / PL •Zczujnikiem ciepła
promieniowania / HR •Sosjetnikom scrnom
žaruljom / GR •με αισθητήρα θερμομέτρου
μελανής σφαίρας
no / ne / nie / nem
/ nie / ne / όχι
EN •Self-learning functionality / CZ •Funkce
samoučení / SK •Funkcia samoučenia /
HU •Öntanulási képesség / PL •Funkcja
samouczenia się / HR •Funkcionalnost
samostalnog učenja / GR •Λειτουργικότητα
αυτομάθησης
no / ne / nie / nem
/ nie / ne / όχι
EN •Control accuracy / CZ •Přesnost
regulace / SK •Presnosť ovládania /
HU •Szabályozási ponosság / PL •Precyzja
regulacji / HR •Točnost regulacije /
GR •Ακρίβεια ελέγχου
no / ne / nie / nem
/ nie / ne / όχι
www.sencor.com
info@sencor.cz
