SHF 7647WH
EN
SMART ULTRASONIC MIST
HUMIDIFIER
Translation of the original manual
SHF 7647WH
A
1
2
8
3
4
5
6
7
9
10
11
12
13
B
7
1 2 3 4 5 6
C
2
3
4
5
1
9
10
11
12
6 7
8

D
1
6
2
3
4
5
7
8
9
10

- 1 -
04/2024
2024, .
EN Smart Ultrasonic Mist Humidifier
Important Safety Instructions
READ CAREFULLY AND STORE FOR FUTURE USE.
• This appliance may be only used by children 8 years of
age and older and by persons with physical, sensory or
mental impairments or by inexperienced persons, if they
are properly supervised or have been informed about how
to use the product in asafe manner and understand the
potential dangers.
• Children must not play with the appliance. Cleaning and
maintenance must not be performed by children without
supervision.
• If the power cable is damaged, have it replaced in
aprofessional service centre in order to prevent
adangerous situation. It is forbidden to use the appliance
with the power cable damaged.
• When filling the appliance, always observe the indicated
maximum level. Never fill water above the maximum level
mark.
• Follow the instructions inthis user manual for filling,
cleaning anddescaling.
• Care should be taken when using the appliance as it
produces steam.
• Disconnect the appliance by pulling the plug from the
socket before filling or cleaning.
- 2 -
04/2024
2024, .
• Note that high humidity values can promote the growth of
biological organisms in theenvironment.
• Do not allow the area around the humidifier to become
damp or wet. If this occurs, switch the humidifier to alower
power setting. If it is not possible to reduce the humidifier
power, use the humidifier intermittently. Do not allow
absorbent materials, such as carpets, curtains, drapes or
tablecloths to become damp.
• Never leave water in the appliance if not in use.
• Empty andclean the humidifier before storing. Clean the
humidifier before each use.
Clean the water tank every 3 days.
WARNING:
Microorganisms present in the water or in the
environment where the appliance is used or stored,
may multiply in the water tank and, when dispersed
into the air, may pose serious health risks if the
water is not changed and the tank is not regularly
cleaned every 3 days.
• Empty and refill the tank every third day. Before filling
it, clean it with clean tap water or detergents, if required
by the manufacturer. Remove any limescale, deposits
or coating that has formed on the tank walls or internal
surfaces, and wipe all surfaces dry.
• Keep the appliance out of the reach of children. Steam
andboiling water may cause burns.

- 3 -
04/2024
2024, .
• Before connecting the appliance to the power socket, ensure that the technical data on its rating plate matches the electrical voltage of the socket.
• Ensure that the power socket is properly grounded. If the adapter is incorrectly plugged into the socket, it may overheat and cause damage.
• Lead the adapter cable so that it is not tripped over or stepped on to avoid damage or tipping over of the appliance in case of cable entanglement.
• The appliance is intended for use in households, offices, or similar spaces.
• Always place the appliance on aflat, dry and stable surface.
• Do not place the appliance near an open flame, gas appliances, or devices that are asource of heat, and do not expose it to direct sunlight.
• Do not place any objects on the appliance, do not sit or step on the appliance.
• Do not use the appliance inrooms where there may be leaks of flammable gases, chemical vapours, or rooms with high dust levels. The operating
appliance must be placed at asufficient distance from curtains or drapes and at least 1 m away from electrical and electronic devices or materials
sensitive to moisture to prevent damage due to increased humidity.
• Do not use the appliance in places or rooms where insect repellents, oil-based preparations, or chemical preparations, e.g., an ignited incense stick,
are used.
• Always use original parts andaccessories specified by the manufacturer. Do not replace any part of the appliance with components or accessories
from another manufacturer.
• Fill the tank only with clean cold water without any additives. Do not pour water into the tank through the steam outlet. Do not pour hot water into
the tank.
• Do not drink the water from the tank, do not water flowers with it, and do not give it to pets. Always pour unused water in the tank into the sink or
drain.
• Before putting the appliance into operation, ensure that it is properly assembled and that the water tank is filled.
• Do not cover the appliance while it is in operation, especially the openings intended for steam discharge. Do not insert any objects into the steam
outlet or ventilation openings. Ensure that none of theopenings are blocked by foreign objects.
• Due to increased humidity in the room, condensation of water on window panes or interior furnishings may occur. If this situation arises, turn the
appliance off.
• Never tilt, move, disassemble or refill the water into an empty tank while the appliance is in operation.
• If you need to move, clean, disassemble, or refill water into the tank, always turn it off, wait for it to cool down, and then disconnect the adapter plug
from the power socket.
• Clean the water tank every week. In case of frequent use, you can clean it twice aweek.
• Do not usedetergents, petrol, window cleaners, furniture cleaners, solvents or other chemical products to clean the appliance.
• Handle the appliance with increased caution when moving, especially if it is filled with water, to prevent spilling.
• To avoid the risk of electric shock, do not immerse the base of the appliance in water or any other liquid.
• Do not disconnect the appliance from the power socket by pulling the cable. It could cause damage to the cable or the power socket. Always
disconnect by pulling the adapter.
• Do not use adamaged device, an adapter with adamaged cable, or an adapter with adamaged plug.
• Under no circumstances attempt to repair the device yourself, do not make any modifications to the device – there is arisk of electric shock! Entrust
all repairs and adjustments of this device to aspecialised company/service. Failure to do so will expose you to the risk of voiding the warranty policy.
- 4 -
04/2024
2024, .
• Thank you for purchasing our SENCOR product; we hope it will serve
to your satisfaction.
• Before using this appliance, please familiarise yourself with the user
manual, even if you are already familiar with using similar types of
appliances. Use the appliance only as described in this user manual.
Keep the manual for future reference.
• It is recommended to keep the original packaging, packing material,
receipt and confirmation of the extent of the seller'sliability or warranty
certificate at least for the duration of the legal right of defective
performance or quality guarantee. When transporting the appliance,
we recommend packaging it again in the original box provided by the
manufacturer.
. . . . . . . . . . . . . . . . . . . . . . . . . . . . . . . . . . . . . . . . . . . . . . . . . . . . . . . . . . . . . . . . . . . .
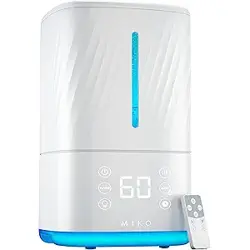
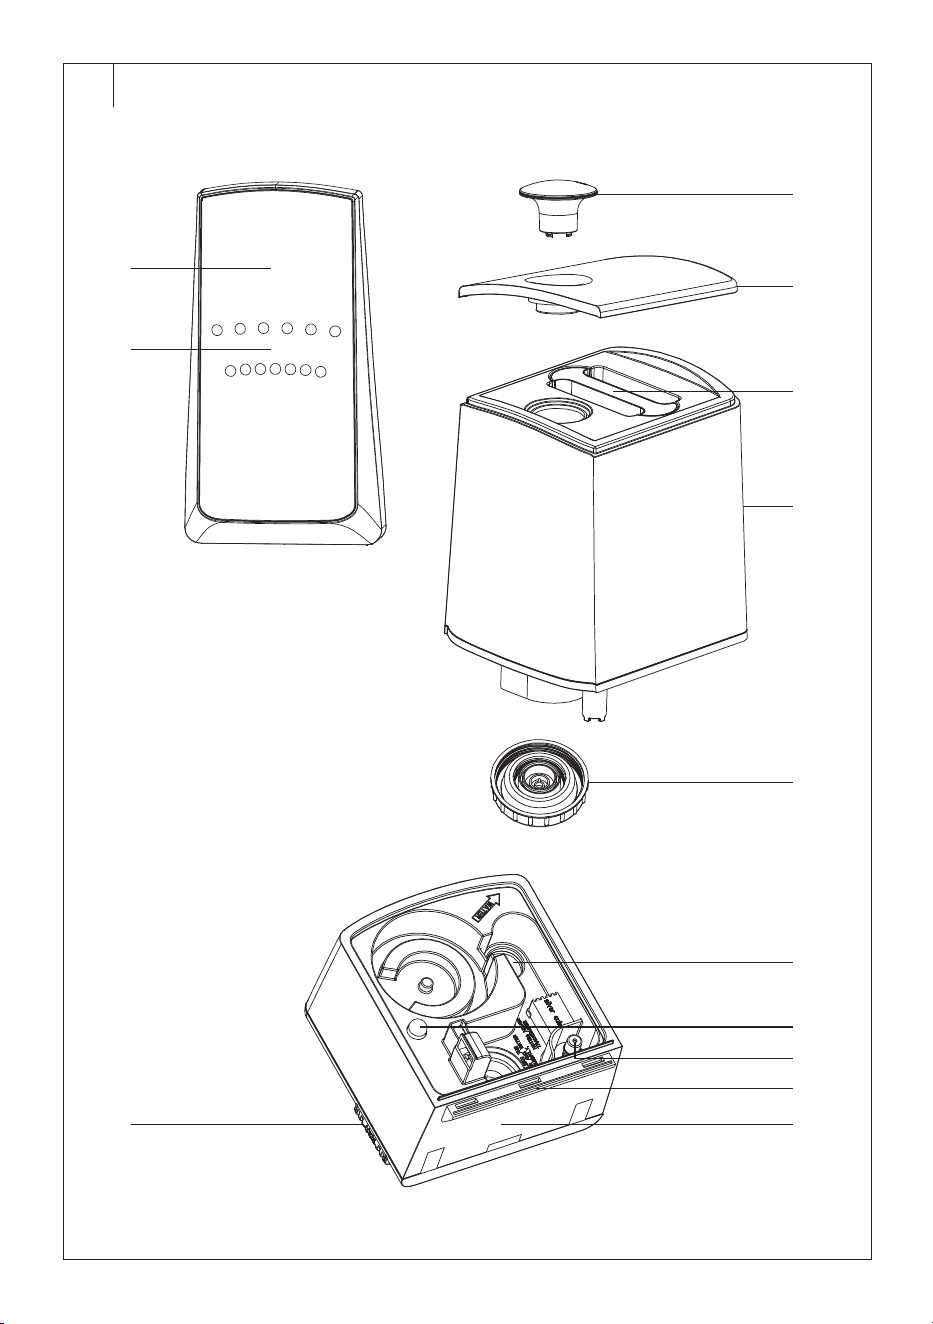
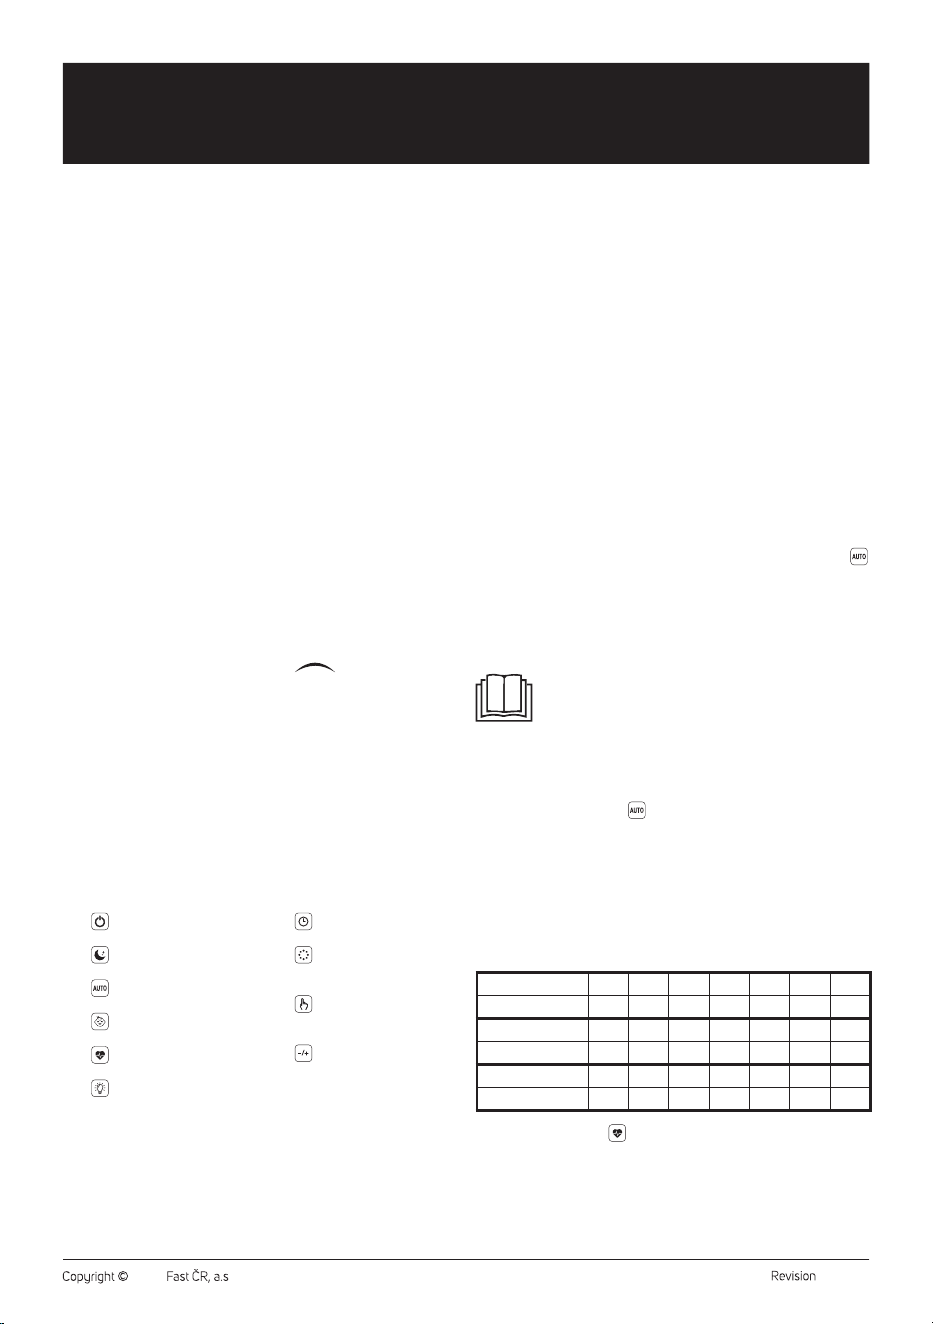
HUMIDIFIER DESCRIPTION
A1 Display
A2 Control panel
A3 Steam outlet
A4 Lid
A5 Water tank handle
A6 Water tank
A7 Water tank cap
A8 Aroma box
A9 Heating element
A10 Light indicator
A11 Water level detector
A12 Ultrasonic disc
A13 Humidifier base
. . . . . . . . . . . . . . . . . . . . . . . . . . . . . . . . . . . . . . . . . . . . . . . . . . . . . . . . . . . . . . . . . . . .
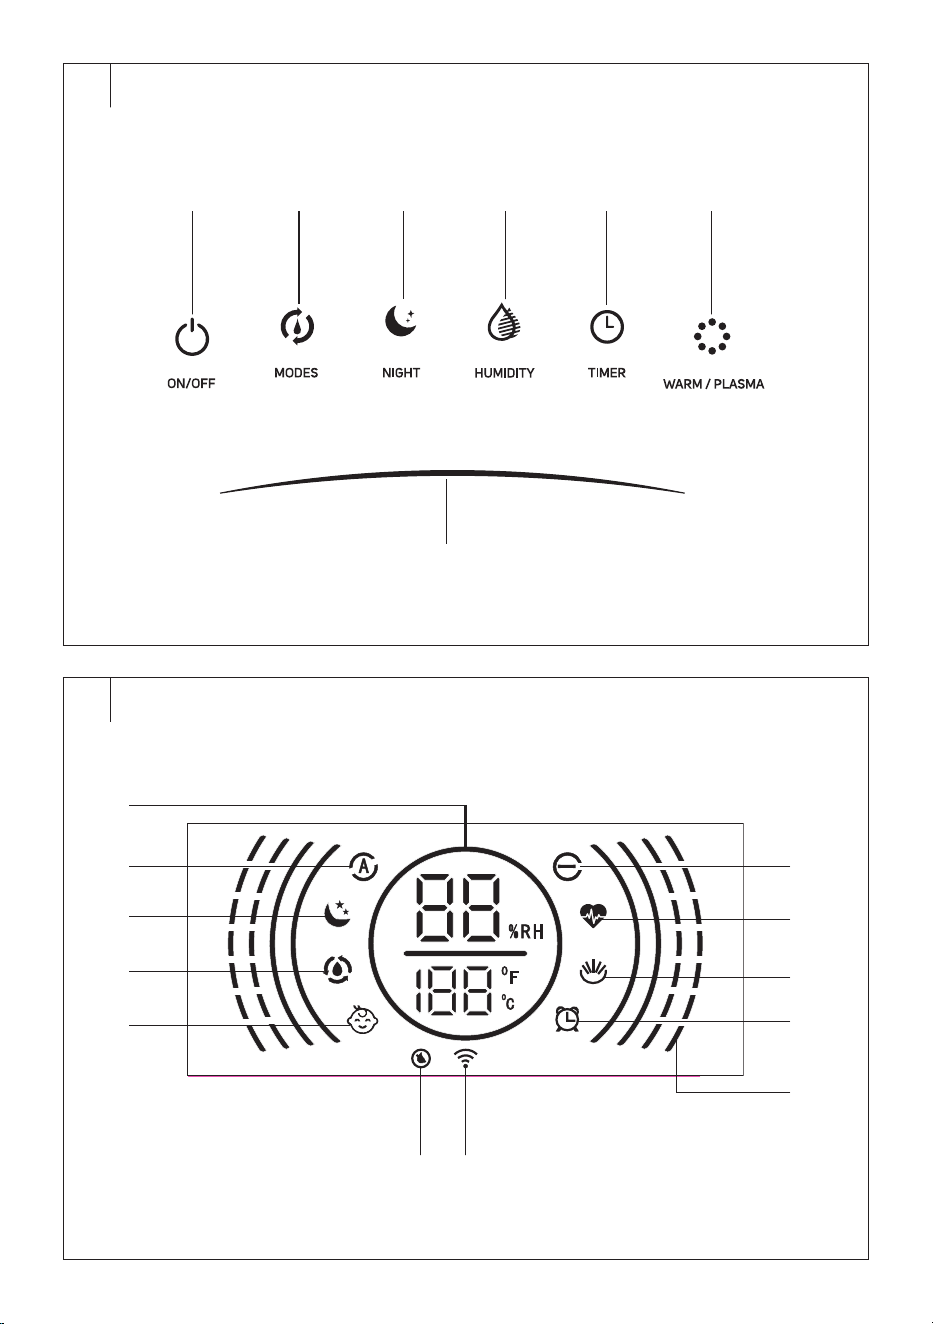
CONTROL PANEL DESCRIPTION
B1 ON/OFF button to switch the
humidifier on/off
B2 MODES button to select the
operating mode
B3 NIGHT button to switch the
sleep mode on/off
B4 HUMIDITY button toset the
target humidity
B5 TIMER button to set
automatic shutdown
B6 WARM/PLASMA button
toswitch the hot vapour
andionisation functions on/off
B7
slider for manual
power setting (1-7)
. . . . . . . . . . . . . . . . . . . . . . . . . . . . . . . . . . . . . . . . . . . . . . . . . . . . . . . . . . . . . . . . . . . .
DISPLAY DESCRIPTION
C1 Numeric display
C2 Automatic mode icon
C3 Sleep mode icon
C4 Continuous humidification
icon
C5 Child mode icon
C6 Empty tank icon
C7 Wi-Fi icon
C8 Ionisation function icon
C9 “Health” operating mode icon
C10 Hot vapour release icon
C11 Automatic shutdown icon
C12 Steam release speed icons
inmanual mode
. . . . . . . . . . . . . . . . . . . . . . . . . . . . . . . . . . . . . . . . . . . . . . . . . . . . . . . . . . . . . . . . . . . .
REMOTE CONTROL DESCRIPTION
D1
button to switch the
humidifier on/off
D2
button to switch the sleep
mode on/off
D3
button to switch the
automatic mode on/off
D4
button to switch the child
mode on/off
D5
button to switch the health
mode on/off
D6
button to switch the
control panel on/off
D7
button to set automatic
shutdown
D8
button toswitch the hot
vapour andionisation function
on/off
D9
button to switch
continuous humidification on/
off
D10
button toset the steam
release speed
. . . . . . . . . . . . . . . . . . . . . . . . . . . . . . . . . . . . . . . . . . . . . . . . . . . . . . . . . . . . . . . . . . . .
BEFORE FIRST USE
• Before first use, remove the appliance and its accessories form the
packaging and discard all promotional labels and tags. Check that
neither the appliance nor any of its components is damaged.
FILLING THE TANK
1. Ensure that the power cable is unplugged from the power socket.
2. Remove the lid.
3. Grip the water tank by the handle and lift it up.
4. Turn the tank upside down andunscrew the water tank cap.
5. Fill your tank with clean cold water.
6. Screw the cap back on. Make sure it is tightly secured to prevent
water leakage. Turn the tank with the cap pointing down. If no water
leaks from the tank, the cap is securely tightened.
7. Insert the tank back into the base and put on the lid.
. . . . . . . . . . . . . . . . . . . . . . . . . . . . . . . . . . . . . . . . . . . . . . . . . . . . . . . . . . . . . . . . . . . .
OPERATION VIA CONTROL PANEL
Switching the Humidifier On/Off
1. Place the humidifier on adry, flat andwaterproof surface at
adistance of about 15 cm from walls or other objects. Ensure there
is sufficient free space around the humidifier. Do not place the
humidifier on carpets, towels, blankets or other absorbent materials.
2. Plug the power cable into the socket.
3. Ashort sound alert will play, and the control panel will briefly light
up. Then, only the ON/OFF button lights up. This indicates that the
humidifier is instandby mode.
4. Briefly press the ON/OFF button to switch the humidifier on. The
humidifier will start inautomatic mode. The automatic mode icon
will light up and the numeric display will show relative humidity and
temperature.
If you need to switch off the humidifier, press the ON/OFFoff button.
The humidifier will switch off and enter standby mode. For complete
shutdown, unplug the power cable from the socket.
Note:
Instandby mode, the Wi-Fi icon may blink if the humidifier
is not paired with the Sencor HOME app. If the humidifier is
paired with the app, the Wi-Fi icon will not blink but will light
up when the humidifier is switched on.
Operating Mode Selection
Press the MODES button repeatedly to select one of theoperating modes.
Automatic Operating Mode (
)
Inthis mode, the humidifier determines the optimum humidity
automatically based on the ambient temperature andhumidity
andadjusts the speed andamount of steam released as needed. Every
minute, the ambient temperature andhumidity are checked to ensure
optimum humidity.
When the humidifier detects low ambient humidity, it will increase the
steam output andvice versa.
Thefollowing table shows the relationship between temperature
andoptimum humidity.
Temperature (°C)
≤19 20 21 22 23 24 25
Humidity (%)
65 60 58 57 55 53 50
Temperature (°C)
26 27 28 29 30 31 32
Humidity (%)
48 45 43 40 38 36 35
Temperature (°C)
33 34 35 36 ≥37
Humidity (%)
34 32 31 30 25
Health Operating Mode (
)
• The relative humidity of this mode is automatically set to 60%. Once
this mode is selected, ahigh steam release speed is initiated to quickly
reach the set humidity. When the set humidity is reached, the steam
release speed changes to low. Every minute, the humidity is checked,
and the steam release speed is adjusted as needed.
EN
Smart Ultrasonic Mist Humidifier
User Manual
- 5 -
04/2024
2024, .
• Inthis mode, the hot vapour function is also active. The
icon will
light up.
Child Operating Mode (
)
• The relative humidity of this mode is automatically set to 55%. Once
this mode is selected, ahigh steam release speed is initiated to quickly
reach the set humidity. When the set humidity is reached, the steam
release speed changes to low. Every minute, the humidity is checked,
and the steam release speed is adjusted as needed.
• Inthis mode, the hot vapour function is also active, the icon
will
light up, as well as the ionisation function, the icon will light
up.
Note:
The hot vapour ( ) and ionisation ( ) functions are
available for all three operating modes. You can turn them
on/off by repeatedly pressing the WARM/PLASMA button.
Sleep Mode (
)
• Inthis mode, the display and control panel backlight are dimmed, and
the humidifier operates quietly to ensure sleep comfort.
• Press the NIGHT button to activate sleep mode. The
icon will light
up. The display and control panel are dimmed to 1/3 of the original
brightness.
After 15 seconds of inactivity, the display andcontrol panel will turn off
completely, only the
icon will remain on. Pressing any button will
restore the dimmed brightness of the display andcontrol panel.
• The humidifier operation remains the same as inautomatic mode.
• Press the NIGHT button to cancel the sleep mode and activate the
automatic mode.
Continuous Humidification and Humidity Setting
• By repeatedly pressing the HUMIDITY button, set the desired
humidity in the range between 30 and 75% RH. The
icon will light
up on the display.
Each time the button is pressed, the humidity increases by5%. Wait
until the humidity value stabilises on the display, showing the relative
humidity. This sets the humidity setting. The humidifier will then start
the steam release speed based on the difference between the set
humidity and the measured relative humidity, as follows:
• If the set humidity is 1 to 9% higher than the measured relative
humidity, the steam release rate will be low.
• If the set humidity is 10 to 15% higher than the measured relative
humidity, the steam release rate will be medium.
• If the set humidity is higher by15% or more than the measured relative
humidity, the steam release rate will be high.
• The steam release speed cannot be set inthis mode.
• When the set humidity is reached, the steam release stops. However,
when the relative humidity decreases by3% compared to the set
humidity, the steam release resumes.
• If you press andhold the HUMIDITY button for 2 seconds during
humidity setting, you cancel the humidity setting, and the humidifier
switches to automatic mode.
Note:
If you press the HUMIDITY button once more after setting
75% humidity, the display will show “--” andafter pressing
the button again, 30% will be displayed.
Manual Mode
• While the humidifier is inautomatic mode, child mode or health mode,
press the slider to enter the manual mode. Inthis mode, you
can adjust the steam release speed as needed in the range from 1 to 7,
where 1 represents low speed and7 represents high speed.
• The entire length of the
slider serves to select the speed,
with speed 1 at the far left and speed 7 at the far right. Speed 4 is
approximately in the middle of the button. Press the corresponding
position on the button to set the speed, or you can slide your finger
across the entire length of the button from right to left and vice versa,
stopping at the desired speed.
• According to the set speed, the corresponding number of icons will
light up on the outer part of the display.
• Once the relative humidity is displayed on the screen, the set speed is
saved, and the humidifier will release steam at the set speed.
Automatic Shutdown
• The automatic shutdown function allows you to switch off the
humidifier after aset period. The humidifier will then enter the standby
mode.
• By repeatedly pressing the TIMER, set the automatic shutdown time
from 01 to 12 hours. The
icon will light up on the display. Wait until
the value on the display stabilises, showing the ambient temperature.
This saves the set automatic shutdown time in memory andstarts the
countdown.
• The display will alternately show the ambient temperature and the
automatic shutdown time.
• As the automatic shutdown time counts down, the current time will
alsoappear on the display. For example, if you set the automatic
shutdown time to 8 hours, it will gradually display 7, 6, 5 hours, and
so on.
• Once the set time elapses, the humidifier will turn off and switch to
standby mode.
• If you need to cancel the automatic shutdown function, repeatedly
press the TIMER button until “--” appears on the display. Wait until
the ambient temperature is shown and the icon
on the display
goes out.
Hot Vapour andIonisation Functions
To tun on and off the hot vapour andionisation functions, use the WARM/
PLASMA button. Pressing it repeatedly will activate the functions in the
following order:
– The first press activates the hot vapour function, the icon
lights
up.
– The second press activates the ionisation function, the icon
lights
up.
– The third press turns off the hot vapour function, the icon goes
out.
– The fourth press turns off the ionisation function, the icon
goes
out.
Low Water Level Indicator
• Once the water level drops below the specified level, an audible alert
will sound, and the icon
will light up on the display. The operation
of the humidifier will pause, and it is necessary to refill water into the
tank.
• Turn off the humidifier and disconnect it from the power source. Then
follow the instructions in the “Filling the Tank” section.
Warning:
Never remove the tank from the base while the
humidifier is in operation. This would result in
automatic shutdown of the humidifier and pose the
risk of irreversible damage, adangerous situation, and
the risk of injury.
Steam Release Direction Setting
You can adjust the direction of the steam release as needed by rotating
the steam outlet (A3) within a360° angle.
Aromatic Oil
• This humidifier is designed to use aromatic oils.
• Remove the aroma box from the bottom of the base.
• Drip aromatic oil onto the pad. Use only water-soluble aromatic oils.
• Insert the aroma box back into the base.
• If you are not using or storing the humidifier, clean the aroma box
following the instructions inthe “Cleaning andMaintenance” section.
Warning:
Do not under any circumstances pour aromatic oil
into the water tank or base. This could damage the
internal components of the humidifier.
- 6 -
04/2024
2024, .
Display and Control Panel Backlighting
The backlight of the display andcontrol panel is dimmed to 1/3 of its
original brightness after being idle for 15 minutes. Pressing any button will
restore the original brightness.
. . . . . . . . . . . . . . . . . . . . . . . . . . . . . . . . . . . . . . . . . . . . . . . . . . . . . . . . . . . . . . . . . . . .
REMOTE CONTROL OPERATION
Inserting Batteries into the Remote Control
1. Press the latch of the battery holder on the rear side of the remote
control andpull out the holder.
2. Insert anew CR2025 type battery into the holder. Ensure the correct
polarity when inserting the battery. The polarity is indicated on the
rear side of the remote control.
3. Insert the holder back into the remote control.
To use the remote control, point it at the humidifier. The maximum signal
range is 6 m. If you place the remote in such away that the transmission
of the signal is blocked by barrier, the signal may not be transmitted at all.
If you are replacing the batteries, follow the same procedure, but remove
the old batteries first.
Note:
If you plan not to use the remote control for an extended
period of time, remove the batteries. Never put batteries in
afire, short-circuit or damage in any way. Dispose of them
in an environmentally friendly manner at the end of their
lifespan. Never dispose of batteries in municipal waste.
The principle of operating the humidifier via the remote control is the
same as described in the “OPERATION VIA CONTROL PANEL” section.
. . . . . . . . . . . . . . . . . . . . . . . . . . . . . . . . . . . . . . . . . . . . . . . . . . . . . . . . . . . . . . . . . . . .
OPERATION VIA SENCOR HOME APP
This humidifier can be controlled via the Sencor HOME application.
Download the app on your smart phone, register, and control the
humidifier through the application.
If the app is already installed, add the humidifier to your devices.
Adding the Humidifier to the Device List via Bluetooth
You can add the humidifier to the Sencor HOME app by pairing it via
Bluetooth.
1. Enable Bluetooth on your mobile phone.
2. Turn on the humidifier.
3. Open the application, click on the “+” icon on the home page'stop
right.
4. The device will offer the “Add Device” option.
5. Click and the app will automatically guide you through the addition
process.
Note:
If Bluetooth connection fails, ensure there are no obstacles
between your phone and the humidifier, and that both
devices are close to each other.
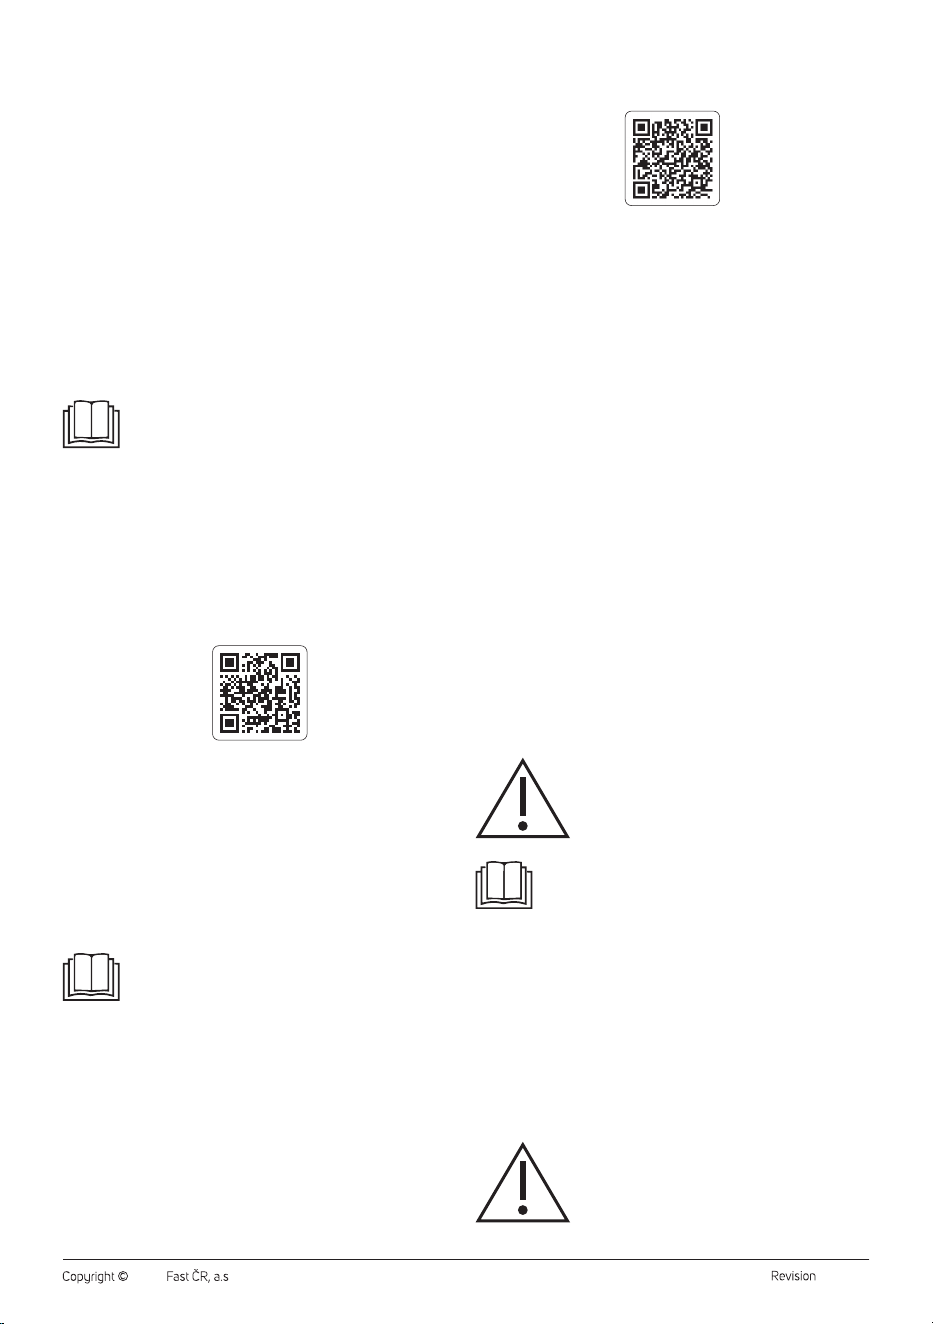
Adding the Humidifier to the Device List viaQR Code
• The humidifier can also be added to the Sencor HOME app using the
QR code provided below. On the home page, click on the “+” icon and
select "[–] Scan QR Code" in the top right corner.
• You will be prompted toreset the device. Press and hold the ON/
OFF button for about 5 seconds. The Wi-Fi indicator light blinks. This
indicates that the humidifier is ready for pairing. Instructions can also
be found on the app screen.
• Inthe app, confirm that the (Wi-Fi) light is blinking, then click “Next”.
• The process of adding the device starts. Wait until the humidifier is
paired.
• In the device list on the main screen, click on the humidifier icon to
enter its control.
QR code for adding the control panel of the humidifier to the Sencor
HOME app
Manual Addition of the Humidifier to the Device List
• On the home page, click on “Add Device” or the “+” in the top right
corner, and then click on "Add Device".
• Ascreen with appliance categories and alist of appliances will appear.
• Select the “Air Quality” category and choose the humidifier model
from the product list.
• You will be prompted toreset the device. Press and hold the ON/
OFF button for about 5 seconds. The Wi-Fi indicator light blinks. This
indicates that the humidifier is ready for pairing. Instructions can also
be found on the app screen.
• Inthe app, confirm that the (Wi-Fi) light is blinking, then click “Next”.
• On the next screen, you will be prompted toselect aWi-Fi network.
Select the network, enter your password andclick “Next”.
• The process of adding the device starts. Wait until the humidifier is
paired.
• In the device list on the main screen, click on the humidifier icon to
enter its control.
Wi-Fi Reset
While the humidifier is in operation, press and hold the ON/OFF button
for 5 seconds. The Wi-Fi settings will be reset and the Wi-Fi icon will blink
rapidly (twice per second).
. . . . . . . . . . . . . . . . . . . . . . . . . . . . . . . . . . . . . . . . . . . . . . . . . . . . . . . . . . . . . . . . . . . .
CLEANING AND MAINTENANCE
• Before cleaning, unplug the power cable from the socket and allow the
appliance to cool down.
• Please adhere to the following cleaning and maintenance instructions
for the humidifier. Otherwise, the performance of the humidifier may
be adversely affected and undesirable microorganisms may multiply
inside.
Warning:
To avoid the risk of electric shock, do not immerse the
appliance, plug, or cable in water or any other liquid.
Note:
Do not use abrasive cleaning agents, solvents, or any
substances to clean any parts of the appliance that
could damage the surface of the appliance. None of the
components of this appliance are dishwasher safe.
Cleaning after Each Use
1. Turn off the humidifier and disconnect it from the power socket.
2. Remove the lid.
3. Grip the water tank by the handle and lift it up.
4. Turn the tank upside down andunscrew the water tank cap.
5. Pour the remaining water in the tank into the sink or drain.
6. Rinse the tank with clean water andremove any dirt or deposits.
7. Wipe the outer surface with adry cloth.
8. Let the tank dry.
9. Use aclean soft cloth slightly dampened in warm water to clean the
base. Wipe dry with aclean cloth.
Warning:
Do not leave water in thetank for an extended period
of time.

- 7 -
04/2024
2024, .
Removing Limescale Deposits
Depending on water hardness and frequency of use, regularly remove
limescale at least once aweek. Limescale may negatively affect the
operation of the humidifier andits lifespan.
If you have hard water, consider using distilled water.
1. Turn off the humidifier and disconnect it from the power socket.
2. Remove the lid.
3. Grip the water tank by the handle and lift it up.
4. Turn the tank upside down andunscrew the water tank cap.
5. Pour the remaining water in the tank into the sink or drain.
6. Fill the tank with one cup of white vinegar andlet it sit for
approximately 15 minutes. Use abrush with soft bristles to remove
limescale from the tank.
7. Pour the tank contents into the sink or drain andrinse the tank with
clean cold water.
8. Wipe the outer surface with adry cloth.
9. Let the tank dry.
Cleaning the Ultrasonic Discs
1. Turn off the humidifier and disconnect it from the power socket.
2. Remove the water tank from the base.
3. Use asoft cloth to clean the ultrasonic disc. Carefully wipe the disc
to remove dirt anddust.
Aroma Box
We recommend cleaning the aroma box after each use.
1. Remove the aroma box from the bottom of the base.
2. Remove the pad from thebox.
3. Wipe the aroma box with asoft cloth slightly dampened in warm
water.
4. Rinse the pad under running water and let it air dry. Then place it
back into the aroma box.
5. Insert the aroma box back into the base.
Storage
• If not using the appliance for an extended period, unplug it from the
power socket, let it cool down, and clean it following the instructions
provided above.
• Before storing, ensure that the appliance and all accessories are
thoroughly clean and dry and there is no water in the tank.
• Store the appliance in adry, clean, and well-ventilated place away
from extreme temperatures and out of the reach of children or pets.
. . . . . . . . . . . . . . . . . . . . . . . . . . . . . . . . . . . . . . . . . . . . . . . . . . . . . . . . . . . . . . . . . . . .
- 8 -
04/2024
2024, .
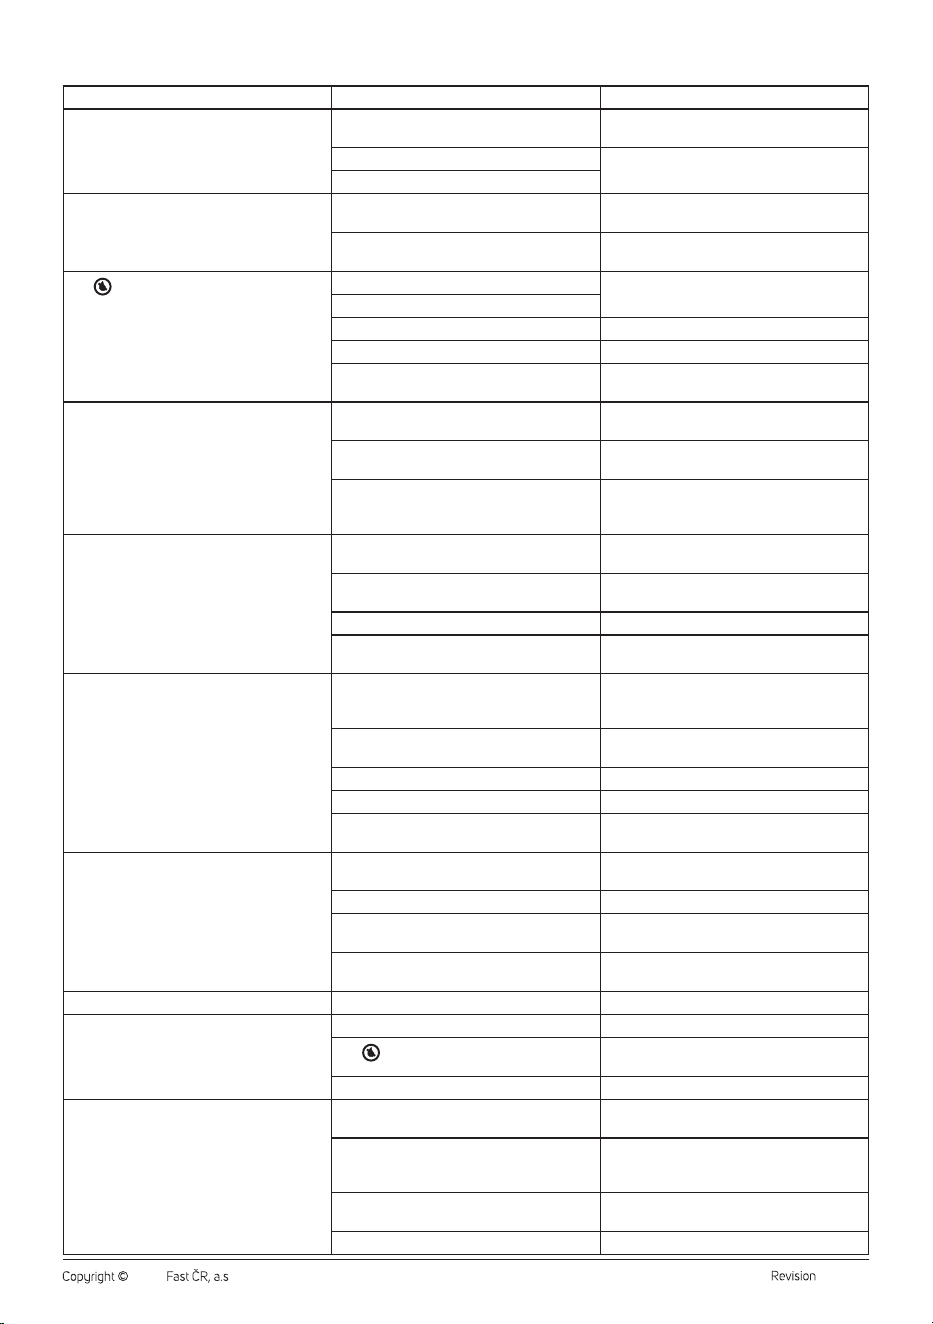
TROUBLESHOOTING
Problem Cause Solution
The humidifier cannot be turned on. The power cable plug is not inserted in the
socket.
Insert the plug to the socket.
The power cable is damaged. Do not use the humidifier andcontact an
authorised service centre.
The humidifier is damaged.
The ON/OFF button is lit, but no steam is
released.
The humidifier in not turned on. Press the ON/OFF button to illuminate the
control panel anddisplay.
The set humidity has been reached. Increase the humidity setting or change the
operating mode.
The
icon appeared on the display.
There is no water in the tank. Refill the water tank. Follow the instructions
inthe “Filling the Tank” section.
There is not enough water in the tank.
Water is pumped into the evaporation chamber. Wait approximately 1 minute.
The water tank is incorrectly placed in thebase. Placed the water tank correctly in the base.
The humidifier is on an uneven or inclined
surface.
Place the humidifier on aflat and stable surface.
The released steam has an unpleasant odour. The humidifier is switched on for the first time. Remove the water tank, rinse it andlet it dry
before first use.
Water in the tank is dirty or has been in it for
too long.
Clean the tank and change the water daily with
regular use.
There is residue of aromatic oil in the aroma
box.
Remove the aroma box andclean it
followingthe “Cleaning andMaintenance”
section.
The humidifier is too noisy or produces unusual
sounds.
There is not enough water in the tank, which
may cause ahigher noise level.
Refill the water tank. Follow the instructions
inthe “Filling the Tank” section.
The humidifier is on an uneven or inclined
surface.
Place the humidifier on aflat and stable surface.
The water tank is incorrectly placed in thebase. Placed the water tank correctly in the base.
The humidifier is damaged. Do not use the humidifier andcontact an
authorised service centre.
The humidifier does not humidify sufficiently. There is anatural or artificial air exchange in the
room (e.g. open doors) that interferes with the
increase in relative humidity.
Close the doors or windows, turn off the air
conditioning.
The air inlet and the steam outlet are blocked. Remove the blockage from the air inlet andthe
steam outlet.
The water tank is covered with limescale. Remove the limescale.
The set humidity is too low. Increase the set humidity.
Water in the tank is dirty or has been in it for
too long.
Clean the tank and change the water daily with
regular use.
The ambient humidity is too high. The humidifier is inthe continuous
humidification mode.
Change the operating mode.
The set humidity is too high. Lower the set humidity.
The room is not sufficiently ventilated. Regularly ventilate the room by opening
windows or doors.
Excess water from thetank spilled when filling
or when inserting the tank back into the base.
Wipe the excess water from the base andfrom
the water tank.
Water is condensing in the room. The room temperature is too low. Increase the room temperature.
The steam release suddenly stopped. The automatic shutdown time has elapsed. Turn on the humidifier.
The
icon appeared on the display.
Refill the water tank. Follow the instructions
inthe “Filling the Tank” section.
The set humidity has been reached. Increase the humidity as needed.
The display does not show the correct humidity. The room is larger than the effective range of
the humidifier.
Move the humidifier to aroom that corresponds
to its effective range.
Steam has accumulated on the humidity
sensor.
Turn off the humidifier and disconnect from the
power source. Allow the humidity sensor to dry
before next use.
The steam outlet is directed straight at the
humidity sensor.
Rotate the steam outlet.
The humidity sensor is damaged. Contact an authorised service centre.
- 9 -
04/2024
2024, .
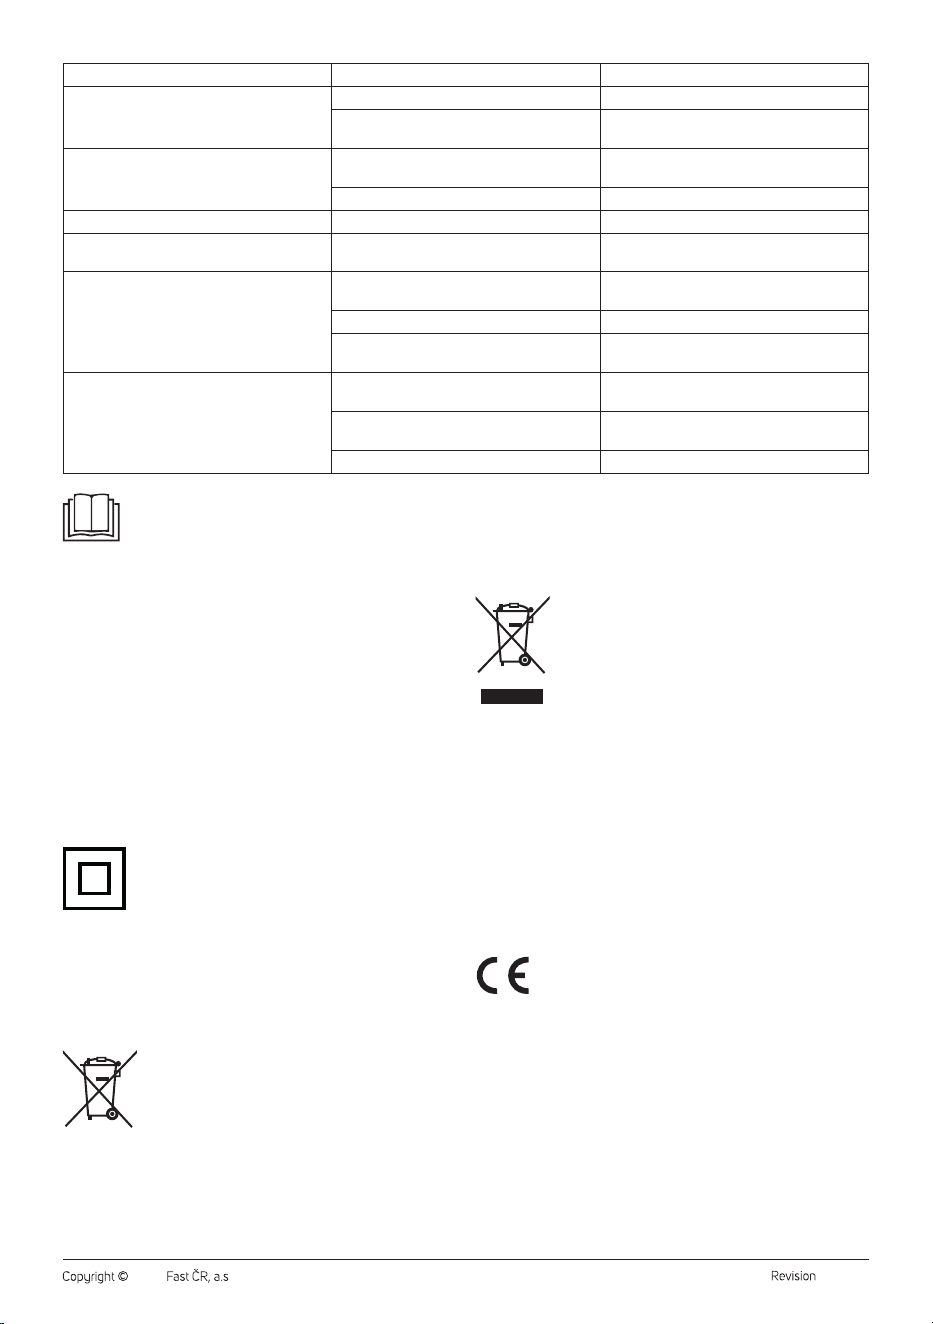
Problem Cause Solution
The control panel does not respond to touch. Your fingers are damp or oily. Wipe your fingers with adry towel.
The humidifier is damaged. Do not use the humidifier andcontact an
authorised service centre.
Awhite film appeared around the humidifier. The water inthe tank has ahigh mineral
content.
We recommend using distilled or filtered water.
The humidifier has not been cleaned properly. Clean the humidifier, especially the water tank.
The steam comes out from the base. The water tank is incorrectly placed in thebase. Placed the water tank correctly in the base.
The steam comes out from under the steam
outlet.
The steam outlet is not positioned correctly. Place the steam outlet into the hole correctly.
The humidifier does not produce hot vapour. The humidifier is warming up. Wait afew minutes until the hot vapour release
starts.
The vapour is too fine to be warm. Increase the speed.
The temperature inthe room is too low and the
hot vapour cools down quickly.
Increase the room temperature.
The remote control doesn't work. The distance between the remote control and
the humidifier is too great.
Shorten the distance between the remote
control and the humidifier.
The battery may be provided with aprotective
tape from the factory.
Remove the tape.
The battery is exhausted. Replace the battery.
INSTRUCTIONS AND INFORMATION ON DISPOSAL OF USED
PACKAGING MATERIAL
Dispose of used packaging material in the designated waste disposal area
determined by the municipality.
DISPOSAL OF USED ELECTRICAL AND ELECTRONIC EQUIPMENT
This symbol on the products or accompanying documents
indicates that used electrical and electronic products
should not be disposed of with regular municipal waste.
For proper disposal and recycling of these products, deliver
them to designated collection points. Alternatively, in some
European Union states or other European countries the
products can be returned to the local retailer when buying
an equivalent new product. By properly disposing of this
product, you help preserve valuable natural resources and contribute to
preventing potential negative impacts on the environment and human
health resulting from improper waste disposal. For further details, contact
your local authorities or the nearest collection point. Fines may be
imposed for improper disposal of this type of waste in accordance with
national regulations.
For Business Entities in European Union States
If you want to dispose of electric or electronic devices, ask your retailer or
supplier for the necessary information.
Disposal in Other Countries Outside the European Union
This symbol is valid in the European Union. To dispose of this product
elsewhere, request necessary information on the correct disposal method
from local authorities or your retailer.
This product complies with all the essential requirements of
the applicable EU directives.
Note:
If your problem is not listed above or any of the mentioned
problems persist, turn off the humidifier and stop using it.
The humidifier does not contain user-serviceable parts.
Contact an authorised service centre.
. . . . . . . . . . . . . . . . . . . . . . . . . . . . . . . . . . . . . . . . . . . . . . . . . . . . . . . . . . . . . . . . . . . .
TECHNICAL SPECIFICATIONS
Rated power .............................................................................................220–240 V~
Rated frequency ...........................................................................................50/60 Hz
Rated input ..............................................................................................................110 W
Noise level ......................................................................................................<35 dB(A)
Water tank capacity ................................................................................................... 5 l
Humidification output ..........................................................350 ml/h (± 50 ml/h)
Recommended room size .................................................................................50 m
2
Dimensions (L x Wx H) ..................................................................18 x 25 x 36 cm
Weight .....................................................................................................................2.5 kg
The declared noise emission level of the appliance is 35 dB(A),
representing the A-weighted sound power level relative to the reference
sound power level of 1 pW.
Safety Class for Electric Shock Protection:
Class II – Electric shock protection is provided by double or
heavy-duty insulation.
We reserve the right to change the text and technical specifications.
By this, SENCOR declares that the type of radio device SHF 7647WH
complies with Directive 2014/53/EU. The full text of the EU Declaration of
Conformity is available at: www.sencor.eu.
. . . . . . . . . . . . . . . . . . . . . . . . . . . . . . . . . . . . . . . . . . . . . . . . . . . . . . . . . . . . . . . . . . . .
DISPOSAL OF USED BATTERIES
Batteries contain environmentally damaging substances
and should not be disposed of with regular municipal
waste. Please dispose of used batteries at designated
collection points for proper recycling.