
Operation Manual
Operation Manual
Please read the instruction carefully before using
Operation Manual
P2 Electric Inflator

Contents
English
1. NOTE
2. Product Illustration
3. Installation
4. Instructions
5. Specification
6. After Sales Service
----------------------------------------------------------
-----------------------------------------------
Deutsch
1. Anmerkungen
2. Produktabbildung
3. Einrichtung
4. Anleitung
5. Spezifikationen
6. Kundenbetreuung
Español
1. Notas
2. Ilustración del producto
3. Instalación
4. Instrucciones
5. Especificaciones
6. Después del servicio de venta
Italia
1. Nota
2. Illustrazione prodotto
3. Installazione
4. Istruzioni
5. Specifiche
6. Servizi post vendita
1
-------------------------------------------------------
1
-----------------------------------------------------
7
-----------------------------------------------------
13
----------------------------------------------------------
19
2
------------------------------------------------------
3
------------------------------------------------------
4
----------------------------------------------------
5
---------------------------------------------
6
---------------------------------------------------
------------------------------------------------
7
8
------------------------------------------------------
9
-------------------------------------------------------
10
--------------------------------------------------
11
------------------------------------------------
12
----------------------------------------------------------
------------------------------------------
13
14
-----------------------------------------------------
15
----------------------------------------------------
16
------------------------------------------------
17
------------------------------------
18
-----------------------------------------------------------
19
20
----------------------------------------------------
-------------------------------------------------------
-----------------------------------------------------
----------------------------------------------
---------------------------------------------
21
22
23
24

Français
1. Note
2. Product Illustration
3. Installation
4. Instructions
5. Spécifications
6. Service après-vente
----------------------------------------------------
25
----------------------------------------------------------
----------------------------------------------
25
26
-----------------------------------------------------
27
----------------------------------------------------
28
-------------------------------------------------
29
--------------------------------------------
30

P2 Operation Manual
Note
Thank you for choosing Oasser P2 smart electric inflator! Please read this opera-
tion manual carefully before using it for the first time.
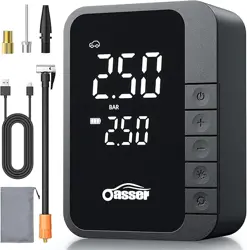
P2 electric inflator is portable, which comes with two optional dedicated lithium
battery and cigaratte lighter 12V DC. There are the functions of tire pressure
metering and digital LCD screen display, and you can preset the tire pressure. It is
very suitable for car users to check the tire pressure regularly and inflate the tire in
case of emergency to ensure your driving safety. Also this inflator can be applied to
cars, bicycles, motorbikes, balls, inflatable toys and etc.
Children are not allowed to use this product! Please put it in a place where
children cannot reach! Don’t insert the air hose / trachea into the mouths, ears
or eyes of human beings or animals! Don’t regard it as a toy!
Do not use this pump near the places with flammable and explosive liquids and
gases (eg. gas stations)
Due to the high pressure, the pump will generate heat during inflating. Please
be aware of the heat, especially when removing the air hose/trachea, please
use the supplied gloves! It is advisable to cool down the pump for 10 minutes
after continuous use for 5-10 minutes.
Please make sure the pump is fully charged before using it. It must be charged
with the specialized charger.
Please keep it away from rain, water, falling, and bumping.
Please keep it in a dry place, if the inflator is placed for a long time, it is
recommended to recharge it every six months.
If there is something wrong when using it, please stop using it immediately and
contact our technical team. we provide 100% after sales service.
Note: This electric inflator cannot be used for trucks, vans, and buses.
EnglishDeutschEspañolItaliaFrançais
1.
2.
3.
4.
5.
6.
7.
8.
1
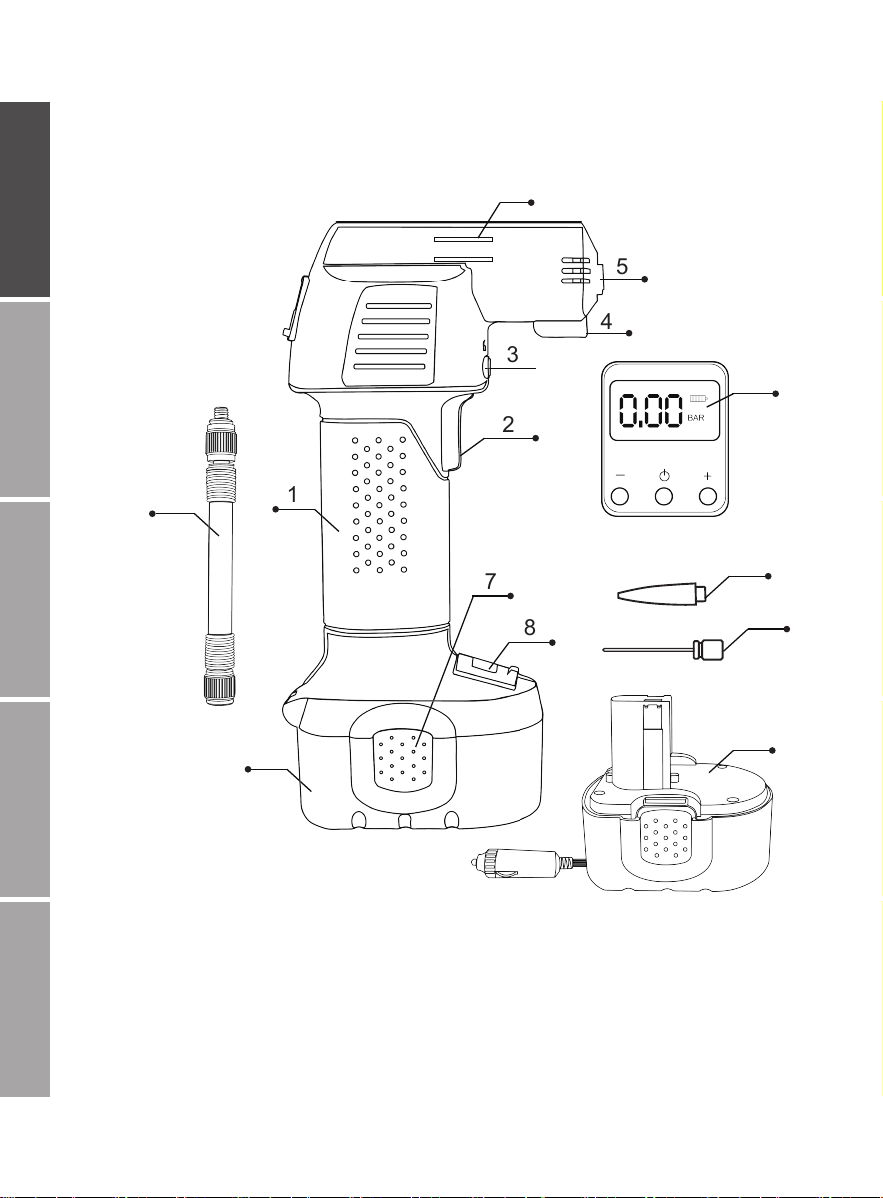
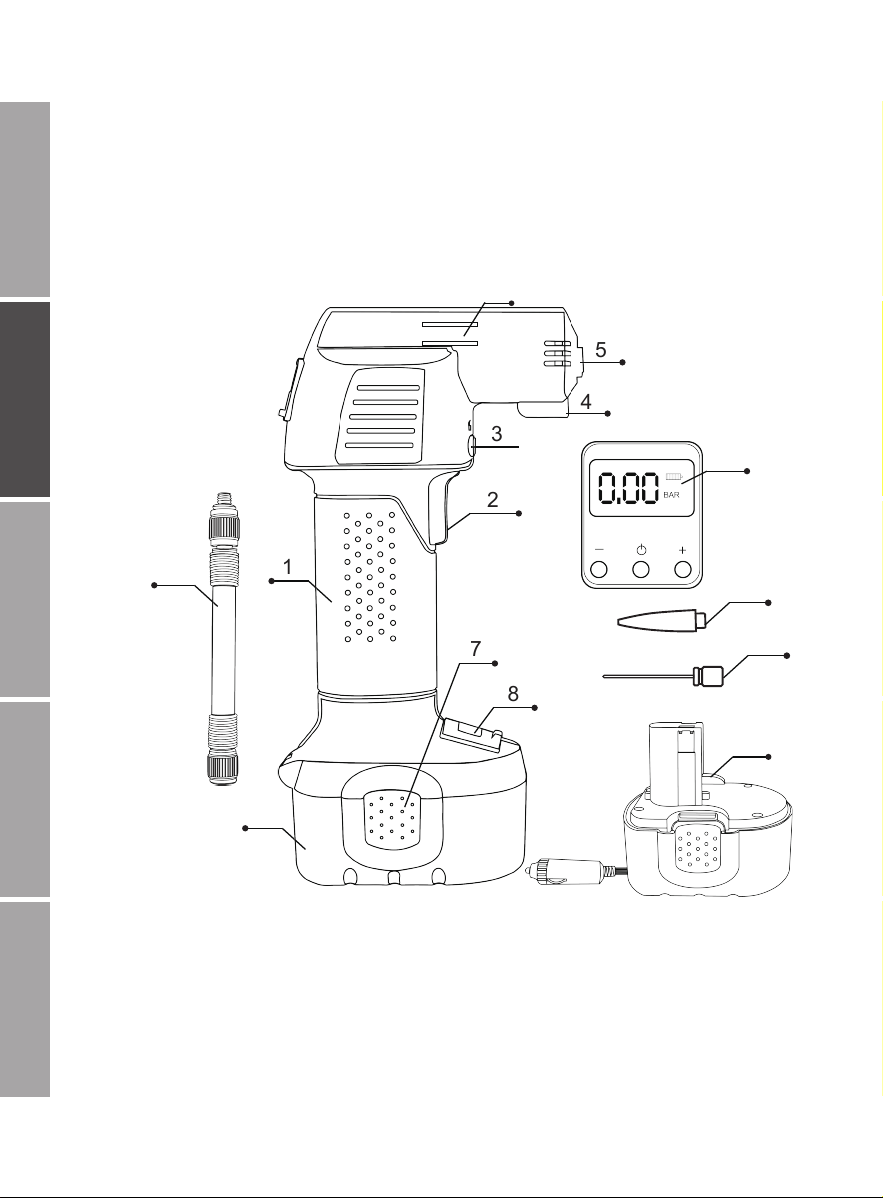
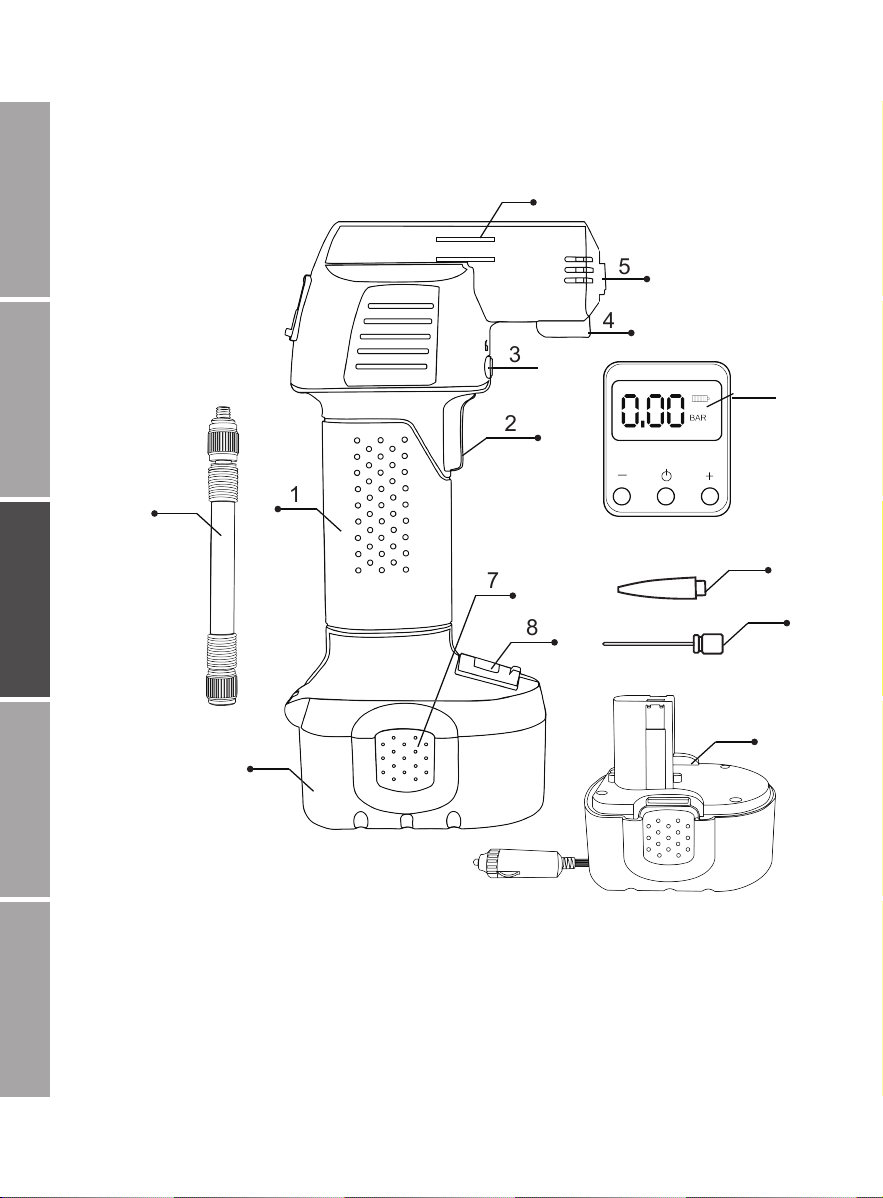
Product Illustration
1. Case
2. Tyre Inflator Switch
3. Switch Lock
4. LED Light
5. Air Hose Port
6. Air Hose Slot
7. Battery Pack Buckle
8. The Cover of Placed Accessories
9. Battery Pack
10. LCD Display System
11. Air Hose/Trachea
12. Lamplighter power
13. Ball needle
14. Inflatable toy nozzle
EnglishDeutschEspañolItaliaFrançais
1
10
9
8
7
2
3
4
5
6
11
2
12
13
14
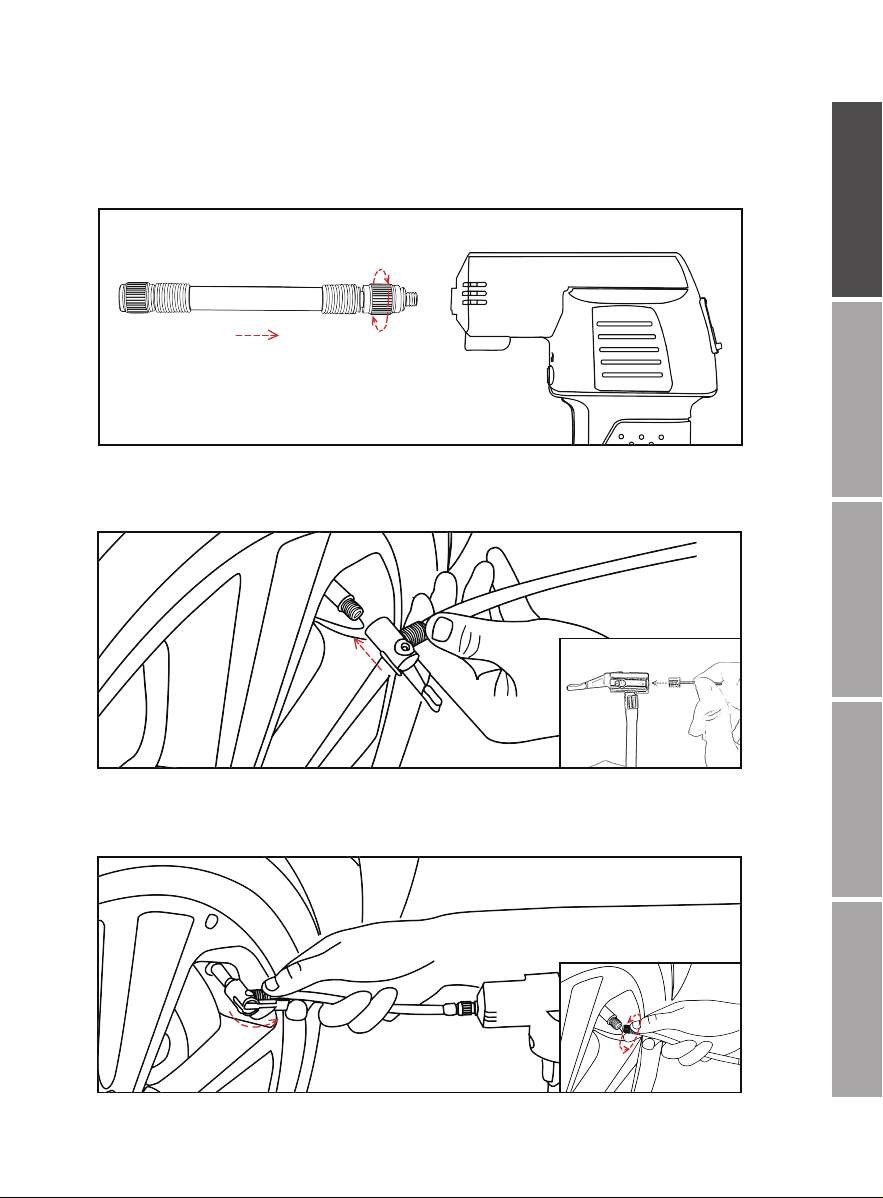
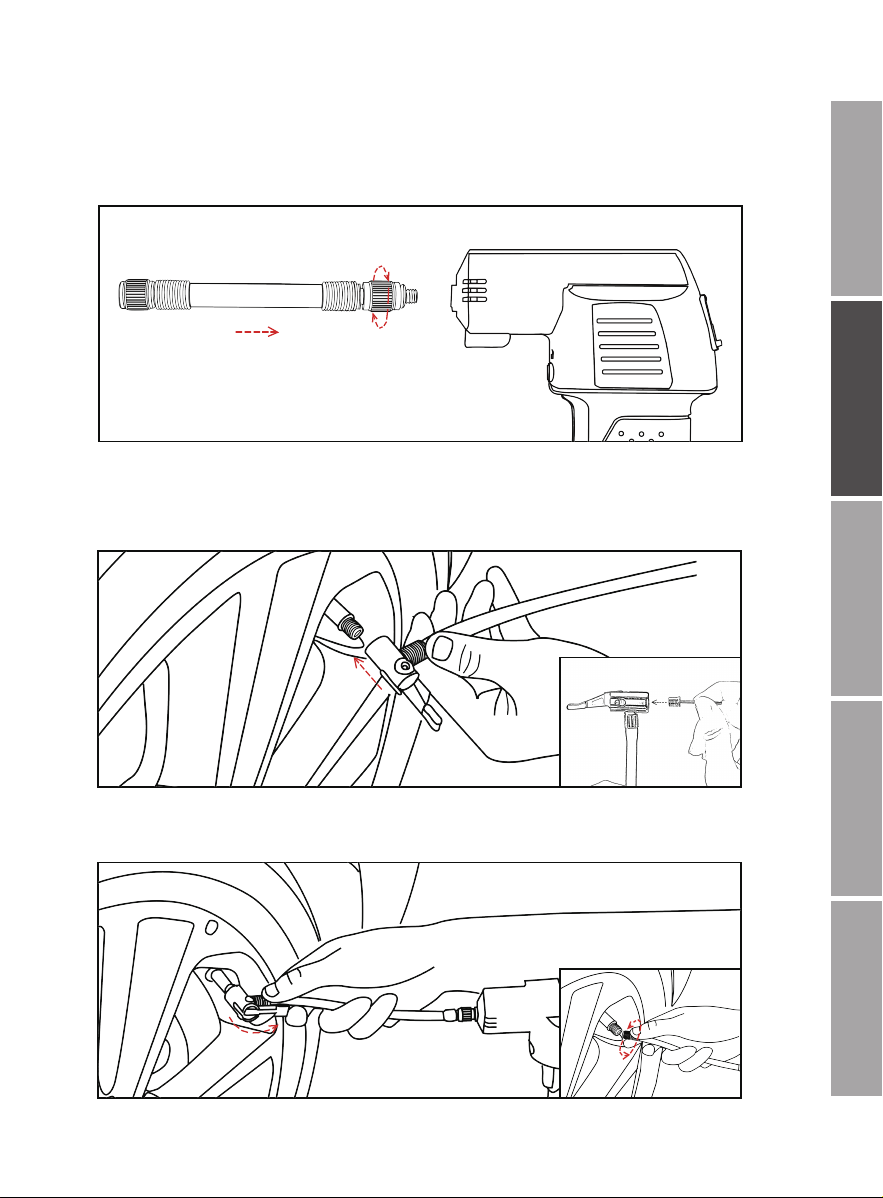
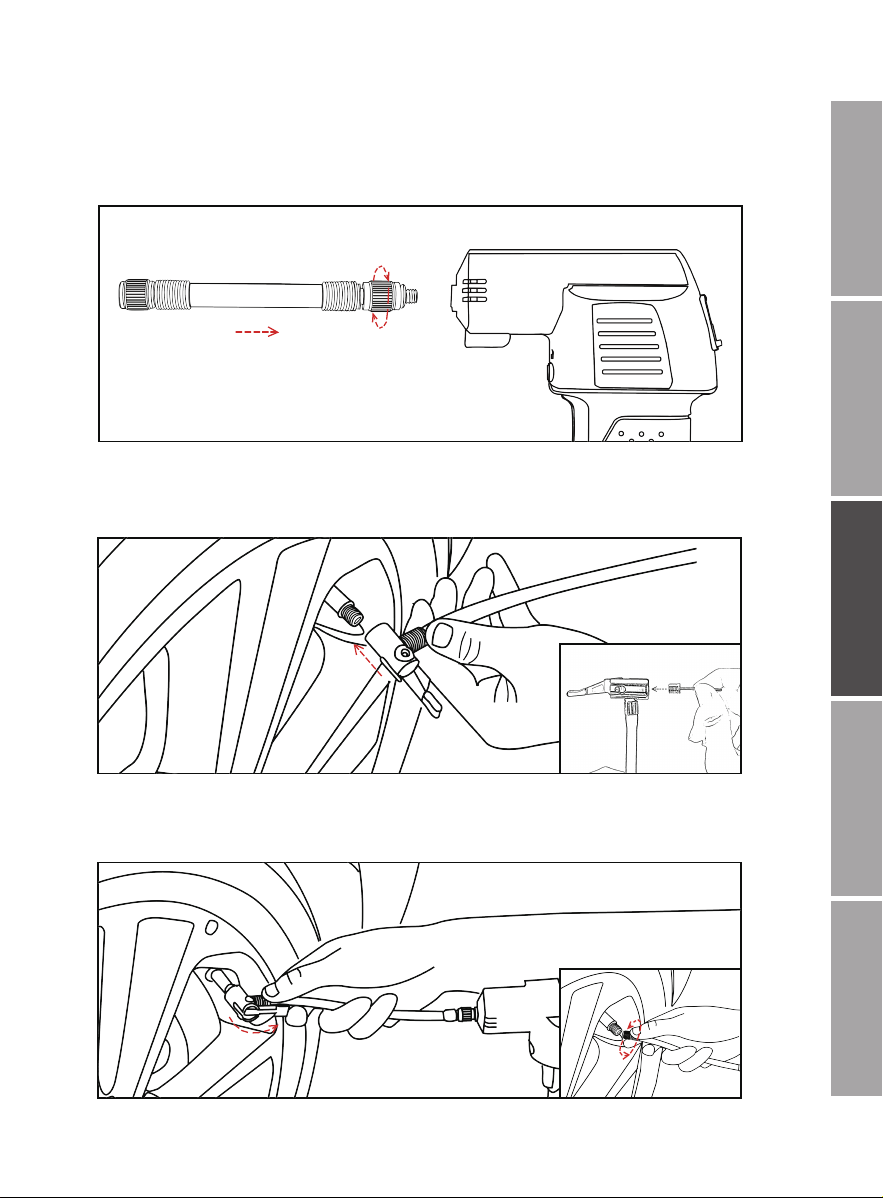
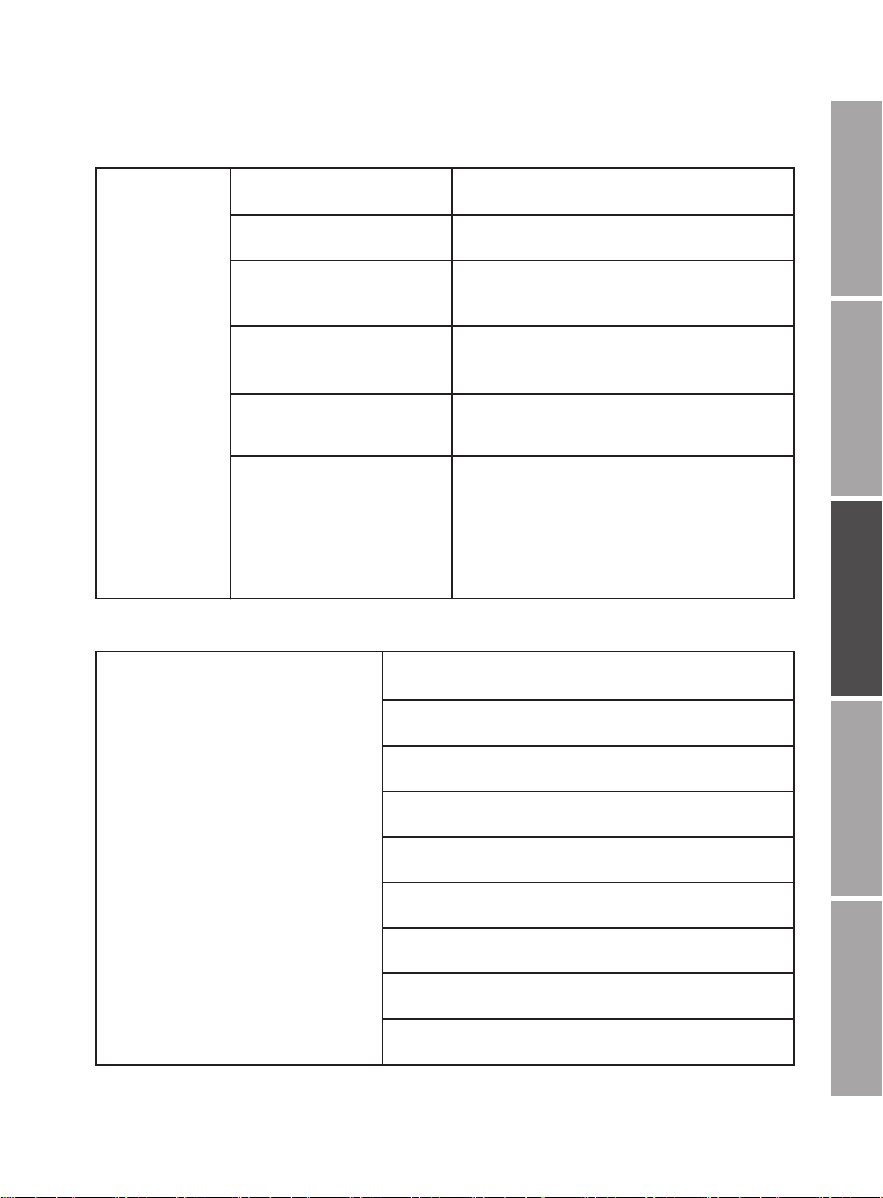
Installation
1. Please connect the air hose/trachea to the electric inflator.
EnglishDeutschEspañolItaliaFrançais
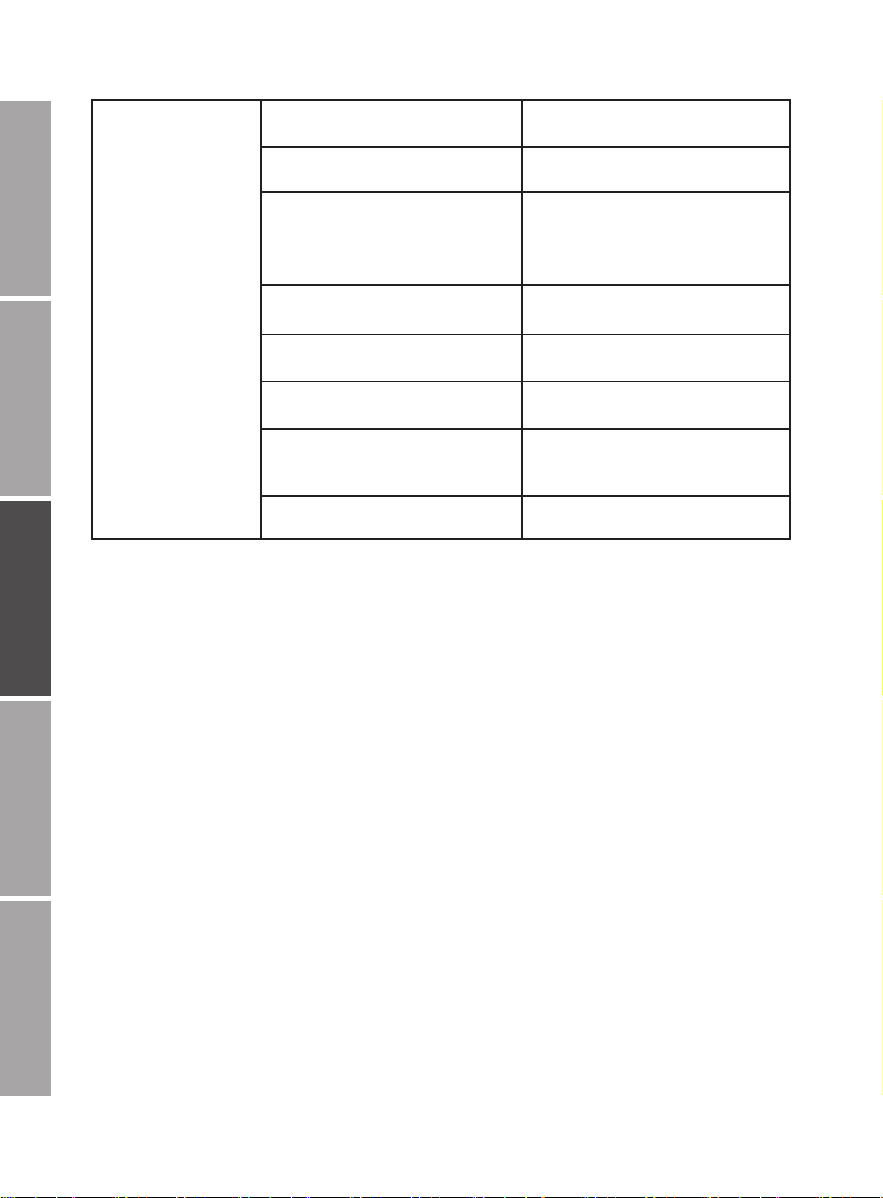
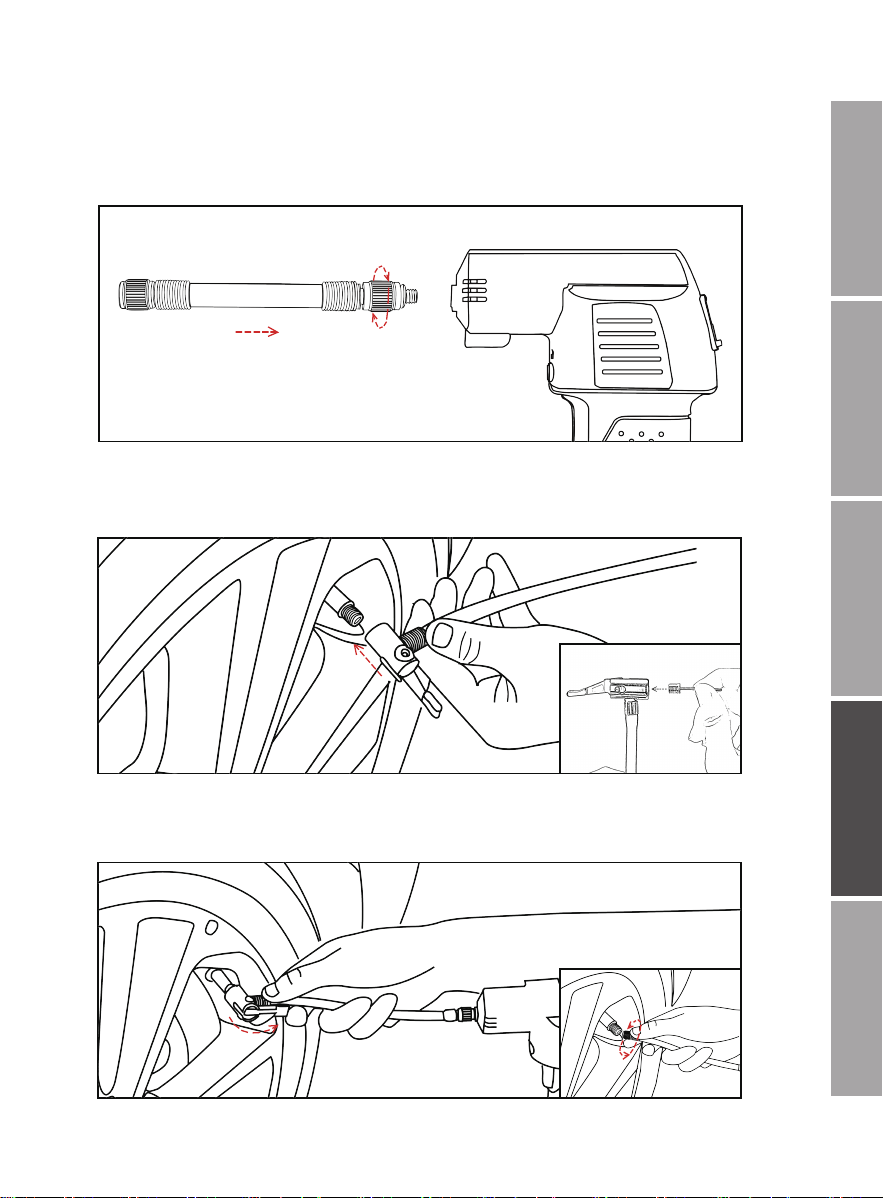
2. Please connect the trachea to the car tire or the adapter.
3. Please fasten the buckle or tighten the screw tube.
3

Instructions
1.
2.
3.
4.
5.
6.
7.
8.
9.
10.
EnglishDeutschEspañolItaliaFrançais
Please connect the inflator to the battery pack or the 12V DC power
Choose the suitable trachea and rotate it into the inflator, by the other end of
the trachea, just connect it to the tire value nozzle. While there needs connect-
ing to the balls, inflatable toys, or the French value, please choose the compati-
ble adapter.
Please press the " " button to activate the LCD display, and the top LED
lamp of the inflator will be turned on.
Please press the " " button to switch the value units: PSI, BAR, kg/cm2.
The screen will display the current pressure.
Please press “+” & “-” to set the desired pressure. Short press is slow adjust-
ment, long press is fast adjustment. After setting, the value in the screen will
flash for 4 seconds, which means auto setting is completed (Or you can press
the " " to complete the setting)
Press power button to start inflating. The inflator will stop inflating automatically
when the pressure reaches the preset value, and you can put off the trachea
and finish inflating.
Attention: Please firstly put off the inflatable side of trachea adapter, and then
remove the other side of the inflator's trachea, which to avoid both the tyre and
the inflator's pressure leaking
If you want to pause or terminate inflating, you can press the Power button to
switch off.
Automatic power off: Oasser inflator has automatic power off setting, it will
automatically shut down in 90 seconds without any operation.
Air hose/Trachea can be inserted to the trachea groove of the inflator when you
don’t need it.
In the process of inflating, there will produce the heat that generated by high
pressure, please pay attention to preventing burns, it is recommended to
operate with our gift gloves.
4
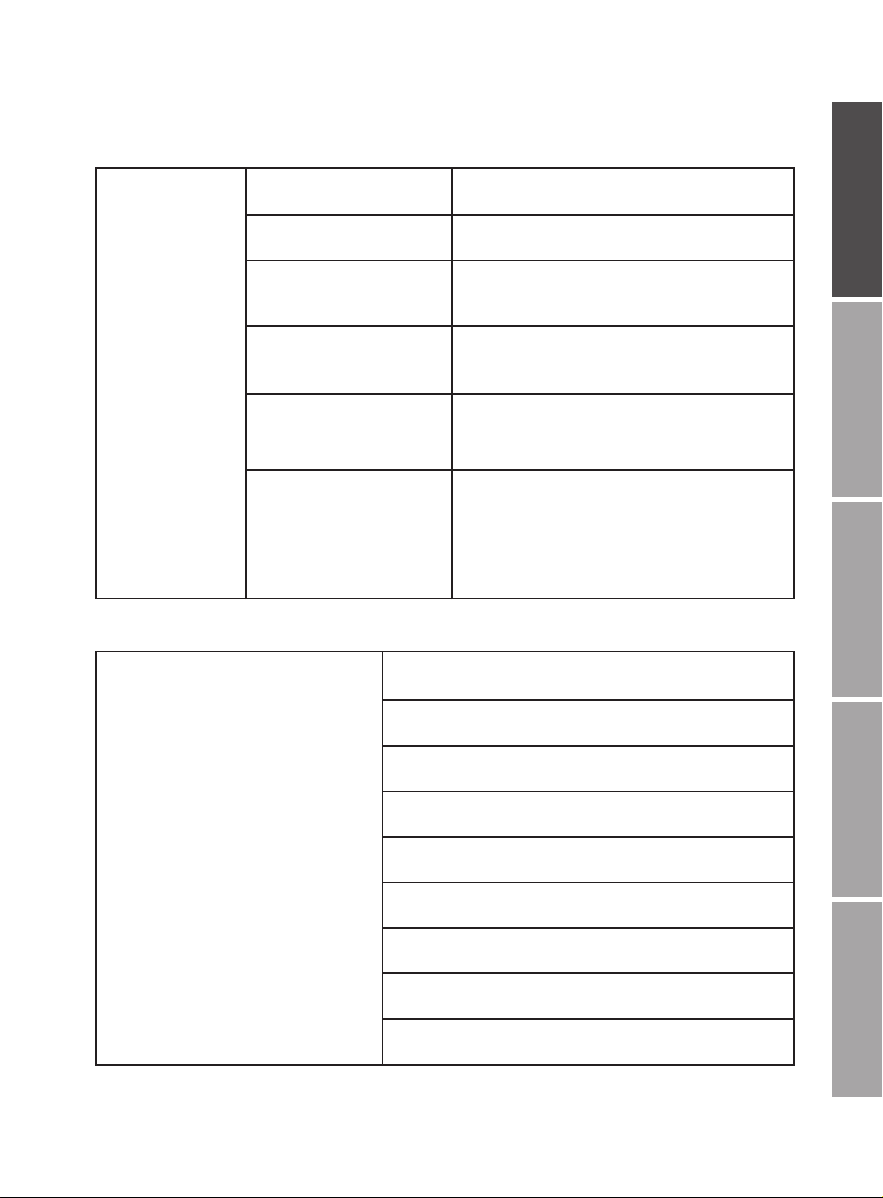
Battery
Dedicated battery Lithium battery
Battery capacity 2200mAh
3 -5hours
Disassemble
Push both side slots of the battery
pack and remove the battery pack
Charging
Please use the dedicated charger
to charge
Charging time
Precautions
Specification
EnglishDeutschEspañolItaliaFrançais
Package Including
Electric Inflator *1
Dedicated lithium battery*1
Dedicated 12V DC power*1
12cm/4.72inch trachea*1
35cm/13.78 inch trachea*1
French adapter*1
Ball needle*1
Inflatable toy nozzle*1
Gloves*1
Please keep it away from fire. If the
inflator is placed for a long time,
it is recommended to recharge it
every six months.
5
EnglishDeutschEspañolItaliaFrançais
After Sales Service:
The warranty period is 24 months.
Warranty Range: During the warranty period, we promise to repair the product
or return a new replacement for free while our quality department confirm that
the problem is related to the product itself.
The situations which do not belong to the warranty period:Operate the product
that is not according to the instruction; improper operation; user disassembles
and replaces the elements of the product when it is damaged; the product is
damaged due to natural disasters or other accidents; the warning sign is rip off.
Warranty definition: Our company is responsible for repairing and replacing the
product when our directly sold products are damaged.
Contact us:
US: support-us@oasser.net
CA: support-ca@oasser.net
UK: support-uk@oasser.net
DE: support-de@oasser.net
IT: support-it@oasser.net
ES: support-es@oasser.net
FR: support-fr@oasser.net
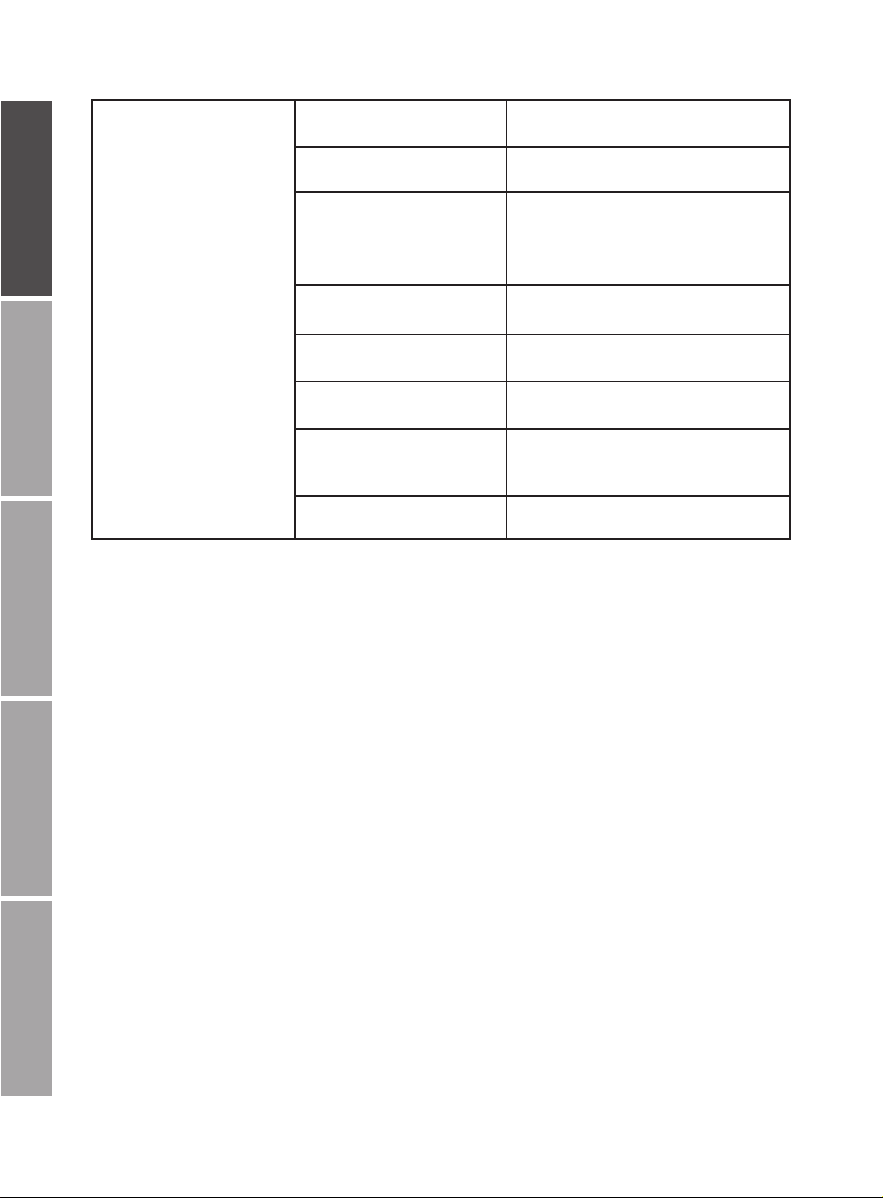
Inflator
Specifications
Working voltage DC 9~12V
Working voltage Less than12A
Max inflation pressure 130PSI
Pressure accuracy ±0.5PSI
Product size
7.8*8.5*26.5cm
(3.1*3.5*10.4inch)
Working temperature -20℃~+60℃
Product weight 1250g
Inflating efficiency
3L/min(It will spend less than
6 minutes to full inflate the
185/70R14 specification tires)
(1)
(2)
(3)
(4)
(5)
6

P2 Bedienungsanleitung
Anmerkungen:
Vielen Dank, dass Sie sich für die P2 elektronische Luftpumpe entschieden haben!
Bitte lesen Sie diese Bedienungsanleitung sorgfältig durch, bevor Sie sie zum
ersten Mal benutzen.
Die P2 elektronische Luftpumpe kann wahlweise mit der Lithiumbatterie verwendet
werden oder an den 12V DC Zigarettenanschluss betrieben werden. Es gibt die
Funktionen den Reifendruck zu messen. Mit Hilfe des digitalen LCD-Displays,
können Sie den Reifendruck voreinstellen. Es eignet sich sehr gut für Autofahrer,
den Reifendruck regelmäßig zu überprüfen und den Reifen im Notfall aufzupump-
en, um Ihre Fahrsicherheit zu gewährleisten. Auch diese Aufblasvorrichtung kann
auf Autos, Fahrräder, Motorräder, Bälle, aufblasbare Spielwaren und etc. angewen-
det werden.
Kinder dürfen dieses Produkt nicht benutzen! Bitte benutzen Sie es an einem
Ort, an dem Kinder es nicht erreichen können! Legen Sie den Luftschlauch / die
Trachea nicht in den Mund, die Ohren oder Augen von Menschen oder Tieren.
Es handelt sich nicht um ein Spielzeug!
1.
Aufgrund des hohen Drucks erzeugt die Pumpe während des Aufblasens Wärme.
Bitte beachten Sie die Hitze, besonders beim Entfernen des Luftschlauchs / der
Trachea, verwenden Sie bitte die mitgelieferten Handschuhe! Es empfiehlt sich,
die Pumpe 10 Minuten nach Dauerbetrieb 5-10 Minuten abkühlen zu lassen.
3.
Bitte stellen Sie sicher, dass die Pumpe vollständig aufgeladen ist, bevor Sie sie
benutzen. Es muss mit dem beiliegenden Ladegerät aufgeladen werden.
4.
Bitte halten Sie es weg von Regen, Wasser. Lassen Sie es nicht fallen und
setzen sie es keinen Stößen aus.
5.
Bitte bewahren Sie die Pumpe an einem trockenen Ort auf, wenn die Aufblasvor-
richtung für eine lange Zeit nicht benutzt wird. Es wird empfohlen, sie alle sechs
Monate aufzuladen.
6.
Verwenden Sie diese Pumpe nicht in der Nähe der Orte mit brennbaren und
explosiven Flüssigkeiten und Gasen (zum Beispiel an Tankstellen)
2.
EnglishDeutschEspañolItaliaFrançais
7
Falls das Gerät nicht ordnungsgemäß arbeitet, setzen Sie sich bitte mit unserem
Kundendienst in Verbindung. Wir versprechen 100% Kundenzufriedenheit
7.
Anmerkung: Diese elektrische Pumpe kann nicht für LKW, Lieferwagen und Busse
benutzt werden.
8.
Product Illustration
1. Gehäuse
2. Reifendruck Schalter
3. Einspaltsperre
4. LED Lampe
5. Luftschlauchanschluss
6. Luftschlauchblende
7. Akku-Schnalle
8. Abdeckung für das Zubehör
9. Akku-Pack
10. LCD Bildschirm mit Funktionen
11. Luftschlauch / Trachea
12. Zigarettenanzünder Netz
13. Ballnadel
14. Aufblasbare Spielzeugdüse
EnglishDeutschEspañolItaliaFrançais
1
10
9
8
7
2
3
4
5
6
11
8
12
13
14
EnglishDeutschEspañolItaliaFrançais
Einrichtung
1. Bitte verbinden Sie den Luftschlauch / die Luftröhre mit der elektrischen Pumpe.
2. Bitte verbinden Sie die Trachea mit dem PKW-Reifen oder verwenden Sie
einen der beiliegenden Adapter.
3. Bitte befestigen Sie die Schnalle oder ziehen Sie das Schraubenrohr an
9

EnglishDeutschEspañolItaliaFrançais
Verbinden Sie die elektrische Pumpe mit dem Akku oder der 12V DC Stromver-
sorgung
Wählen Sie die passende Trachea und drehen Sie diese auf die Aufblasvorrich-
tung, Verbinden Sie die Trachea mit dem Ventil Ihres PKW Reifens. Zum
Aufblasen von Bällen etc., verwenden Sie einen der mitgelieferten Adapter.
Drücken Sie die Taste " ", um die LCD-Anzeige zu aktivieren, und die obere
LED-Lampe der Pumpe wird eingeschaltet.
Bitte drücken Sie die Taste erneut " ", um die Werte einzuschalten: PSI,
BAR, kg / cm2. Der Bildschirm zeigt den aktuellen Druck an.
Bitte drücken Sie "+" & "-", um den gewünschten Druck einzustellen. Kurzer
Druck = langsame Einstellung, langer Druck = schnelle Einstellung. Nach dem
Einstellen blinkt der Wert auf dem Bildschirm für 4 Sekunden, das bedeutet,
dass die automatische Einstellung abgeschlossen ist (oder Sie können die
" " drücken, um die Einstellung abzuschließen)
Drücken Sie den Netzschalter, um das Aufblasen zu starten. Die Aufblasvor-
richtung stoppt automatisch, wenn der Druck den voreingestellten Wert
erreicht, und Sie können die Trachea abstecken und das Aufblasen beenden.
Achtung: Bitte zuerst die aufblasbare Seite des Trachea-Adapters ablegen und
dann die andere Seite der Luftröhre entfernen, um den Reifen und den Druck
der elektrischen Pumpe zu vermeiden
Wenn Sie das Aufblasen anhalten oder beenden möchten, können Sie den
Netzschalter ausschalten.
Automatische Abschaltung: Die elektronische Pumpe verfügt über eine
automatische Abschaltung, Sie wird nach 90 Sekunden ohne Verwendung
automatisch abgeschaltet
Luftschlauch / Trachea kann in die Trachea-Nut der Aufblasvorrichtung
eingesetzt werden, wenn Sie diese gerade nicht benötigen.
Im Vorgang des Aufblasens wird Hitze erzeugt, die durch hohen Druck erzeugt
wird, bitte achten Sie darauf, Verbrennungen zu verhindern, es wird empfohlen,
mit unseren Geschenkhandschuhen zu arbeiten.
Anleitung
1.
2.
3.
4.
5.
6.
7.
8.
9.
10.
10

Batterie
Batterietyp Lithiumbatterie
Batteriekapazität 2200mAh
3 -5 Stunden
Akku einlegen
Ladung
Bitte nutzen Sie das beiliegende
Netzteil
Drücken Sie beide Seitenschlitze des
Akkupacks und entfernen Sie den Akku
Ladezeit
Vorsichtsmaßnahmen
Spezifikationen
Lieferinhalt
Elektrische Luftpumpe* 1
wiederaufladbare Lithiumbatterie * 1
12V DC Netzteil*1
12cm/4.72inch Trachea*1
35cm/13.78 inch Trachea*1
Französischer Adapter *1
Ballnadel*1
Aufblasbare Spielzeugdüse * 1
Handschuhe*1
Bitte halten Sie es fern vom Feuer.
Wenn die Pumpe für eine lange Zeit
gelagert wird, wird empfohlen, sie
alle sechs Monate aufzuladen.
11
EnglishDeutschEspañolItaliaFrançais

EnglishDeutschEspañolItaliaFrançais
Kundenbetreuung:
Die Gewährleistungsfrist beträgt 24 Monate.
Garantieanspruch: Während des Garantiezeitraums versprechen wir, das Produkt
zu reparieren oder einen neuen Ersatz zu leisten, wenn unsere Qualitätsabteilung
bestätigt, dass das Problem mit der Pumpe selbst zusammenhängt.
Die Gewährleistungsfrist greift nicht: Betrieb des Produkts, u; Unsachgemäße
Bedienung; Benutzer zerlegt und ersetzt die Elemente des Produkts, wenn es
beschädigt ist; Das Produkt ist durch Naturkatastrophen oder andere Unfälle
beschädigt; Das Warnschild ist abgerissen.
Gewährleistungsdefinition: Unsere Firma ist verantwortlich für die Reparatur und das
Ersetzen des Produktes, wenn unsere direkt verkauften Produkte beschädigt sind.
Kontaktieren Sie uns:
US: support-us@oasser.net
CA: support-ca@oasser.net
UK: support-uk@oasser.net
DE: support-de@oasser.net
IT: support-it@oasser.net
ES: support-es@oasser.net
FR: support-fr@oasser.net
Arbeitsspanunng DC 9~12V
Betriebsspannung Weniger als 12 A
Maximaler Aufblasdruck 130PSI
Druckgenauigkeit ±0.5PSI
Produktabmessung
7.8*8.5*26.5cm
(3.1*3.5*10.4inch)
Arbeitstemperatur -20℃~+60℃
Produktgewicht 1250g
Aufblasleistung
3L/min (Es dauert etwa 6
Minuten um den Reifen
vollständig aufzublasen
185/70R14 Reifenspezifkation)
(1)
(2)
(3)
(4)
(5)
12
Elektrische
Luftpumpe
Technische Daten

P2 Manual de instrucciones
Notas:
Gracias por elegir el inflador eléctrico inteligente Oasser P2. Por favor lea con
cuidado este manual de instrucciones antes de usar el producto por primera vez.
El inflador eléctrico P2 es portátil, que viene con dos baterías dedicadas de litio y
un adaptador para la toma del encendedor de cigarrillos de 12V DC. Tiene las
funciones de medición de la presión y un monitor LCD y puede fijar los valores de
la presión. Es muy adecuado para los conductores de coches ya que pueden
regularizar la presión de los neumáticos en caso de emergencia y así poder
conducir de manera segura. Este inflador se puede usar en los coches, bicicletas,
motos, pelotas, cualquier juguete hinchable etc.
Mantener alejado el producto de los niños. Por favor coloquelo en un lugar
donde no pueda ser alcanzado por los niños. No inserten los accesorios del
inflador en la boca, orejas u ojo de cualquier ser humano o animal. No lo
confundan con un juguete!
1.
Debido a la alta presión, el inflador producirá calor durante el proceso de inflación.
Por favor tenga en cuenta el calor que desprende, especialmente al quitar la
boquilla. Por favor usen los guantes proporcionados. Se aconseja dejar enfriar el
inflador 10 minutos por cada 5-10 minutos de uso continuo.
3.
Por favor asegurese de que el inflador está completamente cargado antes de su
uso. Tiene que cargarse con el cargador especifico.
4.
Por favor manténgalo alejado de la lluvia, agua, caídas o golpes.
5.
Nota: Este inflador NO se puede usar en camiones, furgonetas o autobuses.
8.
Por favor manténgalo en un sitio seco, si el inflador no se usó en mucho tiempo,
es recomendable recargarlo periódicamente cada 6 meses.
6.
Si notan que algo no funciona correctamente mientras trabajan con el producto,
por favor detengan el proceso y contacte con nuestro equipo técnico. Lo asegura-
mos al 100% después del servicio de venta.
7.
No usen el inflador cerca de sitios potencialmente inflamables y gases o
líquidos inflamables (por ejemplo gasolineras)
2.
EnglishDeutschEspañolItaliaFrançais
13
EnglishDeutschEspañolItaliaFrançais
Ilustración del producto:
1. Estuche/Caja
2. Interruptor del inflador
3. Seguro del interruptor
4. Luz LED
5. Puerto aire comprimido
6. Ranura aire comprimido
7. Hebilla baterías
8. Envoltorio de accesorios
9. Baterías
10. Monitor LCD
11. Tubo aire comprimido
12. Cigarrillos encendedor
13. Aguja para pelotas
14. Boquilla para inflar juguetes
1
10
9
8
7
2
3
4
5
6
11
14
12
13
14
EnglishDeutschEspañolItaliaFrançais
Instalación:
Por favor conecte la boquilla de la tráquea al inflador eléctrico.
2. Por favor conecte la tráquea al neumático del coche o el adaptador.
3. Por favor ajuste la hebilla o apriete el tornillo del tubo.
15

EnglishDeutschEspañolItaliaFrançais
Por favor conecte el inflador a la batería o el adaptador de 12V DC.
Elija la tráquea adecuada y girelo en el inflador. Por el otro lado de la tráquea,
conectelo a la boquilla hinchado del neumático. Para el uso de pelotas,
juguetes hinchables por favor escoja el adaptador compatible.
Por favor presione el botón " " para activar el monitor LCD. Una vez hecho
el botón LED se encenderá.
Por favor presione el botón " " para cambiar los valores: PSI, BAR,
KG/cm2. El monitor mostrará la presión actual.
Presione "+" o "-" para elegir la presión deseada. Mantener pulsado breve-
mente es para ajustes pequeños de presión. Mantener pulsación larga es para
elegir valores altos. Después de ajustar la presión deseada, en el monitor
aparecerá el valor elegido durante 4 segundos de manera intermitente.
Eso significará que se ha configurado el valor deseado (También puede
presionar el botón " " para completar la configuración del valor).
Presione el botón de encendido para iniciar el proceso de inflación. El inflador
se detendrá automáticamente cuando haya alcanzado el valor de presión
establecido. Una vez finalizado puede retirar la boquilla de la tráquea y finalizar
el proceso de inflación.
Si desea pausar o terminar la inflación puede presionar el botón de encendido
para apagarlo.
Detención automática: El inflador Oasser tiene una opción de apagado
automático. Si no se usa durante 90 segundos el dispositivo se detendrá.
La tráquea puede insertarse en la ranura del inflador si ya no se va a utilizar.
En el proceso de inflación, se producirá calor debido a la alta presión, por favor
preste atención para evitar quemaduras. Se recomienda trabajar con los
guantes proporcionados por nosotros.
Instrucciones:
1.
2.
3.
4.
5.
6.
7.
8.
9.
10.
16
Batería
Batería dedicada Batería de litio
Capacidad de la batería 2200mAh
3 -5 horas
Desmontaje
Para la carga Use el cargador proporcionado
Presione ambas ranuras en la cámara
de la batería y quite la batería.
Tiempo de carga
Precauciones
Especificaciones:
El paquete incluye
Inflador eléctrico*1
Batería dedicada de litio*1
Dedicado 12V DC potencia*1
12cm/4.72inch tráquea*1
35cm/13.78 inch tráquea*1
French adapter*1
Aguja para pelotas*1
Boquilla para inflar juguetes*1
Guantes*1
Manténgalo fuera del alcance del
fuego. Si el inflador está guardado
por mucho tiempo, se aconseja
recargarlo periódicamente cada 6
meses.
17
EnglishDeutschEspañolItaliaFrançais
EnglishDeutschEspañolItaliaFrançais
Después del servicio de venta:
El período de garantía es de 24 meses.
La garantía abarca: Durante el período de garantía, prometemos reparar el producto
o realizar un reemplazo del mismo gratuito siempre y cuando nuestro departamento
de calidad confirme que se trada de una incidencia del mismo dispositivo.
Situaciones que no pertenecen al período de garantía:Manejar el producto de
manera diferente a las instrucciones; uso indebido; el usuario desmonta y reemplaza
los elementos del producto si éste se ha dañado; el producto se ha dañado debido a
desastres naturales u otros accidentes; Si la señal de aviso se ha desplegado.
Definición de la garantía: Nuestra empresa es responsable de reparar y reemplazar
el producto, cuando dicho producto se ha vendido de manera directa por nosotros
dañado.
Contacte con nosotros:
US: support-us@oasser.net
CA: support-ca@oasser.net
UK: support-uk@oasser.net
DE: support-de@oasser.net
IT: support-it@oasser.net
ES: support-es@oasser.net
FR: support-fr@oasser.net
Voltaje funcionamiento DC 9~12V
Voltaje funcionamiento Less than12A
Presión máxima de inflado 130PSI
Precisión de la presión ±0.5PSI
Dimensiones del producto
7.8*8.5*26.5cm
(3.1*3.5*10.4inch)
Temperatura funcionamiento -20℃~+60℃
Peso del producto 1250g
Eficiencia de inflado
3L/min(tardará menos de 6
minutos para inflar completa-
mente los neumáticos
185/70R14)
(1)
(2)
(3)
(4)
(5)
18
Especificaciones
Inflador

P2 Manuale di istruzioni
Nota:
Grazie per aver scelto Oasser P2 compressore elettrico intelligente! Si prega di
leggere queste istruzioni con attenzione prima dell’uso.
Il compressore elettrico P2 è portatile e la confezione è provvista di 2 batterie al litio
opzionali ed un’entrata per collegarlo all’accendisigari 12V DC. Può misurare la
pressione dei pneumatici ed è provvisto di un display digitale LCD dove inserire la
pressione che si vuole raggiungere. E’ adatto per coloro che necessitano di
controllare la pressione dei pneumatici regolarmente e di gonfiare le gomme in
caso di emergenza per assicurare la sicurezza alla guida. Può essere utilizzato per
le ruote delle macchine, delle bicilette, delle moto, per gonfiare i palloni o i giochi
gonfiabili.
I bambini non devono utilizzare questo prodotto! Si prega di riporlo in un posto
dove i bambini non possono raggiungerlo! Non inserire il tubo dell’aria nella
bocca, nelle orecchie o negli occhi di persone o animali! Non dimenticare che
non si tratta di un giocattolo!
1.
A causa dell’alta pressione, la pompa produrrà calore durante l’uso. Si prega di
fare attenzione, specialmente quando si rimuove il tubo dell’aria, si prega di usare i
guanti in dotazione. E’ raccomandabile farla raffreddare per 10 minuti dopo un uso
continuativo di 5-10 minuti.
3.
Si prega di fare attenzione che la pompa sia completamente carica prima
dell’uso. Deve essere caricata con il suo caricatore.
4.
Si prega di tenere lontano dalla pioggia, dall’acqua e di evitare cadute ed urti.
5.
Nota: questo compressore elettrico non può essere usato sulle ruote di camion,
furgoni ed autobus.
8.
Si prega di tenere in un luogo asciutto, se non si usa il compressore per un lungo
periodo di tempo, è raccomandabile ricaricarlo ogni 6 mesi.
6.
Se c’è qualche problema durante l’uso, si prega di interrompere immediatamente e
contattare un tecnico. Vi garantiamo un efficiente servizio post vendita.
7.
Non usare questa pompa vicino a luoghi infiammabili o vicino a liquidi o gas
(es. Distributori di benzina)
2.
EnglishDeutschEspañolItaliaFrançais
19

EnglishDeutschEspañolItaliaFrançais
Illustrazione prodotto:
1. Contenitore
2. Interruttore di gonfiaggio
del pneumatico
3. Blocco interruttore
4. Luce LED
5. Porta tubo dell’aria
6. Fessura del tubo dell’aria
7. Parte inserimento batteria
8. Copri accessori
9. Batteria
10. Sistema display LCD
11. Tubo dell’aria
12. Alimentazione accendisigari
13. Ago per palloni
14. Ugello per giocattoli gonfiabili
1
10
9
8
7
2
3
4
5
6
11
20
12
13
14
EnglishDeutschEspañolItaliaFrançais
Installazione
1. Si prega di collegare il tubo dell’aria
2. Si prega di collegare il tubo dell’aria al pneumatico della macchina o
all’adattatore.
3. Si prega di fissare la fibbia
21