
19-Cylinder Tire
Inflator
Model: LS4015
KPA KG/CM2
PSI
BAR
OUT
User Manual
Vt-8E
LE-ZE
LE-9Z
sz-oz
6L-VL
E 1-80
LO-LO
I-I-Olna
qs!10d
I-aeneu
s!e5ueJd
loyedsa
l.pslnaa
qs!161-13
swalL10)
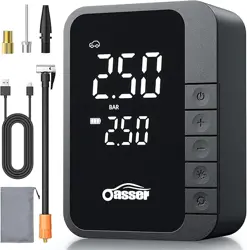
Thank you for purchasing the Oasser 19-Cylinder Tire
Inflator! Please read this manual carefully before initial use.
The Oasser 19-Cylinder Tire Inflator is a powerful and efficient
device, engineered for a wide range of inflation tasks. Its
robust motor and built-in battery not only ensure high
performance but also provide an emergency charging
function for your mobile phone.
Almportant Safety Instructions:
I.Keep away from open flames and heat sources.
2.The pump will not activate if the preset pressure is lower
than that of the tire/equipment.
3.Allow the pump to cool down for 5 minutes after 8-10
minutes of continuous use to prevent overheating.
4. To maintain battery health, recharge the pump at least once
every 3 months during prolonged storage.
5.1mmediately turn off the pump if unusual noise or excessive
heat occurs during operation.
6.Before setting the pressure, ensure the correct unit (PS',
BAR, KPa, KG/CM2) is selected to avoid over-inflation.
7.Exercise extreme caution when inflating low-pressure items
(e.g., balloons, toy balls, swim rings). Do not use the preset
pressure mode to prevent over-inflation.
8.This pump is a low-volume, high-pressure device. It is
designed for small cars, SUVs, bicycles and sports balls. It is
NOT suitable for larger applications such as wagons, vans,
trailers, air mattresses, swim ring or inflatable water
platforms.
EN -01
D Accessories List:
EN -02
O
o
19-cylinder Tire
Inflator
-rääi
user Manual
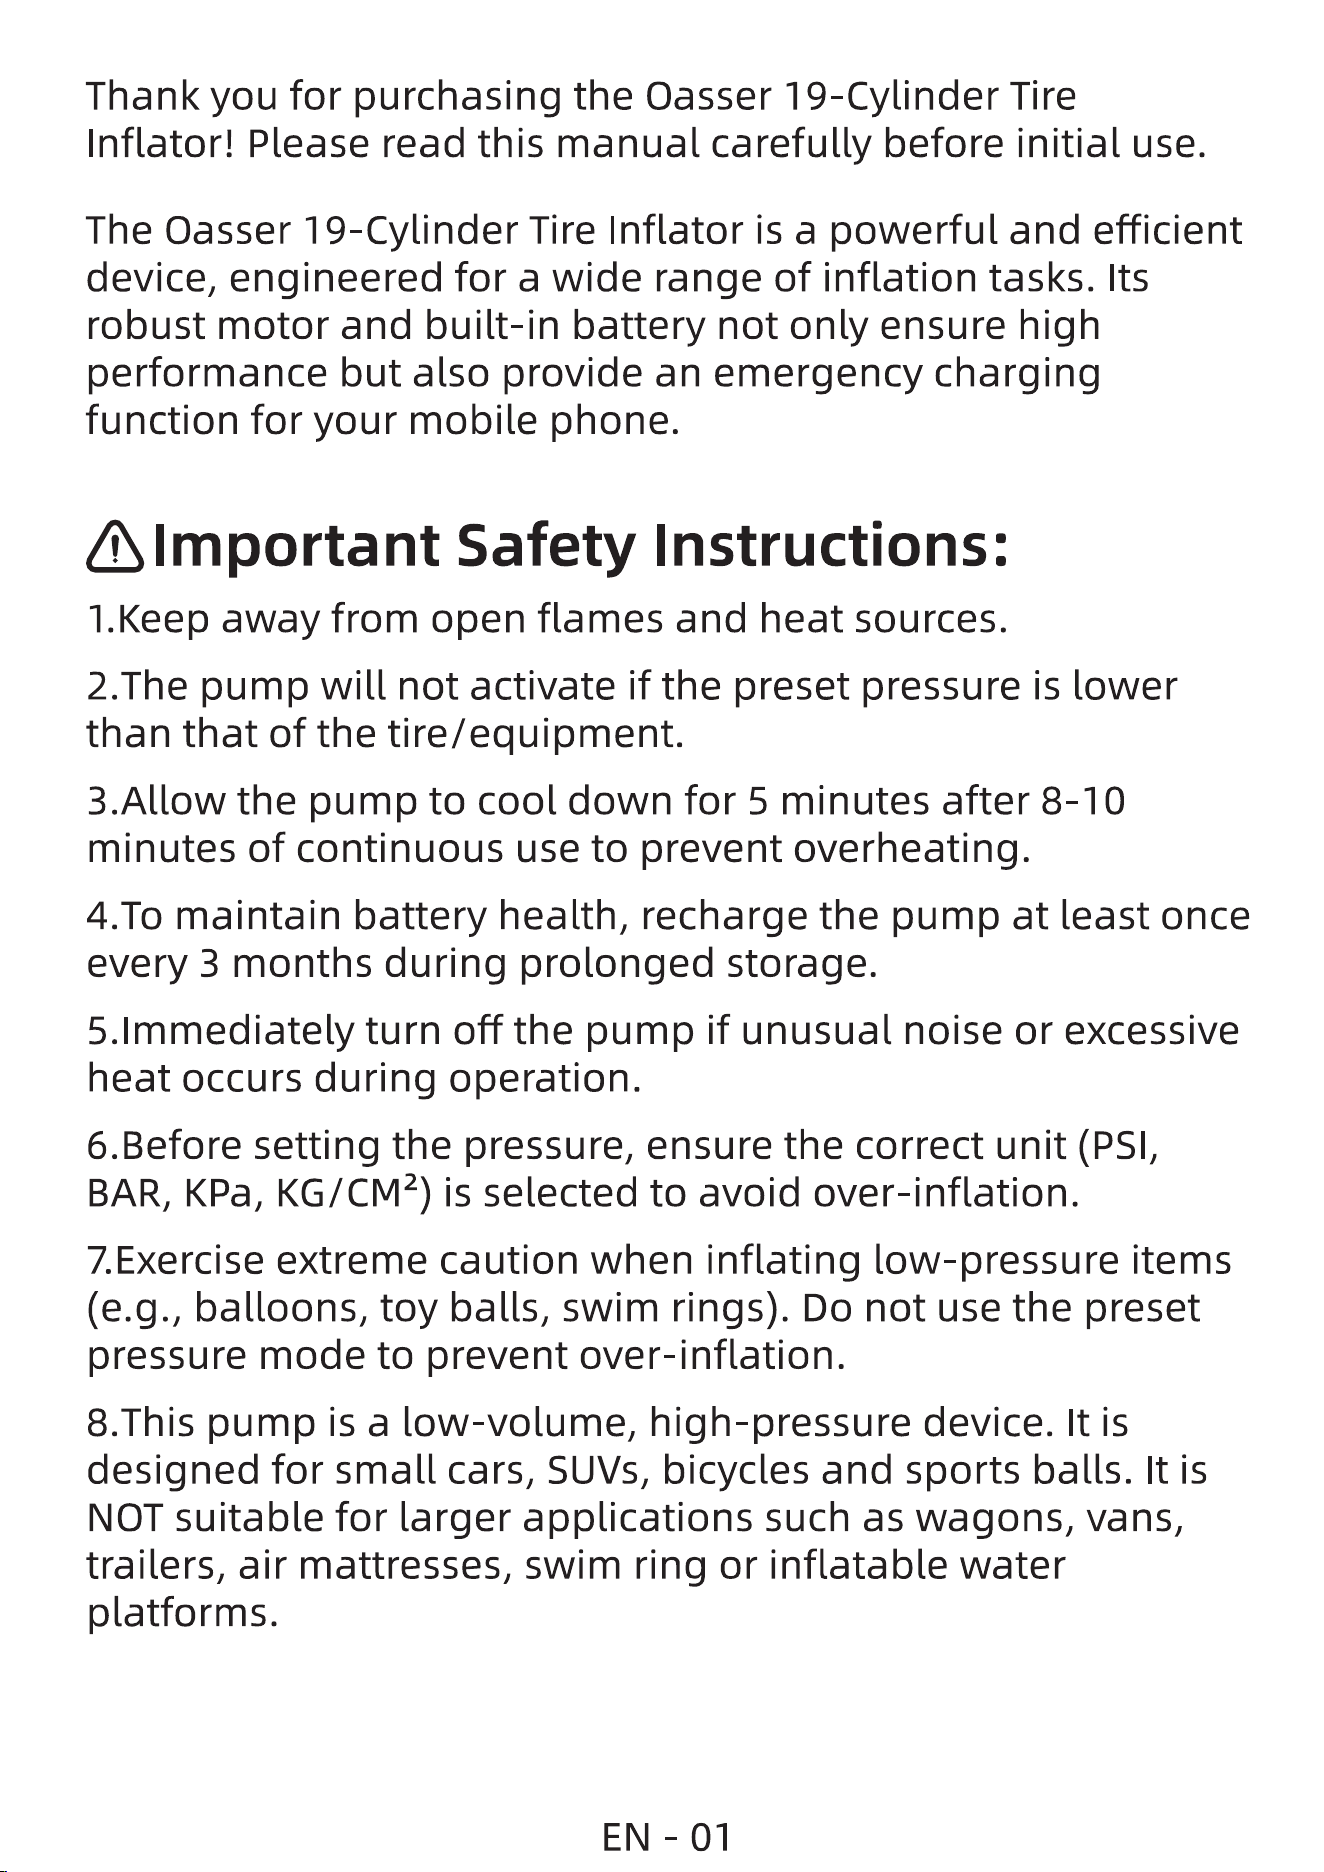
0 1m Type-C Charging Cable x 1
@ 30cm Air Hose x 1
O Ball Needle x 1
@ Toy/ Swim Ring Nozzle x 1
O Presta Valve Adapter x 1
O Storage Bag x 1
O User Manual xl
Product Specifications:
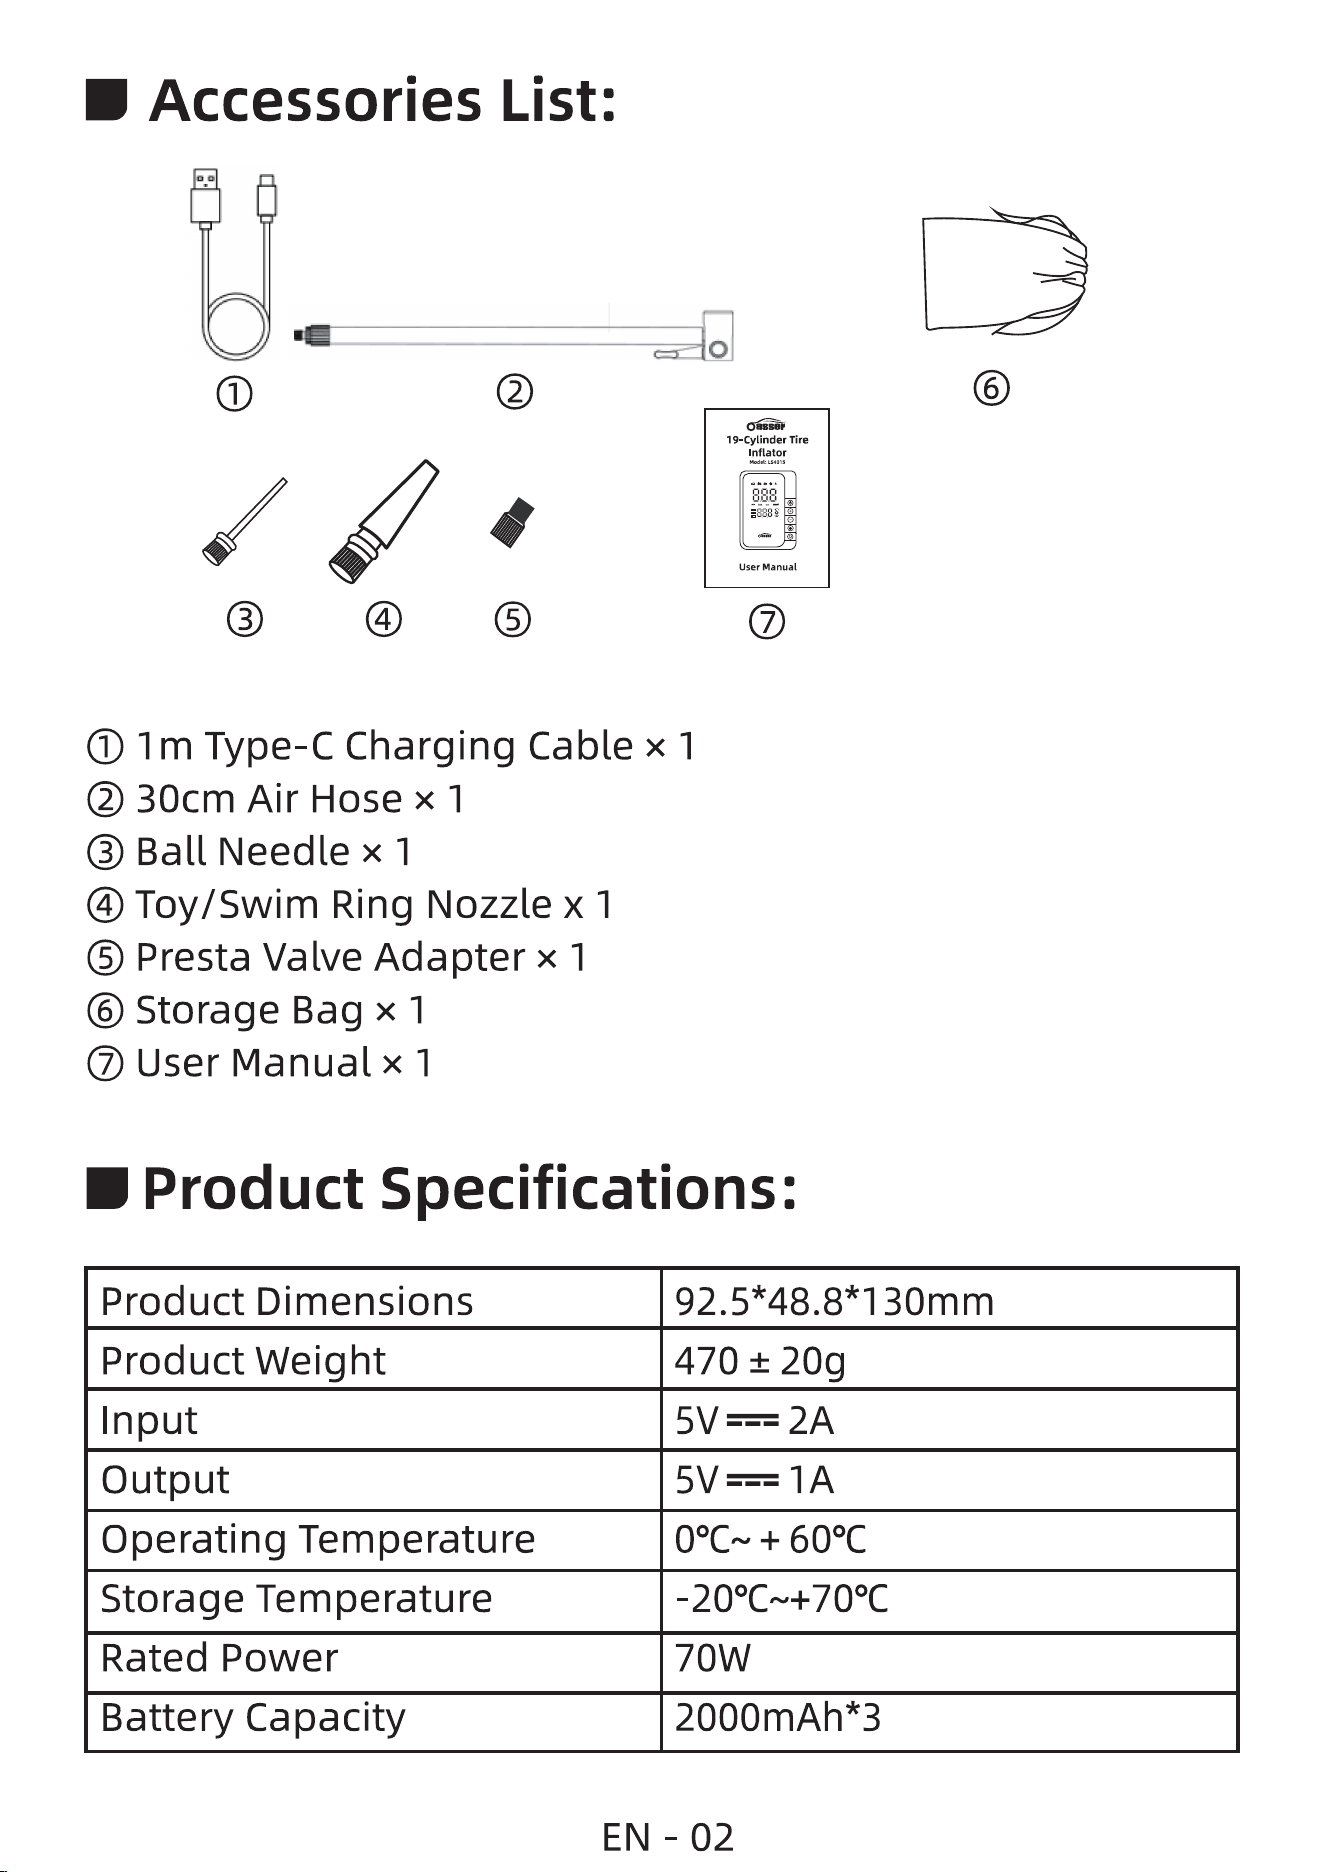
Product Dimensions
Product Weight
Input
Output
Operating Temperature
Storage Temperature
Rated Power
Battery Capacity
470 ± 20g
+ oOC
-200Cæ+700C
70W
2000mAh*3
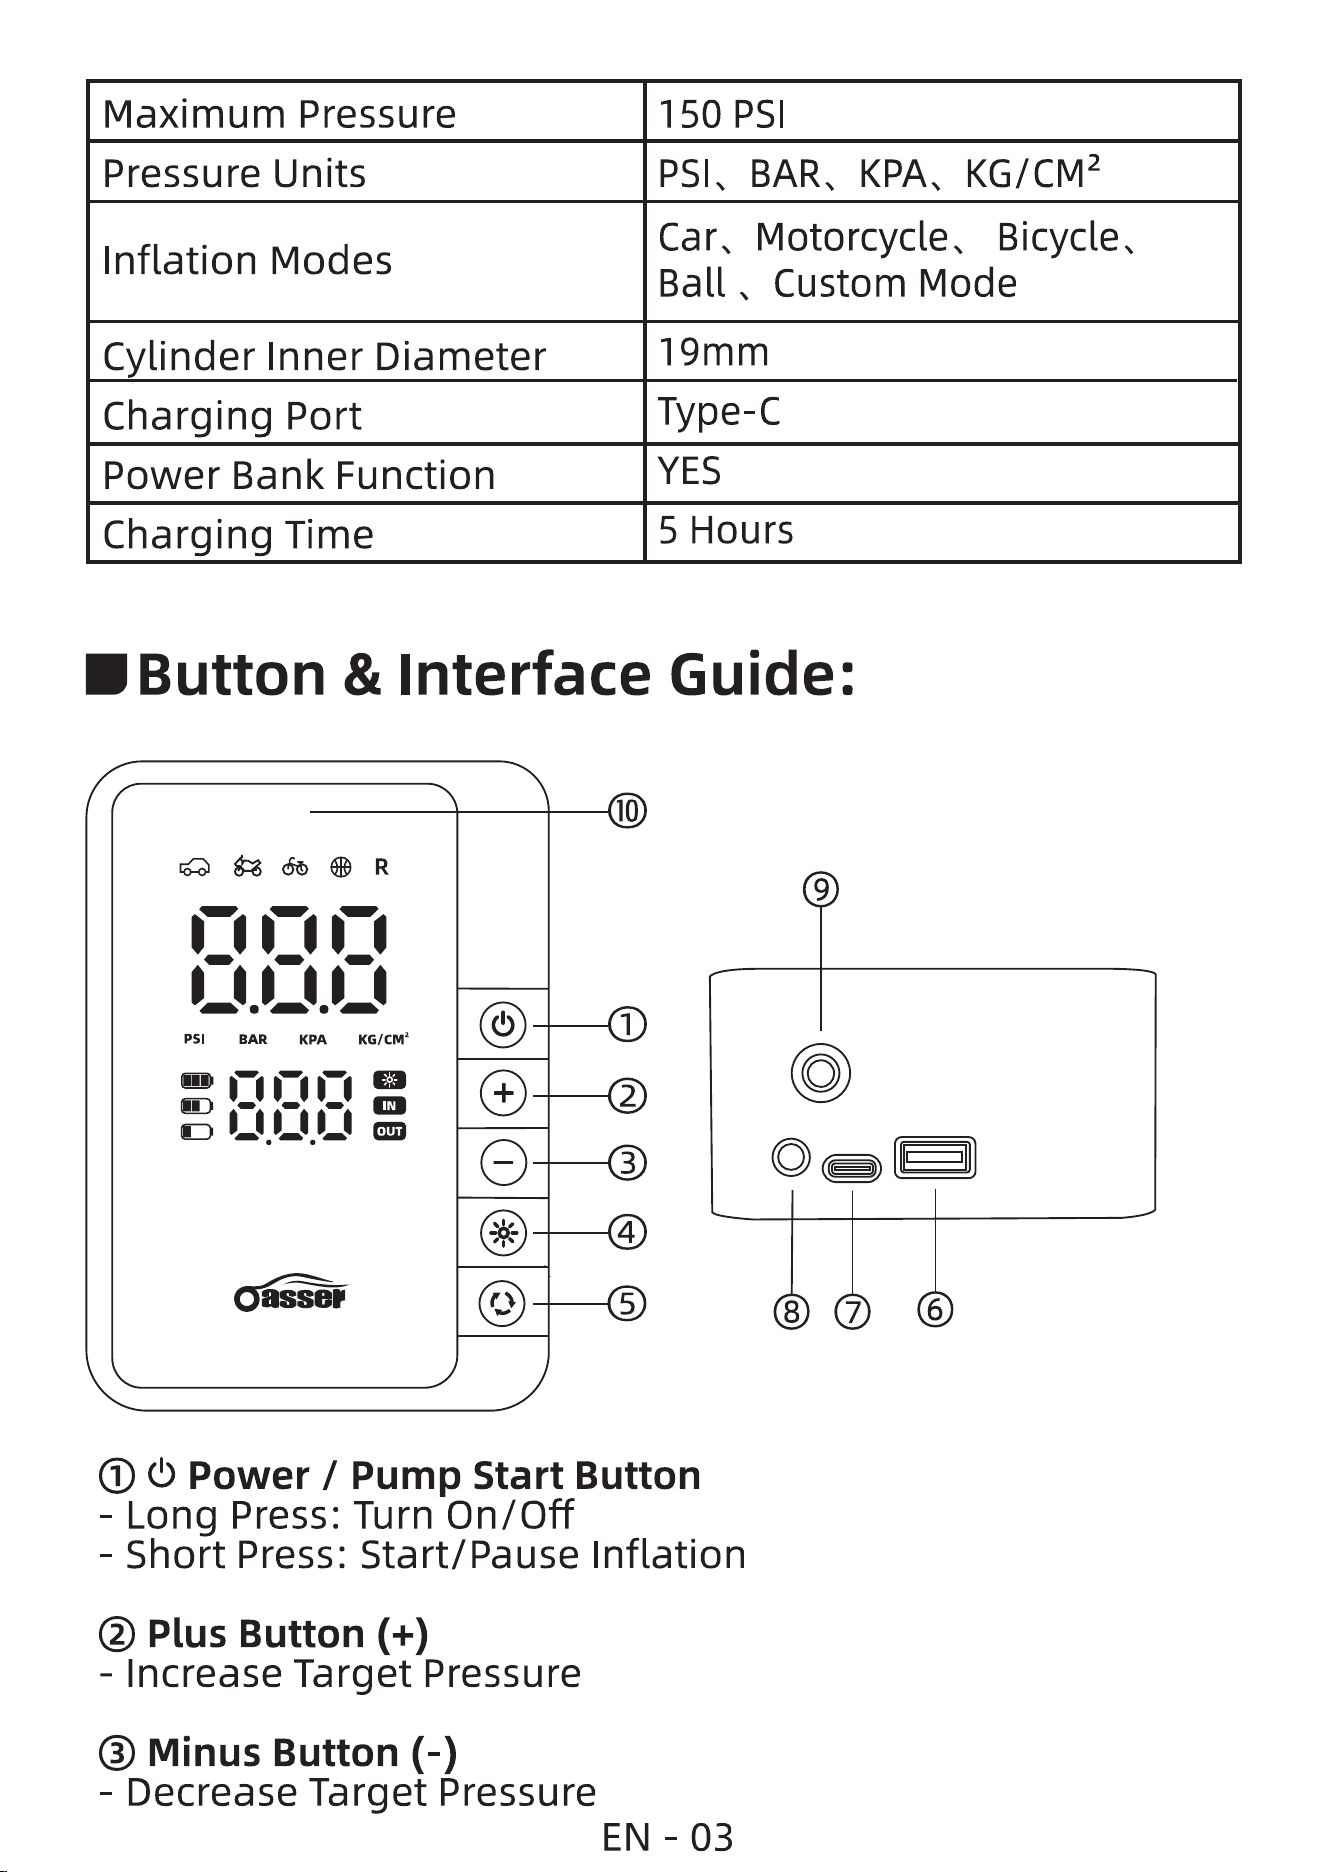
Maximum Pressure
150 PSI
BARS KPAS KG/CM2Pressure Units
Cars Motorcycles Bicycles
Inflation Modes
Ball Custom Mode
19mm
C linder Inner Diameter
Type-C
Charging Port
YES
Power Bank Function
5 Hours
Charging Time
DButton & Interface Guide:
EN -03
KPA KG/CM2
PSI
BAR
OUT
10
1
2
3
4
5
9
8
7
6
O Power / Pump Start Button
- Long Press: Turn On/Off
Short Press: Start/Pause Inflation
@ Plus Button (+)
- Increase Target Pressure
@ Minus Button (-)
Decrease Target Pressure

LED Light Button
Short Press: Cycle Through Modes - Constant On / Flashing
/ sos / off
00 Mode Button
Short Press: Cycle Scene Modes - Car (2.5 Bar), Motorcycle
(2.4 Bar), Bicycle (45 PS'), Ball (8 PSI), Custom Mode (36 PSI)
Long Press: Cycle Units - PSI / BAR / KPa / KG/CM2
O USB Port
- Emergency Power Output (e.g., for phone charging)
O Charging Port
Type-C Port for charging the device
@ LED Light
O Air Hose Connector
Connect the air hose
O Display Screen
Shows: Active Mode, Pressure Value, Unit, Battery Level
'Operating Instructions:
Note: Please fully charge the device before first use.
O
I.Connect the air hose to
the pump's connector.
2
2.Attach the hose nozzle firmly
onto the tire valve, press down
completely and lock it in place
by flipping the lever.
EN - 04
BAR KPA
OUT
O
OGi O
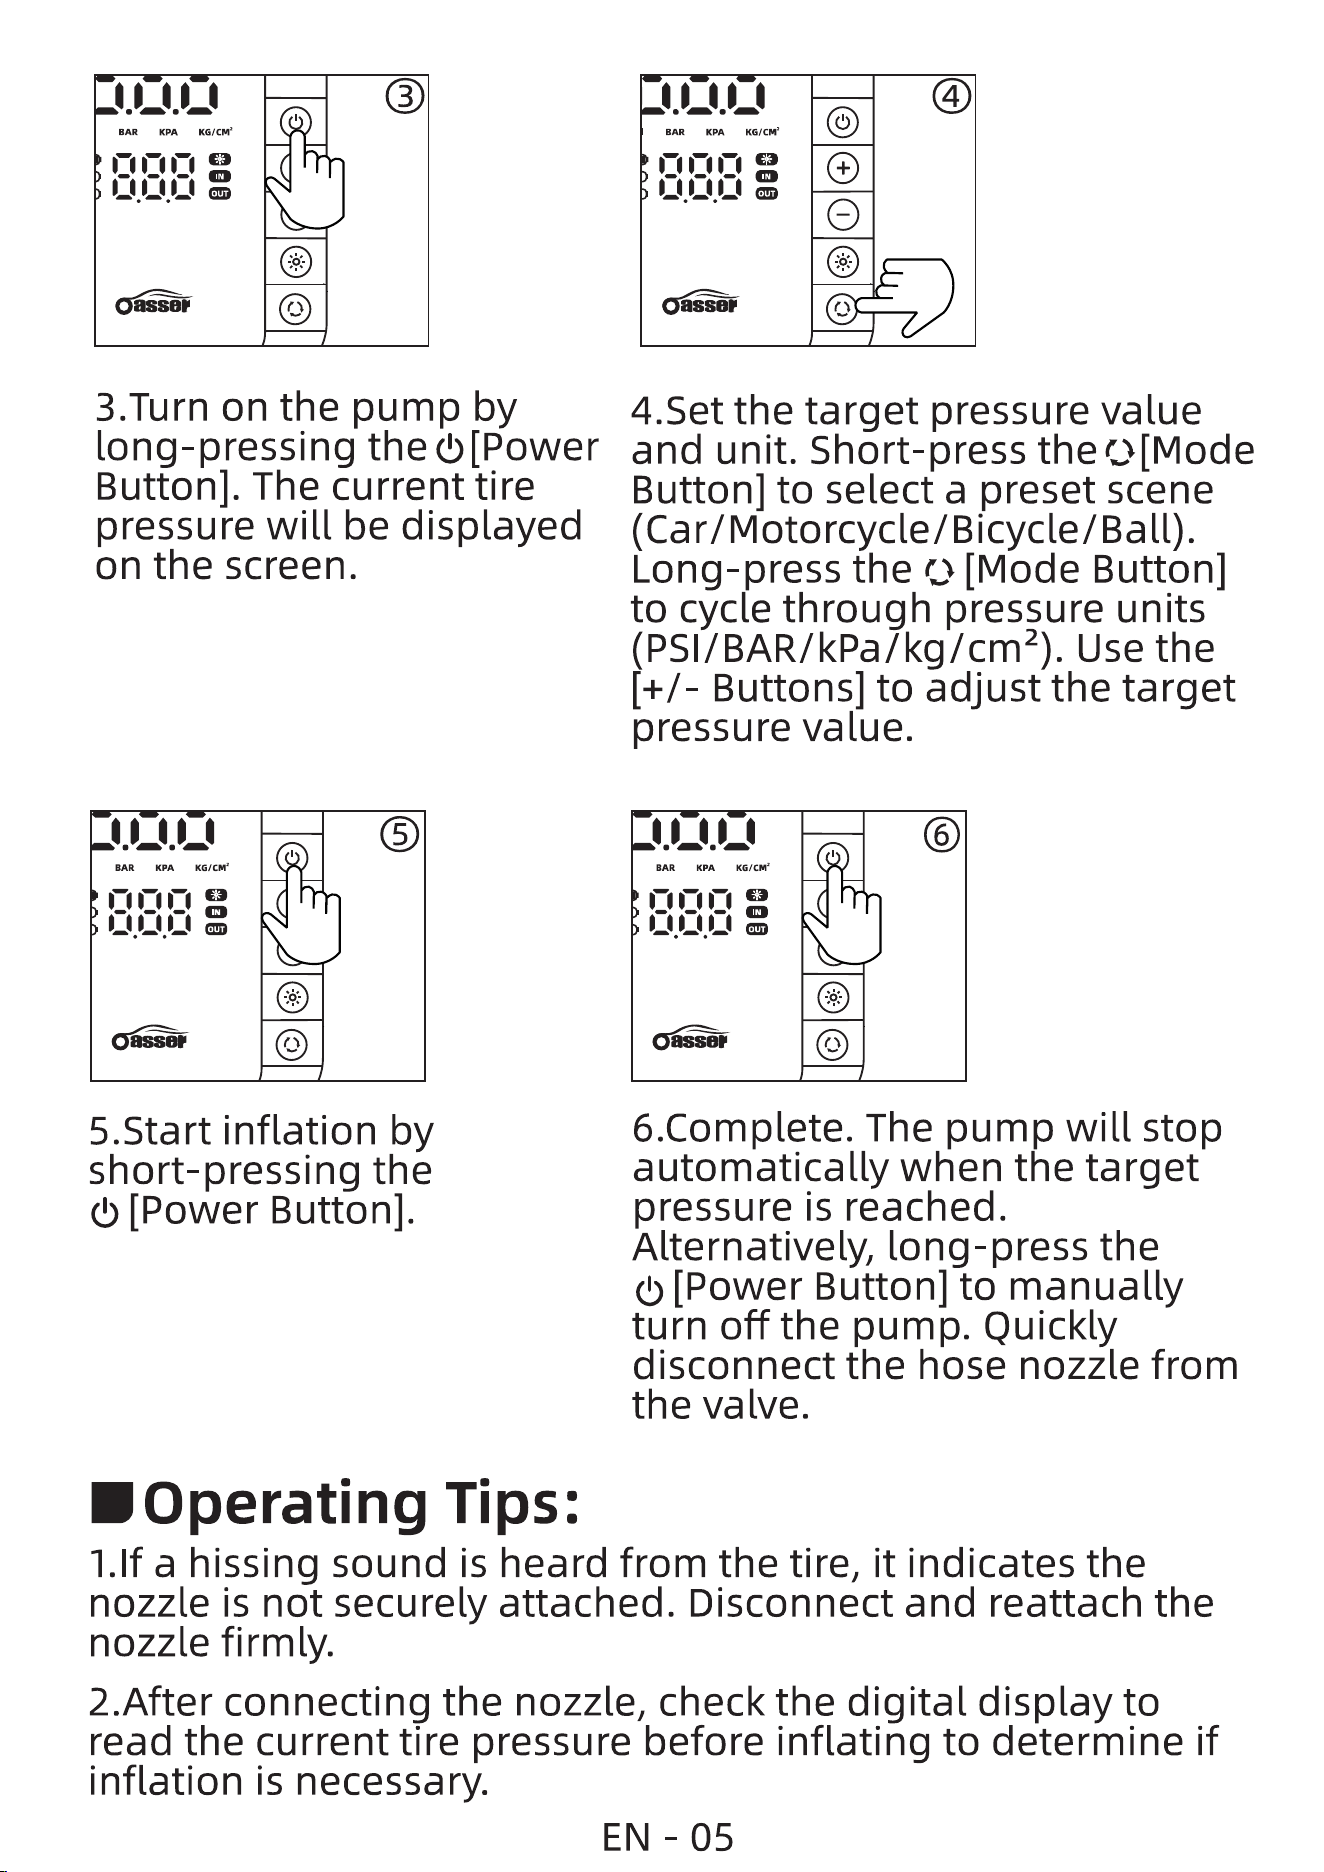
3.Turn on the pump by
long-pressing the (b[Power
Button]. The current tire
pressure will be displayed
on the screen.
BAR KPA KG/CM•
O
5.Start inflation by
short-pressing the
(.b [Power Button].
"Operating Tips:
BAR KPA KG/CM'
j_uZtjZt
assor
4.Set the target pressure value
and unit. Short-press theo[Mode
Button] to select a preset scene
(Car/Motorcycle/Bicycle/Ball).
Long-press the O [Mode Button]
to cycle through pressure units
(PSI/BAR/kPa/kg/cm2). Use the
[+/- Buttons] to adjust the target
pressure value.
BAR KPA KG/CM'
O
6.Complete. The pump will stop
automatically when the target
pressure is reached.
Alternatively, long-press the
(b [Power Button] to manually
turn off the pump. Quickly
disconnect the hose nozzle from
the valve.
I.If a hissing sound is heard from the tire, it indicates the
nozzle is not securely attached. Disconnect and reattach the
nozzle firmly.
2.After connecting the nozzle, check the digital display to
read the current tire pressure before inflating to determine if
inflation is necessary.
EN -05
3.During inflation, it is recommended to operate the pump
for no more than 10 minutes at a time, allowing for cooling
intervals.
'After-Sales Service:
Should you encounter any issues, please contact us via the
email below. We will provide the best possible solution and
service.
Website: oasser.net
Operation is subject to the following
two conditions:
(1) This device may not cause harmful interference, and
(2) This device must accept any interference received,
including interference that may cause undesired operation.
Note: This equipment has been tested and found to comply
with the limits for a Class B digital device, pursuant to part 15
of the FCC Rules. These limits are designed to provide
reasonable protection against harmful interference in a
residential installation. This equipment generates, uses and
can radiate radio frequency energy and, if not installed and
used in accordance with the instructions, may cause harmful
interference to radio communications. However, there is no
guarantee that interference will not occur in a particular
installation. If this equipment does cause harmful
interference to radio or television reception, which can be
determined by turning the equipment off and on, the user is
encouraged to try to correct the interference by one or more
of the following measures:
—Reorient or relocate the receiving antenna.
—Increase the separation between the equipment and
receiver.
—Connect the equipment into an outlet on a circuit different
from that to which the receiver is connected.
—Consult the dealer or an experienced radio/ TV technician
for help.
EN - 06
D Correct Disposal of this product
This symbol indicates that the product must not be
disposed of with other household waste
throughout the EU. To prevent possible harm to the
environment or human health from uncontrolled
waste disposal, it is necessary to recycle it
responsibly to promote the sustainable reuse of
material resources. To return the used device, use
the return and collection systems or contact the
retailer where the product was purchased. They
can take this product for environmentally safe
recycling.
EN -07

Vielen Dank, dass Sie sich für die Oasser 19-Zylinder
Reifenluftpumpe entschieden haben! Bitte lesen Sie diese
Anleitung vor der ersten Inbetriebnahme sorgfältig durch.
Die Oasser 19-Zylinder Reifenluftpumpe ist eine
leistungsstarke und effiziente Luftpumpe. Dank des starken
Motors und des eingebauten Akkus ist sie für vielseitige
Aufgaben geeignet. Der integrierte Akku kann zudem als
Notfall-Powerbank zum Aufladen Ihres Handys genutzt
werden.
AWichtige Hinweise:
I.Von offenen Flammen und anderen Hitzequellen fernhalten.
2.Wenn der eingestellte Druck niedriger ist als der Druck im
Reifen/Objekt, Wird sich die Pumpe nicht einschalten.
3.Die Pumpe erzeugt während des Betriebs Wärme. Nach 8-10
Minuten Dauerbetrieb sollten Sie die Pumpe für mindestens 5
Minuten abkühlen lassen, um Beschädigungen vorzubeugen.
4.Längere Nichtbenutzung kann die Batterieleistung
beeinträchtigen. Es Wird empfohlen, den Akku mindestens
alle 3 Monate vollständig aufzuladen.
5.Bei ungewöhnlichen Geräuschen Oder Überhitzung während
des Aufpumpens schalten Sie die Pumpe sofort aus.
6.Stellen Sie vor der Druckeinstellung sicher, dass die korrekte
Einheit (PSI, BAR, KPA,KG/CM2)gewählt ist, um ein Überfüllen
aufgrund von Verwechslungen zu vermeiden.
7.Für Objekte mit sehr niedrigem Druck wie Luftballons,
Spielbälle Oder Schwimmreifen sollte der
Voreinstellungsmodus nicht verwendet werden. Seien Sie
besonders vorsichtig, um ein Überfüllen zu vermeiden.
8.Dies ist eine Pumpe mit niedrigem Luftstrom und hohem
Druck. Sie wurde hauptsächlich für das Aufpumpen von
Reifen kleiner Autos, familienüblicher SUVs, Fahrräder und
DE - 08

O
0
01m Type-C-Kabelx 1
@ 30cm Luftschlauch x 1
@ Ballnadelxl
Bälle entwickelt. Sie ist NICHT geeignet für größere Objekte wie
Wohnmobile, Transporter, Anhänger, Luftmatratzen, Pools Oder
Schlauchboote.
Zubehörliste:
IA
DE - 09
o
19-Cylinder Tire
Inflator
iii
'888
User Manual
O
@ Aufsatz für Spielzeug/Schwimmreifen x 1
O Adapter für französisches Ventil (Sclaverand) x 1
O Aufbewahrungstasche x 1
O Bedienungsanleitung x 1
D Produktspezifikationen:
Produktabmessungen
Produktgewicht
Eingang
Ausgang
Betriebstemperatur
92,5 x x 130 mm
470 ± 20 g
OOC + 600 C
Lagertemperatur
Nennleistung
Akkukapazität
Max. Druck
Druckeinheiten
Füllmodi
Zylinderbohrung
Ladeanschluss
Powerbank-Funktion
Ladezeit
-200C +700C
70W
2000 mAh x 3
150 PSI
PS', BAR, KPA, KG/CM2
Auto, Motorrad, Fahrrad,
Ball, Benutzerdefiniert
19 mm
Type-C
5 Stunden
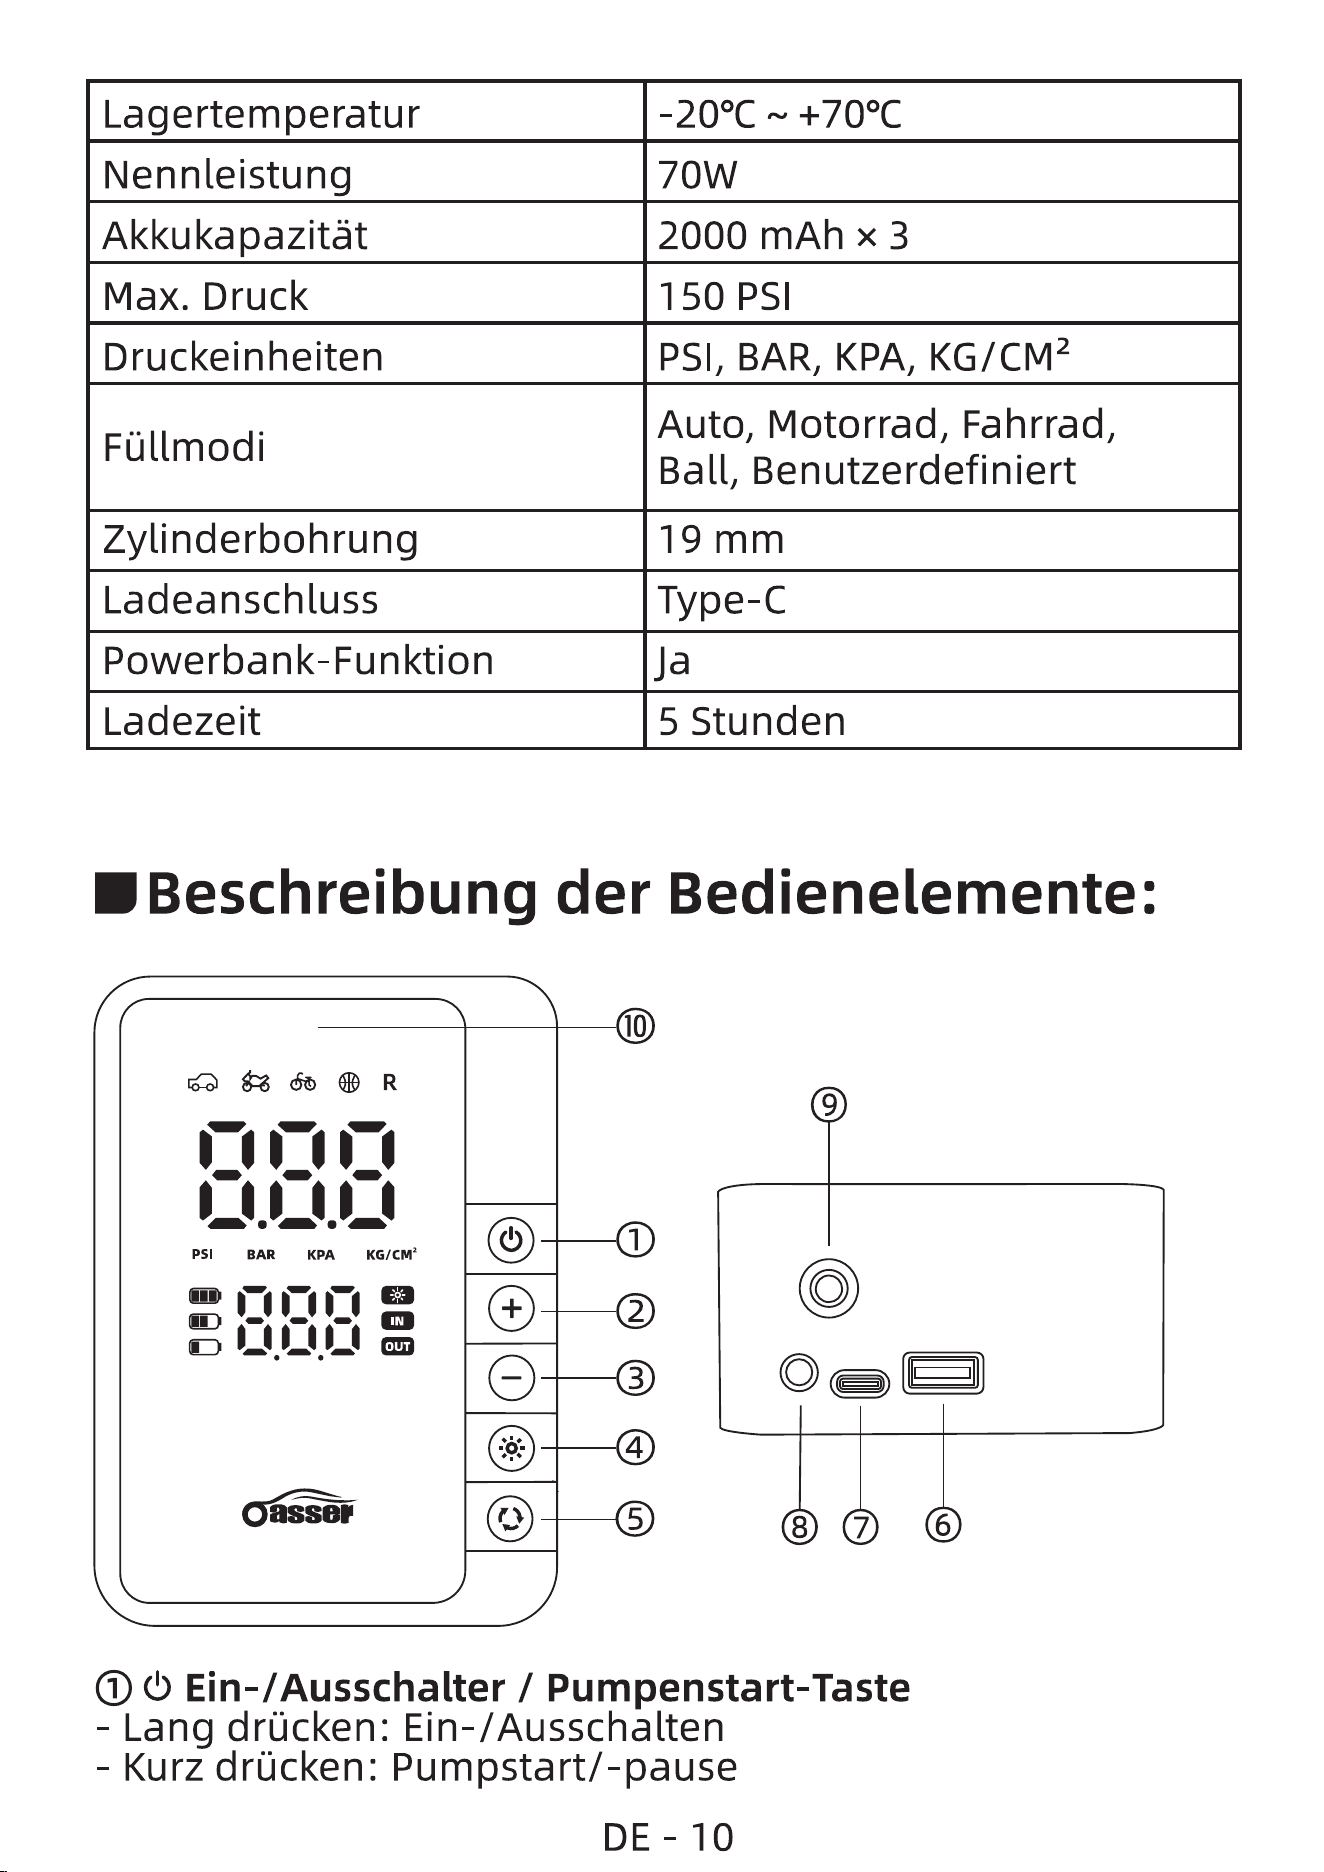
DBeschreibung der Bedienelemente:
BAR KPA KG/CM2
PSI
OUT
10
2
3
4
5
9
8 7
6
O (b Ein-/Ausschalter / Pumpenstart-Taste
- Lang drücken: Ein-/Ausschalten
Kurz drücken: Pumpstart/-pause
DE-IO
@ Plus-Taste (+)
Erhöht den eingestellten Druckwert
@ Minus-Taste (-)
- Verringert den eingestellten Druckwert
@ LED-Licht-Taste
Kurz drücken: Wechselt Dauerlicht/Blinken/SOS/Aus
O O Umschalt-Taste
- Kurz drücken: Wechselt Modus - Auto (2,5 Bar), Motorrad
(2,4 Bar), Fahrrad (45 PSI), Ball (8 PS'), Benutzerdefiniert (36
Lang drücken: Wechselt Einheit - PSI, BAR, KPA, KG/CM2
@ USB-Anschluss
- Kann für Notfall-Stromabgabe genutzt werden (Z.B. zum
Handy-Aufladen)
Achtung!Nutzen Sie die Powerbank-Funktion nur in echten
Notfällen. Verwenden Sie die Pumpe nicht dauerhaft zur
Stromversorgung Ihres Handys, da dies sowohl den Akku
des Handys als auch den Lithium-Akku der Pumpe
beschädigen kann!
O Ladeanschluss
Type-C-Anschluss zum Aufladen des Geräts
O LED-Licht
@ Luftschlauch-Anschluss
- Zum Anschluss des Luftschlauches
@)Display-Anzeige
- Zeigt Modus, Druckwert, Einheit und Akkustatus an
DE-II

Gebrauchsanweisung
A Hinweis: Bitte laden Sie die Pumpe vor der ersten
Verwendung vollständig auf.
O
Schritt 1: Schließen Sie
den Luftschlauch an
die Pumpe an.
BAR KPA KG/CM•
O
oGi O
Schritt 3: Schalten Sie
die Pumpe durch
langes Drücken der
Power-Taste ein. Der
aktuelle Reifendruck
Wird angezeigt.
BAR KPA KG/CN'
Schritt 5: Starten Sie
den Füllvorgang durch
kurzes Drücken der
Power-Taste.
2
Schritt 2: Setzen Sie die Düse des
Schlauches vollständig auf das
Ventil des Reifens auf und ziehen
Sie den Hebel, um die Düse zu
arretieren.
BAR KPA KG/Cm•
assm
Schritt 4: Stellen Sie die
gewünschte Druckeinheit und den
Druckwert ein. Kurzes Drücken der
[Umschalt-Taste] wählt den Modus,
langes Drücken wählt die Einheit.
Die [±-Tasten] stellen den
Druckwert ein.
BAR KPA
O
Schritt 6: Die Pumpe stoppt
automatisch, sobald der Sollwert
erreicht ist. Alternativ können Sie
sie durch langes Drücken der
Power-Taste ausschalten. Entfernen
Sie die Schlauchdüse promptly.
DE-12
Bedienungshinweise
•Wenn Sie ein Zischen vom Reifen hören, bedeutet dies,
dass die Düse nicht richtig sitzt. Lösen Sie die Düse und
setzen Sie sie erneut an.
•Nach dem Anschließen der Düse sollten Sie vor dem
Aufpumpen den digitalen Display ablesen, um den
Reifendruck zu prüfen und festzustellen, 0b Luft nachgefüllt
werden muss.
'Beim Aufpumpen Wird empfohlen, die Dauerbetriebszeit
von 10 Minuten nicht zu überschreiten und zwischendurch
Pausen einzulegen.
Kundendienst
Falls Sie während der Nutzung Probleme haben, kontaktieren
Sie uns bitte unter der unten stehenden E-Mail-Adresse. Wir
bieten Ihnen die bestmögliche Lösung und Service.
Website: oasser.net
Ordnungsgemäße Entsorgung dieses
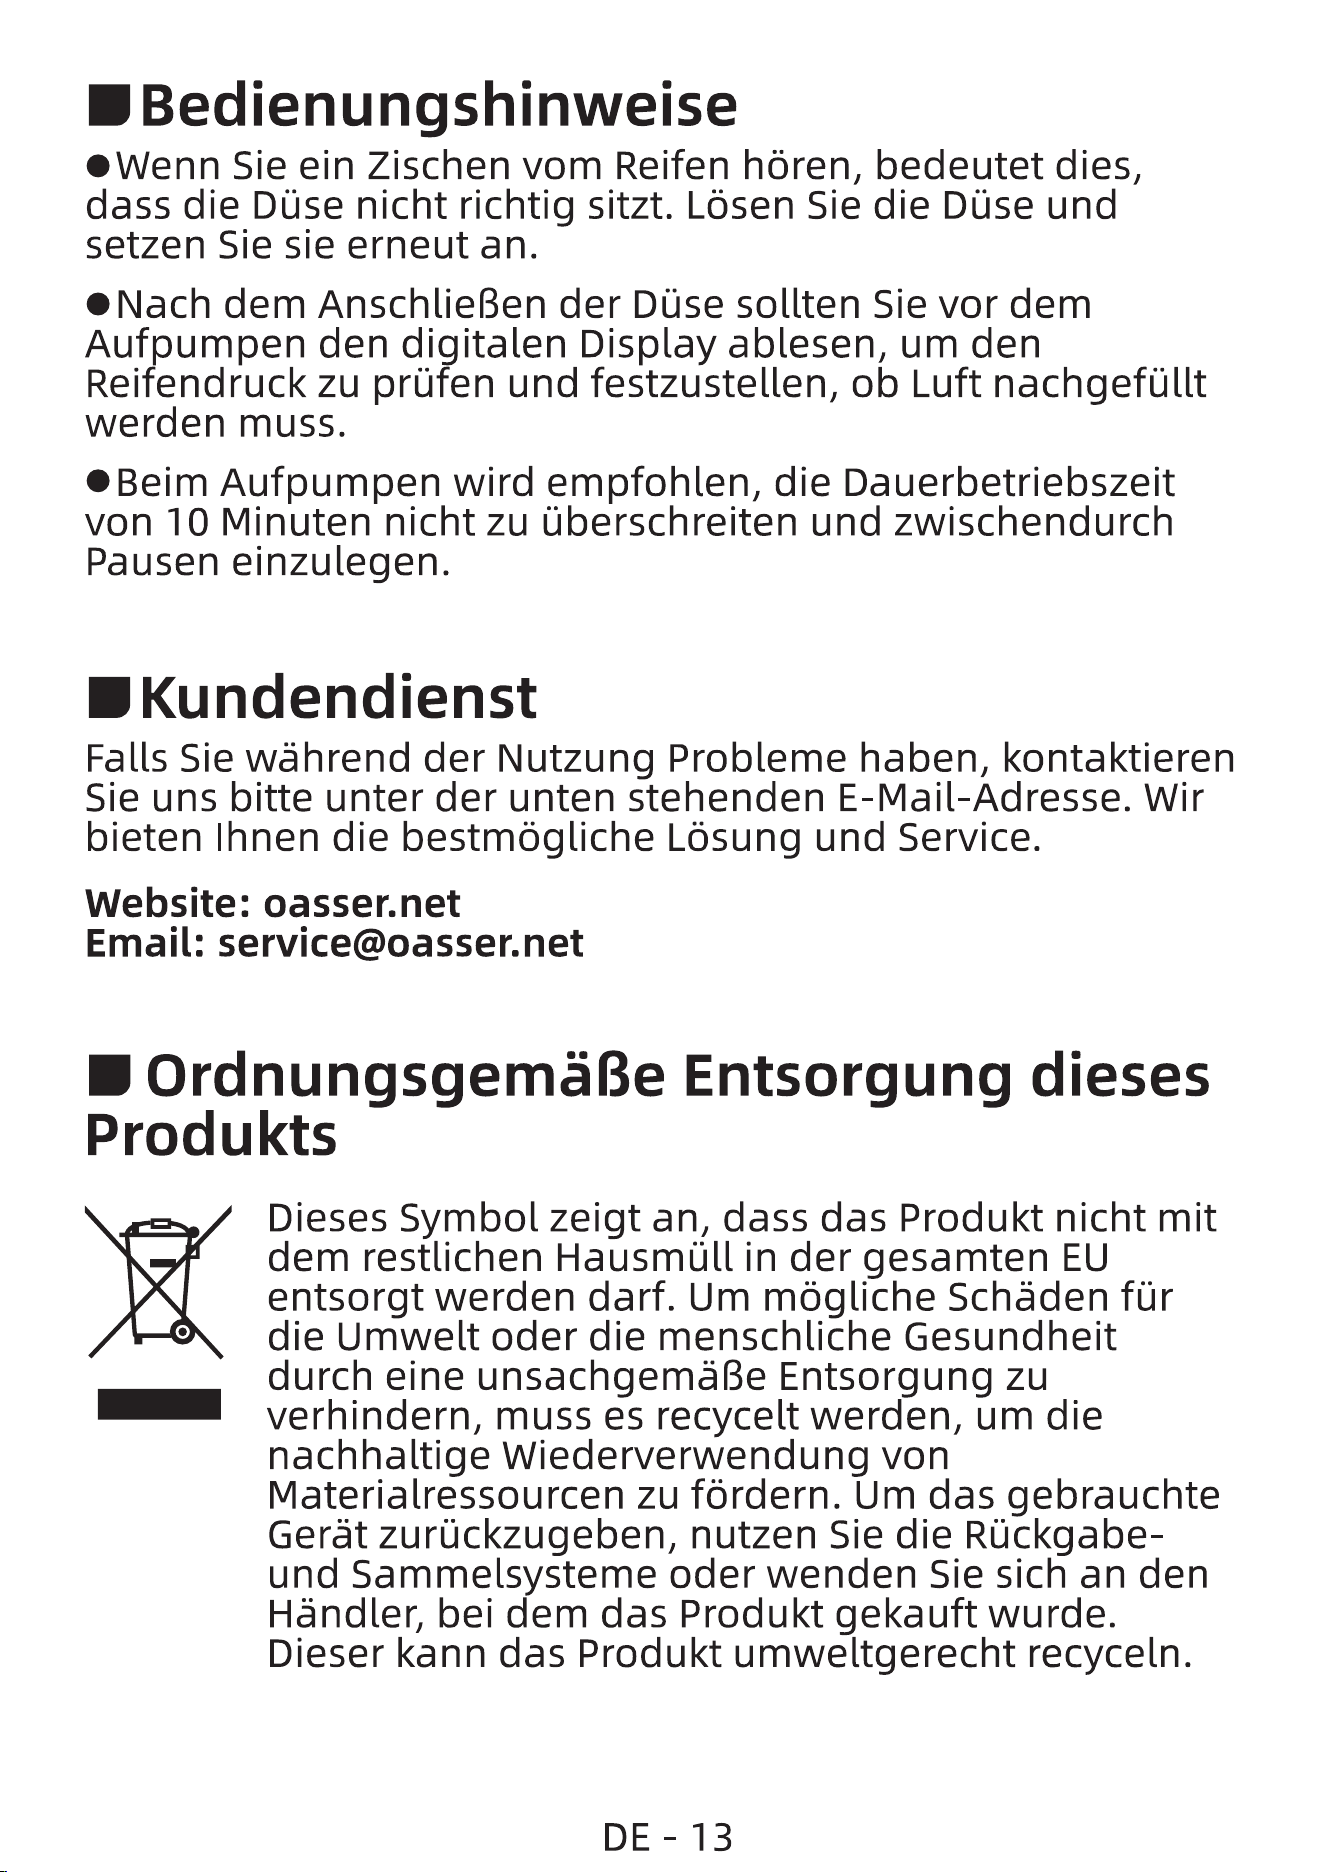
Produkts
Dieses Symbol zeigt an, dass das Produkt nicht mit
dem restlichen Hausmüll in der gesamten EU
entsorgt werden darf. Um mögliche Schäden für
die Umwelt Oder die menschliche Gesundheit
durch eine unsachgemäße Entsorgung zu
verhindern, muss es recycelt werden, um die
nachhaltige Wiederverwendung von
Materialressourcen zu fördern. IJm das gebrauchte
Gerät zurückzugeben, nutzen Sie die Rückgabe-
und Sammelsysteme Oder wenden Sie sich an den
Händler, bei dem das Produkt gekauft wurde.
Dieser kann das Produkt umweltgerecht recyceln.
DE-13
iGracias por su compra del Oasser inflador ruedas coche!
Antes de utilizar el inflador por primera vez, lea
atentamente este manual de instrucciones.
El Oasser inflador ruedas coche es un equipo potente y
eficiente. Gracias a su motor de alto rendimiento y a la
bateria incorporada, es ideal para mültiples tareas. Ademås,
la bateria integrada puede funcionar como fuente de energia
de emergencia para cargar su teléfono mövil.
APrecauciones
1. Manténgase alejado de llamas abiertas y otras fuentes de
calor.
2. Si la presiön configurada es inferior a la del neumätico/
equipo, el inflador no funcionaré.
3. El inflador genera calor durante el uso. Después de 8-10
minutos de uso continuo, deje que se enfrie durante 5
minutos para evitar daäos.
4. El almacenamiento prolongado puede reducir el
rendimiento de la bateria. Se recomienda cargarla al menos
una vez cada 3 meses.
5. Si se detectan ruidos anormales o sobrecalentamiento
durante el inflado, apague el inflador inmediatamente.
6. Antes de configurar la presiön, asegürese de seleccionar la
unidad correcta (PSI, BAR, KPA, KG/CM2) para evitar
sobreinflado debido a confusiön de unidades.
7. Para articulos que requieren baja presiön de aire como
globos, pelotas dejuguete o flotadores, no se permite
preestablecer un valor de presiön. Extreme las precauciones
para evitar sobreinflado.
8. Este es un inflador de bajo flujo y alta presiön, diseäado
principalmente para inflar automöviles pequeäos, SUV
ES - 14
O
0
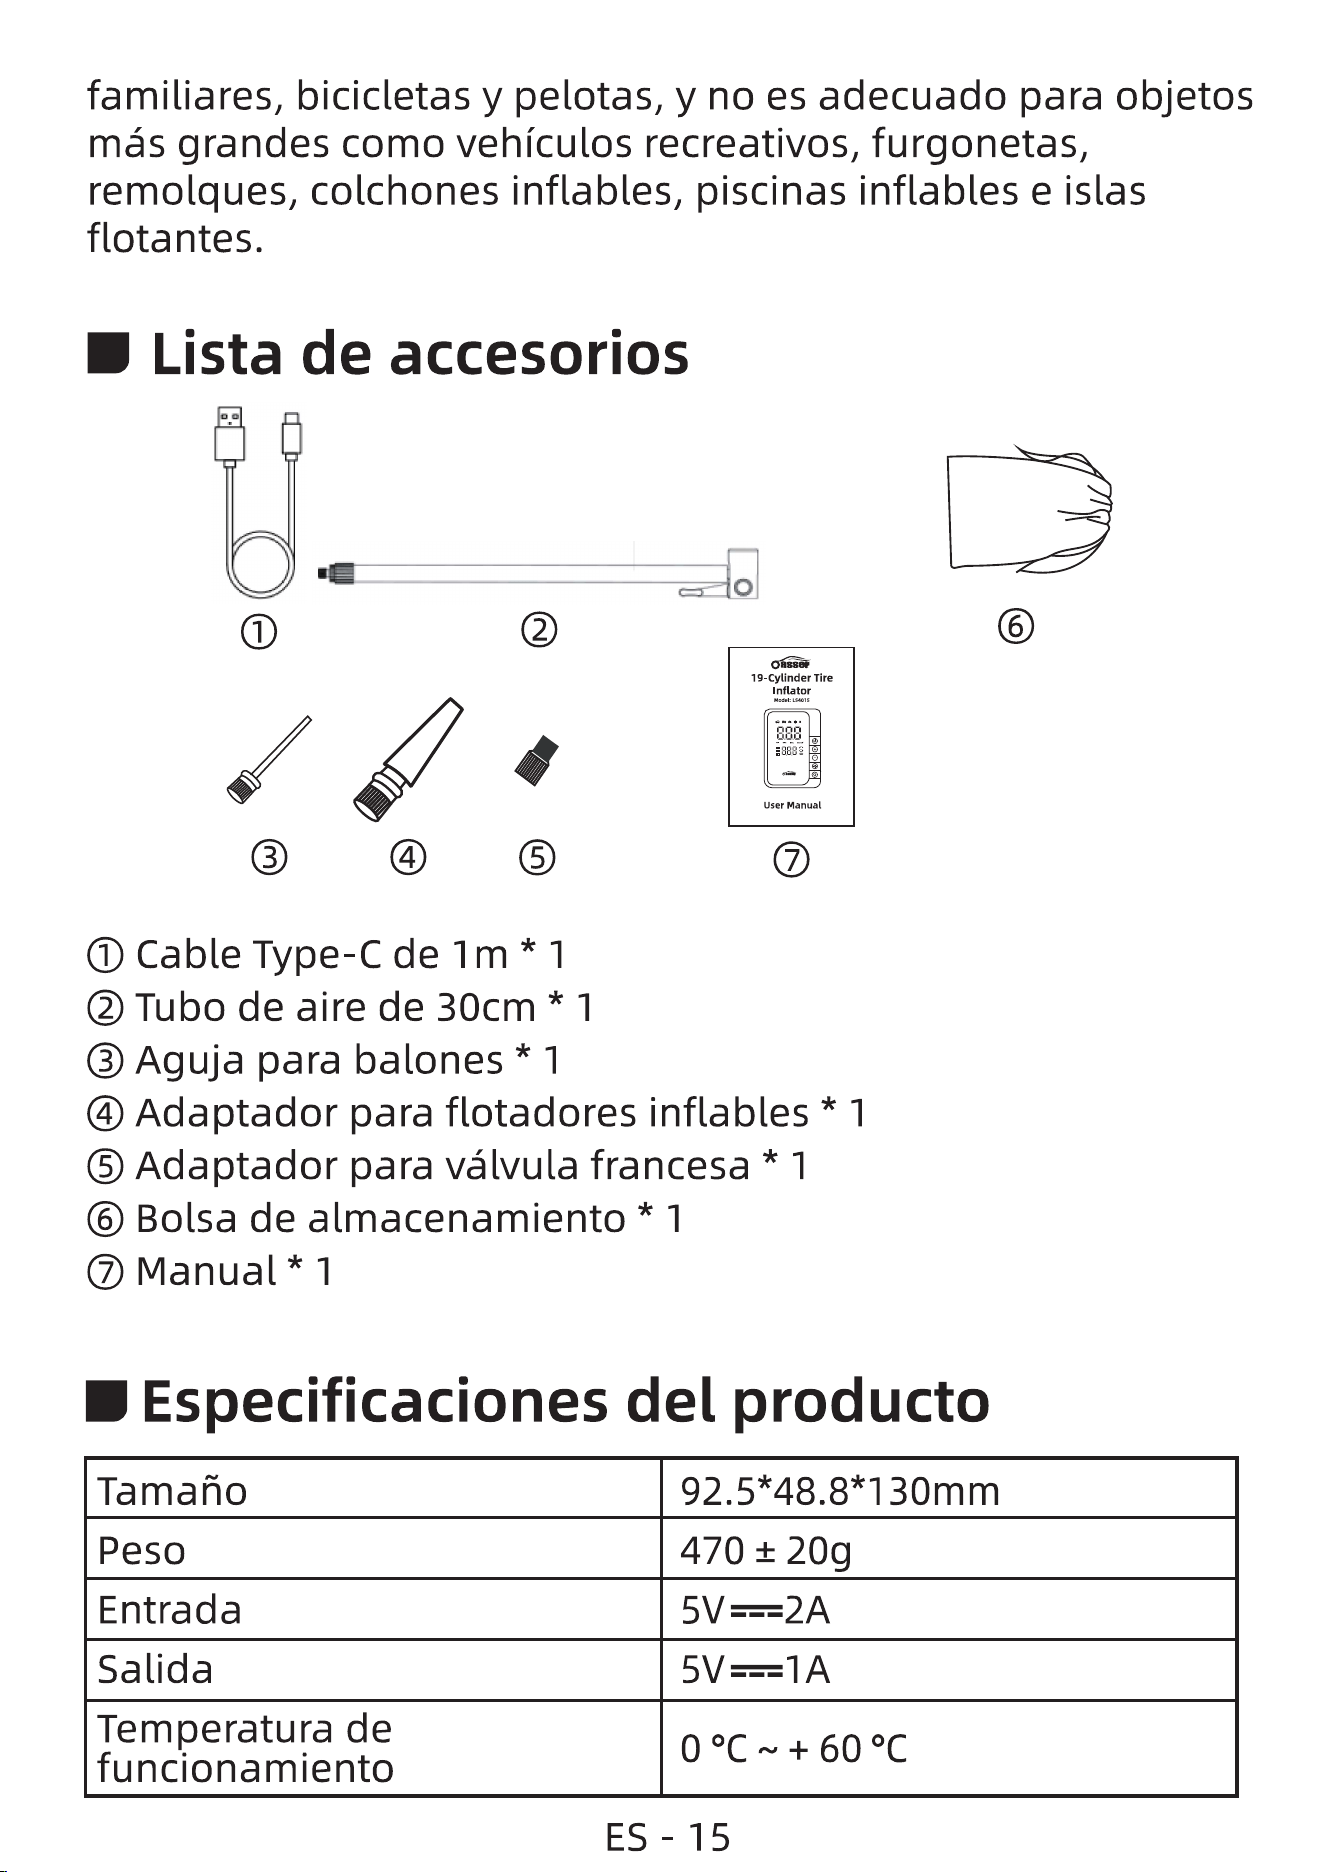
O Cable Type-C de 1m *1
@ Tubo de aire de 30cm *1
@ Aguja para balones * 1
familiares, bicicletas y pelotas, y no es adecuado para objetos
més grandes como vehiculos recreativos, furgonetas,
remolques, colchones inflables, piscinas inflables e islas
flotantes.
D Lista de accesorios
ES-15
o
19-Cylinder Tire
Inflator
iii
'888
User Manual
O
@ Adaptador para flotadores inflables
O Adaptador para välvula francesa * 1
O Bolsa de almacenamiento * 1
O Manual *1
D Especificaciones del producto
Tamaäo
Peso
Entrada
Salida
Temperatura de
funcionamiento
470 ± 20g

Temperatura de
almacenamiento
Potencia Nominal
Bateria
Presiön méxima
Unidades de presiön
Modos de inflado
Diémetro interno del cilindro
Puerto de carga
Funciön de power bank
Tiempo de carga
-20 OC +70 OC
70W
2000mAh *3
150 PSI
PS', BAR, KPA, KG/CM2
Auto, Moto, Bicicleta, Pelota,
Modo Personalizado
19mm
Type-C
5 horas
'Descripciön de los botones
BAR KPA KG/CM2
PSI
OUT
10
1
2
3
4
5
9
8 7
6
O e.) Botön de alimentaciön/activaciön del inflador
Mantener pulsado: Encender/Apagar
- Pulsar breve: Iniciar/Pausar el inflado
ES-16
@ Botön de aumento (+)
Aumentar valor de presiön establecido
@ Botön de reducciön (-)
Disminuir valor de presiön establecido
Botön de luz LED
Pulsar breve: Cambiar entre modo fijo/intermitente/SOS/
apagado
00 Botön de cambio
Pulsar breve: Cambiar entre modos de escena: Coche (2.5
Bar), Bicicleta (45 PSI), Moto (2.4 Bar), Balön (8 PSI),
Personalizado (36 PS')
- Mantener pulsado:Cambiaentrelasunidades:PSI,BAR,
KPA, KG/CM
O Puerto USB
- Para salida de emergencia (ej: cargar teléfono)
O Puerto de carga
Puerto Type-C para cargar el dispositivo
O Luz LED
@ Conector de la manguera
- Conectar manguera de inflado
O Contenido de pantalla
- Muestra: modo, valor de presiön, unidad, nivel de bateria
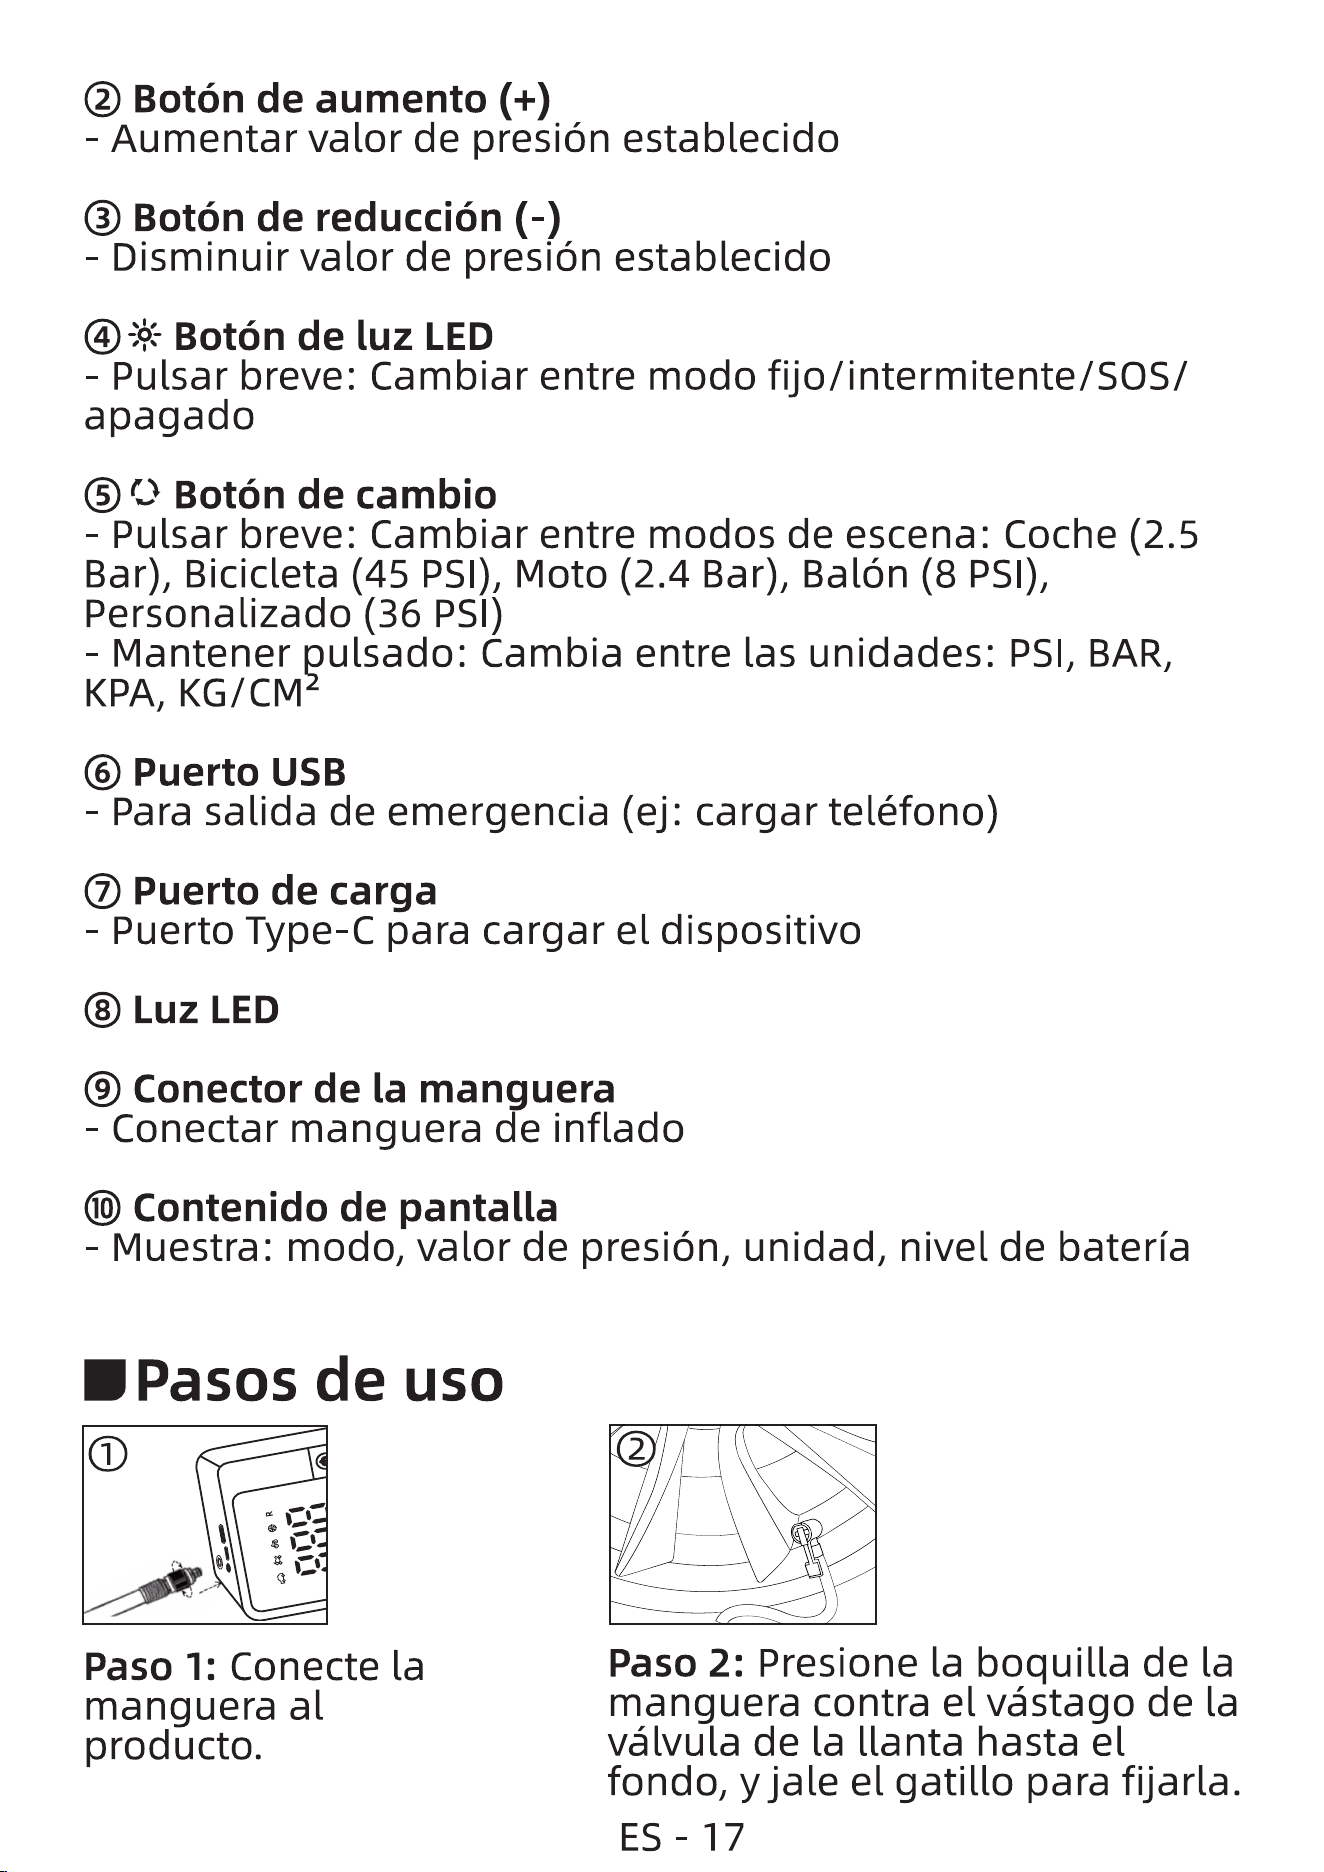
DPasos de uso
Paso 1: Conecte la
manguera al
producto.
2
Paso 2: Presione la boquilla de la
manguera contra el västago de la
välvula de la llanta hasta el
fondo, y jale el gatillo para fijarla.
ES-17
BAR KPA KG/CM' BAR KPA KG/CMZ
O
asser
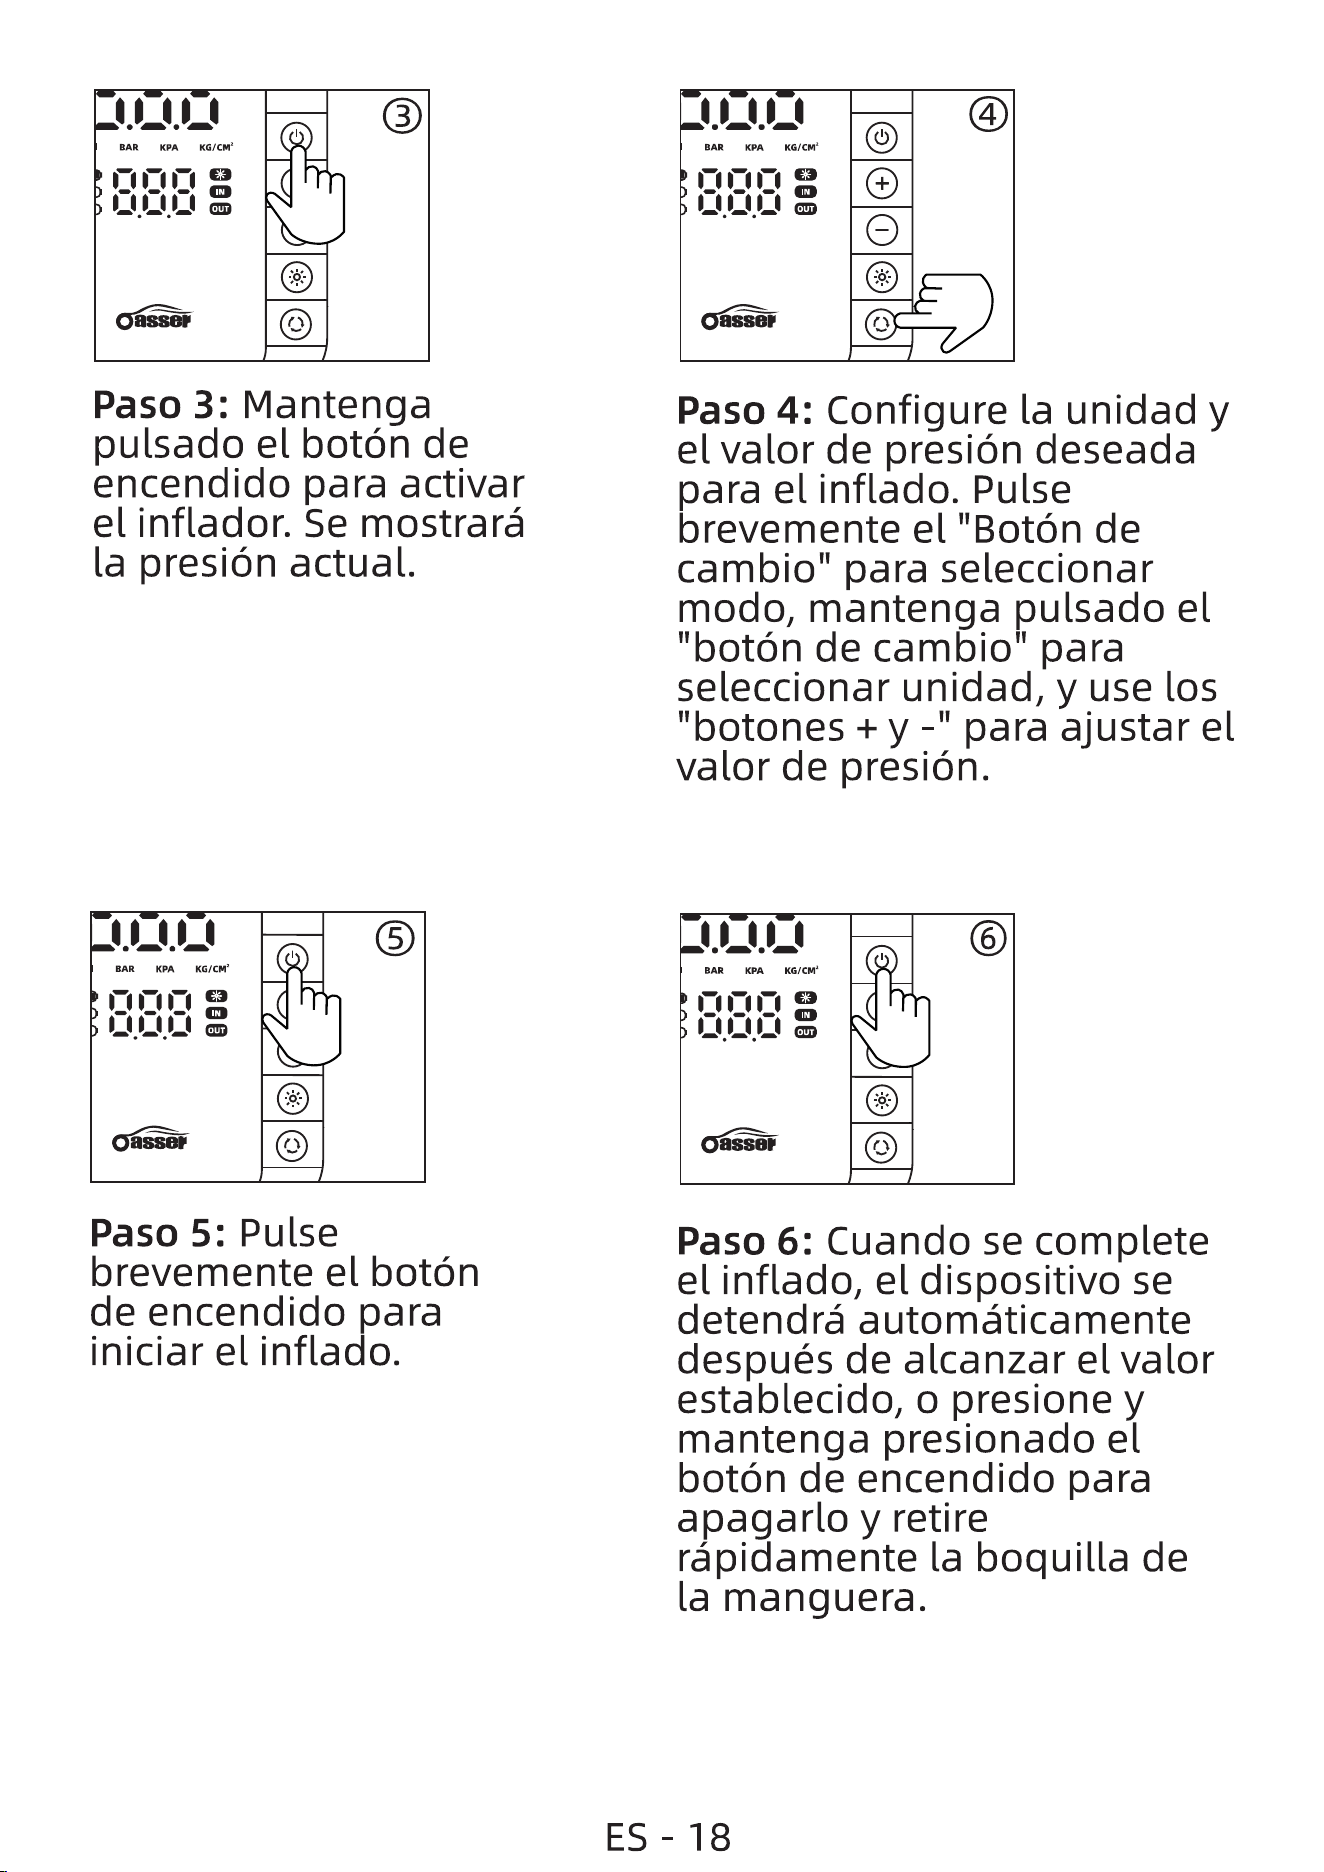
Paso 3: Mantenga
pulsado el boton de
encendido para activar
el inflador. Se mostraré
la presiön actual.
KPA KG/CM*
BAR
OUT
Paso 5: Pulse
brevemente el botön
de encendido para
iniciar el inflado.
ES-18
o
Paso 4: Configure la unidad y
el valor de presiön deseada
para el inflado. Pulse
brevemente el "Botön de
cambion para seleccionar
modo, mantenga pulsado el
"botön de cambio" para
seleccionar unidad, y use los
"botones + y -" para ajustar el
valor de presiön.
BAR
KPA KG/CM*
O
Paso 6: Cuando se complete
el inflado, el dispositivo se
detendrä automåticamente
después de alcanzar el valor
establecido, o presione y
mantenga presionado el
botön de encendido para
apagarlo y retire
räpidamente la boquilla de
la manguera.
D Indicaciones de operaciön
1. Si escucha un silbido en la llanta, significa que la boquilla
no estä fijada correctamente. Debe retirarla y volver a
conectarla de manera segura.
2. Después de conectar la boquilla, observe la pantalla
digital para verificar la presiön de la llanta antes de inflar, asi
determinarä si es necesario inflarla.
3. Durante el inflado, se recomienda no exceder los 10
minutos de uso continuo y realizar pausas intermitentes.
DServicio posventa
Si tiene algün problema durante el uso, contäctenos a través
del correo electrönico a continuaciön. Le brindaremos las
mejores soluciones y servicios.
Sitio web: oasser.net
Eliminaciön correcta de este producto
Este simbolo indica que el producto no debe
desecharse con otros residuos domésticos en la
Uniön Europea. Para prevenir posibles dafios al
medio ambiente o a la salud humana por una
gestiön incontrolada de residuos, es necesario
reciclarlo de manera responsable para promover
la reutilizaciön sostenible de recursos materiales.
Para devolver el dispositivo usado, utilice los
sistemas de devoluciön y recogida establecidos o
contacte con el comercio donde adquiriö el
producto. Ellos pueden aceptar este producto para
su reciclaje ambientalmente seguro.
ES -19
Merci d'avoir acheté Oasser Gonfleur Pneus Voiture
Lithium-ion! Veuillez lire attentivement ce manuel
d'utilisation avant la premiére utilisation.
Oasser Gonfleur Pneus Voiture Lithium-ion est puissante et
efficace. Gräce son moteur puissant et sa batterie
intégrée, elle peut étre utilisée pour de nombreuses täches.
La batterie intégrée peut également servir de batterie
d'urgence pour recharger votre téléphone.
APrécautions
I.Tenir l'écart des flammes nues et autres sources de
chaleur.
2. La pompe ne fonctionnera pas si la pression réglée est
inférieure å celle des pneus/de l'appareil.
3. La pompe génére de la chaleur pendant son
fonctionnement. Apres 8 å 10 minutes d'utilisation continue,
laissez-la refroidir pendant 5 minutes pour éviter tout
dommage.
4. Une inactivité prolongée peut dégrader les performances
de la batterie. Nous recommandons de recharger la pompe
au moins tous les 3 mois.
5. Si la pompe émet des bruits inhabituels ou atteint des
températures élevées pendant le gonflage, éteignez-la
immédiatement.
6. Avant de régler la pression, vérifiez l'unité correcte (PSI,
BAR, KPA, KG/CM2) afin d'éviter toute surcharge due å une
confusion d'unités.
7. Les ballons, les ballons de jeu et les bouées ne peuvent
pas étre préréglés en raison de leur faible pression. Soyez
extrémement prudent pour éviter toute surcharge.
8. Cette pompe faible débit et haute pression est
principalement conque pour gonfler les petites voitures, les
FR - 20
O
0
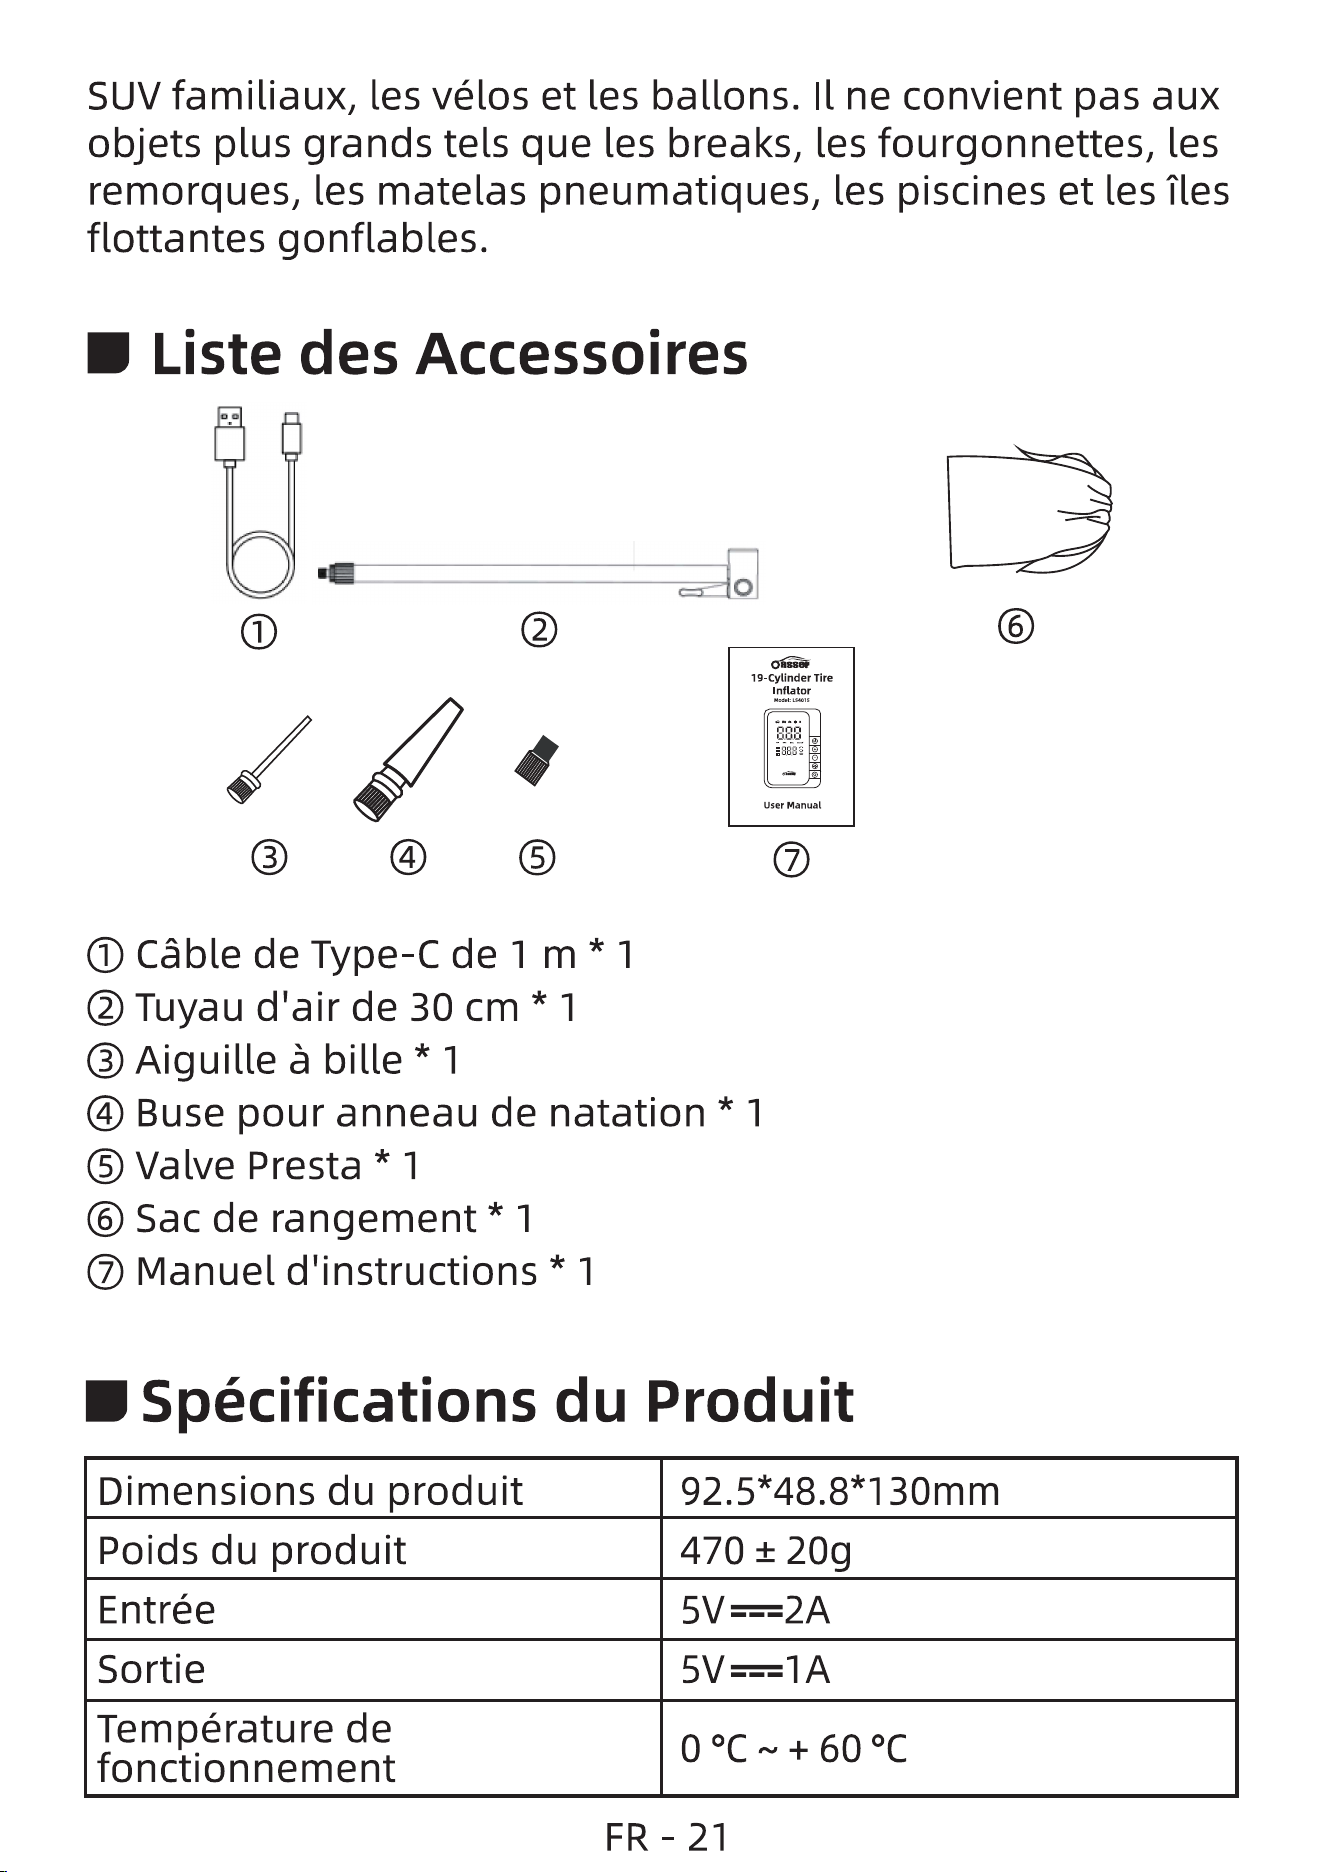
O Cäble de Type-C de 1 m* 1
@ Tuyau d'air de 30 cm * 1
@ Aiguille bille *1
@ Buse pour anneau de natation
O Valve Presta * 1
O Sac de rangement * 1
O Manuel d'instructions * 1
SUV familiaux, les vélos et les ballons. II ne convient pas aux
objets plus grands tels que les breaks, les fourgonnettes, les
remorques, les matelas pneumatiques, les piscines et les fles
flottantes gonflables.
D Liste des Accessoires
R -21
o
19-Cylinder Tire
Inflator
iii
'888
User Manual
O
D Spécifications du Produit
Dimensions du produit
Poids du produit
Entrée
Sortie
Température de
fonctionnement
470 ± 20g
Température de stockage
Puissance nominale
Capacité de la batterie
Pression d'air maximale
Unité de pression d'air
Mode de gonflage
Alésage du cylindre
Interface de chargement
Fonction de sortie de la
batterie externe
Temps de chargement
-200Cæ+700C
70W
2000mAh*3
150 PSI
I<PÆ KG/CM2
Voiture, moto, vélo, ballon,
Mode Personnalisé
19 mm
Type-C
Oui
5 heures
'Description du Bouton
BAR KPA KG/CM2
PSI
OUT
10
1
2
3
4
5
9
8 7
6
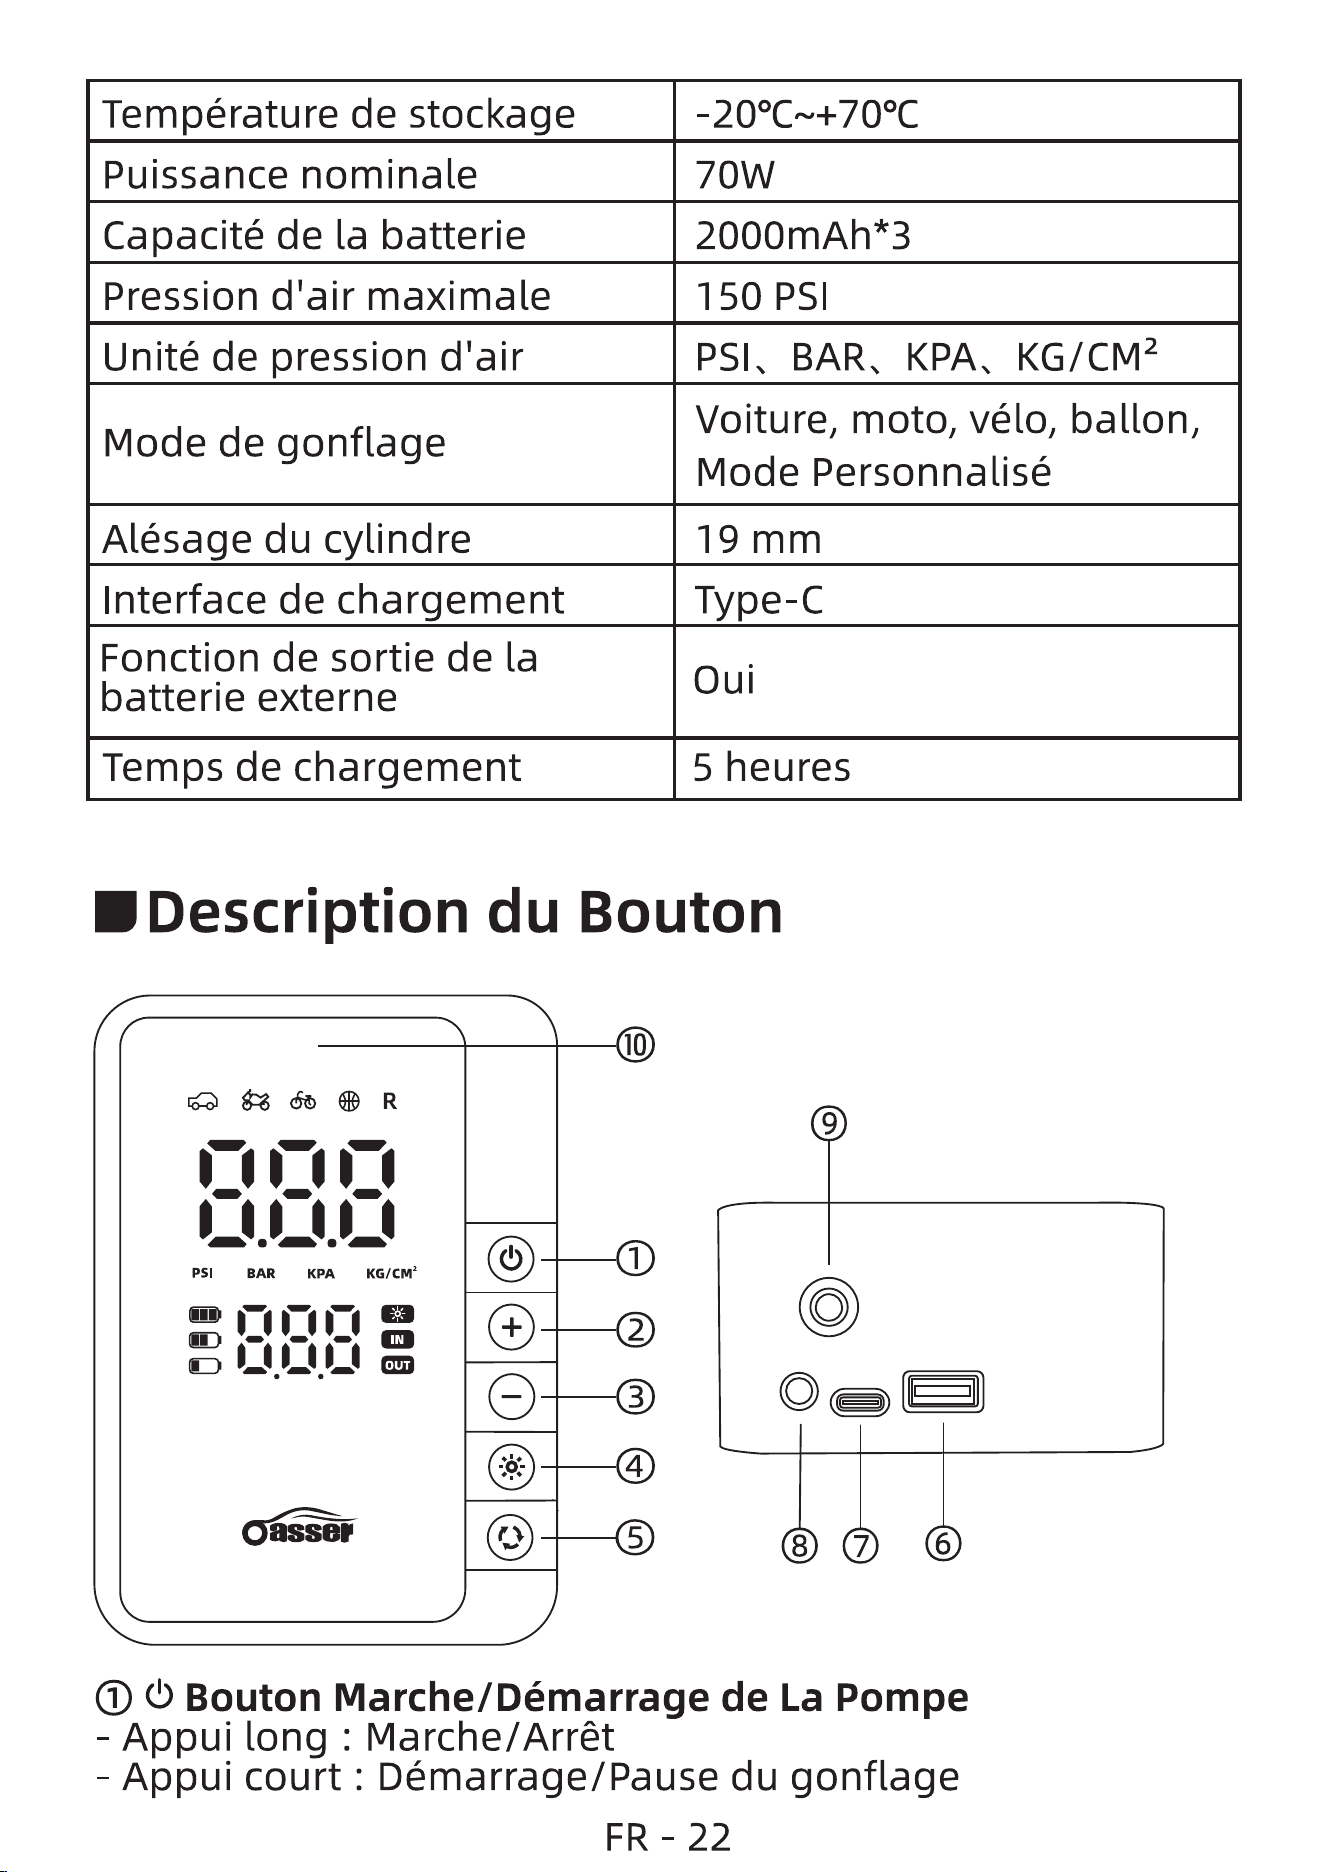
O (b Bouton Marche/Démarrage de La Pompe
Appui long : Marche/Arrét
- Appui court : Démarrage/Pause du gonflage
FR - 22
@ Bouton Plus (+)
Augmente la valeur de pression réglée
@ Bouton Moins (-)
Diminue la valeur de pression réglée
Bouton d'éclairage LED
Appui court : Commutation entre allumé fixe/clignotant/
SOS/éteint
O O Bouton de Commutation
Appui court : commutation entre les modes - Voiture : 2,5
bars, Motos : 2,4 bars, Vélos : 45 PSI, Ballons : 8 PS', Mode
Personnalisé : 36 PSI
- Appui long : commutation entre les unités - PSI, BAR, KPA,
KG/CM2
O Port USB
- Peut étre utilisé comme sortie d'urgence (par exemple,
pour charger un téléphone)
O Port de Charge
- Port de charge Type-C pour charger des appareils
O Voyant LED
O Connecteur de Tuyau
- Se connecte au tuyau de gonflage
O Contenu de l'écran
- Affiche la scene, la pression, Ilunité et le niveau de batterie
•Étapes d'utilisation
A Remarque : veuillez vous assurer que l'appareil est
L.L.S completementchargéavantutilisation.
FR -23
o
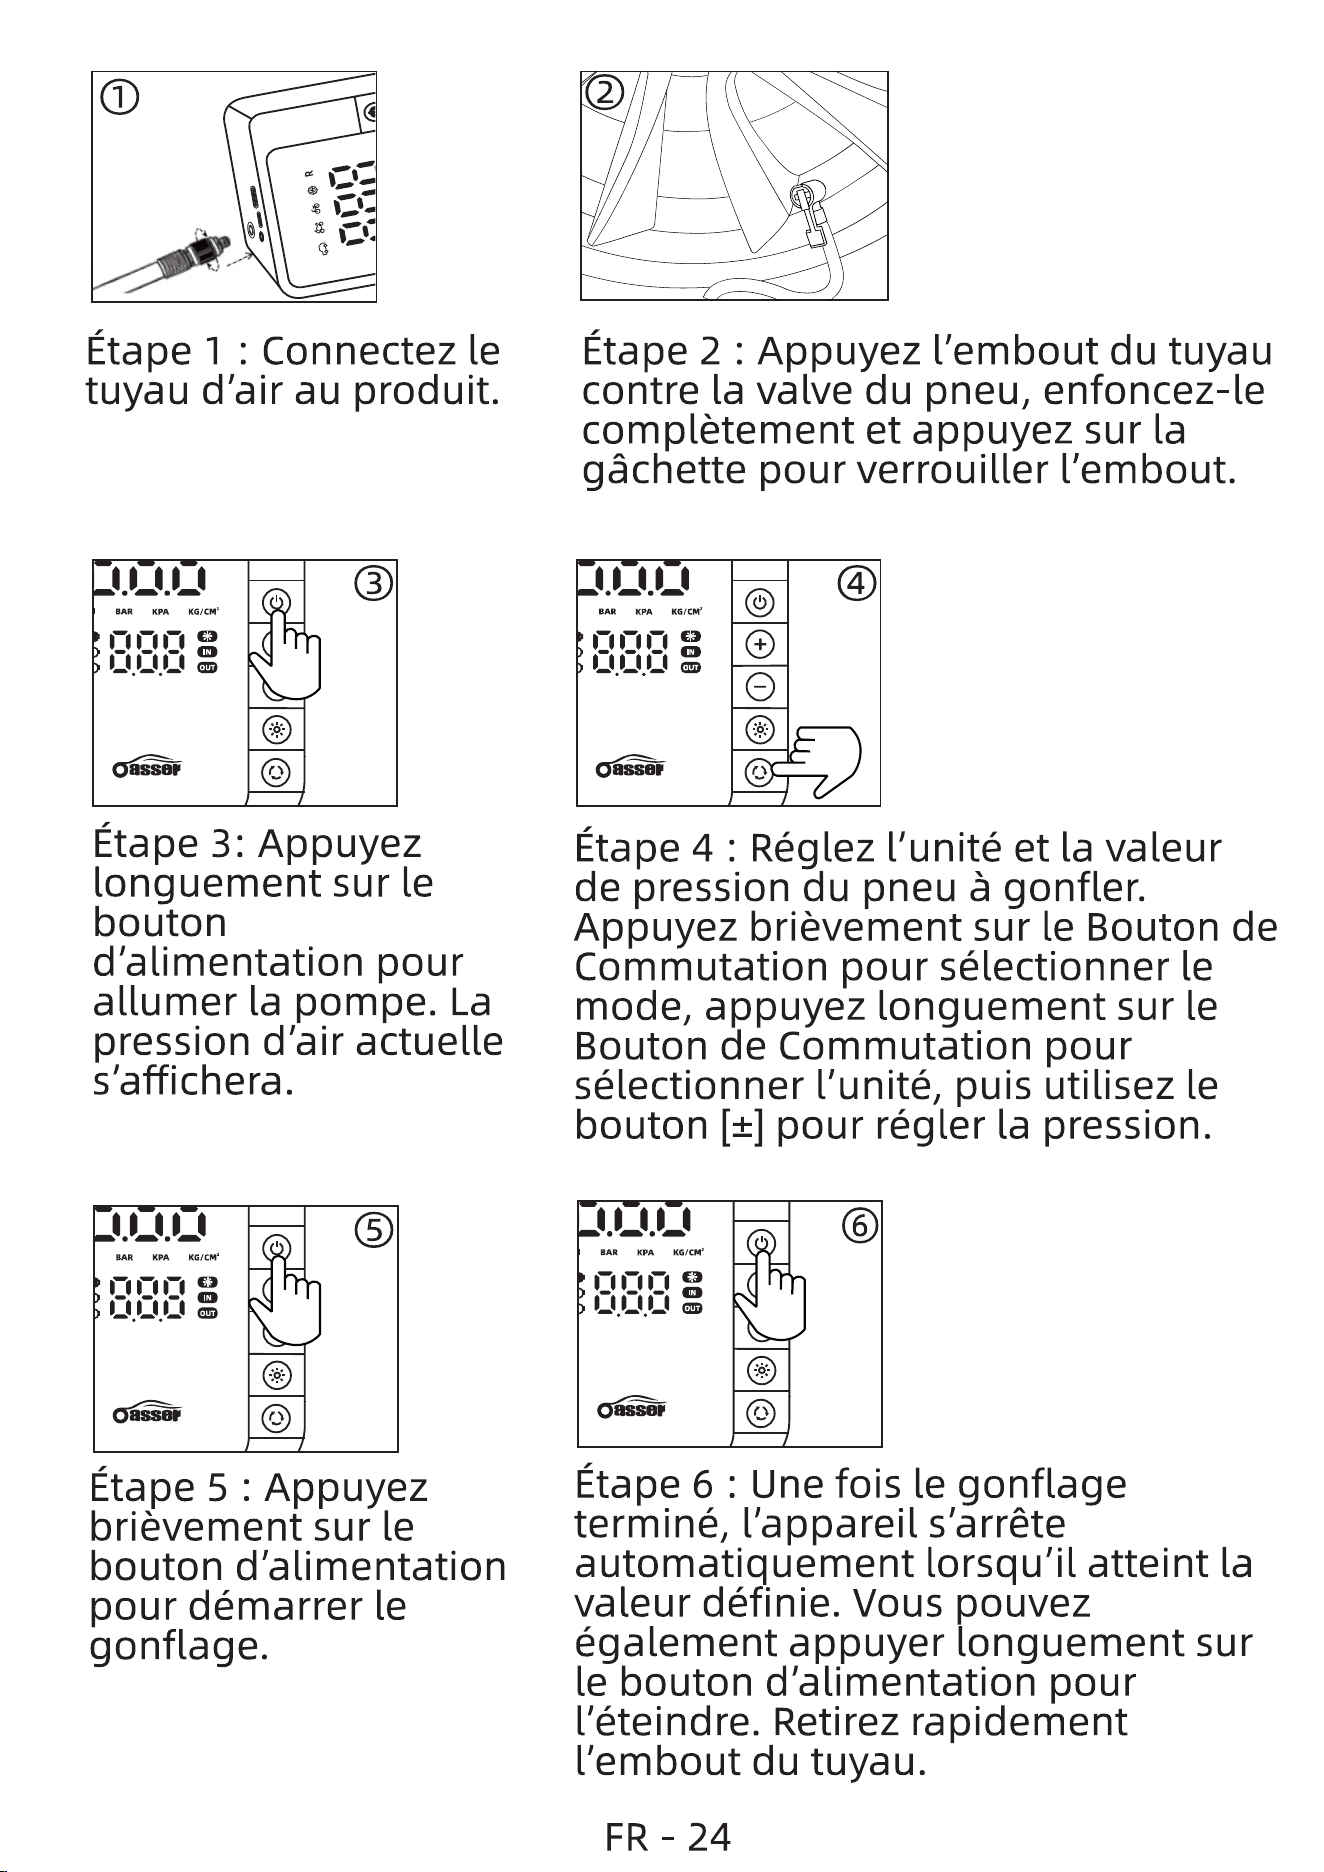
Étape 1 : Connectez le
tuyau d'air au produit.
BAR KPA
O
Étape 3: Appuyez
longuement sur le
bouton
d'alimentation pour
allumer la pompe. La
pression d'air actuelle
s'affichera.
BAR
O
Étape 5 : Appuyez
briévement sur le
bouton d'alimentation
pour démarrer le
gonflage.
Étape 2 : Appuyez l'embout du tuyau
contre la valve du pneu, enfoncez-le
complétement et appuyez sur la
gächette pour verrouiller l'embout.
BAR KPA
O
aGü
Étape 4 . Réglez l'unité et la valeur
de pression du pneu gonfler.
Appuyez briévement sur le Bouton de
Commutation pour sélectionner le
mode, appuyez longuement sur le
Bouton de Commutation pour
sélectionner l'unité, puis utilisez le
bouton [±] pour régler la pression.
BAR
O
Étape 6 : Une fois le gonflage
terminé, l'appareil s'arréte
automatiquement lorsqu'il atteint la
valeur définie. Vous pouvez
également appuyer longuement sur
le bouton d'alimentation pour
l'éteindre. Retirez rapidement
l'embout du tuyau.
FR - 24
•Conseils d'utilisation
1. Si vous entendez un sifflement provenant du pneu, cela
signifie que la buse n'est pas correctement fixée. Débranchez
puis rebranchez la buse.
2. Aprés avoir branché la buse, vérifiez la pression du pneu
sur l'écran numérique avant de gonfler afin de déterminer si
davantage d'air est nécessaire.
3. Lors du gonflage, il est recommandé de ne pas dépasser
10 minutes d'affilée, en faisant des pauses entre les
gonflages.
D Service Apres-vente
Si vous rencontrez des problémes lors de l'utilisation, veuillez
nous contacter lladresse e-mail ci-dessous. Nous vous
fournirons les meilleures solutions et le meilleur service.
Site web: oasser.net
D Mise au Rebut Correcte du Produit
Ce symbole indique que ce produit ne doit pas étre
jeté avec les autres déchets ménagers dans I'UE.
Afin d'éviter tout risque pour l'environnement ou la
santé humaine lié une élimination incontrölée
des déchets, il est nécessaire de le recycler de
maniére responsable afin de promouvoir une
réutilisation durable des ressources matérielles.
Pour retourner l'appareil usagé, utilisez les
systémes de retour et de collecte ou contactez le
revendeur oü vous avez acheté le produit. Ce
dernier pourra le reprendre pour un recyclage
respectueux de l'environnement.
FR -25
Grazie per aver acquistato Oasser Compressore Aria
Portatile 19 litri! Prima di utilizzare il prodotto per la prima
volta, leggere attentamente questo manuale.
II compressore d'aria portatile Oasser da 19 litri é un
gonfiatore potente ed efficiente. Grazie al motore ad alta
prestazione e alla batteria incorporata, é adatto per molteplici
applicazioni. La batteria integrata puö anche fungere da
power bank d'emergenza per ricaricare dispositivi mobili.
AAvvertenze importanti:
1. Tenere lontano da fiamme libere e altre fonti di calore.
2. Se il valore di pressione impostato é inferiore a quella
dello pneumatico/dell'attrezzatura, il compressore non si
avvierå.
3. II compressore genera calore durante il funzionamento.
Dopo un uso continuo di 8-10 minuti, lasciarlo raffreddare
per almeno 5 minuti per prevenire danni.
4. La prolungata inattivitå puö ridurre le prestazioni della
batteria. Si consiglia di ricaricarla completamente almeno
una volta ogni 3 mesi.
5. In caso di rumori anomali o surriscaldamento durante il
gonfiaggio, spegnere immediatamente il compressore.
6. Prima di impostare la pressione, assicurarsi di aver
selezionato l'unitå di misura corretta (PS', BAR, KPA, KG/CM2)
per evitare sovragonfiaggio dovuto a confusione tra le unitå.
7. Per oggetti come palloncini, palloni giocattolo e braccioli
gonfiabili, che richiedono pressioni molto basse, non
utilizzare la modalitå di pressione preimpostata. Prestare
particolare attenzione per evitare il sovragonfiaggio.
8. Questo é un compressore a flusso d'aria basso e alta
pressione. É progettato principalmente per gonfiare
pneumatici di auto piccole, SUV familiari, biciclette e palloni.
IT - 26
O
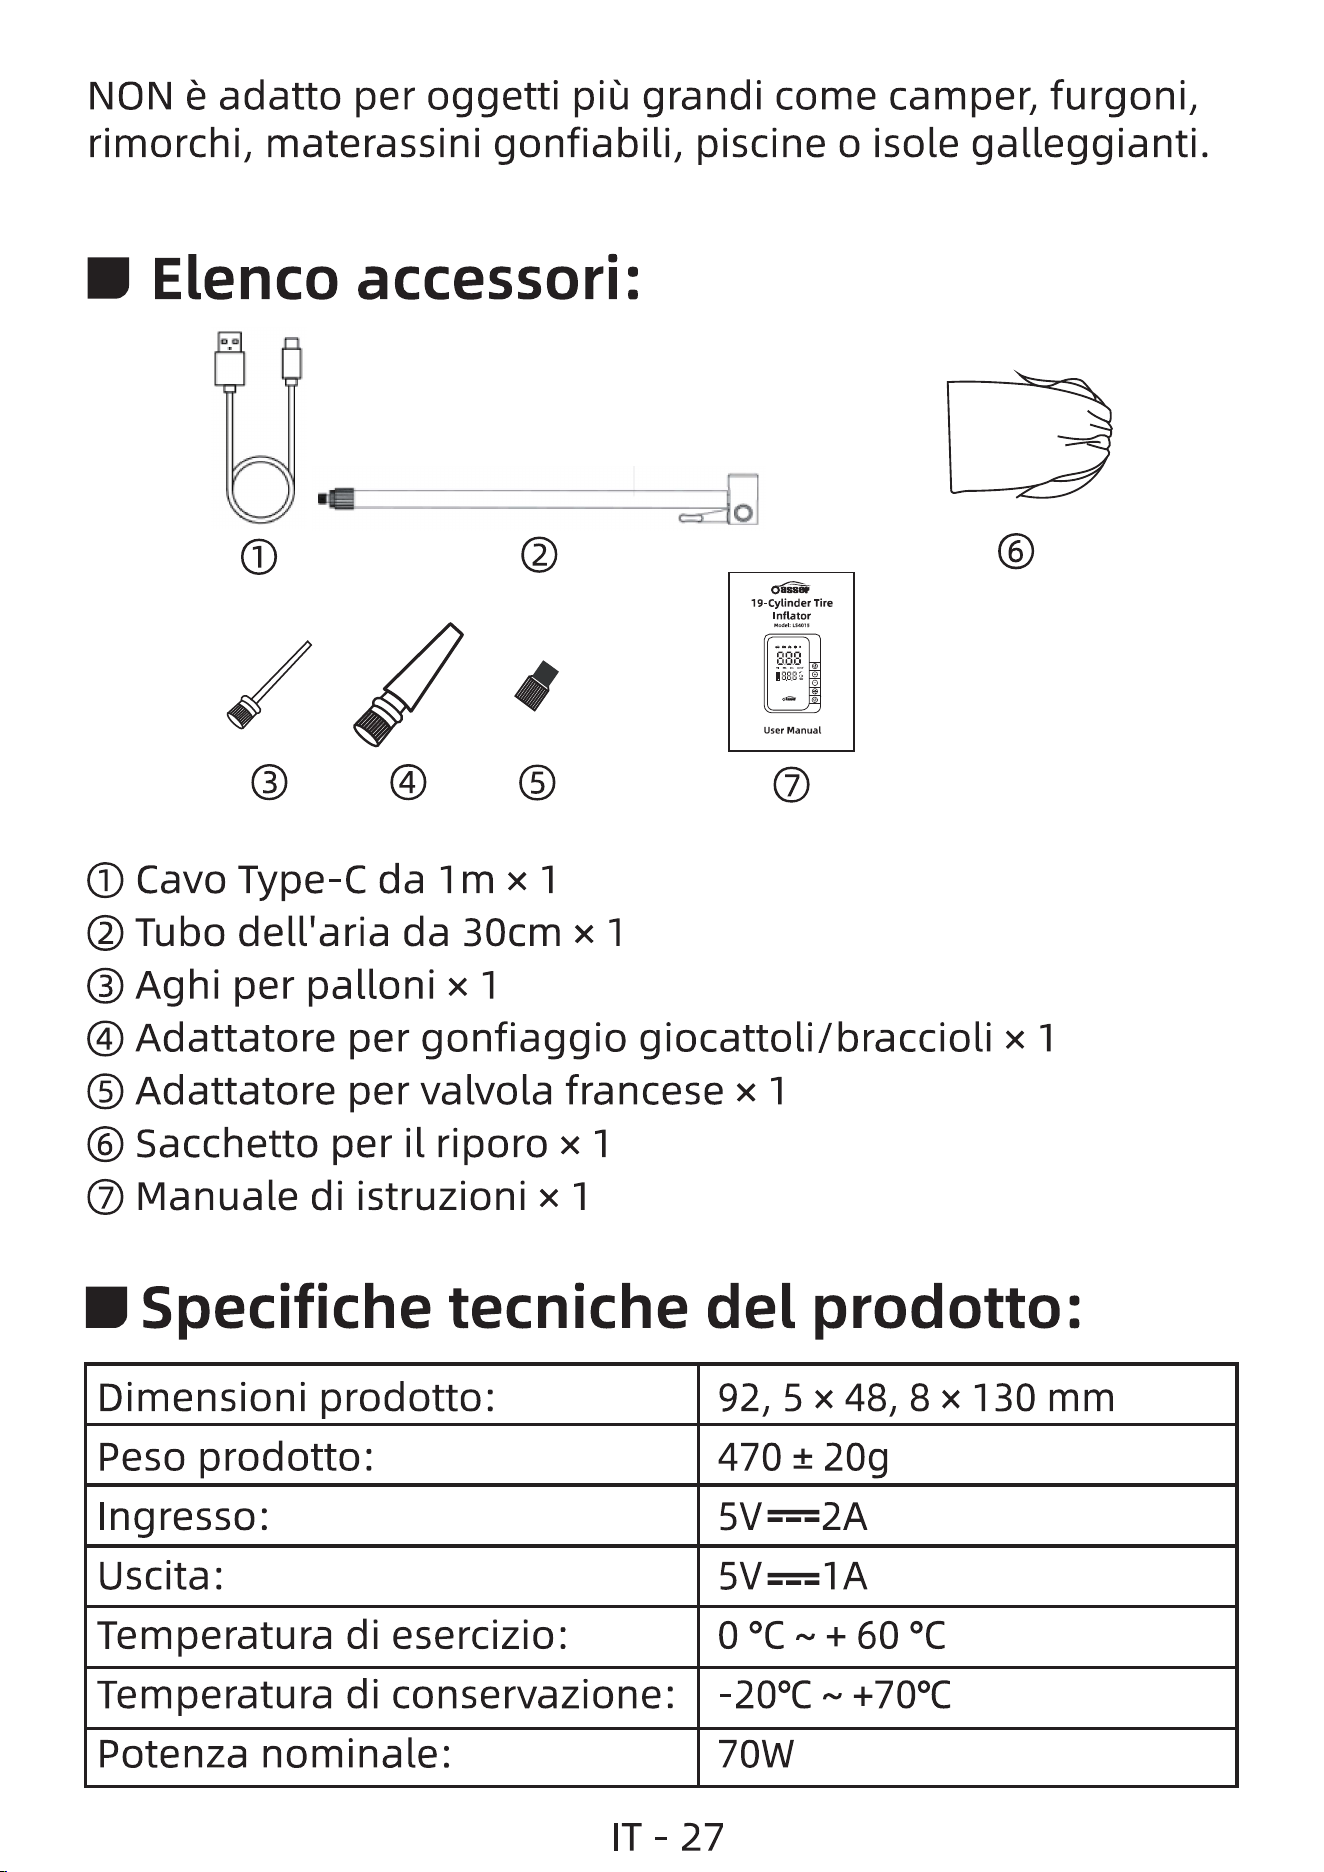
O Cavo Type-C da 1m x 1
@ Tubo dell'aria da 30cm x 1
O Aghi per palloni x 1
NON é adatto per oggetti piü grandi come camper, furgoni,
rimorchi, materassini gonfiabili, piscine o isole galleggianti.
Elenco accessori:
IT - 27
o
19-cylinder Tire
Inflator
ääi
user Manual
O
@ Adattatore per gonfiaggio giocattoli/braccioli x 1
O Adattatore per valvola francese x 1
O Sacchetto per il riporo x 1
O Manuale di istruzioni x 1
D Specifiche tecniche del prodotto:
Dimensioni prodotto:
Peso prodotto:
Ingresso:
Uscita:
Temperatura di esercizio:
Temperatura di conservazione:
Potenza nominale:
92, 5 x 48, 130 mm
470 ± 20g
5V—1A
o ocæ+60 oc
-noc +700C
70W
Capacitå batteria:
Pressione massima:
Unitå di pressione:
Modalitä di gonfiaggio:
Diametro interno cilindro:
Interfaccia ricarica:
Funzione power bank (uscita):
Tempo di ricarica:
2000 mAh* 3
150 PSI
PSI, BAR, KPA, KG/CM2
Auto, Moto, Bici, Palloni,
Modalitå Personalizzata
19 mm
Type-C
Si
5 ore
D Descrizione controlli e interfacce:
BAR KPA KG/CMZ
PSI
OUT
10
2
3
4
5
9
8 7
6
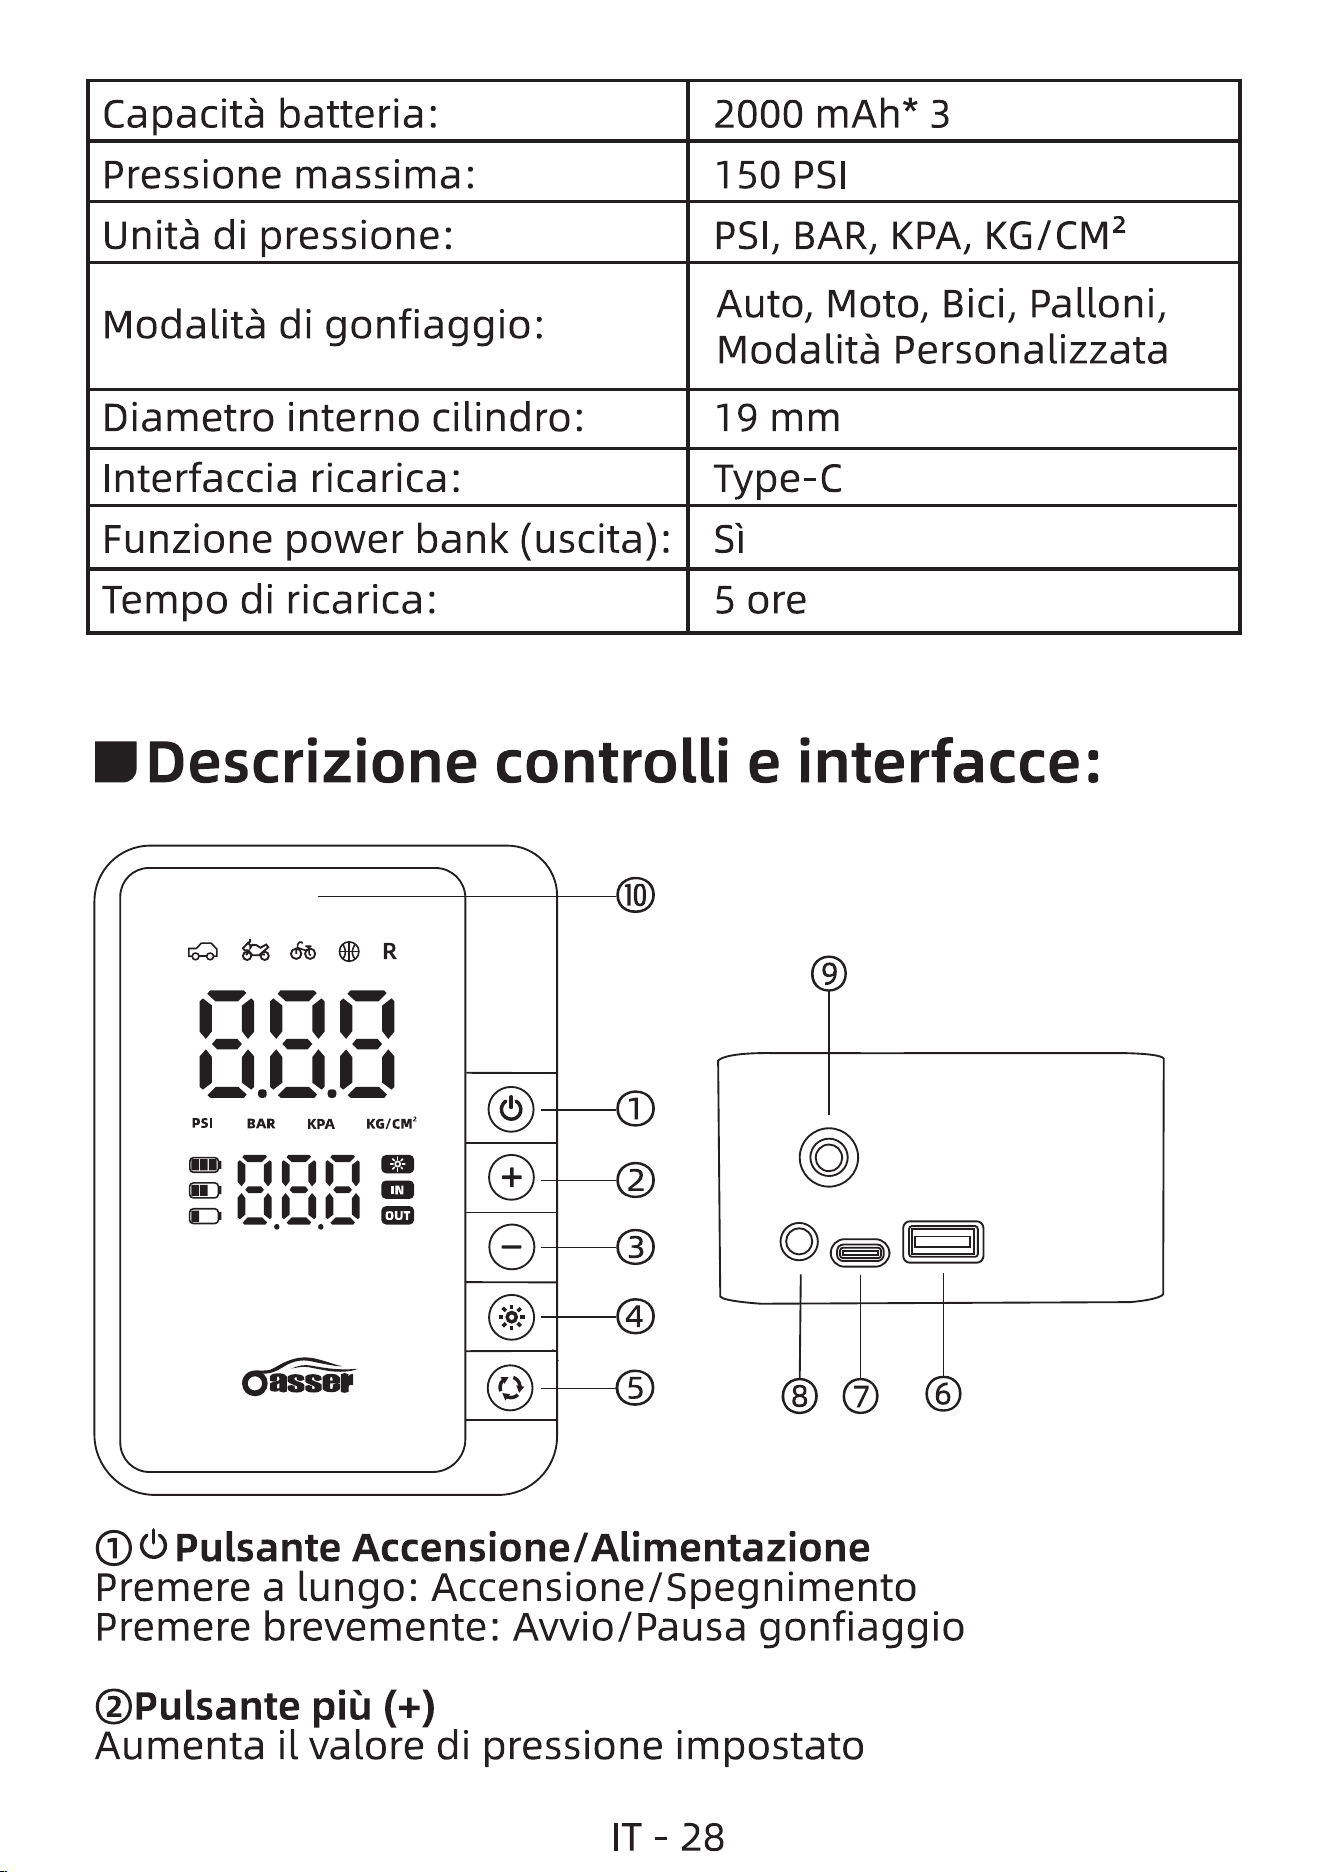
O (b Pulsante Accensione/Alimentazione
Premere a lungo: Accensione/Spegnimento
Premere brevemente: Avvio/Pausa gonfiaggio
@Pulsante piü (+)
Aumenta il valore di pressione impostato
IT - 28
@Pulsante meno (-)
Riduce il valore di pressione impostato
@ * Pulsante luce LED
Premere brevemente: Cambia modalitå (Luce fissa, Luci
lampeggianti, SOS, Spento)
OOPulsante di selezione
Premere brevemente: Cambia modalitå - Auto(2,5Bar),
Bici(45PSl), Pallone (8PSI) , Modalitå
personalizzata(36 PS')
Premere a lungo: Cambia unitå di misura (PS', BAR, KPA,
KG/CM2)
OPorta USB
Uscita di emergenza (es. per ricaricare telefoni)
OPorta di ricarica
Porta Type-C per ricaricare il dispositivo
OLuci LED
OAttacco per tubo dell'aria
Collegare il tubo flessibile per gonfiaggio
ODisplay schermo
Mostra: Modalitå, Valore pressione, Unitå di misura, Livello
batteria
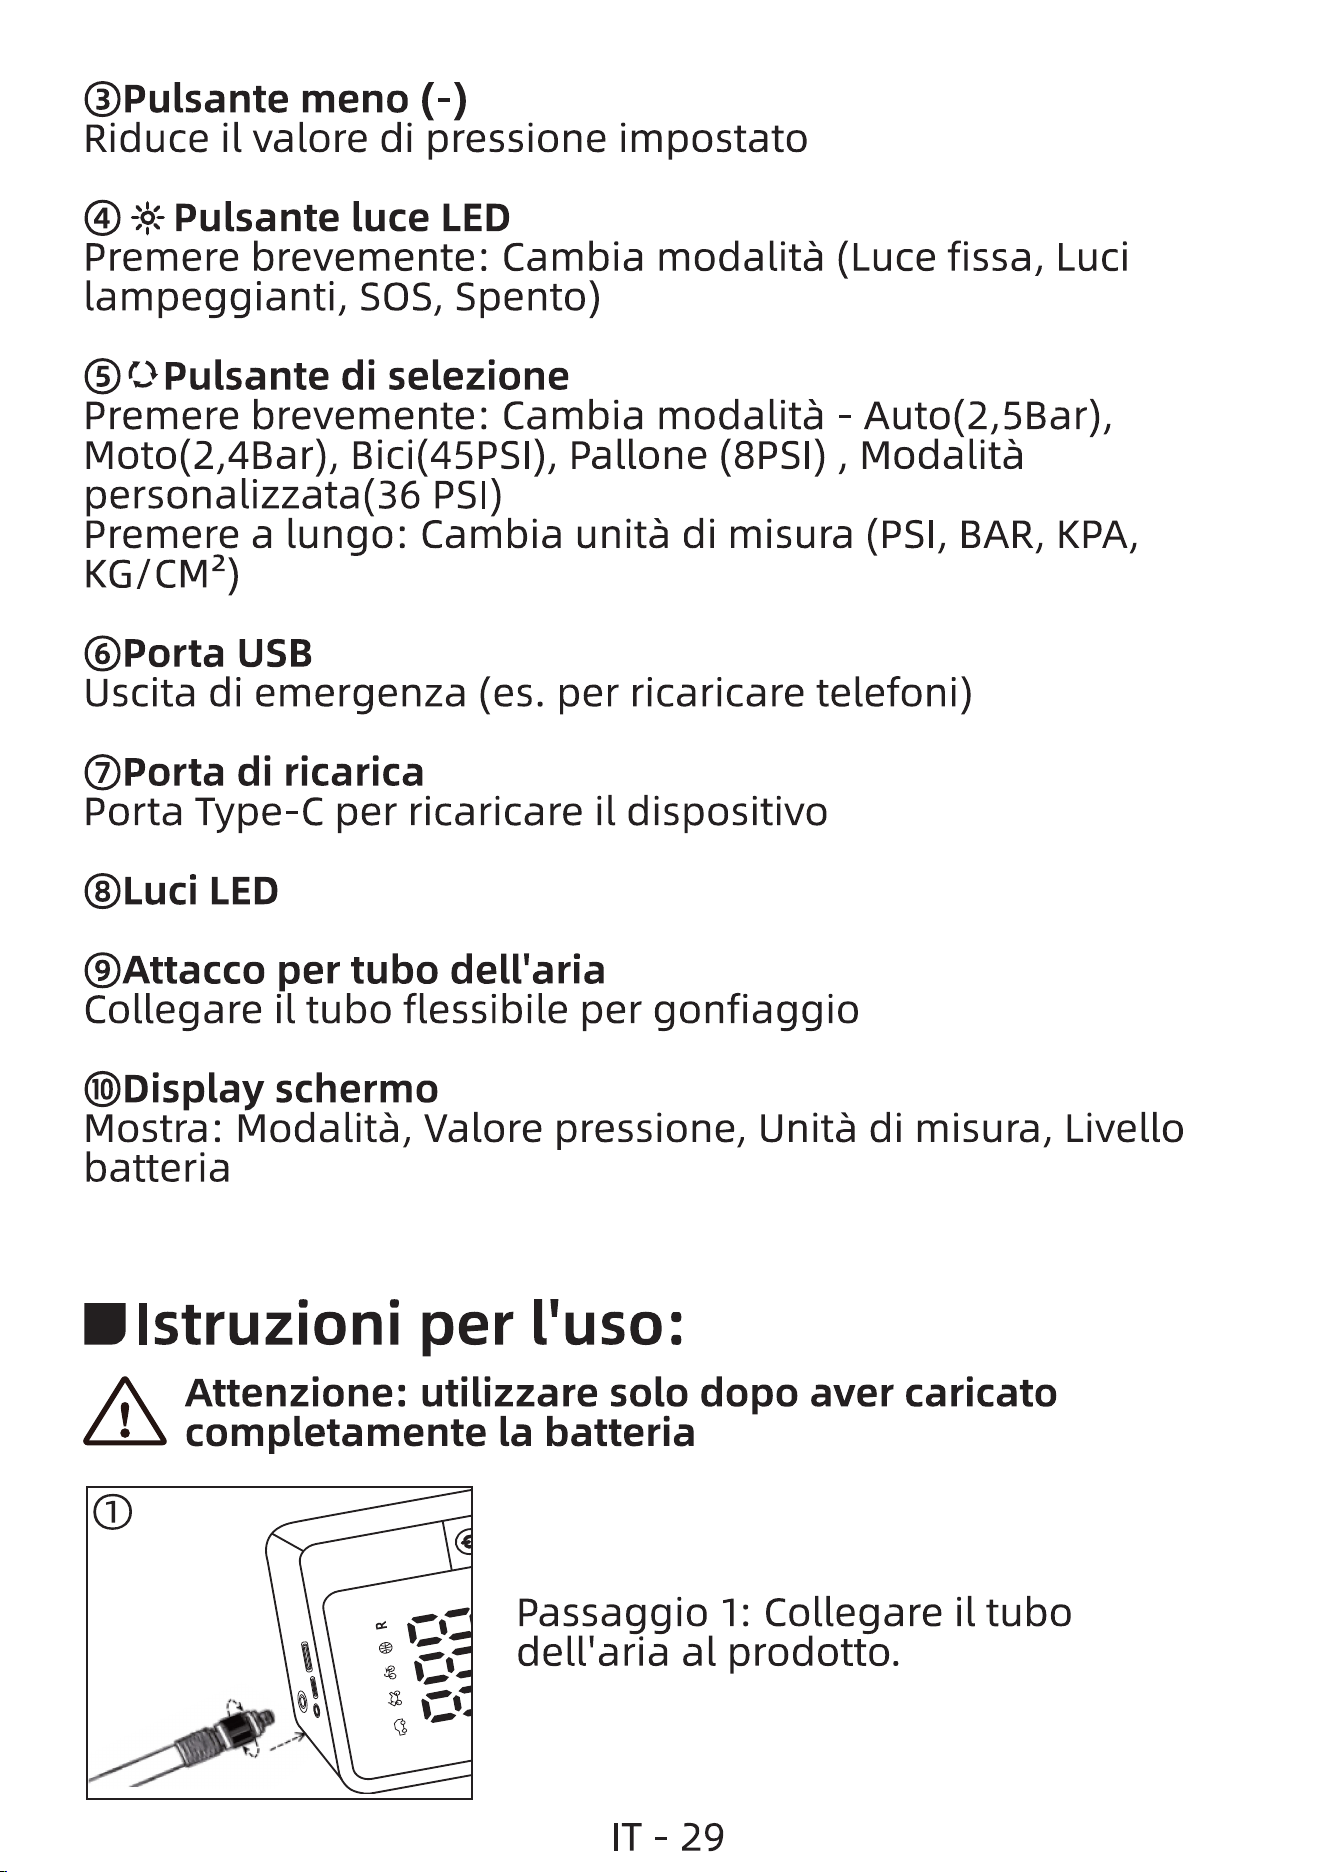
'Istruzioni per l'uso:
A Attenzione: utilizzare solo dopo aver caricato
L.!....x completamentela batteria
O
Passaggio 1: Collegare il tubo
dell'aria al prodotto.
IT - 29
BAR
KPA KG/CM2
OUT
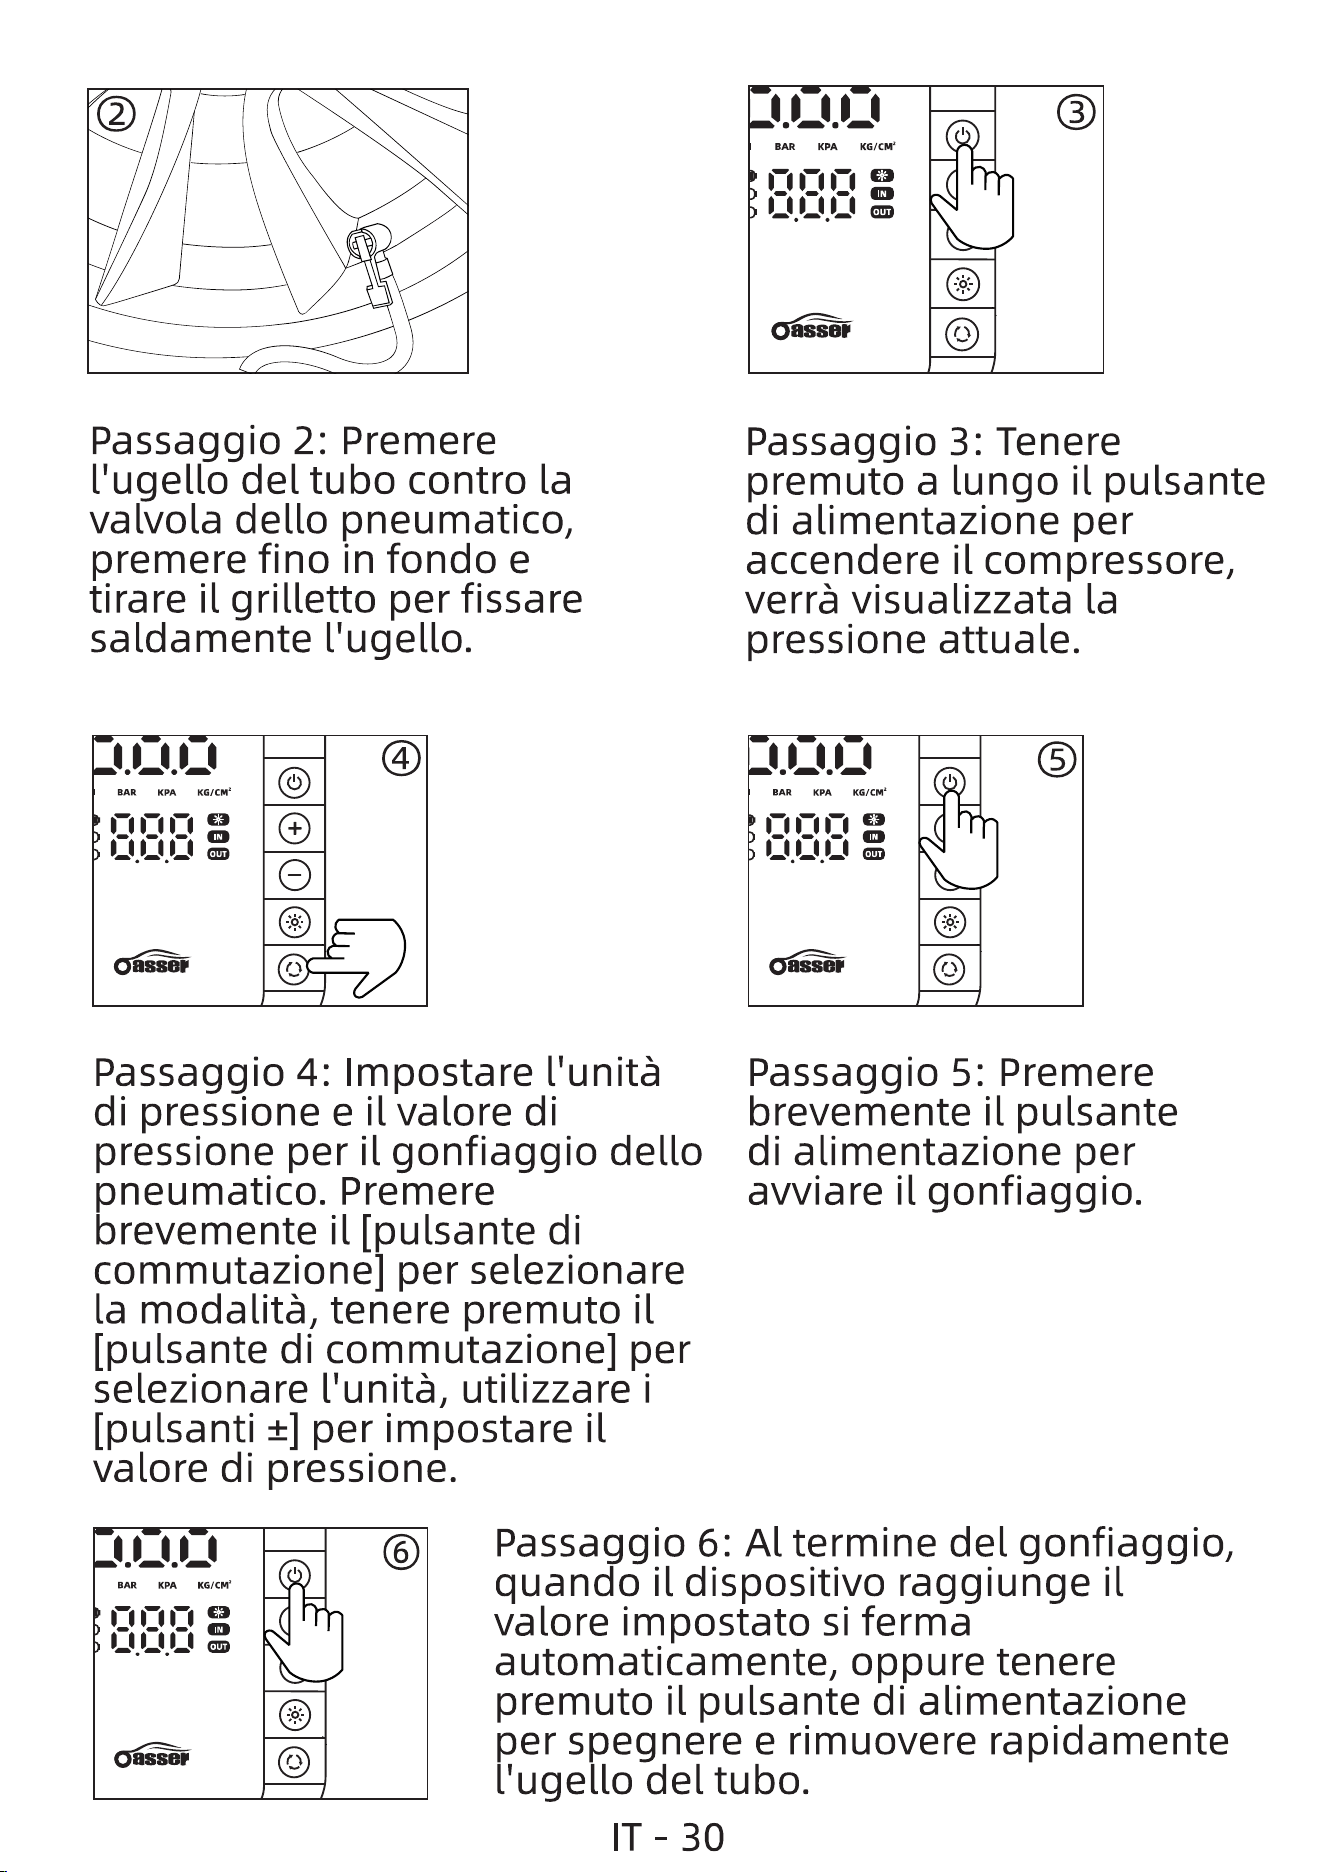
Passaggio 2: Premere
Ilugello del tubo contro la
valvola dello pneumatico,
premere fino in fondo e
tirare il grilletto per fissare
saldamente l'ugello.
BAR KPA KG/CM2
asser
o
Passaggio 3: Tenere
premuto a lungo il pulsante
di alimentazione per
accendere il compressore,
verrå visualizzata la
pressione attuale.
KPABAR
o
Passaggio 5: Premere
brevemente il pulsante
di alimentazione per
avviare il gonfiaggio.
Passaggio 4: Impostare Ilunitä
di pressione e il valore di
pressione per il gonfiaggio dello
pneumatico. Premere
brevemente il [pulsante di
commutazione] per selezionare
la modalitå, tenere premuto il
[pulsante di commutazione] per
selezionare l'unitå, utilizzare i
[pulsanti ±] per impostare il
valore di pressione.
BAR KPA KG/CM'
OGer
O
Passaggio 6: A1termine del gonfiaggio,
quando il dispositivo raggiunge il
valore impostato si ferma
automaticamente, oppure tenere
premuto il pulsante di alimentazione
per spegnere e rimuovere rapidamente
l'ugello del tubo.
IT - 30
DSuggerimenti operativi:
Se si sente un sibilo dallo pneumatico, significa che
l'ugello non é fissato correttamente. Scollegare l'ugello e
ricollegarlo.
Dopo aver collegato l'ugello, osservare il display digitale
per testare la pressione degli pneumatici prima del
gonfiaggio, in modo da determinare se é necessario gonfiare
10 pneumatico.
Durante il gonfiaggio, si consiglia di non superare i 10
minuti di funzionamento continuo ed é necessario fare pause
intermittenti.
DServizio post-vendita:
Se si riscontrano problemi durante l'utilizzo, contattaci via
email all'indirizzo indicato di seguito. Forniremo la migliore
soluzione e servizio.
Website: oasser.net
Smaltimento corretto del prodotto
Questo simbolo indica che il prodotto non deve
essere smaltito insieme ai rifiuti domestici in tutta
I'UE. Per prevenire possibili danni all'ambiente o
alla salute umana derivanti da uno smaltimento
incontrollato, é necessario riciclarlo in modo
responsabile per promuovere il riutilizzo
sostenibile delle risorse materiali. Per restituire il
dispositivo usato, utilizzare i sistemi di reso e
raccolta o contattare il rivenditore presso il quale il
prodotto é stato acquistato. Questi possono ritirare
il prodotto per un riciclaggio ecologicamente
sicuro.
IT - 31
Dziekujemy za zakup naszego produktu Oasser
19-cylindrowej pompy do opon!Przed pierwszym uiyciem
pompy prosimy doktadnie zapoznaé sie z niniejsza
instrukcja obstugi.
Oasser pompa do opon 19-cylindrowa to poteina i wydajna
pompa do pompowania powietrza.Dzieki swojemu silnemu
silnikowi oraz wbudowanemu akumulatorowi typu
litowo-jonowego moie bye uiywana do röinych zadah.
Wbudowany akumulator moie röwniei petniC funkcje
awaryjna do tadowania telefonu komörkowego.
AIJwagi
I.Trzymaj pompe z dala od otwartego ognia i innych irödet
ciepta.
2.JeÉli ustawisz ciÉnienie niisze nii aktualne ciÉnienie w
oponie/urzadzeniu, pompa nie zadziata.
3.Podczas pracy pompa grzeje sie - po 8-10 minutach
ciagtego uiytkowania wytaczja na 5 minut, aby uniknaé
uszkodzeh.
4.Dtugotrwata nieuiywana pompa moie pogorszyt
wydajnoÉC baterii - zaleca sie tadowanie co najmniej raz na 3
miesiqce.
5.JeÉli podczas pompowania ustyszysz nietypowe diwieki lub
zauwaiysz nadmierne nagrzewanie, od razu wytacz pompe.
6.Przed ustawieniem ciÉnienia upewnij Sie, ie wybrano
wtagciwa jednostke (PSI, BAR, KPA, KG/CM2), aby uniknaC
przekroczenia ciÉnienia spowodowanego btednym wyborem
jednostki.
7.Balony, Pitki zabawkowe, plywak i inne obiekty wymaga-
jace niskiego ciÉnienia nie moga mieC ustawionej wartogci
ciÉnienia z gory - naleiy szczegölnie uwa2aC, aby uniknqC
przekroczenia ciénienia.
PL - 32
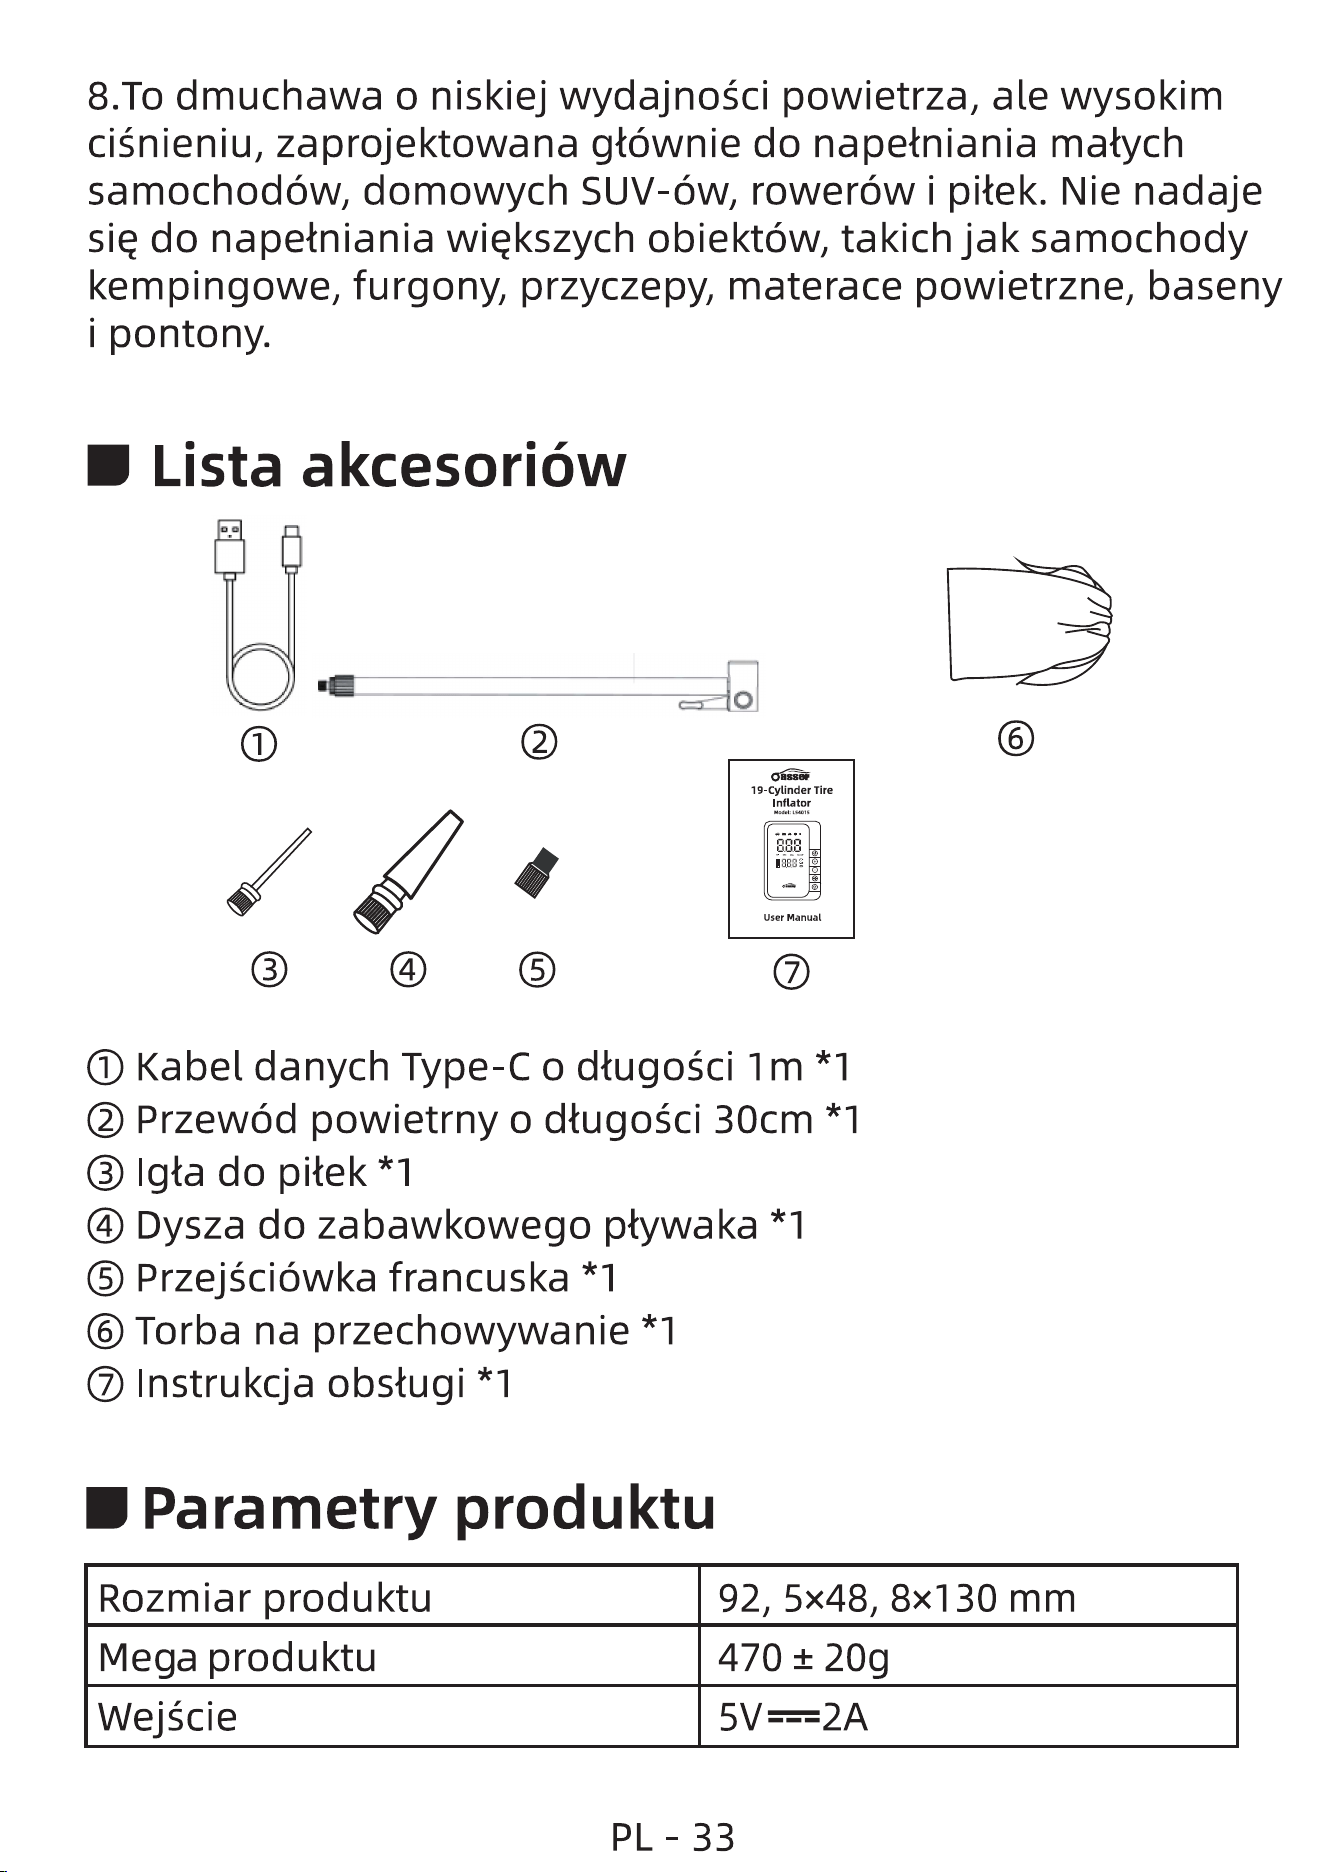
O Kabel danych Type-C o dtugogci 1m *1
@ Przewöd powietrny o dtugogci 30cm *1
O Igla do pilek *1
@ Dysza do zabawkowego ptywaka *1
O Przejgciöwka francuska *1
O Torba na przechowywanie *1
O Instrukcja obstugi *1
Parametry produktu
8.To dmuchawa o niskiej wydajnogci powietrza, ale wysokim
ciÉnieniu, zaprojektowana gtöwnie do napetniania matych
samochodöw, domowych SUV-öw, roweröw i pitek. Nie nadaje
sie do napetniania wiekszych obiektöw, takich jak samochody
kempingowe, furgony, przyczepy, materace powietrzne, baseny
i pontony.
Lista akcesoriöw
PL -33
O
0
o
19-Cylinder Tire
Inflator
388
User Manual
O
Rozmiar produktu
Mega produktu
Wejgcie
92, 5x48, 30 mm
470 ± 20g
WyjÉcie
Temperatura pracy
Temperatura przechowywania
Moc znamionowa
Pojemnogt baterii
Maksymalne ciÉnienie
Jednostki ciÉnienia
Tryb pompowania
grednica cylindra
Port tadowania
oocæ +
-200Cæ+700C
70W
2000mAh*3
150 PSI
PSI, BAR, KPA, KG/CM2
Samochöd, Motocykl, Rower,
Pitka, Tryb niestandardowy
19mm
Type-C
Funkcja zasilania przenoÉnego Tak
Czas tadowania
5 godziny
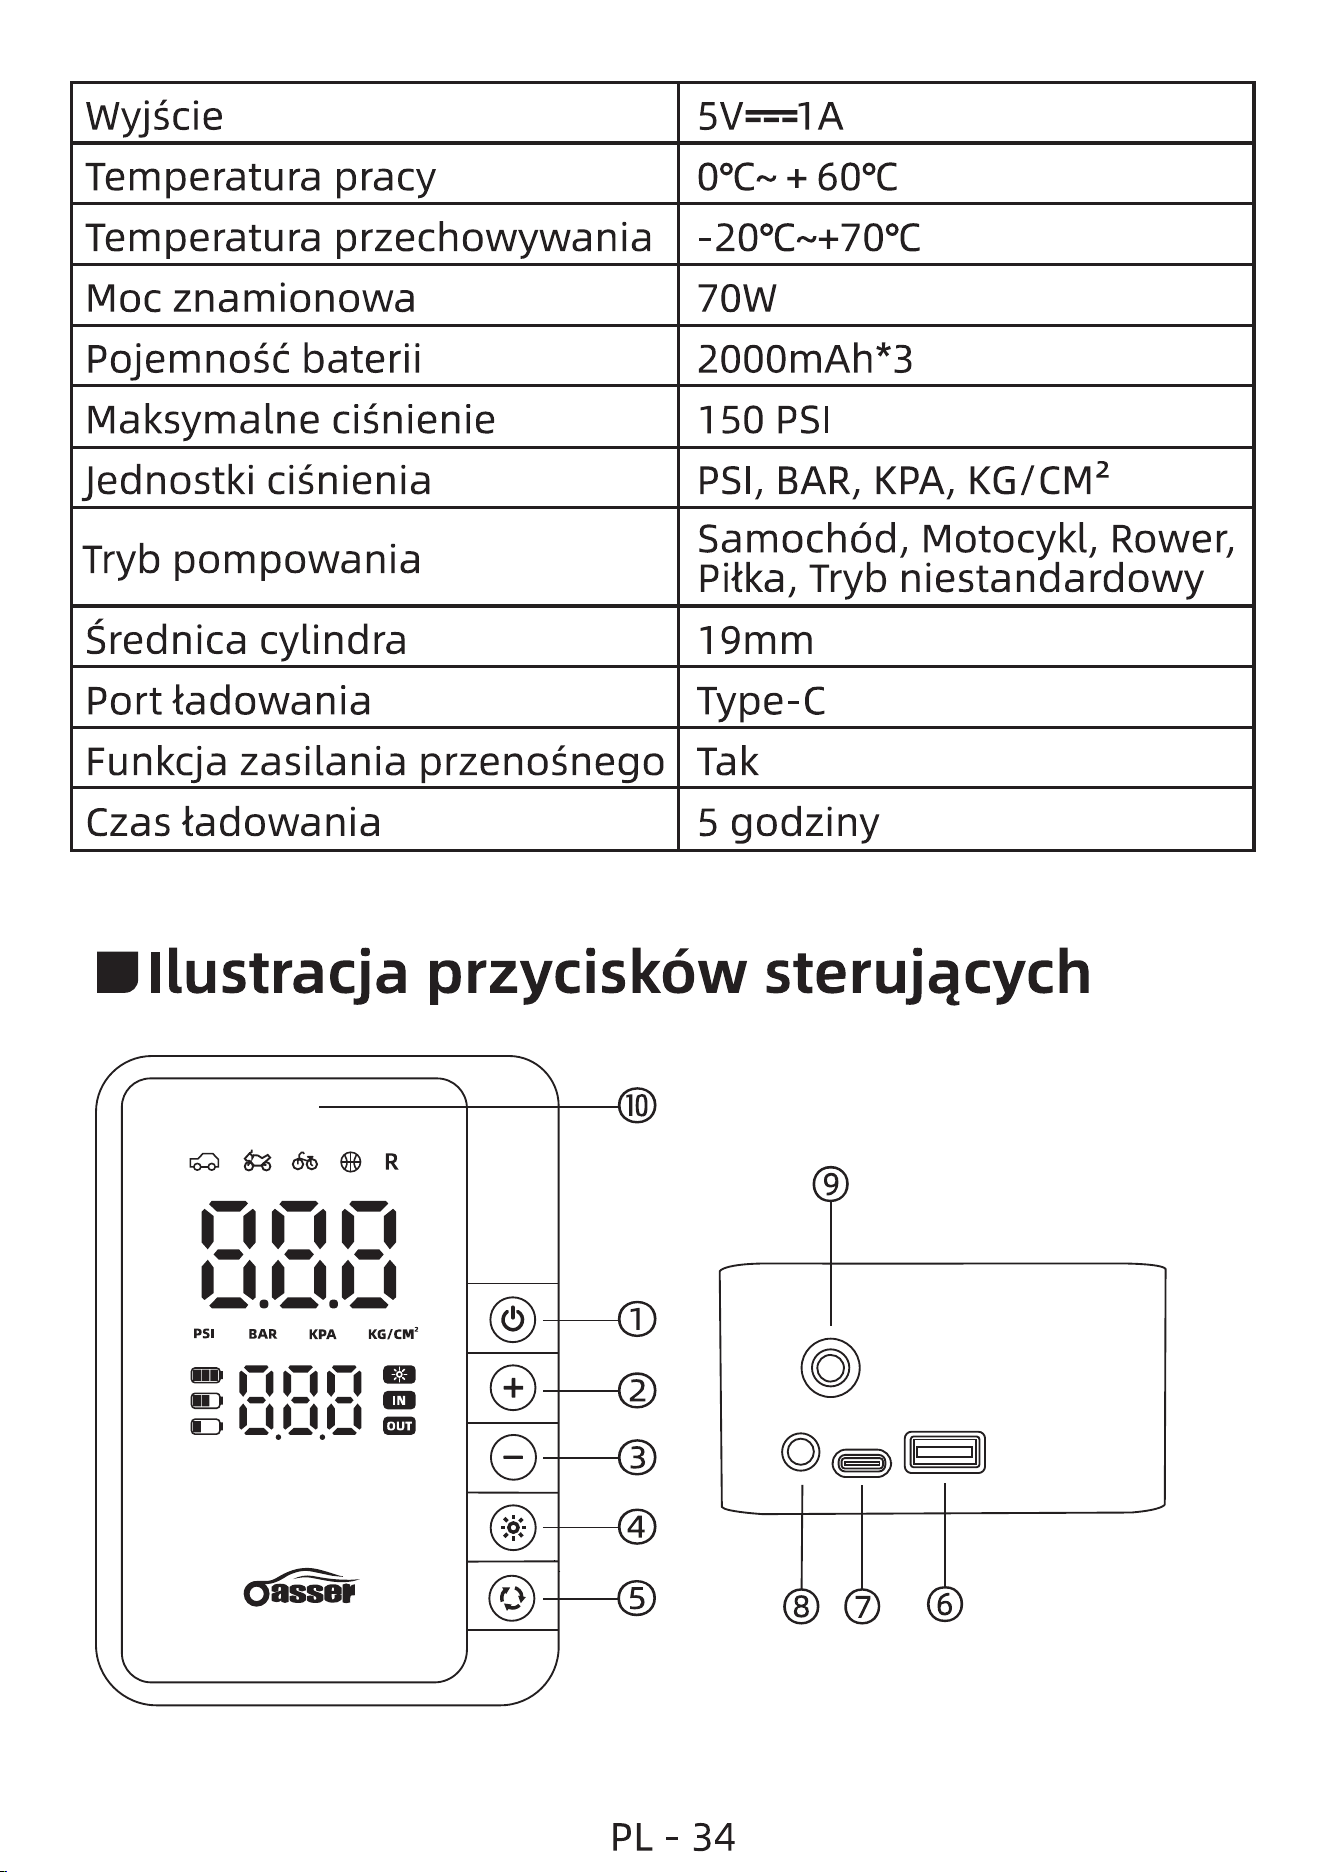
Ilustracja przycisköw sterujqcych
BAR KPA KG/CM2
PSI
OUT
10
1
2
3
4
5
PL -
9
8
34
7
6
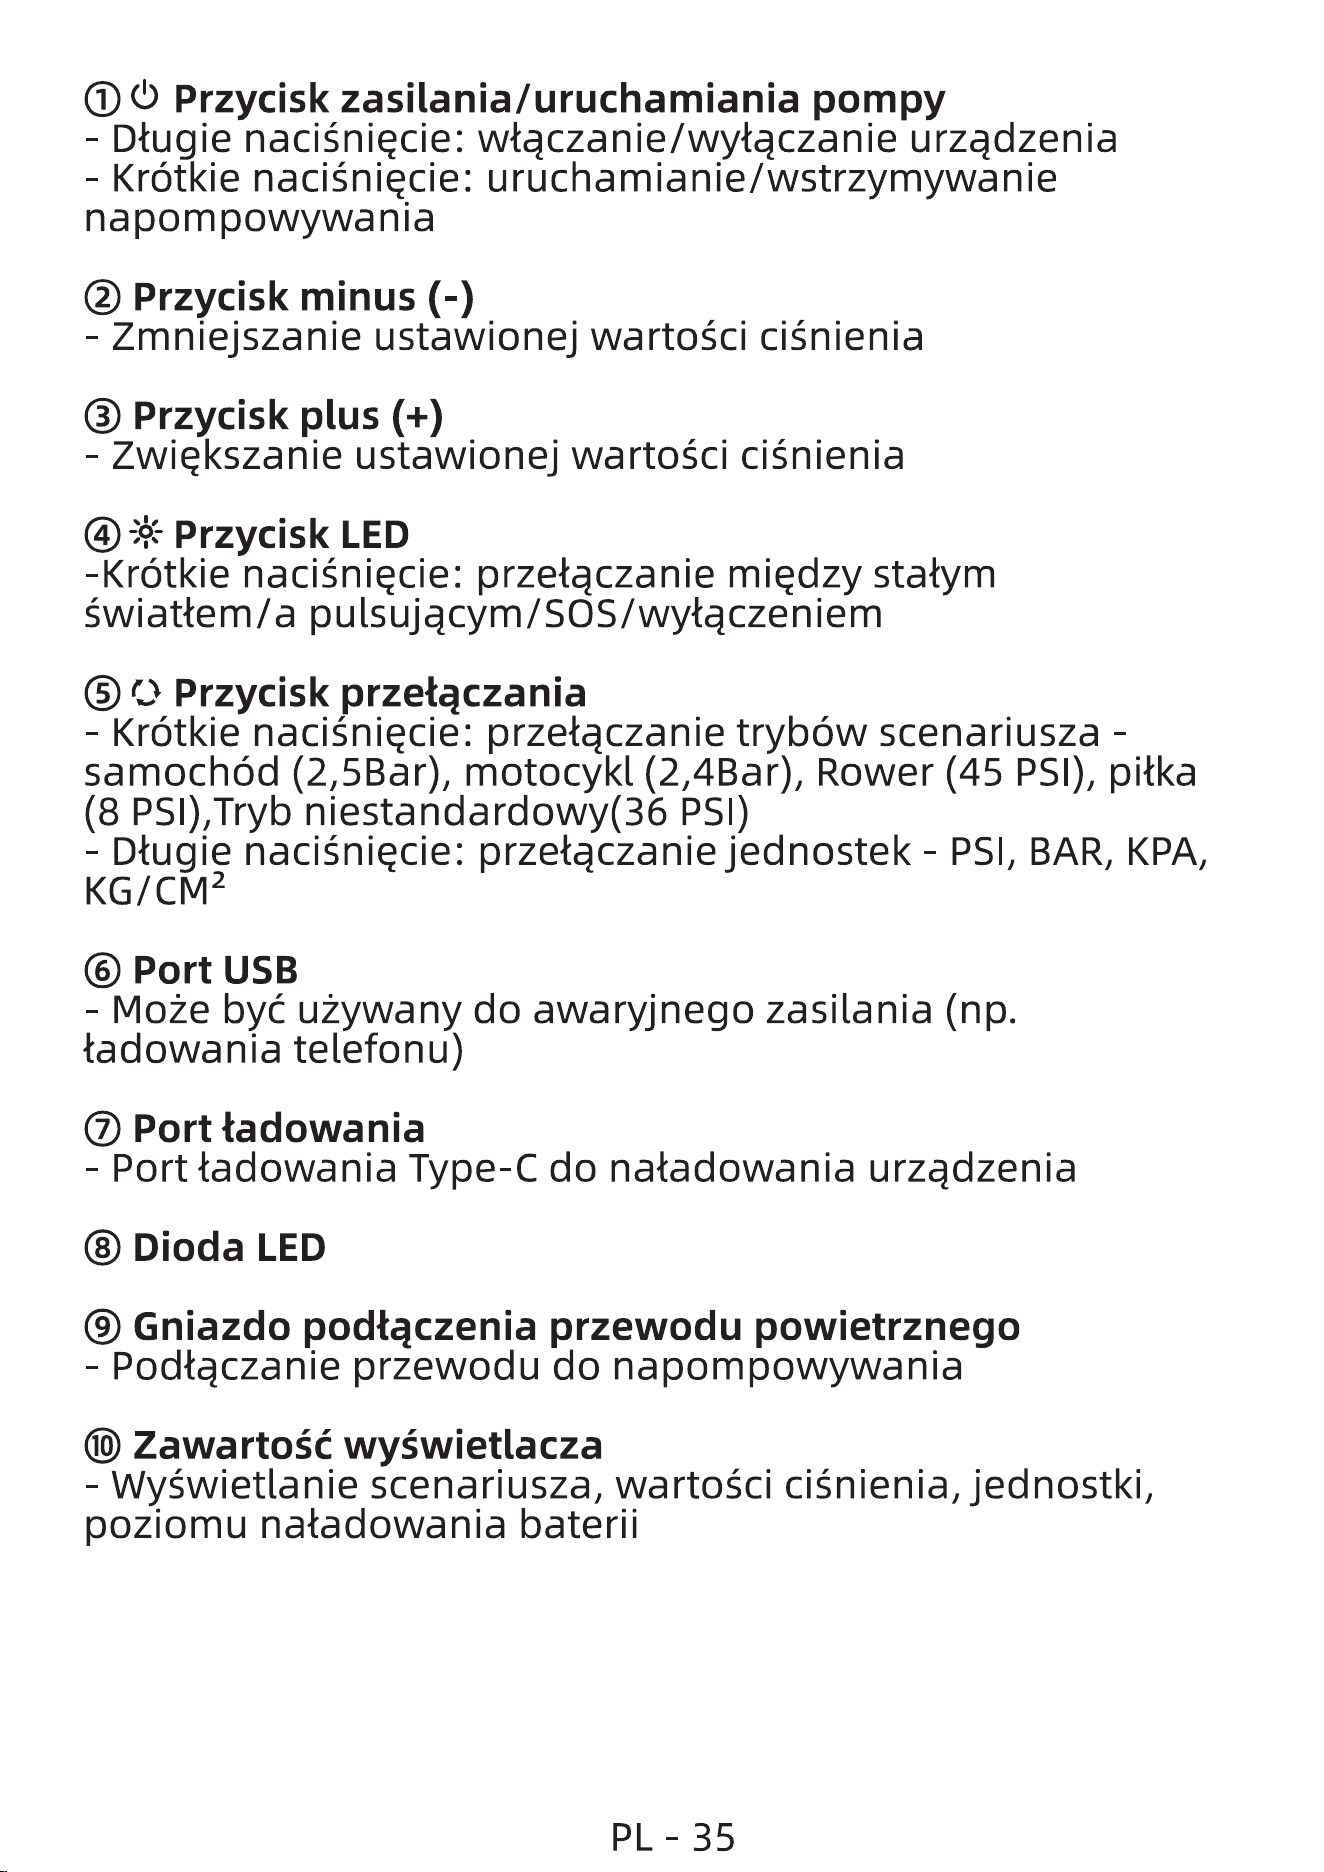
O (b Przycisk zasilania/uruchamiania pompy
Dtugie naciéniecie: wtaczanie/wytaczanie urzadzenia
Krötkie naciÉniecie: uruchamianie/wstrzymywanie
napompowywania
@ Przycisk minus (-)
- Zmniejszanie ustawionej wartogci ciÉnienia
@ Przycisk plus (+)
Zwiekszanie ustawionej wartogci ciÉnienia
Przycisk LED
-Krötkie naciÉniqcie: przetqczanie miqdzy statym
Éwiattem/a pulsujacym/SOS/wytaczeniem
O O Przycisk przetaczania
- Krötkie naciÉniqcie: przetaczanie tryböw scenariusza
samochöd (2,5Bar), motocykl (2,4Bar), Rower (45 PS'), Pitka
(8 PS'), Tryb niestandardowy(36 PSI)
Dtugie naciéniecie: przetaczanie jednostek - PSI, BAR, KPA,
KG/CM2
O Port USB
Moie bye uiywany do awaryjnego zasilania (np.
tadowania telefonu)
O Port tadowania
- Port tadowania Type-C do natadowania urzadzenia
@ Dioda LED
@ Gniazdo podtqczenia przewodu powietrznego
- Podtqczanie przewodu do napompowywania
@)ZawartoÉé wyswietlacza
- Wygwietlanie scenariusza, wartogci ciénienia, jednostki,
poziomu natadowania baterii
- 35
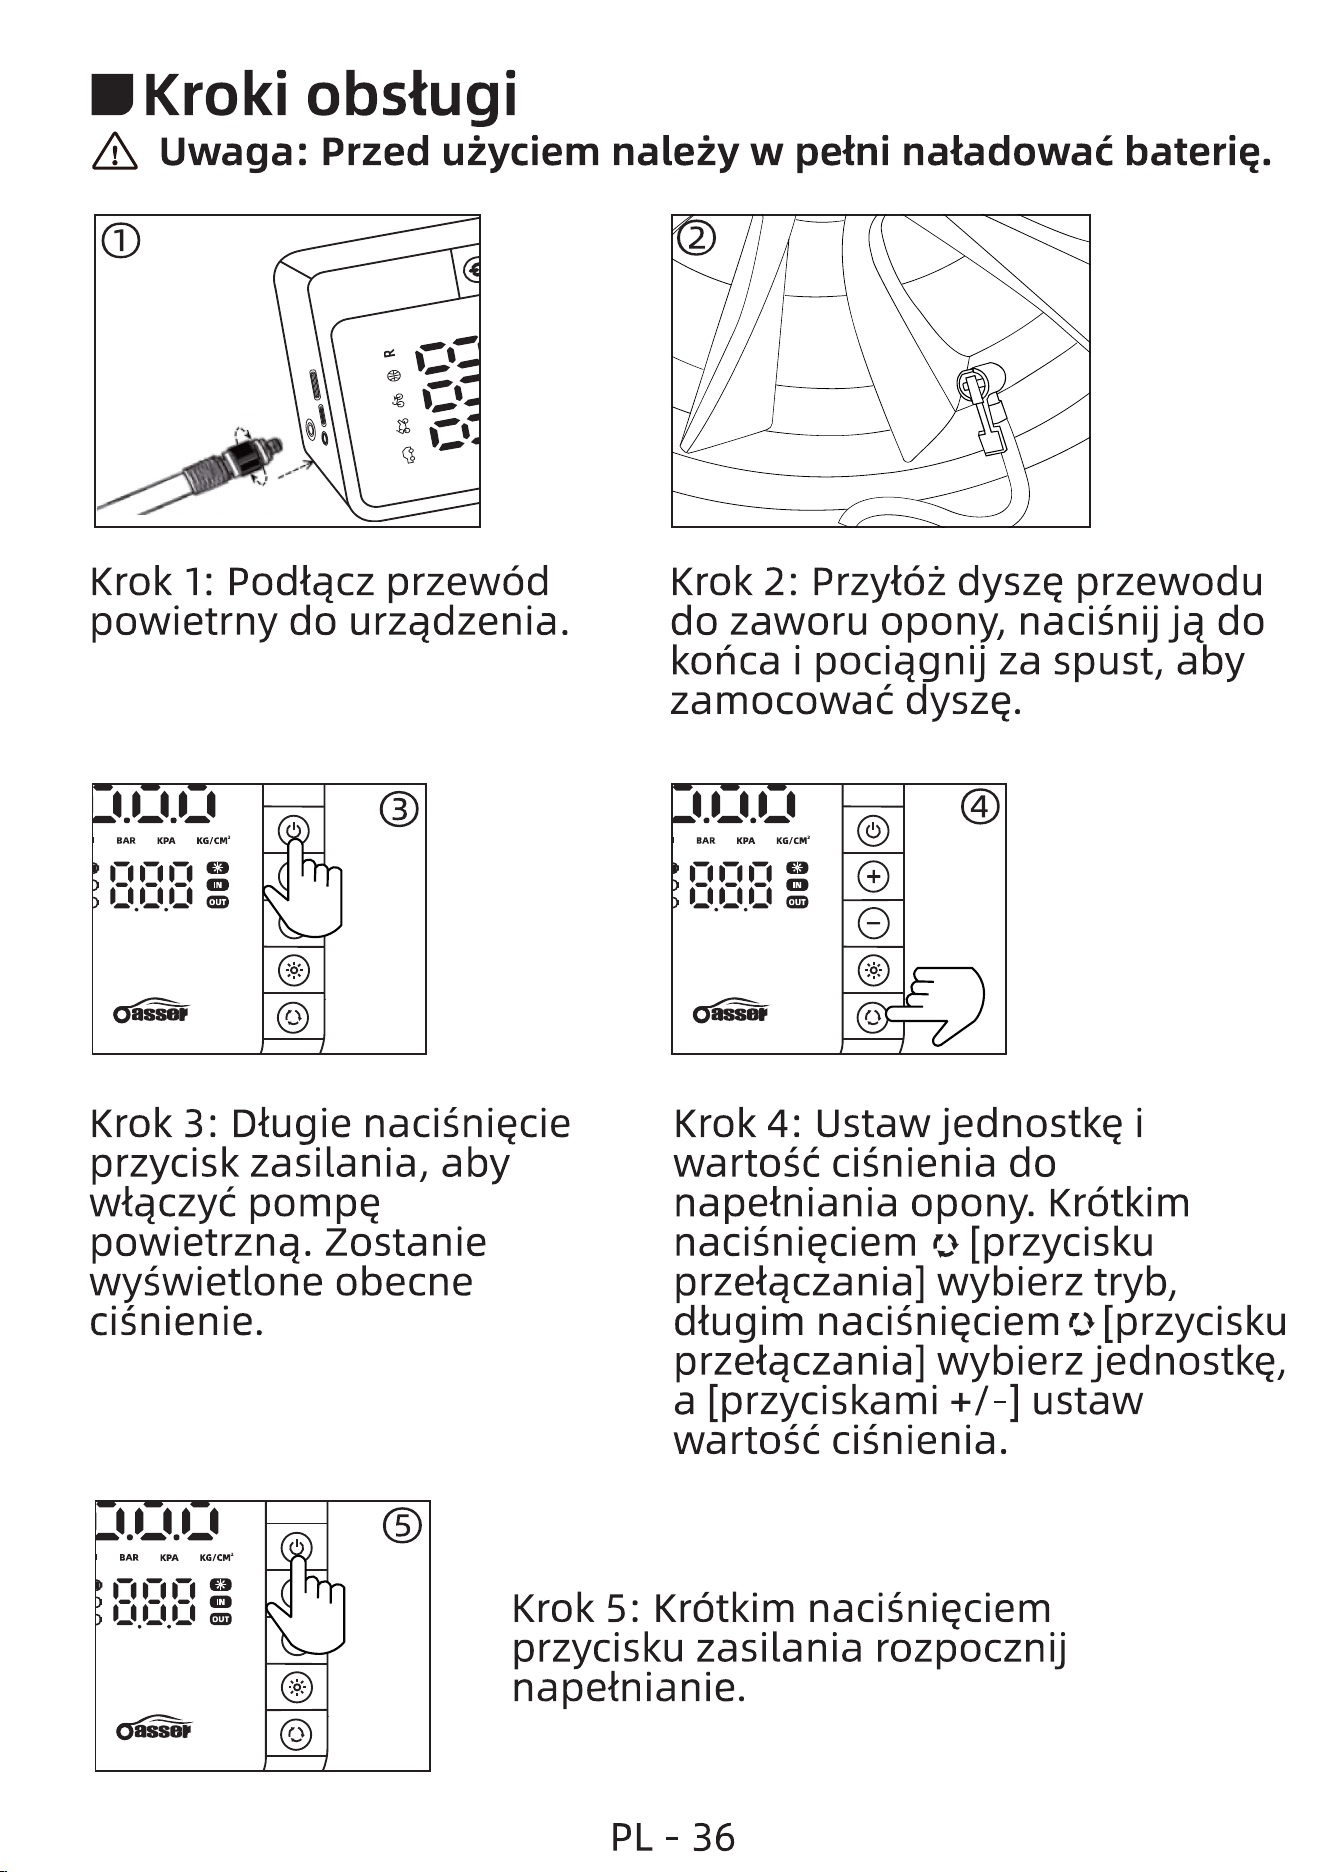
E Kroki obstugi
Uwaga: Przed u±yciem nale±y w petni natadowaé baterie.
O
Krok 1: Podtacz przewöd
powietrny do urzadzenia.
BAR KPA KG/CMZ
Krok 3: Dtugie naciÉniecie
przycisk zasilania, aby
wtaczyé pompe
powietrzna. Zostanie
wyswietlone obecne
ciÉnienie.
BAR KPA KG'CM2
2
Krok 2: Przytöi dysze przewodu
do zaworu opony, naciÉnijjQ do
kohca i pociqgnij za spust, aby
zamocowaé dysze.
BAR KPA KG/CM*
o
Krok 4: Ustaw jednostke i
wartoÉC ciÉnienia do
napetniania opony. Krötkim
naciénieciem o [przycisku
przetaczania] wybierz tryb,
dtugim naciÉnieciem o [przycisku
przetaczania] wybierz jednostke,
a [przyciskami +/-] ustaw
wartoÉC ciÉnienia.
ouT
Krok 5: Krötkim naciÉnieciem
przycisku zasilania rozpocznij
napetnianie.
PL - 36
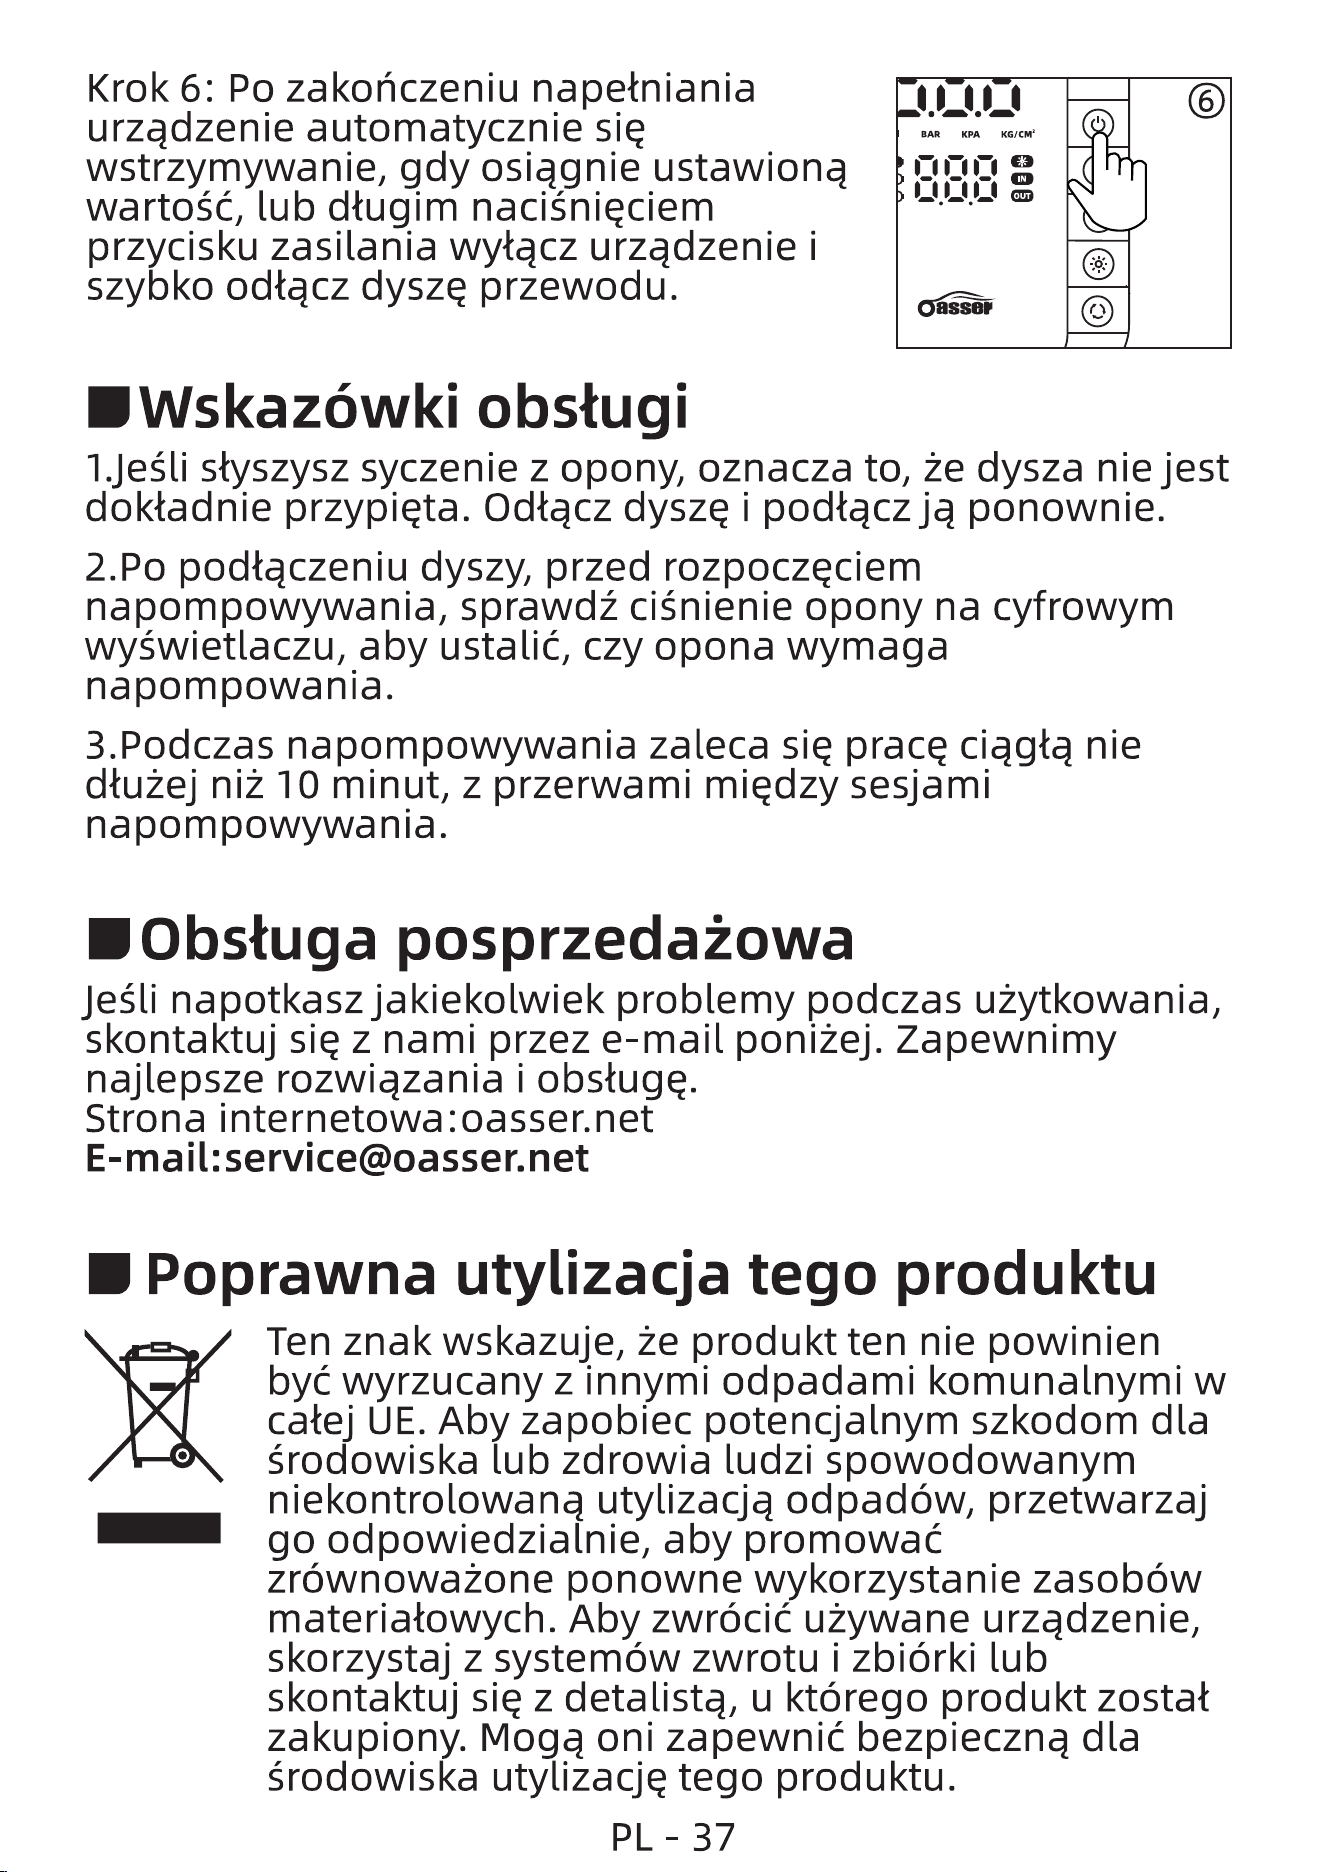
Krok 6: Po zakohczeniu napetniania
urzadzenie automatycznie sie
wstrzymywanie, gdy osiagnie ustawionq
warto", lub dtugim naciÉnieciem
przycisku zasilania wytqcz urzadzenie i
szybko odtacz dysze przewodu.
DWskaz6wki obstugi
BAR KPA
OUT
O
I.JeÉli styszysz syczenie z opony, oznacza to, ie dysza nie jest
doktadnie przypieta. Odtacz dyszq i podtaczja ponownie.
2.Po podtaczeniu dyszy, przed rozpoczeciem
napompowywania, sprawdi ciÉnienie opony na cyfrowym
wygwietlaczu, aby ustalié, czy opona wymaga
napompowania.
3.Podczas napompowywania zaleca sie prace ciagta nie
dtuiej nii 10 minut, z przerwami miedzy sesjami
napompowywania.
D Obstuga posprzedaüowa
JeÉli napotkaszjakiekolwiek problemy podczas uiytkowania,
skontaktuj sie z nami przez e-mail poniiej. Zapewnimy
najlepsze rozwiazania i obstuge.
Strona internetowa:oasser.net
E-mail:[email protected]
D Poprawna utylizacja tego produktu
Ten znak wskazuje, ie produkt ten nie powinien
bye wyrzucany z innymi odpadami komunalnymi w
catej UE. Aby zapobiec potencjalnym szkodom dla
grodowiska lub zdrowia ludzi spowodowanym
niekontrolowana utylizacja odpadöw, przetwarzaj
go odpowiedzialnie, aby promowaé
zröwnowaione ponowne wykorzystanie zasoböw
materiatowych. Aby zwröcié uiywane urzqdzenie,
skorzystaj z systemöw zwrotu i zbiörki lub
skontaktuj sie z detalista, u ktörego produkt zostat
zakupiony. Moga oni zapewnit bezpieczna dla
grodowiska utylizacje tego produktu.
PL -37
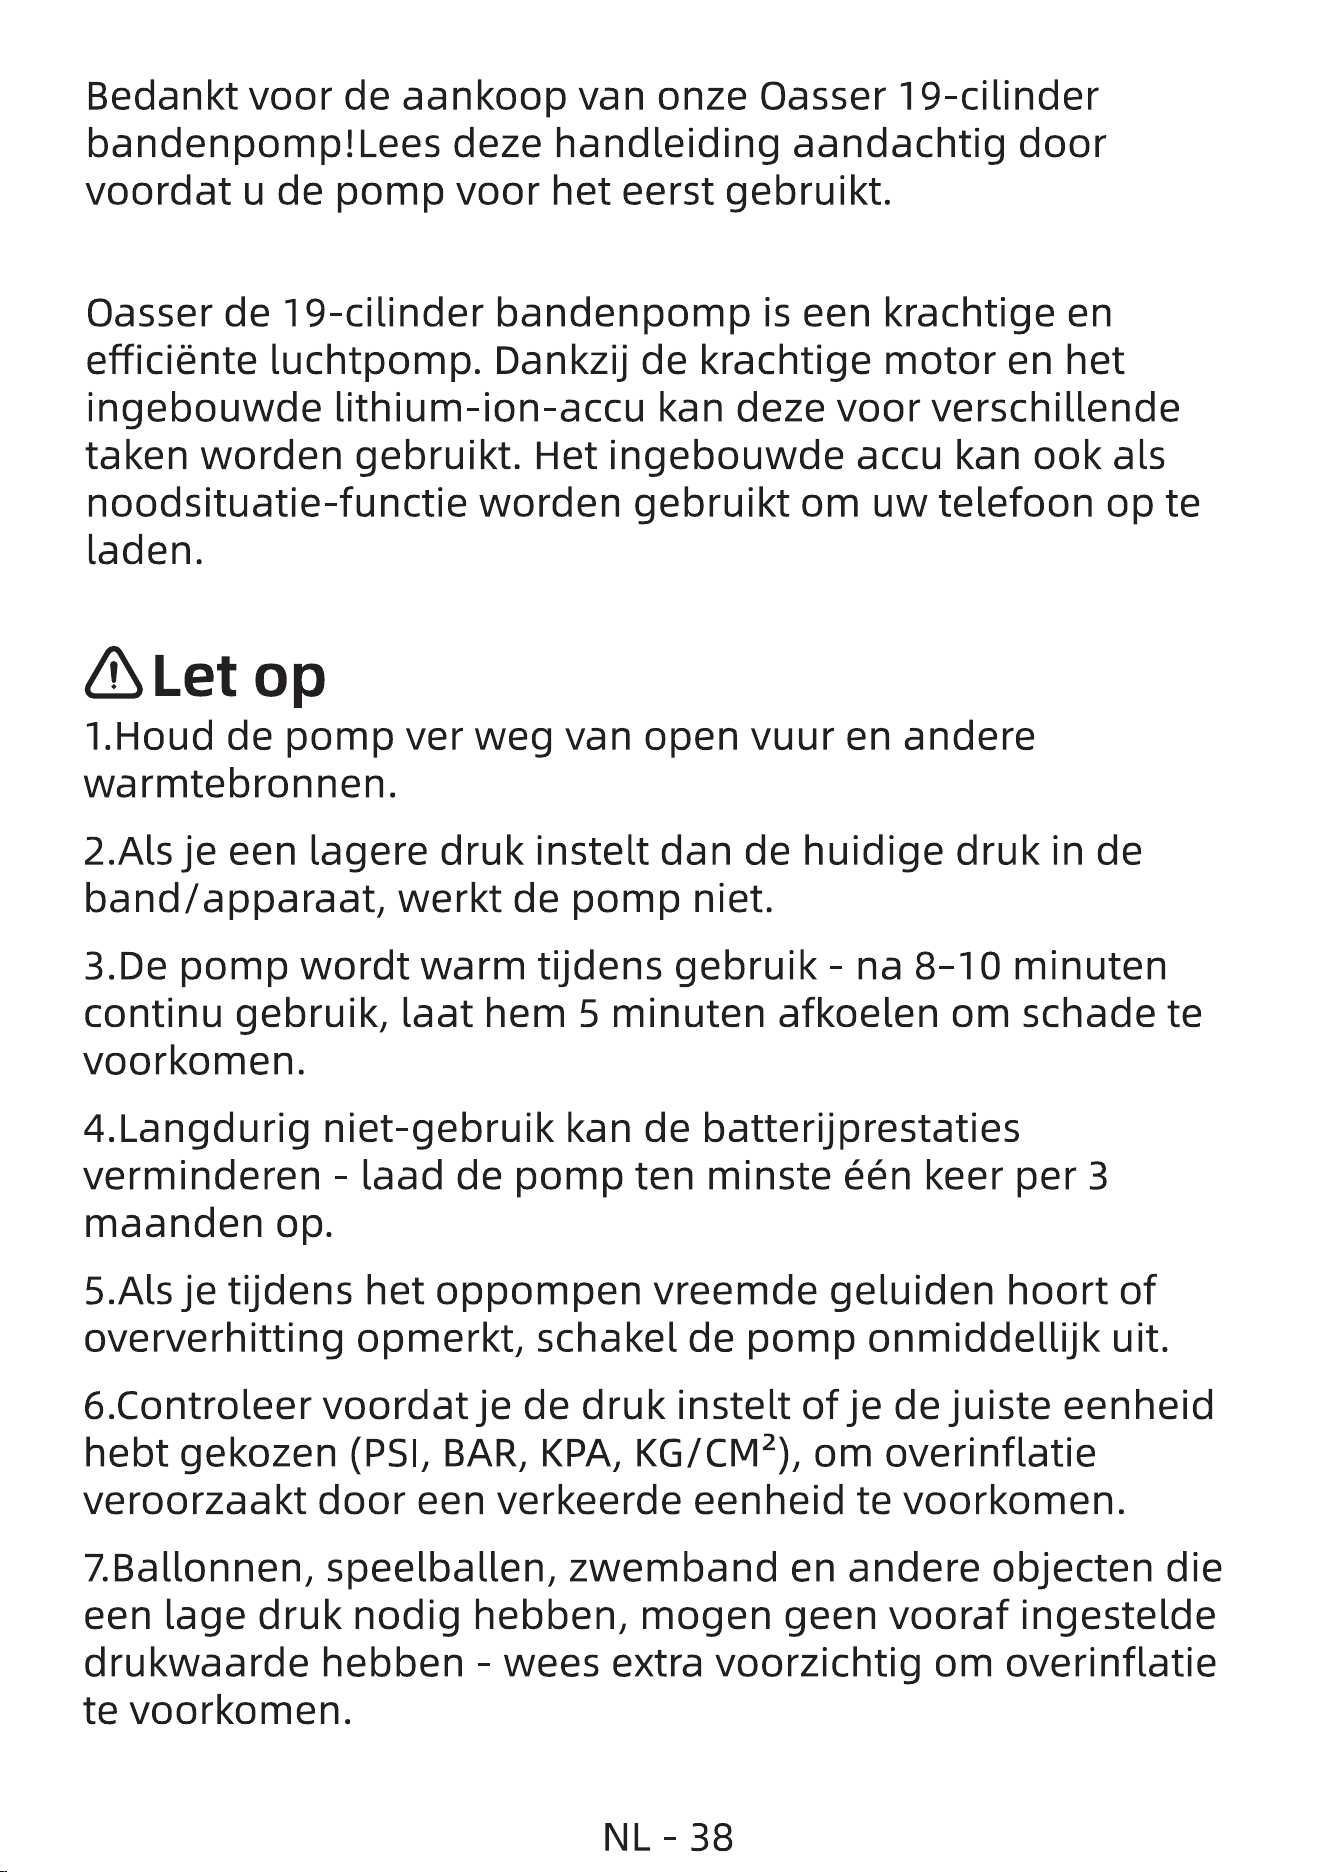
Bedankt voor de aankoop van onze Oasser 19-cilinder
bandenpomp!Lees deze handleiding aandachtig door
voordat u de pomp voor het eerst gebruikt.
Oasser de 19-cilinder bandenpomp is een krachtige en
efficiénte luchtpomp. Dankzij de krachtige motor en het
ingebouwde lithium-ion-accu kan deze voor verschillende
taken worden gebruikt. Het ingebouwde accu kan ook als
noodsituatie-functie worden gebruikt om uw telefoon op te
laden.
A Let op
I.Houd de pomp ver weg van open vuur en andere
warmtebronnen.
2.Alsje een lagere druk instelt dan de huidige druk in de
band/apparaat, werkt de pomp niet.
3.De pomp wordt warm tijdens gebruik - na 8-10 minuten
continu gebruik, laat hem 5 minuten afkoelen om schade te
voorkomen.
4.Langdurig niet-gebruik kan de batterijprestaties
verminderen - laad de pomp ten minste één keer per 3
maanden op.
5.Als je tijdens het oppompen vreemde geluiden hoort of
oververhitting opmerkt, schakel de pomp onmiddellijk uit.
6.Controleer voordatje de druk instelt of je de juiste eenheid
hebt gekozen (PS', BAR, KPA, KG/CM2), om overinflatie
veroorzaakt door een verkeerde eenheid te voorkomen.
7.Ballonnen, speelballen, zwemband en andere objecten die
een lage druk nodig hebben, mogen geen vooraf ingestelde
drukwaarde hebben - wees extra voorzichtig om overinflatie
te voorkomen.
NL-38
O
0
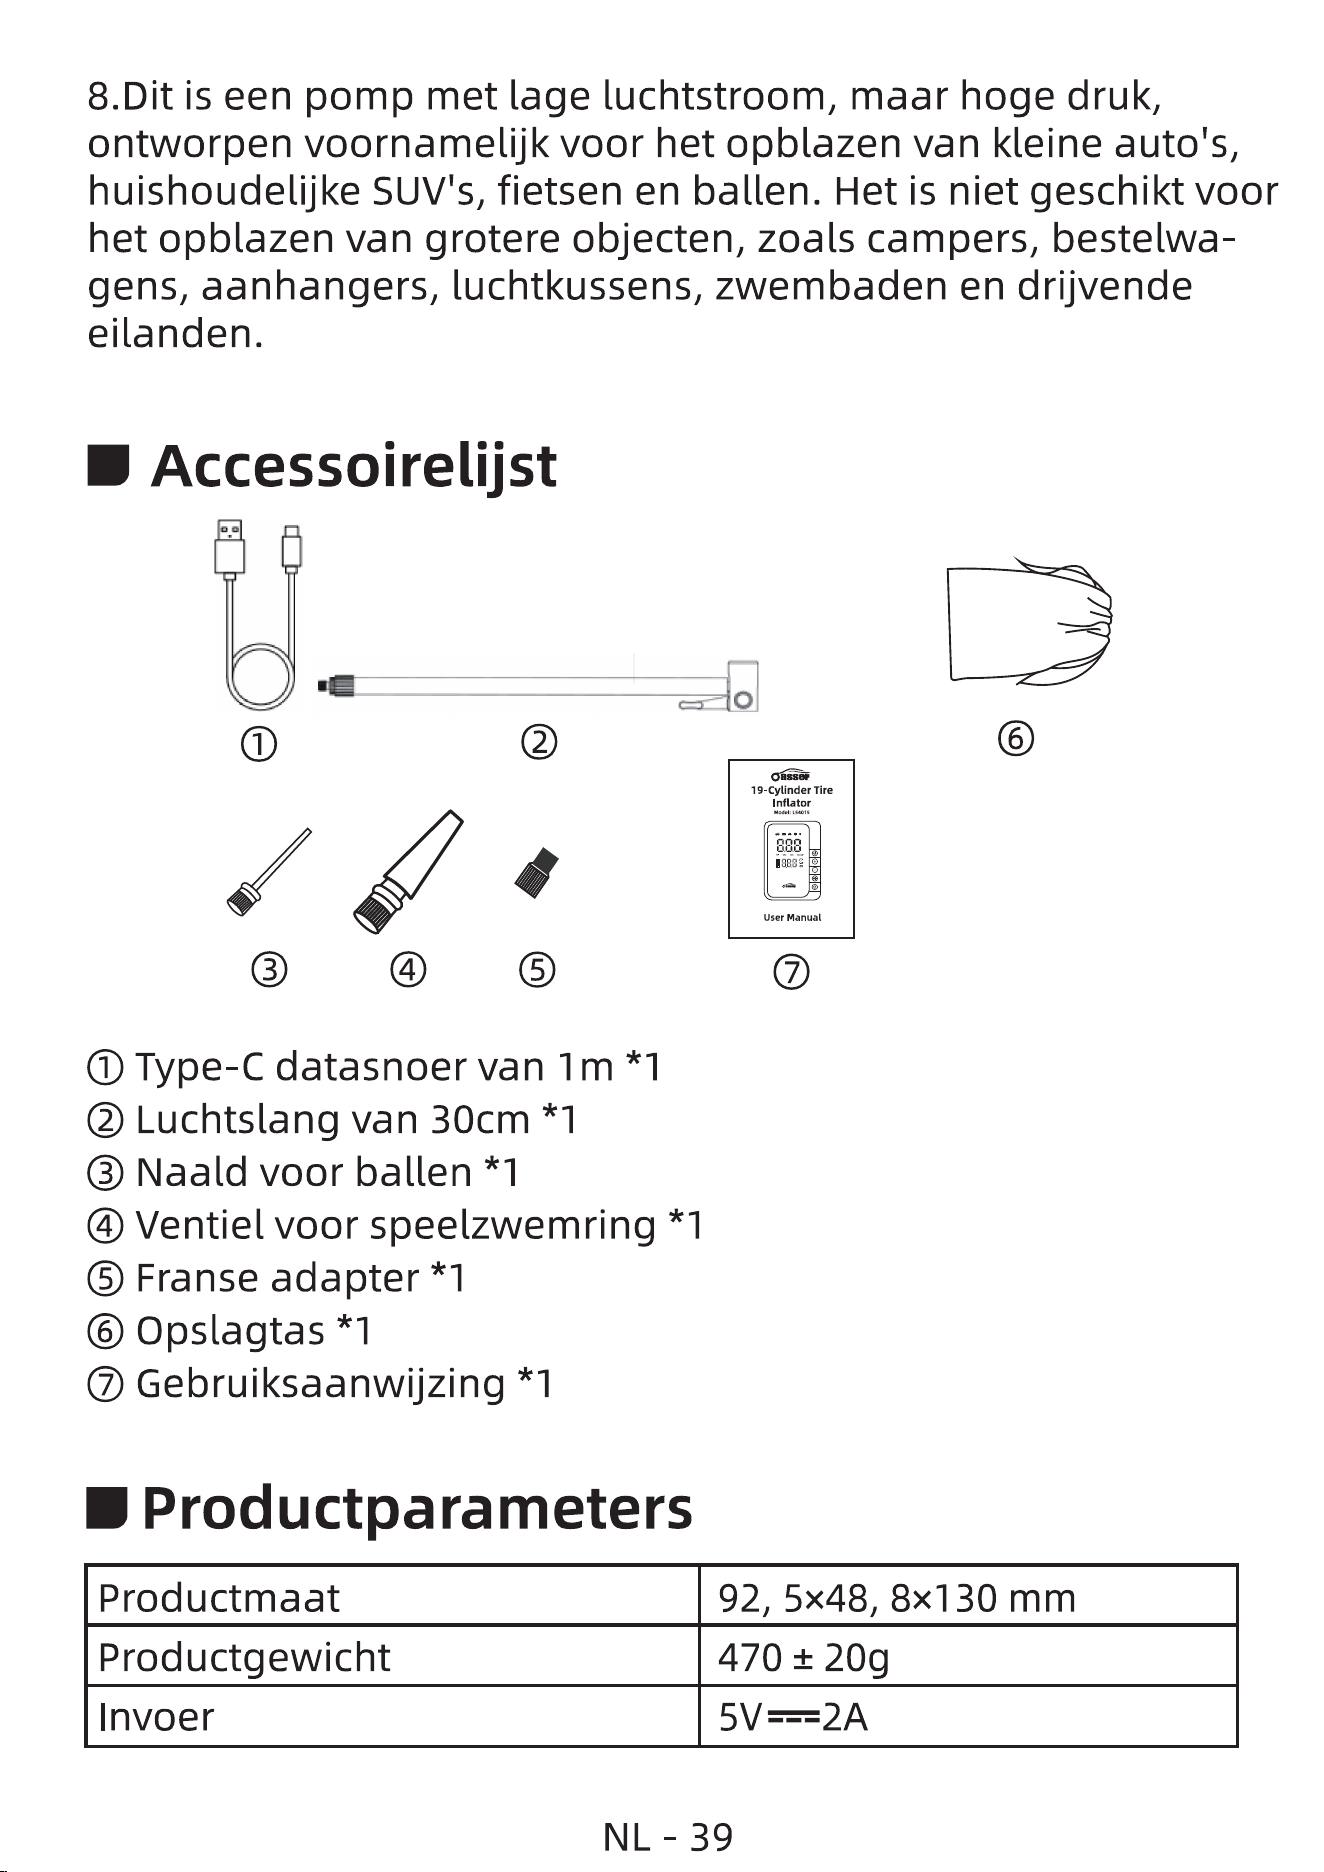
O Type-C datasnoer van 1m *1
@ Luchtslang van 30cm *1
O Naald voor ballen *1
@ Ventiel voor speelzwemring *1
O Franse adapter *1
O Opslagtas *1
O Gebruiksaanwijzing *1
Productparameters
Productmaat
Productgewicht
Invoer
8.Dit is een pomp met lage luchtstroom, maar hoge druk,
ontworpen voornamelijk voor het opblazen van kleine auto's,
huishoudelijke SUV's, fietsen en ballen. Het is niet geschikt voor
het opblazen van grotere objecten, zoals campers, bestelwa-
gens, aanhangers, luchtkussens, zwembaden en drijvende
eilanden.
Accessoirelijst
NL-39
o
19-Cylinder Tire
Inflator
388
User Manual
O
92, 5x48, 30 mm
470 ± 20g
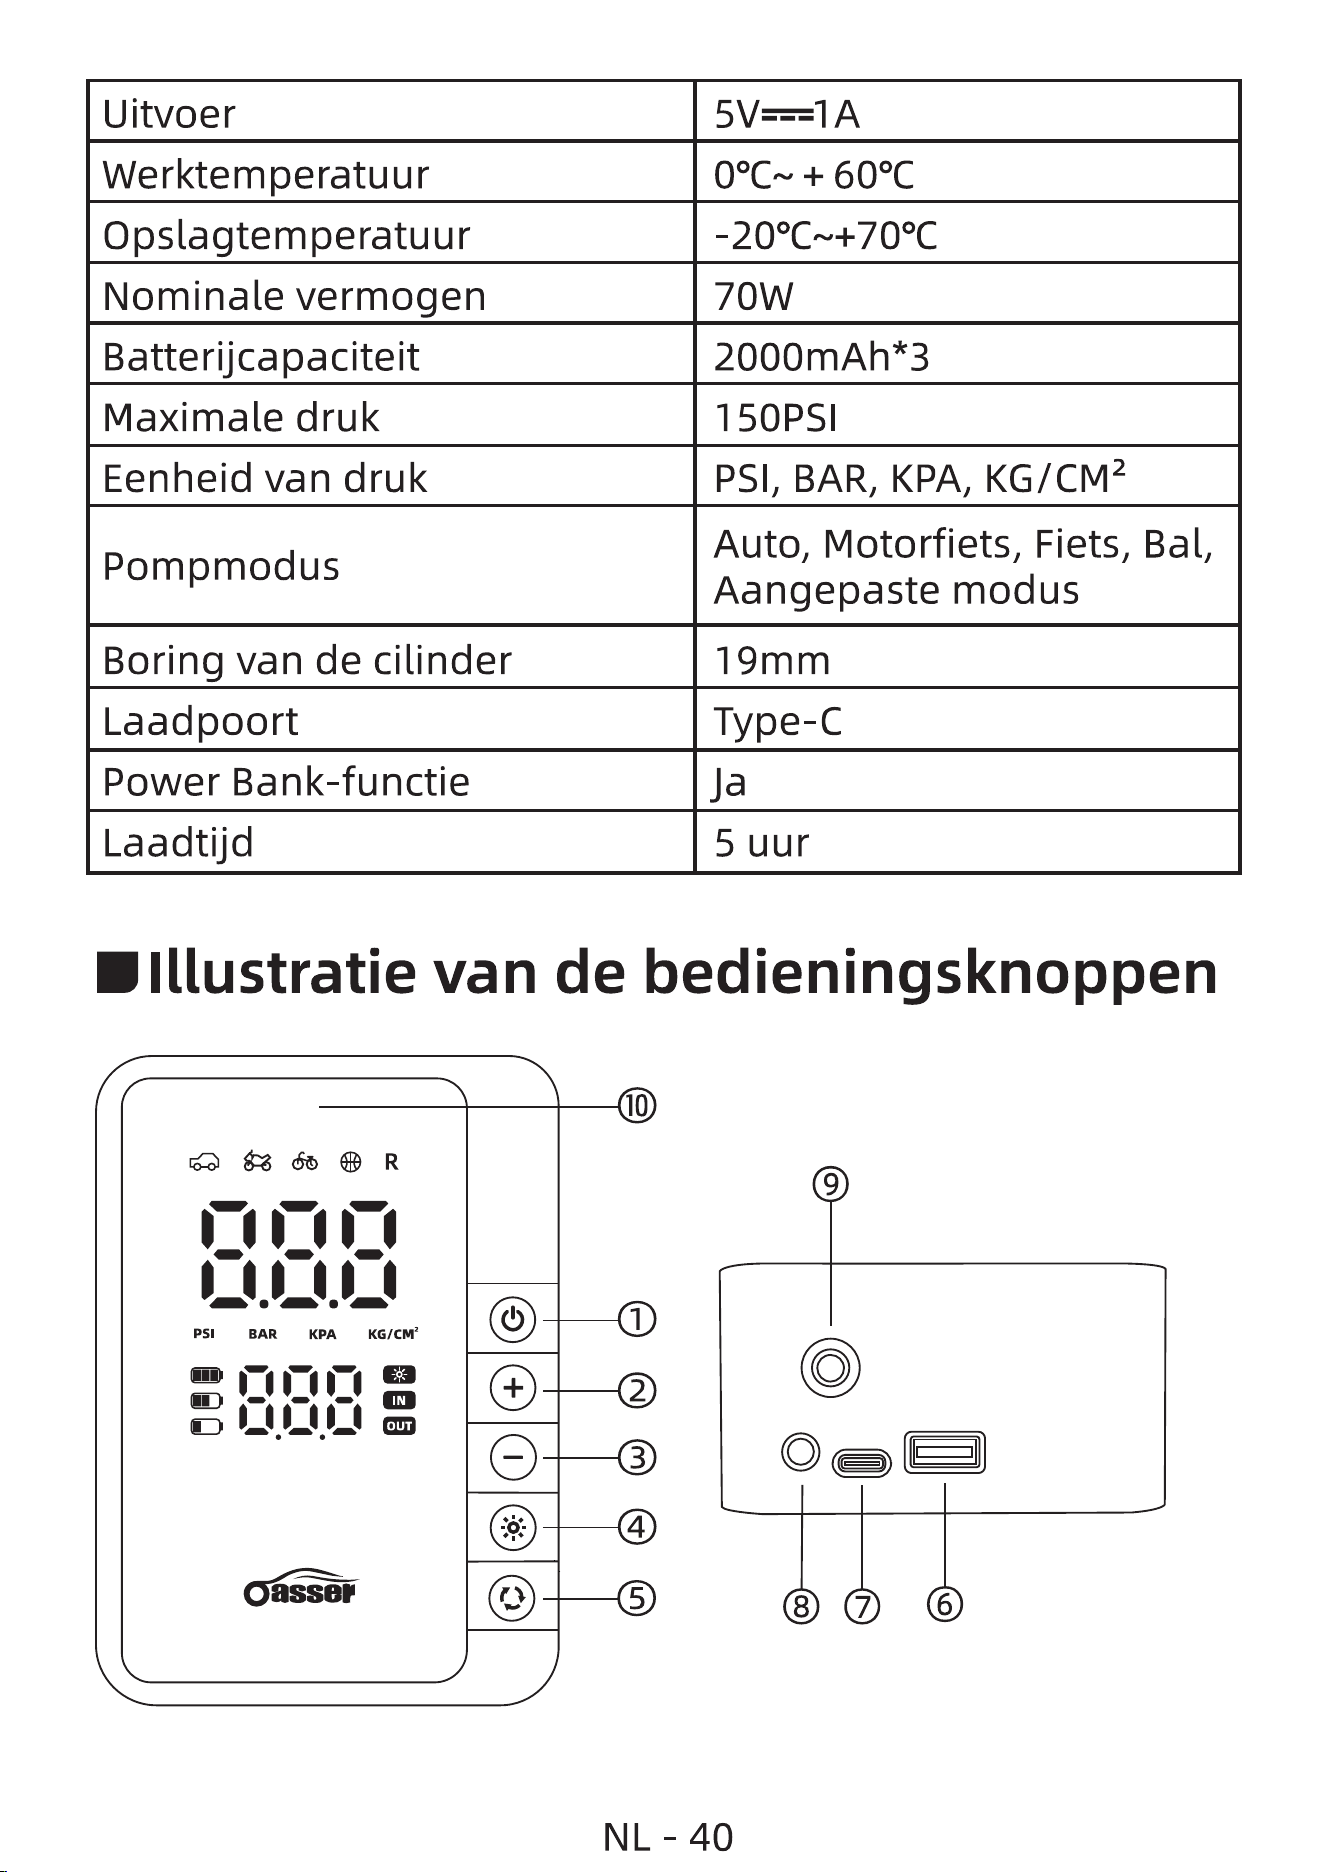
Uitvoer
Werktemperatuur
+ 600C
Opslagtemperatuur
-200cæ+700C
Nominale vermogen
70W
2000mAh*3
Batterijcapaciteit
Maximale druk
1 50PSI
PSI, BAR, KPA, KG/CM2
Eenheid van druk
Auto, Motorfiets, Fiets, Bal,
Pompmodus
Aangepaste modus
Boring van de cilinder
19mm
Laadpoort
Type-C
Power Bank-functie
Laadtijd
5 uur
'Illustratie van de bedieningsknoppen
NL - 40
BAR KPA KG/CM2
PSI
OUT
10
1
2
3
4
5
9
8
7
6
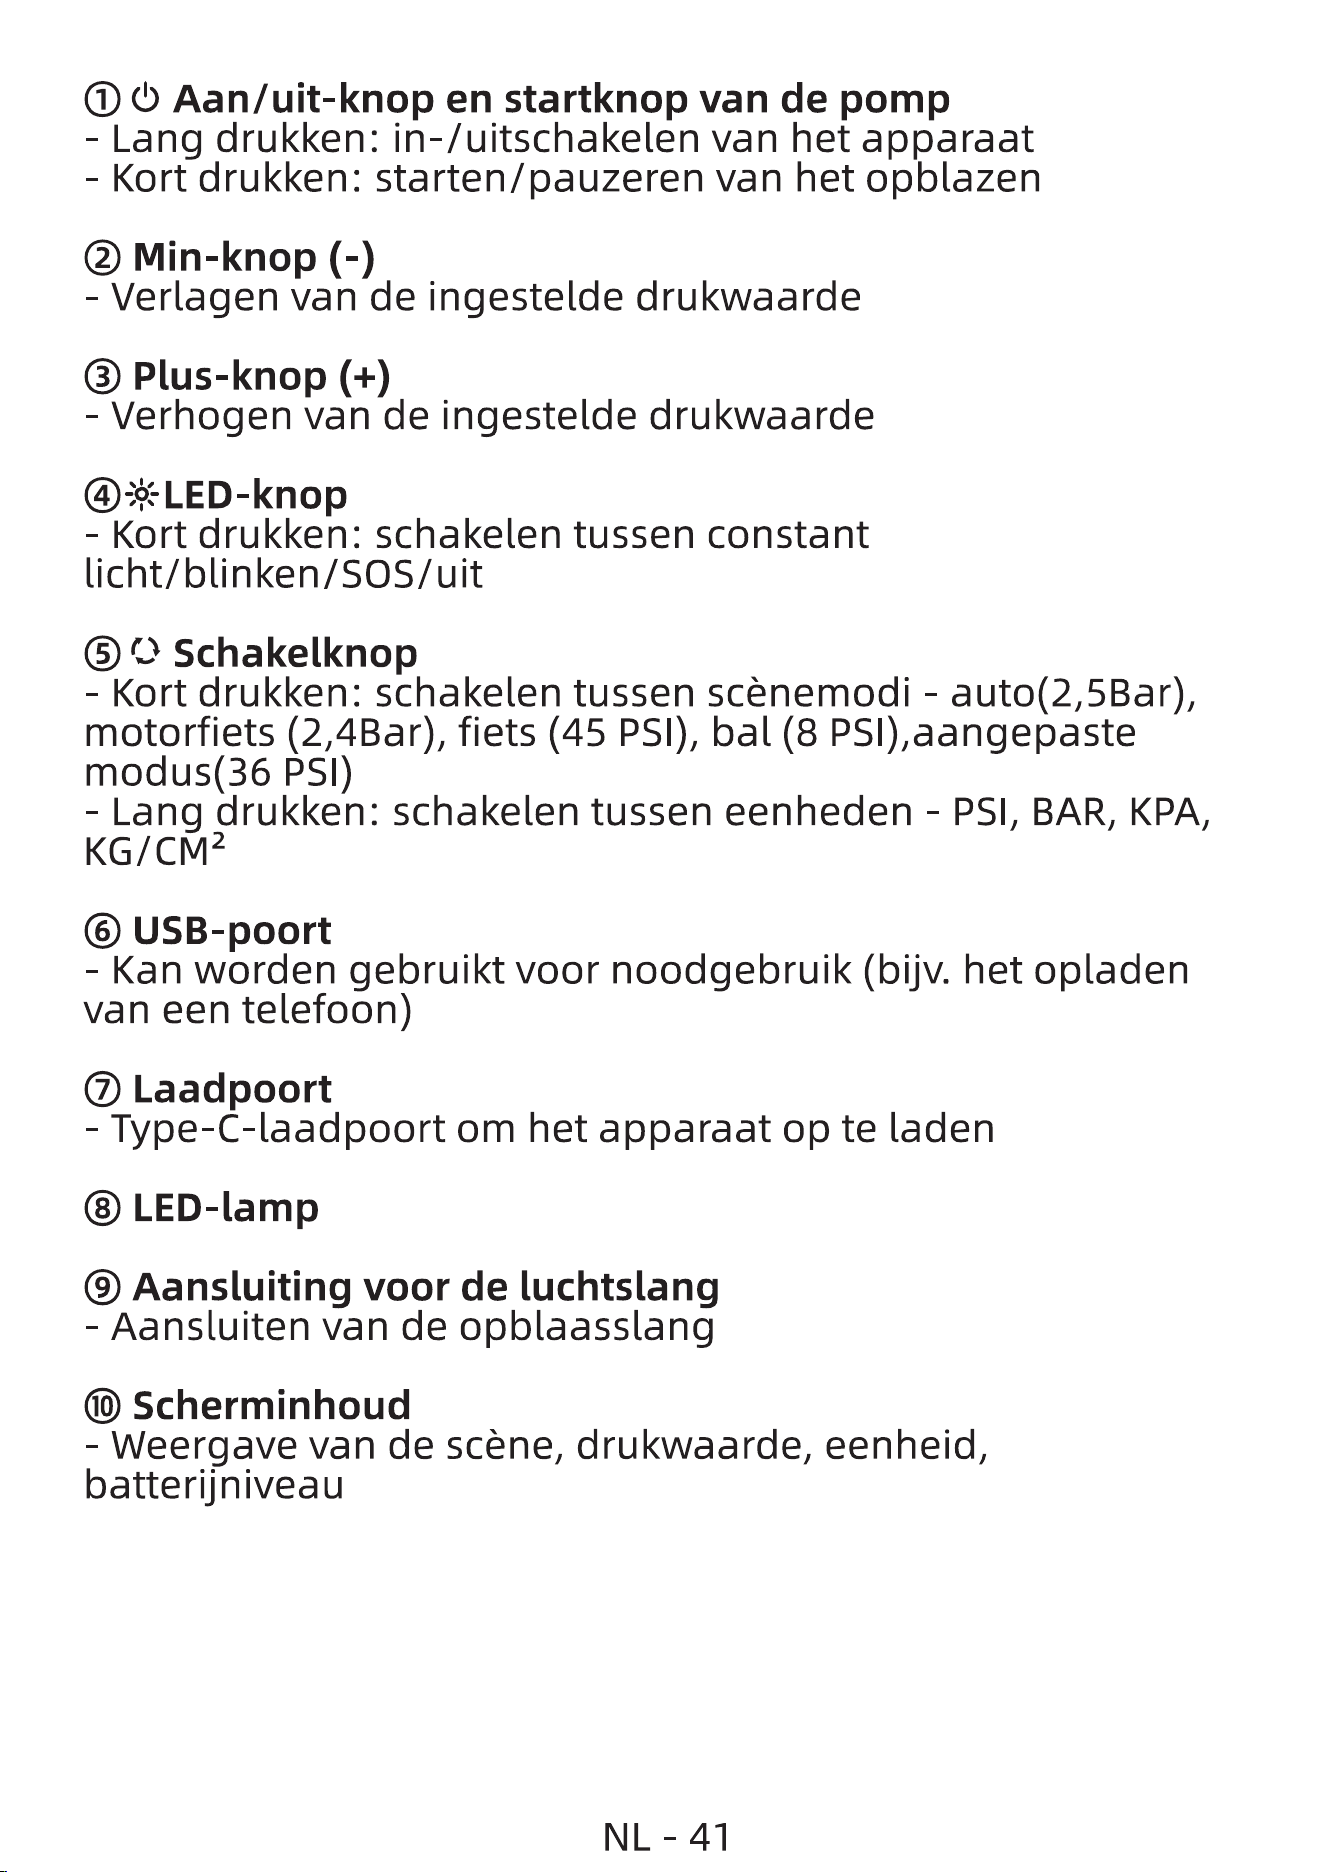
O Aan/uit-knop en startknop van de pomp
Lang drukken: in-/uitschakelen van het apparaat
Kort drukken: starten/pauzeren van het opblazen
@ Min-knop (-)
Verlagen van de ingestelde drukwaarde
@ Plus-knop (+)
- Verhogen van de ingestelde drukwaarde
Kort drukken: schakelen tussen constant
licht/blinken/SOS/uit
O O Schakelknop
Kort drukken: schakelen tussen scénemodi - auto(2,5Bar),
motorfiets (2,4Bar), fiets (45 PSI), bal (8 PSI),aangepaste
modus(36 PSI)
- Lang drukken: schakelen tussen eenheden - PSI, BAR, KPA,
KG/CM2
O USB-poort
- Kan worden gebruikt voor noodgebruik (bijv. het opladen
van een telefoon)
O Laadpoort
- Type-C-laadpoort om het apparaat op te laden
@ LED-Iamp
@ Aansluiting voor de luchtslang
- Aansluiten van de opblaasslang
O Scherminhoud
- Weergave van de scene, drukwaarde, eenheid,
batterijniveau
NL-41
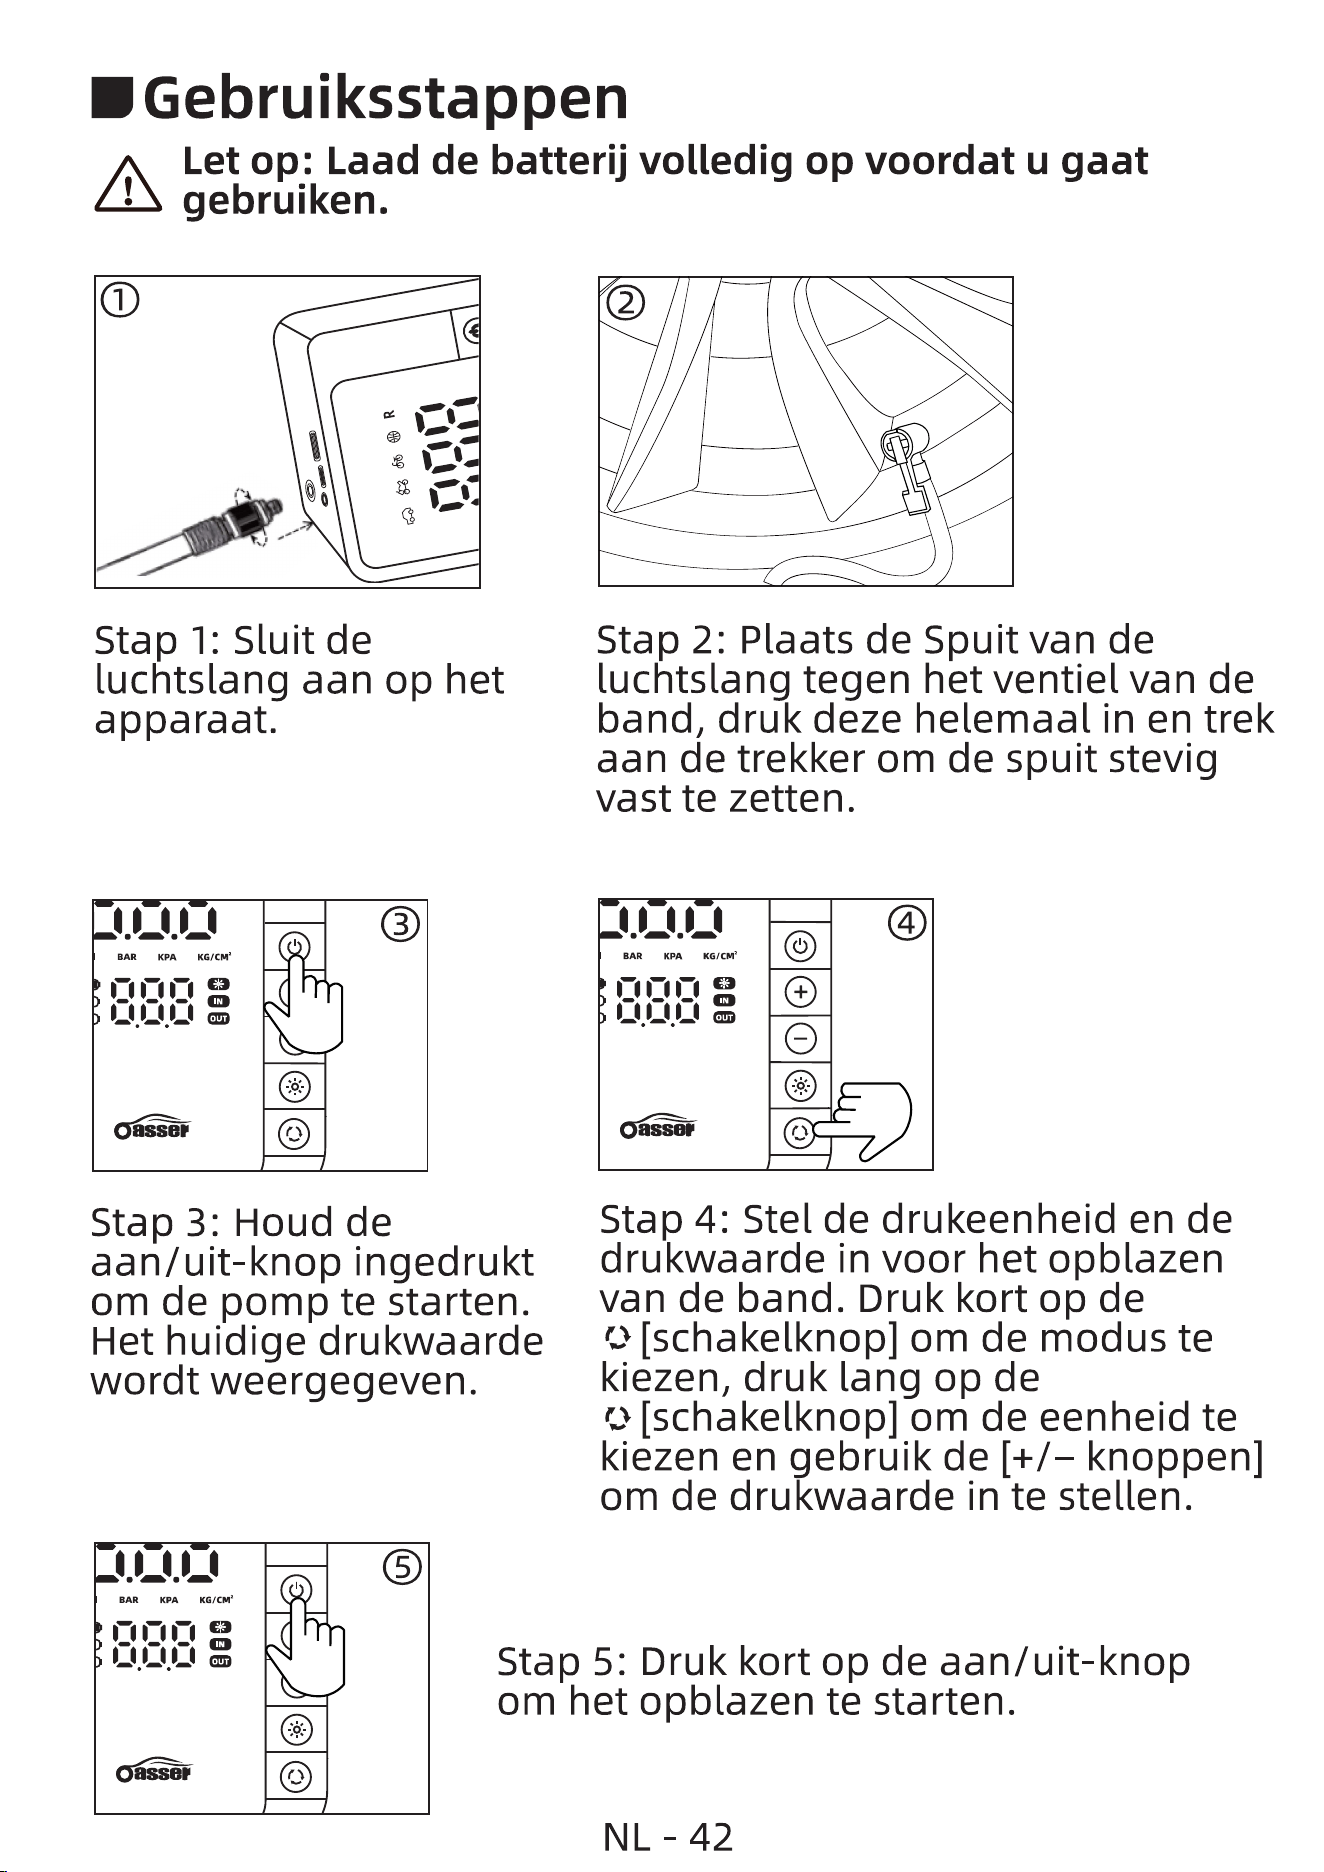
"Gebruiksstappen
A Let op: Laad de batterij volledig op voordat u gaat
LLS gebruiken.
O
Stap 1: Sluit de
luchtslang aan op het
apparaat.
BAR KPA
o
Stap 3: Houd de
aan/uit-knop ingedrukt
om de pomp te starten.
Het huidige drukwaarde
wordt weergegeven.
BAR KPA KG/CM2
Stap 2: Plaats de Spuit van de
luchtslang tegen het ventiel van de
band, druk deze helemaal in en trek
aan de trekker om de spuit stevig
vast te zetten.
BAR KPA KG/CM'
asser
O
Stap 4: Stel de drukeenheid en de
drukwaarde in voor het opblazen
van de band. Druk kort op de
o [schakelknop] om de modus te
kiezen, druk lang op de
o [schakelknop] om de eenheid te
kiezen en gebruik de [+/- knoppen]
om de drukwaarde in te stellen.
Stap 5: Druk kort op de aan/uit-knop
om het opblazen te starten.
NL - 42
I.Alsje een sissend geluid van de band hoort, betekent dit
dat de spuit niet goed vastzit. Verwijder de spuit en sluit deze
opnieuw aan.
2.Nadatje de spuit hebt aangesloten, controleer de
banddruk op het digitale scherm voordatje begint met
opblazen om te bepalen of de band lucht nodig heeft.
3.Bij het opblazen wordt aanbevolen om niet langer dan 10
minuten continu te werken, met pauzes tussen de
opblaassessies.
DAftersaleservice
Als u problemen ondervindt tijdens het gebruik, neem dan
contact met ons op via de onderstaande e-mail. Wij zullen de
beste oplossingen en service bieden.
Website:oasser.net
E-mail:[email protected]
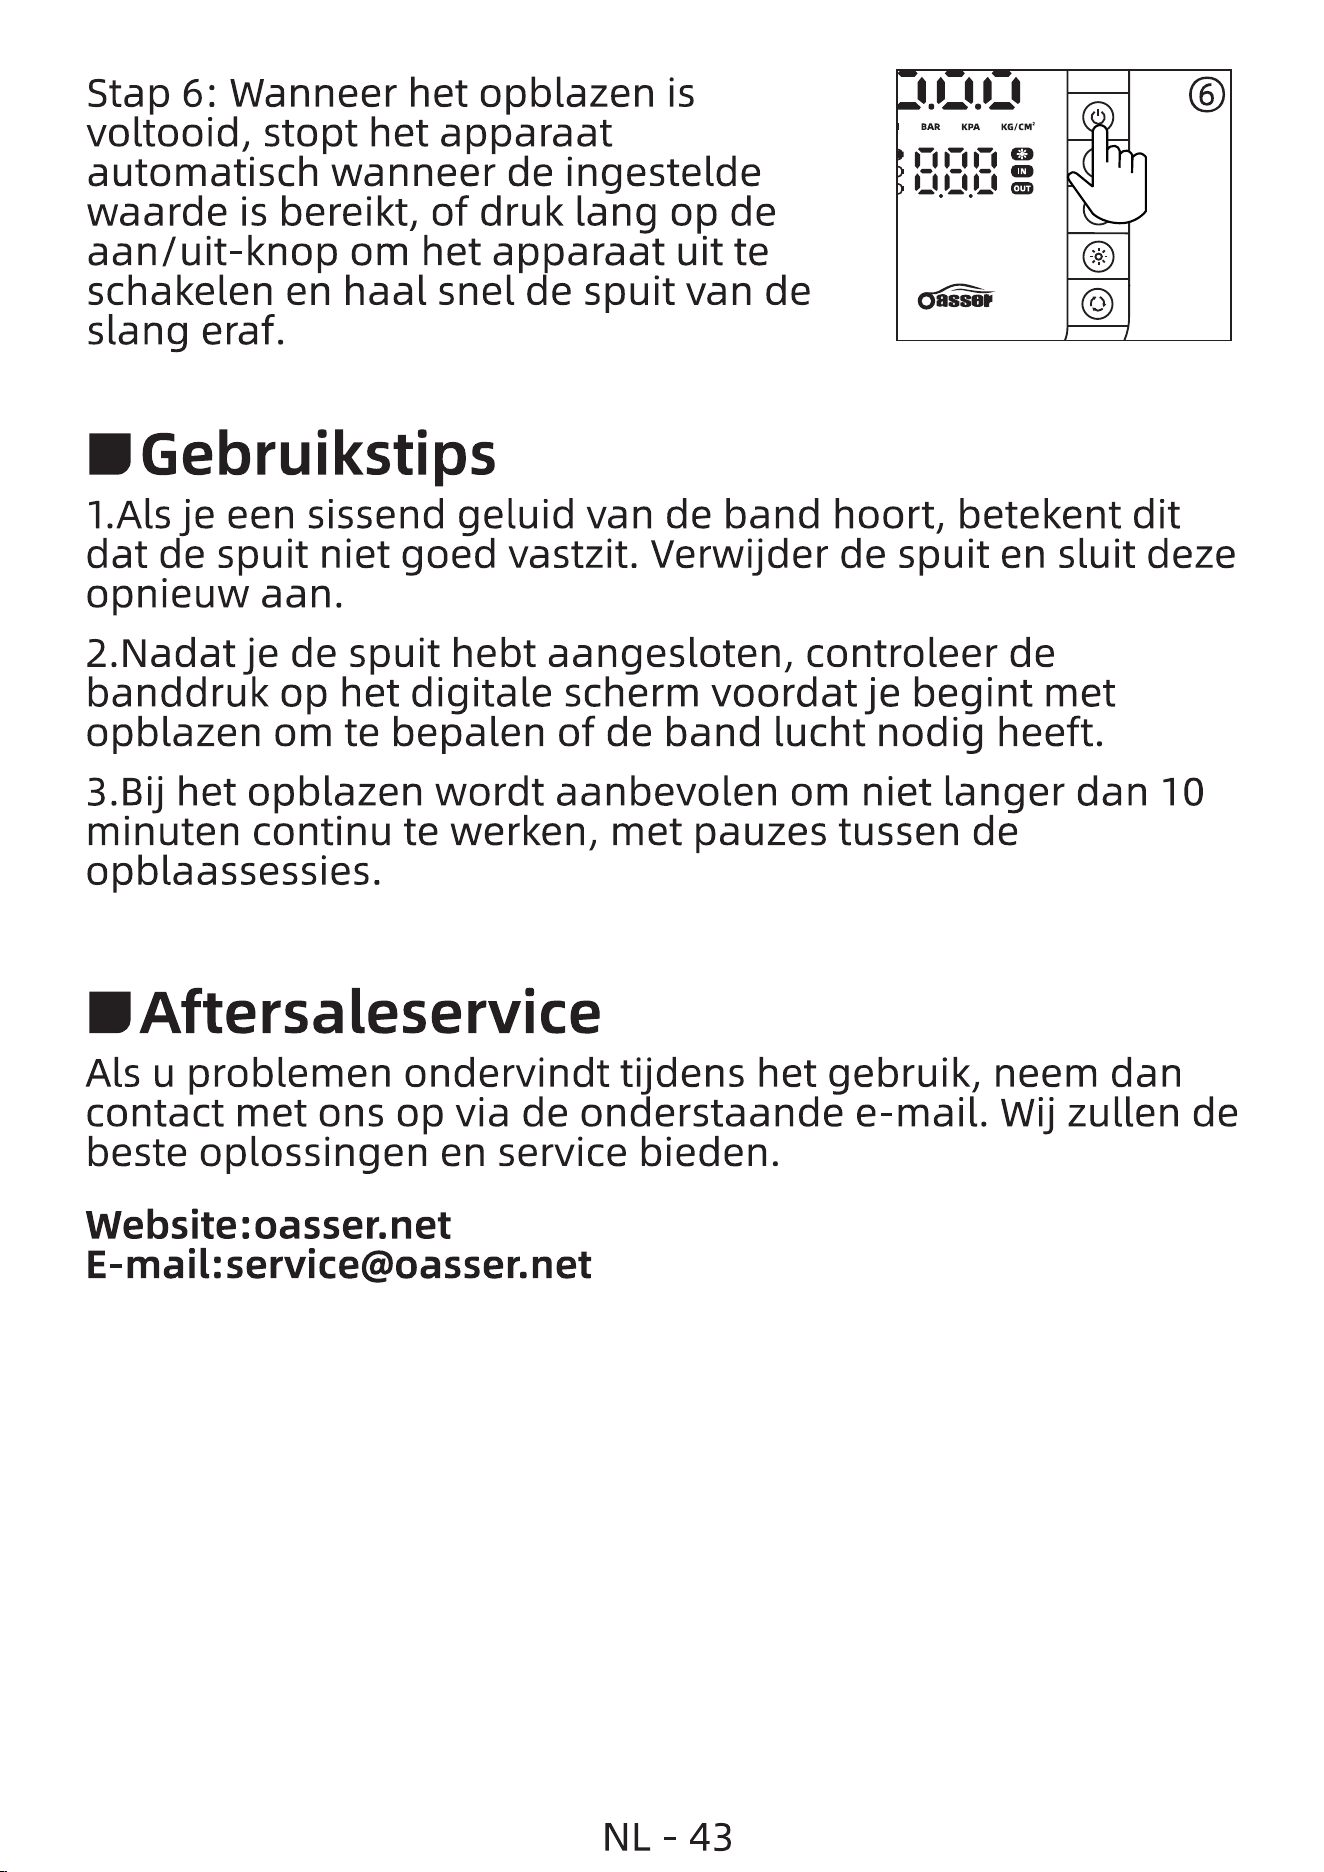
Stap 6: Wanneer het opblazen is
voltooid, Stopt het apparaat
automatisch wanneer de ingestelde
waarde is bereikt, of druk lang op de
aan/uit-knop om het apparaat uit te
schakelen en haal snel de spuit van de
slang eraf.
DGebruikstips
NL - 43
BAR KPA
OUT
O
DJuiste verwijdering van dit product
Dit label geeft aan dat dit product niet samen met
ander huishoudelijk afval in de EU mag worden
weggegooid. 0m mogelijke schade aan het milieu of
de menselijke gezondheid door ongecontroleerde
afvalverwerking te voorkomen, recycleer het
verantwoord om de duurzame hergebruik van
grondstoffen te bevorderen. 0m uw gebruikte
apparaat terug te geven, gebruikt u het retour- en
inzamelsysteem of neemt u contact op met de winkel
waar het product is aangeschaft. Zij kunnen dit
product veilig voor het milieu recyclen.
Manufacturer: HONG KONG TORSTEN E-COMMERCE CO., LIMITED
Address: FLAT/RM 616 6/F KAM TEEM INDUSTRIAL BLDG 135
CONNAUGHT ROAD WEST SHEUNG WAN HK
RAAZE SPSAPLAASPETR S.R.L.
EC REP
str. Nicolae Balcescu 12 Et. 1 CAM. C2, Bacau, RO, 600051
Email
I-JKImporter: OH GOOD LIMITED
Address: UNIT 929 44A FRANCES STREET, NEWTOWNARDS, NORTHERN
IRELAND, GB, BT23 7DN
NL - 44
EMBALLAGE
DÉPOSERDANS
LE BAC DE TRI
BAC
TRI
RECICLA
A1 Azul
r-:ji
Made in China
