
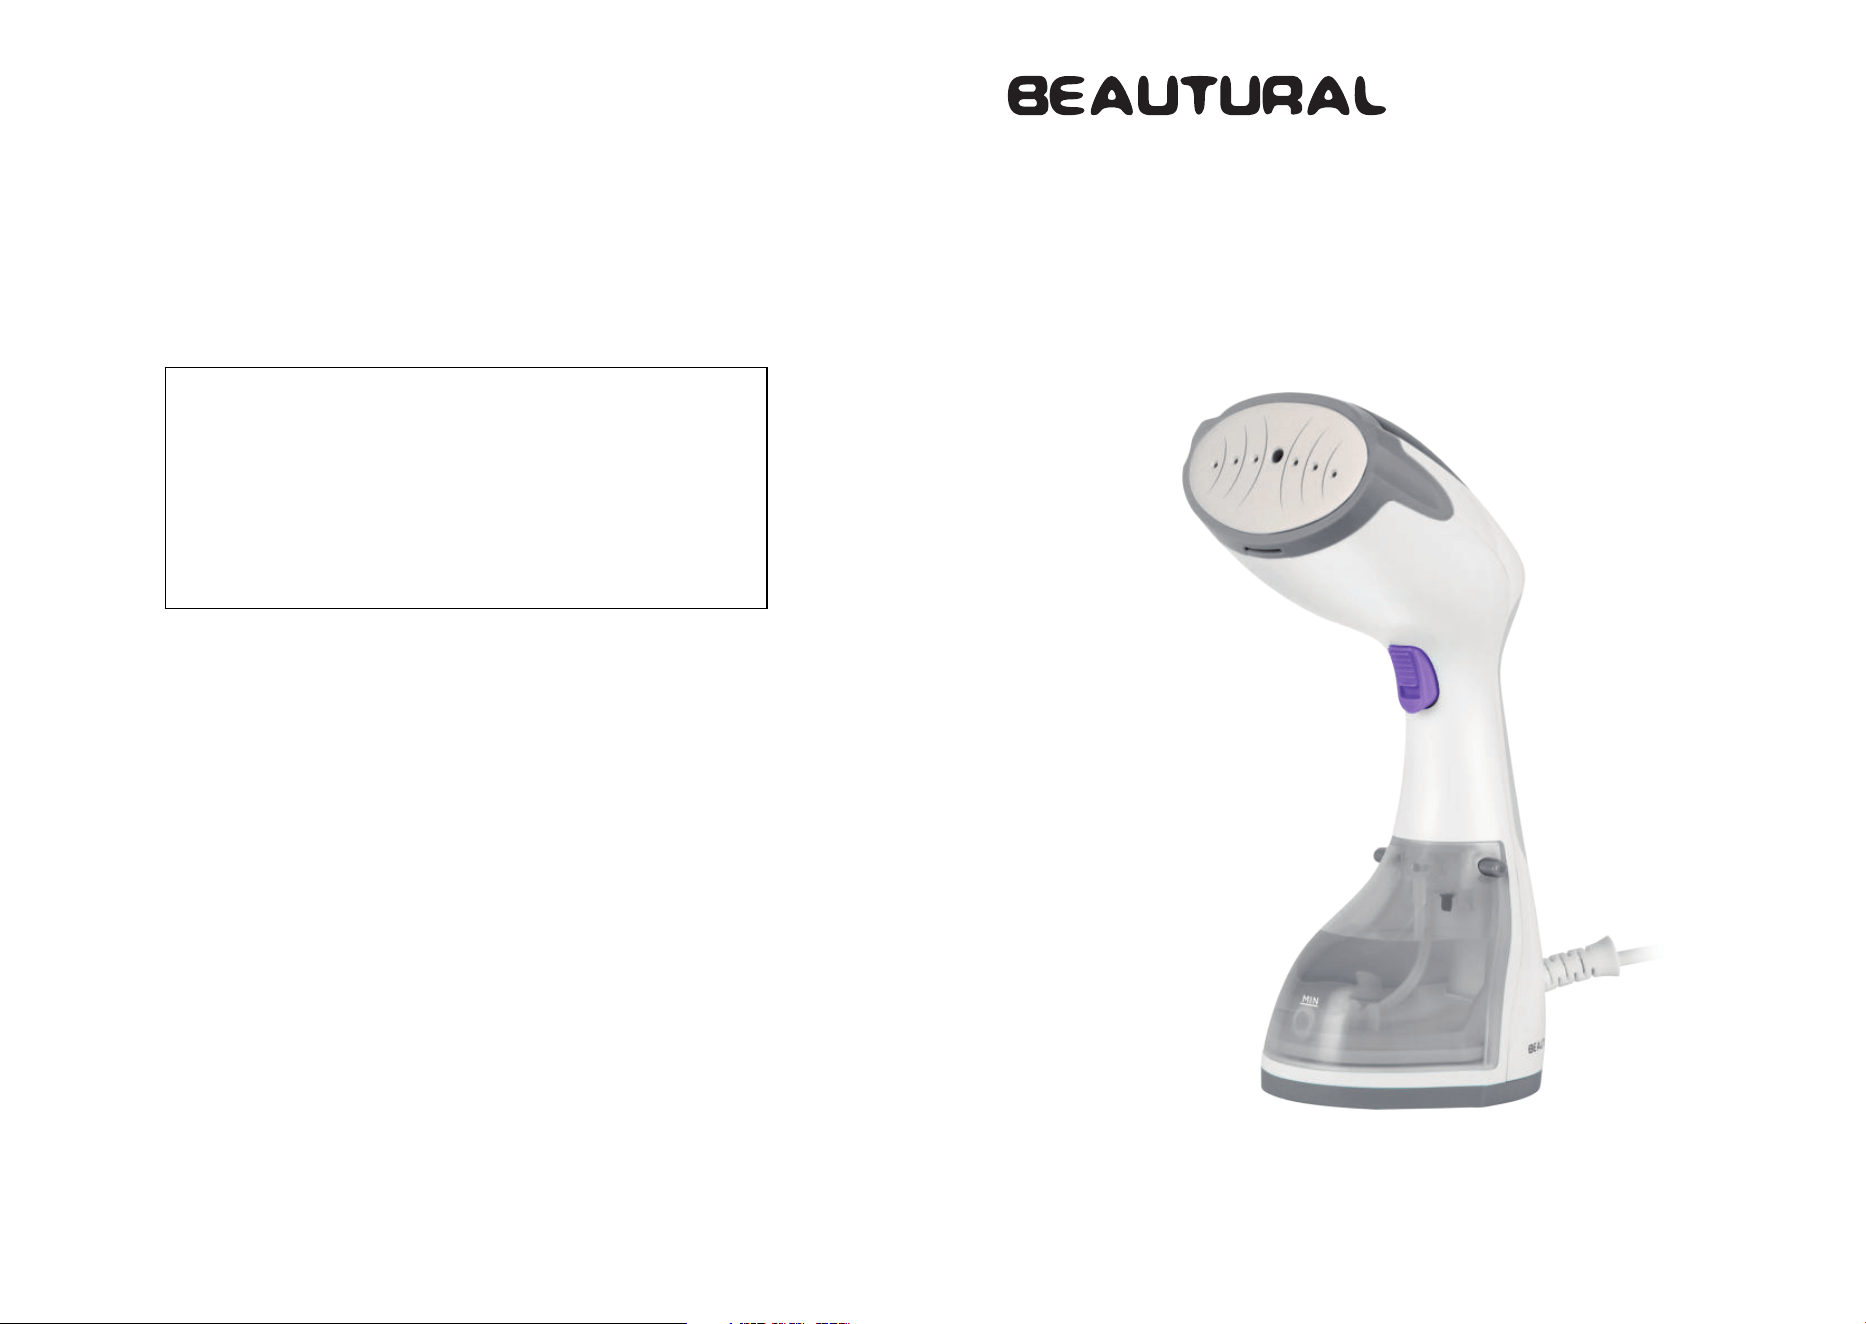
HANDHELD GARMENT STEAMER
Instruction Manual/ Manuel d'instructions/
Manual de instrucciones
24-Hour Customer Service & 2-Year Warranty
Phone: +1 909-391-3888
(Mon-Fri 9:00am - 5:00pm PST)
Website: www.1byonebros.com
If any accessory is missing from the package or there are any
issues with the product, please get in touch with our official
customer service. We will be pleased to serve you!
1byone Products Inc.
1230 E Belmont Street, Ontario, CA, USA 91761
Customer Service: +1 909-391-3888
www.1byonebros.com
Made in China

1
Introduction
Thank you for purchasing BEAUTURAL Handheld Garment Steamer. This
instruction manual contains important information about safety, usage,
and disposal. Use the product as described and keep this manual for
future reference. If you sell this steamer or pass it on, also give this manual
to the new owner.
Safety Instructions
• This steamer can be used by children aged from 8 years and above and
persons with reduced physical, sensory or mental capabilities or lack
of experience and knowledge if they have been given supervision or
instruction concerning use of the steamer in a safe way and understand
the hazards involved. Children shall not play with the steamer.
Cleaning and user maintenance shall not be made by children without
supervision.
• The voltage of the power source must be compatible with the voltage
displayed on the rating plate of this steamer.
• Never place heavy or sharp objects on the steamer's power cable.
• All cables should be positioned so they cannot be tripped over or
become obstructions.
• It is recommended to not plug in any other appliances into the same
circuit when the garment steamer is in use to avoid overload.
• If the supplied power cord is damaged, it should be replaced by a
qualified technician.
• Do not expose the steamer to humidity or use it outdoors.
• Only fill the water tank with tap or distilled water. Other liquids may
damage the steamer.
• Do not put any additives in the water tank. These can damage the steamer.
• Never leave the steamer unattended when it is hot, switched on, or
connected to power.
• Do not use the steamer if it has fallen from a high place, or if there are
visible signs of damage or leakage.
• The garment steamer provides a thermal safety fuse to protect it from
over-heating. However, the steamer should not be left unattended
while it is connected to power. Take care when there are children in the
vicinity of the steamer.
2 3
• Never use the steamer on clothes that are being worn. Never direct the
steamer towards people or animals.
• There may be leakage from the heating plate
if the steamer's temperature
is not high enough to vaporize water and generate steam. Therefore,
make sure the steamer is always preheated for 2-3 minutes before use.
• Always unplug the steamer before attaching or detaching the
attachment brush.
• Only use officially provided attachments and accessories.
Appliance Description
A
B
C
D
E
F
G
H
I
J
K
A. Heating Plate
B. Steam Trigger with Built-in
Continuous Steam Switch
C. Water Tank Release Button
D. Water Tank (Removable)
E. Power Indicator Light
F. Handle
G. Power Button
H. Cord Guard
I. Fabric Brush (Removable)
J. Soft Cushion Brush (Removable)
K. Measuring Cup
Included Items
1 x Garment Steamer
1 x Fabric Brush
1 x Soft Cushion Brush
1 x Measuring Cup
1 x Instruction Manual
Note: When unpacking the garment steamer, check if you have received
all the items listed.
Before the First Use
When you first use the steamer, some residual water from the testing
might be emitted from the heating plate.
This is normal and will not affect
the use of the steamer and will disappear quickly.
What Water to Use?
Using distilled, purified or filtered water is highly recommended and will
reduce mineral buildup. Never use water containing additives (starch,
perfume, aromatic substances, softeners, etc.), or condensation water (for
example water from tumble dryers, water from refrigerators, water from air
conditioning units, rainwater). This water contains organic waste m
aterials or
minerals that concentrate under the effect of heat and cause spitting, brown
coloring or premature ageing of your steamer.
Before Use
Unlock and remove the water tank.
Pull off the water inlet cover.
Fill the water tank with clean water.
Do not overfill.
Firmly close the water inlet to
prevent leakage.
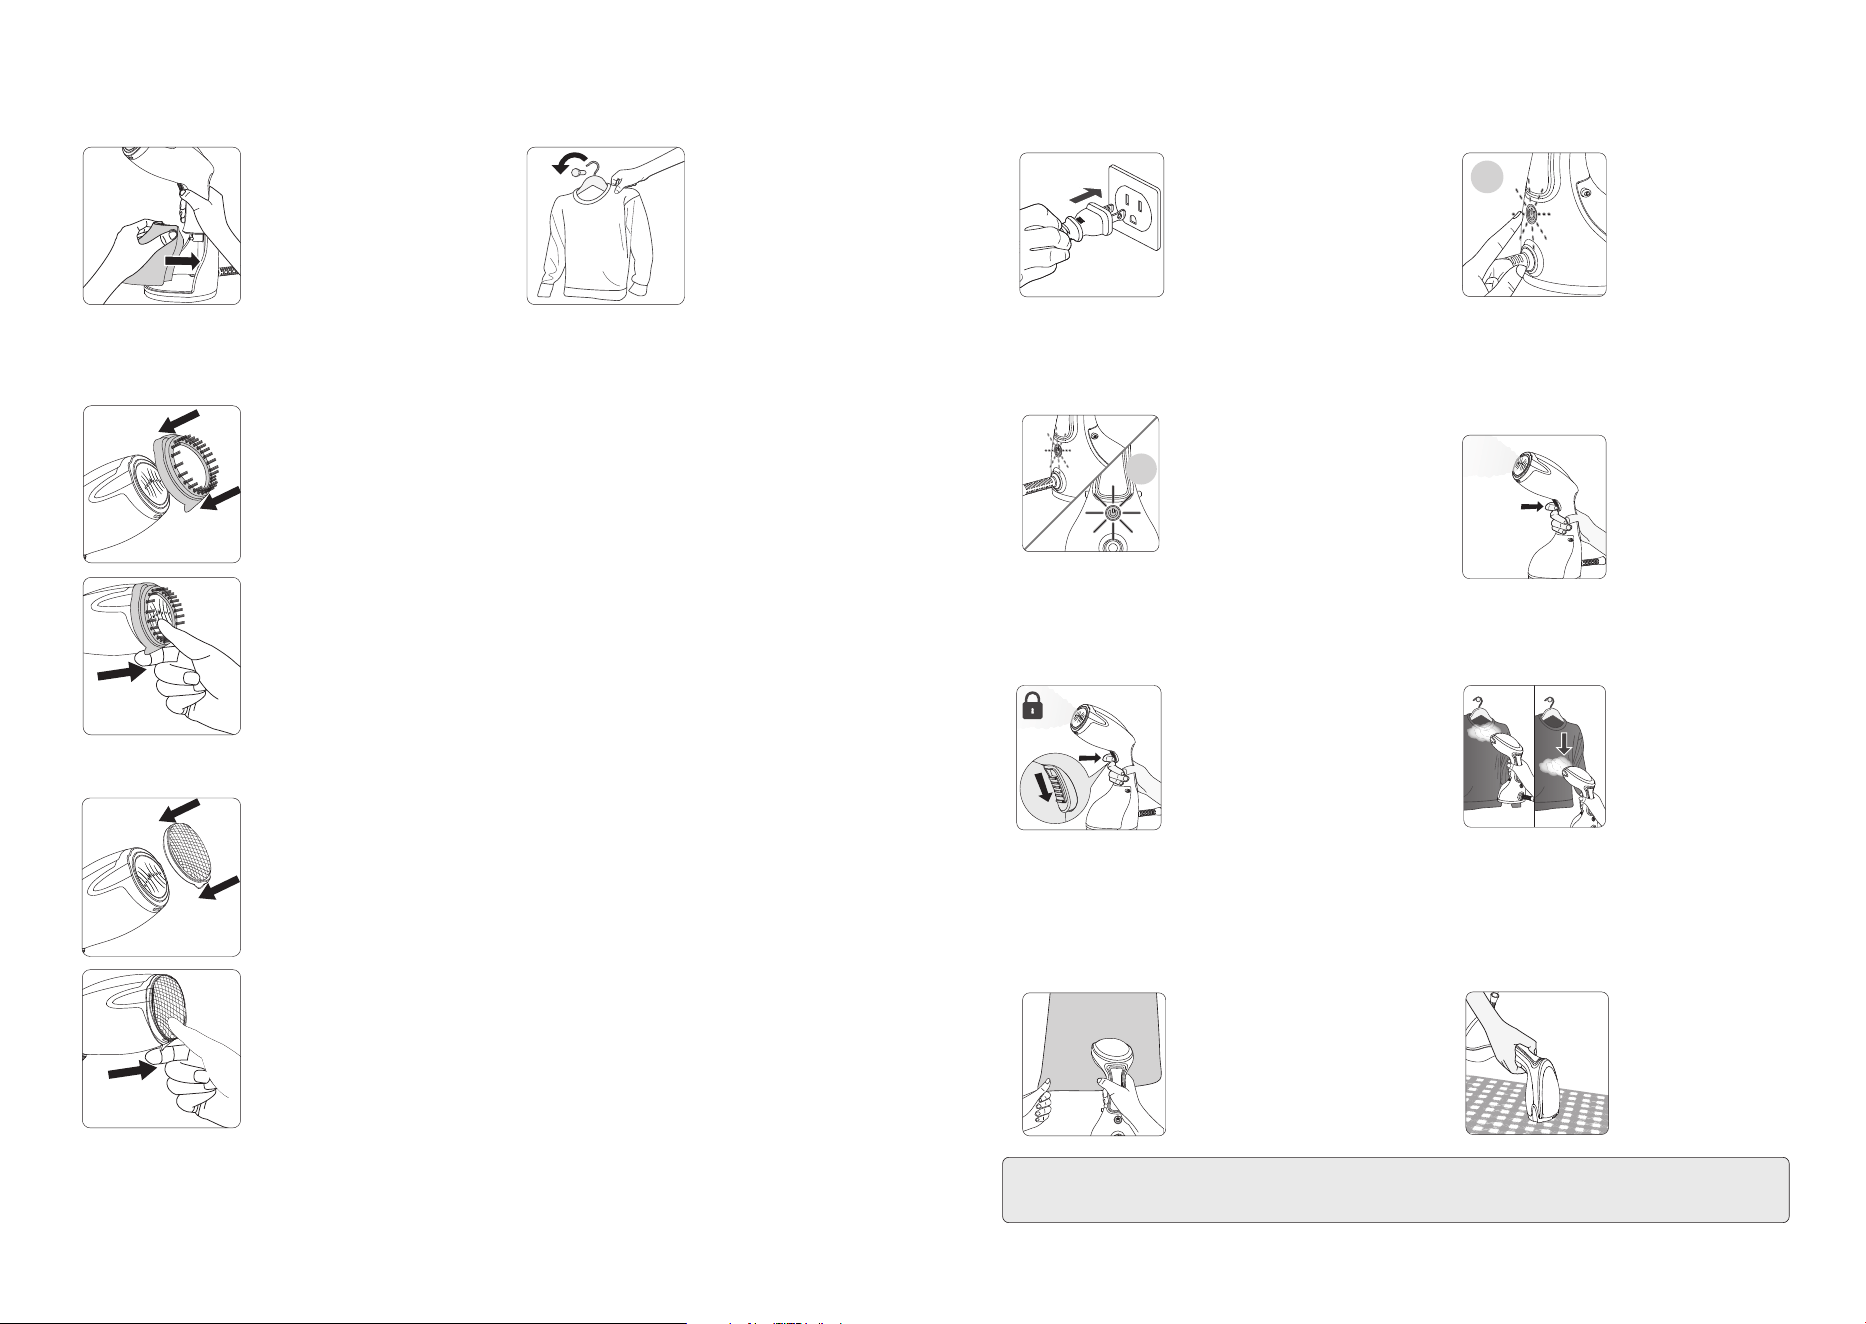
4 5
Push the water tank back into the
steamer until it clicks into place.
Hang your garment on a
clothes hanger.
Accessories
The fabric brush allows to remove lints, pet hair,
dust, dirt and dander on overcoat and down jacket.
To attach: While the brush and steamer are cool,
align the fabric brush to the heating plate
and lock it
into position (an audible "click" will be heard when
correctly locked). Keep the pointed side facing
downward.
To remove: Allow the steamer to cool prior to
removing the brush. Put your finger under the
pointed tip and lift it up.
The soft cushion brush can protect delicate fabrics
(such as nylon, silk and polyester) from damage
caused by high-temperature panel or hot steam.
To attach: While the brush and steamer are cool,
align the
soft cushion brush
to the heating plate
and lock it in
to position (an audible "click" will be
heard when correctly locked). Keep the pointed
side facing downward.
To remove: Allow the steamer to cool prior to
removing the brush. Put your finger under the
pointed tip and lift it up.
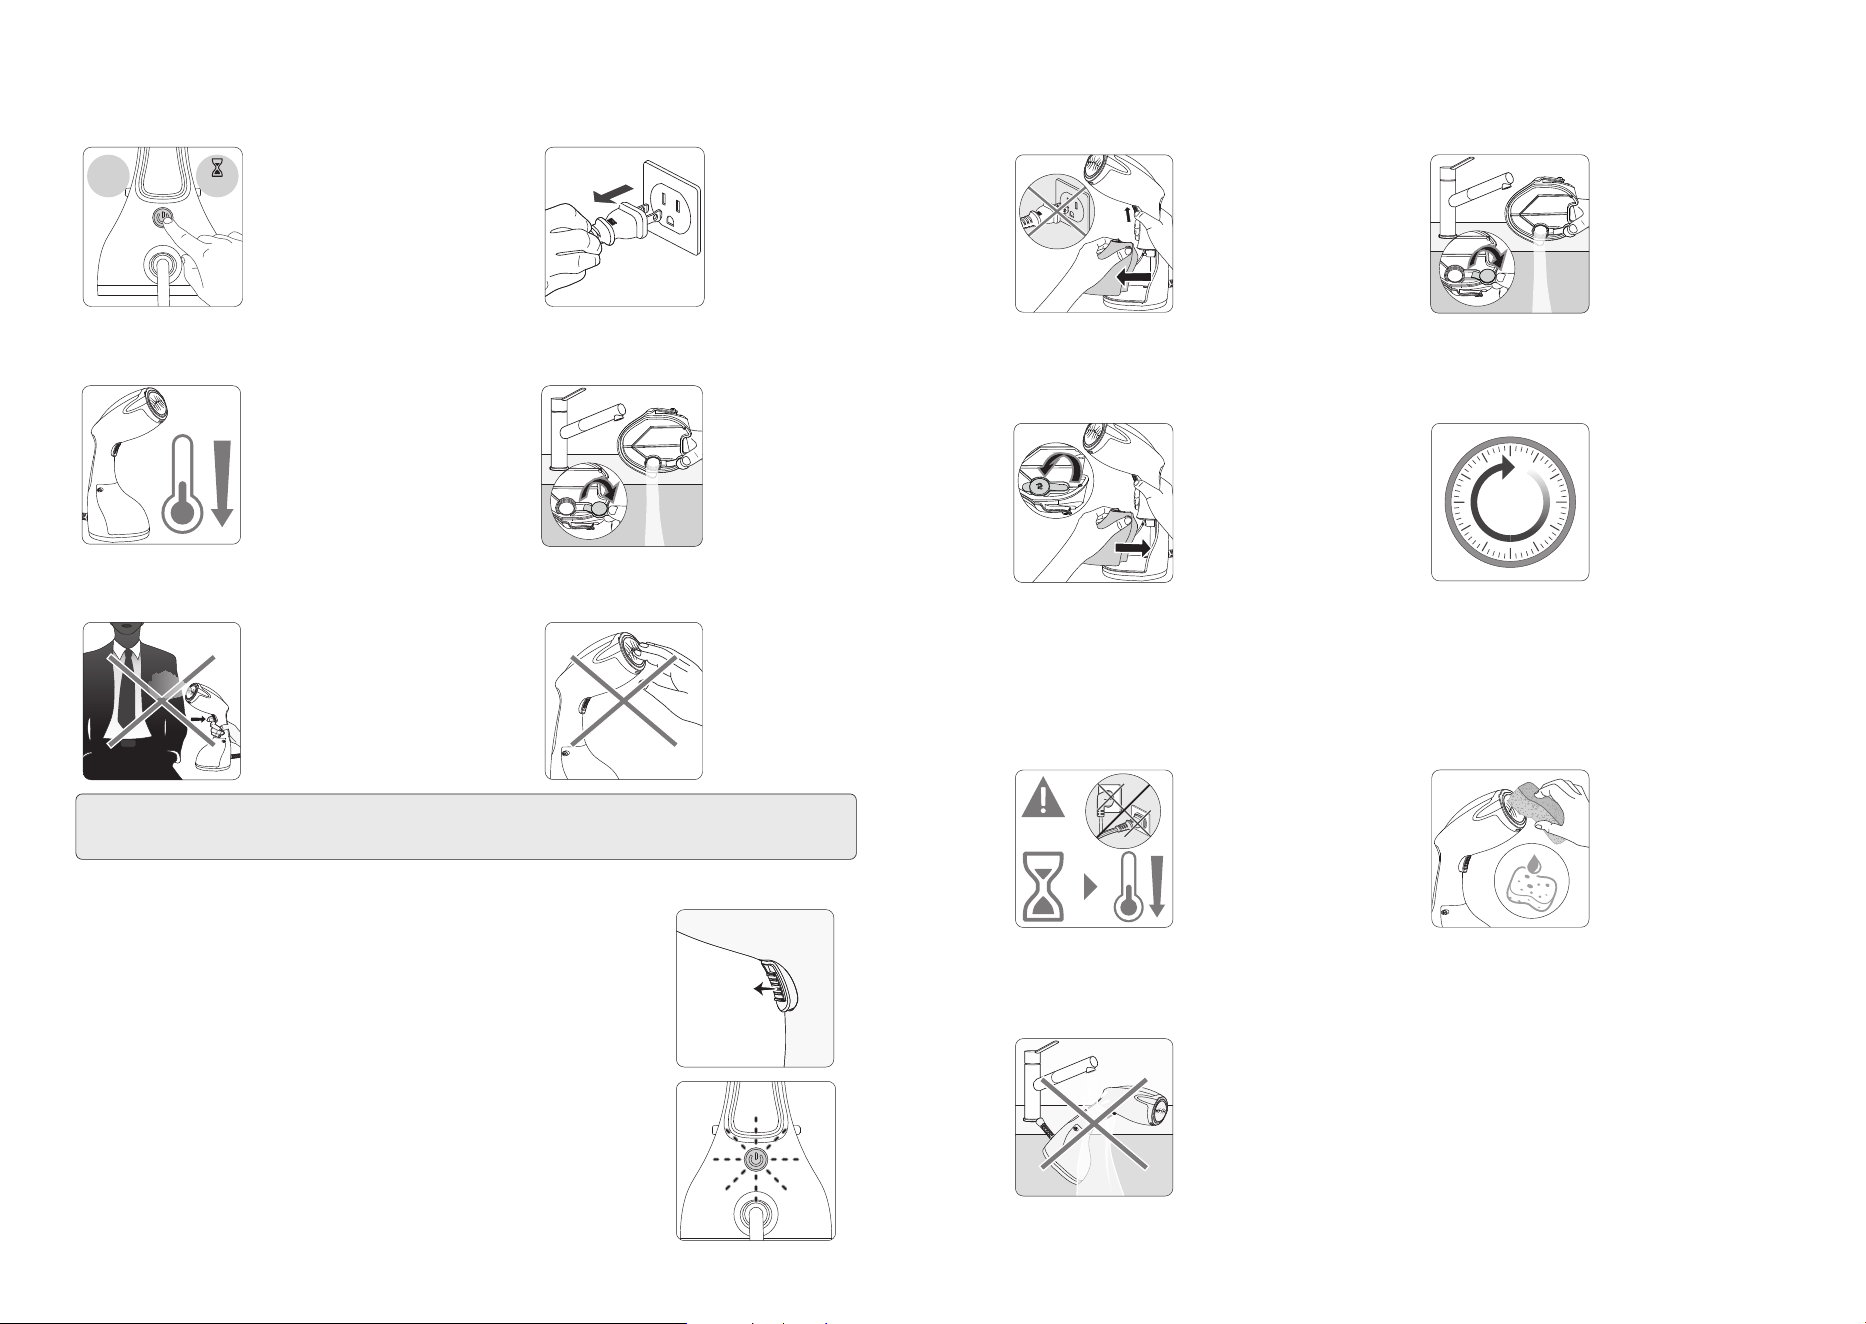
Use
Plug in the steamer.
Switch on the steamer.
ON
Allow the steamer to preheat, when
the indicator light becomes solid the
steamer is ready to use.
OK
Press the steam button with
the steam brush facing away
from you holding it in a vertical
position.
For continuous steam, lock the steam
trigger by pushing the locker switch
down. To release it, push it up.
For optimal use, move the
steam jets over your garment
from top to bottom.
Use your free hand to keep the
fabric taut and stretched. Steam
the garment with slow, downward
strokes, keeping the head of the
steamer in contact with the fabric.
This steamer is anti-dripping,
meaning it can be used
horizontally to steam garments
on an ironing board.
Tip: If you find the garment damp after steam ironing, stop the steam and
use the heating plate to dry iron the garment for a while to make it dry.
6 7
Press the On/Off button to switch the
steamer off.
OFF
3 sec.
Unplug the steamer.
Stand the steamer on its base and allow
it to completely cool off before storing.
To avoid mineral buildup,
empty the tank after each use.
Warning: Never steam a garment while
it is being worn.
Warning: Never touch the
soleplate of the steamer.
Note: When the water tank is empty, it is normal to feel or hear the water
pump in the handle.
Standby Mode
1) For your safety, the steamer is fitted with a standby
monitoring system, which is activated automatically
after approximately 8 minutes without using the
steam trigger.
2) The power indicator light flashes to indicate that the
steamer is on standby mode.
3) To reactivate the steamer:
a. Press the power button and wait that the power
indicator light stops flashing.
b. Press the steam trigger to start steaming again.
Steam
Trigger
After Use
Unlock and remove the water tank.
Empty the water tank completely.
Return the water tank to its place
on the steamer.
Wait for an hour for your steamer
to cool before storing.
1h
Cleaning
Wait an hour for complete cool
down.
1H
Only use a soft sponge with
water to clean. Do not use any
detergent product.
Never wash or rinse steamer
directly over a sink.

8 9
Troubleshooting
Symptom
Cause
Solution
Critical Notes
Specifications
Model: 722NA-0008, HJ-3000B
Rated voltage: AC 120V~60Hz
Rated power: 1200W
Water tank capacity: 8.8 fluid ounces (0.26 liters)
Steaming Tips
To Steam Garments
1. Place the fabric in a dry and ventilated place and at least 20 cm (8
inches) away from any walls (otherwise moisture may cause mildew).
2. Empty garment pockets and straighten turn-ups such as cuffs and
hems.
3. Hang the garment from a hanger and stretch the fabric slightly with
one hand, making sure there is nothing behind the fabric that could be
damaged by the steam.
4. Put the heating plate
against the garment, pressing and holding the
Steam Activation Button while moving your arm in an up and down
motion, targeting creases on the fabric.
NOTE: Do not steam over metal accessories. Use with caution when
steaming around metal accessories.
WARNING: When using the garment steamer, do not touch the
heating
plate
. This garment steamer will generate a large flow of high temperature
air that can cause burns if not handled carefully.
To Steam Curtains
1. Wash and dry the curtains.
2. Steam when they are hanging.
3. While steaming, stretch the curtains with one hand to help remove
creases more easily.
Indicator
light OFF
Faulty
evaporation
plate
Contact after-sales
service
Never
disassemble
evaporation plate
Do NOT attempt repair
Indicator light
FLASHING
continuously
Blown fuse
(Non-120V
region use)
Contact after-sales
service immediately
Electrical hazard
risk
Water tank
hose
disconnected
Loose
internal
connection
Contact us for free tank
replacement
Non-user-re
pairable
Water tank
intact +
Abnormal
noise
Clogged
water
pump
Cleaning procedure:
1. Hold steam button
30s → Remove tank
if no steam
- Compressed air
(recommended)
- Pressurized water
(syringe/tool)
4. Reassemble & retest
2. Locate water inlet
hole (handle base)
3. Clear clog with:
Use distilled
water to prevent
clogs
Normal light
(30s flash →
steady) + NO
STEAM
Follow step-by-step
diagnosis:
Requires component
replacement

10
To Steam Upholstery
1. The garment steamer can be used to kill bacteria, remove odors and
freshen up furniture upholstery, slip covers, and cushions.
2. Move the garment steamer over the fabric, cushions should be
removed for steaming. Allow cushions to dry thoroughly before placing
back on furniture.
The appliance’s packaging is made from environmentally friendly
material and can be disposed of at your local recycling plant.
Customer Service/
Service Clients/Atención al cliente
UNITED STATES
Phone: +1 909-391-3888 (Mon-Fri 9:00am - 5:00pm PST)
Email: [email protected]
CANADA
Email: [email protected]
UNITED KINGDOM
Email: [email protected]
GERMANY/FRANCE
ITALY/SPAIN
Email: [email protected]
BRAND OWNER
1byone Products Inc.
1230 E Belmont Street, Ontario, CA, USA 91761
Customer Service: +1 909-391-3888
www.1byonebros.com
