QUICK-START GUIDE
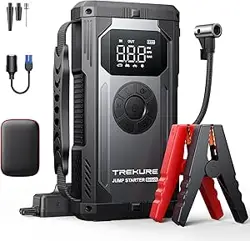
Beta06 JUMP STARTER

Language
English
Deutsch
Francais
Italia
España
01-08
09-16
17-24
25-32
33-40

IMPORTANT SAFETY WARNING
ATTENTION Please read the following safety warning before using the product
and take safety protection measures to avoid malfunctions caused by accidental
operation.
1. Store in a cool and well-ventilated place out reach of children and pets.
2. Do not place the product in high temperature environment for a long
time. The operation temperature of this product is -4煔~140煔. The storage
temperature should not exceed 122煔.
Personal Safety
1. Only start vehicles with the smart jumper cable supplied by the manufacturer.
2. Do not use the product if the clamp or cable is damaged.
3. Do not connect the red and black clamps together when the product is
outputting.
4. Do not connect the red and black clamps to the same piece of metal.
5. Do not disassemble or modify this product.
6. Do not use detergent to clean this product.
7. Do not abuse this product and avoid heavy dropping or repeatedly hitting
it.
8. Do not operate the product in explosive environments such as flammable
liquidsgases or dusts.
9. Do not immerse the product in water.
Electrical Safety
1. Do not litter the product and it should be safely recycled.
2. Do not incinerate the product or exposed to high temperaturesas they
may explode.
3. Only use replacement parts or accessories provided or recommended
by manufacturer.
Battery Safety
EN 01
02 03 04 05 06 07 08
09 10 11 12 13 14 15 16
17 18 19 20 21 22 23 24
25 26 27 28 29 30 31 32
33 34 35 36 37 38 39 40

WARRANTY
TREKURE provides customers with warranty of 24 months from the date
of purchase.
For assistance or warranty cover claim, please contact us via email at
1. Please use the included USB-C cable and 5V/2A or above adapter for
charging.
2. Please make sure the device is fully charged before using the product
for the first time.
3. It is recommended to fully charge the device at least once every 3 months
to help extend the life of the device.
PRECAUTIONS BEFORE USE
SPECIFICATIONS
Model
Capacity
USB1 Output
USB2 Output
USB-C Input
Operation Temp
Beta06
23800mAh, 88.06Wh
5V/2.4A
5V/2.4A 9V/2A 12V/1.5A
5V/2A 9V/2A
-4煔~140煔
EN
01 02 03 04 05 06 07 08
09 10 11 12 13 14 15 16
17 18 19 20 21 22 23 24
25 26 27 28 29 30 31 32
33 34 35 36 37 38 39 40

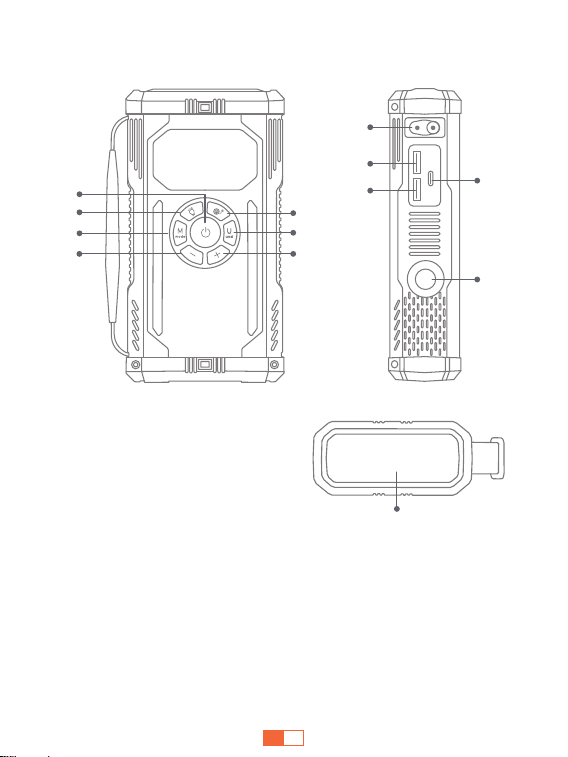
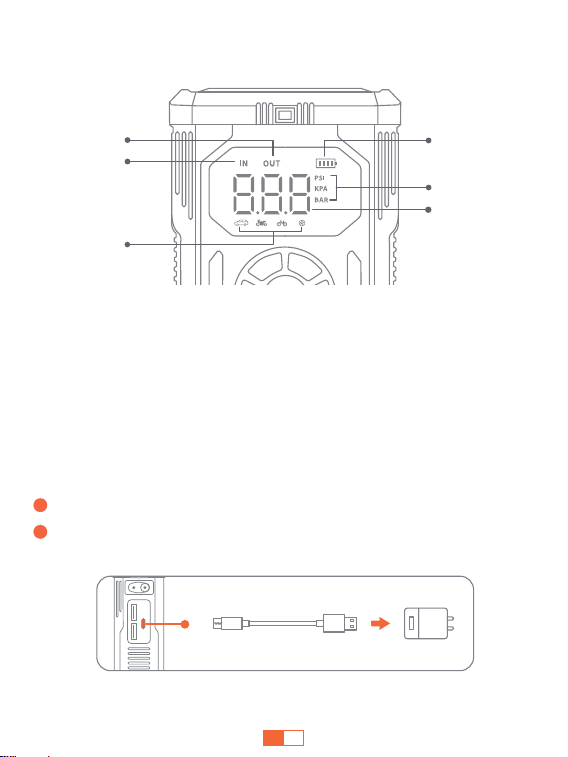
1.PRODUCT OVERVIEW
滬
滧
滦
滩
Η
Θ
Ι
滪
滫
滨
滮
滯
滭
滦XõĦÁąĕĐĐõî
滧>ÖÍÓĐÖîÍĕĐĐõî
滨/îÌç§ĐÖõîDõ½Á_ĦÖĐ·ÓĕĐĐõî
滩ÖąXąÁĉĉĕąÁ[Á½ĕ·ĐÖõîĕĐĐõî濎瀆濏
滪ÖąXąÁĉĉĕąÁ/î·ąÁ§ĉÁĕĐĐõî濎灢濏
滫XąÁĉĉĕąÁkîÖĐ_ĦÖĐ·ÓĕĐĐõî
滬/îÌç§ĐÖõî_ЧąĐĕĐĐõî
滭:ĕìĂĉЧąĐXõąĐ
滮k_KĕĐĂĕĐ溢濎溡溨Ħ濏
滯k_KĕĐĂĕĐ溡
Η k_瀆/îĂĕĐ
Θ Öą,õĉÁ/îĐÁąÌ§·Á
Ι >>ÖÍÓĐ
EN
01 02 03 04 05 06 07 08
09 10 11 12 13 14 15 16
17 18 19 20 21 22 23 24
25 26 27 28 29 30 31 32
33 34 35 36 37 38 39 40

2.DISPLAY OVERVIEW
Λ
Κ
Ν
Μ
Ξ
Ο
Κ%JTDIBSHJOH
Λ$IBSHJOH
Μ*OBUJPO.PEF5ZQFT
Ν"JS1SFTTVSF7BMVF
Ξ"JS1SFTTVSF6OJU5ZQFT
Ο#BUUFSZ*OEJDBUPS
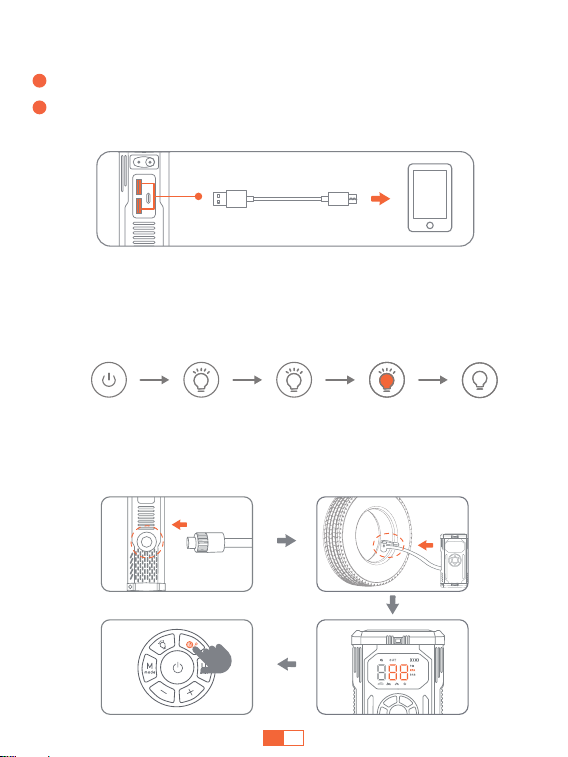
1
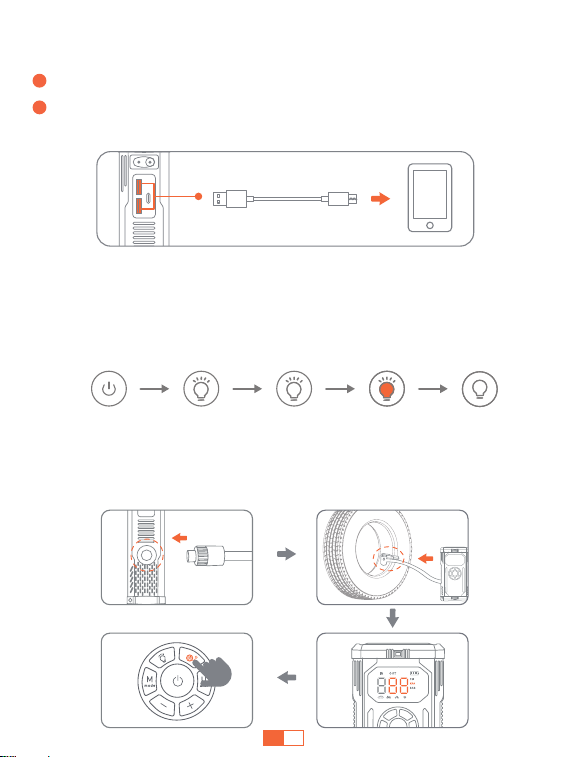
2
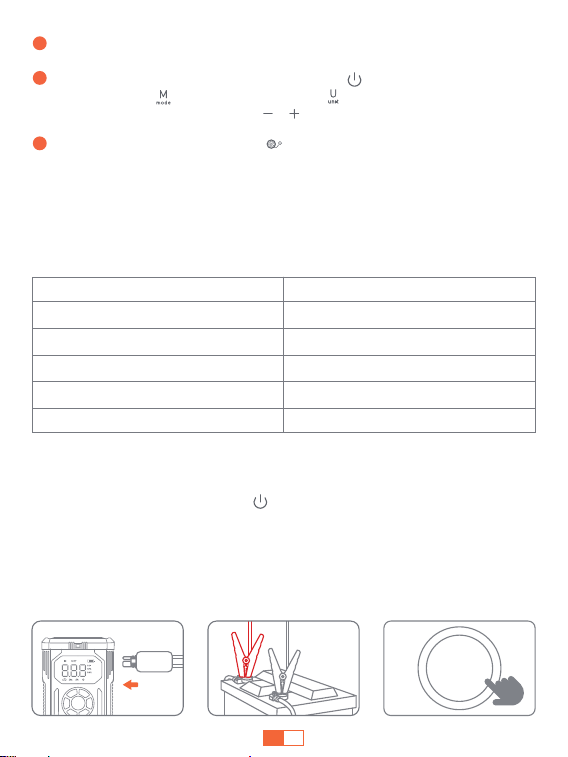
Insert the charging cable into USB C port.
Connect to 5V/2A or above adapter (adapter not included).
3.CHARGING YOUR JUMP STARTER
EN
01 02 03 04 05 06 07 08
09 10 11 12 13 14 15 16
17 18 19 20 21 22 23 24
25 26 27 28 29 30 31 32
33 34 35 36 37 38 39 40

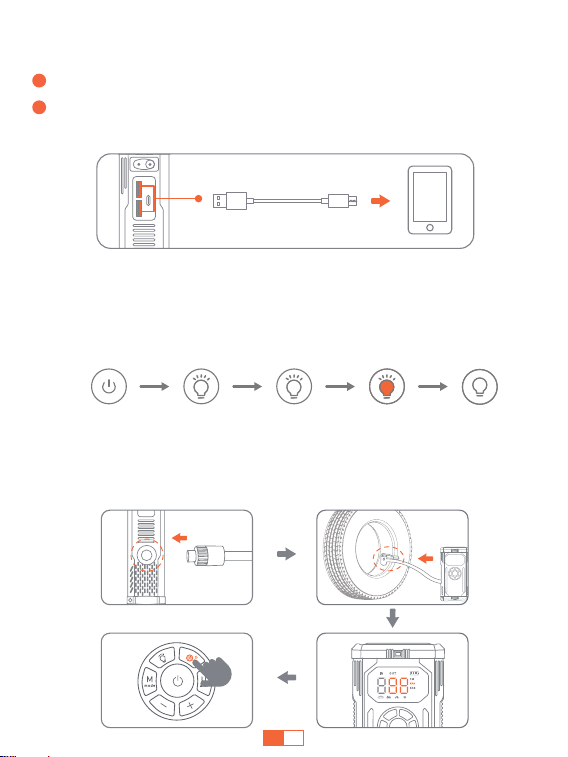
1
2
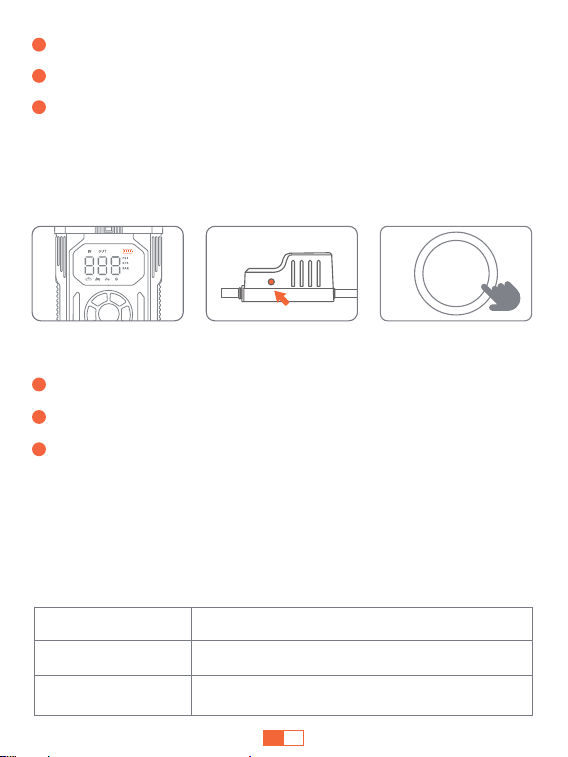
Plug the cable into corresponding USB output port.
Connect to electronics, such as smartphones. And then, press the power
on/off button.
4.CHARGE ELECTRONIC DEVIDES
5.LED LIGHTING
6.INFLATE YOUR CAR TIRES
Device switch SOS (Orange) OFFLighting (White) Strobe (White)
Press shortly
Press the
light button
Press shortly Press shortly
EN
01 02 03 04 05 06 07 08
09 10 11 12 13 14 15 16
17 18 19 20 21 22 23 24
25 26 27 28 29 30 31 32
33 34 35 36 37 38 39 40
· Checking your car's tire pressure
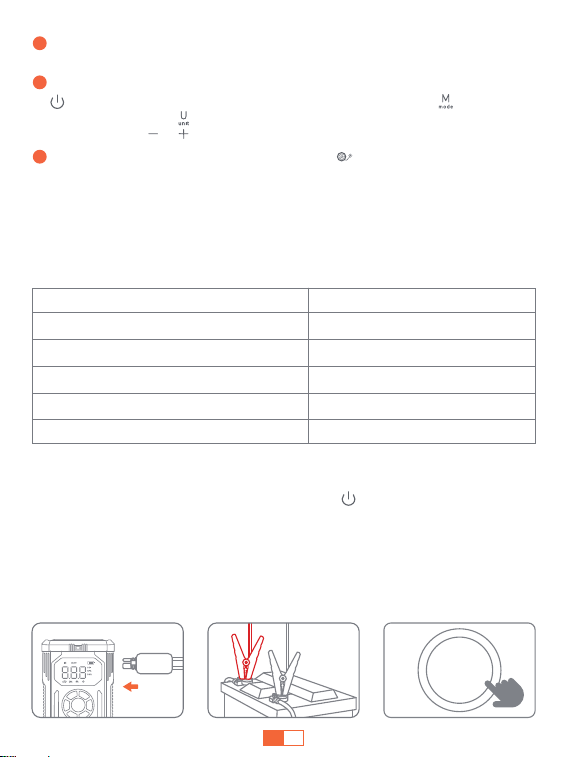
1. Short press the power button “ ” to turn on the machine.
2. Connect the air hose connector to the tire nozzle and pay attention to
press to the end and press firmly.
3. The pressure shown on the display is the current tire pressure.
· Support 5 inflation modes, up to 150 PSI
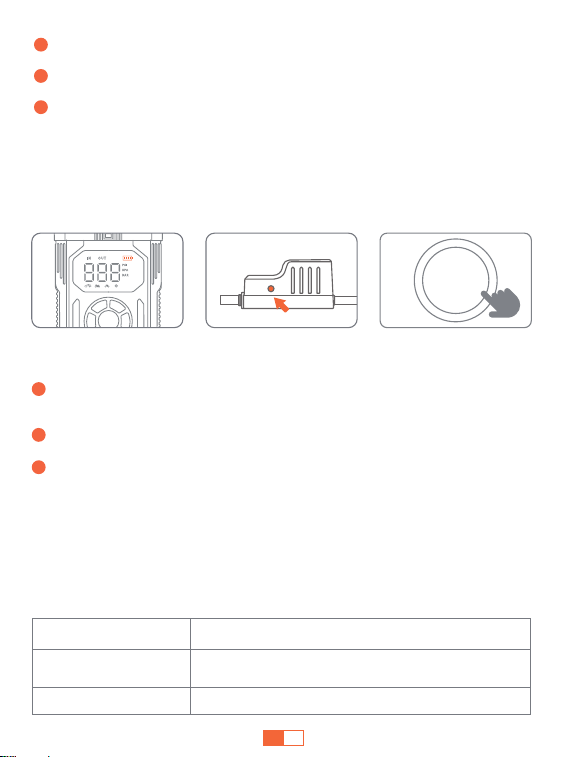
1
Connect the air hose firmly to product and tire respectively, and tighten it.
Long press the inflation button “ ” to start. It will stop automatically
when the air pressure reaches the preset value.
Set pressure. Short press the power button “ ” to power on, select the
inflation mode “ ” and air pressure unit “ ” , then optionally adjust the
air pressure value with buttons “ ” “ ” .
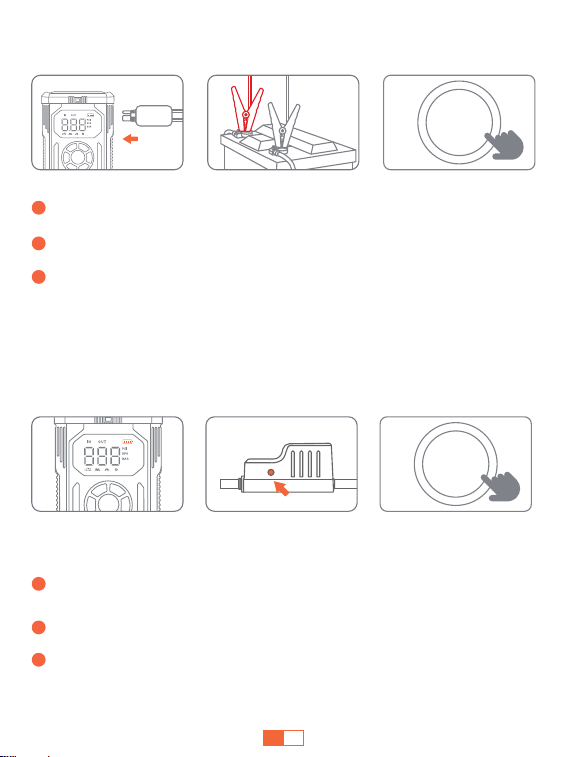
7.JUMP START YOUR CAR
+
-
START
/STOP
1
2
3
Tip: If used for a long time, it is recommended to stop every 10 minutes
to cool down.
Inflatable Mode
Car Inflatable Mode
Motorcycle Inflation Mode
Bicycle Inflatable Mode
Basketball Inflation Mode
Customized Air Pressure Mode
Air Pressure Range
26-51 PSI,1.8-3.5 BAR,180-350 KPA
26-44 PSI,1.8-3.0 BAR,180-300 KPA
29-65 PSI,2.0-4.5 BAR,200-450 KPA
4-16 PSI,0.2-1.1 BAR,20-110 KPA
3-150 PSI,0.2-10.3 BAR,20-990 KPA
EN
01 02 03 04 05 06 07 08
09 10 11 12 13 14 15 16
17 18 19 20 21 22 23 24
25 26 27 28 29 30 31 32
33 34 35 36 37 38 39 40
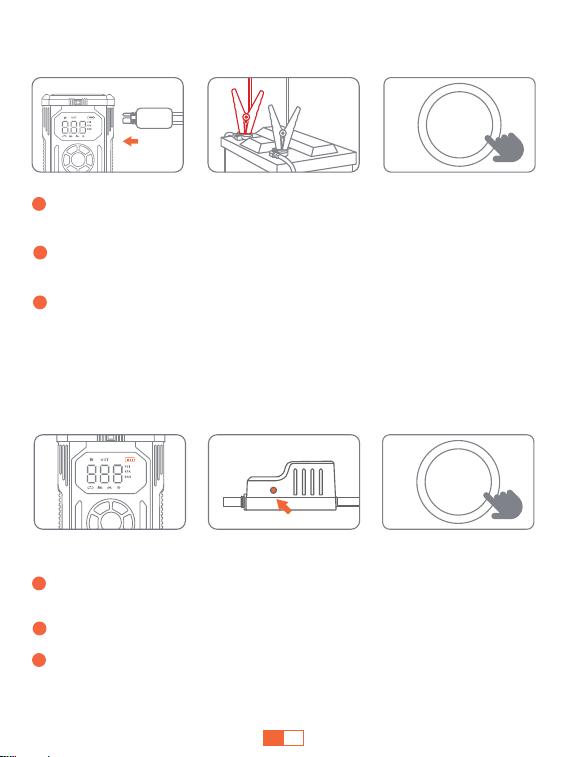
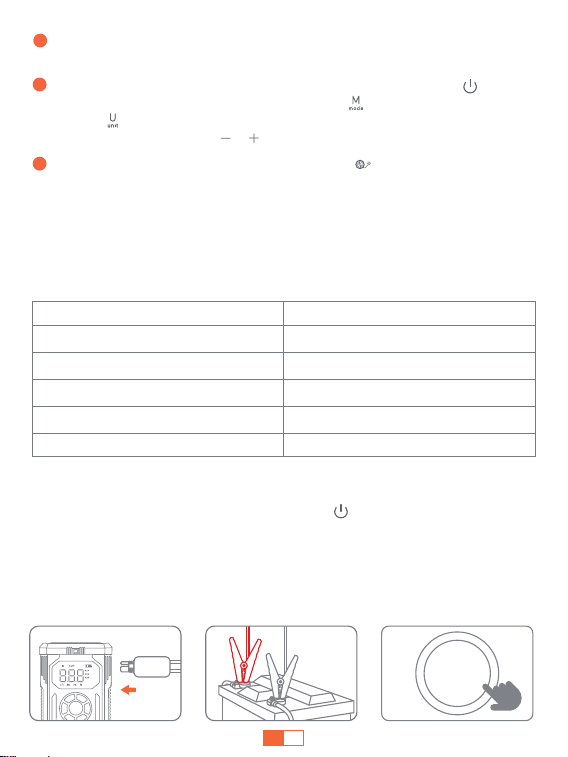
1
Insert the jumper cable into the jump starter (20% power at least).
Connect the clamps to car battery (red to +, black to -).
Start your car engine.
2
3
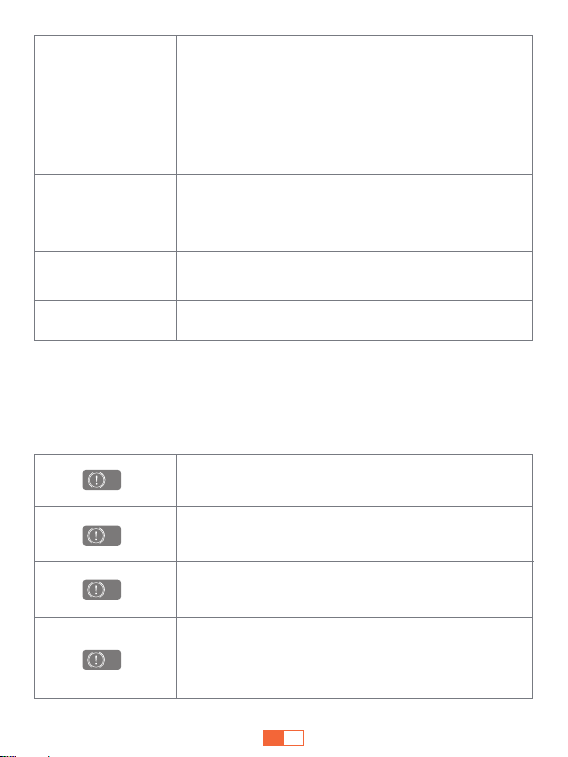
8.TROUBLESHOOTING ABOUT CLAMPS
In any of the following situations, the smart clamp will turn protections on:
Indicator
Standby statusFlashing red and green
Ready to startSolid green
Situations
· ABOUT THE FORCE START FUNCTION
If three attempts fail when the clamps correctly connected to your car,
you can use the Force Start Function to enter boost mode.
START
/STOP
1
Check the clamps connection and the product’s battery is above 20%.
2
Press the Force Start Button for 3 seconds.
3
The indicator will be green, and go back to start engine ignition.
Caution: When using this function, auto-detection and safety features will
be disabled temporarily.
3 steps to fix the problem:
EN
01 02 03 04 05 06 07 08
09 10 11 12 13 14 15 16
17 18 19 20 21 22 23 24
25 26 27 28 29 30 31 32
33 34 35 36 37 38 39 40
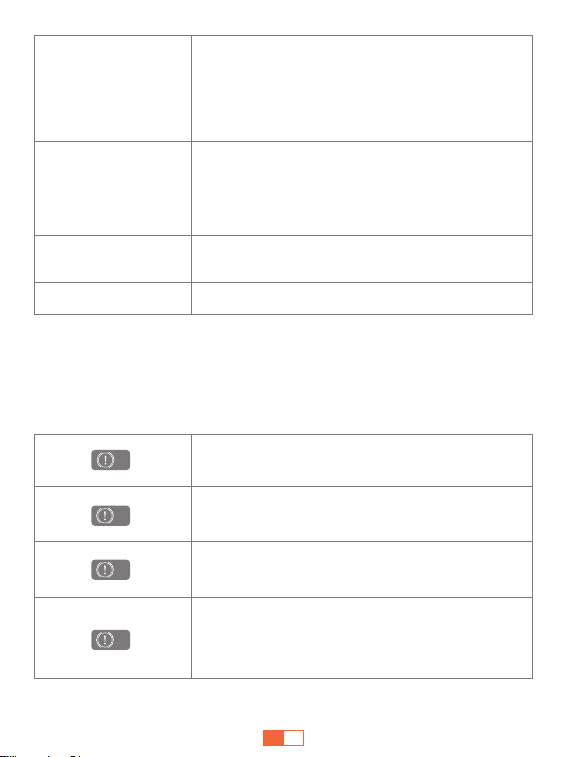
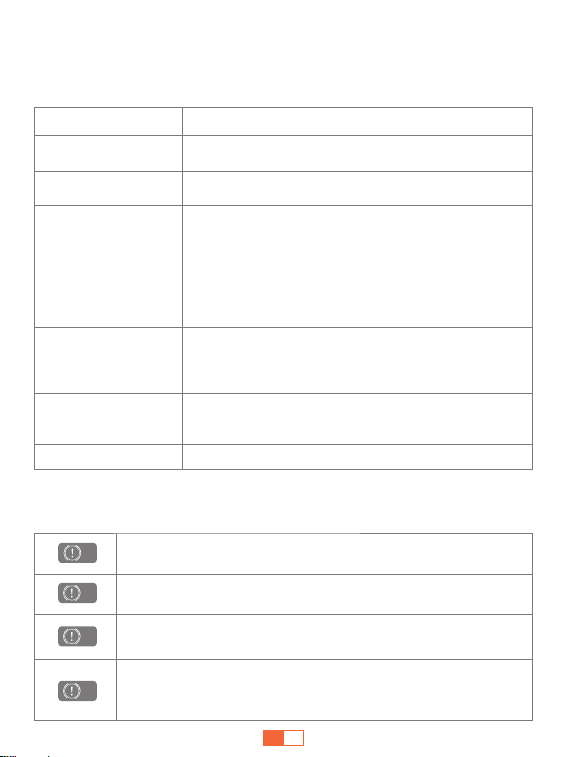
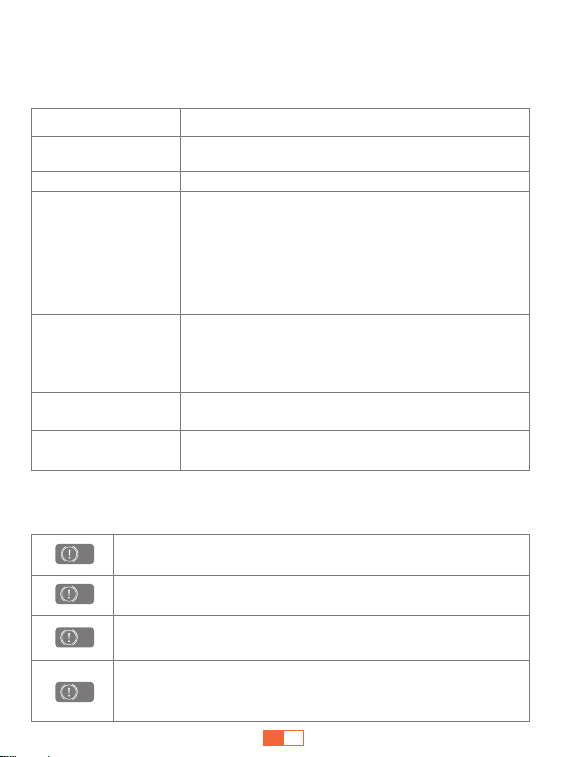
9.TROUBLESHOOTING ABOUT JUMP STARTER
Solid red
Solid red with
discontinuous beep
Solid red with long
beep
Other
Low temperature charging protection
---Unplug the charger and wait for the protection
to be released
High temperature charging protection
---Unplug the charger and wait for the protection
to be released
High temperature discharge protection
---Unplug the electrical equipment and wait for
the protection to be released
Cylinder over temperature protection
---Do not touch the machine and trachea
immediately to prevent high temperature burns
and wait for the machine to stand for 10 ~ 15
minutes
Short-circuit protection ---Don't connect the clips
together or to the same metal
1. Low voltage protection ---Recharge the product
2. Over-heating protection ---Remove the clamps
to let it cool
3. Timeout protection ---Connection timed out.
Start engine within 60s or remove the clip within
30s after a successful start
1. Reverse polarity protection ---Reverse the clips
and ensure the correct connection (red to +, black
to -)
2. Sticking fault ---Contact [email protected]
for replacement parts
Please contact [email protected] with details
1
2
3
7
EN
01 02 03 04 05 06 07 08
09 10 11 12 13 14 15 16
17 18 19 20 21 22 23 24
25 26 27 28 29 30 31 32
33 34 35 36 37 38 39 40

WICHTIGER SICHERHEITSHINWEIS
ACHTUNG Bitte lesen Sie den folgenden Sicherheitshinweis, bevor Sie das
Produkt verwenden, und ergreifen Sie Sicherheitsmaßnahmen, um Fehlfunk-
tionen durch versehentliche Bedienung zu vermeiden.
1. Bewahren Sie das Gerät an einem kühlen und gut belüfteten Ort außerhalb
der Reichweite von Kindern und Haustieren auf.
2. Legen Sie das Produkt nicht über längere Zeit in eine Umgebung mit
hohen Temperaturen. Die Betriebstemperatur dieses Produkts beträgt
-20煓~60煓. Die Lagertemperatur sollte 50煓 nicht überschreiten.
Persönliche Sicherheit
1. Starten Sie Fahrzeuge nur mit dem vom Hersteller gelieferten intelligenten
Starthilfekabel.
2. Verwenden Sie das Produkt nicht, wenn die Klemme oder das Kabel be-
schädigt ist.
3. Verbinden Sie die rote und die schwarze Klemme nicht miteinander, wenn
das Produkt in Betrieb ist.
4. Verbinden Sie die rote und die schwarze Klemme nicht mit demselben
Metallstück.
5. Zerlegen oder modifizieren Sie dieses Produkt nicht.
6. Verwenden Sie keine Reinigungsmittel, um dieses Produkt zu reinigen.
7. Missbrauchen Sie dieses Produkt nicht und vermeiden Sie es, es fallen zu
lassen oder wiederholt darauf zu schlagen.
8. Betreiben Sie das Produkt nicht in explosionsgefährdeten Umgebungen,
wie z.B. bei entflammbaren Flüssigkeiten, Gasen oder Stäuben.
9. Tauchen Sie das Produkt nicht in Wasser ein.
Elektrische Sicherheit
1. Werfen Sie das Produkt nicht in den Müll, sondern recyceln Sie es sicher.
2. Verbrennen Sie das Produkt nicht und setzen Sie es keinen hohen Tem-
peraturen aus, da es explodieren kann.
3. Verwenden Sie nur Ersatzteile oder Zubehör, die vom Hersteller geliefert
oder empfohlen werden.
Sicherheit der Batterie
DE
01 02 03 04 05 06 07 08
09 10 11 12 13 14 15 16
17 18 19 20 21 22 23 24
25 26 27 28 29 30 31 32
33 34 35 36 37 38 39 40

GARANTIE
TREKURE gewährt seinen Kunden eine Garantie von 24 Monaten ab dem
Kaufdatum.
Für Unterstützung oder Garantieansprüche kontaktieren Sie uns bitte per
E-Mail an [email protected]
1. Bitte verwenden Sie das mitgelieferte USB-C-Kabel und 5V/2A oder höher
Adapter zum Aufladen.
2. Bitte stellen Sie sicher, dass das Gerät vollständig aufgeladen ist, bevor
Sie das Produkt zum ersten Mal verwenden.
3. Es wird empfohlen, das Gerät mindestens einmal alle 3 Monate vollständig
aufzuladen, um die Lebensdauer des Geräts zu verlängern.
VORSICHTSMASSNAHMEN VOR DEM GEBRAUCH
SPEZIFIKATIONEN
Modell
Kapazität
USB1 Ausgang
USB2 Ausgang
USB-C Eingang
Betriebstemperatur
Beta06
23800mAh, 88.06Wh
5V/2.4A
5V/2.4A 9V/2A 12V/1.5A
5V/2A 9V/2A
-20煓~60煓
DE
01 02 03 04 05 06 07 08
09
10 11 12 13 14 15 16
17 18 19 20 21 22 23 24
25 26 27 28 29 30 31 32
33 34 35 36 37 38 39 40

1.PRODUKTÜBERSICHT
滬
滧
滦
滩
Η
Θ
Ι
滪
滫
滨
滮
滯
滭
滦Öîĉ·Ó§çĐäîõĂÌ
滧ÁçÁĕ·ÓĐĕîÍĉЧĉĐÁ
滨_·Ó§çĐÁąÌĚąĕÌĂĕìĂìõ½ĕĉ
滩>ĕÌĐ½ąĕ·ä瀆[Á½ĕıÖÁąĕîÍĉЧĉĐÁ濎瀆濏
滪>ĕÌĐ½ąĕ·äÁąÓúÓĕîÍĉЧĉĐÁ濎灢濏
滫_·Ó§çĐäîõĂÌąĕ·äÁÖîÓÁÖĐ
滬<îõĂÌıĕì_ЧąĐÁî½Áąĕ̶ç§ĉĕîÍ
滭:ĕìĂĉЧąĐ瀆îĉ·Óçĕĉĉ
滮k_瀆ĕĉͧîÍ溢濎溡溨Ħ濏
滯k_瀆ĕĉͧîÍ溡
Η k_瀆ÖîͧîÍ
Θ >ĕÌĐĉ·Óç§ĕ·Ó瀆_·ÓîÖĐĐĉĐÁççÁ
Ι >瀆>Ö·ÓĐ
DE
01 02 03 04 05 06 07 08
09 10
11 12 13 14 15 16
17 18 19 20 21 22 23 24
25 26 27 28 29 30 31 32
33 34 35 36 37 38 39 40

Λ
Κ
Ν
Μ
Ξ
Ο
Κ&OUMBEFO
Λ"VBEFO
Μ*OBUJPOTNPEVT5ZQFO
Ν-VGUESVDLXFSU
Ξ-VGUESVDLFJOIFJU5ZQFO
Ο#BUUFSJF"O[FJHF
Stecken Sie das Ladekabel in den USB-C-Anschluss.
Schließen Sie es an einen 5V/2A oder höheren Adapter an (Adapter nicht
im Lieferumfang enthalten).
3.AUFLADEN DES STARTHILFEGERÄTS
2.ANZEIGEÜBERSICHT
1
2
DE
01 02 03 04 05 06 07 08
09 10 11
12 13 14 15 16
17 18 19 20 21 22 23 24
25 26 27 28 29 30 31 32
33 34 35 36 37 38 39 40
Stecken Sie das Kabel in den entsprechenden USB-Ausgang.
Verbinden Sie es mit elektronischen Geräten, wie z.B. Smartphones.
Und dann, drücken Sie die Power on/off-Taste.
4.ELEKTRONISCHE GERÄTE AUFLADEN
5.LED-BELEUCHTUNG
Kurz drücken Kurz drücken Kurz drücken
6.AUFPUMPEN DER AUTOREIFEN
1
2
Geräteschalter SOS (Orange) OFFBeleuchtung
(Weiß)
Stroboskop
(Weiß)
Drücken Sie
die Lichttaste
DE
01 02 03 04 05 06 07 08
09 10 11 12
13 14 15 16
17 18 19 20 21 22 23 24
25 26 27 28 29 30 31 32
33 34 35 36 37 38 39 40

1
1
2
3
· Unterstützt 5 Aufblasmodi, bis zu 150 PSI
Schließen Sie den Luftschlauch fest an das Produkt bzw. den Reifen an
und ziehen Sie ihn fest.
Drücken Sie lange auf den Aufblasknopf “ ”, um zu starten. Es wird
automatisch gestoppt, wenn der Luftdruck den voreingestellten Wert
erreicht.
Den Druck einstellen. Drücken Sie kurz die Einschalttaste “ ”, um das Gerät
einzuschalten, wählen Sie den Aufblasmodus “ ” und die Luftdruckein-
heit “ ” aus, und stellen Sie dann optional den Luftdruckwert mit den
Tasten “ ” “ ” ein.
Tipp: Bei längerem Gebrauch empfiehlt es sich, alle 10 Minuten eine Pause
einzulegen, um sich abzukühlen.
Aufblasbarer Modus
Aufblasbarer Auto-Modus
Motorrad-Aufblasmodus
Aufblasbarer Modus für Fahrräder
Basketball-Aufblasmodus
Modus "Individueller Luftdruck
Luftdruckbereich
26-51 PSI,1.8-3.5 BAR,180-350 KPA
26-44 PSI,1.8-3.0 BAR,180-300 KPA
29-65 PSI,2.0-4.5 BAR,200-450 KPA
4-16 PSI,0.2-1.1 BAR,20-110 KPA
3-150 PSI,0.2-10.3 BAR,20-990 KPA
· Überprüfen Des Reifendrucks Ihres Autos
1. Drücken Sie kurz die Einschalttaste “ ” , um das Gerät einzuschalten.
2. Schließen Sie den Luftschlauch an die Reifendüse an, achten Sie darauf,
dass Sie ihn bis zum Ende durchdrücken und fest andrücken.
3. Der auf dem Display angezeigte Druck ist der aktuelle Reifendruck.
DE
01 02 03 04 05 06 07 08
09 10 11 12 13
14 15 16
17 18 19 20 21 22 23 24
25 26 27 28 29 30 31 32
33 34 35 36 37 38 39 40
7.STARTHILFE FÜR IHR AUTO
+
-
START
/STOP
1
Stecken Sie das Überbrückungskabel in die Starthilfe (mindestens
20% Leistung).
1
2
Überprüfen Sie den Anschluss der Klemmen und ob die Batterie des
Geräts mehr als 20 % beträgt.
Drücken Sie die Starttaste 3 Sekunden lang.
Die Anzeige leuchtet grün, und der Motor wird wieder gezündet.
3
Achtung: Wenn Sie diese Funktion verwenden, werden die automatische
Erkennung und die Sicherheitsfunktionen vorübergehend deaktiviert.
3 Schritte zur Behebung des Problems:
· ÜBER DIE ZWANGSSTARTFUNKTION
Wenn der Anlauf dreimal fehlschlägt, obwohl die Klemmen korrekt an
Ihrem Gerät angeschlossen sind, können Sie mit der Force-Start-Funktion
den Boost-Modus aktivieren.
START
/STOP
3
Schließen Sie die Klemmen an die Autobatterie an (rot an +, schwarz
an -).
Starten Sie den Motor Ihres Autos.
2
DE
01 02 03 04 05 06 07 08
09 10 11 12 13 14
15 16
17 18 19 20 21 22 23 24
25 26 27 28 29 30 31 32
33 34 35 36 37 38 39 40
8.INDIKATOREN UND FEHLERSUCHE
In einer der folgenden Situationen schaltet die intelligente Klemme die
Schutzmaßnahmen ein.
9.FEHLERSUCHE ÜBER DIE STARTHILFE
Niedrigtemperatur-Ladeschutz ---Ziehen Sie den Stecker des
Ladegeräts und warten Sie, bis der Schutz aufgehoben wird
Ladeschutz bei hoher Temperatur ---Ziehen Sie den Stecker
des Ladegeräts und warten Sie, bis der Schutz aufgehoben ist
Entladeschutz bei hoher Temperatur ---Ziehen Sie den Stecker
des elektrischen Geräts und warten Sie, bis der Schutz ausgelöst
wird
Übertemperaturschutz des Zylinders ---Berühren Sie das Gerät
und die Luftröhre nicht sofort, um Verbrennungen durch hohe
Temperaturen zu vermeiden, und warten Sie 10 bis 15 Minuten,
bis das Gerät steht
1
2
3
7
Indikator
Rote und grüne
Lichter blinken
Standby-Status
Situationen
Grünes Licht
bleibt an
Bereit zum Start
Rote Licht bleibt an
Durchgehend rot
Licht mit
diskontinuierlichem
Piepton
Rote Licht bleibt an
mit langem Signalton
Andere
Bitte wenden Sie sich an [email protected]
1. Schutz vor Niederspannung ---Wiederaufladen des
Produkts
2. Überhitzungsschutz ---Entferne die Klemmen, um
sie abkühlen zu lassen
3. Timeout-Schutz ---Zeitüberschreitung bei der
Verbindung. Starten Sie den Motor in 60 Sekunden.
Oder entfernen Sie den Clip innerhalb von 30
Sekunden nach erfolgreichem Start.
1. Schutz vor Verpolung ---Umkehrung der Clips und
Sicherstellung der korrekten Verbindung
2. Überbrückungskabel hat einen klemmenden Fehler
---Kontaktiere [email protected] für Ersatzteile
Schutz vor Kurzschlüssen ---Die Clips dürfen nicht
zusammen oder mit demselben Metall verbunden
werden
DE
01 02 03 04 05 06 07 08
09 10 11 12 13 14 15
16
17 18 19 20 21 22 23 24
25 26 27 28 29 30 31 32
33 34 35 36 37 38 39 40

AVERTISSEMENT DE SÉCURITÉ IMPORTANT
ATTENTION Veuillez lire l'avertissement de sécurité suivant avant d'utiliser le
produit et prenez des mesures de protection pour éviter les dysfonctionne-
ments causés par un fonctionnement accidentel.
1. Conservez l'appareil dans un endroit frais et bien ventilé, hors de portée
des enfants et des animaux domestiques.
2. Ne pas placer le produit dans un environnement à haute température
pendant une longue période. La température de fonctionnement de ce
produit est de -4煔~140煔. La température de stockage ne doit pas dépasser
122煔.
Sécurité personnelle
1. Ne démarrez les véhicules qu'avec le câble de démarrage intelligent fourni
par le fabricant.
2. Ne pas utiliser le produit si la pince ou le câble est endommagé.
3. Ne pas connecter les pinces rouge et noire ensemble lorsque le produit
est en cours de production.
4. Ne pas connecter les pinces rouge et noire à la même pièce de métal.
5. Ne pas démonter ou modifier ce produit.
6. Ne pas utiliser de détergent pour nettoyer ce produit.
7. N'abusez pas de ce produit et évitez de le faire tomber lourdement ou de
le heurter de manière répétée.
8. Ne pas utiliser le produit dans des environnements explosifs tels que des
liquides, des gaz ou des poussières inflammables.
9. Ne pas immerger le produit dans l'eau.
Sécurité électrique
1. Ne pas jeter le produit dans les ordures et le recycler en toute sécurité.
2. Ne pas incinérer le produit ou l'exposer à des températures élevées, car
il risque d'exploser.
3. N'utiliser que les pièces de rechange ou les accessoires fournis ou
recommandés par le fabricant.
Sécurité de la batterie
FR
01 02 03 04 05 06 07 08
09 10 11 12 13 14 15 16
17 18 19 20 21 22 23 24
25 26 27 28 29 30 31 32
33 34 35 36 37 38 39 40

GARANTIE
TREKURE offre à ses clients une garantie de 24 mois à compter de la date
d'achat.
Pour toute assistance ou demande de garantie, veuillez nous contacter
par courrier électronique à l'adresse [email protected].
1.Veuillez utiliser le câble USB-C inclus et l'adaptateur 5V/2A ou supérieur
pour la charge.
2.Veuillez vous assurer que l'appareil est complètement chargé avant
d'utiliser le produit pour la première fois.
3.Il est recommandé de charger complètement l'appareil au moins une
fois tous les 3 mois pour aider à prolonger la durée de vie de l'appareil.
PRÉCAUTIONS D'EMPLOI
CARACTÉRISTIQUES TECHNIQUES
Modèle
Capacité
Sortie USB1
Sortie USB2
Entrée USB-C
Température de fonctionnement
Beta06
23800mAh, 88.06Wh
5V/2.4A
5V/2.4A 9V/2A 12V/1.5A
5V/2A 9V/2A
-4煔~140煔
FR
01 02 03 04 05 06 07 08
09 10 11 12 13 14 15 16
17
18 19 20 21 22 23 24
25 26 27 28 29 30 31 32
33 34 35 36 37 38 39 40

1.APERÇU DU PRODUIT
滬
滧
滦
滩
Η
Θ
Ι
滪
滫
滨
滮
滯
滭
滦õĕĐõî½瀢§çÖìÁîЧĐÖõî
滧õĕĐõî½瀢·ç§Öą§ÍÁ
滨õĕĐõî½Á·õììĕЧĐÖõî½ĕìõ½Á½ÁÍõîÌç§ÍÁ
滩õĕĐõî½ÁąÂ½ĕ·ĐÖõî½Áç§ĂąÁĉĉÖõî½瀢§Öą濎瀆濏
滪õĕĐõî½瀢§ĕÍìÁîЧĐÖõî½Áç§ĂąÁĉĉÖõî½瀢§Öą濎灢濏
滫õĕĐõî½Á·õììĕЧĐÖõî½Áç瀢ĕîÖĐ½ÁĂąÁĉĉÖõî
滬õĕĐõî½Á½Âì§ąą§ÍÁ½ĕÍõîÌç§ÍÁ
滭XõąĐ½Á½Âì§ąą§ÍÁą§ĂÖ½Á
滮_õąĐÖÁk_溢濎溡溨Ħ濏
滯_õąĐÖÁk_溡
Η k_瀆/îĂĕĐ
Θ /îĐÁąÌ§·ÁĐĕĬ§ĕ½瀢§Öą
Ι >>ÖÍÓĐ
FR
01 02 03 04 05 06 07 08
09 10 11 12 13 14 15 16
17 18
19 20 21 22 23 24
25 26 27 28 29 30 31 32
33 34 35 36 37 38 39 40

2.APERÇU DE L'AFFICHAGE
Λ
Κ
Ν
Μ
Ξ
Ο
Κ*OEJDBUFVSEFTPSUJF
Λ*OEJDBUFVSEFDIBSHF
Μ*OBUJPO.PEF5ZQFT
Ν"DIBHFEFMBQSFTTJPOEBJS
Ξ6OJU¨EFQSFTTJPOEBJS
Ο5¨NPJOEFCBUUFSJF
1
2
Insérez le câble de charge dans le port USB C.
Connecter à un adaptateur de 5V/2A ou plus (adaptateur non inclus).
3.CHARGEMENT DU DÉMARREUR DE SECOURS
FR
01 02 03 04 05 06 07 08
09 10 11 12 13 14 15 16
17 18 19
20 21 22 23 24
25 26 27 28 29 30 31 32
33 34 35 36 37 38 39 40
1
2
Branchez le câble dans le port de sortie USB correspondant.
Connectez les appareils électroniques, tels que les smartphones. Ensuite,
appuyez sur le bouton marche/arrêt.
4.CHARGER LES APPAREILS ÉLECTRONIQUES
5.ÉCLAIRAGE LED
6.GONFLER LES PNEUS DE VOTRE VOITURE
Interrupteur
de l'appareil
SOS (Orange) OFFL'éclairage
(blanc)
Strobe
(blanc)
Appuyer
brièvement
Appuyer sur le
bouton d'éclairage
Appuyer
brièvement
Appuyer
brièvement
FR
01 02 03 04 05 06 07 08
09 10 11 12 13 14 15 16
17 18 19 20
21 22 23 24
25 26 27 28 29 30 31 32
33 34 35 36 37 38 39 40

1. Appuyer brièvement sur le bouton d'alimentation “ ” pour allumer la
machine.
2. connecter le tuyau d'air à l'embout du pneu, en veillant à appuyer jusqu'au
bout et à appuyer fermement.
3. la pression affichée à l'écran est la pression actuelle du pneu.
· Vérifier la pression des pneus de votre voiture
· Prise en charge de 5 modes de gonflage, jusqu'à 150 PSI
1
Connecter fermement le tuyau d'air au produit et au pneu respectivement,
et le serrer.
Appuyer longuement sur le bouton de gonflage “ ” pour démarrer. Il
s'arrêtera automatiquement lorsque la pression d'air atteindra la valeur
préréglée.
Régler la pression. Appuyer brièvement sur le bouton d'alimentation “ ”
pour mettre en marche, sélectionner le mode de gonflage “ ” et l'unité
de pression d'air “ ” , puis régler éventuellement la valeur de la pression
d'air “ ” “ ” .
1
2
3
Conseil : En cas d'utilisation prolongée, il est recommandé de s'arrêter
toutes les 10 minutes pour refroidir.
Mode gonflable
Mode de gonflage voiture
Mode de gonflage moto
Mode de gonflage vélo
Mode de gonflage du ballon de basket
Mode de pression d'air personnalisé
Gamme de pression d'air
26-51 PSI,1.8-3.5 BAR,180-350 KPA
26-44 PSI,1.8-3.0 BAR,180-300 KPA
29-65 PSI,2.0-4.5 BAR,200-450 KPA
4-16 PSI,0.2-1.1 BAR,20-110 KPA
3-150 PSI,0.2-10.3 BAR,20-990 KPA
FR
01 02 03 04 05 06 07 08
09 10 11 12 13 14 15 16
17 18 19 20 21
22 23 24
25 26 27 28 29 30 31 32
33 34 35 36 37 38 39 40
7.DÉMARRAGE D'URGENCE DE VOTRE VOITURE
+
-
START
/STOP
1
Insérer le câble de démarrage dans le démarreur (20 % de puissance
au moins).
Connecter les pinces à la batterie de la voiture (rouge à +
, noir à -).
Démarrez le moteur de votre voiture.
2
3
· À PROPOS DE LA FONCTION DE DÉMARRAGE FORCÉ
Si trois tentatives échouent alors que vous avez correctement connecté
les pinces à votre voiture, vous pouvez utiliser la fonction de démarrage
forcé pour passer en mode boost.
START
/STOP
1
Vérifiez que les pinces sont bien connectées et que la batterie du produit
est supérieure à 20 %.
2
Appuyez sur le bouton de démarrage forcé pendant 3 secondes.
3
L'indicateur devient vert et retourne à l'allumage du moteur.
Attention: Lors de l'utilisation de cette fonction, l'auto-détection et les
fonctions de sécurité seront temporairement désactivées.
3 étapes pour résoudre le problème :
FR
01 02 03 04 05 06 07 08
09 10 11 12 13 14 15 16
17 18 19 20 21 22
23 24
25 26 27 28 29 30 31 32
33 34 35 36 37 38 39 40
9.TROUBLESHOOTING ABOUT JUMP STARTER
1
2
3
7
8.À PROPOS DU DÉPANNAGE
Dans l'une des situations suivantes, la pince intelligente activera les
protections:
Indicateur
Clignotant en
rouge et vert
Vert solide
État de veille
Prêt à démarrer
Situations
Protection contre le chargement à basse température
---Débrancher le chargeur et attendre que la protection soit levée
Protection contre la charge à haute température
---Débrancher le chargeur et attendre la fin de la protection
Protection contre les décharges à haute température
---Débrancher l'équipement électrique et attendre que la
protection soit libérée
Protection contre la surchauffe du cylindre
---Ne pas toucher l'appareil et la trachée immédiatement pour
éviter les brûlures dues à la température élevée et attendre que
l'appareil soit au repos pendant 10 à 15 minutes
Rouge uni
Rouge fixe avec bip
discontinu
Rouge fixe avec
bip long
Autres
Veuillez contacter [email protected] pour
plus d'informations.
1. Protection contre les basses tensions ---Recharger
le produit
2. Protection contre la surchauffe ---Retirer les pinces
pour laisser refroidir le produit
3. Protection contre le dépassement de temps ---La
connexion est interrompue. Démarrer le moteur dans
les 60 secondes ou retirer la pince dans les 30
secondes après un démarrage réussi.
1. Protection contre les inversions de polarité
---Inverser les clips et assurer une connexion correcte
2. Défaut de collage ---Contactez
[email protected] pour obtenir des pièces de
rechange
Protection contre les courts-circuits ---Ne pas
connecter les pinces ensemble ou sur le même métal
FR
01 02 03 04 05 06 07 08
09 10 11 12 13 14 15 16
17 18 19 20 21 22 23
24
25 26 27 28 29 30 31 32
33 34 35 36 37 38 39 40

1. Avviare i veicoli solo con il cavo intelligente fornito dal costruttore.
2. Non utilizzare il prodotto se il morsetto o il cavo sono danneggiati.
3. Non collegare insieme i morsetti rosso e nero quando il prodotto è in uscita.
4. Non collegare i morsetti rosso e nero allo stesso pezzo di metallo.
5. Non smontare o modificare il prodotto.
6. Non utilizzare detergenti per pulire il prodotto.
7. Non abusare del prodotto ed evitare di farlo cadere pesantemente o di
colpirlo ripetutamente.
8. Non utilizzare il prodotto in ambienti esplosivi come liquidi o polveri
infiammabili.
9. Non immergere il prodotto in acqua.
Sicurezza elettrica
1. Non gettare il prodotto tra i rifiuti e riciclarlo in modo sicuro.
2. Non incenerire il prodotto e non esporlo ad alte temperature perché
potrebbe esplodere.
3. Utilizzare solo parti di ricambio o accessori forniti o raccomandati dal
produttore.
Sicurezza della batteria
IMPORTANTE AVVERTENZA DI SICUREZZA
1. Conservare in un luogo fresco e ben ventilato, fuori dalla portata di bambini
e animali domestici.
2. Non collocare il prodotto in ambienti ad alta temperatura per lungo tempo.
La temperatura di funzionamento di questo prodotto è di -4煔~140煔. La
temperatura di conservazione non deve superare i 122煔
ATTENZIONE: Leggere le seguenti avvertenze di sicurezza prima di utilizzare il
prodotto e adottare misure di protezione per evitare malfunzionamenti causati
da operazioni accidentali.
.
Sicurezza personale
IT
01 02 03 04 05 06 07 08
09 10 11 12 13 14 15 16
17 18 19 20 21 22 23 24
25 26 27 28 29 30 31 32
33 34 35 36 37 38 39 40

GARANZIA
TREKURE offre ai clienti una garanzia di 24 mesi dalla data di acquisto.
Per assistenza o richiesta di copertura della garanzia, contattateci via
e-mail all'indirizzo [email protected].
1. Per la ricarica, utilizzare il cavo USB-C incluso e l'adattatore da 5V/2A o
superiore.
2. Assicurarsi che il dispositivo sia completamente carico prima di utilizzare
il prodotto per la prima volta.
3. Si consiglia di caricare completamente il dispositivo almeno una volta
ogni 3 mesi per prolungarne la durata.
PRECAUZIONI PRIMA DELL'USO
SPECIFICHE TECNICHE
Modello
Capacità
Uscita USB1
Uscita USB2
Ingresso USB-C
Temperatura di funzionamento
Beta06
23800mAh, 88.06Wh
5V/2.4A
5V/2.4A 9V/2A 12V/1.5A
5V/2A 9V/2A
-4煔~140煔
IT
01 02 03 04 05 06 07 08
09 10 11 12 13 14 15 16
17 18 19 20 21 22 23 24
25
26 27 28 29 30 31 32
33 34 35 36 37 38 39 40
1.PANORAMICA DEL PRODOTTO
滬
滧
滦
滩
Η
Θ
滪
滫
滨
滮
滯
滭
Ι
滦Xĕçĉ§îĐÁ½Ö§··ÁîĉÖõîÁ
滧Xĕçĉ§îĐÁ½ÖÖççĕìÖî§ıÖõîÁ
滨Xĕçĉ§îĐÁ½Ö·õììĕЧıÖõîÁ½Áçç§ìõ½§çÖĐ½ÖÍõîÌÖ§ÍÍÖõ
滩Xĕçĉ§îĐÁ½ÖąÖ½ĕıÖõîÁ½Áçç§ĂąÁĉĉÖõîÁ½Áçç瀢§ąÖ§濎瀆濏
滪Xĕçĉ§îĐÁ½Ö§ĕìÁîĐõ½Áçç§ĂąÁĉĉÖõîÁ½Áçç瀢§ąÖ§濎灢濏
滫Xĕçĉ§îĐÁ½Ö·õììĕЧıÖõîÁ½Áçç瀢ĕîÖĐ½ÖĂąÁĉĉÖõîÁ
滬Xĕçĉ§îĐÁ½Ö§ĥĥÖõ½ÁçÍõîÌÖ§ÍÍÖõ
滭XõąĐ§½Ö§ĥĥÖ§ìÁîĐõ§ĉ§çĐõ
滮kĉ·ÖЧk_溢濎溡溨Ħ濏
滯kĉ·ÖЧk_溡
Η瀵/îÍąÁĉĉõk_瀆
Θ/îĐÁąÌ§··Ö§Đĕ¶õ§ąÖ§
Ι>ĕ·Á§>
IT
01 02 03 04 05 06 07 08
09 10 11 12 13 14 15 16
17 18 19 20 21 22 23 24
25 26
27 28 29 30 31 32
33 34 35 36 37 38 39 40
2.PANORAMICA DEL DISPLAY
Λ
Κ
Ν
Μ
Ξ
Ο
Κ4DBSJDP
Λ3JDBSJDB
Μ.PEBMJUEJHPOBHHJPUJQJ
Ν7BMPSFEFMMBQSFTTJPOFEFMMBSJB
Ξ6OJUEJQSFTTJPOFEFMMBSJBUJQJ
Ο*OEJDBUPSFEFMMBCBUUFSJB
1
2
Inserire il cavo di ricarica nella porta USB C.
Collegare a un adattatore da 5V/2A o superiore (adattatore non incluso).
3.RICARICA IL TUO AVVIATORE DI SALTO
IT
01 02 03 04 05 06 07 08
09 10 11 12 13 14 15 16
17 18 19 20 21 22 23 24
25 26 27
28 29 30 31 32
33 34 35 36 37 38 39 40

1
2
Inserire il cavo nella porta di uscita USB corrispondente.
Collegare ai dispositivi elettronici, come gli smartphone. Quindi, premere
il pulsante di accensione/spegnimento.
4.CARICARE I DISPOSITIVI ELETTRONICI
5.ILLUMINAZIONE A LED
6.GONFIARE I PNEUMATICI DELL'AUTO
Interruttore del
dispositivo
SOS (arancione) OFFIlluminazione
(bianco)
Stroboscopio
(bianco)
Premere
brevemente
Premere il pulsante
di illuminazione
Premere
brevemente
Premere
brevemente
IT
01 02 03 04 05 06 07 08
09 10 11 12 13 14 15 16
17 18 19 20 21 22 23 24
25 26 27 28
29 30 31 32
33 34 35 36 37 38 39 40
· Controllo della pressione degli pneumatici dell'auto
1. Premere brevemente il pulsante di accensione per accendere la macchina.
2. Collegare il connettore del tubo dell'aria all'ugello del pneumatico facendo
attenzione a premere fino all'estremità e a premere con forza.
3. La pressione visualizzata sul display è la pressione attuale del pneumatico.
Modalità gonfiabile
Modalità gonfiabile auto
Modalità di gonfiaggio moto
Modalità gonfiabile bicicletta
Modalità di gonfiaggio del pallone da basket
Modalità di pressione dell'aria personalizzata
Intervallo di pressione dell'aria
26-51 PSI,1.8-3.5 BAR,180-350 KPA
26-44 PSI,1.8-3.0 BAR,180-300 KPA
29-65 PSI,2.0-4.5 BAR,200-450 KPA
4-16 PSI,0.2-1.1 BAR,20-110 KPA
3-150 PSI,0.2-10.3 BAR,20-990 KPA
· Supporto di 5 modalità di gonfiaggio, fino a 150 PSI
1
Collegare saldamente il tubo dell'aria rispettivamente al prodotto e al
pneumatico e serrarlo.
Premere a lungo il pulsante di gonfiaggio “ ” per iniziare. Si arresterà
automaticamente quando la pressione dell'aria raggiungerà il valore
preimpostato.
Impostare la pressione. Premere brevemente il pulsante di accensione “
”per accenderlo, selezionare la modalità di gonfiaggio “ ” e l'unità di
pressione dell'aria “ ” , quindi regolare il valore della pressione dell'aria
con i pulsanti “ ” “ ”.
7.AVVIAMENTO DELL'AUTO
+
-
START
/STOP
1
2
3
Suggerimento: in caso di utilizzo prolungato, si consiglia di fermarsi ogni
10 minuti per raffreddarsi.
IT
01 02 03 04 05 06 07 08
09 10 11 12 13 14 15 16
17 18 19 20 21 22 23 24
25 26 27 28 29
30 31 32
33 34 35 36 37 38 39 40
· SULLA FUNZIONE DI AVVIAMENTO FORZATO
Se tre tentativi falliscono quando le pinze sono correttamente collegate
all'auto, è possibile utilizzare la funzione di avviamento forzato per entrare
in modalità boost.
START
/STOP
1
Controllare il collegamento dei morsetti e che la batteria del prodotto
sia superiore al 20%.
2
Premere il pulsante di avvio forzato per 3 secondi.
3
L'indicatore diventa verde e torna ad accendere il motore.
Attenzione: quando si utilizza questa funzione, il rilevamento automatico
e le funzioni di sicurezza saranno temporaneamente disabilitate.
3 passaggi per risolvere il problema:
8.SULLA RISOLUZIONE DEI PROBLEMI
In una delle seguenti situazioni, la pinza intelligente attiva le protezioni:
Indicatore
Rosso e verde
lampeggianti
Verde fisso
Stato di standby
Pronti a partire
Situazioni
1
Inserire il cavo di avviamento nell'avviatore (almeno al 20% di potenza).
Collegare i morsetti alla batteria dell'auto (rosso a +, nero a -).
Avviare il motore dell'auto.
2
3
IT
01 02 03 04 05 06 07 08
09 10 11 12 13 14 15 16
17 18 19 20 21 22 23 24
25 26 27 28 29 30
31 32
33 34 35 36 37 38 39 40
9.COMPROBAR LA PRESIÓN DE LOS NEUMÁTICOS
Protezione della carica a bassa temperatura
---Scollegare il caricabatterie e attendere che
la protezione venga rilasciata
Protezione per la carica ad alta temperatura
---Scollegare il caricabatterie e attendere il
rilascio della protezione
Protezione da scarica ad alta temperatura
---Scollegare l'apparecchiatura elettrica e
attendere il rilascio della protezione
Protezione da sovratemperatura del cilindro
---Non toccare immediatamente la macchina
e la trachea per evitare ustioni da alta
temperatura e attendere che la macchina si
fermi per 10-15 minuti
1
2
3
7
Rosso solido
Rosso fisso con segnale
acustico discontinuo
Rosso fisso con segnale
acustico lungo
Altro
Si prega di contattare [email protected]
per i dettagli
1. Protezione a bassa tensione ---Ricarica il prodotto
2. Protezione contro il surriscaldamento ---Rimuo-
vere i morsetti per lasciarlo raffreddare
3. Protezione contro il timeout --Il collegamento è
scaduto. Avviare il motore entro 60s o rimuovere la
pinza entro 30s dopo un avvio riuscito.
1. Protezione contro l'inversione di polarità
---Invertire le clip e assicurare il corretto
collegamento
2. Guasto appiccicoso --Contattare
[email protected] per le parti di ricambio
Protezione contro i cortocircuiti ---Non collegare le
clip tra loro o allo stesso metallo.
IT
01 02 03 04 05 06 07 08
09 10 11 12 13 14 15 16
17 18 19 20 21 22 23 24
25 26 27 28 29 30 31
32
33 34 35 36 37 38 39 40

1. Arranque los vehículos únicamente con el cable de arranque inteligente
suministrado por el fabricante.
2. No utilice el producto si la pinza o el cable están dañados.
3. No conecte las pinzas roja y negra juntas cuando el producto esté saliendo.
4. No conecte las pinzas roja y negra a la misma pieza de metal.
5. No desmonte ni modifique este producto.
6. No utilice detergente para limpiar este producto.
7. No abuse de este producto y evite dejarlo caer con fuerza o golpearlo
repetidamente.
8. No utilice el producto en entornos explosivos como líquidos, gases o polvos
inflamables.
9. No sumerja el producto en agua.
Seguridad eléctrica
1. No tire el producto a la basura y debe reciclarse de forma segura.
2. No incinere el producto ni lo exponga a altas temperaturasya que pueden
explotar.
3. Utilice únicamente piezas de repuesto o accesorios suministrados o re-
comendados por el fabricante.
Seguridad de la batería
ADVERTENCIA DE SEGURIDAD IMPORTANTE
ATENCIÓN Lea la siguiente advertencia de seguridad antes de utilizar el
producto y tome las medidas de protección necesarias para evitar fallos de
funcionamiento causados por un manejo accidental.
1. Almacene en un lugar fresco y bien ventilado fuera del alcance de niños
y mascotas.
2. No exponga el producto a altas temperaturas durante mucho tiempo. La
temperatura de funcionamiento de este producto es de -4煔~140煔. La
temperatura de almacenamiento no debe superar los 122煔.
Seguridad personal
ES
01 02 03 04 05 06 07 08
09 10 11 12 13 14 15 16
17 18 19 20 21 22 23 24
25 26 27 28 29 30 31 32
33 34 35 36 37 38 39 40

GARANTÍA
TREKURE ofrece a sus clientes una garantía de 24 meses a partir de la
fecha de compra.
Para asistencia o reclamación de cobertura de garantíapor favor, póngase
en contacto con nosotros por correo electrónico a [email protected].
1.Por favor, utilice el cable USB-C incluido y el adaptador de 5V/2A o superior
para la carga.
2.Por favor, asegúrese de que el dispositivo está completamente cargado
antes de utilizar el producto por primera vez.
3.Se recomienda cargar completamente el dispositivo al menos una vez
cada 3 meses para ayudar a prolongar la vida útil del dispositivo.
PRECAUCIONES ANTES DEL USO
ESPECIFICACIONES
Modelo
Capacidad
Salida USB1
Salida USB2
Entrada USB-C
Temperatura de funcionamiento
Beta06
23800mAh, 88.06Wh
5V/2.4A
5V/2.4A 9V/2A 12V/1.5A
5V/2A 9V/2A
-4煔~140煔
ES
01 02 03 04 05 06 07 08
09 10 11 12 13 14 15 16
17 18 19 20 21 22 23 24
25 26 27 28 29 30 31 32
33
34 35 36 37 38 39 40

1.RESUMEN DEL PRODUCTO
滬
滧
滦
滩
Η
Θ
滪
滫
滨
滮
滯
滭
Ι
滦õĐöî½ÁÁî·Áî½Ö½õ
滧õĐöî½ÁÖçĕìÖÖöî
滨õĐöî½Á·õîìĕЧ·Ööî½Áçìõ½õ½ÁÖîÌ秽õ
滩õĐöî½ÁąÁ½ĕ··Ööî½Áç§ĂąÁĉÖöî½Áç§ÖąÁ濎瀆濏
滪õĐöî½Á§ĕìÁîĐõ½Áç§ĂąÁĉÖöî½Áç§ÖąÁ濎灢濏
滫õĐöî½Á·õîìĕЧ·Ööî½Áç§ĕîÖ½§½½ÁĂąÁĉÖöî
滬õĐöî½ÁÖîÖ·Öõ½ÁÖîÌ秽õ
滭XĕÁąĐõ½Á§ąą§îĄĕÁą¨ĂÖ½õ
滮_§çÖ½§k_溢濎溡溨Ħ濏
滯_§çÖ½§k_溡
ΗîĐą§½§k_瀆
Θ/îĐÁąÌ§ı½Áì§îÍĕÁą§½Á§ÖąÁ
Ι>ĕı>
ES
01 02 03 04 05 06 07 08
09 10 11 12 13 14 15 16
17 18 19 20 21 22 23 24
25 26 27 28 29 30 31 32
33 34
35 36 37 38 39 40

Λ
Κ
Ν
Μ
Ξ
Ο
Κ%FTDBSHB
Λ$BSHB
Μ.PEPEFJOBEP5JQPT
Ν7BMPSEFMBQSFTJ²OEFMBJSF
Ξ6OJEBEEFQSFTJ²OEFBJSF5JQPT
Ο*OEJDBEPSEFCBUFS¬B
Inserta el cable de carga en el puerto USB C.
Conéctalo a un adaptador de 5V/2A o superior (adaptador no incluido).
3.CARGA TU ARRANCADOR DE COCHES
2.RESUMEN DE PANTALLA
1
2
ES
01 02 03 04 05 06 07 08
09 10 11 12 13 14 15 16
17 18 19 20 21 22 23 24
25 26 27 28 29 30 31 32
33 34 35
36 37 38 39 40
Enchufa el cable en el puerto USB de salida correspondiente.
Conéctalo a dispositivos electrónicos, como smartphones. Y después,
pulsa el botón de encendido/apagado.
4.CARGAR DISPOSITIVOS ELECTRÓNICOS
5.ILUMINACIÓN LED
Pulse
brevemente
Pulse
brevemente
Pulse
brevemente
6.INFLAR LOS NEUMÁTICOS DEL COCHE
1
2
Interruptor del
dispositivo
SOS (Naranja) OFFIluminación
(Blanco)
Strobe
(Blanco)
Pulse el botón
de luz
ES
01 02 03 04 05 06 07 08
09 10 11 12 13 14 15 16
17 18 19 20 21 22 23 24
25 26 27 28 29 30 31 32
33 34 35 36
37 38 39 40
1
1
2
3
· Soporta 5 modos de inflado, hasta 150 PSI
Conecte firmemente la manguera de aire al producto y al neumático
respectivamente, y apriétela.
Pulse prolongadamente el botón de inflado “ ” para comenzar. Se
detendrá automáticamente cuando la presión de aire alcance el valor
preestablecido.
Ajuste la presión. Pulse brevemente el botón de encendido “ ” para
encenderlo, seleccione el modo de inflado “ ” y la unidad de presión
de aire “ ” , a continuación, ajuste opcionalmente el valor de presión
de aire con los botones “ ” “ ” .
7.ARRANQUE SU COCHE
+
-
START
/STOP
Consejo: Si se utiliza durante mucho tiempo, se recomienda parar cada
10 minutos para que se enfríe.
Modo inflable
Modo inflable para coche
Modo Inflado Moto
Modo Hinchable Bicicleta
Modo Hinchable Baloncesto
Modo presión de aire personalizada
Rango de Presión del Aire
26-51 PSI,1.8-3.5 BAR,180-350 KPA
26-44 PSI,1.8-3.0 BAR,180-300 KPA
29-65 PSI,2.0-4.5 BAR,200-450 KPA
4-16 PSI,0.2-1.1 BAR,20-110 KPA
3-150 PSI,0.2-10.3 BAR,20-990 KPA
· Comprobar la presión de los neumáticos
1. Pulse brevemente el botón de encendido “ ” para encender la máquina.
2.Conecte el conector de la manguera de aire a la boquilla del neumático-
preste atención a presionar hasta el final y presione firmemente.
3.La presión mostrada en la pantalla es la presión actual de los neumáticos.
ES
01 02 03 04 05 06 07 08
09 10 11 12 13 14 15 16
17 18 19 20 21 22 23 24
25 26 27 28 29 30 31 32
33 34 35 36 37
38 39 40

1
Inserte el cable de arranque en el arrancador de Coches (20% de
potencia como mínimo).
· ACERCA DE LA FUNCIÓN DE ARRANQUE FORZADO
Si fallan tres intentos al conectar correctamente las pinzas a su coche,
puedes utilizar la función de arranque forzado para entrar en el modo
boost.
START
/STOP
1
2
Comprueba la conexión de las pinzas y que la batería del producto está
por encima del 20%.
Pulse el botón de arranque forzado durante 3 segundos.
El indicador se iluminará en verde y volverá a encender el motor.
3
3
Precaución: Al utilizar esta función, la detección automática y las funciones
de seguridad se desactivarán temporalmente.
3 pasos para solucionar el problema:
Conecte las pinzas a la batería del coche (rojo a +, negro a -).
Arranque el motor de su coche.
2
8.SOBRE LA RESOLUCIÓN DE PROBLEMAS
En cualquiera de las siguientes situaciones, la pinza inteligente activará las
protecciones:
Indicador
Rojo y verde
intermitentes
Verde sólido
Estado de espera
Listo para arrancar
Situaciones
ES
01 02 03 04 05 06 07 08
09 10 11 12 13 14 15 16
17 18 19 20 21 22 23 24
25 26 27 28 29 30 31 32
33 34 35 36 37 38
39 40
9.RESOLUCIÓN DE PROBLEMAS SOBRE ARRANCADOR
DE COCHES
Protección contra carga a baja temperatura
--- Desenchufe el cargador y espere a que se libere
la protección
Protección contra carga a alta temperatura
---Desenchufe el cargador y espere a que se libere la
protección
Protección contra descarga a alta temperatura
---Desenchufe el equipo eléctrico y espere a que se
libere la protección
Protección contra sobretemperatura del cilindro
---No toque la máquina ni la tráquea inmediatamente
para evitar quemaduras por alta temperatura y espere
a que la máquina repose durante 10 ~ 15 minutos
1
2
3
7
Rojo sólido
Rojo fijo con pitido
discontinuo
Rojo fijo con pitido
largo
Otros
Si desea más información, póngase en contacto con
1. Protección contra baja tensión ---Recarga el
producto
2. Protección contra sobrecalentamiento ---Retire las
pinzas para dejarlo enfriar
3. Protección contra desconexión ---Conexión
temporizada. Arranque el motor en 60 segundos o
retire la pinza en 30 segundos después de un arranque
correcto.
1. Protección contra polaridad inversa ---Invierta los clips
y asegure la conexión correcta
2. Fallo de adherencia ---Contacte con
[email protected] para obtener piezas de repuesto
Protección contra cortocircuitos ---No conecte los
clips entre sí o al mismo metal
ES
01 02 03 04 05 06 07 08
09 10 11 12 13 14 15 16
17 18 19 20 21 22 23 24
25 26 27 28 29 30 31 32
33 34 35 36 37 38 39
40

Declaration of Conformity
We (EU based importer is responsible for this declaration)
Outong GmbH
(Company name)
Brehmstr.56, 40239 Duesseldorf, Germany
(Company address)
declare under our sole responsibility that the product
Trade name: TREKURE
Equipment: Jump Starter
Model No. : Beta 06
to which this declaration relates is in conformity with the essential
requirement set out in the Council Directive on the Approximation of the
laws of the Member States relating to LVD Directive(2014/35/EU) & EMC
Directive(2014/30/EU) & RoHS(2011/65/EU) product is responsible to affix CE
marking, the following standards were applied:
EN IEC 62368-1:2020+A11:2020
EN 55032:2015 AMD.1:2020+A11:2020
EN 55035:2017AMD.1:2020
EN IEC 61000-3-2:2019/A1:2021
EN 61000-3-3:2013AMD.1:2019+ AMD.2:2021
IEC62321-3-1:2013
IEC62321-4:2013
IEC62321-5:2013
IEC62321-6:2015
IEC62321-7-1:2015
IEC62321-7-2:2017
IEC62321-8:2017
Full Name: George.wang Position: Approbation Manager
Signature: Place/Date: Shenzhen,China/Nov.25-2021
