
日本語
EnglishDeutschFrançaisEspañol
简体中文
Русский
한국어
トランペット / コルネット /
フリューゲルホルン / ロータリートランペット
取扱説明書
Trumpet/Cornet/Flugelhorn/
Rotary Trumpet
Owner’s Manual
Trompete/Kornett/Flügelhorn/
Drehventiltrompete
Benutzerhandbuch
Trompette/Cornet/Bugle/
Trompette à palettes
Mode d’emploi
Trompeta/Corneta/Fliscorno/
Trompeta de cilindros
Manual de instrucciones
Trompete/Cornet/Flugelhorn
Trompete de Rotor
Manual de instruções
小号 / 短号 / 富鲁格号 /
转阀式小号
使用说明书
Труба/Корнет/Флюгельгорн/
Педальная труба
Руководство пользователя
트럼펫 / 코넷 / 후루겔혼 /
로터리 트럼펫
사용설명서
小號 /短號 /柔音號 /
轉閥式小號
使用說明書
Português
繁體中文
JA EN DE FR ES PT ZH-CH RU KO ZH-TW

2
このたびは、ヤマハ管楽器をお買い上げいただき、まことにありがとうございます。
楽器を正しく組み立て性能をフルに発揮させるため、また永く良い状態で楽器を
お使いいただくために、この取扱説明書をよくお読みください。
P. 3
You are now the owner of a high quality musical instrument. ank you for choosing Yamaha.
For instructions on the proper assembly of the instrument, and how to keep the instrument in optimum
condition for as long as possible, we urge you to read this Owner’s Manual thoroughly.
P. 3
Sie sind nun der stolze Besitzer eines hochwertigen Musikinstruments. Vielen Dank, dass Sie sich für ein
Instrument der Marke Yamaha entschiedenen haben. Um mit den Handgri en zum Zusammensetzen
und Zerlegen des Instruments vertraut zu werden und dieses über Jahre hinweg in optimalem Zustand
halten zu können, raten wir Ihnen, diese Anleitung aufmerksam durchzulesen.
P. 3
Vous êtes dès à présent le propriétaire d’un instrument de musique de haute qualité.
Nous vous remercions d’avoir choisi Yamaha. En ce qui concerne les instructions relatives à un assem-
blage adéquat de l’instrument et sur la façon de garder l’instrument dans des conditions optimales aussi
longtemps que possible, nous vous conseillons vivement de lire entièrement le présent Mode d’emploi.
P. 3
P. 3
Usted es ahora propietario de un instrumento musical de alta calidad. Le agradecemos su elección de un
instrumento Yamaha. Le aconsejamos que lea todo este manual de instrucciones para ver las instruc-
ciones para el montaje correcto del instrumento y para aprender a conservar el instrumento en óptimas
condiciones durante tanto tiempo como sea posible.
Agora você é o proprietário de um instrumento musical de alta qualidade. Obrigado por escolher a marca
Yamaha. Aconselhamos que leia cuidadosamente todo o manual do proprietário para ver as instruções de
montagem adequada do instrumento, bem como manter em ótimas condições de uso pelo máximo de
tempo possível.
P. 3
现在您已经是高品质乐器的主人了 ! 在此 , 我们衷心感谢您选择雅马哈乐器 ,
同时也恳请您完整阅读该使用说明书 , 从而可以充分了解有关乐器正确组装
及如何使您的乐器尽可能长久地处于最佳状况的使用说明。
P. 3
P. 3
야마하 악기를 구입해 주셔서 감사합니다 . 악기의 알맞은 조립 방법 및 보관을 위해
본 사용설명서를 반드시 읽어주시기 바랍니다 .
P. 3
Вы стали обладателем высококачественного музыкального инструмента. Благодарим Вас
за выбор продукции Yamaha. Для получения инструкций по правильной сборке данного
инструмента и его длительном хранении в оптимальных условиях мы настоятельно
рекомендуем Вам внимательно прочитать настоящее руководство.
P. 3
您現在擁有高品質的樂器。感謝您選擇 Yamaha。
我們強烈建議您完整閱讀本使用說明書,以便了解如何正確組裝樂器,並且
使樂器盡可能長時間保持在最佳狀態。
3
Trumpet/Cornet/
Fluegelhorn/Rotary Trumpet
Owner’s Manual
Do not throw or swing the instrument when others
are close by.
The mouthpiece or other parts may fall off hitting other
people. Always treat the instrument gently.
Keep the oil, polish, etc., out of children’s mouths.
Keep the oil, polish, etc., out of children’s reach and do
maintenance when children are not present.
Be aware of climatic conditions such as tempera-
ture, humidity, etc.
Keep the instrument away from heat sources such as
heaters, etc. Also, do not use or store the instrument
in any extreme conditions of temperature or humidity.
Doing so may result in damage to key balance, linkage,
or pads, resulting in problems during performance.
Never use benzene or thinner for maintenance on
instruments with a lacquer nish.
Doing so may result in damage to the nish’s top coat.
Precautions
Please read before using
The precautions given below concern the proper and safe use of the instrument, and are to protect
you and others from any damage or injuries. Please follow and obey these precautions.
If children are using the instrument, a guardian should clearly explain these precautions to the child and make sure
they are fully understood and obeyed. After reading this manual, please keep it in a safe place for future reference.
About the Icons
: This icon indicates points which should be paid attention to. : This icon indicates actions that are prohibited.
Caution
In regards to brass instruments with a plate nish, the color of the nish may change over time however, it should be
of no concern in regards to the instrument’s performance. Discoloration in its early stage can easily be removed with
maintenance. (As discoloration progresses, it may be dif cult to remove.)
* Please use the accessories that are speci ed for use with the particular type of nish found on the instrument. Also, metal polishes
remove a thin layer of the nish’s top coat which will make the nish thinner. Please be aware of this before using polish.
Some instruments are shipped with a black cap attached to the end
of the 3rd valve slide ring (A in the diagram) to prevent the ring from
being lost during shipping.
The cap can be removed before you start playing, but leaving it in
place will not affect the operation of the instrument.
Take care not to dis gure the instrument.
Placing the instrument where it is unstable may cause
the instrument to fall or drop resulting in dis gurement.
Take care as to where and how you place the instru-
ment.
Do not modify the instrument.
Besides voiding the warranty, modi cation of the instru-
ment may make repairs impossible.
Keep small parts out of the reach of infants.
Your children may accidentally swallow them.
Use with the screw parts securely tightened.
If this precaution is not observed, other parts may move
or fall off unintentionally, possibly causing injury.
Disobeying the points indicated with this mark may lead to
damage or injury.
4
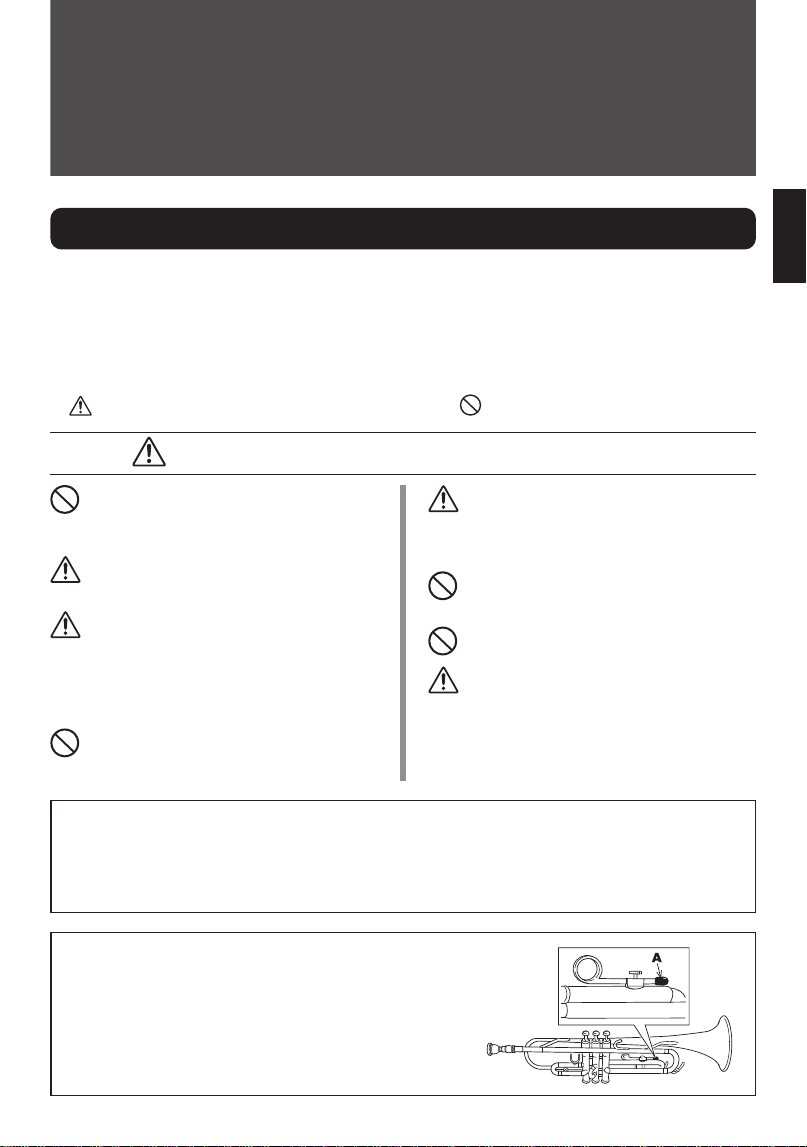
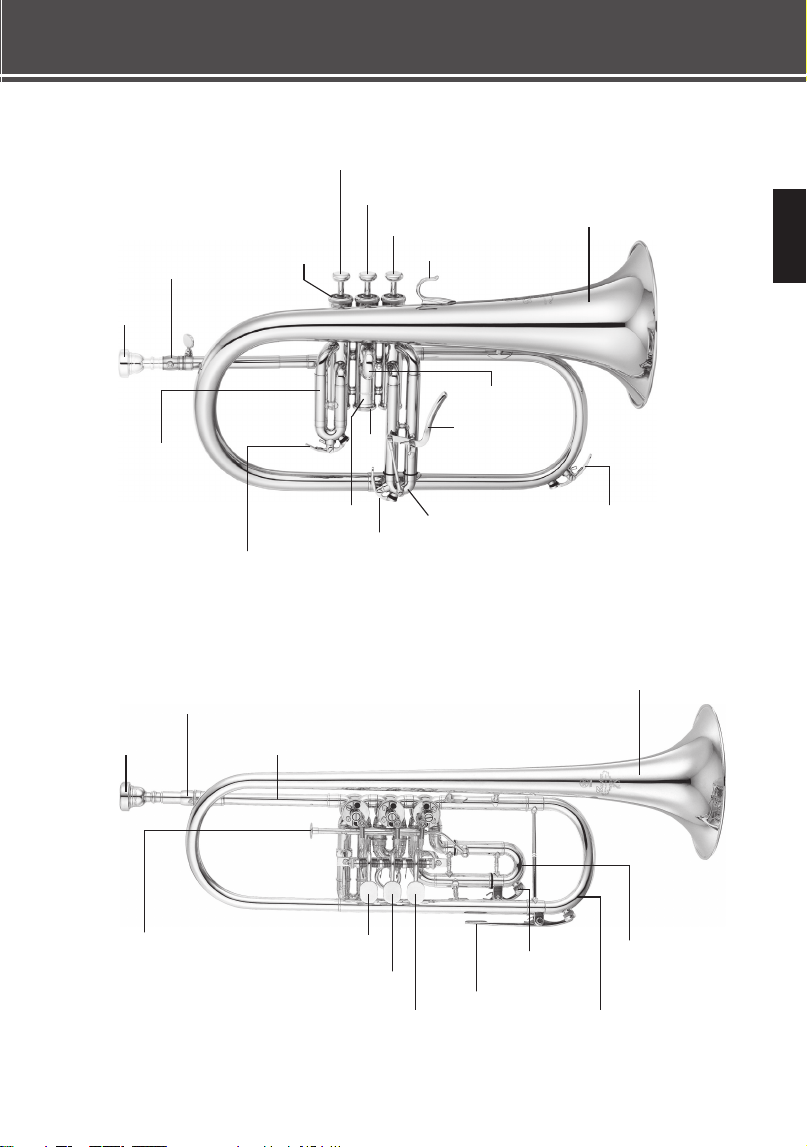
Nomenclature
Trumpet
Cornet
Mouthpiece
Mouthpiece Receiver
Lead Pipe
1st Valve
2nd Valve
3rd Valve
Finger Hook
Bell
1st Valve Slide Hook
1st Valve Slide
2nd Valve Slide
Valve
Casing
3rd Valve
Slide Ring
3rd Valve Slide
Main Water Key
Main Tuning Slide
Cap
3rd Valve
Water Key
3rd Valve Slide
Stopper Screw
Cap
Mouthpiece
Mouthpiece
Receiver
Lead Pipe
1st Valve
2nd Valve
3rd Valve
Finger Hook
Bell
1st Valve
Slide Hook
1st Valve Slide
Main Tuning Slide
2nd Valve Slide
Valve Casing
3rd Valve Slide Ring
Main Water Key
3rd Valve Slide
Cap
3rd Valve
Water Key
5
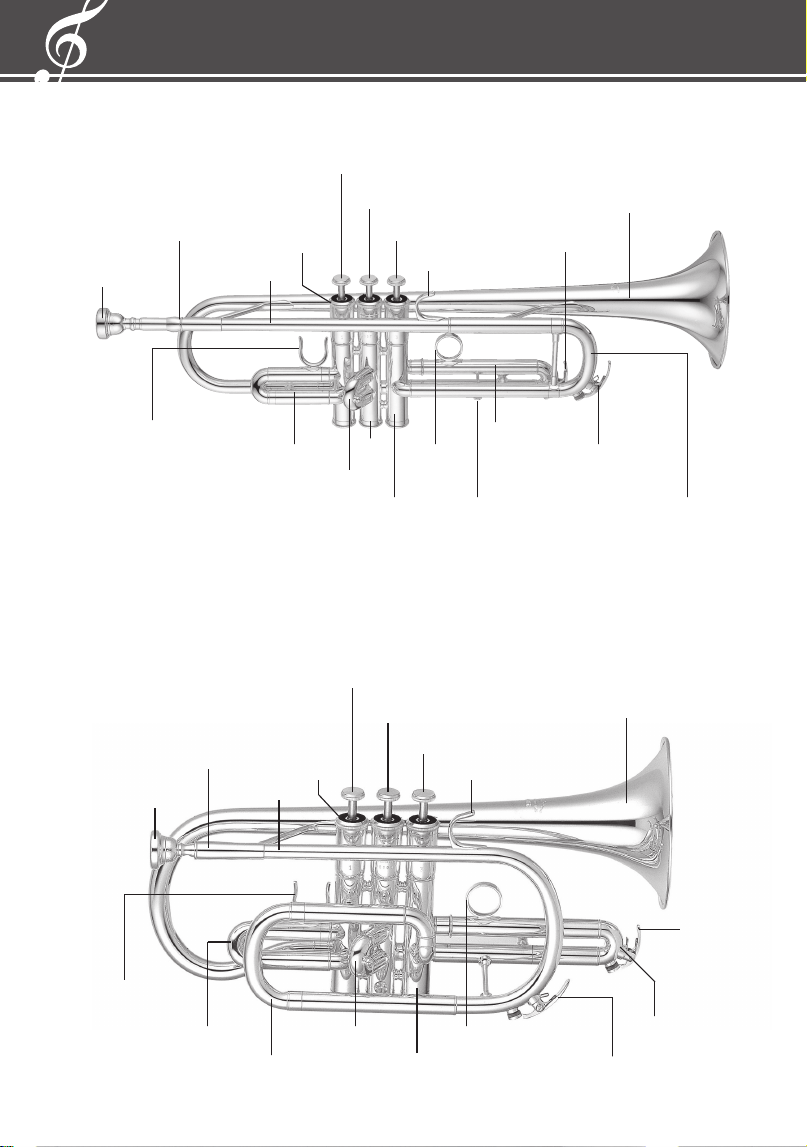
* Speci cations and/or design may change for reasons of improvement without notice.
Flugelhorn
Nomenclature
Mouthpiece
Mouthpiece Receiver
1st Valve
2nd Valve
3rd Valve
Finger Hook
Bell
1st Valve Slide
Valve Casing
3rd Valve Slide
3rd Valve
Slide Trigger
Main Water Key
2nd Valve Slide
Cap
Cap
3rd Valve
Water Key
1st Valve Water Key
Rotary Trumpet
Mouthpiece
Mouthpiece Receiver
Lead Pipe
Bell
1st Valve
2nd Valve
3rd Valve
Main
Water Key
Main Tuning Slide
3rd Valve Slide
3rd Valve Slide Trigger
3rd Valve
Water Key
6
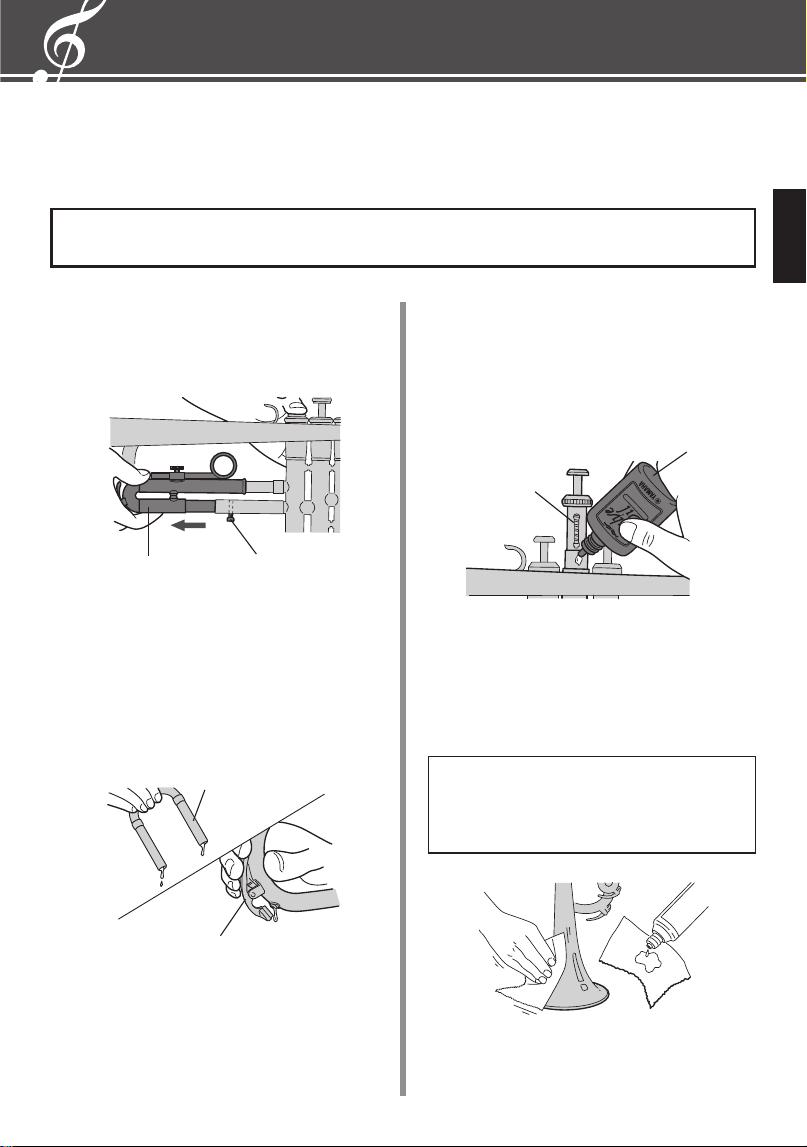
Bef ore You Play
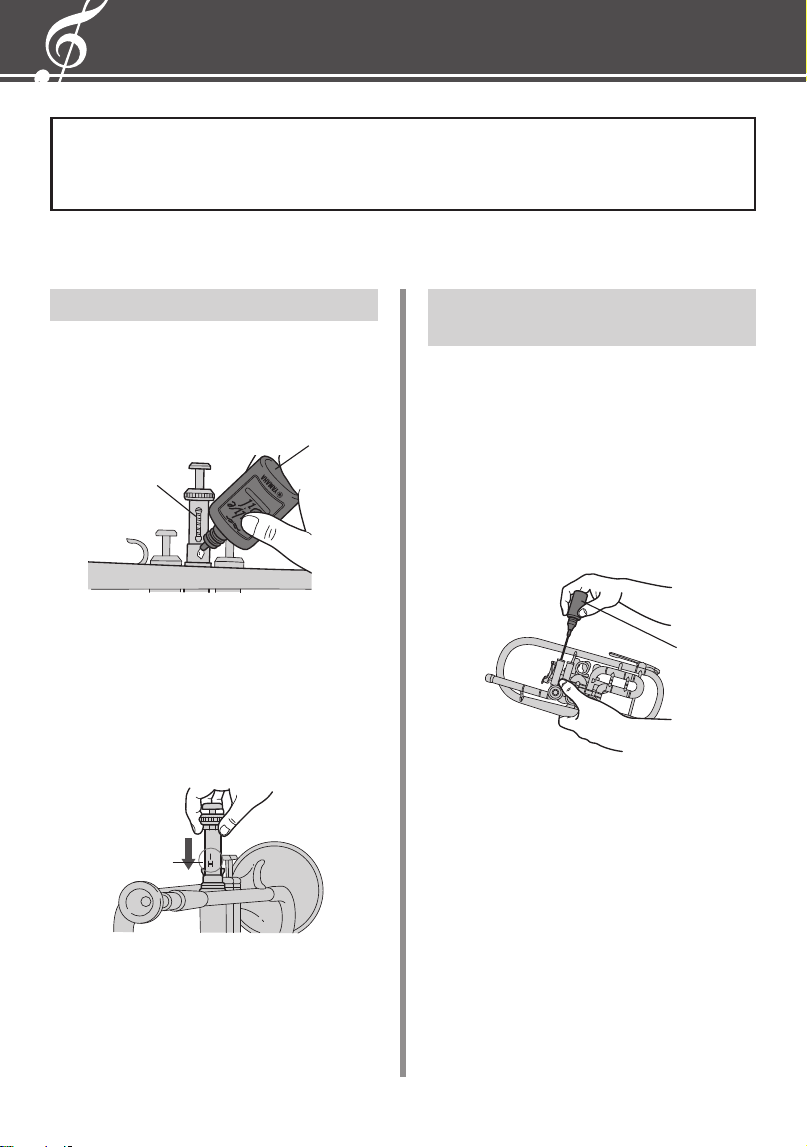
Applying Oil
Apply oil to the pistons
1.
Unscrew the valve cap and pull the piston
straight out of the valve casing until about half
of the valve piston is exposed.
2.
Apply a few drops of valve oil on the piston.
* Do not apply too much oil.
3.
Slowly, return the piston into the valve casing.
At this time, make sure the number stamped
on the piston is facing the mouthpiece. After
the valve cap is tightened rmly, move the
piston up and down a few times to distribute
the oil over the piston evenly.
Piston
Valve oil
* If all pistons have been removed from the valve
casings, make sure the number stamped on the
piston matches the number stamped on the casing
before returning the piston into the valve casing.
* e pistons must be oiled for them to function
properly and smoothly.
* To keep oil from mixing with the slide grease or
dirt inside of the pipe, hold the oil container’s
spout so that is does not come into contact with
the inner walls of the pipe.
* If the spout of the oil container you are using is
metallic, be careful not to let the spout come into
direct contact with the rotor.
3.
Hold the lever down and replace the valve
slide.
* If you replace the valve slide without holding the
lever down, pressure built up inside the pipe can
cause poor rotor function or damage to the inside
of the pipe.
Rotor oil
Handling the Instrument
As the trumpet is made of thin metal, handle the instrument carefully. Do not apply any exces-
sive force, or bump the instrument so as to dent or damage it.
Applying Oil To e Rotors
(Rotary Trumpets Only)
1.
Hold the lever down and remove the valve
slide.
* If the valve slide is removed without holding the
lever down, air pressure in the pipe drops creating
a suction that can cause poor rotor function or
damage to the inside of the pipe.
2.
Apply some rotor oil to the rotor and then
move the lever a few times to distribute the oil
evenly.
Number
7
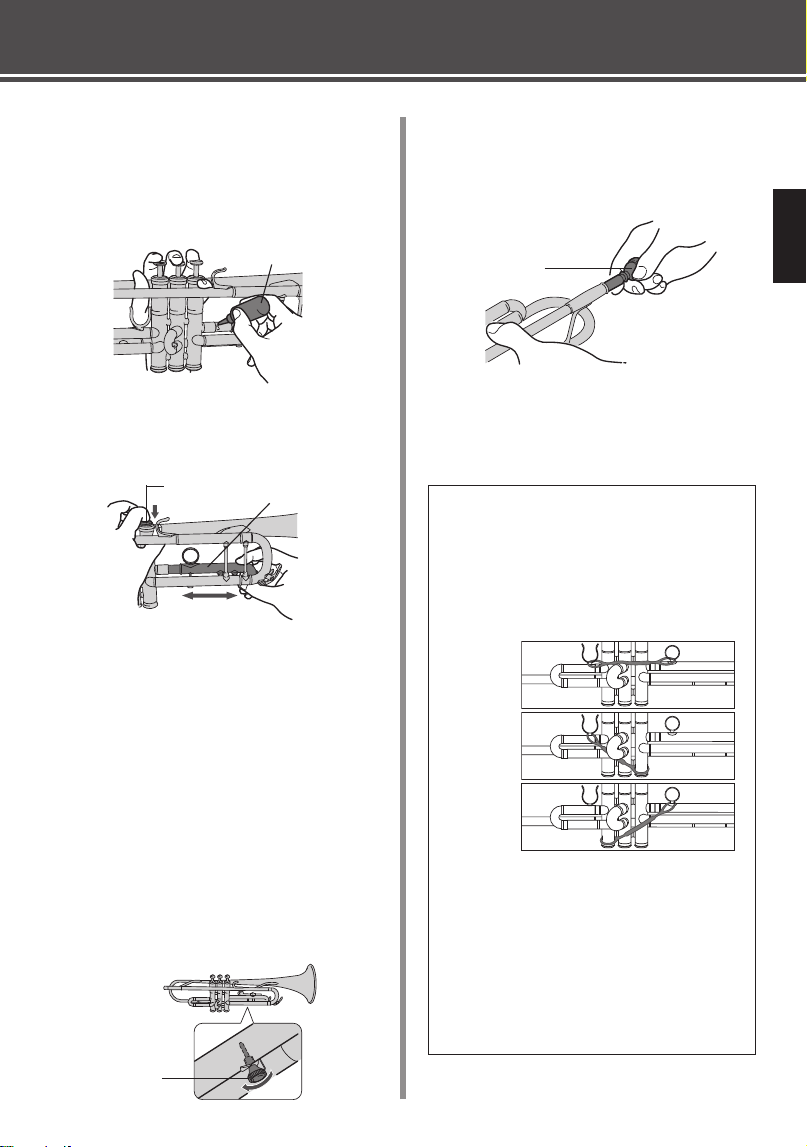
Bef ore You Play
About the slide stopper
Some instruments are supplied with a silicon
Yamaha Slide Stopper to prevent accidental
removal of the tuning slides. e stopper can
be left in place when playing and used in
other con gurations as shown below.
* Make sure that the ring is hooked on securely to
prevent it from coming unhooked.
* Wash with water when necessary.
* Do not expose the product to any heat source, high
temperature, or direct sunlight.
* Keep out of reach of young children.
* In rare instances, oil may seep from the silicon
rubber. is has no a ect on product quality or the
instrument.
When
shipped
Example-1
Example-2
* If you remove or replace the valve slide without
holding the piston down, the drop or buildup
of air pressure in the pipe can cause poor piston
function or damage to the inside of the pipe.
* e pistons must be oiled for them to function
properly and smoothly.
After applying slide oil to valve slides equipped
with a spring type slide trigger, hold the piston
down and move the slide in and out a few times
as you did before to distribute the oil evenly.
CAUTION —Preventing e 3rd
Valve Slide From Falling O .
On instruments tted with a stopper screw,
make sure the screw is tight.
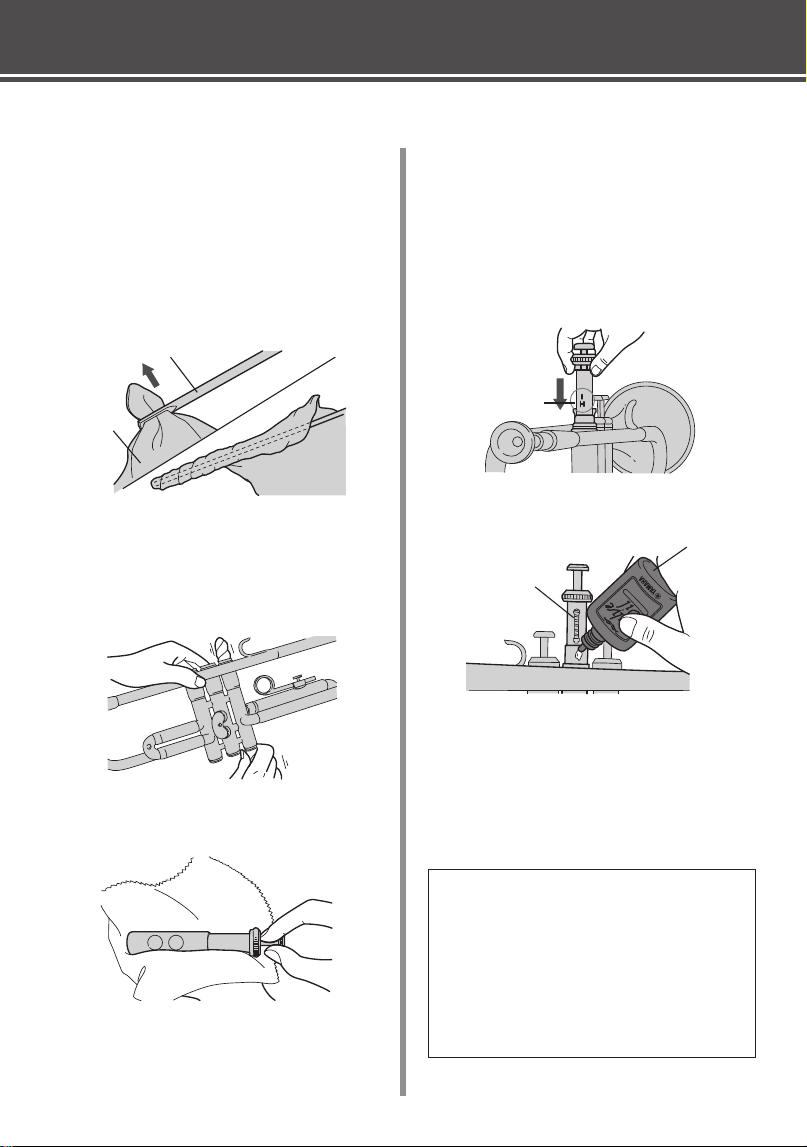
Applying Oil To e Valve Slides
1.
Depress the piston that corresponds to the
slide that you want to apply oil and partially
remove the slide. Apply a few drops of tuning
slide oil.
* Do not apply too much oil.
2.
Hold the piston down and move the slide in
and out a few times.
Setting e Mouthpiece
Insert the mouthpiece into the mouthpiece
receiver so that the mouthpiece is not loose in
the receiver.
Stopper screw
* Never force the mouthpiece into the mouthpiece
receiver. e mouthpiece may become jammed
making removal di cult.
Tuning slide oil
3rd valve
3rd valve slide
Mouthpiece
8
Bef ore You Play
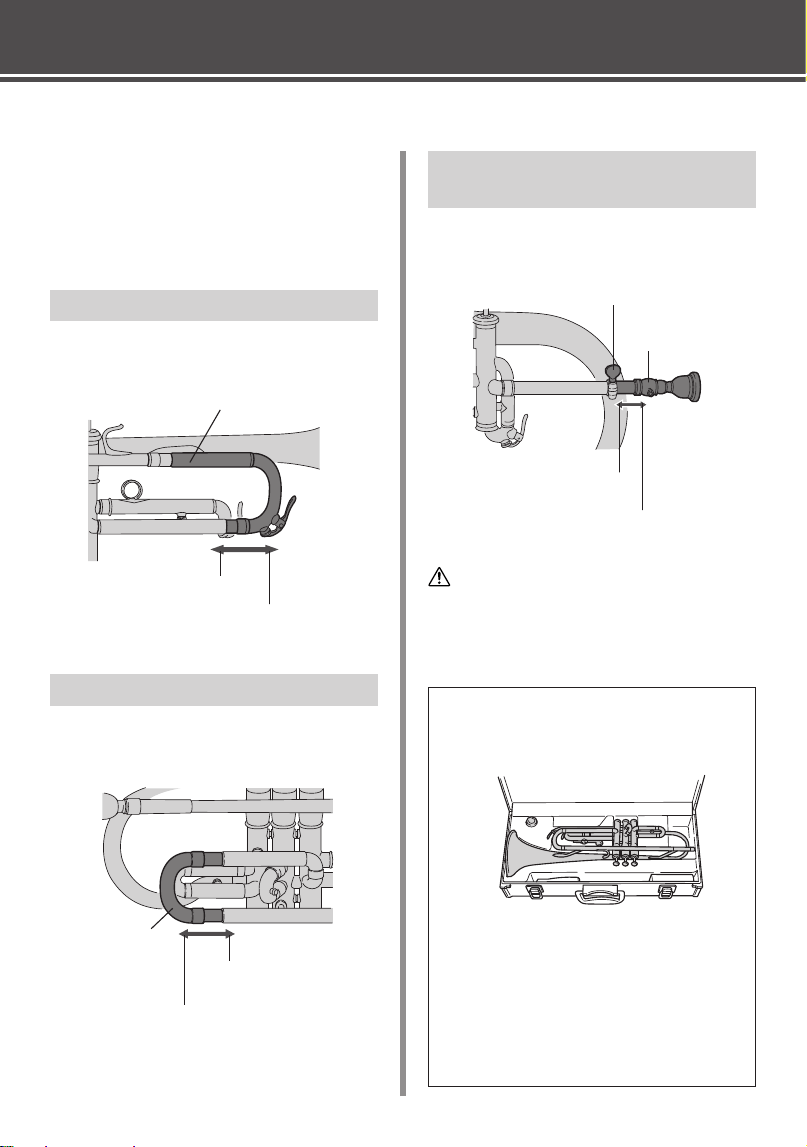
Tuning
Slide the main tuning slide in or out to tune the
instrument. Since changes in temperature can
have an e ect on the pitch, blow some warm
air into the instrument to warm it up before
tuning.
Main tuning slide
When the instrument’s
pitch is low
When the instrument’s
pitch is high
When the instrument’s
pitch is high
Flugelhorn/Piccolo Trumpet/
E
b
Cornet
Loosen the mouthpipe screw and slide the mouth-
pipe in or out to tune the instrument.
Main tuning
slide
Always store the instrument in its case when
taking a break, during transport, and after
playing.
About the mouthpiece
e mouthpiece that is supplied with your
instrument is a standard mouthpiece for the
instrument. e mouthpiece is designed to t
into the mouthpiece receiver without being
loose. Do not treat the mouthpiece roughly,
drop, or damage it.
Trumpet/Rotary Trumpet
Slide the main tuning slide in or out to tune the
instrument.
Cornet
Slide the main tuning slide in or out to tune the
instrument.
When the instrument’s
pitch is low
Mouthpipe screw
Mouthpipe
When the instrument’s
pitch is low
When the instrument’s
pitch is high
CAUTION
Securely tighten the mouthpipe screw after tuning.
Otherwise, the mouthpipe may move during while
you are playing, possibly causing injury.
9
Maintenance
After playing
After playing, make sure that moisture or dirt is removed from the instrument using the method
described below.
Please consult with a wind instrument technician in regard to disassembling and mainte-
nance the spring trigger.
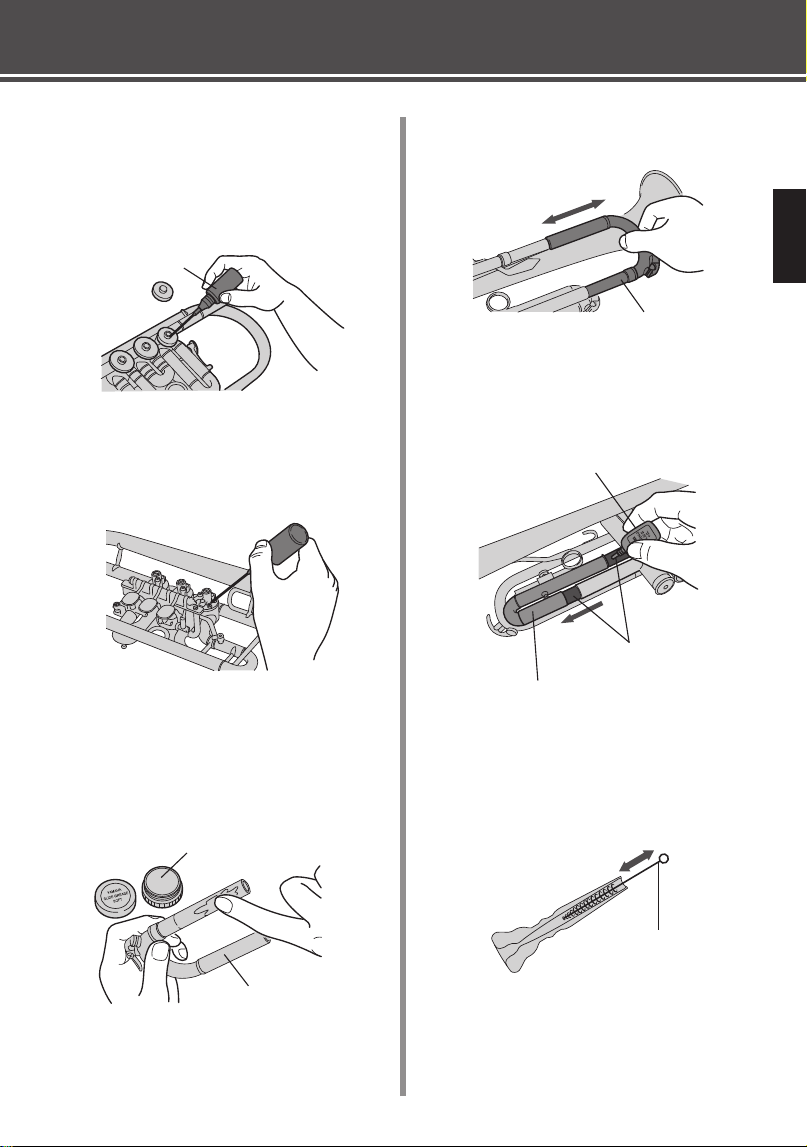
Valve slide maintenance
1.
Depress the piston that corresponds to the
valve slide you want to clean, and remove the
slide.
* If you remove the valve slide without holding the
piston down, air pressure in the pipe drops creat-
ing a suction that can cause poor piston function
or damage to the inside of the pipe.
* If the instrument is equipped with a slide stopper
screw, loosen the screw before removing the slide.
2.
Remove moisture from the slide. Also, remove
moisture from the water key.
3rd valve slide
Water key
* Valve slides are made of brass or nickel silver
that is excellent at resisting corrosion however,
corrosion may appear if moisture is left in the
instrument for an extended period of time. Please
use caution.
* You can remove water from the inside of the in-
strument more certainly by using a cleaning swab.
Other maintenance
Apply some valve oil to the pistons and move the
piston up and down a few times, the same as you
do before playing the instrument.
Likewise, apply some rotor oil to the rotors on
rotary trumpets and move the levers a few times.
* Do not apply too much oil.
Body maintenance
Gently wipe the surface of the instrument with a
polishing cloth. If dirt or tarnish is obvious, the
following products can be used.
For lacquer nishes
Lacquer cloth + lacquer polish
For silver plate
Silver cloth + silver polish
3rd valve slide stopper screw
Main tuning slide
Piston
Valve oil
10
Maintenance
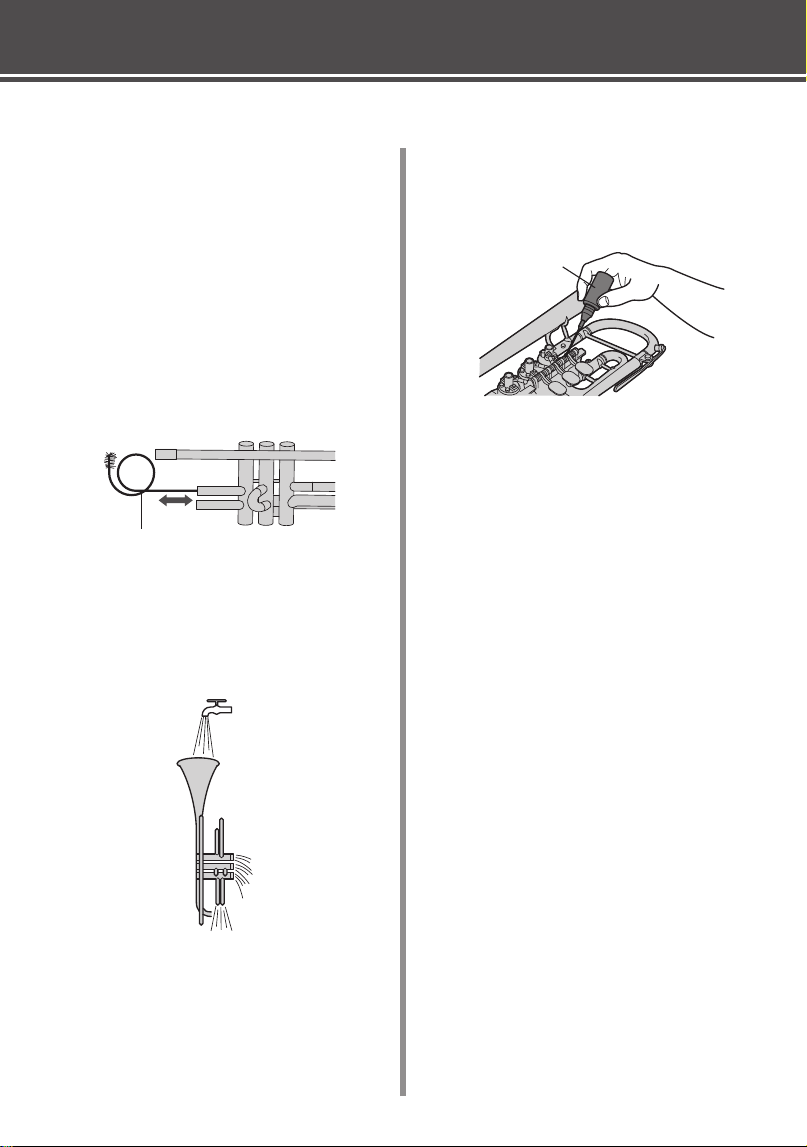
Once a week maintenance
Piston and valve casing maintenance
e trumpet’s valves are designed with very little
clearance between the piston and the casing there-
fore, it is very important that these precision parts
be handled with care.
1.
Wrap the cleaning rod with gauze leaving no
bare metal exposed.
* Exposed metal can result in damaged valve casings
or pistons.
2.
Remove dirt from the inside of the valve cas-
ings.
3.
Remove dirt from the pistons.
4.
Return the piston to its corresponding valve
casing.
After con rming that the number stamped on
the piston matches the number stamped on the
valve casing, carefully insert the piston straight
into the valve casing with the number stamped
on the piston facing the mouthpiece. Do not
rotate the piston in the valve casing.
5.
Apply valve oil to the piston.
* Do not apply too much oil.
* If air does not pass through the instrument when
the piston is fully depressed, the piston may be
placed in the wrong valve casing. Make sure that
the numbers stamped on the piston and valve
casing match.
e piston is the most important part of the
trumpet.
Never treat the pistons roughly, drop the
piston, or let the piston fall, etc. If the
piston becomes damaged or dented, never
return it to the valve casing. Contact the
dealer from whom you purchased the instru-
ment.
Cleaning rod
Gauze
Piston
Valve oil
Number
11
Maintenance
Rotor maintenance
(Rotary trumpets only)
1.
Remove the rotary valve cap and apply some
rotor spindle oil to the place to the spindle in
the center of the rotor.
2.
Apply some rotor spindle oil to point where
the rotor rotates. Replace the rotary valve cap
and move the lever a few times to distribute
the oil evenly.
Valve slide maintenance
1.
Apply a thin coating of slide grease to the main
tuning slide, 2nd valve slide, and valve slides
that are not equipped with a slide trigger.
2.
Slide the main tuning slide back and forth a
few times to distribute the grease evenly.
3rd Valve Slide
Rotor spindle oil
Slide grease
Main tuning slide
Main tuning slide
Apply here.
Tuning slide oil
Mouthpiece brush
3.
On the 1st and 3rd valves, which are equipped
with slide triggers, apply a small amount of
tuning slide oil to the tuning slides.
Cleaning the mouthpiece
Dip the mouthpiece brush in the brass soap water
solution and clean the mouthpiece throat with the
brush. Rinse the mouthpiece out with clean water.
* For instructions on how to prepare the brass soap
water solution, refer to the instructions included
with your particular brass soap.
12
Maintenance
Monthly Maintenance
Cleaning the instrument
1.
Make a brass soap water solution.
For instructions on how to prepare the brass
soap water solution, refer to the instructions
included with your particular brass soap.
Before putting the instrument into the soap
water solution, remove the pistons, valve cas-
ing covers, slide valves.
2.
With the instrument removed from the water,
apply some soap water solution to a exible
cleaner and use the cleaner to clean the inside
of the instrument’s pipes.
Flexible cleaner
3.
After cleaning the instrument, use clean water
and thoroughly rinse out the brass soap water
solution. After that, apply valve oil and slide
grease and reassemble the instrument.
Rotor maintenance
(Rotary trumpets only)
Apply some lever oil to the lever shaft.
Lever oil

13
Troubleshooting
Tone is not clear and pitch is poor.
• e valves are dirty.
Clean the valves.
• ere is a large dent or air is leaking from
the trumpet.
• e mouthpiece doesn’t t the mouthpiece
receiver and air is leaking.
Contact the dealer from whom you pur-
chased the instrument.
• e felt or cork is damaged.
Contact the dealer from whom you pur-
chased the instrument.
No sound.
• e holes in the piston are not aligned with
the holes in the valve casing.
Make sure the number stamped on the
piston matches the number stamped on the
valve casing.
e pistons are sluggish.
• Dirt has accumulated between the pistons
and valve casings.
Clean the inside of the valve casing.
• Dropping or hitting the piston has damaged
it.
Do not use the instrument with a damaged
piston.
Contact the dealer from whom you pur-
chased the instrument.
• e piston or valve casing is corroded.
Contact the dealer from whom you pur-
chased the instrument.
e valve slide is stuck and cannot be
removed. e slide is sluggish.
• Dirt has accumulated between the valve slide
and inner tube.
oroughly remove dirt and apply some
slide grease that matches the type of slide,
or apply some tuning slide oil.
• Dropping or hitting the slide has caused a
dent, or the slide was bent while cleaning.
Contact the dealer from whom you pur-
chased the instrument.
e screw is too tight and cannot be
removed.
• e screw is corroded.
• Dropping or hitting the instrument has dam-
aged the screw.
Contact the dealer from whom you pur-
chased the instrument.
Air does not pass thorough the instru-
ment.
• e piston is in the wrong valve casing.
Set the piston into the proper valve casing.
e mouthpiece cannot be removed.
• e instrument was dropped or hit with the
mouthpiece attached. Or, the mouthpiece
was inserted with force.
• e instrument has been left for a long
period of time with the mouthpiece inserted
in the instrument.
Contact the dealer from whom you pur-
chased the instrument.
e instrument makes a strange sound
when played.
• Solder on the instrument has come loose, or
a foreign object is inside it.
Contact the dealer from whom you pur-
chased the instrument.
e piston makes a metallic noise when
pressed.
• e felt is torn or lost.
Please contact the dealer from whom you
purchased the instrument.
• e cover on the piston valve or valve casing
is loose.
Firmly tighten the covers.
• e piston’s shaft is bent.
Please contact the dealer from whom you
purchased the instrument.
14
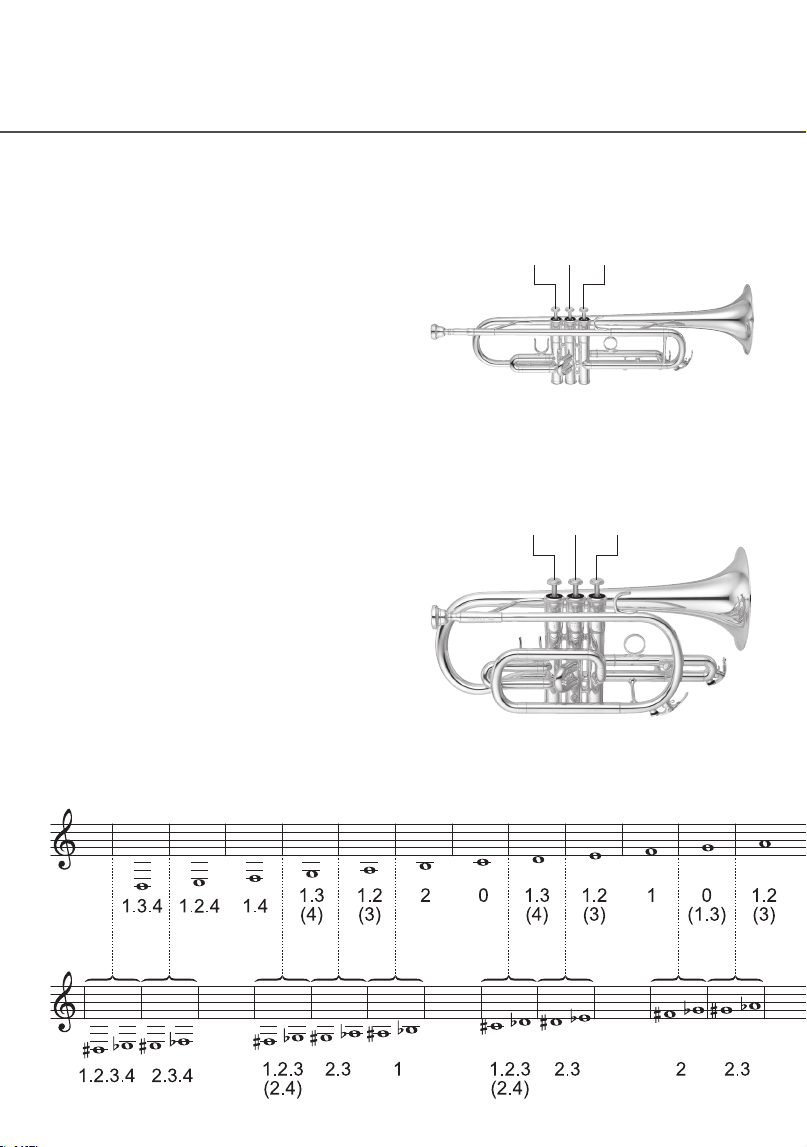
フィンガリングチャート
/Fingering Chart /Gri tabelle/
Ta be la de d i g i t a çã o
/
指法表
/
Таблица аппликатуры
/
() はかえ指です。
Alternate fingerings are given in paren-
thesis ( ).
Alternative Griffe stehen in Klammern
( ).
Les autres doigtés de remplacement
sont indiqués entre parenthèse ( ).
Se muestran digitaciones alternativas
entre paréntesis ( ).
As posições entre parêntesis ( ) indi-
cam posições alternativas.
圆括号中的指法也可采用。
Дополнительная аппликатура
указана в круглых скобках ( ).
괄호 ( ) 안은 핑거링 또는 대체 핑거링
을 나타냅니다 .
圓括號中的指法也可採用。
トランペット
/Trumpet/Trompete/
Tr om pe t t e / Tr om pe t a / Tr om pe t e /
小号
/
Труба
/
트럼펫
/
小號
123
123
コルネット
/Cornet/Kornett/Cornet/
Corneta / Cornet /
短号
/
Корнет
/
코넷
/
短號
15
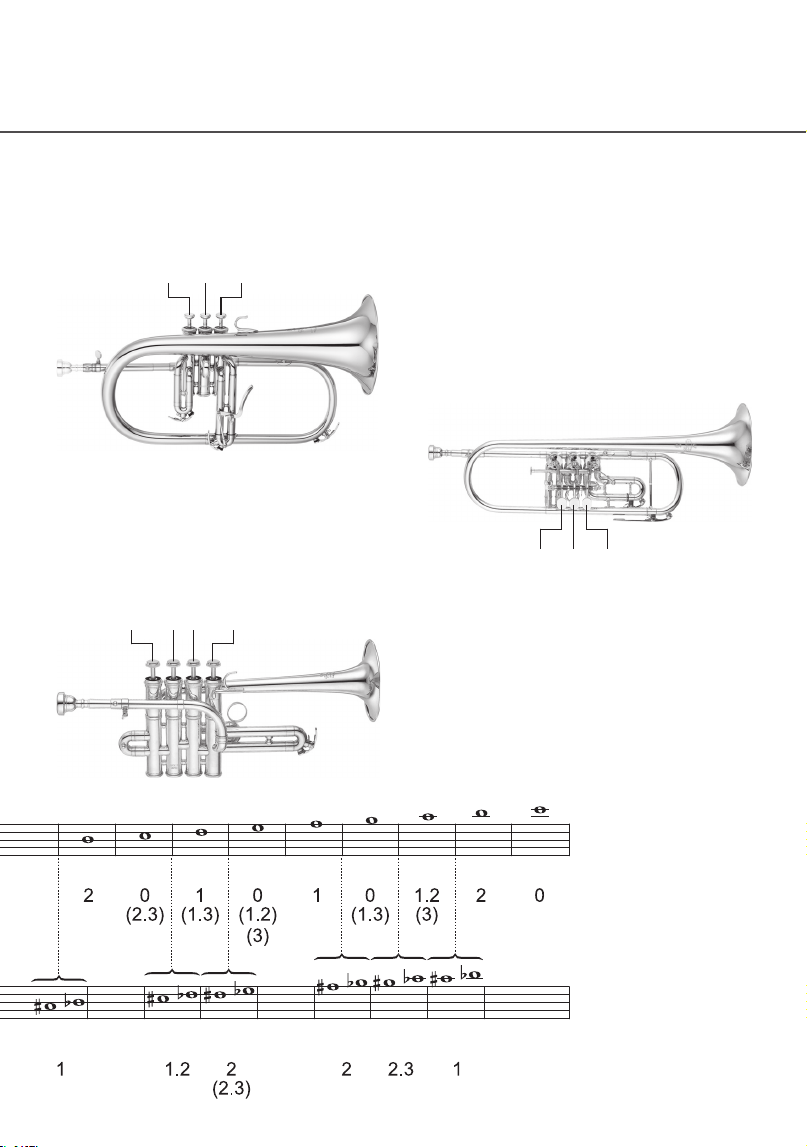
Tablature / Tabla de digitaciones/
운지법
/
指法表
フリューゲ ル ホルン
/Flugelhorn/
Flügelhorn/Bugle/Fliscorno/
Flugelhorn/
富鲁格号
/
Флюгельгорн
/
후루겔혼
/
柔音號
ピッコロトランペット
/Piccolo Trumpet /
Piccolotrompete/Trompette Piccolo/
Trompeta píccolo/Trompete Piccolo/
高音小号
/
Труба пикколо
/
피콜로 트럼펫
/
高音小號
ロータリートランペット
/
Rotary Trumpet /
Drehventiltrompete/
Trompette à palettes /
Trompeta de cilindros/
Trompeta de cilindros/
转阀式小号
/
Вентильная труба
/
로터리 트럼펫
/
轉閥式小號
123
1234
123

Manual Development Group
© 2013 Yamaha Corporation
Published 03/2022
2022
年
3
月
发行
POCP-B0
VDE1660
〒430-8650 静岡県浜松市中区中沢町 10-1