
User Manual
0.3.0.02.680X00-AT-01
T20
E- collar

Dear Pet Parent!
Thank you for purchasing AbbiDot.
Here at Abbi, we are happy if you and your pet are happy. We know
that nurturing a lasting bond with a pet takes patience, commitment
and just a little bit of help. This is why we dedicate all of our time
and creative resources to making pet care accessories that are
smart and simple.
Our products are not meant to replace the training process — they
are here to aid it. They should never be used as punishment,
overused or treated as a one-fit-all solution. They are most effective
at the very start of the training process and when showing your pet
the danger of certain behaviors: like crossing the road or picking up
food on the street.
We strongly recommend focusing on reward training and making
positive reinforcement the base of your training routine. Your pet’s
safety and well-being should always stay a priority throughout this
experience.
We know that any training process is a two-way street. We learn
just as much from our pets as they do from us. Helps us make our
products better by sharing your training success stories with us.
AbbiDot Team
Yours

3
Table of Contents
Overview .................................................................................04
Product Setup .........................................................................05
Get the Remote Ready............................................................06
How to Use the Light Test Tool? .............................................07
How To Pair Remote With the Collar? ....................................08
How To Find The Best Stimulation Level For Your Pet...........09
Frequently Asked Questions ...................................................10
Troubleshooting Guide ............................................................12
Dog Training Guide .................................................................13
Teaching Basic Obedience .....................................................14
The “Come” Command............................................................15
The “Stay” Command ..............................................................16
Jumping Up .............................................................................17
Digging ....................................................................................18
Chasing ...................................................................................19
Trash Raiding ..........................................................................20
General Tips............................................................................20
Terms of Use and Limitation of Liability .................................21
Training Large Breeds.............................................................22
Training Small Dogs ................................................................23
Warranty and repair information..............................................24
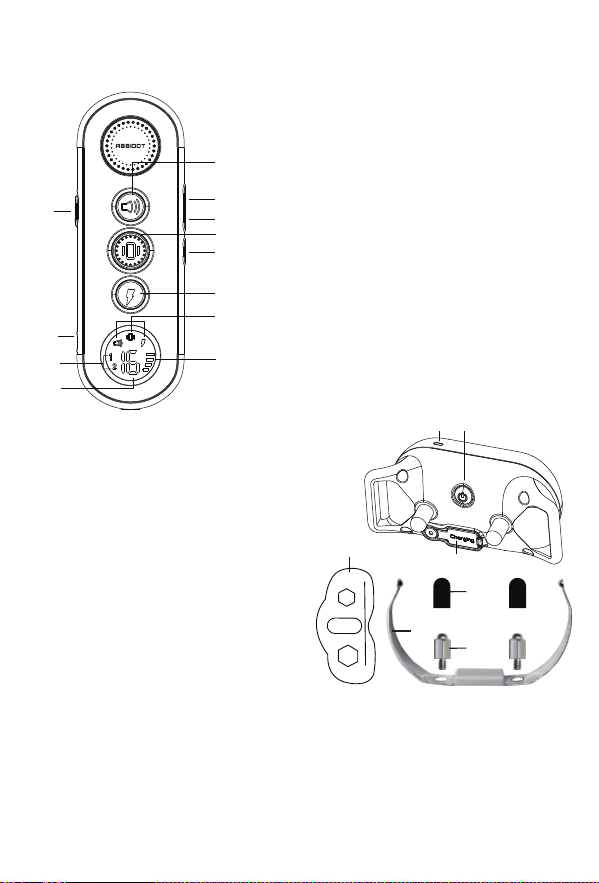
.LED In dicato r
.On/Off Button
.
.
.
.
.
4
M
N
O
P
Q
R
S
Remote
A . To n e B u t t o n
B . S h o c k L e v e l +
C . S h o c k L e v e l -
D . V i b r a t i o n B u t t o n
E . O n / Off B u t t o n
F. Stimulation
Charging Port(with cover)
B u t t o n
G . M o d e i n d i c a t i o n
H . B a t t e r y D i s p l a y
I . S w i t c h d o g 1 o r d o g 2 m o d e
J . C h a r g i n g P o r t
K . D o g 1 o r d o g 2 m o d e
L . S h o c k L e v e l D i s p l a y
Collar
A
B
C
D
F
G
K
E
H
I
J
L
O
N
M
Overview
Set Up the Collar
1. Please choose the right Contact Points that fits your dog.
2. Please remove the Metal Extension Contact if your dog's hair is very short.
3. Please use the Test Light to tighten the contact points, then put on the Silicone
Caps to protect your dog effectively.
S
Q
R
P
Contact Points(x4)
Silicone Caps(x4)
Metal Extension Contact
Test Light

5
Note:
Product Setup
How to Charge the Remote and Collar?
Before using the Dog Training Collar, follow these setup steps:,
1. Charge the Remote and Collar.
2. Get the Remote ready and turn it on.
3. Get the Collar ready and turn it on.
4. Test all button functions before placing the collar on your pet.
5. Use the Light Test Tool
6. Pair the Remote and Collar
1. Charge the remote and collar using their dedicated charger — make sure
to charge each device for at least 4 hours. For subsequent charges, 2-3
hours will be enough.
2. Once the collar is fully charged, its red LED indicator will turn green.
Once the remote is fully charged, its battery indicator will show up as full.
3. Once the collar is fully charged, place the rubber cap covering the charging
port back in its place.
1. Excessive charging will shorten battery life. Try to only charge and the
remote and collar when they are low on battery.
2. When you’re not using the collar, turn the device off to save battery.
3. Use the following output: DC 5V 500-800mA
Don’t use chargers that don’t meet necessary specifications to charge the
remote and collar.
Signs you need to charge the device:
1.The LED indicator on the collar is red and flashing rapidly.
2.The bar indicator on the remote’s screen shows just one bar.
3.The LED light on either the collar or remote doesn’t turn on.
4.The LED light on either the collar or remote blinks but doesn’t turn on when
you press any of the mode buttons.

6
We strongly suggest that you first text all the three shock levels of the collar on
yourself to see exactly how they feel. We recommend you start at the lowest level
and then move on to higher ones up to your personal comfort level.
Continuous stimulation will go on for no more than 10 seconds.
To reactivate stimulation, release and press the button again.
1.Place one finger over both contact points of the training collar.
2.Hold the remote at approximately 2 ft away from the training collar as you press
the Vibration Button continuously for 1 to 2 seconds. At this level, you should feel
continuous vibration.
3.Next, go to level 1 and press the Shock Button.
4.Keep increasing the levels until the sensation begins to feel uncomfortable.
Make sure to turn the collar off when it’s not in use to save battery.
1.To turn on the remote, push the lock switch from “ ” to “ ” to turn on the
remote.
2.The screen will light up and display current channel data and battery level.
If the screen doesn’t light up, charge the remote.
3.To turn off the remote, push the lock switch from “ to “.
1.To turn on the collar, press the ON/OFF button.
2.The LED light on the collar will turn green. In standard mode, the greed
LED will flash every 4 seconds indicating that the collar is on and ready to
receive a signal from the remote.
How to Perform a Function Test?
Get the Remote Ready
Note:
How To Turn ON/OFF the Remote?
How To Turn On the Collar?
7
Shock intensity can be adjusted from level 1 to level 16. Make sure to make these
adjustments carefully based on your dog’s reaction.
Tone: sends a tone (non-adjustable level) to the training collar.
Vibration: sends a vibration (non-adjustable level) to the
training collar.
Shock: sends static stimulation (adjustable in 1-16 levels) to the
training collar.
Switch between channels (Dog 1 and Dog 2)
Press and hold to turn on/off
Press to increase shock level
Press to decrease shock level
How To Use the Test Light Tool?
Note:
Do not press and hold the Vibration/Shock Button for extended periods of time.
This may cause physical or psychological pain to your pet.
Important!
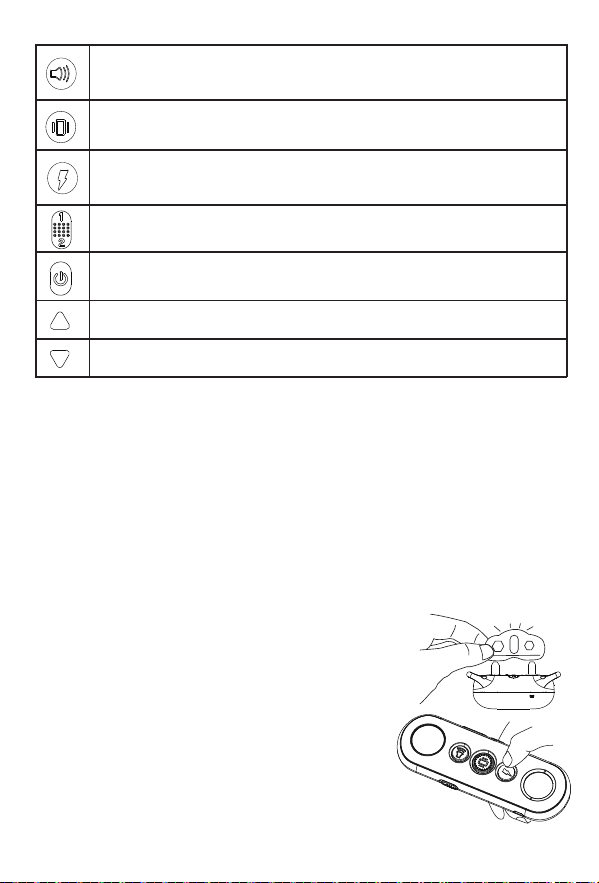
Shock Function Test
1.Make sure the collar is off your dog.
2.Turn on the collar.
3.Hold the test light’s contacts against the constant
points of the collar.
4.Press the Shock Button — the test light tool will
light up. Its brightness will increase or decrease
depending on the level of stimulation you are using.

8
1.On the remote, use the channel switch to select Dog 1.
2.With the remote turned on and the collar turned off, press and hold the
ON/OFF button on the collar for 4-5 seconds.
3.The LED on the collar will flash for about 10 seconds to indicate that it’s
ready for pairing.
4.Press and hold Tone Button and Vibration Button at the same time for 2-3
seconds. The green LED on the training collar will blink 5 times to indicate
successful pairing.
On the remote, use the channel switch to select Dog 2. Next, follow the
above steps (2-4) to complete the pairing process.
For the best results, it’s important to select suitable contact points based on
the thickness of your dog’s coat.
You can use the contact points separately or together with the spring sheet.
When placing the collar on your dog, make sure it fits properly and the
contact points are pressed firmly against the dog’s skin. If the collar is fitted
too loosely, it may move during the training process and the contact points
may hurt the dog’s skin.
The collar should also not be fitted too tightly: you should be able to place a
finger between the dog’s neck and the training collar. If placed too tightly, the
collar may cause breathing difficulties for your dog.
How To Pair Remote With the Collar?
Dog Training
How To Pair The Second Collar With The Remote?
How to Select Contact Points and Contact Spring Sheet?
Collar Fitting

9
Do not shave your pet’s neck as this may increase
the risk of skin irritation.
Your dog shouldn’t wear the collar for more than 12
hours per day.
Caution:
How To Find The Best Stimulation Level For Your Pet?
Follow the steps below:
Important: always start with the vibration mode first and use the static shock
mode as the last resort.
Depending on the model of your training collar, you may be able to access
anywhere from one to sixteen different stimulation levels. This can help you
find the level that is best for your dog.
Once you’ve placed the collar on your pet, it’s time to find the most suitable
stimulation level.
At this stage of the process, you will need to watch your pet carefully for the
slightest changes in behavior like looking around in curiosity, scratching at
the collar or flicking ears. All these behaviors are indicators that you have
found a suitable stimulation level. This is also known as Recognition Level.
1.Start at the lowest stimulation level: press and hold the Vibration or Shock
Stimulation Button continuously (further referred to as the [S] button).
2.If your pet shows no reaction, repeat the first step several times before
moving up to a higher stimulation level.
3.Your pet should not bark or panic when receiving stimuli. If this happens,
the stimulus level is too high and you need to go back to the previous level
and repeat the process.
4.Move up through the available stimulation levels until your pet responds.
5.If your pet continues to show no response at the highest stimulation level,
check if the collar is fitted properly. If your pet has long or thick fur, try using
the longer set of contact points. Then go back to step 1 and repeat the
process. If there is no change, you might need to trim your dog’s hair around
the contact points.

10
Once my pet’s training is
complete, do I need to
keep using the collar?
How long can I
continuously deliver
Vibration or Shock
stimulation to my pet?
What should I do if my
dog’s neck becomes red
and irritated?
It fully depends on your and your pet’s situation.
You might need to reinforce the results of collar
training from time to time.
No longer than 10 seconds for Vibration mode.
No longer than 3 seconds for Static Shock mode.
IMPORTANT: while it is okay to use the
Vibration mode for up to 10 seconds, it is highly
recommended to limit the continuous Static
Shock stimulation to no more than 3 seconds
(the smaller the dog the shorter the time)
Stop using the product immediately for at least
48 hours. If the condition persists beyond 48
hours, consult your veterinarian.
Can I attach a leash to
the e-collar?
No, this can result in pulling the contact points
too tightly against your dog’s neck. Use a
separate collar when needed.
How long can I leave the
e-collar on my dog for?
How long can I
continuously deliver
ibration/Shock to
my pet?
The collar is not designed to be worn continu-
ously. We recommend your pet only wears the
e-collar during training sessions or other
outdoor activities.
The maximum amount of time you can press
the Vibration/Shock Button and deliver
Vibration/Shock to your pet continuously is
10 seconds. After this, there’s a time-out an
Vibration/Shock cannot be delivered for 5
seconds. After the 5 second time-out period,
Button can be pressed and Vibration/Shock
can be delivered again.
Frequently Asked Questions

11
Probably not. You may need to reinforce
training with the Receiver Collar from
time to time.
Yes.
While the Vibration/Shock stimulation may be
unpleasant, it is generally harmless to your
pet when used correctly. However, your input
as a trainer is essential in ensuring the safety
of this process.
Your pet should be able to recognize basic
obedience commands such as “Sit” or “Stay”.
Pets should be at least 6 months old before
you can use the training collar to train them.
The range of the remote may be affected by
a number of factors like terrain, weather,
vegetation, transmission from other radio
devices and so on.
As advised by the USA Dog Experts, the
ABBIDOT Dog Training Collar will beep when
in stimulation mode. This coupling teaches
your dog that the tone alone is indicating
bad behavior. This can help train your dog
respond to commands when they only hear
the beep. And yes, you can turn the sound if
you don’t like it. Simply press and hold the
ON/OFF button on the collar 5 times in 3
seconds to turn it off. Do the same to turn it
back on.
How long should the
training session be?
Why does the collar
beep when used? Can I
turn it off?
Will I get exactly 1500 feet
of range with the collar’s
remote?
Once my pet is trained
and has been obeying my
commands, will he have
to continue to wear the
Receiver Collar?
How old does my pet
have to be for me to use
the e-collar for training?
Is the Vibration/Shock
safe for my pet?
Is the e-collar waterproof?
Training sessions should be kept short and
positive (10-15 minutes).
Battery Type Rechargeable, lithium polymer battery
Not waterproof (keep away from water)
IEC 60529 IPX7, waterproof
From 0-40℃ (from 32-104℉)
20dBm (100mW)
900m (3000 feet) in open space
Remote: 27 days, Collar: 11 daysBattery Life (standard use)
Remote Waterproof Rating
Collar Waterproof Rating
Operating Temperature Range
Wireless Power
Wireless Range
Make sure the Collar is turned on.
Check if the battery level is low on either the Collar or
the Remote.
The range of the remote may be affected by a number of
factors like terrain, weather, vegetation, transmission
from other radio devices and so on.
Try testing the Collar using the test light tool (see
above).
Try increasing the stimulation level (please refer to the
How To Find The Best Stimulation Level For Your Pet
section).
Make sure the Collar’s contact points are in good contact
with your pet’s skin. Refer to the Collar Fitting section for
more information.
Make sure the Collar is charged.
When charging the Collar for the first time, charge it for at
least 4 hours. Subsequent charges only take 2-3 hours.
Make sure the Collar is turned on. Check if both the Collar
and the remote are sufficiently charged.
Try pairing the Remote and Collar again (refer to the How
to Pair the Remote with the Collar section).
Troubleshooting Guide
My pet doesn’t
react to
stimulation
The collar
won’t turn on
The collar isn’t
responding to
the remote
Specification

Dog Training Guide
Basic Obedience Training with the ABBIDOT E-Collar
Dog Training Collar Introduction
Whether you are training a companion dog, a hunting dog or a dog athlete,
we generally want to attain the same results: we want our pets to be happy
and safe. We also want them to respond to commands timely even when at a
distance and in the presence of distractions.
The ABBIDOT Dog Training Collar is a powerful training tool that can help
you attain these results.
The ABBIDOT electronic training collar (e-collar) is a safe, reliable and
effective training tool. With it, you can make timely corrections to your dog’s
behavior — even at a distance.
Thanks to the collar’s adjustable levels, you get to match the intensity of
stimulation to your dog’s temperament and the distraction level of the
moment for maximum training efficiency.
With that, correcting unwanted behaviors is only a fraction of you can do with
your new e-collar.
In fact, the ABBIDOT e-collar can be a powerful tool for encouraging desired
behavior. But first, you need to identify the right e-collar settings for your dog:
the one that is high enough to be noticed but not so high as to be disruptive.
The next step would be for your dog to control the “behavior” of the collar with
their actions.
You may soon find that these methods of e-collar training are actually gentler
than many traditional leash-training methods. E-collar training can improve
communication with your pet by providing instant feedback to your dog during
training. This reduces confusion, fosters a positive training attitude and
accelerates learning, rapidly producing off-leash reliability.
Even if your dog already knows the basic obedience commands, follow the
procedures given. Your dog must learn how to respond to the e-collar for
each command before you can use your ABBIDOT collar for training at a
distance.
13
Teaching Basic Obedience
The “Sit” Command
1.Put a separate, non-metallic collar on your pet’s neck ABOVE the e-collar
and attach a 10-foot leash. Note: be sure the extra collar does not put
pressure on the contact points.
2.Hold the leash and the remote in one hand. Keep your other hand free to
guide your pet into a “Sit” position.
3.Press and hold the [S] button, starting at your pet’s Recognition Level.
4.Immediately give the “Sit” command while continuing to hold the [S] button.
5.Release the [S] button as soon as your pet is in position and praise him.
6.Release your pet from the “Sit” command and play.
7.Repeat Steps 2 through 6.
Note: if your pet breaks the “Sit” command, repeat steps 3 through 6. Keep
your pet close to you while teaching the “Sit” command.
14

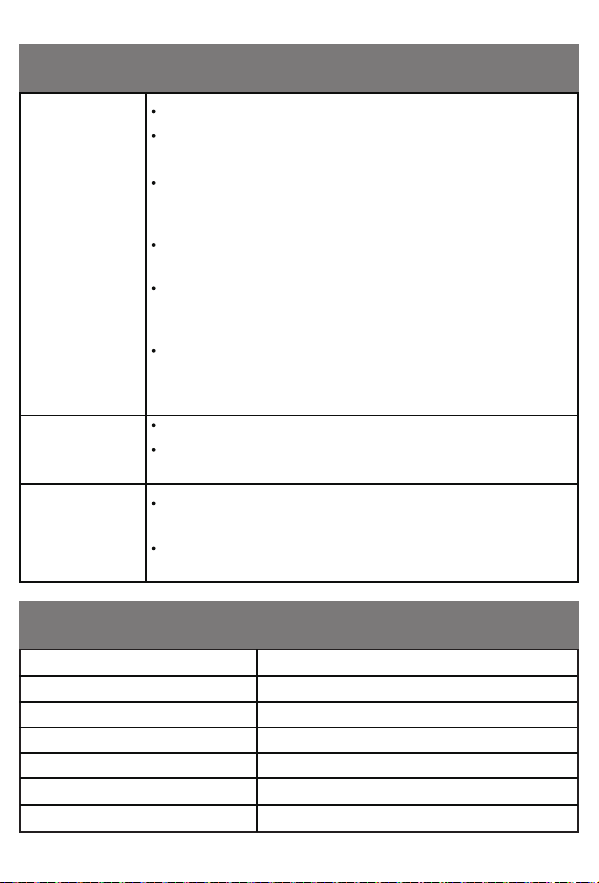
The “Come” Command
1.Put a separate, non-metallic collar on
your pet’s neck ABOVE the collar
and attach a 10-foot leash.
Note: be sure the extra collar does not
put pressure on the contact points.
2.Hold your leash in one hand and the
remote in the other.
3.Wait for your pet to walk away from
you. Using the Recognition Level for your
pet, press and hold the [S] button on
your remote.
4.Immediately give the command “Come”
while continuing to hold the [S] button.
5.Using the leash, gently guide your pet
toward you until they begin to come in your
direction.
6.Immediately release the
[S] button as soon as your pet steps
towards you and praise them enthusiasti-
cally.
7.Quickly move backwards as your pet
begins to come back to you praising him
the entire time.
8.Praise your pet when he returns to you.
9.Repeat Steps 3 through 8.
10.Once your pet has responded readily to the “Come” command several
times, back away from him without giving a command. When your pet turns
toward you, give the “Come” command (WITHOUT STIMULATION) and praise
them while you continue to back up. Praise your pet when he returns to you.
11.Use your leash to prevent your pet from running past you. If your pet
manages to run past you, repeat Steps 3 through 8.
15
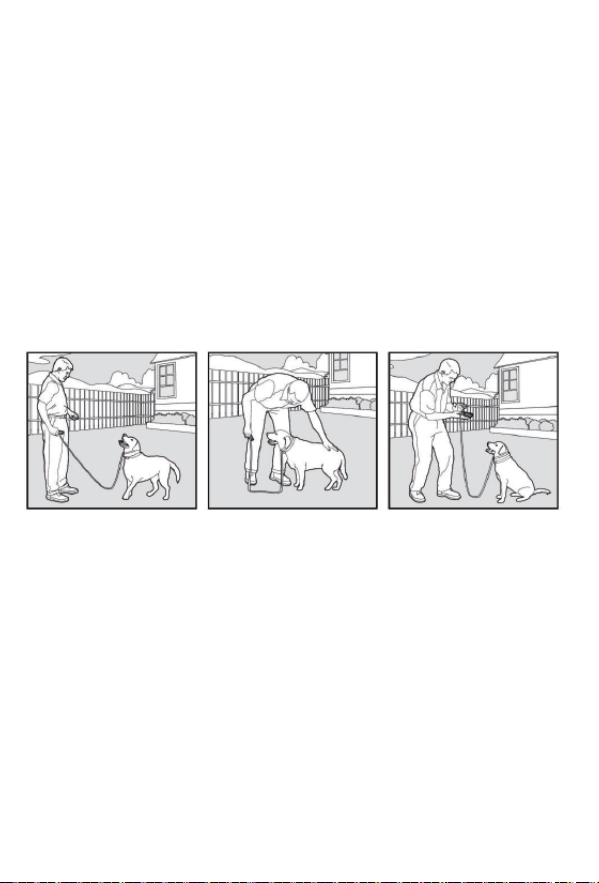
The “Stay” Command
1.Put a separate, non-metallic collar on your pet’s neck ABOVE the collar
and attach a 10-foot leash. Note: be sure the extra collar does not put
pressure on the contact points.
2.Put your pet on his bed or on a cooling mat. Hold your leash in one hand
and the remote in the other.
3.Staying within 3 feet, walk the perimeter of the bed. Do not say anything to
your pet.
4.If your pet tries to leave the bed, press and hold the [S] button and give the
“Stay” command. Continue to hold the button until your pet is back on their
bed. If necessary, use the leash to guide your pet onto their place.
5.Praise your pet when they are back on their bed. You are welcome to use
treats.
6.Once your pet has settled for a few seconds, release him and play calmly.
7.Repeat steps 1 through 5.
16
Eliminating Unwanted Behavior
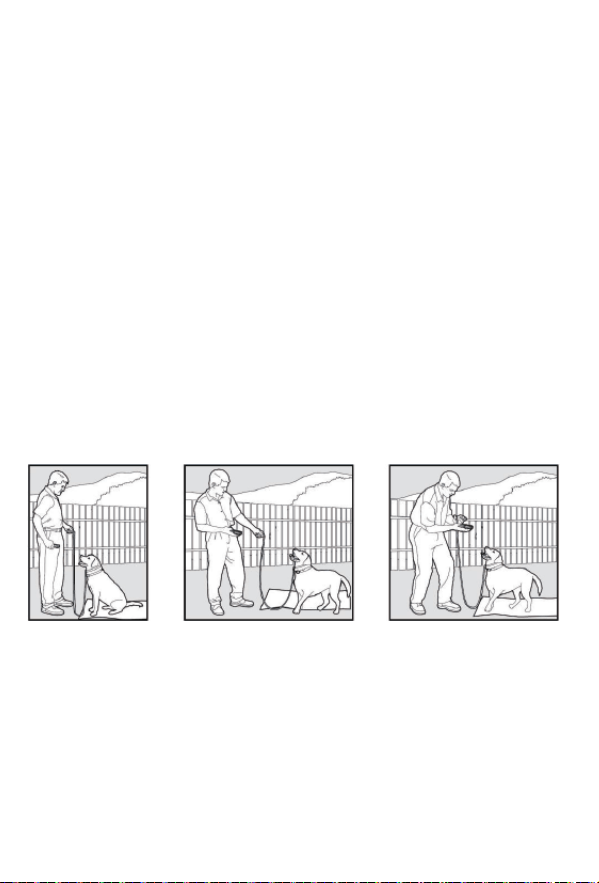
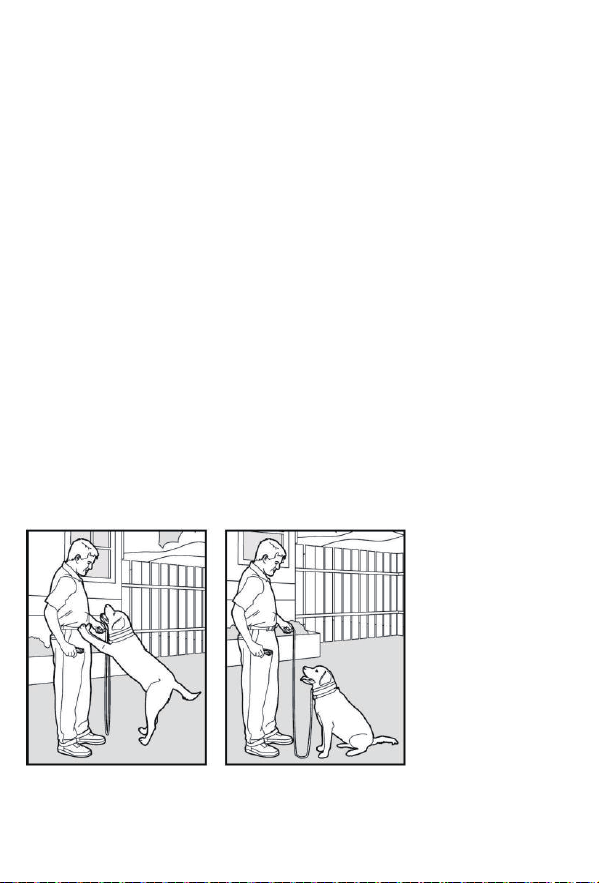
Jumping Up
Pets typically jump up to get attention. If you do not want your pet to jump on
you, then friends or members of the family should not encourage this
behavior as well. This means that every time your pet jumps on someone,
they should be reprimanded or redirected to an alternate and acceptable
behavior, for which they can receive praise.
1.On the remote, select your pet’s Recognition Level.
2.As soon as your pet lifts a paw off the ground to jump on you, press the
[S] button and give the “Sit” command.
3.Release the [S] button immediately once your pet is sitting, and verbally
praise them.
4.If your pet ignores the stimulation, increase the Intensity Level.
5.Practice this exercise in several different areas and use different people for
distractions.
Note: it is best if your pet first understands the “Sit” command.
17
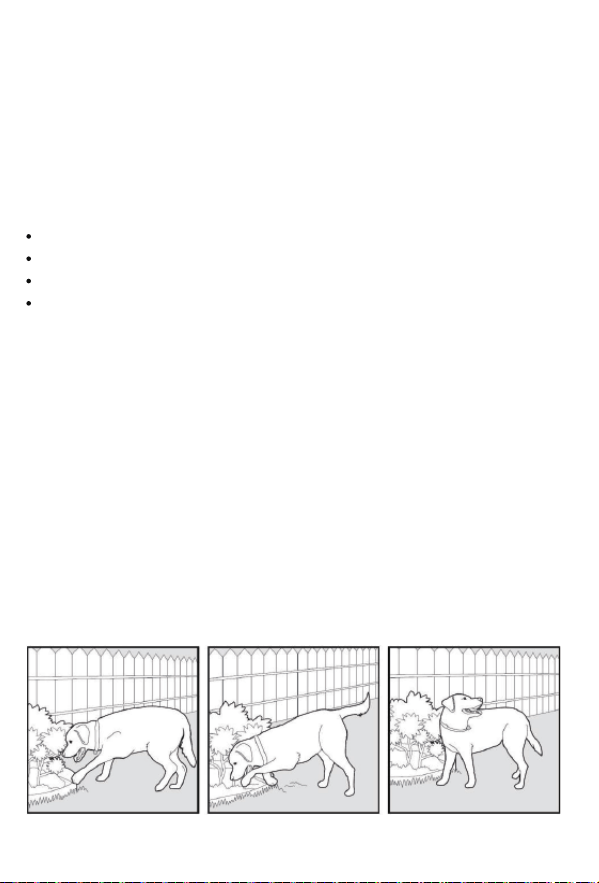
Digging
18
It is important to first understand why your pet is digging. Many dogs like
terriers, were bred to flush out prey and digging is very natural to them.
Other dogs may be digging to find a cool spot to lay down or simply out of
boredom.
Your pet may no longer have the desire to dig if they are is provided with the
following:
A cool, shaded area in which to lay down, and plenty of water.
An alternate activity, such as a favorite toy.
Plenty of play, exercise, and attention.
A yard free from rodents or prey that your dog may be trying to find.
1.Choose the intensity level that is one level above your pet’s Recognition Level.
2.Place the collar on your pet and wait at least 10 minutes before letting them
out in the yard. No other people or pets should be in the yard, as you do not
want your pet to associate the stimulation with anything other than digging. Your
pet must be securely fenced in or contained during training.
3.From a window or area where your pet cannot see you, wait until your pet
begins to dig.
4.As your pet starts digging, press the [S] button and release it when the digging
stops. Only press the button while your pet is in the act of digging and do not say
anything.
5.If your pet ignores the stimulation, increase the Intensity Level.
6.Continue to watch your pet as they may choose another area to dig.
7.Do not allow your pet in the yard unsupervised until the digging has stopped
completely.
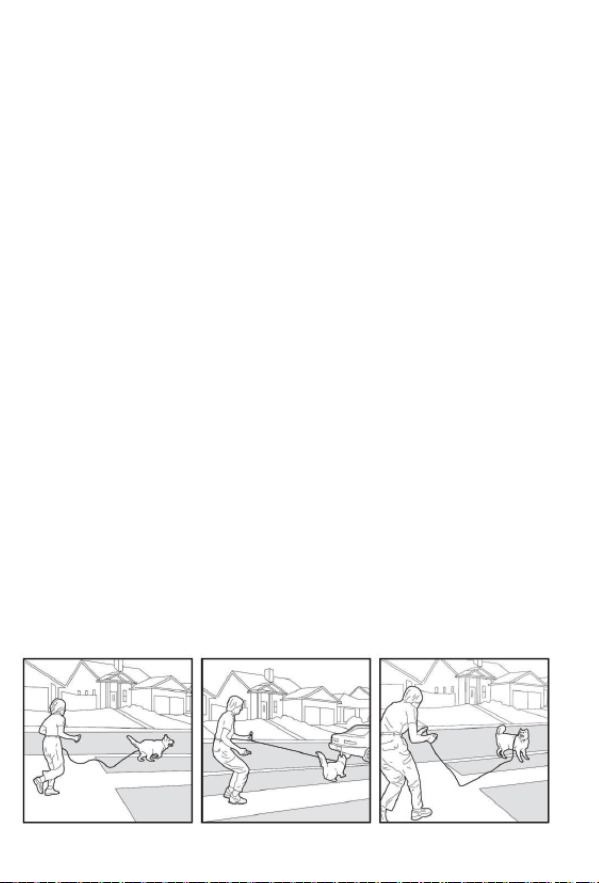
Chasing
Chasing is an instinctive behavior stimulated by moving objects. Some dogs
have a particularly strong desire to chase that can put them in harm’s way
and leave you helpless. Never allow your dog off the leash or out of a
contained area until they have learned the “Come” command, regardless of
the distraction. Be consistent and correct your dog every time they chase
something.
CAUTION! It is vitally important that you and your dog remain safe while
learning during on-leash training. Your dog should be on a strong leash, long
enough for him to attempt to chase an object, but short enough for him not to
reach a road or other unsafe area. You must also be physically strong to
restrain your dog when they try to chase.
1.If your dog has not learned the “Come” command, keep a leash on them so
that you can physically stop them before they reach the object that is being
chased.
2.Choose the intensity level that is one level above your pet’s Recognition Level.
3.Set up a scenario where your dog is enticed to chase an object. Common
items could be cars, motorcycles, bicycles, etc. (do not use toys).
4.When the object passes in front of your dog, make sure to hold the leash with a
firm grip. As soon as your dog begins to chase the object, press and hold the [S]
Abutton until they stop.
5.When your dog stops chasing the object, immediately release the button, walk
backwards and give the “Come” command. Praise your dog as they come to you.
6.Repeat the process until your dog stops chasing the object.
19

●The ABBIDOT Dog Training Collar is not designed to be worn constantly. We
strongly advise you to reserve collar usage to active training sessions. When you
leave your dog unattended, make sure to take the collar off.
●Most dogs will feel uncomfortable when wearing the collar for the first time.
Don’t use any commands until your dog has got used to the collar which will
normally take several days.
●Eliminate one unwanted action or teach one obedience command at a time. If
you move too quickly with the training, your dog may become confused.
●Be consistent in your training. Give your dog the same stimulation for each
unwanted action. We suggest you to use Vibration Stimulation before starting the
Static Shock Stimulation. If you follow this training method, your dog will learn
that Static Shock Stimulation might come after Vibration. This way, the Vibration
Stimulation alone can effectively curb unwanted behavior of your dog.
●Do not over-correct. Use as little stimulation as possible to train your dog.
●Following a predefined scenario in all your training sessions can dramatically
improve your chances of success.
●Should your dog react to the training by hiding or acting fearfully, try to redirect
their attention to a simple command such as “Speak” or “Sit” to calm them down.
Use treats to help your dog understand what commands have been done
correctly.
Trash Raiding
General Tips
The easiest way to prevent trash raiding is to remove garbage and tempting
food from your pet’s environment. You can use the e-collar to teach
your pet to stay away from these items; however, you must be prepared to
correct your pet every time they approach them.
1.Choose the Intensity Level 1 higher than your pet’s Recognition Level.
2.Choose the intensity level that is one level above your pet’s Recognition Level.
3.Pick a temptation for your pet and position yourself where they cannot see you.
4.While your pet’s mouth is touching the temptation, press and hold the [S] button.
Immediately release the button when your pet leaves the temptation.
5.Do not say anything, as you want your pet to associate the stimulation with their
behavior, not you.
6.If your pet does not respond to the stimulation, increase the Intensity Level
by 1 level and repeat the process.
7.Repeat this process in several different locations with different temptations.
20

Terms of Use and Limitation of Liability
Terms of Use
No Unlawful or Prohibited Use
The ABBIDOT Dog Training Collar can be used for puppies/cats/dogs
weighing between 5 and 100 lbs. However, we do not recommend e-collar
training for puppies under 6 months old. E-collar training is also not
recommended if your pet is behaving aggressively.
If you are unsure about whether this type of training is suitable for your pet,
consult your veterinarian or a certified trainer.
Proper use includes reviewing the entire User Manual and Dog Training
Guide provided with Thai product. Pay extra attention to all the Caution
statements.
This Product is designed for use with dogs and cats only. The ABBIDOT dog
training collar is not intended to harm, injure or provoke. Using this product in
a way that is not intended could result in violation of Federal, State or local
laws.
Limitation of Liability
In no event shall we be liable for any direct, indirect, punitive, incidental,
special or consequential damages, or any damages whatsoever arising out of
or connected with the use or misuse of this Product. Buyer assumes all risks
and liability from the use of this Product.
Modification of Terms and Conditions
We reserve the right to change the terms, conditions and notices under which
this Product is offered.
21

22
You might need to use a higher seng with your large breed dog! Even
so, you sll want to begin with a low seng or simple vibraon and work
your way up unl you find something appropriate.
Step One: Size your e-collar appropriately for your larger dog, ensuring a
snug (yet not too ght) fit. You should be able to fit two fingers between
the contact leads and your dog’s skin.
Your electric collar’s contact points should make contact with your dog’s
skin. Make sure they aren’t covered by maed fur.
The contact points should apply only light pressure to your dog’s neck.
Step Two: Begin training using beep with vibraon mode. If you need to
use ‘safe shock with beep‘, start at level 1 and slowly increase unl you
find a suitable level.
Step Three: Give your dog a command he knows, while simultaneously
pressing the acvaon buon on your dog’s e-collar remote. You’ll
release the smulaon once your dog follows through!
Remember, this isn’t meant to be used as punishment and shouldn’t be
uncomfortable. It is only a sort of physical reinforcer to go along with
your audible commands.
Closely monitor your large breed dog during the first day of use to ensure
a proper, working fit.
Removing your dog’s electric collar at night or when you can’t offer
supervision is recommended. There is always a slight chance the collar
can catch and cause a hazard.
Training Large Breeds
What Setting Should You Use with Large Breeds?

23
Because smaller dogs are much more delicate, you want to stay on a
lower seng. Begin with an audible tone or vibraon, moving to one of
the lower sengs if necessary. Only move up if your dog doesn’t respond
to the current seng.Be very cauous when training small puppies. You
never want to frighten your puppy. It’s best to avoid any physical
smulaon unl your dog reaches at least adolescence (18-24 months).
Limit your electric collar to an audible tone at this stage.
Step One: Size your e-collar appropriately for your smaller dog, ensuring
a snug (yet not too ght) fit. You should be able to fit two fingers
between the contact leads and your dog’s skin.
Your electric collar’s contact points should make contact with your dog’s
skin. Make sure they aren’t covered by maed fur.The contact points
should apply only light pressure to your dog’s neck.
Step Two: Begin training using beep with vibraon mode. If you need to
use ‘safe shock with beep’, start at level 1 and slowly increase unl you
find a suitable level.
Step Three: Give your small dog a command he knows, while simultane-
ously pressing the acvaon buon on your dog’s e-collar remote. You’ll
release the smulaon once your dog follows through!
Remember, this isn’t meant to be used as punishment and shouldn’t be
uncomfortable. It is only a sort of physical reinforcer to go along with
your audible commands.
Closely monitor your small breed dog during the first day of use to ensure
a proper, working fit.
Removing your dog’s electric collar at night or when you can’t offer
supervision is recommended. There is always a slight chance the collar
can catch and cause a hazard.
Training Small Dogs
What Setting Should You Use with Small Breeds?