RANGE HOOD INSTRUCTION MANUAL
FRHRE5346-48/60
5011160
Conforms to UL STD. 507
Certified to CSA STD. C22.2 NO.113
IMPORTANT:
READ AND SAVE THESE INSTRUCTIONS
NOTICE:
Installer: Leave this guide with the homeowner
Homeowner: Keep this guide for future reference
07/17/2023
Cusmer Care
Thank you for purchasing a FORNO product. Please read the entire instruction manual before operating
your new appliance for the first time. Whether you are an occasional user or an expert , it will be beneficial
to familiarize yourself with the safety practices, features, operation and care recommendations of your
appliance.
Both the model and serial number are listed inside the product. For warranty purposes and establish
warranty period, you will also need the serial number, the date of purchase & a copy of your proof of
purchase.
Record this information below for future reference.
SERVICE INFORMATION
Model Number
Serial Number
Date of Purchase
Purchase Address & Phone
Use these number in any correspondance or
service calls concerning your product.
If you received a damaged product,
immediately contact FORNO.
Save time and money. Before you call for
service, check the Troubleshooting Guide. It
lists the causes of minor operating problems
that you can correct yourself.
SERVICE IN CANADA & UNITED STATES
Keep the instruction manual handy to answer your questions. You can also find all the information
you need online at .forno.ca.
If you don't understand something or need more assistance, please visit our website or email:
If there is a problem, please contact FORNO customer service. Please note that troubleshooting
with a customer service representative will be needed before being able to send a service
provider. All warranty work needs to be authorized by FORNO customer service. All our
authorized service providers are carefully selected and rigorously trained by us.
9
9
8HOW TO REPLACE THE LED LAMP
TROUBLESHOOTING
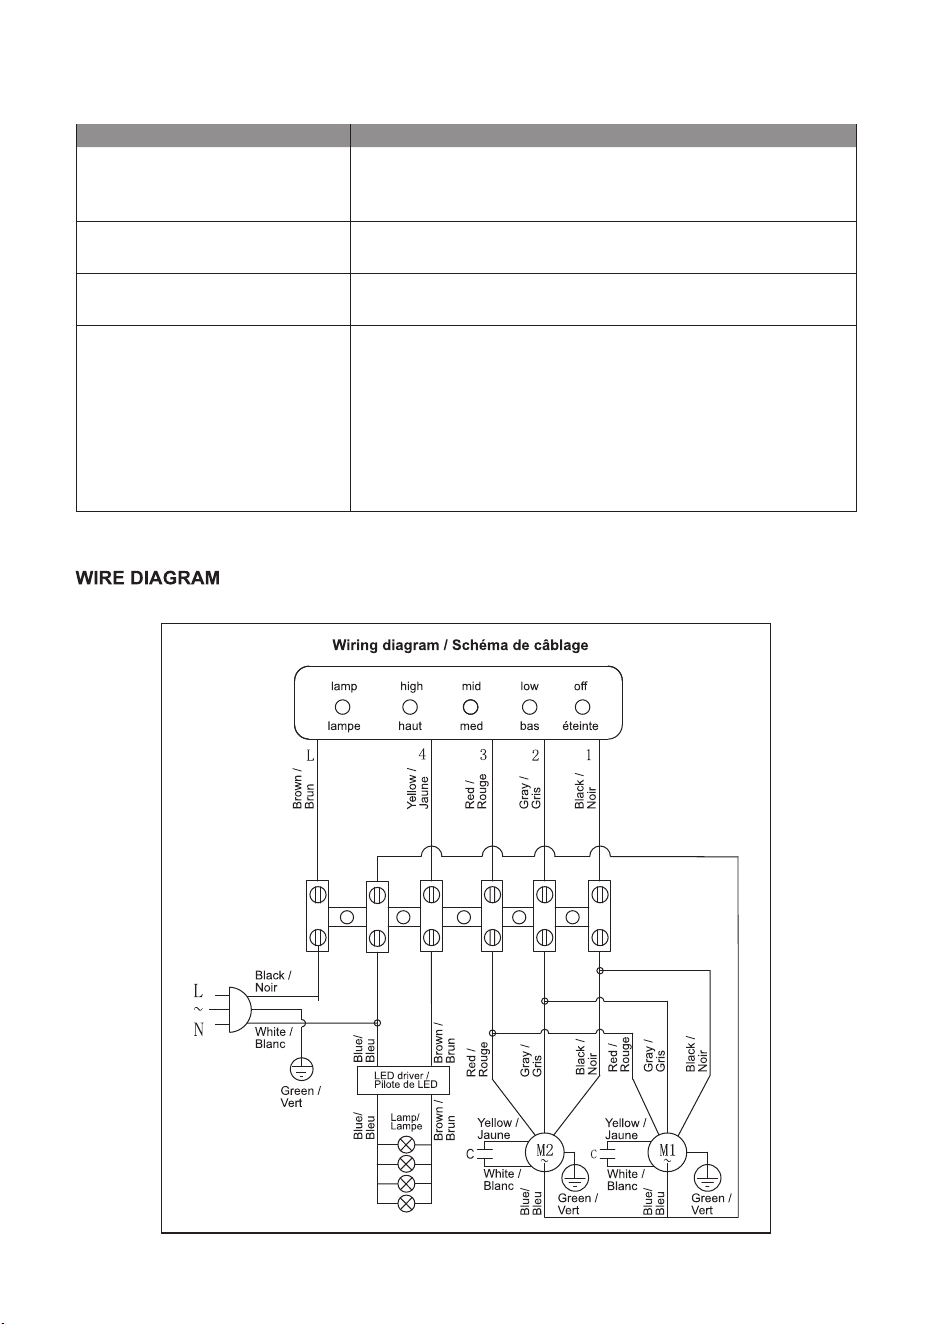
Rated Voltage: 120V/60Hz
Light Power: LED Lamp Max 8W total
Motor Power: 230W
Total Power: 238W
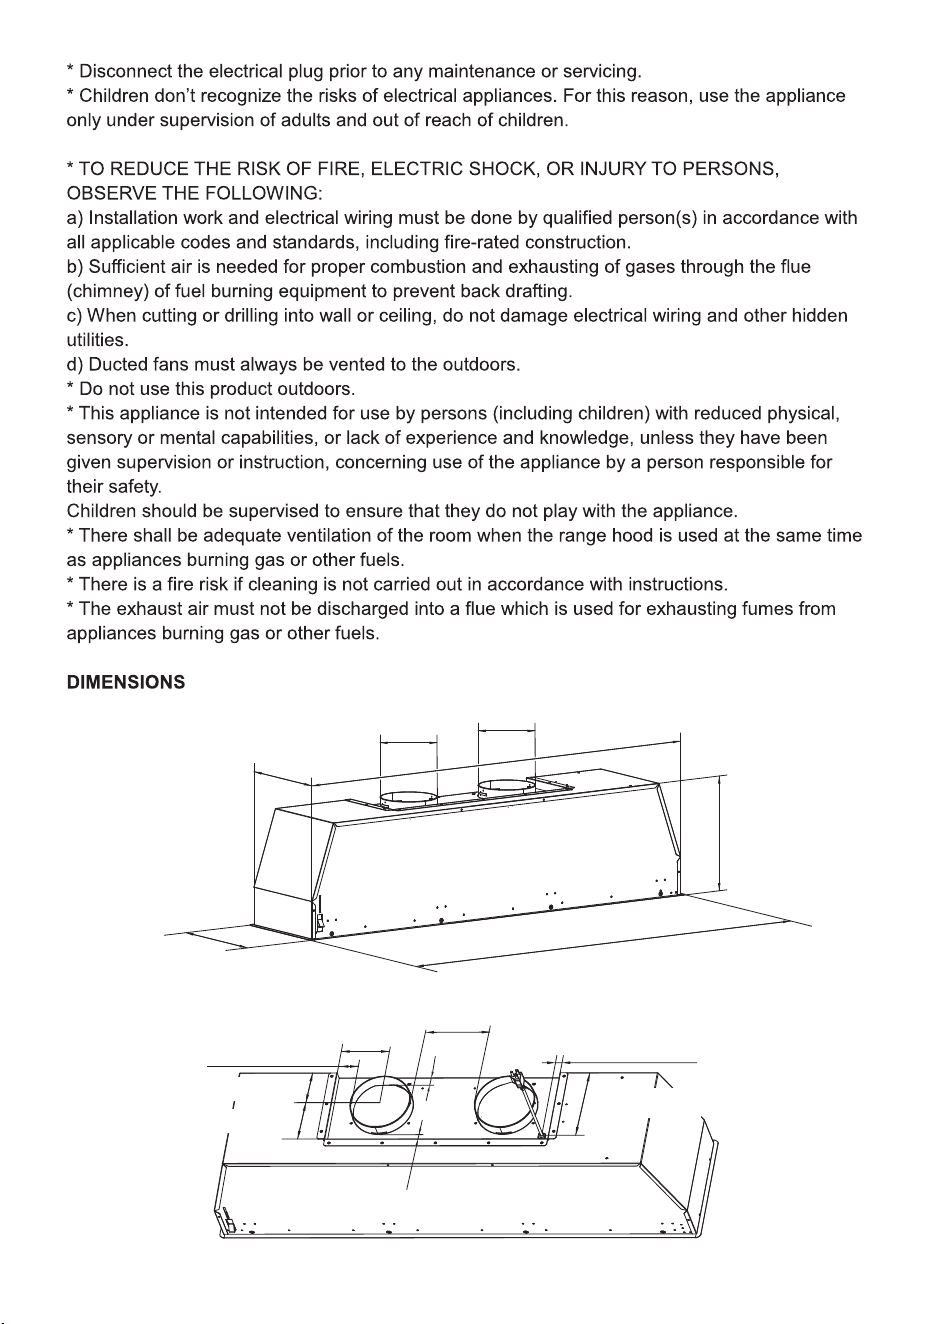
Air outlet diameter: 5 7/8"
1
2
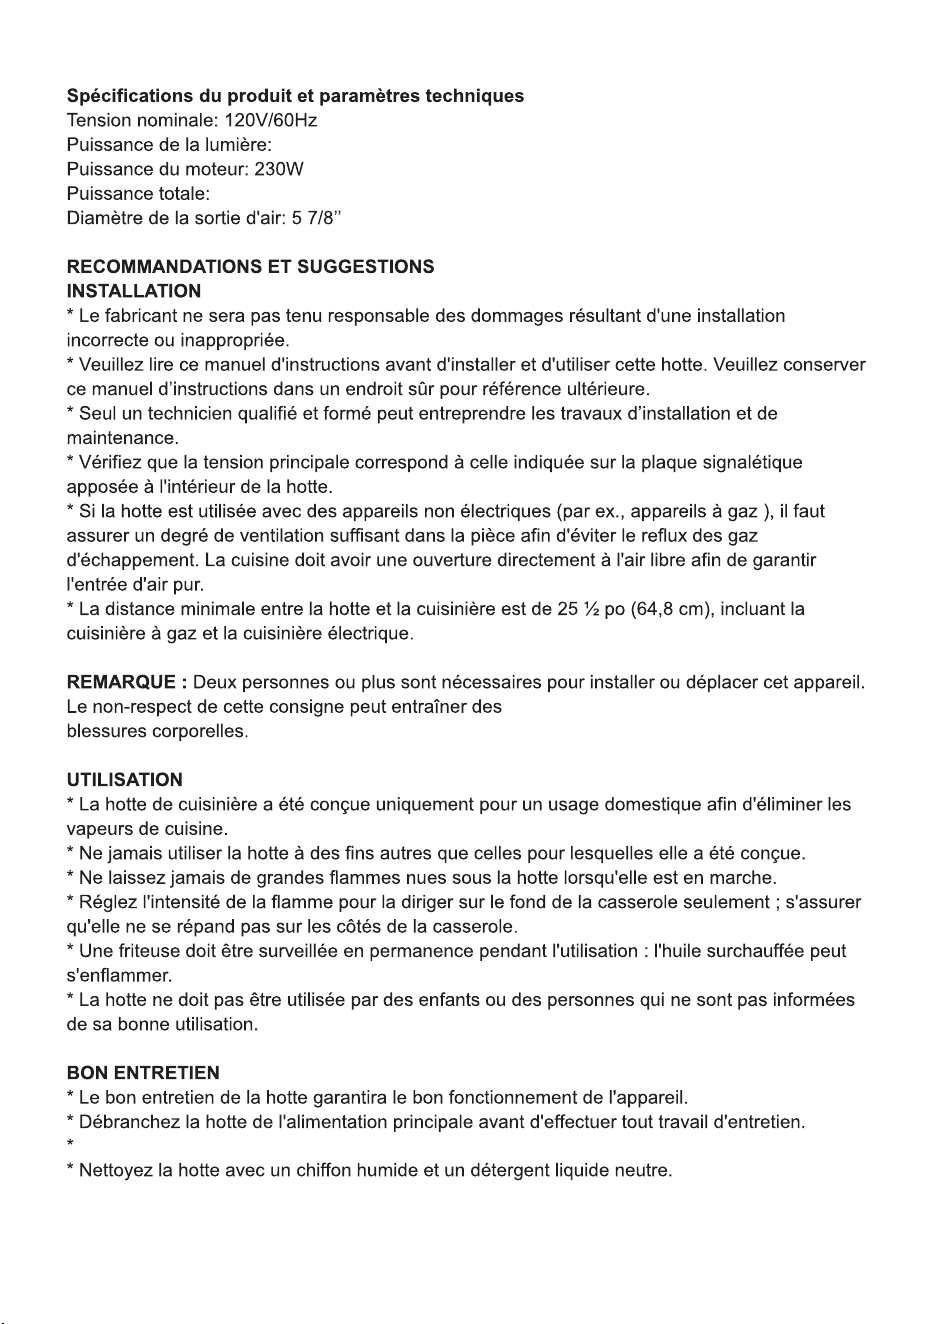
FRHRE5346-48
φ5 7/8"
(150mm)
46 3/8'' (1178mm)
47 1/8'' (1197mm)
φ5 7/8"
(150mm)
10 3/8"
(263mm)
11 1/8"
(282mm)
11 27/32"
(301mm)
7/8"(22.5mm)
4 3/8"
(110mm)
1/2'' (14mm)
7 1/8''(181mm)
1 1/2'' (38mm)
6 3/4"(171mm)
4 1/8"(104mm)
3 1/2"(89mm)
1 5/32''(29mm)
FRHRE5346-48---View from the top (exhaust & power cord location)
3

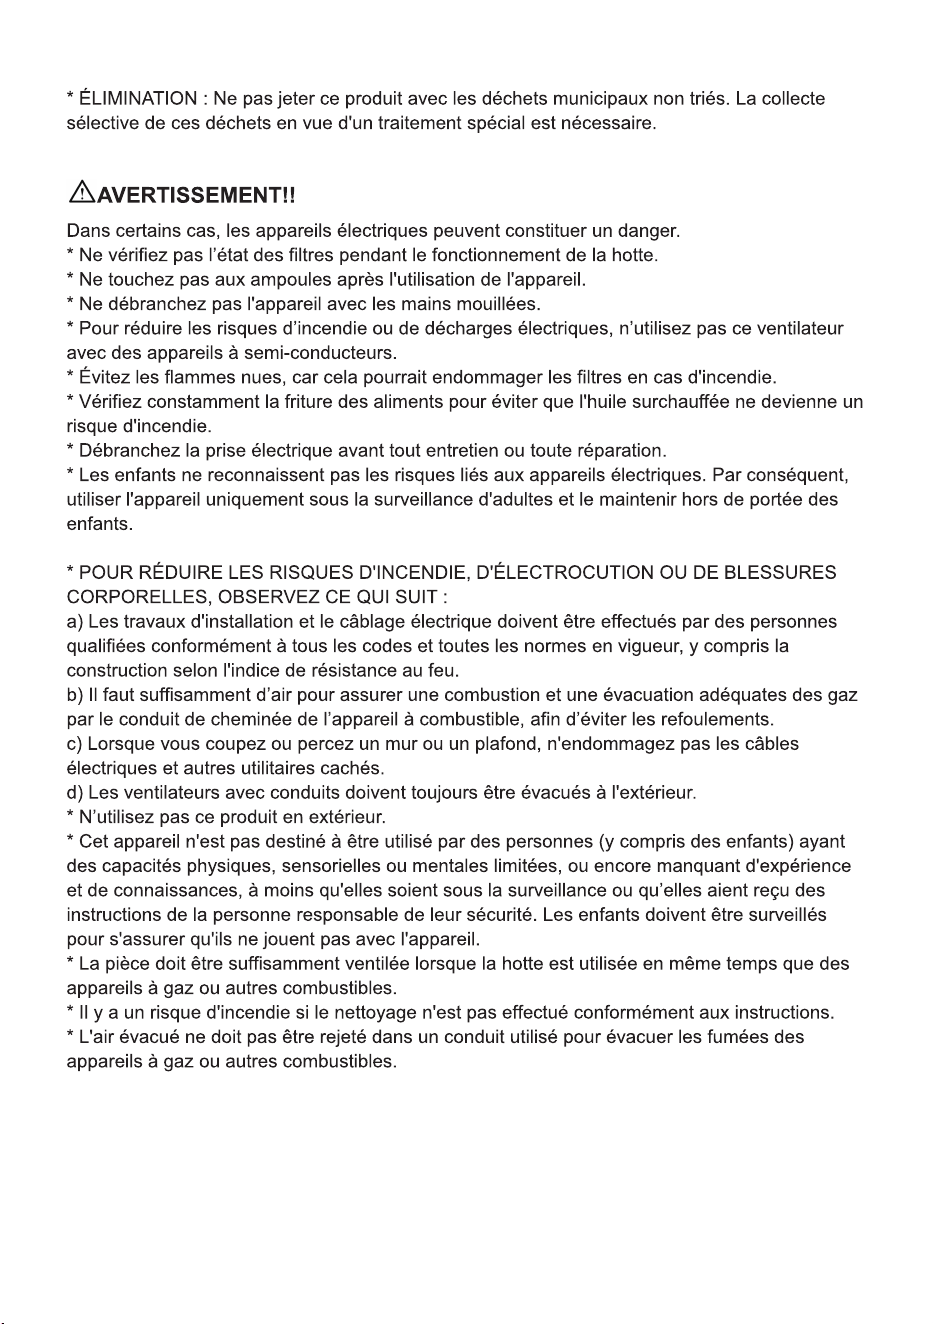
FRHRE5346-60
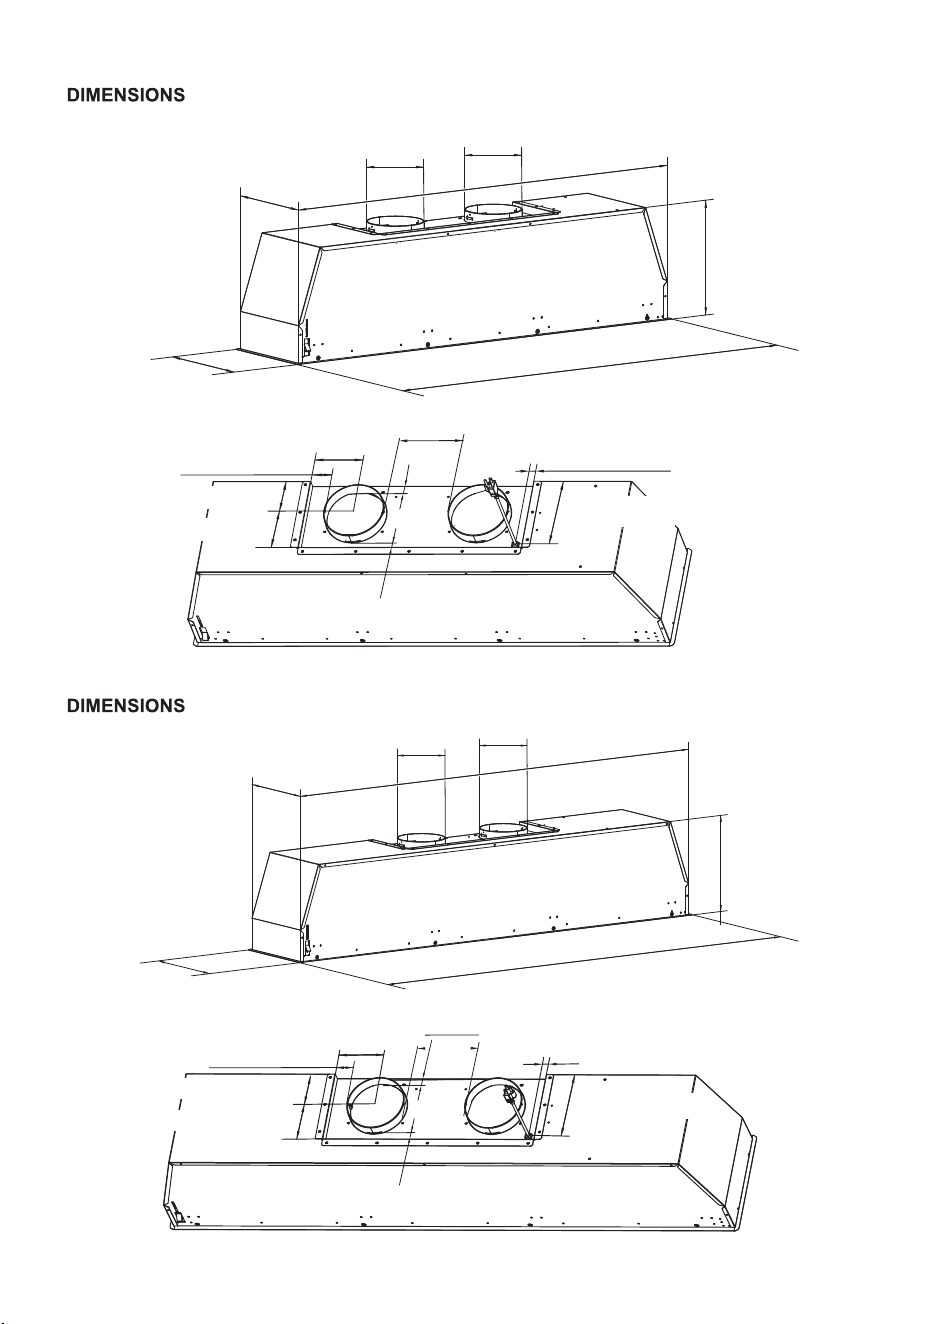
The hood is operated using the push button on the front panel.
The light switch turns the lamps on and off. The blower switch
turns the blower on to three speed settings:
- OFF
1 - LOW SPEED
2 - MEDIUM SPEED
3 - HIGH SPEED
φ5 7/8"
(150mm)
58 3/16'' (1478mm)
58 15/16''(1497mm)
φ5 7/8"
(150mm)
10 3/8"
(263mm)
11 1/8"
(282mm)
11 27/32"
(301mm)
7/8"(22.5mm)
4 3/8"
(110mm)
1/2'' (14mm)
7 1/8''(181mm)
1 1/2'' (38mm)
6 3/4"(171mm)
4 1/8"(104mm)
3 1/2"(89mm)
1 5/32''(29mm)
FRHRE5346-60---View from the top (exhaust & power cord location)
4
5
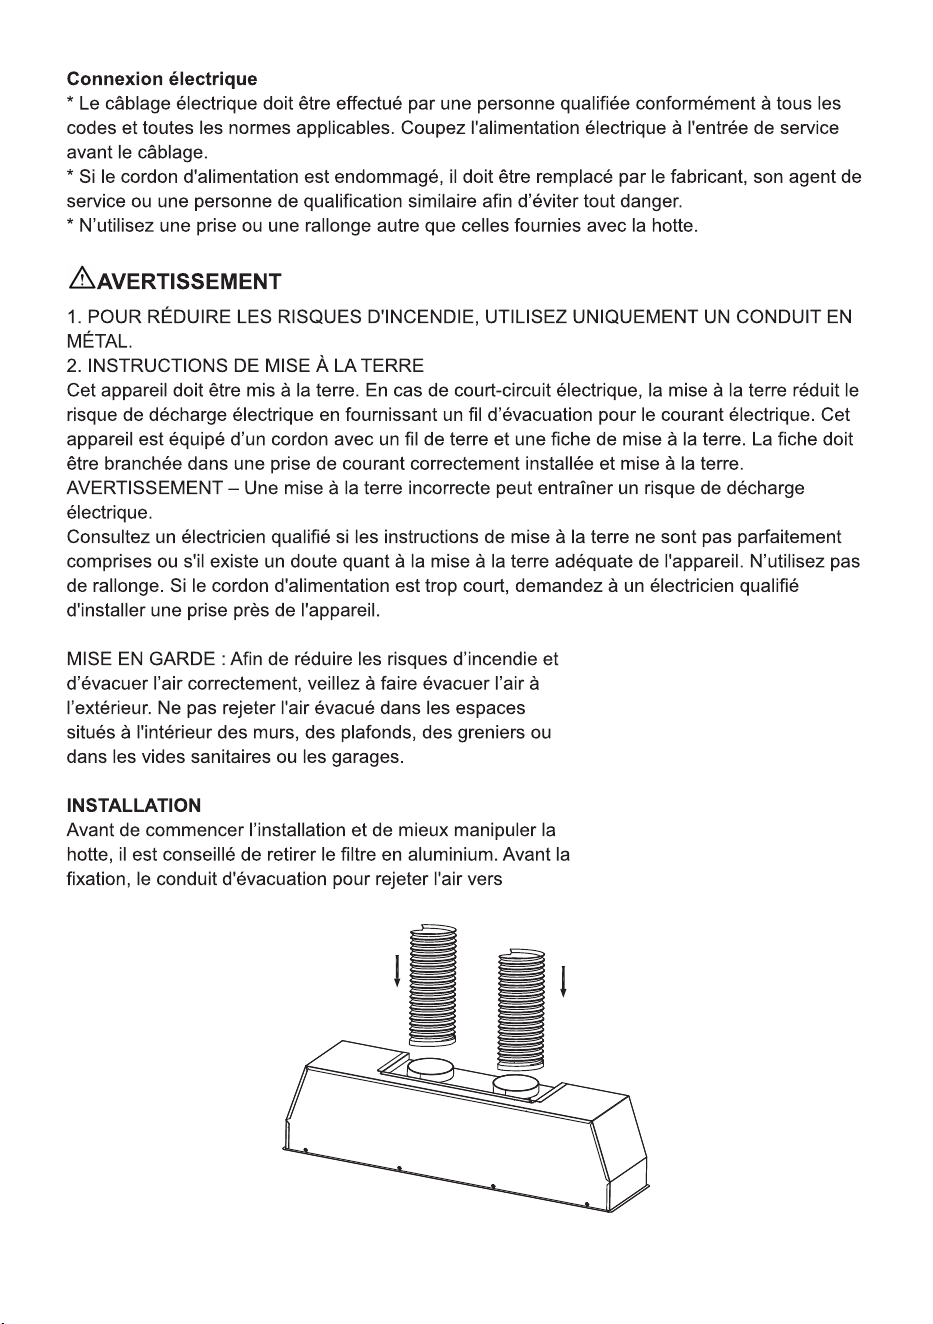
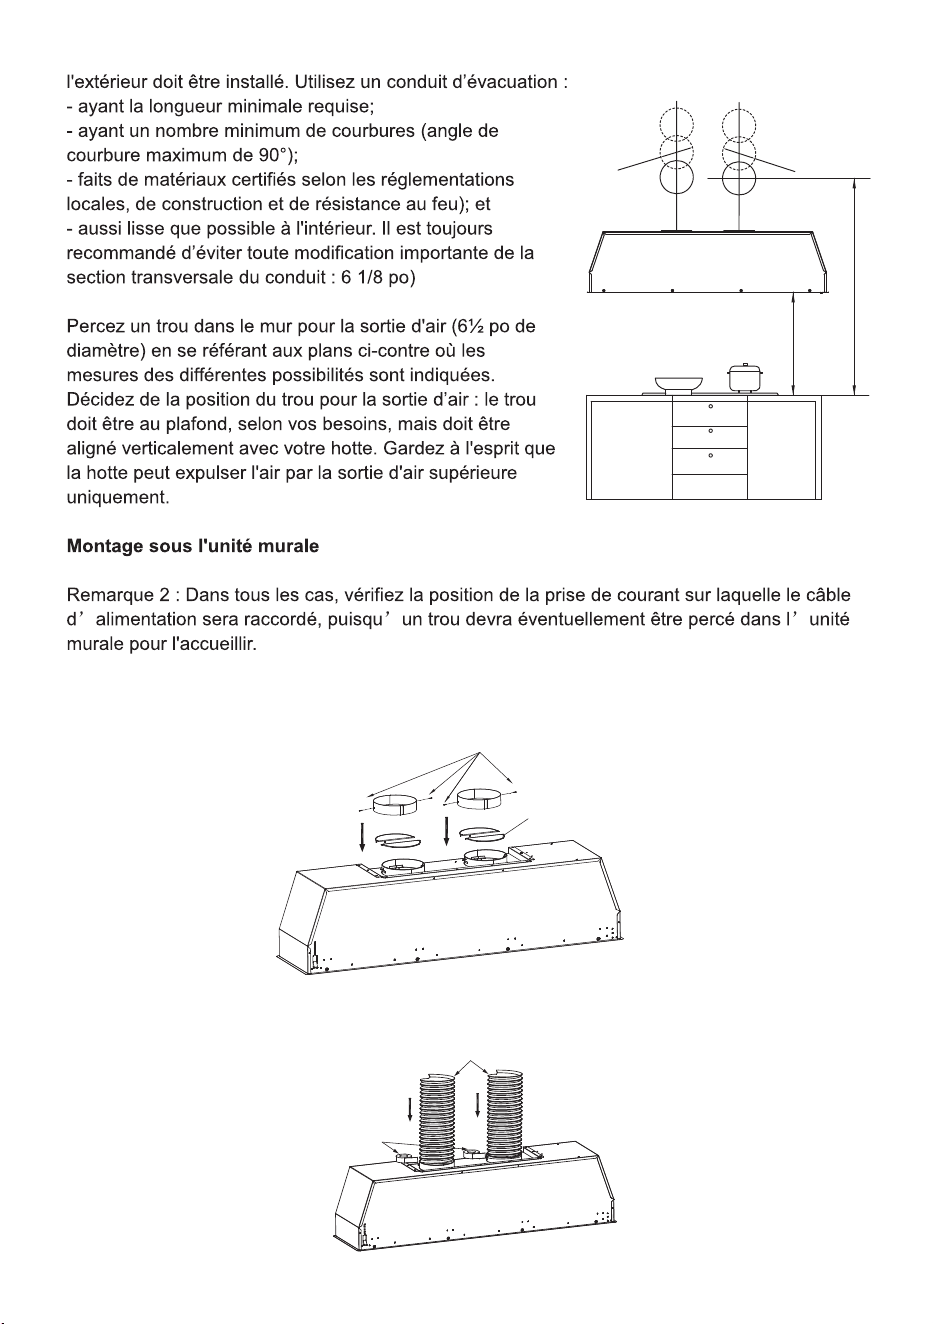
Note 1: Before attaching the hood to the wall unit, drill 2
holes of 6 1/2" diameter into the wall unit.
Note 2: In any case, check the position of the power outlet
where the power cable will run, since a hole might have to
be made in the wall unit to accommodate it.
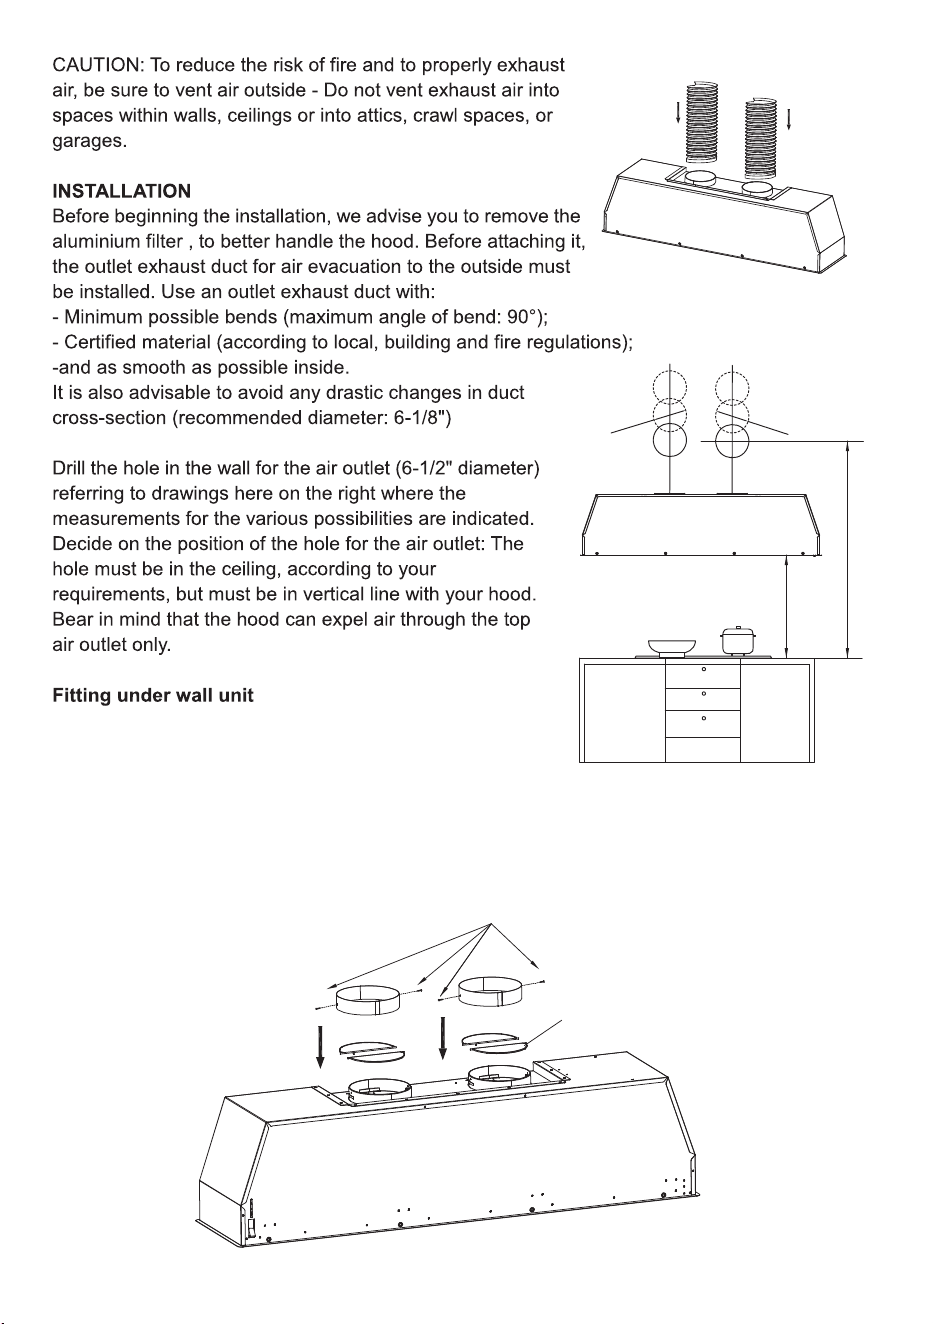
1.Fix the metal adapter to the air outlet with 4 screws ST2.9*8. And install the blade to the air
outlet. Please refer to Pic. 1.
φ6 1/2"
(165mm)
φ6 1/2"
(165mm)
min44 3/32"(1120mm)
min25 1/2"
(650mm)
Screw (ST2.9*8)
Blade
1.
6
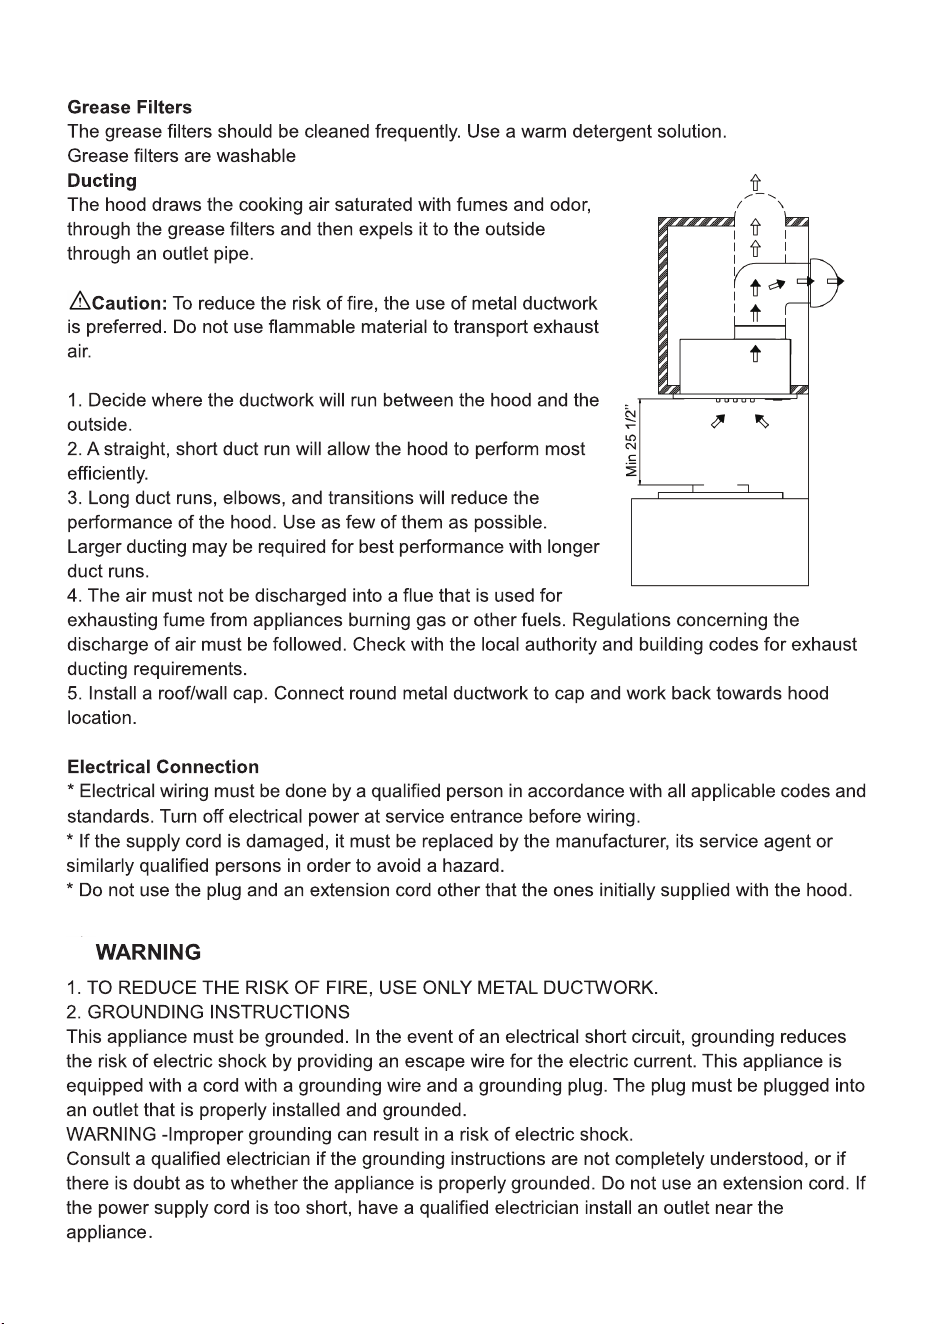
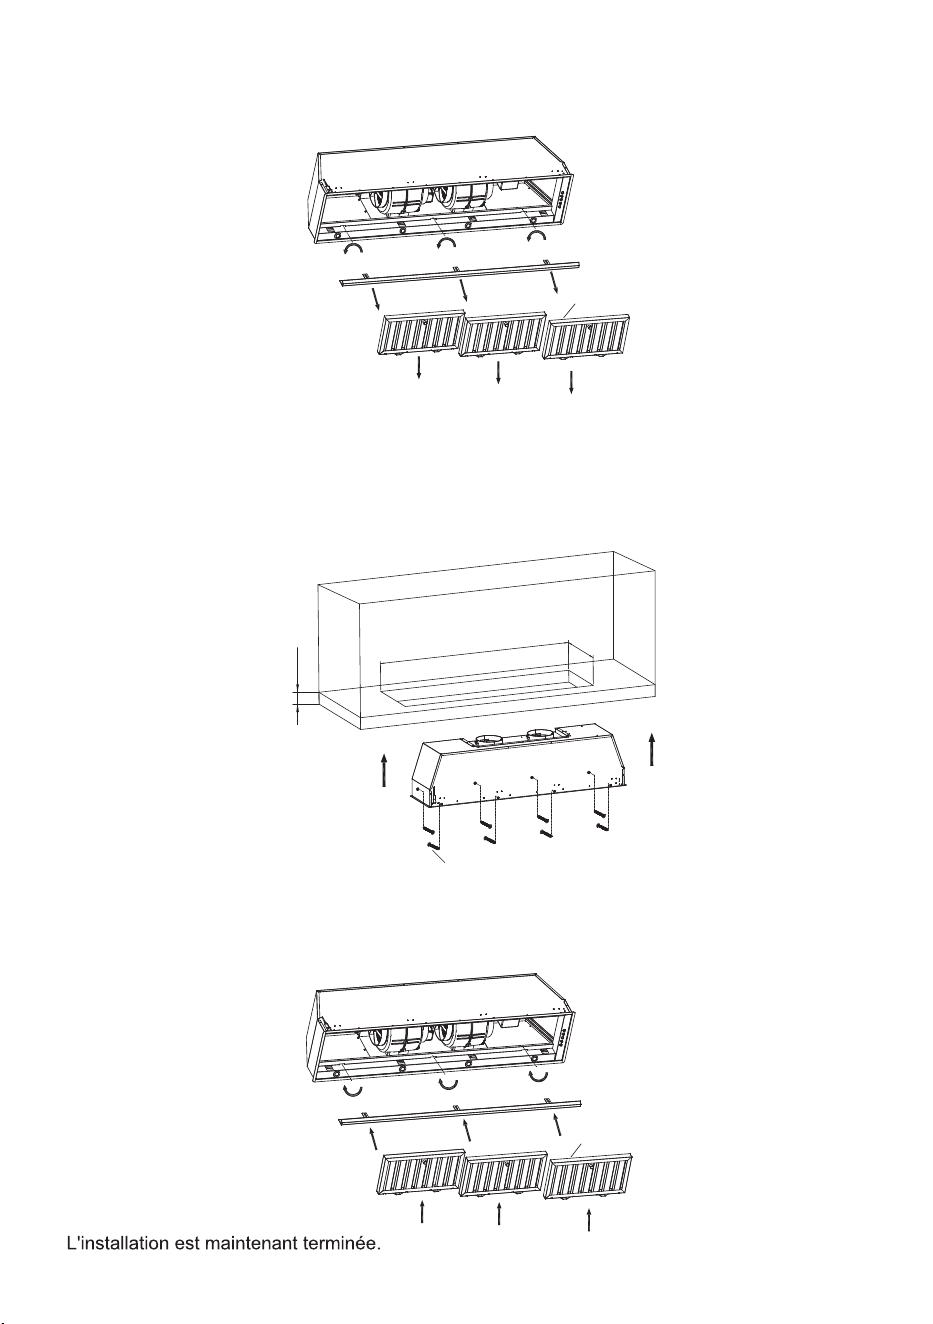
Fix the duct to the air outlet with tape. Please refer to Pic. 2.
Hold the filter lock and push the fiter backword to take off the filters. Release the 3 screws
indicated in Pic. 3 and take off the oil cup.
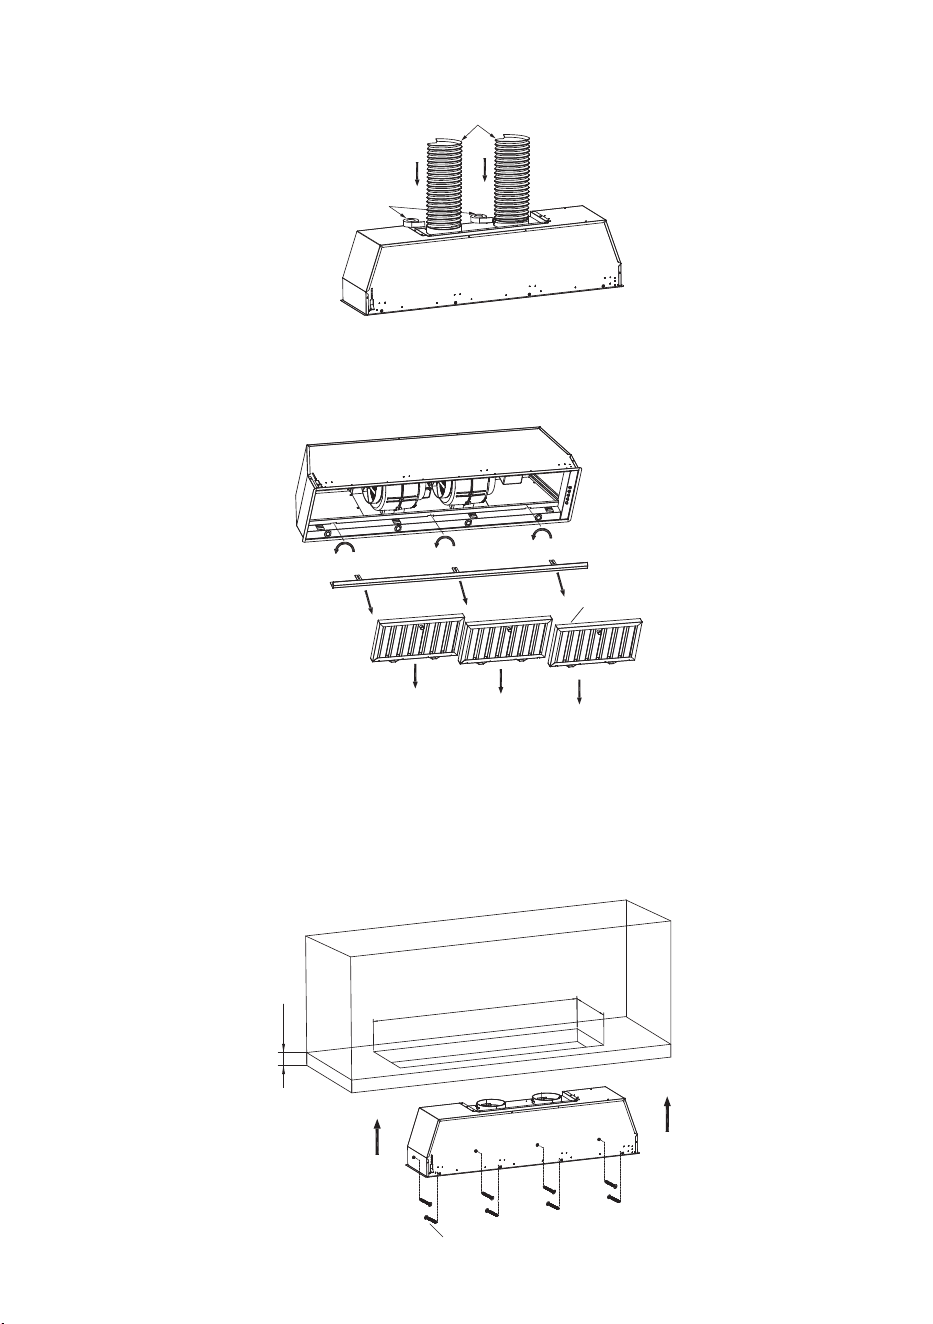
Please cut the hole on the cabinet board. The cut out size for FRHRE5346-48 would be 10
1/2'' * 46 15/32''(267 * 1180mm).
The cut out size for FRHRE5346-60 would be 10 1/2'' * 58 1/4''(267 * 1480mm). It's required
to have the cabinet board thickness to be Min 25/32'' (20mm). Push the range hood upword
to the cabinet hole and fix the hood from inside to the cabinet board with 8 screws ST3.9 *
25. Please refer to Pic. 4.
2.
3.
4.
4.
3.
Filter
Oil cup
Tape
(Not provided)
Duct
2.
FRHRE5346-48: 10 1/2'' * 46 15/32'' (267 * 1180mm)
FRHRE5346-60: 10 1/2'' * 58 1/4''(267 * 1480mm)
Min 25/32'' (20mm)
Screw (ST3.9*25)
7
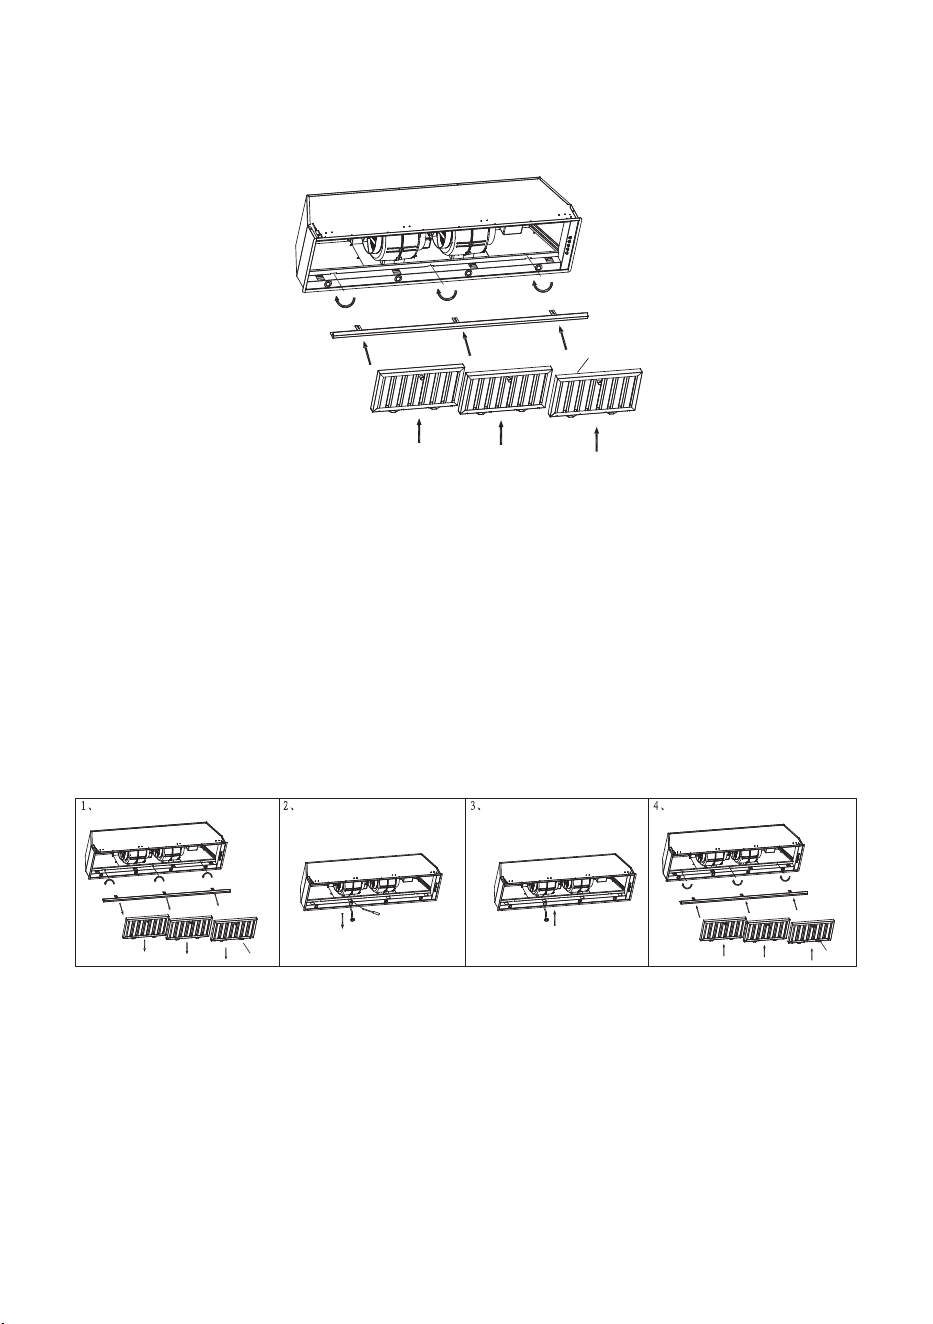
HOW TO REPLACE THE LED LAMP?
1. Take off the baffle fitler. Loose the screws showed on Pic 1 and take out the oil cup.
2. Use the screw driver to push the LED lamp out of the panel through the hole.Please refer to
Pic 2 below.
3. Disconnect the LED terminator and then replace it with new LED lamp. And reconnect the
terminator. Fix the new lamp back to position.
4. Install the oil cup back to position and fix the 3 screws back to position.Install the filters back
to position. Please refer to Pic.4 below.
The installation is now complete.
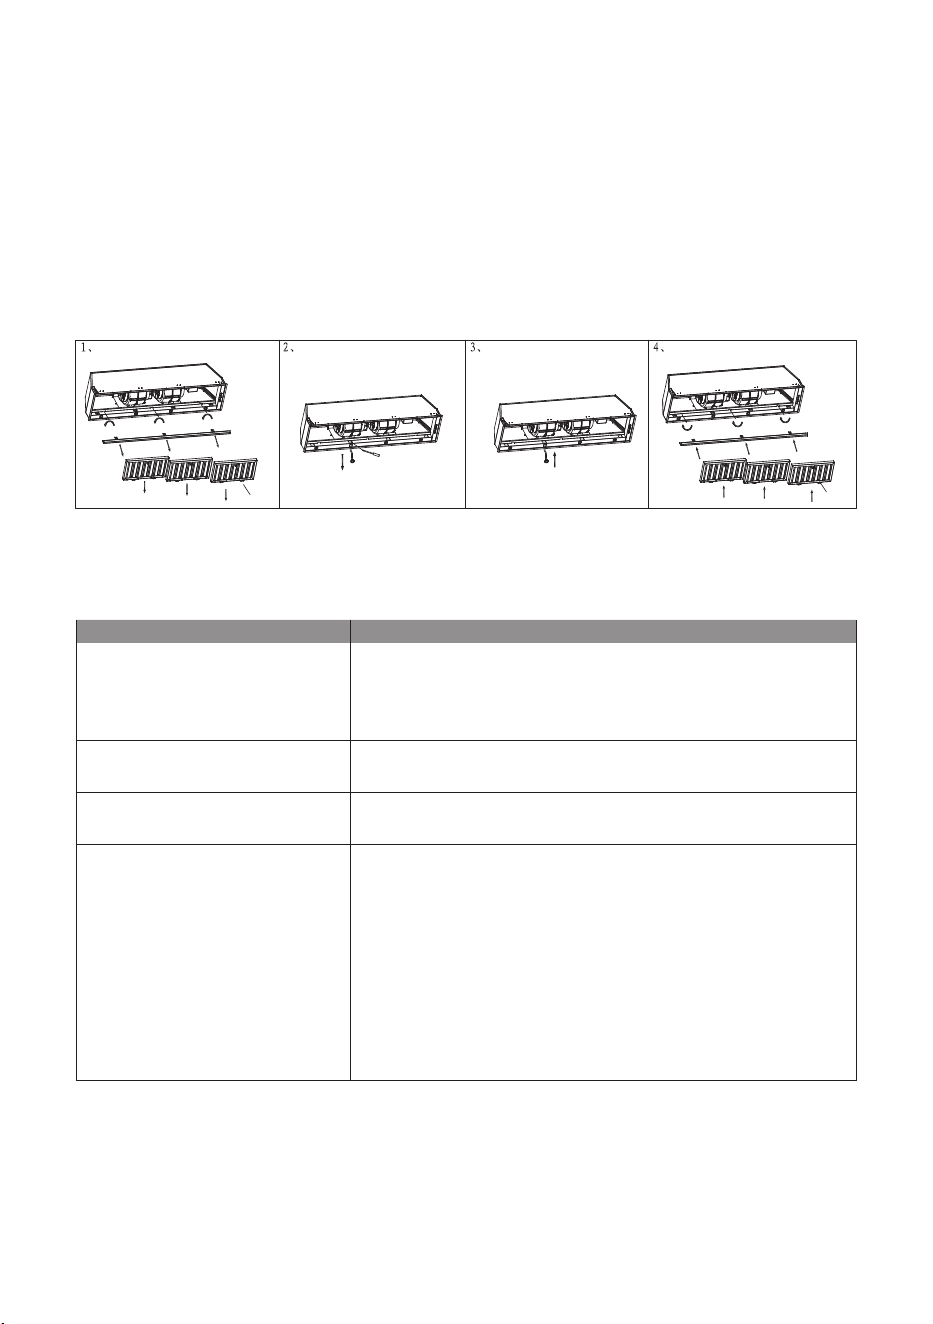
Install the oil cup back to position and screw back the 3 screws. Install the filters back to
poisiton. Hold the filter lock and push back the filter towards the oil cup. And then push it back
to position. Then the installation is done. Please refer to Pic.5.
5.
Filter
Oil cup
5.
Led lamp
with terminator
Oil cup
Oil cup
Led lamp
with terminator
Filter
Filter
8
TROUBLESHOOTING
Issue Possible Cause / Solution
The range hood doesn't turn on
•
Check if the range hood is plugged in. Make sure that all
power is turned ON, the fuse isn't blown and all electrical
wirings are properly connected.
The range hood turns on but the
LED light doesn't
•
Replace the defective LED assembly. Refer to "HOW TO
REPLACE LED LAMP" section.
The range hood vibrates when
the blower is on
•
Check and tighten the mounting screws to secure the
hood to the cabinet or wall properly.
The blower or fan seems weak
•
Check that the duct size used is at least 6” Range hood
WILL NOT function efficiently with insufficient duct size.
For example: 6” duct over 7” top vent and not sealed
properly.
•
Check if the duct is clogged or the damper (half-circular
flapper) is not installed correctly or opening properly. A
tight mesh on a side wall cap might also cause restriction
to the air flow.
9
FRHRE5346-48/60
SEICE A LA CLIENTELE
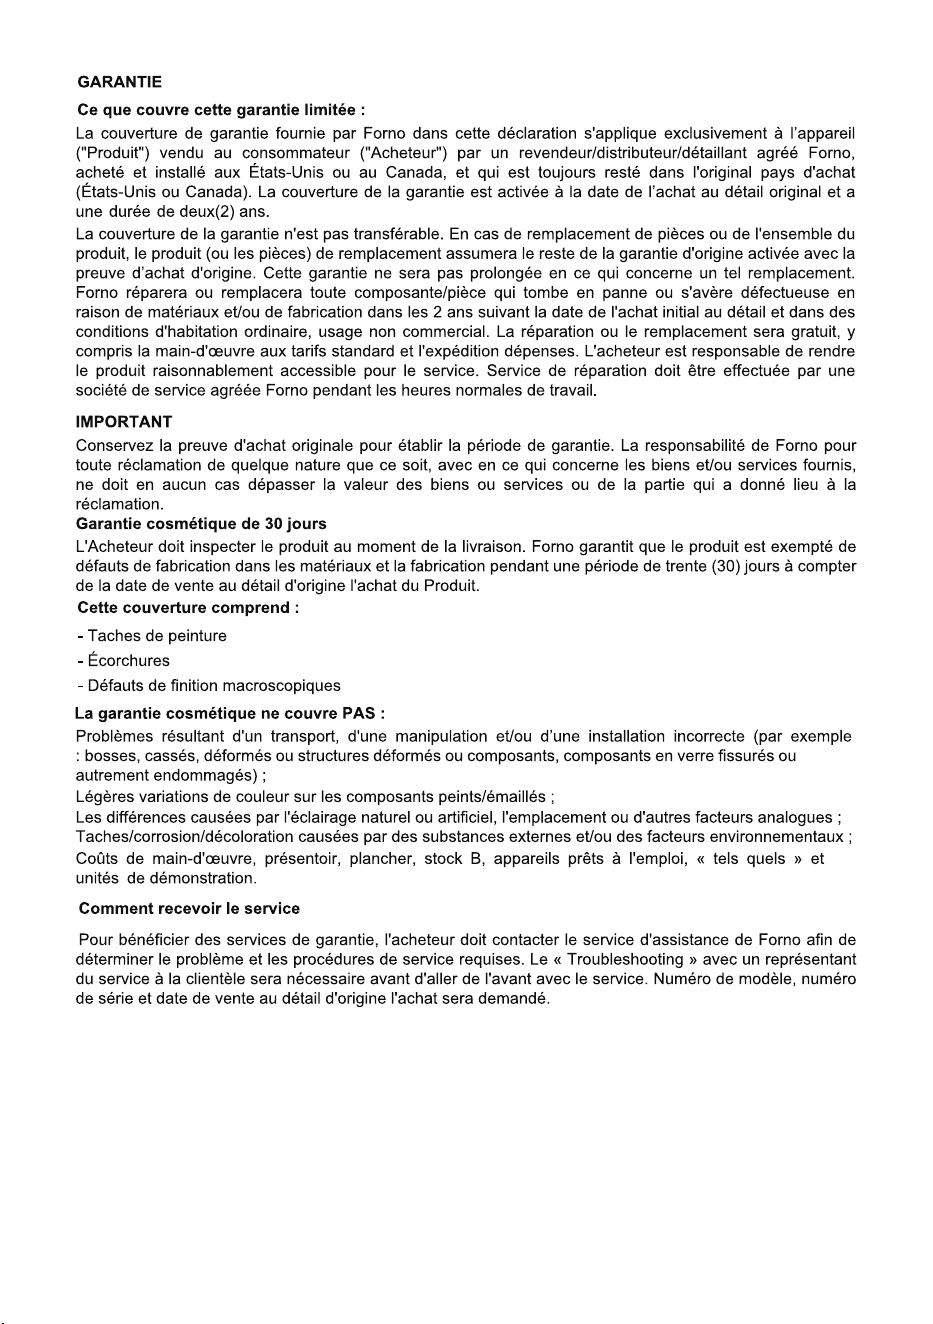
Merci d'avoir achete un produit FORNO. Veuillez lire le manuel d'utilisation en entier avant la
premiere utilisation. Que vous soyez un utilisateur occasionnel ou averti, vous aurez avantage a
vous familiariser avec les mesures de securite, les caracteristiques, le fonctionnement et les
recommandations d'entretien et de nettoyage de votre appareil.
Le numero de modele et le numero de serie sent indiques a l'interieur de l'appareil. Pour fins de
garantie, vous aurez besoin du numero de serie, de la date d'achat et d'une copie de votre
preuve d'achat. Notez l'inrmation ci-dessous pour reference ulterieure.
INFORMION A FOURNIR POUR TOUTE REPARATION
Numero de modele:
Numero de serie:
Date d'achat:
Adresse et numero de telephone
ou l'appareil a ete achete:
Utilisez ces numeros pour toute
correspondance ou pour tout appel au service
des reparations concernant votre appareil.
Si vous avez re9u un appareil endommage,
communiquez immediatement FORNO.
Economisez temps et argent. Avant tout appel
de reparation, verifiez le guide de depannage.
us y trouverez une liste
des causes de problemes mineurs que vous
pouvez reparer vous-meme.
POUR UNE RERATION AU CANADA & AUX ETATS-UNIS
Conservez ce manuel d'instruction a portee de main si vous avez des doutes. Vous pouvez
retrouver taus les infomation en ligne .forno.ca.
Pour plus de precision ou si vous avez besoin d'aide, veuillez communiquer avec notre
service a la clientele a : [email protected]
En cas de probleme, veuillez contacter le service client FORNO. Veuillez noter que le
"troubleshoong" avec un representant du service a la clientele sera necessaire avant de
pouvoir envoyer un technicien. Taus les travaux sous garantie doivent etre autorises par le
service client FORNO. Taus nos prestataires de services agrees sent soigneusement
selectionnes et rigoureusement formes par FORNO.
10
10
9COMMENT REMPLACER LA LAMPE LED
DÉPANNAGE
5
1
Nettoyez les filtres à graisse après une période de temps spécifiée.
Lampe LED Max 8W total
238W
2
3
FRHRE5346-48
FRHRE5346-60
φ5 7/8"
(150mm)
58 3/16'' (1478mm)
58 15/16''(1497mm)
φ5 7/8"
(150mm)
10 3/8"
(263mm)
11 1/8"
(282mm)
11 27/32"
(301mm)
φ5 7/8"
(150mm)
46 3/8'' (1178mm)
47 1/8'' (1197mm)
φ5 7/8"
(150mm)
10 3/8"
(263mm)
11 1/8"
(282mm)
11 27/32"
(301mm)
7/8"(22.5mm)
4 3/8"
(110mm)
1/2'' (14mm)
7 1/8''(181mm)
1 1/2'' (38mm)
6 3/4"(171mm)
4 1/8"(104mm)
3 1/2"(89mm)
7/8"(22.5mm)
4 3/8"
(110mm)
1/2'' (14mm)
7 1/8''(181mm)
1 1/2'' (38mm)
6 3/4"(171mm)
4 1/8"(104mm)
3 1/2"(89mm)
1 5/32''(29mm)
FRHRE5346-48---Vue du dessus (échappement et emplacement du cordon d'alimentation)
1 5/32''(29mm)
FRHRE5346-60---Vue du dessus (échappement et emplacement du cordon d'alimentation)
4
LUMIÈRE
5
6
2. Fixez le conduit à la sortie d'air avec du ruban adhésif. Veuillez vous référer à la photo. 2.
Ruban
(Non fourni)
Canal
2.
1. Fixez l'adaptateur métallique à la sortie d'air avec 4 vis ST2.9*8. Et installez la lame sur la
sortie d'air. Veuillez vous référer à la photo. 1.
φ6 1/2"
(165mm)
φ6 1/2"
(165mm)
min44 3/32"(1120mm)
min25 1/2"
(650mm)
Vis (ST2.9*8)
Lame
1.
Avant de fixer la hotte à l'unité murale, percez 2 trous de 6 1/2'' de diamètre dans l'unité murale.
7
3. Maintenez le verrou du filtre et poussez le filtre vers l'arrière pour retirer les filtres. Dévisser
les 3 vis indiquées sur la Fig. 3 et retirer la coupelle d'huile.
3.
Filtre
Tasse à huile
4.
FRHRE5346-48: 10 1/2'' * 46 15/32'' (267 * 1180mm)
FRHRE5346-60: 10 1/2'' * 58 1/4''(267 * 1480mm)
Min 25/32'' (20mm)
Screw (ST3.9*25)
4. Veuillez couper le trou sur le panneau de l'armoire. La taille de découpe pour FRHRE5346-48
serait de 10 1/2''* 46 15/32''(267*1180mm). La taille de découpe pour FRHRE5346-60 serait de
10 1/2 '' * 58 1/4 '' (267*1480mm). Il est nécessaire que l'épaisseur du panneau de l'armoire soit
d'au moins 25/32'' (20 mm). Poussez la hotte vers le haut dans le trou de l'armoire et fixez la
hotte de l'intérieur au panneau de l'armoire avec 8 vis ST3.9*25. Veuillez vous référer à la
photo. 4.
5. Remettez la coupelle d'huile en place et revissez les 3 vis. Remettez les filtres en place.
Maintenez le verrou du filtre et repoussez le filtre vers la coupelle d'huile. Et puis repoussez-le
en position. Ensuite, l'installation est terminée. Veuillez vous référer à Pic.5.
Filtre
Tasse à huile
5.
8
COMMENT REMPLACER LA LAMPE LED ?
1.Retirez le filtre déflecteur. Desserrez la vis indiquée sur la photo 1 et retirez la coupelle
d'huile.
2.Utilisez le tournevis pour pousser la lampe LED hors du panneau à travers le trou. Veuillez
vous référer au choix 2 ci-dessous.
3.Débranchez le terminateur LED, puis remplacez-le par une nouvelle lampe LED. Et
reconnectez le terminateur. Fixez la nouvelle lampe en position.
4.Remettez la coupelle d'huile en place et fixez les 3 vis en position. Remettez les filtres en
place. Veuillez vous référer à la photo 4 ci-dessous.
DÉPANNAGE
Publier Cause possible / Solution
La hotte aspirante ne s
'allume pas
•
Vérifiez si la hotte est branchée. Assurez-vous que
l'alimentation est allumée, que le fusible n'est pas grillé
et que tous les câblages électriques sont correctement
connectés.
La hotte s'allume mais la
lumière LED ne s'allume pas
La hotte de cuisine vibre lorsque
le ventilateur est en marche
Le ventilateur ou le ventilateur
semble faible
•
Remplacez l'ensemble LED défectueux. Reportez-vous à la
section "COMMENT REMPLACER LA LAMPE LED".
•
Vérifiez et serrez les vis de montage pour fixer
correctement la hotte à l'armoire ou au mur.
•
Vérifiez que le diamètre de conduit utilisé est d'au moins
6''. La hotte de cuisinière NE FONCTIONNERA PAS
efficacement si la taille du conduit est insuffisante. Par
exemple : Conduit de 6'' sur évent supérieur de 7'' et mal
scellé.
•
Vérifiez si le conduit est obstrué ou si le registre (clapet
demi-circulaire) n'est pas installé correctement ou ne
s'ouvre pas correctement. Un maillage serré sur un
capuchon de paroi latérale peut également entraîner une
restriction du flux d'air.
Lampe led
avec terminateur
Tasse
à huile
Oil cup
Lampe led
avec terminateur
Filter
Filtre
9

10
