

Dynaudio Professional AIR reference manual – 2014-09-28 a
Table of contents
Important safety instructions 1
EMC/EMI 3
Before you begin 4
Your new Dynaudio Professional AIR monitors 5
About this manual 6
The AIR concept 7
Introduction 8
The master/slave concept 9
The Master unit 9
The Slave and subwoofer units 10
Initializing the network 10
Remote control using AIR Remote or
AIR Control software 11
Common features for both the
Master and Slave units 11
Standby, Power Save mode and
powering down your AIR system 12
Other AIR features 12
Rear panel controls and connections 13
AIR Master unit with analog inputs – rear panel 14
Slave/Sub – rear panel 15
Digital I/O card (optional) 15
Operating your AIR monitors 16
The AIR display and keys 17
Basic navigation/operation 17
AIR Menu structure and parameters 19
Home screen 20
Conguring bass management 21
Setup menu ► Setup selection 22
Setup menu ► Monitor tasks setup 23
Setup menu ► External clock setup 24
Setup menu ► Analog input sensitivity 25
Setup menu ► Monitor calibration 26
Setup menu ► Clear setup for entire network 28
AIR setups 29
Stereo setup – digital or analog 31
Stereo setup with mono subwoofer –
digital or analog 32
Stereo setup with two subwoofers –
digital or analog 33
5.1 setup – digital 34
5.1 setup – analog 35
5.3 setup – digital 36
5.3 setup – analog 37
6.1 setup – analog 38
5.1 setup with Digital AES/EBU card 40
Stereo setup with chains on left and right 41
7.1 setup – analog or digital 42
5.1 setup – digital – 192 kHz 44
6.1 setup – digital – 192 kHz 45
Recalling and storing presets 46
Recalling presets 47
Storing presets 47
Parameter storage 47
Placing the monitors 48
Overview 49
General considerations: symmetry 50
Front monitors, left and right 51
Center front monitor 51
Surround monitors, left and right 51
Monitor positions 52
Checking and optimizing monitor placement 53
Overview 54
Assigning monitor positions 54
Phase checking 54
Checking monitor placement 55
Equalizing the monitors 56
Calibrating the main monitors 57
Placing the subwoofer 59
Checking subwoofer placement 60
Calibrating the subwoofers
with the main monitors 61
AIR Remote 63
AIR Remote – introduction 64
AIR Control software 66
AIR Control software – introduction 67
AIR Control software main features 67
AIR Control software system requirements 67
Obtaining AIR Control software 68
Installing AIR Control software 68
Setting up AIR Control software 69
Global and local parameters 70
Basic editing procedures 70
AIR Control software version information 70
Global – Main page 71
File page 71
Bass management page 73
EQ Link page 74
Lock page 75
Preferences page 76
Selecting monitors for conguration 77
Monitor Setup page 78
Monitor EQ page 80
Monitor Firmware page 81
Monitor Log page 81

Dynaudio Professional AIR reference manual – 2014-09-28 b
Cables 82
TC LINK via standard Cat 5 cables 83
AES/EBU cables 83
Balanced audio cables 84
Custom serial to CAT 5 cable 84
USB to COM 9 pin adapter 84
Presets 85
Reset procedures 87
Error messages 89
Warranty 91
Exceptions 92
Technical specications 93
AIR 6 & AIR 15 (Master and Slave) 94
AIR 20 & AIR 25 (Master and Slave) 95
AIR BASE 1 & AIR BASE 2 96
AIR Base 12 97
AIR Base 24 98
Room size and typical listening distance 99
General specications for AIR 6,
AIR 15, AIR 20, AIR 25, AIR BASE 1,
AIR BASE 2, AIR BASE 12 & AIR Base 24 100
AIR Remote 101
General specications for all products 102
Delay in system 103
Certicate of conformity 104
Appendix: Acoustics 106
Introduction 107
Sabine’s formula 108
Absorbers 109
Diffusors 110
Standing waves 111
Comb ltering 113
Rear wall cancellation 115
Subwoofers 116
Bass management 117
The LFE Channel 118
Delaying monitors 119
Line-up and calibration 120
Measuring sound pressure 122
Links 123
Support resources 124
Dynaudio Professional on… 124
Dynaudio Professional newsletter 124

Important safety instructions
Dynaudio Professional AIR reference manual – 2014-09-28 2
The lightning ash with an arrowhead symbol
within an equilateral triangle is intended to alert
the user to the presence of uninsulated “danger-
ous voltage” within the product’s enclosure that
may be of sufcient magnitude to constitute a
risk of electric shock to persons.
The exclamation point within an equilateral tri-
angle is intended to alert the user to the pres-
ence of important operating and maintenance
(servicing) instructions in the literature accom-
panying the product.
1. Read these instructions.
2. Keep these instructions.
3. Heed all warnings.
4. Follow all instructions.
5. Do not use this apparatus near water.
6. Clean only with dry cloth.
7. Install in accordance with the manufacturer’s in-
structions.
8. Do not install near any heat sources such as ra-
diators, heat registers, stoves, or other appara-
tus (including ampliers) that produce heat.
9. Do not defeat the safety purpose of the polar-
ized or grounding-type plug. A polarized plug
has two blades with one wider than the other. A
grounding type plug has two blades and a third
grounding prong. The wide blade or the third
prong are provided for your safety. If the pro-
vided plug does not t into your outlet, consult
an electrician for replacement of the obsolete
outlet.
10. Protect the power cord from being walked on
or pinched particularly at plugs, convenience
receptacles, and the point where they exit from
the apparatus.
11. Only use attachments/accessories spe cied by
the manufacturer.
12. Use only with the cart, stand, tripod, bracket, or
table specied by the manufacturer, or sold with
the apparatus. When a cart is used, use caution
when moving the cart/apparatus combi-
nation to avoid injury from tip-over.
13. Unplug this apparatus during lightning storms or
when unused for long periods of time.
14. Refer all servicing to qualied service person-
nel. Servicing is required when the apparatus
has been damaged in any way, such as pow-
er-supply cord or plug is damaged, liquid has
been spilled or objects have fallen into the appa-
ratus, the apparatus has been exposed to rain
or moisture, does not operate normally, or has
been dropped.
Warning!
►
To reduce the risk of re or electrical shock, do not
expose this equipment to dripping or splashing and
ensure that no objects lled with liquids, such as
vases, are placed on the equipment.
►
This apparatus must be earthed.
►
Use a three wire grounding type line cord like the
one supplied with the product.
►
Be advised that different operating voltages require
the use of different types of line cord and attach-
ment plugs.
►
Check the voltage in your area and use the correct
type. See table below:
Voltage Line plug according to standard
110-125V UL817 and CSA C22.2 no 42.
220-230V CEE 7 page VII, SR section 107-2-D1/IEC 83
page C4.
240V BS 1363 of 1984. Specication for 13A fused
plugs and switched and unswitched socket
outlets.
►
This equipment should be installed near the socket
outlet and disconnection of the device should be
easily accessible.
►
To completely disconnect from AC mains, discon-
nect the power supply cord from the AC receptacle.
►
The mains plug of the power supply shall remain
readily operable.
►
Do not install in a conned space.
►
Do not open the unit – risk of electric shock inside.
►
For use at altitude 2000 m or lower
►
Mains ground must be connected.
►
Norwegian:
Apparatet må tilkoples jordet stikkontakt.
►
Swedish:
Apparaten skall anslutas till jordat uttag.
►
Finnish:
Laite on liitettävä suojakoskettimilla varus-tettuun
pistorasiaan.
Caution
You are cautioned that any change or modications not
expressly approved in this manual could void your au-
thority to operate this equipment.
Service
►
There are no user-serviceable parts inside.
►
All service must be performed by qualied person-
nel.

Important safety instructions
Dynaudio Professional AIR reference manual – 2014-09-28 3
EMC/EMI
This equipment has been tested and found to comply
with the limits for a Class B Digital device, pursuant to
part 15 of the FCC rules.
These limits are designed to provide reasonable protec-
tion against harmful interference in residential installa-
tions. This equipment generates, uses and can radiate
radio frequency energy and, if not installed and used
in accordance with the instructions, may cause harmful
interference to radio communications. However, there
is no guarantee that interference will not occur in a par-
ticular installation. If the equipment does cause harmful
interference to radio or television reception, which can
be determined by turning the equipment off an on, the
user is encouraged to try to correct the interference by
one or more of the following measures.
►
Reorient or relocate the receiving antenna.
►
Increase the separation between the equipment
and receiver.
►
Connect the equipment into an outlet on a circuit
different from that to which the receiver is connect-
ed.
►
Consult the dealer or an experienced radio/TV
technician for help.
For customers in Canada:
This Class B digital apparatus complies with Canadian
ICES-003.
Cet appareil numérique de la classe B est conforme à
la norme NMB-003 du Canada.


Before you begin
Dynaudio Professional AIR reference manual – 2014-09-28 5
Your new Dynaudio Professional AIR monitors
Congratulations on your purchase of the Dynaudio Pro-
fessional AIR active monitor system. With the right care
and attention, it will provide many years of excellent
and trouble-free audio reproduction.
Care
Components of the highest quality are used in your Dy-
naudio Professional AIR speakers. This assures years
of trouble-free operation. Following precautions should
still be made though.
►
Avoid running the system into severe clipping.
Although there is an advanced protection system,
you may be able to destroy your speakers by se-
verely overpowering them. The limiter works over
a certain range, but exceeding this level may send
a severely clipped signal to your drivers. When a
noticeable distortion occurs, please turn down the
level to your speakers.
►
Avoid hot-plugging the equipment connected to
the monitors. Always turn off the speaker and other
equipment when plugging or unplugging signals, or
switching equipment on or off.
►
Do not touch the drive units by hand.
Break-in time
The transducers of your Dynaudio Professional AIR
monitor will achieve better sound quality after breaking
in. Especially after the rst hours of use you may notice
a signicant advance in sound quality, and further sub-
tle improvements in subsequent hours of use.
Downloading test tone sets
To set up, congure and calibrate your Dynaudio Pro-
fessional monitors, we have created two sets of test
tones in WAV format – a stereo set and a multichannel
set. Throughout this manual, we will refer to these test
tones by their numbers.
You can download both sets of test tones from this
page:
dynaudioprofessional.com/pages/choosing-by-ear/
Service
There are no user serviceable parts inside the monitor.
Getting support
If you still have questions about the product after read-
ing this manual, please get in touch with Dynaudio Pro-
fessional Support:
dynaudioprofessional.com/support/

Before you begin
Dynaudio Professional AIR reference manual – 2014-09-28 6
About this manual
Read this manual to learn how to set up and operate
your Dynaudio Professional AIR monitors.
To get the most from this manual, please read it from
start to nish, or you may miss important information.
This manual is available as a PDF download from the
Dynaudio Professional website.
Of course, you can print this manual, but we encourage
you to use the PDF version, which has both internal
and external hyperlinks. For example, clicking the logo
in the upper left corner of each page will take you back
to the table of contents.
To download the most current version of this manual,
visit
dynaudioprofessional.com/support/


The AIR concept
Dynaudio Professional AIR reference manual – 2014-09-28 8
Introduction
Dynaudio and TC Electronic are proud to present
the AIR monitor system.
The AIR monitor systems take a giant step forward in
near-eld monitoring. They include switch-mode ampli-
cation and power-supply. With the addition of DSP and
CPU, new possibilities are opened for easy, convenient
and precise central control of both audio and setup.
The AIR monitor system’s networking possibilities will
t nicely into today’s applications and can be taken far
into the future studio.
A brief overview of the advantages offered by the AIR
concept:
►
System integration and networking: total recall,
central control
►
Flexibility/adjustment possibilities: to the room,
personal liking etc.
►
Extreme precision: precise alignment of individual
monitors at the factory
►
Improved audio quality: from intelligent algorithms
and precision lters
►
Direct Digital Reference (Digital Input)
Both AIR 6 and AIR 15 are professional audio rear-
ported near-eld monitors and are excellent for both
stereo and surround setups in applications such as mu-
sic recording/mixing, post production, lm, broadcast,
video-editing etc.
Extreme precision
The frequency response and timing of the woofer and
tweeter signals of AIR monitors is controlled to a level
of precision only practically obtainable with DSP. Fur-
thermore, the sensitivity of each individual loudspeaker
driver is measured in the line of production, and devi-
ations are compensated in the DSP software to 0.1 dB
steps.
Perfectly aligned monitors also give the so far unseen
advantage of interchangeability. In the unlikely case of
a monitor breakdown, a perfectly matching monitor can
be added instantly.
As most productions do end up in a digital format these
days, the AIR series allow monitoring of the “pure” dig-
ital signal. Simply feed the monitors directly with an
AES/EBU signal.
Having said that, many studios today are still working
with analog signals for monitoring – therefore, an ana-
log input option is also provided.
The following section is an introduction to the basic
AIR system components and concepts. You will nd
detailed parameter explanations, setup guides and cal-
ibration info in later sections of this manual.

The AIR concept
Dynaudio Professional AIR reference manual – 2014-09-28 9
The master/
slave concept
The networking feature allows all monitors in a setup –
no matter if it is stereo or surround, digital or analog – to
always be aligned. This provides great possibilities in
terms of general control of the entire system.
Two physically different units exist for each AIR model:
a Master unit and a Slave unit.
AIR Master units
An AIR Master unit is able to:
►
receive digital audio on AES connections
►
receive analog audio (if an analog card is installed)
►
send and receive audio and control data via the
proprietary TC LINK connection.
Fig. 1: AIR Master monitor – rear
Audio signals from your studio are fed to the Master
monitors only, and the signals are distributed from here
to the connected Slave units through a proprietary net-
working protocol. Please note that a Master monitor
acts exactly as a Slave monitor when its TC LINK
button is set to the in “IN” position.
Master monitor as System Controller
Setting up an AIR system is done from the System
Controller monitor.
You set up, set tasks and calibrate all connected mon-
itors in the entire system either using AIR control soft-
ware or from a Master monitor that acts as the System
Controller monitor.
One – and only one – of the Master monitors must be
set up as the System Controller. This is done by set-
ting the TC LINK button on the rear panel to the “Out”
position.
Air Slave units
A Slave unit is able to receive and distribute audio and
control data via the proprietary TC LINK connection.
Fig. 2: Slave monitor – rear
The Master unit
The Master unit distributes audio and control data to the
connected Slave units.
System Controller, Master or Slave
To set up a Master unit to be either the System Control-
ler or a regular Master or Slave unit, the LINK switch on
the rear panel must be set up correctly.
LINK switch on AIR Master Unit set to “Out”:
The monitor operates as a System Controller.
LINK switch on AIR Master Unit set to “In”:
The monitor operates as either:
►
a regular Master with digital Inputs (analog Inputs
are only with the optional analog I/O card installed)
or
►
as a Slave unit.
Inputs and outputs
An AIR Master unit is equipped with
►
AES/EBU Input connectors and
►
three Link connectors carrying both audio and
control data to connected Slave units.
Connectors
►
1* AES/EBU – XLR
►
2* Link RJ45 connectors
►
1* Link/Input RJ45 connector
►
1* Word Clock BNC sync

The AIR concept
Dynaudio Professional AIR reference manual – 2014-09-28 10
Option slot
Two card types are currently available.
►
An analog input module allowing you to feed a
Master unit with two analog input signals.
►
An AES Digital Input card (TC Electronic item
number 995285001) giving you the option of send-
ing all six channels in a 5.1 setup to one single
Master monitor. This card will also support inputs
at 192 kHz.
From there, the signal is distributed to four slave
monitors and a subwoofer via the TC LINK RJ-45
connections, creating a fully digital 5.1 setup.
The Slave and
subwoofer units
The Slave and Sub units contain one RJ45 Input con-
nector and one Link connector.
Audio and control data are sent from the Master unit to
the Slave units via the RJ45 Input connector. The RJ45
Link connector can be used for data transmission to
additional monitors.
Initializing the network
When the setup is powered up for the rst time, the
Master unit scans the setup in order to determine the
number of monitors connected. Each monitor is recog-
nized via a unique serial number, but can be renamed
according to its task.
After the initial scanning of the setup, the Master unit
will be re-scanning the setup every ve seconds in or-
der to determine any change.
Additional AIR Control units
Additional control units – such as a computer running
the AIR Control software or the AIR Remote – can be
connected to any free “Link” connector in the system.
Control data is transmitted via the System Controller,
and distributed to other monitors in the network.

The AIR concept
Dynaudio Professional AIR reference manual – 2014-09-28 11
Remote control using
AIR Remote or AIR
Control software
You can set up and control AIR monitor systems …
1. locally via the Master monitor’s user interface
(the display and the buttons surrounding it)
2. via the optional AIR Remote or
3. from a computer running the free AIR Control
software.
AIR Remote
AIR Remote is a dedicated hardware remote control
that ensures convenient daily operation. AIR Remote
provides instant access to all signicant operation
parameters such as global volume, reference levels,
preset recall as well as solo and mute status for each
monitor. The AIR Remote is powered through a TC Link
cable which can be connected to any AIR monitor.
To learn more about AIR Remote, go to
dynaudioprofessional.com/
air-series/monitors/air-remote/
AIR Control software
AIR Control software allows you to carry out advanced
calibration and alignment of your AIR monitoring sys-
tem. The software provides access to advanced tools
and features inside AIR monitors and subwoofers, in-
cluding timing and SPL calibration and parametric EQs
for each monitor. AIR Control lets you dene and store
custom setups and presets with selective parameter
locking, and a special measurement mode provides EQ
line signal out from selected monitors.
To download AIR Control software, go to
dynaudioprofessional.com/
air-series/monitors/air-control/
For more information about AIR Control software, see
“AIR Control software” on page 66.
Common features
for both the Master
and Slave units
Advanced Condition Monitoring
For both the Master and the Slave units, several pro-
tection systems are included in the AIR monitors. They
insure both short term protection against large dynamic
pulse signals and long term protection against over-
heating, which could permanently damage the drivers.
Long term thermal protection
Inside the amplier module, the temperature of the
heat sink is constantly monitored so any dangerous
over-temperature situations can be avoided, protecting
the entire electronic module. Furthermore, the tempera-
ture of the tweeter voice coil is calculated with behav-
ioral modeling of the tweeter’s thermal characteristics.

The AIR concept
Dynaudio Professional AIR reference manual – 2014-09-28 12
Standby, Power Save
mode and powering
down your AIR system
The amplier in an AIR monitor can detect whether or
not there is a signal on the analog or digital inputs.
If no input has been detected for more than half an hour
(this is the default value), all monitors in a network will
go to Standby mode. They will recover from Standby
mode automatically when a signal is received. The
power up time from Standby is a few hundred millisec-
onds.
If no input signal is detected for 2.5 hours (again, this
is a default value), the system will go into Power Save
mode. Any user intervention – such as touching the
Master Volume dial on the AIR Remote or touching the
Master monitor display – will recover the system from
Standby mode.
You can change the Standby mode and Power Save
mode activation times using the Utility menu on an AIR
Master unit or using the AIR Control software – see
“Preferences page” on page 76.
Activating Power Save mode manually
In general, you should activate Power Save mode in-
stead of powering your AIR system down using the
main switches.
►
To activate Power Save mode manually, press and
hold the Exit button on the System controller.
►
To wake your AIR system from Power Save mode,
press any button on the System controller.
Your AIR system will automatically go into Power Save
mode after 2.5 hours by default.
Powering down
If you need to switch the system off using the mains
switches on the rear panels of your AIR monitors, make
sure to turn down the global volume rst.
Switch Slave monitors off before switching of Master
monitors.
Other AIR features
High-efciency compact switched-
mode power supply (SMPS)
For saving overhead power consumption and to insure
optimal performance, every AIR monitor is equipped
with a high-efciency compact switched-mode Power
Supply (SMPS). Using switched technology both in am-
pliers and power supply can reduce the heat sink size
to about a third of the size it would be with regular pow-
er supply and class AB ampliers.

Rear panel controls and connections
Dynaudio Professional AIR reference manual – 2014-09-28 14
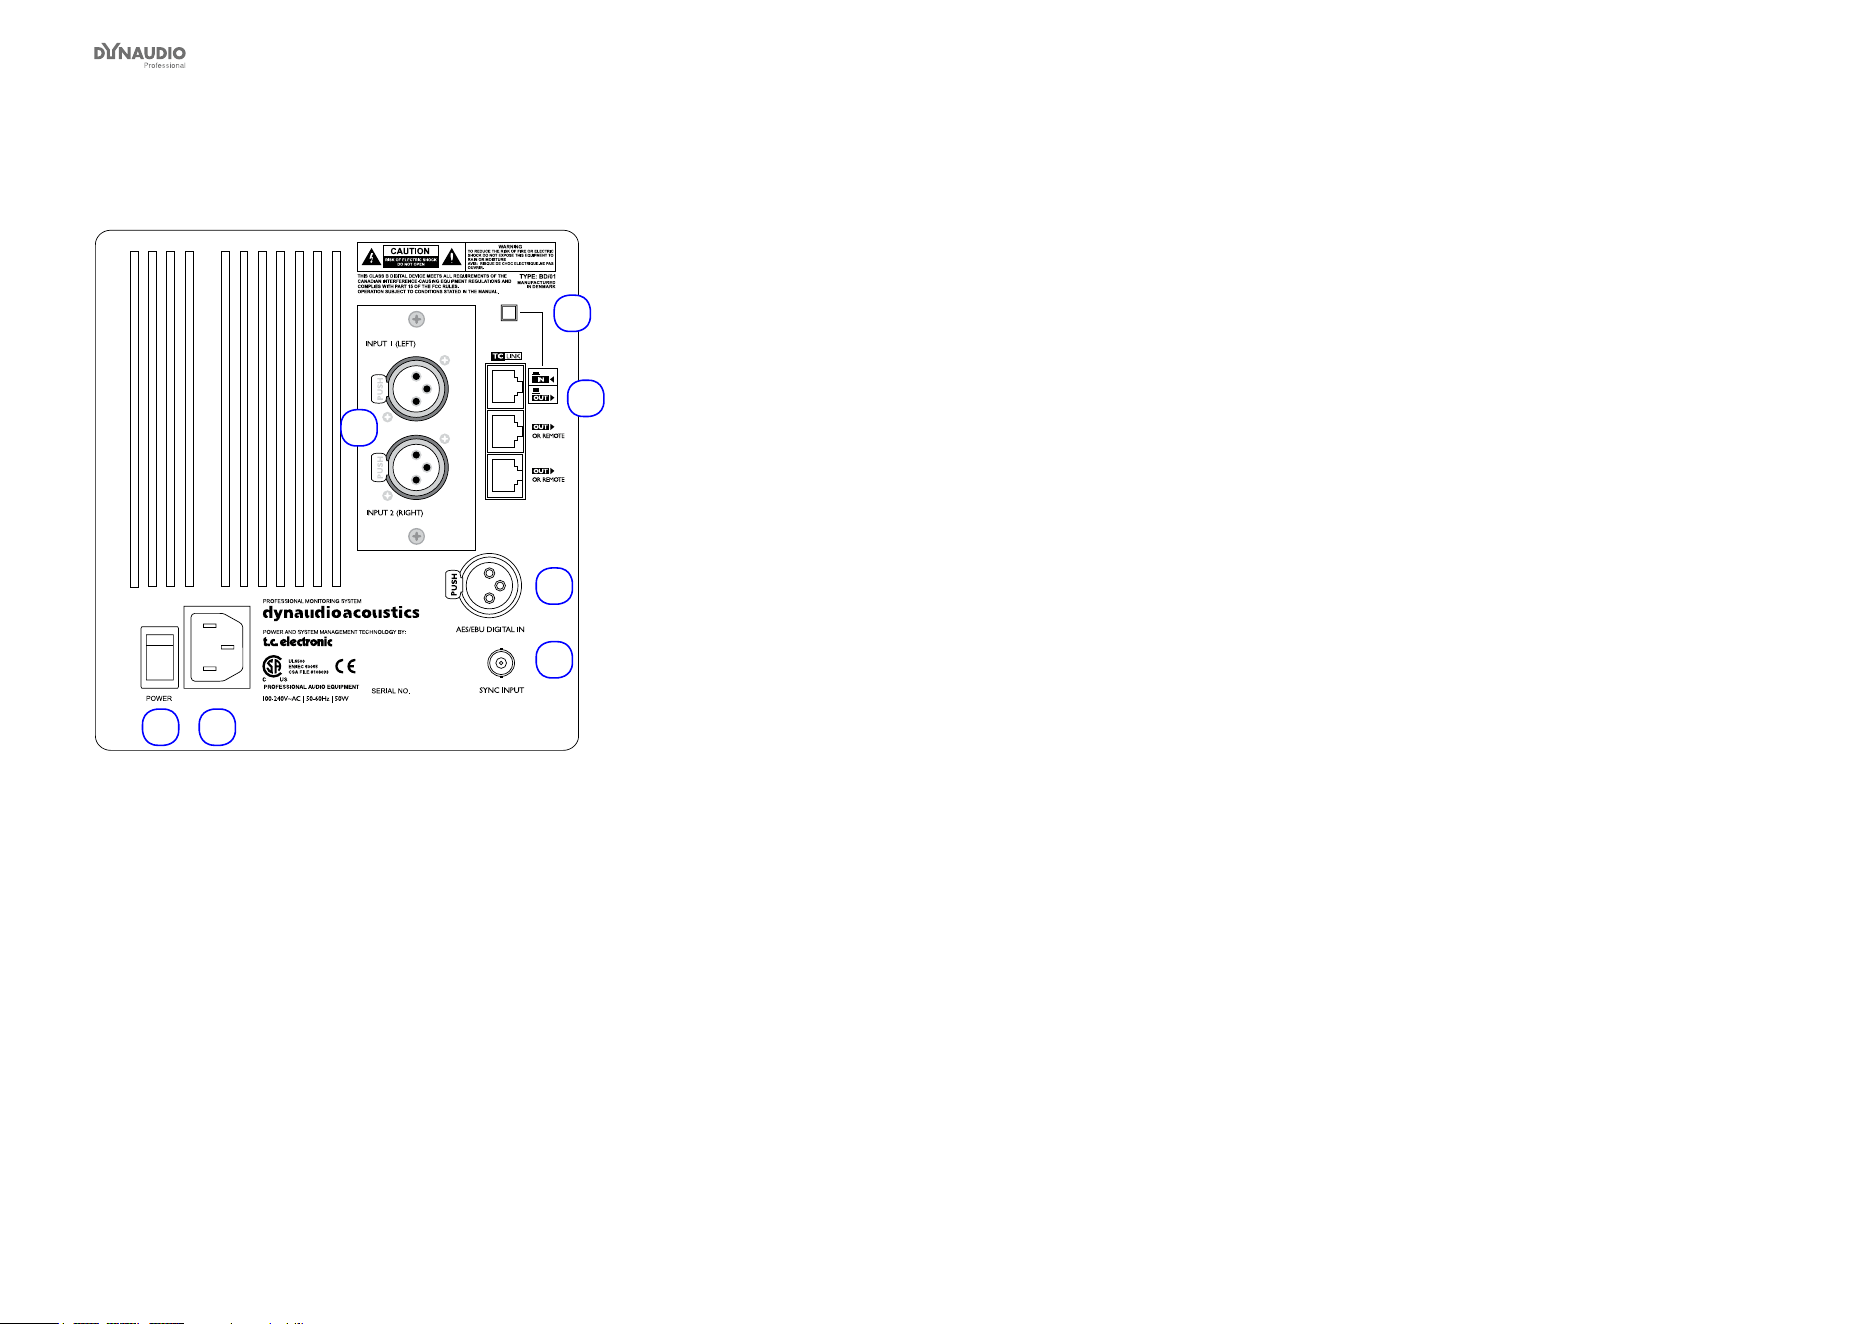
AIR Master unit with analog inputs – rear panel
1
6 7
5
3
4
2
Fig. 3: AIR Master unit with analog inputs – rear panel
1. System Controller/Slave switch
Out position: The monitor operates as a System
Controller. There can be only one System Control-
ler in a setup.
In position: The monitor operates as either a regu-
lar Master or a Slave unit.
2. RJ45 Link connections for downstream Slave units
3. Option slot with analog I/O card installed (optional)
4. AES/EBU digital Input
5. Word Clock BNC sync input
6. Power input – 100 to 240 V
7. Power On/Off switch
Rear panel controls and connections
Dynaudio Professional AIR reference manual – 2014-09-28 15
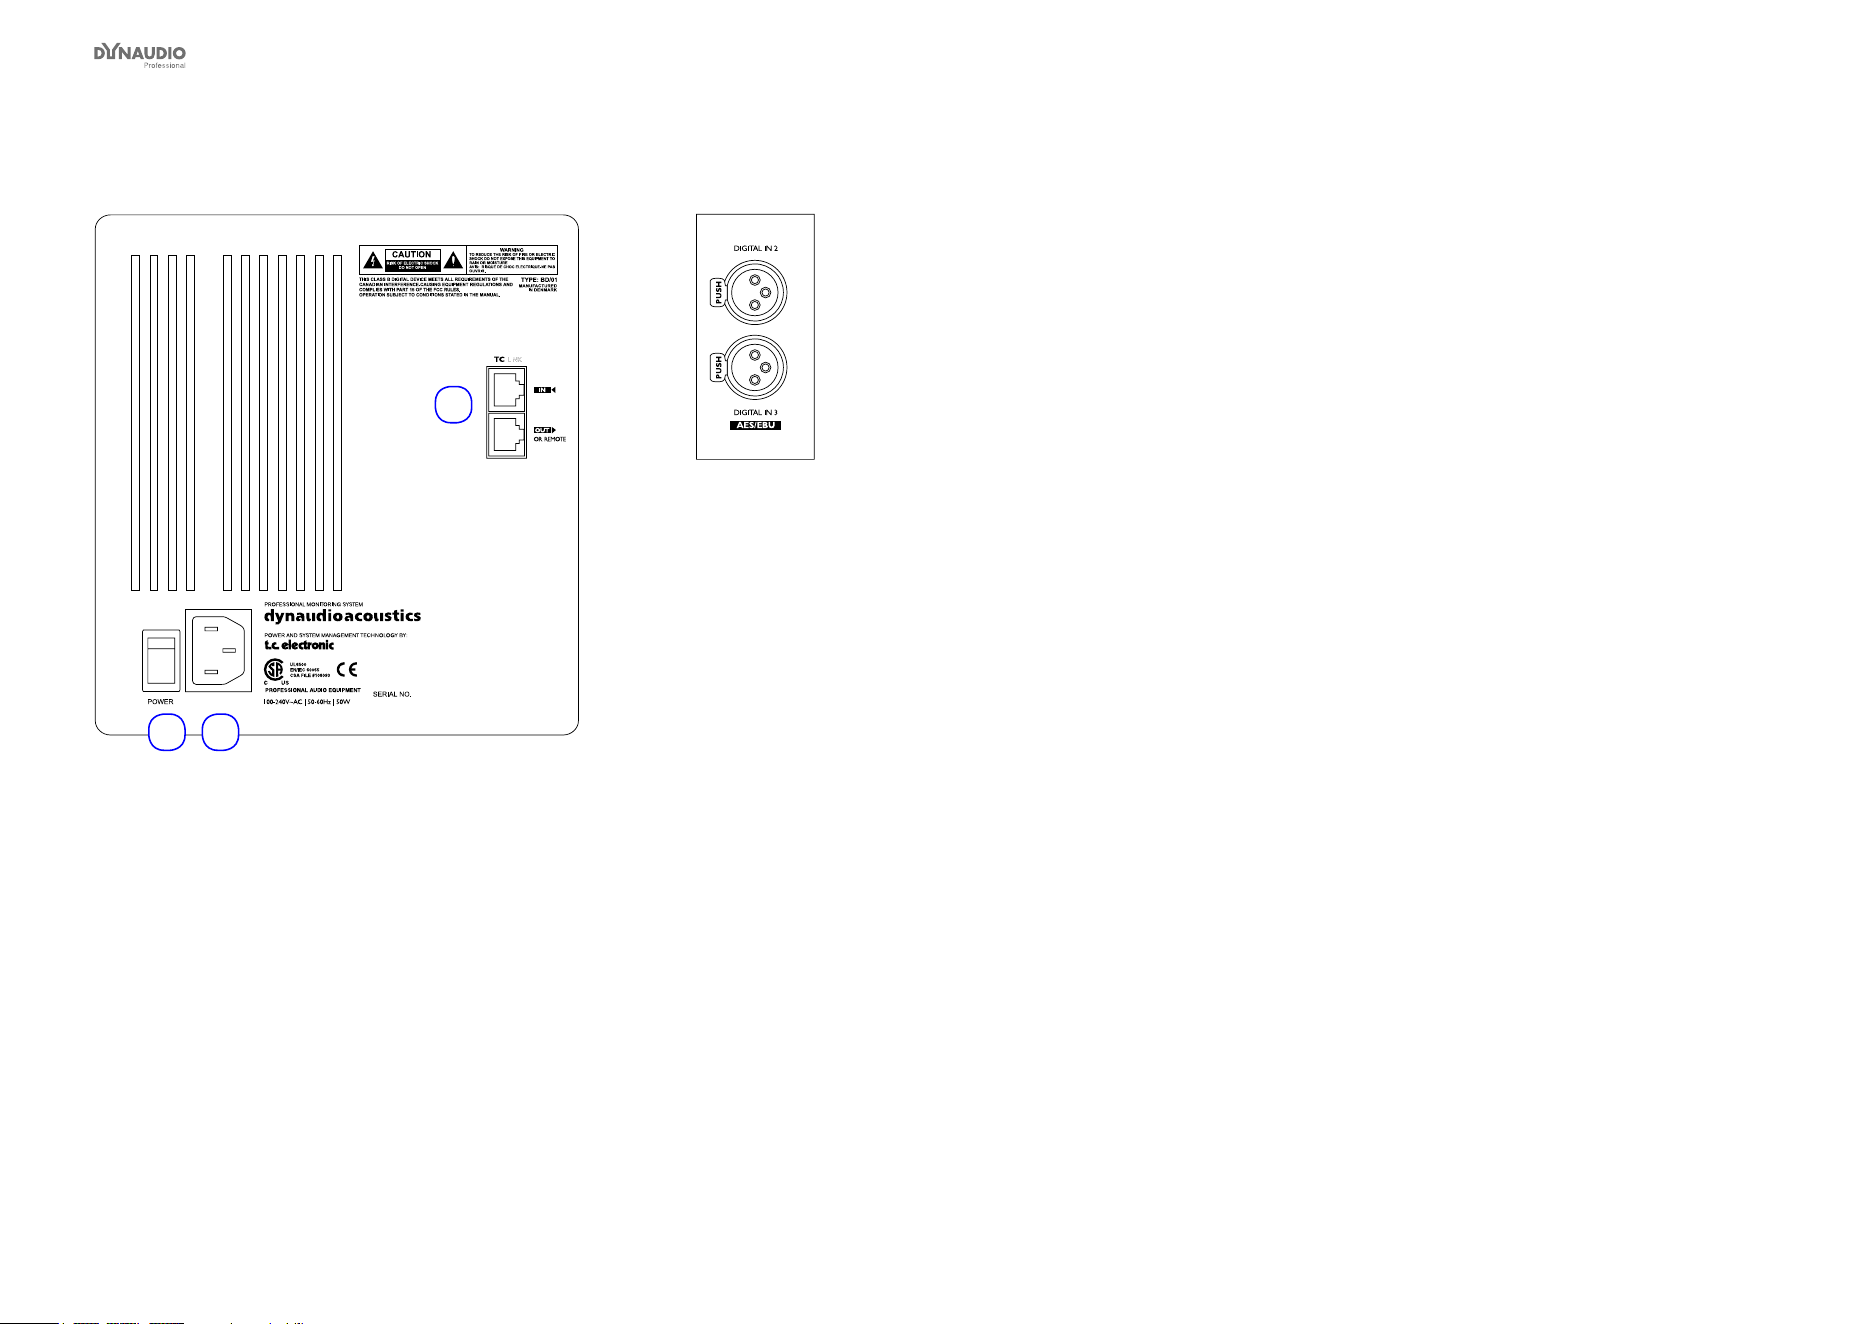
Slave/Sub – rear panel
1
23
Fig. 4: Slave/Sub – rear panel
1. RJ45 Link connections for downstream Slave units
2. Power input – 100 to 240 V
3. Power On/Off switch
Digital I/O card (optional)
Fig. 5: Digital I/O card (optional)
With this card installed in the option slot of the Master
unit, a 5.1 Digital/6 Master setup becomes an option.
Three AES/EBU connections (6 channels) can then be
fed to one Master monitor and distributed downstream.
For more information, see “Setups”.

Operating your AIR monitors
Dynaudio Professional AIR reference manual – 2014-09-28 17
The AIR display and keys
Use the four keys to the left and the right of the display
to navigate the menus of your AIR Master unit.
Fig. 6: The display and keys of an AIR master unit
ENTER key
The ENTER key has two main functions:
►
To enter the menus currently displayed.
►
To set the displayed parameter in Edit mode.
When a parameter can be edited using the arrow keys
to the right of the display, a “*” is set as the rst charac-
ter in front of the parameter.
EXIT key
The EXIT key is used to exit the current display and go
to previous menu level.
Arrow (up and down) keys
These keys are used for navigating and adjusting pa-
rameter values.
A parameter can be edited when it has been selected
using the ENTER key. Editable parameters are indicat-
ed by an asterisk (“*”).
Once you have set a parameter (e.g. a monitor task),
you do not need to conrm it. Changes are applied im-
mediately. However, if you later want to recall a given
conguration, you need to store it as a preset rst – see
“Storing presets” on page 47.
Overload Indication LED
When this LED ashes, the monitor’s built-in amp is
driven beyond maximum performance. A continuous
overload will activate the amp protection circuit and the
monitor will be shut down. The monitor can be reacti-
vated after a short period of cooling down.
This situation will NOT damage the monitor in any way.
Basic navigation/
operation
►
Use the two arrow keys to select a value for a pa-
rameter or a submenu. When a parameter namer
is preceded by an asterisk (“ * “), it can be altered
using the arrow keys.
►
Use the ENTER key to enter a menu or to conrm
an operation.
►
Use the EXIT key to move up one level in the
menu hierarchy or to discard (cancel) an operation.
Navigating the setup menu
►
From the home screen, press the ENTER key.
“Bass Management” is displayed.
►
Press the DOWN key until “Setup menu” is dis-
played.
►
Press the ENTER key again.
►
Press the UP and DOWN keys to select the
desired submenu (for example “Setup” or “Set
monitor tasks”).
►
Press the ENTER key to open the desired sub-
menu.
►
An asterisk will be shown in front of the menu
name (for example “*Select clock”), indicating that
you can select an option.
►
Press the UP and DOWN keys to select the de-
sired setting.
►
After making settings, press the EXIT key (repeat-
edly, if required) to close the menu and return to
the home screen.
Operating your AIR monitors
Dynaudio Professional AIR reference manual – 2014-09-28 18
AIR menu structure
This overview shows the AIR parameter structure accessible via the AIR monitor set as System Controller. Default values are highlighted.
[Serial No.] [Monitor task]
Volume -50.0 dB
Home screen –
see “Home screen” on page 20.
Press the Enter key to navigate the menus structure shown below.
Bass Management X-over *Select Mode: Off / X-over 50Hz / X-over 80Hz
/ X-over Ext 50Hz / X-over Ext 80Hz / X-over
THX 80Hz / X-over SC 120Hz
Setup Menu Setup “xxxx” *Select setup: Empty / Custom / Stereo analog / Stereo digital / 5.1 analog / 5.1 digital / 6.1 ana-
log / 6.1 digital / 5.3 analog / 5.3 digital / 5.1 digital/6 Master
Set monitor tasks – *Select AIR Master “xxxx” *Select task: No task / L Front / R Front / Center / (C) SUB / L Sur / R Sur / C Sur / L SUB / R
SUB / L Chain / R Chain / L Inner / Custom 1-4
External clock
BNC Sync “xxx”
*Select clock: BNC Input Off / BNC Input On
Input Sensitivity
A-Input Gain
*Sensitivity A-Input: +9 dBu / +15 dBu / +21 dBu / +27 dBu
Calibrate monitor – *Select AIR Master “xxxx” For AIR monitors:
Pink Noise: Off/On
Calib: 0.0 dB
Rel. Lev: -5.0 dB
Position: Neutral / Wall / Corner / Console C. / Wall C. / Corn
Bass: 0.0 dB
Treble: 0.0 dB
For AIR BASE subwoofers:
Pink Noise: Off / On
Calib: 0.0 dB
Rel. Lev: -5.0 dB
LFE LP: Off / On
LFE Gain: 0 to 14 dB
Polarity: 0/180 degrees
Phase: 0 to 180 degrees
Recall Preset *Select preset 1 User Preset locations: User presets (1 to 15) and factory presets (16 to 32)
Store Preset *Select preset 1 User Storage locations for user presets: 1 to 15
Utility Menu Duration before Standby:
15 min / 30 min / 1 h / 1.5 h / off
Powersave: 1 h / 1.5 h / 2.5 h / 3 h / 5 h / off
Backlight: on / auto / off
Autosave volume: on / off

AIR Menu structure and parameters
Dynaudio Professional AIR reference manual – 2014-09-28 20
In this chapter, you will learn how to navigate the menu
structure of your AIR monitors, access and change pa-
rameters such as system setup, bass management and
monitor tasks.
Once you know how to navigate the AIR Menu struc-
ture, you can congure and calibrate your system. All
standard setups are shown and explained in “AIR set-
ups” on page 29.
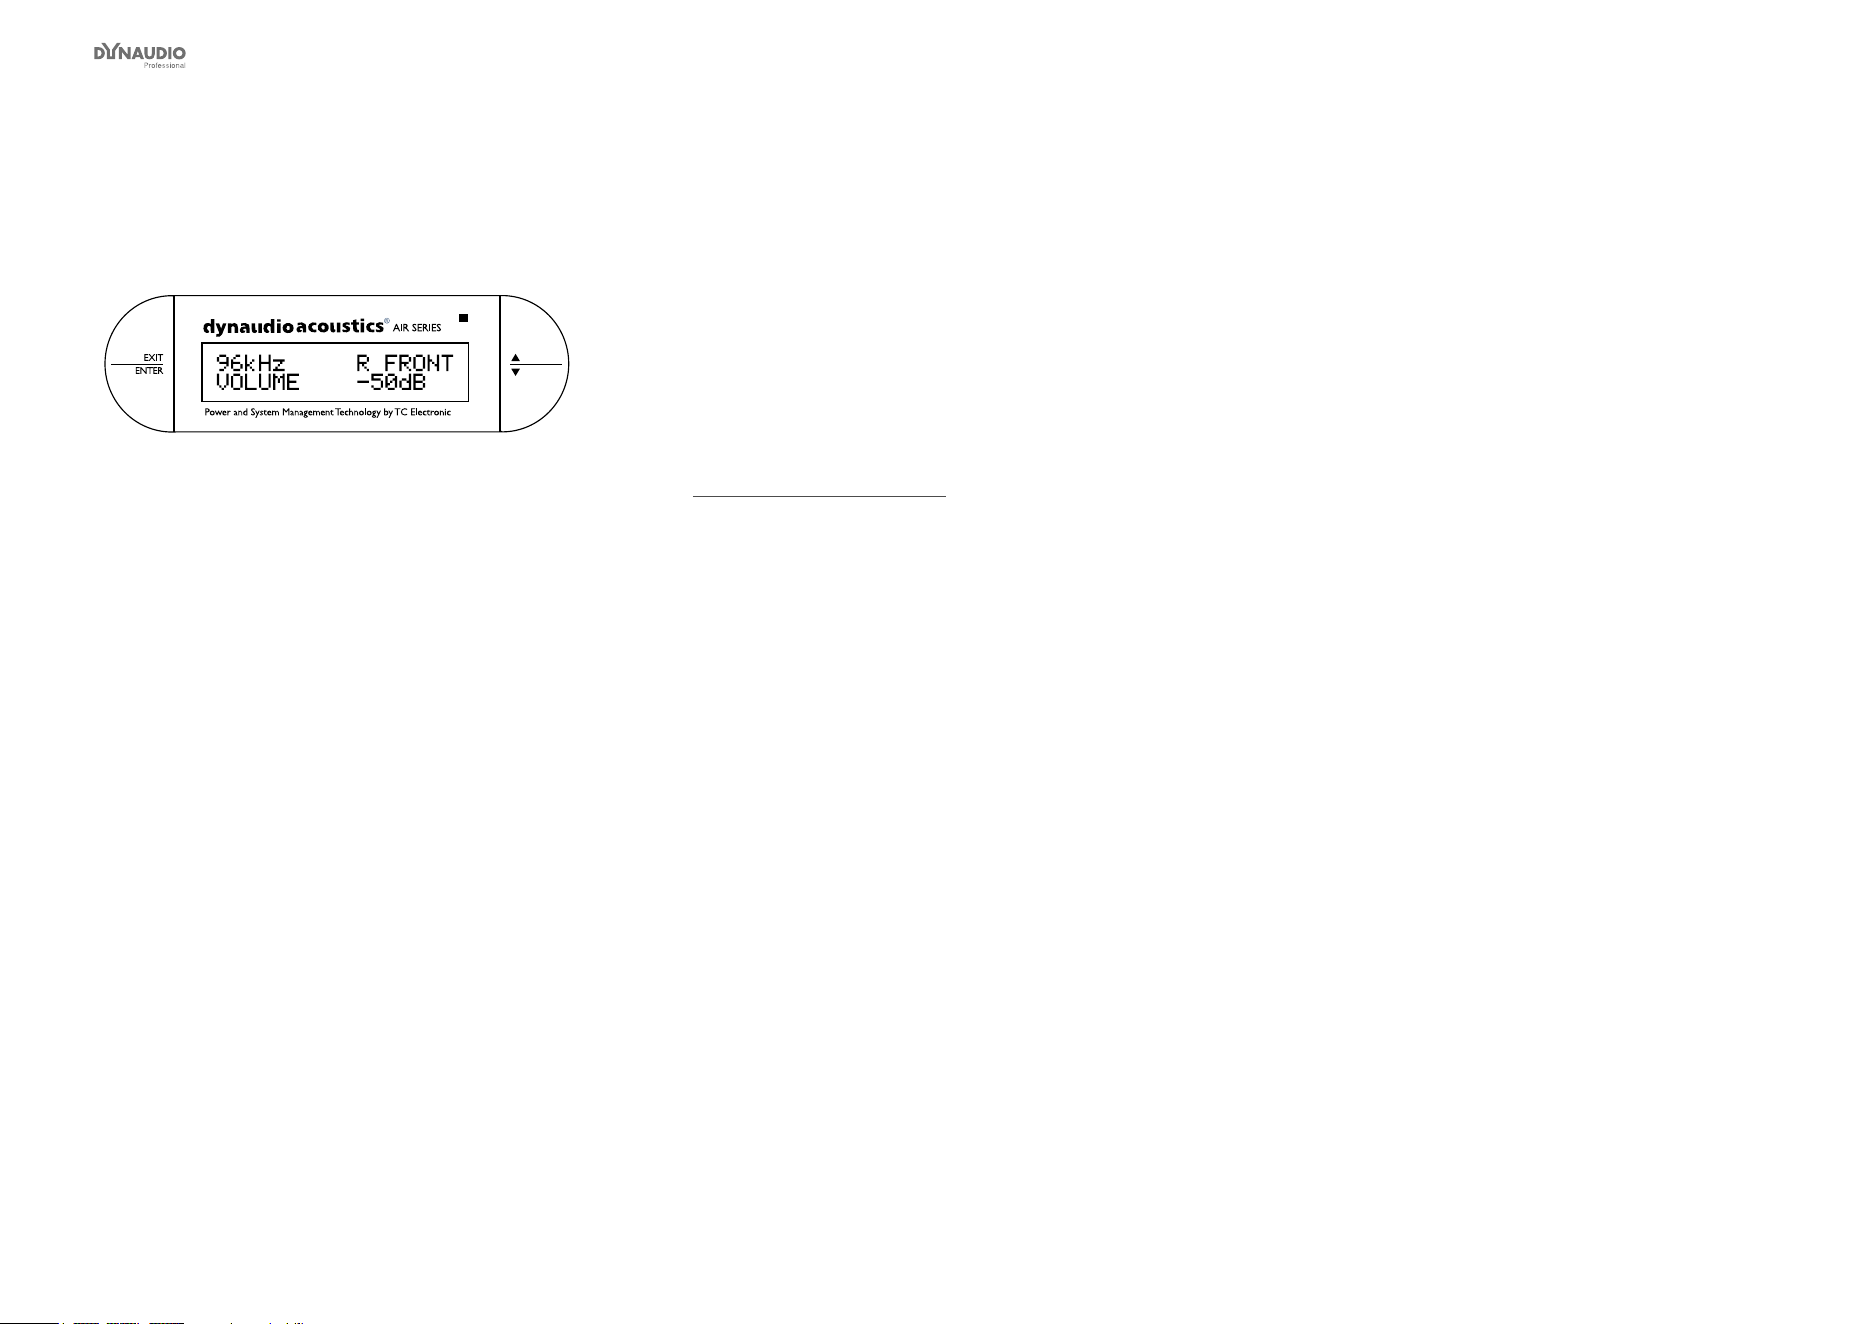
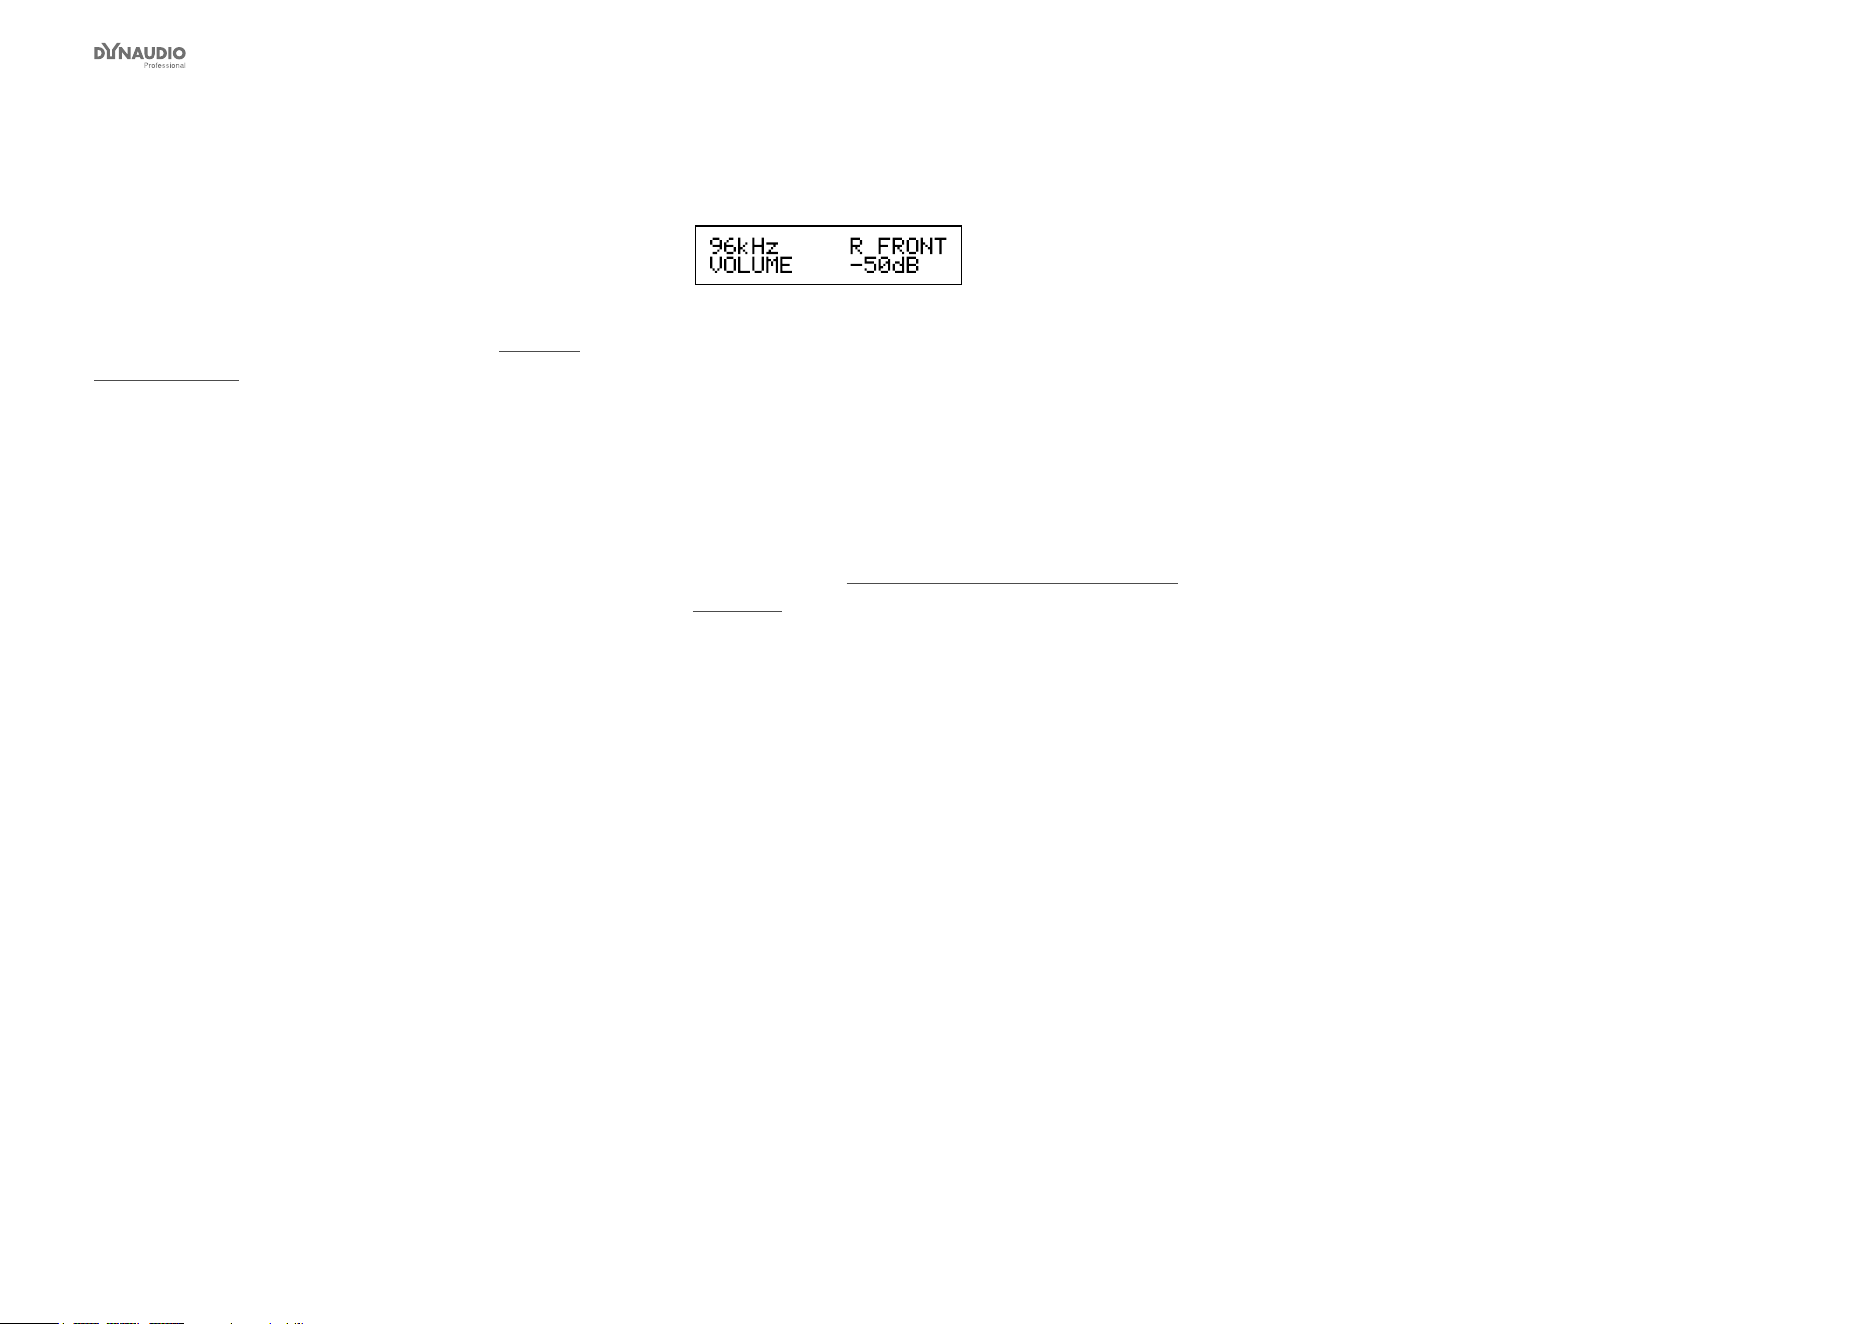
Home screen
Fig. 7: AIR monitor home screen, showing the sample
rate, the monitor’s task and the volume
The home screen of your AIR Master unit will show the
role/position of the monitor (once it has been set up)
and the set volume for this unit.
A “+” in the upper right corner indicates that this spe-
cic Master Unit has been set up to act as the System
Controller – see “System Controller, Master or Slave”
on page 9.
When the home screen is shown, you can use the ar-
row keys to the right of the display to set the volume.
Tap the buttons to change volume in 0.5 dB steps,
press and hold to change it continuously.

AIR Menu structure and parameters
Dynaudio Professional AIR reference manual – 2014-09-28 21
Conguring bass
management
Bass management is available for the following setups:
►
Standard Stereo with 1 subwoofer
►
Standard Stereo with 2 subwoofer
►
5.1 Analog
►
5.3 Analog
►
6.1 Analog
►
6.1 Digital – at 192 kHz
►
5.3 Digital
►
5.1 Digital/6 Master
►
5.1 Digital – at 192 kHz
Notes on bass management
►
Satellite monitors use 2nd order highpass lters
to attenuate frequencies below the set crossover
frequency.
►
Subwoofers use 4th order lowpass lters to attenu-
ate frequencies above the set crossover frequency.
Conguring bass management
►
From the home screen, press the ENTER key.
“Bass Management” is displayed.
►
Press the ENTER key again.
“*Select Mode” is displayed.
►
Select the desired mode using the UP and DOWN
keys.
►
After setting the desired mode, press the EXIT key
to close the menu.
Bass management modes and crossover frequencies
Displayed name Bass management mode name Satellite
lter
Sub 4th
order
Sub 2nd
order
LFE = Sub
Off (No bass management; only the LFE
channel is distributed to the sub.)
X-Over 50 Hz X-Over 50 Hz 50 Hz 50 Hz 50 Hz No
X-Over 80 Hz X-Over 80 Hz 80 Hz 80 Hz 80 Hz No
Ext. 50 Hz Extension 50 Hz Off 50 Hz 50 Hz No
Ext. 80 Hz Extension 80 Hz Off 80 Hz 80 Hz No
THX 80 Hz THX Simulation 80 Hz 80 Hz 80 Hz Off Yes
SC 120 Hz Small Consumer 120 Hz * 120 Hz 120 Hz 80 Hz Yes
Note that the modes “Extension 50” and “Extension 80
Hz” use no bass management on satellite speaker, thus
playing full range.
Bass management and AIR Control software
Via AIR Control software, you can access an advanced
Bass Management mode. In this mode, all lters (Sat-
ellite, Sub 4 and Sub 2) can be controlled to suit de-
manding setups. See “Bass management page” on
page 73.

AIR Menu structure and parameters
Dynaudio Professional AIR reference manual – 2014-09-28 22
Setup menu ►
Setup selection
Use the Setup selection menu to specify how your AIR
system is set up. All standard setups are shown and
explained in “AIR setups” on page 29.
Selecting your AIR system setup
►
From the home screen, press the ENTER key.
►
Press the DOWN key until “Setup menu” is dis-
played.
►
Press the ENTER key.
“Setup” is displayed.
►
Press the ENTER key.
“*Select setup” is displayed.
►
Press the UP and DOWN keys to select the correct
setup.
►
Press the ENTER key to conrm your selection.
►
Press the EXIT key repeatedly to return to the
home screen.
Setup name Remarks
Empty No selection
Custom For custom congurations.
Stereo analog Two monitor stereo setup with analog* inputs selected
Stereo Digital Two monitor stereo setup with digital inputs selected
5.1 Analog 5.1 setup with analog* inputs selected
5.1 Digital 5.1 setup with digital inputs selected
6.1 Analog 5.1 Setup + Center surround on a separate channel gives the 6.1 setup.
6.1 Digital 5.1 Setup + Center surround on a separate channel gives the 6.1 setup.
5.3 Analog Analog setup with 5 monitors and 3 subs
5.3 Digital Digital setup with 5 monitors and 3 subs
5.1 Digital/6 Master 5.1 Setup using one Master unit with optional Digital I/O card installed, 4 slave monitors (or Masters set as slave) and 1 sub
* Analog inputs are only available with an optional analog card installed.

AIR Menu structure and parameters
Dynaudio Professional AIR reference manual – 2014-09-28 23
Setup menu ►
Monitor tasks setup
Use the Setup monitor tasks menu to assign tasks to
the monitors in your AIR System.
Each monitor must be given a task indicating its func-
tion and position. The System Controller – Master unit
will only be able to identify and control all monitors in
your AIR system correctly if these tasks have been as-
signed correctly.
Selecting the task for an AIR monitor
►
From the home screen, press the ENTER key.
►
Press the DOWN key until “Setup menu” is dis-
played.
►
Press the ENTER key.
►
Press the DOWN key until “Set monitor tasks” is
displayed.
►
Press the ENTER key.
►
Press the UP and DOWN keys to select a monitor.
Each monitor is identied by its serial number,
which is shown on a label with a barcode on the
back.
►
Press the ENTER key.
►
Press the UP and DOWN keys to select a monitor
task.
►
Press the ENTER key to conrm your selection.
►
Press the EXIT key repeatedly to return to the
home screen.
Displayed task name Full monitor task name
No task No task assigned
L Front Left Front
R Front Right Front
Center Center
(C) Sub (C) Subwoofer
L Sub Left Subwoofer
R Sub Right Subwoofer
L Sur Left Surround
R Sur Right Surround
C Sur Center Surround
LsChain Left Surround / Chain
RsChain Right Surround / Chain
CsChain Center Surround / Chain
L Inner Left Inner
R Inner Right Inner
Fig. 8: Available monitor tasks

AIR Menu structure and parameters
Dynaudio Professional AIR reference manual – 2014-09-28 24
Setup menu ►
External clock setup
Conguring external clock
►
From the home screen, press the ENTER key.
►
Press the DOWN key until “Setup menu” is dis-
played.
►
Press the ENTER key.
►
Press the DOWN key until “External clock” is
displayed.
►
Press the ENTER key.
“*Select clock” is displayed.
►
Press the UP and DOWN keys to select the de-
sired mode.
►
Press the ENTER key to conrm your selection.
►
Press the EXIT key repeatedly to return to the
home screen.
Display clock
mode name
Remarks
BNC Sync On The monitor attempts to lock on the Word Clock BNC.
BNC Sync Off The monitor will attempt to lock on the AES input.
Fig. 9: External clock modes

AIR Menu structure and parameters
Dynaudio Professional AIR reference manual – 2014-09-28 25
Setup menu ► Analog
input sensitivity
Conguring analog input sensitivity
►
From the home screen, press the ENTER key.
►
Press the DOWN key until “Setup menu” is dis-
played.
►
Press the ENTER key.
►
Press the DOWN key until “Sensitivity” is dis-
played.
►
Press the ENTER key.
“*Sensitivity” is displayed.
►
Press the UP and DOWN keys to select the de-
sired sensitivity.
►
Press the ENTER key to conrm your selection.
►
Press the EXIT key repeatedly to return to the
home screen.
Analog input sensitivity settings
+9 dBu
+15 dBu
+21 dBu
+27 dBu
Fig. 10: Analog input sensitivity settings

AIR Menu structure and parameters
Dynaudio Professional AIR reference manual – 2014-09-28 26
Setup menu ►
Monitor calibration
Use the calibration menu to calibrate each monitor in
your AIR System.
This section only describes the basic parameters of the
monitor calibration submenu. For more information re-
garding monitor placement and calibration, see “Plac-
ing the monitors” on page 48 and “Calibrating the
main monitors” on page 57.
Calibrating monitors in your AIR system
►
From the home screen, press the ENTER key.
►
Press the DOWN key until “Setup menu” is dis-
played.
►
Press the ENTER key.
►
Press the DOWN key until “Calibrate monitor” is
displayed.
►
Press the ENTER key.
►
Press the UP and DOWN keys to select a monitor.
►
Press the ENTER key.
►
Press the UP and DOWN keys to select a calibra-
tion parameter.
►
Press the ENTER key to activate the selected
parameter for editing.
►
Press the UP and DOWN keys to set the selected
parameter to the desired value.
►
Press the ENTER key to conrm your selection.
►
Press the EXIT key to move up one level in the
hierarchy and select another parameter for editing,
or
►
Press the EXIT key repeatedly to return to the
home screen.
Notes regarding the LFE channel
Please note that in general the LFE channel should be
mixed with +10 dB headroom.
If you are not able to boost your LFE monitor output
from your console, +10 dB gain can be added on your
AIR BASE input. Most format encoders / decoders take
the LFE boost into account, meaning that you should
leave the AIR BASE LFE gain at 0 dB when playing
back a DTS or DOLBY encoded material on your AIR
system. LFE gain is set at 0 dB in all factory presets, so
if you need to add gain on your AIR BASE please ad-
just this parameter and store the new setting in a user
preset location.

AIR Menu structure and parameters
Dynaudio Professional AIR reference manual – 2014-09-28 27
Parameters available for all AIR monitors
Parameter Range / values Explanation
Pink Noise On/Off
Calibrate -6 dB to +6 dB Level calibration of the selected monitor
Rel. Lev -40 dB to 0 dB Relative preset volume for the selected monitor
Room Position Neutral / Wall / Corner / Console / C. Wall
(Console Wall) / C. Corn (Console Corner)
Bass -6 dB to +6 dB Bass adjustment for the selected monitor
Treble -6 dB to +6 dB Treble adjustment for the selected monitor
Fig. 11: Parameters available for all AIR monitors
Parameters for AIR BASE subwoofers
Parameter Range / values Explanation
Pink Noise On/Off
Calibrate -18 dB to +6 dB Level calibration of the selected monitor.
Rel. Lev. –
(Relative Level)
-40 dB to 0 dB Preset volume for the selected monitor relative to the calibrated and
global volume.
LFE Low Pass On/Off Brick wall Limiter on the LFE channel attenuating frequencies above
120 Hz.
LFE Gain -6 to +8 dB With this parameter you can boost the acoustic gain of the LFE
channel.
Polarity 0 / 180º If the Subwoofer is correctly placed, setting the Polarity parameter
to 180º should result in a full phase cancellation at the set crossover
frequency. If this is not the case, the Delay parameter should be
adjusted.
Phase 0 to 180° Use this parameter to time-compensate if the subwoofer is not placed
according to the ITU 775 recommendations. There are individual
Phase settings for each of the Bass Management Cross-over
frequencies. Once set, these are stored as Global settings.
Fig. 12: Parameters for AIR BASE subwoofers

AIR Menu structure and parameters
Dynaudio Professional AIR reference manual – 2014-09-28 28
Setup menu ► Clear
setup for entire network
Use this function to clear settings for your entire AIR
system. All connected monitors will be reset to default
settings.
Clearing the setup for the entire network
►
From the home screen, press the ENTER key.
►
Press the DOWN key until “Setup menu” is dis-
played.
►
Press the ENTER key.
►
Press the DOWN key until “Clear setup for entire
network” is displayed.
►
Press the ENTER key.
“Accept to clear network setup?” is displayed.
►
Press the ENTER key to clear the setup or press
the EXIT key to discard.


AIR setups
Dynaudio Professional AIR reference manual – 2014-09-28 30
The setups shown in this chapter will only oper-
ate correctly if all connections are made exactly as
seen in the illustrations!
Important: Master monitor setting
►
In each setup, one specic Master monitor must be
set as the System Controller.
►
To set a Master monitor as System Controller, the
TC LINK button on the rear panel of this monitor
must be set to the Out position.
►
The TC LINK button on all other Master monitors
must be set to the In position.
Reading the setup illustrations
►
The AIR Remote shown in most setups is an op-
tional hardware remote control. For more informa-
tion, see “AIR Remote” on page 63.
►
Audio signals are represented by solid lines:
►
TC link signals are represented by dashed lines:
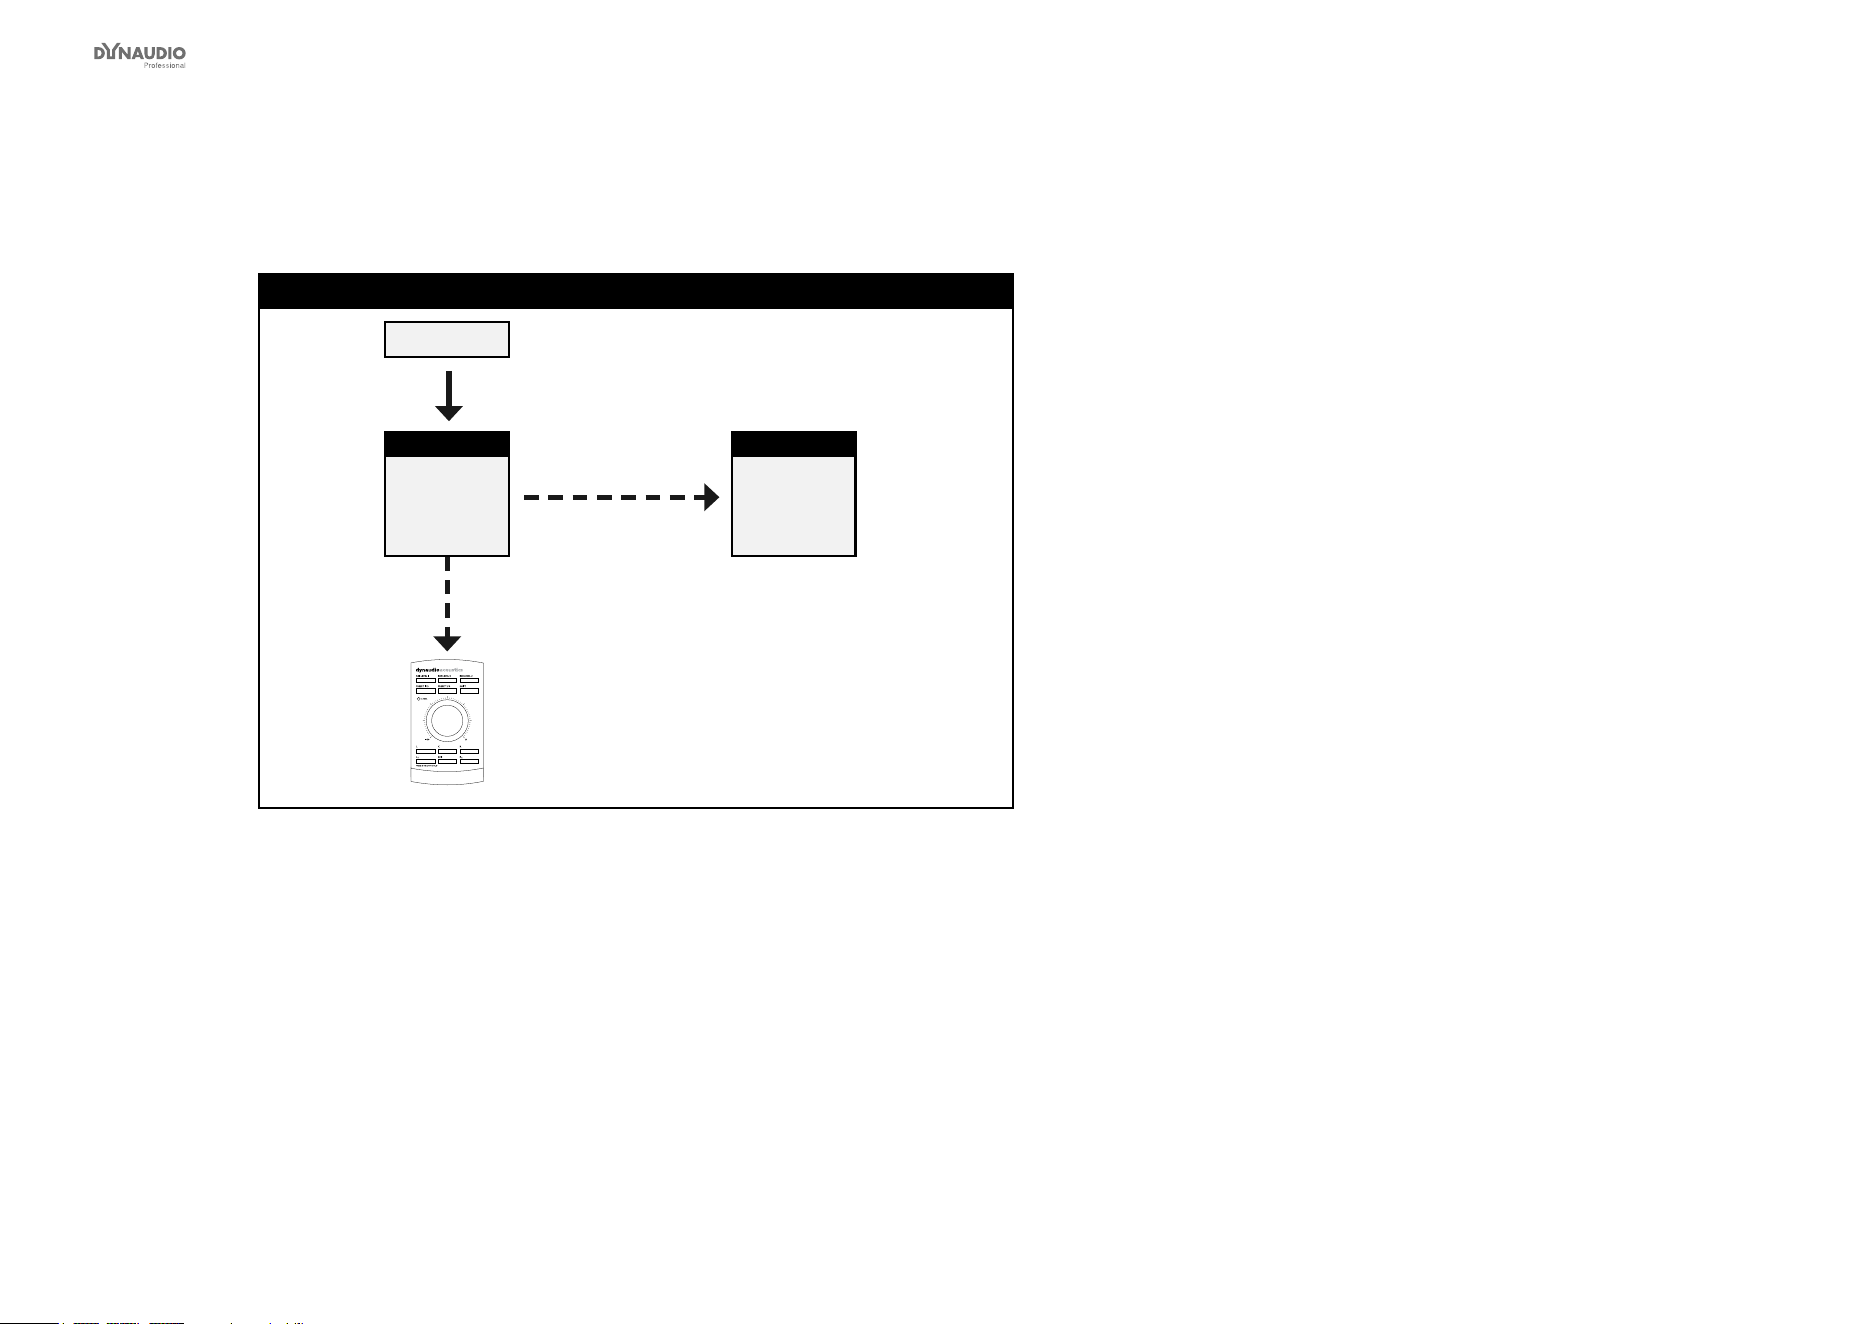
AIR setups
Dynaudio Professional AIR reference manual – 2014-09-28 31
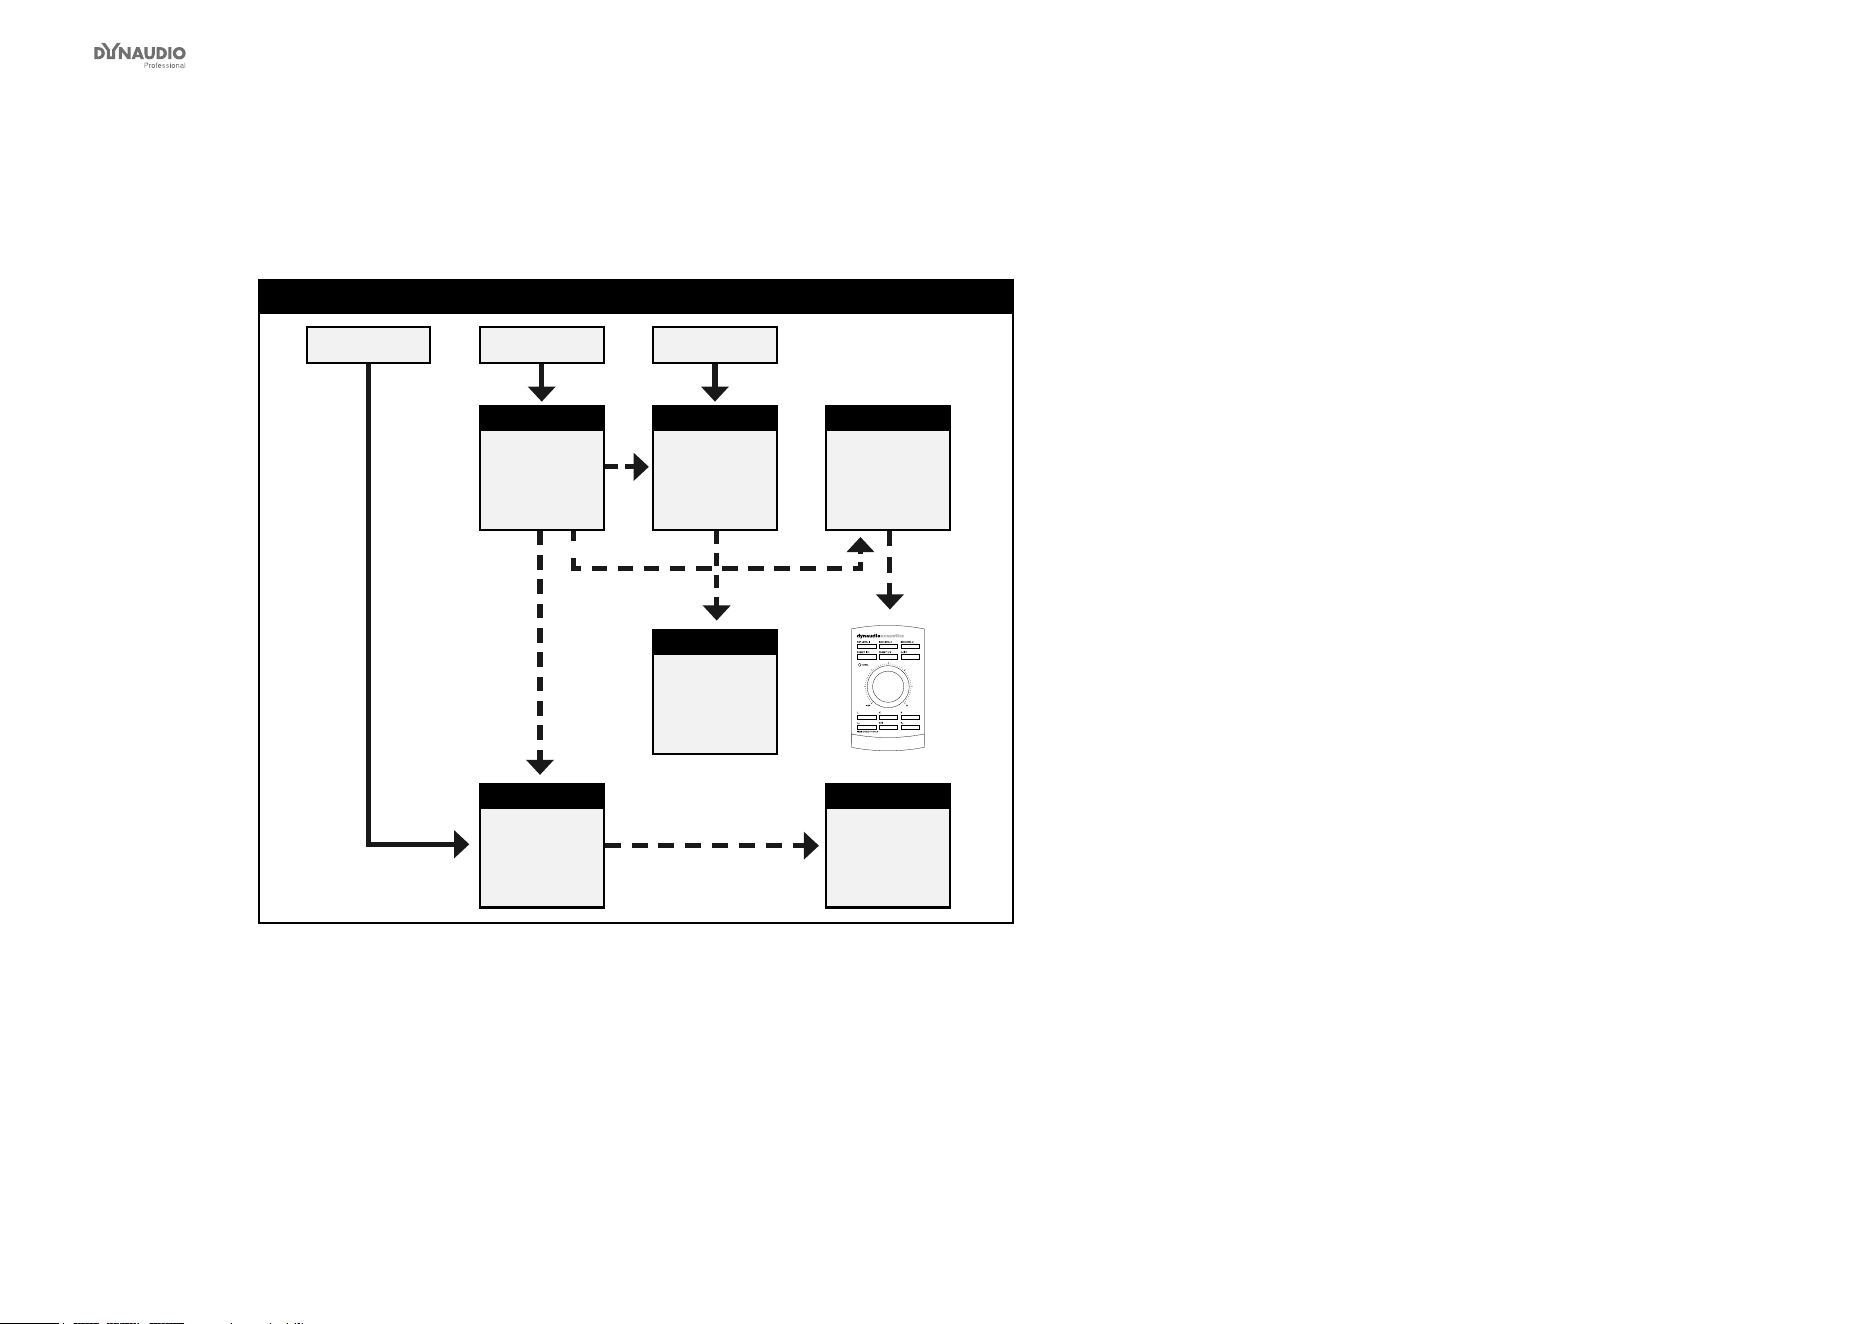
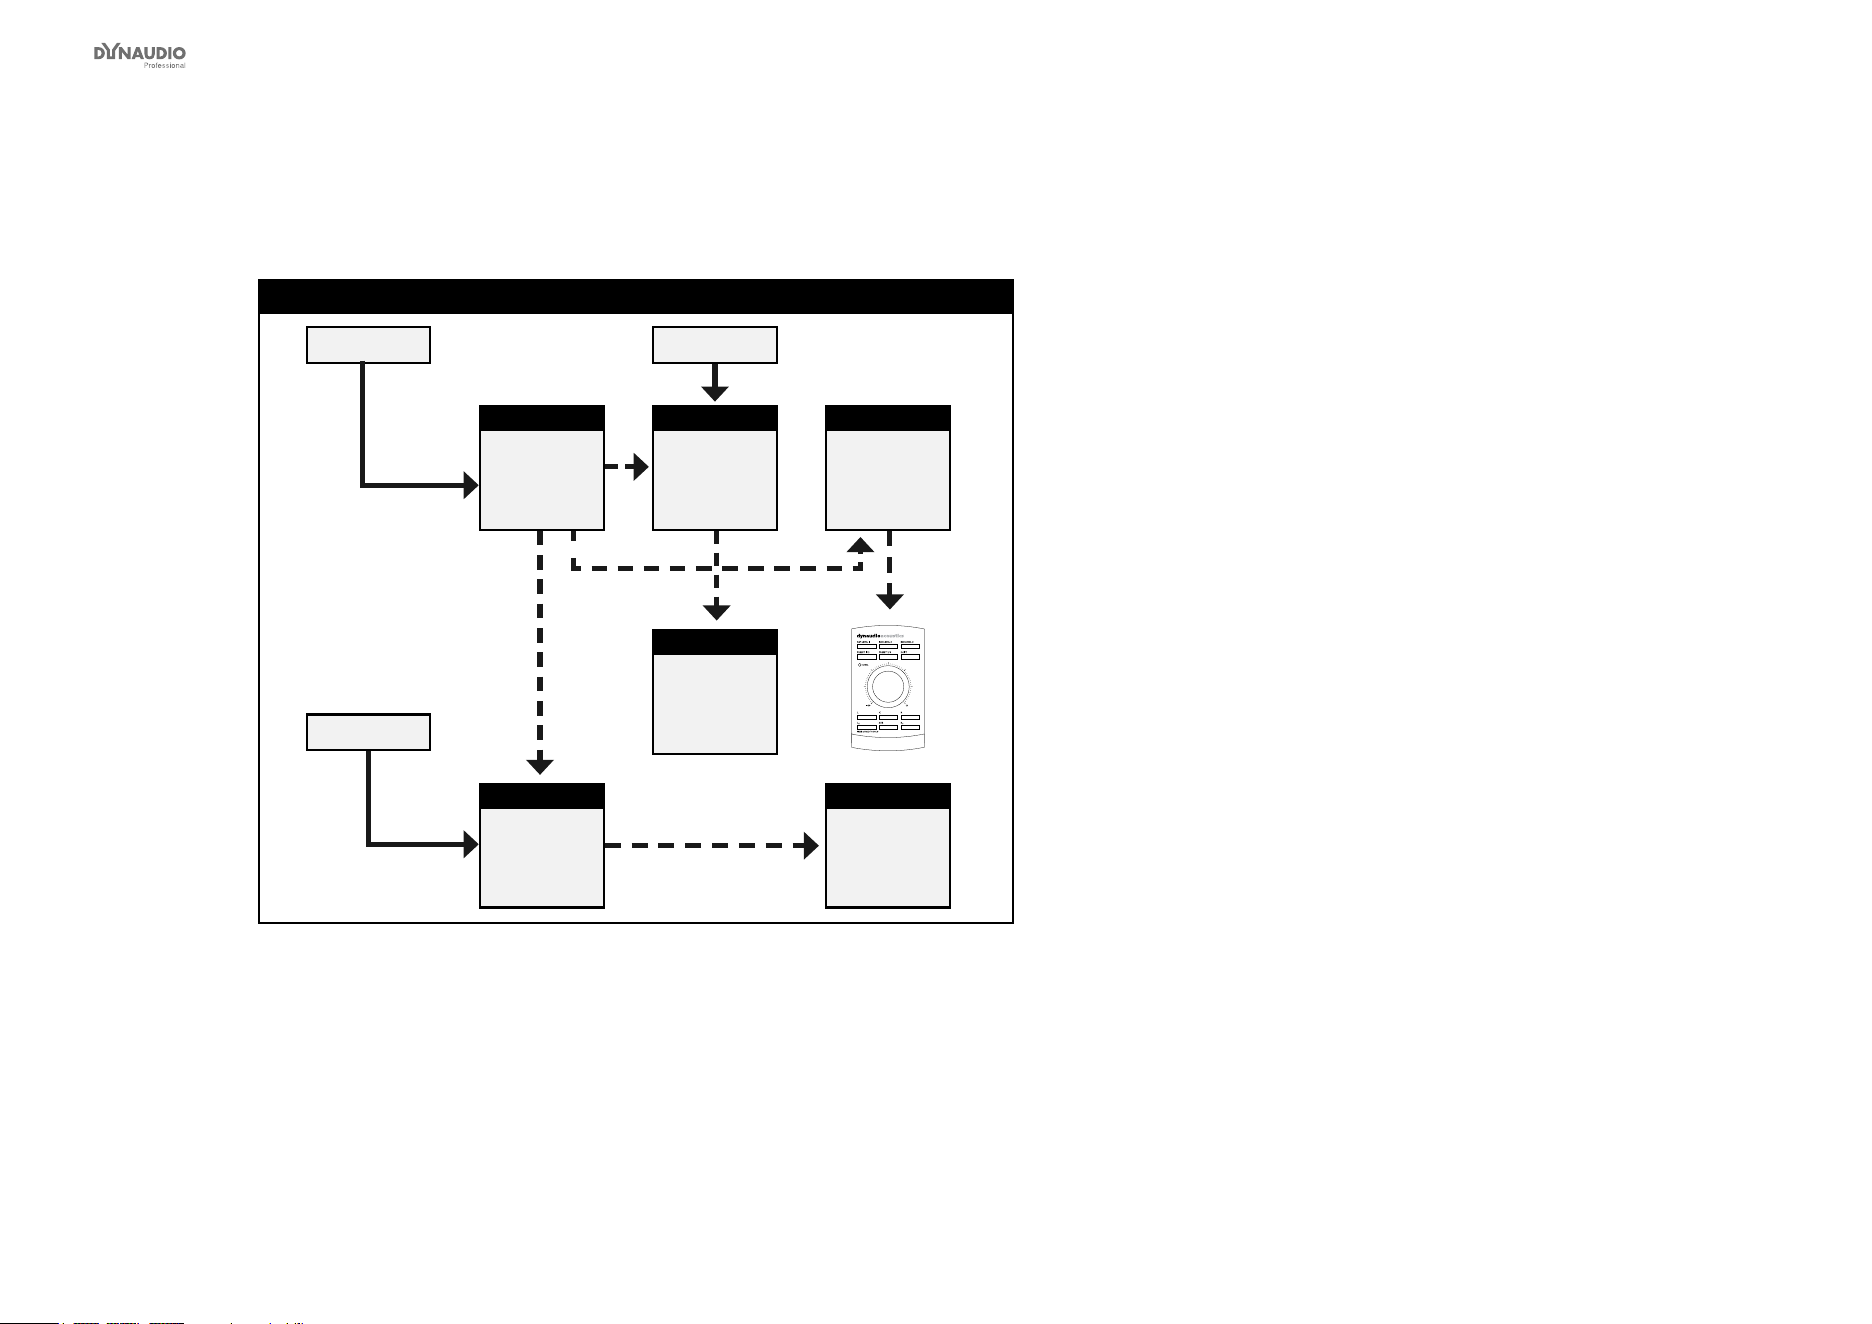
Stereo setup – digital or analog
Stereo setup – digital or analog
Master
Left
System Ctrl.
L + R
Digital (AES) or analog audio signals
Slave
Right
Fig. 13: This illustration shows how to connect a standard stereo setup.
Understanding and using this setup
►
Audio signals are represented by solid lines.
►
TC link signals are represented by dashed lines.
►
The left monitor is set as the System Controller by
setting the TC Link button on the rear panel to the
“out” position.
►
The left monitor receives both the left and right
input signals.
►
The right monitor receives audio via the TC-LINK
RJ-45 connection.
►
The AIR Remote or a computer running the AIR
Control software (both optional) can be connected
to any available TC LINK Out connection.

AIR setups
Dynaudio Professional AIR reference manual – 2014-09-28 32
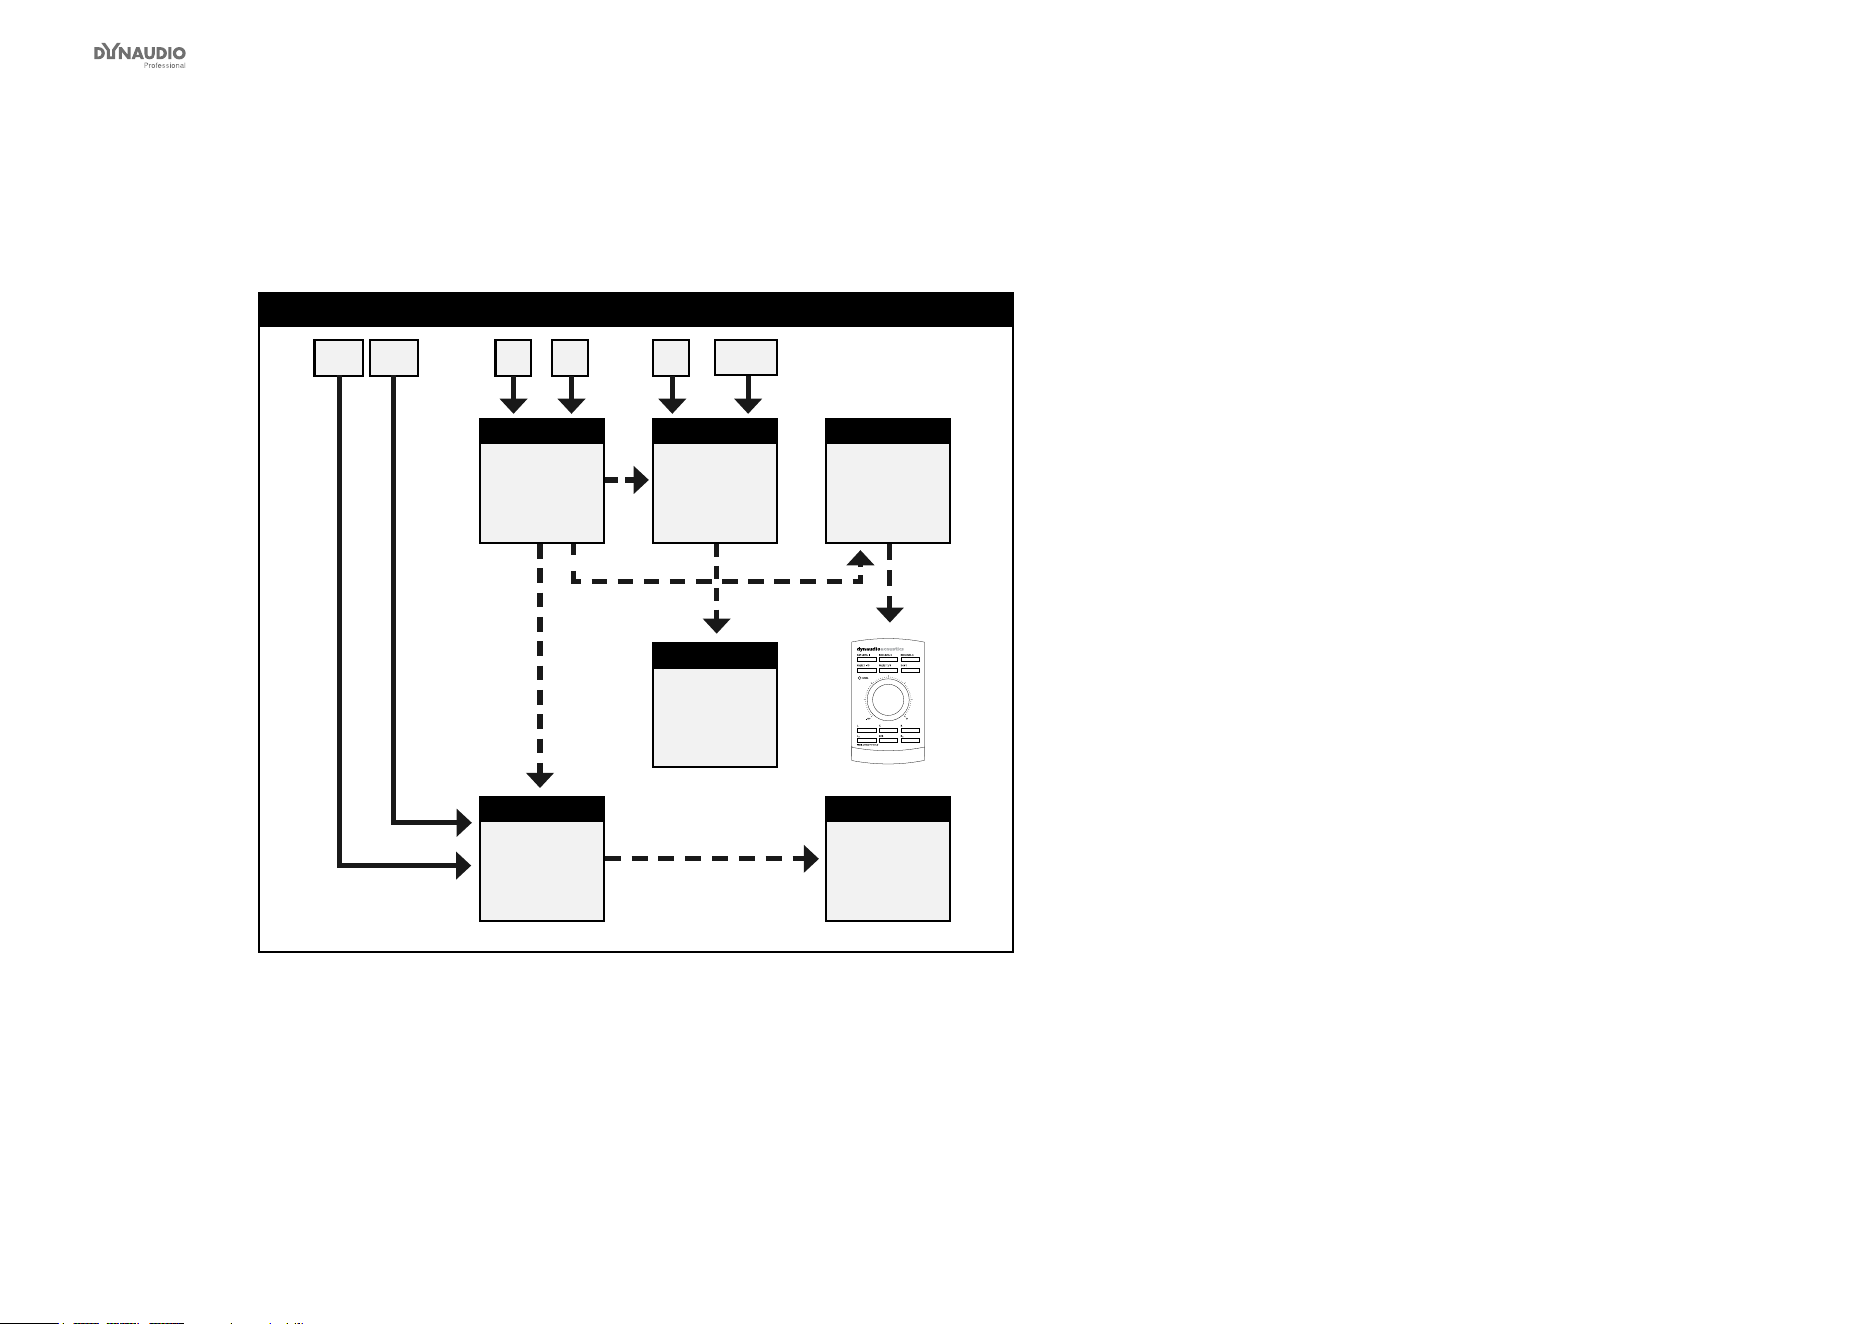
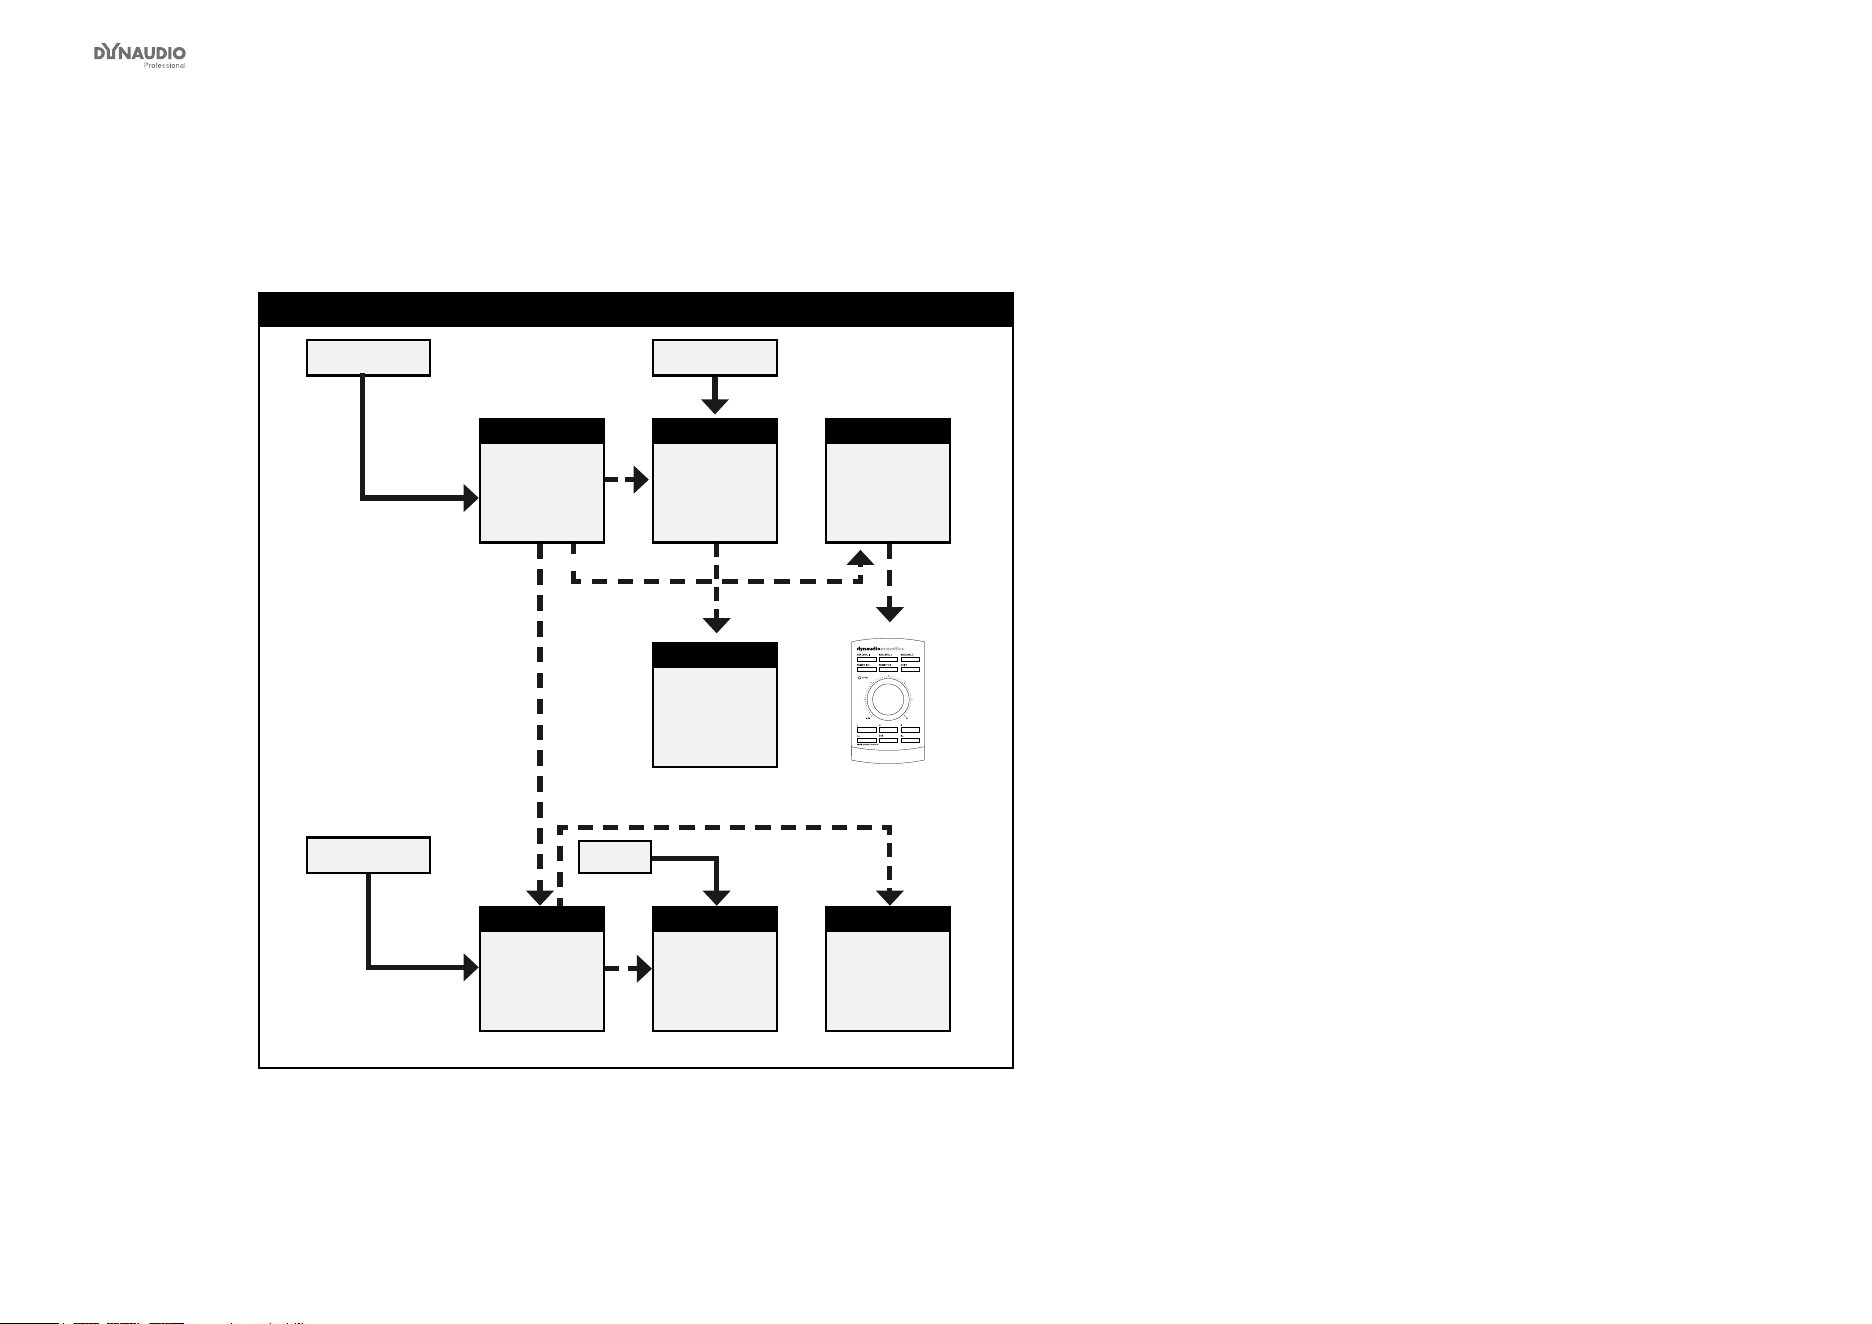
Stereo setup with mono subwoofer – digital or analog
Stereo Setup with 1 subwoofer – digital or analog
Master
Left
System Ctrl.
L + R Digital (AES) or analog audio signals
Slave
Right
Sub
Subwoofer
Fig. 14: This illustration shows how to connect a stereo setup with one subwoofer.
Understanding and using this setup
►
Audio signals are represented by solid lines.
►
TC link signals are represented by dashed lines.
►
The left monitor is set as the System Controller by
setting the TC Link button on the rear panel to the
“out” position.
►
The left monitor receives both the left and right
input signals.
►
The right monitor and the subwoofer receive audio
via the TC-LINK RJ-45 connection from the left
monitor.
►
With no bass management, no signal is sent to the
subwoofer.
►
With bass management activated, low-frequency
information is extracted from the left and right
channels below the set crossover frequency and
fed to the subwoofer.
►
The AIR Remote or a computer running the AIR
Control software (both optional) can be connected
to any available TC LINK Out connection.

AIR setups
Dynaudio Professional AIR reference manual – 2014-09-28 33
Stereo setup with two subwoofers – digital or analog
Stereo setup with 2 subs – digital or analog
Master
Left
System Ctrl.
L + R AES or analog signal
Slave
Right
Sub
Right
subwoofer
Sub
Left
subwoofer
Fig. 15: This illustration shows how to connect a stereo setup with two subwoofers.
Understanding and using this setup
►
Audio signals are represented by solid lines.
►
TC link signals are represented by dashed lines.
►
The left monitor is set as the System Controller by
setting the TC Link button on the rear panel to the
“out” position.
►
The left monitor receives both the left and right
input signals.
►
The right monitor and the subwoofers receive
audio via the TC-LINK RJ-45 connection from the
left monitor.
►
With no bass management, no signal is sent to the
subwoofers.
►
With bass management activated, low-frequency
information is extracted from the left and right
channels below the set crossover frequency.
Low-frequency information from the left channel
is sent to the left subwoofer, and low-frequency
information from the right channel is sent to the
right subwoofer.
►
The AIR Remote or a computer running the AIR
Control software (both optional) can be connected
to any available TC LINK Out connection.
AIR setups
Dynaudio Professional AIR reference manual – 2014-09-28 34
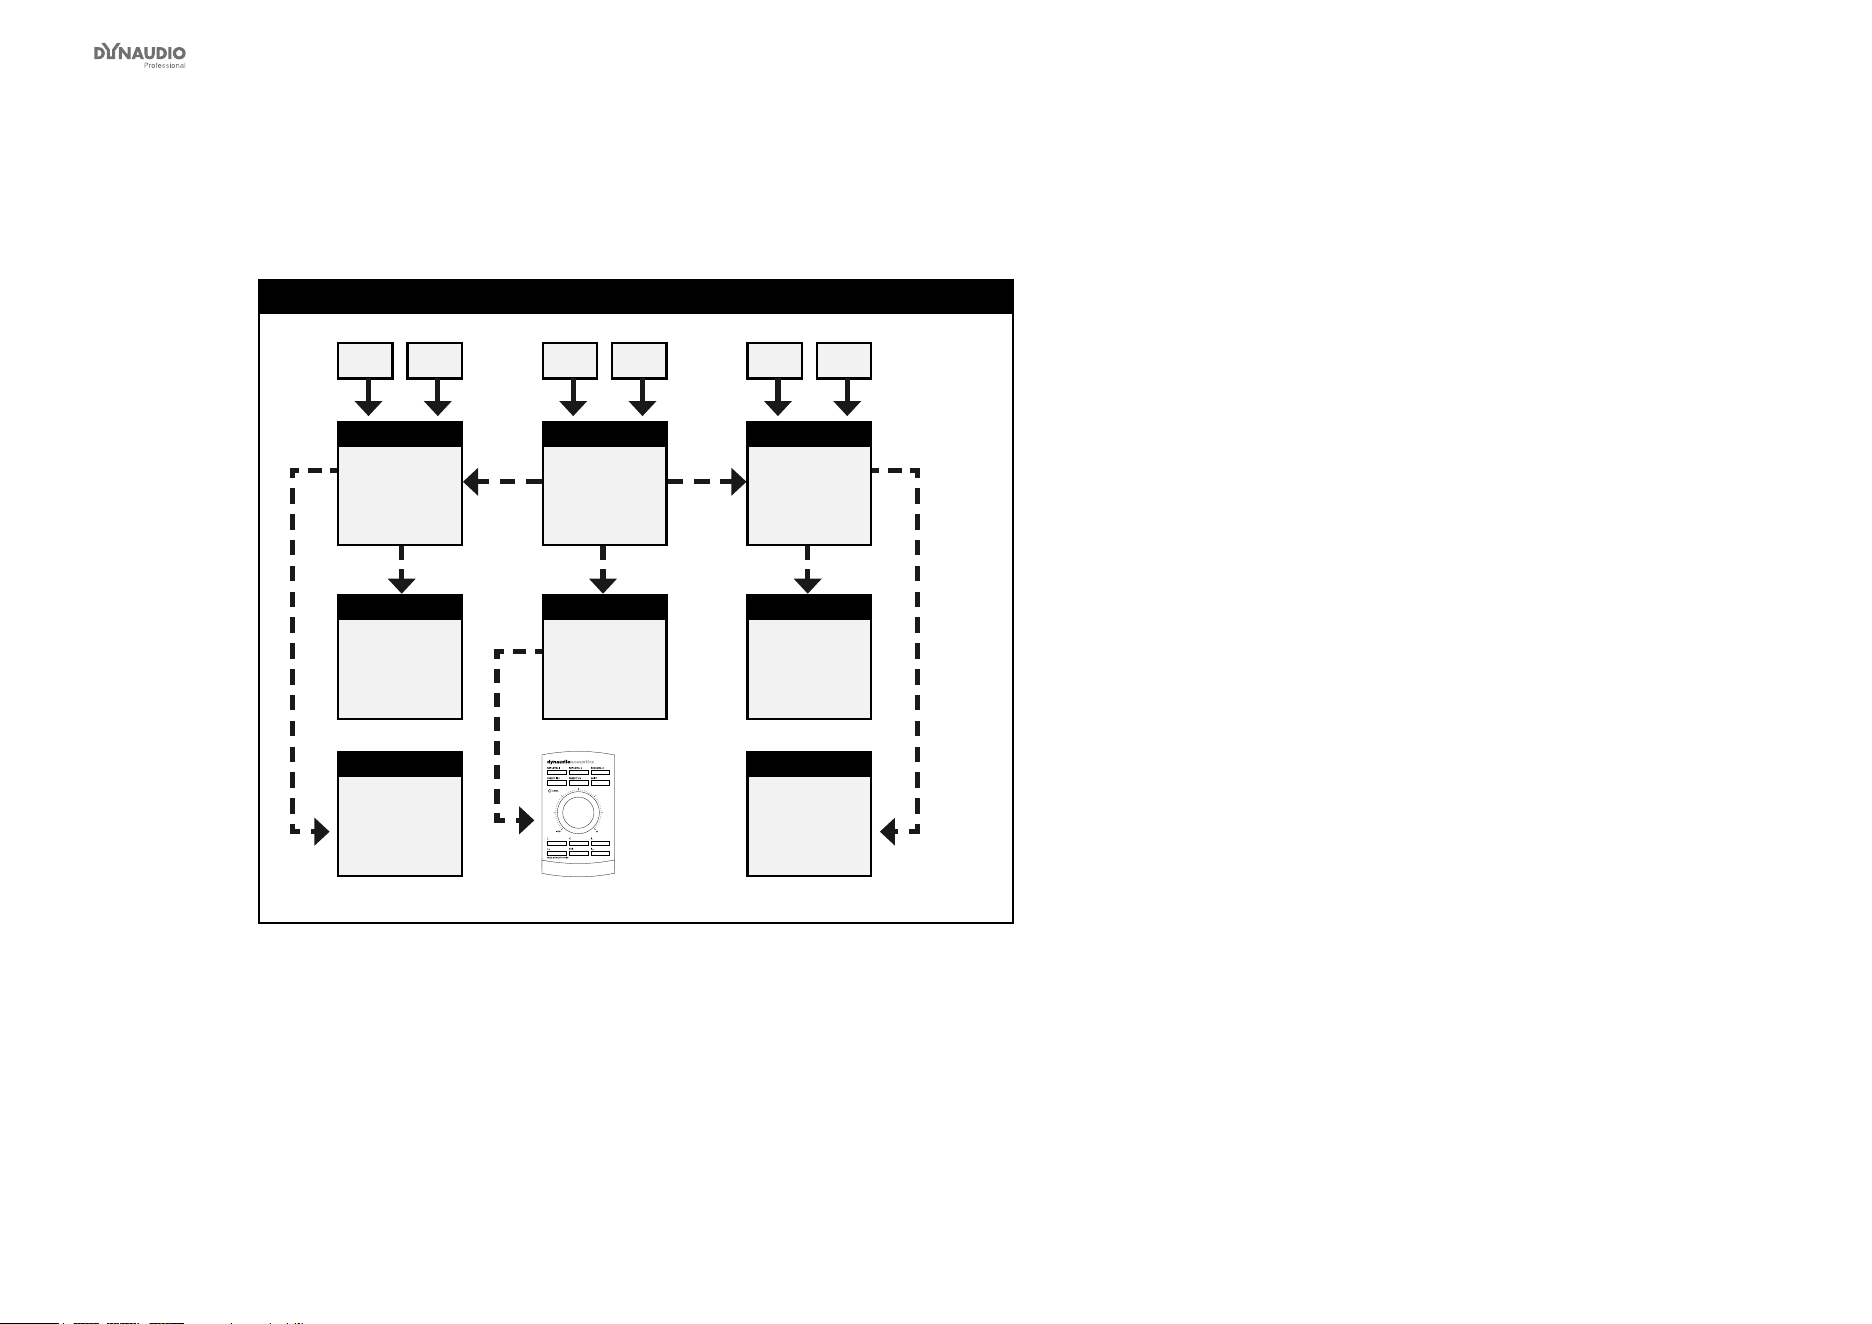
5.1 setup – digital
5.1 setup – digital
Master
Left
System Ctrl.
Master
Left
Surround
Master
Center
L + R C + LFELS + RS
Slave
Right
Surround
Sub
Subwoofer
Slave
Right
Fig. 16: This illustration shows how to connect a 5.1 digital setup.
Understanding and using this setup
►
Audio signals are represented by solid lines.
►
TC link signals are represented by dashed lines.
►
The left monitor is set as the System Controller by
setting the TC Link button on the rear panel to the
“out” position.
►
The left monitor receives both the left and right
input signals.
►
The right monitor receives audio via the TC-LINK
RJ-45 connection from the left monitor.
►
The left surround monitor (LS) receives both the
left and right surround channel signals.
►
The right surround monitor receives audio via the
TC-LINK RJ-45 connection from the left surround
monitor.
►
The center monitor (C) receives both center and
LFE channels.
►
The LFE monitor receives audio via the RJ-45
connection from the center monitor.
►
The AIR Remote or a computer running the AIR
Control software (both optional) can be connected
to any available TC LINK Out connection.
►
Bass management is only available in this digital
setup if the optional Digital input cards are in-
stalled.
►
On the System controller (C), set setup to “5.1
digital/Digi 6”.
AIR setups
Dynaudio Professional AIR reference manual – 2014-09-28 35
5.1 setup – analog
L
L
LR
R
R
5.1 setup – analog
Master
Left
Sytem Ctrl.
Master
Left
Surround
Master
Center
L R C
LFE
LS RS
Slave
Right
Surround
Sub
Subwoofer
Slave
Right
Fig. 17: This illustration shows how to connect a 5.1 analog setup.
Understanding and using this setup
►
Audio signals are represented by solid lines.
►
TC link signals are represented by dashed lines.
►
The left monitor is set as the System Controller by
setting the TC Link button on the rear panel to the
“out” position.
►
The left monitor receives both the left and right
input signals.
►
The right monitor receives audio via the TC-LINK
RJ-45 connection from the left monitor.
►
The left surround monitor (LS) receives both the
left and right surround channel signals.
►
The right surround monitor receives audio via the
TC-LINK RJ-45 connection from the left surround
monitor.
►
The center monitor (C) receives both center and
LFE channels.
►
The LFE monitor receives audio via the RJ-45
connection from the center monitor.
►
With no bass management, the subwoofer will play
only the LFE channel.
►
With bass management activated, low-frequency
information from the ve main channels is extract-
ed and sent to the subwoofer, where it is summed
with the LFE channel.
►
The AIR Remote or a computer running the AIR
Control software (both optional) can be connected
to any available TC LINK Out connection.
AIR setups
Dynaudio Professional AIR reference manual – 2014-09-28 36
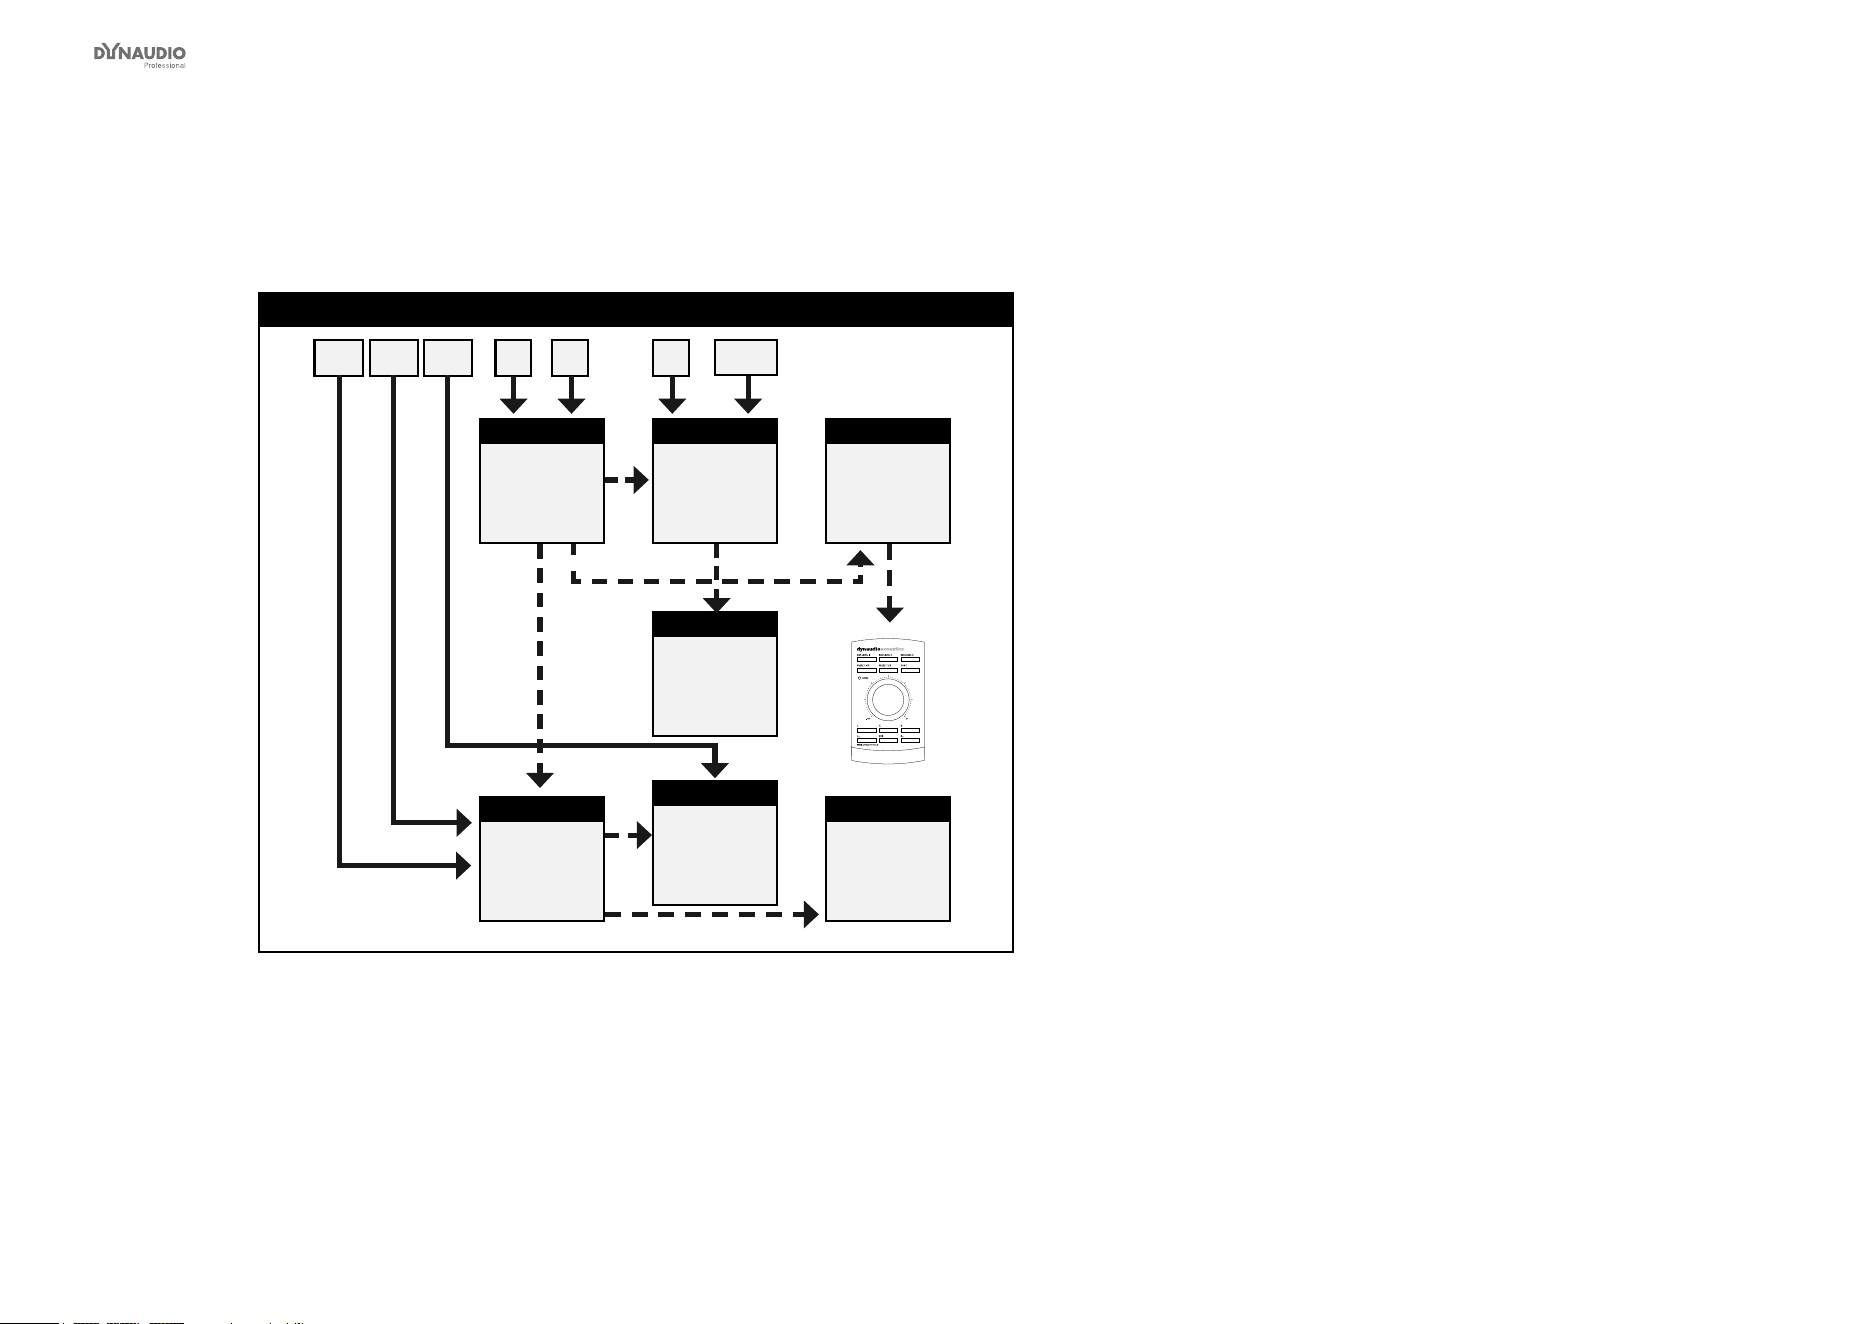
5.3 setup – digital
5.3 setup – digital
Master
Left
Slave
Left
surround
Master
Center
System Ctrl.
Slave
Right
surround
Sub
Left
subwoofer
Sub
Center
subwoofer
Sub
Right
subwoofer
Slave
Right
C + LFEL + LS R + RS
Fig. 18: This illustration shows how to connect a digital 5.3 setup.
Understanding and using this setup
►
Audio signals are represented by solid lines.
►
TC link signals are represented by dashed lines.
►
The center monitor (C) is set as the System
Controller by setting the TC Link button on the rear
panel to the “out” position.
►
The left monitor receives both the left and left sur-
round input signals.
►
The right monitor receives both the right and right
surround input signals.
►
The left surround monitor is fed via the TC LINK
RJ-45 connection from the left monitor.
►
The right surround monitor is fed via the TC LINK
RJ-45 connection from the right monitor.
►
The center monitor (C) receives both center and
LFE channels.
►
The LFE monitor receives audio via the RJ-45
connection from the center monitor.
►
With bass management off, the left and right sub-
woofers will receive no signal.
►
With bass management on, …
►
low-frequency information is extracted from the
left and left surround signals and fed to the left
subwoofer.
►
low-frequency information is extracted from the
right and right surround signals and fed to the
right subwoofer.
►
low-frequency information is extracted from the
center signal, summed with the LFE channel
and fed to the center subwoofer.
►
The AIR Remote or a computer running the AIR
Control software (both optional) can be connected
to any available TC LINK Out connection.
AIR setups
Dynaudio Professional AIR reference manual – 2014-09-28 37
5.3 setup – analog
5.3 setup – analog
Master
Left
Slave
Left
surround
Master
Center
System Ctrl.
Slave
Right
surround
Sub
Left
subwoofer
Sub
Center
subwoofer
Sub
Right
subwoofer
Slave
Right
L LS C LFE R RS
L R L R L R
Fig. 19: This illustration shows how to connect an analog 5.3 setup.
Understanding and using this setup
Please see the description of the digital 5.3 setup re-
garding bass management, but make analog connec-
tions as explained in this section:
►
The left input of the left monitor receives the left
signal.
►
The right input of the left monitor receives the left
surround signal.
►
The left input of the center monitor receives the
center signal.
►
The right input of the center monitor receives the
LFE signal.
►
The left input of the right monitor receives the right
signal.
►
The right input of the right monitor receives the
right surround signal.
►
The AIR Remote or a computer running the AIR
Control software (both optional) can be connected
to any available TC LINK Out connection.
AIR setups
Dynaudio Professional AIR reference manual – 2014-09-28 38
6.1 setup – analog
L
L
LR
R
R
6.1 setup – analog
Master
Left
Master
Left
surround
Master
Center
System Ctrl.
L R C
LFE
LS RS CS
Slave
Right
surround
Sub
Subwoofer
Slave
Right
Master
Center
surround
Fig. 20: This illustration shows how to connect an analog 6.1 setup.
Understanding and using this setup
►
Audio signals are represented by solid lines.
►
TC link signals are represented by dashed lines.
►
The left monitor is set as the System Controller by
setting the TC Link button on the rear panel to the
“out” position.
►
The left monitor receives both the left and right
input signals.
►
The right monitor receives audio via the TC-LINK
RJ-45 connection from the left monitor.
►
The center monitor (C) receives both the center
and LFE channels.
►
The LFE monitor receives audio via the RJ-45
connection from the center monitor.
►
The left surround monitor (LS) receives both the
left and right surround channel signals.
►
The right surround monitor receives audio via the
TC-LINK RJ-45 connection from the left surround
monitor.
►
The center surround monitor receives only the
center surround signal.
►
Center Chain: Starting with AIR software version
1.10, it is possible to connect one or more Center
Chain monitors.
►
With no bass management, only the LFE signal is
fed to the subwoofer.
►
With bass management activated, low-frequency
information from the ve main channels is extract-
ed below the set crossover frequency and sent to
the subwoofer, where it is summed with the LFE
channel.
►
The AIR Remote or a computer running the AIR
Control software (both optional) can be connected
to any available TC LINK Out connection.
►
Channels must be connected as follows:
►
Left channel to the left input on the left monitor.

AIR setups
Dynaudio Professional AIR reference manual – 2014-09-28 39
►
Right channel to the right input on the left mon-
itor.
►
Center channel to the left input on the center
monitor.
►
LFE channel to the right input on the center
monitor.
►
Left surround channel to the left input on the left
surround monitor.
►
Right surround channel to the right input on the
left surround monitor.
AIR setups
Dynaudio Professional AIR reference manual – 2014-09-28 40
5.1 setup with Digital AES/EBU card
5.1 setup with Digital AES/EBU card
Slave
Left
Master
Left
surround
Master
Center
System Ctrl.
L + R C + LFELS + RS
Slave
Right
surround
Slave
Right
Sub
Subwoofer
Fig. 21: This illustration shows how to connect 5.1 digital setup with optional bass management.
Understanding and using this setup
This setup requires…
►
one Master monitor with the optional Digital AES/
EBU Input Card installed,
►
four Slave monitors (or Masters set as Slave) and
►
one subwoofer.
►
Audio signals are represented by solid lines.
►
TC link signals are represented by dashed lines.
►
The Center monitor is set as the System Controller
by setting the TC Link button on the rear panel to
the “out” position.
►
The Center monitor receives all six channels on its
three AES/EBU connections.
►
The monitor’s Digital IN connection receives the
Center and LFE signals.
►
The digital input No. 2 on the I/O card receives the
left signal and the right signal.
►
The digital input No. 3 on the I/O card receives the
left surround signal and the right surround signal.
►
The right, left, left surround and right surround
monitor and the subwoofer receive their signal
via TC LINK RJ-45 connections from the Center
Master monitor.
►
A clock signal must be sent over the AES connec-
tion feeding the Center/LFE channels (or via BNC).
►
With no bass management, only the LFE signal is
fed to the Sub.
►
With bass management activated, low-frequency
information is extracted from the ve main chan-
nels below the set crossover frequency and fed to
the subwoofer.
►
The AIR Remote or a computer running the AIR
Control software (both optional) can be connected
to any available TC LINK Out connection.
AIR setups
Dynaudio Professional AIR reference manual – 2014-09-28 41
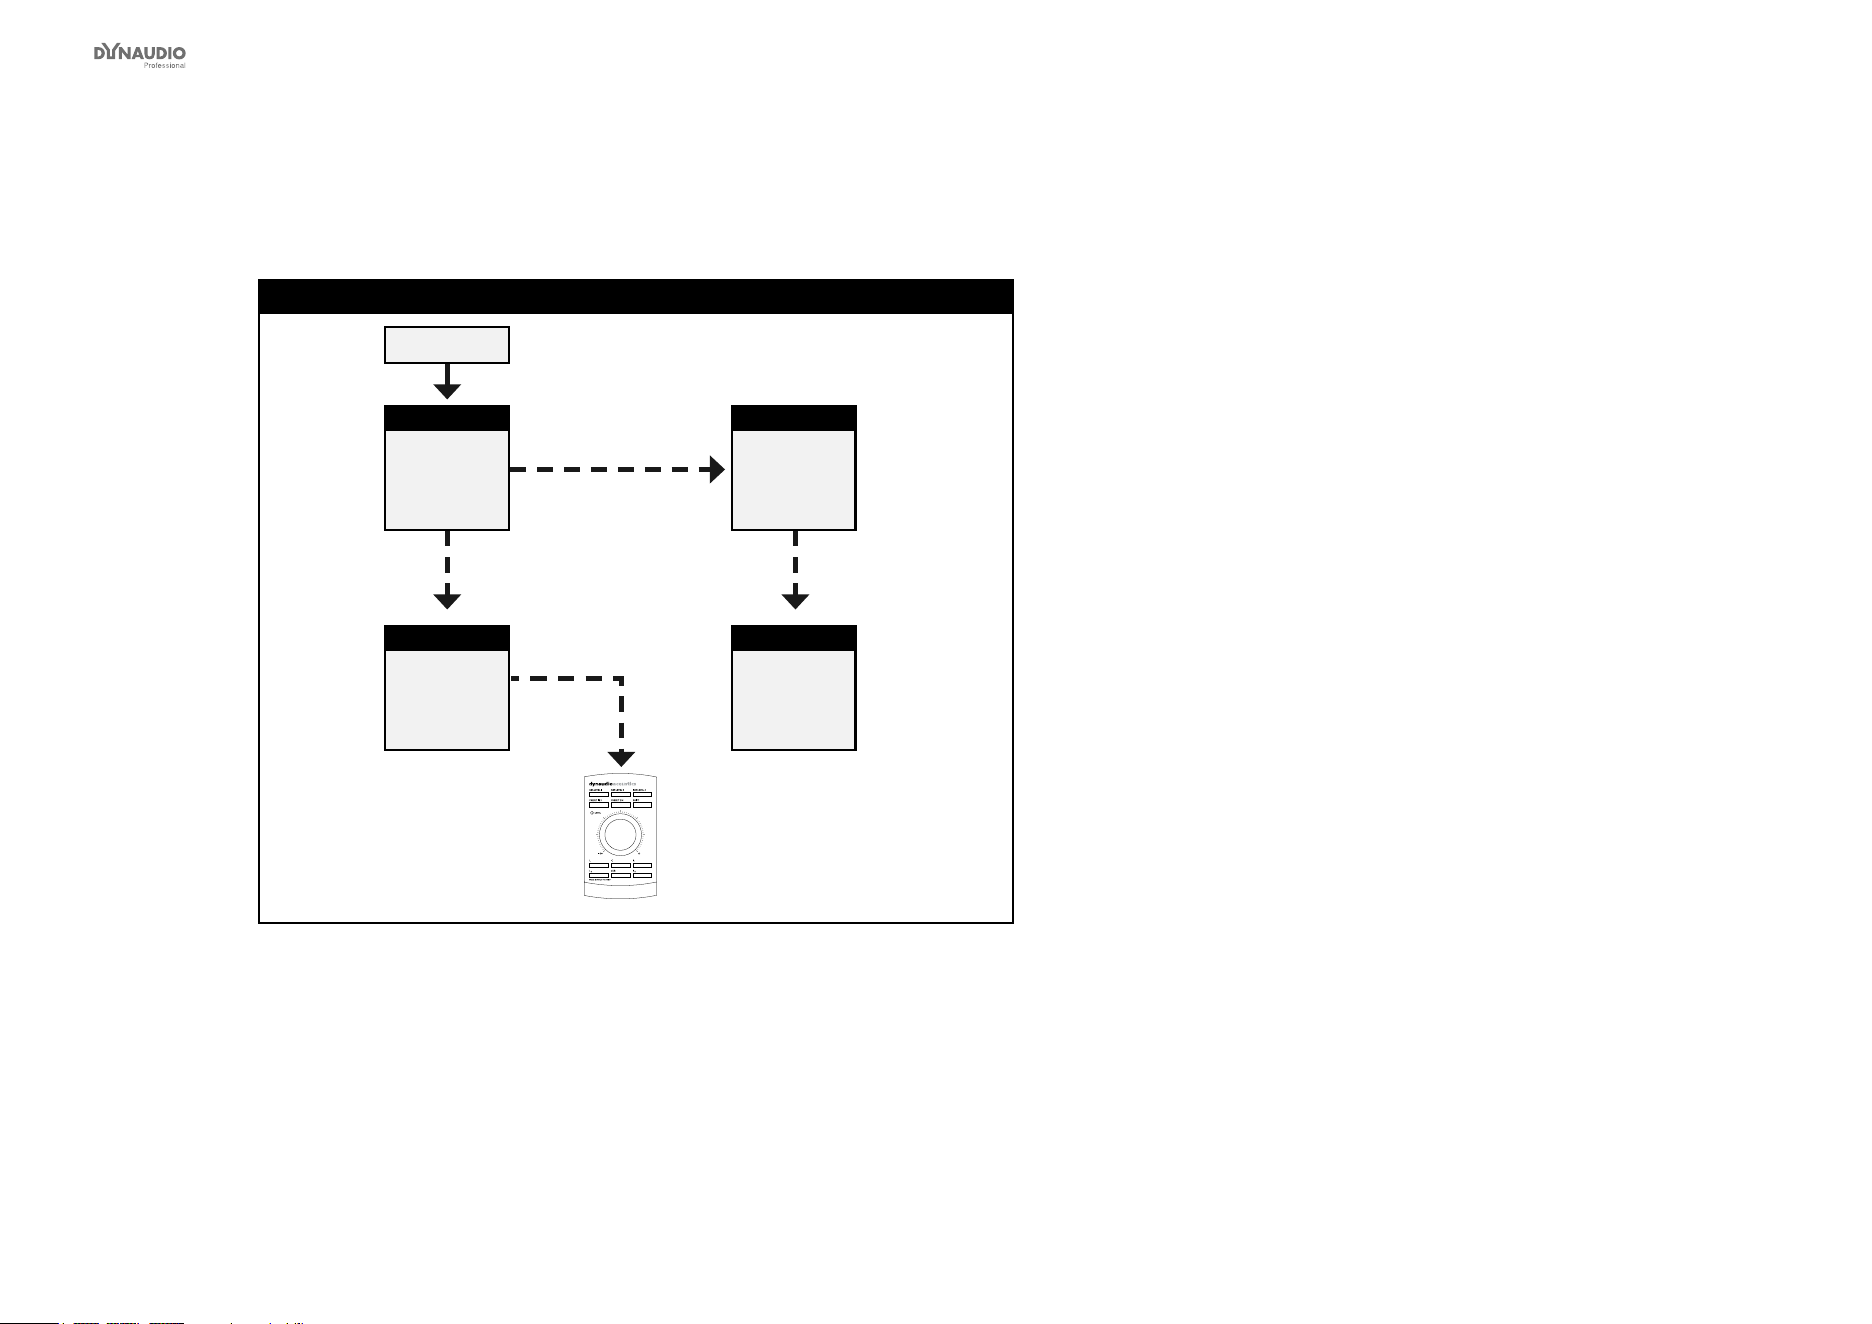
Stereo setup with chains on left and right
Stereo setup with chains – digital or analog
Master
Left
System Ctrl.
L + R AES or analog signal
Slave
Right
Sub
Right
Chain
Sub
Left
Chain
Fig. 22: This illustration shows how to connect a stereo setup with chains on Left and Right.
Understanding and using this setup
►
Audio signals are represented by solid lines.
►
TC link signals are represented by dashed lines.
The two chained monitors are fed with the same signal
as the two front monitors (left and right). This is the kind
of setup you would use when you want to alternate be-
tween a set of main and neareld monitors.
►
The left monitor is set as the System Controller by
setting the TC Link button on the rear panel to the
“out” position.
►
The left monitor receives both the left and right
input signals.
►
The right monitor receives audio via the TC-LINK
RJ-45 connection from the left monitor.
►
The AIR Remote or a computer running the AIR
Control software (both optional) can be connected
to any available TC LINK Out connection.
Other “Chained” Setups
Starting with software version 1.10, the available set-
ups with “chain” option are: 5.1, 6.1 and 5.3 for analog
and digital as well as 5.1/6 master (digital only).
The installed option card will limit the choices of setups
presented on the speakers. If the AES/EBU option card
is installed, the default digital input will become Input 1
on the option card.
AIR setups
Dynaudio Professional AIR reference manual – 2014-09-28 42
7.1 setup – analog or digital
7.1 setup – analog or digital
Master
Left
System Ctrl.
Master
Left
Back
Master
Left
surround
Slave
Right
surround
Master
Center
L + R C + LFE
L B. + R B.
L sur.
R sur.
Slave
Right
Back
Sub
Subwoofer
Slave
Right
Fig. 23: This illustration shows how to connect an analog or digital 7.1 setup
Understanding and using this setup
It is not possible to choose a 7.1 setup in the setup
menu. You need to choose either a 5.1 or 6.1 setup and
set up the Left surround and Right surround speakers
for “L Inner” and “R Inner” tasks respectively.
►
Audio signals are represented by solid lines.
►
TC link signals are represented by dashed lines.
Digital connections
►
The center monitor is set as the System Controller
by setting the TC Link button on the rear panel to
the “out” position.
►
The left monitor receives both the left and right
input signals. The right monitor is fed via the TC
LINK RJ-45 connection from left to right.
►
The center monitor receives both the Center and
LFE signals. The LFE monitor is fed via the TC
LINK RJ-45 connection from Center to LFE.
►
The left surround monitor receives both the left sur-
round and right surround signals.
►
The right surround monitor is fed via the TC LINK
RJ-45 connection from left surround to right sur-
round.
►
The left back monitor receives both the left back
and the right back signal. The right back monitor
is fed via the TC LINK RJ-45 connection from left
back to right back.
►
With bass management activated, low-frequency
information is extracted from the ve main chan-
nels and fed to the subwoofer, where it is summed
with the LFE channel. With bass management
activated, low-frequency information is not extract-
ed for the left and right inner monitors.
►
The AIR Remote or a computer running the AIR
Control software (both optional) can be connected
to any available TC LINK Out connection.

AIR setups
Dynaudio Professional AIR reference manual – 2014-09-28 43
Analog connections
►
The left input of the left monitor receives the left
signal.
►
The right input of the left monitor receives the left
surround signal.
►
The left input of the center monitor receives the
center signal.
►
The right input of the center monitor receives the
LFE signal.
►
The left input of the left surround monitor receives
the left surround signal.
►
The right input of the left surround monitor receives
the right surround signal.
►
The left input of the left inner monitor receives the
left inner signal.
►
The right input of the left inner monitor receives the
right inner signal.
AIR setups
Dynaudio Professional AIR reference manual – 2014-09-28 44
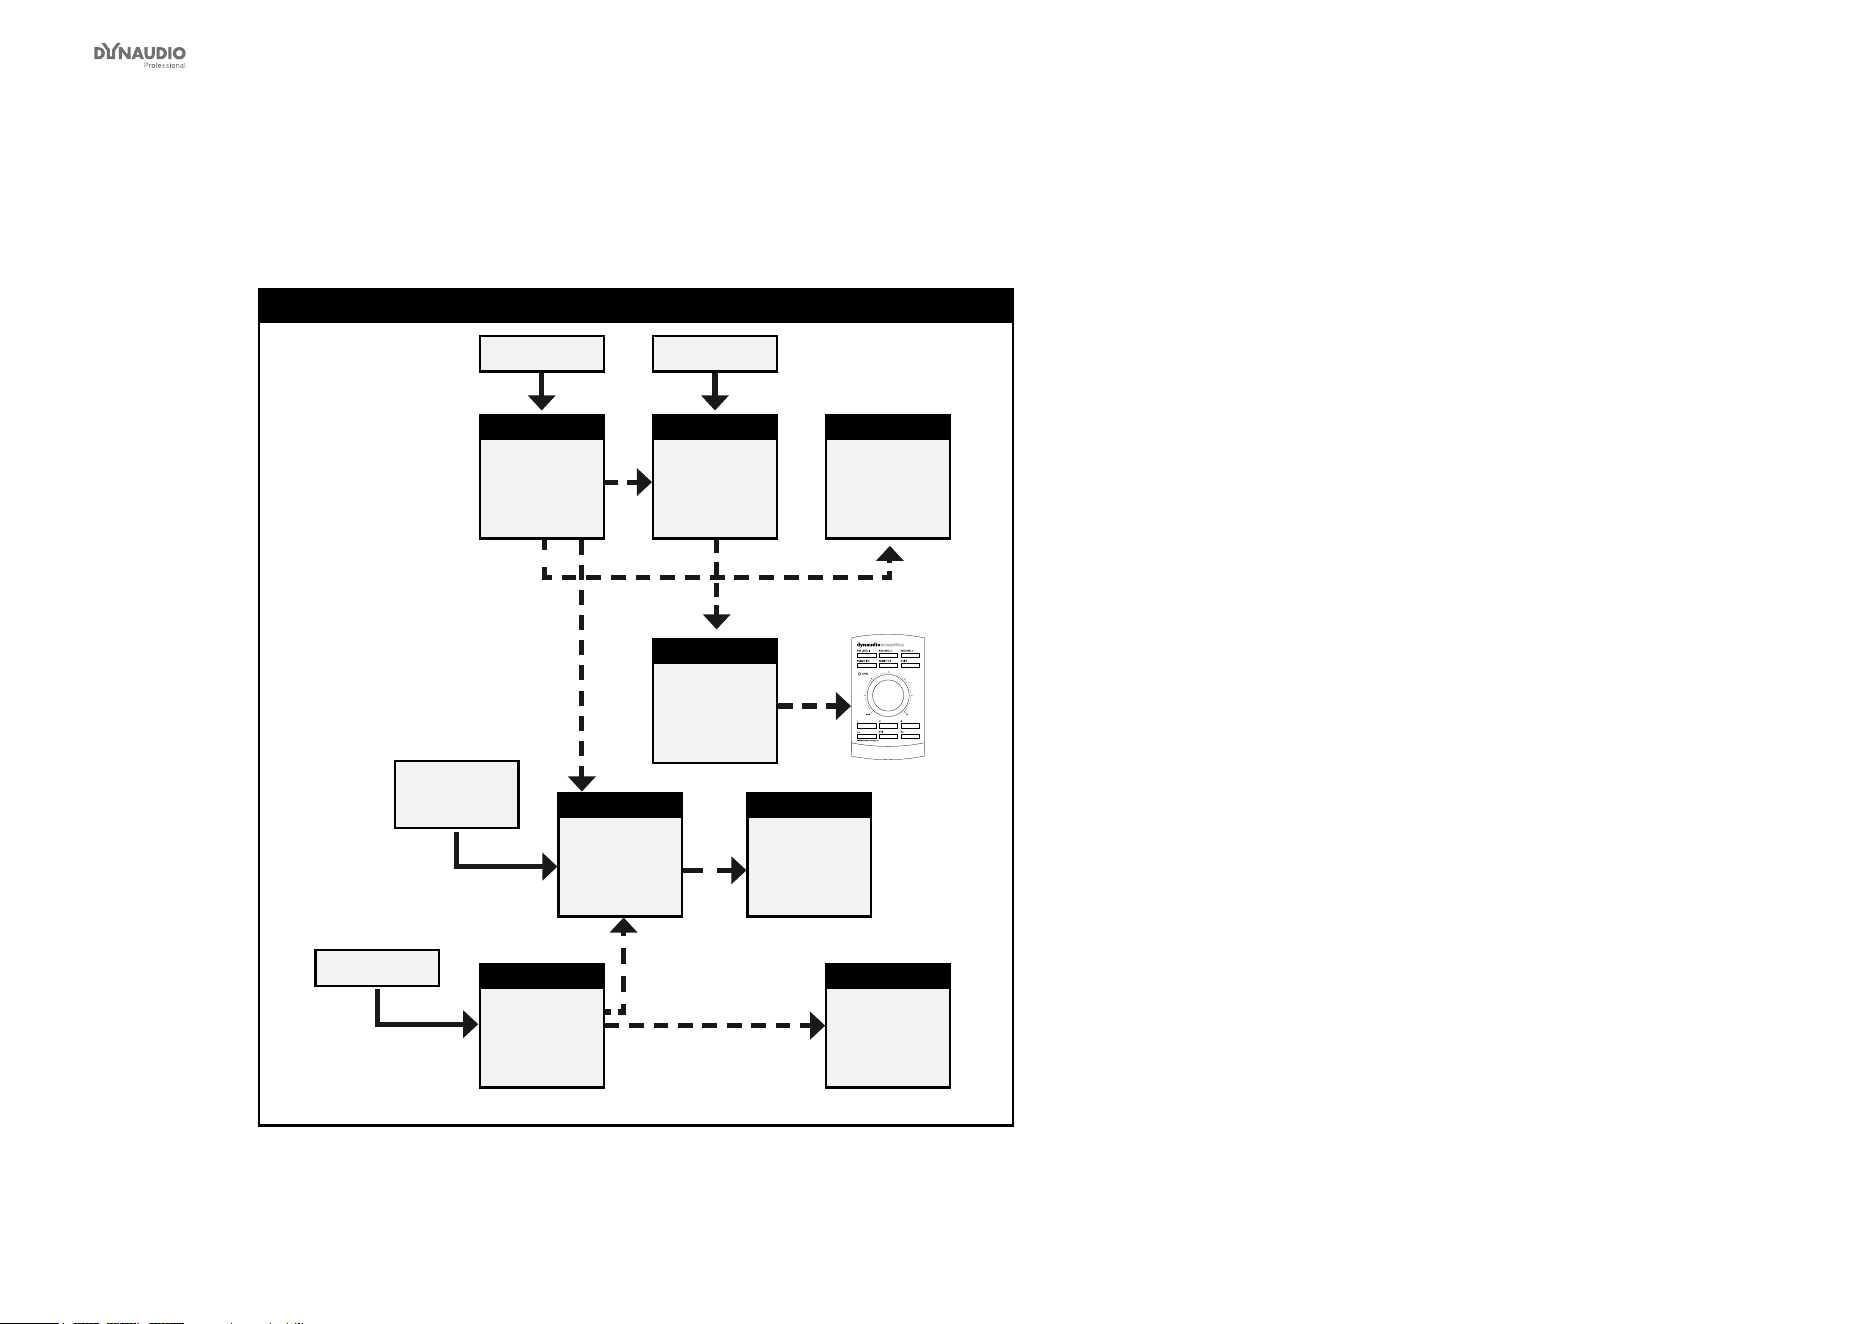
5.1 setup – digital – 192 kHz
5.1 setup – digital – 192 kHz
Master
L
System Ctrl.
Master
LS
Master
C
C + SubLF + RF
LS + RS
Slave
RS
Sub
Sub
Slave
R
Fig. 24: This illustration shows how to connect a digital 192 kHz 5.1 setup.
Understanding and using this setup
►
Audio signals are represented by solid lines.
►
TC link signals are represented by dashed lines.
This is a 5.1 digital setup at 192 kHz with optional bass
management.
This setup requires…
►
three Master monitors with the optional Digital I/O
card installed,
►
two Slave monitors and
►
one subwoofer.
►
The left monitor is set as the System Controller by
setting the TC Link button on the rear panel to the
“out” position.
►
The left monitor receives the left and right front
channel signals.
►
The center monitor receives the center channel
and the subwoofer signal.
►
The left rear monitor receives the left surround and
right surround channel signals.
►
The subwoofer receives its signal via the TC LINK
RJ-45 connection from the center Master monitor.
►
A clock signal must be sent over the AES connec-
tion feeding the Center/LFE channels (or via BNC).
►
With no bass management, only the LFE signal is
fed to the Sub.
►
With bass management activated, low-frequency
information is extracted from the ve main chan-
nels below the set crossover frequency and fed to
the subwoofer, where it is summed with the LFE
channel.
►
The AIR Remote or a computer running the AIR
Control software (both optional) can be connected
to any available TC LINK Out connection.
AIR setups
Dynaudio Professional AIR reference manual – 2014-09-28 45
6.1 setup – digital – 192 kHz
6.1 setup – digital – 192 kHz
Master
L
System Ctrl.
Master
LS
Master
CS
Master
C
C + SubLF + RF
LS + RS
CS
Slave
RS
Sub
Sub
Slave
R
Fig. 25: This illustration shows how to connect a digital 6.1 setup.
Understanding and using this setup
►
Audio signals are represented by solid lines.
►
TC link signals are represented by dashed lines.
This is a 6.1 digital setup with optional bass manage-
ment. This setup requires…
►
four Master monitors with the optional Digital I/O
card installed,
►
two Slave monitors (or Masters set as slaves) and
►
one subwoofer.
►
The left monitor is set as the System Controller by
setting the TC Link button on the rear panel to the
“out” position.
►
The left monitor receives the left and right front
channel signals.
►
The right monitor receives its signal via the TC
LINK cable.
►
The left surround monitor receives both the left and
right surround signals.
►
The center monitor receives the center channel
and the subwoofer signal.
►
The subwoofer receives its signal via the TC LINK
RJ-45 connection from the center Master monitor.
►
A clock signal must be sent over the AES connec-
tion feeding the Center/LFE channels (or via BNC).
►
With no bass management, only the LFE signal is
fed to the Sub.
►
With bass management activated, low-frequency
information is extracted from the six main chan-
nels below the set crossover frequency and fed to
the subwoofer, where it is summed with the LFE
channel.
►
The AIR Remote or a computer running the AIR
Control software (both optional) can be connected
to any available TC LINK Out connection.


Recalling and storing presets
Dynaudio Professional AIR reference manual – 2014-09-28 47
Recalling presets
►
From the home screen, press the ENTER key.
►
Press the DOWN key until “Recall preset” is dis-
played.
►
Press the ENTER key.
“*Current preset” and the name of the currently
active preset is displayed.
►
Press the UP and DOWN keys to browse presets.
When you have found a preset you want to recall,
press the ENTER key.
The selected preset is recalled (activated), and the
name of the selected preset is displayed.
►
Press the EXIT key repeatedly to return to the
home screen.
Storing presets
►
From the home screen, press the ENTER key.
►
Press the DOWN key until “Store preset” is dis-
played.
►
Press the ENTER key.
“*Select preset” and the number and name of a
preset is displayed.
►
Press the UP and DOWN keys to select a storage
location. Please note that the preset currently
stored at the selected location will be overwritten
once you perform the Store operation.
►
When you have found a storage location for your
preset, press the ENTER key.
The number of the selected Preset slot and the
preset name “User” is displayed.
►
Press the EXIT key repeatedly to return to the
home screen.
For a complete list of presets, see ”Presets” on page
85.
Parameter storage
To use your AIR system and the preset recall feature ef-
ciently, it is important to understand what parameters
are stored with a preset.
Global Parameters
These parameters apply to your entire AIR system.
Global parameters that are stored with presets
►
Bass management
►
Mute status
►
Selected setup
Global parameters that are NOT stored with presets
►
Ref. Levels
►
Analog Input Sensitivity
►
BNC Sync
Local Parameters
These parameters apply to individual monitors.
Local parameters that are stored with presets
►
X-Curve
►
Parametric EQ setting (set via AIR PC-IP)
►
LFE Gain (for subwoofers)
►
LFE Low Pass (for subwoofers)
►
Rel. Level
Local parameters that are NOT stored with presets
►
Bass and Treble
►
Delay
►
Lock status
►
Room position
►
Calibration Level
►
Tasks
►
Phase (for subwoofers)
►
Polarity (for subwoofers)


Placing the monitors
Dynaudio Professional AIR reference manual – 2014-09-28 49
This section of the manual is a guide to optimizing your
listening facilities to ensure optimal performance of
your AIR monitor system.
To ensure optimum results, it is essential that you have
connected all monitors in your AIR System properly.
Please refer to “AIR setups” on page 29.
For additional information on optimizing setups, in-
depth explanations and background information of vari-
ous acoustic phenomena, see “Appendix: Acoustics” on
page 106.
Overview
AngleDistance from listener
Left front-30°Minimum 1 m
Right front+30°Minimum 1 m
Centre0°Same distance as L or R front
1)
Left surround-110° ±10°Same distance as L or R front
2)
Right surround-110° ±10°Same distance as L or R front
2)
Notes:
1.) If you want to fulll the requirements of the ITU 775
standard, you should use one of the two approach-
es for position the center front monitor, along with a
Delay on the center monitor in order to achieve the
same time of arrival from all monitors.
2.) The delay time for each monitor can be adjusted
using the AIR Control software.
Placing the monitors
Dynaudio Professional AIR reference manual – 2014-09-28 50
General considerations:
symmetry
Basically it is preferred to establish a loudspeaker
layout that provides an adequate and equal left/right
image. The basis for this is symmetry – meaning that
the distance to the left and the right monitor should be
identical and that (unless you are monitoring in the near
eld) the distance from the left and right monitor to the
respective sidewall should be identical, and the side-
walls should be identical.
The AIR System offer tools for compensation – but
whenever possible, symmetry should be established.
Monitor
Listening
position
Monitor
Fig. 26: Asymmetric position (should be avoided):
Distances to left and right wall not identical
Monitor
Listening
position
Monitor
Fig. 27: Asymmetric position (should be avoided):
Distance to speakers not identical
Monitor
Listening
position
Monitor
Fig. 28: Symmetric position (recommended)
Placing the monitors
Dynaudio Professional AIR reference manual – 2014-09-28 51
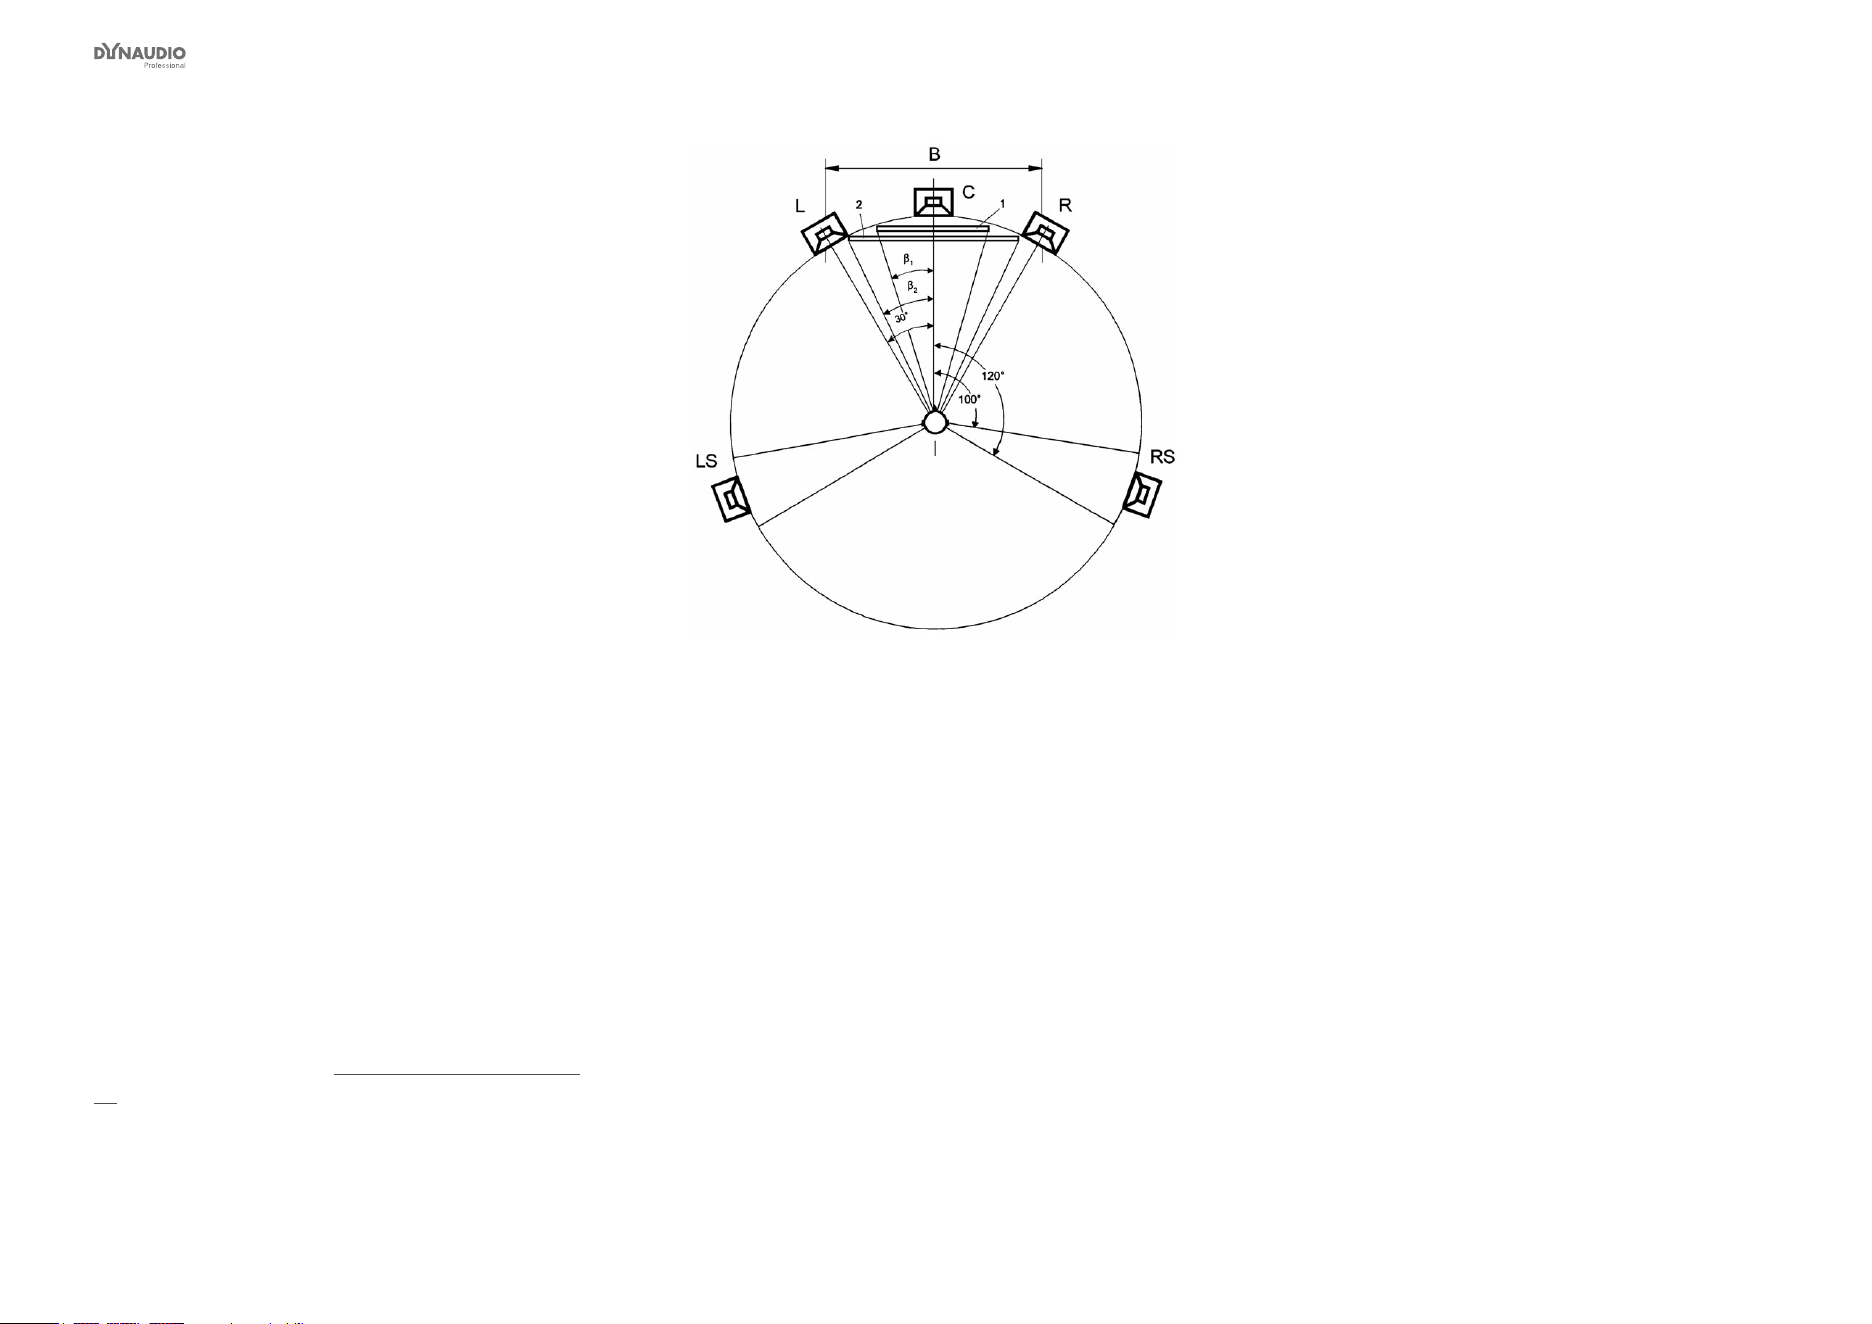
Front monitors,
left and right
For proper stereo monitoring, the monitors should be
placed at an angle of ±30º in front of the listening po-
sition. This goes both for a basic stereo setup and for
the left and right front monitors in a four or ve channel
setup.
Center front monitor
The center front loudspeaker can be placed either
►
in the middle and in the same distance from the
listening position as the left and right front monitors
or
►
in the middle and on a straight line between the
left and right front monitors.
Surround monitors,
left and right
The surround monitors should be placed at an angle of
±110° (±10°) and at the same distance to the listening
position as the left and right front monitors.
For more information, see “Monitor positions” on page
52.
Fig. 29: ITU 775

Placing the monitors
Dynaudio Professional AIR reference manual – 2014-09-28 52
Monitor positions
Monitor placement and acoustics have a signicant in-
uence on monitor sound. AIR series provides powerful
tools to compensate for various, less than ideal place-
ments. Below, you will nd a description of the most
common monitor placements and appropriate compen-
sation. Using material from the Dynaudio Profession-
al AIR test tone sets together with the AIR placement
compensation settings will allow you to nd a perfect
balance between the AIR monitors and the acoustics
the studio.
In general, we recommended consulting an acoustics
expert for measurement and advanced adjustment and
alignment. AIR Control software provides comprehen-
sive features for EQ and Delay adjustments. For instal-
lations where ush mounting is considered, be sure to
consult an expert.
Below nd a list of compensation options based on the
Room position settings in the Calibration submenu of
the Setup menu.
For more information on navigating to the Calibration
submenu and setting parameters, see “Setup menu ►
Monitor calibration” on page 26.
Monitor position Free standing (“Neutral”)
The monitor is placed on a stand or hung from the ceil-
ing some distance away from walls and other surfaces.
This position requires the “Neutral” setting (which is
the default in the Calibration menu). Try to place the
monitor optimally with regard to reections and stand-
ing waves.
A monitor setup this way should be your reference –
you can always try to compare performance of an op-
timally placed freestanding AIR monitor (“Neutral” in
calibration menu) with any other monitor placed in an-
other position (Wall, Corner, Console) to determine if
compensation in these positions is needed.
Monitor position Close to wall (“Wall”)
When a monitor is placed close to a wall, bass re-
sponse needs to be decreased. The “Wall” setting in
the Calibration submenu of the Setup menu takes this
and other aspects into account. Try to compare this set-
ting with “Neutral” to determine which works better in
your studio.
If the opposite wall is parallel to the wall where the mon-
itor is placed, be aware that low frequency cancella-
tion might occur. You should also look out for standing
waves which might occur due to an uneven distribution
of low frequencies.
Monitor position Corner
Here, the same considerations as in the “Wall” position
apply – but in a corner position, bass response needs
to be decreased even more.
Try the “Corner” setting found in the Calibration sub-
menu of the Setup menu and then evaluate perfor-
mance in comparison to a freestanding monitor in “Neu-
tral” position. Use the Bass and Treble lters for ne
adjustment.
Monitor position On the bridge / “Console”
Placing a monitor on a meter bridge of a console will re-
sult in a strong single reection from the desk’s surface,
which may color the sound. This comb ltering effect
sounds similar to signal modulation. In general it helps
to minimize the distance between the monitor and the
reective surface.
Although it is not possible to fully eliminate comb lter-
ing using an equalizer, try to select the “Console” set-
ting in the Calibration submenu of the Setup menu and
evaluate performance in your studio.
Other positions/congurations
In the Calibration submenu of the Setup menu, you will
nd additional settings which take combinations of the
above into account – e.g. “Console Wall”, which should
be used if the monitor is placed both close to a wall and
has a console reection.


Checking and optimizing monitor placement
Dynaudio Professional AIR reference manual – 2014-09-28 54
Overview
1. In the Setup menu, select the setup type (e.g.
“5.1” or “Stereo”) matching your application.
2. Check the phase using the Dynaudio Profes-
sional AIR test tone sets available at www.dy-
naudioprofessional.com.
3. Check the monitor positions.
4. Equalize each monitor as required using the
Bass and Treble parameters.
5. In the Setup menu of the System controller, nav-
igate to the Calibration submenu.
Assigning monitor
positions
►
Select the correct position for each monitor – see
“Placing the monitors” on page 48.
Room positions can be selected via the Calibration
submenu of the Setup menu – see “Setup menu ►
Monitor calibration” on page 26.
►
Set the volume of every monitor to -10 dB.
Phase checking
The rst procedure you should carry out is checking
signal phase.
A number of signals both for two-channel stereo and
for multichannel reproduction are part of the Dynaudio
Professional AIR test tone sets.
Phase checking – two-channel Stereo:
Use tracks 45 to 49 for Stereo phase checking. Left and
right signals are presented in phase and subsequently
out of phase.
Phase checking – Multichannel:
Use tracks 45 to 64 for multichannel phase checking.
These are DTS-encoded signals that can be compared
pairwise: Left/Right, Left/Center, Left/Left Surround,
Right/Right Surround.
If you do not have a DTS decoder, you may route the
stereo L/R signals to other channels using your mixing
console.
If you already have a phase checking measurement
system that can be used as well.
Checking by ear when listening to the signals
In phase:
You will hear more bass and the sound will appear to
come from a xed point between the monitors.
Out of phase:
You will hear the sound image lose bass, the sound
image will be diffuse, and the directional information will
be blurred.

Checking and optimizing monitor placement
Dynaudio Professional AIR reference manual – 2014-09-28 55
Checking monitor
placement
When checking the placement of your monitors, you
rst have to focus on the low frequencies. The signals
to be used are the low-frequency sweeps (tracks 31 to
39 from the Dynaudio Professional AIR test tone sets).
Low-frequency sweeps
The tracks 31 to 38 contains the following sweep se-
quences:
►
Track 31: 200 to 20 Hz
►
Track 32: 160 to 20 Hz
►
Track 33: 125 to 20 Hz
►
Track 34: 100 to 20 Hz
►
Track 35: 80 to 20 Hz
►
Track 36: 63 to 20 Hz
►
Track 37: 50 to 20 Hz
►
Track 38: 40 to 20 Hz
During the sweeps you will hear short “bleeps” indicat-
ing when the signal passes one of the ISO center fre-
quencies (see tables in the Appendix).
There are two “bleeps” every time the frequency pass-
es a whole octave center frequency and one “bleep”
every time the in-between 1/3-octave center frequen-
cies are passed.
Play all the low-frequency sweep tracks using only one
monitor at a time.
Evaluation
From your listening position, you should hear the sig-
nal smooth and even throughout all frequency sweeps
(bearing in mind that the frequency response of the ear
is not at).
If you have a sound level meter, it should be set to
“LIN” with no frequency weighting. If the meter does not
have a LIN position, you can use the C-weighting, al-
though the response is attenuated approximately 3 dB
at 31.5 Hz and approximately 6 dB at 20 Hz.
In the Appendix, you can nd instructions on how you
can alternatively use a studio microphone if you do not
have a sound level meter.
If the results are OK, proceed to “Calibrating the main
monitors” on page 57.
If the results are not OK, you must reposition the mon-
itors.
You have to dene at what frequency the response
becomes bad. Once you have located the problematic
frequency, you need to set a higher frequency as the
cross-over frequency between the main monitors and
a subwoofer.
If it is not possible for you to nd good positions for the
main monitors and/or for the subwoofer(s), you should
consider changing the acoustics of the room.
Equalization is a common tool for obtaining a smoother
frequency response for steady-state signals (such as
the sweeps). But remember that equalizing can never
repair bad acoustics.

Checking and optimizing monitor placement
Dynaudio Professional AIR reference manual – 2014-09-28 56
Equalizing the monitors
The AIR System menu offers a two-band shelving type
equalizer. This equalizer can be congured individually
for each monitor, and it is implemented for ne-adjust-
ments of the tonal balance.
For information on navigating to the Calibration sub-
menu and setting parameters, see “Setup menu ►
Monitor calibration” on page 26.
Range ±6 dB
Adjustment step 0.5 dB
Equalizer Band I (Bass) 100 Hz to 1 kHz
Equalizer Band II (Treble) 1 kHz to 5 kHz
Filter type Shelving
Notes considering equalization
You should be very careful using the equalizer if you
are making adjustments by ear. In a room with good
acoustics, equalization should not be necessary at all.
As a test signal you can use full bandwidth pink noise
(tracks 2 or 13) from the Dynaudio Professional AIR
test tone sets.
In a room that you feel is heavily overdamped at higher
frequencies, you may wish to add some level in the high
end in order to get the right balance.
In a highly reective room, you may wish to attenuate
the high frequencies.
If you have made a good job placing the monitor in a
proper position you should not have to touch the low
frequency band.
Once you have made adjustments using the equaliz-
er, you should leave the room and come back about
15 minutes later, bringing some music that you know
well. Play this music. Your rst impression at this point
is very important for the assessment of the tonal bal-
ance of the monitor system. Listening for a long time
will change your perception of timbre. This effect is sim-
ilar to the “white balance” your brain performs for what
you are seeing. After a short time, you are getting used
to a new tonal balance or timbre. What sounds “cool” or
“fat” then is not necessarily sounding right for monitor-
ing purposes.
Please note that additional equalizing can be done us-
ing the AIR Control software. It includes a four-band
parametric EQ that will allow for more precise EQ ad-
justment of each monitor.
Proceed with “Calibrating the main monitors” on page
57.

Checking and optimizing monitor placement
Dynaudio Professional AIR reference manual – 2014-09-28 57
Calibrating the
main monitors
Calibration is required to ensure that all monitors pro-
duce the same sound pressure level in the listening po-
sition when fed with the same signal.
The level of the input signal can be locked to a specic
sound pressure produced by the monitors.
Inter-channel calibration
►
Navigate to the Calibration submenu as described
under “Setup menu ► Monitor calibration” on page
26.
►
Select the “Master L Front” monitor.
►
Select the “Calib” (Calibration level) parameter and
press ENTER.
►
Set Calib to 0.0 dB.
►
Play tracks 11/23 (two channel stereo) or track 11
(multi channel DTS) from the Dynaudio Profession-
al AIR test tone sets. These tracks contain ltered
Pink Noise (500 Hz to 2 kHz).
►
Continue to the next channel and set “Calib” to
the same level as the rst monitor. If you are using
a multichannel setup, continue to the remaining
monitors.
Acoustic level calibration
In some parts of the audio industry, the monitoring sys-
tem has to be related to absolute acoustic levels.
In the Dynaudio Professional AIR test tone sets, the
tracks mentioned above are recorded at -20 dBFS. This
level correspond to different acoustic levels depending
on the kind of business you are in:
FilmVideoMusic
83 dB(C)78 dB(C)78 to 93 dB(C)
►
Select the rst monitor (L).
►
Play the track from the Dynaudio Professional AIR
test tone sets related to this monitor.
►
Set Calib to 0.0 dB.
►
Adjust the global volume until the desired
C-weighted level is obtained on a sound level me-
ter in the listening position.
►
Proceed to the next monitor.
►
Adjust Calib until the same C-weighted level is
obtained from this monitor.
►
Repeat this procedure until all monitors are cali-
brated.
►
Exit Calibration.
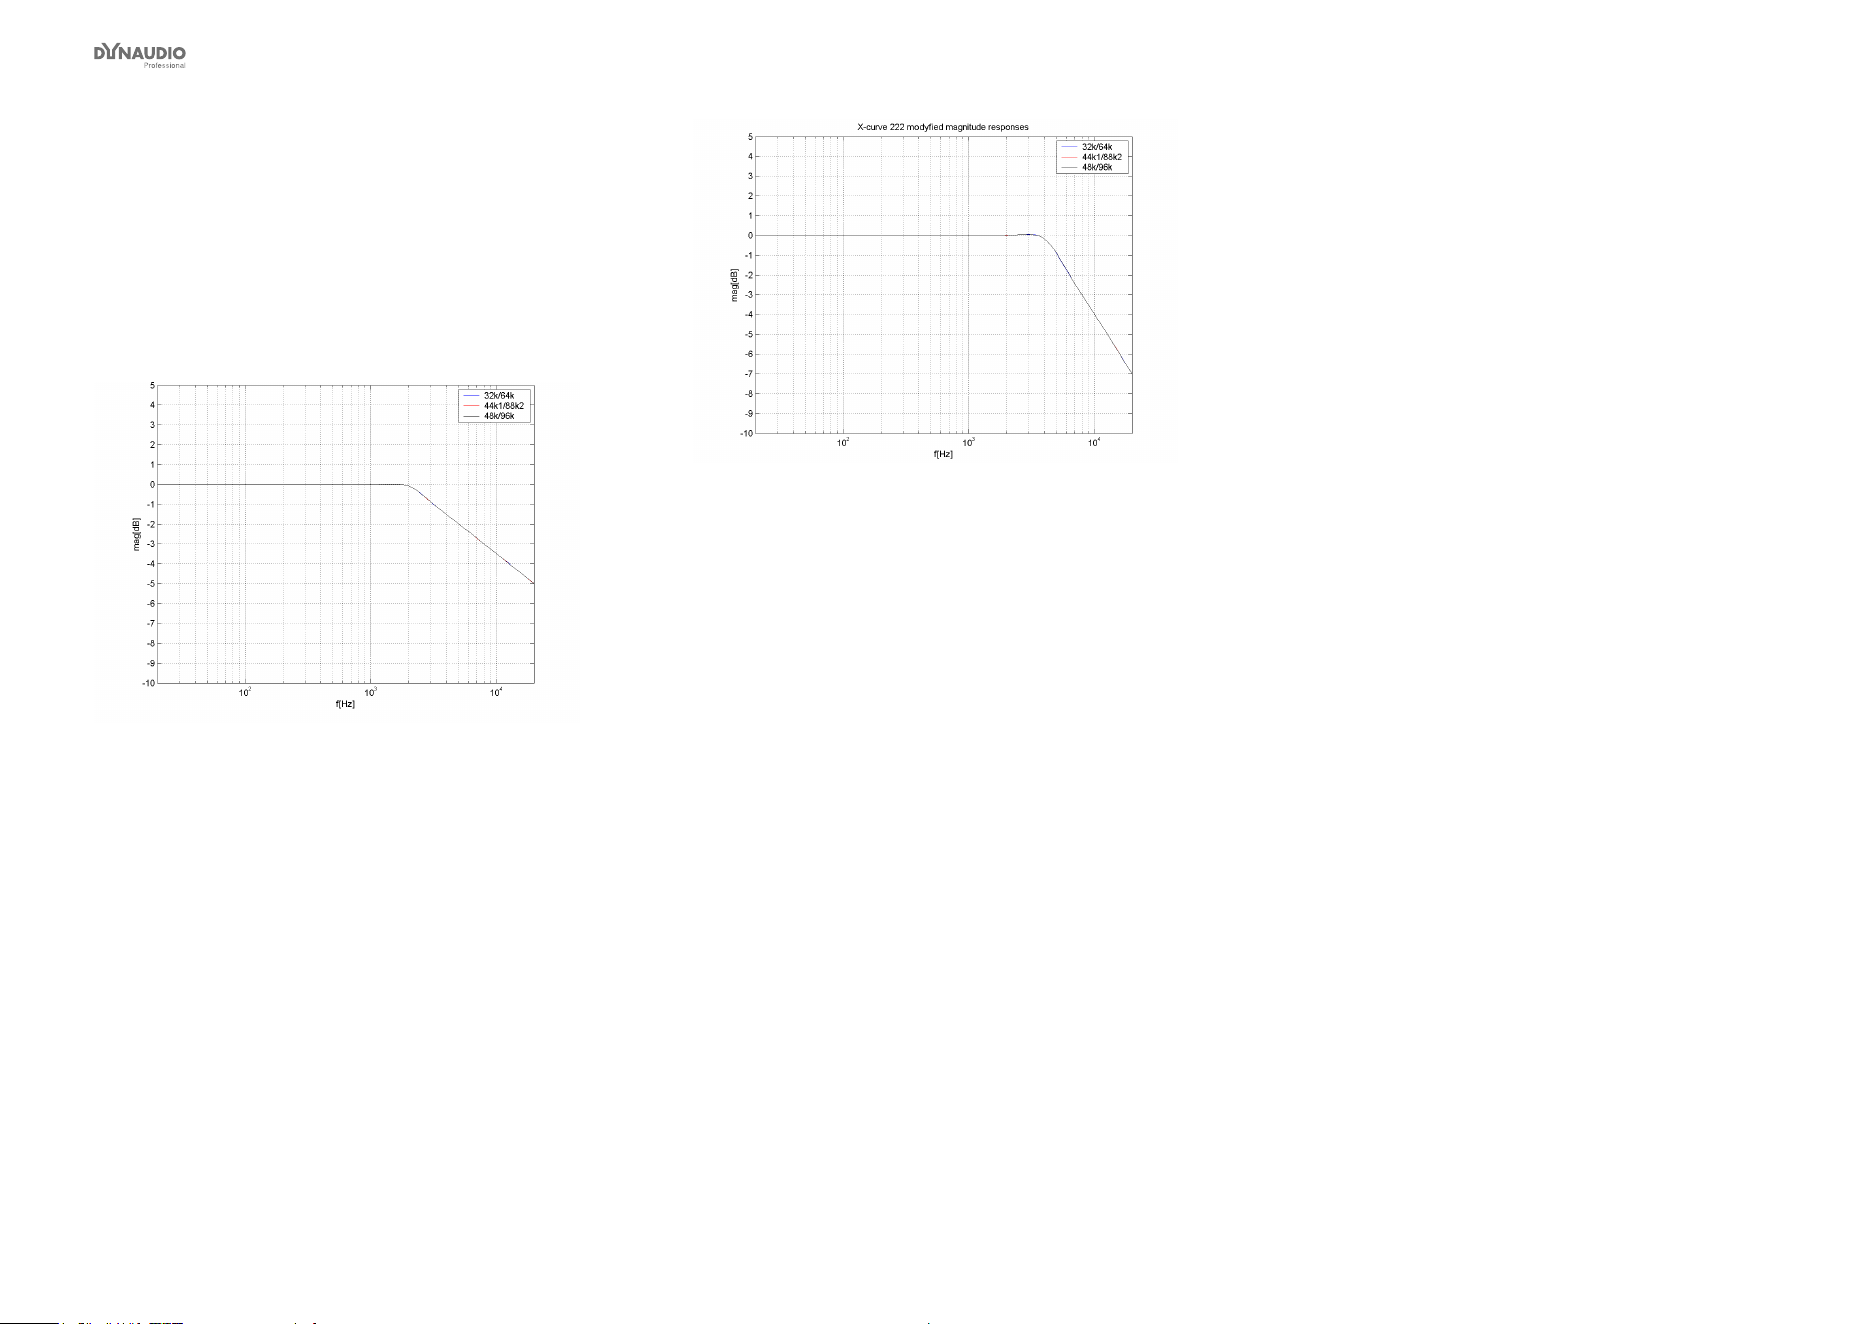
Checking and optimizing monitor placement
Dynaudio Professional AIR reference manual – 2014-09-28 58
X-Curves
For small rooms (dened as less than 5300 cubic feet
or 150 cubic meters), ANSI/SMPTE 222M calls for a
modication of the X-curve with at natural response to
2 kHz and then a 1.5 dB per octave roll off above 2 kHz.
This curve is useful when mixing in a small room and be
playing back in a large room.
Fig. 30: X-Curve 1
Another variation is to begin the high-end roll-off at
4 kHz and roll off 3 dB per octave instead of 1.5 per
octave.
Fig. 31: X-Curve 2 – modied magnitude response

Checking and optimizing monitor placement
Dynaudio Professional AIR reference manual – 2014-09-28 59
Placing the subwoofer
Overview
DisadvantagesAdvantagesPlacement on the oor
Excitation of most standing waves in the room,
hence very uneven sound distribution
Gain of bass responseIn the corner
Excitation of several standing waves in the
room, hence very uneven sound distribution
Gain of bass responseAdjacent to wall
It may take up space on the oorPosition can be optimized with regard to stand-
ing waves
Free standing
Subwoofer placement on the oor
Under normal conditions, the subwoofer is placed di-
rectly on the oor. This is taken into account in the basic
design and the basic settings of the AIR system.
Subwoofer placement in the corner
This is a π/2 radiation, which yields a gain of 18 dB in
the frequency range where the monitor is considered to
be omnidirectional.
Most standing waves have their maximum in the cor-
ners of the room.
The placement of the subwoofer in the corner may
cause uneven sound distribution of the bass – espe-
cially if the room has a cubic or shoe-box shape (i.e., if
all opposing walls are in parallel).
The corner position is only preferable if the opposing
surfaces in the room are not in parallel.
Subwoofer placement adjacent to a wall
This is a π radiation, which yields a gain of 12 dB in the
frequency range where the monitor is considered to be
omnidirectional.
This position adjacent to a wall is commonly used
and can lead to good results. However, the subwoof-
er should not be placed in the middle or in the quarter
points between two side walls if these are in parallel.
Free standing subwoofer
This is a π radiation, which yields a gain of 6 dB in the
frequency range where the monitor is considered to be
omnidirectional.
The free standing position is highly recommended for
all cubic and shoe-box shaped rooms.
In any case, avoid placing the woofer on the half or
quarter lines between walls.
Checking and optimizing monitor placement
Dynaudio Professional AIR reference manual – 2014-09-28 60
Checking subwoofer
placement
Fig. 32: Avoid placing the subwoofer on these lines
quarter or halfway between walls.
►
From the home screen, press the ENTER key.
“Bass Management” is displayed.
►
Press the ENTER key again.
“Select Mode” is displayed.
►
Press the DOWN key until “SC 120 Hz” is dis-
played.
►
Check the monitor position using low-frequency
sweeps as described below.
Low-frequency sweeps
The tracks 31 to 38 contains the following sweep se-
quences:
►
Track 31: 200 to 20 Hz
►
Track 32: 160 to 20 Hz
►
Track 33: 125 to 20 Hz
►
Track 34: 100 to 20 Hz
►
Track 35: 80 to 20 Hz
►
Track 36: 63 to 20 Hz
►
Track 37: 50 to 20 Hz
►
Track 38: 40 to 20 Hz
During the sweeps you will hear short “bleeps” indicat-
ing when the signal passes one of the ISO center fre-
quencies (see tables in the Appendix).
There are two “bleeps” every time the frequency pass-
es a whole octave center frequency and one “bleep”
every time the in-between 1/3-octave center frequen-
cies are passed.
Play all the low-frequency sweep tracks using only the
subwoofer. Mute all other monitors.
Evaluation
From your listening position, you should hear the sig-
nal smooth and even throughout all frequency sweeps
(bearing in mind that the frequency response of the ear
is not at).
If you have a sound level meter, it should be set to
“LIN” with no frequency weighting. If the meter does not
have a LIN position, you can use the C-weighting, al-
though the response is attenuated approximately 3 dB
at 31.5 Hz and approximately 6 dB at 20 Hz.
In the Appendix, you can nd instructions on how you
can alternatively use a studio microphone if you do not
have a sound level meter.
If the results are OK, proceed to “Calibrating the sub-
woofers with the main monitors” on page 61.
If the results are not OK, you must reposition the mon-
itors.

Checking and optimizing monitor placement
Dynaudio Professional AIR reference manual – 2014-09-28 61
Calibrating the
subwoofers with the
main monitors
About bass management
Bass management is a very important and useful tool
– and it is in general an absolute necessity if you want
to work with a ve channel setup in a small room. For
more information, see “Bass management” on page
117.
Calibration – overview
►
From the home screen, set the volume to -30 dB.
►
Press the ENTER key.
“Bass Management” is displayed.
►
Press the ENTER key again.
“Select Mode” is displayed.
►
Press the UP and DOWN keys until “80 Hz” is
displayed.
►
Navigate to the Calibration submenu – see “Setup
menu ► Monitor calibration” on page 26.
►
Run tracks 40 to 42 from the Dynaudio Profes-
sional AIR test tone sets (low frequency sweeps).
►
If required, adjust level or crossover frequency
settings.
Calibration
Start by setting the volume on the home screen to a
reasonable level – for example, -30 dB.
Set a crossover frequency for bass management – see
“Conguring bass management” on page 21. If you
have no other preferences, we suggest using the 80 Hz
setting.
If measurements or listening to the main monitors in-
dicate uneven level distribution or uneven frequency
response at frequencies above 80 Hz, select a higher
crossover frequency.
Checking the crossover frequency
►
In order to conrm the selected crossover frequen-
cy, use the test Dynaudio Professional AIR test
tone sets . To make sure that you are listening to
one monitor at a time, select one of the main chan-
nels in the Calibrate monitor submenu of the Setup
menu. For a start, select Master Left.
►
Play back the test tone tracks containing the low
frequency sweeps. Listen to the response or
perform sound level measurements if you have a
meter connected.
►
If you have a spectrum analyzer, you can play
the test tone tracks containing full bandwidth pink
noise instead.
►
Any uneven frequency response across the cross-
over frequency should be avoided.
►
Adjust the crossover frequency in the bass man-
agement setup, if necessary.
►
After adjusting one channel, the other channels
should be monitored one by one. Finally, monitor
all channels together.
►
Your system is now calibrated.
There are four other parameters that you should con-
sider with regards to the subwoofer. These parameters
are only available in the Calibrate monitor submenu for
subwoofers.
LFE Low Pass Filter (subwoofer parameter)
Settings: On /Off
When you set LFE Low Pass Filter to On, a very steep
(7th order) low pass lter is activated at 120 Hz. This
will lter out all content above 120 Hz. Use this lter
when no media encoder is in use. Switch it off when
your signal has passed through a media encoder/de-
coder. Most media encoders such as DTS and Dolby
employ an anti-aliasing lowpass lter. Therefore, in a
production environment it is important to use this lter
when monitoring the LFE channel to learn how the sig-
nal will sound after encoding/decoding (i.e., in a domes-
tic or cinema environment).
LFE Gain (subwoofer parameter)
Range: 0 to +14 dB
Use the LFE Gain parameter to boost the LFE channel
by up to 18 dB.
Polarity (subwoofer parameter)
Range: 0 or 180º
If the Subwoofer is placed correctly, setting the Polarity
parameter to 180º should result in a full phase cancel-
lation at the set crossover frequency. If this is not the
case , the Phase parameter described below should be
adjusted.

Checking and optimizing monitor placement
Dynaudio Professional AIR reference manual – 2014-09-28 62
Phase parameter (subwoofer parameter)
Range: 0 to 180º
The integration of the AIR BASE subwoofer with the AIR
monitors requires on location tuning. Apart from level
calibration and choosing a Bass management cross-
over frequency, the issue of phase alignment remains.
For this purpose, AIR BASE subwoofer have a 0° to
180° phase adjustment (in 5 degree steps) and a Polar-
ity parameter. The optimum setting of these will depend
on several factors:
►
Room acoustics
►
Placement of monitors and listening position
►
Set crossover frequency
►
AIR Monitor type (6 or 15)
Phase settings are automatically saved and linked to
the currently selected crossover frequency.
Phase settings are Global settings and are not saved
with individual presets.
Phase – initial setting
During calibration of the AIR BASE’s DSP software, we
have come up with default settings that we found op-
timal in our listening room. If you are placing the AIR
BASE subwoofer at the same distance from your lis-
tening position as the AIR Monitors, the default phase
settings can be used as initial guidelines for setting the
phase. If the distances are signicantly different, these
values are not likely to be optimal.
Phase adjustment
►
Play a low-frequency sweep signal that sweeps
over the crossover frequency that you have cho-
sen. Tracks 31 to 42 from the Dynaudio Profes-
sional AIR test tone sets may be used. Repeat as
necessary.
►
Between each sweep, change the Polarity setting.
Note the difference.
Ideally (i.e., with the right level calibration and phase
setting), the sound should cancel out and virtually dis-
appear at or near the crossover frequency when the
Polarity parameter is set to “180°”.
Tune the Phase parameter to get the largest possi-
ble difference between the two Polarity settings. Then
leave it in the position where no cancellation occurs.
Iteration
You may need to iterate quite a bit, maybe readjust the
level calibration a bit as well. You may even want to
reconsider your initial choice of crossover frequency
and/or monitor placement and start the process over
again. Be patient – the time spent getting this right is
well spent!

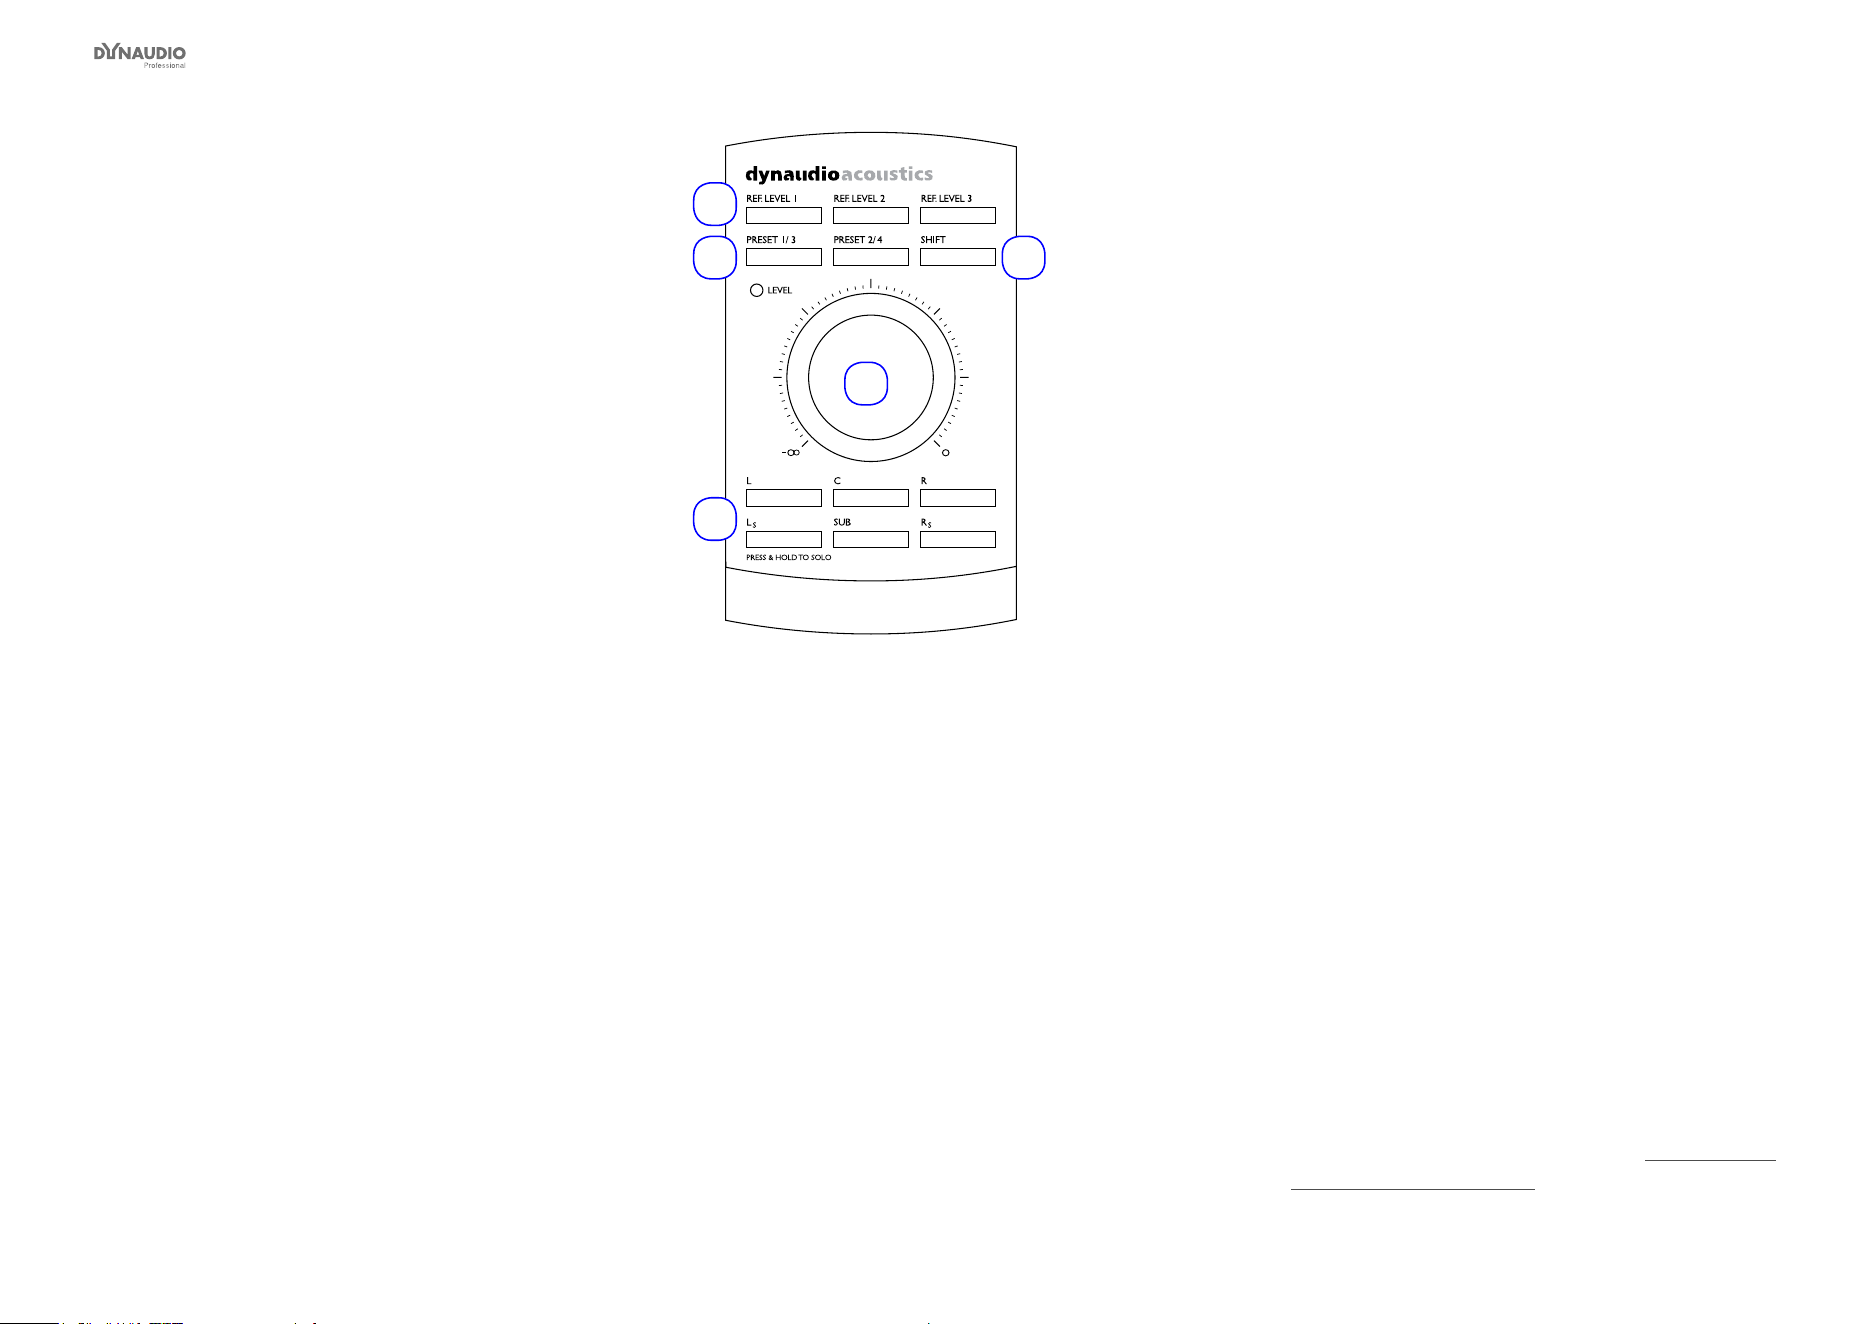
AIR Remote
Dynaudio Professional AIR reference manual – 2014-09-28 64
AIR Remote –
introduction
When you have set up and calibrated your setup as
good as possible, optimal performance from your AIR
system monitors is achieved by controlling the levels
on the monitors themselves as opposed to controlling
via the mixing console. Therefore a remote control is a
natural extension of your AIR monitor system.
Remote Control Features
►
Instant access to three different user-dened Ref-
erence Level settings.
►
Instant Preset Recall function of up to 4 presets.
This way you can easily switch between different
setups from your listening position.
►
Mute/unmute and solo function for each monitor in
the setup.
►
Easy Master Level adjustment via large dial.
1
2
4
5
3
Fig. 33: AIR Remote
1. Reference Level selection keys
2. Preset selection keys
3. Shift key (for selecting presets 3 and 4)
4. Master Volume dial
5. Mute/Unmute/Solo buttons for each channel
REF LEVEL 1 to 3 keys
Use the REF LEVEL keys to recall and store reference
levels.
Recalling Reference Level 1 to 3:
►
Press the relevant key shortly. The key LED indi-
cates the activated Reference Level.
Setting Reference Level 1 to 3:
►
Set the level using the large VOLUME dial in the
center of the remote.
►
Press and hold the relevant Reference level key for
approximately two seconds.
The LED will ash three times, indicating that the
new Reference level has been stored.
When you power up/connect AIR Remote, no REF
LEVEL key is active – the volume is dened by the po-
sition of the Master Volume dial.
PRESET 1/3, PRESET 2/4 and SHIFT keys
Use the PRESET 1/3 and PRESET 2/4 keys in combi-
nation with the SHIFT key to recall AIR monitor presets.
►
To recall Preset 1, press the PRESET 1/3 key.
►
To recall Preset 2, press the PRESET 2/4 key.
►
To recall Preset 3, press and hold the SHIFT key
and press the PRESET 1/3 key.
►
To recall Preset 4, press and hold the SHIFT key
and press the PRESET 2/4 key.
When you power up/connect AIR Remote, no presets
are recalled.
For more information on presets, see “Recalling and
storing presets” on page 46.

AIR Remote
Dynaudio Professional AIR reference manual – 2014-09-28 65
L / C / R / Ls / SUB / Rs – Mute/Unmute/Solo keys
Use these six keys to mute, unmute and solo channels:
►
L: Left
►
C: Center
►
R: Right
►
Ls: Left surround
►
SUB: Subwoofer
►
Rs: Right surround
The LEDs of these keys indicate the current state for a
channel as follows:
►
LED on: Speaker on
►
LED off: Speaker muted
►
LED ashing: Speaker solo
Muting and unmuting a speaker
►
To mute a speaker/channel, press the respective
key.
►
To unmute a speaker/channel, press the respective
key again.
Solo Function
►
To activate the Solo function for a speaker/channel,
press and hold the respective key.
►
To deactivate the Solo function, press (but do not
hold) the respective key again. This will return the
speaker to the previous state (active or muted).
You can set one or multiple monitors to Solo mode.
When you power up/connect AIR Remote, every chan-
nel is active.
Setups with more speakers
When you are operating a system with more channels
(i.e., 6.1, 7.1 or higher), the Ls and Rs buttons will de-
ne the states (Mute/Solo) for the additional speakers.
If you are using more than one subwoofer, the SUB but-
ton will mute or solo these additional subwoofers.
Master Volume dial
►
If none of the REF LEVEL keys is active, the
Master Volume dial sets the Master volume on all
channels in your AIR system.
►
If a REF LEVEL keys is active, it will dene the
reference level.
►
When a REF LEVEL key is deactivated, the Master
volume returns to the level dened by the position
of the Master Volume dial.
When you power up/connect AIR Remote, the Master
Volume setting denes volume level.
Master Volume LED
►
When the level is dened by the Master Volume
dial setting, the LED is on.
►
When the volume is set by another device, the
Master Volume LED goes off.
When you power up/connect AIR Remote, the LED is
on, indicating that the Master Volume dial denes the
volume.


AIR Control software
Dynaudio Professional AIR reference manual – 2014-09-28 67
AIR Control software –
introduction
AIR Control software is the installation and congura-
tion software for the Dynaudio Professional AIR series
monitors.
AIR Control software allows you to carry out advanced
calibration and alignment of your AIR monitoring sys-
tem. The software provides access to advanced tools
and features of AIR monitors and subwoofers, including
timing and SPL calibration and parametric equalizers
for each monitor.
AIR Control also lets you dene and store custom set-
ups and presets with selective parameter locking.
About TC PC-IP installer software (discontinued)
AIR Control replaces the TC PC-IP installer software,
which was developed for professional installers. The
new AIR Control application design is easier to use and
offers an even more efcient way to ne-tune your AIR
monitoring system.
AIR Control software
main features
Global
►
Advanced conguration, calibration and installation
software for Dynaudio Professional AIR
►
Reference levels control for calibrated listening
►
Advanced bass management with variable cross-
over frequencies
►
EQ link: Group your speakers using up to 3 EQ
groups
►
Advanced locking of parameters
►
Front panel control lock
►
Setups can be saved as presets
►
For OS X and Windows
Per monitor controls
►
Four band parametric precision EQ
►
Adjustment of individual delay times and calibration
levels
►
Role and room position control
►
Test tone generator
AIR Control software
system requirements
System requirements for Mac OS X
►
CPU: Intel CPU
(min. 2 GHz recommended)
►
RAM: 2 GB RAM
►
Operating system: Apple OS X 10.8 or higher
►
USB 2.0, USB 3.0 or serial port
System requirements for Microsoft Windows
►
CPU: Intel-compatible CPU
(min. 2 GHz recommended)
►
RAM: 2 GB RAM
►
Operating system: Microsoft Windows 7 or higher
►
USB 2.0, USB 3.0 or serial port
Due to the touch-based user interface, AIR Control
software works very well with Windows-based tablets.
However, please note that AIR Control software will not
run on Android or iOS tablets (iPads).
For more information on the cables/adapters required
to connect your computer and your AIR system, see
“Cables” on page 82.

AIR Control software
Dynaudio Professional AIR reference manual – 2014-09-28 68
Obtaining AIR
Control software
You can download AIR Control software from
tcelectronic.com/air-control/support/
Installing AIR
Control software
►
Run the AIR Control software installer for your
operating system. You may need an administrator
account name and password to run the installer.
►
Read and accept the Software License Agreement
presented by the installer.
►
Finish the installation of the AIR Control software
and quit the installer.

AIR Control software
Dynaudio Professional AIR reference manual – 2014-09-28 69
Setting up AIR
Control software
Connecting your computer to
your AIR monitor system
You need to connect the computer running AIR Control
software to an AIR monitor. Depending on your comput-
er’s hardware, this may require
►
only the custom Serial to CAT 5 cable or
►
the custom Serial to CAT 5 cable and
the USB to COM 9 pin adapter.
Both cables are part of the Air Cable package (item
number 995282002).
Your computer and your AIR monitors should be
switched off.
►
Plug the RJ45 plug connector of the custom Serial
to CAT 5 cable into a TC Link port on an AIR moni-
tor that is labeled “Out or Remote”.
►
If your computer is equipped with a serial port, plug
the Serial connector of the Serial to CAT 5 cable
into your computer’s serial port.
►
If your computer is not equipped with a serial port,
but has a USB (2.0 or 3.0) connector,
►
connect the Serial connector of the Serial to
CAT 5 cable to the serial port of the USB to COM
9 pin adapter and
►
plug the USB connector of the USB to COM 9
pin adapter into the USB port on your computer.
For more information on cables and adapters, see “Ca-
bles” on page 82.
►
Switch on your AIR monitors.
►
Switch on your computer.
►
Launch AIR Control software.
Fig. 34: AIR Control software scanning for a connected
AIR system
If everything works as expected, you should be seeing
the Global/Main screen of the AIR Control software us-
er interface as described in “Global and local parame-
ters” on page 70.
If AIR Control software cannot establish communication
with AIR system, the following screen will be shown:
Fig. 35: AIR Control software – network not found
At this point, you can…
►
try to troubleshoot the connection between your
computer and the AIR monitor network as de-
scribed below or
►
run the software without access to the monitors
in demo mode by clicking the “Demo” or “Demo
Surround” button. This will allow you to become
familiar with the software interface, but as no con-
nection has been established, your changes will
not be applied.
What to do when no connection can
be established between AIR Control
software and the AIR monitor network
►
Make sure that you are using the right cable(s).
See “Cables” on page 82.
►
Make sure the USB or Serial port on your com-
puter that the cable/adapter is connected to is
operational – e.g. by plugging in another device
and verifying that it works as expected.
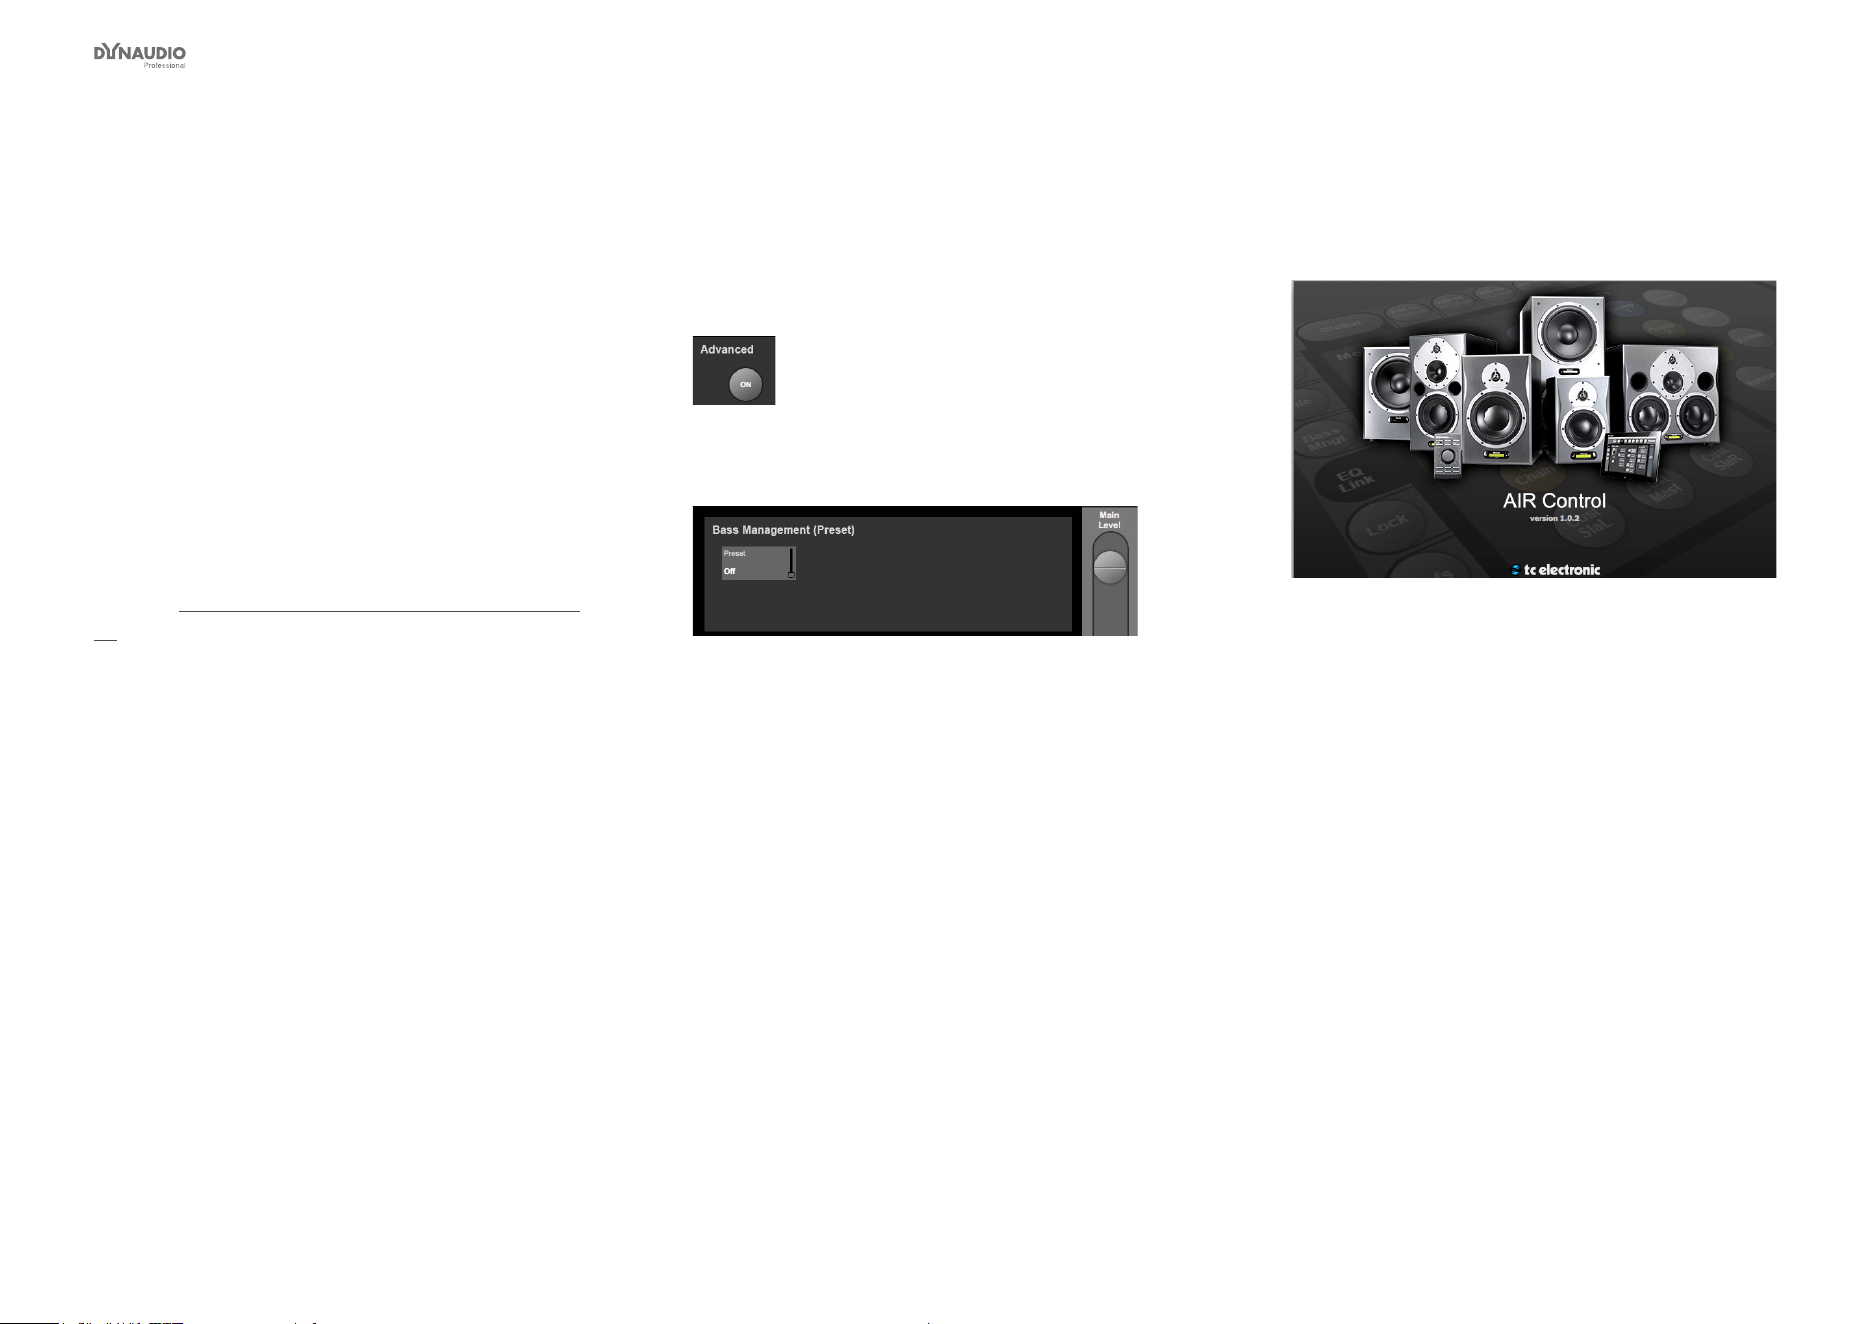
AIR Control software
Dynaudio Professional AIR reference manual – 2014-09-28 70
Global and local
parameters
AIR Control software allows you to access and set two
kinds of parameters:
►
Global parameters that apply to all monitors in
an AIR system or dene general attributes of this
system, and
►
Local parameters for individual monitors.
When setting up your AIR system using AIR Control
software, start by setting the Global parameters and
then proceed to adapt the settings for individual moni-
tors. Descriptions of monitor-specic (local) parameters
start with “Selecting monitors for conguration” on page
77.
To access the Global parameters, click the Global but-
ton on top of the AIR Control software window.
Basic editing procedures
If a parameter or function in the AIR Control software
is represented by a round button, click this button to
select/deselect it or execute the respective function.
Fig. 36: Click a button to select/deselect or activate the
respective feature.
Fig. 37: Click a parameter eld to select it and then
edit its value using the large slider on the right side of
the window
If a parameter in the AIR Control software is represent-
ed by a rectangle with a parameter name, the current
parameter value and a miniature fader, you can either…
►
drag the miniature fader in the eld with your
mouse or
►
select the parameter eld by clicking it once and
then use the large fader on the right side of the
window to adjust it. You can also use the up and
down keys on your computer keyboard to adjust
a selected parameter. If your mouse has a scroll
wheel, you can also use this scroll wheel to
change the selected parameter.
AIR Control software
version information
Fig. 38: AIR Control software – version information
Click the Dynaudio Professional logo in the upper right
corner of the window to display a version information
panel. Click into the panel to dismiss it.
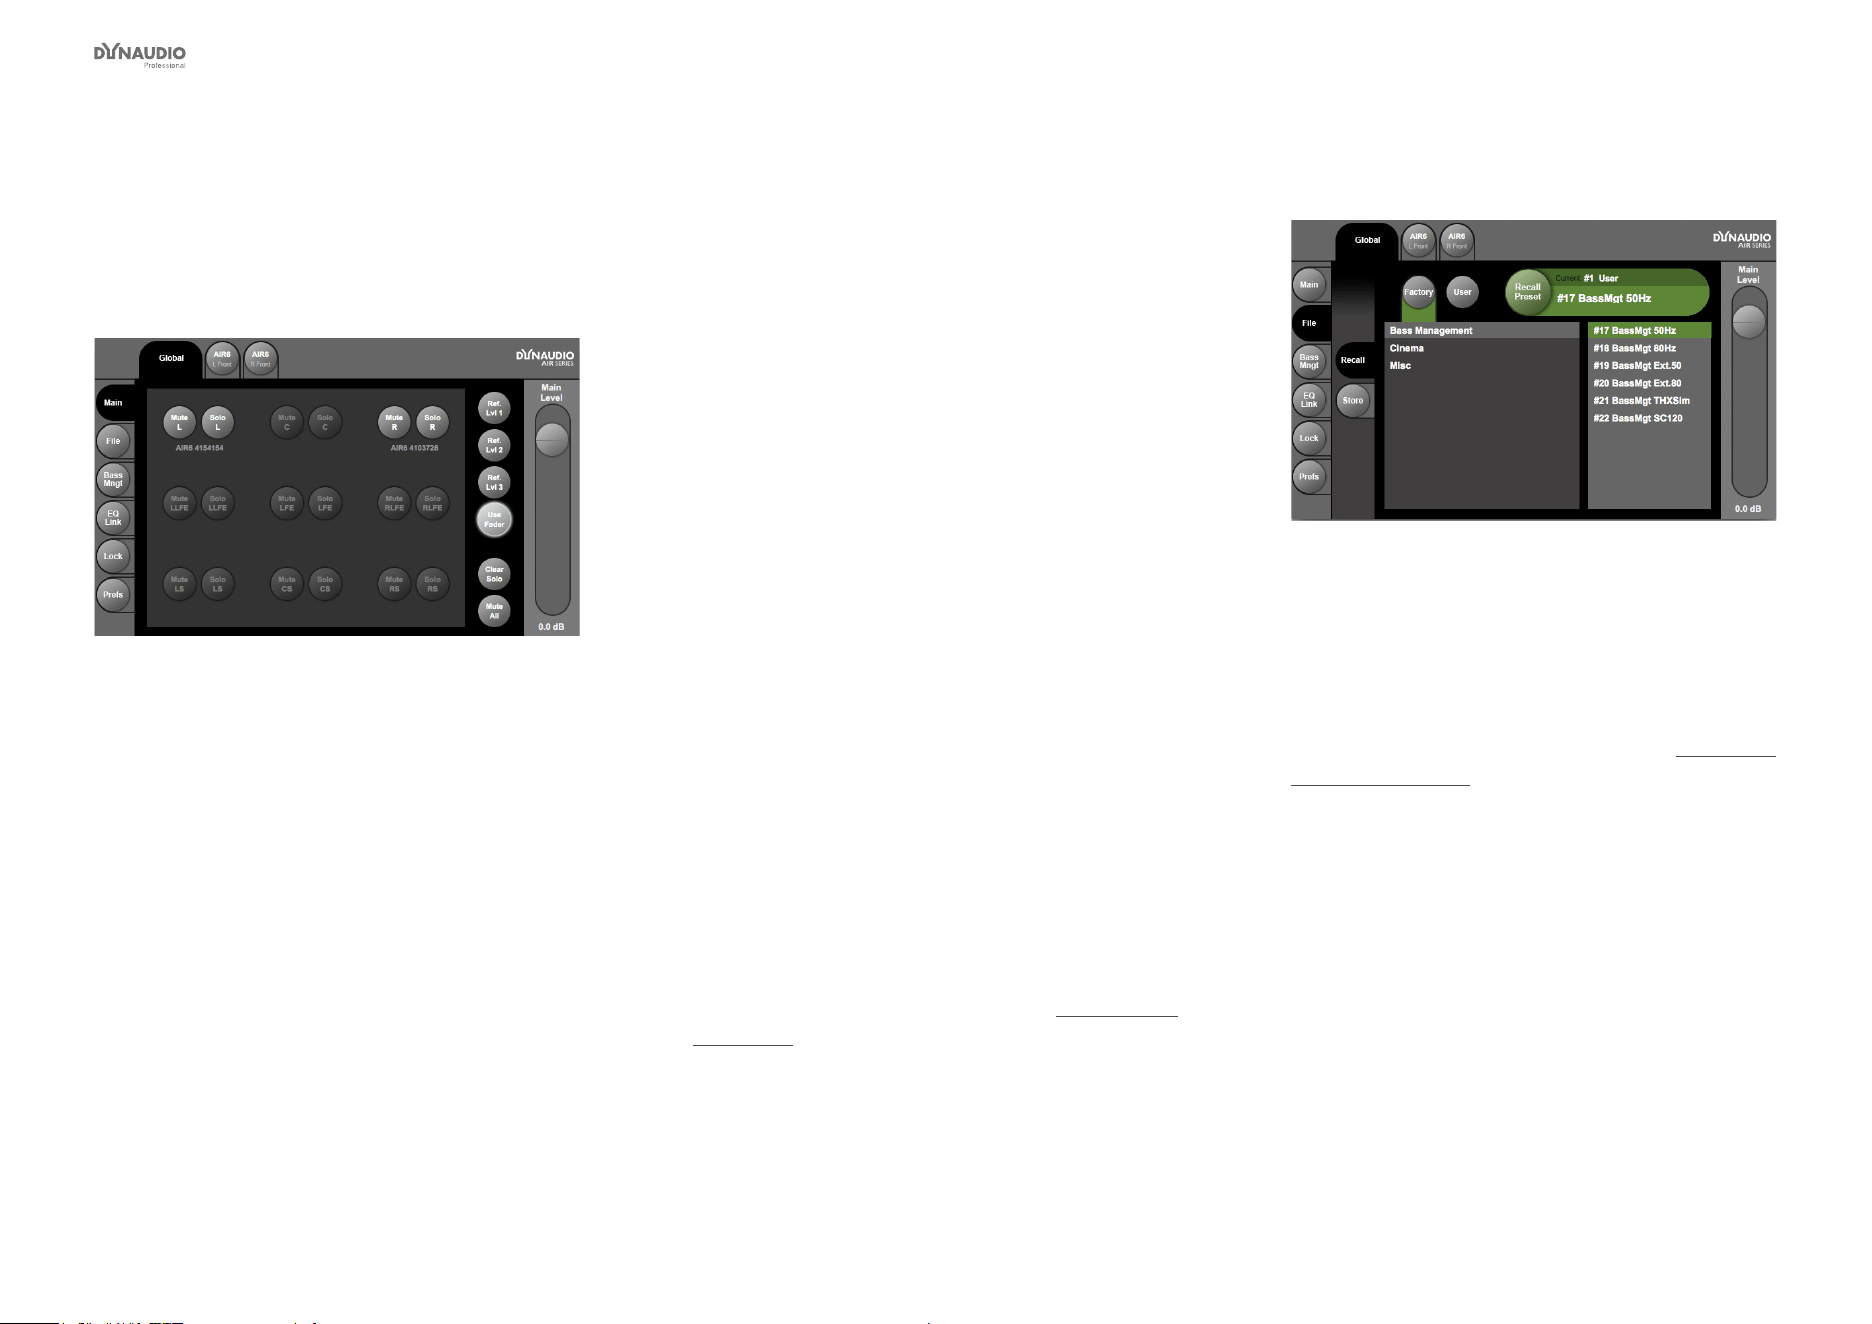
AIR Control software
Dynaudio Professional AIR reference manual – 2014-09-28 71
Global – Main page
Use the Main page to see an overview of your AIR sys-
tem, mute and solo monitors, set and access reference
levels.
Fig. 39: AIR Control software – Global – Main
Mute buttons
To mute a monitor, click its Mute button. The Mute but-
ton will turn yellow. You can mute multiple monitors. To
unmute a monitor, click its Mute button again.
To mute all monitors at once, click the Mute All button
on the right side of the window.
To unmute all monitors at once, click the same button
(now labeled “Unmute All”) again.
Solo buttons
To solo a monitor, click its Solo button. The Solo button
will turn orange. You can switch multiple monitors to So-
lo mode. To remove a monitor from the Solo group, click
its Solo button again.
To remove all monitors from the Solo group at once,
click the Clear Solo button on the right side of the win-
dow.
Setting and recalling Reference levels
You can specify three Reference levels for your AIR
system. Working with predened reference levels and
a well-calibrated AIR system ensures that you get pre-
dictable results.
To set a Reference level, click one of the three “Ref. Lvl”
buttons. Please note that the volume will immediately
jump to the level currently stored for this Reference lev-
el slot, so you should not be playing back a high level
signal while doing so!
Drag the Main Level slider on the right side of the win-
dow to set the desired level. To ne-tune the level, drag
the slider with the mouse while holding down the Shift
key on your computer keyboard. The new Reference
level is stored immediately.
You can use the optional AIR Remote to access your
previously stored Reference levels – see “AIR Remote”
on page 63.
To set the Master Level freely without it being stored to
one of the three Reference level slots, click the User
Fader button rst.
File page
Fig. 40: AIR Control software – Global – File page –
Recall section
Use the File page in the Global section of the AIR Con-
trol software to recall and store presets.
To learn what global and local parameters are stored in
presets and which parameters aren’t, see “Parameter
storage” on page 47.
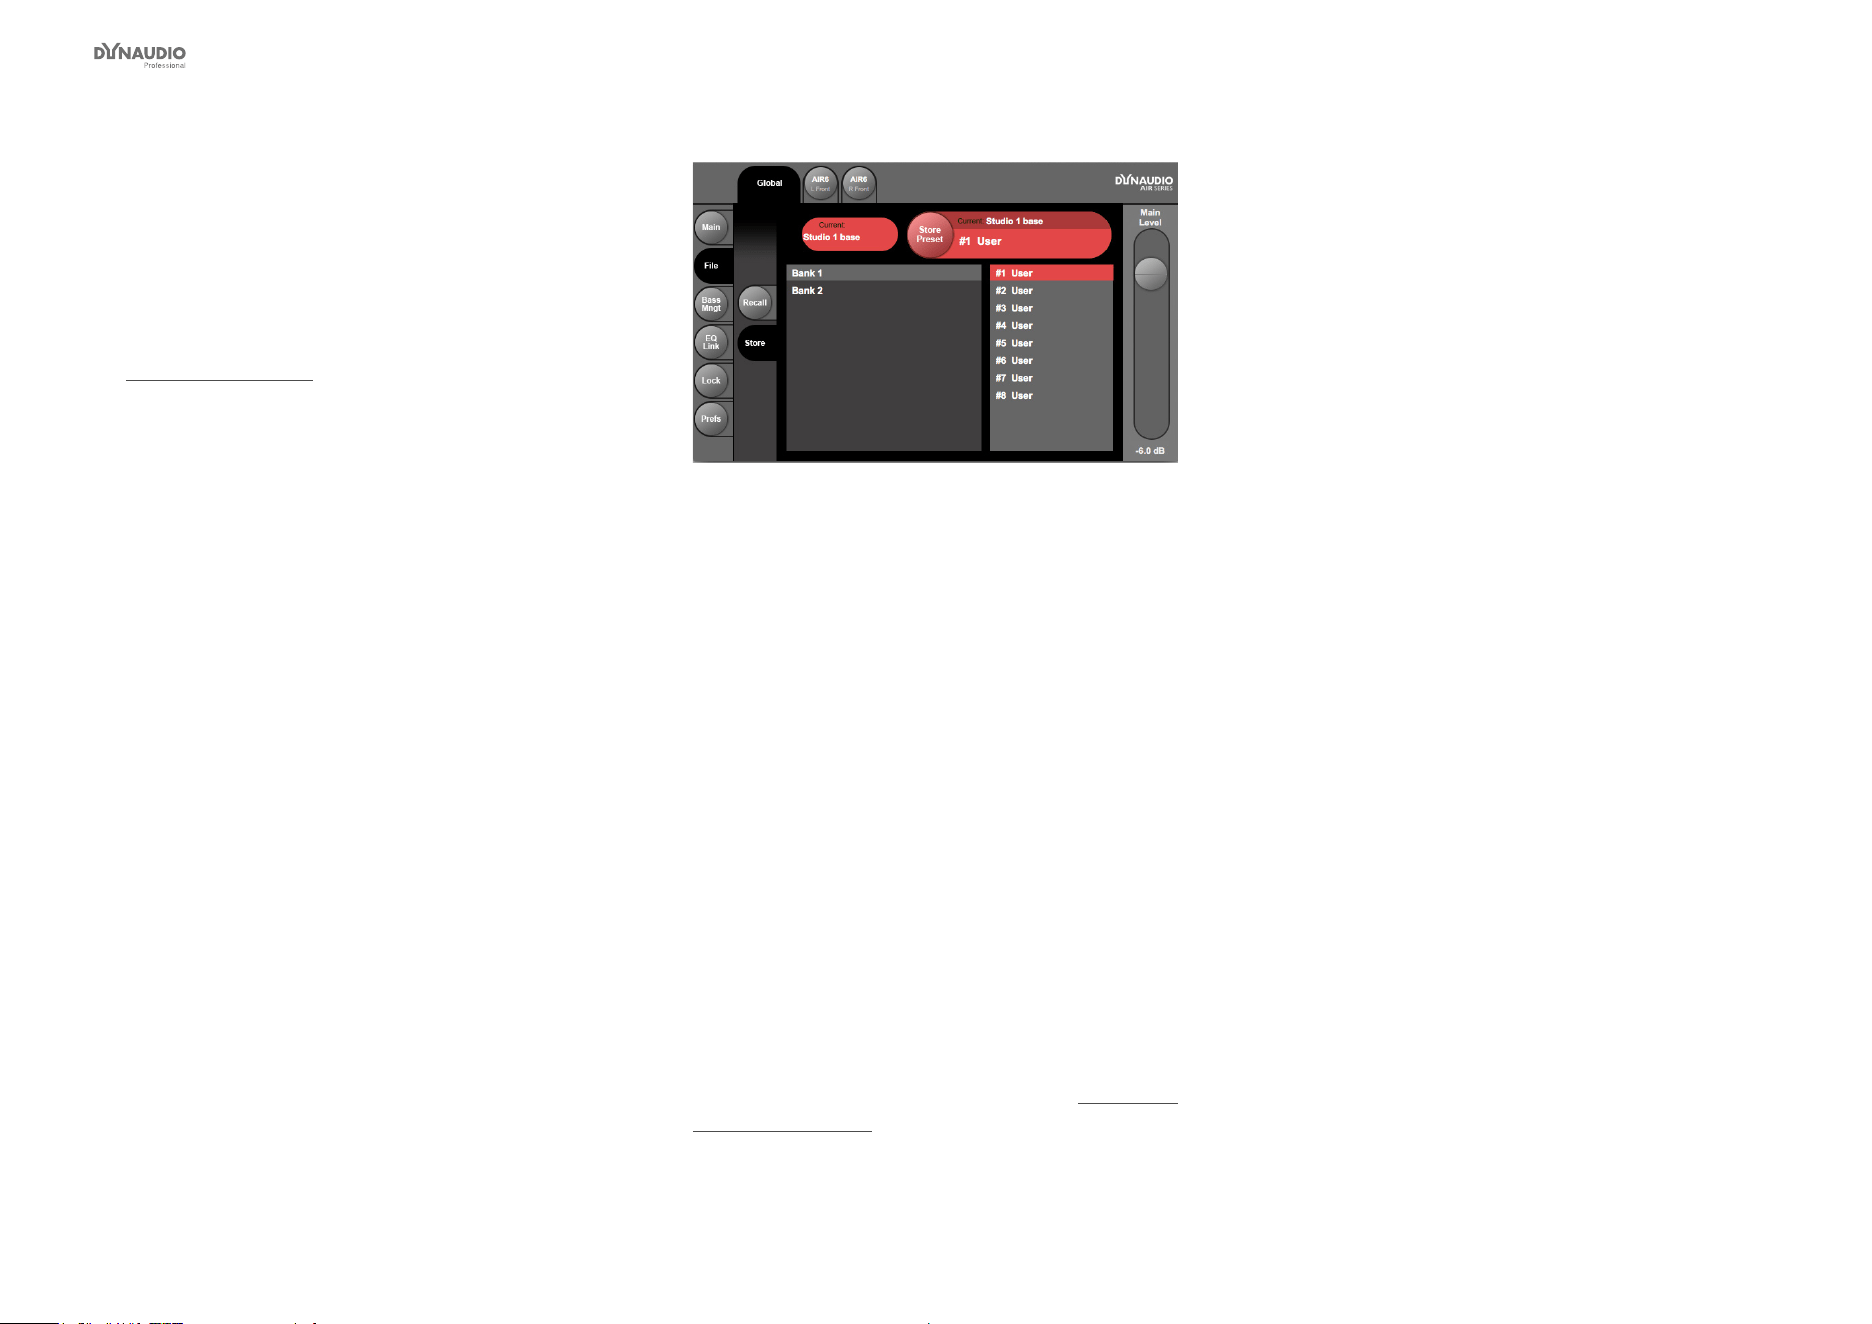
AIR Control software
Dynaudio Professional AIR reference manual – 2014-09-28 72
Recalling (activating) presets
►
Click the Recall tab on the left side of the window.
The name of the currently selected preset is shown
in the upper right corner of the window, within the
green “Recall Preset” area.
►
Select the preset category you want to access:
Factory presets or User presets.
For a list and description of factory presets, see
“Presets” on page 85.
►
If you have selected the Factory presets group,
select the desired preset group (“Bass Manage-
ment”, “Cinema”, “Misc(ellaneous)”) by clicking on
its name in the left column.
►
Select the desired preset from the column on the
right.
►
Press the large green Recall Preset button in
the upper right corner of the window to recall the
selected preset.
Storing and naming the current preset
Fig. 41: AIR Control software – Global – File page –
Store section
►
Click the Store tab on the left side of the window.
The name of the currently selected preset is shown
on top of the window.
►
If you want to edit the name of the preset before
storing it, just click the name shown under “Cur-
rent” and edit it using your computer keyboard.
►
15 User preset slots in two banks are available.
Select the bank (“Bank 1” or “Bank 2”) by clicking
its name in the left column.
►
Select the preset slot where you want to store the
preset in the column on the right.
►
Click the large red Store Preset button in the upper
right corner of the window to store the current
preset to the selected User preset slot. This will
overwrite (delete) the preset currently stored in this
preset slot.
To learn what global and local parameters are stored in
presets and which parameters aren’t, see “Parameter
storage” on page 47.
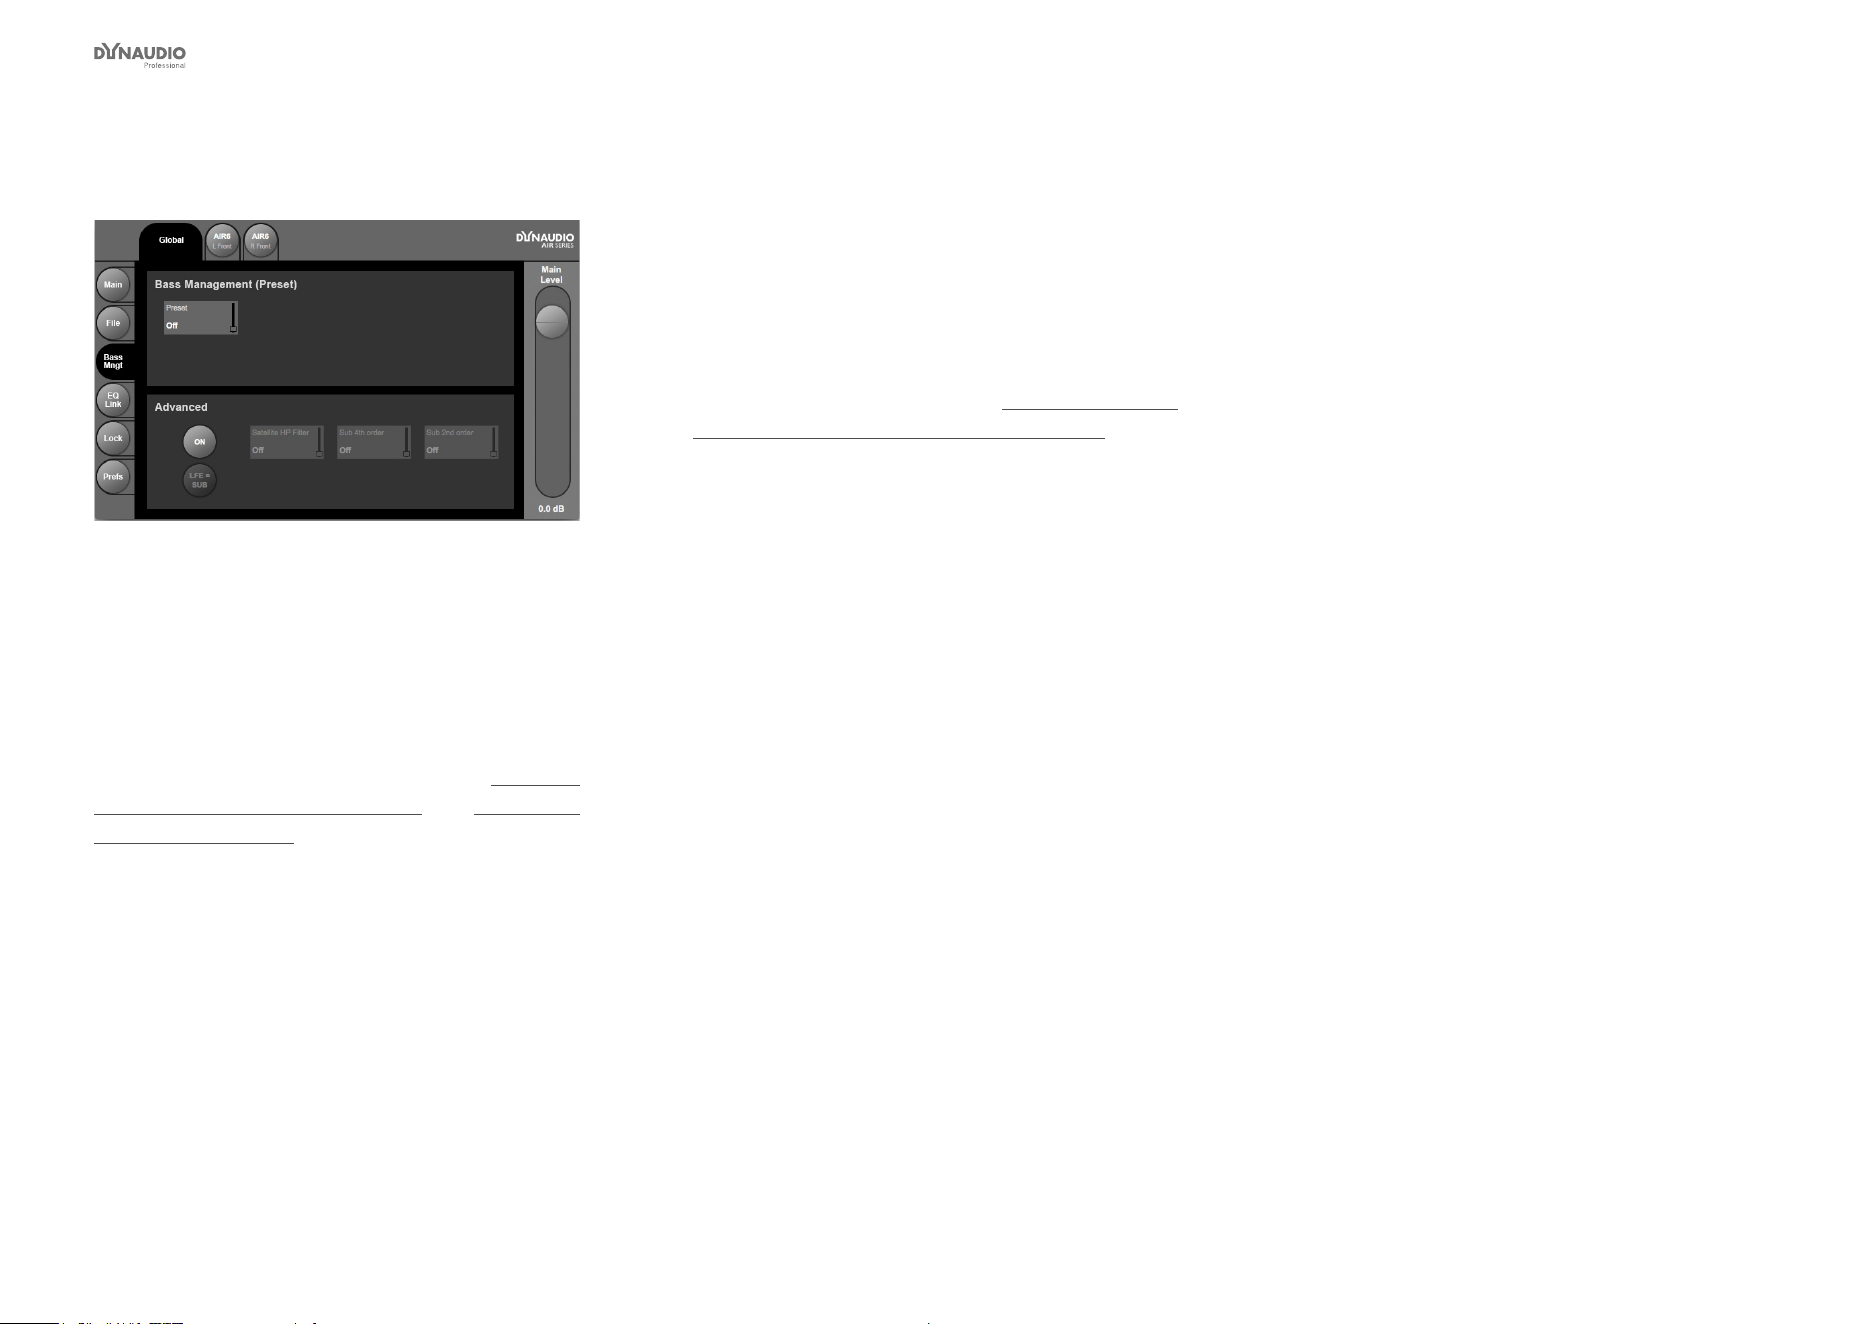
AIR Control software
Dynaudio Professional AIR reference manual – 2014-09-28 73
Bass management page
Fig. 42: AIR Control software – Global – Bass
management page
Use the Bass management page in the Global section
of the AIR Control software to recall Bass management
presets and activate Advanced bass management fea-
tures.
To learn more about bass management, see “Congur-
ing bass management” on page 21 and “Bass man-
agement” on page 117.
Recalling Bass management presets
►
Click the Preset eld in the Bass Management
(Preset) section of the bass management page.
This will assign Bass management preset selection
to the large slider on the right of the window.
►
Drag the slider to select the desired bass manage-
ment preset.
For a description of the bass management presets,
their parameters and values, see “Bass management
modes and crossover frequencies” on page 21.
Advanced bass management
In bass management presets, the states of the three
lters (Satellite, Sub 4 and Sub 2) are predened. Using
Advanced bass management, you can activate these
lters individually for ne-grained control of demanding
speaker setups.
To activate Advanced bass management, click the On
button in the Advanced section of the Bass manage-
ment page. This will enable the remaining buttons in
this section.
►
Click the eld for the lter (Satellite HP, Sub 4th
order or Sub 2nd order) that you want to congure.
This will assign this lter to the large slider on the
right of the window.
►
Set the desired crossover frequency for this lter or
drag the slider down to set the lter to Off.
►
Click the LFE = Sub button to include the LFE
channel in bass management.
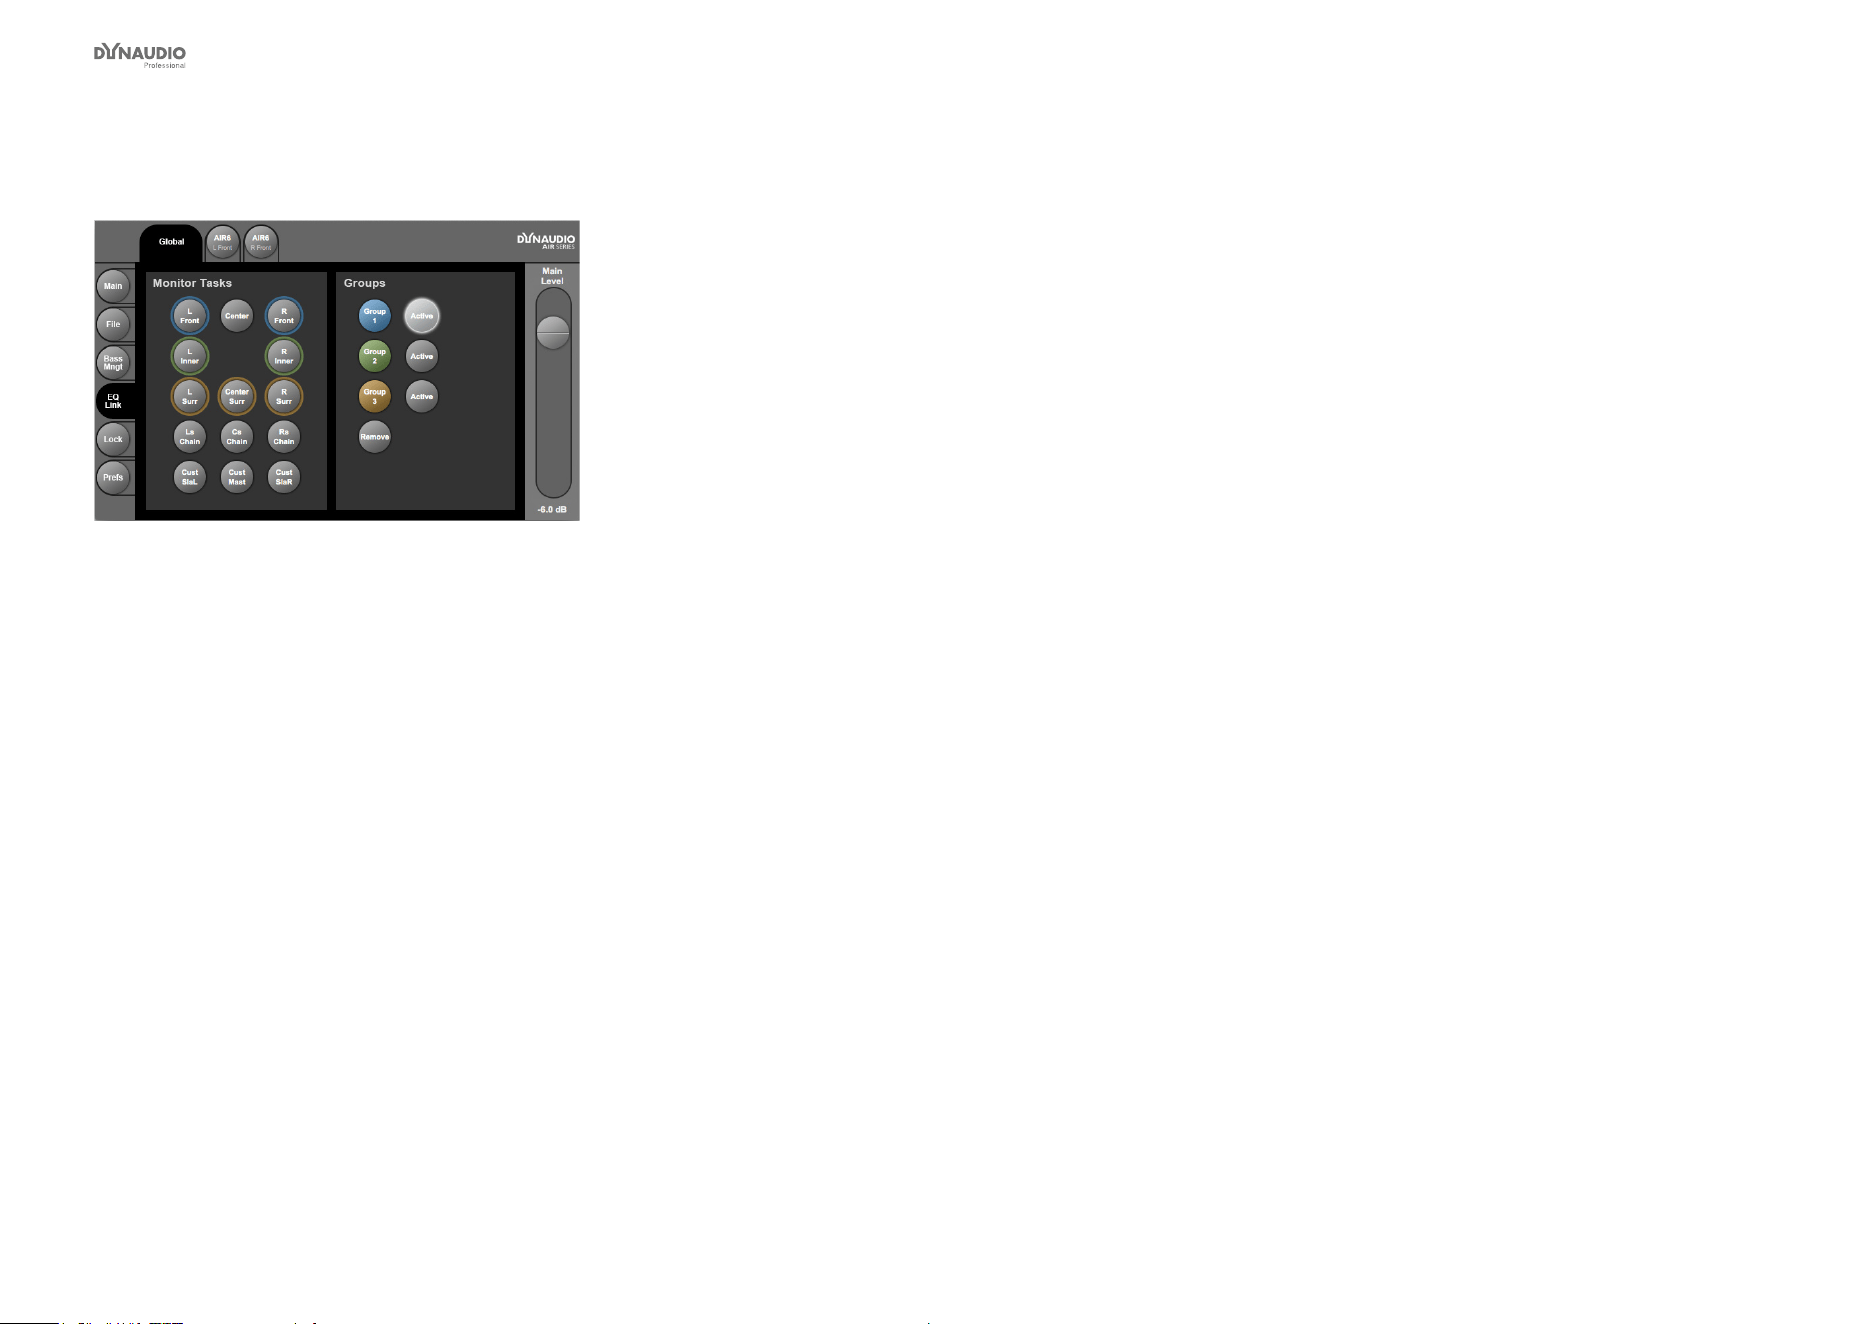
AIR Control software
Dynaudio Professional AIR reference manual – 2014-09-28 74
EQ Link page
Fig. 43: AIR Control software – Global – EQ Link
page. Group 1 (containing the left and right front
speakers) is active.
Use the EQ Link page in the Global section of the AIR
Control software to group the EQs of AIR monitors, al-
lowing you to modify their settings more easily.
Assigning monitors to EQ Groups
Three EQ Groups (shown on the left of the window) are
available.
►
Click the name of one or multiple monitors in the
left half of the window to select them. Selected
monitors are highlighted.
►
To remove a monitor from the selection, click its
button again.
►
To assign all selected monitors to an EQ Group,
click the button for that EQ Group on the right side
of the window.
All previously selected monitor buttons will now be
surrounded by a ring in the color of that EQ Group.
Removing monitors from an EQ Groups
►
Click the name of one or multiple monitors in the
left half of the window to select them. Selected
monitors are highlighted.
►
Click the Remove button in the right half of the
window. The previously selected monitors will be
removed from their group.
Activating an EQ Group
To use an EQ Group (i.e., have the EQ settings for all
monitors in that group synced), you need to activate it.
To activate an EQ Group, click the Active button right to
the respective EQ Group button (1, 2 or 3) in the right
half of the EQ link window. Multiple groups can be ac-
tive at the same time.
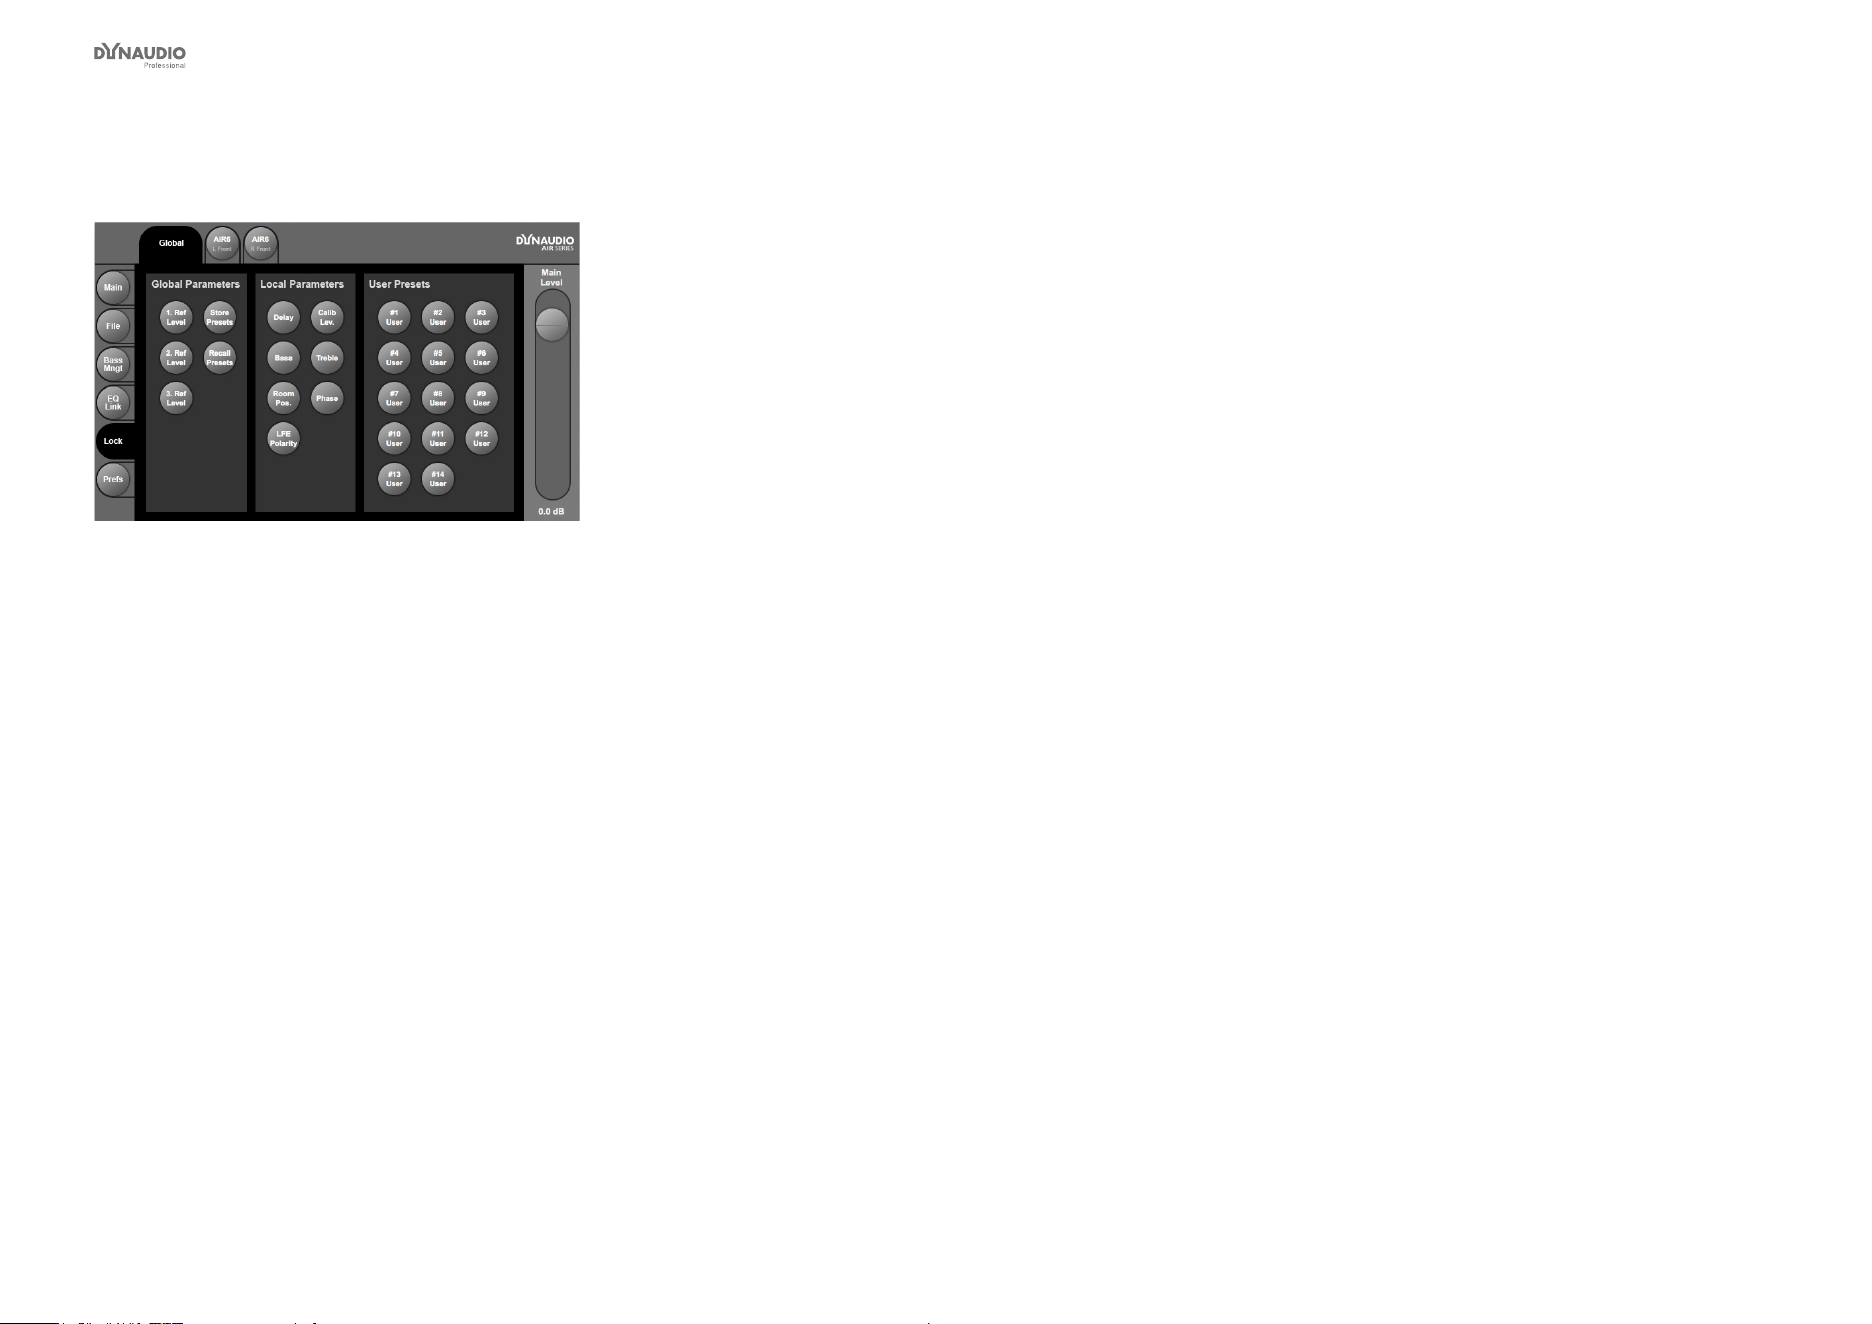
AIR Control software
Dynaudio Professional AIR reference manual – 2014-09-28 75
Lock page
Fig. 44: AIR Control software – Global – Lock page
Use the Lock page in the Global section of the AIR Con-
trol software to lock features of your AIR monitor sys-
tem, allowing you to restrict a user’s access to a subset
of parameters.
Instead of a simple, global “Lock” feature that would al-
low no user control at all, AIR Control software allows
for ne-grained control of the features that a user has
access to. This allows you to congure your AIR system
so that an untrained user can operate it without being
able to change critical parameters.
►
To lock a feature or preset slot, click its button so it
is highlighted.
Please note that even when a parameter has been
locked, the user will still be able to navigate to it and
see its current setting on an AIR master monitor. How-
ever, he won’t be able to change it. Instead, the display
will show the message “Locked” when an arrow key is
pressed.
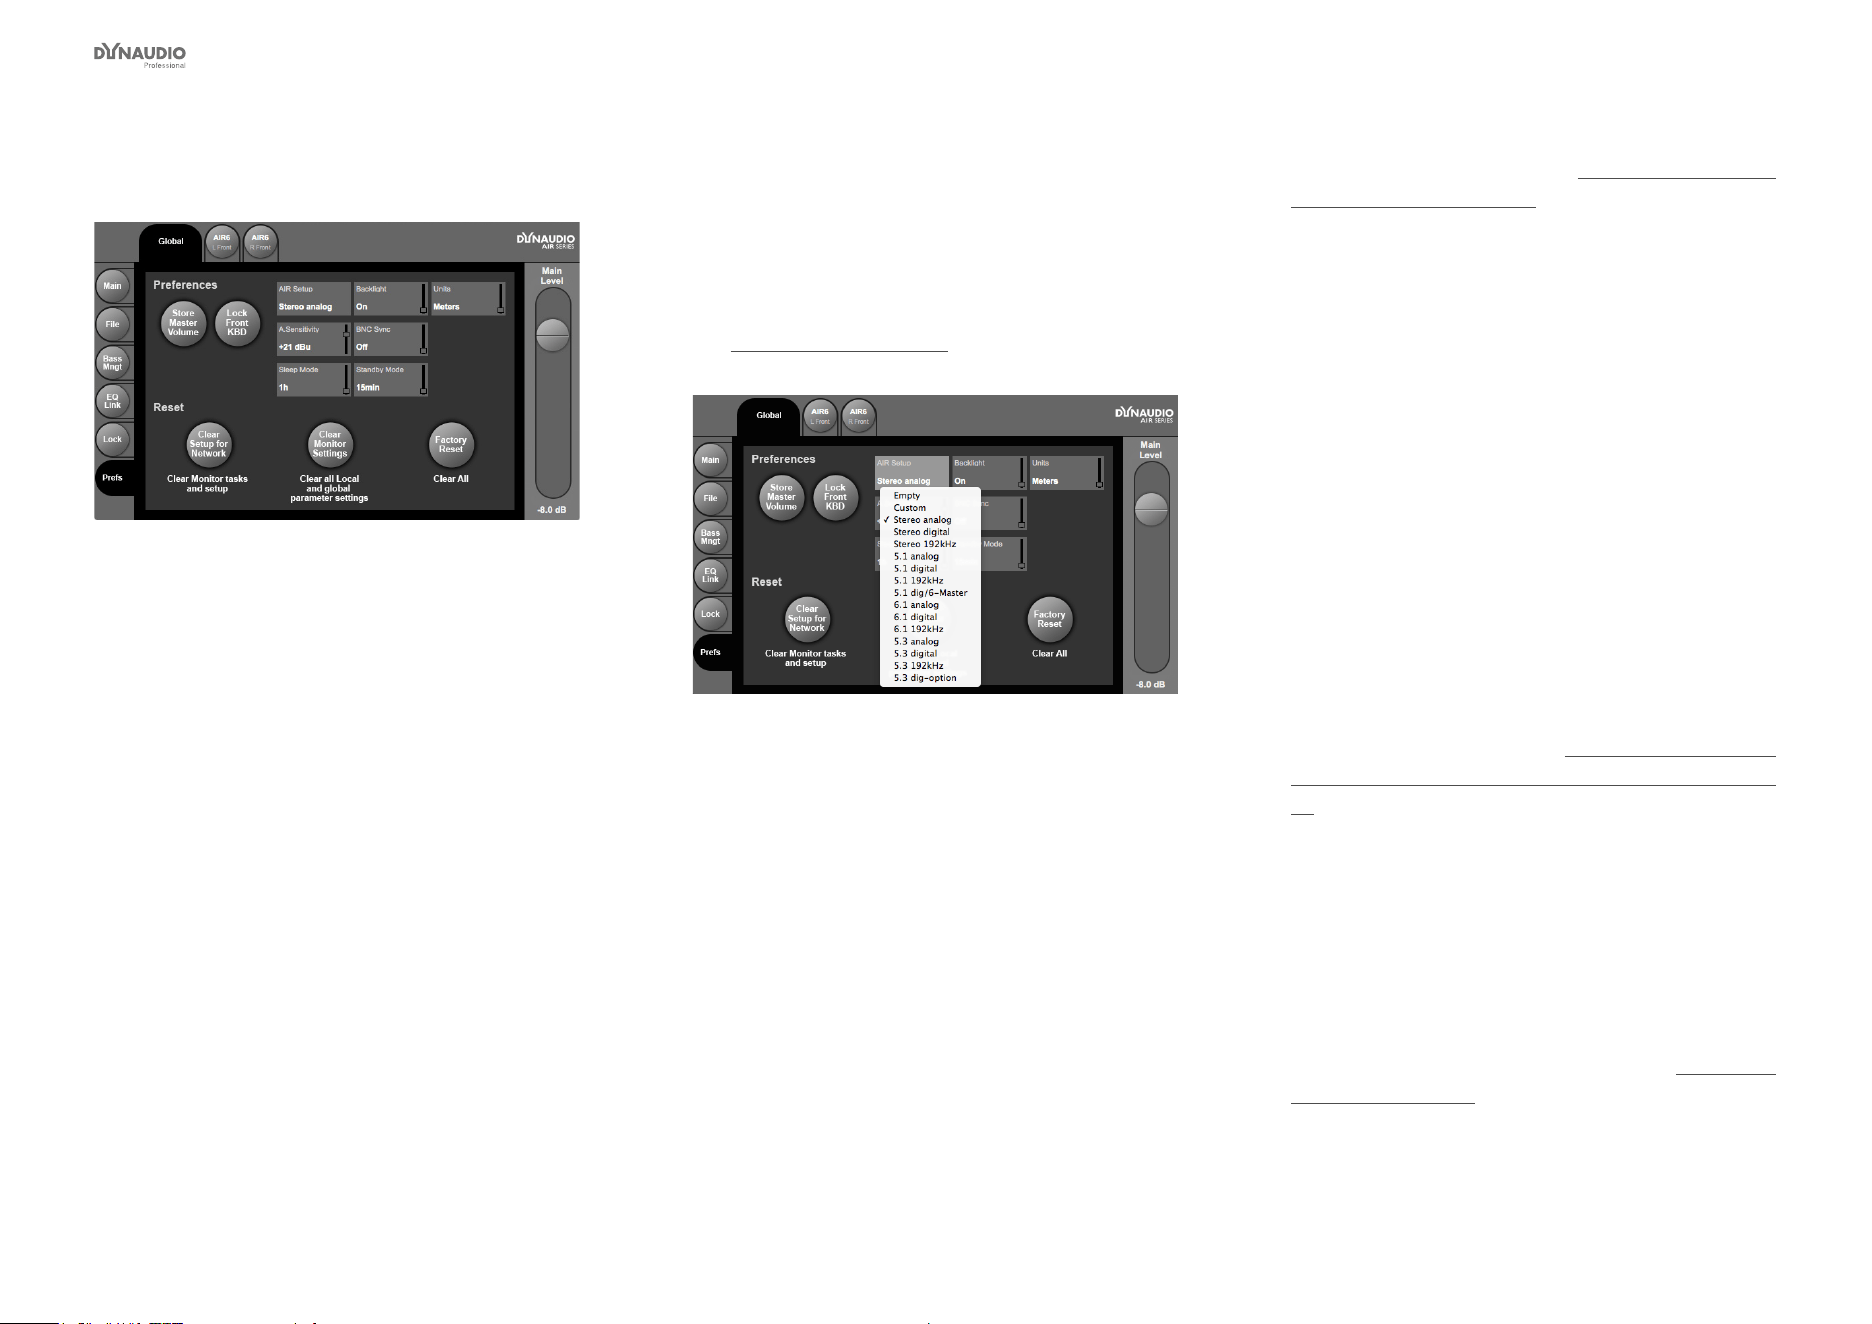
AIR Control software
Dynaudio Professional AIR reference manual – 2014-09-28 76
Preferences page
Fig. 45: AIR Control software – Global – Preferences
Page
Use the Preferences page in the Global section of the
AIR Control software to congure certain global fea-
tures of your AIR system and access various Reset
features.
Storing the Master volume
To have your AIR monitor system store and recall the
last used master volume level when it is switched off
and on again, click the Store Master Volume button.
Locking the front keyboards of
your AIR Master monitors
To lock the front keyboards of your AIR Master moni-
tors, click the Lock Front KBD button.
For each of the remaining functions, select the respec-
tive eld. This will assign it to the large slider on the
right of the window. Drag the slider to set the parameter.
AIR Setup
Use the AIR setup parameter to specify the setup for
your AIR system. Clicking this parameter eld will show
a drop-down menu.
Make sure to have your monitors connected exactly as
required for the selected setup. For more information,
see “AIR setups” on page 29.
Fig. 46: AIR Setup selection
Backlight
Use the Backlight parameter to set the backlight of your
AIR Master monitor(s) display(s) on or off.
Units
Use the Units parameter to set the unit for the delay
parameter either to meters or inches.
Port:
If your computer has multiple Com ports, set the Port
parameter to the port your are using for connection to
your AIR system.
BNC Sync
Switch BNC Sync on or off. See “Setup menu ► Exter-
nal clock setup” on page 24.
A. Sensitivity
Use the A(nalog) Sensitivity parameter to set the input
of the analog input in dB.
Sleep Mode
Use the Sleep Mode parameter to set the time until the
monitors of your AIR system go into power save mode
after no signal has been detected.
Standby Mode
Use the Standby Mode parameter to set the time until
the monitors of your AIR system go into standby mode
after no signal has been detected.
Fore more information, see “Standby, Power Save
mode and powering down your AIR system” on page
12.
Reset procedures
Click one of the three buttons in the lower half of the
window to execute the respective Reset procedure.
please note that the Reset will occur immediately, so
make sure that this is what you want.
For a description of Reset procedures, see “Reset pro-
cedures” on page 87.
AIR Control software
Dynaudio Professional AIR reference manual – 2014-09-28 77
Selecting monitors
for conguration
►
Please refer to the section “AIR setups” on page
29 of this manual to nd the setup you want to
use.
►
Position and connect your monitors exactly as
described in the section for this setup.
After you have done this, you can use AIR Control
software to access each connected monitor and
congure its settings.
Selecting a monitor for conguration
Each detected monitor in an AIR system is represented
by a “tab” on top of the AIR Control software window.
Fig. 47: AIR Control software window top bar – two
monitors connected and detected. The left monitor
(“AIR 6 L Front”) is selected for editing its settings.
Select the monitor you want to set up by clicking its tab
and congure it as described on the following pages. All
settings are applied immediately.

AIR Control software
Dynaudio Professional AIR reference manual – 2014-09-28 78
Monitor Setup page
Fig. 48: AIR Control software – Monitor setup page
Use the Setup page to send test signals and congure
basic parameters for the selected monitor.
The following setup parameters are available for all AIR
monitors.
Test
Click the Test button to generate a test signal. To stop
the test signal, click this button again.
Please note that the test signal will be generated at the
currently set level.
Monitor Task
Use the Monitor Task parameter to specify the task
(e.g. Left Front or Right Front) for the selected monitor
in the current setup.
Room position
Use the Room position parameter to specify the room
position of the selected monitor. See “Monitor positions”
on page 52.
Test Signals
Use the Test Signals parameter to specify the test sig-
nal type/source for this monitor. You can choose be-
tween Pink Noise and 96 kHz EQ out.
When you set Test Signals to Pink Noise and click the
Test button, the speaker will output pink noise at the
currently set level.
When you set Test Signals to 96 kHz EQ out and click
the Test button, the Master speaker will output an AES/
EBU signal on its TC link output. This test signal can
be used to check the EQ settings using a measuring
device connected to the TC Link port using an RJ45-
AES/EBU cable.
X-Curve
Use the X-Curve parameter to select the X-Curve for
the selected monitor. See “X-Curves” on page 58.
Delay
Use the Delay parameter to specify a delay for the sig-
nal assigned to this monitor. See “Delaying monitors”
on page 119.
Calib Level
Use the Calib Level parameter to calibrate each moni-
tor. See “Calibrating the main monitors” on page 57
and “Calibrating the subwoofers with the main moni-
tors” on page 61.
Ref. Level
Use the Ref. Level parameter to set the reference level
for each monitor.
Treble
Use the Treble parameter to set the amplication or at-
tenuation for the treble band of the two-band shelving
EQ in each monitor
Bass
Use the Bass parameter to set the amplication or at-
tenuation for the bass band of the two-band shelving
EQ in each monitor. For more information, see “Equal-
izing the monitors” on page 56.
The following setup parameters are only available for
AIR subwoofers:
LFE Gain
Use the LFE Gain parameter to set the LFE channel
gain for the selected subwoofer. See “LFE Gain (sub-
woofer parameter)” on page 61 and “The LFE Chan-
nel” on page 118 for background information on LFE.
Phase
Use the Phase parameter to set the signal Phase for
the selected subwoofer. See “Calibrating the subwoof-
ers with the main monitors” on page 61.
Pol 180deg
Use the Pol 180deg parameter to reverse the polarity of
the signal during calibration for the selected subwoofer.
See “Polarity (subwoofer parameter)” on page 61.

AIR Control software
Dynaudio Professional AIR reference manual – 2014-09-28 79
LFE Low Pass
Use the LFE Low Pass parameter to activate the Low-
pass lter for the LFE channel on the selected subwoof-
er. See “LFE Low Pass Filter (subwoofer parameter)”
on page 61.
Locking parameters for individual monitors
The Lock page in the Global section of the AIR Con-
trol software allows you to lock certain features for all
monitors in your AIR system – see “Lock page” on page
75. In addition, you can lock parameters for individu-
al monitors on the Monitor Setup page.
To lock a parameter for a monitor, so that it cannot be
changed using the System Controller’s navigation keys,
►
select this monitor’s tab in the AIR Control soft-
ware,
►
go to the Setup page and
►
click the Lock button to the left of the respective
parameter.
Please note that even when a parameter has been
locked, the user will still be able to navigate to it and
see its current setting on an AIR master monitor. How-
ever, he won’t be able to change it. Instead, the display
will show the message “Locked” when an arrow key is
pressed.

AIR Control software
Dynaudio Professional AIR reference manual – 2014-09-28 80
Monitor EQ page
Fig. 49: AIR Control software – Monitor EQ page
Use the EQ page to congure the parametric four band
equalizer built into each AIR monitor.
The parametric four band equalizer is only accessible
from AIR Control software, not from the monitor itself.
Using EQ Groups
While the EQ can be congured for each monitor in-
dividually, AIR Control software allows you to combine
monitors in up to three groups and control the EQ set-
tings for all monitors in such an EQ Group together. See
“EQ Link page” on page 74.
If the monitor you have selected is part of an EQ Group,
the color of the EQ Group will be indicated by a small
dot in that EQ Group’s color (blue, green or brown) in
the monitor’s tab.
If the monitor you have selected is part of an EQ Group,
and this EQ Group has been activated on the EQ Link
page, the tabs for all monitors in that Group are high-
lighted when you edit the EQ settings for one monitor,
indicating that your changes will be applied to all mon-
itors in that group.
Fig. 50: AIR Control software – Monitor EQ page with
two monitors assigned to an active EQ Group. Settings
will be applied to all monitors in this EQ Group.
Making EQ settings
►
Activate the EQ for the selected monitor (or
currently active EQ Group) by clicking the EQ On
button.
►
Select one of the four EQ bands for editing by
clicking one of the four numbered tabs in the upper
half of the window.
►
Use the parameter elds on the bottom of the win-
dow to congure the selected EQ band as follows:
►
Gain: Use this parameter to attenuate or amplify
the selected frequency band by up to 6 dB.
►
Frequency: Use this parameter to set the cutoff/
operating frequency for the selected frequency
band.
►
Type: Use this parameter to set the lter type for
the selected frequency band. Choose between
Band off (EQ band inactive), Parametric, Notch,
Low Shelf, High Shelf, Low Pass, High Pass
►
S/BW: Use this parameter to set the slope for
the selected EQ band.
►
Proceed to select and adjust the other EQ bands.
Resetting the EQ
To reset the parameters of all four EQ bands to their
default values, click the Reset button.
EQ defaults
EQ Band Gain Frequency Type S/BW
1 0 dB 100 Hz Low Shelf 9 Oct.
2 0 dB 500 Hz Parametric 4 Oct.
3 0 dB 2000 Hz Parametric 1 Oct.
4 0 dB 10000 Hz High Shelf 3 Oct.
Fig. 51: Four-band EQ defaults
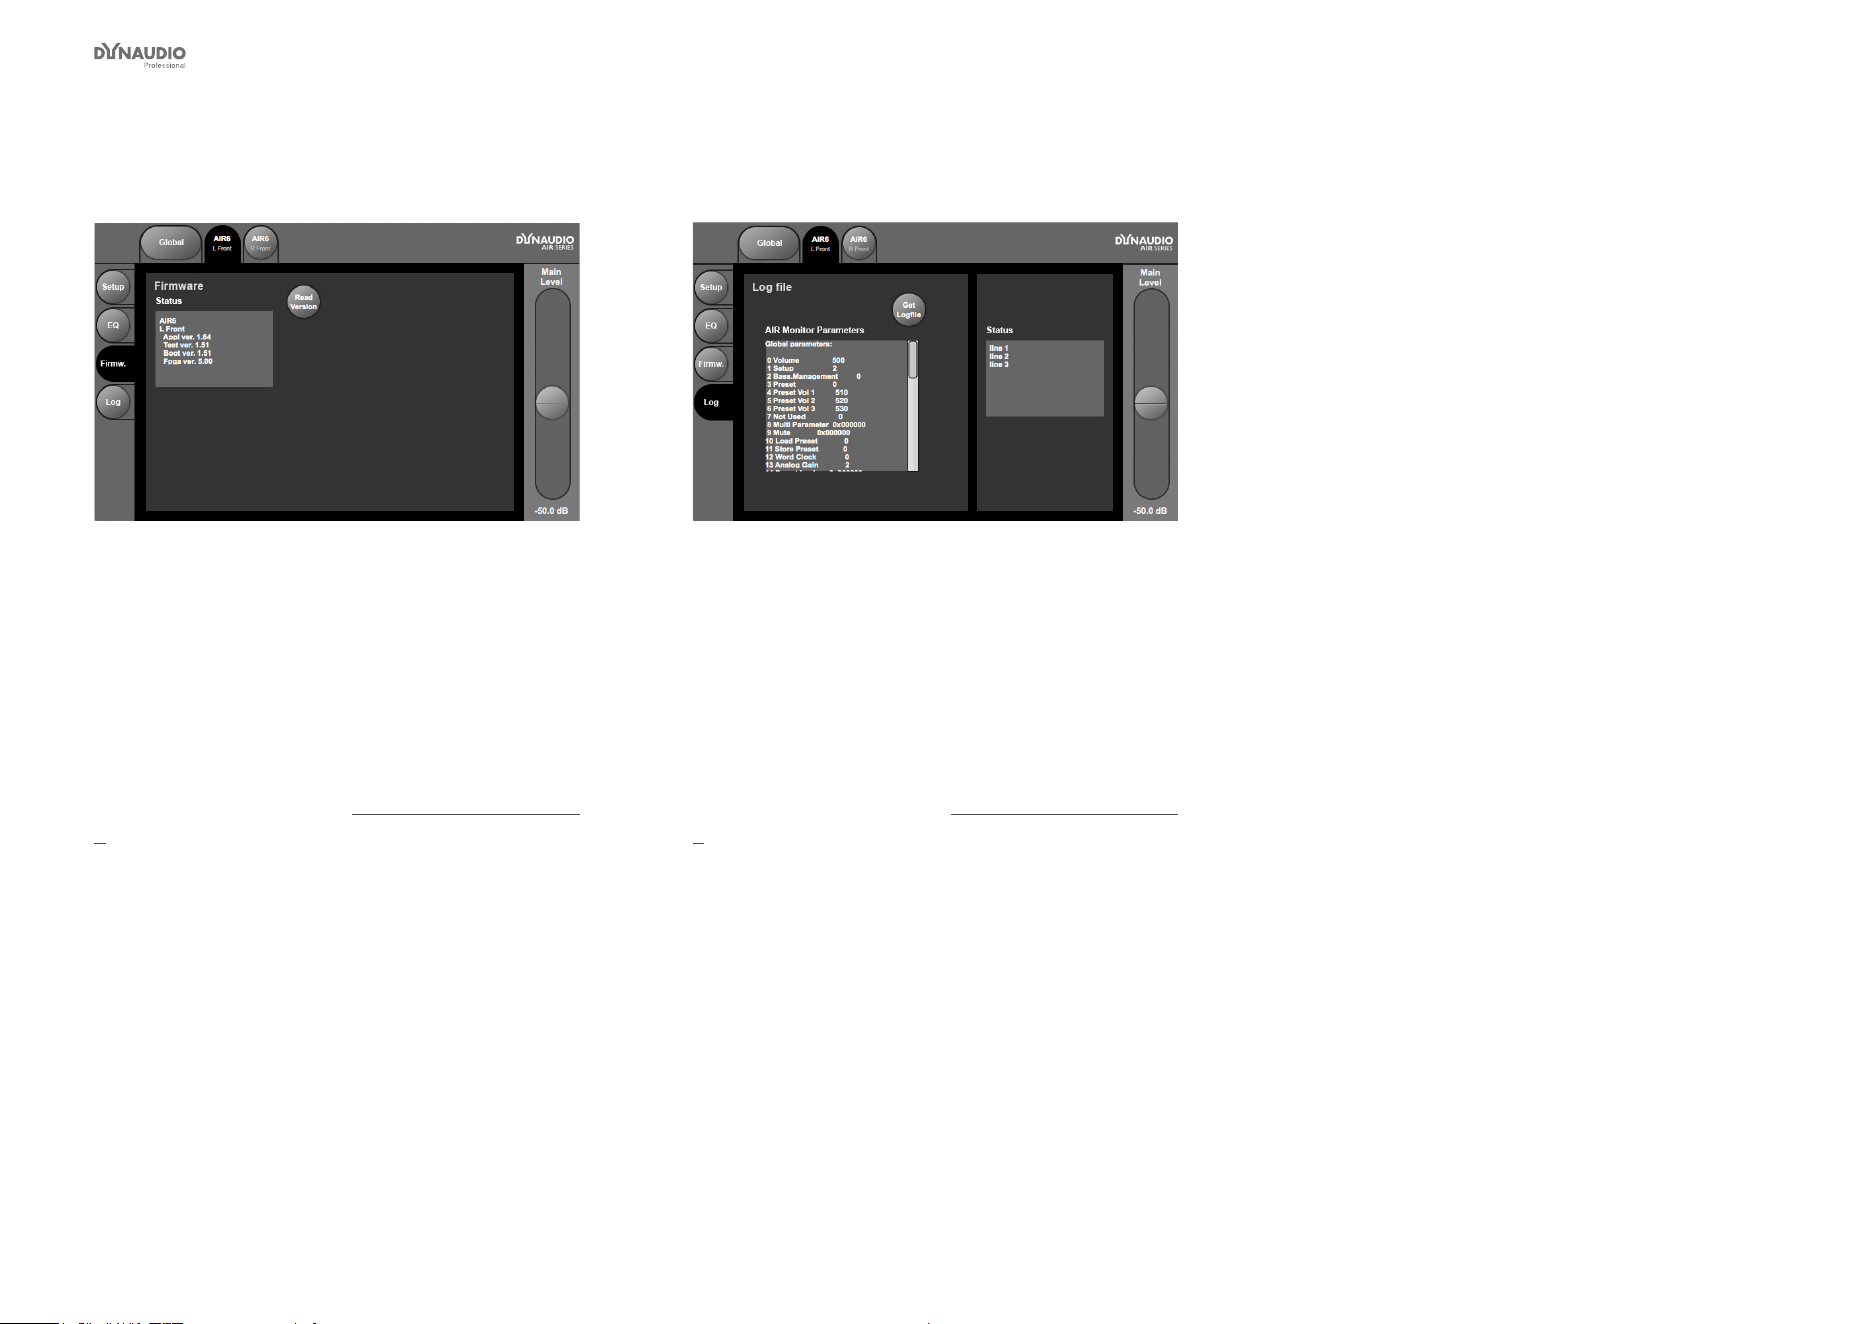
AIR Control software
Dynaudio Professional AIR reference manual – 2014-09-28 81
Monitor Firmware page
Fig. 52: AIR Control software – Monitor rmware page
Use the Firmware page to access rmware information
for the currently selected monitor.
►
Click the Read Version button to retrieve rmware
version information from the selected monitor.
If you encounter problems with an AIR monitor and
need to contact support (see “Getting support” on page
5), you should have this information ready.
Monitor Log page
Fig. 53: AIR Control software – Monitor Log page
Use the Monitor Log page to retrieve a log le showing
the current settings for the selected monitor.
►
Click the Get Logle button for a full list of all AIR
Monitor parameters.
If you encounter problems with an AIR monitor and
need to contact support (see “Getting support” on page
5), you should have this information ready.

Cables
Dynaudio Professional AIR reference manual – 2014-09-28 83
Several types of cables are used for connecting the
components of your AIR system. TC LINK via standard
Cat 5 cables
TC LINK connections carry digital audio (24 bit) and
network control information between the monitors in
your AIR system.
Fig. 54: TC LINK (standard Cat 5) cable
►
Cable type: Shielded Ethernet cable – Category 5
►
Connector type: RJ45
►
Maximum cable length: 15 meters
Connector 1 Connector 2 Color
1 1 Brown
2 2 White/Brown
3 3 Green
4 4 White/Blue
5 5 Blue
6 6 White/Green
7 7 Orange
8 8 White/Orange
AES/EBU cables
Standard AES/EBU cables are used to connect audio
sources to the inputs of the System controller monitor.
►
Cable type: 110 Ohm
►
Connector type: XLR
►
Maximum cable length: 100 meters
Connector 1 Connector 2
Pin 1 Pin 1 Ground
Pin 2 Pin 2 Hot
Pin 3 Pin 3 Cold
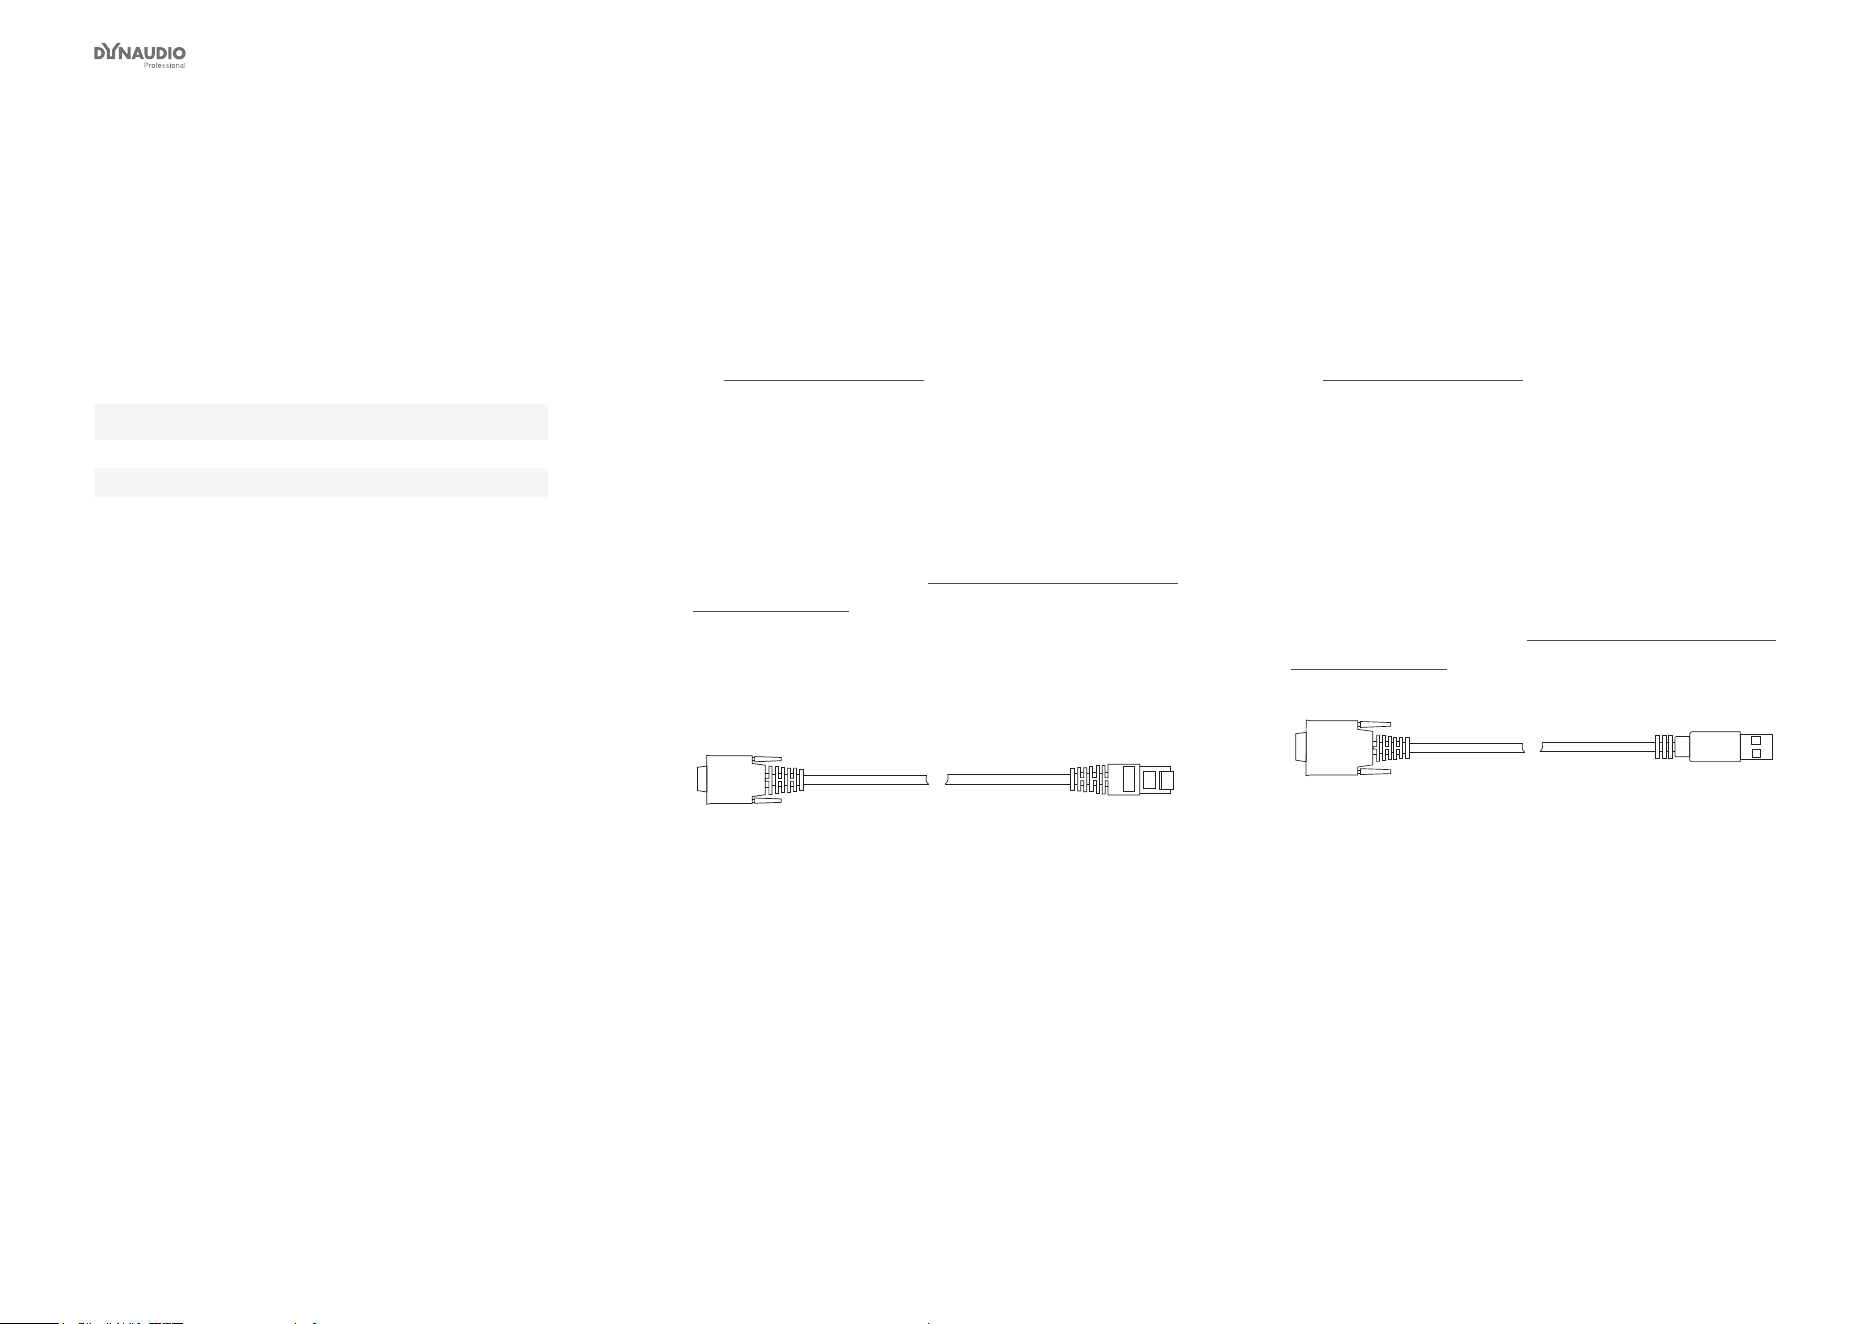
Cables
Dynaudio Professional AIR reference manual – 2014-09-28 84
Balanced audio cables
Standard balanced audio cables are used to connect
audio sources to the analog audio inputs of the System
controller monitor.
►
Cable type: 110 Ohm
►
Connector type: XLR
Connector 1 Connector 2
Pin 1 Pin 1 Ground
Pin 2 Pin 2 Hot
Pin 3 Pin 3 Cold
Custom serial to
CAT 5 cable
The Serial to Cat-5 cable is part of the Air Cable pack-
age, which can be obtained from the TC Electronic
Store (item number 995282002):
►
store.tcelectronic.com/
This is a proprietary cable with built-in electronics for
use with AIR Systems only. Use this cable to connect
your computer running AIR Control software to the Sys-
tem controller monitor.
For more information, see “Setting up AIR Control soft-
ware” on page 69.
Do not use an off-the-shelf Serial to CAT 5 cable/adapt-
er for this connection as it will not work.
Fig. 55: Serial to CAT-5 cable
USB to COM 9
pin adapter
The Serial to Cat-5 cable is part of the Air Cable pack-
age, which can be obtained from the TC Electronic
Store (item number 995282002):
►
store.tcelectronic.com/
The USB to COM 9 pin adapter is part of the Air Cable
package.
Use this adapter in conjunction with the Serial to CAT 5
cable described above if your computer has USB ports,
but no serial port.
For more information, see “Setting up AIR Control soft-
ware” on page 69.
Fig. 56: USB to COM 9 adapter


Presets
Dynaudio Professional AIR reference manual – 2014-09-28 86
Preset level in dB Gain
in dB
Preset no. Preset name Preset description L C R Ls Rs Sub LFE X-Over
(Hz)
X-Curve 1
*
X-Curve 2
**
1-15 Empty / User Presets 1 to 15 are “empty” until you choose to store something,
after which the respective preset name is “User Preset”.
Presets can be named using AIR Control software.
16 Neutral All parameters neutral – a good starting point 0 0 0 0 0 0 0 Off Off Off
17 BassMgt 50Hz Music, video and post for domestic (not Cinema) use – Stereo, 5.1, 5.3 and 6.1 0 0 0 0 0 0 0 50 Off Off
18 BassMgt 80Hz Music, video and post for domestic (not Cinema) use – Stereo, 5.1, 5.3 and 6.1 0 0 0 0 0 0 0 80 Off Off
19 BassMgt Ex50Hz Music, video and post for domestic (not Cinema) use – Stereo, 5.1, 5.3 and 6.1 0 0 0 0 0 0 0 50 Off Off
20 BassMgt Ex80Hz Music, video and post for domestic (not Cinema) use – Stereo, 5.1, 5.3 and 6.1 0 0 0 0 0 0 0 80 Off Off
21 BassMgt THXSim Music, video and post for domestic (not Cinema) use – Stereo, 5.1, 5.3 and 6.1 0 0 0 0 0 0 0 115 Off Off
22 BassMgt SC120 Music, video and post for domestic (not Cinema) use – Stereo, 5.1, 5.3 and 6.1 0 0 0 0 0 0 0 120 Off Off
23 Cinema Flat Mixing for Cinema without compensation for X-curve. 5.1 0 0 0 -3 -3 0 0 Off Off Off
24 Cine X-curve Mixing for Cinema in a small room – compensates for X-curve. 5.1 0 0 0 -3 -3 0 0 Off Yes Off
25 Cine X-curve2 Mixing for Cinema in a small room – compensates for modied X-curve. 5.1 0 0 0 -3 -3 0 0 Off Off Yes
26 Cinema X-50Hz Mixing for Cinema with small room X-curve compensation and bass management 0 0 0 -3 -3 0 0 50 Yes Off
27 Cinema X-80Hz Mixing for Cinema with small room X-curve compensation and bass management 0 0 0 -3 -3 0 0 80 Yes Off
28 Cine X-SC120Hz Mixing for Cinema with small room X-curve compensation and bass management 0 0 0 -3 -3 0 0 120 Yes Off
29 Cinema 80Hz Mixing for Cinema with bass management but without compensation for X-curve 0 0 0 -3 -3 0 0 80 Off Off
30 Cinema SC120 Mixing for Cinema with bass management but without compensation for X-curve 0 0 0 -3 -3 0 0 120 Off Off
31 OB Van SC120 OB vans and very small rooms where rear channels are close to sweet spot 0 0 0 -2 -2 0 0 120 Off Off
32 Neutral All parameters neutral – a good starting point 0 0 0 0 0 0 0 Off Off Off
* X-curve #1: ANSI / SMPTE222M – 1.5 dB roll off
per octave from 2 kHz. For more information, see
“X-Curves” on page 58.
** X-curve #2: ANSI / SMPTE222M Mod. – 3 dB roll off
per octave from 4 kHz. For more information, see
“X-Curves” on page 58.
Notes on LFE Gain
Please note that the LFE channel should be mixed with
+10 dB headroom. If you are not able to boost your
LFE monitor output, you should add +10 dB gain on
your AIR BASE subwoofer. Most format encoders/de-
coders take the LFE boost into account, meaning that
you should leave the AIR BASE LFE gain at 0 dB when
playing back DTS-encoded or DOLBY-encoded materi-
al on your AIR system.


Reset procedures
Dynaudio Professional AIR reference manual – 2014-09-28 88
Three different Reset “levels” exist. All Reset proce-
dures will affect all monitors connected when they
are executed.
Clear Monitor Settings
The Clear monitor settings reset procedure will reset
all global and local parameters for all connected moni-
tors. Preset and network settings are not affected.
To access this Reset procedure, press and hold the EN-
TER key on the System Controller monitor while pow-
ering it up.
Reset All Settings
The Reset all settings reset procedure is a “factory
reset” that will delete all global and local parameter set-
tings as well as preset and network settings.
To access this Reset procedure, press and hold the EN-
TER key on the System Controller monitor while pow-
ering it up.
Clear Setup for entire network
The Clear setup for entire network reset procedure
will clear settings for your entire AIR system. All con-
nected monitors will be reset to default settings.
To access this Reset procedure, proceed as follows:
►
From the home screen, press the ENTER key.
►
Press the DOWN key until “Setup menu” is dis-
played.
►
Press the ENTER key.
►
Press the DOWN key until “Clear setup for entire
network” is displayed.
►
Press the ENTER key.
“Accept to clear network setup?” is displayed.
►
Press the ENTER key to clear the setup or press
the EXIT key to discard.

Error messages
Dynaudio Professional AIR reference manual – 2014-09-28 90
Error message Explanation
“!”
(e.g. as “96 kHz Center!”)
The “!” indicates that the monitor is not connected to the network. The volume
is then automatically set to -50 dB for this monitor.
“+”
(e.g. as “96 kHz L Front+”)
The “+” indicates that this monitor is the System Controller.
>> A-Input Lo << This message is displayed in analog setups only. It indicates that the input
level has been detected to be between -60 dB and -20 dB for a period longer
than 3 minutes. This is a hint to turn up the Analog Input Sensitivity parameter
– see “Setup menu ► Analog input sensitivity” on page 25.
>> A-Input Hi << This message is displayed in analog setups only. It indicates that an input
level near 0 dB has been detected (peaks in 2 seconds above -1 dB). This
is a warning and you should reduce Analog input sensitivity accordingly. See
“Setup menu ► Analog input sensitivity” on page 25.
>> PSU error << This message is displayed if the power supplies fails. The power will be
turned off and the monitor cannot operate. In this case, get in touch with
support. See “Service” on page 5.
<Locked> This message is displayed when a parameter is locked by AIR Control soft-
ware and cannot be changed. Use AIR Control software to unlock parame-
ters. See “AIR Control software” on page 66.
Standby This message is displayed when no input signal above -65 dB has been de-
tected for more than 30 minutes. The amplier is turned off. Standby mode is
released as soon a signal level above -65 dB has been detected.
>> Power save << This message is displayed when no signal has been detected on all net-
worked monitors for more than 2.5 hours. Power is turned off. Exit this mode
by pressing any key on the System controller or adjusting the volume from
the AIR Remote.


Warranty
Dynaudio Professional AIR reference manual – 2014-09-28 92
Dynaudio Professional products are warranted to be
free from defects in components and factory workman-
ship under normal use and service for a period of two
(2) years when bought from a reseller within the EU.
Dynaudio Professional products are warranted to be
free from defects in components and factory workman-
ship under normal use and service for a period of one
(1) year when bought from a reseller outside the EU.
When failing to perform as specied during the warran-
ty period we will undertake to repair, or at our option,
replace this product at no charge to its owner, provided
the unit is returned undamaged and shipping prepaid,
to an authorized service facility or to the factory.
Dynaudio shall not be responsible for any incidental
or consequential damages. Dynaudio’s responsibility
is limited to the product itself. Dynaudio assumes no
responsibility for any loss due to cancellation of any
events, or rent of replacement equipment or costs due
to third party’s or customer’s loss of prot, or any other
indirect cost or losses however incurred.
Dynaudio reserves the right to make changes or im-
provements in design or manufacturing without as-
suming any obligation to change or improve products
previously manufactured and/or sold. The product war-
ranty is only valid in the country where the product was
purchased.
Exceptions
Dynaudio will always follow the law of the respective
markets should it differ from the policy stated above or
the exceptions stated below.
This warranty shall be null and void, if the product is
subjected to repair work or alteration by a person or
facility other than those authorized by Dynaudio; me-
chanical damage including shipping accidents; war, civ-
il insurrection, misuse, abuse, operation with incorrect
AC voltage, incorrect connections, wrong accessories,
incorrect use of accessories, operation with faulty asso-
ciated equipment, exposure to inclement weather con-
ditions and normal wear and tear.
Units on which the serial number has been removed or
defaced are not eligible for warranty service.


Technical specications
Dynaudio Professional AIR reference manual – 2014-09-28 94
AIR 6 & AIR 15 (Master and Slave)
AIR 6AIR 15Model
Two-way Active Neareld MonitorTwo-way Active Neareld MonitorSystem
40 Hz – 22 kHz33 Hz – 22 kHzFrequency response (±3 dB)
> 128 dB peak> 128 dB peakPeak SPL 1 m, pair (IEC Short
Term)
> 126 dB peak> 126 dB peak (no LFE)Peak SPL 2 m, 5.1 (IEC Short
Term)
104 dB RMS103 dB RMSMax SPL 1 m, (IEC Long Term)
±0.2 dB±0.2 dBPrecision of monitor matching
45 Hz40 HzPort tuning frequency
12.1 liters27 litersInternal cabinet volume
Bass reexBass reexBass principle
2150 Hz (DSP generated)2150 Hz (DSP generated)Crossover frequency
24 dB/oct (Linkwitz Riley, DSP generated)24 dB/oct (Linkwitz Riley, DSP generated)Crossover slope
Esotec 28 mm / 1.1” soft dome, rear chamber,
magnetic uid, 4 mm die-cast aluminum front, pure
aluminum wire voice coil
Esotec 28 mm / 1.1” soft dome, rear chamber,
magnetic uid, 4 mm die-cast aluminum front, pure
aluminum wire voice coil
Tweeter
175 mm / 6.5”, one-piece molded polypropylene
cone, 75 mm / 3” pure aluminum voice coil, magnetic
shielded
240 mm / 10”, one-piece molded polypropylene cone,
100 mm / 4” pure aluminum voice coil
Woofer
100 to 240 VAC, 50 to 60 Hz (auto-select)100 to 240 VAC, 50 to 60 Hz (auto-select)Mains voltage
40 W @ 1/8 max power (IEC 60065)40 W @ 1/8 max power (IEC 60065)Power consumption
Finish
Black anodized aluminum back plateBlack anodized aluminum back plateAmp
Dark gray MDF bafe, Silver foilDark gray MDF bafe, Silver foilCabinet
338 x 216 x 345 mm / 13,3” x 8,5” x 13,6”425 x 275 x 395 mm / 16,7” x 10,8” x 15,5”Dimensions (H x W x D)
9.8 kg / 21.8 lbs15.5 kg / 34.5 lbsWeight
Amplier
Tweeter 200 W PWM amp/Woofer 200 W PWM ampTweeter 200 W PWM amp/Woofer 200 W PWM ampTweeter and woofer

Technical specications
Dynaudio Professional AIR reference manual – 2014-09-28 95
AIR 20 & AIR 25 (Master and Slave)
AIR 20AIR 25Model
Three-way Semi-active Neareld MonitorThree-way Active Neareld MonitorSystem
31 Hz to 22 kHz: ±3 dB28 Hz to 22 kHz: ±3 dBFrequency response (±3 dB)
131 dB peak134 dB peakPeak SPL 1 m, pair (IEC Short
Term)
129 dB peak132 dB peakPeak SPL 2 m, 5.1 (IEC Short
Term)
104 dB RMS107 dB RMSMax SPL 1 m, (IEC Long Term)
±0.2 dB±0.2 dBPrecision of monitor matching
40 Hz35 HzPort tuning frequency
35 liters68 litersInternal cabinet volume
Bass reexBass reexBass principle
390 Hz (DSP generated) and 2600 Hz400 Hz (DSP generated) and 2400 Hz (DSP gener-
ated)
Crossover frequency
12 dB/oct and 6 dB/octCrossover slope
Esotar 28 mm / 1.1” soft dome, neodymium magnet,
rear chamber, magnetic uid, 4 mm steel front, pure
aluminum wire voice coil
Esotar 28 mm / 1.1” soft dome, neodymium magnet,
rear chamber, magnetic uid, 4 mm steel front, pure
aluminum wire voice coil
Tweeter
145 mm / 5,5”, one-piece molded polypropylene
cone, 38 mm / 1,5” pure aluminum voice coil
145 mm / 5,5”, one-piece molded polypropylene
cone, 38 mm / 1,5” pure aluminum voice coil
Midrange
2 x 240 mm / 9,5”, one-piece molded polypropylene
cone, 100 mm / 4” pure aluminum voice coil
240 mm / 9,5”, one-piece molded polypropylene
cone, 100 mm / 4” pure aluminum voice coil
Woofer
100 to 240 VAC, 50 to 60 Hz (auto-select)100 to 240 VAC, 50 to 60 Hz (select)Mains voltage
45 W @ 1/8 max power (IEC 60065)45 W @ 1/8 max power (IEC 60065)Power consumption
Finish
Black painted back plateBlack painted back plateAmp
Black ash with dark gray MDF bafeBlack ash with dark gray MDF bafeCabinet
575 x 310 x 395 mm / 22,6” x 12,2” x 15,5”510 x 535 x 450 mm / 20” x 21” x 17,7”Dimensions (H x W x D)
435 mm / 17,0”490 mm / 19,3”Depth incl. amp and driver
28 kg / 62.2 lbs46 kg / 101 lbsWeight
Amplier
Tweeter & Midrange 200 W amp / Woofer 200 W ampTweeter 300 W amp / Midrange 300 W amp / Woofer
2 x 300 W amp
Tweeter, midrange and woofer

Technical specications
Dynaudio Professional AIR reference manual – 2014-09-28 96
AIR BASE 1 & AIR BASE 2
Active SubwoofersSystem
25 Hz – bssmng: 120 Hz, LFE: 2.5 kHz /
23 Hz – bssmng: 120 Hz, LFE: 2.5 kHz: ±3 dB
Total frequency response:
119 dB peak / 121 dB peakMax. SPL 1 m, one (IEC Short Term)
113 dB peak / 115 dB peak
(no front, rear & center)
Max. SPL 2 m, 5.1 (IEC Short Term)
±0.2 dBPrecision of monitor matching
30 Hz / 27 HzPort tuning frequency
37 liters / 78 litersInternal cabinet volume
Bass reexBass principle
1 / 2 pcs. 240 mm / 10”, one-piece molded polypro-
pylene cone, 100 mm / 4” pure aluminum voice coil
Woofer
100 to 240 VAC, 50 to 60 Hz (auto-select)Mains voltage
40 W @ 1/8 max power (IEC 60065)Power consumption
Finish
Black anodized aluminum back plateAmp
Dark gray MDF bafe, Silver foilCabinet
310 x 480 x 420 mm / 900 x 310 x 420 mm
(12.2” x 18,9” x 16.5” / 35.4” x 12.2” x 16.5”)
Depth incl. amp and driver: 447 mm / 447 mm (17.6”
/ 17.6”)
Dimensions (H x W x D)
18 kg / 29 kg (39.6 lbs / 63.8 lbs)Weight
250 W PWM ampAmplier

Technical specications
Dynaudio Professional AIR reference manual – 2014-09-28 97
AIR Base 12
Active SubwooferSystem
22 Hz to 200 Hz ±3 dB, depending on settingTotal frequency response
123 dB peakMax. SPL 1 m, one (IEC Short Term)
117 dB peakMax. SPL 2 m, 5.1 (IEC Short Term)
±0.2 dBPrecision of monitor matching
24 HzPort tuning frequency
41 litersInternal cabinet volume
Bass reex. Down-ring portBass principle
1 pcs. 300 mm/12”, two-piece molded polypropylene
cone, 75 mm/3” pure copper voice coil
Woofer
100 to 240 VAC, 50 to 60 Hz (select)Mains voltage
Idle: 50 W/Max: 375 WPower consumption
Finish
Black painted metal back plateAmp
Black ash with dark gray MDF bafeCabinet
460 x 360 x 502 mm (18.1 x 14.2 x 19.7)
Depth incl. amp and driver: 550 mm (not moving)
Height incl. “feet”: 738
Dimensions (H x W x D)
38 kg (83.8 lbs)Weight
500 W ampAmplier

Technical specications
Dynaudio Professional AIR reference manual – 2014-09-28 98
AIR Base 24
Active SubwooferSystem
20 Hz to 200 Hz ±3 dB, depending on settingTotal frequency response
126 dB peakMax. SPL 1 m, one (IEC Short Term)
120 dB peakMax. SPL 2 m, 5.1 (IEC Short Term)
±0.2 dBPrecision of monitor matching
22 HzPort tuning frequency
77 litersInternal cabinet volume
Bass reex. Down-ring portBass principle
2 pcs. 300 mm/12”, two-piece molded polypropylene
cone, 75 mm/3” pure copper voice coil
Woofer
100 to 240 VAC, 50 to 60 Hz (select)Mains voltage
Idle: 50 W/Max: 375 WPower consumption
Finish
Black painted metal back plateAmp
Black ash with dark gray MDF bafeCabinet
720 x 360 x 502 mm (28.3 x 14.2 x 19.7)
Depth incl. amp and driver: 550 mm (not moving)
Height incl. “feet”: 738 mm
Dimensions (H x W x D)
60 kg (132.3 lbs)Weight
700 W ampAmplier

Technical specications
Dynaudio Professional AIR reference manual – 2014-09-28 99
Room size and typical listening distance
Typical listening
distance
AIR 25AIR 20AIR 15AIR 6
1.5 to 3 m / 5 to 10.2 ft1.5 to 2.5 m / 5 to 8,5 ft1.2 to 2 m / 4 to 7 ft
Typical room size
AIR 25AIR 20AIR 15AIR 6
80 to 130 m
3
/
2800 to 4600 ft
3
75 to 125 m
3
/
2600 to 4400 ft
50 to 100 m
3
/
1600 to 3500 ft
Two or three AIR
BASE 1’s
Two or three AIR
BASE 1’s
AIR BASE 2AIR BASE 1
75 to 125 m
3
/
2600 to 4400 ft
3
50 to 100 m
3
/
1600 to 3500 ft
3
50 to 100 m
3
/
1600 to 4400 ft
3
30 to 60 m
3
/
1000 to 2000 ft
3

Technical specications
Dynaudio Professional AIR reference manual – 2014-09-28 100
General specications for AIR 6, AIR 15, AIR 20, AIR 25,
AIR BASE 1, AIR BASE 2, AIR BASE 12 & AIR Base 24
System sample rates
192 and 176.4 via Dual Wire (optional Digital Card
required) and 96, 88.2, 64, 48, 44.1 or 32 kHz
Internal sample rate
AIR Masters only
XLR (2 channels AES/EBU in)
3 x RJ45 proprietary TC LINK
I/O Connectors
AES/EBU (24 Bit)Formats
BNC, 75 ohm, 0.6 to 10 VppWord clock input
2 x 16 character dot matrixDisplay
Menu system / four buttonsOperation
Analog input option
XLR balanced (pin 2+, pin 3-)Input connectors
10/3 kOhm (Balanced/unbalanced)Impedance
+9, +15, +21, +27 dBuSelectable full scale input level
> 113 dB typ. (unweighted), BW: 20 Hz to 20 kHzDynamic Range
< -105 dB typ. @ 1 kHz, -3 dBFSTHD+N
< -120 dB, 20 Hz to 20 kHzCrosstalk
24 Bit (Dual bit delta sigma sampling at
4.1/5.6/6.1/6.1 MHz)
A to D Conversion
AIR Slaves only
2 x RJ45 proprietary TC LINKI/O Connectors

Technical specications
Dynaudio Professional AIR reference manual – 2014-09-28 101
AIR Remote
Black anodized aluminum and plasticFinish
120 x 70 x 35 mmDimensions (D x W x H)
250 gWeight
1 x RJ45 proprietary TC LINKI/O Connectors
EMC
EN 55103-1 and EN 55103-2, FCC part 15 class B, CISPR 22 class BComplies with
Safety
IEC 60065, EN 60065, UL 6500 and CSA E60065 CSA FILE #LR108093Certied to
Environment
32° F to 122° F (0° C to 50° C)Operating Temperature
-22° F to 167° F (-30° C to 70° C)Storage Temperature
Max. 90 % non-condensingHumidity
Warranty
1 year on parts and laborParts and labor

Technical specications
Dynaudio Professional AIR reference manual – 2014-09-28 102
General specications for all products
EN 55103-1 and EN 55103-2, FCC part 15 class B,
CISPR 22 class B
EMC complies with
IEC 60065, EN 60065, UL 6500 and CSA E60065
CSA FILE #LR108093
Safety certied to
32° F to 122° F
(0° C to 50° C)
Environment operating temperature
-22° F to 167° F
(-30° C to 70° C)
Storage temperature
Max. 90 % non-condensingHumidity
2 years on parts and laborWarranty

Technical specications
Dynaudio Professional AIR reference manual – 2014-09-28 103
Delay in system
Digital InputAnalog Input *)Sample Rate
Converter kHzSamples @
Input Rate
millisecondscentimetersSamples @
Converter Rate
millisecondscentimeters(AES or WC In)
kHz
64932.91100731.143932
88.2681.5453730.832844.1
96400.8329730.762648
64340.5318731.143964
88.2340.3913730.832888.2
96340.3512730.762696
* In Analog Input mode without WC Input selected, the system runs on the Master monitor’s own 96 kHz clock.
Due to continuous development, these specications are subject to change without notice.


Certicate of conformity
Dynaudio Professional AIR reference manual – 2014-09-28 105
TC Electronic A/S, Sindalsvej 34, 8240 Risskov, Den-
mark, hereby declares on own responsibility that follow-
ing products:
►
AIR 6
►
AIR 15
►
AIR 20
►
AIR 25
►
AIR BASE 1
►
AIR BASE 2
►
AIR BASE 12
►
AIR BASE 24
►
AIR REMOTE
that are covered by this certicate and marked with
CE-label conform with following standards:
►
EN 60065 (IEC 60065) – Safety requirements for
mains operated electronic and related apparatus
for household and similar general use
►
EN 55103-1 Product family standard for audio, vid-
eo, audio-visual and entertainment lighting control
apparatus for professional use. Part 1: Emission.
►
EN 55103-2 Product family standard for audio, vid-
eo, audio-visual and entertainment lighting control
apparatus for professional use. Part 2: Immunity.
With reference to regulations in following directives:
73/23/EEC, 89/336/EEC
Issued in Risskov, December 2002
Mads Peter Lübeck
Chief Executive Ofcer

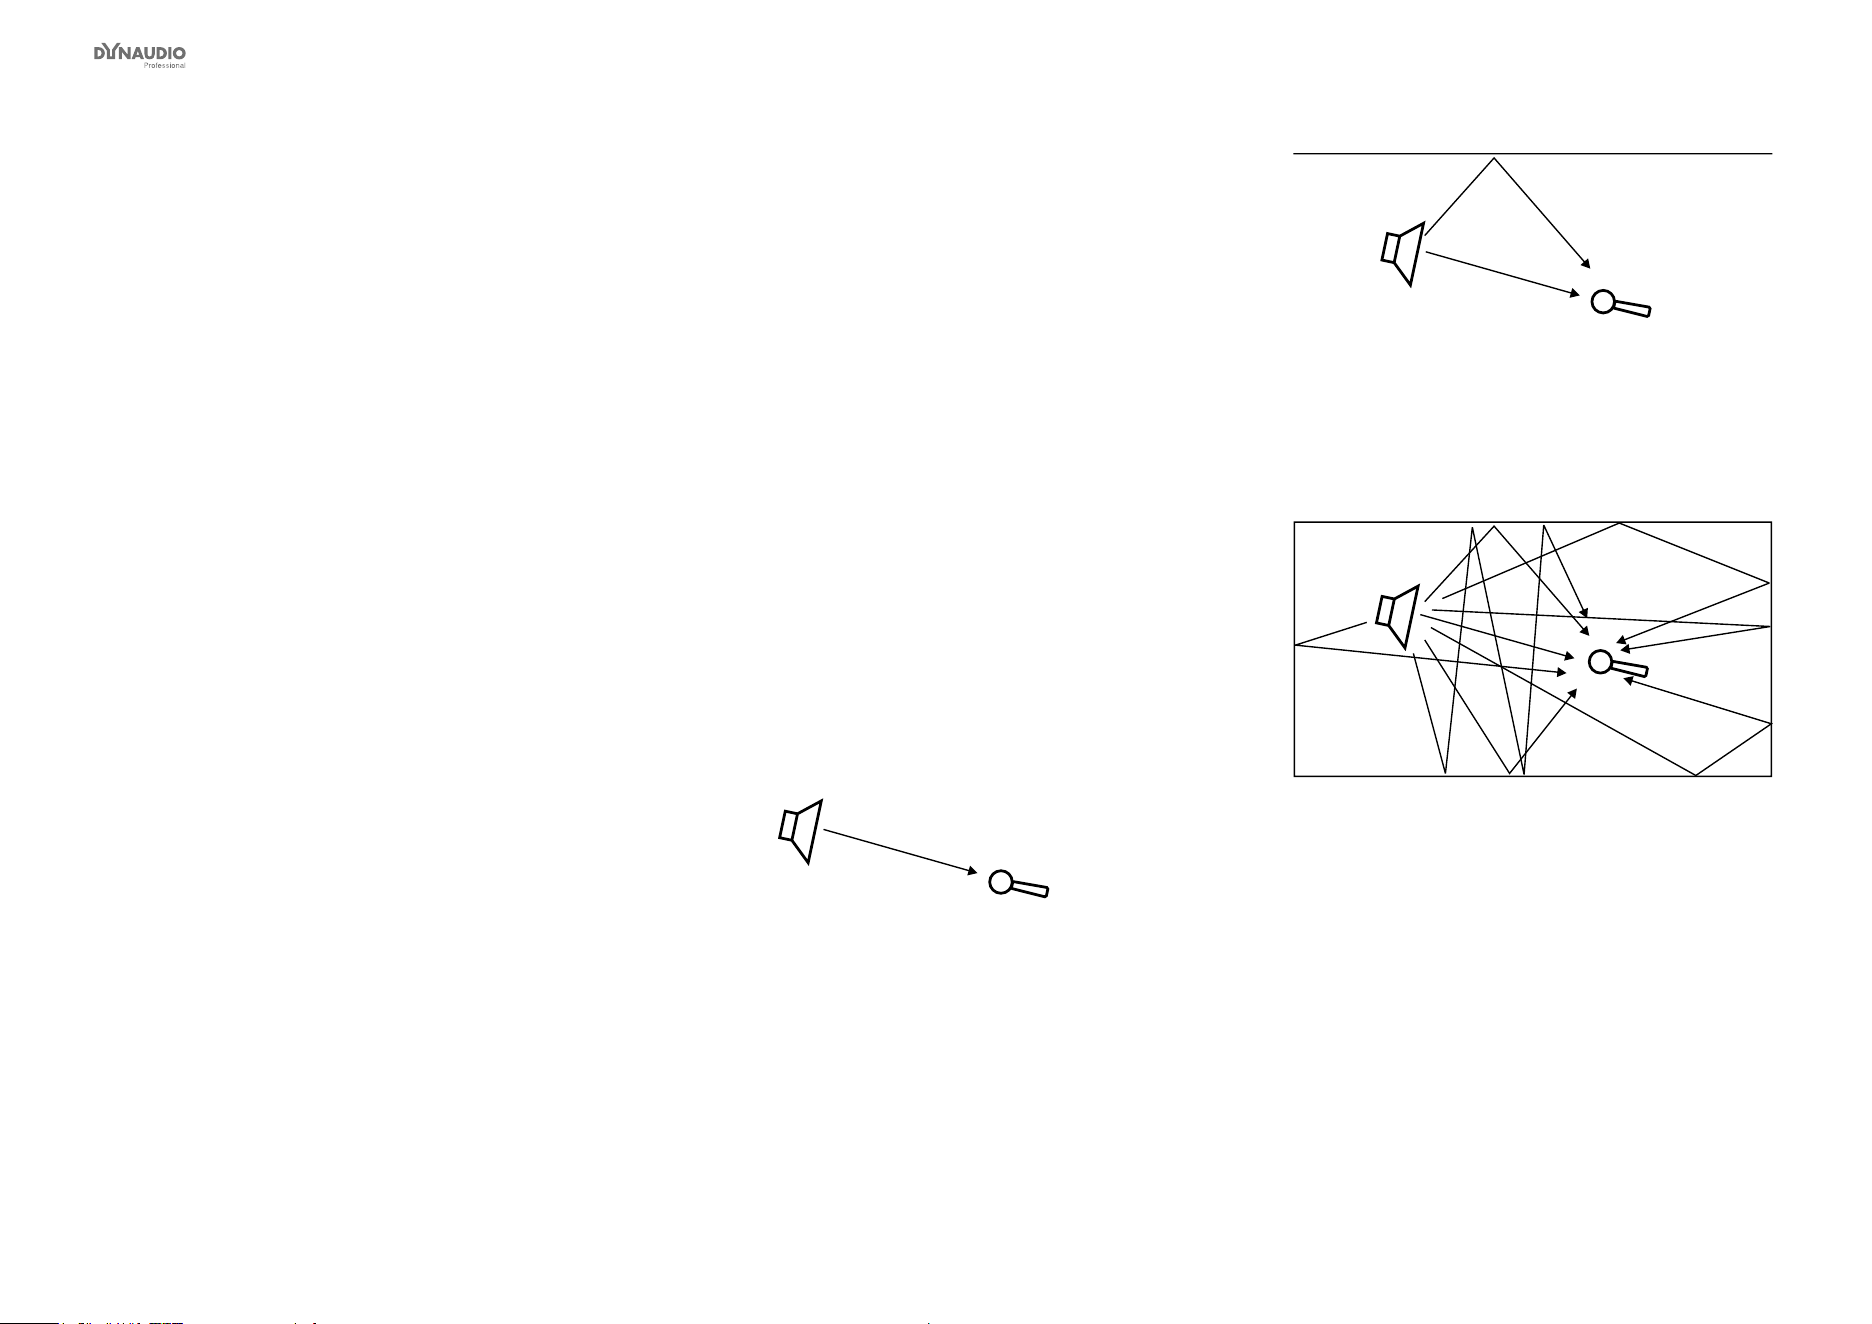
Appendix: Acoustics
Dynaudio Professional AIR reference manual – 2014-09-28 107
Introduction
When we talk about making a room “sound right”, we
are usually dealing with room acoustics. As a science,
acoustics has been around for about a hundred years.
Until then, good acoustics happened by experiment, by
experience, or simply by accident. Today, we know a lot
more about the parameters that inuence the “sound”
of a room.
A control room should basically act as neutral as possi-
ble. But this is not always the case. Let’s take a look on
some of the issues that we need to be aware of.
Good acoustics
Here is a list of important parameters concerning good
acoustics.
►
Proper reverberation time
►
Good sound distribution
►
Adequate sound pressure level
►
Low background noise level
►
No (utter) echo
Now let us go through these issues one by one.
Reverberation time
The reverberation time is dened as the time un-
til a sound is attenuated by 60 dB after the source is
stopped.
In real life, we can experience reverb times from ap-
proximately 0 seconds (outdoors or in anechoic cham-
bers) to around 10 to 12 seconds. In special reverb
chambers, the time may exceed 20 seconds.
Control rooms should normally have a reverb time
around 0.2 to 0.3 seconds.
Why do we have reverberation?
The speed of the propagating sound wave is very slow
– at least compared to light, which travels at approxi-
mately 1130 feet or 340 meters per second.
If there are no reecting surfaces between the sound
source and our ears, only the direct sound is heard, and
there is no reverberation.
If there is a single reecting surface, we may hear the
reected sound in one way or another – but there is still
no reverberation.
If the sound is generated in a typical room, there are
many reections. Each of these reections travels dif-
ferent paths, with varying distances to the listener. Each
time the sound hits an (absorbing) surface, it will lose
some energy.
Fig. 57: One sound source, one receiver and no room.
Only the direct sound is received.
Fig. 58: One sound source, one receiver, and one
reecting surface. The sound is received twice. In the
control room, this is normally experienced as comb
ltering – see later.
Fig. 59: One sound source and one receiver in a
typical room. The sound impulse is reected on
many surfaces. The reections are perceived as
reverberation.

Appendix: Acoustics
Dynaudio Professional AIR reference manual – 2014-09-28 108
Sabine’s formula
Wallace Clement Sabine (1868-1919) is the father of
modern acoustics. He found that reverberation time is
described by a relationship between the room size and
the amount of absorption in the room. Larger rooms
will have longer reverberation. More absorption leads
to shorter reverberation. This can be expressed in Sa-
bine’s formula:
T = 0.161 * V / A
where:
►
T: Reverberation time in seconds
►
V: Volume in m
3
►
A: Absorption in m
2
Sabine
►
0.161: A constant (to adapt the calculation to the
actual units)
One square meter (1 m
2
) Sabine is comparable to an
open window with an area of one square meter. The
sound that hits this hypothetical window will disappear
and never return. In other words: One square meter Sa-
bine is one square meter with full absorption.
The basic formula sounds simple – but the problem is
that the materials in the room will absorb differently at
different frequencies. The absorption may range from
nothing (fully reective) to total absorption.
A proper reverb time should be constant with frequency,
but this is not always the case because of the behav-
ior of the materials in the room. The low frequencies
are the hardest to control. This is why the reverberation
time against frequency in practice may look like this:
Fig. 60: Reverberation time measured in a control
room. From 250 Hz and above, the curve is nicely
placed around 0.3 seconds. But for lower frequencies,
the reverb time rises to 0.75 seconds, which is too
much.
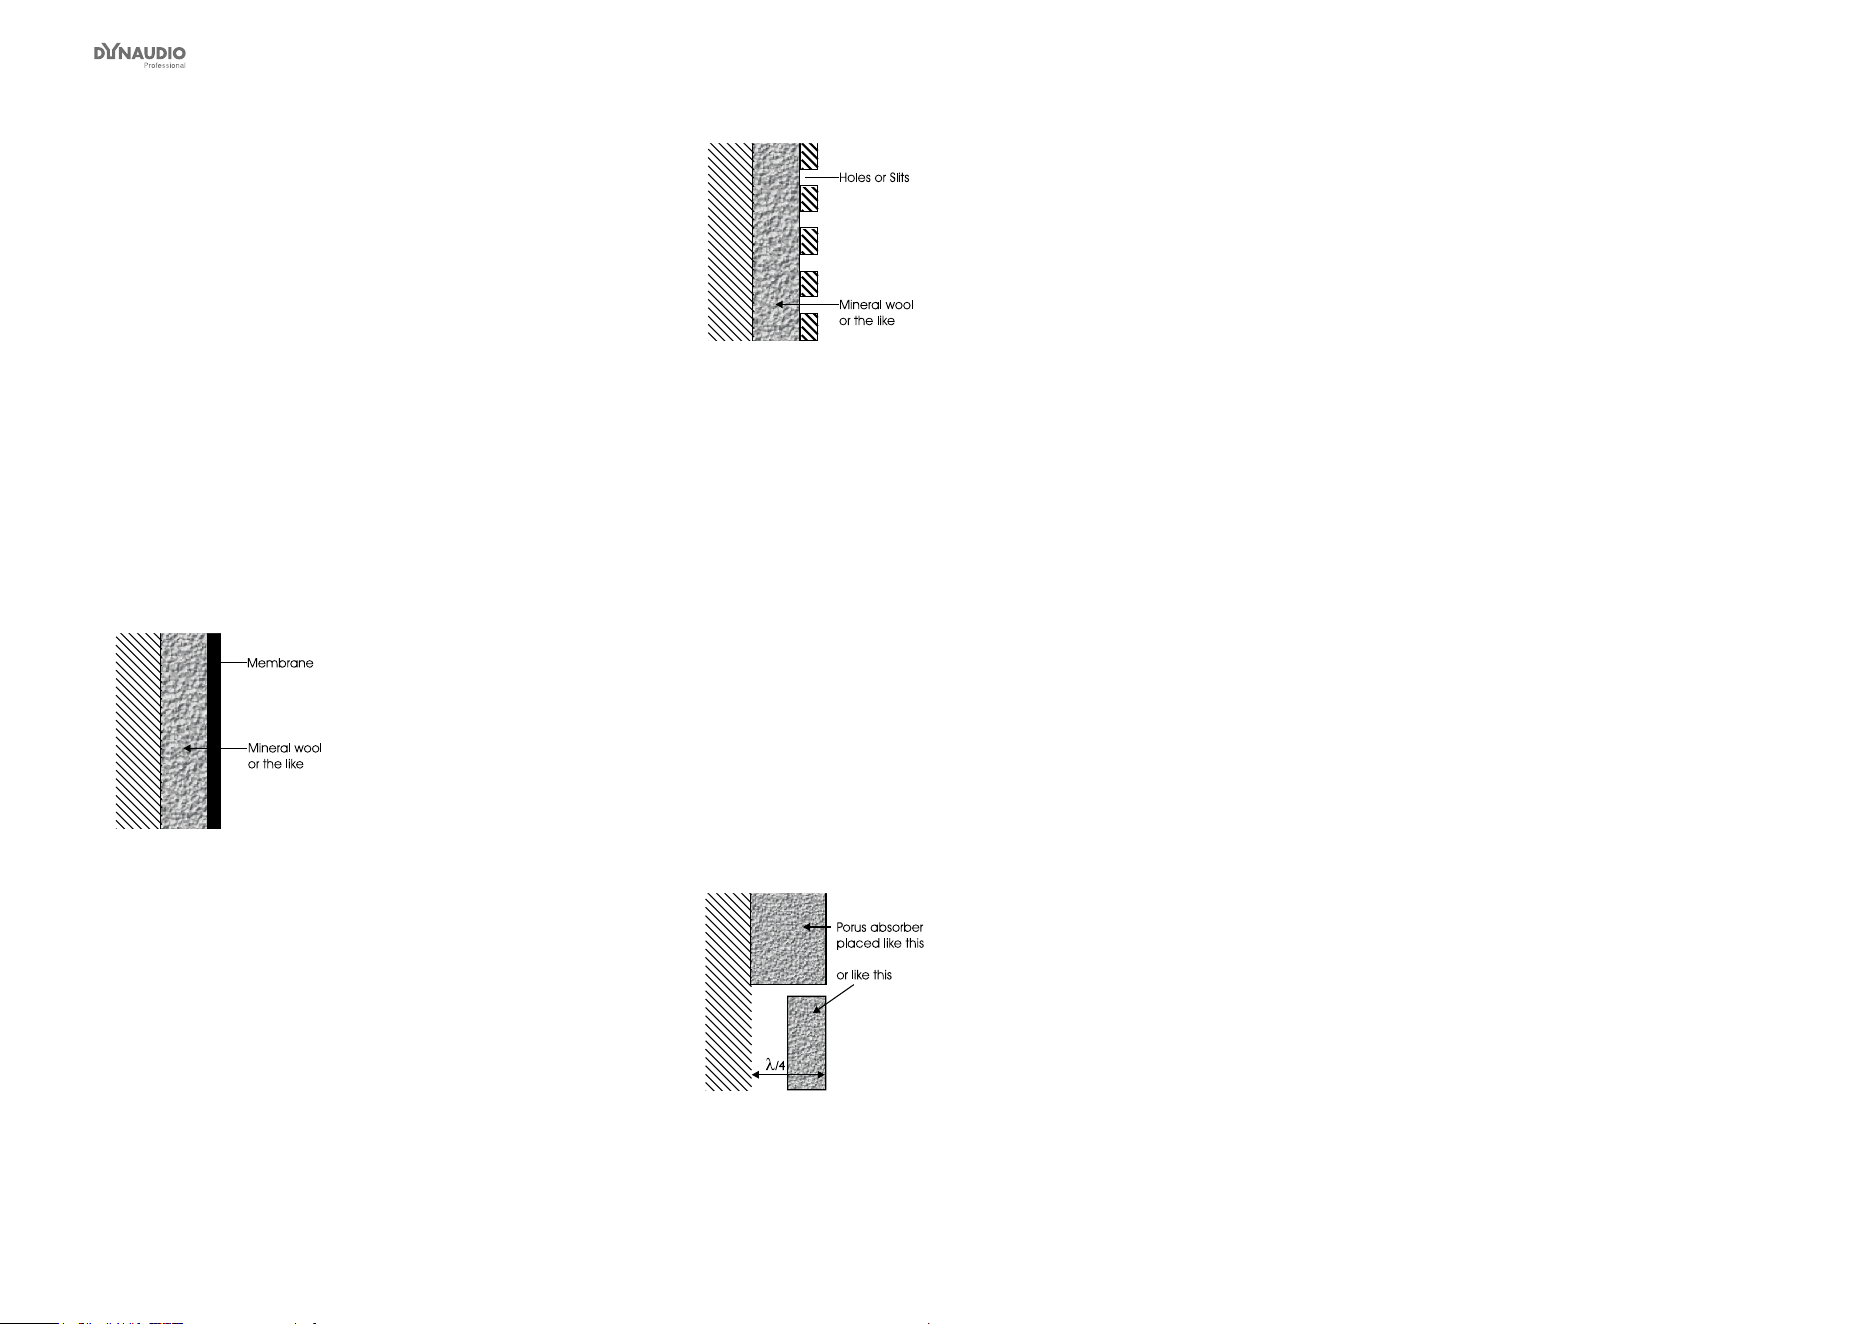
Appendix: Acoustics
Dynaudio Professional AIR reference manual – 2014-09-28 109
Absorbers
All materials in a room act acoustically – even if they
are not so-called “acoustical materials”. Basically, there
are three kinds of absorbers:
Membrane absorbers
This class of absorber includes wooden oors, win-
dows, doors, etc. These absorbers provide absorption
in the low end of the frequency range. Under normal
conditions, large areas of a basic room belong to this
class. While their efciency is normally not very high,
specially designed membrane absorbers can be very
effective.
Fig. 61: Membrane absorbers
Resonance absorbers
Resonance absorbers include slit panels, perforated
plates, Helmholtz resonators etc. These absorbers are
normally used for midrange frequencies. The absorp-
tion is medium to high.
Fig. 62: Resonance absorbers
Porous absorbers
These absorbers include mineral wool, carpets, cur-
tains, and so on. They can be very effective, but the
thickness of the material has to be taken into account.
Thin layers will only absorb the highest frequencies.
Think of a rehearsal room in a concrete basement
where the only damping is a carpet on the oor – this
will do very little for low frequencies!
To absorb a given frequency (and all frequencies
above), the thickness of the absorber must be the quar-
ter of the wavelength of that frequency. Put differently:
The front of the material must be placed at a distance
of one quarter of the wavelength.
Fig. 63: Porous absorbers

Appendix: Acoustics
Dynaudio Professional AIR reference manual – 2014-09-28 110
Diffusors
A diffusor provides diffuse reection of the sound radiat-
ed against it. Diffusers can be very useful in situations
where reections are disturbing the sound image and it
is not advisory to add further absorption. So in order to
reduce utter echoes, comb ltering etc., special ele-
ments can be placed on the “disturbing” surface. These
elements must have dimensions comparable to the fre-
quencies at which diffusion is wanted.
Absorption or diffusion?
Fig. 64: Absorption versus diffusion
A special technique developed by Manfred Schroed-
er is very capable in making a smooth and controlled
diffusion. These “Schroeder Diffusors” are available as
prefab modules.
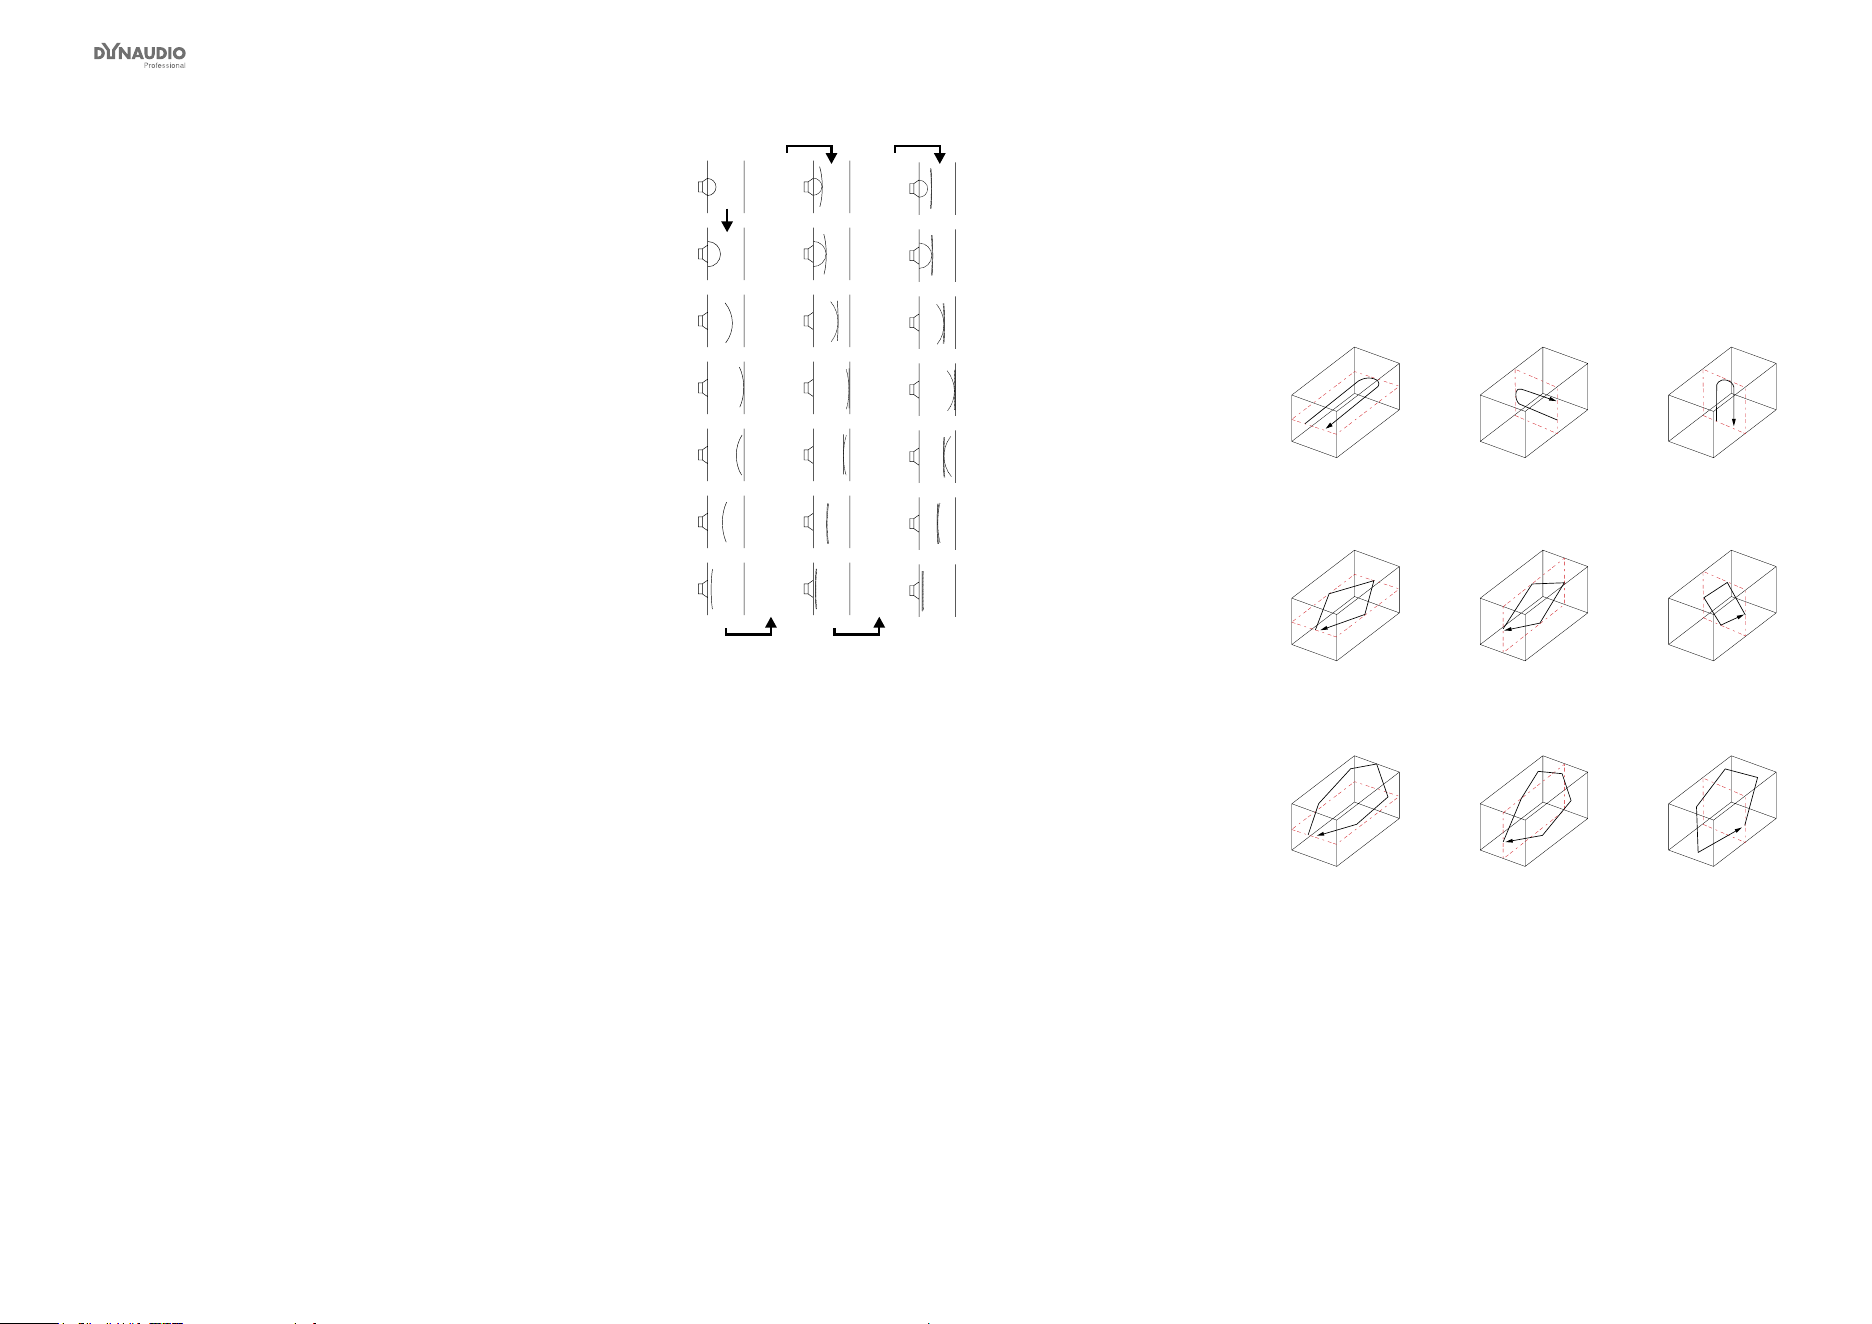
Appendix: Acoustics
Dynaudio Professional AIR reference manual – 2014-09-28 111
Standing waves
Standing waves exist in all kind of rooms. Important
parameters that will determine the frequencies around
which the phenomenon exists as well as the distribution
of these standing waves are the shape of the room, the
dimensions of the room, and the relationship between
the dimensions of the room.
How do standing waves occur?
Imagine a sound source. When a sound is emitted, the
sound wave will propagate in all directions if no obsta-
cles in sight. This will of course happen with the speed
of sound.
Now, if the sound source is placed inside a room, the
sound wave will hit the boundaries of the room. If the
boundaries consist of acoustically hard (reective) sur-
faces, the sound is reected. If the angle of incidence
is 90º, the sound will be reected right back where it
came from. Under certain circumstances – for instance
if the sound is reected between two parallel walls –,
the sound wave will meet itself again. This becomes a
problem when the sound wave not only meets itself, but
when it meets itself in phase. And this will happen when
the distance between the walls is half a wavelength of
the radiated sound wave. Or one whole wavelength – or
1.5, 2, 2.5 and so on.
This phenomenon is called standing waves. Actually,
the sound wave is not “standing”. But it is experienced
as that because the sound pressure maxima and mini-
ma are located in xed places in the room.
Fig. 65: The sound eld is initially radiated exposing
a radial wave front – but within a few reections, the
sound eld has obtained a plane wave front.
Room modes
These special frequencies are also called room modes.
Standing waves between parallel walls are called axial
modes. Other modes exist – for instance, tangential
modes and radial modes (see the following illustra-
tions). Normally, the axial modes are the strongest.
Fig. 66: Room modes: Axial modes
Fig. 67: Room modes: Tangential modes
Fig. 68: Room modes: Radial modes
Standing waves are characterized by having a maxi-
mum sound pressure at the boundaries of the room.
Depending on the frequency there are one or more dips
across the room.
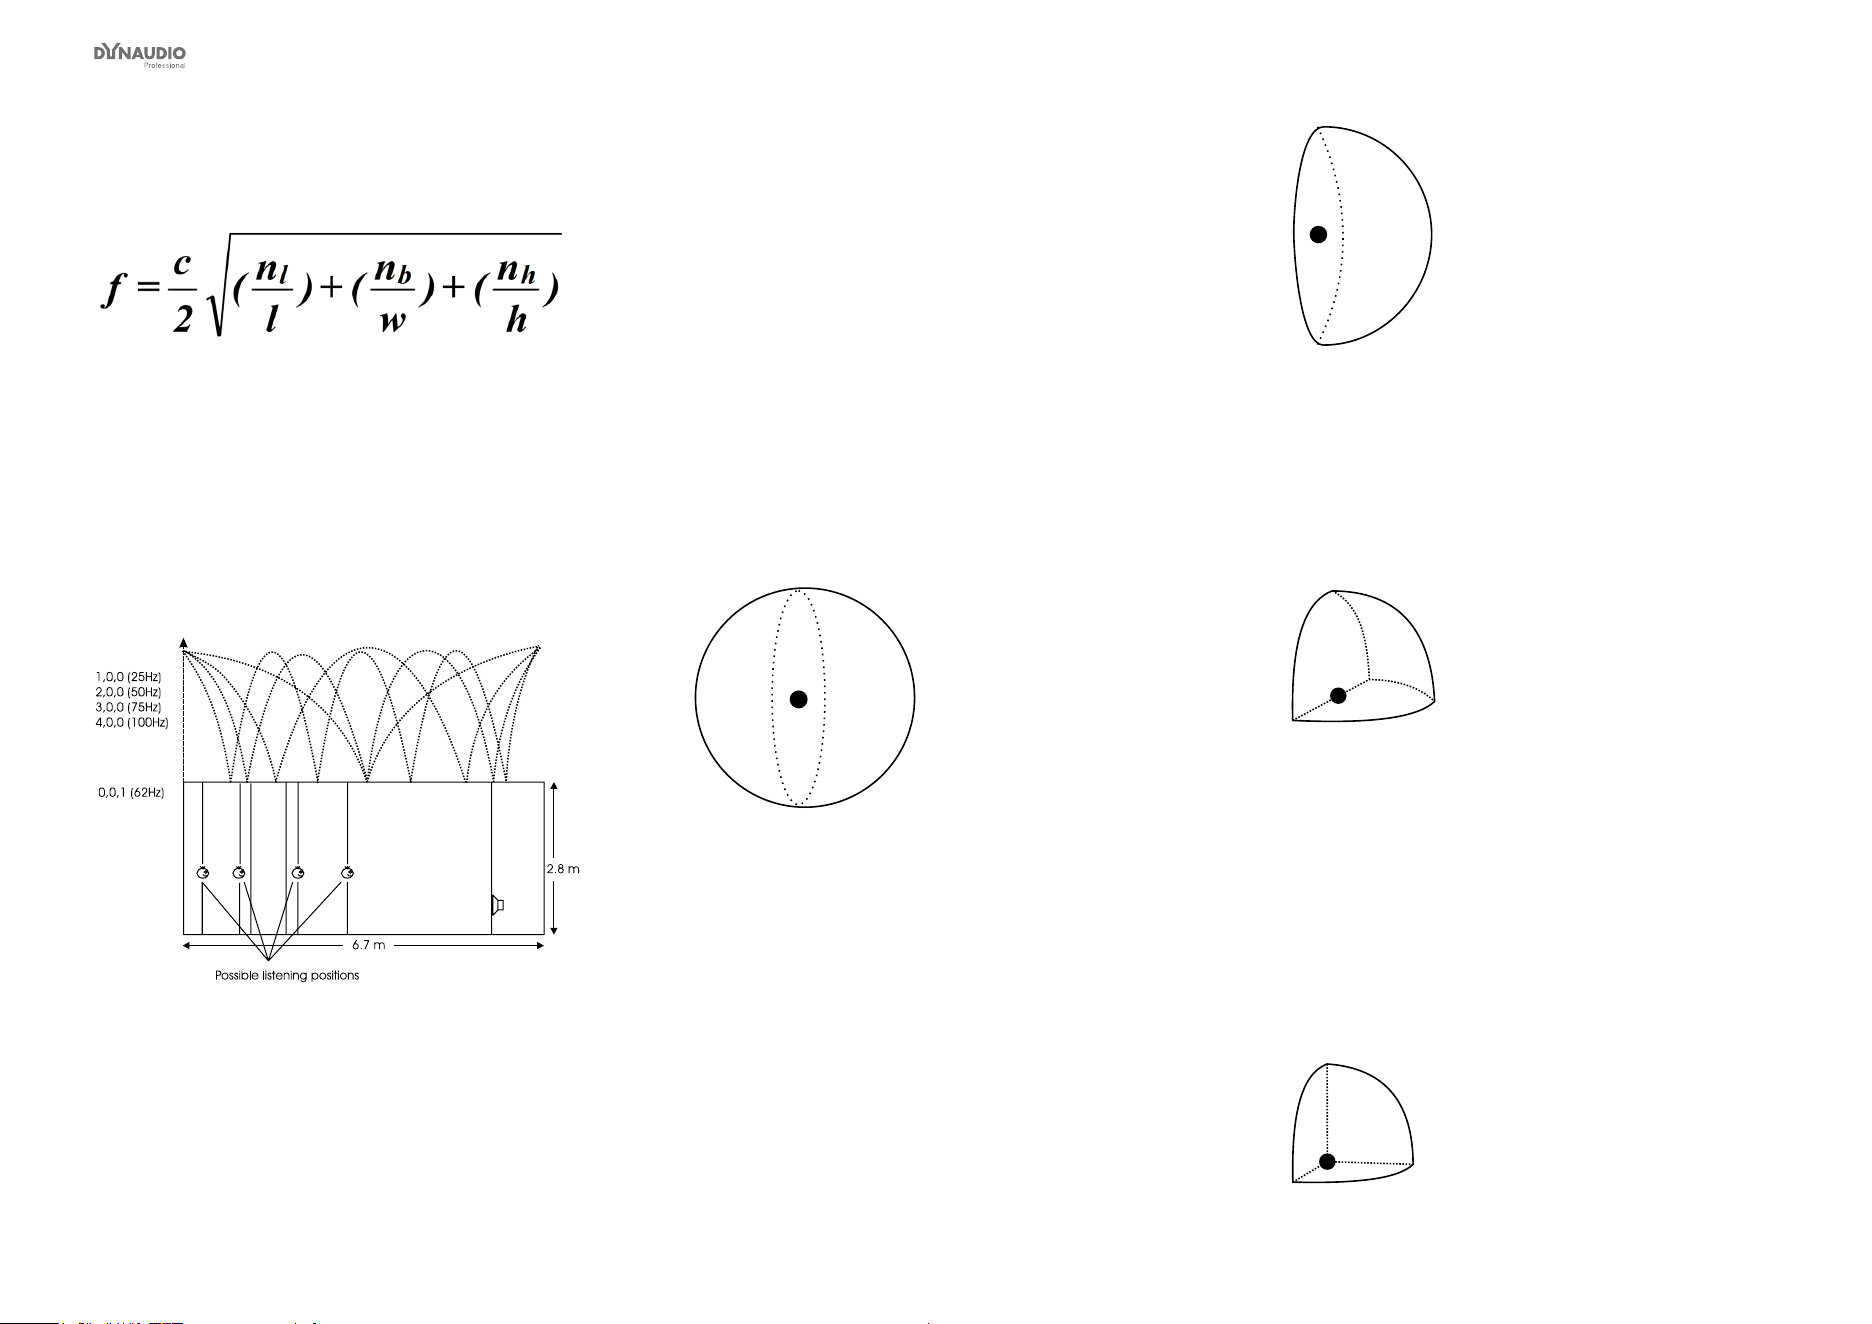
Appendix: Acoustics
Dynaudio Professional AIR reference manual – 2014-09-28 112
In a box-shaped room, the frequencies can be calculat-
ed as follows:
where
►
f = frequency in Hz
►
c = speed of sound (approx. 340 m/s or 1130 ft/s)
►
l = length of the room
►
w = width of the room
►
h = height of the room
►
n = integer from 0 and up
Fig. 69: Maxima of standing waves
The curves shown here express the area of the room
where the respective frequency is audible. At the min-
ima, that frequency’s level is much lower (sometimes
-40 dB compared to the maximum).
If the room’s length, width and even height are identical,
obtaining an even sound distribution can be very hard.
Prohibiting standing waves
Parallel walls in the room should be prevented. This will
suppress the strongest modes.
When placing monitors, it is important that as few
modes as possible are excited. This is why no monitor
should be placed at the maximum of a standing wave.
When monitors are built into walls, you should therefore
make sure that the opposite wall is not parallel to the
wall with the monitor.
At low frequencies, a monitor can be considered as ra-
diating its sound energy in all directions. This is also
called a 4 π radiation.
Fig. 70: 4 π radiation
When the monitor is placed close to a solid boundary
(for instance a wall), the sound energy that should have
been radiated in the direction of the wall is radiated into
the free half space instead. Hence the sound pressure
is doubled in the half space, which yields +6 dB. This is
also called a 2 π radiation.
Fig. 71: 2 π radiation
When the monitor is placed against two boundaries (for
instance in a corner limited by two walls), it is now ra-
diating its energy to the quarter space. Accordingly, the
sound pressure is doubled twice, which yields +12 dB.
This is also called a π radiation.
Fig. 72: π radiation
When the monitor is placed against three boundaries
(for instance in a corner limited by the oor and two
walls), the sound is radiated into 1/8 of the space.
Compared to free space, the sound pressure now is
increased by 18 dB. This is also called π/2 radiation.
In practice, placing a monitor close to boundaries will
inuence the frequency range below 125 to 150 Hz.
Fig. 73: π/2 radiation
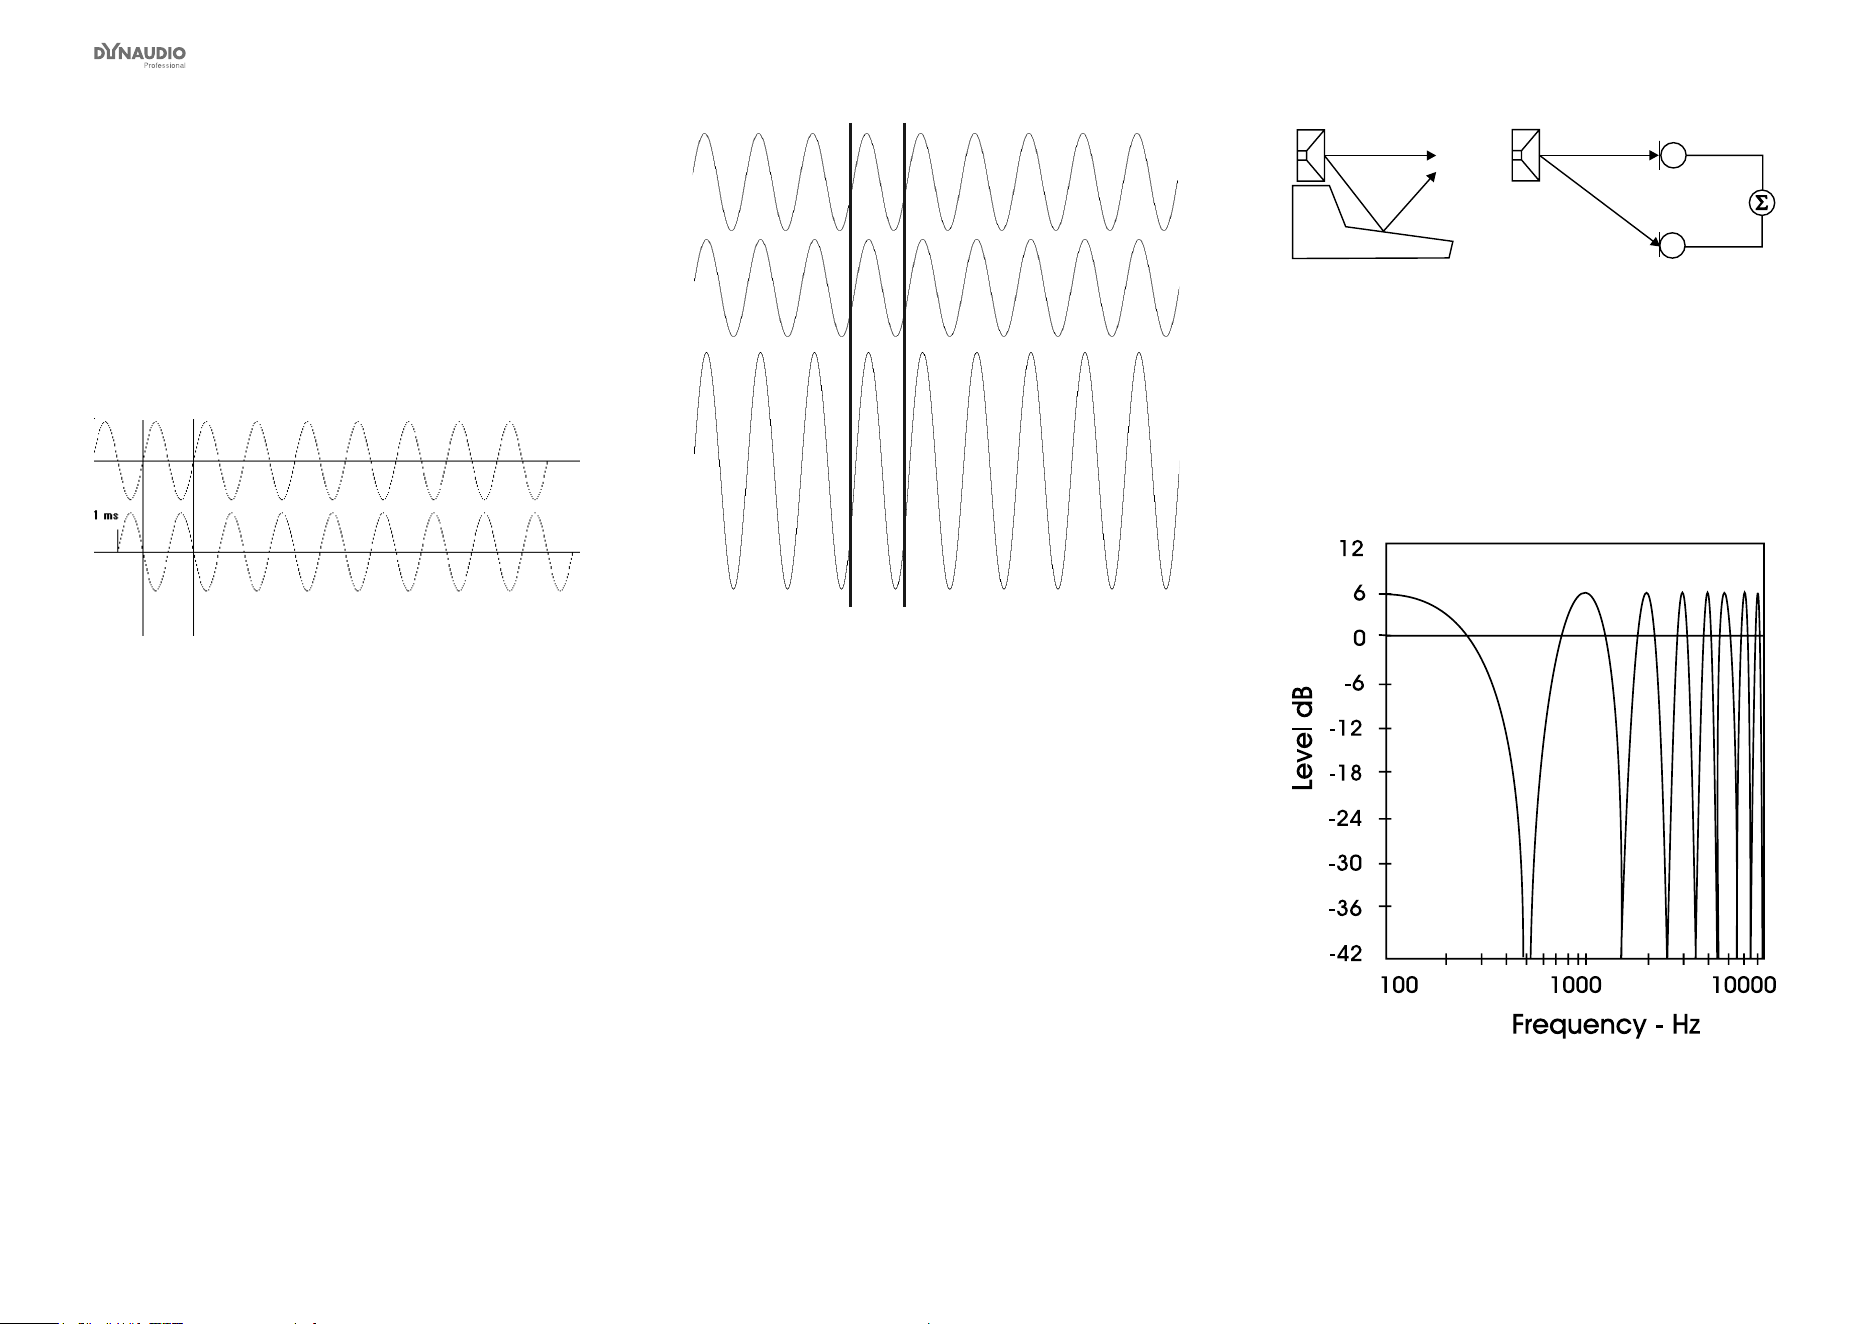
Appendix: Acoustics
Dynaudio Professional AIR reference manual – 2014-09-28 113
Comb ltering
The ltering function that arises when a signal is added
to itself after having been delayed in time is called a
comb lter.
The resulting frequency response resembles a comb,
hence the name.
Fig. 74: Two 500 Hz sinusoidal tones added. The
second tone is delayed 1 millisecond, hence the sum
is zero.
Fig. 75: Two 1 kHz sinusoidal tones added. The
summed level is doubled (+6 dB).
The comb lter function is almost never intentional – but
it is heard all the time in audio productions, where it can
arise both for acoustical and electrical reasons.
Acoustically, comb lter effects typically occur when
part of the sound travels from source to recipient both
on a direct path and via a single reective surface.
This reection must be attenuated at least 10 dB and
preferably 15 dB in order for it not to have an effect on
the sound eld at the recipient’s position. Electrically,
the phenomenon arises when two microphones with a
certain distance between them capture the same sig-
nal and the level from each microphone is of the same
order of magnitude.
Fig. 76: Two typical situations in which comb ltering
occurs, either acoustically or electrically
Generally speaking, all digital signal processing takes
time. This means in practice that comb lter effects can
arise if you send a signal through a signal processor
and combine the processed (and hence delayed) signal
with the original.
Fig. 77: An example of a comb lter effect created by
combining two signals with the same amplitude and
a one millisecond delay between them. Dips occur
due to cancellation at 500 Hz, 1.5 kHz, 2.5 kHz etc.,
and the two signals’ levels double (+6 dB) at low
frequencies with a full wavelength’s delay at 1 kHz,
2 kHz, 3 kHz etc.

Appendix: Acoustics
Dynaudio Professional AIR reference manual – 2014-09-28 114
Dip frequencies
Cancellation occurs for a comb lter at all the frequen-
cies where the two signals are in opposite phase. This
occurs when the time delay comprises duration of 0.5,
1.5, 2.5 etc. periods. At 1 kHz, the period is 1 millisec-
ond. Half of the period is 0.5 milliseconds.
If a time delay of precisely 0.5 millisecond occurs, this
will result in cancellation not only at 1 kHz, but also at
2 kHz, 3 kHz, 4 kHz etc.
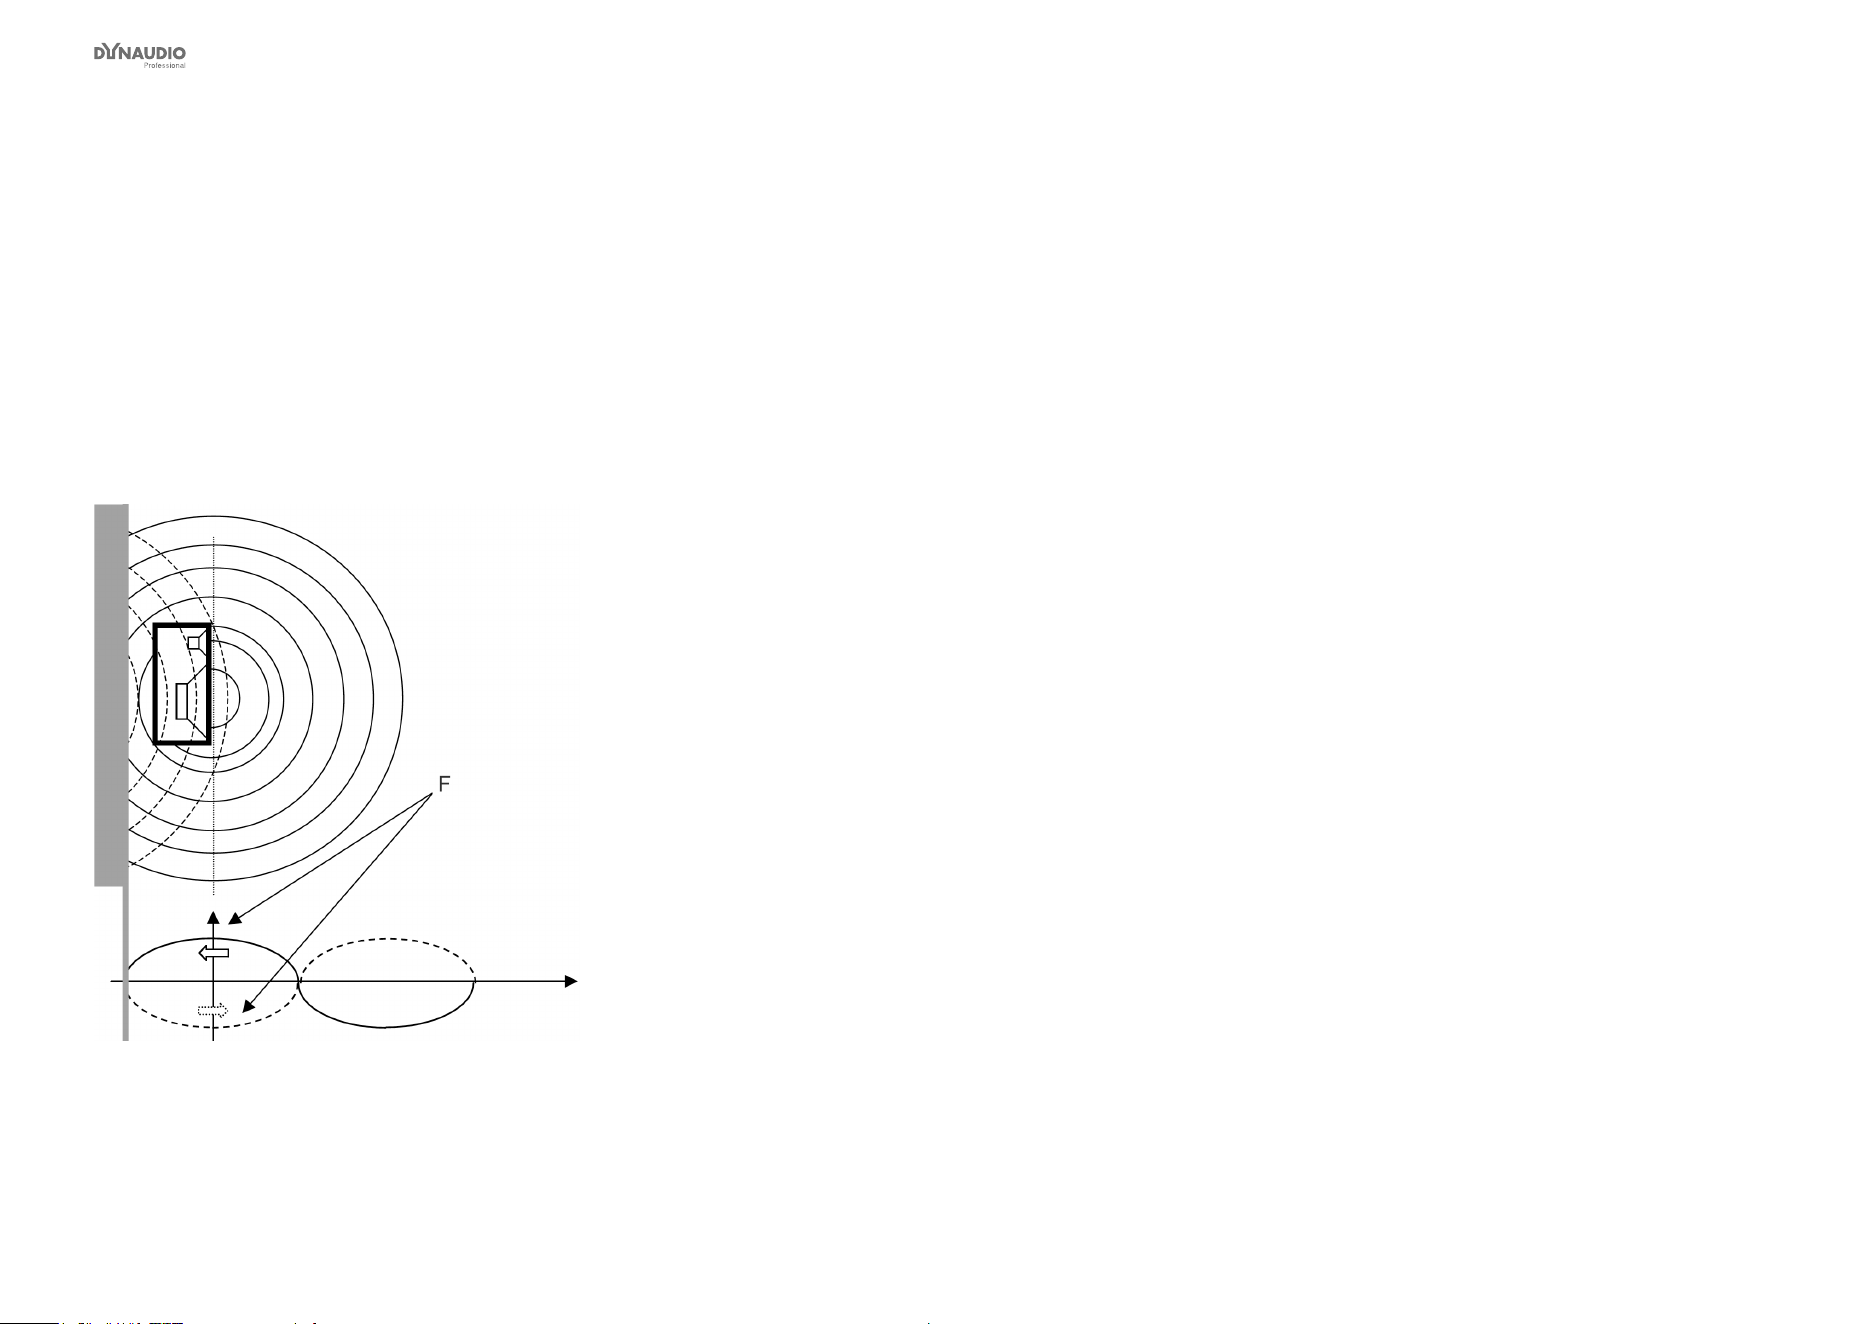
Appendix: Acoustics
Dynaudio Professional AIR reference manual – 2014-09-28 115
Rear wall cancellation
When the monitor is set up at some distance in front of
a wall, reections from the wall may occur and inuence
the perceived frequency response. This could result in
comb ltering if all frequencies produced by the monitor
were radiated in all directions. But monitors are typically
only omnidirectional at low frequencies.
The result of the reection is a single or a few dips in the
frequency response perceived in front of the monitor.
Fig. 78: A frequency (F) that has a wavelength of four
times the distance to the rear wall is canceled because
of the oppositely phased reection.
The dip – or cancellation frequency – depends on the
distance to the wall. If the distance is 1 meter, the rst
dip frequency will occur at a frequency with a wave-
length of 4 meters.
l = c / f
where
►
l = wavelength [meters or feet)
►
c = speed of sound (meters/second or feet/second)
►
f = frequency [Hz]
Hence
►
4 = 344 / f
►
f = 86 Hz
A closer position will result in a cancellation at a higher
frequency. This is then limited by the frequency where
the monitor becomes directional and does rot radiate
sound to the rear.
A farther position will result in cancellation at a lower
frequency. This is limited by the distance being so long,
that the reected sound is attenuated due to the long
extra path travel.

Appendix: Acoustics
Dynaudio Professional AIR reference manual – 2014-09-28 116
Subwoofers
A subwoofer is a monitor that reproduces low frequen-
cies. The purpose is to take over from the main mon-
itor(s) as frequencies approach the lower end of the
frequency range – approximately below 120 Hz. For
professional monitor systems, it is commonly preferred
to use subwoofers below approximately 80 Hz – but of
course, the best solution depends on the performance
of the main monitors.
The low frequency contents of just one or all the main
channels can be directed to one subwoofer.
Psychoacoustics tells us that there is no directional in-
formation in audio signals below approximately 120 Hz.
Accordingly, a subwoofer should be placed in a position
where the best distribution is achieved. However, it is
very important to reduce subwoofer distortion to an ab-
solute minimum, because distortion will add harmonics
(2, 3, 4 etc. times the frequency reproduced). Especially
the third harmonic may dominate the signal. Reproduc-
ing a frequency of 100 Hz can result in the generation
of an audible frequency component at 300 Hz, which
presents directional information to the human hearing
system.
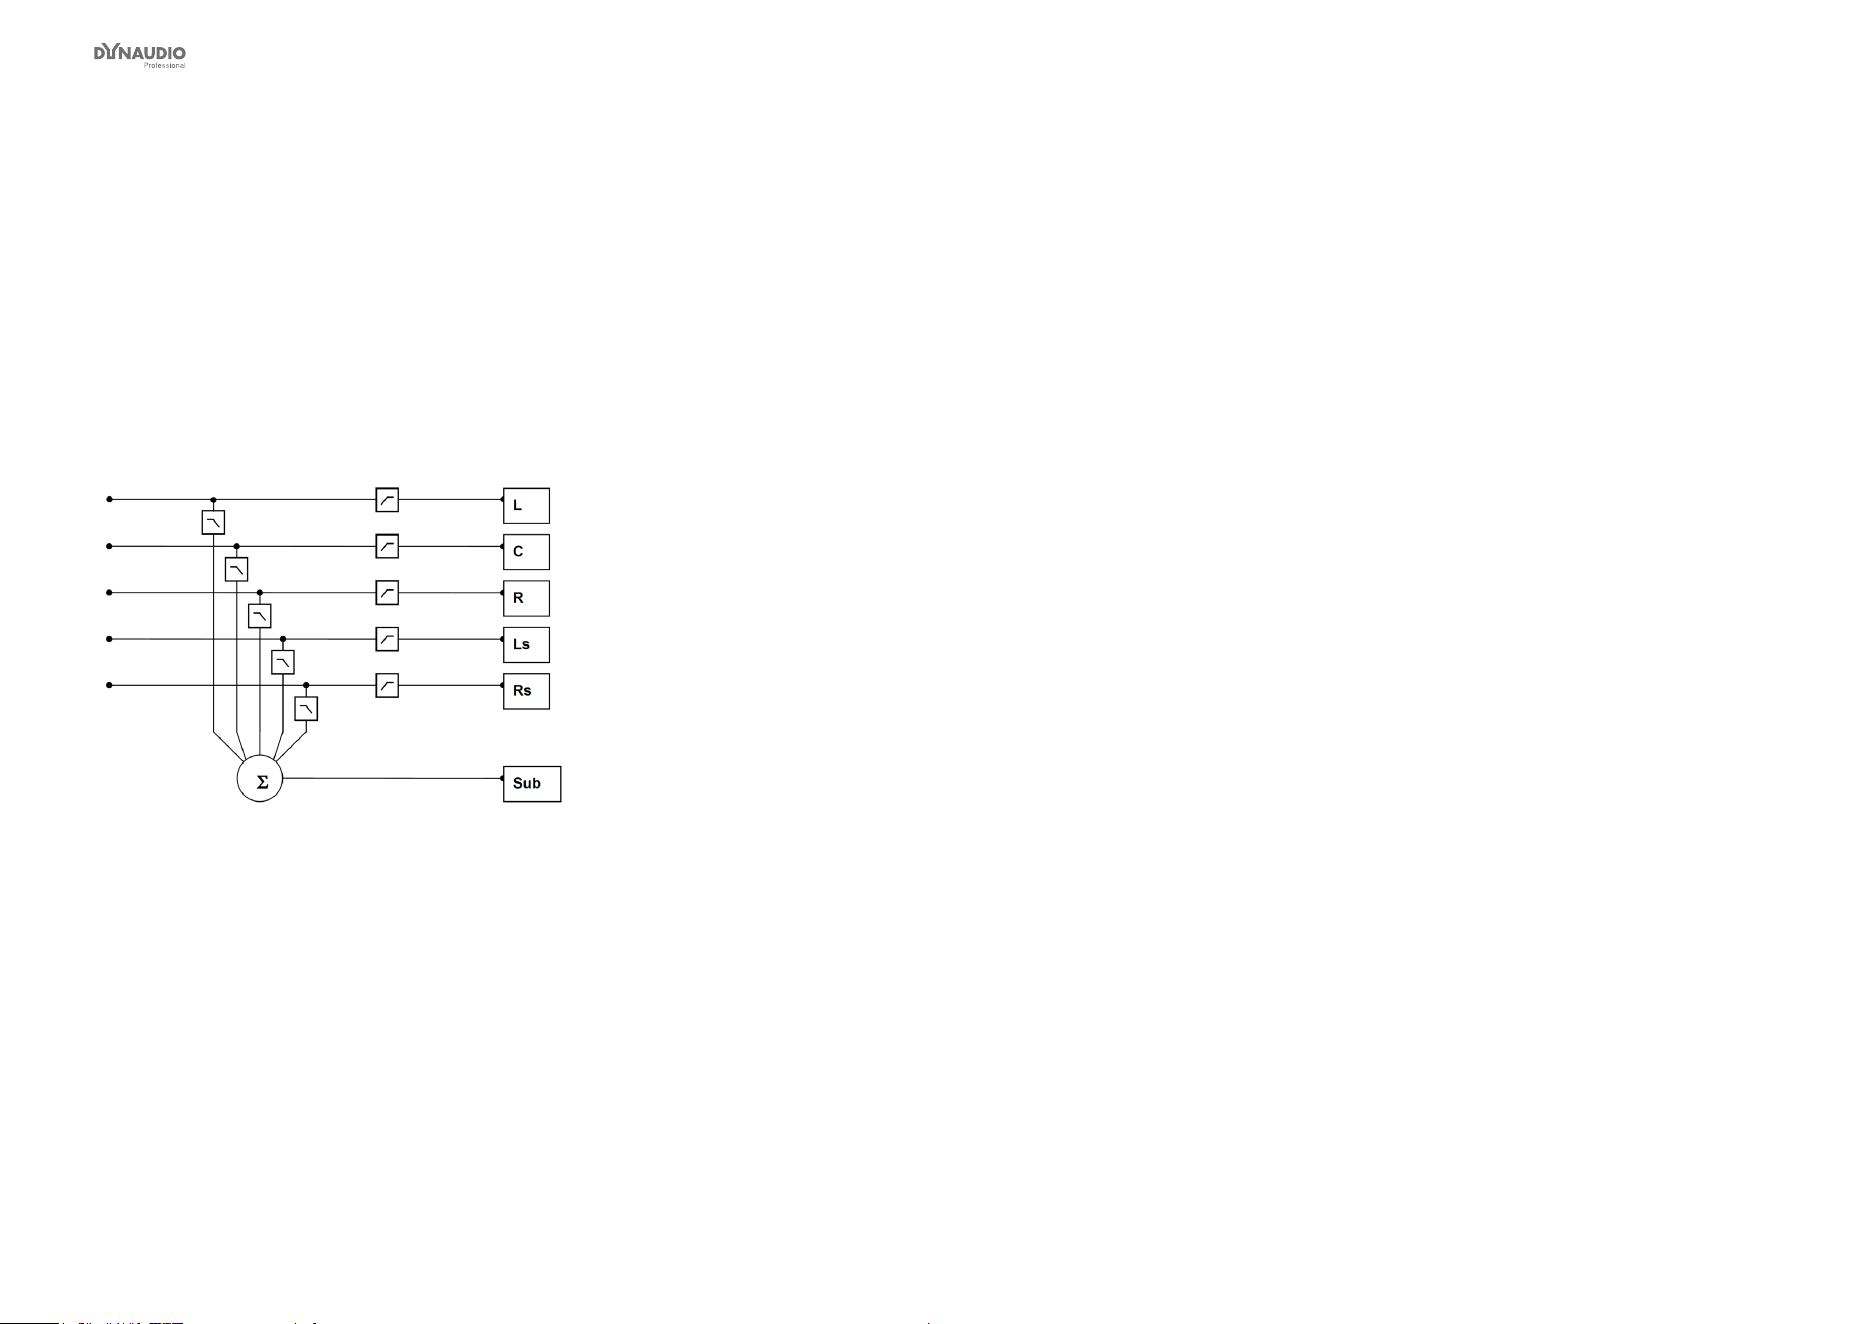
Appendix: Acoustics
Dynaudio Professional AIR reference manual – 2014-09-28 117
Bass management
Bass management is a very important and useful tool
– and it is in general an absolute necessity if you want
to work with a ve channel setup in a small room. The
bass management system is designed to subtract the
bass contents from all main channels and reproduce it
using a subwoofer. The AIR series provides a number
of possible crossover frequencies that can be selected
by the user.
Fig. 79: Basic bass management setup
Checking summing phase cancellation
In a basic two channel setup or a ve channel setup
(such as ITU-775), a subwoofer is not specied and is
not required. But when creating audio that should be
played back using consumer equipment, one has to en-
sure that the mix will sound right in this situation. Many
consumer setups today contain a subwoofer. Accord-
ingly, it is very important to check what bass summing
will sound like. If the program material basically is out
of phase, the bass will be canceled when summed elec-
trically. But this is not the case if the bass signals are
reproduced by the main monitors and summed acousti-
cally. The difference can be dramatic!
Controlling standing waves
It can already be difcult to position two monitors cor-
rectly in order to prevent the excitation of the standing
waves. But placing ve monitors is even more difcult.
In theory, each monitor should play under the same
conditions – but this is rarely the case.
Three front monitors can normally be placed away from
disturbing boundaries to prohibit the excitation of the
standing waves. But in small rooms, the rear monitors
are very often placed in corners or on a wall. Having
the full frequency range reproduced from such monitors
may lead to serious problems, resulting in poor low fre-
quency distribution in the room. This is another reason
for using bass management.
Simply put: When working with bass management, only
one monitor – the subwoofer – has to be placed in a
“safe” position. The crossover frequency can be set to a
value just above the problematic frequency range.

Appendix: Acoustics
Dynaudio Professional AIR reference manual – 2014-09-28 118
The LFE Channel
LFE is an abbreviation for “Low Frequency Enhance-
ment” or “Low Frequency Effects”. While the rst is the
original name, the second is more correct with regards
to its main applications.
LFE is also referred to as the “.1 channel”, which indi-
cates that the frequency range of this channel is only a
fraction of the other channels in a multi channel setup.
The actual frequency range is 20 Hz to 120 Hz. When
reproduced, the signal is gained by 10 dB compared
to the main channels. This provides a possibility of re-
producing occasional high-level low frequency contents
without affecting the general level setting of the main
channels.
Signals being sent to the LFE channel should always
be evaluated carefully, as not all transmission or re-
production systems may include this channel. In mu-
sic production and mixing, there is usually no need for
using this channel (unless you are recording the 1812
Overture with all these cannons shots…).

Appendix: Acoustics
Dynaudio Professional AIR reference manual – 2014-09-28 119
Delaying monitors
ITU 775
When using a 5.x setup with monitors arranged on a
circle (as with ITU 775), the distance from the listener
to each of the main monitors is the same.
If space is limited, the three front monitors can be ar-
ranged on a straight line instead of a circle. To compen-
sate the center monitor being closer to the listener than
the left and right monitor in this setup, the center sig-
nal can be delayed. To obtain coincident arrival of the
sound from all front monitors, a delay between 0 and 3
milliseconds is used for compensation. The speed of
sound is approximately 340 m/s or 1130 ft./s. Accord-
ingly, approximately 1 millisecond delay will be used
to virtually move the monitor 1 foot or 30 centimeters
backwards.
Cinema setup
In a cinema setup, the front monitors are always ar-
ranged on a straight line. Here, the audience is closer
to the surround monitor(s) than to the front monitors. In
order to retain the directional information towards the
screen, the surround monitors are delayed.
Normally the psychoacoustic Haas effect is taken into
account. In the listening position, the sound from the
surround monitors will arrive about 15 to 20 millisec-
onds after the sound from the front monitors. The delay
times involved with cinema processing for the surround
channel is dependent on the size of the mixing facili-
ty, the cinema, or the home theatre/living room. Proper
setup requires calculating the difference in distance be-
tween the front monitors and the closest surround mon-
itor. Then, the time difference is calculated. To this, 15
to 20 milliseconds are added.
Example: From a listening position, the distance to
the front monitors is 20 meters and ve meters to the
surround monitors, so the difference is (20 - 5 =) 15
meters. The time difference that needs to be compen-
sated is 15/340 sec, which equals 0,044 seconds or 44
milliseconds. To this value, 15 milliseconds are added.
Accordingly, the surround signal has to be delayed 59
milliseconds (or the closest possible value).
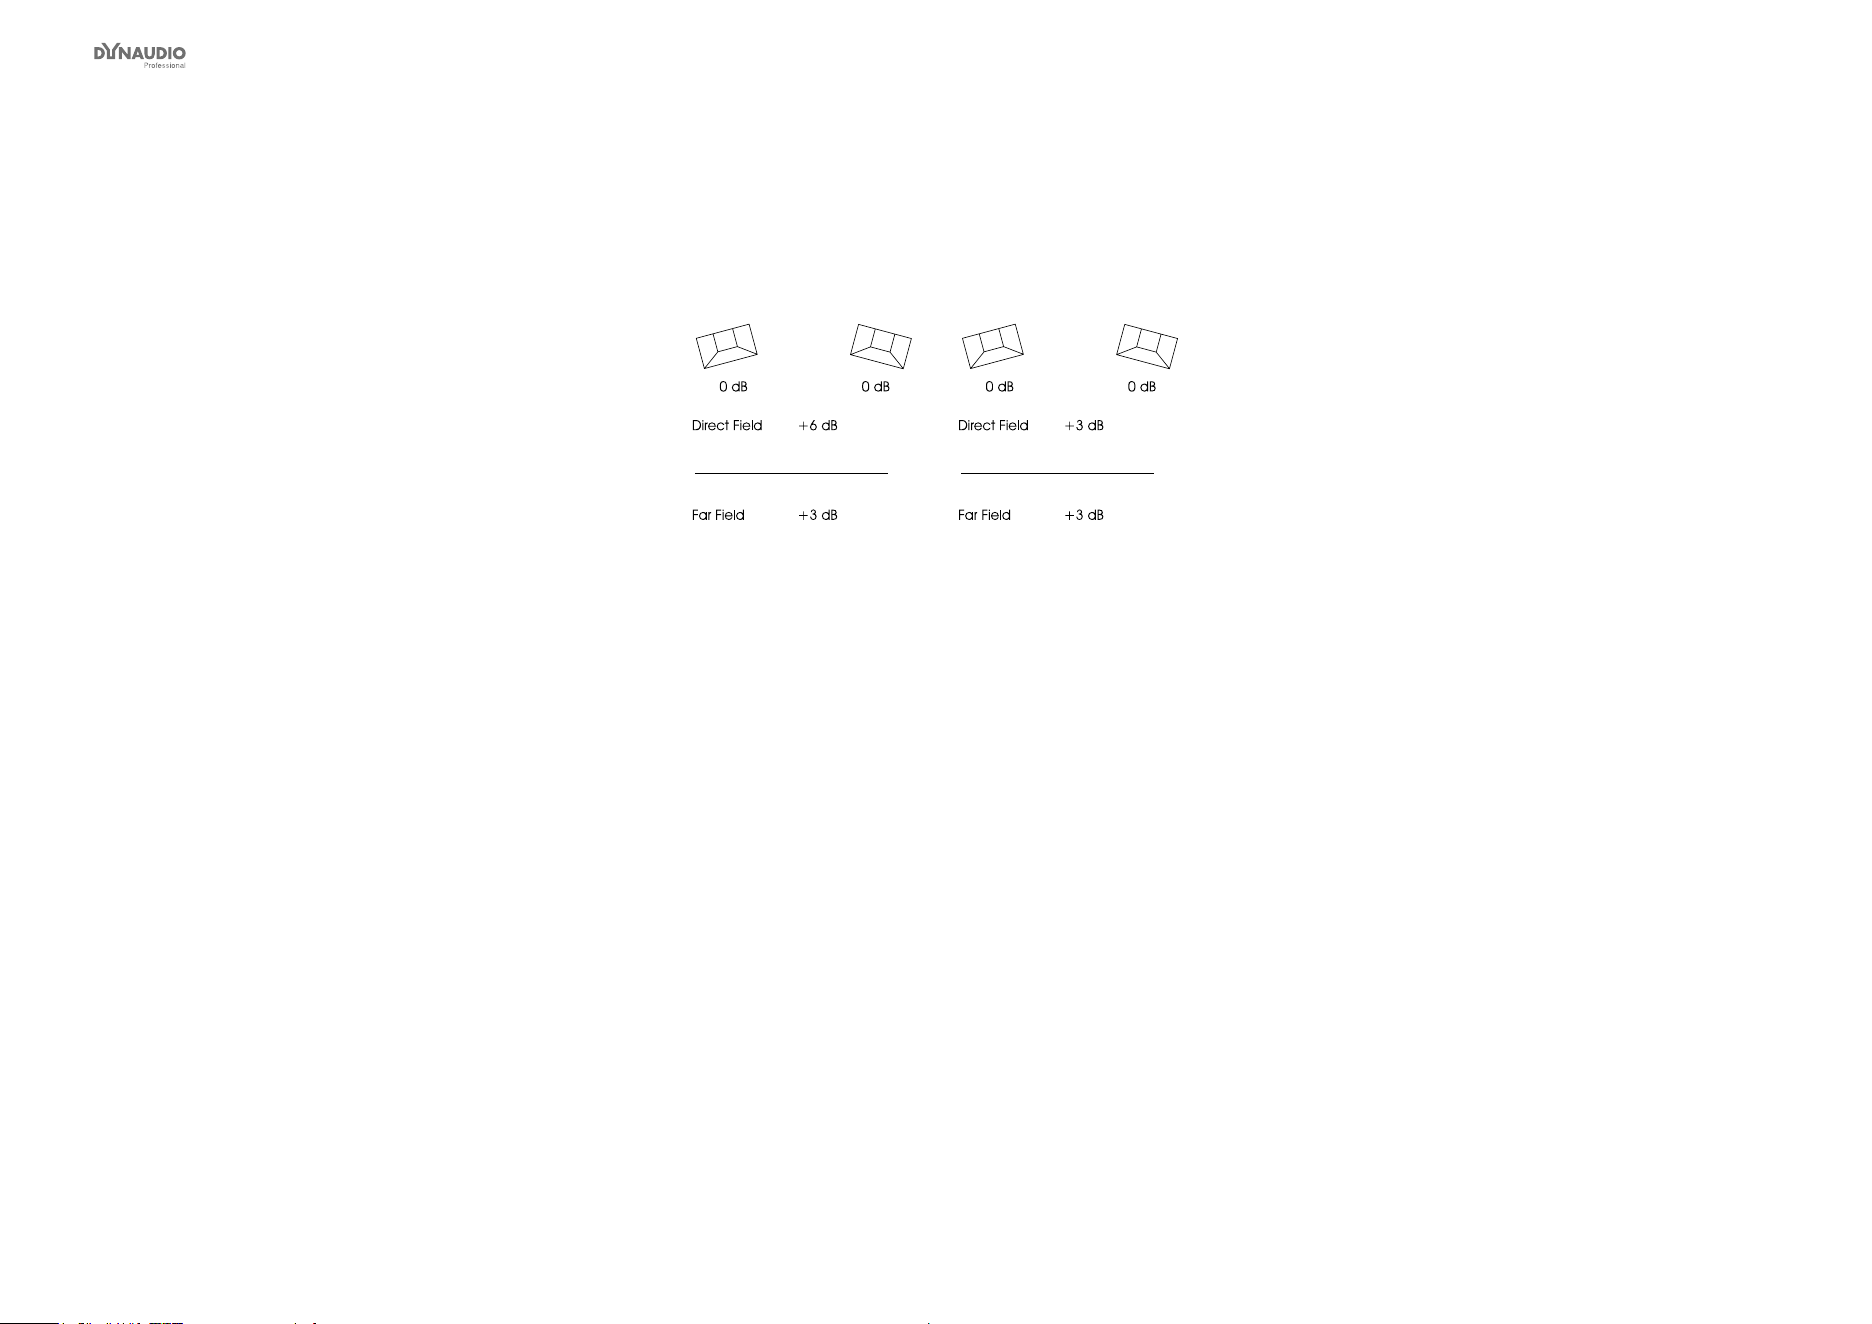
Appendix: Acoustics
Dynaudio Professional AIR reference manual – 2014-09-28 120
Line-up and calibration
Acoustic summation of audio signals
When summing two sound sources (for example, two
monitors), the resulting total sound level depends on
both the signal and the acoustics. The sound sources
can be correlated or uncorrelated. The listening posi-
tion (or measurement position) can be either in the di-
rect sound eld or in the diffuse sound eld.
In the direct sound eld, there is only one sound di-
rection. This direct eld exists either in the open, in a
reection-free room or close to the monitors.
The diffuse sound eld occurs in a room when you are
so far away from the monitors that the portion of direct
sound is less than the sum of all the reections.
The distance from the monitors where the direct sound
eld and the diffuse sound eld are equally large is
called the critical distance. In a control room, it can typ-
ically be 1 to 3 meters. The near eld in front of the
monitors can be regarded as a direct eld.
If all monitors are in phase, the sum of the sound pres-
sure from two monitors playing at the same level is 3 dB
– unless the signals are correlated (identical) and the
sum is measured in the direct eld. In this case, the
resulting sound pressure level is 6 dB higher than the
level of the individual monitors.
Fig. 80: Correlated (left) and uncorrelated (right)
signals
Acoustic calibration of multi-channel systems
When working with sound for lm, calibration of the
acoustic sound levels has been a requirement for many
years, but it has not been particularly common in oth-
er branches of the sound industry. However, with the
widespread use of multi-channel formats for all forms of
music and lm presentation in the home, the benets of
controlling levels have become obvious in recent years.
It is important to differentiate between production for
the cinema and production for 5.1 channel reproduction
in the home based upon ITU 775.
Calibration of 5.1 in an ITU-775 arrangement
In a 5.1 system based on the ITU arrangement, all main
channels are operated under the same conditions:
There is one monitor per channel, and each monitor is
placed at the same distance from the listener. However,
there is no international agreement on the level or the
bandwidth of the noise signals that should be used for
acoustic calibration. Pink noise is a good starting point,
as it includes all frequencies. However, it is impractical
due to its “unsettled” character, which makes it difcult
to measure at low frequencies.

Appendix: Acoustics
Dynaudio Professional AIR reference manual – 2014-09-28 121
Surround Sound Forum
Surround Sound Forum is a German interest group
composed of the VDT (Verband Deutscher Tonmeister;
Association of German Sound Engineers), the Institut
für Rundfunktechnik (IRT) and the Schule für Rund-
funktechnik (SRT). The SSF has prepared calibration
guidelines, which are generally accepted in Europe.
They specify three test signal, which are recorded at
-18 dBFS (RMS).
Signal (only in one channel) PPM level
t < 0,1 ms
PPM level
t < 10 ms
RMS level Sound pressure
level SLOW
Sound pressure
level SLOW
[dB] [dB] [dB] [dB] [dB(A)]
1 kHz sine -18 -18 -18
Pink noise 20 Hz to 20 kHz -9 -13 -18 82 78
Pink noise 200 Hz to 20 kHz -11 -15 -20 80 78
SMPTE
The corresponding SMPTE standard (RP155) uses
a standard of -20 dBFS for the reference level. Here,
the C-weighted sound pressure level of a 500 to 2 kHz
noise signal ends up at 83 dB.
Calibration of cinema systems
In a cinema, the listeners are sitting far from the moni-
tors. Presumably, the majority sits in the diffuse sound
eld. Attempts are made to establish a diffuse sound
eld from the surround monitors. Accordingly, when the
sound pressure is measured inside the cinema or in a
mixing theatre, it must be averaged over many differ-
ent measurement locations. The typical basis for the
majority of the standards is measuring at four or more
locations. If there are different areas for the audience
(for example main oor and balcony), measurements
should be made in at least four locations in each area.
Before these measurements can be made, the sys-
tem’s frequency response must also be in order.

Appendix: Acoustics
Dynaudio Professional AIR reference manual – 2014-09-28 122
Measuring sound
pressure
Using a sound level meter or microphone
If you are used to performing acoustic measurements,
you probably already own a sound level meter. A
sound level meter can be used for the level calibration
of the monitors.
If you do not have a sound level meter, there still is
another possibility: Use an omni-directional micro-
phone (this is also called a pressure microphone). A
studio condenser microphone is normally preferred, but
the microphone must not be too big. A simple clip micro-
phone can be used, as it does not inuence the sound
eld. In any case, the microphone should have a at
frequency response.
►
Place the microphone on a stand positioned at
the listening seat. Leave the microphone pointing
upwards to avoid sound pressure build-up in front
of the diaphragm and to provide equal conditions
for monitors in all directions.
►
Connect the microphone to a mixing desk or a
recording machine that has a meter built in.
►
Play back a track containing pink noise from the
Dynaudio Professional AIR monitors test signal
collection, or use one of the other tracks that you
have used for monitor setup and calibration.
►
Adjust the gain on the microphone channel until
the meter deection reaches a point 10 dB below
full scale. This is now your reference for following
measurements.
Make sure that you have marks on the scale that
makes it possible to read steps of 1 or 2 dB on
either side of the reference deection.
If 10 dB below full scale is not an adequate point
on your meter, you may choose another one – just
be sure to have a reading on a adequate resolu-
tion.
If you use this microphone setup as described, it can be
used for comparing levels between individual monitors.
Absolute sound pressure levels can be measured if
you…
1. are using a well-calibrated microphone channel
and
2. know the sensitivity of the microphone.


Links
Dynaudio Professional AIR reference manual – 2014-09-28 124
Support resources
There is a large knowledge base and forum for you to
use. Please make sure to search for your particular is-
sue there before submitting a support ticket. It’s likely
that someone has already addressed the question and
posted an answer.
►
Dynaudio Professional support:
dynaudioprofessional.com/support/
►
Dynaudio Professional warranty information:
dynaudioprofessional.com/en/pages/warranty
►
Dynaudio Professional AIR:
dynaudioprofessional.com/air-series/
►
AIR Control software:
dynaudioprofessional.com/air-series/
monitors/air-control/
Dynaudio
Professional on…
►
the web:
dynaudioprofessional.com/
►
Facebook:
facebook.com/dynaudioprofessional
►
YouTube:
youtube.com/dynaudioacoustics
Dynaudio Professional
newsletter
For more information about your Dynaudio Professional
products, latest news and updates, tips and tricks, sub-
scribe to our newsletter:
►
dynaudioprofessional.com/support/