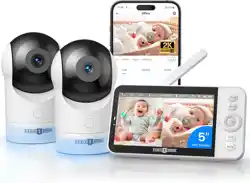

Baby Monitor
User Manual
Model: PE-BBM002, PE-BBM003,
PE-BBM002-MON, PE-BBM002-CAM
E-mail:
US: support@parisrhone.com
DE: support.de@parisrhone.com
Manufacturer: Shenzhen Aspiron Technology Company Limited
Address: 3rd Floor, Yiben Building, No.1063 Chaguang Road,
Xili Street, Nanshan District, Shenzhen, Guangdong,
China
Rev_1.1_EN-DE
www.parisrhone.com
01

MENU
ZOOM
TALK
OK
BACK
02 03
MENU
ZOOM
TALK
OK
BACK
02 03
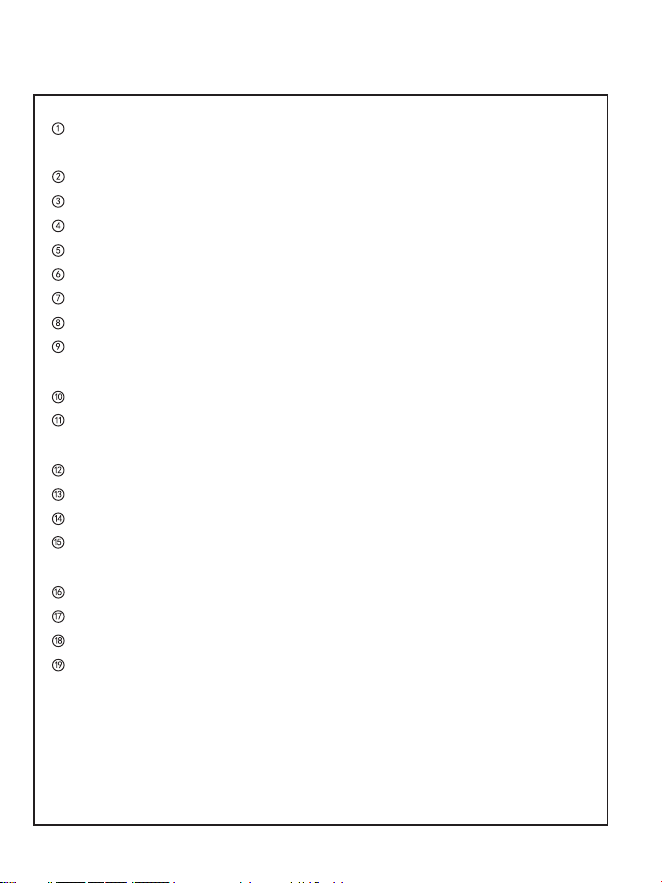
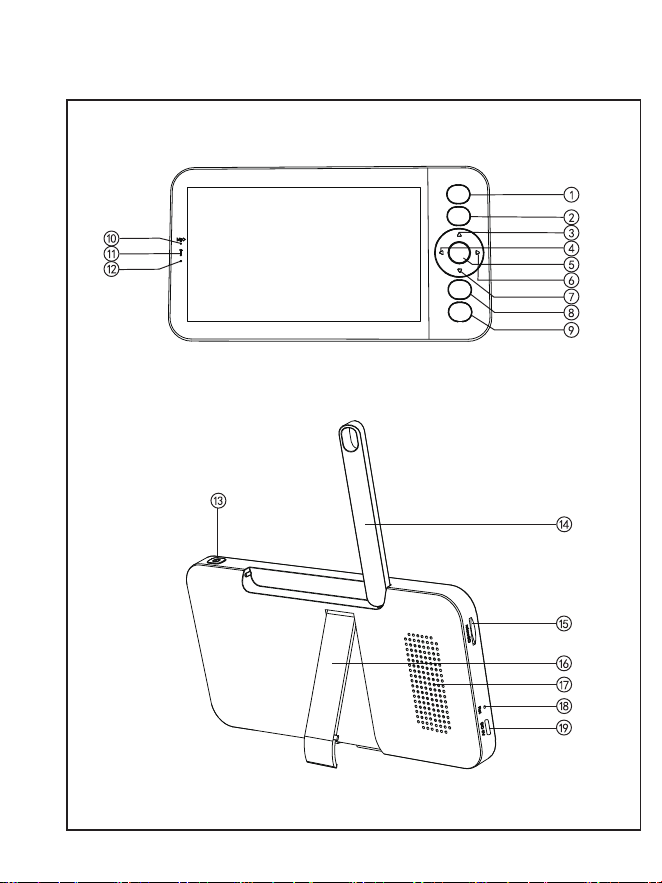
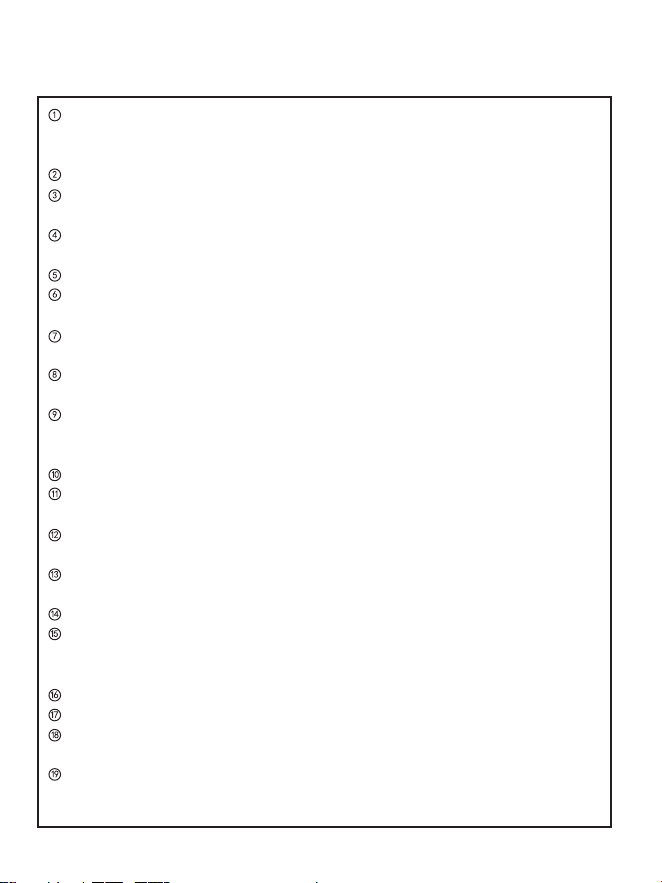
Zoom Button: Press to zoom in/out the screen, then scroll the screen
with the up/down/left/right buttons.
Menu Button: Press to enter menu page.
Up Button: Select options upwards or tilt the camera upwards.
Left Button: Select options leftwards or pan the camera leftwards.
OK Button: Confirm your selections.
Right Button: Select options rightwards or pan the camera rightwards.
Down Button: Select options downwards or tilt the camera downwards.
Talk Button: Press to talk to persons in front of the camera.
Back Button: Press to return to last page. On the homepage, hold to
stop playing music.
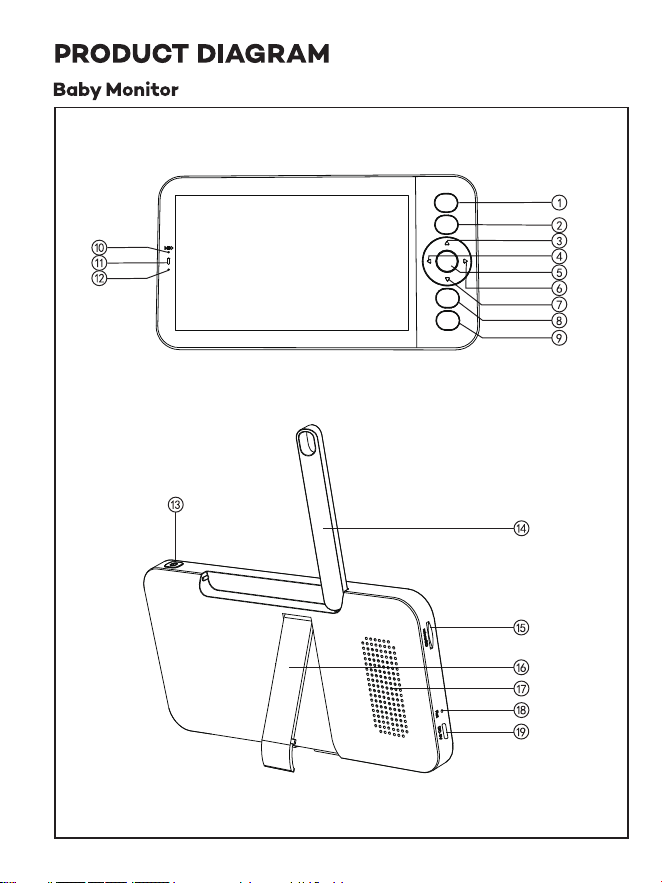
Mic: Capture the sound around the baby monitor.
Indicator Light for the Charging Status.
Orange: charging; Green: fully charged.
Indicator Light for Using. Yellow: monitor on; No light: monitor off.
Power ON/OFF Button: Hold to turn on/off the monitor.
Antenna: Adjust the angle for better signals.
SD Card Slot: Insert an SD card (not included) for storing more videos.
(128G max. is supported)
Monitor Holder: Adjust to make the monitor stand steadily.
Speaker: Output the sound around the camera.
Reset Button: Press with the Pin (included) to reset the monitor.
Type-C Port: Charge the monitor with the Type-C cable (included).
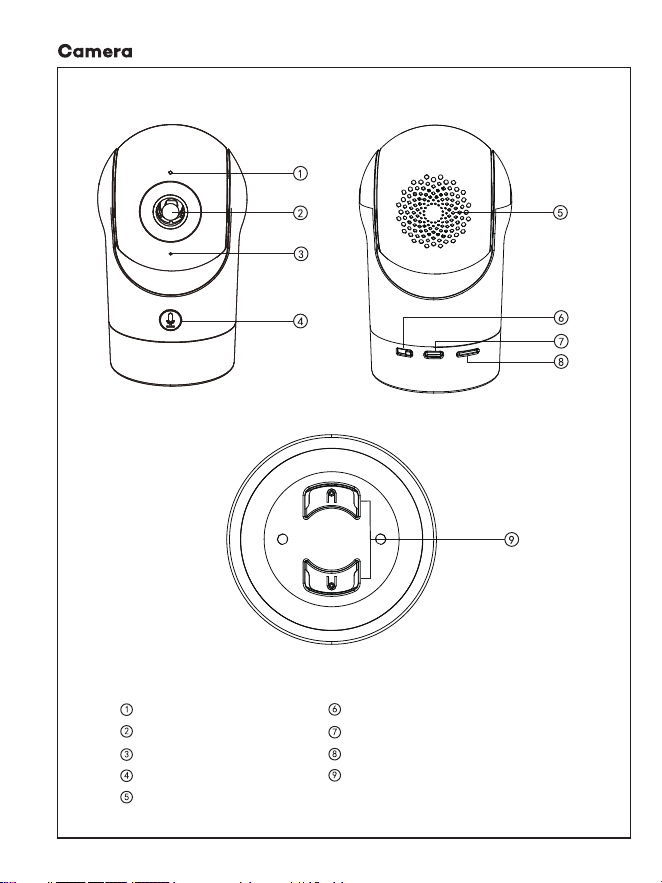
Status Light
Camera Lens
Microphone
Call
Speaker
Reset
Type-C Port
SD Card Slot (256G Max)
Wall Mounting Threaded Holes
0504
Zoom Button: Press to zoom in/out the screen, then scroll the screen
with the up/down/left/right buttons.
Menu Button: Press to enter menu page.
Up Button: Select options upwards or tilt the camera upwards.
Left Button: Select options leftwards or pan the camera leftwards.
OK Button: Confirm your selections.
Right Button: Select options rightwards or pan the camera rightwards.
Down Button: Select options downwards or tilt the camera downwards.
Talk Button: Press to talk to persons in front of the camera.
Back Button: Press to return to last page. On the homepage, hold to
stop playing music.
Mic: Capture the sound around the baby monitor.
Indicator Light for the Charging Status.
Orange: charging; Green: fully charged.
Indicator Light for Using. Yellow: monitor on; No light: monitor off.
Power ON/OFF Button: Hold to turn on/off the monitor.
Antenna: Adjust the angle for better signals.
SD Card Slot: Insert an SD card (not included) for storing more videos.
(128G max. is supported)
Monitor Holder: Adjust to make the monitor stand steadily.
Speaker: Output the sound around the camera.
Reset Button: Press with the Pin (included) to reset the monitor.
Type-C Port: Charge the monitor with the Type-C cable (included).
Status Light
Camera Lens
Microphone
Call
Speaker
Reset
Type-C Port
SD Card Slot (256G Max)
Wall Mounting Threaded Holes
0504
Installation
Camera Using Tips
• Live video viewing:
In the camera control interface of the APP, you can view the camera
monitoring in real-time, adjust the resolution, capture images, record video,
and make 2-way talking.
• Infrared night vision:
The camera can automatically switch to night vision mode (black & white) at
night according to the degree of change in surrounding light. With built-in
red Infrared LED lights, the night vision distance can reach 10 meters, and it
can be viewed super clearly in the dark.
• Motion detection:
The camera can detect the movement changes in the camera's view, and
push the notification of the movement changes to the APP.
Set from: APP >> Device (tap device to live video page) >> Settings >> Alert
Settings >> Motion Detection.
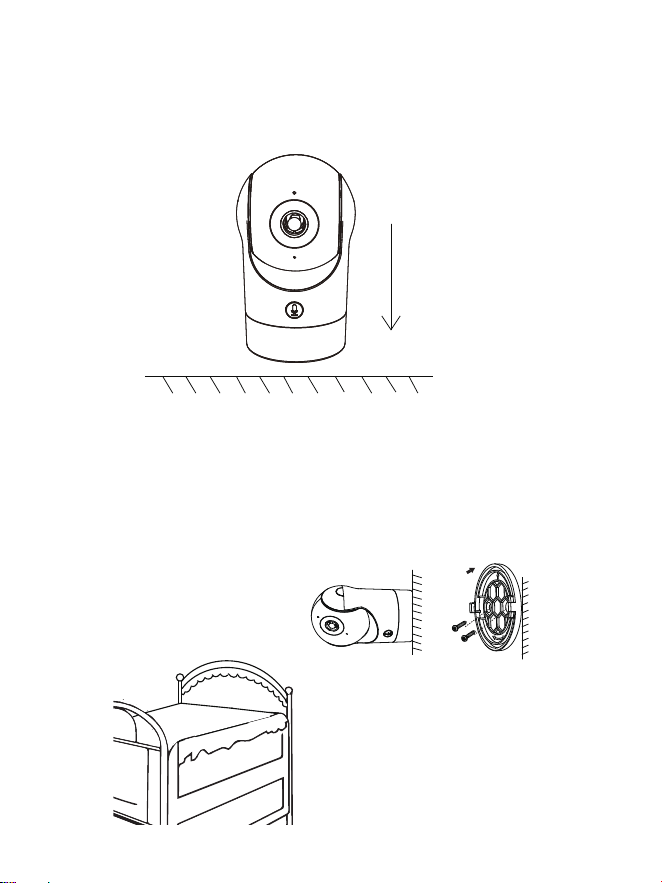
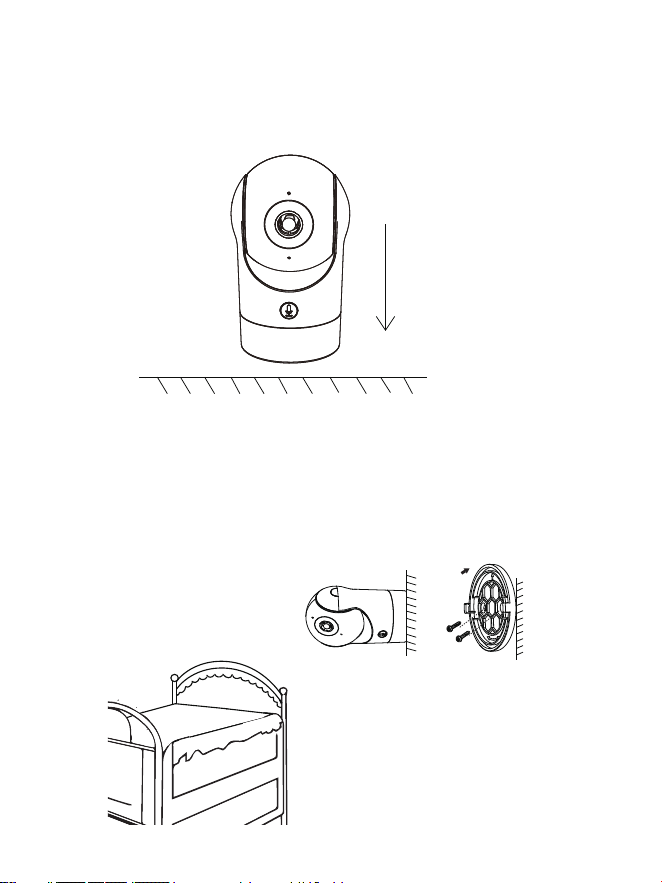
Method 1:
Install the camera on a flat surface.
Method 2:
Use the included mounting bracket to fix the camera to a clean surface.
Note: The wall needs to be able to bear at least 3 times the total weight of
the camera.
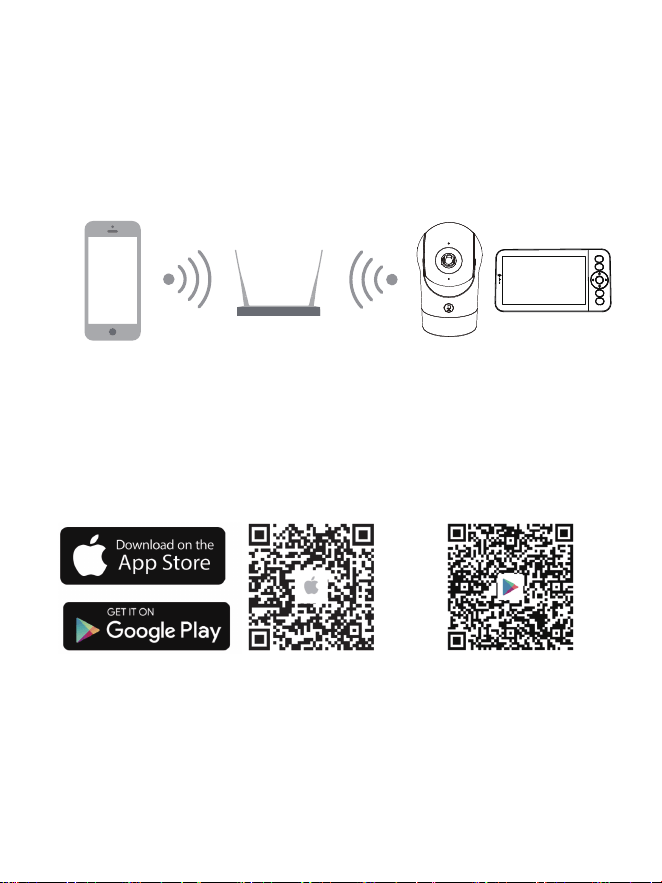
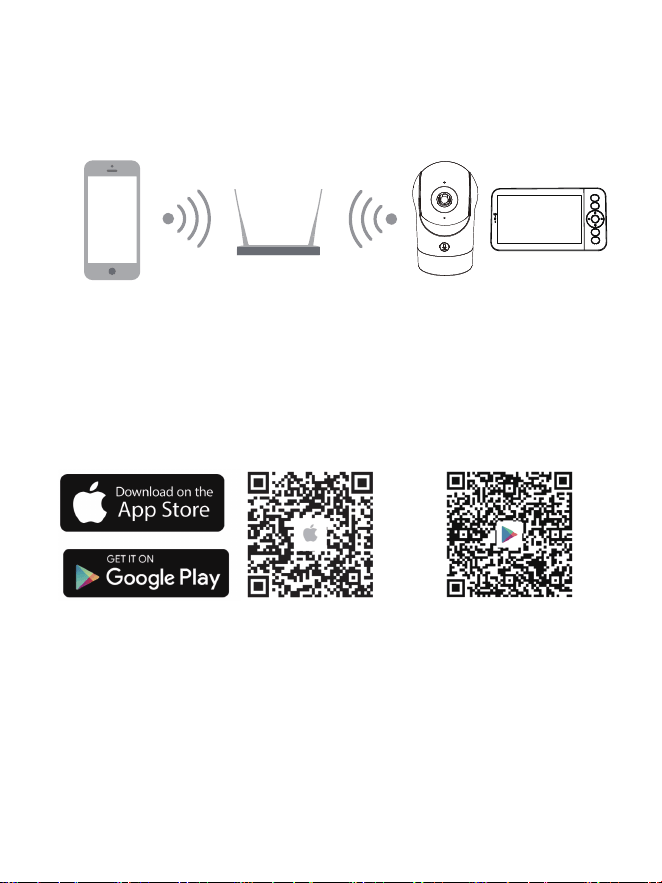
Connection of Camera and App
The camera can be connected both to the monitor and the App.
Generally, it is connected to the monitor by default.
Follow the steps below to connect the camera to the App:
1. Make sure the Wi-Fi network is a 2.4 GHz network, as the camera doesn't
support 5 GHz Wi-Fi.
2. Download the App on your phone. Register a new account to log in or log in
directly.
3. Reset the camera using a pin until the status light is red in fast blinking.
(You have to connect the camera to the App within 2 minutes; otherwise,
you have to reset the camera again.)
(If you are using the monitor, the audio and video will be temporarily
disconnected, and will automatically resume after the camera is
successfully configured with the network. The maximum time is 2 minutes.)
4. Follow the step instructions on your smartphone to add the monitor, and
06 07

Installation
Camera Using Tips
• Live video viewing:
In the camera control interface of the APP, you can view the camera
monitoring in real-time, adjust the resolution, capture images, record video,
and make 2-way talking.
• Infrared night vision:
The camera can automatically switch to night vision mode (black & white) at
night according to the degree of change in surrounding light. With built-in
red Infrared LED lights, the night vision distance can reach 10 meters, and it
can be viewed super clearly in the dark.
• Motion detection:
The camera can detect the movement changes in the camera's view, and
push the notification of the movement changes to the APP.
Set from: APP >> Device (tap device to live video page) >> Settings >> Alert
Settings >> Motion Detection.
Method 1:
Install the camera on a flat surface.
Method 2:
Use the included mounting bracket to fix the camera to a clean surface.
Note: The wall needs to be able to bear at least 3 times the total weight of
the camera.
Connection of Camera and App
The camera can be connected both to the monitor and the App.
Generally, it is connected to the monitor by default.
Follow the steps below to connect the camera to the App:
1. Make sure the Wi-Fi network is a 2.4 GHz network, as the camera doesn't
support 5 GHz Wi-Fi.
2. Download the App on your phone. Register a new account to log in or log in
directly.
3. Reset the camera using a pin until the status light is red in fast blinking.
(You have to connect the camera to the App within 2 minutes; otherwise,
you have to reset the camera again.)
(If you are using the monitor, the audio and video will be temporarily
disconnected, and will automatically resume after the camera is
successfully configured with the network. The maximum time is 2 minutes.)
4. Follow the step instructions on your smartphone to add the monitor, and
06 07
scan the QR code with your camera.
• Set Up A Router
Please keep the network available
The router supports 2.4GHz WiFi (doesn't support the 5GHz), and is
connected to the WiFi network. Please set the parameters of the router
before connecting to the WiFi network, and record the SSID and password of
your WiFi.
• Connect the CloudEdge APP
Scan the QR code to download and install the CloudEdge APP. Also, you can
search "CloudEdge" on App Store (IOS) or Google Play (Android). Download
and install CloudEdge APP. Open the APP home page, click "+" at the right
top page. Follow the guide on the APP to add the camera step by step.
After the connection is successful, the indicator is solid blue.
Monitor Using Tips
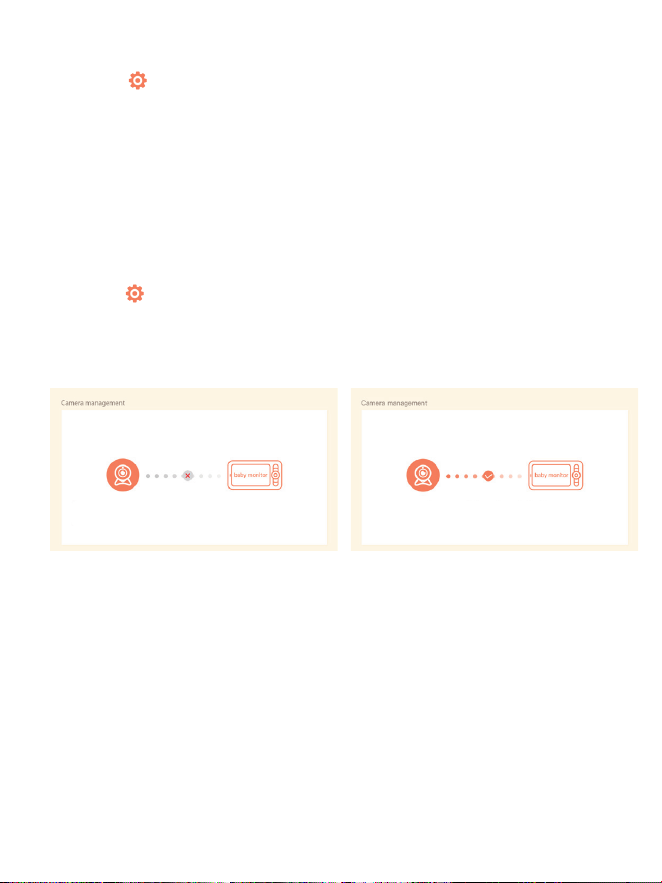
• Pairing of Camera & Monitor:
Power on the camera and the monitor, and they will automatically connect. If
the connection fails, please follow the steps below to pair. The pairing is
distance-limited, so make sure the distance between the camera and the
monitor is no further than 200m.
1. Press the Menu button on the monitor screen, and select > Camera.
2. Select Camera 1 or Camera 2 which you need to unbind.
3. Long press the OK button to release the binding.
(2) Unbind the monitor and camera:
1. Press the Menu button on the monitor screen, and select > Camera.
2. Select Camera 1 or Camera 2 which you need to pair.
3. Long press the camera pairing button until you hear the prompt tone.
4. Press the OK button on the monitor screen to start pairing.
5. For 2 cameras, repeat step 2~ step 4.
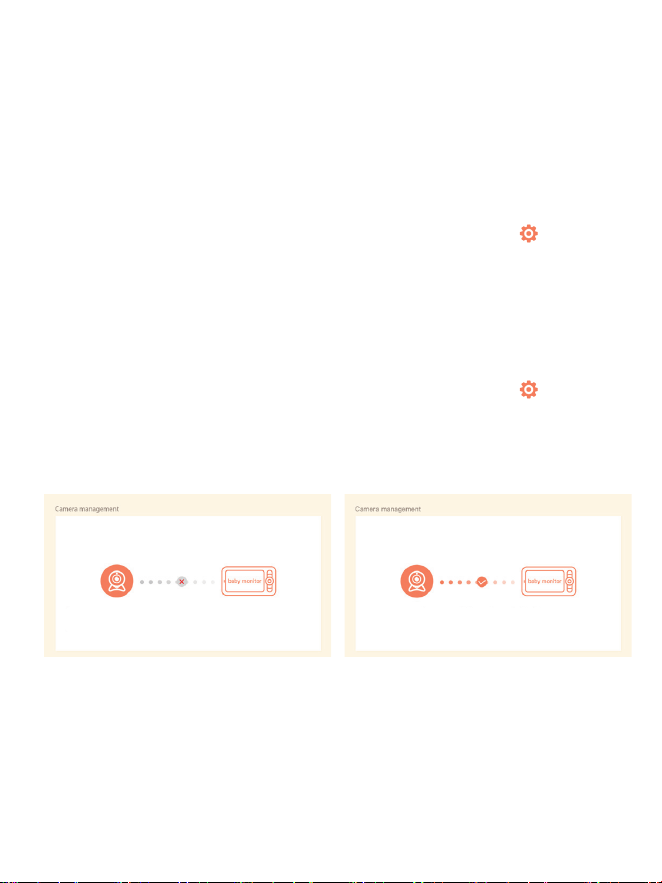
(1) Pair the monitor and camera:
Press and hold OK to unpair your camera
Camera Successfully Paired
1. Press and hold the pairing button on the camera until you hear the tone.
2. Press the OK button on the monitor to finalize pairing your camera.
Camera Not Paired
MENU
ZOOM
TALK
OK
BACK
0908
scan the QR code with your camera.
• Set Up A Router
Please keep the network available
The router supports 2.4GHz WiFi (doesn't support the 5GHz), and is
connected to the WiFi network. Please set the parameters of the router
before connecting to the WiFi network, and record the SSID and password of
your WiFi.
• Connect the CloudEdge APP
Scan the QR code to download and install the CloudEdge APP. Also, you can
search "CloudEdge" on App Store (IOS) or Google Play (Android). Download
and install CloudEdge APP. Open the APP home page, click "+" at the right
top page. Follow the guide on the APP to add the camera step by step.
After the connection is successful, the indicator is solid blue.
Monitor Using Tips
• Pairing of Camera & Monitor:
Power on the camera and the monitor, and they will automatically connect. If
the connection fails, please follow the steps below to pair. The pairing is
distance-limited, so make sure the distance between the camera and the
monitor is no further than 200m.
1. Press the Menu button on the monitor screen, and select > Camera.
2. Select Camera 1 or Camera 2 which you need to unbind.
3. Long press the OK button to release the binding.
(2) Unbind the monitor and camera:
1. Press the Menu button on the monitor screen, and select > Camera.
2. Select Camera 1 or Camera 2 which you need to pair.
3. Long press the camera pairing button until you hear the prompt tone.
4. Press the OK button on the monitor screen to start pairing.
5. For 2 cameras, repeat step 2~ step 4.
(1) Pair the monitor and camera:
Press and hold OK to unpair your camera
Camera Successfully Paired
1. Press and hold the pairing button on the camera until you hear the tone.
2. Press the OK button on the monitor to finalize pairing your camera.
Camera Not Paired
MENU
ZOOM
TALK
OK
BACK
0908
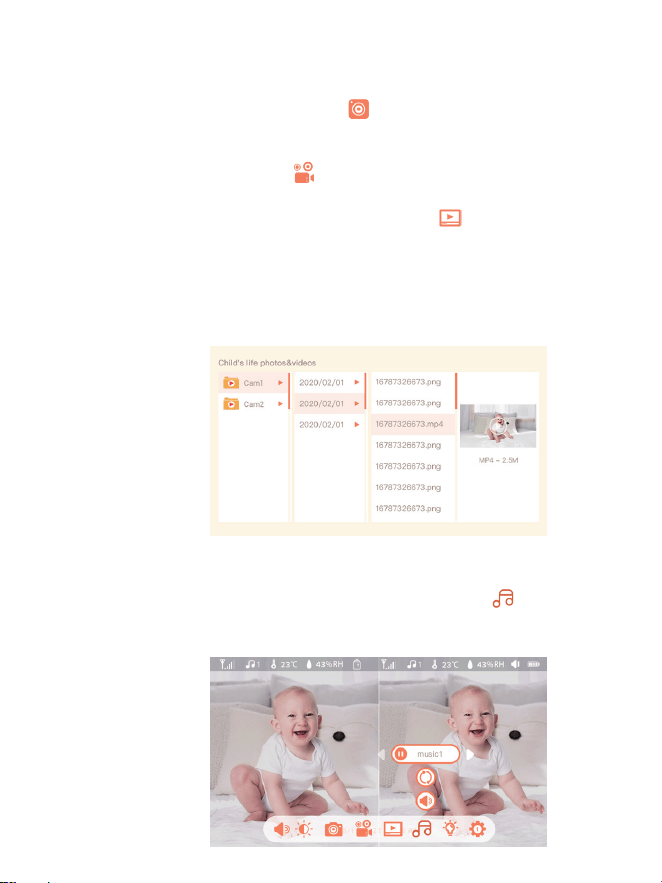
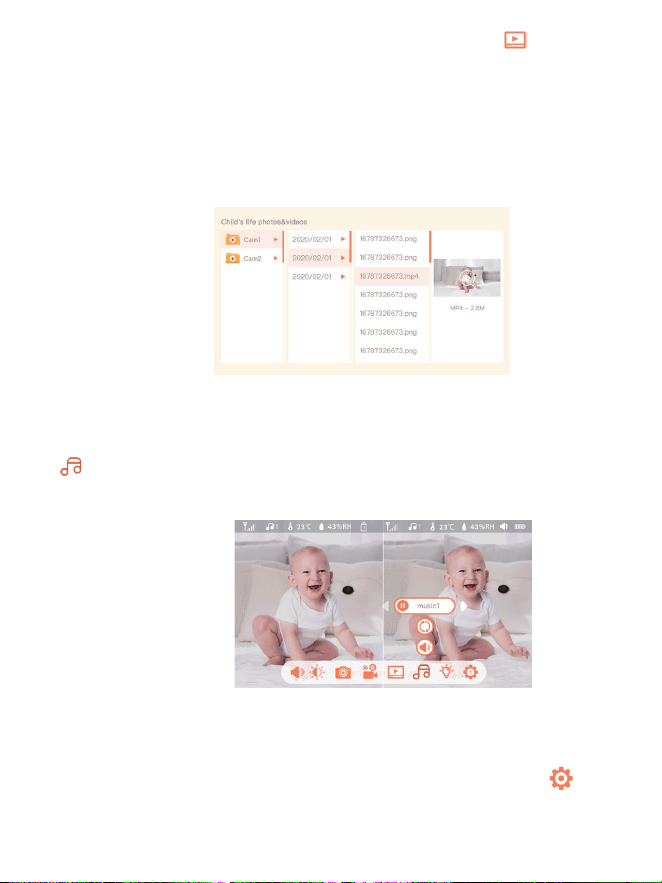
1. Press the Menu button on the monitor, select and press OK to
enter the interface.
2. Select the camera and date, select the photo or video you want to view
and press OK to enter preview mode.
* For a video, press OK to play or pause in the preview mode.
* Press the backup button to the quit preview or return to the main menu.
You can record a video to capture a meaningful time of a baby. Press
Menu on the monitor, select and press OK to record a video.
You can take a photo to capture any interesting scene of a baby. Press
Menu button on the monitor, select and press OK to take a photo.
• Play Music
• Photo & Video
(1) Take a photo:
(2) Record a video:
(3) View the taken photos & recorded videos:
You can play music to soothe your baby when the baby is crying or sleeping.
Press the Menu button on the monitor screen, and select and press OK
to enter the music interface. You can select different music, change the
music cycle mode, or adjust the music volume.
• Rotate the Camera
You can adjust the monitoring angle for better vision.
The direction buttons on the monitor screen are available when the camera
is powered on. Press the direction buttons to rotate the camera horizontally
and vertically for better vision.
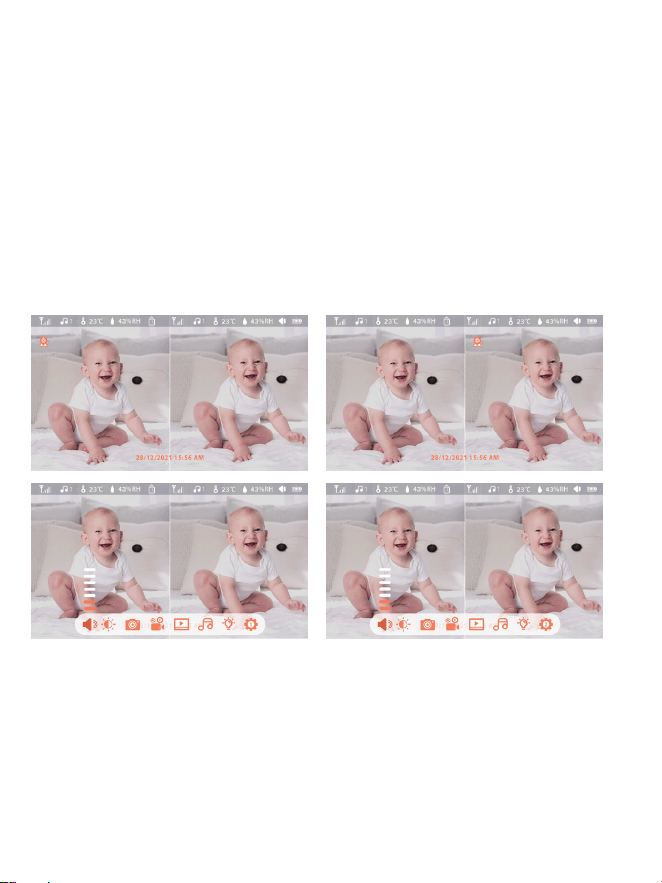
• Camera Selection Method:
Note:
* For different products, you may add 1 or 2 cameras. If you have added 2
cameras, the monitor screen will display 2 live views at the same time.
* If you want to set parameters or enable functions of one of the cameras,
you need to select the camera first.
On the home page, press the Zoom button to switch the camera between
Cam1 and Cam2 if you have added two cameras.
If you have added two cameras, select one camera you need and press the
OK button on the monitor to enter full-screen viewing mode. And then you
can press the Zoom button again to zoom in and zoom out. (Zooming
function does not work when the screen is not in full screen.)
1110
1. Press the Menu button on the monitor, select and press OK to
enter the interface.
2. Select the camera and date, select the photo or video you want to view
and press OK to enter preview mode.
* For a video, press OK to play or pause in the preview mode.
* Press the backup button to the quit preview or return to the main menu.
You can record a video to capture a meaningful time of a baby. Press
Menu on the monitor, select and press OK to record a video.
You can take a photo to capture any interesting scene of a baby. Press
Menu button on the monitor, select and press OK to take a photo.
• Play Music
• Photo & Video
(1) Take a photo:
(2) Record a video:
(3) View the taken photos & recorded videos:
You can play music to soothe your baby when the baby is crying or sleeping.
Press the Menu button on the monitor screen, and select and press OK
to enter the music interface. You can select different music, change the
music cycle mode, or adjust the music volume.
• Rotate the Camera
You can adjust the monitoring angle for better vision.
The direction buttons on the monitor screen are available when the camera
is powered on. Press the direction buttons to rotate the camera horizontally
and vertically for better vision.
• Camera Selection Method:
Note:
* For different products, you may add 1 or 2 cameras. If you have added 2
cameras, the monitor screen will display 2 live views at the same time.
* If you want to set parameters or enable functions of one of the cameras,
you need to select the camera first.
On the home page, press the Zoom button to switch the camera between
Cam1 and Cam2 if you have added two cameras.
If you have added two cameras, select one camera you need and press the
OK button on the monitor to enter full-screen viewing mode. And then you
can press the Zoom button again to zoom in and zoom out. (Zooming
function does not work when the screen is not in full screen.)
1110

1. Press Menu on the monitor and select > Smart Care.
2. Press UP and DOWN direction buttons to select options between motion
detection, noise detection, cry detection, and alarm volume, and press OK to
save.
3. When starting to set up one detection mode, press LEFT and RIGHT
direction buttons to change options, and press UP and DOWN direction
buttons to adjust the sensitivity.
* You can select different sensitivity according to needs. Low is low
sensitivity, and high is high sensitivity.
4. When setting up the alarm volume, press LEFT and RIGHT direction
buttons to adjust.
5. There will be an alarm when the set detection is triggered, press OK to
stop the alarm.
• Smart Care
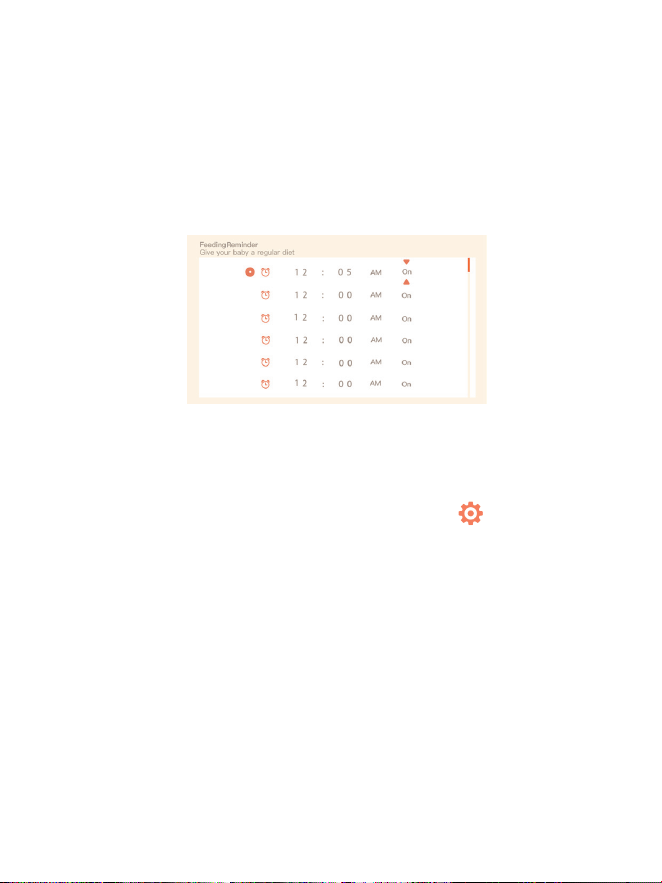
• Feeding Reminder
Remind you to feed your baby, when you are too busy, or when you want to
give your baby a regular diet.
1. Press the Menu button on the monitor screen, and select > Feeding
Reminder.
2. Press UP and DOWN direction buttons to select between 10 time options,
and press OK to start the time setting.
3. When starting to set up one feeding time, press the LEFT and RIGHT
buttons to change options between hour, minute, second, and on/off; and
press UP and DOWN direction buttons to change values and select on or off.
4. Select on or off to open or close feeding reminders. You can set up to 10
feeding times one day. And when the set time is up, a feeding alarm will
appear on the monitor screen.
You can turn on functions of motion detection, noise detection, and cry
detection, so that you can know the baby's status immediately, no matter
what you are doing.
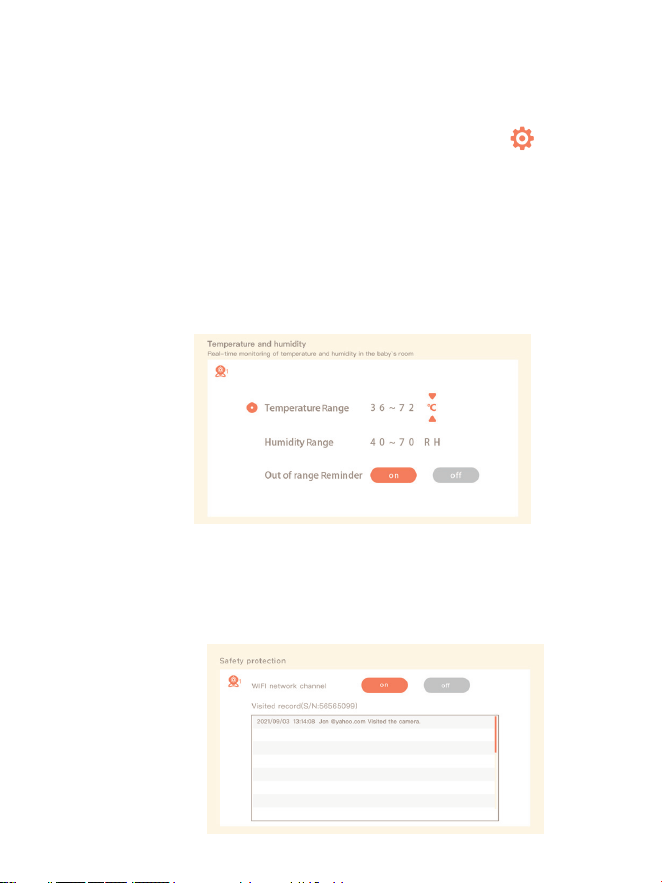
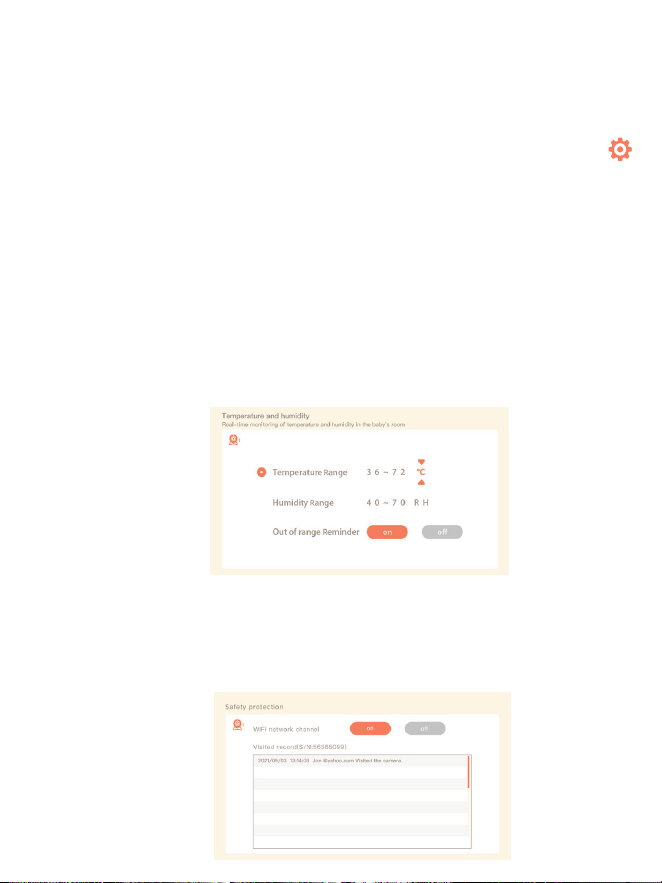
1. Press the Menu button on the monitor screen, and select >
Temperature and humidity.
2. Press the UP and DOWN direction buttons to select options between
temperature range, humidity range and out-of-range reminder, and press
OK to start setting.
3. Press the LEFT and RIGHT buttons to change options, and press the UP
and DOWN buttons to change values and units.
4. In the Out of range reminder option, select to turn on or off the alarm
when the temperature and humidity are out of range.
• Temperature and humidity detection
You can real-time monitor the temperature and humidity of your baby's
room. When the temperature and humidity are out of range, you can get
the alarms immediately, and then take measures.
• Safety Protection
You can turn on or turn off the Wi-Fi network channel so that others
cannot live view the videos by App if the function is off. You can also
view the visited records as all visits through the App will be recorded.
1312
1. Press Menu on the monitor and select > Smart Care.
2. Press UP and DOWN direction buttons to select options between motion
detection, noise detection, cry detection, and alarm volume, and press OK to
save.
3. When starting to set up one detection mode, press LEFT and RIGHT
direction buttons to change options, and press UP and DOWN direction
buttons to adjust the sensitivity.
* You can select different sensitivity according to needs. Low is low
sensitivity, and high is high sensitivity.
4. When setting up the alarm volume, press LEFT and RIGHT direction
buttons to adjust.
5. There will be an alarm when the set detection is triggered, press OK to
stop the alarm.
• Smart Care
• Feeding Reminder
Remind you to feed your baby, when you are too busy, or when you want to
give your baby a regular diet.
1. Press the Menu button on the monitor screen, and select > Feeding
Reminder.
2. Press UP and DOWN direction buttons to select between 10 time options,
and press OK to start the time setting.
3. When starting to set up one feeding time, press the LEFT and RIGHT
buttons to change options between hour, minute, second, and on/off; and
press UP and DOWN direction buttons to change values and select on or off.
4. Select on or off to open or close feeding reminders. You can set up to 10
feeding times one day. And when the set time is up, a feeding alarm will
appear on the monitor screen.
You can turn on functions of motion detection, noise detection, and cry
detection, so that you can know the baby's status immediately, no matter
what you are doing.
1. Press the Menu button on the monitor screen, and select >
Temperature and humidity.
2. Press the UP and DOWN direction buttons to select options between
temperature range, humidity range and out-of-range reminder, and press
OK to start setting.
3. Press the LEFT and RIGHT buttons to change options, and press the UP
and DOWN buttons to change values and units.
4. In the Out of range reminder option, select to turn on or off the alarm
when the temperature and humidity are out of range.
• Temperature and humidity detection
You can real-time monitor the temperature and humidity of your baby's
room. When the temperature and humidity are out of range, you can get
the alarms immediately, and then take measures.
• Safety Protection
You can turn on or turn off the Wi-Fi network channel so that others
cannot live view the videos by App if the function is off. You can also
view the visited records as all visits through the App will be recorded.
1312
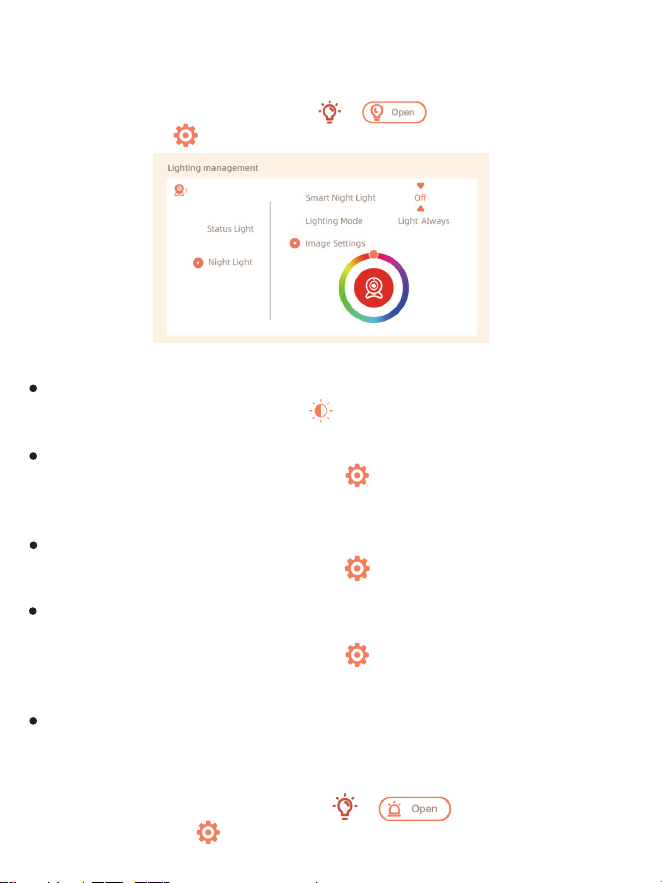
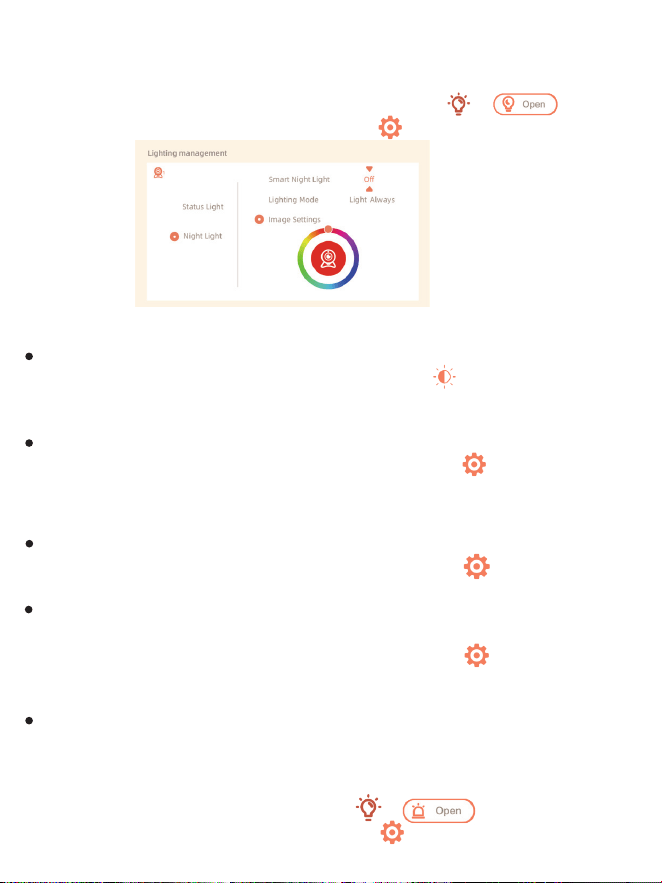
• Night Light
You can turn on the night light if needed, and you can set lighting mode and
light color.
Press Menu on the monitor and select > . Or press the Menu
button, and select > Light > Night light.
• General Setting
Set up brightness:
1. Press Menu on the monitor select and press OK to enter.
2. Press the UP and DOWN buttons to adjust brightness.
Set up time:
1. Press Menu on the monitor and select > Time setting.
2. Press the direction buttons to change the date, time, and time
displaying mode.
Set up language:
1. Press Menu on the monitor and select > Language.
2. Select the language you need.
Set up sleep mode:
You can set up sleep mode to increase standby time.
1. Press Menu on the monitor and select > Sleep mode.
2. Select sleep mode as 1 minute, 5 minutes, 10 minutes, 30 minutes, 60
minutes, or off.
Turn on and off status indicator:
If you turn on the status indicator, you can get the working status of the
camera. You can also turn off the status indicator if you think it will affect
your baby's sleep.
Press Menu on the monitor and select > . (Or Press the
Menu button, select > Light > Status light.)
• How to disable the LED indicator/blue light with my camera?
CloudEdge APP >> Device (tap device to live video page) >> Settings >>
Basic Function >> Network Indicator: Disable it.
• How to turn off the camera real-time monitor, and stop recording?
CloudEdge APP >> Device (tap device to live video page) >> Settings >>
Basic Function >> Privacy Protection >> Lens OFF.
• How to change the WiFi or update the WiFi password for the device?
Please delete the camera on APP, tap "Add" and follow the steps to use the
new WIFI network to add the camera again.
• How to share CloudEdge devices with friends and family?
CloudEdge APP >> Device (Tap device to live video page) >> Settings >>
Device Share >> Add, follow the guide to share your device.
• Failed to access the Live video, prompts offline?
1. Please ensure the camera is in the power-on state: the camera network
indicator will be on.
2. Check the WiFi network is in good condition and restart the router.
3. Try to move the camera near the router, and check again.
FAQ
Low Battery Alarm:
When the camera is low on battery, the low battery alarm will appear on
the monitor screen. Please charge the monitor as soon as possible.
SD Card:
1. Press Menu on the monitor and select > SD card management. Then
you can view the total capacity and remaining capacity of your SD card.
2. (Optional) You can format the SD card as you needed, but make sure
that the important data is backed up.
Upgrade:
Make sure your camera is connected to the 2.4 GHz Wi-Fi. You can upgrade
your camera when the upgrade alarm appears. Or press Menu on the
monitor and select > Device information to check for any new upgrade.
1514

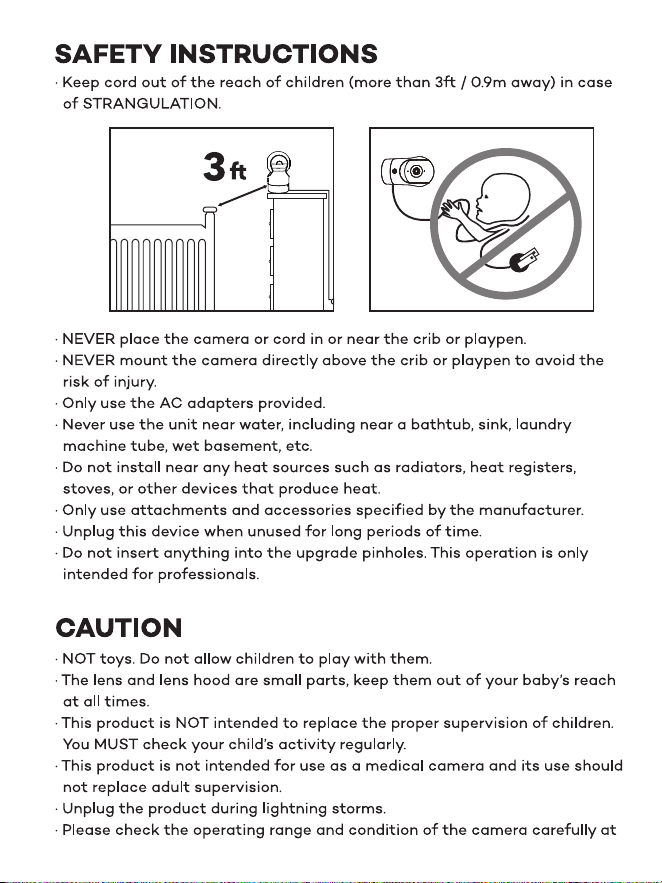
· Halten Sie das Kabel wegen STRANGULATIONSGEFAHR (mindestens 1m)
von Kindern fern.
· Platzieren Sie Kamera oder Kabel NIE in oder in der Nähe eines Kinderbetts
oder Laufstalls.
· Bringen Sie die Kamera NIE direkt über einem Kinderbett oder Laufstall an,
um Verletzungsgefahr vorzubeugen.
· Verwenden Sie nur mitgelieferte Stromstecker.
· Verwenden Sie das Gerät nie in der Nähe von Wasser, inklusive Badewannen,
Waschbecken, Waschmaschinenschläuchen, feuchten Kellern etc.
· Nicht in die Nähe von Hitzequellen wie Radiatoren, Heizregistern, Öfen oder
anderen Geräten, die Hitze erzeugen, stellen.
· Verwenden Sie nur vom Hersteller angegebene Zubehörteile.
· Trennen Sie das Gerät vom Strom, wenn Sie es längere Zeit nicht benutzen.
· Stecken Sie nichts in die Upgrade-Stiftlöcher. Diese Handhabung ist
Experten vorbehalten.
• 12 Month Warranty
• Life-time Support
Note: This warranty is void if the defect is caused by
• Damage caused by force majeure.
• Accidental damage, misuse, abuse, neglect.
• Expired warranty period.
Warranty
4. Delete the camera from CloudEdge APP and add it again. Confirm the
APP and camera firmware are the latest versions.
If there doesn't work, please contact support@parisrhone.com to get help.
Specifications
Product Name
Power
Consumption
Angle of View
Supported phone OS
2.4G Wi-Fi
Working Temp
Local Storage
Baby Monitor
DC 5V, 1A
Up to 4.5W
100°
iOS 9 / Android 5.0 and above version
2412-2472 MHz (Max. power<20dBm )
0 °C to 40 °C
Micro SD card (up to 256GB)
SICHERHEITSHINWEISE
ACHTUNG
· KEIN Spielzeug. Lassen Sie Kinder nicht damit spielen.
· Linse und Blende sind Kleinteile, bewahren Sie diese stets außerhalb der
Reichweite Ihres Babys auf.
· Dieses Produkt soll eine ordnungsgemäße Beaufsichtigung von Kindern
NICHT ersetzen. Sie MÜSSEN regelmäßig nach Ihrem Kind schauen.
· Dieses Produkt soll nicht als medizinische Kamera verwendet werden und
sollte Aufsicht durch Erwachsene nicht ersetzen.
· Trennen Sie das Produkt bei Gewittern vom Strom.
· Bitte prüfen Sie Betriebsreichweite und Kamerazustand bei der Erstinstallation
1716
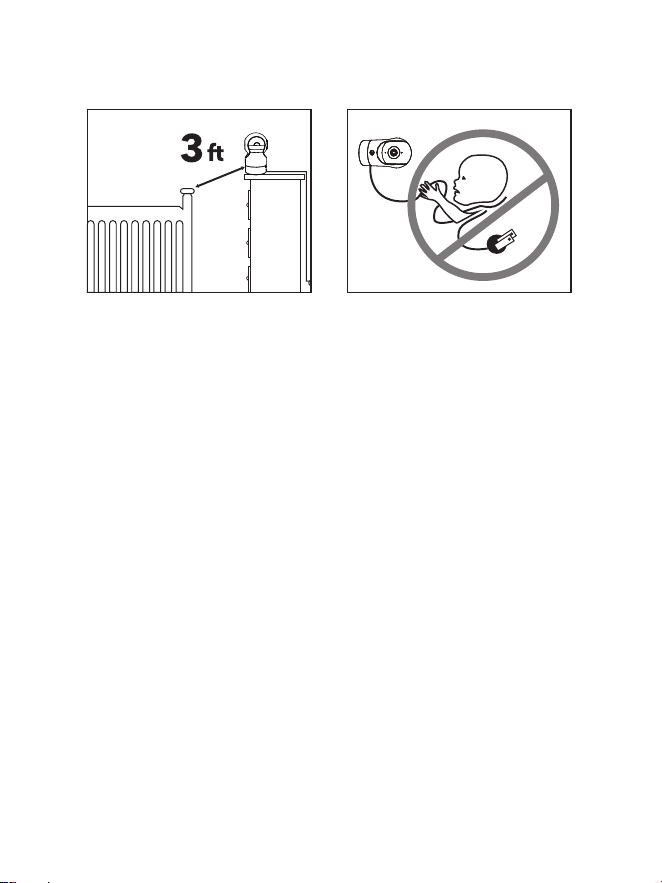

eindringlich und hiernach regelmäßig.
· Überprüfen Sie regelmäßig den Empfang. Testen Sie die Kamera vor
Benutzung und nach Wechsel des Kamera-Aufstellorts.
· Nur für den Innengebrauch.
· Reinigen Sie die Kamera nur mit einem trockenen Tuch.
· Blockieren Sie keine Belüftungsöffnungen.
· Wenn der Monitor zu nah an der Kamera steht, kann es zu
Mikrofon-Rückkopplungen kommen. Halten Sie diese bitte mindestens
1,5m 4.9 ft voneinander entfernt.
PRODUKTABBILDUNG
Baby Monitor
MENU
ZOOM
TALK
OK
BACK
1918
Zoom-Taste: Drücken Sie diese Taste, um den Bildschirm zu
vergrößern/verkleinern, und scrollen Sie dann mit den
Auf-/Ab-/Links-/Rechts-Tasten durch den Bildschirm.
Menütaste: Drücken Sie diese Taste, um die Menüseite aufzurufen.
Aufwärts-Taste: Wählen Sie Optionen nach oben aus oder neigen Sie
die Kamera nach oben.
Linke Taste: Optionen nach links auswählen oder Kamera nach links
schwenken.
OK-Taste: Bestätigen Sie Ihre Auswahl.
Rechte Taste: Optionen nach rechts auswählen oder Kamera nach
rechts schwenken.
Abwärtstaste: Optionen nach unten auswählen oder die Kamera nach
unten neigen.
Sprechtaste: Drücken Sie diese Taste, um mit Personen vor der Kamera
zu sprechen.
Zurück-Taste: Drücken Sie diese Taste, um zur letzten Seite
zurückzukehren. Halten Sie auf der Homepage fest
Hör auf, Musik zu spielen.
Mikrofon: Erfassen Sie den Ton rund um das Babymonitor.
Kontrollleuchte für den Ladestatus.
Orange: Laden; Grün: voll aufgeladen.
Kontrollleuchte für die Verwendung. Gelb: Monitor eingeschaltet; Kein
Licht: Monitor aus.
Ein-/Aus-Taste: Halten Sie sie gedrückt, um den Monitor
ein-/auszuschalten.
Antenne: Passen Sie den Winkel an, um bessere Signale zu erhalten.
SD-Kartensteckplatz: Legen Sie eine SD-Karte (nicht im Lieferumfang
enthalten) ein, um weitere Videos zu speichern. (128G max. wird
unterstützt)
Monitorhalter: Stellen Sie ihn so ein, dass der Monitor stabil steht.
Lautsprecher: Gibt den Ton rund um die Kamera aus.
Reset-Taste: Drücken Sie mit dem Pin (im Lieferumfang enthalten), um
den Monitor zurückzusetzen.
Typ-C-Anschluss: Laden Sie den Monitor mit dem Typ-C-Kabel (im
Lieferumfang enthalten).
Statuslicht
Kameraobjektiv
Mikrofon
Anruf
Lautsprecher
Zurücksetzen
Typ-C-Anschluss
SD-Kartensteckplatz (256G Max)
Gewindelöcher zur Wandmontage
Kamera
2120
Tipps zur Verwendung der Kamera
• Live-Videoanzeige:
In der Kamerasteuerungsschnittstelle der APP können Sie die
Kameraüberwachung in Echtzeit anzeigen, die Auflösung einstellen, Bilder
aufnehmen, Videos aufzeichnen und 2-Wege-Gespräche führen.
• Infrarot-Nachtsicht:
Die Kamera kann nachts automatisch in den Nachtsichtmodus
(schwarz/weiß) wechseln, je nach Grad der Veränderung des
Umgebungslichts. Mit eingebauten roten Infrarot-LED-Lichtern kann die
Nachtsichtdistanz 10 Meter erreichen, und es kann super klar in der
Dunkelheit gesehen werden.
• Bewegungserkennung:
Die Kamera kann die Bewegungsänderungen im Sichtfeld der Kamera
erkennen und eine Benachrichtigung über die Bewegungsänderungen an die
APP senden.
Einstellen über: APP >> Gerät (tippen Sie auf das Gerät, um zur
Live-Video-Seite zu gelangen) >> Einstellungen >> Alarmeinstellungen >>
Verbindung zwischen Kamera und App
Die Kamera kann sowohl mit dem Monitor als auch mit der App verbunden
werden. In der Regel ist sie standardmäßig mit dem Monitor verbunden.
Führen Sie die folgenden Schritte aus, um die Kamera mit der App zu verbinden:
1. Stellen Sie sicher, dass das Wi-Fi-Netzwerk ein 2,4-GHz-Netzwerk ist, da die
Kamera kein 5-GHz-Wi-Fi unterstützt.
2. Laden Sie die App auf Ihr Telefon herunter. Registrieren Sie ein neues Konto,
um sich anzumelden, oder melden Sie sich direkt an.
3. Setzen Sie die Kamera mit einer Stecknadel zurück, bis die Statusleuchte
schnell rot blinkt. (Sie müssen die Kamera innerhalb von 2 Minuten mit der
App verbinden; andernfalls müssen Sie die Kamera erneut zurücksetzen.)
(Wenn Sie den Monitor verwenden, werden Audio und Video vorübergehend
getrennt und automatisch wieder aufgenommen, nachdem die Kamera
erfolgreich mit dem Netzwerk konfiguriert wurde. Die maximale Zeit beträgt
2 Minuten.)
4. Befolgen Sie die Schrittanweisungen auf Ihrem Smartphone, um den Monitor
hinzuzufügen, und scannen Sie den QR-Code mit Ihrer Kamera.
Installation
Methode 1:
Installieren Sie die Kamera auf einer ebenen Fläche.
Methode 2:
Benutzen Sie die mitgelieferte Montagehalterung, um die Kamera auf
einer sauberen Oberfläche zu befestigen.
Hinweis: Die Wand muss mindestens das Dreifache des Gesamtgewichts
der Kamera tragen können.
2322
1. Drücken Sie die Menütaste auf dem Monitorbildschirm und wählen
Sie > Kamera.
2. Wählen Sie Kamera 1 oder Kamera 2, die Sie koppeln möchten.
3. Drücken Sie lange auf die Kamerakopplungstaste, bis Sie den
Aufforderungston hören.
4. Drücken Sie die OK-Taste auf dem Monitorbildschirm, um die Kopplung
zu starten.
5. Für 2 Kameras wiederholen Sie Schritt 2~Schritt4.
• Einrichten eines Routers
Bitte halten Sie das Netz verfügbar
Der Router unterstützt 2.4GHz WiFi (unterstützt nicht 5GHz) und ist mit dem
WiFi-Netzwerk verbunden. Bitte stellen Sie die Parameter des Routers ein,
bevor Sie sich mit dem WiFi-Netzwerk verbinden, und notieren Sie die SSID
und das Passwort Ihres WiFi.
• CloudEdge APP verbinden
Scannen Sie den QR-Code, um die CloudEdge APP herunterzuladen und zu
installieren. Sie können auch nach "CloudEdge" im App Store (IOS) oder
Google Play (Android) suchen. Laden Sie die CloudEdge APP herunter und
installieren Sie sie. Öffnen Sie die APP-Startseite, klicken Sie auf "+" auf der
rechten oberen Seite. Folgen Sie der Anleitung in der APP, um die Kamera
Schritt für Schritt hinzuzufügen.
Nachdem die Verbindung erfolgreich hergestellt wurde, leuchtet
die Anzeige blau.
Monitor Tipps zur Verwendung
• Pairing von Kamera und Monitor:
Schalten Sie die Kamera und den Monitor ein, und sie werden automatisch
verbunden. Wenn die Verbindung fehlschlägt, folgen Sie bitte den nachste-
henden Schritten zur Kopplung. Die Kopplung ist abstandsbegrenzt, daher
sollte der Abstand zwischen der Kamera und dem Monitor nicht mehr als
200 m betragen.
1. Drücken Sie die Menütaste auf dem Monitorbildschirm und wählen
Sie > Kamera.
2. Wählen Sie Kamera 1 oder Kamera 2 aus, deren Bindung Sie
aufheben möchten.
3. Drücken Sie lange auf die OK-Taste, um die Bindung aufzuheben.
(2) Lösen Sie die Verbindung zwischen Monitor und Kamera:
(1) Koppeln Sie den Monitor und die Kamera:
Halten Sie OK gedrückt, um die Kamera zu entkoppeln
Kamera erfolgreich gekoppelt
1. Halten Sie die Pairing-Taste an der Kamera gedrückt, bis Sie den Ton hören.
2. Drücken Sie die OK-Taste auf dem Monitor, um die Kopplung Ihrer Kamera
abzuschließen.
Kamera nicht gekoppelt
• Methode der Kameraauswahl:
Hinweis:
* Für verschiedene Produkte können Sie 1 oder 2 Kameras hinzufügen. Wenn
Sie 2 Kameras hinzugefügt haben, werden auf dem Monitorbildschirm 2
Live-Ansichten zur gleichen Zeit angezeigt.
* Wenn Sie Parameter einstellen oder Funktionen einer der Kameras
aktivieren möchten, müssen Sie zuerst die Kamera auswählen.
Drücken Sie auf der Startseite die Zoom-Taste , um die Kamera zwischen
Cam1 und Cam2 umzuschalten, wenn Sie zwei Kameras hinzugefügt haben.
Wenn Sie zwei Kameras hinzugefügt haben, wählen Sie die gewünschte
Kamera aus und drücken Sie die OK-Taste auf dem Monitor, um den
Vollbildmodus aufzurufen. Dann können Sie die Zoom-Tast e erneut drücken,
MENU
ZOOM
TALK
OK
BACK
2524
1. Drücken Sie die Menütaste auf dem Monitorbildschirm und wählen
Sie > Kamera.
2. Wählen Sie Kamera 1 oder Kamera 2, die Sie koppeln möchten.
3. Drücken Sie lange auf die Kamerakopplungstaste, bis Sie den
Aufforderungston hören.
4. Drücken Sie die OK-Taste auf dem Monitorbildschirm, um die Kopplung
zu starten.
5. Für 2 Kameras wiederholen Sie Schritt 2~Schritt4.
• Einrichten eines Routers
Bitte halten Sie das Netz verfügbar
Der Router unterstützt 2.4GHz WiFi (unterstützt nicht 5GHz) und ist mit dem
WiFi-Netzwerk verbunden. Bitte stellen Sie die Parameter des Routers ein,
bevor Sie sich mit dem WiFi-Netzwerk verbinden, und notieren Sie die SSID
und das Passwort Ihres WiFi.
• CloudEdge APP verbinden
Scannen Sie den QR-Code, um die CloudEdge APP herunterzuladen und zu
installieren. Sie können auch nach "CloudEdge" im App Store (IOS) oder
Google Play (Android) suchen. Laden Sie die CloudEdge APP herunter und
installieren Sie sie. Öffnen Sie die APP-Startseite, klicken Sie auf "+" auf der
rechten oberen Seite. Folgen Sie der Anleitung in der APP, um die Kamera
Schritt für Schritt hinzuzufügen.
Nachdem die Verbindung erfolgreich hergestellt wurde, leuchtet
die Anzeige blau.
Monitor Tipps zur Verwendung
• Pairing von Kamera und Monitor:
Schalten Sie die Kamera und den Monitor ein, und sie werden automatisch
verbunden. Wenn die Verbindung fehlschlägt, folgen Sie bitte den nachste-
henden Schritten zur Kopplung. Die Kopplung ist abstandsbegrenzt, daher
sollte der Abstand zwischen der Kamera und dem Monitor nicht mehr als
200 m betragen.
1. Drücken Sie die Menütaste auf dem Monitorbildschirm und wählen
Sie > Kamera.
2. Wählen Sie Kamera 1 oder Kamera 2 aus, deren Bindung Sie
aufheben möchten.
3. Drücken Sie lange auf die OK-Taste, um die Bindung aufzuheben.
(2) Lösen Sie die Verbindung zwischen Monitor und Kamera:
(1) Koppeln Sie den Monitor und die Kamera:
Halten Sie OK gedrückt, um die Kamera zu entkoppeln
Kamera erfolgreich gekoppelt
1. Halten Sie die Pairing-Taste an der Kamera gedrückt, bis Sie den Ton hören.
2. Drücken Sie die OK-Taste auf dem Monitor, um die Kopplung Ihrer Kamera
abzuschließen.
Kamera nicht gekoppelt
• Methode der Kameraauswahl:
Hinweis:
* Für verschiedene Produkte können Sie 1 oder 2 Kameras hinzufügen. Wenn
Sie 2 Kameras hinzugefügt haben, werden auf dem Monitorbildschirm 2
Live-Ansichten zur gleichen Zeit angezeigt.
* Wenn Sie Parameter einstellen oder Funktionen einer der Kameras
aktivieren möchten, müssen Sie zuerst die Kamera auswählen.
Drücken Sie auf der Startseite die Zoom-Taste , um die Kamera zwischen
Cam1 und Cam2 umzuschalten, wenn Sie zwei Kameras hinzugefügt haben.
Wenn Sie zwei Kameras hinzugefügt haben, wählen Sie die gewünschte
Kamera aus und drücken Sie die OK-Taste auf dem Monitor, um den
Vollbildmodus aufzurufen. Dann können Sie die Zoom-Tast e erneut drücken,
MENU
ZOOM
TALK
OK
BACK
2524

• Drehen Sie die Kamera
Sie können den Überwachungswinkel für eine bessere Sicht einstellen.
Die Richtungstasten auf dem Monitorbildschirm sind verfügbar, wenn die
Kamera eingeschaltet ist. Drücken Sie die Richtungstasten, um die Kamera
für eine bessere Sicht horizontal und vertikal zu drehen.
um die Ansicht zu vergrößern oder zu verkleinern. (Die Zoomfunktion
funktioniert nicht, wenn sich der Bildschirm nicht im Vollbildmodus
befindet).
1. Drücken Sie die Menü taste auf dem Monitor, wählen Sie und
drücken Sie OK, um die Schnittstelle aufzurufen.
2. Wählen Sie die Kamera und das Datum, wählen Sie das gewünschte
Foto oder Video und drücken Sie OK, um den Vorschaumodus aufzurufen.
* Bei einem Video drücken Sie OK, um es im Vorschaumodus abzuspielen
oder anzuhalten.
* Drücken Sie die Backup-Taste, um die Vorschau zu beenden oder zum
Hauptmenü zurückzukehren.
Sie können ein Video aufnehmen, um die bedeutsame Zeit eines Babys
festzuhalten. Drücken Sie Menü auf dem Monitor, wählen Sie und
drücken Sie OK, um ein Video aufzunehmen.
Sie können ein Foto machen, um jede interessante Szene eines Babys
festzuhalten. Drücken Sie die Menütaste auf dem Monitor, wählen Sie
und drücken Sie OK, um ein Foto aufzunehmen.
• Musik Abspielen
• Foto und Video
(1) Machen Sie ein Foto:
(2) Nehmen Sie ein Video auf:
(3) Betrachten Sie die aufgenommenen Fotos und Videos:
Sie können Musik abspielen, um Ihr Baby zu beruhigen, wenn es weint oder
schläft. Drücken Sie die Menü taste auf dem Monitorbildschirm, wählen Sie
und drücken Sie OK, um die Musikschnittstelle aufzurufen. Sie können
verschiedene Musik auswählen, den Musikzyklusmodus ändern oder die
Lautstärke der Musik einstellen.
• Fütterungserinnerung
Erinnert Sie daran, Ihr Baby zu füttern, wenn Sie zu viel zu tun haben oder
wenn Sie Ihrem Baby eine regelmäßige Nahrung geben wollen.
1. Drücken Sie die Menü taste auf dem Bildschirm und wählen Sie >
Fütterungserinnerung.
2. Drücken Sie die Richtungstasten AUF und AB, um zwischen 10
2726
Zeitoptionen zu wählen, und drücken Sie OK, um die Zeiteinstellung zu
starten.
3. Wenn Sie mit dem Einstellen einer Fütterungszeit beginnen, drücken Sie
die Richtungstasten LINKS und RECHTS, um zwischen den Optionen Stunde,
Minute, Sekunde und Ein/Aus zu wechseln, und drücken Sie die Richtungstas-
ten AUF und AB, um die Werte zu ändern und Ein oder Aus zu wählen.
4. Wählen Sie Ein oder Aus, um die Fütterungserinnerungen zu öffnen oder zu
schließen. Sie können bis zu 10 Fütterungszeiten pro Tag einstellen. Und wenn
die eingestellte Zeit abgelaufen ist, erscheint ein Fütterungsalarm auf dem
Bildschirm.
1. Drücken Sie auf dem Monitor auf Menü und wählen Sie >Smart Care.
2. Drücken Sie die Richtungstasten AUF und AB, um zwischen den Optionen
Bewegungserkennung, Geräuscherkennung, Schreierkennung und Alarmlaut-
stärke zu wählen, und drücken Sie zum Speichern auf OK.
3. Wenn Sie mit der Einrichtung eines Erkennungsmodus beginnen, drücken
Sie die Richtungstasten LINKS und RECHTS, um die Optionen zu ändern, und
drücken Sie die Richtungstasten AUF und AB, um die Empfindlichkeit
einzustellen.
* Sie können je nach Bedarf verschiedene Empfindlichkeiten auswählen.
Niedrig ist eine niedrige Empfindlichkeit, und hoch ist eine hohe Empfindlich-
keit.
4. Wenn Sie die Alarmlautstärke einstellen, drücken Sie zum Einstellen die
Richtungstasten LINKS und RECHTS.
5. Es wird ein Alarm ausgelöst, wenn die eingestellte Erkennung ausgelöst
wird, drücken Sie OK, um den Alarm zu stoppen.
• Intelligente Betreuung
Sie können die Funktionen der Bewegungs-, Geräusch- und Schreierkennung
aktivieren, so dass Sie den Status des Babys sofort erkennen können, egal
was Sie gerade tun.
1. Drücken Sie die Menü taste auf dem Monitorbildschirm und wählen Sie
> Temperatur und Luftfeuchtigkeit.
2. Drücken Sie die Richtungstasten AUF und AB, um zwischen den Optionen
Temperaturbereich, Luftfeuchtigkeitsbereich und
Bereichsüberschreitungserinnerung zu wählen, und drücken Sie OK, um die
Einstellung zu starten.
3. Drücken Sie die Tasten LINKS und RECHTS, um die Optionen zu ändern,
und drücken Sie die Tasten AUF und AB, um die Werte und Einheiten zu
ändern.
4. Wählen Sie in der Option Erinnerung an Bereichsüberschreitung, ob der
Alarm ein- oder ausgeschaltet werden soll, wenn die Temperatur und die
Luftfeuchtigkeit außerhalb des Bereichs liegen.
• Erkennung von Temperatur und Feuchtigkeit
Sie können die Temperatur und Luftfeuchtigkeit im Zimmer Ihres Babys in
Echtzeit überwachen. Wenn die Temperatur und Luftfeuchtigkeit außerhalb
des Bereichs liegen, können Sie die Alarme sofort erhalten, und dann
Maßnahmen ergreifen.
• Sicherheit Schutz
Sie können den Wi-Fi-Netzwerkkanal ein- oder ausschalten, damit andere
Personen die Videos der App nicht live sehen können, wenn die Funktion
ausgeschaltet ist. Sie können auch die besuchten Datensätze anzeigen, da
alle Besuche über die App aufgezeichnet werden.
2928
• Nachtlicht
Sie können das Nachtlicht bei Bedarf einschalten und den Beleuchtungsmo-
dus und die Lichtfarbe einstellen.
Drücken Sie auf dem Monitor auf "Menü" und wählen Sie >
der drücken Sie die Menü taste und wählen Sie > Licht > Nachtlicht.
• Allgemeine Einstellungen
Einstellen der Helligkeit:
1. Drücken Sie auf dem Monitor auf Menü, wählen Sie und drücken Sie
zum Aufrufen OK.
2. Drücken Sie die Tasten UP und DOWN, um die Helligkeit einzustellen.
Zeit für die Einrichtung:
1. Drücken Sie auf dem Monitor auf Menü und wählen Sie > Zeit für die
Einrichtung.
2. Drücken Sie die Richtungstasten, um das Datum, die Uhrzeit und den
Zeitanzeigemodus zu ändern.
Sprache einrichten:
1. Drücken Sie auf dem Monitor auf Menü und wählen Sie > Sprache.
2. Wählen Sie die gewünschte Sprache aus.
Schlafmodus einrichten:
Sie können den Ruhemodus einrichten, um die Standby-Zeit zu verlängern.
1. Drücken Sie auf dem Monitor auf Menü und wählen Sie > Schlafmodus.
2. Wählen Sie den Ruhemodus als 1 Minute, 5 Minuten, 10 Minuten, 30
Minuten, 60 Minuten oder aus.
Statusanzeige ein/ausschalten:
Wenn Sie die Statusanzeige einschalten, können Sie den Betriebsstatus
der Kamera ablesen. Sie können die Statusanzeige auch ausschalten, wenn
Sie glauben, dass sie den Schlaf Ihres Babys beeinträchtigt. Drücken Sie
auf dem Monitor auf Menü und wählen Sie > .
(Oder drücken Sie die Menütaste, wählen Sie > Licht > Statusleuchte.)
• Wie kann ich die LED-Anzeige/das blaue Licht bei meiner Kamera
deaktivieren?
CloudEdge APP >> Gerät (tippen Sie auf das Gerät, um zur Live-Video-Seite
zu gelangen) >> Einstellungen >> Grundfunktionen >> Netzwerkanzeige:
Deaktivieren Sie sie.
• Wie schaltet man den Echtzeit-Monitor der Kamera aus und stoppt die
Aufnahme?
CloudEdge APP >> Gerät (tippen Sie auf das Gerät, um zur Live-Video-Seite
zu gelangen) >> Einstellungen >> Grundfunktionen >> Datenschutz >>
Objektiv AUS.
• Wie ändert man das WiFi oder aktualisiert das WiFi-Passwort für das
Gerät?
Bitte löschen Sie die Kamera in der APP, tippen Sie auf "Hinzufügen" und
folgen Sie den Schritten, um das neue WIFI-Netzwerk zu verwenden, um die
Kamera wieder hinzuzufügen.
• Wie kann man CloudEdge Geräte mit Freunden und Familie teilen?
CloudEdge APP >> Gerät (Tippen Sie auf das Gerät, um ein Live-Video zu
FAQ
Alarm bei niedrigem Batteriestand:
Wenn die Kamera einen niedrigen Batteriestand aufweist, erscheint auf
dem Monitor der Alarm für niedrigen Batteriestand.Bildschirm. Bitte laden
Sie den Monitor so bald wie möglich auf.
SD-Karte:
1. Drücken Sie auf dem Monitor auf Menü und wählen Sie >
SD-Kartenverwaltung. Dann können Sie können Sie die Gesamtkapazität
und die verbleibende Kapazität Ihrer SD-Karte anzeigen.
2. (Optional) Sie können die SD-Karte nach Bedarf formatieren, aber
stellen Sie sicher, dass die wichtigen Daten gesichert sind.
Aufrüsten:
Stellen Sie sicher, dass Ihre Kamera mit dem 2,4-GHz-Wi-Fi verbunden ist.
Sie können Ihre Kamera aktualisieren wenn der Aktualisierungsalarm
erscheint. Oder drücken Sie auf dem Monitor auf Menü und wählen Sie >
Geräte nformationen, um zu prüfen, ob ein Upgrade vorhanden ist.
3130

• 12 Monate Garantie
• Lebenslanger Support
Hinweis: Diese Garantie erlischt, wenn der Defekt durch verursacht wurde
• Schäden, die durch höhere Gewalt verursacht wurden.
• Unfallschäden, Missbrauch, Missbrauch, Vernachlässigung.
• Garantiezeit abgelaufen.
Garantie
sehen) >> Einstellungen >> Gerätefreigabe >> Hinzufügen, folgen Sie der
Anleitung, um Ihr Gerät freizugeben.
• Der Zugriff auf das Live-Video ist fehlgeschlagen, die Eingabeaufforderung
ist offline?
1. Bitte vergewissern Sie sich, dass die Kamera eingeschaltet ist: Die
Netzwerkanzeige der Kamera leuchtet.
2. Überprüfen Sie, ob das WiFi-Netzwerk in Ordnung ist, und starten Sie den
Router neu.
3. Versuchen Sie, die Kamera in die Nähe des Routers zu bringen, und prüfen
Sie erneut.
4. Löschen Sie die Kamera aus der CloudEdge APP und fügen Sie sie erneut
hinzu. Vergewissern Sie sich, dass die APP und die Kamera-Firmware die
neuesten Versionen sind.
Wenn dies nicht funktioniert, wenden Sie sich bitte an
support@parisrhone.com, um Hilfe zu erhalten.
Spezifikationen
Name des Produkts
Leistung
Verbrauch
Blickwinkel
Unterstütztes Telefon-Betriebssystem
2.4G Wi-Fi
Arbeitstemperatur
Lokale Speicherung
Babymonitor
DC 5V, 1A
Bis zu 4,5 W
100°
iOS 9 / Android 5.0 und höhere Version
2412-2472 MHz (Max. Leistung<20dBm)
0 °C bis 40 °C
Micro SD-Karte (bis zu 256 GB)
FCC STATEMENT :
This device complies with Part 15 of the FCC Rules. Operation is subject to
the following two conditions:
1) This device may not cause harmful interference, and
2) This device must accept any interference received, including interference
that may cause undesired operation.
Warning: Changes or modifications not expressly approved by the party
responsible for compliance could void the user's authority to operate the
equipment.
NOTE: This equipment has been tested and found to comply with the limits for
a Class B digital device, pursuant to Part 15 of the FCC Rules. These limits are
designed to provide reasonable protection against harmful interference in a
residential installation. This equipment generates uses and can radiate radio
frequency energy and, if not installed and used in accordance with the
instructions, may cause harmful interference to radio communications.
However, there is no guarantee that interference will not occur in a particular
installation. If this equipment does cause harmful interference to radio or
television reception, which can be determined by turning the equipment off
and on, the user is encouraged to try to correct the interference by one or
more of the following measures:
• Reorient or relocate the receiving antenna.
• Increase the separation between the equipment and receiver.
• Connect the equipment into an outlet on a circuit different from that to
which the receiver is connected.
• Consult the dealer or an experienced radio/TV technician for help.
FCC Radiation Exposure Statement:
This equipment complies with FCC radiation exposure limits set forth for an
uncontrolled environment. This equipment should be installed and operated
with minimum distance 20cm between the radiator & your body.
3332

This device contains licence-exempt transmitter(s)/receiver(s) that
comply with Innovation, Science and Economic Development Canada’s
licence-exempt RSS(s). Operation is subject to the following two conditions:
(1) This device may not cause interference.
(2) This device must accept any interference, including interference that may
cause undesired operation of the device.
L’émetteur/récepteur exempt de licence contenu dans le présent appareil est
conforme aux CNR d’Innovation, Sciences et Développement économique
Canada applicables aux appareils radio exempts de licence. L’exploitation est
autorisée aux deux conditions suivantes :
(1) L' appareil ne doit pas produire de brouillage;
(2) L' appareil doit accepter tout brouillage radioélectrique subi, même si le
brouillage est susceptible d' en compromettre le fonctionnement.
Radio Frequency Exposure Statement for IC
The device has been evaluated to meet general RF exposure requirements.
The device can be used in mobile exposure conditions. The min separation
distance is 20cm.
Déclaration d'exposition aux radiofréquences pour IC
L’appareil a été utilisé pour répondre aux exigences générales en matière
d’exposition aux radiofréquences.
WEEE Compliance
Correct Disposal of This Product (Waste Electrical & Electronic Equipment)
(Applicable in countries with separate collection systems)This marking on the
product, accessories or literature indicates that the product and its electronic
accessories should not be disposed of with other household waste at the end
of their working life. To prevent possible harm to the environment or human
health from uncontrolled waste disposal, please separate these
items from other types of waste and recycle them responsibly to promote
the sustainable reuse of material resources. Household users should
contact either the retailer where they purchased this product, or their local
government office, for details of where and how they can take these items for
environmentally safe recycling. Business users should contact their supplier
and check the terms and conditions of the purchase contract. This product
and its electronic accessories should not be mixed with other commercial
wastes for disposal.
34 35
Hiermit erklärt Aspiron, dass der Funkanlagentyp PE-BBM002, PE-BBM003,
PE-BBM002-CAM, PE-BBM002-MON der Richtlinie 2014/53/EU und 2014/30/EU
entspricht. Der vollständige Text der EU-Konformität-serklärung ist unter der folgenden
Internetadresse verfügbar:
Aspiron hereby declares that the radio system type PE-BBM002, PE-BBM003,
PE-BBM002-CAM, PE-BBM002-MON complies with Directive 2014/53/EU and
2014/30/EU. The full text of the EU declaration of conformity is available at the following
internet address:
https://eu.parisrhone.com/apps/faqs
36

Baby Monitor
User Manual
Model: PE-BBM002, PE-BBM003,
PE-BBM002-MON, PE-BBM002-CAM
E-mail:
US: support@parisrhone.com
DE: support.de@parisrhone.com
Manufacturer: Shenzhen Aspiron Technology Company Limited
Address: 3rd Floor, Yiben Building, No.1063 Chaguang Road,
Xili Street, Nanshan District, Shenzhen, Guangdong,
China
Rev_1.1_EN-DE
www.parisrhone.com
