
01 02
CONTENTS
SAFETY INSTRUCTIONS
CAUTION
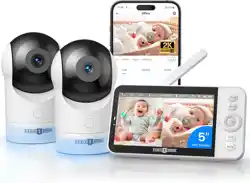
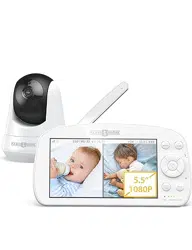
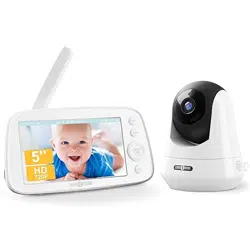
PACKAGE CONTENTS
PRODUCT DIAGRAM
GETTING STARTED
1. Charging & Powering Baby Monitor
2. Powering Camera
3. Pairing the Baby Monitor & the Camera
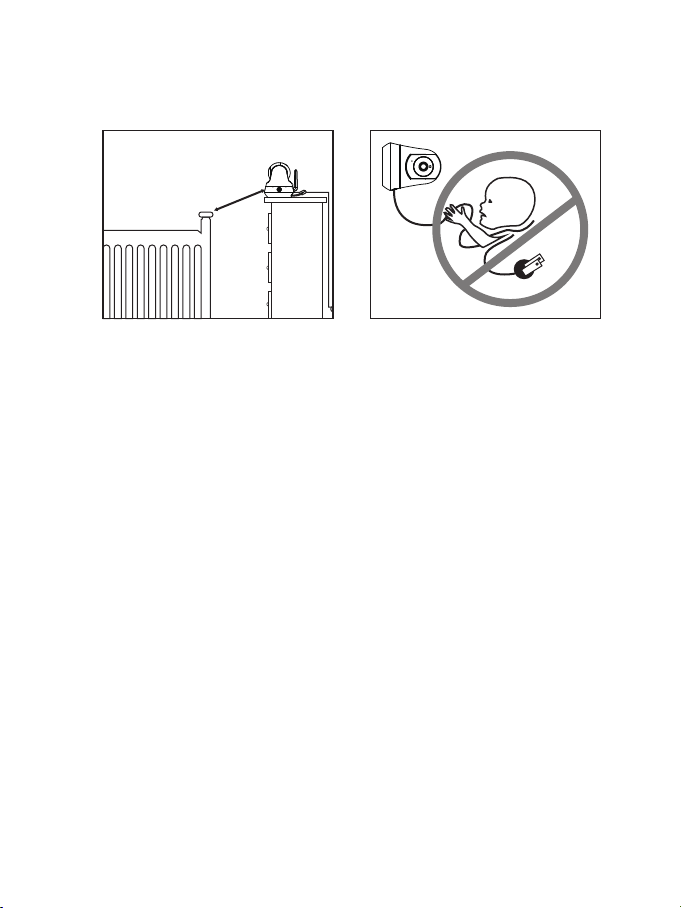
4. Placing the Camera
5. Wall Mounting Camera
FUNCTIONS & OPERATIONS
Top Status Indications
Notifications Icons
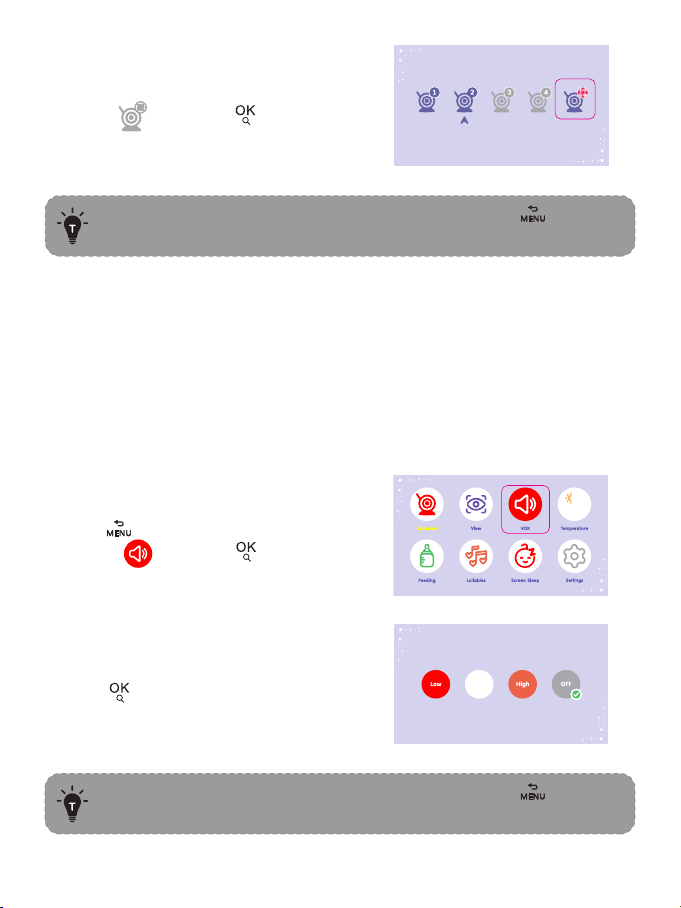
1. Volume Adjustment
2. Display Brightness Adjustment
3. Talkback
4. Add Camera
5. Delete Camera
6. Camera interaction and loop
7. View camera
8. VOX mode
9. Temperature Alarm
10. Feeding
11. Lullabies
12. Screen sleep
13. Settings
SPECIFICATIONS
TROUBLESHOOTING
WARRANTY & CUSTOMER SERVICE
FCC STATEMENT
WEEE COMPLIANCE
02
02
03
04
07
06
06
06
08
09
10
10
10
11
11
11
12
13
13
14
15
16
16
17
18
18
23
25
26
27
29
CAUTION
· NOT toys. Do not allow children to play with them.
· This product is NOT intended to replace the proper supervision of children.
You MUST check your child’s activity regularly.
· This product is not intended for use as a medical camera and its use should
not replace adult supervision.
· Unplug the product during lightning storms.
· Please check the operating range and condition of the camera carefully at
the initial installation, and on a regular basis after that.
· Check the reception regularly. Test the camera before use and after
SAFETY INSTRUCTIONS
· Keep cord out of the reach of children (more than 3ft / 0.9m away) in case
of STRANGULATION.
· NEVER place the camera or cord in or near the crib or playpen.
· NEVER mount the camera directly above the crib or playpen to avoid the
risk of injury.
· Only use the AC adapters provided.
· Never use the unit near water, including near a bathtub, sink, laundry
machine tube, wet basement, etc.
· Do not install near any heat sources such as radiators, heat registers,
stoves, or other devices that produce heat.
· Only use attachments and accessories specified by the manufacturer.
· Unplug this device when unused for long periods of time.
3
ft
01 02
CONTENTS
SAFETY INSTRUCTIONS
CAUTION
PACKAGE CONTENTS
PRODUCT DIAGRAM
GETTING STARTED
1. Charging & Powering Baby Monitor
2. Powering Camera
3. Pairing the Baby Monitor & the Camera
4. Placing the Camera
5. Wall Mounting Camera
FUNCTIONS & OPERATIONS
Top Status Indications
Notifications Icons
1. Volume Adjustment
2. Display Brightness Adjustment
3. Talkback
4. Add Camera
5. Delete Camera
6. Camera interaction and loop
7. View camera
8. VOX mode
9. Temperature Alarm
10. Feeding
11. Lullabies
12. Screen sleep
13. Settings
SPECIFICATIONS
TROUBLESHOOTING
WARRANTY & CUSTOMER SERVICE
FCC STATEMENT
WEEE COMPLIANCE
02
02
03
04
07
06
06
06
08
09
10
10
10
11
11
11
12
13
13
14
15
16
16
17
18
18
23
25
26
27
29
CAUTION
· NOT toys. Do not allow children to play with them.
· This product is NOT intended to replace the proper supervision of children.
You MUST check your child’s activity regularly.
· This product is not intended for use as a medical camera and its use should
not replace adult supervision.
· Unplug the product during lightning storms.
· Please check the operating range and condition of the camera carefully at
the initial installation, and on a regular basis after that.
· Check the reception regularly. Test the camera before use and after
SAFETY INSTRUCTIONS
· Keep cord out of the reach of children (more than 3ft / 0.9m away) in case
of STRANGULATION.
· NEVER place the camera or cord in or near the crib or playpen.
· NEVER mount the camera directly above the crib or playpen to avoid the
risk of injury.
· Only use the AC adapters provided.
· Never use the unit near water, including near a bathtub, sink, laundry
machine tube, wet basement, etc.
· Do not install near any heat sources such as radiators, heat registers,
stoves, or other devices that produce heat.
· Only use attachments and accessories specified by the manufacturer.
· Unplug this device when unused for long periods of time.
3
ft
changing the camera’s location.
· For indoor use only.
· Clean the camera with a dry cloth only.
· Do not block any ventilation openings.
· Microphone feedback might occur when the monitor is too close to the
camera. Please keep them at least 1.5m / 4.9ft apart.
03 04
PRODUCT DIAGRAM
Baby Monitor
MENU
CAM
TALK
ZOOM
/ OK
1
5
6
7
4
9
8
10
11
12
13
2
3
16
17
14
15
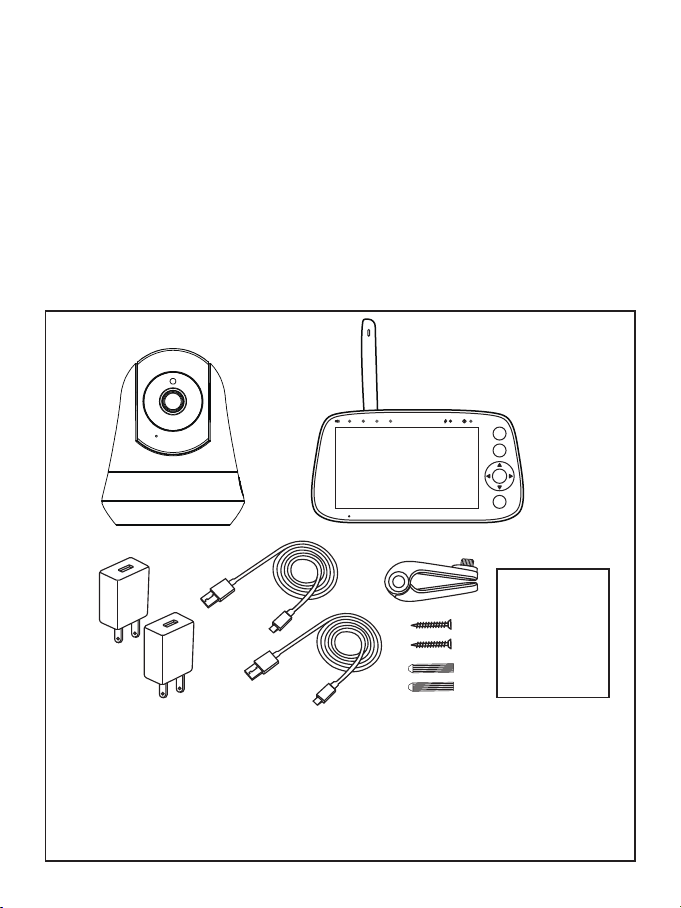
PACKAGE CONTENTS
· Baby Monitor & Camera
· AC Power Adapter *2
· Mount Kit
· Camera Mount
· Power Cable *2
· User Guide
User Guide
MENU
CAM
TALK
ZOOM
/ OK
changing the camera’s location.
· For indoor use only.
· Clean the camera with a dry cloth only.
· Do not block any ventilation openings.
· Microphone feedback might occur when the monitor is too close to the
camera. Please keep them at least 1.5m / 4.9ft apart.
03 04
PRODUCT DIAGRAM
Baby Monitor
MENU
CAM
TALK
ZOOM
/ OK
1
5
6
7
4
9
8
10
11
12
13
2
3
16
17
14
15
PACKAGE CONTENTS
· Baby Monitor & Camera
· AC Power Adapter *2
· Mount Kit
· Camera Mount
· Power Cable *2
· User Guide
User Guide
MENU
CAM
TALK
ZOOM
/ OK
1
2
3
4
5
6
7
8
9
10
11
12
13
14
15
16
17
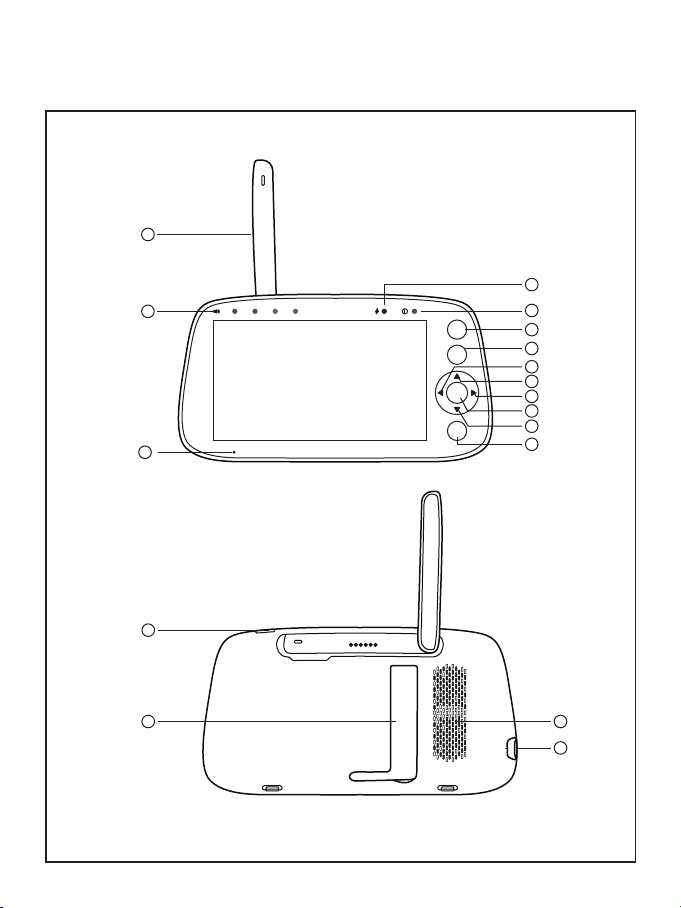
Antenna.
Sound Level LED: Low/high level shows low/high sound detected by
the camera.
Microphone.
Charging Indicator: blue during charging, and goes out when fully
charged; Flashes red when the monitor is in a low power state.
Monitoring Status Indicator: Green. When the camera is discon-
nected, it flashes slowly; when it enters pairing mode, it flashes
quickly; when the camera is turned on, it is always on.
Menu/Back Button: Press to enter menu page or press as a Back
button.
Camera Switch: Switch cameras if connected with two or more
cameras.
Left Button: Press to pan the camera leftward or to change your
selection leftward.
Up Button: Press to tilt the camera upward or to change your
selection upward.
Right Button: Press to pan the camera rightward or to change your
selection rightward.
Confirm/Zoom Button: Press to Zoom in/out or to confirm your
selection.
Down Button: Press to tilt the camera downward or to change your
selection downward.
Call key: long press to talk to the baby on the monitoring screen;
short press to adjust the sound or brightness of the display; short
press next time to enter the lullaby play page.
Power/Sleep Button: Long press to turn on/off the monitor; short
press to turn on/off the screen.
Support Stand
Speaker
Power Input
Camera
05 06
1
2
3
4
5
Night Vision Sensor
Camera Lens
LEDS
Microphone
Antenna
6
7
8
9
10
Speaker
Pair Button
Power Input
Temperature Sensor
Wall Mounting Threaded Holes
1
2
3
4
7
6
8
9
5
IN-5V
PAIR
10
1
2
3
4
5
6
7
8
9
10
11
12
13
14
15
16
17
Antenna.
Sound Level LED: Low/high level shows low/high sound detected by
the camera.
Microphone.
Charging Indicator: blue during charging, and goes out when fully
charged; Flashes red when the monitor is in a low power state.
Monitoring Status Indicator: Green. When the camera is discon-
nected, it flashes slowly; when it enters pairing mode, it flashes
quickly; when the camera is turned on, it is always on.
Menu/Back Button: Press to enter menu page or press as a Back
button.
Camera Switch: Switch cameras if connected with two or more
cameras.
Left Button: Press to pan the camera leftward or to change your
selection leftward.
Up Button: Press to tilt the camera upward or to change your
selection upward.
Right Button: Press to pan the camera rightward or to change your
selection rightward.
Confirm/Zoom Button: Press to Zoom in/out or to confirm your
selection.
Down Button: Press to tilt the camera downward or to change your
selection downward.
Call key: long press to talk to the baby on the monitoring screen;
short press to adjust the sound or brightness of the display; short
press next time to enter the lullaby play page.
Power/Sleep Button: Long press to turn on/off the monitor; short
press to turn on/off the screen.
Support Stand
Speaker
Power Input
Camera
05 06
1
2
3
4
5
Night Vision Sensor
Camera Lens
LEDS
Microphone
Antenna
6
7
8
9
10
Speaker
Pair Button
Power Input
Temperature Sensor
Wall Mounting Threaded Holes
1
2
3
4
7
6
8
9
5
IN-5V
PAIR
10
07 08
GETTING STARTED
1. Charging & Powering Baby Monitor
1) Connect the monitor adapter to the monitor and a power outlet.
2) Unplug the unit when its power indicator turns off, indicating a full
charge.Of course, if you have been plugged in, it will not affect the use, but
it may affect the battery life.
3) Press the Power button on the monitor to power on with the power
indicator lighting green.
2. Powering Camera
1) Connect the camera to power source via the Type-C cable and camera
adapter.
· Only use the power adapters included in the package.
· Do not place the camera and power cord within the reach of your
baby.
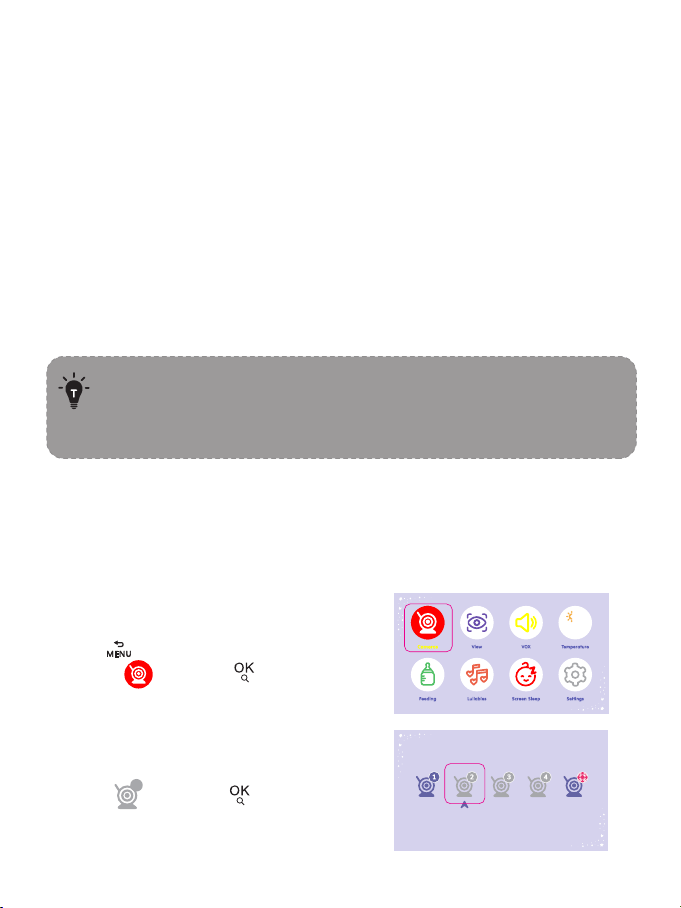
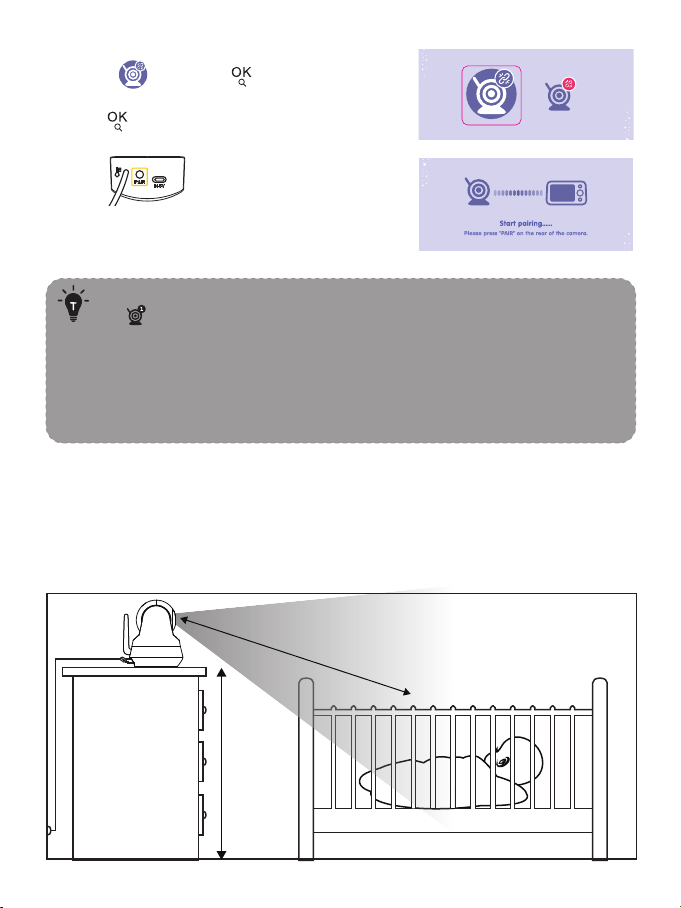
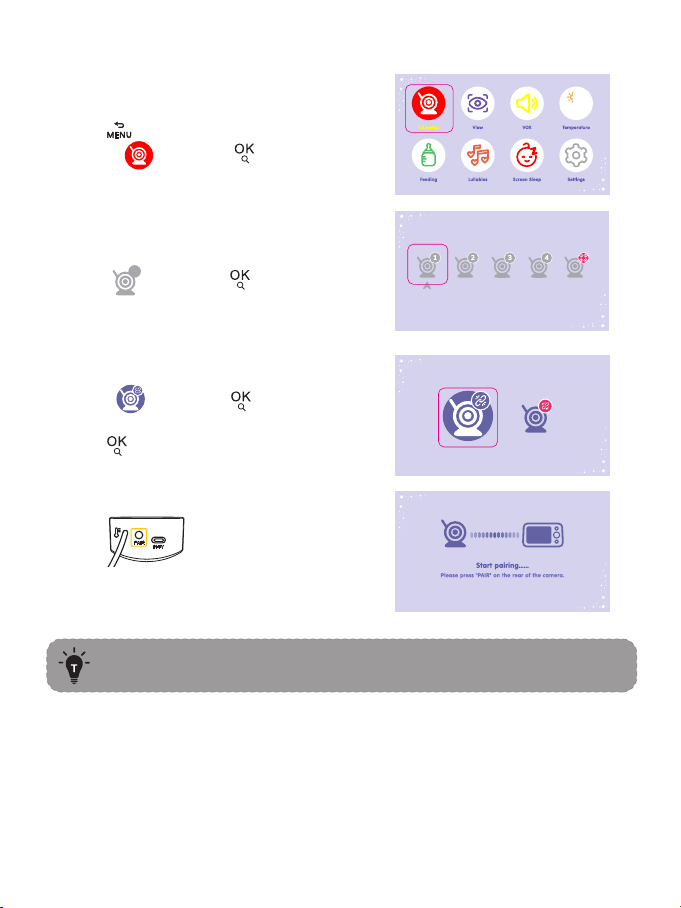
3. Pairing the Baby Monitor & the Camera
By default, one camera has been paired with the monitor when manufactured.
When you power on the monitor and camera, the two will automatically pair.
Step 2:
1. Select then press button.
Step 1:
1. Press to enter menu page.
2. Choose and press button.
To add more cameras.
4. Placing the Camera
For safety reasons and better vision in night vision mode, if the camera is
placed on a 0.75m / 2.5ft table top, the distance from the baby is at least
1.5m / 4.9ft. ( The effective distance between the camera and the baby is
within 6m / 19.7ft. In the meantime, please ensure that the camera power
cord cannot be touched by the baby.)
1.5m / 4.9ft
0.75m / 2.5ft
· Once they’re paired successfully, the camera number with icon
will be shown at the top left.
· It is recommended to pair in the baby's room, or wherever you
intend to place the camera.
· Microphone feedback might occur when the monitor is too close
to the camera. Please keep them at least 1.5m / 4.9ft apart.
· Four cameras at most can be connected to one monitor.
Step 3:
1. Select and press button TWICE.
See Camera is NOT paired.
2. Press button to start pairing.
Step 4:
1. Press PAIR button on the back
of the camera.
2. Then the monitor will auto-pair with the
camera.
07 08
GETTING STARTED
1. Charging & Powering Baby Monitor
1) Connect the monitor adapter to the monitor and a power outlet.
2) Unplug the unit when its power indicator turns off, indicating a full
charge.Of course, if you have been plugged in, it will not affect the use, but
it may affect the battery life.
3) Press the Power button on the monitor to power on with the power
indicator lighting green.
2. Powering Camera
1) Connect the camera to power source via the Type-C cable and camera
adapter.
· Only use the power adapters included in the package.
· Do not place the camera and power cord within the reach of your
baby.
3. Pairing the Baby Monitor & the Camera
By default, one camera has been paired with the monitor when manufactured.
When you power on the monitor and camera, the two will automatically pair.
Step 2:
1. Select then press button.
Step 1:
1. Press to enter menu page.
2. Choose and press button.
To add more cameras.
4. Placing the Camera
For safety reasons and better vision in night vision mode, if the camera is
placed on a 0.75m / 2.5ft table top, the distance from the baby is at least
1.5m / 4.9ft. ( The effective distance between the camera and the baby is
within 6m / 19.7ft. In the meantime, please ensure that the camera power
cord cannot be touched by the baby.)
1.5m / 4.9ft
0.75m / 2.5ft
· Once they’re paired successfully, the camera number with icon
will be shown at the top left.
· It is recommended to pair in the baby's room, or wherever you
intend to place the camera.
· Microphone feedback might occur when the monitor is too close
to the camera. Please keep them at least 1.5m / 4.9ft apart.
· Four cameras at most can be connected to one monitor.
Step 3:
1. Select and press button TWICE.
See Camera is NOT paired.
2. Press button to start pairing.
Step 4:
1. Press PAIR button on the back
of the camera.
2. Then the monitor will auto-pair with the
camera.
Don’t release the camera until you’re sure it is firmly mounted.
5. Wall Mounting Camera
1) Unscrew bracket's nut and adjust the bracket to an appropriate angle.
Screw the nut again tightly.
2) Drill holes on the wall and put green ribbed plastic anchors into holes with a
hammer.
3) Fix the bracket on the wall by screwing its screws into the ribbed plastic
anchors.
4) Screw up the top bolt of bracket with the nut at the bottom of the camera.
5) To better match the proper viewing field, Please unscrew the nut on the
side of the bracket, adjust the angle of the bracket downwards, until the
baby appears in the monitoring range, tighten the nut on the side of the
bracket again, and the installation is complete.
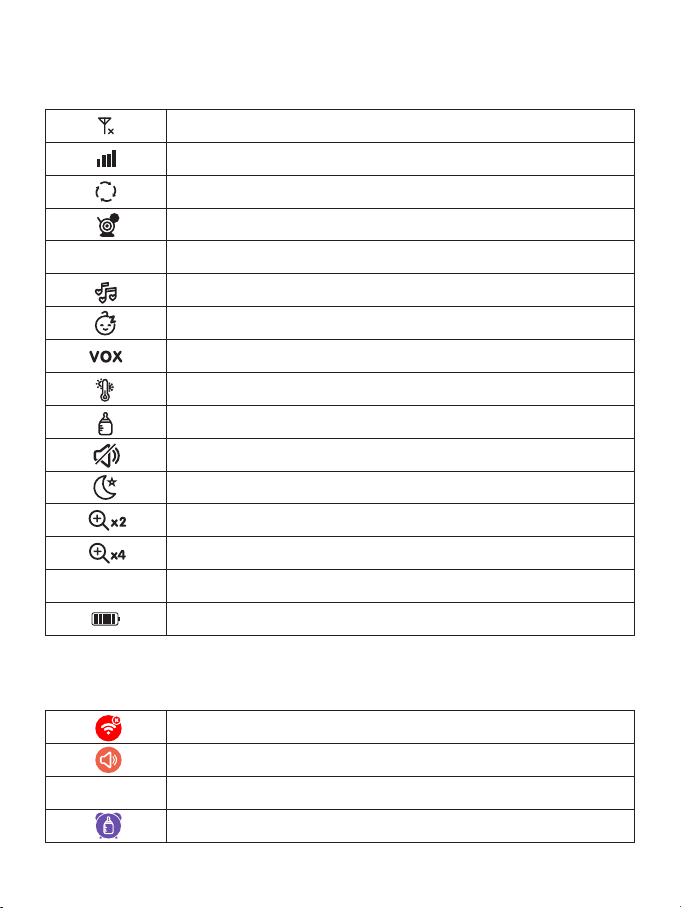
12:08:06
°C / °F
Live video loop (Multiple cameras polling for 10 seconds)
Camera
Current Time
Lullabies enabled
Sleep Mode enabled
Voice Activation Mode
Temperature alarm enabled
Feeding reminder enabled
Screen mute
Night vision Mode
2 times magnification
4 times magnification
Current room temperature
Battery Level
FUNCTIONS & OPERATIONS
Top Status Indications
No signal connection
Signal strength
Notifications Icons
No camera connected
Sound Alarm
Temperature Alarm
Feeding Notification
1 2
3 4
5
09 10
Don’t release the camera until you’re sure it is firmly mounted.
5. Wall Mounting Camera
1) Unscrew bracket's nut and adjust the bracket to an appropriate angle.
Screw the nut again tightly.
2) Drill holes on the wall and put green ribbed plastic anchors into holes with a
hammer.
3) Fix the bracket on the wall by screwing its screws into the ribbed plastic
anchors.
4) Screw up the top bolt of bracket with the nut at the bottom of the camera.
5) To better match the proper viewing field, Please unscrew the nut on the
side of the bracket, adjust the angle of the bracket downwards, until the
baby appears in the monitoring range, tighten the nut on the side of the
bracket again, and the installation is complete.
12:08:06
°C / °F
Live video loop (Multiple cameras polling for 10 seconds)
Camera
Current Time
Lullabies enabled
Sleep Mode enabled
Voice Activation Mode
Temperature alarm enabled
Feeding reminder enabled
Screen mute
Night vision Mode
2 times magnification
4 times magnification
Current room temperature
Battery Level
FUNCTIONS & OPERATIONS
Top Status Indications
No signal connection
Signal strength
Notifications Icons
No camera connected
Sound Alarm
Temperature Alarm
Feeding Notification
1 2
3 4
5
09 10
4. Add Camera
Step 2:
1. Select then press button.
Step 3:
1. Select and press button TWICE.
See Camera is NOT paired.
2. Press button to start pairing.
Step 4:
1. Press PAIR button on the back
of the camera.
2. Then see the prompted Paired.
Four Cameras at most can be connected to one monitor.
Step 1:
1. Press to enter menu page.
2. Choose and press button.
You can open Live-Video-Loop function through shirt presses on
the button until you see on the status bar. When Live-Vid-
eo-Loop function is on, the connected cameras will automatically
switcn every 10 seconds. And if there is a sound/temperature
alarm, the camera-switch function will pause tempararily.
11 12
1. Volume Adjustment
Use Shortcut Button: Press Button -> Left / Right Button to quickly
adjust the volume with & icons.
2. Display Brightness Adjustment
Use Shortcut Button: Press Button -> Up / Down Button to quickly
adjust the volume with & icons.
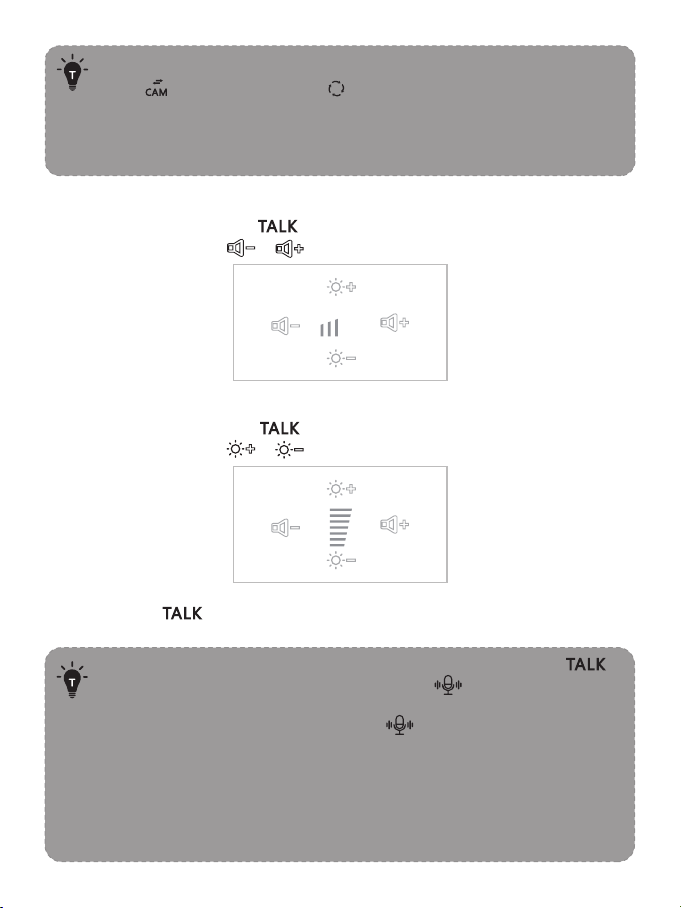
3. Talkback
Press and hold Button to talk to your baby, release it to exit the talking
mode.
• When you are in the monitoring mode, press and hold the
key to enter the intercom mode, and the icon will be
displayed on the monitor. When you enter the menu, the intercom
function can still be used, but the icon will not appear on the
screen.
• When it’s mute or the speaker volume is too low, you may not be
able to hear the baby.
• When you’re pressing the Talk Button, the camera will not transfer
the sound to the monitor. Please release the button to listen to
your baby.
4. Add Camera
Step 2:
1. Select then press button.
Step 3:
1. Select and press button TWICE.
See Camera is NOT paired.
2. Press button to start pairing.
Step 4:
1. Press PAIR button on the back
of the camera.
2. Then see the prompted Paired.
Four Cameras at most can be connected to one monitor.
Step 1:
1. Press to enter menu page.
2. Choose and press button.
You can open Live-Video-Loop function through shirt presses on
the button until you see on the status bar. When Live-Vid-
eo-Loop function is on, the connected cameras will automatically
switcn every 10 seconds. And if there is a sound/temperature
alarm, the camera-switch function will pause tempararily.
11 12
1. Volume Adjustment
Use Shortcut Button: Press Button -> Left / Right Button to quickly
adjust the volume with & icons.
2. Display Brightness Adjustment
Use Shortcut Button: Press Button -> Up / Down Button to quickly
adjust the volume with & icons.
3. Talkback
Press and hold Button to talk to your baby, release it to exit the talking
mode.
• When you are in the monitoring mode, press and hold the
key to enter the intercom mode, and the icon will be
displayed on the monitor. When you enter the menu, the intercom
function can still be used, but the icon will not appear on the
screen.
• When it’s mute or the speaker volume is too low, you may not be
able to hear the baby.
• When you’re pressing the Talk Button, the camera will not transfer
the sound to the monitor. Please release the button to listen to
your baby.
13 14
6. Camera interaction and loop
Note: Connecting multiple cameras is available.
Multiple cameras are powered on and within the monitor connection range.
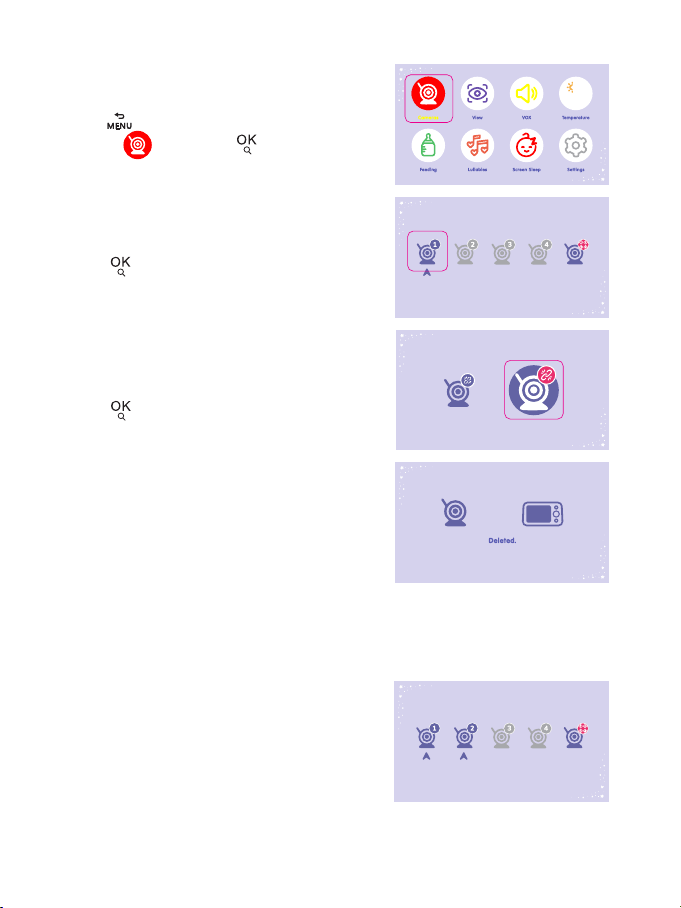
5. Delete Camera
Step 1:
1. Press to enter menu page.
Choose and press button.
Step 2:
1. Select the right camera icon.
Press button TWICE.
2. Select the camera need deleting.
Press button.
2. See Deleted. Your camera is
deleted.
Step 1:
1. Confirm that the camera channel
page is connected to more than
two cameras
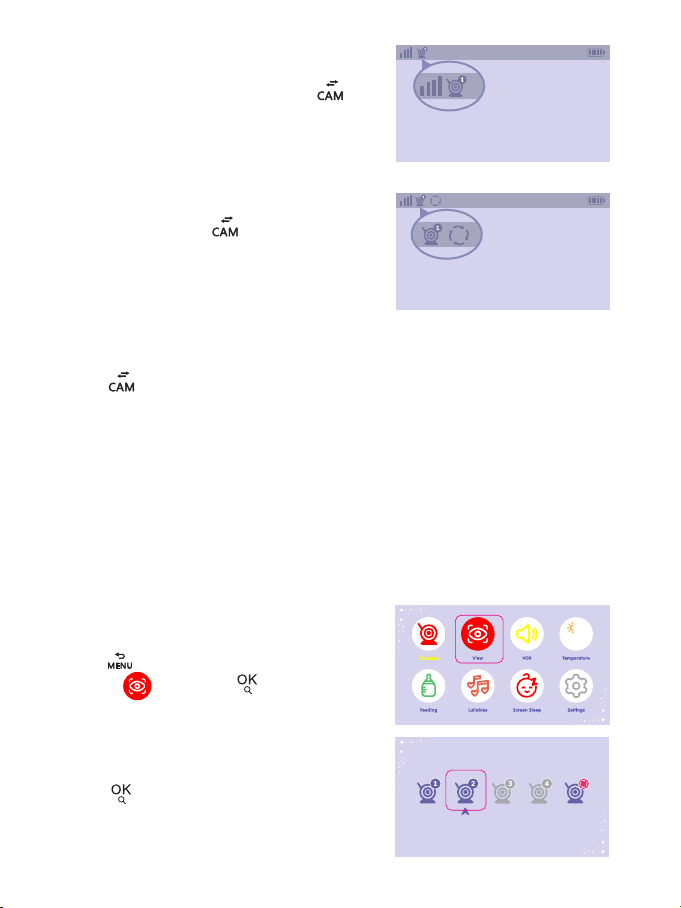
7. View camera
Note:
Connecting multiple cameras is available.
Multiple cameras are powered on and within the monitor connection range.
This function can switch and poll the camera.
Step 1:
1. Press to enter menu page.
Choose and press button.
Step 2:
1. Check the camera channel, click ,
the monitor screen will switch to the
next camera.
Step 3:
1. After all the camera pages have been
switched, click the camera
channel icon to display the loop icon,
and all camera screens will be polled
and played every 10 seconds, with
images and sounds.
Step 4:
1. Click again to exit the screen polling. The camera screen returns to
the current polling screen.
2. Select the camera you want to switch.
press button.
2021/10/01 00:00:00
2021/10/01 00:00:00
Explanation:
13 14
6. Camera interaction and loop
Note: Connecting multiple cameras is available.
Multiple cameras are powered on and within the monitor connection range.
5. Delete Camera
Step 1:
1. Press to enter menu page.
Choose and press button.
Step 2:
1. Select the right camera icon.
Press button TWICE.
2. Select the camera need deleting.
Press button.
2. See Deleted. Your camera is
deleted.
Step 1:
1. Confirm that the camera channel
page is connected to more than
two cameras
7. View camera
Note:
Connecting multiple cameras is available.
Multiple cameras are powered on and within the monitor connection range.
This function can switch and poll the camera.
Step 1:
1. Press to enter menu page.
Choose and press button.
Step 2:
1. Check the camera channel, click ,
the monitor screen will switch to the
next camera.
Step 3:
1. After all the camera pages have been
switched, click the camera
channel icon to display the loop icon,
and all camera screens will be polled
and played every 10 seconds, with
images and sounds.
Step 4:
1. Click again to exit the screen polling. The camera screen returns to
the current polling screen.
2. Select the camera you want to switch.
press button.
2021/10/01 00:00:00
2021/10/01 00:00:00
Explanation:
15 16
3. You need the camera to poll for playback.
Choose and press button.
If you need to return to the video page, please press twice
or wait 30 seconds to return.
8. VOX mode
1.There are three options of sound detection, LOW(78dB), MEDIUM(65dB)
and HIGH(60dB). LOW means the sound can be detected if it reached 78dB,
and so on for MEDIUM and HIGH.
2.Setting “ off ” turns off the alarm sound in VOX mode.
Step 1:
1. Press to enter menu page.
Choose and press button.
2. Select the option you want.
Press button.
If you need to return to the video page, please press twice
or wait 30 seconds to return.
2. Select the option you want.
Press button.
Step 1:
1. Press to enter menu page.
Choose and press button.
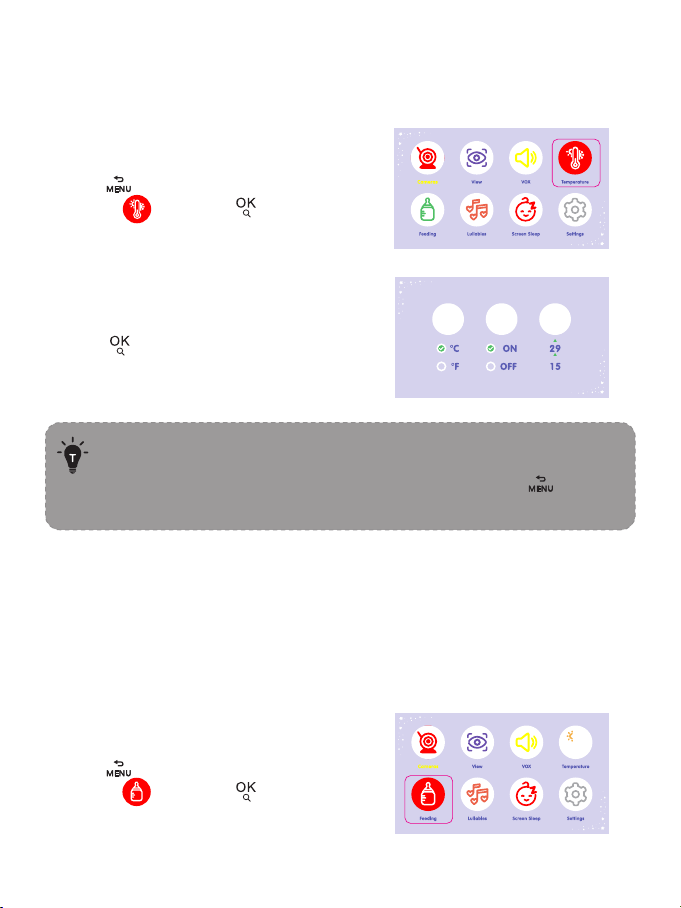
9. Temperature Alarm
Explanation:
indicates that the temperature value for high and low temperature
alarms can be set.
• A vox / temperature alarm can be temporarily turned off by
pressing any button on the monitor.
• If you need to return to the video page, please press twice
or wait 30 seconds to return.
10. Feeding
This function is to remind you of feeding your baby. OFF means you shut
down the function; 2 hour means it reminds you every 2 hours and so on for
the other options.
Step 1:
1. Press to enter menu page.
Choose and press button.
Explanation:
Explanation:
15 16
3. You need the camera to poll for playback.
Choose and press button.
If you need to return to the video page, please press twice
or wait 30 seconds to return.
8. VOX mode
1.There are three options of sound detection, LOW(78dB), MEDIUM(65dB)
and HIGH(60dB). LOW means the sound can be detected if it reached 78dB,
and so on for MEDIUM and HIGH.
2.Setting “ off ” turns off the alarm sound in VOX mode.
Step 1:
1. Press to enter menu page.
Choose and press button.
2. Select the option you want.
Press button.
If you need to return to the video page, please press twice
or wait 30 seconds to return.
2. Select the option you want.
Press button.
Step 1:
1. Press to enter menu page.
Choose and press button.
9. Temperature Alarm
Explanation:
indicates that the temperature value for high and low temperature
alarms can be set.
• A vox / temperature alarm can be temporarily turned off by
pressing any button on the monitor.
• If you need to return to the video page, please press twice
or wait 30 seconds to return.
10. Feeding
This function is to remind you of feeding your baby. OFF means you shut
down the function; 2 hour means it reminds you every 2 hours and so on for
the other options.
Step 1:
1. Press to enter menu page.
Choose and press button.
Explanation:
Explanation:
17 18
2. Select the time you want. Select OFF
to turn off the feeding reminder.
• Selecting will set the alarm to the specified time.
• If you need to return to the video page, please press twice
or wait 30 seconds to return.
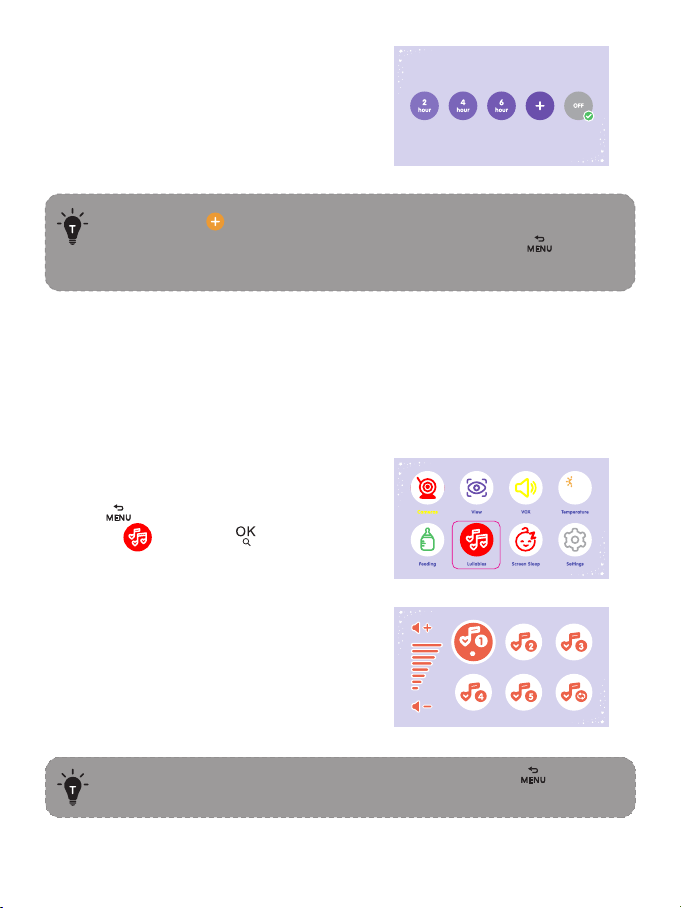
11. Lullabies
This function is to comfort baby when needed.
Explanation:
Explanation:
Explanation:
2. Select the lullaby you want. Select
ALL to play the lullabies in a loop.
If you need to return to the video page, please press twice
or wait 30 seconds to return.
Step 1:
1. Press to enter menu page.
Choose and press button.
2. Select the time you want.
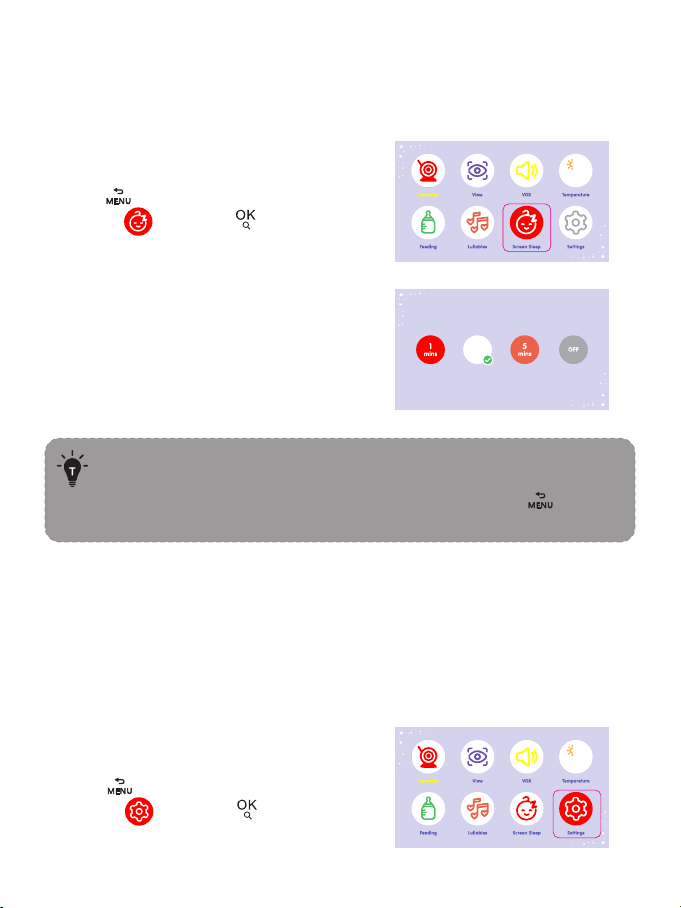
12. SCREEN SLEEP
This function is to prolong your monitor’s runtime by shutting down the
screen.
· The screen will automatically light up if there is a vox alarm or a
temperature alarm.
· If you need to return to the video page, please press twice
or wait 30 seconds to return.
Step 1:
1. Press to enter menu page.
Choose and press button.
13. Settings
This is a submenu of the function page, which can set screen sound and
brightness, system sound, time and date, system language, system reset, and
provide service support information.
Step 1:
1. Press to enter menu page.
Choose and press button.
17 18
2. Select the time you want. Select OFF
to turn off the feeding reminder.
• Selecting will set the alarm to the specified time.
• If you need to return to the video page, please press twice
or wait 30 seconds to return.
11. Lullabies
This function is to comfort baby when needed.
Explanation:
Explanation:
Explanation:
2. Select the lullaby you want. Select
ALL to play the lullabies in a loop.
If you need to return to the video page, please press twice
or wait 30 seconds to return.
Step 1:
1. Press to enter menu page.
Choose and press button.
2. Select the time you want.
12. SCREEN SLEEP
This function is to prolong your monitor’s runtime by shutting down the
screen.
· The screen will automatically light up if there is a vox alarm or a
temperature alarm.
· If you need to return to the video page, please press twice
or wait 30 seconds to return.
Step 1:
1. Press to enter menu page.
Choose and press button.
13. Settings
This is a submenu of the function page, which can set screen sound and
brightness, system sound, time and date, system language, system reset, and
provide service support information.
Step 1:
1. Press to enter menu page.
Choose and press button.
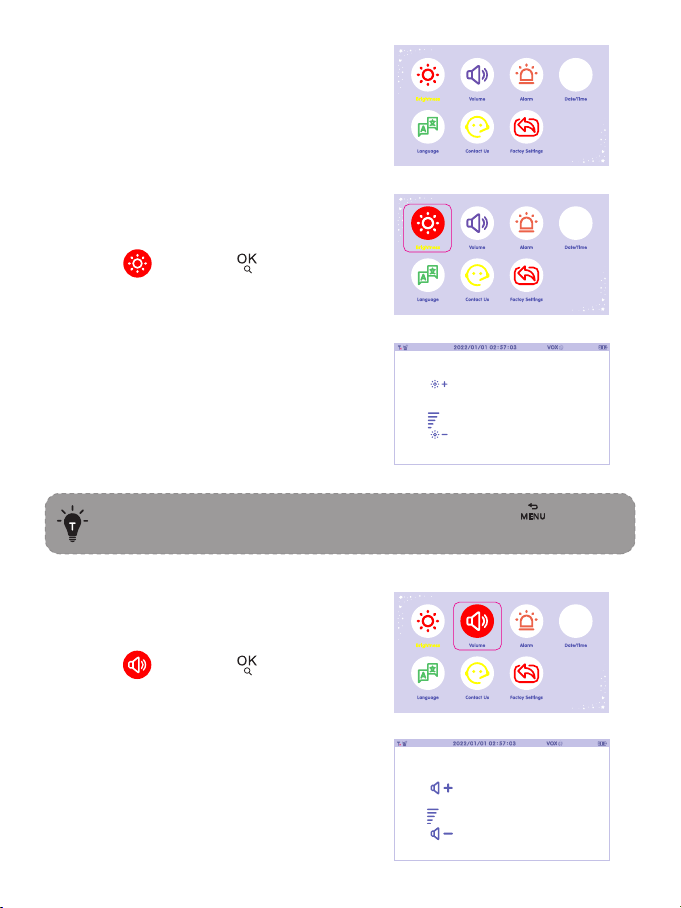
19 20
Alarm
This function is to adjust the monitor
side system sound.
Brightness
Date/Time
Volume
2. Select the option you want.
press button.
If you need to return to the video page, please press twice
or wait 30 seconds to return.
1.In vox mode, set “ silent ” , the alarm sound under vox will not
be turned off
2.If you need to return to the video page, please press twice
or wait 30 seconds to return.
If you need to return to the video page, please press twice
or wait 30 seconds to return.
2. Select the function to be adjusted.
2. Adjust monitor screen brightness.
Step 1:
1. Choose and press button.
Step 1:
1. Choose and press button.
Step 1:
1. Choose and press button.
2. Adjust the monitor volume.
Step 1:
1. Choose and press button.
21 22
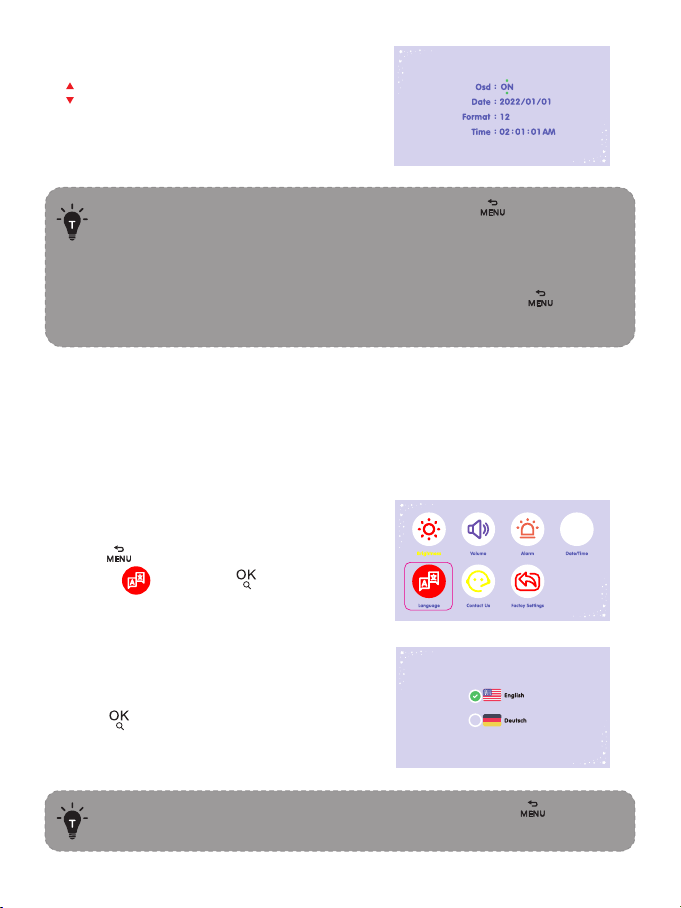
Language
2. stands for finishing the setting.
· Press Up/Down/Left/Right to select and press button to
confirm.
· If OSD in ON, the date and time will be displayed on the status
bar of the monitor; otherwise, it will not be displayed.
· If you need to return to the video page, please press twice
or wait 30 seconds to return.
2. Select your language and
press button.
There are two languages built in your device, you can choose
your language here.
If you need to return to the video page, please press twice
or wait 30 seconds to return.
Step 1:
1. Press to enter menu page.
Choose and press button.
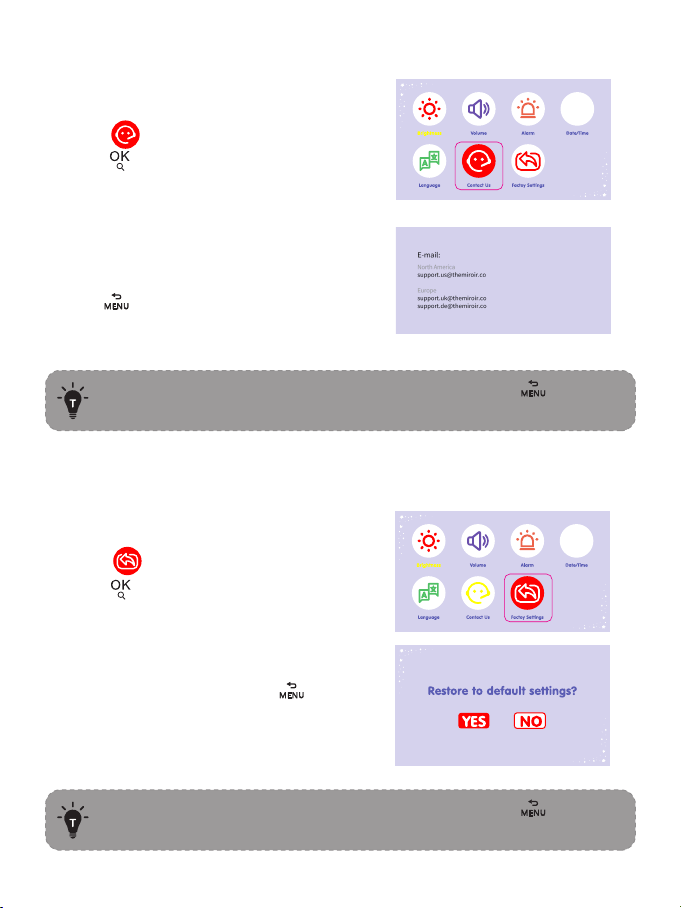
Contact Us
Restore factory settings
If you need to return to the video page, please press twice
or wait 30 seconds to return.
Step 1:
1. Select .
Press to enter the interface.
2. Contact Us.
Pess to return.
2. Conform YES to reset. Press or
conform NO to exit.
If you need to return to the video page, please press twice
or wait 30 seconds to return.
Step 1:
1. Select .
Press to enter the interface.
21 22
Language
2. stands for finishing the setting.
· Press Up/Down/Left/Right to select and press button to
confirm.
· If OSD in ON, the date and time will be displayed on the status
bar of the monitor; otherwise, it will not be displayed.
· If you need to return to the video page, please press twice
or wait 30 seconds to return.
2. Select your language and
press button.
There are two languages built in your device, you can choose
your language here.
If you need to return to the video page, please press twice
or wait 30 seconds to return.
Step 1:
1. Press to enter menu page.
Choose and press button.
Contact Us
Restore factory settings
If you need to return to the video page, please press twice
or wait 30 seconds to return.
Step 1:
1. Select .
Press to enter the interface.
2. Contact Us.
Pess to return.
2. Conform YES to reset. Press or
conform NO to exit.
If you need to return to the video page, please press twice
or wait 30 seconds to return.
Step 1:
1. Select .
Press to enter the interface.

23 24
Camera
720P(1280x720), 1.0M, 1/4"
2.4GHz FHSS
H.264 (frame rate = 15fs)
5V / 1.5A (2.5m long Type-C cable)
100 degrees vertical (Up=90°, Down=10°)
340 degrees horizontal (Left=170°,, Right=170°)
Zoom In (2X)
Zoom In (4X)
D: 81 °, H: 67 °, V: 28 °
1.5m to 6m
Black & White image, 2m clear range,up to 6m
Non-visible IR LED with wavelength 940nm (x 8 pcs)
Ye s
Ye s
-10°C ~ 55°C / 14 °F - 131°F
0°C ~ 40°C / 32 °F - 104 °F
Cmos
Connectivity
Image Compression
Power Input
Pan-n-Tilt
Zoom
View Angle
Depth of Field
Night Vision
IR LED
Light Sensor
Two-Way Talk
Storage Temperature
Operation Temperature
SPECIFICATIONS
Monitor
IPS (720 x 1280), PPI=296
2.4GHz FHSS
16:9 (HD720P)
H.264 (frame rate = 15fs)
280-300m (antenna vertically placed at 90°)
(No interference)
Yes
9 levels
8 levels
Rotatable (max. 90 degree)
5V / 1.5A (2.5m long Type-C cable)
Zoom In (2X)
Zoom In (4X)
Ye s
Max. 4 cameras
-10°C ~ 55°C / 14 °F - 131°F
0°C ~ 40°C / 32 °F - 104 °F
Resolution
Connectivity
Image Aspect
Image Compression
Operating Range
Temperature Alert
Volume Control
Brightness
Antenna
Power Input
Zoom
Two-Way Talk
Multi-Camera
Storage Temperature
Operation Temperature

25 26
· Check that the camera and monitor are turned on.
· Check the camera and make sure it is well plugged
into the outlet.
· Check that the monitor is of enough battery (When the
battery level icon flashes red slowly on the display, it
will automatically turn off in about 10 minutes).
· Check whether the camera is near the monitor
(recommended to keep within 1.5-2m / 4.9-6.6ft).
· Check whether the monitor is of low battery. Charge it
in time to restore good connection.
· Check whether the camera is well connected to power.
· Check whether there are any large metallic objects
including doors, refrigerators, mirrors, etc., are placed
between the camera and monitor thus blocking the
radio signals.
· Check whether there’s any other 2.4GHz product is
used nearby like WiFi routers, microwave ovens, which
may interfere the connection.
· If nothing above is involved, please retry to pair.
· Check all connections to the camera (power cable
plugging and pairing).
· Check whether the screen is in sleep mode. Press any
button to awake it.
· Check whether the camera is within range of the
monitor.
· Adjust the monitor antenna to vertical position for
better signal transfer.
Check whether the system sound volume is set High or
Low. It’ll be mute if set so.
TROUBLESHOOTING
Product not
powering on?
Baby monitor
can’t connect
with the camera?
Nothing shown
when I view a
camera?
No sound from
the monitor?
Night vision LED may be ON. Please turn on room
lights to force it out of the night mode.
· Check whether the camera is near the monitor and
that there’re no obstacles between them.
· Adjust the monitor antenna to vertical position for
better signal transfer.
· Volume may be set too high. Press Shortcut Button
-> Left Button to volume down.
· The camera and monitor may be put too close; keep
them at least 1.5m / 4.9ft apart.
Black and white
pictures?
Choppy videos?
Too much noise?
WARRANTY & CUSTOMER SERVICE
12 months warranty
Lifetime customer service (contacts on the monitor, or back cover of this
User Guide)

27 28
FCC 20cm Statement
This equipment complies with FCC radiation exposure limits set forth for an
uncontrolled environment. This equipment should be installed and operated
with a minimum distance of 20cm between the radiator & your body. This
transmitter must not be co-located or operating in conjunction with any
other antenna or transmitter.
FCC STATEMENT
changes or modifications not expressly approved by the party responsible for
compliance could void the user’s authority to operate the equipment.
This device complies with Part 15 of the FCC Rules. Operation is subject to
the following two conditions:
(1) this device may not cause harmful interference, and
(2) this device must accept any interference received, including interference
that may cause undesired operation.
Note: This equipment has been tested and found to comply with the limits
for a Class B digital device, pursuant to Part 15 of the FCC Rules. These
limits are designed to provide reasonable protection against harmful
interference in a residential installation. This equipment generates, uses, and
can radiate radio frequency energy, and if not installed and used in
accordance with the instructions, may cause harmful interference to radio
communications. However, there is no guarantee that interference will not
occur in a particular installation. If this equipment does cause harmful
interference to radio or television reception, which can be determined by
turning the equipment off and on, the user is encouraged to try to correct
the interference by one or more of the following measures:
– Reorient or relocate the receiving antenna.
– Increase the separation between the equipment and receiver.
– Connect the equipment into an outlet on a circuit different from that to
which the receiver is connected.
– Consult the dealer or an experienced radio/TV technician for help.

WEEE COMPLIANCE
Correct Disposal of This Product (Waste Electrical & Electronic Equipment)
(Applicable in countries with separate collection systems)This marking on
the product, accessories or literature indicates that the product and its
electronic accessories should not be disposed of with other household waste
at the end of their working life. To prevent possible harm to the environment
or human health from uncontrolled waste disposal, please separate these
items from other types of waste and recycle them responsibly to promote
the sustainable reuse of material resources. Household users should
contact either the retailer where they purchased this product, or their local
government office, for details of where and how they can take these items
for environmentally safe recycling. Business users should contact their
supplier and check the terms and conditions of the purchase contract. This
product and its electronic accessories should not be mixed with other
commercial wastes for disposal.
29