
1
The warnings, precautions, and instructions discussed in this manual cannot cover all possible conditions and
situations that may occur. It must be understood by the operator that common sense and caution are factors which
cannot be built into this product, but must be supplied by the operator. Read carefully and understand all instructions
before operating. Failure to follow the safety rules and other basic safety precautions may result in serious personal
injury.
Before each use, carefully check whether the handle is intact and the v
ent pipe is smooth. The Pressure
Regulator and Safety Valve are free moving and clean.
The Cover Lock mechanism is carefully designed and installed at the head of the handle. Never disassemble the
Pressure Canner.
Any commercial use, inappropriate use or failure to comply with the instructions, the manufacturer accepts no
responsibility and the guarantee will not apply. Only use replacement parts supplied by the manufacturer. Failure to
do so will void your warranty.
DO NOT place heavy objects on top of the Pressure Regulator. DO NOT use the cover of the Pressure Canner to
cover other objects.
DO NOT store alkaline, acid, vinegar and other corrosive foods in the canner for an extended time period to avoid
corrosion of the canner body.
Once the Pressure Canner has dry burned, it can no longer be used as a pressure canner.
For domestic use only. This Pressure Canner should not be used for high pressure frying.
DO NOT put the Pressure Canner in the microwave or oven.
When cooking food, the flame should not exceed the bottom of the pot. It should be less than 1/10
th
the total
height of the pot to prevent burning of the handle.
When heating the Pressure Canner, be sure the explosion proof wind should not be facing anyone.
Wait for a while before opening the pressure canner. Allow steam to subside to avoid burns. When releasing
pressure from the canner, the user should stand to the side to avoid burns.
As with any cooking appliance, ensure close supervision if you are using the pressure canner with children
nearby.
When the Pressure Canner is under pressure, take great care when moving it. DO NOT touch the hot surfaces.
Use the handles and knobs. Wear gloves if necessary.
Regularly check that the canner handles are fixed properly. Tighten if necessary.
DO NOT use your pressure canner for any purpose other than that for which it is designed.
SAFETY INFORMATION

2
Your pressure canner cooks under pressure. Burns could result from boiling over if not used properly. Make sure
that the pressure canner is properly closed before bringing it up to pressure.
Always make sure that the valve is the decompression position before opening your pressure canner.
Never force the pressure canner open. Make sure that the internal pressure has returned to normal. Refer to
section “Safety”.
Never use your pressure canner without liquid: this could cause serious damage. Always make sure that there is
enough liquid in it during cooking.
Use heat sources that are compatible with your pressure canner, in line with the instructions for use.
Never make milk-based recipes in your pressure canner.
DO NOT use rock salt in your pressure canner, but rather add table salt when the cooking is nearly finished.
For food that expands during cooking, like rice or dried vegetables or stewed fruit, etc, never fill your pressure
canner more than half full. For certain soups like pumpkin or courgette, give your pressure canner a few minutes to
cool down, then cool it down fully by placing it under cold running water.
After cooking meat which has an outer layer of skin (such as ox tongue), which could swell due to the effects of
pressure, do not pierce the skin after cooking if it appears swollen, you could get burnt. Pierce it before cooking.
When cooking food with a thick texture (chick peas, rhubarb, stewed fruit, etc.), the pressure canner should be
shaken slightly before operating to ensure that the food does not spurt out.
Always check that valves are clear before use.
DO NOT use the pressure canner to fry under pressure suing oil.
DO NOT interfere with the safety systems, except for cleaning and maintenance in accordance with instructions.
Alcohol vapors are flammable. Bring to a boil for about 2 minutes before placing the lid. Watch your appliance when
preparing alcohol-based recipes.
You can use the canner to cook food without the cover. DO NOT use the cover if you do not intend the food to be
cooked under pressure.
If you notice that your pressure canner is broken or cracked, do not attempt to open it under any circumstances,
wait for it to cool down completely before moving it. DO NOT use it, Have it repaired by a qualified technician.
SAFETY INFORMATION
3
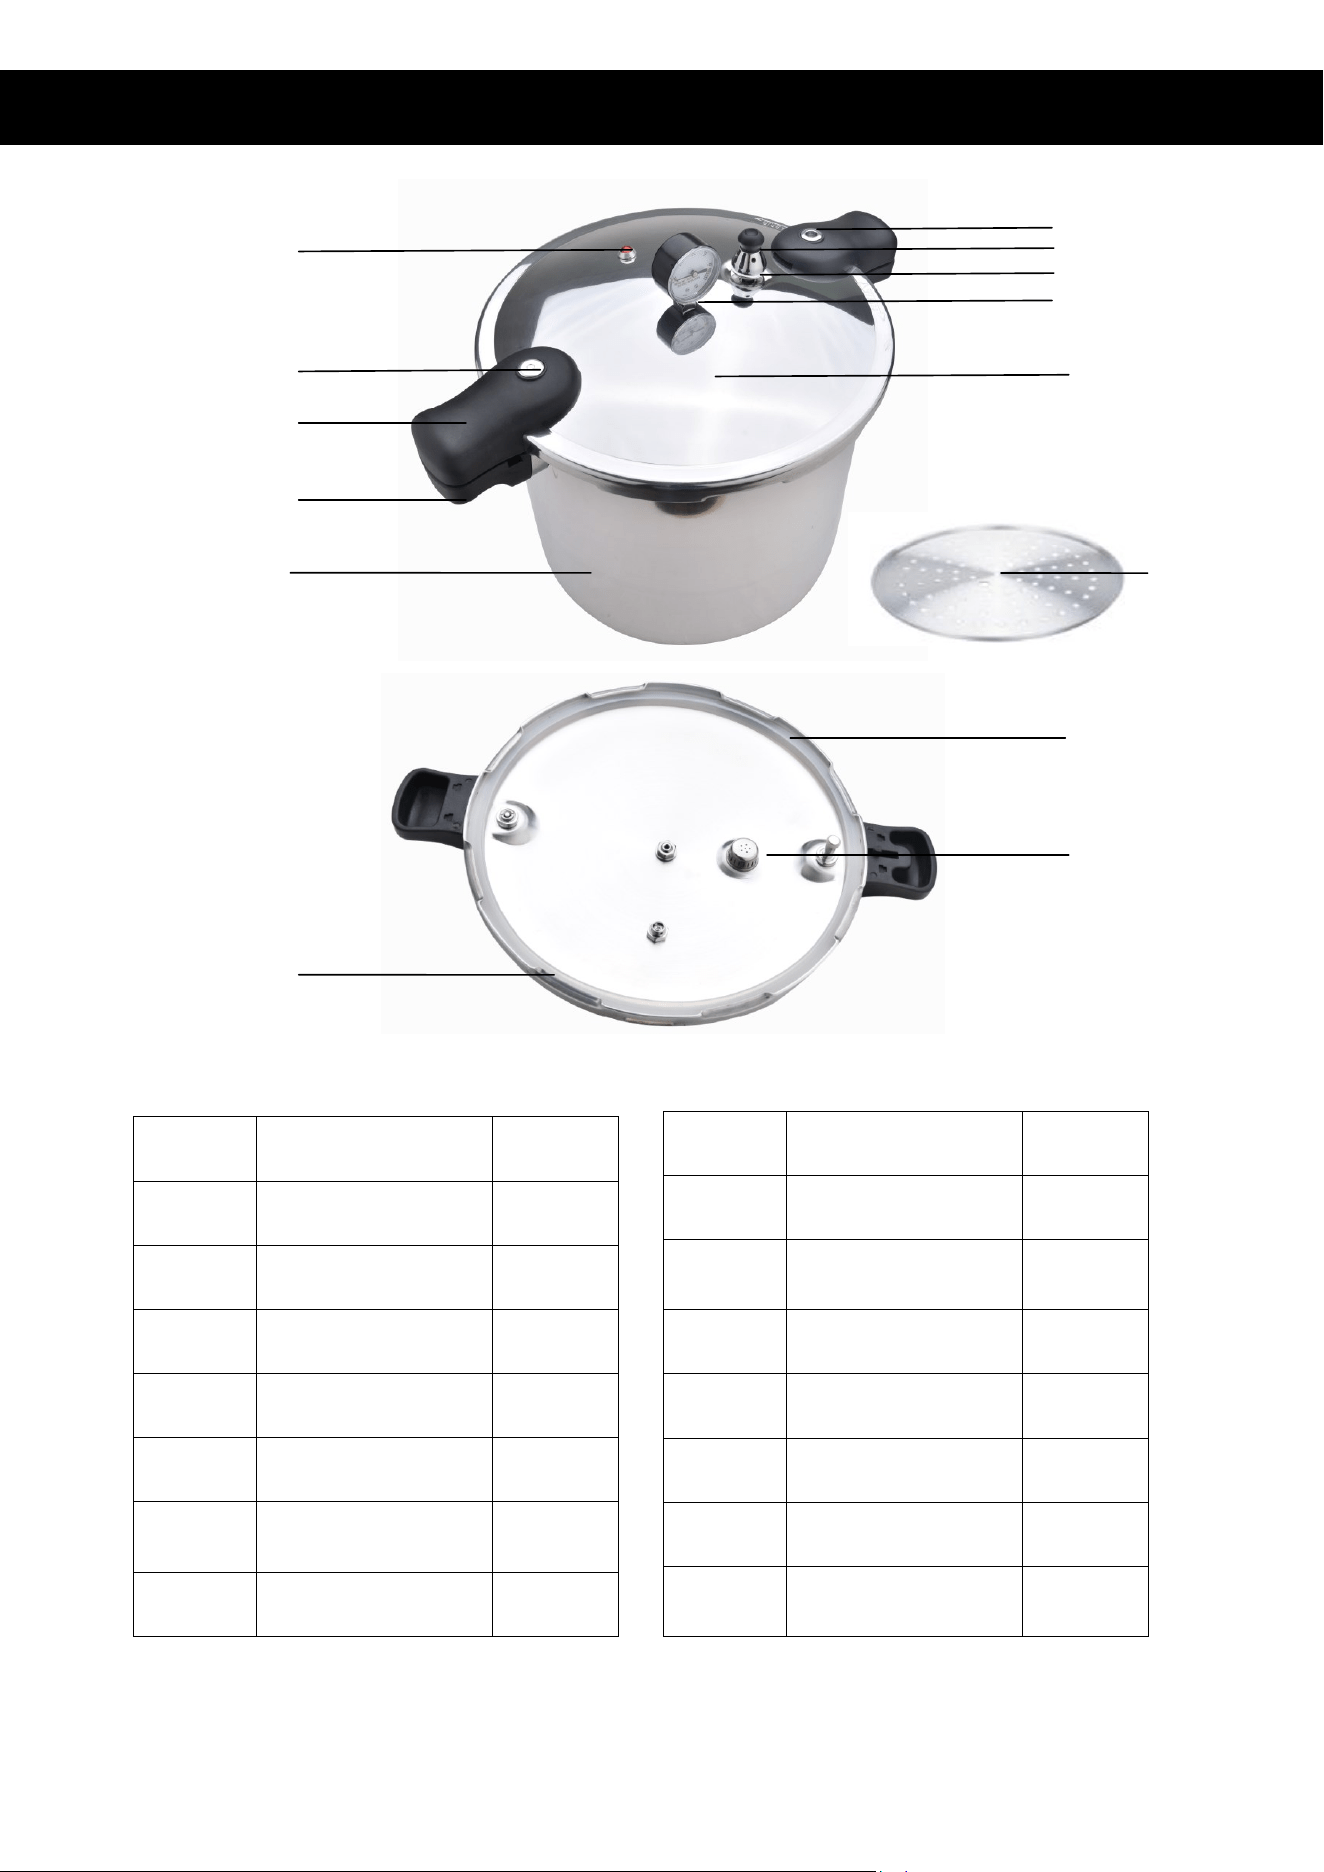
NO.
Parts Name
Quantity
1
Safety Valve
1
2
Double Safety Valve
1
3
Handle on Cover
2
4
Handle on Body
2
5
Canner Body
1
6
Cover Lock
(Pressure Indicator)
1
7
Pressure Regulator
1
NO.
Parts Name
Quantity
8
Vent Pipe
1
9
Pressure Dial
Gauge
1
10
Canner Cover
1
11
Safety Window
12
Cooking Rack
1
13
Sealing Ring
1
14
Removable
Blockage Guard
1
1
2
3
4
5
6
7
8
9
10
11
12
13
14
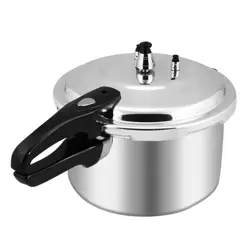
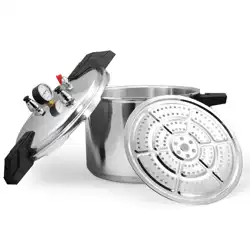
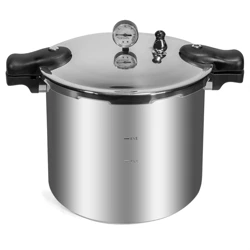
FEATURES AND PARTS
4
1. Before using the canner for the first time, carefully read the instructions. Understand the general structure of the
pressure cooker.
2. Wash the cover, body and sealing ring with warm, soapy water to remove any manufacturing oils. Rinse all parts
with warm water and dry.
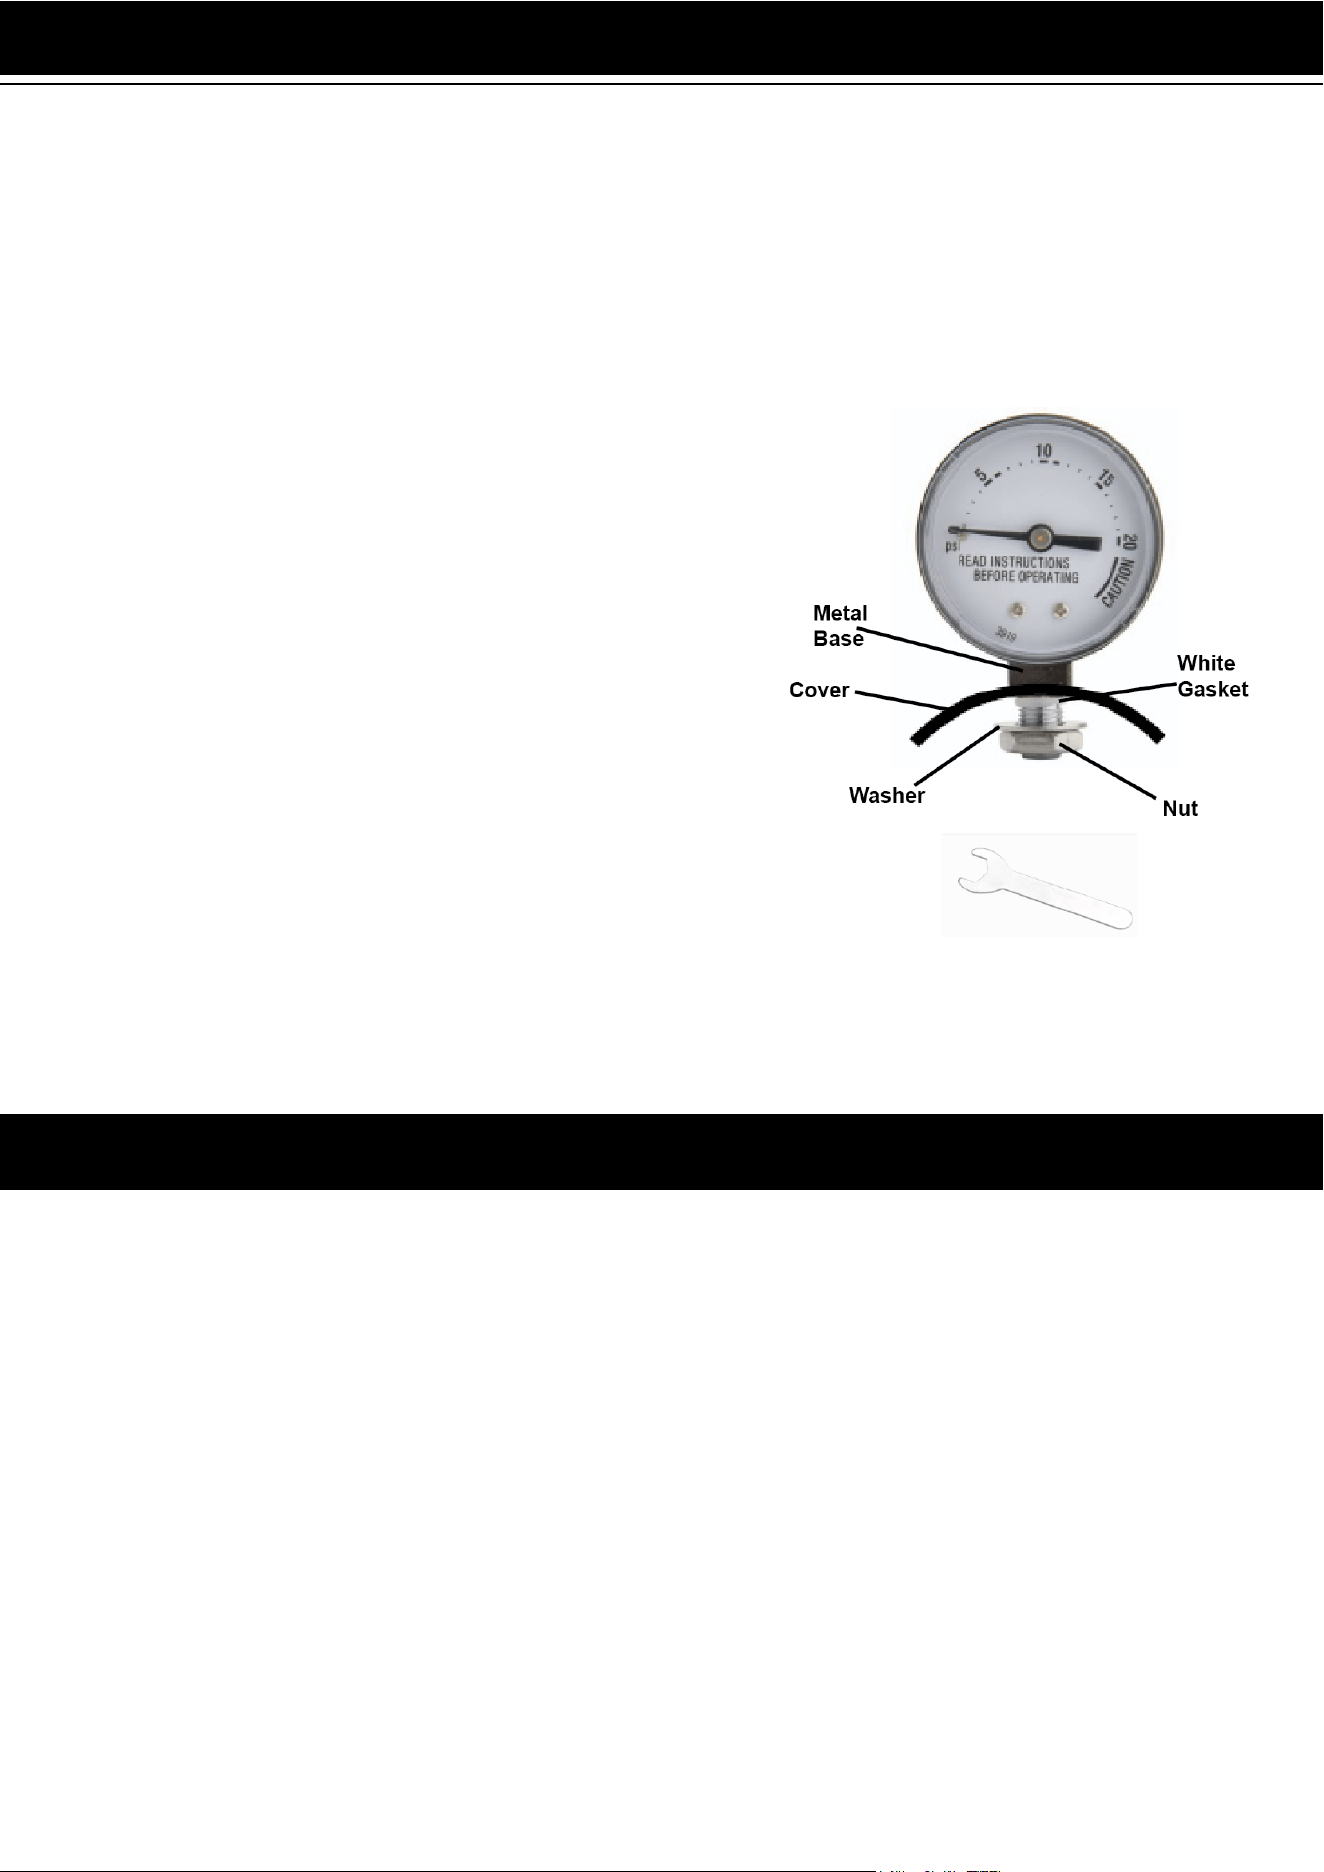
3. Attach the Pressure Dial Gauge to the Canner Cover
Tighten with Mini Spanner(Picture 2) from the package.
Tips: the Dial Gauge is a delicate instrument which must be
assembled carefully. Do not submerse cover or let Gauge
come in contact with any liquid. Do not store the Dial Gauge
at temperatures below freezing.
1. Wash the pressure canner (body and cover) after each use using warm water with washing-up liquid in it. Never
use bleach or chlorine products.
2. Each time the canner is washed, remove the sealing ring an wash the warm, soapy water, rinse , dry and replace
in cover.
3. Replace the Sealing Ring every year or if it shows any signs of splitting or damage.
4. To clean the Vent Pipe, remove the Pressure Regulator and visually check, in daylight, to see that the steam
release outlet is round and hot blocked. If necessary, clean with a toothpick and rinse.
5. To store the pressure canner, turn the cover upside and down on the pressure canner and store in a cool, dry
place.
Nut
Picture 2
MAINTENANCE
Picture 1
BEFORE USING THE CANNER FOR THE FIRST TIME
While holding the Dial Gauge in place, position the gasket, the
metal washer, and the nut on the threaded end of the gauge.
(Picture 1)
By first removing the nut, the metal washer, and the white
compression gasket from the threaded end of the Dial Gauge.
Then turn the Cover upside down. Starting from the bottom,
insert the threaded end of the Dial Gauge up through the hold in
the center of the cover until the metal base rests on the cover.
5
1. Fill the pressure canner with the food and the necessary amount of liquid for cooking and close the lid.
2. Put the Pressure Regulator in its place.
3. Make sure that the pressure canner is properly closed before starting to use it.
4. Place the pressure canner on a heat source set to maximum power.
5. When steam escapes through the Pressure Regulator continuously, and a regular hissing sound is heard, reduce
the source.
6. Set a timer for the cooking time stated in your receipt.
7. During cooking, check the Pressure Regulator murmurs regularly. If there is not enough steam, increase the heat
source slightly. If there is too much steam, reduce the heat source.
NOTE: As with any cooking appliance, watch over it carefully especially if you are using your pressure canner
around children. Steam is very hot as it exits the steam release outlet.
8. Do not pour water into a dry, overheated canner as this may crack the metal.
9. Do not strike the rim of the canner body with any metal utensils as this will cause nicks which may damage the
rim and allow steam to escape.
10. If the canner body or cover handles become loose, tighten them with a screwdriver.
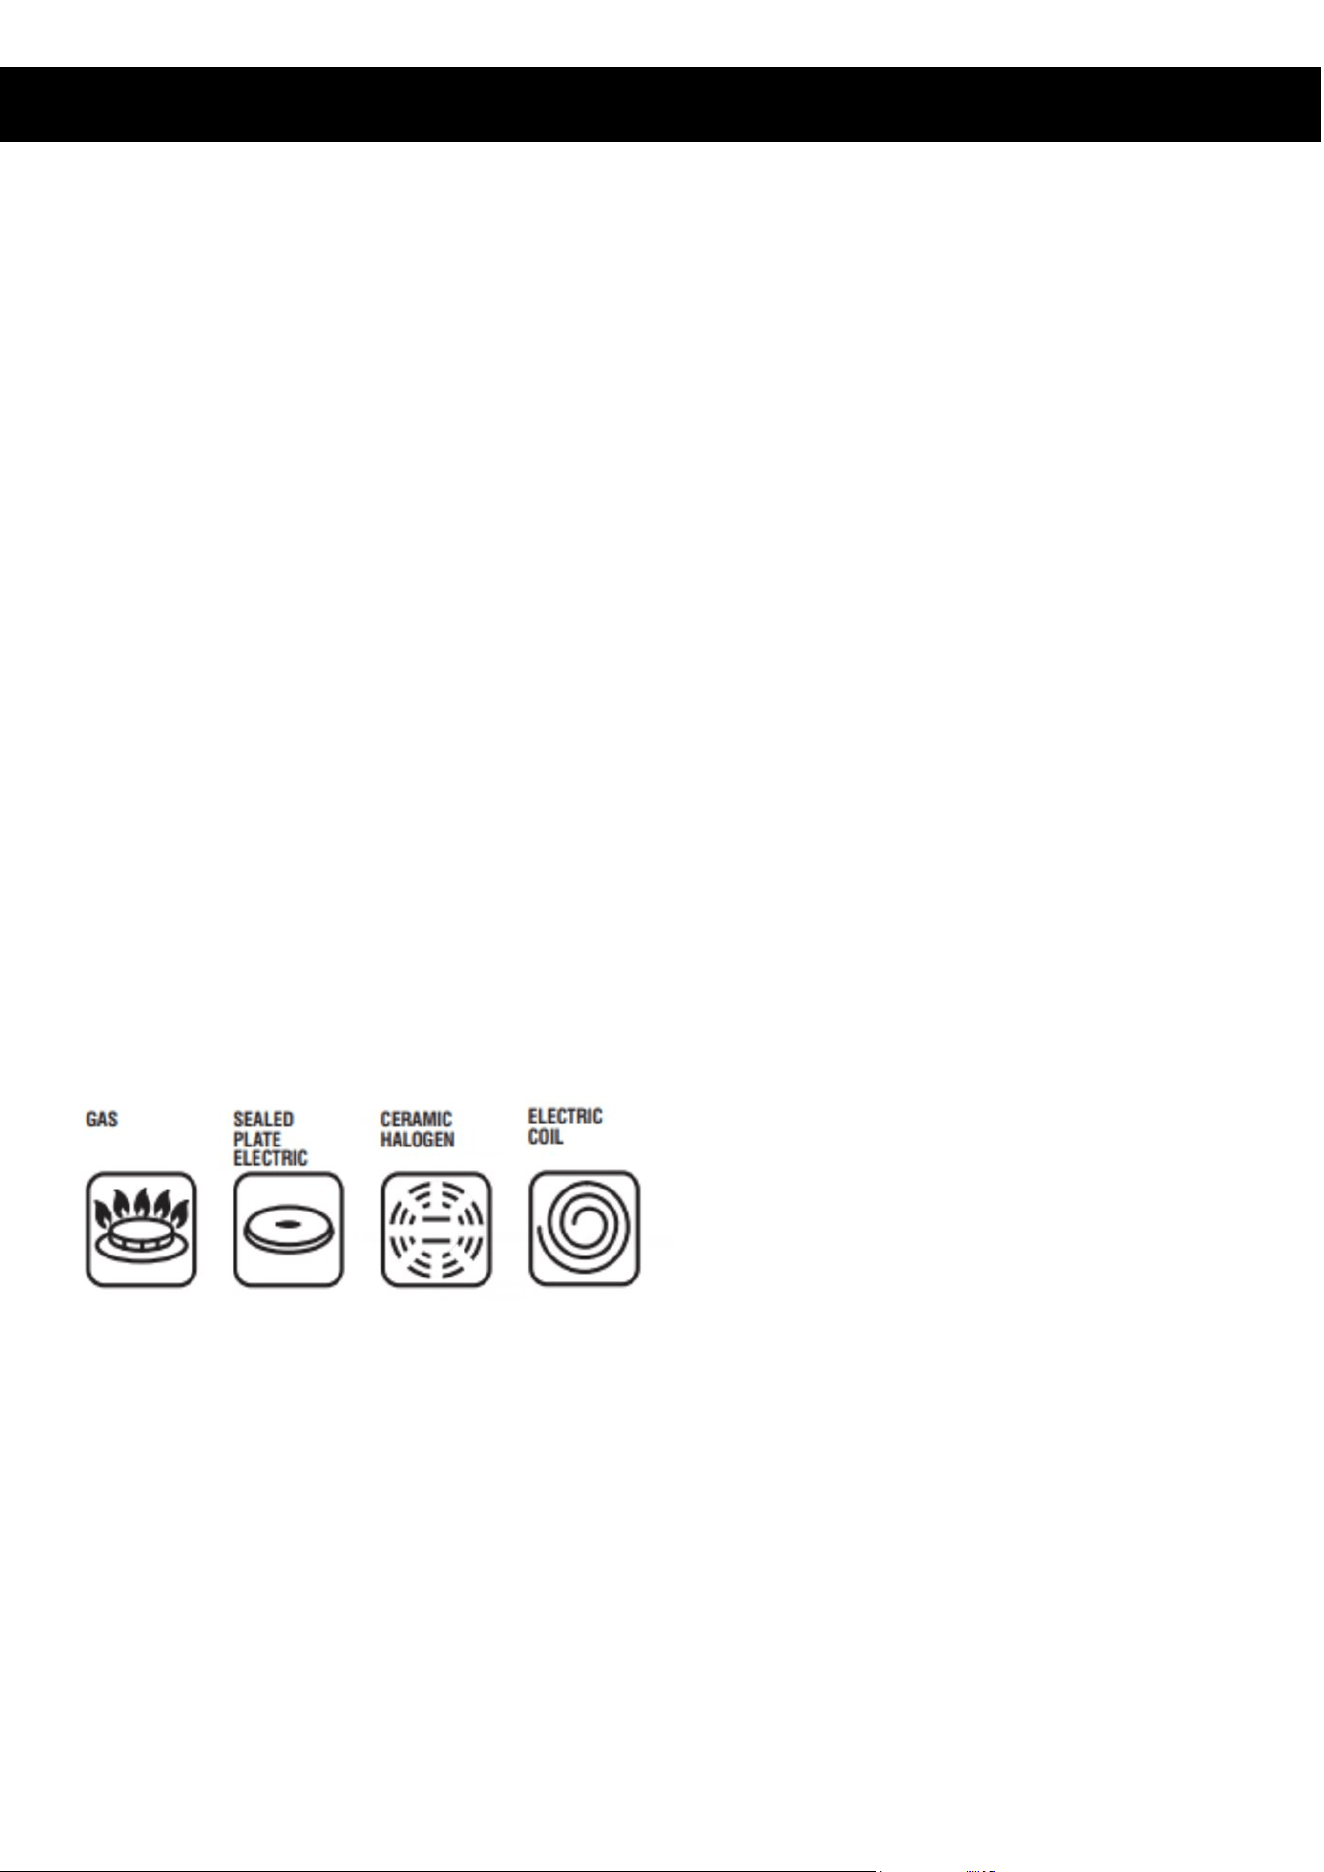
Compatible Heat Sources
When using a heating plate with a diameter equal to or less than that of the pressure canner based. On ceramic and
halogen hobs, make sure that the base of the pan is clean and dry.
Do not leave an empty canner on a heated stove or allow canner to boil dry. This can cause damage to the canner
bottom or stovetop.
On gas, the flame should not extend beyond the diameter of the pan. For all heat sources, make sure that your
pressure canner is well centered.
OPERATIONS
6
PLEASE READ THE FOLLOWING CAREFULLY
THE MANUFACTURER AND/OR DISTRIBUTOR HAS PROVIDED THE PARTS LIST AND ASSEMBLY DIAGRAM IN
THIS MANUAL AS A REFERENCE TOOL ONLY. NEITHER THE MANUFACTURER OR DISTRIBUTOR MAKES ANY
REPRESENTATION OR WARRANTY OF ANY KIND TO THE BUYER THAT HE OR SHE IS QUALIFIED TO MAKE
ANY REPAIRS TO THE PRODUCT, OR THAT HE OR SHE IS QUALIFIED TO REPLACE ANY PARTS OF THE
PRODUCT. IN FACT, THE MANUFACTUREER AND/OR DISTRIBUTOR EXPRESSLY STATES THAT ALL REPAIRS
AND PARTS REPLACEMENTS SHOULD BE UNDERTAKEN BY CERTIFIED AND LICENSED TECHNICIANS, AND
NOT BY THE BUYER. THE BUYER ASSUMES ALL RISK AND LIABILITY ARISING OUT OF HIS OR HER REPAIRS
TO THE ORIGINAL PRODUCT OR REPLACEMENT PARTS THERETO, OR ARISING OUT OF HIS OR HER
INSTALLATION OF REPLACEMENT PARTS THERETO.
Record Product’s Serial Number Here:
Note: If product has no serial number, record month and year of purchase instead.
Note: Some parts are listed and shown for illustration purposes only and are not available individually as replacement
parts.
Questions, problems, missing parts?
Before returning to your retailer, our exceptional customer service is here to help.
Call Us: 909.628.0880
Email Us: customer@bartonliving.com
Hours of Operation: 9am - 4pm (Monday - Friday)
DISCLAIMER

7
STEWED TOMATOES
Processing time: 15 minutes
Pressure: 11 pounds
Yield: 4 pints
12-14pcs large tomatoes, quartered
1/2 cup roughly chopped onion
1/3 cup roughly chopped green bell pepper
2 teaspoons sugar
1 teaspoon canning salt
SWEET CANNED CORN
Processing time: 55 minutes
Pressure: 11 pounds
Yield: 3 pints
7 pounds fresh ears of corn,
husks and silks removed
1 1/2 teaspoon canning salt
CORN RELISH
Processing time: 20 minutes
Pressure: 11 pounds
Yield: 6 pints
16-20 fresh ears of corn, husks and silks removed
2 cups chopped onion
1 cup chopped green bell pepper
3/4 cup chopped red bell pepper
1 1/2 cups sugar
1 quart white or apple cider vinegar
1 tablespoon dry mustard
1 tablespoon mustard seeds
2 tablespoons canning salt
CANNED PEAS
Processing time: 40 minutes
Pressure: 11 pounds
Yield: 3 pints
7 pounds fresh peas in their pods, washed, and peas removed from the pods
1 1/2 teaspoons canning salt
RECIPES

8
SPICED PICKLED BEETS
Processing time: 30 minutes
Pressure: 11 pounds
Yield: 4 pints
4 pounds firm unblemished beets, washed, trimmed, leaving the root intact as well as about 2 inches of
the stems
3 cups thinly sliced white onion
2 cups sugar
2 1/2 cups distilled white vinegar
1 1/2 cups water
1 teaspoon canning salt
2 tablespoons whole-spice pickling mix, or a mix of 1 tablespoon mustard seeds, 1 teaspoon whole
allspice berries, 1 teaspoon whole cloves, and 3 cinnamon sticks
SPICY DILLY BEANS
Processing time: 30 minutes
Pressure: 11 pounds
Yield: 4 pints
2 1/2 cups distilled white vinegar
2 1/2 cups water
1/4 cup canning salt
2 1/2 pounds green beans, ends trimmed, measured and cut so they leave 1/4-inch head space in the jars
9 garlic cloves, peeled
4 stems fresh dill, cut in half if tall
4 dried red chili peppers
1 teaspoon cayenne pepper
1 teaspoon dill seed
KIDNEY BEAN SOUP
Processing time: 60 minutes
Pressure: 11 pounds
Yield: 4 pints
2 quarts chicken or turkey broth or store-bought broth
1 cup diced peeled potatoes
1 cup fresh corn kernels
1/2 cup slices celery
1/2 large yellow onion, diced
1 garlic clove, thinly sliced
1 cup cubed cooked ham
1 cup canned and drained kidney beans
RECIPES

9
APPLE PIE FILLING
Processing time: 10 minutes
Pressure: 6 pounds
Yield: 4 pints
6 pounds apples, washed, cored, peeled, and sliced or cubed into bite-size pieces
2 cups sugar
1/2 cup Clear gel
2 tablespoons freshly squeezed lemon juice
2 teaspoons ground cinnamon
1/2 teaspoon ground nutmeg
BLUEBERRY FILLING
Processing time: 10 minutes
Pressure: 6 pounds
Yield: 4 pints
3/4 cups sugar
1 cup water
1/4 cup Clear gel
3 1/2 teaspoons freshly squeezed lemon juice
3 1/2 cups fresh or frozen and thawed blueberries
SPICED PEARS
Processing time: 11 minutes
Pressure: 6 pounds
Yield: 3 pints
6 cups water, divided
2 tablespoons Fruit-Fresh
3 pounds pears, peeled, cored, and quartered
1 cup sugar
1 cinnamon stick
1/2 vanilla bean, split widthwise
CRANBERRY JELLY
Processing time: 10 minutes
Pressure: 6 pounds
Yield: 2 pints
4 cups fresh whole cranberries
2 cups sugar
finely chopped peel of 1 orange
juice of 1 orange plus enough water to equal 1 cup liquid
1 cinnamon stick
RECIPES

10
HOMEMADE GRAPE DRINK
Processing time: 10 minutes
Pressure: 11 pounds
Yield: 2 pints
3 cups grapes, rinsed
1 1/4 cups sugar
CUBED PORK
Processing time: 75 minutes
Pressure: 11 pounds
Yield: 4 pints
3 pounds lean pork, trimmed of fat and cubed
1 quart water, tomato juice or broth
1 teaspoon canning salt or 4 cubes of bouillon
BACON JAM
Processing time: 75 minutes
Pressure: 11 pounds
Yield: 12.5 pints
5 pounds good-quality bacon, cut into 1-inch pieces
5 large yellow onions, sliced into 1/4-inch-thick slices
10 garlic cloves, minced
1 1/2 cups very strong coffee
1 cup apple cider vinegar
1 cup packed brown sugar
1/2 cup pure maple syrup
pepper to taste
CANNED CHICKEN
Processing time: 75 minutes
Pressure: 11 pounds
Yield: 4 pints
4 pounds boneless, skinless chicken, trimmed of fact and cut into 1-inch
cubes 1 teaspoon canning salt
THANKSGIVING TURKEY SOUP
Processing time: 60 minutes
Pressure: 11 pounds
Yield: 4 pints
RECIPES

11
2 quarts chicken or turkey broth, or store-bought
broth 1/2 cup sliced celery
1/2 cup sliced carrot
1/2 large yellow onion, chopped
1 cup fresh or canned and drained corn
1/2 cup chopped fresh cranberries
1 cup shredded cooked turkey
1 cup Great Northern beans, cooked and drained
1 fresh sage leaf, or 1/2 teaspoon dried sage
salt and pepper to taste
MEXICAN CHICKEN SOUP
Processing time: 60 minutes
Pressure: 11 pounds
Yield: 4 pints
2 quarts chicken or turkey broth, or store-bought
broth 1/2 cup sliced celery
1/2 large yellow onion, chopped
2 garlic cloves, sliced
1 cup dried tomatoes
1 cup fresh or canned and drained corn
1 jalapeno pepper, seeded and minced
1 cup shredded cooked chicken
1 cup canned and drained black beans
2 teaspoons taco seasoning
salt to taste
BEEF SOUP WITH LENTILS
Processing time: 60 minutes
Pressure: 11 pounds
Yield: 4 pints
2 quarts broth of your choice
1 cup peeled and cubed potato
1/2 cup sliced celery
1/2 large yellow onion, chopped
1/2 cup fresh or canned and drained corn
1 cup shredded cooked beef
1 cup lentils, cooked and drained
1 bay leaf
salt and pepper to taste
RECIPES