3/2024
Read these instructions carefully before using your appliance, and keep it carefully.
If you follow the instructions, your appliance will provide you with many years of good service.
MODEL NUMBER: FRHWM5009-30
RANGE HOOD
ENGLISH
®
INSTRUCTION &
INSTALLATION MANUAL
4002621
CONFORMS TO UL
STD.507
CERTIFIED TO CS
A
STD.C22.2 NO.113

2
TABLE OF CONTENTS
Customer Care 4
Warning 5
Important Safety 7
Product Dimension 8
Name of Parts and Accessories 9
Installation Preparations 10
Installation Instructions 11
Operating Instruction 13
Cleaning and Maintenance 14
Troubleshooting 15
Wire Diagram 16
Warranty 17
3
MODEL NUMBER: FRHWM5009-30
RANGE HOOD
4
Thank you for purchasing a Forno product. Please read the entire instruction manual before operating your new appliance
practices, features, operation and care recommendations of your appliance.
Both the model and serial number are listed inside the product. For warranty purposes, you will also need the date of
purchase .
Record this information below for future reference.
Services in Canada and Untied States
Keep the instruction manual handy to answer your questions. If you don’t understand something or need more assistance,
please visit our website for fast support. Please provide us your name, number, address,serial number of the product that
troubleshooting, proof of purchase, and a short description of the issue. A customer service representative will contact you
providers are carefully selected and rigorously trained by us.
Product Information Service Information
Model Number : _________________________________________
Use these numbers in any
correspondence or services calls
concerning your product.
If you received a damaged product,
immediately contact Forno.
To save time and money, before
you call for serviced, check the
troubleshooting guide. It listed the
causes of minor operation problems
that you can correct yourself.
Serial Number :
Date of Purchase :________________________________________
Purchase Address And Phone : _____________________________
_______________________________________________________
_______________________________________________________
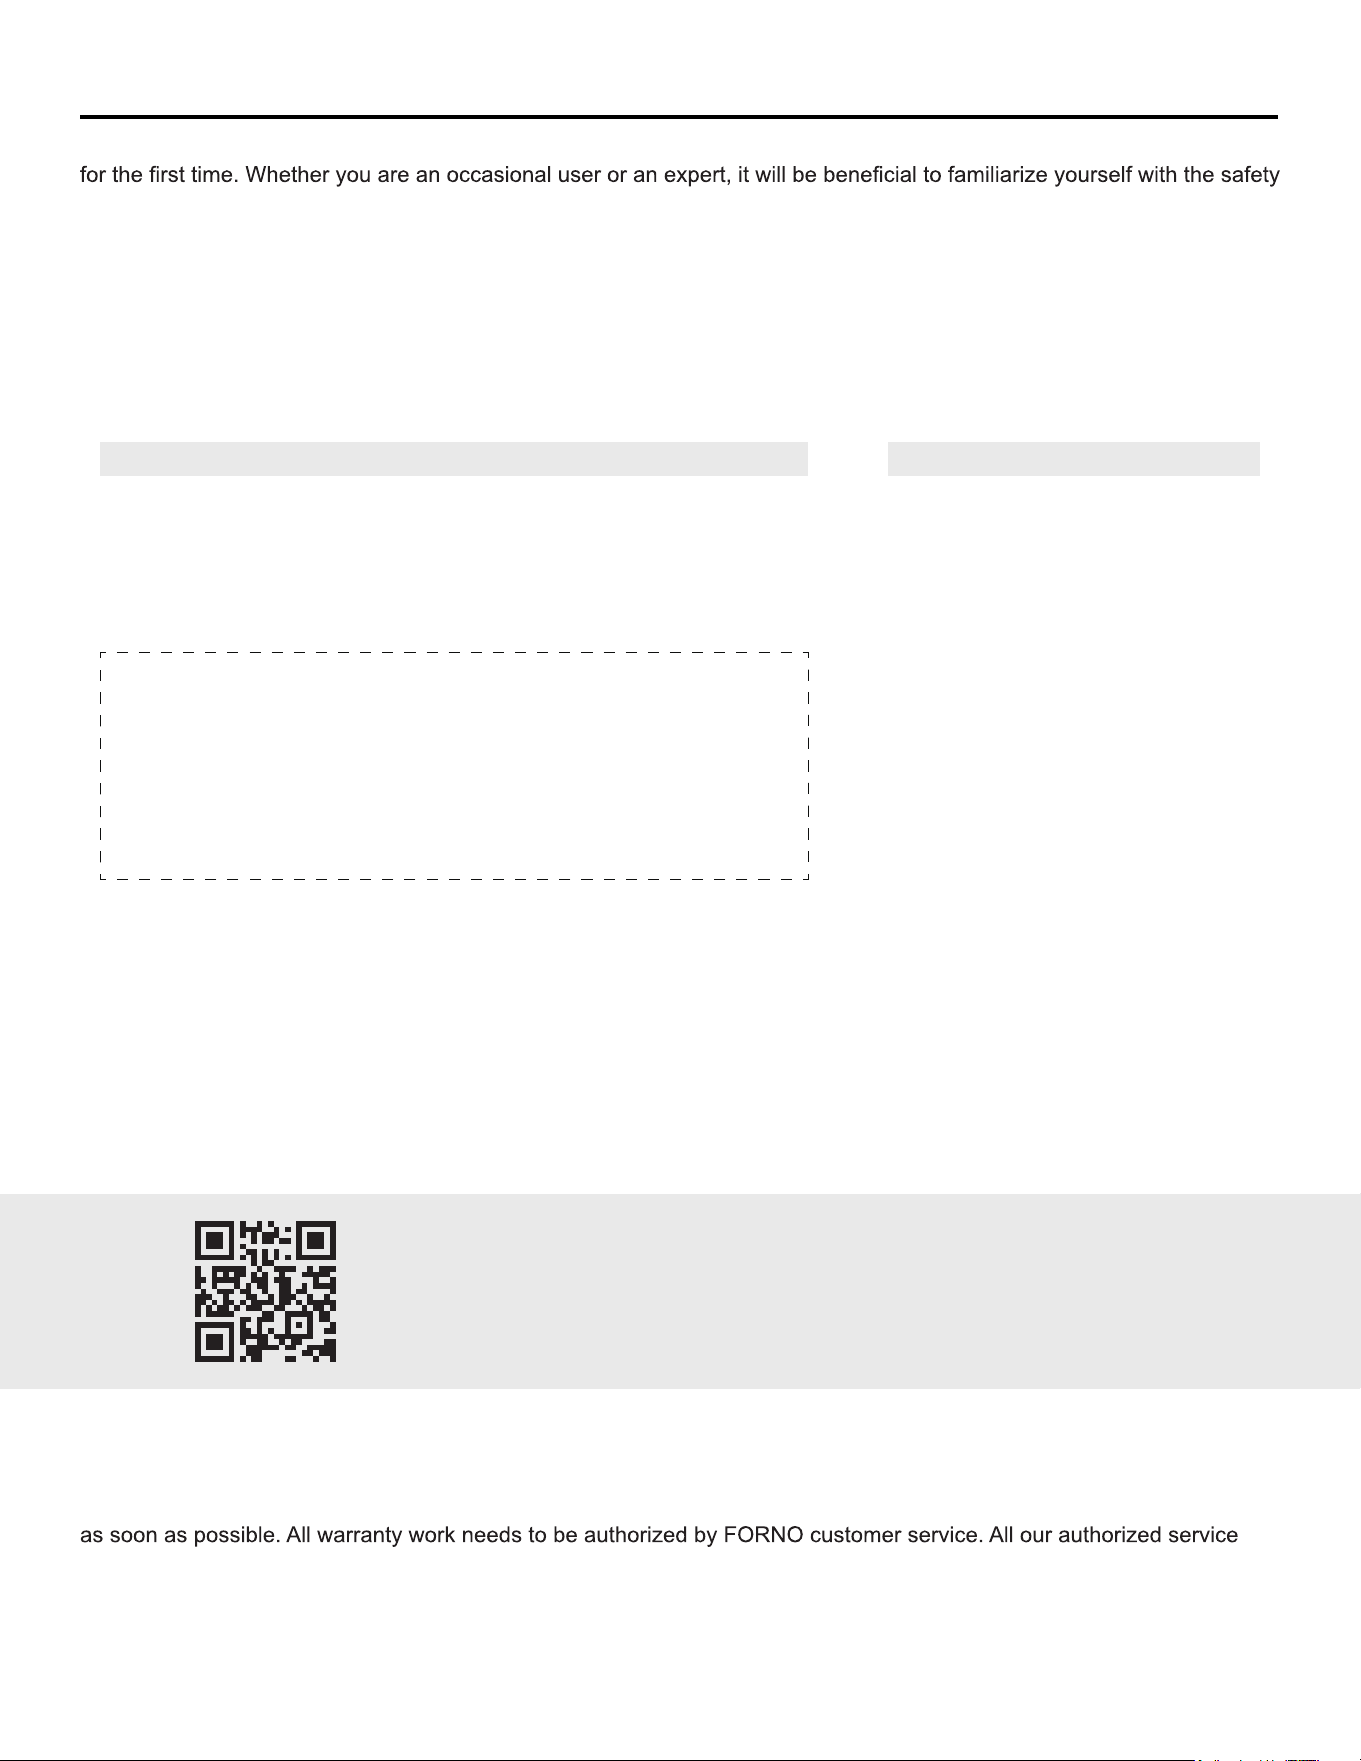
Customer Care
“Need some quick help? Simply scan the qr code and get access
to our fast support form. We’re always here to assist you with any
questions or concerns you may have. So, don’t hesitate to reach out!”
5
WARNING
FOR YOUR SAFETY
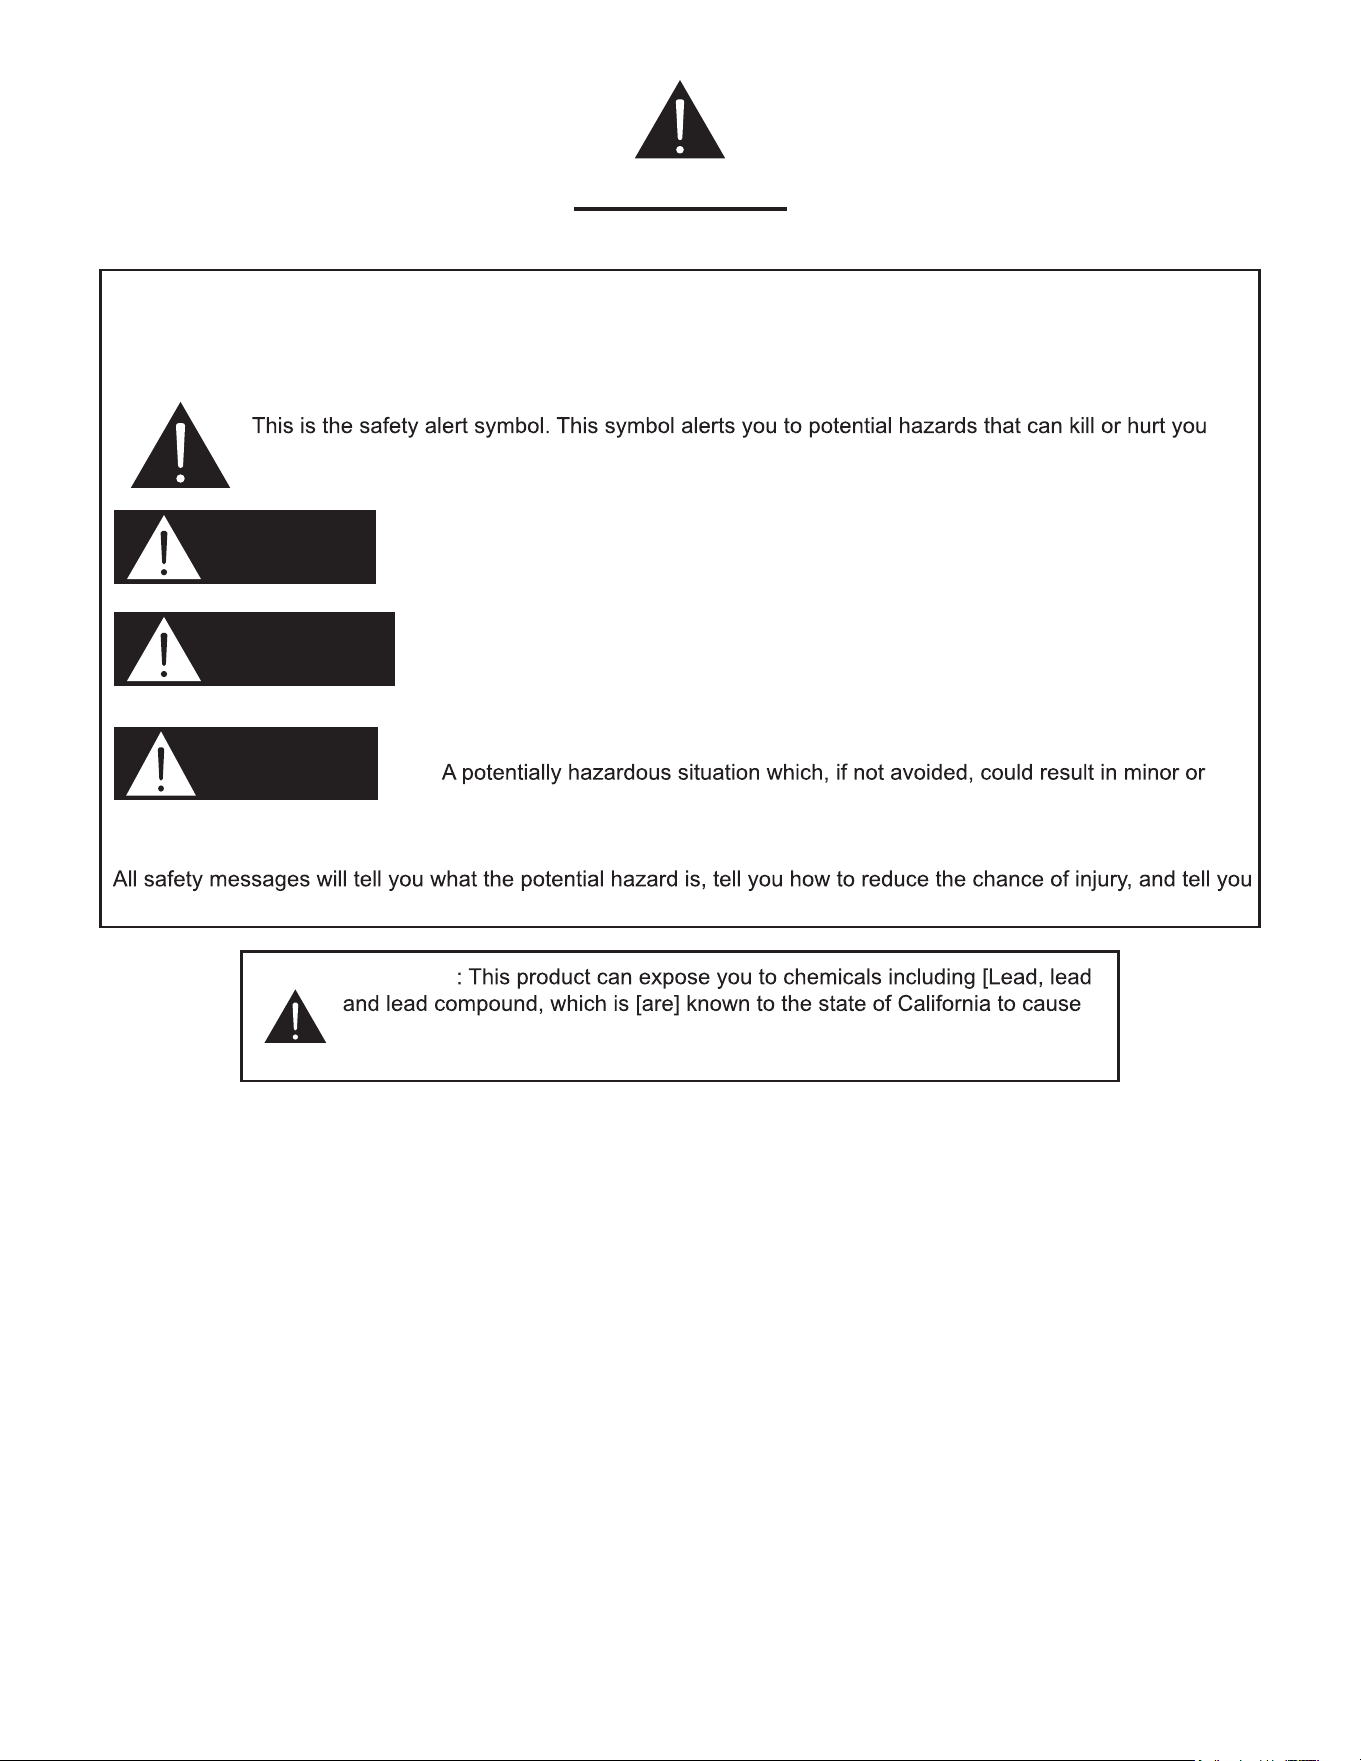
Your safety and the safety of others are very important.
We have provided many important safety messages in this manual and on your appliance. Always read and obey all
safety messages.
and others. Al l safety messages will follow the safety alert symbol and either the word “DANGER,”
“WARNING” or “CAUTION.” These words mean:
• You can be killed or seriously injured if you don’t immediately follow instructions.
• You can be killed or seriously injured if you don’t follow instructions.
•
moderate injury.
what can happen if the instructions are not followed.
DANGER
WARNING
CAUTION
WARNING
cancer and birth defects or other reproductive harm. For more information go
to www.P65Warning.ca.gov.
6
WARNING
FOR YOUR SAFETY
This chapter provides you with important safety notices when handling the device.
The device corresponds with the required safety regulations. Improper use can result in personal or property
damages.
Please read the information contained herein so that you can become familiar with your device quickly and take
advantage of the full scope of its functions.
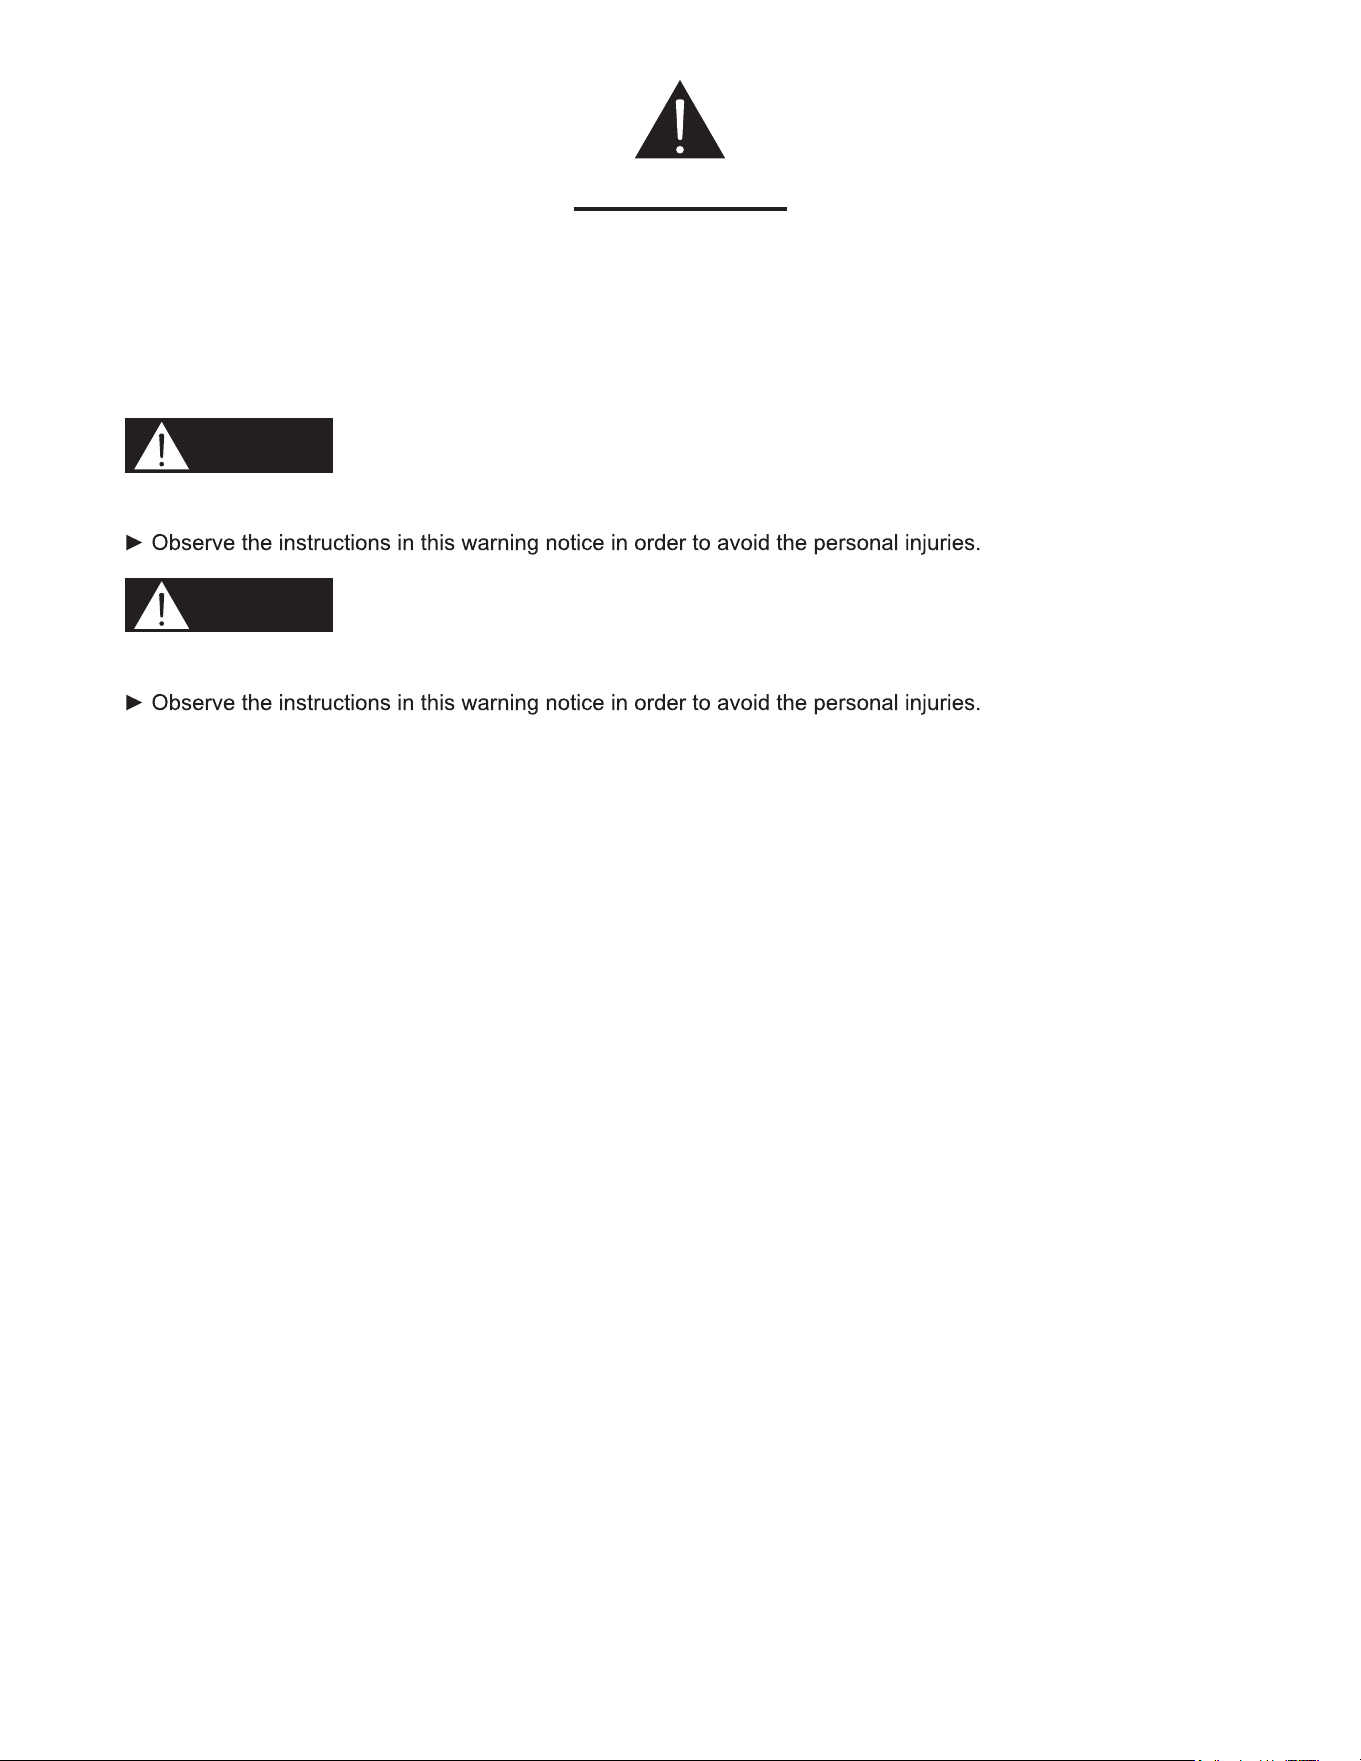
A warning notice of this level of danger indicates a possible dangerous situation.
If the dangerous situation is not avoided, this can lead to serious injuries.
A warning notice of this level of danger indicates a possible dangerous situation.
If the dangerous situation is not avoided, this can lead to slight or moderate injuries.
PLEASE NOTE
A notice of this kind indicates additional information, which will simplify the handling of the machine
WARNING
WARNING
7
Disclaimer:
the instructions provided for installation, maintenance, and suitable use of the product. Manufacturer shall NOT be responsible for
any injury due to negligence and the warranty of the unit shall automatically be voided due to failure to observe proper safety and
installation procedures. The manufacturer will not be held responsible for any damage to personal property, real estate, or any bodily
injuries whether caused directly or indirectly by the range hood.
WARNING - TO REDUCE THE RISK OF FIRE, ELECTRIC SHOCK, OR INJURY TO PERSON, OBSERVE THE FOLLOWING:
*Use this unit only in the manner intended by the manufacturer. If you have questions, contact the manufacturer.
alter the hood.
INSTALLATION:
When cutting or drilling into the wall or ceiling; do not damage electrical wiring and other utilities. It is recommended that two or more
people assist with the installation. The range hood may have very sharp edges; please wear protective gloves if it is necessary to
remove any parts for installing, cleaning or servicing. Read all instructions before beginning installation.
VENTING:
attics and/or garages. Use only metal ductwork. Old ductwork should be cleaned or replaced if necessary to avoid the possibility of
ELECTRICAL:
outlet before servicing and/ or cleaning to ensure your safety.
OPERATION:
Important Safety Instructions
8
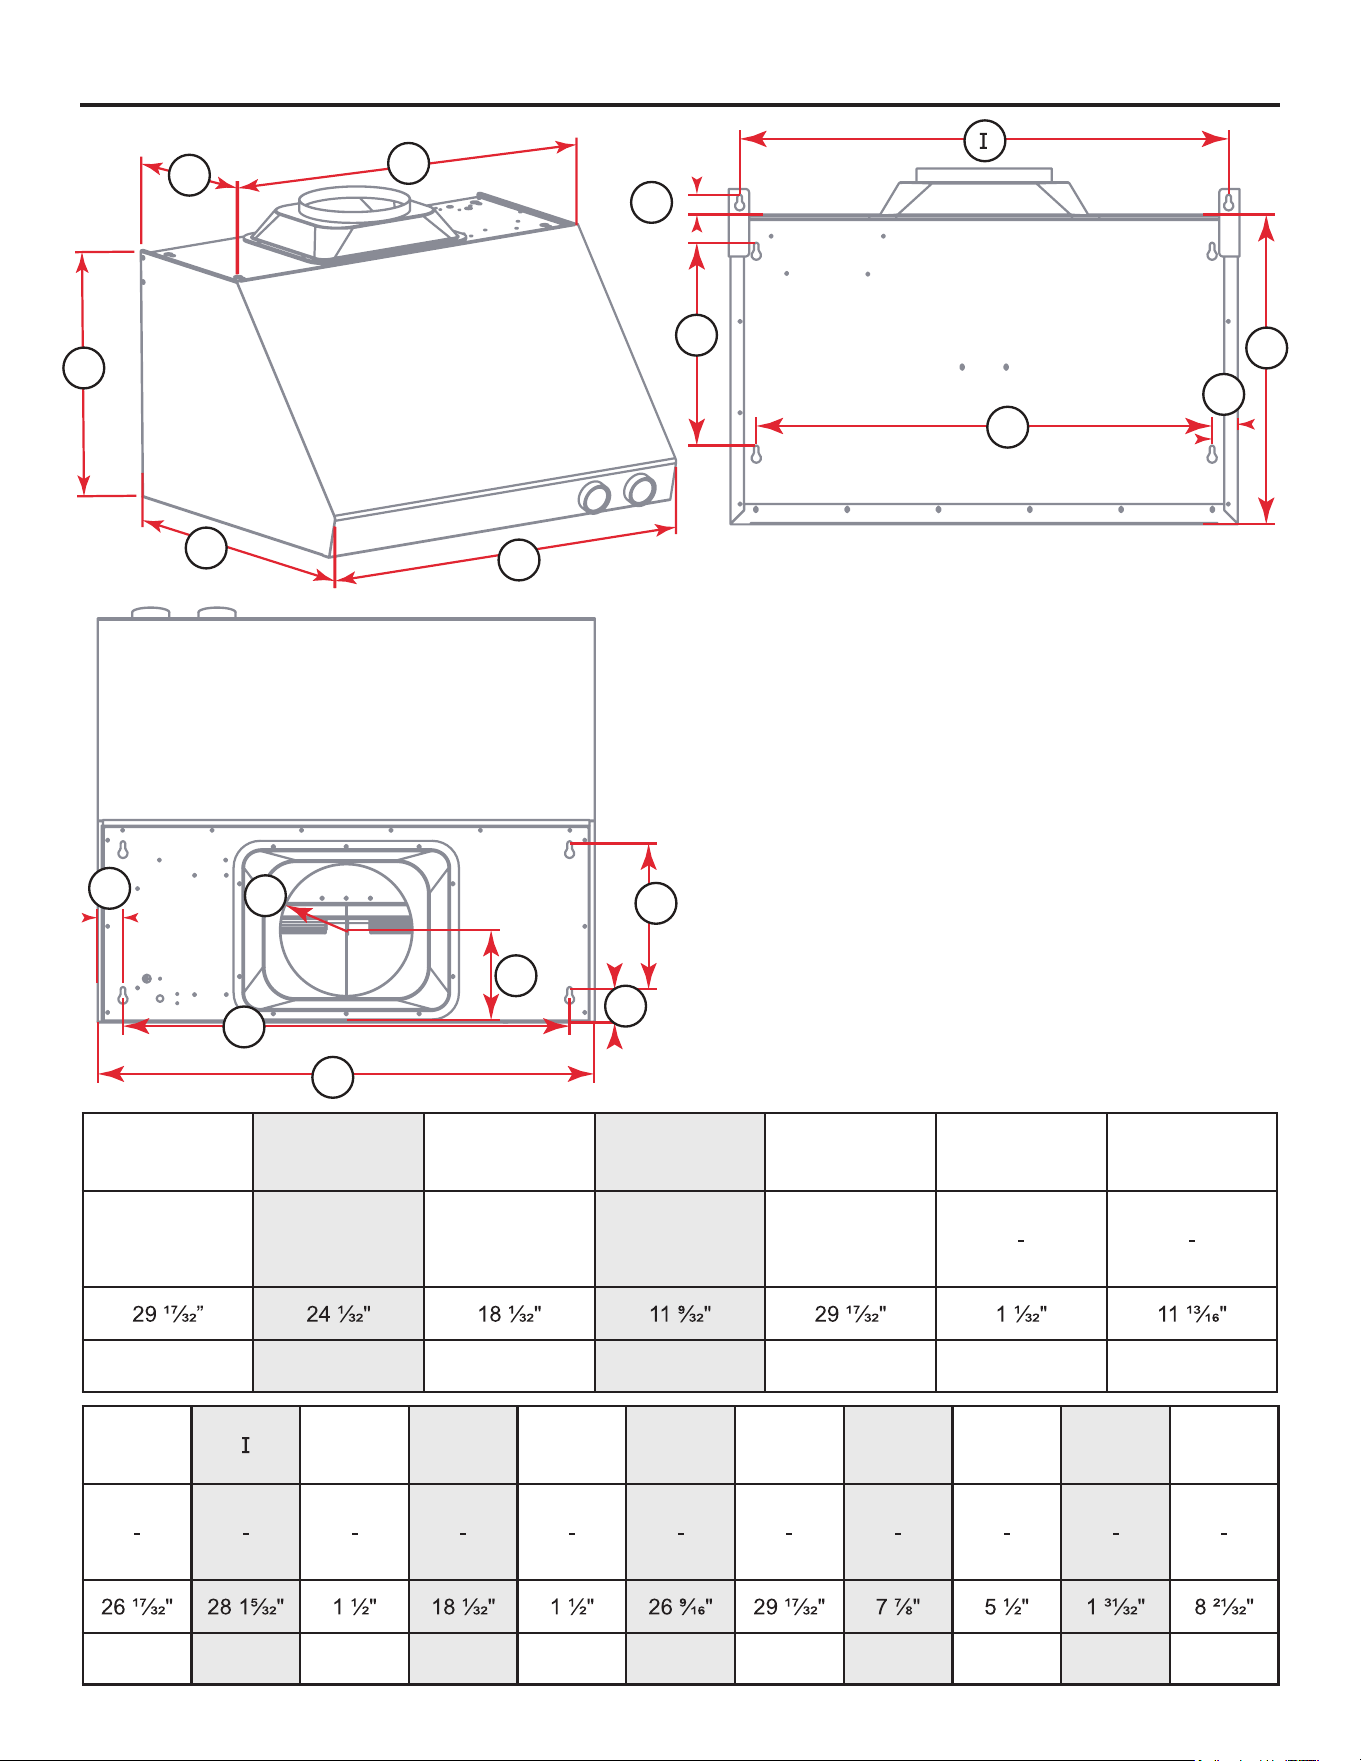
Product Dimension
A B C D E F G
Overall Width Overall Depth Overall Height Depth Width
75.01cm 61.04cm 45.8cm 9.45cm 75.01cm 2.6cm 30cm
H J K L M N O P Q R
67.4cm 72.3cm 3.81cm 45.8cm 38 cm 57.5cm 75cm 20 cm 13.95cm 5cm 22cm
A
B
C
D
E
N
M
P
R
Q
O
L
H
G
F
K
J
9
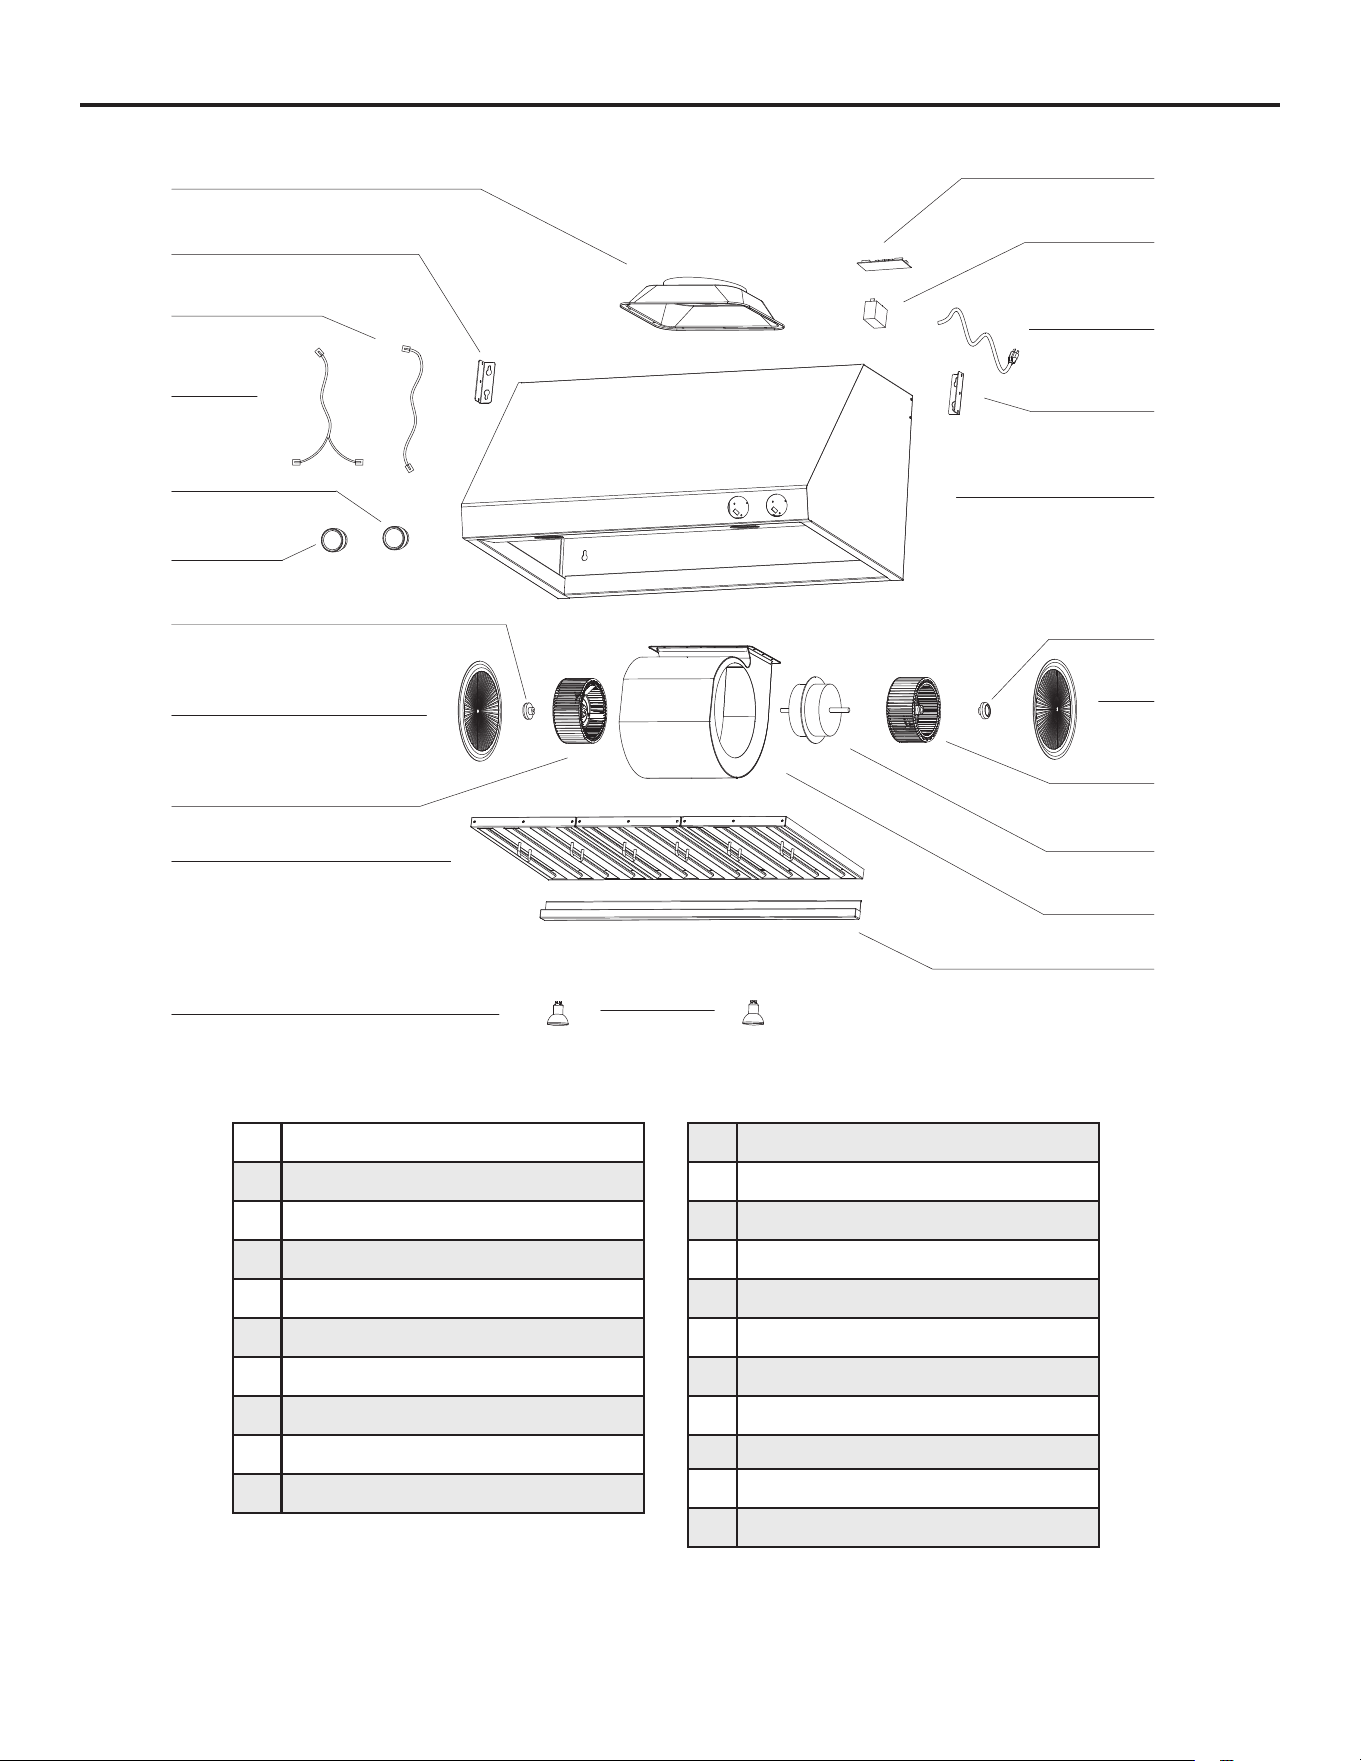
Names of Parts and Accessories
1 Air Outlet
2 Mounting Bracket
3 Switch Cable
4 Lamp Cord
5 KNOB LAMP SWITCH
6 KNOB MOTOR SWITCH
7
8
Left wind wheel cap
9
Wind guide ring
10
Left Wind Wheel
11
FILTER
12
LED light
13
Power Cord
14
BODY
15
PCB
16
Capacitor
17
Right Wind Wheel Cap
18
Right Wind Wheel
19
Motor
20
Motor housing
21
Oil cup
2
3
4
6
7
8
9
10
11
12
13
14
2
15
16
7
17
18
19
20
1
5
10
Installation Preparation
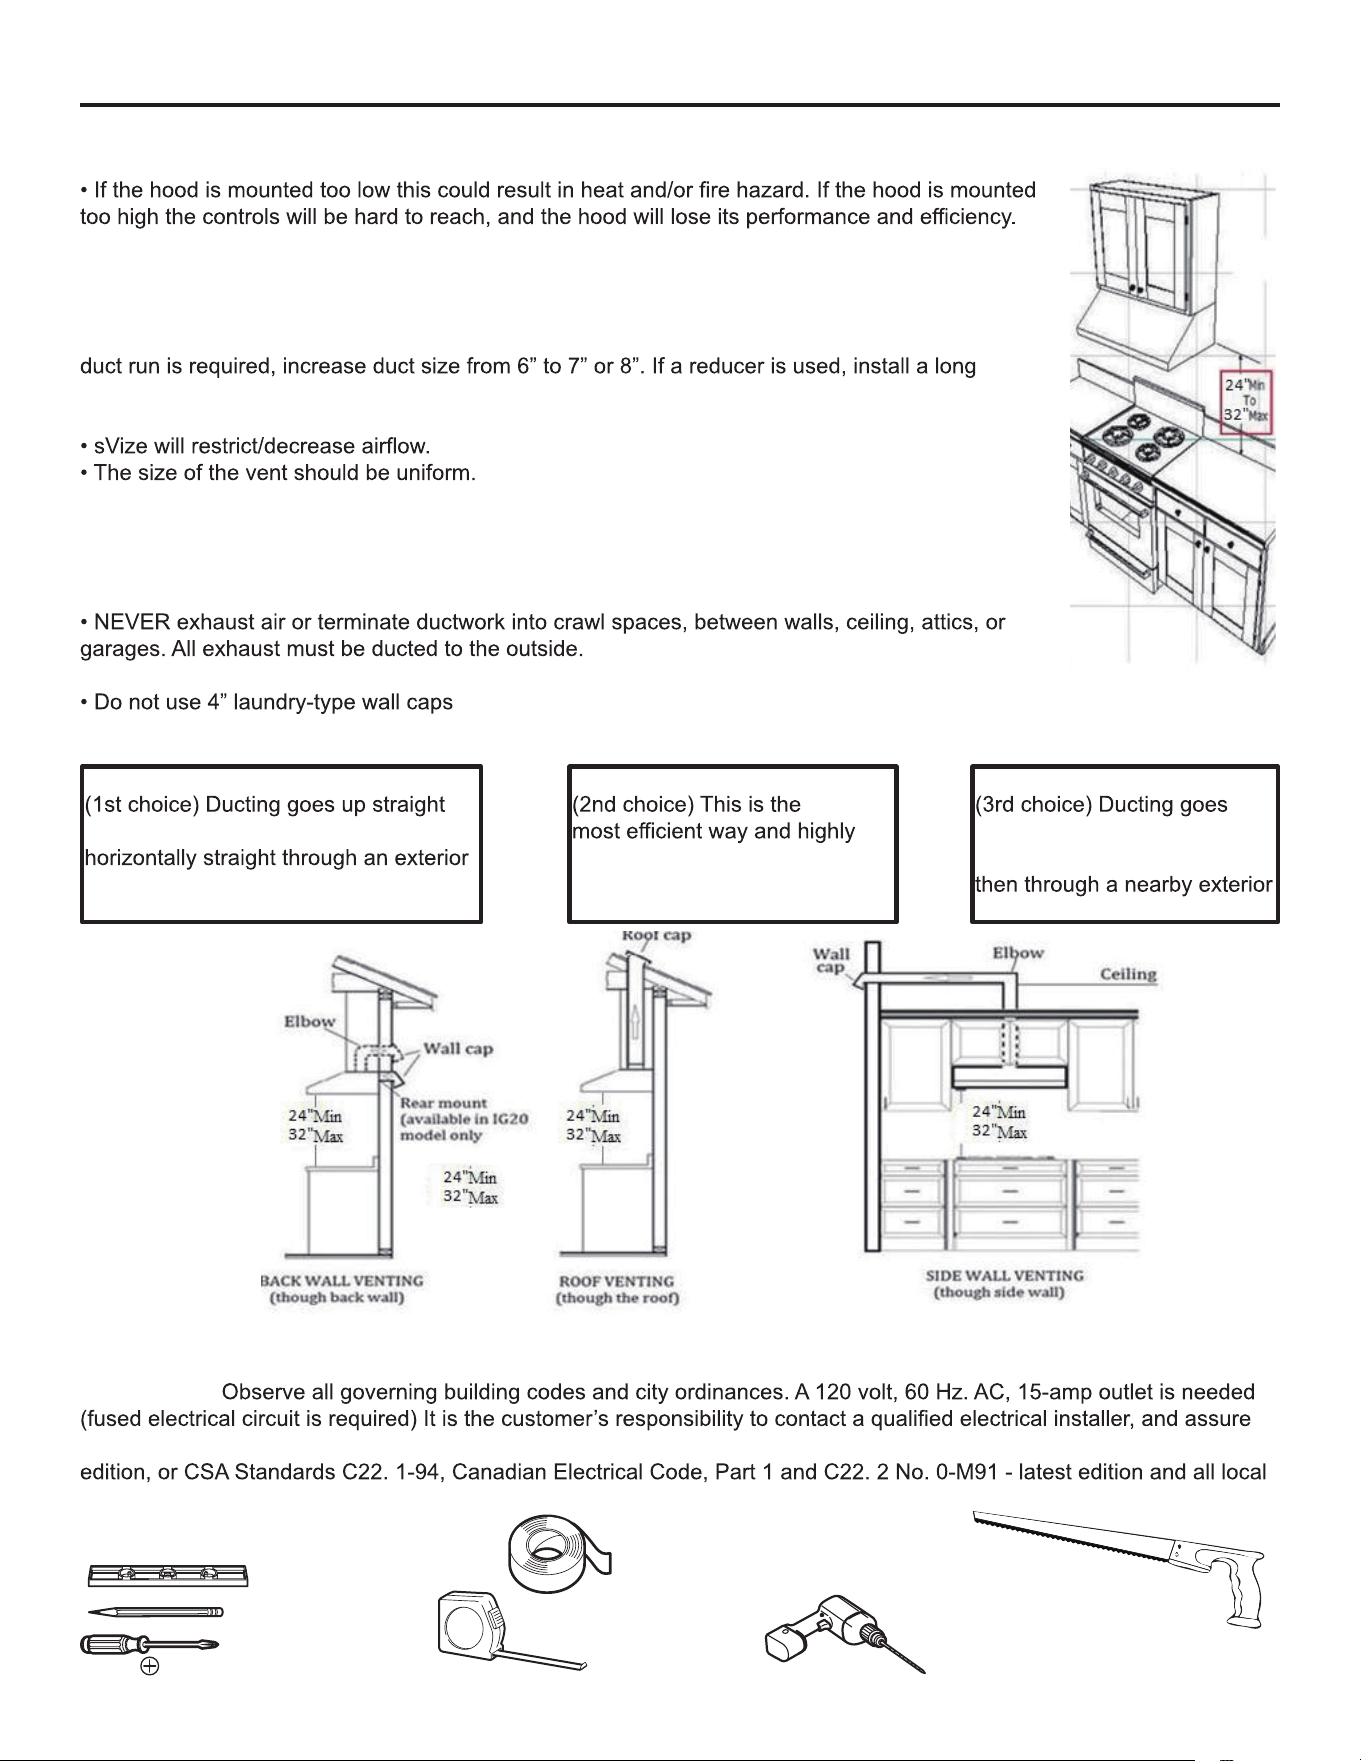
1.MOUNTING HEIGHT FOR THE MOST EFFICIENT & QUIET OPERTION:
• A distance of 24” to 32” is recommended between stove top and the bottom of range hood.
2.VENTING REQUIREMENTS:
• It is recommended that the range hood be vented vertically through the roof with a minimum of
6” or larger vent work.
• ALWAYS, when possible, reduce the number of transitions and turns in the ducting. If a long
reducer instead of a pancake reducer.
Reducing duct:
• Use no more than three 90° elbows in the duct run.
• Make sure there is a minimum of 24” of straight vent between the elbows if more than one
elbow is used
IMPORTANT:
• Do not use plastic ventilation
3.VENTING METHODS
4.ELECTRICAL REQUIREMENTS:
IMPORTANT:
that the electrical installation is adequate and in conformance with National Electrical Code, ANSI/ NFPA 70 — latest
codes and ordinances.
5.TOOL & PARTS YOU WILL NEED
BACK WALL VENTING
inside upper cabinet then turn and goes
wall from the back of the hood. This will
be the shortest ducting length
ROOF VENTING
recommended. Ducting goes
vertically above the range hood
through the house’s roof.
SIDE WALL VENTING
through the kitchen ceiling
from the top of the hood and
wall.
Measuring tape
Phillips screwdriver
Electric drill
Pencil
Level
Aluminium
Tape
11
Installation Instructions
NOTE: DO NOT TRY TO REMOVE BLOWER OR ITS HOUSING. YOU WILL BE UNABLE TO PUT IT BACK IN. MORE
IMPORTANTLY, THE WARRANTY WILL BE VOIDED.
STEP 1: PROTECT THE COOK TOP
Put a thick, protective covering over counter top, cook top or range to protect from damage or dirt.
plywood plank on top of them to protect cook top or stove from damage
or dirt. This plywood will also create a comfortable work station for easy
installation.
cabinet)
• Make sure duct pipe is ready to hook up to the range hood before
where you will be venting your hood)
models, skip this step)
For installing under the cabinet with recessed bottom, attach a b o u t
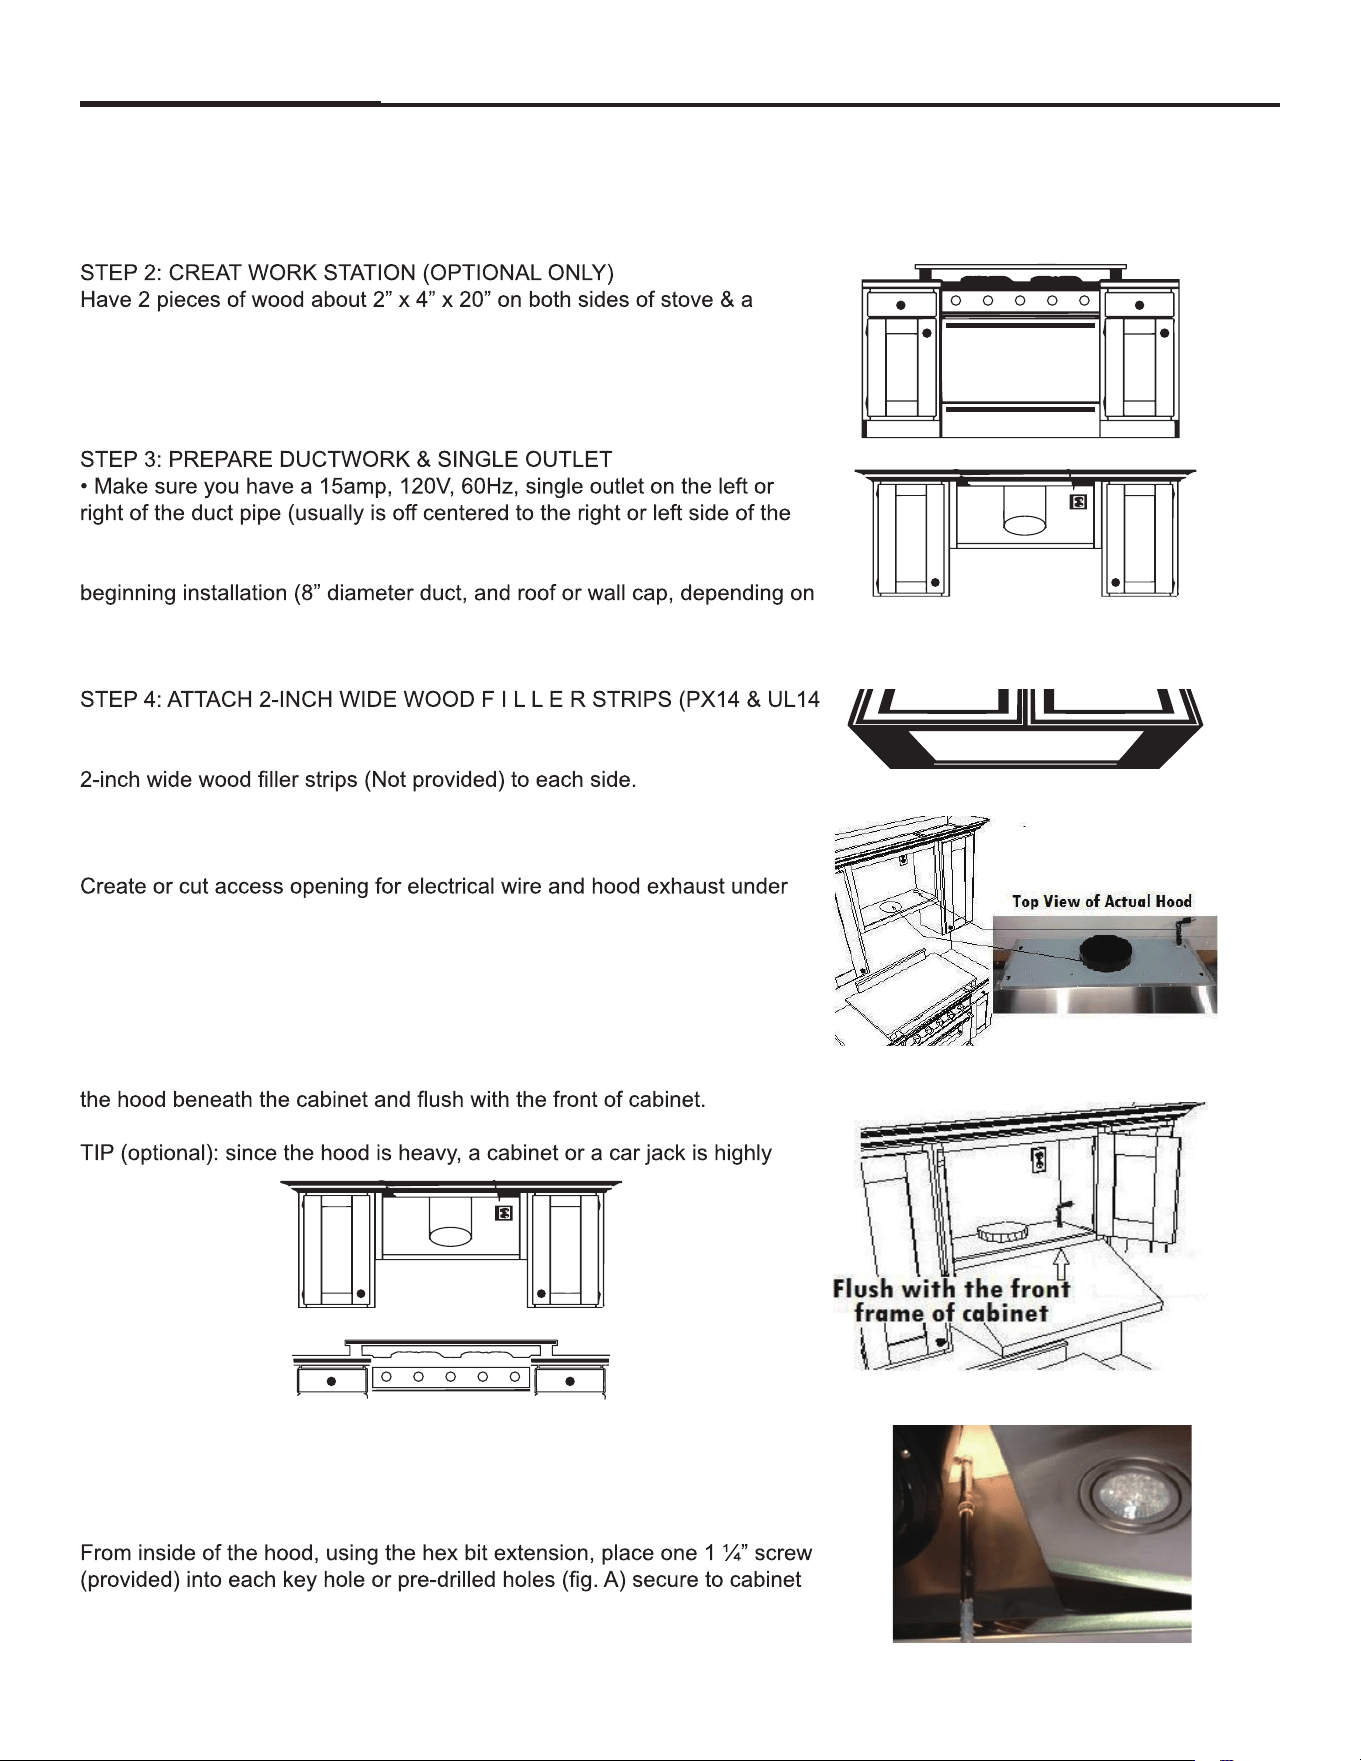
STEP 5: CREATE ACCESS
the cabinet. For easy installation, please cut about ¼” larger ducting
diameter and the plug.
STEP 6: ATTACH THE HOOD
Lift the hood up and have it placed below the cabinet. Make sure to center
recommended.
STEP 7A: SECURE THE HOOD TO BOTTOM CABINET
D09 model: please skip this step if you don’t have a cabinet above the
hood.
bottom. Make sure there is at least 1 screw at each corner of hood body
12
Installation Instructions (continued)
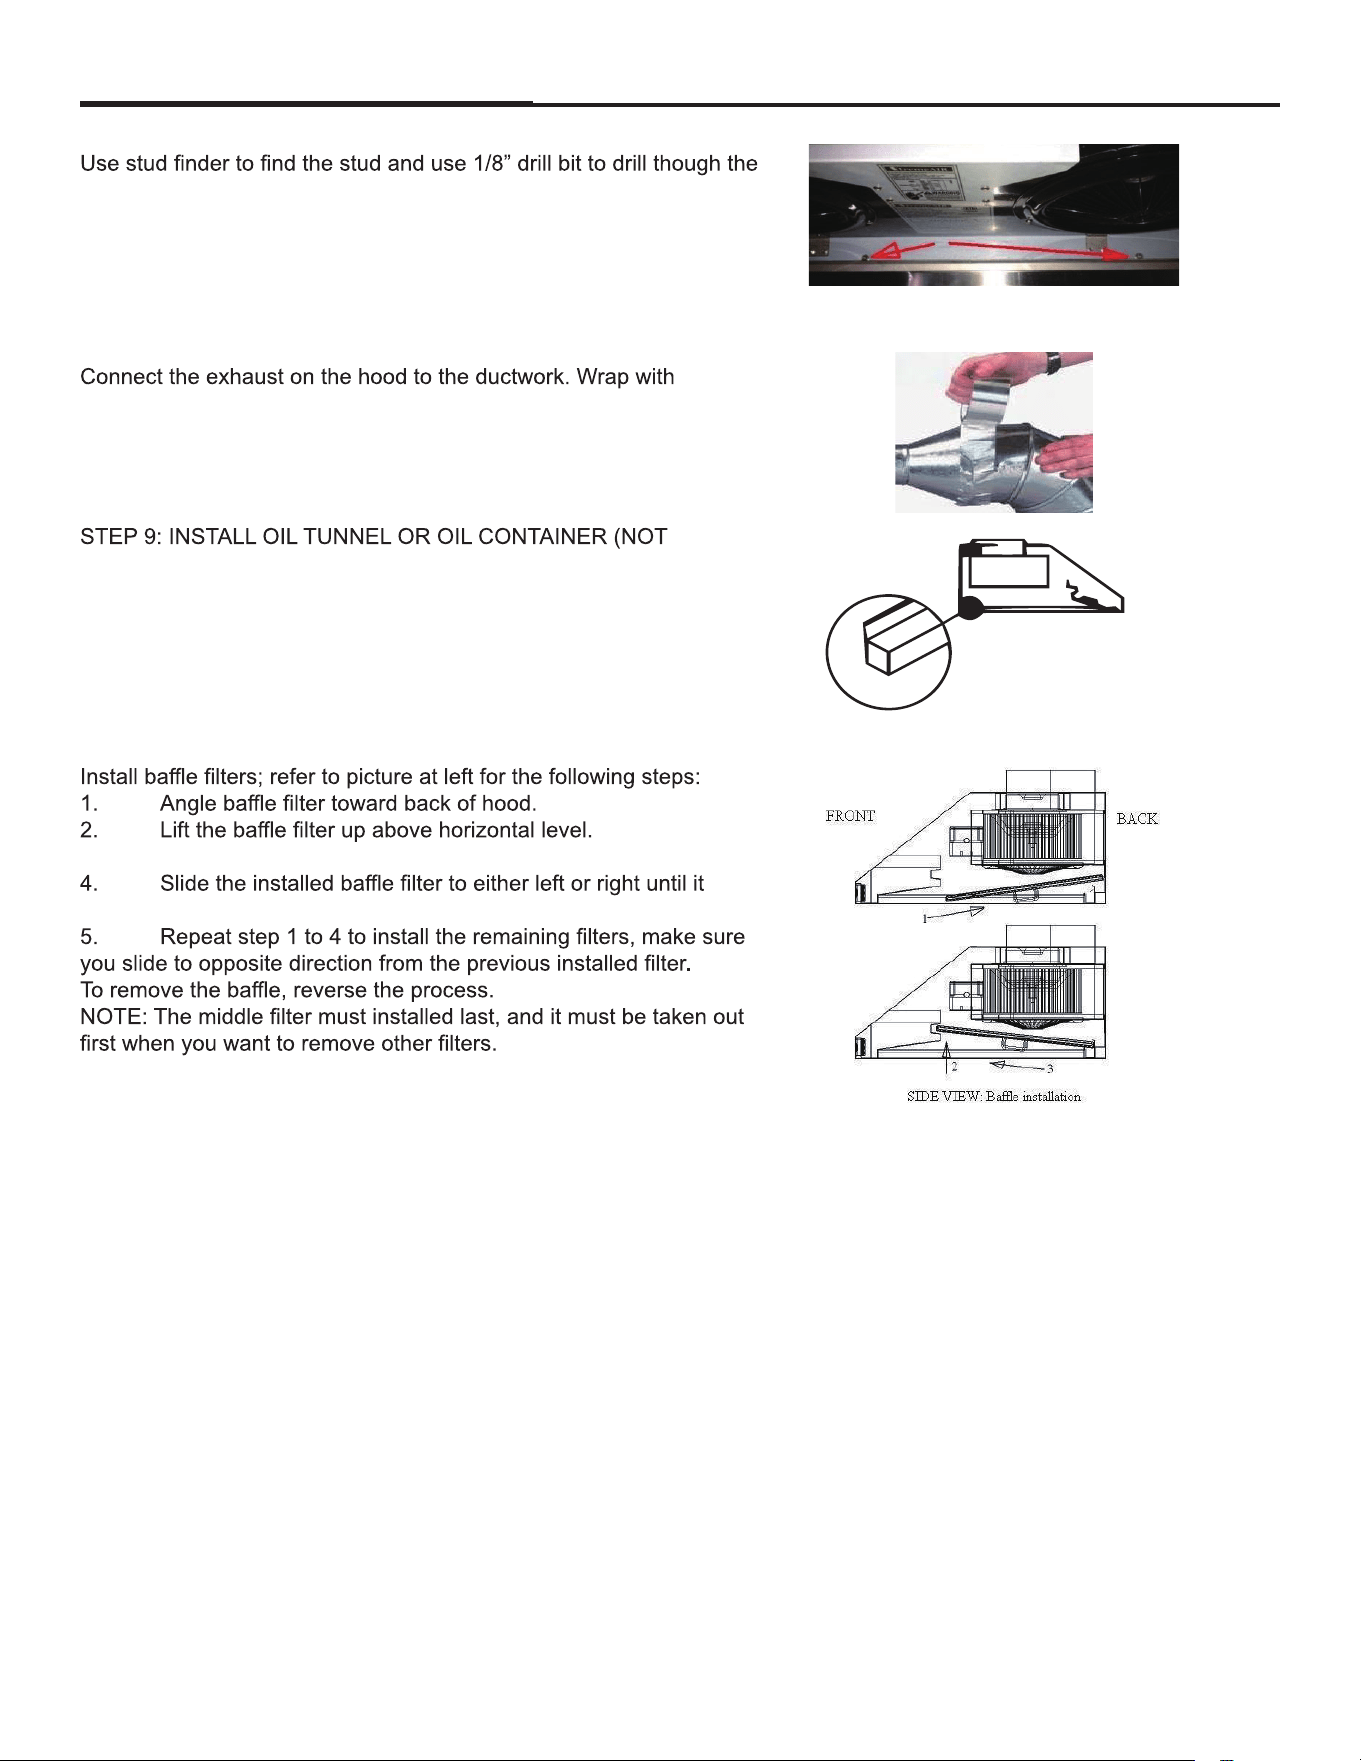
STEP 7B: SECURE THE HOOD TO WALL
back of the hood. Secure the hood by using 1 7/8” provided screws
though the back of the hood to the studs.
STEP 8: CONNECT DUCTWORK
aluminum tape to make all joints are secure And tight.
AVAILABLE FOR ALL MODELS)
Place oil tunnel into recess support near rear of hood. Refer to the left
picture
STEP 10: INSTALL BAFFLE FILTERS
3. Slide forward into slot behind the front of hood.
stops.
13
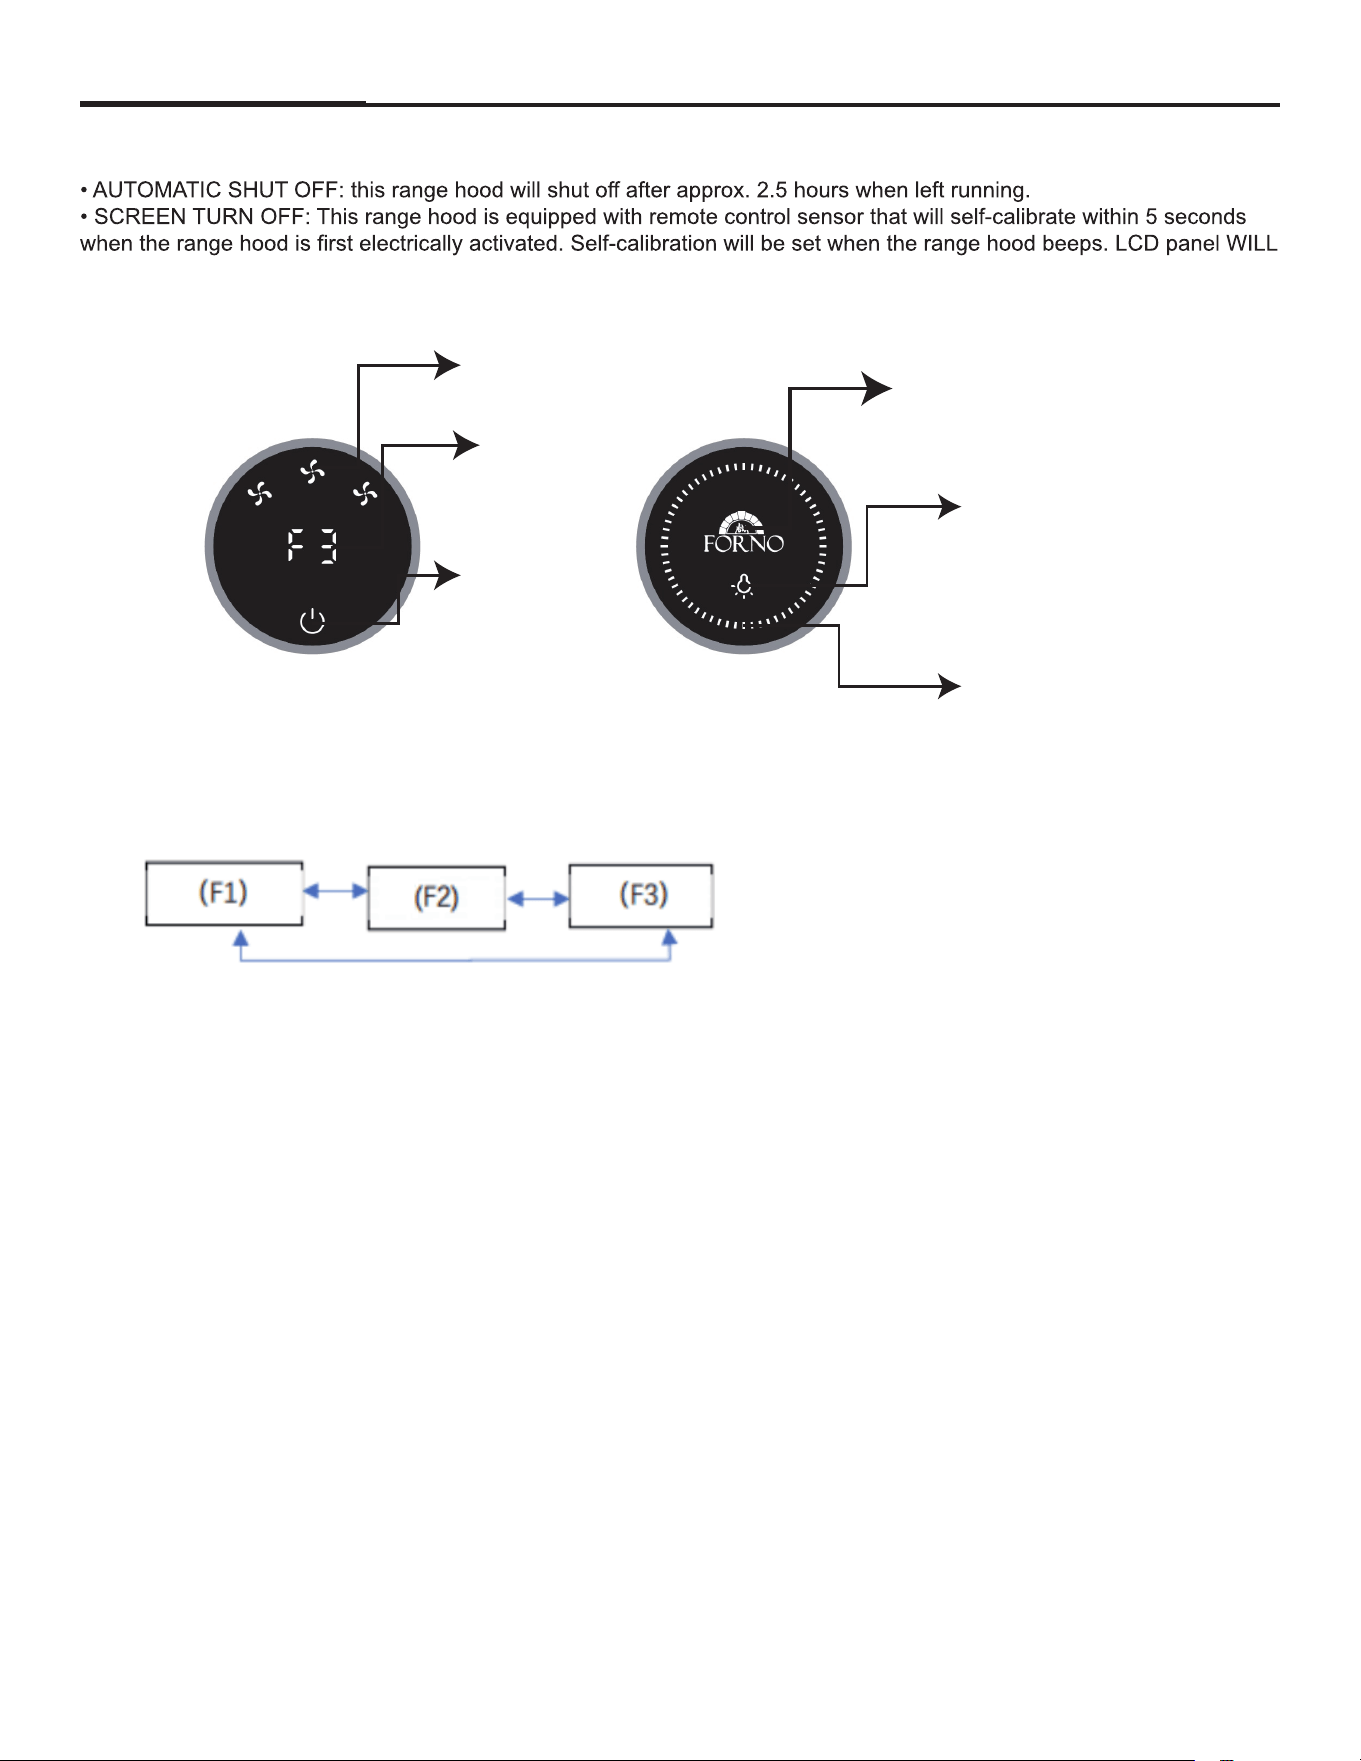
BLACK SCREEN TOUCH CONTROL
Important Note:
TURN OFF automatically after a period of inactivity and every time when plugged into electrical outlet.
Operating Instructions
Range hood knob switch
1.Turning the knob can only adjust the wind speed. The adjustment logic is as shown below.
Speeds light
Speeds
Power
Light brightness
Lighting
Logo
2. Power button: Touch the power button once to enter the 5-minute delay, and then touch it again to switch off the
machine. When the fan is not turned on. When the blower is not on, touching the power button will default the operation
to 1st gear.
Lighting knob switch:
1. Lighting key: touch the "Lighting key" once to turn on the lighting in the off state, the brightness is 50%, the brightness
scale shows 50%; touch the "Lighting key" again to turn off the lighting.
2. Knob: touch the "light key" once under the off state to turn on the light, the brightness is 50%, the brightness scale
shows 50%; turn clockwise to increase the brightness, turn counterclockwise to decrease the brightness, the brightness
scale shows that the brightness increases or decreases with the high and low brightness.
The state display
1. Under the state of shutdown:
Fan knob switch only shows "power button" half bright display;
Lighting knob switch "lighting key" and "LOGO" half bright display. The switch of the lighting knob is half-illuminated.
2. Under power-on condition:
Fan knob switch displays the gear value and corresponding gear icon, power button, and all displays are fully
illuminated;
Lighting knob switch displays the corresponding scale of brightness, LOGO, lighting key, and all displays are fully
illuminated.
14
Cleaning and Maintenance
This chapter provides you with important notices with regard to cleaning and maintaining the device. Please observe the
Operations:
• Read and understand all instructions and warnings in this manual before operating the appliance. Save these
instructions for future reference.
• NEVER dispose of cigarette ashes, ignitable substances, or any foreign objects into blowers.
combustion is higher when the oil has been used several times.
Cleaning:
• FILTERS MUST BE CLEANED PERIODICALLY AND FREE FROM ACCUMULATION OF COOKING RESIDUE.
and warnings in this manual before proceeding.
vv
11. MAINTENANCE
SAFETY WARNING: Never put your hand into area housing the fan while the fan is operating! For optimal operation,
appearance of the range hood.
• Clean periodically with stainless steel cleaner or hot soapy water and clean cotton cloth. Do NOT use corrosive or
cleaner.
stainless luster and grain. Always scrub lightly, with clean cotton cloth, and with the grain.
• Do NOT allow deposits to accumulate or remain on the hood.
• Do NOT use ordinary steel wool or steel brushes. Small bits of steel may adhere to the surface and cause rusting.
• Do NOT allow salt solutions, disinfectants, bleach, or cleaning compounds to remain in contact with stainless
replaced on a regular basis but are required to be kept clean.
• Filters should be cleaned after every 30 hours of use. Remove and clean by hand or dishwasher. Use proper
15
Troubleshooting
1. If the range hood or lights does not operate after installation:
• Check if the range hood has been plugged in. Make sure that all power has been turned back ON.
• Swap out light assembly to working ones to deter mine whether it is caused by defective bulbs.
2. The range hood vibrates when the blower is on:
• The range hood might not have been secured properly to the cabinet or wall.
• Check if the blower wheel is damaged.
3. The blower or fan seems weak:
loosely secured.
4. The lights work but the blower is not spinning at all, is stuck or is rattling.
• The blower might be jammed or scraping the bottom due to shipping damage. Please contact us immediately.
5. The hood is not venting out properly:
• Make sure the distance between the stove top and the bottom of the hood is between 26” and 30” in distance.
• Reduce the number of elbows and length of ductwork.
• Check if all joints are properly connected, sealed, and taped.
• Make sure the power is on high speed for heavy cooking.
6. The hood is noisier than normal.
• The damper was not open.
• The duct is not secure and causes vibration.
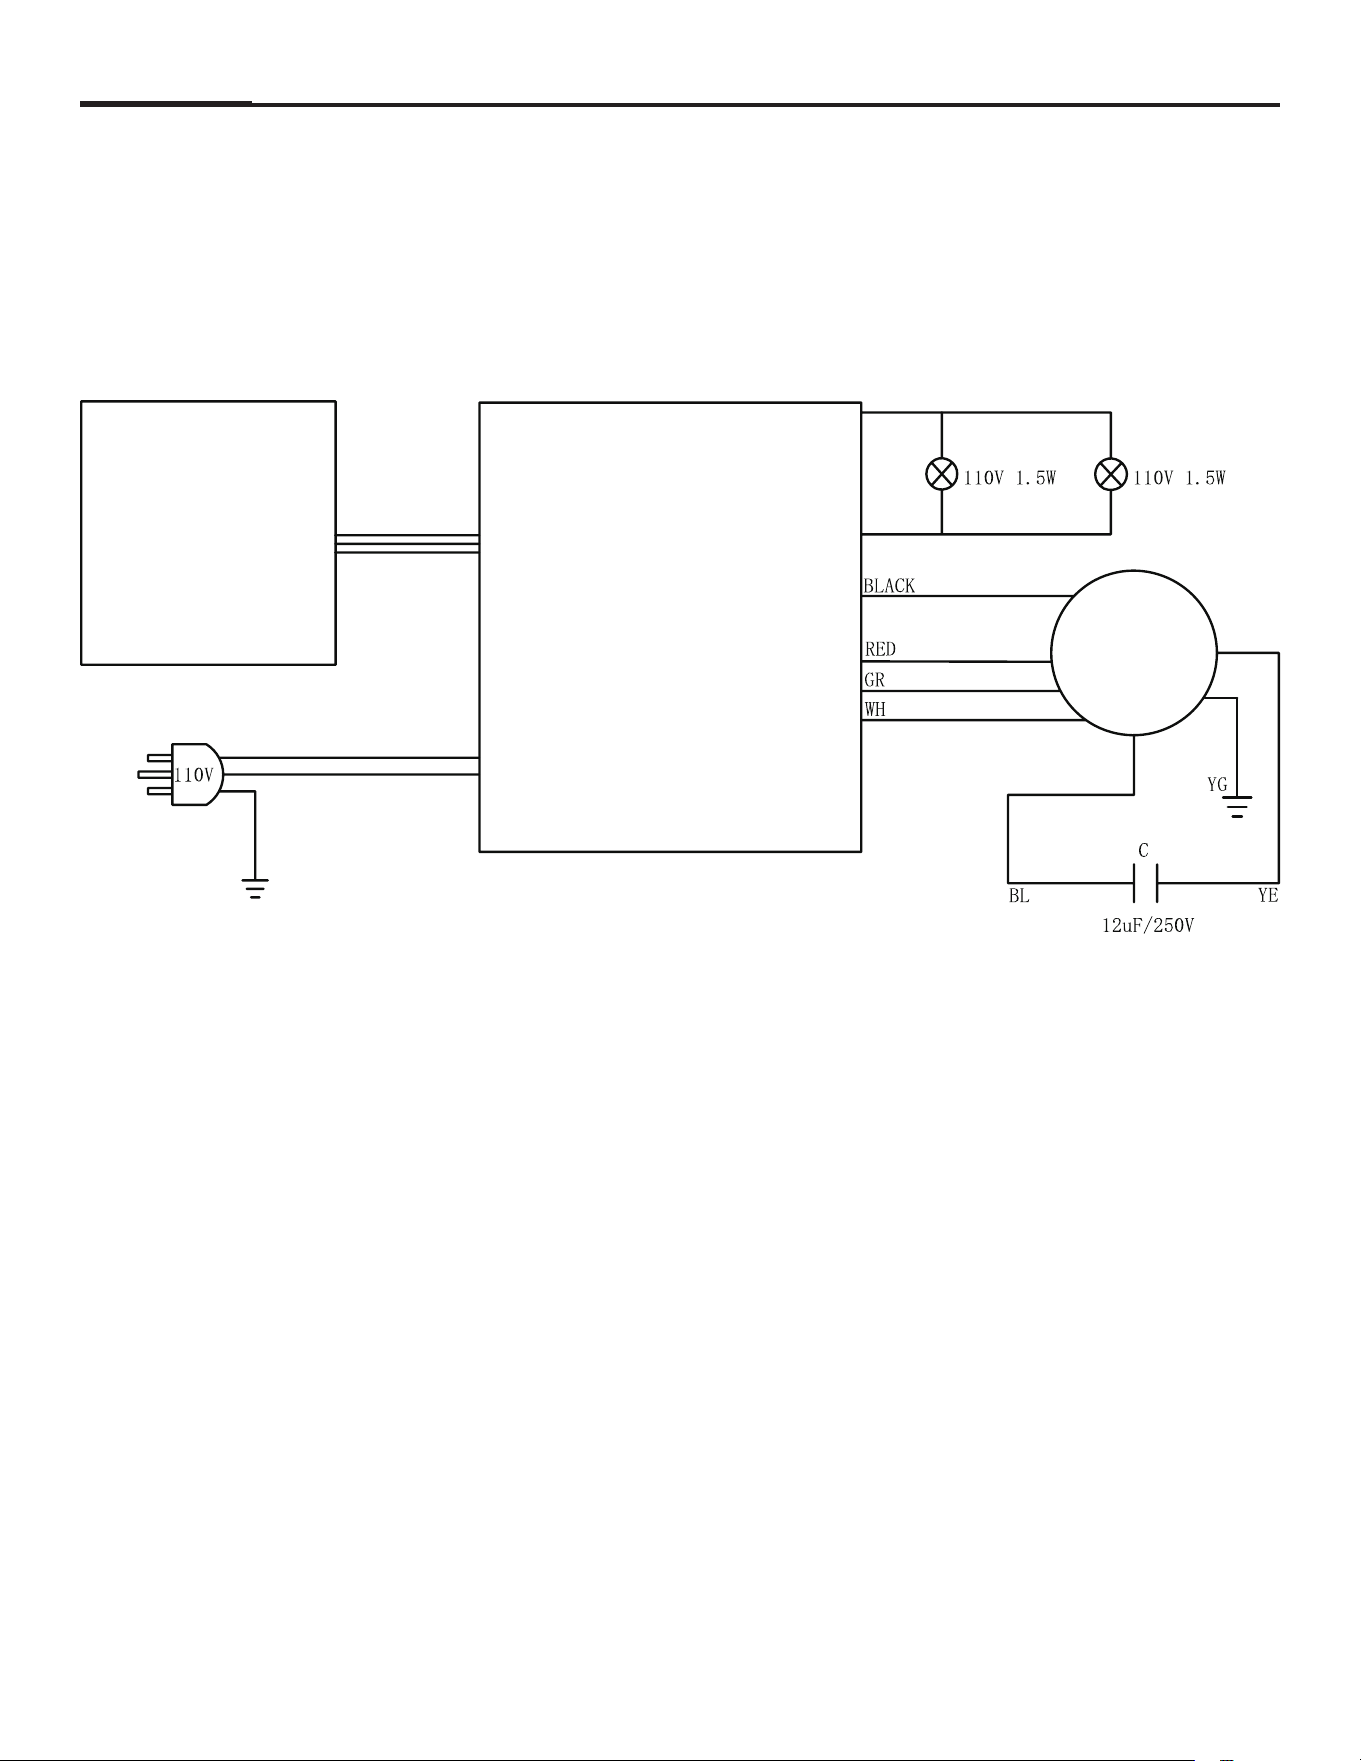
16
Wire Diagram
CIRCUIT DIAGRAM
switch board
/tableau de
distribution
motor
/moteur
power supply
board/tableau
d'alimentation
17
Warranty
What this limited warranty covers:
The Warranty coverage provided by Forno Appliances in
and installed in the United States or Canada, and which has
United States or Canada). Warranty coverage is activated on
the date of the Product’s original retail purchase and has a
replacement of parts or of the entire product, the replacement
Warranty activated with the original retail purchase document.
replacement. Forno Appliances will repair or replace any
component/part which fails or proves defective due to
materials and/or workmanship within 2 years of the date of
the original retail purchase and under conditions of ordinary
will be free of charge, including labor at standard rates and
Product reasonably accessible for service. Repair service
during normal working hours.
Important
Retain proof of original purchase to establish warranty period.
Forno’s liability on any claim of any kind, with respect to the
value of the goods or service or part there of which has given
rise to the claim.
30-Day Cosmetic Warranty
The Purchaser must inspect the product at the time of
delivery. Forno warrants that the Product is free from
manufacturing defects in materials and workmanship for
purchase of the Product.
This coverage includes:
• Paint blemishes
• Chips
•
Cosmetic warranty does NOT cover:
• Issues resulting from incorrect transport, handling and/
structures or components, cracked or otherwise damaged
glass components);
• Slight color variations on painted/enameled components;
•
location or other analogous factors; > stains/corrosion/
How to receive service
To receive warranty services, the Purchaser must contact the
Forno Support department in order to determine the problem
and the required service procedures. Troubleshooting with
a customer service representative will be necessary before
moving forward with the service. Model number, serial number
and date of original retail purchase will be requested.
Warranty Exclusions: What Is Not Covered.
•
application.
• Use of the Product for anything other than its intended
purpose.
• Repair services provided by anyone other than a Forno
• Damages or repair services to correct services provided
• Installation not in accordance with local/state/city/county
building codes, laws or regulations.
• Defects or damage due to improper storage of the
Product.
• Defects, damage or missing parts on products sold out of
the original factory packaging or from displays. > Service
calls or repairs to correct an incorrect installation of the
Product and/or related accessories.
• Replacement of parts/service calls to connect, convert
or otherwise repair the electrical wiring and/or gas line in
order to properly use the product.
• Replacement of parts/service calls to provide instructions
and information on the use of the Product.
• Replacement of parts/service calls to correct issues
arising from the product being used in a manner other
than what is normal and customary for residential use.
• Replacement of parts/service calls due to wear and tear
of components such as seals, knobs, pan supports,
shelving, cutlery baskets, buttons, touch displays,
• Replacement of parts/service calls for lack of/improper
maintenance, including but not limited to: build up of
residues, stains, scratches, discoloration, corrosion.
• Defects and damages arising from accidents, alteration,
misuse, abuse or improper installation.
• Defects and damages arising from Product transport,
logistics and handling. Inspection of the product must be
made at time of delivery. Following receipt and inspection,
any issues arising from handling, transport and logistics.
•
beyond the control of Forno Appliances, including but
failures surrounding the appliance and other acts of God.
• Products whose serial number has been altered/
damaged/tampered with. In no case shall Forno be held
liable or responsible for damage to surrounding property,
structures surrounding the Product. Forno is neither liable
nor responsible for the Product if it is located in a remote
not reasonably available. Purchaser must bear any
transportation and delivery costs of the Product to the

18
THERE ARE NO EXPRESS WARRANTIES OTHER THAN THOSE LISTED AND DESCRIBED ABOVE, AND NO WARRANTIES, EITHER EXPRESS OR IMPLIED,
INCLUDING, BUT NOT LIMITED TO, ANY IMPLIED WARRANTIES OF MERCHANTABILITY OR FITNESS FOR A PARTICULAR PURPOSE THAT SHALL APPLY
AFTER THE EXPRESS WARRANTY PERIODS STATED ABOVE, AND NO OTHER EXPRESS WARRANTY OR GUARANTEE GIVEN BY ANY PERSON, FIRM
OR CORPORATION WITH RESPECT TO THIS PRODUCT SHALL BE BINDING ON FORNO. FORNO SHALL NOT BE LIABLE FOR LOSS OF REVENUE OR
PROFITS, FAILURE TO REALIZE SAVINGS OR OTHER BENEFITS, TIME AWAY FROM WORK, MEALS, LOSS OF FOOD OR BEVERAGES, TRAVELING OR
HOTEL EXPENSES, EXPENSES TO RENT OR PURCHASE APPLIANCES, REMODELING/CONSTRUCTION EXPENSES IN EXCESS OF DIRECT DAMAGES
WHICH ARE UNDENIABLY CAUSED EXCLUSIVELY BY FORNO OR ANY OTHER SPECIAL, INCIDENTAL OR CONSEQUENTIAL DAMAGES CAUSED BY THE
USE, MISUSE OR INABILITY TO USE THIS PRODUCT, REGARDLESS OF THE LEGAL THEORY ON WHICH THE CLAIM IS BASED, AND EVEN IF FORNO
HAS BEEN ADVISED OF THE POSSIBILITY OF SUCH DAMAGES. NOR SHALL RECOVERY OF ANY KIND AGAINST FORNO BE GREATER IN AMOUNT
THAN THE PURCHASE PRICE OF THE PRODUCT SOLD BY FORNO AND CAUSING THE ALLEGED DAMAGE. WITHOUT PREJUDICE TO THE FOREGOING,
PURCHASER ASSUMES ALL RISK AND LIABILITY FOR LOSS, DAMAGE OR INJURY TO PURCHASER AND PURCHASER’S PROPERTY AND TO OTHERS
AND THEIR PROPERTY ARISING FROM THE USE, MISUSE, OR INABILITY TO USE THIS PRODUCT SOLD BY FORNO THAT IS NOT A DIRECT RESULT OF
NEGLIGENCE ON THE PART OF FORNO THIS LIMITED WARRANTY SHALL NOT EXTEND TO ANYONE OTHER THAN THE ORIGINAL PURCHASER OF THIS
PRODUCT, IS NON-TRANSFERABLE, AND STATES YOUR EXCLUSIVE REMEDY.
Warranty (continued)

®
