Chord Tracker Manual
1
Chord Tracker Manual
Chord Tracker is an app for a smart device, such as a smart phone or tablet, that can
analyze audio data on your device for chords. These chords can then be used when
practicing or performing on a musical instrument.
What’s more, when connected to a supported instrument, this app can be used to send
detected chord data to the instrument, or can be used to record your performances.
NOTE
• Information on supported instruments is available on the Yamaha website.
• On some instruments, the function for sending detected chord data cannot be used.
• Recording functions can be used on an instrument which supports wireless LAN connection or an
instrument which has a USB audio interface function.
• Refer to the Smart Device Connection Manual for details on how to connect a smart device to your
instrument.
• Offering cloud storage and file synchronization, Dropbox is a file hosting service operated by Dropbox
Incorporated. Registered users can import audio files stored in the Dropbox to the Chord Tracker.
About this manual
The example screenshots as shown in this manual are taken from an iPhone.
These are for instructional purposes only, and may appear somewhat different from those on your device.
Chord Tracker Manual
2
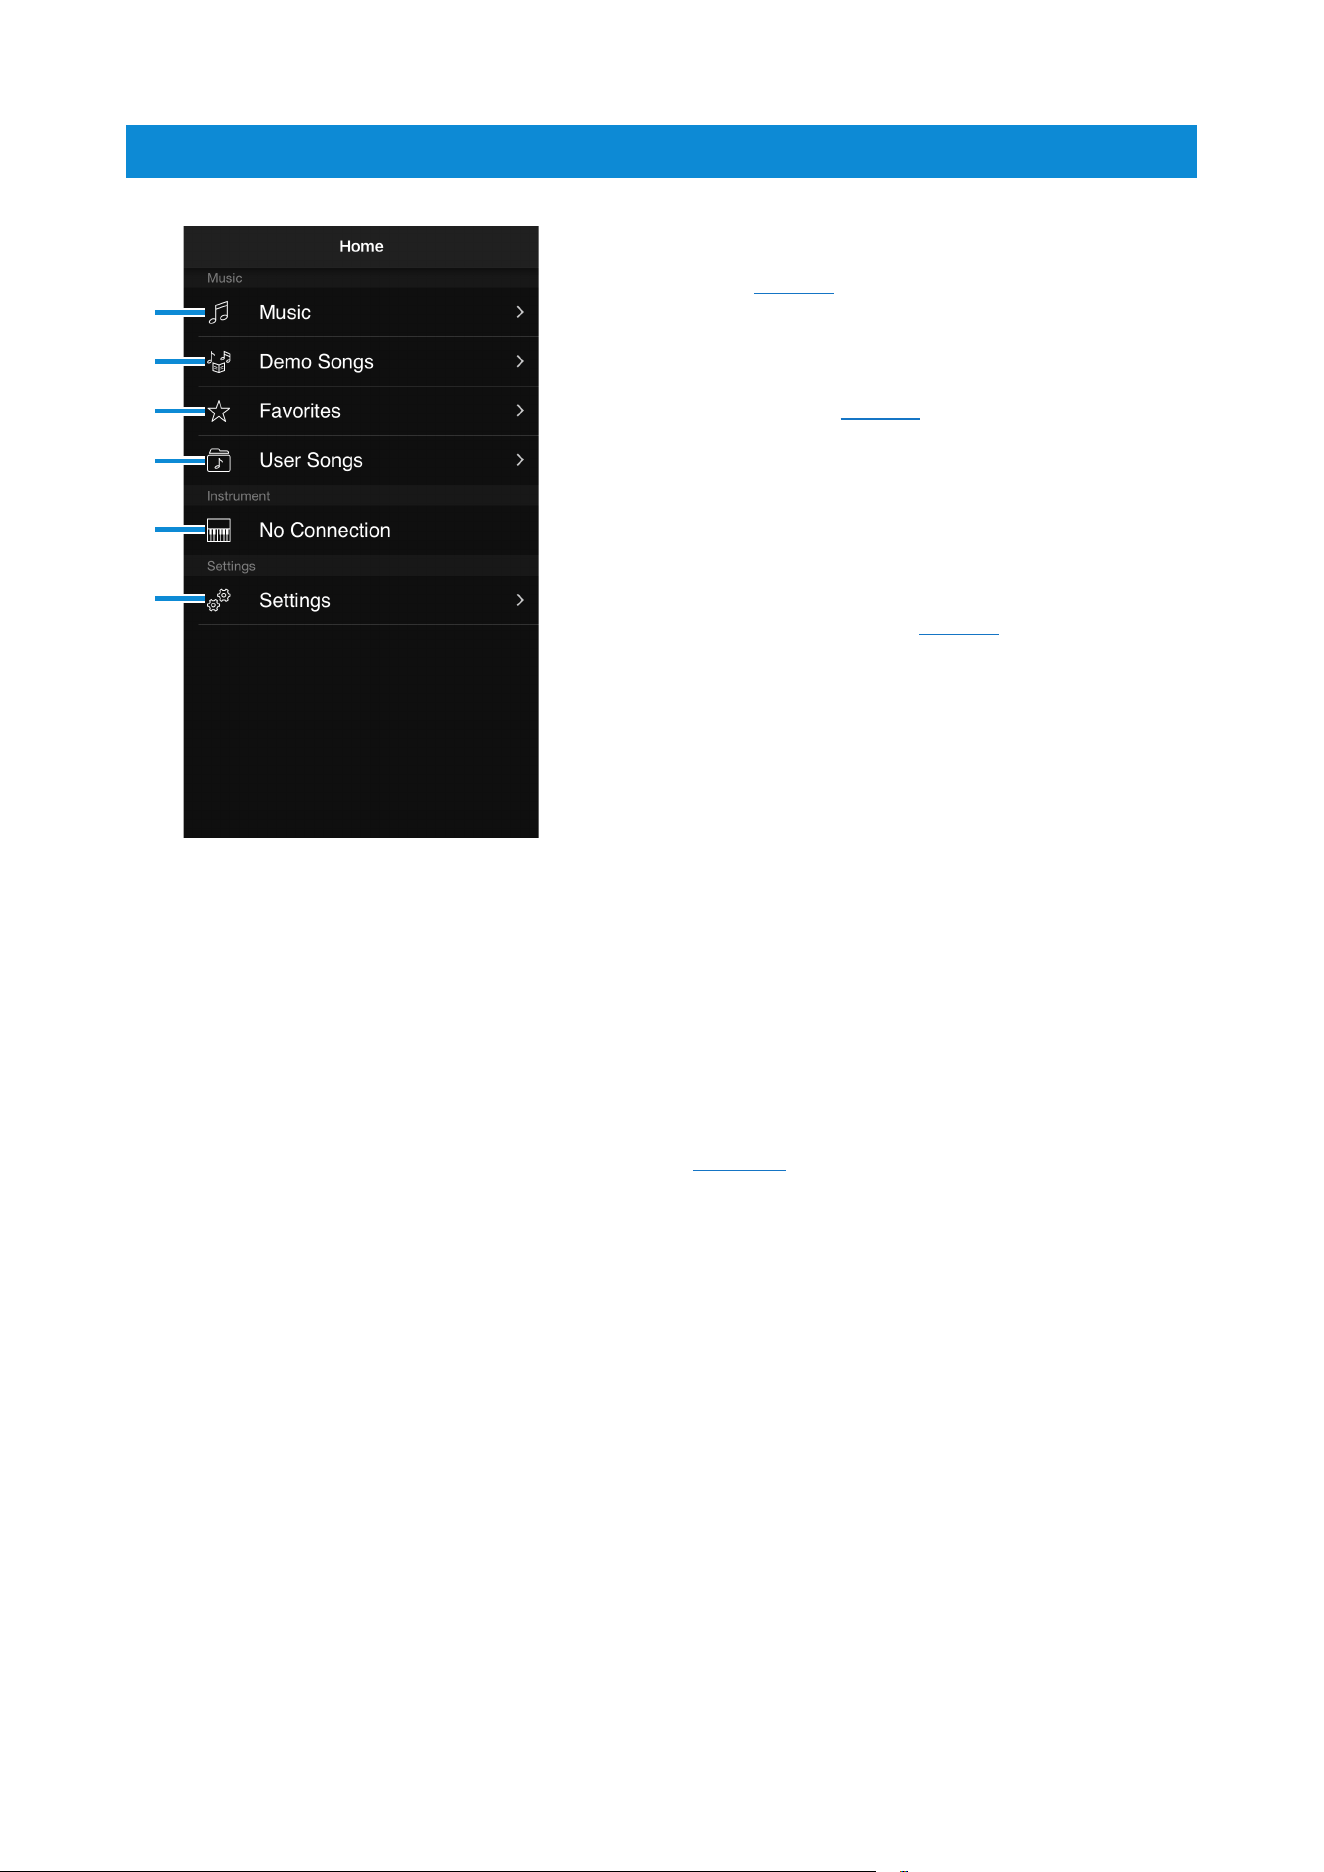
Home screen
1 Tap to switch to the Music Library screen
(See page3).
2 The list of Demo Songs will be displayed.
Tap a song name to switch to the Player
screen (See page4).
3 Tap to display a list of your Favorite songs.
4 Tap to switch to the User Songs screen.
This screen is used to record performances
and to listen to recordings that you have
already made (See page9).
Also, songs can be imported from the
Dropbox.
5 The currently connected musical
instrument.
Tap to display a list of instruments to which
you can connect. Tap a musical instrument
in the list to switch the connection to it.
In order to detect Bluetooth MIDI devices
in the Android version, it is necessary to
allow access to location information by this
application. We do not use GPS to obtain
your location information.
6 Tap to switch to the Settings screen (See
page10).
1
2
3
4
5
6
Chord Tracker Manual
3
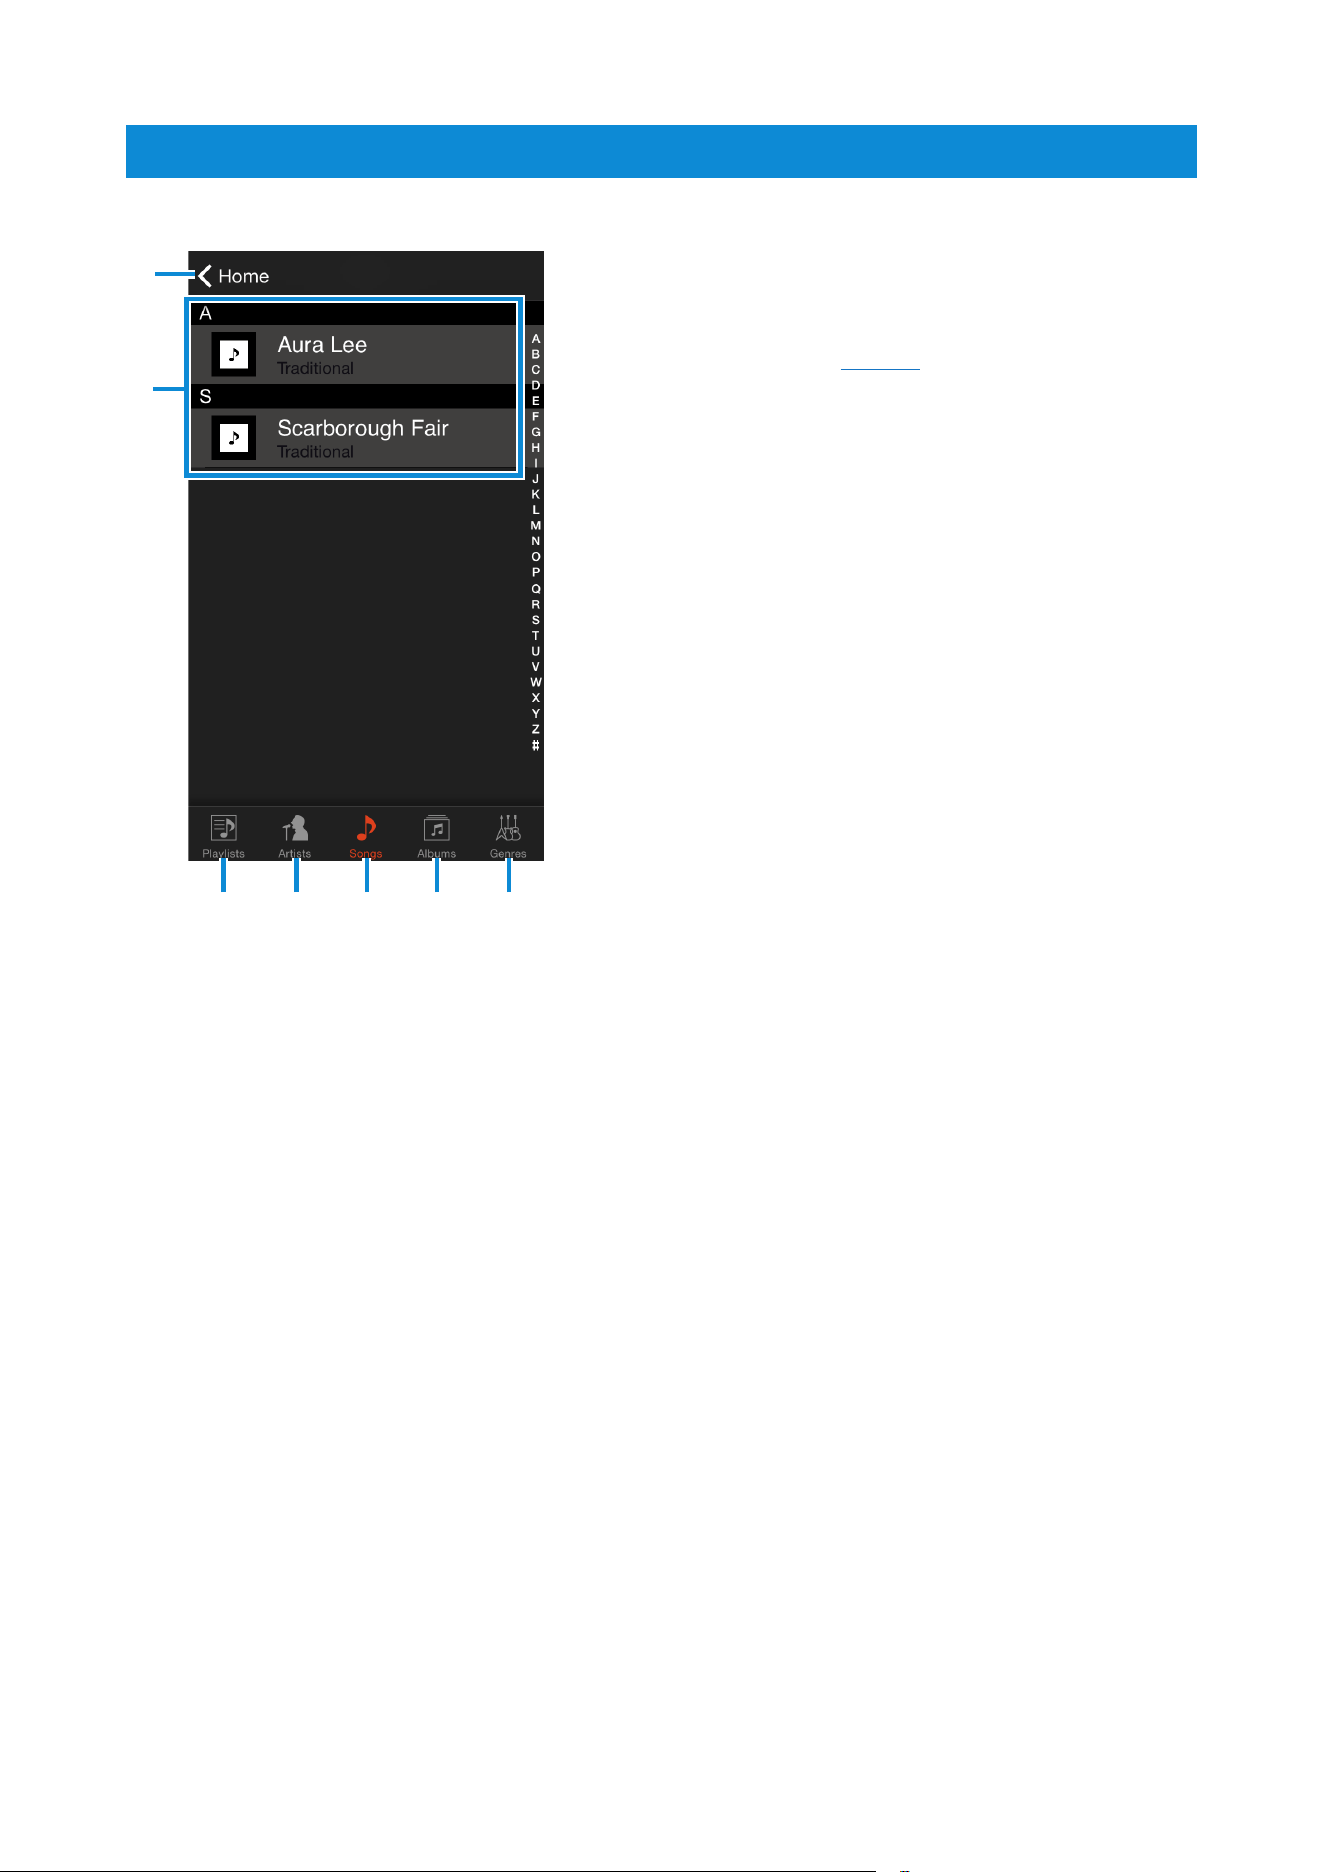
Music Library screen
1 Tap to switch to the Home screen.
2 Tap a song name to switch to the Player
screen (See page4).
3 Tap to display the playlists you have
created.
4 Tap to display the songs on your smart
device by artist.
5 Tap to display a list of all songs on your
smart device.
6 Tap to display the songs on your smart
device by album.
7 Tap to display the songs on your smart
device by genre.
1
3 4 5 6 7
2
Chord Tracker Manual
4
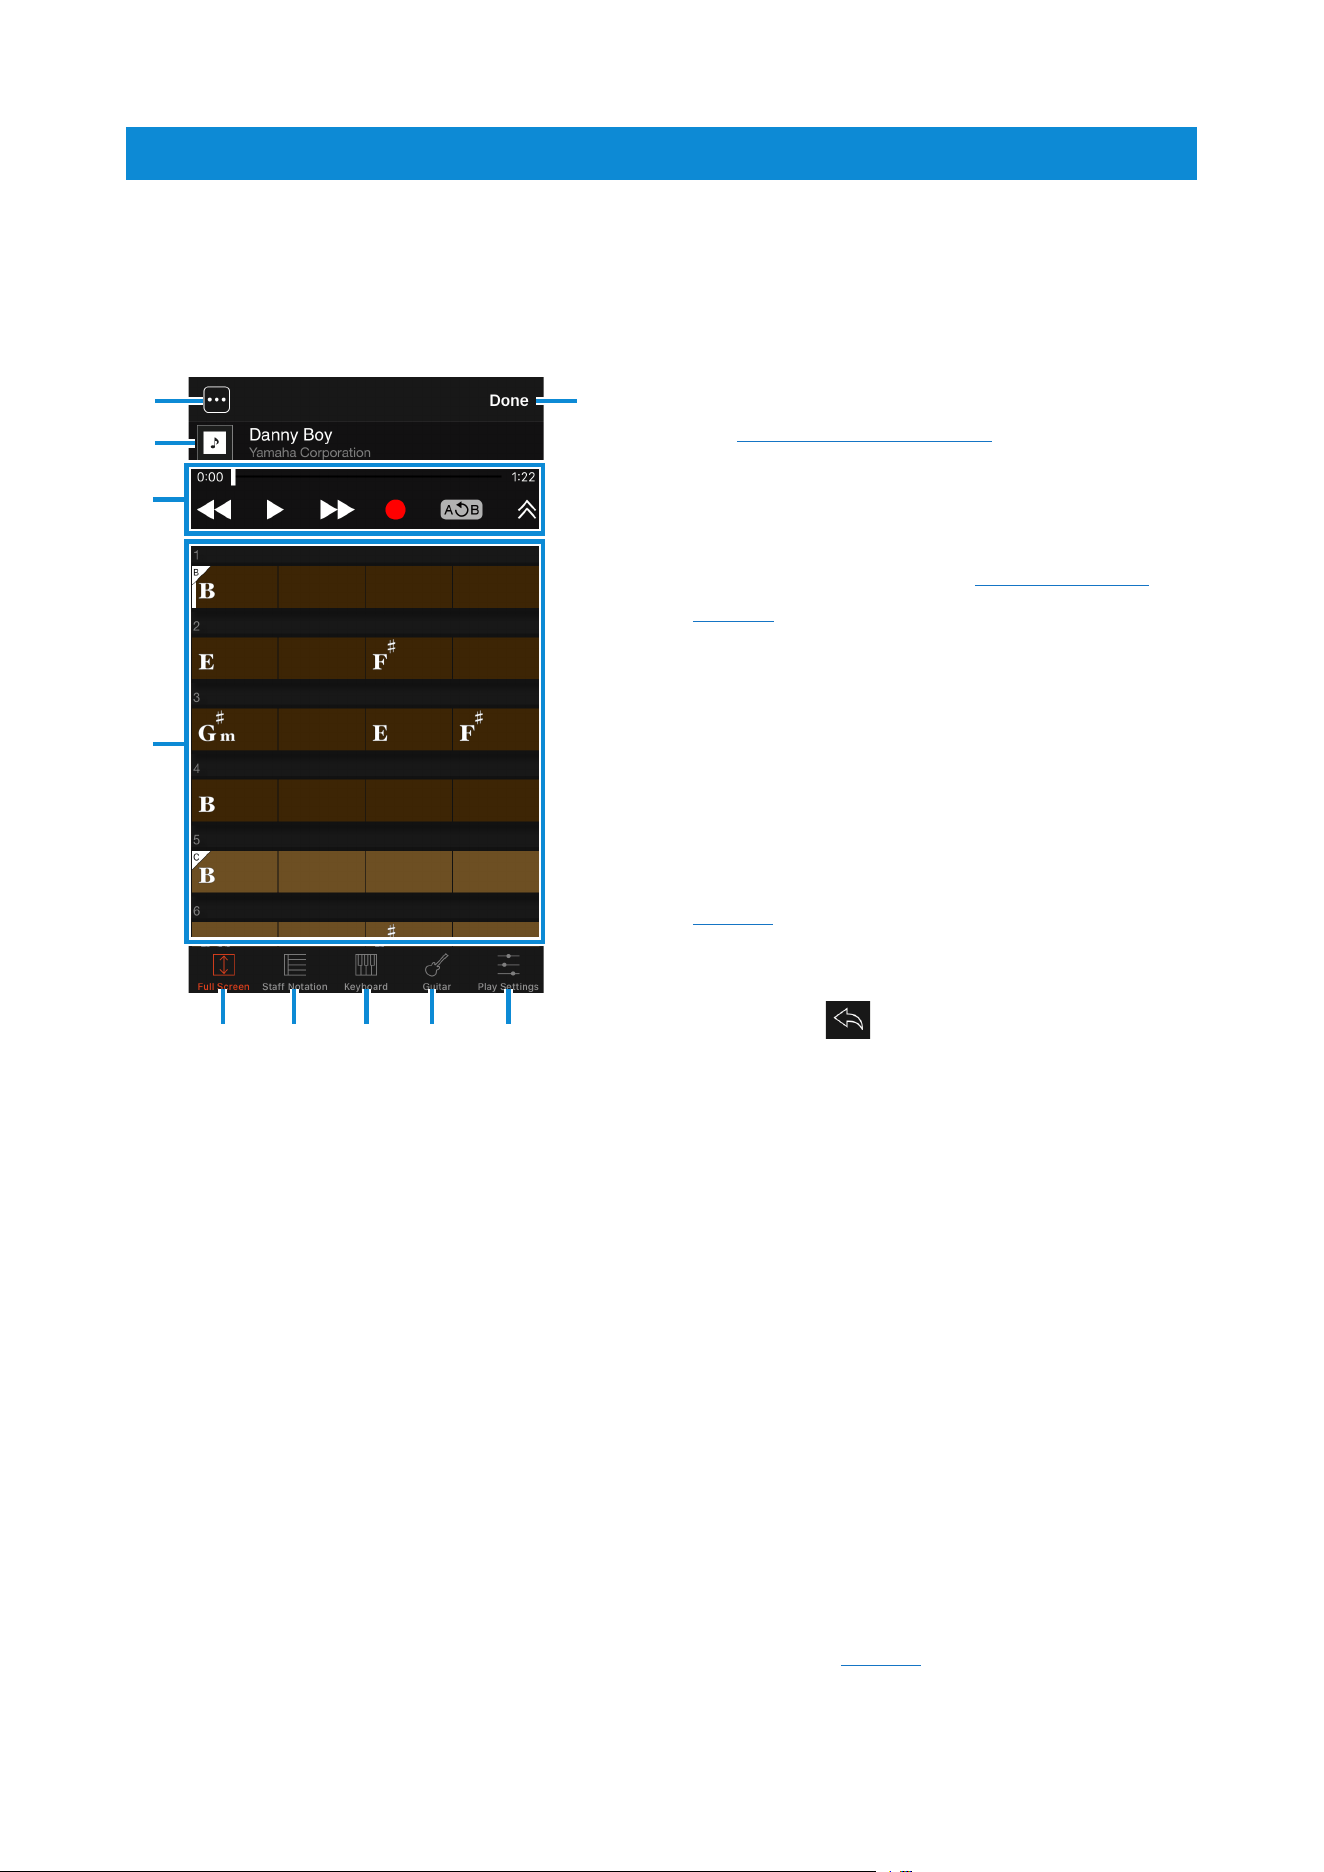
Player screen
Opened by selecting a song on the Music Library screen, this screen is used to
automatically analyze the song’s chords.
Here, you can play the selected song, display its chords, and edit them if necessary.
1 Tap to open the Activity List screen (See
the screenshot on page5 for details).
2 Details of the selected song (i.e., name,
artist, album, and artwork).
3 Transport area (See the screenshot on
page5 for details).
4 Chord Display area
Each block corresponds to one beat from
the song.
Tap a block to move the playback-position
cursor to the corresponding beat.
Tap the block at the cursor position
to open the Chord Edit screen (See
page6).
Tap and hold a block to copy, paste,
or delete. Whenever you perform an
operation, [
] is displayed. You can tap
it to undo your last operation.
NOTE
Tap and hold a block to send the selected chord
sequence to the currently connected musical
instrument as Chord Looper Data. Depending on
the instrument, this function may not be available.
5 Tap to maximize the Chord Display area.
6 Tap to display the chord at the cursor
position using staff notation.
7 Tap to display the chord at the cursor
position as notes on a keyboard.
8Tap to display the chord at the cursor
position using a guitar tablature (tab). You
can tap [Capo] to set the capo position.
9 Tap to display the Playback Settings
screen (See page8).
) Tap to close the Player screen.
1
2
)
5 6 7 8 9
3
4
Chord Tracker Manual
5
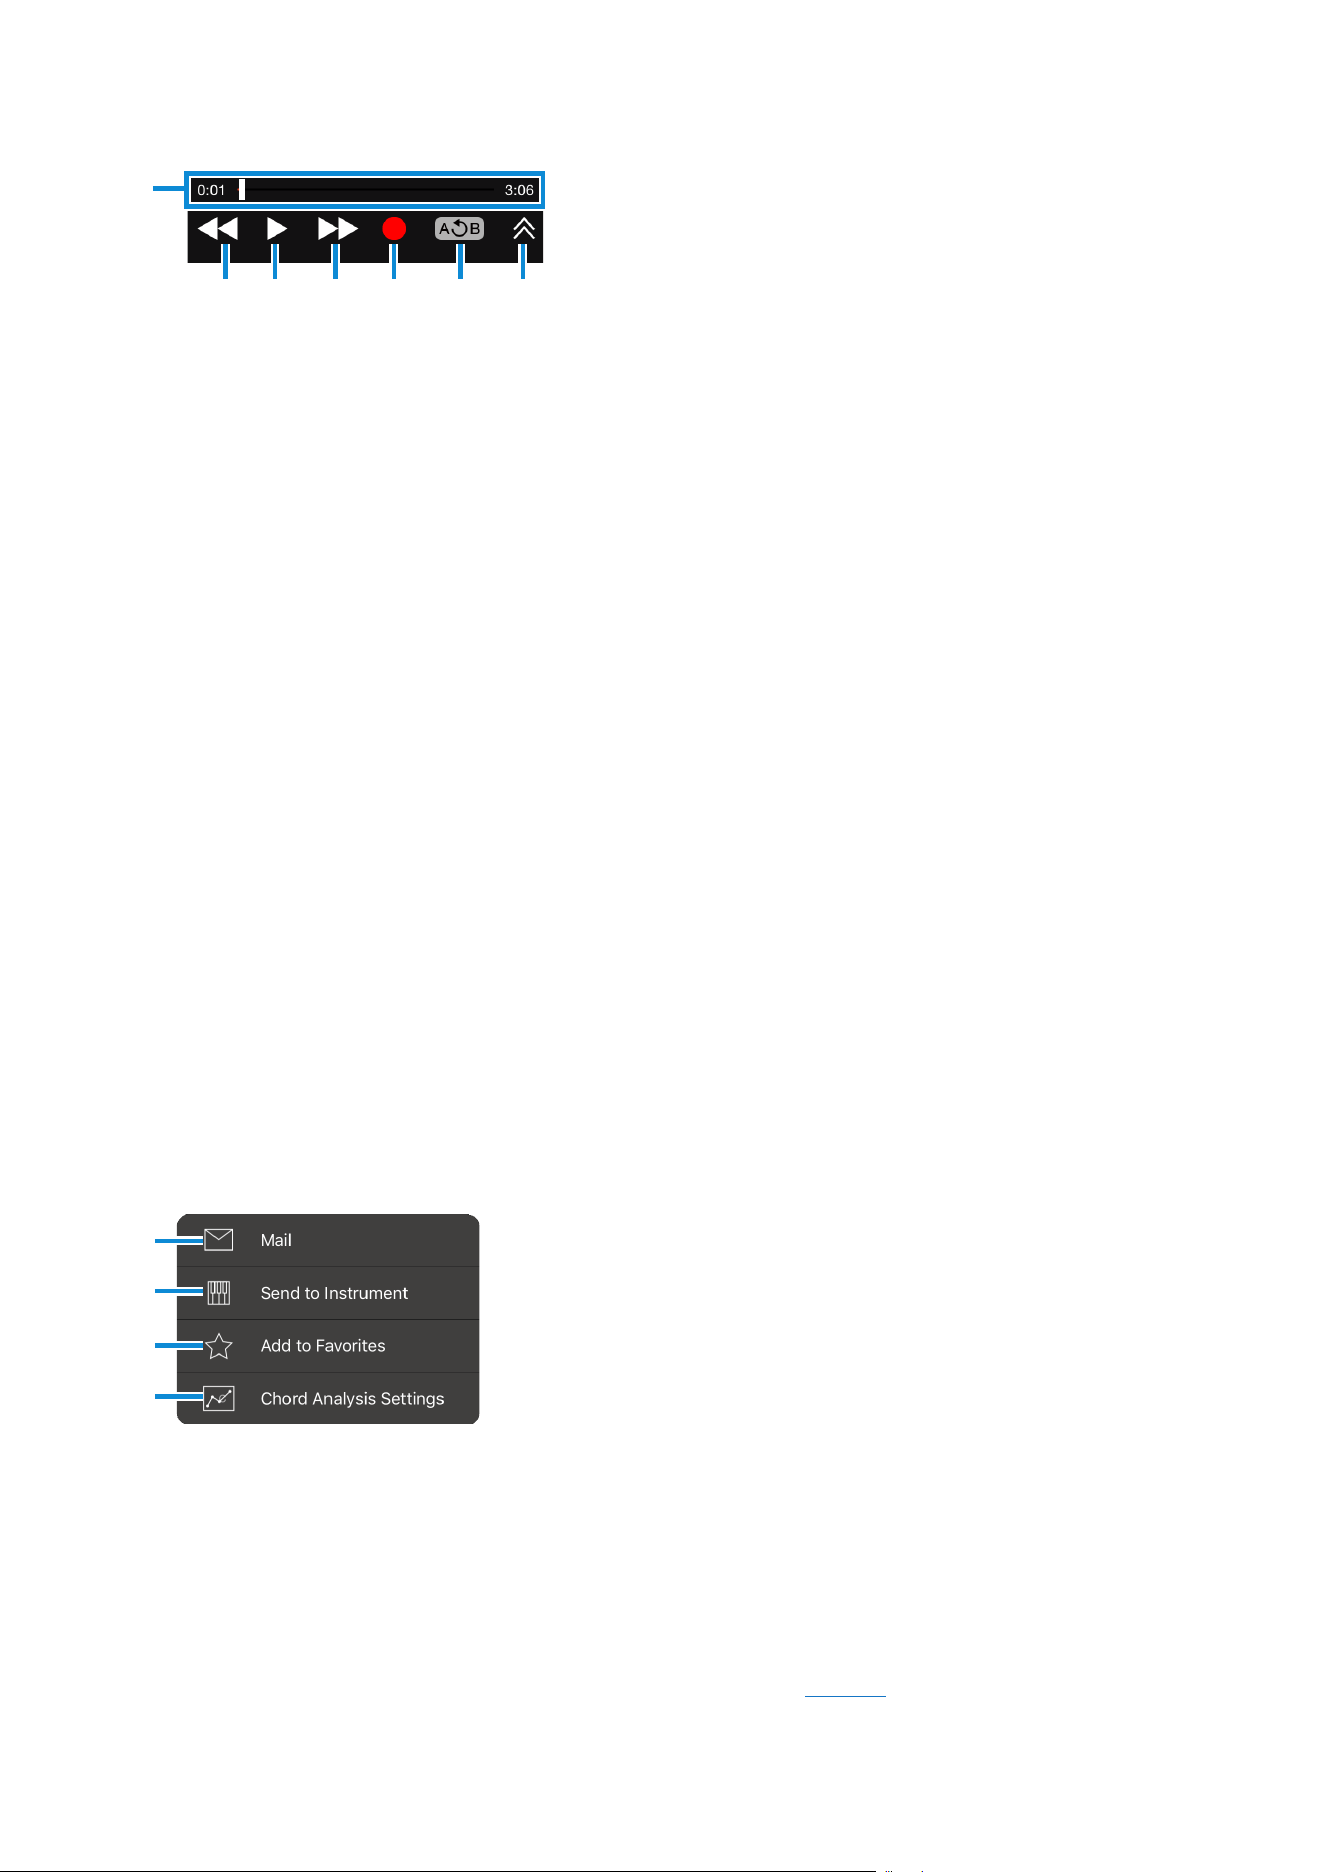
Activity List screen
Transport area in detail
! @ # $ % ^
)
) Playback time and position
Here you can move the cursor and fast
forward or rewind playback.
! Rewind button
Tap once to move back by one measure.
& Tap to send a recording by e-mail (This button is
displayed only for recordings that you have made).
NOTE
Unauthorized copying of copyrighted music and sound data for
purposes other than the purchaser’s personal use is prohibited.
* Tap to send the chord sequence to the currently
connected musical instrument as a Song file. The
*
(
A
&
@ Play/Pause button
Tap to start playback. During playback, tap once again to pause.
# Fast Forward button
Tap once to move forward by one measure.
$ Record button
Tap to activate Record Standby mode, and then press the Play button to start recording.
Tap the Pause button to stop recording.
When Record Standby mode is activated, you can deactivate it by tapping the Record
button once again.
NOTE
• Recording is available only when connected via wireless LAN or a USB cable to a supported
instrument. Note that the connection via a USB cable is available only for instruments with a USB audio
interface function.
• Some instruments cannot record from the Player screen.
% AB Repeat button
Tap to set Point A to the cursor position at that time. Tap once again to set Point B to the
cursor position at that time.
The region between Point A and Point B will be repeatedly played in looped fashion.
Tap once again to stop repeating and return to normal playback.
^ Tap to toggle on and off the display of song information.
recommended style for the song can also be included in this file.
NOTE
• It may not be possible to send a chord progression if the file name is not in English.
• Depending on the instrument, this function may not be available.
( Tap to add the currently selected song to your Favorites.
A Tap to display the Chord Analysis Settings screen (See page7).
Chord Tracker Manual
6
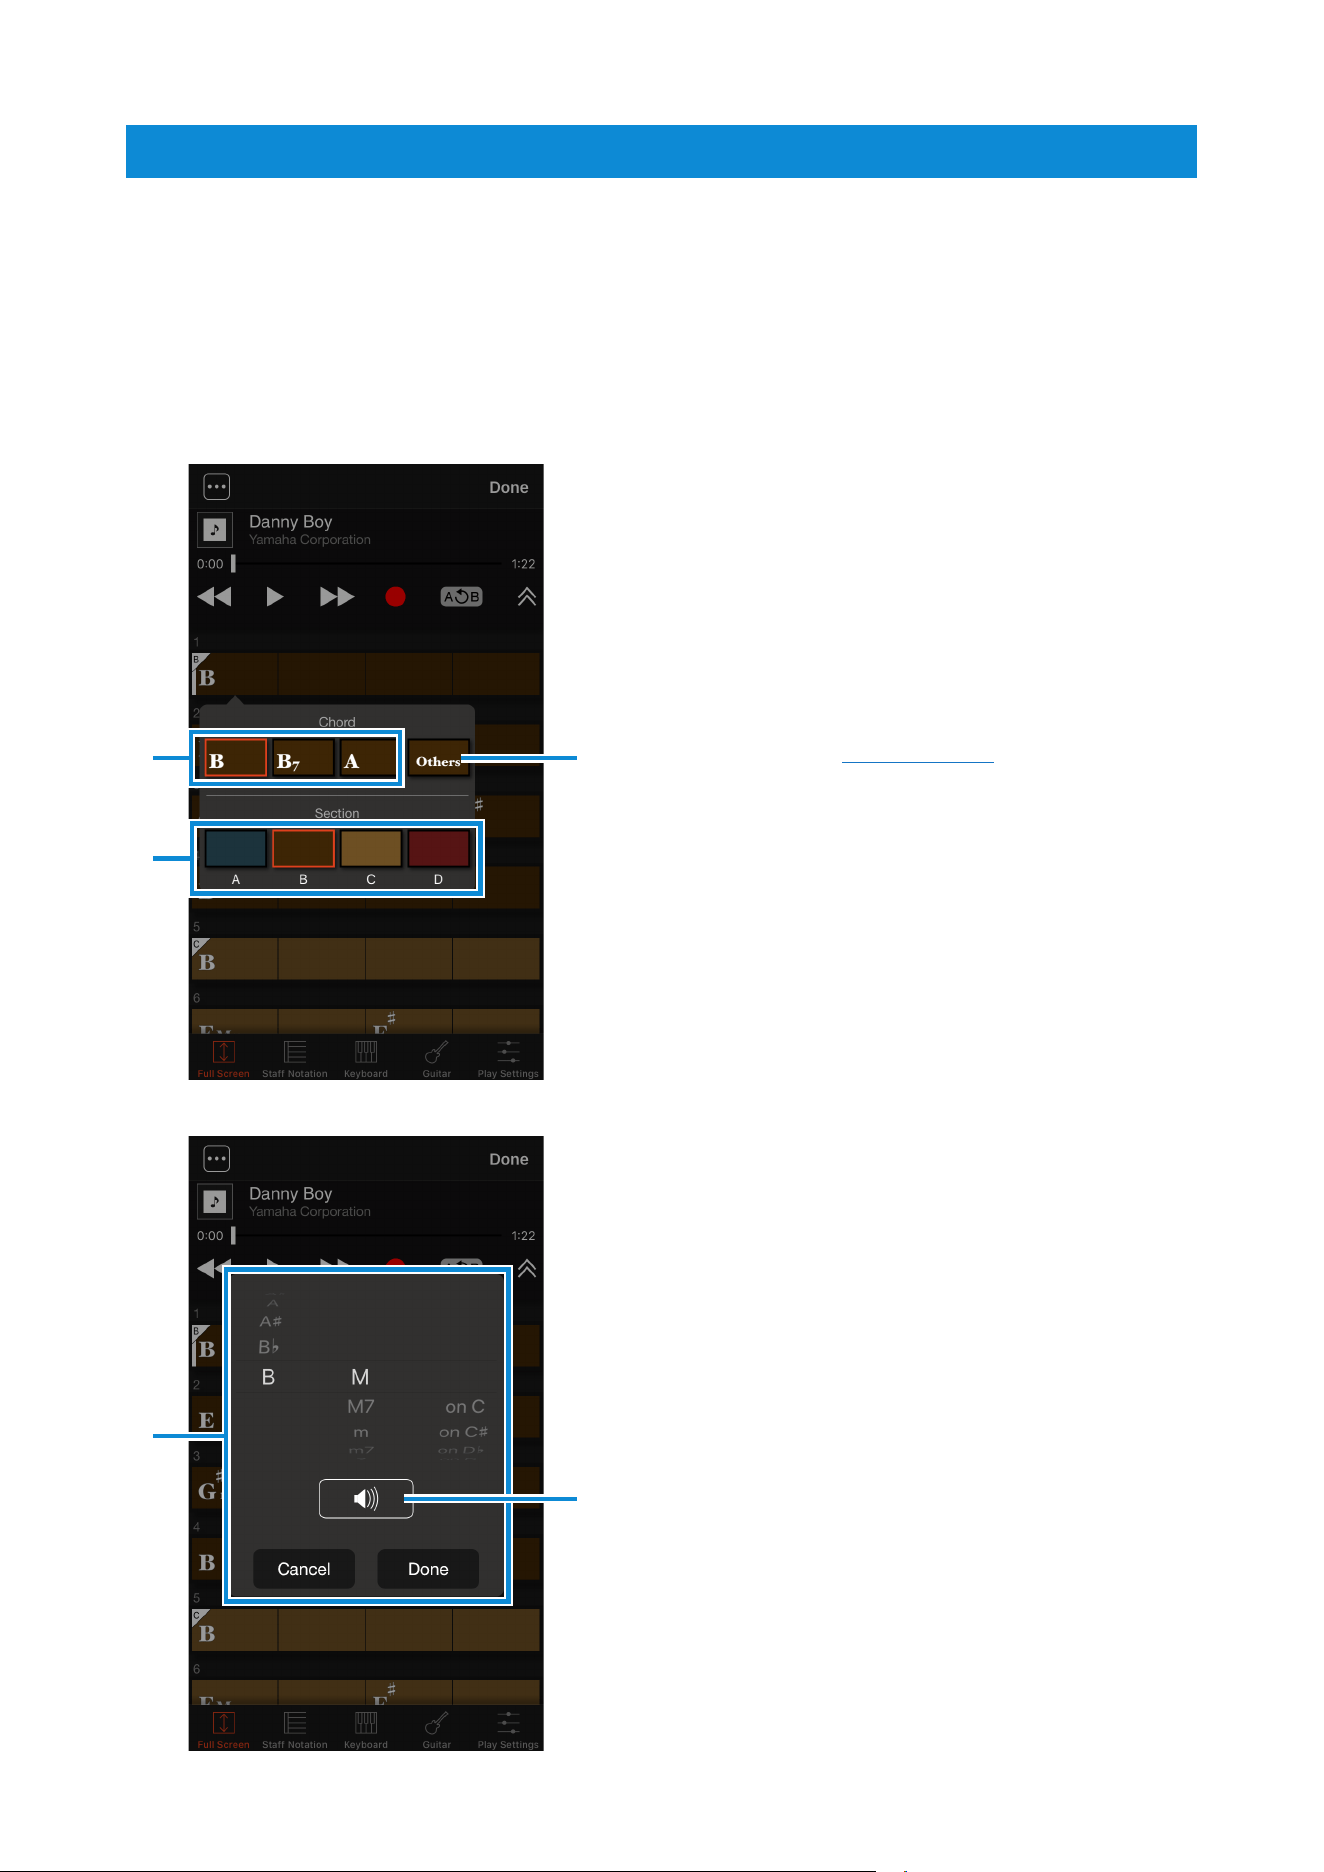
Chord Edit screen
Chord Tracker can analyze chord data with a high degree of accuracy, but in some cases,
the detected chord progression may differ from that of the original song.
In such a case, you can tap the block at the cursor position to open the Chord Edit screen
and edit its chord and section.
NOTE
Sections are distinct, individual parts of a song such as the intro, chorus, and ending.
1 Possible chords based on analysis
Tap to change the chord and hear its
constituent notes.
2 Tap to open a window for freely selecting
chords (See screenshot2 for details).
3 Used to set Song sections.
Tap a section to set it for the current block
and all subsequent blocks.
Tap a selected section once again to
cancel the selection.
If “Section Auto Detection” from the
Settings screen is turned on, sections are
automatically detected.
21
3
4
5
4 Window for freely selecting chords
From the left, you can specify the chord
root, chord type, and bass note.
5 Tap to hear the selected chord’s
constituent notes.
Screenshot 2
Screenshot 1
Chord Tracker Manual
7
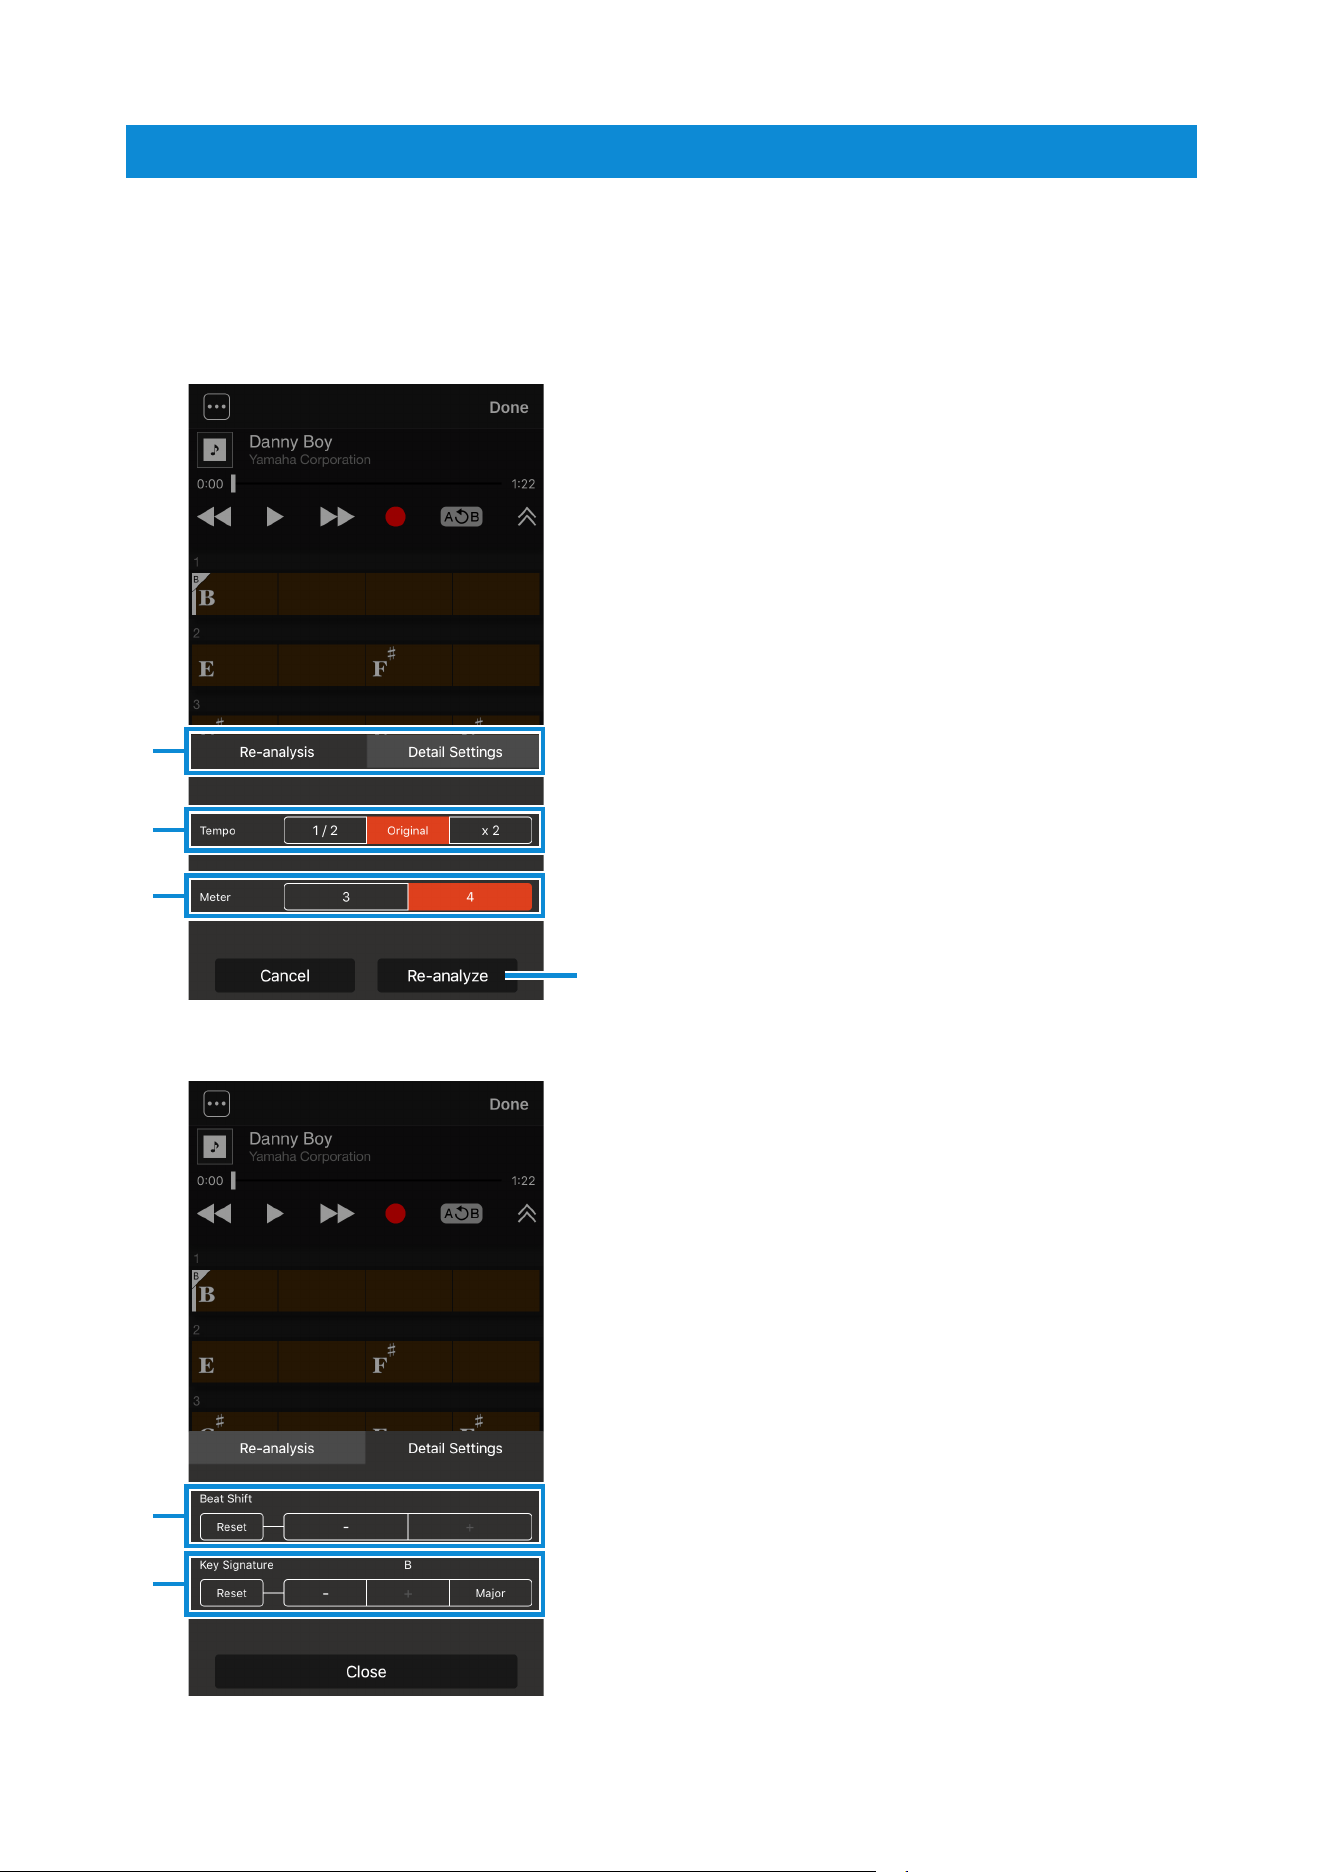
Chord Analysis Settings screen
When analyzing chords, Chord Tracker can also detect tempo and other musical attributes.
If the detected tempo and other musical attributes do not match those of the original song,
adjust the analysis settings on this screen.
1 Used to switch between chord re-analysis
settings and advanced settings.
2 Used to set the tempo for chord re-
analysis.
In specific terms, you can choose the
tempo that was originally detected and the
tempos that are half and twice that.
3 Used to set the beats per measure for
chord re-analysis.
4 Tap to start re-analysis of chords.
4
1
2
3
5
6
5 Used to adjust the measure start position.
Tap the “-” and “+” buttons to shift the start
position backwards or forwards in units of
one beat.
6 Used to change the key of the song.
Detail Settings
Re-analysis
Chord Tracker Manual
8
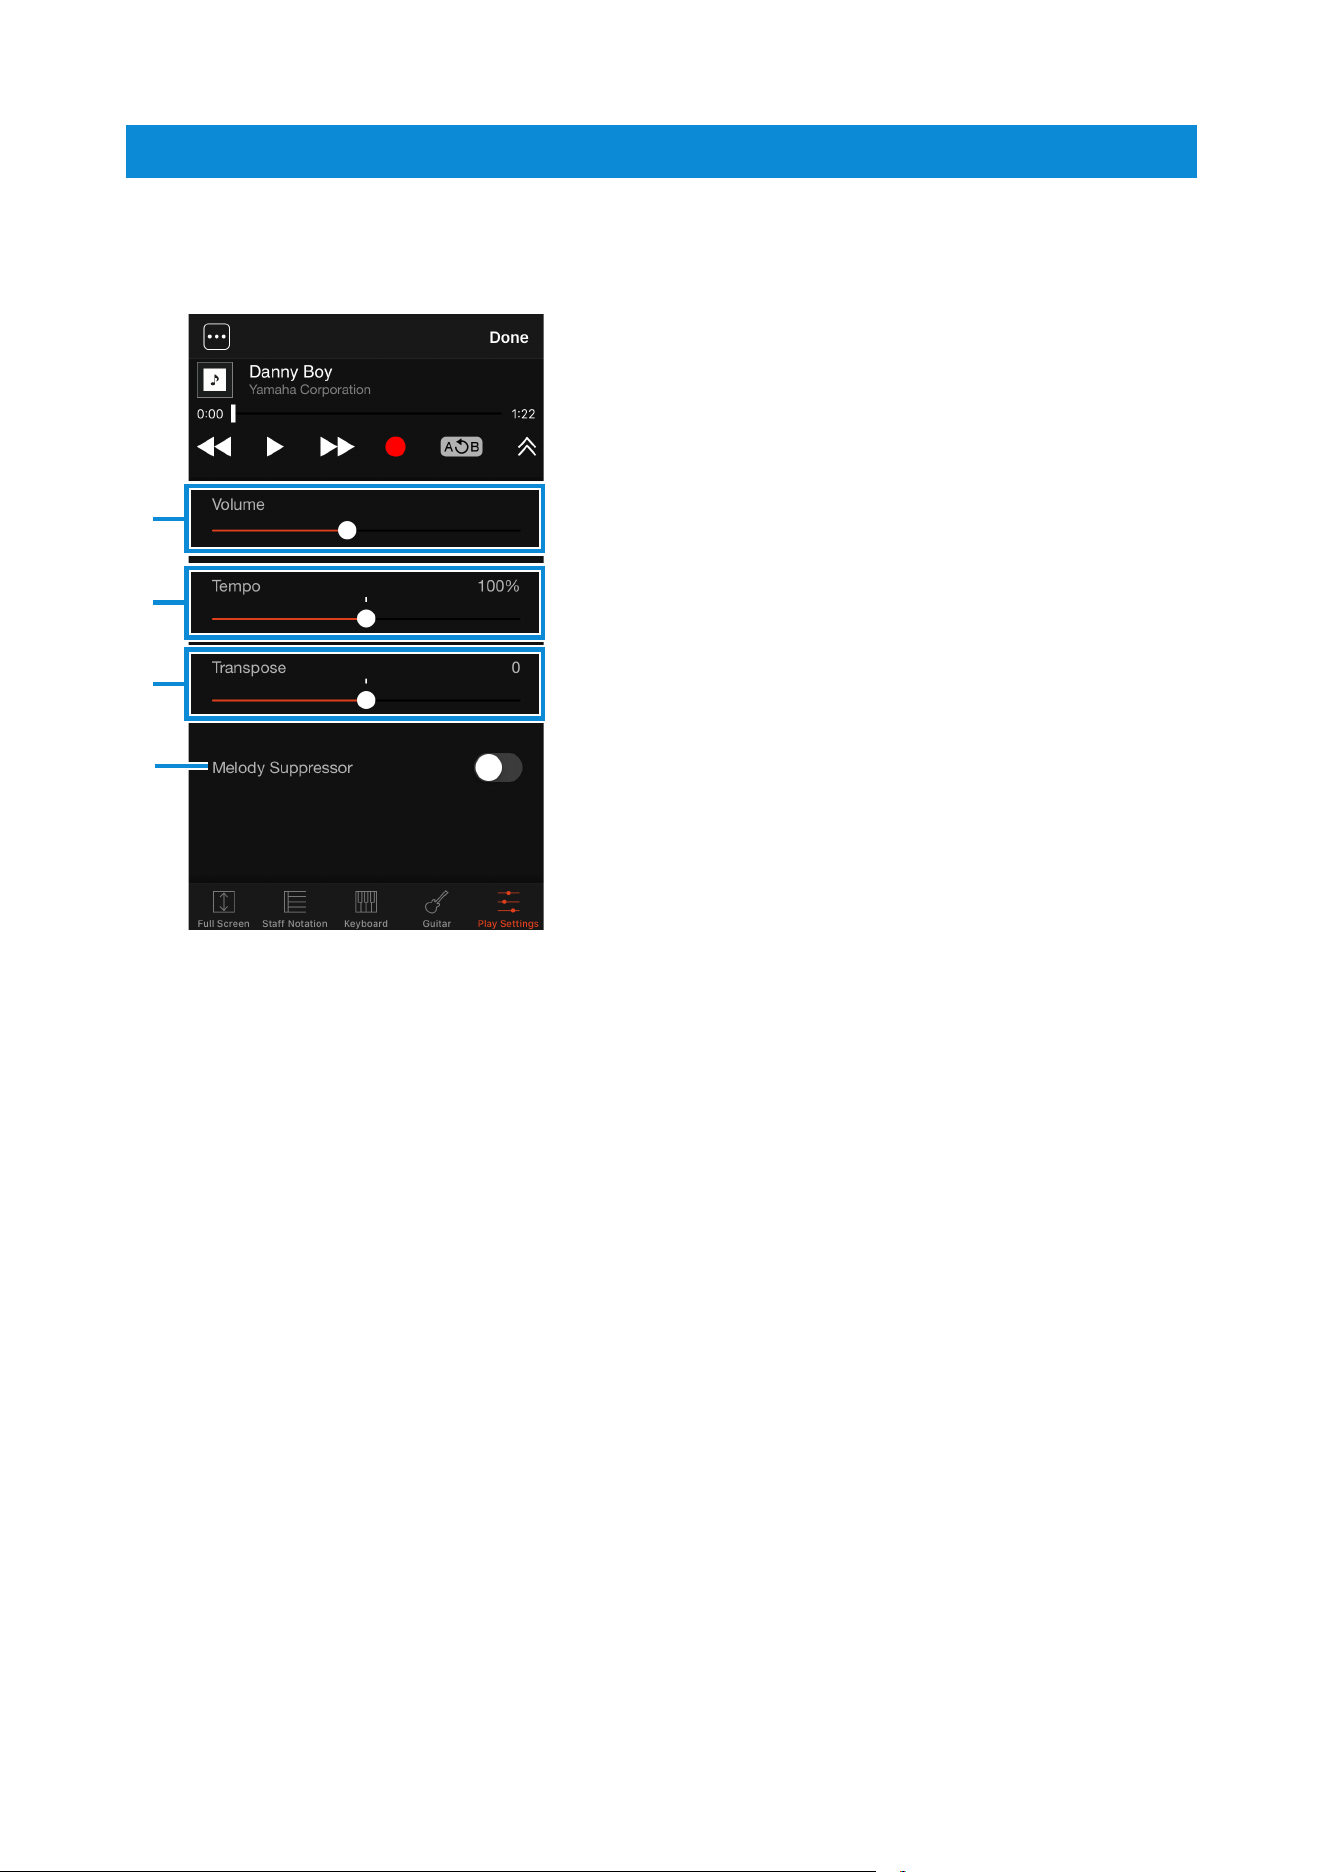
Playback Settings screen
This screen is used to set playback-related parameters.
1 Used to change the volume.
If wirelessly connected to a musical
instrument, the volume of the audio data
being sent to the instrument is changed.
In other cases, the device’s volume is
changed.
2 Used to adjust the tempo.
3 Used to transpose and change the key.
When the key is changed, the chords will
also change automatically in response.
4 Used to turn Melody Cancellation on or off.
This function can be used to cancel (or
minimize) the sound occupying the center
of the stereo field.
Vocals and other melodic parts are
usually panned to the center; therefore,
cancellation of these sounds can be useful
when you want to play melodic parts on a
keyboard.
1
2
3
4
Chord Tracker Manual
9
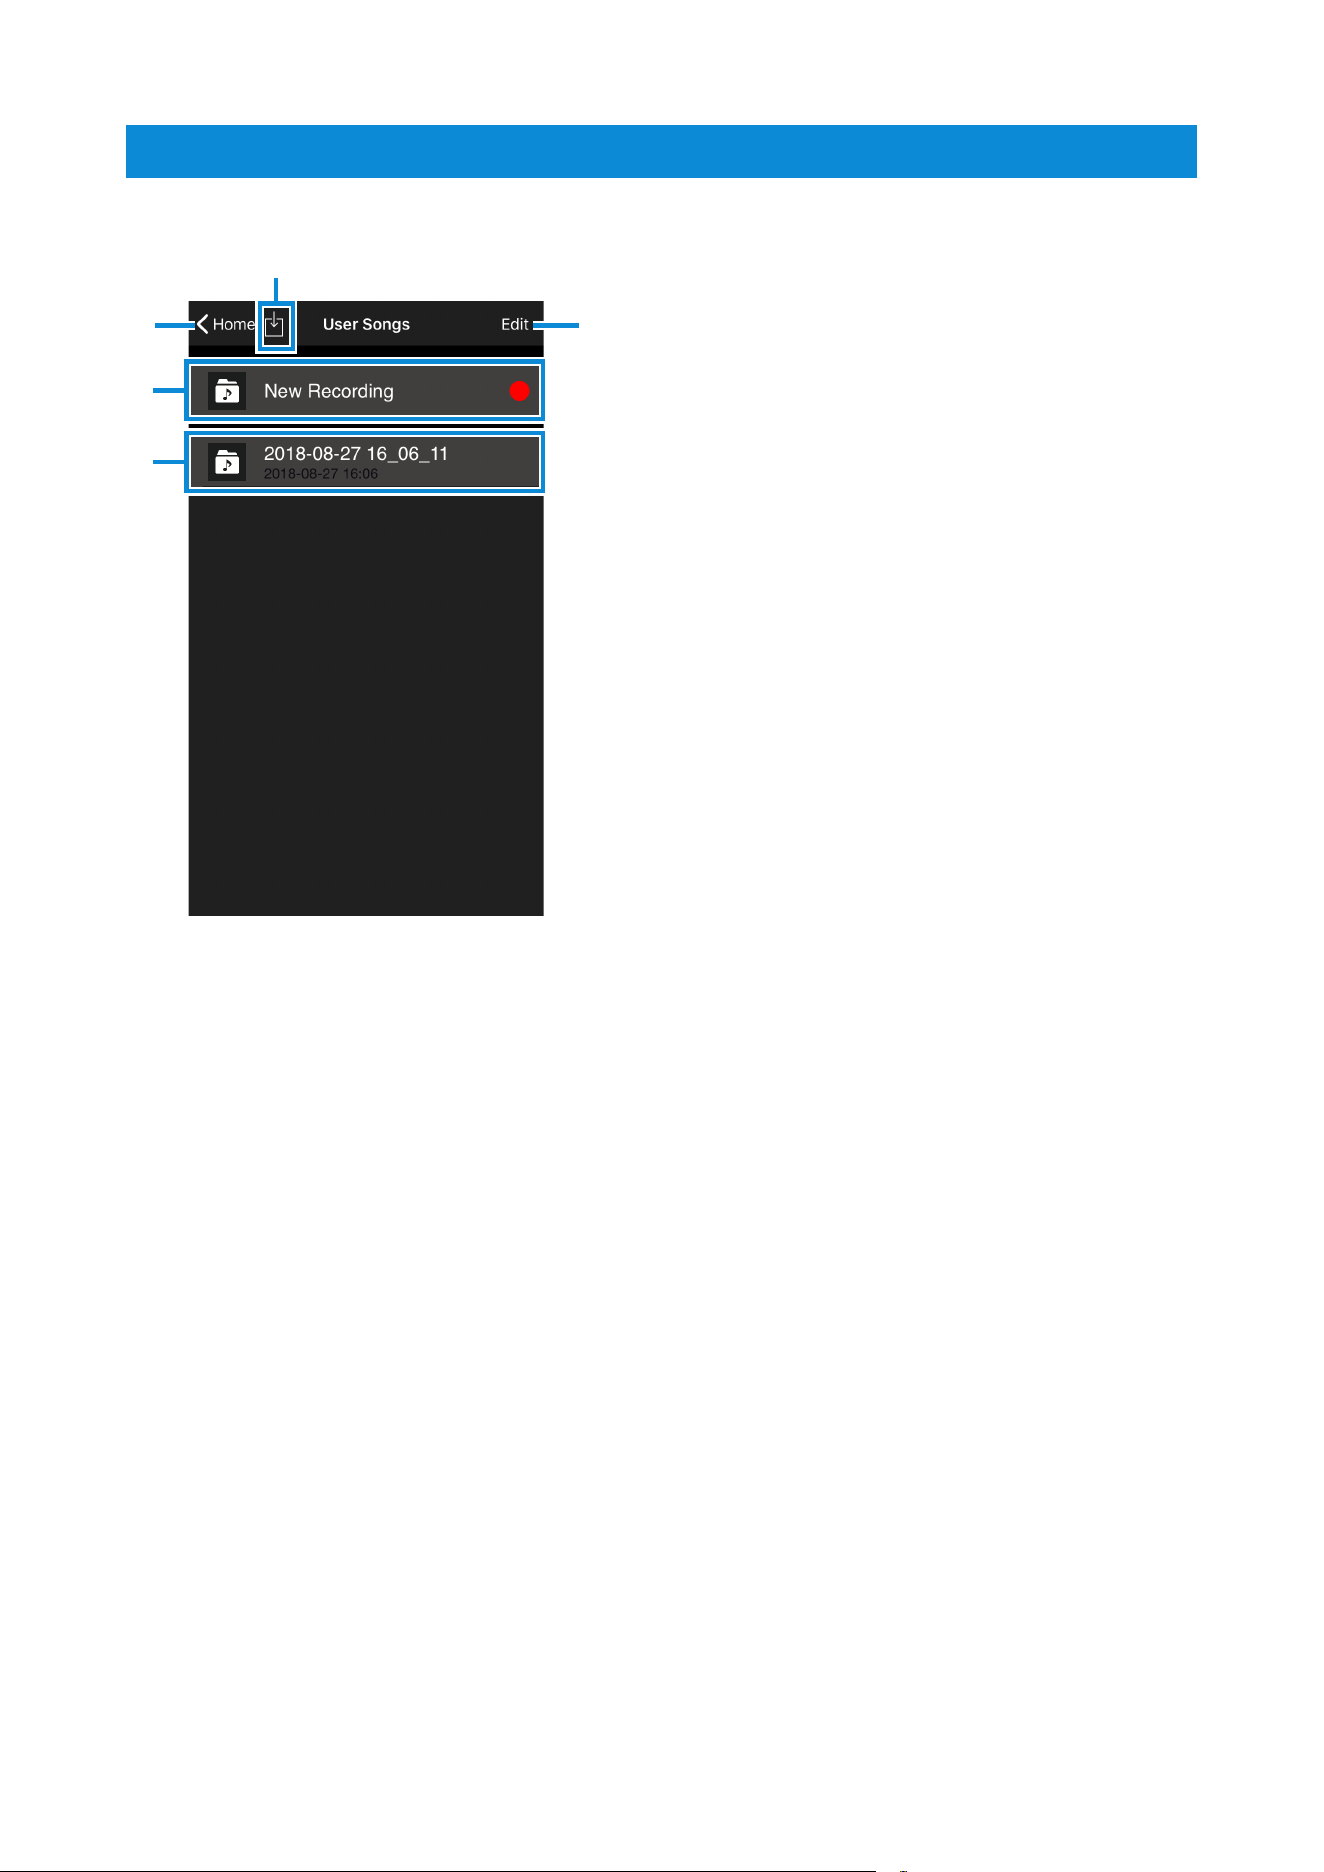
User Songs screen
1 Tap to switch to the Home screen.
2 Tap [l] to start recording.
NOTE
Recording is available only when connected via
wireless LAN or a USB cable to a supported
instrument. Note that the connection via a USB
cable is available only for instruments with a USB
audio interface function.
3 List of User Songs.
Tap to switch to the Player screen (If you
have not made any recordings or imported
songs from Dropbox yet, this area will be
empty).
4 Tap to switch to the Edit screen.
This screen is used to rename and delete
User Songs.
5 After log-in to the Dropbox, tap to import
songs from the “Apps/Chord Tracker”
folder in the Dropbox.
2
3
1 4
5
Chord Tracker Manual
10
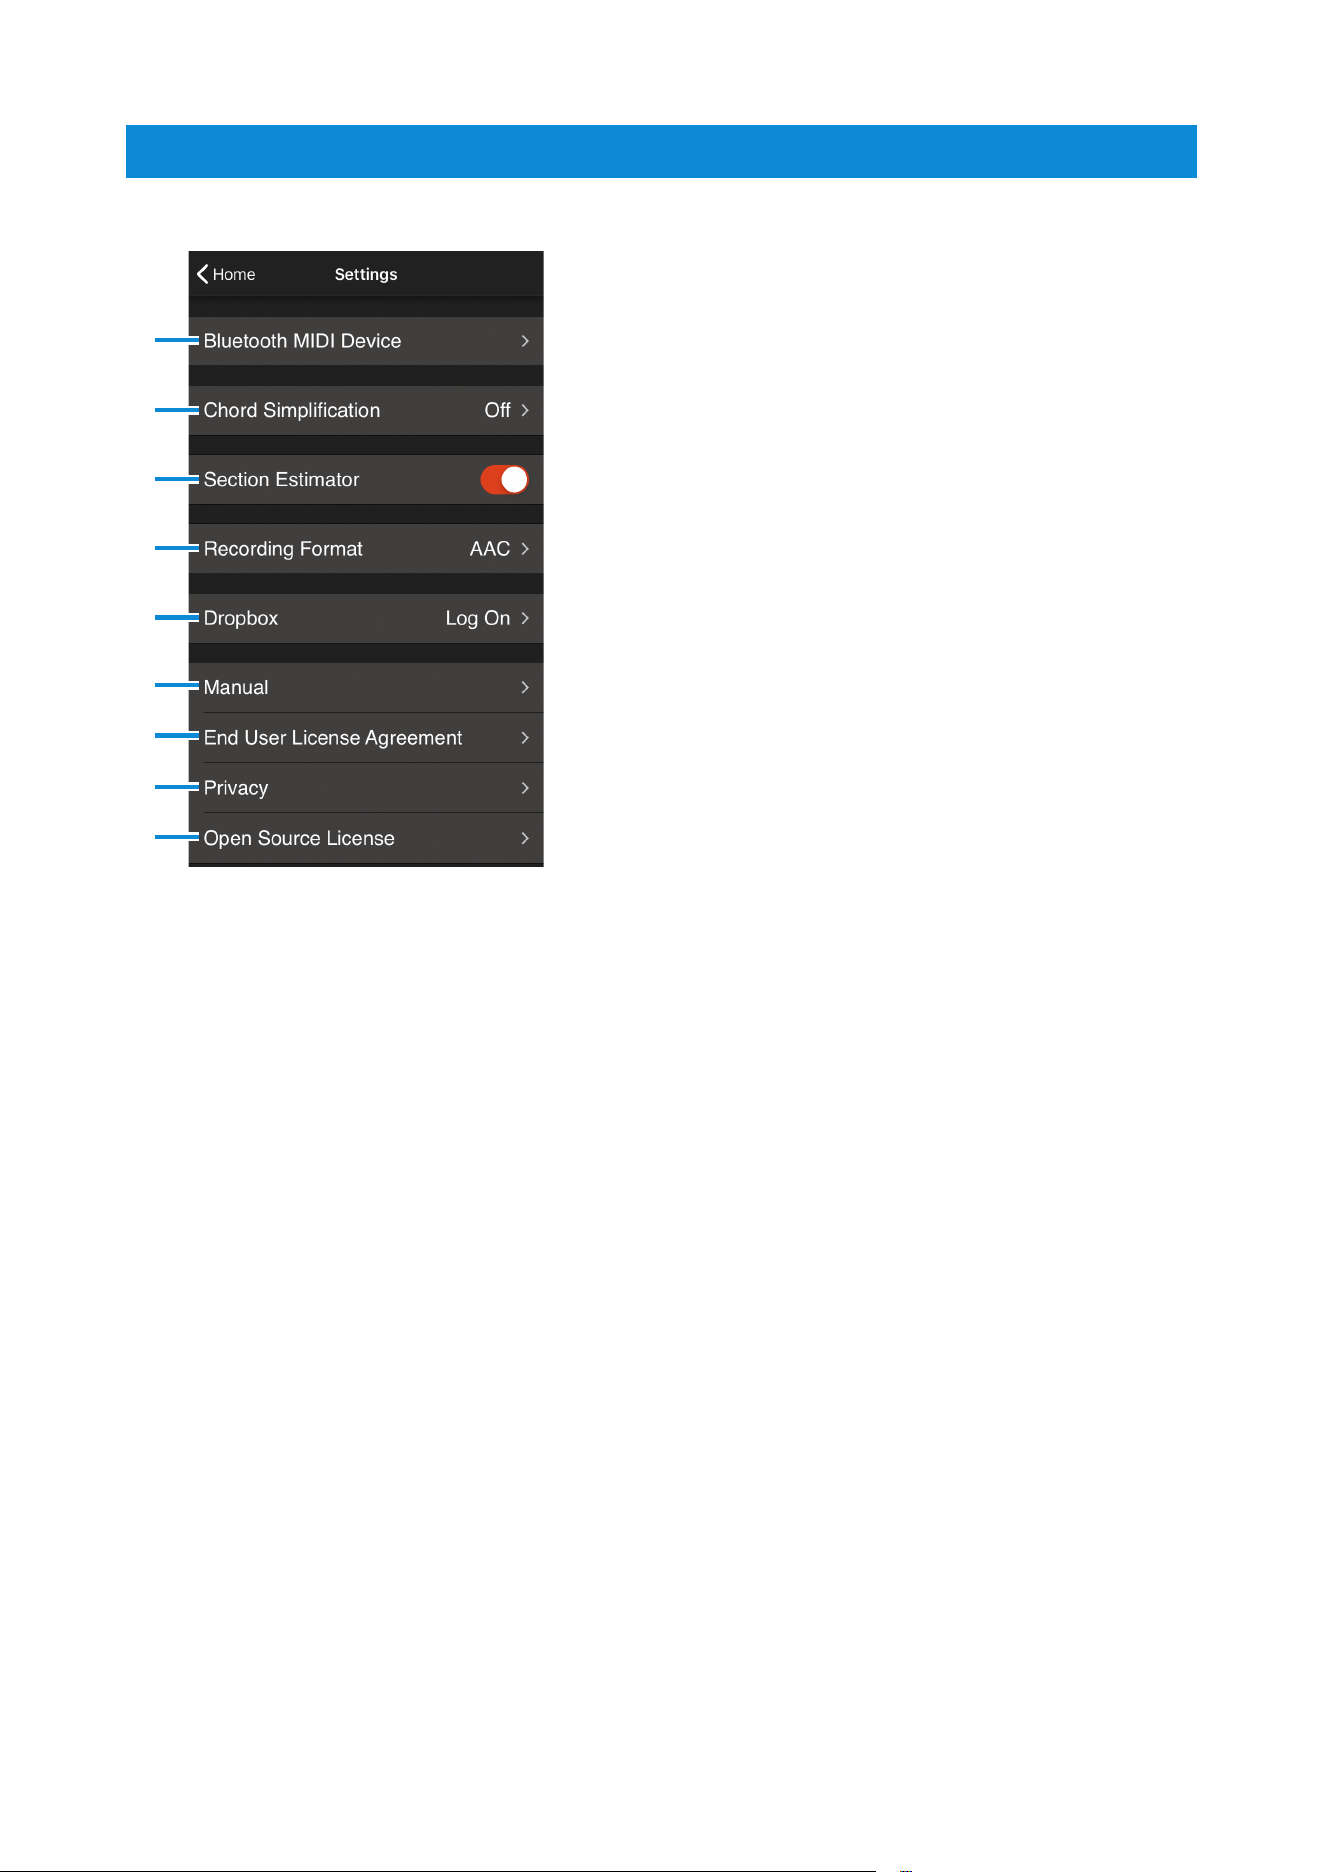
Settings screen
1 Tap to select the instrument to connect via
Bluetooth MIDI.
NOTE
This is not displayed in the Android version.
2 Tap to select the settings for simplifying
Chord Analysis results.
3 Tap to determine whether sections are
automatically detected or not.
4 Tap to select the recording format.
AAC: Compressed audio format. The data
size is smaller than that of WAV format.
WAV: Uncompressed audio format. The
sound quality is higher than that of in AAC
format.
5 Tap to log in or out of Dropbox.
6 Tap to display the manual.
7 Tap to display the License Agreement.
8 Tap to make the privacy related settings.
9 Tap to display the License information.
1
2
3
4
5
6
7
8
9

Chord Tracker Manual
11
• Unauthorized copying of copyrighted software for purposes other than the purchaser's personal use is prohibited.
Consult a legal advisor before using such data.
• This software and its manual are the exclusive copyright of Yamaha Corporation.
• Copying of this software or reproduction of its manual in whole or in part by any means is expressly forbidden without
the written consent of the manufacturer.
• Yamaha makes no representations or warranties with regard to the use of this software and its manual and cannot be
held responsible for the results of use thereof.
• The screen displays shown in this manual are for instructional purposes only and may appear somewhat different
from those on your device.
• MIDI is a registered trademark of the Association of Musical Electronics Industry (AMEI).
• iPhone, iPod touch, iPad, and iTunes are trademarks of Apple Inc. registered in the United States and other countries.
• Dropbox is a trademark or registered trademark of Dropbox Inc.
• Other company names and product names used in this manual are the trademarks or registered trademarks of their
respective companies.
© 2015 Yamaha Corporation. All rights reserved.
Manual Development Group
© 2015 Yamaha Corporation
Published 07/2019 MW-F0