User's Guide

Notations Used in This Guide 8
Using the Manual to Search for Information .....................................9
Searching by Keyword ......................................................................................9
Jumping Directly from Bookmarks .....................................................................9
Printing Only the Pages You Need ..................................................................... 9
Getting the Latest Version of the Documents .................................10
List of Functions 11
Introduction to Your Projector 15
Projector Features ............................................................................. 16
Quick and Easy Setup ......................................................................................16
4K Enhancement Technology to Project Even More Information Crisply and
Cleanly .......................................................................................................... 16
Quick and Easy Multi-projection Setup .............................................................16
Install in a Variety of Environments .................................................................. 16
Easy Wireless Projection ..................................................................................16
Linking with Apple Devices ............................................................................. 17
Environmentally-Friendly ................................................................................18
Projector Parts and Functions .......................................................... 19
Projector Parts - Front/Top
.............................................................................. 19
Projector Parts - Rear .......................................................................................20
Projector Parts - Base ...................................................................................... 21
Projector Parts - Interface Ports ........................................................................21
Projector Parts - Control Panel ......................................................................... 23
Projector Parts - Remote Control ......................................................................24
Setting Up the Projector 26
Projector Placement ..........................................................................27
Notes on Transporting .................................................................................... 29
Projector Setup and Installation Options .......................................................... 29
Precautions on Installation ...........................................................................29
Projection Distance .........................................................................................31
Installing the Safety Wire ..................................................................32
When Using the Ceiling Mount ELPMB22
..........................................................32
When Using the Ceiling Mount ELPMB30 ..........................................................33
Projector Connections .......................................................................35
Connecting to a Computer ..............................................................................35
Connecting to a Computer for HDMI Video and Audio ....................................35
Connecting to Video Sources ...........................................................................35
Connecting to an HDMI Video Source ............................................................36
Connecting to External USB Devices .................................................................36
USB Device Projection ..................................................................................36
Connecting to a USB Device ......................................................................... 37
Disconnecting a USB Device .........................................................................37
Connecting to a Document Camera ................................................................. 37
Connecting to an HDBaseT Transmitter ........................................................... 37
Connecting to the Base Unit ........................................................................... 38
Connecting to External Devices ....................................................................... 39
Connecting to an External HDMI Monitor ...................................................... 39
Connecting to External Speakers .................................................................. 39
Connecting Multiple Projectors of the Same Model .......................41
Projecting the Same Image in a Daisy-Chain Connection ................................... 41
Attaching and Removing the Cable Cover ...................................... 43
Installing Batteries in the Remote Control ...................................... 44
Remote Control Operation .............................................................................. 45
Using Basic Projector Features 46
Turning On the Projector .................................................................. 47
Home Screen ................................................................................................. 48
Turning O the Projector ..................................................................50
Contents
2

Setting the Date and Time ................................................................ 51
Selecting the Language for the Projector Menus ........................... 53
Projection Modes ...............................................................................
54
Changing the Projection Mode Using the Remote Control ................................. 54
Changing the Projection Mode Using the Menus ...............................................54
Setting the Screen Type .................................................................... 56
Adjusting the Image Position Using Screen Position ..........................................56
Changing the Horizontal Position of the Image Using Screen Shift ......................57
Adjusting the Image Position Using Lens Shift ...............................59
Displaying a Test Pattern ..................................................................60
Adjusting the Image Height ............................................................. 61
Image Shape .......................................................................................62
Correcting Image Shape with H/V Keystone ......................................................62
Correcting the Image Shape with Quick Corner .................................................63
Correcting Image Shape with Curved Surface Mode ..........................................66
Correcting Image Shape with Corner Wall Mode ...............................................68
Correcting Image Shape with Point Correction Mode ........................................ 71
Loading Image Shape Setting from Memory .....................................................74
Resizing the Image with the Zoom Ring .......................................... 75
Focusing the Image Using the Focus Ring .......................................76
Focusing the Image Using the Focus Ring (Center/Corner) ........... 77
Selecting an Image Source ................................................................78
Image Aspect Ratio ............................................................................80
Changing the Image Aspect Ratio ....................................................................80
Available Image Aspect Ratios .........................................................................81
Adjusting Image Quality (Color Mode) ............................................ 82
Changing the Color Mode ............................................................................... 82
Available Color Modes .................................................................................... 82
Turning On Automatic Luminance Adjustment ..............................83
Adjusting the Image Color ................................................................84
Adjusting the Hue, Saturation, and Brightness .................................................. 84
Adjusting the Gamma .....................................................................................85
Adjusting the Image Resolution .......................................................87
Adjusting the Brightness .................................................................. 89
Light Source Operation Time ...........................................................................90
Controlling the Volume with the Volume Buttons ......................... 92
Adjusting Projector Features 93
HDMI Link Features ........................................................................... 94
Operating the Connected Devices Using the HDMI Link Features ....................... 94
Projecting Two Images Simultaneously .......................................... 96
Input Sources for Split Screen Projection
.......................................................... 97
Split Screen Projection Restrictions .................................................................. 98
Projecting a PC Free Presentation ....................................................99
Supported PC Free File Types .......................................................................... 99
Precautions on PC Free Projection ....................................................................99
Starting a PC Free Slide Show .........................................................................100
Starting a PC Free Movie Presentation ............................................................101
PC Free Display Options ................................................................................ 102
Projecting in Content Playback Mode ........................................... 104
Supported Content Playback Mode File Types .................................................104
Switching to Content Playback Mode .............................................................104
Projecting Your Playlists ................................................................................105
Creating Playlists Using Epson Web Control .................................................106
Adding Eects to Your Projected Image ..........................................................108
Content Playback Mode Restrictions .............................................................. 109
Shutting O the Image and Sound Temporarily ...........................110
Stopping Video Action Temporarily .............................................. 111
Turning O the Sound Temporarily (Mute) ...................................112
Contents
3

Zooming Images (E-Zoom) ............................................................. 113
Saving a User's Logo Image ............................................................ 114
Saving Settings to Memory and Using Saved Settings ................
116
Using Advanced Image Adjustment Features ...............................117
Adjusting the Color Tone (Color Uniformity) ................................................... 117
Running Light Source Calibration ...................................................................118
Multi-Projection Features ...............................................................120
Conditions for the Camera Correction Function ...............................................120
Procedure Overview ..................................................................................... 120
Preparing for Multi-Projection ........................................................................121
Connecting Projectors ................................................................................121
Initializing Projectors ..................................................................................121
Assigning a Primary Projector ..................................................................... 121
Calibrating Projectors .................................................................................122
Installing Projectors ................................................................................... 122
Performing Rough Image Adjustments ........................................................122
Connecting Projectors to a Network ............................................................122
Image Composition ...................................................................................... 123
Blending Using the Epson Projector Professional Tool Software and the Optional
Camera .....................................................................................................123
Tiling Using the Projector's Menu ................................................................124
Simple Blending Using the Projector's Menu and the Optional External Camera
.................................................................................................................128
Stacking Using the Epson Projector Professional Tool Software and the Optional
Camera .................................................................................................... 129
Stacking Using the Projector's Menu (Simple Stacking) ................................. 129
Stacking & Blending Using the Epson Projector Professional Tool Software .....130
Adjusting Colors ...........................................................................................130
External Camera Usage ................................................................... 131
Connecting to an Optional Camera ................................................................ 131
Projector Security Features ............................................................ 133
Password Security Types ............................................................................... 133
Setting a Password .....................................................................................133
Selecting Password Security Types ..............................................................134
Entering a Password to Use the Projector .....................................................135
Locking the Projector's Buttons ......................................................................135
Unlocking the Projector's Buttons ............................................................... 136
Locking the Remote Control Buttons ..............................................................136
Installing a Security Cable ..............................................................................137
Using the Projector on a Network 138
Wired Network Projection .............................................................. 139
Connecting to a Wired Network .....................................................................139
Selecting Wired Network Settings ..................................................................139
Wireless Network Projection .......................................................... 143
Safety Instructions for Built-in Wireless LAN Module
........................................ 143
Installing the Wireless LAN Module ................................................................ 144
Connection Methods for Wireless Network Projection ......................................144
Selecting Wireless Network Settings Manually .................................................145
Selecting Wireless Network Settings in Windows ..........................................148
Selecting Wireless Network Settings in Mac ................................................. 148
Setting Up Wireless Network Security (When Simple AP is Enabled) ..................148
Setting Up Wireless Network Security (When Simple AP is Disabled) ................. 149
Supported Client and CA Certicates ...........................................................150
Using a QR Code to Connect a Mobile Device ..................................................151
Using a USB Key to Connect a Windows Computer ..........................................152
Wireless Network Projection from a Mobile Device (Miracast) ... 153
Selecting Miracast Settings ............................................................................153
Connecting with the Miracast Function .......................................................... 154
Connecting Using Miracast in Windows 10 ......................................................155
Connecting Using Miracast in Windows 11 ......................................................156
Using AirPlay ....................................................................................157
Settings for AirPlay ........................................................................................157
Streaming/Mirroring Media with an AirPlay Connection ...................................159
Secure HTTP ..................................................................................... 161
Importing a Web Server Certicate Using the Menus ....................................... 161
Supported Web Server Certicates ..............................................................162
Contents
4

Screen Sharing .................................................................................163
Sharing the Screen ........................................................................................163
Finishing the Screen Sharing ...................................................................... 164
Receiving Shared Screen Images ....................................................................165
Monitoring and Controlling the Projector 166
Epson Projector Management Connected/Epson Projector
Management ....................................................................................167
Controlling a Networked Projector Using a Web Browser ...........
168
Web Control Options .................................................................................... 170
Registering Digital Certicates from a Web Browser ................... 177
Setting Up Projector Network E-Mail Alerts ..................................179
Network Projector E-mail Alert Messages ........................................................179
Setting Up Monitoring Using SNMP ...............................................180
Using ESC/VP21 Commands .......................................................... 182
ESC/VP21 Command List ...............................................................................182
Cable Layouts ...............................................................................................182
PJLink Support .................................................................................183
Crestron Connected Support ..........................................................184
Setting Up Crestron Connected Support .........................................................184
Operating the Projector Using Web API ........................................ 186
Enabling Web API ......................................................................................... 186
Setting Projector Event Schedules .................................................187
Adjusting the Menu Settings 190
Using the Projector's Menus ...........................................................191
Using the Displayed Keyboard .......................................................192
Available Text Using the Displayed Keyboard
..................................................192
Image Quality Settings - Image Menu ............................................193
Input Signal Settings - Signal I/O Menu .........................................196
Projector Installation Settings - Installation Menu .......................198
Multiple Projector Operation Settings - Multi-Projection Menu .200
Projector Display Settings - Display Menu .................................... 202
Projector Feature Settings - Operation Menu ...............................204
Functions Available in Standby Mode .............................................................206
Projector Administration Settings - Management Menu .............207
Event ID Code List .........................................................................................208
Projector Network Settings - Network Menu ................................ 211
Network Menu - Network Settings Menu ........................................................ 212
Network Menu - Wireless LAN Menu ............................................................214
Network Menu - Wired LAN Menu ...............................................................216
Network Menu - Mail Notication Menu ...................................................... 216
Network Menu - Projector Control Menu ..................................................... 217
Network Menu - Network Projection Settings ...............................................219
Projector Information Display - Info Menu ................................... 222
Image Quality Memory Settings - Memory Menu .........................223
Projector Setup Settings - ECO Menu ............................................ 224
Projector Initial Settings and Reset Options - Initial/All Settings
Menu .................................................................................................225
Copying Menu Settings Between Projectors (Batch Setup) .........227
Transferring Settings From a USB Flash Drive .................................................. 227
Transferring Settings From a Computer ..........................................................228
Batch Setup Error Notication .....................................................................229
Contents
5

Maintaining the Projector 230
Projector Maintenance ....................................................................231
Cleaning the Lens ............................................................................ 232
Cleaning the Projector Case ...........................................................
233
Air Filter and Vent Maintenance .................................................... 234
Cleaning the Air Filters and Intake Vents ........................................................234
Replacing the Air Filter ..................................................................................236
Updating the Firmware ...................................................................238
Updating Firmware Using a USB Storage Device ..............................................238
Updating the Firmware over the Network .......................................................240
Solving Problems 242
Projection Problems ........................................................................243
Projector Indicator Status ...............................................................244
Viewing the Status Display .............................................................
247
Solving Image or Sound Problems .................................................248
Solutions When No Image Appears ................................................................ 248
Solutions When "No Signal" Message Appears .................................................248
Displaying From a Windows Laptop ............................................................ 249
Displaying From a Mac Laptop ....................................................................249
Solutions When "Not Supported" Message Appears .........................................249
Solutions When Only a Partial Image Appears ................................................. 250
Solutions When the Image Contains Noise or Static .........................................250
Solutions When the Image is Fuzzy or Blurry ................................................... 251
Solutions When the Image is not Rectangular ................................................. 251
Solutions When the Image Brightness or Colors are Incorrect ...........................251
Solutions When Automatic Adjustments are not Applied Correctly ...................252
Solutions When Simple Stacking is not Applied Correctly .................................253
Solutions When Simple Blending is not Applied Correctly ................................ 253
Solutions When an Afterimage Remains on the Projected Image ...................... 253
Solutions to Sound Problems .........................................................................253
Solutions When Image File Names are not Displayed Correctly in PC Free ..........254
Solutions When You Cannot Project Images Using the PC Free Feature .............254
Solving Projector or Remote Control Operation Problems ......... 255
Solutions to Projector Power or Shut-O Problems ..........................................255
Solutions to Problems with the Remote Control ..............................................255
Solutions to Password Problems .................................................................... 256
Solution When "The Battery that Saves Your Clock Settings is Running Low"
Message Appears ..........................................................................................256
Solving Network Problems ............................................................. 257
Solutions When Wireless Authentication Fails ................................................. 257
Solutions When You Cannot Access the Projector Through the Web .................257
Solutions When Network Alert E-Mails are not Received ...................................258
Solutions When the Image Contains Static During Network Projection ..............258
Solutions When You Cannot Connect Using Miracast .......................................258
Solutions When the Image or Sound Contains Static During Miracast Connection
....................................................................................................................259
Solutions When You Cannot Connect Using AirPlay .........................................259
Solutions When the Image or Sound Contains Static During AirPlay Connection 259
Solutions When You Cannot Receive Shared Images ........................................259
Solutions to Problems in Content Playback Mode ....................... 261
Solutions When HDMI Link does not Function ............................. 262
Appendix 263
Optional Accessories and Replacement Parts ...............................264
Screens ........................................................................................................264
Mounts ........................................................................................................264
For Wireless Connection ................................................................................264
External Devices ........................................................................................... 265
Replacement Parts ........................................................................................265
Screen Size and Projection Distance ..............................................266
Supported Monitor Display Resolutions .......................................
274
Contents
6

Projector Specications .................................................................. 275
Connector
Specications ...............................................................................277
External Dimensions ....................................................................... 278
Supported Features for Epson Projector Content Manager ........ 279
List of Safety Symbols and Instructions ........................................ 280
Laser Safety Information ................................................................ 282
Laser Warning Labels .................................................................................... 282
Notices ..............................................................................................289
FCC Compliance Statement ...........................................................................289
Innovation, Science and Economic Development Canada (ISED) Notices ...........289
Restriction of Use ..........................................................................................290
Operating System References ........................................................................290
Trademarks ..................................................................................................290
Copyright Notice .......................................................................................... 291
Copyright Attribution ....................................................................................291
Contents
7
Notations Used in This Guide
Saf
ety Symbols
e projector and its manuals use graphical symbols and labels to indicate content that tells you how to use the projector safely.
Read and carefully follow the instructions that are marked with these symbols and labels to avoid injury to persons or damage to property.
Warning
is symbol indicates information that, if ignored, could possibly result in personal injury or even death.
Caution
is symbol indicates information that, if ignored, could possibly result in personal injury or physical damage due to incorrect handling.
General Information Notations
Attention
is label indicates procedures that may result in damage or injury if sucient care is not taken.
is label indicates additional information that may be useful to know.
[B
utton name] Indicates the name of the buttons on the remote control or the control panel.
Exam
ple: [Esc] button
Menu/Setting name Indicates projector menu and setting names.
Exam
ple:
Select the Image menu
s Image > Color Mode
is label indicates links to the related pages.
s
i
s label indicates the projector's current menu level.
g
Related Links
•
"Usin
g the Manual to Search for Information" p.9
•
"Getting the Latest Version of the Documents" p.10
e PDF manual allows you to search for information you are looking for by
k
eyword, or jump directly to specic sections using the bookmarks. You can
also print only the pages you need. is section explains how to use a PDF
manual that has been opened in Adobe Reader X on your computer.
g
Related Links
•
"Searching by Keyword" p.9
•
"Jumping Directly from Bookmarks" p.9
•
"Printing Only the Pages You Need" p.9
Searching by Keyword
Click Edit > Advanced Search. Enter the keyword (text) for information you
want to nd in the search window, and then click Search. Hits are displayed as a
list. Click one of the displayed hits to jump to that page.
Jumping Directly from Bookmarks
Click a title to jump to that page. Click + or > to view the lower level titles in
t
h
at section. To return to the previous page, perform the following operation on
your keyboard.
•
Windows: Hold down Alt, and then press ←.
•
Mac OS: Hold down the command key, and then press ←.
Printing Only the Pages You Need
You can extract and print only the pages you need. Click Prin
t in the File menu,
and then specify the pages you want to print in Pages in Pages to Print.
•
To specify a series of pages, enter a hyphen between the start page and the
end page.
Example: 20-25
•
To specify pages that are not in series, divide the pages with commas.
Example: 5, 10, 15
Using the Manual to Search for Information
9

List of Functions
e fo
llowing table lists the functions supported by each projector model. Supported functions are indicated by a "✓" mark.
•
Availability of products in this guide varies by country.
•
e images in this manual may not be representative of your product but the steps are the same, unless noted otherwise.
EB-
L890E/EB-
L895E
EB-L790SE/EB-
L795SE
EB-L690S
E/EB-
L695SE
EB-L690E EB-L890U EB-L790U EB-L690U EB-L690SU/EB-
L695SU
Wired LAN ✓ ✓ ✓ ✓ ✓ ✓ ✓ ✓
Wireless LAN (built-in) ✓ ✓ - ✓ ✓ ✓ ✓ ✓
Wireless LAN (optional) - - ✓ - - - - -
Supported EAP type: PEAP, EAP-
TLS
✓ ✓ - ✓ ✓ ✓ ✓ ✓
Supported EAP type: PEAP, PEAP-
TLS, EAP
-TLS, EAP
-Fast
- - ✓ - - - - -
AirPlay ✓ ✓ - ✓ ✓ ✓ ✓ ✓
Miracast ✓ ✓ - ✓ ✓ ✓ ✓ ✓
HDMI1/HDMI2 ports ✓ ✓ ✓ ✓ ✓ ✓ ✓ ✓
HDMI Out port ✓ ✓ ✓ ✓ ✓ ✓ ✓ ✓
HDBaseT port ✓ ✓ ✓ ✓ ✓ ✓ ✓ ✓
LAN port ✓ ✓ ✓ ✓ ✓ ✓ ✓ ✓
USB-A ports ✓ ✓ ✓ ✓ ✓ ✓ ✓ ✓
USB-B port ✓ ✓ ✓ ✓ ✓ ✓ ✓ ✓
Audio Out port ✓ ✓ ✓ ✓ ✓ ✓ ✓ ✓
RS-232C port ✓ ✓ ✓ ✓ ✓ ✓ ✓ ✓

EB-
L890E/EB-
L895E
EB-L790SE/EB-
L795SE
EB-L690S
E/EB-
L695SE
EB-L690E EB-L890U EB-L790U EB-L690U EB-L690SU/EB-
L695SU
Lens cover ✓ ✓ ✓ ✓ ✓ ✓ ✓ ✓
Speaker ✓ ✓ - ✓ ✓ ✓ ✓ ✓
Lens shi dial (horizontal/vertical) ✓ ✓ ✓ ✓ ✓ ✓ ✓ ✓
Z
oom ring ✓ ✓ ✓ ✓ ✓ ✓ ✓ ✓
Focus ring ✓ - - ✓ ✓ ✓ ✓ -
Focus ring (center) - ✓ ✓ - - - - ✓
Focus ring (corner) - ✓ ✓ - - - - ✓
Document camera (optional) ✓ ✓ ✓ ✓ ✓ ✓ ✓ ✓
Beep (Power on/Power o
) ✓ ✓ ✓ ✓ ✓ ✓ ✓ ✓
D
ate & Time setting ✓ ✓ ✓ ✓ ✓ ✓ ✓ ✓
Schedule Settings ✓ ✓ ✓ ✓ ✓ ✓ ✓ ✓
PC Free ✓ ✓ ✓ ✓ ✓ ✓ ✓ ✓
Batch Setup (USB as
h
drive) ✓ ✓ ✓ ✓ ✓ ✓ ✓ ✓
Batch Setup (USB cable) ✓ ✓ ✓ ✓ ✓ ✓ ✓ ✓
User's Logo Protection ✓ ✓ ✓ ✓ ✓ ✓ ✓ ✓
Network Protection ✓ ✓ ✓ ✓ ✓ ✓ ✓ ✓
Schedule Protection ✓ ✓ ✓ ✓ ✓ ✓ ✓ ✓
Epson iProjection ✓ ✓ ✓ ✓ ✓ ✓ ✓ ✓
Epson Projector Management/
E
ps
on Projector Management
Connected
✓ ✓ ✓ ✓ ✓ ✓ ✓ ✓
Epson Projector Professional Tool ✓ ✓ ✓ ✓ ✓ ✓ ✓ ✓
Epson Projector Content Manager ✓ ✓ ✓ ✓ ✓ ✓ ✓ ✓
Epson Creative Projection ✓ ✓ ✓ ✓ ✓ ✓ ✓ ✓
Epson Projector C
o
ng Tool ✓ ✓ ✓ ✓ ✓ ✓ ✓ ✓

EB-
L890E/EB-
L895E
EB-L790SE/EB-
L795SE
EB-L690S
E/EB-
L695SE
EB-L690E EB-L890U EB-L790U EB-L690U EB-L690SU/EB-
L695SU
Epson Web Control ✓ ✓ ✓ ✓ ✓ ✓ ✓ ✓
Mail Notication ✓ ✓ ✓ ✓ ✓ ✓ ✓ ✓
S
NMP ✓ ✓ ✓ ✓ ✓ ✓ ✓ ✓
Secure HTTP (HTTPS) ✓ ✓ ✓ ✓ ✓ ✓ ✓ ✓
ESC/VP21 Commands ✓ ✓ ✓ ✓ ✓ ✓ ✓ ✓
ESC/VP.net (Ver. 2.0) ✓ ✓ ✓ ✓ ✓ ✓ ✓ ✓
Web API ✓ ✓ ✓ ✓ ✓ ✓ ✓ ✓
PJLink ✓ ✓ ✓ ✓ ✓ ✓ ✓ ✓
Crestron Integrated Partner ✓ ✓ ✓ ✓ ✓ ✓ ✓ ✓
Extron IP Link ✓ ✓ ✓ ✓ ✓ ✓ ✓ ✓
Extron XTP ✓ ✓ ✓ ✓ ✓ ✓ ✓ ✓
AMX Device Discovery ✓ ✓ ✓ ✓ ✓ ✓ ✓ ✓
Control4 Simple Device Discovery
P
r
otocol
✓ ✓ ✓ ✓ ✓ ✓ ✓ ✓
Crestron Connected ✓ ✓ ✓ ✓ ✓ ✓ ✓ ✓
4K Enhancement ✓ ✓ ✓ ✓ - - - -
Firmware update using USB-A
(
) port (USB ash
dr
ive)
✓ ✓ ✓ ✓ ✓ ✓ ✓ ✓
Firmware update using USB-A
(
5V 2.0A
) port (USB ash
dr
ive)
- - ✓ - - - - -
Firmware update over network ✓ ✓ - ✓ ✓ ✓ ✓ ✓
Wireless LAN Diagnosis - - ✓ - - - - -
Wireless LAN system (Wi-Fi4/5) - - ✓ - - - - -

EB-
L890E/EB-
L895E
EB-L790SE/EB-
L795SE
EB-L690S
E/EB-
L695SE
EB-L690E EB-L890U EB-L790U EB-L690U EB-L690SU/EB-
L695SU
Auto Conguration - - ✓ - - - - -
U
se Temporary Address - - ✓ - - - - -
Wireless Presentation System
(ELPWP20)
✓ ✓ - ✓ ✓ ✓ ✓ ✓


is projector comes with these special features. Refer to these sections for more
det
ails.
g
Related Links
•
"Quick and Easy Setup" p.16
•
"4K Enhancement Technology to Project Even More Information Crisply and
Cleanly" p.16
•
"Quick and Easy Multi-projection Setup" p.16
•
"Install in a Variety of Environments" p.16
•
"Easy Wireless Projection" p.16
•
"Linking with Apple Devices" p.17
•
"Environmentally-Friendly" p.18
Quick and Easy Setup
You can easily make projector settings using NFC technology.
4K Enhancement Technology to Project Even More
Information Crisply and Cleanly
•
e hig
h r
esolution of 4K enhancement technology allows you to display
more information than when using WUXGA or Full HD.
•
High brightness realizes crisp, clean images even in bright environments.
•
e high color reproducibility of 3LCD technology allows you to experience
images rich with color.
Quick and Easy Multi-projection Setup
•
Wh
en using multiple projectors, you can attach an optional external camera
to automatically compensate for unevenness in brightness and color that
occur due to installation and the passage of time.
•
Epson Projector Professional Tool allows you to quickly and easily setup and
adjust multiple projectors and perform advanced geometric correction.
•
By allowing daisy-chain connections, you can project simultaneously without
having to use a distributor.
•
Using the blending function with 4K enhanced image quality, you can realize
a large screen with high image quality.
Install in a Variety of Environments
•
A ligh
tweight and compact housing provides a space-saving installation.
•
A zoom of x1.4 or greater combined with lens shiing capability allows you
to avoid uneven ceilings and lighting when installing. e zoom value varies
depending on your projector model.
•
With a throw ratio of 0.5 or greater, you can install the projector with a short
distance. e throw ratio varies depending on your projector model.
Easy Wireless Projection
•
Co
nnect your projector and mobile device wirelessly using Miracast
technology to project images.
Projector Features
16
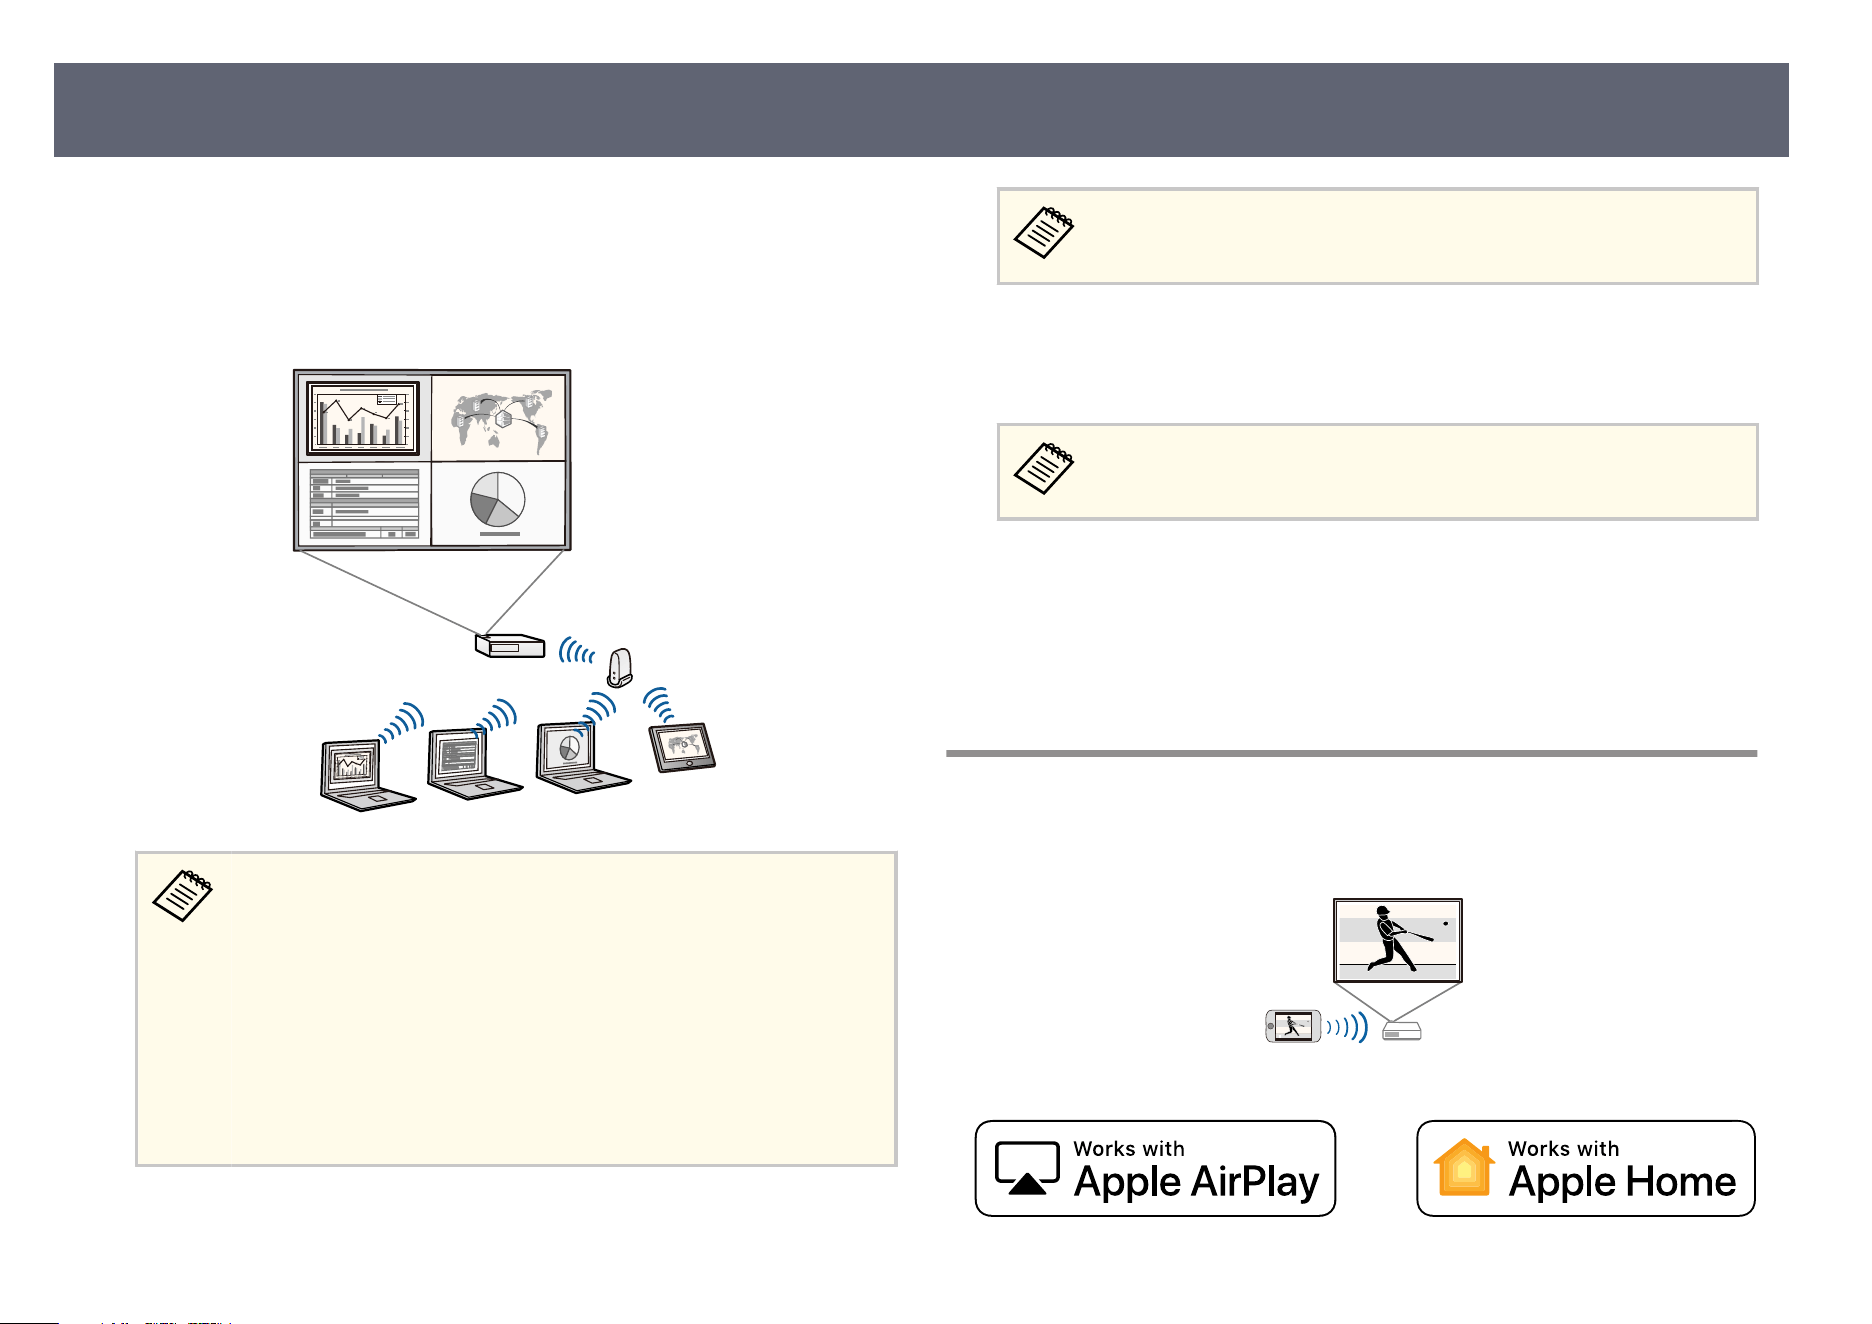
•
Eps
on iProjection (Windows/Mac) to project up to four images at the same
time by splitting the projected screen. You can project images from computers
on the network, or from smartphones or tablet devices on which Epson
iProjection is installed.
See the Epson iProjection Operation Guide (Windows/Mac) for details.
•
When projecting images using a wireless LAN, set up your projector
and computer for wireless projection.
Depending on your projector model, you may need to purchase the
optional wireless LAN module.
•
Some models have built-in wireless LAN modules.
•
You can download the necessary soware and manuals from the
following Web site:
epson.com/support (U.S.), epson.ca/support (Canada), or
latin.epson.com/support (Latin America)
•
Eps
on iProjection (iOS/Android) to connect your projector and mobile
device wirelessly using the app available on the App Store or Google Play.
Any fees incurred when communicating with the App Store or Google
Pl
ay are the responsibility of the customer.
•
Eps
on iProjection (Chromebook) to connect your projector and
Chromebook device wirelessly using the app available on the Chrome Web
Store.
Any fees incurred when communicating with the Chrome Web Store
are t
he responsibility of the customer.
g
Related Links
•
"W
ir
ed Network Projection" p.139
•
"Wireless Network Projection" p.143
•
"Wireless Network Projection from a Mobile Device (Miracast)" p.153
•
"List of Functions" p.11
Linking with Apple Devices
•
Wi
th AirPlay, you can stream media such as videos, music, and photos to this
projector using Apple devices that support AirPlay.
Projector Features
17

Use of the Works with Apple AirPlay badge means that an accessory has been
design
ed to work specically with the technology identied in the badge and
has been certied by the developer to meet Apple performance standards.
Use of the Works with Apple badge means that an accessory has been designed
to work specically with the technology identied in the badge and has been
certied by the developer to meet Apple performance standards. Apple is not
responsible for the operation of this device or its compliance with safety and
regulatory standards.
Controlling this HomeKit-enabled accessory automatically and away from
home requires a HomePod, HomePod mini, or Apple TV set up as a home
hub. It is recommended that you update to the latest soware and operating
system.
Environmentally-Friendly
•
We h
ave used pulp-molded products for cushioning materials (or cushioning
packaging materials) and recycled plastics for part of the projector body.
•
We aim to reduce the environmental impact through power consumption
reduction functions.
•
Equipped with an air lter that does not require replacement for an extended
period.
Projector Features
18
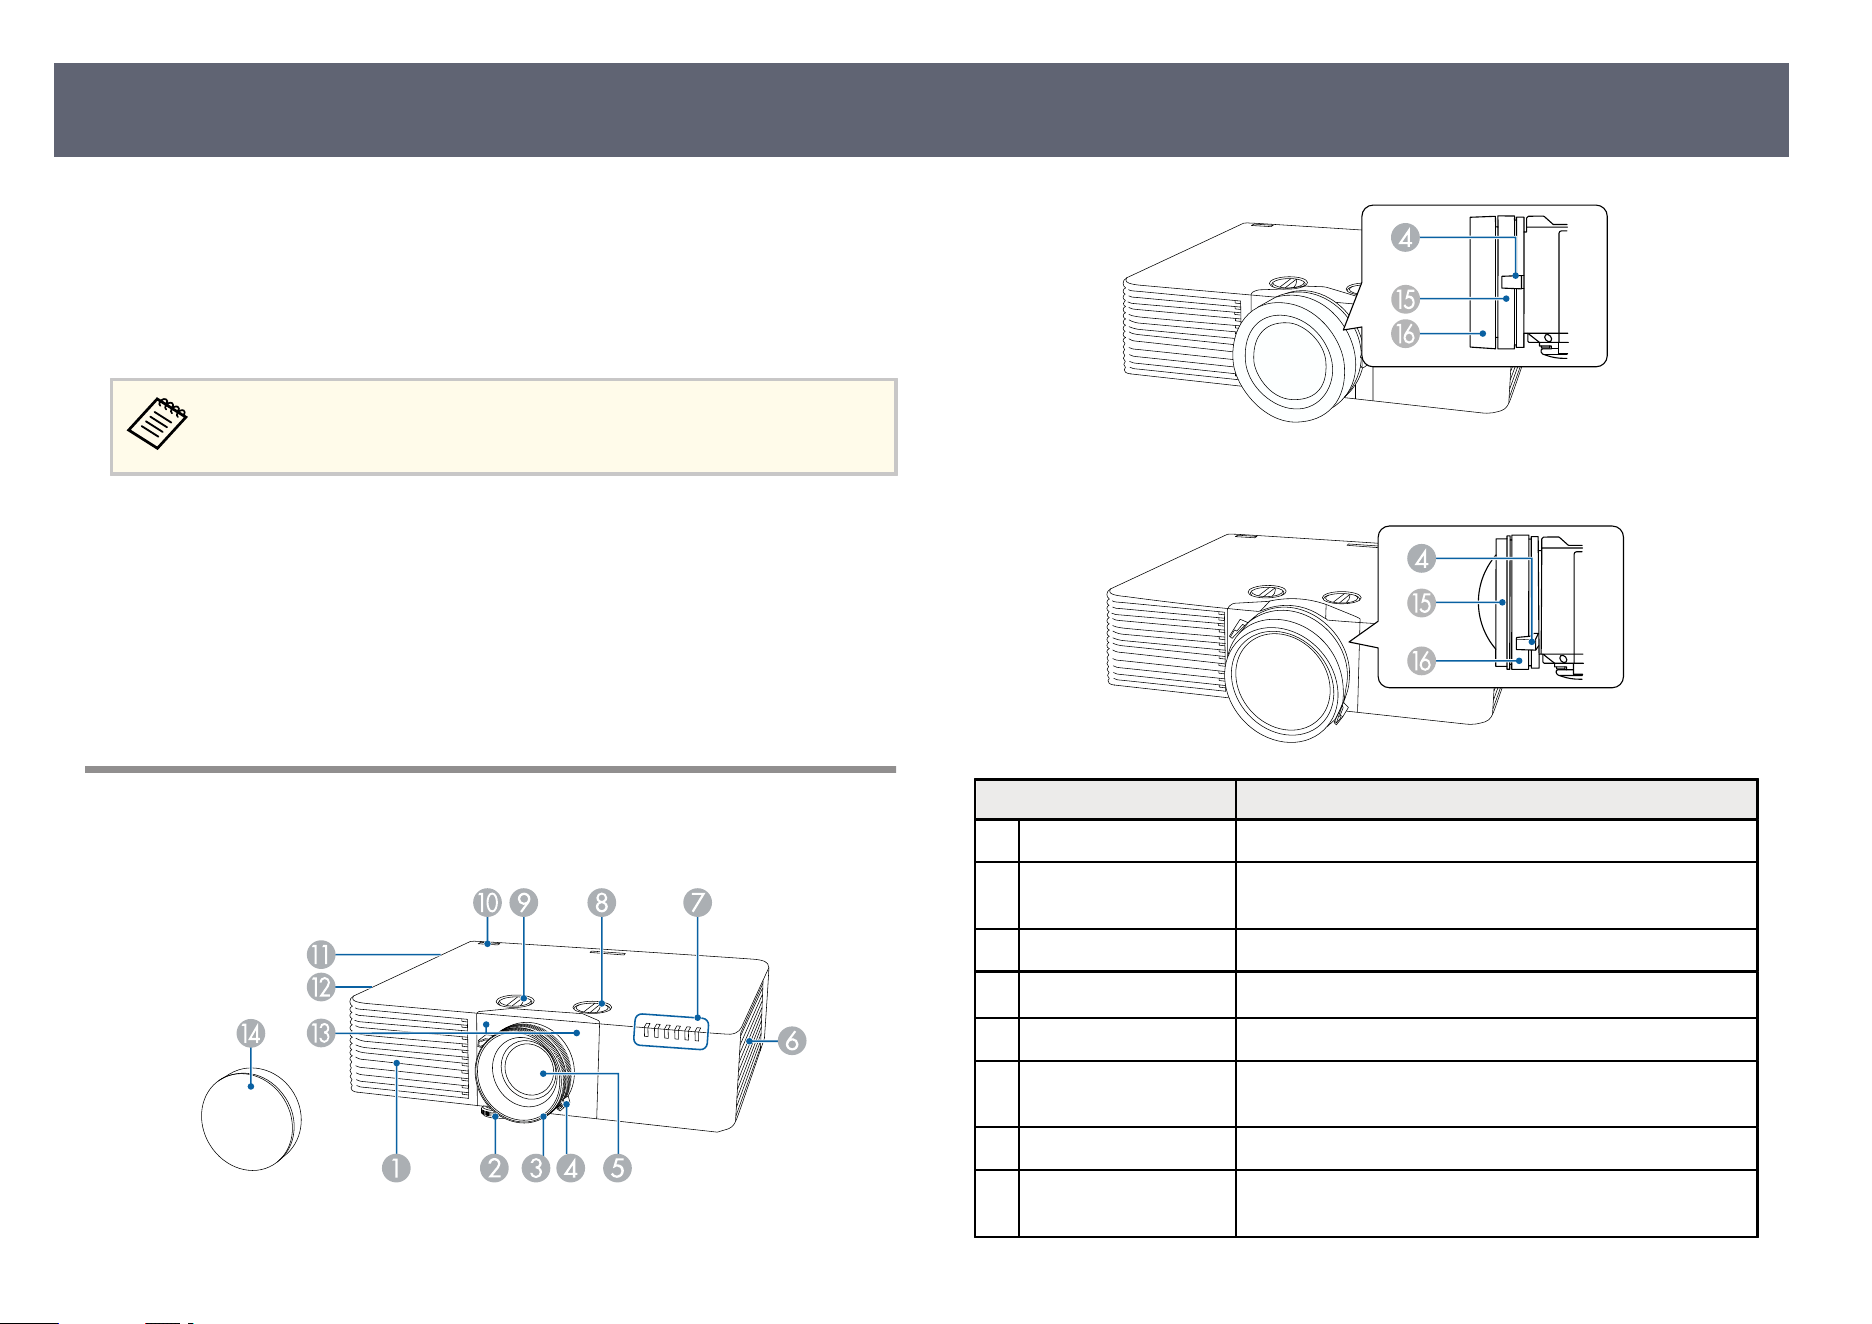
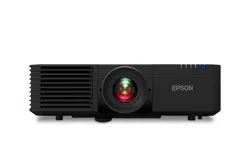
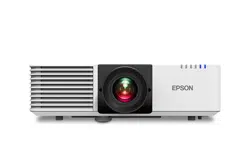
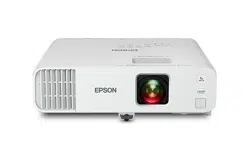
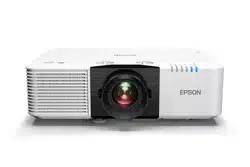
e following sections explain the projector parts and their functions.
A
ll of the features in this guide are explained using illustrations of EB-L890E
unless otherwise mentioned.
e shape of the projector part may vary depending on the model of your
projector.
Remove the protective lm fr
om the projector before using for the rst
time.
g
Related Links
•
"Pr
ojector Parts - Front/Top" p.19
•
"Projector Parts - Rear" p.20
•
"Projector Parts - Base" p.21
•
"Projector Parts - Interface Ports" p.21
•
"Projector Parts - Control Panel" p.23
•
"Projector Parts - Remote Control" p.24
Projector Parts - Front/Top
EB-L890E/EB-L895E/EB-L690E/EB-L890U/EB-L790U/EB-L690U
EB-L790SE/EB-L795SE/EB-L690SU/EB-L695SU
EB-L690SE/EB-L695SE
Name Function
A
Air intake vent Takes in air to cool the projector internally.
B
Front adjustable foot When setup on a surface such as a desk, extend the foot
to ad
just the position of the image.
C
Focus ring Adjusts the image focus.
D
Zoom ring Adjusts the image size.
E
Lens Images are projected from here.
F
Air intake vent (air
l
t
er)
Takes in air to cool the projector internally.
G
Indicators Indicates the projector's status.
H
Vertical lens shi
dial Turn the dial to move the position of the projected
image up or down.
Projector Parts and Functions
19
Name Function
I
Horizontal lens shi
di
al
Turn the dial to move the position of the projected
image le or right.
J
Remote receiver Receives signals from the remote control.
K
Speaker Outputs audio.
L
Air exhaust vent Exhaust vent for air used to cool the projector internally.
Caution
Whi
le projecting, do not put your face or hands
near the air exhaust vent, and do not place
objects that may become warped or damaged
by heat near the vent. Hot air from the air
exhaust vent could cause burns, warping, or
accidents to occur.
M
Remote receiver Receives signals from the remote control.
N
Lens cover Attach when not using the projector to protect the lens.
O
Focus ring (center) Adjusts the focus of the center of the image.
P
Focus ring (corner) Adjusts the focus of the corner of the image.
g
Related Links
•
"Resizin
g the Image with the Zoom Ring" p.75
•
"Focusing the Image Using the Focus Ring" p.76
•
"Focusing the Image Using the Focus Ring (Center/Corner)" p.77
•
"Attaching and Removing the Cable Cover" p.43
•
"Adjusting the Image Position Using Lens Shi" p.59
•
"Projector Indicator Status" p.244
•
"Remote Control Operation" p.45
•
"Air Filter and Vent Maintenance" p.234
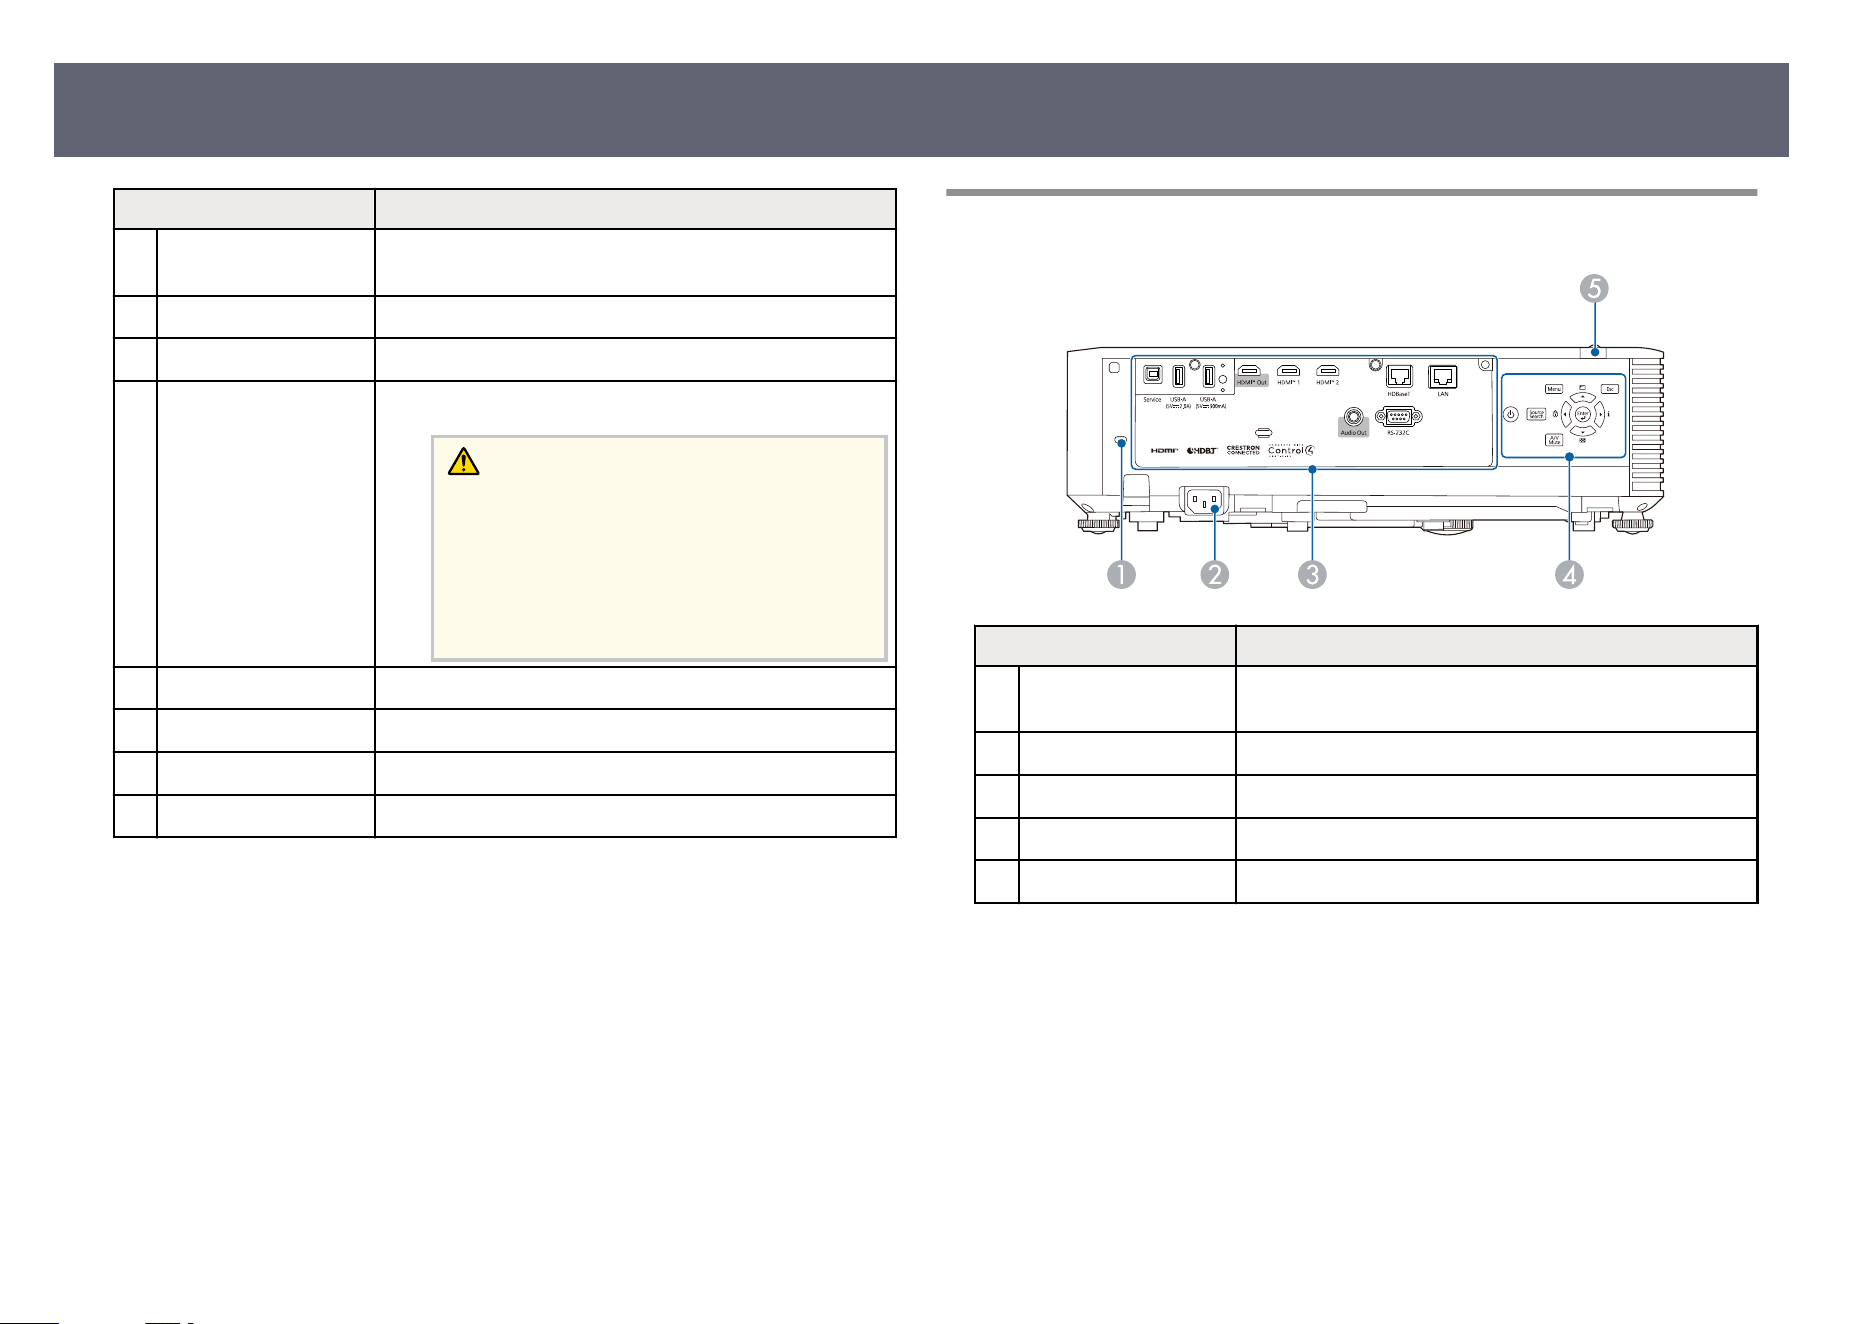
Projector Parts - Rear
Name Function
A
Security slot e security slot is compatible with the Microsaver
S
ecurity System manufactured by Kensington.
B
Power inlet Connects the power cord to the projector.
C
Interface ports Connects cables for external devices.
D
Control panel Operates the projector.
E
Remote receiver Receives signals from the remote control.
g
Related Links
•
"Pr
ojector Parts - Interface Ports" p.21
•
"Installing a Security Cable" p.137
Projector Parts and Functions
20
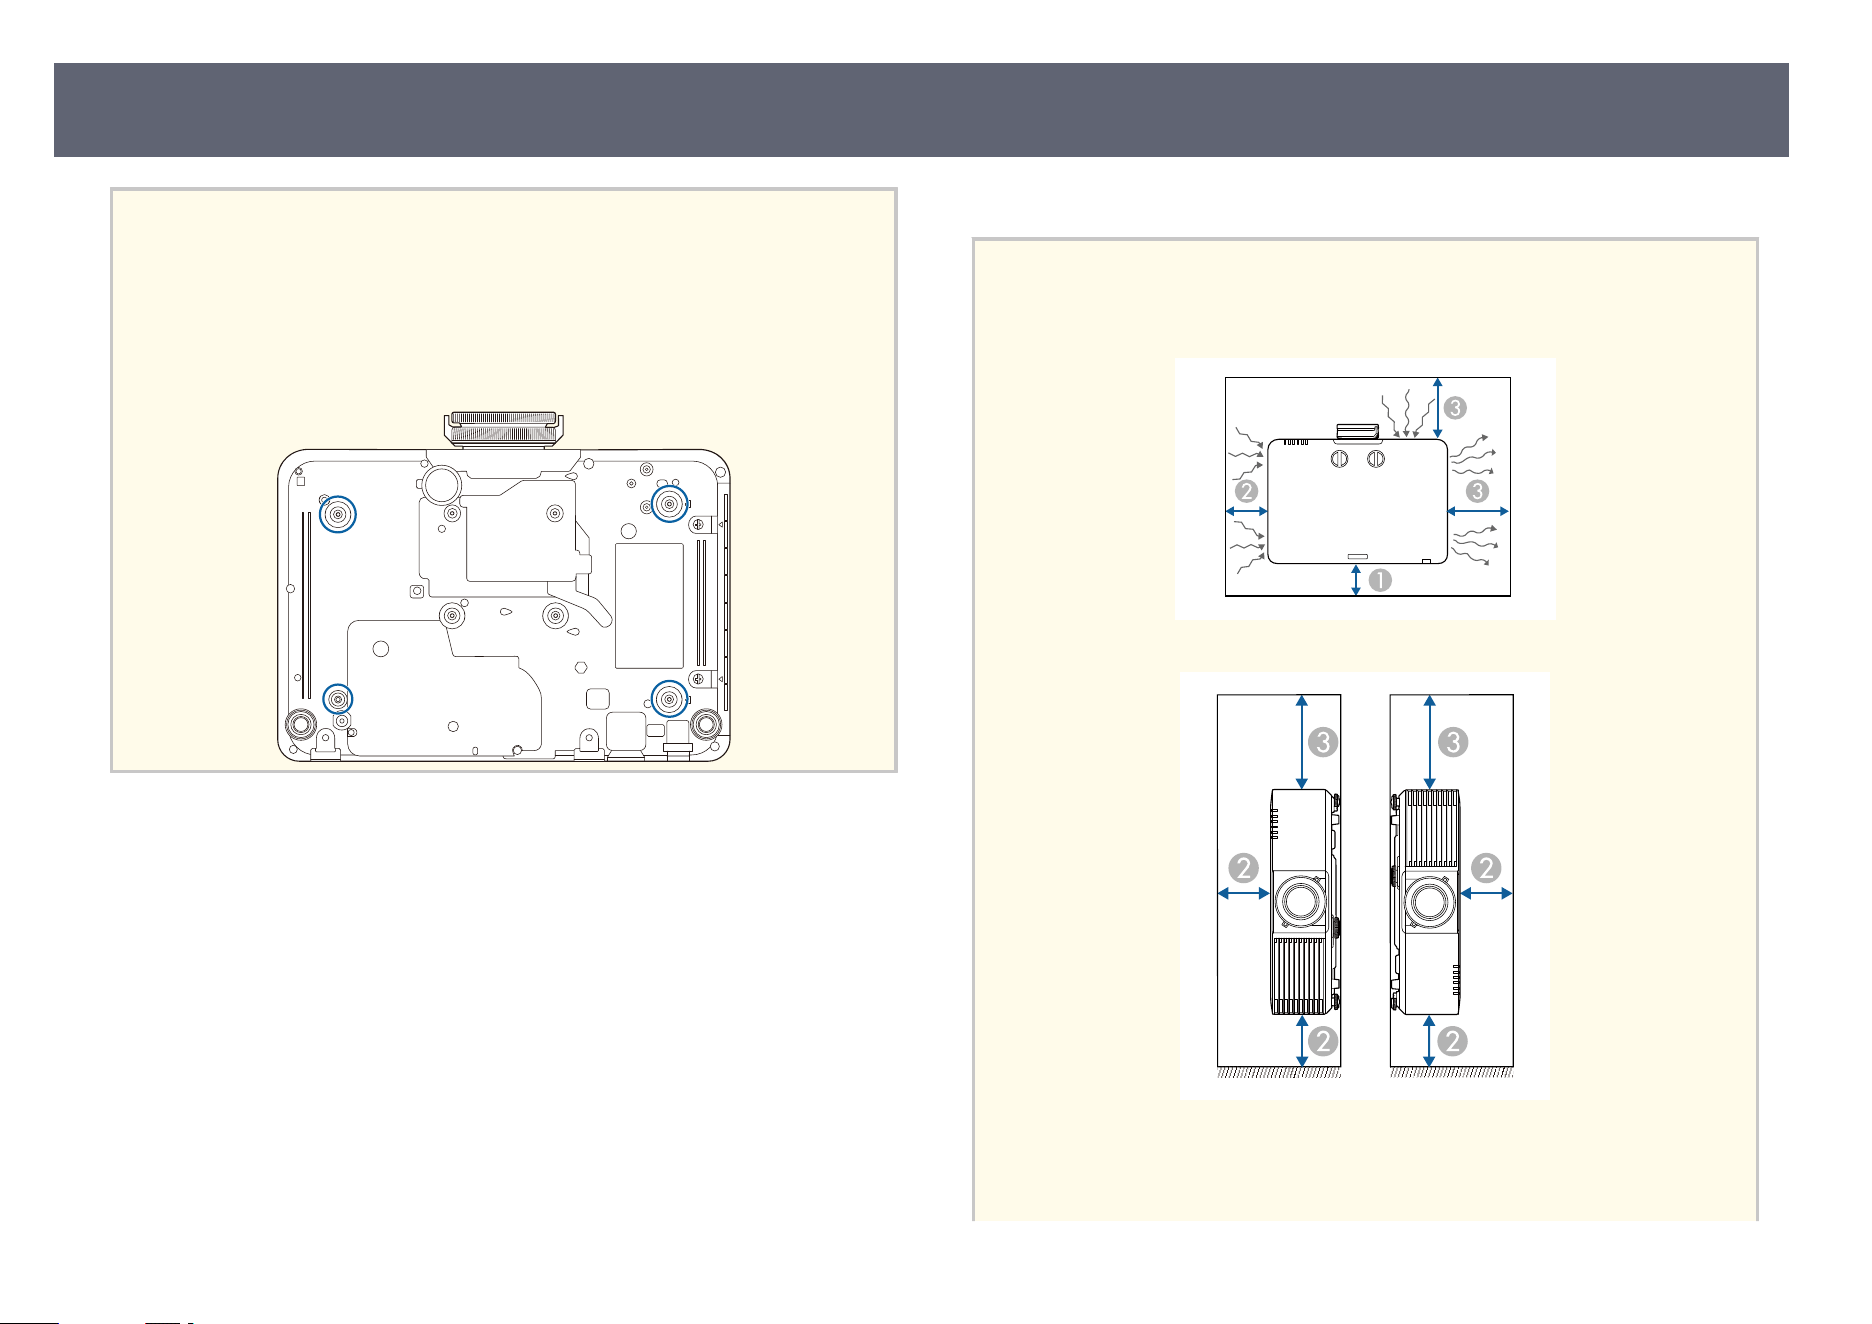
Projector Parts - Base
Name Function
A
Front adjustable foot When setup on a surface such as a desk, extend the foot
t
o ad
just the position of the image.
B
Ceiling mount xing
p
oints (four points)
Use all the xing points to attach the optional ceiling
mount here when suspending the projector from a
ceiling.
C
Wire clamp xing
p
oint
When you use the optional ceiling mount, x the
carabiner here to attach the safety wire and prevent the
projector from falling from the ceiling or wall.
D
Rear feet When setup on a surface such as a desk, turn to extend
and r
etract to adjust the horizontal tilt.
Name Function
E
Screw holes for
op
tional cable cover
Screw holes to x the optional cable cover in place.
F
Security cable
att
achment point
Pass a commercially available wire lock through here
and lock it in place.
Warning
Do n
ot attach the safety wire to this point.
G
Air lter cover screws Screws to x th
e air lter cover in place.
H
Fixing points (four
po
ints)
Use all the xing points to attach a commercially
available mount compatible with the VESA Mounting
Interface Standard (100 × 100 mm) when installing the
projector on a wall or suspending the projector from a
ceiling.
g
Related Links
•
"In
stalling a Security Cable" p.137
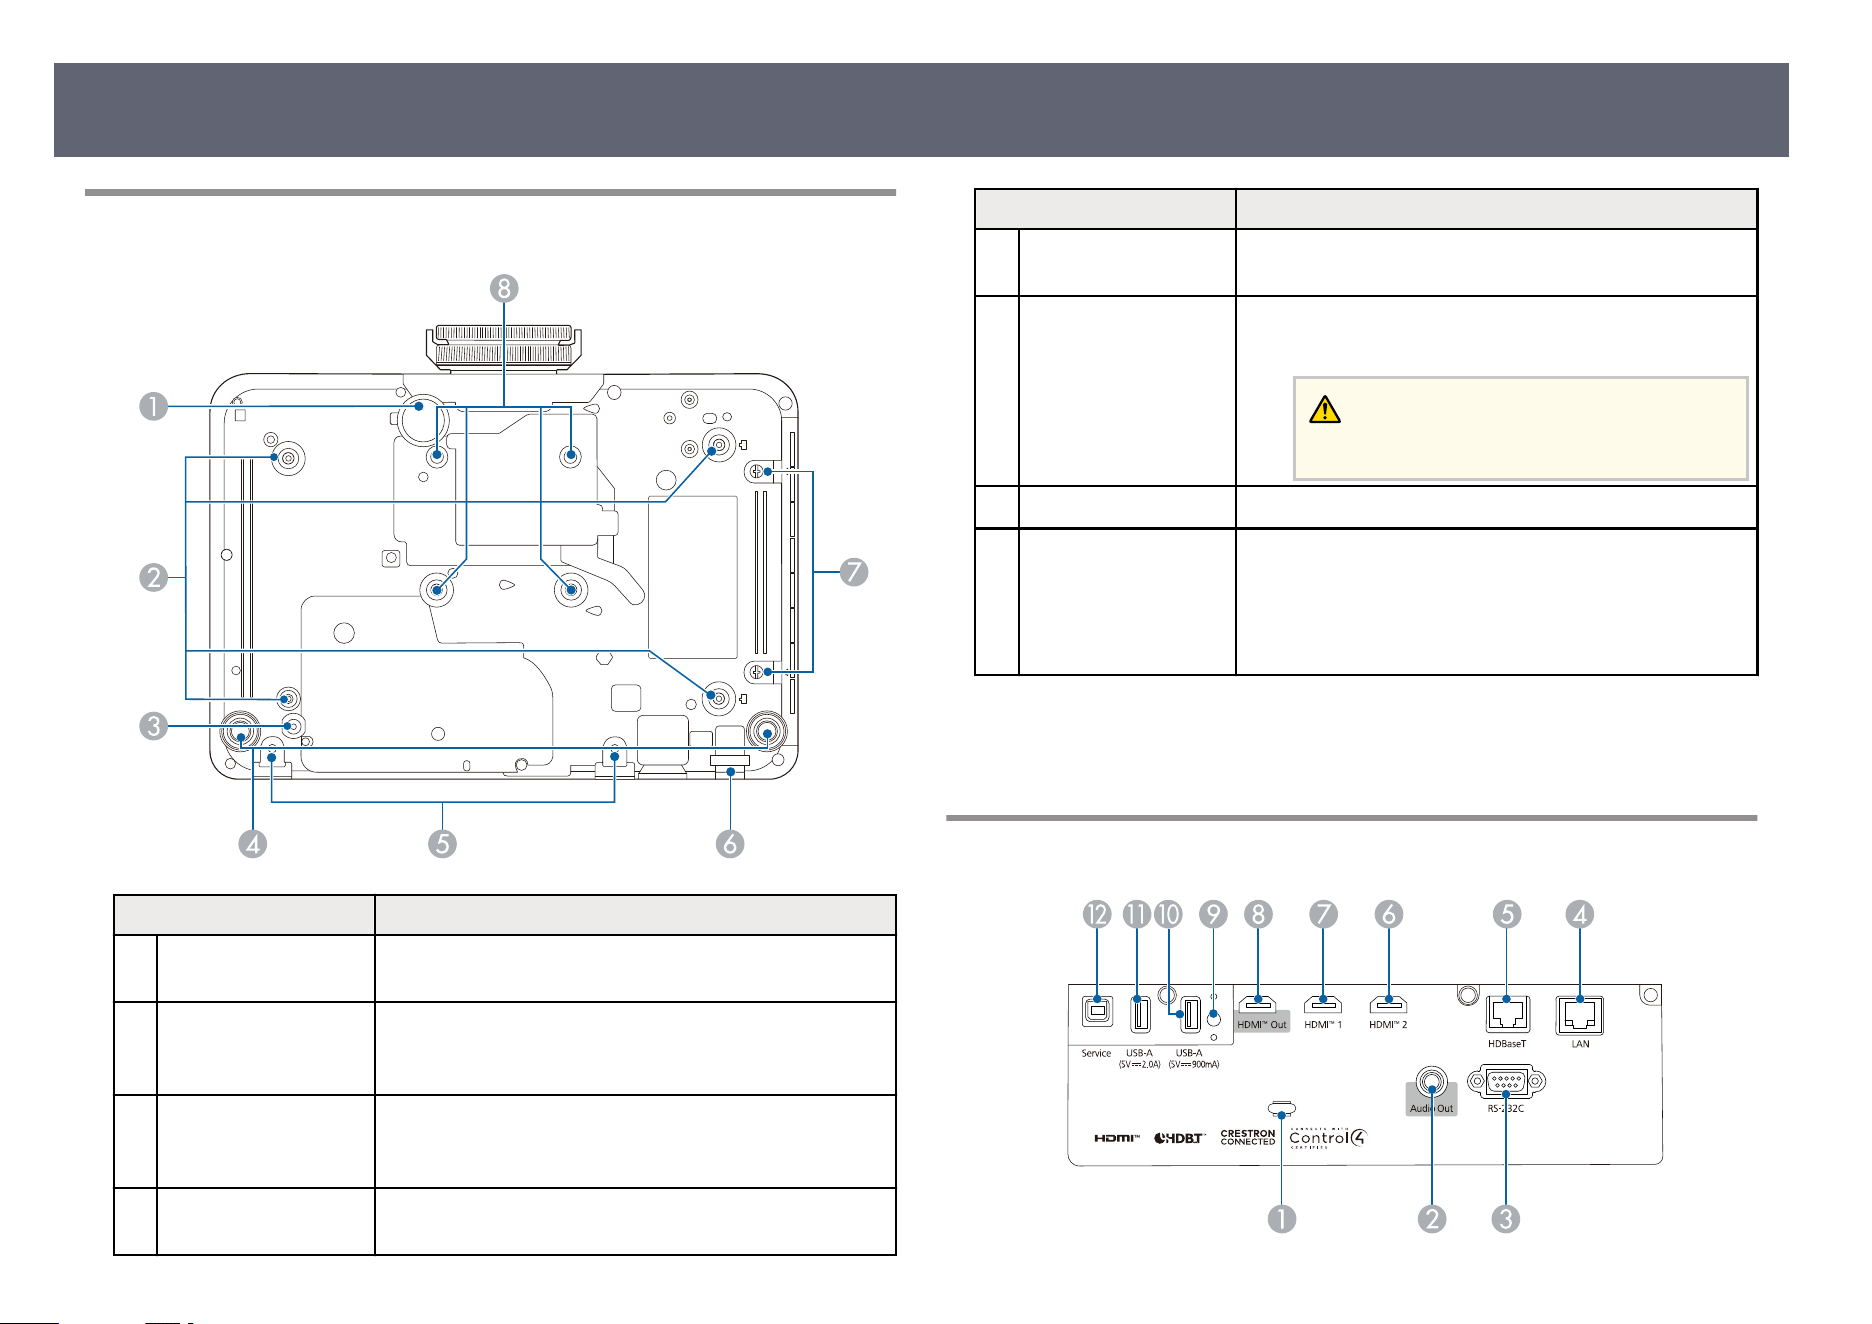
Projector Parts - Interface Ports
Projector Parts and Functions
21
Name Function
A
Cable holder Pass a commercially available cable tie through here to
se
cure cables.
B
Audio Out port Outputs audio from the current input source to an
exter
nal speaker.
C
RS-232C port Connects an RS-232C cable to control the projector
fr
om a computer. (You do not need to use this port
normally.)
D
LAN port Connects a LAN cable to connect to a network.
E
HDBaseT port Connects a LAN cable to the optional HDBaseT
Tran
smitter.
is port is compatible with HDCP2.3.
F
HDMI2 port Inputs video signals from HDMI compatible video
eq
uipment and computers.
is port is compatible with HDCP2.3.
G
HDMI1 port
H
HDMI Out port Connecting an HDMI cables from this port to the
HDMI p
ort of another projectors lets you create and
project a single unied image.
is port is compatible with HDCP2.3.
I
Wireless LAN module
xing
screw
Secures the wireless LAN module cover. (EB-
L690SE/EB-L695SE)
Name Function
J
USB-A
( ) port
Connects a USB device and projects movies or images.
Us
e to connect the optional document camera.
Use to connect the wireless LAN module.
Use to connect the external camera.
Use to connect a USB memory device to save error and
operation log les.
It is also used for batch settings and rmware update.
e method for updating the rmware diers depending
on your projector model. For details, see the "List of
Functions" in this manual.
In this guide, USB-A ( )
and US
B-A (
5V 2.0A
) ports are
col
lectively referred to as the USB-A
port.
K
USB-A (
5V 2.0A
)
po
rt
Connects a USB device and projects movies or images.
Use to connect the optional document camera.
Use to connect the external camera.
Use to connect a USB memory device to save error and
operation log les.
It is also used for batch settings and rmware update.
e method for updating the rmware diers depending
on your projector model. For details, see the "List of
Functions" in this manual.
In this guide, USB-A ( )
and USB-A (
5V 2.0A
) ports are
collectively referred to as the USB-A
port.
Projector Parts and Functions
22
Name Function
L
Service port is port is used for batch settings and rmware update.
e
method for updating the rmware diers depending
on your projector model. For details, see the "List of
Functions" in this manual.
g
Related Links
•
"List of Functions" p.11
•
"Copying Menu Settings Between Projectors (Batch Setup)" p.227
•
"Updating the Firmware" p.238
•
"External Camera Usage" p.131
•
"Connecting Multiple Projectors of the Same Model" p.41
•
"Projector Connections" p.35
•
"Wireless Network Projection" p.143
Projector Parts - Control Panel
Name Function
A
Power button ( )
Turns the projector on or o.
B
[S
ource Search]
bu
tton
Changes to the next input source.
Name Function
C
[A/V Mute] button Turns the video and audio on or o
temporarily.
D
Le arrow button Displays the Control Panel Lock screen.
Se
lects menu items while displaying the projector's
menu.
E
Down arrow button Displays a test pattern.
Se
lects menu items while displaying the projector's
menu.
F
[Enter] button (
)
Enters the current selection and moves to the next level
whi
le displaying the projector's menu.
G
Right arrow button Displays the Info screen.
Se
lects menu items while displaying the projector's
menu.
H
[Esc] button Stops the current function.
Mo
ves back to the previous menu level while displaying
the projector's menu.
I
Up arrow button Displays the Geometry Correction screen.
Se
lects menu items while displaying the projector's
menu.
J
[Menu] button Displays and closes the projector's menu.
g
Related Links
•
"Se
lecting an Image Source" p.78
•
"Adjusting the Menu Settings" p.190
Projector Parts and Functions
23
Projector Parts - Remote Control
Name Function
A
Power button (
)
Turns the projector on or o
.
B
[HD
MI] button Switches the image source between the HDMI1 and
HDMI2 p
orts.
C
[Wireless] button Switches the image source to the network connected
dev
ice.
D
Numeric buttons Enters numbers in the projector's menu.
E
[Customize] button Performs settings assigned in the Cus
tomize Button
setting in the projector's Management menu.
F
[Menu] button Displays and closes the projector's menu.
G
Arrow buttons Selects menu items while displaying the projector's
men
u.
H
[Enter] button (
)
Enters the current selection and moves to the next level
whi
le displaying the projector's menu.
I
[Home] button Displays and closes the Home screen.
J
[Volume] up/down
bu
ttons
Adjusts the speaker volume.
K
[A/V Mute] button Turns the video and audio on or o
temporarily.
L
[Mute] button Turns the audio on or o
temporarily.
M
Rewind button Rewinds the images. (For streaming with AirPlay/For
HDMI CEC)
N
P
ause/Play button Pauses or plays the images. (For streaming with
AirP
lay/For HDMI CEC)
O
Fast-Forward button Fast-forwards the images. (For streaming with
AirP
lay/For HDMI CEC)
P
[Freeze] button Pauses or resumes images.
Q
[E-Zoom] +/– buttons Resizes the projected image.
R
[Default] button Returns the selected setting to its default value.
Projector Parts and Functions
24
Name Function
S
[Esc] button Stops the current function.
Mo
ves back to the previous menu level while displaying
the projector's menu.
T
[ID] button Hold down this button and press the numeric buttons to
se
lect the ID for the projector you want to operate using
the remote control.
U
[Computer/
HDB
aseT] button
Switches the image source from the HDBaseT input
port.
V
[USB] button Selects the USB-A port as the image source.
W
[Source Search]
bu
tton
Switches to the next input source.
X
Remote control light
emit
ting area
Outputs remote control signals.
g
Related Links
•
"Se
lecting an Image Source" p.78
•
"Projecting in Content Playback Mode" p.104
•
"Adjusting the Menu Settings" p.190
•
"Adjusting Image Quality (Color Mode)" p.82
•
"Image Aspect Ratio" p.80
•
"Zooming Images (E-Zoom)" p.113
•
"Shutting O the Image and Sound Temporarily" p.110
•
"Projecting Two Images Simultaneously" p.96
•
"Home Screen" p.48
•
"Stopping Video Action Temporarily" p.111
•
"Controlling the Volume with the Volume Buttons" p.92
Projector Parts and Functions
25

Setting Up the Projector
Fo
llow the instructions in these sections to set up your projector.
g
Related Links
•
"Projector Placement" p.27
•
"Installing the Safety Wire" p.32
•
"Projector Connections" p.35
•
"Connecting Multiple Projectors of the Same Model" p.41
•
"Attaching and Removing the Cable Cover" p.43
•
"Installing Batteries in the Remote Control" p.44
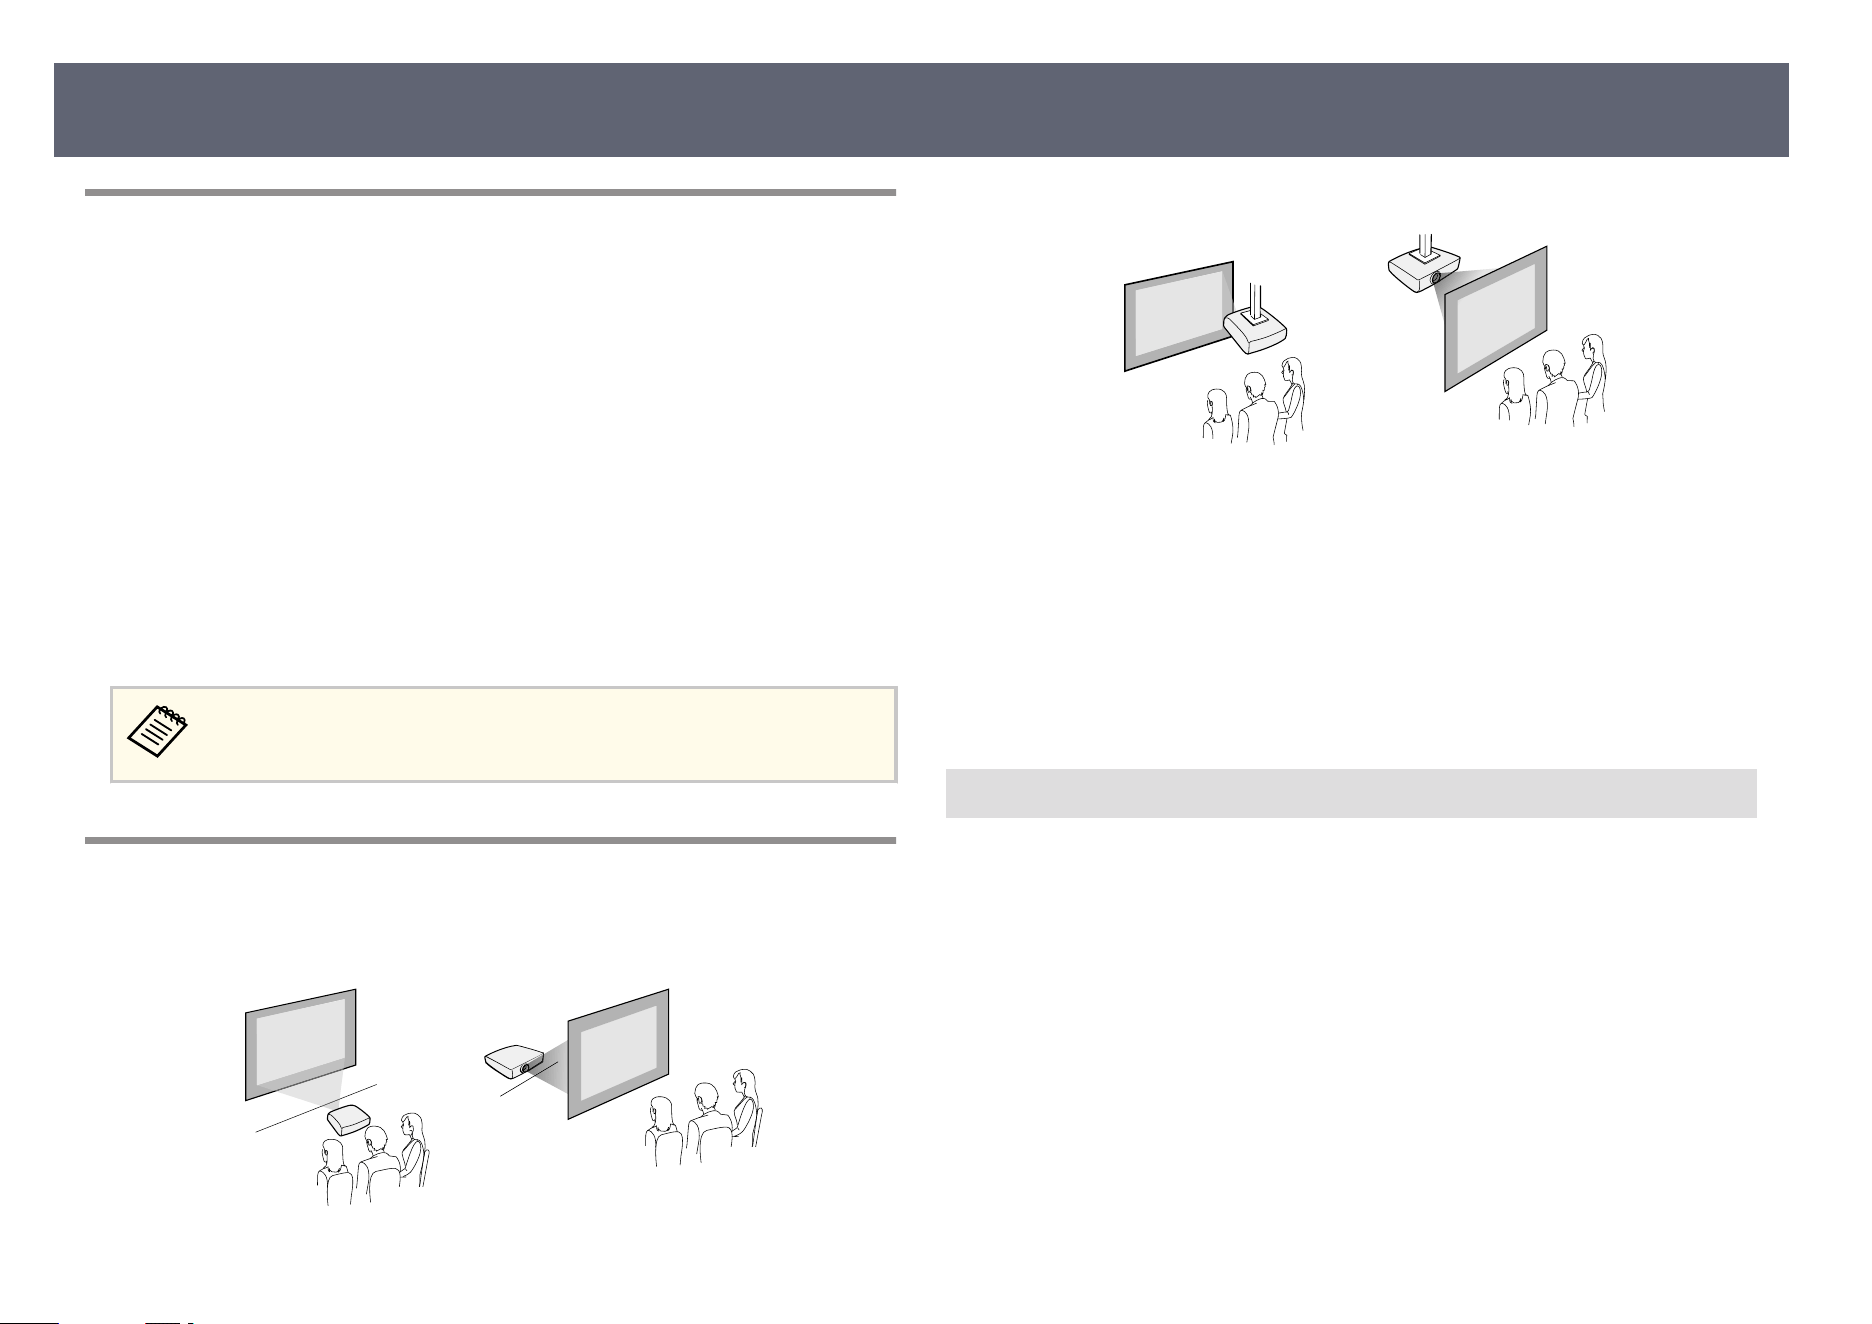
You can place the projector on almost any at sur
face to project an image.
You can also install the projector in a ceiling mount if you want to use it in
a xed location. An optional ceiling mount is required when suspending the
projector from a ceiling.
You can also use a commercially available mount compatible with the VESA
Mounting Interface Standard (100 × 100 mm).
e projector can be installed at various angles. ere is no vertical or
horizontal limit to how the projector can be installed.
Note the following points when selecting a projector location:
•
Pl
ace the projector on a sturdy, level surface or install it using a compatible
mount.
•
Le
ave plenty of space around and under the projector for ventilation, and do
not place it on top of or next to anything that could block the vents.
•
Place the projector so it squarely faces the screen, not at an angle.
Projector Placement
27
Warning
•
Yo
u must install a ceiling mount when suspending the projector from a ceiling. If
you do not install the projector correctly, it could fall and cause damage or injury.
•
Do not use adhesives on the ceiling mount xing points to prevent the screws
from loosening, or use lubricants, oils, or similar substances on the projector; the
projector case may crack causing it to fall from its ceiling mount. is could cause
serious injury to anyone under the ceiling mount and could damage the projector.
•
Improper installation of the ceiling mount and projector could cause the projector
to fall. Secure the ceiling mount using all of the ceiling mount xing points
specied in the projector's User's Guide. Also, use a wire or other item that is
strong enough to secure the projector and the mount. Use only mounts specied
by Epson that are compatible with this projector.
•
Do not install the projector in a location subject to high levels of dust or humidity,
or in a location subject to smoke or steam. Otherwise, it could cause a re
or electric shock to occur. e projector's case could also deteriorate and be
damaged causing the projector to fall from the mount.
Examples of environments that could cause the projector to fall due to case
deterioration
•
Locations subject to excessive smoke or airborne oil particles, such as factories
or kitchens
•
Locations containing volatile solvents or chemicals, such as factories or
laboratories
•
Locations where the projector could be subjected to detergents or chemicals,
such as factories or kitchens
•
Locations in which aroma oils are oen used, such as relaxation rooms
•
Near devices that produce excessive smoke, airborne oil particles, or foam at
events
•
Locations near humidiers
Warning
•
Do n
ot cover the projector's air intake or air exhaust vents. If the vents are
covered, the internal temperature could rise and cause a re.
•
Do not use or store the projector in locations where it will be subject to dust or
dirt. Otherwise, the quality of the projected image may decline. If the lens or air
lter gets dusty, it may result in a malfunction or re.
•
Do not install the projector on an unstable surface or in a location beyond the
weight specications of the projector. Otherwise, it could fall or topple causing an
accident and injury.
•
If the projector is mounted on a ceiling or wall, it should be installed by qualied
technicians using mounting hardware designed for use with this projector. When
installing the projector in a high position, take measures to prevent falling by
using wires to ensure safety in an emergency, such as an earthquake, and to
prevent accidents. If it is not installed correctly, it could fall causing an accident
and injury. Contact your dealer to carry out the installation work.
•
Do not install in locations where salt damage could occur, or in locations subject
to corrosive gas such as sulphuric gas from hot springs. Otherwise, corrosion
could cause the projector to fall. It could also cause the projector to malfunction.
Attention
•
If y
ou are using the projector at altitudes above 4,921 feet (1,500 m), set the High
Altitude Mode setting to On in the projector's Installation menu to ensure the
projector's internal temperature is regulated properly.
•
Try not to setup the projector in locations subject to high humidity and dust, or in
locations subject to smoke from res or tobacco smoke.
g
Related Links
•
"No
tes on Transporting" p.29
•
"Projector Setup and Installation Options" p.29
•
"Projection Distance" p.31
•
"Image Shape" p.62
Projector Placement
28
Notes on Transporting
ere are many glass parts and precision components inside the projector. To
p
revent damage due to impacts when transporting, handle the projector as
follows.
•
Remove any equipment connected to the projector.
•
Position the lens near the center of the lens shi adjustment range by turning
the vertical and horizontal lens shi dials.
•
Attach the lens cover that was included with the projector.
•
When transporting the projector a long distance or as checked luggage, pack
it in a rm box with cushioning around it and mark the box "Fragile."
•
When shipping the projector for repairs, place it in its original packing
materials, if possible, or use equivalent materials with cushioning around the
projector. Mark the box "Fragile."
Epson shall not be liable for any damages incurred during transportation.
Projector Setup and Installation Options
You can set up or install your projector in the following ways:
Fr
ont/Rear
Front Ceiling/Rear Ceiling
Select the correct Pr
ojection option in the projector's Installation menu
according to the installation method being used. If necessary, turn on the Inv
Direction Button setting in the projector's Installation menu and adjust the
Menu Rotation setting in the projector's Display menu.
g
Related Links
•
"Precautions on Installation" p.29
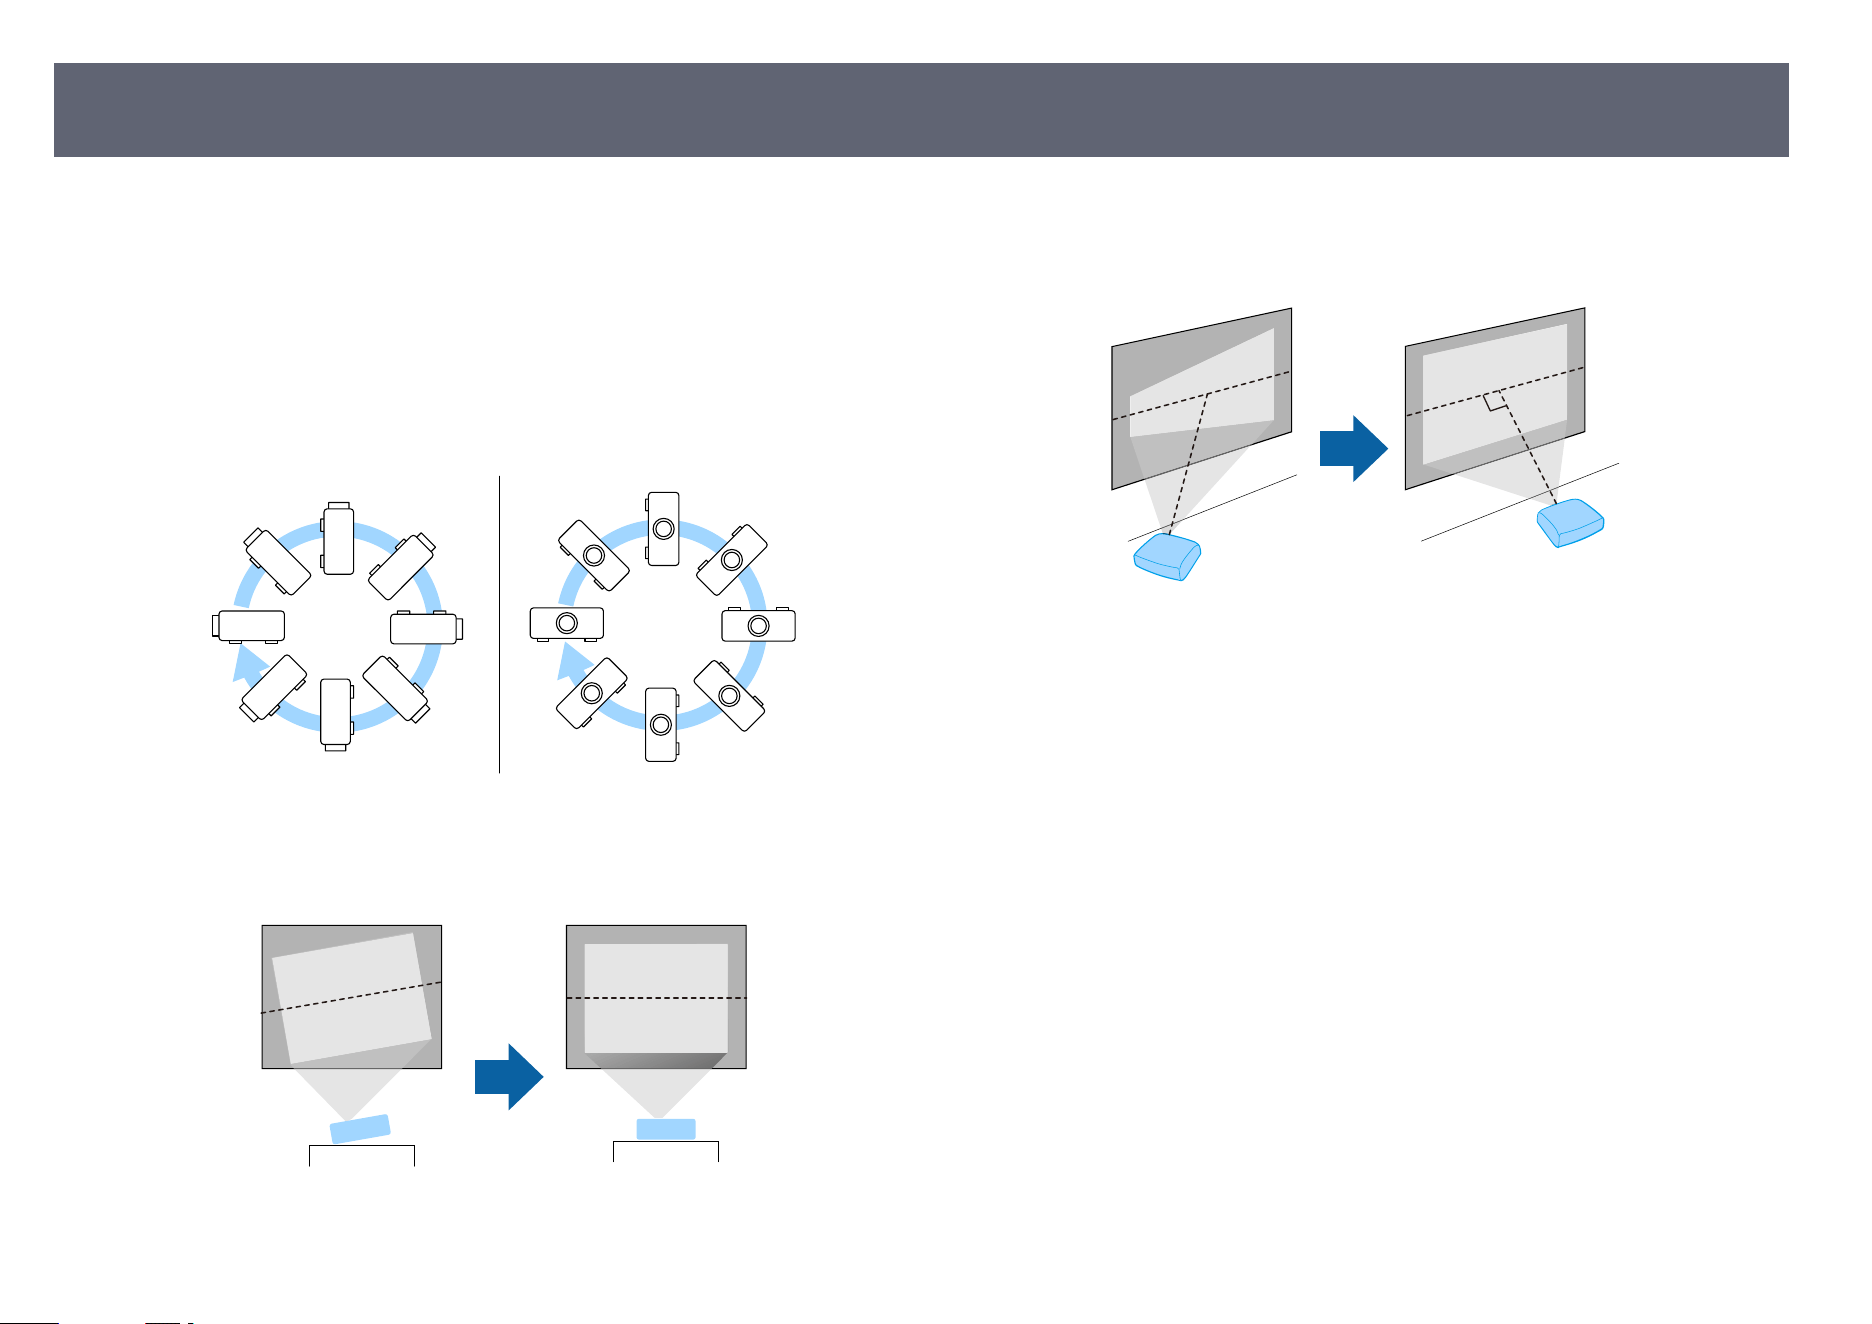
•
"Projection Modes" p.54
Precautions on Installation
No
te the following precautions when installing the projector.
Projector Placement
29
Attention
•
If t
he projector is installed at an angle, it should be installed by qualied
technicians using mounting hardware designed for use with this projector.
•
Install the projector appropriately to prevent it from falling down.
•
Use M4 screws (up to a depth of 0.35 in [9 mm]) to x the projector's ceiling
mount xing points and the mounting hardware at four points.
Installation space
Attention
Be s
ure to leave the following amount of space around the projector so as not to
block the air exhaust and intake vents.
A
3.9 in (10 cm)
B
7.9 in (20 cm)
Projector Placement
30
C
15.7 in (40 cm)
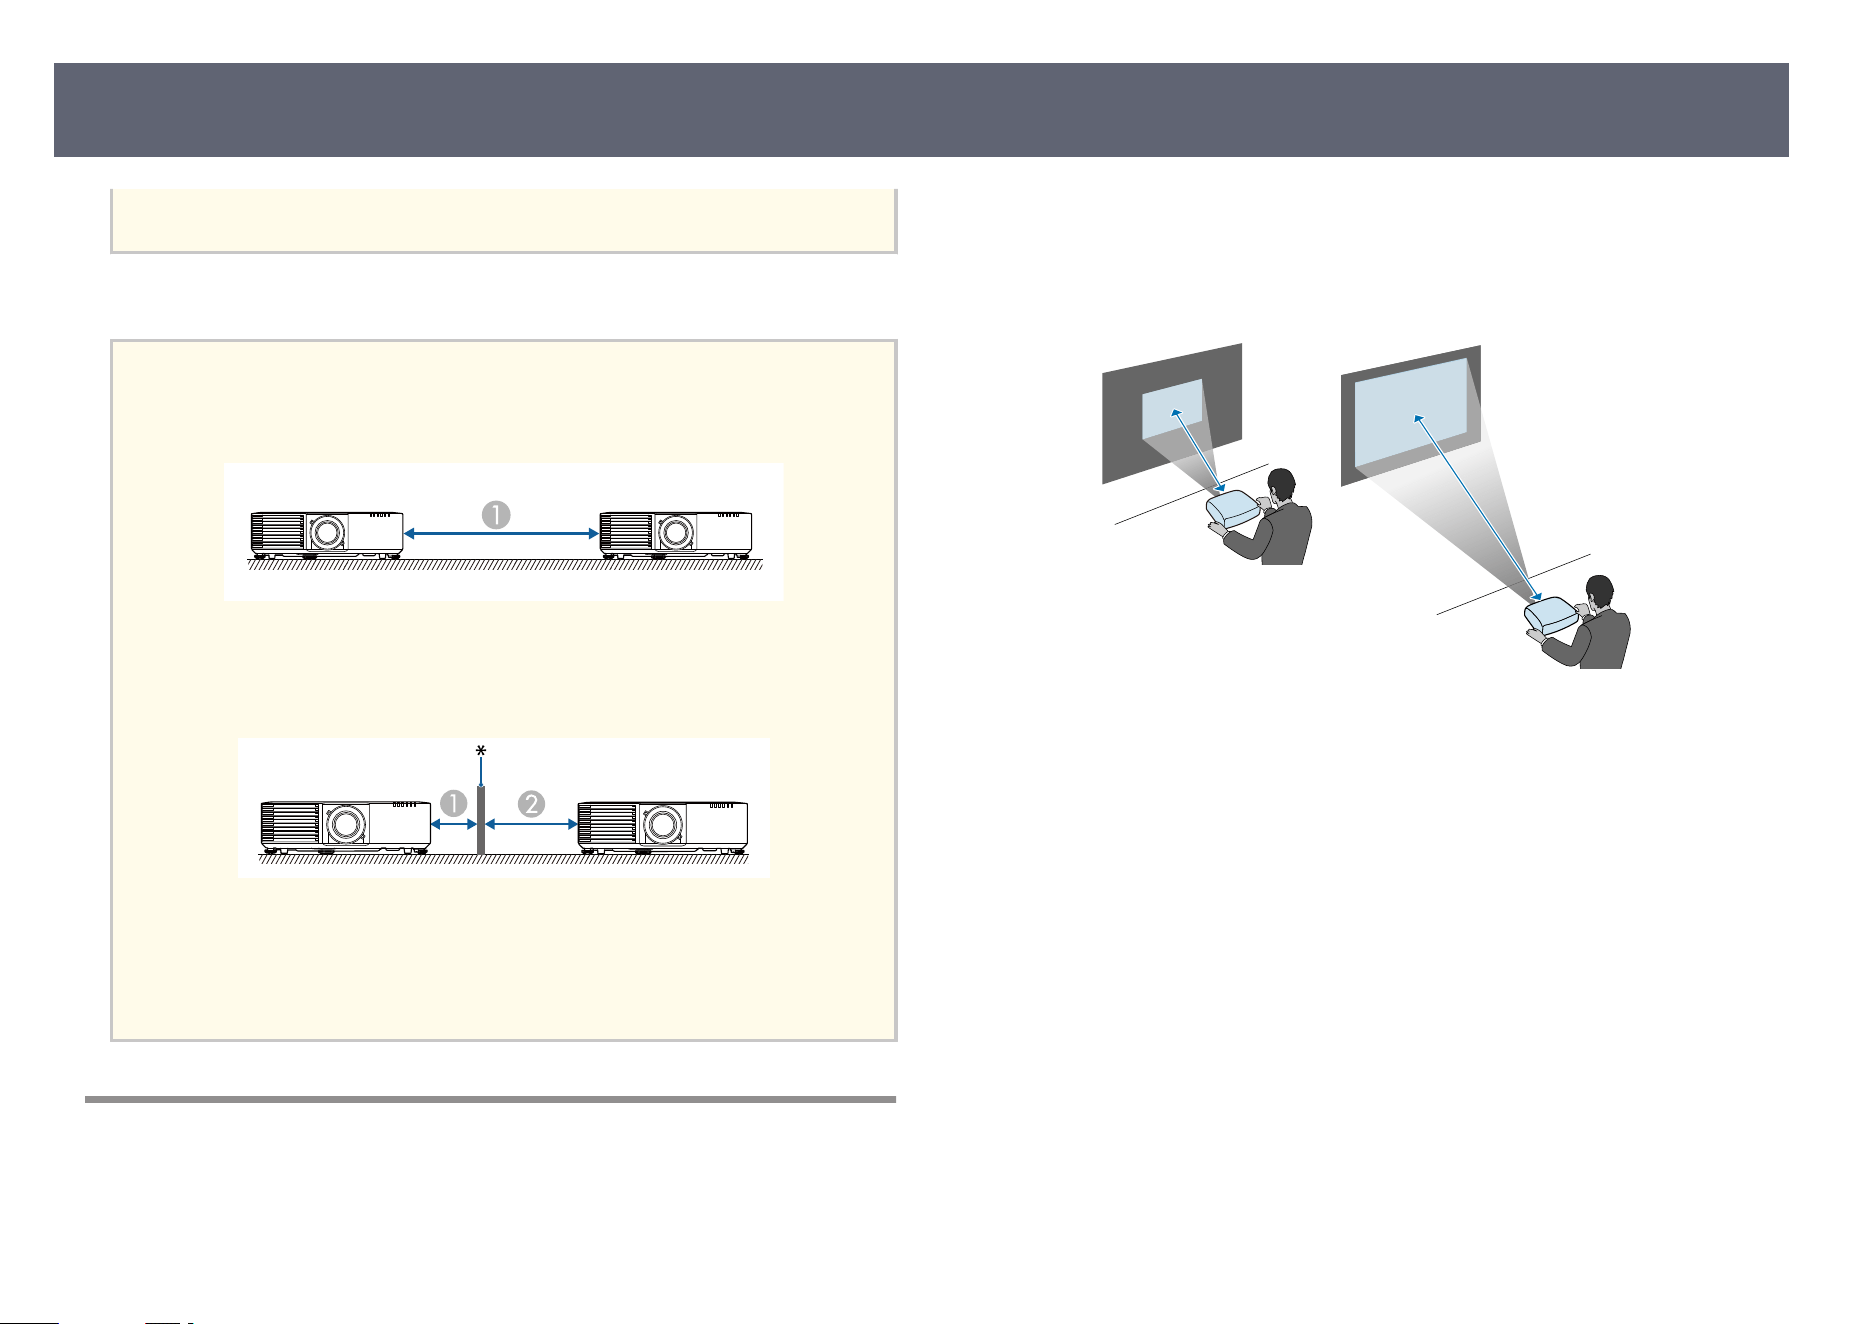
Installation space (When installing multiple projectors side by side)
Attention
•
If you are installing multiple projectors next to each other, make sure hot air from
the exhaust vent does not go into the air intake vent of another projector.
A
59.1 in (150 cm)
•
If y
ou use a partition, you can narrow the space between the projectors.
A
7.9 in (20 cm)
B
15.7 in (40 cm)
* Partition
Projection Distance
e distance at which you place the projector from the screen determines the
approximate size of the image. e image size increases the farther the projector
is from the screen, but can vary depending on the zoom factor, aspect ratio, and
ot
her settings.
See the Appendix for details about how far to place the projector from the
screen based on the size of the projected image.
g
Related Links
•
"Scr
een Size and Projection Distance" p.266
Projector Placement
31
You can install the safety wire to prevent the projector from falling from the
ceilin
g.
Warning
Be s
ure to use the safety wire provided with the Epson ceiling mount. e safety wire
is available as an optional Safety Wire Set ELPWR01.
Attention
Wh
en placing the projector upside down, make sure to place a cloth or other
cushioning material underneath the projector to protect the lens. (EB-L790SE/EB-
L795SE/EB-L690SE/EB-L695SE/EB-L690SU/EB-L695SU)
g
Related Links
•
"Wh
en Using the Ceiling Mount ELPMB22" p.32
•
"When Using the Ceiling Mount ELPMB30" p.33
When Using the Ceiling Mount ELPMB22
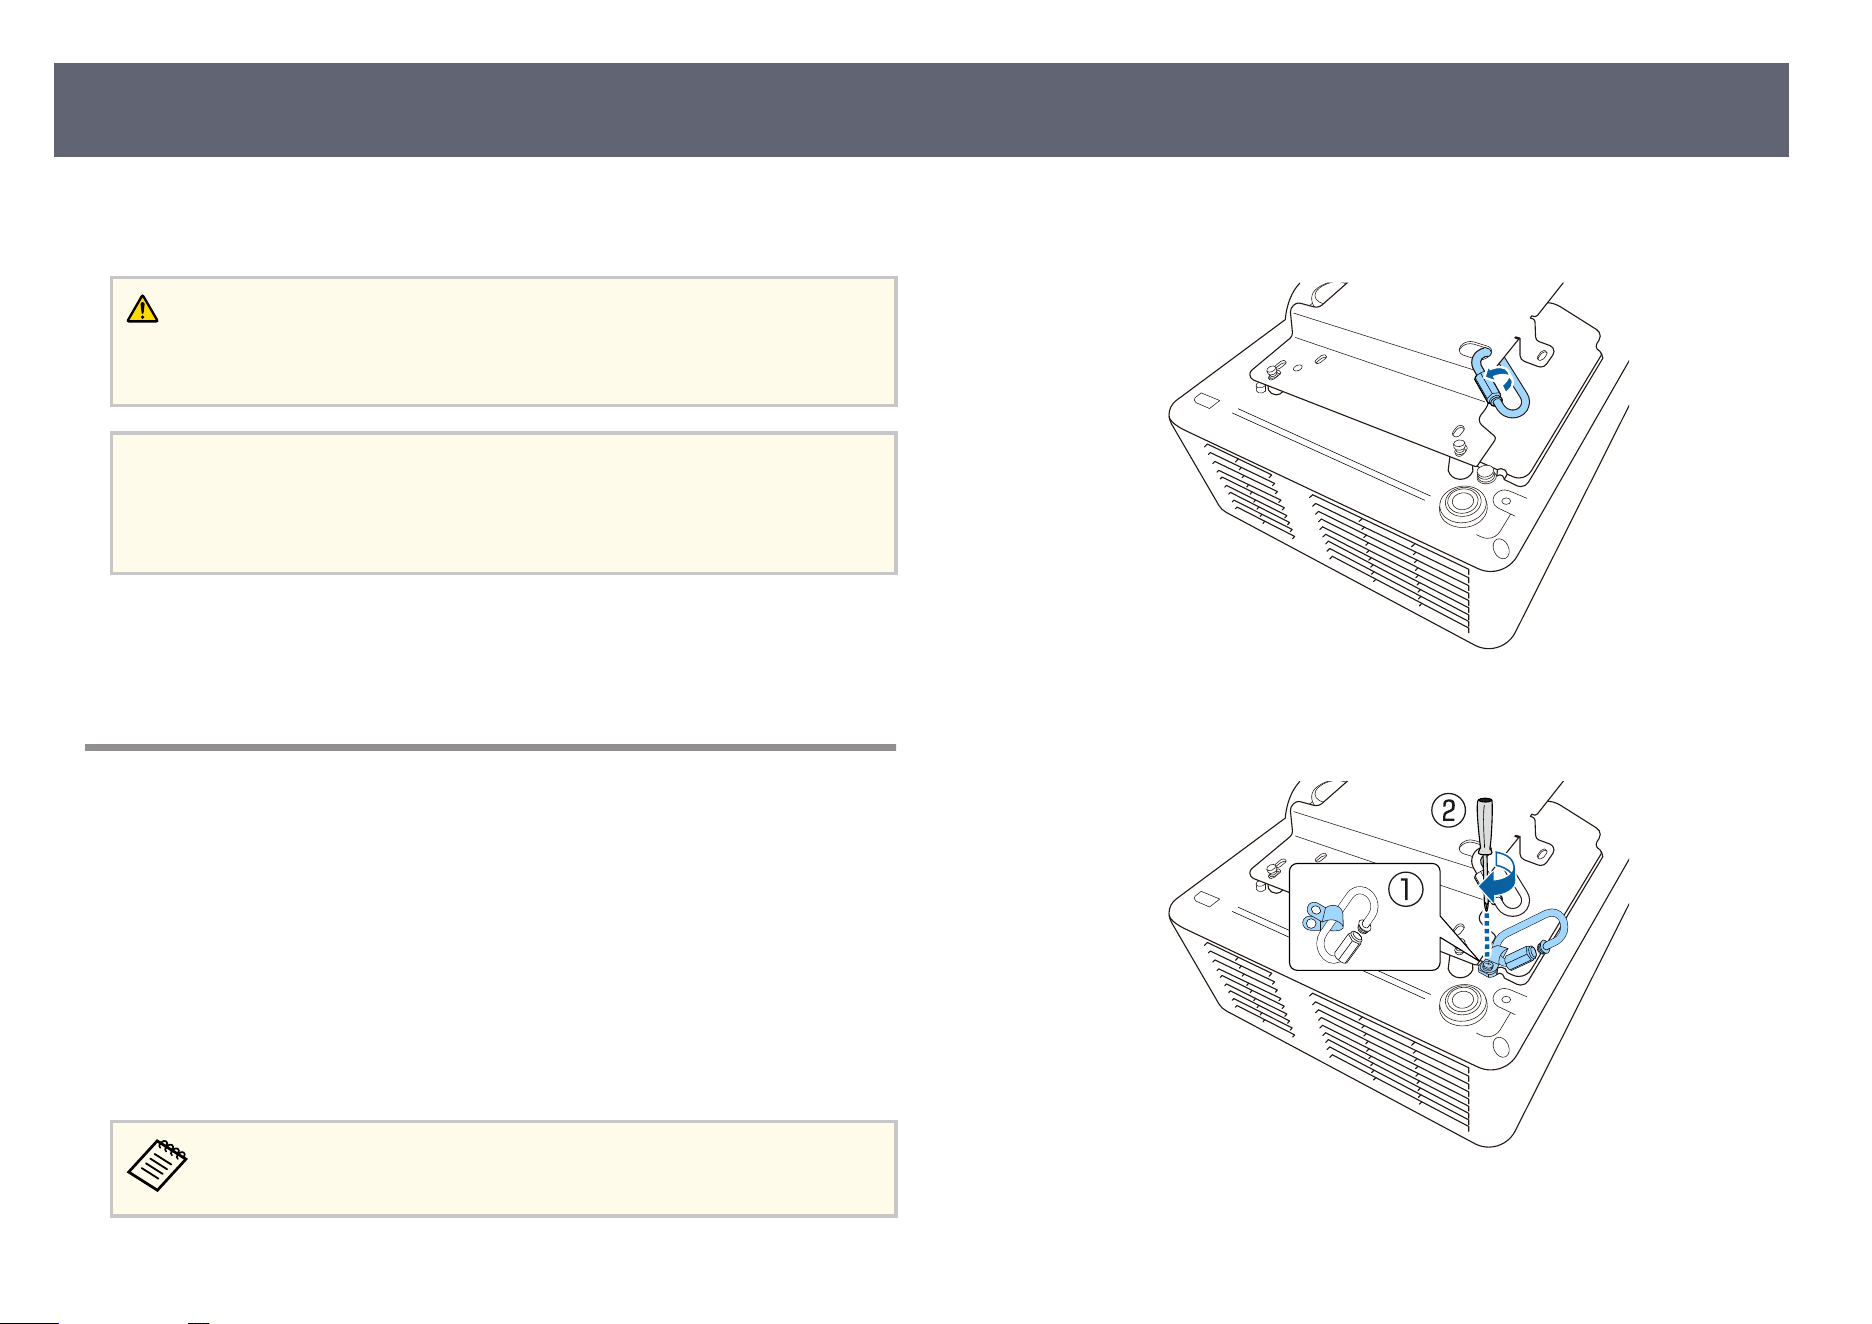
You can attach a safety wire to your projector for increased safety as shown.
Bef
ore you start, make sure you have rmly installed the ELPMB22 ceiling
mount on the projector and have the following items that are included in the
safety wire set:
•
Safety wire × 1
•
Carabiner × 2
•
Wire clamp × 1
•
Attaching screw (M4 × 10 mm) × 1
For details on installing the ELPMB22, see the Ceiling Mount ELPMB22/
ELPMB23 Instruction Manual.
a
Attach a carabiner to the hole on the ceiling mount, and tighten the
carab
iner lock.
b
Attach the wire clamp to another carabiner, and then use the screw to x
th
e wire clamp to the wire clamp xing point on the projector.
Installing the Safety Wire
32
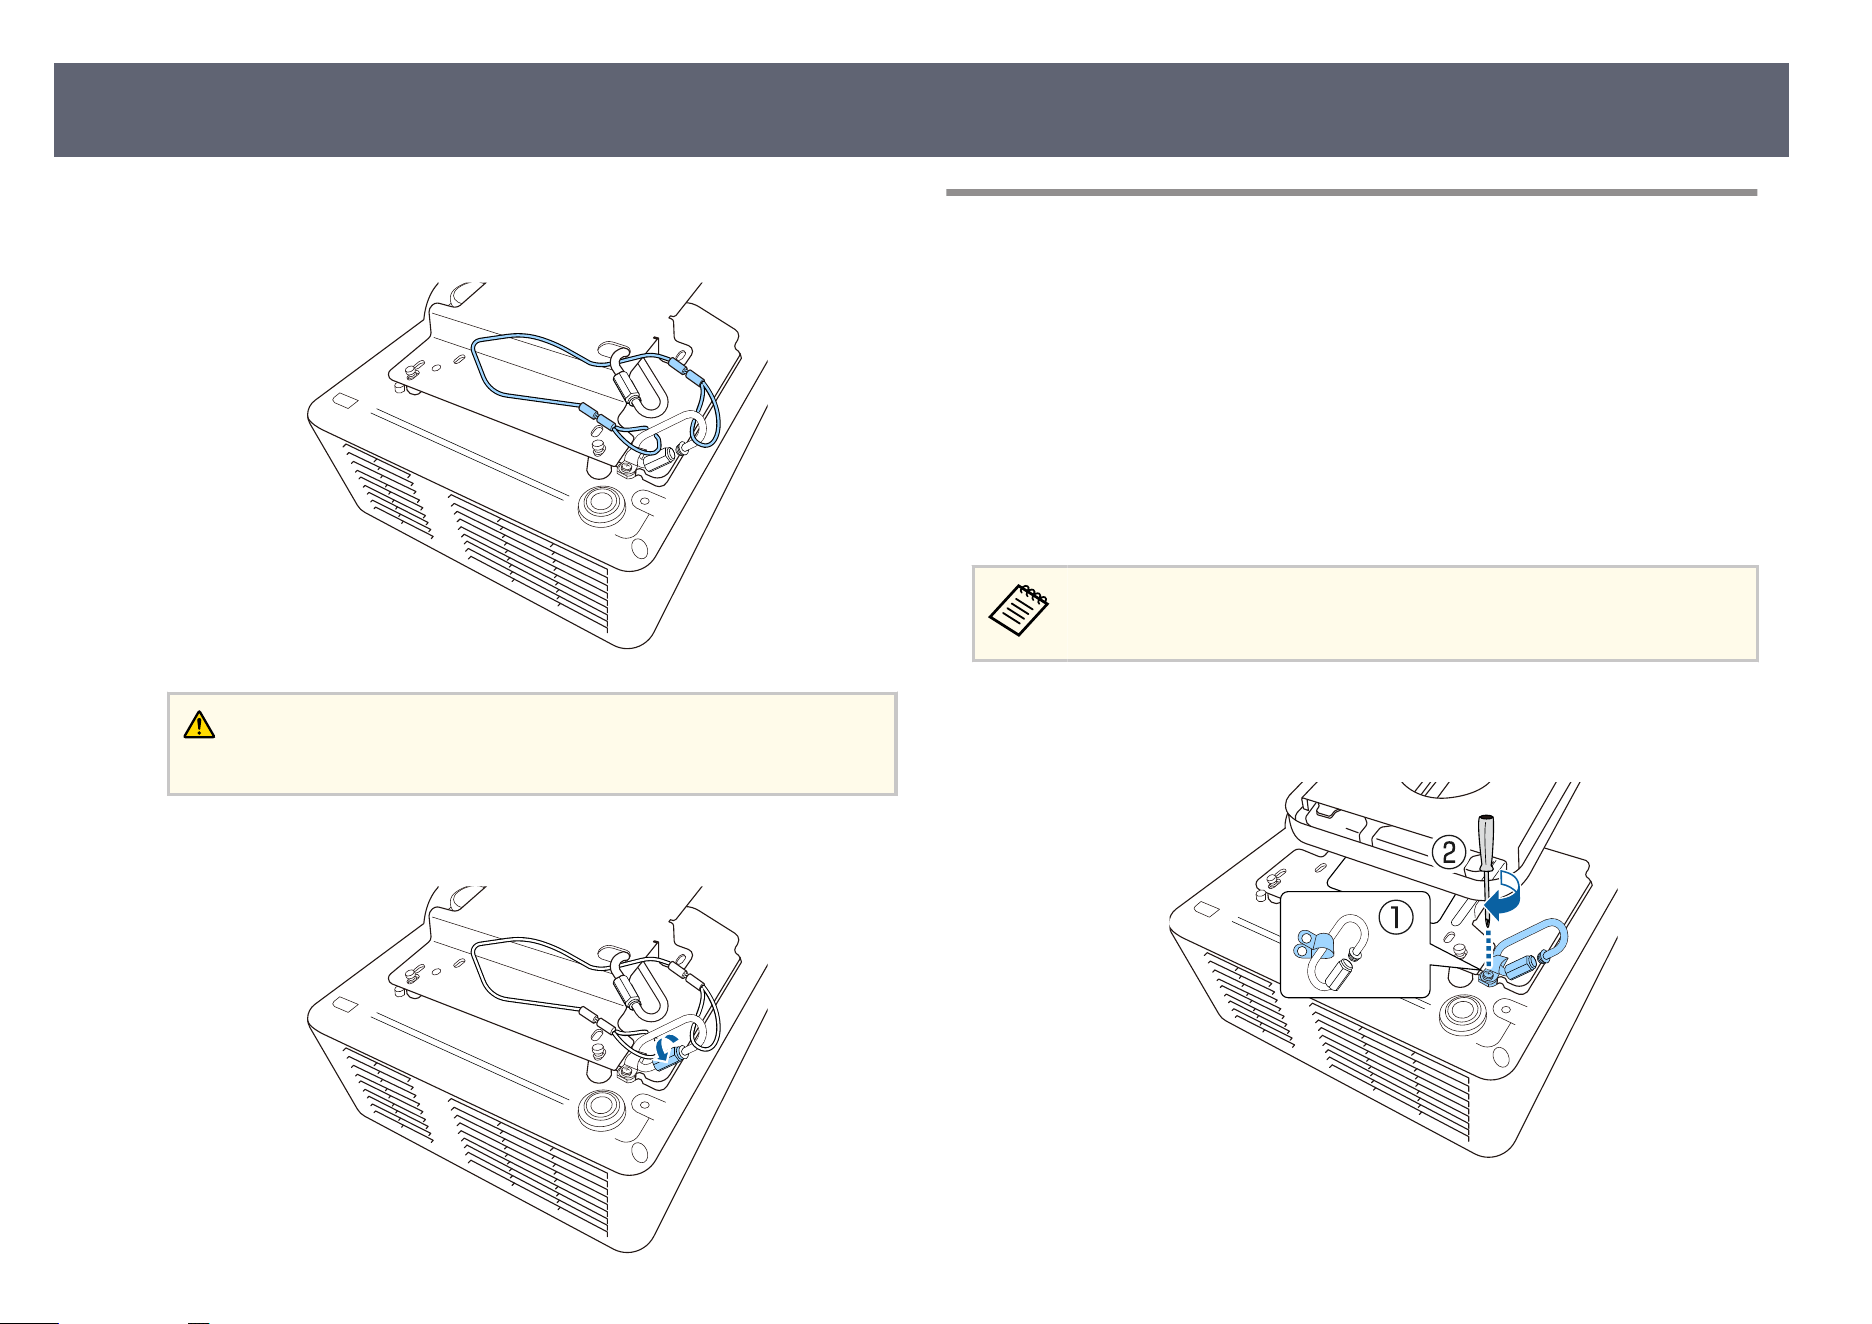
c
Loop the safety wire through the carabiner on the ceiling mount, and
att
ach both ends to the carabiner on the projector.
Warning
Do n
ot attach the safety wire to the security cable attachment point.
d
Tighten the carabiner lock.
When Using the Ceiling Mount ELPMB30
You can attach a safety wire to your projector for increased safety as shown.
Bef
ore you start, make sure you have rmly installed the ELPMB30 ceiling
mount on the projector and have the following items that are included in the
safety wire set:
•
Safety wire × 1
•
Carabiner × 2 (Only one carabiner is used for the ELPMB30.)
•
Wire clamp × 1
•
Attaching screw (M4 × 10 mm) × 1
For details on installing the ELPMB30, see the ELPMB30 Us
er's Guide.
a
Attach the wire clamp to the carabiner, and then use the screw to x t
h
e
wire clamp to the screw into the wire clamp xing point on the projector.
Installing the Safety Wire
33
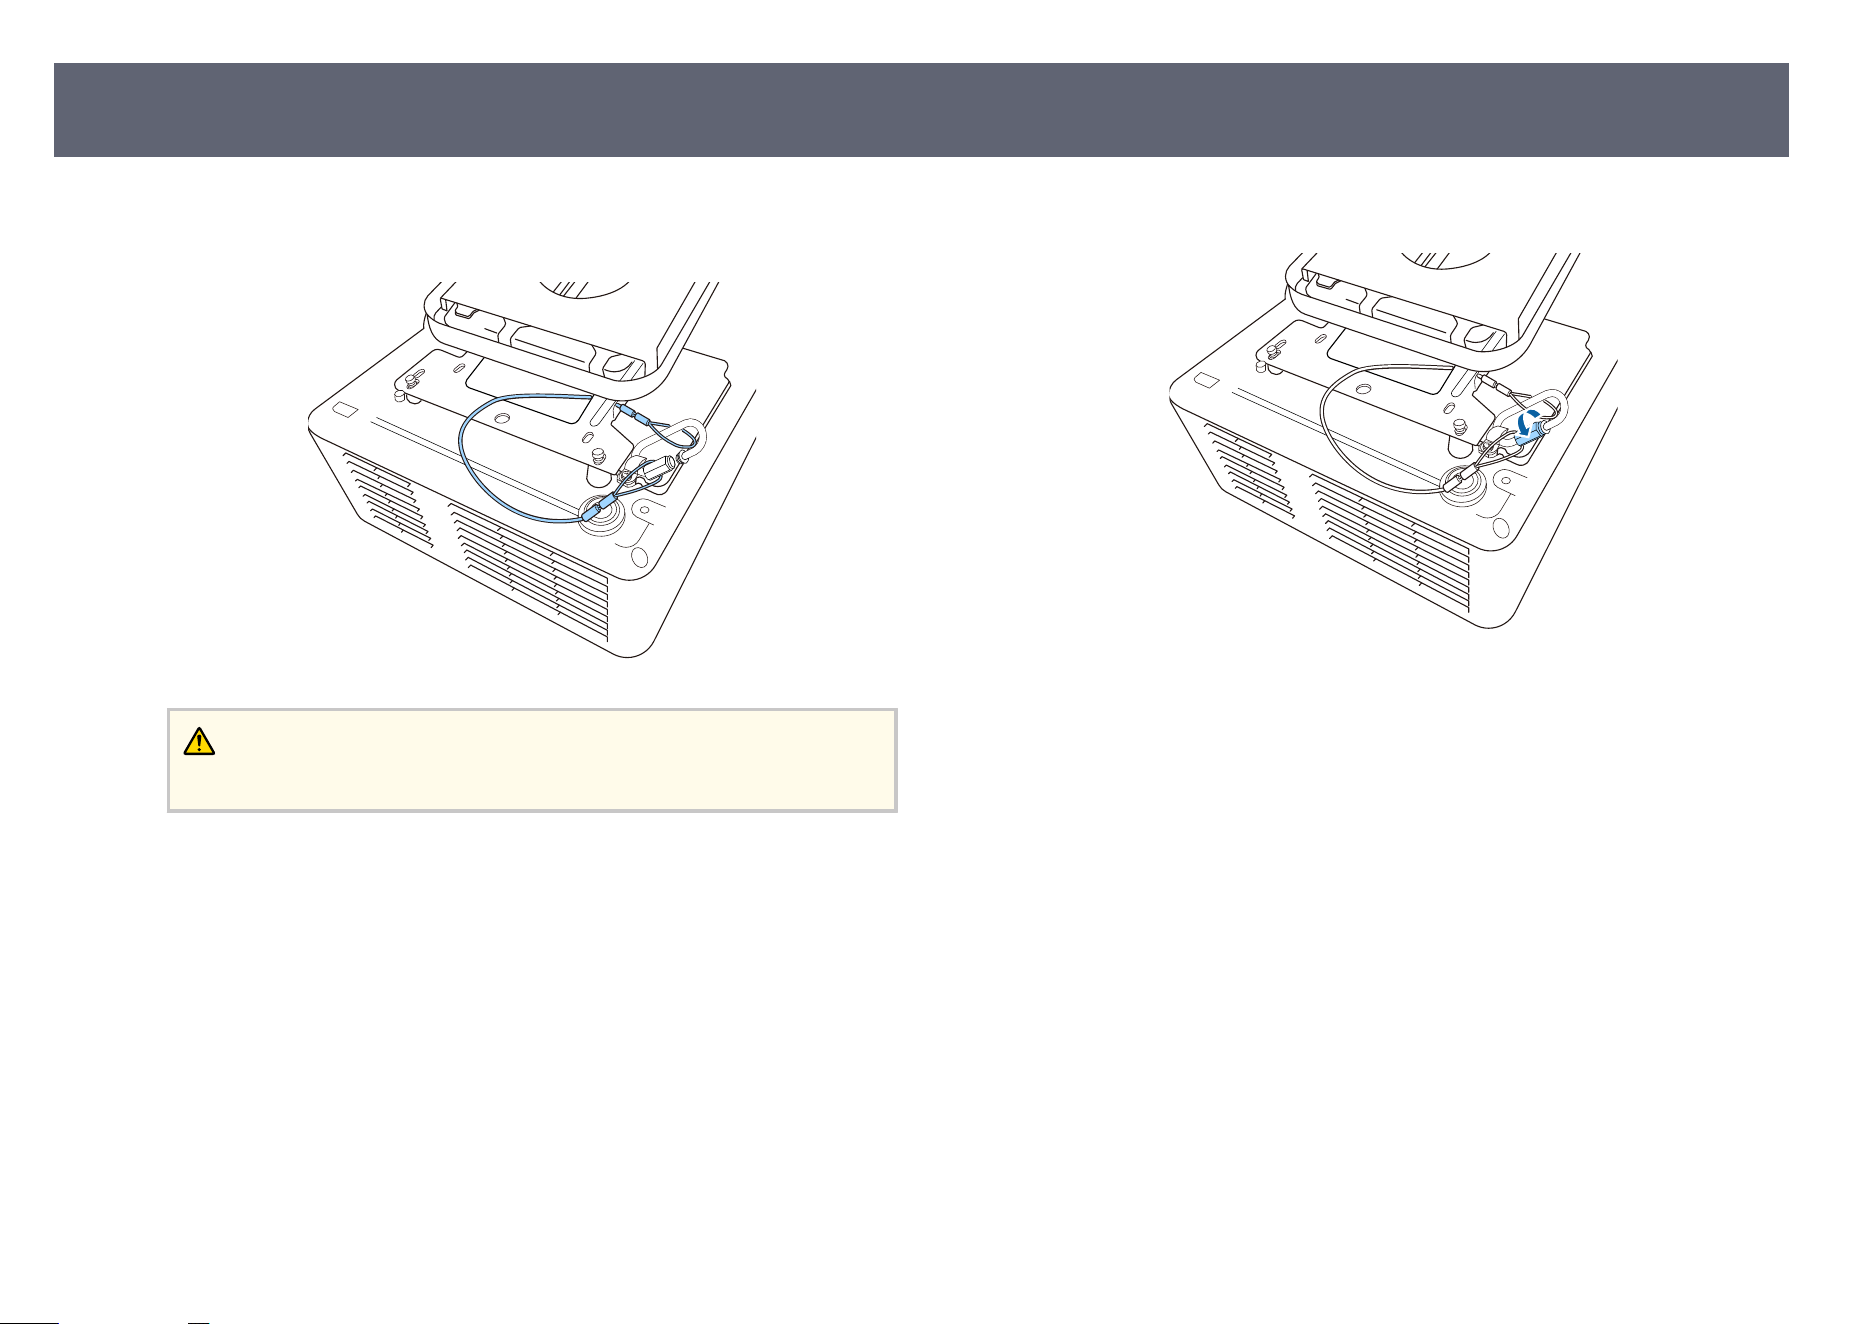
b
Loop the safety wire through the hole in the ceiling mount, and then
att
ach both ends to the carabiner.
Warning
Do n
ot attach the safety wire to the security cable attachment point.
c
Tighten the carabiner lock.
Installing the Safety Wire
34
See these sections to connect the projector to a variety of projection sources.
Attention
•
Ch
eck the shape and orientation of the connectors on any cable you plan to
connect. Do not force a connector into a port if it does not t. e device or your
projector could be damaged or could malfunction.
Purchase optional or commercially available cables when necessary.
g
Related Links
•
"Co
nnecting to a Computer" p.35
•
"Connecting to Video Sources" p.35
•
"Connecting to External USB Devices" p.36
•
"Connecting to a Document Camera" p.37
•
"Connecting to an HDBaseT Transmitter " p.37
•
"Connecting to the Base Unit " p.38
•
"Connecting to External Devices" p.39
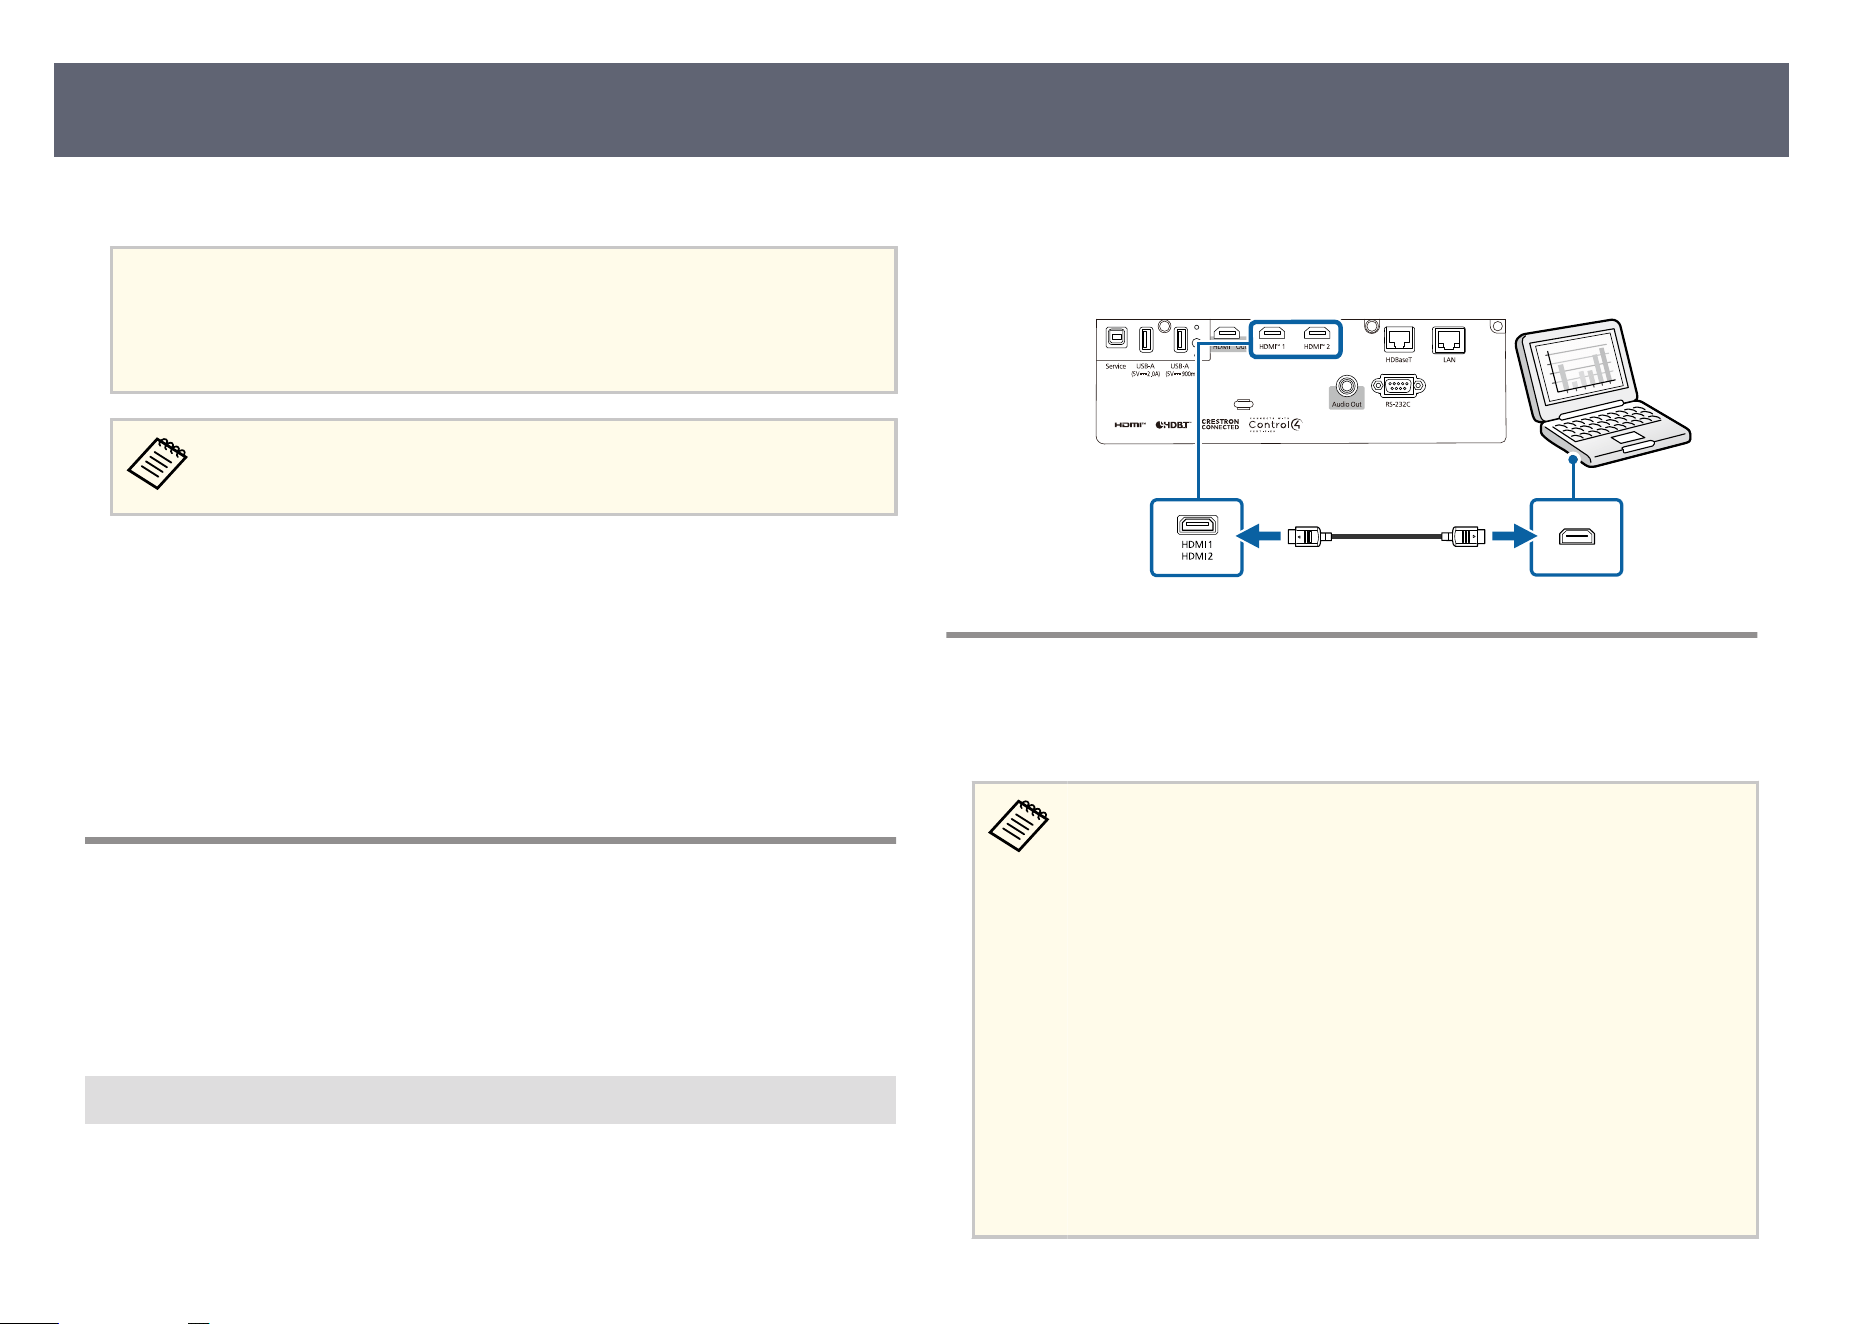
Connecting to a Computer
Follow the instructions in these sections to connect a computer to the projector.
g
Related Links
•
"Co
nnecting to a Computer for HDMI Video and Audio" p.35
Connecting to a Computer for HDMI Video and Audio
If your computer has an HDMI port, you can connect it to the projector using
an HDMI cable and send the computer's audio with the projected image.
a
Connect the HDMI cable to your computer's HDMI output port.
b
Connect the other end to the projector's HDMI port.
Connecting to Video Sources
Follow the instructions in these sections to connect video devices to the
pr
ojector.
•
When sending 18 Gbps images such as 4K 60Hz 4:4:4, use an HDMI
cable (premium-high speed). If you use an incompatible cable, images
may not be displayed correctly.
•
If the port on the device you connect has an unusual shape, use the
cable supplied with the device or an optional cable to connect to the
projector.
•
e cable diers depending on the output signal from the connected
video devices.
•
Some video devices are capable of outputting dierent types of signals.
See your video device manual to conrm what type of signals can be
output.
•
If audio is not output correctly, check the settings in Audio Out
Device.
s Signal I/O > HDMI Link > Audio Out Device
Projector Connections
35
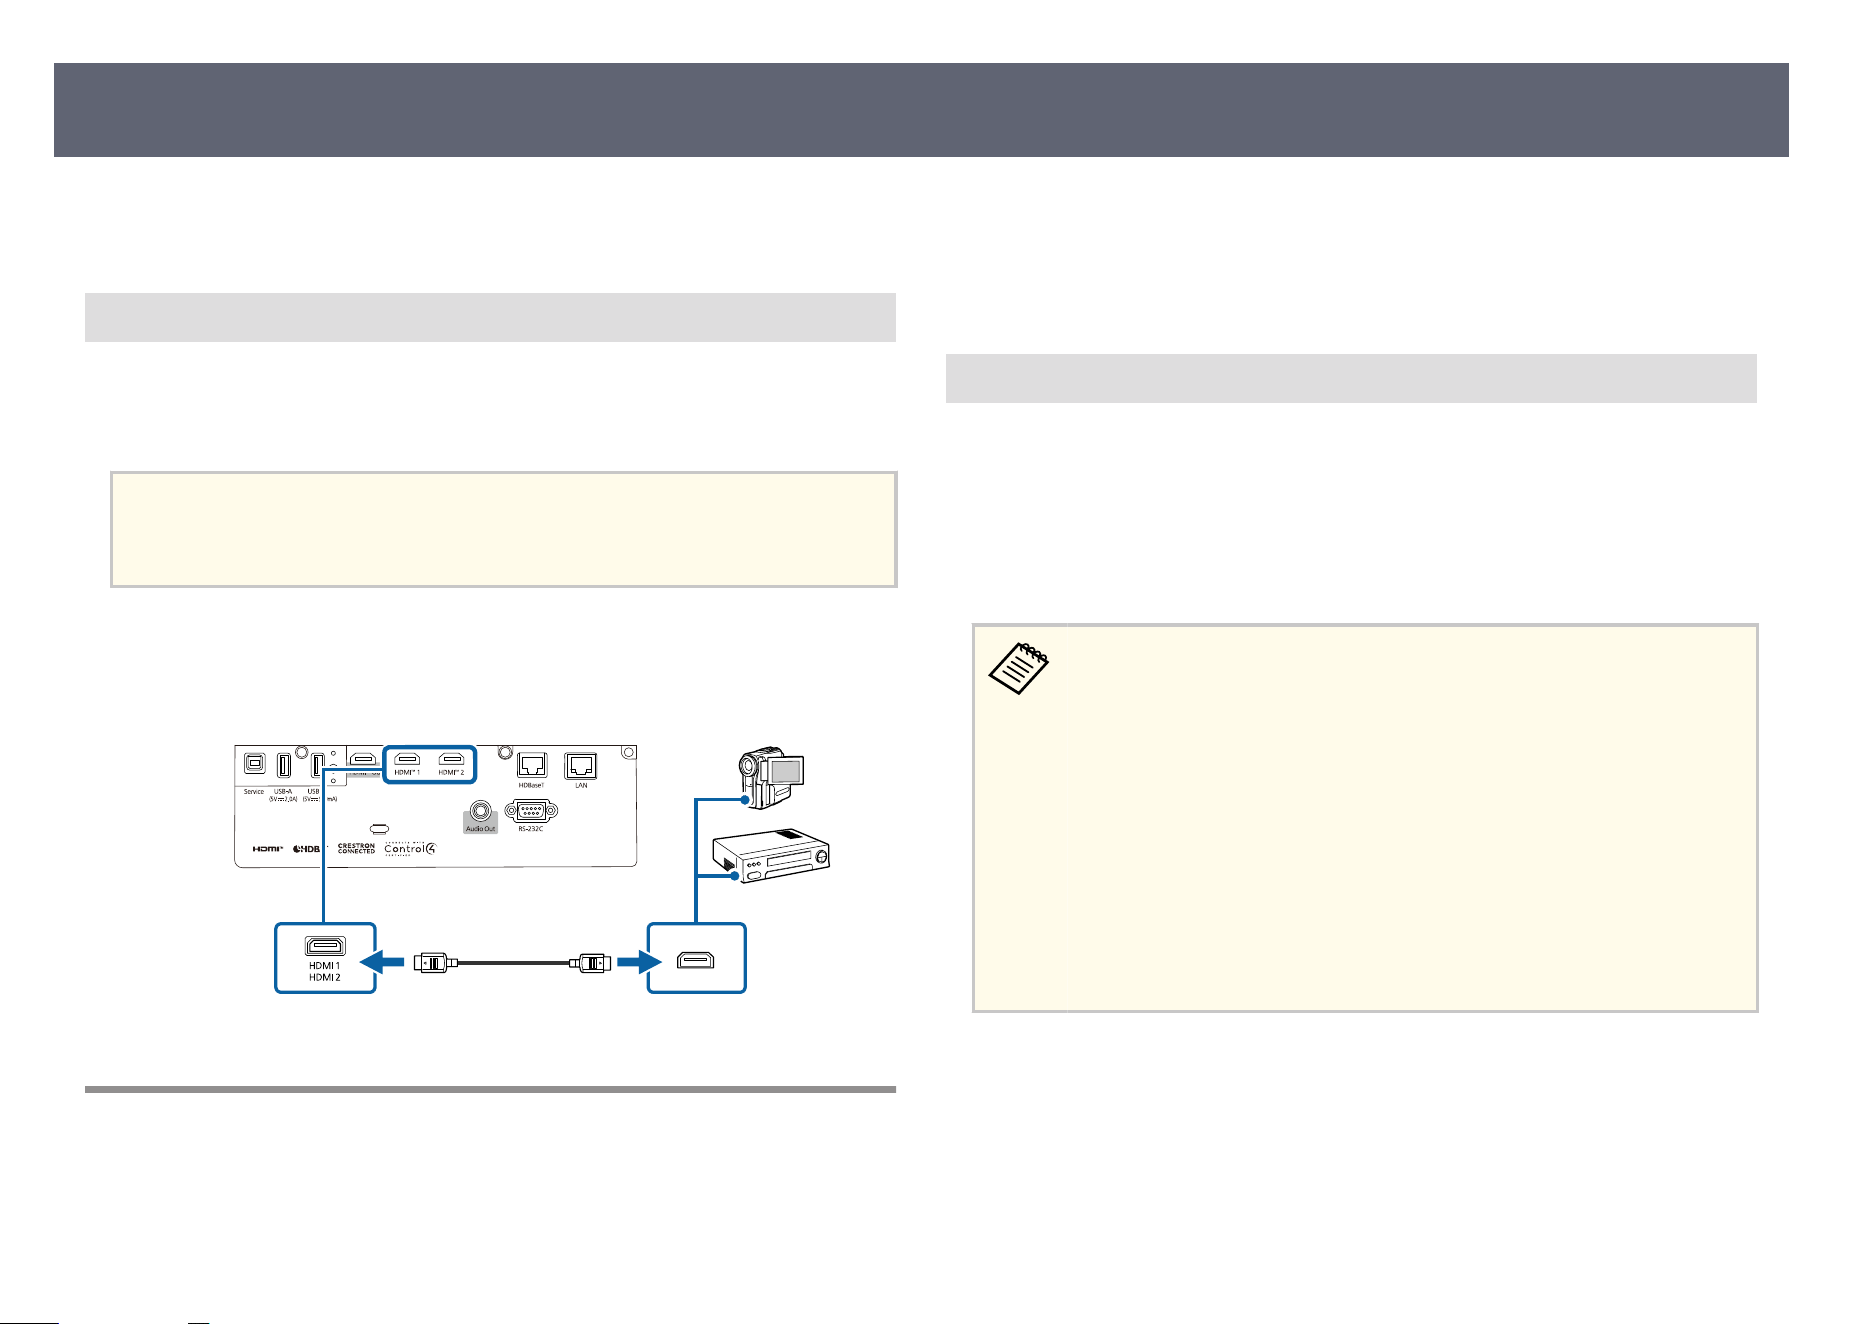
g
Related Links
•
"Co
nnecting to an HDMI Video Source" p.36
Connecting to an HDMI Video Source
I
f y
our video source has an HDMI port, you can connect it to the projector
using an HDMI cable and send the image source's audio with the projected
image.
Attention
Do n
ot turn on the video source before connecting it to the projector. Doing so could
damage the projector.
a
Connect the HDMI cable to your video source's HDMI output port.
b
Connect the other end to the projector's HDMI port.
Connecting to External USB Devices
Follow the instructions in these sections to connect external USB devices to the
pr
ojector.
g
Related Links
•
"USB D
evice Projection" p.36
•
"Connecting to a USB Device" p.37
•
"Disconnecting a USB Device" p.37
USB Device Projection
Y
o
u can project images and other content without using a computer or video
device by connecting any of these devices to your projector:
•
USB ash drive
•
Digital camera or smartphone
•
USB hard drive
•
Digi
tal cameras or smartphones must be USB-mounted devices, not
TWAIN-compliant devices, and must be USB Mass Storage Class-
compliant.
•
USB hard drives must meet these requirements:
•
USB Mass Storage Class-compliant (not all USB Mass Storage Class
devices are supported)
•
Formatted in FAT16/32
•
Self-powered by their own AC power supplies (bus-powered hard
drives are not recommended)
•
MBR partition table format
•
Avoid using hard drives with multiple partitions
You can also project playlists that contain images and movies saved on a USB
ash
drive in Content Playback mode.
g
Related Links
•
"Projecting a PC Free Presentation" p.99
•
"Projecting in Content Playback Mode" p.104
Projector Connections
36
Connecting to a USB Device
Yo
u can connect your USB device to the projector's USB-A port and use it to
project images and other content.
a
If your USB device came with a power adapter, plug the device into an
ele
ctrical outlet.
b
Connect the USB cable or USB ash
drive to the projector's USB-A port as
shown.
Attention
•
U
s
e the USB cable supplied with or specied for use with the device.
•
Do not connect a USB hub or a USB cable longer than 9.8 feet (3 m), or the
device may not operate correctly.
c
Connect the other end to your device, if necessary.
Disconnecting a USB Device
Wh
en you have nished projecting with a connected USB device, disconnect the
device from the projector.
a
Turn o
and unplug the device, if necessary.
b
Di
sconnect the USB device from the projector.
Connecting to a Document Camera
You can connect a document camera to your projector to project images viewed
by the camera.
e connection method varies depending on your Epson document camera
model. See the document camera manual for details.
Connecting to an HDBaseT Transmitter
To send an HDMI or RS-232C signal over a long distance, you can connect
t
h
e projector to an optional HDBaseT transmitter using a 100Base-TX network
cable. is is useful when you want to send a signal to or control the projector
from a remote location, such as in a hall or event site, since you can use a
network cable up to 100 m in length. To ensure proper data transmission, use
a Category 5e STP cable or better. However, operation is not guaranteed for all
input/output devices and environments.
Projector Connections
37
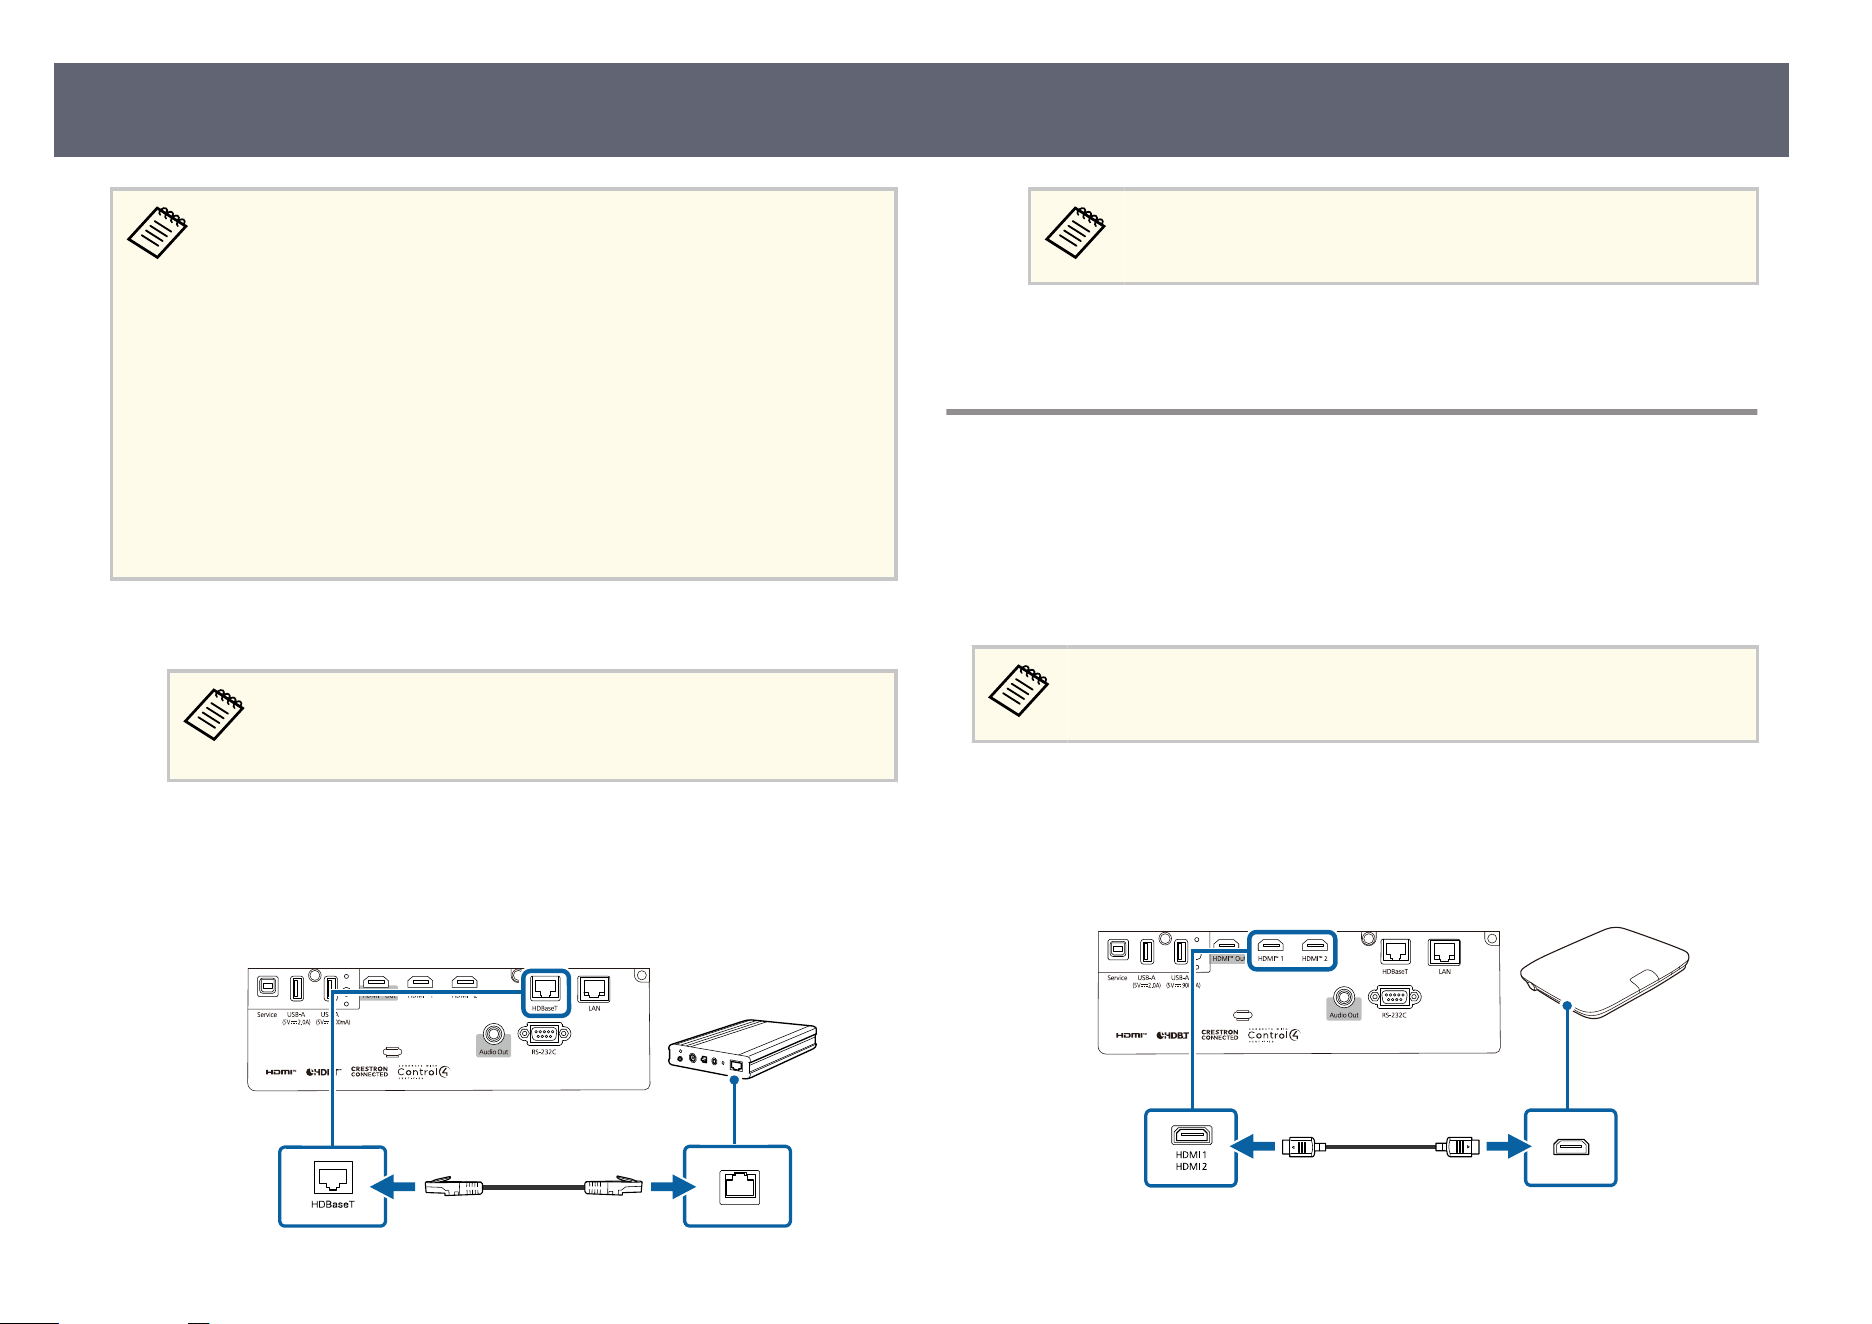
•
To en
able communication from the Ethernet and serial ports on the
transmitter, select On as the Control Communications setting in
the projector's Operation menu. Turning on this setting disables the
projector's LAN and RS-232C ports.
s Operation > HDBaseT > Control Communications
•
If you connected an Extron XTP transmitter or switcher to the
projector's HDBaseT port, select On as the Extron XTP setting in the
projector's Operation menu.
s Operation > HDBaseT > Extron XTP
•
If you want to control the projector when the projector does not project
any images, set the Standby Mode setting to Normal in the projector's
Operation menu.
a
Turn o the projector and HDBaseT transmitter.
Make sure the projector and HDBaseT transmitter are turned o
w
hen connecting or disconnecting a network cable between the two
devices.
b
Connect one end of the network cable to the HDBaseT port on the
tran
smitter.
c
Connect the other end to the projector's HDBaseT port.
See the documentation that came with the HDBaseT transmitter for
ins
tructions on connecting it to your video device or computer.
d
Turn on the projector and HDBaseT transmitter.
Connecting to the Base Unit
You can use the optional wireless presentation system to project through the
bas
e unit (receiver). Your wireless presentation system (ELPWP20) includes
one base unit (ELPBU01) and two wireless transmitters (ELPWT01). Using the
projector with wireless transmitters allows you to connect to Windows/Mac
computers through the base unit and project your images easily.
See the ELPWP20 Qu
ick Start Guide for details on installing the base unit.
a
Connect the HDMI cable supplied with your wireless presentation system
t
o t
he HDMI Out port on the base unit.
b
Connect the other end to the projector's HDMI port.
Projector Connections
38
c
Connect the wireless transmitter to a USB port on your computer. See the
Ep
son Wireless Presentation System User's Guide for details.
Connecting to External Devices
Follow the instructions in these sections to connect external devices to the
pr
ojector.
g
Related Links
•
"Connecting to an External HDMI Monitor" p.39
•
"Connecting to External Speakers" p.39
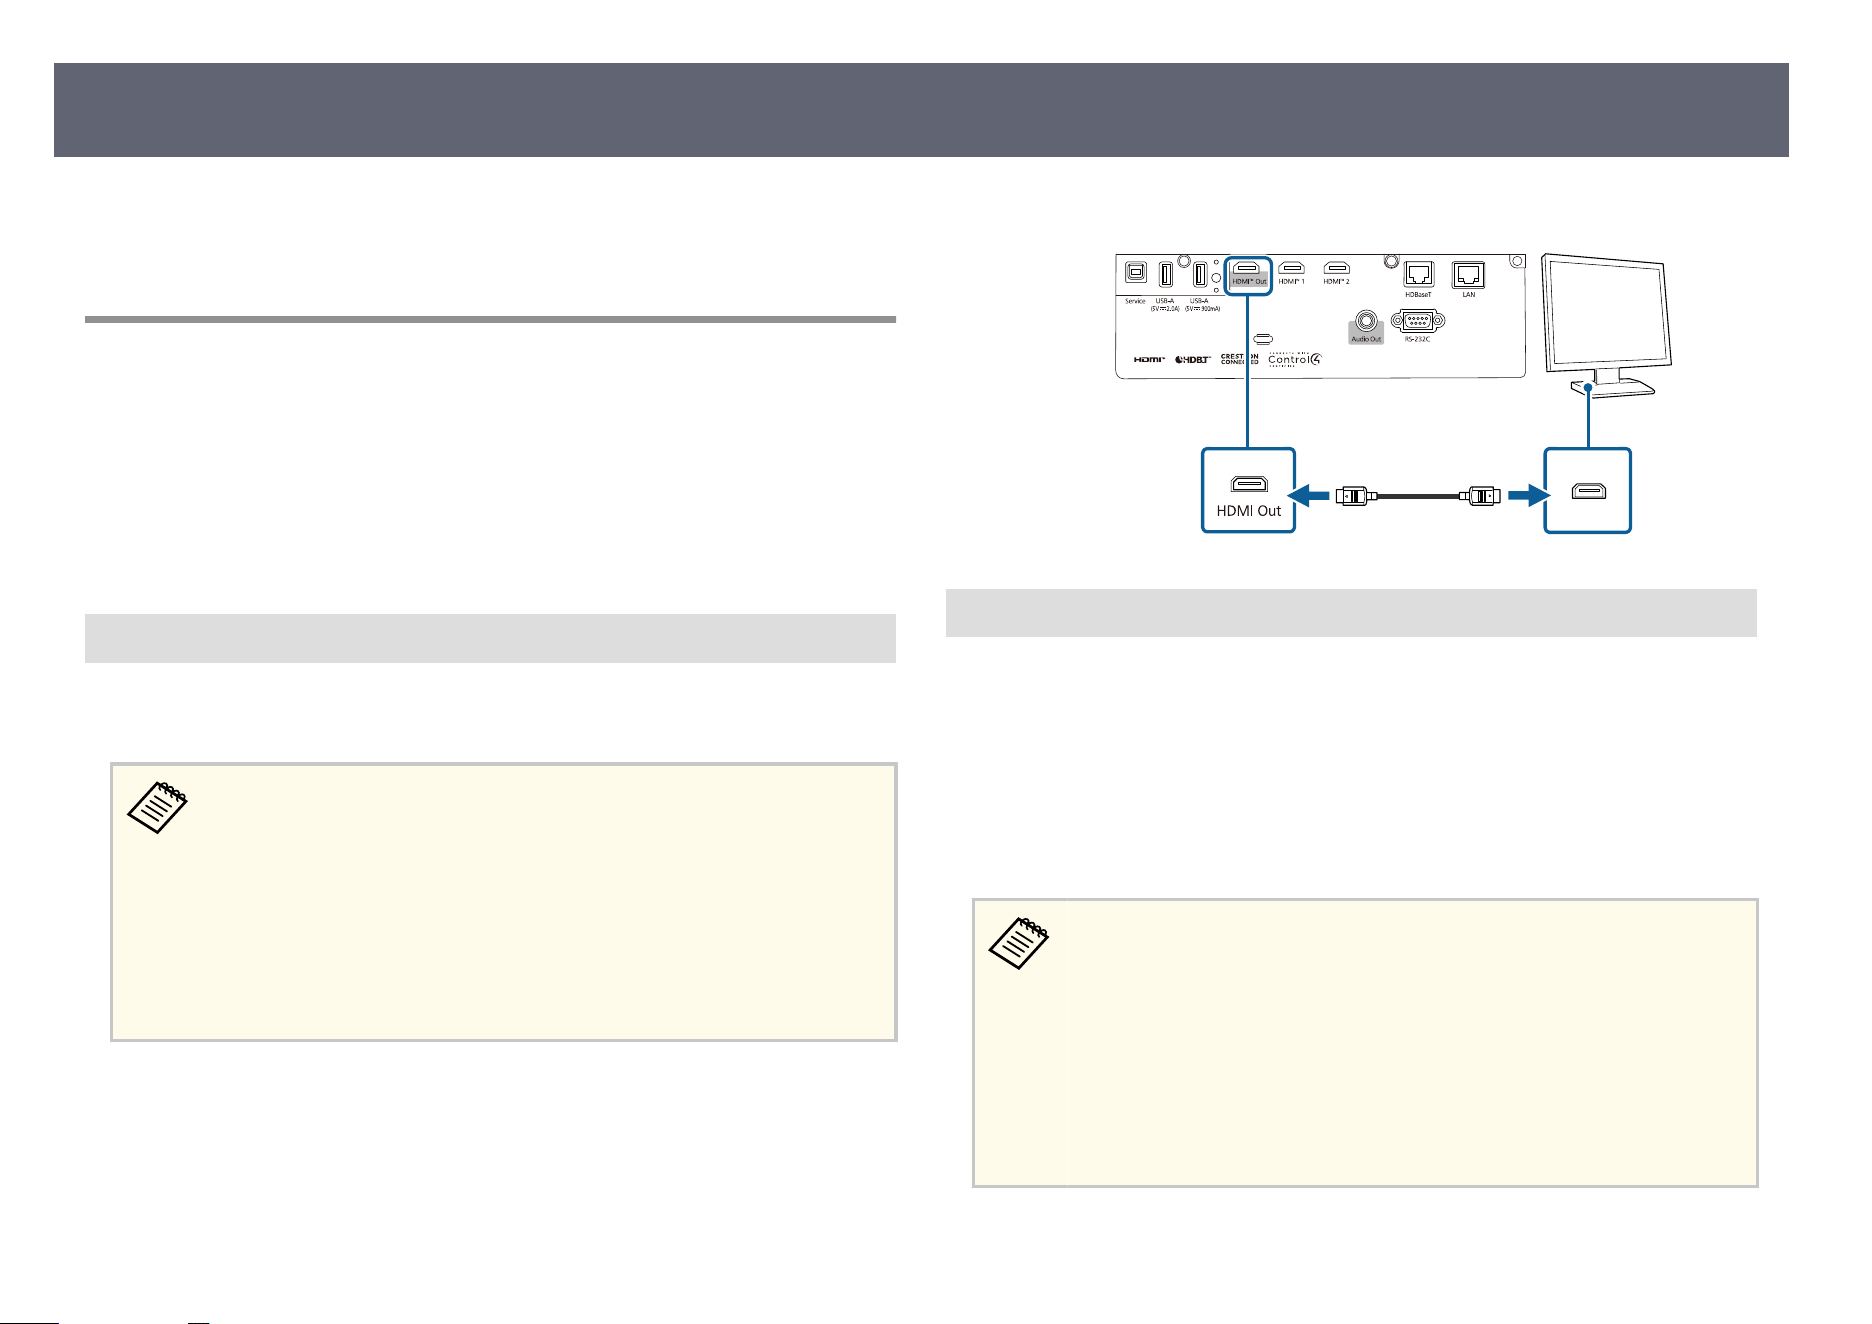
Connecting to an External HDMI Monitor
Yo
u can connect an external HDMI monitor to the projector's HDMI Out port
and use it to display images from the current input source.
•
If the audio from the projector and HDMI monitor is out of sync, mute
the audio on either the projector or the HDMI monitor.
•
If the output image does not appear on the HDMI monitor, change
the EDID settings in the projector's Signal I/O menu to match the
resolution of the HDMI monitor.
•
Use an HDMI monitor that supports HDCP2.3.
•
e HDMI Out port is not guaranteed to operate for all monitor
devices and products.
a
Connect the HDMI cable to your monitor's HDMI input port.
b
Connect the other end to the projector's HDMI Out port.
Connecting to External Speakers
Yo
u can connect the projector to external self-powered speakers. You can
control the volume using the projector's remote control.
To output audio from external speakers, set the Audio Out Device setting to
Projector in the projector's Signal I/O menu. When an audio/video system is
not connected to the projector, audio is output from the external speakers even
if Audio Out Device is set to AV System.
s Signal I/O > HDMI Link > Audio Out Device
•
If y
ou want to output audio from the external speakers when the
projector is turned o, set the following items in the projector's
Operation menu:
•
Select Normal as the Standby Mode setting
•
Select On as the Standby Audio Output setting
•
You can also connect the projector to an amplier with speakers.
•
e projector's built-in speaker system is disabled when you connect
external speakers.
Projector Connections
39
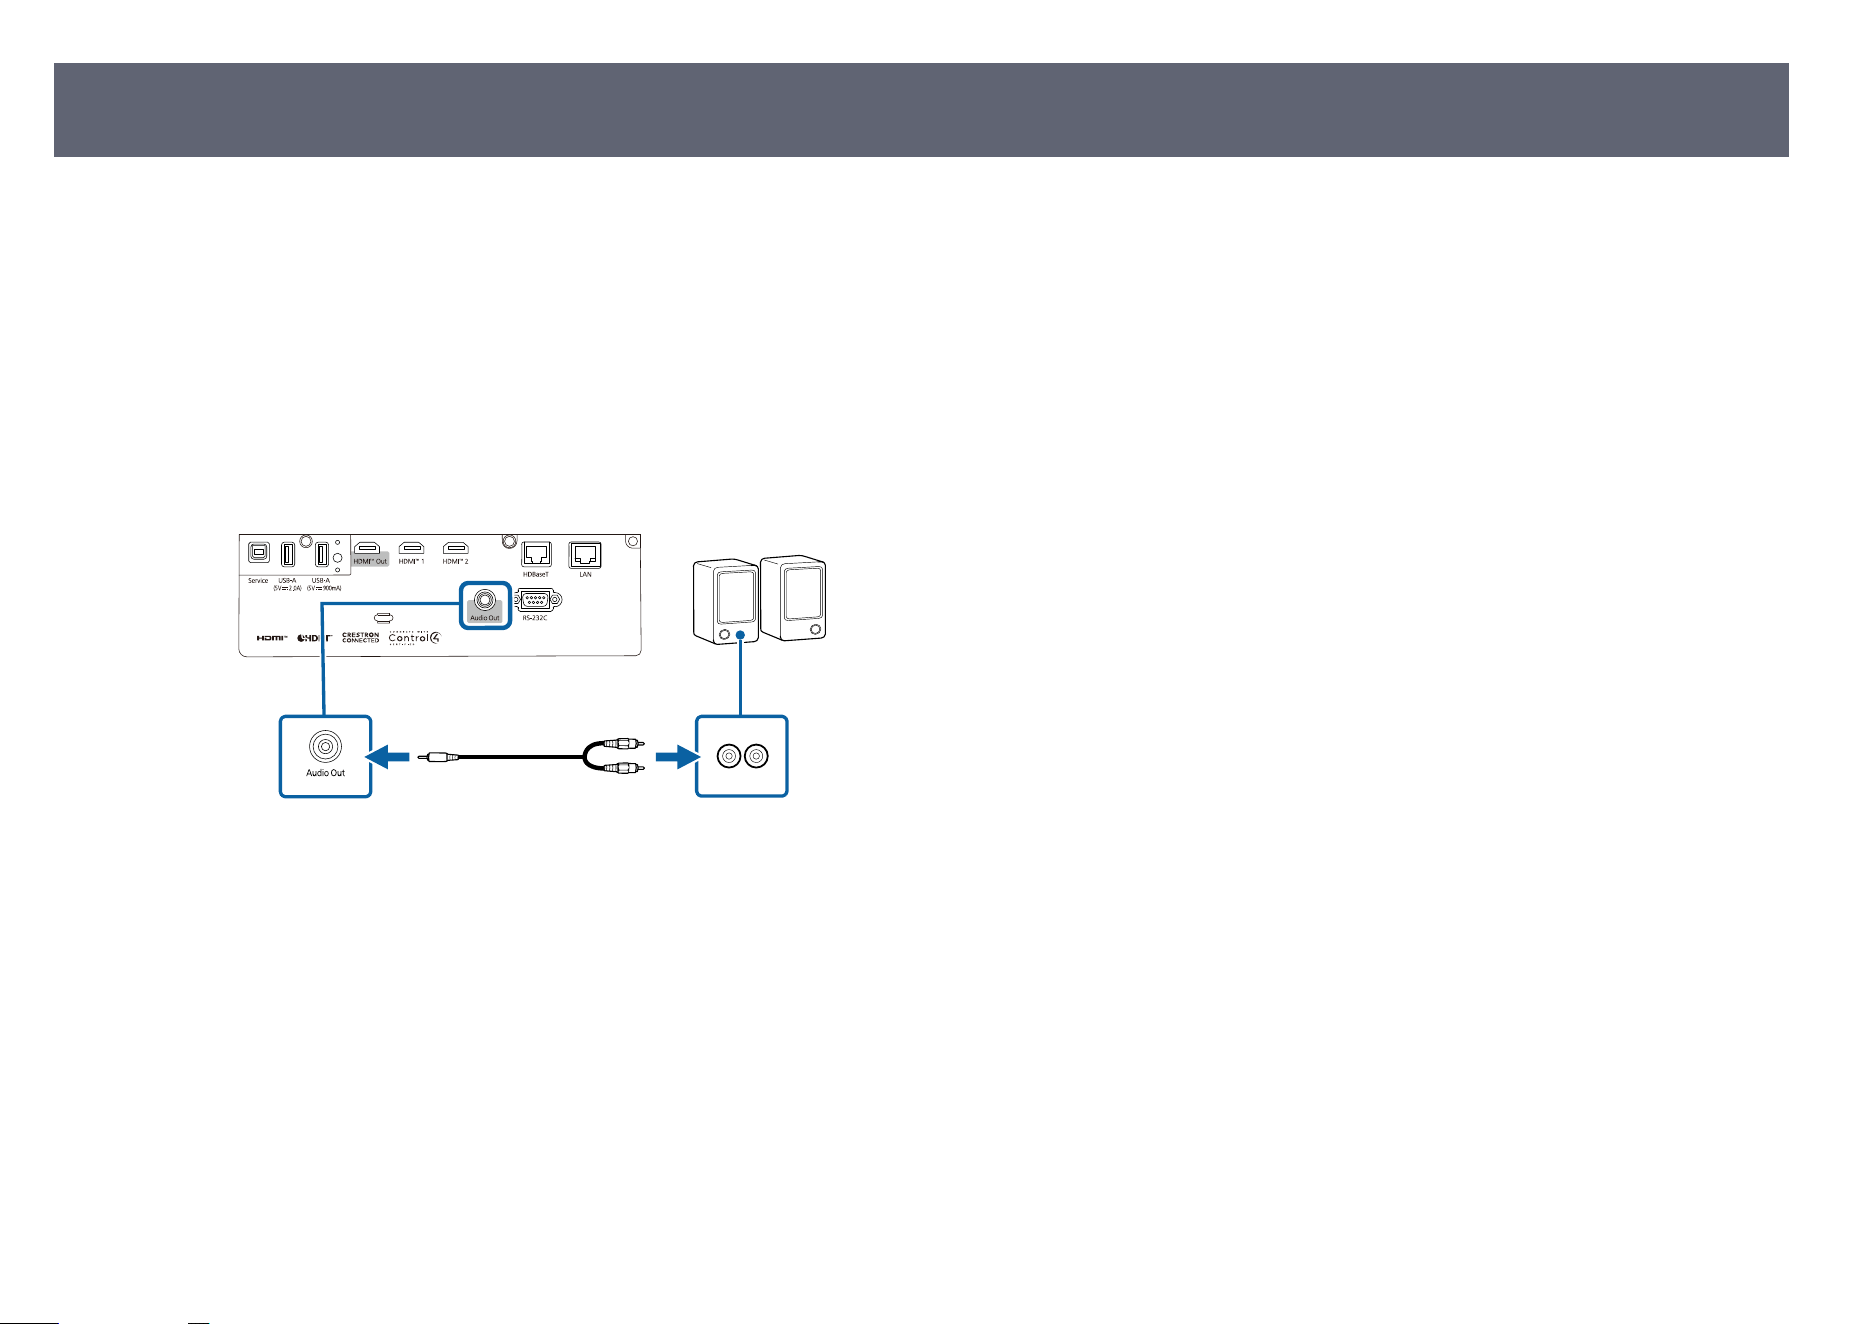
a
Make sure your computer or video source is connected to the projector
wi
th both audio and video cables as necessary.
b
Locate the appropriate cable to connect your external speakers, such as a
st
ereo mini-jack-to-pin-jack cable, or another type of cable or adapter.
c
Connect one end of the cable to your external speakers as necessary.
d
Connect the stereo mini-jack end of the cable to your projector's Audio
O
u
t port.
Projector Connections
40
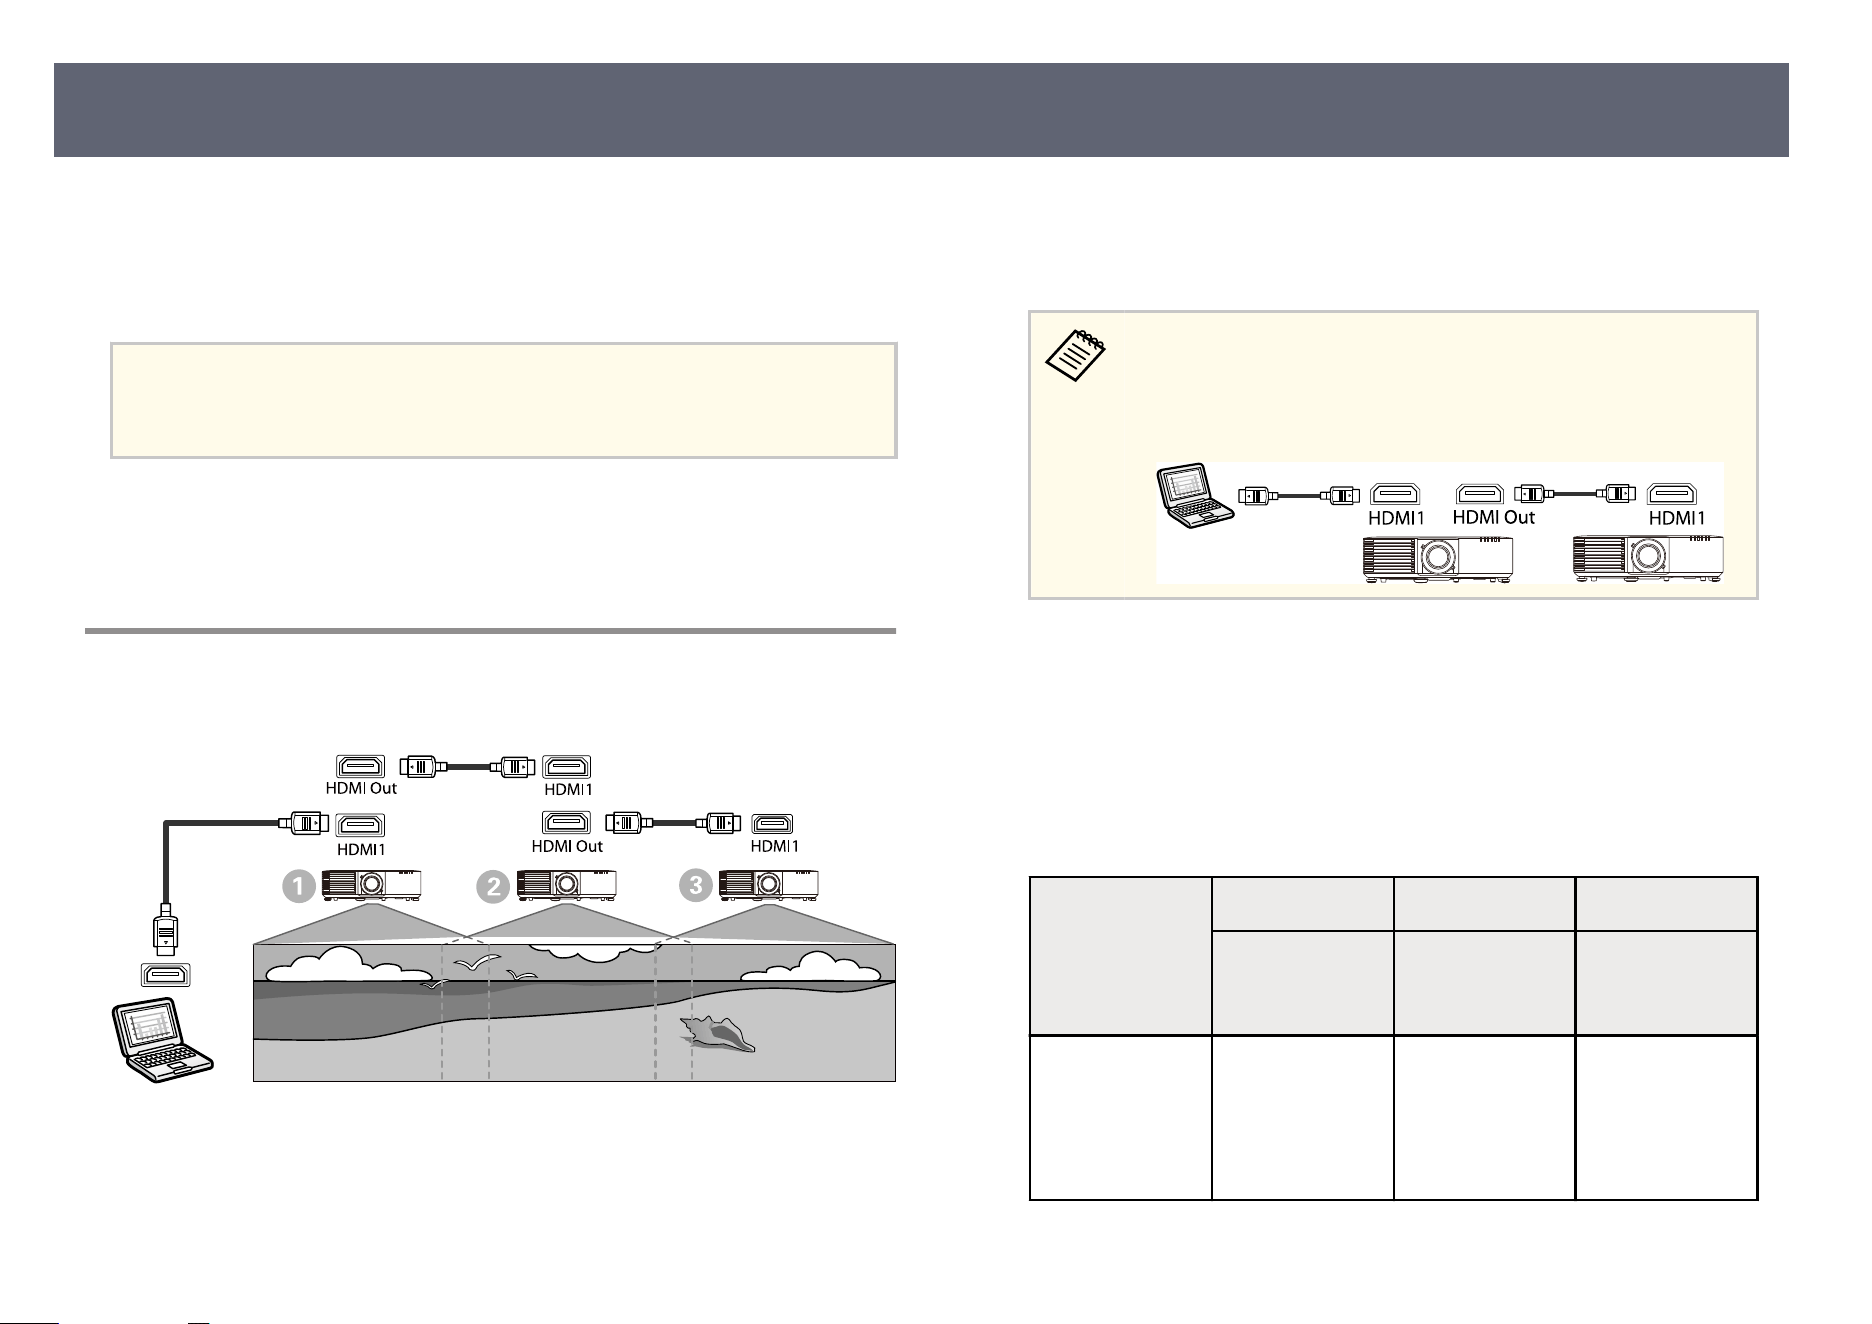
You can project the same image from multiple projectors.
Yo
u can connect multiple projectors using either of the following methods:
daisy-chain connection or distributor connection. You can connect up to four
projectors in a daisy-chain connection.
Attention
Wh
en installing the projectors, make sure hot air from the exhaust vent does not go
into the air intake vent of another projector.
g
Related Links
•
"Pr
ojecting the Same Image in a Daisy-Chain Connection" p.41
•
"Precautions on Installation" p.29
Projecting the Same Image in a Daisy-Chain
Connection
a
Connect the projector to the computer using the HDMI cable, and then
conn
ect the HDMI1 port and HDMI Out port of the projectors using the
HDMI cable.
•
e imag
e is output from the HDMI Out port only when HDMI1
is selected as the image source.
•
If you are connecting three or four projectors in a daisy-chain,
connect the projectors as shown.
b
Press the [Menu] button on the control panel or remote control.
c
Select the C
olor Mode setting to Multi-Projection in the projector's
I
mage menu for all of the projectors.
d
Select the necessary HDMI L
ink setting in the projector's Signal I/O
menu. See the list of settings for more details.
Setting Item
A B C
First projector
to co
nnect to
the device
Projectors in the
middle
Terminal
projector
HDMI Link
Set
ting
HDMI Out
Power Link: On
HDMI Out
Terminal End:
O
HDMI Out
Power Link: On
HDMI Out
Terminal End:
O
HDMI Out
Power Link: On
HDMI Out
Terminal End:
On
Connecting Multiple Projectors of the Same Model
41
is may not work if ve or more projectors are connected in a
d
aisy-chain or if the settings are not correct.
e
Select the necessary settings in the projector's Multi-Projection menu.
f
Press [Menu] or [Esc] to exit the menus.
g
Related Links
•
"Mu
lti-Projection Features" p.120
Connecting Multiple Projectors of the Same Model
42
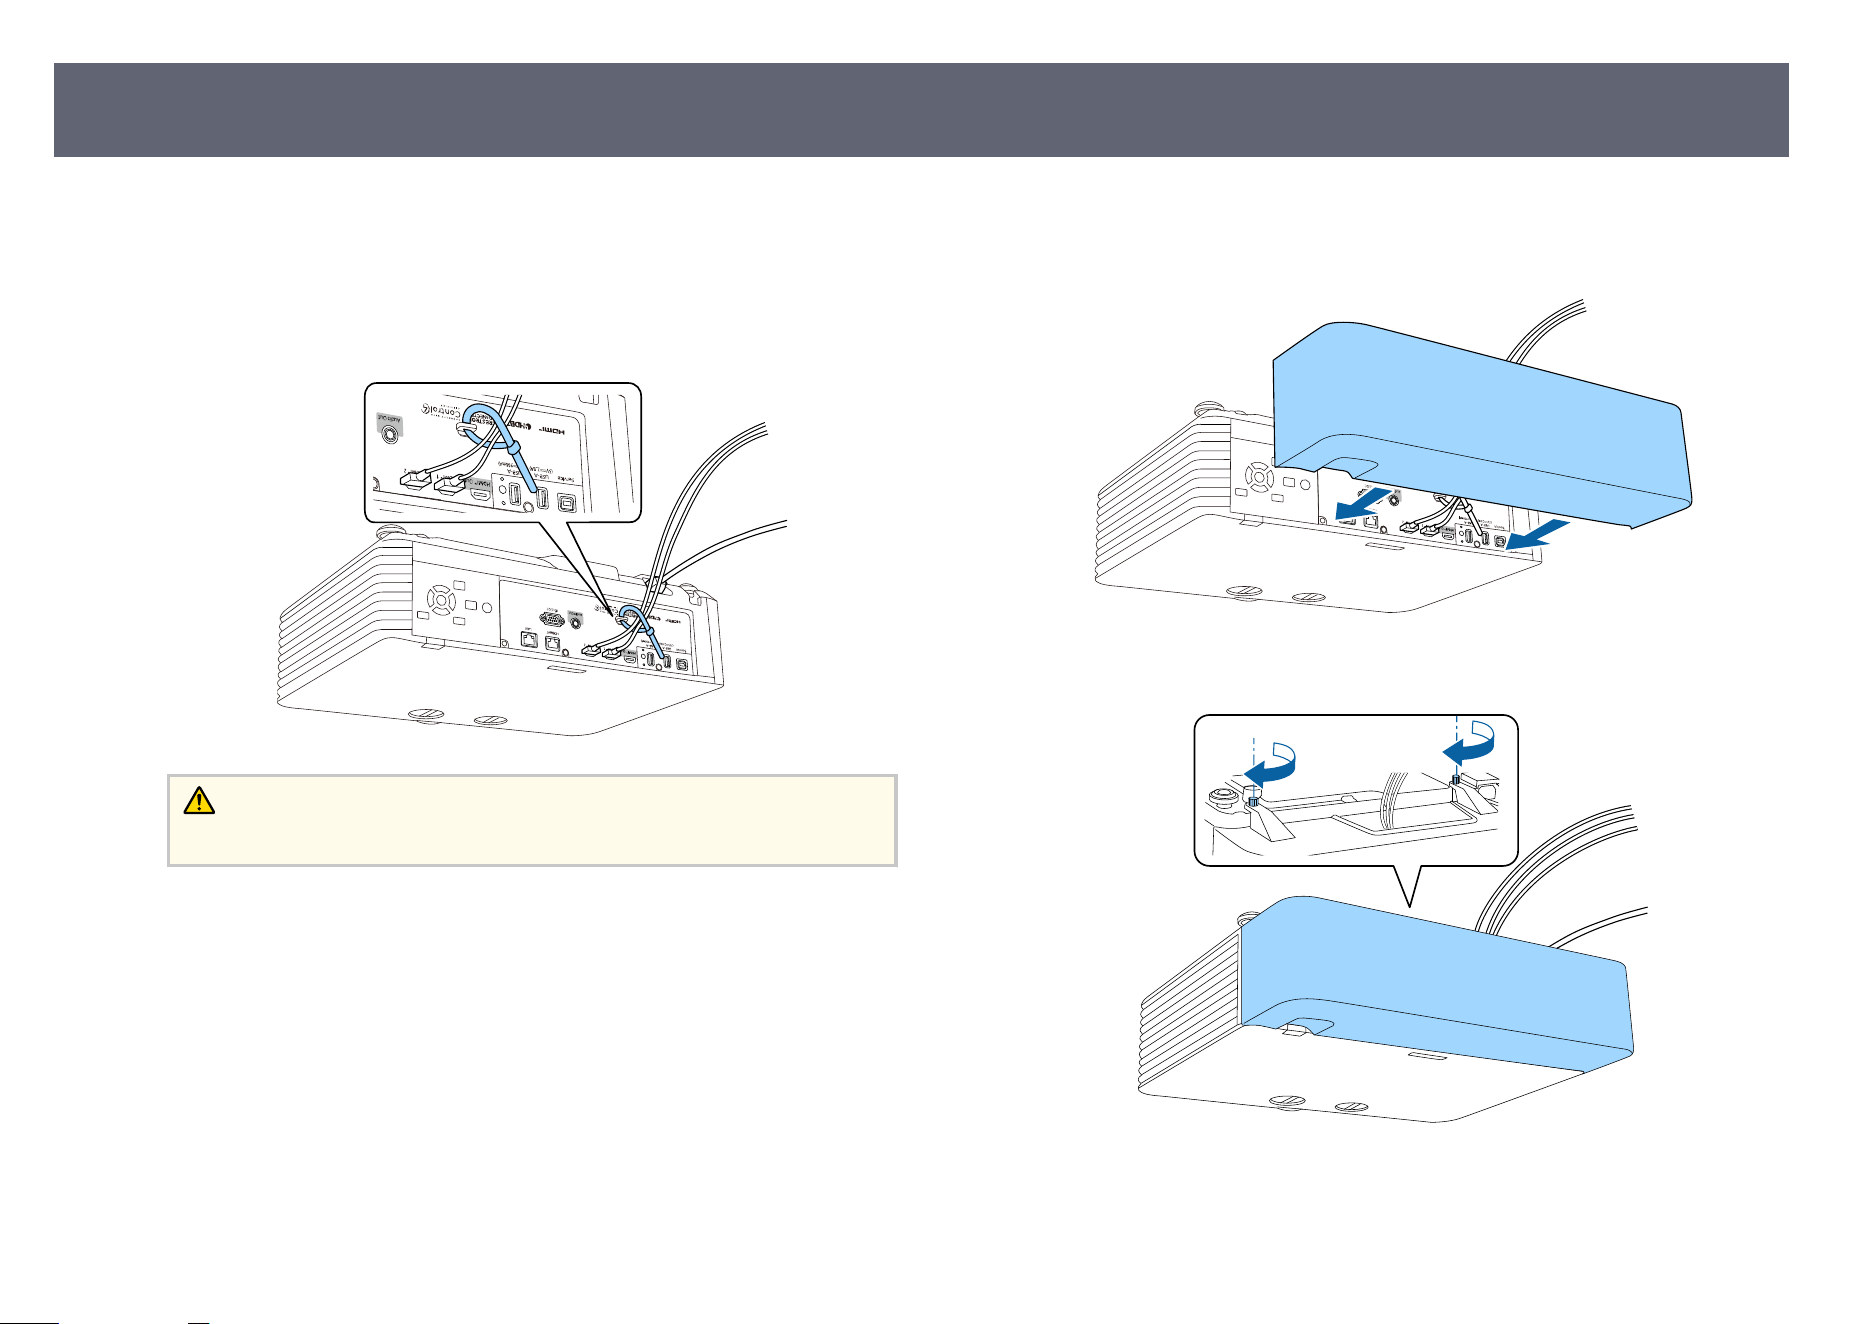
When suspending the projector from a ceiling, you can attach the optional cable
cov
er to hide the attached cables from view.
a
Pass a commercially available cable tie through the cable holder and tie
th
e cables together.
Caution
D
o n
ot bundle the power cord to the other cables. Otherwise, a re may occur.
b
Place the cable cover on the projector as shown, guiding the cables
thr
ough the notch on the base of the cable cover.
c
Tighten the cable cover screws.
To remove the cover, loosen the cover screws and pull the cover o of the
projector.
Attaching and Removing the Cable Cover
43

e remote control uses the two AA batteries that came with the projector.
Attention
Mak
e sure you read the safety instructions in the online Notices guide before
handling the batteries.
Replace the batteries as soon as they run out. e rem
ote control uses two
AA manganese or alkaline batteries.
a
Remove the battery cover as shown.
b
Remove the old batteries, if necessary.
Dispose of used batteries according to local regulations.
c
Insert the batteries with the + and
– ends facing as shown.
Warning
Ch
eck the positions of the (+) and (–) marks inside the battery holder to
ensure the batteries are inserted the correct way. If the batteries are not used
correctly, they could explode or leak causing a re, injury, or damage to the
product.
d
Replace the battery cover and press it down until it clicks into place.
g
Related Links
•
"Rem
ote Control Operation" p.45
Installing Batteries in the Remote Control
44
Remote Control Operation
e remote control lets you control the projector from almost anywhere in the
r
oom.
Make sure that you aim the remote control at the projector's receivers within the
distance and angles listed here.
A
26.3 feet (8 m)
Avoid using the remote control in conditions with bright uor
escent lights
or in direct sunlight, or the projector may not respond to commands. If
you are not going to use the remote control for a long time, remove the
batteries.
Installing Batteries in the Remote Control
45

Using Basic Projector Features
Fo
llow the instructions in these sections to use your projector's basic features.
g
Related Links
•
"Turning On the Projector" p.47
•
"Turning O the Projector" p.50
•
"Setting the Date and Time" p.51
•
"Selecting the Language for the Projector Menus" p.53
•
"Projection Modes" p.54
•
"Setting the Screen Type" p.56
•
"Adjusting the Image Position Using Lens Shi" p.59
•
"Displaying a Test Pattern" p.60
•
"Adjusting the Image Height" p.61
•
"Image Shape" p.62
•
"Resizing the Image with the Zoom Ring" p.75
•
"Focusing the Image Using the Focus Ring" p.76
•
"Focusing the Image Using the Focus Ring (Center/Corner)" p.77
•
"Selecting an Image Source" p.78
•
"Image Aspect Ratio" p.80
•
"Adjusting Image Quality (Color Mode)" p.82
•
"Turning On Automatic Luminance Adjustment" p.83
•
"Adjusting the Image Color" p.84
•
"Adjusting the Image Resolution" p.87
•
"Adjusting the Brightness" p.89
•
"Controlling the Volume with the Volume Buttons" p.92
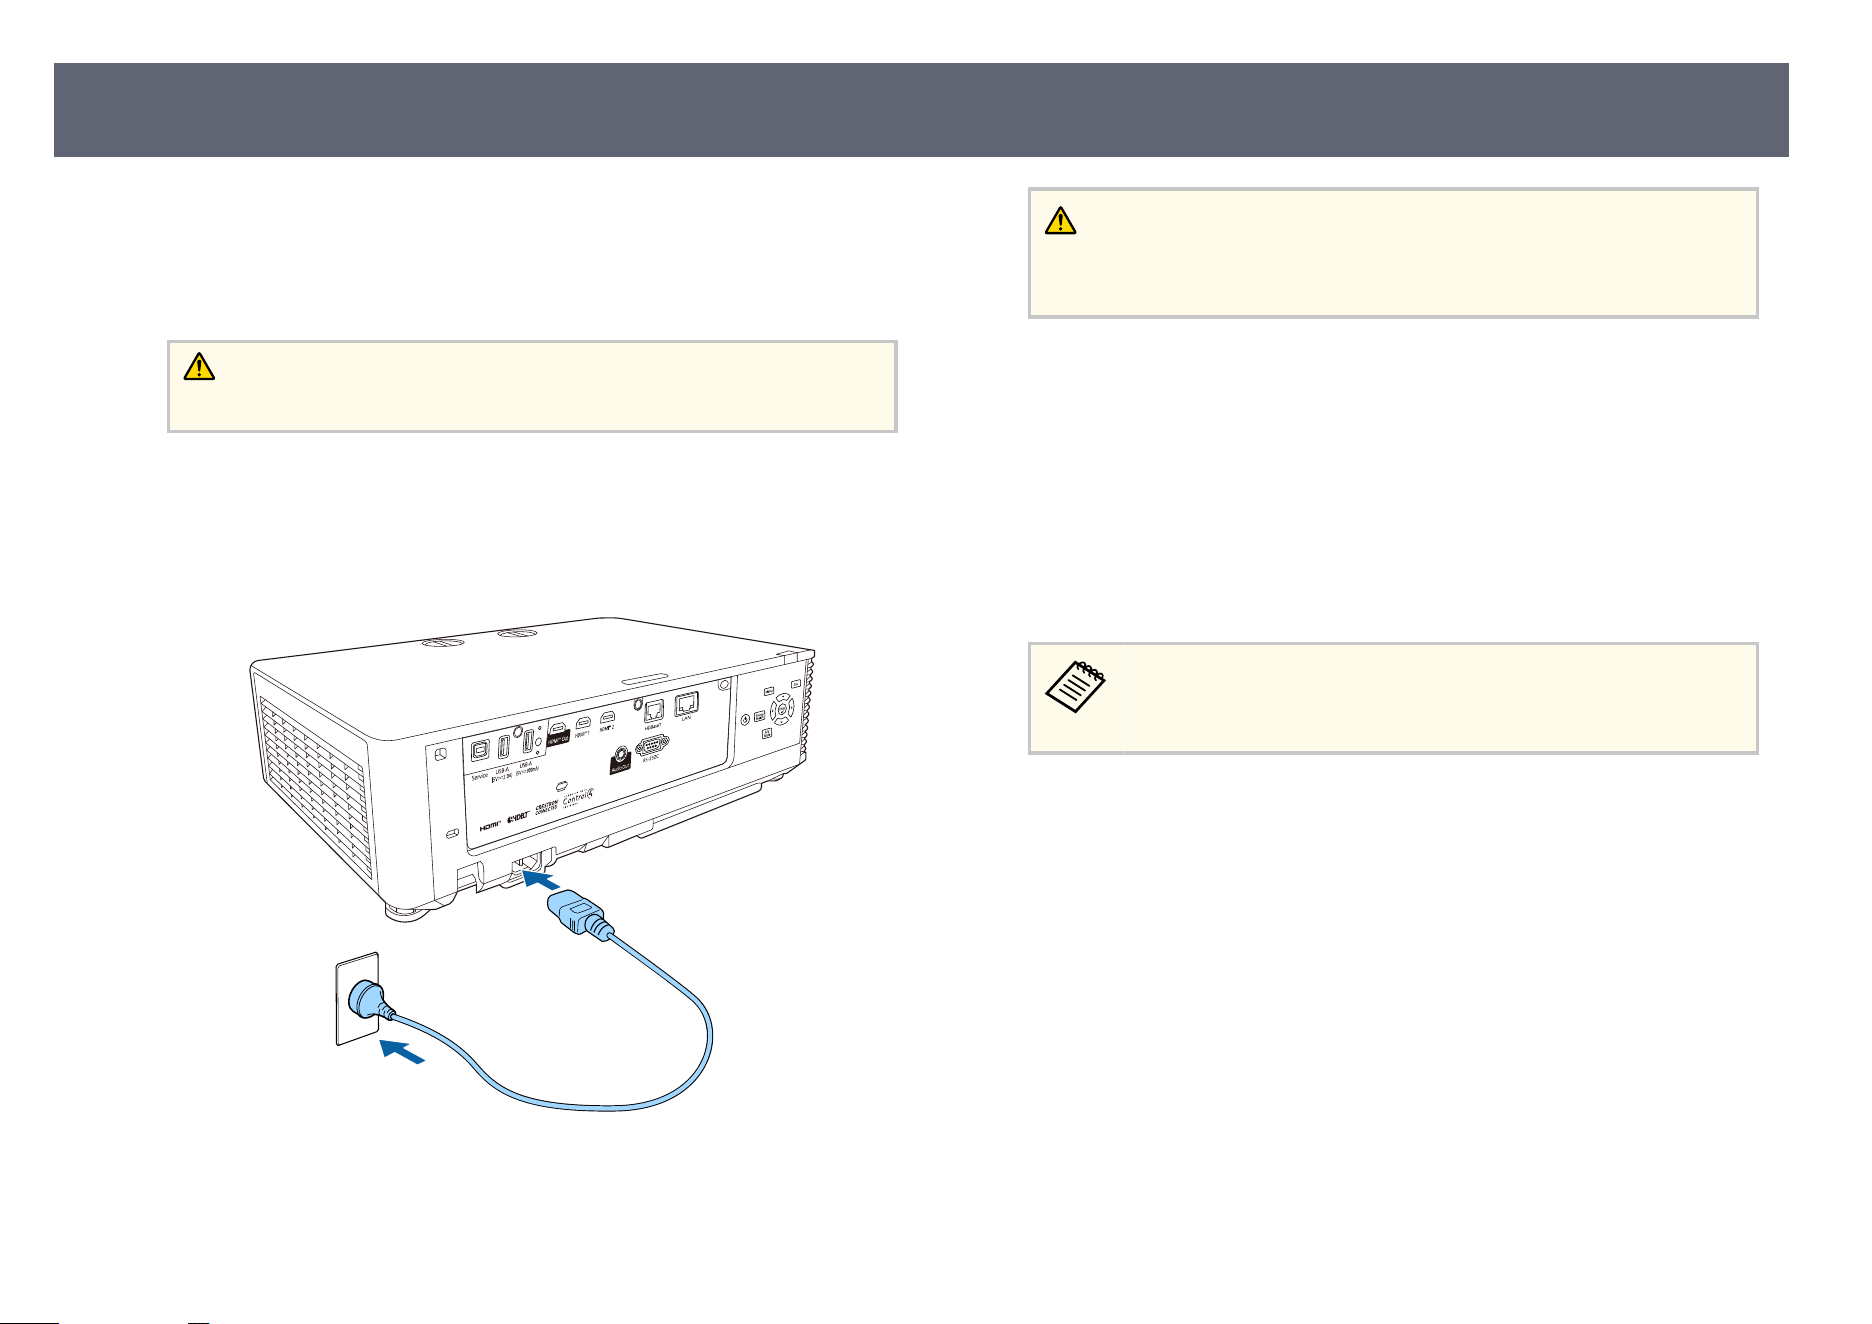
Turn on the computer or video equipment you want to use aer yo
u turn on the
projector.
a
Connect the device to the projector.
Caution
A
er
connecting the device to the projector, connect the power cord.
b
Remove the lens cover.
c
Connect the power cord to the projector's power inlet and plug it into an
e
le
ctrical outlet.
Warning
Be s
ure to connect to ground before plugging in. When you remove the
ground connection, unplug the power cord and disconnect from ground.
e projector's power indicator turns blue. is indicates that the
p
rojector is receiving power, but is not yet turned on (it is in standby
mode).
d
Press the power button on the control panel or remote control to turn on
th
e projector.
e projector beeps and the status indicator ashes blue as the projector
warms up. Once the projector is warmed up, the status indicator stops
ashing and turns blue.
When Quick Startup is enabled in the projector's Operation menu,
t
he projector becomes ready for use in several seconds the next time
you press the power button.
Try the following if you do not see a projected image.
•
T
ur
n on the connected computer or video device.
•
Change the screen output from the computer when using a laptop computer.
•
Insert a DVD or other video media, and press play (if necessary).
•
Press the [Source Search] button on the control panel or remote control to
detect the source.
•
Press the button for the desired video source on the remote control.
•
If the Home screen is displayed, select the source you want to project.
Turning On the Projector
47
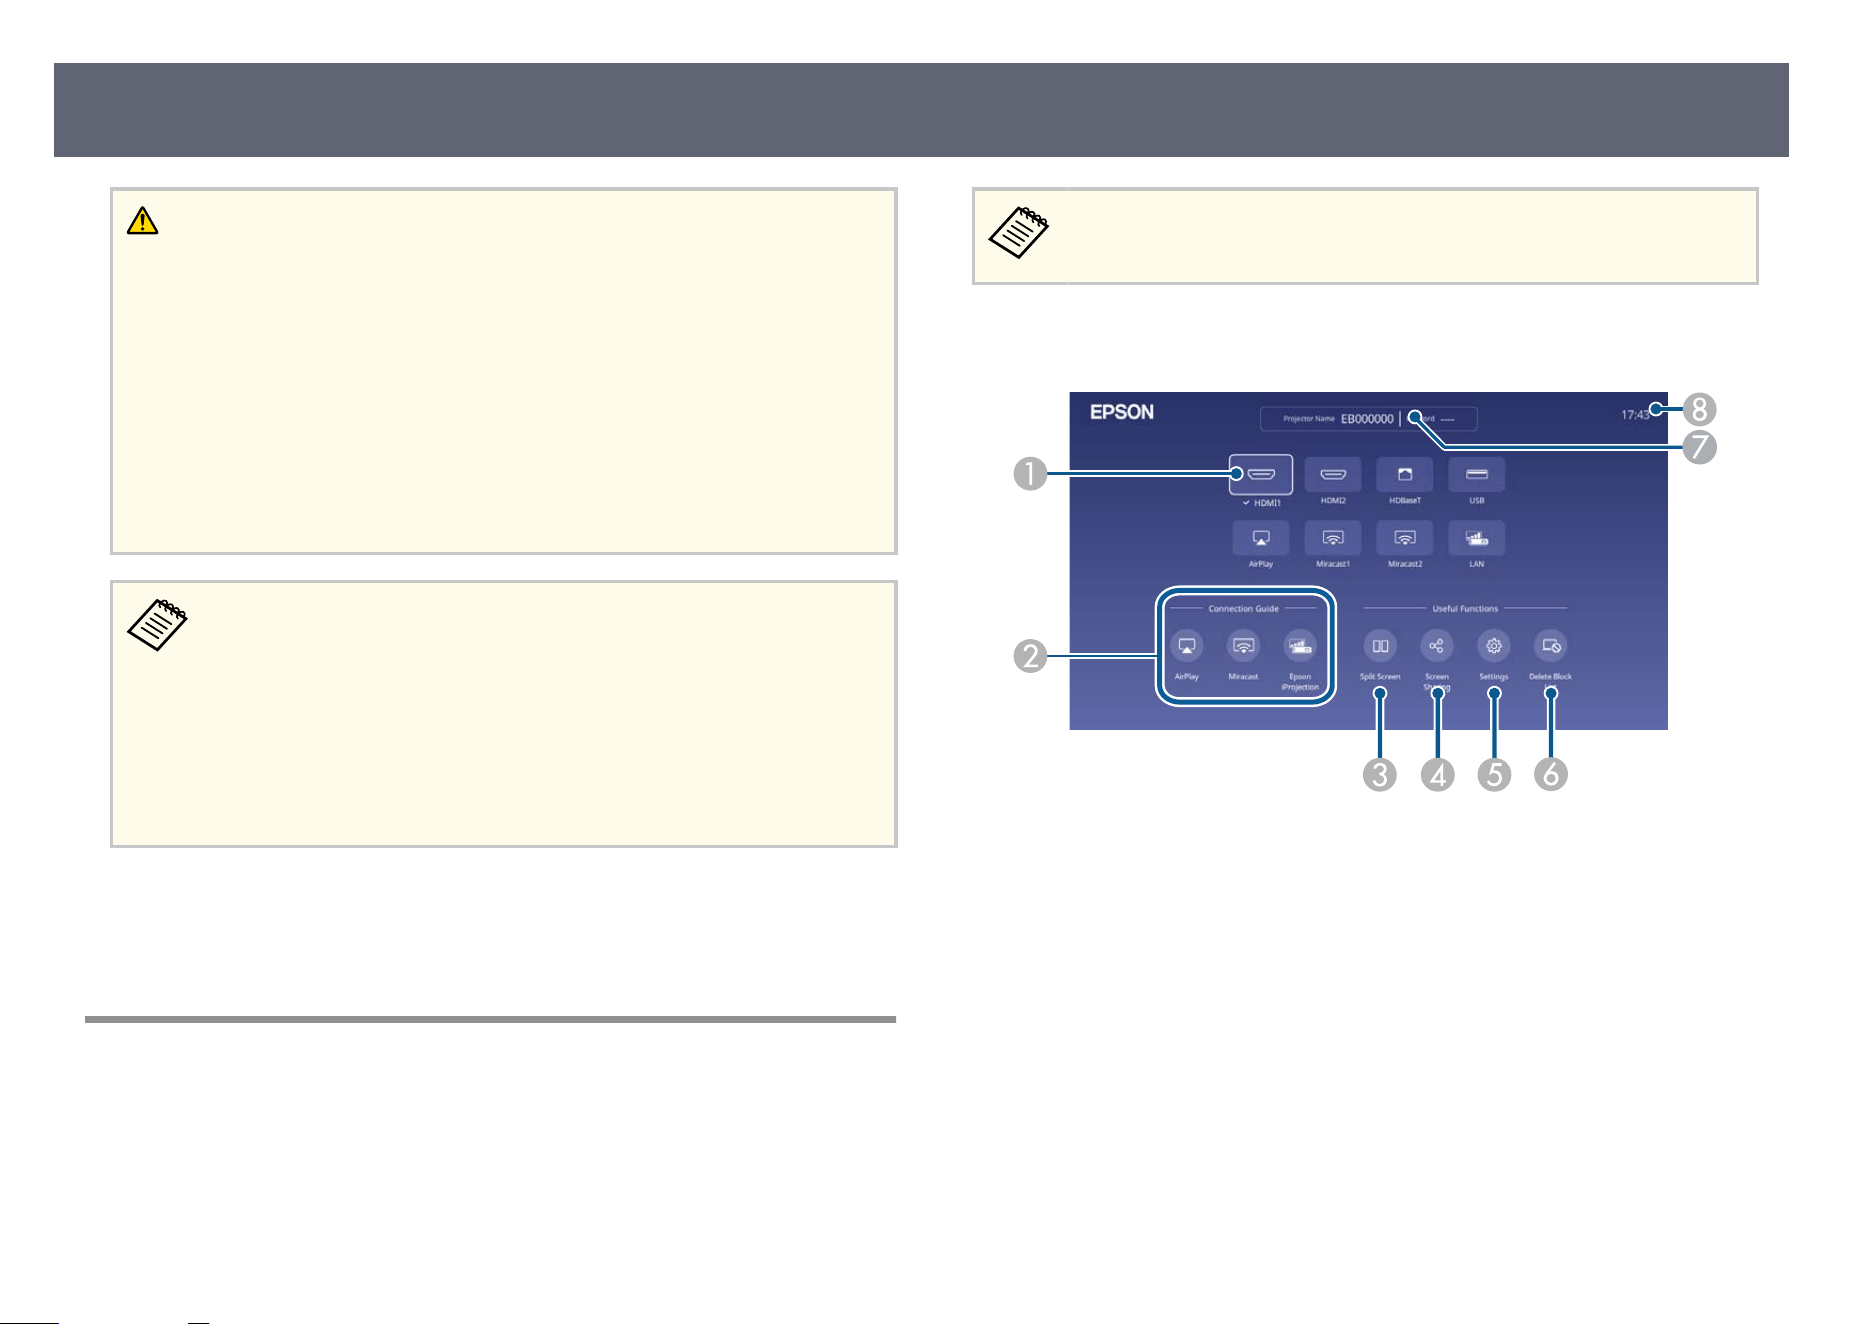
Warning
•
Ne
ver look into the projector lens when the light source is on. is can damage
your eyes and is especially dangerous for children.
•
When turning on the projector at a distance using the remote control, make sure
there is no one looking into the lens.
•
During projection, do not block the light from the projector with a book or
other objects. If the light from the projector is blocked, the area on which the
light shines becomes hot which could cause it to melt, burn, or start a re. Also,
the lens may get hot due to the reected light which could cause the projector
to malfunction. To stop projection, use the A/V Mute function, or turn o the
projector.
•
Wh
en the Direct Power On setting is set to On in the projector's
Operation menu, the projector turns on as soon as you plug it in. Note
that the projector also turns on automatically in cases such as recovery
from a power outage.
s Operation > Operation Settings > Direct Power On
•
If you select a specic port as the Auto Power On setting in the
projector's Operation menu, the projector turns on as soon as it detects
a signal or cable connection from that port.
g
Related Links
•
"Ho
me Screen" p.48
•
"Projector Feature Settings - Operation Menu" p.204
Home Screen
e Home screen feature allows you to easily select an image source and access
u
seful functions. You can display the Home screen by pressing the [Home]
button on the remote control.
e Home screen is also displayed when you turn on the projector and no
sig
nal is being input.
Press the arrow buttons on the control panel or remote control to select a menu
it
em, and then press [Enter].
A
Selects the source you want to project.
A ch
eck mark appears next to the current input source.
You can check a preview of the current input image for most sources as a
thumbnail (other than the USB input source in Content Playback mode).
B
Displays the connection guide. You can select the wireless connection methods
according to the devices you are using, such as smartphones or computers.
C
Projects two images from dierent image sources simultaneously by splitting the
projected screen.
D
Shares your projected screen image with other projectors connected to the same
network.
Turning On the Projector
48
E
Lets you select the following common projector settings (settings may vary
depen
ding on other selected settings):
•
Color Mode
•
Brightness Level
•
Volume
•
Geometry Correction (H/V-Keystone and Quick Corner are available.)
•
Aspect
•
e Ge
ometry Correction setting is only displayed when
Geometry Correction is set to H/V-Keystone or Quick Corner
in the projector's Installation menu.
•
e Aspect setting is only displayed when the current source is
HDMI, HDBaseT, or USB and USB document camera. (Turn o
the Scale setting or set the Scale Mode setting to Full Display
rst in the projector's Image menu.)
F
When Access Control is set to On in the projector's Network Projection menu,
y
ou can manage which devices are allowed to connect via Miracast. If a device
tries to connect and you block it from the conrmation screen, it will be added
to a block list. To unblock devices, you can use this icon to cancel blocked
connections.
G
Displays the projector name and the projector keyword.
H
Displays the current time.
e Home screen disappears aer 10 minutes of inactivity.
g
Related Links
•
"Image Quality Settings - Image Menu" p.193
•
"Projector Installation Settings - Installation Menu" p.198
•
"Image Shape" p.62
•
"Using a QR Code to Connect a Mobile Device" p.151
•
"Using the Projector's Menus" p.191
•
"Projecting Two Images Simultaneously" p.96
•
"Scr
een Sharing" p.163
Turning On the Projector
49
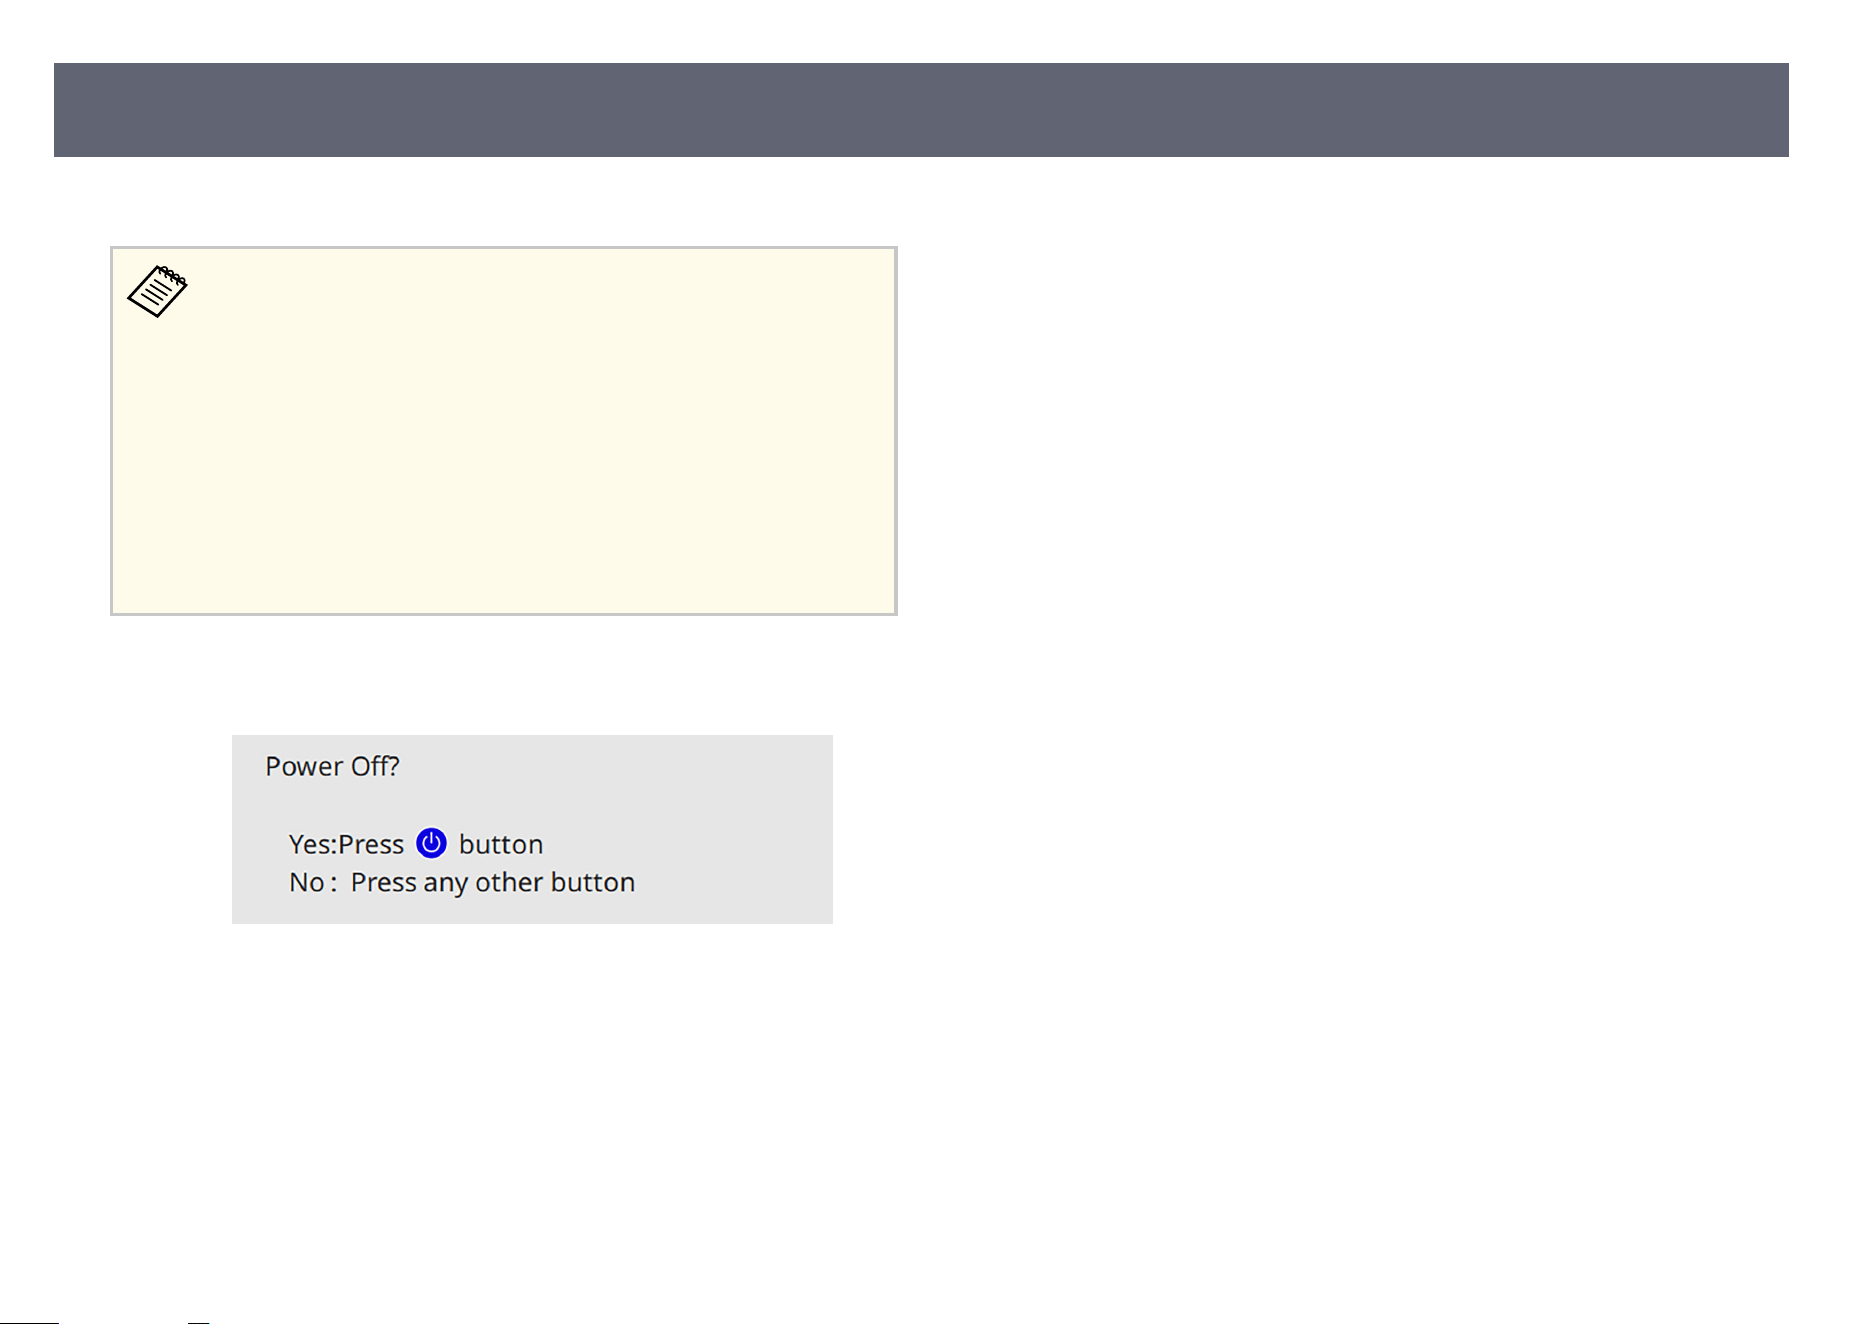
Turn o the projector aer use.
•
Tur
n o this product when it is not in use to prolong the life of the
projector. Light source life varies depending on the mode selected,
environmental conditions, and usage. Brightness decreases over time.
•
If the Light Source Calibration setting is set to Run Periodically
in the projector's Management menu, light source calibration starts
automatically if you turn o the projector and the following conditions
are present:
•
100 hours have passed since the last light source calibration
•
You have used the projector continuously for more than 20 minutes
•
Since the projector supports the direct shutdown feature, it can be
turned o directly using the breaker.
a
Press the power button on the control panel or remote control.
e pr
ojector displays a shutdown conrmation screen.
b
Press the power button again. (To leave it on, press any other button.)
e p
r
ojector beeps twice, the light source turns o, and the status
indicator turns o.
c
To transport or store the projector, make sure the power indicator is blue
(b
u
t not ashing) and the status indicator is o, then unplug the power
cord.
d
Attach the lens cover.
Turning O the Projector
50

You can set the date and time for the projector.
If the date and time are not correctly set on the projector, the AirPlay
conn
ection may be disconnected while projecting. Set the correct date and
time in Date & Time and Daylight Saving Time from the Management
menu.
a
Turn on the projector.
b
Press the [Menu] button on the control panel or remote control.
c
Select the M
anagement setting and press [Enter].
d
Select the Date & Time setting and press [Enter].
e
S
elect the Date & Time setting and press [Enter].
Y
ou see this screen:
f
Select Date, press [Enter], and use the displayed keyboard to enter today's
d
ate.
g
Select Time, press [Enter], and use the displayed keyboard to enter the
c
urrent time.
h
Select Time Dierence (UTC), press [Enter], and set the time dierence
f
rom Coordinated Universal Time.
i
When you are ni
s
hed, select Set and press [Enter].
Setting the Date and Time
51
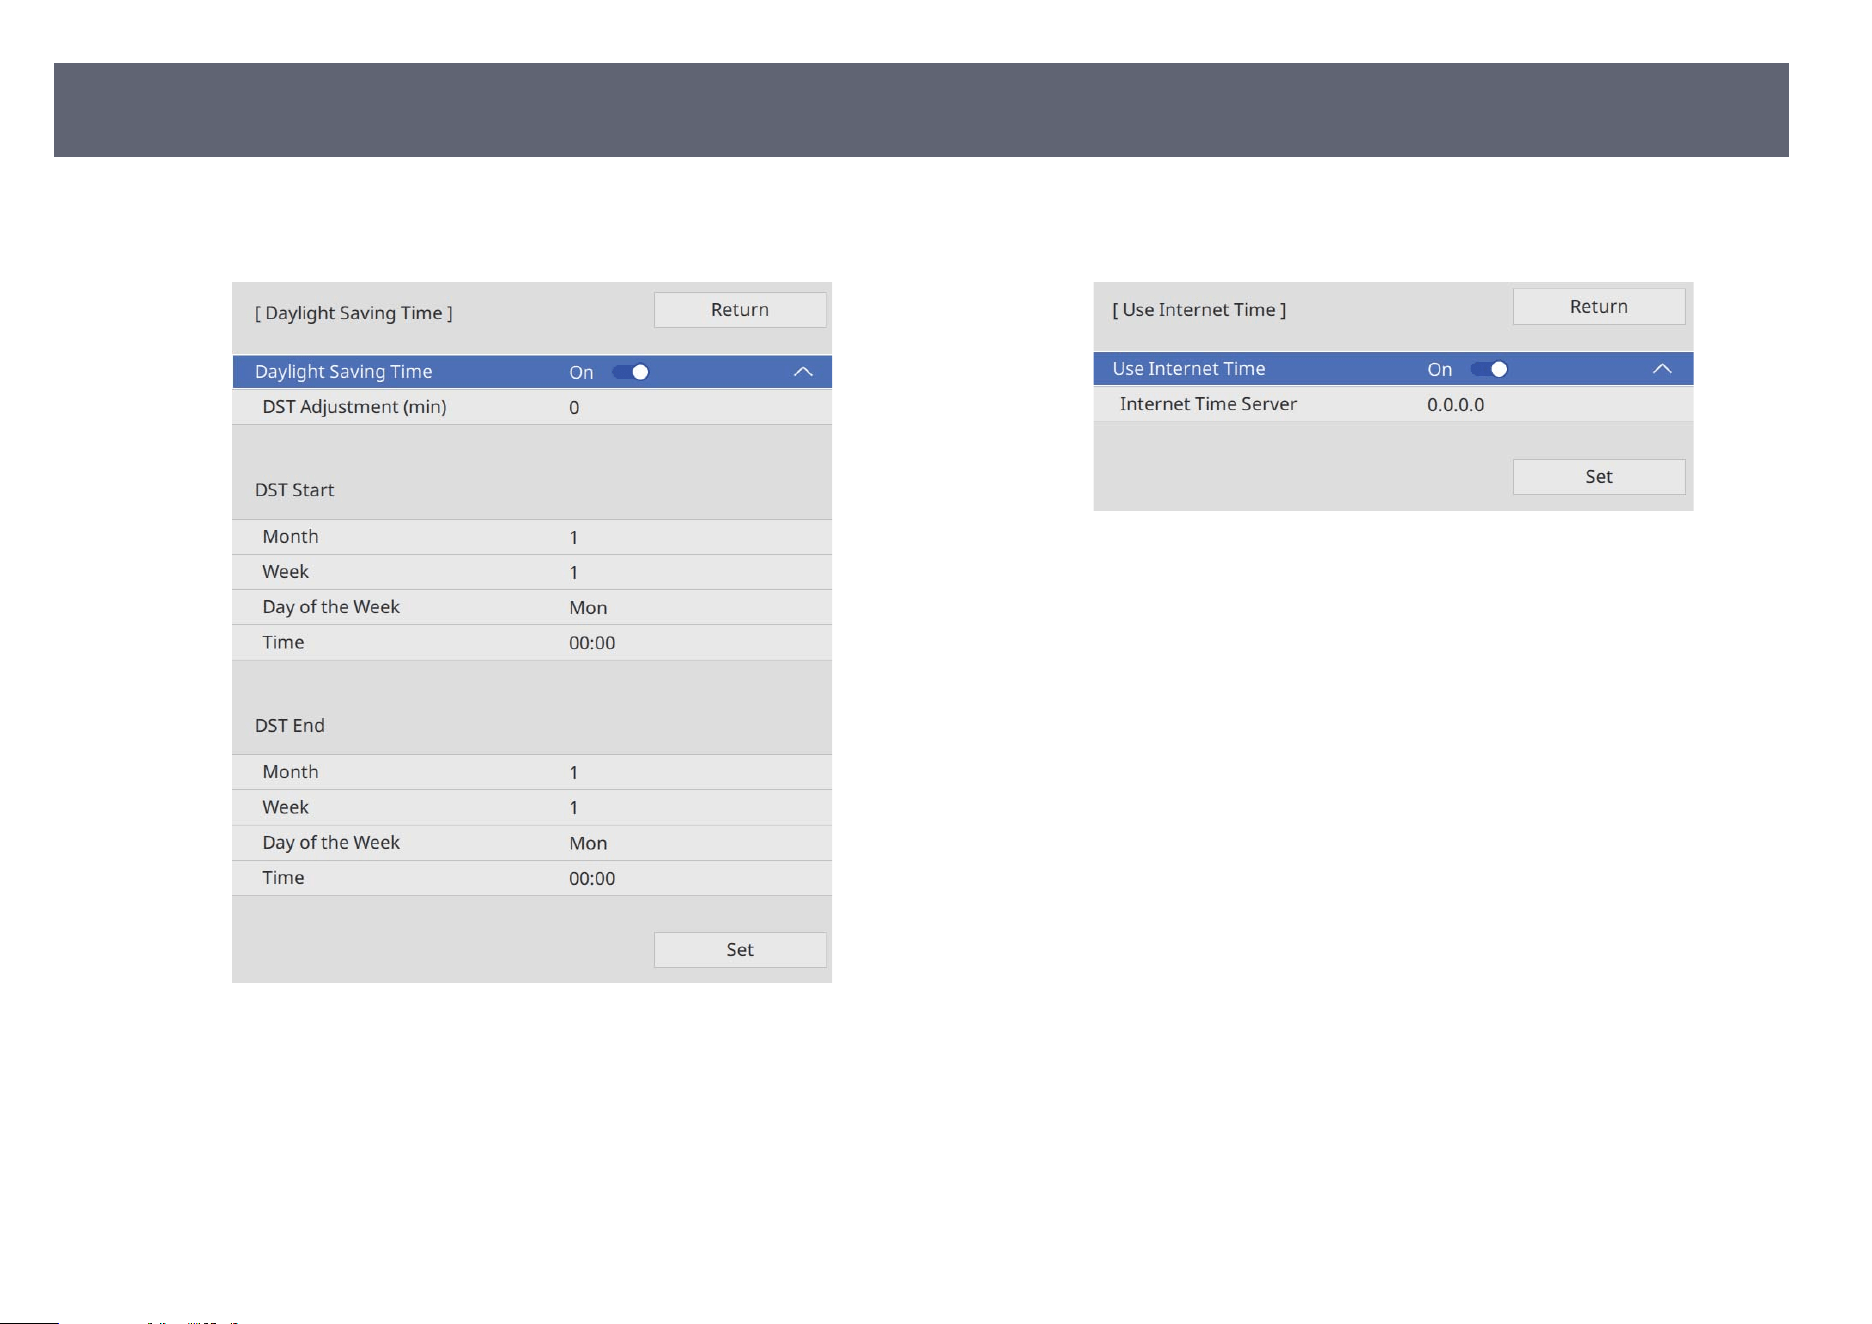
j
To activate daylight saving time, select the Day
light Saving Time setting
and set it to On. en select settings.
k
When you are nis
hed, select Set and press [Enter].
l
To update the time automatically through an Internet time server, select
the Internet Time setting and set it to On. en select settings.
m
When you are ni
s
hed, select Set and press [Enter].
n
Press [Menu] or [Esc] to exit the menus.
Setting the Date and Time
52
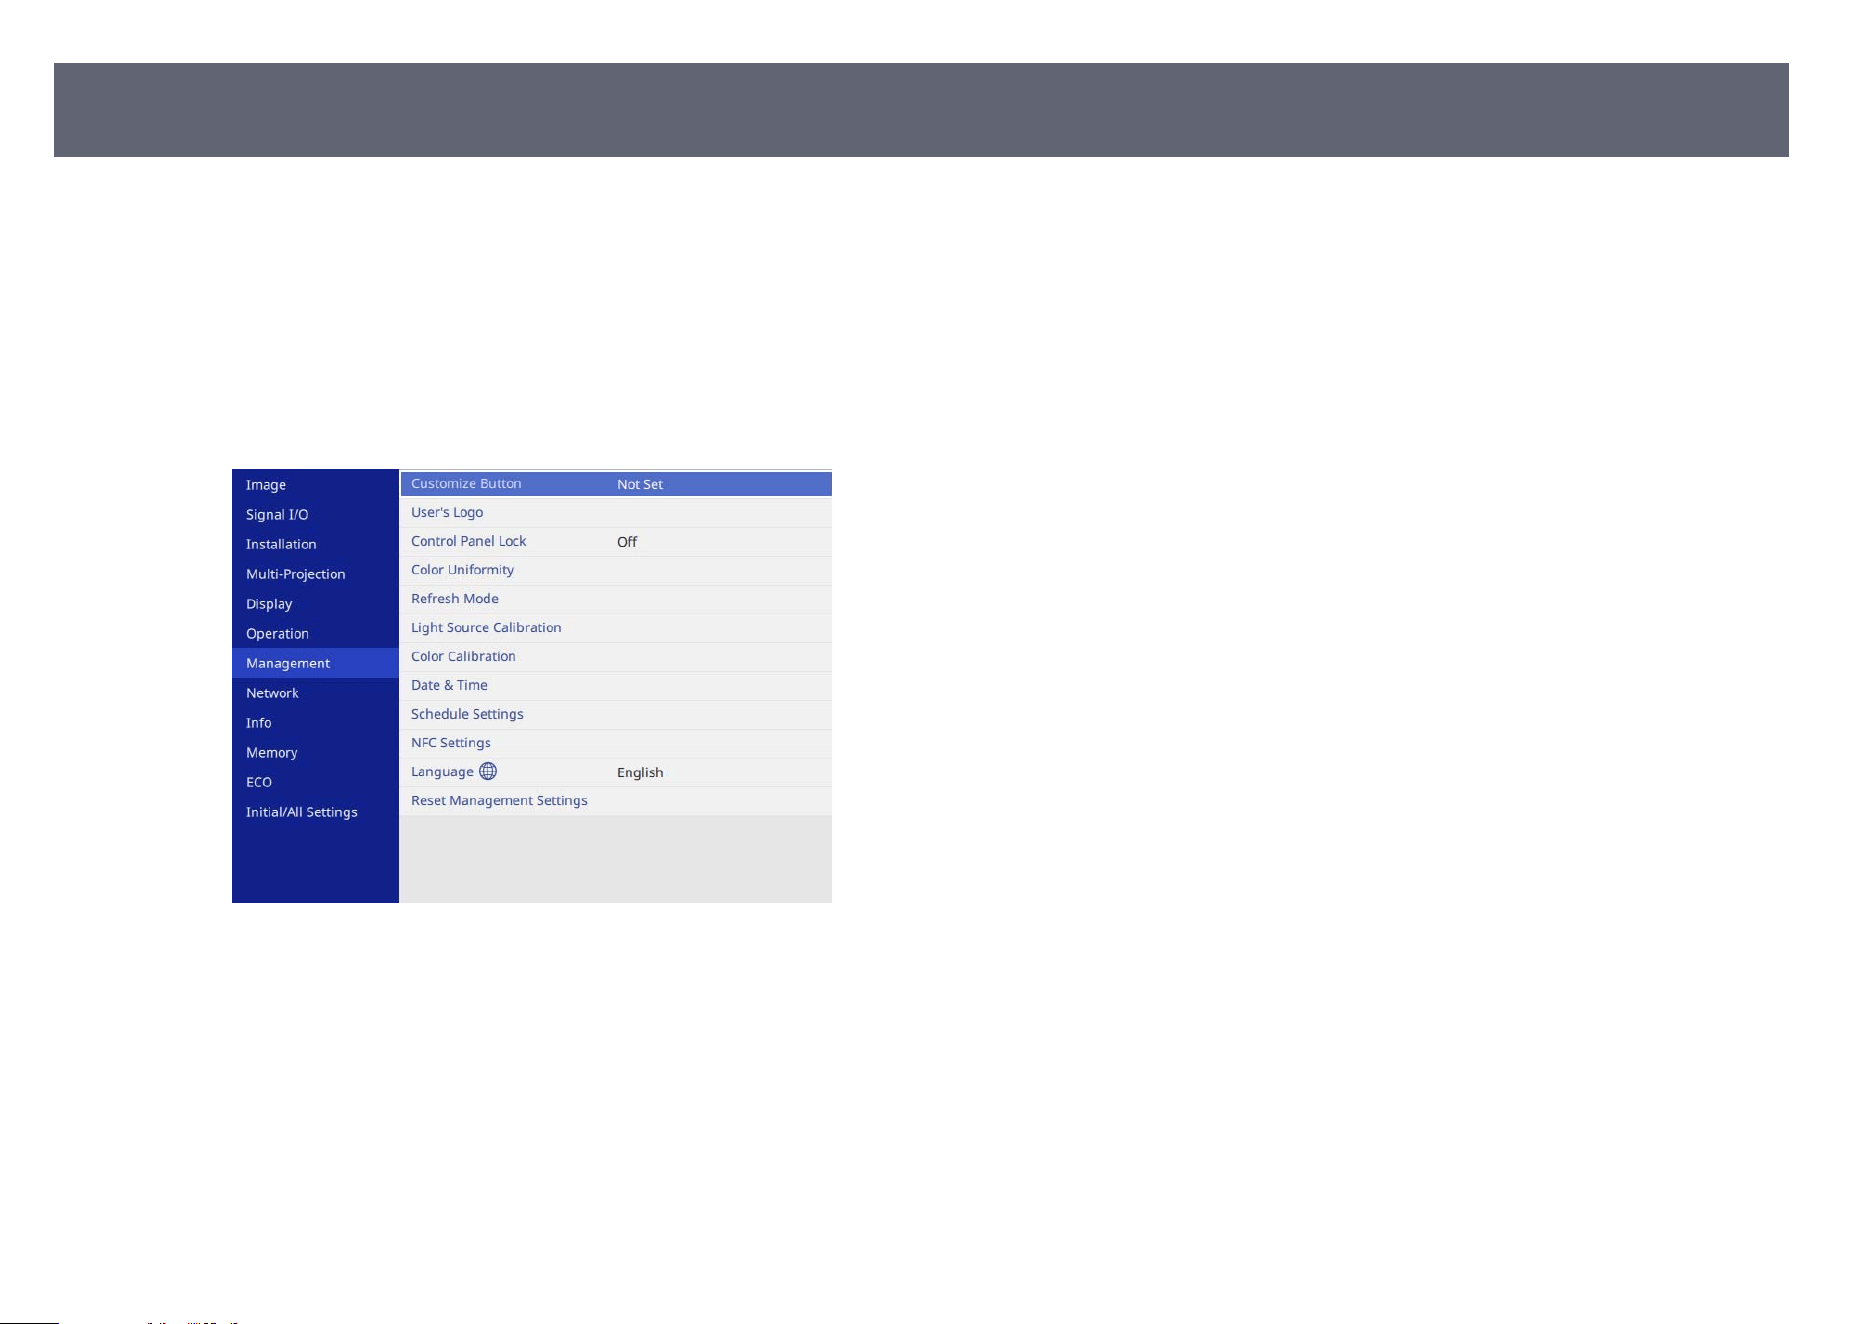
If you want to view the projector's menus and messages in another language,
yo
u can change the Language setting.
a
Turn on the projector.
b
Press the [Menu] button on the control panel or remote control.
c
Select the M
anagement setting and press [Enter].
d
Select the L
anguage setting and press [Enter].
e
S
elect the language you want to use and press [Enter].
f
Press [Menu] or [Esc] to exit the menus.
Selecting the Language for the Projector Menus
53
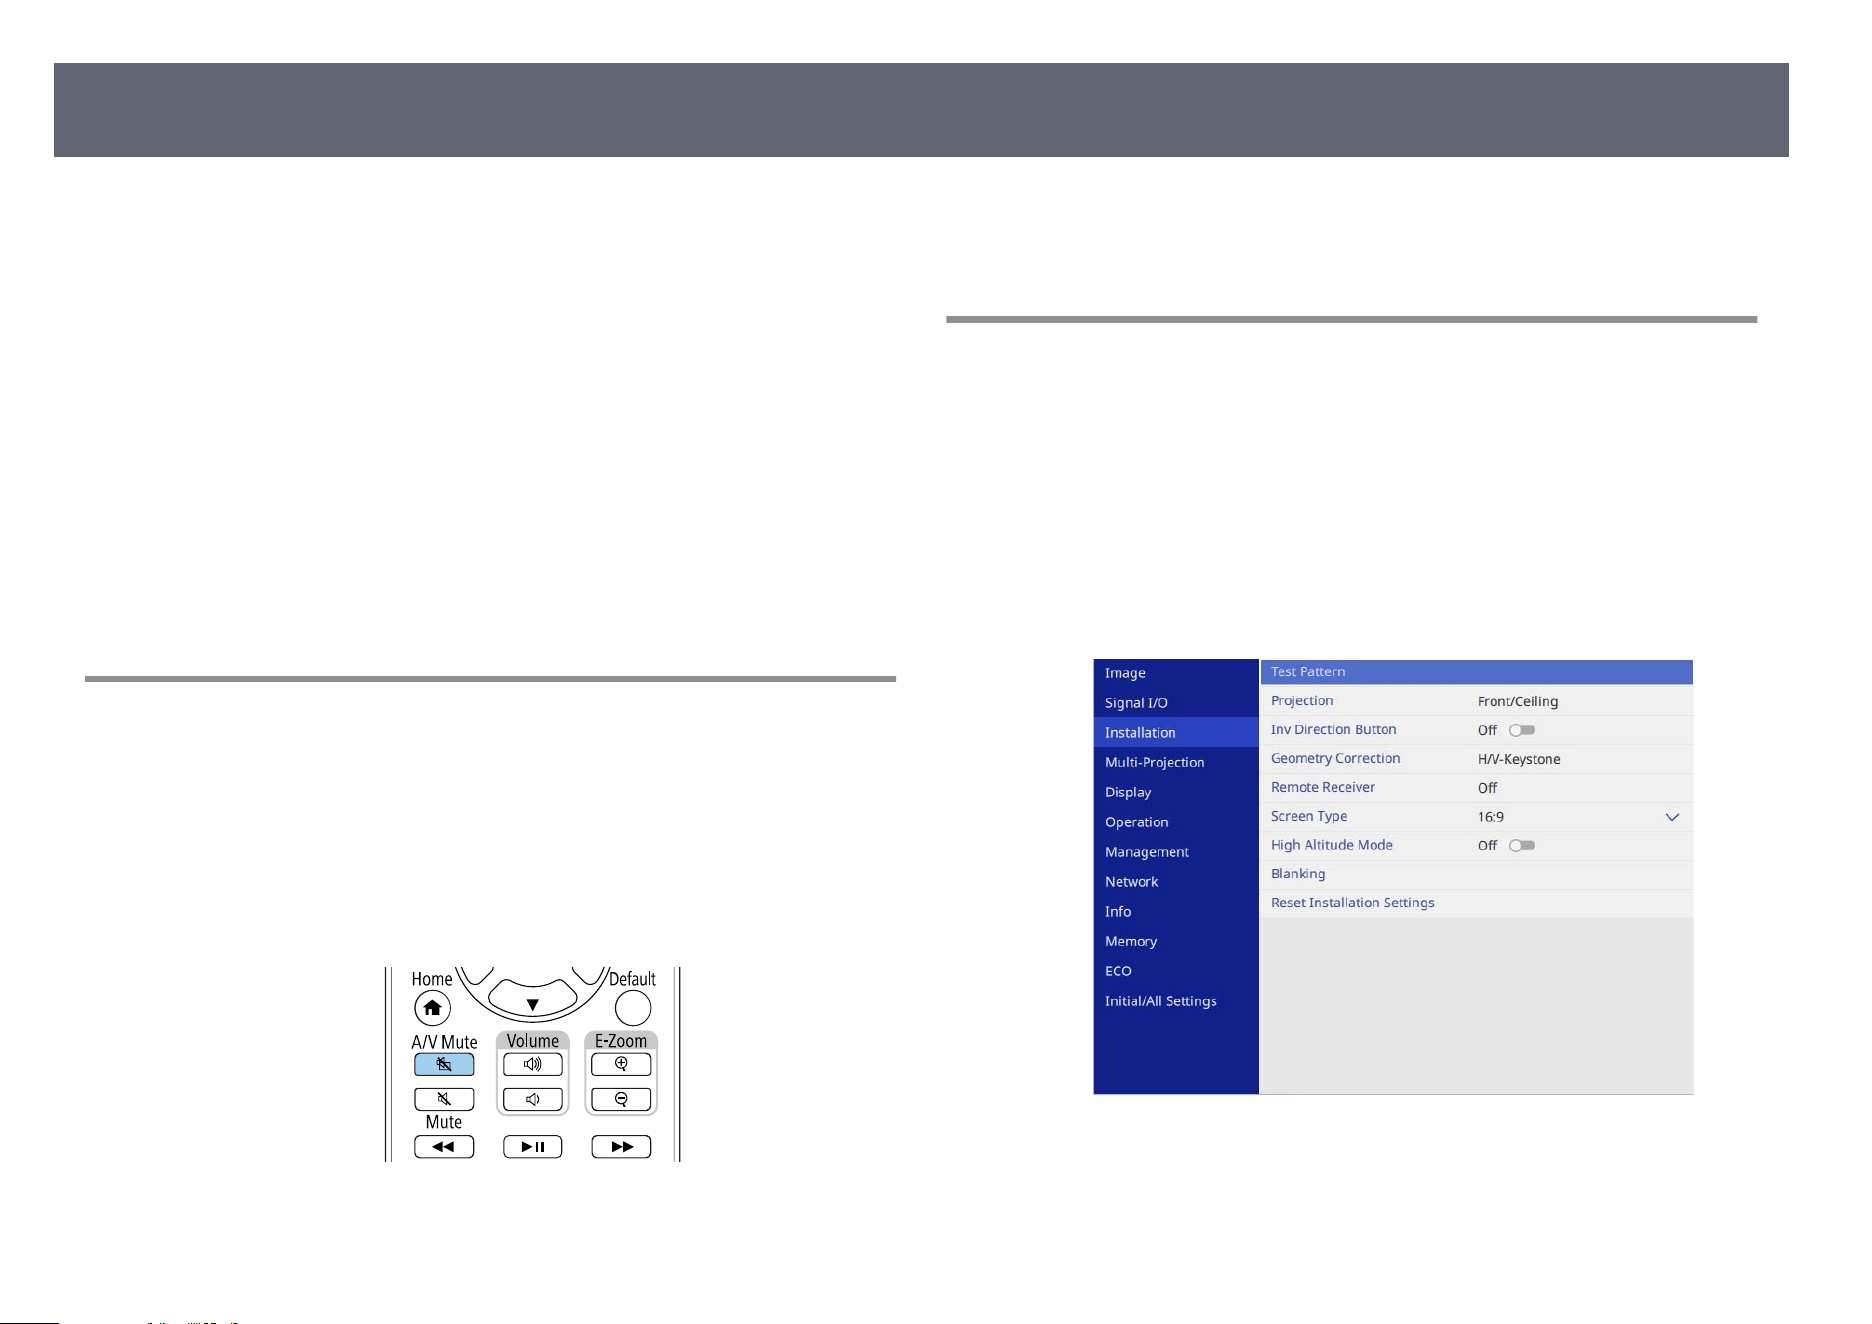
Depending on how you positioned the projector, you may need to change the
pr
ojection mode so your images project correctly.
•
Front lets you project from a table in front of the screen.
•
Front/Ceiling ips the image over top-to-bottom to project upside-down
from a ceiling or wall mount.
•
Rear ips the image horizontally to project from behind a translucent screen.
•
Rear/Ceiling ips the image over top-to-bottom and horizontally to project
from a ceiling or wall mount and behind a translucent screen.
g
Related Links
•
"Changing the Projection Mode Using the Remote Control" p.54
•
"Changing the Projection Mode Using the Menus" p.54
•
"Projector Setup and Installation Options" p.29
Changing the Projection Mode Using the Remote
Control
You can change the projection mode to ip the image over top-to-bottom.
a
Turn on the projector and display an image.
b
Hold down the [A/V Mute] button on the remote control for 5 seconds.
e image disappears briey and reappears ipped top-to-bottom.
c
T
o change projection back to the original mode, hold down the [A/V
Mu
te] button for 5 seconds again.
Changing the Projection Mode Using the Menus
You can change the projection mode to ip
the image over top-to-bottom
and/or le-to-right using the projector menus.
a
Turn on the projector and display an image.
b
Press the [Menu] button on the control panel or remote control.
c
Select the I
nstallation menu and press [Enter].
d
Select Projection and press [Enter].
Projection Modes
54
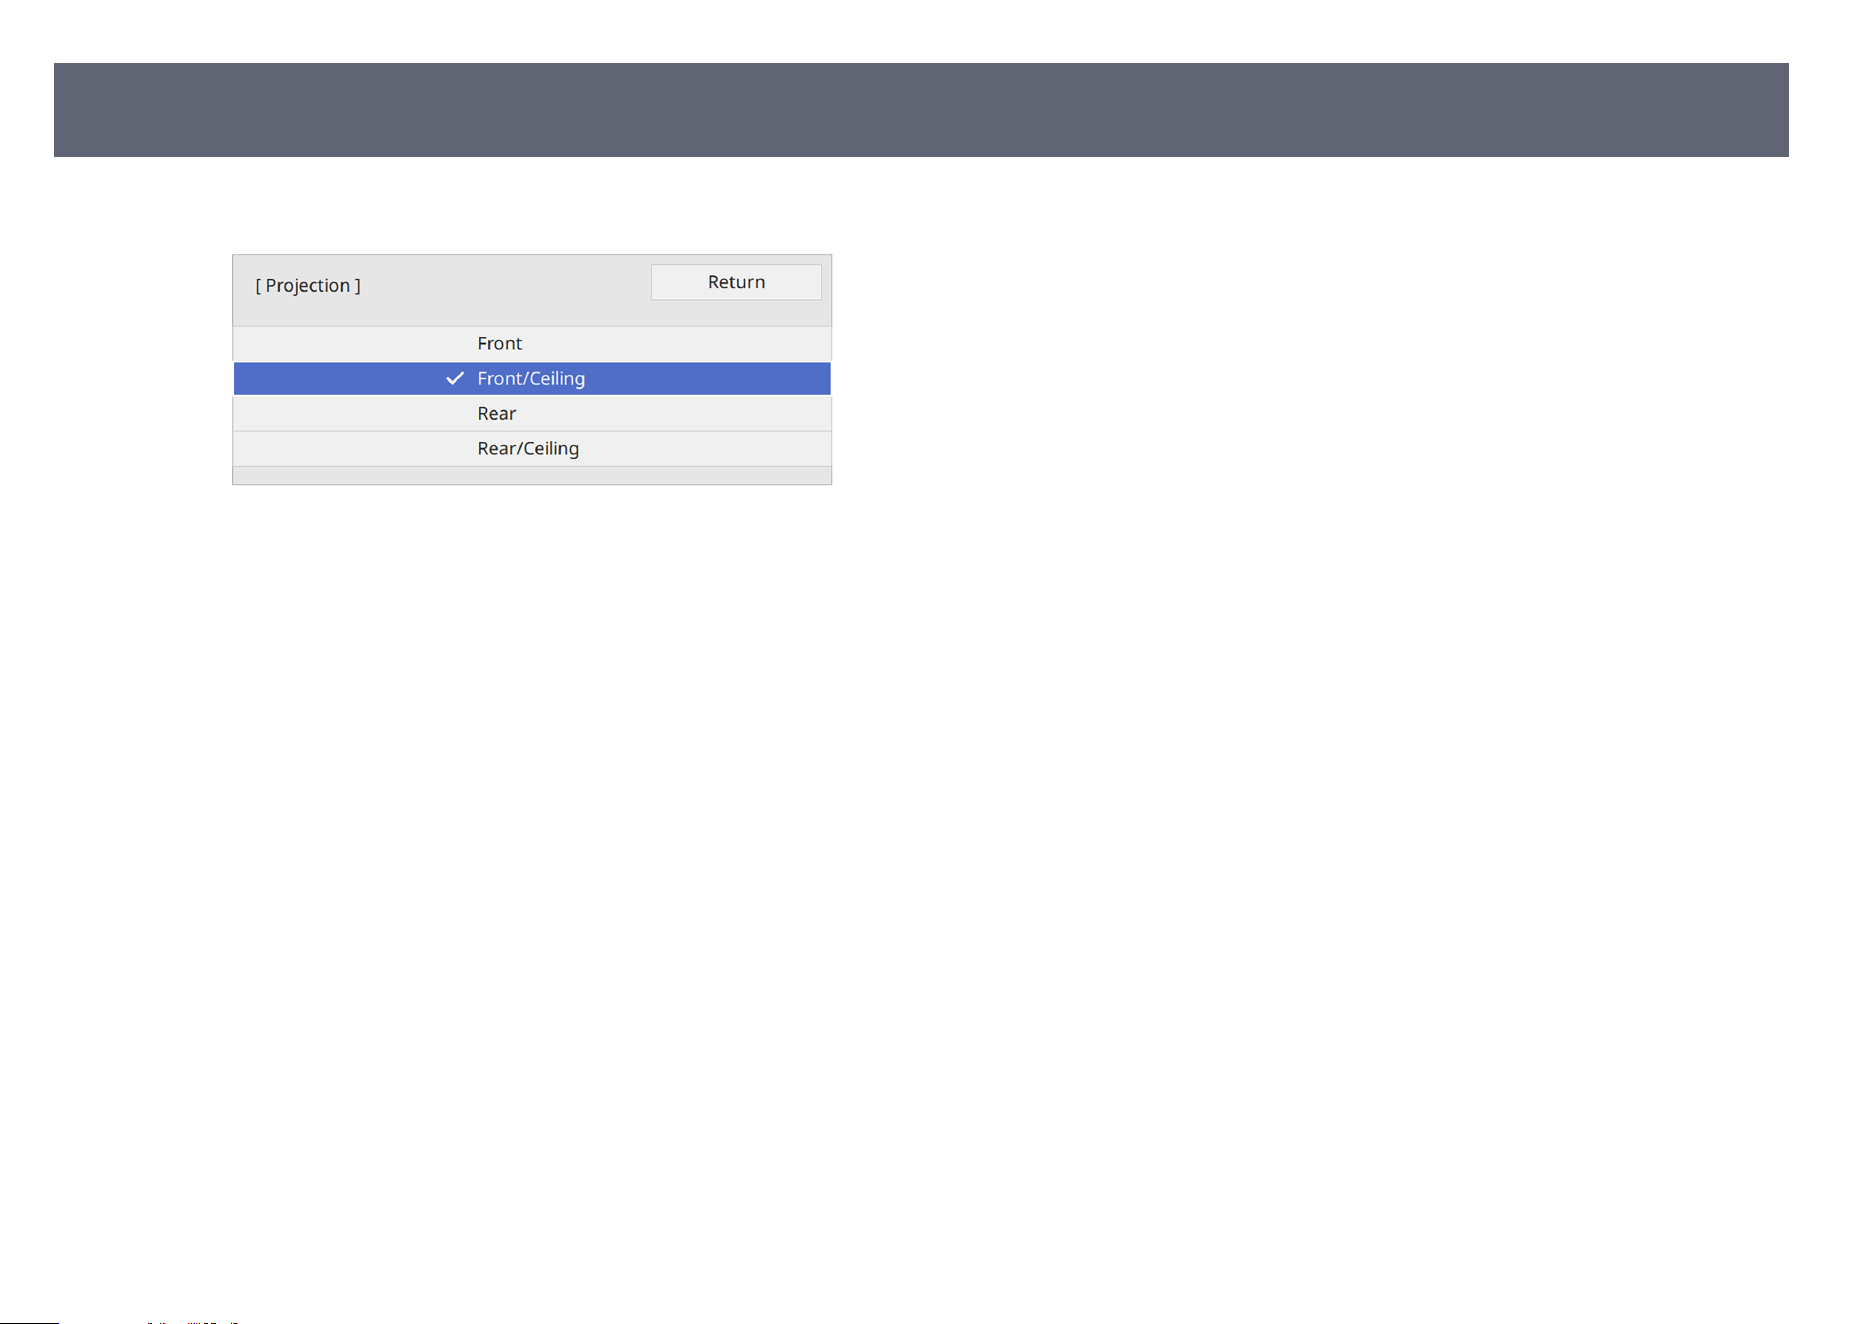
e
Select a projection mode and press [Enter].
f
Press [Menu] or [Esc] to exit the menus.
Projection Modes
55

You can use the Scr
een Type setting to match the aspect ratio of the displayed
image to the screen you are using.
•
Yo
u cannot change the Screen Type setting when the Content
Playback setting is set to On in the projector's Operation menu.
•
If you change the Screen Type setting, the Geometry Correction
settings are initialized.
a
Turn on the projector and display an image.
b
Press the [Menu] button on the control panel or remote control.
c
Select the I
nstallation menu and press [Enter].
d
Select Screen Type and press [Enter].
e
S
elect your screen's aspect ratio and press [Enter].
f
Press [Menu] to exit the menus.
You may need to restart the projector. Follow the on-screen
ins
tructions.
g
Adjust the aspect ratio for the projected image, if necessary.
When the Screen Type setting changes, the EDID settings are
au
tomatically adjusted.
g
Related Links
•
"Ad
justing the Image Position Using Screen Position" p.56
•
"Changing the Horizontal Position of the Image Using Screen Shi" p.57
Adjusting the Image Position Using Screen Position
You can adjust the image position if there are margins between the edge of the
imag
e and the projected screen frame.
Setting the Screen Type
56
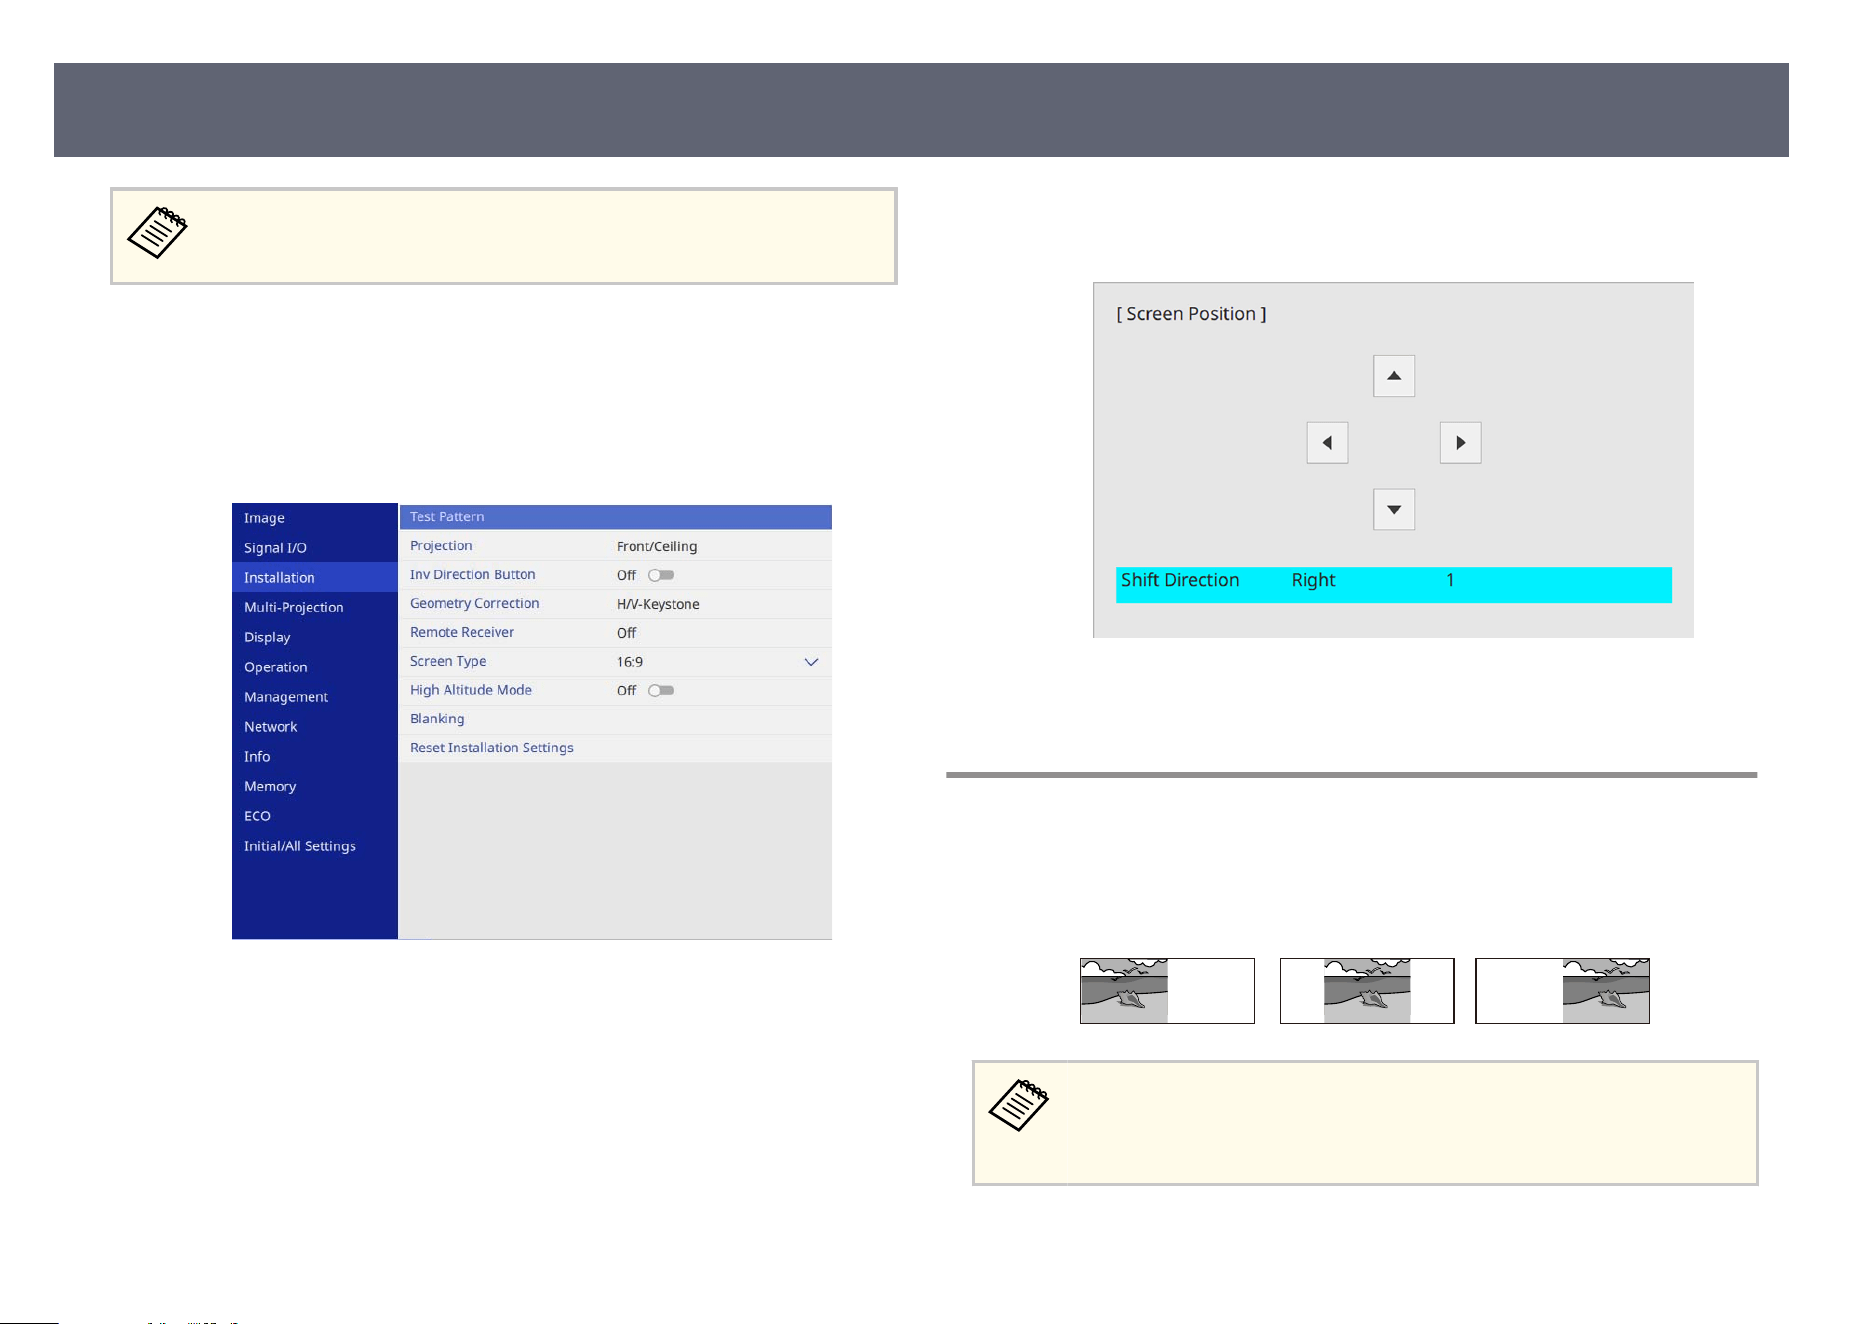
You cannot adjust the screen position if the Scr
een Type setting is set to
16:10.
a
Turn on the projector and display an image.
b
Press the [Menu] button on the control panel or remote control.
c
Select the I
nstallation menu and press [Enter].
d
Select S
creen Position, and press [Enter].
e
U
se the arrow buttons on the control panel or remote control to adjust the
posi
tion of the image.
f
When you are ni
s
hed, press [Menu].
Changing the Horizontal Position of the Image Using
Screen Shift
You can specify the horizontal position of the image inside the ultra-wide
display when the Screen Type is set to 16:6.
•
Avai
lable only when Aspect is set to Auto for the HDMI and HDBaseT
sources in the projector's Image menu.
•
Unavailable in the split screen projection.
a
Turn on the projector and display an image.
Setting the Screen Type
57
b
Press the [4], [5], or [6] button on the remote control.
c
Adjust the horizontal position of the projected image by pressing the
f
o
llowing numeric buttons on the remote control:
•
[4] to project the image in the le position.
•
[5] to project the image in the center.
•
[6] to project the image in the right position.
e setting is saved until the projector is turned o.
d
When you are nis
hed, press [Esc].
Setting the Screen Type
58

If you cannot install the projector directly in front of the screen, you can adjust
th
e position of the projected image using the lens shi feature.
Attention
Wh
en adjusting the image position with the vertical lens shi, adjust it by moving
the image from the bottom to the top. If you adjust it from the top to the bottom, the
image position may move down slightly aer adjusting.
•
Wai
t 30 minutes aer turning on the projector before setting the focus,
zoom, and lens shi for maximum accuracy.
•
Keep the vertical and horizontal lens shi dials in their center positions
of the lens shi adjustment range for the clearest picture.
a
Turn on the projector and display an image.
b
Turn the vertical and horizontal lens s
hi
dials on the projector to adjust
the position of the projected image as necessary.
A
Projected image at the center of the lens shi
adjustment range
B
Maximum range: V × 50%
C
When the horizontal direction is at the maximum value: V × 12%
•
You cannot move the image horizontally when the lens is shied
vertically all the way.
•
e lens shi adjustment range is an approximate value.
Adjusting the Image Position Using Lens Shift
59

You can display a test pattern to adjust the projected image without connecting
a com
puter or video device.
•
e tes
t pattern's shape is determined by the Screen Type setting. Be
sure to set the correct screen type before adjusting with the test pattern.
•
To set menu items that cannot be set while the test pattern is being
displayed or to ne-tune the projected image, project an image from
the connected device.
•
If you capture the projected image as a test pattern during Freeze, you
can use the captured image as one of the test patterns. e captured
image is not 4K enhanced image quality.
a
Turn on the projector.
b
Press the down arrow button on the control panel.
A test pattern is displayed.
You can also display a test pattern from the projector's I
ns
tallation
menu.
c
Press the le or r
ight arrow button on the remote control, or press [Enter]
on the control panel to cycle through the available test patterns.
d
Adjust the image as necessary.
e
To remove the test pattern, press [Esc].
Displaying a Test Pattern
60
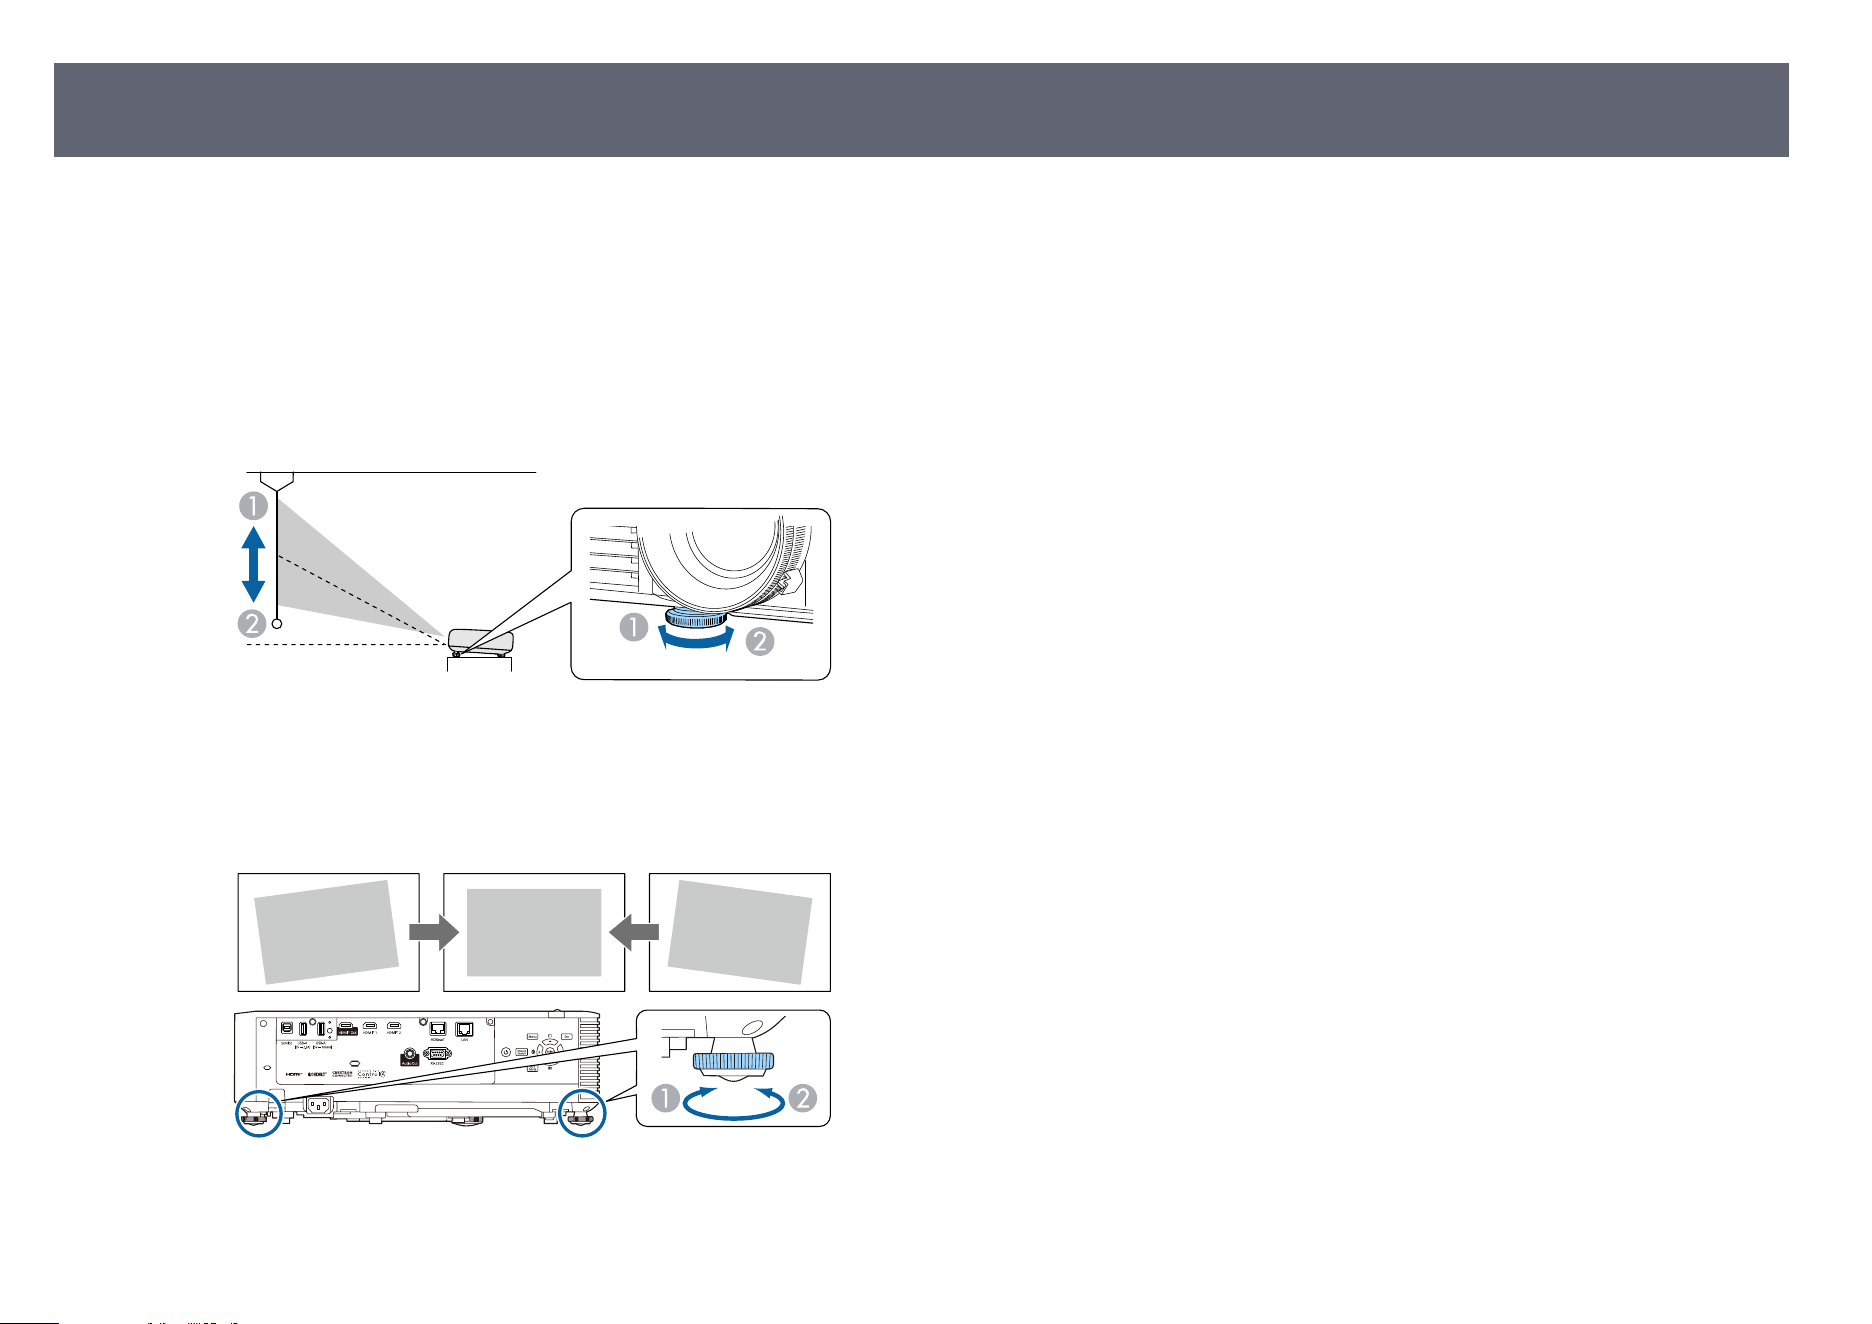
If you are projecting from a table or other at sur
face and the image is too high
or low, you can adjust the image height using the projector's adjustable feet.
e larger the angle of tilt, the harder it becomes to focus. Locate the projector
so that it only needs to be tilted at a small angle.
a
Turn on the projector and display an image.
b
To adjust the image height, rotate the front foot to extend or retract it.
A
Extend the front foot
B
Retract the front foot
c
If the image is tilted, rotate the rear feet to adjust their height.
A
Extend the rear foot
B
Retract the rear foot
If the projected image is unevenly rectangular, you need to adjust the image
sh
ape.
g
Related Links
•
"Image Shape" p.62
Adjusting the Image Height
61

You can project an even, rectangular image by placing the projector directly in
fr
ont of the center of the screen and keeping it level. If you place the projector at
an angle to the screen, or tilt it up or down, or o to the side, you may need to
correct the image shape.
Aer correction, your image is slightly smaller.
For the best quality images, we recommend adjusting the installation position of
the projector to achieve the correct image size and shape.
g
Related Links
•
"Correcting Image Shape with H/V Keystone" p.62
•
"Correcting the Image Shape with Quick Corner" p.63
•
"Correcting Image Shape with Curved Surface Mode" p.66
•
" Correcting Image Shape with Corner Wall Mode " p.68
•
"Correcting Image Shape with Point Correction Mode" p.71
•
"Loading Image Shape Setting from Memory" p.74
Correcting Image Shape with H/V Keystone
You can use the projector's H/V-Keystone setting to correct the shape of an
image that is unevenly rectangular on the sides.
You can correct images up to 30º right, le, up
,
or down. (EB-L890E/EB-L895E/EB-L790SE/EB-L795SE/EB-L695SE/EB-
L690E/EB-L890U/EB-L790U/EB-L690U/EB-L690SU/EB-L695SU)
You can correct images up to 25° right, le, up, or down. (EB-L690SE)
•
If y
ou need to change the Screen Type and Screen Position settings,
change them rst.
•
You cannot combine with other correction methods.
a
Turn on the projector and display an image.
b
Press the [Menu] button on the control panel or remote control.
c
Select the I
nstallation menu and press [Enter].
d
Select Geometry Correction and press [Enter].
e
Geometry Correction screen is displayed.
You can also access the Geometry Correction screen by pressing
the up arrow button on the control panel.
Image Shape
62
e
Select H/V-Keystone and press [Enter]. Select Yes if necessary.
Y
ou see the H/V-Keystone adjustment screen:
f
Use the arrow buttons on the projector or the remote control to select
bet
ween vertical and horizontal keystone correction and to adjust the
image shape as necessary.
•
V-Keystone
•
H-Ke
ystone
If you have adjusted the position of the projected image by using the
lens
shi feature, adjust the V-Balance and H-Balance settings as
necessary.
•
V-Balance
•
H-Balanc
e
g
When you are nis
hed, press [Esc].
Aer correction, your image is slightly smaller.
To save the current shape of an image you have adjusted, select Sav
e
Memory. You can save up to three image shapes in the memory.
s Installation > Geometry Correction > Memory > Save
Memory
Correcting the Image Shape with Quick Corner
You can use the projector's Quick Corner setting to correct the shape and size
of an image that is unevenly rectangular.
Image Shape
63
If you change the Scr
een Type and Screen Position settings, the
adjustments are reset.
a
Turn on the projector and display an image.
b
Press the [Menu] button on the control panel or remote control.
c
Select the I
nstallation menu and press [Enter].
d
Select Geometry Correction and press [Enter].
Y
ou see the Geometry Correction screen.
e
Select Quick Corner and press [Enter]. Select Yes if necessary.
Y
ou see the area selection screen.
Image Shape
64
f
Use the arrow buttons to select the area of the image you want to adjust.
en pr
ess [Enter].
To reset the Qui
ck Corner corrections, hold down [Esc] for about 2
seconds while the area selection screen is displayed, and then select
Yes.
g
Press the arrow buttons to adjust the image shape as necessary.
T
o r
eturn to the area selection screen, press [Enter].
•
Yo
u can also select the area by pressing the following numeric
buttons on the remote control:
•
[1] selects the upper le area.
•
[3] selects the upper right area.
•
[7] selects the lower le area.
•
[9] selects the lower right area.
•
If you see this screen, you cannot adjust the shape any further in
the direction indicated by the gray triangle.
h
Repeat steps 6 and 7 as needed to adjust any remaining corners.
i
When you are ni
s
hed, press [Esc].
e Geometry Correction setting is now set to Quick Corner in the projector's
Installation menu.
Image Shape
65
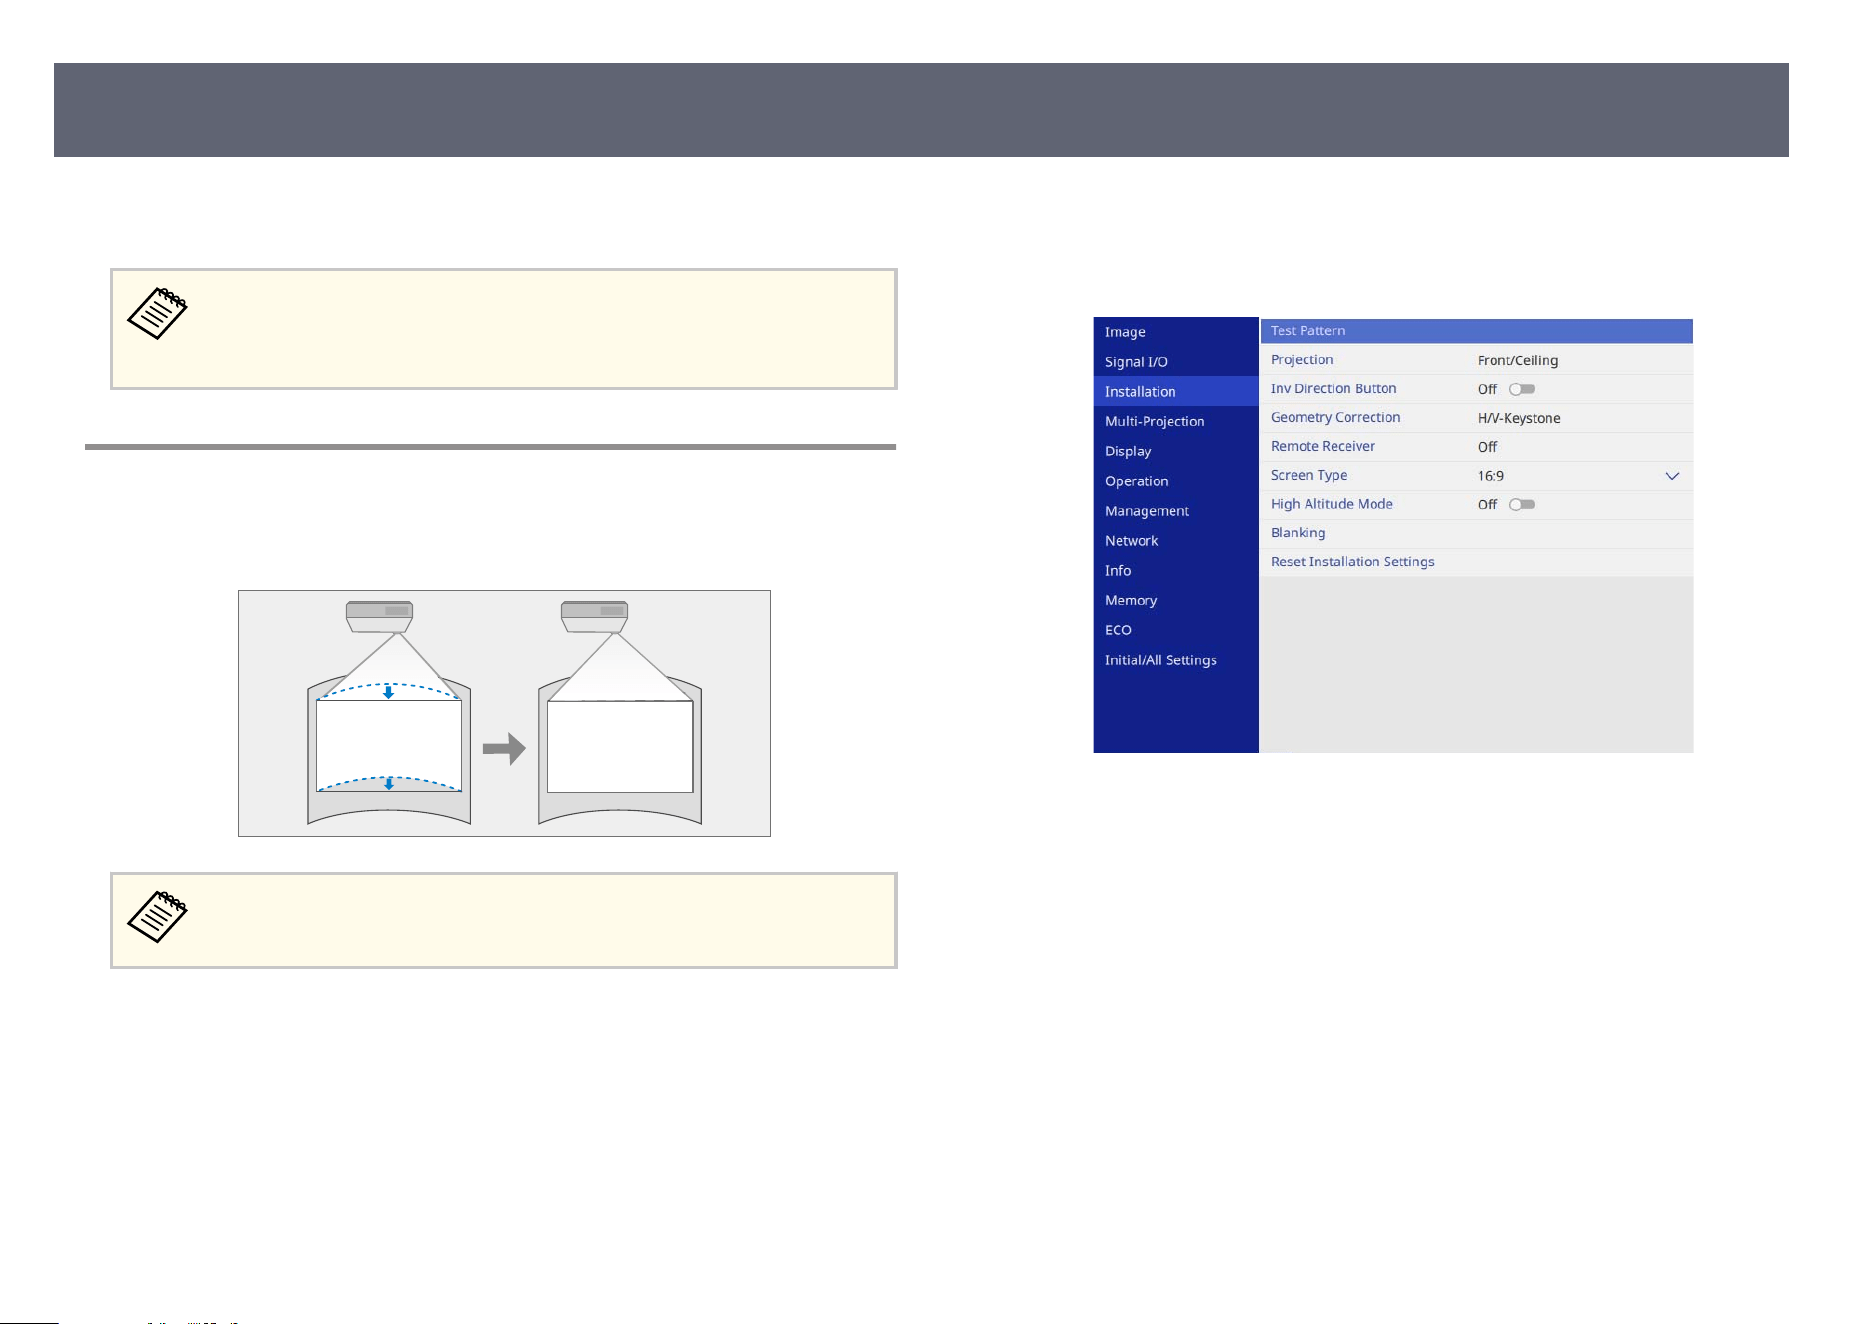
e next time you press the up arrow button on the control panel, the area
s
election screen is displayed.
To save the current shape of an image you have adjusted, select Sav
e
Memory. You can save up to three image shapes in the memory.
s Installation > Geometry Correction > Memory > Save Memory
Correcting Image Shape with Curved Surface Mode
You can use the projector's Curved Surface setting to adjust the shape of an
im
ag
e projected on a curved or spherical surface.
If you change the Scr
een Type and Screen Position settings, the
adjustments are reset.
a
Turn on the projector and display an image.
b
Press the [Menu] button on the control panel or remote control.
c
Select the I
nstallation menu and press [Enter].
d
Select G
eometry Correction and press [Enter].
Y
ou see the Geometry Correction screen.
Image Shape
66

e
Select Curved Surface Mode and press [Enter]. Select Yes if necessary.
Y
ou see the Curved Surface Mode screen.
f
Select Curved Surface and press [Enter].
g
Select Correct Shape and press [Enter].
Y
ou see the area selection screen.
h
Use the arrow buttons to select the area of the image you want to adjust,
th
en press [Enter].
i
Press the arrow buttons to adjust the image shape of the selected area as
n
e
cessary.
To return to the area selection screen, press [Esc].
Image Shape
67
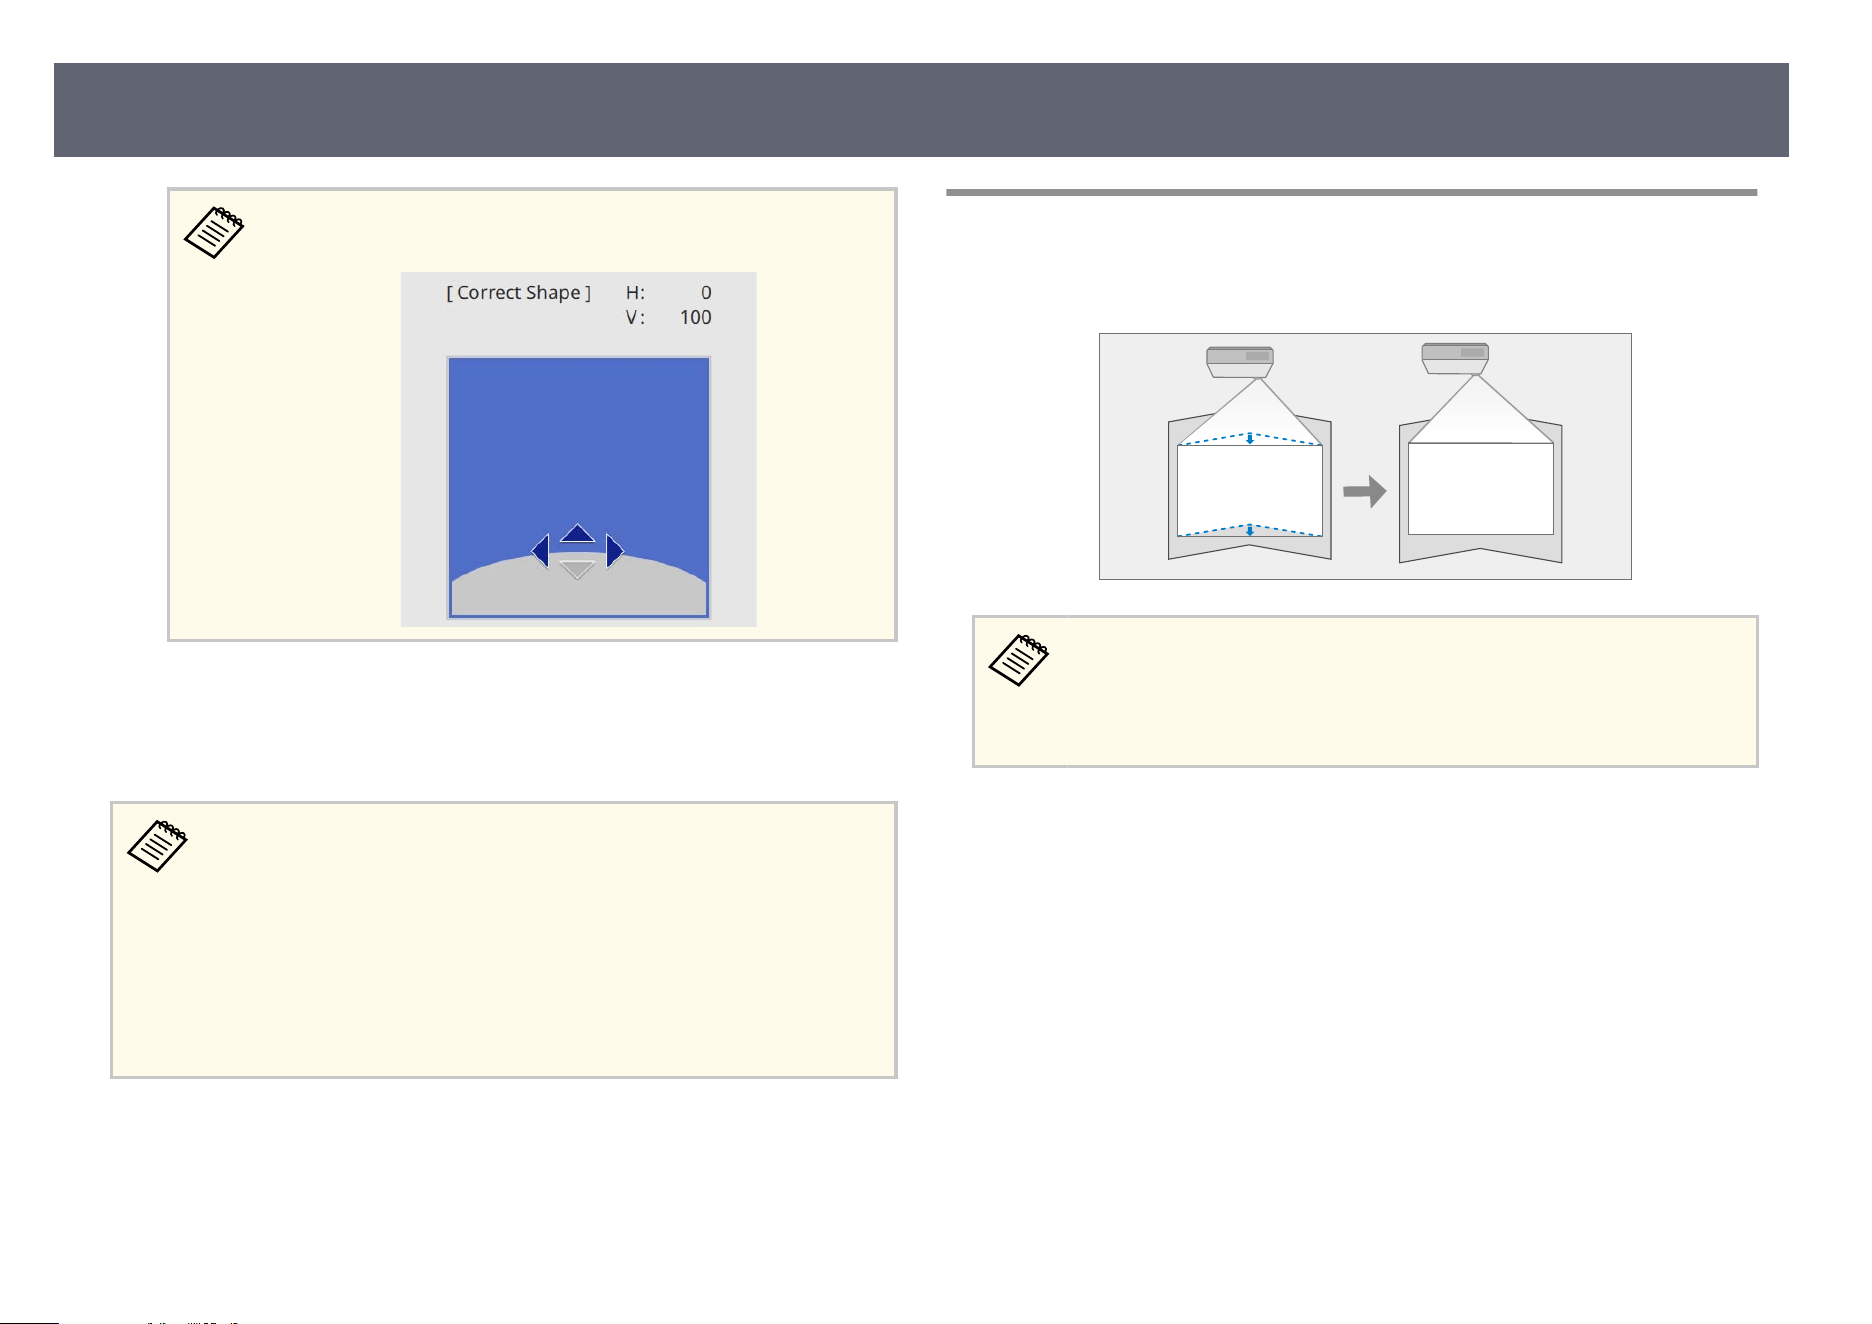
If you see this screen, you cannot adjust the shape any further in the
dire
ction indicated by the gray triangle.
j
Repeat steps 8 and 9 as needed to adjust any remaining corners.
k
When you are nis
hed, press [Esc].
•
You can ne tune the corrected results. Use Quick Corner to adjust the
tilt of the image, and then use Point Correction for ne tuning. Select
Quick Corner or Point Correction on the screen in step 6.
•
To save the current shape of an image you have adjusted, select Save
Memory. You can save up to three image shapes in the memory.
s Installation > Geometry Correction > Memory > Save Memory
•
To reset the Curved Surface settings, hold down [Esc] for about 2
seconds while the area selection screen is displayed, and then select Yes.
g
Related Links
•
"Co
rrecting the Image Shape with Quick Corner" p.63
•
"Correcting Image Shape with Point Correction Mode" p.71
Correcting Image Shape with Corner Wall Mode
You can use the projector's Corner Wall setting to correct the corners and sides
of an im
age projected on a curved surface with right angles.
•
If y
ou change the Screen Type and Screen Position settings, the
adjustments are reset.
•
We recommend you adjust the image shape based on the point nearest
to the center of the screen.
a
Turn on the projector and display an image.
Image Shape
68
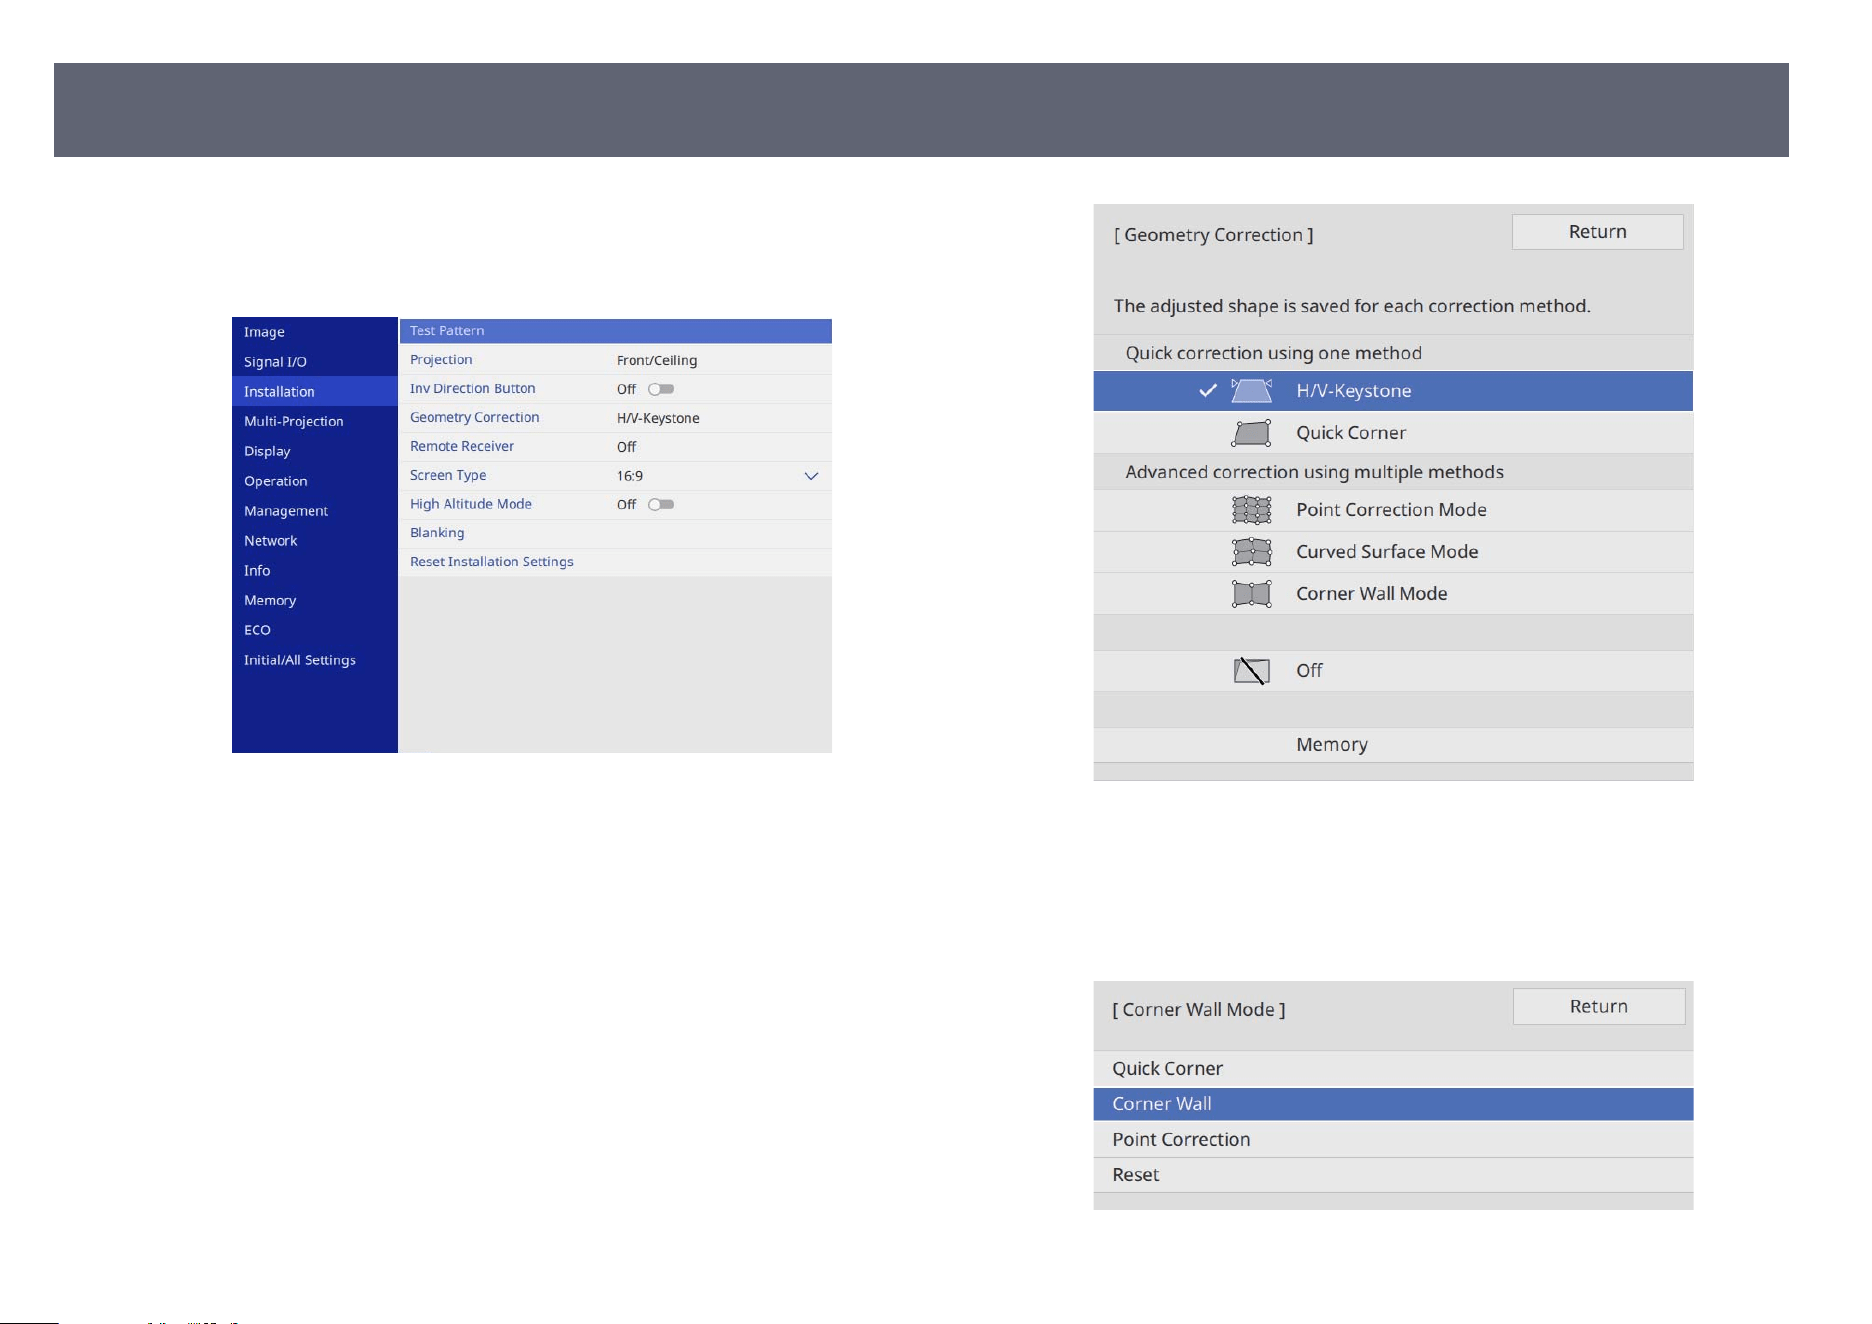
b
Press the [Menu] button on the control panel or remote control.
c
Select the I
nstallation menu and press [Enter].
d
Select G
eometry Correction and press [Enter].
Y
ou see the Geometry Correction screen.
e
Select Corner Wall Mode and press [Enter]. Select Yes if necessary.
Y
ou see the Corner Wall Mode screen.
f
Select Corner Wall and press [Enter].
Image Shape
69
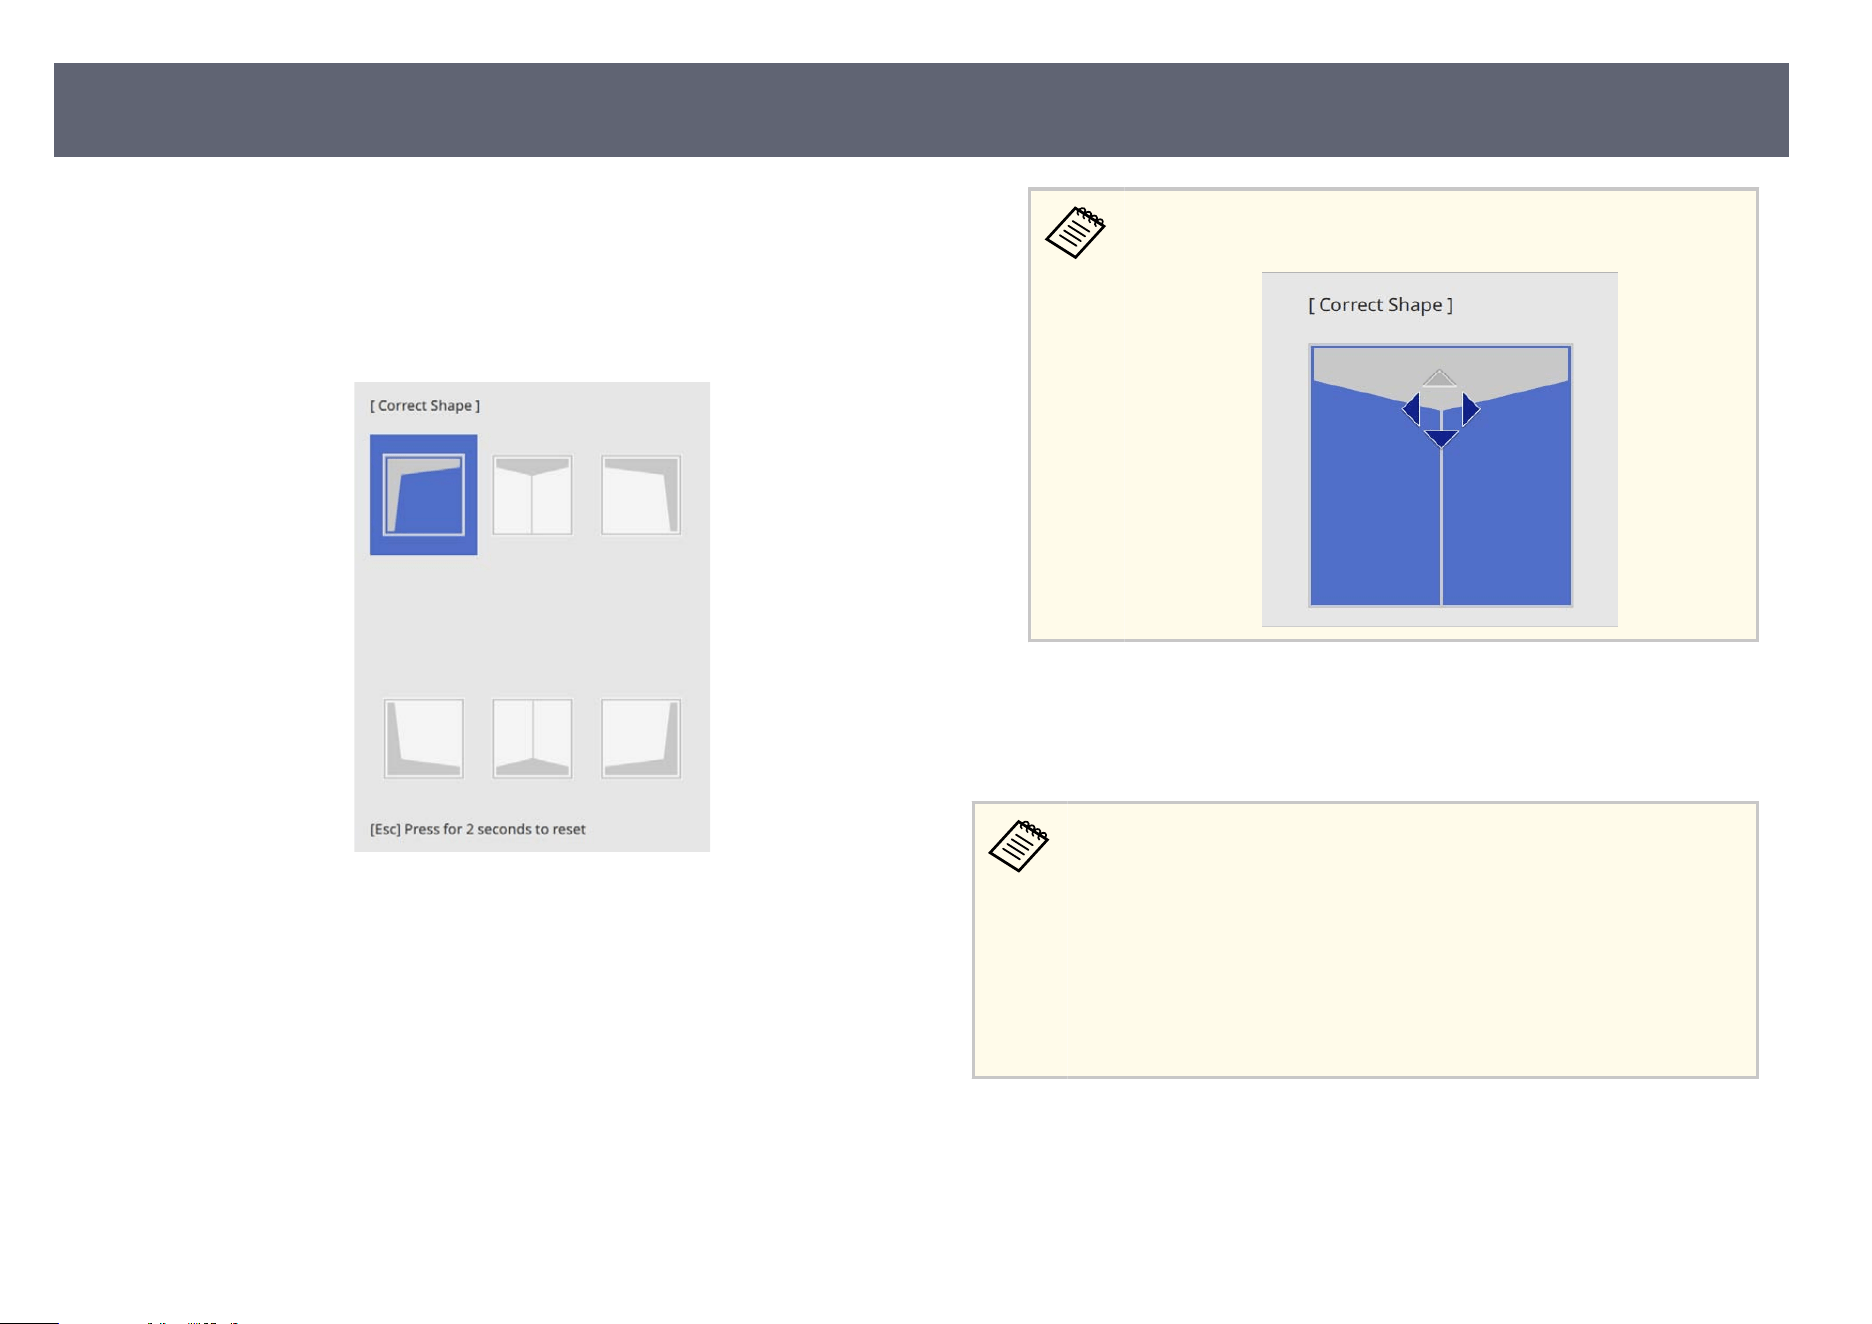
g
Select Correct Shape and press [Enter].
Y
ou see the area selection screen.
h
Use the arrow buttons to select the area of the image you want to adjust,
th
en press [Enter].
i
Press the arrow buttons to adjust the image shape of the selected area as
n
e
cessary.
To return to the area selection screen, press [Esc].
If you see this screen, you cannot adjust the shape any further in the
dire
ction indicated by the gray triangle.
j
Repeat steps 8 and 9 as needed to adjust any remaining corners.
k
When you are nis
hed, press [Esc].
•
You can ne tune the corrected results. Use Quick Corner to adjust the
tilt of the image, and then use Point Correction for ne tuning. Select
Quick Corner or Point Correction on the screen in step 6.
•
To save the current shape of an image you have adjusted, select Save
Memory. You can save up to three image shapes in the memory.
s Installation > Geometry Correction > Memory > Save Memory
•
To reset the Corner Wall settings, hold down [Esc] for about 2 seconds
while the area selection screen is displayed, and then select Yes.
g
Related Links
•
"Co
rrecting the Image Shape with Quick Corner" p.63
•
"Correcting Image Shape with Point Correction Mode" p.71
Image Shape
70
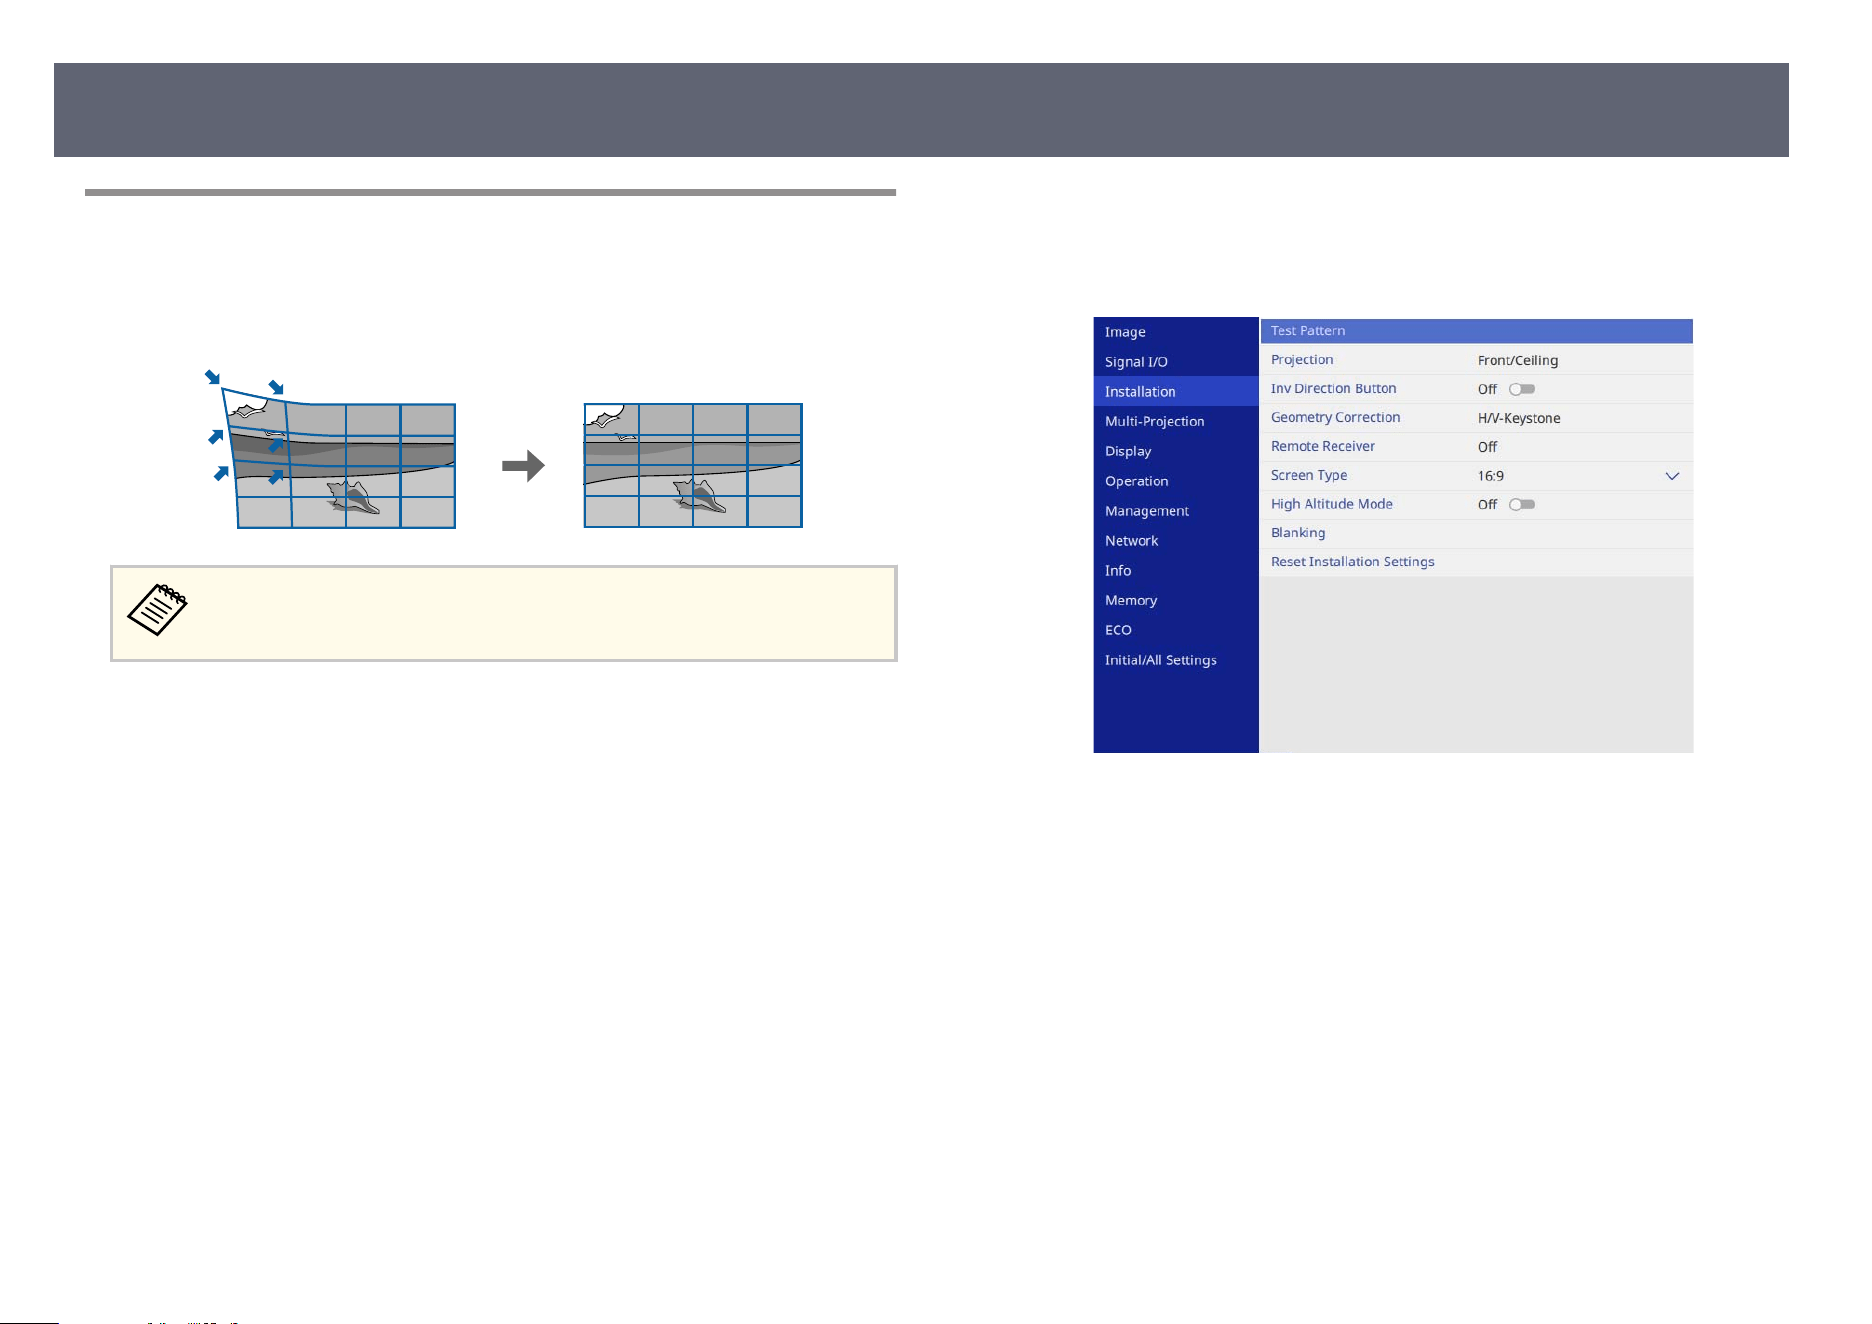
Correcting Image Shape with Point Correction Mode
You can use the projector's Po
int Correction setting to ne-tune the image
shape in portions of an image. e image is divided into a grid which allows you
to move intersection points on the grid as necessary to correct distortion.
If you change the Scr
een Type and Screen Position settings, the
adjustments are reset.
a
Turn on the projector and display an image.
b
Press the [Menu] button on the control panel or remote control.
c
Select the I
nstallation menu and press [Enter].
d
Select G
eometry Correction and press [Enter].
Y
ou see the Geometry Correction screen.
Image Shape
71
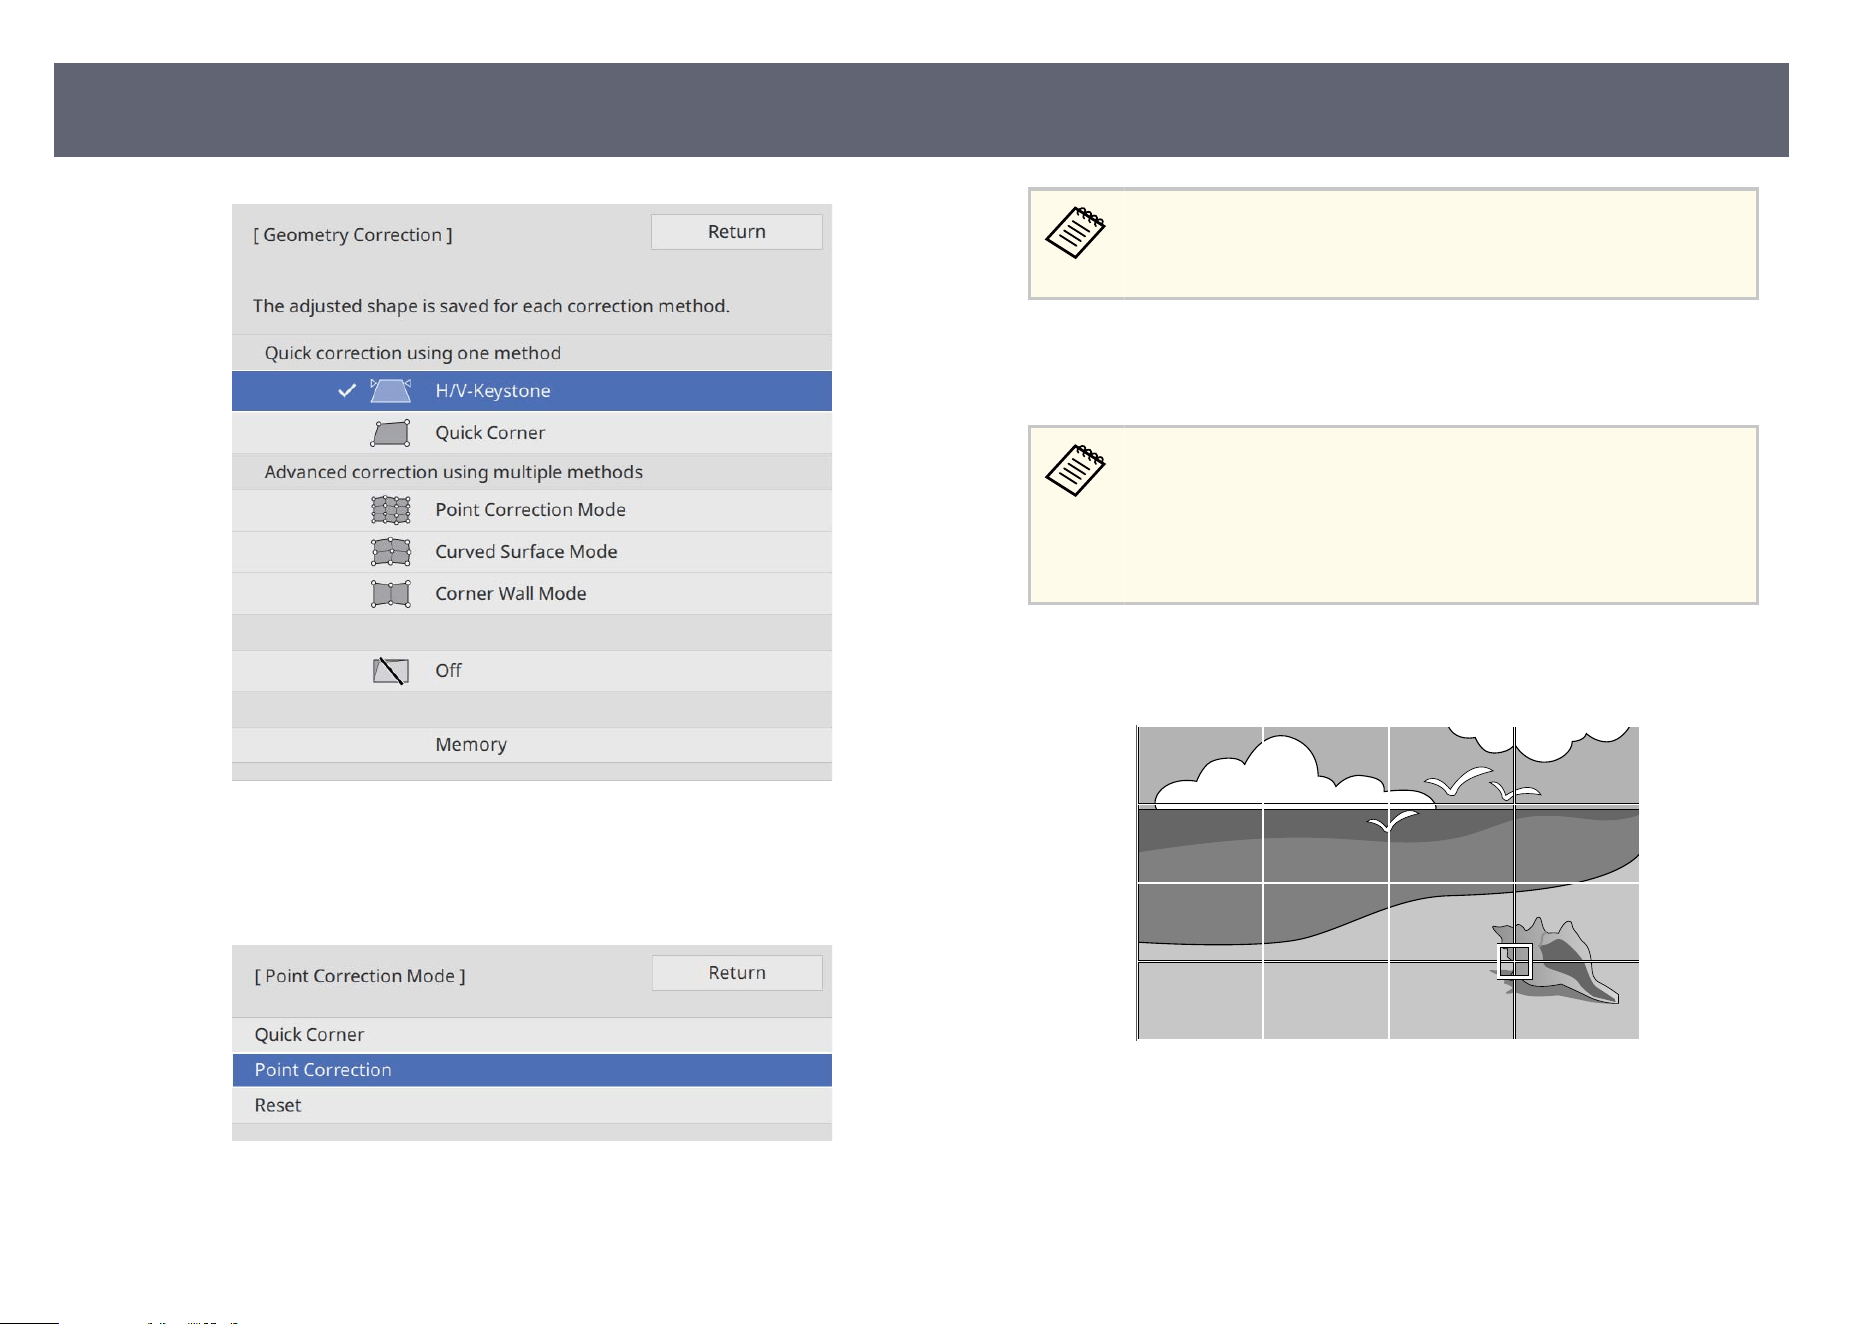
e
Select Point Correction Mode and press [Enter]. Select Yes if necessary.
f
S
elect Point Correction and press [Enter].
For ne tuning, select Quick Corner to correct the shape and size
o
f an image roughly, and then select Point Correction to adjust
them precisely.
g
Select Point Correction and press [Enter].
Y
ou see the grid on the projected image.
•
If y
ou want to change the point number, press [Esc], then select a
dierent Grid Size setting in the Point Correction menu.
•
If you want to change the grid color for visibility, press [Esc],
then select a dierent Pattern Color setting in the Point
Correction menu.
h
If you want to correct one point at a time, use the arrow buttons to move
to t
he point you want to correct, then press [Enter].
Image Shape
72
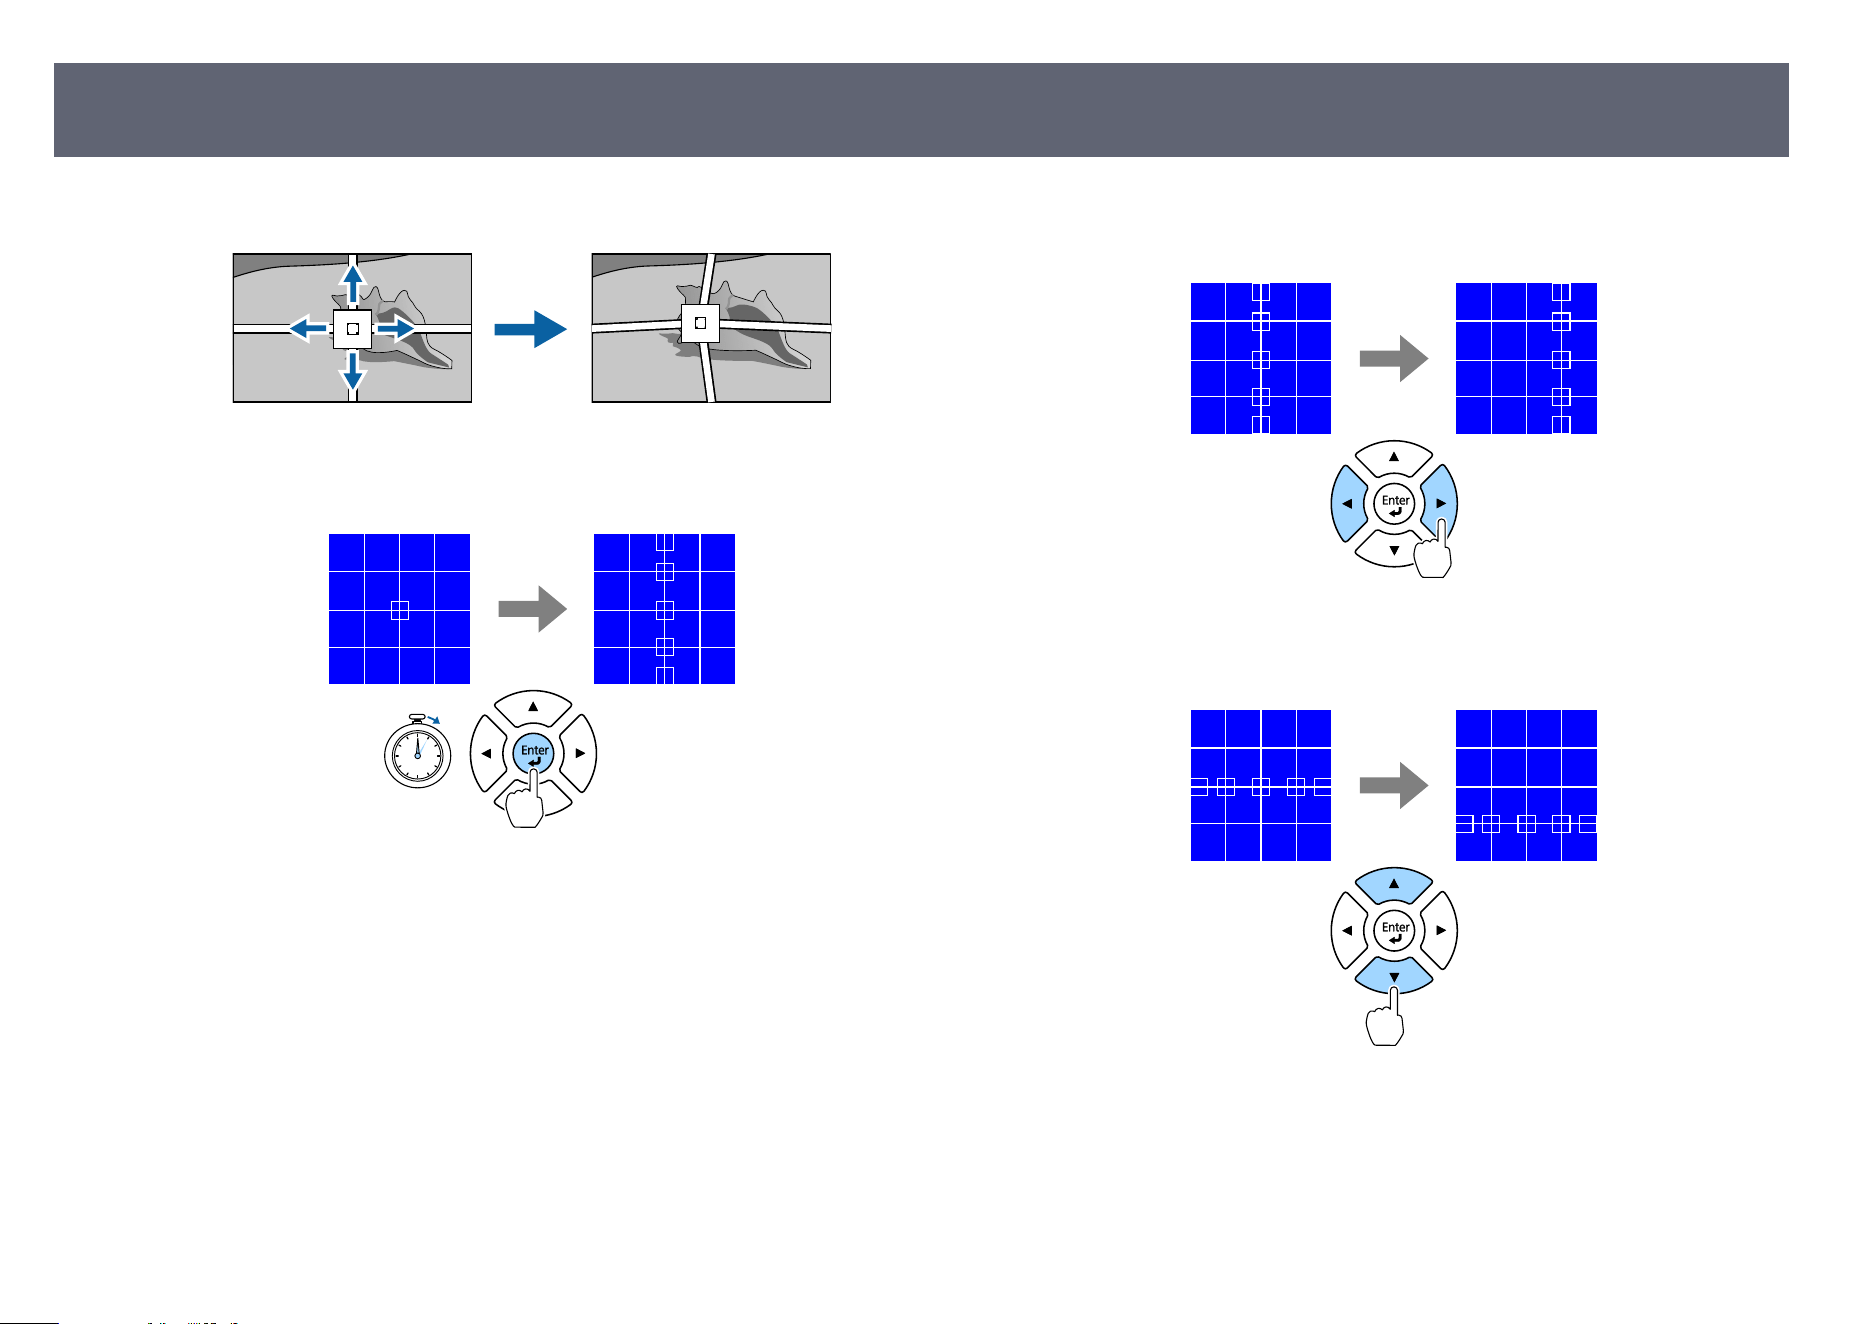
i
Use the arrow buttons to correct distortion as necessary.
j
If you want to correct all points in a specied vertical column or
horizontal row at once, hold down the [Enter] button for two seconds.
k
Use the le and r
ight arrow buttons to select the column you want to
adjust, and then press [Enter].
l
Use the up and down arrow buttons to select the row you want to adjust,
and t
hen press [Enter].
m
To correct any remaining points, press [Esc] to return to the previous
scr
een, then repeat steps 8 to 12.
n
When you are ni
s
hed, press [Esc].
Image Shape
73
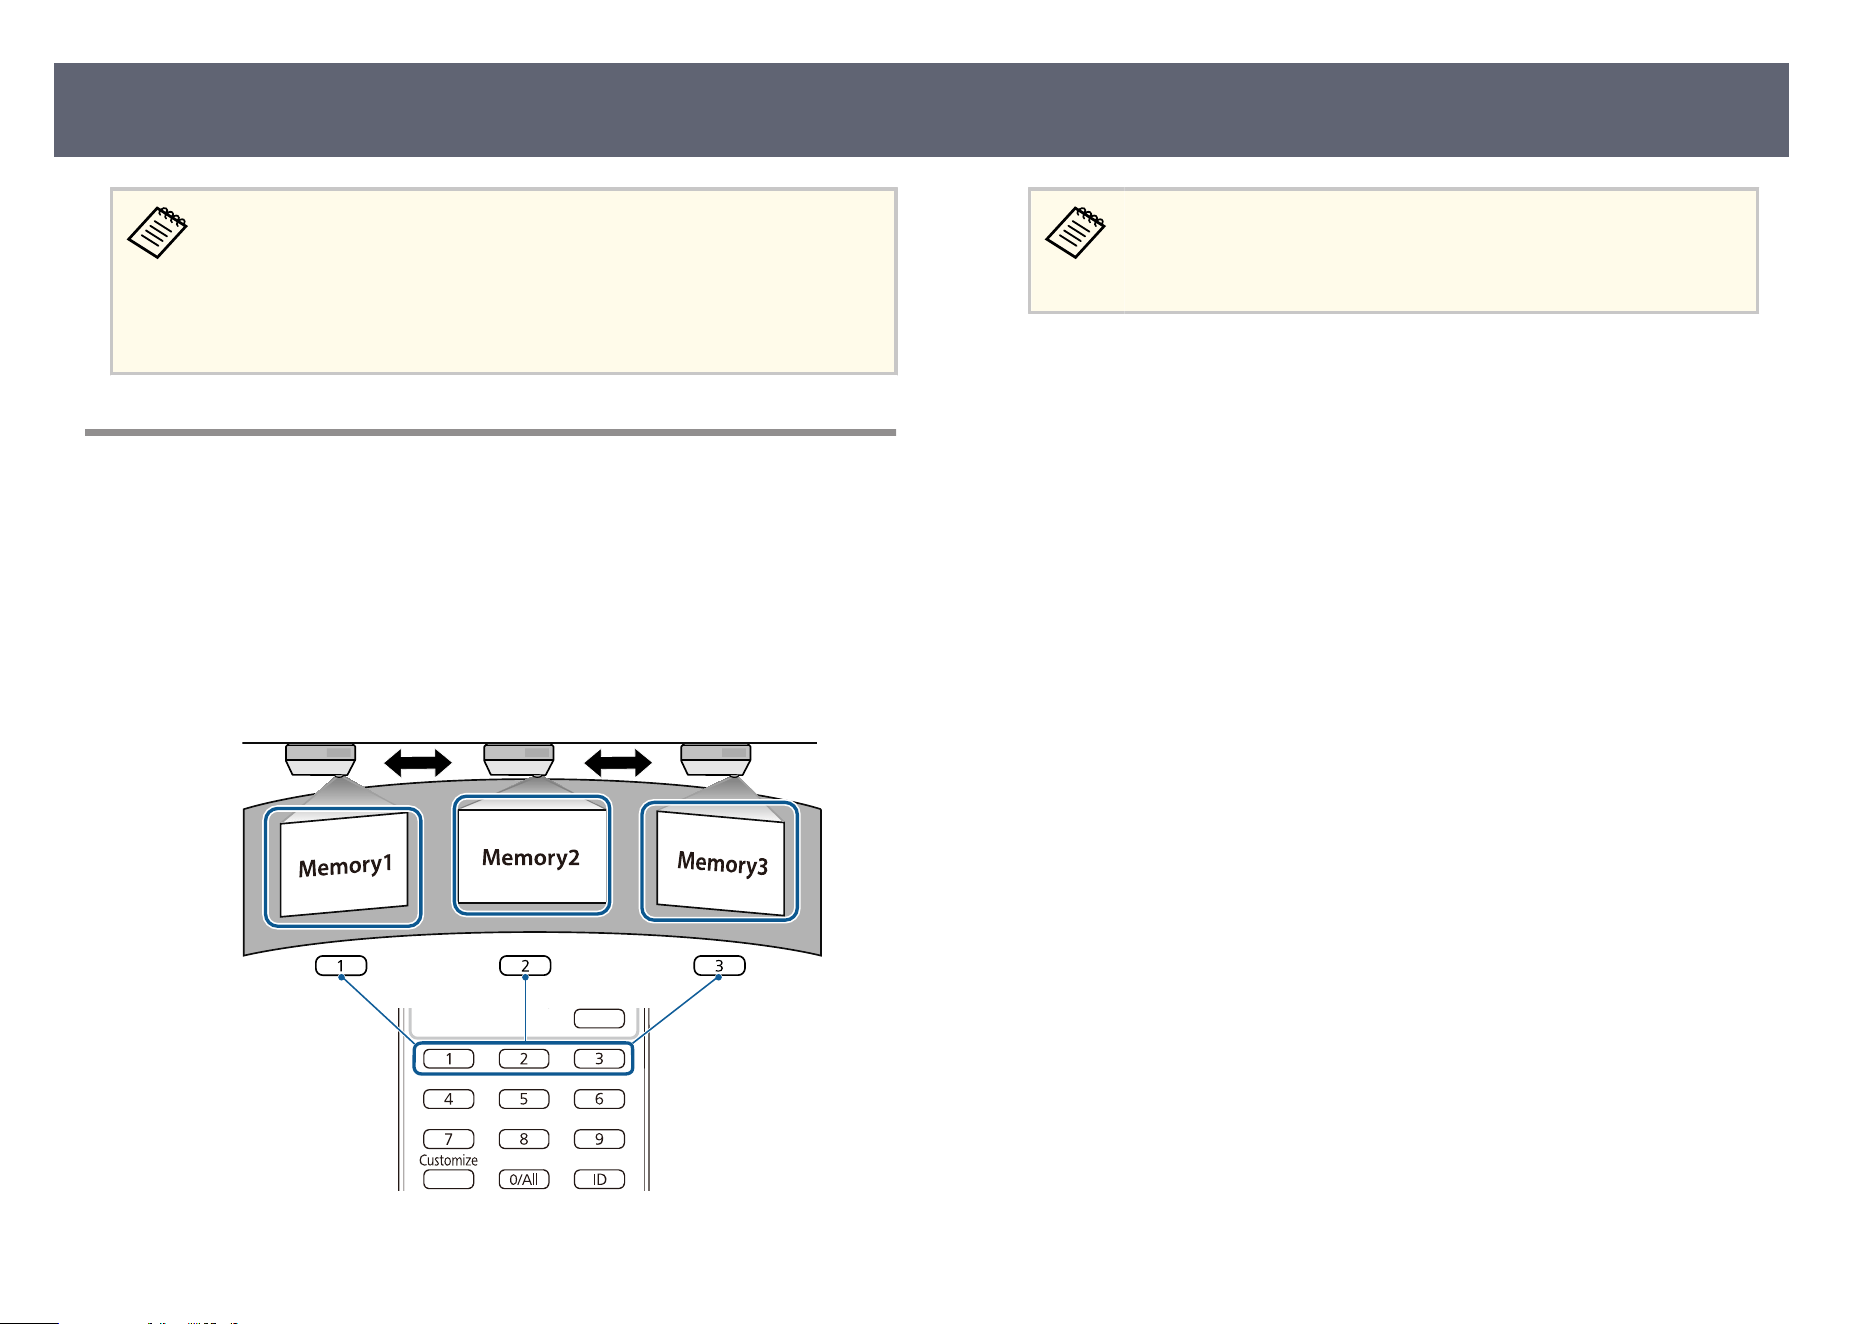
•
To s
ave the current shape of an image you have adjusted, select Save
Memory. You can save up to three image shapes in the memory.
s Installation > Geometry Correction > Memory > Save Memory
•
To reset the Point Correction settings to their original positions, select
Reset on the Point Correction screen.
Loading Image Shape Setting from Memory
You can load the image shape settings you selected and saved to the projector's
m
em
ory and apply them to the current image.
a
Turn on the projector and display an image.
b
Press the numeric button (1, 2, or 3) on the remote control that matches
t
h
e number of the saved setting.
•
e il
lustration above is only an example.
•
You can also load the saved image shape settings by selecting
Load Memory in the Memory menu.
c
When you have nis
hed loading the settings, follow the on-screen
instructions.
Image Shape
74
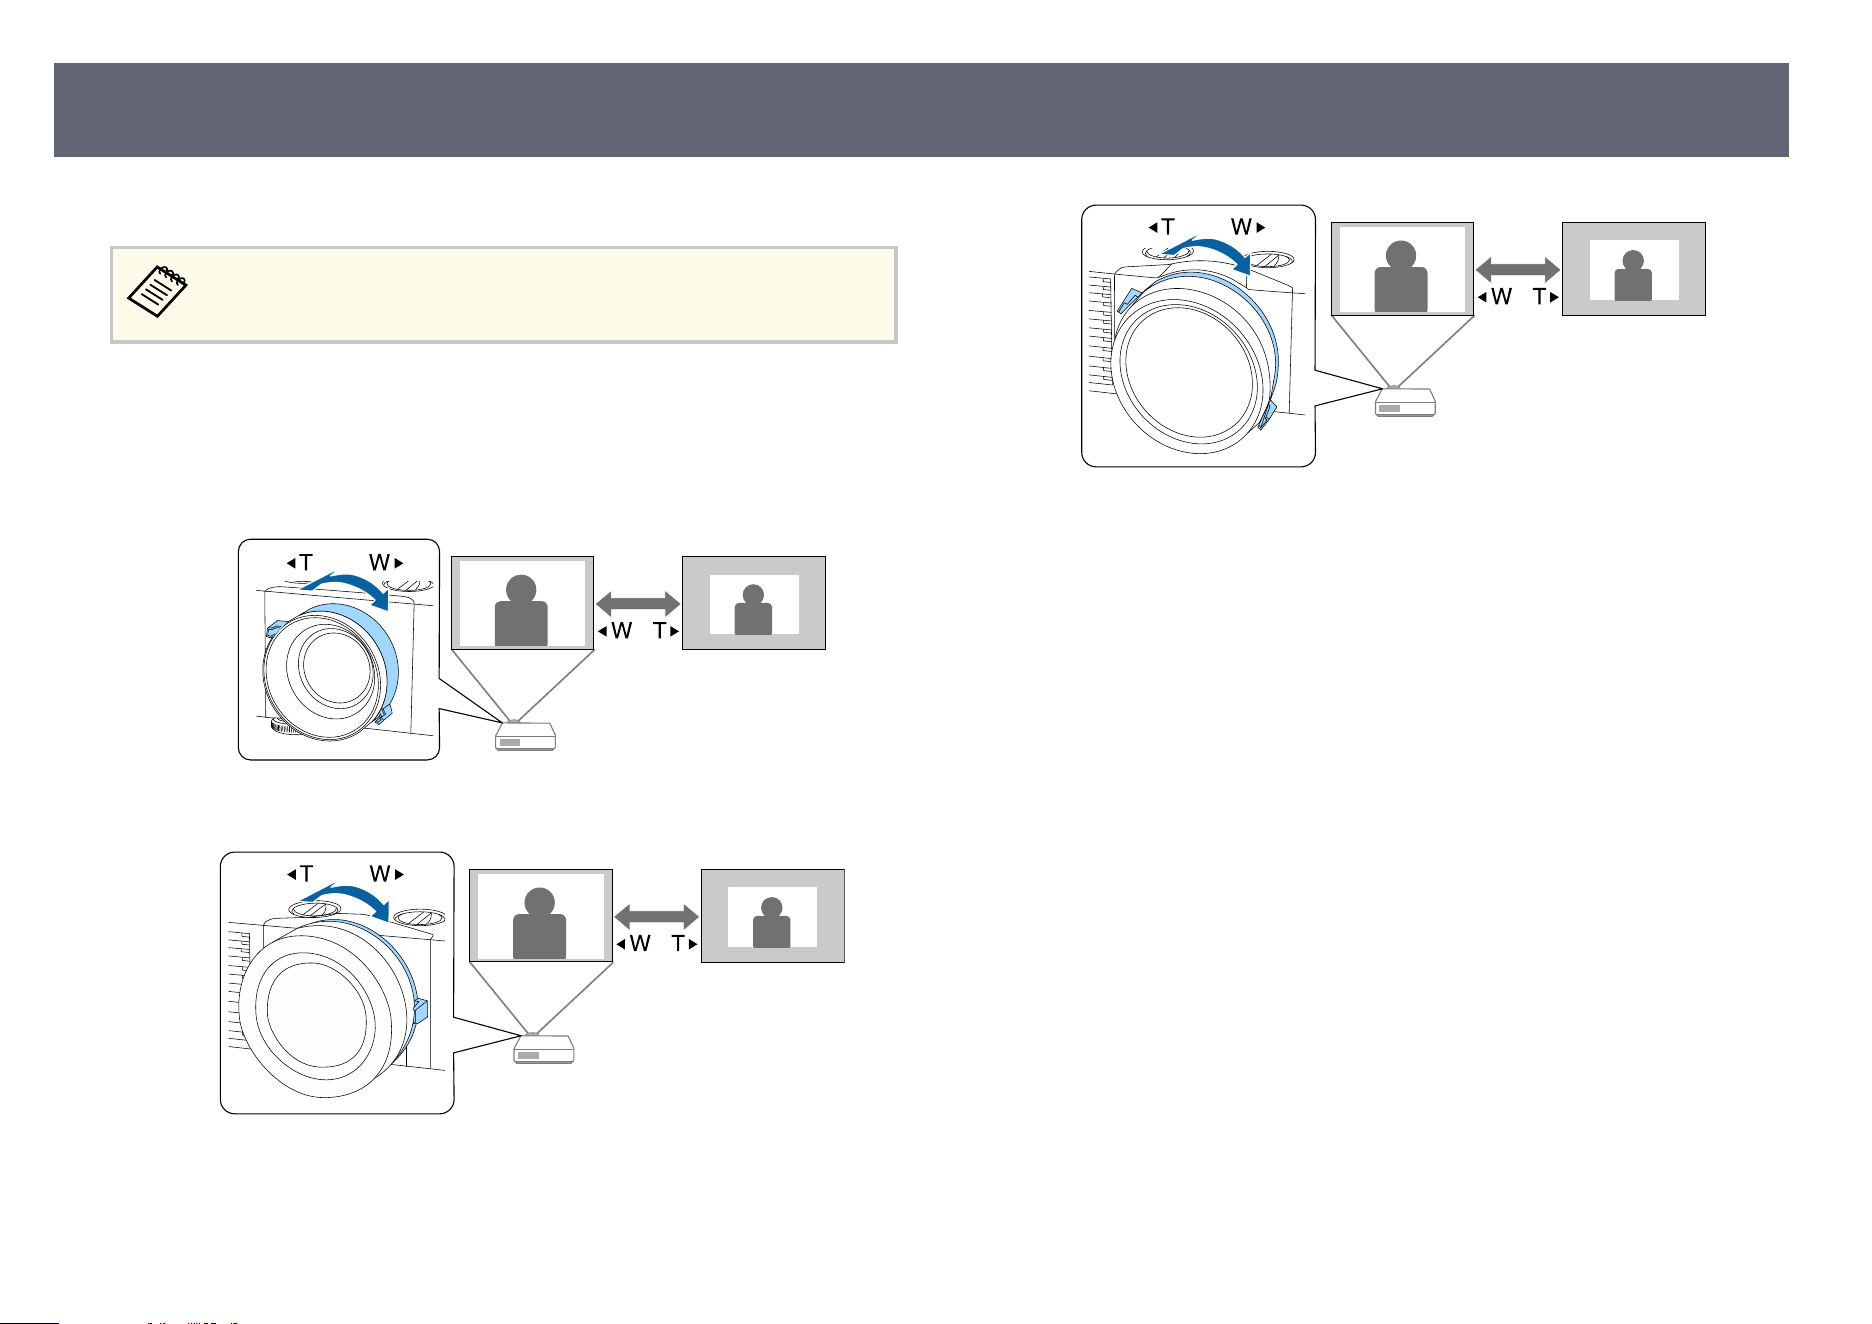
You can resize the image using the projector's zoom ring.
Wait 30 minutes aer tur
ning on the projector before setting the focus,
zoom, and lens shi for maximum accuracy.
a
Turn on the projector and display an image.
b
Rotate the zoom ring to enlarge or reduce the image.
EB-L890E/EB-L895E/EB-L690E/EB-L890U/EB-L790U/EB-L690U
EB-L790SE/EB-L795SE/EB-L690SU/EB-L695SU
EB-L690SE/EB-L695SE
Resizing the Image with the Zoom Ring
75
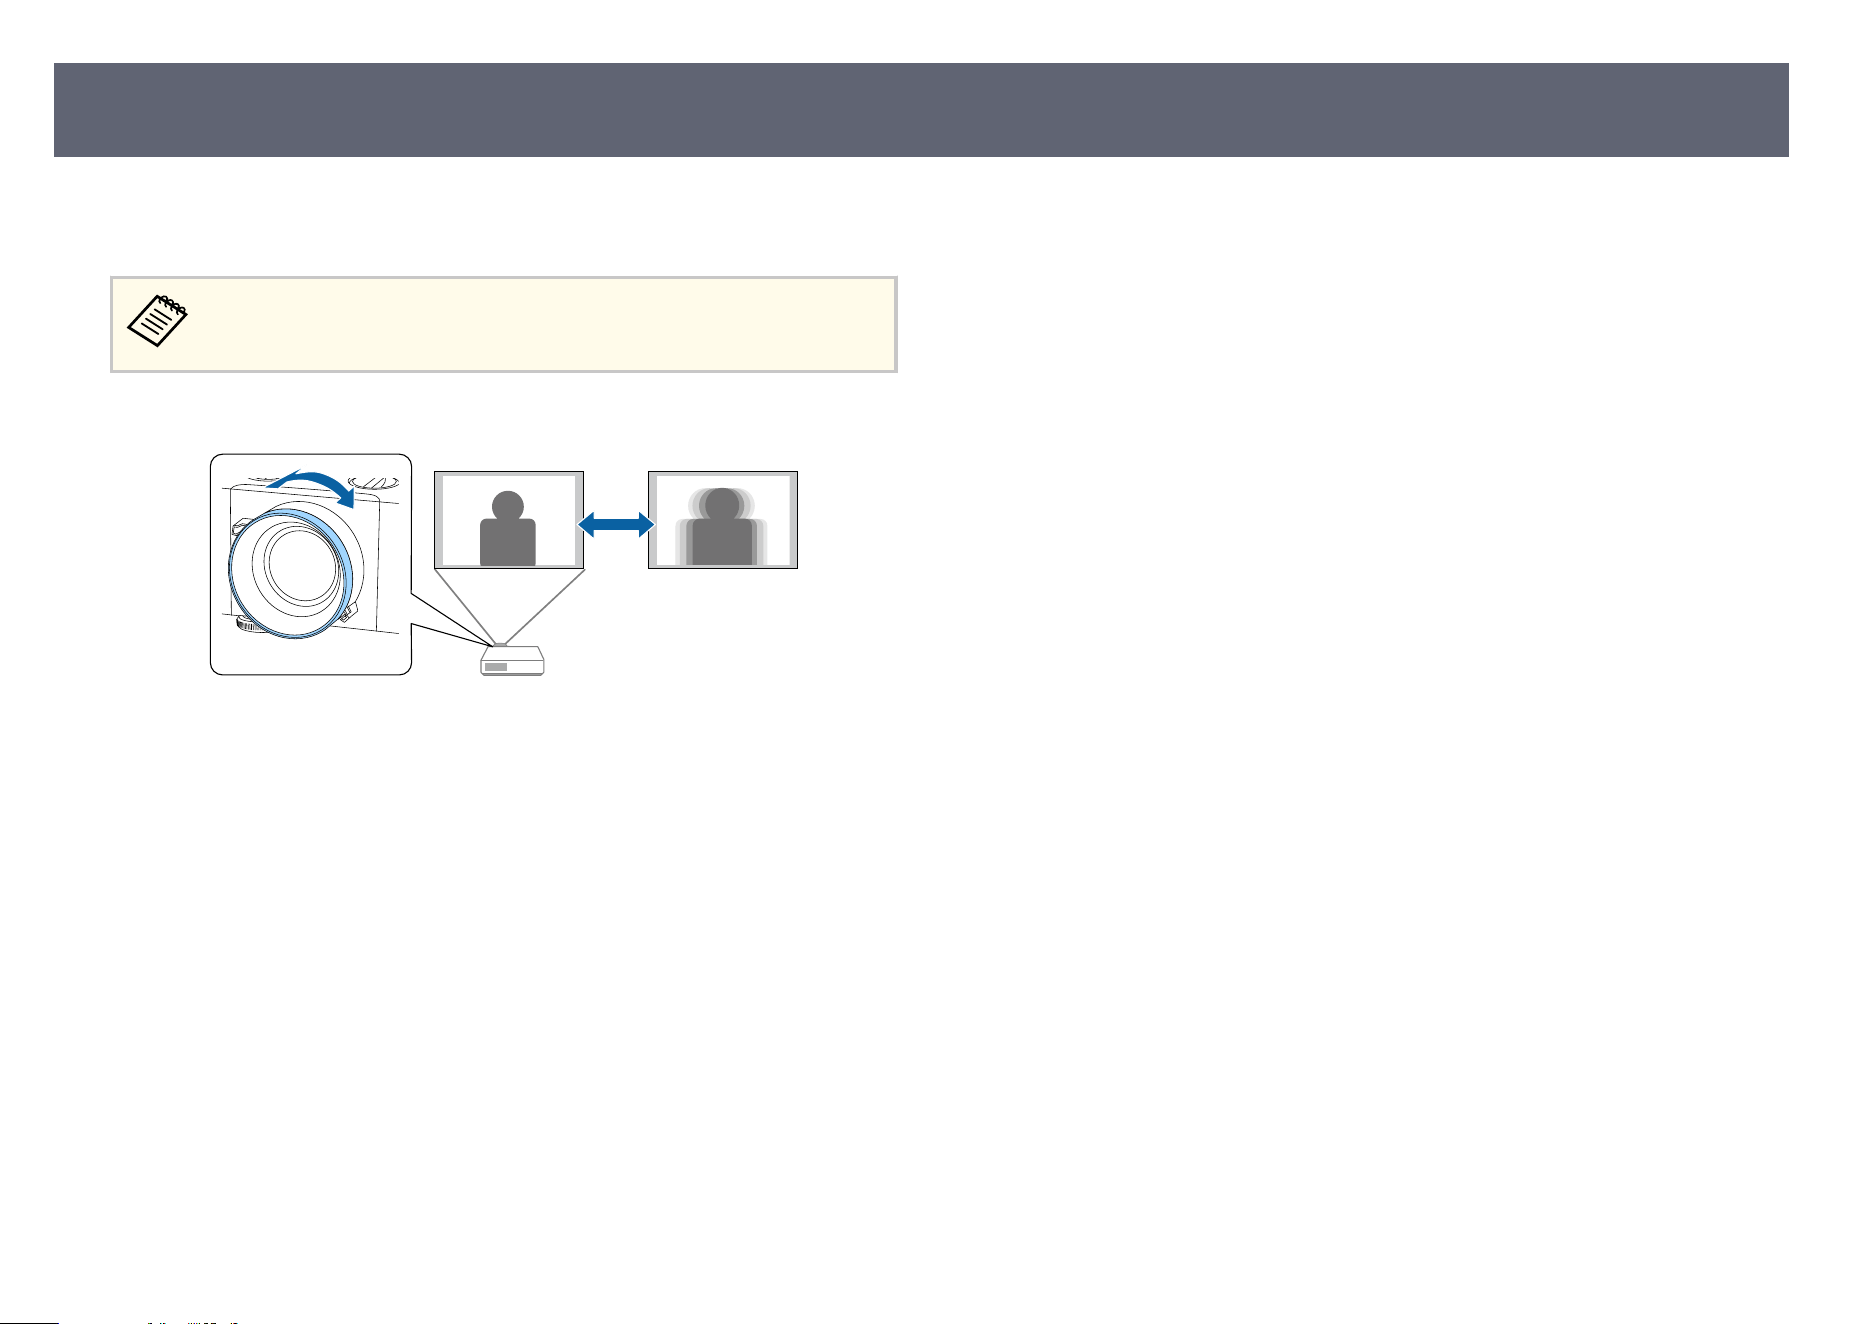
You can correct the focus using the focus ring. (EB-L890E/EB-L895E/EB-
L690E/EB-L890U/EB-L790U/EB-L690U)
Wait 30 minutes aer tur
ning on the projector before setting the focus,
zoom, and lens shi for maximum accuracy.
Turn the focus ring to focus the entire screen.
Focusing the Image Using the Focus Ring
76
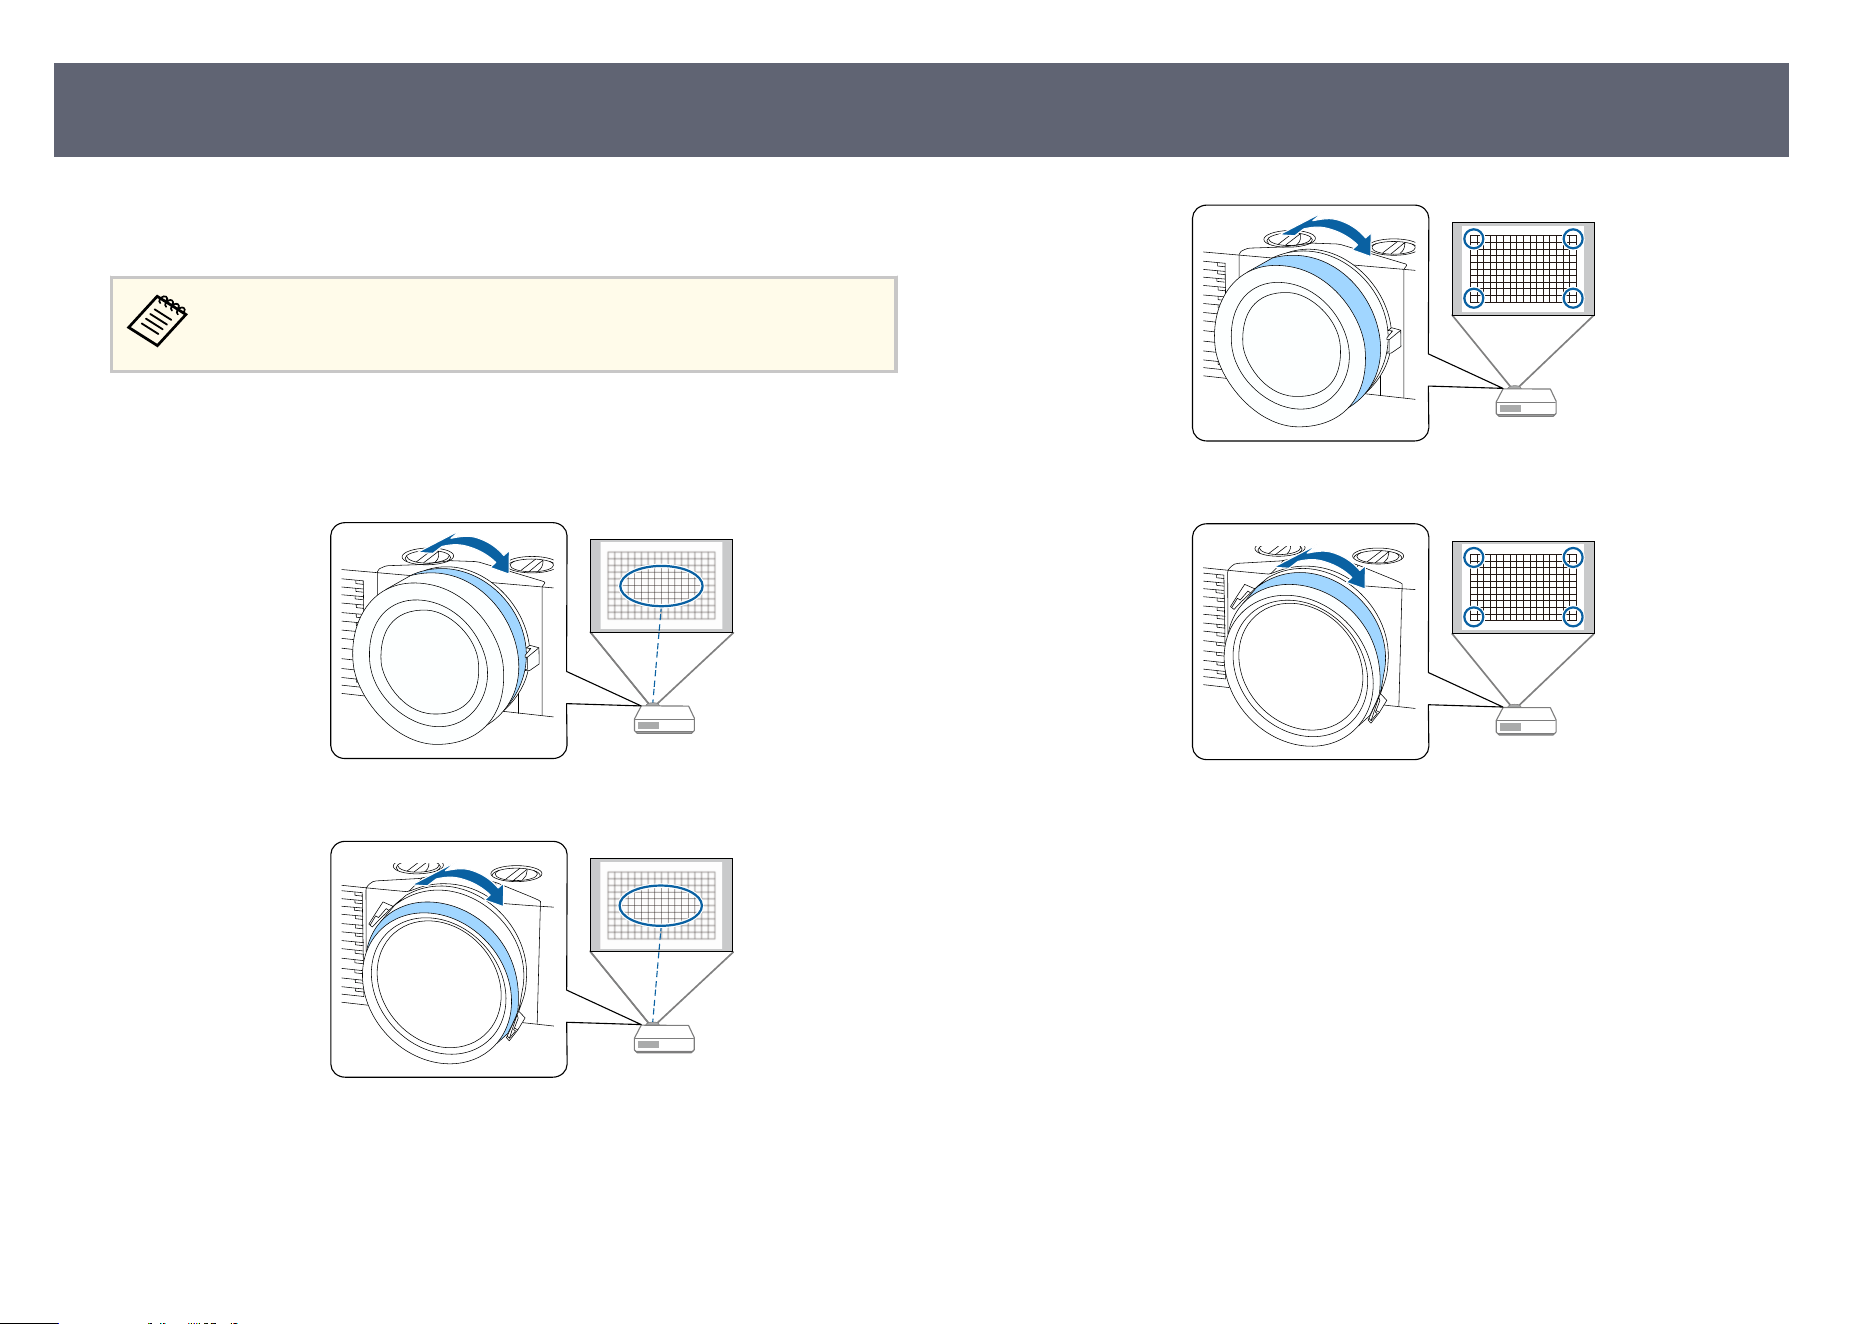
You can correct the focus using the center focus ring and corner focus ring.
(EB-L790SE/EB-L795S
E/EB-L690SE/EB-L695SE/EB-L690SU/EB-L695SU)
Wait 30 minutes aer tur
ning on the projector before setting the focus,
zoom, and lens shi for maximum accuracy.
a
Adjust the center focus while looking at the center of the projection
screen.
EB-L790SE/EB-L795SE/EB-L690SU/EB-L695SU
EB-L690SE/EB-L695SE
b
Adjust the corner focus while looking at the four corners of the projection
scr
een.
EB-L790SE/EB-L795SE/EB-L690SU/EB-L695SU
EB-L690SE/EB-L695SE
c
If the image is still not focused, repeat steps 1 and 2 to adjust it again.
g
Related Links
•
"Pr
ojector Parts - Front/Top" p.19
Focusing the Image Using the Focus Ring (Center/Corner)
77
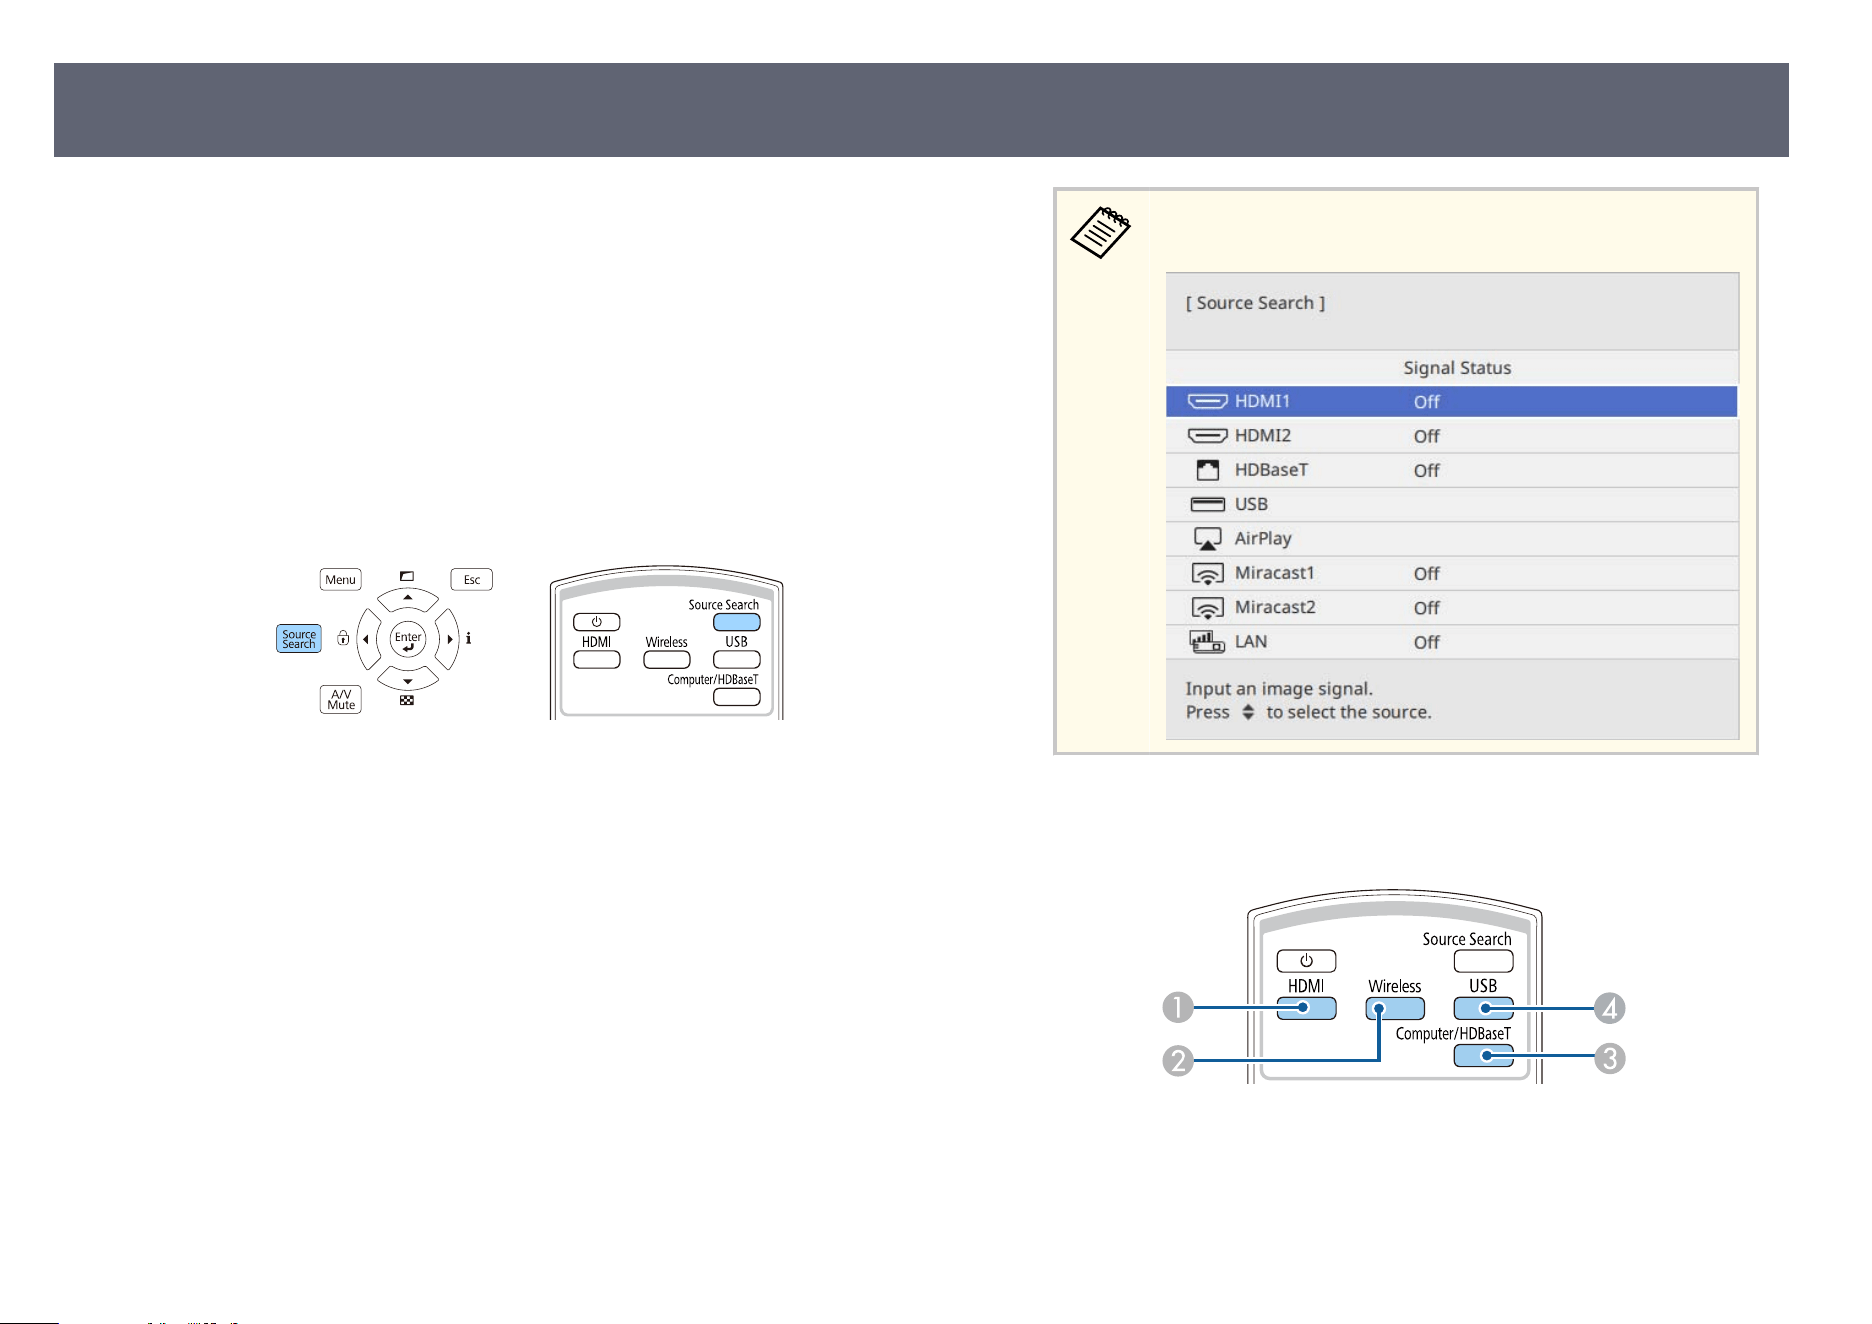
When multiple image sources are connected to the projector, such as a
com
puter and DVD player, you can switch from one image source to the other.
a
Make sure the connected image source you want to use is turned on.
b
For video image sources, insert a DVD or other video media and press
p
l
ay.
c
Do one of the following:
•
Pr
ess the [Source Search] button on the control panel or remote control
until you see the image from the source you want.
is screen is displayed when no image signal is detected. Check
t
he cable connections between the projector and image source.
•
Pr
ess the button for the source you want on the remote control. If there
is more than one port for that source, press the button again to cycle
through the sources.
A
HDMI sources (HDMI1 and HDMI2 ports)
B
Network source (AirPlay, Miracast, and LAN)
C
Computer/HDBaseT port source (HDBaseT port)
Selecting an Image Source
78
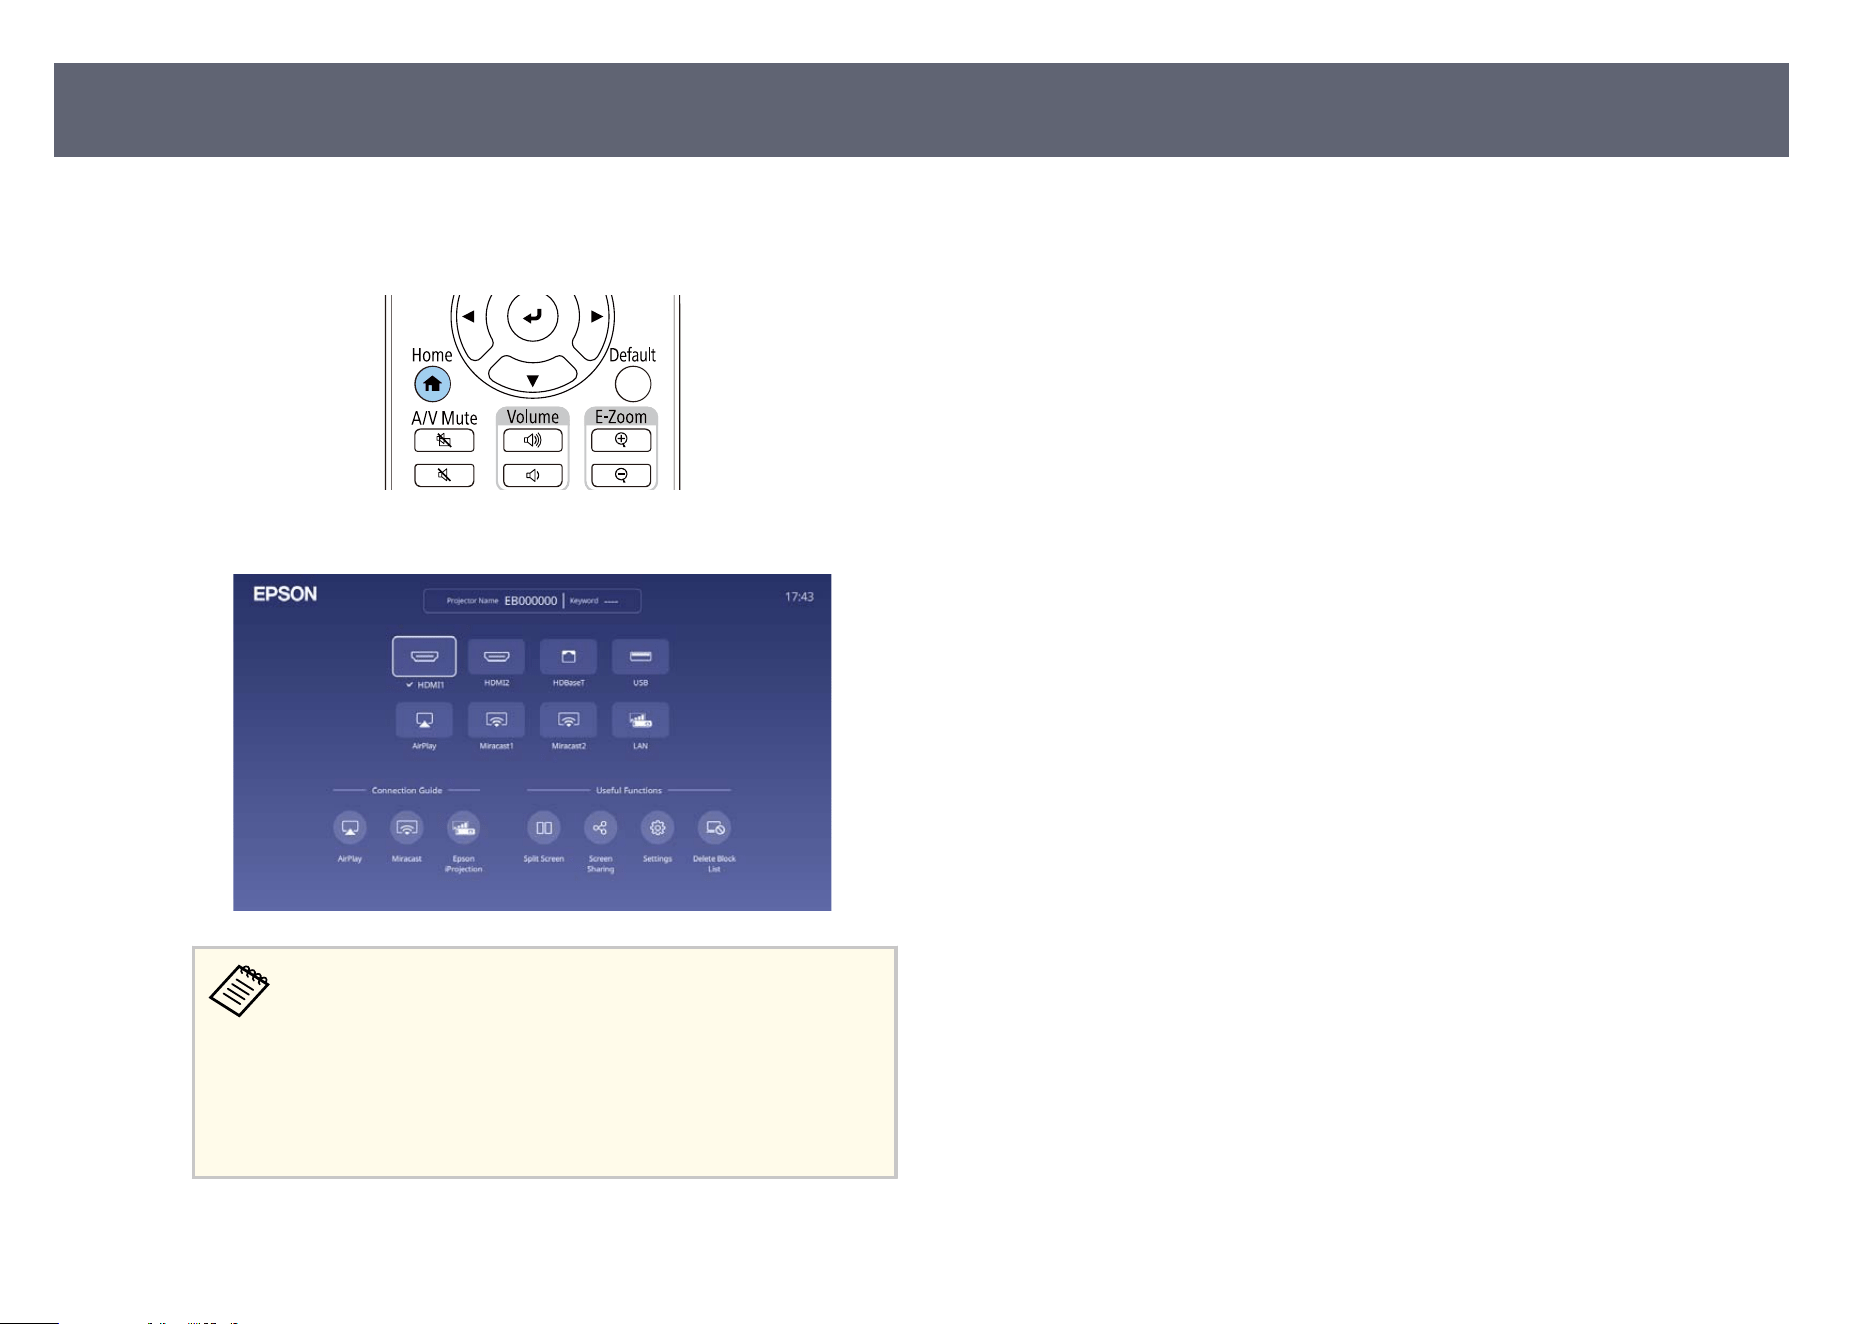
D
USB port source
•
Pr
ess the [Home] button on the remote control.
en select the source you want to use from the screen displayed.
•
e dis
play order of the input sources changes when the
projector detects an input signal. (e detected input source
appears in the upper le position.)
•
A check mark appears on the image from the current input
source. You can check a preview of the current input image for
most sources as a thumbnail (other than the USB input source
in Content Playback mode).
g
Related Links
•
"Pr
ojector Parts - Remote Control" p.24
Selecting an Image Source
79
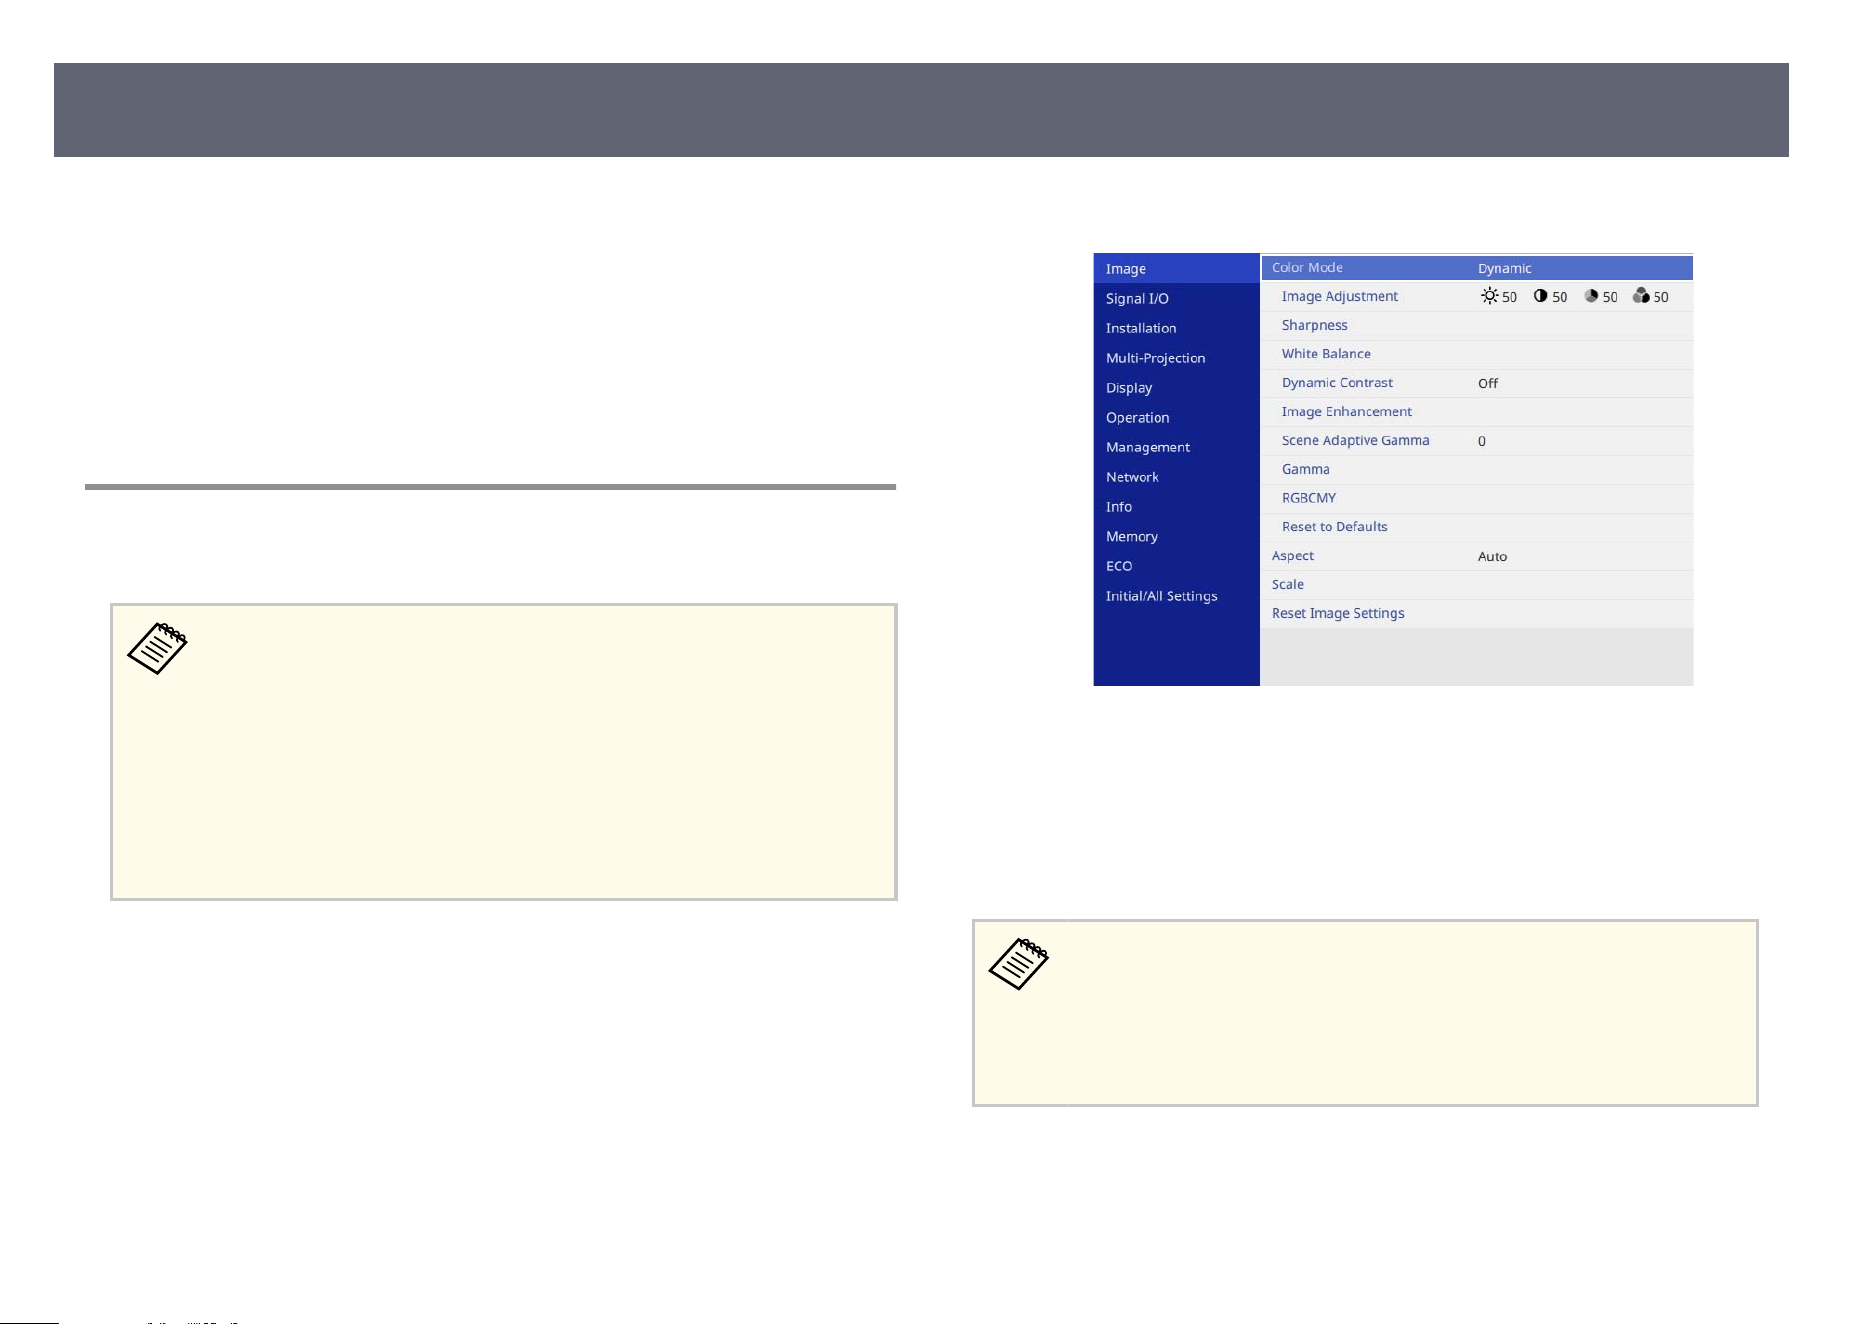
e projector can display images in dierent width-to-height ratios called
as
pect ratios. Normally, the input signal from your video source determines
the image's aspect ratio. However, you can change the aspect ratio for certain
images to t your screen.
g
Related Links
•
"Changing the Image Aspect Ratio" p.80
•
"Available Image Aspect Ratios" p.81
Changing the Image Aspect Ratio
You can change the aspect ratio of the displayed image.
•
Set t
he Screen Type setting in the projector's Installation menu before
changing the aspect ratio.
•
Available only when using one of the following input sources:
•
HDMI
•
HDBaseT
•
Available only when the Scale setting is turned o or the Scale Mode
setting is set to Full Display.
s Image > Scale > Scale Mode
a
Turn on the projector and switch to the image source you want to use.
b
Press the [Menu] button on the control panel or remote control.
c
Select the I
mage menu and press [Enter].
d
Select Aspect and press [Enter].
e
S
elect the aspect ratio for your input signal.
f
Press [Menu] or [Esc] to exit the menus.
•
e avail
able aspect ratio setting varies depending on the input signal.
•
If there are margins between the edge of the image and the projected
screen frame, you can adjust the position of the image using the Screen
Position setting in the projector's Installation menu.
s Installation > Screen Position
g
Related Links
•
"Im
age Quality Settings - Image Menu" p.193
•
"Projector Installation Settings - Installation Menu" p.198
Image Aspect Ratio
80
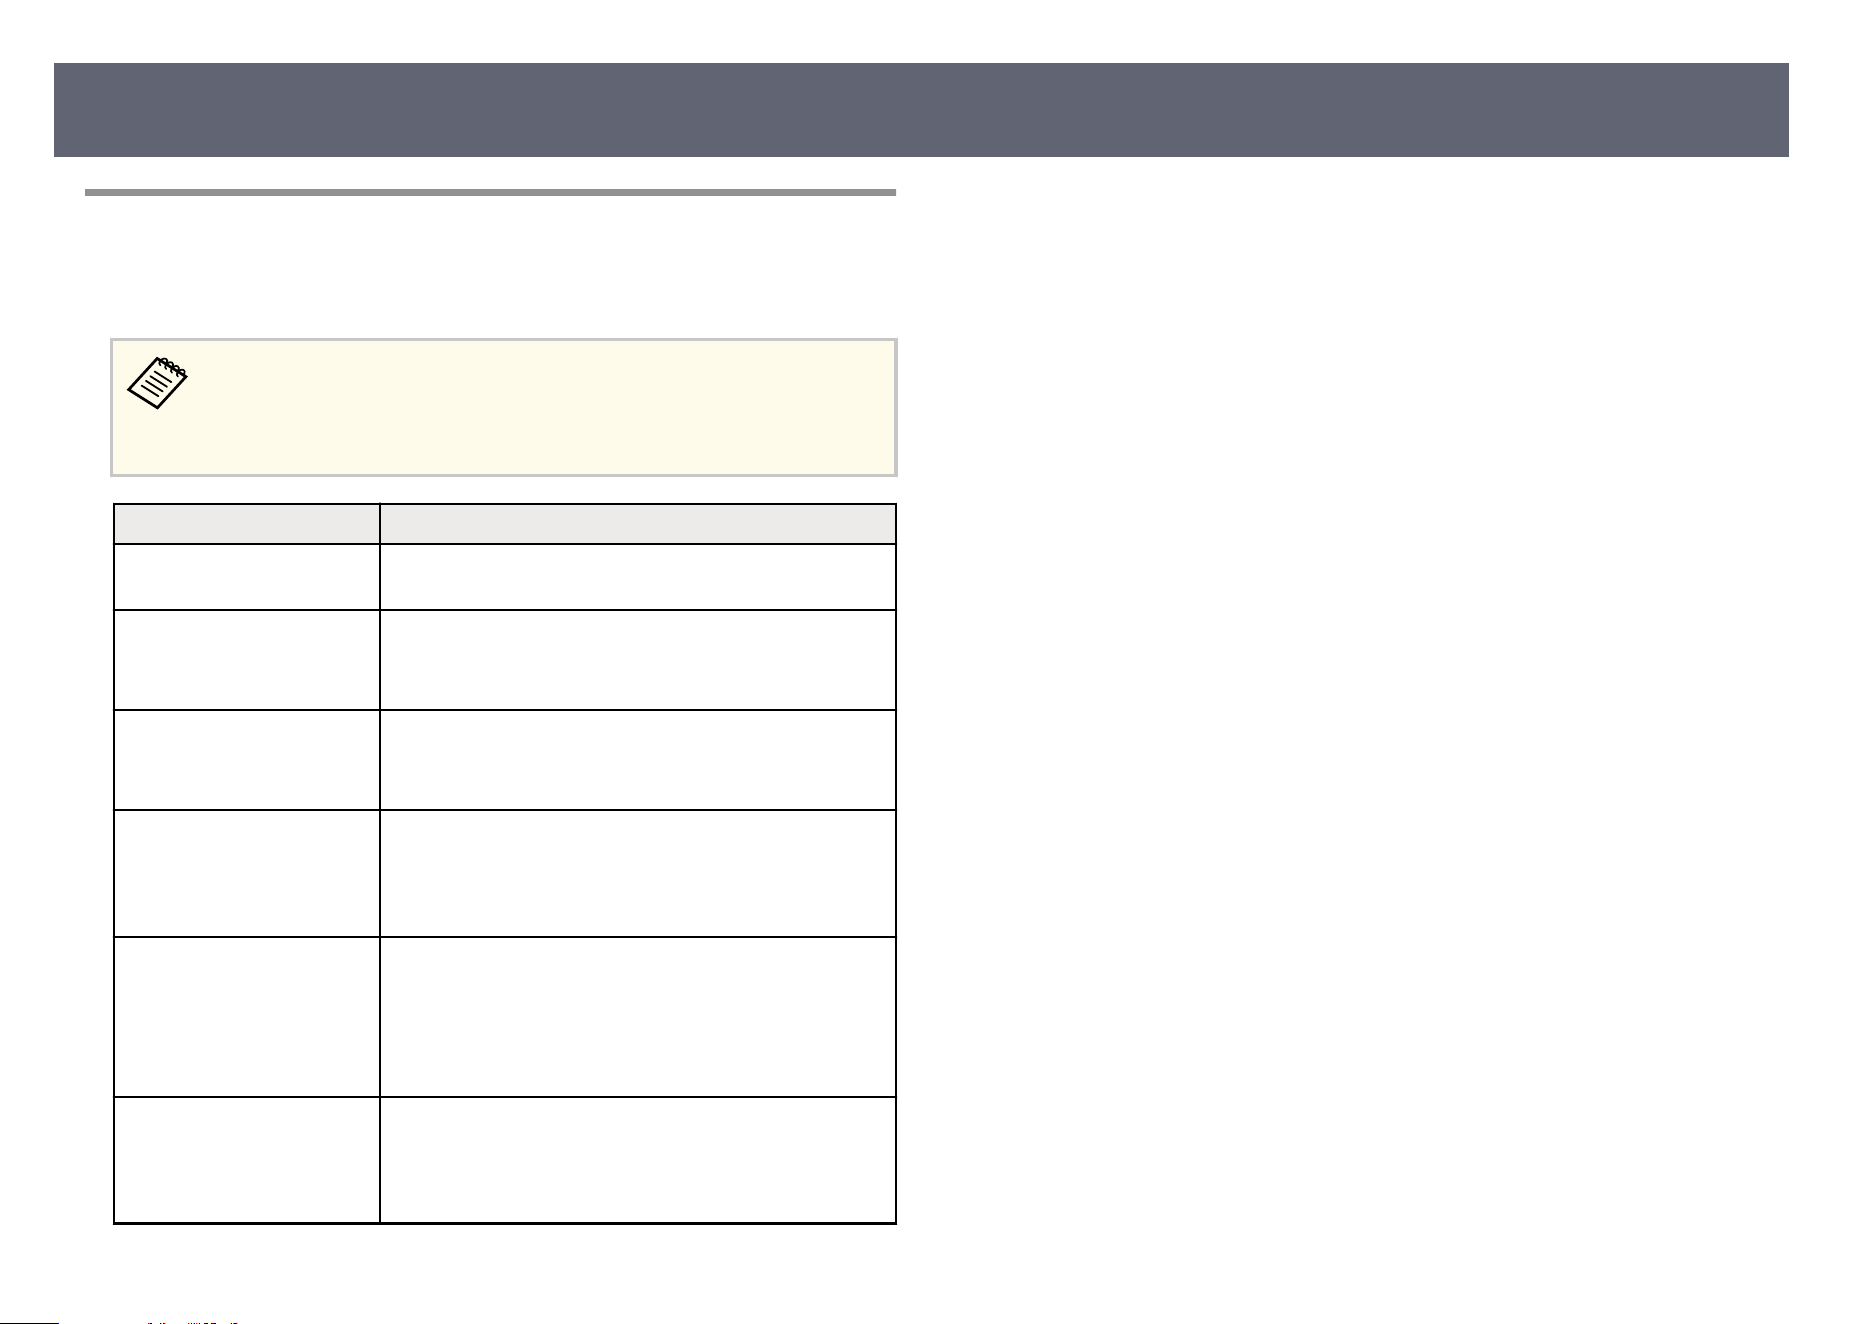
Available Image Aspect Ratios
You can select the following image aspect ratios, depending on the selected
Scr
een Type setting and the input signal from your image source.
Note that using the aspect ratio function of the projector to reduce,
enl
arge, or split the projected image for commercial purposes or for public
viewing may infringe upon the rights of the copyright holder of that image
based on copyright law.
Aspect mode Description
Auto Automatically sets the aspect ratio according to the
inp
ut signal.
4:3
(Avai
lable when Screen
Type is set to 4:3)
Converts the aspect ratio of the image to 4:3.
16:9
(Avai
lable when Screen
Type is set to 4:3 or 16:10)
Converts the aspect ratio of the image to 16:9.
Full
(Avai
lable when Screen
Type is set to 16:6, 16:9,
16:10 or 21:9)
Displays images using the full size of the projection
area, but does not maintain the aspect ratio.
H-Zoom
V-Z
oom
(Available when Screen
Type is set to 4:3, 16:9,
16:10 or 21:9)
Displays images using the full width (H-Zoom) or full
height (V-Zoom) of the projection area and maintains
the aspect ratio of the image. Areas that exceed the
edges of the projected screen are not projected.
Native
(Avai
lable when Screen
Type is set to 4:3, 16:9,
16:10 or 21:9)
Displays images as is (aspect ratio and resolution
are maintained). Areas that exceed the edges of the
projected screen are not projected.
Image Aspect Ratio
81
e projector oers dierent color modes to provide optimum brightness,
co
ntrast, and color for a variety of viewing environments and image types.
You can select the mode designed to match your image and environment, or
experiment with the available modes.
g
Related Links
•
"Changing the Color Mode" p.82
•
"Available Color Modes" p.82
Changing the Color Mode
You can change the projector's Color Mode using the remote control to optimize
the image for your viewing environment.
a
Turn on the projector and switch to the image source you want to use.
b
Press the [Menu] button on the control panel or remote control.
c
Select the I
mage menu and press [Enter].
d
Select Color Mode and press [Enter].
e
S
elect the color mode for your input signal.
f
Press [Menu] or [Esc] to exit the menus.
g
Related Links
•
"I
m
age Quality Settings - Image Menu" p.193
•
"Multiple Projector Operation Settings - Multi-Projection Menu" p.200
Available Color Modes
You can set the projector to use these color modes, depending on the input
so
urce you are using:
Color mode Description
Dynamic is is the brightest mode. Best for prioritizing
b
rightness.
Presentation Best for projecting vivid images.
Natural Reproduces colors faithfully. Ideal for projecting still
pic
tures such as photos.
Cinema Best for enjoying content such as movies.
BT.709 Produces images that conform to the ITU-R BT.709.
DICOM SIM Best for projecting X-ray photographs and other
me
dical images. is mode is for reference purposes
only and should not be used to make medical
diagnoses.
Multi-Projection Best for projecting from multiple projectors (reduces
th
e color tone dierence between images).
Adjusting Image Quality (Color Mode)
82
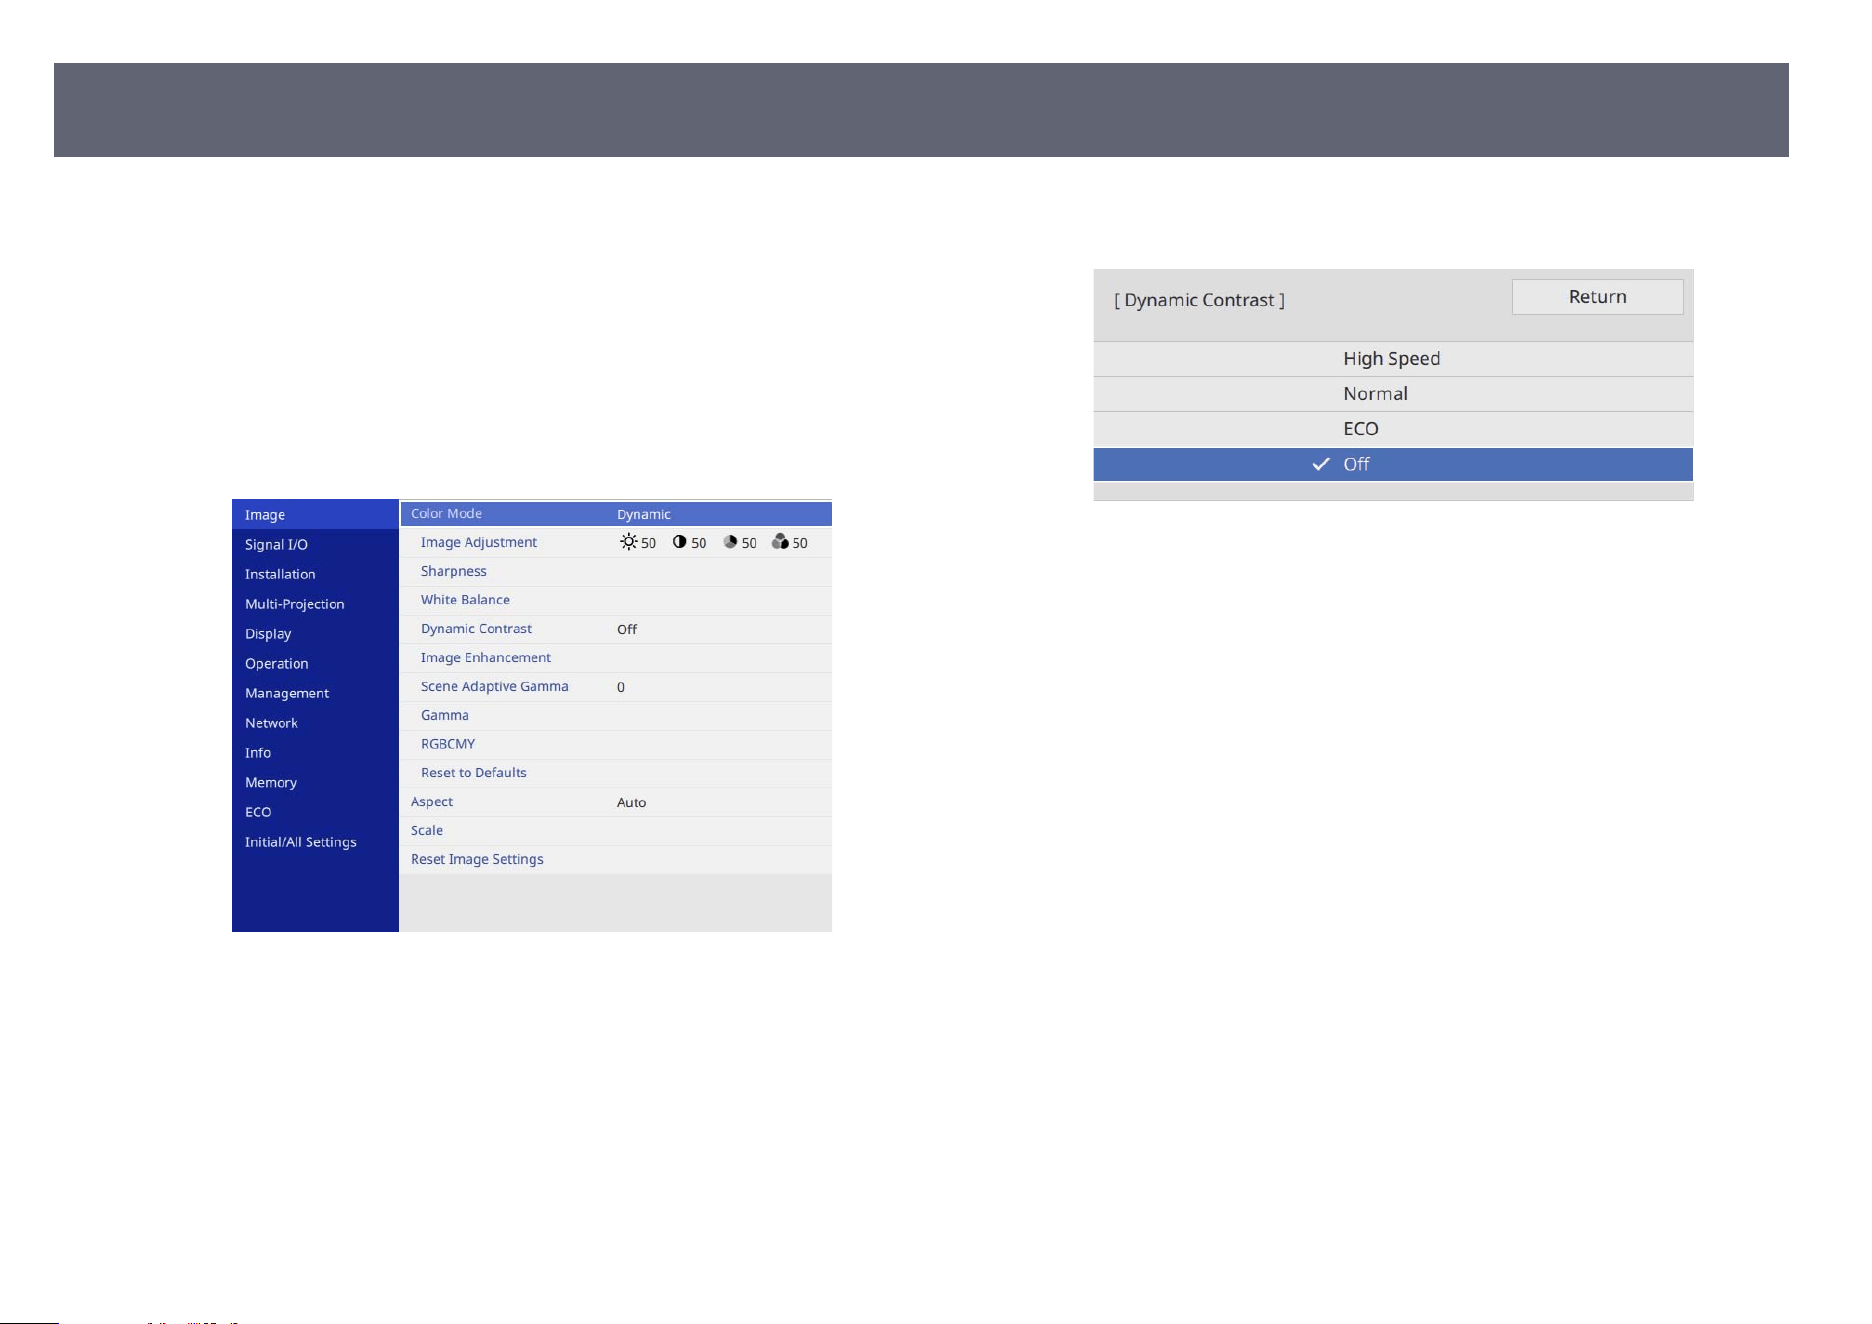
You can turn on Dynamic Contrast to automatically optimize the image
lumin
ance. is improves the image contrast based on the brightness of the
content you project.
a
Turn on the projector and switch to the image source you want to use.
b
Press the [Menu] button on the control panel or remote control.
c
Select the I
mage menu and press [Enter].
d
Select Dynamic Contrast and press [Enter].
e
C
hoose one of the following options and press [Enter]:
•
No
rmal for standard brightness adjustment using minimal brightness
changes.
•
High Speed to adjust brightness as soon as the scene changes.
Brightness changes signicant ly.
•
ECO
to adjust brightness while minimizing power consumption
without compromising image quality.
f
Press [Menu] or [Esc] to exit the menus.
Turning On Automatic Luminance Adjustment
83
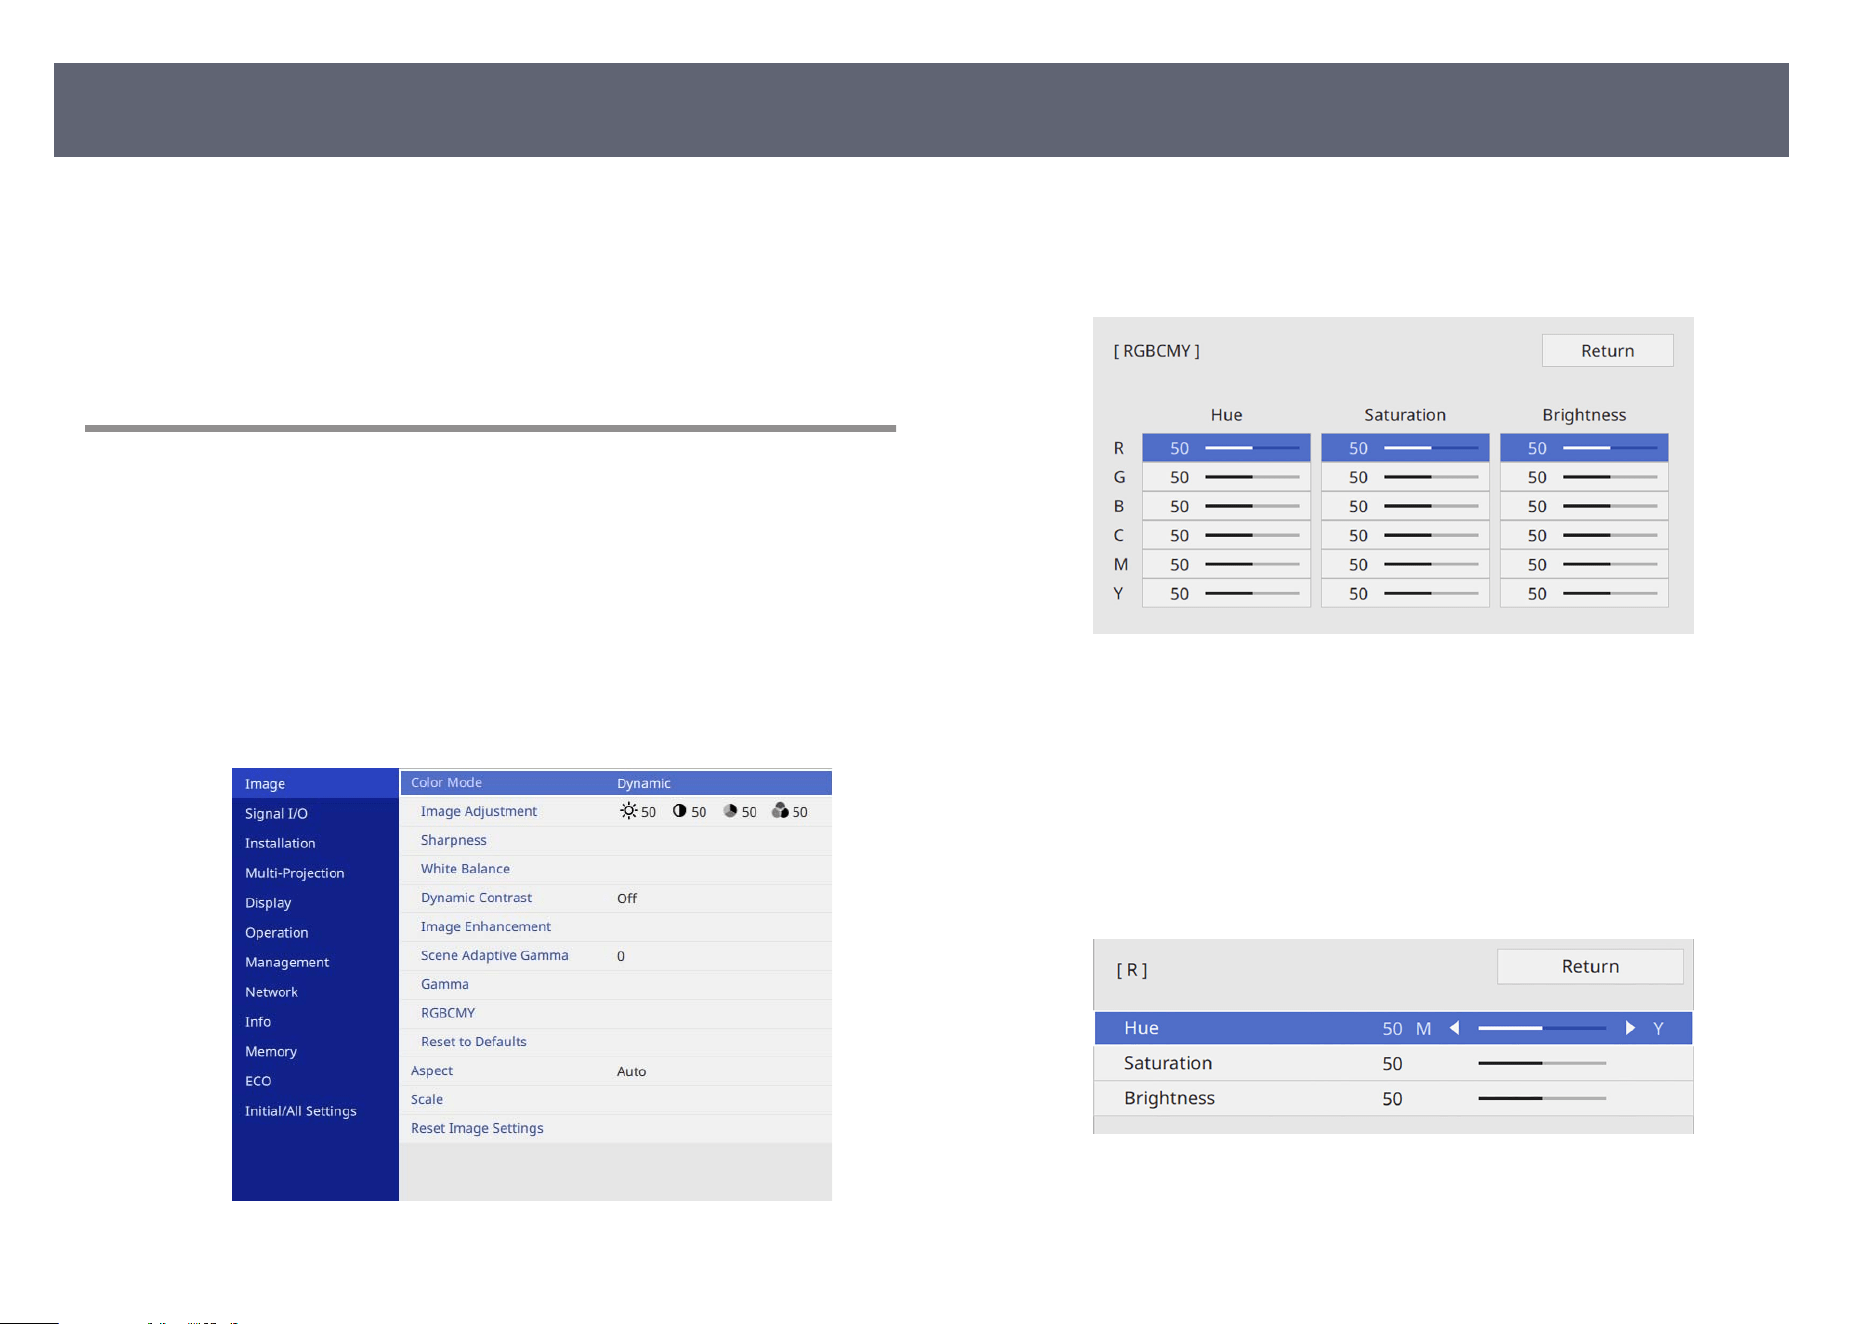
You can ne-tune various aspects of how colors are displayed in your projected
im
ages.
g
Related Links
•
"Adjusting the Hue, Saturation, and Brightness" p.84
•
"Adjusting the Gamma" p.85
Adjusting the Hue, Saturation, and Brightness
You can adjust the Hue, Saturation, and Brightness settings for individual image
colors.
a
Turn on the projector and switch to the image source you want to use.
b
Press the [Menu] button on the control panel or remote control.
c
Select the I
mage menu and press [Enter].
d
Select RGBCMY and press [Enter].
e
S
elect the color to adjust, and press [Enter].
f
Do the following as necessary for each setting:
•
To ad
just the overall hue of the color, bluish - greenish - reddish, adjust
the Hue setting.
•
To adjust the overall vividness of the color, adjust the Saturation
setting.
•
To adjust the overall color brightness of the color, adjust the Brightness
setting.
g
Press [Menu] or [Esc] to exit the menus.
Adjusting the Image Color
84
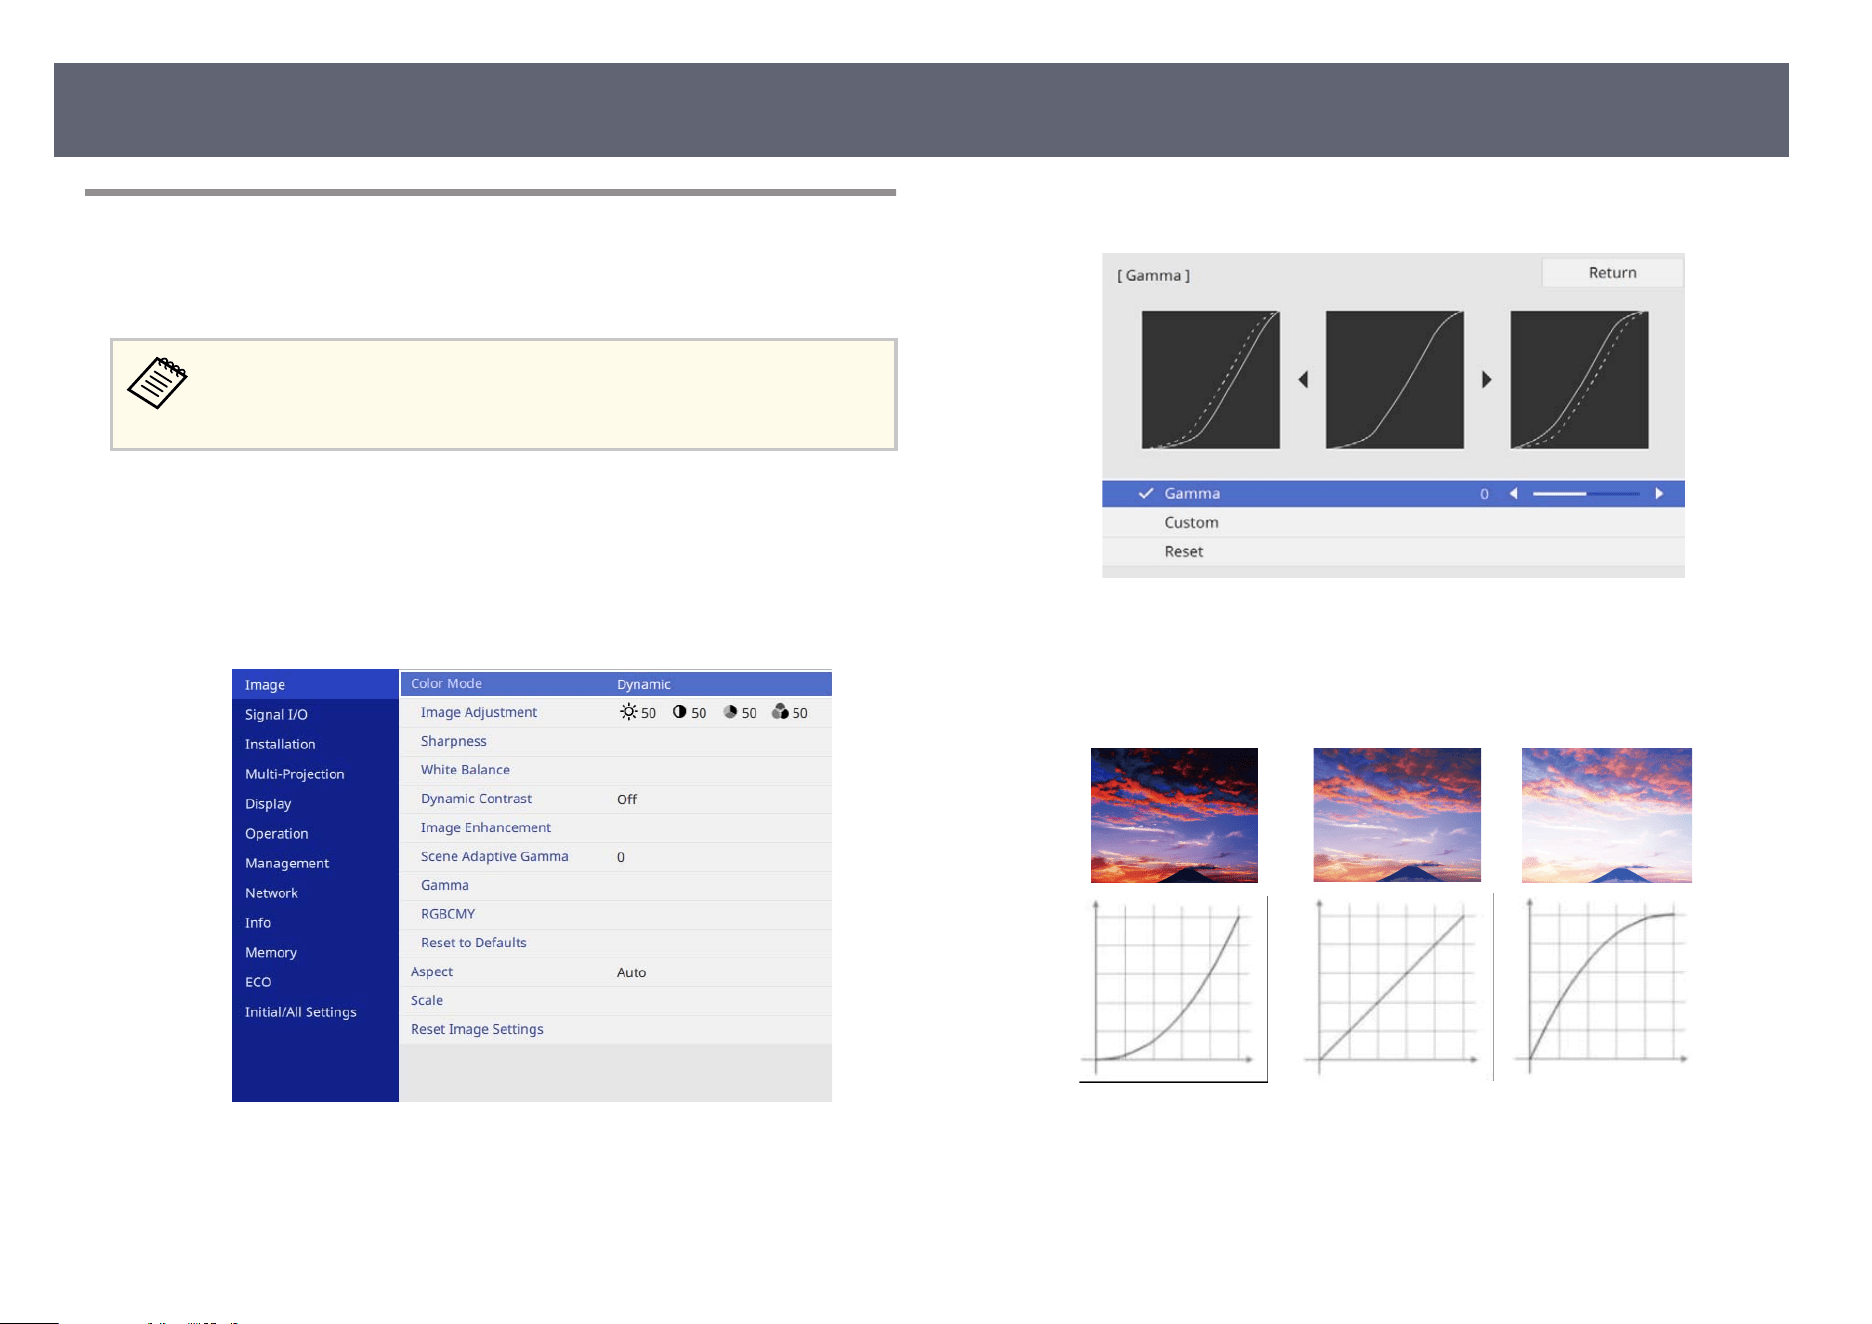
Adjusting the Gamma
You can correct dieren
ces in projected image colors that occur between
dierent image sources by adjusting the Gamma setting.
To optimize the color tone according to the scene, and to obtain a more
vi
vid image, correct the image by adjusting the Scene Adaptive Gamma
setting.
a
Turn on the projector and switch to the image source you want to use.
b
Press the [Menu] button on the control panel or remote control.
c
Select the I
mage menu and press [Enter].
d
Select Gamma and press [Enter].
e
A
djust the correction value for the Gamma
setting and press [Enter].
When you select a smaller value, you can reduce the overall brightness of
th
e image to make the image sharper. When you select a larger value, the
dark areas of images become brighter, but the color saturation for lighter
areas may become weaker.
Adjusting the Image Color
85
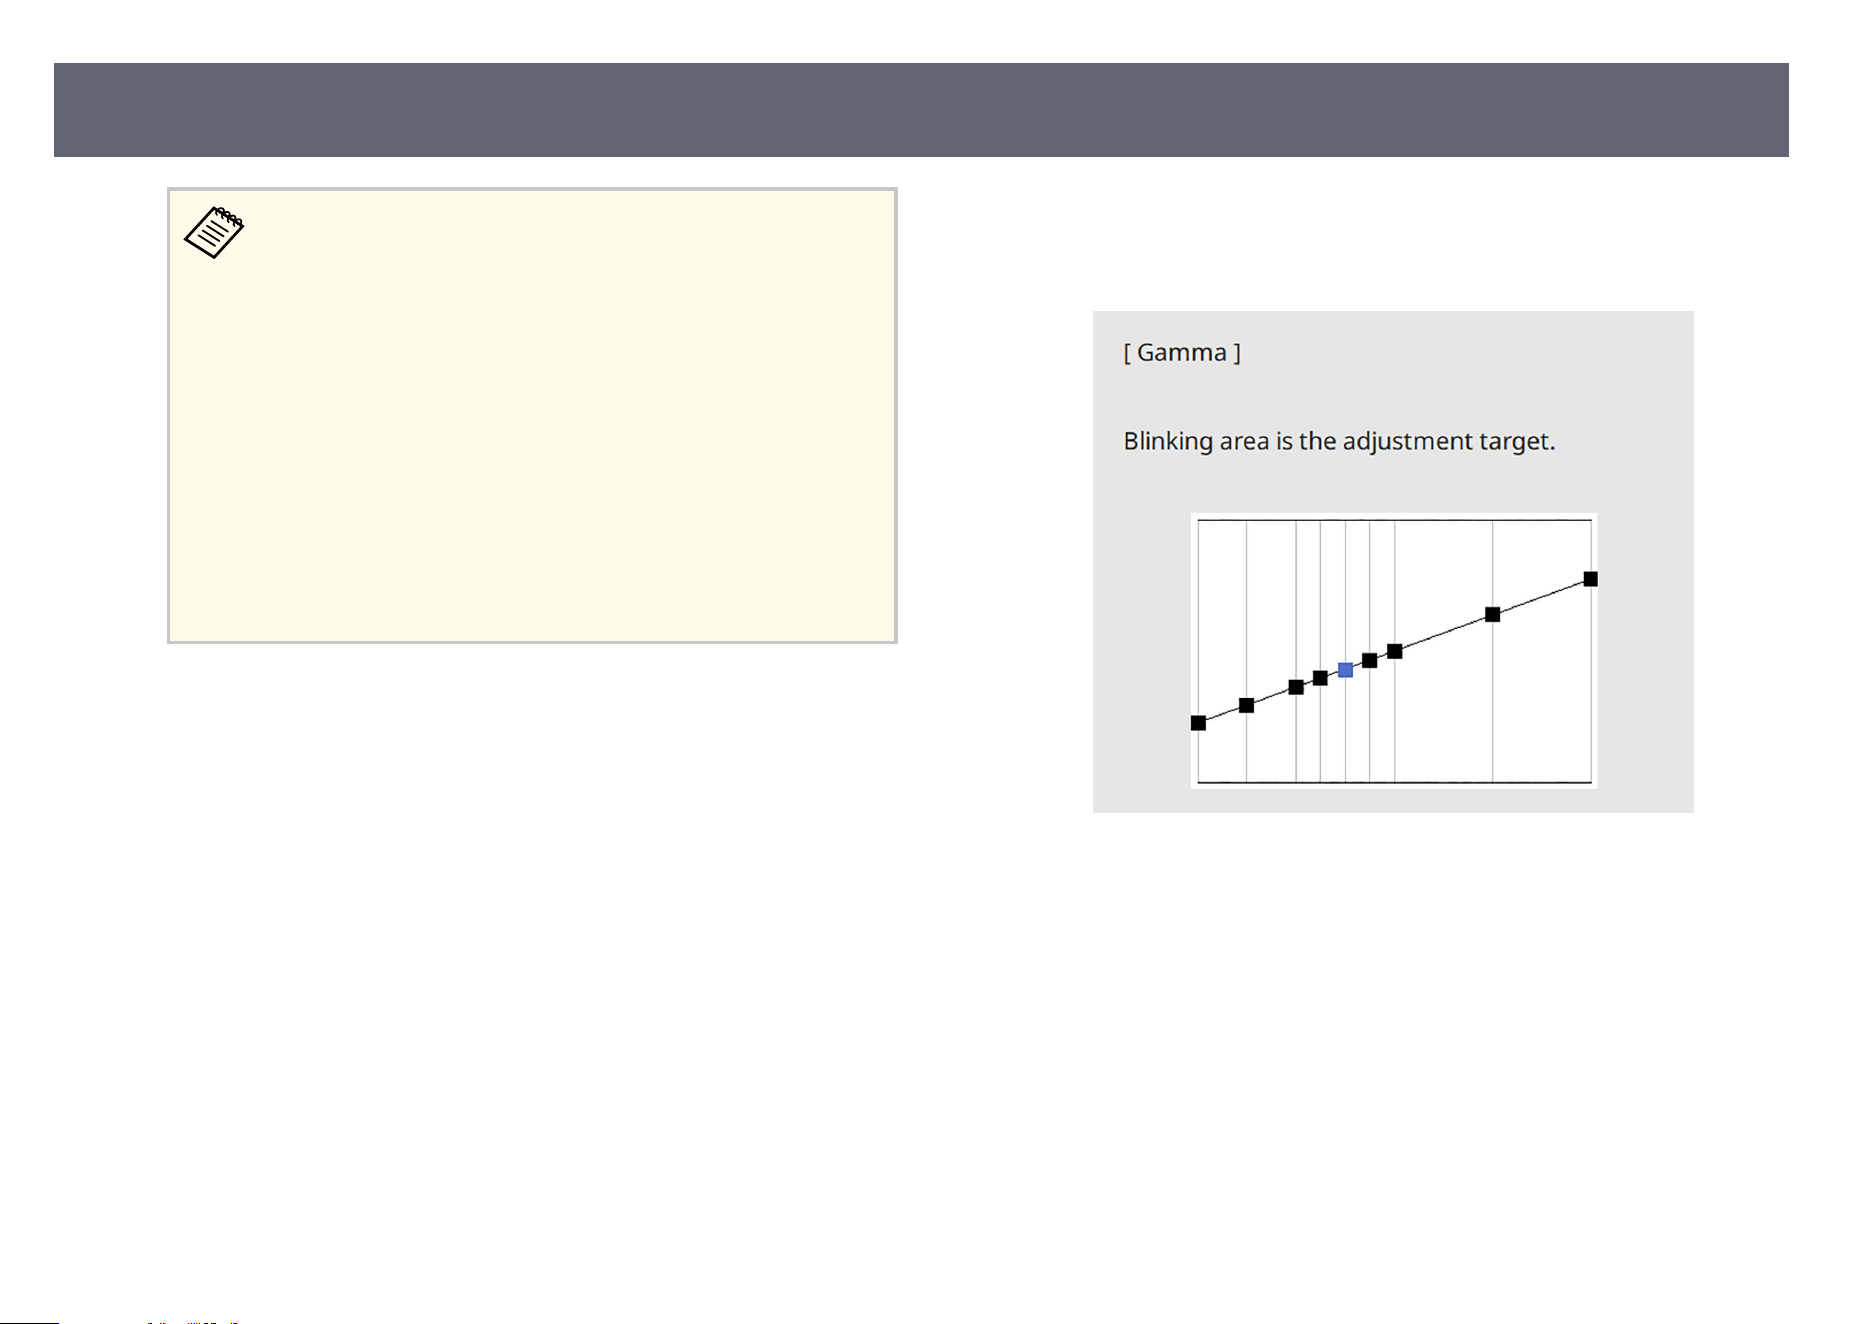
•
If y
ou set the Color Mode setting to anything other than
Dynamic or DICOM SIM in the projector's Image menu, the
gamma setting method is reversed.
When you select a larger value, you can reduce the overall
brightness of the image to make the image sharper. When you
select a smaller value, the dark areas of images become brighter,
but the color saturation for lighter areas may become weaker.
•
If you set the Color Mode setting to DICOM SIM in the
projector's Image menu, select the adjustment value according
to the projection size.
•
If the projection size is 120 inches or less, select a small value.
•
If the projection size is 120 inches or more, select a large value.
•
Medical images may not be reproduced correctly depending on
your settings and screen specications.
f
If you want to make ner
adjustments, select Custom and press [Enter].
g
Press the le o
r r
ight arrow buttons to select the color tone you want to
adjust on the gamma adjustment graph. en press the up or down arrow
button to adjust the value and press [Enter].
h
Press [Menu] or [Esc] to exit the menus.
g
Related Links
•
"I
m
age Quality Settings - Image Menu" p.193
Adjusting the Image Color
86
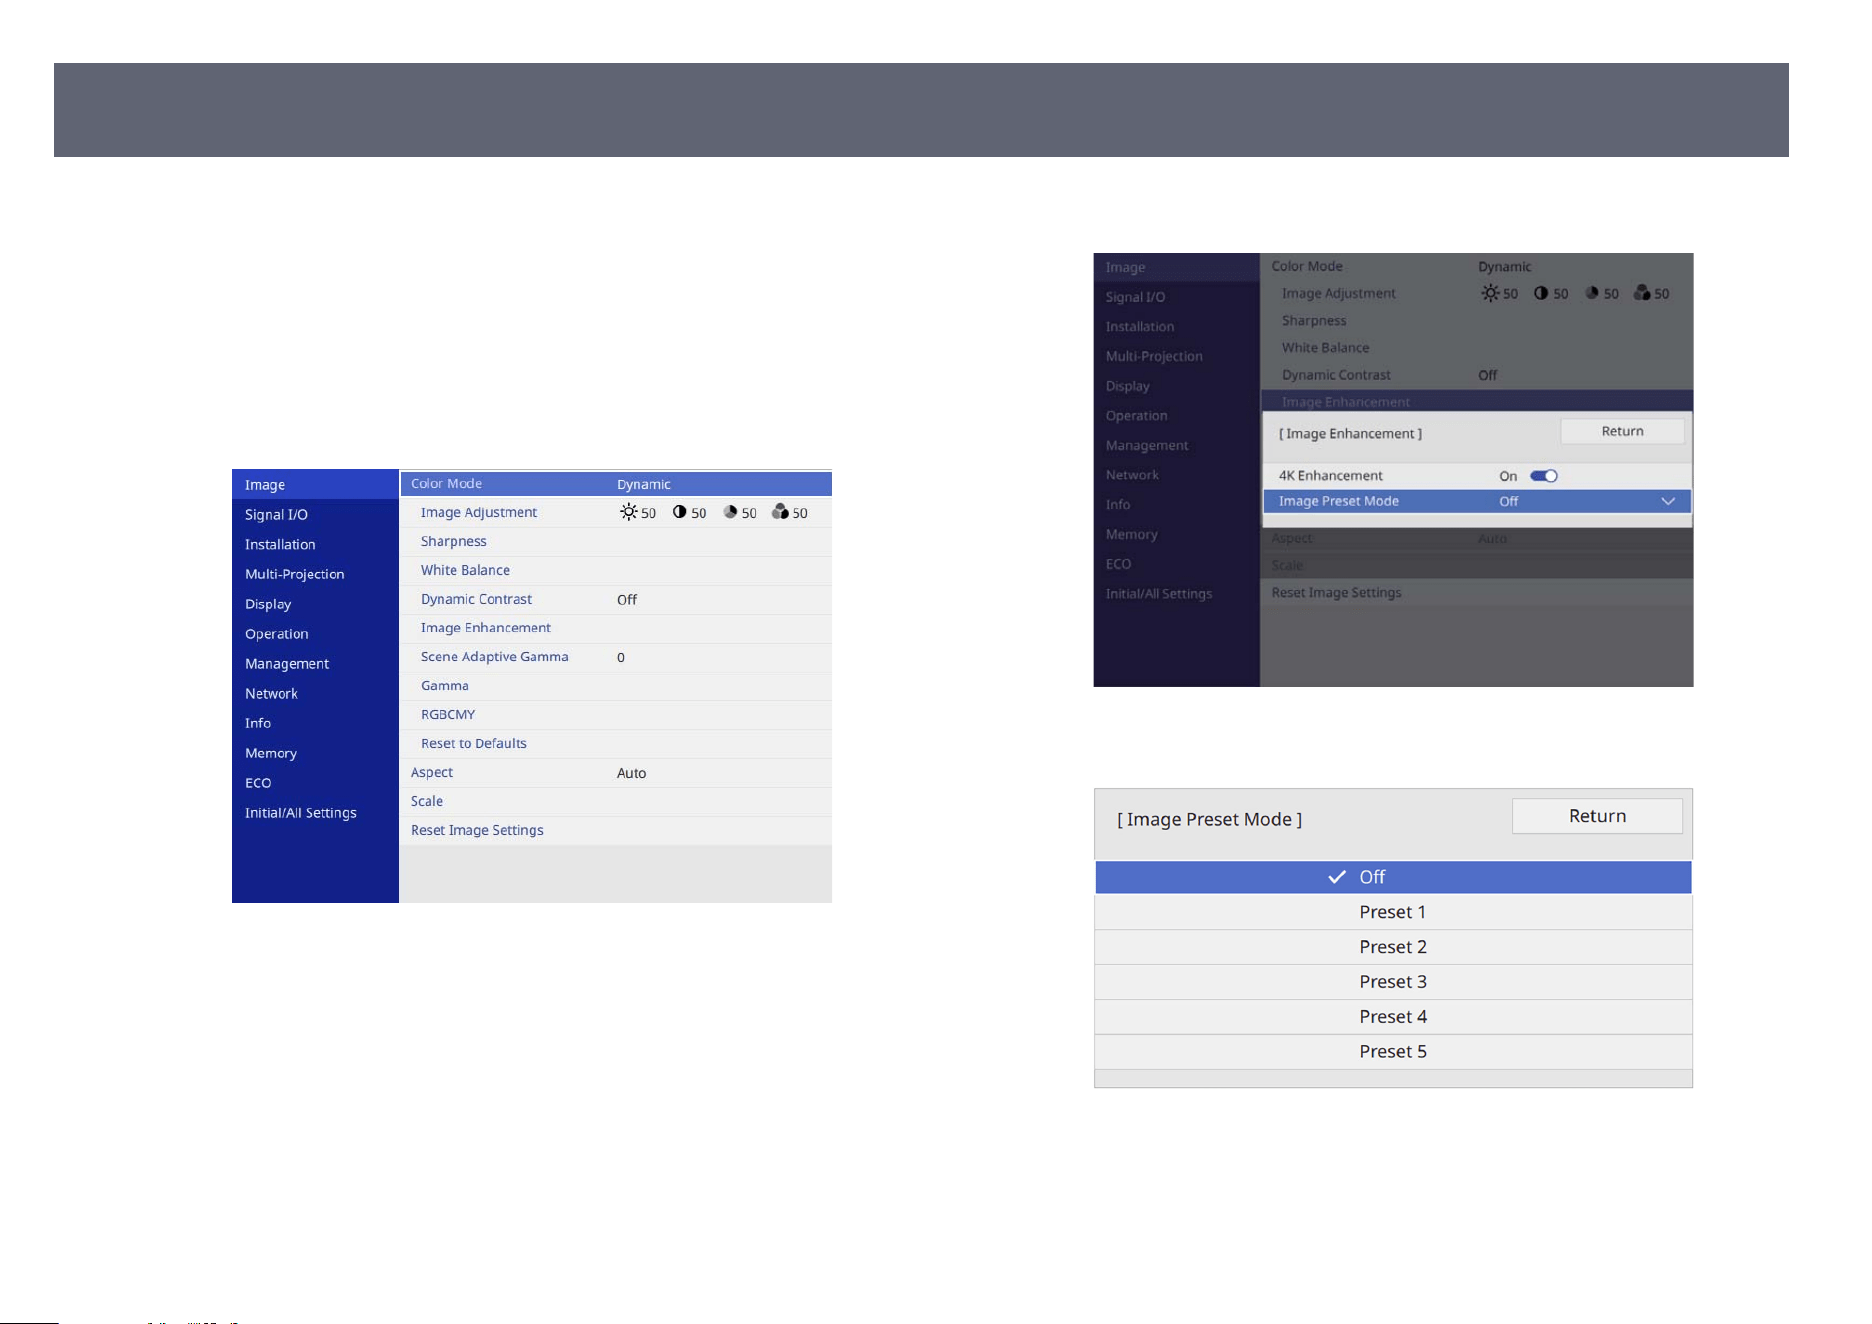
You can adjust the resolution of the image to reproduce a clear image with an
emp
hatic texture and material feel.
a
Turn on the projector and switch to the image source you want to use.
b
Press the [Menu] button on the control panel or remote control.
c
Select the I
mage menu and press [Enter].
d
Select Image Enhancement and press [Enter].
e
S
elect Image Preset Mode and press [Enter].
f
Select the preset option and press [Enter].
e following settings saved in the preset option are applied to the image.
•
N
oise Reduction
•
MPEG Noise Reduction
Adjusting the Image Resolution
87
•
De
tail Enhancement
g
Adjust each setting individually as necessary.
•
To r
educe ickering in images, adjust the Noise Reduction setting.
•
To reduce the noise or artifacts seen in MPEG video, adjust the MPEG
Noise Reduction setting.
•
To create a more emphatic texture and material feel of the image, adjust
the Detail Enhancement setting.
e settings value in the preset option are overwritten.
h
Press [Menu] or [Esc] to exit the menus.
Adjusting the Image Resolution
88
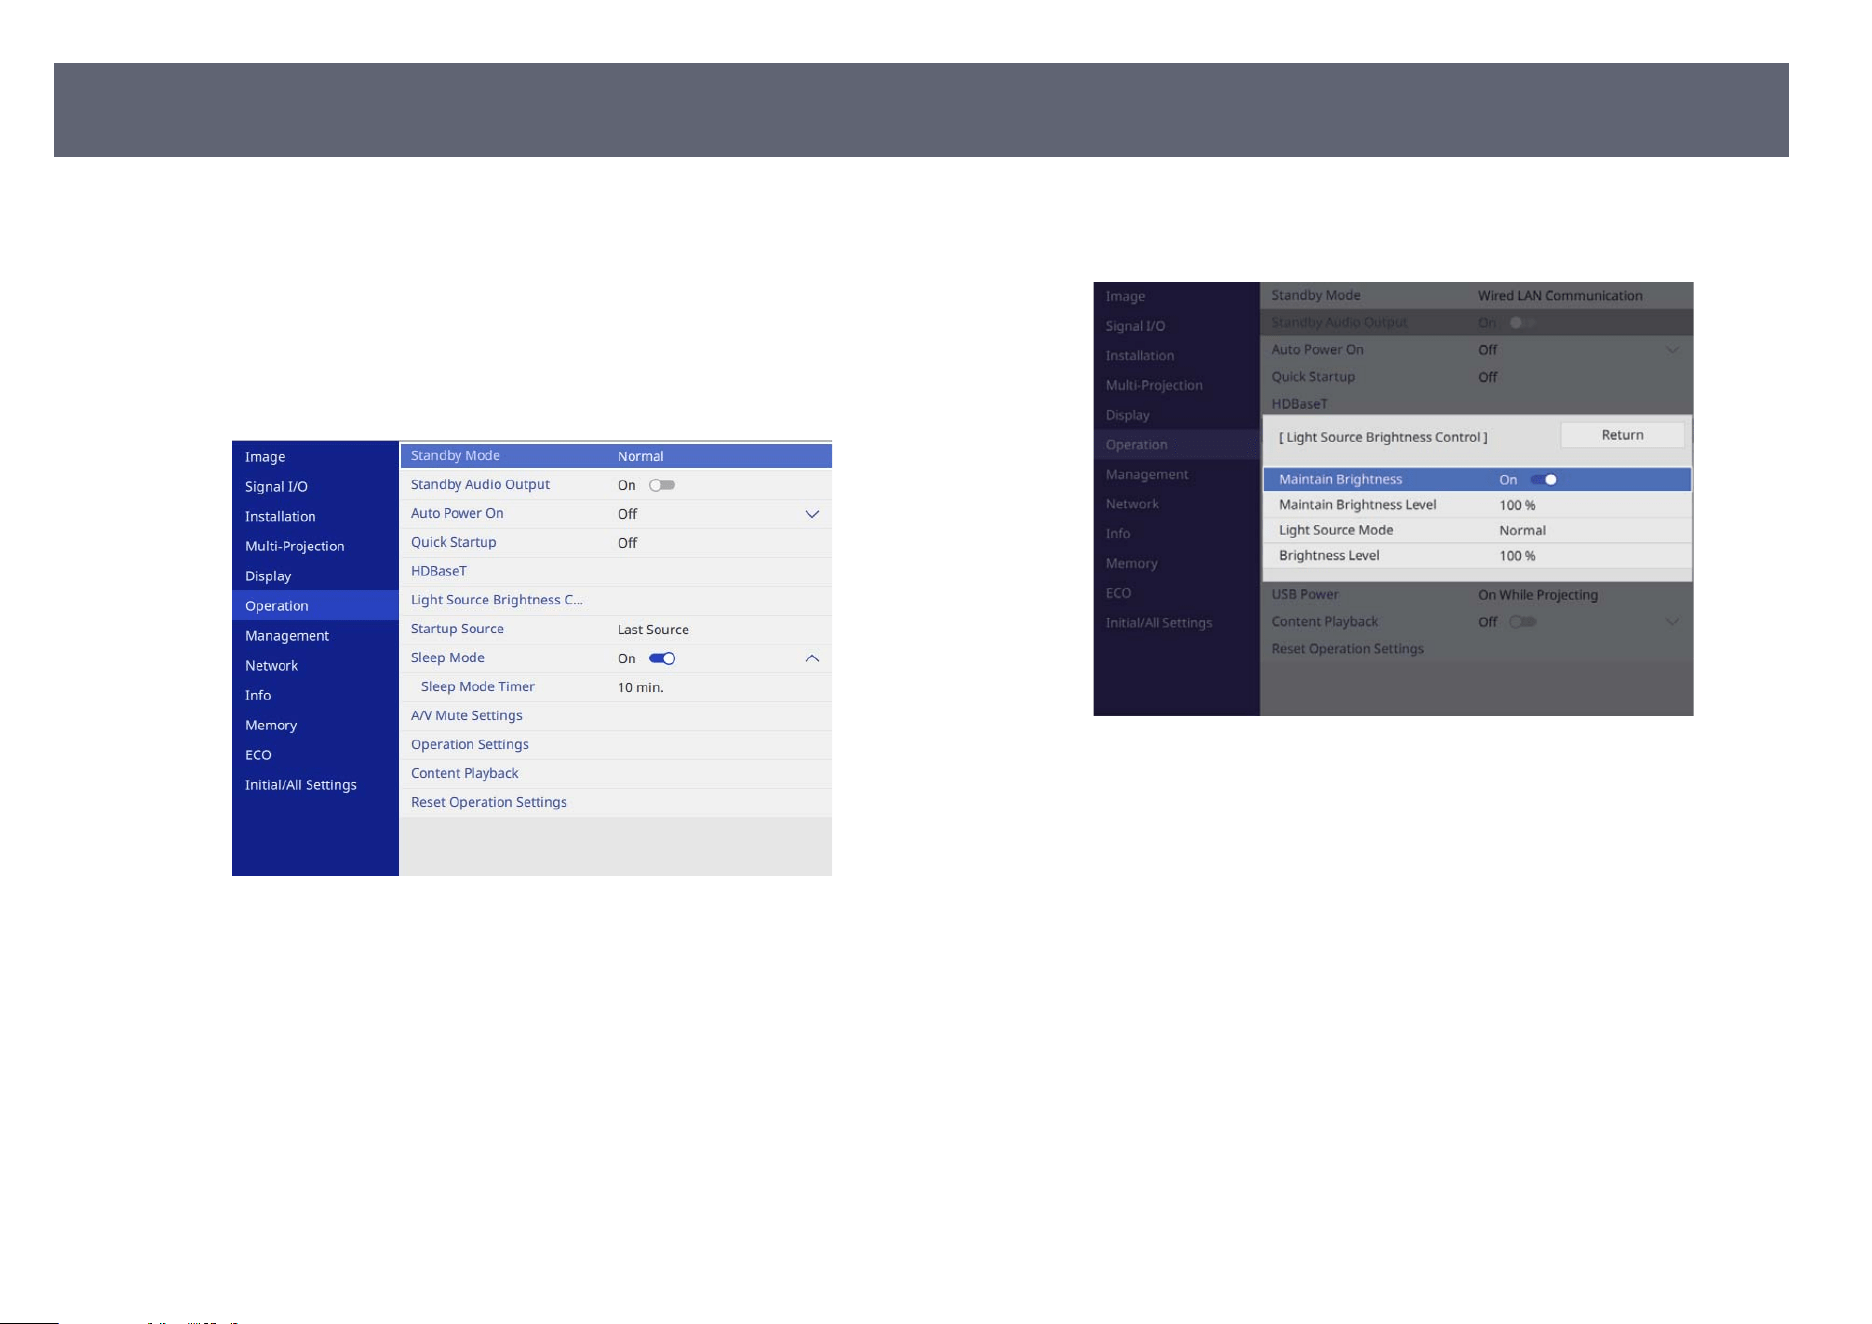
You can adjust the brightness of your projector's light source.
a
Turn on the projector and switch to the image source you want to use.
b
Press the [Menu] button on the control panel or remote control.
c
Select the O
peration menu and press [Enter].
d
Select Light Source Brightness Control and press [Enter].
e
I
f you want to maintain the brightness at a sp
ecic level, select the
Maintain Brightness setting and select On.
f
If you turn o
Maintain Brightness, select the Light Source Mode
setting:
•
Normal lets you set the brightness to the maximum level. is makes
the light source operation time approximately 20,000 hours.
•
Quiet lets you set the brightness to 70% and reduces fan noise. is
makes the light source operation time approximately 20,000 hours.
•
Extended lets you set the brightness to 70% and extends the life
expectancy of the light source. is makes the light source operation
time approximately 30,000 hours.
•
Custom lets you to select a custom brightness level between 70 to 100%.
Adjusting the Brightness
89
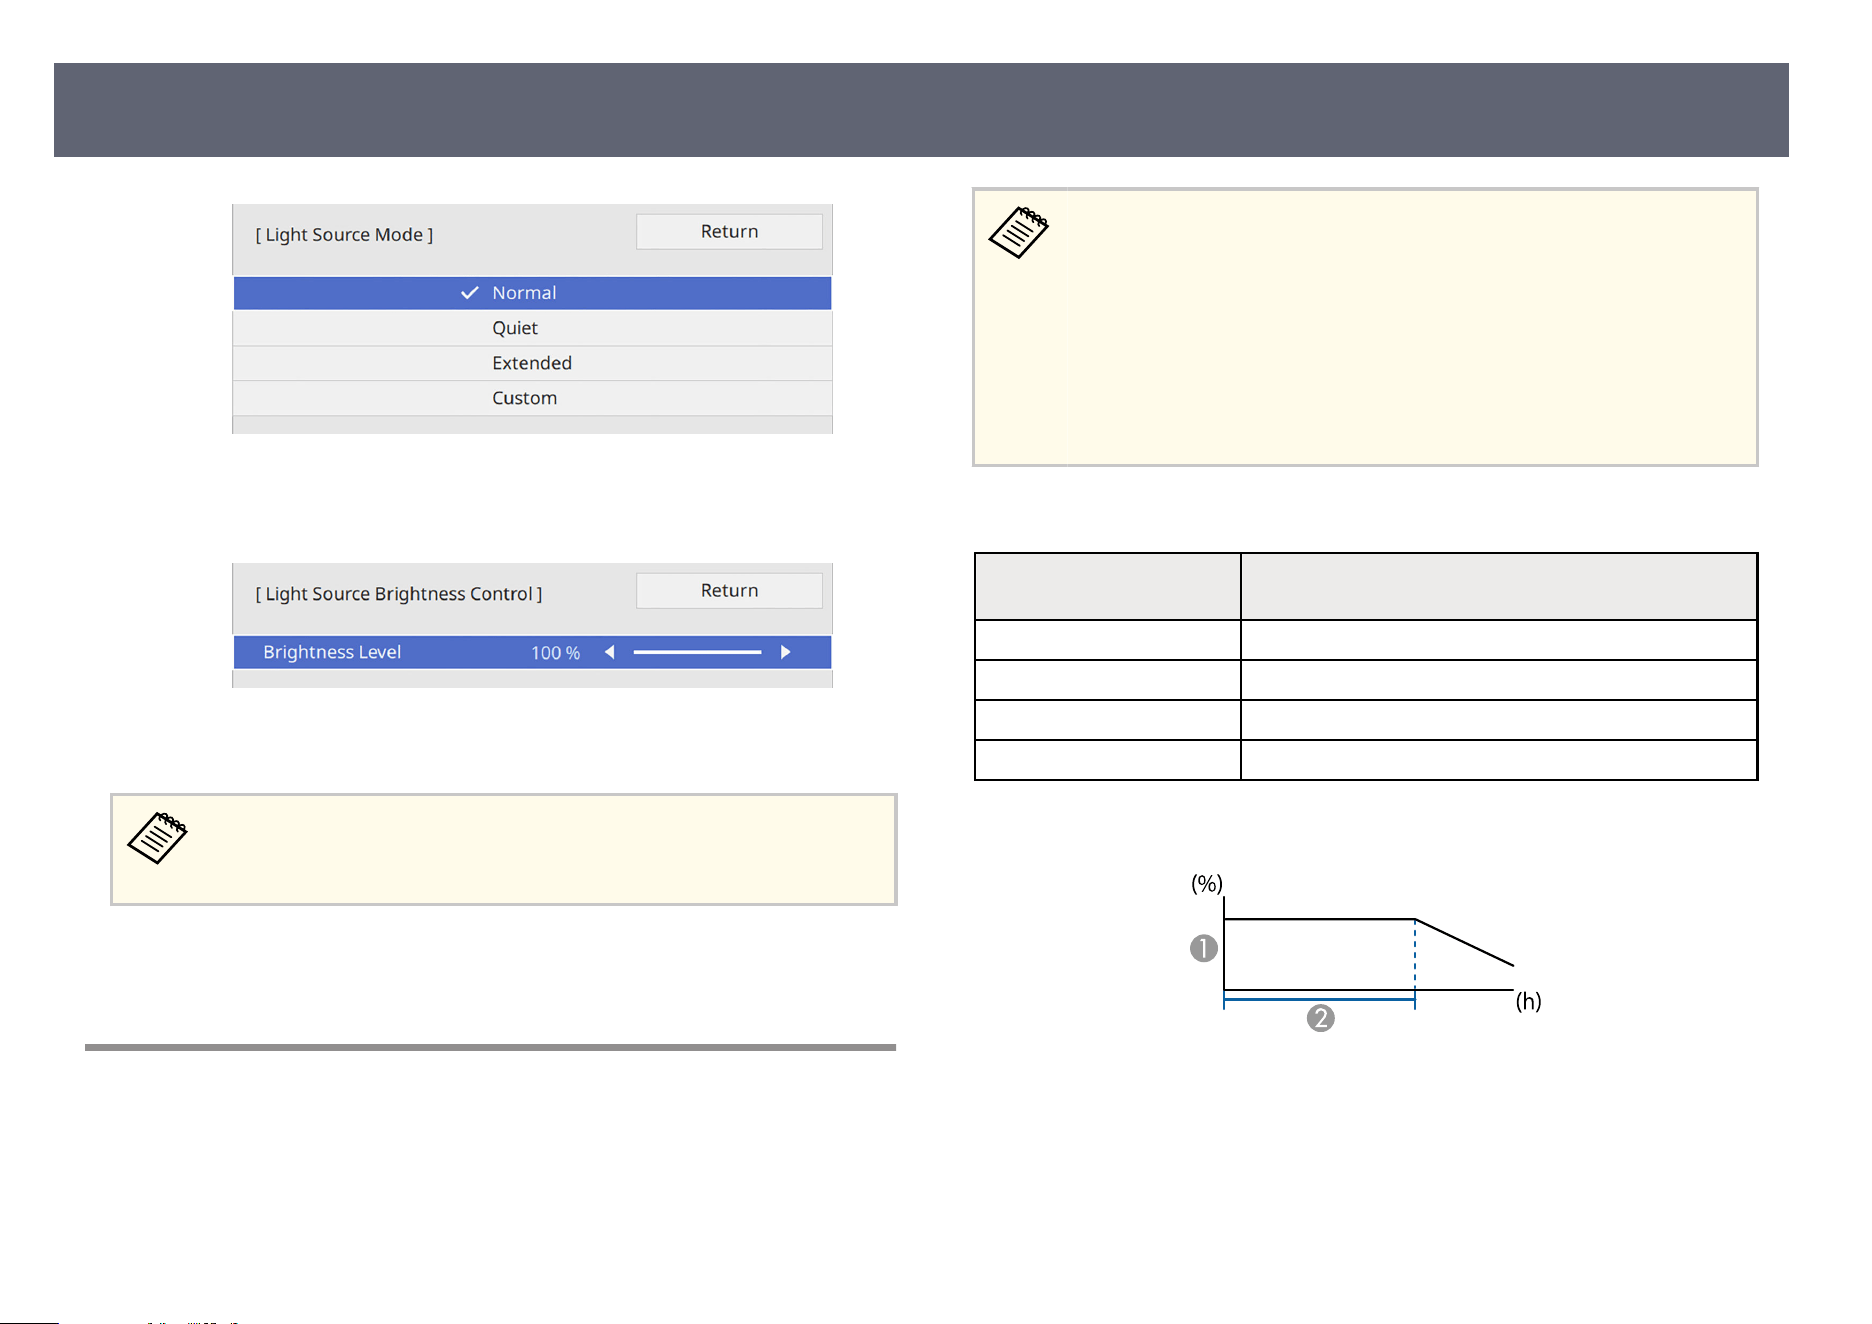
g
If you set the Lig
ht Source Mode setting to Custom, select Brightness
Level and use the le and right arrow buttons to select the brightness.
h
Press [Menu] or [Esc] to exit the menus.
For the best results in maintaining a constant brightness, set the
Lig
ht Source Calibration setting to Run Periodically in the projector's
Management menu.
g
Related Links
•
"Lig
ht Source Operation Time" p.90
Light Source Operation Time
e light source operation time varies depending on the Brightness Level
s
etting and whether Maintain Brightness is on or o.
•
e ligh
t source operation time varies depending on the environmental
conditions and usage.
•
e hours listed here are an approximate and are not guaranteed.
•
You may need to replace internal parts sooner than the estimated light
source operation time.
•
If Maintain Brightness is turned on, and you have exceeded the usage
hours listed here, you may not be able to select a high Maintain
Brightness Level setting.
Maintain Brightness o
Brightness Level setting Time before the brightness of the light source is reduced
by h
alf (approximate)
100% 20,000 hours
90% 21,000 hours
80% 24,000 hours
70% 30,000 hours
Maintain Brightness on
A
Maintain brightness level
B
Time the projector can maintain constant brightness (approximate)
Adjusting the Brightness
90
Maintain Brightness Level
set
ting
Hours
85% 6,000 hours
80% 10,000 hours
75% 14,000 hours
70% 19,000 hours
Adjusting the Brightness
91
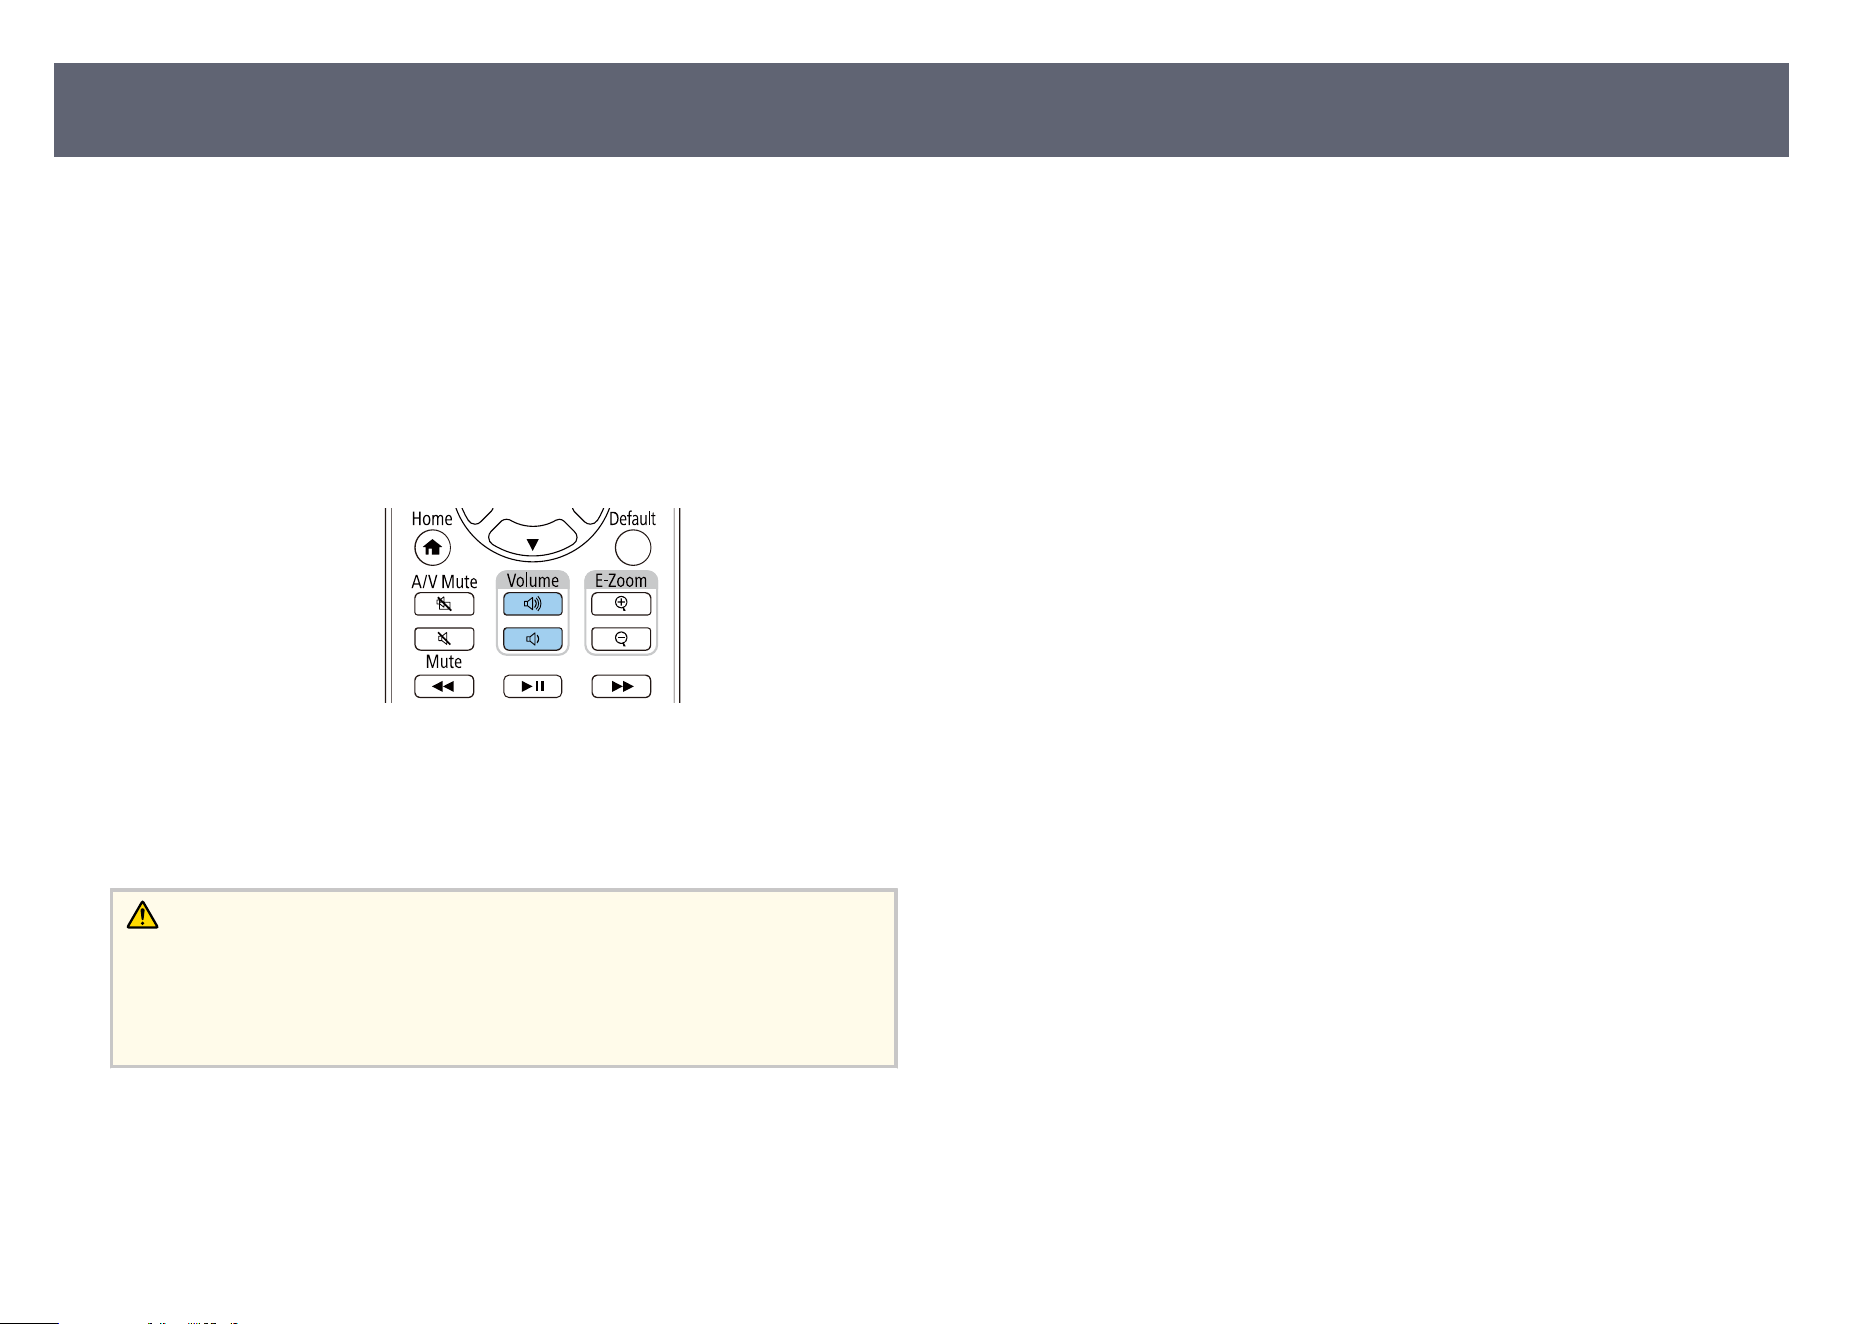
e volume buttons control the projector's internal speaker system.
Y
ou can also control the volume of any external speakers you connected to the
projector.
You must adjust the volume separately for each connected input source.
a
Turn on the projector and start a presentation.
b
To lower or raise the volume, press the [Volume] buttons on the remote
co
n
trol as shown.
A volume gauge appears on the screen.
c
To set the volume to a sp
ecic level for an input source, select Volume in
the projector's Signal I/O menu.
Caution
Do n
ot start a presentation at a high volume setting. Sudden loud noises may cause
hearing loss.
Always lower the volume before powering o, so that you can power on and then
gradually increase the volume.
Controlling the Volume with the Volume Buttons
92

Adjusting Projector Features
Fo
llow the instructions in these sections to use your projector's adjustment features.
g
Related Links
•
"HDMI Link Features" p.94
•
"Projecting Two Images Simultaneously" p.96
•
"Projecting a PC Free Presentation" p.99
•
"Projecting in Content Playback Mode" p.104
•
"Shutting O the Image and Sound Temporarily" p.110
•
"Stopping Video Action Temporarily" p.111
•
"Turning O the Sound Temporarily (Mute)" p.112
•
"Zooming Images (E-Zoom)" p.113
•
"Saving a User's Logo Image" p.114
•
"Saving Settings to Memory and Using Saved Settings " p.116
•
"Using Advanced Image Adjustment Features" p.117
•
"Multi-Projection Features" p.120
•
"External Camera Usage" p.131
•
"Projector Security Features" p.133
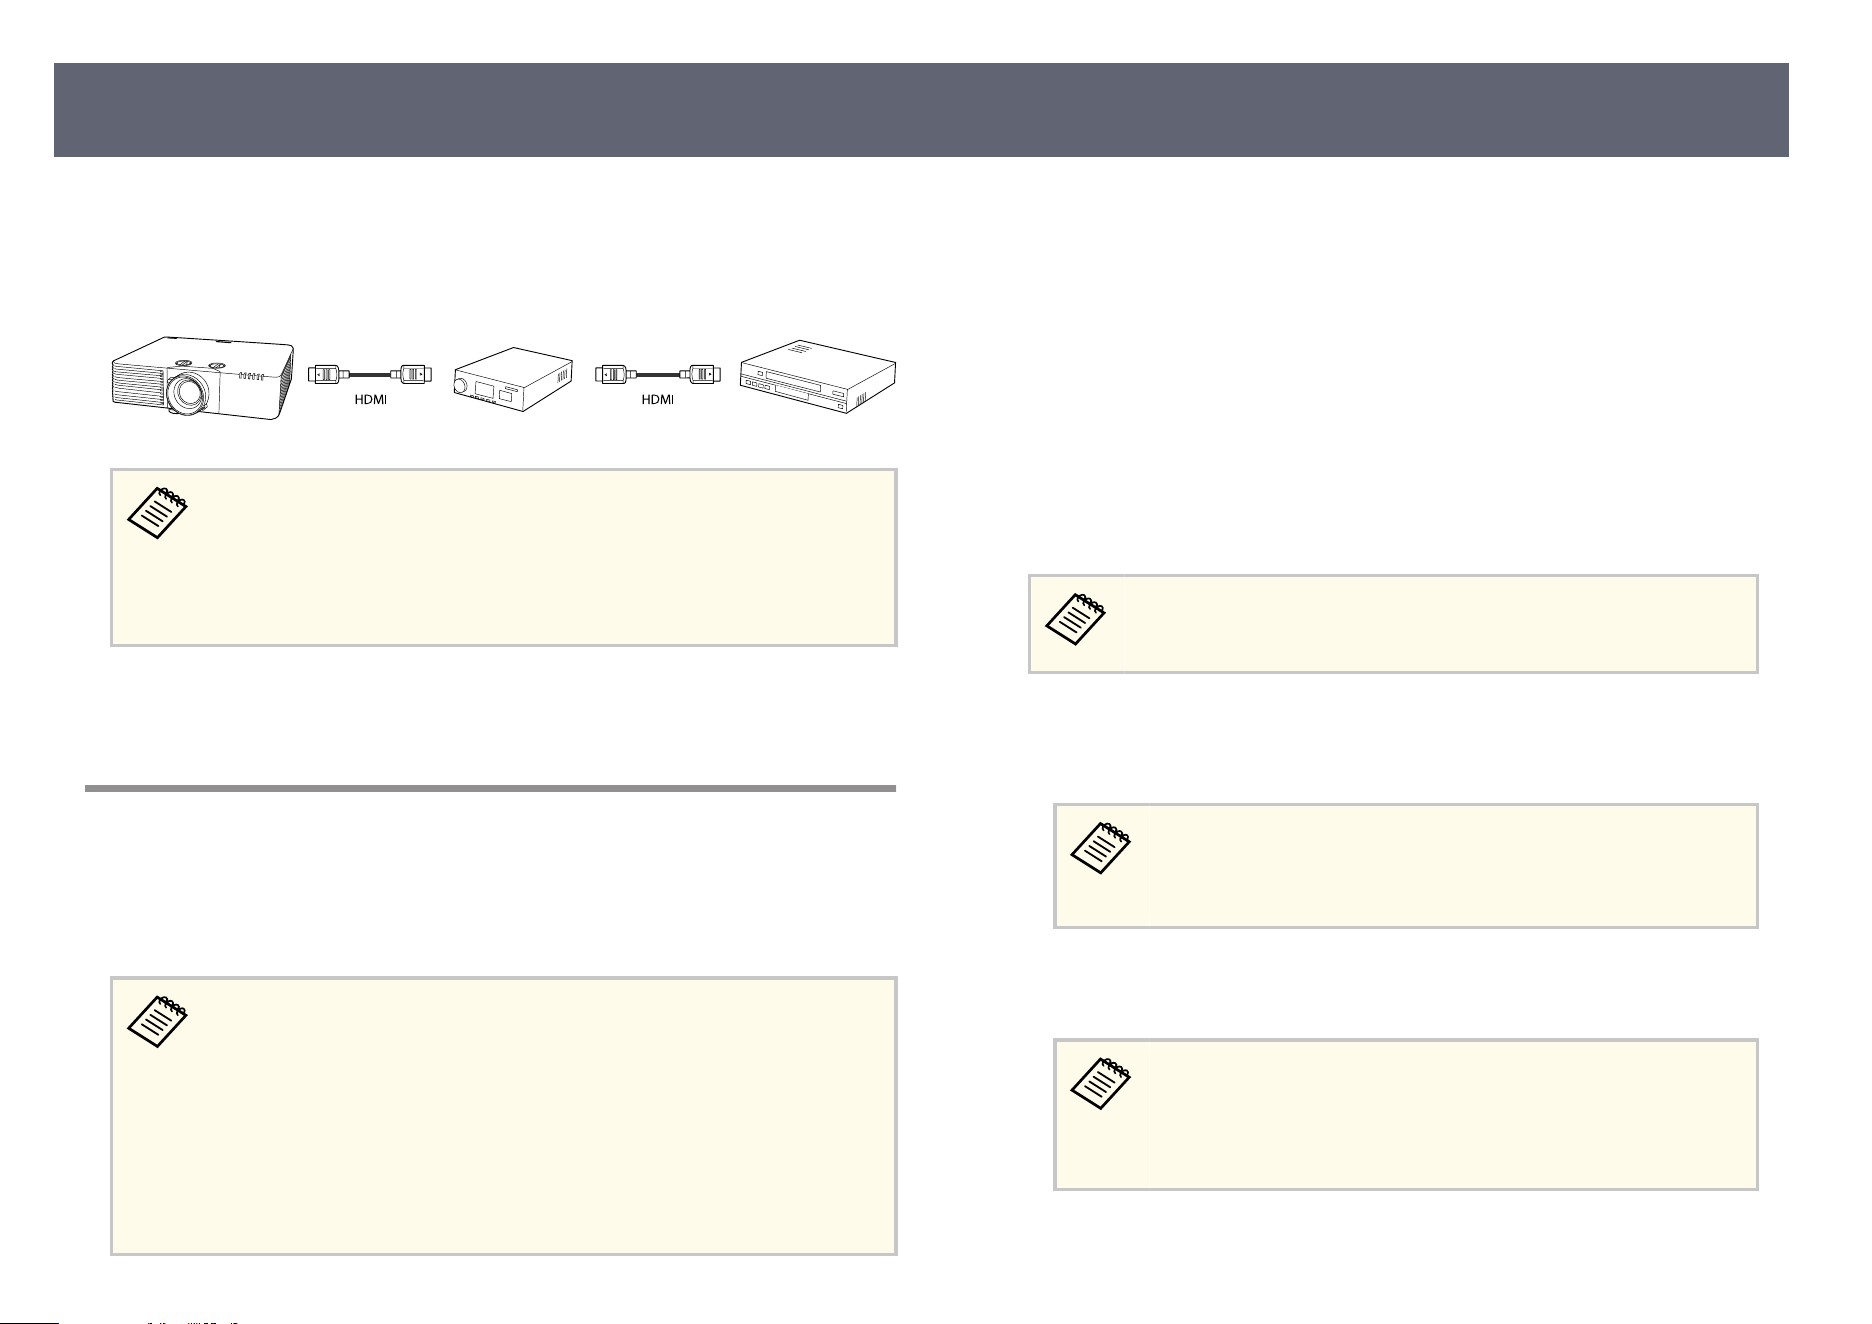
When an audio/video source that meets the HDMI CEC standard is connected
to t
he projector's HDMI port, you can use the projector's remote control to
control certain features of the linked device.
Example: Projector, audio/video system, and multi-media players connection
•
As long as the connected device meets the HDMI CEC standard,
you can use the HDMI Link features even if the audio/video system
in-between does not meet the HDMI CEC standard.
•
Up to 3 multi-media players that meet the HDMI CEC standard can be
connected at the same time.
g
Related Links
•
"Op
erating the Connected Devices Using the HDMI Link Features" p.94
Operating the Connected Devices Using the HDMI Link
Features
You can select the connected device that is available for HDMI Link and control
th
e selected device using the HDMI Link features.
•
Wh
en you use the HDMI Link features, set the HDMI Link setting to
On in the projector's Signal I/O menu.
•
You must also congure the connected device. See the documentation
supplied with the device for more information.
•
Some connected devices or functions of those devices may not
operate properly even if they meet the HDMI CEC standard. See the
documentation supplied with the device for more information.
•
Use a cable that supports the HDMI standard.
a
Press the [Menu] button on the control panel or remote control.
b
Select S
ignal I/O and press [Enter].
c
S
elect HDMI Link and press [Enter].
On t
he screen displayed, make sure that HDMI Link is set to On.
d
Select Device Connections and press [Enter].
e
S
elect the device you want to control and project the image from, and
pr
ess [Enter].
•
A link
ed device is indicated by a blue mark.
•
e device name is le blank if it cannot be acquired.
f
Press [Esc] to select the HDMI Link options as necessary.
•
Au
dio Out Device: Select the device for audio output.
•
Se
lect Projector to output audio from the projector itself.
•
Select AV System to output audio from an AV amplier that is
connected using an HDMI cable.
•
Po
wer On Link lets you control what happens when you turn on the
projector or linked device.
•
Se
lect PJ -> Device or Bidirectional to turn the linked device
on when the projector is turned on.
•
Select Device -> PJ or Bidirectional to turn the projector on
when the linked device is turned on.
HDMI Link Features
94
•
Po
wer O Link lets you control whether linked devices are turned o
when the projector is turned o.
•
Po
wer O Link only works when the connected device's CEC
power link function is enabled.
•
Note that depending on the status of the connected device (for
example, if it is recording), the device may not be turned o.
g
Press [Esc] to exit the menus.
Yo
u can use the projector's remote control to control the linked device, such as
playback, stop, fast forward, and rewind.
HDMI Link Features
95
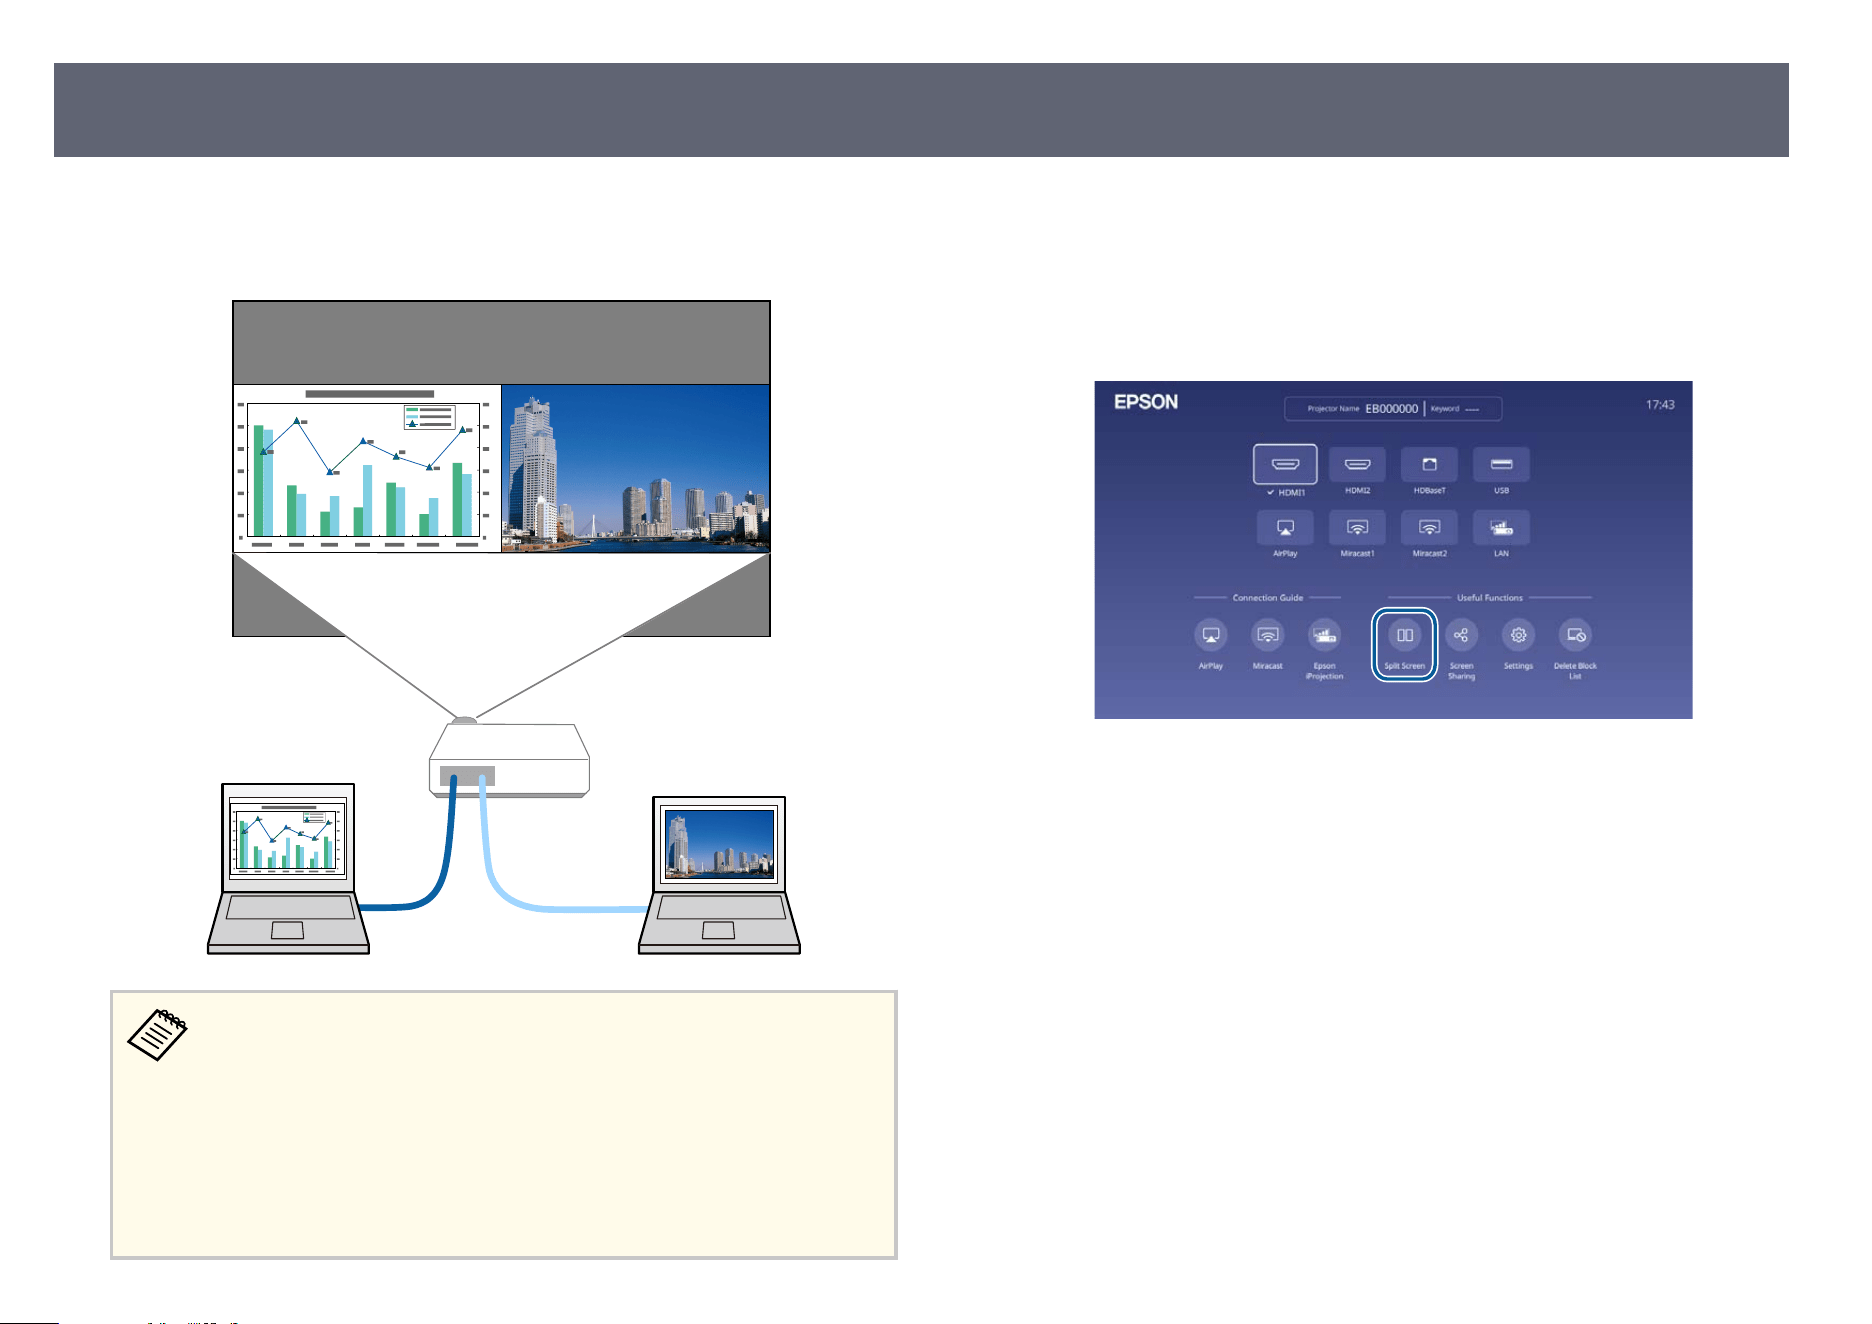
You can use the split screen feature to simultaneously project two images from
dieren
t image sources. You can control the split screen feature using the
remote control or the projector menus.
•
Whi
le using the split screen feature, other projector features may not
be available and some settings may be automatically applied to both
images.
•
You cannot perform split screen projection when the Content
Playback setting is set to On in the projector's Operation menu.
•
You may not be able to perform split screen projection when you
use the Scale feature or the Edge Blending feature in the projector's
Multi-Projection menu.
a
Turn on the projector and display an image
b
Press the [Home] button.
c
Select S
plit Screen.
d
Press the [Menu] button.
Projecting Two Images Simultaneously
96
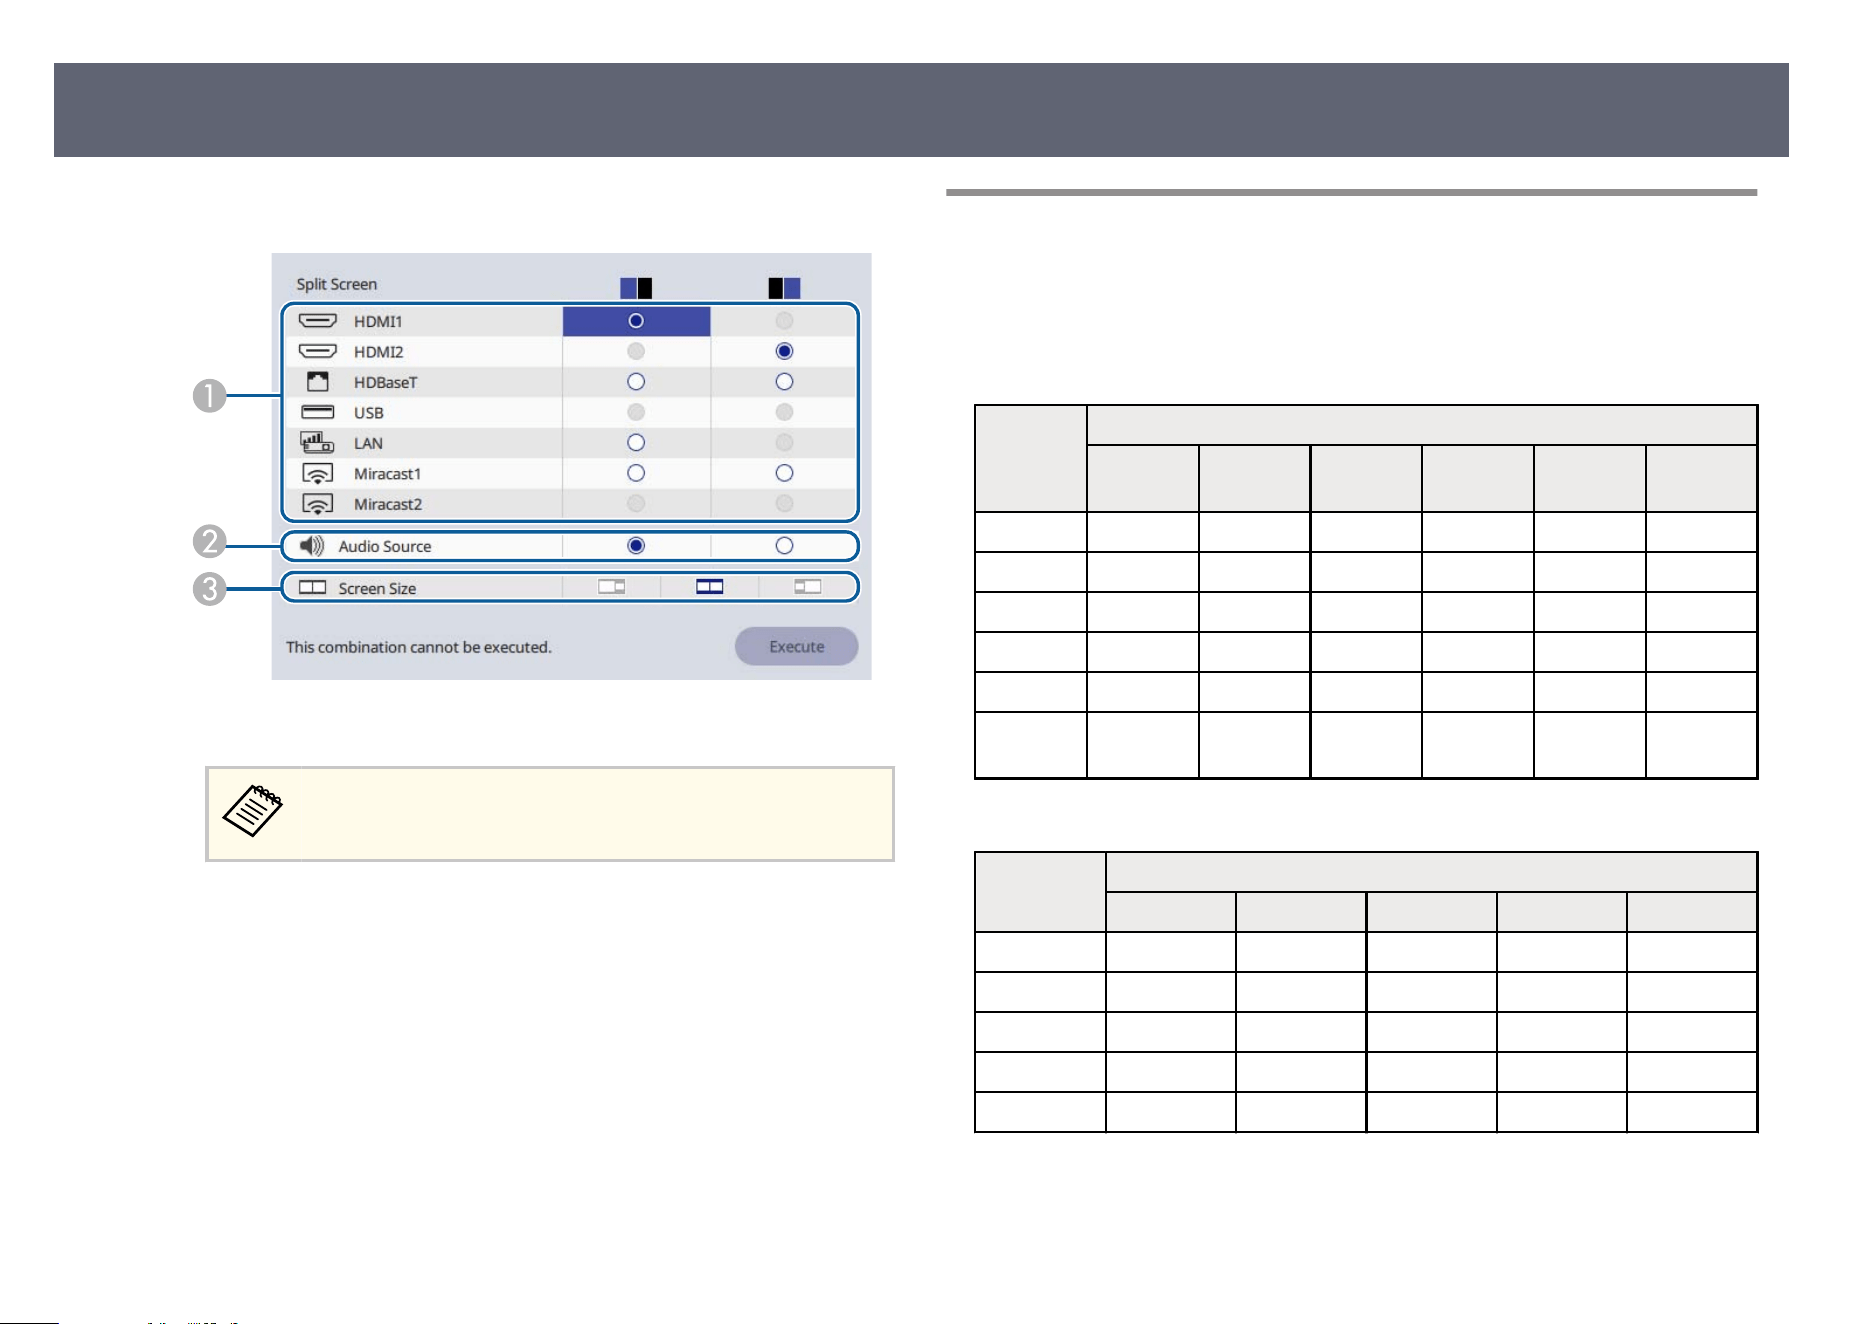
e
When splitting screen into halves, do the following as necessary:
A
Select the input source.
You can only select input sources that can be combined.
B
Select the screen from which you want to hear audio.
C
Select the screen size.
f
Select Execute and press [Enter].
g
T
o exit the split screen feature, press [Esc].
g
Related Links
•
"In
put Sources for Split Screen Projection" p.97
•
"Split Screen Projection Restrictions" p.98
Input Sources for Split Screen Projection
e combinations of input sources that can be projected on a split screen are
li
sted below.
EB-L890E/EB-L895E/EB-L790SE/EB-L795SE/EB-L690E/EB-L890U/EB-
L790U/EB-L690U/EB-L690SU/EB-L695SU
Le
Scr
een
Right Screen
HDMI1 HDMI2 HDBaseT USB LAN Miracast1
/2
HDMI1 - ✓ ✓ ✓ - -
HDMI2 ✓ - - ✓ ✓ ✓
HDBaseT ✓ - - ✓ ✓ ✓
USB ✓ ✓ ✓ - - ✓
LAN - ✓ ✓ - - -
Miracast1
/2
-
✓ ✓ ✓
- -
EB-L690SE/EB-L695SE
Le Screen R
ight Screen
HDMI1 HDMI2 HDBaseT USB LAN
HDMI1 - ✓ ✓ ✓ ✓
HDMI2 ✓ - - ✓ ✓
HDBaseT ✓ - - ✓ ✓
USB ✓ ✓ ✓ - -
LAN ✓ ✓ ✓ - -
Projecting Two Images Simultaneously
97

Split Screen Projection Restrictions
Operating restrictions
e fo
llowing operations cannot be performed during split screen projection.
•
Setting the projector's menu
•
E-Zoom
•
Switching the aspect mode (the aspect mode is set to Auto)
•
Operations using the [Customize] button on the remote control, other than
displaying the network information on the projected surface.
•
Applying the Dynamic Contrast setting
•
Displaying the network information on the projected surface by a method
other than pressing the [Customize] button.
•
Displaying the Miracast information bar
Image restrictions
•
Even if you set No-signal Screen to Logo in the projector's Display menu,
the blue screen appears when no image signal is being input.
•
When you create a single unied image projected from multiple projectors
and use the split screen feature, the second projector does not detect an image
signal.
g
Related Links
•
"Image Aspect Ratio" p.80
•
"Zooming Images (E-Zoom)" p.113
•
"Turning On Automatic Luminance Adjustment" p.83
•
"Adjusting the Menu Settings" p.190
Projecting Two Images Simultaneously
98
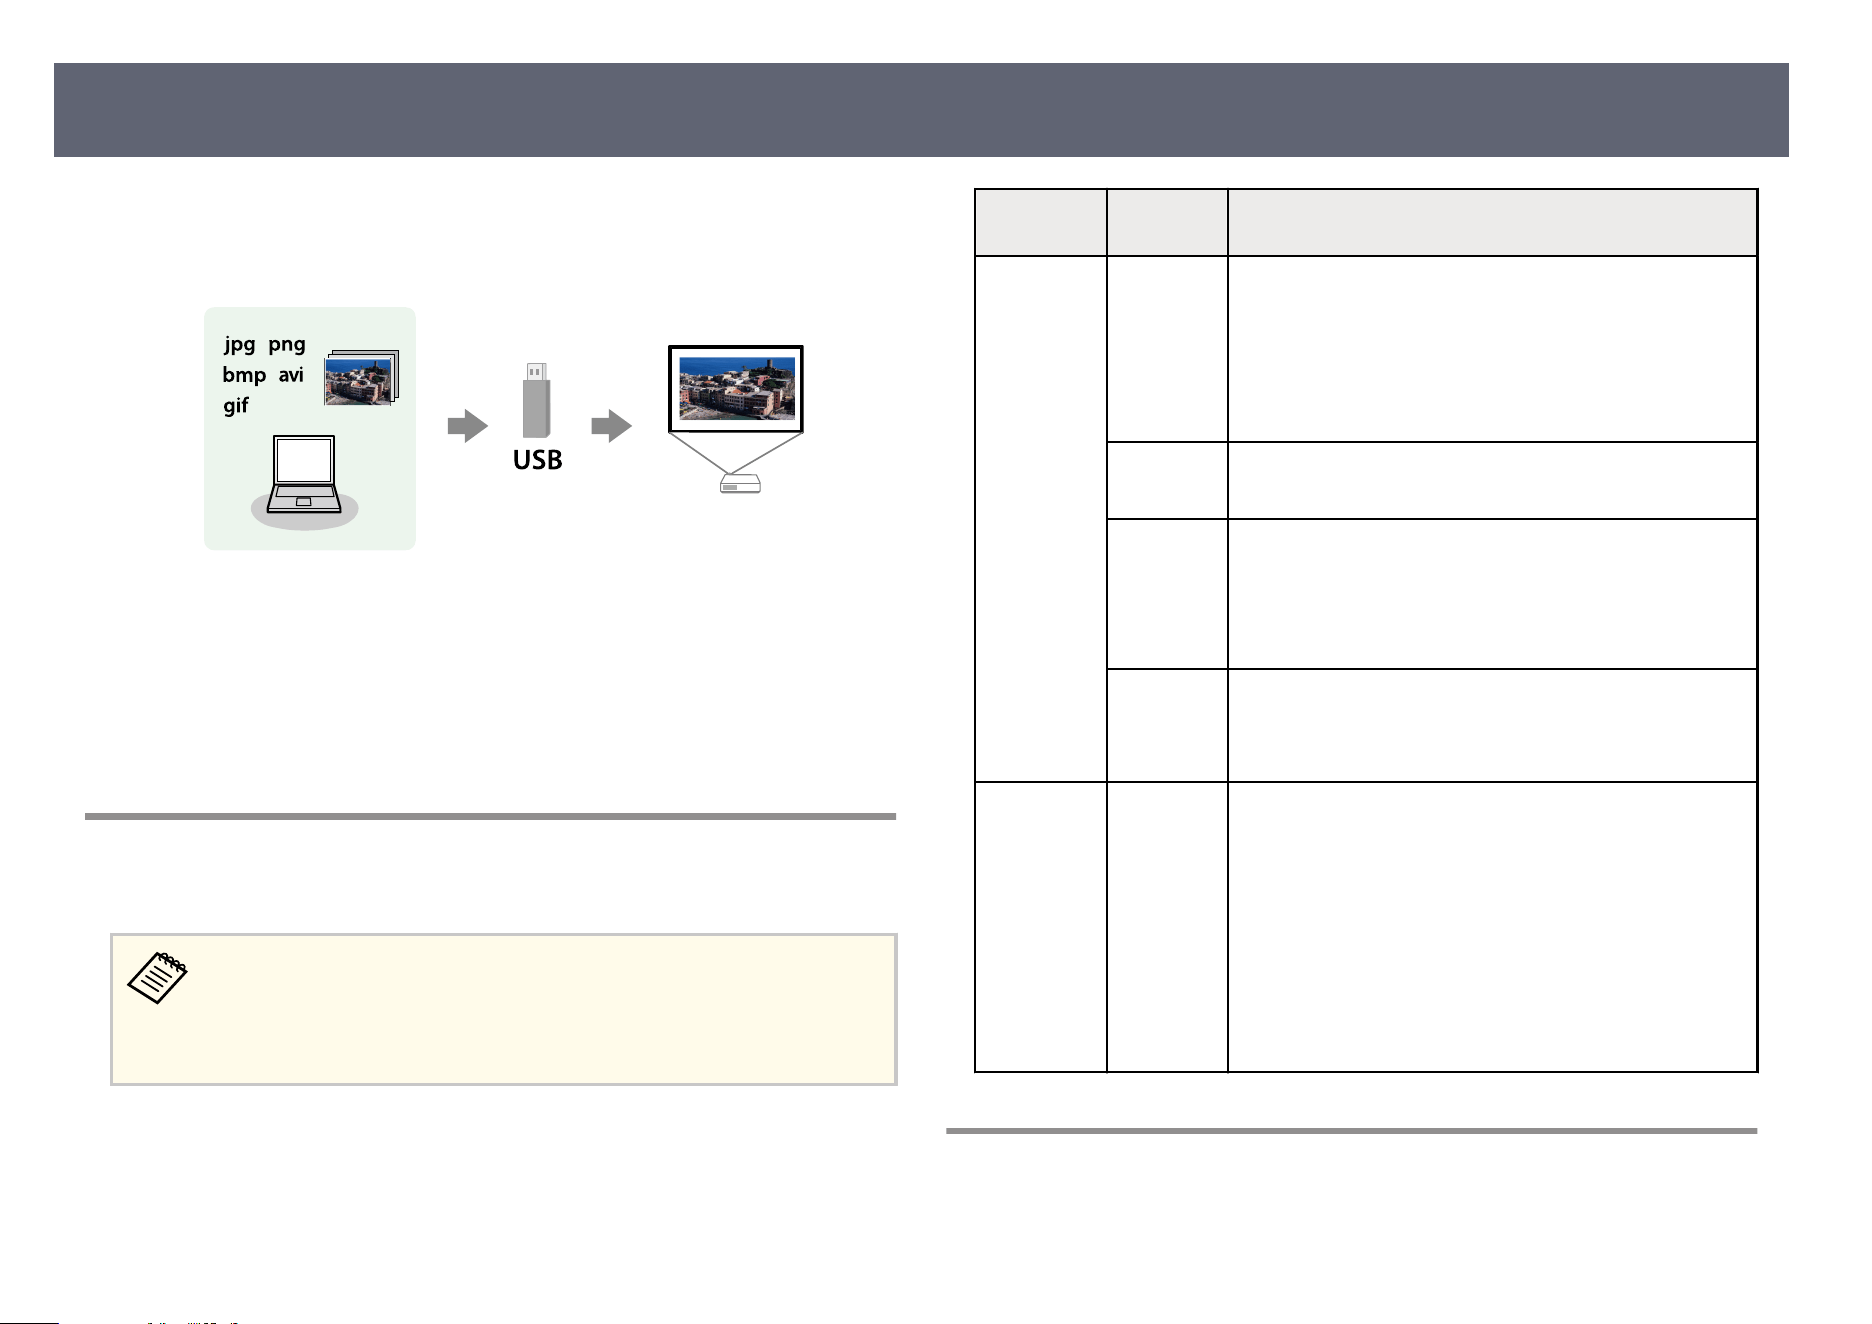
You can use your projector's PC Free feature whenever you connect a USB
dev
ice that contains compatible presentation les. is lets you quickly and
easily display a presentation and control it using the projector's remote control.
g
Related Links
•
"Su
pported PC Free File Types" p.99
•
"Precautions on PC Free Projection" p.99
•
"Starting a PC Free Slide Show" p.100
•
"Starting a PC Free Movie Presentation" p.101
•
"PC Free Display Options" p.102
Supported PC Free File Types
You can project these types of les usin
g the projector's PC Free feature.
•
F
o
r best results, place your les on media that is formatted in
FAT16/32.
•
If you have trouble projecting from media formatted for non-Windows
le systems, try formatting the media for Windows instead.
File contents File type
(exten
sion)
Details
Image .jpg Make sure the le is n
ot:
•
CMYK format
•
Progressive format
•
Highly compressed
•
Above 8,192 × 8,192 resolution
.bmp Make sure the le is n
ot:
•
Above 1,280 × 800 resolution
.gif Make sure the le is n
ot:
•
Above 1,280 × 800 resolution
•
Animated
•
Interlaced
.png Make sure the le is n
ot:
•
Above 1,920 × 1200 resolution
•
Interlaced
Movie .avi •
Ver
sion: AVI 1.0 only
•
Resolution: 1,280 × 720 or less
•
Size: 2 GB or less
•
Movie Codec: Motion JPEG
•
Frame Rate: up to 30 fps
•
Audio Codec: LPCM or IMA ADPCM
•
Audio Sampling Rate: 11.025 kHz, 22.05 kHz, 44.1
kHz, 16 kHz, 24 kHz, 32 kHz, or 48 kHz
Precautions on PC Free Projection
Note the following precautions when using PC Free features.
Projecting a PC Free Presentation
99
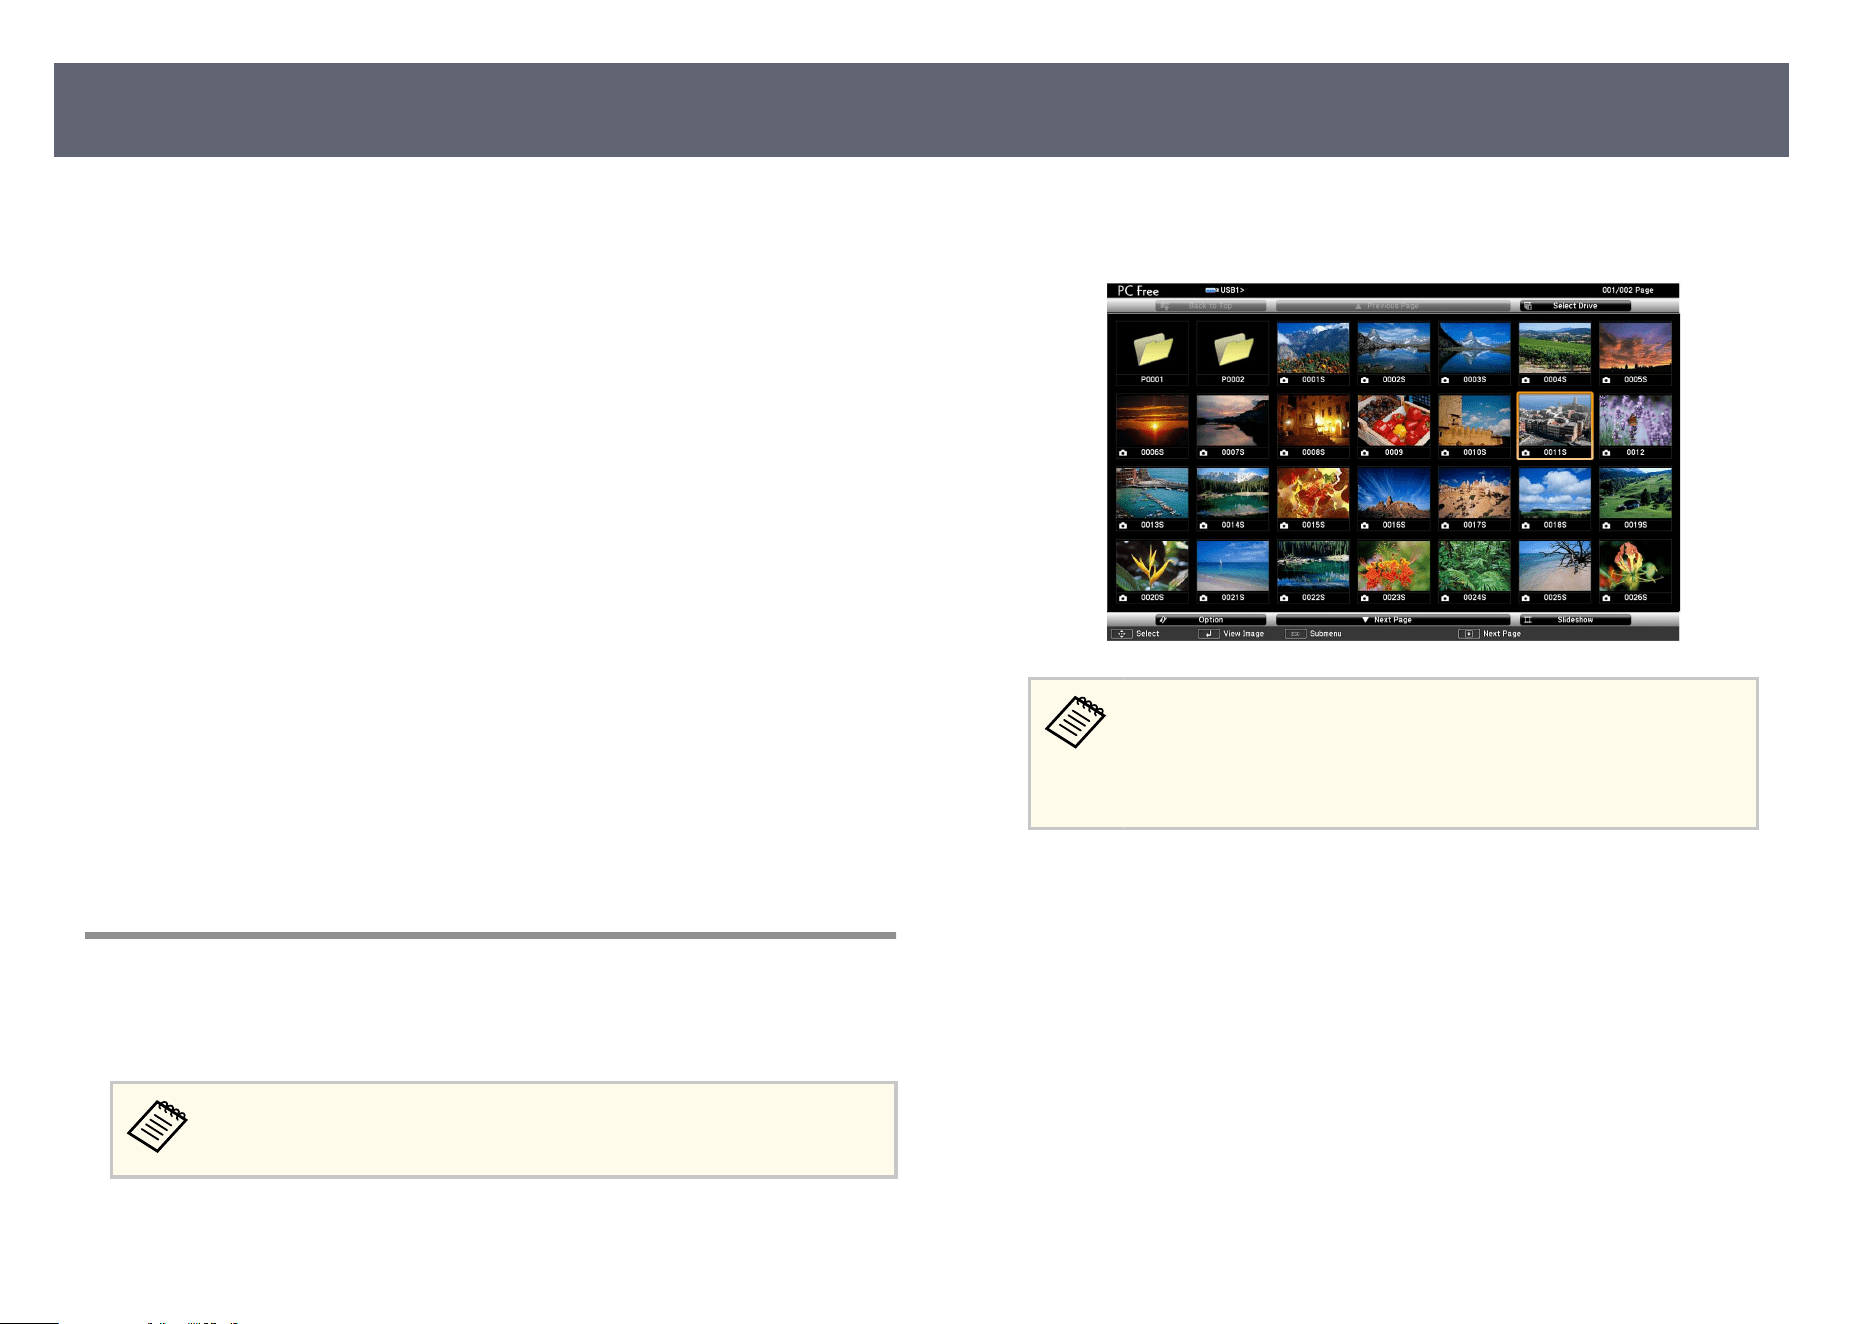
•
Yo
u cannot use a USB key for PC Free features.
•
Do not disconnect the USB storage device while it is being accessed;
otherwise, PC Free may not operate correctly.
•
You may not be able to use the security features on certain USB storage
devices with PC Free features.
•
When connecting a USB device that includes an AC adapter, connect the AC
adapter to an electrical outlet when you use the device with your projector.
•
Some commercially available USB card readers may not be compatible with
the projector.
•
e projector can recognize up to 5 cards inserted into the connected card
reader at one time.
•
You can use the following functions while projecting in PC Free.
•
Freeze
•
A/V Mute
•
E-Zoom
g
Related Links
•
"Stopping Video Action Temporarily" p.111
•
"Shutting O the Image and Sound Temporarily" p.110
•
"Zooming Images (E-Zoom)" p.113
Starting a PC Free Slide Show
Aer connecting a USB device to the projector, you can switch to the USB input
source and start your slide show.
You can change the PC Free operation options or add special eec
ts by
highlighting Option at the bottom of the screen and pressing [Enter].
a
Press the [USB] button on the remote control.
e PC Fr
ee le list screen is displayed.
•
If t
he Select Drive screen is displayed, press the arrow buttons to
select the drive and press [Enter].
•
To display images on the other USB drive, highlight Select Drive
at the top of the le list screen and press [Enter].
b
Do one of the following to locate your les:
•
I
f y
ou need to display les inside a subfolder on your device, press the
arrow buttons to highlight the folder and press [Enter].
•
To move back up a folder level on your device, highlight Back to Top
and press [Enter].
•
To view additional les in a folder, highlight Next Page or Previous
Page and press [Enter].
Projecting a PC Free Presentation
100
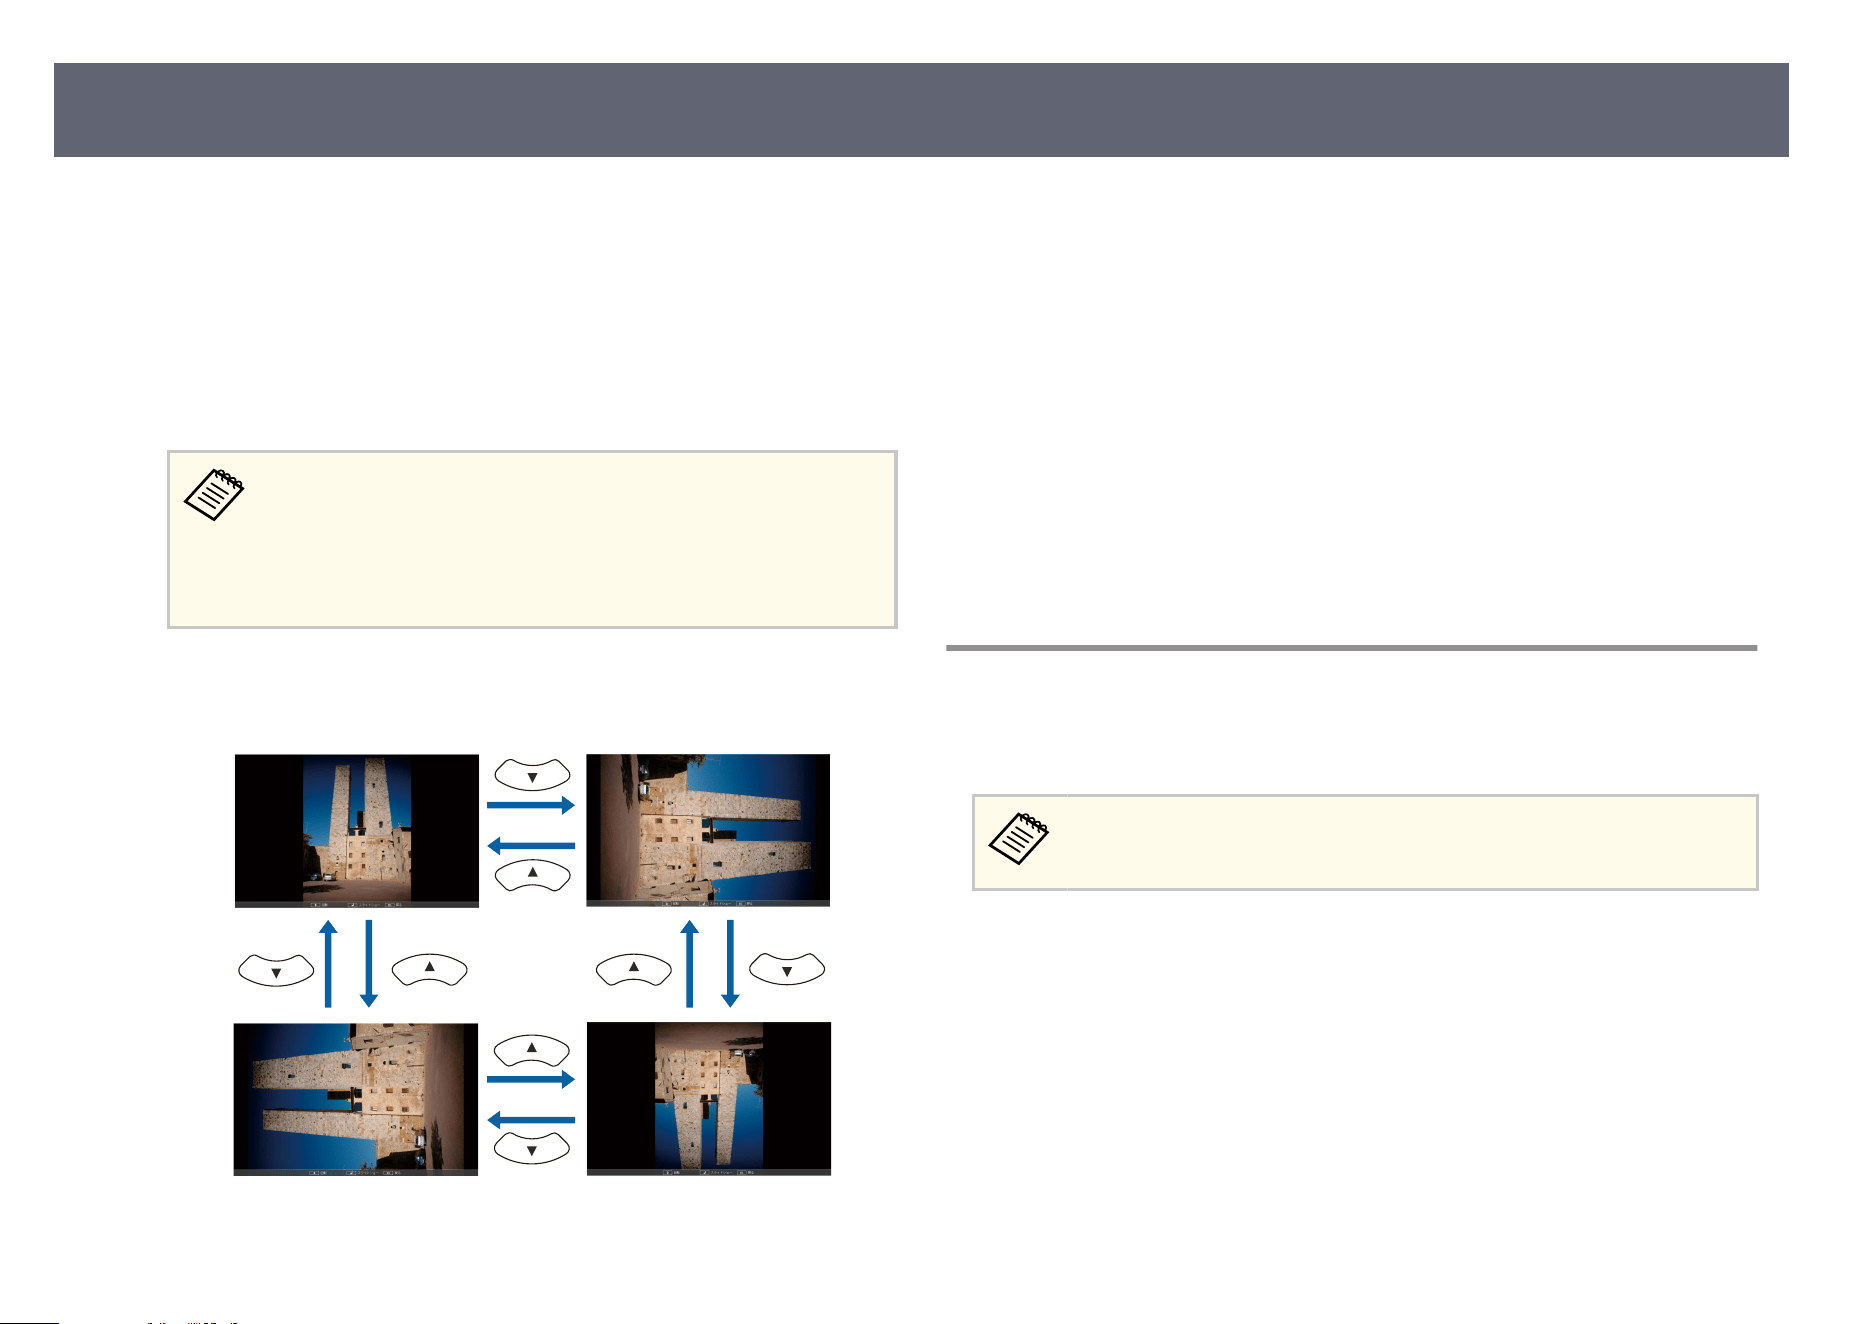
c
Do one of the following:
•
To di
splay an individual image, press the arrow buttons to highlight the
image and press [Enter]. (Press the [Esc] button to return to the le list
screen.)
•
To display a slide show of all the images in a folder, press the arrow
buttons to highlight the Slideshow option at the bottom of the screen
and press [Enter].
•
Yo
u can change the image switching time by highlighting Option
at the bottom of the screen and pressing [Enter].
•
If any le names are longer than the display area or include
unsupported symbols, the le names may be shortened or
changed only on the screen display.
d
While projecting, use the following commands to control the display:
•
T
o r
otate a displayed image, press the up or down arrow button.
•
To m
ove to the next or previous image, press the le or right arrow
button.
e
To stop the display, follow the on-screen instructions or press the [Esc]
bu
tton.
You return to the le list screen.
f
Turn o the USB device, if necessary, and then disconnect the device from
t
he projector.
g
Related Links
•
"Connecting to a USB Device" p.37
•
"PC Free Display Options" p.102
Starting a PC Free Movie Presentation
Aer connecting a USB device to the projector, you can switch to the USB input
s
ource and start your movie.
You can change the PC Free operation options by highlighting Op
tion at
the bottom of the screen and pressing [Enter].
a
Press the [USB] button on the remote control.
e PC Free le list screen is displayed.
Projecting a PC Free Presentation
101
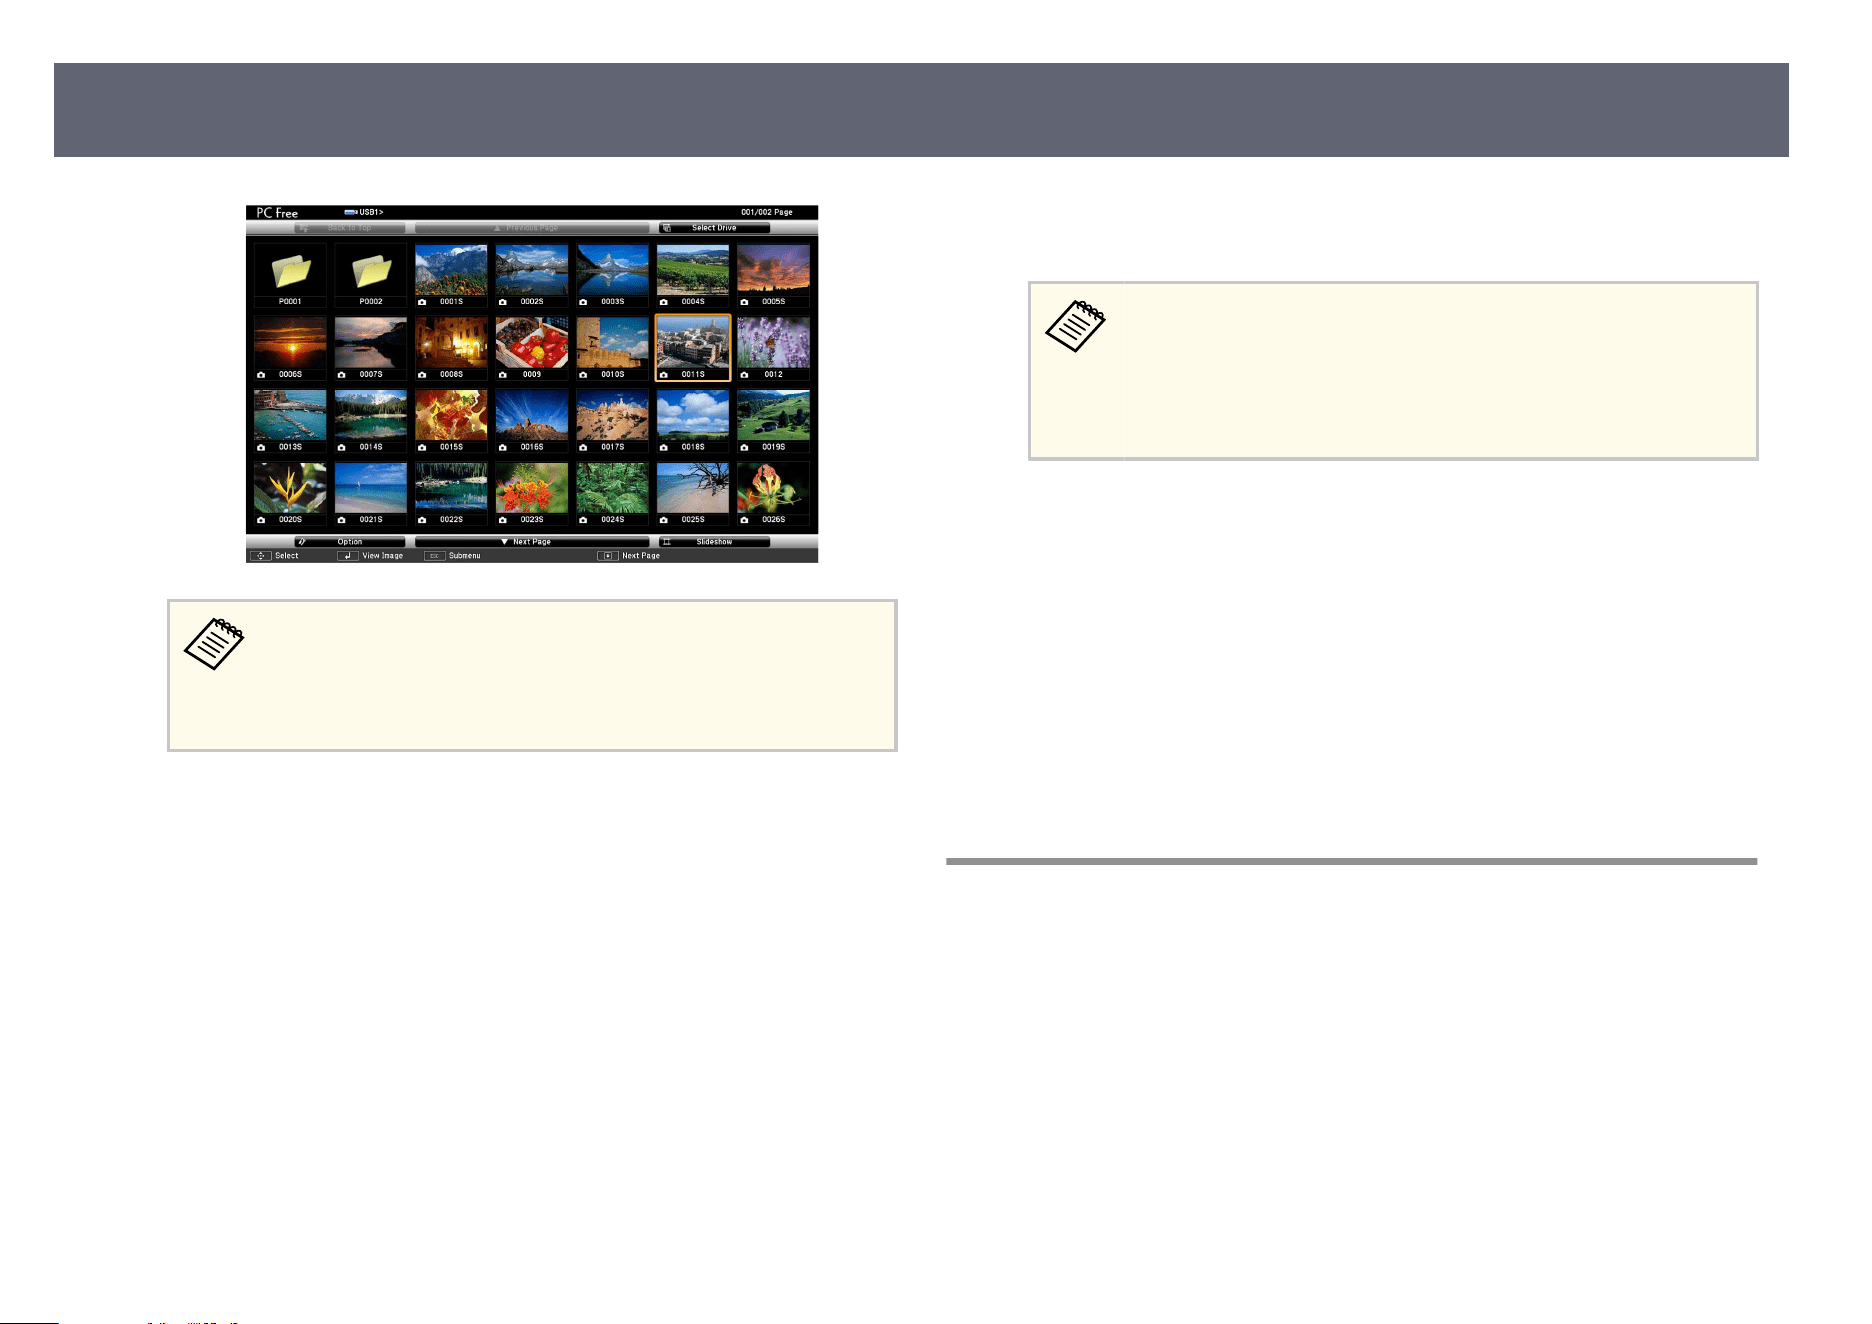
•
If t
he Select Drive screen is displayed, press the arrow buttons to
select the drive and press [Enter].
•
To display movie les on the other USB drive, highlight Select
Drive at the top of the le list screen and press [Enter].
b
Do one of the following to locate your les:
•
If y
ou need to display les inside a subfolder on your device, press the
arrow buttons to highlight the folder and press [Enter].
•
To move back up a folder level on your device, highlight Back to Top
and press [Enter].
•
To view additional les in a folder, highlight Next Page or Previous
Page and press [Enter].
c
To play back a movie, press the arrow buttons to highlight the le an
d
p
ress [Enter].
•
If an
y le names are longer than the display area or include
unsupported symbols, the le names may be shortened or
changed only on the screen display.
•
If you want to play back all the movies in a folder in sequence,
select the Slideshow option at the bottom of the screen.
d
To stop movie playback, press the [Esc] button, highlight E
xi
t, and press
[Enter].
You return to the le list screen.
e
Turn o the USB device, if necessary, and then disconnect the device from
t
he projector.
g
Related Links
•
"Connecting to a USB Device" p.37
•
"PC Free Display Options" p.102
PC Free Display Options
You can select these display options when using PC Free. To access this screen,
hig
h
light Option at the bottom of the PC Free le list screen and press [Enter].
Projecting a PC Free Presentation
102
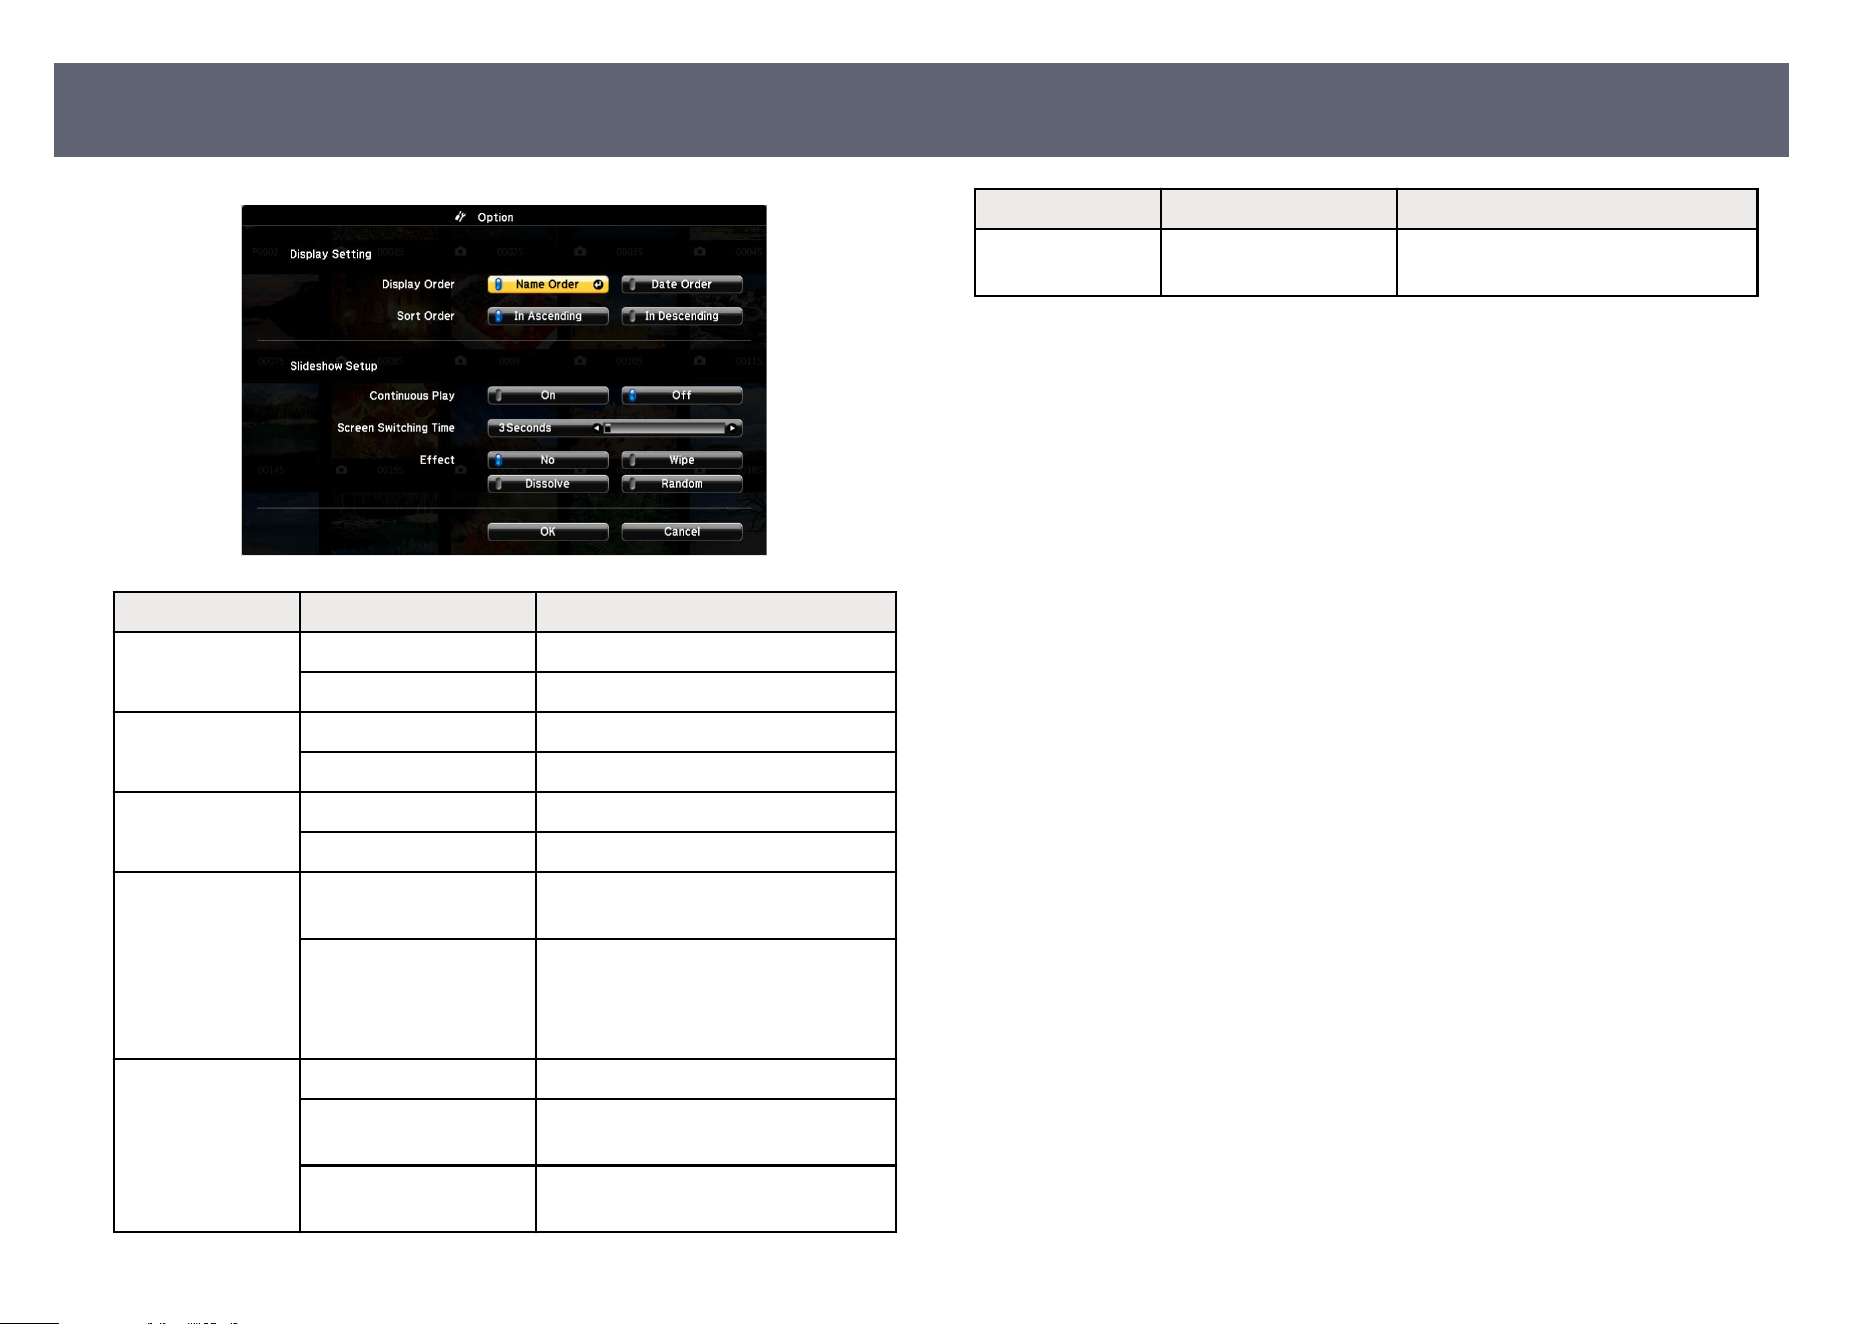
Setting Options Description
Display Order Name Order Displays les in name order
Date Order Displays les in dat
e order
Sort Order In Ascending Sorts les in rs
t-to-last order
In Descending Sorts les in las
t-to-rst order
Continuous Play On Displays a slide show continuously
O Displays a slide show once
Screen Switching
Tim
e
No Does not display the next le
automatically
1 Second to 60 Seconds Displays les fo
r the selected time and
switches to the next le automatically;
high resolution images may switch at
a slightly slower rate
Eect No No eect
W
ipe Transitions between images using a
wi
pe eect
Dissolve Transitions between images using a
dis
solve eect
Setting Options Description
Random Transitions between images using a
rando
m variety of eects
Projecting a PC Free Presentation
103
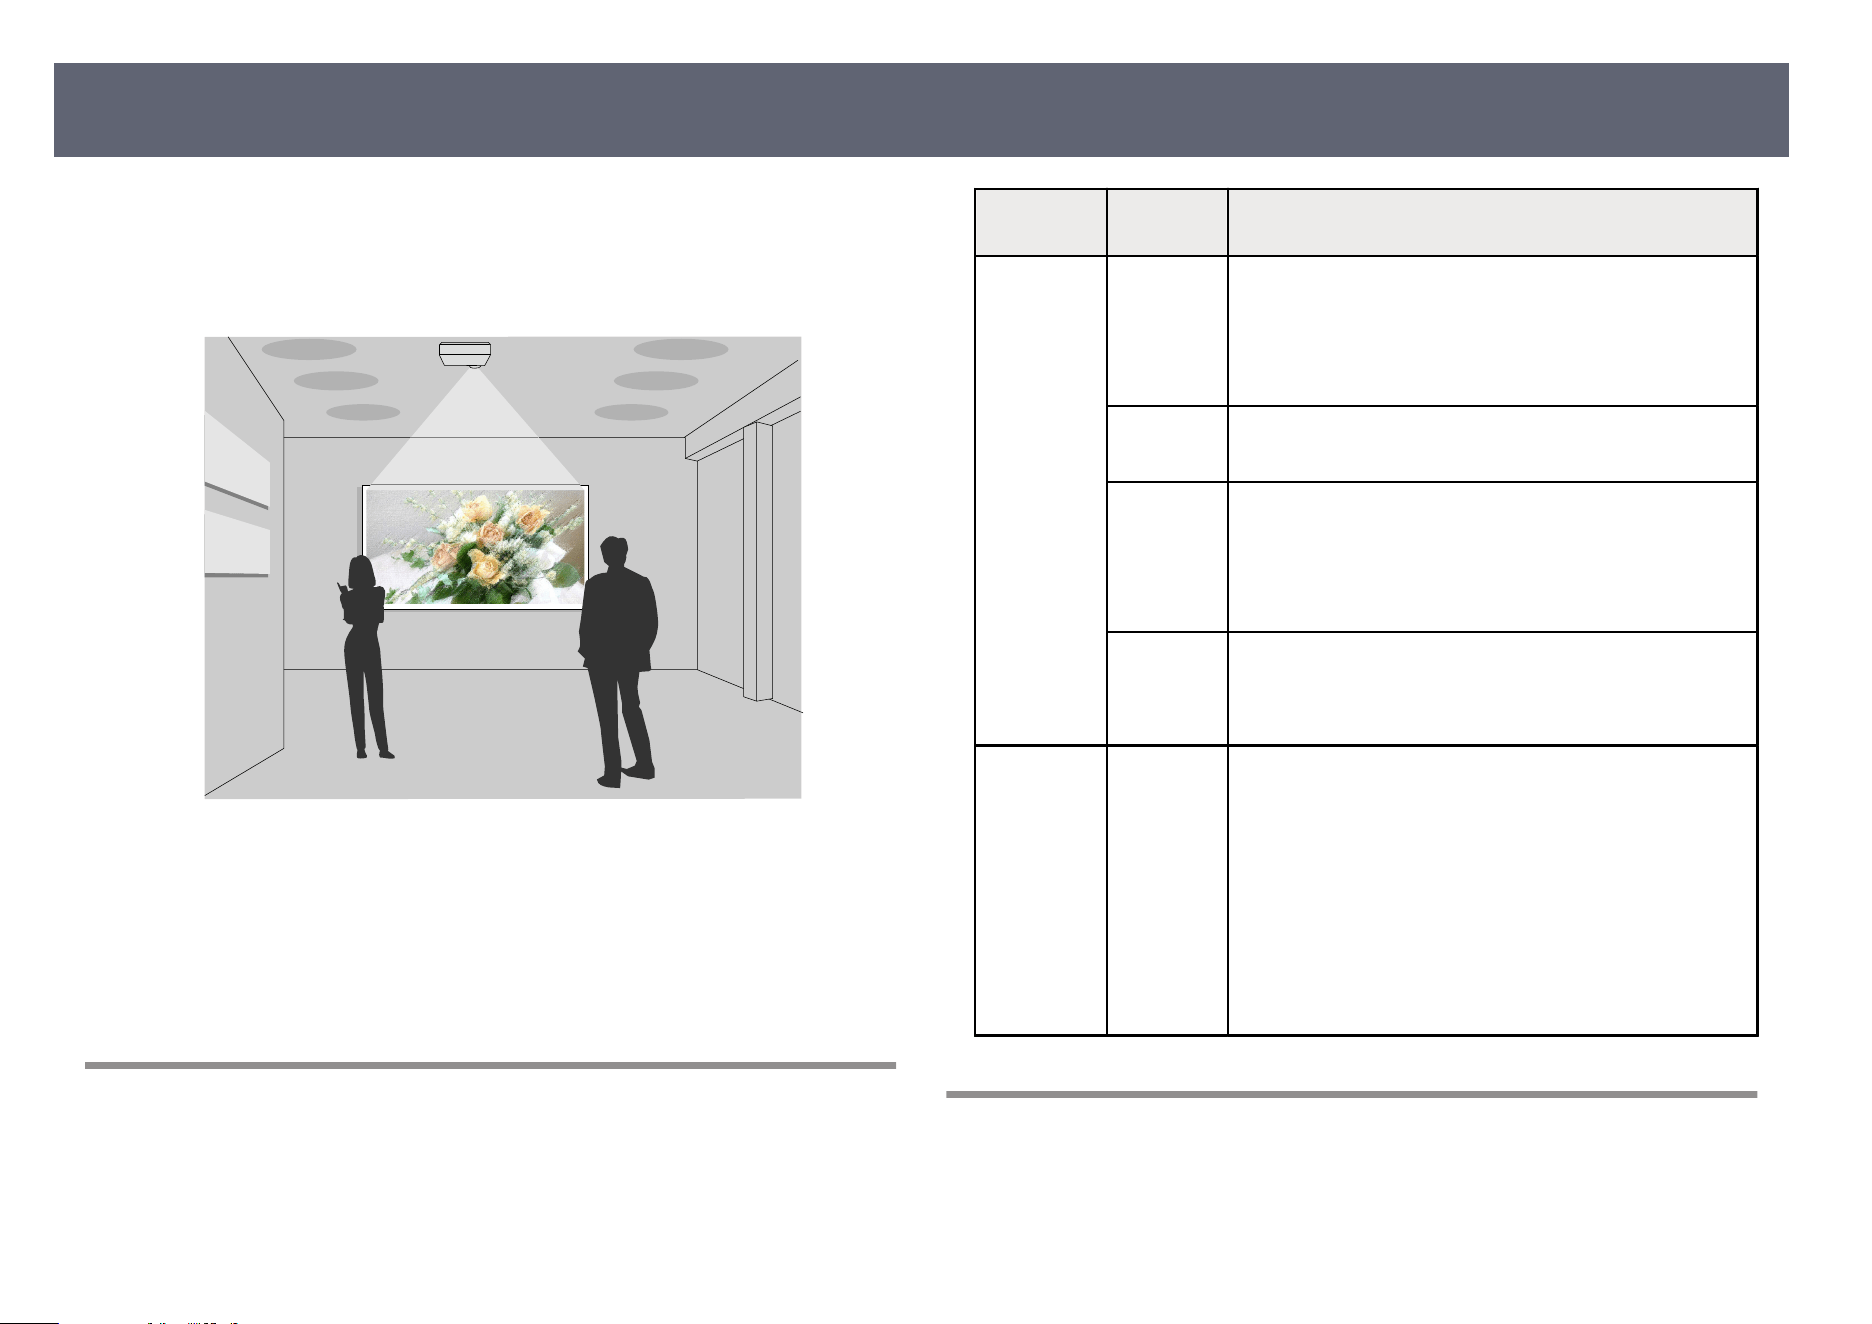
Your projector's Content Playback feature allows you to project your digital
sign
age content. You can easily project playlists that contain images and movies
saved on an external storage device. You can also add color and shape eects to
your projected image.
g
Related Links
•
"Supported Content Playback Mode File Types" p.104
•
"Switching to Content Playback Mode" p.104
•
"Projecting Your Playlists" p.105
•
"Adding Eects to Your Projected Image" p.108
•
"Content Playback Mode Restrictions" p.109
Supported Content Playback Mode File Types
You can project these types of les usin
g the projector's Content Playback
feature.
File contents File type
(exten
sion)
Details
Image .jpg Make sure the le is n
ot:
•
Progressive format
•
Highly compressed
•
Above 8,192 × 8,192 resolution
.bmp Make sure the le is n
ot:
•
Above 1,280 × 800 resolution
.gif Make sure the le is n
ot:
•
Above 1,280 × 800 resolution
•
Animated
•
Interlaced
.png Make sure the le is n
ot:
•
Above 1,280 × 800 resolution
•
Interlaced
Movie .avi
(Mo
tion
JPEG)
•
Version: AVI 1.0 only
•
Resolution: 1,280 × 720 or less
•
Size: 2 GB or less
•
Movie Codec: Motion JPEG
•
Frame Rate: up to 30 fps
•
Audio Codec: LPCM or IMA ADPCM
•
Audio Sampling Rate: 11.025 kHz, 22.05 kHz, 44.1
kHz, 16 kHz, 24 kHz, 32 kHz, or 48 kHz
Switching to Content Playback Mode
Before you project your playlists, you need to switch to Content Playback mode.
a
Turn on the projector.
Projecting in Content Playback Mode
104
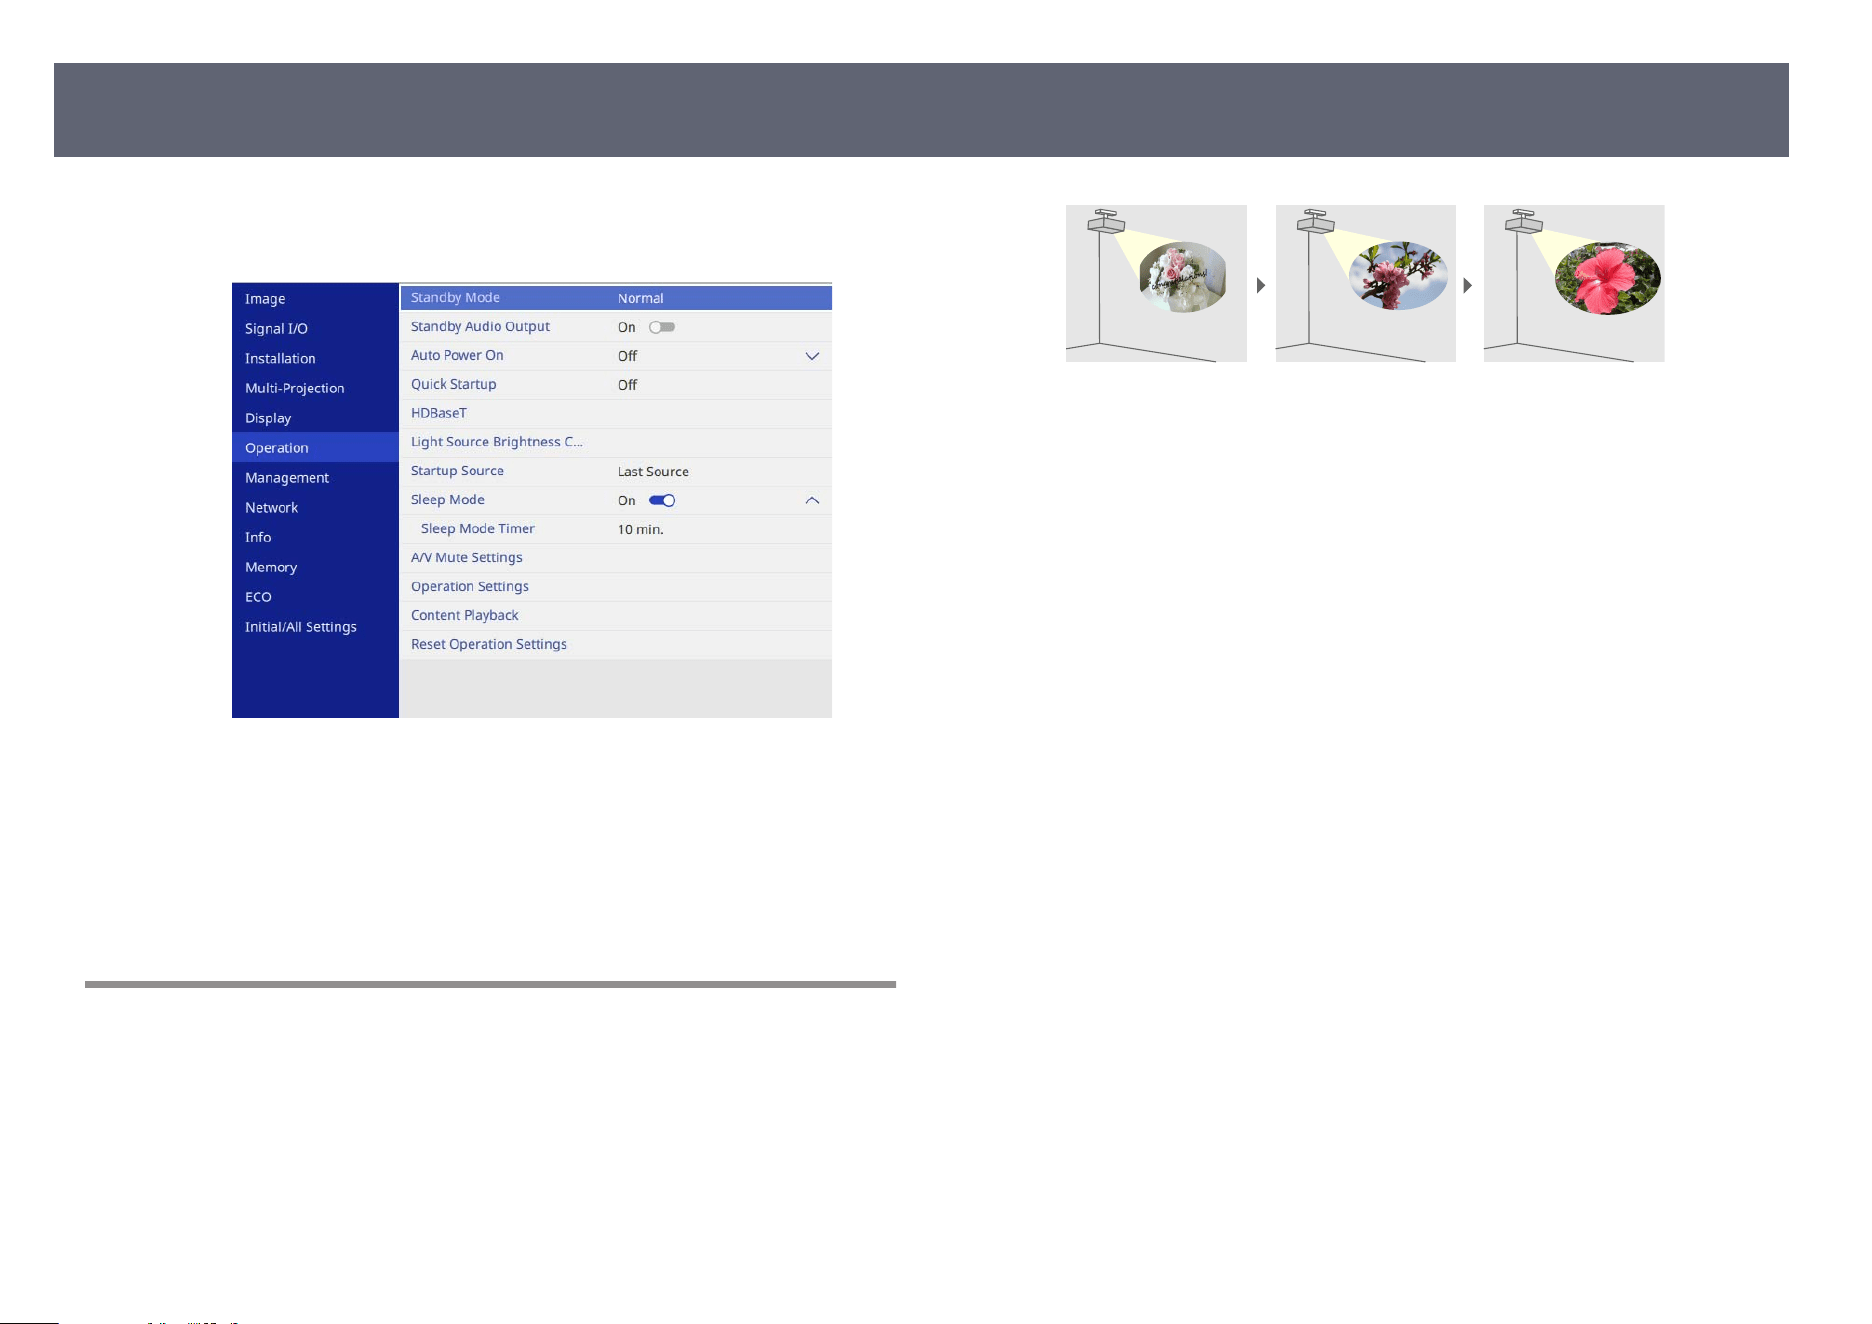
b
Press the [Menu] button, select the Op
eration menu, and then press
[Enter].
c
Select the Content Playback setting and set it to On.
Y
ou see a conrmation prompt.
d
Turn o the projector, then turn it on again to enable Content Playback
m
ode.
Projecting Your Playlists
You can project playlists that contain images and movies in Content Playback
mo
de.
a
Create your playlists and export them to a USB ash drive using one of the
following methods:
•
e Epson Projector Content Manager soware lets you create playlists
and save them on an external storage device. You can also add color and
shape eects to your projected image, and schedule playlists.
You can download and install Epson Projector Content Manager from
the following Web site.
epson.com/support (U.S.), epson.ca/support (Canada), or
latin.epson.com/support (Latin America)
See the Epson Projector Content Manager Operation Guide for
instructions.
•
Epson Web Control allows you to create playlists using a Web browser
and save them to an external storage device connected to a projector on
a network. You can also add color and shape eects to your projected
image.
•
e Epson Creative Projection app lets you create content on iOS
devices. You can also transfer content to the projector wirelessly.
You can download Epson Creative Projection from the App Store.
Any fees incurred when communicating with the App Store are the
responsibility of the customer.
b
In Content Playback mode, connect the USB as
h
drive into the
projector's USB-A port.
Projecting in Content Playback Mode
105
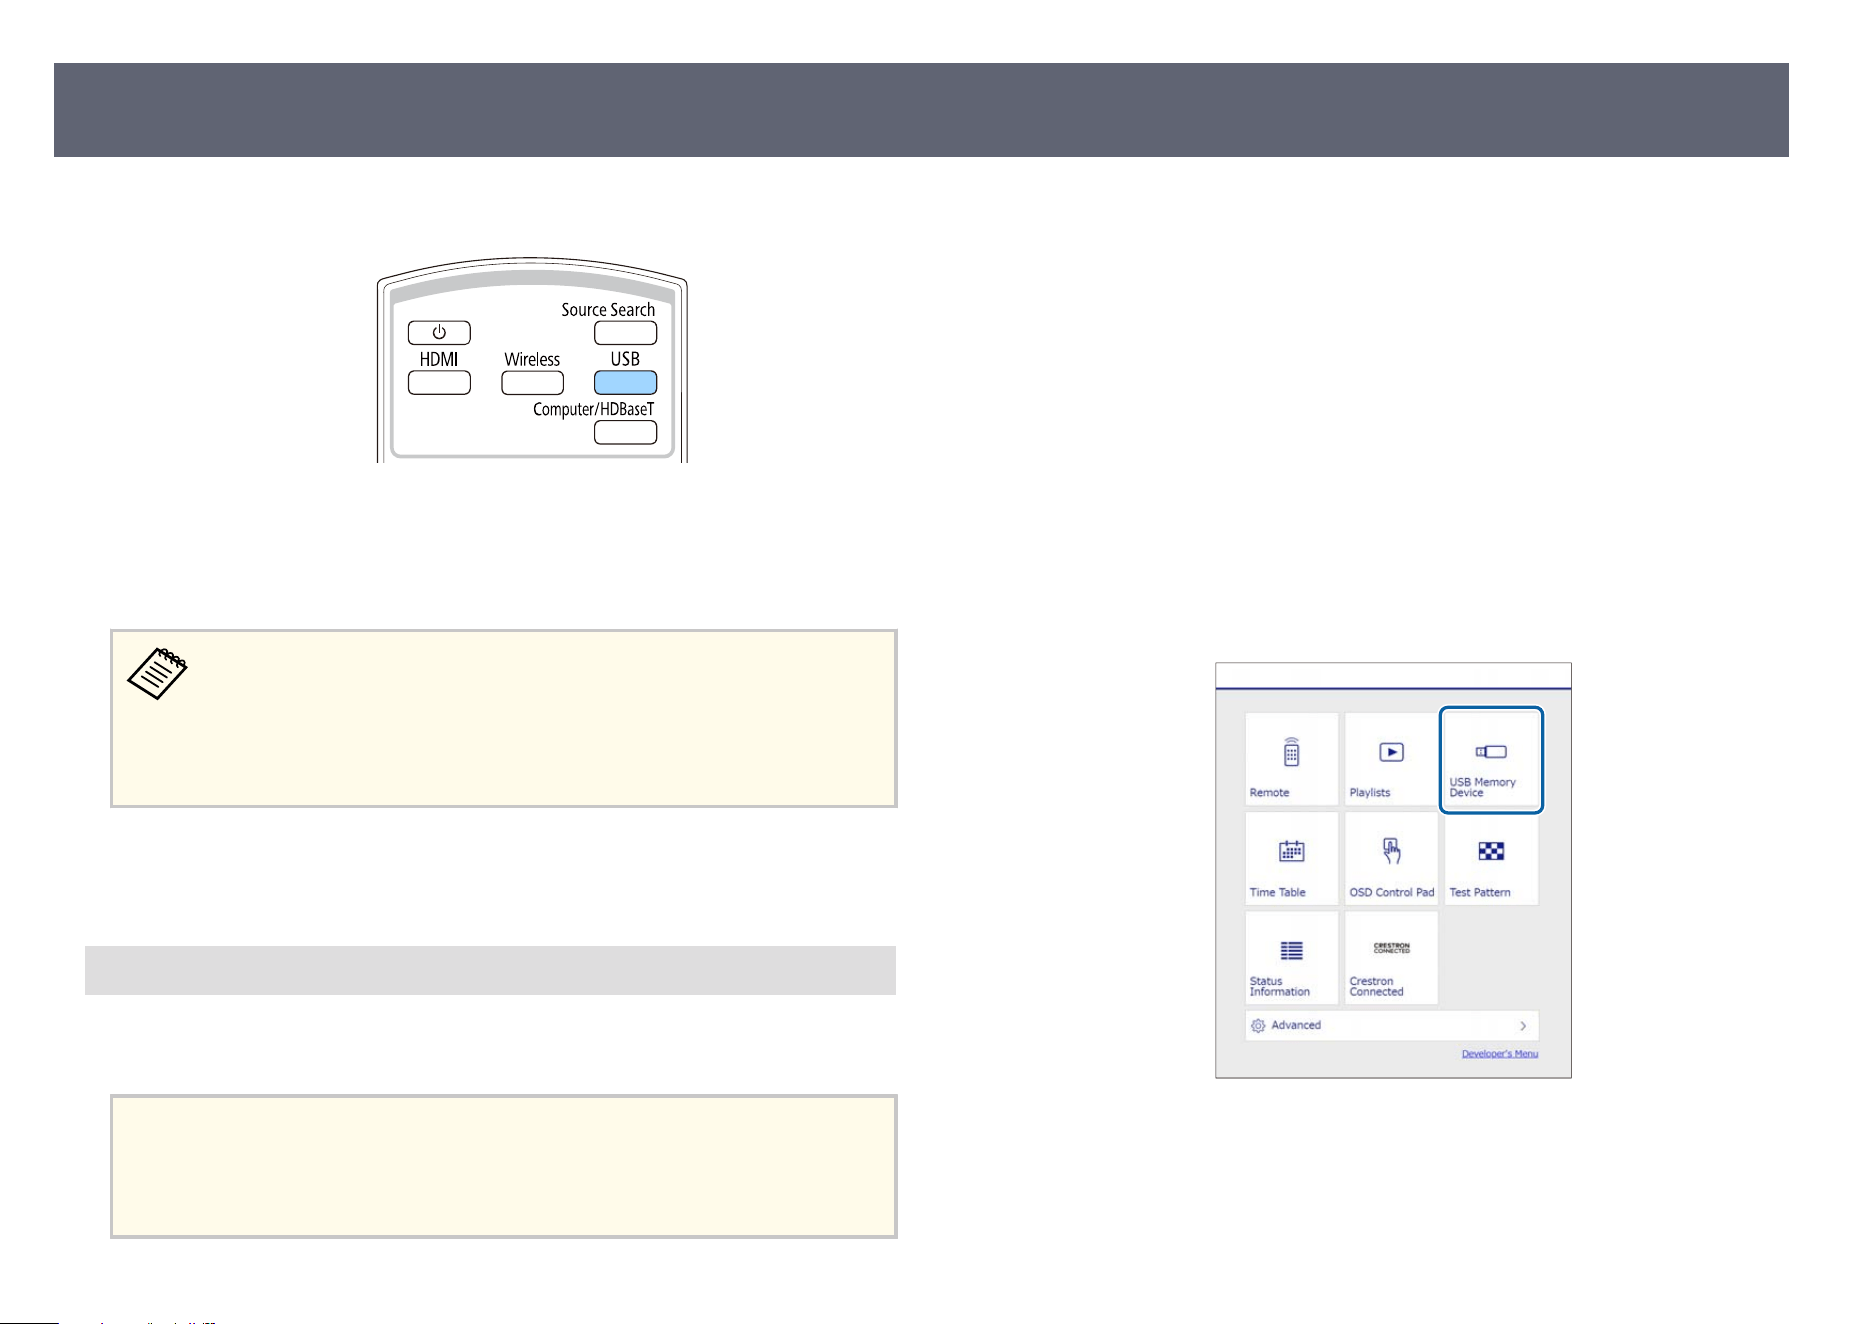
c
Press the [USB] button on the remote control.
e playlist that was played last is projected. If there is a timetable
as
signed, the playlist will play back according to the schedule in the
timetable.
•
Yo
u can also press the numeric buttons to project your favorite playlist.
You can set a remote control shortcut key using the soware you used
to create the playlists.
•
To select the target playlist from the list, select USB Viewer in the
projector's Operation menu, and use the arrow buttons.
g
Related Links
•
"Cre
ating Playlists Using Epson Web Control" p.106
Creating Playlists Using Epson Web Control
In C
ontent Playback mode, you can create playlists using a Web browser and
save them to a USB ash drive connected to a projector on a network.
Attention
Do n
ot remove the USB ash drive from the projector or disconnect the projector's
power cord while creating playlists. Data saved on the USB ash drive may be
damaged.
a
Make sure the projector is operating in Content Playback mode.
b
Make sure your computer or device is connected to the same network as
t
h
e projector.
c
Make sure a USB ash
drive is connected to the projector's USB-A port.
d
Start your Web browser on your computer or device.
e
Go to the Epson Web Control screen by entering the projector's IP address
in
t
o the browser's address box. When entering an IPv6 address, wrap the
address with [ and ].
f
Select US
B Memory Device.
Epson Web Control
Projecting in Content Playback Mode
106
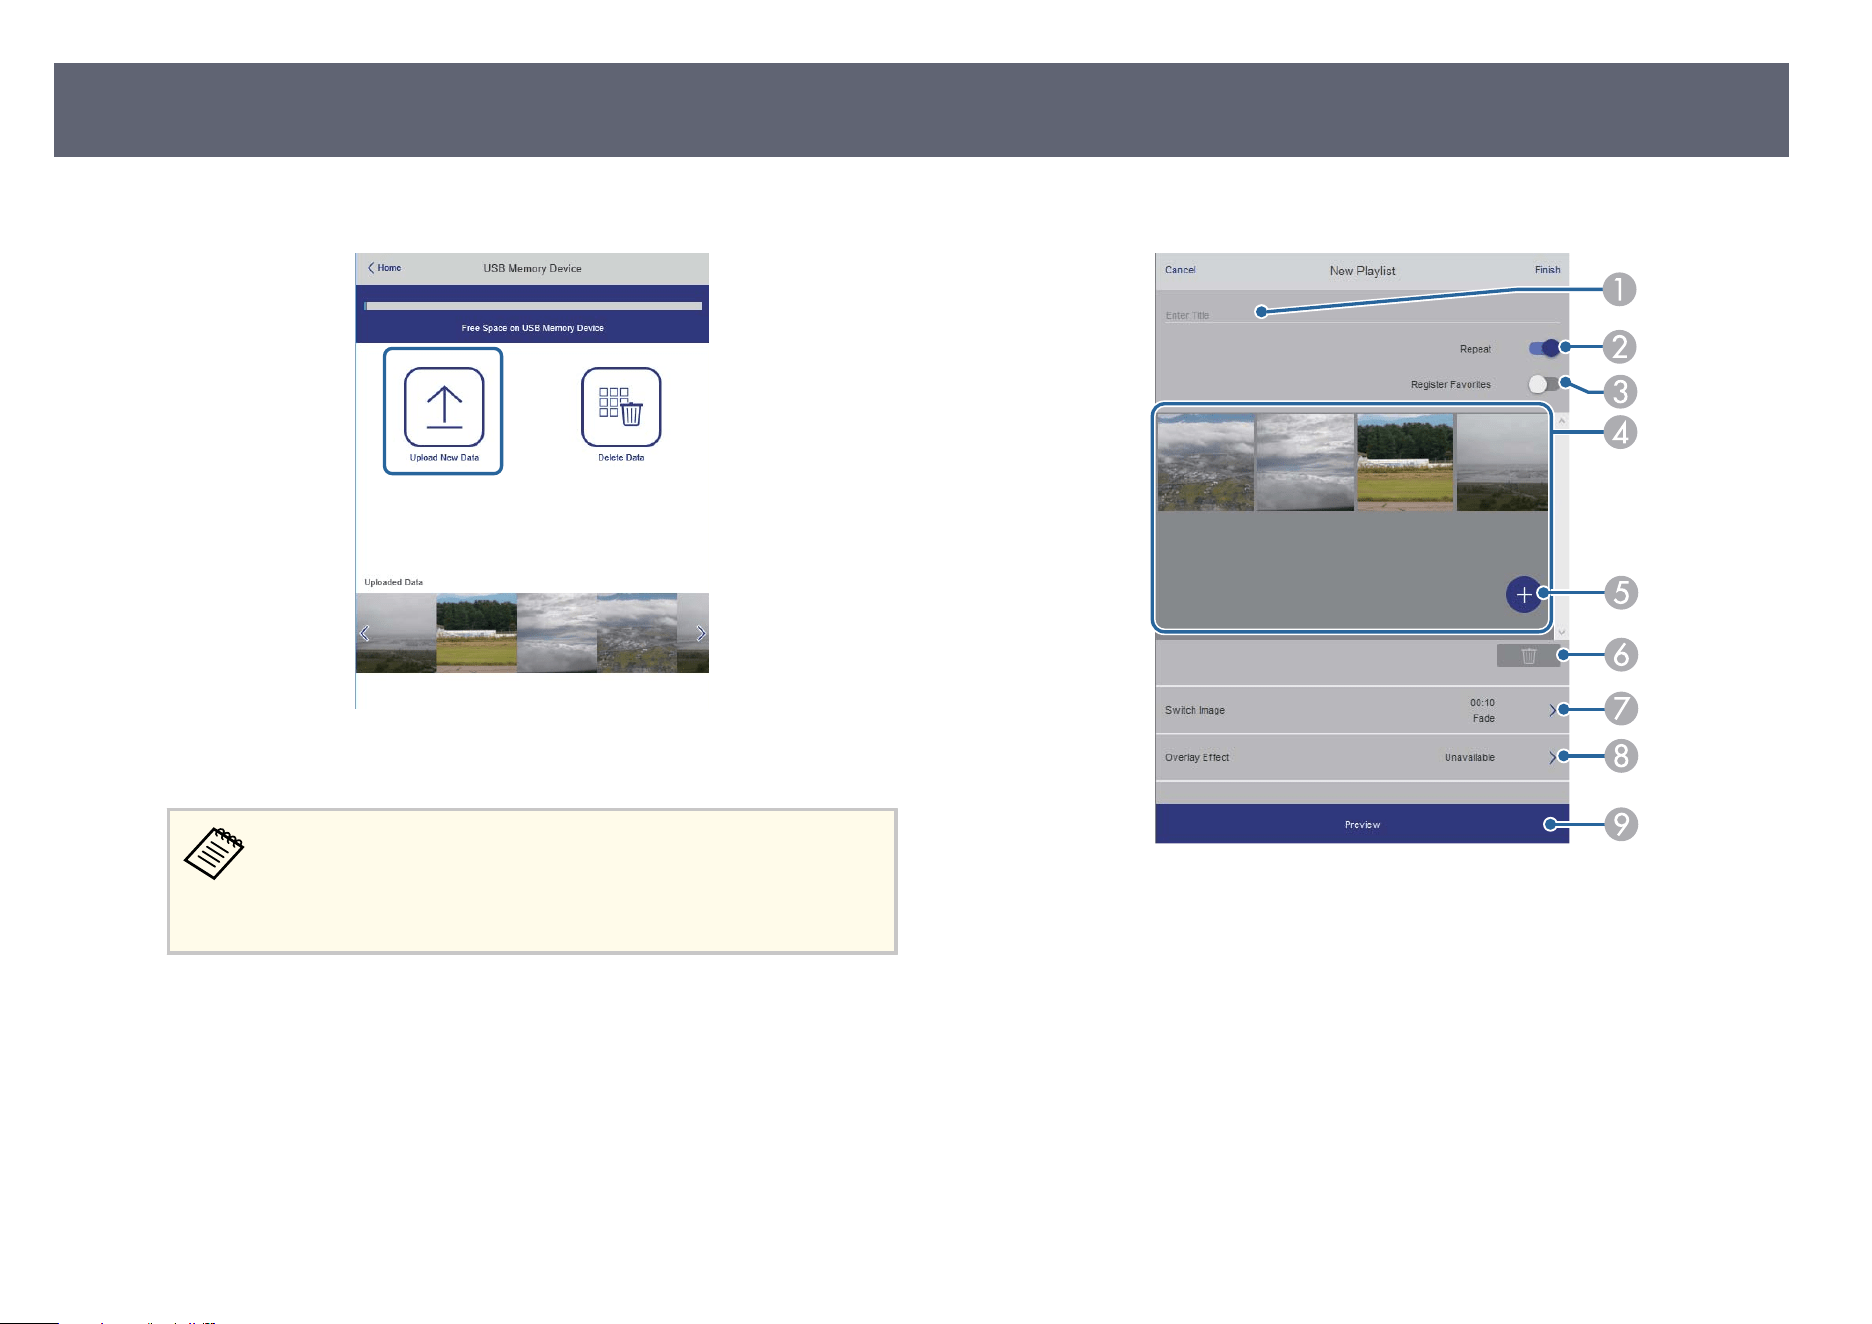
g
Select Upload New Data.
h
Select the images or movies you want to add to the playlist.
You can upload .avi, .jpeg (.jpg), .png, .bmp, or .gif les.
If y
ou want to add .mp4 or .mov les to the playlist, use the
Epson Projector Content Manager soware or the Epson Creative
Projection app.
e selected les are copied to the connected USB ash drive.
i
Do one of the following:
•
To add t
hem to the existing playlist, select Add to Playlist and select
the playlist you want to add them to.
•
To create a new playlist and add them to it, select Create New Playlist.
j
Edit the playlist.
A
Edits the playlist name.
B
Selects whether to enable repeat playback or not.
C
Registers the playlist to your favorites.
Wh
en a playlist has been registered as a favorite, you can start playback
quickly using the Remote screen or the remote control.
D
Displays the images or movies you have added to the playlist. e playlist
plays the images or movies in order.
E
Adds images or movies to the playlist.
F
Deletes images or movies from the playlist.
Projecting in Content Playback Mode
107
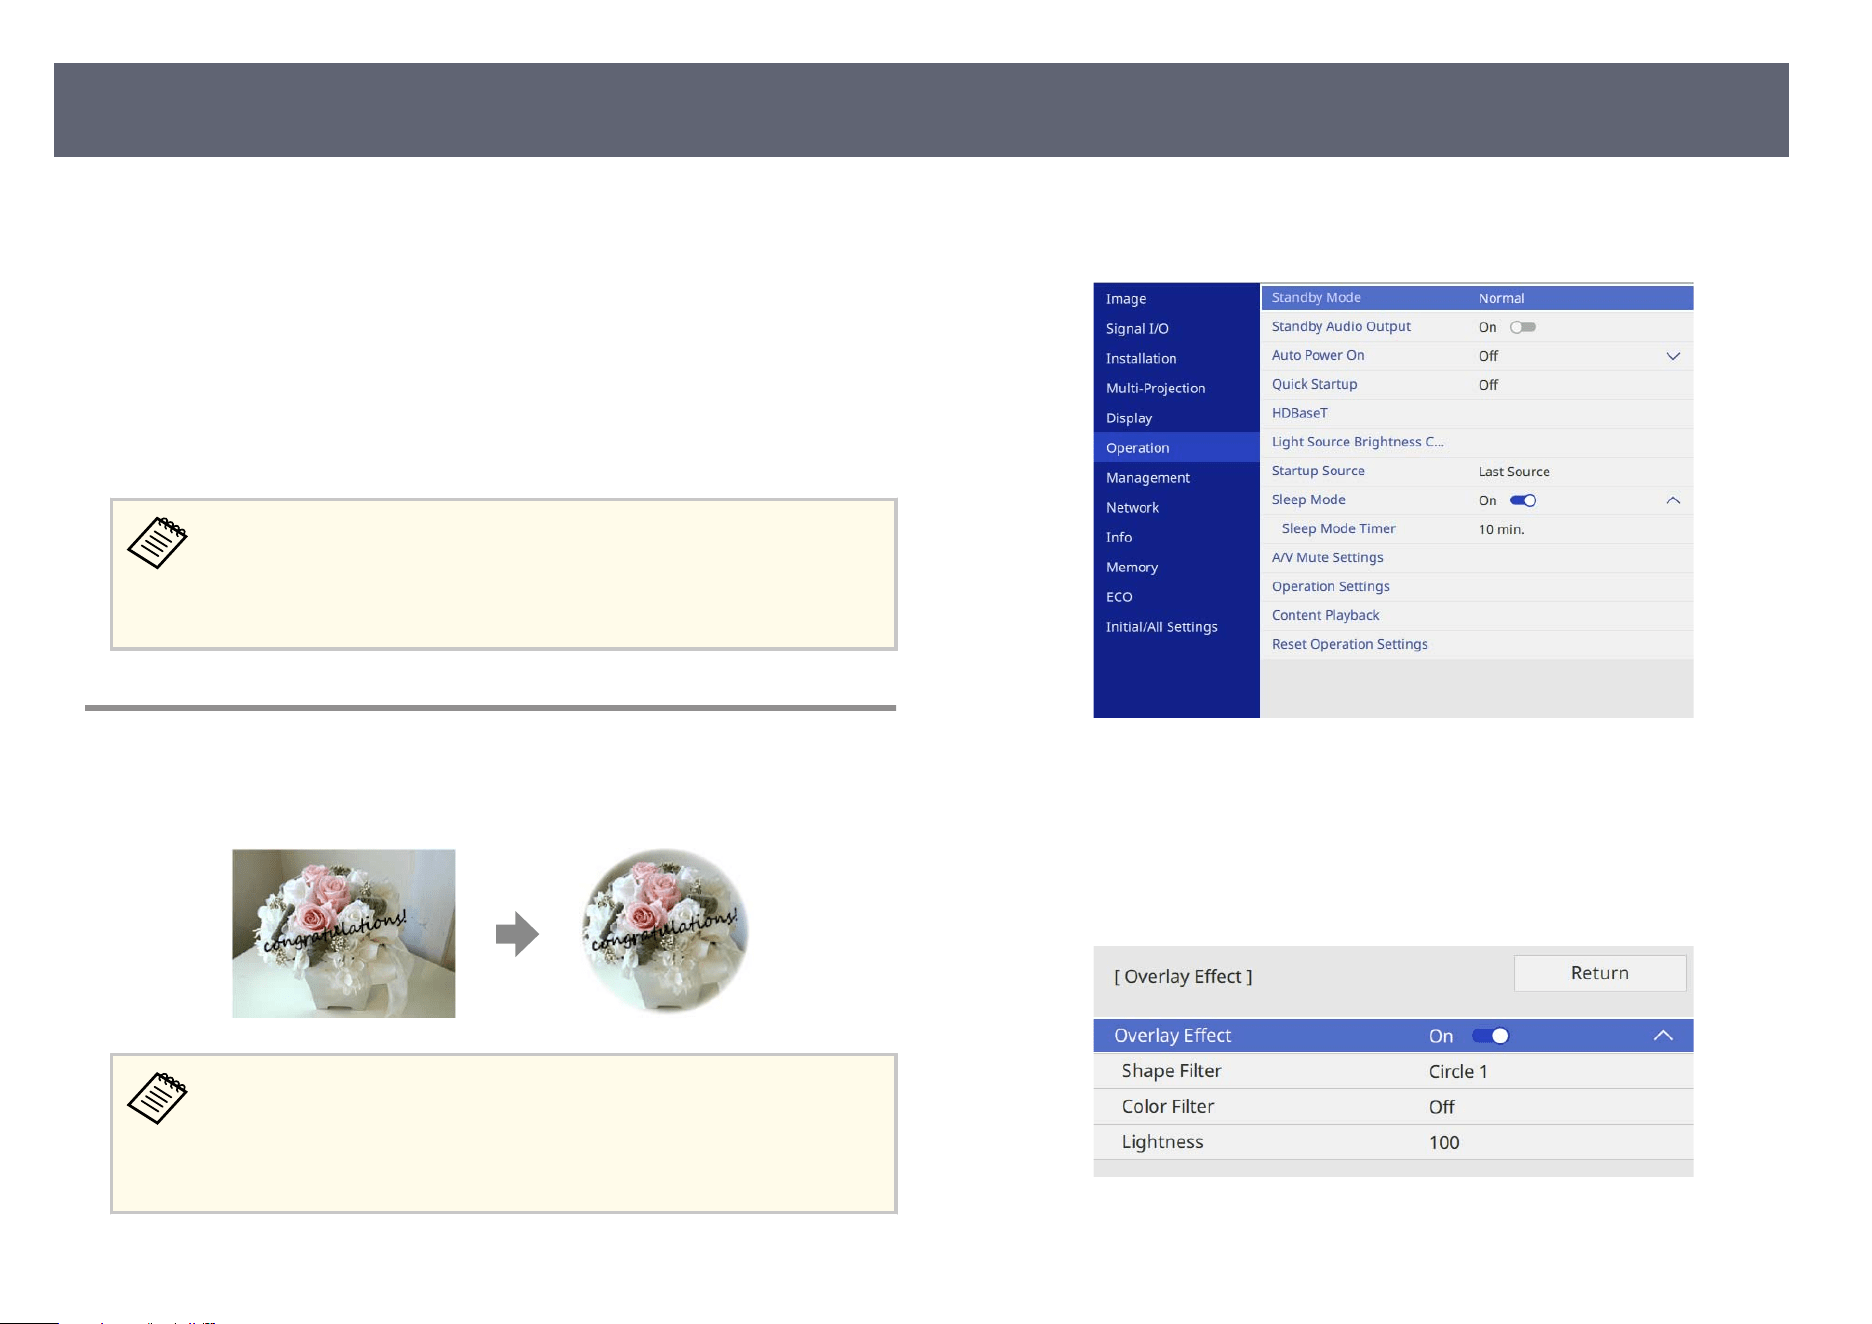
G
Opens the Switch Image screen.
Y
ou can specify the time interval to switch to the next image le. You can also
select a transition eect.
H
Opens the Eects screen.
You can add predened color and shape eect lters to a playlist. You can
also create a customized eect.
I
Previews the playlist.
k
When you have nis
hed editing the playlist, select Finish.
•
Yo
u can play the playlist from the Remote or Playlist screen.
•
When you want to specify when the playlist starts and nishes,
schedule the playlist using the Epson Projector Content Manager
soware.
Adding Eects to Your Projected Image
You can add color and shape eec
ts to the projected image in Content Playback
mode.
•
To u
se the eect functions, make sure you perform Refresh Mode
regularly.
s Management > Refresh Mode
•
is feature is not available when using the Edge Blending feature.
a
In Content Playback mode, press the [Menu] button, select the Op
eration
menu, and then press [Enter].
b
Select Content Playback and press [Enter].
c
S
elect Overlay Eect and press [Enter].
d
S
elect On as th
e Overlay Eect setting and press [Enter].
e
Select S
hape Filter and press [Enter].
Projecting in Content Playback Mode
108
f
Adjust each of the following options as necessary:
•
Shap
e to select the shape eect you want from circles, rectangles, or
customized shapes.
You can add your images as customized shapes using the Epson
Pr
ojector Content Manager soware. See the Epson Projector
Content Manager Operation Guide for details.
•
Fi
lter Eect to select whether to mask inside or outside of the selected
shape.
•
Size to set the shape size.
•
Position to set the shape position.
When you use a customized shape, you cannot change the Siz
e
and Position settings.
g
Select C
olor Filter and press [Enter].
h
A
djust each of the following options as necessary:
•
Co
lor Filter to select the color.
•
Custom to set a customized color by adjusting Red, Green, and Blue
individually.
i
Select Lightness to set the brightness level.
j
W
hen you are nis
hed, press [Menu] to exit the menus.
g
Related Links
•
"Projector Feature Settings - Operation Menu" p.204
Content Playback Mode Restrictions
Operating restrictions
e fo
llowing operations cannot be performed in Content Playback mode.
•
Changing the Color Temp. setting in the Image menu (when Warm White
or Cool White is selected as Color Filter)
•
Split Screen
•
Log Save Destination
•
Blanking
•
Changing the Screen Type setting in the Installation menu
•
Changing the No-signal Screen setting in the Display menu
•
Detecting the input signal automatically
•
Changing Remote Password in the Network Settings menu
•
Basic Control
•
PC Free
•
USB Document camera
•
Screen delivery function using the Epson iProjection soware
g
Related Links
•
"Image Quality Settings - Image Menu" p.193
•
"Network Menu - Network Settings Menu" p.212
•
"Projecting Two Images Simultaneously" p.96
•
"Setting the Screen Type" p.56
•
"Projecting a PC Free Presentation" p.99
Projecting in Content Playback Mode
109
You can temporarily turn o
the projected image and sound.
is is eective when you want to redirect your audience's attention during a
presentation.
Any sound or video action continues to run, however, so you cannot resume
projection at the point that you stopped it.
a
Press the [A/V Mute] button on the control panel or remote control.
e light source turns o and the projected image and sound are
in
terrupted.
b
To turn the image and sound back on, press [A/V Mute] again.
•
e pr
ojector's power automatically turns o 30 minutes aer A/V
Mute is enabled. You can disable this feature.
s Operation > A/V Mute Settings > A/V Mute Timer
•
If you selected A/V Mute as the Button to Release A/V Mute setting
in the Operation menu, you can still control the projector while A/V
Mute is enabled.
s Operation > A/V Mute Settings > Button to Release A/V Mute
g
Related Links
•
"Pr
ojector Feature Settings - Operation Menu" p.204
Shutting O the Image and Sound Temporarily
110
You can temporarily stop the action in a video or computer presentation and
ke
ep the current image on the screen. Any sound or video action continues to
run, however, so you cannot resume projection at the point that you stopped it.
a
Press the [Freeze] button on the remote control to stop the video action.
b
To restart the video action in progress, press [Freeze] again.
When you press the [Freeze] button on the remote control, a screen
is di
splayed asking if you want to capture the image currently being
projected and use it as a test pattern. (is screen is not displayed
when 4K Enhancement is set to On.)
If you press the [Enter] button and capture the projected image as
a test pattern during Freeze, you can use the captured image as
one of the test patterns. While projecting the captured image, you
can perform adjustments such as lens shi, focus, and geometry
correction.
e captured test pattern is available until you turn o the projector.
Stopping Video Action Temporarily
111
You can temporarily turn o
the sound.
a
Press the [Mute] button on the remote control.
b
To turn the sound back on, press [Mute] again.
Turning O the Sound Temporarily (Mute)
112
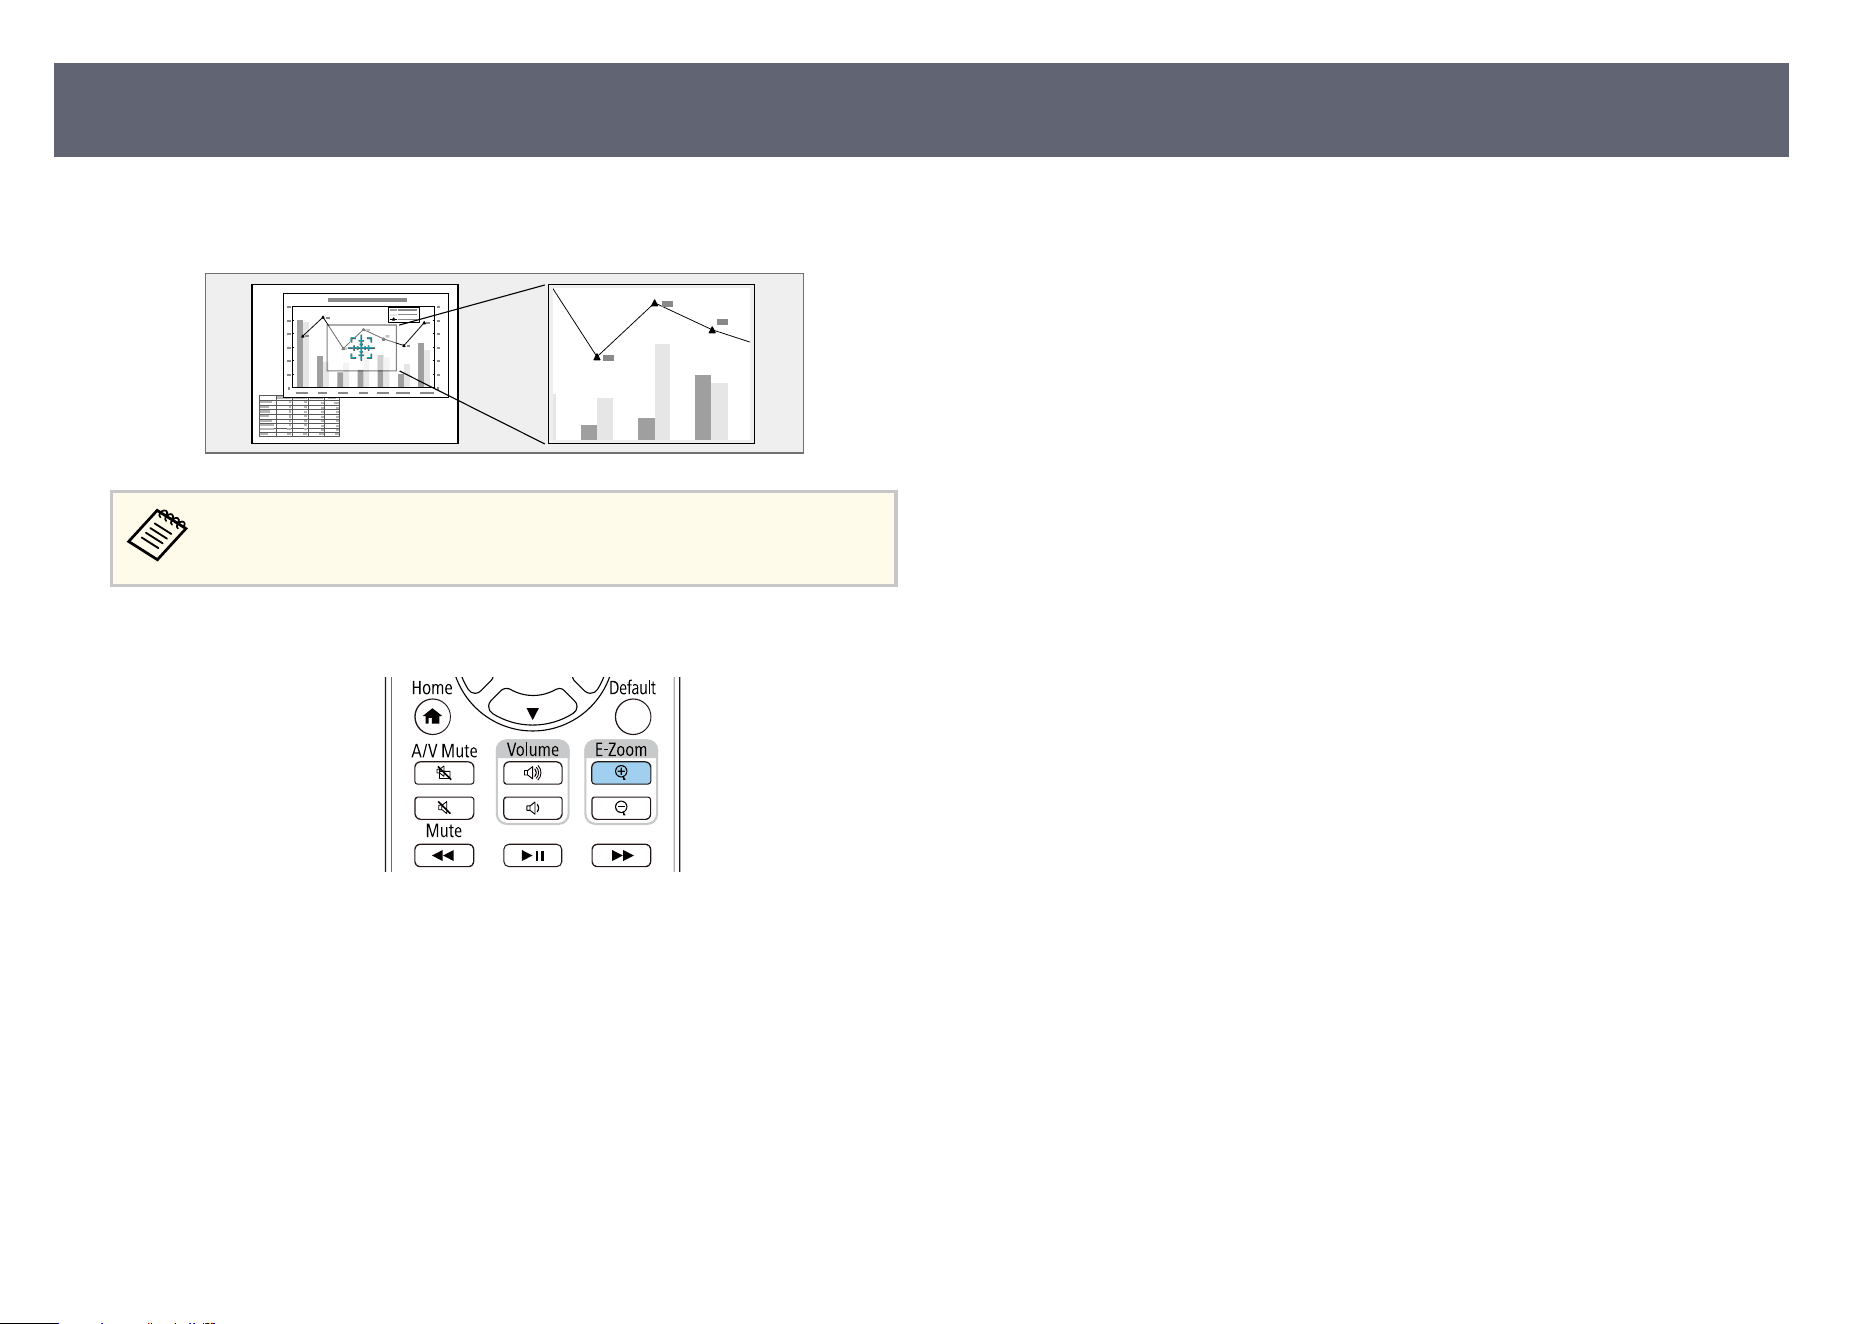
You can draw attention to parts of a presentation by zooming into a portion of
th
e image and enlarging it on the screen.
is feature is unavailable if the Scale setting in the projector's Image
m
enu is enabled.
a
Press the [E-Zoom] + button on the remote control.
You see a crosshair on the screen indicating the center of the zoom area.
b
Use the following buttons on the remote control to adjust the zoomed
imag
e:
•
Use the arrow buttons to position the crosshair in the image area you
want to zoom into. To move the crosshair diagonally, press any pair of
adjacent arrow buttons at the same time.
•
Press the [E-Zoom] + button repeatedly to zoom into the image area.
Press and hold the [E-Zoom] + button to zoom in more quickly.
•
To pan around the zoomed image area, use the arrow buttons.
•
To zo
om out of the image, press the [E-Zoom] – button.
•
To return to the original image size, press [Esc].
e enlarged image is projected and the enlargement ratio is displayed on
the screen.
You can enlarge the selected area to between one to four times in 25
incremental steps.
When projecting images from an Epson document camera using a USB
connection, you can enlarge the selected area from one to eight times its
size in 57 incremental steps.
Zooming Images (E-Zoom)
113
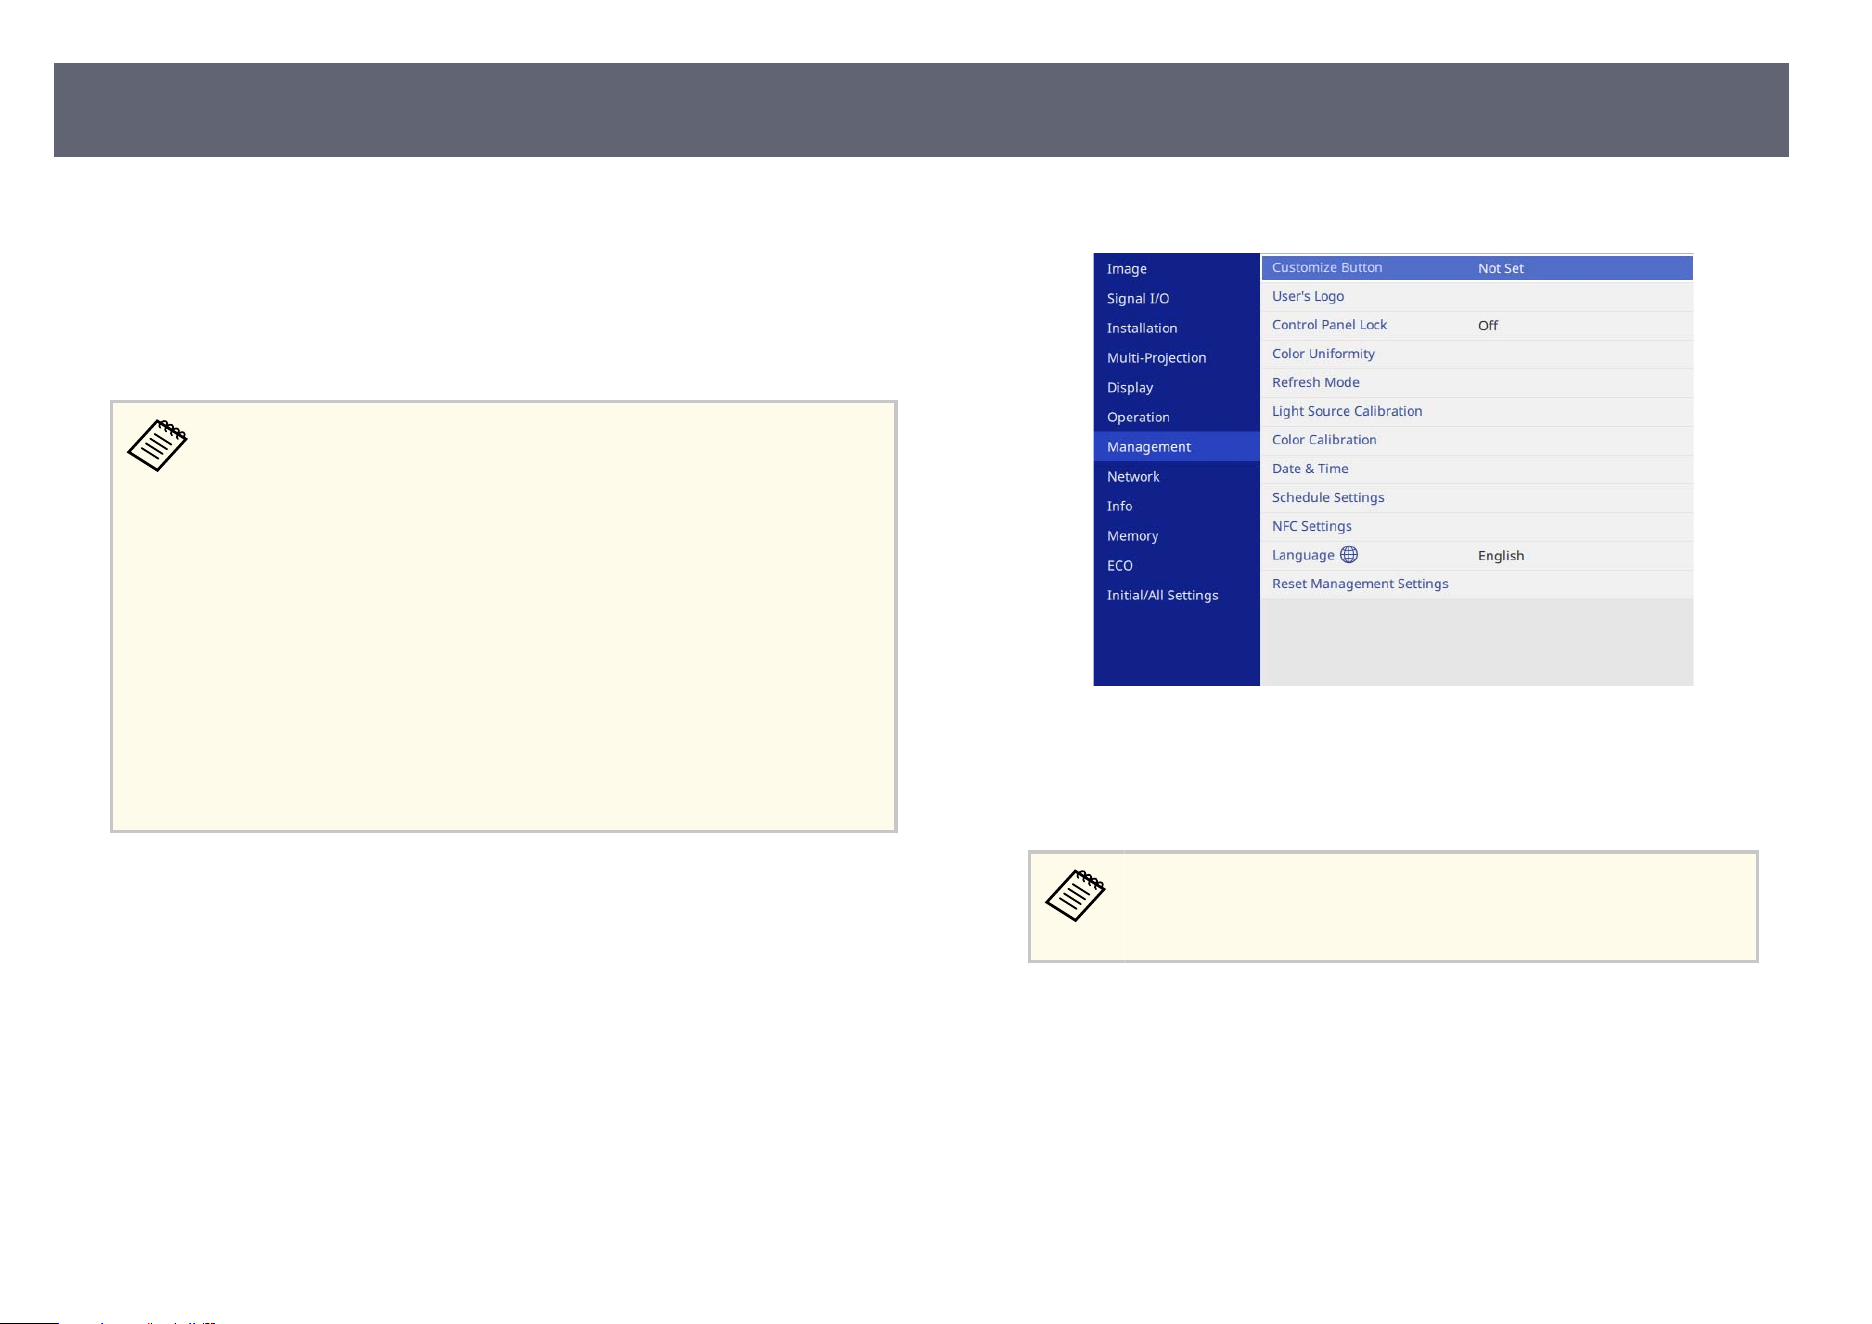
You can save an image on the projector and display it whenever the projector
tur
ns on. You can also display the image when the projector is not receiving an
input signal. is image is called the user's logo screen.
You can select a photo, graphic, or company logo as the user's logo, which is
useful in identifying the projector's owner to help deter the. You can prevent
changes to the user's logo by setting up password protection.
•
If y
ou turned on Menu Protection for the User's Logo setting, set it to
O before performing the steps here to save the user's logo.
•
When you copy the menu settings from one projector to another using
the batch setup feature, user's logo is also copied. Do not register the
information that you do not want to share between multiple projectors
as a user's logo.
•
You cannot save content that is protected by HDCP.
•
When Content Playback is set to On, you can display the user's logo
only when the projector starts up.
•
e user's logo image is not 4K enhanced image quality.
•
is function is unavailable if the input source is AirPlay,
LAN or Miracast. (EB-L890E/EB-L895E/EB-L790SE/EB-L795SE/EB-
L690E/EB-L890U/EB-L790U/EB-L690U/EB-L690SU/EB-L695SU)
a
Display the image you want to project as the user's logo.
b
Press the [Menu] button, select the M
anage
ment menu, and press [Enter].
c
Select U
ser's Logo > Start Setting and press [Enter].
Y
ou see a prompt asking if you want to use the displayed image as a user's
logo.
Adjustments such as G
e
ometry Correction, E-Zoom, Aspect,
Scale, or Screen Type are temporarily canceled when you select
User's Logo.
d
Select Y
es and press [Enter].
e
C
heck the displayed image, and then select Y
es
to save it as the user's logo.
e user's logo is overwritten and a completion message is displayed.
f
Press [Esc] to exit the message screen.
Saving a User's Logo Image
114
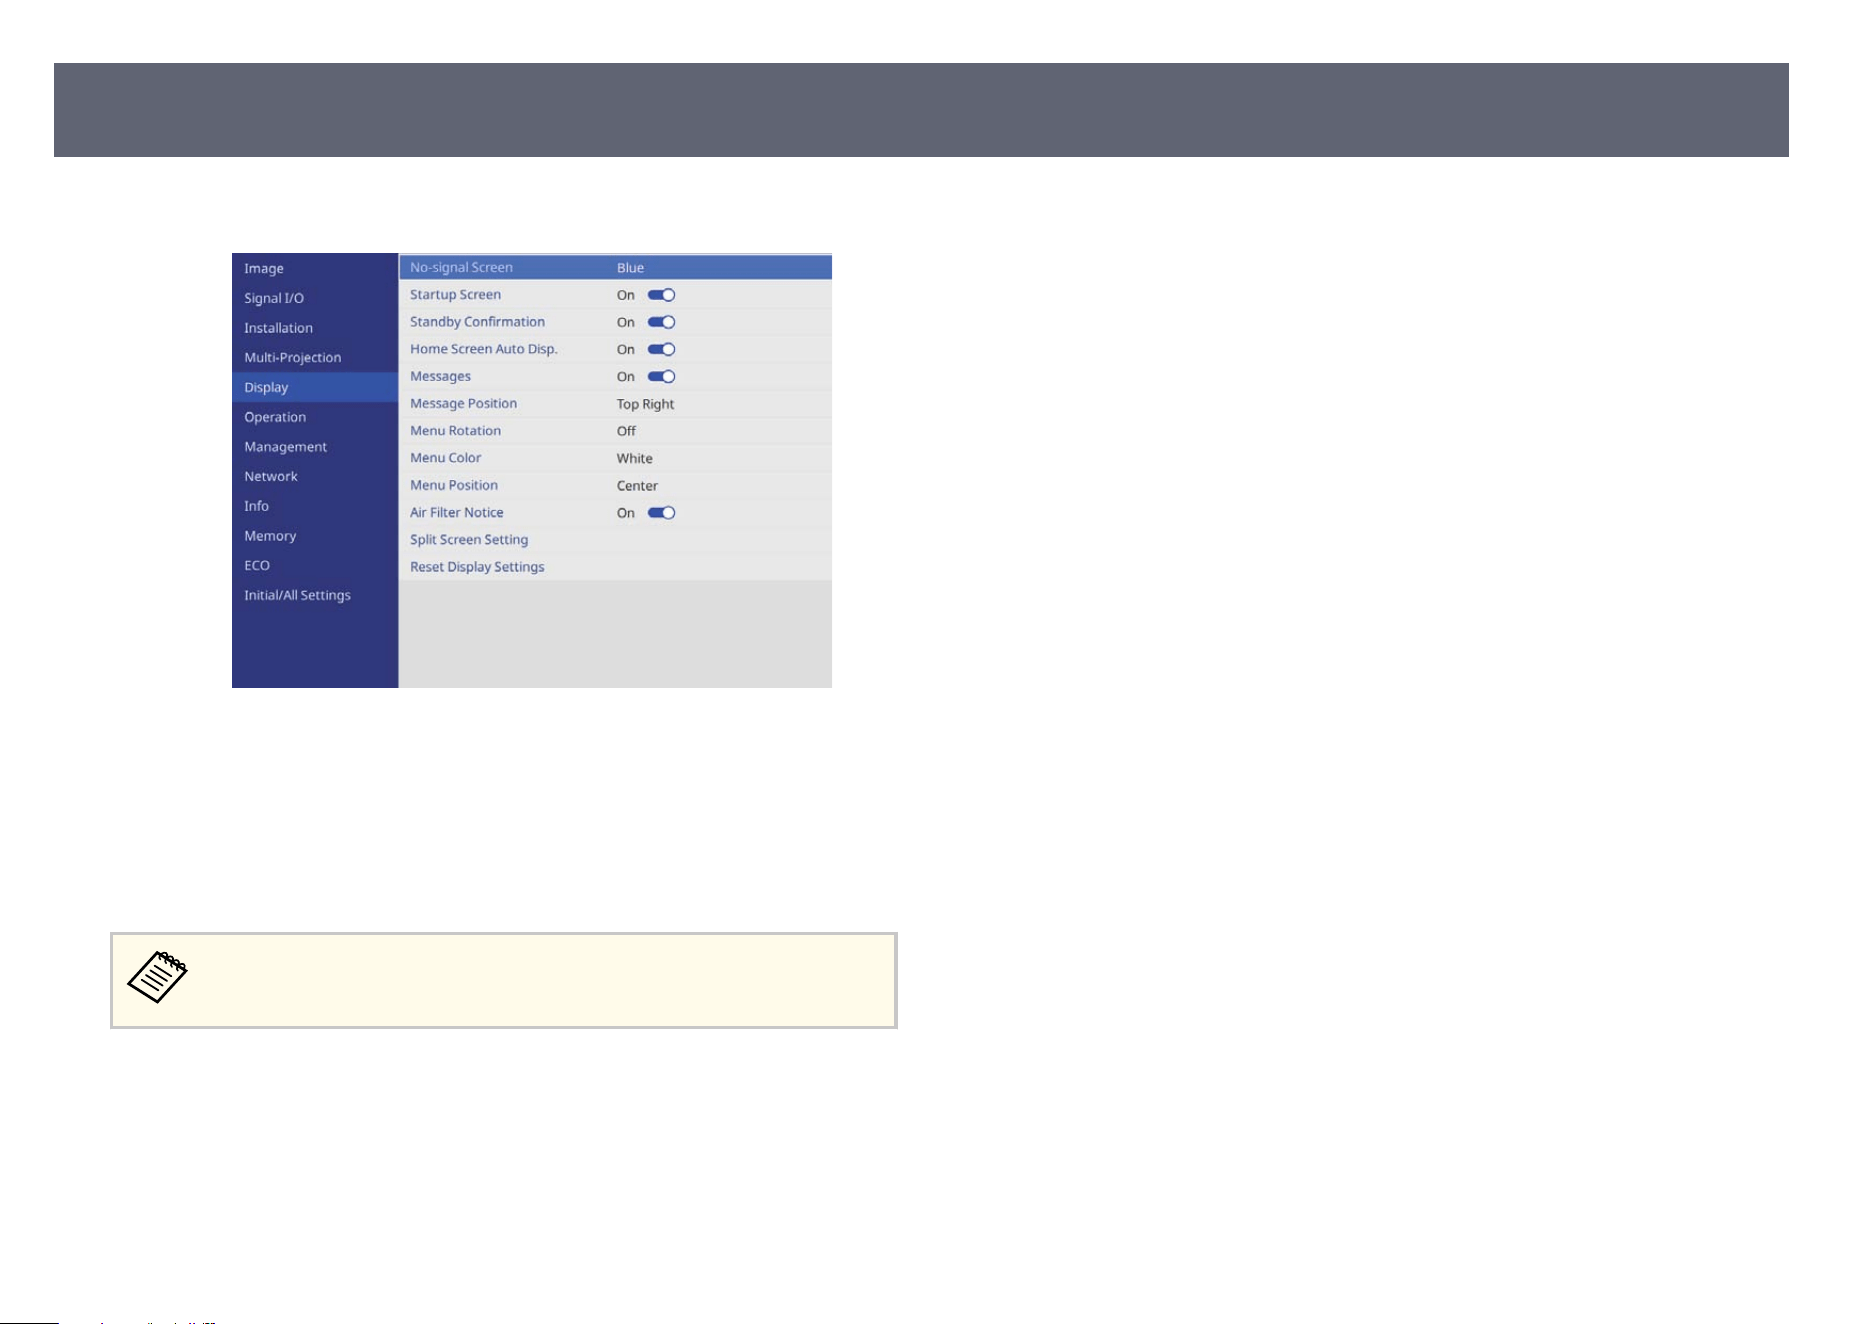
g
Select the Disp
lay menu and press [Enter].
h
Select when you want to display the User's Logo screen:
•
To di
splay it whenever there is no input signal, select No-signal Screen
and set it to Logo.
•
To display it whenever you turn the projector on, select Startup Screen
and set it to On.
To prevent changes to the Us
er's Logo settings, turn on Menu Protection
for the User's Logo setting and set the password.
g
Related Links
•
"Se
lecting Password Security Types" p.134
Saving a User's Logo Image
115
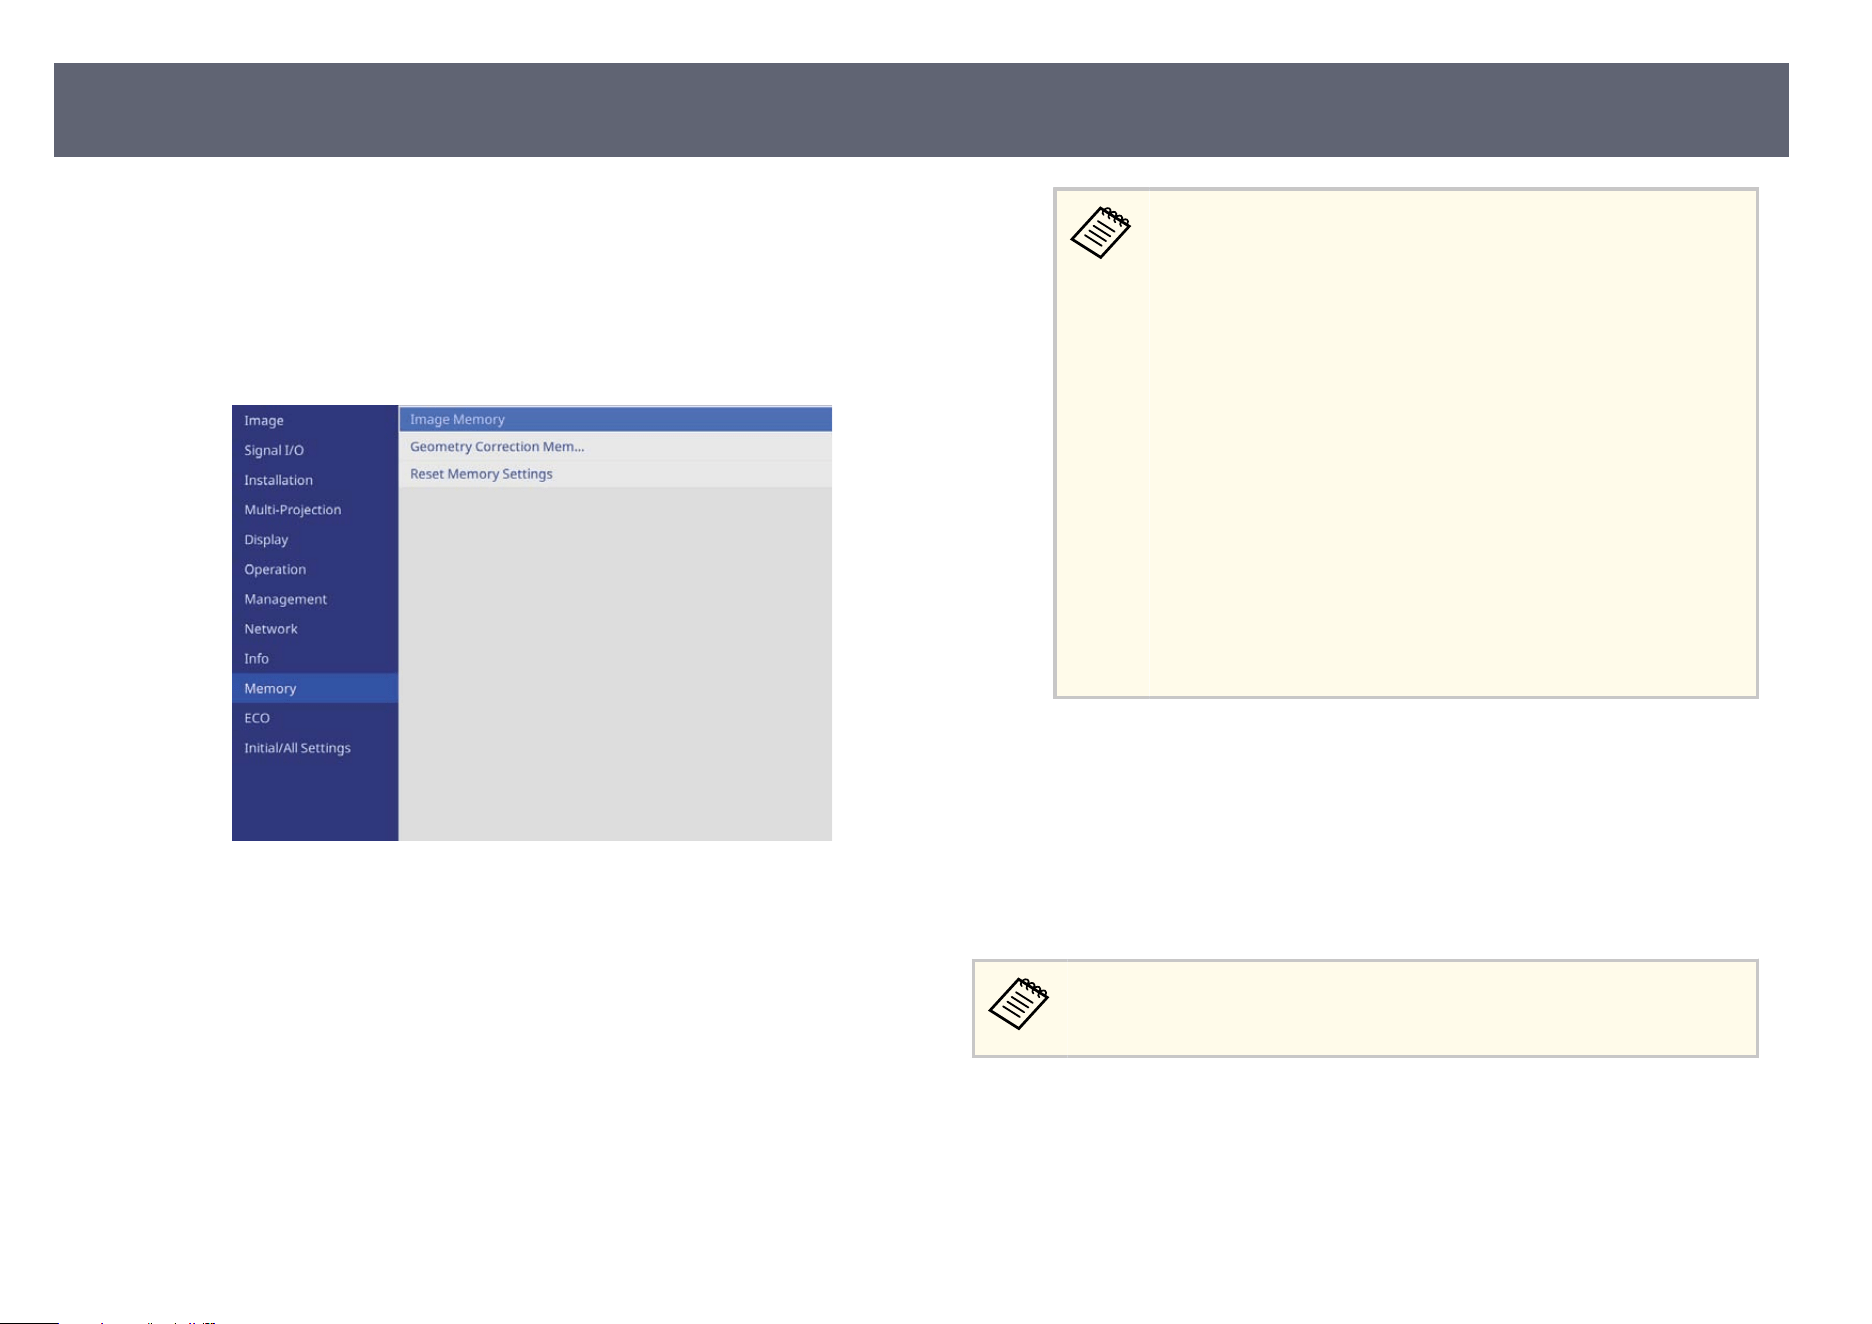
You can save customized settings and then select the saved settings whenever
yo
u want to use them.
a
Turn on the projector and display an image.
b
Press the [Menu] button, select the M
e
mory menu, and press [Enter].
c
Select I
mage Memory then press [Enter].
d
S
elect one of the following options:
•
Sav
e Memory lets you save your current settings to memory (10
memories with dierent names are available).
•
Yo
u can save the following settings:
•
Image menu settings for each color mode
•
Video Range in the Signal I/O menu
•
Light Source Mode and Brightness Level in the
Operation menu
s Operation > Light Source Brightness Control > Light
Source Mode
s Operation > Light Source Brightness Control >
Brightness Level
•
Color Matching in the Multi-Projection menu
s Multi-Projection > Screen Matching > Color
Matching
•
A memory name that has already been used is indicated by a
blue mark. Saving over a previously saved memory overwrites
the settings with your current settings.
•
Lo
ad Memory lets you overwrite your current settings with saved
settings.
•
Rename Memory lets you rename a saved memory.
•
Erase Memory lets you erase the selected memory settings.
e
Press [Menu] or [Esc] to exit the menus.
•
e sav
ed Color Mode is displayed on the right of the memory name.
•
To delete all saved memories, select Reset Memory Settings.
g
Related Links
•
"Im
age Quality Settings - Image Menu" p.193
•
"Input Signal Settings - Signal I/O Menu" p.196
•
"Projector Feature Settings - Operation Menu" p.204
•
"Multiple Projector Operation Settings - Multi-Projection Menu" p.200
Saving Settings to Memory and Using Saved Settings
116
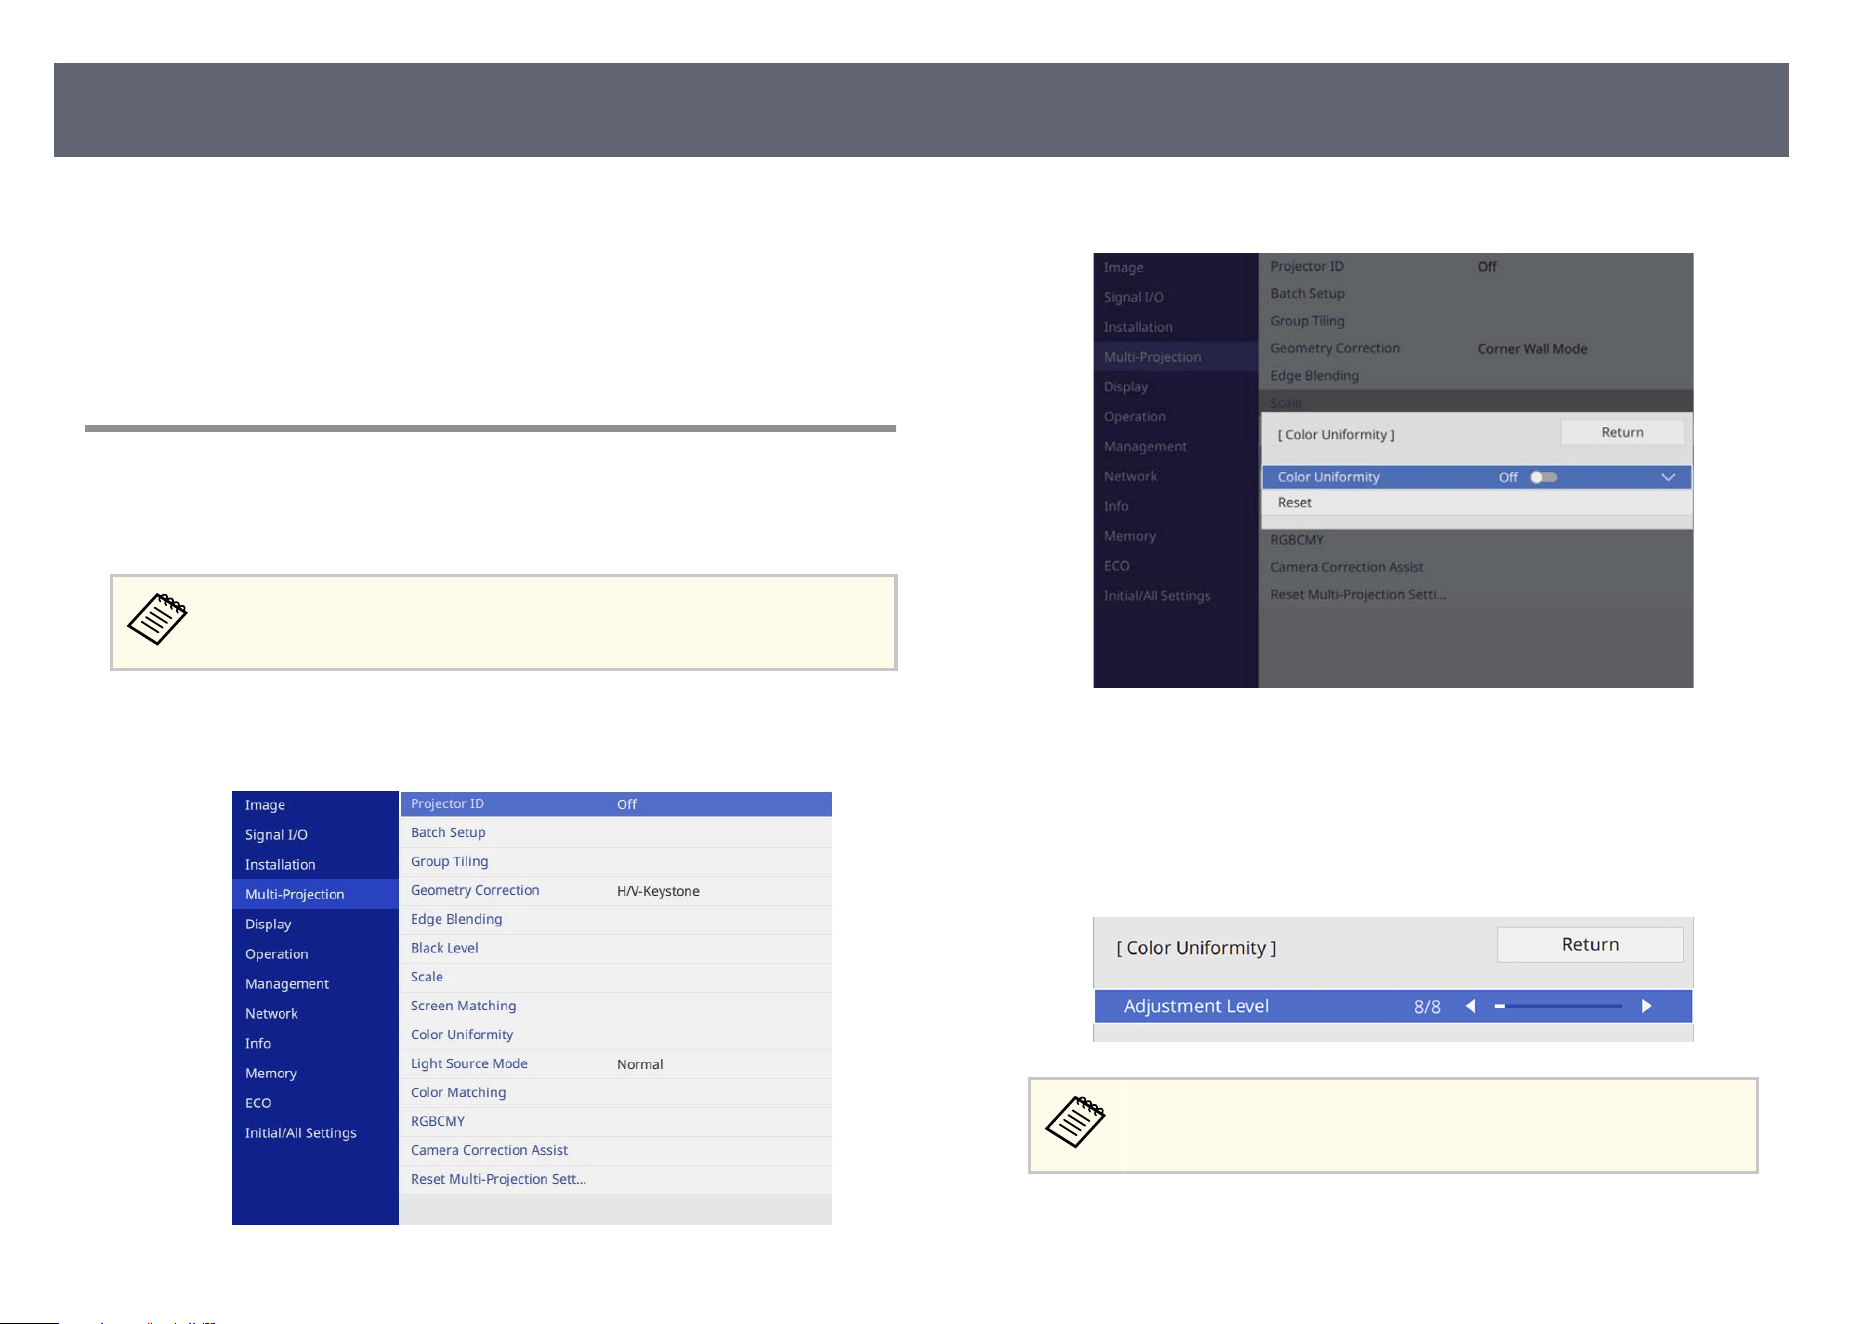
Follow the instructions in these sections to use your projector's advanced image
adj
ustments.
g
Related Links
•
"Adjusting the Color Tone (Color Uniformity)" p.117
•
"Running Light Source Calibration" p.118
Adjusting the Color Tone (Color Uniformity)
You can use the Color Uniformity feature to manually adjust the color tone
balance in the projected image.
e color tone may not be uniform even aer adjusting the color
unif
ormity.
a
Press the [Menu] button, select the Mu
lti-Projection menu, and press
[Enter].
b
Select Color Uniformity and press [Enter].
c
Select Color Uniformity again and set it to On.
d
S
elect Adjustment Level and press [Enter].
e
S
elect the rst adjustment level you want to adjust and press [Esc].
ere are eight adjustment levels, from white to gray to black. You
c
an adjust each level individually.
f
Select Start Adjustments and press [Enter].
Using Advanced Image Adjustment Features
117
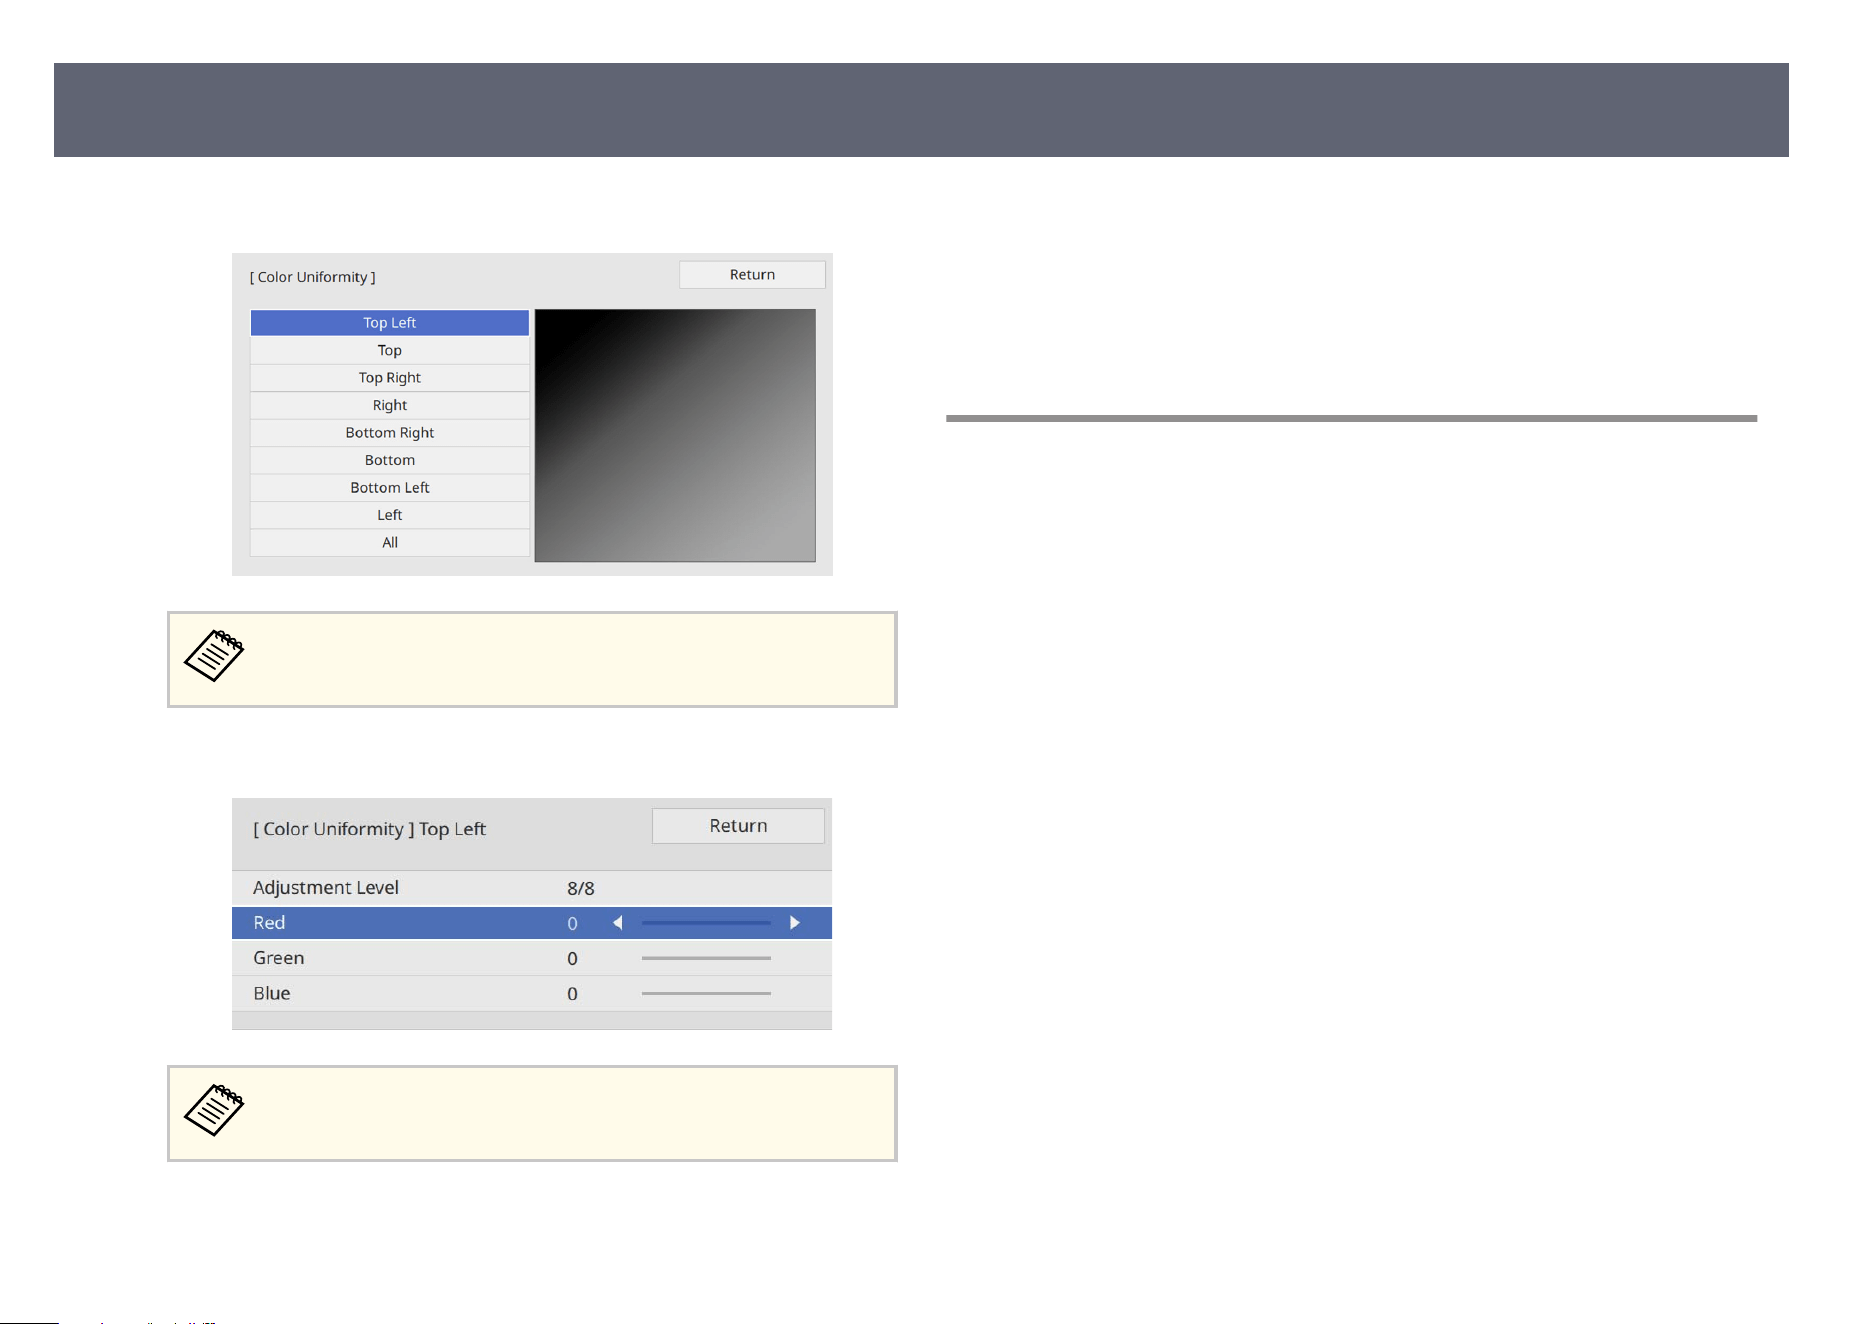
g
Select the area of the image you want to adjust and press [Enter].
Adjust each area individually, then select All
and adjust the entire
screen.
h
Select Red, Green, or Blue and adjust the color tone, if necessary.
e adjustment screen changes each time you press [Enter].
i
Press [Esc] to return to the area selection screen.
j
Repeat the color adjustments to each area.
k
Return to step 4 and repeat all steps to adjust other levels.
l
When you are ni
s
hed, press [Menu] to exit.
Running Light Source Calibration
Light source calibration automatically adjusts any dieren
ce between the white
balance and the brightness level of the light source. You should perform light
source calibration every 100 hours of projector usage. You can also schedule
automatic calibration or run the light source calibration manually using the
menus.
Automatic light source calibration may not start in the following conditions:
•
Within 30 minutes of turning on the projector.
•
When using direct shutdown.
•
When you have used the projector continuously for over 24 hours.
•
When the projector brightness is automatically dimmed due to high
temperatures.
a
Turn on the projector.
Using Advanced Image Adjustment Features
118
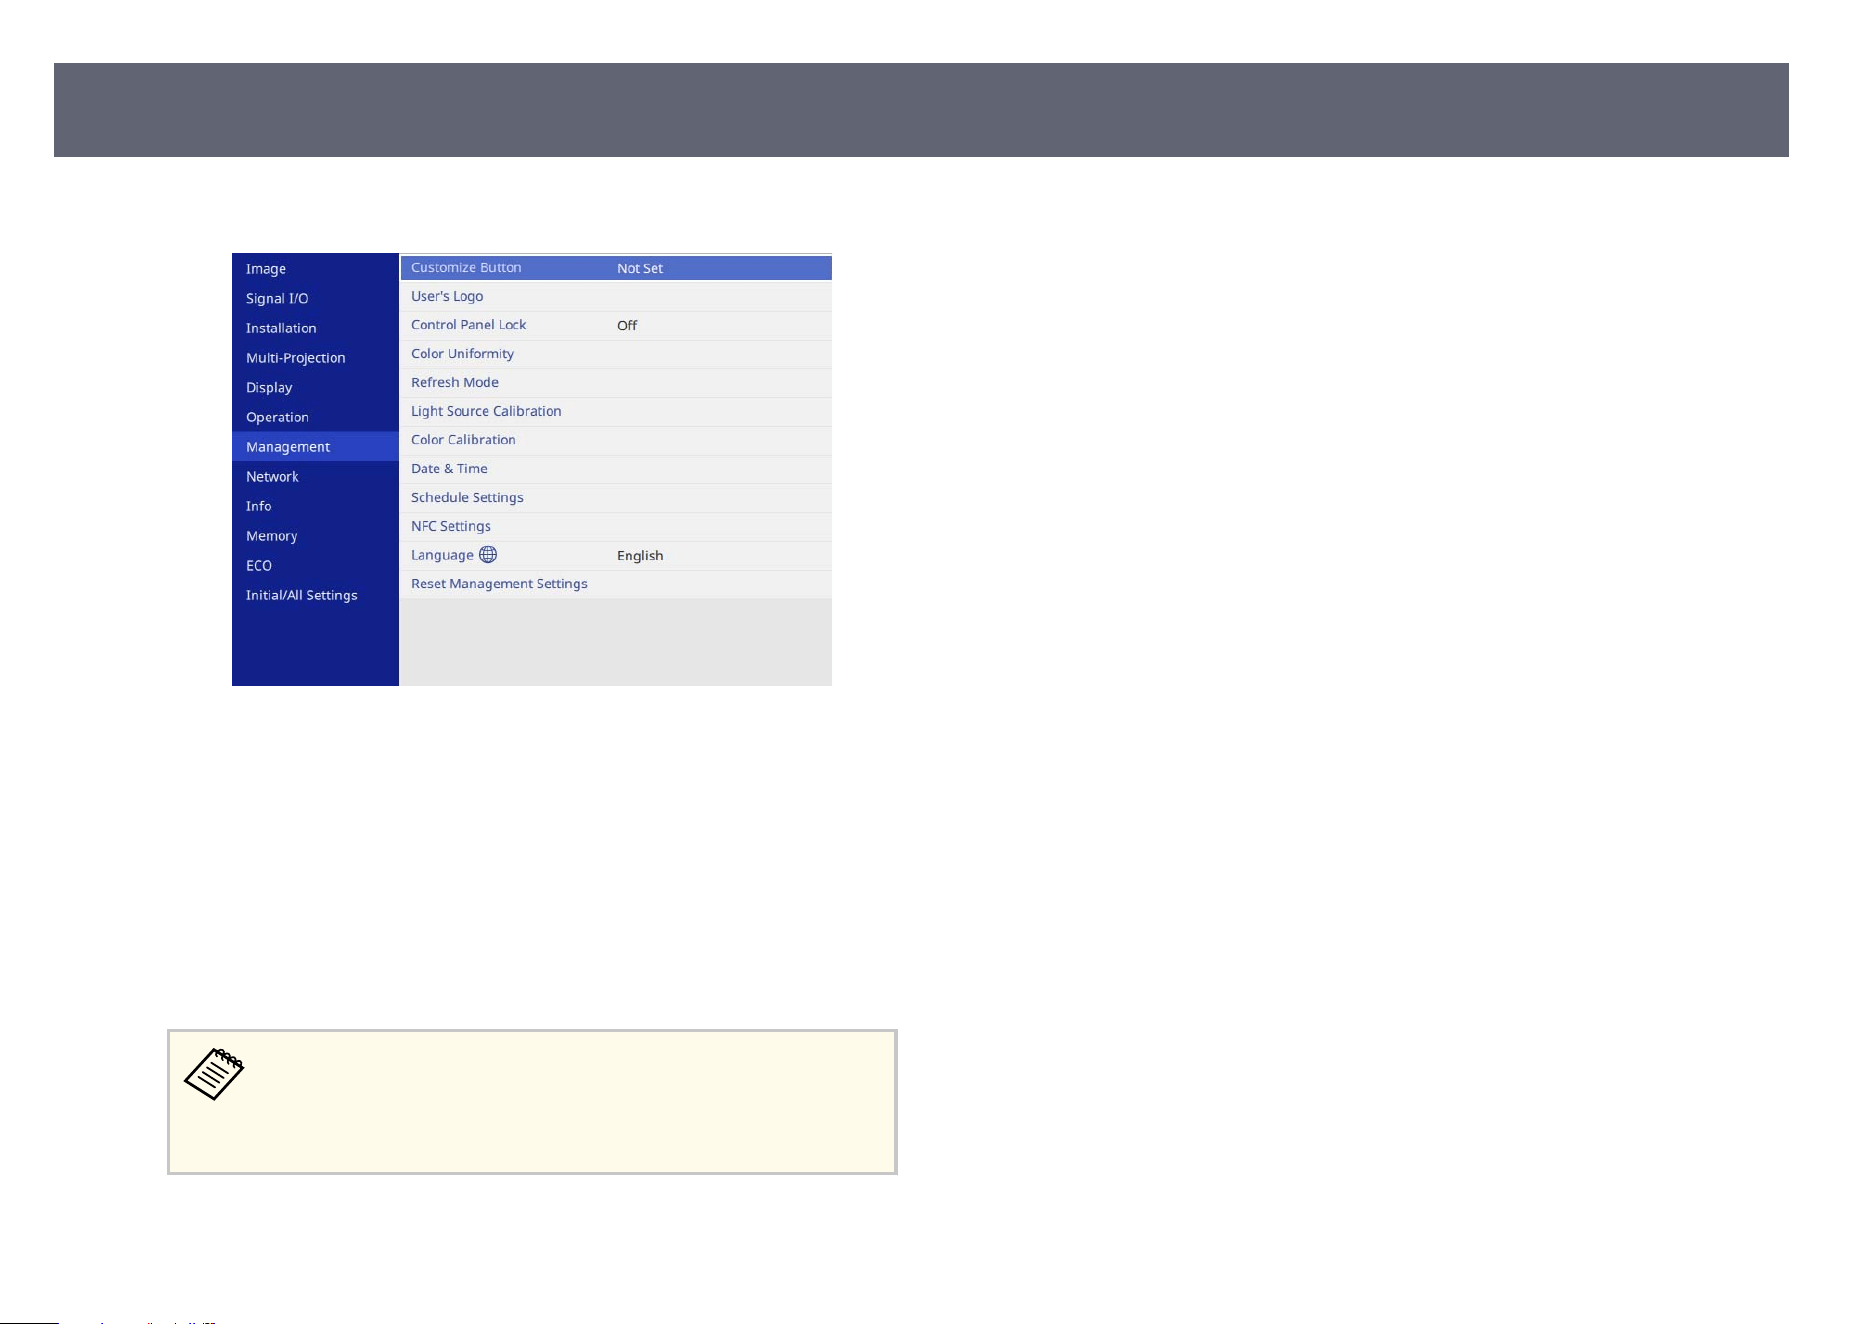
b
Press the [Menu] button, select the Manage
ment menu, and press [Enter].
c
Select L
ight Source Calibration and press [Enter].
d
S
elect any of the following:
•
To r
un the light source calibration now, select Run Now.
•
To automatically run the light source calibration every 100 hours of
projector usage, select Run Periodically and set it to On.
•
To check the last time the projector performed a calibration, see Last
Run.
If you use the projector continuously for more than 24 hours or
us
e direct shutdown regularly, select Schedule Settings to schedule
calibration of the light source periodically.
To schedule automatic calibration, select Schedule Settings.
e
When you are nis
hed, press [Menu] to exit the menus.
g
Related Links
•
"Set
ting Projector Event Schedules" p.187
Using Advanced Image Adjustment Features
119

You can combine the projected images from multiple projectors to create one
br
ight image or a large seamless image (Multi-Projection).
e number of projectors that can be used depends on the function and
method.
•
Projecting one large image by compositing several images
•
Using the projector's menu with an optional external camera: up to 2
projectors (simple blending)
•
Using the Epson Projector Professional Tool Soware and an optional
external camera, or using the projector's menu: up to 15 projectors
(blending)
•
Projecting a bright image by overlaying images
•
Using the Epson Projector Professional Tool soware with the optional
external camera: up to 6 projectors (stacking)
•
Using the projector's menu with the optional external camera: up to 2
projectors (simple stacking)
g
Related Links
•
"Conditions for the Camera Correction Function" p.120
•
"Procedure Overview" p.120
•
"Preparing for Multi-Projection" p.121
•
"Image Composition" p.123
•
"Adjusting Colors" p.130
•
"External Camera Usage" p.131
Conditions for the Camera Correction Function
We recommend meeting the following conditions when using the camera
cor
rection function.
•
An optional external camera is installed on each projector.
•
Wait for 2 minutes aer turning on two projectors before starting the simple
stacking process.
•
Yo
u are projecting on a matte white diusion screen that is at and even.
•
e projector is placed so it squarely faces the screen, not at an angle.
•
Nothing is blocking the optional external camera and the projected image.
•
e illuminance ratio on the screen surface when projecting an all-white
screen and when projecting an all-black screen is 8:1 or more. (When the
screen illuminance is 40 lux or less, the projection size within the following
range is recommended.)
•
Up to 9.9 Klm: 50 to 200 inches
•
10 Klm to 14.9 Klm: 60 to 300 inches
•
15 Klm to 19.9 Klm: 70 to 350 inches
•
20 Klm to 24.9 Klm: 80 to 400 inches
•
25 Klm to 29.9 Klm: 90 to 450 inches
•
30 Klm or more: 100 to 500 inches
•
e original resolution of all the projector is same.
•
Projection in the projector's Installation menu is set to Front or Front/
Ceiling for all projectors.
Procedure Overview
We recommend using the following procedure for Multi-Projection.
Pr
eparation
•
Connecting projectors
•
Initializing projectors
•
Assigning a primary projector
•
Calibrating projectors
•
Installing projectors
•
Performing rough image adjustments
•
Connecting projectors to a network
Multi-Projection Features
120

Image Composition
•
Blen
ding
•
Tiling
•
Stacking
Adjusting colors
•
Adjust the Hue, Saturation, and Brightness settings for individual image
colors.
•
Adjust the overall tint of the image.
Preparing for Multi-Projection
is section explains how to perform basic settings before installing the
p
rojector and preparing in advance for easier operations later.
g
Related Links
•
"Connecting Projectors" p.121
•
"Initializing Projectors" p.121
•
"Assigning a Primary Projector" p.121
•
"Calibrating Projectors" p.122
•
"Installing Projectors" p.122
•
"Performing Rough Image Adjustments" p.122
•
"Connecting Projectors to a Network" p.122
•
"Projecting the Same Image in a Daisy-Chain Connection" p.41
Connecting Projectors
Co
nnect multiple projectors. For details, see "Projecting the Same Image in a
Daisy-Chain Connection".
g
Related Links
•
"Projecting the Same Image in a Daisy-Chain Connection" p.41
Initializing Projectors
Yo
u need to correct the dierence in settings for each projector.
You can make the necessary settings as a batch by using Batch Setup before you
start Multi-Projection in the projector's Multi-Projection menu.
Be sure to make the necessary settings for all of the projectors.
•
Initializes the following:
•
Color Uniformity
•
Screen Matching
•
Color Matching
•
Image
•
Black Level
•
Brightness Level
•
Changes the following:
•
Multi-Projection for Color Mode
•
O for Dynamic Contrast
•
Custom for Light Source Mode
•
O for Sleep Mode
Assigning a Primary Projector
Se
lect one projector to be the basis for adjustment.
Display test patterns from all projectors and select the one that has less color
unevenness as the primary projector.
Multi-Projection Features
121
•
We r
ecommend displaying the following test patterns:
Grayscale, Gray Bars V, Gray Bars H, and White
•
When using the remote control, we recommend assigning the same ID
for the primary projector and the remote control to limit the control
target.
Calibrating Projectors
Perform the following operations for all projectors to adjust the color balance
and brightness that has deteriorated over time, and minimize the color tone
dierence between each projected image:
•
Perform light source calibration.
s Management > Light Source Calibration
•
Perform color calibration if you install the optional external camera.
s Management > Color Calibration
•
Perform Color Uniformity if you do not install the optional external camera
or you were unsuccessful performing color calibration.
s Multi-Projection > Color Uniformity
s Management > Color Uniformity
•
Set the Color Mode setting to Multi-Projection.
s Image > Color Mode
We recommend that you set Run P
eriodically to O in the Light Source
Calibration menu. If you set On, the color adjusted in multi-projection
may be changed due to auto calibration.
Installing Projectors
I
n
stall all projectors in an appropriate location.
When you install the primary projector in the center, you can easily calibrate
colo
rs because any unevenness at the center of the projected area is reduced.
Performing Rough Image Adjustments
Per
form the following operations for all projectors to adjust the position and the
shape for rectangular projected images.
Displaying the test pattern makes it easier to adjust the projection position and
the shape.
•
For projection position, adjust the location, the angle, and the lens shi.
•
For projection size, adjust the location and the zoom.
•
For image focus, adjust the focus.
•
e pr
ojected images are not stable right aer turning on the projector.
We recommend adjusting the projector at least 30 minutes aer you
start projecting.
•
We recommend displaying the following test patterns:
Grayscale, Gray Bars V, Gray Bars H, and White
•
When adjusting the image height with vertical lens shi, adjust it by
moving the image from the bottom to the top.
If you adjust it from the top to the bottom, the image position may
move down slightly aer adjusting.
•
It is not recommended that you perform geometry correction for the
following reasons:
•
Image quality may decline.
•
If the correction value is too large, image calibration may be dicult.
Connecting Projectors to a Network
Co
nnect all projectors to the network hub with LAN cables.
Multi-Projection Features
122

When a connection is established, check that all projectors have been assigned
th
eir own IP address assigned.
If you are combining images from multiple projectors on a network, you
can as
sign one projector as the "primary" and automatically adjust all the
images to match the "primary" image. If the projectors are not connected
to a network, you can match each projector's images manually.
Image Composition
You can create a bright composite image and a large image from multiple
p
r
ojectors.
Choose an adjustment method for composing images based on your
environment.
•
If you have installed the optional external camera, you can easily adjust image
by using the projector's menu.
•
If you have installed the optional external camera and the Epson Projector
Professional Tool soware is available, you can automatically adjust image by
using the Camera Assist function of the Epson Projector Professional Tool
soware.
•
If you have not installed the optional external camera or the Epson Projector
Professional Tool soware is not available, you can manually adjust image
using the projector's menu.
•
Yo
u can download the Epson Projector Professional Tool soware and
its manual from the following website.
epson.com/support (U.S.), epson.ca/support (Canada), or
latin.epson.com/support (Latin America)
•
When compositing projected images using the camera assist feature in
the Epson Projector Professional Tool soware, the following functions
support curved surfaces.
•
Screen Matching (convex surfaces are not supported)
•
Color Calibration
•
Blending
•
Stacking
•
Stacking & Blending
g
Related Links
•
"Blen
ding Using the Epson Projector Professional Tool S oware and the
Optional Camera" p.123
•
"Tiling Using the Projector's Menu" p.124
•
"Simple Blending Using the Projector's Menu and the Optional External
Camera" p.128
•
"Stacking Using the Epson Projector Professional Tool Soware and the
Optional Camera " p.129
•
"Stacking Using the Projector's Menu (Simple Stacking)" p.129
•
"Stacking & Blending Using the Epson Projector Professional Tool Soware"
p.130
Blending Using the Epson Projector Professional Tool Software
and the Optional Camera
Yo
u can project one large image from up to 15 projectors using the optional
external camera and the Epson Projector Professional Tool soware.
See the Epson Projector Professional Tool Operation Guide for details.
Multi-Projection Features
123
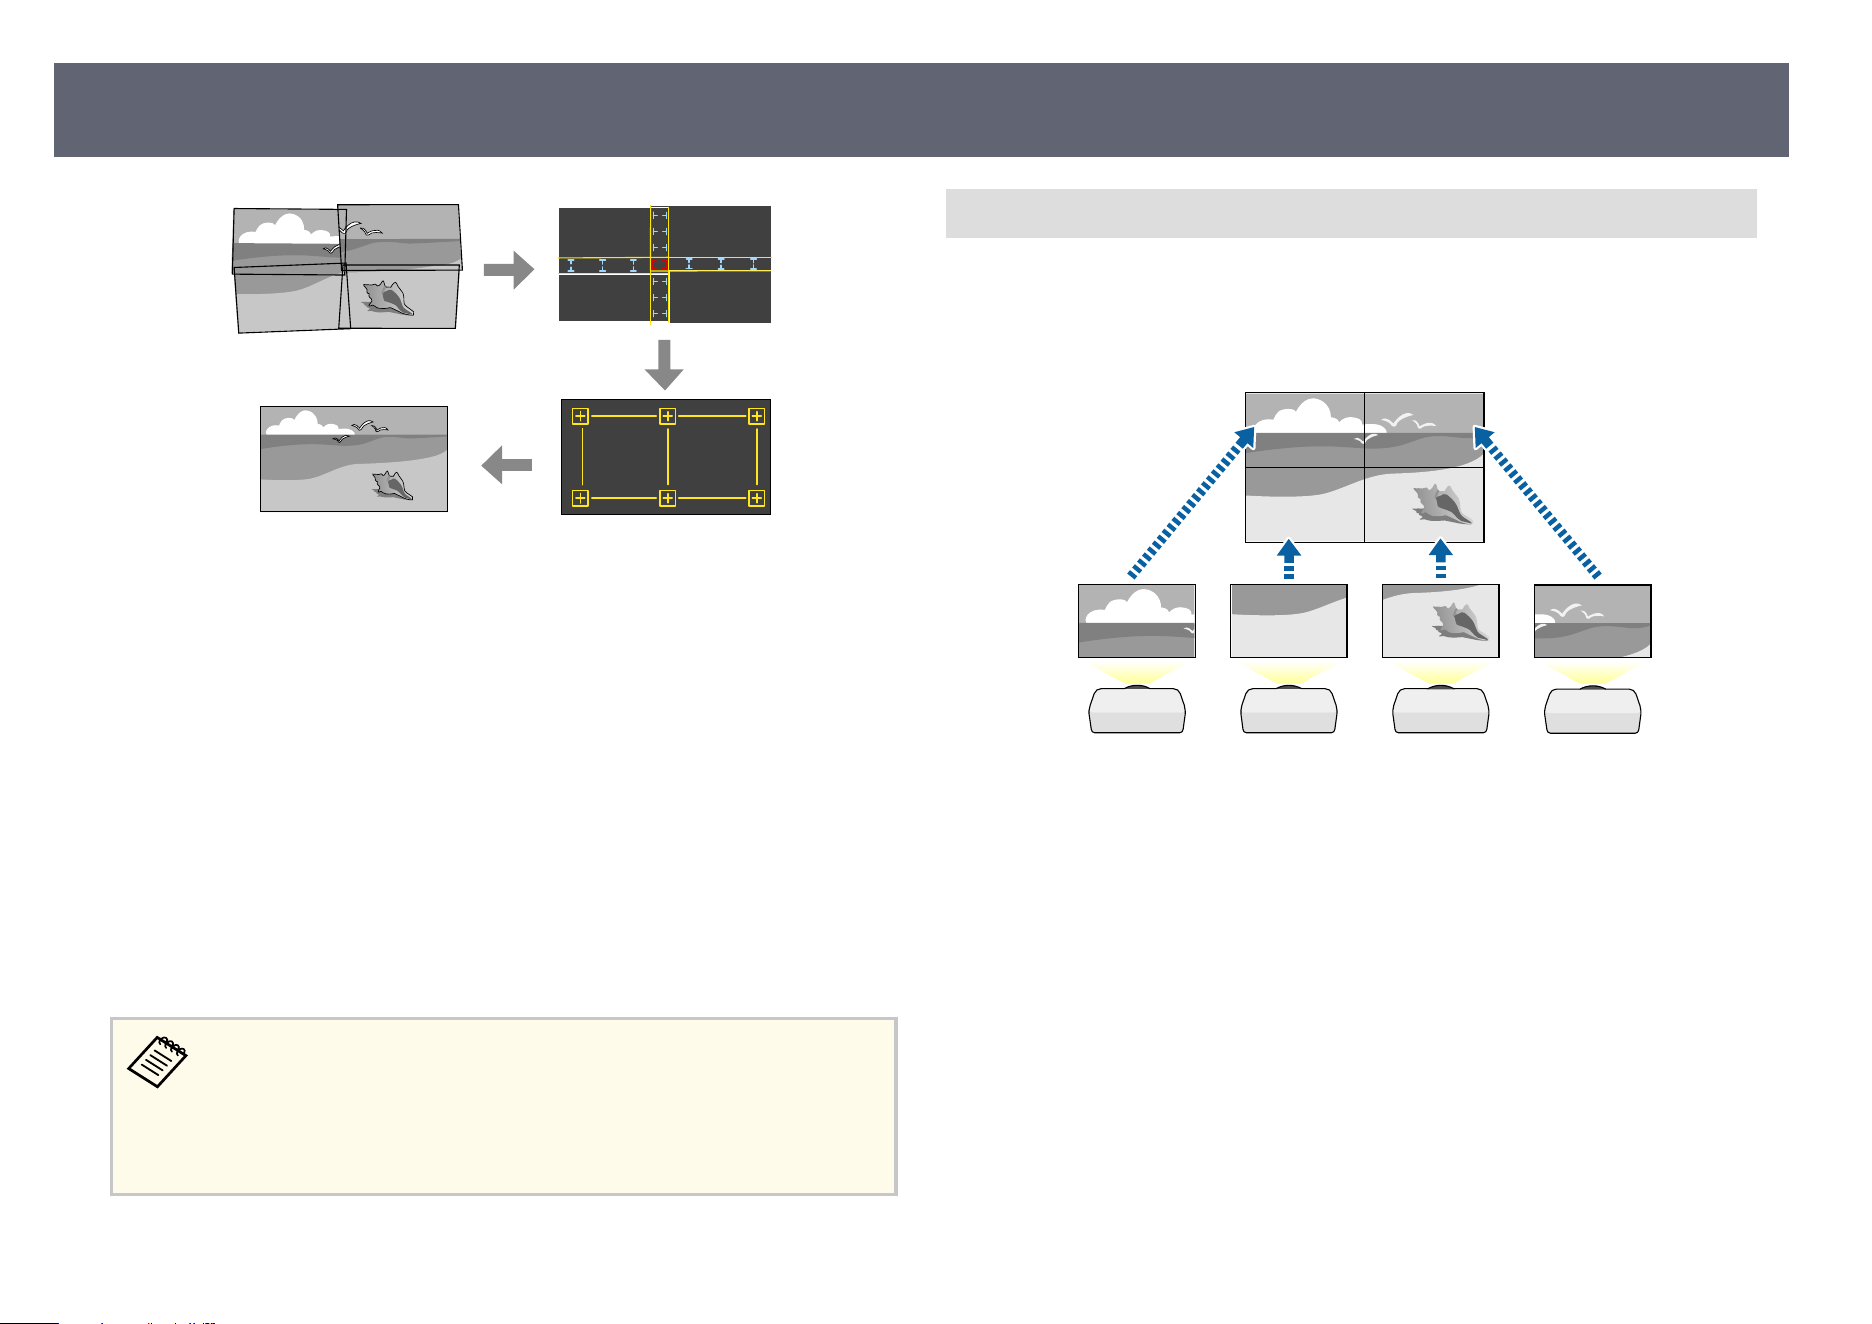
a
Start the Epson Projector Professional Tool s
o
ware.
b
Create a group of projectors on the Lay
out/Monitoring tab.
c
Specify each projector's position using Ti
ling and Stacking Settings on
the Edit Group screen.
d
Start the Geometry Assist - Blending Function wizard.
W
hen the wizard has nished, perform the following operations as necessary:
•
Screen Matching to correct the tint and brightness of each projected image.
•
Point Correction to adjust the gaps in the positions of the projected image.
•
Scale to crop and/or scale portions of the image.
•
e r
e
quired time for conguring tiling automatically varies depending
on the layout and number of projectors. It takes up to approximately 8
minutes.
•
e required time for screen matching varies depending on the layout
and number of projectors. It takes up to approximately 18 minutes.
Tiling Using the Projector's Menu
If y
ou have not installed the optional external camera or the Epson Projector
Professional Tool soware is not available, you can project one large image from
up to 15 projectors using the projector's menu. is section explains how to
adjust the images from all projectors manually.
a
Select the Projector ID setting in the projector's Multi-Projection menu,
an
d give each projector a unique ID to control multiple projectors from a
remote control.
b
Set the remote control's ID to match the projector's ID to operate only a
p
ar
ticular projector. Press the [ID] button on the remote control, and then
press the numeric button that matches the projector's ID within 5 seconds.
(Enter a one-digit number.)
c
If you are combining images from multiple projectors on a network, select
th
e Projector Grouping setting on the primary projector and create a
group of projectors that you can control simultaneously.
d
Select Group Tiling setting in the projector's Multi-Projection menu on
t
he primary projector, and press [Enter].
Multi-Projection Features
124
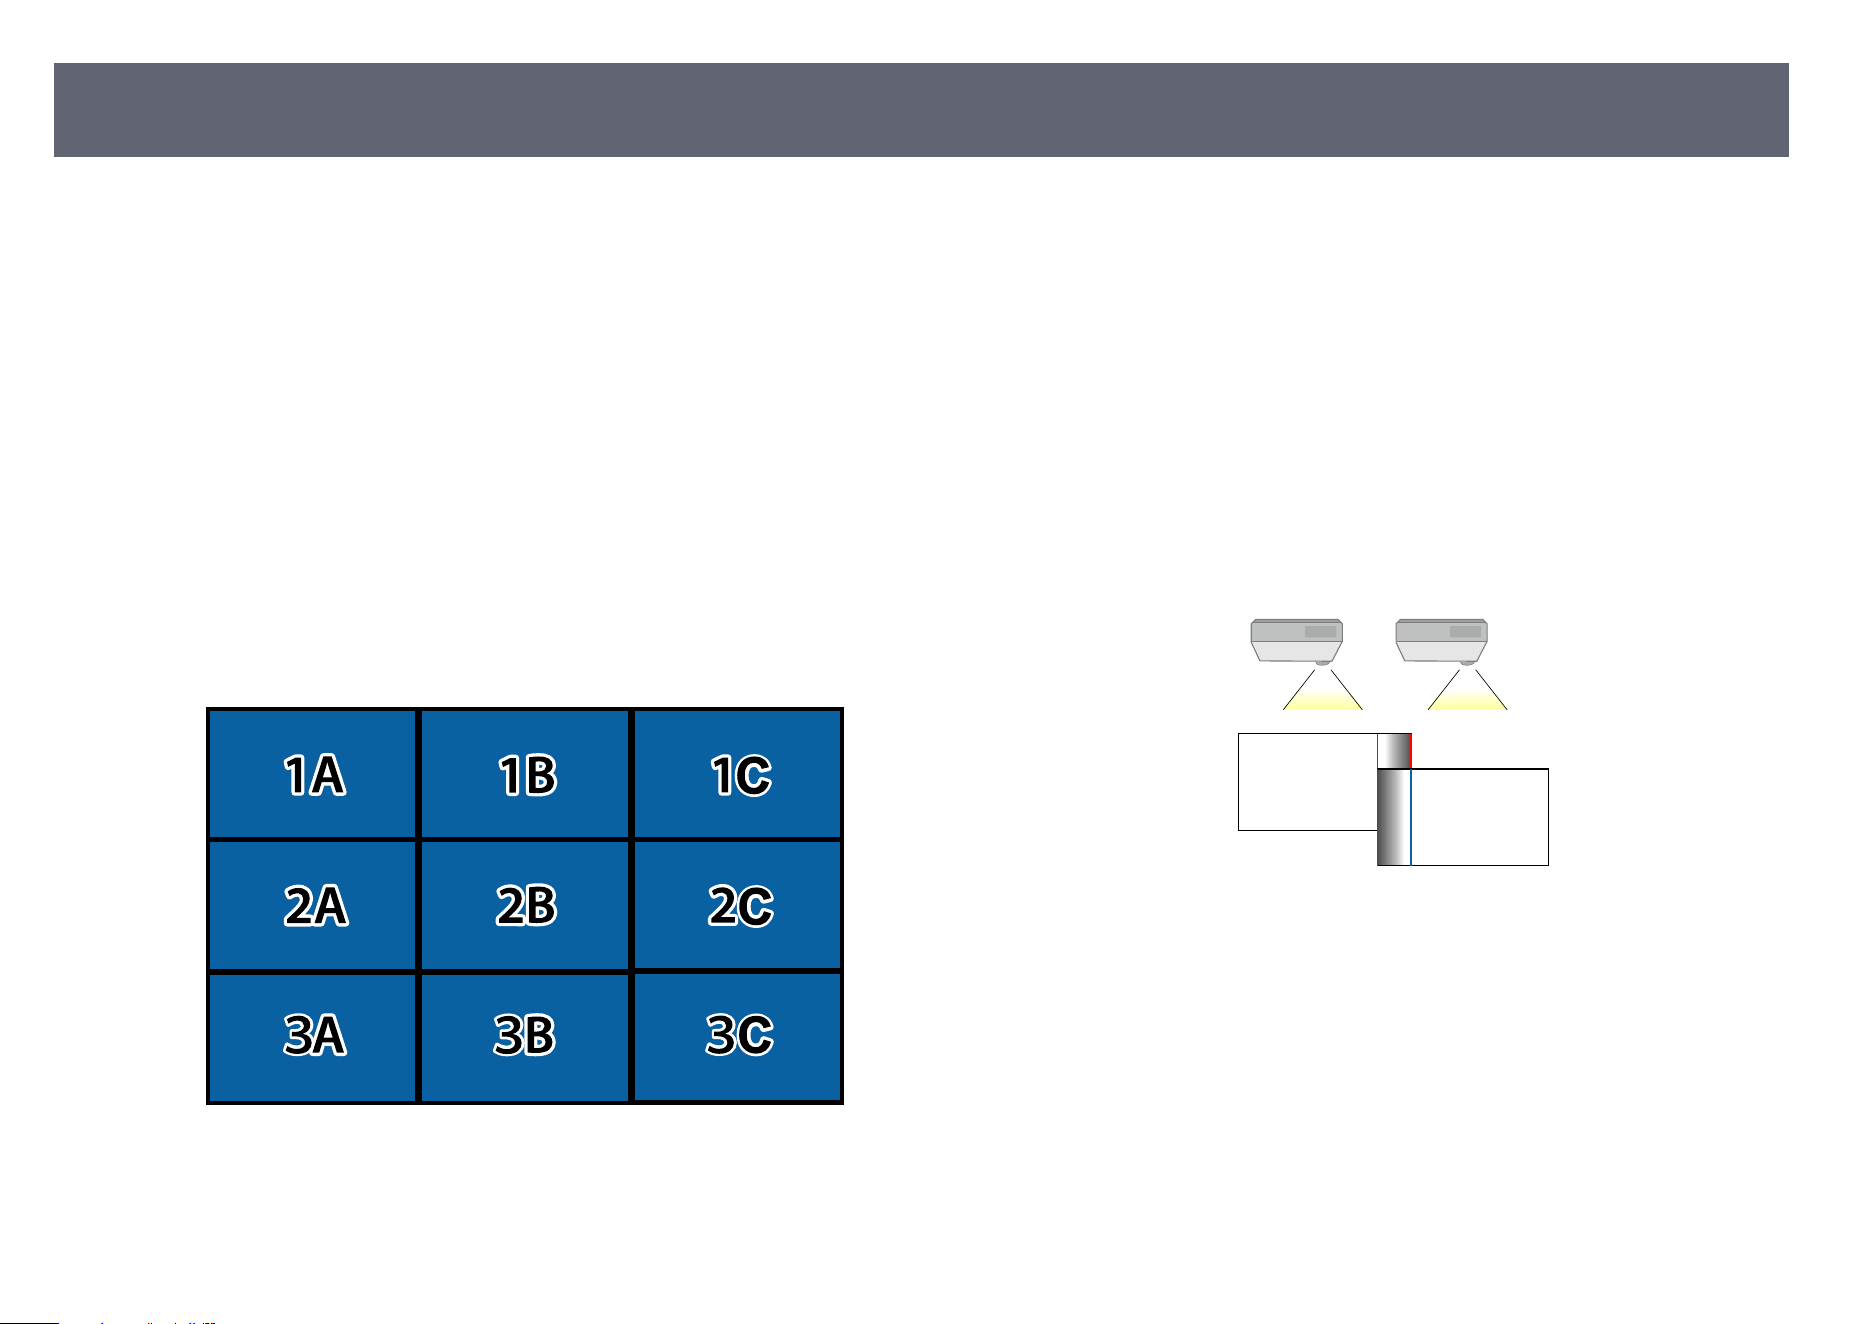
e
Select Tiling and press [Enter].
f
S
elect the Tiling setting to adjust the arrangement of the images to create
o
ne large image.
•
If you have installed the optional external camera, select Auto on the
primary projector.
•
If you have not installed the optional external camera or tiling the
images automatically was unsuccessful, select Manual.
•
When selecting Manual, select Layout, and then select the number of
rows and columns you are setting up as the Row and Column settings.
•
Aer making the Layout settings, select Location Setup. Select the
position of each projected image as follows: Row Order to layout the
screens from top to bottom in sequential order starting with 1 at the
top, Column Order to layout the screens from le to right starting with
A on the le.
•
Se
lect the Layout and Location Setup settings on each projector you
are setting up.
g
Select the input signal to display an image.
h
Select Edge Blending to adjust the edges of the images.
•
S
et the Edge Blending setting to Blending/Black Level and turn on the
Line Guide and Pattern Guide settings rst.
•
Select the edge you want to blend on each projector, and set the
Blending setting to On.
•
Select the Blend Start Position setting and adjust the blending start
position.
•
Select the Blend Range setting and use the arrow buttons to select the
width of the blended area so that the displayed guides are at the edges
of the overlapping area between the two images.
•
Se
lect the Blend Curve setting and select a gradient for the shaded area
on the projectors.
When the edges are blended, turn o the Line Guide and Pattern Guide
settings on each projector to check the nal settings.
i
Select the Black Level settings to make the dierence less noticeable for
t
he overlapping areas.
•
Select Color Adjustment rst.
e adjustment areas are displayed based on the Edge Blending setting.
Multi-Projection Features
125
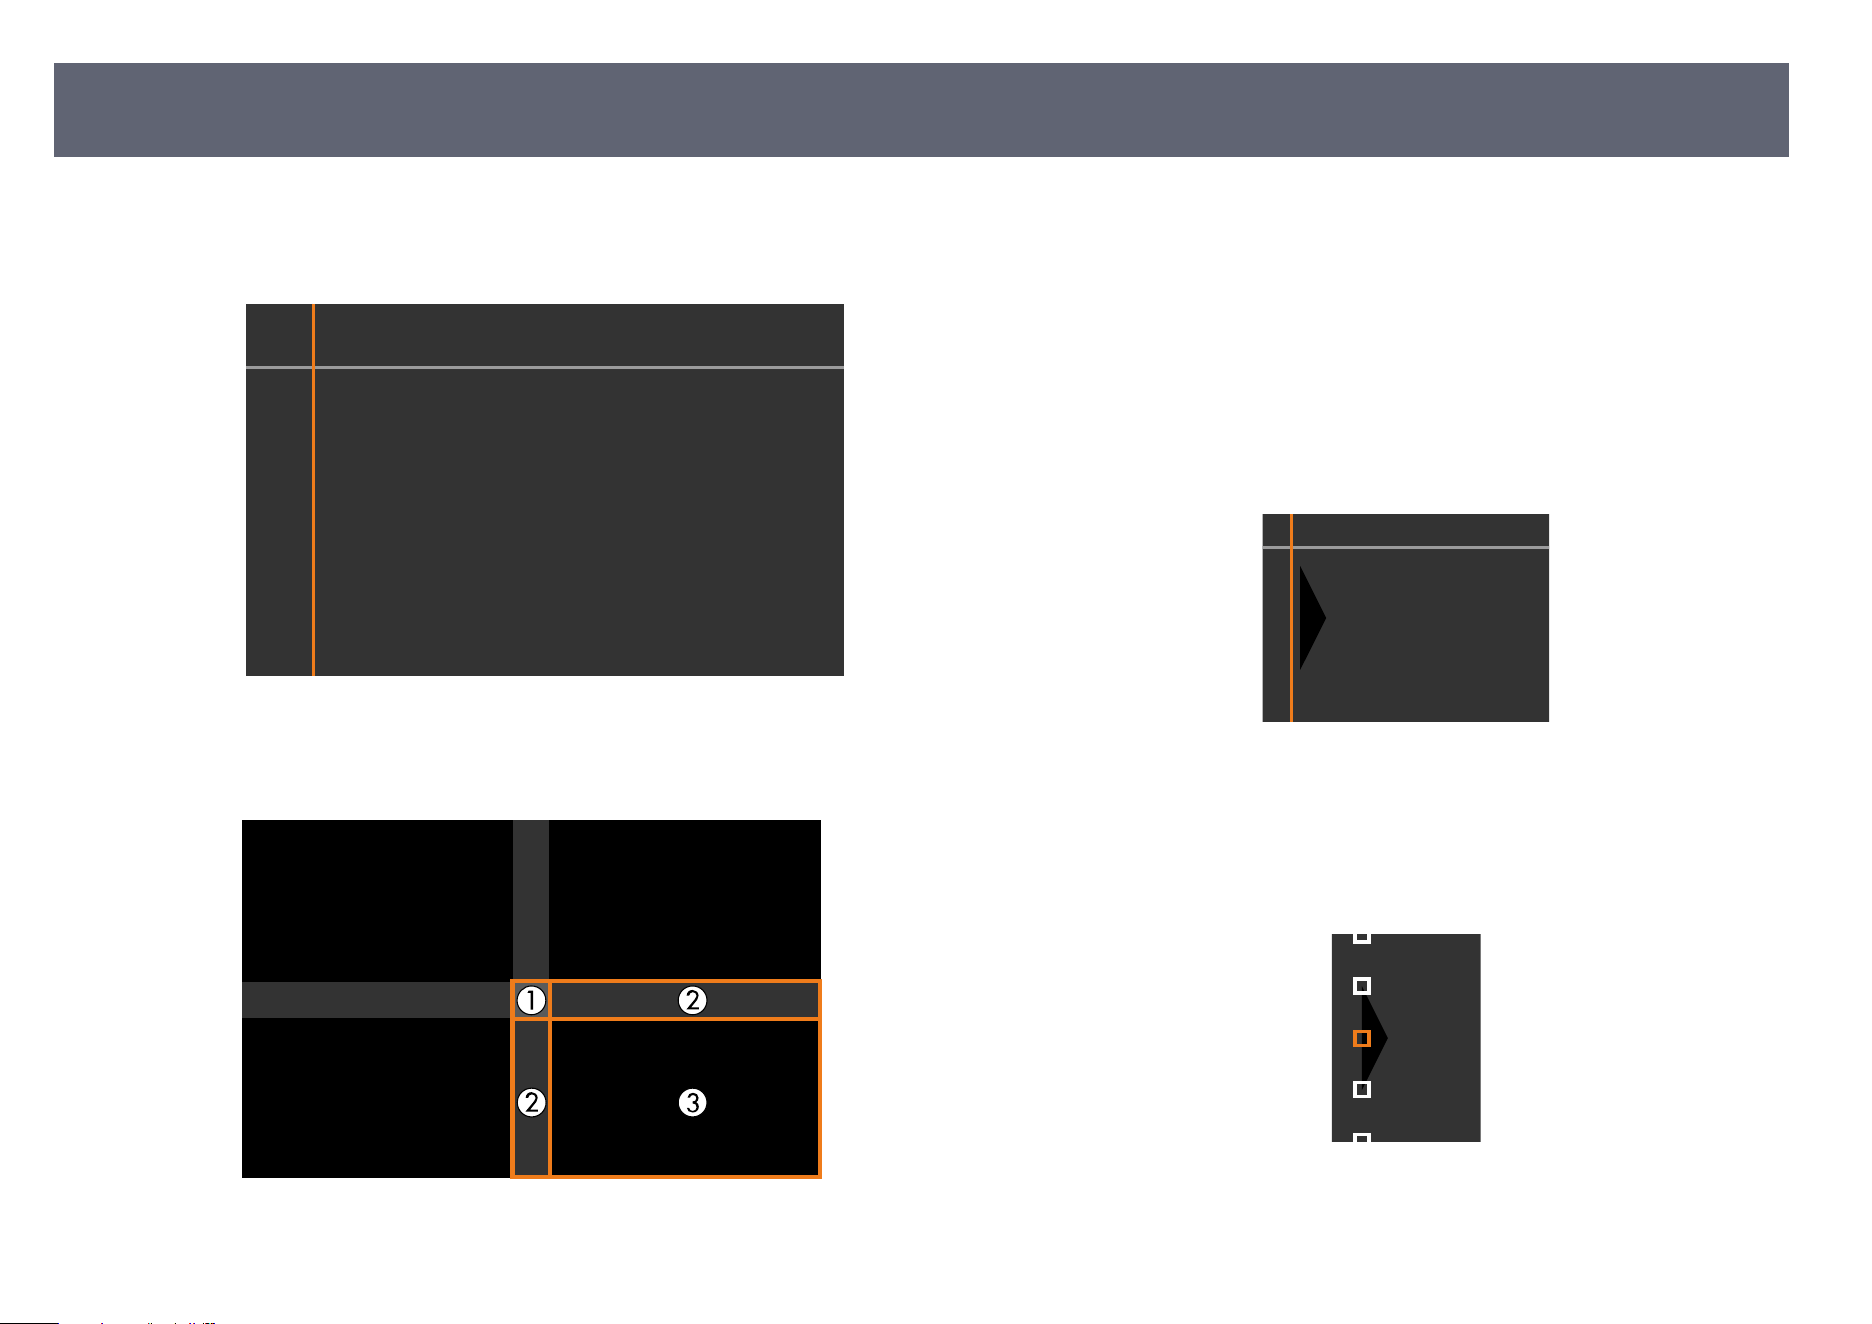
•
Us
e the arrow buttons to select the area you want to adjust and press
[Enter].
e selected area is displayed in orange. Adjust the black tone.
•
Wh
en multiple screens are overlapping, adjust based on the area with
the most overlap (the brightest area). In the illustration below, rst align
(2) with (1), and then adjust so that (3) aligns with (2).
•
R
ep
eat these steps as needed to adjust any remaining screen areas.
•
Wh
en you are nished, press the [Esc] button.
j
If there are areas where the color does not match, select Ar
ea Correction.
•
Select Start Adjustments rst.
Boundary lines indicating where images overlap are displayed. e lines
are displayed based on the Edge Blending setting.
•
Use the arrow buttons to select the boundary line you want to adjust,
and then press [Enter].
e selected line is displayed in orange.
•
Us
e the arrow buttons to adjust the line position, and then press
[Enter]. Next, use the arrow buttons to select the point you want to
move, and then press [Enter].
e selected point is displayed in orange. You can move the point using
the arrow buttons.
Multi-Projection Features
126
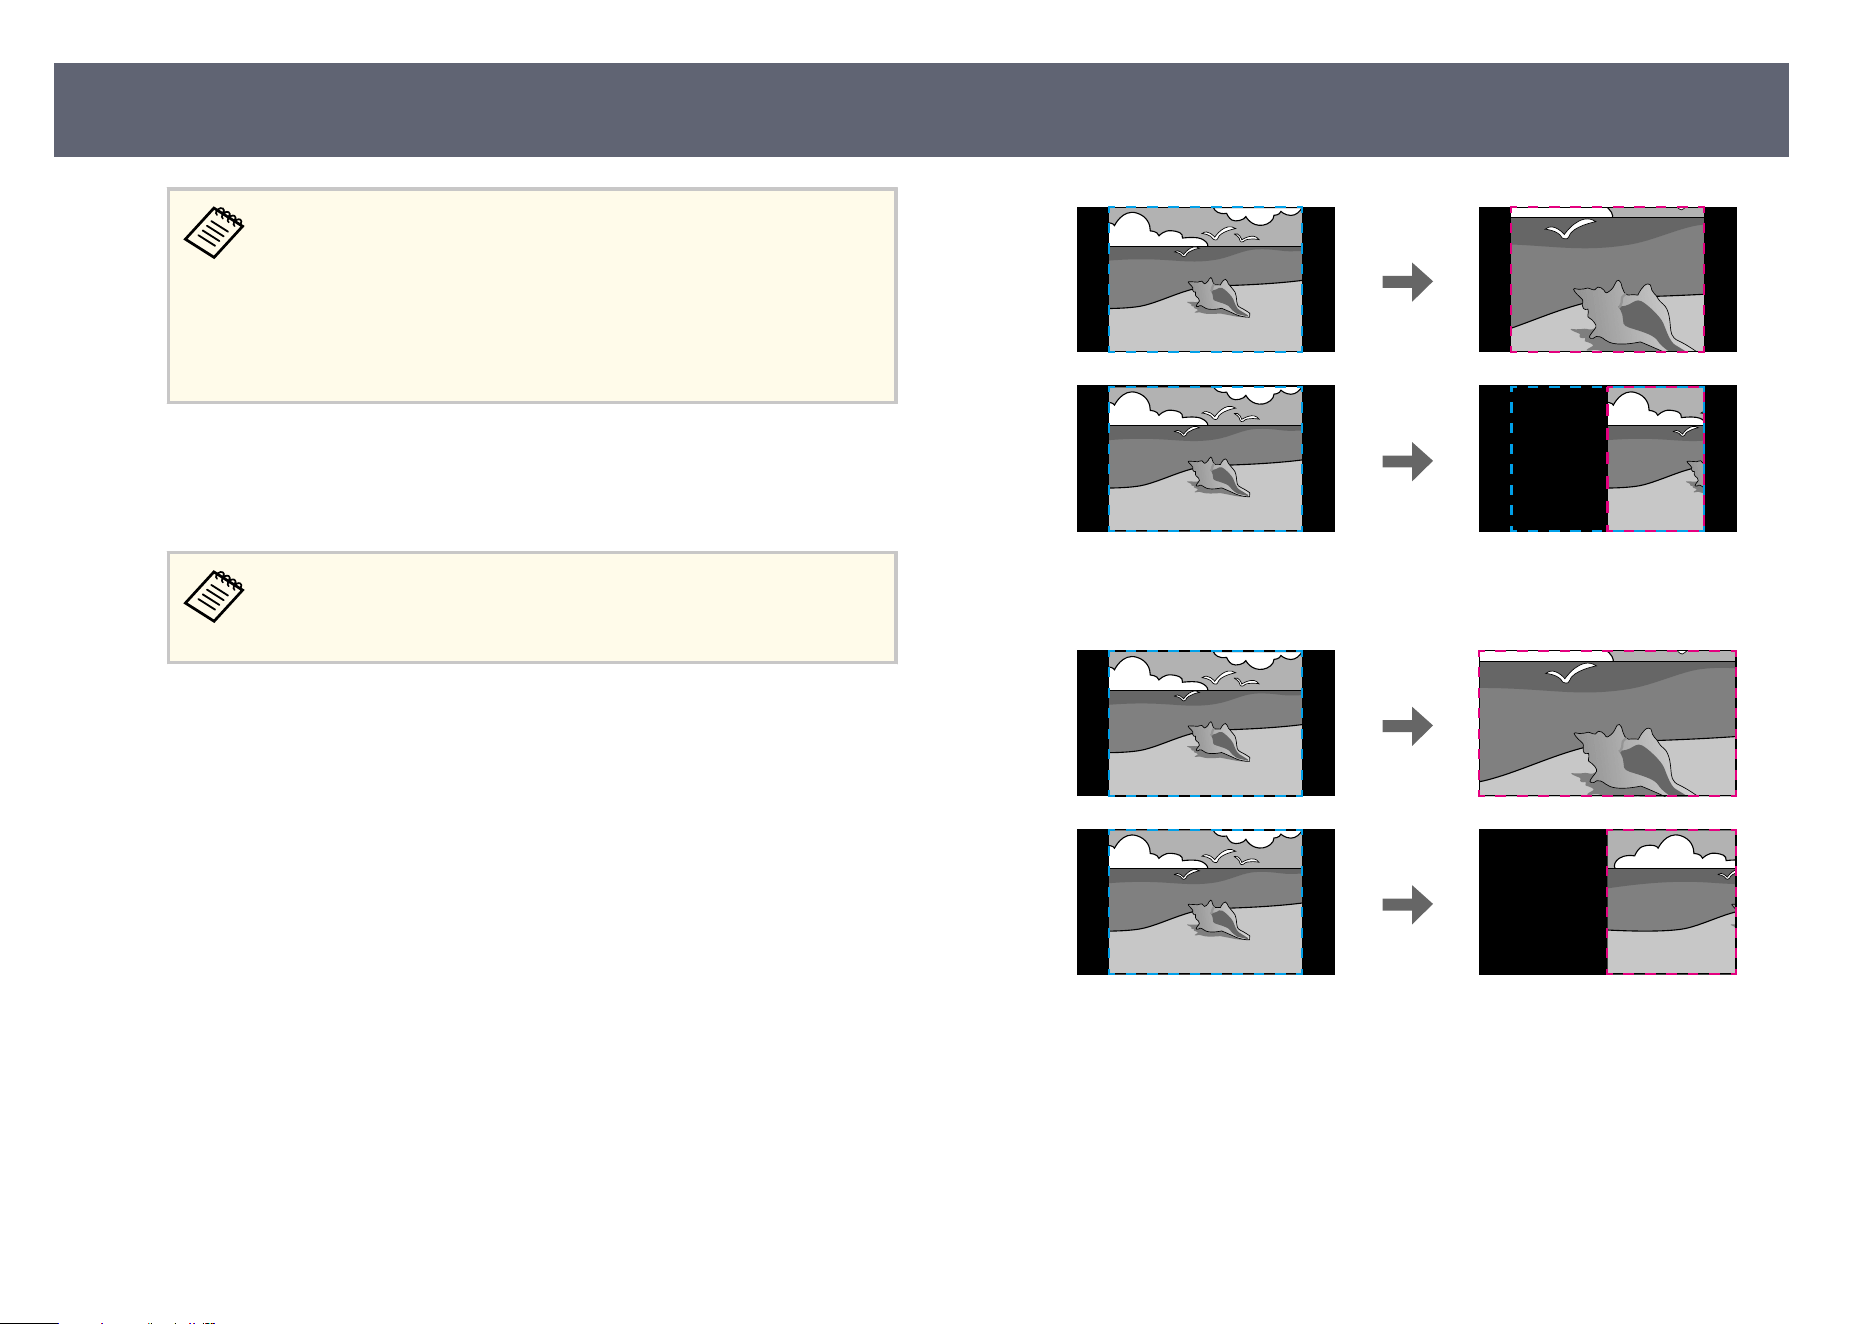
•
Yo
u can change the number of the displayed points using the
Points setting.
•
To continue to move another point, press [Esc] and then repeat
the previous steps.
•
To adjust another boundary line, press [Esc] until the screen is
displayed.
k
If you are combining images from multiple projectors on a network,
se
lect the Screen Matching setting to adjust the brightness and tint of the
images.
e required time for screen matching varies depending on the
l
ayout and number of projectors. It can take up to approximately 18
minutes.
l
If the projectors are not connected to a network or you want to
adj
ust manually aer performing automatic adjustments, select the Color
Matching setting to adjust the brightness and tint of the images manually.
•
Select a value for the Adjustment Level setting, and adjust the
color tone for the Red, Green, or Blue settings, and then adjust the
Brightness setting.
•
Repeat these steps as necessary to adjust each adjustment level.
m
Select the Scale setting to select sections of the images.
•
S
et the Scale setting to Auto or Manual rst.
•
Select the Scale Mode setting and select one of the following options:
•
Zoom Display to maintain the image aspect ratio as you scale the
image.
•
F
u
ll Display to adjust the image to the projector's screen size as you
scale the image.
•
Select one or more of the following scaling options and adjust it as
necessary:
•
Scale V/H to scale the image horizontally and vertically at the same
time.
•
Scale Vertically to scale the image vertically only.
•
Scale Horizontally to scale the image horizontally only.
Multi-Projection Features
127
•
Se
lect the Clip Adjustment setting and use the arrow buttons to adjust
the coordinates and size of each image as you view the screen.
•
Select Display Clip Range to preview the clipped area you selected.
Simple Blending Using the Projector's Menu and the Optional
External Camera
Yo
u can create a horizontally wide screen image projected from two projectors
using the optional external camera.
is function is only available when the optional external camera is installed,
and the projectors are connected with a distributor.
a
Connect two projectors using a LAN cable.
b
Make sure the DHCP setting is turned on in the projector's Network menu
f
o
r two projectors.
Wait for 1 minute aer assig
ning an IP address automatically.
c
Select M
ulti-Projection > Camera Correction Assist > Simple Blending,
an
d press [Enter]. Select Yes if necessary.
d
Select the Location Setup setting and specify the position of the primary
p
rojector from A1, B1, or C1.
e
Select the image aspect in the W
ho
le Screen Aspect setting for the
merged wide image.
You can set the following aspects using the Who
le Screen Aspect
menu.
Selectable items vary depending on the screen type setting.
•
21:9 (EDID 3440x1440)
•
21:9 (EDID 2560x1080)
•
16:6 (EDID 2880x1080)
•
16:6 (EDID 1920x720)
•
3:1 (EDID 3240x1080)
•
32:10 (EDID 3456x1080)
•
32:9 (EDID 3200x900)
f
Perform S
tart Auto Adjustment. If the projection position cannot be
ad
justed fully using lens shi dials, move the projectors so that the green
pattern and the magenta pattern overlap and become white.
g
Aer auto adjustment is complete, perform Correct Shape following the
in
structions on the screen.
h
Perform Screen Matching to adjust the brightness and tint of the images.
W
hen the automatic adjustment has nished, if there are any gaps in the pixels
of the projected images, adjust the Point Correction setting manually.
Multi-Projection Features
128
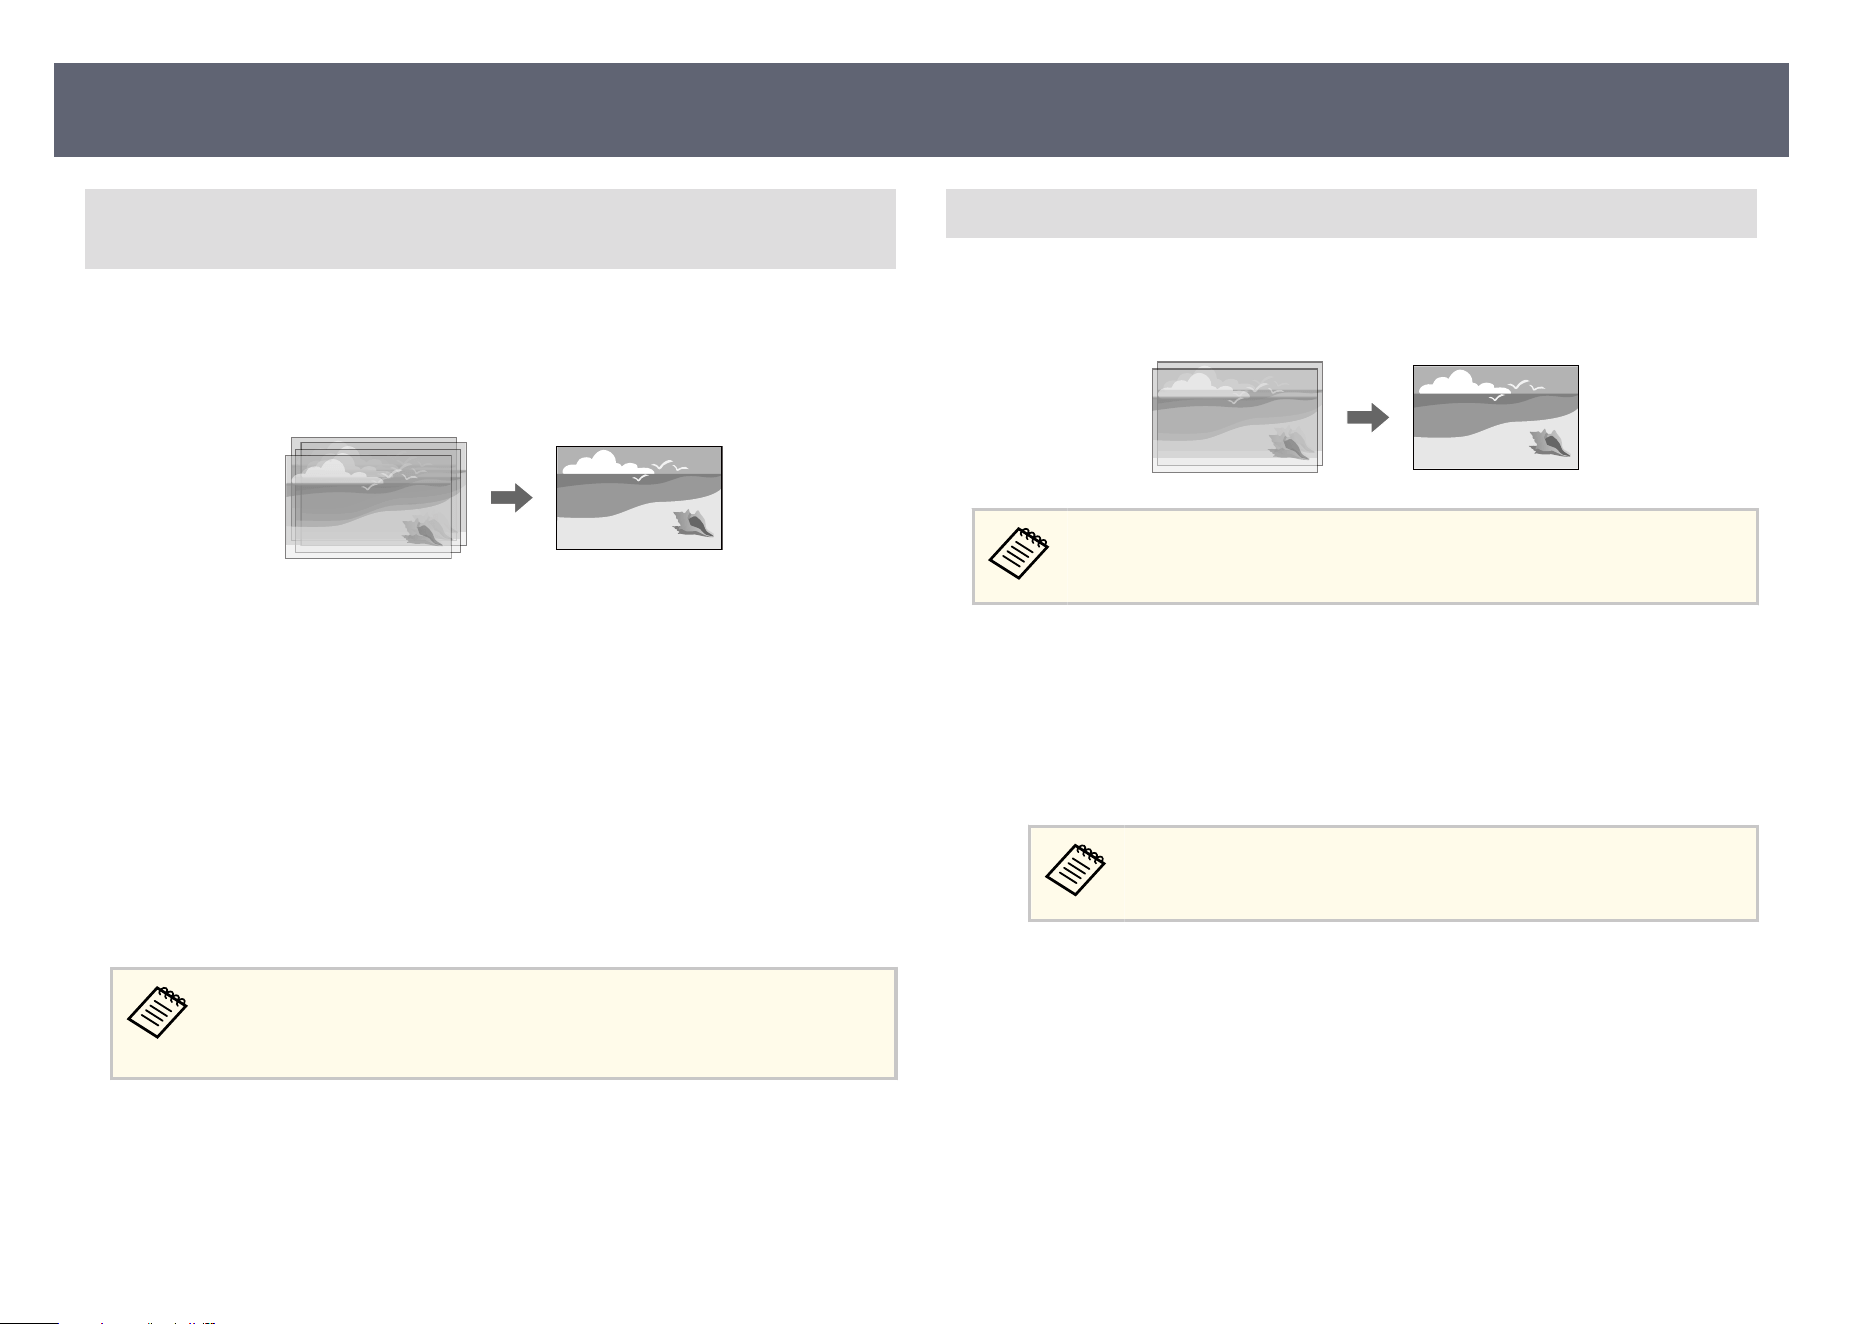
Stacking Using the Epson Projector Professional Tool Software and
the Optional Camera
Yo
u can create one bright image by overlaying images from up to 6 projectors
using the optional external camera and the Epson Projector Professional Tool
soware.
See the Epson Projector Professional Tool Operation Guide for details.
a
Start the Epson Projector Professional Tool s
o
ware.
b
Create a group of projectors on the Lay
out/Monitoring tab.
c
Specify each projector's position using Ti
ling and Stacking Settings on
the Edit Group screen.
d
Start the G
eometry Assist - Stacking Function wizard.
W
hen the wizard has nished, if there are any gaps in the pixels of the projected
images, adjust the Point Correction setting manually.
e r
equired time to automatically congure stacking varies depending on
t
he layout and number of projectors. It can take up to approximately 9
minutes.
Stacking Using the Projector's Menu (Simple Stacking)
If t
he Epson Projector Professional Tool soware is not available, you can
create one bright image by overlaying images from up to 2 projectors using the
projector's menu.
is function is only available when the optional external camera is
in
stalled.
a
Connect two projectors using a LAN cable.
b
Make sure the D
H
CP setting is turned on in the projector's Network
menu for two projectors.
s Network > Network Settings > Wired LAN > IP Settings > DHCP
Wait for 1 minute aer assig
ning an IP address automatically.
c
Select Multi-Projection > Camera Correction Assist > Simple Stacking
>
Point Correction, and adjust the image position, shape, and focus on
one of the projectors (this projector becomes the primary projector), using
the Quick Corner menu.
d
Select Start Auto Adjustment and follow the on-screen instructions.
W
hen the automatic adjustment has nished, if there are any gaps in the pixels
of the projected images, adjust the Point Correction setting manually.
Multi-Projection Features
129
•
e re
quired time for simple stacking varies depending on the
projector layout. It can take up to approximately 5 minutes.
•
If you have not installed the optional external camera, adjust the
following settings manually:
•
Focus
•
Zoom
•
Lens Shi
•
Geometry Correction
Stacking & Blending Using the Epson Projector Professional Tool
Software
Yo
u can use the Geometry Assist - Stacking & Blending Function wizard to
easily and quickly create a single large, bright, projected image by joining and
overlapping the images of multiple projectors.
See Epson Projector Professional Tool Operation Guide for more details.
a
Start the Epson Projector Professional Tool so
ware.
b
Create a group of projectors that support Stacking & Blending on the
Lay
out/Monitoring tab.
c
Select Blending and Stacking Settings on the Create Group screen.
d
S
pecify the projectors' positions in the Bl
ending and Stacking Settings.
e
Start the Geometry Assist - Stacking & Blending Function wizard.
W
hen the wizard has nished, perform the following operations as
necessary:
•
Screen Matching to correct the tint and brightness of each projected
image.
•
Po
int Correction to adjust the gaps in the positions of the projected
image.
Adjusting Colors
Display the test patterns from all projectors to check each color tone.
If y
ou need adjust the color tone, perform the following operations:
•
Adjust the Hue, Saturation, and Brightness settings for individual image
colors.
s Image > RGBCMY
•
Adjust the overall tint of the image.
s Image > White Balance
We recommend displaying the following test patterns:
Gr
ay Bars V, Gray Bars H, and White
Multi-Projection Features
130
When you install the optional external camera on the projector, you can use the
fo
llowing functions to help you adjust the image.
•
Adjust the image automatically using the Epson Projector Professional Tool
soware (Camera Assist function).
•
Create a bright projected image by overlapping the images from two
projectors (Simple Stacking).
•
Create a horizontally wide screen image projected from two projectors
(Simple Blending).
•
Check the image you captured using the optional external camera in Epson
Web Control (Remote Camera Access).
•
Correct dierences in the tint and brightness between projectors to optimize
the display quality of the combined image (Screen Matching).
•
Adjust the color tone of the entire screen when it has declined over time
(Color Calibration).
As the external camera is installed on the projector or the lens, a tripod and
installation space is unnecessary. ere is also no need to adjust the focus, angle,
and exposure.
See the external camera manual for the installation method.
You can download the Epson Projector Professional Tool s
o
ware and
manual from the following website.
epson.com/support (U.S.), epson.ca/support (Canada), or
latin.epson.com/support (Latin America)
g
Related Links
•
"Co
nnecting to an Optional Camera" p.131
Connecting to an Optional Camera
You can connect an optional external camera ELPEC01 to your projector to
adj
ust images projected from multiple projectors.
Aer attaching the external camera ELPEC01 to your projector by referring to
t
he ELPEC01 User's Guide, secure the USB cable that comes with the ELPEC01
to the projector as shown.
Before you start, make sure you have the following items:
•
Commercially available cable tie × 1
a
Aer installing the external camera, secure the USB cable through the
p
ath on the bottom of the projector.
External Camera Usage
131
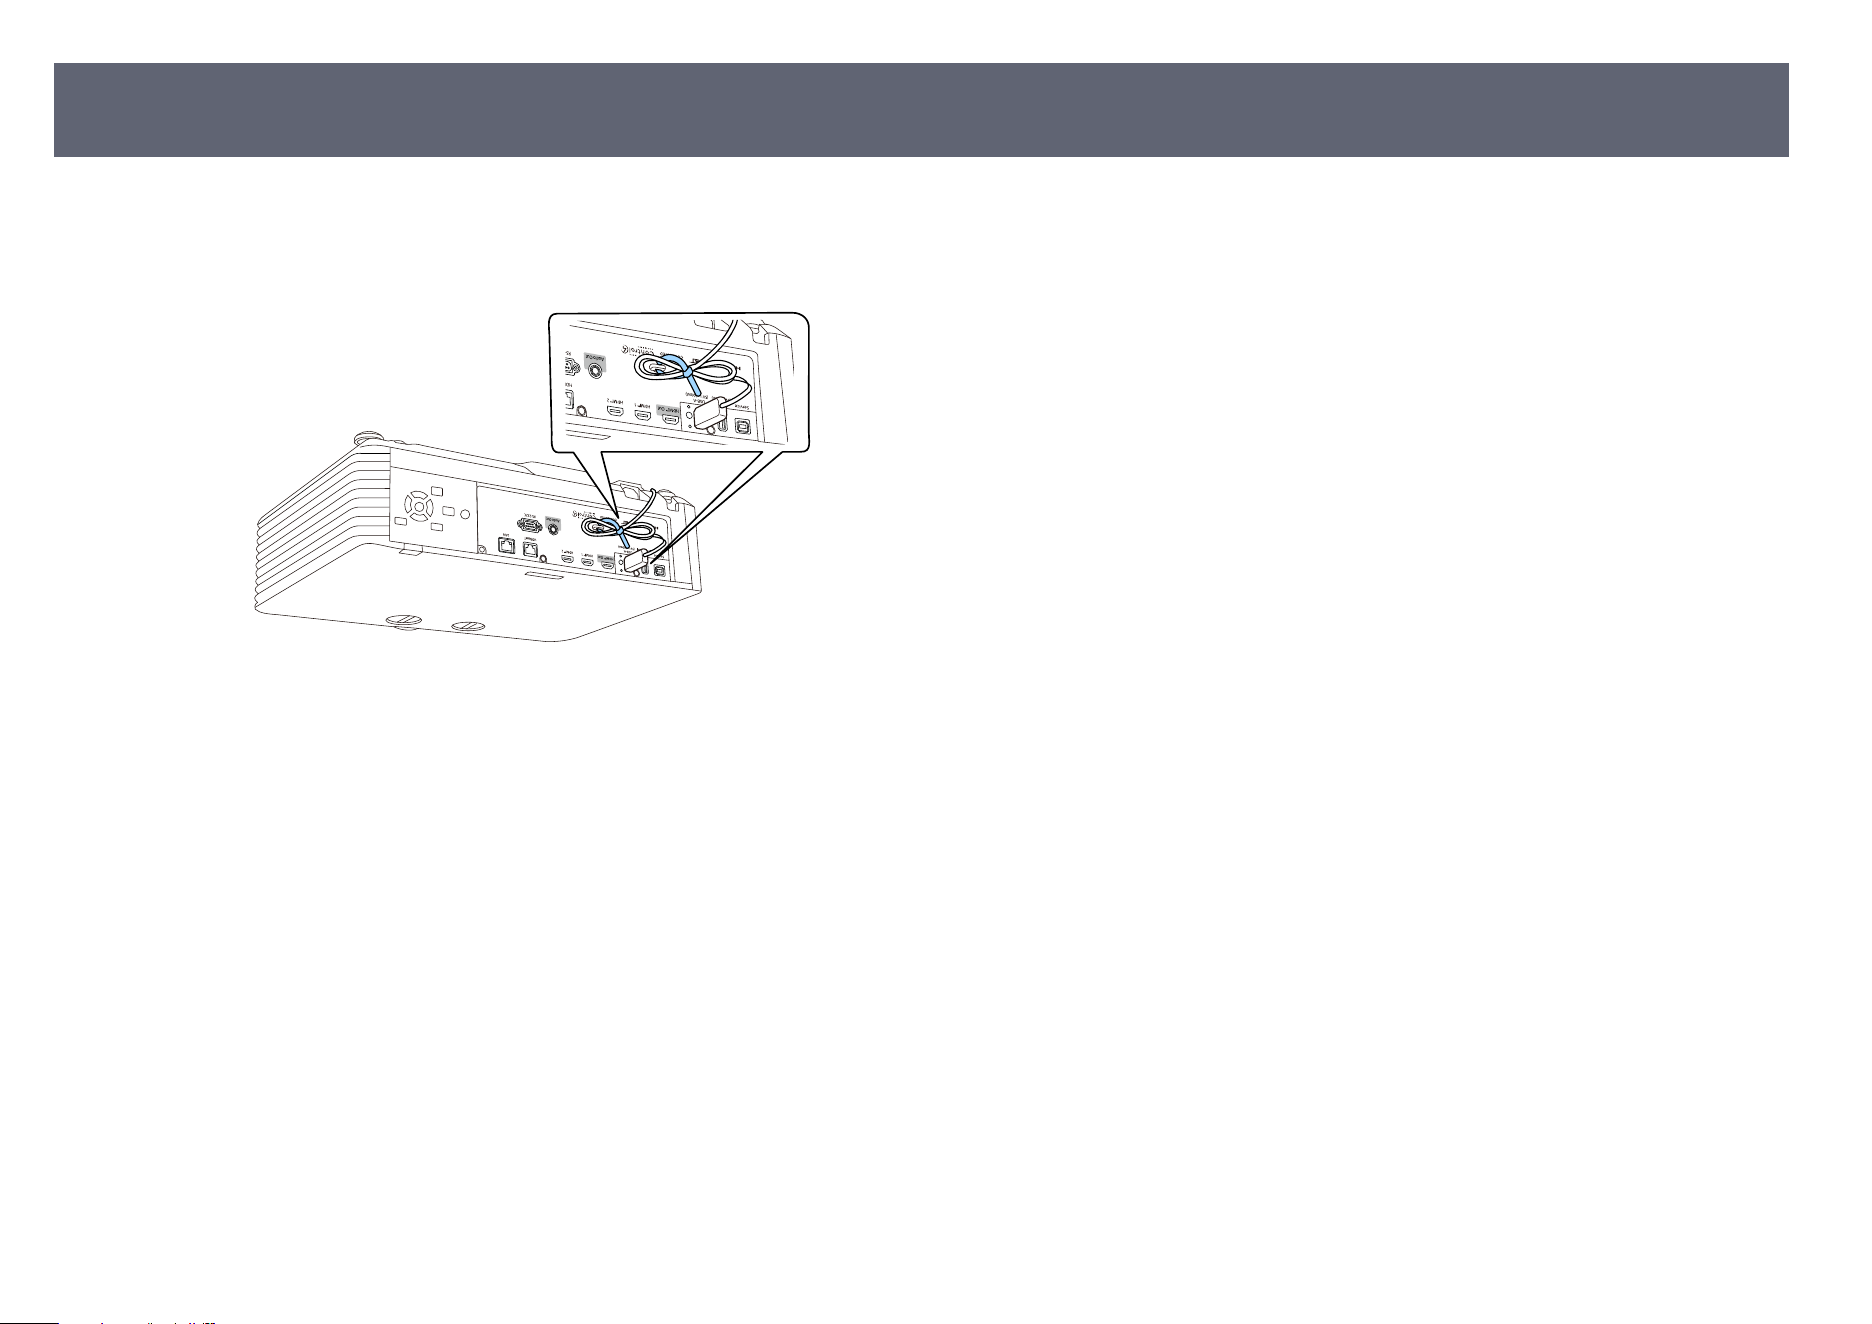
b
Aer connecting the end of the USB cable to the projector, loop the cable
t
ie through the cable holder of the projector, and then fold the USB cable
and x with the cable tie.
External Camera Usage
132
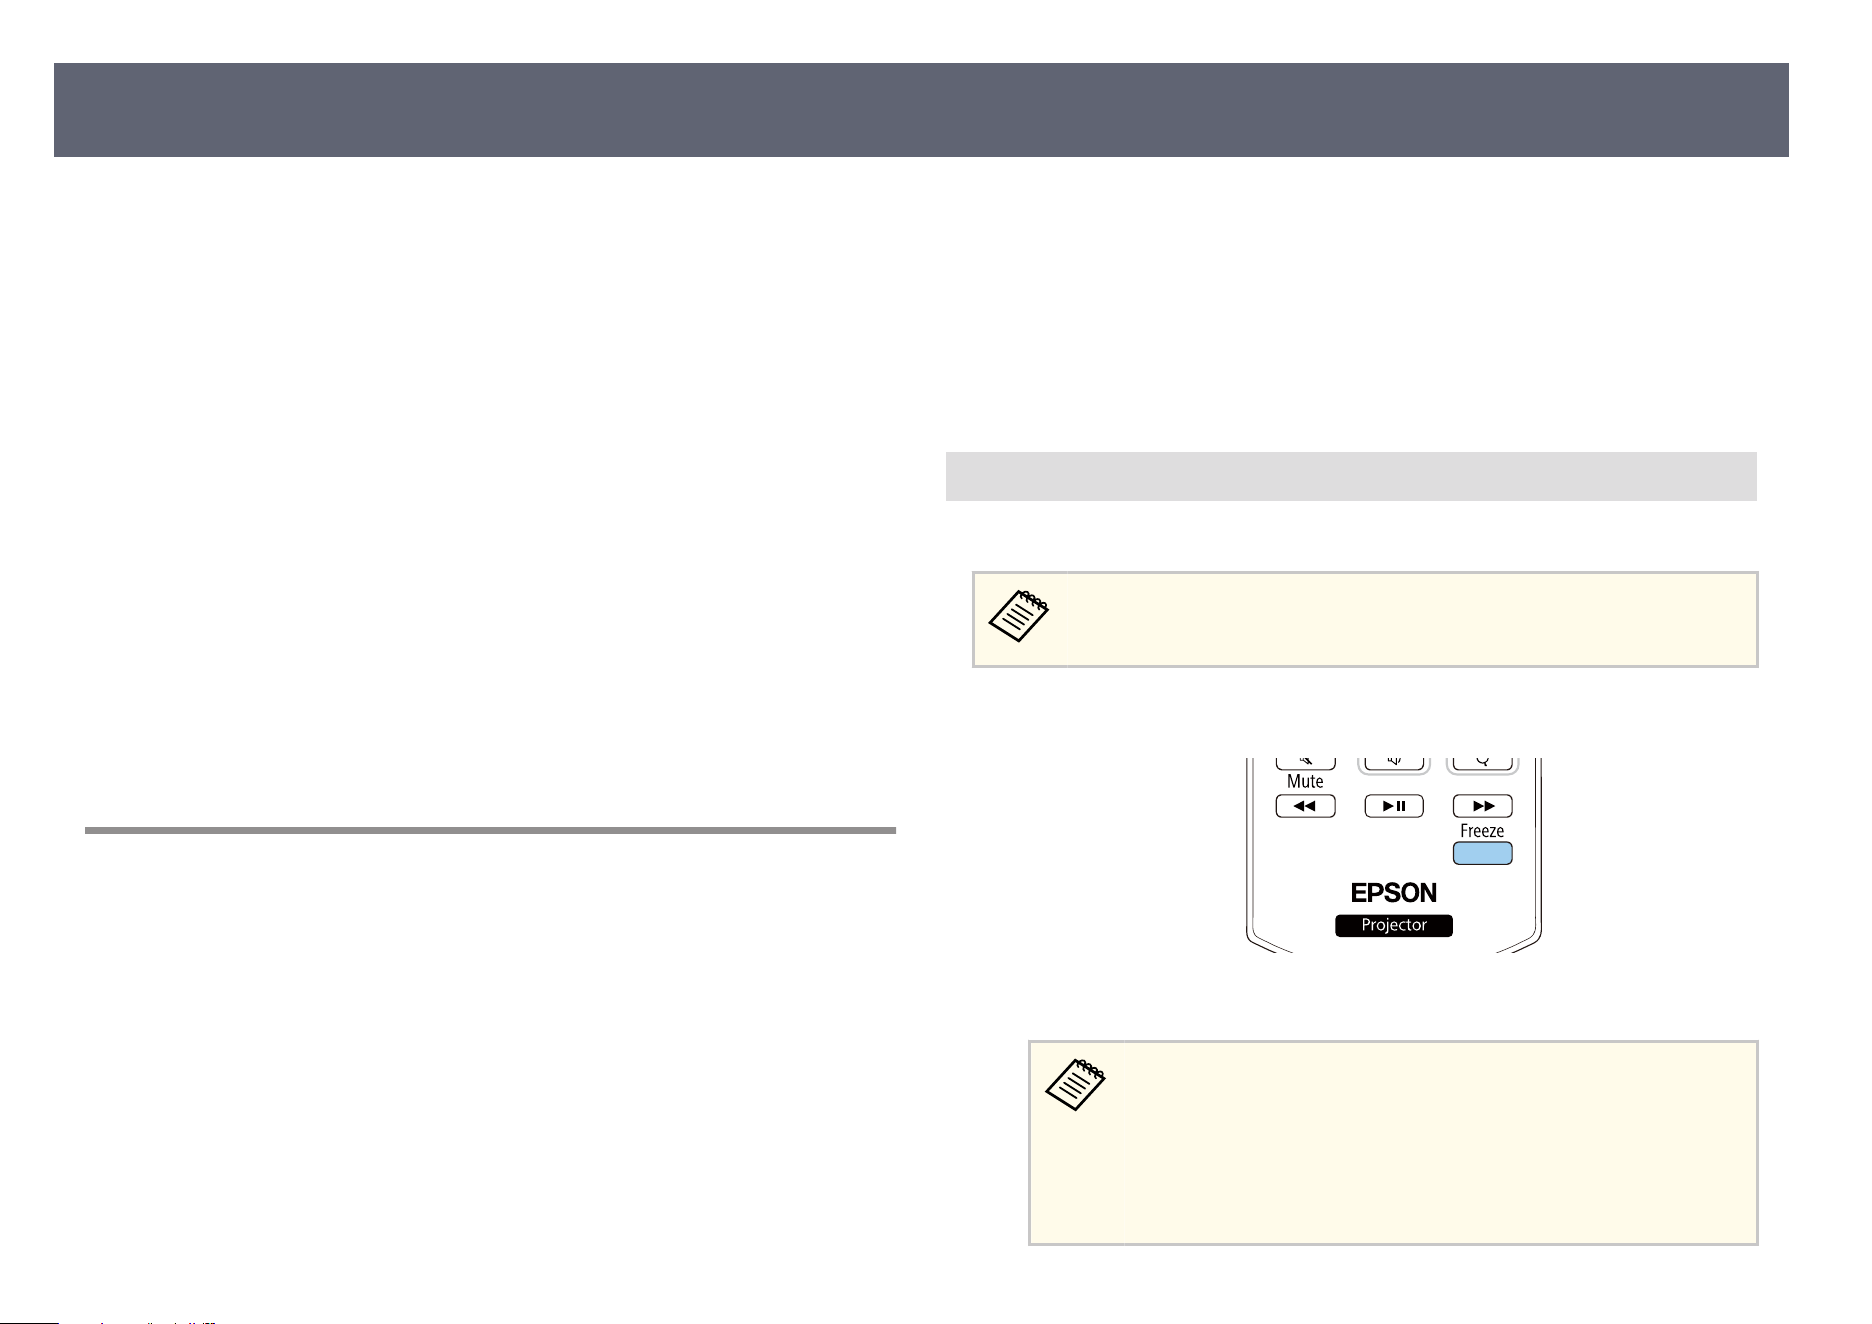
You can secure your projector to deter th
e or prevent unintended use by
setting up the following security features:
•
Password security to prevent people who do not know the password from
using the projector, and prevent changes to the startup screen and other
settings.
is acts as an anti-the function as the projector cannot be used even if it is
stolen, and you can limit who can use the projector.
•
Button lock security to block operation of the projector using the buttons on
the control panel.
is is useful at events or shows when you want to deactivate all buttons
during projection or at schools when you want to limit button operation.
•
Security cabling to physically secure the projector in place.
g
Related Links
•
"Password Security Types" p.133
•
"Locking the Projector's Buttons" p.135
•
"Locking the Remote Control Buttons" p.136
•
"Installing a Security Cable" p.137
Password Security Types
You can set up the following types of password security using one shared
password:
•
Power On Protection prevents anyone from using the projector without rst
entering a password. When plugging the power cord and turning on the
projector, you must enter the correct password. is also applies to Direct
Power On and Auto Power On.
•
Menu Protection of User's Logo prevents anyone from changing the custom
screen displayed when the projector turns on or receives an input signal. e
custom screen deters the by identifying the projector's owner.
•
Menu Protection of Schedule prevents anyone from changing the projector's
schedule settings.
•
Me
nu Protection of Network prevents anyone from changing the projector's
Network settings.
g
Related Links
•
"Setting a Password" p.133
•
"Selecting Password Security Types" p.134
•
"Entering a Password to Use the Projector" p.135
Setting a Password
F
o
r the rst time you use the projector, you must set a password.
No password is set by default. You must set a password.
a
Hold down the [Freeze] button on the remote control for about 5 seconds.
You see the Password Protection setting menu.
•
If n
o password has been set, a screen prompting you to set
a password is displayed before you can view the Password
Protection setting menu.
•
If Password Protection is already activated, you must enter the
correct password to display the Password Protection setting
menu.
Projector Security Features
133
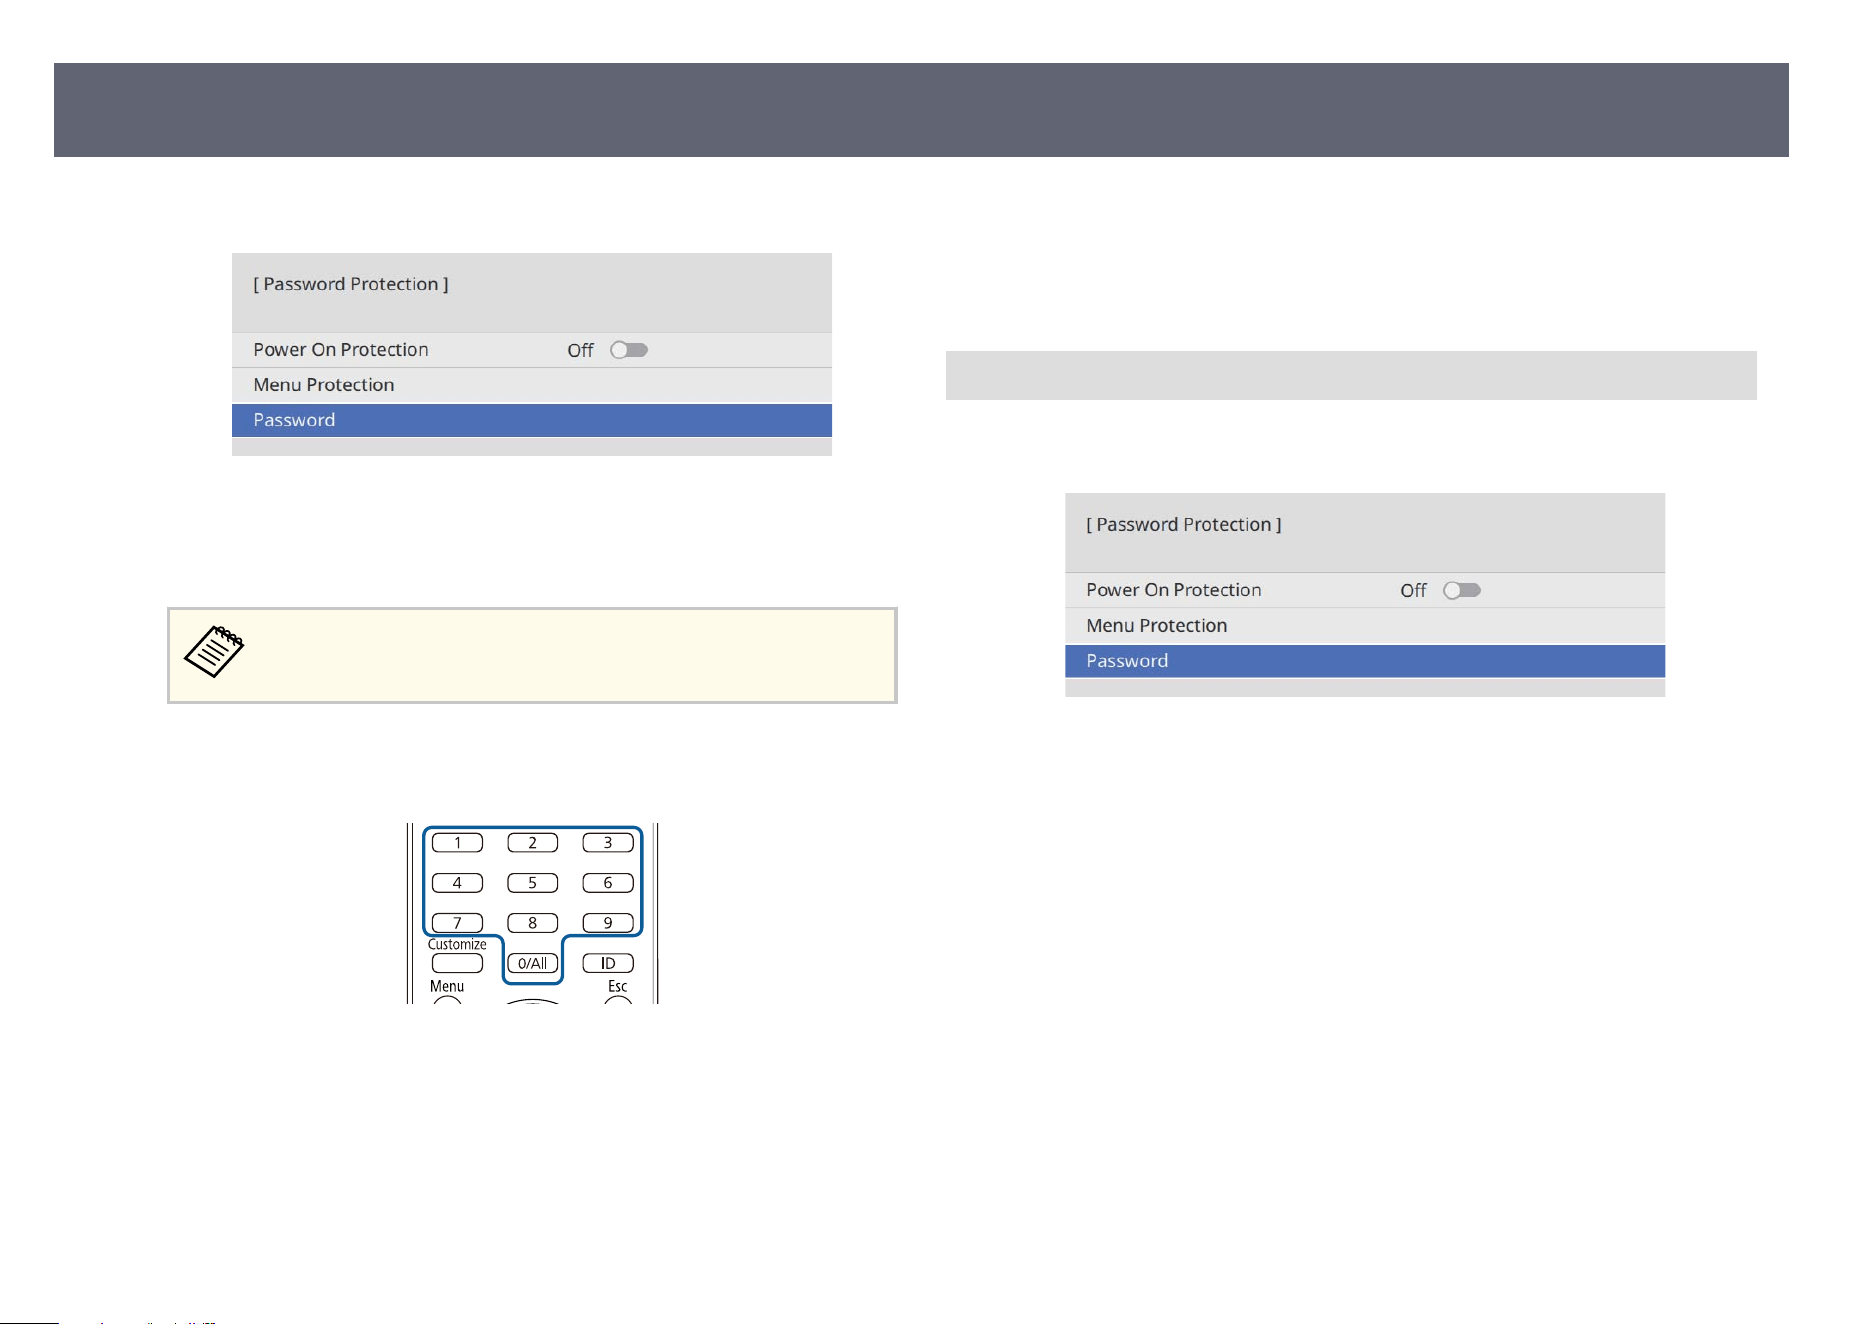
b
Select Password and press [Enter].
You see the prompt Chan
ge the password?.
c
Select Yes and press [Enter].
If you select No
, the Password Protection setting menu is displayed
again.
d
Use the numeric buttons on the remote control to set a four-digit
pas
sword.
e password displays as **** as it is entered. A conrmation prompt is
di
splayed when you enter the fourth digit.
e
Enter the password again.
Yo
u see the message Password accepted. If you enter the password
incorrectly, a message is displayed prompting you to re-enter the
password.
f
Press [Esc] to return to the menu.
g
Make a note of the password and keep it in a safe place.
Selecting Password Security Types
A
er
setting a password, you see this menu, allowing you to select the password
security types you want to use.
If you do not see this menu, hold down the [Freeze] button on the remote
con
trol for 5 seconds until the menu appears.
•
To prevent unauthorized use of the projector, set the Power On Protection
setting to On.
•
To prevent changes to the projector's settings, select the Menu Protection
setting, press [Enter], and select the options as necessary.
•
To prevent changes to the User's Logo screen or related display settings, set
the User's Logo setting to On.
•
To prevent changes to the projector's schedule settings, set the Schedule
setting to On.
•
To prevent changes to projector's network settings, set the Network setting
to On.
You can attach the password protect sticker to the projector as an additional
the deterrent.
Projector Security Features
134
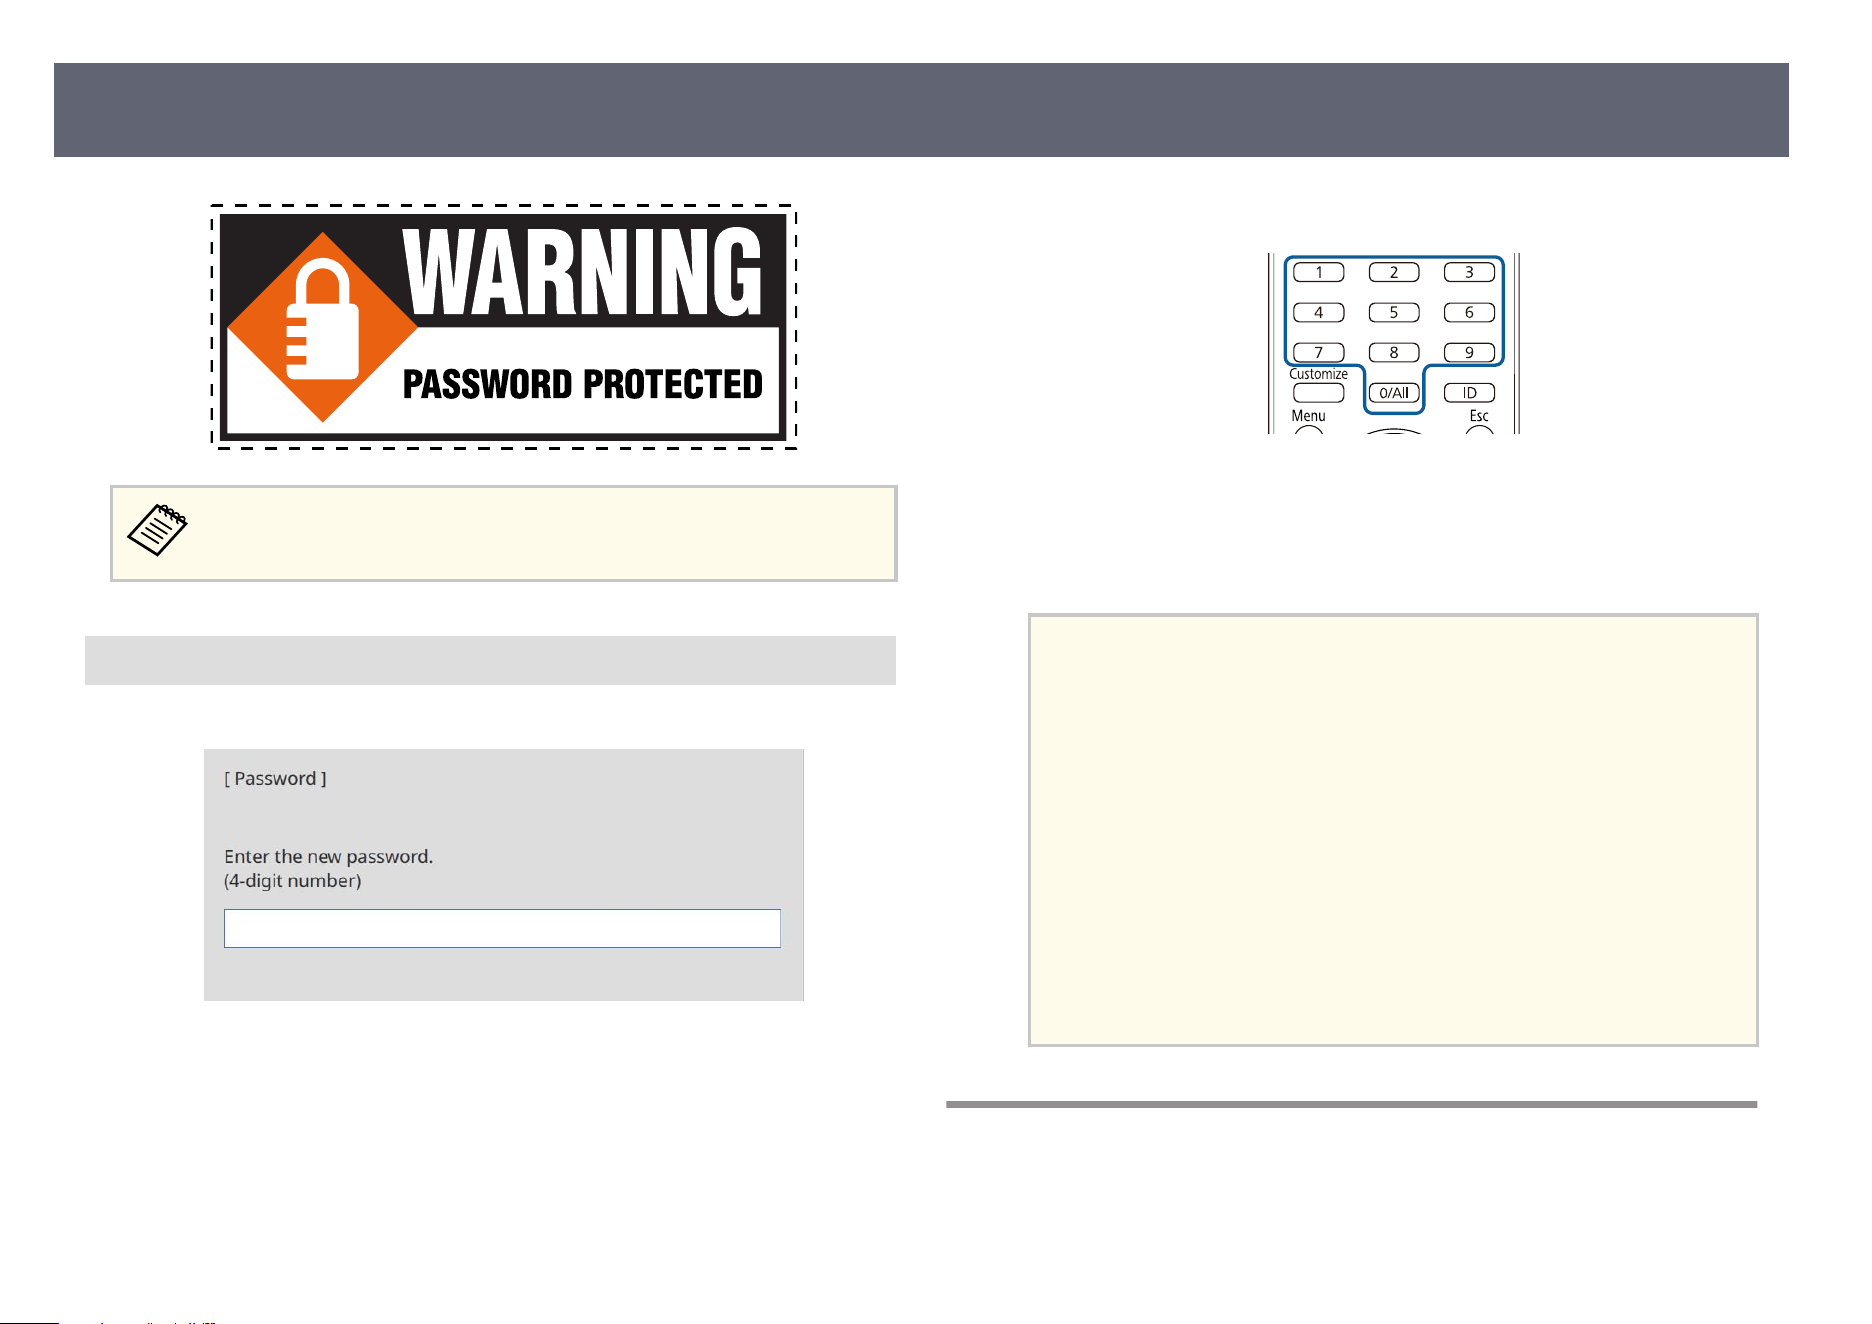
Be sure to keep the remote control in a safe place; if you lose it, you will
no
t be able to enter the password.
Entering a Password to Use the Projector
Wh
en the password screen is displayed, enter the correct password.
a
Enter the password using the numeric buttons on the remote control.
e password screen closes.
b
If the password is incorrect, you see a message and a prompt to try again.
Ent
er the correct password to proceed.
Attention
•
If an incorrect password is entered three times in succession, the message
e projector's operation will be locked. is displayed for approximately
5 minutes, and the projector switches to standby mode. If this happens,
disconnect the power plug from the electrical outlet, reinsert it, and turn
the projector back on. e projector displays the password entry screen
again so that you can enter the correct password.
•
If you have forgotten the password, make a note of the " Request Code:
xxxxx" number that appears on the screen and contact Epson for help.
•
If you continue to repeat the above operation and input the wrong
password 30 times in succession, the message e projector's operation
will be locked. Contact Epson as described in your documentation. is
displayed and the projector does not accept any more password entries.
Contact Epson for help.
Locking the Projector's Buttons
You can lock the buttons on the control panel to prevent anyone from using the
pr
ojector. e projector can still be operated using the remote control.
Projector Security Features
135

a
Press the [Menu] button, select the Manage
ment menu, and press [Enter].
b
Select C
ontrol Panel Lock and press [Enter].
c
S
elect one of these lock types and press [Enter]:
•
To lo
ck all of the projector's buttons, select Full Lock.
•
To lock all buttons except the power button, select Except for Power.
You see a conrmation prompt.
d
S
elect Yes and press [Enter].
e
Control Panel Lock setting takes eect.
g
Related Links
•
"Unlocking the Projector's Buttons" p.136
Unlocking the Projector's Buttons
If t
he projector's buttons have been locked, do one of the following to unlock
them.
•
Hold down the [Enter] button on the control panel for 7 seconds. A message
is displayed and the lock is released.
•
Set the Control Panel Lock setting to O in the projector's Management
menu.
g
Related Links
•
"Projector Administration Settings - Management Menu" p.207
Locking the Remote Control Buttons
You can lock some of the buttons on the remote control.
To lo
ck the remote control buttons shown here, press and hold the [Home]
button on the remote control for approximately 5 seconds.
To unlock the buttons, press and hold the [Home] button again for
approximately 5 seconds.
Projector Security Features
136
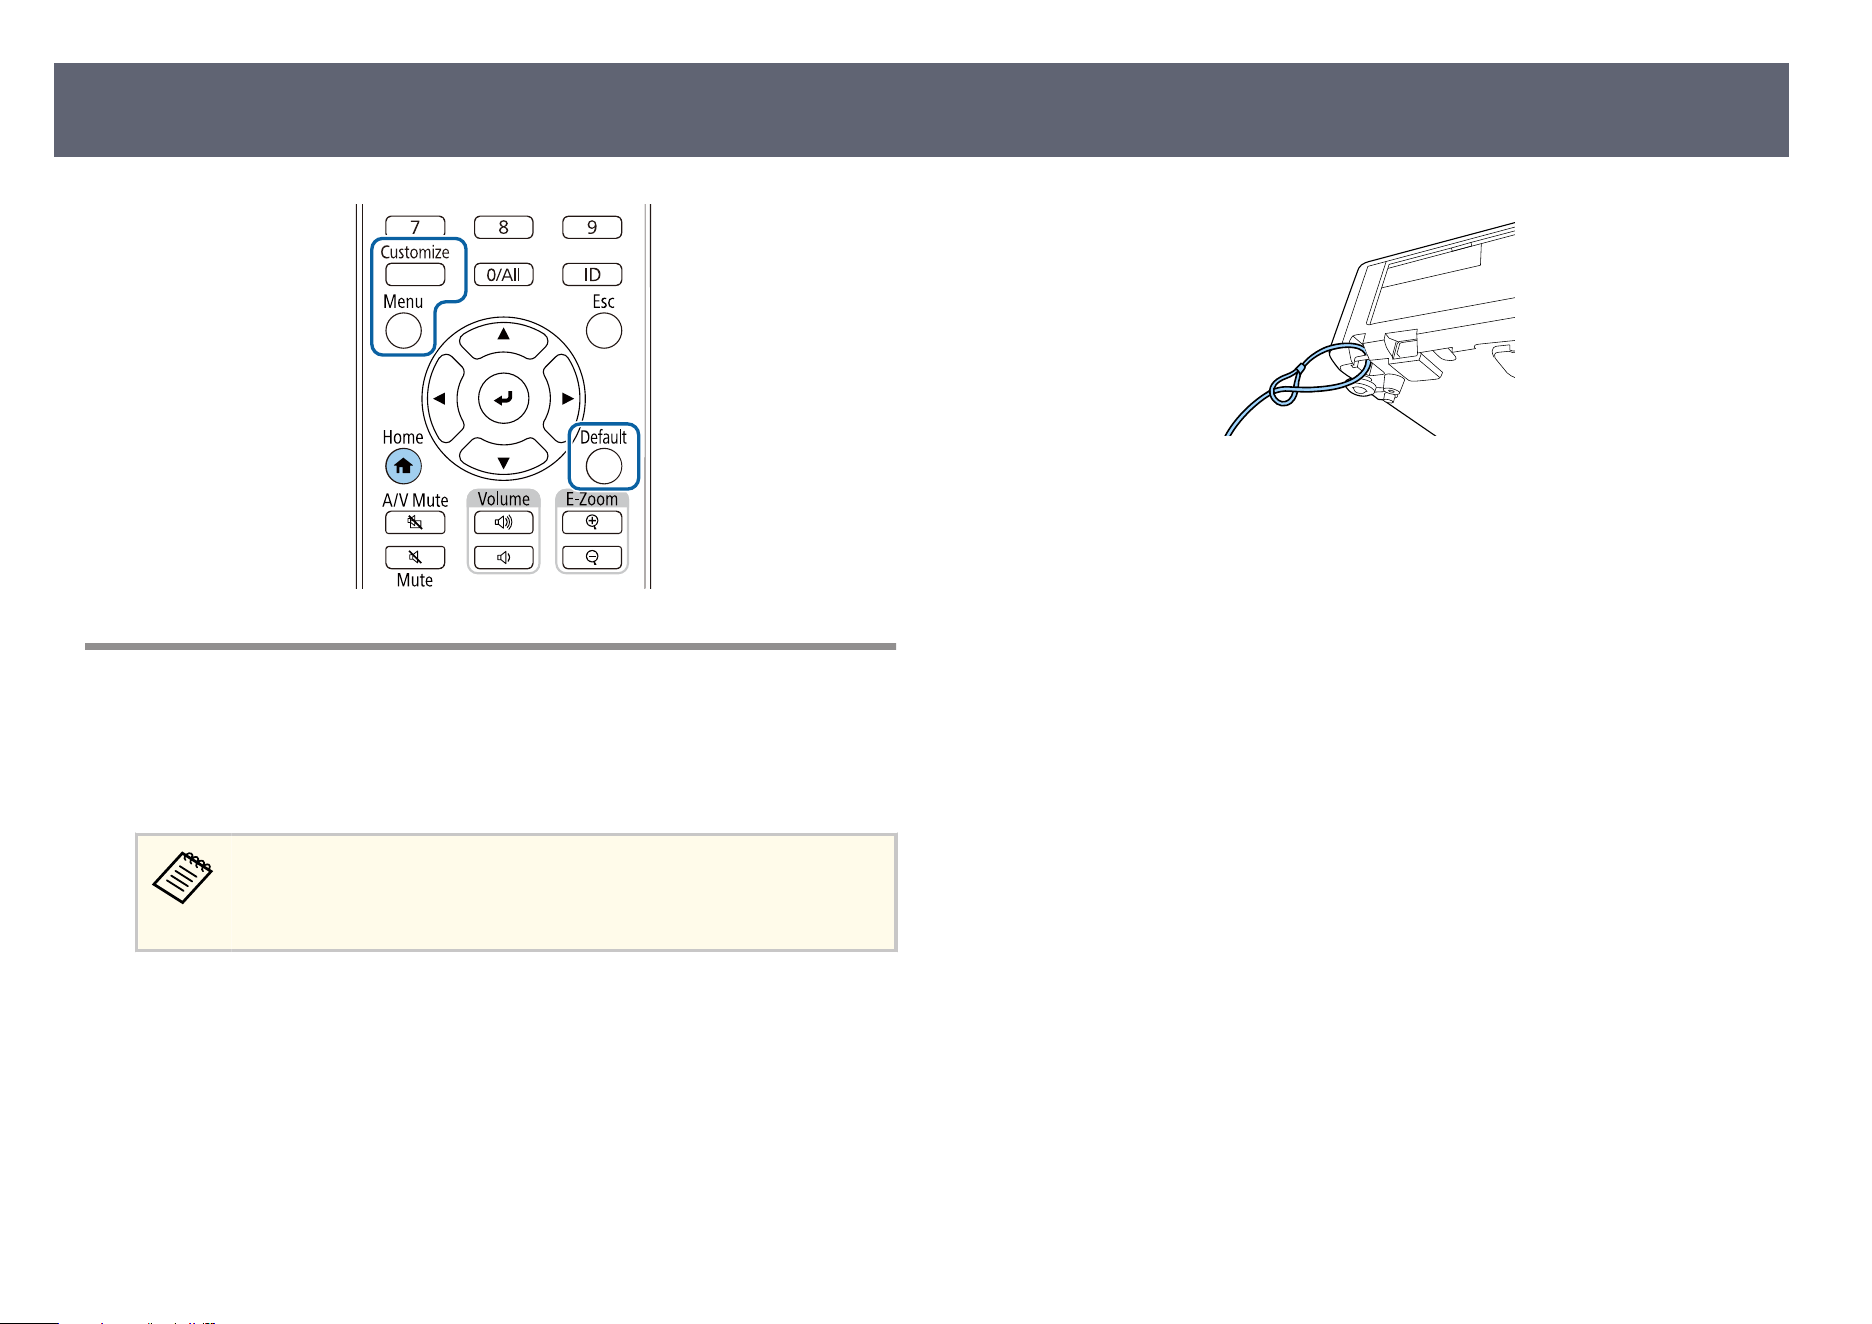
Installing a Security Cable
You can install the security cable on the projector to deter th
e.
•
Use the security slot on the projector to attach a Kensington Microsaver
Security system.
For more details on the Microsaver Security System, visit the
Ken
sington Web site.
https://www.kensington.com/
•
U
s
e the security cable attachment point on the projector to attach a wire cable
and secure it to a room xture or heavy furniture.
Projector Security Features
137

Using the Projector on a Network
Fo
llow the instructions in these sections to set up your projector for use on a network. (Available only for models that have a built-in wireless module or that support the
optional wireless module.)
g
Related Links
•
"Wired Network Projection" p.139
•
"Wireless Network Projection" p.143
•
"Wireless Network Projection from a Mobile Device (Miracast)" p.153
•
"Using AirPlay" p.157
•
"Secure HTTP" p.161
•
"Screen Sharing" p.163
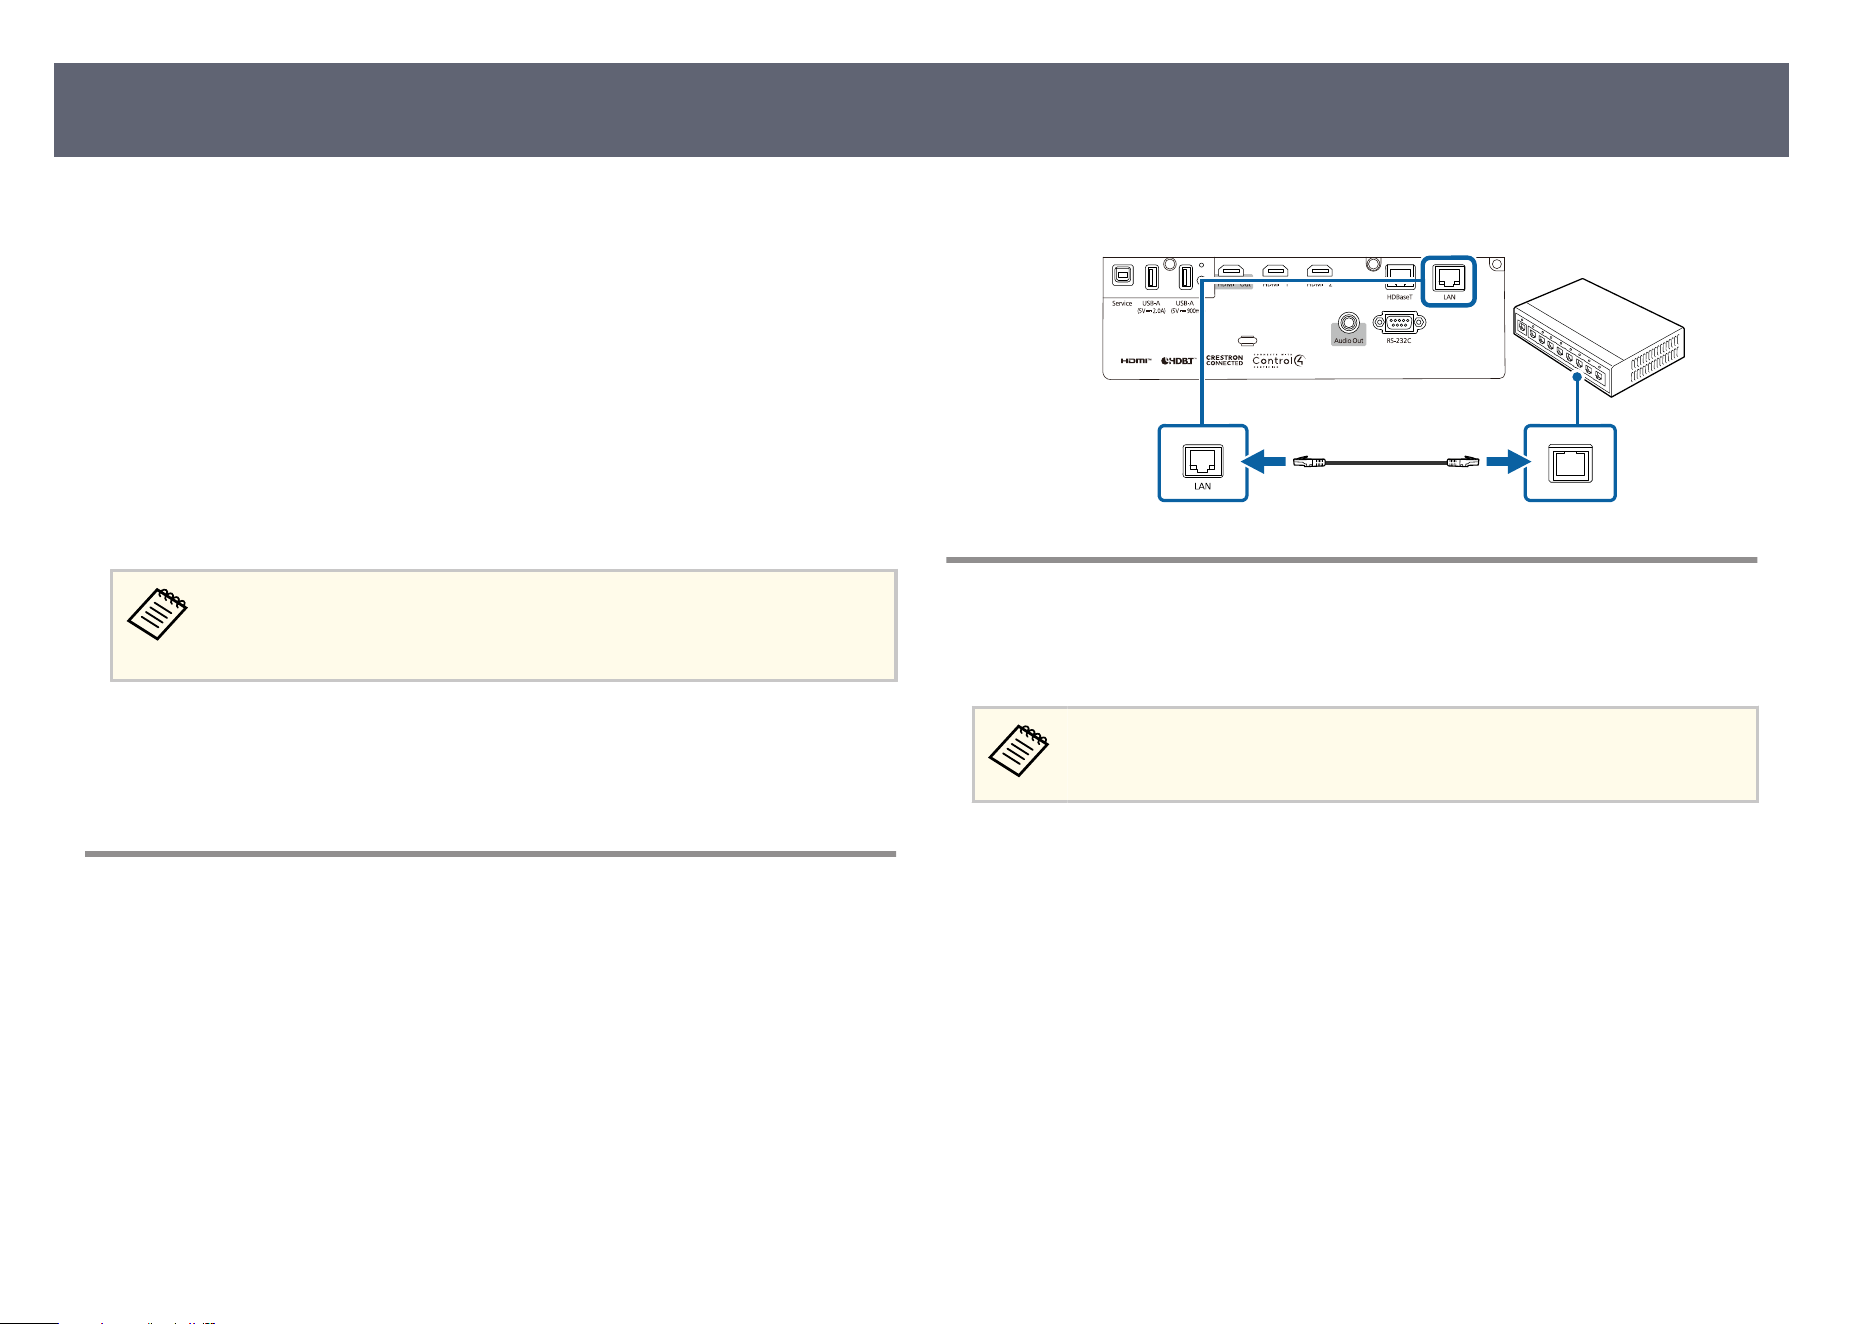
You can send images to your projector through a wired network. To do this,
conn
ect the projector to your network, and then set up your projector and
computer for network projection.
Aer connecting and setting up the projector as described here, download and
install Epson iProjection (Windows/Mac) from the following Web site.
epson.com/support (U.S.), epson.ca/support (Canada), or latin.epson.com/
support (Latin America)
Epson iProjection soware sets up your computer for network projection. It also
allows you to hold interactive meetings by projecting user's computer screens
over a network. See the Epson iProjection Operation Guide (Windows/Mac) for
instructions.
If the Web Control Password has not been set, a screen prompting you to
s
et a password is displayed when you save the network settings. Follow the
on-screen instructions to set the password.
g
Related Links
•
"Co
nnecting to a Wired Network" p.139
•
"Selecting Wired Network Settings" p.139
Connecting to a Wired Network
To connect the projector to a wired local area network (LAN), use a 100Base-TX
or 10B
ase-T network cable. To ensure proper data transmission, use a Category
5 shielded cable or better.
a
Connect one end of the network cable to your network hub, switch, or
ro
uter.
b
Connect the other end of the cable to the projector's LAN port.
Selecting Wired Network Settings
Before you can project from computers on your network, you need to select
network settings on the projector.
Make sure you already connected the projector to your wired network
usin
g the LAN port.
Wired Network Projection
139
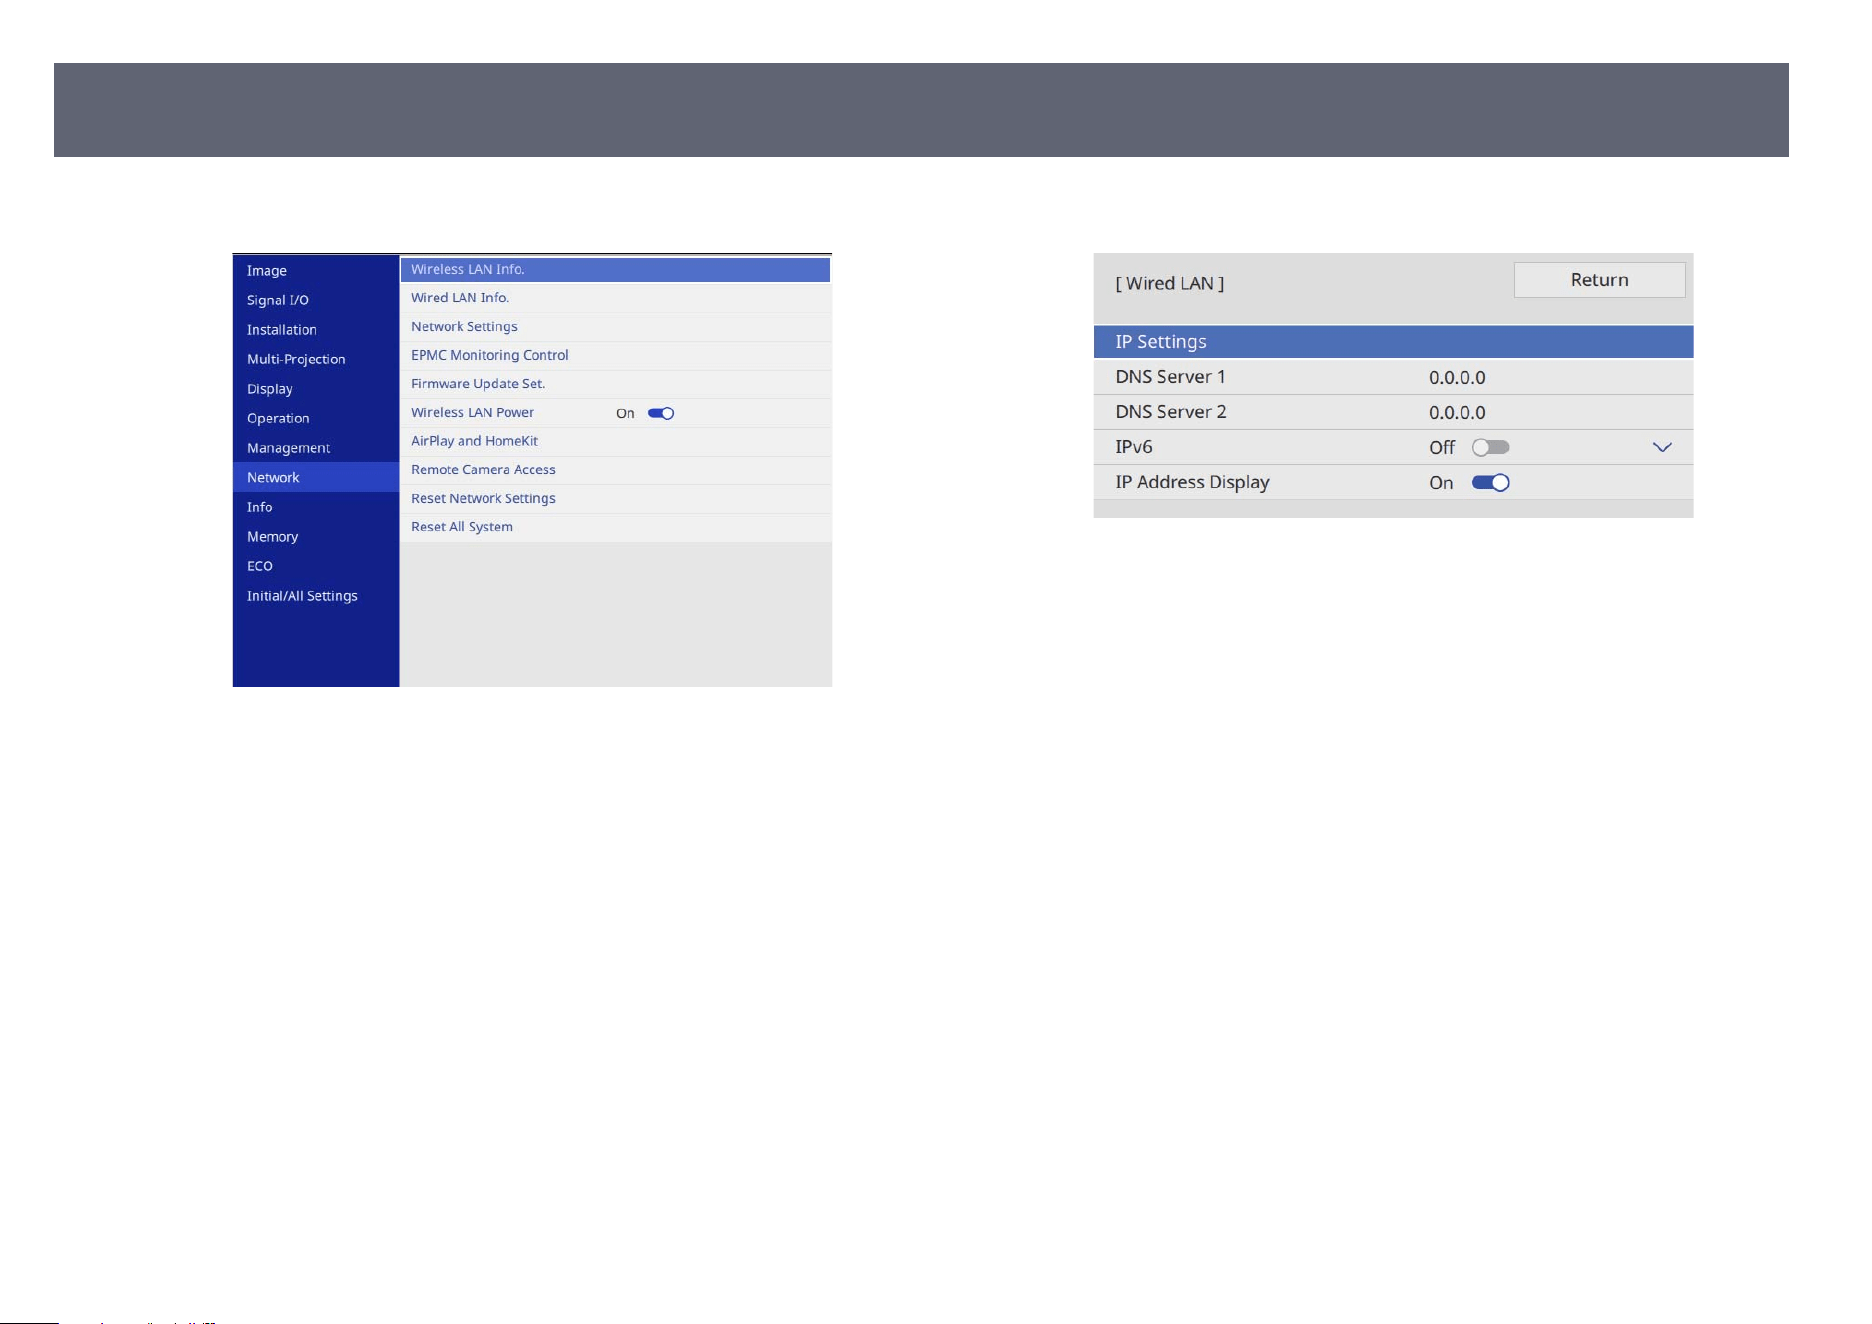
a
Press the [Menu] button, select the Ne
twork menu, and press [Enter].
b
Select N
etwork Settings and press [Enter].
c
T
o identify the projector over the network, select Pr
ojector Name and
enter a name up to 16 alphanumeric characters long.
d
Set the Priority Control Interface setting to Wired LAN.
e
S
elect the W
ired LAN menu and press [Enter].
f
Assign the IP settings for your network as necessary.
•
I
f y
our network assigns addresses automatically, select IP Settings to set
the DHCP setting to On.
•
If you must set addresses manually, select IP Settings to set the DHCP
setting to O, and then enter the projector's IP Address, Subnet Mask,
and Gateway Address as necessary.
g
To prevent the IP address from being displayed on the network
info
rmation screen, set the IP Address Display setting to O.
Wired Network Projection
140

h
Select the Network Projection menu and press [Enter].
i
Turn on the P
r
ojector Keyword setting if you want to prevent access to
the projector by anyone not in the room with it.
When you turn on this setting, you must enter a displayed,
ran
do
mized keyword from a computer using Epson iProjection to
access the projector and share the current screen.
j
Set the E
pson iProjection setting to On.
k
S
elect the options as necessary.
•
SSID Dis
play lets you select whether to display projector's SSID on the
network information screen and Home screen.
•
LAN I
nfo. Settings lets you set the display format for the projector's
network information.
•
Moderator Password lets you enter a four-digit number password for
accessing the projector as a moderator using Epson iProjection. (No
password is set by default.)
•
Keyword Interrupt Display lets you select whether to display a
projector keyword on the projected image when accessing the projector
using Epson iProjection.
l
When you nis
h selecting settings, go back to the Network Settings
screen, select Set, and follow the on-screen instructions to save your
settings and exit the menus.
If no Web Control Password has been set, a screen prompting
y
ou to set a password is displayed before you can save the settings.
Follow the on-screen instructions to set the password.
m
Press the [Wireless] button on the remote control to switch to the LAN
s
o
urce.
e wired network settings complete when you see the correct IP address
on the network information screen.
Wired Network Projection
141

Wired Network Projection
142
You can send images to your projector through a wireless network.
•
To do t
his, you must install the Epson wireless LAN module, and then set up
your projector and computer for wireless projection.
•
Some models have built-in wireless LAN modules. You must set up your
projector and computer for wireless projection.
You can connect the projector to your wireless network by conguring the
connection manually using the projector's Network menus.
Aer setting up the projector, download and install the network soware from
the following Web site.
epson.com/support (U.S.), epson.ca/support (Canada), or latin.epson.com/
support (Latin America)
Use the following soware and documentation to set up and control wireless
projection:
•
Epson iProjection (Windows/Mac) soware allows you to hold interactive
meetings by projecting the computer screens of users over a network. See the
Epson iProjection Operation Guide (Windows/Mac) for instructions.
•
Epson iProjection (iOS/Android) app allows you to project from iOS or
Android devices.
You can download Epson iProjection for free from the App Store or Google
Play. Any fees incurred when communicating with the App Store or Google
Play are the responsibility of the customer.
•
Epson iProjection (Chromebook) app allows you to project from
Chromebook devices.
You can download Epson iProjection from the Chrome Web Store. Any
fees incurred when communicating with the Chrome Web Store are the
responsibility of the customer.
If the Web Control Password has not been set, a screen prompting you to
s
et a password is displayed when you save the network settings. Follow the
on-screen instructions to set the password.
g
Related Links
•
"Safet
y Instructions for Built-in Wireless LAN Module" p.143
•
"Installing the Wireless LAN Module" p.144
•
"Connection Methods for Wireless Network Projection" p.144
•
"Selecting Wireless Network Settings Manually" p.145
•
"Setting Up Wireless Network Security (When Simple AP is Enabled)" p.148
•
"Setting Up Wireless Network Security (When Simple AP is Disabled)" p.149
•
"Using a QR Code to Connect a Mobile Device" p.151
•
"Using a USB Key to Connect a Windows Computer" p.152
Safety Instructions for Built-in Wireless LAN Module
If your projector contains built-in wireless LAN modules, be sure to follow these
important guidelines when using a wireless LAN connection.
Warning
•
Do n
ot use the device near medical equipment such as pace makers. Furthermore,
when using the device, make sure there is no medical equipment such as pace
makers, in the surrounding area. Electromagnetic interference may cause medical
equipment to malfunction.
•
Electromagnetic interference may cause automatically controlled equipment
to malfunction which could cause an accident. Do not use the device near
automatically controlled equipment such as automatic doors or re alarms.
Caution
Mak
e sure you keep a distance of at least 20 cm between the device and your body.
Otherwise, it could cause you to feel unwell.
Wireless Network Projection
143
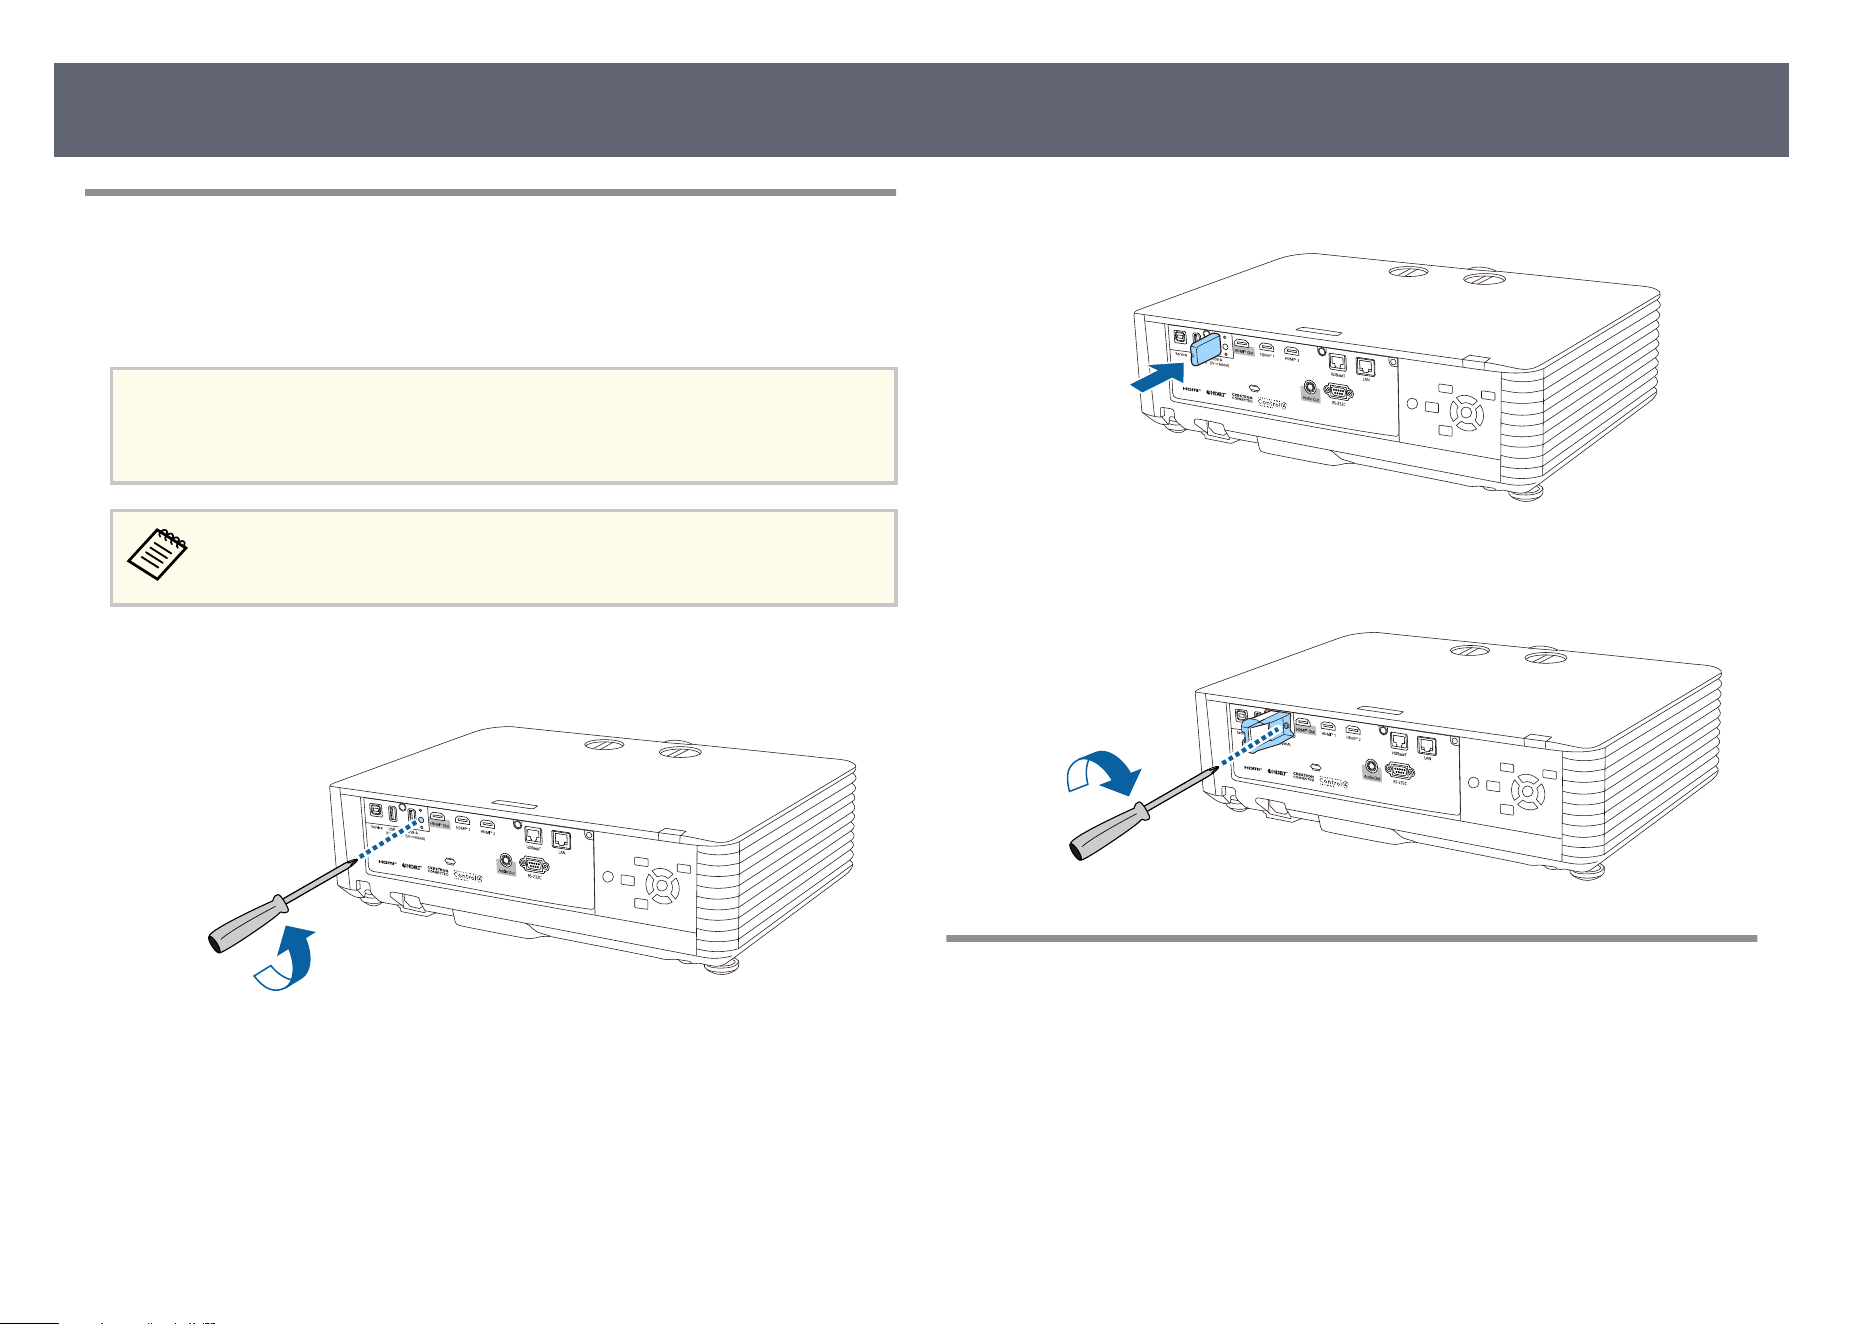
Installing the Wireless LAN Module
To use the projector over a wireless network, install the Epson wireless LAN
mo
dule (EB-L690SE/EB-L695SE). Do not install any other type of wireless LAN
module.
Attention
Ne
ver remove the module while its indicator is blue or ashing, or while you are
projecting wirelessly. is could damage the module or lose data.
e indicator on the wireless LAN module does not operate. See the
w
ireless LAN indicator on the projector to check the wireless LAN status.
a
Use a cross-head screwdriver to remove the screw that secures the wireless
L
AN m
odule cover.
b
Connect the wireless LAN module to the USB-A port.
c
Attach the cover comes with your wireless LAN module, and secure it in
pl
ace with the screw.
Connection Methods for Wireless Network Projection
Choose a connection method for connecting your computer and projector over
a n
et
work based on your network environment.
•
Turning on simple AP mode lets you directly connect to smartphones,
tablets, or computers using your projector as an access point. When you
use this method, connect the projector using Quick Connection Mode of
the Epson iProjection soware, using Miracast, or using the optional wireless
presentation system.
Wireless Network Projection
144
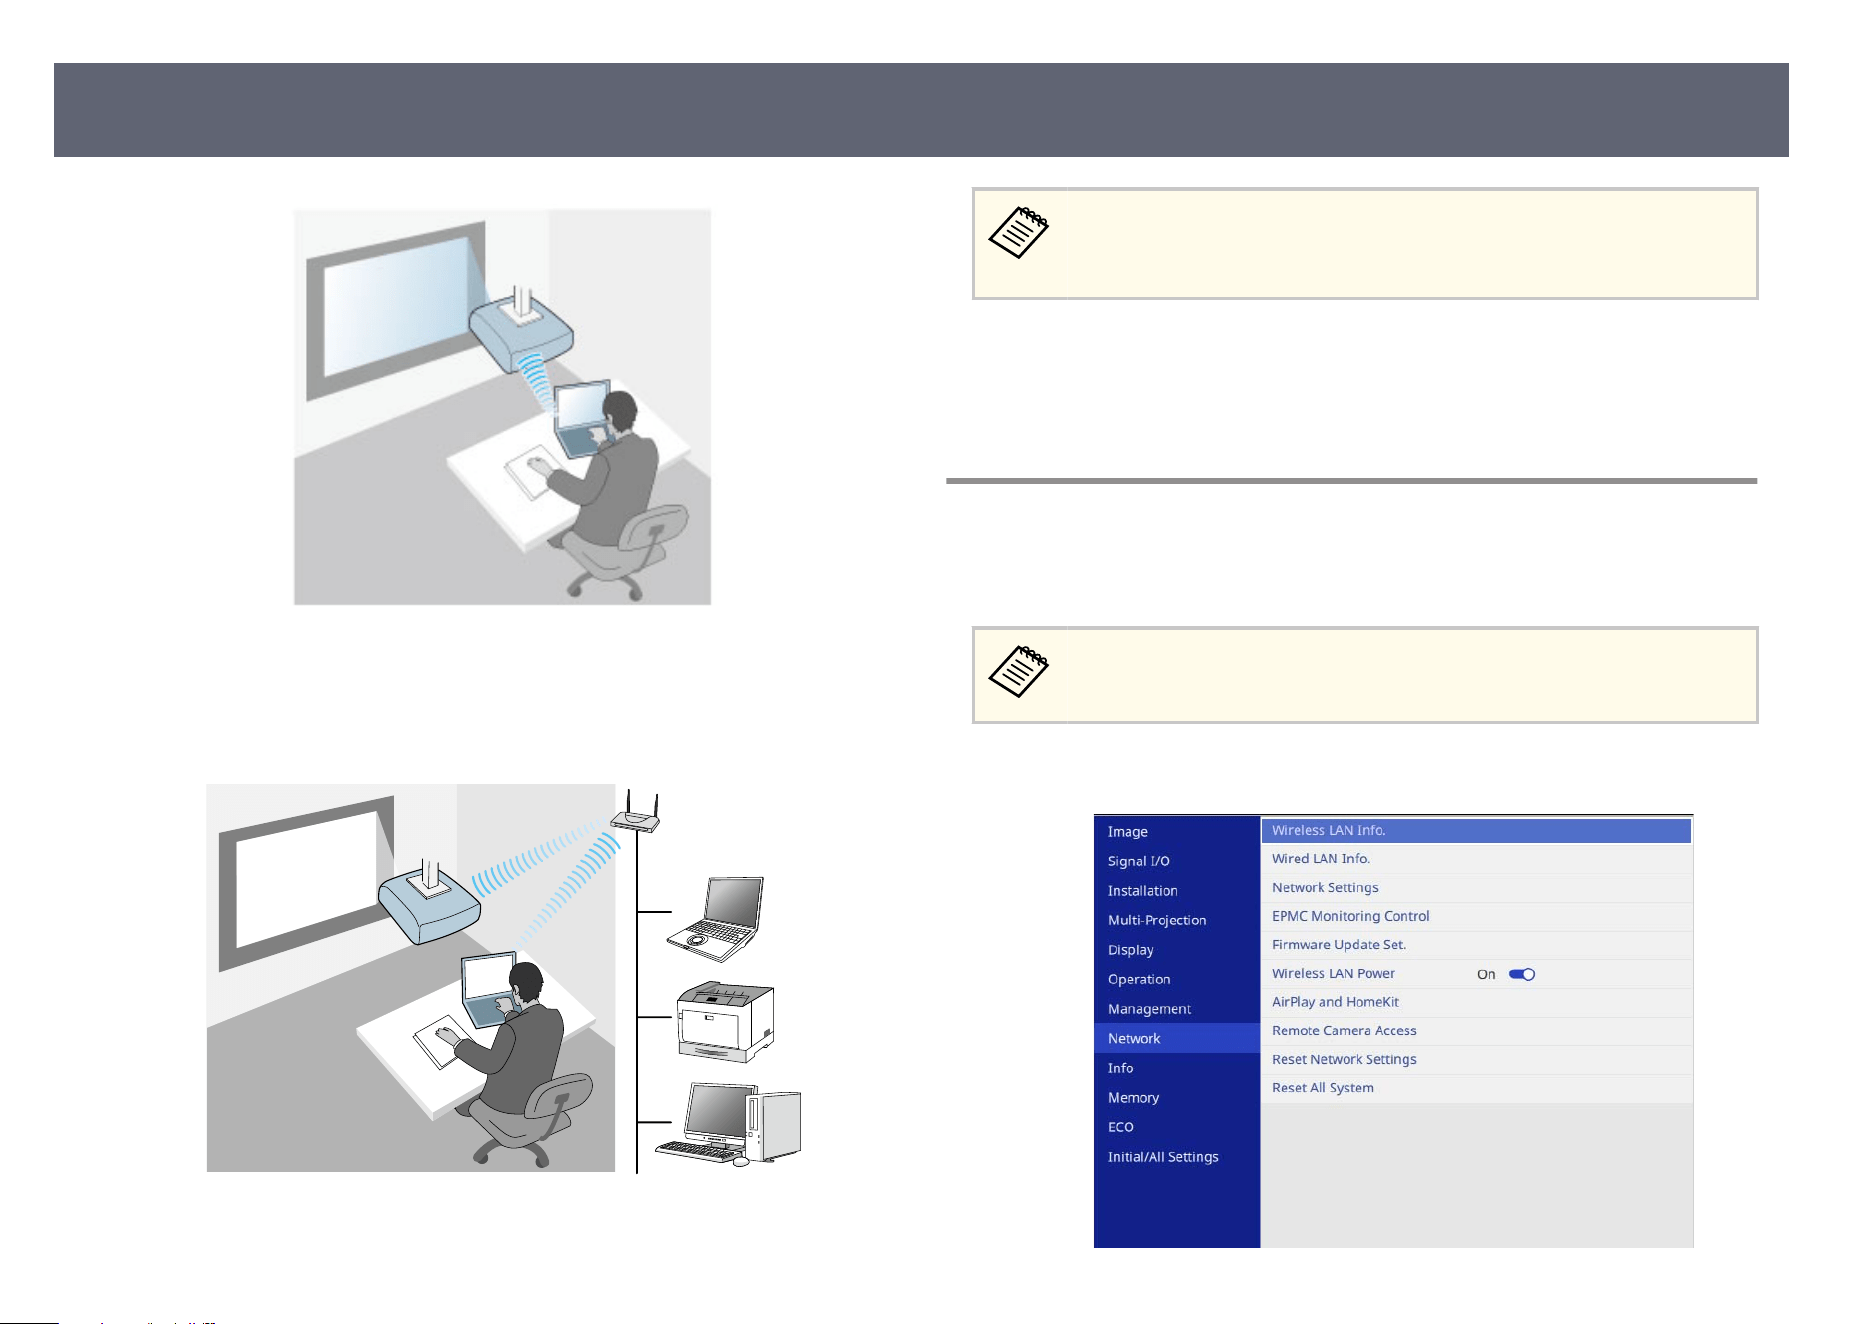
•
Tur
ning o simple AP mode lets you connect to smartphones, tablets, or
computers over a wireless network access point. Select this mode when
connecting using Epson iProjection's Advanced Connection Mode (EB-
L690SE/EB-L695SE).
When monitoring or controlling the projector using wireless LAN in
st
andby mode, set the Simple AP setting to O, and connect your
computer and projector.
If your projector has built-in wireless LAN modules, you can use both network
conn
ection methods at the same time. Set the Simple AP setting to On.
s Network > Network Settings > Simple AP
Selecting Wireless Network Settings Manually
Before you can project from your wireless network, you need to select network
s
et
tings for the projector.
To use the projector over a wireless network, install the Epson wireless
LAN m
odule (EB-L690SE/EB-L695SE).
a
Press the [Menu] button, select the N
e
twork menu, and press [Enter].
Wireless Network Projection
145

b
Set the Wireless LAN Power setting to On.
c
S
elect Network Settings and press [Enter].
d
T
o identify the projector over the network, select Pr
ojector Name and
enter a name up to 16 alphanumeric characters long.
e
Set the Priority Control Interface setting to Wireless LAN.
f
S
elect the connection method.
•
Fo
r simple AP mode, set the Simple AP setting to On and go to step 11.
•
For the access point connection, set the Simple AP setting to O and
go to next step.
•
If you want to use both connection methods at the same time, set the
Simple AP setting to On and go to next step.
g
Select the W
ireless LAN menu and press [Enter].
e projector starts searching for access points.
You can also search for access points using the Se
arch Access Point
setting manually.
h
Select the access point you want to connect to.
If you need to assign the SSID manually, select SSID
to enter the
SSID.
i
Assign the IP settings for your network as necessary.
•
If y
our network assigns addresses automatically, select IP Settings to set
the DHCP setting to On.
•
If you must set addresses manually, select IP Settings to set the DHCP
setting to O, and then enter the projector's IP Address, Subnet Mask,
and Gateway Address as necessary.
j
To prevent the IP address from being displayed on the network
inf
o
rmation screen, set the IP Address Display setting to O.
Wireless Network Projection
146

k
Select the Network Projection menu and press [Enter].
l
Turn on the P
r
ojector Keyword setting if you want to prevent access to
the projector by anyone not in the room with it.
When you turn on this setting, you must enter a displayed,
ran
do
mized keyword from a computer using Epson iProjection to
access the projector and share the current screen.
m
Set the E
pson iProjection setting to On.
n
S
elect the options as necessary.
•
SSID Dis
play lets you select whether to display projector's SSID on the
network information screen and Home screen.
•
LAN I
nfo. Settings lets you set the display format for the projector's
network information.
•
Moderator Password lets you enter a four-digit number password for
accessing the projector as a moderator using Epson iProjection. (No
password is set by default.)
•
Keyword Interrupt Display lets you select whether to display a
projector keyword on the projected image when accessing the projector
using Epson iProjection.
o
When you nis
h selecting settings, go back to the Network Settings
screen, select Set, and follow the on-screen instructions to save your
settings and exit the menus.
If no Web Control Password has been set, a screen prompting
y
ou to set a password is displayed before you can save the settings.
Follow the on-screen instructions to set the password.
p
Press the [Wireless] button on the remote control to switch to the LAN
s
o
urce.
e wireless network settings are complete when you see the correct IP
address on the network information screen.
Wireless Network Projection
147
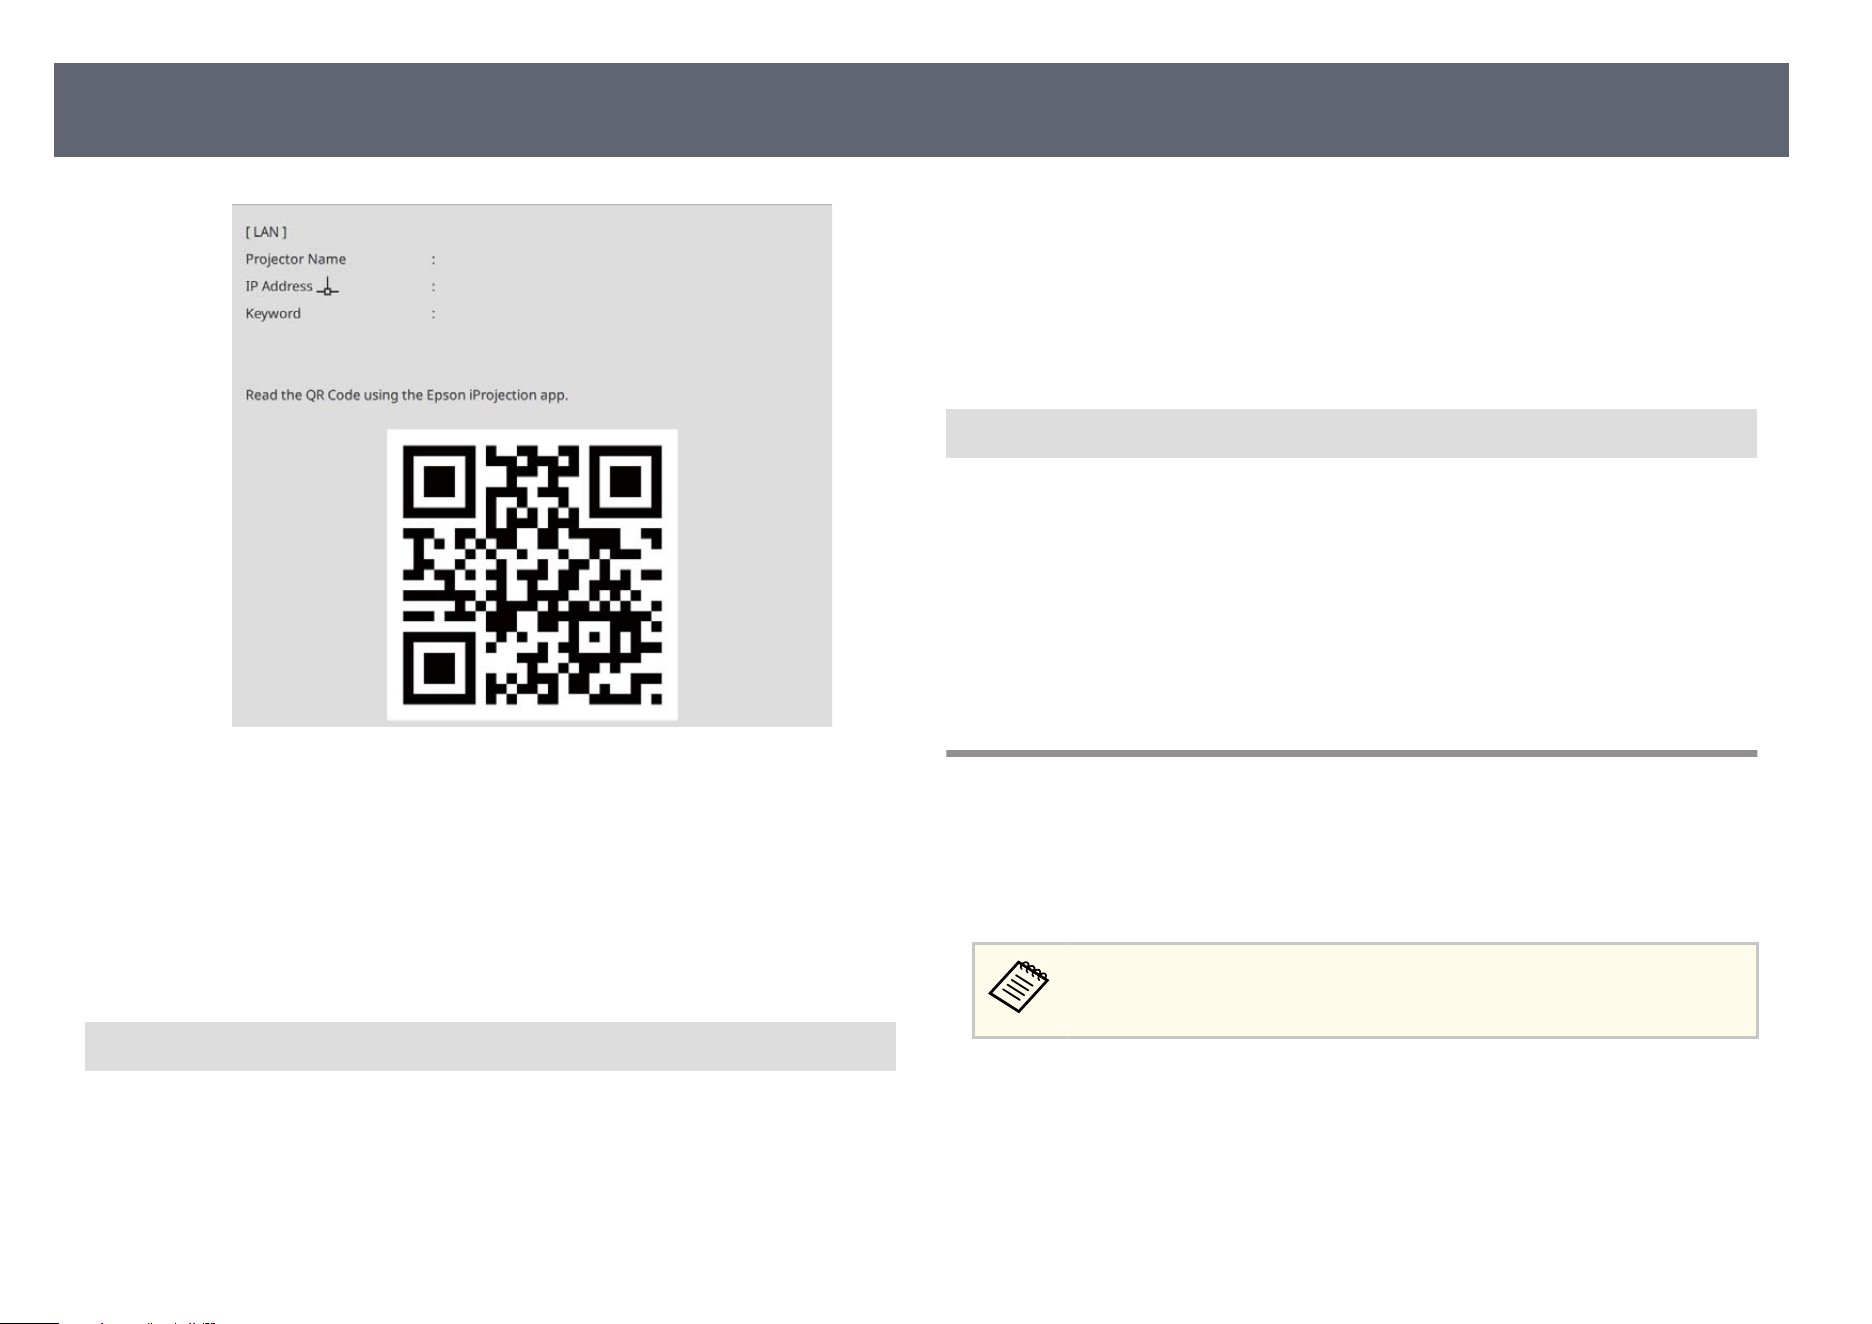
When you have nished making wireless settings for your projector, you need to
select the wireless network on your computer. en start the network soware
to send images to your projector through a wireless network.
g
Related Links
•
"Selecting Wireless Network Settings in Windows" p.148
•
"Selecting Wireless Network Settings in Mac" p.148
Selecting Wireless Network Settings in Windows
Bef
ore connecting to the projector, select the correct wireless network on your
computer.
a
To access your wireless utility so
ware, click the network icon on the
Windows taskbar.
b
When connecting to devices over a wireless network access point, make
s
ur
e Wi-Fi is turned on and select the network name (SSID) of the
network the projector is connecting to.
c
Click Connect.
Selecting Wireless Network Settings in Mac
B
ef
ore connecting to the projector, select the correct wireless network in Mac.
a
Click the Wi-Fi icon on the menu bar at the top of the screen.
b
When connecting to devices over a wireless network access point, make
s
ur
e Wi-Fi is turned on and select the network name (SSID) of the
network the projector is connecting to.
Setting Up Wireless Network Security (When Simple
AP is Enabled)
You can set up security for your projector to use on a wireless network with
simp
le AP mode. You can use WPA2-PSK security.
Contact your network administrator for guidance on entering the correct
info
rmation.
a
Press the [Menu] button, select the Ne
twork menu, and press [Enter].
b
Select Network Settings and press [Enter].
Wireless Network Projection
148
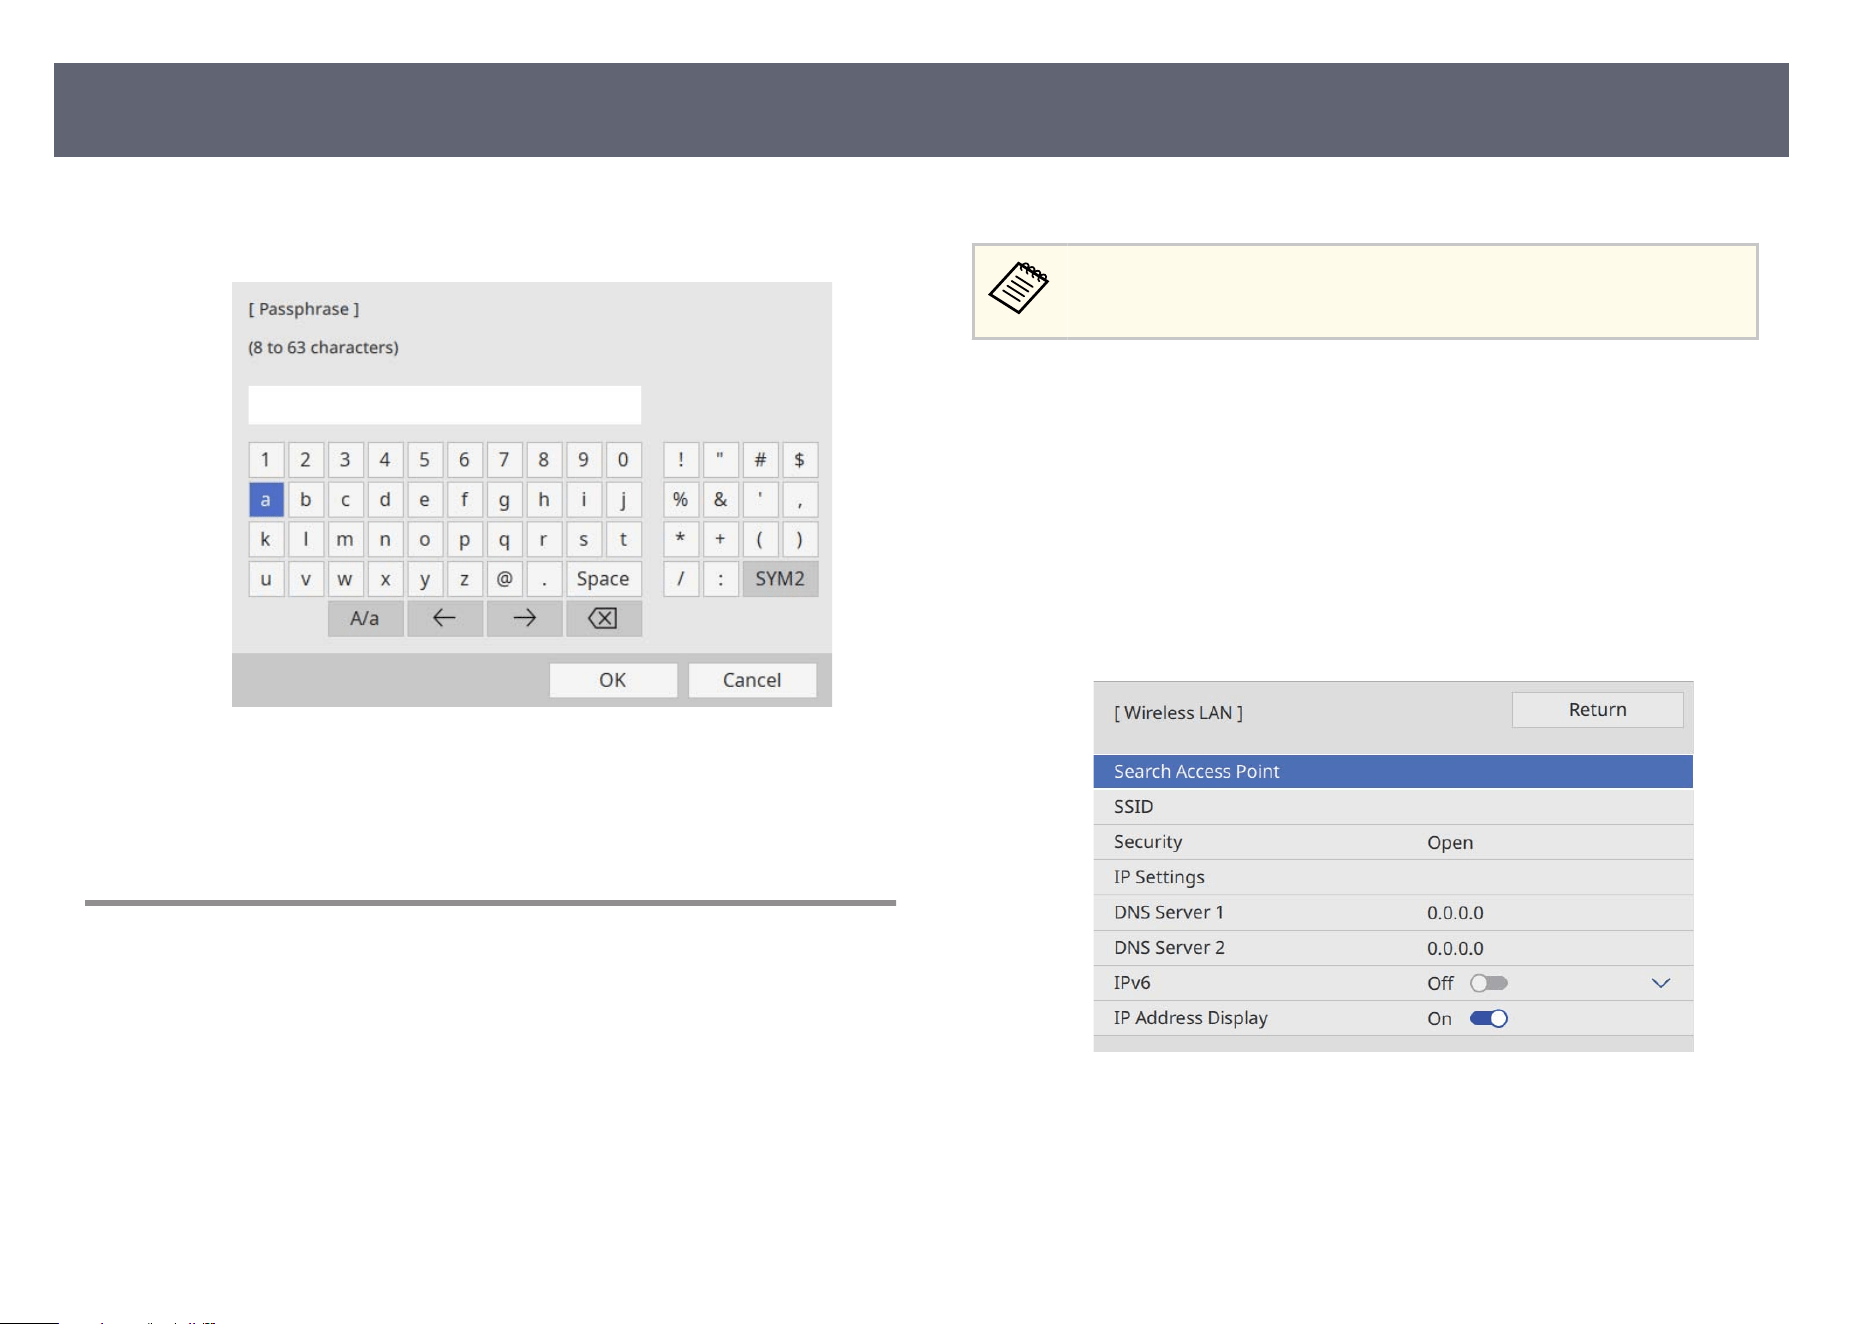
c
Select Passphrase, press [Enter], and enter a passphrase from 8 to 63
c
haracters long.
d
When you nis
h entering a passphrase, go back to the Network Settings
screen, select Set, and follow the on-screen instructions to save your
settings and exit the menus.
Setting Up Wireless Network Security (When Simple
AP is Disabled)
You can set up security for your projector to use on a wireless network with
infras
tructure mode. Set up one of the following security types to match the
settings used on your network:
•
WPA3-PSK security
•
WPA2/WPA3-PSK security
•
WPA3-EAP security
•
WPA2/WP
A3-EAP security
Contact your network administrator for guidance on entering the correct
info
rmation.
a
If you want to set up WPA3-EAP or WPA2/WPA3-EAP security, make
sure your digital certicate le is compatible with projector registration
type and placed directly on a USB storage device.
b
Press the [Menu] button, select the Ne
twork menu, and press [Enter].
c
Select Network Settings and press [Enter].
d
S
elect the Wireless LAN menu and press [Enter].
e
Select the Security setting and press [Enter].
Wireless Network Projection
149
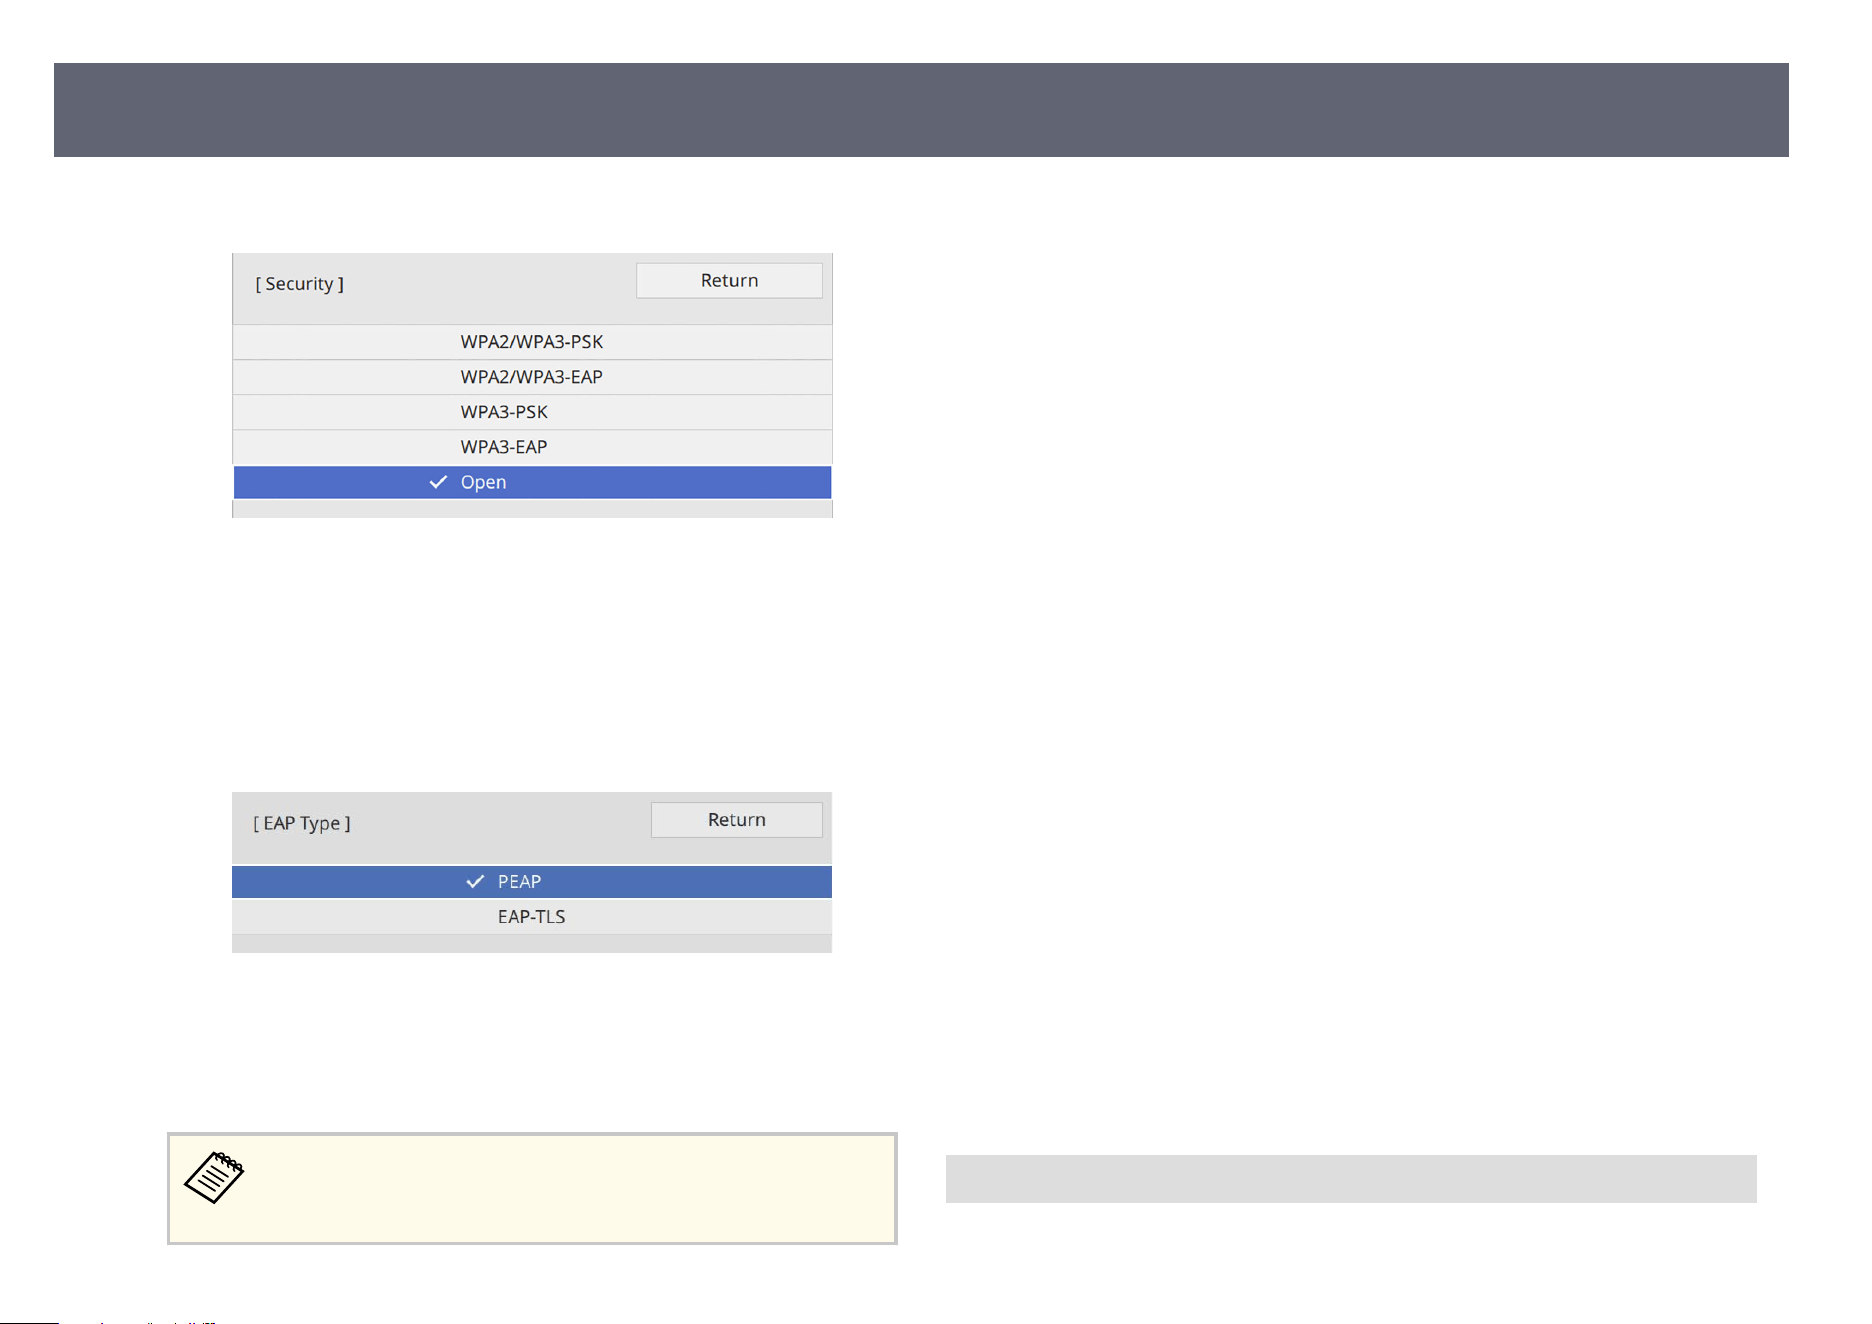
f
Select the security settings to match your network settings.
g
Do one of the following according to the security you selected.
•
WP
A3-PS
K or WPA2/WPA3-PSK: Select Passphrase, press [Enter],
and enter a passphrase from 8 to 63 characters long. en go to step 16.
•
WPA3-EAP or WPA2/WPA3-EAP: Select EAP Type and press [Enter].
h
Select the protocol for authentication as the EAP Ty
pe setting.
i
To import your cert
icate, select the certicate type and press [Enter].
•
Client Certicate for the EAP-TLS type
•
CA certicate for all EAP types
You can also register the digital cert
icates using your Web browser.
However, be sure to register just once or the certicate may not
install correctly.
j
Select Save and press [Enter].
k
F
ollow the on-screen instructions to connect a USB storage device to the
pr
ojector's USB-A port.
l
Press [Enter] to display the cert
icate list.
m
Select the cert
icate to import using the displayed list.
A message is displayed prompting you to enter the password for the
certicate.
n
Enter a password and press [Enter].
e cert
icate is imported and a completion message appears.
o
Select your EAP settings as necessary.
•
Us
er name lets you enter a user name using up to 64 alphanumeric
characters. When importing a client certicate, the name the certicate
was issued to is automatically set.
•
Password lets you enter a password using up to 64 alphanumeric
characters for authentication when using the PEAP type.
•
RADIUS Server Name lets you enter the server name to be veried.
p
When you nis
h making settings, go back to the Network Settings screen,
select Set, and follow the on-screen instructions to save your settings and
exit the menus.
g
Related Links
•
"Supported Client and CA Certicates" p.150
Supported Client and CA Certicates
Yo
u can register these types of digital certicates.
Wireless Network Projection
150
Client Certicate (EAP-TLS)
Specication Description
Format PKCS#12
Extension PFX, P12
Encryption RSA
Hashes MD5/SHA-1/SHA-256/SHA-384/SHA-512
Key length 512/1024/2048/4096 bit
Password Up to 64 alphanumeric characters; required
CA Certicate (PEAP/EAP-TLS)
Specication Description
Format X509v3
Extension DER/CER/PEM
Encryption RSA
Hashes MD5/SHA-1/SHA-256/SHA-384/SHA-512
Key length 512/1024/2048/4096 bit
Encoding BASE64/Binary
Using a QR Code to Connect a Mobile Device
Aer selecting the wireless network settings for your projector, you can display
a QR code on the screen and use it to connect a mobile device using the Epson
iProjection (iOS/Android) app.
•
Mak
e sure you have installed the latest version of Epson iProjection on
your device.
•
You can download Epson iProjection for free from the App Store or
Google Play. Any fees incurred when communicating with the App
Store or Google Play are the responsibility of the customer.
•
When using Epson iProjection in Quick connection mode, we
recommend making security settings.
a
Press the [Wireless] button on the remote control.
e QR co
de is displayed on the projected surface.
•
If y
ou do not see the QR code, set the LAN Info. Settings setting
to Text & QR Code in the projector's Network menu.
s Network > Network Settings > Network Projection >
Epson iProjection > LAN Info. Settings
•
To hide the QR code, press [Esc].
•
When the QR code is hidden, press [Enter] to display the code.
b
Start Epson iProjection on your mobile device.
c
Read the projected QR code using Epson iProjection to connect it to the
p
r
ojector.
To correctly read the QR code, make sure you face the screen
sq
uarely and closely enough so that the projected code ts into the
guide of the mobile device's QR code reader. If you are too far from
the screen, the code may not be read.
When a connection is established, select Co
ntents menu from
, and
th
en select the le you want to project.
Wireless Network Projection
151

Using a USB Key to Connect a Windows Computer
You can set up your USB ash
drive as a USB key to quickly connect the
projector to a wireless LAN supported Windows computer. Aer creating the
USB key, you can quickly project images from the network projector.
a
Set up the USB key using USB K
ey Setup Tool of the Epson iProjection
(Windows/Mac) soware.
See the Epson iProjection Operation Guide (Windows/Mac) for
in
structions.
b
Make sure the wireless LAN module is installed or built into your
p
r
ojector.
c
Turn on the projector.
d
Press the [Wireless] button on the remote control.
Y
o
u see the network information screen. Verify that an SSID and IP
address are displayed.
e
Remove the wireless LAN module from the projector's USB-A port (if
in
s
talled) and insert the USB key into the same port.
You see a projected message that the network information update is
complete.
f
Remove the USB key.
If y
our projector needs the wireless LAN module, reinsert the wireless
LAN module into the projector.
g
Connect the USB key to a USB port on your computer.
h
Follow the on-screen instructions to install the necessary application.
•
If t
he Windows Firewall message is displayed, click Yes to disable
the rewall.
•
You need administrator authority to install the soware.
•
If it is not installed automatically, double-click MPPLaunch.exe
in the USB key.
Aer a few minutes, your computer image is displayed by the projector.
i
W
hen you have nis
hed projecting wirelessly, select the Safely Remove
Hardware option in the Windows taskbar, and then remove the USB key
from your computer.
You may need to restart your computer to reactivate your wireless
L
AN co
nnection.
Wireless Network Projection
152
You can send image to your projector from mobile devices such as laptops,
smar
tphones, and tablets using Miracast technology.
If your device supports Miracast, you do not need to install any additional
soware. When using a Windows computer, make sure the necessary adapter
for the Miracast connection is available.
Note the following limitations when using Miracast features.
•
You cannot play an interlaced image.
•
You cannot play multi-channel audio over 3ch (channel 3).
•
You may not be able to project images depending the resolution and frame
rate.
•
You cannot play 3D video.
•
You cannot view contents with copyright protection using a Miracast
connection.
•
Do not change the projector's Miracast setting during Miracast projection.
Doing so may cause the projector to disconnect and it may take a while to
re-connect.
s Network > Network Conguration > Network Projection > Miracast
•
Do not turn o the projector directly by the breaker during Miracast
projection.
•
M
o
bile devices with Android installed or Windows 8.1 or later installed
mainly support Miracast.
Support for Miracast varies depending on the mobile device. See your
mobile device manual for details.
•
If the Web Control Password has not been set, a screen prompting
you to set a password is displayed when you save the network settings.
Follow the on-screen instructions to set the password.
g
Related Links
•
"Se
lecting Miracast Settings" p.153
•
"Connecting with the Miracast Function" p.154
•
"Connecting Using Miracast in Windows 10" p.155
•
"C
o
nnecting Using Miracast in Windows 11" p.156
Selecting Miracast Settings
You must select Mirac
ast settings for your projector to project images from your
mobile device.
If you use Windows 10 or Windows 11, you can cast images using the
fo
llowing connections:
•
Casting images from your device to the projector directly
•
Casting images via local area network
When you cast images via local area network, the connection is more
stable and secure. Do one of the following to connect your projector to a
local area network:
•
Connect a LAN cable.
•
Select the Wireless LAN setting to connect to the wireless access point.
Wireless Network Projection from a Mobile Device (Miracast)
153
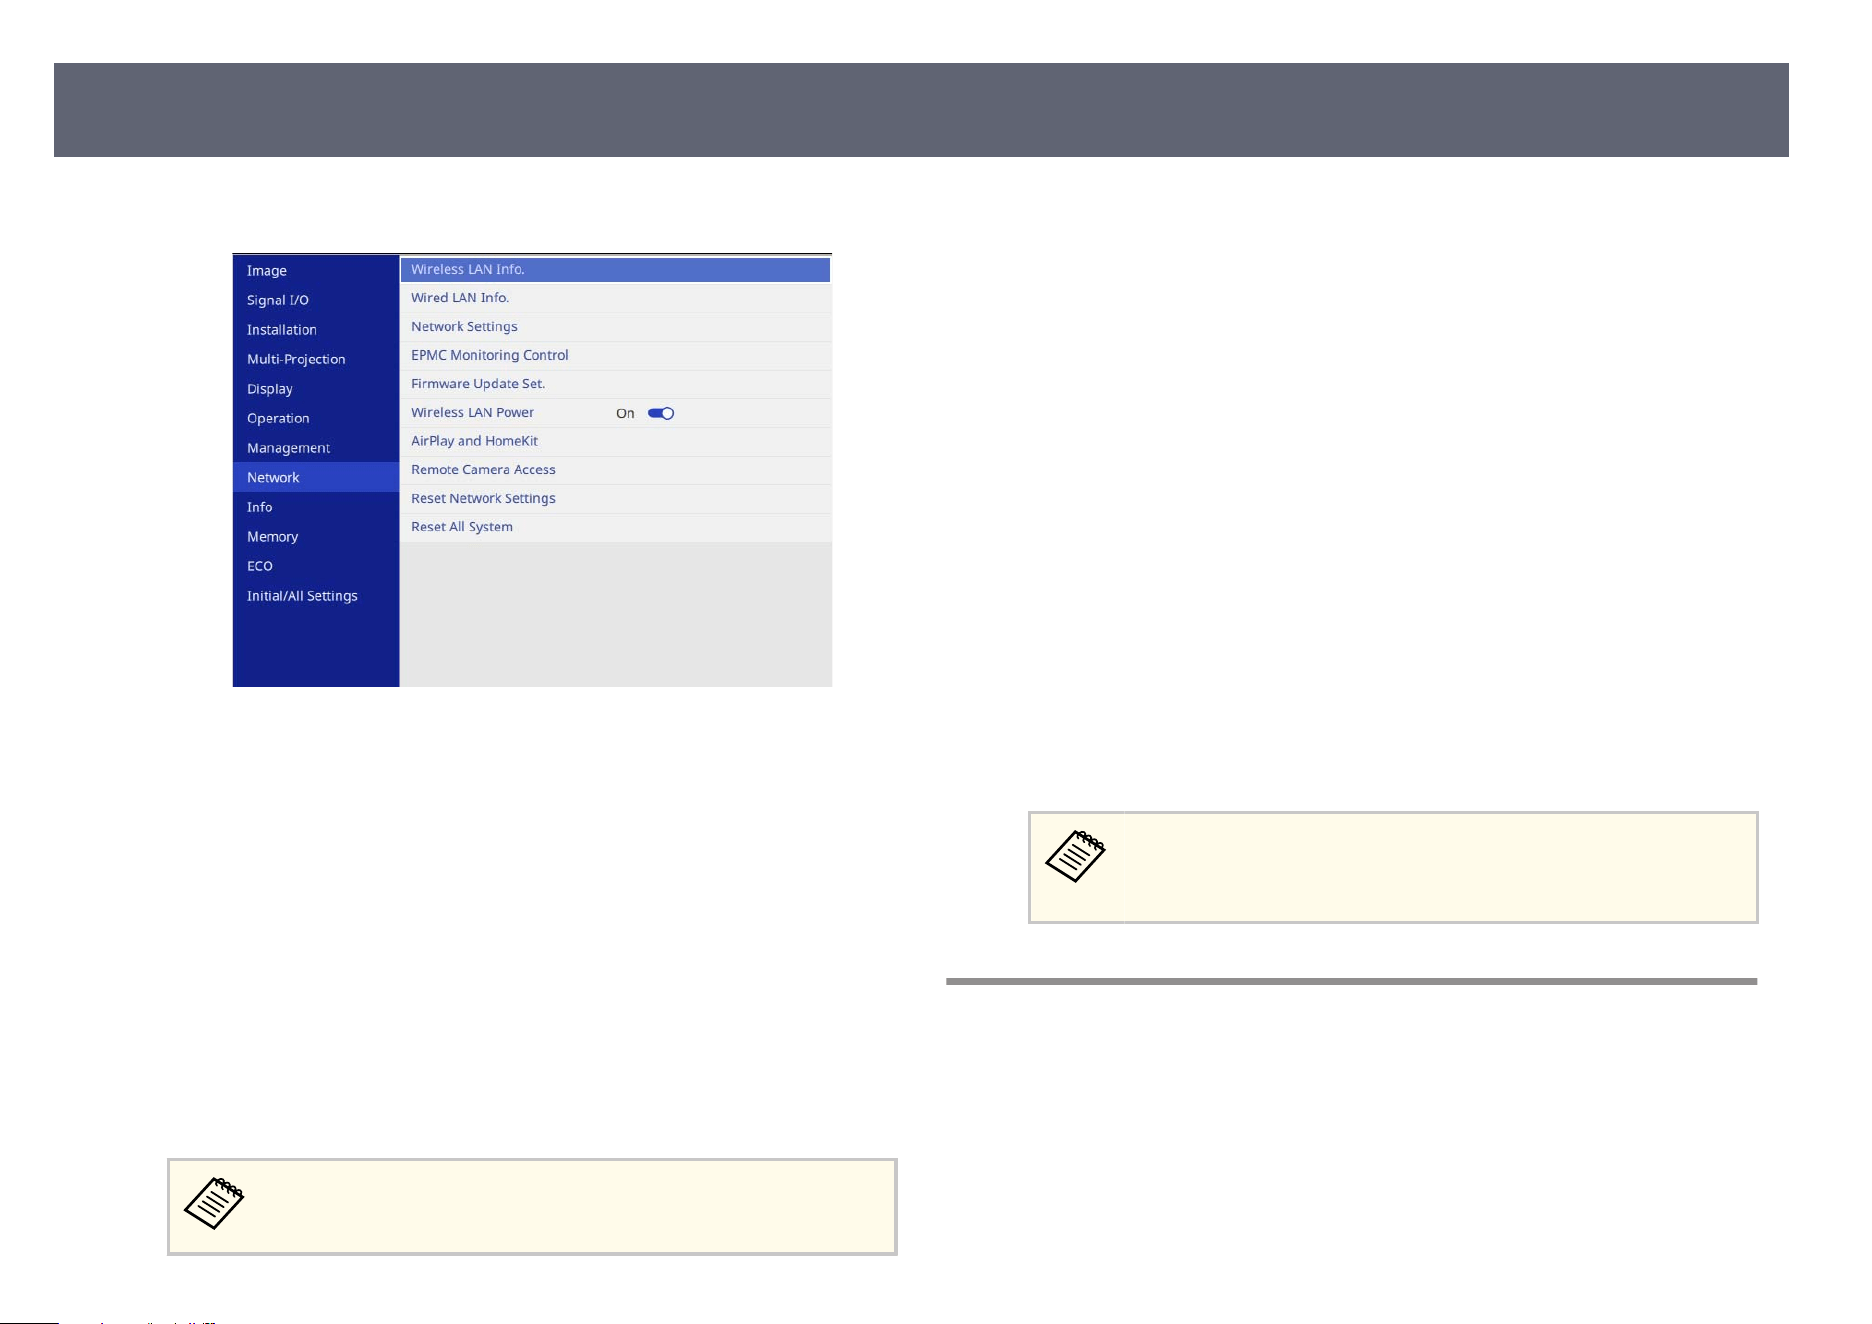
a
Press the [Menu] button, select the Ne
twork menu, and press [Enter].
b
Set the W
ireless LAN Power setting to On.
c
S
elect Network Settings and press [Enter].
d
C
hoose one of the following options:
•
If y
ou cast the data via local area network using the wired LAN, select
Wired LAN.
•
If you cast the data directly or via wireless access point, select Wireless
LAN.
•
If your device only supports casting data directly, select Wireless LAN.
e
Set the Simple AP setting to On.
If no password has been set, a screen prompting you to set a
pas
sword is displayed before you can set Simple AP to On.
f
Select Network Projection.
g
S
et the Miracast setting to On.
h
S
elect the options as necessary.
•
Ac
cess Control lets you select whether or not to connect to another
mobile device during Miracast projection.
•
Secondary Connections lets you select the connection behavior for
devices attempting to connect during a Miracast connection.
•
Adjust Image Quality lets you adjust the Miracast speed/quality. Select
a small number to improve the quality and select large number to
increase the speed.
•
Miracast Info. displays connection information when projecting the
Miracast source.
i
When you nis
h selecting settings, go back to the Network Settings
screen, select Set, and follow the on-screen instructions to save your
settings and exit the menus.
If no Web Control Password has been set, a screen prompting
you to set a password is displayed before you can save the settings.
Follow the on-screen instructions to set the password.
Connecting with the Miracast Function
If your mobile device such as a smartphone supports Miracast, you can connect
it t
o the projector wirelessly and project images. You can play audio through the
projector's speaker system by connecting using Miracast.
a
Select the Mirac
ast setting on your projector as necessary.
Wireless Network Projection from a Mobile Device (Miracast)
154
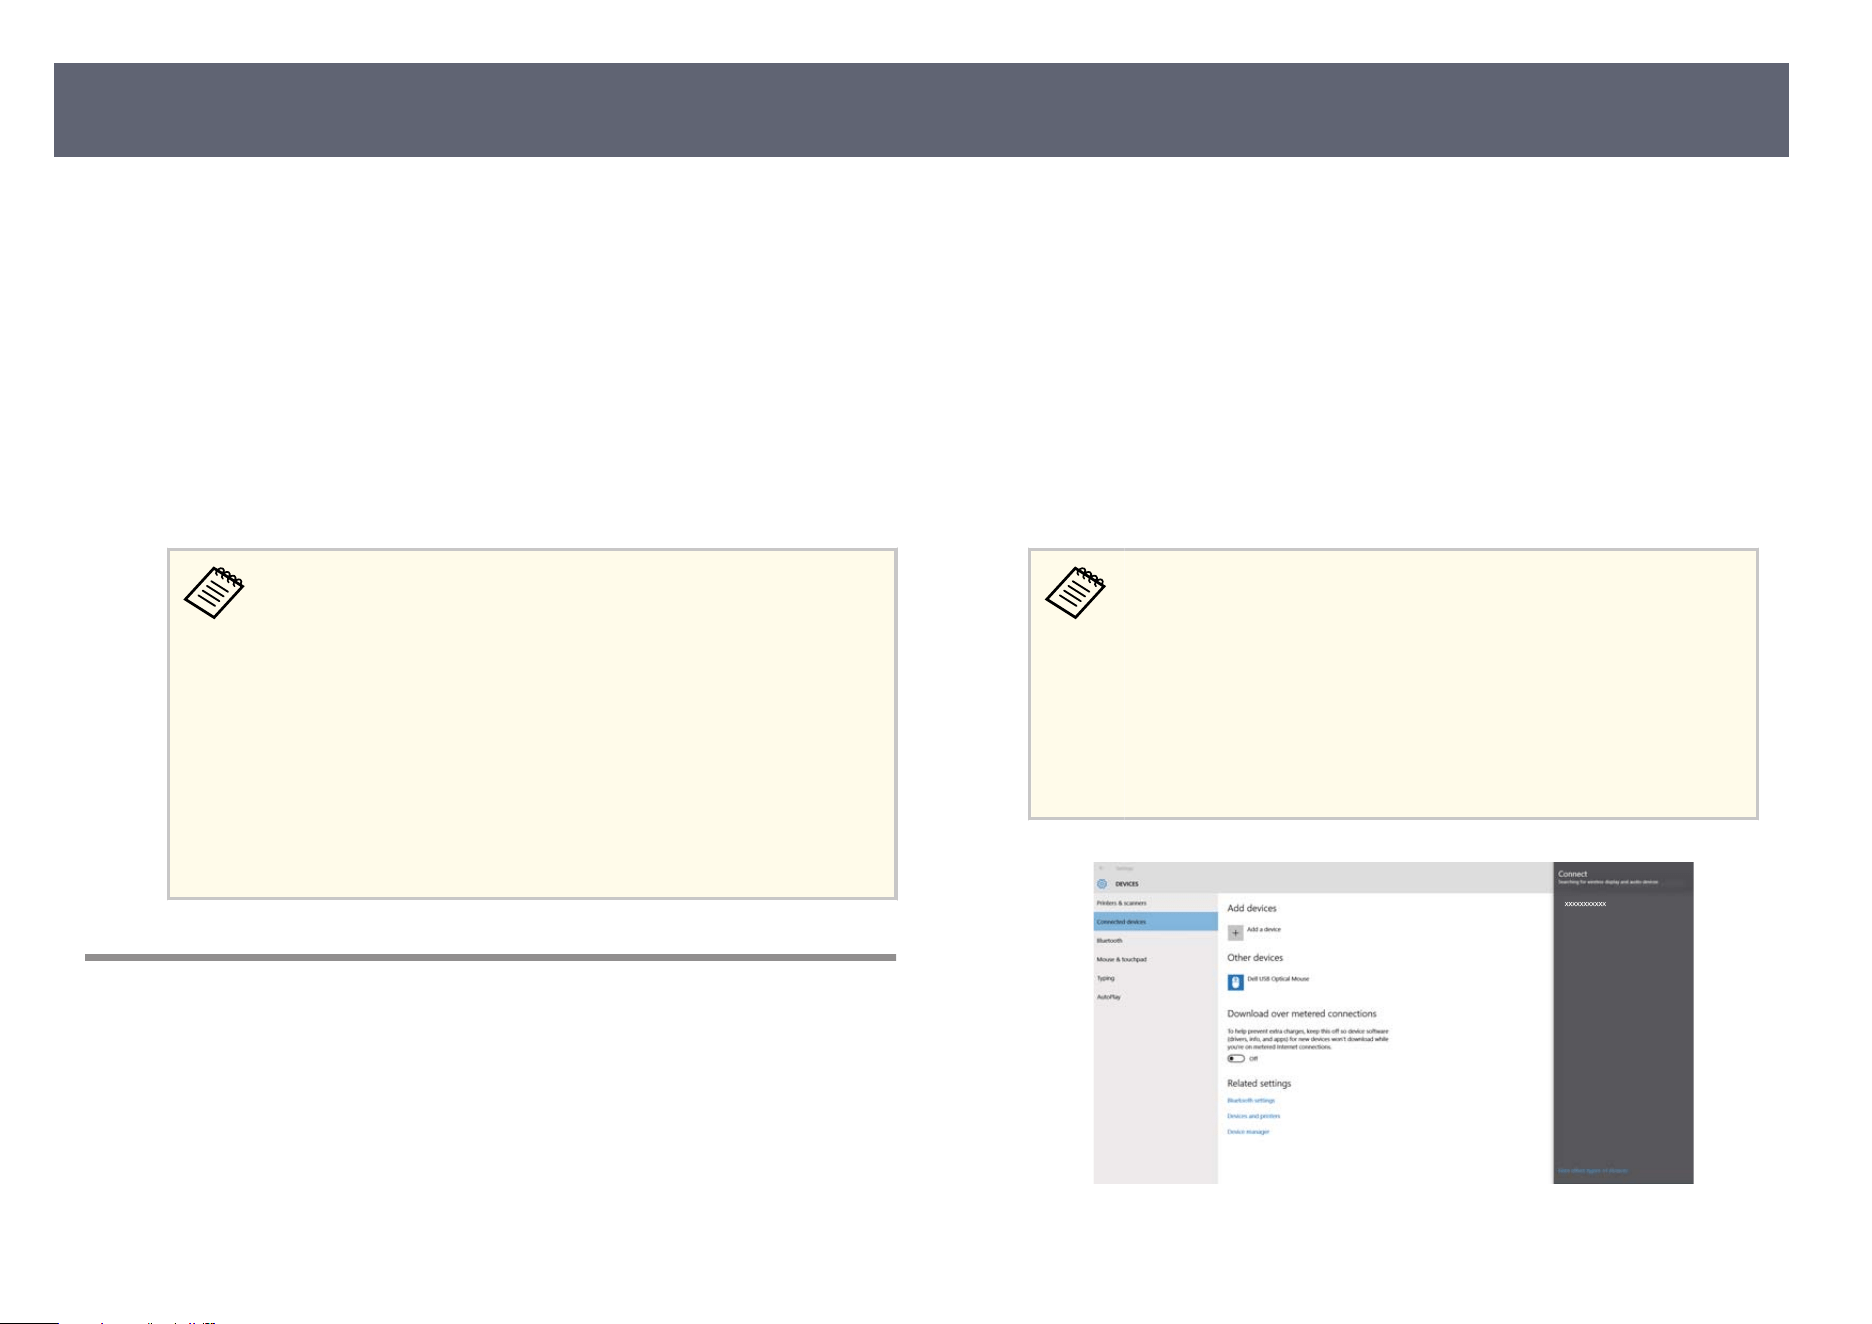
b
Press the [Wireless] button on the remote control to switch to the Miracast
so
urce.
You see the network information screen.
c
On your mobile device, use your Miracast function to search for the
pr
ojector.
You see a list of available devices.
d
Select the projector's Projector Name from the list.
e pr
ojector displays the image from your mobile device.
•
W
h
en Access Control is set to On, select Yes on the displayed
projection permission screen to start projection.
You can also force the device to disconnect by pressing the
[Esc] button on the remote control or the control panel during
projection.
•
It may take some time until the connection is established. While
connecting, do not disconnect the projector's power cord. Doing
so may cause your device to freeze or malfunction.
Depending on the mobile device, you may need to delete a device
when connecting. Follow the on-screen instructions on your
device.
Connecting Using Miracast in Windows 10
You can set up your computer for wireless projection and play audio through
th
e projector's speaker system by connecting using Miracast.
a
Select the Mirac
ast setting on your projector as necessary.
b
Press the [Wireless] button on the remote control to switch to the Miracast
source.
You see the network information screen.
c
Hold down the Windows key and press K on y
our keyboard at the same
time.
You see a list of available devices.
d
Select the projector's Projector Name from the list.
e pr
ojector displays the image from your computer.
•
W
h
en Access Control is set to On, select Yes on the displayed
projection permission screen to start projection.
You can also force the device to disconnect by pressing the
[Esc] button on the remote control or the control panel during
projection.
•
It may take some time until the connection is established. While
connecting, do not disconnect the projector's power cord. Doing
so may cause your device to freeze or malfunction.
Wireless Network Projection from a Mobile Device (Miracast)
155
Connecting Using Miracast in Windows 11
You can set up your computer for wireless projection and play audio through
th
e projector's speaker system by connecting using Miracast.
a
Select the Mirac
ast setting on your projector as necessary.
b
Press the [Wireless] button on the remote control to switch to the Miracast
so
urce.
You see the network information screen.
c
Click the speaker icon on your computer's taskbar.
d
Click C
ast.
Y
ou see a list of available devices.
If Cast is not displayed or another message is displayed, see the
m
anual supplied with the computer.
e
Select the projector's Projector Name from the list.
e projector displays the image from your computer.
•
Wh
en Access Control is set to On, select Yes on the displayed
projection permission screen to start projection.
You can also force the device to disconnect by pressing the
[Esc] button on the remote control or the control panel during
projection.
•
It may take some time until the connection is established. While
connecting, do not disconnect the projector's power cord. Doing
so may cause your device to freeze or malfunction.
Wireless Network Projection from a Mobile Device (Miracast)
156
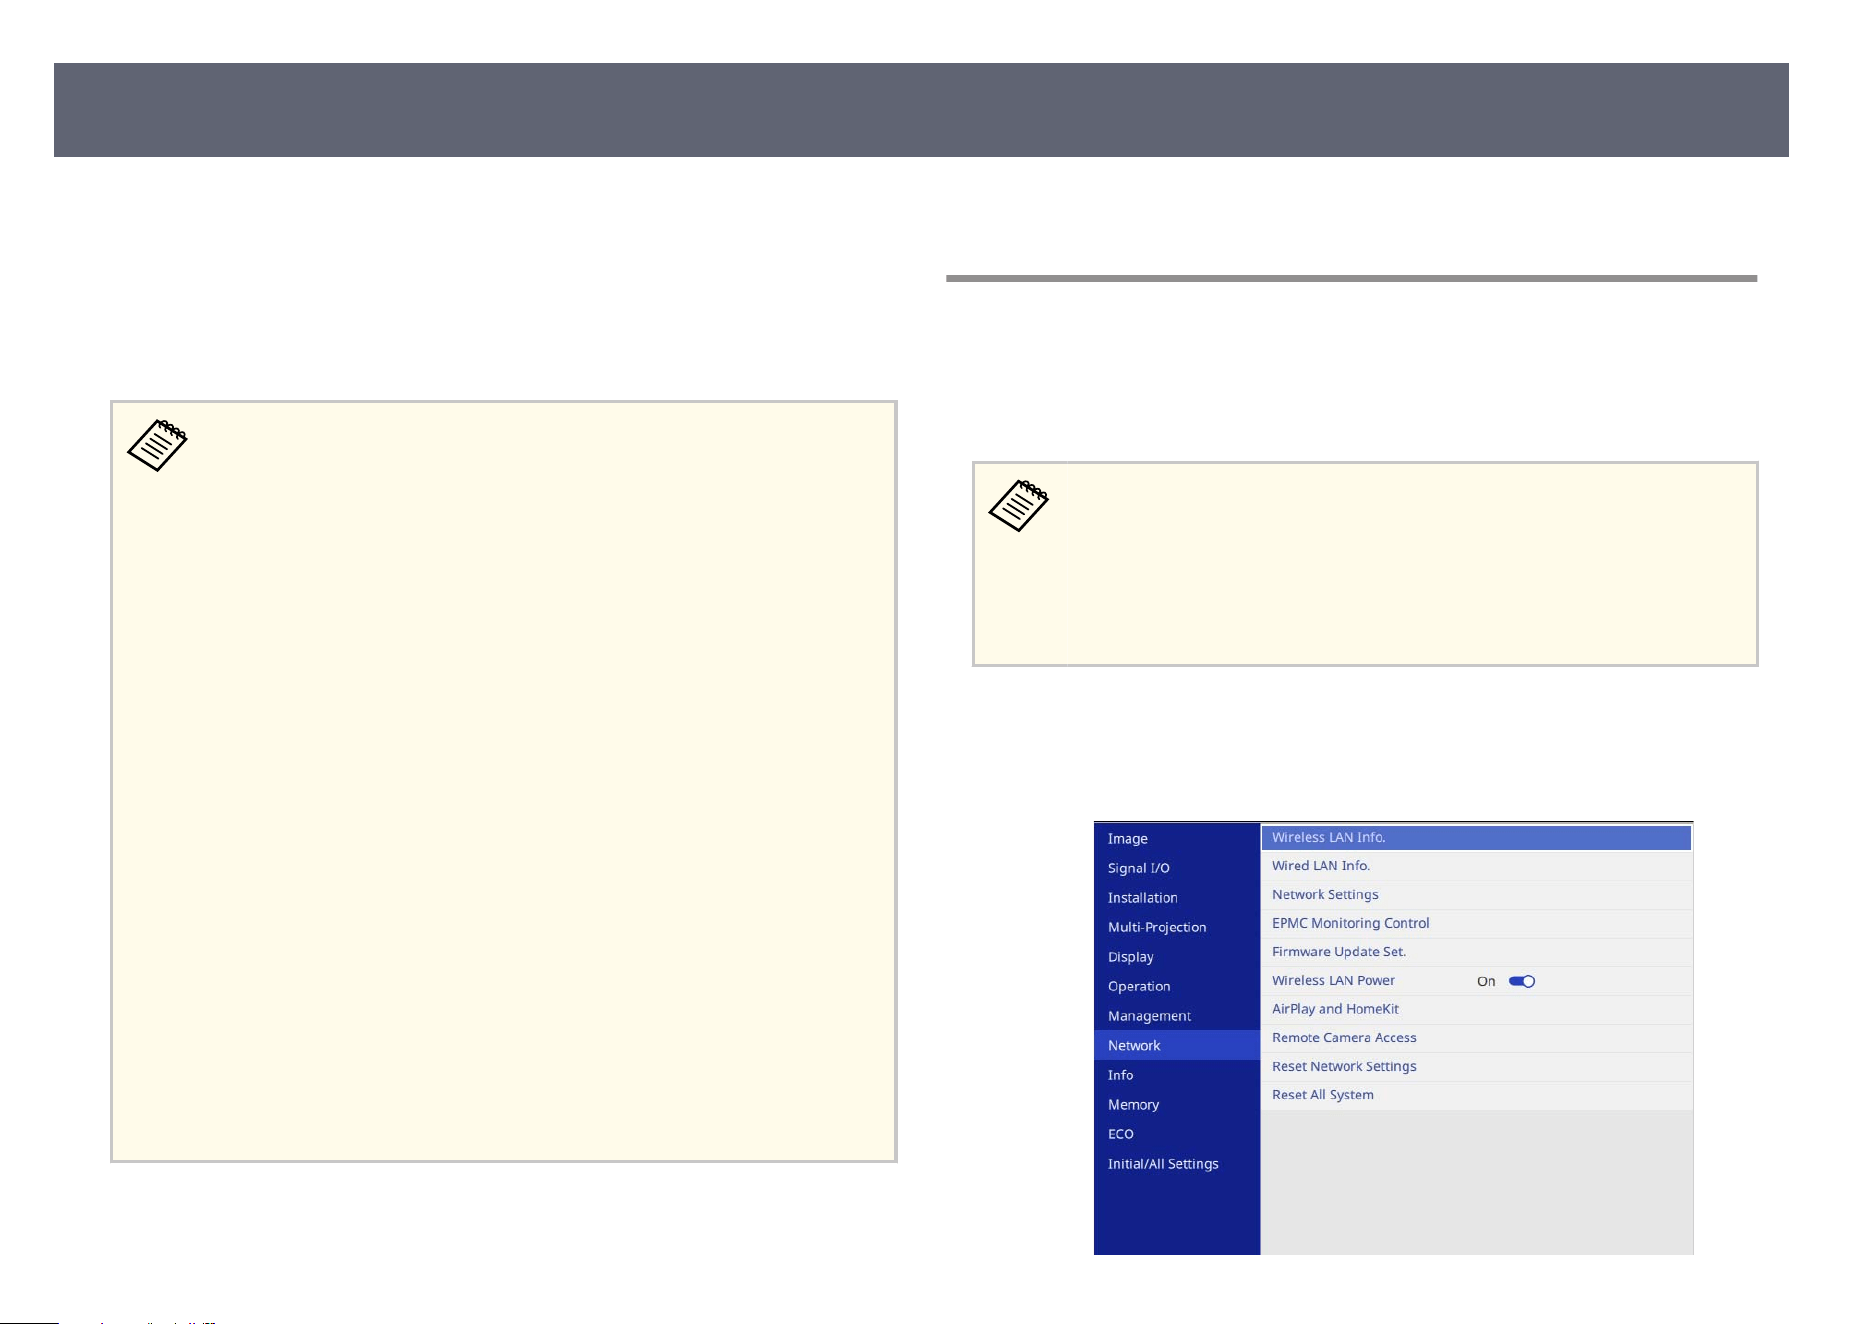
You can stream media such as videos, music, and photos to the projector using
Ap
ple devices that support AirPlay. You can also mirror the entire screen of
your Apple device.
is projector is compatible with HomeKit. When you register the projector
with HomeKit on your Apple device, you can control the projector using the
Apple Home app on your Apple device.
•
Wh
en Standby Mode is set to Normal in the Operation menu, you
can make AirPlay connections even if the projector is in standby mode
(when the power is o).
•
You need to connect to the internet to enable AirPlay. Make network
settings in the Network menu. If you have never connected to the
internet before, a screen is displayed indicating that you need to make
network settings when you try to connect using AirPlay.
•
You need to congure a DNS server to use AirPlay. Depending on your
network, set DHCP to On in IP Settings from the Wired LAN menu
or the Wireless LAN menu. If DHCP is set to O, or if you want to
specify a DNS server address, enter the IP address in DNS Server 1 or
DNS Server 2.
s Network > Network Settings > Wired LAN
s Network > Network Settings > Wireless LAN
•
You cannot use AirPlay when the same access point is used for wired
LAN and wireless LAN.
•
To stream content that is not stored on your Apple device with
AirPlay, set Priority Control Interface to Wireless LAN or Wired
LAN according to the network to be used.
•
e maximum display resolution is 1920 × 1080.
•
You may not be able to use AirPlay to view copyright-protected
content.
•
e audio supports up to 2 channels with a maximum sampling
frequency of 44.1 kHz.
g
Related Links
•
"Set
tings for AirPlay" p.157
•
"St
reaming/Mirroring Media with an AirPlay Connection" p.159
Settings for AirPlay
When using AirPlay, make sure your Apple device and the projector are using
th
e same network.
You can make AirPlay settings from the AirPlay and HomeKit settings screen.
•
If t
he date and time are not correctly set on the projector, the AirPlay
connection may be disconnected while projecting. Set the correct
date and time in Date & Time and Daylight Saving Time from the
Management menu.
•
When using AirPlay, if there are no operations for about 10 minutes on
the standby screen, the screen may turn black to prevent burn-in.
a
Change the source to something other than AirPlay.
b
Press the [Menu] button, select the Ne
twork menu, and press [Enter].
Using AirPlay
157
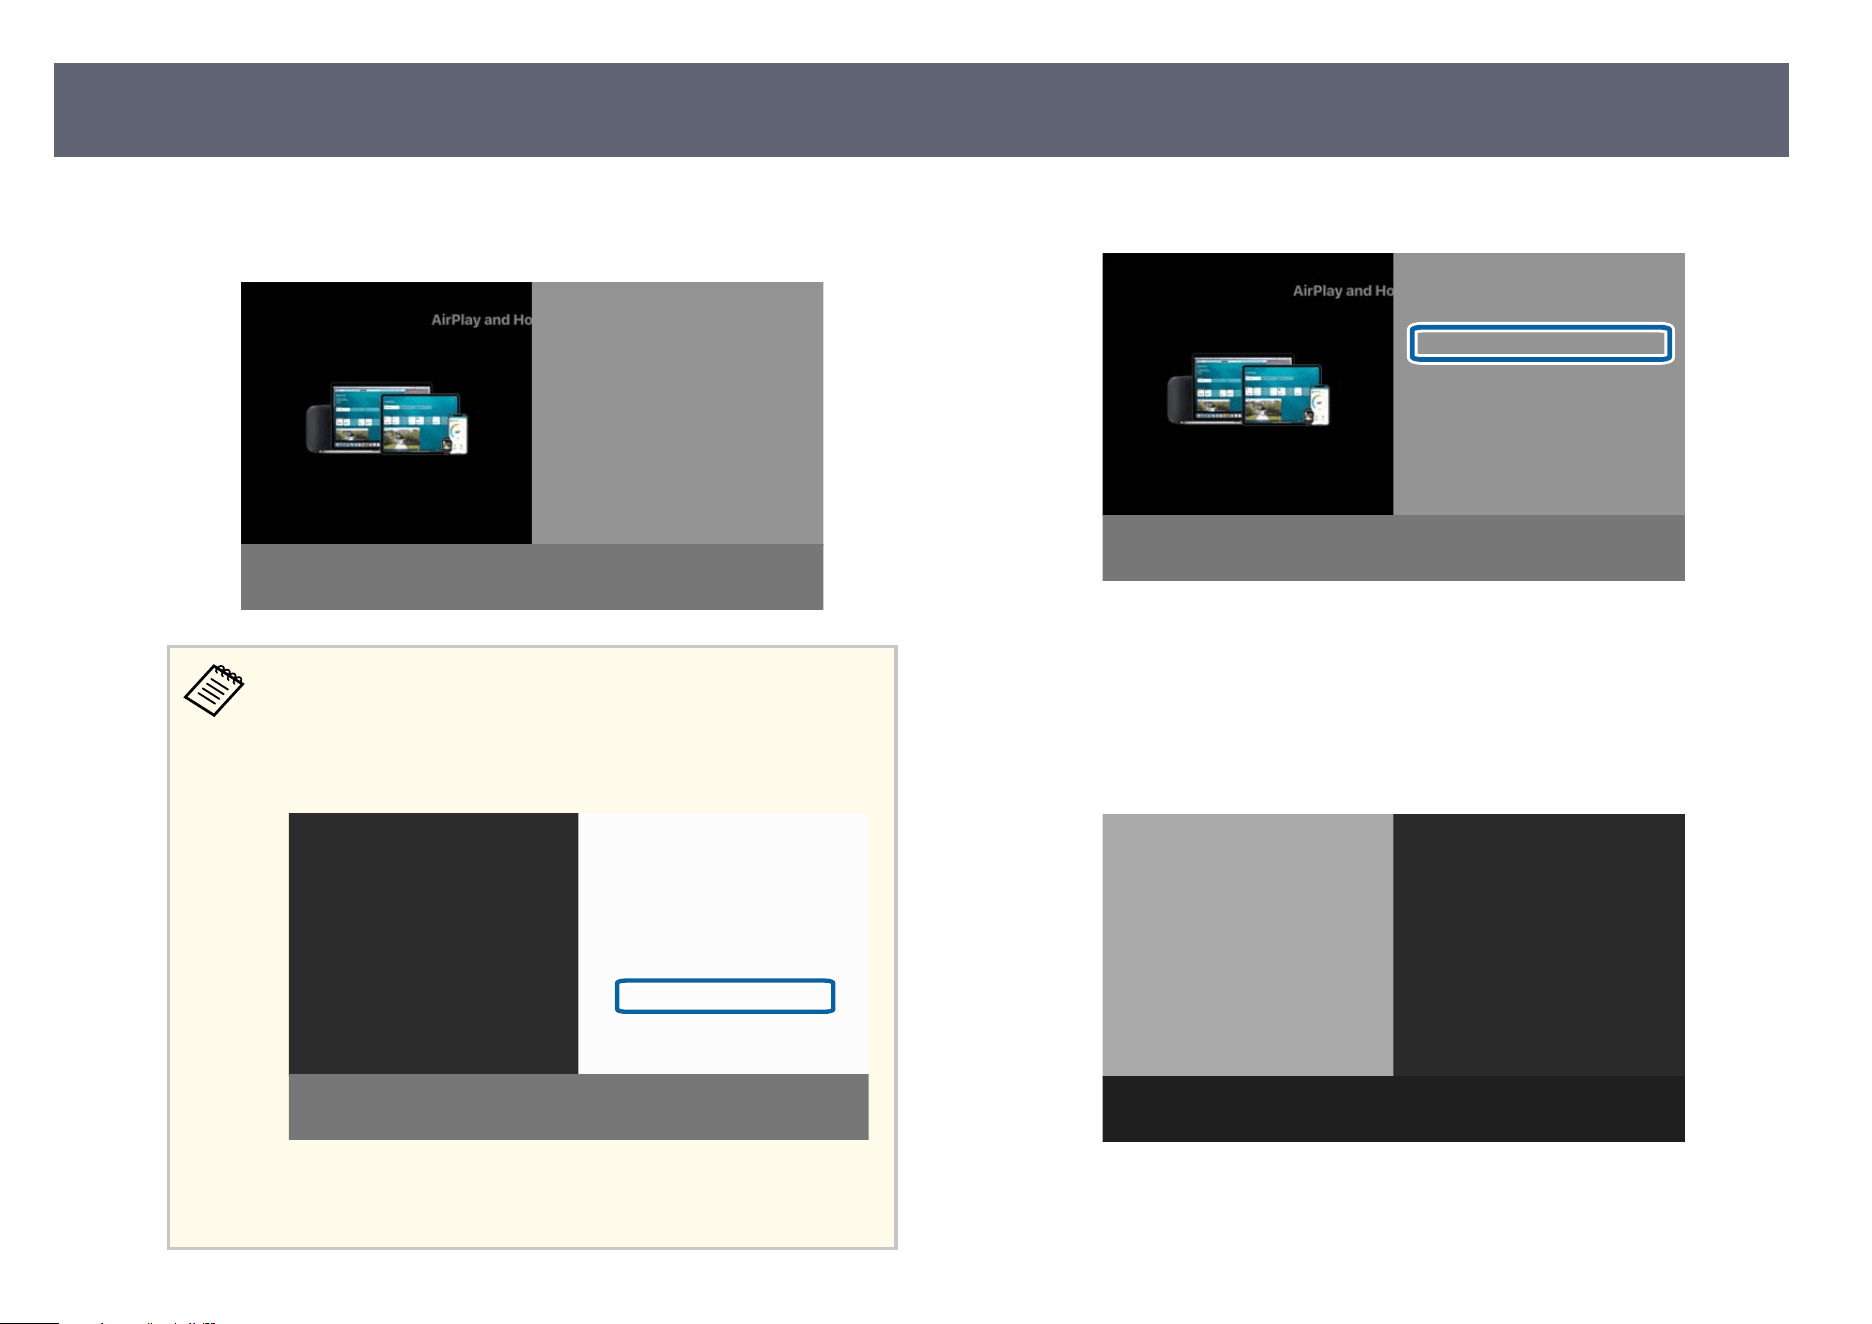
c
Select AirPlay and HomeKit in the Network menu and press [Enter].
e
AirPlay and HomeKit settings screen is displayed.
•
Wh
en the source is AirPlay, you cannot select AirPlay and
HomeKit from the Network menu. If you want to change the
settings, stop playback on your Apple device. Display the AirPlay
and HomeKit settings screen from the following screen that is
displayed.
•
Wh
en AirPlay is O, the AirPlay and HomeKit settings screen is
displayed when you set the source to AirPlay.
d
Set AirPlay to On.
e
Change the other settings as needed.
To r
egister with HomeKit, scan the projected QR code using your Apple
device.
Once registered with HomeKit, you can control the projector and change
the device name from the Home app on your Apple device.
Using AirPlay
158
When changing the device name in the Home app, only characters
th
at can be entered using the so keyboard are available. You
cannot use other characters.
g
Related Links
•
"Avai
lable Text Using the Displayed Keyboard" p.192
Streaming/Mirroring Media with an AirPlay
Connection
When using an Apple device that supports AirPlay, you can stream media such
as vide
os, music, and photos to the projector. You can also mirror and display
the entire screen of your Apple device.
When using AirPlay, if there are no operations for about 10 minutes on
the standby screen, the screen may turn black to prevent burn-in.
a
On your Apple device, select the media you want to play using AirPlay
an
d s
elect the AirPlay icon (
or ).
To mir
ror, open the Control Center and select the screen mirroring icon
(
).
b
Select the projector's device name from the list displayed on your Apple
de
v
ice.
•
To c
heck the projector's device name, stop media playback on
your Appledevice and press the [Wireless] button on the remote
control until the following screen is displayed. You can also check
it on the Home screen or LAN standby screen.
•
Wh
en AirPlay is o, the projector's device name is not displayed
in the list on your Apple device. Use one of the following
operations to display the AirPlay and HomeKit settings screen,
and then turn on AirPlay.
•
Press the [Wireless] button until the AirPlay and HomeKit
settings screen is displayed.
•
Select AirPlay and HomeKit in the Network menu and press
[Enter].
Using AirPlay
159
c
If the projector prompts you for a 4-digit PIN code, enter it on your Apple
de
v
ice.
Media streaming or mirroring of your Apple device screen starts.
When streaming, you can play, pause, fast-forward, rewind, change
th
e volume, and mute using the projector's remote control.
d
To end the AirPlay connection, press [Esc].
e screen that was displayed before the connection started is projected.
•
Yo
u can also end the AirPlay connection by switching to a
dierent target device or by canceling mirroring on your Apple
device.
•
e AirPlay connection ends if you switch from the screen on
which AirPlay is playing to another display, such as displaying
the projector's home screen.
Using AirPlay
160
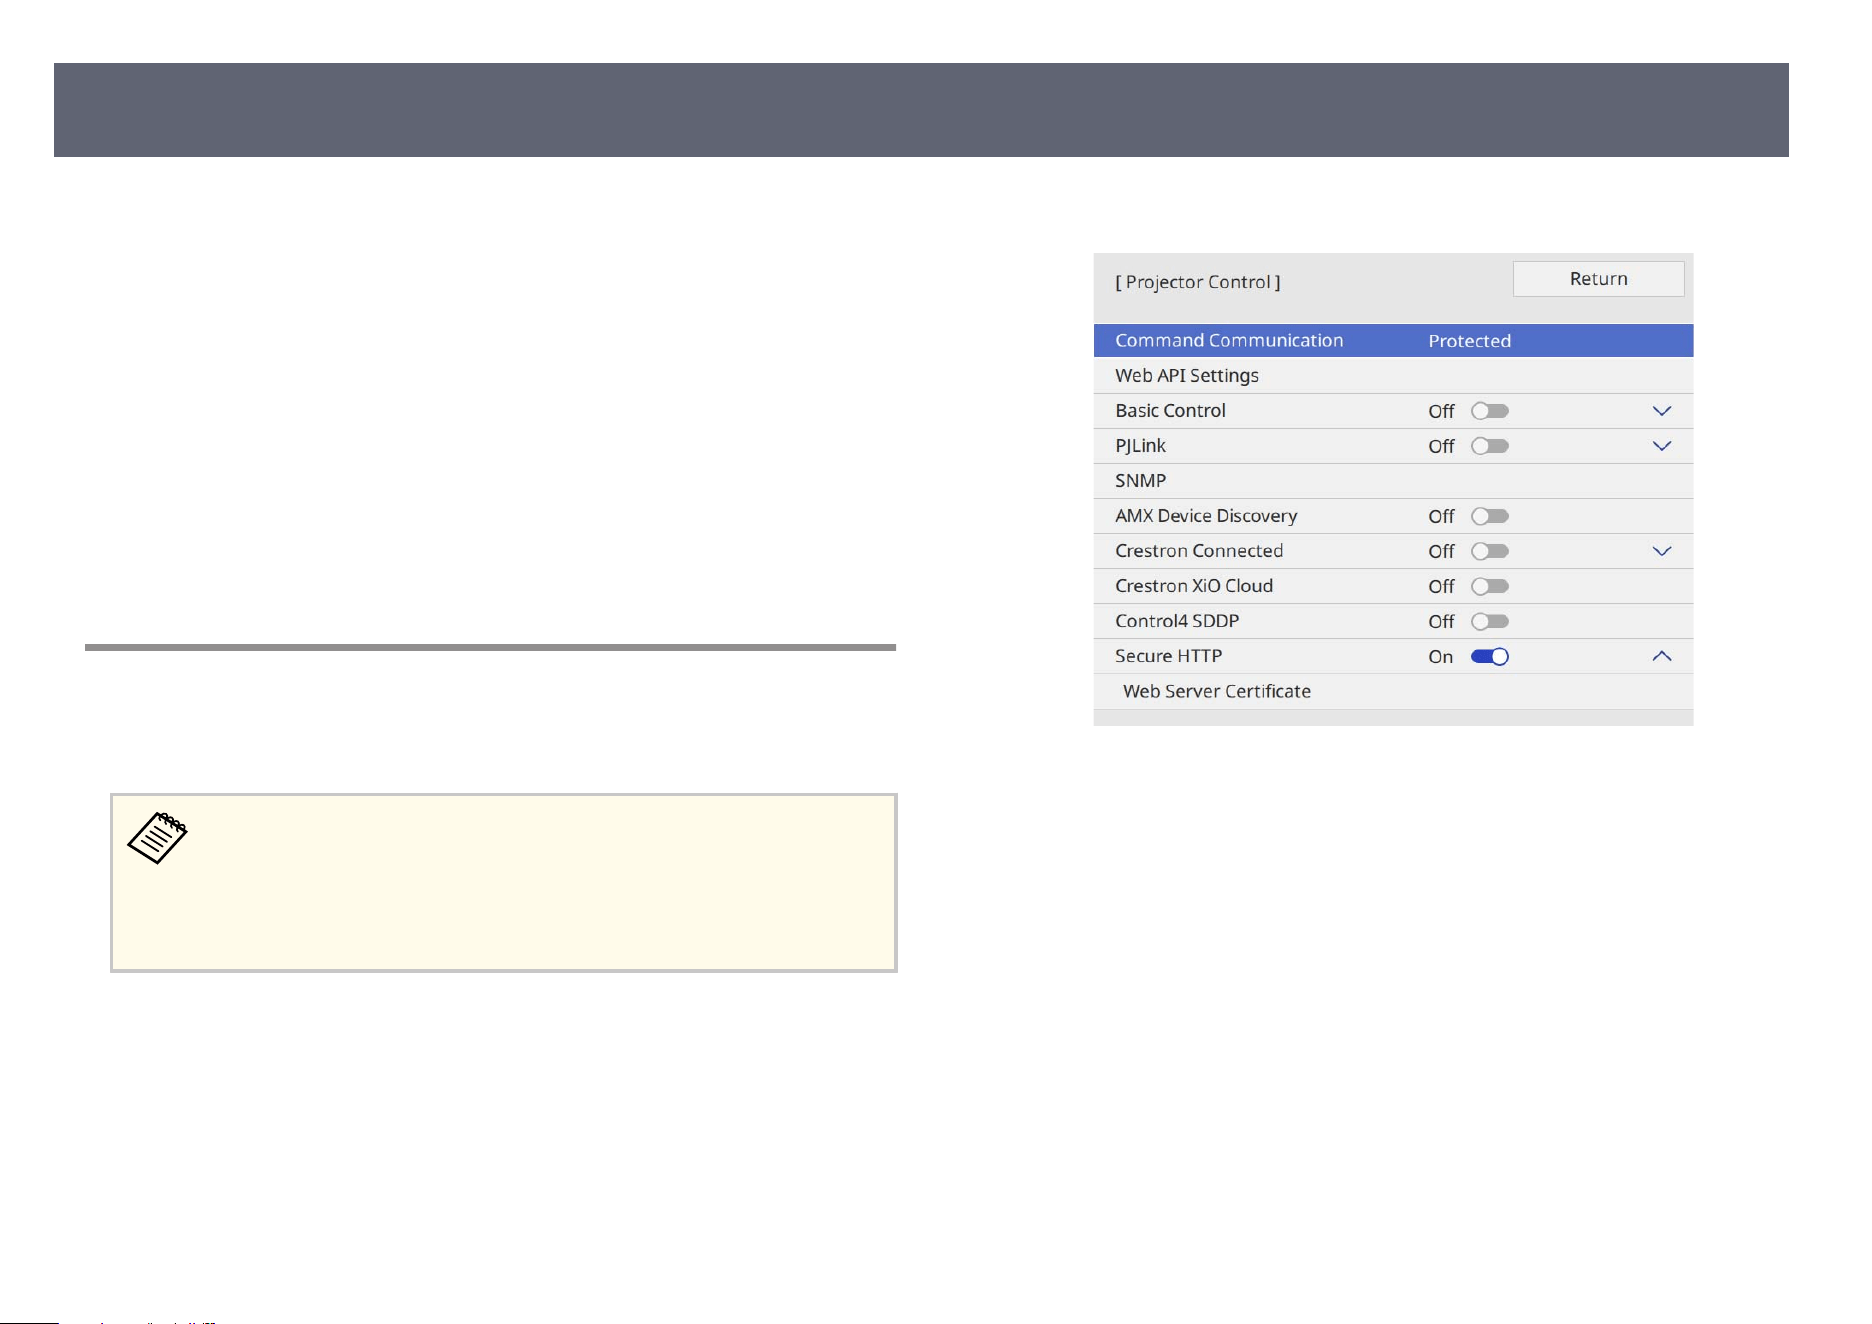
You can use the HTTPS protocol to increase security between the projector and
a We
b browser communicating with it. To do this, you create a server certicate,
install it on the projector, and turn on the Secure HTTP setting in the projector
menus to verify the reliability of the Web browser.
s Network > Network Settings > Projector Control > Secure HTTP
Even if you do not install a server certicate, the projector automatically
creates a self-signed certicate and allows communication. However, because
the self-signed certicate cannot verify reliability from a Web browser, you see a
warning about the server's reliability when you access the projector from a Web
browser. is warning does not prevent communication.
g
Related Links
•
"Importing a Web Server Certicate Using the Menus" p.161
Importing a Web Server Certicate Using the Menus
You can create your Web server certicate and import it using the projector
menus and an external storage device.
•
Yo
u can use a USB ash drive as an external storage device for this
model.
•
You can also register the digital certicates from your Web browser.
However, be sure to register just once or the certicate may not install
correctly.
a
Make sure your digital cer
t
icate le is compatible with projector
registration and directly placed on the USB storage device.
b
Press the [Menu] button, select the Ne
twork menu, and press [Enter].
c
Select Network Settings and press [Enter].
d
S
elect the P
rojector Control menu and press [Enter].
e
Set the Secure HTTP setting to On.
f
S
elect Web Server Certicate and press [Enter].
g
S
elect Save and press [Enter].
h
F
ollow the on-screen instructions to connect a USB storage device to the
pr
ojector's USB-A port.
i
Press [Enter] to display the cert
icate list.
j
Select the cert
icate to import using the displayed list.
A message is displayed prompting you to enter the password for the
certicate.
Secure HTTP
161
k
Enter a password and press [Enter].
e cert
icate is imported and a completion message appears.
g
Related Links
•
"Supported Web Server Certicates" p.162
Supported Web Server Certicates
Yo
u can register these types of digital certicates.
Web Server Certicate (Secure HTTP)
Specication Description
Format PKCS#12
Extension PFX, P12
Encryption RSA
Hashes MD5/SHA-1/SHA-256/SHA-384/SHA-512
Key length 512/1024/2048/4096 bit
Common name Network host name
Organization Optional
Password Up to 64 alphanumeric characters; required
Secure HTTP
162
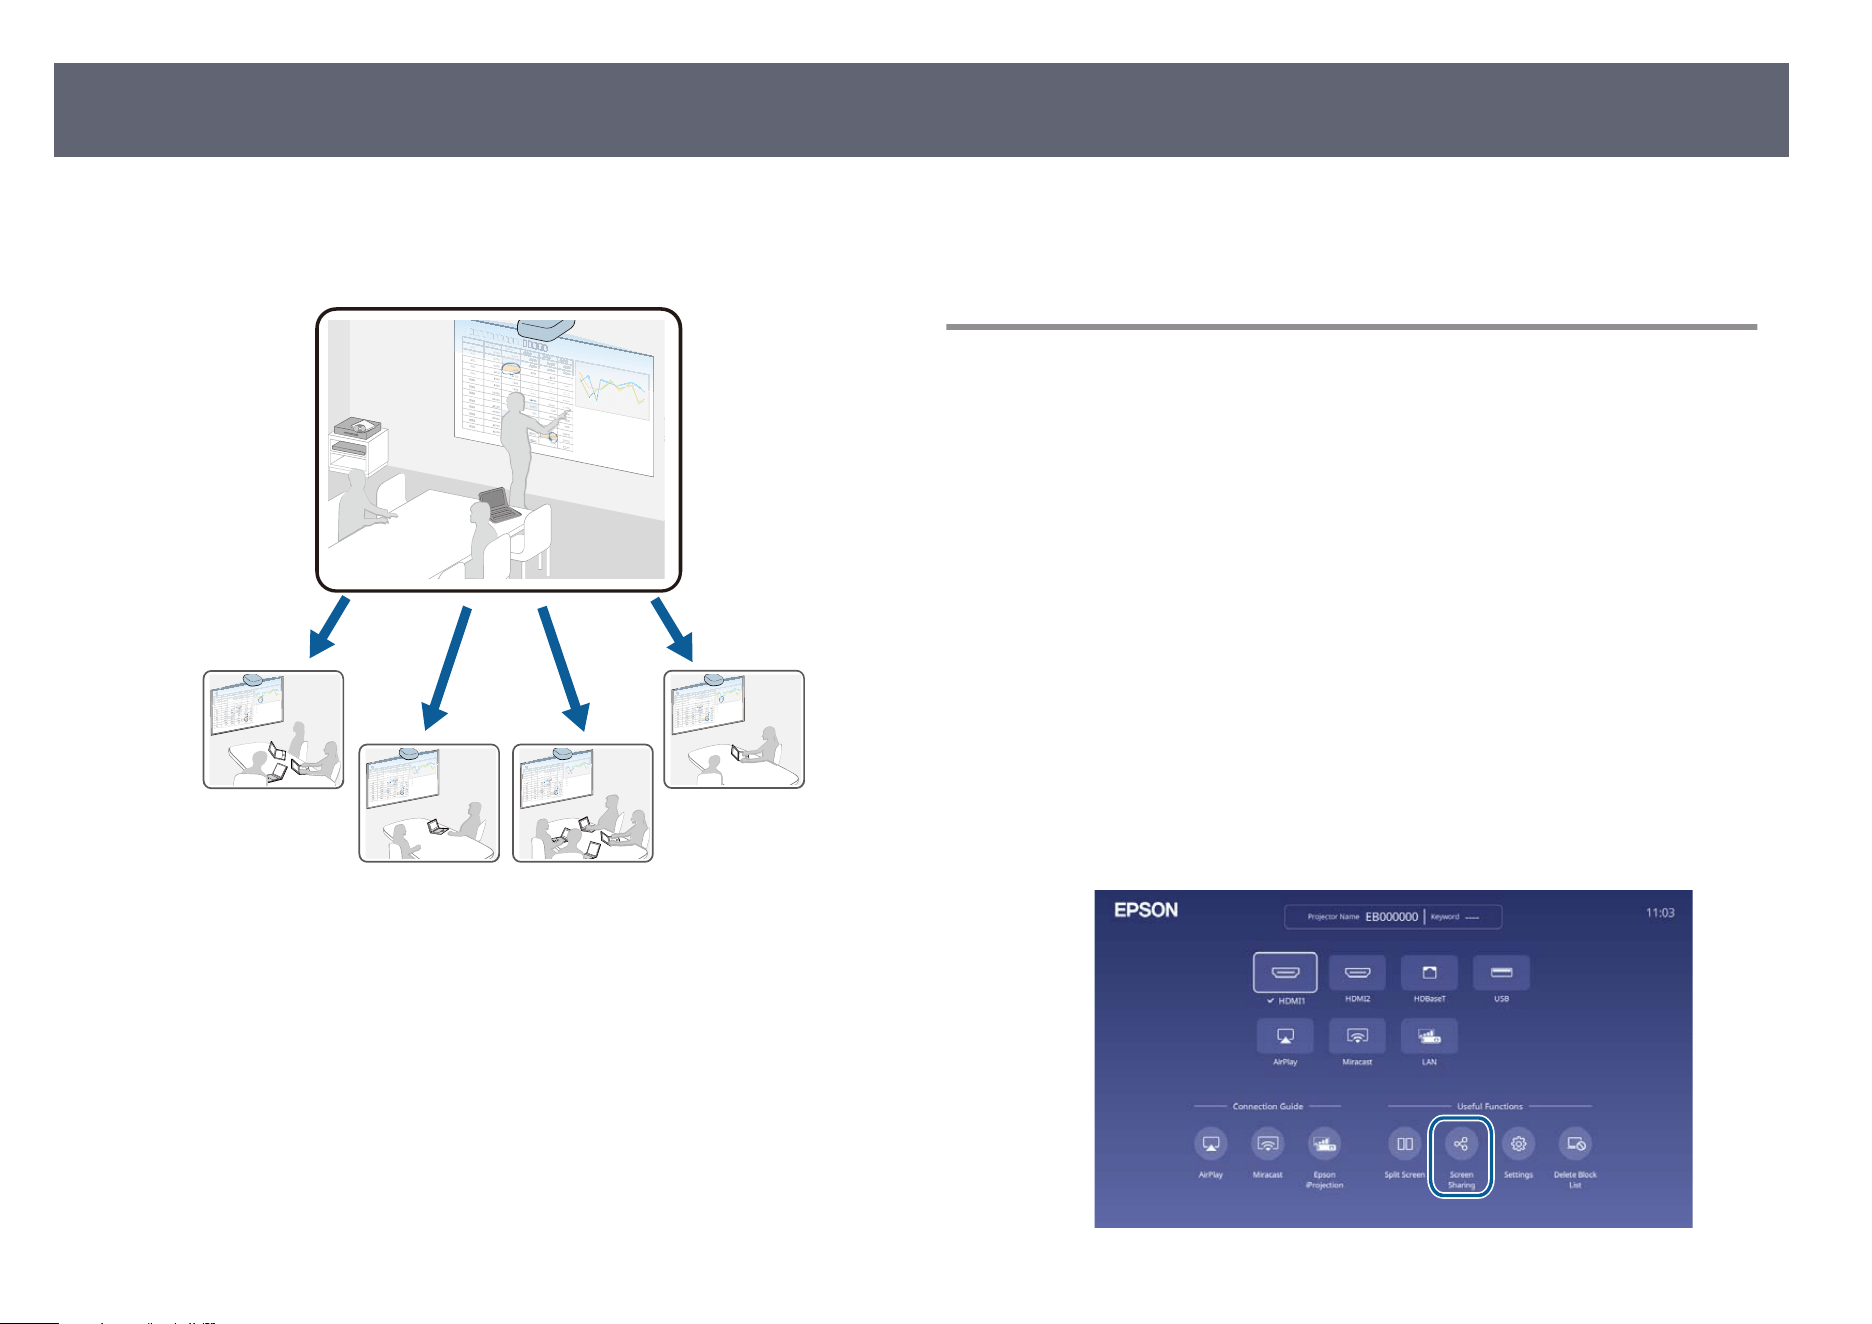
You can distribute the currently projected screen image to up to four projectors
th
at are connected to the same network. is allows you to view the image at the
same time from other projectors.
Note the following limitations when using the Screen Sharing function.
•
Yo
u can share the screen with projectors that support the screen sharing
feature.
•
If the rmware version amongst the projectors sharing the screen is not the
same, you may need to update the projector's rmware to share your screen.
•
You cannot distribute images that are protected by HDCP.
•
You cannot change the projector's Network settings during Screen Sharing.
•
is function is unavailable if the input source is AirPlay, LAN
or Miracast. (EB-L890E/EB-L895E/EB-L790SE/EB-L795SE/EB-L690E/EB-
L890U/EB-L790U/EB-L690U/EB-L690SU/EB-L695SU)
g
Related Links
•
"Sh
aring the Screen" p.163
•
"Receiving Shared Screen Images" p.165
Sharing the Screen
Before sharing the screen, you need to select settings on your projector.
•
Connect the projector to the network.
•
Make sure the Screen Sharing setting is set to On.
s Network > Network Settings > Network Projection > Screen Sharing
•
If you want to skip authentication of keywords for other projectors so you can
quickly connect to them, set the Connection Mode setting to Keyword O.
s Network > Network Settings > Network Projection > Screen Sharing >
Connection Mode
a
Turn on the projector and display an image.
b
Press the [Home] button.
c
Select S
creen Sharing.
Screen Sharing
163
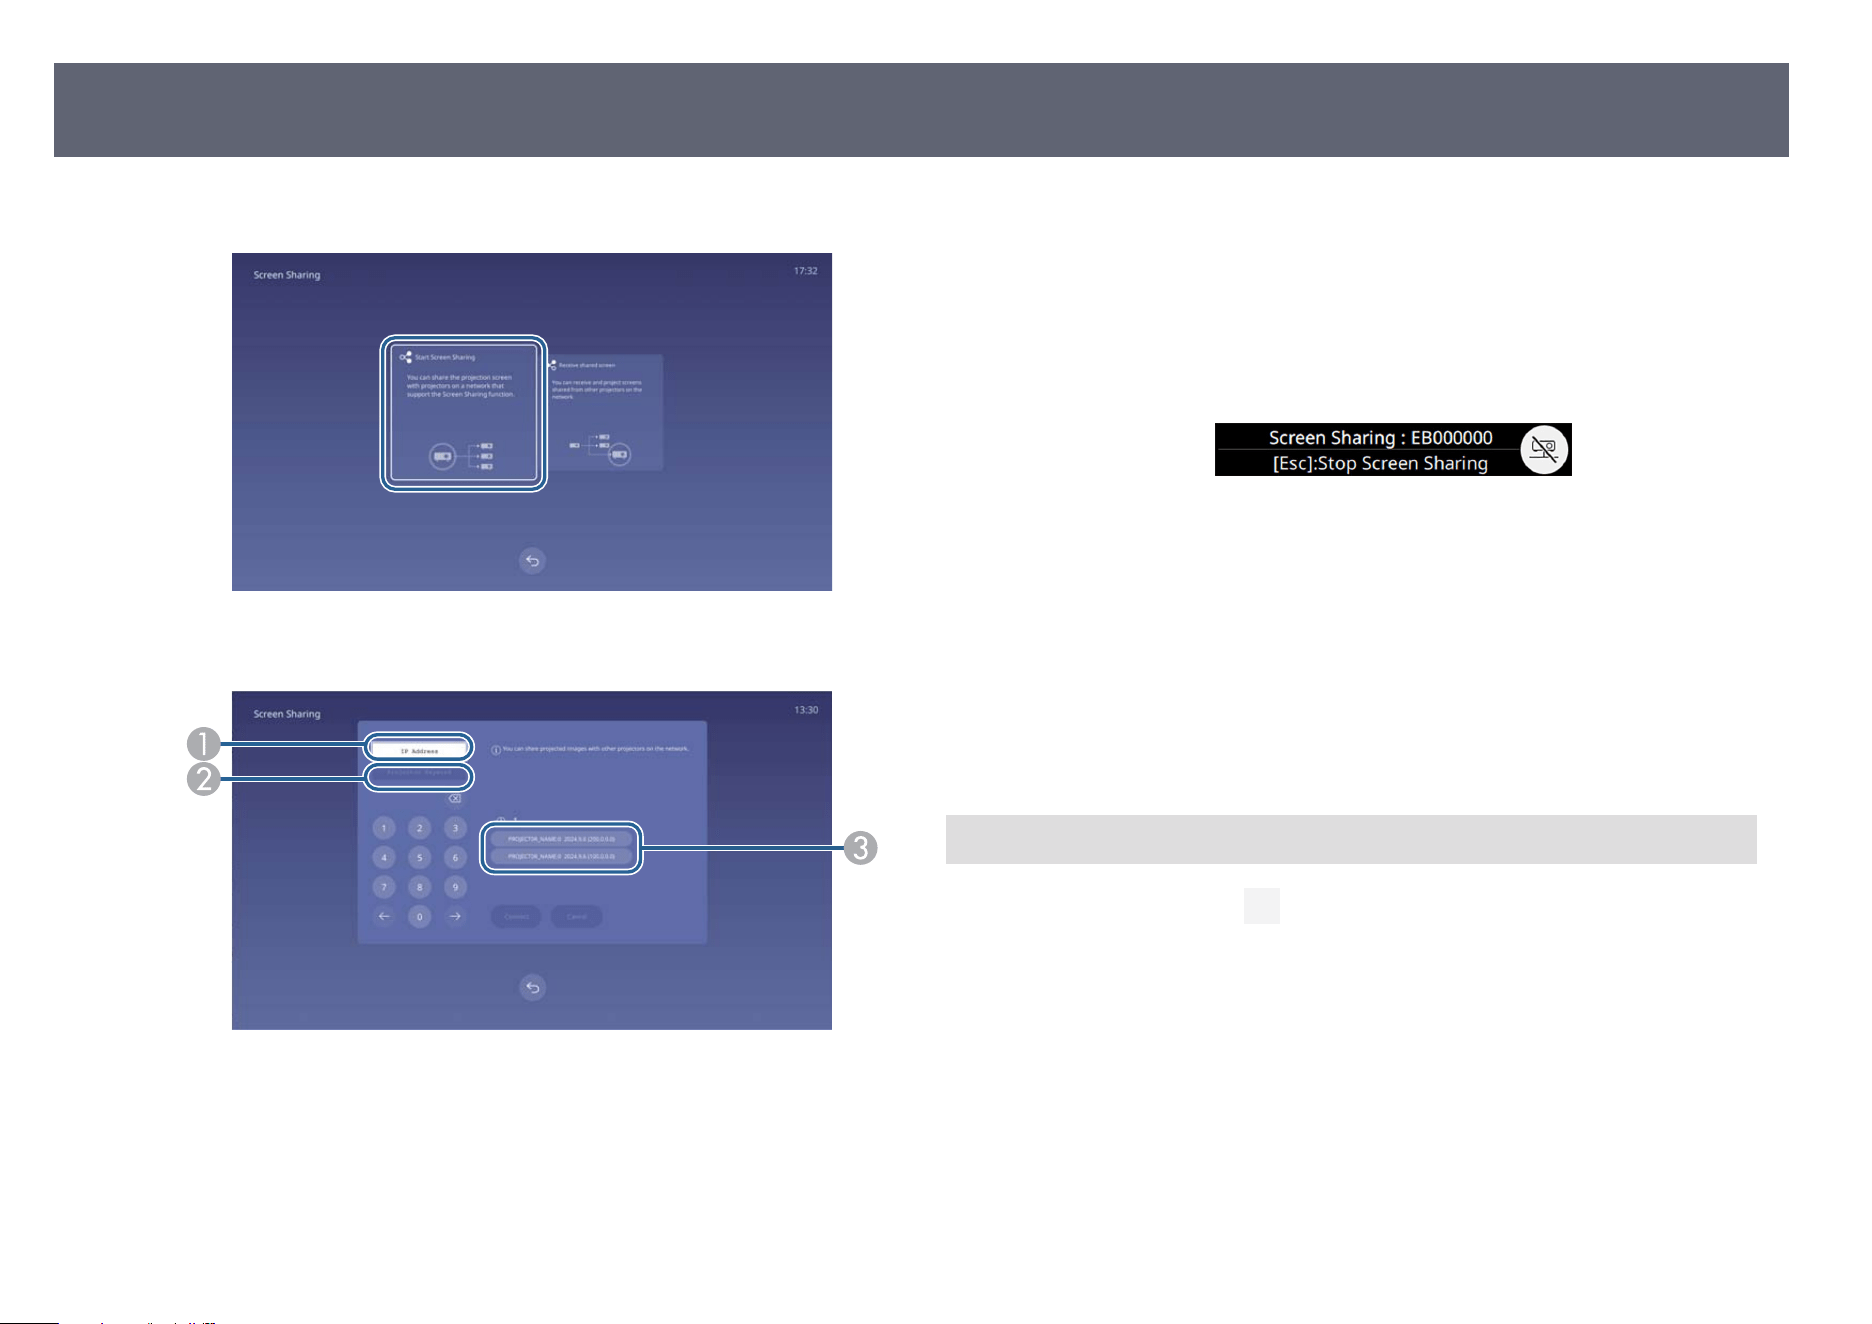
d
Select Start Screen Sharing.
e
Specify the projector you want to share your screen with.
A
Enter the IP address using the numeric keypad.
B
Enter the projector keyword using the numeric keypad, if required. e
p
r
ojector keyword is displayed on the projected image of the receiving
projector.
C
Displays the connection history. To connect to a projector that you have
pr
eviously connected to, select the IP address from the displayed list.
f
Select Connect.
W
hen the connection is established, the bar indicating the shared status
appears at the upper right of the screen. You can drag and drop the shared
status bar position.
g
Repeat steps 3 to 6 as needed to connect to more projectors.
h
Select the input source to project images you want to share.
e im
ag
e is distributed to the receiving projectors.
g
Related Links
•
"Finishing the Screen Sharing" p.164
Finishing the Screen Sharing
To
nish sharing, select the
icon on the shared status bar. is
option
disconnects all projectors at one time. If you want to disconnect specic
projector, follow the steps below.
Screen Sharing
164
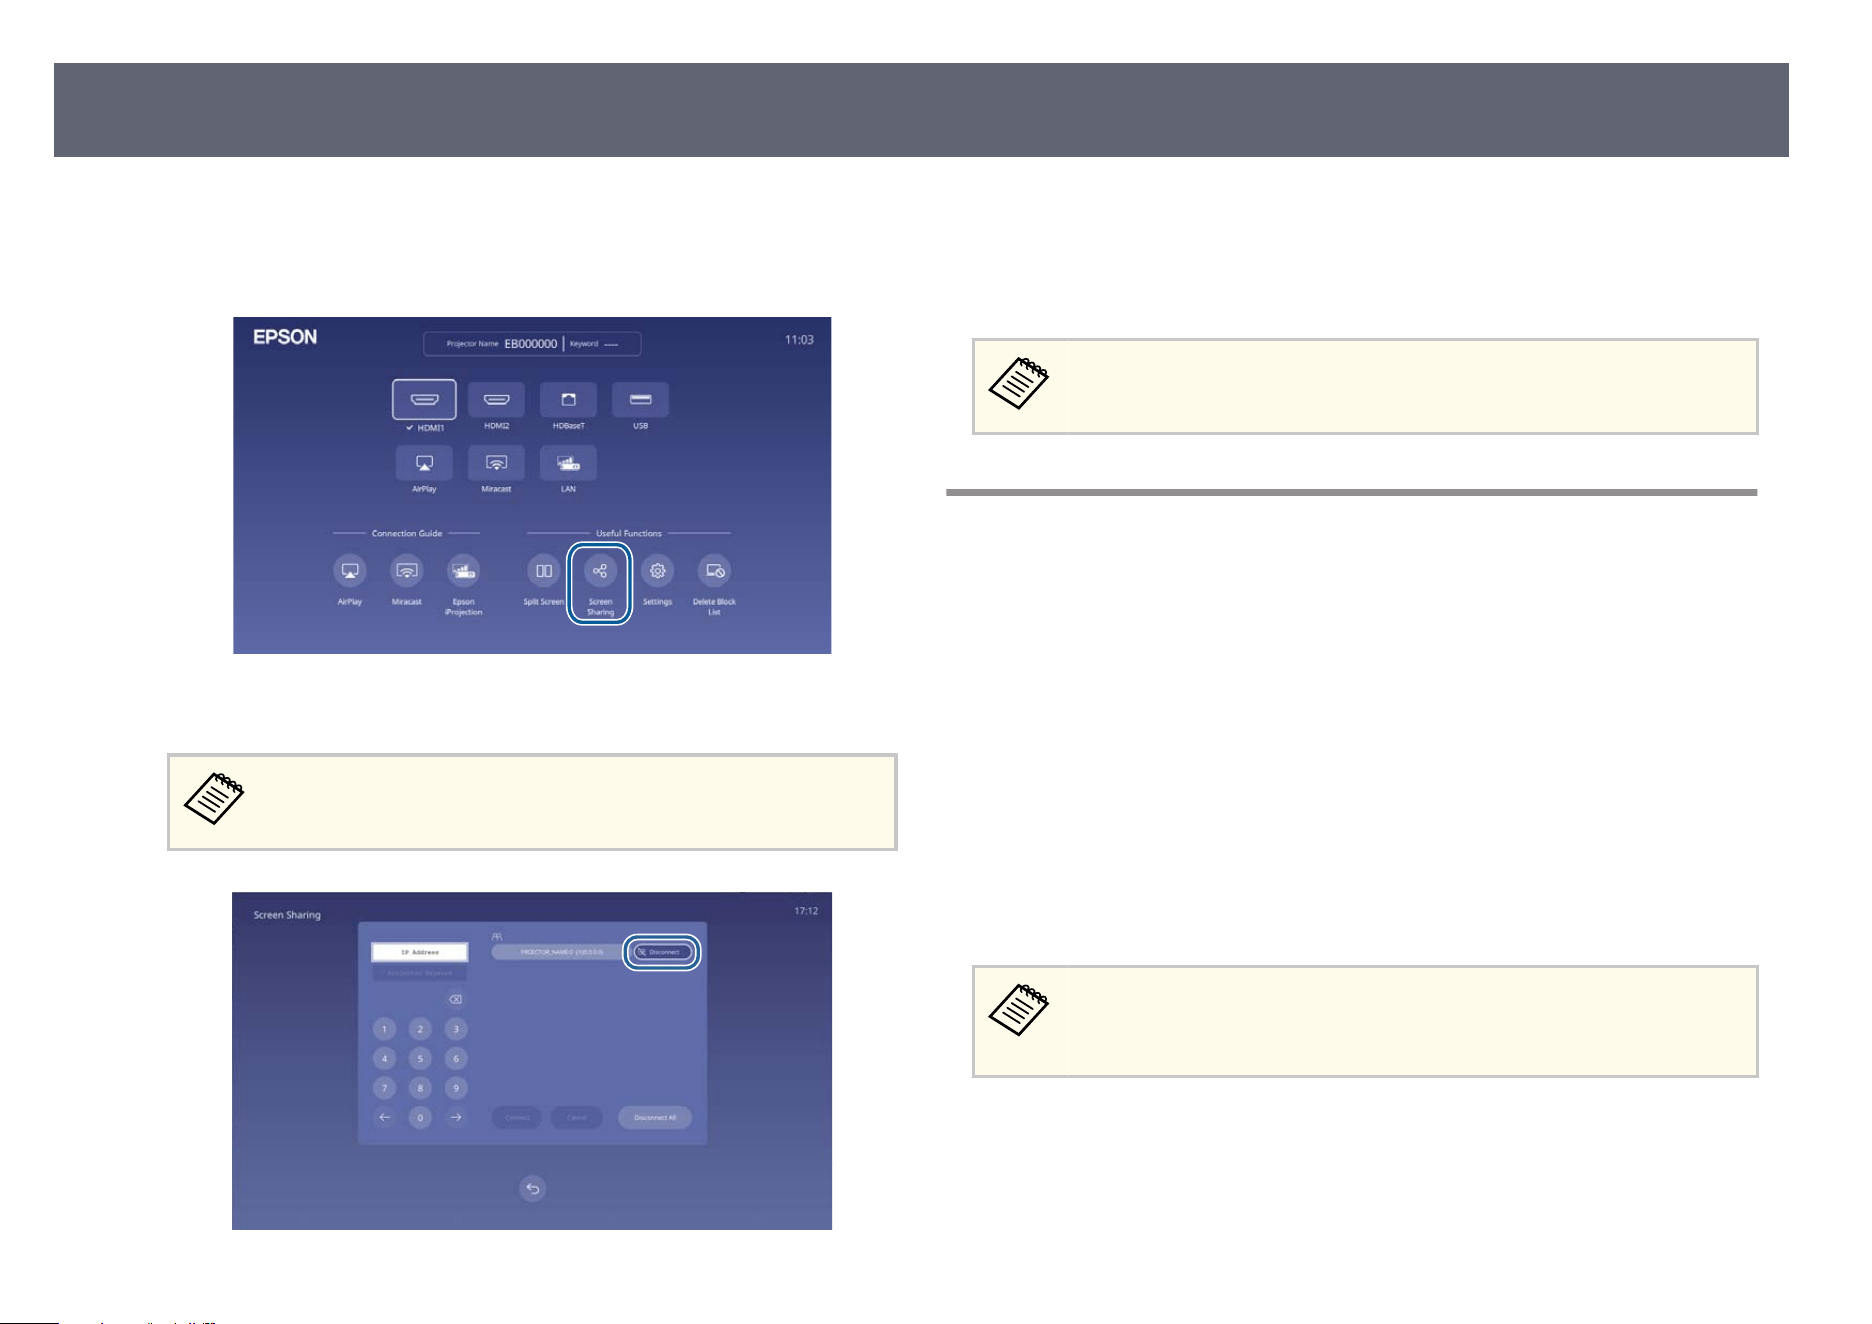
a
Press the [Home] button.
b
Select S
creen Sharing.
c
Select the projector you want to disconnect and select Disconnect.
When you select Disc
onnect, the button changes to Conrm.
Select the button again to disconnect the projector.
e selected projector is disconnected and screen sharing nishes to this
p
rojector.
d
Repeat step 3 as needed to disconnect to more projectors.
When you select Disc
onnect All, the button changes to Conrm. Select
the button again to disconnect all projectors.
Receiving Shared Screen Images
Before receiving the screen, you need to select settings on your projector.
•
Co
nnect the projectors to the same network as the projector that is sharing
images.
•
Make sure that no other device is connecting to the projector using the Epson
iProjection soware.
•
Make sure the Screen Sharing setting is set to On.
s Network > Network Settings > Network Projection > Screen Sharing
When the other projector starts sharing screen, the shared screen image is
automatically displayed.
If not, press the [Wireless] button on the remote control.
To remove the shared image during projection, press the [Esc] button.
If you do not have the IP address for your projector, press the [Home]
bu
tton and select Screen Sharing. You can check the IP address displayed
on the guide screen.
Screen Sharing
165

Monitoring and Controlling the Projector
Ch
eck these sections to monitor and control the projector over a network.
g
Related Links
•
"Epson Projector Management Connected/Epson Projector Management" p.167
•
"Controlling a Networked Projector Using a Web Browser" p.168
•
"Registering Digital Certicates from a Web Browser" p.177
•
"Setting Up Projector Network E-Mail Alerts" p.179
•
"Setting Up Monitoring Using SNMP" p.180
•
"Using ESC/VP21 Commands " p.182
•
"PJLink Support" p.183
•
"Crestron Connected Support" p.184
•
"Operating the Projector Using Web API" p.186
•
"Setting Projector Event Schedules" p.187

Epson Projector Management Connected and Epson Projector Management
so
ware (Windows only) lets you monitor and control your projector over a
network.
With Epson Projector Management Connected, projector information is
managed on a cloud server, so it can be remotely monitored and controlled
from any device.
Epson Projector Management is a Windows-only soware that allows you to
monitor and control projectors within the same network from your computer.
Choose one of the soware programs mentioned above depending on your
usage environment and purpose.
For more information, visit the following Web site.
https://www.projection-service.epson.com/epm-connected/
e authentication method when registering projectors varies depending
o
n the version of the Epson Projector Management soware you are using.
•
Epson Projector Management Ver. 5.30 or earlier: Monitor Password
•
Epson Projector Management Ver. 5.40 or later: Web Control
Password
For the best results, we recommend that you use the latest version of the
Epson Projector Management soware.
Epson Projector Management Connected/Epson Projector Management
167
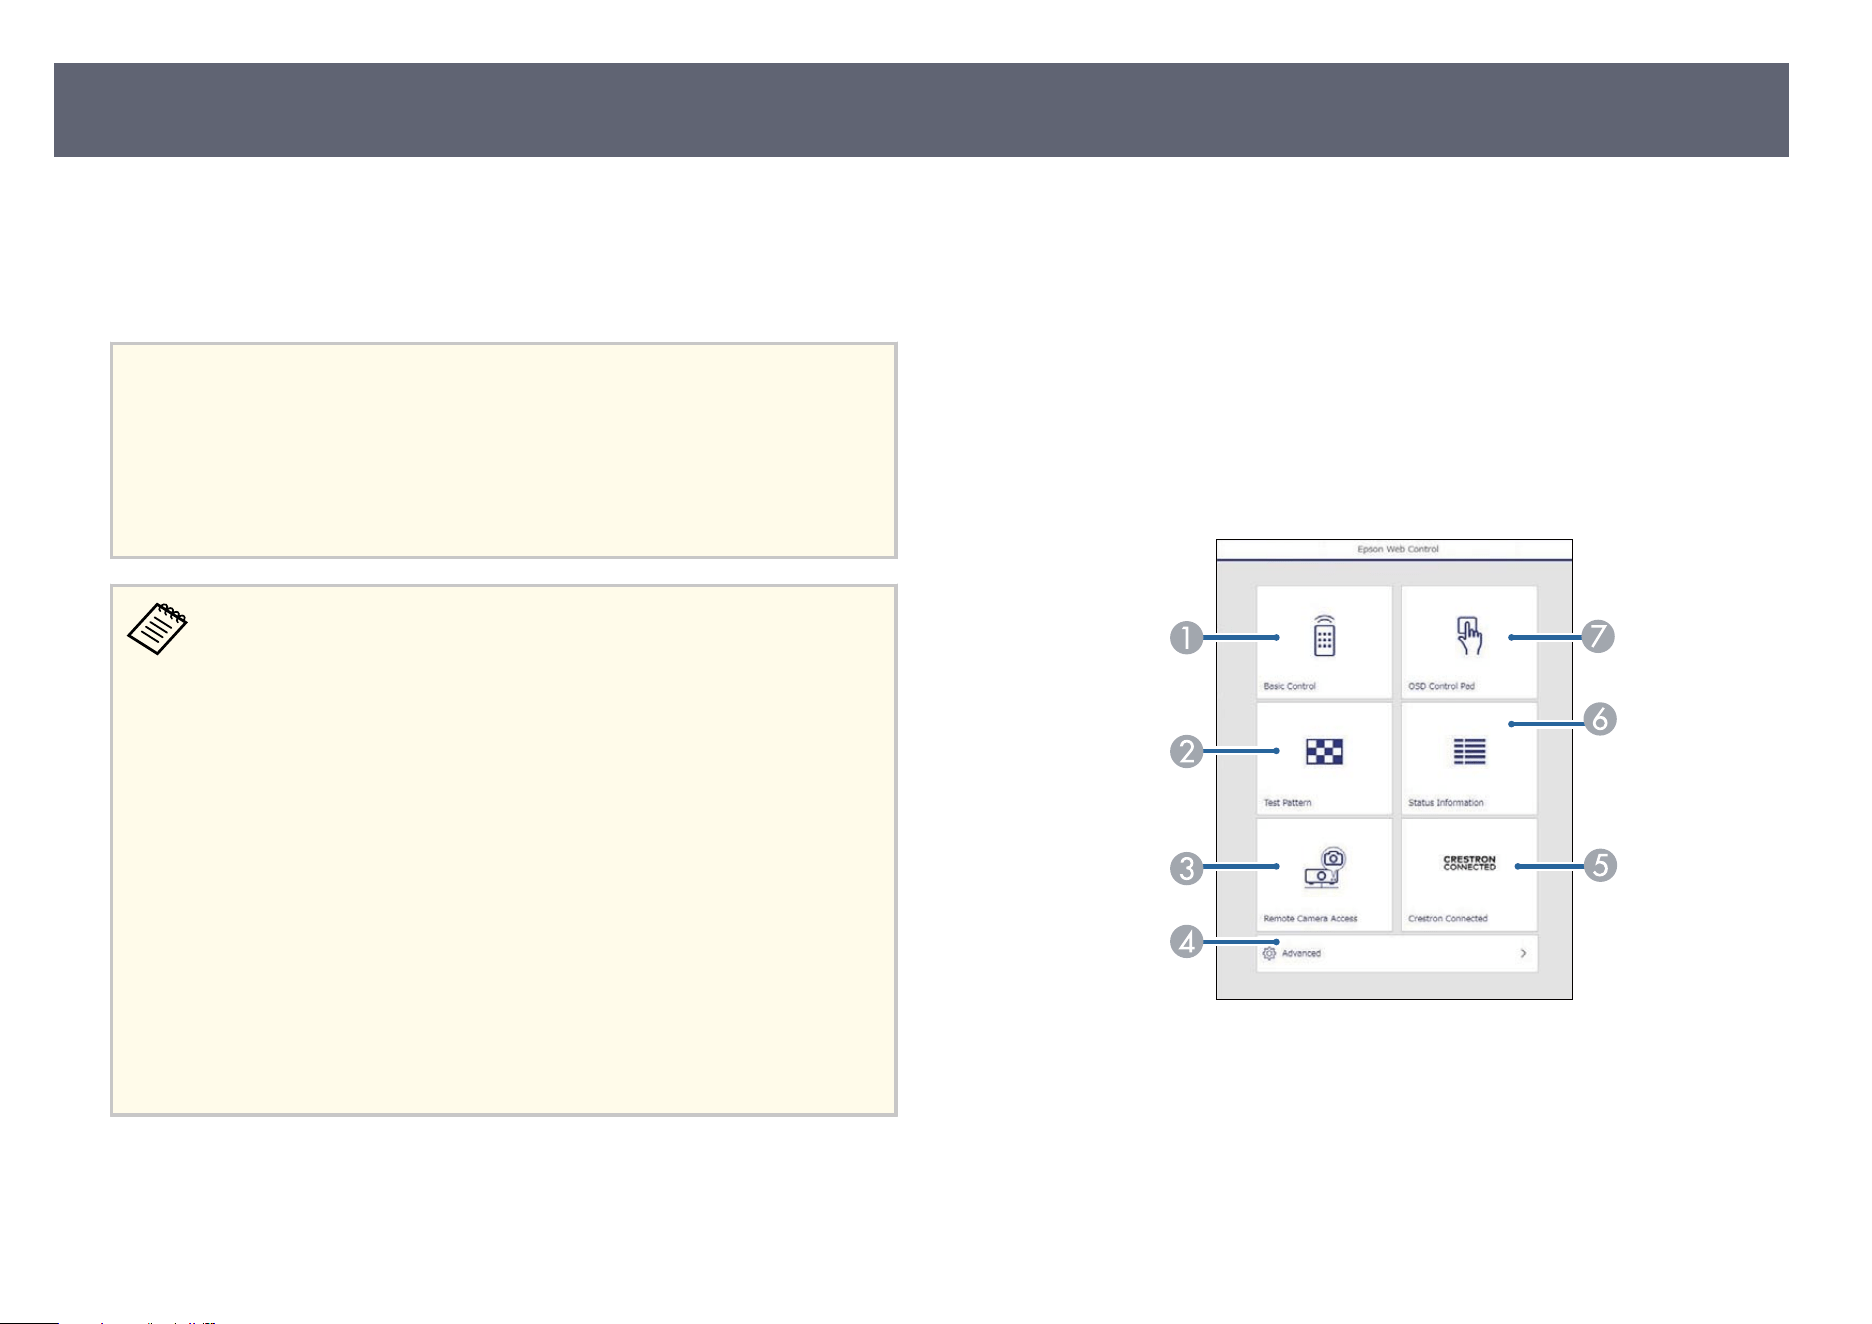
Once you have connected your projector to your network, you can select
pr
ojector settings and control projection using a compatible Web browser. is
lets you access the projector remotely.
In Content Playback mode, you can also edit playlists.
Attention
In C
ontent Playback mode, do not remove the USB ash drive from the projector or
disconnect the projector's power cord in the following situations. Data saved on the
USB ash drive may be damaged.
•
When the Playlists screen is displayed
•
When the USB Memory Device screen is displayed
•
Mak
e sure the computer and projector are connected to the network.
If you are connecting wirelessly, connect to devices over a wireless
network access point.
•
You can use the following Web browsers.
•
Microso Edge (Windows)
•
Safari (Mac, iOS)
•
Chrome (Android)
•
While using the Web browser, do not connect using a proxy server. You
cannot select all of the projector menu settings or control all projector
functions using a Web browser.
•
If you set the Standby Mode setting to Normal in the projector's
Operation menu, you can use a Web browser to select settings and
control projection even if the projector is in standby mode (when the
power is o).
•
You can also control the projector using a Web browser through the
Epson iProjection (iOS/Android) app.
a
Make sure the projector is turned on.
b
Make sure your computer or device is connected to the same network as
t
h
e projector.
c
Start your Web browser on the computer or device.
d
Go to the E
pson Web Control screen by entering the projector's IP
addr
ess into the browser's address box. When entering an IPv6 address,
wrap the address with [ and ].
You see the Epson Web Control screen.
•
In normal mode
A
Controls the projector remotely.
B
Displays a test pattern.
C
Takes an image capture of the displayed image from a remote location.
Avai
lable only when the Remote Camera Access menu is enabled in the
projector's Network menu.
D
Sets detailed projector settings.
Controlling a Networked Projector Using a Web Browser
168
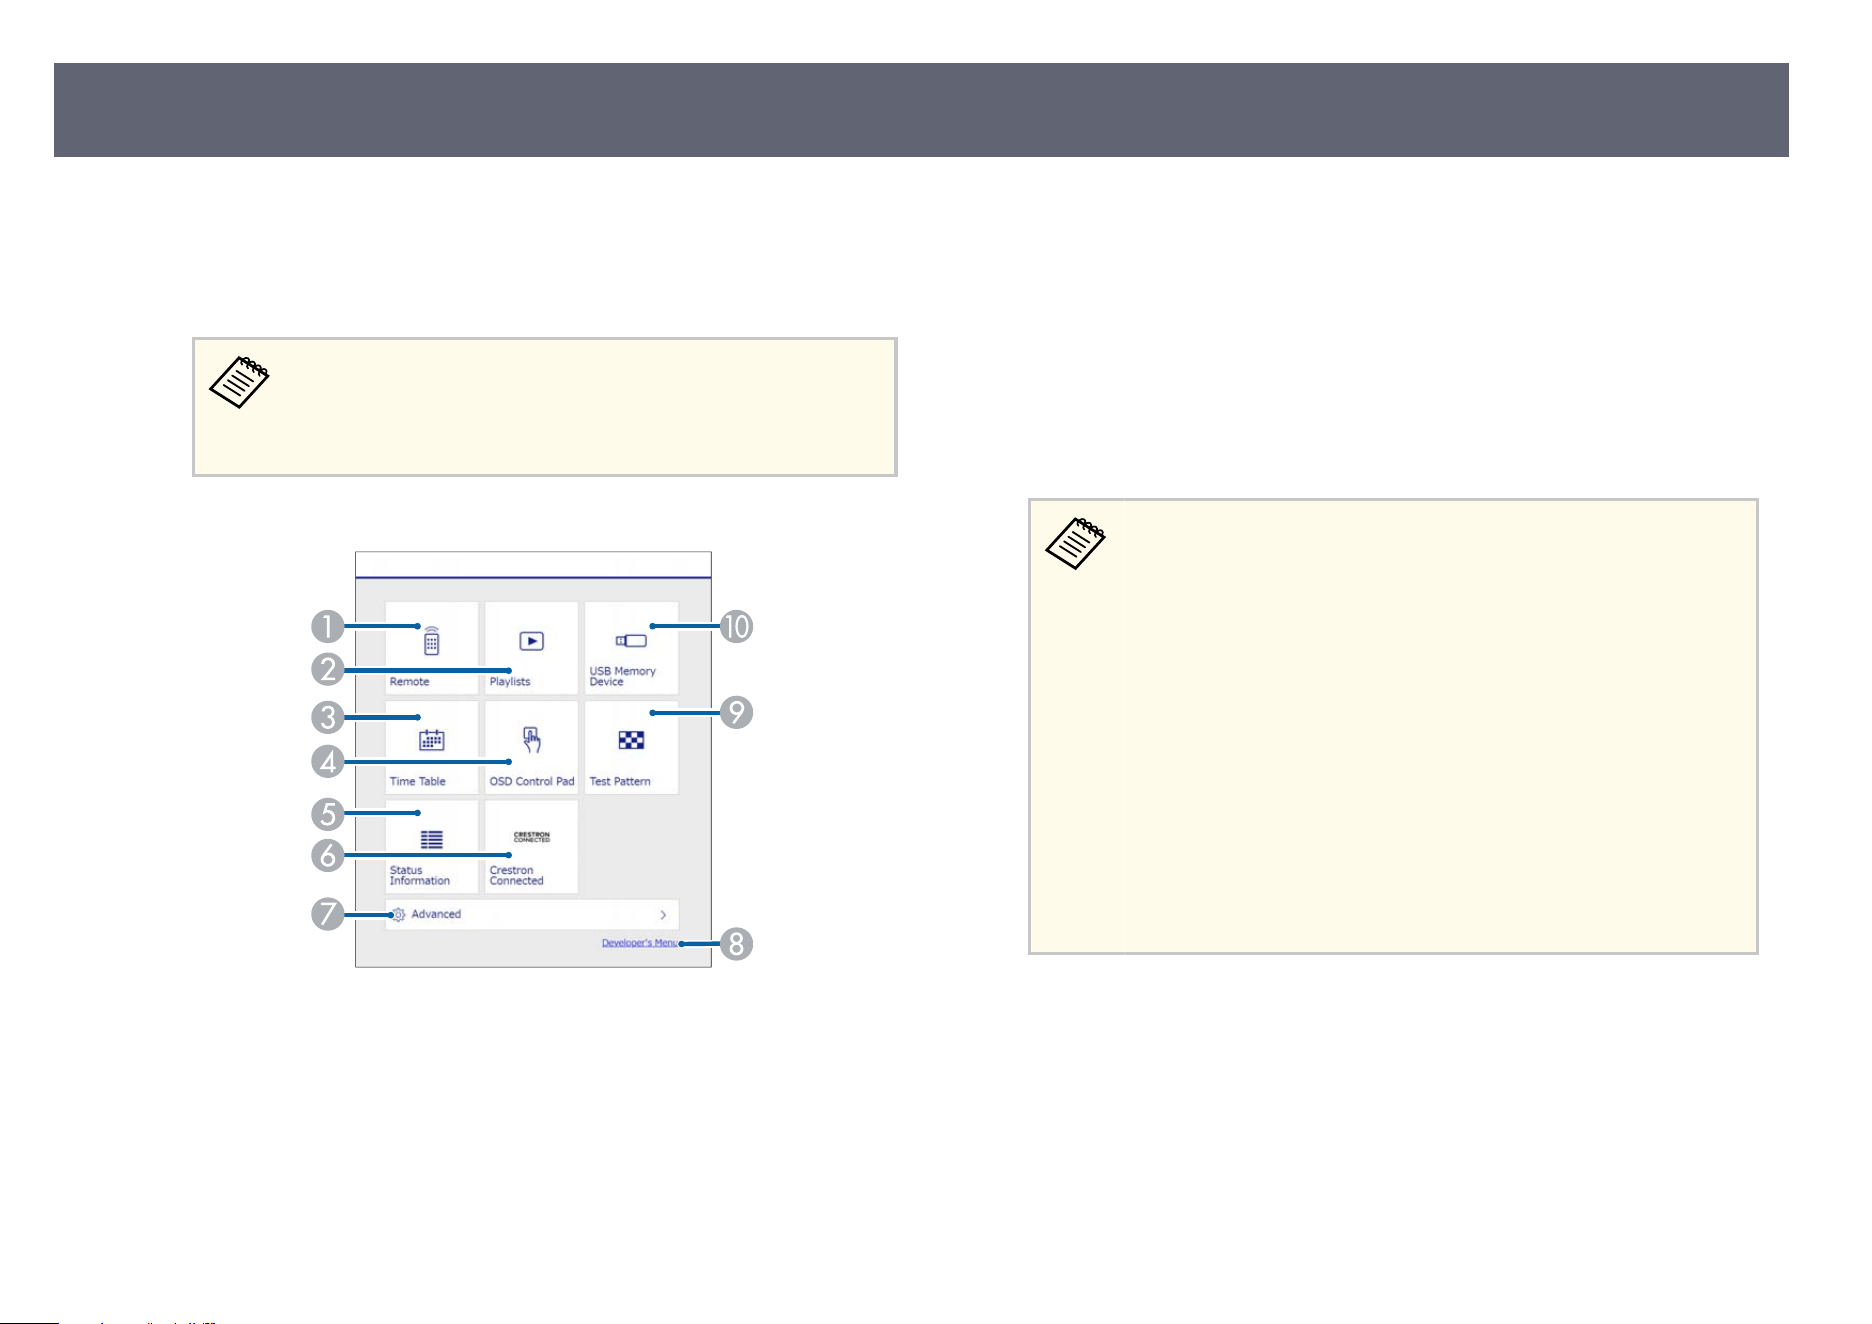
E
Opens the Cr
estron Connected operation window. Available only when
you set the Crestron Connected system.
F
Displays the projector's status.
G
Operates the projector's menu settings with your nger or mouse.
You can also check the projector's log les by en
tering "https://
<projector's IP address>/logs/" into your browser's URL bar
when you set Log Save Destination to USB and Internal
Memory in the projector's Management menu.
•
In
Content Playback mode
Epson Web Control
A
Controls the projector remotely.
B
Selects the playlist you want to play, and allows you to create or edit
pl
aylists.
C
Displays the Time Table screen.
D
Operates the projector's menu settings with your nger or mouse.
E
Displays the projector's status.
F
Opens the Crestron Connected operation window. Available only when
yo
u set the Crestron Connected system.
G
Sets detailed projector settings.
H
Displays the Developer's Menu screen.
I
Displays a test pattern.
J
Registers or deletes the data for a playlist on the USB ash drive.
e
Select the option corresponding to the projector function you want to
con
trol.
You may need to log in to access some of the options on the Eps
on
Web Control screen. Set the following passwords rst.
•
To access the Basic Control option, you need to log in using
EPSONREMOTE as the user name and your Remote Password.
(No password is set by default.)
Set Basic Control to On in the projector's Network menu, and
then set the password.
s Network > Network Settings > Projector Control > Basic
Control
•
To access other options and save settings, you need to log in
using EPSONWEB as the user name and your Web Control
Password. (No password is set by default.)
Set the password in the projector's Network menu.
s Network > Network Settings > Web Control Password
g
Related Links
•
"We
b Control Options" p.170
•
"Projector Network Settings - Network Menu" p.211
Controlling a Networked Projector Using a Web Browser
169
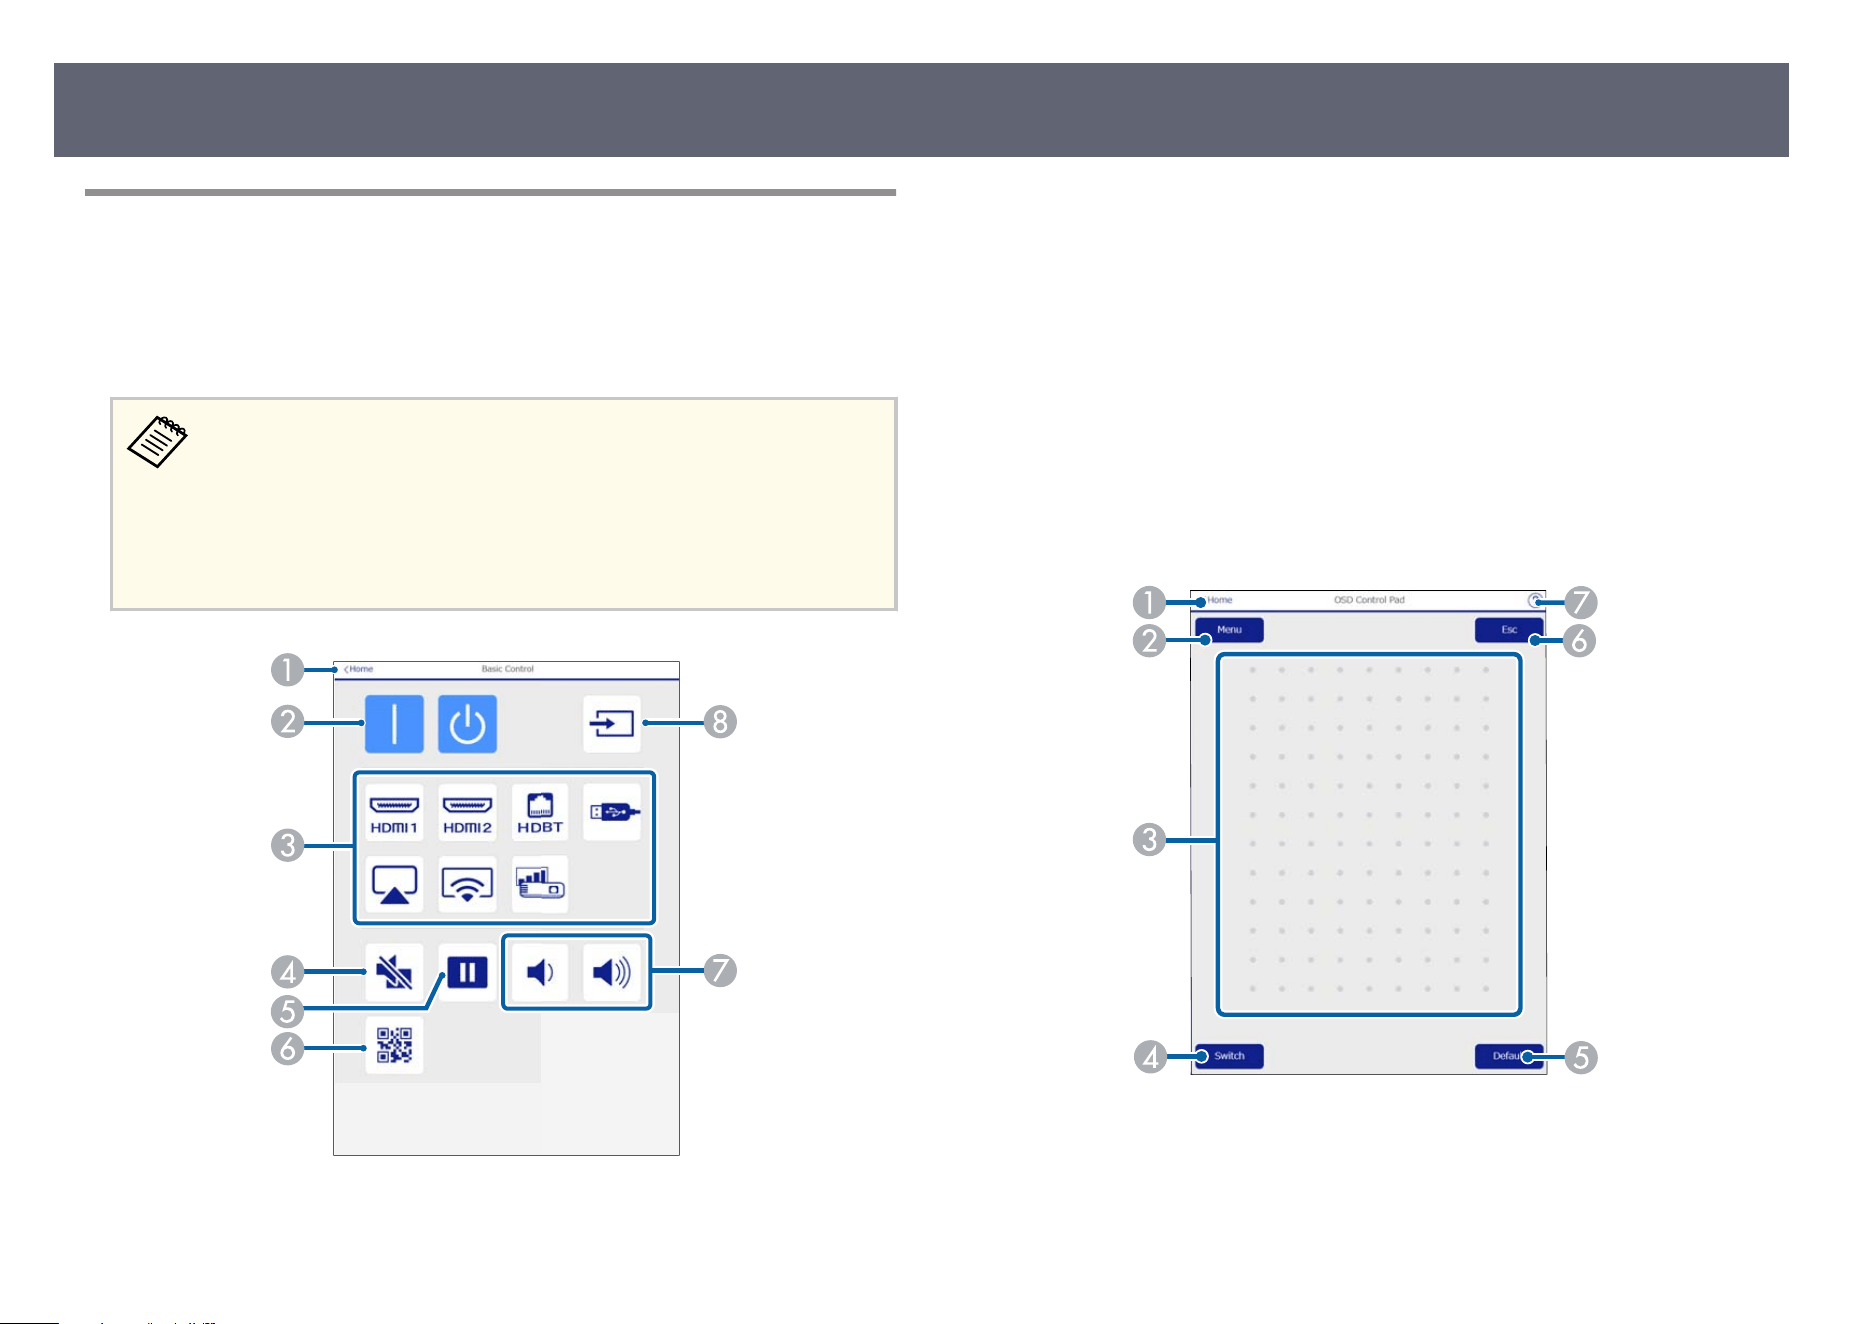
Web Control Options
Basic Control
Op
tions on the Basic Control screen allow you to select the input source and
control the projector.
•
If y
ou see a log in window, enter your user name and password. (e
user name is EPSONREMOTE. No password is set by default. When
you are using the function for the rst time, follow the on-screen
instructions to set a password.)
•
You can change the password in the projector's Network menu.
s Network > Network Settings > Projector Control > Basic Control
A
Returns to the E
ps
on Web Control screen.
B
Turns the projector on or o.
C
S
elects the input source.
D
Turns the video and audio on or o temporarily.
E
Pauses or resumes images.
F
Displays the QR code.
G
Adjusts the speaker volume.
H
Searches for sources.
OSD Control Pad
Options on the OSD Control Pad screen allow you to display the projector's
setting menus and select them moving your nger or mouse on the pad.
A
Returns to the Eps
on Web Control screen.
B
Displays the projector's setting menus.
C
Use your nger or mouse to navigate the menus.
Controlling a Networked Projector Using a Web Browser
170
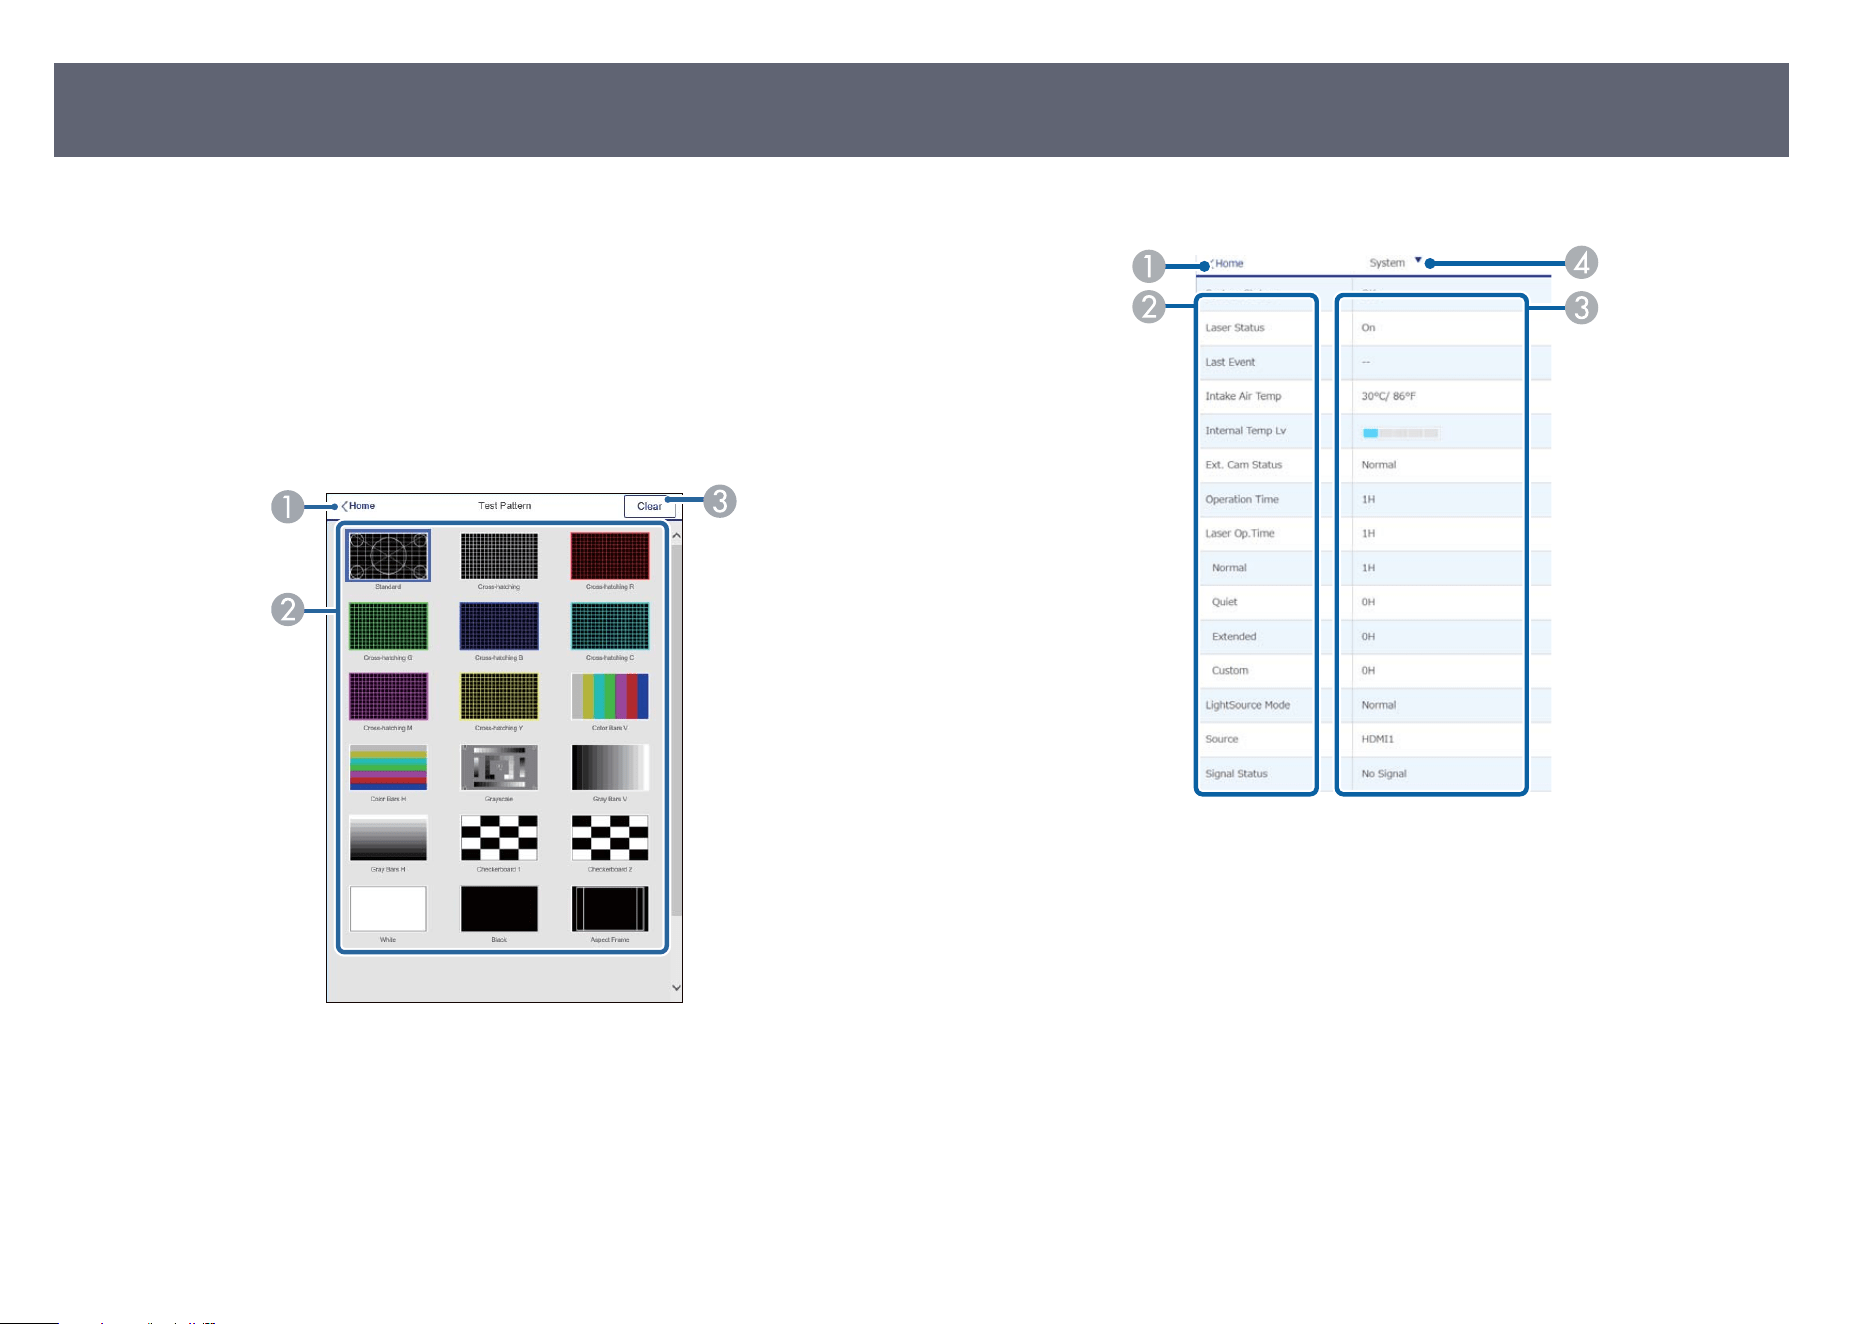
D
Displays the button operation screen.
E
Resets the selected setting to its default value.
F
Returns to the previous menu.
G
Displays help topics.
Test Pattern
e Tes
t Pattern screen displays the available test patterns and allow you to
select to project it.
A
Returns to the Eps
on Web Control screen.
B
Displays available test patterns; select to project a test pattern.
C
Turns o test pattern display.
Status Information
A
Returns to the Eps
on Web Control screen.
B
Displays a list of monitored settings.
C
Displays the setting status.
D
Select to view dierent status information.
Controlling a Networked Projector Using a Web Browser
171
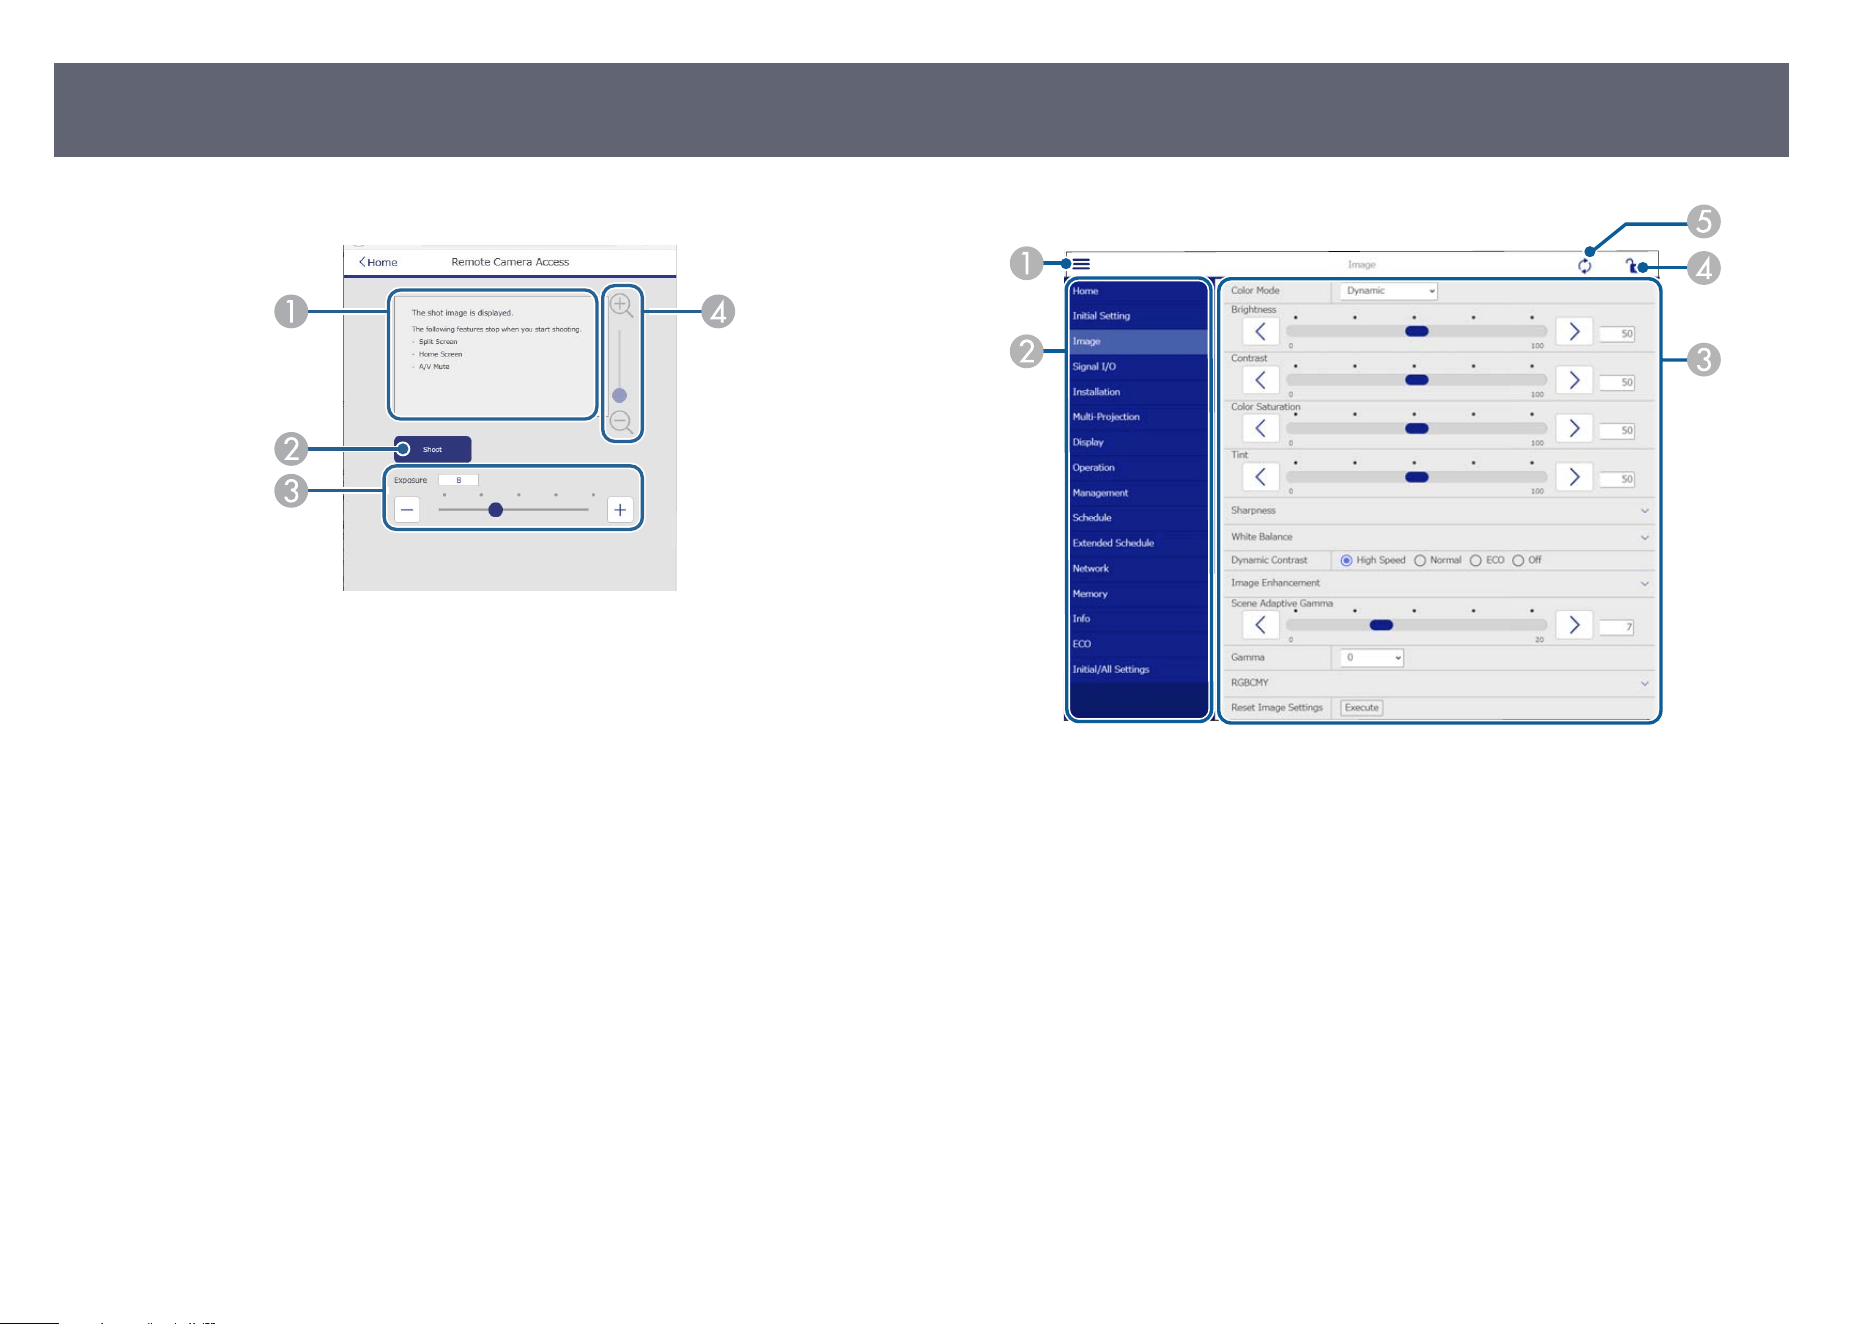
Remote Camera Access (only in normal mode)
A
Displays the image you captured using the Shoot button.
B
Takes a picture of the projected image using the optional external camera installed
on the projector.
C
Adjusts the image exposure.
D
Zooms in or out on the image you captured.
Advanced
e Advanced screen allow you to select the projector's settings.
A
Opens the menus.
B
Displays the menu name you selected.
C
Species the projector settings. (e available settings vary depending on your
p
rojector model.)
D
Locks/unlocks the projector settings.
E
Updates the projector settings.
Controlling a Networked Projector Using a Web Browser
172
You cannot change the following settings using Epson Web Control.
•
HDMI L
ink
•
Batch Setup
•
Camera Correction Assist
•
Remote Camera Access
•
Content Playback
•
Customize Button
•
User's Logo
•
Wireless LAN Diagnosis
•
Language
•
Search Access Point
•
Crestron Connected
•
HDBaseT Signal Level
•
Event ID
•
HDBaseT Tx
•
Antenna Level
•
Reset Network Settings
•
Firmware Update
You can select the following settings only with Epson Web Control.
•
Mo
nitor Password (up to 16 alphanumeric characters)
•
IPv6 Settings (manual)
•
HTTP port (port number used for Web Control except for 80 [default],
843, 3620, 3621, 3625, 3629, 4352, 4649, 5357, 10000, 10001, 41794)
•
Display Logs
Remote (only in Content Playback mode)
Op
tions on the Remote screen allow you to select the input source, control the
projector, and start projecting playlists.
Playlist B
Playlist C
A
Returns to the Eps
on Web Control screen.
B
Turns the projector on or o.
C
Selects the input source. (e available sources vary depending on your projector
model.)
D
Turns the video and audio on or o temporarily.
E
Overlay Eect option is displayed when the current source is anything other than
US
B.
Turns Overlay Eect on or o to add color and shape eects to a playlist.
When turning on, the Eects screen is displayed. You can add predened color and
shape eect lters to a playlist. You can also create a customized eect.
F
Species the screen settings.
G
Displays your favorite playlists. Select a playlist to start projecting.
Controlling a Networked Projector Using a Web Browser
173
H
Displays information for the playlist being projected.
e icon
s indicate the playlist settings.
: Overlay eec
ts have been applied
: Repeat playback has been applied
: Length of the playlist
Se
lect the arrow at the bottom-right to display the following screen.
I
Adjusts the speaker volume.
Screen displayed while projecting playlist (only in Content Playback mode)
A
Stops projection.
B
Turns the video and audio on or o
temporarily. However, the audio and video
continue to run so you cannot resume projection at the point you activated this
function.
C
Adjusts the speaker volume.
D
Opens the Eects screen. You can select preset eects or select individual
brightness, color, and shape eect lters.
Playlist (only in Content Playback mode)
Options on the Playlist screen allow you to select the playlist you want to play
from the list, and create or edit playlists.
A
Returns to the Epson Web Control screen.
Controlling a Networked Projector Using a Web Browser
174
B
Starts projecting the playlist.
e icon
s indicate the playlist settings.
: Number assigned to your favorite playlists
: Repeat playback has been applied
: Overlay eec
ts have been applied
C
Opens the menu that allows you to edit, copy, register to your favorites, or delete
the playlist.
When you select Edit or Duplicate, the Edit Playlist screen is displayed.
D
Opens the New Playlist screen where you can create a new playlist.
New Playlist/Edit Playlist screen (only in Content Playback mode)
A
Edits the playlist name.
B
Selects whether to enable repeat playback or not.
C
Registers the playlist as favorites.
Wh
en registering favorites, you can quickly start playback of the favorite playlist
using the Remote screen or the remote control.
D
Displays the images or movies you have added to the playlist. e playlist plays the
images or movies in order.
E
Adds images or movies to the playlist.
F
Deletes images or movies from the list.
G
Opens the Switch Image screen.
You can specify the time interval to switch to the next image le. You can also select
a transition eect.
H
Opens the Eects screen.
You can add predened color and shape eect lters to a playlist. You can also
create a customized eect.
I
Previews the playlist.
USB Memory Device (only in Content Playback mode)
Options on the USB Memory Device screen allow you to upload data for a
playlist to the USB ash drive or delete the data on the USB ash drive.
You can upload .avi, .jpeg (.jpg), .png, .bmp, or .gif les.
If y
ou want to add the .mp4 and .mov les to the playlist, use the Epson
Projector Content Manager soware or the Epson Creative Projection app.
Controlling a Networked Projector Using a Web Browser
175
A
Returns to the Eps
on Web Control screen.
B
Copies images or movies you want to add to playlists to a USB ash drive.
C
Deletes images or movies on the USB ash drive.
Time Table (only in Content Playback mode)
Options on the Time Table screen allow you to enable or disable the specied
time table features.
A
Returns to the Eps
on Web Control screen.
B
Turns the time table on or o.
You can specify when each playlist starts and nis
hes using the time table
feature in the Epson Projector Content Manager soware.
For details, see the Epson Projector Content Manager Operation Guide.
Controlling a Networked Projector Using a Web Browser
176
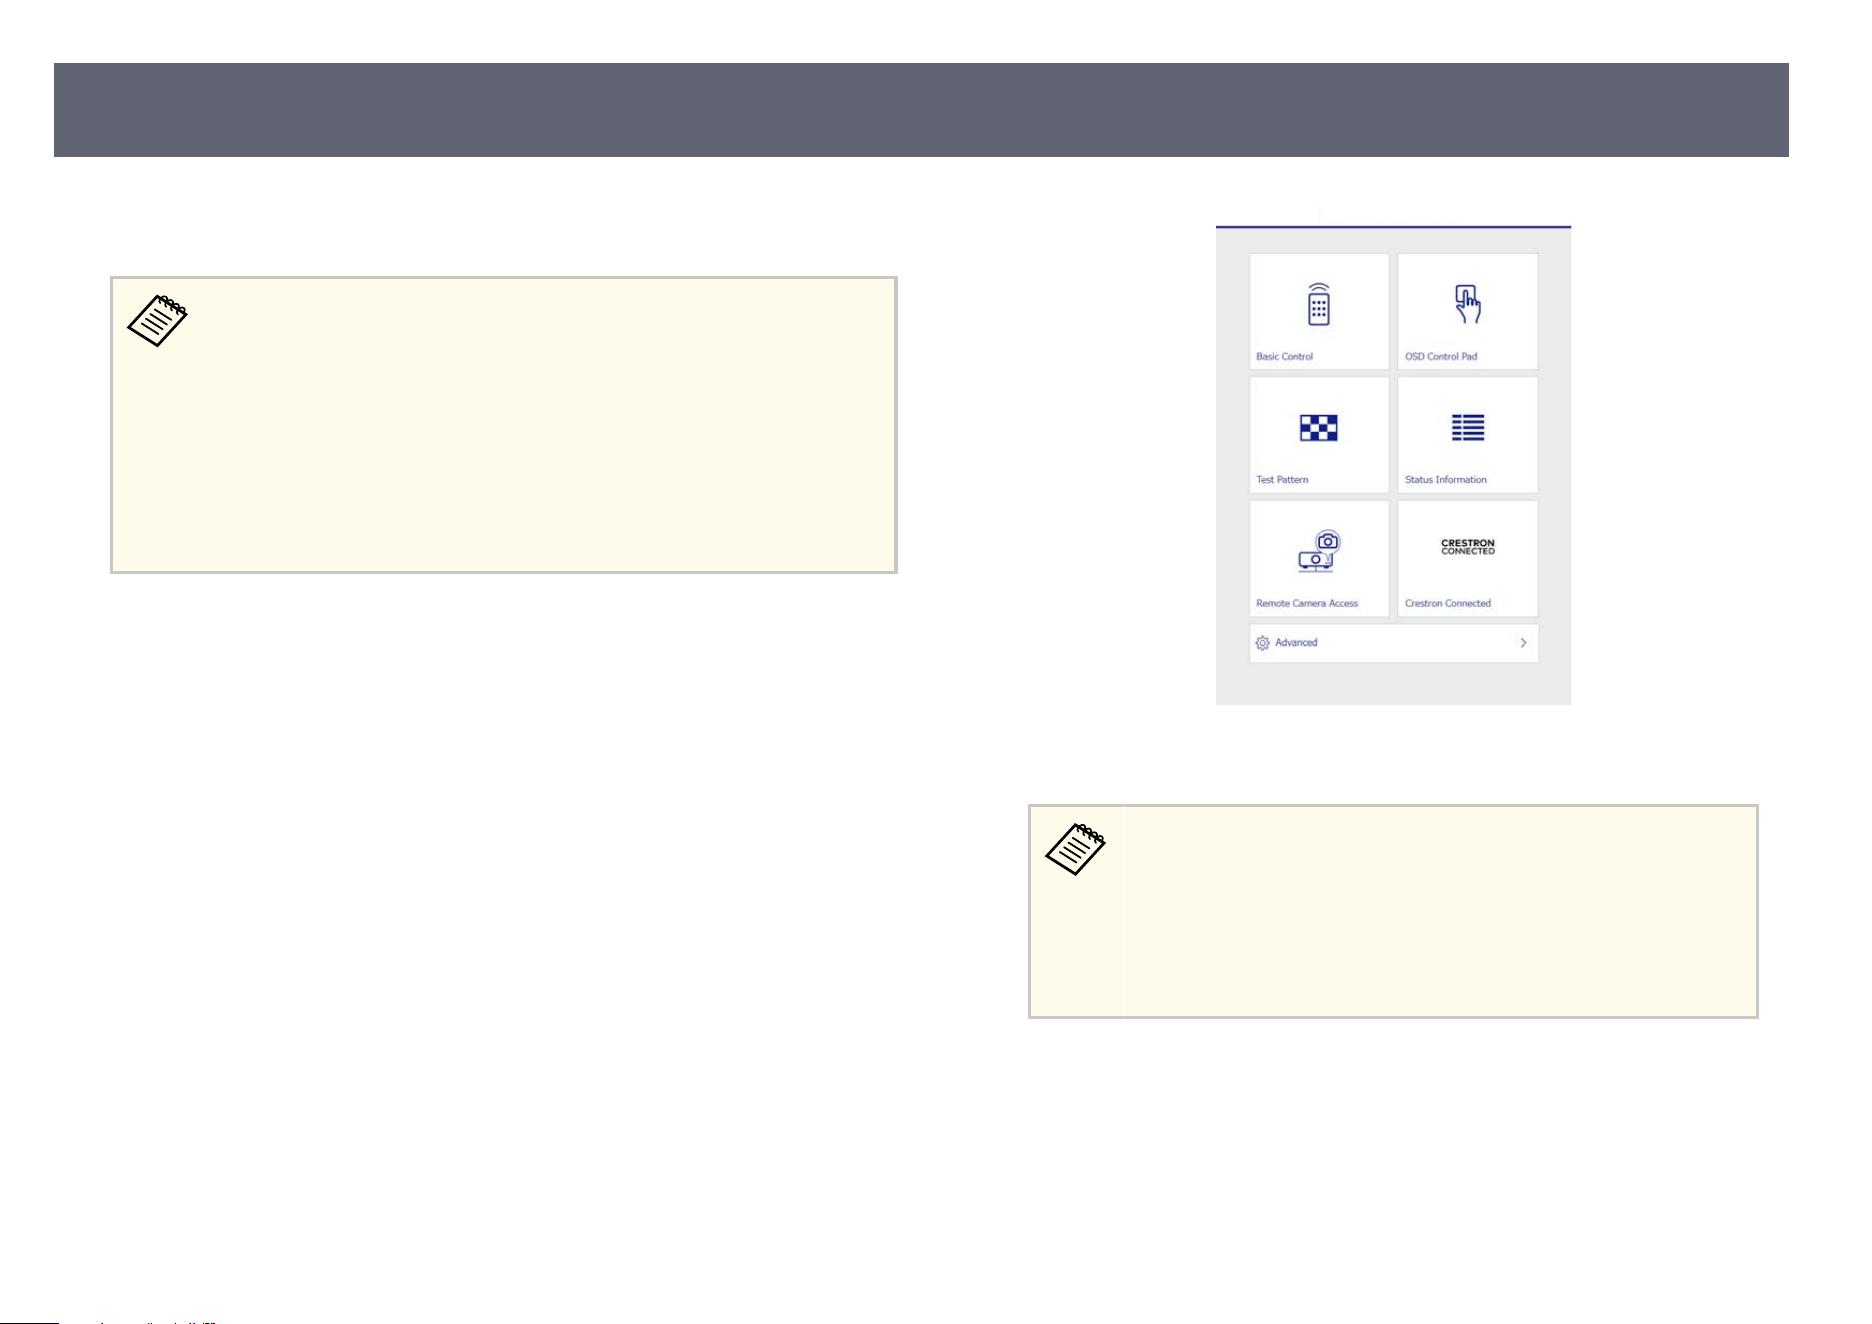
You can register the digital cert
icates on the projector to provide security for
your presentation les.
You can also register the digital cert
icates in the projector's Network
menu. However, be sure to register just once or the certicate may not
install correctly.
s Network > Network Conguration > Wireless LAN > EAP Method
> Client Certicate
s Network > Network Conguration > Wireless LAN > EAP Method
> CA certicate
s Network > Network Conguration > Others > Web Server
Certicate
a
Make sure your digital cert
icate le is compatible with projector
registration.
b
Make sure the projector is turned on.
c
Start your Web browser on a computer or device connected to the
n
et
work.
d
Go to the Epson Web Control screen by entering the projector's IP address
in
t
o the browser's address box.
You see the Epson Web Control screen.
Epson Web Control
e
Select A
dvanced.
•
Yo
u may need to log in before you see the Advanced screen. If
you see a log in window, enter your user name and password.
(e user name is EPSONWEB. No password is set by default.)
•
You can change the password in the projector's Network menu.
s Network > Network Conguration > Basic > Web Control
Password
f
Under Network, select Certicate.
g
S
elect the cert
icate le you want to register.
h
Enter the password in the Pass
word box, and then click Send.
Registering Digital Certicates from a Web Browser
177

i
When you nis
h registering the certicate, click Apply to nalize your
changes and complete the registration.
Registering Digital Certicates from a Web Browser
178
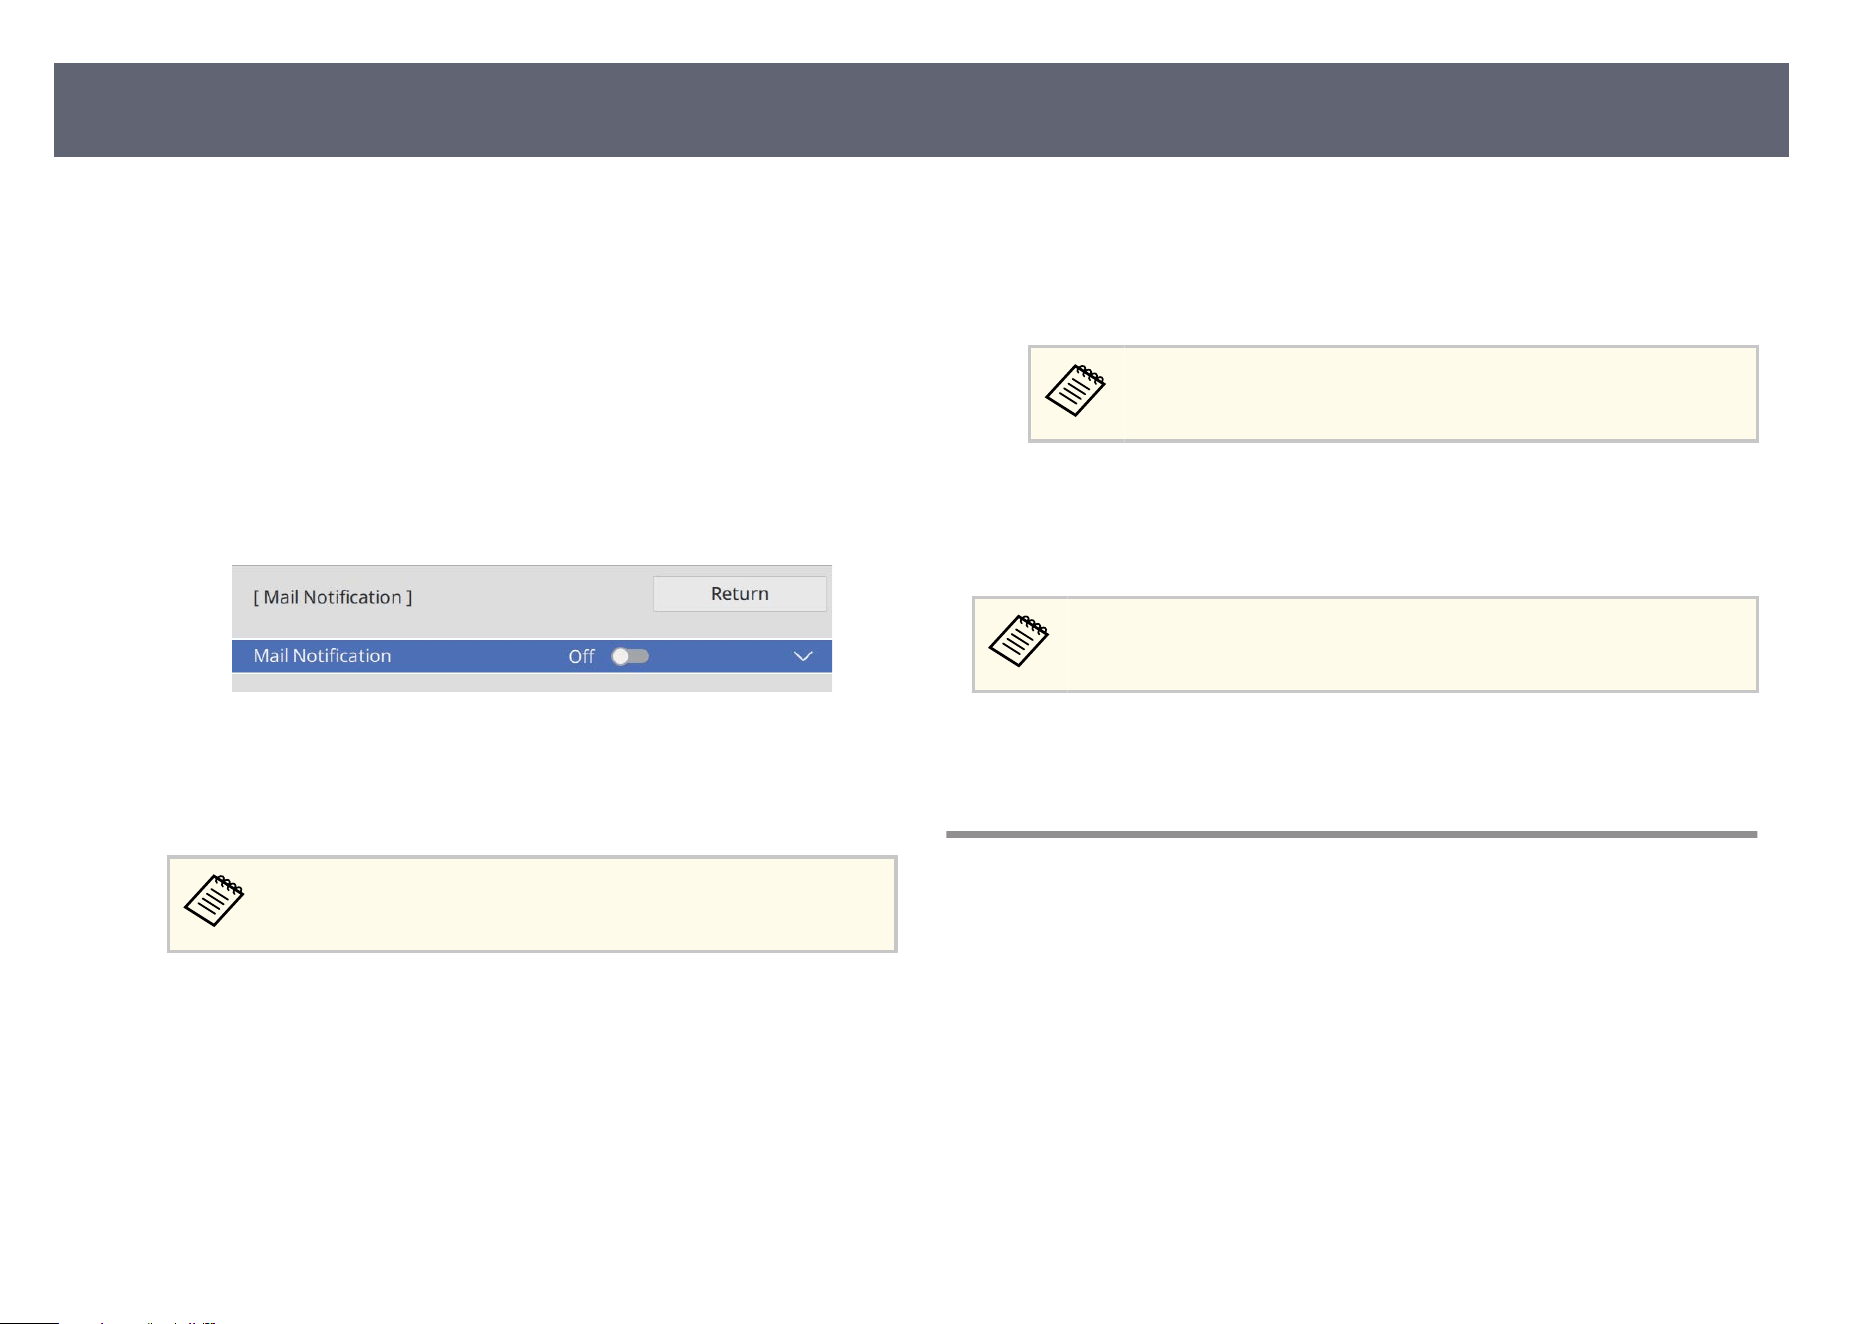
You can set up the projector to send you an e-mail alert over the network if
th
ere is a problem with the projector.
If you set the Standby Mode setting to Normal in the projector's Operation
menu, you can receive the e-mail alerts even if the projector is in standby mode
(when the power is o).
a
Press the [Menu] button, select the Ne
twork menu, and press [Enter].
b
Select Network Settings and press [Enter].
c
S
elect the Mail Notication menu and press [Enter].
d
Set the M
ail Notication setting to On.
e
En
ter the IP address for the SMTP S
erver option.
Do not use "127.x.x.x" (where x is a number from 0 to 255) for the
SMTP S
erver.
f
Select a type of Au
thentication of SMTP server.
g
Select a number for the SMTP server Po
rt Number, from 1 to 65535
(default is 25).
h
Enter a User Name for the SMTP server.
i
En
ter a Password for the SMTP server authentication.
j
En
ter the e-mail address to be indicated as the sender in F
r
om.
k
Choose an address eld
, enter the e-mail address, and select the alerts you
want to receive. Repeat for up to three addresses.
Your e-mail address can be up to 64 alphanumeric characters long.
l
When you ni
s
h selecting settings, go back to the Network Settings
screen, select Set, and follow the on-screen instructions to save your
settings and exit the menus.
If a critical problem causes a projector to shut down, you may not receive
an e-m
ai
l alert.
g
Related Links
•
"Net
work Projector E-mail Alert Messages" p.179
Network Projector E-mail Alert Messages
When a problem occurs with a projector on the network, and you selected
to r
eceive e-mail alerts, you receive an e-mail containing the following
information:
•
e email address set in From as the mail sender
•
Epson Projector in the subject line
•
e name of the projector experiencing a problem
•
e IP address of the aected projector
•
Detailed information about the problem
Setting Up Projector Network E-Mail Alerts
179
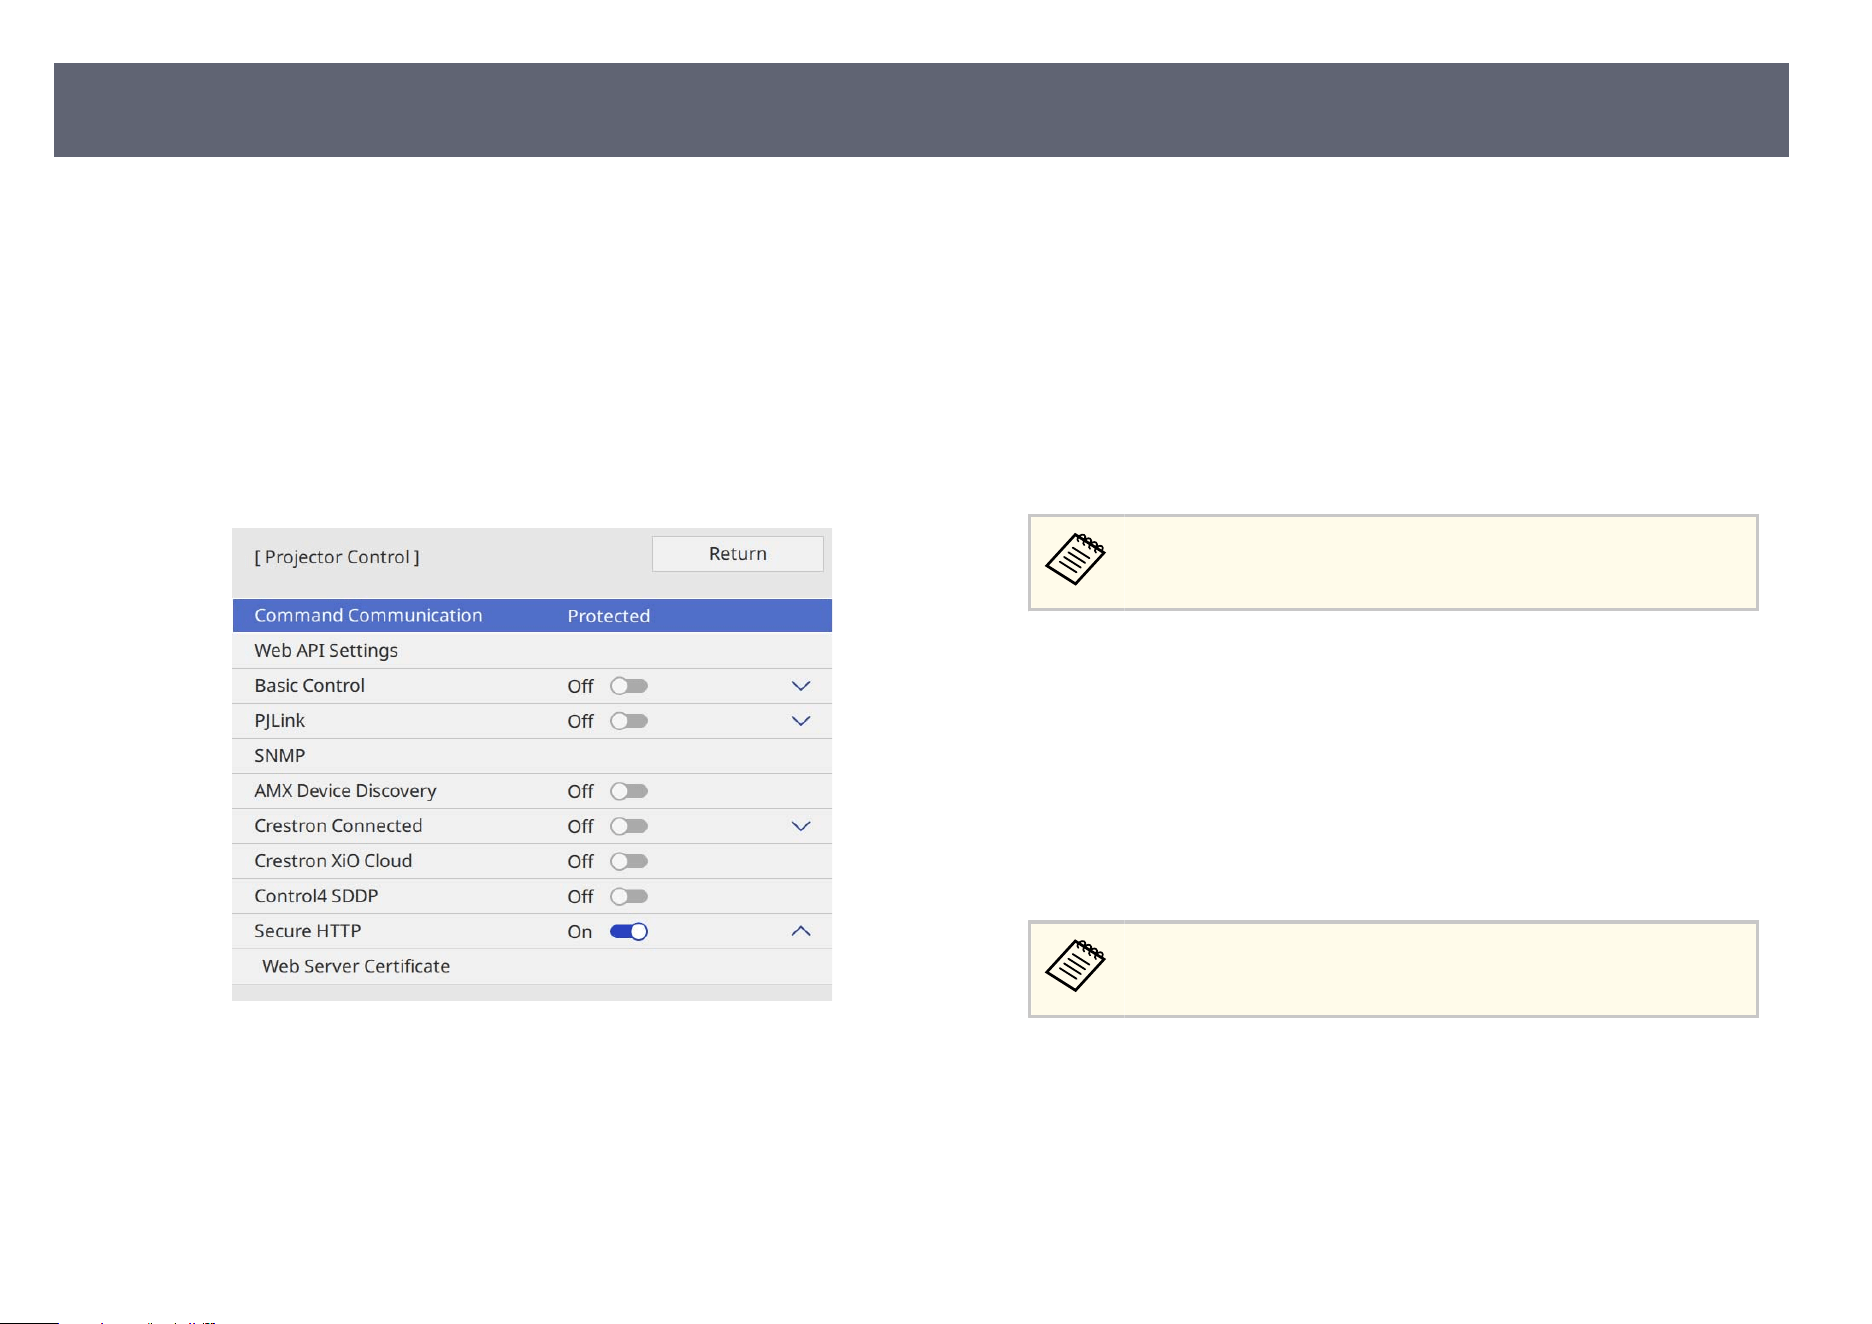
Network administrators can install SNMP (Simple Network Management
Pr
otocol) soware on network computers so they can monitor projectors.
If your network uses this soware, you can set up the projector for SNMP
monitoring.
a
Press the [Menu] button, select the Ne
twork menu, and press [Enter].
b
Select Network Settings and press [Enter].
c
S
elect the Projector Control menu and press [Enter].
d
Select the SNMP setting and press [Enter].
e
S
elect the SNMP agent version settings to match your network settings.
f
Do one of the following according to the SNMP agent version you
s
elected.
•
SNMPv1/v2c: Set to On and enter the SNMP Community Name up to
32 alphanumeric characters long.
•
SNMPv3: Set to On and then go to step 8.
g
Enter up to two IP addresses to receive SNMP no
tications as the Trap IP
Address 1 and Trap IP Address 2 settings, using 0 to 255 for each address
eld.
Do not use these addresses: 224.0.0.0 through 255.255.255.255.
en go to step 9.
h
S
elect your SNMP settings as necessary.
•
Us
er name lets you enter a user name using up to 32 alphanumeric
characters.
•
Trap IP Address 1 and Trap IP Address 2 lets you enter up to two IP
addresses to receive SNMP notications, using 0 to 255 characters for
each address eld.
Do not use these addresses: 224.0.0.0 through 255.255.255.255.
•
Au
thentication lets you select the type of SNMPv3 authentication.
•
Authentication Password lets you enter a password for the SNMPv3
authentication using up to 32 alphanumeric characters.
•
Encryption Type lets you select the type of SNMPv3 encryption.
•
Encryption Password lets you enter a password for the SNMPv3
encryption using up to 32 alphanumeric characters.
Setting Up Monitoring Using SNMP
180

i
When you nis
h selecting settings, go back to the Network Settings
screen, select Set, and follow the on-screen instructions to save your
settings and exit the menus.
Setting Up Monitoring Using SNMP
181
You can control the projector from an external device using ESC/VP21.
g
Related Links
•
"ESC/VP21 Co
mmand List" p.182
•
"Cable Layouts" p.182
ESC/VP21 Command List
When the power ON command is transmitted to the projector, the power turns
on and it enters warm-up mode. When the projector's power has turned on, a
colon ":" (3Ah) is returned.
When a command is input, the projector executes the command and returns a
":", and then accepts the next command.
If the command being processed terminates abnormally, an error message is
output and a ":" is returned.
You can check the available commands in the projector's Specications.
g
Related Links
•
"Getting the Latest Version of the Documents" p.10
Cable Layouts
Serial connection
•
Co
nnector shape: D-Sub 9-pin (male)
•
Projector input port name: RS-232C
•
Cable type: Crossover (null modem) cable
In the following illustration, the projector side is shown on the le, and the
computer side on the right:
Signal name Function
GND Signal wire ground
TD Transmit data
RD Receive data
Communications protocol
•
Defau
lt baud rate setting: 9600 bps
•
Data length: 8 bit
•
Parity: None
•
Stop-bit: 1 bit
•
Flow control: None
Using ESC/VP21 Commands
182

PJLink was established by the JBMIA (Japan Business Machine and Information
Sys
tem Industries Association) as a standard protocol for controlling network-
compatible projector's as part of their eorts to standardize projector control
protocols.
e projector complies with the PJLink Class2 standard established by the
JBMIA.
e port number used for the PJLink search function is 4352 (UDP).
You need to make network settings before you can use PJLink.
It complies with all commands except for the following commands dened
by PJLink Class2, and agreement was conrmed by the PJLink standard
adaptability verication.
http://pjlink.jbmia.or.jp/english/
•
Non-compatible commands
Function PJLink command
Mute settings Image muting set AVMT 11
Audio muting set AVMT 21
•
In
put ports and corresponding input source number
Input port name Input source number
HDMI1 32
HDMI2 33
USB 41
LAN 52
HDBaseT 56
Miracast 57
AirPlay 59
•
Man
ufacturer name displayed for "Manufacture name information query"
EPSON
•
M
o
del name displayed for "Product name information query"
•
EPSON L895E/L890E
•
EPSON L795SE/L790SE
•
EPSON L790G/L695SE/L690SE
•
EPSON L690E
•
EPSON L890U
•
EPSON L790U
•
EPSON L690U
•
EPSON L695SU/L690SU
g
Related Links
•
"Using the Projector on a Network" p.138
PJLink Support
183
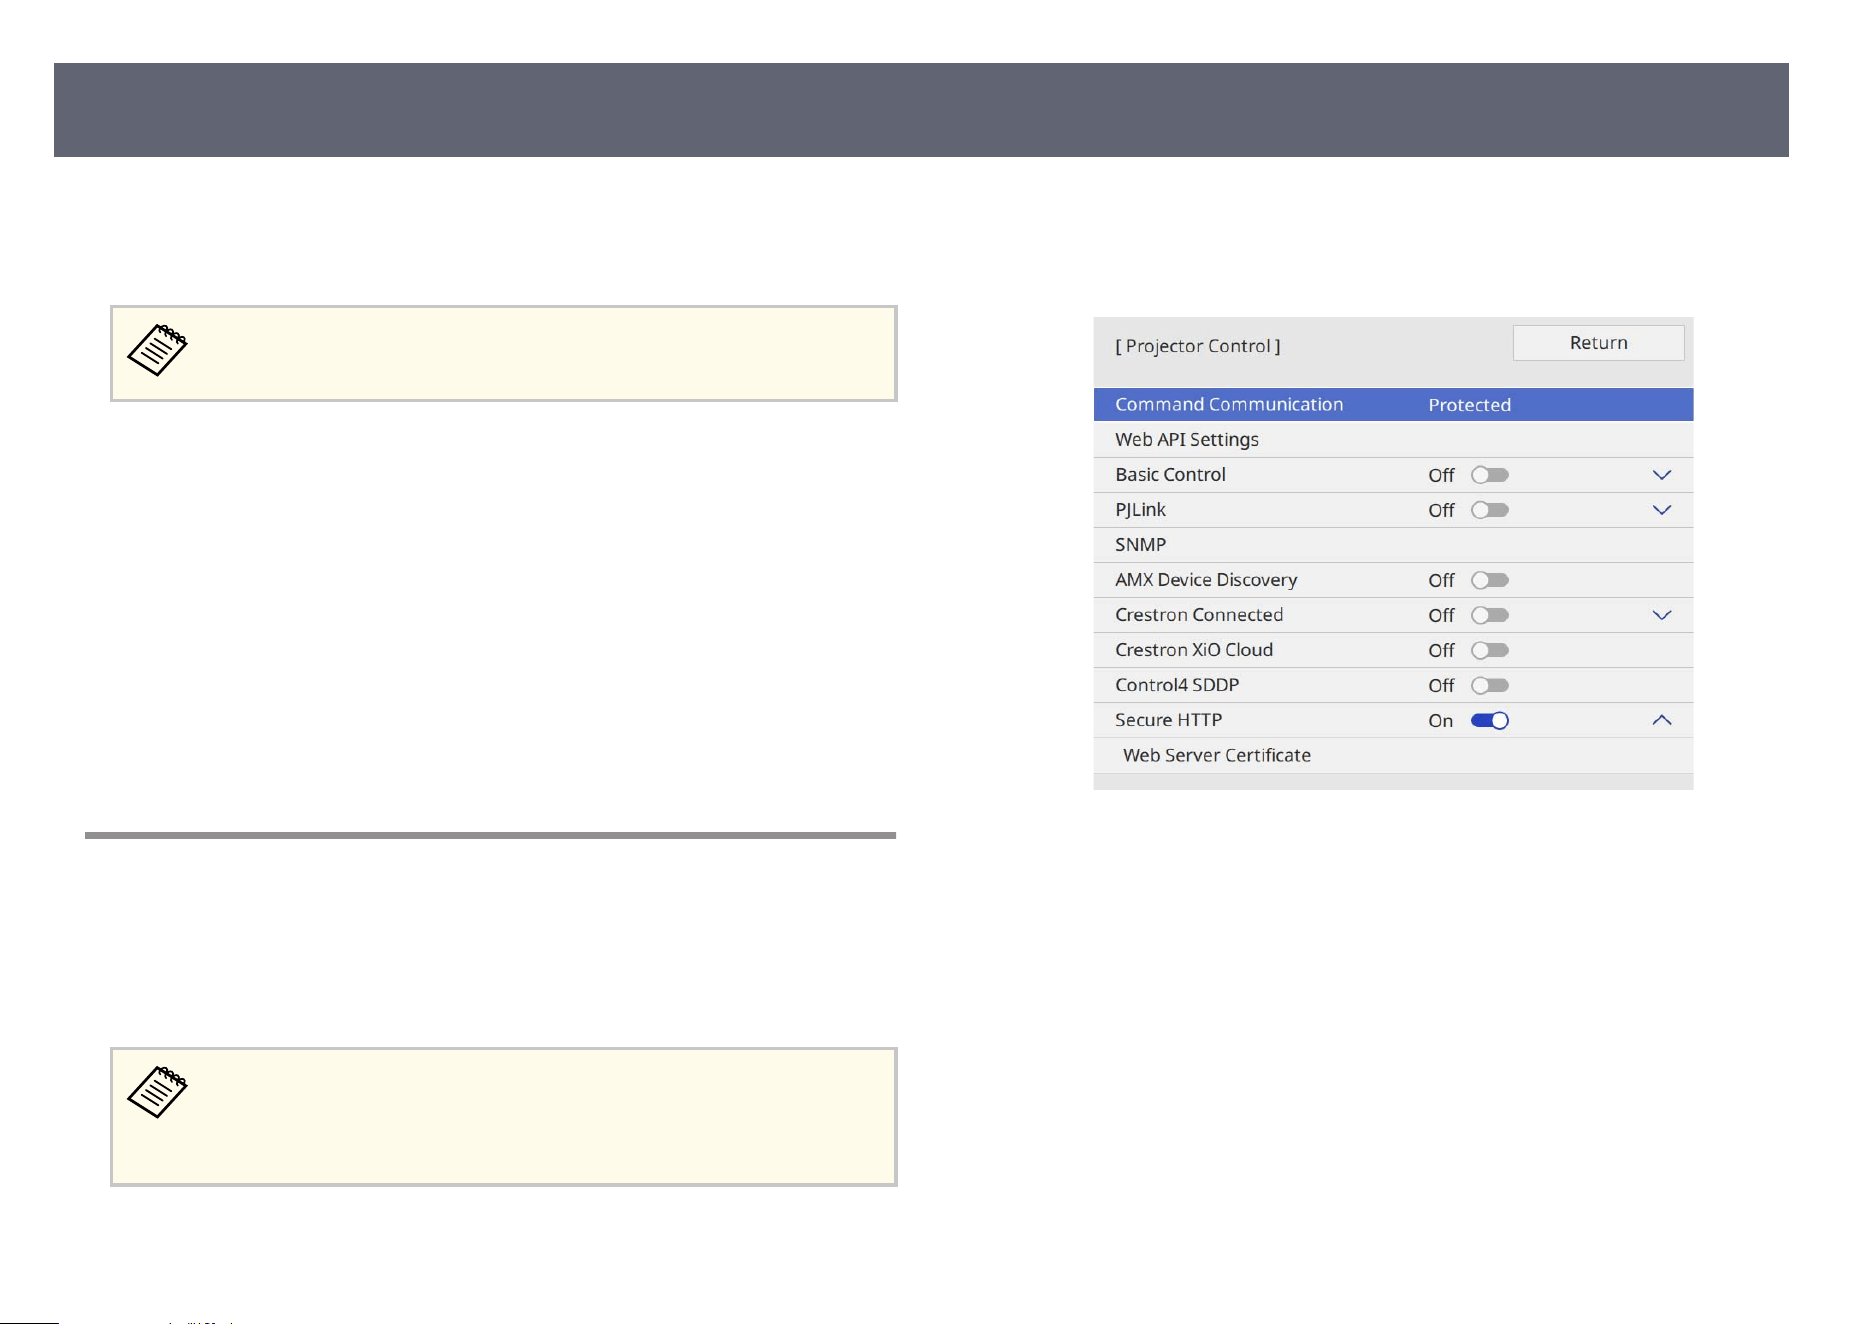
If you are using the Crestron Connected network monitoring and control
syst
em, you can set up your projector for use on the system. Crestron
Connected lets you control and monitor your projector using a Web browser.
•
Yo
u cannot use the Message Broadcasting feature in Epson Projector
Management when you use Crestron Connected.
For additional information on Crestron Connected, visit the Crestron Web site.
ht
tps://www.crestron.com/
To monitor devices in the system, you can use Crestron RoomView Express or
Crestron Fusion provided by Crestron. You can communicate with the help desk
and send emergency messages. See the following Web site for details.
http://www.crestron.com/getroomview
is manual describes how to perform operations on your computer using a
Web browser.
g
Related Links
•
"Setting Up Crestron Connected Support" p.184
Setting Up Crestron Connected Support
To set up your projector for monitoring and control using a Crestron Connected
system, make sure your computer and projector are connected to the network.
If you are connecting wirelessly, connect to devices over a wireless network
access point.
If you set the Stand
by Mode setting to Normal in the projector's
Operation menu, you can use a Web browser to select settings and control
projection even if the projector is in standby mode (when the power is
o).
a
Press the [Menu] button, select the N
e
twork menu, and press [Enter].
b
Select Network Settings and press [Enter].
c
S
elect the Projector Control menu and press [Enter].
d
Set the C
restron Connected setting to On to allow the projector to be
det
ected.
e
When you nis
h selecting settings, go back to the Network Settings
screen, select Set, and follow the on-screen instructions to save your
settings and exit the menus.
f
Turn o the projector, and then turn it on again to enable the setting.
g
S
tart your Web browser on a computer or device connected to the
net
work.
Crestron Connected Support
184

h
Go to the Epson Web Control screen by entering the projector's IP address
int
o the browser's address box.
i
Select the Crestron Connected settings. See the Crestron Web site for
det
ails.
Crestron Connected Support
185
You can use Web API to operate the projector in Content Playback mode and
Pr
ojector Control. See the Web API Specications for Projectors for details.
•
Yo
u can authenticate Web API communications using API
authentication (Digest authentication).
•
e user name for API authentication is EPSONWEB; use the
password that is set for Web Control Password.
s Network > Network Settings > Web Control Password
g
Related Links
•
"Enabling Web API" p.186
Enabling Web API
You can enable Web API from a Web browser.
a
Select D
eveloper's Menu on the Epson Web Control screen.
b
S
et Enable API to On.
Operating the Projector Using Web API
186
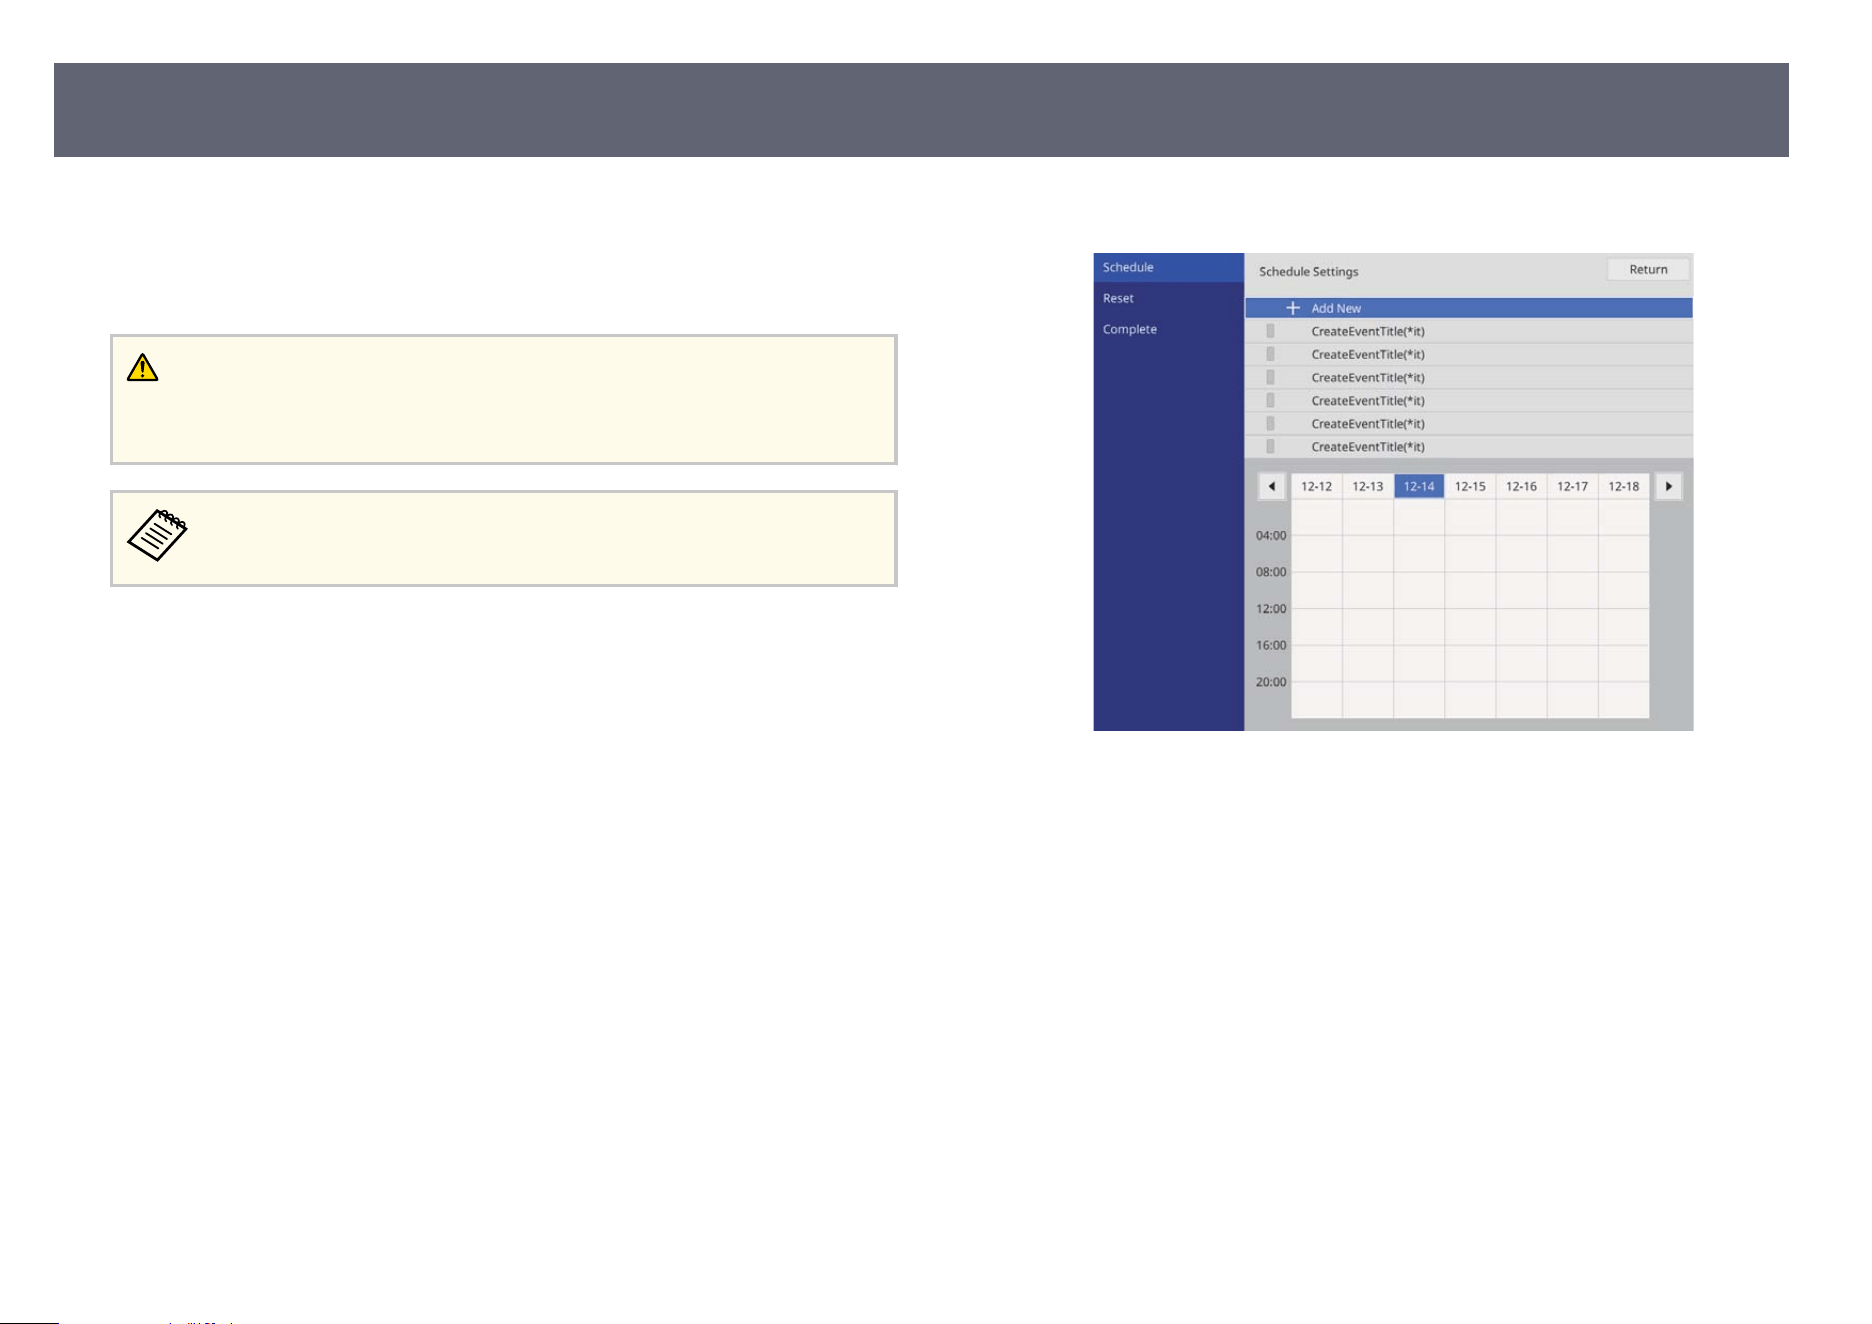
You can schedule up to 30 events to occur automatically on your projector, such
as tur
ning the projector on or o or switching the input source. e projector
performs the selected events on the specied date and time in the schedule you
set up.
Warning
Do n
ot place ammable objects in front of the lens. If you schedule the projector to
turn on automatically, ammable objects in front of the lens could catch on a re.
•
If y
ou set a Menu Protection of Schedule to On, turn it o rst.
a
Set the date and time in the Date & Time menu in the projector's
Management menu.
b
Press the [Menu] button, select the Manage
ment menu, and press [Enter].
c
Select Schedule Settings and press [Enter].
d
S
elect Schedule and press [Enter].
e
S
elect Add New and press [Enter].
Setting Projector Event Schedules
187
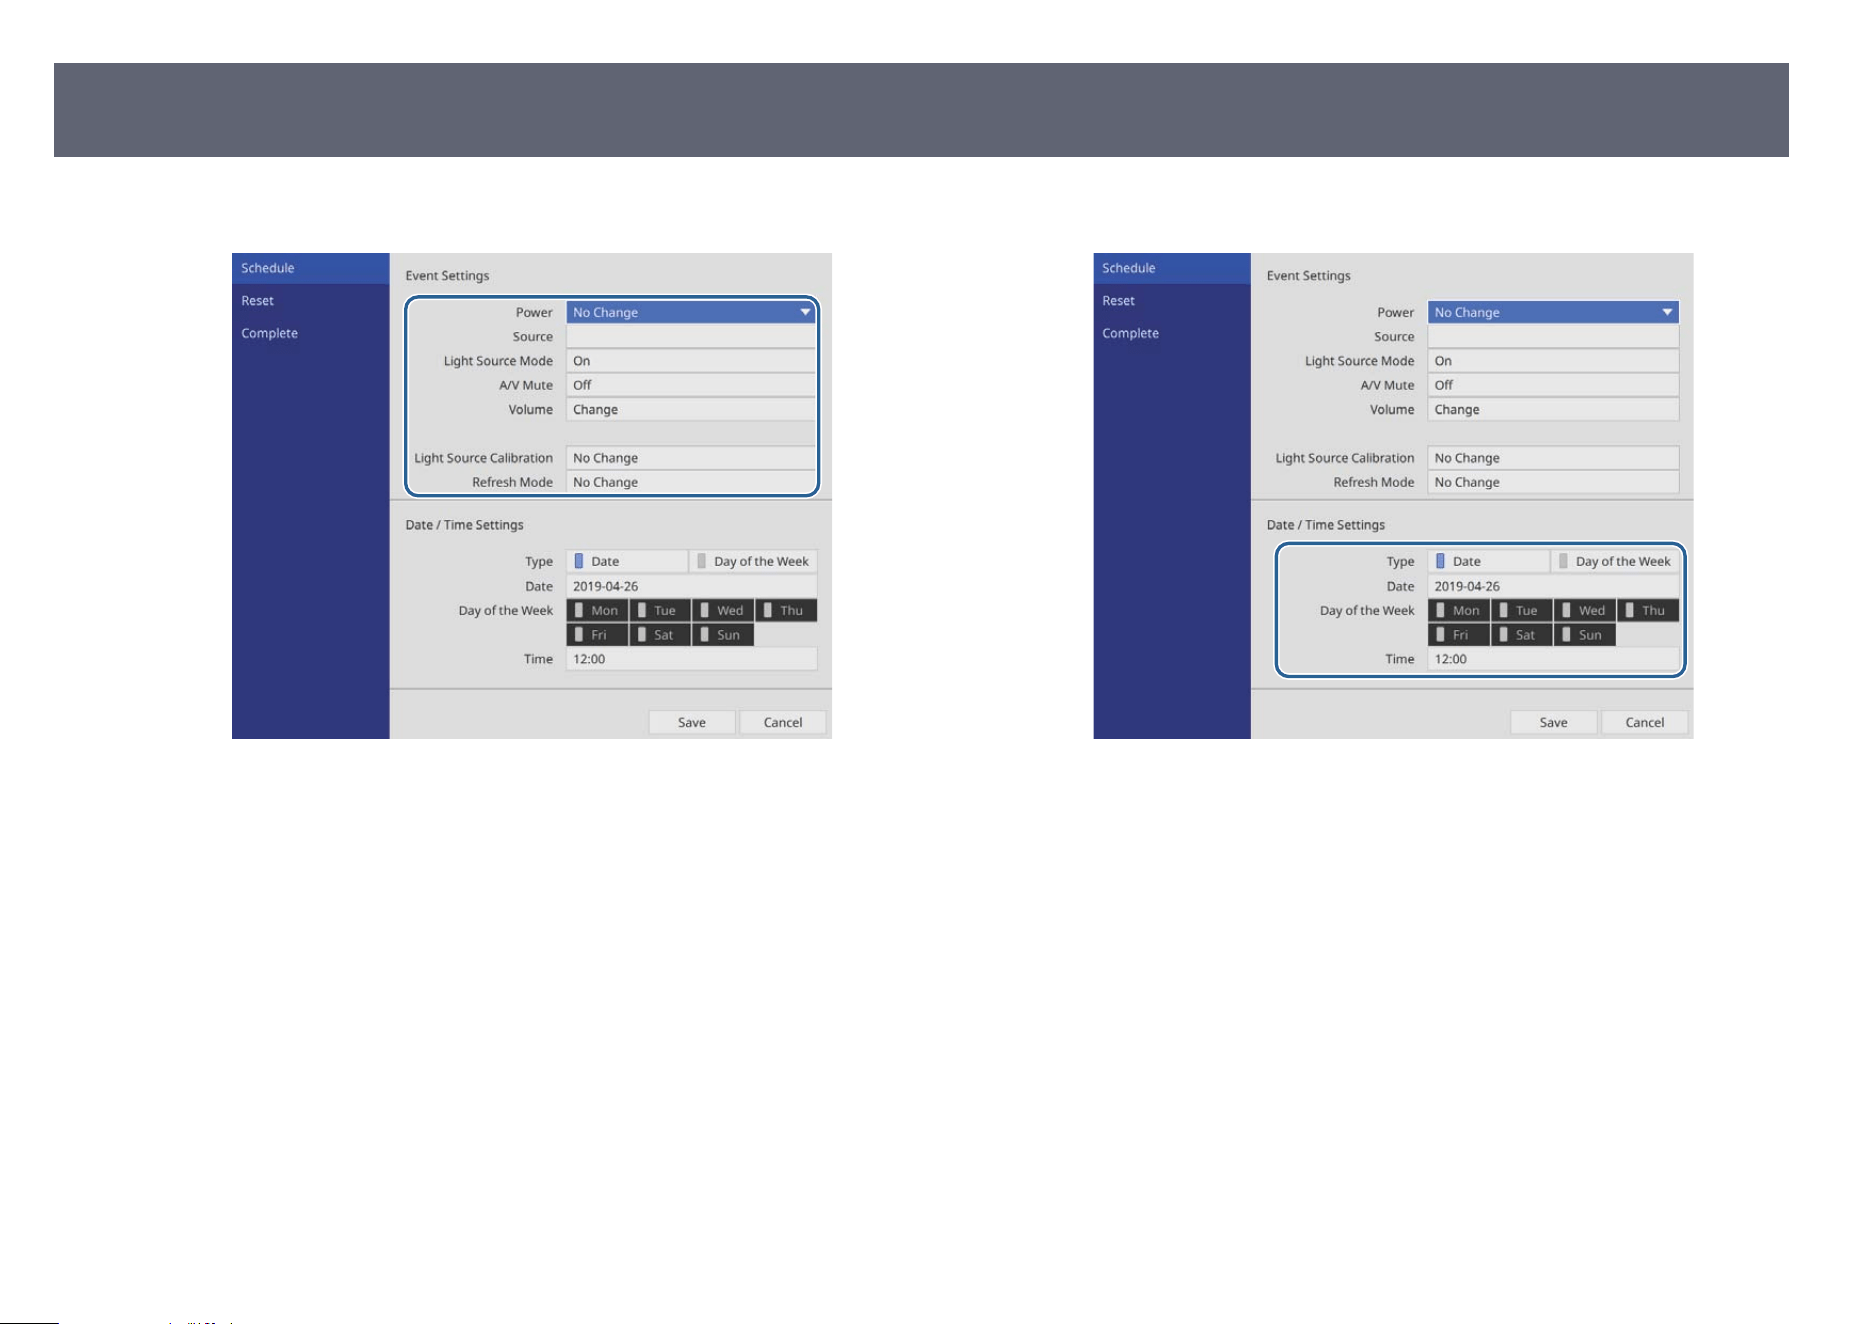
f
Select the event details you want to perform.
g
Select the date and time at which you want the event to occur.
h
Select S
ave and press [Enter].
e
scheduled events are displayed on the screen with icons indicating the
event status.
Setting Projector Event Schedules
188
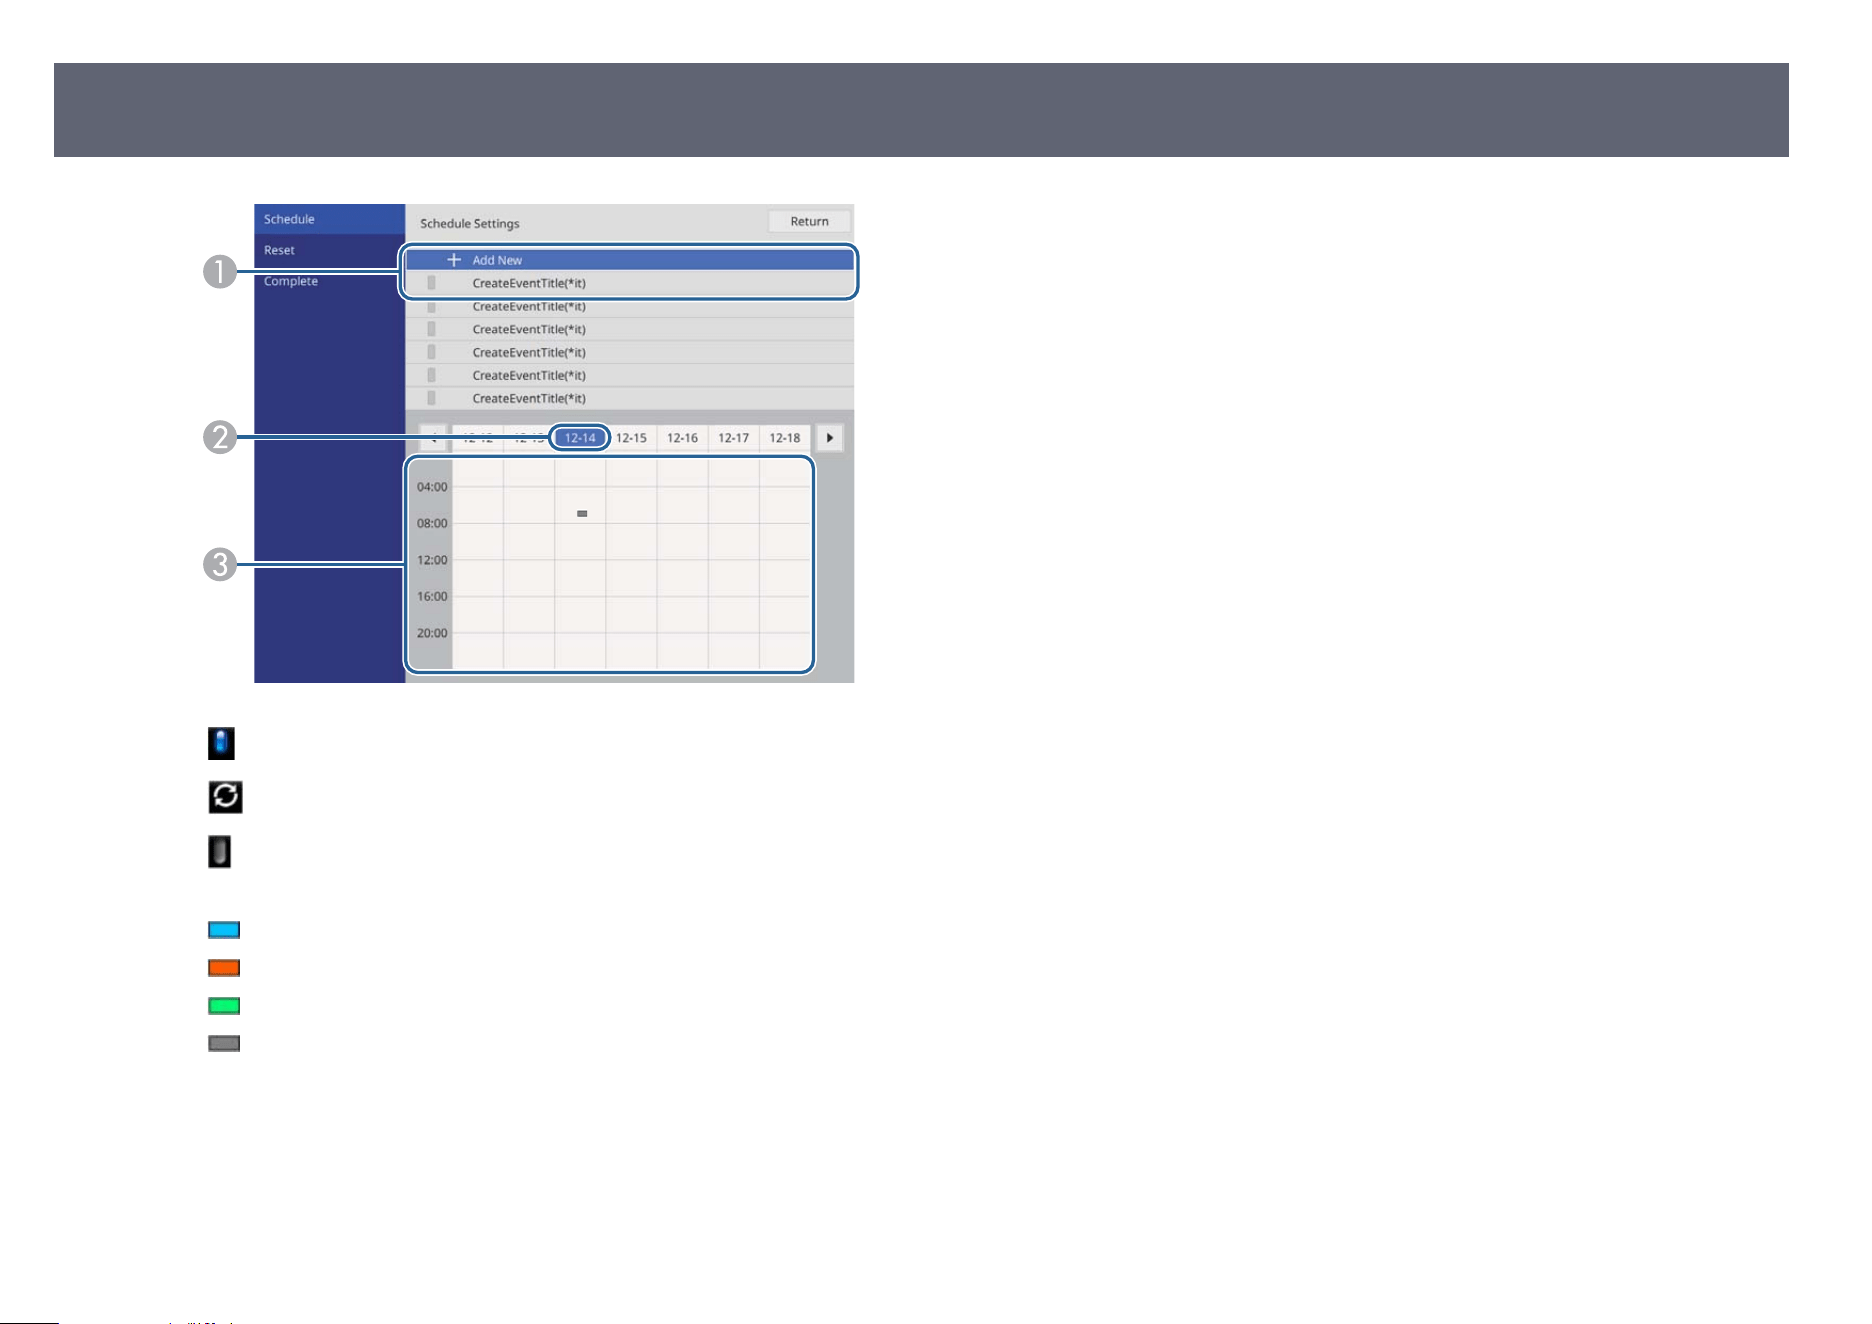
A
: valid schedule
: regular schedule
: invalid schedule
B
e date currently selected (highlighted)
C
: one time schedule
: regular schedule
: standby schedule (turns communication on or o
during standby)
: invalid schedule
i
To edit a scheduled event, select the schedule and press [Esc].
j
Select an option from the menu displayed.
•
On o
r
O lets you enable or disable the selected event.
•
Edi
t lets you change the event details or date and time.
•
Clear lets you remove the scheduled event from a list.
k
Select Setup complete, then select Yes.
T
o delete all scheduled events, select Schedule Reset.
g
Related Links
•
"Setting the Date and Time" p.51
•
"Projector Administration Settings - Management Menu" p.207
Setting Projector Event Schedules
189

Adjusting the Menu Settings
Fo
llow the instructions in these sections to access the projector menu system and change projector settings.
g
Related Links
•
"Using the Projector's Menus" p.191
•
"Using the Displayed Keyboard" p.192
•
"Image Quality Settings - Image Menu" p.193
•
"Input Signal Settings - Signal I/O Menu" p.196
•
"Projector Installation Settings - Installation Menu" p.198
•
"Multiple Projector Operation Settings - Multi-Projection Menu" p.200
•
"Projector Display Settings - Display Menu" p.202
•
"Projector Feature Settings - Operation Menu" p.204
•
"Projector Administration Settings - Management Menu" p.207
•
"Projector Network Settings - Network Menu" p.211
•
"Projector Information Display - Info Menu" p.222
•
"Image Quality Memory Settings - Memory Menu" p.223
•
"Projector Setup Settings - ECO Menu" p.224
•
"Projector Initial Settings and Reset Options - Initial/All Settings Menu" p.225
•
"Copying Menu Settings Between Projectors (Batch Setup)" p.227

You can use the projector's menus to adjust the settings that control how your
pr
ojector works. e projector displays the menus on the screen.
a
Press the [Menu] button on the control panel or remote control.
Yo
u see the menu screen.
b
Press the up or down arrow buttons to move through the menus listed on
th
e le. e settings for each menu are displayed on the right.
c
To change settings in the displayed menu, press [Enter].
d
Press the up or down arrow button to move through the settings.
e
To return all the menu settings to their default values, select I
ni
tial/All
Settings.
f
When you nis
h changing settings on a menu, press [Esc].
g
Press [Menu] or [Esc] to exit the menus.
e arrow indicates that the menu contains sub items. When you turn
on a m
enu setting or select a specic value for it, the menu system displays
the sub items.
Using the Projector's Menus
191
You can use the displayed keyboard to enter numbers and characters.
a
Use the arrow buttons on the control panel or remote control to highlight
th
e number or character you want to enter and press the [Enter] button.
Each time you select the A/a key, the characters change between
up
per case and lower case. Each time you select the SYM1/2 key, the
symbols enclosed by the frame change.
b
Aer en
tering the text, select OK on the keyboard to conrm your entries.
S
elect Cancel to cancel entering text.
You can select projector settings and control projection over a network
usin
g a Web browser from your computer.
Some symbols cannot be entered using the displayed keyboard. Use your
Web browser to enter the text.
g
Related Links
•
"Avai
lable Text Using the Displayed Keyboard" p.192
Available Text Using the Displayed Keyboard
You can enter the following text when using the displayed keyboard.
Text type Details
Numbers 0123456789
Alphabet ABCDEFGHIJKLMNOPQRSTUVWXY
Z
ab
cdefg
hijklmnopqrstuvwxyz
Symbols ! " # $ % & ' ( ) * + , - . / : ; < = > ? @ [ \ ] ^
_ ` { | } ~
Using the Displayed Keyboard
192
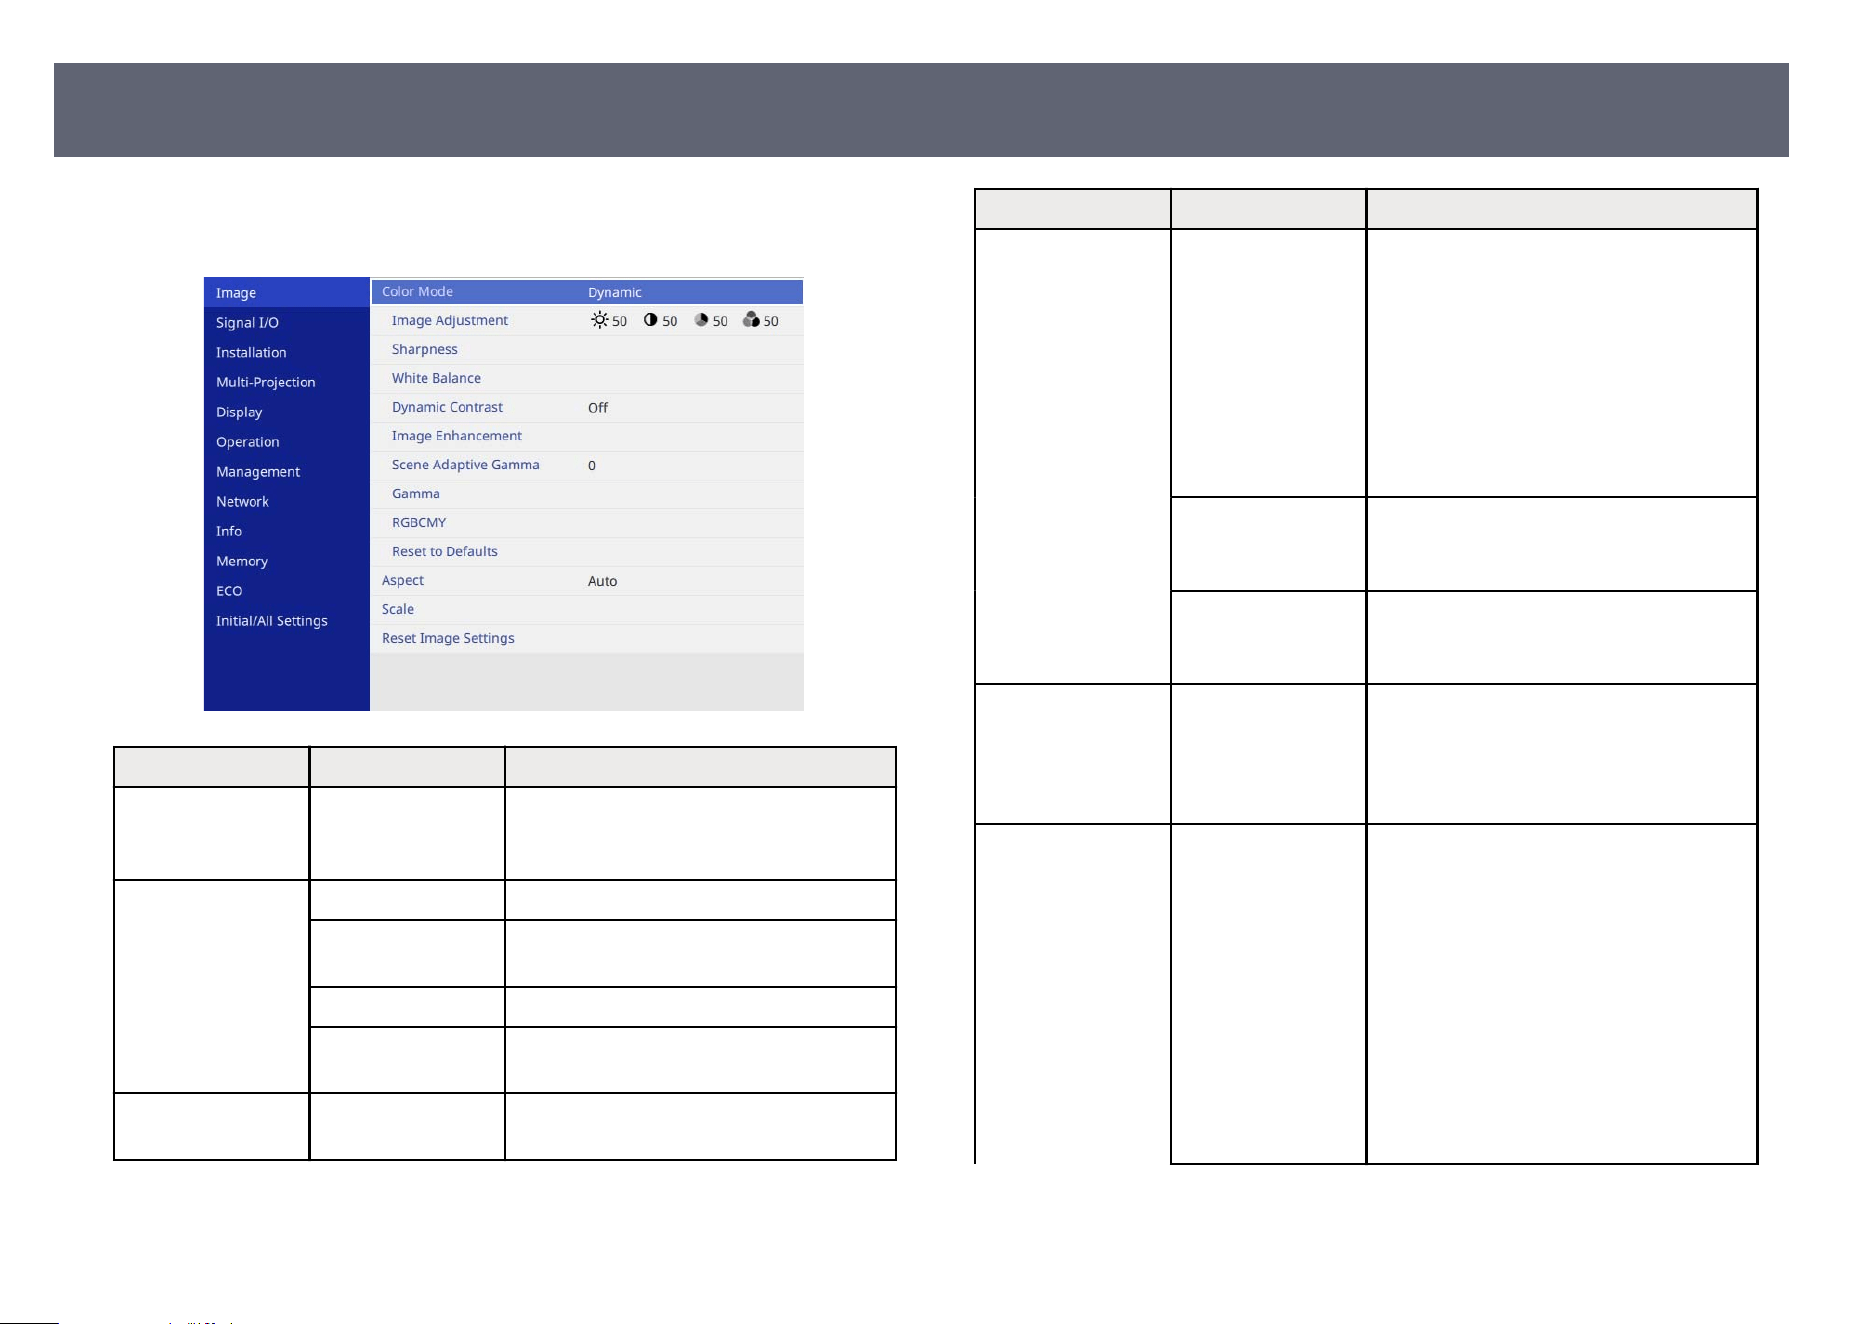
Settings on the Image
menu let you adjust the quality of your image. e
available settings depend on the currently selected color mode and input source.
Setting Options Description
Color Mode See the list of
avail
able color
modes
Adjusts the vividness of image colors for
various image types and environments.
Image Adjustment Brightness Lightens or darkens the overall image.
Contrast Adjusts the dieren
ce between light and
dark areas of the image.
Color Saturation Adjusts the intensity of the image colors.
Tint Adjusts the balance of green to magenta
to
nes in the image.
Sharpness Various levels
avail
able
Adjusts the sharpness or soness of image
details.
Setting Options Description
White Balance Color Temp. Sets the color temperature according to
th
e color mode you selected. Higher
values tint the image blue and lower
values tint the image red.
Setting is only displayed when Color
Filter is not set to Warm White or Cool
White.
s Operation > Content Playback >
Overlay Eect > Color Filter
G-M Correction Makes ne adjustments to the color tone.
H
igher values tint the image green and
lower values tint the image red.
Custom Adjusts the individual R (re
d), G (green),
and B (blue) components of the oset and
gain.
Dynamic Contrast High Speed
No
rmal
ECO
O
Adjusts the projected luminance based on
the image brightness.
Image
Enh
ancement
4K Enhancement (is setting may be unavailable
depending on your projector model.)
You can project an image at a doubled
resolution by diagonally shiing 1 pixel in
increments of 0.5 pixels. A highresolution
image signal is projected in ne detail.
is item is disabled in the following
cases:
•
e Aspect setting is set to Native
•
You are using the Screen Sharing
function
Image Quality Settings - Image Menu
193
Setting Options Description
Image Preset Mode Selects the settings prepared in advance
as th
e settings for Noise Reduction,
MPEG Noise Reduction, and Detail
Enhancement.
Noise Reduction Reduces ickering in analog images.
i
s item is disabled in the following
cases:
•
When using one of the following input
sources (Available input sources dier
depending on your projector model.)
•
USB
•
LAN
•
AirPlay
•
Miracast
•
An image that exceeds 2k resolution is
being input
•
An interlaced signal is being input
•
4K Enhancement is set to On
•
Edge Blending is set to Blending/
Black Level or Black Level
MPEG Noise
Re
duction
Reduces the noise or artifacts seen in
MPEG video.
is setting is unavailable when using one
of the following input sources:
•
USB
•
LAN
Detail
Enh
ancement
Creates a more emphatic texture and
material feel of the image.
Reset Resets all adjustment values on the Image
E
nhancement setting to their default
settings.
Setting Options Description
Scene Adaptive
Gamma
V
arious levels
available
Adjusts the coloring according to the
scene, and obtains a more vivid image.
Select a large number to enhance
contrast.
Gamma -5 to 5
Cu
stom
Adjusts the coloring by selecting one of
the gamma correction values, or referring
to a gamma graph.
RGBCMY Various levels
avail
able
Adjusts the hue, saturation, and
brightness of each color R (red), G
(green), B (blue), C (cyan), M (magenta),
Y (yellow) individually.
Reset to Defaults — Resets all settings for the current color
mo
de.
Aspect See the list of
avail
able aspect
ratios
Sets the aspect ratio (width-to-height
ratio) for the selected input source.
(Turn o the Scale setting or set the Scale
Mode setting to Full Display rst.)
is setting is only displayed when the
current source is HDMI, HDBaseT, or
USB while projecting images viewed by
the document camera.
Scale Various scale
op
tions
Enlarges or reduces the image
horizontally and vertically.
Adjusts the scale of the image displayed
by each projector when using multiple
projectors to project one image.
Reset Image
Set
tings
— Resets all adjustment values on the Image
menu to their default settings.
•
e Brig
htness setting does not aect light source brightness. To
change the light source brightness, select the Light Source Brightness
Control setting in the projector's Operation menu.
Image Quality Settings - Image Menu
194

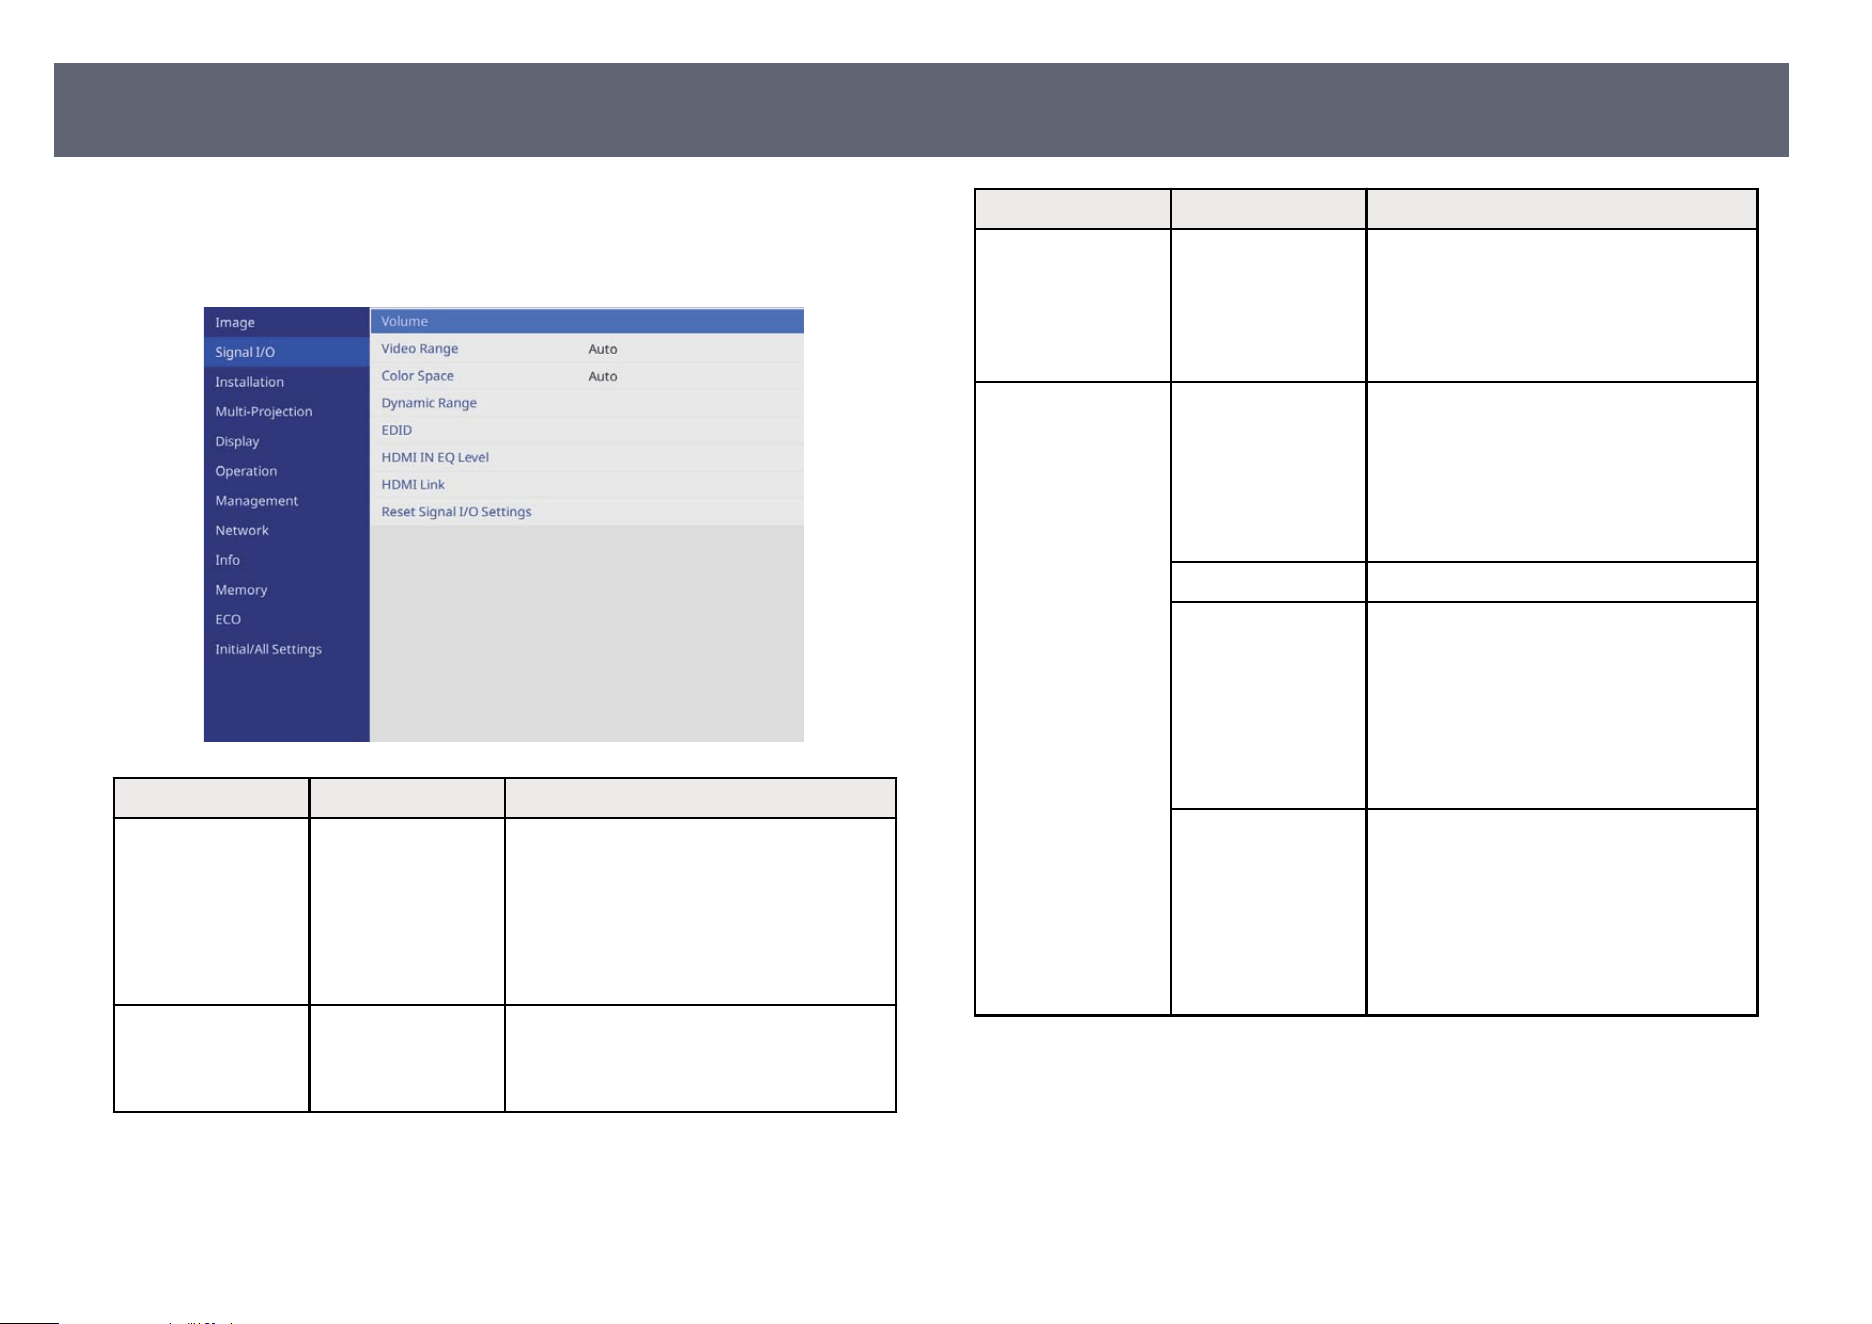
Normally the projector automatically detects and optimizes the input signal
set
tings. If you need to customize the settings, you can use the Signal I/O menu.
e available settings depend on the currently selected input source.
Setting Options Description
Volume Various levels
avail
able for each
source
Adjusts the volume of projector’s speaker
system.
You can also adjust the volume of external
speakers.
Setting is only displayed when the audio
is not output to AV system.
Video Range Auto
Limi
ted (16-235)
Full (0-255)
Sets the video range to match the setting
of input source.
Setting Options Description
Color Space Auto
BT
.709
BT.2020
Sets the conversion system for the color
space.
You cannot select this setting when Color
Mode is set to BT.709 or DICOM SIM in
the projector's Image menu.
Dynamic Range Dynamic Range Changes the range of dark and bright
are
as in images; choose from Auto
(recommended), SDR, HDR10 or HLG.
You cannot select this setting when Color
Mode is set to BT.709 or DICOM SIM in
the projector's Image menu.
Signal Status Displays the detected input image signal.
HDR10 Setting Changes the PQ (Perceptual Quantizer)
cur
ve of the dynamic range using the
HDR PQ method.
is setting is only displayed when
Dynamic Range is set to Auto and
Signal Status is set to HDR10, or when
Dynamic Range is set to HDR10.
HLG Setting Changes the HLG (Hybrid Log Gamma)
cur
ve of the dynamic range using the
HDR HLG method.
is setting is only displayed when
Dynamic Range is set to Auto and Signal
Status is set to HLG, or when Dynamic
Range is set to HLG.
Input Signal Settings - Signal I/O Menu
196
Setting Options Description
EDID EDID (HDMI1)
EDID (HD
MI2)
EDID (HDBaseT)
Describes the display capabilities of
your projector. Change this setting as
necessary according to the resolution of
the image.
Even in setups with multiple displays with
dierent resolutions, you can switch the
EDID of the current source and unify the
EDID across the displays by setting the
same EDID as the standard display.
HDMI IN EQ Level HDMI1
HDMI2
A
djusts the HDMI input signal level
depending on the devices connected to
the HDMI port. If there is a lot of
interference in the image, or if a problem
such as no image being projected occurs,
change the setting.
You can select the settings for individual
input sources without changing the input
source.
HDMI Link HDMI Link Set to On to enable the HDMI Link
f
eatures.
Device
Co
nnections
Lists the devices connected to the HDMI
ports.
Setting is only displayed when HDMI
Link is set to On.
Audio Out Device Selects whether to output audio from the
int
ernal speakers or a connected audio/
video system.
Setting Options Description
Power On Link Controls what happens when you turn on
th
e projector or connected device.
is setting is not available when HDMI
Out Power Link is set to On.
•
Bidirectional: automatically turns on
the connected device when you turn
on the projector, and vice versa.
•
Device -> PJ: automatically turns on
the projector when you turn on the
connected device.
•
PJ -> Device: automatically turns on
the connected device when you turn
on the projector.
Power O Link Controls whether connected devices are
tur
ned o when you turn o the
projector.
is setting is not available when HDMI
Out Power Link is set to On.
HDMI Out Power
Lin
k
Turns on or o devices connected to
the HDMI Out port when you turn the
projector on or o.
HDMI Out
Ter
minal End
Set to On only for the projector at the end
of the daisy chain.
is setting is not available when HDMI
Out Power Link is set to O.
Reset Signal I/O
Set
tings
— Resets all adjustment values on the Signal
I/O menu to their default settings.
Input Signal Settings - Signal I/O Menu
197
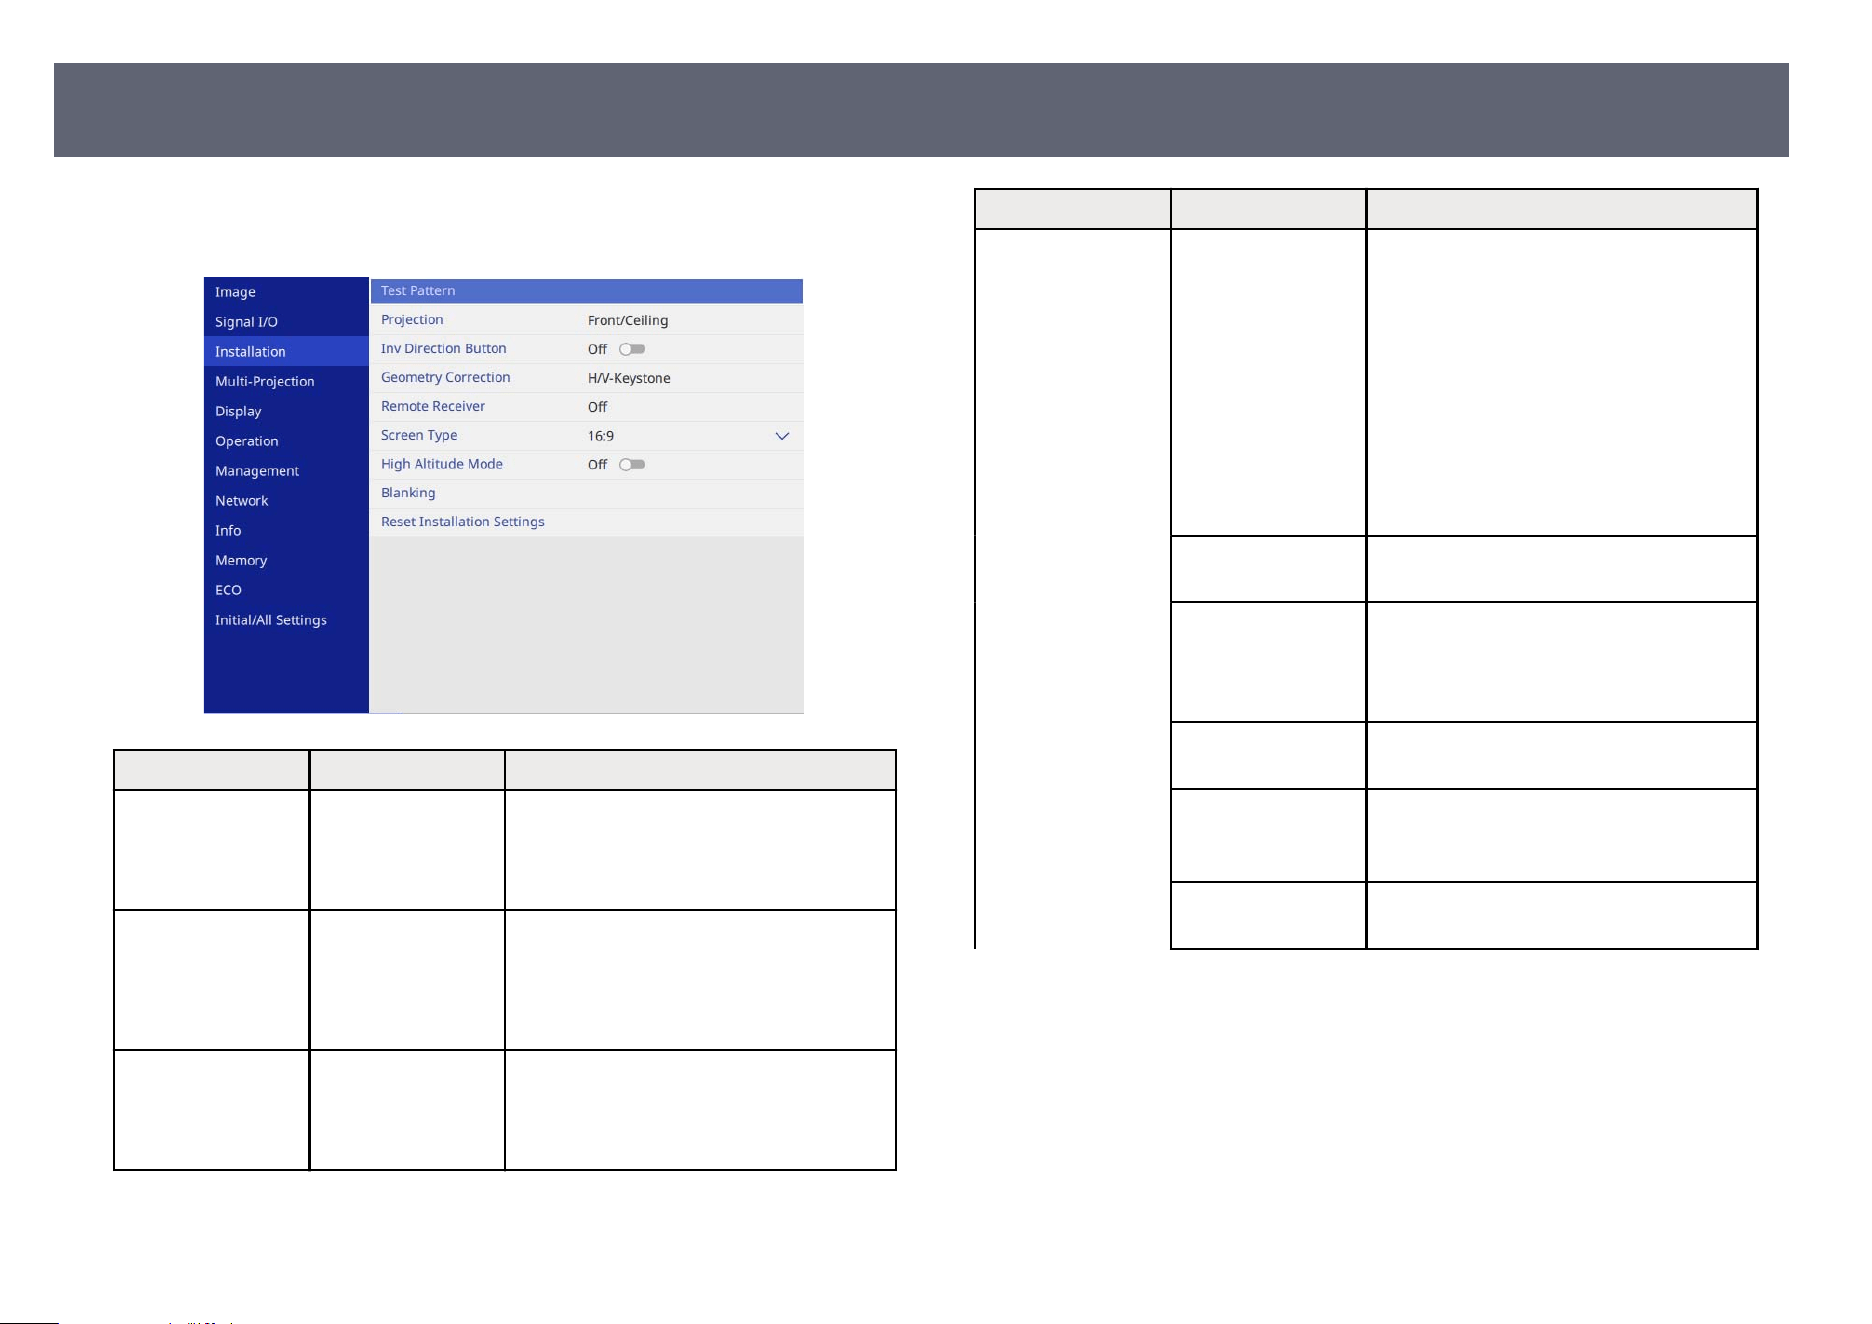
Settings on the Ins
tallation menu help you set up your projector in your
installation environment.
Setting Options Description
Test Pattern — Displays a test pattern to assist in
f
o
cusing and zooming the image and
correcting image shape (press the [Esc]
button to cancel pattern display).
Projection Front
Re
ar
Front/Ceiling
Rear/Ceiling
Sets the way the projector faces the screen
so the image is oriented correctly.
Inv Direction
Bu
tton
On
O
When suspending the projector from a
ceiling, set to On to invert the operation
direction of the control panel arrow
buttons.
Setting Options Description
Geometry
Co
rrection
H/V-Keystone Manually corrects horizontal and vertical
sides.
V-Keystone: lets you manually correct
vertical side.
V-Balance: lets you manually correct
vertical balance.
H-Keystone: lets you manually correct
horizontal side.
H-Balance: lets you manually correct
horizontal balance.
Quick Corner Corrects image shape and alignment
usin
g an on-screen display.
Point Correction
Mo
de
Divides the projected image into a grid
and corrects the distortion by moving the
selected point of intersection from side to
side and up and down.
Curved Surface
Mo
de
Corrects the corners and sides of an
image projected on a curved surface.
Corner Wall Mode Corrects the corners and sides of an
imag
e projected on a curved surface with
right angles.
O Temporarily cancels the geometry
cor
rection.
Projector Installation Settings - Installation Menu
198
Setting Options Description
Memory Save customized sets of settings to
mem
ory.
•
Save Memory: saves the current shape
of an image you have adjusted.
•
Load Memory: loads the settings you
made and saved.
•
Rename Memory: changes the name
of the memory settings.
•
Erase Memory: deletes a saved
memory.
•
Reset Memory: resets all saved
memories.
Remote Receiver Front/Rear
Fr
ont
Rear
O
Limits reception of remote control signals
by the selected receiver; O turns o all
receivers.
Screen Type 4:3
16:6
16:9
16:10
21:9
Sets the aspect ratio of the screen to t
th
e image into the projection area.
Setting is only displayed when Content
Playback is set to O in the projector's
Operation menu.
Screen Position Various positions
avail
able
Shis the image position horizontally and
vertically.
is feature is not available if you set the
Screen Type setting to the same aspect
ratio as the projector resolution.
High Altitude
Mo
de
On
O
Regulates the projector’s operating
temperature at altitudes above 4,921 feet
(1,500 m).
Setting Options Description
Blanking Top
Bo
ttom
Le
Right
Hides an area of the projected image that
you select using the arrow buttons.
Setting is only displayed when Content
Playback is set to O in the projector's
Operation menu.
Reset Installation
Set
tings
— Resets all adjustment values on the
Installation menu to their default
settings.
Projector Installation Settings - Installation Menu
199
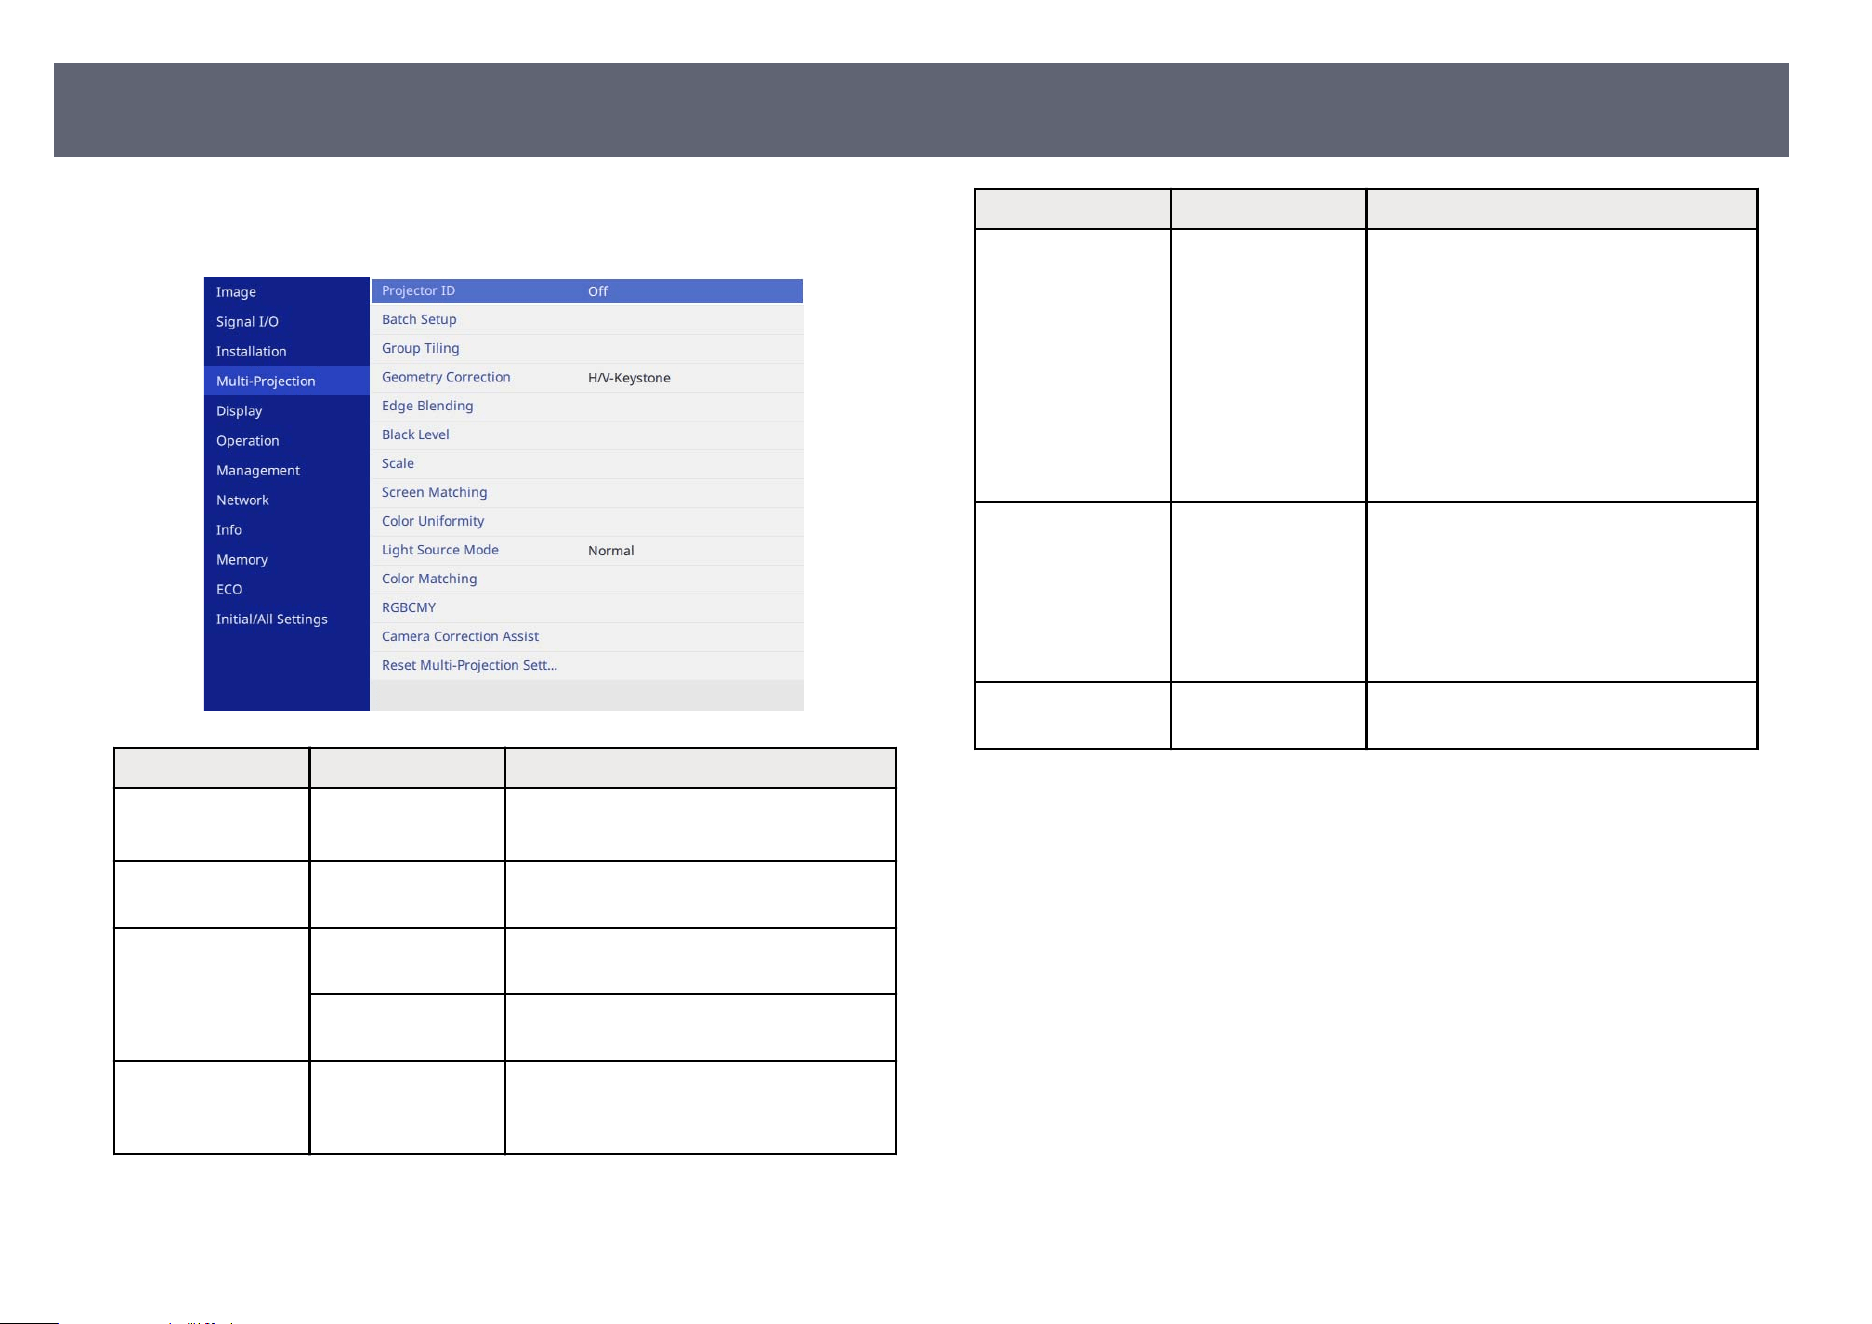
Settings on the Mu
lti-Projection menu let you set up multiple projectors to
project a single unied image.
Setting Options Description
Projector ID O
1 through 9
Assigns an ID for the projector when you
use multiple projectors.
Batch Setup — Performs batch settings necessary to use
th
e Multi-Projection features.
Group Tiling Projector Grouping Creates a group of projectors that you can
con
trol simultaneously.
Tiling Sets the number of split screens and the
posi
tion of each image.
Geometry
Co
rrection
— See the Installation menu table for
details on the Geometry Correction
settings.
Setting Options Description
Edge Blending Edge Blending
To
p Edge
Bottom Edge
Le Edge
Right Edge
Line Guide
Pattern Guide
Guide Color
Blends the border between multiple
images to create a seamless screen.
Black Level Color Adjustment
Ar
ea Correction
Reset
Adjusts the black color of the overlapping
image area.
You cannot select this setting when
Blending is set to On for the Top Edge,
Bottom Edge, Le Edge, or Right Edge
setting.
Scale — See the Image menu table for details on
t
he Scale settings.
Multiple Projector Operation Settings - Multi-Projection Menu
200
Setting Options Description
Screen Matching Start Auto
Ad
justment
Undo
Redo
Schedule Settings
Color Mode
Light Source
Brightness Control
Color Matching
Color Uniformity
Black Level
Reset
You can adjust the tint, brightness,
black level, and blend curve of multiple
projectors so that they match better.
•
e auto adjustment feature is
only available under the following
conditions.
•
When you set the position of each
image using Location Setup in the
Tiling menu
•
When an optional camera is
installed
•
When Color Calibration in the
projector's Management menu is
set to On
•
You can undo or redo the screen
matching procedure only when Light
Source Mode is set to Custom.
Color Uniformity Color Uniformity Set to On to adjust the color tone balance
f
or the whole screen.
Adjustment Level Sets the adjustment level.
Start Adjustments Adjusts the red, green, and blue color
to
nes individually for the selected area.
Reset Resets all adjustment values on the
Co
lor Uniformity menu to their default
settings.
Setting Options Description
Light Source Mode Normal
Quiet
E
xtended
Custom
Select the brightness for the light source.
is setting is not available when
Maintain Brightness is set to On in the
projector's Operation menu.
•
Normal: maximum brightness.
•
Quiet: 70% brightness with reduced
fan noise.
•
Extended: 70% brightness and extends
the life expectancy of the light source.
•
Custom: select a custom brightness
level.
Color Matching Adjustment Level
Re
d
Green
Blue
Brightness
Corrects the dierence between the tint
and brightness of each projected image.
RGBCMY — See the Image menu table for details on
t
he RGBCMY settings.
Camera Correction
As
sist
Simple Stacking Creates a bright projected image by
overlapping the images from two
projectors.
Simple Blending Creates one large image by compositing
se
veral images from two projectors.
Reset Multi-
Pr
ojection Settings
— Resets all adjustment values on the Multi-
Projection menu to their default settings.
Multiple Projector Operation Settings - Multi-Projection Menu
201
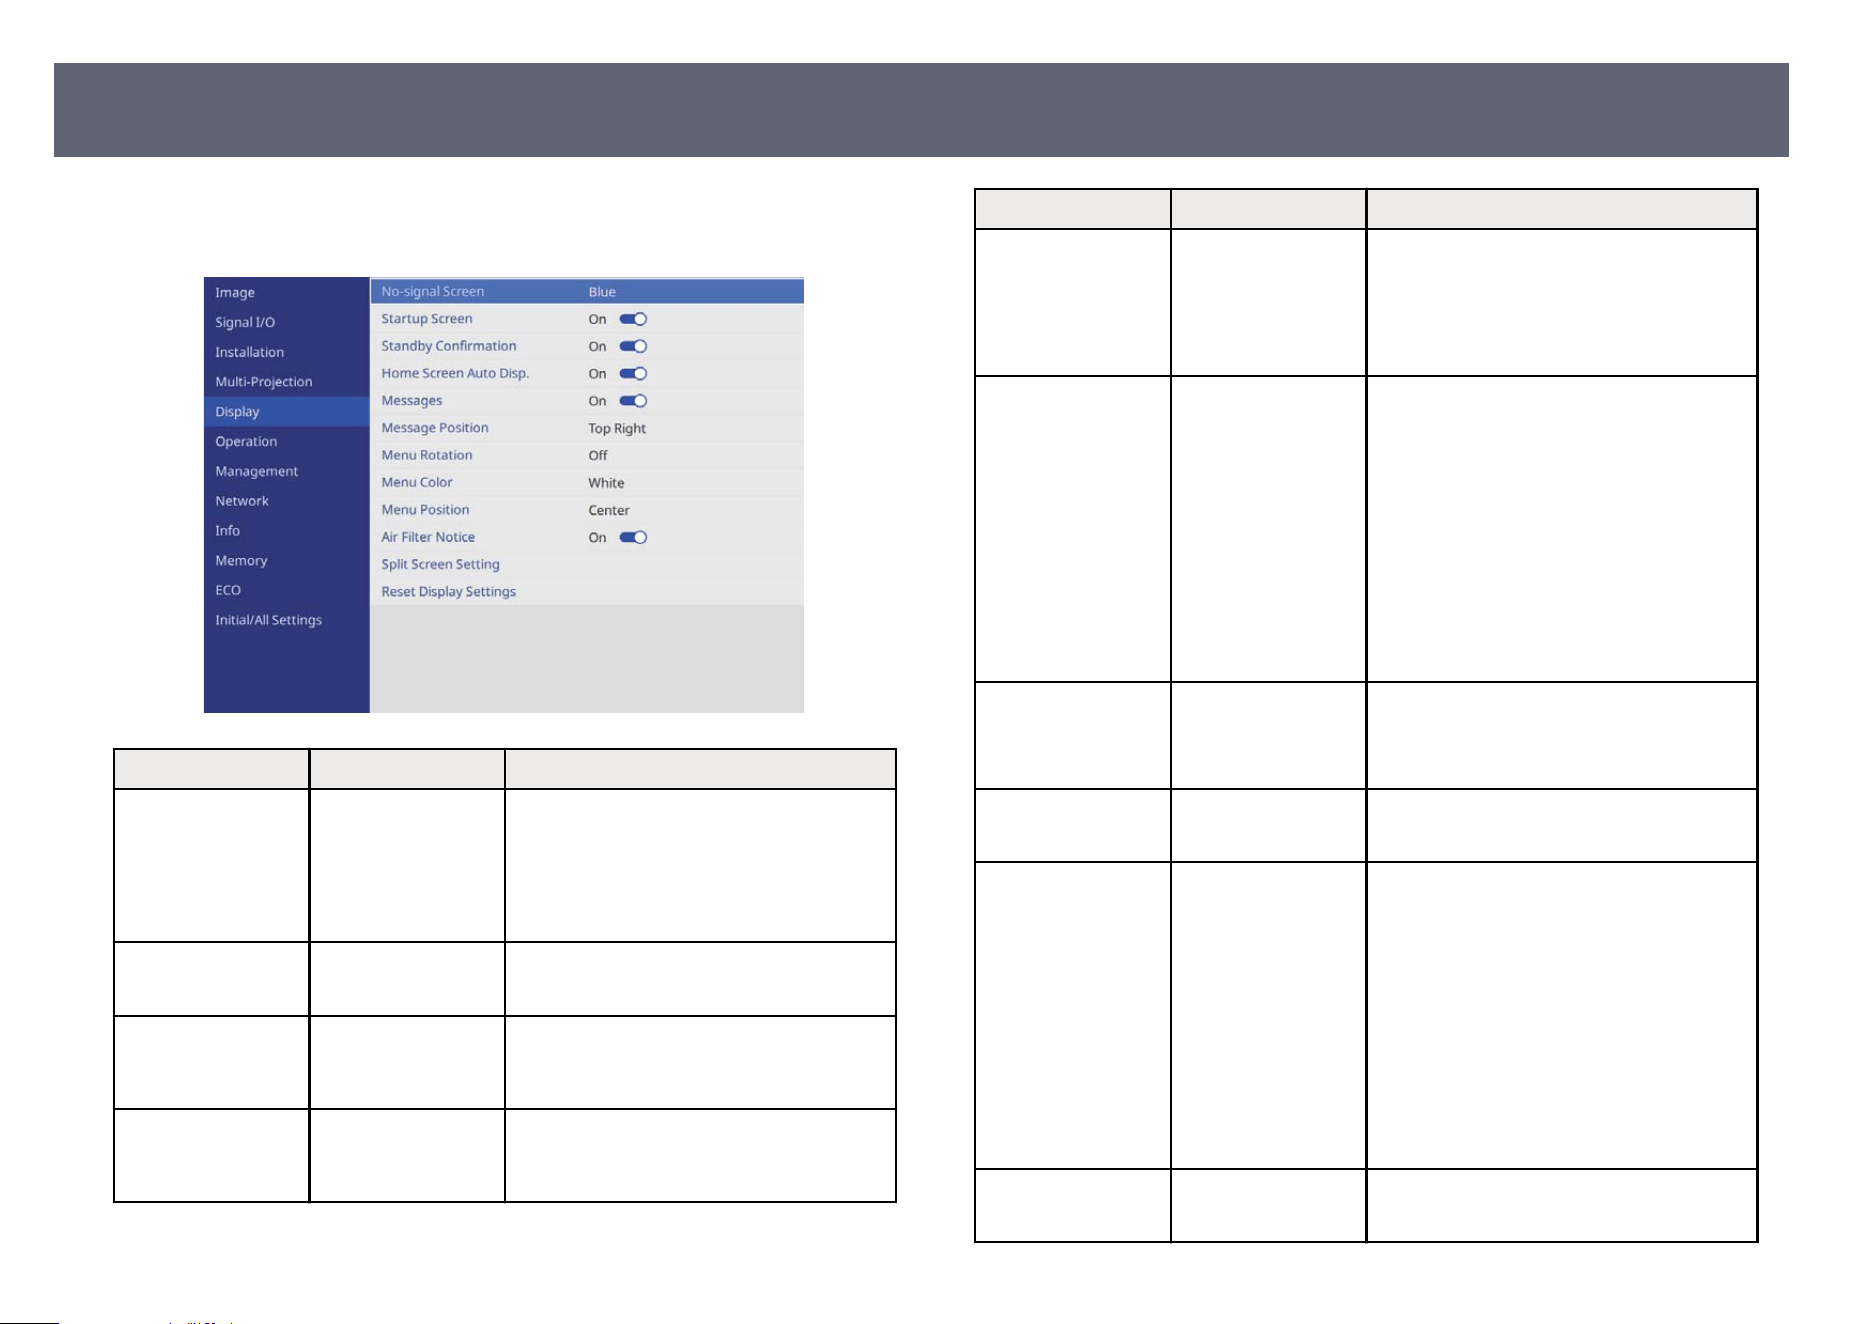
Settings on the Disp
lay menu let you customize various projector display
features.
Setting Options Description
No-signal Screen Black
Bl
ue
Logo
Sets the screen color or logo to display
when no signal is received.
Setting is only displayed when Content
Playback is set to O in the projector's
Operation menu.
Startup Screen On
O
Set to On to display a logo when the
p
rojector starts up.
Standby
Co
nrmation
On
O
Set to On to display a conrmation
message aer pressing the power button
on the remote control.
Home Screen Auto
Dis
p.
On
O
Set to On to display the Home screen
automatically when there is no input
signal when turning on the projector.
Setting Options Description
Messages On
O
Set to On to display messages such as
in
put source name, color mode name,
aspect ratio, no signal message, or high
temperature warning on your projected
image.
Message Position Top Right
Rig
ht
Bottom Right
Bottom
Bottom Le
Le
Top Le
Top
Center
Selects the position of the projector menu
displayed on the screen.
Menu Rotation Right 90 Degree
Le
90 Degree
O
Rotates the menu display 90°.
Menu Color Black
Whi
te
Sets the color theme of the Home screen
and projector menu system.
Menu Position Center
To
p Right
Right
Bottom Right
Bottom
Bottom Le
Le
Top Le
Top
Selects the position of menu displayed on
the screen.
Air Filter Notice On
O
Set to On to display a message when a
c
log in the air lter is detected.
Projector Display Settings - Display Menu
202
Setting Options Description
Split Screen Setting Display Audio
Ou
tput Source
Set to On to display an icon with the
source providing audio output during
split screen projection.
Setting is only displayed when Content
Playback is set to O in the projector's
Operation menu.
Align If you have split two screen images, select
th
e position of the images to be aligned at
the Top or Middle of the image area.
Setting is only displayed when Content
Playback is set to O in the projector's
Operation menu.
Reset Display
Set
tings
— Resets all adjustment values on the
Display menu to their default settings.
If you turn on Me
nu Protection of User's Logo, you cannot change the
following user's logo display settings; you must turn o Menu Protection
of User's Logo rst.
•
No-signal Screen
•
Startup Screen
g
Related Links
•
"Pr
ojecting Two Images Simultaneously" p.96
Projector Display Settings - Display Menu
203
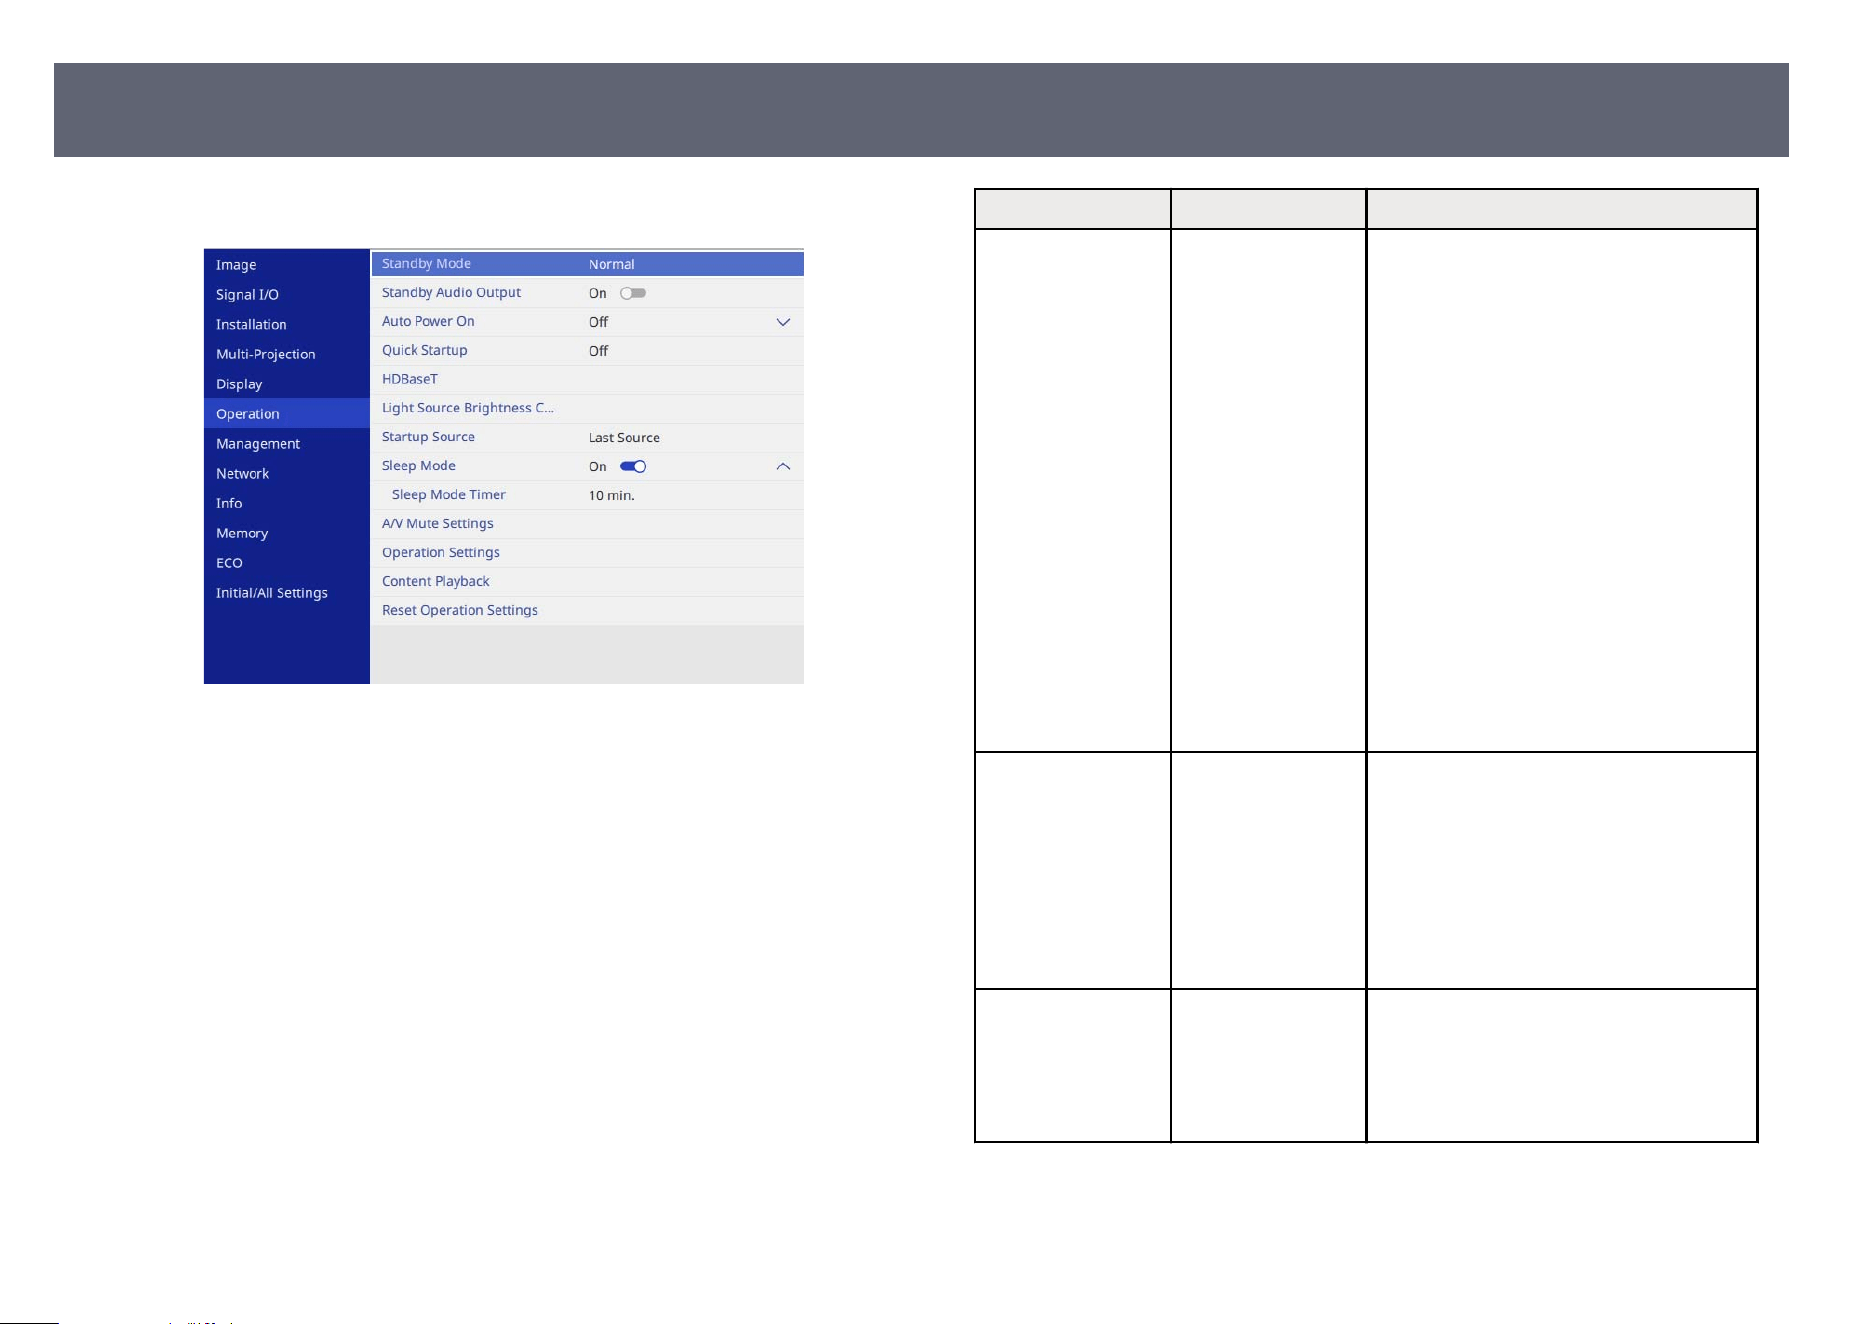
Settings on the Op
eration menu let you customize various projector features.
Setting Options Description
Standby Mode ECO
Wir
ed LAN
Communication
Normal
Sets the operation status when the
projector is in standby mode.
•
ECO: disables network
communication and reduces standby
power to the minimum.
•
Wired LAN Communication: enables
wired network communication even
when no images are being projected
and reduces standby power.
•
Normal: enables network
communication and USB power
supply even when no images are being
projected.
Setting is only displayed in the following
cases:
•
Auto Power On is set to O
•
Quick Startup is set to O
Standby Audio
Ou
tput
On
O
Sets whether or not to output audio when
no image is being projected.
Setting is only displayed in the following
cases:
•
Standby Mode is set to Normal
•
Auto Power On is set to O
•
Quick Startup is set to O
Auto Power On O
HDMI1
HD
BaseT
Sets the image source from which you
want to automatically start projection.
When the projector detects the input
signal from the selected image source, it
projects automatically in standby mode.
Projector Feature Settings - Operation Menu
204
Setting Options Description
Quick Startup O
60min.
90min.
Sets the time period for Quick Startup
mo
de. e projector enters this mode
when you turn it o. You can start
projecting in approximately 5 seconds by
pressing the power button.
However, it may take longer to become
ready for use in the following situations:
•
When projecting from the projector's
USB port
•
When projecting using the Miracast
features
Setting is only displayed in the following
cases:
•
Auto Power On is set to O.
HDBaseT Control
Co
mmunications
Enables or disables communication
from the Ethernet and serial ports on
the HDBaseT transmitter or switcher;
turning on this setting disables the
projector's LAN and RS-232C ports.
Setting is only displayed when Extron
XTP is set to O.
Extron XTP Set to On when you connect an Extron
X
TP transmitter or switcher to the
HDBaseT ports. See the following Extron
Web site for more details on the XTP
system.
http://www.extron.com/
Light Source
Br
ightness Control
Maintain
Brightness
Set to On to maintain a constant
brightness for the light source.
Maintain
Br
ightness Level
Select the brightness level you want to
maintain constantly.
Setting is only displayed when Maintain
Brightness is set to On.
Setting Options Description
Light Source Mode See the Multi-Projection menu table
f
or details on the Light Source Mode
settings.
Setting is only displayed when Maintain
Brightness is set to O.
Brightness Level Select the brightness level you want when
Cus
tom is set to Light Source Mode.
Setting is only displayed when Maintain
Brightness is set to O.
Auto Source Search On
O
Set to On to detect the input signal
au
tomatically and project images when
there is no input signal.
is function is disabled when you turn
on the projector in the Quick Startup
mode.
Setting is only displayed when Content
Playback is set to O.
Startup Source Various input
so
urces available
Select the image source you want to
project when the projector is turned on
in Content Playback mode.
Sleep Mode On
O
Set to On to automatically turns o the
p
rojector aer an interval of inactivity.
Sleep Mode Timer 15 seconds to 30
minu
tes
Sets the interval for Sleep Mode.
A/V Mute Settings A/V Mute Timer Turns o the projector automatically if
A/V M
ute is enabled and 30 minutes of
inactivity has passed.
Button to Release
A/V Mu
te
Select A/V Mute if you want to use only
the [A/V Mute] button to turn o A/V
Mute, or select Any Button to use any
button to turn it o.
Projector Feature Settings - Operation Menu
205
Setting Options Description
Operation Settings Direct Power On Set to On to turn on the projector by
p
lugging it in without pressing the power
button.
Indicators Set to O to turn o the indicator lights
o
n the projector except when an error or
warning occurs.
Beep Controls the beep that sounds when you
tur
n the projector on or o.
Log Save
Des
tination
Sets the location in which to save error
and operation log les.
Setting is only displayed when Content
Playback is set to O.
Batch Setup Range Select All to copy all of the projector
m
enu settings using the batch setup
feature. Select Limited, if you do not
want to copy the following settings:
•
Password Protection settings
•
EDID in the Signal I/O menu
•
Network menu settings
Content Playback On
O
Set to On to play back a playlist.
O
verlay Eect O
verlay Eect
Shape Filter
Color Filter
Lightness
Adds color and shape eects to the
projected image.
Setting is only displayed in the following
cases:
•
Edge Blending is set to O in the
projector's Multi-Projection menu.
•
In Content Playback mode, the playlist
can be played and no writable error
has occurred.
USB Viewer — Selects and plays back a playlist saved on
th
e USB ash drive.
Setting Options Description
Reset Operation
Set
tings
— Resets all adjustment values on the
Operation menu to their default settings.
g
Related Links
•
"Functions Available in Standby Mode" p.206
•
"Adjusting the Brightness" p.89
•
"Projecting in Content Playback Mode" p.104
Functions Available in Standby Mode
e following table shows the combination of the Standby Mode settings and
avai
lable functions.
Function
Auto
Po
wer
On
Quick
Startup
Audio
Output
USB
power
supply
Wireles
s LAN
Wired
LAN
AirPlay
ECO — — — — — — —
Wired LAN
Co
mmunication
— — — — — ✓ *1 —
Normal ✓*2 ✓ *2 ✓ *2 ✓ *1 ✓ *1 ✓ *1 ✓ *1
*1: is function's availability depends on the Standby Mode setting.
*2: T
o use this function, you must also enable it in the setting for each function.
Projector Feature Settings - Operation Menu
206
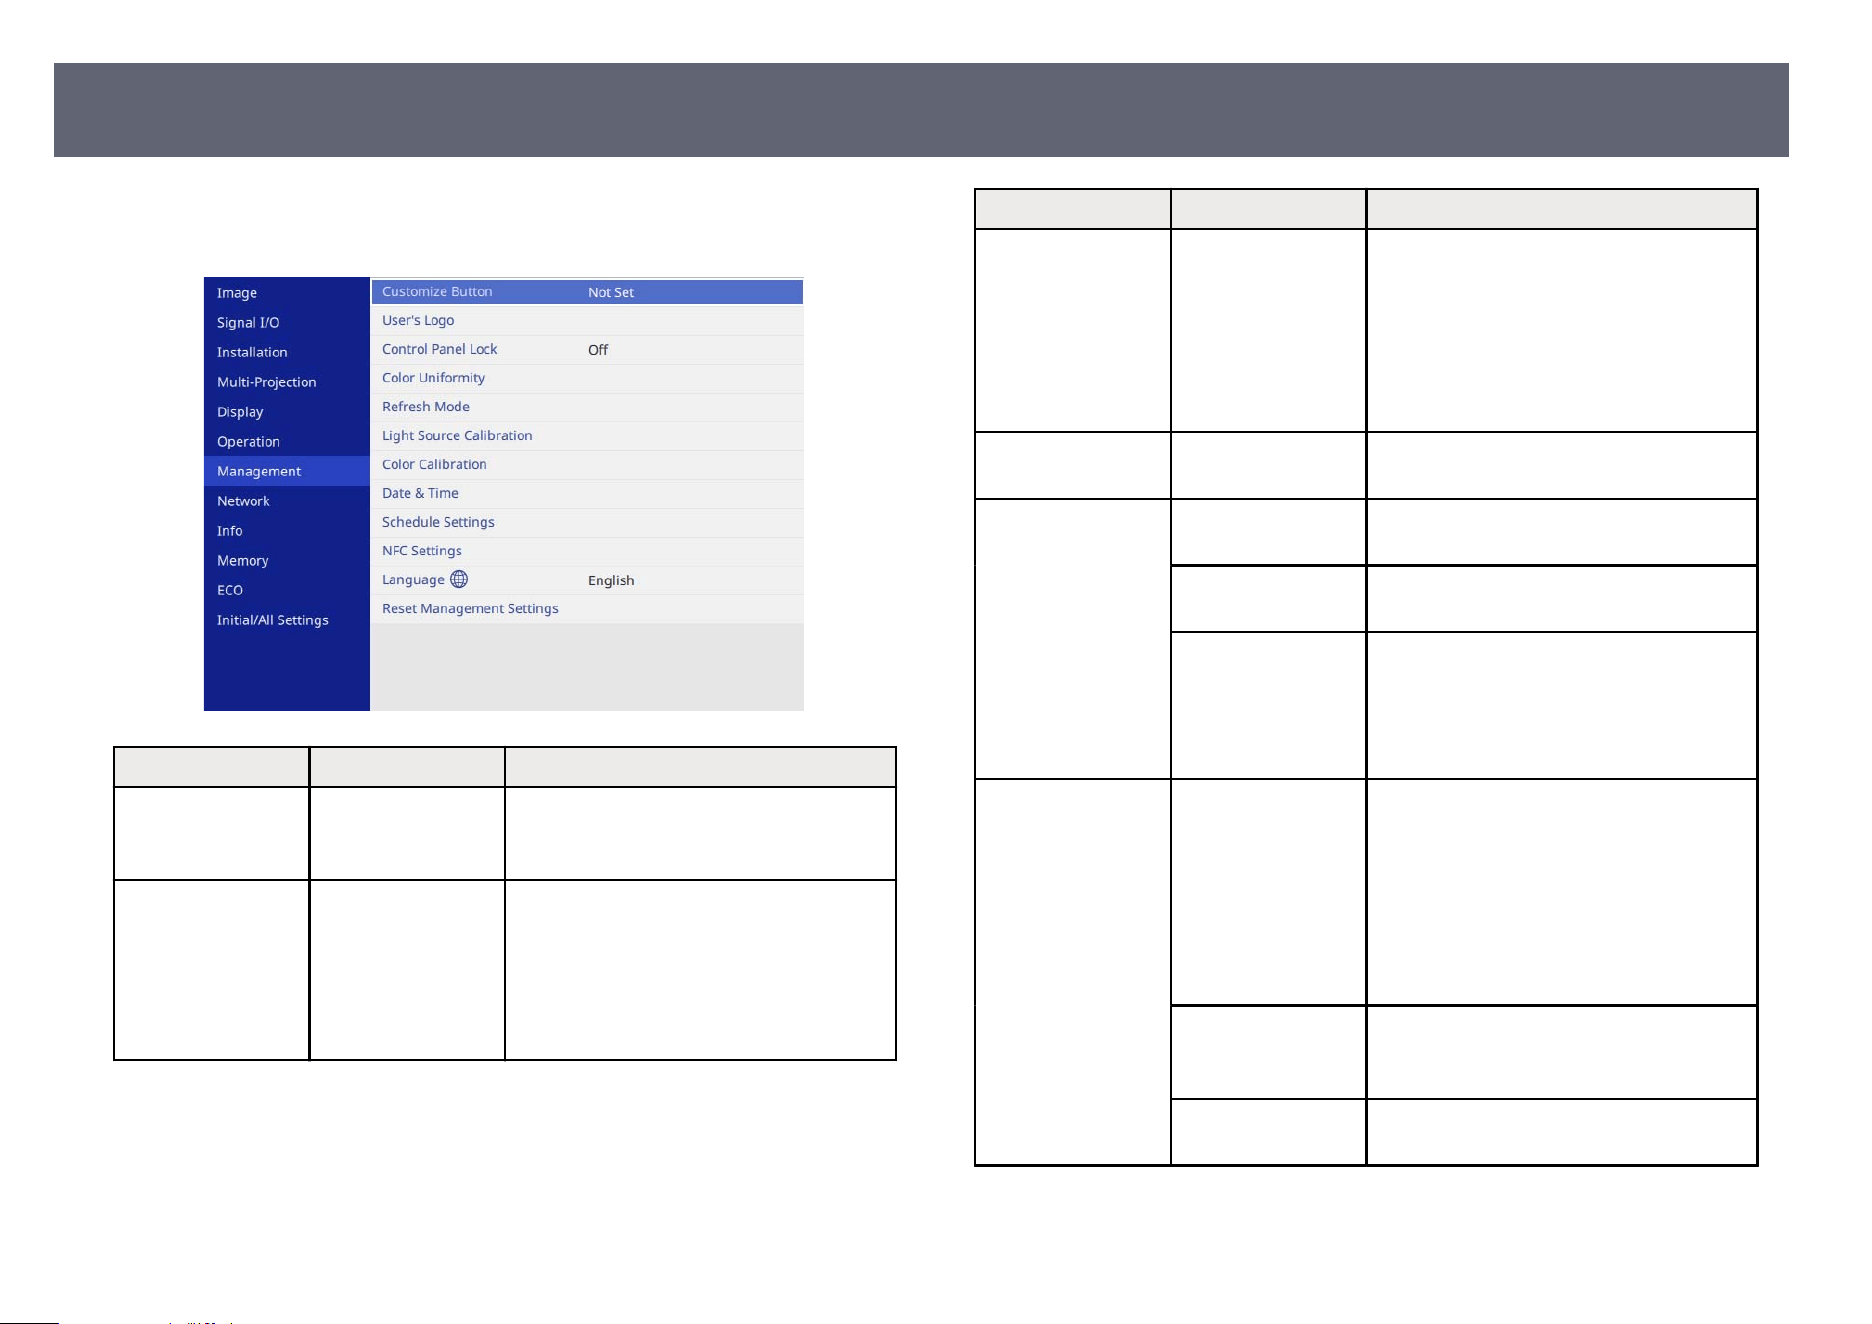
Settings on the Manage
ment menu let you customize various projector
administrative features.
Setting Options Description
Customize Button Various menu
op
tions available
Assigns a menu option to the
[Customize] button on the remote control
for one-touch access.
User's Logo Start Setting
Res
et
Creates a screen that the projector
displays to identify itself and enhance
security.
is setting is unavailable when Test
Pattern is set to Captured Image in the
projector's Installation menu.
Setting Options Description
Control Panel Lock Full Lock
Ex
cept for Power
O
Controls projector button locking to
secure the projector:
•
Full Lock: locks all buttons.
•
Except for Power: locks all buttons
except the power button.
•
O: no buttons locked.
Color Uniformity — See the Multi-Projection menu table for
det
ails on the Color Uniformity settings.
Refresh Mode Timer Sets a time period during which the
pr
ojector displays the refresh image.
Messages Set to On to display a message informing
y
ou that the projector is in refresh mode.
Start Starts the refresh mode process to clear
any p
rojected aerimage and turn o the
projector aer a specied period of time.
Press any button on the remote control to
cancel this process.
Light Source
Cali
bration
Run Now Starts light source calibration to optimize
the white balance of the currently
projected image. You may not be able
to start calibration if the projector's
environmental temperature is out of
range. (Wait 30 minutes aer turning on
the projector before starting calibration
for the best results.)
Run Periodically Set to On to perform light source
c
alibration periodically every 100 hours
of usage.
Last Run Displays the date and time of the last light
so
urce calibration.
Projector Administration Settings - Management Menu
207
Setting Options Description
Color Calibration Color Calibration e color calibration process adjusts the
co
lor balance and brightness that has
deteriorated over time based on images
taken by the optional external camera,
and restores the default image quality.
Set to On to enable the color calibration
process.
You need to connect the optional external
camera for the color calibration process.
Start Auto
Ad
justment
Starts auto adjustment.
Undo You can undo auto adjustment.
Redo Select aer selecting Undo to restore the
im
age to the status aer auto adjustment.
Color Uniformity You can adjust the color tone balance for
th
e whole image.
Reset You can reset all adjustment values on the
Co
lor Calibration menu to their default
settings.
Date & Time Date & Time
Day
light Saving
Time
Internet Time
Adjusts the projector's system time and
date settings. Select Daylight Saving
Time to set daylight saving time settings
for your region. Select Internet Time to
automatically acquire the time from an
Internet time server.
Schedule Settings — Schedules projector events to occur
aut
omatically at selected dates and times.
Setting Options Description
NFC Settings NFC Write
Pr
otection
NFC Write
Password
Prevents scanning the projector's settings.
•
NFC Write Protection: prevents
anyone from scanning the projector's
settings.
•
NFC Write Password: you can set a
password for scanning the projector's
settings using up to 32 alphanumeric
characters.
Language Various languages
avail
able
Select the language for projector menu
and message displays.
Reset Management
Set
tings
— Resets all adjustment values on the
Management menu to their default
settings, except for the following:
•
Date & Time
•
Language
When you set Me
nu Protection of Schedule to On, you cannot change
settings on the Schedule Settings. Set Menu Protection of Schedule to
O rst.
g
Related Links
•
"Ev
ent ID Code List" p.208
Event ID Code List
If the Event ID option on the Information screen displays a code number,
c
heck this list of Event ID codes for the solution to the projector problem
associated with the code.
If you cannot resolve the problem, contact your network administrator or Epson
for technical support.
Projector Administration Settings - Management Menu
208
Event ID
code
C
ause and solution
0432
0435
e network soware did not start. Turn the projector o and then on
again.
0433
Cannot display the transferred images. Restart the network so
ware.
0434
0481
0482
0485
Unstable network communication. Check the network
comm
unication status, wait a few moments, and try connecting to
the network again.
0483
04FE
e network soware quit unexpectedly. Check the network
co
mmunication status, then turn the projector o and then on again.
0484 Communication with computer was disconnected. Restart the
net
work soware.
0479
04FF
A projector system error has occurred. Turn the projector o
and then
on again.
0523 When attempting to connect using Miracast, the WPS connection
tim
ed out. Move the projector and mobile device closer together and
try connecting again.
0524 When attempting to connect using Miracast, an unknown error
occ
urred during the WPS process between the projector and mobile
device. Set Miracast to O in Network Projection from the Network
Settings menu, then set it back to On, and restart the projector.
0525 When attempting to connect using Miracast, the security settings
bet
ween the projector and mobile device do not match. Set Miracast
to O in Network Projection from the Network Settings menu, then
set it back to On, and restart the projector.
0526 When attempting to connect using Miracast, the WPA2 handshake
was no
t completed correctly. Set Miracast to O in Network
Projection from the Network Settings menu, then set it back to On,
and restart the projector.
Event ID
code
C
ause and solution
0527 When attempting to connect using Miracast, the WPA2 four-way
han
dshake failed, and the connection could not be established. Set
Miracast to O in Network Projection from the Network Settings
menu, then set it back to On, and restart the projector.
0528 Aer connecting using Miracast, IP address acquisition failed, or the
p
rojector was unable to provide a valid IP address. Set Miracast to O
in Network Projection from the Network Settings menu, then set it
back to On, and restart the projector.
0529 Miracast control communication (RTSP message exchange) failed.
Dis
connect the Miracast connection and then reconnect.
0530 When attempting to connect using Miracast, video or audio streaming
cou
ld not be performed correctly. Move the projector and mobile
device closer together and try connecting again.
0532 When attempting to connect using Miracast, there is a video or audio
code
c incompatibility between the mobile device and projector, such
as dierences in H.264/H.265, or an unsupported format is being
used. Check if the resolution and codec settings on the mobile device
are compatible with Miracast specications.
0535 e Miracast session ended unexpectedly. Restart the projector and
m
obile device and try connecting again.
0536 When attempting to connect using Miracast, an unexpected
comm
unication disconnection occurred, such as an application crash.
Restart the projector and try connecting using Miracast again.
0542 When attempting to connect using Miracast, an unknown P2P
conn
ection error occurred. Restart the projector and mobile device
and try connecting again.
0543 When attempting to connect using Miracast, a video format
err
or occurred. You cannot project using the projector due to an
unsupported resolution or frame rate. Check if your mobile device is
compatible with Miracast specications.
Projector Administration Settings - Management Menu
209
Event ID
code
C
ause and solution
0544 e mobile device you tried to connect to the projector using Miracast
i
s on the block list, and the connection has been denied. Remove the
device from the block list and try connecting again.
0891 Cannot nd an access point with the same SSID. Set your computer,
acces
s point, and projector to the same SSID.
0892 e WPA/WPA2/WPA3 authentication type does not match. Make
s
ure the wireless network security settings are correct.
0893 e TKIP/AES encr
yption type does not match. Make sure the
wireless network security settings are correct.
0894 Communication with an unauthorized access point was disconnected.
Co
ntact your network administrator.
0895 Communication with a connected device was disconnected. Check
yo
ur device connection status.
0898 Failed to acquire DHCP. Make sure the DHCP server is operating
cor
rectly. If you are not using DHCP, set the DHCP setting to O in
the projector's Network menu.
s Network > Network Settings > Wired LAN > IP Settings >
DHCP
s Network > Network Settings > Wireless LAN > IP Settings >
DHCP
0899 Other communication errors.
089A e EAP authentication type does not match the network. Check
t
he wireless LAN security settings and make sure that the security
certicate is installed correctly.
089B EAP server authentication failed. Check the wireless LAN security
set
tings and make sure that the security certicate is installed
correctly.
089C EAP client authentication failed. Check the wireless LAN security
set
tings and make sure that the security certicate is installed
correctly.
Event ID
code
C
ause and solution
089D Key exchange failed. Check the wireless LAN security settings and
mak
e sure that the security certicate is installed correctly.
Projector Administration Settings - Management Menu
210
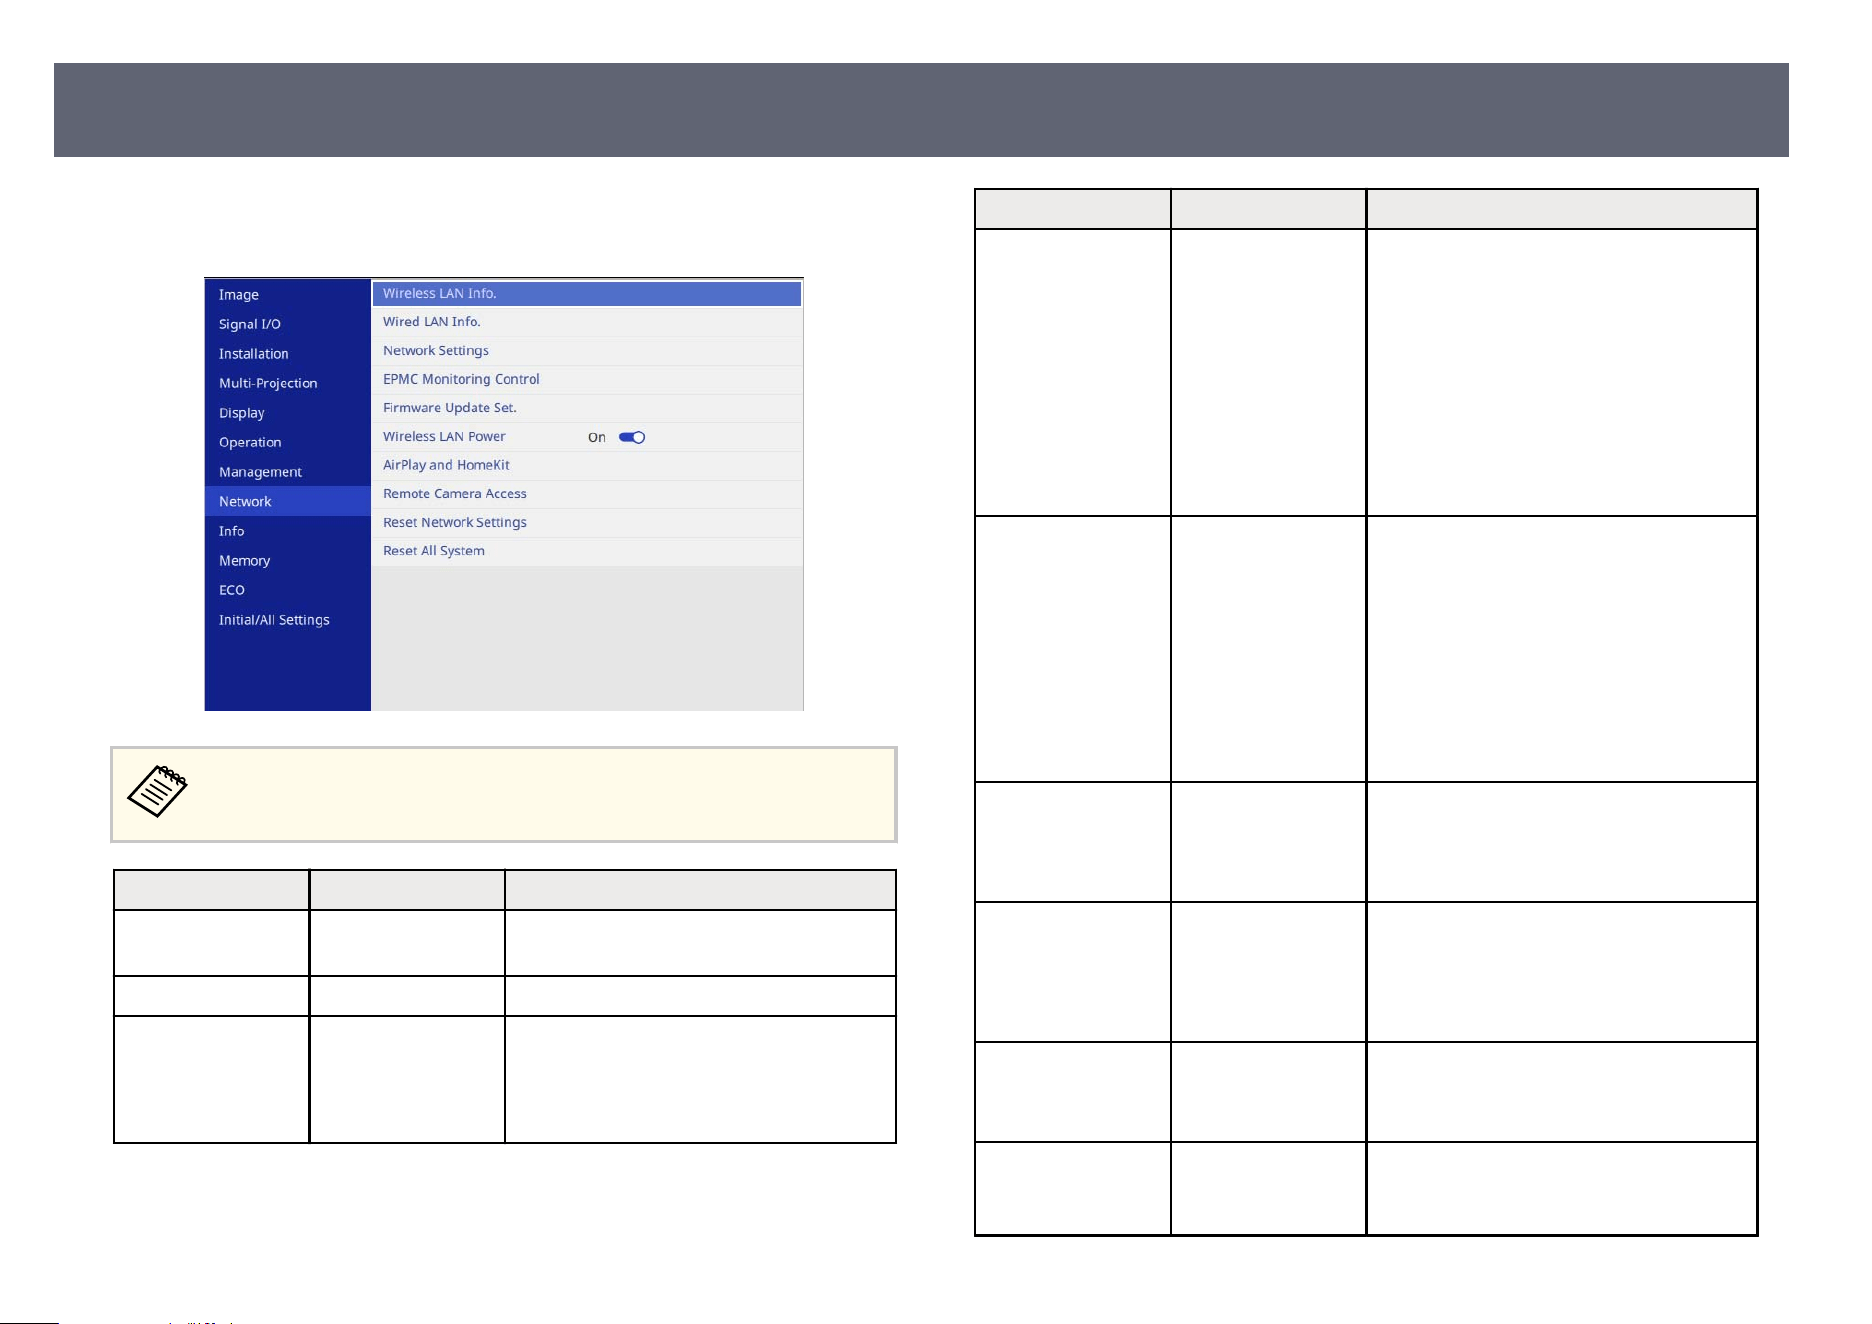
Settings on the Ne
twork menu let you view network information and set up the
projector for controlling over a network.
When you set Me
nu Protection of Network to On, you cannot change the
network settings. Set Menu Protection of Network to O rst.
Setting Options Description
Wireless LAN Info. Wireless LAN Info. Displays wireless network status and
detai
ls.
Wired LAN Info. Wired LAN Info. Displays wired network status and details.
Network Settings — Congures yo
ur projector network
settings. See the network menu table for
details on the Network Settings.
Not available when the source is AirPlay.
Setting Options Description
EPMC Monitoring
Co
ntrol
EPMC Settings
Export EPMC
Settings
Import EPMC
Settings
Set to On and make the necessary settings
to directly communicate with the Epson
Projector Management Connected cloud
server, not through the Epson Projector
Connected Agent. See the Epson Projector
Management Connected Operation Guide
for more details.
https://www.projection-
service.epson.com/pages/epm-connected/
online-manual/web-front/EN/index.html
Firmware Update
Set.
N
otify
Do not notify
Auto update at
midnight
O
(is setting may be unavailable
depending on your projector model.)
Set whether to send a notication
containing projector rmware update
information, and whether to
automatically update the rmware.
We recommend setting it to O when
you are using the Epson Projector
Management Connected soware.
Wireless LAN
Po
wer
On
O
Set to On to project images via a wireless
LAN. If you do not want to connect
via wireless LAN, turn it O to prevent
unauthorized access by others.
Wireless LAN
Diag
nosis
Ping
IP Address
Ping until stopped
Start
(is setting may be unavailable
depending on your projector model.)
Transmits Ping to conr m
communication status.
AirPlay and
Ho
meKit
— Displays the AirPlay and HomeKit
settings screen.
Not available when the source is AirPlay.
Remote Camera
Acces
s
Remote Camera
Access
You can display the image taken by the
optional external camera using Epson
Web Control.
Projector Network Settings - Network Menu
211
Setting Options Description
Reset Network
Set
tings
— Resets all adjustment values on the
Network menu to their default settings.
Not available when the source is AirPlay.
Attention
Al
l of the passwords that have
been set for the Network menu
are also reset and you need to
set them again. To prevent the
passwords from being reset by
unauthorized users, set Network
to On in the Menu Protection
menu.
Reset All System — Resets the projector's network rm
ware.
Not available when the source is AirPlay.
Attention
All of the passwords that have
been set for the Network menu
are also reset and you need to
set them again. To prevent the
passwords from being reset by
unauthorized users, set Network
to On in the Menu Protection
menu.
Once you have connected your projector to your network, you can select
pr
ojector settings and control projection using a compatible Web browser.
is allows you to access the projector remotely.
g
Related Links
•
"Net
work Menu - Network Settings Menu" p.212
•
"List of Functions" p.11
•
"Co
ntrolling a Networked Projector Using a Web Browser" p.168
Network Menu - Network Settings Menu
Settings on the Ne
twork Settings menu let you select the basic network settings.
•
If y
ou are connecting via wireless LAN, make sure the followings to
enable wireless LAN settings:
•
Check that the wireless LAN module is built in, or install the
wireless LAN module on your projector.
•
Turn on the Wireless LAN Power setting in the projector's Network
menu.
•
If the Web Control Password has not been set, a screen prompting you
to set a password is displayed before you can save network settings.
Follow the on-screen instructions to set the password.
Setting Options Description
Projector Name Up to 16
alp
hanumeric
characters
(do not use " *
+ , / : ; < = > ? [ \ ] `
| spaces)
Enter a name to identify the projector
over the network.
Web Control
Pas
sword
8 to 32
alphanumeric
characters
(do not use * :
spaces)
Enter a password for accessing the
projector over the Web. (e user name
is EPSONWEB. No password is set by
default.)
Priority Control
In
terface
Wired LAN
Wireless LAN
Sets the priority gateway.
Projector Network Settings - Network Menu
212
Setting Options Description
Proxy IP Address
Po
rt Number
(is setting may be unavailable
depending on your projector model.)
Enter the IP Address and Port Number
of the proxy server.
IPv6 On
O
(is setting may be unavailable
dep
ending on your projector model.)
Set to On if you want to connect the
projector to the network using IPv6.
IPv6 is supported to monitor and control
the projector over a network using Epson
Web Control and PJLink.
Simple AP On
O
Set to On to enable simple access point
m
ode for direct connection between your
projector and input devices. Make sure
you are also doing the following:
•
Using Quick Connection Mode of
Epson iProjection
•
Using Miracast connection
Setting is only displayed when Wireless
LAN Power is set to On in the projector's
Network menu.
SSID Automatically
assig
ned SSID
Displays the SSID of the projector for
selection on your device in simple AP
connections.
You cannot select this setting when
Simple AP is set to O.
Security WPA2-PSK Displays the security type for simple AP
conn
ections.
You cannot select this setting when
Simple AP is set to O.
Setting Options Description
Passphrase Various
pas
sphrases from 8
to 63 characters
Enter the passphrase of the projector
for entry on your device in simple AP
connections.
You cannot select this setting when
Simple AP is set to O.
Wireless LAN
syst
em
802.11ac (Wi-Fi 5)
802.11n (Wi-Fi 4)
(is setting may be unavailable
depending on your projector model.)
Sets the communication method between
the projector and the mobile device.
e available methods vary depending
on countries, regions, and your projector
model.
You cannot select this setting when
Simple AP is set to O.
Channel Various channels
avail
able
Sets the frequency band (channel) used in
simple AP connections.
You cannot select this setting when
Simple AP is set to O.
Wireless LAN — See the Wireless LAN menu table for
det
ails.
Wired LAN — See the Wired LAN menu table for
det
ails.
Mail Notication — S
ee the Mail Notication menu table for
details.
Projector Control — See the Projector Control menu table for
det
ails.
Network Projection — See the Network Projection menu table
f
or details.
g
Related Links
•
"Net
work Menu - Wireless LAN Menu" p.214
•
"Network Menu - Wired LAN Menu" p.216
Projector Network Settings - Network Menu
213
•
"Net
work Menu - Mail Notication Menu" p.216
•
"Network Menu - Projector Control Menu" p.217
•
"Network Menu - Network Projection Settings" p.219
Network Menu - Wireless LAN Menu
Set
tings on the Wireless LAN menu let you select the wireless LAN settings.
•
Tur
n on the Wireless LAN Power setting in the projector's Network
menu.
•
If you did not install an optional wireless LAN module, turn o the
Simple AP setting to enable you to select wireless LAN settings.
•
If you have installed the optional wireless LAN module, turn on the
Simple AP setting to enable you to select wireless LAN settings.
When connecting to a wireless network, it is strongly recommended that you set
security. When setting security, follow the instructions from the administrator
of the network system you want to connect to.
WPA is an encryption standard that improves the security for wireless networks.
e projector supports AES encryption methods.
WPA2/WPA3-EAP and WPA3-EAP do not support WPA3 192-bit
se
curity.
Setting Options Description
Search Access Point To Search View Search for available wireless network
access p
oints. Depending on the access
point settings, they may not be displayed
in the list.
SSID Up to 32
alp
hanumeric
characters
Enter the SSID (network name) of the
wireless LAN system the projector is
connecting to.
Setting Options Description
Security WPA2/WPA3-PSK Connects in WPA2/WPA3 personal
mo
de. Encryption method is selected
automatically according to the access
point settings. Set a passphrase which is
the same for the access point.
WPA2/WPA3-EAP Connects in WPA2/WPA3 enterprise
mo
de. Encryption method is selected
automatically according to the access
point settings.
WPA3-PSK Connects in WPA3 personal mode.
Co
mmunication is performed using
WPA3 security. Uses AES method
for encryption. When establishing a
connection from a computer to the
projector, enter the value set in the
passphrase.
WPA3-EAP Connects in WPA3 enterprise mode.
Encr
yption method is selected
automatically according to the access
point settings.
Open Security is not set.
Passphrase
(Fo
r WPA2/WPA3-
PSK and WPA3-
PSK security)
Various
passphrases from 8
to 63 characters
Enter the pre-shared passphrase used on
the network.
When the passphrase is entered and the
[Enter] button is pressed, the value is set
and displayed as an asterisk (*).
We recommend changing the passphrase
periodically for security. If the network
settings are initialized, it returns to the
initial passphrase.
EAP Type
(Fo
r WPA2/WPA3-
EAP and WPA3-
EAP security)
PEAP Authentication protocol widely used in
Windows Server.
EAP-TLS Authentication protocol widely used to
us
e a client certicate.
Projector Network Settings - Network Menu
214
Setting Options Description
User name Up to 64
alp
hanumeric
characters
Enter a user name for the network.
To include a domain name, add it
before a backslash and the user name
(domain\username).
When importing a client certicate, the
name the certicate was issued to is
automatically set.
Password Up to 64
alp
hanumeric
characters
Enter a password for authentication. Aer
you enter the password and select Set, the
password is displayed as an asterisk (*).
Setting is only displayed when EAP Type
is set to PEAP.
Client Certicate — I
mports the client certicate.
Setting is only displayed when EAP Type
is set to EAP-TLS.
CA certicate — I
mports the CA certicate.
RADIUS Server
Nam
e
Up to 64
alphanumeric
characters
Enter the server name to verify.
IP Settings DHCP
IP Addr
ess
Subnet Mask
Gateway Address
Set DHCP to On if your network assigns
addresses automatically; set to O to
manually enter the network's IP Address,
Subnet Mask, and Gateway Address
using 0 to 255 for each address eld.
Do not use these addresses:
0.0.0.0, 127.x.x.x, 192.0.2.x, 192.168.48.x,
192.168.88.x or 224.0.0.0 through
255.255.255.255 (where x is a number
from 0 to 255) for IP Address,
255.255.255.255 or 0.0.0.0 through
254.255.255.255 for Subnet Mask, and
0.0.0.0, 127.x.x.x or 224.0.0.0 through
255.255.255.255 for Gateway Address.
Setting Options Description
DNS Server 1
DNS S
erver 2
Various IP
addresses
Enter the IP address for the DNS server,
using 0 to 255 for each address eld.
e DNS server resolves the host name.
Do not use the following IP addresses:
127.x.x.x (where x is a number from 0 to
255).
When these settings are not set
and remain as 0.0.0.0, DNS server
information is acquired using DHCP.
Aer acquiring the information, the
values remain as 0.0.0.0.
IPv6 On
O
(is setting may be unavailable
dep
ending on your projector model.)
Set to On if you want to connect the
projector to the network using IPv6.
IPv6 is supported to monitor and control
the projector over a network using Epson
Web Control and PJLink.
Auto Conguration On
O
(i
s setting may be unavailable
depending on your projector model.)
Set to On to assign addresses
automatically according to the Router
Advertisement.
Use Temporary
Addr
ess
On
O
(is setting may be unavailable
depending on your projector model.)
Set to On if you want to use a temporary
IPv6 address.
IP Address Display On
O
Set to On to display the IP address on the
n
etwork information screen and Home
screen.
g
Related Links
•
"L
i
st of Functions" p.11
Projector Network Settings - Network Menu
215
Network Menu - Wired LAN Menu
Set
tings on the Wired LAN menu let you select the wired LAN settings.
Setting Options Description
IP Settings DHCP
IP Addr
ess
Subnet Mask
Gateway Address
Set DHCP to On if your network assigns
addresses automatically; set to O to
manually enter the network's IP Address,
Subnet Mask, and Gateway Address
using 0 to 255 for each address eld.
Do not use these addresses:
0.0.0.0, 127.x.x.x, 192.0.2.x, 192.168.48.x,
192.168.88.x, or 224.0.0.0 through
255.255.255.255 (where x is a number
from 0 to 255) for IP Address,
255.255.255.255 or 0.0.0.0 through
254.255.255.255 for Subnet Mask, and
0.0.0.0, 127.x.x.x or 224.0.0.0 through
255.255.255.255 for Gateway Address.
DNS Server 1
DNS S
erver 2
Various IP
addresses
Enter the IP address for the DNS server,
using 0 to 255 for each address eld. e
DNS server resolves the host name. You
cannot use the following IP addresses:
127.x.x.x (where x is a number from 0 to
255).
When these settings are not set
and remain as 0.0.0.0, DNS server
information is acquired using DHCP.
Aer acquiring the information, the
values remain as 0.0.0.0.
Setting Options Description
IPv6 On
O
(is setting may be unavailable
dep
ending on your projector model.)
Set to On if you want to connect the
projector to the network using IPv6.
IPv6 is supported to monitor and control
the projector over a network using Epson
Web Control and PJLink.
Auto Conguration On
O
(i
s setting may be unavailable
depending on your projector model.)
Set to On to assign addresses
automatically according to the Router
Advertisement.
Use Temporary
Addr
ess
On
O
(is setting may be unavailable
depending on your projector model.)
Set to On if you want to use a temporary
IPv6 address.
IP Address Display On
O
Set to On to display the IP address on the
n
etwork information screen and Home
screen.
g
Related Links
•
"Li
st of Functions" p.11
Network Menu - Mail Notication Menu
Set
tings on the Mail Notication menu let you receive an email notication if a
problem or warning occurs in the projector.
Setting Options Description
Mail Notication On
O
S
et to On to send an email to the preset
addresses when a problem or warning
occurs with a projector.
Projector Network Settings - Network Menu
216
Setting Options Description
SMTP Server Up to 64
alp
hanumeric
characters
(do not use " * + , : ;
< = > ? [ \] ` |
spaces)
Enter the IP address or FQDN (Fully
Qualied Domain Name) for the
projector's SMTP server using 0 to 255
for each address eld.
Do not use these addresses:
127.x.x.x, 192.0.2.x or 224.0.0.0 through
255.255.255.255 (where x is a number
from 0 to 255).
DNS server settings are required when
specifying an FQDN.
Authentication Open
Au
th
SSL
TLS
Select the authentication type of the
SMTP server.
Port Number 1 to 65535 (default
is 25)
En
ter a number for the SMTP server Port
Number.
User Name Up to 64
alp
hanumeric
characters
Enter a user name for the SMTP server.
Password Up to 64
alp
hanumeric
characters
Enter a password for authentication on
the SMTP server.
From Up to 64
alp
hanumeric
characters
(do not use " ( ) , : ;
< > [ \] spaces)
Enter the email address of the sender.
Enter an email address that does not
contain personal information.
Address 1 Setting
Addr
ess 2 Setting
Address 3 Setting
Enter the e-mail address, and select the
alerts you want to receive. Enter an email
address that does not contain personal
information.
Network Menu - Projector Control Menu
Set
tings on the Projector Control menu let you select settings for controlling
the projector over a network.
Setting Options Description
Command
Co
mmunication
Protected
Compatible
Selects the authentication method for
command communication.
Set to Protected when performing a
digest authentication using Web Control
Password. You need to install the
latest version of the Epson Projector
Management soware.
Set to Compatible when performing
plain text authentication using the
Monitor Password.
Select Compatible when monitoring
projectors with a switcher and a system
controller or using Epson Projector
Management ver. 5.30 or earlier.
Monitor Password Up to 16
alp
hanumeric
characters (do not
use spaces or any
symbols other than
@)
Enter a password for monitoring
projectors with a switcher and a system
controller, or using Epson Projector
Management ver. 5.30 or earlier. Make
sure that the Monitor Password matches
the password set for the switcher or the
system controller.
Web API Settings Web API Select On to enable the Web API
f
unction.
Projector Network Settings - Network Menu
217
Setting Options Description
Authentication Select the authentication method for Web
API co
mmunication.
Open: Security is not set.
Digest: Communication is performed
using API authentication (Digest
authentication).
See the Web API Specications for
Projectors for details.
Basic Control On
O
Set to On to monitor and control the
p
rojector using Basic Control in Epson
Web Control.
is setting is only displayed when
Content Playback is set to O in the
projector's Operation menu.
Remote Password 8 to 32
alp
hanumeric
characters
(do not use * :
spaces)
Enter a password to access the
projector using Basic Control in Epson
Web Control. (e user name is
EPSONREMOTE. No password is set by
default.)
PJLink On
O
Set to On to enable the PJLink
n
otication function.
PJLink Password Up to 32
alp
hanumeric
characters
(do not use spaces
and any symbols)
Enter a password for using the PJLink
protocol for projector control.
Setting Options Description
Notied IP Addr
ess Various IP
addresses
Enter the IP address to receive the
projector's operating status when the
PJLink notication function is enabled.
Enter the addresses using 0 to 255 for
each address eld.
Do not use these addresses: 127.x.x.x or
224.0.0.0 through 255.255.255.255 (where
x is a number from 0 to 255).
SNMP SNMPv1/v2c Set to On to monitor the projector
u
sing SNMPv1/v2c. To monitor the
projector, you need to install the SNMP
manager program on your computer.
SNMP should be managed by a network
administrator.
Trap IP Address 1
Trap IP A
ddress 2
Enter up to two IP addresses to receive
SNMP notications, using 0 to 255 for
each address eld.
Do not use these addresses: 224.0.0.0
through 255.255.255.255 (where x is a
number from 0 to 255).
Community Name Enter the SNMP community name. You
can u
se up to 32 alphanumeric characters
(do not use spaces and any symbols).
SNMPv3 Set to On to monitor the projector
u
sing SNMPv3. To monitor the projector,
you need to install the SNMP manager
program on your computer. SNMP
should be managed by a network
administrator.
User name Enter the SNMP user name. You can use
up t
o 32 alphanumeric characters.
Projector Network Settings - Network Menu
218
Setting Options Description
Trap IP Address 1
Trap IP A
ddress 2
Enter up to two IP addresses to receive
SNMP notications, using 0 to 255 for
each address eld.
Do not use these addresses: 224.0.0.0
through 255.255.255.255 (where x is a
number from 0 to 255).
Authentication Selects the type of SNMPv3
aut
hentication.
Authentication
Pas
sword
is password is used for the SNMPv3
authentication.
is must be set to use the feature
securely.
You can use up to 32 alphanumeric
characters.
Encryption Type Selects the type of SNMPv3 encryption.
Encryption
Pas
sword
is password is used for the SNMPv3
encryption.
is must be set to use the feature
securely.
You can use up to 32 alphanumeric
characters.
AMX Device
Dis
covery
On
O
Set to On when you want to allow the
projector to be detected by AMX Device
Discovery.
Crestron
Co
nnected
On
O
Set to On only when monitoring or
controlling the projector over the network
using Crestron Connected.
Enabling Crestron Connected disables
the Epson Message Broadcasting feature
in the Epson Projector Management
soware.
Setting Options Description
Crestron XiO
Clo
ud
On
O
Set to On to monitor or control your
projector and other devices over the
network using the Crestron XiO Cloud
service.
Control4 SDDP On
O
Set to On to allow device information
t
o be acquired using Control4 Simple
Device Discovery Protocol (SDDP).
Secure HTTP On
O
To strengthen security, communication
bet
ween the projector and computer
in Web control is encrypted. When
setting security with Web control, it is
recommended to set this to On.
Web Server
Cer
ticate
— Imports the Web server certicate for
secure HTTP.
Network Menu - Network Projection Settings
Set
tings on the Network Projection menu let you select the settings relates to
network projection.
Setting Options Description
Projector Keyword On
O
Set to On t
o enable a security password to
p
revent access to the projector by anyone
not in the same room as the projector.
You must enter a displayed, randomized
keyword from a computer using Epson
iProjection to access the projector and
share the current screen.
Epson iProjection On
O
Set to On to use Epson iProjection.
Projector Network Settings - Network Menu
219
Setting Options Description
SSID Display On
O
Set to On to display the SSID on the
n
etwork information screen and Home
screen.
LAN Info. Settings Text & QR Code
Text
S
ets the display format for the projector's
network information.
By simply reading the QR code with
Epson iProjection, you can connect the
mobile device to the projector through a
network.
Moderator
Pas
sword
Four-digit number Enter a password for accessing the
projector as a moderator using Epson
iProjection. (No password is set by
default.)
Keyword Interrupt
Dis
play
On
O
Set to On to display a projector keyword
on the projected image when accessing
the projector using Epson iProjection.
Available when Projector Keyword is set
to On.
Miracast On
O
(is setting may be unavailable
dep
ending on your projector model.)
Set to On to use the Miracast feature.
Access Control On
O
(is setting may be unavailable
dep
ending on your projector model.)
Set to On to display a conrmation
screen that asks whether to allow
projection each time a Miracast
connection is made.
Setting Options Description
Secondary
Co
nnections
Interruptions OK
No Interruptions
O
(is setting may be unavailable
depending on your projector model.)
Selects the connection behavior for
devices attempting to connect during a
Miracast connection.
•
Interruptions OK: Images from
devices that connect subsequently are
projected as the Miracast1 source.
If the subsequent device is
disconnected when Access Control is
set to On, images from the previously
connected device are projected as the
Miracast1 source. You can connect up
to two devices to the projector at the
same time.
When Access Control is set to O,
the previously connected device is
disconnected.
•
No Interruptions: A second device
can connect to the projector while
images from the previously connected
device continue to be projected as
the Miracast1 source. If you switch
the source to Miracast2, images from
the second device are projected. You
can connect up to two devices to the
projector at the same time.
•
O: No additional devices can connect
to the projector during Miracast
connection.
Adjust Image
Qu
ality
1 (Fine)
2
3
4 (Fast)
(is setting may be unavailable
depending on your projector model.)
Adjusts the Miracast speed/quality.
1: increases image quality.
4: increases processing speed.
Projector Network Settings - Network Menu
220

Setting Options Description
Miracast Info. On
O
(is setting may be unavailable
dep
ending on your projector model.)
Set to On to display connection
information when projecting from a
Miracast source.
Message
Br
oadcasting
On
O
Set to On to receive the message delivered
by Epson Projector Management. See the
Epson Projector Management Operation
Guide for details.
Setting is only displayed when Crestron
Connected is set to O in the projector's
Projector Control menu.
Screen Sharing On
O
Set to On to enable screen sharing
b
etween network projectors.
Connection Mode Keyword On
Ke
yword O
Set to Keyword O to skip authentication
of keywords for other projectors so you
can quickly connect to them.
Projector Network Settings - Network Menu
221

You can display information about the projector and version by viewing the
Inf
o menu. However, you cannot change any settings in the menu.
Information item Description
Information Displays information about the projector and input
so
urces. e displayed items vary depending on the
current input source.
Display Status Displays the projector's status information.
Temp Warning Info Displays various high temperature warnings.
Power On/O Hi
story Displays the projector's power on and power o history.
Projector Information Display - Info Menu
222
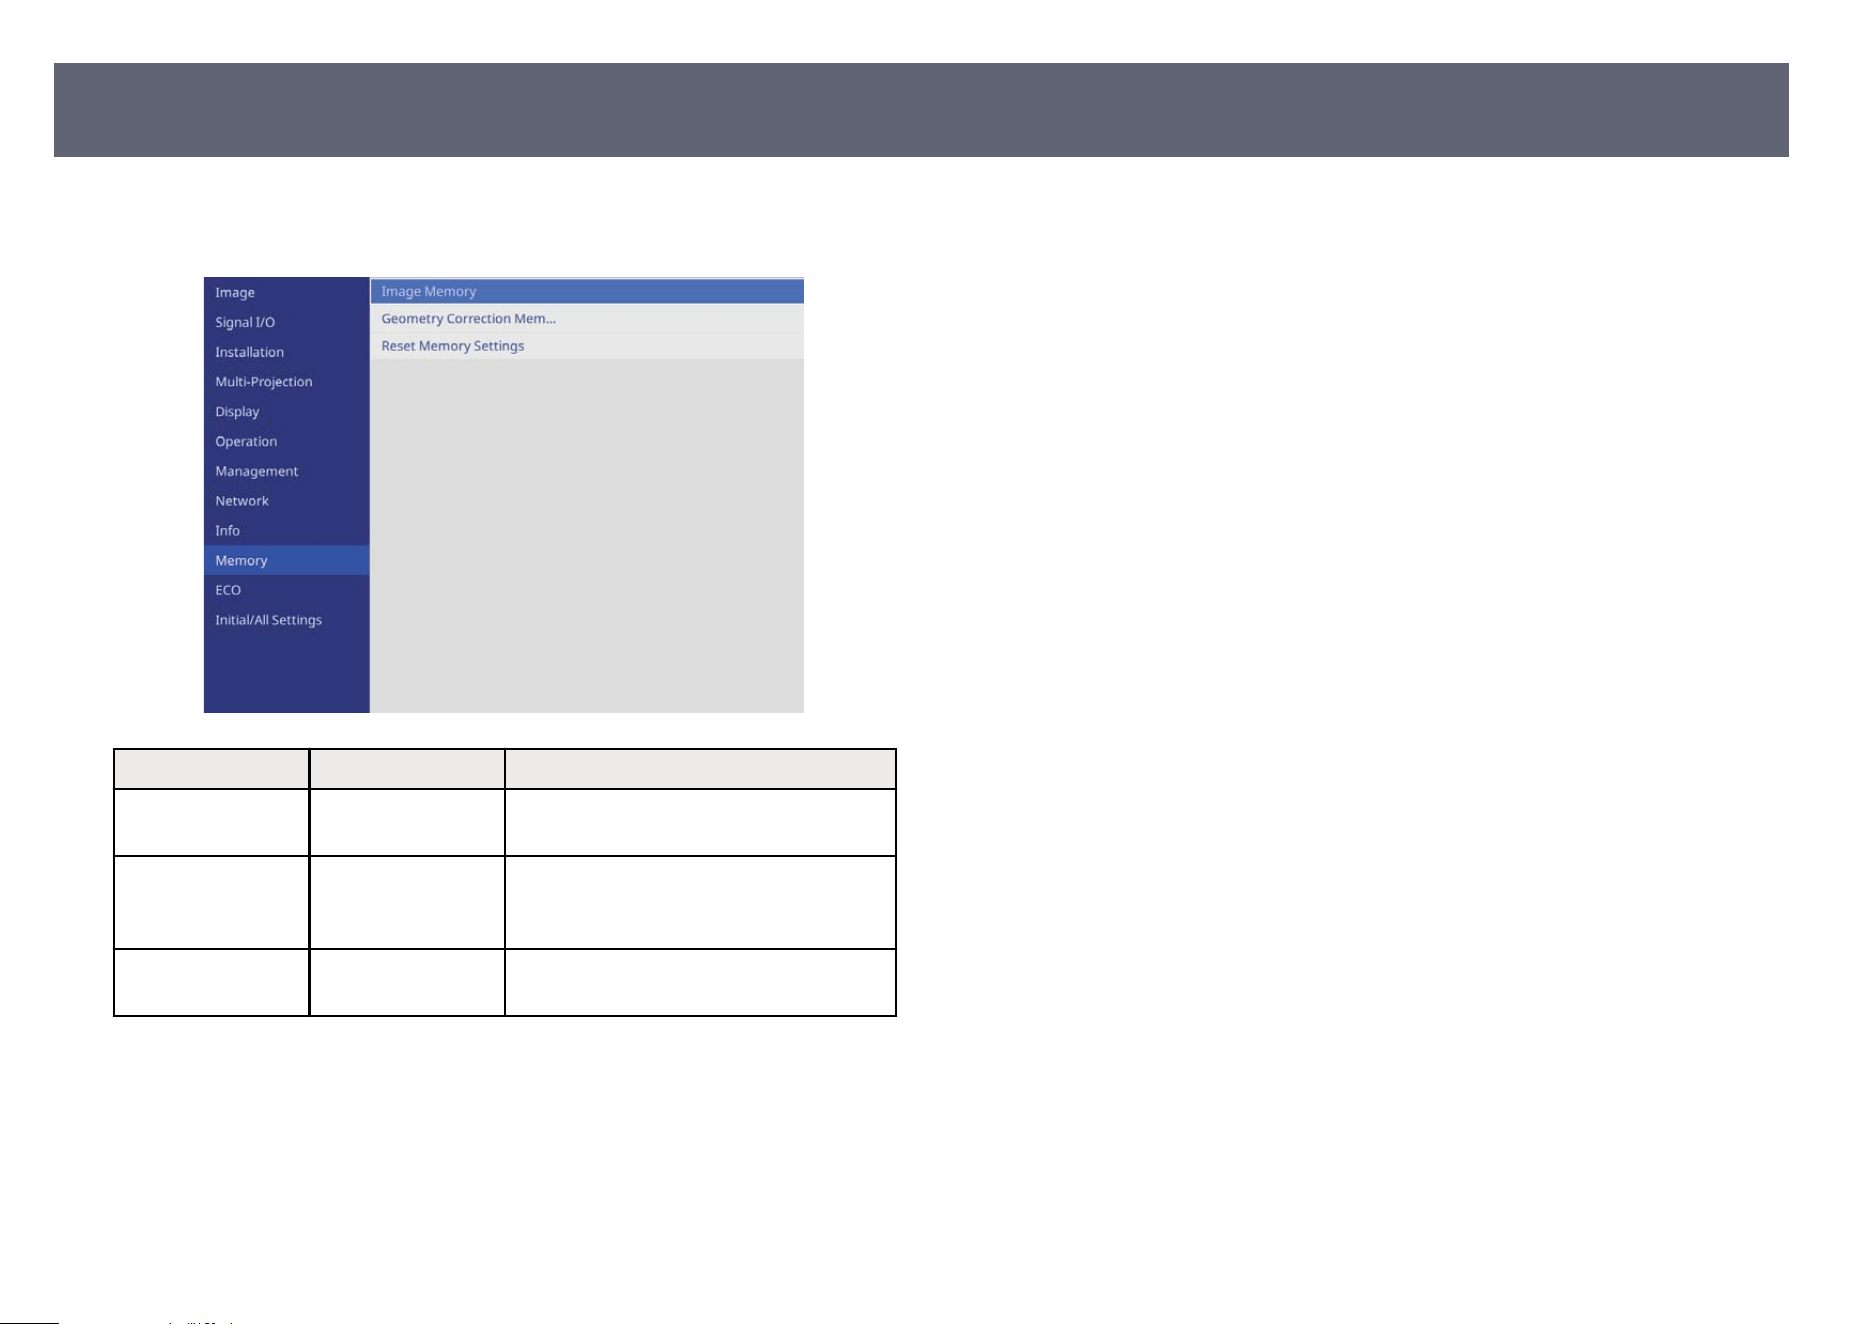
Settings on the Me
mory menu let you manage saving and loading of image
quality settings in the projector's memory.
Setting Options Description
Image Memory — Saves image adjustment settings and
ch
anges the memory name.
Geometry
Co
rrection
Memory
— Saves the geometry correction settings
and changes the memory name.
Reset Memory
Set
tings
— Resets all saved memories.
g
Related Links
•
"Savin
g Settings to Memory and Using Saved Settings " p.116
Image Quality Memory Settings - Memory Menu
223
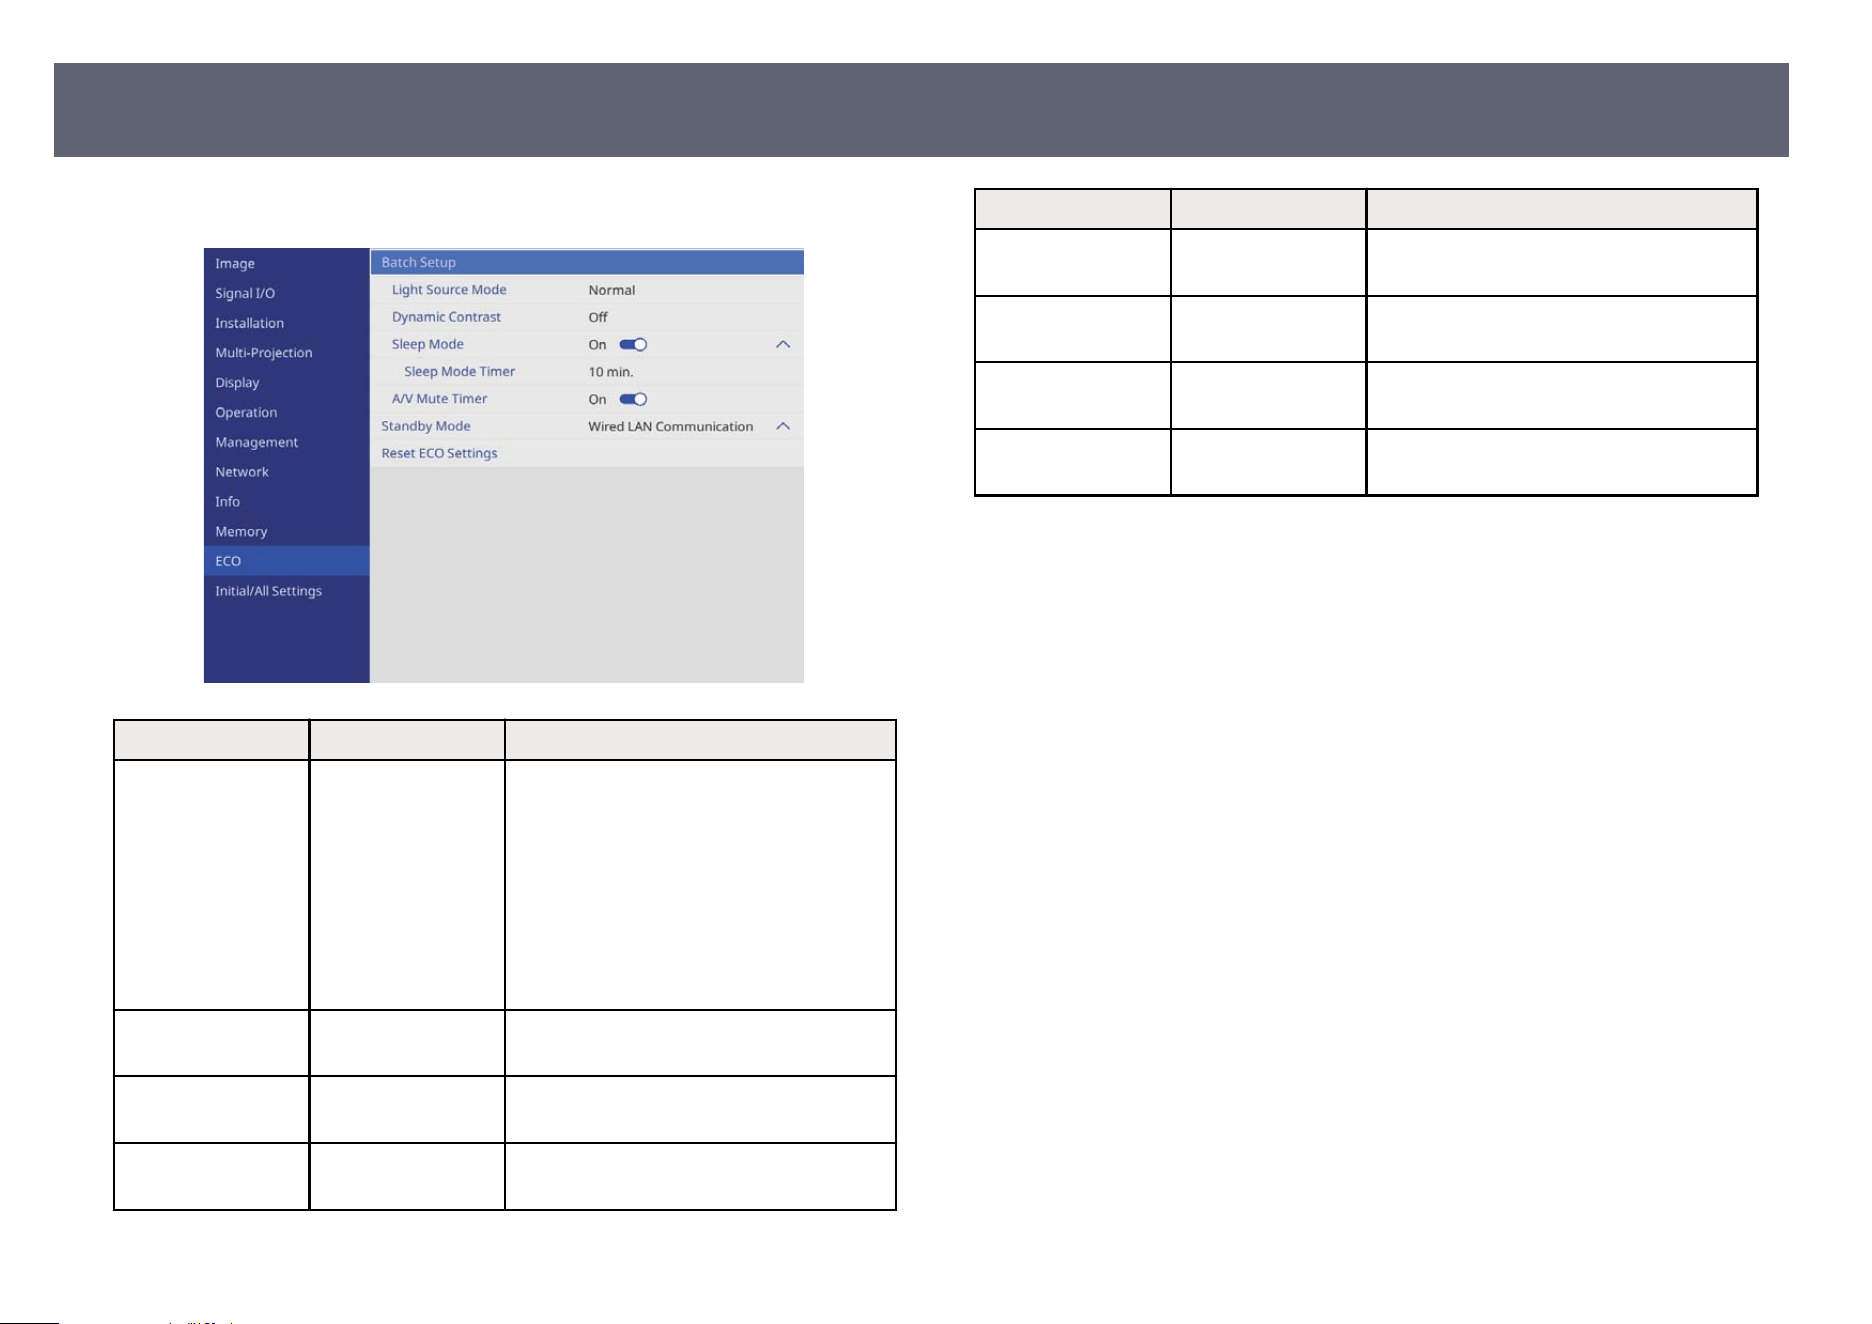
Settings on the ECO
menu let you customize projector functions to save power.
Setting Options Description
Batch Setup — Performs the following settings at once to
sav
e power.
•
Light Source Mode
•
Dynamic Contrast
•
Sleep Mode
•
Sleep Mode Timer
•
A/V Mute Timer
Light Source Mode — See the Operation menu table for details
o
n the Light Source Mode settings.
Dynamic Contrast — See the Image menu table for details on
t
he Dynamic Contrast settings.
Sleep Mode — See the Operation menu table for details
o
n the Sleep Mode settings.
Setting Options Description
Sleep Mode Timer — See the Operation menu table for details
o
n the Sleep Mode Timer settings.
A/V Mute Timer — See the Operation menu table for details
o
n the A/V Mute Timer settings.
Standby Mode — See the Operation menu table for details
o
n the Standby Mode settings.
Reset ECO Settings — Resets all adjustment values on the ECO
m
enu to their default settings.
g
Related Links
•
"Im
age Quality Settings - Image Menu" p.193
•
"Projector Feature Settings - Operation Menu" p.204
Projector Setup Settings - ECO Menu
224
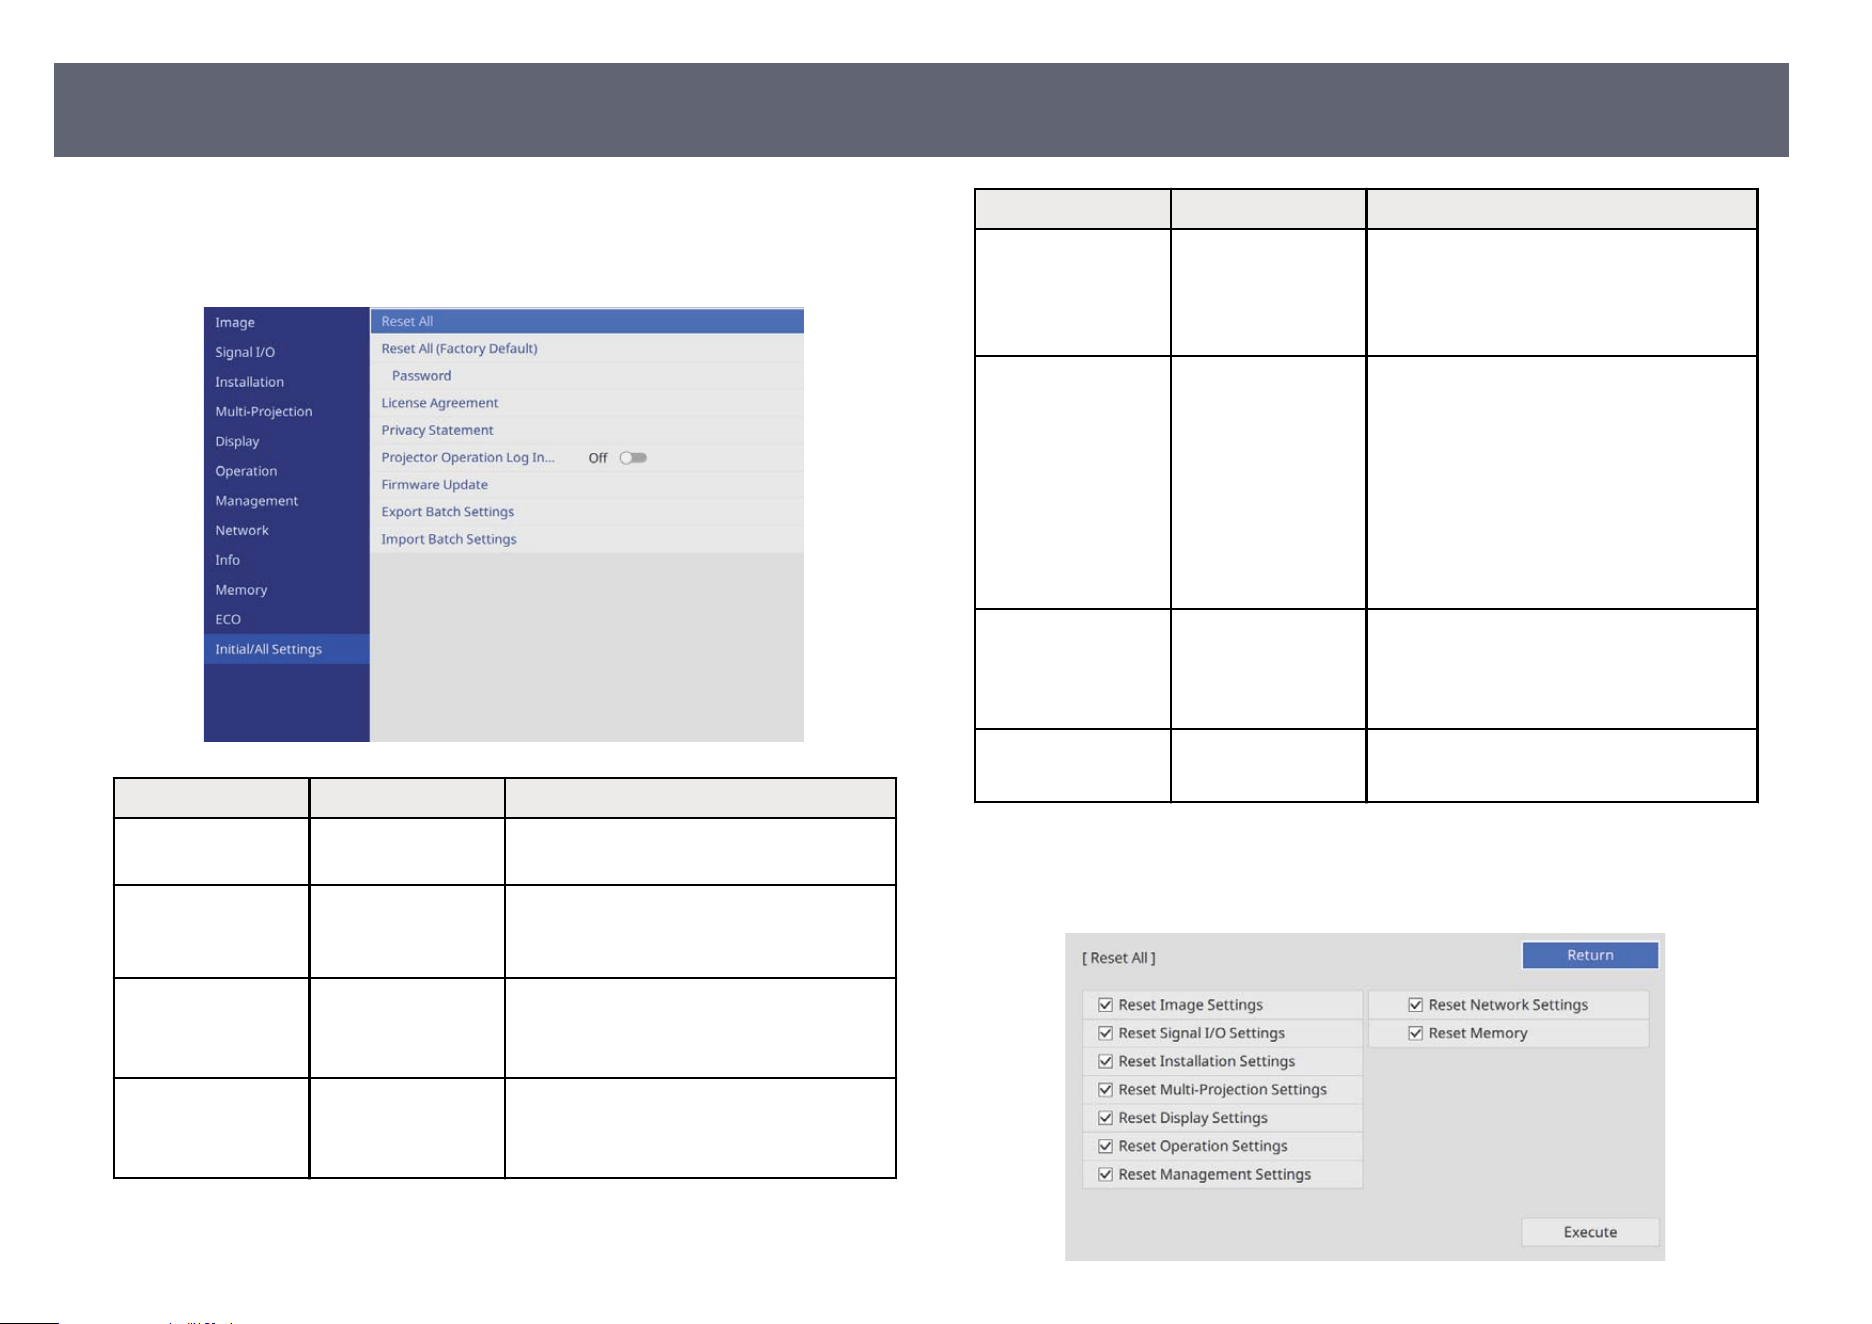
Settings on the Ini
tial/All Settings menu let you reset certain projector settings
to their default values and place the projector in rmware update mode so you
can update the rmware.
Setting Options Description
Reset All — Lets you select menus for resetting the
set
tings to default values.
Reset All (Factory
Defau
lt)
— Resets all of the projector settings to
their default values. Set your password if
needed.
License Agreement — (is setting may be unavailable
dep
ending on your projector model.)
Displays the license agreement.
Privacy Statement — (is setting may be unavailable
dep
ending on your projector model.)
Displays the privacy statement.
Setting Options Description
Projector
Op
eration Log
Information
— (is setting may be unavailable
depending on your projector model.)
Selects whether to send projector
operation log information to Epson.
Firmware Update Update by USB
Up
date over
Network
(ese settings may be unavailable
depending on your projector model.)
Updates the projector rmware using the
USB-A port or Service port.
•
Update by USB: updates by USB with
the pre-downloaded rmware le.
•
Update over Network: updates over a
network.
Export Batch
Set
tings
Yes
No
Exports the projector's menu settings to a
USB ash drive or a computer, allowing
you to copy them to other projectors of
the same model.
Import Batch
Set
tings
Yes
No
Imports menu settings that have been
saved to a USB ash drive or a computer.
Reset All options
Wh
en you select Reset All, you see the following screen.
Projector Initial Settings and Reset Options - Initial/All Settings Menu
225
If you do not want to reset values in particular menus, deselect the check box
next t
o the menu name. When you are ready to reset setting values, select
Execute.
You cannot reset the following settings:
•
Language
Attention
If y
ou perform Reset All, all of the passwords that have been set for the Network
menu are also reset and you need to set them again. To prevent the passwords
from being reset by unauthorized users, set Network to On in the Menu Protection
menu.
For the Network menu, if you turn on the Menu Protection setting, the
s
ettings do not return to their default values when using the Reset All
option.
Reset All (Factory Default) option
Yo
u cannot reset the following settings using the Reset All (Factory Default)
option:
•
Date & Time
•
Light Source Hours
•
Password
•
Password Protection settings
•
Schedule Settings *
* is setting is reset when you set Schedule Protection to O.
Attention
If you perform Reset All (Factory Default), all of the passwords that have been set
for the Network menu are also reset and you need to set them again. To prevent the
passwords from being reset by unauthorized users, set Network to On in the Menu
Protection menu.
g
Related Links
•
"Up
dating the Firmware" p.238
Projector Initial Settings and Reset Options - Initial/All Settings Menu
226
Aer selecting the projector's menu settings for one projector, you can use the
f
ollowing methods to copy the settings to other projectors, as long as they are
the same model.
•
by using a USB ash drive
•
by connecting a computer and projector using a USB cable
•
by using Epson Projector Management
You cannot copy any information unique to an individual projector, such as
Light Source Hours or Status.
•
Per
form batch setup before adjusting the image settings such as
keystone distortion correction. Since image adjustment values are
also copied to another projector, the adjustments you made before
performing the batch setup are overwritten and the projected screen
you adjusted may change.
•
When copying the menu settings from one projector to another, user's
logo is also copied. Do not register the information that you do not
want to share between multiple projectors as a user's logo.
•
Make sure Batch Setup Range is set to Limited if you do not want to
copy the following settings:
•
Password Protection settings
•
EDID in the Signal I/O menu
•
Network menu settings
s Operation > Operation Settings > Batch Setup Range
Caution
Eps
on takes no responsibility for batch setup failures and associated repair costs due
to power outages, communication errors, or other problems that may cause such
failures.
g
Related Links
•
"Tran
sferring Settings From a USB Flash Drive" p.227
•
"Transferring Settings From a Computer" p.228
Transferring Settings From a USB Flash Drive
You can copy menu settings from one projector to another of the same model
usin
g a USB ash drive.
•
e USB
ash drive must use a FAT16/32 format and not incorporate
any security function. Delete any les on the drive before using it for
batch setup or the settings may not be saved correctly.
•
You can also use this batch setup method from the projector's menu.
a
Disconnect the power cord from the projector, and check that all of the
pr
ojector's indicators have turned o.
b
Connect an empty USB ash
drive directly to the projector's USB-A port.
c
Hold down the [Esc] button on the remote control or the control panel
and co
nnect the power cord to the projector.
d
When all of the projector's indicators turn on, release the [Esc] button.
e indic
ators start ashing and the batch setup le is written to the USB
ash drive. When writing is nished, the projector turns o.
Caution
D
o n
ot disconnect the power cord or the USB ash drive from the projector
while the le is being written. If the power cord or USB ash drive is
disconnected, the projector may not start correctly.
Copying Menu Settings Between Projectors (Batch Setup)
227
e
Remove the USB ash
drive.
e le name for the batch setup le is PJCONFDATA.bin. If you
n
eed to change the le name, add text aer PJCONFDATA using
only alphanumeric characters. If you change the PJCONFDATA
section of the le name, the projector may not be able to recognize
the le correctly.
f
Disconnect the power cord from the projector to which you want to copy
s
et
tings, and check that all of the projector's indicators have turned o.
g
Connect the USB ash
drive containing the saved batch setup le to the
projector's USB-A port.
h
Hold down the [Menu] button on the remote control or the control panel
and co
nnect the power cord to the projector.
i
When all of the projector's indicators turn on, release the [Menu] button.
Wh
en all of the indicators start ashing, the settings are being written.
When writing is nished, the projector turns o.
Caution
D
o n
ot disconnect the power cord or the USB ash drive from the projector
while the le is being written. If the power cord or USB ash drive is
disconnected, the projector may not start correctly.
j
Remove the USB as
h
drive.
Transferring Settings From a Computer
You can copy menu settings from one projector to another of the same model by
connecting the computer and projector with a USB cable.
•
Yo
u can use this batch setup method with the following operating
system versions:
•
Windows 10 and later
•
macOS 10.12.x and later
•
You can also use this batch setup method from the projector's menu.
a
Disconnect the power cord from the projector, and check that all of the
pr
ojector's indicators have turned o.
b
Connect a USB cable to the computer's USB port and to the projector's
Ser
vice port.
c
Hold down the [Esc] button on the remote control or the control panel
and co
nnect the power cord to the projector.
d
When all of the projector's indicators turn on, release the [Esc] button.
e com
puter recognizes the projector as a removable disk.
e
Open the removable disk icon or folder, and save the batch setup le to t
he
computer.
e le name for the batch setup le is PJCONFDATA.bin. If you
n
eed to change the le name, add text aer PJCONFDATA using
only alphanumeric characters. If you change the PJCONFDATA
section of the le name, the projector may not be able to recognize
the le correctly.
f
Eject the USB device (Windows) or drag the removable disk icon to the
T
ras
h (Mac).
g
Disconnect the USB cable.
e pr
ojector turns o.
Copying Menu Settings Between Projectors (Batch Setup)
228
h
Disconnect the power cord from the projector to which you want to copy
set
tings, and check that all of the projector's indicators have turned o.
i
Connect the USB cable to the computer's USB port and to the projector's
Ser
vice port.
j
Hold down the [Menu] button on the remote control or the control panel
and co
nnect the power cord to the projector.
k
When all of the projector's indicators turn on, release the [Menu] button.
e com
puter recognizes the projector as a removable disk.
l
Copy the batch setup le (PJ
C
ONFDATA.bin) that you saved to your
computer to the top level folder of the removable disk.
Do not copy any les or f
olders other than the batch setup le to the
removable disk.
m
Eject the USB device (Windows) or drag the removable disk icon to the
Tras
h (Mac).
n
Disconnect the USB cable.
W
h
en all of the indicators start ashing, the settings are being written.
When writing is nished, the projector turns o.
Caution
Do n
ot disconnect the power cord from the projector while the le is being
written. If the power cord is disconnected, the projector may not start
correctly.
g
Related Links
•
"Bat
ch Setup Error Notication" p.229
Batch Setup Error Notication
e pr
ojector's indicators notify you if an error occurs during a batch setup
operation. Check the status of the projector's indicators and follow the
instructions described in the table here.
Indicator status Problem and solutions
•
Las
er: Orange - ashing
fast
•
Temp: Orange - ashing
fast
e batch setup le may be corrupt, or the USB ash
drive may not be connected correctly.
Disconnect the USB ash drive, unplug and then plug in
the projector's power cord, and then try again.
•
Po
wer: Blue - ashing
fast
•
Status: Blue - ashing
fast
•
Laser: Orange - ashing
fast
•
Temp: Orange - ashing
fast
Writing the settings may have failed and an error may
have occurred in the projector's rmware.
Stop using the projector, remove the power plug from
the electrical outlet. Contact Epson for help.
Copying Menu Settings Between Projectors (Batch Setup)
229

You may need to clean the projector's lens periodically, and clean the air
lt
er and air vents to prevent the projector from overheating due to blocked
ventilation.
e only parts you should replace are the air lter and remote control batteries.
If any other part needs replacing, contact Epson.
Warning
Bef
ore cleaning any part of the projector, turn it o and unplug the power cord.
Never open any cover on the projector, except as specically explained in this
manual. Dangerous electrical voltages in the projector can injure you severely.
Projector Maintenance
231
Clean the projector's lens periodically, or whenever you notice dust or smudges
on t
he surface.
•
To remove dust or smudges, gently wipe the lens with clean and dry lens-
cleaning paper.
•
If the lens is dusty, blow o dust using a blower, and then wipe the lens.
Warning
•
Bef
ore cleaning the lens, turn o the projector and unplug the power cord.
•
Do not use any ammable gas sprays such as air dusters to blow o dust. e
high heat generated by the projector may cause a re.
Attention
•
Do n
ot wipe the lens right aer you turn o the projector. Doing so could
damage the lens.
•
Do not use any harsh materials to clean the lens and do not subject the lens to
any impacts; otherwise, it could be damaged.
Cleaning the Lens
232

Before cleaning the projector case, turn o
the projector and unplug the power
cord.
•
To remove dust or dirt, use a so, dry, lint-free cloth.
•
To remove stubborn dirt, use a so cloth moistened with water and mild
soap. Do not spray liquid directly on the projector.
Attention
Do n
ot use wax, alcohol, benzene, paint thinner, or other chemicals to clean the
projector case. ese can damage the case. Do not use canned air, or the gases
may leave a ammable residue.
Cleaning the Projector Case
233
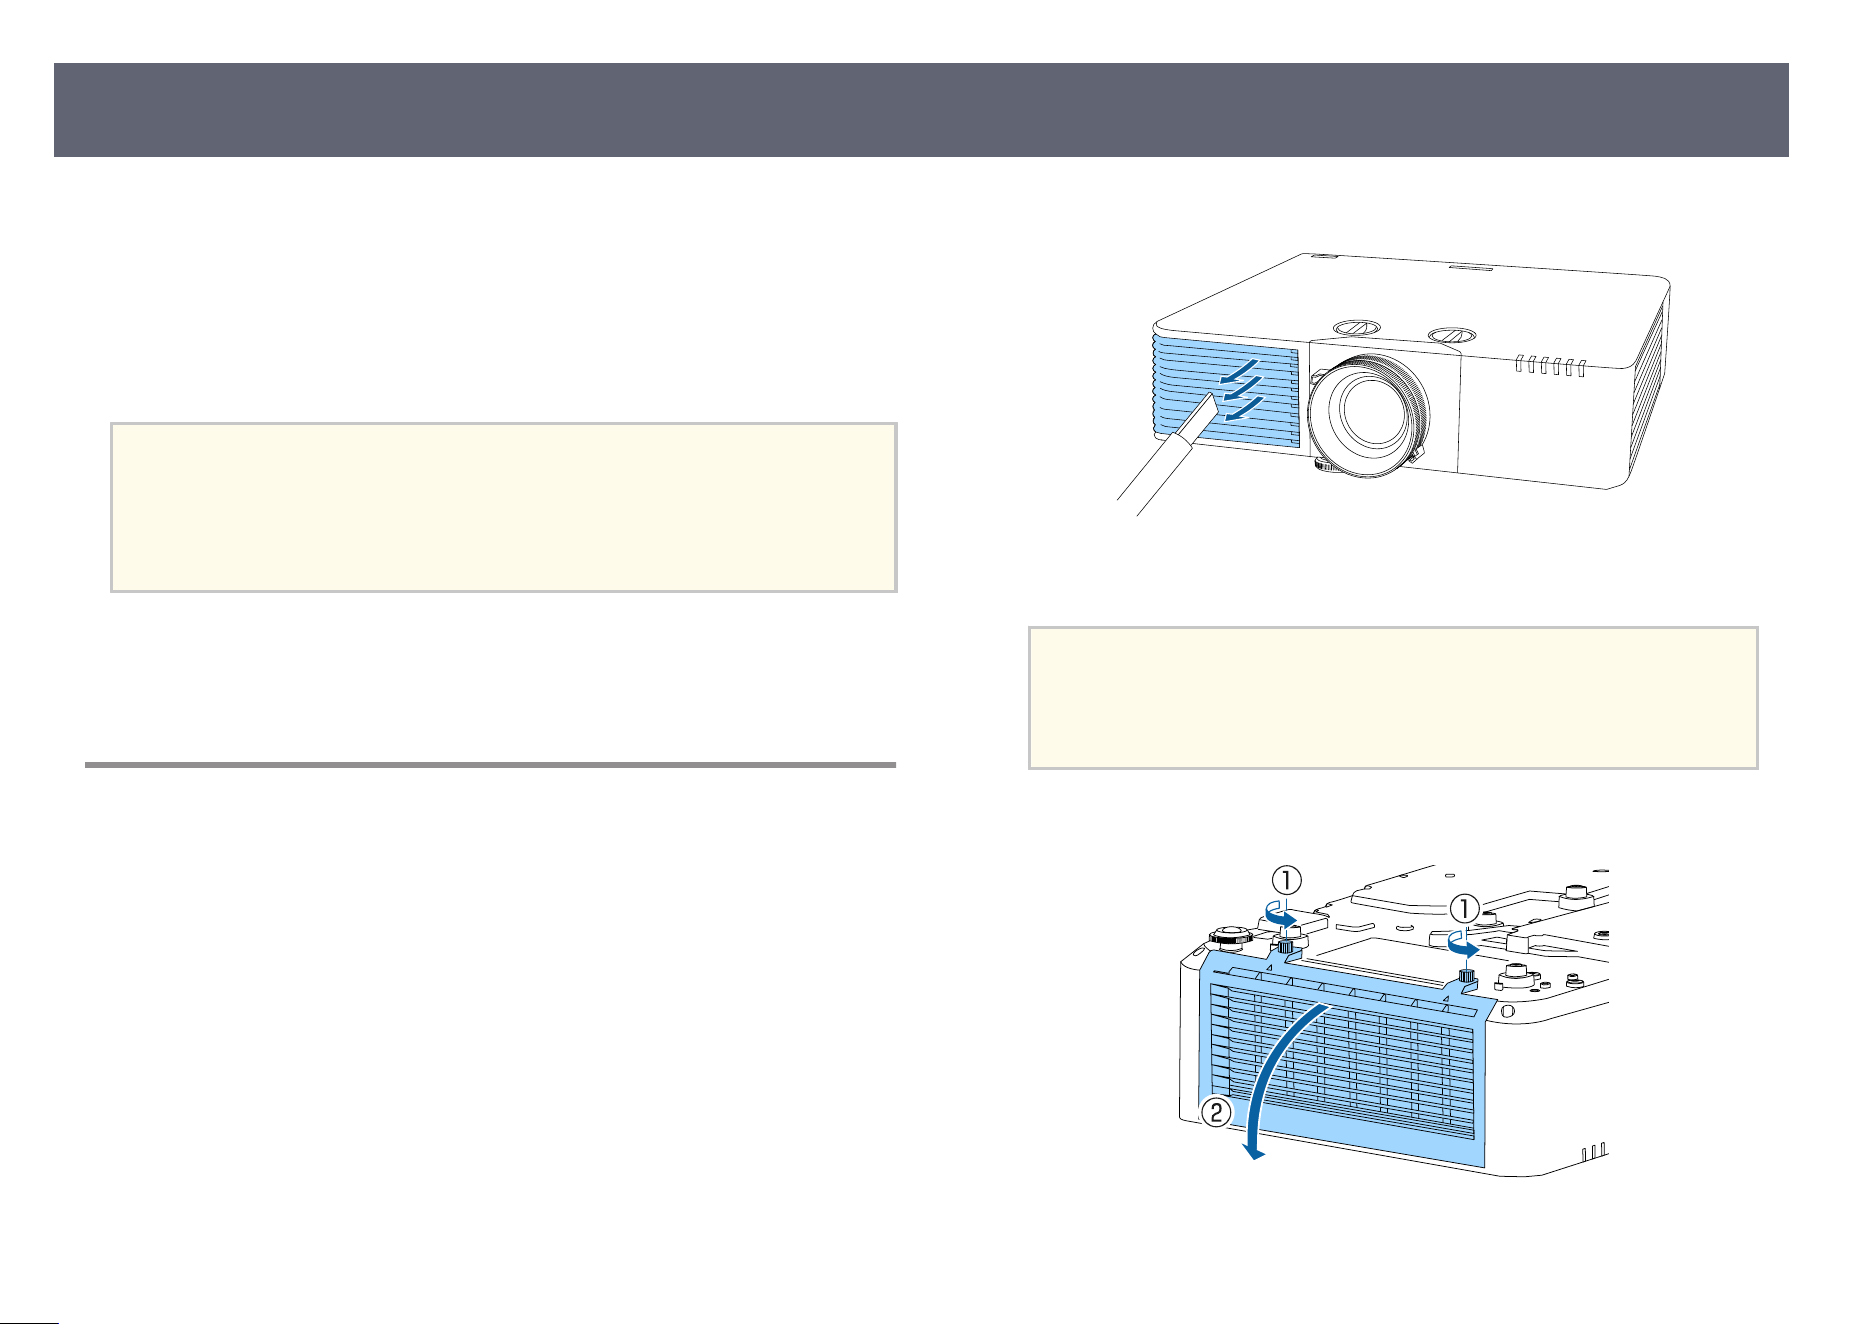
Regular lter maintenance is important to maintain your projector. Clean
t
he air lter when a message appears telling you the temperature inside the
projector has reached a high level. It is recommended that you clean these
parts over a 20,000‑hour period. Clean them more oen than this if you use
the projector in an environment that is dustier than expected. (Assuming the
projector is used in an atmosphere in which airborne particulate matter is less
than 0.04 to 0.2 mg/m3.)
Attention
If r
egular maintenance is not performed, your Epson projector will notify you when
the temperature inside the projector has reached a high level. Do not wait until this
warning appears to maintain your projector lter as prolonged exposure to high
temperatures may reduce the life of your projector.
g
Related Links
•
"Cleaning the Air Filters and Intake Vents " p.234
•
"Replacing the Air Filter" p.236
Cleaning the Air Filters and Intake Vents
You need to clean the projector's air lt
ers in the following situations:
•
e lter or vents get dusty.
•
You see a message telling you to clean it.
•
e projector's Filter indicator ashes orange.
a
Turn o the projector and unplug the power cord.
b
C
arefully remove the dust using a vacuum cleaner or a brush.
c
Turn the projector upside down.
Attention
Wh
en placing the projector upside down, be sure to place a cloth or
other cushioning material underneath the projector to protect the lens. (EB-
L790SE/EB-L795SE/EB-L690SE/EB-L695SE/EB-L690SU/EB-L695SU)
d
Loosen the screws and open the air lt
er cover.
Air Filter and Vent Maintenance
234
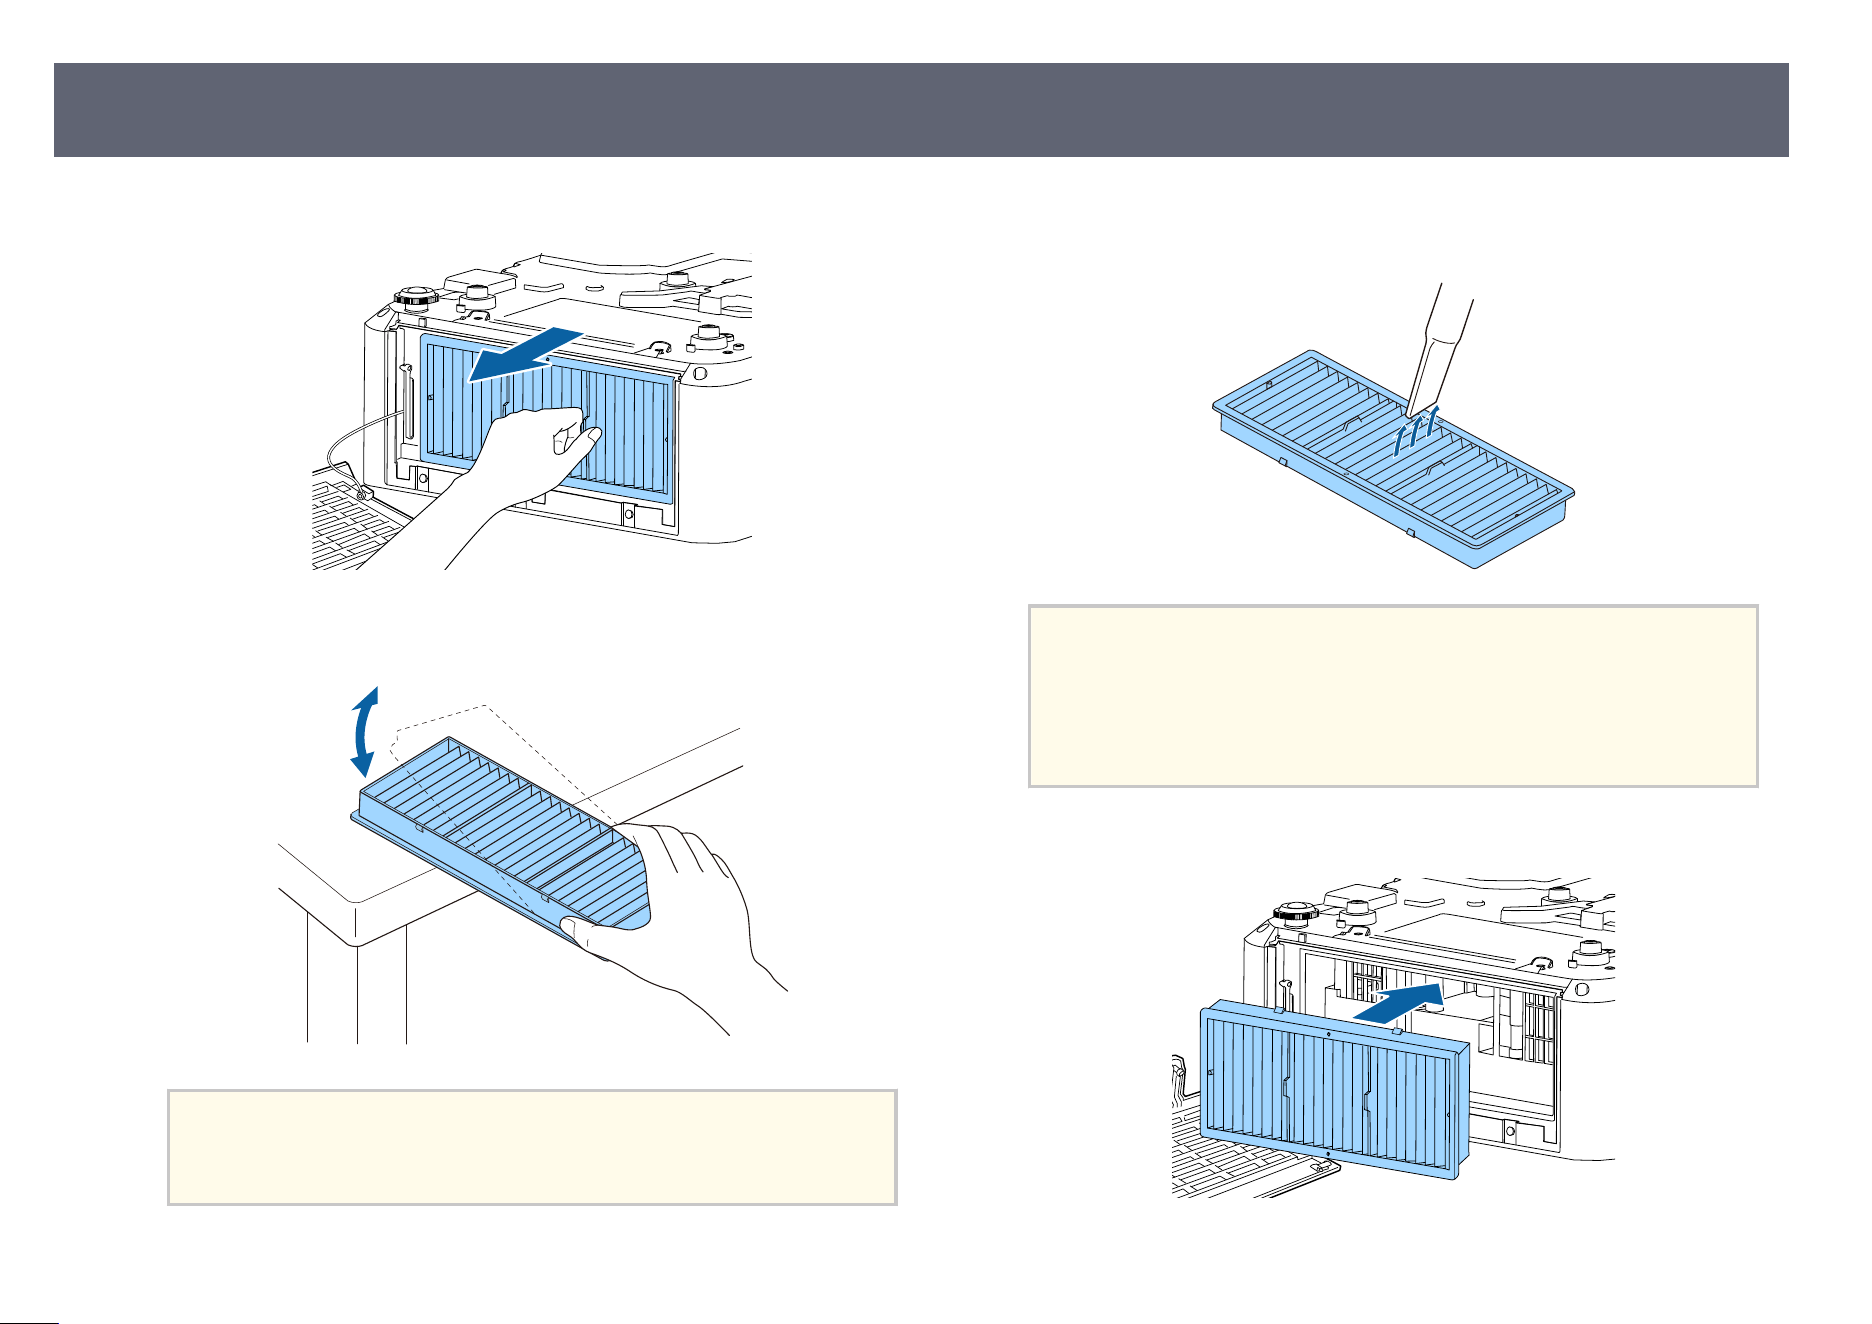
e
Pull the air lt
er out of the projector.
f
Tap each side of the air lt
er 4 to 5 times to shake o any excess dust.
Attention
Do n
ot use excessive force when tapping the air lter, or it may crack and
become unusable.
g
Vacuum the front of the air lt
er (the side with the tabs) to remove any
remaining dust.
Attention
•
Do n
ot rinse the air lter in water, or use any detergent or solvent to clean
it.
•
Do not use canned air. e gases may leave a ammable residue or push
dust and debris into the projector's optics or other sensitive areas.
h
Place the air l
t
er in the projector as shown.
Air Filter and Vent Maintenance
235
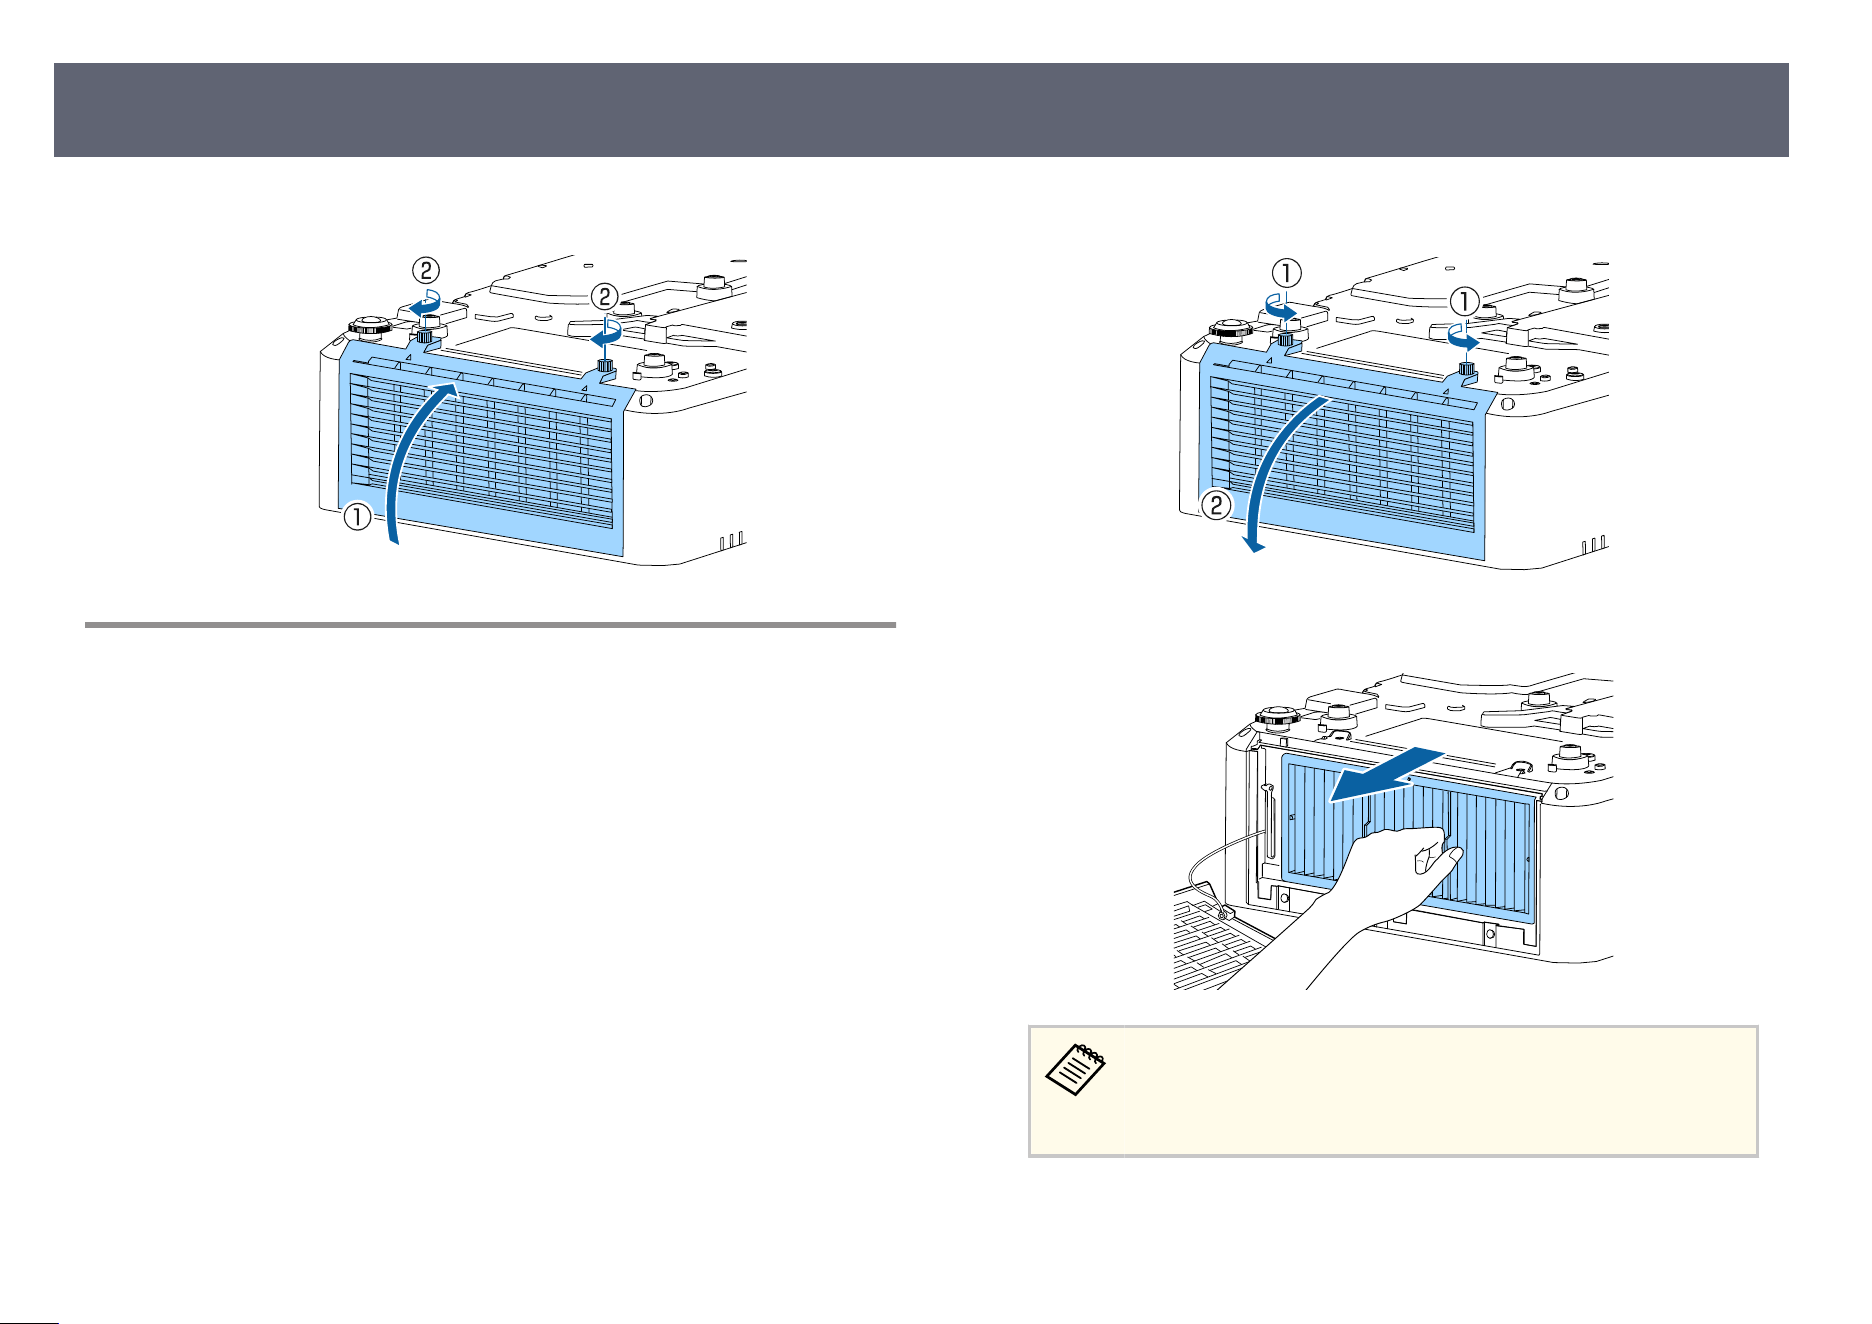
i
Close the air lt
er cover and tighten the screws.
Replacing the Air Filter
You need to replace the air lt
er in the following situations:
•
Aer cleaning the air lter, you see a message telling you to clean or replace it.
•
Aer cleaning the air lter, the projector's Filter indicator ashes orange.
•
e air lter is torn or damaged.
You can replace the air lter while the projector is mounted to the ceiling or
placed on a table.
a
Turn o the projector and unplug the power cord.
b
T
urn the projector upside down.
c
Loosen the screws and open the air lt
er cover.
d
Pull the air lt
er out of the projector.
Dispose of used air l
t
ers according to local regulations.
•
Filter frame: Polypropylene
•
Filter: Polypropylene, PET
Air Filter and Vent Maintenance
236
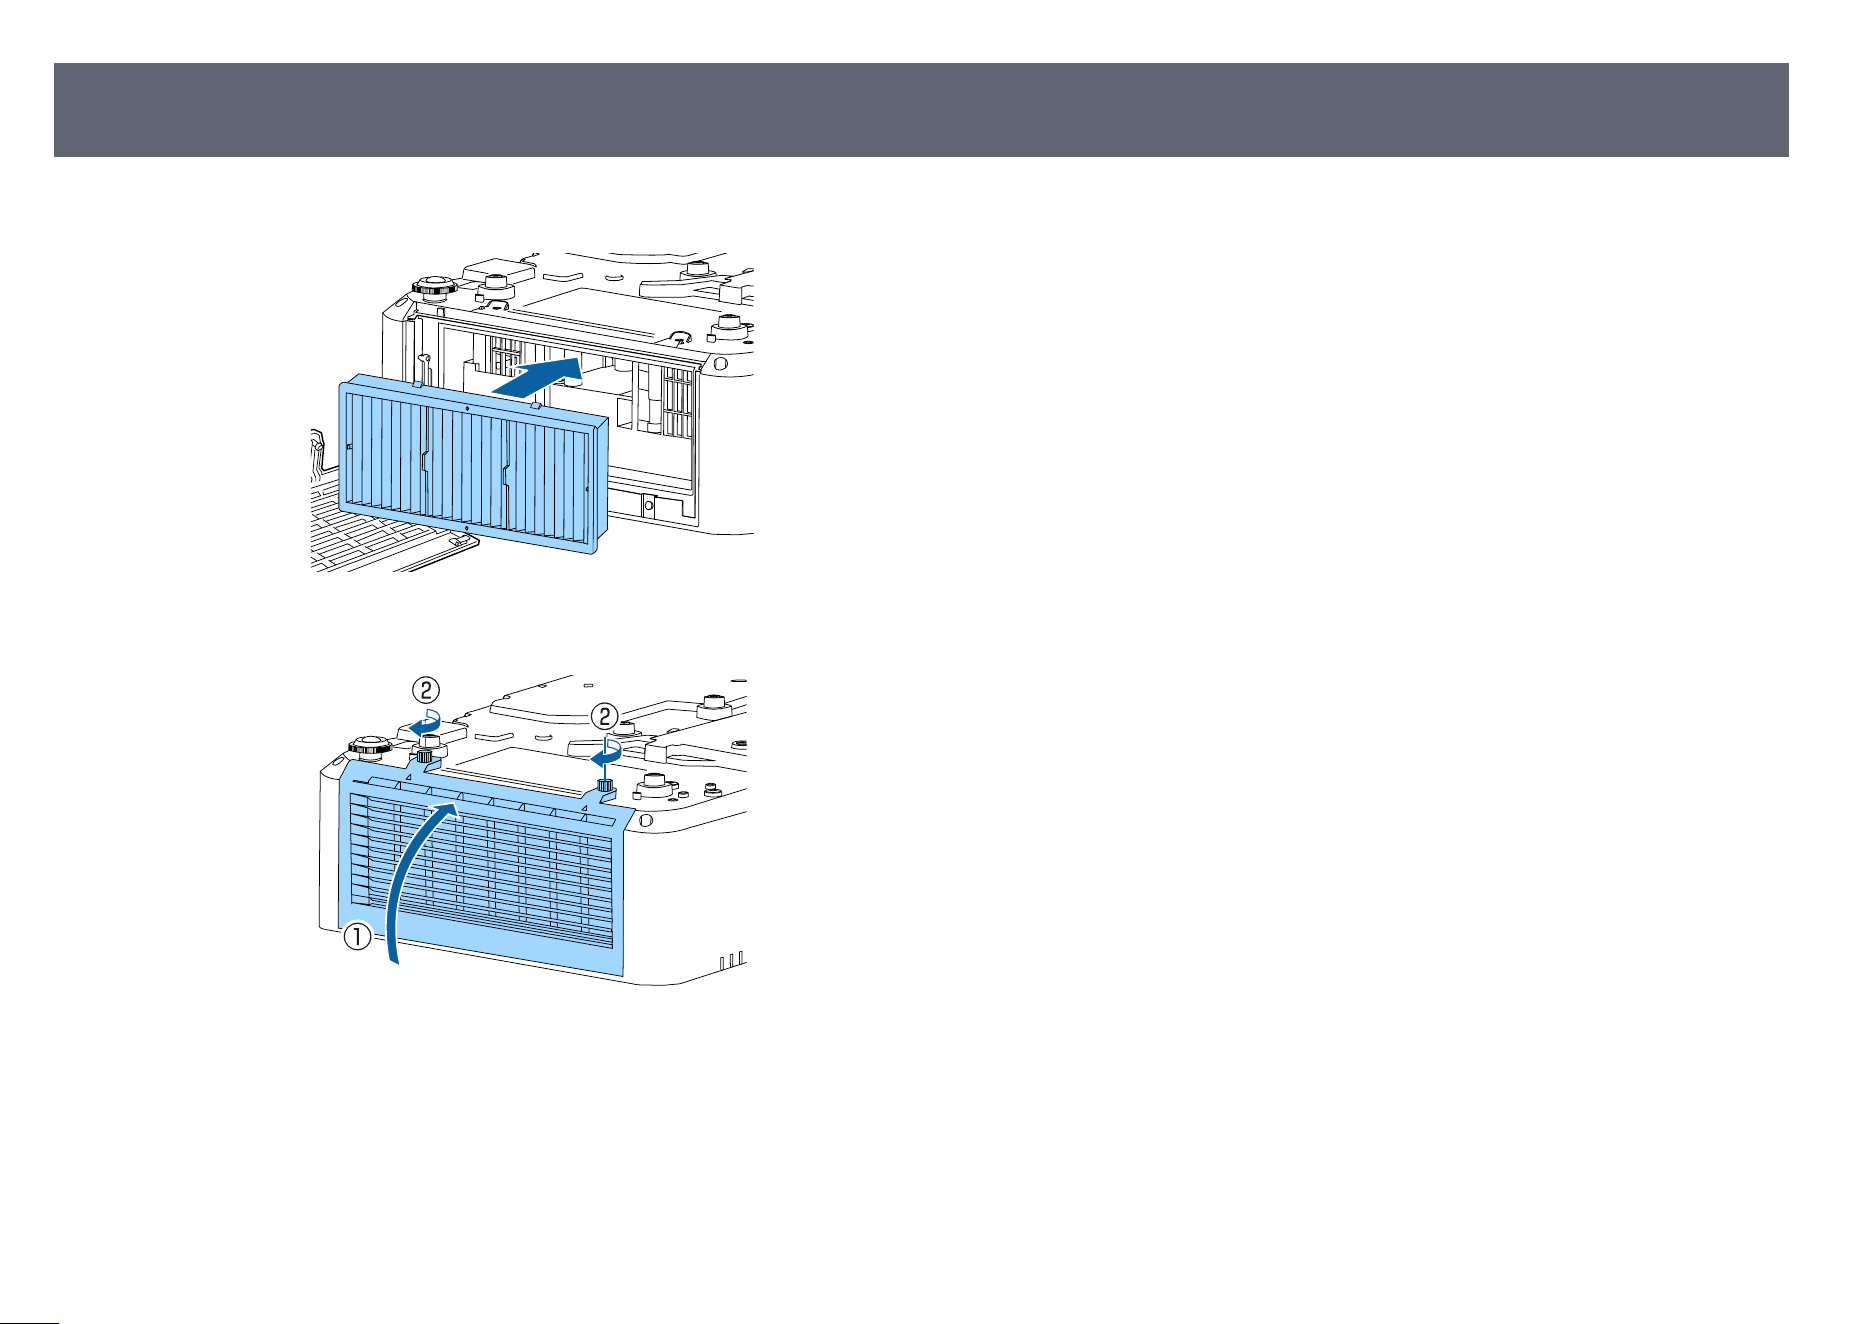
When you select the Firm
ware Update option in the projector's Initial/All
Settings menu, the projector enters rmware update mode and is ready to
perform a rmware update using the USB-A or Service port.
You can also update the projector's rmware over the network using the Epson
Projector Management Connected or Epson Projector Management soware.
See the Epson Projector Management Connected Operation Guide or Epson
Projector Management Operation Guide for instructions.
•
Wh
en a rmware update is being performed over a
network, you cannot perform a rmware update from the
projector menu. (EB-L890E/EB-L895E/EB-L790SE/EB-L795SE/EB-
L690E/EB-L890U/EB-L790U/EB-L690U/EB-L690SU/EB-L695SU)
•
e method for updating the rmware diers depending on your
projector model. For details, see the "List of Functions" in this manual.
g
Related Links
•
"Updating Firmware Using a USB Storage Device" p.238
•
"Updating the Firmware over the Network" p.240
•
"List of Functions" p.11
Updating Firmware Using a USB Storage Device
You can update the projector's rm
ware using a USB storage device.
Responsibility for updating the rmware lies with the customer. If a
rmware update fails due to problems such as a power failure or
communication problems, a fee will be charged for any necessary repairs.
a
Download the projector rmware le from the Epson Web site.
Visit epson.com/support (U.S.), epson.ca/support (Canada), or
latin.epson.com/support (Latin America) and search for your product.
b
Copy the downloaded r m
ware le to the root folder (highest folder in the
hierarchy) of the USB storage device.
•
e USB s
torage device must be formatted in FAT format.
•
Do not copy any other les to the USB storage device.
•
Do not change the rmware's le name. If the le name is
changed, the rmware update will not start.
•
Check that the rmware le you copied is the correct le for your
projector model. If the rmware le is not correct, the rmware
update will not start.
c
Connect the USB storage device to the projector's USB-A port.
Connect the USB storage device directly to the projector. If the USB
s
t
orage device is connected using a USB hub, the rmware update
may not be applied correctly.
Updating the Firmware
238
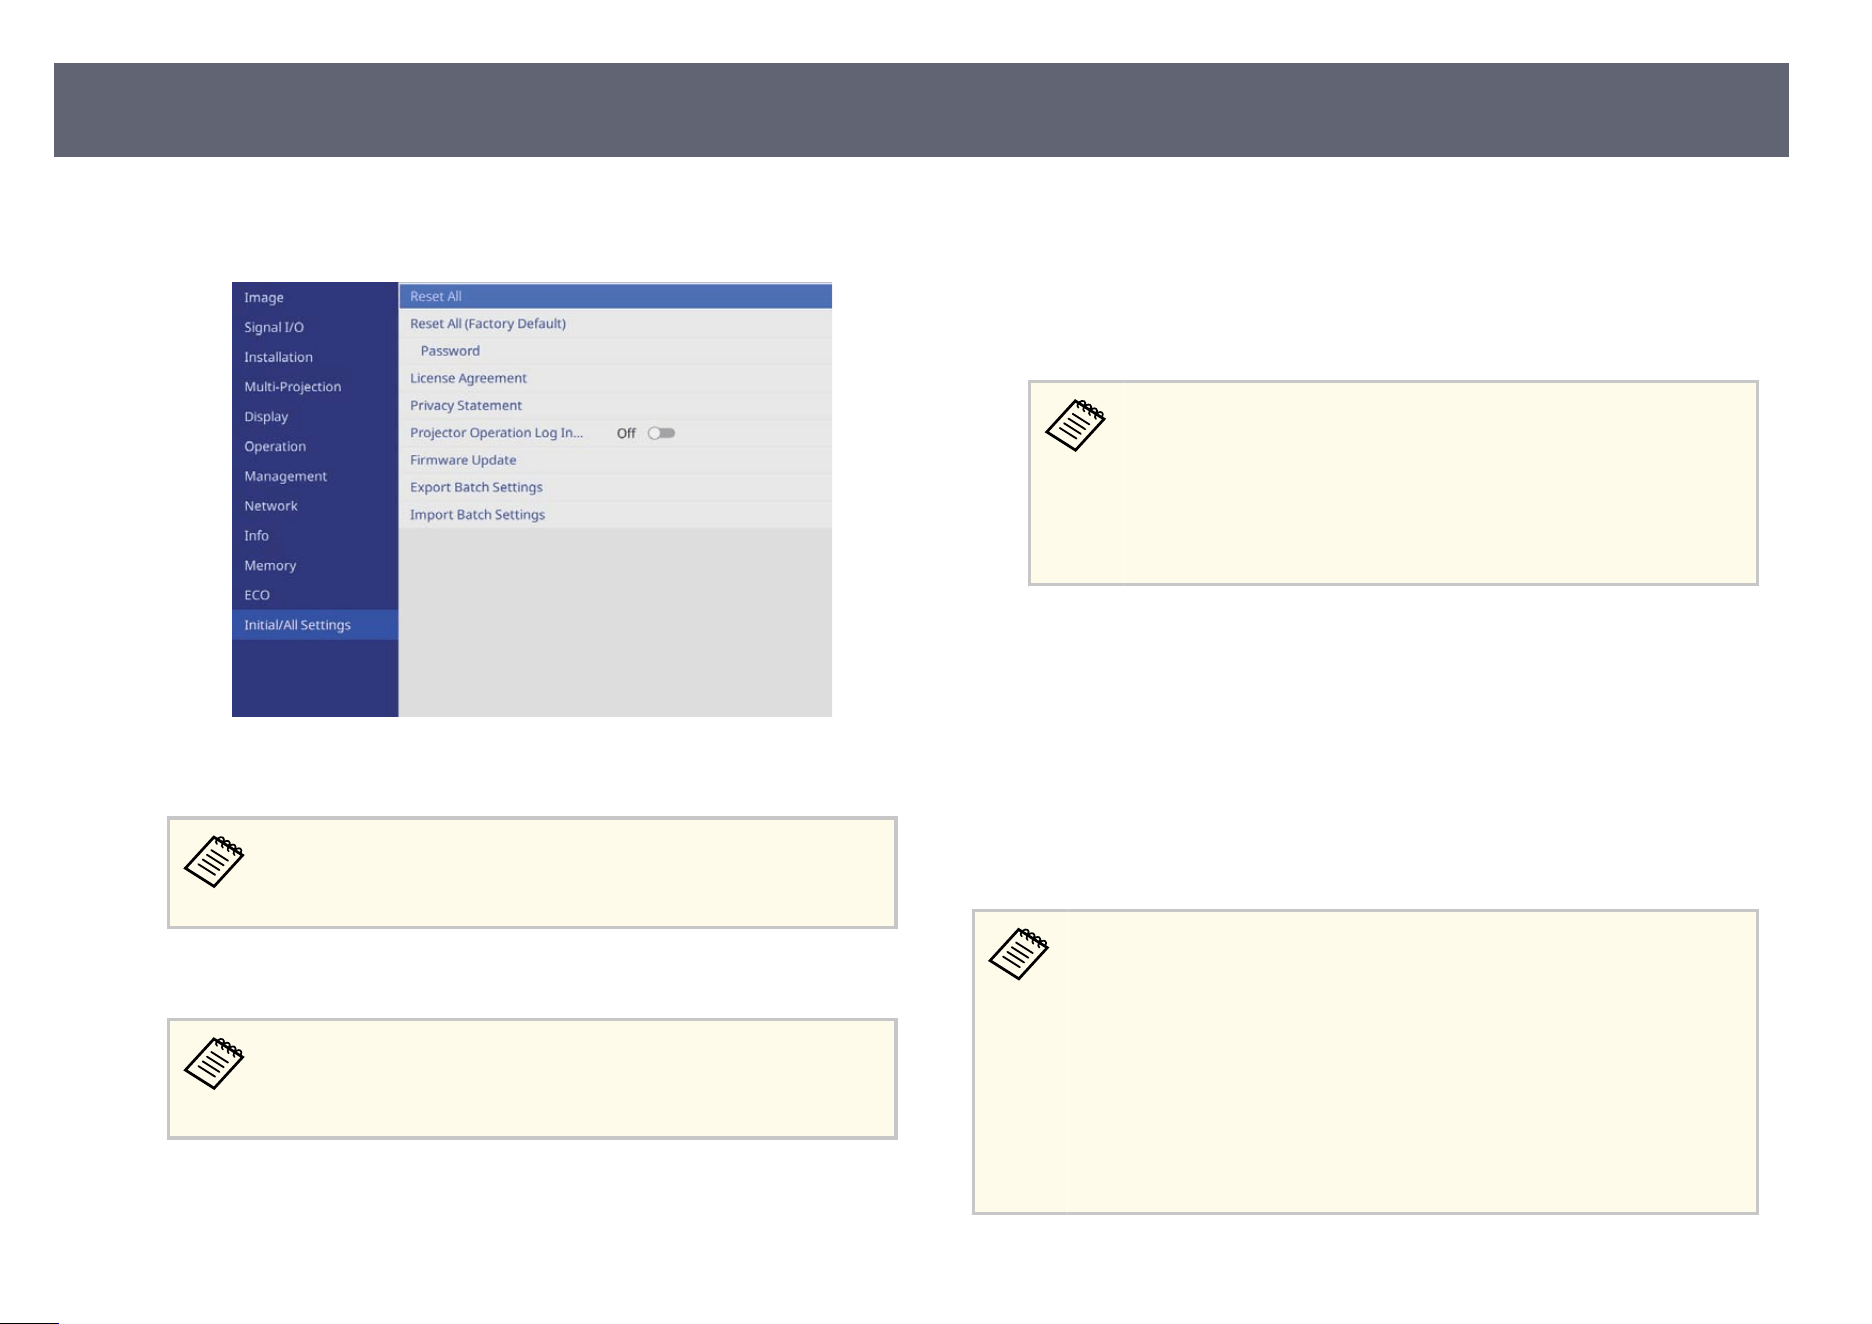
d
Press the [Menu] button, select the Ini
tial/All Settings menu, and press
[Enter].
e
Select Firmware Update and press [Enter].
Do not select Firm
ware Update during the network rmware
update. Wait until the network rmware update is complete before
updating the projector.
f
Select Update by USB and press [Enter].
Set Log Save Destination to Ineternal Memory in the projector's
O
peration menu beforehand.
s Operation > Operation Settings > Log Save Destination
g
Select Yes to start the rmware update.
e
Firmware Update screen is displayed.
h
Select List update and press [Enter].
i
Select the le li
s
ted and press [Enter].
j
Select Transfer and press [Enter] to start the rm
ware update.
•
D
o n
ot disconnect the power cord from the projector while the
rmware is updating. If the power cord is disconnected, the
projector may not start correctly.
•
Do not disconnect the USB storage device from the projector
while the rmware is updating. If the USB storage device is
disconnected, the update may not be applied correctly.
All of the projector's indicators start ashin
g and the rmware update
starts.
k
Once the update is complete, Reboot is displayed. Select Reboot and press
[Ent
er].
When the update nishes, check the projector's Info menu to make sure that the
Version information has been updated to the correct rmware version.
s Info > Information > Version
•
Wh
en all indicators ash rapidly, the rmware update may have failed.
Disconnect the power cord from the projector, and then reconnect it to
the projector. If the indicators continue to ash even aer reconnecting
the power cord, remove the power plug from the electrical outlet and
contact Epson.
•
If the rmware update fails due to a timeout or other issues, check the
following.
•
Make sure there is enough free space on the USB storage device.
•
Make sure the USB storage device is not write-protected.
Updating the Firmware
239
Updating the Firmware over the Network
Once the latest rm
ware has been uploaded to the server, you can update the
projector’s rmware over the network.
e procedures for updating the rmware vary depending on the settings in
Firmware Update Set. from the Network menu.
•
Notify: When the projector is turned on, a rmware update conrmation
screen is displayed.
Select OK to start the update.
•
Do not notify: You can update the rmware from the Initial/All Settings
menu.
•
Auto update at midnight: When the projector is in standby mode, the
rmware is automatically updated between 12:00 AM and 4:00 AM.
•
O: Disables rmware updates over the network.
•
Yo
u need to congure a DNS server to update the rmware over the
network.
Depending on your network, set DHCP to On in IP Settings from the
Wired LAN menu or the Wireless LAN menu. If DHCP is set to O
or if you want to specify a DNS server address, enter the IP address in
DNS Server 1 or DNS Server 2.
s Network > Network Settings > Wireless LAN
s Network > Network Settings > Wired LAN
•
If you are using Epson Projector Management Connected, we
recommend setting Firmware Update Set. to O in the Network
menu.
If Firmware Update Set. is set to Do not notify in the Network menu, follow
t
he steps below to update the rmware.
If Firmware Update Set. is set to Notify and you did not select OK when
turning on the projector, or if it is set to Auto update at midnight but the
update was not performed because the projector was on, you can update the
rm
ware using the same procedure.
a
Press [Menu], select Ini
tial/All Settings, and then press [Enter].
b
Select Firmware Update and press [Enter].
c
S
elect Update over Network and press [Enter].
•
I
f t
he latest rmware has not been uploaded to the server, you
cannot select Update over Network.
•
If Firmware Update Set. is set to O in the Network menu, you
cannot select Update over Network.
d
Select Y
es to start the rmware update.
Do not disconnect the power cord from the projector while the
rm
ware is updating. If the power cord is disconnected, the
projector may not start correctly.
All of the projector's indicators start ashin
g and the rmware update
starts. When the update nishes normally, the projector enters standby
status (only the power indicator is lit blue). If Direct Power On is set to
On in the projector's Operation menu, the projector turns back on again.
s Operation > Operation Settings > Direct Power On
When the update nishes, check the projector's Info menu to make sure
that the Version information has been updated to the correct rmware
version.
s Info > Information > Version
Updating the Firmware
240
When all indicators ash
rapidly, the rmware update may have
failed.
Disconnect the power cord from the projector, and then reconnect
it to the projector. If the indicators continue to ash even aer
reconnecting the power cord, remove the power plug from the
electrical outlet and contact Epson.
g
Related Links
•
"Projector Network Settings - Network Menu" p.211
•
"Projector Information Display - Info Menu" p.222
•
"Projector Feature Settings - Operation Menu" p.204
•
"Projector Initial Settings and Reset Options - Initial/All Settings Menu" p.225
Updating the Firmware
241

Solving Problems
Ch
eck the solutions in these sections if you have any problems using the projector.
g
Related Links
•
"Projection Problems" p.243
•
"Projector Indicator Status" p.244
•
"Viewing the Status Display" p.247
•
"Solving Image or Sound Problems" p.248
•
"Solving Projector or Remote Control Operation Problems" p.255
•
"Solving Network Problems" p.257
•
"Solutions to Problems in Content Playback Mode" p.261
•
"Solutions When HDMI Link does not Function" p.262
If the projector is not working properly, turn it o,
unplug it, and then plug it
back in and turn it on.
If this does not solve the problem, check the following:
•
e indicators on the projector may indicate the problem.
•
e solutions in this manual can help you solve many problems.
If none of these solutions help, contact Epson for technical support.
Aer repairing the projector, Epson may return the projector to you in its
ini
tial status. Make sure you make a note of the account information of
each online service before you contact Epson.
s Operation > Operation Settings > Indicators
Projection Problems
243
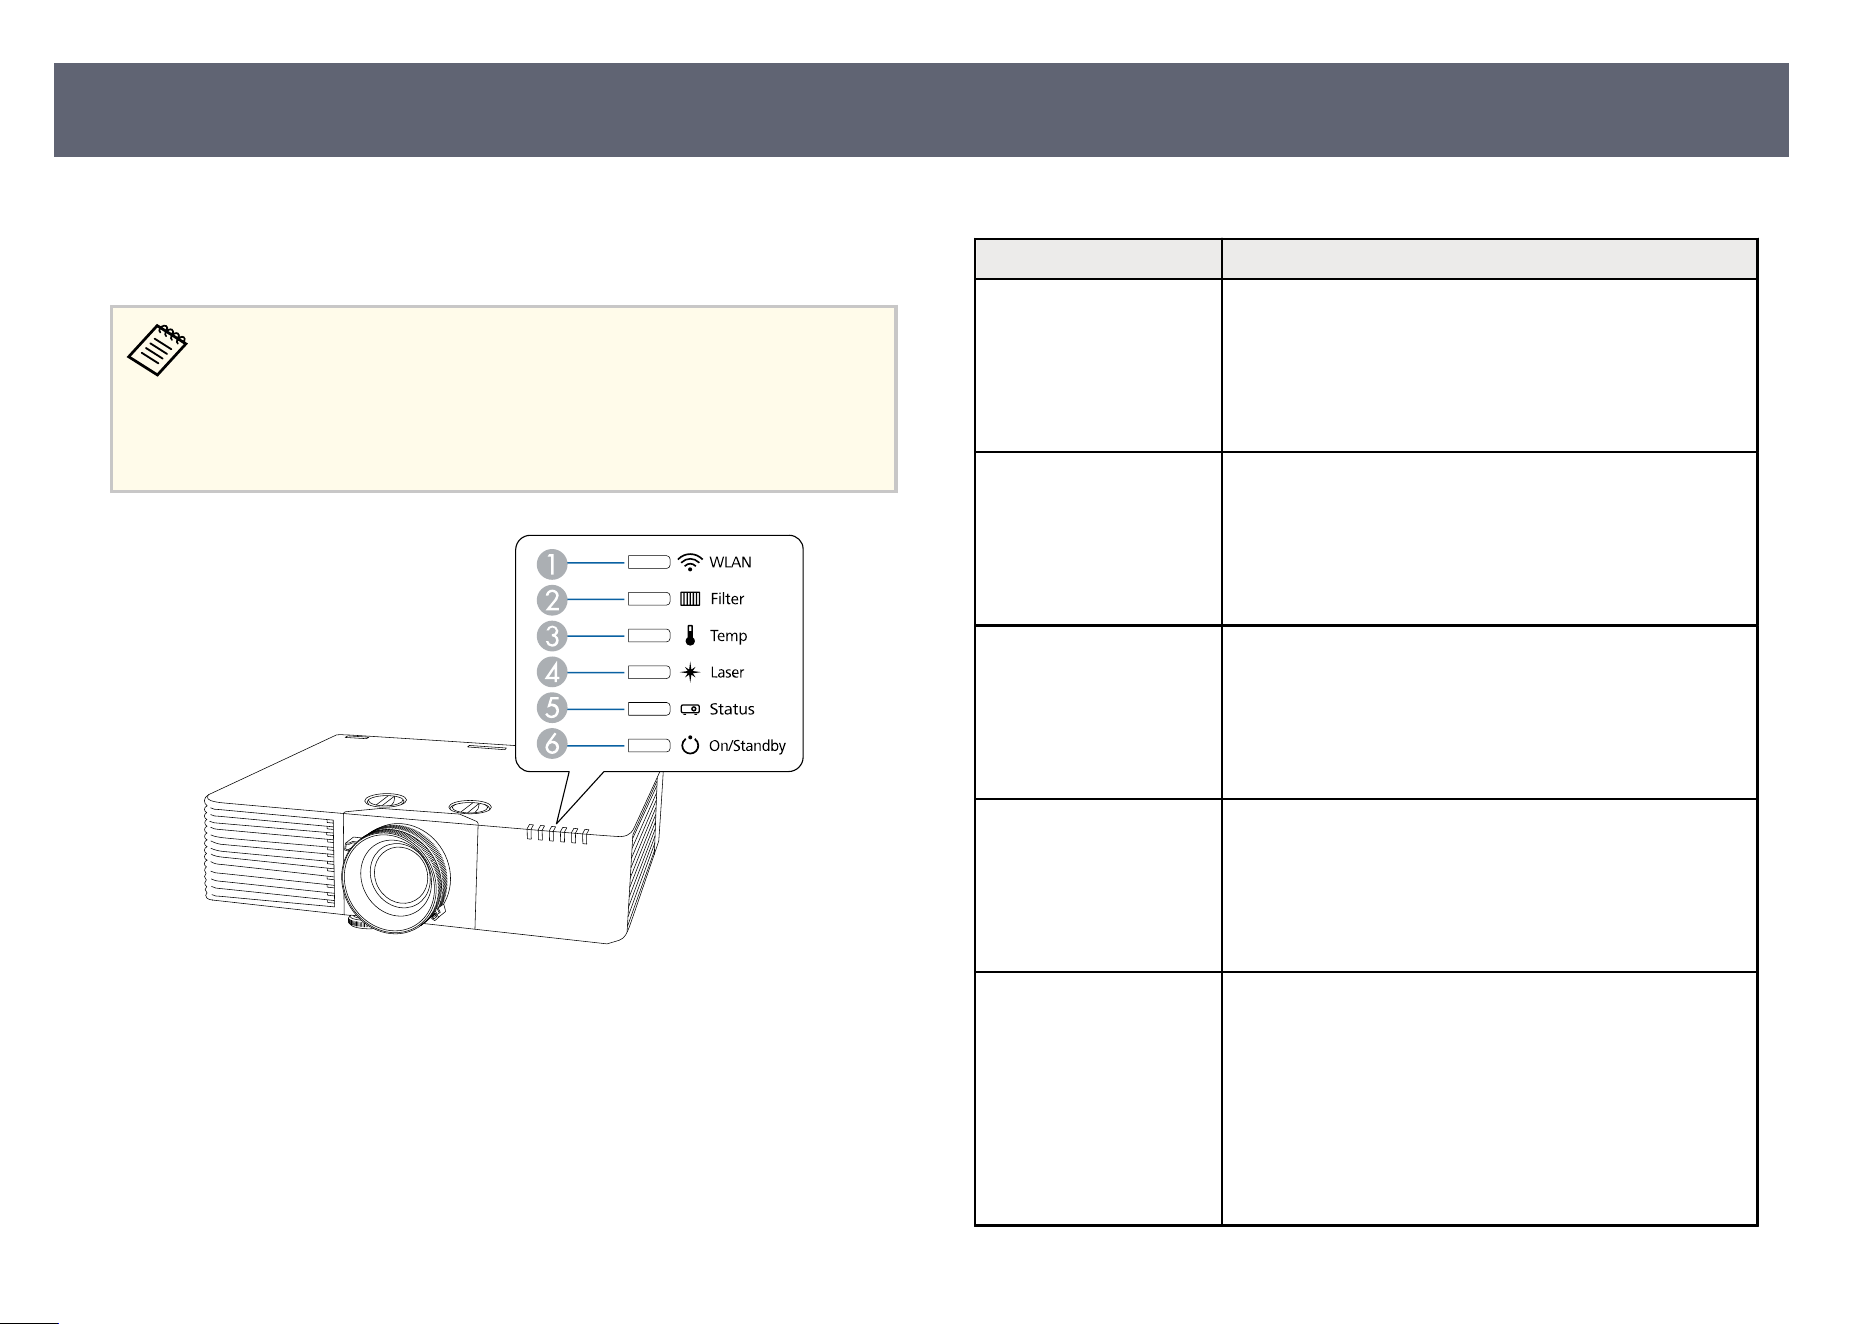
e indicators on the projector indicate the projector status and let you know
w
hen a problem occurs. Check the status and color of the indicators and then
refer to this table for a solution.
•
If t
he indicators display a pattern not listed in the table below, turn the
projector o, unplug it, and contact Epson for help.
•
When the Indicators setting is set to O in the projector's Operation
menu, all indicators are o.
s Operation > Operation Settings > Indicators
A
WLAN (wireless LAN) indicator
B
Filter indicator
C
Temp (temperature) indicator
D
Laser indicator
E
Status indicator
F
On/Standby (power) indicator
Projector status
Indicator and status Problem and solutions
Power: Lit blue
St
atus: Lit blue
Laser: O
Temp: O
Filter: O
Normal operation.
Power: Lit blue
St
atus: Flashing blue
Laser: O
Temp: O
Filter: O
Warming up, shutting down, or cooling down.
When warming up, wait about 30 seconds for an image to
appear.
All buttons are disabled during warm-up, shutting down,
and cooling down.
Power: Lit blue
St
atus: O
Laser: O
Temp: O
Filter: O
Standby, sleep mode, or monitoring.
When you press the power button, projection starts.
Power: Flashing blue
St
atus: O
Laser: O
Temp: O
Filter: O
Preparing for monitoring or quick startup mode. All
features are disabled.
Power: Indicator status
varies
S
tatus: Flashing blue
Laser: Flashing orange
Temp: Indicator status
varies
Filter: Indicator status
varies
Refresh Mode is in progress.
s Management > Refresh Mode
Projector Indicator Status
244
Indicator and status Problem and solutions
Power: Lit blue
St
atus: Lit blue
Laser: Lit orange
Temp: Lit orange
Filter: O
Batch Setup is in progress.
Saving to memory ready/Writing to device ready.
Power: Flashing blue
St
atus: Flashing blue
Laser: Flashing orange
Temp: Flashing orange
Filter: O
Batch Setup is in progress.
Saving to memory/Writing to device.
Power: Flashing blue
St
atus: Indicator status
varies
Laser: Indicator status
varies
Temp: Flashing orange
Filter: Indicator status
varies
Projector is too hot.
•
Make sure that the vents and air lter are not clogged
with dust or obstructed by nearby objects.
•
Clean or replace the air lter.
•
Make sure the environmental temperature is not too
hot.
Power: O
St
atus: Flashing blue
Laser: O
Temp: Lit orange
Filter: O
Projector has overheated and turned o. Leave it turned
o to cool down for 5 minutes.
•
Make sure that the vents and air lter are not clogged
with dust or obstructed by nearby objects.
•
Make sure the environmental temperature is not too
hot.
•
Clean or replace the air lter.
•
If operating the projector at high altitude, set the
High Altitude Mode setting to On in the projector's
Installation menu.
•
If the problem persists, unplug the projector and
contact Epson for help.
Indicator and status Problem and solutions
Power: Flashing blue
St
atus: Indicator status
varies
Laser: Flashing orange
Temp: Indicator status
varies
Filter: Indicator status
varies
Laser warning.
Turn the projector o, unplug it, and contact Epson for
help.
Power: O
St
atus: Flashing blue
Laser: Lit orange
Temp: O
Filter: O
Laser has a problem.
Turn the projector o, unplug it, and contact Epson for
help.
Power: O
St
atus: Flashing blue
Laser: O
Temp: Flashing orange
Filter: O
A fan or sensor has a problem.
Turn the projector o, unplug it, and contact Epson for
help.
Power: O
St
atus: Flashing blue
Laser: Flashing orange
Temp: O
Filter: O
Internal projector error.
Turn the projector o, unplug it, and contact Epson for
help.
Projector Indicator Status
245
Indicator and status Problem and solutions
Power: Indicator status
varies
S
tatus: Indicator status
varies
Laser: Indicator status
varies
Temp: Indicator status
varies
Filter: Flashing orange
It is time to clean the air lter.
Power: Flashing blue
St
atus: Indicator status
varies
Laser: Indicator status
varies
Temp: Indicator status
varies
Filter: Lit orange
Low air ow through the air lter.
•
Make sure that the vents and air lter are not clogged
with dust or obstructed by nearby objects.
•
Clean or replace the air lter.
•
If the problem persists, unplug the projector and
contact Epson for help.
Power: O
St
atus: Flashing blue
Laser: O
Temp: O
Filter: Lit orange
Low air ow through the projector.
•
Make sure that the vents and air lter are not clogged
with dust or obstructed by nearby objects.
•
Clean or replace the air lter.
•
If the problem persists, unplug the projector and
contact Epson for help.
Power: Indicator status
varies
S
tatus: Indicator status
varies
Laser: Flashing orange
Temp: Indicator status
varies
Filter: Indicator status
varies
e projector is unable to maintain constant brightness
and the setting is disabled.
s Operation > Light Source Brightness Control >
Maintain Brightness
Indicator and status Problem and solutions
Power: O
St
atus: Flashing blue
Laser: Lit orange
Temp: Lit orange
Filter: O
Supply Voltage error
Communication error with AC Micro controller
Turn the projector o, unplug it, and contact Epson for
help.
Wireless LAN status
Wireless LAN indicator
status
Problem and solutions
Lit blue Wireless LAN is available or the projector is operating in
simp
le AP mode.
Flashing blue (quickly) Connecting to the access point.
Flashing blue (slowly) An error has occurred. Turn o
the projector and then on
again.
O Wireless LAN is not available. Make sure the wireless
LAN s
ettings are correct.
g
Related Links
•
"Cle
aning the Air Filters and Intake Vents " p.234
•
"Replacing the Air Filter" p.236
Projector Indicator Status
246
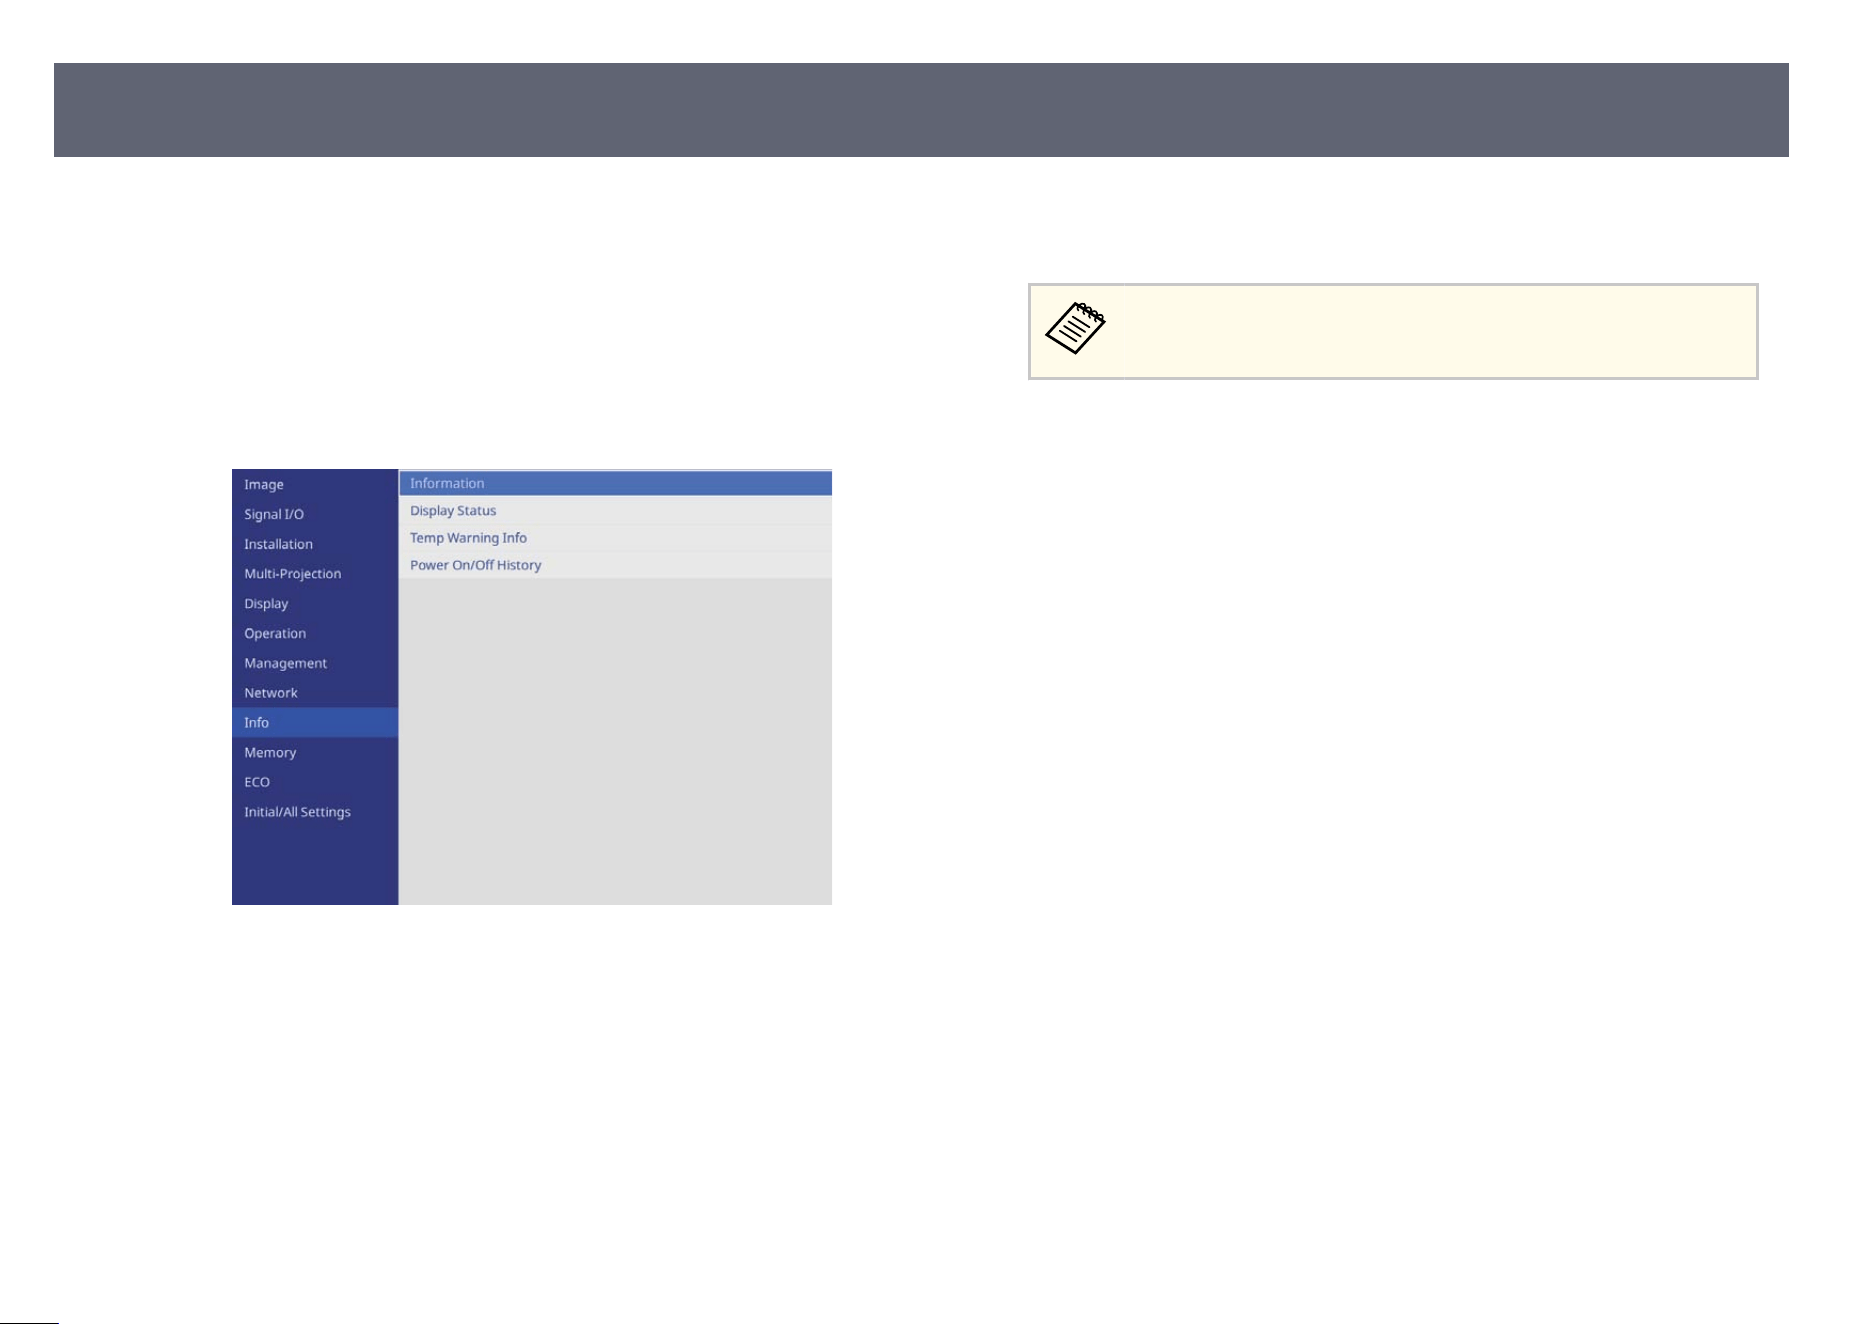
You can monitor the projector's status and view error information from the
st
atus display.
a
Turn on the projector.
b
Press the [Menu] button on the control panel or remote control.
c
Select the I
nfo setting and press [Enter].
d
Select Display Status and press [Enter].
e
P
ress the le or r
ight arrow buttons to view dierent categories of the
following information.
•
System: e projector's system status
•
Version: e projector's rmware version
•
Network Wired: Wired LAN settings
•
Network Wireless: Wireless LAN settings
•
In
put Signal: Input signal information
•
Output Signal: Output signal information
Status messages are available only in English. See the Su
pplemental
Guide for Display Status Menu for details.
Viewing the Status Display
247

Check the solutions in these sections if you have any problems with projected
imag
es or sound.
g
Related Links
•
"Solutions When No Image Appears" p.248
•
"Solutions When "No Signal" Message Appears" p.248
•
"Solutions When "Not Supported" Message Appears" p.249
•
"Solutions When Only a Partial Image Appears" p.250
•
"Solutions When the Image Contains Noise or Static" p.250
•
"Solutions When the Image is Fuzzy or Blurry" p.251
•
"Solutions When the Image is not Rectangular" p.251
•
"Solutions When the Image Brightness or Colors are Incorrect" p.251
•
"Solutions When Automatic Adjustments are not Applied Correctly" p.252
•
"Solutions When Simple Stacking is not Applied Correctly" p.253
•
"Solutions When Simple Blending is not Applied Correctly" p.253
•
"Solutions When an Aerimage Remains on the Projected Image" p.253
•
"Solutions to Sound Problems" p.253
•
"Solutions When Image File Names are not Displayed Correctly in PC Free"
p.254
•
"Solutions When You Cannot Project Images Using the PC Free Feature"
p.254
Solutions When No Image Appears
If no image appears, try the following solutions:
•
Press the [A/V Mute] button on the projector or remote control to see if the
image was temporarily turned o.
•
Make sure all necessary cables are securely connected and the power is on for
the projector and connected video sources.
•
Press the projector's power button to wake it from standby or sleep mode.
Also, check if the connected computer is in sleep mode or displaying a blank
screen saver.
•
If t
he projector does not respond when you press the control panel buttons,
the buttons may be locked for security. Unlock the buttons in the Control
Panel Lock setting in the projector's Management menu or use the remote
control to turn on the projector.
•
If the projector does not respond when you press any buttons on the
projector, an internal error may have occurred in the projector. Contact
Epson for help.
•
Adjust the Brightness setting in the projector's Image menu for individual
image colors.
s Image > Image Adjustment > Brightness
•
Adjust the brightness of your projector's light source.
s Operation > Light Source Brightness Control
•
Make sure the Messages setting is set to On in the projector's Display menu.
•
e projector may not be able to project copyrighted videos that you play
back on a computer. For more details, see the manual supplied with the
computer.
•
For images projected with Windows Media Center, reduce the screen size
from full screen mode.
•
For images projected from applications using Windows DirectX, turn o
DirectX functions.
g
Related Links
•
"Projector Administration Settings - Management Menu" p.207
•
"Image Quality Settings - Image Menu" p.193
•
"Projector Feature Settings - Operation Menu" p.204
•
"Projector Display Settings - Display Menu" p.202
•
"Unlocking the Projector's Buttons" p.136
Solutions When "No Signal" Message Appears
If the No Signal message appears, try the following solutions:
Solving Image or Sound Problems
248

•
Pr
ess the [Source Search] button and wait a few seconds for an image to
appear.
•
Turn on the connected computer or video source, and press play to begin
your presentation, if necessary.
•
Check that all cables required for projection are securely connected.
•
If you are projecting from a laptop computer, make sure it is set up to display
on an external monitor.
•
If necessary, turn o the projector and the connected computer or video
source, and then turn them back on.
•
If you are projecting from an HDMI source, replace the HDMI cable with a
shorter one.
g
Related Links
•
"Displaying From a Windows Laptop" p.249
•
"Displaying From a Mac Laptop" p.249
Displaying From a Windows Laptop
If t
he message No Signal is displayed when projecting from a laptop, you need
to set up the Windows laptop to display on an external monitor.
a
Hold down the Windows key and press P on y
our keyboard at the same
time, then click Duplicate.
b
If the same image is not displayed by the laptop and projector, check
th
e Windows Display utility to make sure the external monitor port is
enabled and extended desktop mode is disabled.
c
If necessary, check your video card settings and set the multiple display
op
tion to Mirror or Duplicate.
Displaying From a Mac Laptop
If t
he message No Signal is displayed when projecting from a Mac laptop, you
need to set up the laptop for mirrored display. (See your laptop manual for
details.)
a
Open the System Preferences utility and select Displays.
b
S
elect the Disp
lay or Color LCD option, if necessary.
c
Click the Arrange or Arrangement tab.
d
S
elect Mirror Displays.
Solutions When "Not Supported" Message Appears
If the message No
t supported is displayed, try the following solutions:
•
Make sure the correct input signal is selected in the projector's Signal I/O
menu.
•
Make sure the computer's display resolution does not exceed the projector's
resolution and frequency limits. If necessary, select a dierent display
resolution for your computer.
•
If you are projecting from an HDMI source, change the HDMI IN EQ Level
setting in the projector's Signal I/O menu. Aer changing the setting, you
may need to restart the projector. Follow the on-screen instructions.
•
Change the HDMI IN EQ Level setting.
s Signal I/O > HDMI IN EQ Level > HDMI1
s Signal I/O > HDMI IN EQ Level > HDMI2
g
Related Links
•
"Input Signal Settings - Signal I/O Menu" p.196
•
"Supported Monitor Display Resolutions" p.274
Solving Image or Sound Problems
249

Solutions When Only a Partial Image Appears
If only a partial computer image appears, try the following solutions:
•
Mak
e sure you selected the correct Screen Type setting in the projector's
Installation menu for the screen you are using.
If there are margins between the edge of the image and the projected screen
frame, adjust the position of the image.
•
Make sure the Scale setting is turned o in the projector's Image menu.
•
Try adjusting the image position using the Screen Position setting.
s Installation > Screen Position
•
Change the Aspect setting in the projector's Image menu to select a dierent
image aspect ratio.
•
Change the Blanking setting in the projector's Installation menu so that the
image appears as you expect.
•
If you zoomed into or out of the image using the [E-Zoom] buttons, press the
[Esc] button to return to the original image size.
•
Check your computer display settings to disable dual display and set the
resolution within the projector's limits.
•
Check the resolution assigned to your presentation les to see if they are
created for a dierent resolution.
•
When projecting in Content Playback mode, make sure you are using the
appropriate Overlay Eect settings.
s Operation > Content Playback > Overlay Eect
•
Make sure you selected the correct Projection setting in the projector's
Installation menu.
g
Related Links
•
"Projector Installation Settings - Installation Menu" p.198
•
"Adjusting the Image Position Using Screen Position" p.56
•
"Image Quality Settings - Image Menu" p.193
•
"Supported Monitor Display Resolutions" p.274
•
"A
ddin
g Eects to Your Projected Image" p.108
Solutions When the Image Contains Noise or Static
If the projected image contains electronic interference (noise) or static, try the
fo
llowing solutions:
•
Check the cables connecting your computer or video source to the projector.
ey should be:
•
Separated from the power cord to prevent interference
•
Securely connected at both ends
•
Not connected to an extension cable
•
Adjust the Noise Reduction and MPEG Noise Reduction settings in the
projector's Image menu.
s Image > Image Enhancement > Noise Reduction
s Image > Image Enhancement > MPEG Noise Reduction
•
Select a computer video resolution and refresh rate that are compatible with
the projector.
•
If you adjusted the image shape using the projector controls, try decreasing
the Sharpness setting in the projector's Image menu to improve image
quality.
•
If you connected an extension power cable, try projecting without it to see if
it caused interference in the signal.
•
Make sure you selected the correct Video Range or EDID setting in the
projector's Signal I/O menu, if available for your image source.
•
When interlaced signals are input, line doubler processing is not performed,
so the projected image may icker. We recommend that interlaced signals be
progressively converted using an external device before being input.
g
Related Links
•
"Image Quality Settings - Image Menu" p.193
•
"Supported Monitor Display Resolutions" p.274
Solving Image or Sound Problems
250
•
"In
put Signal Settings - Signal I/O Menu" p.196
Solutions When the Image is Fuzzy or Blurry
If the projected image is fuzzy or blurry, try the following solutions:
•
Dis
play a test pattern and use it to adjust the image focus using the focus ring.
•
Position the projector close enough to the screen.
•
Position the projector so the keystone adjustment angle is not so wide that it
distorts the image.
•
Clean the projector lens.
To avoid condensation on the lens aer br
inging the projector in from
a cold environment, let the projector warm up to room temperature
before using it.
•
Ad
just the Sharpness setting in the projector's Image menu to improve image
quality.
•
If you are projecting from a computer, use a lower resolution or select a
resolution that matches the projector's native resolution.
g
Related Links
•
"Focusing the Image Using the Focus Ring" p.76
•
"Cleaning the Lens" p.232
•
"Image Quality Settings - Image Menu" p.193
Solutions When the Image is not Rectangular
If the projected image is not evenly rectangular, try the following solutions:
•
Pl
ace the projector directly in front of the center of the screen, facing it
squarely, if possible.
•
Ad
just the H/V-Keystone setting to correct the image shape.
s Multi-Projection > Geometry Correction > H/V-Keystone
•
Adjust the Quick Corner setting to correct the image shape.
s Multi-Projection > Geometry Correction > Quick Corner
•
Adjust the Curved Surface setting to correct the image shape projected on a
curved surface.
s Multi-Projection > Geometry Correction > Curved Surface Mode >
Curved Surface
•
Adjust the Corner Wall setting to correct the image shape projected on a
curved surface with right angles.
s Multi-Projection > Geometry Correction > Corner Wall Mode >
Corner Wall
•
Adjust the Point Correction setting to correct slight distortion which occurs
partially.
s Multi-Projection > Geometry Correction > Point Correction Mode >
Point Correction
g
Related Links
•
"Correcting Image Shape with H/V Keystone" p.62
•
"Correcting the Image Shape with Quick Corner" p.63
•
"Correcting Image Shape with Curved Surface Mode" p.66
•
" Correcting Image Shape with Corner Wall Mode " p.68
•
"Correcting Image Shape with Point Correction Mode" p.71
Solutions When the Image Brightness or Colors are
Incorrect
If the projected image is too dark or light, or the colors are incorrect, try the
following solutions:
•
Select the Color Mode setting in the projector's Image menu to try dierent
color modes for the image and environment.
Solving Image or Sound Problems
251

•
Ch
eck your video source settings.
•
Adjust the available settings in the projector's Image menu for the current
input source, such as Brightness, Contrast, Tint, Color Saturation, and
RGBCMY.
s Image > Image Adjustment > Brightness
s Image > Image Adjustment > Contrast
s Image > Image Adjustment > Color Saturation
s Image > Image Adjustment > Tint
•
Make sure you selected the correct Video Range or EDID setting in the
projector's Signal I/O menu, if available for your image source.
•
Make sure all the cables are securely connected to the projector and your
video device. If you connected long cables, try connecting shorter cables.
•
Position the projector close enough to the screen.
•
When using multiple projectors, make sure the Light Source Calibration
setting in the projector's Management menu is set to the same option on all
the projectors and that the projectors have been calibrated recently. If certain
projectors are not calibrated recently, the white balance and brightness level
may not match the other projectors.
g
Related Links
•
"Adjusting Image Quality (Color Mode)" p.82
•
"Image Quality Settings - Image Menu" p.193
•
"Supported Monitor Display Resolutions" p.274
•
"Input Signal Settings - Signal I/O Menu" p.196
•
"Projector Administration Settings - Management Menu" p.207
Solutions When Automatic Adjustments are not
Applied Correctly
If you have problems with automatic adjustments not being applied correctly,
try the following solutions:
•
Be s
ure to wait at least 30 minutes aer turning on the projector before
performing automatic adjustments. is gives the projector's temperature a
chance to stabilize.
•
Check that the camera area is clean.
•
Make sure the cable of the optional external camera is securely connected to
the projector.
•
e optional external camera may be defective. Contact Epson for help.
•
Make sure that a powerful spotlight or source of strong natural light is
not shining into the projection environment and interfering with automatic
adjustments.
•
Check that your image correction and image blending settings are within
reasonable ranges. If the projection angle is very large, try turning o the
Geometry Correction setting or reduce the projection angle. If you are using
the Edge Blending setting, make sure the blending width is between 15 to
43%.
•
If you see an error message during automatic adjustments, check the error
codes in the message.
During Screen Matching:
•
0101: Measurement value error
•
0102: Measurement failure
•
0103: Switch camera failure
•
0104/0105: Model mismatch
•
0108: Camera error
During Color Matching:
•
0201: Measurement value error
•
0202: Measurement failure
•
0203: Switch camera failure
•
0208: Camera error
Contact Epson for support for details.
Solving Image or Sound Problems
252

Solutions When Simple Stacking is not Applied
Correctly
If you have problems with simple stacking not being applied correctly, try the
fo
llowing solutions:
•
Make sure the projectors are placed correctly and connected using a LAN
cable.
•
Make sure the optional external camera is installed correctly and the cable is
securely connected to the projector.
•
e optional external camera may be defective. Contact Epson for help.
•
Make sure that a powerful spotlight or source of strong natural light is not
shining into the projection environment and interfering with simple stacking.
•
Resize the projection size.
•
If you see an error message during the simple stacking process, check the
error codes in the message.
•
0302: Measurement failure
•
0306: Geometry correction error
•
0307/0308: e external camera may be defective, or a communication
error has occurred.
Contact Epson for support for details.
Solutions When Simple Blending is not Applied
Correctly
If you have problems with simple blending not being applied correctly, try the
fo
llowing solutions:
•
Make sure the projectors are placed correctly and connected using a LAN
cable.
•
Make sure the optional external camera is installed correctly and the cable is
securely connected to the projector.
•
e optional external camera may be defective. Contact Epson for help.
•
Make sure that a powerful spotlight or source of strong natural light is not
shining into the projection environment and interfering with simple stacking.
•
Resize the projection size.
•
If you see an error message during the simple blending process, check the
error codes in the message.
•
0402: Measurement failure
•
0406: Geometry correction error
•
0407/0408: e external camera may be defective, or a communication
error has occurred.
Contact Epson for support for details.
Solutions When an Afterimage Remains on the
Projected Image
If you see an aerim
age in the projected image, use the Refresh Mode feature to
clear it. Select Refresh Mode > Start in the projector's Management menu.
g
Related Links
•
"Projector Administration Settings - Management Menu" p.207
Solutions to Sound Problems
If there is no sound or the volume is too low or high, try the following solutions:
•
A
d
just the projector's volume settings.
•
Press the [A/V Mute] button on the projector or remote control to resume
video and audio if they were temporarily stopped.
Solving Image or Sound Problems
253

•
Pr
ess the [Mute] button on the remote control to resume audio if it was
temporarily stopped.
•
Check your computer or video source to make sure the volume is turned up
and the audio output is set for the correct source.
•
Check the audio cable connections between the projector and your video
source.
•
Make sure any connected audio cables are labeled "No Resistance".
•
If you do not hear sound from an HDMI source, set the connected device to
PCM output.
•
When you are connecting the projector to a Mac using an HDMI cable, make
sure your Mac supports audio through the HDMI port. If not, you need to
connect an audio cable.
•
If the volume for the computer is set to the minimum while the projector is
set to the maximum, the noise may be mixed. Turn up the computer's volume
and turn down the projector's volume. (When you use Epson iProjection
(Windows/Mac).)
g
Related Links
•
"Controlling the Volume with the Volume Buttons" p.92
•
"Projector Connections" p.35
Solutions When Image File Names are not Displayed
Correctly in PC Free
If any le names are longer than the display area or include unsupported
sy
mbols, the le names are shortened or changed in PC Free. Shorten or change
the le name.
g
Related Links
•
"Projecting a PC Free Presentation" p.99
Solutions When You Cannot Project Images Using the
PC Free Feature
If you cannot project images using the PC Free feature, try the following
so
lutions:
•
If you are using a USB device with a slow transfer speed, you may not be able
to project movies correctly.
g
Related Links
•
"Supported PC Free File Types" p.99
Solving Image or Sound Problems
254

Check the solutions in these sections if you have problems operating the
pr
ojector or remote control.
g
Related Links
•
"Solutions to Projector Power or Shut-O Problems" p.255
•
"Solutions to Problems with the Remote Control" p.255
•
"Solutions to Password Problems" p.256
•
"Solution When "e Battery that Saves Your Clock Settings is Running Low"
Message Appears" p.256
Solutions to Projector Power or Shut-O Problems
If the projector does not turn on when you press the power button or it turns o
unexpectedly, try the following solutions:
•
Make sure the power cord is securely connected to the projector and to a
working electrical outlet.
•
If the power button on the remote control does not turn on the projector,
check its batteries and make sure at least one of the remote receivers are
available in the Remote Receiver setting in the projector's Installation menu.
•
e projector's buttons may be locked for security. Unlock the buttons in the
Control Panel Lock setting in the projector's Management menu or use the
remote control to turn on the projector.
•
If the projector's light source turns o unexpectedly, it may have entered
sleep mode aer a period of inactivity. Perform any operation to wake the
projector. To turn o sleep mode, set the Sleep Mode setting to O in the
projector's Operation menu.
•
If the projector's light source turns o unexpectedly, the A/V mute timer
may be enabled. Set the A/V Mute Timer setting to O in the projector's
Operation menu.
s Operation > A/V Mute Settings > A/V Mute Timer
•
If t
he projector's light source turns o, the status indicator is ashing, and the
temp (temperature) indicator is lit, the projector has overheated and turned
o.
•
e cooling fans may run in standby status depending on the projector
settings. Also, when the projector wakes from standby status, the fans may
cause an unexpected noise. is is not a malfunction.
•
e power cord may be defective. Disconnect the cord and contact Epson for
help.
g
Related Links
•
"Projector Administration Settings - Management Menu" p.207
•
"Projector Feature Settings - Operation Menu" p.204
•
"Unlocking the Projector's Buttons" p.136
•
"Projector Indicator Status" p.244
Solutions to Problems with the Remote Control
If the projector does not respond to remote control commands, try the following
solutions:
•
Check that the remote control batteries are installed correctly and have
power. If necessary, replace the batteries.
•
Make sure you are operating the remote control within the reception angle
and range of the projector.
•
Make sure the projector is not warming up or shutting down.
•
Check to see if a button on the remote control is stuck down, causing it to
enter sleep mode. Release the button to wake the remote control up.
•
Strong uorescent lighting, direct sunlight, or infrared device signals may be
interfering with the projector's remote receivers. Dim the lights or move the
projector away from the sun or interfering equipment.
•
Make sure at least one of the remote receivers are available in the Remote
Receiver setting in the projector's Installation menu.
Solving Projector or Remote Control Operation Problems
255

•
If t
he Remote Receiver setting is disabled, hold down the [Menu] button on
the remote control for at least 15 seconds to reset the setting to its default.
•
If you assigned an ID number to the projector to operate multiple projectors
from the remote control, you may need to check or change the ID setting.
•
Press the 0 (zero) button on the remote control while holding down the
[ID] button. By selecting 0 on the remote control, you can operate all of the
projectors regardless of the projector ID settings.
•
If you lose the remote control, you can order another one from Epson.
g
Related Links
•
"Remote Control Operation" p.45
•
"Installing Batteries in the Remote Control" p.44
•
"Projector Installation Settings - Installation Menu" p.198
Solutions to Password Problems
If you cannot enter or remember a password, try the following solutions:
•
If you have entered an incorrect password too many times and see a message
displaying a request code, write down the code and contact Epson for help.
Provide the request code and proof of ownership for assistance in unlocking
the projector.
•
If you lose the remote control you cannot enter a password. Order a new one
from Epson.
Attention
If y
ou perform Reset All or Reset Network Settings in the projector's menu, all of
the passwords that have been set for the Network menu are also reset and you need
to set them again. To prevent the passwords from being reset by unauthorized users,
set Network to On in the Password Protection menu.
Solution When "The Battery that Saves Your Clock
Settings is Running Low" Message Appears
If the following message is displayed, contact Epson for help:
e bat
tery that saves your clock settings is running low.
Solving Projector or Remote Control Operation Problems
256
Check the solutions in these sections if you have problems using the projector
on a n
etwork.
g
Related Links
•
"Solutions When Wireless Authentication Fails" p.257
•
"Solutions When You Cannot Access the Projector rough the Web" p.257
•
"Solutions When Network Alert E-Mails are not Received" p.258
•
"Solutions When the Image Contains Static During Network Projection"
p.258
•
"Solutions When You Cannot Connect Using Miracast" p.258
•
"Solutions When the Image or Sound Contains Static During Miracast
Connection" p.259
•
"Solutions When You Cannot Connect Using AirPlay" p.259
•
"Solutions When the Image or Sound Contains Static During AirPlay
Connection" p.259
•
"Solutions When You Cannot Receive Shared Images" p.259
Solutions When Wireless Authentication Fails
If you are having trouble with the authentication, try the following solutions:
•
If the wireless settings are correct, but authentication fails, you may need to
update the Date & Time settings in the projector's Management menu.
•
Check the Security settings in the projector's Network menu.
s Network > Network Settings > Wireless LAN > Security
•
If the access point security is WPA3-EAP, change the access point setting to
WPA2/WPA3-EAP.
g
Related Links
•
"Projector Network Settings - Network Menu" p.211
Solutions When You Cannot Access the Projector
Through the Web
If you are unable to access the projector through a Web browser, make sure you
are u
sing the correct ID and password.
•
Make sure you use the following user IDs. (You cannot change the user IDs.)
•
To access the Basic Control option, enter EPSONREMOTE.
•
To access other options and save settings, enter EPSONWEB.
•
For the password, enter the password set in the projector's Network menu.
No password is set by default.
•
When connecting to the access point, make sure you have access to the
network the projector is on.
•
If your Web browser is set up to connect via a proxy server, the Epson Web
Control screen cannot be displayed. Make settings for a connection without
using a proxy server.
•
If you set the Standby Mode setting to Normal in the projector's Operation
menu, make sure the network device is turned on. Aer turning on the
network device, turn on the projector. If you are connecting wirelessly,
connect to devices over a wireless network access point.
e user ID and password are case sensitive.
g
Related Links
•
"Pr
ojector Feature Settings - Operation Menu" p.204
Solving Network Problems
257

Solutions When Network Alert E-Mails are not
Received
If you do not receive an e-mail alerting you to problems with a projector over
th
e network, try the following solutions:
•
Make sure the projector is turned on and connected to the network correctly.
(If an error shuts down the projector, the email may not be delivered.)
•
Make sure you set up the projector e-mail alert settings correctly in the
projector's network Mail Notication menu or in the network soware.
•
Set the Standby Mode setting to Normal in the projector's Operation menu
so that the network soware can monitor the projector in standby mode.
If you are connecting wirelessly, connect to devices over a wireless network
access point.
g
Related Links
•
"Network Menu - Mail Notication Menu" p.216
•
"Installing Batteries in the Remote Control" p.44
Solutions When the Image Contains Static During
Network Projection
If the projected image contains static during network projection, try the
f
o
llowing solutions:
•
Check for any obstacles between the access point, the computer, the
mobile device, and the projector, and change their positions to improve
communication.
•
Make sure that the access point, the computer, the mobile device and the
projector are not too far apart. Move them closer together and try to connect
again.
•
Ch
eck for interference from other equipment, such as a Bluetooth device or
microwave. Move the interfering device farther away or expand your wireless
bandwidth.
•
Reduce the number of connected devices if the connection speed declines.
Solutions When You Cannot Connect Using Miracast
If you are unable to connect to the projector using Miracast, try the following
so
lutions:
•
Check the projector's settings.
•
Set the Simple AP setting to On.
s Network > Network Settings > Simple AP
•
Set the Miracast setting to On, and then restart the projector.
s Network > Network Conguration > Network Projection > Miracast
•
Select the Miracast setting to O, select On again, and then restart the
projector.
s Network > Network Conguration > Network Projection > Miracast
•
Check the mobile device's settings.
•
Make sure the settings on the mobile Miracast device are correct.
•
When connecting again immediately aer disconnecting, it may take some
time until the connection is established. Reconnect aer waiting for a
while.
•
Restart the mobile device.
•
Once you have connected using Miracast, the projector connection
information may be recorded on the mobile device. However, you may
not be able to reconnect to the projector from the recorded information.
Select the projector from the list of available devices.
g
Related Links
•
"Network Menu - Network Settings Menu" p.212
Solving Network Problems
258

•
"Net
work Menu - Network Projection Settings" p.219
Solutions When the Image or Sound Contains Static
During Miracast Connection
If the projected image or sound contains static when connecting using Miracast,
tr
y the following solutions:
•
Avoid covering the Wi-Fi antenna of the mobile device.
•
If you use a Miracast connection and an internet connection at the
same time, the image may stop or contain noise. Disconnect the internet
connection to expand your wireless bandwidth and improve the connection
speed of the mobile device.
•
Make sure the projection contents meet the Miracast requirements.
•
Depending on the settings of the mobile device, the connection may be lost
when the device enters power saving mode. Check the electrical power saving
settings on the mobile device.
•
Update to the latest version of the wireless driver or rmware on the mobile
device.
Solutions When You Cannot Connect Using AirPlay
If you cannot connect using AirPlay, check the following solutions.
•
Ch
eck the projector's settings.
•
Check that your Apple device and the projector are using the same
network connection.
•
Set AirPlay to On from the AirPlay and HomeKit settings screen.
•
Restart the projector.
•
Check that the settings on your Apple device are correct.
•
If t
he date and time are not correctly set on the projector, the AirPlay
connection may be disconnected while projecting.
Set the correct date and time in Date & Time and Daylight Saving Time
from the Management menu.
•
Check if the network you are using is congured to block specic network
port communications.
Solutions When the Image or Sound Contains Static
During AirPlay Connection
If the video or audio is distorted when using AirPlay, check the following
so
lutions.
•
Check for obstacles between the access point, Apple device, and projector,
and change their positions to improve the signal strength.
•
Check that the Wi-Fi antenna part of your Apple device is not covered.
•
Check that the content is suitable for streaming or mirroring using AirPlay.
•
Depending on your Apple device settings, the connection may be lost during
power saving. Check the power saving settings on your Apple device.
•
Update your Apple device soware to the latest version.
Solutions When You Cannot Receive Shared Images
If you cannot receive shared images from other projectors, try the following
so
lutions:
•
Connect the projector to the same network as the projector that is sharing
images.
•
Make sure the Screen Sharing setting is set to On.
s Network > Network Settings > Network Projection > Screen Sharing
Solving Network Problems
259

•
Mak
e sure that no other device is connecting to the projector using the Epson
iProjection soware.
•
If the rmware version amongst the projectors sharing the screen is not the
same, you may need to update the projector's rmware to share your screen.
g
Related Links
•
"Network Menu - Network Projection Settings" p.219
Solving Network Problems
260

If you cannot play back a playlist correctly, try the following solutions:
•
Mak
e sure Content Playback is set to On in the projector's Operation menu.
•
Make sure the USB ash drive contains a playlist.
•
Make sure the USB ash drive is directly connected to the projector. Do not
use a multi-card reader or a USB hub to expand a USB port.
•
If the USB ash drive is partitioned, you may not be able to play back
playlists. Delete all of the partitions before saving the playlists on the USB
ash drive.
•
Do not share a playlist between projectors that are dierent in resolution.
Color and shape eects added by using Overlay Eect in the projector's
Operation menu may not be reproduced correctly.
g
Related Links
•
"Multiple Projector Operation Settings - Multi-Projection Menu" p.200
Solutions to Problems in Content Playback Mode
261

If you cannot operate the connected devices using the HDMI Link features, try
th
e following solutions:
•
Make sure the cable meets the HDMI CEC standard.
•
Make sure the connected device meets the HDMI CEC standard. See the
documentation supplied with the device for more information.
•
Check that all cables required for HDMI Link are securely connected.
•
Make sure the connected devices are turned on and in standby status. See the
documentation supplied with the device for more information.
•
If you connected a speaker, set it to PCM output.
•
If you connect a new device or change the connection, set the CEC function
for the connected device again and restart the device.
•
Do not connect 4 or more multi-media players. You can connect up to 3
multi-media players that meet the HDMI CEC standard at the same time.
•
If the device does not appear in the Device Connections list, it does not meet
the HDMI CEC standards. Connect a dierent device.
Solutions When HDMI Link does not Function
262

Appendix
Ch
eck these sections for the technical specications and important notices about your product.
g
Related Links
•
"Optional Accessories and Replacement Parts" p.264
•
"Screen Size and Projection Distance" p.266
•
"Supported Monitor Display Resolutions" p.274
•
"Projector Specications" p.275
•
"External Dimensions" p.278
•
"Supported Features for Epson Projector Content Manager" p.279
•
"List of Safety Symbols and Instructions" p.280
•
"Laser Safety Information" p.282
•
"Notices" p.289
e following optional accessories and replacement parts are available. Please
p
urchase these products as and when needed.
e following list of optional accessories and replacement parts is current as of:
January 2025.
Details of accessories are subject to change without notice and availability may
vary depending on the country of purchase.
g
Related Links
•
"Screens" p.264
•
"Mounts" p.264
•
"For Wireless Connection" p.264
•
"External Devices" p.265
•
"Replacement Parts" p.265
Screens
80" Mobile X-Type Screen ELPSC21
Portable X-type screens. (aspect ratio 16:9)
70" portable screen ELPSC23
80" portable screen ELPSC24
90" portable screen ELPSC25
Portable roll-type screens. (aspect ratio 16:10)
Multi Aspect Screen ELPSC26/ES3000
Portable multi-aspect screen.
60" portable screen ELPSC27
80" portable screen ELPSC28
100" portable screen ELPSC29
Portable roll-type screens. (aspect ratio 4:3)
53" portable screen ELPSC30
64" portable screen ELPSC31
Portable magnetic screens. (aspect ratio 4:3)
50" portable screen ELPSC32/ES1000
A com
pact screen that can be carried easily. (aspect ratio 4:3)
Mounts
Ceiling mount ELPMB22
Ceiling mount (Low prole) ELPMB30
Us
e when installing the projector on a ceiling.
Safety Wire Set ELPWR01
Use when connecting the projector to the installation mount to prevent the
projector from falling down.
Ceiling pipe (450 mm) ELPFP13
Ceiling pipe (700 mm) ELPFP14
Use when installing the projector on a high ceiling.
Special expertise is required to suspend the projector from a ceiling.
Co
ntact Epson for help.
For Wireless Connection
Wireless LAN module ELPAP11
Us
e this to project images from a computer via a wireless communication.
Wireless Presentation System ELPWP20
Use when directly connecting to Windows/Mac computers and projecting
images wirelessly. Includes two wireless transmitters (ELPWT01) and one
base unit (ELPBU01).
Optional Accessories and Replacement Parts
264

External Devices
Document Camera ELPDC30
Document Camera ELPDC21
Document Camera ELPDC13
Document Camera ELPDC07
Us
e when displaying image such as books or printed materials.
HDBaseT Transmitter ELPHD01
Use when sending an HDMI signal over a long distance. (HDCP 2.2 is not
supported)
External Speaker ELPSP02
External self‑powered speaker.
External Camera ELPEC01
Use this to automatically adjust images projected from multiple projectors.
Cable Cover ELPCC07W/ELPCC07B
Use this to hide the attached cables from view when suspending the
projector from a ceiling.
Replacement Parts
Air lter ELPAF65
Us
e as a replacement for used air lters.
Optional Accessories and Replacement Parts
265
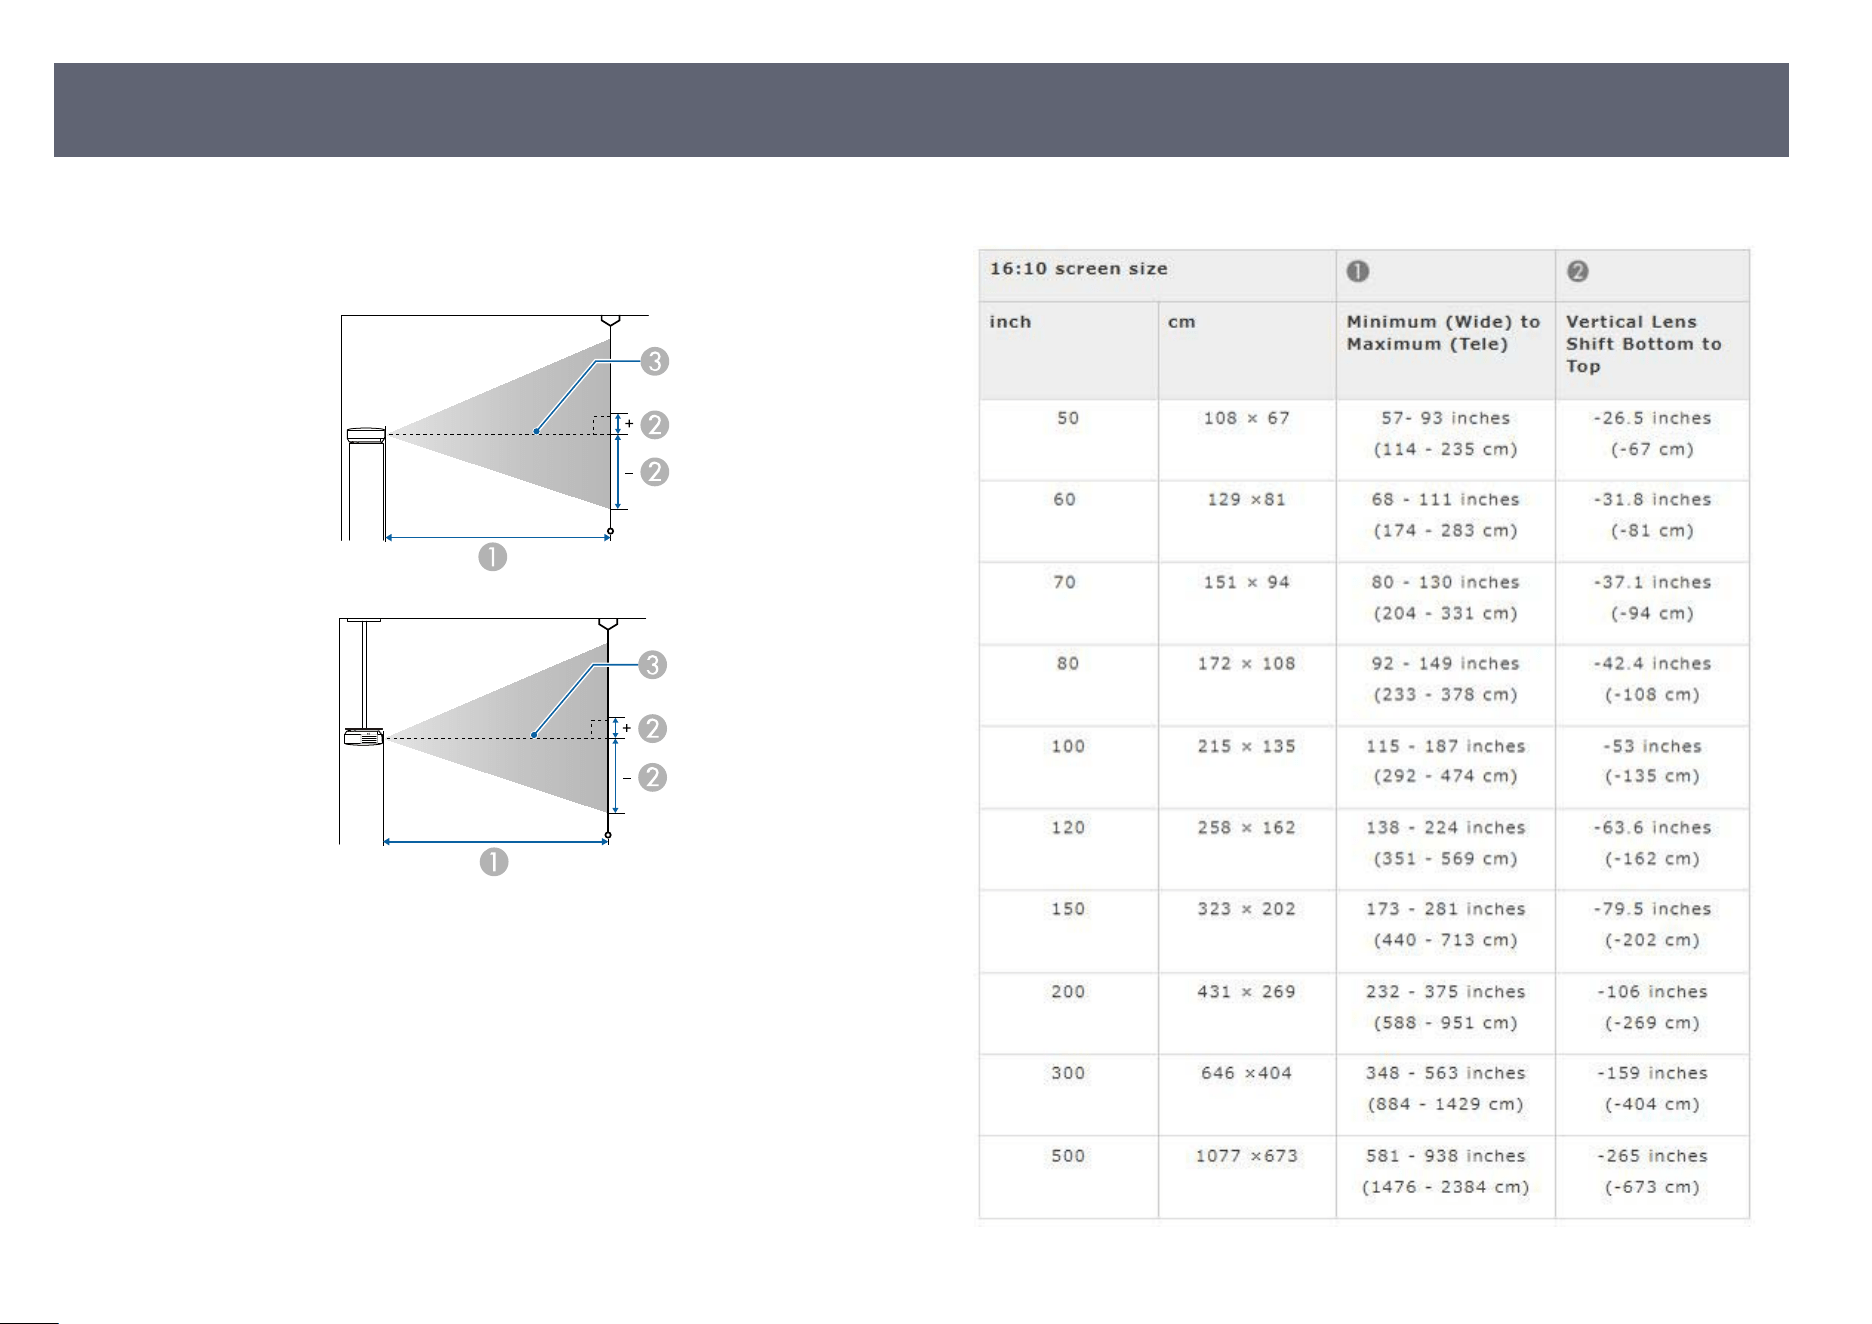
Check the table here to determine how far to place the projector from the screen
bas
ed on the size of the projected image.
e projection distances are approximate values.
A
Projection distance (cm)
B
Distance from the center of the lens to the base of the screen (is
changes
depending on the setting for vertical lens shi.) (cm)
C
Center of lens
EB-L890E/EB-L895E/EB-L690E/EB-L890U/EB-L895U/EB-L790U/EB-L690U
Screen Size and Projection Distance
266
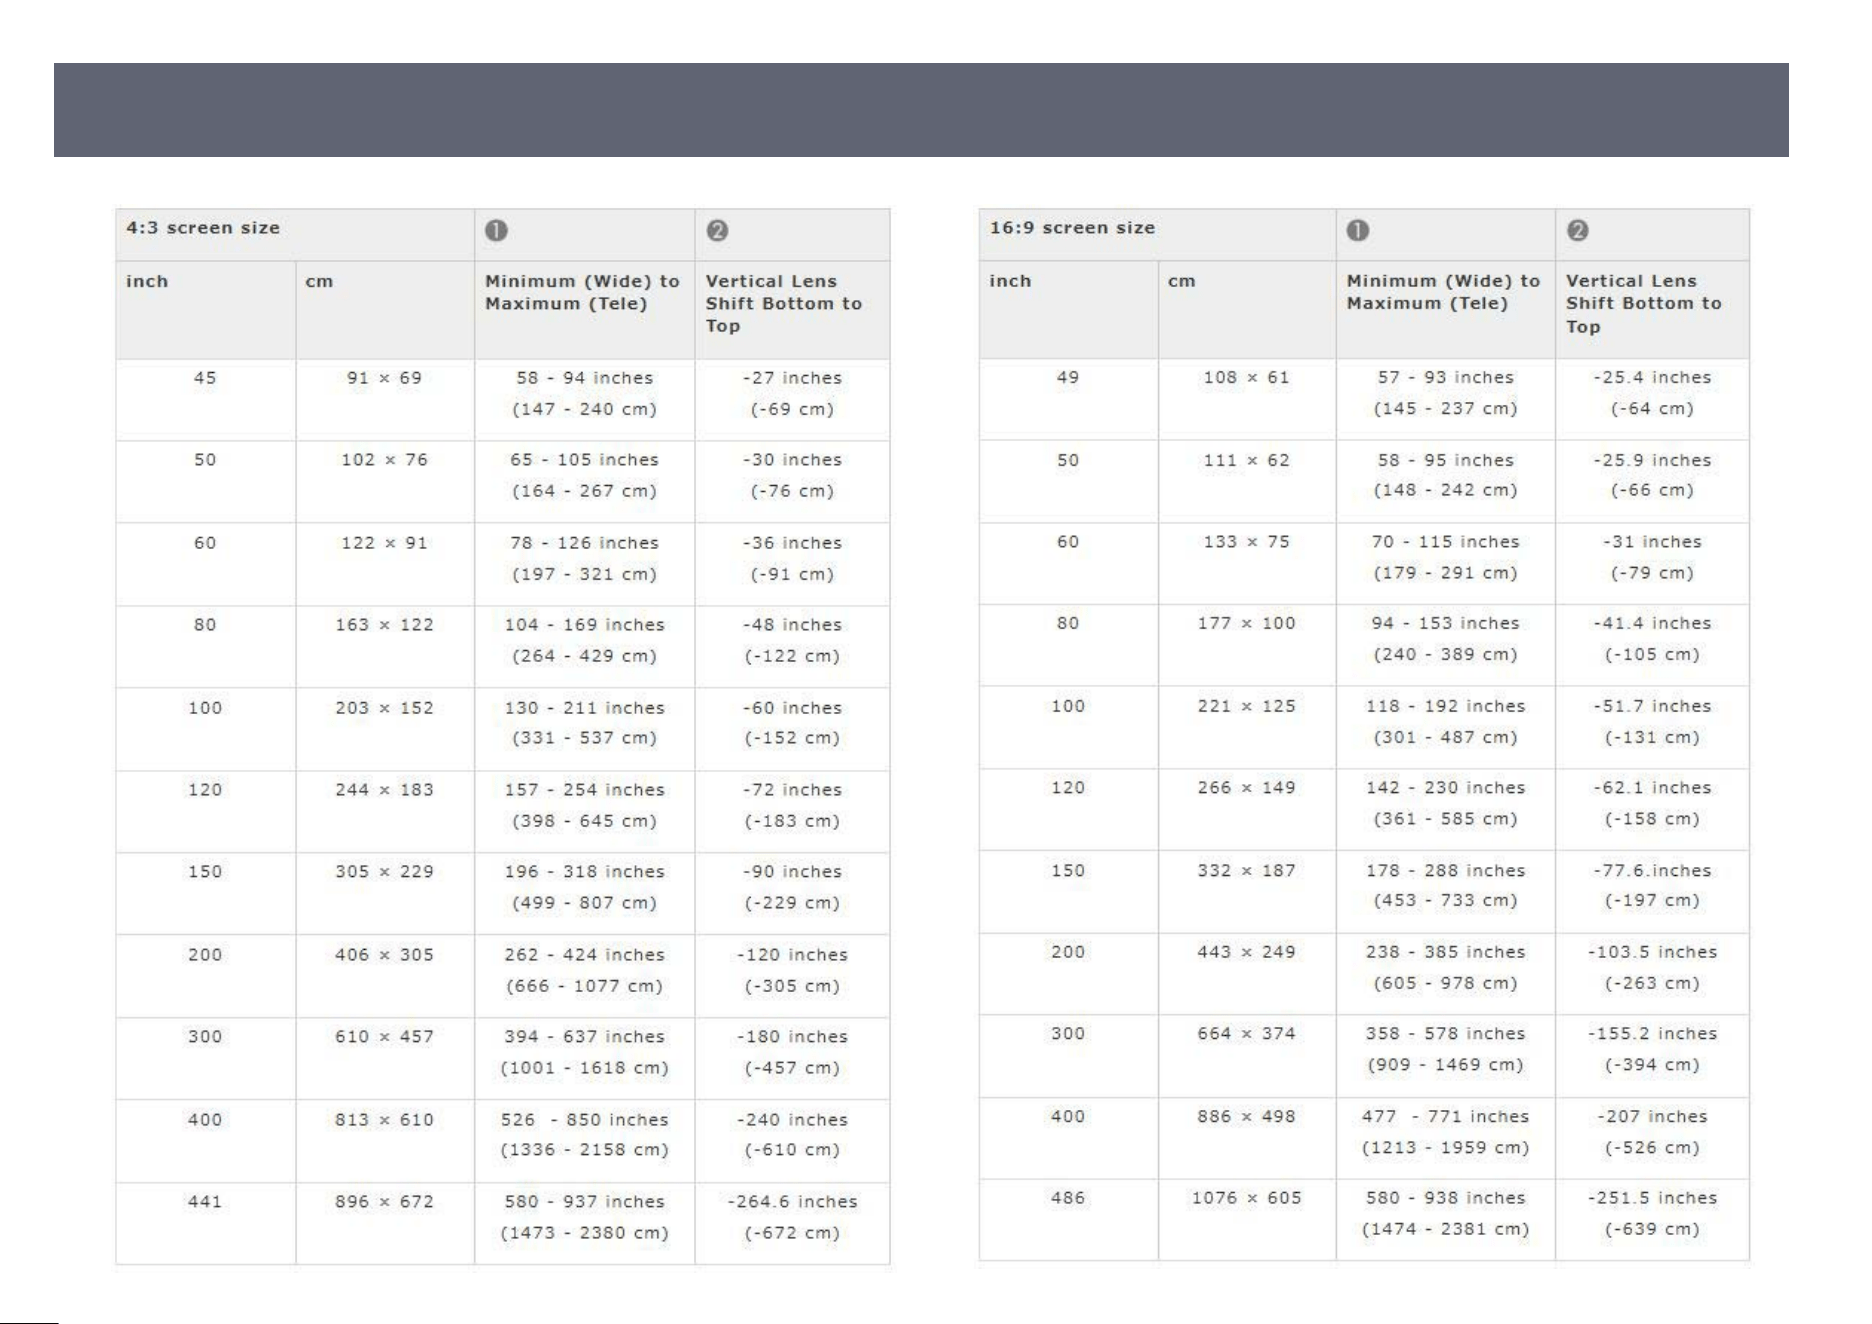
Screen Size and Projection Distance
267
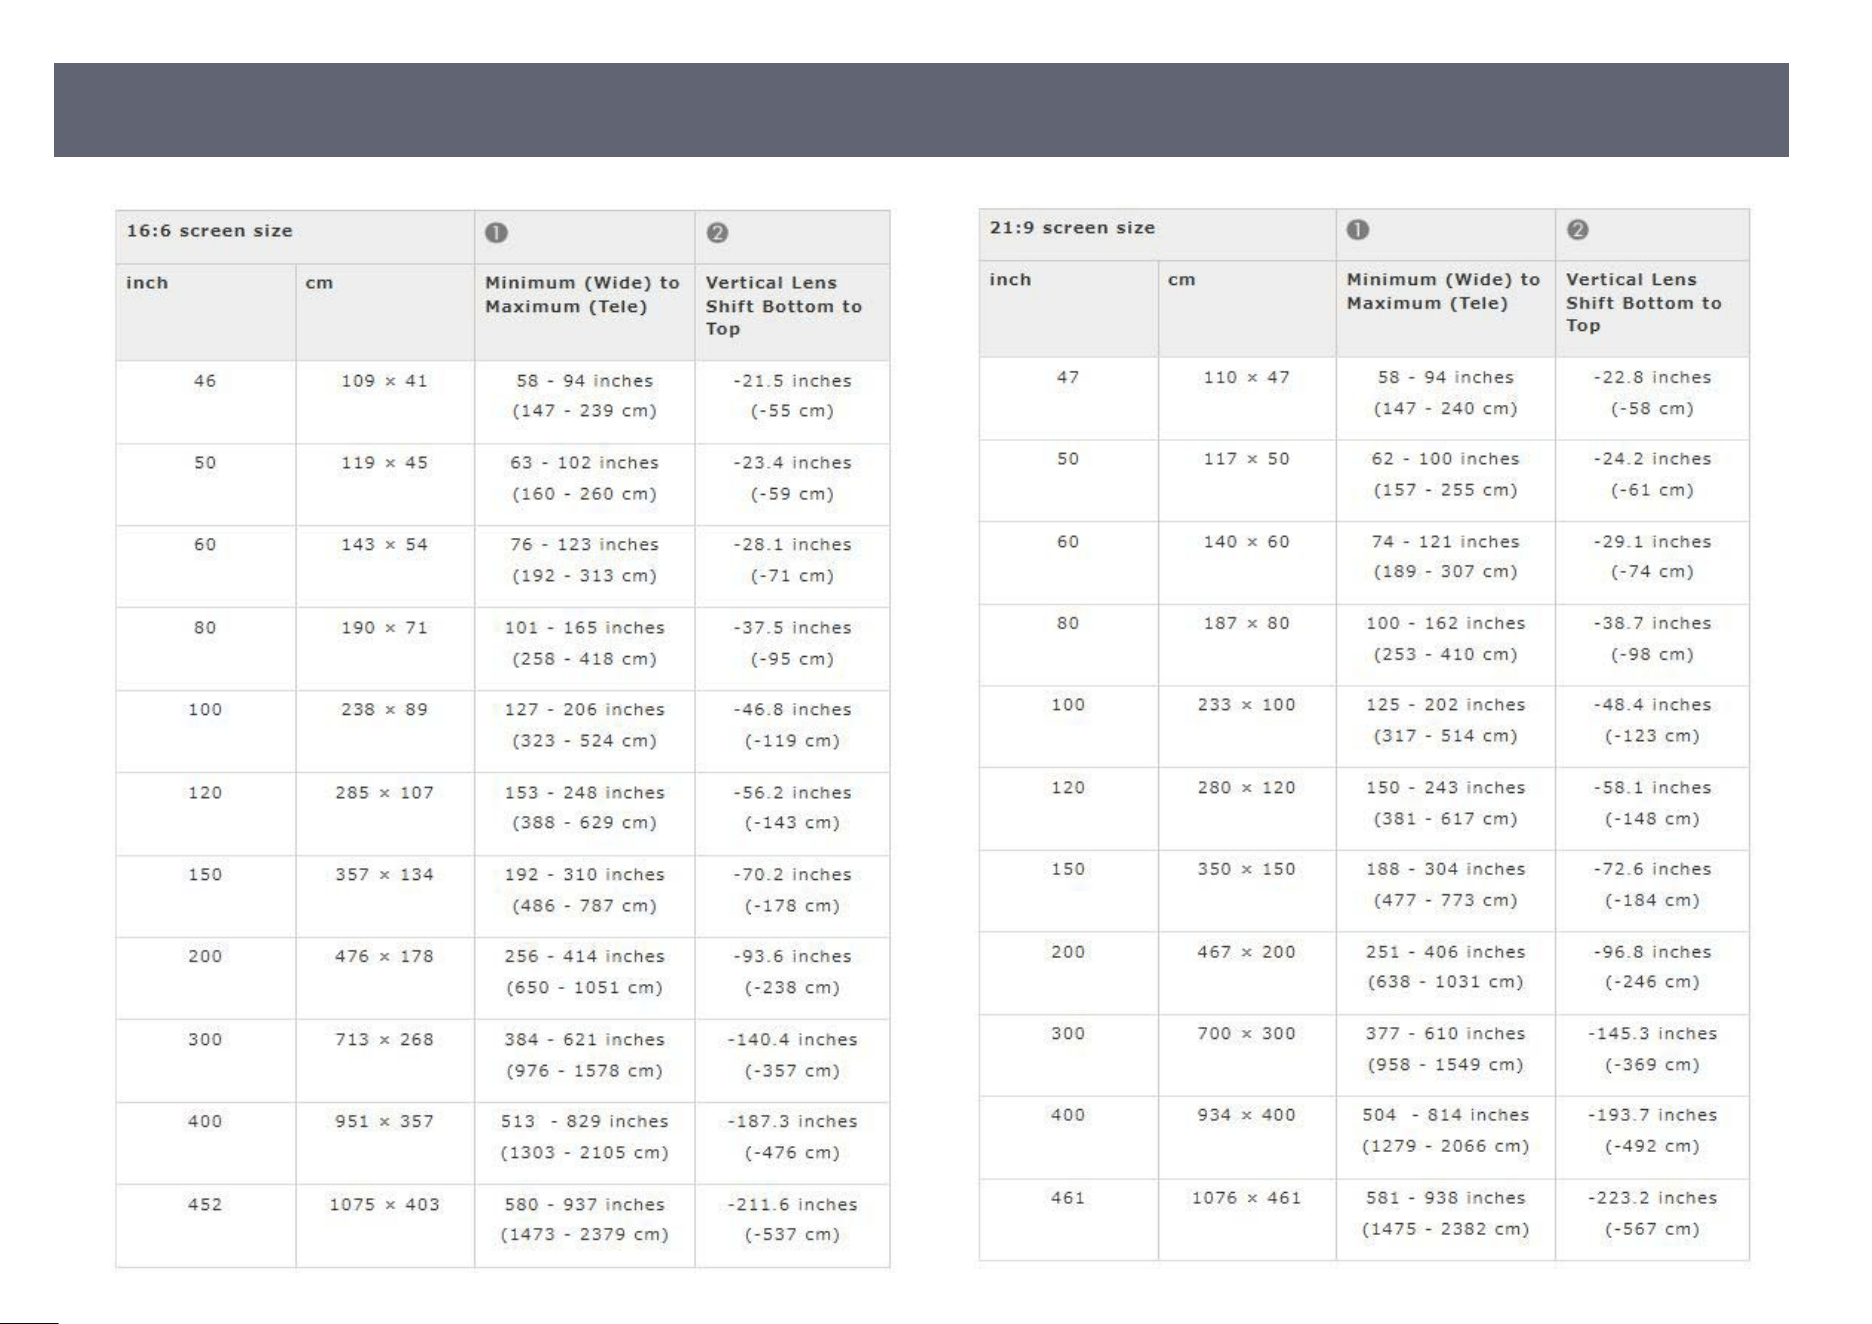
Screen Size and Projection Distance
268
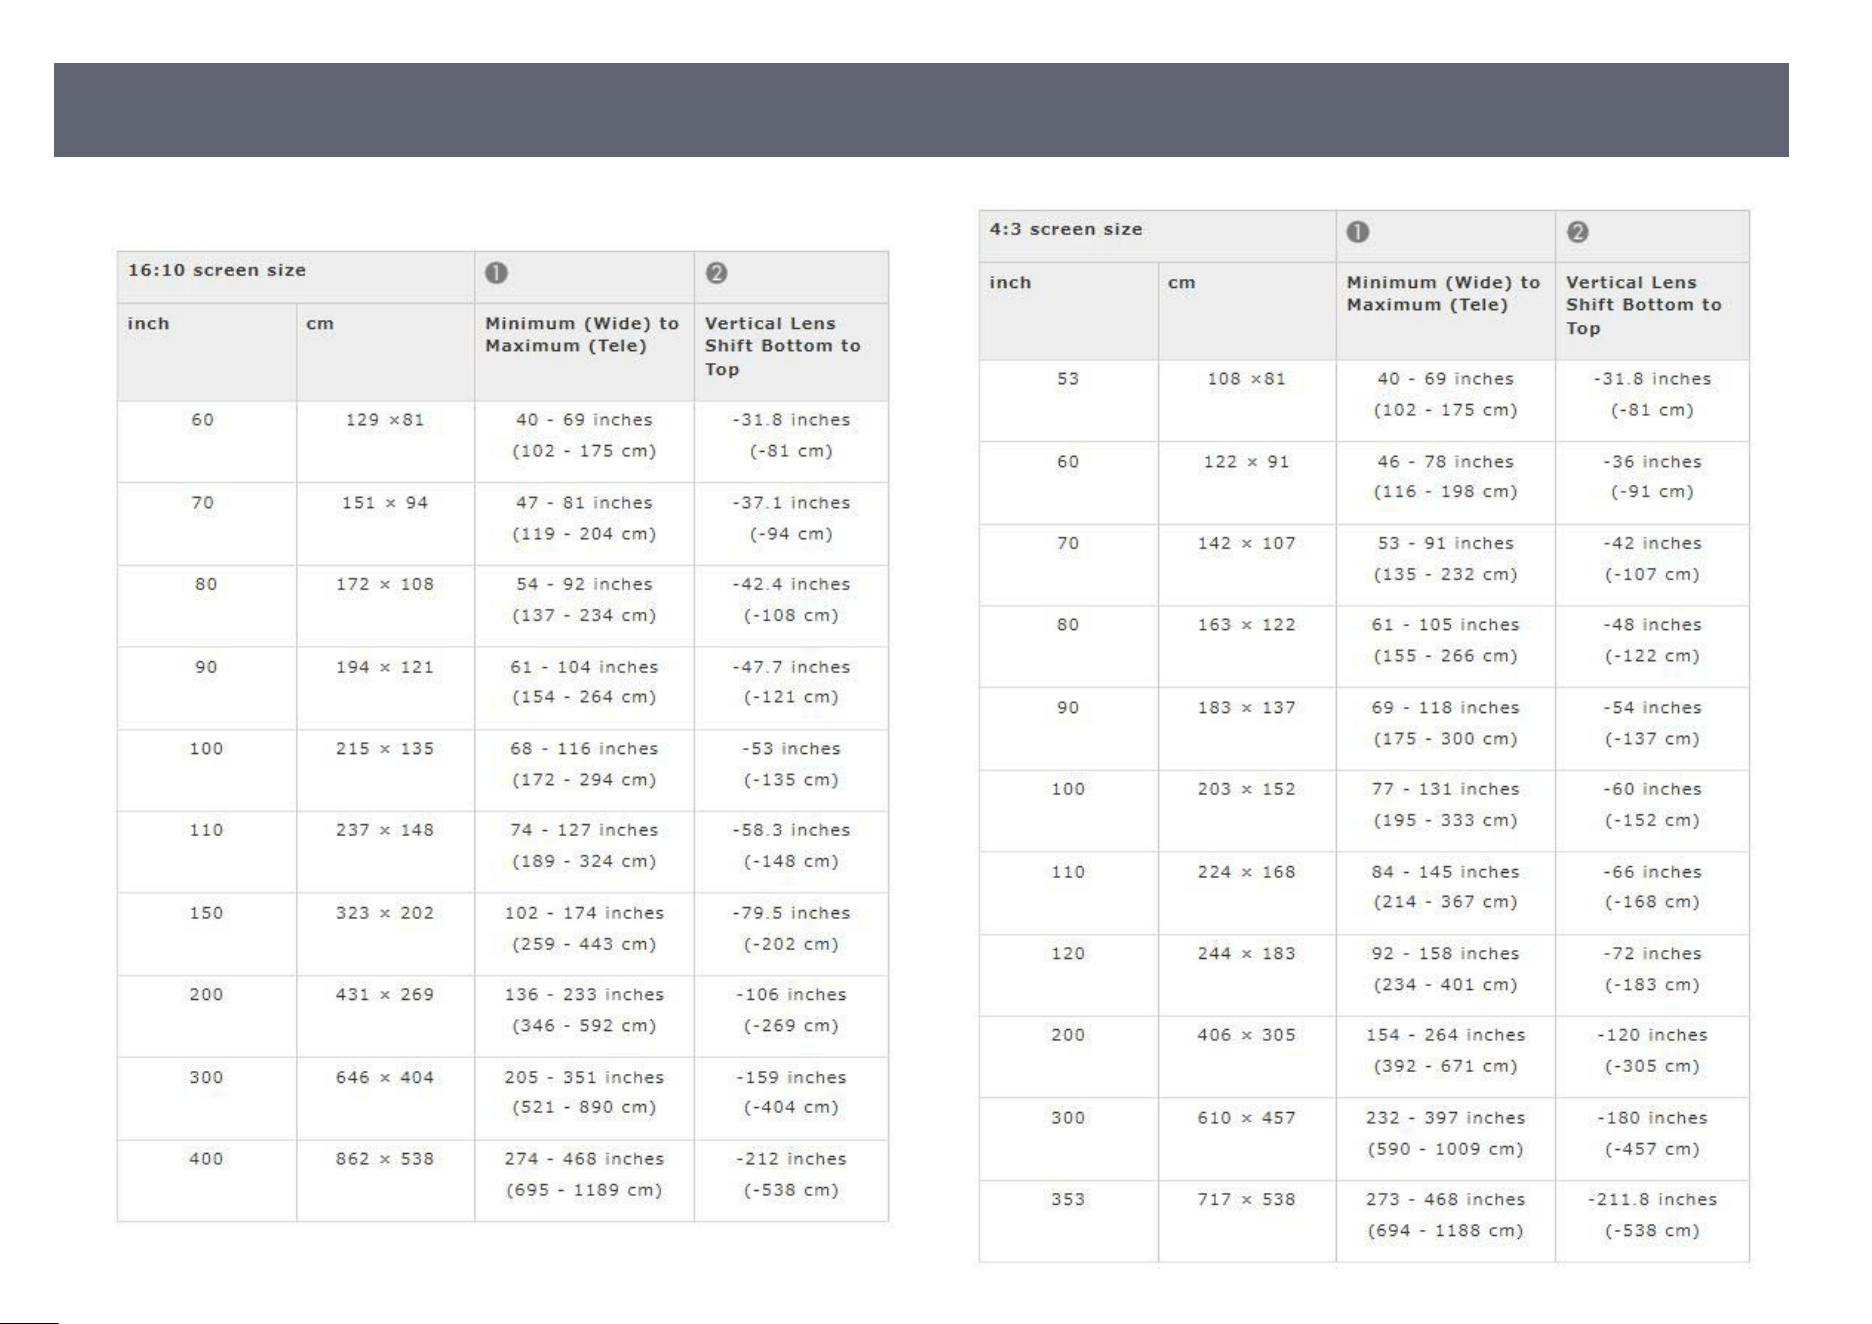
EB-L790SE/EB-L795SE/EB-L790SU/EB-L690SU/EB-L695SU
Screen Size and Projection Distance
269
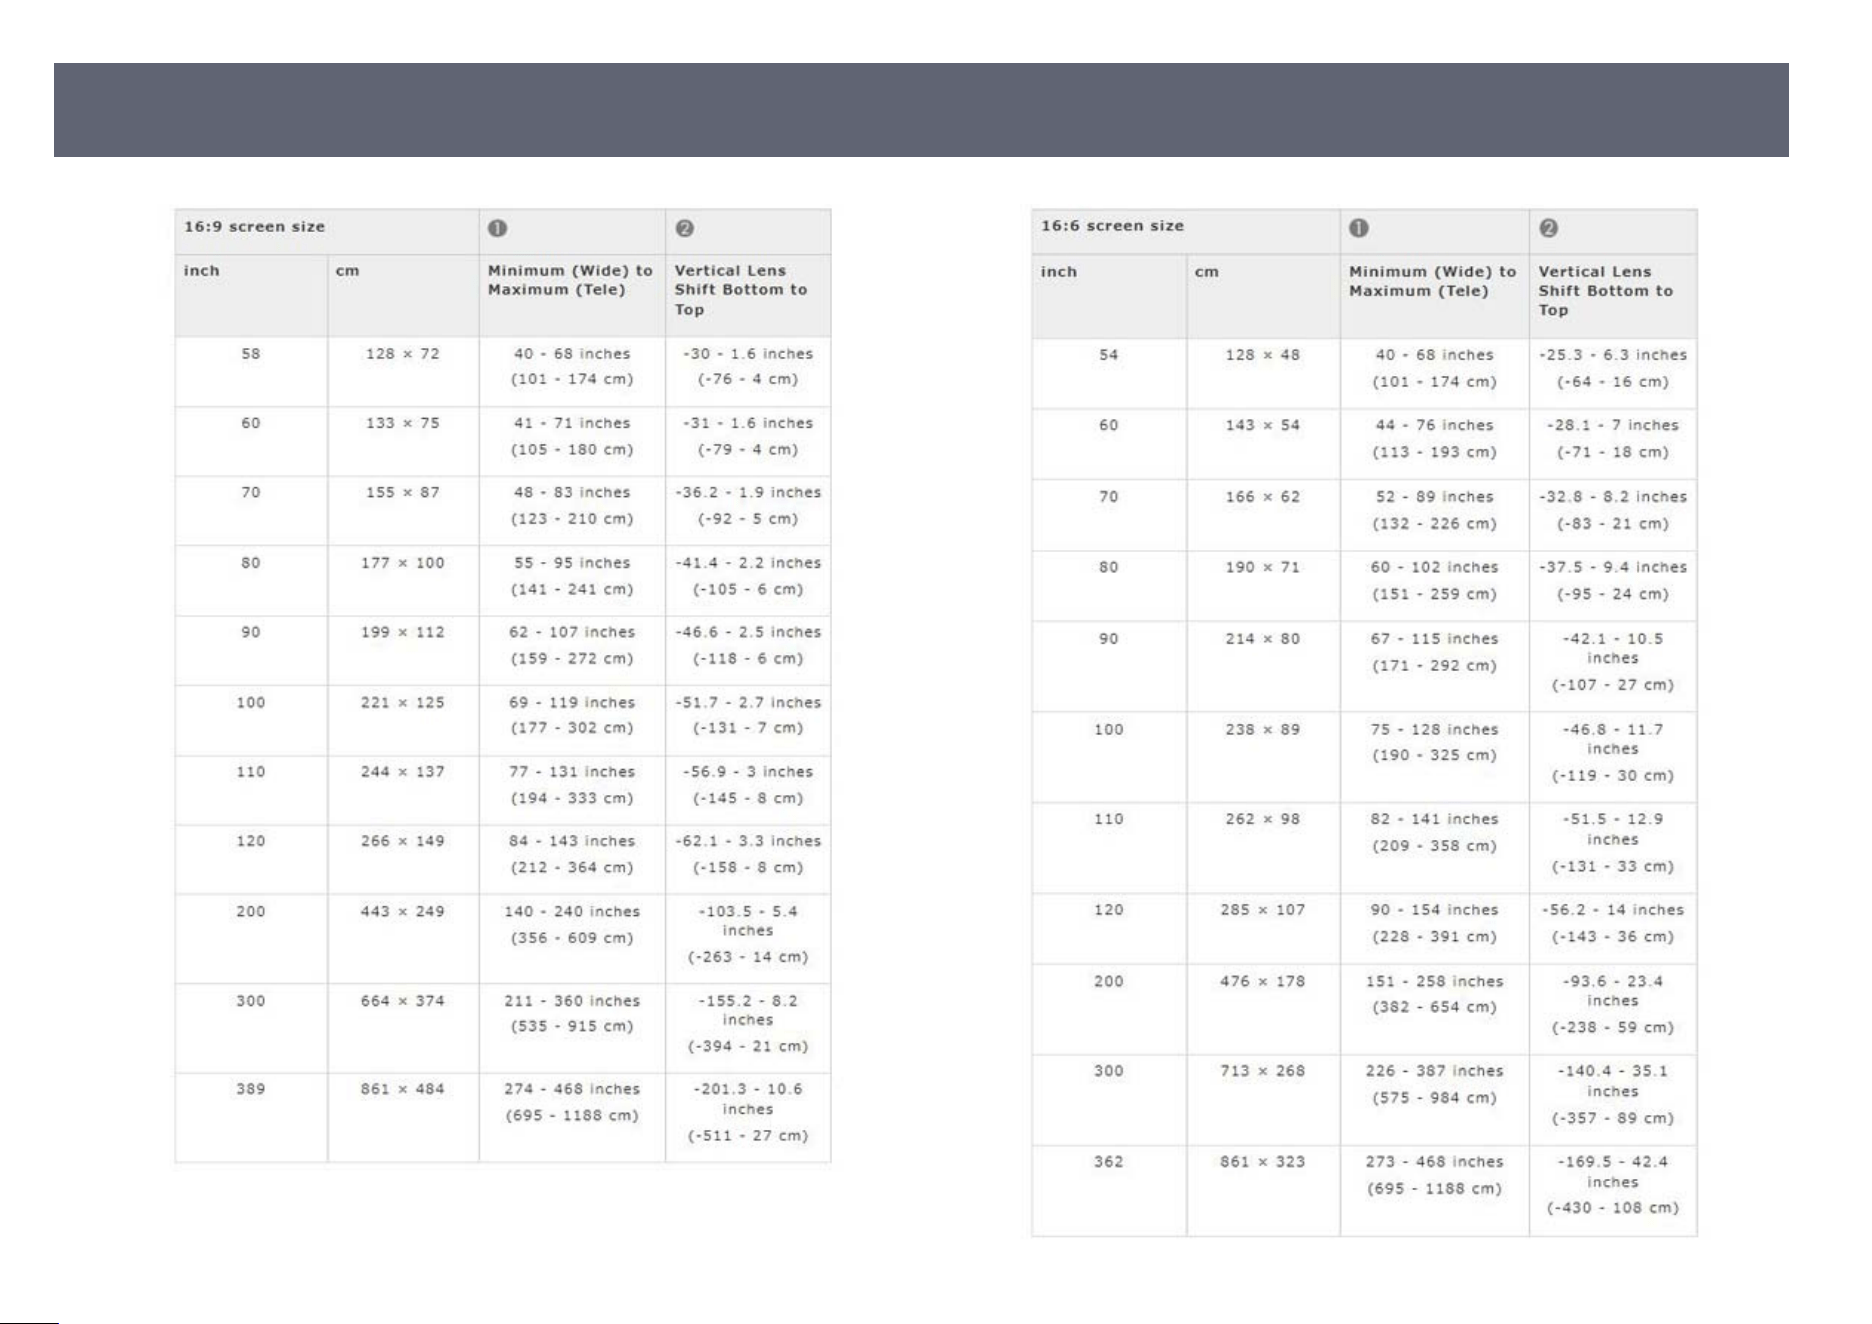
Screen Size and Projection Distance
270
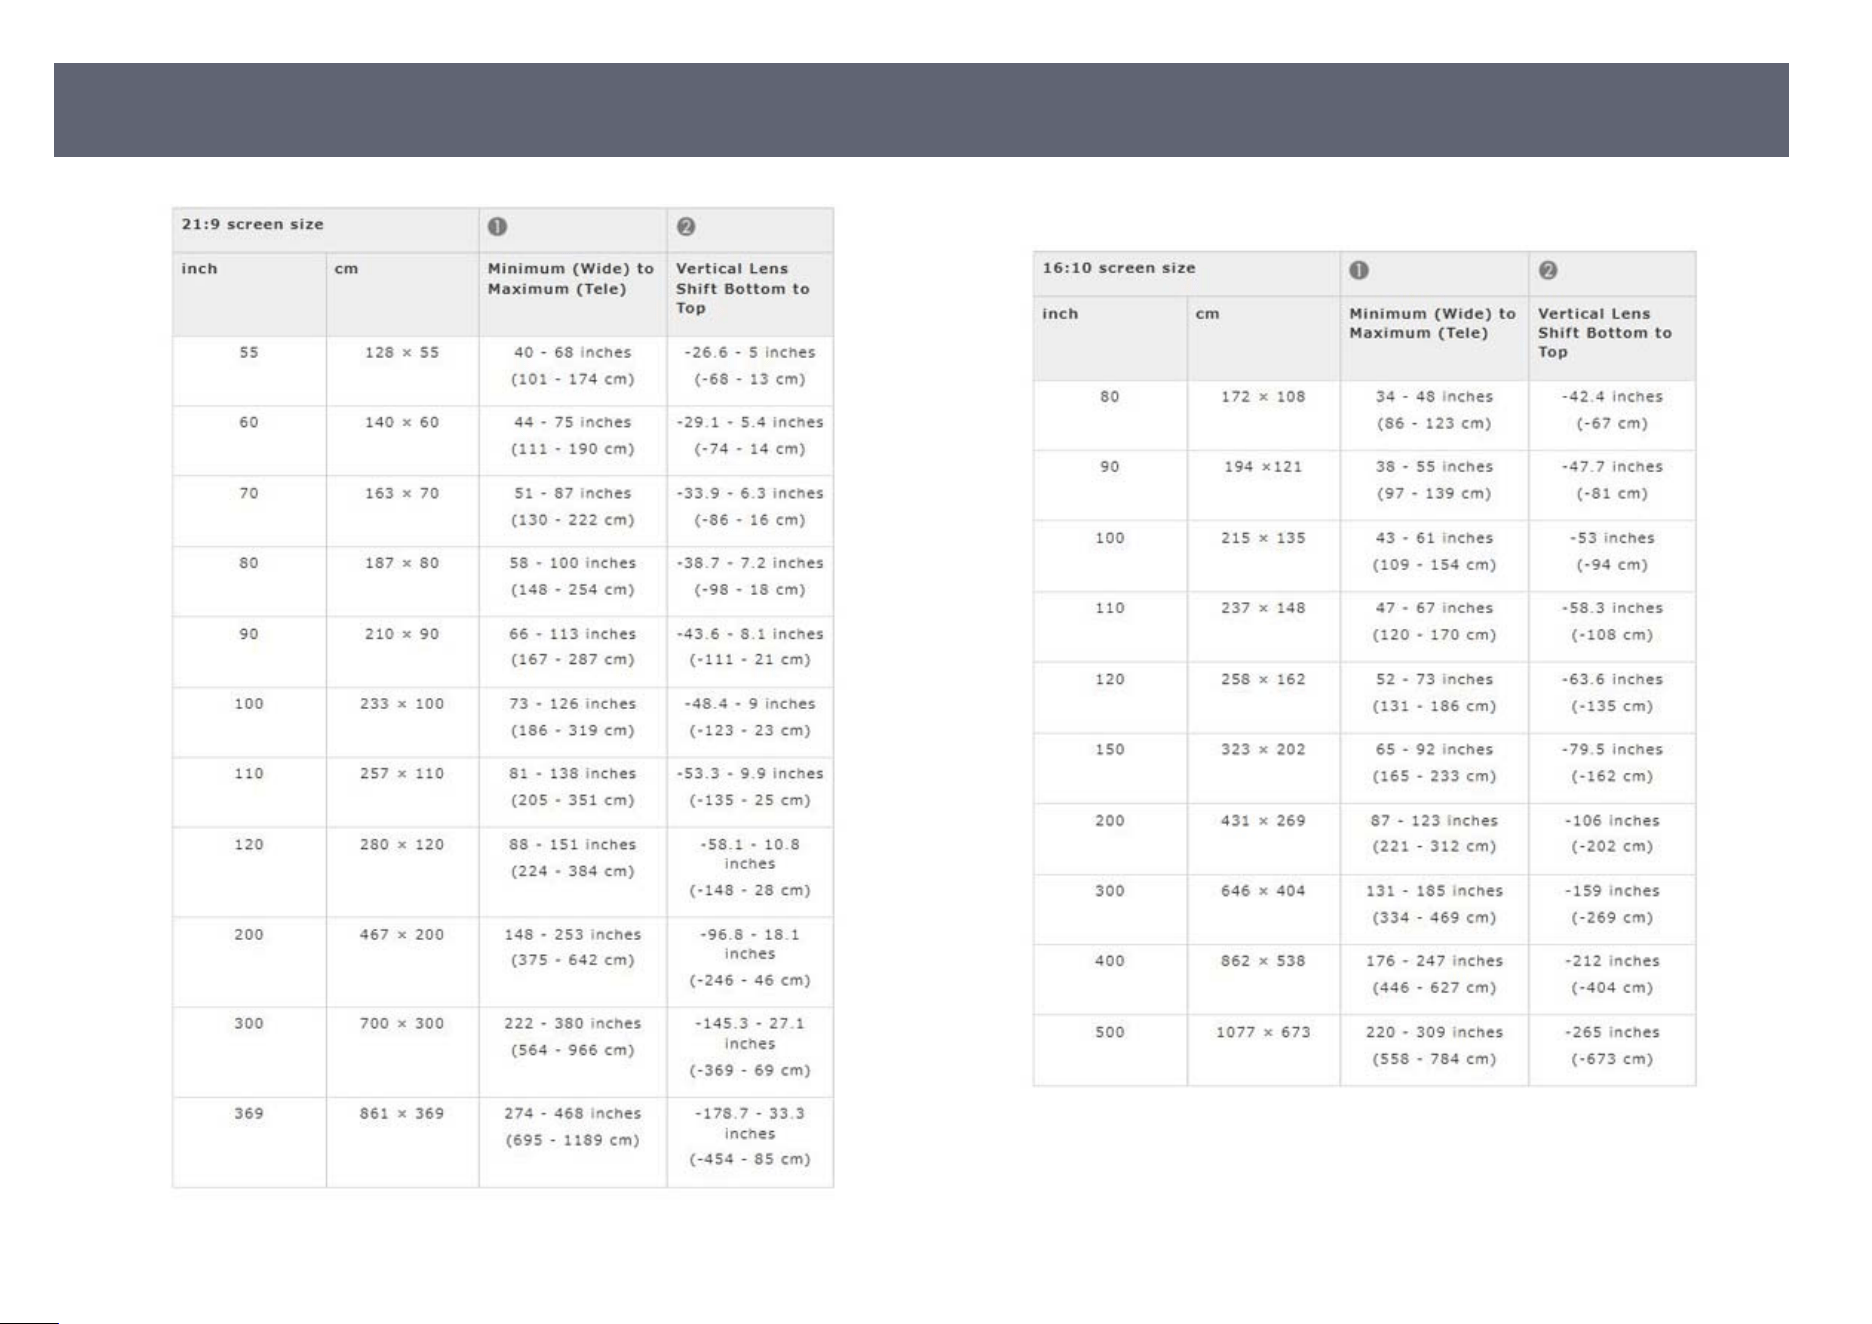
EB-L690SE/EB-L695SE
Screen Size and Projection Distance
271
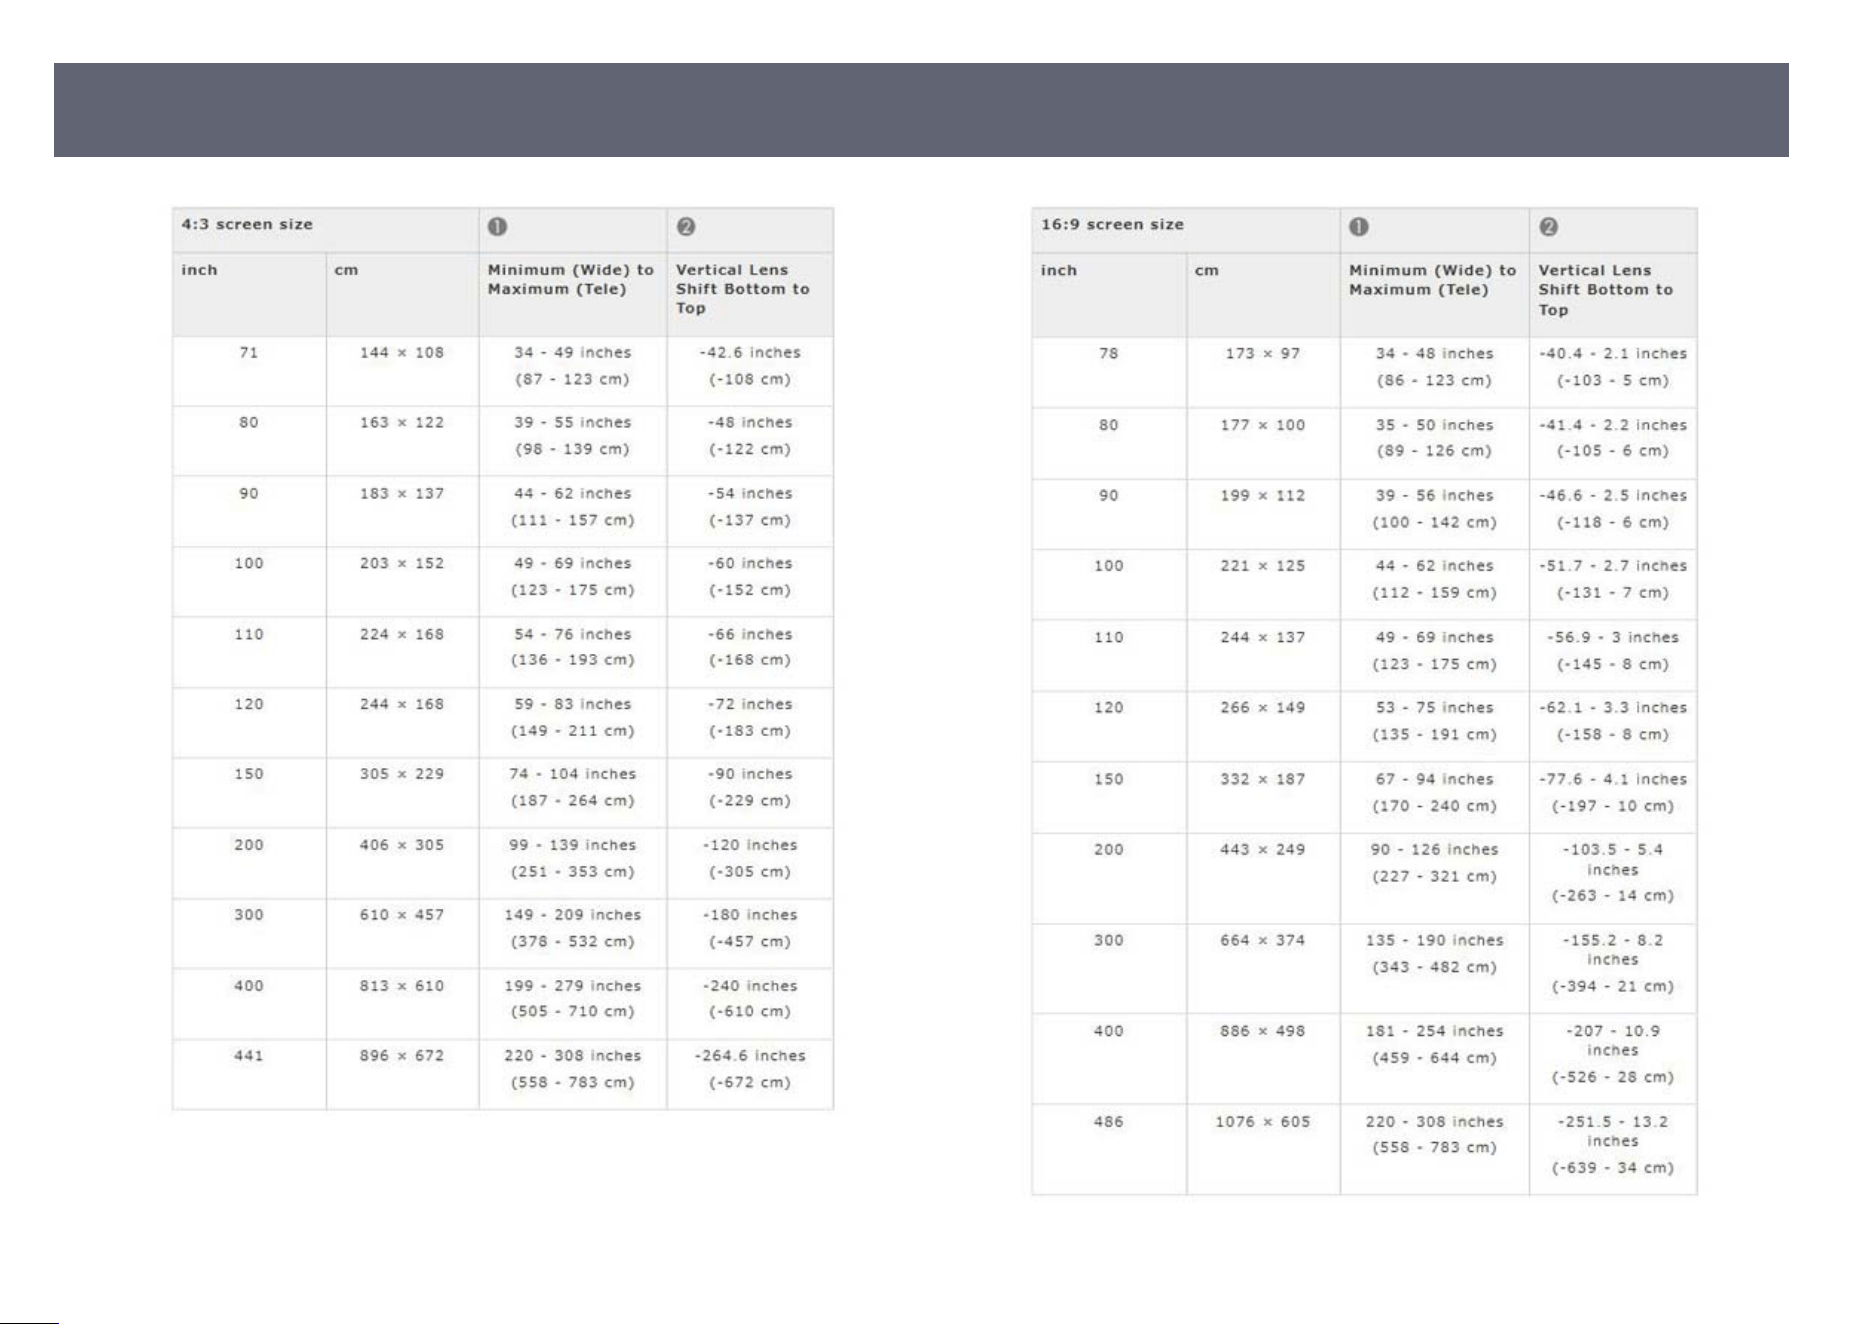
Screen Size and Projection Distance
272
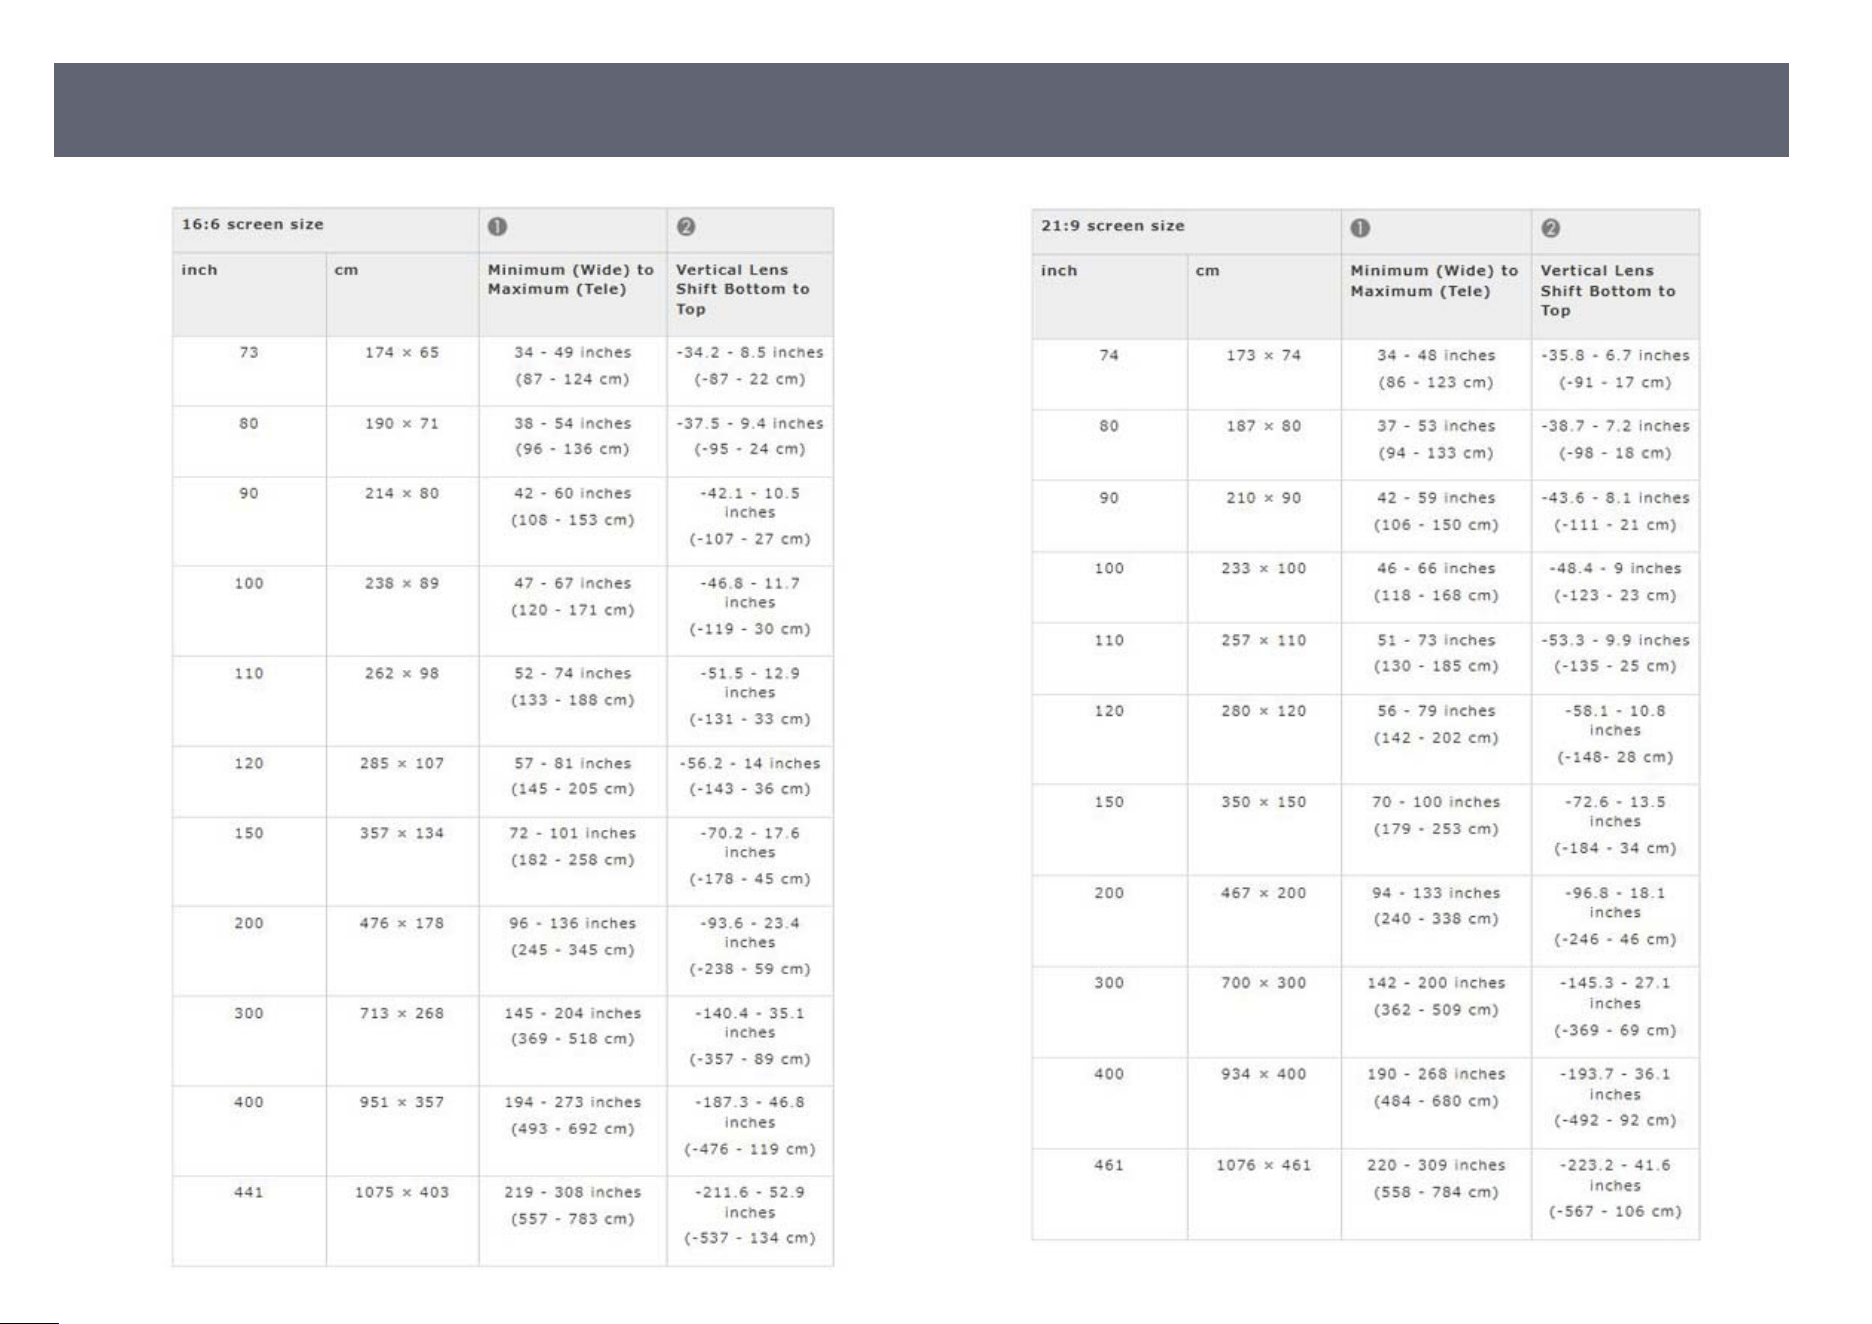
Screen Size and Projection Distance
273

See the Specications for detailed information on compatible refresh rates and
r
esolutions for each compatible video display format.
Supported Monitor Display Resolutions
274
Product name EB-L890E/EB-L895E/EB-L790SE/EB-L795SE/EB-
L690SE/EB-L695S
E/EB-L690E/EB-L890U/EB-
L790U/EB-L690U/EB-L690SU/EB-L695SU
Dimensions 17.3 x 4.8 x 12.0 inches (440 x 122 x 304 mm) (not
inc
luding raised section)
LCD panel size 0.67"
Display method 3LCD
Number of pixels WUXGA (1,920 (W) × 1,200 (H) dots) × 3
Screen Resolution 2,304,000 pixels (1,920 × 1,200 × 3)
Focus adjustment Manual
Zoom adjustment EB-L890E/EB-L895E/EB-L690E/EB-L890U/EB-
L790U/EB-L690U:
1.0 t
o 1.6 (O
ptical zoom)
EB-L790SE/EB-L795SE/EB-L690SU/EB-L695SU:
1.0 to 1.7 (Optical zoom)
EB-L690SE/EB-L695SE:
1.0 to 1.4 (Optical zoom)
Lens Shi M
anual
Maximum vertical direction: Approx. ±50%
Maximum horizontal direction: Approx. ±20%
Light source Laser diode
Light source output
po
wer
EB-L890E/EB-L895E/EB-L790SE/EB-L795SE/EB-
L890U:
Up to 177 W
EB-L690E/EB-L790U/EB-L690U/EB-L690SU/EB-
L695SU:
Up to 153 W
EB-L690SE/EB-L695SE:
Up to 165 W
Wavelength 449 to 461 nm
Light source operation
tim
e *
Normal or Quiet Light Source Mode: Up to about 20,000
hours
Extended Light Source Mode: Up to about 30,000 hours
Max. audio output EB-L890E/EB-L895E/EB-L790SE/EB-L795SE/EB-
L690E/EB-L890U/EB-L790U/EB-L690U/EB-
L690SU/EB-L695S
U:
10 W
EB-L690SE/EB-L695SE:
-
Laser class (internal laser
ligh
t source)
Class 4
Speaker EB-L890E/EB-L895E/EB-L790SE/EB-L795SE/EB-
L690E/EB-L890U/EB-L790U/EB-L690U/EB-
L690SU/EB-L695S
U:
1
EB-L690SE/EB-L695SE:
-
Power supply EB-L890E/EB-L895E/EB-L790SE/EB-L795SE/EB-
L890U:
100-240V AC±10% 50/60H
z 4.8 - 2.1 A
EB-L690SE/EB-L695SE/EB-L690E/EB-L790U/EB-
L690U/EB-L690SU/EB-L695SU:
100-240V AC±10% 50/60Hz 4.4 - 2.0 A
Projector Specications
275
Operating power
con
sumption (100 to 120
V area)
EB-L890E/EB-L895E/EB-L790SE/EB-L795SE/EB-
L890U:
Light Source Mode: Normal, Custom: 470 W
Light Source Mode: Quiet: 341 W
Light Source Mode: Extended: 321 W
EB-L690SE/EB-L695SE:
Light Source Mode: Normal, Custom: 432 W
Light Source Mode: Quiet: 313 W
Light Source Mode: Extended: 295 W
EB-L690E/EB-L790U/EB-L690U/EB-L690SU/EB-
L695SU:
Light Source Mode: Normal, Custom: 415 W
Light Source Mode: Quiet: 305 W
Light Source Mode: Extended: 287 W
Operating power
con
sumption (220 to 240
V area)
EB-L890E/EB-L895E/EB-L790SE/EB-L795SE/EB-
L890U:
Light Source Mode: Normal, Custom: 450 W
Light Source Mode: Quiet: 330 W
Light Source Mode: Extended: 310 W
EB-L690SE/EB-L695SE:
Light Source Mode: Normal, Custom: 415 W
Light Source Mode: Quiet: 303 W
Light Source Mode: Extended: 286 W
EB-L690E/EB-L790U/EB-L690U/EB-L690SU/EB-
L695SU:
Light Source Mode: Normal, Custom: 399 W
Light Source Mode: Quiet: 295 W
Light Source Mode: Extended: 278 W
Standby power
con
sumption
When Standby Mode is set to Wired LAN
Communication: 2.4 W
When Standby Mode is set to ECO: 0.3 W (100 to 120 V
area), 0.4 W (220 to 240 V area)
Operating altitude 0 to 10,000 feet (3,048 m)
Operating temperature ** 0 to 7,500 feet (2,286 m): 32 to 113°F (0 to 45°C)
(Humidi
ty of 20 to 80%, No condensation)
7,500 to 10,000 feet (2,287 to 3,048 m): 32 to 104°F (0 to
40°C) (Humidity of 20 to 80%, No condensation)
Storage temperature 14 to 140°F (-10 to 60°C) (No condensation)
Mass EB-L890E/EB-L895E/EB-L790SE/EB-L795SE/EB-
L890U/EB-L690SU/EB-L695S
U:
Approx. 20.9 lb (9.5 kg)
EB-L690E/EB-L790U/EB-L690U:
Approx. 19.8 lb (9.0 kg)
EB-L690SE/EB-L695SE:
Approx. 22.0 lb (10.0 kg)
* Approximate time until the light source brightness decreases to half of
its o
riginal value. (Assuming the projector is being used in an environment
containing airborne particles of 0.04 to 0.2 mg/m3. is is an approximate guide
only and may change depending on the projector’s usage and surroundings.)
** Light source brightness automatically dims if the surrounding temperature
gets too high. (Approximately 95°F (35°C) at an altitude of 0 to 7,500 feet
(2,286 m), and approximately 86°F (30°C) at an altitude of 7,500 to 10,000
feet (2,287 to 3,048 m); however, this may vary depending on the surrounding
environment.)
is product is also designed for IT power distribution system with phase-to-
phase voltage 230V.
e rating label is attached on the bottom surface of the projector.
is product is certied for wireless communication in Zambia. See the
following URL for the certication number.
https://download2.ebz.epson.net/sec_pubs_visual/zicta/
g
Related Links
•
"Connector Specications" p.277
Projector Specications
276
Connector Specications
Audio Out port 1 Stereo mini pin jack
Ou
tput Level: 2Vrms
Output Impedance: 100 ohm
HDMI1 port 1 HDMI (Audio is only supported by PCM)
HDMI2 port 1 HDMI (Audio is only supported by PCM)
HDMI Out port 1 HDMI (Audio is only supported by PCM)
USB-A ports 2
USB connector (Type A for
5V 2.0A
and for
)
Service port 1 USB connector (Type B)
LAN port 1 RJ-45
HDBaseT port 1 RJ-45
RS-232C port 1 Mini D-Sub 9-pin (male)
•
USB-A and USB-B port supports USB 2.0. However, USB ports are not
guaranteed to operate all devices that support USB.
•
USB-B port does not support USB 1.1.
Projector Specications
277

See the Specications for external dimension diagrams.
External Dimensions
278
Your projector supports the following features and options of the Epson
Pr
ojector Content Manager soware.
Features/Options
Simultaneous playback -
Save the playlist to the projector via a network ✓
Settings > Vi
deo Format Auto Select ✓
AVI Format ✓
MP4 Format -
Supported Features for Epson Projector Content Manager
279
e following table lists the meaning of the safety symbols labeled on the
e
quipment.
No. Symbol mark Approved
st
andards
Description
A
IEC60417
No
. 5007
"ON" (power)
To indicate connection to the mains.
B
IEC60417
No. 5008
"OFF" (power)
To indicate disconnection from the
mains.
C
IEC60417
No
. 5009
Stand-by
To identify the switch or switch
position by means of which part of the
equipment is switched on in order to
bring it into the stand-by condition.
D
ISO7000
N
o
. 0434B,
IEC3864-B3.1
Caution
To identify general caution when using
the product.
E
IEC60417
No
. 5041
Caution, hot surface
To indicate that the marked item can
be hot and should not be touched
without taking care.
F
IEC60417
No
. 6042
ISO3864-B3.6
Caution, risk of electric shock
To identify equipment that has risk of
electric shock.
G
IEC60417
No
. 5957
For indoor use only
To identify electrical equipment
designed primarily for indoor use.
No. Symbol mark Approved
st
andards
Description
H
IEC60417
No
. 5926
Polarity of d.c. power connector
To identify the positive and negative
connections (the polarity) on a piece
of equipment to which a d.c. power
supply may be connected.
I
— e same as No. 8.
J
IEC60417
No
. 5001B
Battery, general
On battery powered equipment. To
identify a device for instance a cover
for the battery compartment, or the
connector terminals.
K
IEC60417
No
. 5002
Positioning of cell
To identify the battery holder itself and
to identify the positioning of the cell(s)
inside the battery holder.
L
— e same as No. 11.
M
IEC60417
No
. 5019
Protective earth
To identify any terminal which is
intended for connection to an external
conductor for protection against
electric shock in case of a fault, or the
terminal of a protective earth electrode.
N
IEC60417
No
. 5017
Earth
To identify an earth (ground) terminal
in cases where neither the symbol No.
13 is explicitly required.
List of Safety Symbols and Instructions
280
No. Symbol mark Approved
st
andards
Description
O
IEC60417
No
. 5032
Alternating current
To indicate on the rating plate that the
equipment is suitable for alternating
current only; to identify relevant
terminals.
P
IEC60417
No. 5031
Direct current
To indicate on the rating plate that the
equipment is suitable for direct current
only; to identify relevant terminals.
Q
IEC60417
No
. 5172
Class II equipment
To identify equipment meeting the
safety requirements specied for Class
II equipment according to IEC 61140.
R
ISO 3864 General prohibition
To iden
tify actions or operations that
are prohibited.
S
ISO 3864 Contact prohibition
To in
dicate injury that could occur
due to touching a specic part of the
equipment.
T
— Never look into the optical lens while
t
h
e projector is on.
U
— To indicate that the marked item don’t
pl
ace anything on projector.
V
ISO3864
IEC60825-1
Caution, laser radiation
To in
dicate the equipment has a laser
radiation part.
No. Symbol mark Approved
st
andards
Description
W
ISO 3864 Disassembly prohibition
To in
dicate a risk of injury, such as
electric shock, if the equipment is
disassembled.
X
IEC60417
No. 5266
Standby, partial standby
To indicate that part of the equipment
is in the ready status.
Y
ISO3864
IEC60417
No
. 5057
Caution, movable parts
To indicate that you must keep away
from movable parts according to
protection standards.
Z
IEC60417
No. 6056
Caution (Moving Fan Blades)
As a safety precaution, stay away from
the moving fan blades.
a
IEC60417
No
. 6043
Caution (Sharp Corners)
To indicate sharp corners that should
not be touched.
b
— To indicate that looking into the lens
whi
le projecting is prohibited.
c
ISO7010
N
o
. W027
ISO 3864
Warning, Optical radiation (such as
UV, visible radiation, IR)
Taking care to avoid injury to eyes and
skin when in the vicinity of optical
radiation.
d
IEC60417
No
. 5109
Not to be used in residential areas.
To identify electrical equipment which
is not suitable for a residential area.
List of Safety Symbols and Instructions
281
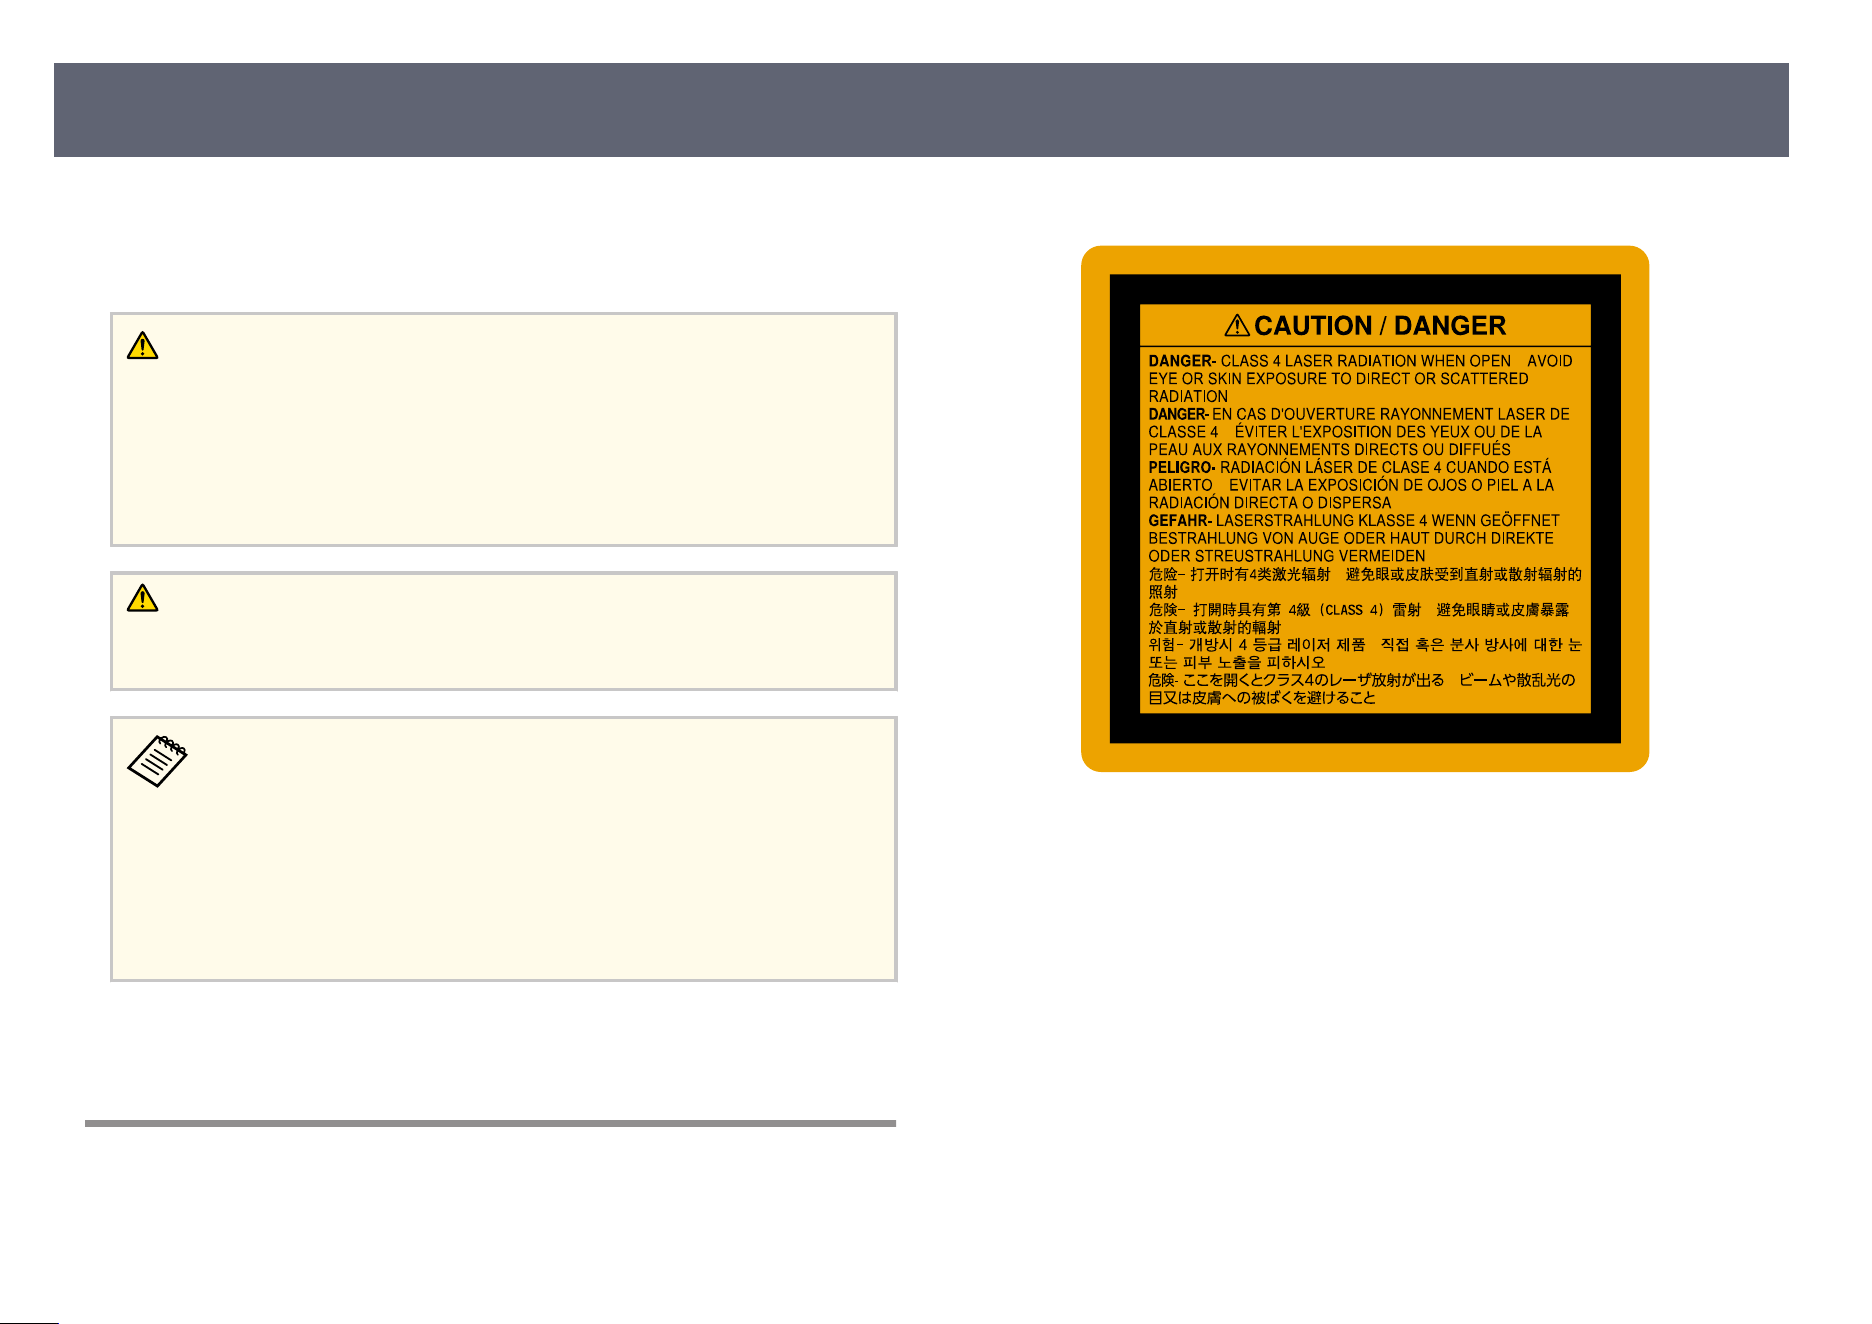
is projector is a Class 1 laser product that complies with the IEC60825-1:2014
an
d EN60825-1:2014 + A11:2021 international standard for lasers.
Follow these safety instructions when using the projector.
Warning
•
is
is a class A product. In a domestic environment this product may cause radio
interference in which case the user may be required to take adequate measures.
•
Do not open the projector's case. e projector contains a high-powered laser.
•
Possibly hazardous optical radiation emitted from this product. Do not look at
operating light source. Eye injury may result.
Caution
Do n
ot disassemble the projector when disposing of it. Dispose according to your
local or national laws and regulations.
e projector uses a laser as the light source. e laser has the following
c
haracteristics.
•
Depending on the surroundings, the brightness of the light source may
decline. e brightness declines a lot when the temperature gets too
high.
•
e brightness of the light source declines the longer it is used. You can
change the relationship between usage time and decline in brightness
settings.
g
Related Links
•
"Las
er Warning Labels" p.282
Laser Warning Labels
Laser warning labels are attached on the projector.
Inside
Laser Safety Information
282
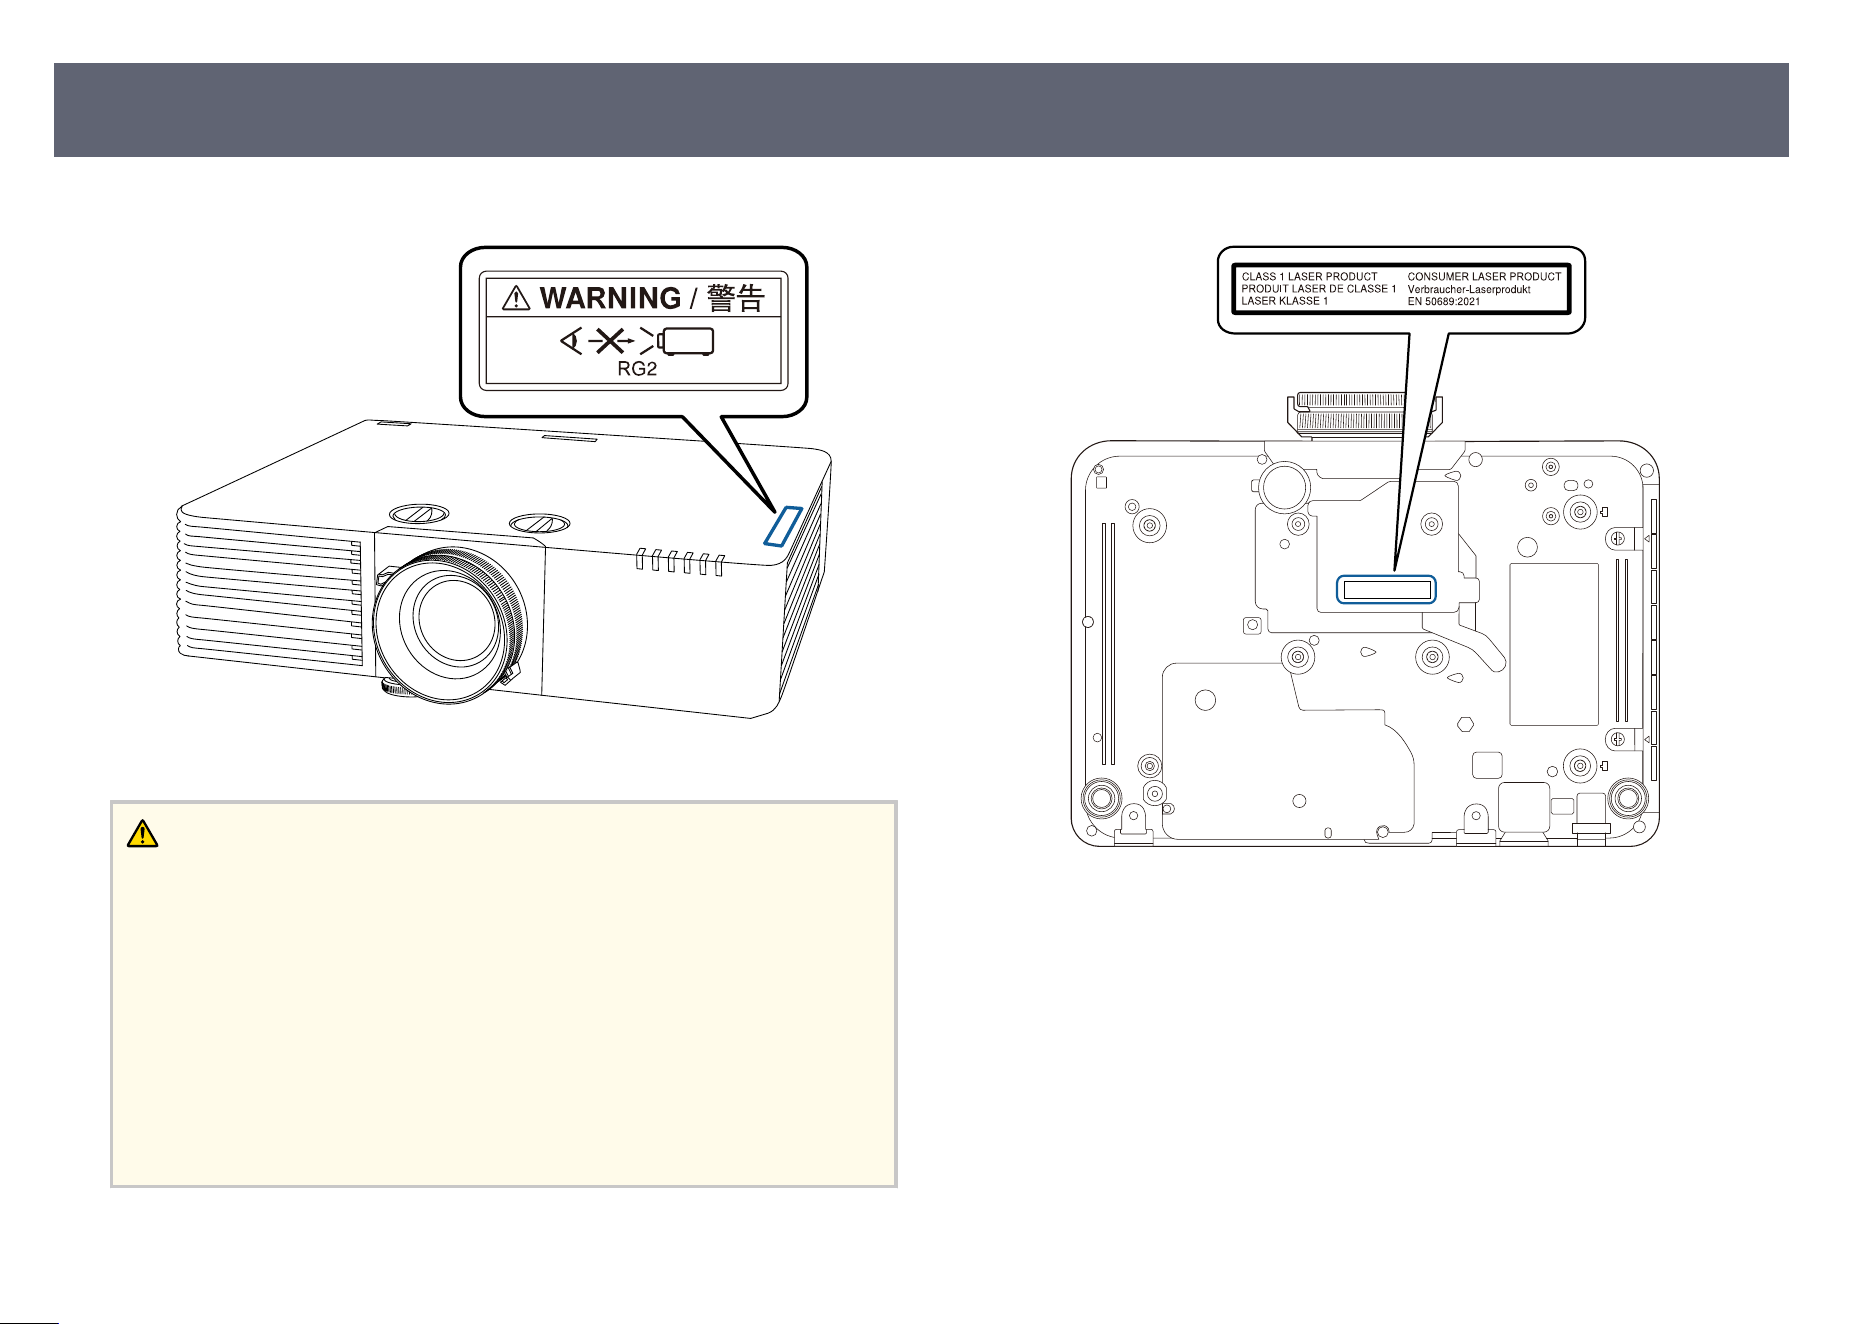
Top
Warning
•
Ne
ver look into the projector lens when the laser is on. is can damage your eyes
and is especially dangerous for children and pets.
•
As with any bright source, do not stare into the beam, RG2 IEC/EN 62471-5:2015.
•
When turning on the projector at a distance using the remote control, make sure
no one is looking into the lens.
•
Do not allow small children to operate the projector. Children must be
accompanied by an adult.
•
Do not look into the lens during projection. Also, do not look into the lens using
optical devices, such as a magnifying glass or telescope. is could cause visual
impairment.
Bottom
is projector is a consumer Class 1 laser product that complies with
EN50689:2021 s
tandard.
is projector is the product that projects images onto walls, screens, etc.
e label attached on the projector varies depending on the countries and
regions.
For North/South America
e rating label contains the certication and identication information for the
projector.
Rating Label Position
Laser Safety Information
283
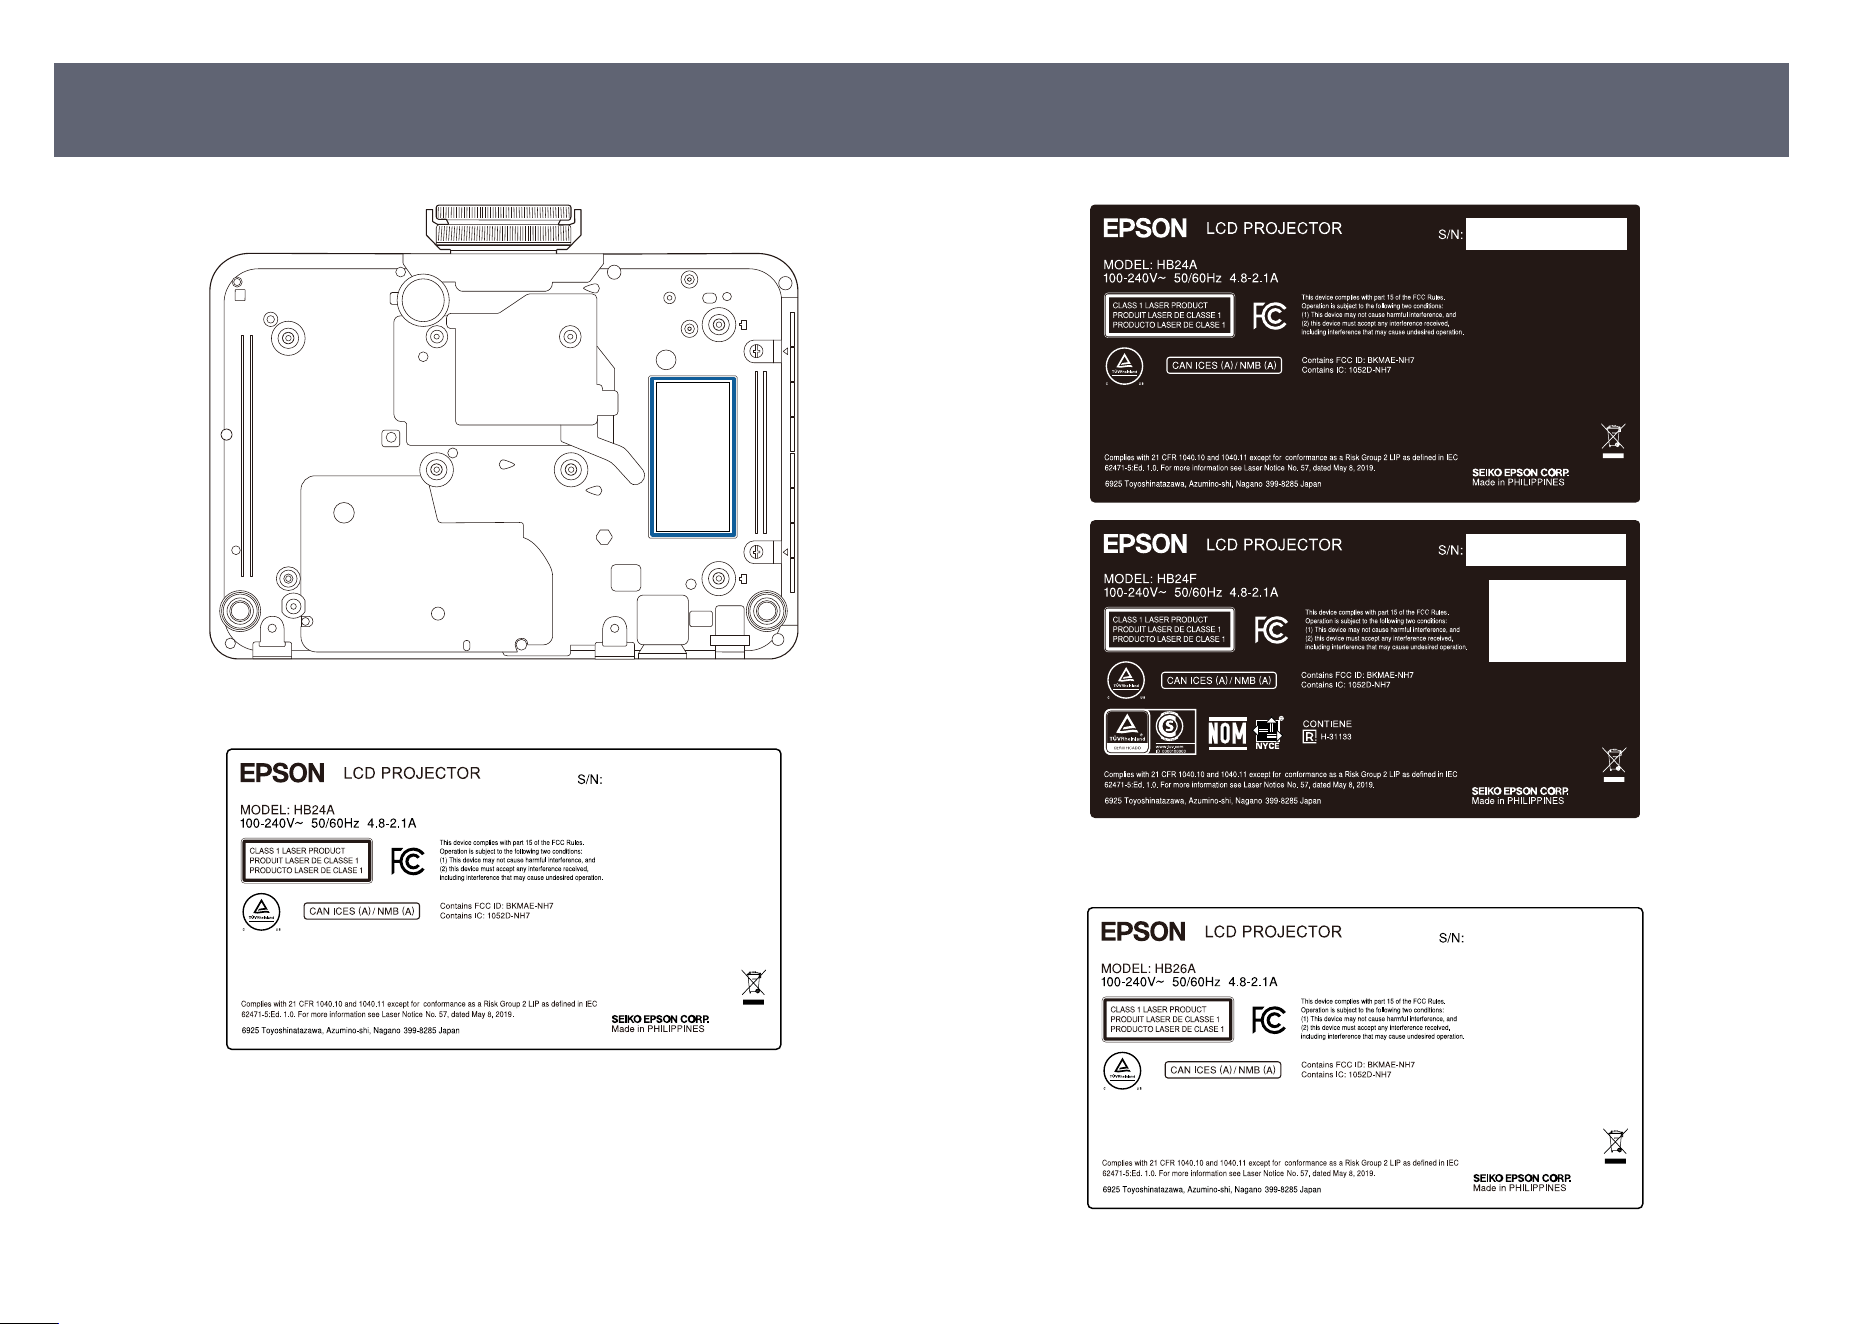
EB-L890E
EB-L895E
EB-L790SE
Laser Safety Information
284
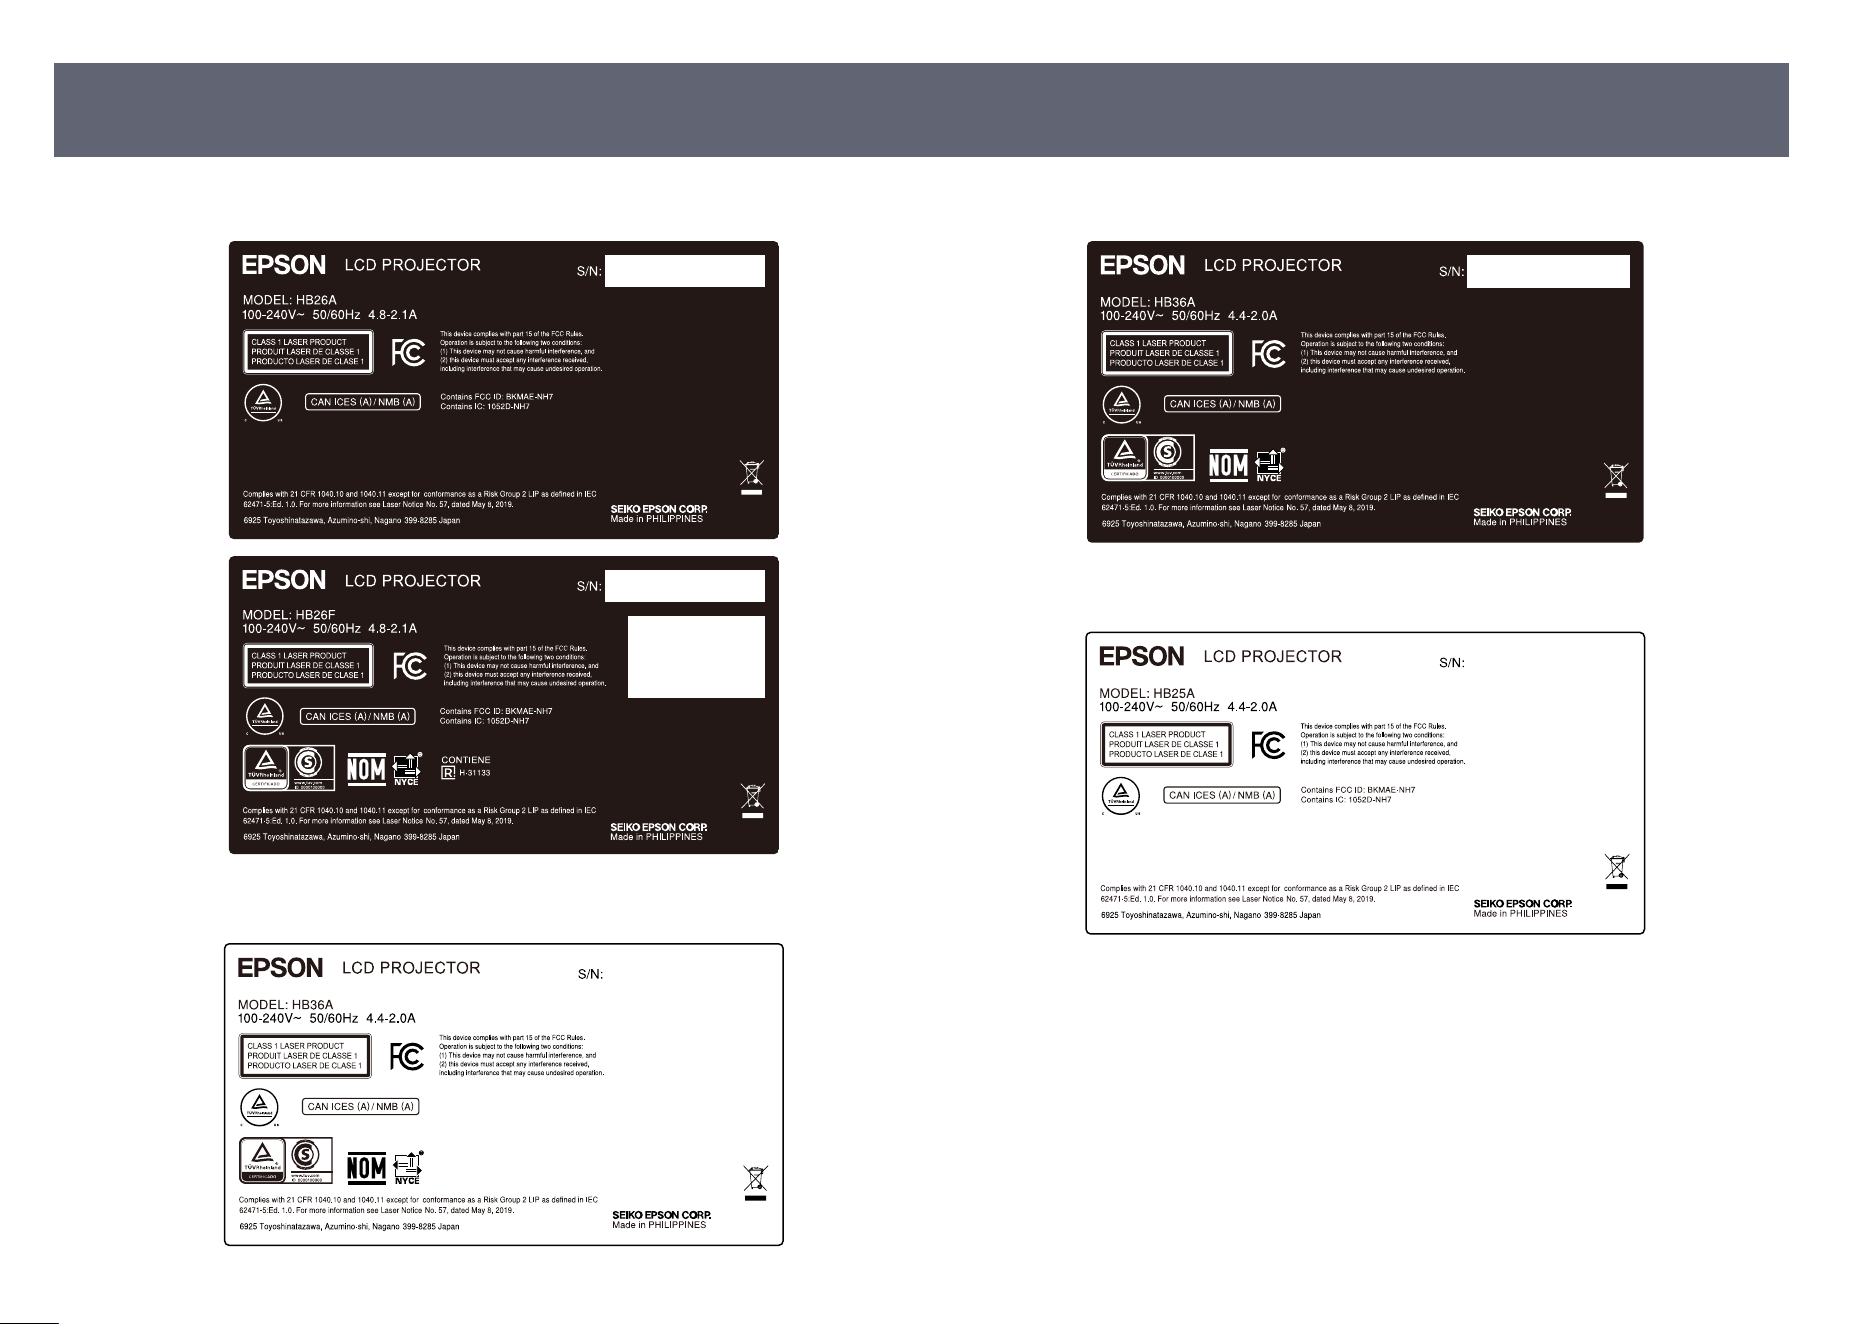
EB-L795SE
EB-L690SE
EB-L695SE
EB-L690E
EB-L890U
Laser Safety Information
285
EB-L790U
EB-L690U
EB-L690SU
Laser Safety Information
286
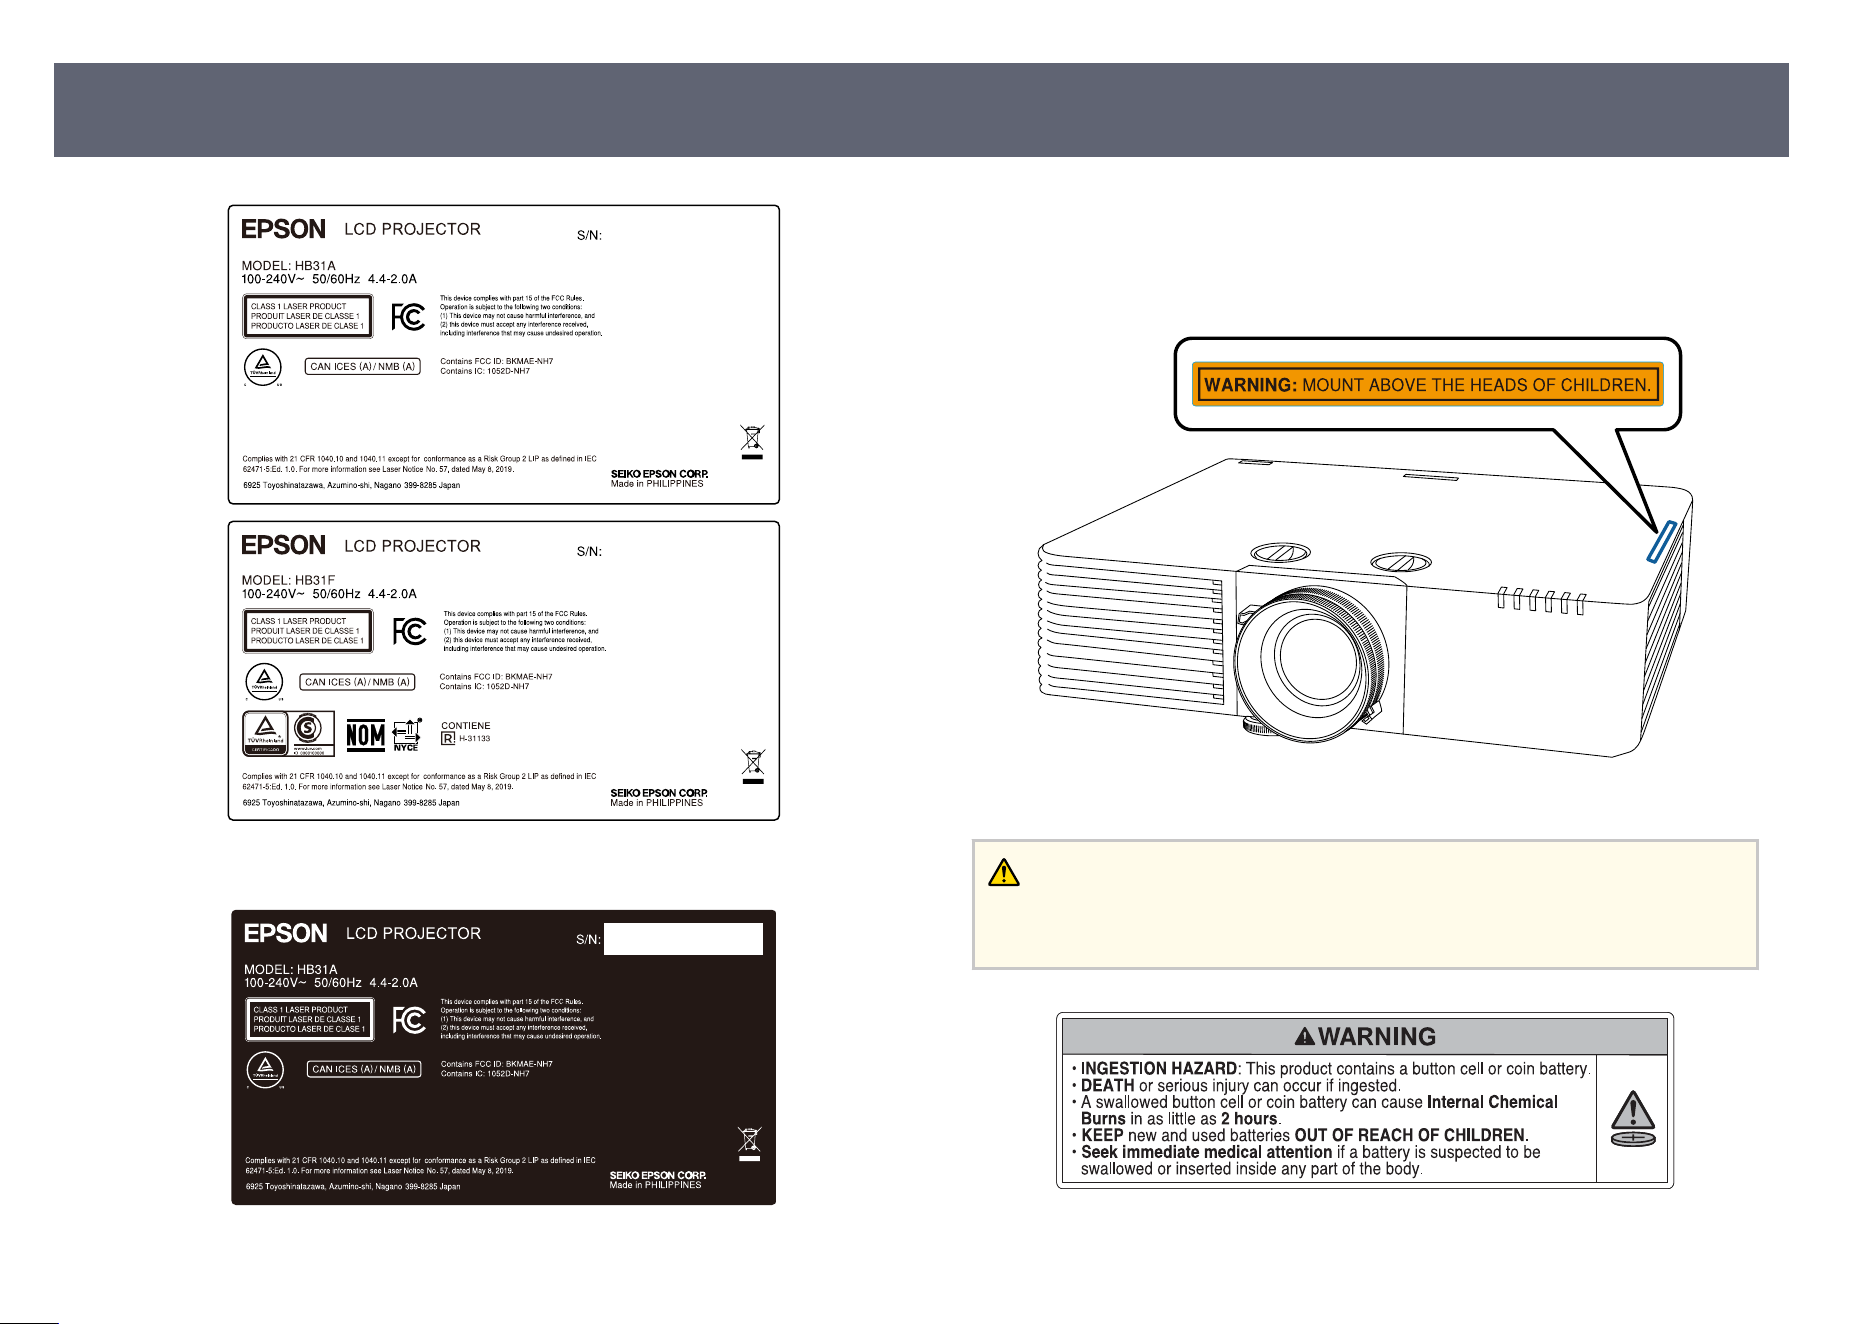
EB-L695SU
Complies with FDA performance standards for laser products except for
conf
ormance as a Risk Group 2 LIP as dened in IEC 62471-5: Ed. 1.0. For
more information see Laser Notice No. 57, dated May 8, 2019.
EB-L890E/EB-L895E/EB-L890U/EB-L790U
Warning
MO
UNT ABOVE THE HEADS OF CHILDREN. e use of a ceiling mount is
recommended with this product to place it above the eyes of children.
Laser Safety Information
287

•
is
product contains an inaccessible, non-replaceable coin battery. Coin
batteries are an ingestion hazard.
•
Keep new and used coin batteries out of the reach of children. Even used
batteries may cause severe injury or death.
•
Seek immediate medical attention if a battery is ingested and follow any other
consensus medical advice. Call a local poison control center for treatment
information.
•
Remove and immediately recycle or dispose of used batteries according to
local regulations. Do NOT dispose of batteries in household trash.
•
Do not force discharge, recharge, or disassemble batteries, heat them above
the manufacturer's specied temperature rating, or incinerate them. Doing
so may result in injury due to venting, leakage or explosion, resulting in
chemical burns.
•
Do not charge non-rechargeable batteries.
•
Battery type: BR2032
•
Voltage: 3.0 V DC
Laser Safety Information
288
Check these sections for important notices about your projector.
g
Related Links
•
"FCC C
ompliance Statement" p.289
•
"Innovation, Science and Economic Development Canada (ISED) Notices"
p.289
•
"Restriction of Use" p.290
•
"Operating System References" p.290
•
"Trademarks" p.290
•
"Copyright Notice" p.291
•
"Copyright Attribution" p.291
FCC Compliance Statement
FCC Compliance Statement For United States Users
is device complies with part 15 of the FCC Rules. Operation is subject to the
following two conditions: (1) is device may not cause harmful interference,
and (2) this device must accept any interference received, including interference
that may cause undesired operation.
is equipment has been tested and found to comply with the limits for a Class
A digital device, pursuant to Part 15 of the FCC Rules. ese limits are designed
to provide reasonable protection against harmful interference when the
equipment is operated in commercial environment. is equipment generates,
uses, and can radiate radio frequency energy and, if not installed and used
in accordance with the instruction manual, may cause harmful interference to
radio communications. Operation of this equipment in residential area is likely
to cause harmful interference in which case the user will be required to correct
the interference at this own expense.
WARNING
e connection of a non-shielded equipment interface cable to this equipment
will invalidate the FCC Certication or Declaration of this device and may
cause interference levels which exceed the limits established by the FCC for
this equipment. It is the responsibility of the user to obtain and use a shielded
eq
uipment interface cable with this device. If this equipment has more than
one interface connector, do not leave cables connected to unused interfaces.
Changes or modications not expressly approved by the manufacturer could
void the user's authority to operate the equipment.
Innovation, Science and Economic Development
Canada (ISED) Notices
Contains IC: 1052D-NH7
Operating frequency range: 2.402-2.480GHz, 5.18-5.24GHz, 5.26-5.32GHz,
5.50-5.72GHz, 5.745-5.825GHz, 5.845-5.885GHz, 5.955-7.115GHz
is device contains license-exempt transmitter(s)/receiver(s) that comply
with Innovation, Science and Economic Development Canada's license-exempt
RSS(s). Operation is subject to the following two conditions:
(1) is device may not cause interference,
(2) is device must accept any interference, including interference that cause
undesired operation of the device.
is device is restricted for indoor use only. Especially, ISED regulations state
that operation in 5150-5250MHz & 5850-5895MHz is for indoor use only.
is equipment (without Bluetooth
®
remote controller) complies with ISED
radiation exposure limits set forth for an uncontrolled environment and meets
RSS-102 of the ISED radio frequency (RF) Exposure rules.
CAUTION: Exposure to Radio Frequency Radiation
1. To comply with the Canadian RF exposure compliance requirements, this
device and its antenna must not be co-located or operating in conjunction with
any other antenna or transmitter.
Notices
289

2. To comply with RSS-102 RF exposure compliance requirements, this
eq
uipment should be installed and operated, keeping the radiator at least 7.9
inches (20cm) or more away from the person's body.
Wireless caution for Wi-Fi 6E
e following uses of this device are prohibited by ISED, RSS-248 regulations.
•
Devices shall not be used for control of or communications with unmanned
aircra systems.
•
Devices shall not be used on oil platforms.
•
Devices shall not be used on aircra, except for the low-power indoor access
points, indoor subordinate devices, low-power client devices, and very low-
power devices operating in the 5925-6425 MHz band, that may be used on
large aircra as dene d in the Canadian Aviation Regulations, while ying
above 3,048 meters (10,000 feet).
•
Devices shall not be used on automobiles.
•
Devices shall not be used on trains.
•
Devices shall not be used on maritime vessels.
Restriction of Use
When this product is used for applications requiring high reliability/safety
suc
h as transportation devices related to aviation, rail, marine, automotive etc.;
disaster prevention devices; various safety devices etc; or functional/precision
devices etc, you should use this product only aer giving consideration to
including fail-safes and redundancies into your design to maintain safety
and total system reliability. Because this product was not intended for use
in applications requiring extremely high reliability/safety such as aerospace
equipment, main communication equipment, nuclear power control equipment,
or medical equipment related to direct medical care etc, please make your own
judgment on this product’s suitability aer a full evaluation.
Operating System References
•
M
icr
oso
®
Windows
®
8.1 operating system
•
Microso
®
Windows
®
10 operating system
•
Microso
®
Windows
®
11 operating system
In this guide, the operating systems above are referred to as "Windows 8.1",
"Windows 10", and "Windows 11". Furthermore, the collective term "Windows"
is used to refer to them all.
•
macOS 10.13.x
•
macOS 10.14.x
•
macOS 10.15.x
•
macOS 11.0.x
•
macOS 12.0.x
In this guide, the collective term "Mac" is used to refer to all of the operating
systems above.
Trademarks
EPSON is a registered trademark of Seiko Epson Corporation.
Ap
p Store is a service mark of Apple Inc., registered in the U.S. and other
countries.
Apple, Mac, macOS, AirPlay, Apple Home, Apple TV, HomeKit, HomePod, and
HomePod Mini are trademarks of Apple Inc., registered in the U.S. and other
countries.
Microso, Windows, and Windows Server are trademarks or registered
trademarks of Microso Corporation in the United States and/or other
countries.
Wi-Fi
®
, WPA2
™
, WPA3
™
, and Wi-Fi CERTIFIED Miracast
®
are trademarks of
Wi-Fi Alliance
®
.
Notices
290

Chrome, Chromebook, and Google Play are trademarks of Google LLC.
e ter
ms HDMI, HDMI High-Denition Multimedia Interface, HDMI Trade
dress and the HDMI Logos are trademarks or registered trademarks of HDMI
Licensing Administrator, Inc.
"QR Code" is a registered trademark of DENSO WAVE INCORPORATED.
PJLin
k trademark is a trademark applied for registration or is already registered
in Japan, the United States of America and other countries and areas.
Crestron
®
, Crestron Connected
®
, Crestron Fusion
®
, Crestron Control
®
, and
Crestron RoomView
®
are registered trademarks of Crestron Electronics, Inc.
Intel
®
is a registered trademark of Intel Corporation in the U.S. and/or other
countries.
Extron
®
and XTP
®
are registered trademarks of RGB Systems. Incorporated.
HDBaseT
™
and the HDBaseT Alliance logo are trademarks of the HDBaseT
Alliance.
e N-Mark is a trademark or registered trademark of NFC Forum, Inc. in the
United States and in other countries.
Other product names used herein are also for identication purposes only and
may be trademarks of their respective owners. Epson disclaims any and all
rights in those marks.
Copyright Notice
All rights reserved. No part of this publication may be reproduced, stored in
a ret
rieval system, or transmitted in any form or by any means, electronic,
mechanical, photocopying, recording, or otherwise, without the prior written
permission of Seiko Epson Corporation. No patent liability is assumed with
respect to the use of the information contained herein. Neither is any liability
assumed for damages resulting from the use of the information contained
herein.
Neither Seiko Epson Corporation nor its aliates shall be liable to the purchaser
of this product or third parties for damages, losses, costs, or expenses incurred
by the purchaser or third parties as a result of: accident, misuse, or abuse of this
pr
oduct or unauthorized modications, repairs, or alterations to this product,
or (excluding the U.S.) failure to strictly comply with Seiko Epson Corporation's
operating and maintenance instructions.
Seiko Epson Corporation shall not be liable against any damages or problems
arising from the use of any options or any consumable products other than
those designated as Original Epson Products or Epson Approved Products by
Seiko Epson Corporation.
e contents of this guide may be changed or updated without further notice.
Illustrations in this guide and the actual projector may dier.
Copyright Attribution
is information is subject to change without notice.
© 2025 S
eiko Epson Corporation
2025.6 414567804 EN
Notices
291