
SVW 8872BK
SVW 8822BK
EN
ULTIMATE ALL-IN-ONE CLEANING
SYSTEM
Translation of the original manual
SVW 8872BK
SVW 8822BK
A
1
2
3
4
5
7
8
9
10
6
11
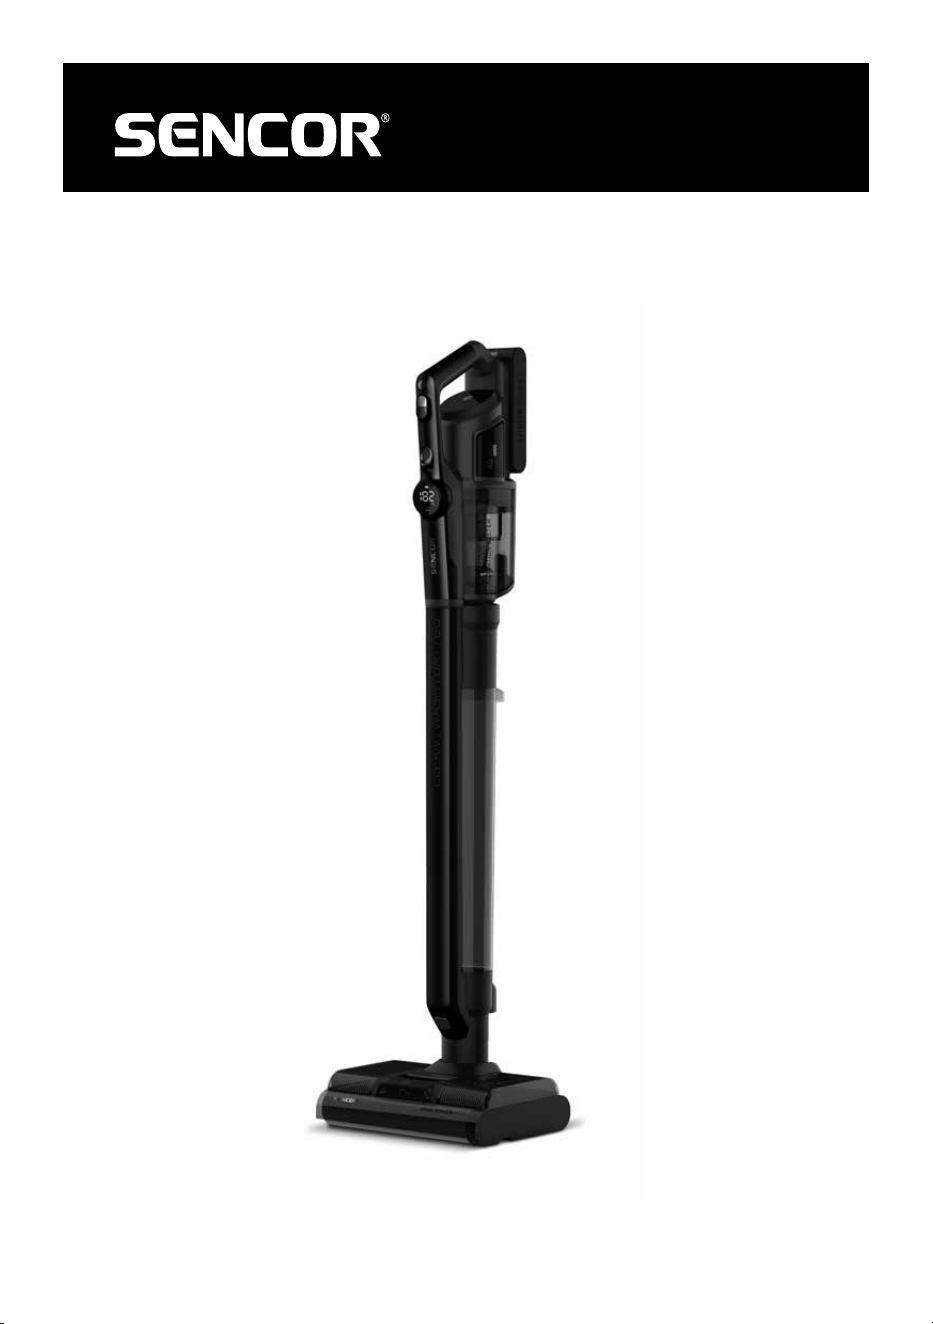
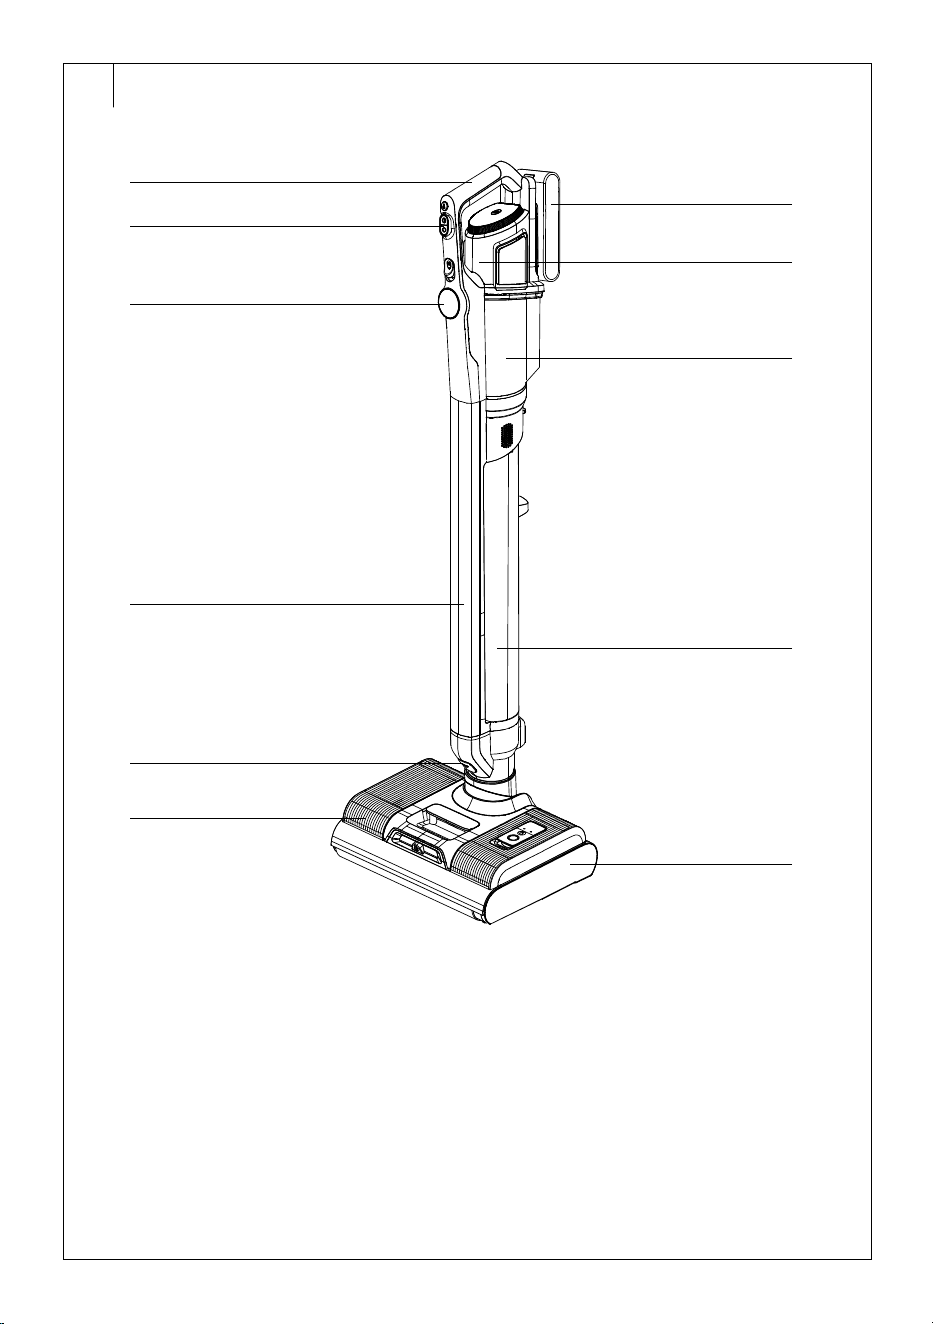
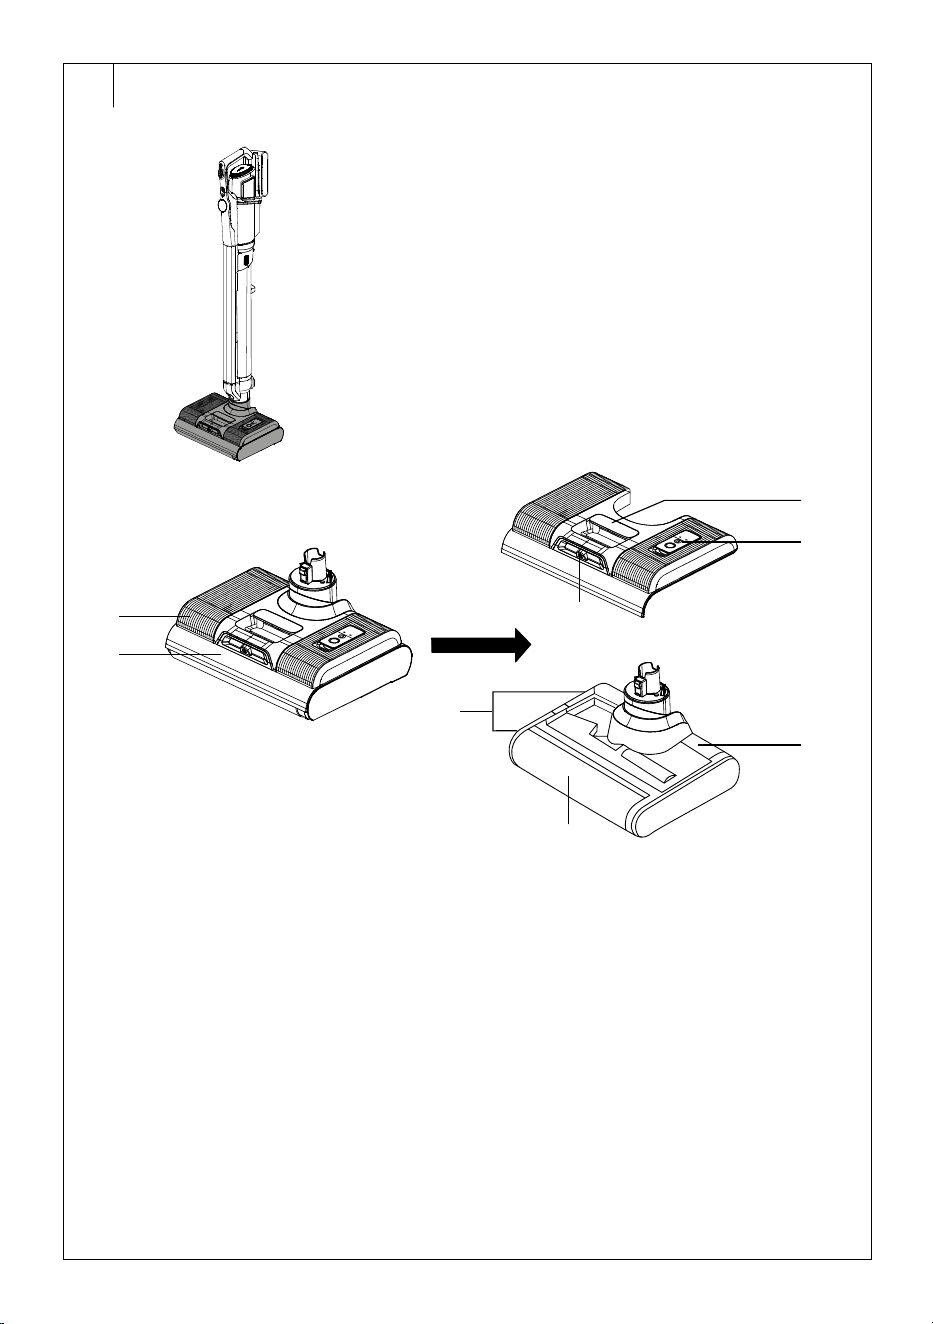
A1 Cleaner handle
A2 Control buttons
A3 Display
A4 Tube
A5 Button torelease the wet
vacuum nozzle
A6 Water tank
A7 Battery
A8 Motor unit
A9 Dust container
A10 Dirty water tank
A11 Wet vacuuming nozzle
A1 Rukojeť čističe
A2 Ovládací tlačítka
A3 Displej
A4 Kovová trubice
A5 Tlačítko k uvolnění hubice
k vytírání
A6 Nádržka na vodu
A7 Akumulátor
A8 Motorová jednotka
A9 Nádoba na prach
A10 Zásobník na špinavou
vodu
A11 Hubice na mokré vysávání
A1 Rukoväť čističa
A2 Ovládacie tlačidlá
A3 Displej
A4 Trubica
A5 Tlačidlo nauvoľnenie
hubice na mokré
vysávanie
A6 Nádržka na vodu
A7 Akumulátor
A8 Motorová jednotka
A9 Nádoba na prach
A10 Zásobník na špinavú vodu
A11 Hubica na mokré
vysávanie
A1 Tisztító fogantyú
A2 Kezelőgombok
A3 Kijelző
A4 Cső
A5 Gomb anedves szívófej
kioldásához
A6 Víztartály
A7 Akkumulátor
A8 Motoregység
A9 Porzsák
A10 Szennyezett vizes tartály
A11 Nedves szívófej

A
13
14
15
16
19
20
21
22
12
23
24
18
25
17
A12 Self-cleaning button
A13 Button for soaking the
rotating brush
A14 Power on/off button
A15 Mode selection button
A16 Dust container release
button
A17 Suction nozzle
A18 Charging connector
A19 Button toremove the
battery
A20 Charging contacts
A21 HEPA filter
A22 Foam filter
A23 Coarse dust container filter
A24 Button to release the
bottom of the dust
container
A25 Hinged dust container
bottom
A12 Tlačítko samočištění
A13 Tlačítko knamáčení
rotačního kartáče
A14 Tlačítko zapnutí/vypnutí
A15 Tlačítko výběru režimu
A16 Tlačítko kuvolnění nádoby
na prach
A17 Sací tryska
A18 Nabíjecí konektor
A19 Tlačítko kvyjmutí
akumulátoru
A20 Nabíjecí kontakty
A21 HEPA filtr
A22 Pěnový filtr
A23 Hrubý filtr nádoby na prach
A24 Tlačítko kuvolnění dna
nádoby na prach
A25 Výklopné dno nádoby na
prach
A12 Tlačidlo samočistenia
A13 Tlačidlo nanamáčanie
rotačnej kefy
A14 Tlačidlo zapnutia/vypnutia
A15 Tlačidlo výberu režimu
A16 Tlačidlo nauvoľnenie
nádoby na prach
A17 Nasávacia dýza
A18 Nabíjací konektor
A19 Tlačidlo navybratie
akumulátora
A20 Nabíjacie kontakty
A21 HEPA filter
A22 Penový filter
A23 Hrubý filter nádoby na
prach
A24 Tlačidlo na uvoľnenie dna
nádoby na prach
A25 Výklopné dno nádoby na
prach
A12 Öntisztító gomb
A13 Állvány aforgókefe
beáztatásához
A14 Be-/kikapcsoló gomb
A15 Üzemmódválasztó gomb
A16 Porzsák kioldó gomb
A17 Szívófej
A18 Töltőcsatlakozó
A19 Akkumulátor eltávolító
gomb
A20 Töltőérintkezők
A21 HEPA szűrő
A22 Habszűrő
A23 Aportartály durva szűrője
A24 Portartály kioldó gomb
A25 Nyitható portartály ürítő
A
26
27
28
29
30
31
32
9
A9 Dust container
A26 Button to release the
motor unit
A27 Button to release the dirty
water tank
A28 Dirty water tank handle
A29 Filter for wet vacuuming
A30 Filter holder for wet
vacuuming
A31 Dirty water tank lid
A32 Coarse filter for dirty water
tank
A9 Zásobník na špinavou
vodu
A26 Tlačítko k uvolnění
motorové jednotky
A27 Tlačítko k uvolnění
zásobníku na špinavou
vodu
A28 Rukojeť zásobníku na
špinavou vodu
A29 Filtr pro mokré vysávání
A30 Držák filtru pro mokré
vysávání
A31 Víko zásobníku na
špinavou vodu
A32 Hrubý filtr zásobníku na
špinavou vodu
A9 Nádoba na prach
A26 Tlačidlo na uvoľnenie
motorovej jednotky
A27 Tlačidlo na uvoľnenie
zásobníka na špinavú
vodu
A28 Rukoväť zásobníka na
špinavú vodu
A29 Filter na mokré vysávanie
A30 Držiak filtra na mokré
vysávanie
A31 Veko zásobníka na
špinavú vodu
A32 Hrubý filter zásobníka na
špinavú vodu
A9 Porzsák
A25 Nyitható portartály ürítő
A26 Motoregység kioldó gomb
A27 Szennyezett vizes tartály
kioldó gomb
A28 Aszennyezett vizes
tartály fogantyúja
A29 Nedves porszívó szűrő
A30 Nedves porszívó szűrő
tartó
A31 Szennyezett vizes tartály
fedele
A32 Szennyezett vizes tartály
durva szűrője
A
6
33
34
37
37
35
36
11
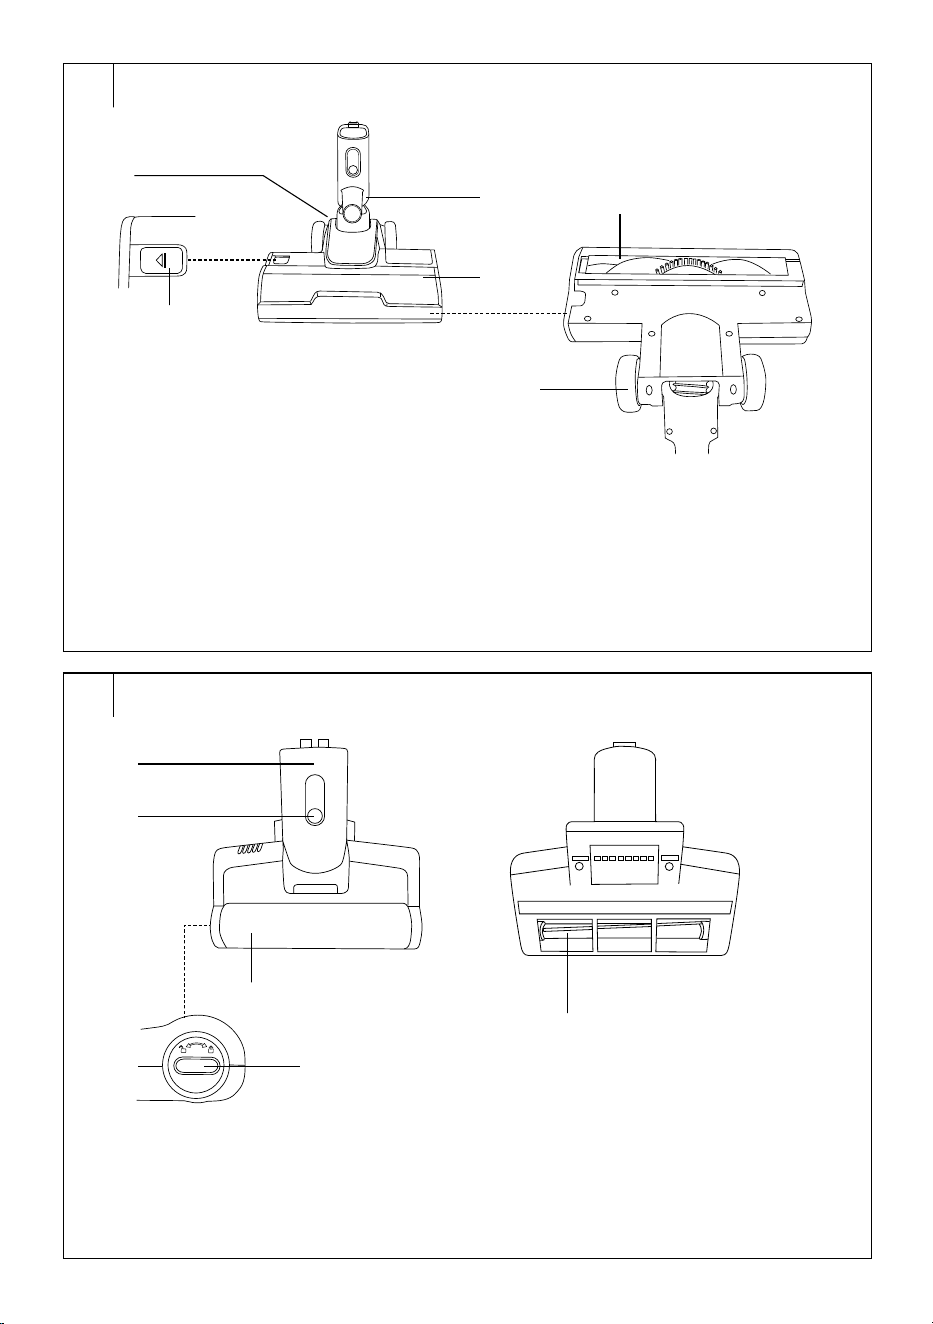
A6 Water tank
A11 Wet vacuuming nozzle
A33 Water tank handle
A34 Water tank lid
A35 Jet
A36 Rotating brush locks
A37 Soft rotating brushes
A6 Nádržka na vodu
A11 Hubice na mokré vysávání
A33 Rukojeť nádržky na vodu
A34 Víko nádržky na vodu
A35 Tryska
A36 Zámky rotačních kartáčů
A37 Měkké rotační kartáče
A6 Nádržka na vodu
A11 Hubica na mokré
vysávanie
A33 Rukoväť nádržky na vodu
A34 Veko nádržky na vodu
A35 Dýza
A36 Zámky rotačných kief
A37 Mäkké rotačné kefy
A6 Víztartály
A11 Nedves szívófej
A33 Víztartály fogantyúja
A34 Víztartály fedele
A35 Fúvóka
A36 Forgókefe zárak
A37 Puha forgókefék
B
1.1
1.2
1.5
1.3
1.4
1
Only SVW 8872BK
B1 Dry vacuuming nozzle
B1.1 Flexible joint
B1.2 Rotating brush front cover
B1.3 Button toremove the
rotating brush
B1.4 Rotating brush
B1.5 Travel wheels
Pouze SVW 8872BK
B1 Hubice na suché vysávání
B1.1 Ohebný kloub
B1.2 Přední kryt rotačního
kartáče
B1.3 Tlačítko k vyjmutí
rotačního kartáče
B1.4 Rotační kartáč
B1.5 Pojezdová kolečka
Iba SVW 8872BK
B1 Hubica na suché
vysávanie
B1.1 Ohybný kĺb
B1.2 Predný kryt rotačnej kefy
B1.3 Tlačidlo navybratie
rotačnej kefy
B1.4 Rotačná kefa
B1.5 Pojazdové kolieska
Czak SVW 8872BK
B1 Száraz porszívó fej
B1.1 Rugalmas csukló
B1.2 Forgókefe előlap
B1.3 Gomb aforgókefe
eltávolításához
B1.4 Forgókefe
B1.5 Görgők
B
2
2.1
2.3
2.2
2.4
B2 Mini brush nozzle
B2.1 Button to release the
nozzle
B2.2 Rotating brush protective
cover
B2.3 Rotating lock torelease
the rotating brush
B2.4 Rotating brush
B2 Mini kartáčová hubice
B2.1 Tlačítko k uvolnění hubice
B2.2 Ochranný kryt rotačního
kartáče
B2.3 Otočný zámek k uvolnění
rotačního kartáče
B2.4 Rotační kartáč
B2 Mini kefová hubica
B2.1 Tlačidlo na uvoľnenie
hubice
B2.2 Ochranný kryt rotačnej
kefy
B2.3 Otočná zámka na
uvoľnenie rotačnej kefy
B2.4 Rotačná kefa
B2 Mini kefés szívófej
B2.1 Szívófej kioldó gomb
B2.2 Forgókefe védőburkolat
B2.3 Forgózár aforgókefe
kioldásához
B2.4 Forgókefe
B
3 4
5
7
6
8
9
10
11
B3 Flexible hose
(SVW 8872BK only)
B4 Long slot nozzle
withillumination
B5 Soft dust brush (SVW
8872BK only)
B6 Dust brush
B7 Cleaning brush
B8 Metal tube
(SVW 8872BK only)
B9 Charging andstorage base
B10 Metal tube andflexible hose
holder (SVW 8872BK only)
B11 Supply cable
B3 Flexibilní hadice (pouze
model SVW 8872BK)
B4 Dlouhá štěrbinová hubice s
osvětlením
B5 Měkký prachový
kartáč (pouze model
SVW 8872BK)
B6 Prachový kartáč
B7 Čisticí kartáček
B8 Kovová trubice (pouze
model SVW 8872BK)
B9 Nabíjecí a úložná základna
B10 Držák na kovovou trubici a
flexibilní hadici (pouze model
SVW 8872BK)
B11 Přívodní kabel
B3 Flexibilná hadica
(iba model SVW 8872BK)
B4 Dlhá štrbinová hubica
sosvetlením
B5 Mäkká prachová kefa (iba
model SVW 8872BK)
B6 Prachová kefa
B7 Čistiaca kefka
B8 Kovová trubica
(iba model SVW 8872BK)
B9 Nabíjacia aúložná základňa
B10 Držiak na kovovú trubicu
aflexibilnú hadicu (iba
model SVW 8872BK)
B11 Prívodný kábel
B3 Rugalmas tömlő
(csak SVW 8872BK modell)
B4 Hosszú réstisztító fej
világítással
B5 Puha porkefe (csak az
SVW 8872BK modell)
B6 Porkefe
B7 Tisztítókefe
B8 Fémcső
(csak SVW 8872BK modell)
B9 Töltő éstároló alapzat
B10 Fémcső ésrugalmas
tömlőtartó (csak
SVW 8872BK modell)
B11 Tápkábel
C
1
2
3
4
5
7
8
9
10
6
11
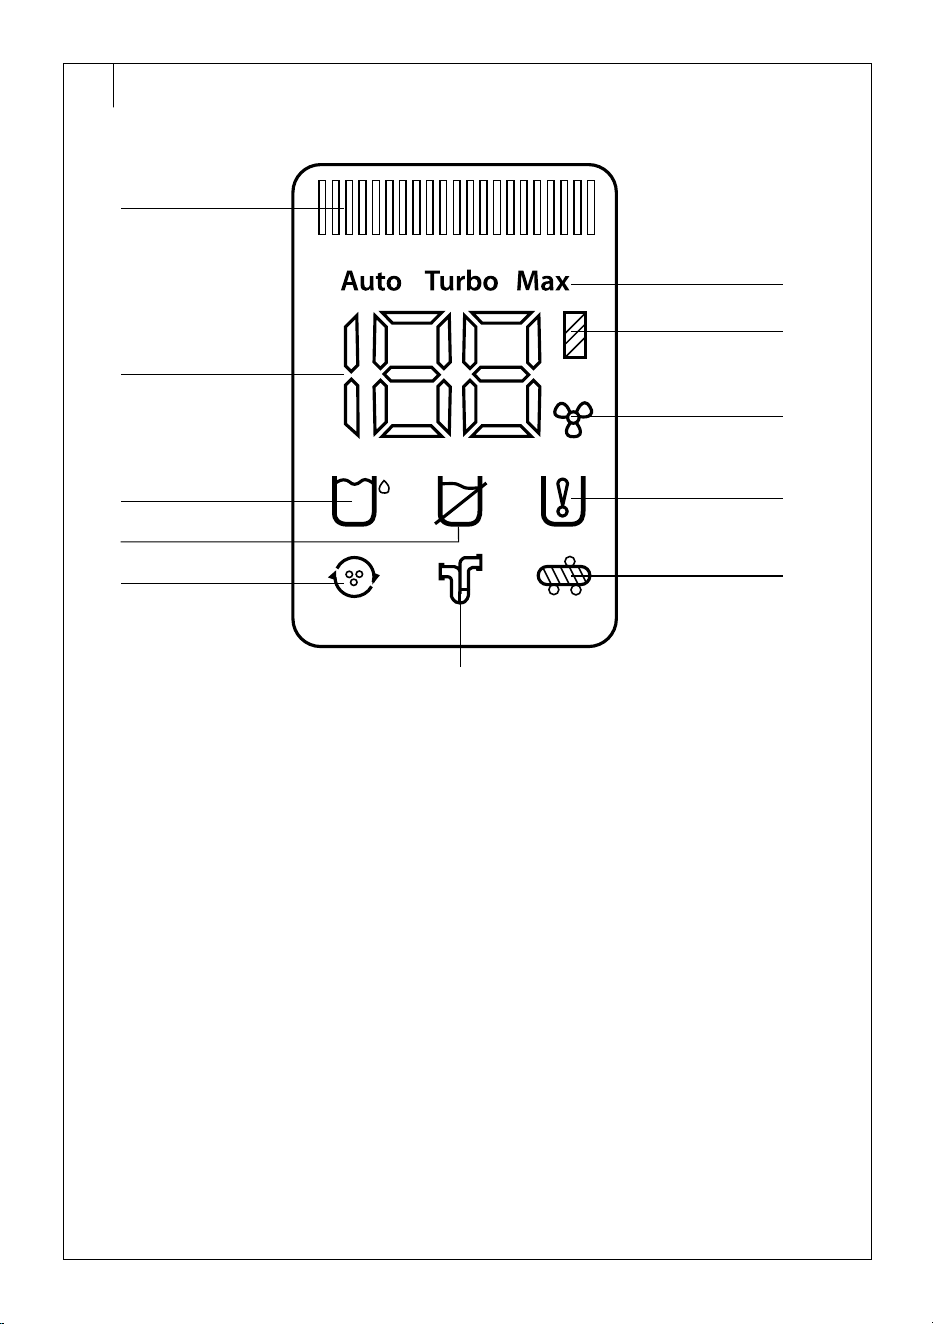
C1 Light indicator
C2 Battery charge status
indication
C3 Full dirty water tank icon
C4 Badly loaded tray icon
C5 Self-cleaning icon
C6 Blocked suction tube icon
C7 Operating mode icons
C8 Low battery alert icon
C9 Rotating brush drying icon
C10 Empty water tank icon
C11 Automatic brush soak icon
C1 Světelný indikátor
C2 Zobrazení stavu nabití
akumulátoru
C3 Ikona plného zásobníku na
špinavou vodu
C4 Ikona špatně vloženého
zásobníku
C5 Ikona samočištění
C6 Ikona zablokované sací
trubice
C7 Ikony provozních režimů
C8 Ikona upozornění na nízký
stav akumulátoru
C9 Ikona sušení rotačního
kartáče
C10 Ikona prázdné nádržky na
vodu
C11 Ikona automatického
namáčení kartáče
C1 Svetelný indikátor
C2 Zobrazenie stavu nabitia
akumulátora
C3 Ikona plného zásobníka na
špinavú vodu
C4 Ikona zle vloženého
zásobníka
C5 Ikona samočistenia
C6 Ikona zablokovanej
nasávacej trubice
C7 Ikony prevádzkových
režimov
C8 Ikona upozornenia na nízky
stav akumulátora
C9 Ikona sušenia rotačnej kefy
C10 Ikona prázdnej nádržky na
vodu
C11 Ikona automatického
namáčania kefy
C1 Világító jelzőfény
C2 Az akkumulátor töltöttségi
állapotának megjelenítése
C3 Szennyezett vizes tartály
megtelt ikon
C4 Rosszul behelyezett tartály
ikon
C5 Öntisztítás ikon
C6 Eltömődött szívócső ikon
C7 Az üzemmódok ikonjai
C8 Alacsony töltöttségű
akkumulátor figyelmeztető
ikon
C9 Forgókefe szárítás ikon
C10 Üres víztartály ikon
C11 Kefe automatikus bemerítés
ikon
D
E
E1 E2
E3
E4
E5
E6
E
E7 E8
E9 E10
E11 E12
(SVW 8872BK)
F
F1 F2
F3
G
G1 G2
H
H1 H2 H3
H4
I
I1
I3
I2
J
J1 J2
J3
J4
K
K1 K2
K3
L
L1 L2
M
M1 M2
M3

- 1 -
08/2025
2025, .
EN
Ultimate All-in-One Cleaning System
User Manual
Important Safety Instructions
READ CAREFULLY AND STORE FOR FUTURE USE.
• This appliance may be only used by children aged
8 years and older and by persons with physical, sensory
or mental impairments or lack of experience and
knowledge, if they are supervised or have been instructed
on the safe use of the appliance and understand the
potential hazards.
• Children must not play with the appliance. Cleaning and
maintenance must not be performed by unsupervised
children.
• If the power cord is damaged, have it replaced in
aprofessional service centre in order to prevent
adangerous situation. It is forbidden to use the appliance
with the cable damaged.
• The cleaner must be turned off andmust not be placed in
the base, the battery must be removed during cleaning or
maintenance.
• The mini brush nozzle contains arotating brush andthere
is arisk of getting caught in this part incase of improper
handling.
• Use the cleaner only with the accessories that come with
it or that are recommended by the manufacturer. Do not
use other accessories. This could lead to adangerous
situation, property damage or electric shock.
HARD FLOOR CLEANER

- 2 -
08/2025
2025, .
• Do not immerse any part of the cleaner or its accessories
in water or other liquids when cleaning. There is arisk of
injury by electrical shock.
• Regularly check the condition of the cleaner andits
accessories for damage. Damaged cleaner or damaged
accessories must not be used. There is arisk of electrical
shock or damage to property.
• The appliance must only be used with the charging base
supplied with the appliance.
• Do not use the charging base to charge other appliances
that are not designed for this purpose.
. . . . . . . . . . . . . . . . . . . . . . . . . . . . . . . . . . . . . . . . . . . . . . . . . . . . . . . . . . . . . . . . . . . . . . . . . . . . . . . . . . . . . . . . . . . . . . . . . . . . . . . . . . . . . . . . . . . . . . . . . . . . . . . . . . . . . . . . . . . .
Additional Important Safety Instructions forUse of the Appliance
• This cleaner is intended for use in households, offices and similar spaces. Do not use in industrial surroundings. Do not use it outdoors.
• Do not expose the cleaner to direct sunlight and do not place it near open flames or appliances that are heat sources. Avoid using or storing the
cleaner in an environment where flammable, volatile, or explosive substances are used or stored.
• Before connecting the power cable to apower socket, check that the technical details on its rating label match the electrical voltage in the socket.
• Only plug the mains plug into aproperly earthed mains socket.
• Do not short-circuit the charging station or battery connectors.
• Do not touch the connectors of the charging station or power adapter with wet hands.
• The recommended operating temperature is 0 to 40 °C. Do not use the cleaner at alower or higher temperature.
• Make sure that the power cable does not touch hot surfaces or sharp objects.
• Do not immerse the cleaner in water or any other liquid, or rinse it under running water, unless otherwise specified by the manufacturer.
• Before switching on the cleaner, make sure it is correctly assembled.
• Ensure that the air outlet or suction port is not blocked during operation of the cleaner.
• Only the wet vacuum nozzle is designed for vacuuming water. Do not use the dry vacuum nozzle or other accessories to vacuum up water or other
liquids.
• Do not use the cleaner to vacuum:
– smouldering cigarettes, burning objects, matches or hot ash;
– flammable or volatile substances;
– sharp objects, such as shards, needles, pins, etc.;
– flour, plaster, cement and other building materials;
– larger pieces of paper or plastic bags, which can easily block the suction opening.
• Vacuuming certain types of floor coverings may create electrostatic charge, which poses no danger to the user.
• Take extra care when using the cleaner on stairs.
• Do not apply the suction ports to any parts of the face or body.
• Always turn the cleaner off andremove it from the charging base when assembling, disassembling or changing accessories.
• Disconnect the power cord from the socket by pulling the plug, not the cord. Otherwise, you may damage the power cable or the socket.
• Keep the cleaner clean. Wipe the outer surface with aclean, dry sponge. Follow the cleaning instructions provided in this manual.
• Empty the dirty water tank when the display shows the appropriate warning. Follow the instructions inthis manual if water enters the motor unit.
• Clean the appliance after each use according to the instructions in the chapter “CLEANING AND MAINTENANCE”.
• Do not use the cleaner if it does not operate properly, has been damaged, or has been submerged in water.
• Do not attempt to repair or modify the cleaner yourself. All repairs should be carried out by an authorised service centre. Tampering with the
appliance may result in the loss of your legal rights regarding faulty performance or warranty for quality.
- 3 -
08/2025
2025, .
Warning When Charging the Battery
• Use only the supplied charging and storage base to charge the battery. Ensure that the base is connected to apower source.
• We recommend fully charging the battery before use.
• Before placing the cleaner in the charging base, make sure that the contacts on the cleaner and on the charging base are clean and dry.
• Do not leave the cleaner unattended while it is charging.
• Do not charge the cleaner near flammable materials or objects or at high ambient temperatures. We recommend charging the cleaner at
temperatures between 5 and 40 °C.
• Do not expose the cleaner to direct sunlight during charging.
• Ensure sufficient clearance around the cleaner. Do not cover the cleaner while charging.
• Regularly check the charging base or the cleaner for damage. Do not charge the cleaner if the battery is visibly damaged, inflated, or has fallen into
water.
• During charging, the battery and the part of the base in which the cleaner is located may heat up. This is normal. If these parts are very hot, unplug
the power cord from the power outlet and let the cleaner cool down. Then start charging again. If the problem persists, unplug the power cord from
the power outlet and contact an authorised service centre.
Safety Instructions for the Li-ion Battery
• Use only the battery supplied with the cleaner. Do not use the battery withanother appliance or withthis cleaner.
• Do not allow children to play with the battery.
• Always remove the battery from the motor unit before cleaning or maintenance.
• To remove the battery, first press the button on the battery andthen remove it from the motor unit.
• Do not remove or apply force to the battery.
• Before switching on the cleaner, make sure that the battery is correctly inserted.
• The battery is intended for indoor use only. Do not use or store the battery in excessively dusty environments.
• Do not expose the battery to the outdoor environment, extreme temperatures, rapid temperature changes, heat, fire or direct sunlight.
• Keep the battery dry out of reach of children and pets. Do not expose it to moisture or immerse it in water or any other liquid.
• Do not make any adjustments to the battery.
• Do not use abattery whose power contacts show signs of damage or corrosion.
• Do not expose the battery to mechanical shocks. Do not disassemble, modify, throw into fire or expose the battery to high pressure.
• Do not short-circuit the battery power contacts. Do not store the battery in places where metal objects such as paper clips, coins, nails, screws, etc.
could short circuit the power contacts. There is arisk of fire if ashort circuit occurs.
• Do not use the battery if it is damaged, bloated or has fallen into water.
• Charge anduse the battery inadry environment at an ambient temperature of 5 to 40°C.
• Incorrect use may cause fluid to leak out of the battery.
• In the event of abattery fluid leak:
– wear gloves, goggles or other protective equipment (such as abreathing mask); do not handle the battery with your bare hands.
– place the battery on anon-combustible surface, ideally outdoors or in awell-ventilated place;
– if there is astrong chemical smell, leave the room and ventilate it well, or leave the window or door open.
– Transfer the battery to asuitable container (ametal container with alid or aplastic box that is resistant to chemicals and lined with non-
conductive bulk material) and take it to acollection yard or contact aprofessional hazardous waste disposal company;
– Never dispose of adamaged battery in normal waste.
• In case of skin or eye splashes, rinse with plenty of water and seek medical attention.
• Inthe event of ingestion, contact immediate medical help
. . . . . . . . . . . . . . . . . . . . . . . . . . . . . . . . . . . . . . . . . . . . . . . . . . . . . . . . . . . . . . . . . . . . . . . . . . . . . . . . . . . . . . . . . . . . . . . . . . . . . . . . . . . . . . . . . . . . . . . . . . . . . . . . . . . . . . . . . . . .
EXPLANATION OF SYMBOLS PLACED ON THE PRODUCT OR INTHE ACCOMPANYING DOCUMENTATION
The product meets all the basic requirements of the applicable EU directives.
Used electrical andelectronic products must not be disposed of in ordinary municipal waste.
Used accumulators and batteries do not belong in normal municipal waste.
. . . . . . . . . . . . . . . . . . . . . . . . . . . . . . . . . . . . . . . . . . . . . . . . . . . . . . . . . . . . . . . . . . . . . . . . . . . . . . . . . . . . . . . . . . . . . . . . . . . . . . . . . . . . . . . . . . . . . . . . . . . . . . . . . . . . . . . . . . . .

- 4 -
08/2025
2025, .
• Thank you for purchasing our SENCOR product; we hope it will serve
to your satisfaction.
• Prior to using this appliance, please read the user manual thoroughly,
even in cases when you are already familiar with the use of similar
types of appliances. Use the appliance only as described in this
user manual. Keep the manual for future reference. If you pass the
appliance on to another person, ensure that this user manual is
included.
• Carefully unpack the appliance and make sure not to discard any part
of the packaging material until you have removed all the components.
It is recommended that you keep the original packaging, packing
material, receipt and confirmation of the extent of the seller'sliability
or warranty certificate at least for the duration of the legal right to
file adefect claim or the quality warranty. When transporting the
appliance, we recommend repackaging it in the original box provided
by the manufacturer.
. . . . . . . . . . . . . . . . . . . . . . . . . . . . . . . . . . . . . . . . . . . . . . . . . . . . . . . . . . . . . . . . . . . .
CLEANER DESCRIPTION
A1 Cleaner handle
A2 Control buttons
A3 Display
A4 Tube
A5 Button torelease the wet
vacuum nozzle
A6 Water tank
A7 Battery
A8 Motor unit
A9 Dust container
A10 Dirty water tank
A11 Wet vacuuming nozzle
A12 Self-cleaning button
A13 Button for soaking the rotating
brush
A14 Power on/off button
A15 Mode selection button
A16 Dust container release button
A17 Suction nozzle
A18 Charging connector
A19 Button toremove the battery
A20 Charging contacts
A21 HEPA filter
A22 Foam filter
A23 Coarse dust container filter
A24 Button to release the bottom
of the dust container
A25 Hinged dust container bottom
A26 Button to release the motor
unit
A27 Button to release the dirty
water tank
A28 Dirty water tank handle
A29 Filter for wet vacuuming
A30 Filter holder for wet
vacuuming
A31 Dirty water tank lid
A32 Coarse filter for dirty water
tank
A33 Water tank handle
A34 Water tank lid
A35 Jet
A36 Rotating brush locks
A37 Soft rotating brushes
. . . . . . . . . . . . . . . . . . . . . . . . . . . . . . . . . . . . . . . . . . . . . . . . . . . . . . . . . . . . . . . . . . . .
DESCRIPTION OF ACCESSORIES
Only model SVW 8872BK
B1 Dry vacuuming nozzle
B1.1 Flexible joint
B1.2 Rotating brush front cover
B1.3 Button toremove the rotating
brush
B1.4 Rotating brush
B1.5 Travel wheels
. . . . . . . . . . . . . . . . . . . . . . . . . . . . . . . . . . . . . . . . . . . . . . . . . . . . . . . . . . . . . . . . . . . .
B2 Mini brush nozzle
B2.1 Button to release the nozzle
B2.2 Rotating brush protective
cover
B2.3 Rotating lock torelease the
rotating brush
B2.4 Rotating brush
. . . . . . . . . . . . . . . . . . . . . . . . . . . . . . . . . . . . . . . . . . . . . . . . . . . . . . . . . . . . . . . . . . . .
B3 Flexible hose
(SVW 8872BK only)
B4 Long slot nozzle
withillumination
B5 Soft dust brush (SVW
8872BK only)
B6 Dust brush
B7 Cleaning brush
B8 Metal tube
(SVW 8872BK only)
B9 Charging andstorage base
B10 Metal tube andflexible hose
holder (SVW 8872BK only)
B11 Supply cable
. . . . . . . . . . . . . . . . . . . . . . . . . . . . . . . . . . . . . . . . . . . . . . . . . . . . . . . . . . . . . . . . . . . .
DESCRIPTION OF THE DISPLAY
C1 Light indicator
C2 Battery charge status
indication
C3 Full dirty water tank icon
C4 Badly loaded tray icon
C5 Self-cleaning icon
C6 Blocked suction tube icon
C7 Operating mode icons
C8 Low battery alert icon
C9 Rotating brush drying icon
C10 Empty water tank icon
C11 Automatic brush soak icon
. . . . . . . . . . . . . . . . . . . . . . . . . . . . . . . . . . . . . . . . . . . . . . . . . . . . . . . . . . . . . . . . . . . .
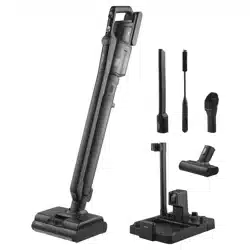
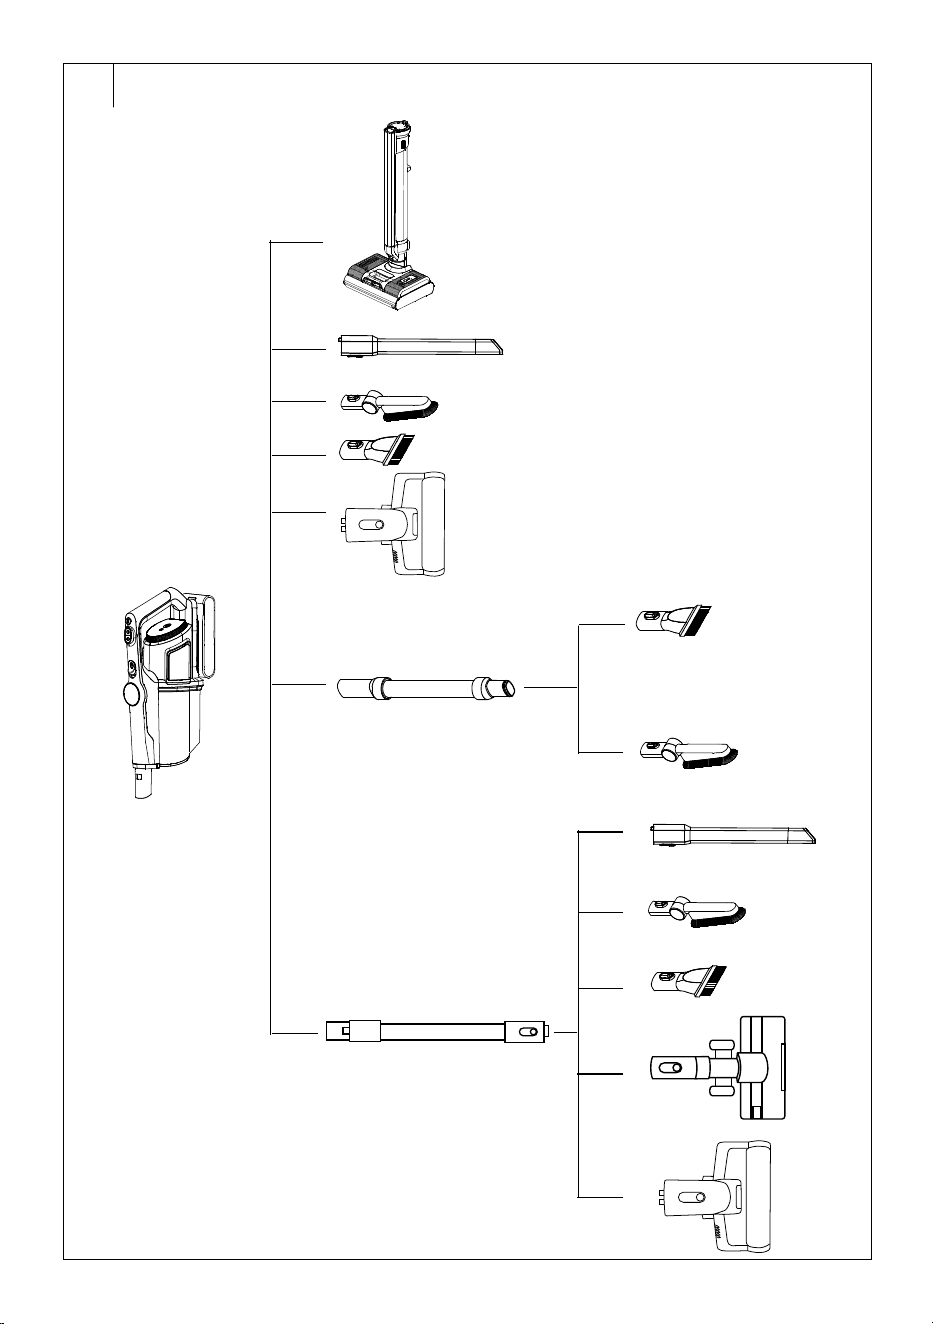
INCLUDED CONTENTS (SVW 8872BK)
• Hard Floor Cleaner
• Wet vacuuming nozzle
• Dry vacuuming nozzle
• Mini brush nozzle
• Flexible hose
• Long slot nozzle withillumination
• Soft dust brush
• Dust brush
• Cleaning brush
• Metal tube
• Charging andstorage base
• Metal tube andflexible hose holder
• Power cord
. . . . . . . . . . . . . . . . . . . . . . . . . . . . . . . . . . . . . . . . . . . . . . . . . . . . . . . . . . . . . . . . . . . .
INCLUDED CONTENTS (SVW 8822BK)
• Hard Floor Cleaner
• Wet vacuuming nozzle
• Mini brush nozzle
• Long slot nozzle withillumination
• Dust brush
• Cleaning brush
• Charging andstorage base
• Power cord
. . . . . . . . . . . . . . . . . . . . . . . . . . . . . . . . . . . . . . . . . . . . . . . . . . . . . . . . . . . . . . . . . . . .
INTENDED USE
• Thanks to its rich accessories, the hard floor cleaner is designed
forcleaning various surfaces andplaces in your home. For options on
how to combine the accessories with each other, see Figure D.
• The hard floor cleaner is designed for cleaning all types of hard floors,
such as wooden or laminate floating floors, tiles, vinyl, etc.
• The dry vacuuming nozzle is designed forcleaning carpets, mats,
runners, etc., as well as forvacuuming hard floors.
• The mini brush nozzle is designed to remove animal hair, human hair,
etc. and is simultaneously suitable for vacuuming difficult-to-access
areas. You can use it not only at home, but alsoinyour car. It quickly
andeffectively removes hair, animal hair andother dirt from car seats,
upholstery, pillows andother textile surfaces.
• The metal tube serves toextend the reach of the attached accessory.
• The flexible hose serves toextend the reach of the attached
accessory. It can be stretched to the desired length, thus allowing
easier handling during cleaning.
• The long slot nozzle withillumination is suitable for vacuuming in
hard-to-reach places (e.g. windows, corners, bookcases, spaces
between mattresses, upholstery, etc.). It is equipped with lighting,
which will make it easier to clean such places.
• The soft dust brush is suitable forvacuuming dirt anddust fromfragile
objects, libraries, walls, blinds, furniture, etc.
EN
Ultimate All-in-One Cleaning System
User Manual
- 5 -
08/2025
2025, .
• The dust brush is suitable forvacuuming surfaces such as furniture
or upholstery. Thanks to its fine bristles, it is suitable forremoving dirt
fromdelicate surfaces such as curtains, draperies, etc.
• The cleaning brush is an aid for cleaning individual parts of the
cleaner. Two other aids are built into the handle, which serve, among
other things, toloosen andremove tangled hair andhair fromrotating
brushes.
. . . . . . . . . . . . . . . . . . . . . . . . . . . . . . . . . . . . . . . . . . . . . . . . . . . . . . . . . . . . . . . . . . . .
CLEANING MODES
• The cleaner is equipped with three operating modes:
– Auto mode: the cleaner itself adjusts the suction power according
to the level of dirtiness. This saves the capacity of the battery,
andthus its overall lifetime.
– Turbo mode: mode withthe highest suction power.
– Max mode: mode with increased suction power.
Note:
The Auto andMax modes are available for wet vacuuming.
Turbo mode is only available when using a separate
handheld unit.
. . . . . . . . . . . . . . . . . . . . . . . . . . . . . . . . . . . . . . . . . . . . . . . . . . . . . . . . . . . . . . . . . . . .
SETUP BEFORE USE
• Remove the hard floor cleaner and all accessories out of the
packaging. Check that you have removed all parts. Check for any
damage to the cleaner and its accessories.
• Remove any protective films and advertising labels from the cleaner
and all accessories.
. . . . . . . . . . . . . . . . . . . . . . . . . . . . . . . . . . . . . . . . . . . . . . . . . . . . . . . . . . . . . . . . . . . .
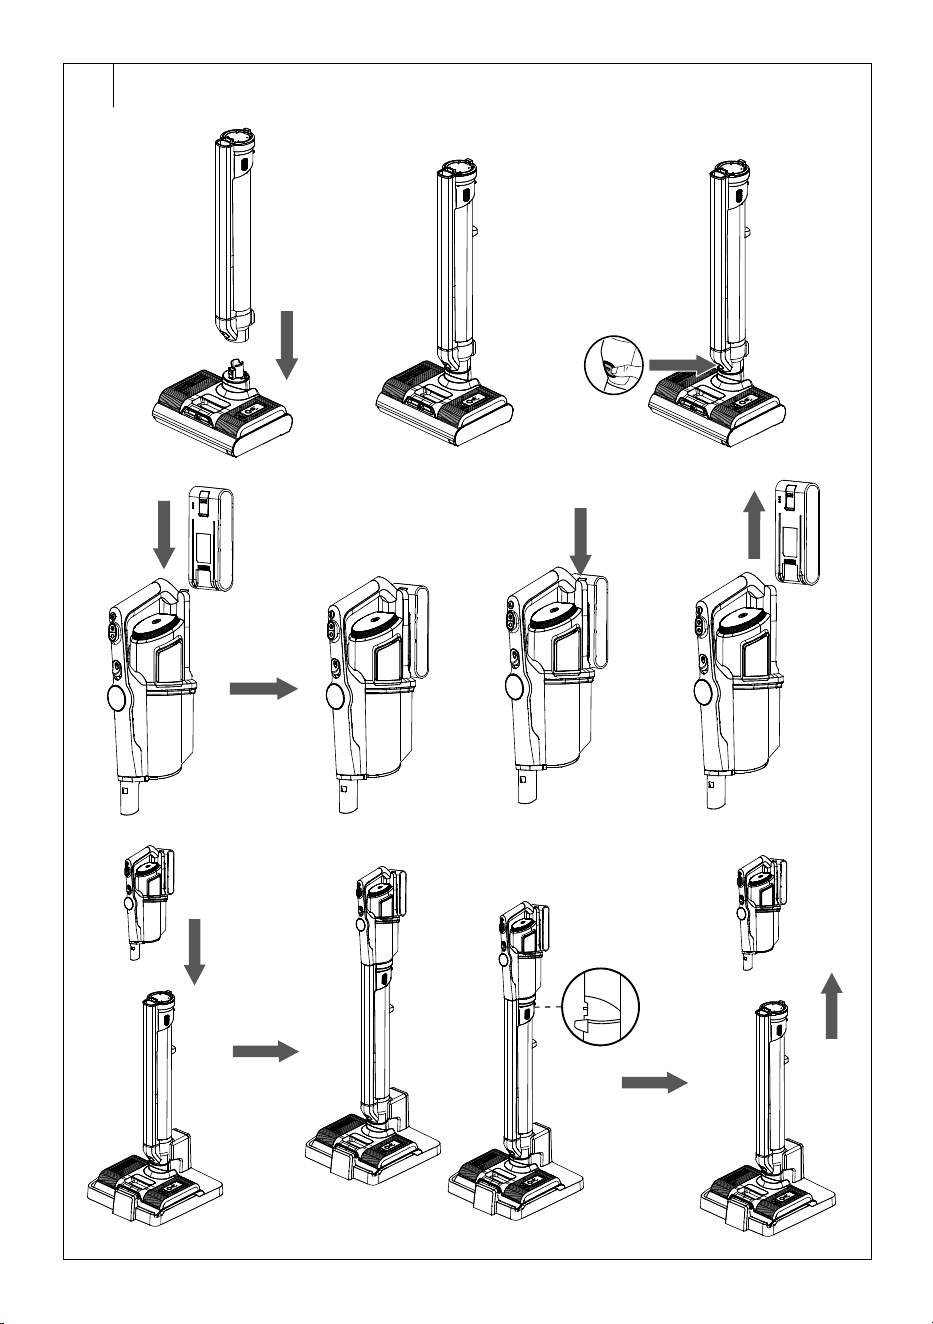
ASSEMBLY/DISASSEMBLY OF THE CLEANER
The hard floor cleaner is supplied disassembled. Follow these steps for
assembly.
Assembly/Disassembly of the Metal Tube and Wet Vacuum
Nozzle
• Insert the bottom of the metal tube onto the wet vacuum nozzle – see
figure E1. Make sure that the connectors at theback of the metal tube
are aligned with the connectors on the nozzle.
• Press gently until you hear aclick. This indicates that the metal tube
is properly secured.
• If you need to remove the metal tube, hold the metal tube with one
hand and press the metal tube release button with the other hand –
see figure E2.
• Pull the metal tube upwards.
Inserting/Removing the Battery
• Hold the battery with one hand and the motor unit with the other.
• Align the battery with the guide grooves in the compartment in
the motor unit – see figure E3; and insert the battery by moving it
downwards. Press gently until you hear aclick. This indicates that the
battery is correctly fitted.
• If you need toremove the battery, press the battery release button
andat the same time pull it upwards from the motor unit – see figure
E4.
Note:
With the exception of replacing the battery andcleaning
the motor unit, it is not necessary to insert andremove it
frequently.
Inserting/Removing the Motor Unit
• Hold the motor unit with one hand and hold the metal tube with the
other hand.
• Insert the motor unit through the suction hole into the hole in the metal
tube – see Figure E5.
• Make sure that the contacts on the motor unit are aligned with the
contacts in themetal tube.
• Press gently until you hear aclick. This indicates that the motor unit is
properly secured.
• If you need to remove the motor unit, press the motor unit release
button andpull it upwards from the metal tube – see figure E6. We
recommend holding the metal tube with your other hand.
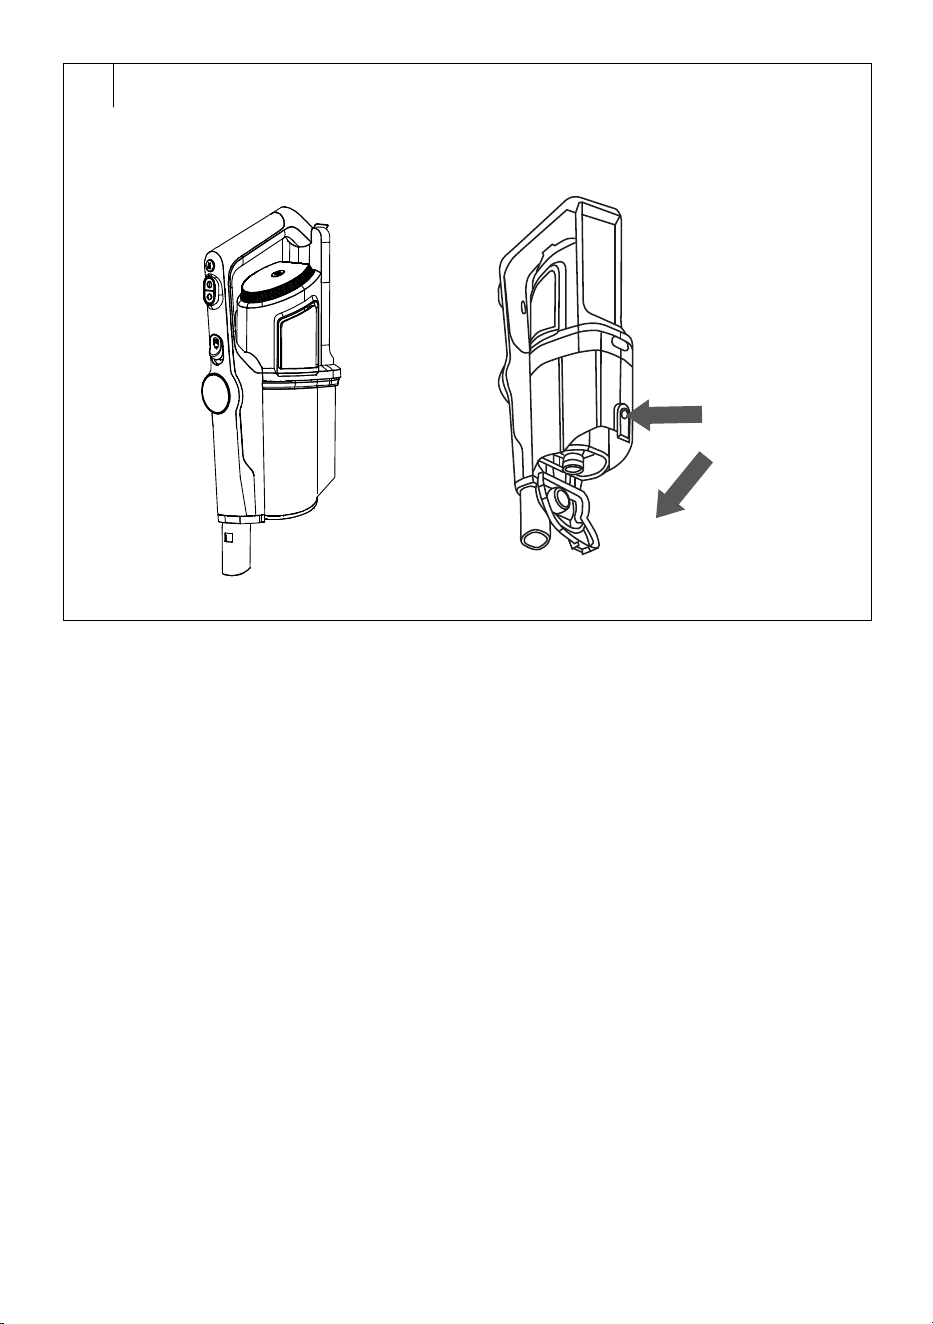
Inserting/Removing the Dirty Water Tank
• When inserting the dirty water tank, first insert the bottom part of the
groove tank in the cleaner body – see figure E7.
• Place the top part of the tank towards the cleaner body andpush the
tank inwards – see figure E8.
• Press gently until you hear aclick. This indicates that the dirty water
tank is properly secured.
• If you need to remove the dirty water tank, hold the cleaner body with
one hand and grip the tank by the handle with the other. Press the
button torelease the tray with your thumb andtilt the top part – see
figure E9. Now remove the bottom part of the tank fromthe cleaner
body – see figure E10.
Assembling the Charging andStorage Base
• The base serves both tocharge the battery andtostore the cleaner
andits accessories.
• Put the charging connector and the rod on the bottom of the base –
see figure E11 (only model SVW 8872BK). Press gently until you hear
aclick. This indicates that the base is properly composed.
• Icons next to individual tips indicate which accessories can be
deployed.
• Plug the power cord connector into the socket in the base – see
Figure E12.
. . . . . . . . . . . . . . . . . . . . . . . . . . . . . . . . . . . . . . . . . . . . . . . . . . . . . . . . . . . . . . . . . . . .
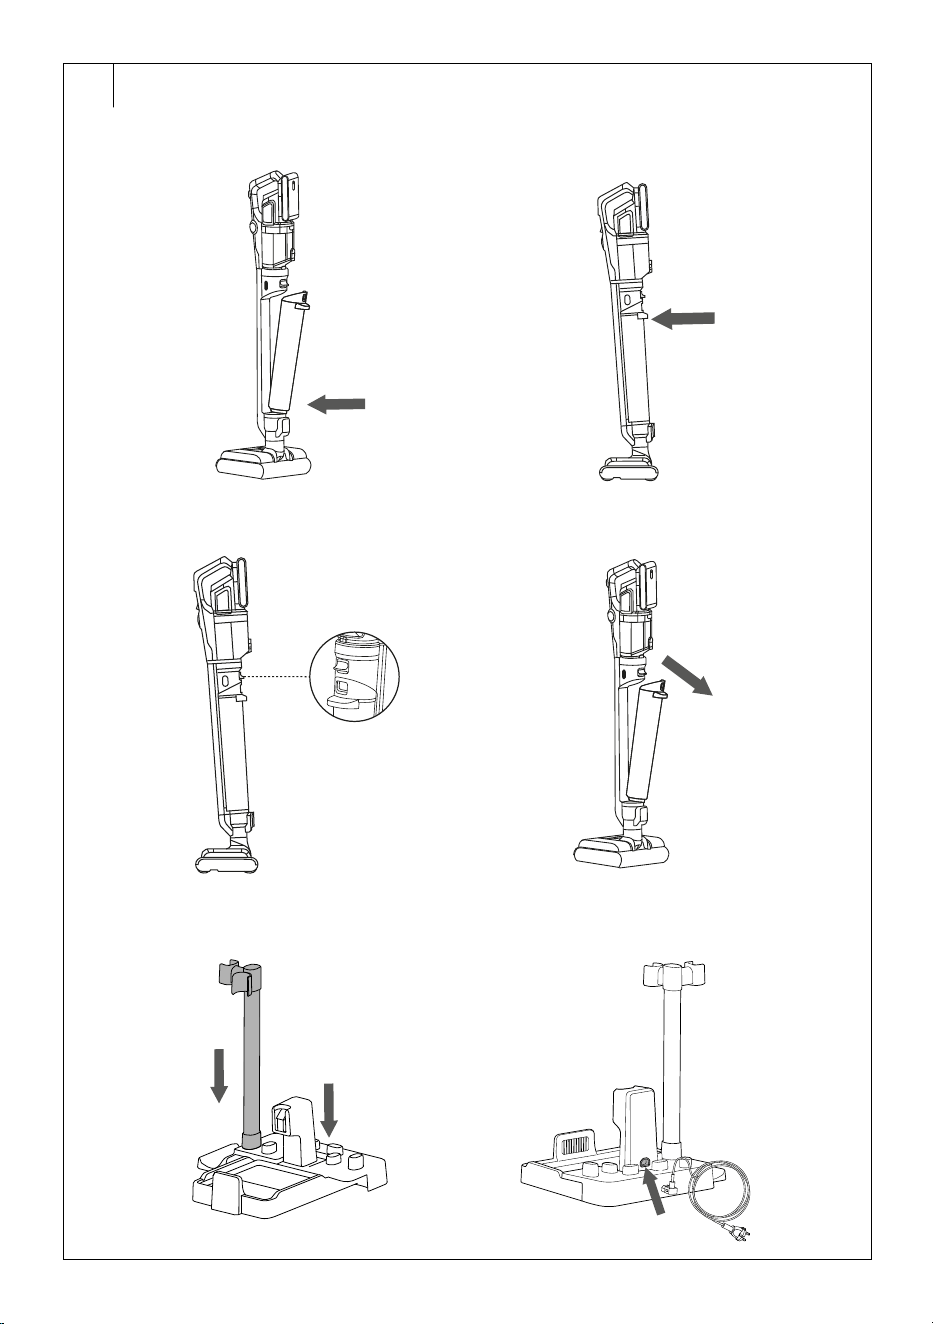
CHARGING AND STORAGE BASE LOCATION
• Place the charging station on ahard, horizontal anddry surface
withineasy reach of apower socket.
• Plug the power cord connector into the socket on the base.
• Insert the plug of the power cord into the power socket. Place the
power cable so that it will not be stepped on or tripped over. Do not
place heavy objects on the power cable or lead it under the carpet.
. . . . . . . . . . . . . . . . . . . . . . . . . . . . . . . . . . . . . . . . . . . . . . . . . . . . . . . . . . . . . . . . . . . .
CHARGING THE CLEANER
• Use only the supplied charging and storage base to charge the
cleaner. Ensure that the base is connected to apower source.
• It is recommended to fully charge the cleaner before use.
• Position the cleaner over the base so that the connectors at the rear
bottom of the cleaner body are aligned with the charging connectors
in the base.
• Carefully lower the cleaner down to connect the connectors.
• Charging will start automatically. The battery charge status will be
displayed on the screen in %. Once 100% is displayed, the battery is
fully charged.
. . . . . . . . . . . . . . . . . . . . . . . . . . . . . . . . . . . . . . . . . . . . . . . . . . . . . . . . . . . . . . . . . . . .
FILLING THE WATER TANK
• Always fill the tank with clean andcold water. Afew drops of asuitable
cleaning agent, which is designed for this type of appliance, can be
added. Do not use any foaming detergents, chemicals, etc. Follow
thedosing instructions provided on the packaging of the detergent.
• Hold the water tank by the handle andpull it upwards from thenozzle
– see figure F1. We recommend holding the nozzle with the other
hand.
• Open the lid and pour clean water into the tank – see Figure F2.
• Close the lid andput the tank back on the nozzle – see figure F3.
Press gently until you hear aclick. This indicates that the tank is
properly in place.

- 6 -
08/2025
2025, .
. . . . . . . . . . . . . . . . . . . . . . . . . . . . . . . . . . . . . . . . . . . . . . . . . . . . . . . . . . . . . . . . . . . .
USING THE CLEANER
• Ensure the cleaner is properly assembled, there is water in the clean
water tank, the dirty water tank is empty, and the cleaner is fully
charged.
1. Remove the cleaner from thecharging base andplace it on the floor.
2. Hold the cleaner by the handle andunlock it from theparking position
by gently pulling the handle backwards.
3. Press the button
once briefly, and the cleaner will start
inautomatic mode.
4. Press the button
repeatedly to select the cleaning mode: Auto –
Turbo – Max.
Note:
The Auto andMax modes are available for wet vacuuming.
Turbo mode is only available when using a separate
handheld unit.
5. Move the cleaner back and forth to clean the floor.
6. After cleaning, press the button to turn off the cleaner.
7. Return the cleaner to avertical position andsecure it in theparking
position.
8. Clean the dirty water tank andempty the water from the clean
water tank. Clean the cleaner according to the instructions in the
"CLEANING AND MAINTENANCE" section.
• If the icon
flashes during cleaning, the dirty water tank needs
to be emptied. Follow the instructions in the "CLEANING AND
MAINTENANCE" section.
• If the icon
flashes during cleaning, the water tank needs to be
refilled. Turn off the cleaner with button and add water following the
instructions in the “Filling the Water Tank” section.
• The operation of the cleaner will pause when it is brought into
avertical position. This is asafety feature.
Warning:
Do not run the cleaner over thresholds, door sills or
other obstacles or foreign objects.
Warning:
Do not turn the cleaner upside down when the dirty
water tank is full. Otherwise, water may enter the
motor unit and cause irreversible damage.
Note:
When the cleaner is turned off or brought into avertical
position, the movement of the rotating brushes and the
water dispensing will stop, however, the cleaner will
vacuum for afew seconds (about 5 seconds). This is to
suck out residual water anddirt that may have remained
inside.
Front Nozzle Water Dispensing Function
• The water dispensing function is used todispense water through the
nozzle in the front of the tank andthe brush is soaked with water.
• When the cleaner is inoperation, water is automatically released
through the internal system into the rotating brushes.
• Press andhold the button
, the water dispensing through the
internal system is interrupted and the water dispensing through the
nozzle is started.
• When you release the button
, the water release through the
nozzle stops and the water release through the internal system
resumes.
Note:
It is not possible to use this function at the same time as the
on/off button or the mode selection button.
Overview of icons and their meaning on the display
ICON MEANING WHAT TO DO
The dirty water
tank is full.
Empty the dirty water tank
according to the instructions inthe
“EMPTYING THE DIRTY WATER
TANK” section.
The water tank is
incorrectly inserted
or not inserted
at all.
Attach the nozzle tank to the wet
vacuum.
The water tank is
empty.
Refill the water tank according to the
instructions in the section “FILLING
THE WATER TANK”.
The rotating brush
is being cleaned.
Wait for the vacuum cleaner to
complete the cleaning process.
The suction port
and the pipe are
blocked.
Clean andremove the cause of
the blockage from the suction
hole and the pipe after removing
the rotating brushes according
to the instructions in the section
“CLEANING THE ROTATING
BRUSHES and the WET VACUUM
NOZZLE”.
The automatic
brush soaking
function is
switched on.
To end the automatic soaking
function of the brush, press the
water spray button.
The rotating brush
is drying.
Wait for the vacuum cleaner to finish
the drying process.
On. Normal condition. Displays the
battery charge status.
Flashing. It is necessary to charge the battery.
. . . . . . . . . . . . . . . . . . . . . . . . . . . . . . . . . . . . . . . . . . . . . . . . . . . . . . . . . . . . . . . . . . . .
CLEANING AND MAINTENANCE
• The cleaner must be turned off before cleaning. When cleaning the
motor unit, the battery must be removed.
• Never use abrasive cleaning agents, solvents, etc. for cleaning.
• Neglecting cleaning and maintenance may negatively affect the
cleaner operation and lead to reduced performance.
• For daily cleaning andmaintenance, wipe the cleaner body
andcharging base with adry cloth.
Warning:
Do not immerse the motor unit, battery, charging
base or power cord in water or other liquids. There is
arisk of injury by electrical shock.
. . . . . . . . . . . . . . . . . . . . . . . . . . . . . . . . . . . . . . . . . . . . . . . . . . . . . . . . . . . . . . . . . . . .
SELF-CLEANING FUNCTION
• The self-cleaning function allows you to quickly andefficiently
remove dirt from therotating brushes andthe internal intake manifold.
Ensure that the dirty water tank is empty. We recommend that the
water tank is approximately half full.
• When the cleaner is placed in thecharging station, press the self-
cleaning button. The process of cleaning the soft rotating brushes
andinternal pipes will start.
• When the self-cleaning process is complete, the cleaner will
automatically switch to drying the rotating brushes.
• We recommend that you allow the self-cleaning anddrying function
to complete. However, if you need to cancel the self-cleaning or drying
function, press the on/off button or the mode selection button.
• When the self-cleaning and brush drying function is complete,
remove, empty and clean the dirty water tank.
• Charging starts again after the self-cleaning anddrying function of the
brushes is completed.
- 7 -
08/2025
2025, .
Note:
Before starting the self-cleaning function, check that the
battery is sufficiently charged. Charging is interrupted
during the self-cleaning anddrying process. When the
charge level is
≤ 10%, the self-cleaning andsubsequent drying function
will not be able to be switched on.
. . . . . . . . . . . . . . . . . . . . . . . . . . . . . . . . . . . . . . . . . . . . . . . . . . . . . . . . . . . . . . . . . . . .
DRYING FUNCTION
• The drying function is used todry the rotating brushes. The brush is
designed (or is designed, as the feature is) to prevent bacteria from
multiplying or odours from wet brushes.
• When the cleaner is placed in thecharging station, press the mode
selection button
to start the drying process. The drying time is
approximately 3 hours. First, the brushes will rotate quickly toremove
as much water as possible, then they will start to rotate slowly
anddry. The fan and the heating element will remain running at all
times. The fan will remain running for approximately 3 minutes after
the drying function has finished, evenif the function is cancelled inthe
middle.
Note:
When the brushes rotate quickly, you may experience
higher noise than when the brushes rotate anddry slowly.
This is normal.
• We recommend to allow the drying function to complete. However,
if you need to cancel the drying function, press the mode selection
button.
• Charging starts again after the drying function is completed.
. . . . . . . . . . . . . . . . . . . . . . . . . . . . . . . . . . . . . . . . . . . . . . . . . . . . . . . . . . . . . . . . . . . .
CLEANING THE WATER TANK
• Grab the water tank by the handle andpull it upwards from thenozzle
– see Figure G1. We recommend holding the nozzle with the other
hand.
• Open the lid andpour out the remaining water from the tank – see
figure G2. If necessary, it will be necessary to knock the tank alittle or
tilt it to pour all the water out ofit.
• Leave the lid open to allow the tank to dry.
• Wipe the outer surface of the tank with asoft sponge slightly
dampened in warm water. Wipe with adry cloth.
• When the tank is dry, close the cover andput the tank back on the
nozzle.
. . . . . . . . . . . . . . . . . . . . . . . . . . . . . . . . . . . . . . . . . . . . . . . . . . . . . . . . . . . . . . . . . . . .
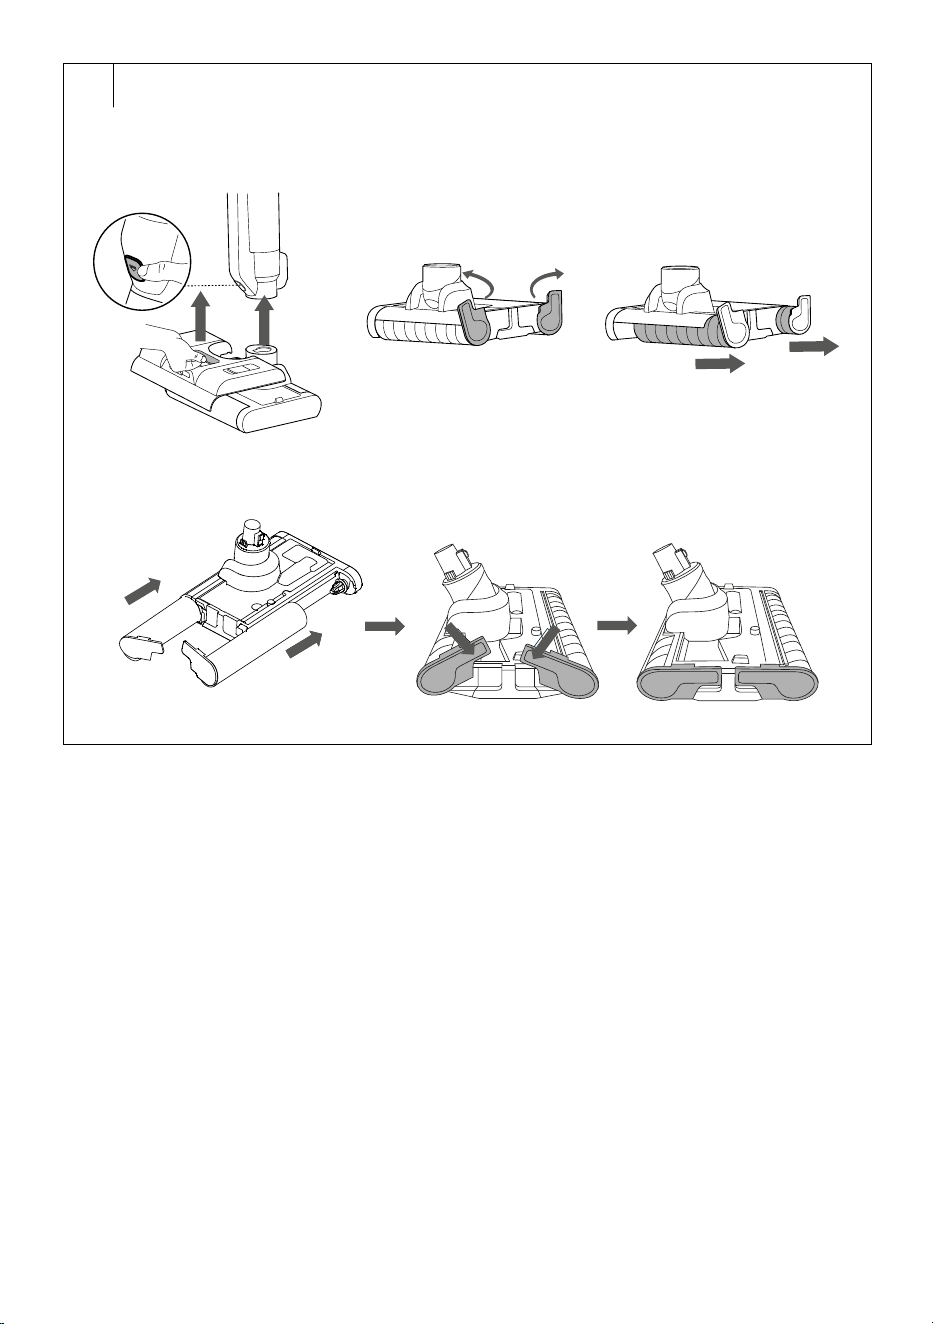
CLEANING THE ROTATING BRUSHES and WET
VACUUM NOZZLE
• Use the self-cleaning anddrying function to clean the rotating
brushes. However, if necessary, the rotating brushes can be cleaned
manually.
• Remove the tube from the wet vacuum nozzle andremove the water
tank – see figure H1.
• Release the locks on the nozzle side – see figure H2; and pull the
rotating brushes out of the nozzle with arotating motion – see figure H3.
• Remove hair and fur entangled in the brushes. You can use the tools
found in the cleaning brush to loosen or remove them.
• Carefully rinse the brushes under running water. Make sure that water
does not get inside the rotating brush. Press the brushes with your
hands to remove excess water. Allow to dry freely or put them back on
andstart the drying function.
• Wipe the wet vacuum nozzle, especially the suction hole, with asoft
sponge slightly moistened inwarm water. Wipe with adry cloth.
• You can use acleaning brush to clean the inlets.
• Insert the rotating brushes back into the nozzle andsecure the locks
– see figure H4.
Caution:
Do not submerge rotating brushes in water, do not
wash them in awashing machine or dishwasher, and
do not dry them in adryer.
Note:
The rotating brushes of the wet vacuum nozzle need to be
replaced from time to time. Check their condition regularly
andreplace them after 6–12 months or as needed.
. . . . . . . . . . . . . . . . . . . . . . . . . . . . . . . . . . . . . . . . . . . . . . . . . . . . . . . . . . . . . . . . . . . .
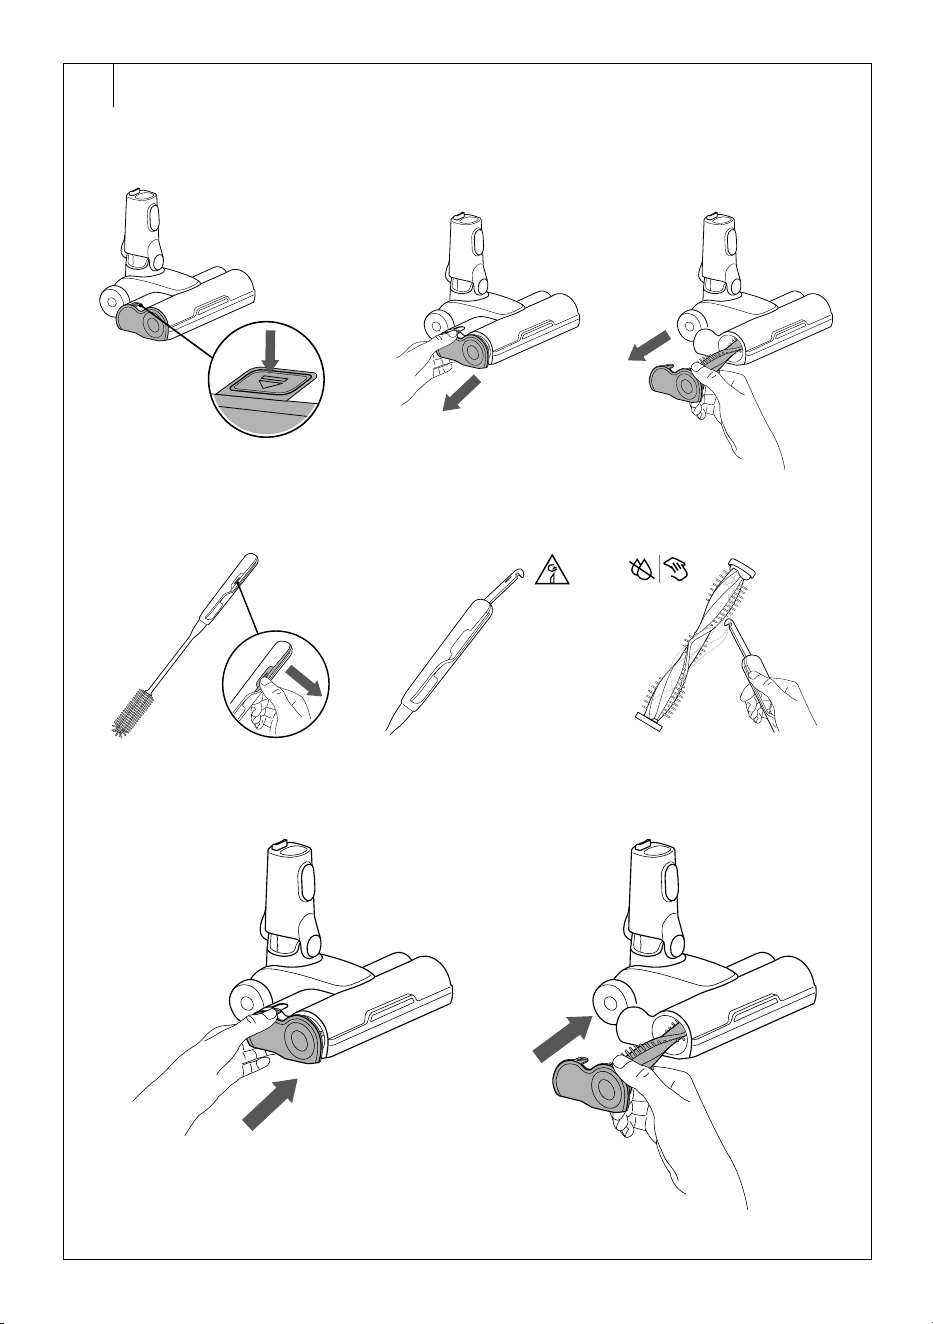
CLEANING THE DRY VACUUM NOZZLE
(only SVW 8872BK)
• Remove the metal tube from the nozzle.
• Press the button to release the rotary brush and pull it towards the
nozzle – see Figure I1.
• Remove hair and fur entangled in the brush. You can use the tools
found in the cleaning brush to loosen or remove them – see Figure I2.
• Wipe the nozzle, especially the suction opening, with asoft sponge
slightly dampened in warm water. Wipe with adry cloth.
• You can use acleaning brush to clean the inlets.
• Insert the rotary brush back into the nozzle – see Figure I3. Press
gently until you hear aclick. This indicates that the brush is properly
secured.
Warning:
Do not submerge the nozzle in water or wash it under
water. There is arisk of damage andinjury by electric
shock.
. . . . . . . . . . . . . . . . . . . . . . . . . . . . . . . . . . . . . . . . . . . . . . . . . . . . . . . . . . . . . . . . . . . .
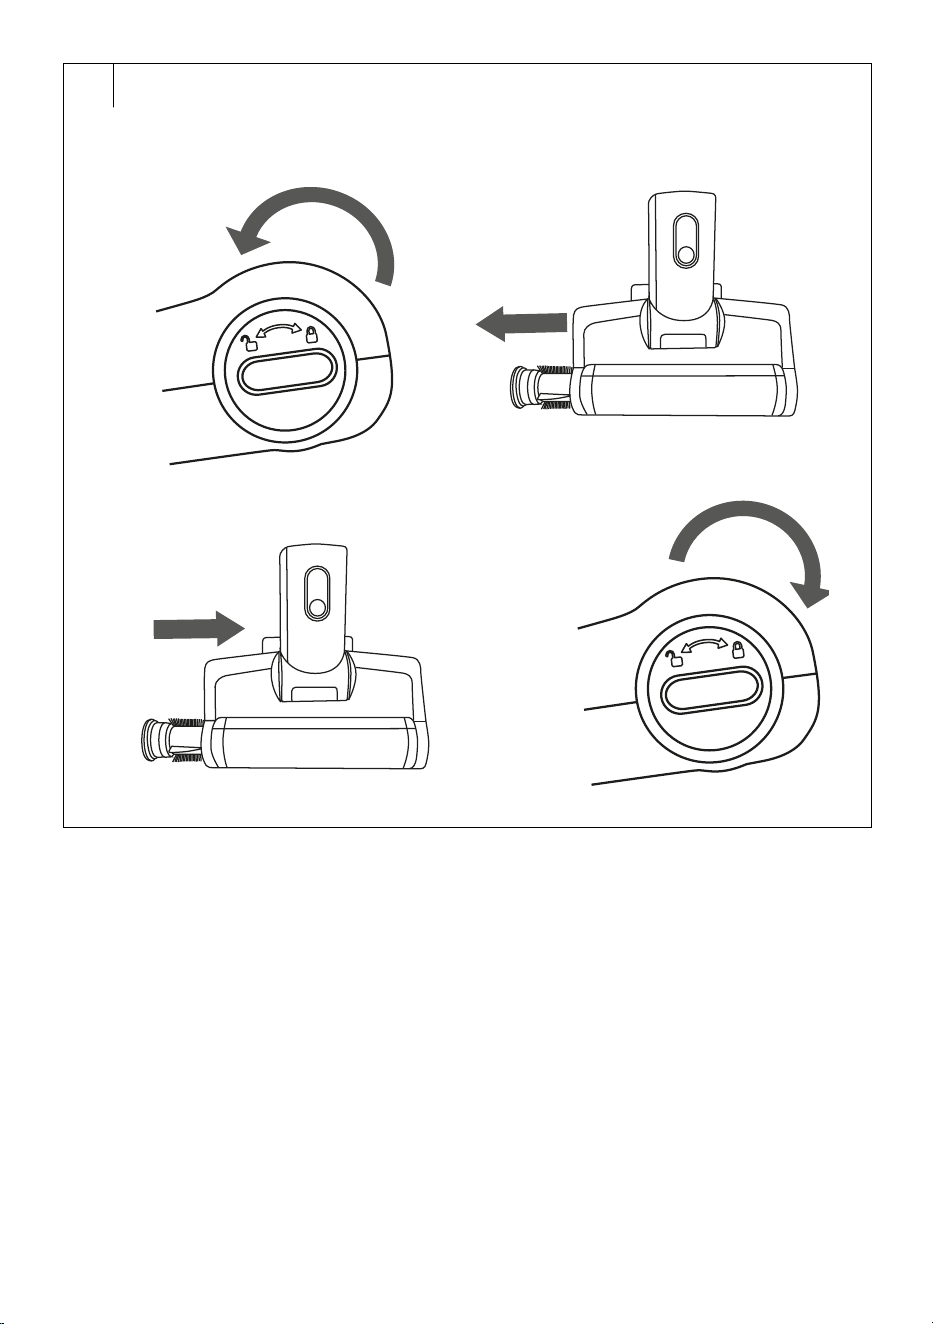
CLEANING THE MINI BRUSH NOZZLE
• Turn the lock on the side of the mini brush head towards the open lock
symbol to release the rotating brush – see figure J1.
• Pull the rotating brush out of thebrush nozzle – see figure J2.
• Remove hair and fur entangled in the brush. To loosen or remove
them, you can use the tools found in thecleaning brush.
• Wipe the mini brush nozzle, especially the suction hole, with asoft
sponge slightly moistened inwarm water. Wipe with adry cloth.
• You can use acleaning brush to clean the inlets.
• Insert the rotating brush back into the nozzle – see figure J3. Push
gently until you feel resistance andturn the lock towards the closed
lock symbol – see Figure J4.
. . . . . . . . . . . . . . . . . . . . . . . . . . . . . . . . . . . . . . . . . . . . . . . . . . . . . . . . . . . . . . . . . . . .
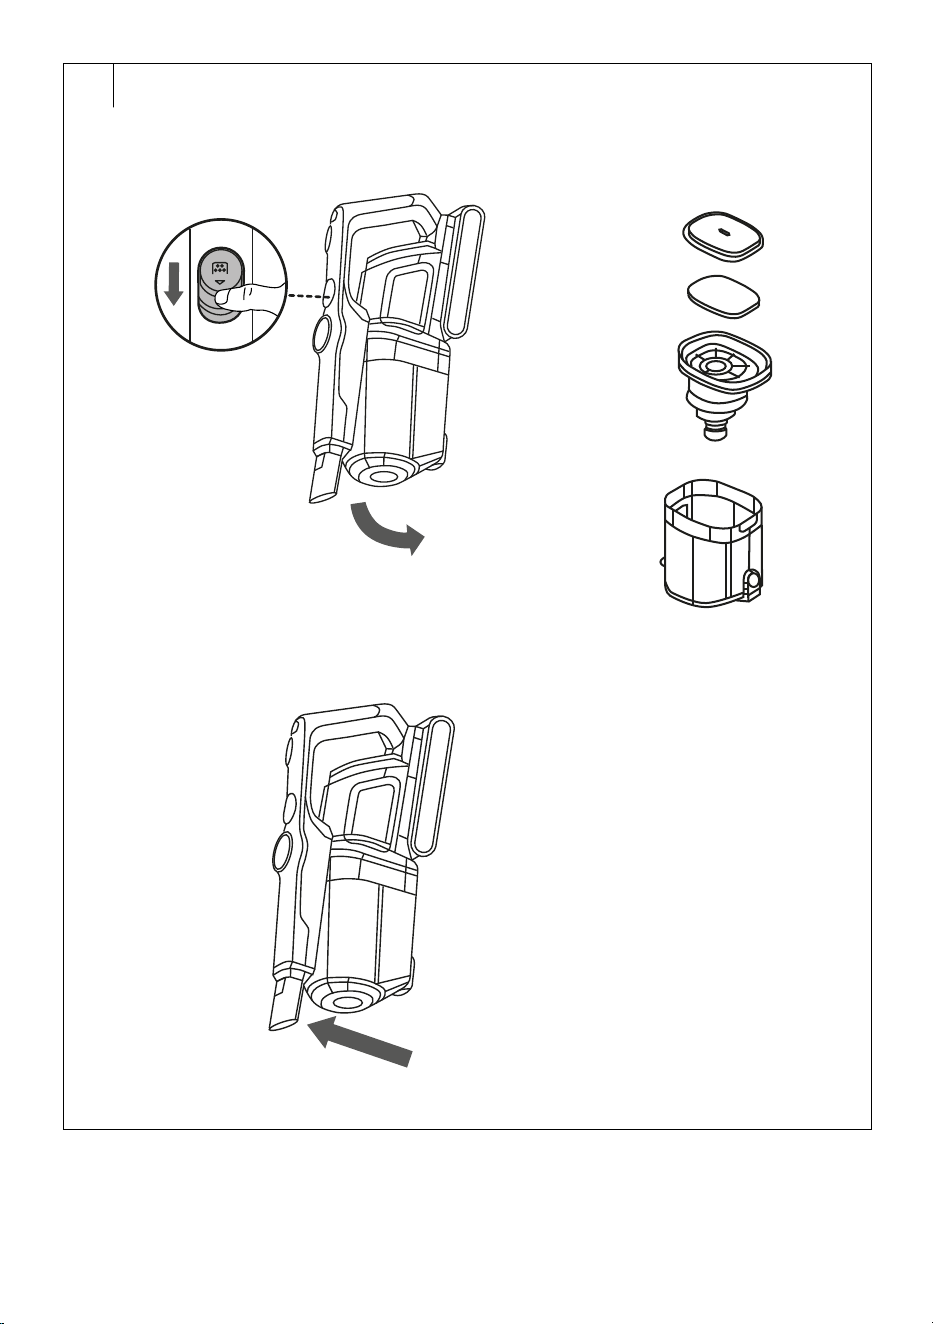
EMPTYING THE DIRTY WATER TANK
• Switch off the vacuum cleaner and remove the dirty water tank – see
figure K1.
• Pull the filter lid and coarse filter out of the tank and pour the dirty
water down the drain.
• Rinse the tank as needed andremove coarse debris from thefilter.
• Put the coarse filter back in and replace the lid.
• Place the container back into the vacuum cleaner body – see Figure K2.
. . . . . . . . . . . . . . . . . . . . . . . . . . . . . . . . . . . . . . . . . . . . . . . . . . . . . . . . . . . . . . . . . . . .
CLEANING THE DIRTY WATER TANK
• Clean the dirty water tank after each use, after the self-cleaning
function is completed, andwhen the full tank icon lights up.
• Switch off the vacuum cleaner and remove the dirty water tank – see
figure K1.
• Remove the filter cover and the coarse filter from the tank and dispose
of the dirty water in the waste – see figure K3.
• Rinse the dirty water tank with clean water. Use acleaning brush
toremove dirt from the walls of the tank. Rinse again andallow to dry
freely, or wipe the outer surface of the tank with aclean cloth.
- 8 -
08/2025
2025, .
• Remove the dirt from the coarse filter anddispose of it into the
household waste. Rinse the coarse filter under flowing water andallow
to dry freely or wipe the coarse filter with aclean cloth.
• Removethe filter for wet vacuuming from the lid. Rinse the lid andfilter
under clean running water andallow to dry freely, or wipe the lid
andfilter with aclean cloth.
• Insert the filter into the tank. When inserting, make sure that the
protrusion on the mandrel in the centre of the tray fits into the cut-out
at the bottom of the filter.
• Place the clean anddry filter in the cover; and put the assembled
cover back on the tank.
• Insert the assembled tank into the cleaner body – see figure K2.
Note:
The filter for wet vacuuming needs to be replaced from time
to time. Regularly check its condition andreplace it after
6–12 months or as needed.
. . . . . . . . . . . . . . . . . . . . . . . . . . . . . . . . . . . . . . . . . . . . . . . . . . . . . . . . . . . . . . . . . . . .
EMPTYING THE DUST CONTAINER
• Disconnect the motor unit andremove the battery.
• Move the motor unit over the dust bin so that the bottom of the dust
bin is pointing downwards – see Figure L1.
• Press the button to release the bottom of the dust container – see
figure L2. The bottom is released and the contents of the container are
poured into the bin.
• Use your free hand to attach the bottom back to thecontainer. Press
gently until you hear aclick. This indicates that the bottom has been
properly secured.
. . . . . . . . . . . . . . . . . . . . . . . . . . . . . . . . . . . . . . . . . . . . . . . . . . . . . . . . . . . . . . . . . . . .
CLEANING THE DUST CONTAINER
• Empty the dust container according to the instructions above.
• Press the dust container release button and remove it from themotor
unit – see Figure M1.
• Remove the HEPA filter, foam filter andcoarse filter from the dust
container – see figure M2.
• Remove dirt from the coarse filter. Ifnecessary, you can rinse it under
running water. And then wipe dry with aclean cloth.
• Tap the foam filter above the rubbish bin. Do not soak the foam
filter in water or vacuum it with avacuum cleaner. This may lead to
irreversible damage.
• Shake the HEPA filter and remove the dirt with asoft brush or dry
cloth. In the event of heavy soiling, you can vacuum them out using
adifferent vacuum cleaner with an attached brush nozzle. Do not
wash the HEPA filter in water. This may damage the appliance. In
the event that the HEPA filter is already heavily soiled or deformed,
replace it with anew one. We recommend replacing the HEPA filter
based on the frequency of use at least once every six months. Always
replace the HEPA filter and the foam filter together.
• Wipe the inner walls of the dust container with aslightly moistened
soft sponge. Wipe with aclean cloth until dry.
Warning:
Never install the filters if they are wet or damp. Before
installing them, make sure that they are thoroughly
dry.
• Put the coarse filter, the foam filter andfinally the HEPA filter in the
dust container.
• Attach the dust container to themotor unit perpendicularly so that the
protrusion at the rear of the motor unit fits into the opening atthe top of
the dust container.
• Then press the bottom of the dust container against themotor unit –
see Figure M3. Press gently until you hear aclick. This indicates the
correct attachment of the dust container.
. . . . . . . . . . . . . . . . . . . . . . . . . . . . . . . . . . . . . . . . . . . . . . . . . . . . . . . . . . . . . . . . . . . .
CLEANING THE CLEANER BODY, ACCESSORIES
AND CHARGING BASE
• Disconnect the power cord from the power socket.
• Wipe the charging base, cleaner body and accessories with adry
cloth.
Warning:
Do not block the ventilation openings of the base. Do
not pour water into the openings or insert any foreign
objects.
. . . . . . . . . . . . . . . . . . . . . . . . . . . . . . . . . . . . . . . . . . . . . . . . . . . . . . . . . . . . . . . . . . . .
RECOMMENDED MAINTENANCE
ANDREPLACEMENT OF ACCESSORIES
Cleaner Part
Recommended
Maintenance
Recommended
Replacement
Clean Water Tank After each use --
Dirty water tank After each use --
HEPA filter andfoam filter After each use
Replacement every
3–6 months
Rotating brush nozzle for
wet vacuuming
After each use
Replacement 6–12
months or if worn or
damaged
Rotating brush for dry
mopping nozzle
After each use
Replacement incase
of wear or damage
Rotating brush of the mini
brush nozzle
After each use
Replacement incase
of wear or damage
Charging Base Every week --
Other accessories (flexible
hose, long slot nozzle
withillumination, soft dust
brush, dust brush)
After each use
Replacement incase
of wear or damage
Castors for dry mopping
nozzle
Once amonth --
Filter for wet vacuuming After each use
Replacement 6–12
months or if worn or
damaged
Note:
The above values are approximated andmay vary
dependingon the frequency of use of the cleaner.
. . . . . . . . . . . . . . . . . . . . . . . . . . . . . . . . . . . . . . . . . . . . . . . . . . . . . . . . . . . . . . . . . . . .
LONG-TERM STORAGE
• If you will not be using the cleaner for an extended period, clean it
according to the instructions above and make sure it is completely
dry. Disconnect the charging base from the power socket. Store the
cleaner with all accessories in adry, clean and cool place.
• We recommend charging the cleaner every 3 months to extend the
life of the built-in battery.
. . . . . . . . . . . . . . . . . . . . . . . . . . . . . . . . . . . . . . . . . . . . . . . . . . . . . . . . . . . . . . . . . . . .
- 9 -
08/2025
2025, .
TECHNICAL SPECIFICATIONS
Hard Floor Cleaner
Operating voltage .................................................................................................21.6 V
Rated power (hard floor cleaner) ................................................................... 500 W
Rated power (wet vacuuming nozzle) ............................................................ 70 W
Rated power (dry vacuuming nozzle, SVW 8872BK only)........................ .
50 W
Rated power (mini brush nozzle) .................................................................... 20 W
Battery ........................................................................... Li-ion / 21.6 V / 4600 mAh
Cleaner Dimensions ............................................................. 265 × 216 × 1150 mm
Weight .....................................................................................................................5.2 kg
Operating time per single charge* ...............................................................30 min
Charging time approx. ................................................................................ 4.5 hours
Clean water tank capacity ..............................................................................600 ml
Dirty water tank capacity ................................................................................600 ml
Waterproof rating ....................................................................................................IPX4
* This is the operating time for wet vacuuming.
Charging Base
Nominal voltage range .........................................................................100–240 V~
Rated frequency ..........................................................................................50–60 Hz
Rated power .................................................................................................70–200 W
Output ..................................................................................................25,8 V
1,0 A
. . . . . . . . . . . . . . . . . . . . . . . . . . . . . . . . . . . . . . . . . . . . . . . . . . . . . . . . . . . . . . . . . . . .
ORIGINAL CONSUMABLE ACCESSORIES
AVAILABLE FOR PURCHASE
SVWX 8801 Battery
SVWX 8802 HEPA filter and foam filter set
SVWX 8803 Filter for wet vacuuming
SVWX 8804 Rotating brush
. . . . . . . . . . . . . . . . . . . . . . . . . . . . . . . . . . . . . . . . . . . . . . . . . . . . . . . . . . . . . . . . . . . .
INSTRUCTIONS AND INFORMATION ON DISPOSAL
OF USED PACKAGING MATERIAL
Dispose of used packaging material at the designated municipal waste
disposal site.
. . . . . . . . . . . . . . . . . . . . . . . . . . . . . . . . . . . . . . . . . . . . . . . . . . . . . . . . . . . . . . . . . . . .
DISPOSAL OF USED ELECTRICAL AND ELECTRONIC
EQUIPMENT
Used electrical andelectronic products must not be disposed of in
ordinary municipal waste. To enable the proper disposal and recycling
of these products, deliver them to the designated collection points.
Alternatively, in some European Union states or other European
countries the products can be returned to the local retailer when buying
an equivalent new product. By properly disposing this product, you
help preserve valuable natural resources and help to prevent potential
damage to the environment and human health resulting from improper
waste disposal. For more details, contact your local authority or nearest
collection point. Fines may be imposed for improper disposal of this type
of waste as per national regulations.
For business entities in European Union States
To dispose of electric or electronic equipment, request the necessary
information from your retailer or supplier.
Disposal in other countries outside the European Union
To dispose of this product elsewhere, request the necessary information
on the correct disposal method from local authorities or your retailer.
. . . . . . . . . . . . . . . . . . . . . . . . . . . . . . . . . . . . . . . . . . . . . . . . . . . . . . . . . . . . . . . . . . . .
Changes to text and technical parameters are reserved.
TROUBLESHOOTING
PROBLEM CAUSE SOLUTION
The cleaner
cannot be
turned on
andoper-
ated.
The battery is depleted. Allow the battery to fully
charge.
The dirty water tank is
full (the cleaner turned
off).
Empty the dirty water tank.
The rotating brush is
blocked.
Clean the rotating brush.
The cleaner is in
avertical position.
Release it from the vertical
position by gently pulling the
handle backward.
The suction
output is
weak.
The dirty water tank is
full (the cleaner turned
off).
Empty the dirty water tank.
The rotating brush or
dirty water tank is not
properly installed.
Properly insert the rotating
brush or dirty water tank.
The rotating brush is
blocked.
Clean the rotating brush.
The HEPA filter is wet. Remove the HEPA filter
andallow it to dry.
The HEPA filter is
blocked.
Clean the HEPA filter.
The suction port or pipes
are clogged.
Remove the cause of the
blockage.
The floor is
not properly
cleaned.
There is insufficient
water in the tank.
Refill the water tank.
The dirty water tank /
clean water tank is not
properly inserted.
Insert the dirty water tank
properly.
The cleaner
cannot be
charged.
The plug is not properly
inserted into the power
socket.
Insert the plug properly into
the socket.
The cleaner is not
properly placed on the
charging base.
Place the cleaner on the base
so that the contacts connect.
The charging base is not
properly assembled.
Ensure that the holder with the
charging contacts is properly
fitted in the base.
The cleaner
makes an
unusual
sound.
The motor is blocked. Turn off the cleaner
andremove the blockage.
The dirty water tank
is full.
Empty the tank.
The water tank is empty. Refill the water tank.
The HEPA filter is
not inserted or is not
correctly inserted.
Insert the HEPA filter, or check
that it is correctly inserted.
The nozzle
is not
working.
There is insufficient
water in the tank.
Refill the water tank.
You did not press the
water spray button.
Press and hold the button to
spray water.
The water tank is not
inserted correctly.
Place the water tank correctly
on the wet vacuum nozzle.
The air
outlet is
leaking
water.
The dirty water tank is
not properly assembled.
Remove the water tank
andfold it correctly. Then,
reinsert it.
The gasket on the tray
is missing or not in its
correct location.
Insert the gasket in the same
position.
Note:
If the problem or error message persists, turn off the cleaner
andcontact an authorised service centre.
. . . . . . . . . . . . . . . . . . . . . . . . . . . . . . . . . . . . . . . . . . . . . . . . . . . . . . . . . . . . . . . . . . . .

- 10 -
08/2025
2025, .
