INSTRUCTION MANUAL
2 PLACE TABLE TOP DISHWASHER
EQDWTTGF
Thank you for choosing electriQ
Please read the manual before using this dishwasher
and keep it safe for future reference.
Visit our page www.electriQ.co.uk for our entire product range

2
CONTENTS
SAFETY
3
INSTALLATION
4
PRODUCT OVERVIEW
6
OPERATION
7
DETERGENT
8
ADDING SALT
9
WATER SOFTENER
10
LOADING THE APPLIANCE
11
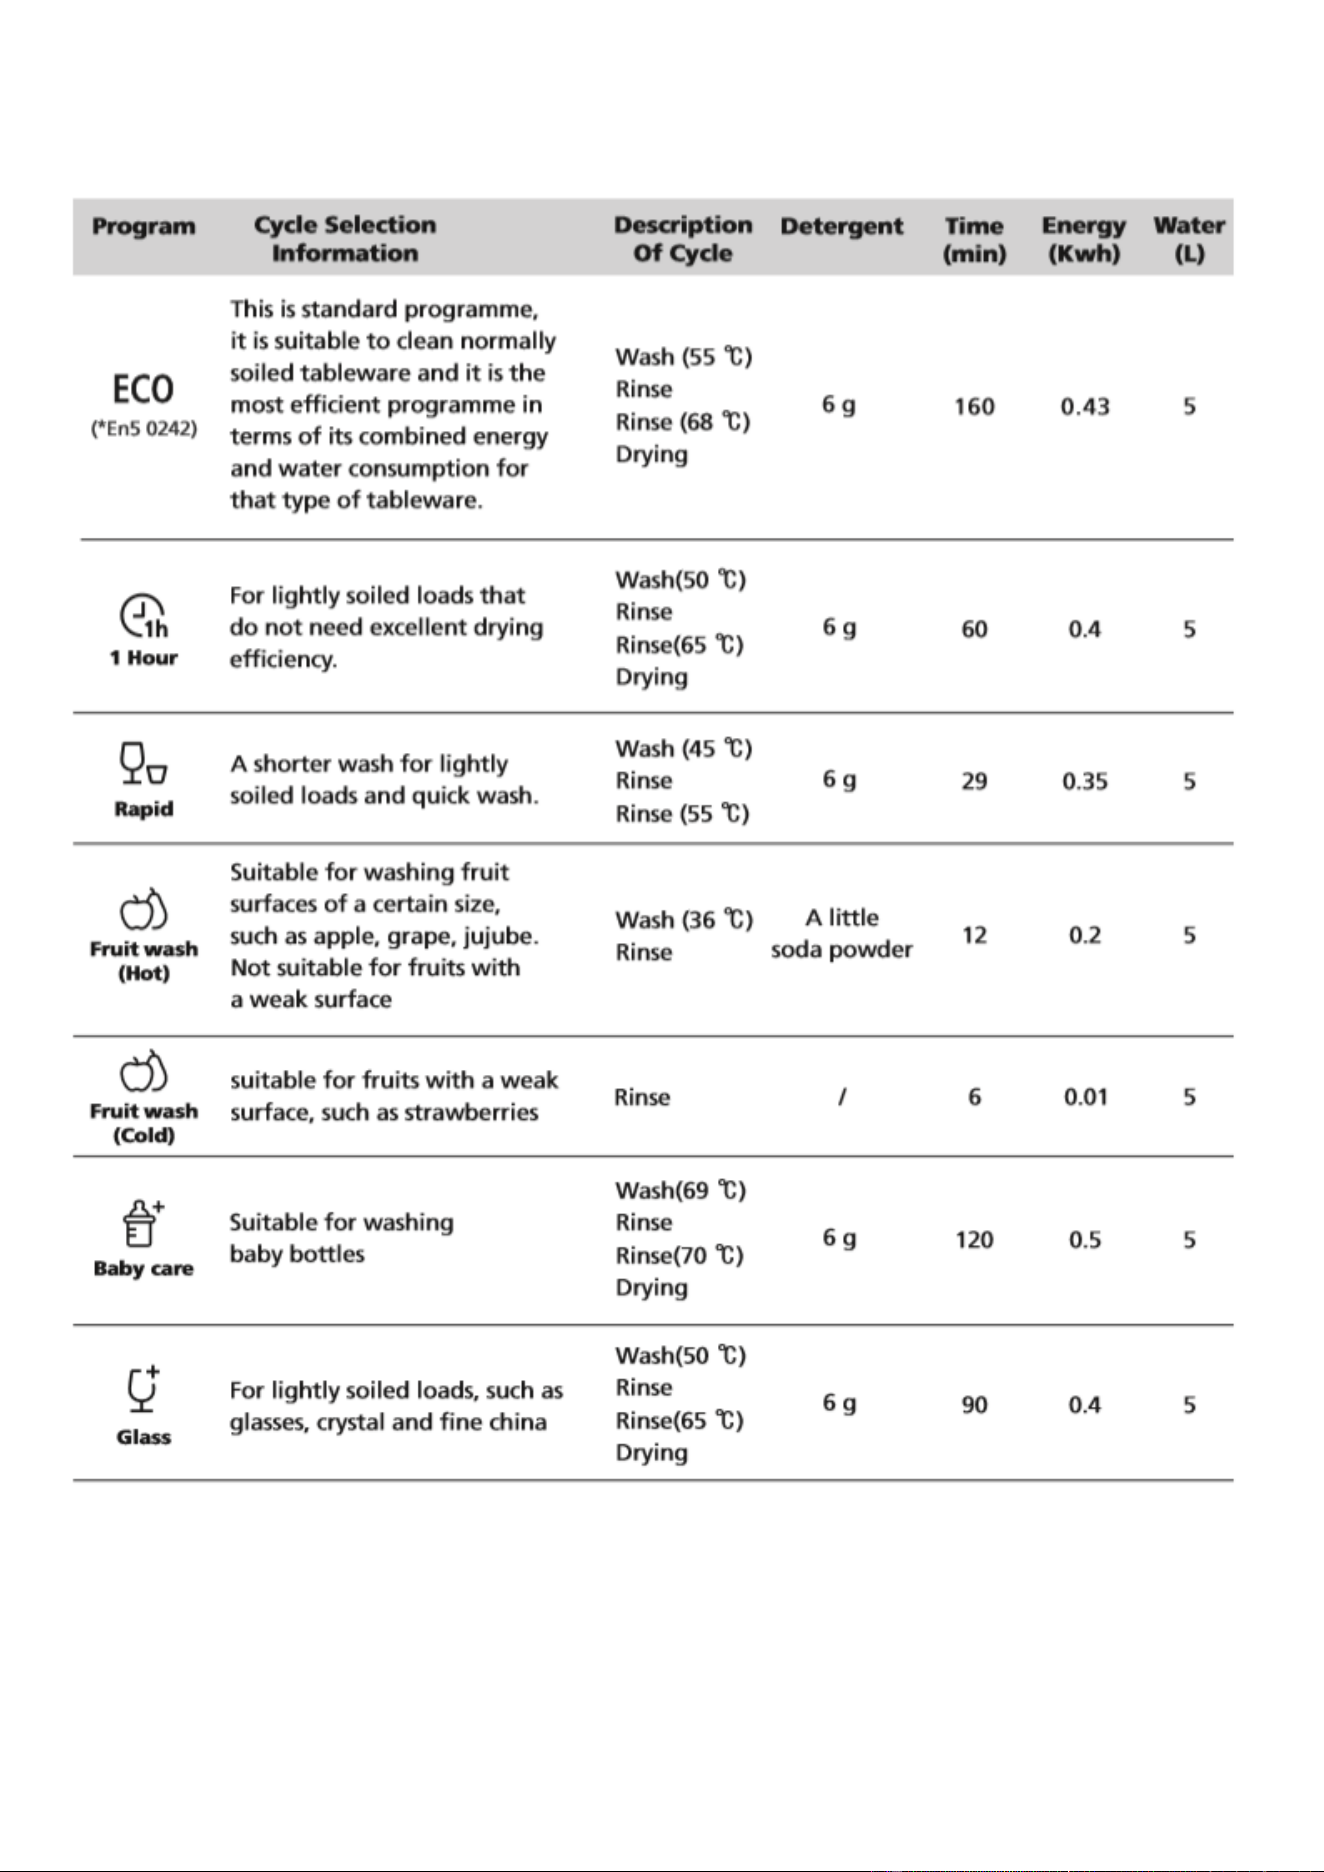
PROGRAM INFORMATION
12
FILTER ASSEMBLY
14
MAINTENANCE AND CLEANING
15
TROUBLESHOOTING
17
TECHNICAL INFORMATION
19
PRODUCT FICHE
20
ERROR CODES
21
SUPPORT
21

3
SAFETY INFORMATION
• Installation and repair must only be carried out by a qualified technician.
• This appliance is intended to be used in household and similar applications.
• This appliance can be used by children aged from 8 years and above and persons with
reduced physical, sensory or mental capabilities or lack of experience and knowledge if
they have been given supervision or instruction concerning use of the appliance in a
safe way and understand the hazards involved.
• Children must not play with the appliance.
• Cleaning and user maintenance must not be done by children without supervision.
• This appliance is not intended for use by persons or children with reduced physical,
sensory or mental capabilities, or lack of experience and knowledge, unless they have
been given supervision or instruction concerning use of the appliance by a person
responsible for their safety.
• Packaging material could be dangerous for children.
• This appliance is for indoor household use only.
• To protect against the risk of electric shock, do not immerse the unit, cord or plug in
water or other liquid.
• Do not abuse, sit on, or stand on the door or dish rack of the dishwasher.
• Do not operate your dishwasher unless all enclosure panels are properly in place.
• Open the door very carefully if the dishwasher is operating, there is a risk of water
squirting out.
• Do not place any heavy objects on or stand on the door when it is open. The appliance
could tip forward.
• When loading items to be washed locate sharp items so that they are not likely to
damage the door seal.
Warning: Knives and other utensils with sharp points must be loaded in the
basket with their points facing down or placed in a horizontal position.
• Some dishwasher detergents are strongly alkaline. They can be extremely dangerous if
swallowed. Avoid contact with the skin and eyes and keep children away from the
dishwasher when the door is open. Check that the detergent powder is empty after
completion of the wash cycle.
• Do not wash plastic items unless they are marked “dishwasher safe” or the equivalent.
• For unmarked plastic items, check the manufacturer's recommendations. Only use
detergent and rinse agents recommended for use in an automatic dishwasher.
• Never use soap, laundry detergent, or hand washing detergent in your dishwasher.
• The door should not be left open, since this could increase the risk of tripping. If the
supply cord is damaged, it must be replaced by the manufacturer or its service agent or
a similarly qualified person in order to avoid a hazard.
• During installation, the power supply must not be excessively or dangerously bent or
flattened.

4
• Do not tamper with controls. The appliance needs to be connected to the main water
valve using new hose sets. Old sets should not be reused. To save energy, in standby
mode, the appliance will switch off automatically while there is no any operation in 30
minutes.
Earthing Instructions
• This appliance must be earthed. In the event of a malfunction or breakdown, earthing
will reduce the risk of an electric shock by providing a path of least resistance of electric
current.
• This appliance is equipped with an earthing conductor plug. The plug must be plugged
into an appropriate outlet that is installed and earthed in accordance with all local codes
and ordinances. Improper connection of the equipment-earthing conductor can result in
the risk of an electric shock.
• Check with a qualified electrician or service representative if you are in doubt whether
the appliance is properly grounded.
• Do not modify the plug provided with the appliance; If it does not fit the outlet. Have a
proper outlet installed by a qualified electrician.
INSTALLATION INSTRUCTIONS
IMPORTANT: Electrical installation should only be performed by a professional and
qualified electrician.
• Do not use an extension cord or an adapter plug with this appliance. Do not,
under any circumstances, cut or remove the earthing connection from the power
cord.
• Please look at the rating label to know the rating voltage and connect the
dishwasher to the appropriate power supply. Use the required fuse 13Amp, time
delay fuse or circuit breaker recommended and provide separate circuit serving
only this appliance.
• Ensure the voltage and frequency of the power corresponds to those on the
rating plate. Only insert the plug into an electrical socket which is earthed
properly. If the electrical socket to which the appliance must be connected is not
appropriate for the plug, replace the socket, rather than using an adaptor or the
like as they could cause overheating and burns.
NOTE: Diagrams and pictures in this manual may differ from the product due to
continuous product improvement.
5
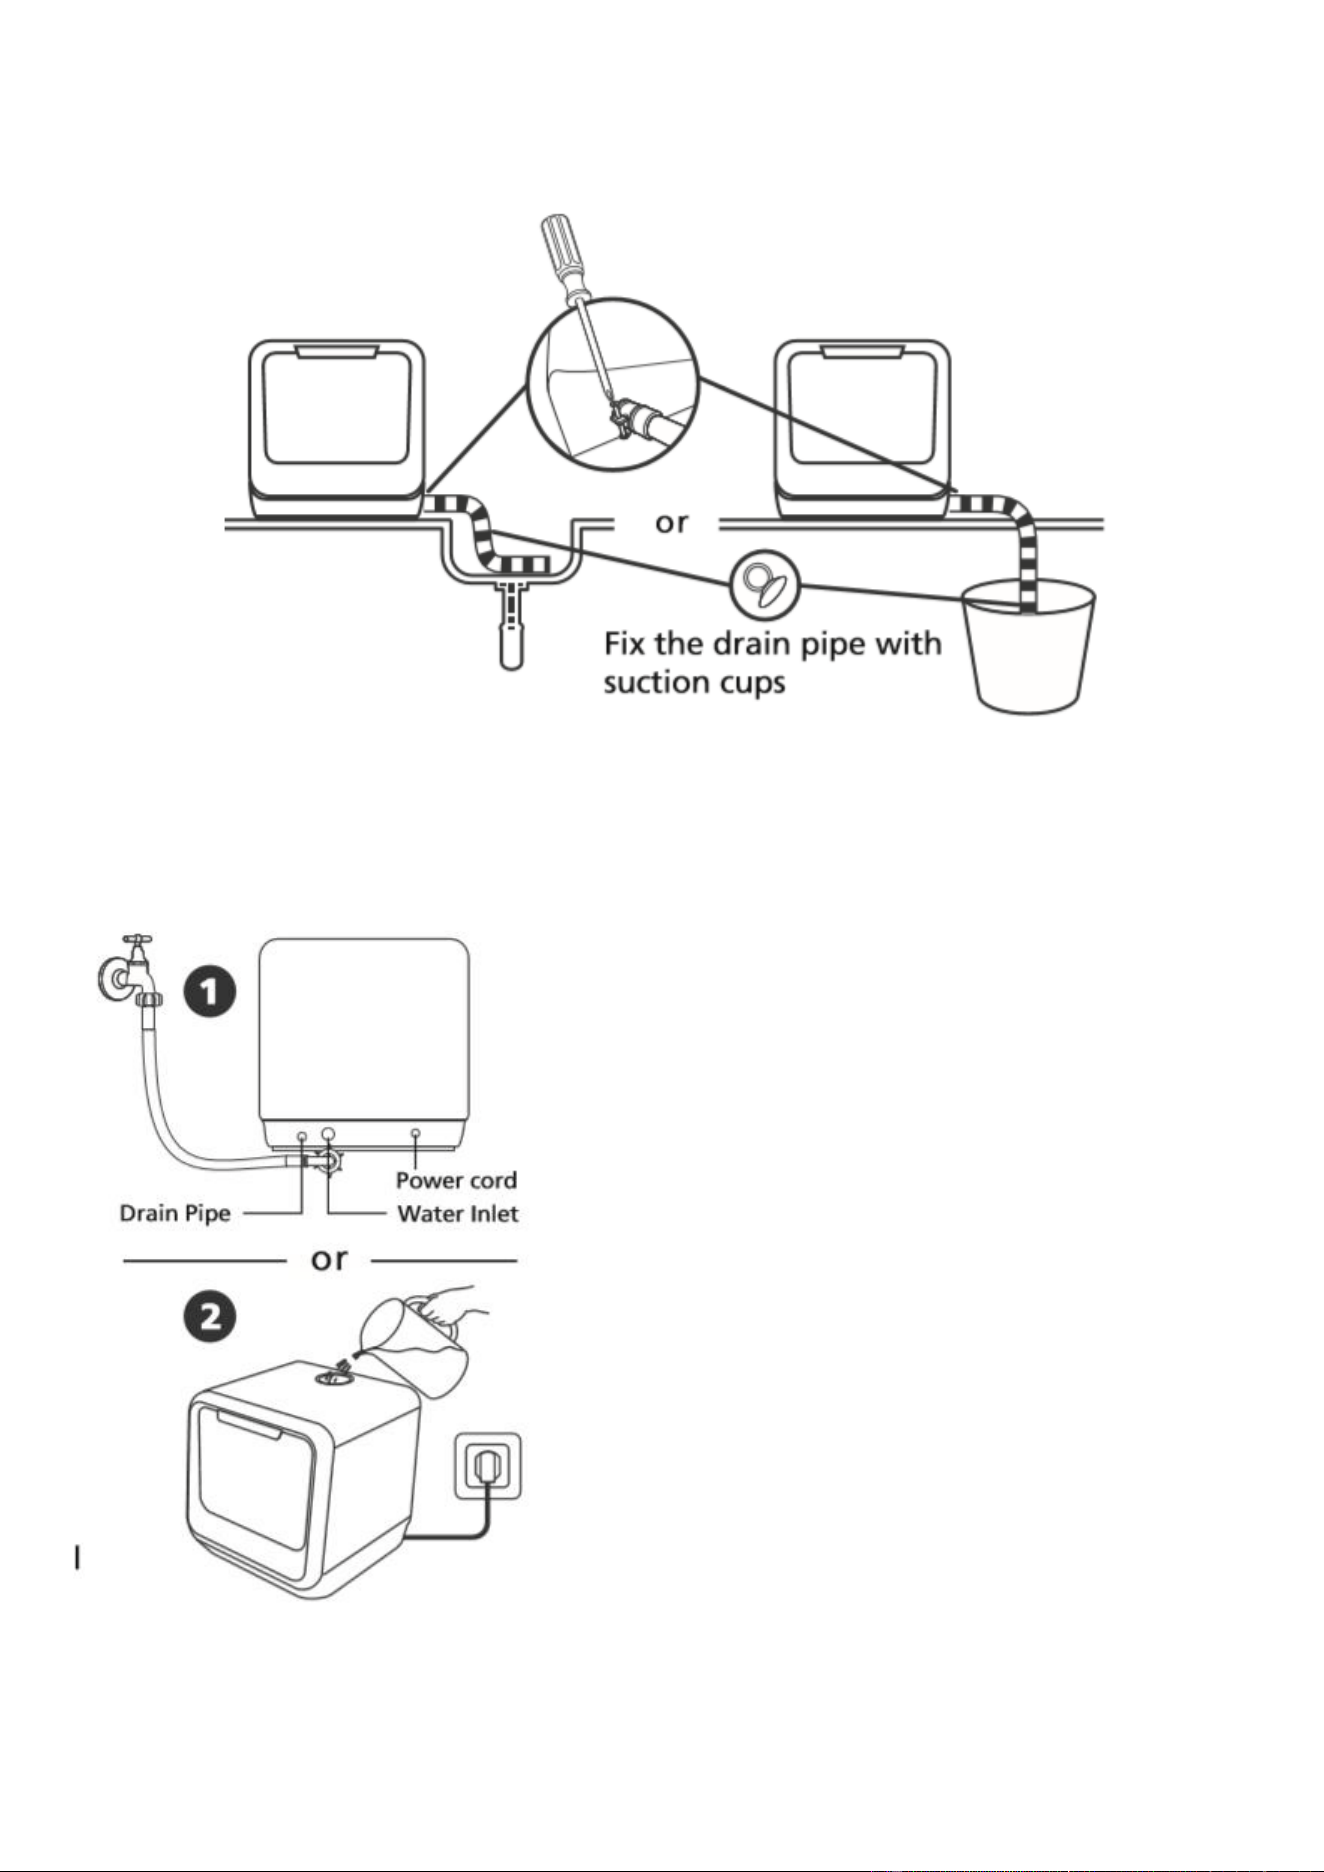
CONNECTION OF THE DRAIN HOSE
Fix the drain pipe to the unit following the diagram below.
ADDING WATER TO THE UNIT
There are two ways of filling the tank:
1. Connect inlet hose to the tap
2. Open the cap and add water into the
dishwasher’s tank manually
When the tank is full of water, the machine will
beep for 3 seconds.

6
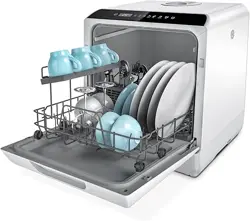
PRODUCT OVERVIEW
7
OPERATING INSTRUCTIONS
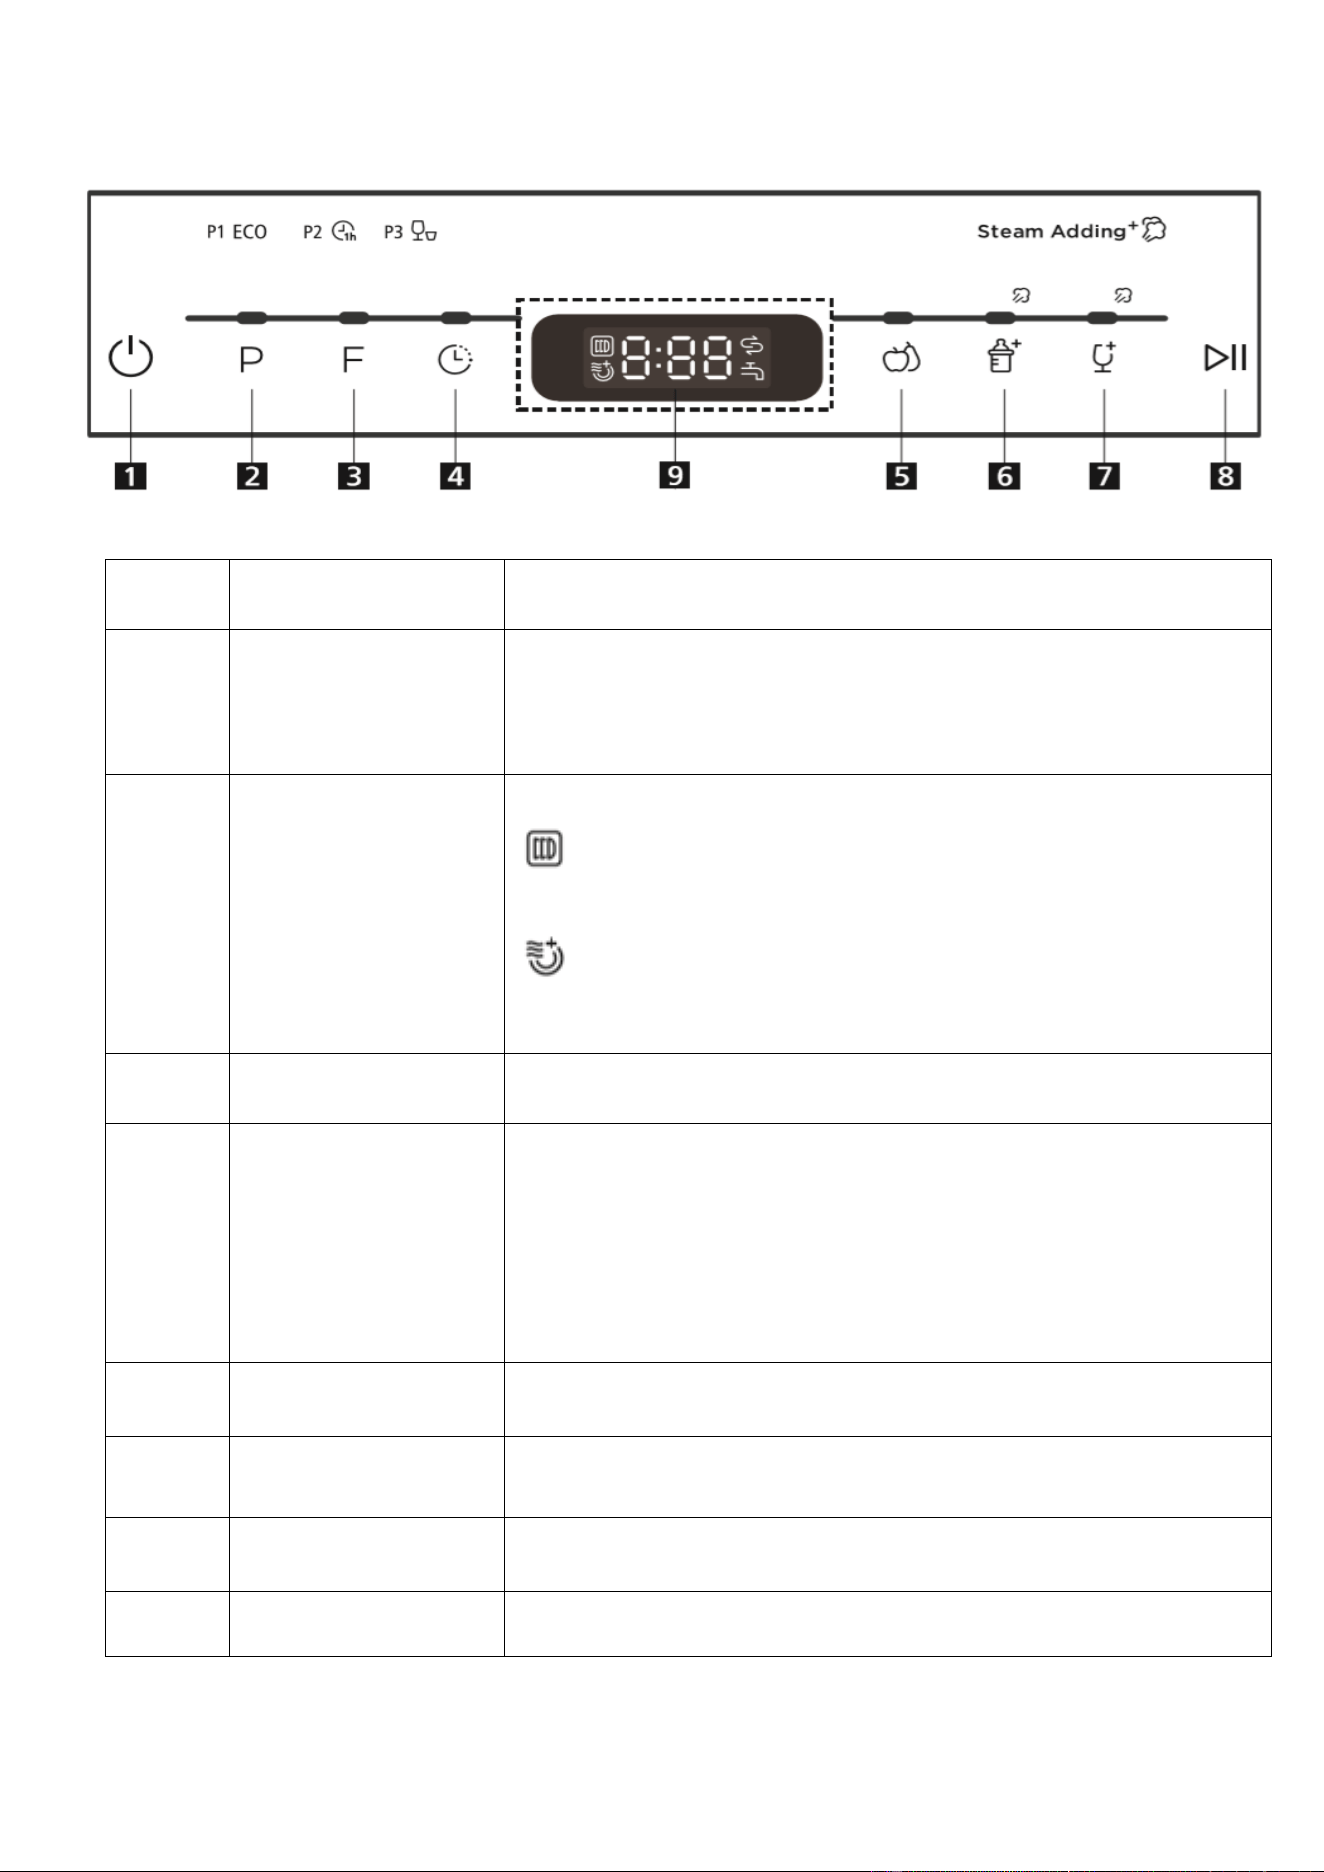
CONTROL PANEL
2h 4h 8h
1
POWER
Turn the unit ON/OFF
2
PROGRAM
Program button sets the program and allows you
select the cycle wash.
P1 = ECO P2 = 1 Hour P3 = Rapid
3
FUNCTION
Storage – Get rid of the smell/damp and enable
mildew prevention.
Extra Dry – Enable extra dry. 4
4
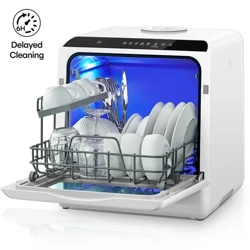
DELAY
Shows the delay time 00-24 hours.
5
FRUIT WASH
Hot Water: suitable for washing fruit surfaces of a
certain size like apples and grapefruits ect.
Cold water: Suitable for fruit with weaker surfaces
such as strawberries.
6
BABY CARE
Suitable for washing bottles (adds steam)
7
GLASS WASH
For lightly soiled loads such as glasses and fine
china.
8
START PAUSE
Start or pause the current cycle.
9
DISPLAY
Display the time, function, ect.
8
DETERGENT
Fill the detergent dispenser with detergent.
Please observe the manufacturers dosing and storage Recommendations as stated on the
detergent packaging.
Close the lid and press until it locks in place.
If the dishes are heavily soiled, place an additional detergent dose in the pre-wash detergent
chamber. This detergent will take effect during the pre-wash phase.
The dispenser must be refilled before the start of each wash cycle following the instructions
provided in the wash cycle table. Your dishwasher uses less detergent and rinse aid than
Conventional dishwasher.
Generally, only one tablespoon of detergent is needed for a normal wash load. More heavily
soiled items need more detergent.
DETERGENT

9
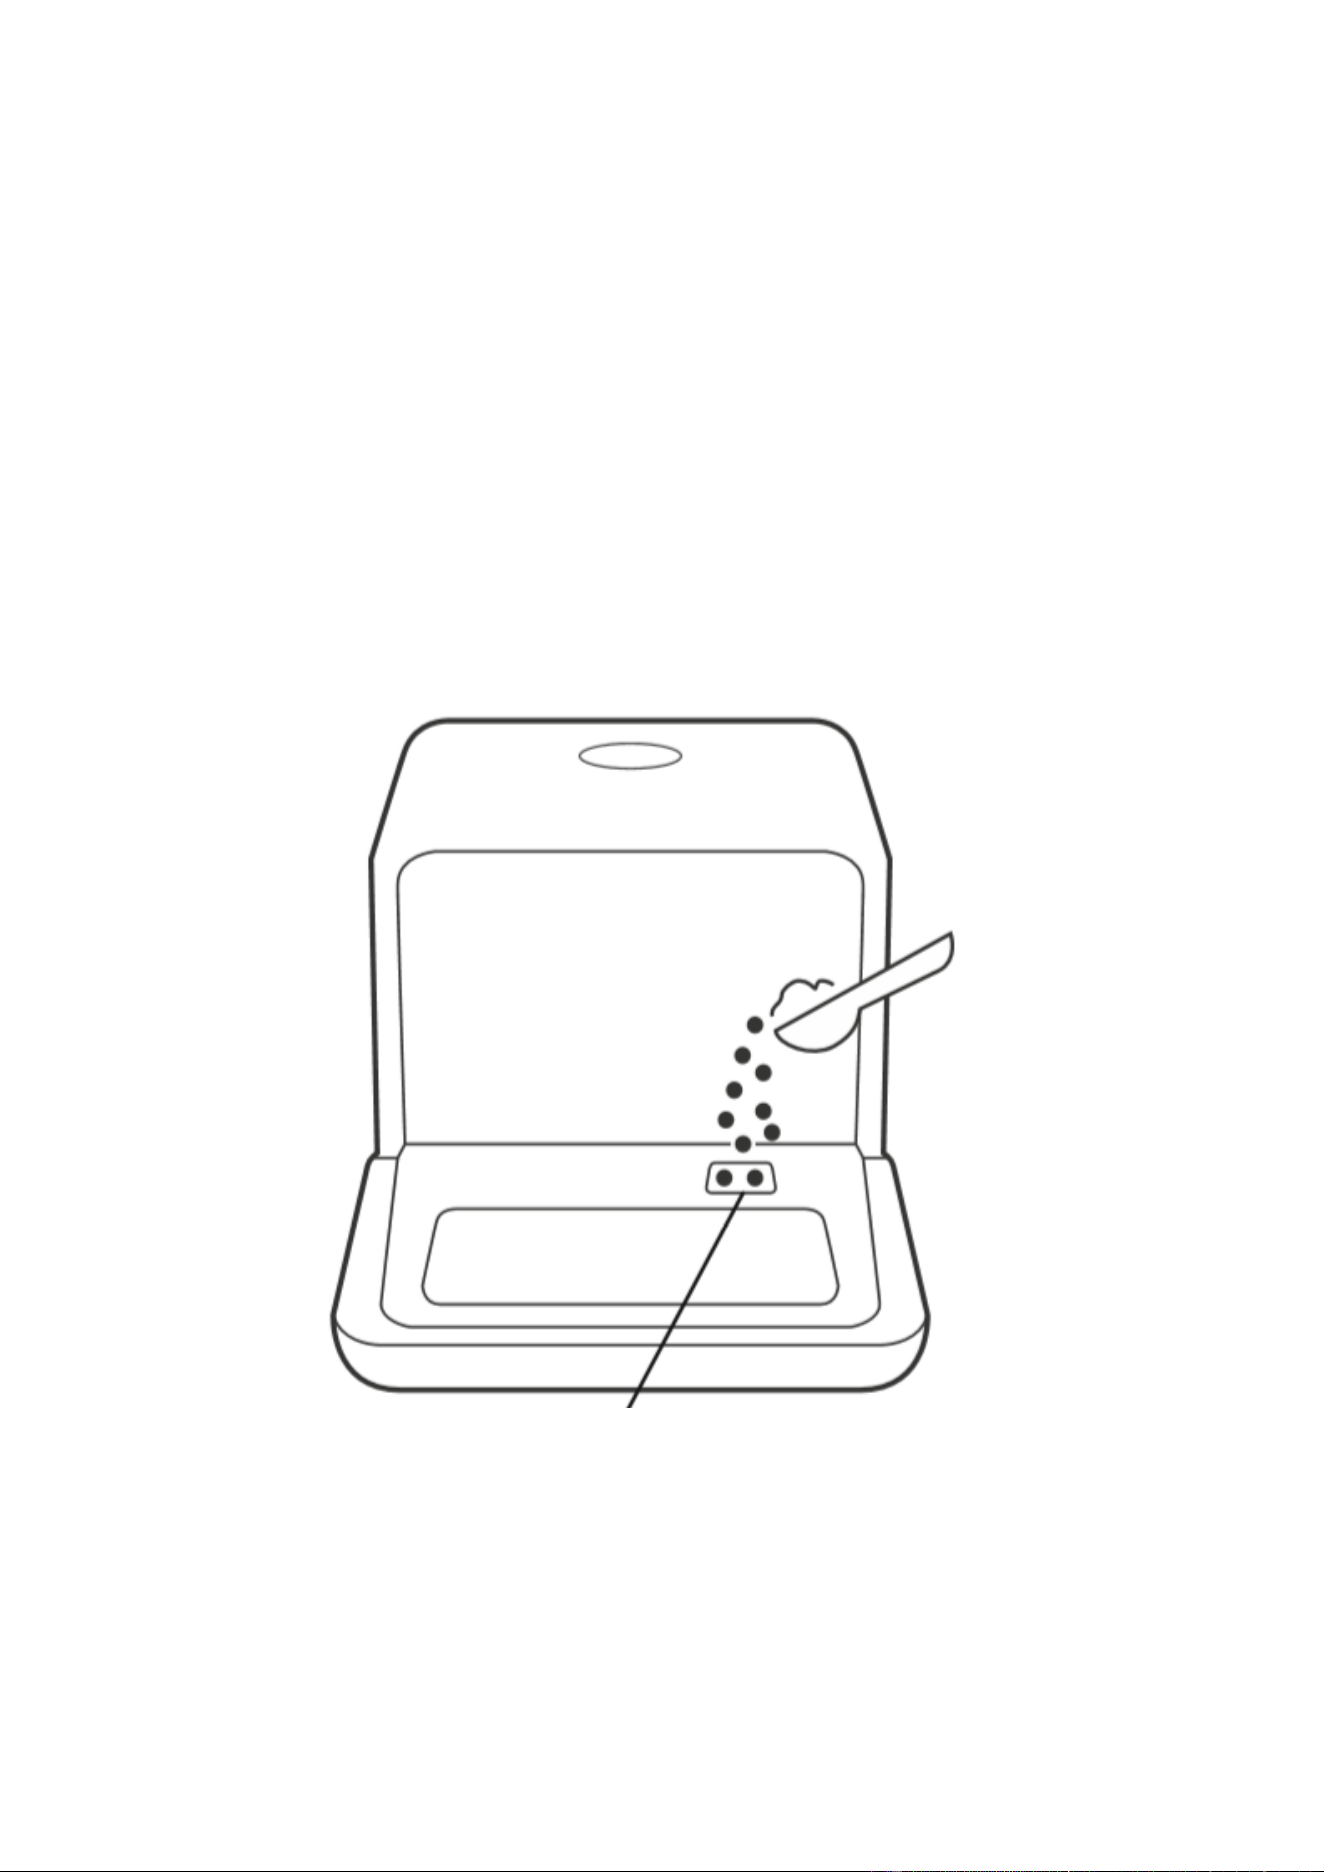
ADDING SALT
Remove the lower basket and unscrew the reservoir cap
Place the end of the funnel into the hole and pour in around 1.5kg of salt
Fill the salt container to its maximum limit with water. It is normal for a
small amount of water to come out the salt container.
After filling the container, screw the cap back on.
The salt warning light will stop after the salt container has been filled.
Immediately after filling the salt into the salt container, a washing program
should be started (We suggest to use a short program). Otherwise the filter
system, pump or other important parts of the machine may be damaged by
salty water. Failure to do this would be classed as misuse and would not be
covered under the warranty.
NOTE: The salt container must only be refilled when the salt warning light ( ) on the control
panel illuminates.
Depending on how well the salt dissolves, the salt warning light may still be on even though the
salt container is filled. If salt has spilled, run a soak or quick program to remove it.
10
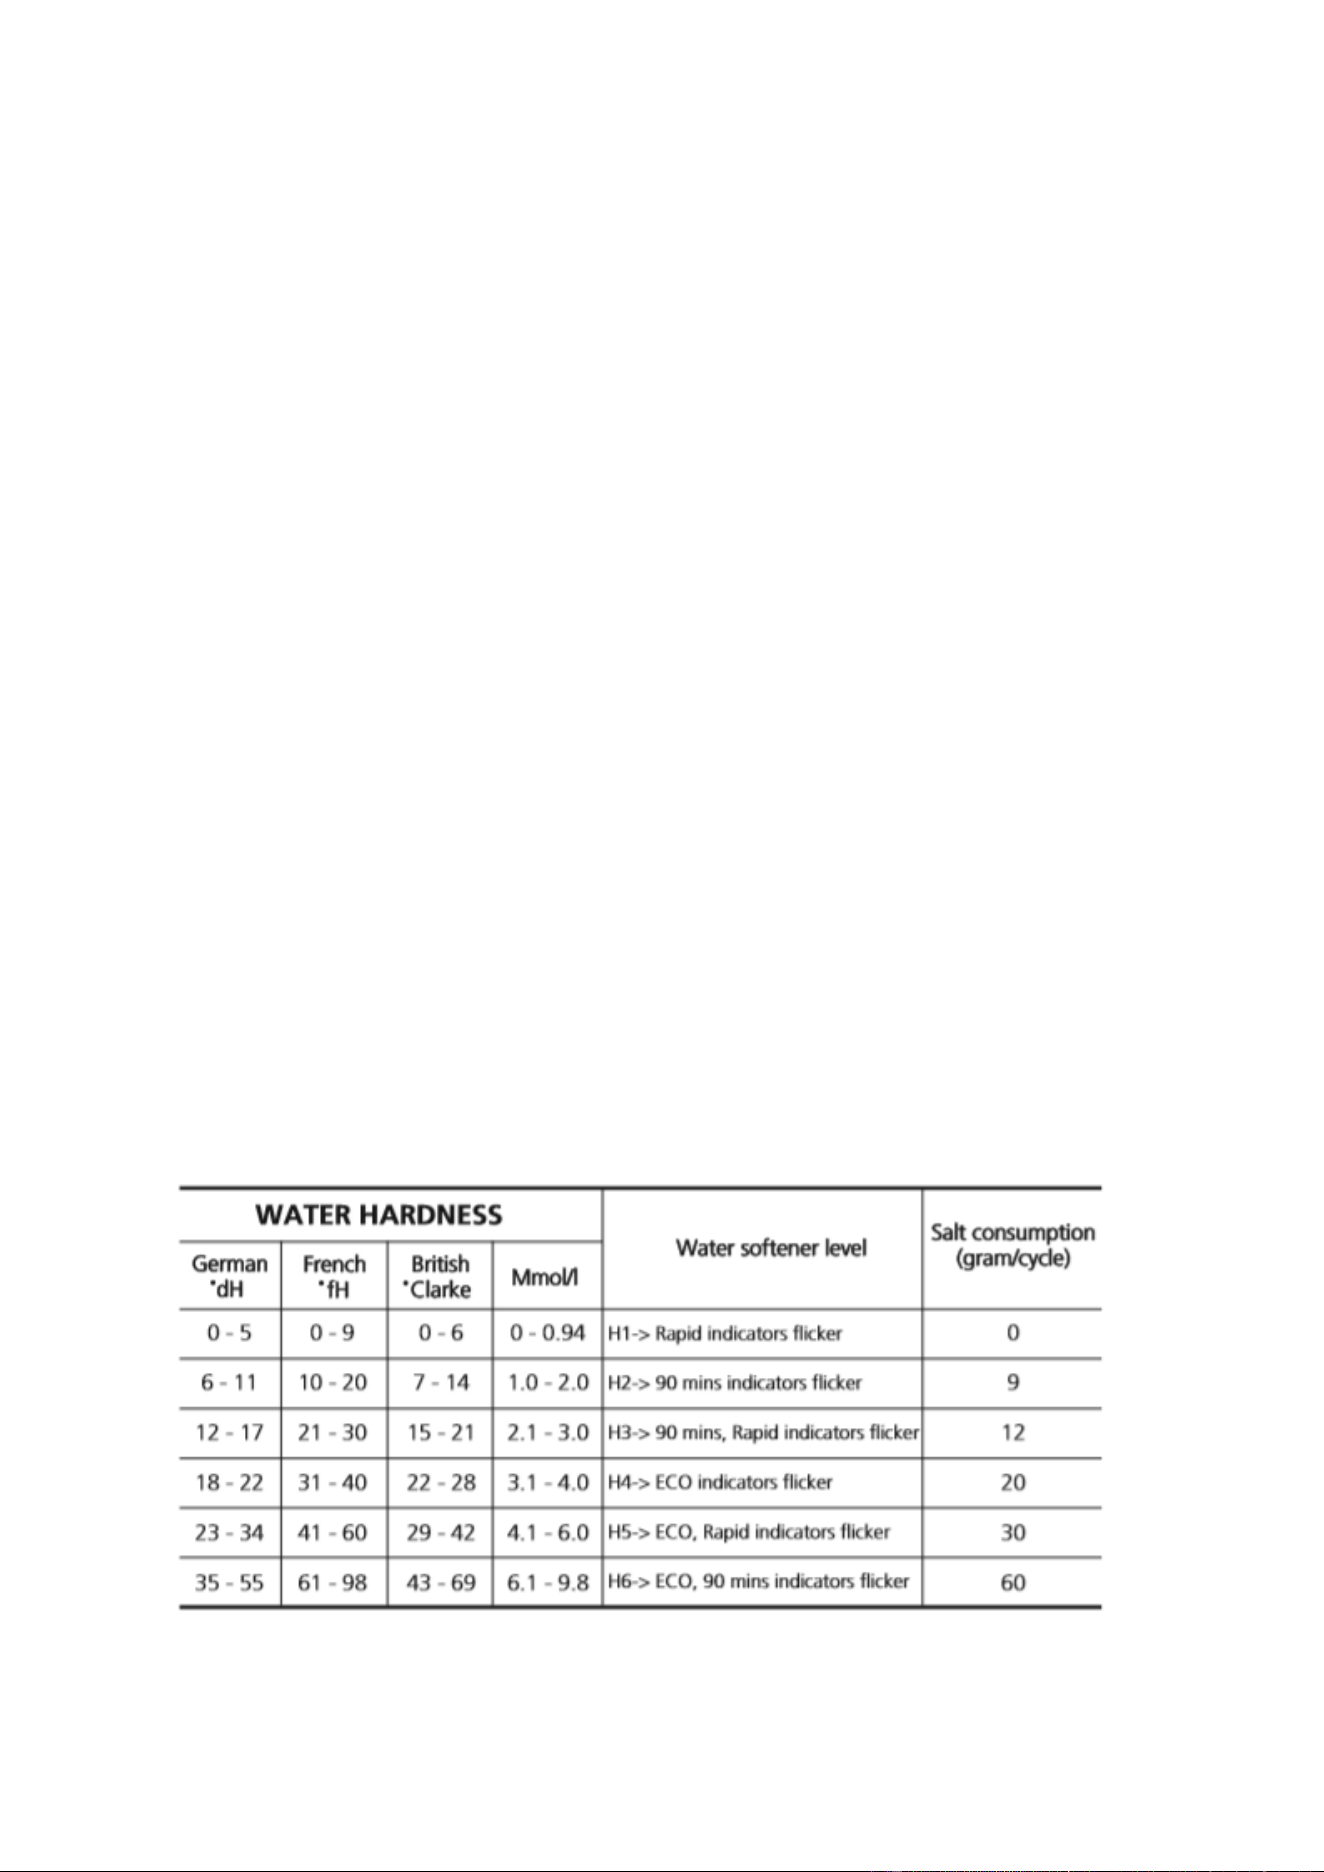
ADJUSTING THE SALT CONSUMPTION
Step 1: Enter the salt adjustment settings
Close the door, within 60 seconds after power on, press Start/Reset button and hold for 5
seconds, the machine will enter the setting mode.
Step 2: Select the level of salt consumption. Press the Start/pause button to select the
required level according to your local environment, following the table below.
WATER SOFTNER
• The hardness of water varies from place to place. If hard water is used in the dishwasher,
deposits will form on the dishes and utensils. The appliance is equipped with a special softener
that uses a salt container specifically designed to eliminate lime and minerals from the water.
• The water softener must be set manually, using the water hardness dial. The water softener is
designed to remove minerals and salts from the water, which would have a detrimental or
adverse effect on the operation of the appliance. The more minerals there are, the harder your
water is. The softener should be adjusted according to the hardness of the water in your area.
Your local Water Authority can advise you on the hardness of the water in your area.
• Adjusting salt consumption, the dishwasher is designed to allow for adjustment in the amount of
salt consumed based on the hardness of the water used. This is intended to optimise and
customise the level of salt consumption.
1. Switch on the appliance and close the door.
2. Press the Start/Pause button for more than 5 seconds to start the water softener set model
within 60 seconds after the appliance was switched on.
3. Press the Start/Pause button to select the proper set according to your local environment, the
sets will change in the following sequence:
4. Press the Power button to end the set-up mode.
H1->H2->H3->H4->H5->H6
Step 3: Exit the salt adjustment Settings
While in the settings adjustment menu, the unit will exit the mode, and return to the standby mode
if input is not received within five seconds.
11
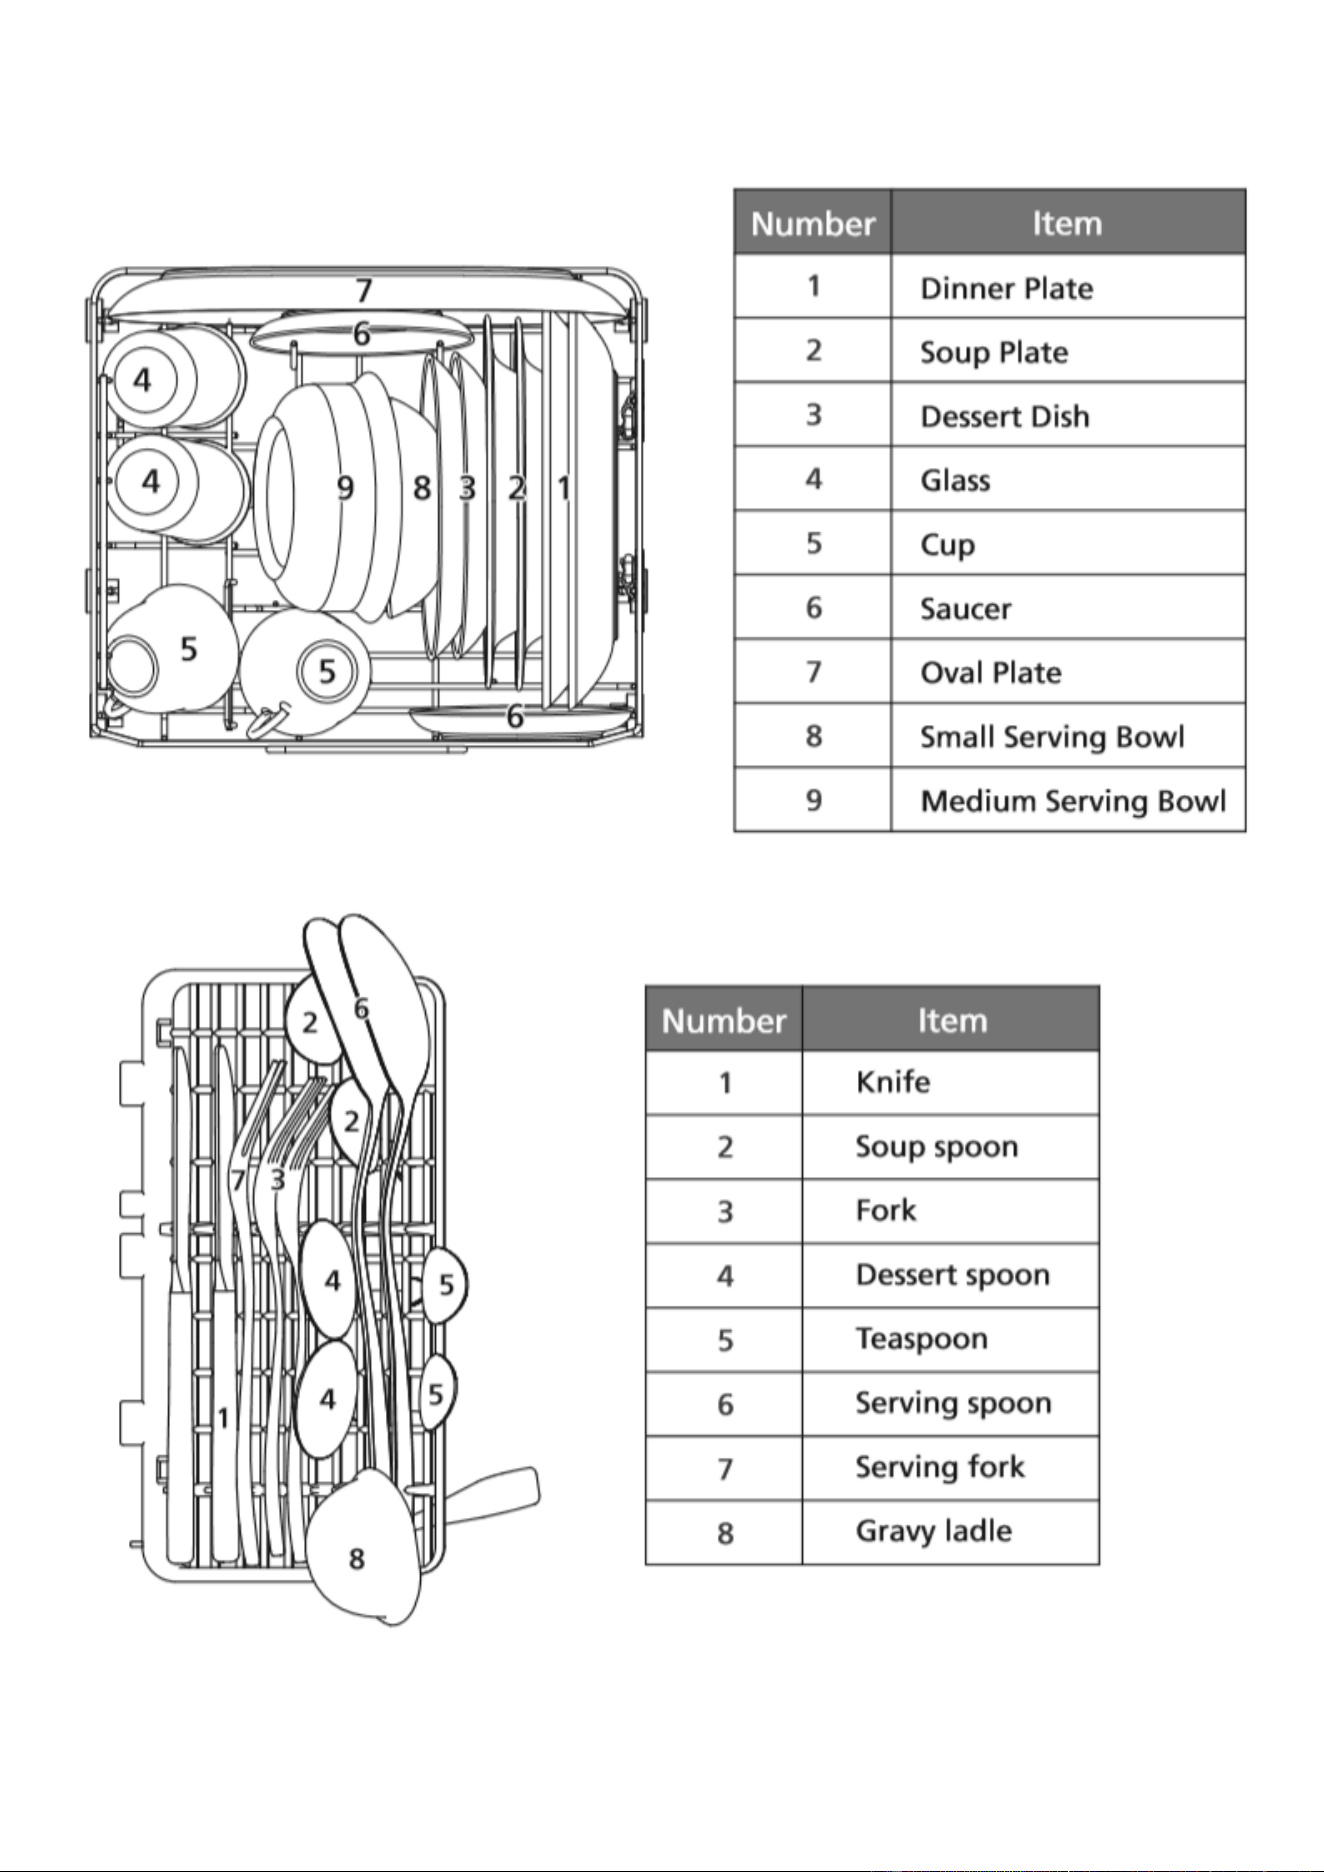
LOADING THE BASKETS
12
STARTING A WASHING PROGRAMME

13
CHANGING THE PROGRAMME
You can modify the washing program, If the dishwasher has only been running for a short
time, Otherwise, the detergent may have already been released, and the appliance may have
already drained the wash water. In this case, the detergent dispenser must be refilled.
Press the Start/Pause Button to pause the machine when the door is closed,
Hold the program Button for more than three seconds and the machine will enter its stand by
state, allowing you to change the program to the desired cycle setting (see the section
entitled " Starting a wash program”).
The program lights show the status of the dishwasher:
a) One of the program lights on----------standby or pause.
b) One of the program lights flashes ----- unit is running.
If you open the door during washing, the machine will pause. After the
door has closed
the machine will resume after 10 seconds.
FORGOT TO ADD A DISH
A forgotten dish can be added any time before the detergent cup opens.
1. Press the Start/Pause button.
2. Open the door a little to stop the
washing.
3. After the spray arms stop working, you
can open the door completely.
4. Add forgotten dishes.
5. Close the door.
6. Press the Start/Pause button, the
dishwasher will run after 10 seconds.
AT THE END OF THE WASH CYCLE
Turn off the appliance using the ON/OFF button, shut off the water supply and open the door
of the dishwasher.
Wait a few minutes before unloading the dishwasher to avoid scalding, the dishes and
utensils are still hot and more susceptible to breakage. They will also dry better.
Switch Off the Dishwasher
Switch off the dishwasher by pressing the ON/OFF button.
Open the door carefully.
Hot dishes are sensitive to knocks. The dishes should be allowed to cool down
around 15 minutes before removing from the appliance.
Open the dishwasher's door, leave it ajar and wait a few minutes before removing the
dishes. In this way they will be cooler and the drying will be improved.
Unloading the dishwasher
It is normal that the dishwasher is wet inside.
14
FILTER ASSEMBLY
• The filter efficiently removes food particles from the wash water, allowing it to be recycled during
the cycle.
• For best performance and results, the filter assembly must be cleaned regularly. For this
reason, it is a good idea to remove the larger food particles trapped in the filter after each
wash cycle by rinsing the filter and cup under running water. To remove the filter
assembly, pull the cup handle in the upward direction
• Never run the dishwasher without the filters in place. The dishwasher must
never be used without the filters.
• Improper replacement of the filter may reduce the performance level of the appliance and
damage dishes and utensils.
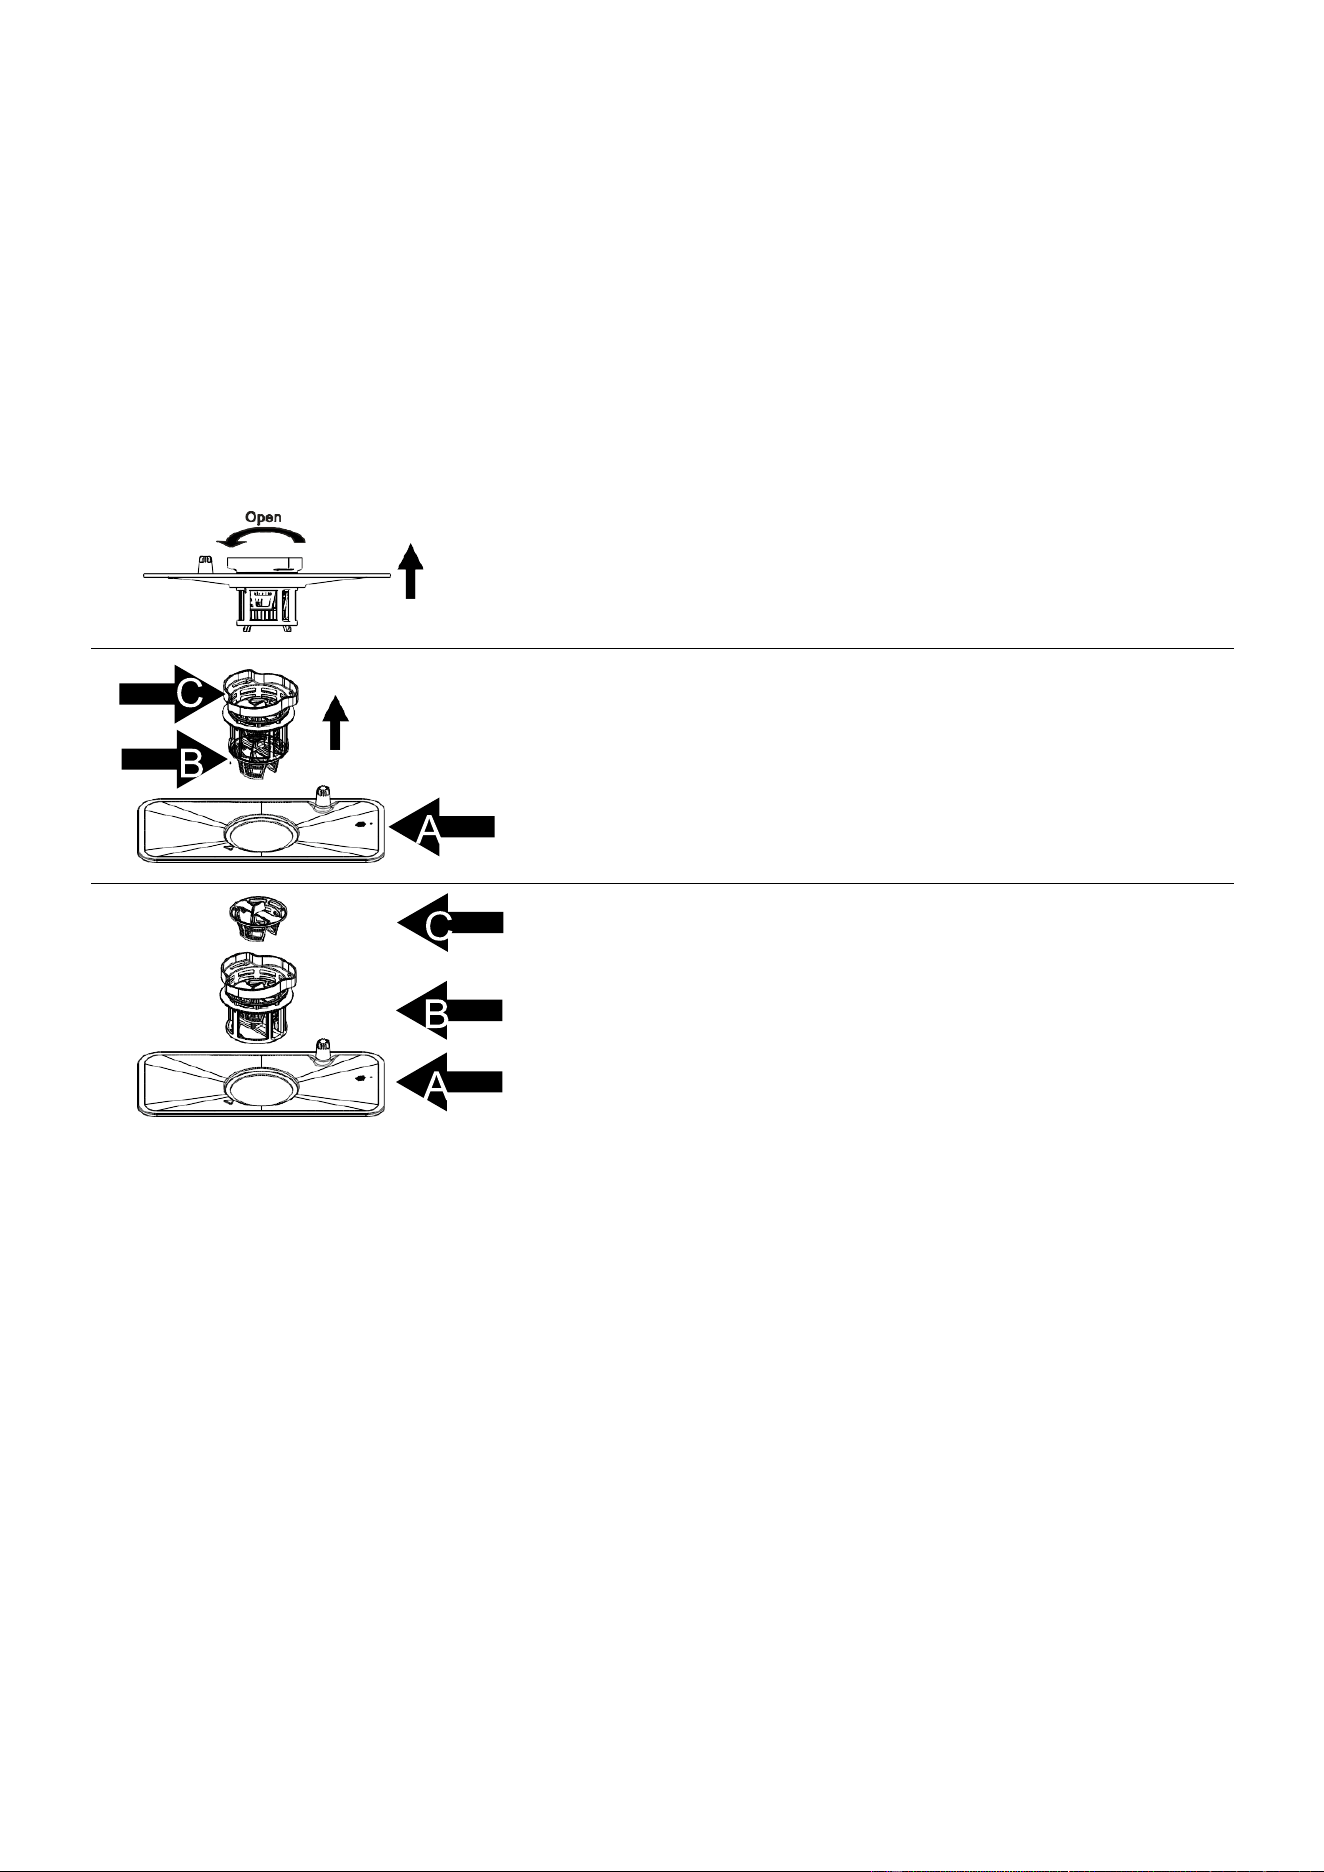
Step 1:Rotate the filter assembly anticlockwise (A,B
and C), then lift it all up.
Step 2: Lift B and C up from A;
Step 3: Separate B and C.
Reverse the steps to reinstall.
15
MAINTENANCE AND CLEANING
The door and the door seal Clean the door seals regularly with a soft damp cloth to remove food
deposits. When the dishwasher is being loaded, food and drink residues may drip onto the sides
of the dishwasher door. These surfaces are outside the wash cabinet and are not accessed by
water from the spray arms. Any deposits should be wiped off before the door is closed.
If The control panel needs to be cleaned it should be wiped with a soft damp cloth.
NOTE: The filtering system in the base of the wash cabinet retains coarse debris from the
washing cycle. The collected coarse debris may cause the filters to clog. Check the
condition of the filters regularly and clean them if necessary under running water. Follow
the steps below to clean the filters in the wash cabinet.
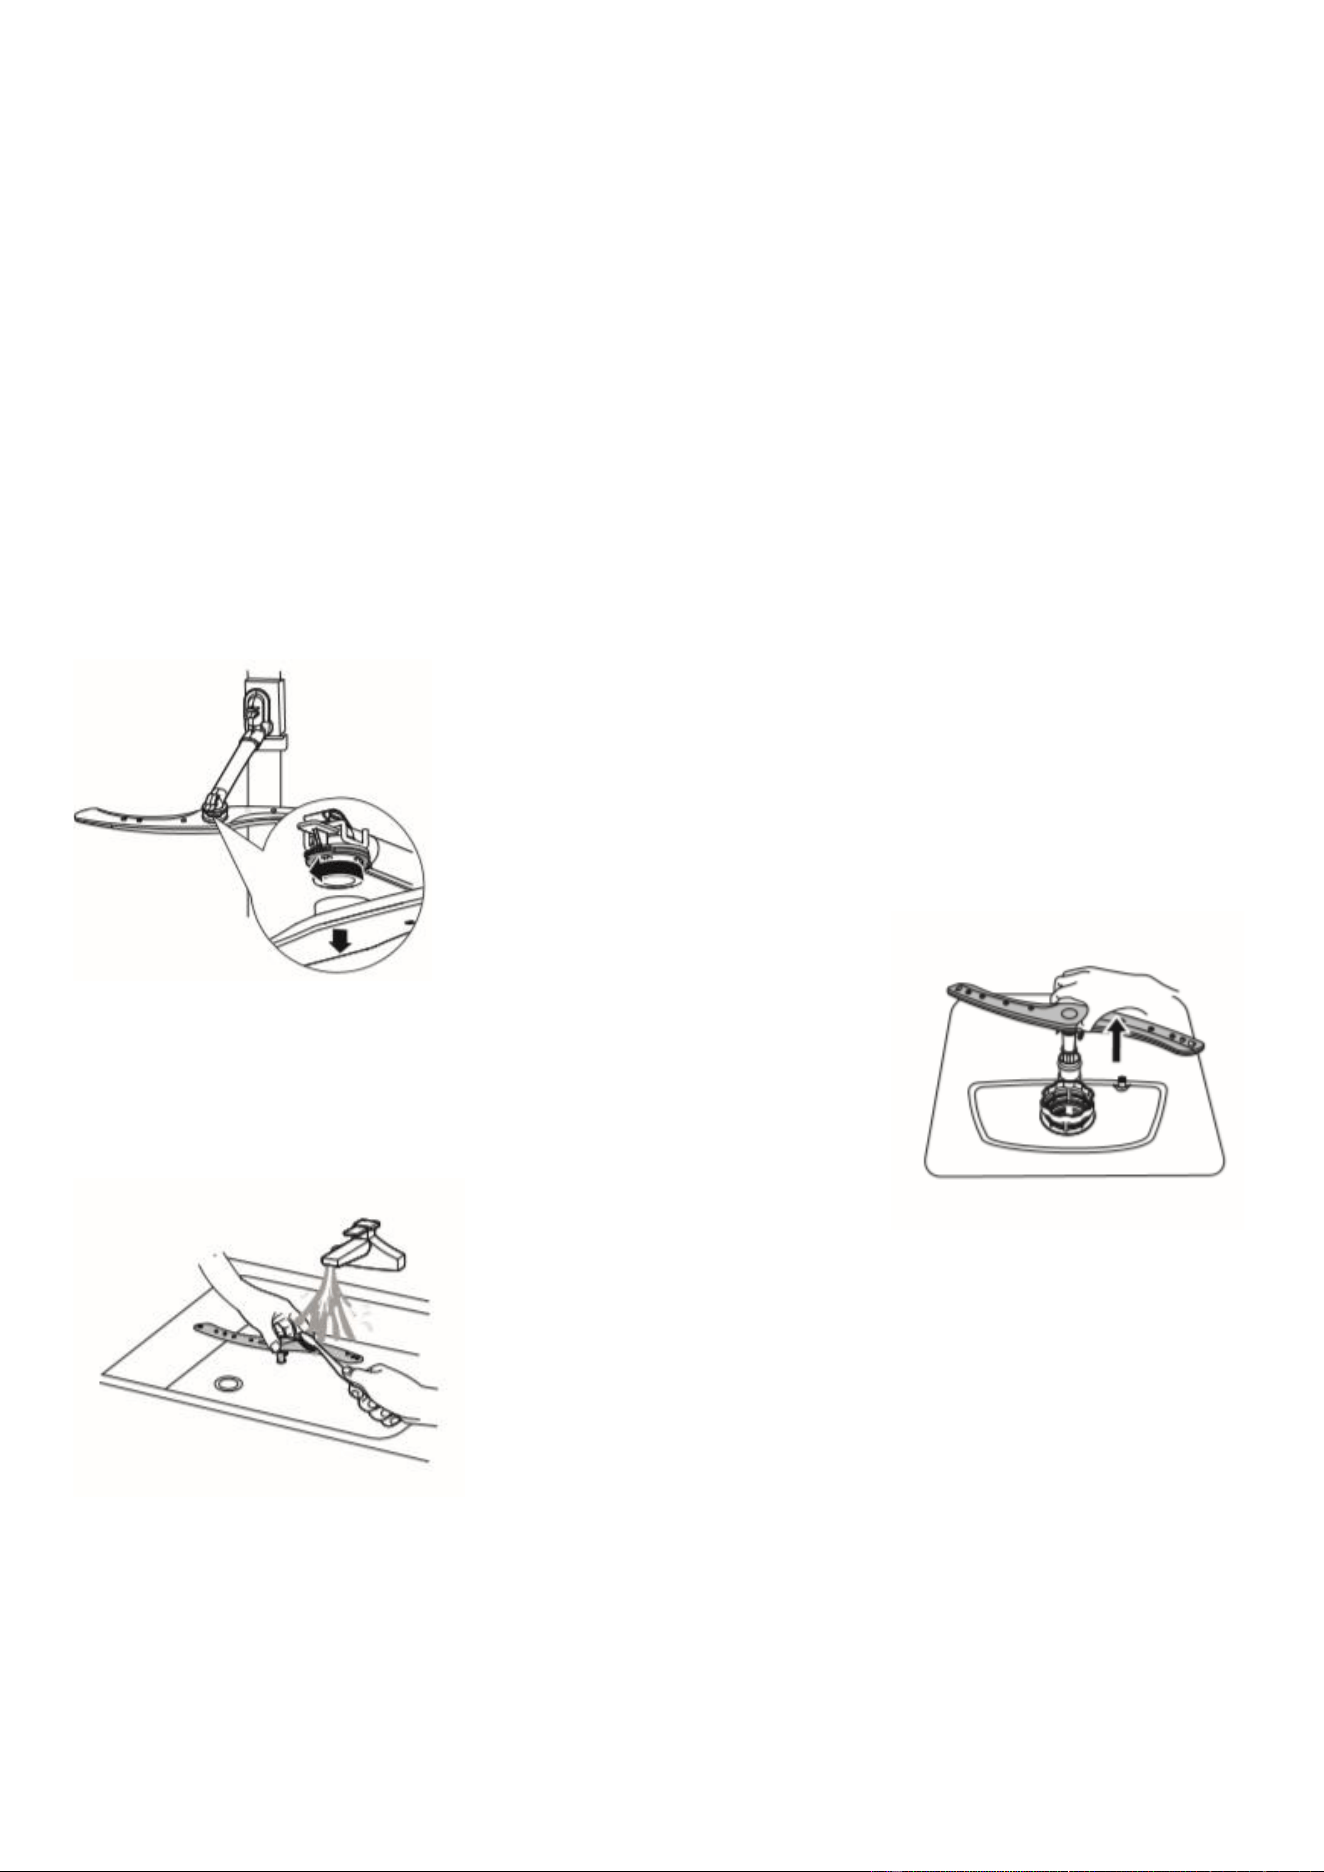
CLEANING THE SPRAY ARMS
It is necessary to clean the spray arms regularly for hard water chemicals will clog the
spray arm jets and bearings. To clean the spray arms, follow the instructions below:
Wash the arms in soapy warm water
and use a soft brush to clean the
jets. Rinse thoroughly and replace
by following the instructions in
reverse order.
To remove the lower spray arm, pull
the spray arm out with an upwards
motion.
To remove the upper spray arm,
hold the nut and rotate the arm
clockwise.

16
FROST PRECAUTION
Please take frost protection measures on the dishwasher in winter. Every time after washing
cycles, please operate as follows:
1. Cut off the electrical power to the dishwasher at the supply source.
2. Turn off the water supply and disconnect the water inlet pipe from the water valve.
3. Drain the water from the inlet pipe and water valve. (Use a pan to gather the water)
4. Reconnect the water inlet pipe to the water valve.
5. Remove the filter at the bottom of the tub and use a sponge to soak up water in the sump.
After every wash, turn off the water supply to the appliance and leave the door slightly open so that
moisture and odours are not trapped inside.
Remove the plug Before cleaning or performing maintenance, always remove the plug from the
socket.
NO SOLVENTS OR ABRASIVE CLEANING
To clean the exterior and rubber parts of the dishwasher, do not use solvents or abrasive cleaning
products.
Only use a cloth with warm soapy water. To remove spots or stains from the surface of the interior,
use a cloth dampened with water and a little vinegar, or a cleaning product made specifically for
dishwashers. When not in use for a long time It is recommend that you run a wash cycle with the
dishwasher empty and then remove the plug from the socket, turn off the water supply and leave
the door of the appliance slightly open. This will help the door seals to last longer and prevent
odours from forming within the appliance.
Seals One of the factors that cause odours to form in the dishwasher is food that remains trapped
in the seals. Periodic cleaning with a damp sponge will prevent this from occurring.
17
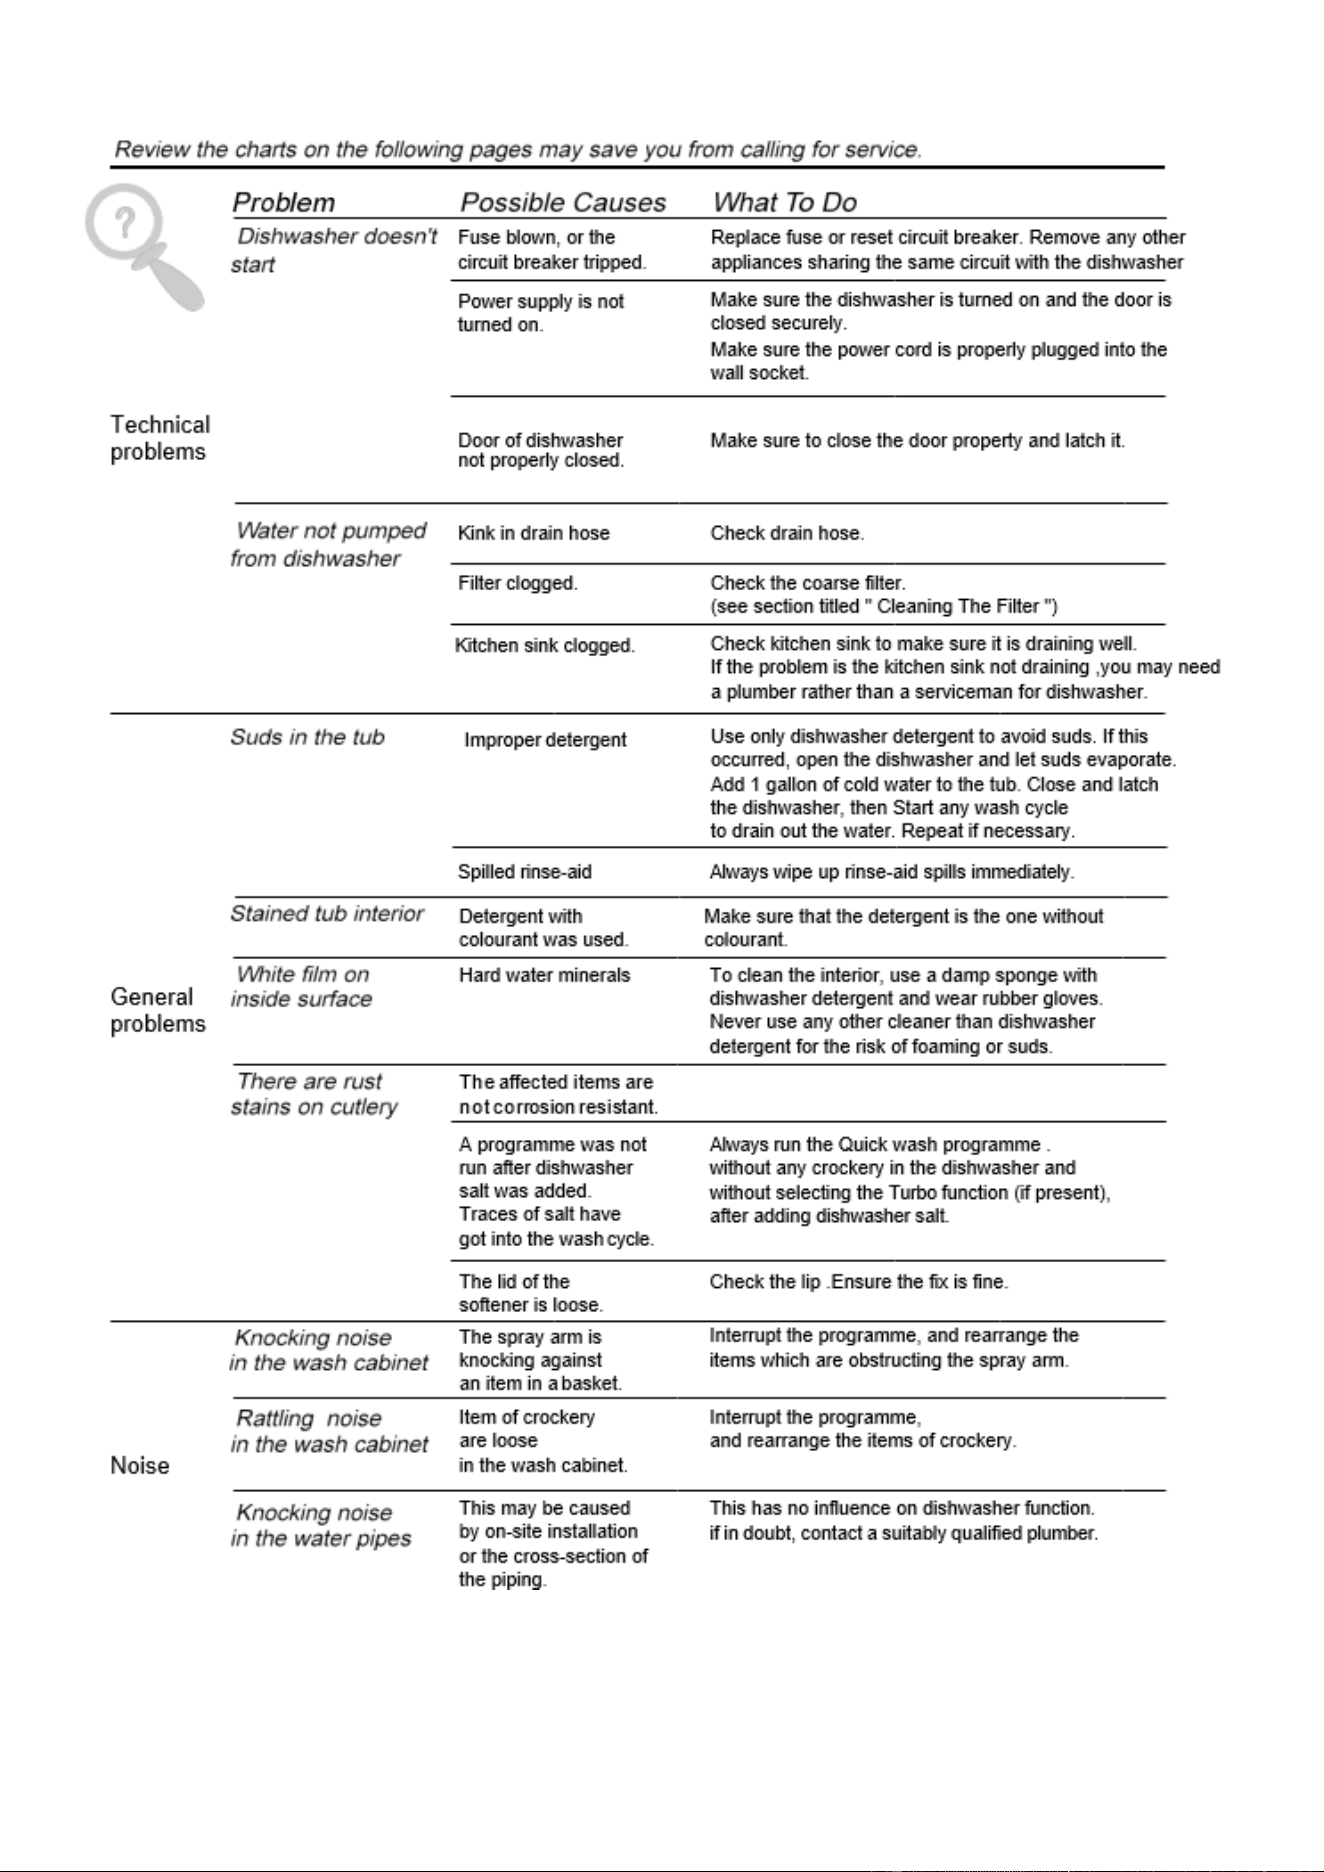
TROUBLESHOOTING
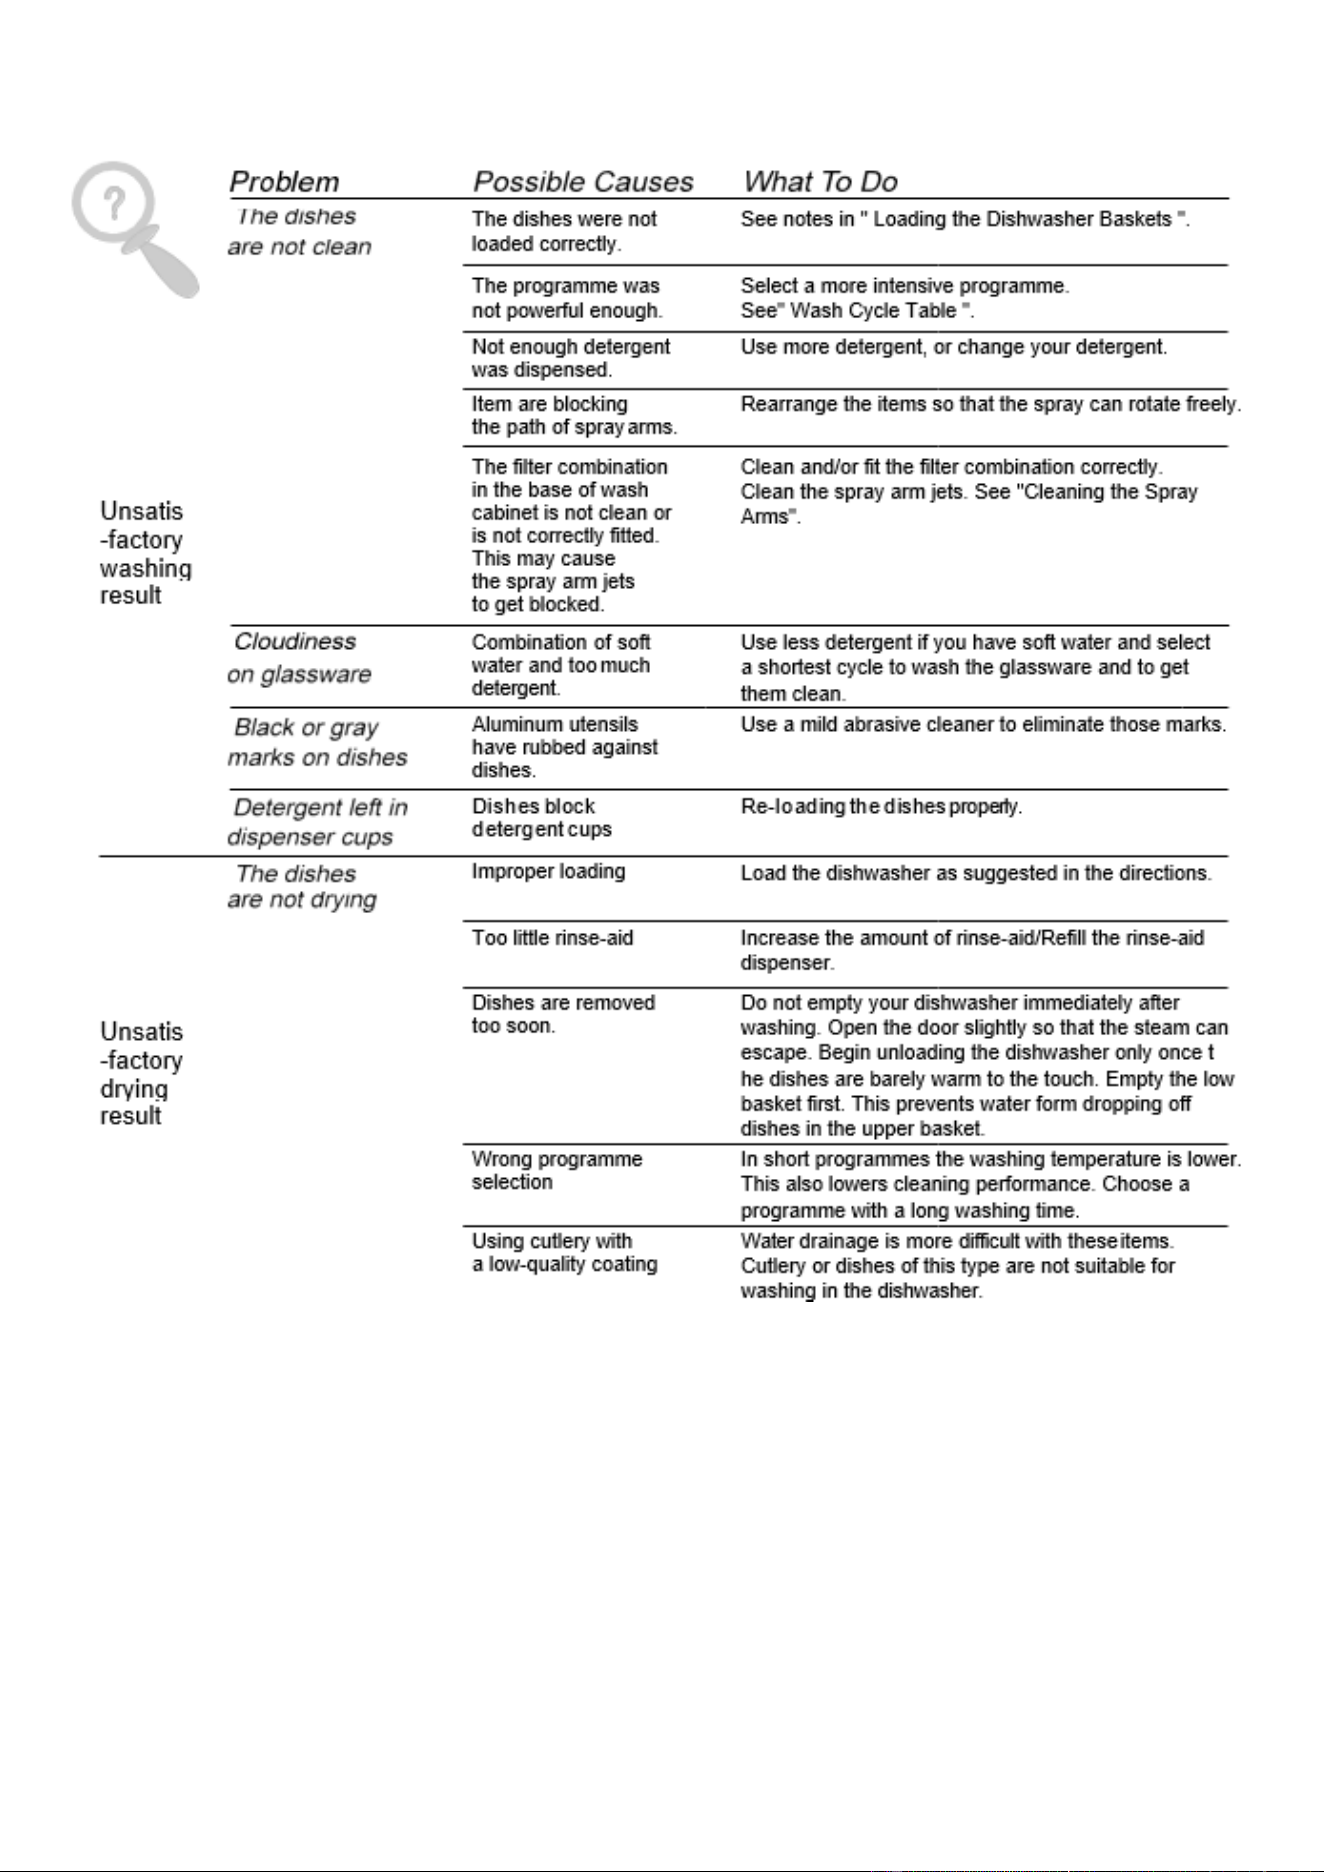
18
19
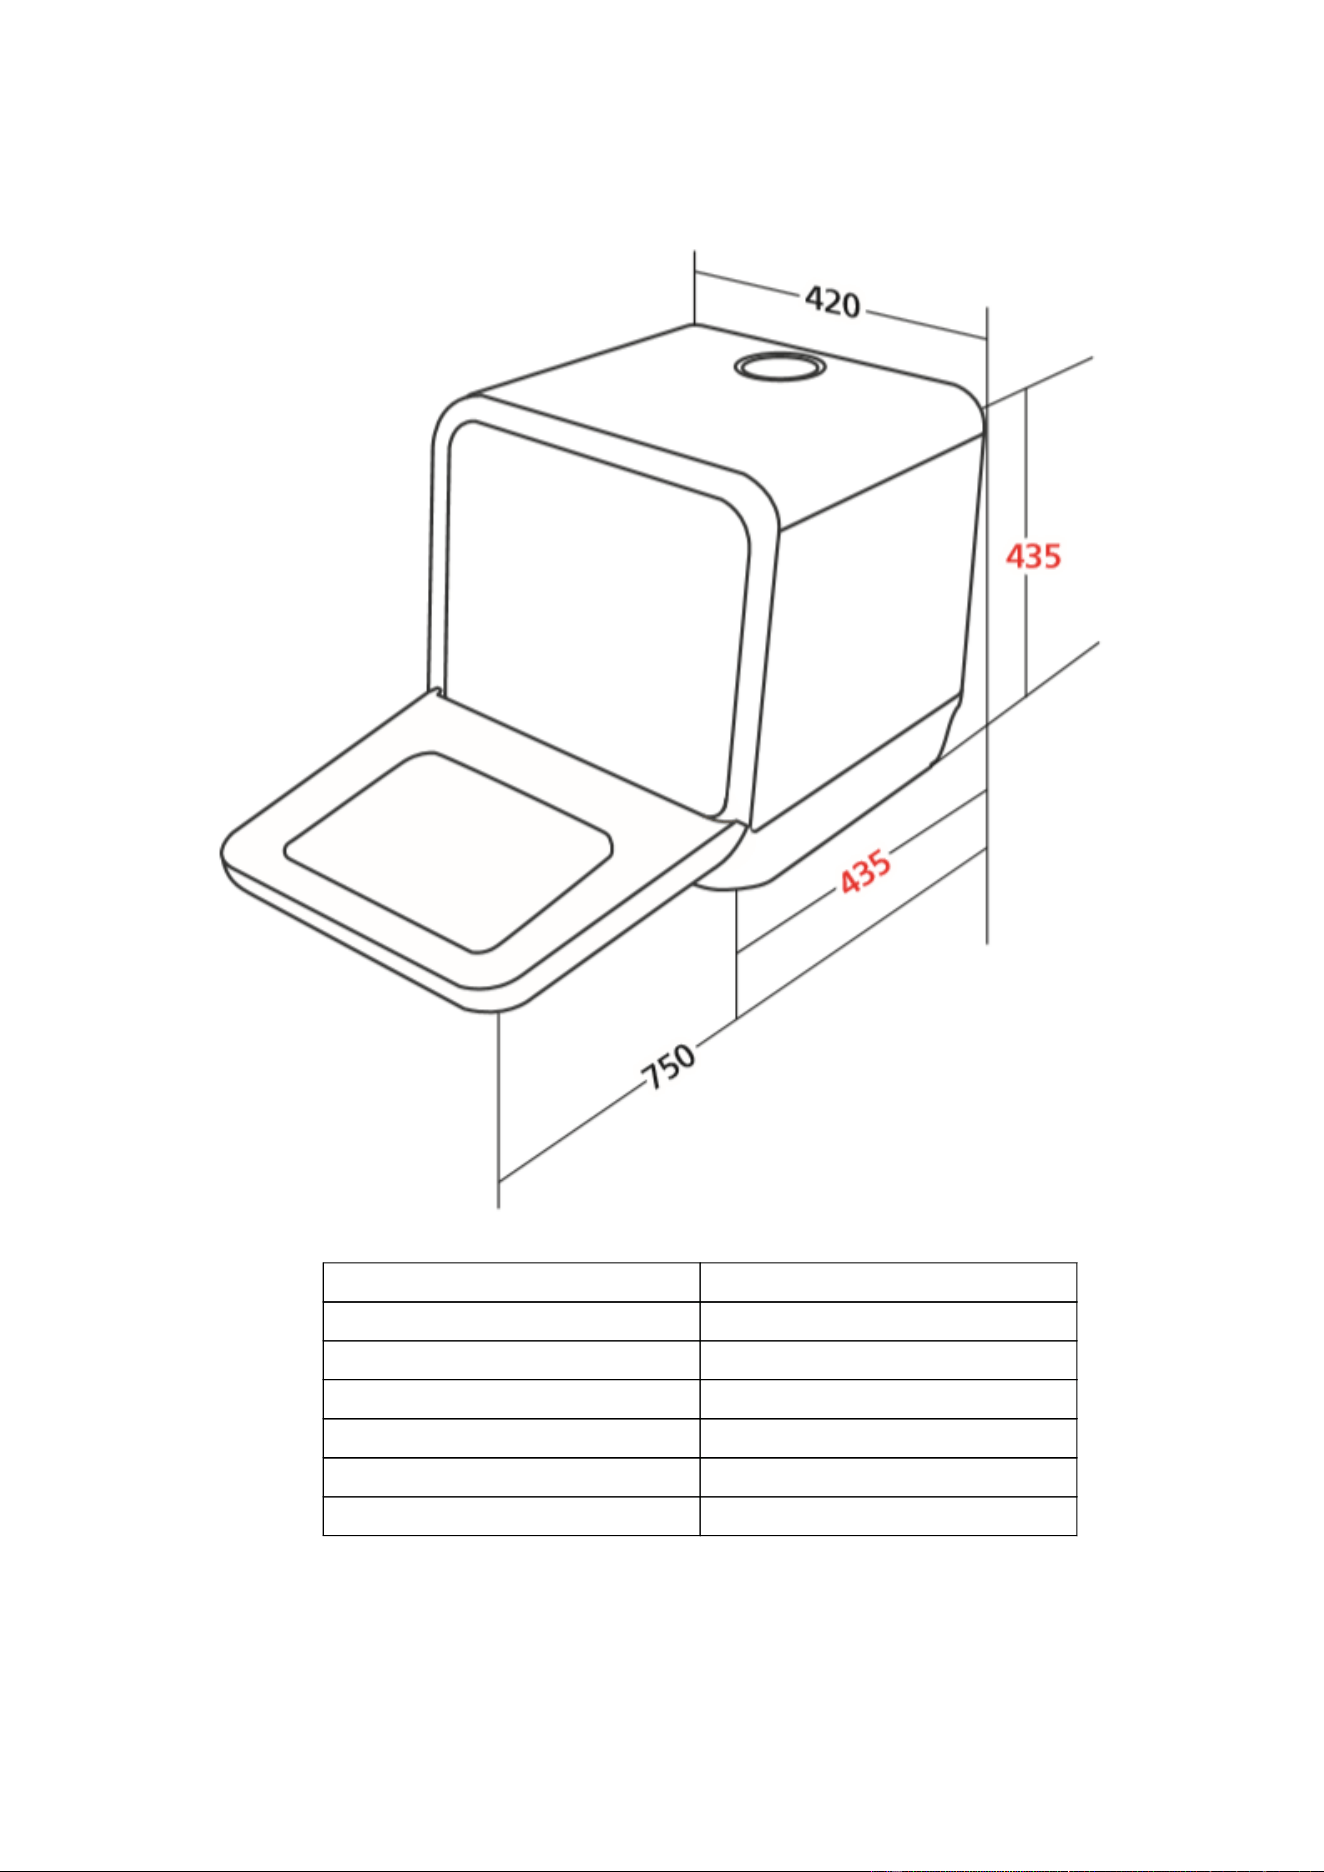
TECHNICAL INFORMATION
Height
Width
Depth
Voltage connected Load
Water pressure
Power supply
Capacity
435mm
420mm
435mm
see rating label
0.04-1.0MPa
See rating label
2 Place settings

2220
PRODUCT FICHE
Model
EQDWTTGF
Installation (countertop\freestanding\semi-build
in\full-build in)
Countertop
Capacity (place settings)
2
Noise (dB(A))
58
energy consumption per annuum/annum)
125
energy consumption per cycle(kwh/cycle)
0.43
water consumption per annum(l/annum)
1400
water consumption per cycle(l/cycle)
5
Type of indicator
LED
Voltage / V
220-240V
Frequency/Hz
50
Rated power
750W
Inlet water pressure (Mpa)
0.04~1
Power of heat element
700W
Type of heating element(standard/hidden)
hidden
Filter type (self-cleaning filter system / Removable
System)
self-cleaning filter system
Filter material
PP-GF30+AISI 304
Tub material
PP-T30
Water softener
Yes
Drying system (residual heating dry/turbo drying
with fan/hot wind dry)
residual heating dry
Type of inlet hose (Standard, PEX, aqua-stop)
standard
Temperature of inlet hose (cold water/hot water)
cold water
Power Cord Length
1500mm
Inlet hose length
1500mm
Outlet hose length the all long)
1750mm
Outlet hose length Expose length outside the machine)
1500mm
Product Dimension(width×depth×height) mm
435*420*435
Package Dimension(width×depth×height) mm
532*552*558
Unit net weight (kg)
14
Unit gross weight (kg)
16.25
20
2220
ERROR CODES
CODES
MEANINGS
POSSIBLE CAUSES
E1
Longer inlet time
Faucets are not opened; water
intake is restricted or water
pressure is to low
E3
Not reaching required temperature
Malfunction of heating element
E4
Overflow
An element of the dishwasher is
leaking
E9
Touch button adhesion
Water or other material is affecting
the buttons.
Ed
Communication
Contact a qualified professional
Ef
Water tank float issue
Contact a qualified professional
EA
Steam generator issue
Water tank float issue
WARNING: If overflow occurs, turn off the main water supply before calling a service. If there is water in
the base pan because of an overfill or small leak, the water should be removed before restarting the
dishwasher.
SUPPORT
electriQ UK SUPPORT
www.electriQ.co.uk/support
Please, for your own convenience, check the troubleshooting guide before calling the
service line.
If the unit still fails to operate call: 0333 043 6692
Office hours: 9AM - 5PM Monday to Friday
www.electriQ.co.uk
Unit J6, Lowfields Business Park
Lowfields Way, Elland
West Yorkshire, HX5 9DA
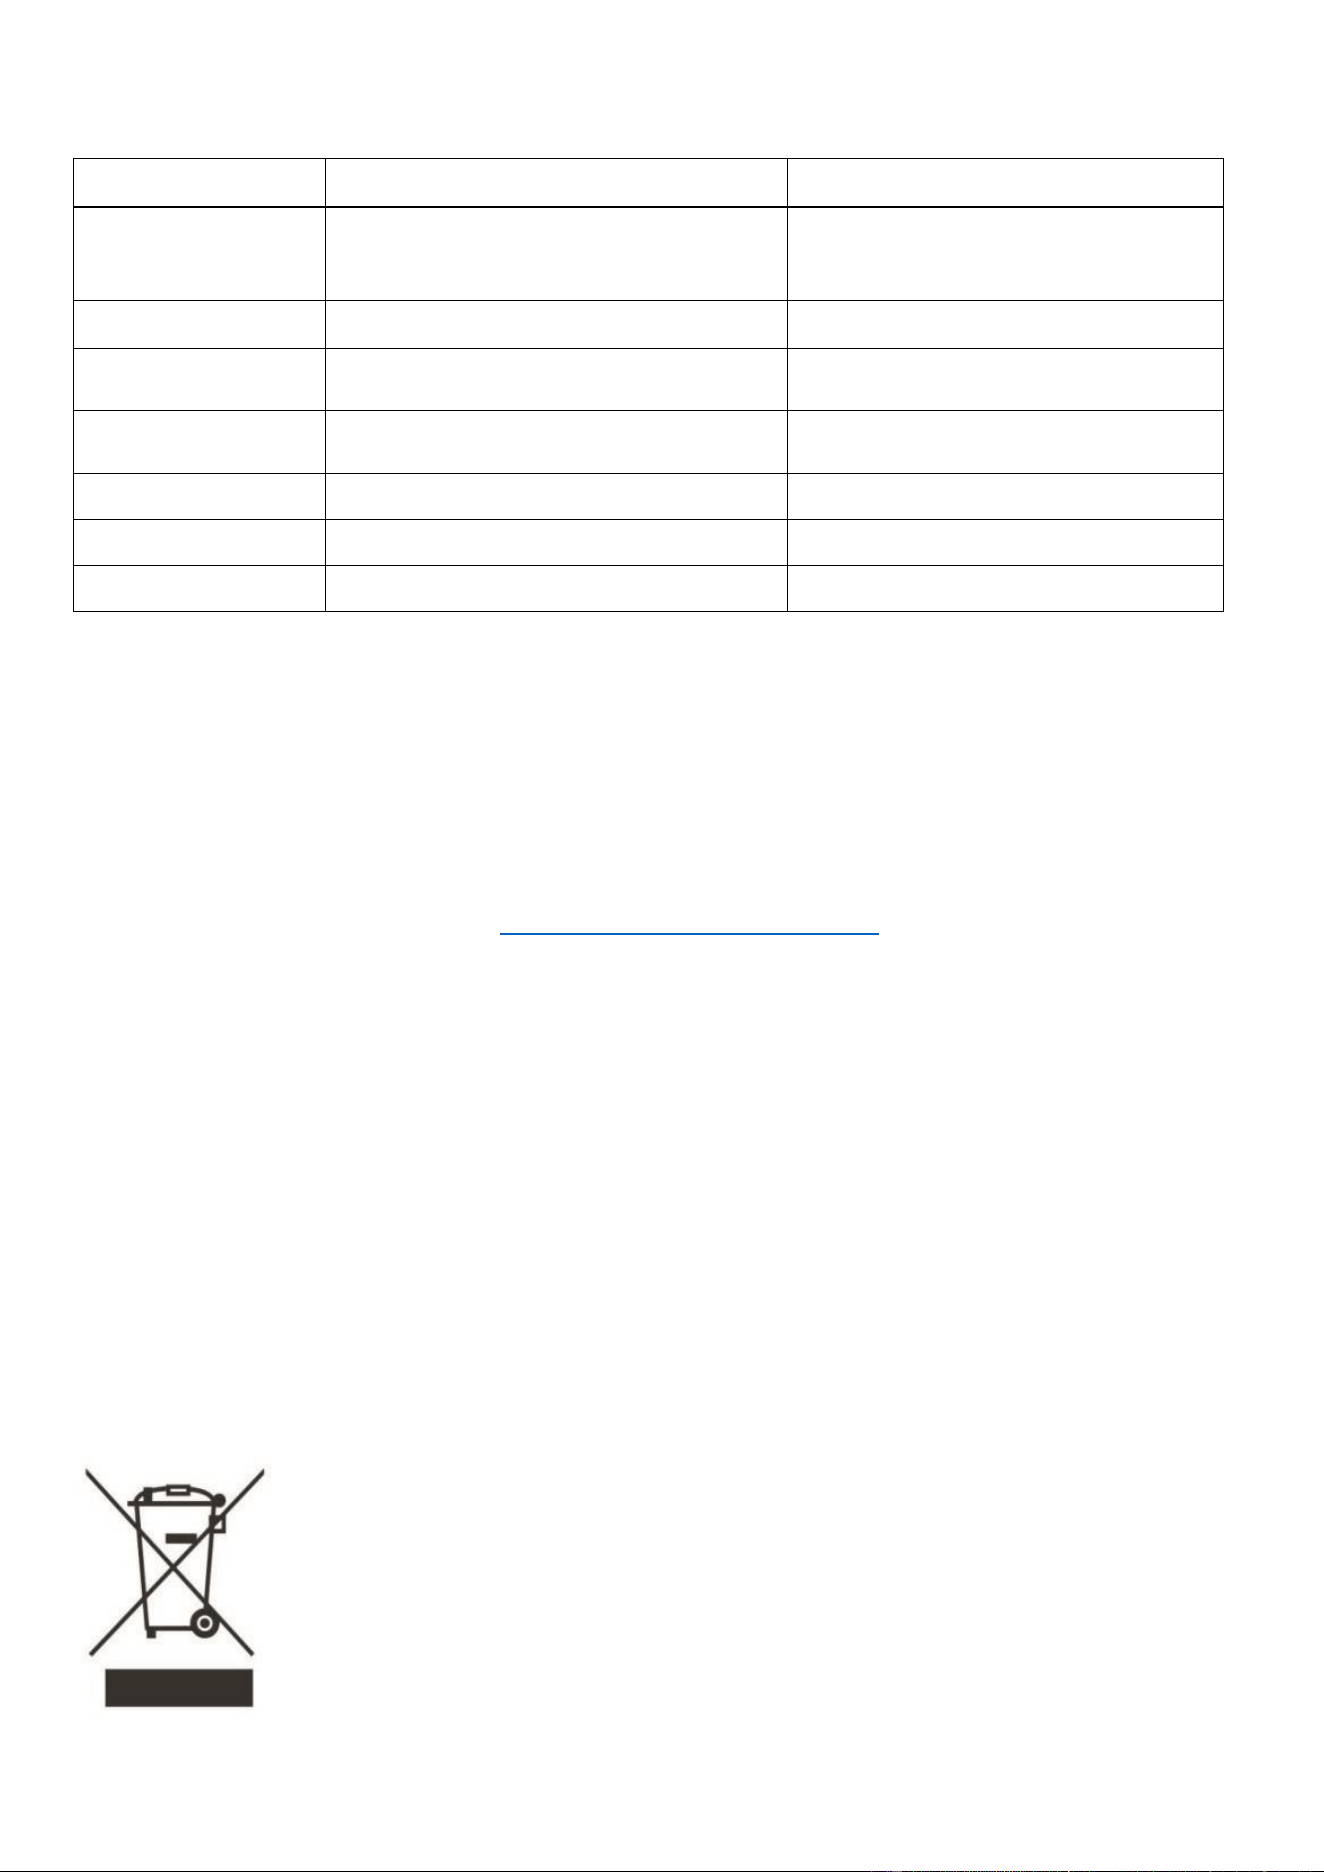
DISPOSAL
Disposal: Do not dispose this product as unsorted waste. Collection of such waste
must be handled separately as special treatment is necessary.
Recycling facilities are now available for all customers at which you can deposit your
old electrical products. Customers will be able to take any old electrical equipment
to participating sites run by their local councils. Please remember that this equipment
will be further handled during the recycling process, so please be considerate when
depositing your equipment. Please contact the local council for details of your local
household waste recycling centres.
21