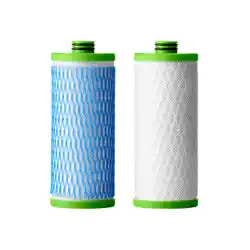
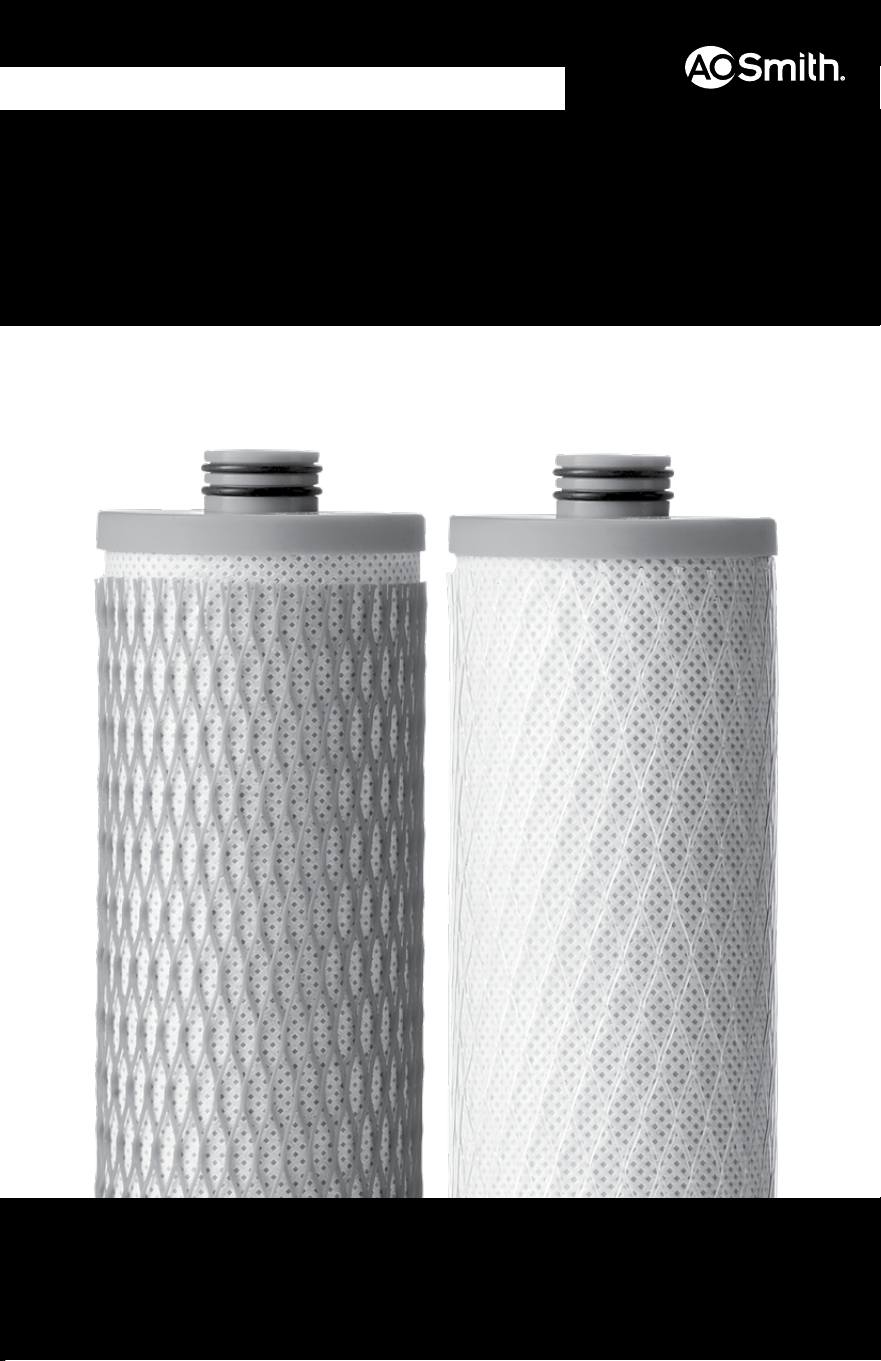
2-STAGE WATER FILTER
AO-US-200-R
FOR USE WITH AO-US-200
FILTRO DE AGUA DE 2 ETAPAS | PARA USAR CON AO-US-200
Replacement Manual | Manual de repuesto
IF YOU NEED HELP OR HAVE A QUESTION, WE’VE GOT YOU COVERED. GIVE US A CALL AT 877.333.7108
SI NECESITA AYUDA O TIENE ALGUNA CONSULTA, LLÁMENOS AL 877.333.7108.
–
–
NOTICE
• Compatible battery type: CR2450 Lithium Coin Battery
• Compatible battery voltage: 3V
• Ensure battery is installed correctly according to polarity (+ and -).
• Do not mix old and new batteries, different brands or types of batteries, such as alkaline,
carbon-zinc, or rechargeable batteries.
• Non-rechargeable batteries are not to be recharged.
• Do not force discharge, recharge, disassemble, heat above 90°F, or incinerate. Doing so
may result in injury due to venting, leakage, or explosion resulting in chemical burns.
• Remove and immediately recycle or dispose of batteries from equipment not used for an
extended period of time according to local regulations.
• Always completely secure the battery compartment. If the battery compartment does not
close securely, stop using the product, remove the batteries, and keep them away from
children.
• Remove and immediately recycle or dispose of used batteries according to local regulations
and keep them away from children. Do NOT dispose of batteries in household trash or
incinerate them.
• Even used batteries may cause injury or death.
• Call a local poison control center for treatment information.
NOTICES
INSTALLATION GUIDE
NEED HELP? GIVE US A CALL 877.333.7108
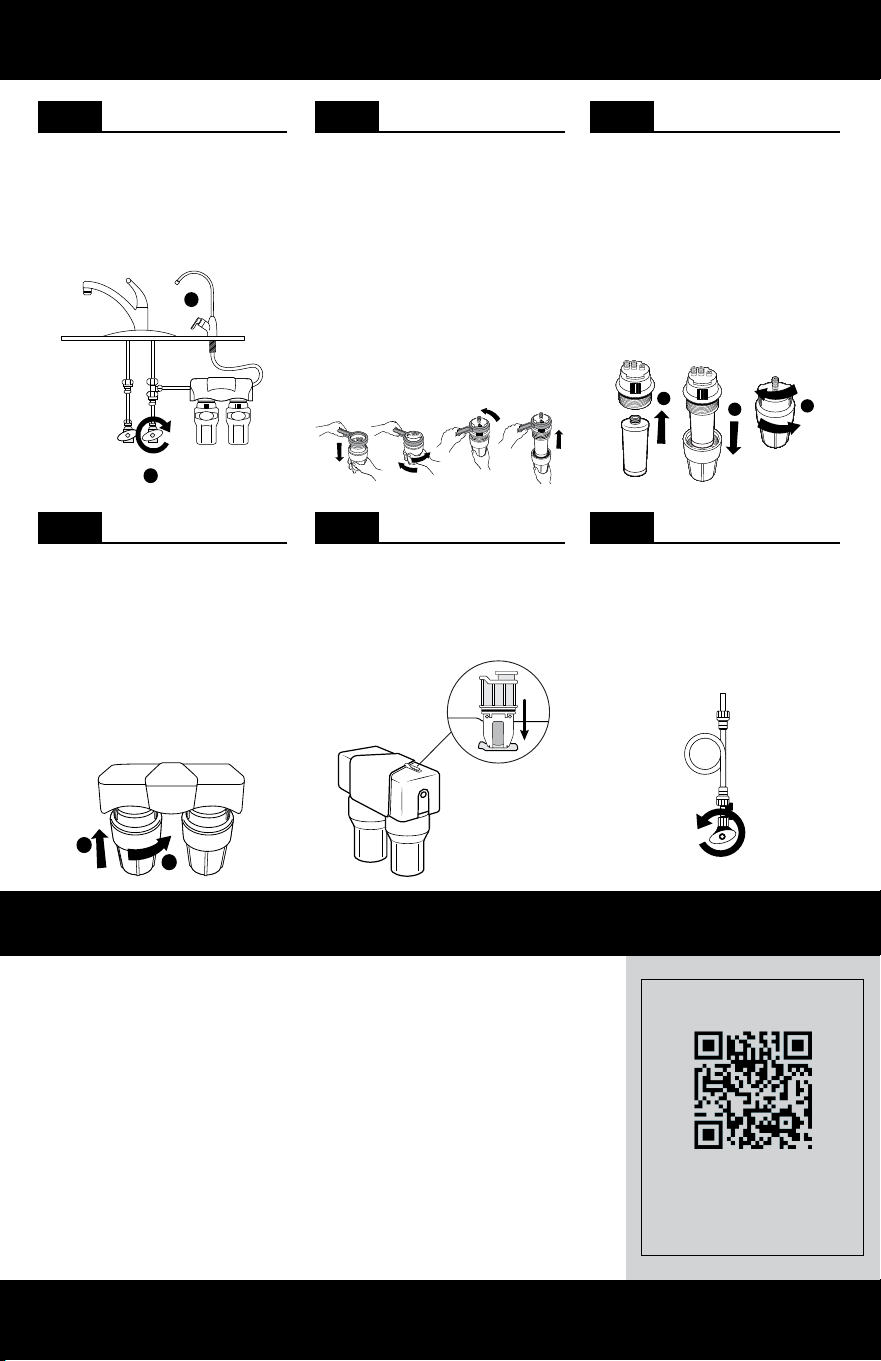
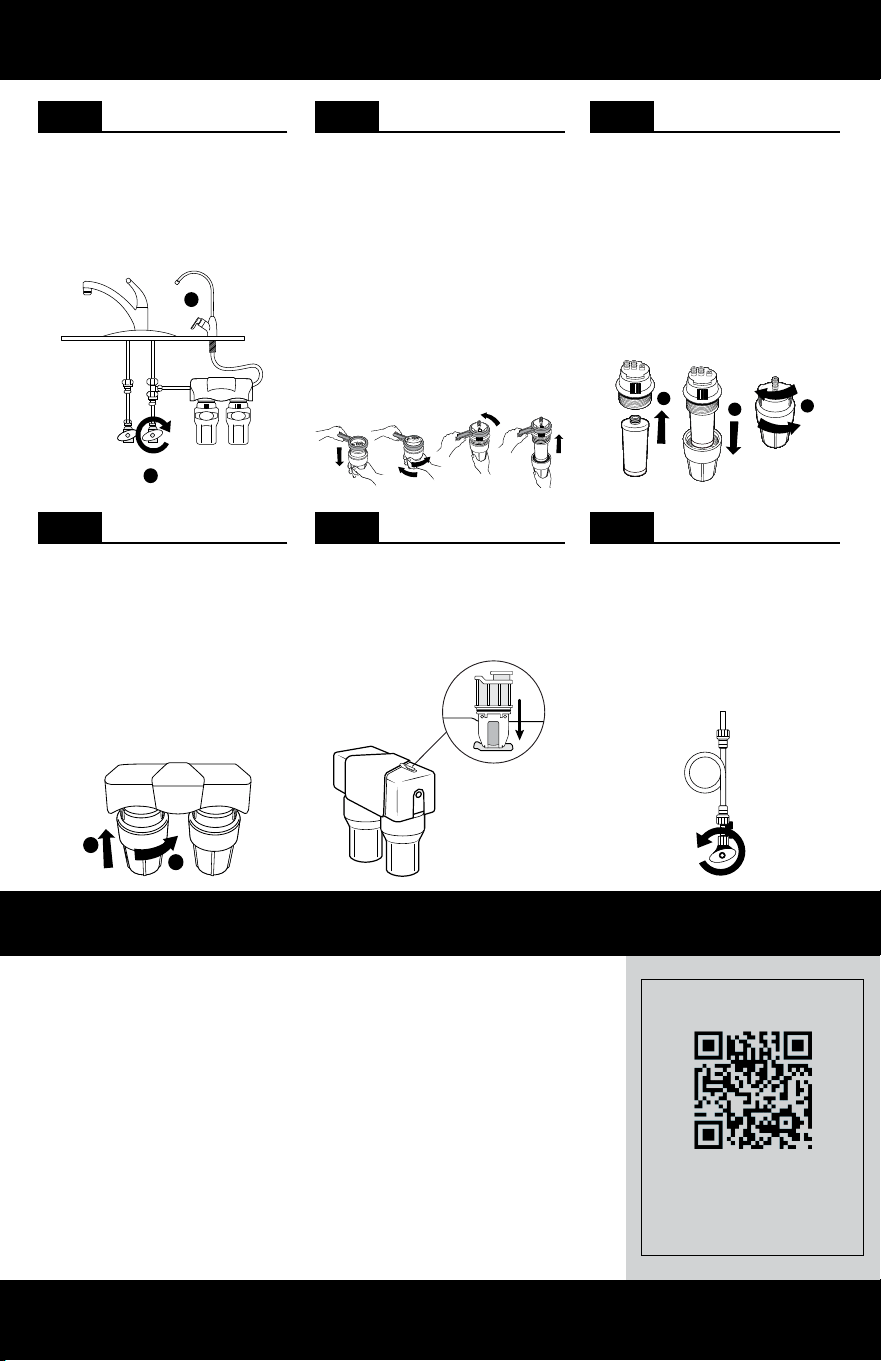
STEP 1 Prepare for Installation
STEP 4 Reattach Sumps
1
2
1
2
3
1
2
1. Turn off COLD water valve (1). Release
pressure from system by turning on
dedicated faucet until water stops
owing (2).
2. Unbox lter cartridge replacements and
remove plastic.
Reattach sumps to system manifold with Stage
1 on the left and Stage 2 on the right. Ensure
connection points are aligned, push top of
sump into bottom of system housing, and
twist to the right till you feel a ‘click.’ Ensure
that each sump is fully attached and locked in.
Note: Ensure sumps are not on an angle
while reattaching. This may result in
damage to the o-ring.
Note: If your system was purchased before
2024, you may not hear the click while
attaching the sumps.
STEP 2 Remove Filter Cartridges
STEP 5 Replace Battery
1. Remove each sump from the unit
housing by rotating the sump to the
left and pulling down.
2. Holding the sumps over the sink,
unscrew the top of the sump from
the bottom by turning the bottom
portion to the right. Pour excess water
down the drain. Then, pull down on
each lter cartridge to disconnect the
lter cartridge from the top half of
the sump.
3. Discard both lter cartridges.
Note: If sumps are too tight to
disconnect by hand, please use the
plastic wrench included with original
system.
Remove battery tray and dispose of per
instructions in NOTICES section. Remove
plastic from new battery tray and insert new
battery tray into battery compartment. When
inserted correctly, system will beep ve times
and blink red.
STEP 3 Insert Filter Cartridges
STEP 6 Flush and Check for Leaks
1. Press new lter with clear netting to
the top of the Stage 1 sump. Reattach
the bottom of the sump by ensuring
connection points are correctly aligned,
then turn to the right to tighten.
2. Continue this step for Stage 2 using the
new lter with the blue netting.
Note: Do not use tools to tighten. Hand
tighten only.
Slowly turn on COLD water supply. Turn off
dedicated faucet and check for leaks. Then,
turn on dedicated faucet and leave water
running to ush cartridges for 10 minutes
or until water is clear of carbon nes.
Note: Do not drink ushed water.
Scan to view AO-US-200
replacement video.
–
–
Escanee para ver el video de
reemplazo de AO-US-200.
AVISO
• Tipo de batería compatible: Pila de botón de litio CR2450
• Voltaje de la batería compatible: 3 V
• Asegúrese de que la batería esté instalada correctamente respetando la polaridad (+ y -).
• No mezcle pilas viejas y nuevas, ni pilas de diferentes marcas o tipos, como alcalinas, de carbono-zinc
o recargables.
• Las pilas no recargables no deben recargarse.
• No fuerce la descarga, recargue, desarme, caliente a más de 32 °C ni las incinere. Hacerlo podría
provocar lesiones por ventilación, fugas o explosiones que provoquen quemaduras químicas.
• Retire y recicle o deseche inmediatamente las pilas de equipos que no se utilicen durante un período
prolongado, de acuerdo con la normativa local.
• Cierre siempre el compartimento de las pilas completamente. Si el compartimento no cierra bien,
deje de usar el producto, retire las pilas y manténgalas fuera del alcance de los niños.
• Retire y recicle o deseche inmediatamente las pilas usadas, de acuerdo con la normativa local, y
manténgalas fuera del alcance de los niños. NO deseche las baterías en la basura doméstica ni las
incinere.
• Incluso las baterías usadas pueden causar lesiones o la muerte.
• Llame a un centro local de control de intoxicaciones para obtener información sobre el tratamiento.
AVISO
PASO 1 Prepare para la Instalación
PASO 4 Vuelva a conectar los Sumideros
1
2
1
2
3
1
2
1. Cierre la válvula de agua FRÍA (1). Para
liberar la presión del sistema, gire la llave
dedicada hasta que se detenga el ujo de
agua (2).
2. Desembale los repuestos de cartuchos de
ltro y retire el plástico.
Vuelva a conectar los sumideros al colector del
sistema con la Etapa 1 a la izquierda y la Etapa
2 a la derecha. Asegúrese de que los puntos de
conexión estén alineados, empuje la parte superior
del sumidero hacia la parte inferior de la carcasa
del sistema y gírelo hacia la derecha hasta que
sienta un ‘clic’. Asegúrese de que cada sumidero
esté completamente conectado y bloqueado.
Nota: Asegúrese de que los sumideros no estén
en ángulo mientras los vuelve a colocar. Esto
puede provocar daños en la junta tórica.
Nota: Si compró su sistema antes de 2024, es
posible que no escuche el clic al colocar los
sumideros.
PASO 2 Retire los Cartuchos de Filtro
PASO 5 Reemplace la Batería
1. Para retirar cada sumidero de la carcasa de la
unidad, gire el sumidero hacia la izquierda y
tire de él hacia abajo.
2. Sosteniendo los sumideros sobre el
fregadero, desenrosque la parte superior
del sumidero de la parte inferior girando
la parte inferior hacia la derecha. Vierta el
exceso de agua por el desagüe. Luego, tire
hacia abajo de cada cartucho de ltro para
desconectar el cartucho de ltro de la mitad
superior del sumidero.
3. Deseche ambos cartuchos de ltro.
Nota: Si los sumideros están demasiado
apretados para desconectarlos a mano,
utilice la llave de plástico incluida con el
sistema original.
Retire la bandeja de la batería y deséchela según
las instrucciones de la sección AVISOS. Retire
el plástico de la bandeja de la batería nueva
e inserte la bandeja de la batería nueva en el
compartimiento de la batería. Una vez insertada
correctamente, el sistema emitirá cinco pitidos y
parpadeará en rojo.
PASO 3 Inserte los Cartuchos de Filtro
PASO 6 Enjuague y Revise si Hay Fugas
1. Presione el ltro nuevo con malla
transparente hasta la parte superior del
sumidero de la Etapa 1. Vuelva a colocar la
parte inferior del sumidero, asegurándose de
que los puntos de conexión estén alineados
correctamente, luego gire a la derecha para
apretar.
2. Continúe este paso para la Etapa 2 usando el
nuevo ltro con la malla azul.
Nota: No use herramientas para apretar.
Apriete a mano solamente.
Abra lentamente el suministro de agua FRÍA.
Cierre la llave dedicada y verique que no
haya fugas. Luego, abra la llave dedicada y
deje correr el agua para enjuagar los cartuchos
durante 10 minutos o hasta que el agua esté
libre de partículas de carbón.
Nota: No beba agua de enjuague.
¿NECESITAS AYUDA? LLÁMANOS AL 877.333.7108
GUÍA DE INSTALACIÓN
This lter system is designed and tested for use with genuine A. O. Smith parts, including replacement lters, faucet
and all hardware. Use of parts from other manufacturers may result in loss of contaminant reduction performance,
system damage or failure. Use of parts from other manufacturers will also void your warranty. Please visit
AOSmithAtLowes.com for replacement parts. Installation must comply with state and local ordinances.
A. O. Smith is not liable for consequential or incidental damages due to improper installation.
Este sistema de ltrado está diseñado y probado para ser usado con piezas originales de A. O. Smith, lo que incluye los ltros, la llave y todas
las piezas metálicas de repuesto. El uso de piezas de otros fabricantes puede generar una pérdida en el rendimiento de la reducción de
contaminantes, dañar el sistema o causar fallas. El uso de piezas de otros fabricantes también anulará su garantía. Visite AOSmithAtLowes.com
para pedir repuestos. La instalación debe cumplir con las ordenanzas estatales y locales.
A. O. Smith no se hace responsable por daños indirectos o emergentes a causa de una instalación incorrecta.
A. O. Smith Corporation 11270 W Park Pl #170, Milwaukee, WI 53224 | 877.333.7108
AO-US_200R_Oct2025
The recommended replacement frequency for the AO-US-200 is every
6 months or every 500 gallons of use.
La frecuencia de cambio recomendada para el AO-US-200 es cada 6 meses o
cada 1,892litros (500 galones) de uso.
Use only certified, genuine A. O. Smith replacement filters for continued
contaminant removal and system performance.
Solo use ltros de repuesto originales A.O.Smith y certicados para eliminación de
contaminantes y rendimiento del sistema constantes.
Conforms to NSF/ANSI 53 for VOC reduction. See Performance Data Sheet for
individual contaminants and reduction performance.
Conforma a NSF/ANSI 53 para la reducción de COV. Ve la Hoja de datos de rendimiento
por contaminantes individuales y rendimiento de reducción.
Tested and Certied by WQA to NSF/ANSI Standards 42, 53, and 401 when used in AO-US-200
for the reduction of the claims specied on the Performance Data Sheet and at www.WQA.org.
Probado y certicado por el laboratorio WQA según las normas NSF/ANSI 42, 53, y 401 cuando se utiliza
en AO-US-200 para la reducción de las declaraciones especicadas en la Hoja de datos de rendimiento
y en www.WQA.org.
For the full list of contaminants ltered, scan to
view the AO-US-200 Performance Data Sheet.
Para conocer la lista completa de los contaminantes ltrados,
escanee para ver la hoja de datos de rendimiento de AO-US-200.
WARNING
• INGESTION HAZARD: This product contains a button cell or coin battery.
• DEATH or serious injury can occur if ingested.
• A swallowed button cell or coin battery can cause Internal Chemical Burns in as little as 2 hours.
• KEEP new and used batteries OUT OF REACH of CHILDREN.
• Seek immediate medical attention if a batter is suspected to be swallowed or inserted inside
any part of the body.
