3
2
1
4
English
Before using, please read this owner’s manual,
and use this product in a safe and proper man-
ner. Particularly in the case of children and
young users, parents or an instructor should
teach the children the proper manner in which
to use the device.
NOTICE
• Do not step on or place heavy objects on the product. It may result in damage.
• Do not use or keep the product in places with extremely high temperature (places in direct sunlight, close to a heater,
in a closed car, etc.) or high humidity (bathroom, outside on a rainy day, etc.). Doing so may result in deformation,
discoloration, damage or deterioration.
• When cleaning the product, do not use benzine, thinner or alcohol as it may result in discoloration or deformation.
Please wipe with a soft cloth or a damp cloth that has been wrung out thoroughly. If the product is soiled or sticky,
use a neutral detergent on a cloth then wipe with a damp cloth that has been wrung out thoroughly to remove any
remaining detergent. Also pay close attention so as not to let the water and detergent come into contact with the cush-
ions used in the product; doing so may result in deterioration.
• Make sure you hold onto the plug, not the cable, when connecting or disconnecting the cable. Also, never place any
heavy or sharp objects on the cable. Applying excessive force to the cable may result in damage to the cable, such
as the wires being severed, etc.
PRECAUTIONS
CAUTION
If this symbol is ignored and the equipment is used improperly, there is a danger
or injury to persons handling the equipment.
If this product is used with a hi-hat stand, do not place a stand on a sloping, unstable surface, or on steps.
The stand may overturn or be damaged, resulting in injury.
If this product is used with a hi-hat stand, make sure all bolts are tightened firmly. Also, when adjusting the
height or angle, do not suddenly loosen the bolts. Loose bolts may result in the stand overturning or parts
dropping, causing injury.
Please be careful when children are close to or touching the product. Careless movement around the product
may result in injury.
When setting the product, please pay close attention to the handling and setting of cables. Carelessly placed
cables may cause the user and others to trip and fall.
Do not alter the product. Doing so may result in injury or damage/deterioration to the product.
The symbols that appear on this product and in this own-
er’s manual mean as follows:
This symbol indicates something that requires your
attention, such as “Please pay close attention to -----.”
This symbol indicates something prohibited, such as
“Do not do -----.”
This symbol indicates something mandatory, such as
“Be sure to do -----.”
Deutsch
Bitte lesen Sie vor Gebrauch diese Be-
dienungsanleitung, und verwenden Sie
das Produkt sicher und auf geeignete
Weise. Besonders für Kinder und jünge-
re Anwender sollten die Eltern oder ein
Lehrer den Kindern die richtige Art und
Weise zeigen, in der das Produkt ange-
wendet werden sollte.
ACHTUNG
• Treten Sie nicht auf das Produkt und stellen Sie keine schweren Gegenstände darauf ab. Dadurch kann das Produkt
beschädigt werden.
• Lagern oder verwenden Sie das Produkt nicht an Orten mit extrem hoher Temperatur (in direktem Sonnenlicht, in
Nähe einer Heizung, in einem geschlossenen Fahrzeug usw.) oder hoher Luftfeuchtigkeit (Badezimmer, draußen im
Regen usw.). Dadurch könnte das Instrument beschädigt, verfärbt, verformt oder sonstwie beeinträchtigt werden.
• Verwenden Sie kein Benzin, Lösemittel oder Alkohol, um das Produkt zu reinigen, da dies zu Verfärbung oder Ver-
formung führen kann. Bitte wischen Sie das Produkt mit einem weichen oder leicht angefeuchtetem und gut ausge-
wrungenem Tuch sauber. Wenn das Produkt stark verschmutzt ist, verwenden Sie ein Tuch mit einem neutralen
Reinigungsmittel, und wischen Sie das Produkt mit einem leicht angefeuchtetem und gut ausgewrungenem Tuch sau-
ber, so dass kein Reinigungsmittel auf dem Produkt verbleibt. Achten Sie auch besonders darauf, dass kein Wasser
und Reinigungsmittel in Kontakt mit den Kissen des Produkts gerät; dadurch wird das Produkt beeinträchtigt.
• Vergewissern Sie sich, dass Sie am Stecker ziehen und nicht am Kabel, wenn Sie dieses anschließen oder entfernen.
Platzieren Sie auch keine schweren oder scharfen Gegenstände auf dem Kabel. Anwendung übermäßiger Kraft auf
das Kabel kann dieses beschädigen, z. B. durchtrennte Leiter usw.
VORSICHTSMASSNAHMEN
VORSICHT
Wenn dieses Symbol ignoriert und das Produkt falsch angewendet wird, besteht
Verletzungsgefahr für Personen, die mit dem Produkt umgehen.
Wenn dieses Produkt mit einem Hi-Hat-Ständer verwendet wird, stellen Sie den Ständer nicht auf eine schie-
fe, unstabile Oberfläche oder auf Stufen usw. Der Ständer könnte umkippen und beschädigt werden und da-
bei Verletzungen verursachen.
Wenn dieses Produkt mit einem Hi-Hat-Ständer verwendet wird, achten Sie darauf, dass alle Bolzen festgezogen
sind. Wenn Sie Höhe oder Neigungswinkel einstellen, achten Sie darauf, nicht versehentlich die Bolzen zu lösen.
Lose Bolzen können bewirken, dass der Ständer umfällt und beschädigt wird sowie Verletzungen verursacht.
Bitte seien Sie vorsichtig, wenn Kinder in der Nähe sind oder das Produkt berühren. Sorglose Bewegungen
in der Nähe des Produkts können Verletzungen verursachen.
Achten Sie beim Einstellen der Pads bitte sorgfältig auf die Handhabung der Kabel und die Kabelführung.
Achtlos platzierte Kabel können dazu führen, dass der Anwender oder Andere stolpern und hinfallen.
Modifizieren Sie das Produkt nicht. Dadurch können Verletzungen auftreten oder das Produkt beschädigt
oder beeinträchtigt werden.
Die auf diesem Gerät und in dieser Bedienungsanleitung verwen-
deten Symbole haben folgende Bedeutung:
Hier wird Aufmerksamkeit verlangt, z. B. „Achten Sie beson-
ders auf ...“.
Hier wird auf ein Verbot hingewiesen, z. B. „Kein/Nicht ...“
Hier wird auf eine Pflicht hingewiesen, z. B. „Sicherstellen,
dass ...“
Français
Veuillez lire ce mode d’emploi en tout
premier, afin d’utiliser ce produit de ma-
nière correcte et sans danger. Les pa-
rents ou les instructeurs sont invités à
enseigner aux enfants et aux jeunes uti-
lisateurs la manière correcte d’utiliser
cet instrument.
AVIS
• Ne marchez pas sur le produit et ne placez pas dessus des objets lourds. Cela pourrait l’endommager.
• N’utilisez pas et ne conservez pas le produit dans des lieux à température très élevée (à la lumière directe du soleil, à
proximité d’un radiateur ou dans une voiture fermée à clé, etc.) ou à forte humidité (salle de bain, à l’extérieur par une
journée pluvieuse, etc.). Cela pourrait entraîner sa déformation et sa décoloration, et l’endommager ou le détériorer.
• Pour nettoyer le produit, n’utilisez pas de benzène, de diluant ou d’alcool au risque de provoquer sa décoloration ou
sa déformation. Essuyez-le avec un chiffon sec et doux ou un tissus humide ayant été très bien essoré. Si le produit
est sale ou collant, nettoyez-le avec un tissus imbibé de détergent neutre puis essuyez-le avec un chiffon humide
ayant été préalablement bien essoré afin d’en retirer toute trace de détergent. Veillez à ne pas laisser l’eau ou le dé-
tergent entrer en contact avec les coussins utilisés dans le produit, car cela pourrait le détériorer.
• Assurez-vous de tenir la prise et non le câble lors de la connexion ou déconnexion du câble. Veillez également à ne
pas poser sur le câble des objets lourds ou pointus. L’application d’une force excessive sur le câble peut entraîner
des dommages au câble, notamment aux fils.
PRÉCAUTIONS D’USAGE
ATTENTION
Si ce symbole est ignoré et l’équipement utilisé de manière incorrecte, cela
pourra exposer les personnes manipulant l’équipement à des blessures.
Si ce produit est utilisé avec un support pour charleston, ne placez pas celui-ci sur une surface inclinée ou
instable ou sur des marches. Le support risque de se renverser ou de s’endommager, en provoquant des
blessures.
Si ce produit est utilisé avec un support pour charleston, vérifiez que tous les boulons sont fermement res-
serrés. Lorsque vous réglez la hauteur ou l’angle, ne desserrez pas brusquement les boulons. Des boulons
desserrés peuvent provoquer le renversement du support ou la chute de pièces, causant des blessures.
Soyez très vigilant avec les enfants lorsqu’ils s’approchent du produit ou cherchent à le toucher. Tout mou-
vement inconsidéré autour du produit risque d’entraîner des blessures.
Lors du réglage des pads, soyez attentif à la manipulation et à la configuration des câbles. Des câbles disposés
n’importe comment peuvent provoquer le trébuchement et la chute de l’utilisateur ainsi que d’autres personnes.
Ne modifiez pas le produit. Cela pourrait l’endommager, le détériorer ou provoquer des blessures.
Les symboles figurant sur ce produit et utilisés dans ce mode
d’emploi ont le sens suivant :
Ce symbole signale un point important requérant toute votre
attention.
Ce symbole signale des choses à éviter à tout prix.
Ce symbole signale des choses à effectuer impérativement.
Português
Antes de usar, leia este manual do proprietário e
use este produto de maneira segura e apropria-
da. Particularmente no caso de crianças e usuá-
rio jovens, pais ou um instrutor devem ensinar a
criança a maneira apropriada de usar o disposi-
tivo.
AVISO
• Não pise nem coloque objetos pesados sobre o produto. Isso pode danificá-lo.
• Não use nem mantenha o produto em locais com temperatura muito alta (sob incidência direta de luz do sol, próximo
a aquecedores, em carros fechados etc.) ou alta umidade (banheiros, ao ar livre em dias chuvosos etc.). Isso pode
causar deformação, descoloração, dano ou deterioração.
• Ao limpar o produto, não use benzina, solvente nem álcool, pois esses produtos podem causar descoloração ou de-
formação. Limpe usando pano macio ou umedecido e bem torcido. Se o produto estiver empoeirado ou pegajoso,
use um pano com detergente neutro e limpe usando um pano umedecido e bem torcido para remover resíduos do
detergente. Também preste bastante atenção para não permitir que água e detergente entrem em contato com os
acolchoamentos usados no produto, pois isso pode causar deterioração.
• Ao conectar ou desconectar o plugue, segure pelo plugue, e não pelo cabo. Além disso, jamais coloque objetos pe-
sados ou pontiagudos sobre o cabo. A aplicação de força excessiva ao cabo pode danificá-lo; por exemplo, com o
rompimento dos fios etc.
PRECAUCIONES
CUIDADO
Se este símbolo for ignorado e o equipamento for usado indevidamente, as pes-
soas estarão sujeitas a perigos ou ferimentos ao manusear o equipamento.
Se este produto for usado com um suporte para chimbal, não coloque um suporte sobre superfícies inclina-
das, instáveis nem com degraus. O suporte pode virar ou ser danificado, causando ferimentos.
Se este produto for usado com um suporte para chimbal, certifique-se de que os parafusos estejam bem
apertados. Além disso, ao ajustar a altura ou o ângulo, não solte repentinamente os parafusos. Soltar os
parafusos pode provocar a queda do suporte ou das peças, causando ferimentos.
Tome cuidado quando houver crianças próximas ou ao tocar o produto. Um movimento descuidado próximo
do produto pode causar ferimentos.
Ao instalar o produto, preste bastante atenção ao manuseio e à disposição dos cabos. Cabos mal colocados
podem provocar tropeços e quedas do usuário e de outras pessoas.
Não altere o produto. Isso pode causar ferimentos ou dano/deterioração do produto.
Os símbolos que aparecem neste produto e neste manu-
al do proprietário significam o seguinte:
Este símbolo indica algo que requer sua atenção,
como “Por favor, preste atenção -----.”
Este símbolo indica algo proibido, como “Não faça -
----.”
Este símbolo indica algo obrigatório, como “Certifi-
que-se de fazer -----.”
* To customers who purchased a Pads Set, please refer to the attached “Accessories List” sheet included
with the Pads Set when confirming package contents.
RHH135: z RHH135 main unit × 1 ( : Main unit × 1, : Clamp base assembly × 1, : Stand base × 1),
x Stereo phone cable × 2, c Cable band × 1 , v Owner’s Manual (this sheet) × 1
* Kunden, die ein Pads-Set erworben haben, beachten bitte das Blatt „Zubehörliste“, das mit dem Pads-Set
geliefert wurde, um den Lieferumfang zu prüfen.
RHH135: z RHH135-Haupteinheit × 1 ( : Haupteinheit × 1, : Klemmen-Einheit × 1, : Standfuß × 1),
x Stereo-Klinkenkabel × 2, c Kabelbinder × 1, v Bedienungsanleitung (dieses Blatt) × 1
* Pour les clients qui achètent un jeu de pads, veuillez consulter la fiche intitulée « Liste des accessoires »
fournie avec ce produit, pour la vérification du contenu de l’emballage.
RHH135: z Unité principale RHH135 × 1 ( : Unité principale × 1, : Embase de pince assemblée × 1,
: Base de support × 1), × Câble stéréo × 2, c Bande de câble × 1,
v Mode d’emploi (cette fiche) × 1
* Para clientes que tenham comprado um conjunto de pads, consulte o folheto anexo “Lista de acessórios”
que o acompanha para confirmar o conteúdo da embalagem.
RHH135: z 1 unidade principal RHH135 ( : 1 unidade principal,
: 1 montagem para a base da braçadeira, : 1 base do suporte), x 2 cabos estereofônicos,
c uma faixa para cabo, v 1 Manual do Proprietário (este folheto)
Package Contents
Lieferumfang
Contenu de l’emballage
Conteúdo da embalagem
a
b
c
a
b
c
a
b
c
a
b
c
z
c
x
b
a c
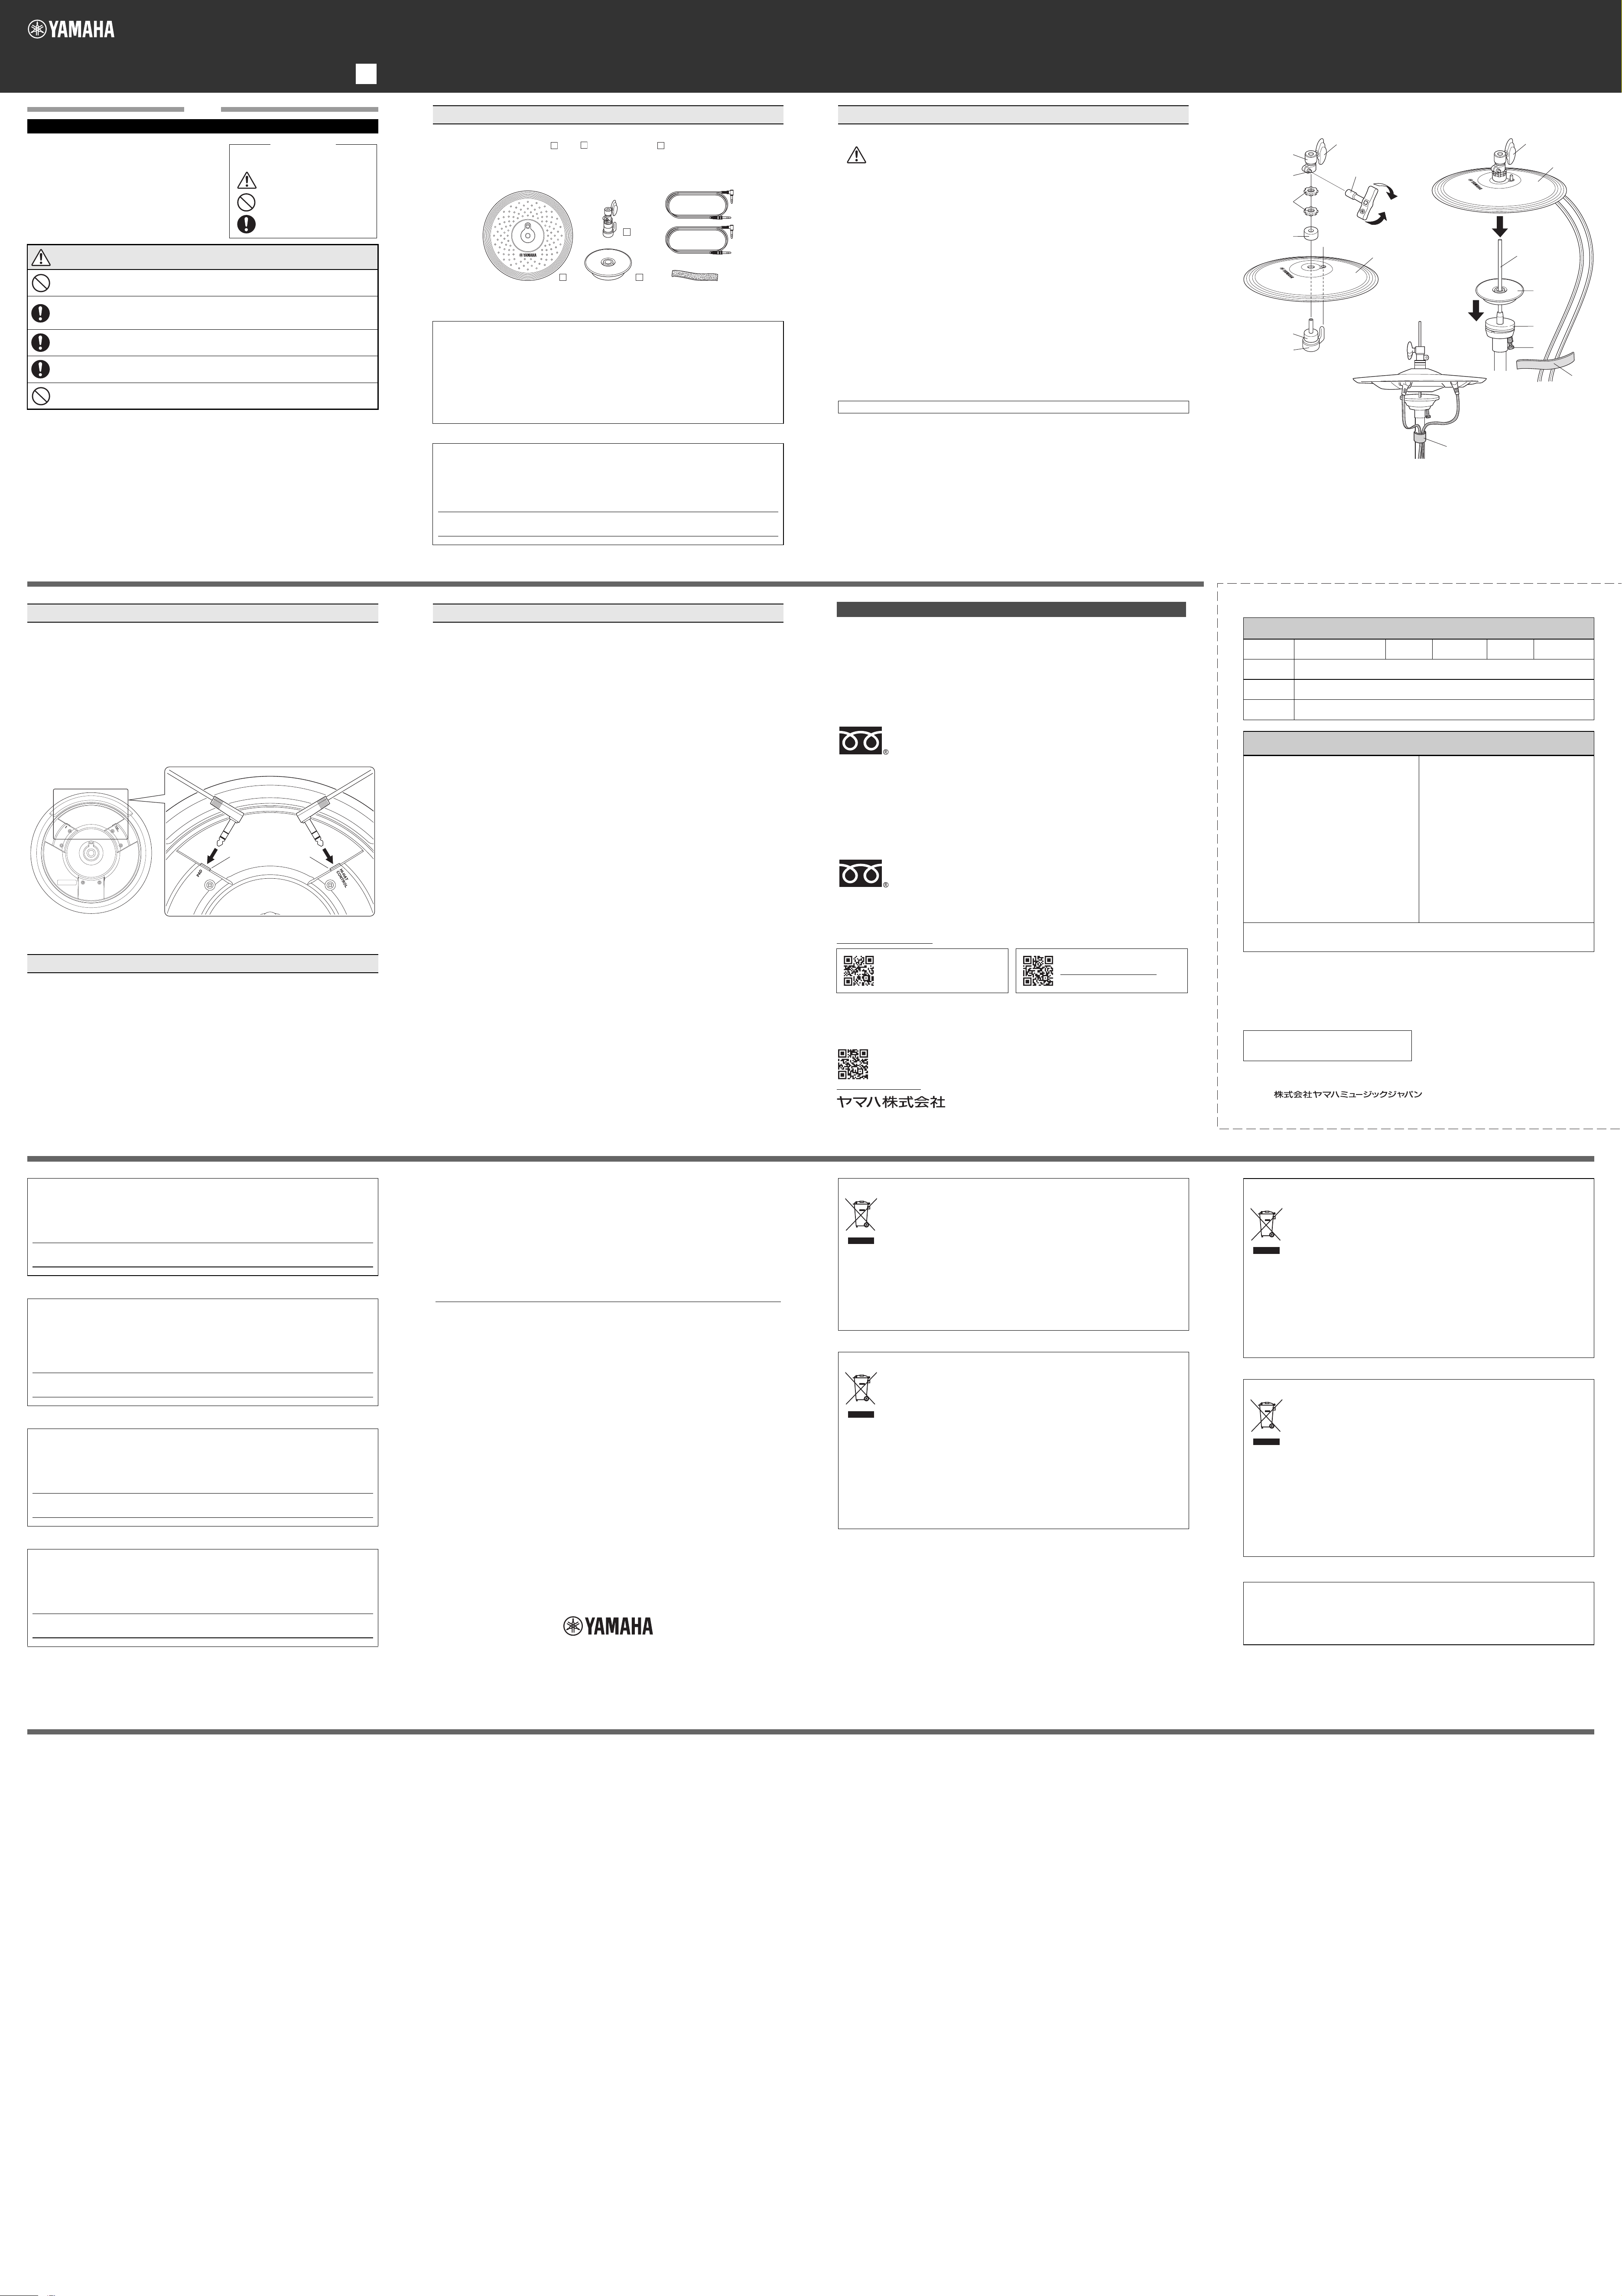
Using the two supplied stereo phone cables, connect the RHH135’s output jacks to the input jacks on your DTX
Series Drum Trigger Module.
First, connect the RHH135’s [PAD] output jack to the module’s [HI HAT] input jack, then the RHH135’s [HI-HAT
CONTROL] output jack to the module’s [HI HAT CONTROL] input jack. The L-shaped connectors should be
connected to the RHH135.
* The RHH135 incorporates switches in its edge and controller sections. Make sure that a stereo phone cable
is used when making connections between the RHH135 and the module. The RHH135 will not operate using
a mono phone cable.
Module Settings
The functions that the pad can perform will depend on which of your drum module’s trigger input jacks it is con-
nected to. A chart showing the pad functions available with various input jack types can be accessed from the
web site shown below.
https://download.yamaha.com/
Verbinden Sie mit den zwei beiliegenden Stereo-Klinkenkabeln die Ausgangsbuchsen des RHH135 mit den
Eingangsbuchsen am Drum-Trigger-Modul der DTX-Serie.
Verbinden Sie als erstes die Ausgangsbuchse [PAD] des RHH135 mit der Eingangsbuchse [HI HAT] des Mo-
duls und dann die Ausgangsbuchse [HI-HAT CONTROL] des RHH135 mit der Eingangsbuchse [HI HAT CON-
TROL] des Moduls. Die L-förmigen Anschlüsse sollten an das RHH135 angeschlossen werden.
* Das RHH135 ist am Rand- und Controller-Bereich mit Schaltern ausgestattet. Achten Sie darauf, ein Stereo-
Klinkenkabel zu verwenden, wenn Sie Verbindungen zwischen RHH135 und Modul herstellen. Das RHH135
kann nicht über ein Mono-Klinkenkabel betrieben werden.
Moduleinstellungen
Die Funktionen, die das Pad erfüllen kann, hängen davon ab, an welcher Trigger-Eingangsbuchse des Schlag-
zeugmoduls es angeschlossen ist. Eine Tabelle mit den verfügbaren Pad-Funktionen bei verschiedenen An-
schlussarten ist auf der unten angegebenen Website zu finden.
https://download.yamaha.com/
Servez-vous des deux câbles stéréo fournis pour connecter les prises d’entrée de l’unité RHH135 aux prises
d’entrée de votre système Drum Trigger Module de série DTX.
Connectez d’abord la prise de sortie [PAD] de l’unité RHH135 à la prise d’entrée [HI HAT] du module, puis reliez
la prise de sortie [HI-HAT CONTROL] de l’unité RHH135 à la prise d’entrée [HI HAT CONTROL] du module.
Les connecteurs en L doivent être branchés à l’unité RHH135.
* L’unité RHH135 comprend des commutateurs au niveau de ses sections de périphérie et de contrôleur. As-
surez-vous d’utiliser un câble stéréo lorsque vous effectuez des connexions entre l’unité RHH135 et le mo-
dule. L’unité RHH135 ne fonctionne pas à l’aide d’un câble mono.
Réglages du module
Les fonctions exécutées par le pad varient selon la prise d'entrée de déclenchement à laquelle le module de
batterie est connecté. Vous pouvez accéder au tableau des fonctions de pad disponibles avec les divers types
de prise d'entrée sur le site Web, à l'adresse suivante :
https://download.yamaha.com/
Connections
Anschlüsse und Verbindungen
Connexions
Lors de l’utilisation de l’unité RHH135, si vous rencontrez l’un des problèmes listés ci-dessous, vérifiez d’abord
les points suivants avant de contacter votre revendeur pour solliciter de l’aide.
Aucun son, volume faible
Le pad est-il connecté au numéro d’entrée adéquat du système Drum Trigger Module de série DTX à l’aide
du câble stéréo fourni ? (Reportez-vous à la section « Connexions » ci-dessus). L’unité RHH135 ne fonc-
tionne pas lorsqu’un câble mono est utilisé.
Un capteur intégré de pad de cymbale est situé à proximité du logo Yamaha présent sur la surfacesupérieure.
Pour tirer pleinement parti de votre pad, positionnez celui-ci de façon à pouvoir frapper facilement la surface
autour du logo.
Un seul coup produisant plusieurs sons (déclenchement en double)
Veillez à configurer correctement les réglages de rejet sur le modèle Drum Trigger Module de série DTX que
vous utilisez.
La cymbale de charleston ne se ferme correctement que lorsque vous appuyez avec
force sur la pédale du support pour charleston.
Le disque de feutre se trouve-t-il encore sous la base du support ? Essayez de retirer le disque fourni avec
le support pour charleston et réinstallez la base de celui-ci sans le disque. (Reportez-vous à la section
« Configuration ».)
Consultez également le mode d’emploi fourni avec votre système Drum Trigger Module de série DTX pour ob-
tenir plus d’informations sur les problèmes décrits plus haut ainsi que tout autre problème éventuel auquel vous
auriez à faire face. Si aucune solution ne peut être trouvée au problème après consultation des manuels,
contactez le revendeur auprès duquel vous avez acheté le produit.
Se ocorrer o problema a seguir quando o RHH135 for usado, verifique os seguintes pontos antes de solicitar
assistência ao revendedor.
Sem som, volume baixo
O pad está conectado ao número de entrada correto do Módulo acionador de bateria série DTX por meio do
cabo estereofônico fornecido? (Consulte “Conexões” acima.) O RHH135 não funcionará com um cabo mo-
nofônico.
O sensor interno do pad do prato está localizado próximo do logotipo da Yamaha na superfície superior. Para
obter o melhor desempenho do pad, posicione-o de forma que a área em torno do logotipo possa ser facil-
mente atingida.
Uma batida no pad produz vários sons (disparo duplo)
Não se esqueça de definir corretamente as configurações de rejeição no Módulo acionador de bateria série
DTX.
O som do chimbal fechado não sairá, a menos que o pedal do chimbal seja pisado com
força.
A arruela de feltro ainda está sob a base do suporte? Tente remover o feltro que acompanha o suporte para
chimbal e reinstalar a base do suporte sem ele. (Consulte “Instalação”.)
Além disso, consulte o Manual do Proprietário que acompanha o Módulo acionador de bateria série DTX para
obter mais informações a respeito dos problemas descritos acima e de outros problemas que talvez você esteja
enfrentando. Se não encontrar uma solução para o problema após consultar os manuais, entre em contato com
o revendedor de quem você comprou o produto.
Résolution des problèmes
Solução de problemas
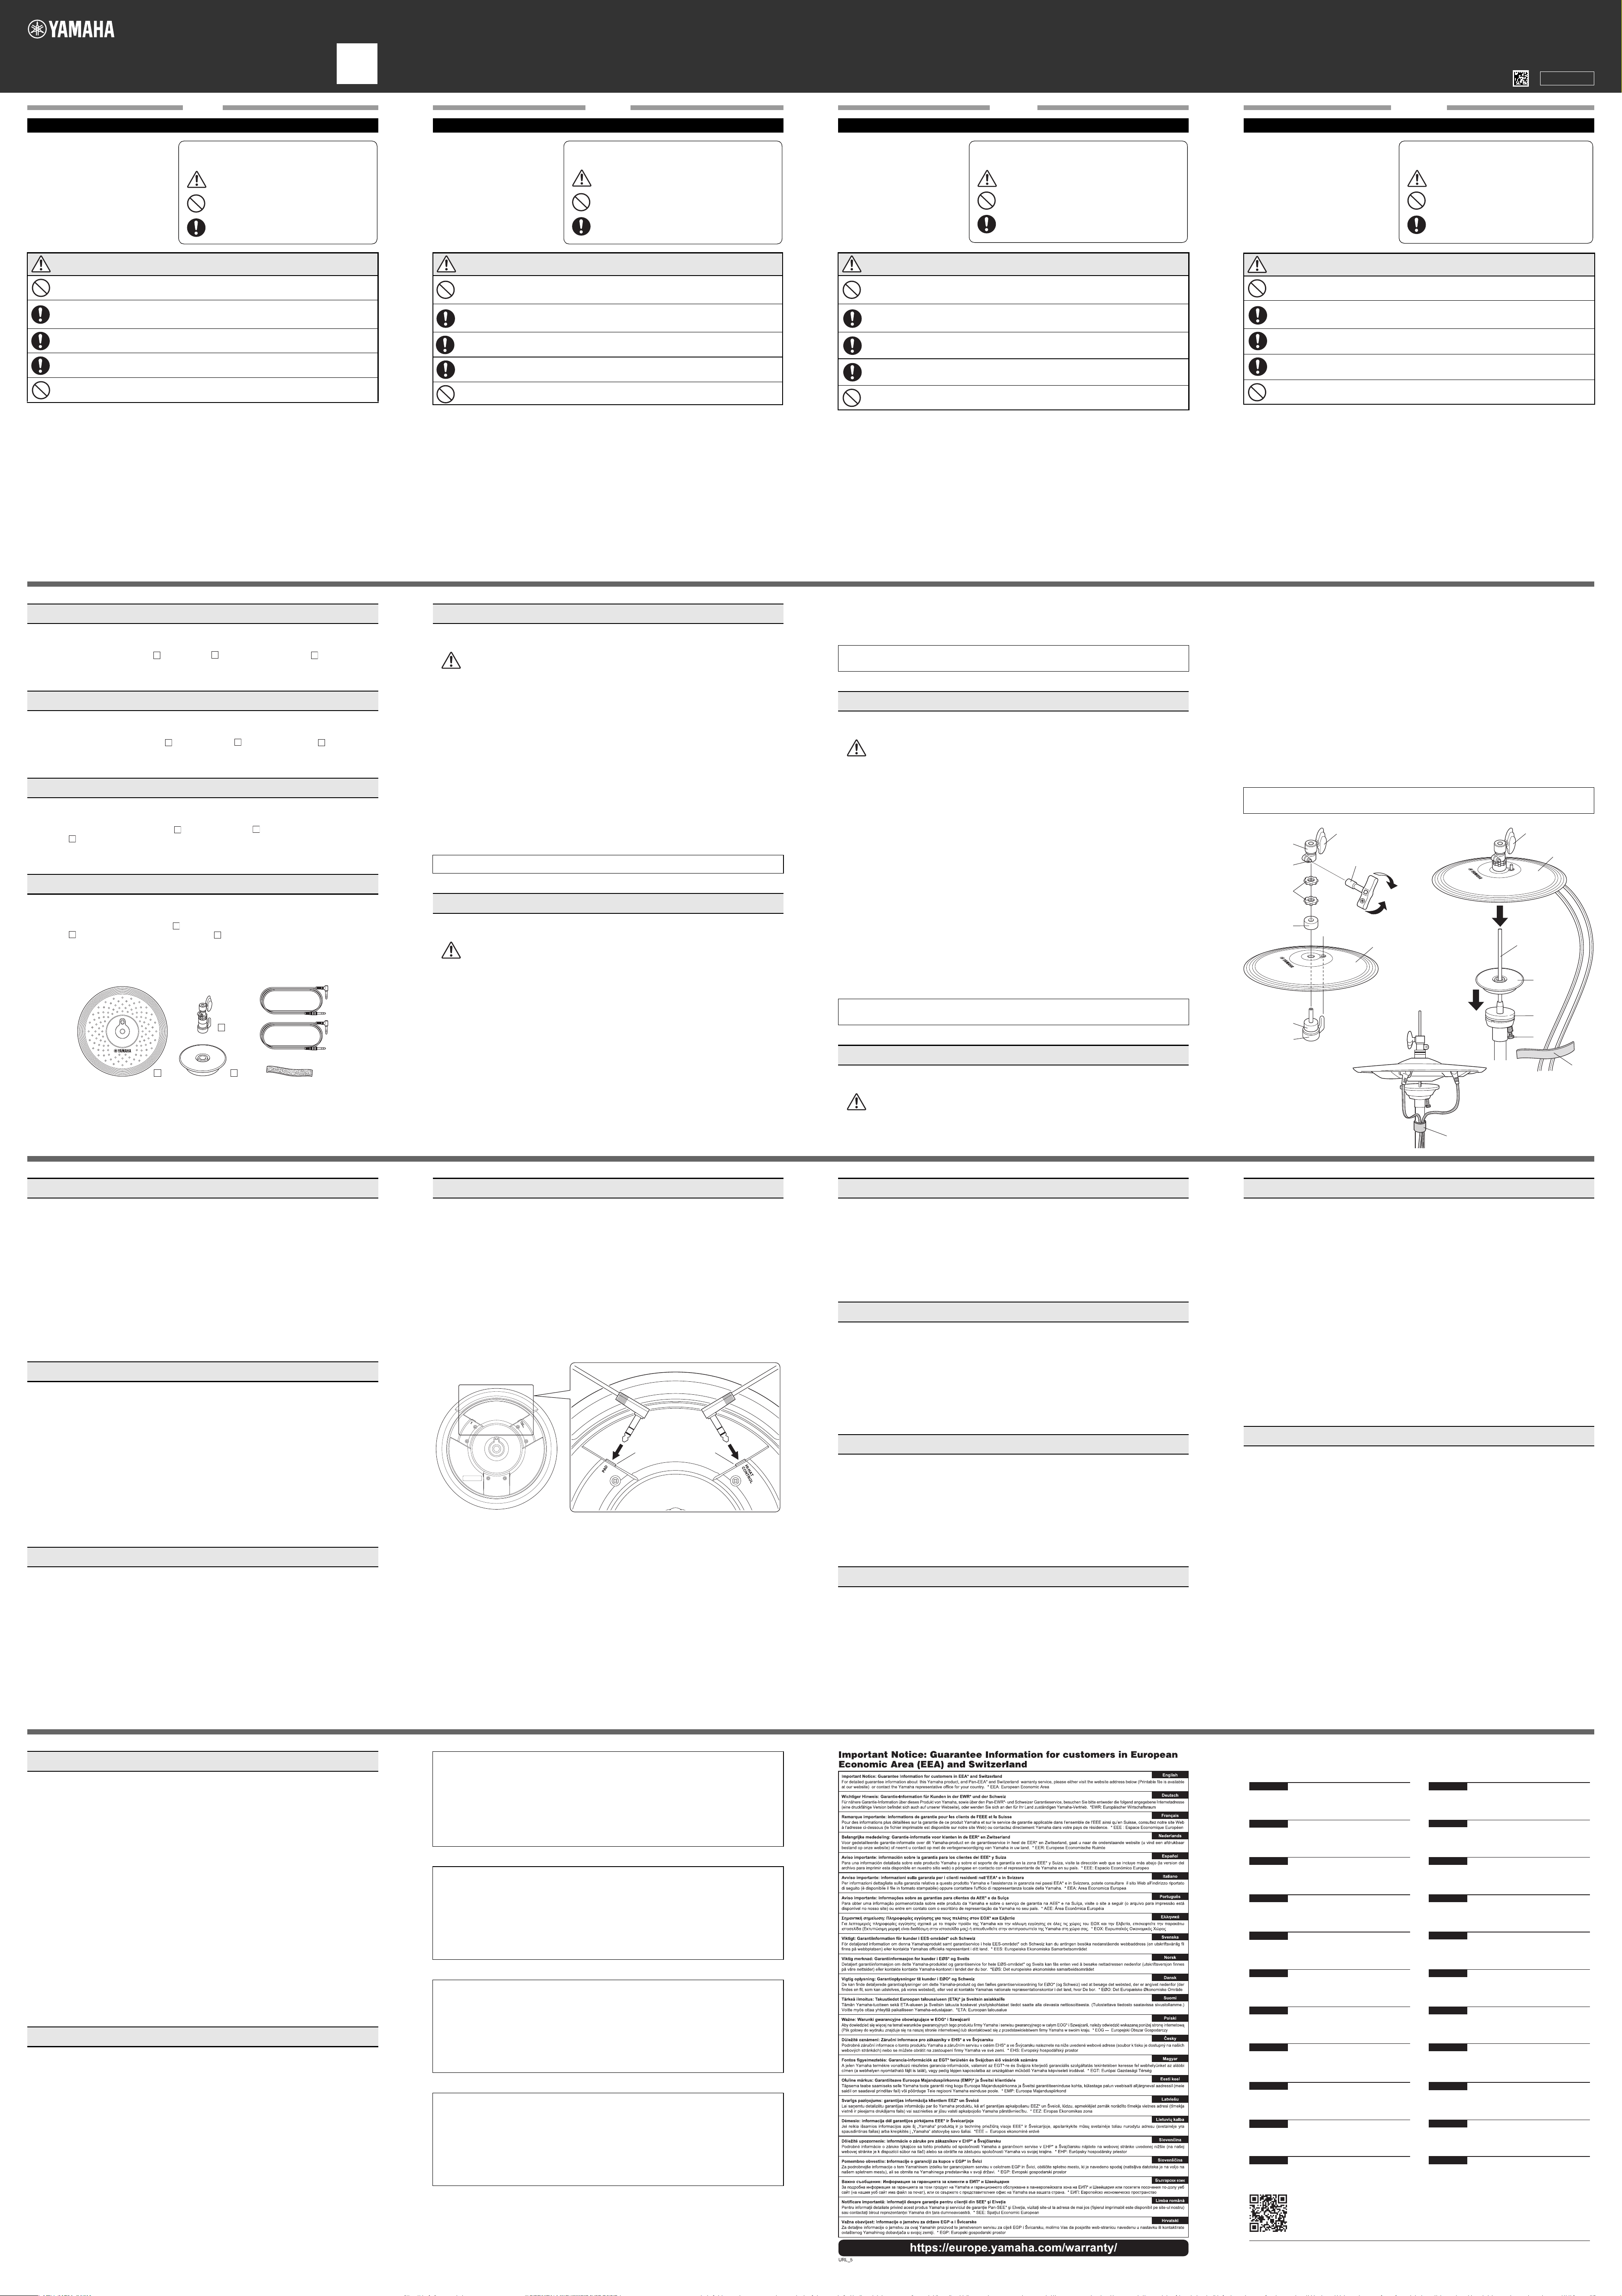
Before setting up the RHH135, prepare a hi-hat stand (Yamaha HS series stands, etc.), then follow the proce-
dures below to set up the RHH135.
Make sure the stand is set up in a stable and secure manner. If the clamp bolts, etc. are not tightened
securely, the pad or stand can fall over causing injury. Also, placing the rack or stand on an unstable
surface, etc., can cause the pad or stand to fall over, resulting in injury.
NOTE: Since hi-hat stands made by other manufacturers may not be compatible with the RHH135, we rec-
ommend that a Yamaha hi-hat stand be used. (Recommended: HS650A, HS740A)
1. After loosening the keybolt q of the hi-hat clutch using the tuning key w, remove the clutch head e, lock
nuts r and felt washer t (as shown).
* Leave felt washer y on top of stopper u (as shown).
2. Place the RHH135 pad onto the stopper u, aligning the rods with the holes.
3. Fix the felt washer t, lock nuts r and clutch head onto the stopper bolt in order (as shown), tightening all
parts firmly so that the hi-hat and clutch head assembly are secure.
4. Fix the drum keybolt q tightly using the tuning key w.
5. Set the hi-hat stand on a stable surface. Remove the hi-hat clutch and felt that came with the hi-hat stand.
(The clutch is not needed when using the RHH135; however, keep it in a safe place for future use.)
To adjust the support plate o horizontally, use the knob bolt i located on the underside of the support plate.
6. Slide the stand base !0 onto the hi-hat stand shaft !1.
7. After loosening the wing bolt !2 on the RHH135, slide the RHH135 onto the hi-hat stand shaft !1 then set
the RHH135 so that YAMAHA logo mark appears in front.
8. Raise the RHH135 to a suitable height, and tighten the wing bolt !2 to secure the hi-hat shaft !1 to the clutch
base. As the upper position of the clutch base determines the open hi-hat position (the space between the
open cymbals), set the clutch base position according to your playing preference.
* Make sure to tighten the hi-hat shaft so that it doesn’t turn. This prevents the RHH135 from moving and
possibly entangling and damaging the cable.
* Secure the cables to the assembly using the cable band !3 as shown in Fig. A.
Bereiten Sie vor der Einrichtung des RHH135 einen Hi-Hat-Ständer vor (Ständer der Serie Yamaha HS usw.)
und folgen Sie dann dem nachstehenden Verfahren zur Einrichtung des RHH135.
Stellen Sie sicher, dass der Ständer stabil und sicher steht. Wenn die Klemmbolzen nicht richtig an-
gezogen sind, können Pad oder Ständer umkippen und Verletzungen verursachen. Wenn Sie das
Rack oder den Ständer auf eine instabile Unterlage usw. stellen, können Pad oder Ständer umkippen
und Verletzungen verursachen.
HINWEIS: Da Hi-Hat-Ständer anderer Hersteller möglicherweise nicht mit dem RHH135 kompatibel sind,
empfehlen wir die Verwendung eines Hi-Hat-Ständers von Yamaha. (Empfohlen: HS650A, HS740A)
1. Entfernen Sie nach dem Lösen des Schlüsselbolzens q der Hi-Hat-Klemme mit dem Stimmschlüssel w
den Klemmenkopf e, die Sperrmuttern r und die Filz-Unterlegscheibe t (wie gezeigt).
* Lassen Sie die Filz-Unterlegscheibe y oben auf dem Stopper u liegen (wie gezeigt).
2. Platzieren Sie das Pad RHH135 auf den Stopper u, wobei Sie die Löcher auf die Stangen ausrichten.
3. Stecken Sie die Filz-Unterlegscheibe t, die Sperrmuttern r und den Klemmenkopf in dieser Reihenfolge
(wie gezeigt) auf den Stopperbolzen, und achten Sie bei jedem Teil auf festen Sitz, so dass die Hi-Hat und
der Klemmenkopf sicher und fest sitzen.
4. Ziehen Sie den Schlüsselbolzen q mit dem Stimmschlüssel gut fest w.
5. Stellen Sie den Hi-Hat-Ständer auf eine stabile Oberfläche. Entfernen Sie die Hi-Hat-Klemme und den Filz,
welche mit dem Hi-Hat-Ständer ausgeliefert wurden. (Die Klemme wird bei Verwendung des RHH135 nicht
benötigt; bewahren Sie sie jedoch für späteren Gebrauch an einem sicheren Ort auf.)
Zur horizontalen Einstellung der Stützplatte o verwenden Sie den Knopfbolzen i an der Unterseite der
Stützplatte.
6. Schieben Sie die Basis des Ständers !0 auf den Schaft des Hi-Hat-Ständers !1.
7. Nachdem Sie die Flügelschraube !2 am RHH135 gelöst haben, schieben Sie das RHH135 auf den Schaft
!1 des Hi-Hat-Ständers und justieren das RHH135 so, dass das YAMAHA-Logo vorne erscheint.
8. Heben Sie das RHH135 auf eine geeignete Höhe und ziehen Sie die Flügelschraube !2 fest, um den Hi-
Hat-Schaft !1 sicher mit der Klemmen-Einheit zu verbinden. Da die obere Stellung der Klemmen-Einheit die
Setting Up
* When not playing or using the RHH135, make sure to leave space between the pad and the stand base !0.
Resting the pad on the stand base for extended periods of time may result in response problems.
Spielvorbereitungen
Usando os dois cabos estereofônicos fornecidos, conecte as saídas do RHH135 às entradas do Módulo acio-
nador de bateria série DTX.
Primeiro conecte a saída do [PAD] do RHH135 à entrada [HI HAT] do módulo e a saída [HI-HAT CONTROL]
do RHH135 à entrada [HI HAT CONTROL] do módulo. Os conectores em “L” devem estar conectados ao
RHH135.
* O RHH135 conta com chaves nas seções da borda e do controlador. Certifique-se de que um cabo estereo-
fônico seja usado ao estabelecer conexões entre o RHH135 e o módulo. O RHH135 não funcionará com um
cabo monofônico.
Configurações do módulo
As funções que o pad pode executar dependerão da entrada do acionador do módulo da bateria a que ele es-
tiver conectado. É possível acessar um quadro que mostra as funções de pad disponíveis com diversos tipos
de entrada no site mostrado abaixo.
https://download.yamaha.com/
Conexões
PAD HI-HAT CONTROL
offene Hi-Hat-Position darstellt (den Zwischenraum zwischen den offenen Beckentellern), justieren Sie bitte
die Position der Klemmen-Einheit Ihrem Spielstil entsprechend.
* Achten Sie darauf, den Hi-Hat-Schaft so festzuziehen, dass er sich nicht dreht. Das verhindert, dass sich
das RHH135 bewegt und möglicherweise das Kabel eindreht und beschädigt.
* Befestigen Sie die Kabel an der Einheit mit dem Kabelbinder !3, wie in Abb. A gezeigt.
Avant de configurer l’unité RHH135, apprêtez le support pour charleston (supports pour la série Yamaha HS),
puis suivez les procédures ci-dessous pour installer l’unité.
Assurez-vous que le support est installé de manière stable et sécurisée. Si les boulons de pince et
autres éléments ne sont pas fermement resserrés, le pad ou le support pourra se renverser et pro-
voquer des blessures. De la même façon, si le rack ou le support est placé sur une surface instable
ou inappropriée, il pourra tomber par terre et causer des blessures.
NOTE: les supports pour charleston fabriqués par des tiers peuvent être incompatibles avec l’unité
RHH135. Par conséquent, nous vous recommandons d’utiliser un support pour charleston Yamaha.
(Recommandé : HS650A, HS740A).
1. Après avoir desserré le boulon à clavette q de la vis à réglage du charleston à l’aide de la clef d’accord w,
retirez la tête de la vis de réglage e, les vis de serrage r et le disque de feutre t (tel qu’indiqué).
* Laissez le disque de feutre y en haut de la butée u (tel qu’indiqué).
2. Placez le pad RHH135 sur la butée u, en alignant les tiges sur les trous.
3. Fixez le disque de feutre t, les vis de serrage r et la tête de la vis de réglage sur le boulon de la butée
dans l’ordre indiqué, en resserrant fermement toutes les parties de sorte que l’assemblage du charleston et
de la tête de la vis de réglage soit sécurisé.
4. Fixez fermement le boulon à clavette de la batterie q à l’aide de la clef d’accord w.
5. Installez le support pour charleston sur une surface stable. Retirez la vis à réglage du charleston et le feutre
fourni avec le support de charleston. (La vis à réglage n’est pas nécessaire lors de l’utilisation du RHH135
; cependant, il convient de la conserver dans un endroit sûr en vue de s’en servir ultérieurement.)
Pour ajuster la plaque du support o horizontalement, servez-vous du boulon du bouton i situé sous la
plaque du support.
6. Faites glisser la base du support !0 sur la tige du support pour charleston !1.
7. Après avoir desserré le boulon à oreilles !2 sur le RHH135, faites glisser le RHH135 sur la tige du support
pour charleston !1 puis réglez le RHH135 de sorte que la marque sur le logo de YAMAHA apparaisse à
l’avant.
8. Soulevez le RHH135 à une hauteur appropriée puis resserrez le boulon à oreilles !2 pour fixer la tige de
charleston !1 sur l’embout de la vis de réglage. La position supérieure de l’embout de la vis de réglage dé-
termine la position de la cymbale charleston ouverte (espace entre les cymbales ouvertes). Par conséquent,
il convient de régler l’embout de la vis de réglage conformément à votre style de jeu préféré.
* Veillez à bien resserrer la tige de charleston afin de l’empêcher de tourner. Ceci évite au RHH135 tout
mouvement et protège le câble contre l’éventualité d’un entremêlement et d’un endommagement.
* Fixez les câbles sur l’assemblage à l’aide de la bande de câble !3, tel qu’indiqué sur la Fig. A.
Antes de instalar o RHH135, prepare um suporte para chimbal (suporte Yamaha série HS etc.) e siga os pro-
cedimentos abaixo para instalar o RHH135.
Certifique-se de que o suporte esteja instalado de maneira estável e segura. Se os parafusos da bra-
çadeira etc. não estiverem bem apertados, o pad ou o suporte poderão cair, causando ferimentos.
Além disso, colocar o rack ou o suporte em uma superfície instável etc. pode fazer o pad ou o su-
porte cair, causando ferimentos.
OBSERVAÇÃO:
Como suportes para chimbal de outros fabricantes podem ser incompatíveis com o RHH135,
é recomendável usar um suporte para chimbal Yamaha. (Recomendados: HS650A, HS740A)
* Wenn Sie das RHH135 nicht spielen bzw. verwenden, achten Sie darauf, dass zwischen dem Pad und der
Basis des Ständers !0 genügend Platz ist. Wenn das Pad längere Zeit auf der Basis des Ständers liegt,
kann dies zu Problemen mit der Spielgenauigkeit führen.
Configuration
* Lorsque vous n’utilisez pas le RHH135, assurez-vous de laisser suffisamment d’espace libre entre le pad
et la base du support !0. Le fait de laisser le pad reposer sur la base du support pendant des périodes de
temps prolongées peut entraîner des problèmes de réponse.
Instalação
1. Depois de soltar o parafuso principal q do engate do chimbal usando a chave de afinação w, remova a
cabeça do engate e, as porcas travantes r e a arruela de feltro t (conforme mostrado).
* Deixe a arruela de feltro y sobre o anteparo u (conforme mostrado).
2. Coloque o pad RHH135 sobre o anteparo u, alinhando as hastes com os furos.
3. Prenda a arruela de feltro t, as porcas travantes r e a cabeça do engate no parafuso do anteparo na
ordem (conforme mostrado), apertando bem todas as peças de maneira que o chimbal e a montagem da
cabeça do engate fiquem presos.
4. Aperte bem o parafuso principal da bateria q usando a chave de afinação w.
5. Coloque o suporte para chimbal sobre uma superfície estável. Remova o engate do chimbal e o feltro que
acompanha o suporte para chimbal. (O engate não é necessário quando se usa o RHH135. Porém, guarde-
o em um lugar seguro para usá-lo futuramente.)
Para ajustar a placa de suporte o horizontalmente, use o parafuso do botão giratório i localizado sob a
placa de suporte.
6. Deslize a base do suporte !0 até o eixo do suporte para chimbal !1.
7. Depois de soltar a porca borboleta !2 do RHH135, deslize o RHH135 até o eixo do suporte para chimbal
!1 e ajuste o RHH135 de maneira que a marca do logotipo YAMAHA fique visível.
8.
Levante o RHH135 até uma altura apropriada e aperte a porca borboleta
!2
para prender o eixo do chimbal
!1
à base do engate. Como a posição superior da base do engate determina a posição aberta do chimbal (o es-
paço entre os pratos abertos), ajuste a posição da base do engate de acordo com a sua preferência ao tocar.
* Não se esqueça de apertar o eixo do chimbal de maneira que ele não vire. Isso evita que o RHH135 se
mova e possa se enrolar e danificar o cabo.
* Prenda os cabos à montagem usando a faixa para cabo !3 conforme mostrado na Fig. A.
* Quando não estiver tocando ou usando o RHH135, não se esqueça de deixar espaço entre o pad e a base
do suporte !0. Deixar o pad sobre a base do suporte por períodos prolongados pode resultar em proble-
mas na resposta.
w
!2
e
y
q
u
t
r
RHH135
!1
!2
RHH135
!0
o
i
!3
!3
1 – 4 6 – 8
[Fig. A]
Yamaha Worldwide Representative Offices
For details on the product(s), contact your nearest Yamaha
representative or the authorized distributor, found by accessing
the 2D barcode below.
English
Wenden Sie sich für nähere Informationen zu Produkten an eine
Yamaha-Vertretung oder einen autorisierten Händler in Ihrer Nähe.
Diese finden Sie mithilfe des unten abgebildeten 2D-Strichodes.
Deutsch
Pour obtenir des informations sur le ou les produits, contactez
votre représentant ou revendeur agréé Yamaha le plus proche.
Vous le trouverez à l'aide du code-barres 2D ci-dessous.
Français
Para ver información detallada sobre el producto, contacte con
su representante o distribuidor autorizado Yamaha más cercano.
Lo encontrará escaneando el siguiente código de barras 2D.
Español
Neem voor meer informatie over de producten contact op met uw
dichtstbijzijnde Yamaha-vertegenwoordiger of de geautoriseerde
distributeur, te vinden via de onderstaande 2D-barcode.
Nederlands
Para mais informações sobre o(s) produto(s), fale com seu
representante da Yamaha mais próximo ou com o distribuidor
autorizado acessando o código de barras 2D abaixo.
Português
$E\X]\VNDüV]F]HJyáRZHLQIRUPDFMHQDWHPDWSURGXNWyZ
VNRQWDNWXMVLĊ]QDMEOLĪV]\PSU]HGVWDZLFLHOHPILUP\<DPDKDOXE
autoryzowanym dystrybutorem, którego znajdziesz za
SRĞUHGQLFWZHPSRQLĪV]HJRNRGXNUHVNRZHJR'
Polski
ɑɬɨɛɵɭɡɧɚɬɶɩɨɞɪɨɛɧɟɟɨɩɪɨɞɭɤɬɟɩɪɨɞɭɤɬɚɯɫɜɹɠɢɬɟɫɶ
ɫɛɥɢɠɚɣɲɢɦɩɪɟɞɫɬɚɜɢɬɟɥɟɦɢɥɢɚɜɬɨɪɢɡɨɜɚɧɧɵɦ
ɞɢɫɬɪɢɛɶɸɬɨɪɨɦ<DPDKDɜɨɫɩɨɥɶɡɨɜɚɜɲɢɫɶɞɜɭɯɦɟɪɧɵɦ
ɲɬɪɢɯɤɨɞɨɦɧɢɠɟ
Ɋɭɫɫɤɢɣ
Om du vill ha mer information om produkterna kan du kontakta
närmaste Yamaha-representant eller auktoriserade distributör
med hjälp av 2D-streckkoden nedan.
Svenska
Hvis du vil have detaljer om produktet/produkterne, kan du kontakte den
nærmeste Yamaha-repræsentant eller autoriserede Yamaha-distributør,
som du finder ved at scanne 2D-stregkode nedenfor.
Dansk
https://manual.yamaha.com/mi/address_list/
Head Office/Manufacturer: Yamaha Corporation 10-1, Nakazawa-cho, Chuo-ku, Hamamatsu, 430-8650, Japan
Importer (European Union): Yamaha Music Europe GmbH Siemensstrasse 22-34, 25462 Rellingen, Germany
Importer (United Kingdom): Yamaha Music Europe GmbH (UK) Sherbourne Drive, Tilbrook, Milton Keynes, MK7 8BL, United Kingdom
DMI37_22m
Per dettagli sui prodotti, contattare il rappresentante Yamaha o
il distributore autorizzato più vicino, che è possibile trovare
tramite il codice a barre 2D in basso.
Italiano
3RGUREQRVWLRSURGXNWXHFK]tVNiWHRGQHMEOLåãtKR]iVWXSFH
VSROHþQRVWL<DPDKDQHERDXWRUL]RYDQpKRGLVWULEXWRUDNWHUêE\O
QDOH]HQSĜLSRXåLWt'þiURYpKRNyGXQtåH
ýHãWLQD
3RGUREQpLQIRUPiFLHRSURGXNWHRFKYiPSRVN\WQHQDMEOLåãt
]iVWXSFDVSRORþQRVWL<DPDKDDOHERDXWRUL]RYDQêGLVWULE~WRU
NWRUpKRQiMGHWHSRPRFRXQLåãLHXYHGHQpKR'þLDURYpKRNyGX
6ORYHQþLQD
A termék(ek)re vonatkozó részletekért forduljon a legközelebbi
Yamaha képviselethez vagy a hivatalos forgalmazóhoz, amelyet
az alábbi 2D vonalkód segítségével találhat meg.
Magyar
ýHåHOLWHSRGUREQHMãHLQIRUPDFLMHRL]GHONLKVHREUQLWHQD
QDMEOLåMHJD<DPDKLQHJDSUHGVWDYQLNDDOLSRREODãþHQHJD
distributerja, ki ga najdete prek 2D-kode v nadaljevanju.
6ORYHQãþLQD
/DLLHJnjWXSODãƗNXLQIRUPƗFLMXSDUL]VWUƗGƗMXPLHPVD]LQLHWLHV
DUWXYƗNR<DPDKDSƗUVWƗYLYDLSLOQYDURWRL]SODWƯWƗMXNXUX
DWUDGƯVLHWL]PDQWRMRWWƗOƗNSLHHMDPR'VYƯWUNRGX
/DWYLHãX
Ɂɚɩɨɞɪɨɛɧɨɫɬɢɨɬɧɨɫɧɨɩɪɨɞɭɤɬɚɢɬɟɫɟɫɜɴɪɠɟɬɟɫɧɚɣɛɥɢɡɤɢɹ
ɩɪɟɞɫɬɚɜɢɬɟɥɧɚ<DPDKDɢɥɢɨɬɨɪɢɡɢɪɚɧɞɢɫɬɪɢɛɭɬɨɪɤɨɣɬɨ
ɦɨɠɟɬɟɞɚɨɬɤɪɢɟɬɟɤɚɬɨɢɡɩɨɥɡɜɚɬɟ'ɛɚɪɤɨɞɚɩɨɞɨɥɭ
Ȼɴɥɝɚɪɫɤɢ
1RUơGDPLJDXWLGDXJLDXLQIRUPDFLMRVDSLHJDPLQƳLXV
NUHLSNLWơVƳDUWLPLDXVLąÄ<DPDKD³DWVWRYąDUEDƳJDOLRWąMƳ
SODWLQWRMąNXUƳUDVLWHQXVNDLWĊWROLDXSDWHLNWą'EUnjNãQLQƳNRGą
/LHWXYLǐ
Toodete kohta täpsema teabe saamiseks võtke ühendust lähima
Yamaha esindaja või autoriseeritud levitajaga, kelle leiate
allpool asuva 2D-vöötkoodi kaudu.
Eesti
hUQOHUKDNNÕQGDD\UÕQWÕODULoLQDúD÷ÕGDNL'NRGOXPRWRUD
HULúHUHNEXOXQDQVL]HHQ\DNÕQ<DPDKDWHPVLOFLVLQHYH\D\HWNLOL
ED\L\HEDúYXUXQ
Türkçe
Za detalje o proizvodima obratite se lokalnom predstavku ili
RYODãWHQRPGLVWULEXWHUXWYUWNH<DPDKDNRMHJPRåHWHSURQDüL
VNHQLUDQMHP'FUWLþQRJNRGDXQDVWDYNX
Hrvatski
3HQWUXGHWDOLLSULYLQGSURGXVHOHFRQWDFWD܊LFHOPDLDSURSLDW
reprezentant Yamaha sau distribuitorul autorizat, pe care îl
SXWH܊LJăVLDFFHVkQGFRGXOGHEDUH'GHPDLMRV
5RPkQă
Owner’s Manual / Benutzerhandbuch
Mode d’emploi / Manual do Proprietário
Adjust the level of the trigger output from the RHH135 with the Gain parameter of Trigger Setup Edit display on
the particular DTX Series Drum Trigger Module you are using.
NOTE: When the RHH135 is used with a DTX Series Drum Trigger Module, enter the module’s Trigger Setup
Edit display and set the Gain (pad input level) parameter so that the display reads 90–95% when the
pad is struck strongly. Refer to the Owner’s Manual that came with your module for more information.
If the output level is too high, the pad’s dynamic range (the difference between loud and soft sounds)
will be reduced and problems such as double triggering (multiple triggers being produced by a single
stroke) may occur.
Stellen Sie den Trigger-Ausgangspegel des RHH135 im Zusammenspiel mit dem Gain-Parameter im Trigger-
Setup-Edit-Display Ihres Drum-Trigger-Modul der DTX-Serie ein.
HINWEIS: Wenn das RHH135 mit einem Drum-Trigger-Modul der DTX-Serie verwendet wird, gehen Sie in das
Trigger-Setup-Edit-Display und stellen Sie den Parameter Gain (Pad-Eingangspegel) so ein, dass
das Display 90–95% anzeigt, wenn das Pad hart angeschlagen wird. Für nähere Informationen le-
sen Sie die Bedienungsanleitung, die mit Ihrem Modul geliefert wurde.
Wenn der Ausgangspegel zu hoch ist, ist der Dynamikbereich (der Unterschied zwischen lauten
und leisen Tönen) des Pads reduziert, und es können vermehrt Probleme wie Doppeltriggerung
(mehrfache Triggerauslösung durch einen einzelnen Schlag) auftreten.
Réglez le niveau de sortie de déclenchement à partir du RHH135 à l’aide du paramètre Gain dans l’écran d’édi-
tion du système Drum Trigger Module de série DTX dont vous disposez.
NOTE: Lorsque l’unité RHH135 est utilisée avec un système Drum Trigger Module de série DTX, accédez à
l’écran Trigger Setup Edit du module afin de régler le paramètre Gain (niveau d’entrée du pad) de
sorte que l’écran affiche 90–95 % lorsque le pad est frappé avec une grande force. Reportez-vous au
mode d’emploi fourni avec votre module pour plus d’informations à ce sujet.
Si le niveau de sortie est trop élevé, la plage dynamique du pad (la différence entre les tonalités
fortes et faibles) sera réduite, ce qui pourra occasionner des déclenchements en double (plusieurs
déclenchements produits par un seul coup).
Ajuste o nível de saída do acionador do RHH135 usando o parâmetro de ganho do visor Trigger Setup Edit
(Edição da configuração do acionador) do Módulo acionador de bateria série DTX que você estiver usando.
OBSERVAÇÃO: Quando o RHH135 for usado com um Módulo acionador de bateria série DTX, veja o visor
Trigger Setup Edit do módulo e defina o parâmetro de ganho (nível de entrada do pad) de
maneira que o visor indique 90 a 95% quando se bater no pad com força. Consulte o Manual
do Proprietário que acompanha o módulo para obter mais informações.
Se o nível de saída estiver muito alto, a faixa dinâmica do pad (a diferença entre sons altos
e baixos) será reduzida, podendo haver problemas como disparo duplo (vários disparos
produzidos por uma única batida).
Output Level Adjustment
Einstellen des Ausgangspegels
Réglage du niveau de sortie
Ajuste do nível de saída
EN DE
FR PT
RHH135
ELECTRONIC DRUM PAD
PAD DE BATTERIE ÉLECTRONIQUE
© 2023 Yamaha Corporation
Published 10/2025
2025年10月発行
IPMA-B0
VJT0710
If the following trouble occurs when the RHH135 is used, please check the following points before asking your
dealer for assistance.
No Sound, Volume is Low
Is the pad connected to the correct input number of the DTX Series Drum Trigger Module using the supplied
stereo phone cable? (See “Connections” above.) The RHH135 will not operate using a mono phone cable.
A cymbal pad’s built-in sensor is located close to the Yamaha logo found on the top surface. In order to
achieve the best performance from your pad, position it such that the area around the logo can be easily
struck.
Hitting the pad once produces multiple sounds (double triggering)
Make sure to properly set the rejection settings on your DTX Series Drum Trigger Module.
The Closed Hi-hat voice does not sound unless the hi-hat pedal is pressed down
strongly.
Is the felt washer still under the stand base? Try removing the felt that came with the hi-hat stand and install
the stand base again without it. (See “Setting Up.”)
Also, please refer to the Owner’s Manual that came with your DTX Series Drum Trigger Module for more infor-
mation regarding the problems described above and any other problems that you may be experiencing. If a solu-
tion cannot be found to the problem after consulting the manuals, please contact the dealer from whom you
purchased the product.
Falls bei Verwendung des Pedals RHH135 eines der folgenden Probleme auftritt, prüfen Sie bitte folgende
Punkte, bevor Sie Ihren Händler um Rat oder Hilfe fragen.
Kein Ton; die Lautstärke ist zu niedrig
Ist das Pad am Drum-Trigger-Modul der DTX-Serie über ein Stereo-Klinkenkabel am Eingang mit der richti-
gen Nummer angeschlossen? (Siehe “Anschlüsse und Verbindungen” weiter oben.) Das RHH135 kann nicht
über ein Mono-Klinkenkabel betrieben werden.
Der eingebaute Sensor eines Becken-Pads befindet sich in Nähe des Yamaha-Logos auf der Oberseite. Um
die beste Leistung aus Ihrem Pad herauszuholen, positionieren Sie es so, dass der Bereich in Nähe des Lo-
gos einfach angeschlagen werden kann.
Einmaliges Anschlagen des Pads produziert den Sound mehrfach (Doppeltriggerung)
Achten Sie darauf, die Rejection-Einstellungen in Ihrem Drum-Trigger-Modul der DTX-Serie richtig einzustel-
len.
Das Hi-Hat-Becken schließt nicht richtig, wenn nicht das Pedal des Hi-Hat-Ständers
stark heruntergedrückt wird.
Befindet sich die Filz-Unterlegscheibe immer noch unter der Basis des Ständers? Probieren Sie aus, den mit
dem Hi-Hat-Ständer gelieferten Filz abzunehmen und die Basis des Ständers ohne die Filzscheibe aufzuset-
zen. (Siehe “Spielvorbereitungen”.)
Lesen Sie bitte auch die Bedienungsanleitung, die mit Ihrem Drum-Trigger-Modul der DTX-Serie geliefert wur-
de, um weitere Informationen zu den oben beschriebenen und weiteren möglichen Problemen zu erhalten.
Wenn das Problem auch nach Lektüre der Bedienungsanleitungen nicht gelöst wurde, wenden Sie sich bitte an
den Händler, bei dem Sie das Produkt erworben haben.
Troubleshooting
Fehlerbehebung
Specifications
RHH135 Real Hi-hat Pad
Size: ø329 × 61 (H) mm (hi-hat clutch not included)
Weight: 1.4 kg (hi-hat clutch included)
Sensor System: Trigger sensor (piezo) × 1, switch × 1 (edge)
Controller Type: Multi-step Switch
Output jack: Standard stereo phone jack × 2
* Specifications are subject to change without notice.
Technische Daten
Echtes Hi-Hat-Pad RHH135
Größe: ø329 × 61 (H) mm (Hi-Hat-Kupplung nicht im Lieferumfang enthalten)
Gewicht: 1,4 kg (einschl. Hi-Hat-Kupplung)
Sensorik: Auslösesensor (Piezo) × 1, Schalter × 1 (Edge)
Controller-Bauart: Mehrstufiger Schalter
Ausgangsbuchse: Standard-Stereoklinkenbuchse × 2
* Die technischen Daten können jederzeit ohne Vorankündigung geändert werden.
Caractéristiques techniques
Véritable pad de charleston RHH135
Dimensions: 329 (ø) × 61 (H) mm (tilter de Charleston non inclus)
Poids: 1,4 kg (tilter de Charleston inclus)
Système de capteur: capteur à déclencheur (piézo) × 1, commutateur × 1 (bord)
Type de contrôleur: commutateur à plusieurs positions
Prise de sortie: prise jack stéréo standard × 2
* Les caractéristiques peuvent être modifiées sans avis préalable.
Especificações
Pad para chimbal RHH135 Real
Tamanho: ø329 × 61 (H) mm (engate do chimbal não incluído)
Peso: 1,4 kg (engate do chimbal incluído)
Sistema sensor: 1 sensor de disparo (piezo), 1 chave (borda)
Tipo de controlador: chave em várias etapas
Saída: 2 saídas para fone estereofônicas padrão
* As especificações estão sujeitas à alteração sem aviso prévio.
3
2
1
4
日本語
ここに示した注意事項は、製品を安全に正しくご使用いただき、あ
なたや他の人々への危害や損害を未然に防止するためのものです。
注意事項は、危害や損害の大きさと切迫の程度を明示するために、
誤った取り扱いをすると生じることが想定される内容を「警告」と
「注意」に区分しています。いずれもお客様の安全や機器の保全に関
する重要な内容ですので、必ずお守りください。
※ お読みになった後は、使用される方がいつでも見られる所に
必ず保管してください。
ご注意
• この製品の上に乗ったり、重いものを乗せたりしないでください。故障の原因になります。
• 温度が極端に高い場所 ( 直射日光の当たる場所、暖房器具の近く、閉めきった車内など )や、湿気の多い場所 ( 風呂
場、雨天の屋外など)での使用、保管はしないでください。変形、変色、故障や性能劣化の原因になります。
• 製品を手入れするときは、ベンジンやシンナー、アルコール類は使用しないでください。製品を変色、変形させる
おそれがあります。お手入れの際は、やわらかい布で乾拭きするか、水を含ませて固く絞った布を用いて汚れをふ
き取ってください。汚れがひどいときは、中性洗剤を含ませた布を固く絞って汚れを拭き取り、そのあとで水を含
ませて固く絞った布を用いて洗剤を拭き取ってください。
• ケーブルの抜き差しは必ずプラグ部分を持って行なってください。また、ケーブルの線の部分に重いものを乗せた
り、とがったものが触れたりしないように注意してください。線の部分に無理な力がかかると断線などのトラブル
の原因になります。
安全上のご注意 ご使用の前に、必ずこの「安全上のご注意」をよくお読みください。
注意
この表示を無視して誤った取り扱いをすると、人が傷害を負うおそれがある内容を示してい
ます。
この製品を、スタンドを用いて設置される際、不安定な場所(水平でない場所、ぐらついている台の上な
ど)に設置しないでください。転倒、落下などにより、ケガの原因となります。
この製品を、スタンドを用いて設置される際、固定用のボルト等はしっかり締め付けてください。また、
固定用ボルト類をゆるめる際は急激にゆるめないでください。この製品やスタンドの部品の落下、転倒な
どにより、ケガの原因となります。
ケガをするおそれがありますので、小さいお子様が取り扱いされる際は十分に注意してください。
この製品を設置される際、接続ケーブルなどの引き回しには十分に注意してください。足を掛けて転倒す
るなど、ケガの原因となります。
この製品を分解したり、改造したりしないでください。ケガまたは故障の原因になります。
記号表示について
この機器や取扱説明書に表示されている記号には、
次のような意味があります。
「ご注意ください」という注意喚起を
示します。
「〜しないでください」という禁止を
示します。
「必ず実行」してくださいという強制
を示します。
※ パッドセットでお買い上げいただいたお客様は、パッドセットに付属の別紙「同梱品一覧」にてご確認ください。
RHH135: zRHH135本体×1( :本体、 :ハイハットクラッチ、 :スタンドベース 各1)、
xステレオフォーンケーブル×2、cケーブルバンド×1、v取扱説明書(本紙)×1
(bottom_ja_02)
同梱品(お確かめください)
仕様
■RHH135リアルハイハットパッド
●外形寸法:φ329×61(H)mm(ハイハットクラッチ部分を除く)
●質量:1.4kg(ハイハットクラッチを含む)
●センサー方式:トリガーセンサー (圧電素子)×1、スイッチ(エッジ)×1
●コントローラー方式:多段スイッチ
●出力端子:標準ステレオフォーンジャック×2
※製品の仕様および外観は、改良のため予告無く変更することがあります。
機種名(品番)、製造番号(シリアルナンバー )、電源条件などの情報は、製品の底面にある銘板ま
たは銘板付近に表示されています。製品を紛失した場合などでもご自身のものを特定していただけ
るよう、機種名と製造番号については以下の欄にご記入のうえ、大切に保管していただくことをお
勧めします。
機種名
製造番号
a
b
c
z
c
x
b
a c
ハイハットスタンド(ヤマハHSシリーズなど)をご用意の上、下記の順番でセッティングしてください。
スタンドのセッティングは確実に行なってください。締め付けボルト等の締め付けが弱いと、パッドや
スタンドが転倒し、ケガをする危険があります。また、平らでない床の上などにラックやスタンドを置
くと、パッドやスタンドが転倒し、ケガをする危険があります。
NOTE: 他社製品では、取付不可能なハイハットスタンドがありますのでハイハットスタンドはヤマハ製のもの
をご使用ください。(推奨商品:HS650A,HS740A)
1. ハイハットクラッチのキーボルトqをチューニングキーwを使ってゆるめて、クラッチヘッドe、調整ナットr
(2個)、フェルト
t(1枚)をはずしておきます。
※ フェルト
y(1枚)は回転ストッパー uにセットしたままにしておきます。
2. 回転ストッパー uをパッド裏面の穴に合わせながらはめ込みます。
3. フェルトt、調整ナットr(2個)、クラッチヘッドeの順で回転ストッパー uにはめて、クラッチヘッドeが
回りきるまで締めます。調整ナット
r(2個)をなるべく締め込んで、パッド部の揺れを小さくしてください。
4. ドラムキーボルトqをチューニングキー w を使ってしっかり締めつけます。
5. ハイハットスタンドを水平な場所に設置します。ハイハットスタンドに付属のハイハットクラッチとフェルトを
はずします(ハイハットクラッチはRHH135には使用しませんが、大切に保管してください)。
調整ネジ
iを使って、サポートプレートoが平行になるように調節します。
6. スタンドベース!0をハイハットスタンドのシャフト!1に通します。
7. RHH135のウイングボルト!2をゆるめてからRHH135 本体をハイハットスタンドのシャフト!1に通します。
8. RHH135を適当な高さに引き上げ、ウイングボルト!2を締め付けてハイハットシャフト !1に固定します。この
引き上げ高さがハイハットのストローク(トップ・ボトムシンバルの間隔)に相当しますので、お好みのストロー
クになるように固定位置を調節してください。
※ ハイハットスタンドのシャフト
!1は回らないようにしっかり締めてください。RHH135が回り、ケーブル
を巻き込み断線するおそれがあります。
※ [Fig.A]のように、ケーブルは付属のケーブルバンド
!3で束ねてください。
セッティングのしかた
※ 演奏しないときは、スタンドベース
!0
からRHH135を離した状態で固定してください。誤動作の原因になります。
w
!2
e
y
q
u
t
r
RHH135
!1
!2
RHH135
!0
o
i
!3
!3
1 – 4 6 – 8
[Fig. A]
付属のステレオフォーンケーブル2本を使って、RHH135の出力をDTXシリーズドラムトリガーモジュールに接続
します。RHH135 の出力〔PAD〕をモジュールの〔HIHAT〕に、〔HI-HATCONTROL〕をモジュールの〔HI
HATCONTROL〕に接続します。ケーブルのL字プラグ側をRHH135に差し込んでください。
※ RHH135のエッジ部およびコントローラー部にはスイッチが内蔵されています。RHH135とモジュールとの接
続には必ずステレオフォーンケーブルを使用してください。モノラルフォーンケーブルを使用した場合、RHH135
は動作しません。
モジュールの設定
パッドの使用可能な機能は、音源モジュールのトリガー入力端子によって異なります。音源モジュールの各トリガー
入力端子とパッドの機能の対応につきましては、下記ウェブサイトにてご確認ください。
https://jp.yamaha.com/dtx/
RHH135からのトリガー出力の大きさの調整は、お使いになるDTXシリーズドラムトリガーモジュールのトリガー
セットアップ画面のゲイン設定で調整してください。
NOTE: RHH135をDTXシリーズドラムトリガーモジュールで使用する場合、ff(フォルティッシモ)で演奏する
とき、モジュールのトリガーセットアップ画面のゲイン設定で、入力レベル表示が 90〜95%になるよう
に調節します。詳しくはモジュールに付属の取扱説明書を参照してください。
出力が大きすぎると、ダイナミックレンジ ( 強弱の差 )が狭くなったり、ダブルトリガー (1回の打撃に対
し複数回音が出てしまう)などのトラブルが起きやすくなったりします。
接続のしかた
出力(LEVEL)調整
PAD HI-HAT CONTROL
(bottom_en_01)
(bottom_de_01)
(bottom_fr_01)
(bottom_pt_01)
The model number, serial number, power requirements, etc., may be found on or near the name
plate, which is at the bottom of the unit. You should note this serial number in the space provided
below and retain this manual as a permanent record of your purchase to aid identification in the
event of theft.
Model No.
Serial No.
Die Nummer des Modells, die Seriennummer, der Leistungsbedarf usw. sind auf dem Typenschild,
das sich auf der Unterseite des Geräts befindet, oder in der Nähe davon angegeben. Sie sollten
diese Seriennummer an der unten vorgesehenen Stelle eintragen und dieses Handbuch als dauer-
haften Beleg für Ihren Kauf aufbewahren, um im Fall eines Diebstahls die Identifikation zu erleich-
tern.
Modell Nr.
Seriennr.
Le numéro de modèle, le numéro de série, l'alimentation requise, etc., se trouvent sur ou près de la
plaque signalétique du produit, située dans la partie inférieure de l'unité. Notez le numéro de série
dans l'espace fourni ci-dessous et conservez ce manuel en tant que preuve permanente de votre
achat afin de faciliter l'identification du produit en cas de vol.
N° de modèle
N° de série
O número de modelo, número de série, requisitos de energia, etc. podem ser encontrados na placa
de nome, que está na parte inferior da unidade. Anote-o no espaço reservado abaixo e guarde este
manual como registro de compra permanente para auxiliar na identificação do produto em caso de
roubo.
N° do modelo
N° de série
RHH135 をご使用の際、次のようなトラブルが出たら、修理を依頼される前に、下記のような確認を行なってくだ
さい。
音が出ない、小さい
RHH135とDTXシリーズドラムトリガーモジュールが、付属のステレオフォーンケーブルで適切な入力端子に接
続されていますか? (上記「接続のしかた」参照)。モノラルフォーンケーブルを使用した場合、RHH135は動作
しません。
シンバルパッドのセンサーは、パッド表面のYAMAHAと書かれたロゴの辺りにあります。パッドの性能を十分に
出せるよう、セッティングするときはYAMAHAのロゴの辺りを叩けるように向きを調節してください。
1回の打撃に対し複数回音が出る(ダブルトリガー )
DTXシリーズドラムトリガーモジュールでリジェクションの設定をしてください(詳しくはモジュールに付属の取
扱説明書を参照してください)。
ハイハットスタンドのペダルを強く踏まないと、ハイハットをクローズできない
スタンドベースの下にフェルトが入ったままになっていませんか?スタンドベースはハイハットスタンドのフェ
ルトを取り外した後に装着してください(「セッティングのしかた」参照)。
上記トラブルや、その他のトラブルについては、DTXシリーズドラムトリガーモジュールに付属の取扱説明書も参照
してください。それでもトラブルが解消されない場合は、お買い上げ店または本取扱説明書巻末に記載のお客様相談
窓口へご相談ください。
困ったときは
電子ドラムパッド
RHH135
JA
取扱説明書
[持込修理]
●保証期間経過後の修理
修理が可能な場合は、ご希望により有料にて修理させ
ていただきます。
有寿命部品については、使用時間や使用環境などによ
り劣化しやすいため、消耗劣化に応じて部品の交換が
必要となります。有寿命部品の交換は、お買い上げの
販売店、または修理ご相談センターにご相談ください。
●補修用性能部品の最低保有期間
製品の機能を維持するために必要な部品の最低保有期
間は、製造終了後 8 年です。
●修理のご依頼
本製品に異常が見られた場合は、まず本書の「困った
ときは」をよくお読みのうえ、本製品の状態をお調べ
ください。それでも改善しないときは、お買い上げの
販売店、または修理ご相談センターにご連絡ください。
●製品の状態は詳しく
修理をご依頼いただくときは、製品名、品番などとあ
わせて、故障の状態をできるだけ詳しくお知らせくだ
さい。
保証書
製品名 電子ドラムパッド 品番 RHH135 製造番号
お買い上げ日 年 月 日
保証期間 ( お買い上げ日から )本体 :6か月
販売店名
保証規定
保証期間中、正常なご使用状態のもとで万一発生した故障につきましては、本保証規定に基づき無料修理いたします。
■保証期間中でも以下の場合は有料となります。
• 購入を証明する書類 ( 領収書や納品書など、製品名、
品番、お買い上げ日、販売店名が記載されたもの ) の
ご提示がない場合
• 納品後、輸送や修理時の取り扱いが適当でないため
に生じた故障の場合
• 提供されている各説明書や本規定に記載の注意事項
に反する取り扱いによって発生した故障の場合
• 故障の原因が本製品以外の機器にある場合
• 塗装面および金属面が経年変化により退色、変色し
た場合
• 弊社認定の修理サービス技術者以外の者が修理 / 改
造した部分で、その修理 / 改造が不適当であった場
合
• 火災、地震、水害、落雷、その他の天災および公害
や電圧異状による故障の場合
• 鼠害、塩害などによる故障、損傷の場合
• 持込修理対象の品番でお客様のご要望により出張修
理を行う場合の出張料金
■転居・譲渡などを伴う場合、その他注意事項
• 転居、ご贈答品などで、お買い上げの販売店に修理
をご依頼できない場合には、修理ご相談センターに
ご相談ください。
• 離島および離島に準ずる遠隔地への出張修理を行う
場合の交通費は実費を申し受けます。
• 保証期間内に、本製品を他人に譲渡あるいは転売さ
れた場合でも、残存期間は保証いたします。
• 本保証内容は、日本国内においてのみ有効です。
(ThiswarrantyisvalidonlywithinJapan.)
この保証内容は本書に明示した期間、条件のもとにおいて無料修理をお約束するものです。本規定によってお客様
の法律上の権利を制限するものではありませんので、保証期間経過後の修理などについてご不明の場合は、お買い
上げの販売店、または修理ご相談センターにお問い合わせください。
有寿命部品の例 :ボリュームコントロール、スイッチ、
ランプ、リレー類、接続端子、鍵盤機構部品、鍵盤接
点、ドラムパッドなど
販売元: LM事業戦略部
〒 220-0012 神奈川県横浜市西区みなとみらい 5 丁目 1 番 2 号横浜シンフォステージ ウエストタワー
*名称、住所は変更になる場合があります。
Drums Limited Warranty
LIMITED WARRANTY ON YAMAHA DRUMS, HARDWARE AND ACCESSORY PRODUCTS
Thank you for selecting a YAMAHA product. YAMAHA products are designed and manufactured to provide a high level of defect-free
performance. Yamaha Corporation of America (“YAMAHA”) is proud of the experience and craftsmanship that goes into each and every
YAMAHA product. YAMAHA sells its products through a network of reputable, specially authorized dealers and is pleased to offer you, the
Original Owner, the following Limited Warranty, which applies only to products that have been (1) directly purchased from YAMAHA’s authorized
dealers in the fifty states of the USA and District of Columbia (the “Warranted Area”) and (2) used exclusively in the Warranted Area. YAMAHA
suggests that you read the Limited Warranty thoroughly, and invites you to contact your authorized YAMAHA dealer or YAMAHA Customer
Service if you have any questions.
THIS WARRANTY COVERS THE LISTED PRODUCTS AGAINST DEFECTS IN MATERIALS OR WORKMANSHIP.
Warranty Term
Duration of Warranty from Date of
Type of Product Purchase by or for the Original Owner
Acoustic Drum Shells, Finish, Drum Hardware, Freestanding Hardware, Pedals, Hardware Accessories 5 Years
Electronic Drums Modules, Pads, Accessories, Hardware, Pedals 1 Year
Coverage: YAMAHA will, at its option, repair or replace the product covered by this warranty if it becomes defective, malfunctions or otherwise
fails to conform with this warranty under normal use and service during the term of this warranty, without charge for labor or materials. Repairs
may be performed using new or refurbished parts that meet or exceed YAMAHA specifications for new parts. If YAMAHA elects to replace the
product, the replacement may be a reconditioned unit. You will be responsible for any installation or removal charges and for any initial shipping
charges if the product(s) must be shipped for warranty service. However, YAMAHA will pay the return shipping charges to any destination
within the USA if the repairs are covered by the warranty. This warranty does not cover (a) damage, deterioration or malfunction resulting from
accident, negligence, misuse, abuse, improper installation or operation or failure to follow instructions according to the Owner’s Manual for this
product; any shipment of the product (claims must be presented to the carrier); repair or attempted repair by anyone other than YAMAHA or an
authorized YAMAHA Service Center; (b) any unit which has been altered or on which the serial number has been defaced, modified or removed;
(c) normal wear and any periodic maintenance; (d) deterioration due to perspiration, corrosive atmosphere or other external causes such as
extremes in temperature or humidity; (e) damages attributable to power line surge or related electrical abnormalities, lightning damage or acts
of God; or (f) RFI/EMI (Interference/noise) caused by improper grounding or the improper use of either certified or uncertified equipment, if
applicable. Any evidence of alteration, erasing or forgery of proof-of-purchase documents will cause this warranty to be void. This warranty
covers only the Original Owner and is not transferable.
In Order to Obtain Warranty Service: Warranty service will only be provided for defective products within the Warranted Area. Contact your
local authorized YAMAHA dealer who will advise you of the procedures to be followed. If this is not successful, contact YAMAHA at the address,
telephone number or website shown below. YAMAHA may request that you send the defective product to a local authorized YAMAHA Servicer or
authorize return of the defective product to YAMAHA for repair. If you are uncertain as to whether a dealer has been authorized by YAMAHA,
please contact YAMAHA’s Service Department at the number shown below, or check Yamaha’s website at https://usa.yamaha.com. Product(s)
shipped for service should be packed securely and must be accompanied by a detailed explanation of the problem(s) requiring service, together
with the original or a machine reproduction of the bill of sale or other dated, proof-of-purchase document describing the product, as evidence of
warranty coverage. Should any product submitted for warranty service be found ineligible therefore, an estimate of repair cost will be furnished
and the repair will be accomplished only if requested by you and upon receipt of payment or acceptable arrangement for payment.
Limitation of Implied Warranties and Exclusion of Damages: ANY IMPLIED WARRANTIES, INCLUDING WARRANTIES OF
MERCHANTABILITY AND FITNESS FOR A PARTICULAR PURPOSE SHALL BE LIMITED IN DURATION TO THE APPLICABLE PERIOD OF TIME
SET FORTH ABOVE. YAMAHA SHALL NOT BE RESPONSIBLE FOR INCIDENTAL OR CONSEQUENTIAL DAMAGES OR FOR DAMAGES BASED
UPON INCONVENIENCE, LOSS OF USE, DAMAGE TO ANY OTHER EQUIPMENT OR OTHER ITEMS AT THE SITE OF USE OR INTERRUPTION OF
PERFORMANCES OR ANY CONSEQUENCES. YAMAHA’S LIABILITY FOR ANY DEFECTIVE PRODUCT IS LIMITED TO REPAIR OR
REPLACEMENT OF THE PRODUCT, AT YAMAHA’S OPTION. SOME STATES DO NOT ALLOW LIMITATIONS ON HOW LONG AN IMPLIED
WARRANTY LASTS OR THE EXCLUSION OR LIMITATION OF INCIDENTAL OR CONSEQUENTIAL DAMAGES, SO THE ABOVE LIMITATION OR
EXCLUSION MAY NOT APPLY TO YOU. This Warranty gives you specific legal rights, and you may also have other rights which vary from state
to state. This is the only express warranty applicable to the product specified herein; Yamaha neither assumes nor authorizes anyone to assume
for it any other express warranty.
If you have any questions about service received or if you need assistance in locating an authorized YAMAHA Servicer, please contact:
CUSTOMER SERVICE
Yamaha Corporation of America
6600 Orangethorpe Avenue, Buena Park, California 90620-1373
Telephone: 800-854-1569 • https://usa.yamaha.com
Do not return any product to the above address without a written Return Authorization issued by YAMAHA.
(weee_eu_en_02)
(weee_eu_de_02)
Information for users on collection and disposal of old equipment:
This symbol on the products, packaging, and/or accompanying documents means that used electrical
and electronic products should not be mixed with general household waste.
For proper treatment, recovery and recycling of old products, please take them to applicable collec-
tion points, in accordance with your national legislation.
By disposing of these products correctly, you will help to save valuable resources and prevent any
potential negative effects on human health and the environment which could otherwise arise from
inappropriate waste handling.
For more information about collection and recycling of old products, please contact your local munici-
pality, your waste disposal service or the point of sale where you purchased the items.
For business users in the European Union:
If you wish to discard electrical and electronic equipment, please contact your dealer or supplier for
further information.
Information on Disposal in other Countries outside the European Union:
This symbol is only valid in the European Union. If you wish to discard these items, please contact
your local authorities or dealer and ask for the correct method of disposal.
Verbraucherinformation zur Sammlung und Entsorgung alter Elektrogeräte
Befindet sich dieses Symbol auf den Produkten, der Verpackung und/oder beiliegenden Unterlagen,
so sollten benutzte elektrische Geräte nicht mit dem normalen Haushaltsabfall entsorgt werden.
In Übereinstimmung mit Ihren nationalen Bestimmungen bringen Sie alte Geräte bitte zur fachge-
rechten Entsorgung, Wiederaufbereitung und Wiederverwendung zu den entsprechenden Sammel-
stellen.
Durch die fachgerechte Entsorgung der Elektrogeräte helfen Sie, wertvolle Ressourcen zu schützen,
und verhindern mögliche negative Auswirkungen auf die menschliche Gesundheit und die Umwelt,
die andernfalls durch unsachgerechte Müllentsorgung auftreten könnten.
Für weitere Informationen zum Sammeln und Wiederaufbereiten alter Elektrogeräte kontaktieren Sie
bitte Ihre örtliche Stadt- oder Gemeindeverwaltung, Ihren Abfallentsorgungsdienst oder die Verkaufs-
stelle der Artikel.
Information für geschäftliche Anwender in der Europäischen Union:
Wenn Sie Elektrogeräte ausrangieren möchten, kontaktieren Sie bitte Ihren Händler oder Zulieferer
für weitere Informationen.
Entsorgungsinformation für Länder außerhalb der Europäischen Union:
Dieses Symbol gilt nur innerhalb der Europäischen Union. Wenn Sie solche Artikel ausrangieren
möchten, kontaktieren Sie bitte Ihre örtlichen Behörden oder Ihren Händler und fragen Sie nach der
sachgerechten Entsorgungsmethode.
サービスのご依頼やお問い合わせは、お買い上げの販売店、またはこの取扱説明書(以下本書)に記載の修理ご相談
センターにご連絡ください。
本書は、保証書の役割を兼ねています。購入を証明する書類(領収書や納品書など、製品名、品番、お買い上げ日、
販売店名が記載されたもの)とあわせて、大切に保管してください。保証期間内に万一本製品が故障した場合には、
購入を証明する書類をご提示のうえ、お買い上げの販売店にご依頼ください。保証規定に基づいて無料修理を行うこ
とをお約束します。
修理に関するお問い合わせ
お買い上げの販売店または下記の修理ご相談センターへご連絡ください。
※修理をご依頼いただくときは、製品名、品番などとあわせて、故障の状態をできるだけ詳しくお知らせください。
製品の仕様や取り扱いに関するお問い合わせ
お買い上げの販売店または下記のお客様コミュニケーションセンターへご連絡ください。
◆お客様コミュニケーションセンターギタードラムご相談窓口
製品登録のご案内
ヤマハミュージックメンバーズでは、お客様がお持ちのヤマハ製品をより長くご愛用いただくために、製品登録をお
すすめしています。
ご登録いただくことで、お客様に合う製品やキャンペーン、イベントなどの情報をWebサイトやメールニュースで
お届けします。
https://4wrd.it/MEMBER-JP
〒430-8650静岡県浜松市中央区中沢町10-1
*都合により、住所、電話番号、名称、営業時間などが変更になる場合がございますので、あらかじめご了承ください。
保証とアフターサービス
◆修理ご相談センター
0120-149-808
050-3852-4106
受付 月曜日〜金曜日10:00〜17:00
(祝日、センター指定休日を除く)
FAX
●東日本(北海道/東北/関東/甲信越/東海):03-5762-2125
●西日本(北陸/近畿/中国/四国/九州/沖縄):06-6649-9340
◆ 修理品お持込み窓口
受付 月曜日〜金曜日10:00〜17:00
(祝日、センター指定休日を除く)
※お電話は、修理ご相談センターでお受けします。
●東日本サービスセンター
〒143-0006東京都大田区平和島2丁目1-1JMT京浜E棟A-5F
FAX 03-5762-2125
●西日本サービスセンター
〒556-0011大阪市浪速区難波中1丁目13-17ナンバ辻本ビル7F
FAX 06-6649-9340
0120-143-808
050-3852-4093
受付 月曜日〜金曜日10:00〜17:00(祝日、センター指定休日を除く)
ヤマハサポート・お問い合わせ
https://jp.yamaha.com/support/
ヤマハ楽器音響製品お客様サポート
LINE公式アカウント
ヤマハ電子ドラムサイト
https://jp.yamaha.com/dtx/
フリーダイヤル
携帯電話、
IP電話からは
フリーダイヤル
携帯電話、
IP電話からは
(weee_eu_fr_02)
(weee_eu_pt_02a)
Informations concernant la collecte et le traitement des
déchets d’équipements électriques et électroniques
Le symbole sur les produits, l'emballage et/ou les documents joints signifie que les produits électriques
ou électroniques usagés ne doivent pas être mélangés avec les déchets domestiques habituels.
Pour un traitement, une récupération et un recyclage appropriés des déchets d’équipements élec-
triques et électroniques, veuillez les déposer aux points de collecte prévus à cet effet, conformément à
la réglementation nationale.
En vous débarrassant correctement des déchets d’équipements électriques et électroniques, vous
contribuerez à la sauvegarde de précieuses ressources et à la prévention de potentiels effets négatifs
sur la santé humaine qui pourraient advenir lors d'un traitement inapproprié des déchets.
Pour plus d'informations à propos de la collecte et du recyclage des déchets d’équipements élec-
triques et électroniques, veuillez contacter votre municipalité, votre service de traitement des déchets
ou le point de vente où vous avez acheté les produits.
Pour les professionnels dans l'Union européenne :
Si vous souhaitez vous débarrasser des déchets d’équipements électriques et électroniques, veuillez
contacter votre vendeur ou fournisseur pour plus d'informations.
Informations sur la mise au rebut dans d'autres pays en dehors de l'Union européenne :
Ce symbole est seulement valable dans l'Union européenne. Si vous souhaitez vous débarrasser de
déchets d’équipements électriques et électroniques, veuillez contacter les autorités locales ou votre
fournisseur et demander la méthode de traitement appropriée.
Informações para os utilizadores relativas à recolha e eliminação de equipamentos usados
Este símbolo, presente em produtos, embalagens e/ou incluído na documentação associada, indica
que os produtos elétricos e eletrónicos usados não devem ser eliminados juntamente com os resí-
duos domésticos em geral.
O procedimento correto consiste no tratamento, recuperação e reciclagem de produtos usados, pelo
que deve proceder à respetiva entrega nos pontos de recolha adequados, em conformidade com a
legislação nacional em vigor.
A eliminação destes produtos de forma adequada permite poupar recursos valiosos e evitar poten-
ciais efeitos prejudiciais para a saúde pública e para o ambiente, associados ao processamento
incorreto dos resíduos.
Para mais informações relativas à recolha e reciclagem de produtos usados, contacte as autoridades
locais, o serviço de eliminação de resíduos ou o ponto de venda onde foram adquiridos os itens rele-
vantes.
Informações para utilizadores empresariais na União Europeia:
Para proceder à eliminação de equipamento elétrico e eletrónico, contacte o seu revendedor ou for-
necedor para obter informações adicionais.
Informações relativas à eliminação em países não pertencentes à União Europeia:
Este símbolo é válido exclusivamente na União Europeia. Caso pretenda eliminar este tipo de itens,
contacte as autoridades locais ou o seu revendedor e informe-se acerca do procedimento correto
para proceder à respetiva eliminação.
Важное примечание: Информация об условиях Гарантии для Клиентов в Российской
Федерации [Русский]
Для получения подробной информации об условиях Гарантии на продукцию Yamaha в России, условиях
гарантийного обслуживания, пожалуйста, посетите веб-сайт по адресу ниже (на сайте доступен файл с
условиями для скачивания и печати) или обратитесь в офис представительства Yamaha в России.
https://ru.yamaha.com/ru/support/