
ENGLISH
6-String Electric Guitar Kit
with Accessory Kit
SCAN ME
PyleUSA.com
Visit Our Website
Please take a few moments to read through this manual. It will provide you with answers to many of your
questions as well as inform you about the care and maintenance of your new instrument
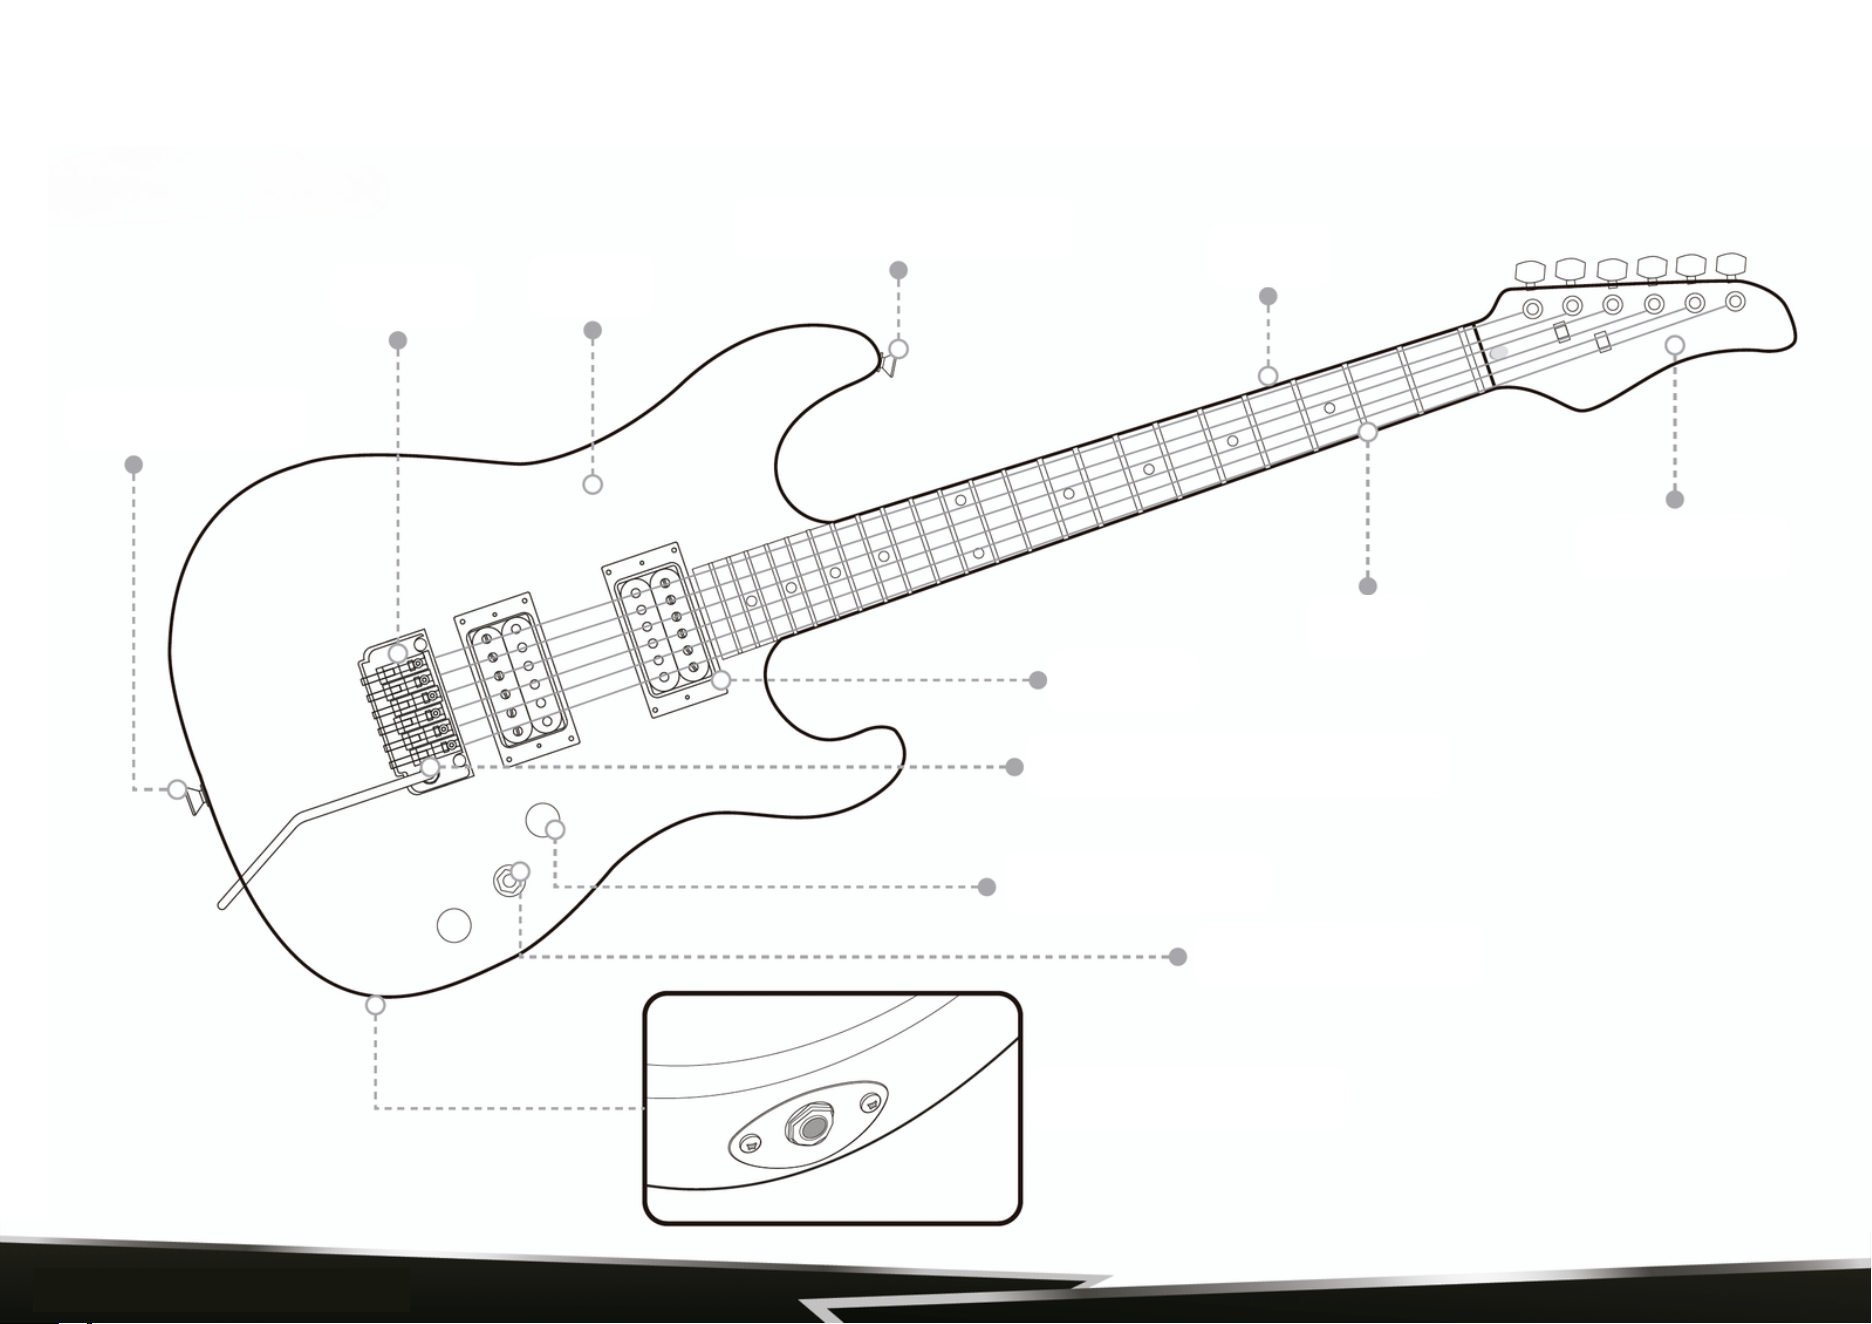
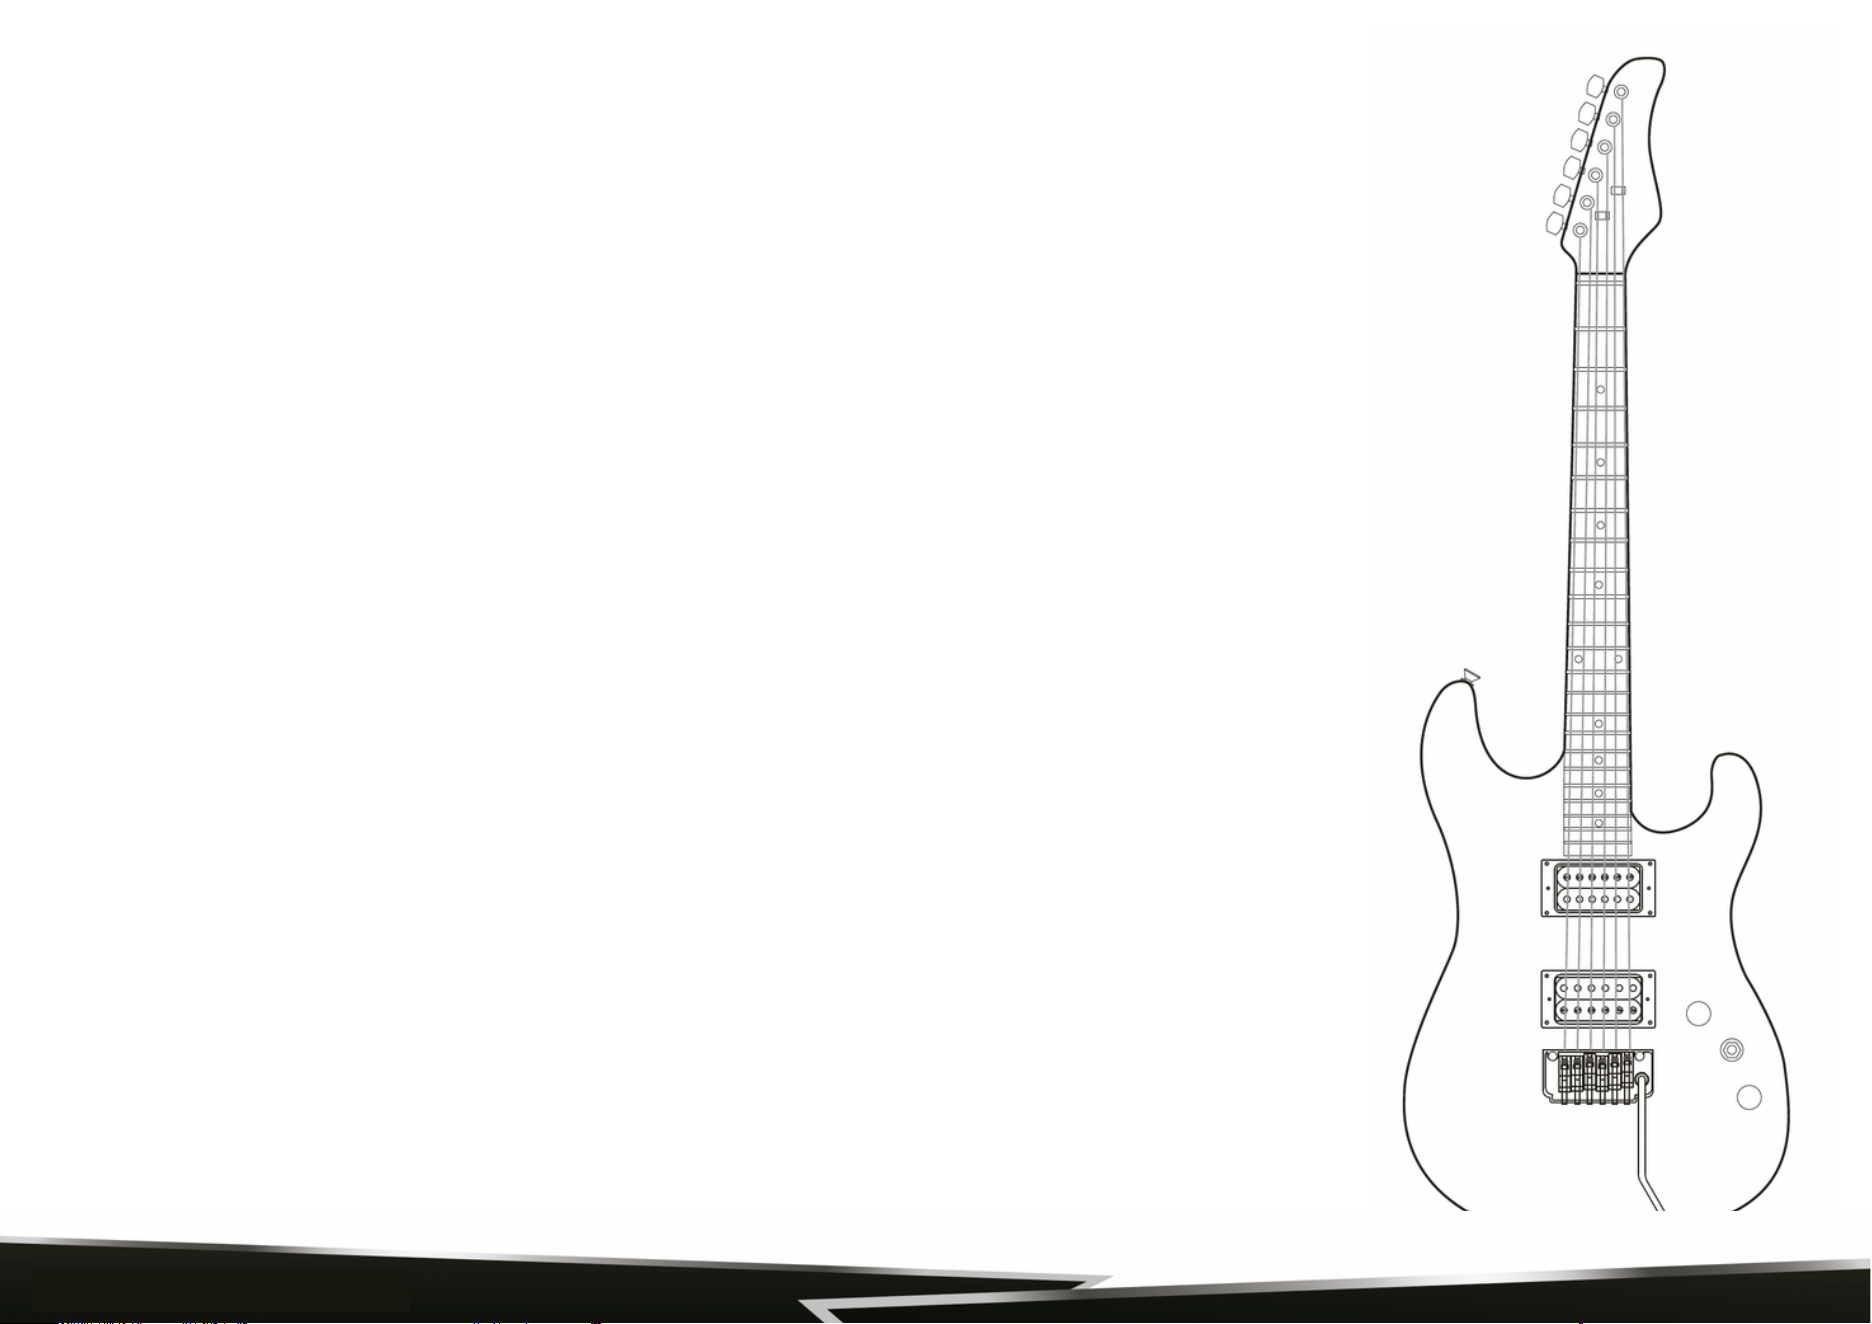
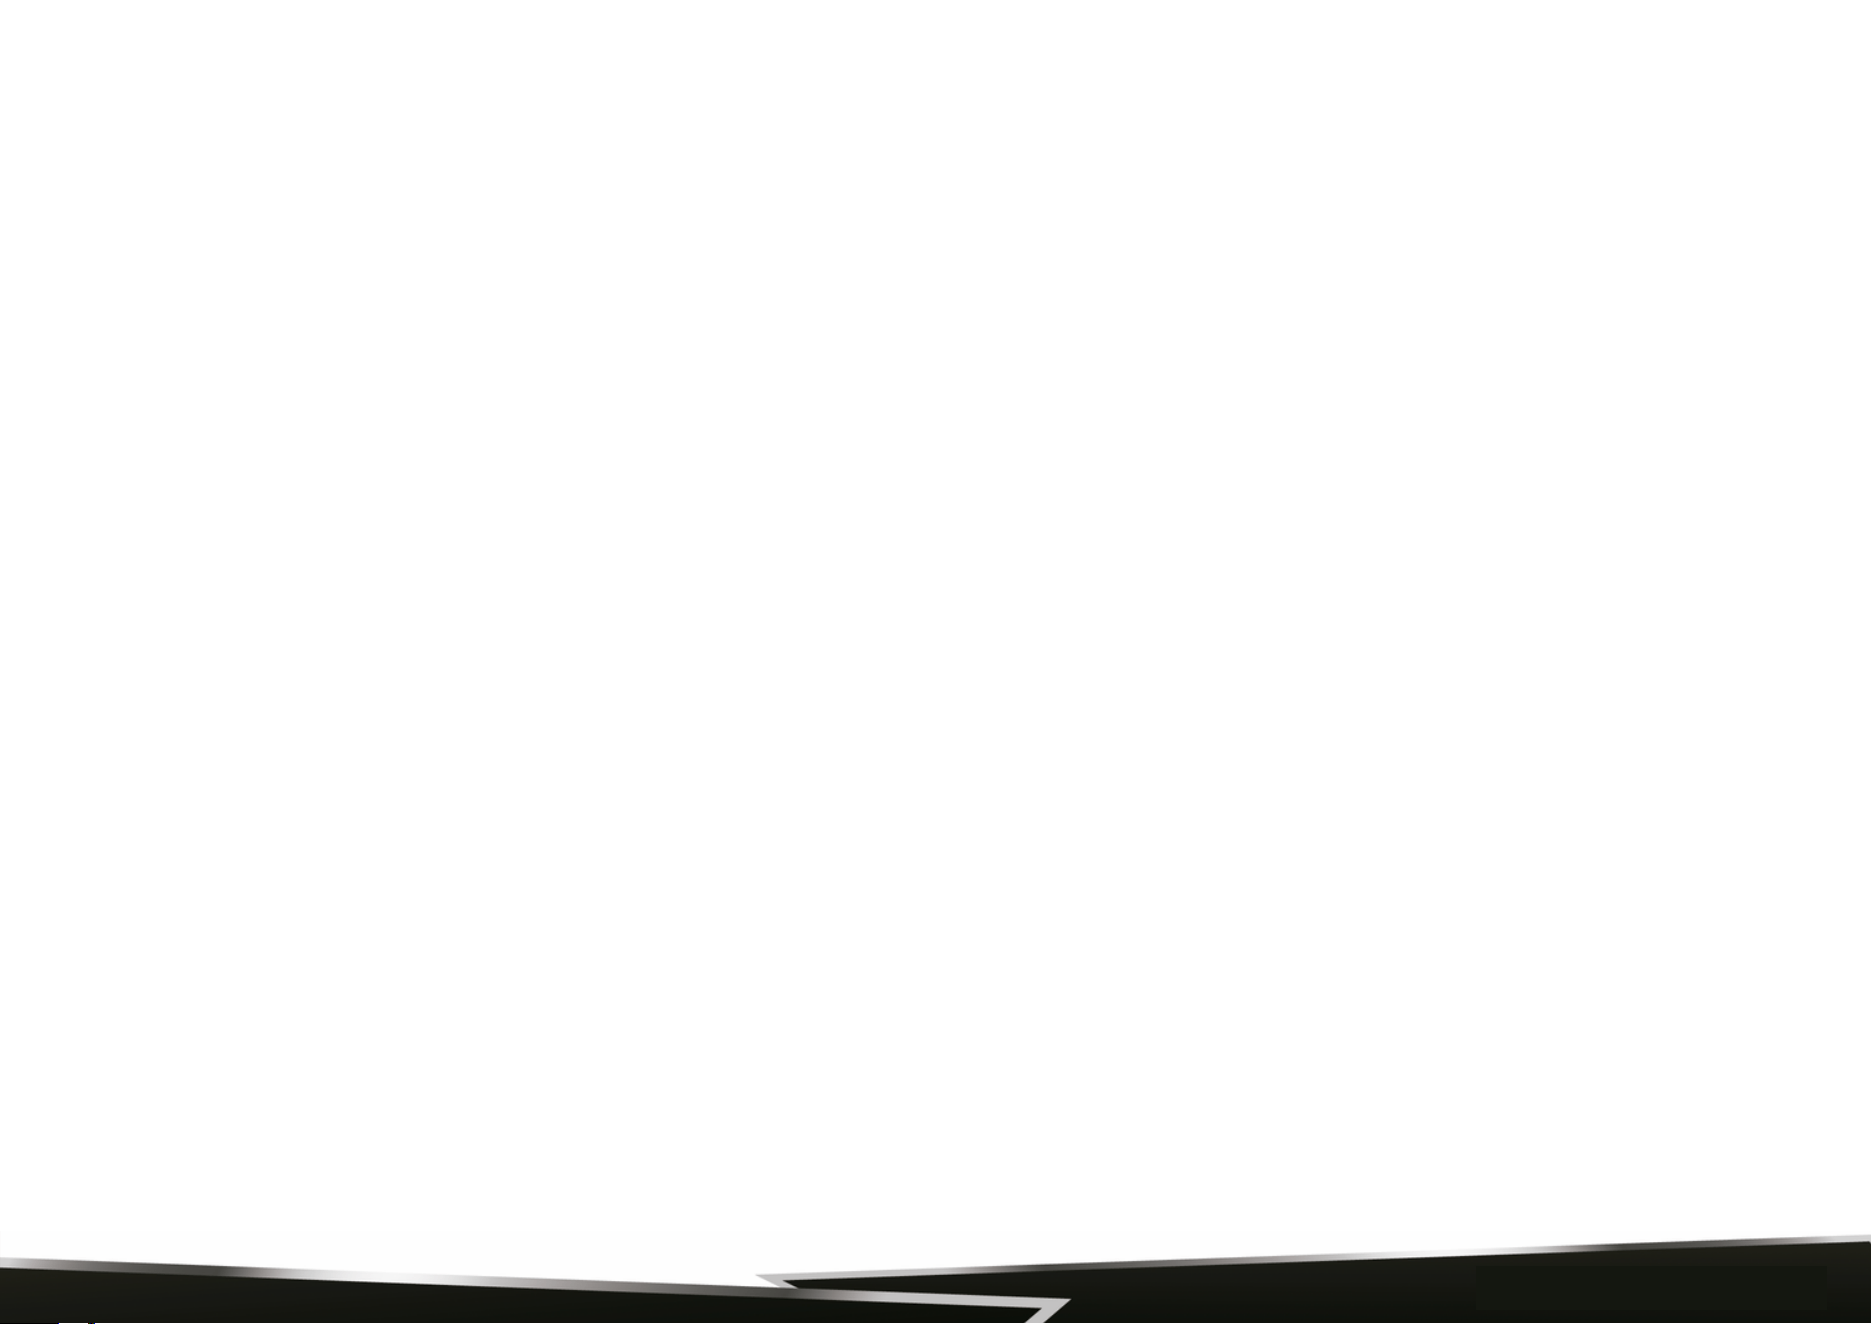
GUITAR ANATOMY
Bridge
Body
Front Strap button
Neck
Strap button
Input Jack socket
Control knobs
Pickup
Frets
Headstock
www.PyleUSA.com
2
Pickup Selector
Vibrato or Tremulo Arm

www.PyleUSA.com
3
Tune your instrument using the tuning keys to raise or lower the pitch.
On a guitar with a locking tremolo system, you must first loosen the locking nut before you can adjust the tuning
with the tuning machines. Although locking tremolo systems have fine tuners located on the bridge, they only allow
limited (fine) tuning. Counter-clockwise rotation of the tuning keys will raise the pitch of the string while clockwise
rotation will lower the pitch of the string you are tuning. Tune your guitar starting with the lowest to highest strings.
After you have done this once, go back and double-check the tuning again. On some instruments you will have to
do this a few times, especially if the strings are new or you have a guitar with a floating tremolo bridge. Tuning one
string may affect the other strings and it is necessary to recheck the tuning until all strings are staying at the desired
pitch.
Note: New strings tend to stretch and detune until they settle. It is a good idea to stretch the strings when you have
just put on a new set. Do this after the initial tuning by bending notes and physically stretching each string by pulling
away from the fingerboard (be careful no to pull too hard as you may break a string that way). After thoroughly
stretching thestrings repeat the tuning process.
CLEANING
Cleaning your guitar regularly is one of the best ways to maintain the finish and prolong string life. Clean your guitar
after each use, making sure to wipe the fingerboard and strings as well as any of the plated parts such as tuners,
pickups,bridge etc. Make sure to remove all perspiration, as it can lead to corrosion and rusting in metal hardware and
strings.
TUNING YOUR GUITAR
We strongly recommend that you change your strings fairly often. If you play daily, we recommend that you change
your strings every 3 months. A new set of strings will sound clear and precise, while an old set will sound dull and can
produce unusual buzzing and dead notes. If you notice that your strings have become dirty, discolored, or produce an
unusual buzzing or dull sound, then it is definitely time to put a new set of strings on your guitar.
Always check your new strings and make sure they are smooth and free of
defects before installing them. If there are any irregularities, such as kinks,
twists, or any other manufacturing defects, they will cause buzzing and
untrue notes as well as sound distortion. We recommend replacing one
string at a time, so that all the tension is not taken off of the neck. This will
make it easier to re-tune and setup the neck.
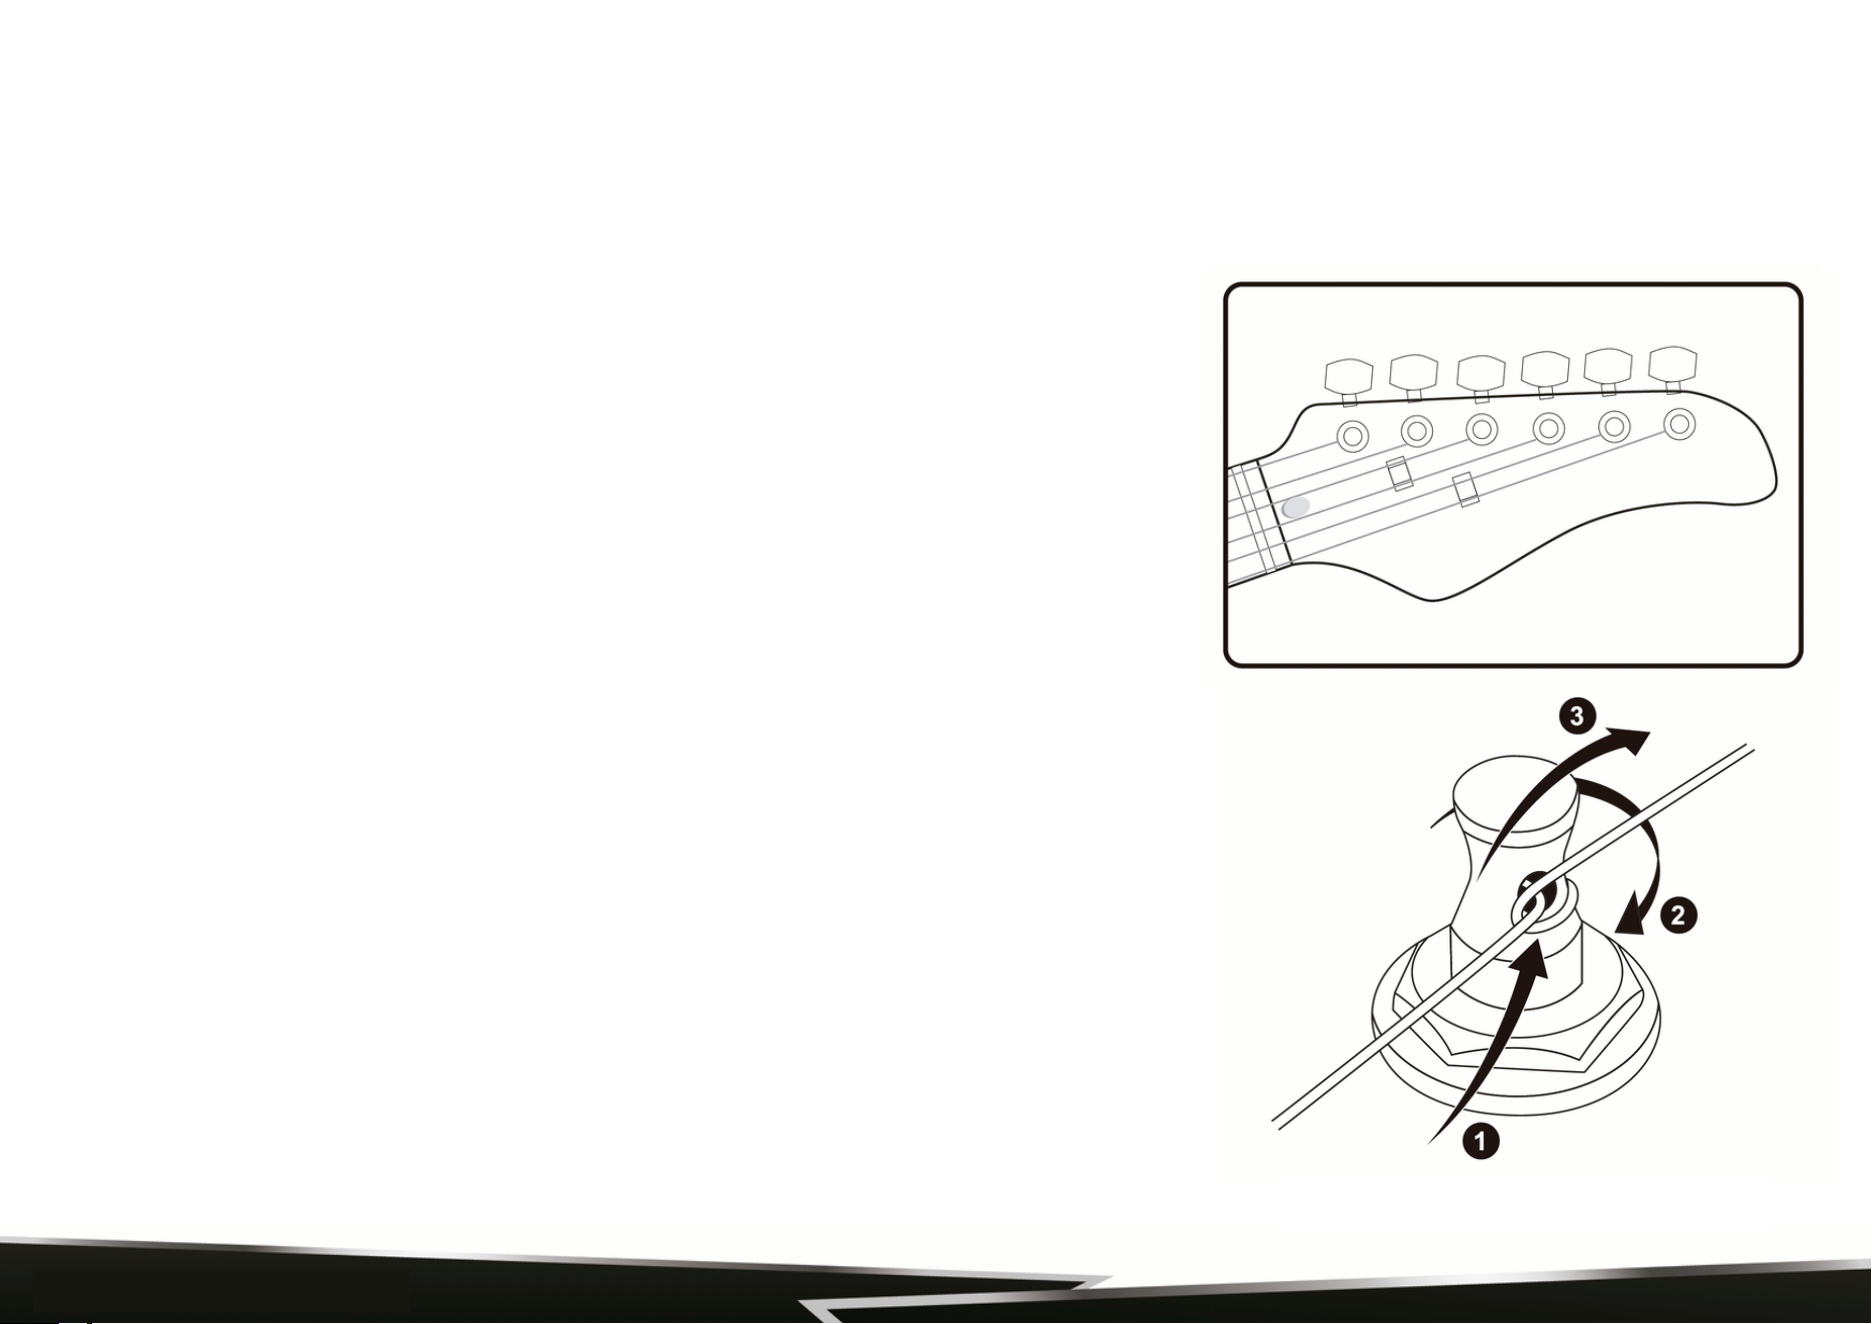
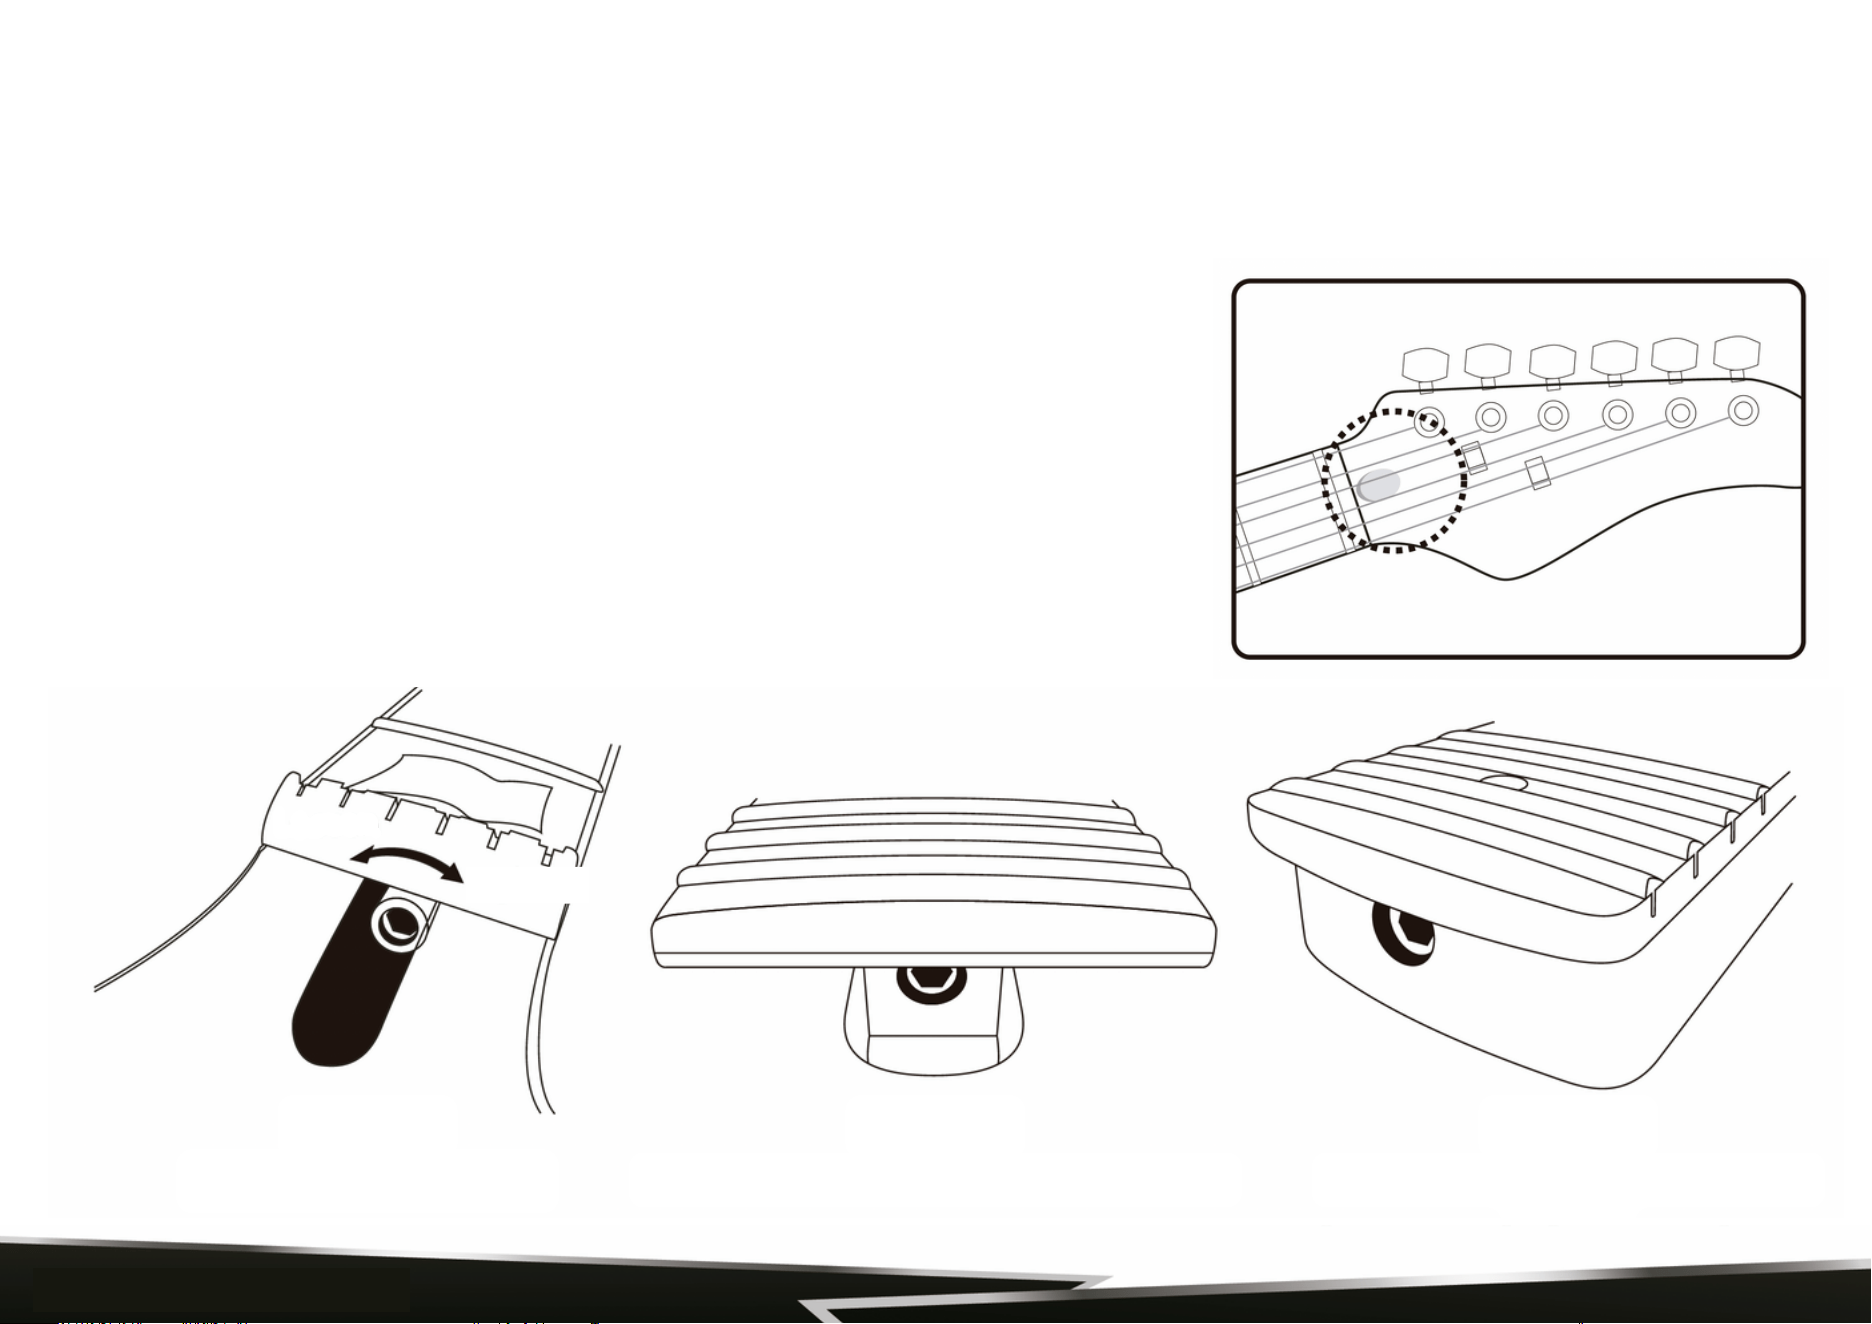
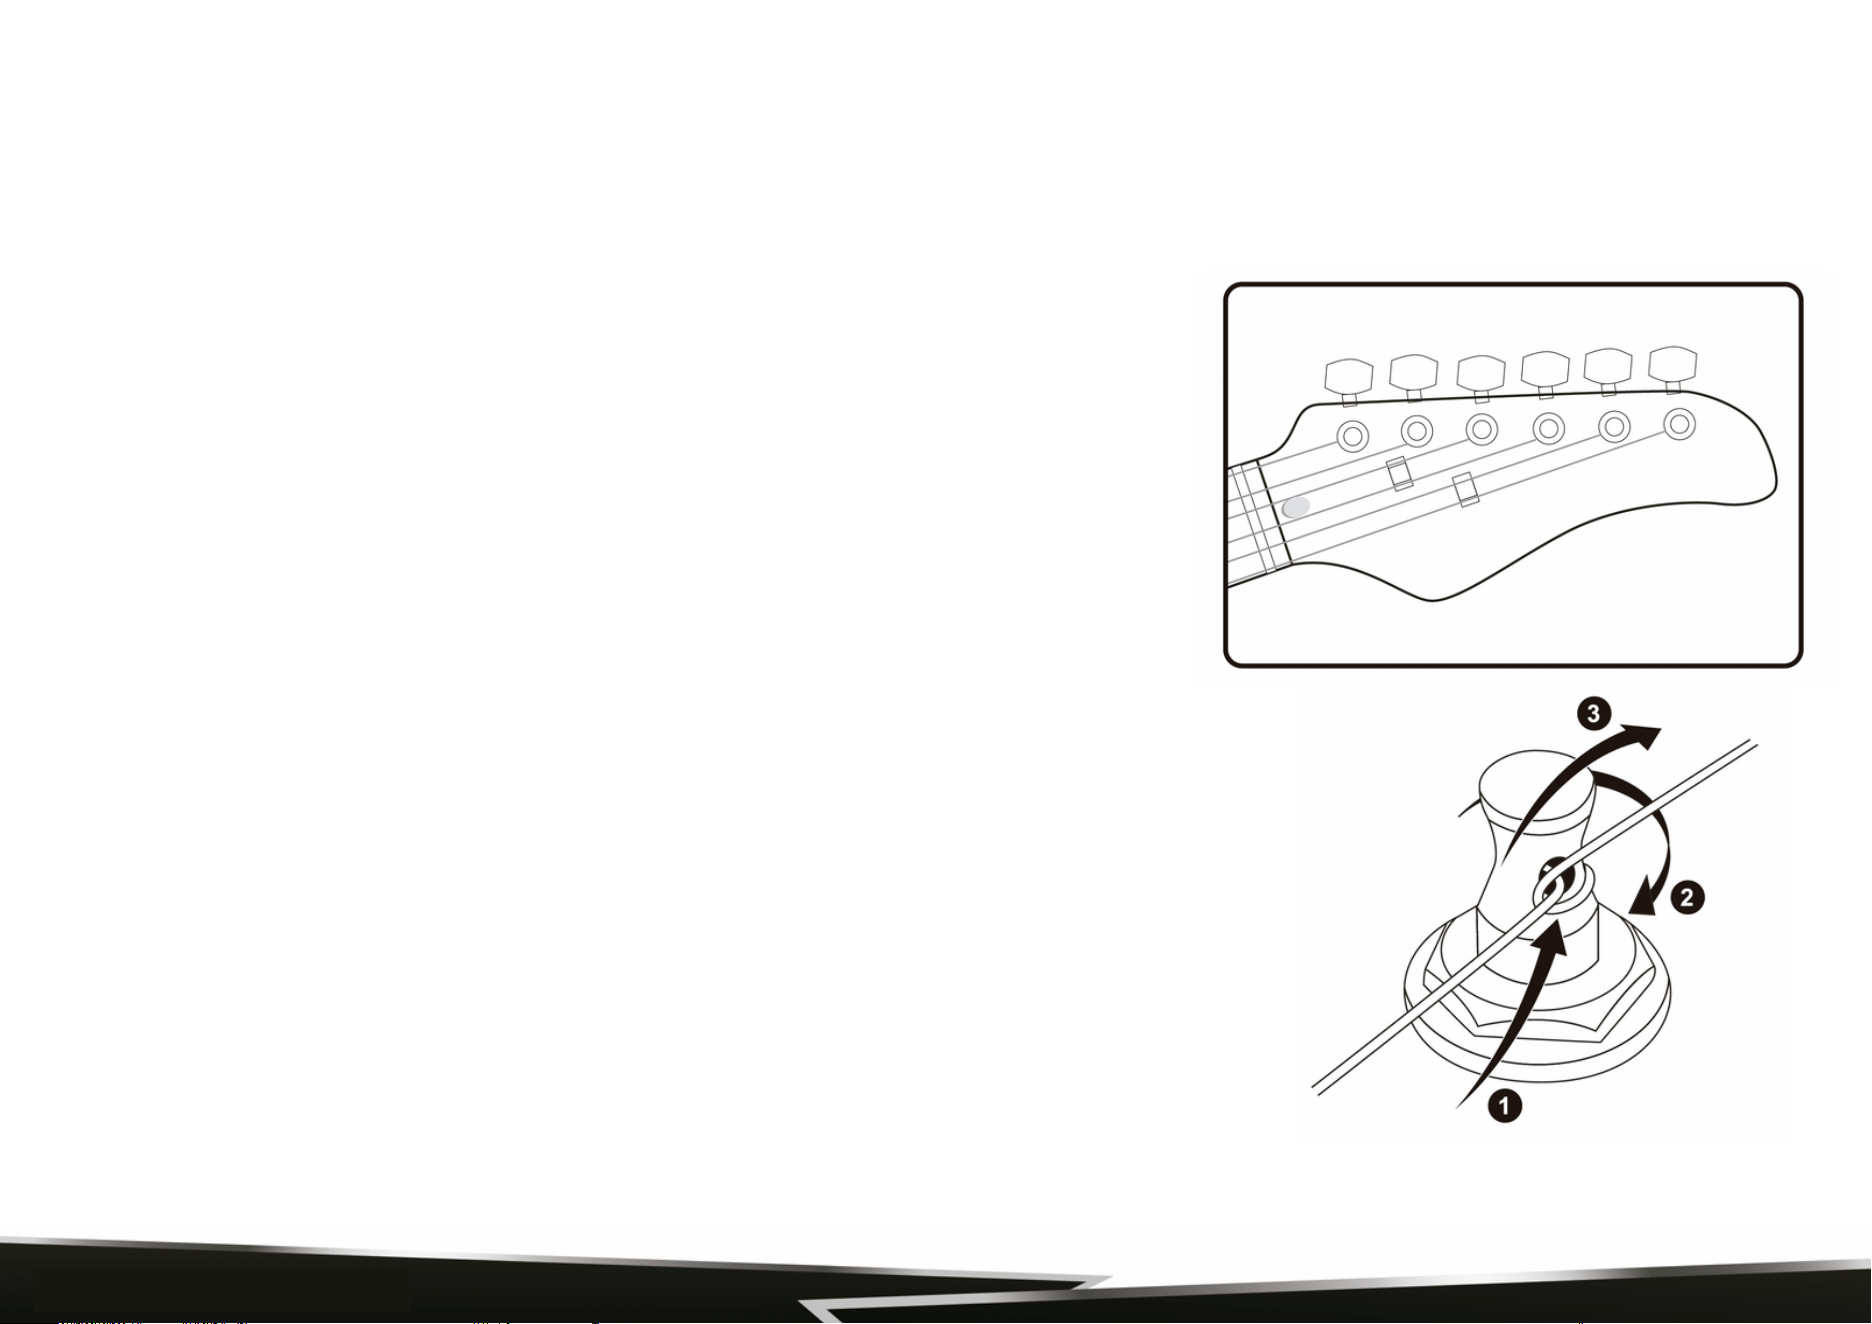
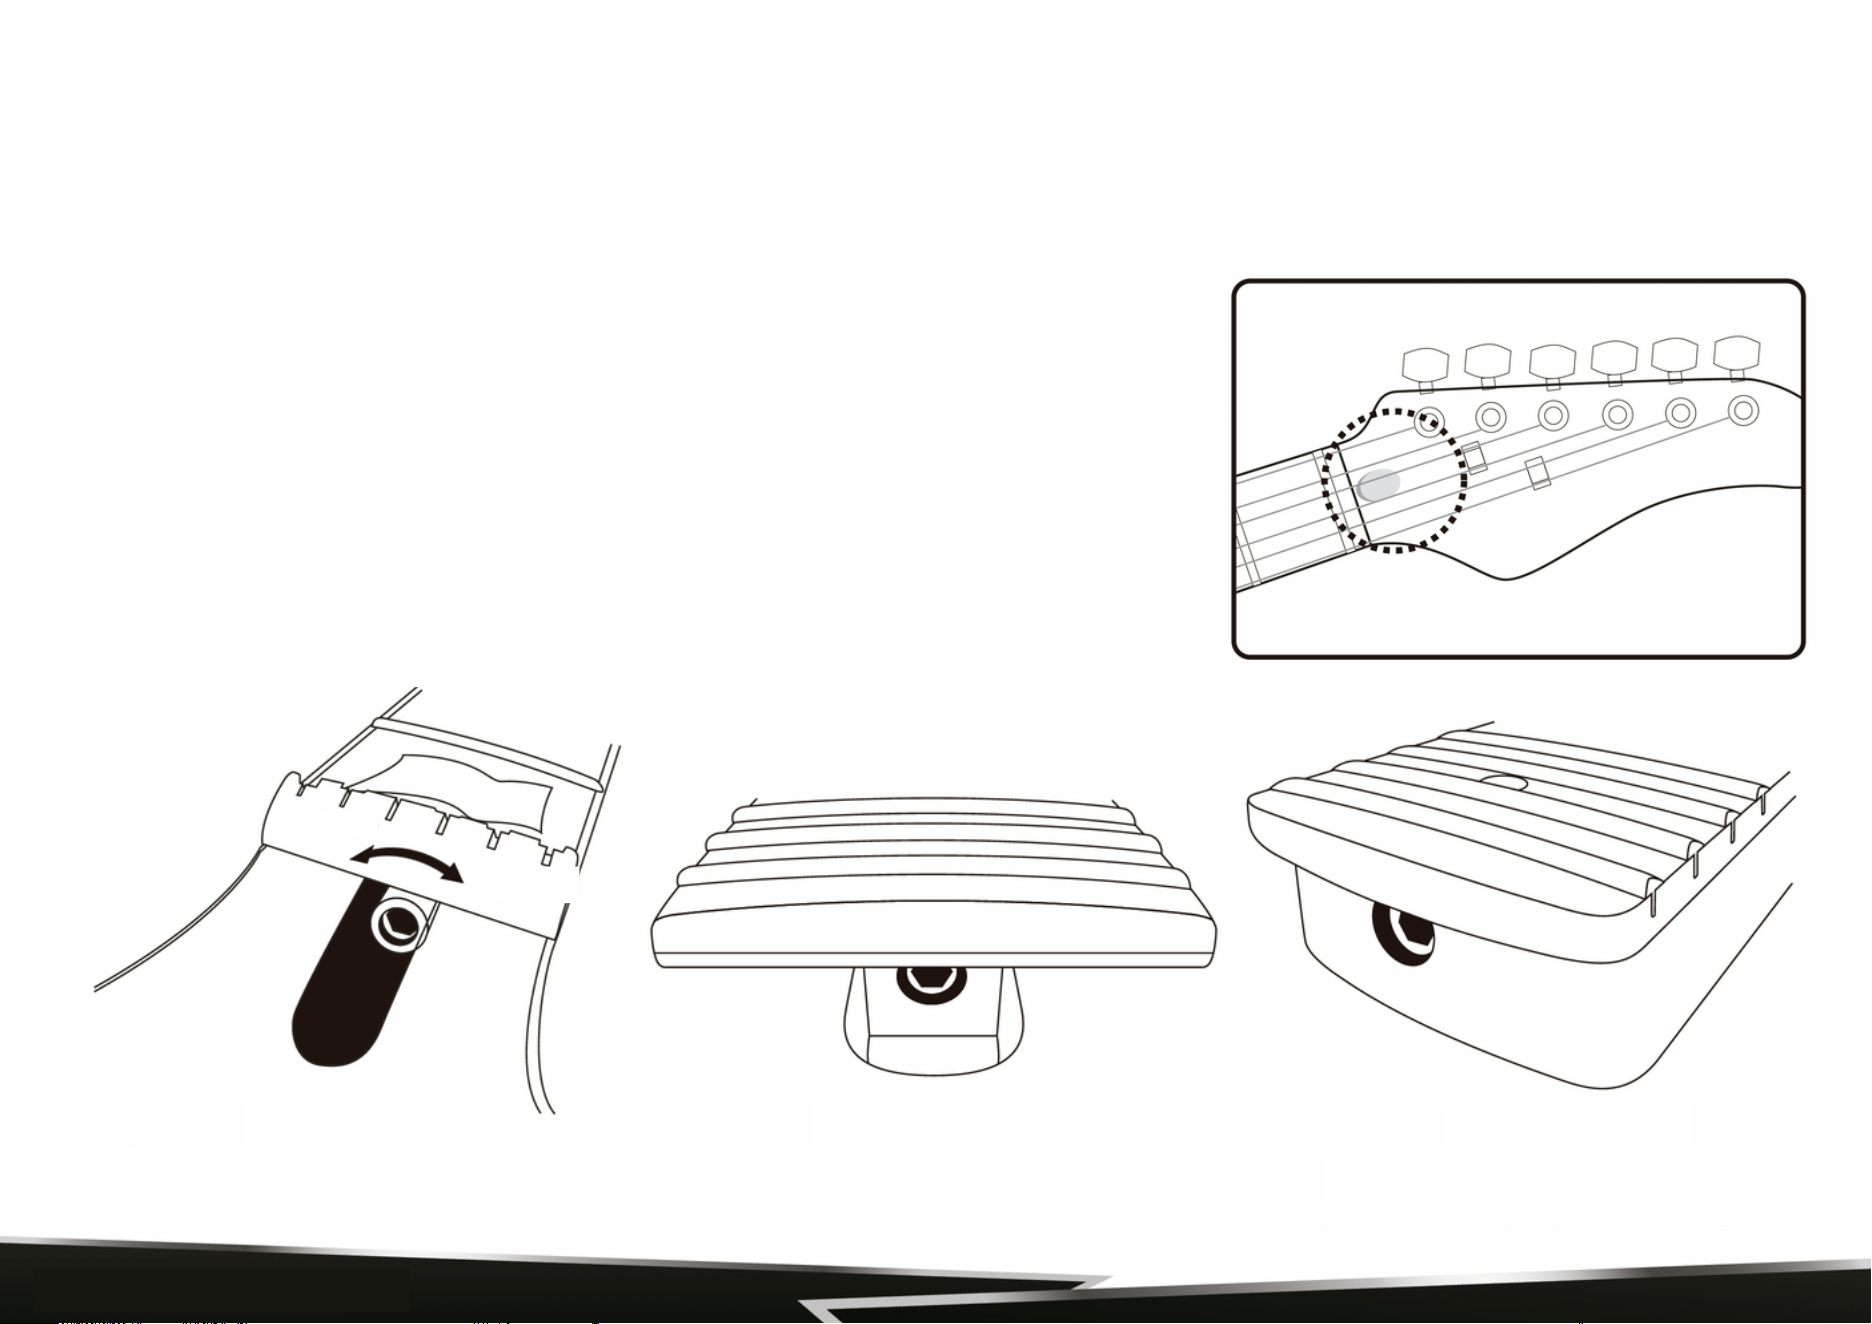
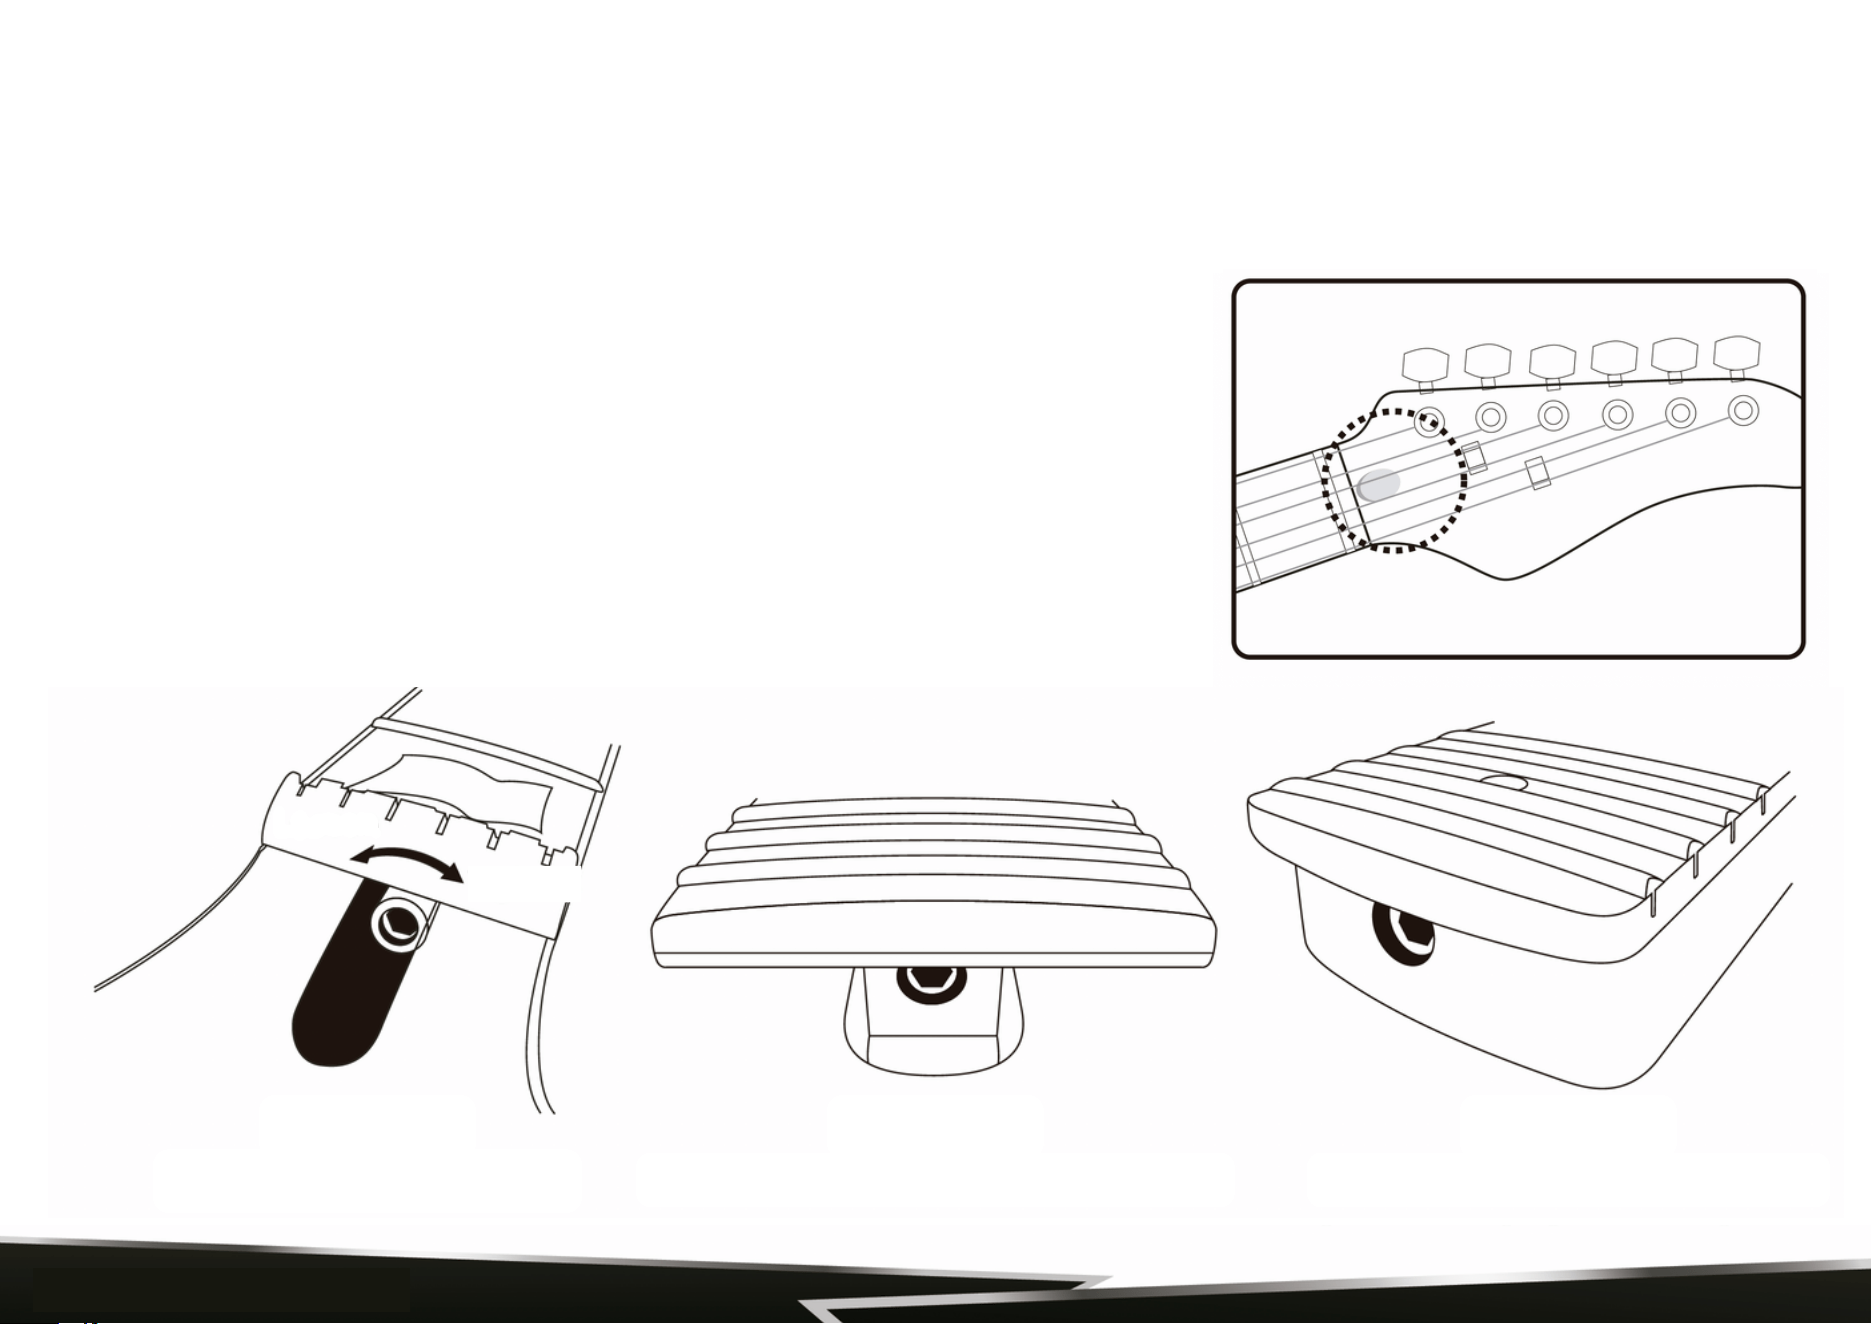
When winding strings on to the tuning machine post, always wind them
tightly and evenly to avoid any slipping than can occur if there are any gaps.
Always use at least 2 or 3 winds around the post starting from top to bottom.
As a rule of thumb, use about and extra 5cm (2 inches) of slack when
restringing a guitar and about 8cm (3 inches) of slack when restringing a
bass. For unwound, or plain strings, follow the diagram (Figure 1) detailing
how to install these strings on to the post to prevent them from slipping.
1. Insert end of string into tuning post (make sure to leave enough slack for a
few wraps around the post).
2. Wrap end of string clockwise around post and under the string where it
goes into the post (counterclockwise when stringing tuners on treble side
of headstock).
CHANGING STRINGS
Figure 1: Stringing Plain Strings
www.PyleUSA.com
4
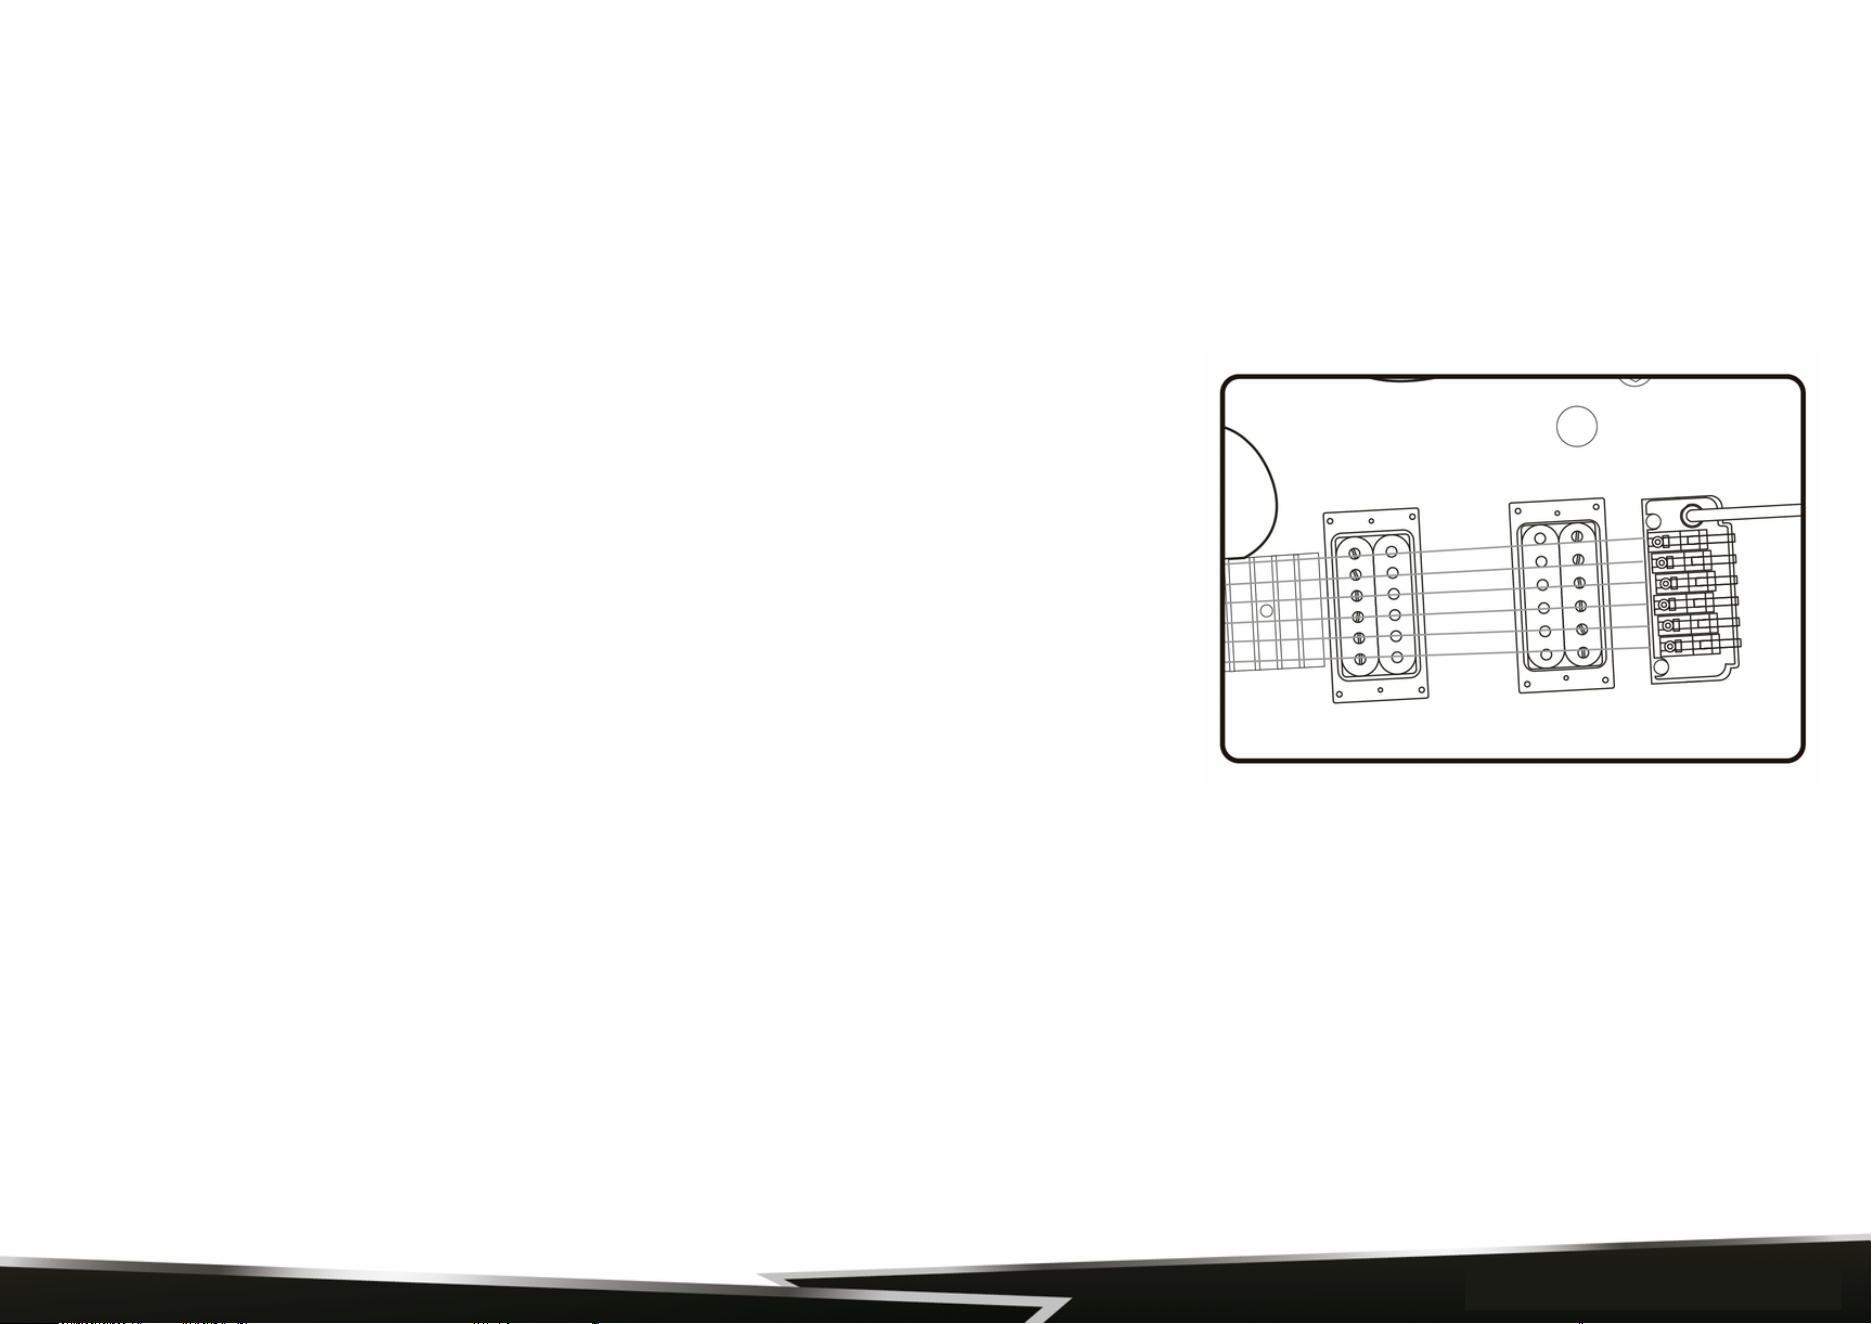
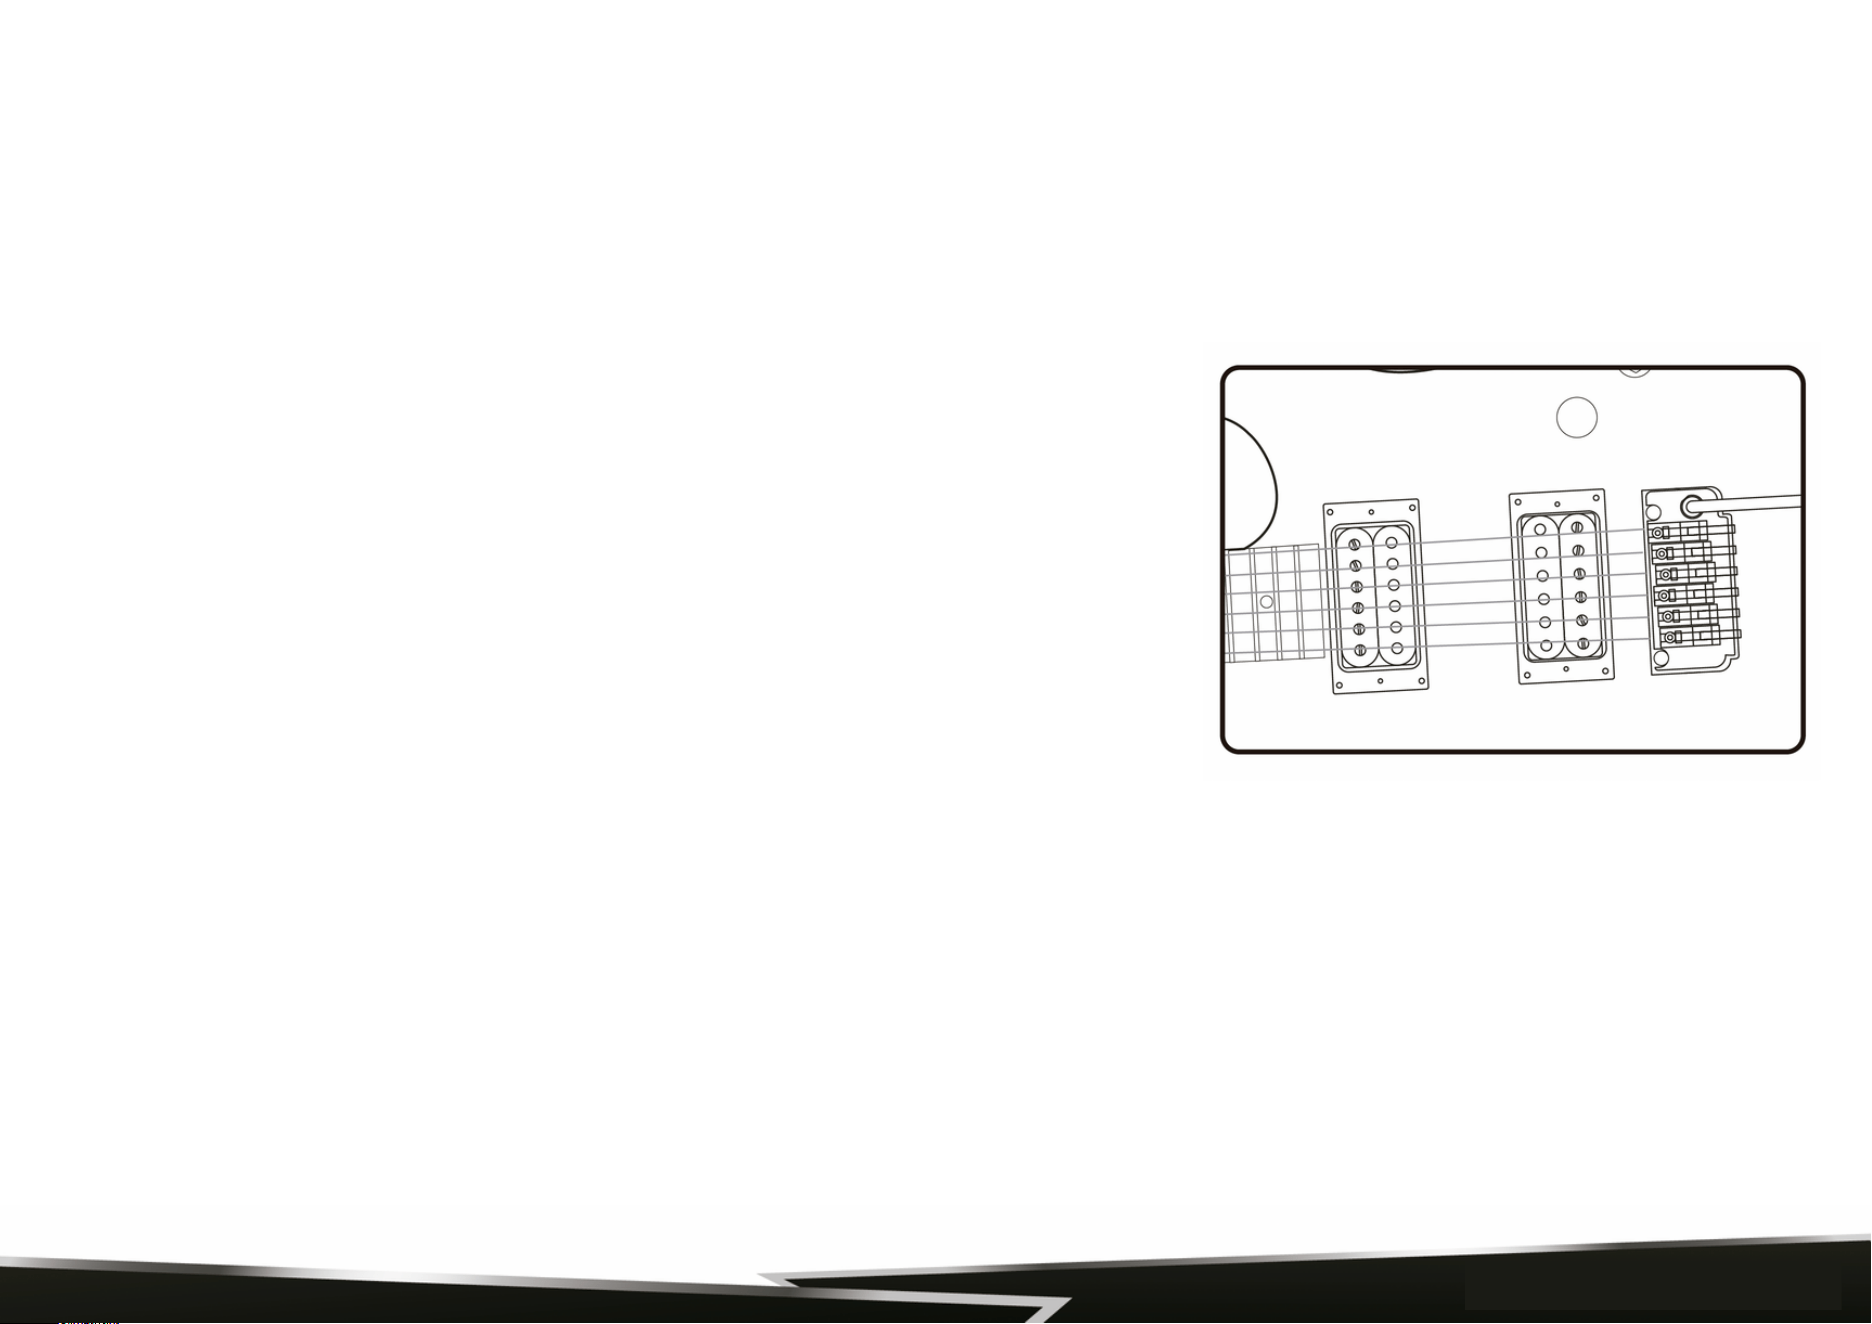
A floating bridge has an arched wooden or metal base held in position on the
instrument top only by the downward pressure of the strings. If the bridge is
moved even slightly while re-stringing, the intonation will no longer be true
(some instruments feature "pinned" bridges that eliminate this possibility).
To adjust floating bridge intonation on a guitar, first check the 12th-fret
harmonic and the fretted 12th-fret tuning of both E strings (high and low).
If properly intonated, the fretted and harmonic 12-fret pitches of both
E strings will agree, with none of them being sharp or flat.
If the pitch of the 12th-fret note is sharp relative to the pitch of the 12th-fret harmonic, lightly tap the foot of the bridge
to move it back toward the tail piece until both pitches agree. If the pitch of the 12th-fret note is flat relative to the pitch
of the 12th-fret harmonic, lightly tap the foot of the bridge to move it forward toward the neck until the two pitches
agree. To fine-tune fully adjustable bridges, adjust each saddle forward or back using the individual intonation screws
while checking the tuning of the 12-fret harmonic against the fretted 12th fret pitch.
IMPORTANT NOTE: When re-stringing a guitar with a floating bridge, change strings one at a time. Do not remove all
the strings at once, as the bridge is held in the correct position only by the downward pressure of the strings.
www.PyleUSA.com
5
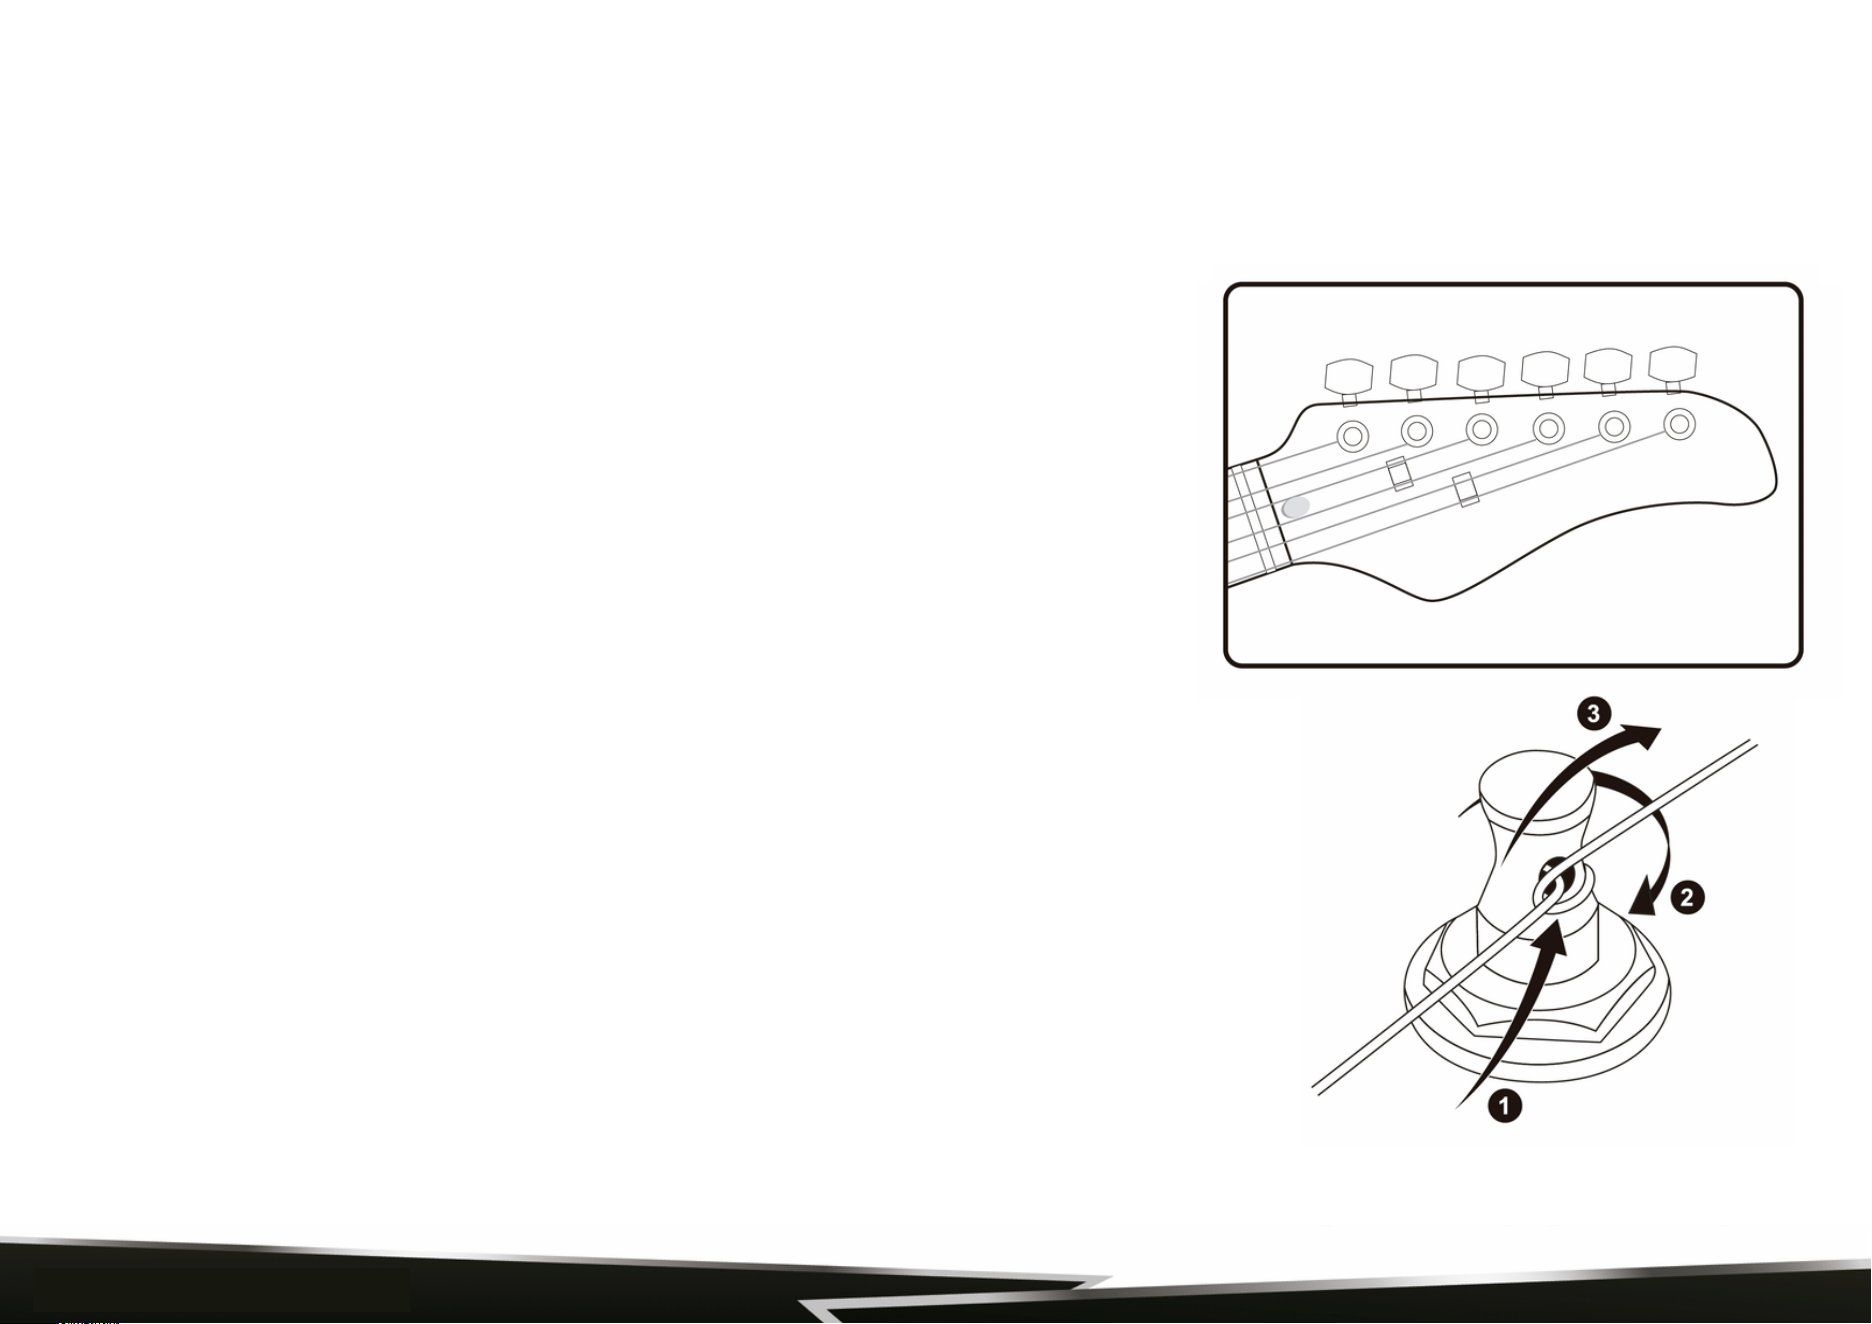
3. Pull end of string tight over itself making a sort of knot (end of string may then be bent down and cut off cleanly near
knot).
4. Tune to pitch, making sure the wraps wind neatly down the tuning post.
Note: Strings are always wound clockwise around the posts on the bass side and counter-clockwise around the posts
on the treble side of headstock.
FLOATING BRIDGE ADJUSTMENT

www.PyleUSA.com
6
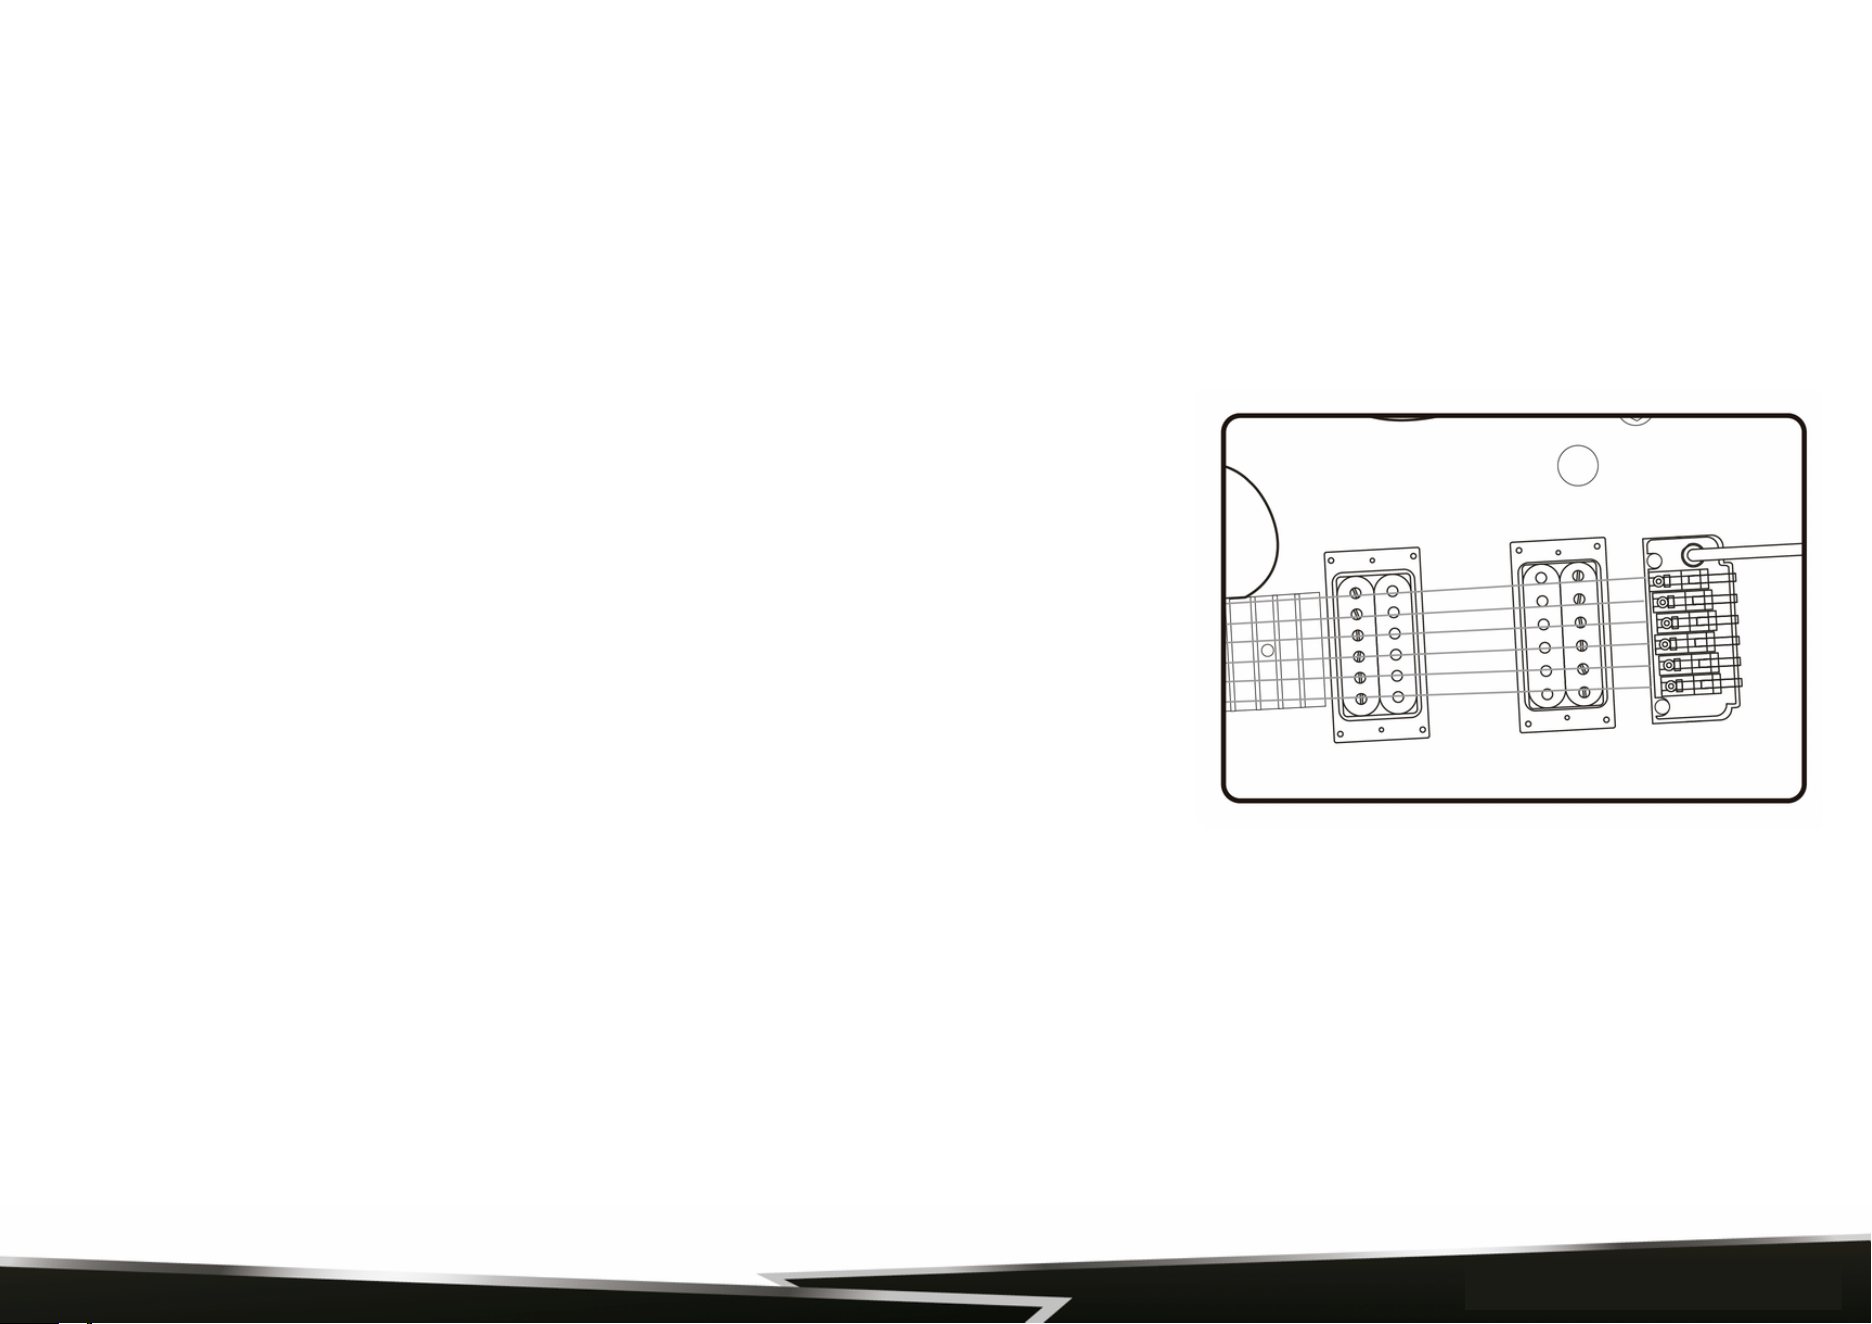
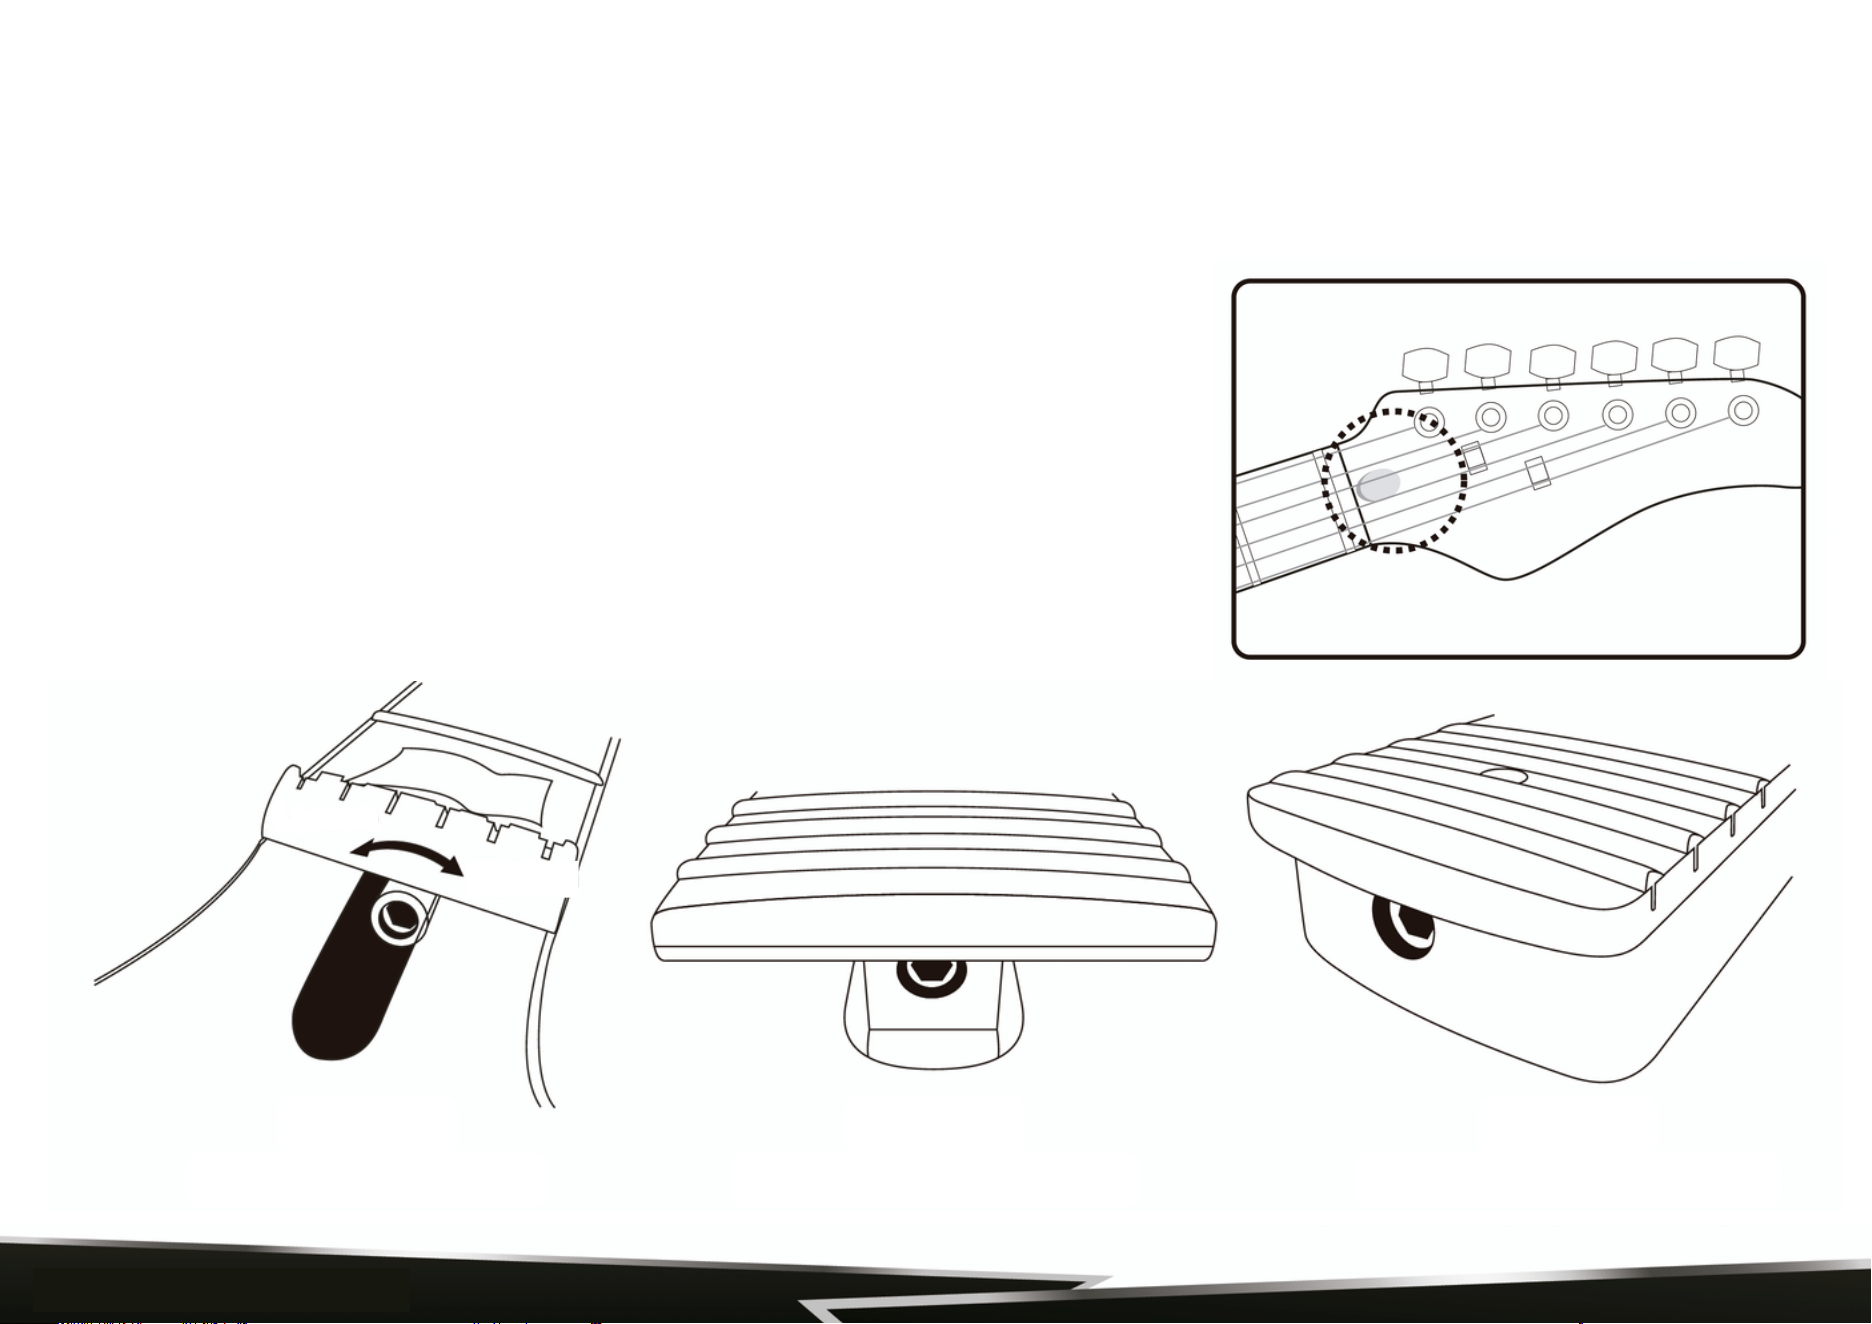
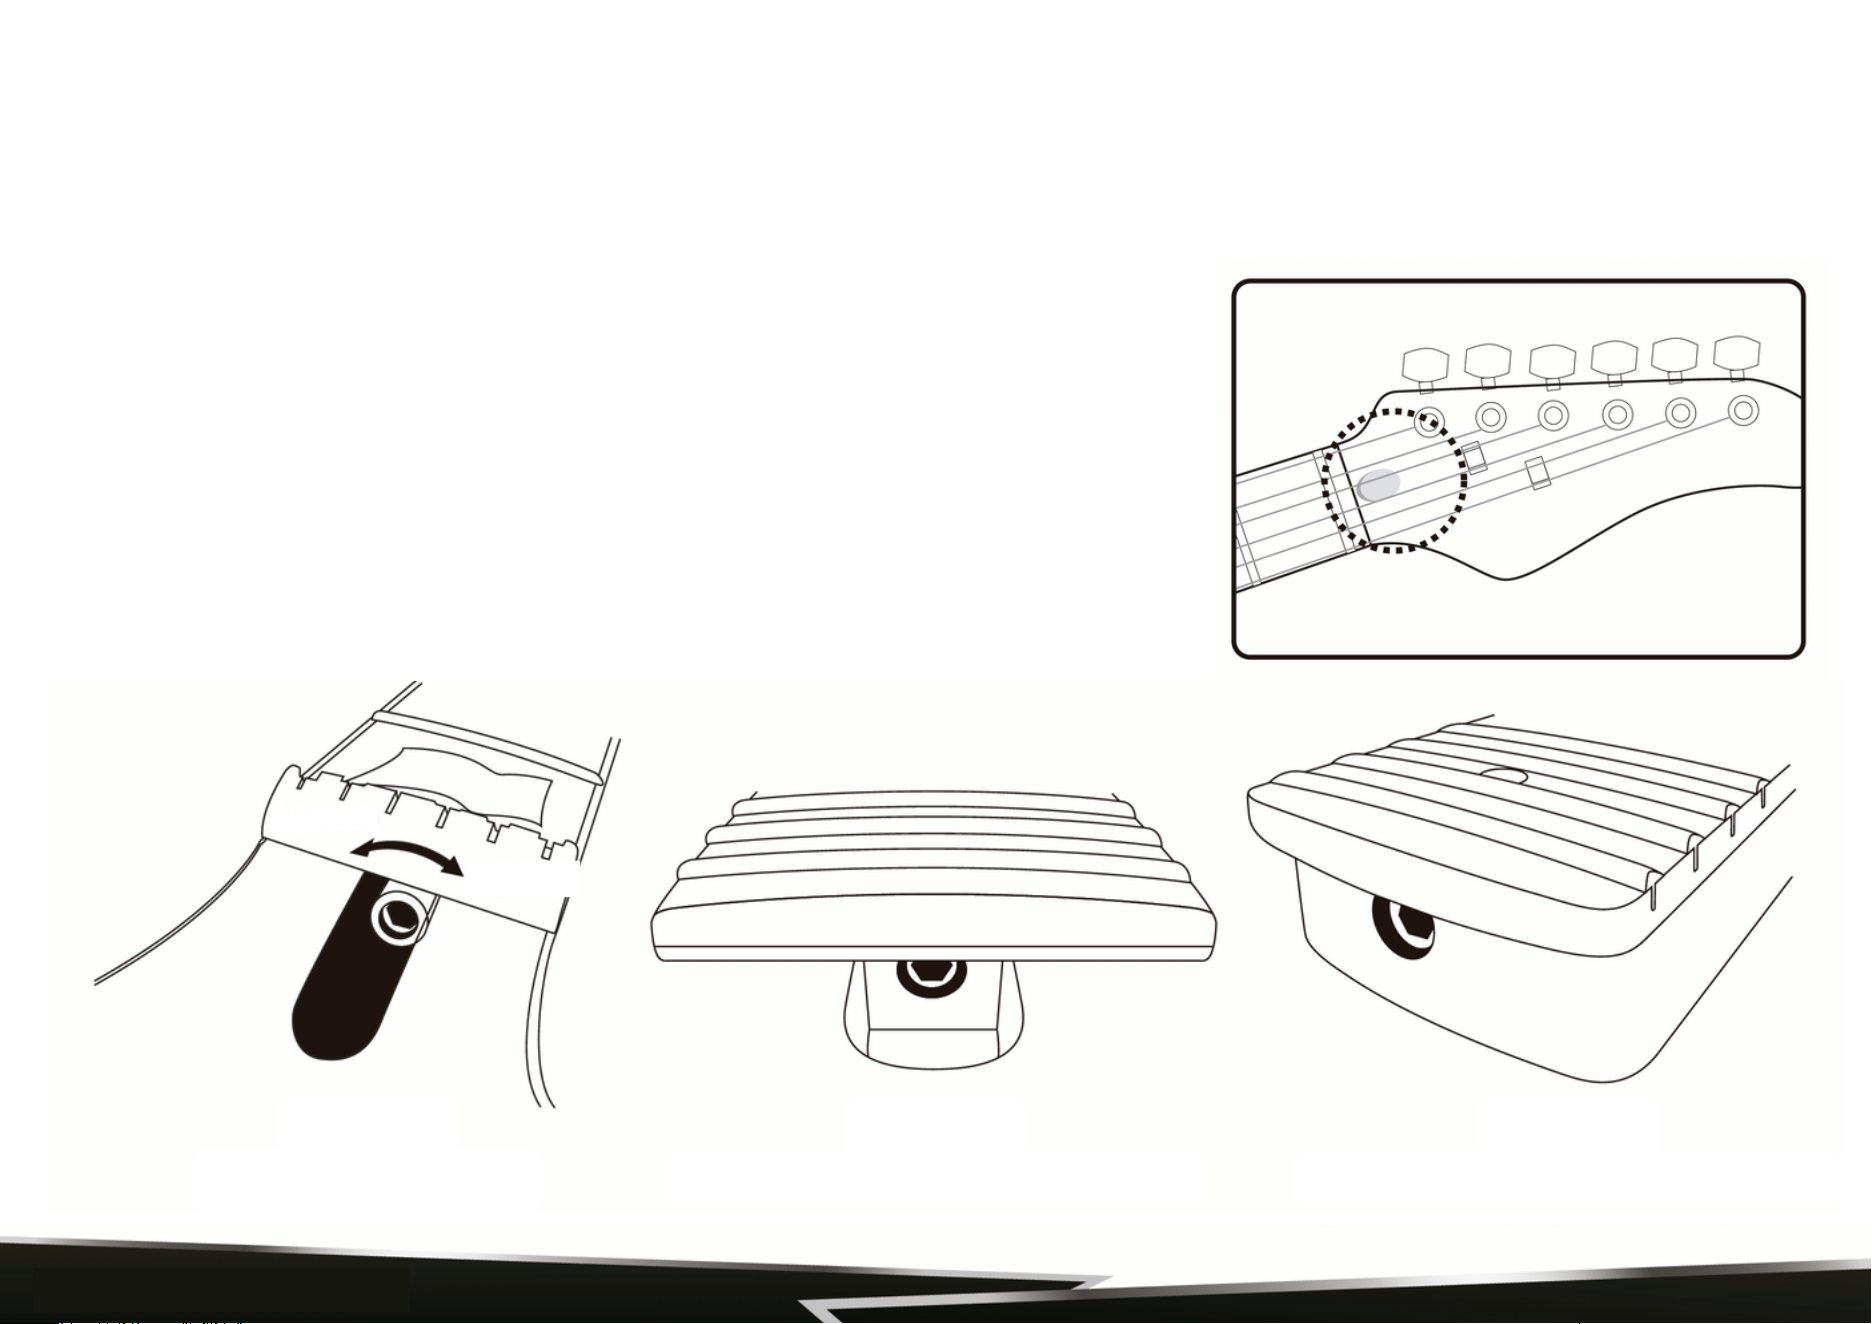
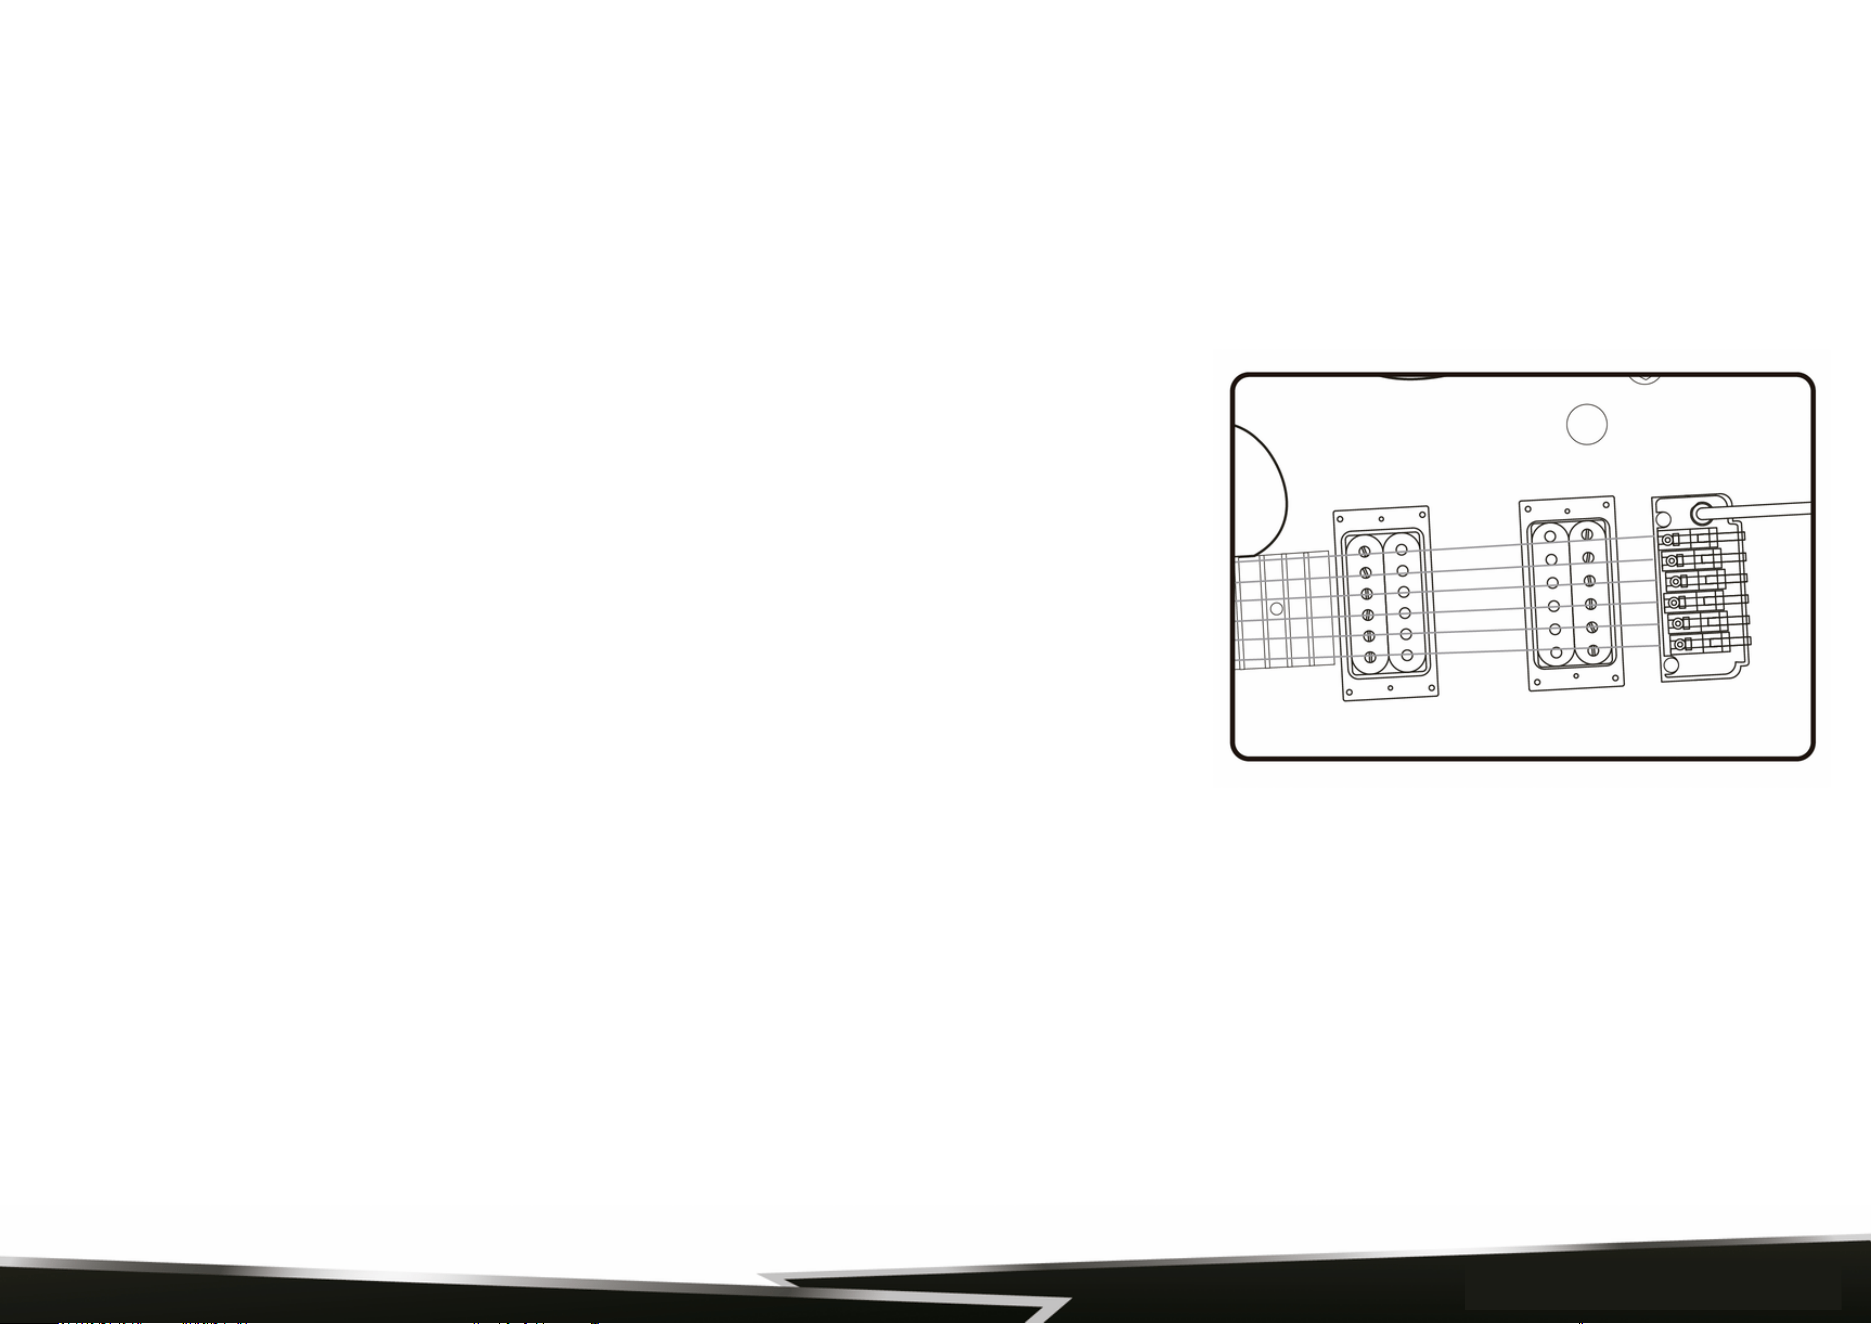
ADJUSTING THE TRUSS ROD
To adjust the truss rod, first locate the truss rod access at the headstock (Figure 2) or end of neck by body joint (Figure 3),
remove the truss rod cover, and insert the correct size allen wrench (4mm) or pipe wrench (8mm) to adjust.
Turn counter-clockwise to loosen and clockwise to tighten.
Note: If your truss rod nut access is not visible, it is possible your instrument
has it located inside of the neck pocket (Figure 4) - this will require the neck
to be taken off of the body to adjust the truss rod.
Truss rod adjustments should only be performed by a qualified technician.
Improperly adjusting or over adjusting the truss rod can result in damage to
the guitar neck and is not covered under the warranty.
Figure 2:
Truss Rod at Headstock
Figure 3:
Truss Rod by Body Joint
Figure 4:
Truss Rod Inside Neck Pocket
Loosen
Thighten
CONTROLS AND SPECS
The following are some brief descriptions of the basic electronic controls and terminology. For more specific
information on your model please visit our website at www.PyleUSA.com.
Note: Most control knobs are easily tightened or removed by using a 2.0mm allen wrench or flathead screwdriver to
adjust the set screw on the side of the knob. If a knob becomes loose, you should first remove the knob and check the
control to make sure It Is properly tightened to the body before re-tightening the knob onto the control shaft. A loose
control shaft can easily be tightened using any adjustable wrench. You will need to remove the electronics backplate
and hold the control from the back of the guitar while tightening the nut from the top of body. This will ensure that you
do not move the controls or damage/break any of the wire connections.
Volume Control
Controls the master output level of the guitar. Turning the knob clockwise will increase the volume while turning counter
clockwise will decrease the volume. Some instruments will have multiple volume controls in which case, you'll find there’s a
volume control for each pickup.
Note: In the case of multiple volume controls, when either volume control is turned off and the pickup selector switch is
in the middle position w/both pickups on, the entire signal of the instrument will be turned off.
Tone Control
This adjusts the high frequencies present in the signal coming from your guitar. With the knob turned fully clockwise, all
frequencies are present. Turning the knob counter-clockwise decreases the high frequencies.
Output Jack
This is where the output signal of the guitar is sent to the amplifier by plugging in any standard 1/4" guitar cable. Most
output jacks are located near the bottom corner of the guitar below the electronics cavity.
www.PyleUSA.com
7
Note: If your guitar has active electronics, you should always remove your cable after playing.
Leaving your cable plugged into your instrument will drain the battery.
If your jack ever comes loose, do not tighten it without first removing the jackplate and
securing the inside of the jack, otherwise you may break the wires causing your guitar to
lose output.
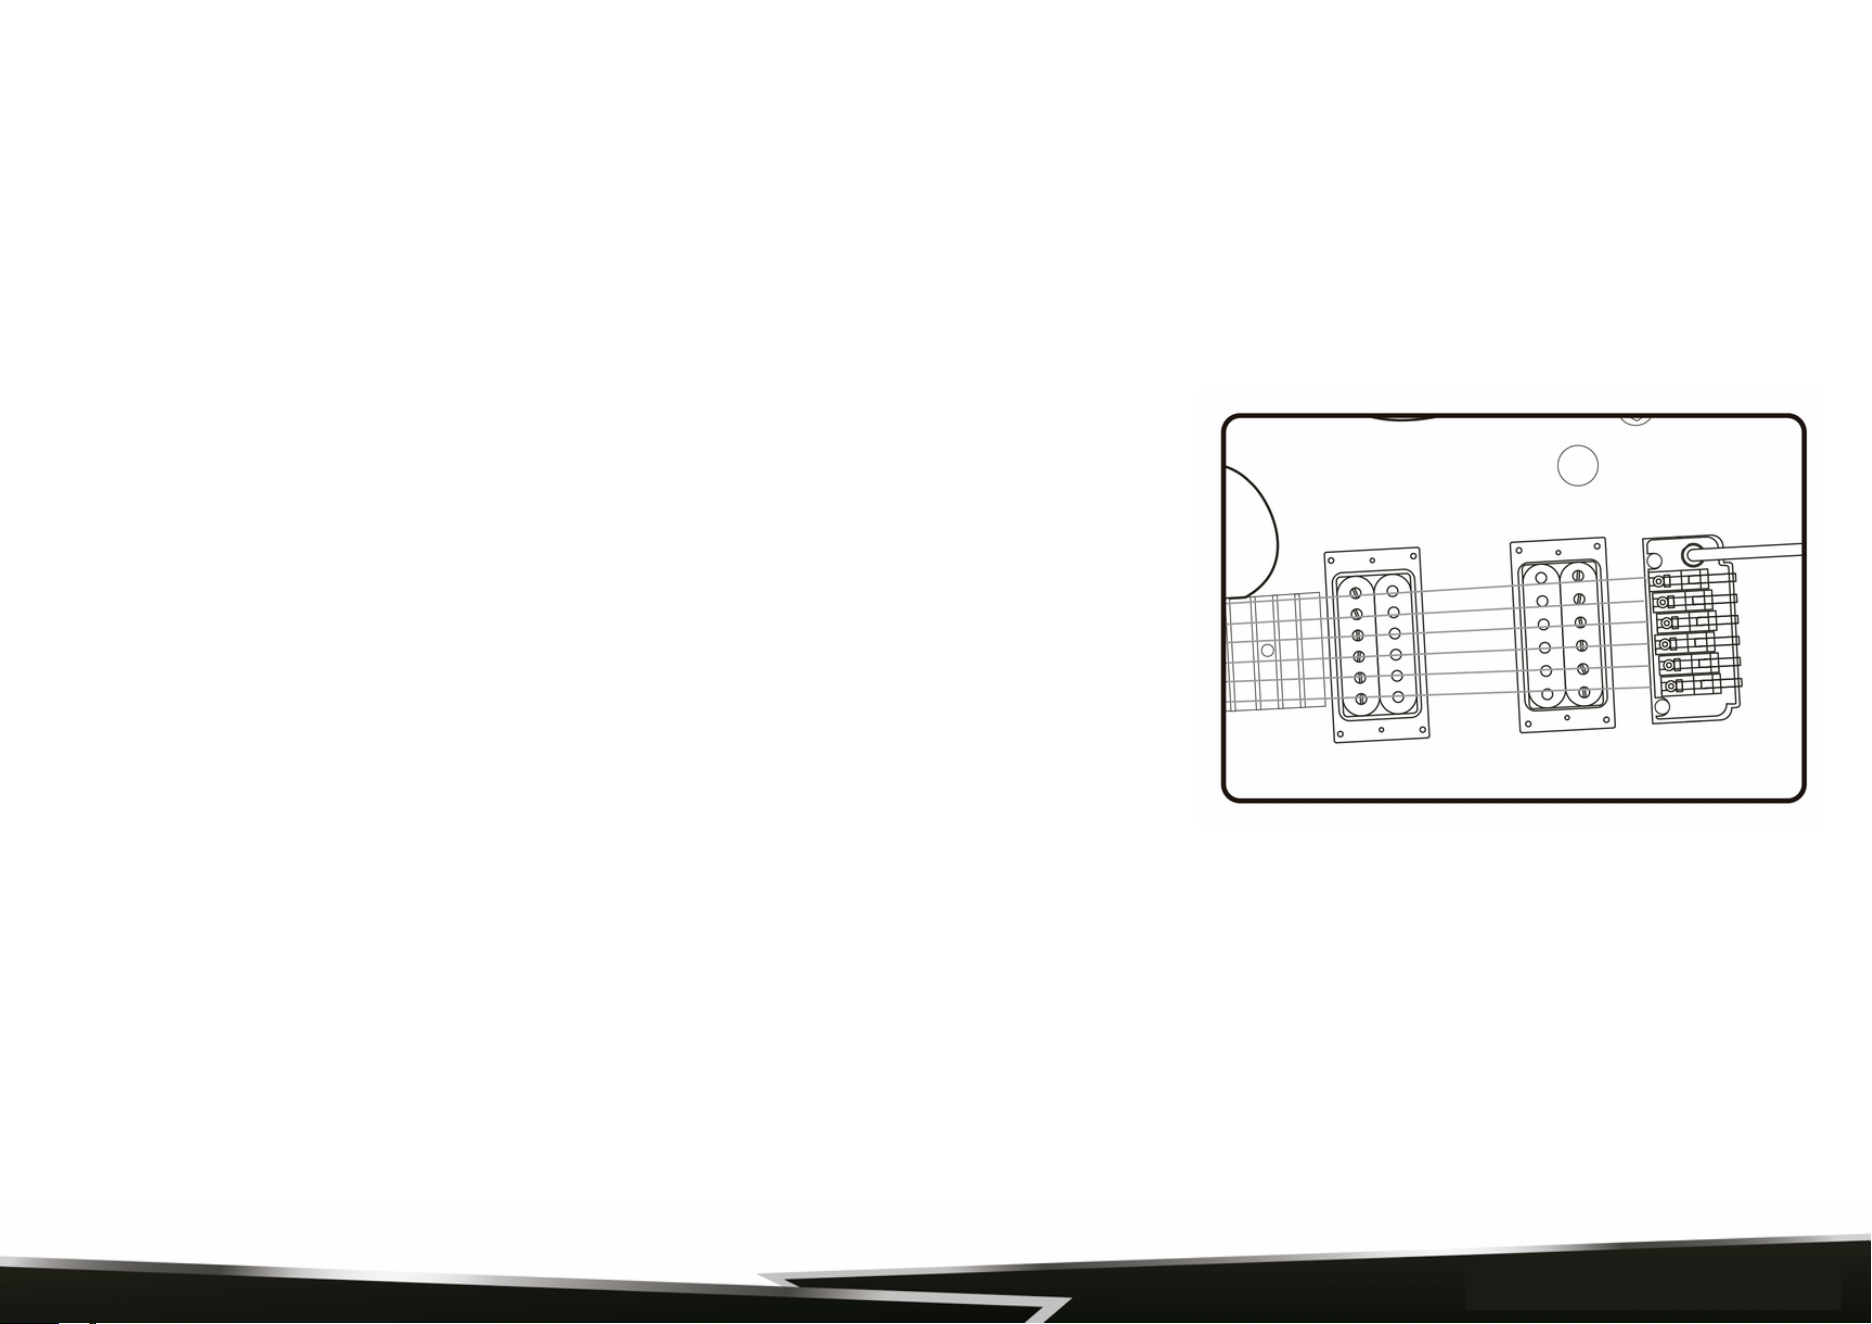
Pickups
The pickups on your guitar turn the string vibrations into an electronic signal that is sent
to your amplifier. Pickups are made up of magnets and coils of wire.
There are 2 types of magnetic pickups used in most electric guitars - Single Coils and
Humbuckers. A Single Coil pickup is made up of only 1 coil of wire and generally has a
weak output.
Due to its construction, a single coil will be noisy since it cannot block hum and RF
interference. Humbuckers on the other hand are in fact"hum-cancelling"because of
their construction using 2 coils side by side. The signals from each coil are combined in
a certain way that cancels the hum and RF interference that is common with single coil
pickups. Humbuckers generally have a higher output signal compared to single coils.
Pickup Selector Switch
The selector is used to switch between different pickups or combinations of pickups
(on guitars with two or more pickups).
www.PyleUSA.com
8

GUITAR AMP SETTINGS GUIDE
INPUT: Plug in your electric guitar here.1.
GAIN: Controls the gain level for overdrive. As the gain increases so will the distortion level in your sound.2.
CLEAN AND DISTORTION MODE: Used to switch the clean and distortion ON/OFF.3.
TONE: Controls the low, middle, and high frequency range.4.
MASTER VOLUME: Overall level control for the clean channel or distortion channel.5.
AUX IN: Accepts mobile devices such as mobile phone, computer, iPad, TV box, CD player, MP3 player and more.6.
PHONE: 3.5mm standard stereo headphone jack for plugging in headphones.7.
POWER LIGHT: This light is normally on when the power is turned on and off when the power is turned off.8.
POWER SWITH: ON/OFF switch for the main power of the amplifier.9.
FUNCTION
www.PyleUSA.com
9

To avoid risk of electrical shock, do not expose to water or damp.
CAUTION
To prevent the xed bolt to touch the switch and fuse holder,
the fixed bolt can’t be over 4mm (Diameter) x 30mm (length).
1.
Unplug amp from mains before replacing the fuse.2.
IMPORTANT!!
Always connect your instrument cord to your guitar before
connecting to your amplifier.
Connecting to your amplifier rst may cause damage to speaker.
DO NOT leave your guitar unattended with the volume turned up.
Neon or uorescent lighting near the ampli er may cay cause slight hum.
This can frequently be eliminated by changing the position of your instrument or the amplifier.
To avoid injuring your ears or damaging your headphones, reduce amplifier volume before plugging in your headphones.
Plugging in a pair of headphones will turn o your ampli er speaker.
Register Product
Thank you for choosing PyleUSA. By registering your product, you ensure that you receive the full
benefits of our exclusive warranty and personalized customer support.
Complete the form to access expert support and to keep your PyleUSA purchase in perfect condition.
www.PyleUSA.com
10

SPANISH
Guitarra Eléctrica de 6 Cuerdas
con Kit de Accesorios
ESCANÉAME
PyleUSA.com
Visítanos en línea

Puente
Cuerpo
Botón de Correa Frontal
Cuello
Botón de Correa
Toma de Entrada
Perillas de Control
Pastillas
Trastes
Clavijero
www.PyleUSA.com
2
Selector de Pastilla
Por favor tómese el tiempo para leer este folleto. En el encontrará respuestas a sus dudas y
preguntas y consejos para el cuidado y mantenimiento de su nuevo instrumento
ANATOMÍA DE LA GUITARRA
Brazo de Vibrato o Trémolo
www.PyleUSA.com
2
Afine su instrumento usando las teclas de afinación para subir o bajar el tono.
En una guitarra con un sistema de trémolo de bloqueo, primero debe aflojar la tuerca de bloqueo antes de poder ajustar la afinación
con los clavijeros. Aunque los sistemas de trémolo de bloqueo tienen afinadores finos ubicados en el puente, solo permiten una
afinación limitada (fina). La rotación en sentido contrario a las agujas del reloj de las teclas de afinación elevará el tono de la cuerda,
mientras que la rotación en el sentido de las agujas del reloj bajará el tono de la cuerda que está afinando. Afine su guitarra
empezando por las cuerdas más graves a las más altas.
Después de haber hecho esto una vez, regrese y vuelva a verificar la afinación. En algunos instrumentos tendrá que hacer esto varias
veces, especialmente si las cuerdas son nuevas o tiene una guitarra con un puente de trémolo flotante. La afinación de una cuerda
puede afectar a las otras cuerdas y es necesario volver a comprobar la afinación hasta que todas las cuerdas permanezcan en el tono
deseado.
Nota: Las cuerdas nuevas tienden a estirarse y desafinarse hasta que se asientan. Es una buena idea estirar las cuerdas cuando acaba
de ponerle un nuevo juego. Hágalo después de la afinación inicial doblando las notas y estirando físicamente cada cuerda alejándola
del diapasón (ten cuidado de no tirar demasiado fuerte, ya que puedes romper una cuerda de esa manera). Después de estirar bien
las cuerdas, repita el proceso de afinación.
LIMPIEZA
Limpiar su guitarra con regularidad es una de las mejores maneras de mantener el acabado y prolongar la vida útil
de las cuerdas. Limpie su guitarra después de cada uso, asegurándose de limpiar el diapasón y las cuerdas, así como
cualquiera de las partes chapadas, como afinadores, pastillas, puente, etc. Asegúrese de eliminar la transpiración, ya
que puede provocar corrosión y oxidación en herrajes y cuerdas de metal.
AFINANDO LA GUITARRA
www.PyleUSA.com
3

Le recomendamos encarecidamente que cambie las cuerdas con bastante frecuencia. Si toca a diario, le recomendamos que
cambie las cuerdas cada 3 meses. Un nuevo juego de cuerdas sonará claro y preciso, mientras que un juego viejo sonará aburrido
y puede producir zumbidos inusuales y notas muertas. Si nota que sus cuerdas se han ensuciado, perdido color o producen un
zumbido inusual o un sonido sordo, entonces definitivamente es hora de poner un nuevo juego de cuerdas en su guitarra.
Revise siempre sus cuerdas nuevas y asegúrese de que estén lisas y libres de
defectos antes de instalarlas. Si hay irregularidades, como torceduras, curvas o
cualquier otro defecto de fabricación, provocarán zumbidos y notas falsas, así
como distorsión del sonido. Recomendamos reemplazar una cuerda a la vez, para
que no se quite la tensión del mástil. Esto hará que sea más fácil volver a afinar y
configurar el mástil.
Al enrollar las cuerdas en el poste del afinador, enróllelas siempre de manera
apretada y uniforme para evitar cualquier deslizamiento que pueda ocurrir si hay
espacios. Siempre de al menos 2 o 3 giros alrededor del poste comenzando de arriba
hacia abajo. Como regla general, use aproximadamente 5 cm (2 pulgadas) adicionales
de holgura al volver a encordar una guitarra y aproximadamente 8 cm (3 pulgadas) de
holgura al volver a encordar un bajo. Para cuerdas sin entorchado o lisas, siga el diagrama
(Figura 1) que detalla cómo instalar estas cuerdas en el poste para evitar que se deslicen.
1.iInserte el final de la cuerda en el poste de afinación (asegúrese de dejar suficiente
holgura para algunas vueltas alrededor del poste).
2. Envuelva el extremo de la cuerda en el sentido de las agujas del reloj alrededor del
poste y debajo de la cuerda donde entra en el poste (en el sentido contrario a las agujas
del reloj cuando encorde los afinadores en el lado agudo del clavijero).
CAMBIANDO LAS CUERDAS
Figura 1: Encordado de Cuerdas Lisas
www.PyleUSA.com
4

Un puente flotante tiene una base arqueada de madera o metal que se mantiene en
posición en la parte superior del instrumento solo por la presión hacia abajo de las
cuerdas. Si el puente se mueve aunque sea ligeramente mientras se vuelve a encordar,
la entonación ya no será verdadera (los instrumentos de Sorne cuentan con puentes
"clavados" que eliminan esta posibilidad).
Para ajustar la entonación del puente flotante en una guitarra, primero compruebe el
armónico del traste 12 y la afinación del traste 12 de ambas cuerdas E (alta y baja).
Si está correctamente entonado, los trastes y los tonos armónicos de 12 trastes de
ambas cuerdas E estarán iguales, y ninguna de ellas será aguda o bemol.
Si el tono de la nota del traste 12 es agudo en relación con el tono del armónico del traste 12, golpee ligeramente el pie del puente
para moverlo hacia el cordal hasta que ambos tonos coincidan. Si el tono de la nota del traste 12 es plano en relación con el tono
del armónico del traste 12, golpee ligeramente el pie del puente para moverlo hacia adelante hacia el mástil hasta que los dos tonos
coincidan. Para afinar los puentes totalmente ajustables, ajuste cada selleta hacia adelante o hacia atrás usando los tornillos de
entonación individuales mientras verifica la afinación del armónico de 12 trastes contra el tono del traste 12.
NOTA IMPORTANTE: Al volver a encordar una guitarra con un puente flotante, cambie las cuerdas una vez. No retire las cuerdas
de una sola vez, ya que el puente se mantiene en la posición correcta solo por la presión hacia abajo de las cuerdas.
3. Tire del extremo de la cuerda con fuerza sobre sí mismo haciendo una especie de nudo (el extremo de la cuerda puede
doblarse hacia abajo y cortarse limpiamente cerca del nudo).
4. Afine al tono, asegurándose de que las envolturas se enrollen perfectamente en el poste de afinación.
Nota: Las cuerdas siempre se enrollan en el sentido de las agujas del reloj alrededor de los postes en el lado de los graves
y en el sentido contrario a las agujas del reloj alrededor de los postes en el lado de los agudos.
AJUSTE DE PUENTE FLOTANTE
www.PyleUSA.com
5
AJUSTE DEL ALMA
Para ajustar el alma, primero ubique el acceso del alma en el cabezal (Figura 2) o al final de la junta del cuello por el cuerpo
(Figura 3), retire la cubierta del alma e inserte la llave Allen del tamaño correcto (4 mm) o la llave de tubo (8 mm) para
ajustarGire en sentido contrario a las agujas del reloj para aflojar y en el sentido de las agujas del reloj para apretar.
Nota: si el acceso a la tuerca del alma no es visible, es posible que la tenga
ubicada dentro del bolsillo del cuello (Figura 4), esto requerirá que se retire
del cuerpo para ajustar la barra del alma.
Los ajustes del alma solo deben ser realizados por un técnico calificado,
ajustar o ajustar en exceso la barra de alma puede dañar el mástil de la
guitarra y no está cubierto por la garantía.
Figura 2:
aaAlma en el clavijero
Figura 3:
Alma en la Junta de Cuerpo
Figura 4:
Alma en el Bolsillo del Cuello
Aflojar
Apretar
www.PyleUSA.com
6
CONTROLES Y ESPECIFICACIONES
A continuación se presentan algunas breves descripciones de los controles electrónicos básicos y la terminología.
Para obtener información más específica sobre su modelo, visite nuestro sitio web en www.PyleUSA.com.
Nota: La mayoría de las perillas de control se aprietan o quitan fácilmente usando una llave Allen de 2.0 mm o un destornillador
de punta plana para ajustar el tornillo de fijación en el costado de la perilla. Si una perilla se afloja, primero debe quitar la perilla
y verificar el control para asegurarse de que esté correctamente apretada al cuerpo antes de volver a apretar la perilla en el eje
de control. Un eje de control suelto se puede apretar fácilmente con cualquier llave ajustable. Tendrá que quitar la placa
posterior de la electrónica y sujetar el control de la parte posterior de la guitarra mientras aprietas la tuerca de la parte superior
del cuerpo. Esto asegurará que no mueva los controles ni dañe o rompa ninguna de las conexiones de cables.
Control de Volumen
Controla el nivel de salida maestra de la guitarra. Girar la perilla en el sentido de las agujas del reloj aumentará el volumen,
mientras que girar en sentido contrario a las agujas del reloj disminuirá el volumen. Algunos instrumentos tendrán múltiples
controles de volumen, en cuyo caso, encontrará que hay un control de volumen para cada pastilla.
Nota: En el caso de varios controles de volumen, cuando cualquiera de los controles de volumen está apagado y el interruptor
selector de pastillas está en la posición central con ambas pastillas encendidas, se apagará toda la señal del instrumento.
Control de Tono
Esto ajusta las frecuencias altas presentes en la señal proveniente de su guitarra. Con la perilla girada completamente en el
sentido de las agujas del reloj, todas las frecuencias están presentes. Al girar la perilla en sentido contrario a las agujas del reloj,
disminuyen las frecuencias altas.
Conector de Salida
Aquí es donde la salida de la guitarra se envía al amplificador conectando cualquier cable de guitarra estándar de 1/4". La
mayoría de los conectores de salida se encuentran cerca de la esquina inferior de la guitarra, debajo de la cavidad electrónica.
www.PyleUSA.com
7
Nota:
Si su guitarra tiene electrónica activa, siempre debe quitar el cable después de tocarla. Si deja el
cable conectado al instrumento, se agotará la batería.
Si alguna vez se suelta el conector, no lo apriete sin quitar primero la placa y asegurar el interior
del conector, de lo contrario puede romper los cables y hacer que su guitarra pierda salida.
Pastillas
Las pastillas de su guitarra convierten las vibraciones de las cuerdas en una señal electrónica que
se envía a tu amplificador. Las pastillas están formadas por imanes y rollos de alambre.
Hay 2 tipos de pastillas magnéticas que se utilizan en la mayoría de las guitarras eléctricas: Single
CoiIs y Humbuckers. Una pastilla de bobina simple se compone de solo 1 bobina de alambre y
generalmente tiene una salida débil.
Debido a su construcción, una sola bobina será ruidosa ya que no puede bloquear el zumbido y
la interferencia de RF. Las humbuckers, por otro lado, son de hecho "canceladoras de zumbidos"
debido a su construcción con 2 bobinas una al lado de la otra. Las señales de cada bobina se
combinan de una manera determinada que cancela el zumbido y la interferencia de RF que es
común con las pastillas de bobina simple. Las humbuckers generalmente tienen una señal de
salida más alta en comparación con las bobinas simples.
Selector de pastillas
El selector se utiliza para cambiar entre diferentes pastillas o combinaciones de pastillas (en
guitarras con dos o más pastillas).
www.PyleUSA.com
8

GUÍA DE AJUSTES DEL AMPLIFICADOR DE GUITARRA
ENTRADA: Conecte su guitarra eléctrica aquí.1.
GAIN: Controla el nivel de ganancia para overdrive. A medida que aumenta la cantidad de ganancia, también lo hará el nivel de distorsión
en su sonido.
2.
DRIVE ON/OFF: Se utiliza para encender/apagar el overdrive.3.
TONO: Controla el rango de frecuencias bajas-medias-altas.4.
VOLUMEN: Este es el control de nivel general para el canal limpio o el canal de distorsión.5.
AUX IN: Acepta teléfono móvil, computadora, iPad, caja de TV, reproductor de CD, reproductor de MP3 y otros dispositivos de audio.6.
TELÉFONO: Conector para auriculares estéreo estándar de 3,5 mm para conectar auriculares.7.
LUZ DE ENCENDIDO: Esta luz normalmente está encendida cuando se enciende la alimentación. Esta luz se apaga cuando se apaga la
alimentación.
8.
INTERRUPTOR DE ENCENDIDO: Interruptor de encendido/apagado para la alimentación principal del amplificador.9.
FUNCIÓN
www.PyleUSA.com
9

Para evitar el riesgo de descarga eléctrica, no lo exponga al agua ni a la
humedad.
PRECAUCIÓN
Para evitar que el perno fijo toque el interruptor y el portafusibles, el
perno fijo no puede tener más de 4 mm (diámetro) x 30 mm (longitud)).
1.
Desconecte el amplificador de la red eléctrica antes de reemplazar el
fusible.
2.
¡¡iMPORTANTE!!
Conecte siempre el cable del instrumento a la guitarra antes de conectarla
al amplificador.
Si se conecta primero al amplificador, es posible que se dañe el altavoz.
NO deje su guitarra desatendida con el volumen subido.
La iluminación de neón o fluorescente cerca del amplificador puede causar un ligero zumbido.
Esto se puede eliminar con frecuencia cambiando la posición de su instrumento o del amplificador.
Para evitar lesionarse los oídos o dañar los auriculares, reduzca el volumen del amplificador antes de enchufarlos.
Al conectar un par de auriculares, se apagará el altavoz del amplificador.
Registrar el Producto
Gracias por elegir PyleUSA. Al registrar su producto, se asegura de recibir todos los beneficios de nuestra garantía exclusiva y
nuestro servicio de atención al cliente personalizado.
Rellene el formulario para acceder a la asistencia de expertos y mantener su compra PyleUSA en perfectas condiciones.
www.PyleUSA.com
10

¡Estamos para ayudarte!
¿Preguntas? ¿Comentarios?
PyleUSA.com/ContactUs
(1) 718-535-1800

FRENCH
Guitare Électrique à 6 Cordes
avec Kit d’Accessoires
SCANNEZ-MOI
PyleUSA.com
Site Web

Pont
Corps
Bouton de courroie sur
aaaale devantaaaa
Manche
Bouton de courroie
Entrée jack
Bouton de contrôle
Micros
Frettes
Poupée
www.PyleUSA.com
2
Sélecteur de Micros
Prenez le temps de lire cette brochure. Vous y trouverez des réponses aux questions que vous vous posez
et des informations sur l'entretien et la maintenance de votre nouvel instrument
ANATOMIE DE LA GUITARE
Bras Vibrato ou Tremulo
www.PyleUSA.com
2

Accordez votre instrument à l'aide des vis d'accordage pour un son plus ou moins haut.
Sur une guitare équipée d'un système de trémolo à blocage, vous devez d'abord desserrer l'écrou de blocage avant de pouvoir régler
l'accordage à l'aide des vils. Bien que les systèmes de trémolo à verrouillage soient dotés d'accordeurs fins situés sur le pont, ils ne
permettent qu'un accordage limité. La rotation des clés d'accordage dans le sens inverse des aiguilles d'une montre augmente la
hauteur de la corde, tandis que la rotation dans le sens des aiguilles d'une montre diminue la hauteur de la corde que vous accordez.
Accordez votre guitare en commençant par les cordes les plus graves jusqu'aux plus aiguës.
Après l'avoir fait une fois, revenez en arrière et revérifiez l'accordage. Sur certains instruments, vous devrez le faire plusieurs fois, en
particulier si les cordes sont neuves ou si votre guitare est équipée d'un pont trémolo flottant. L'accordage d'une corde peut affecter
les autres cordes et il est nécessaire de revérifier l'accordage jusqu'à ce que toutes les cordes soient à la hauteur souhaitée.
Remarque: les cordes neuves ont tendance à s'étirer et à se désaccorder jusqu'à ce qu'elles se stabilisent. C'est une bonne idée de
tendre les cordes lorsque vous venez de mettre un nouveau jeu. Pour ce faire, après l'accordage initial étirez physiquement chaque
corde (veillez à ne pas tirer trop fort, car vous risqueriez de casser une corde). Après avoir bien étiré les cordes, répétez le processus
d'accordage.
NETTOYAGE
LLe nettoyage régulier de votre guitare est l'un des meilleurs moyens d'entretenir la finition et de prolonger la durée de
vie des cordes. Nettoyez votre guitare après chaque utilisation, en veillant à essuyer les zones de contact avec les doigts
et les cordes, ainsi que toutes les pièces plaquées telles que les accordeurs, les micros, le pont, etc. Veillez à éliminer la
transpiration, car elle peut provoquer de la corrosion et de la rouille sur les pièces métalliques et les cordes.
ACCORDER LA GUITARE
www.PyleUSA.com
3

Nous vous recommandons vivement de changer les cordes assez souvent. Si vous jouez tous les jours, nous vous recommandons
de les changer tous les trois mois. Un nouveau jeu de cordes produira un son clair et précis, tandis qu'un vieux jeu de cordes
produira un son terne et pourra produire des bourdonnements inhabituels et des notes mortes. Si vous remarquez que vos cordes
sont sales, décolorées ou qu'elles produisent un bourdonnement inhabituel ou un son terne, il est certainement temps d'installer
un nouveau jeu de cordes sur votre guitare.
Vérifiez toujours vos nouvelles cordes et assurez-vous qu'elles sont lisses et
exemptes de défauts avant de les installer. Les irrégularités telles que les plis, les
courbures ou tout autre défaut de fabrication provoquent des bourdonnements et
des fausses notes ainsi qu'une distorsion du son. Nous recommandons de remplacer
une corde à la fois, afin que la tension ne soit pas totalement supprimée du manche.
Il sera ainsi plus facile de réaccorder et de régler le manche.
Lorsque vous enroulez les cordes sur la vis de l'accordeur, serrez-les toujours
fermement et uniformément afin d'éviter tout glissement qui pourrait se produire
en cas d'écart. Faites toujours au moins 2 ou 3 tours de la vis en partant du haut
vers le bas. En règle générale, utilisez environ 5 cm (2 pouces) de mou supplémentaire
pour réenrouler les cordes d'une guitare et environ 8 cm (3 pouces) pour réenrouler
les cordes d'une basse. Pour les cordes non enroulées ou plates, suivez le schéma
(figure 1) qui explique comment installer ces cordes sur la vis afin d'éviter qu'elles ne glissent.
1.aInsérez l'extrémité de la corde dans la vis d'accord (veillez à laisser suffisamment de
mou pour faire quelques tours autour de la vis).
2. Enroulez l'extrémité de la corde dans le sens des aiguilles d'une montre autour du
tenon et sous la corde à l'endroit où elle entre dans le tenon (dans le sens inverse
des aiguilles d'une montre pour les accordeurs situés sur le côté aigu de la vis).
CHANGER LES CORDES
Figure 1: Fixation Simple de Cordes
www.PyleUSA.com
4
Un pont flottant est constitué d'une base arquée en bois ou en métal qui est
maintenue en position au sommet de l'instrument uniquement par la pression des
cordes vers le bas. Si le pont se déplace ne serait-ce que légèrement lors de la remise
en place des cordes, l'intonation ne sera plus fidèle (les instruments Sorne sont dotés
de ponts "chevillés" qui éliminent cette possibilité).
Pour régler l'intonation du pont flottant d'une guitare, il faut d'abord vérifier
l'harmonique de la 12e frette et l'accord de la 12e frette des deux cordes de mi (aiguës
et graves). Si l'intonation est correcte, les frettes et les harmoniques de 12 frettes des
deux cordes de mi seront égales, et aucune des cordes ne sera dièse ou plate.
Si la hauteur de la note de la 12e frette est aiguë par rapport à la hauteur de l'harmonique de la 12e frette, tapez sur le pied du pont
pour le déplacer vers le cordier jusqu'à ce que les deux hauteurs correspondent. Si la hauteur de la note de la 12e frette est plate par
rapport à la hauteur de l'harmonique de la 12e frette, tapez sur le pied du pont pour l'avancer vers le cordier jusqu'à ce que les deux
hauteurs correspondent. Pour accorder des ponts entièrement réglables, réglez chaque sillet vers l'avant ou vers l'arrière à l'aide des
vis d'accordage individuelles tout en vérifiant l'accord de l'harmonique de la 12e frette par rapport au diapason de la 12e frette.
REMARQUE IMPORTANTE: Lorsque vous remontez les cordes d'une guitare équipée d'un pont flottant, changez-les une seule fois.
Ne retirez pas les cordes en une seule fois, car le pont n'est maintenu dans la bonne position que par la pression des cordes vers le
bas.
3. Tirer l'extrémité de la corde sur elle-même en formant une sorte de nœud (l'extrémité de la corde peut être pliée et
coupée proprement près du nœud).
4. Accordez-la au diapason, en veillant à ce que les spirales soient parfaitement enroulées sur le vis d'accord.
Note: Les cordes sont toujours enroulées dans le sens des aiguilles d'une montre autour des vis du côté des basses et
dans le sens inverse des aiguilles d'une montre autour des vis du côté des aiguës.
RÉGLAGE DU PONT FLOTTANT
www.PyleUSA.com
5
www.PyleUSA.com
AJUSTEMENT DE LA TIGE DE TENSION
Pour serrer la tige de tension, localisez d'abord l'accès à la tige au niveau de la tête (figure 2) ou à l'extrémité de l'articulation du
col près du manche (figure 3), retirez le cache de la tige et insérez la clé Allen (4 mm) ou la clé à douille (8 mm) de la bonne taille
pour serrer la tige de tension. Tournez dans le sens inverse des aiguilles d'une montre pour desserrer et dans le sens des
aiguilles d'une montre pour serrer.
Remarque: si le vis de la tige n'est pas visible, il se peut qu'il se trouve à l'intérieur
de la poche du manche (figure 4), ce qui nécessite de le retirer du boîtier pour
régler la barre de la tige.
Les réglages de la tige de tension ne doivent être effectués que par un technicien
qualifié. Un serrage ou un réglage excessif de la tige de tension peut endommager
le manche de la guitare et n'est pas couvert par la garantie.
Figure 2:
Tige sur le chevillier
Figure 3:
Tige de base intégrée dans le manche
Figure 4:
Poche latérale pour le collier de la tige
Desserrer
Presse
www.PyleUSA.com
6

CONTRÔLES ET CARACTÉRISTIQUES
Vous trouverez ci-dessous une brève description des commandes électroniques de base et de la terminologie. Pour obtenir
des informations plus spécifiques sur votre modèle, veuillez consulter notre site web à l'adresse suivante:
www.PyleUSA.com.
Remarque: la plupart des boutons de commande sont faciles à serrer ou à retirer en utilisant une clé Allen de 2,0 mm ou un tournevis
plat pour serrer la vis de réglage située sur le côté du bouton. Si un bouton se desserre, vous devez d'abord le retirer et vérifier que la
commande est correctement serrée sur le corps avant de resserrer le bouton sur l'arbre de commande. Un arbre de commande
desserré peut être facilement resserré à l'aide d'une clé à molette. Vous devrez retirer la plaque arrière de l'électronique et maintenir
la commande au dos de la guitare tout en serrant l'écrou sur le dessus du corps. Vous vous assurerez ainsi de ne pas déplacer les
commandes et de ne pas endommager ou rompre les connexions des câbles.
Réglage du Volume
Contrôle le niveau de sortie principal de la guitare. Tourner le bouton dans le sens des aiguilles d'une montre augmente le volume,
tandis que le tourner dans le sens inverse diminue le volume. Certains instruments sont dotés de plusieurs commandes de volume,
auquel cas il existe une commande de volume pour chaque micro.
Remarque: dans le cas de commandes de volume multiples, lorsque l'une des commandes de volume est désactivée et que le
sélecteur de micro est en position centrale avec les deux micros activés, l'ensemble du signal de l'instrument est désactivé.
Contrôle de la tonalité
Ce bouton permet de régler les hautes fréquences présentes dans le signal provenant de votre guitare. Lorsque le bouton est tourné
à fond dans le sens des aiguilles d'une montre, toutes les fréquences sont présentes. En tournant le bouton dans le sens inverse des
aiguilles d'une montre, les hautes fréquences diminuent.
Connecteur de sortie
C'est là que la sortie de la guitare est envoyée à l'amplificateur en connectant n'importe quel câble de guitare standard de 1/4". La
plupart des prises de sortie sont situées dans le coin inférieur de la guitare, sous la cavité électronique.
www.PyleUSA.com
7

Remarque :
Si votre guitare est équipée d'un système électronique actif, vous devez toujours retirer le câble
après avoir joué. Laisser le câble branché à l'instrument déchargera la batterie.
Si le connecteur se détache, ne le serrez pas sans avoir préalablement retiré la plaque et sécurisé
l'intérieur du connecteur, sinon vous risquez de casser les fils et de faire perdre la sortie à votre
guitare.
Tablettes
Les micros de votre guitare convertissent les vibrations des cordes en un signal électronique qui est
envoyé à votre amplificateur. Les micros sont constitués d'aimants et de bobines de fil.
Il existe deux types de micros magnétiques utilisés dans la plupart des guitares électriques : les
micros à simple bobine et les micros Humbucker. Un micro à simple bobine est constitué d'une
seule bobine de fil et a généralement une faible puissance de sortie.
En raison de leur design, les simples bobines sont bruyantes car elles ne peuvent pas bloquer les
bourdonnements et les interférences radioélectriques. Les Humbuckers, en revanche, sont en fait
des "annuleurs de bourdonnement" en raison de leur design avec deux bobines côte à côte. Les
signaux de chaque bobine sont combinés d'une certaine manière qui annule le bourdonnement et
les interférences radioélectriques que l'on rencontre fréquemment avec les micros à bobine unique.
Les Humbuckers ont généralement un signal de sortie plus élevé que les simples bobines.
Sélecteur de micro
Le sélecteur permet de passer d'un micro à l'autre ou d'une combinaison de micros à l'autre (sur les
guitares à deux micros ou plus.
www.PyleUSA.com
8

GUIDE DE RÉGLAGE DES AMPLIFICATEURS DE GUITARE
INPUT: Connectez votre guitare électrique ici.1.
GAIN: Contrôle le niveau de gain pour l'overdrive. Plus le gain augmente, plus le niveau de distorsion de votre son augmente.2.
DRIVE ON/OFF: Permet d'activer/désactiver l'overdrive.3.
TONE: Contrôle la plage des fréquences basses, moyennes et hautes.4.
VOLUME: Il s'agit du bouton de niveau général pour le canal clair ou le canal de distorsion.5.
AUX IN: Accepte les martphones, ordinateurs, Ipads, boîtiers TV, lecteurs CD, lecteur MP3 et d'autres appareils audio.6.
PHONE: Il s'agit d'une prise casque stéréo standard de 3,5 mm pour connecter un casque.7.
VOYANT D'ALIMENTATION: Ce voyant s'allume normalement lorsque l'appareil est sous tension. Il s'éteint lorsque l'appareil est mis
hors tension.
8.
INTERRUPTEUR D'ALIMENTATION: Interrupteur marche/arrêt pour l'alimentation principale de l'amplificateur.9.
FONCTION
www.PyleUSA.com
9

Pour éviter tout risque d'électrocution, n'exposez pas l'appareil à l'eau
ou à l'humidité.
ATTENTION
Pour éviter que la broche fixe ne touche l'interrupteur et le porte-
fusible, la broche fixe ne doit pas dépasser 4 mm (diamètre) x 30
mm (longueur).
1.
Débranchez l'amplificateur du secteur avant de remplacer le fusible. 2.
IMPORTANT!!!
Branchez toujours le câble de l'instrument à la guitare avant de le
brancher à l'amplificateur.
Si vous le connectez d'abord à l'amplificateur, vous risquez d'endommager
l’enceinte.
Ne laissez pas votre guitare sans surveillance avec le volume à fond.
L'éclairage au néon ou fluorescent à proximité de l'amplificateur peut provoquer un léger bourdonnement.Ce phénomène
peut souvent être éliminé en repositionnant votre instrument ou l'amplificateur.
Pour éviter d’endommager vos oreilles ou le casque, réduisez le volume de l'amplificateur avant de le brancher.
Le branchement d'un casque éteint l’enceinte de l'amplificateur.
Enregistrer un Produit
Merci d'avoir choisi PyleUSA. En enregistrant votre produit, vous vous assurez de recevoir tous les avantages de notre
garantie exclusive et de notre assistance personnalisée.
Complétez le formulaire pour bénéficier d'une assistance experte et maintenir votre achat PyleUSA en parfait état.
www.PyleUSA.com
10

Nous sommes là pour vous aider!
Des questions? Des commentaires?
PyleUSA.com/ContactUs
(1) 718-535-1800

ITALIAN
SCANSIONARMI
PyleUSA.com
Sito Web
Chitarra Elettrica a 6 Corde
con kit di Accessori

Ponte
Corpo
Perno anteriore per la
aaaacinghiaaaaa
Manico
Perno della cinghia
Ingresso jack
Manopole di controllo
Pickup
Tasti
Tastiera
www.PyleUSA.com
2
Selettore dei pickup
Dedicate qualche istante alla lettura di questo manuale. Esso vi fornirà le risposte a molte delle vostre
domande e vi informerà sulla cura e la manutenzione del vostro nuovo strumento.
PARTI DELLA CHITARRA
Braccio Vibrato o Tremulo
www.PyleUSA.com
2
Accordare lo strumento utilizzando le chiavi di accordatura per alzare o abbassare l'intonazione.
Su una chitarra con sistema tremolo bloccante, è necessario allentare il dado di bloccaggio prima di poter regolare l'accordatore.
Sebbene i sistemi tremolo bloccati siano dotati di accordatori di precisione situati sul ponte, consentono solo un'accordatura (fine)
limitata. La rotazione in senso antiorario delle chiavi di accordatura aumenta l'intonazione, mentre la rotazione in senso orario
abbassa l'intonazione della corda che si sta accordando. Accordare la chitarra iniziando dalle corde più basse a quelle più alte.
Dopo aver fatto questa operazione una volta, tornate indietro e ricontrollate l'accordatura. In alcuni strumenti è necessario ripetere
l'operazione più volte, soprattutto se le corde sono nuove o se si possiede una chitarra con ponte tremolo flottante. L'accordatura di
una corda può influenzare le altre corde ed è necessario ricontrollare fino a quando tutte le corde rimarranno all'altezza desiderata.
Nota: lle corde nuove tendono ad allungarsi e a stonare finché non si stabilizzano. È buona norma tendere le corde quando si è
appena montato un nuovo set. Dopo l'accordatura iniziale, si può fare questo piegando le note e allungando fisicamente ogni corda
tirandola dalla tastiera (attenzione a non tirare troppo forte, perché in questo modo si potrebbe rompere). Dopo aver stirato a fondo
le corde, ripetete il processo di accordatura.
PULIZIA
Pulire regolarmente la chitarra è uno dei modi migliori per preservare la finitura e prolungare la durata delle corde. Pulire
la chitarra dopo ogni utilizzo, assicurandosi di pulire la tastiera e le corde, nonché tutte le parti placcate come
accordatori, pickup, ponte, ecc, ponte, ecc. Assicuratevi di rimuovere il sudore, poiché può causare la corrosione e
l'arrugginimento delle parti metalliche e delle corde.
ACCORDARE LA CHITARRA
www.PyleUSA.com
3

Si consiglia vivamente di cambiare le corde con una certa frequenza. Se si suona quotidianamente, si consiglia di cambiare le
corde ogni 3 mesi. Un nuovo set di corde avrà un suono chiaro e preciso, mentre un vecchio set di corde avrà un suono sordo e
potrà produrre ronzii insoliti e note morte. Se si nota che le corde sono sporche, scolorite o producono un ronzio strano o un
suono sordo, è sicuramente il momento di prendere un nuovo set di corde per la chitarra.
Controllare sempre le corde nuove ed assicurarsi che siano lisce e prive di difetti
prima di montarle. Se ci sono irregolarità, come pieghe, torsioni, o altri difetti di
fabbricazione, causeranno ronzii e note stonate o distorsioni del suono. Si consiglia
di sostituirle una alla volta, in modo da non togliere tutta la tensione alla tastiera.
In questo modo sarà più facile riaccordare e sistemare la tastiera.
Quando si avvolgono le corde sul perno della macchina per l'accordatura, bisogna
sempre avvolgerle in modo stretto ed uniforme, per evitare lo slittamento che può
verificarsi in presenza di spazi vuoti. Avvolgere sempre almeno 2 o 3 volte intorno
al perno partendo dall'alto verso il basso. Come regola generale, utilizzare circa
5¢cm (2 pollici) di allentamento in più quando si riavvolge una chitarra e circa 8 cm
(3 pollici) di allentamento quando si riannoda un basso. Per le corde non avvolte, o
semplici, seguite il diagramma (Figura 1) che spiega come installare le corde su una
chitarra per evitare che scivolino.
1. Inserire l'estremità della corda nel perno di accordatura (assicurarsi di lasciare un
margine di allentamento sufficiente per qualche giro intorno al perno).
2. Avvolgere l'estremità della corda in senso orario intorno al perno e sotto la corda
nel punto in cui entra nel perno (in senso antiorario quando si incordano le corde sul
lato acuto della paletta).
CAMBIARE LE CORDE
Figura 1: Incordatura di corde lisce
www.PyleUSA.com
4
Un ponte flottante ha una base arcuata in legno o metallo tenuta in posizione sul
piano dello strumento solo grazie alla pressione delle corde verso il basso. Se il ponte
viene spostato anche di poco durante la ri-arrangiatura, l'intonazione non sarà più
fedele (alcuni strumenti sono dotati di ponti "a perno" che eliminano questa possibilità).
Per regolare l'intonazione del ponte flottante su una chitarra, controllare prima
l'armonica del 12° tasto e l'accordatura del 12° tasto di entrambe le corde del Mi
(alto e basso). Se intonate correttamente, le altezze dei tasti e dell'armonica a 12
tasti di entrambe le corde del Mi concordano, e nessuna di esse sarà acuta o piatta.
Se l'intonazione della nota al 12° tasto è acuta rispetto all'intonazione dell'armonica al 12° tasto, picchiettare leggermente il piede del
ponte per spostarlo verso la cordiera finché le due altezze non si accordano. Se l'intonazione della nota del 12° tasto è piatta rispetto
all'intonazione dell'armonico del 12° tasto, picchiettare leggermente il piede del ponticello per spostarlo in avanti verso il manico
finché le due altezze non concordano. Per accordare con precisione i ponti flottanti, regolare ciascuna sella in avanti o indietro
utilizzando le singole viti controllando l'accordatura dell'armonica a 12 tasti rispetto all'intonazione al 12° tasto.
NOTA IMPORTANTE: quando si riaccorda una chitarra con ponte flottante, cambiare le corde una alla volta. Non rimuovere tutte le
corde in una volta sola, poiché il ponte è tenuto in posizione corretta solo dalla pressione verso il basso delle corde.
3. L'estremità della corda viene tirata su se stessa formando una sorta di nodo (l'estremità della corda può essere piegata
verso il basso e tagliata in modo netto vicino al nodo).
4. Accordare l'intonazione, assicurandosi che le corde si avvolgano ordinatamente lungo il palo dell'accordatura.
Nota: le corde sono sempre avvolte in senso orario attorno ai pali del lato basso e in senso antiorario attorno ai pali del
lato alto della paletta.
REGOLAZIONE DEL PONTE FLOTTANTE
www.PyleUSA.com
5
www.PyleUSA.com
REGOLAZIONE DEL TRUSS ROD
Per regolare il truss rod, individuare l'accesso al truss rod sulla tastiera (Figura 2) o all'estremità del manico dalla giunzione del
corpo (Figura 3), rimuovere il coperchio del truss rod e inserire la chiave a brugola della misura corretta (4 mm) o la chiave a
tubo (8 mm) per effettuare la regolazione. Ruotare in senso antiorario per allentare e in senso orario per stringere.
Nota: se l'accesso al dado del truss rod non è visibile, è possibile che in questo
strumento si trovi all'interno della tasca del manico (Figura 4) - Questo richiede
di estrarlo dal corpo per regolare il truss rod.
La regolazione del truss rod deve essere eseguita solo da un tecnico qualificato.
Una regolazione errata o eccessiva del truss rod può causare danni al manico
della chitarra e non sono coperti da garanzia.
Figura 2:
Truss Rod alla tastiera
Figura 3:
Truss Rod vicino all'articolazione del corpo
Figura 4:
Truss Rod all'interno della tasca del
manico
Allentare
Stringere
www.PyleUSA.com
6

CONTROLLI E SPECIFICHE
Di seguito sono riportate alcune brevi descrizioni dei controlli elettronici di base e della terminologia. Per informazioni più
specifiche sul vostro modello, visitate il nostro sito web www.PyleUSA.com.
Nota: la maggior parte delle manopole di controllo possono essere facilmente serrate o rimosse utilizzando una chiave a brugola da
2,0 mm o un cacciavite a testa piatta per regolare la vite di fermo sul lato della manopola. Se una manopola si allenta, è necessario
rimuoverla e controllare che il comando sia correttamente serrato al corpo prima di serrare nuovamente la manopola sull'albero di
comando. Se allentato può essere facilmente serrato con una qualsiasi chiave regolabile. Si dovrà rimuovere la piastra posteriore e
tenere il controllo dal retro della chitarra mentre si stringe il dado dalla parte superiore del corpo. In questo modo si eviterà di
spostare i controlli o di danneggiare o rompere i collegamenti.
Controllo del Volume
Controlla il livello di uscita principale della chitarra. Ruotando la manopola in senso orario si aumenta il volume, mentre ruotandola in
senso antiorario lo si diminuisce. Alcuni strumenti sono dotati di più controlli di volume, nel qual caso è presente un controllo di
volume per ogni pickup.
Nota: nel caso di controlli di volume multipli, quando uno dei due controlli di volume è spento e il selettore dei pickup è in posizione
centrale con entrambi i pickup accesi, l'intero segnale dello strumento viene disattivato.
Controllo del Tono
Regola le alte frequenze presenti nel segnale proveniente dalla chitarra. Con la manopola ruotata completamente in senso orario,
sono presenti tutte le frequenze. Ruotando la manopola in senso antiorario si riducono le alte frequenze.
Uscita Jack
È il punto in cui il segnale di uscita della chitarra viene inviato all'amplificatore collegando un qualsiasi cavo standard da 14" per
chitarra. La maggior parte dei jack di uscita si trova vicino all'angolo inferiore della chitarra, sotto la cavità.
www.PyleUSA.com
7

Nota:
Se la chitarra è dotata di elettronica attiva, è necessario rimuovere sempre il cavo dopo aver
suonato. Se si lascia il cavo collegato allo strumento, la batteria si scarica.
Se il jack si allenta, non serrarlo senza aver prima rimosso il jackplate e aver fissato l'interno del jack.
e aver fissato l'interno del jack, altrimenti si rischia di rompere i fili e di perdere l'uscita della chitarra.
chitarra di perdere l'uscita.
Pickup
I pickup della chitarra trasformano le vibrazioni delle corde in un segnale elettronico che viene
inviato all'amplificatore. I pickup sono costituiti da magneti e bobine di filo.
Esistono due tipi di pickup magnetici utilizzati nella maggior parte delle chitarre elettriche: i Single
Coil e gli Humbucker. Un pickup a bobina singola è costituito da una sola bobina di filo e
generalmente ha un'uscita debole.
A causa della sua struttura, un pickup a bobina singola è rumoroso poiché non può bloccare il ronzio
e le interferenze RF. Gli humbucker, invece, hanno di fatto "la cancellazione del rumore" grazie alla
loro costruzione che prevede l'utilizzo di due bobine affiancate. I segnali provenienti da ciascuna
bobina sono combinati in un modo particolare che annulla il ronzio e le interferenze RF comuni con
i pickup a bobina singola. Gli humbucker hanno generalmente un segnale di uscita più elevato
rispetto ai single coil.
Selettore pickup
Il selettore viene utilizzato per passare da un pickup all'altro o da una combinazione di pickup
all'altra (su chitarre con due o più pickup).
www.PyleUSA.com
8

GUIDA ALLE IMPOSTAZIONI DEGLI AMPLIFICATORI PER CHITARRA
INGRESSO: Collegare qui la chitarra elettrica.1.
DISTORSIONE: controlla il livello di distorsione per l'overdrive. Con l'aumento del livello aumenta anche la distorsione del suono.2.
DRIVE ON/OFF: serve per attivare/disattivare l'overdrive.3.
TONE: controlla la gamma di frequenze medi, bassi e alti.4.
VOLUME: è il controllo del livello generale del volume, il principale o il canale di distorsione.5.
AUX IN: Accetta telefono cellulare, computer, iPad, TV box, lettore CD, lettore MP3 e altri dispositivi audio.6.
TELEFONO: È una presa per cuffie stereo standard da 3,5 mm per collegare le cuffie.7.
LUCE DI ALIMENTAZIONE: questa luce è normalmente accesa quando si accende il lettore. Si spegne quando l'apparecchio viene
spento.
8.
INTERRUTTORE DI ALIMENTAZIONE: interruttore ON/OFF per l'alimentazione principale dell'amplificatore.9.
FUNZIONE
www.PyleUSA.com
9

Per evitare il rischio di scosse elettriche, non esporre all'acqua o
all'umidità.
ATTENZIONE
Per evitare che il bullone a taglio tocchi l'interruttore e il
portafusibili, non può superare i 4 mm (diametro) x 30 mm
(lunghezza).
1.
Débranchez l'amplificateur du secteur avant de remplacer le fusible. 2.
IMPORTANTE!!!
Collegare sempre il cavo dello strumento alla chitarra prima di
collegare l'amplificatore.
Il collegamento all'amplificatore per primo potrebbe danneggiare l'altoparlante.
NON lasciare la chitarra incustodita con il volume alzato.
La presenza di luci al neon o fluorescenti vicino all'amplificatore può causare un leggero ronzio.
Spesso questo fenomeno può essere eliminato cambiando la posizione dello strumento o dell'amplificatore.
Per evitare di ferirsi le orecchie o di danneggiare le cuffie, ridurre il volume dell'amplificatore prima di collegare le cuffie.
L'inserimento delle cuffie spegnerà l'altoparlante dell'amplificatore.
Registra il prodotto
Grazie per aver scelto PyleUSA. Registrando il vostro prodotto, vi assicurate di ricevere tutti i vantaggi della nostra
garanzia esclusiva e dell'assistenza clienti personalizzata.
Completate il modulo per accedere all'assistenza di esperti e mantenere il vostro acquisto PyleUSA in perfette condizioni.
www.PyleUSA.com
10

Siamo qui per aiutarti!
Domande? Commenti?
PyleUSA.com/ContactUs
(1) 718-535-1800

GERMAN
MICH SCANNEN
PyleUSA.com
Website
6-saitige E-Gitarre
mit Zubehörsatz

Steg
Körper
Vorderer Gurtknopf
Hals
Gurtknopf
Klinkenbuchse
Kontrollknöpfe
Tonabnehmer
Bünde
Kopfplatte
www.PyleUSA.com
2
Tonabnehmer-Wahlschalter
Bitte nehmen Sie sich ein paar Minuten Zeit, um dieses Handbuch zu lesen. Es wird Ihnen Antworten auf
viele Ihrer Fragen geben und Sie über die Pflege und Wartung Ihres neuen Geräts informieren.
GITARREN-ANATOMIE
Vibrato oder Tremulo Arm
www.PyleUSA.com
2

Stimmen Sie Ihr Instrument mit den Stimmwirbeln, um die Tonhöhe zu erhöhen oder zu senken.
Bei einer Gitarre mit einem Feststelltremolosystem müssen Sie zuerst die Feststellmutter lösen, bevor Sie die Stimmung mit den
Stimmmechaniken einstellen können. Obwohl Tremolosysteme mit Verriegelung über Feinstimmer am Steg verfügen, ermöglichen
sie nur eine begrenzte (Fein-)Stimmung. Wenn Sie die Stimmschlüssel gegen den Uhrzeigersinn drehen, wird die Tonhöhe der Saite
erhöht, während eine Drehung im Uhrzeigersinn die Tonhöhe der Saite, die Sie stimmen, senkt. Stimmen Sie Ihre Gitarre, indem Sie
mit der niedrigsten bis zur höchsten Saite beginnen.
Nachdem Sie dies einmal getan haben, gehen Sie zurück und überprüfen Sie die Stimmung noch einmal. Bei manchen Instrumenten
müssen Sie dies einige Male tun, insbesondere wenn die Saiten neu sind oder Sie eine Gitarre mit einem schwimmenden Tremolo-
Steg haben. Das Stimmen einer Saite kann sich auf die anderen Saiten auswirken und es ist notwendig, die Stimmung erneut zu
überprüfen, bis alle Saiten auf der gewünschten Tonhöhe bleiben.
Hinweis: Neue Saiten neigen dazu, sich zu dehnen und zu verstimmen, bis sie sich gesetzt haben. Es ist eine gute Idee, die Saiten zu
dehnen, wenn Sie gerade einen neuen Satz aufgezogen haben. Tun Sie dies nach dem ersten Stimmen, indem Sie die Noten biegen
und jede Saite physisch dehnen, indem Sie sie vom Griffbrett wegziehen (achten Sie darauf, nicht zu stark zu ziehen, da sonst eine
Saite reißen könnte). Nachdem Sie die Saiten gründlich gedehnt haben, wiederholen Sie den Stimmvorgang.
REINIGUNG
Die regelmäßige Reinigung Ihrer Gitarre ist eine der besten Methoden, um das Finish zu pflegen und die Lebensdauer
der Saiten zu verlängern. Reinigen Sie Ihre Gitarre nach jedem Gebrauch und achten Sie darauf, das Griffbrett und die
Saiten sowie alle beschichteten Teile wie Mechaniken, Tonabnehmer, Steg usw. abzuwischen. Achten Sie darauf,
Schweiß zu entfernen, da er zu Korrosion und Rost an Metallteilen und Saiten führen kann.
STIMMEN IHRER GITARRE
www.PyleUSA.com
3
Wir empfehlen Ihnen dringend, Ihre Saiten recht häufig zu wechseln. Wenn Sie täglich spielen, empfehlen wir Ihnen, Ihre Saiten
alle 3 Monate zu wechseln. Ein neuer Satz Saiten klingt klar und präzise, während ein alter Satz dumpf klingt und ungewöhnliche
Schnarrgeräusche und tote Töne erzeugen kann. Wenn Sie bemerken, dass Ihre Saiten schmutzig geworden sind, sich verfärbt
haben oder einen ungewöhnlich schnarrenden oder dumpfen Klang erzeugen, dann ist es definitiv an der Zeit, einen neuen Satz
Saiten auf Ihre Gitarre zu ziehen.
Überprüfen Sie Ihre neuen Saiten immer und stellen Sie sicher, dass sie glatt und frei
von Mängeln sind, bevor Sie sie aufziehen. Wenn es Unregelmäßigkeiten gibt, wie
Knicke, Verdrehungen oder andere Herstellungsfehler, führen sie zu Schnarren und
unechten Tönen sowie zu Klangverzerrungen. Wir empfehlen, jeweils eine Saite zu
ersetzen, damit nicht die gesamte Spannung vom Hals genommen wird. Das
erleichtert das Nachstimmen und Einstellen des Halses.
Wenn Sie die Saiten auf die Stimmwirbel aufwickeln, wickeln Sie sie immer straff
und gleichmäßig auf, um ein Verrutschen zu vermeiden, das bei Lücken auftreten
kann. Wickeln Sie die Saiten immer mindestens 2 oder 3 Mal von oben nach unten
um den Pfosten. Als Faustregel gilt, dass Sie beim Umspannen einer Gitarre etwa
5 cm (2 Zoll) und beim Umspannen eines Basses etwa 8 cm (3 Zoll) mehr Spiel haben
sollten. Bei unumsponnenen oder blanken Saiten folgen Sie dem Diagramm
(Abbildung 1), das zeigt, wie Sie diese Saiten am Wirbel befestigen, damit sie nicht
verrutschen.
1. Führen Sie das Ende der Saite in den Stimmwirbel ein (achten Sie darauf, dass
genug Spielraum für ein paar Umdrehungen um den Stimmwirbel bleibt).
2. Wickeln Sie das Ende der Saite im Uhrzeigersinn um den Wirbel und unter die
Saite, wo sie in den Wirbel eingeführt wird (gegen den Uhrzeigersinn, wenn Sie
die Mechaniken auf der Diskantseite der Kopfplatte stimmen).
SAITEN WECHSELN
Abbildung 1: Aufziehen einfacher Saiten
www.PyleUSA.com
4
Ein schwebender Steg hat einen gewölbten Holz- oder Metallsockel, der nur durch den
Druck der Saiten auf die Decke des Instruments in Position gehalten wird. Wenn der Steg
beim Nachziehen der Saiten auch nur geringfügig bewegt wird, stimmt die Intonation nicht
mehr (einige Instrumente haben „gestiftete“ Stege, die diese Möglichkeit ausschließen).
Um die Intonation des schwebenden Stegs (floating bridge) an einer Gitarre einzustellen,
überprüfen Sie zuerst die harmonische Oktave auf dem 12. Bund und die gegriffene 12.
Bundstimmung auf beiden E-Saiten (hoch und tief).Wenn die Intonation richtig eingestellt
ist, werden die gestimmten und harmonischen Töne auf dem 12. Bund beider E-Saiten
übereinstimmen, ohne dass einer von ihnen zu hoch oder zu tief ist.
Wenn der Ton auf dem 12. Bund scharf im Vergleich zum Ton der harmonischen Oktave auf dem 12. Bund ist, können Sie leicht auf den
Stegfuß tippen, um ihn in Richtung des Saitenhalters (tailpiece) zu bewegen, bis beide Töne übereinstimmen. Wenn der Ton auf dem 12.
Bund flach im Vergleich zur Tonhöhe der harmonischen Oktave auf dem 12. Bund ist, können Sie leicht auf den Stegfuß tippen, um ihn in
Richtung des Halses zu bewegen, bis die beiden Töne übereinstimmen. Um vollständig einstellbare Brücken feinzustimmen, können Sie
jeden Sattel vorwärts oder rückwärts bewegen, indem Sie die individuellen Intonationsschrauben verwenden und dabei die Stimmung der
harmonischen Oktave auf dem 12. Bund mit der gestimmten Tonhöhe auf dem 12. Bund überprüfen.
WICHTIGER HINWEIS: Beim Neu-Besaiten einer Gitarre mit einem schwebenden Steg sollten Sie die Saiten einzeln wechseln. Entfernen
Sie nicht alle Saiten auf einmal, da der Steg nur durch den nach unten gerichteten Druck der Saiten in der richtigen Position gehalten wird.
3. Ziehen Sie das Ende der Saite fest über sich, sodass eine Art Knoten entsteht (das Ende der Saite kann dann nach
unten gebogen und in der Nähe des Knotens sauber abgeschnitten werden).
4. Stimmen Sie die Saite und achten Sie dabei darauf, dass sich die Umwicklungen sauber um den Stimmwirbel wickeln.
Hinweis: Die Saiten werden immer im Uhrzeigersinn um die Wirbel auf der Bassseite und gegen den Uhrzeigersinn um
die Wirbel auf der Diskantseite der Kopfplatte gewickelt.
EINSTELLUNG DER SCHWEBENDEN STEGEINHEIT
www.PyleUSA.com
5
EINSTELLEN DES HALSSTABES
Um den Halsstab einzustellen, finden Sie zunächst den Zugang zum Halsstab entweder am Kopf der Gitarre (Abbildung 2) oder
am Ende des Halses, wo er auf den Korpus trifft (Abbildung 3). Entfernen Sie die Abdeckung des Halsstabes und setzen Sie den
passenden Inbusschlüssel (4mm) oder Rohrzange (8mm) für die Einstellung ein. Drehen Sie gegen den Uhrzeigersinn, um zu
lockern, und im Uhrzeigersinn, um anzuziehen.
Hinweis: Wenn der Zugang zur Halsstabmutter nicht sichtbar ist, kann es sein,
dass sie sich im Hals-Taschenbereich (Abbildung 4) befindet. Dies erfordert, dass
der Hals vom Korpus getrennt wird, um den Halsstab einzustellen.
Einstellungen am Halsstab sollten nur von einem qualifizierten Techniker
vorgenommen werden. Das Überdrehen oder zu starke Einstellen des Halsstabes
kann den Gitarrenhals beschädigen und ist nicht durch die Garantie abgedeckt.
Abbildung 2:
Halsstab am Kopf der Gitarre
Abbildung 3:
Halsstab an der Korpusverbindung
Abbildung 4:
Seitliche Tasche für den Halsstab
Lösen Sie
Presse
www.PyleUSA.com
6

BEDIENELEMENTE UND SPEZIFIKATIONEN
Die folgenden sind kurze Beschreibungen der grundlegenden elektronischen Steuerelemente und Begriffe. Für genauere
Informationen zu Ihrem Modell besuchen Sie bitte unsere Website unter www.PyleUSA.com.
Hinweis: Die meisten Bedienungsknöpfe können leicht mit einem 2,0 mm Inbusschlüssel oder einem Schlitzschraubendreher
angezogen oder entfernt werden, indem Sie die Einstellschraube an der Seite des Knopfes justieren. Wenn ein Knopf locker wird,
sollten Sie zuerst den Knopf entfernen und die Steuerung überprüfen, um sicherzustellen, dass sie ordnungsgemäß am Gehäuse
befestigt ist, bevor Sie den Knopf wieder auf die Steuerwelle ziehen. Eine lockere Steuerwelle kann leicht mit einem verstellbaren
Schraubenschlüssel angezogen werden. Sie müssen die Elektronikrückplatte entfernen und die Steuerung von der Rückseite der
Gitarre halten, während Sie die Mutter von oben am Gehäuse anziehen. Dadurch wird sichergestellt, dass Sie die Steuerelemente
nicht bewegen oder die Drahtverbindungen beschädigen oder brechen.
Lautstärkeregelung
Regelt den Gesamtausgangspegel der Gitarre. Das Drehen des Knopfes im Uhrzeigersinn erhöht die Lautstärke, während das
Drehen gegen den Uhrzeigersinn die Lautstärke verringert. Einige Instrumente haben möglicherweise mehrere Lautstärkeregler, in
diesem Fall gibt es für jeden Tonabnehmer einen eigenen Lautstärkeregler.
Hinweis: Im Falle mehrerer Lautstärkeregler wird, wenn einer der Lautstärkeregler ausgeschaltet ist und der Tonabnehmer-
Wahlschalter in der Mittelstellung ist und beide Tonabnehmer eingeschaltet sind, das gesamte Signal des Instruments
ausgeschaltet."
Klangregelung
Regelt die hohen Frequenzen im Signal, das von Ihrer Gitarre kommt. Mit dem Knopf vollständig im Uhrzeigersinn sind alle
Frequenzen vorhanden. Wenn Sie den Knopf gegen den Uhrzeigersinn drehen, verringern Sie die hohen Frequenzen.
Ausgangsbuchse
Hier wird das Ausgangssignal der Gitarre an den Verstärker gesendet, indem ein herkömmliches 1/4"-Gitarrenkabel eingesteckt
wird. Die meisten Ausgangsbuchsen befinden sich in der Nähe der unteren Ecke der Gitarre unterhalb des Elektronikfachs.
www.PyleUSA.com
7

Hinweis:
Wenn Ihre Gitarre aktive Elektronik hat, sollten Sie das Kabel nach dem Spielen immer entfernen.
Wenn Sie das Kabel in Ihrem Instrument eingesteckt lassen, wird die Batterie entladen.
Wenn Ihre Buchse jemals locker wird, sollten Sie sie nicht ohne vorheriges Entfernen der
Buchsenplatte und Sicherung des Inneren der Buchse festziehen, da Sie sonst die Kabel beschädigen
könnten, was zu einem Verlust des Gitarrensignals führen kann.
Pastillas
Die Tonabnehmer auf Ihrer Gitarre wandeln die Saitenvibrationen in ein elektronisches Signal um, das
an Ihren Verstärker gesendet wird. Tonabnehmer bestehen aus Magneten und Spulen aus Draht.
Es gibt zwei Arten von magnetischen Tonabnehmern, die in den meisten E-Gitarren verwendet
werden - Single Coils und Humbuckers. Ein Single Coil-Tonabnehmer besteht aus nur einer Spule
Draht und hat im Allgemeinen eine schwache Ausgangsleistung.
Aufgrund seiner Konstruktion ist ein Single Coil-Tonabnehmer anfällig für Rauschen, da er
Störgeräusche und Funkstörungen nicht blockieren kann. Humbuckers hingegen sind tatsächlich
"brummunterdrückend", aufgrund ihrer Konstruktion mit 2 Spulen nebeneinander. Die Signale aus
jeder Spule werden auf eine bestimmte Weise kombiniert, um das Brummen und die Funkstörungen
zu unterdrücken, die bei Single Coil-Tonabnehmern häufig auftreten. Humbuckers haben im
Allgemeinen ein höheres Ausgangssignal im Vergleich zu Single Coils.
Tonabnehmerwahlschalter
Der Wahlschalter dient zum Umschalten zwischen verschiedenen Tonabnehmern oder
Kombinationen von Tonabnehmern (bei Gitarren mit zwei oder mehr Tonabnehmern).
www.PyleUSA.com
8

GITARRENVERSTÄRKER EINSTELLUNGEN
INPUT: Schließen Sie hier Ihre E-Gitarre an. 1.
GAIN: Regelt den Gain-Pegel für Overdrive. Mit zunehmender Verstärkung steigt auch der Verzerrungsgrad in Ihrem Sound. 2.
DRIVE ON/OFF: Hiermit schalten Sie den Overdrive ein/aus. 3.
TONE: Steuert den niedrigen, mittleren und hohen Frequenzbereich. 4.
VOLUME: Dies ist der allgemeine Pegelregler für den Clean-Kanal oder den Distortion-Kanal. 5.
AUX IN: Hier können Sie ein Mobiltelefon, einen Computer, ein iPad, eine TV-Box, einen CD-Player, einen MP3-Player und andere Audiogeräte
anschließen.
6.
PHONE: Dies ist ein 3,5-mm-Standard-Stereo-Kopfhöreranschluss zum Anschließen von Kopfhörern. 7.
POWER LIGHT: Diese Leuchte leuchtet normalerweise, wenn das Gerät eingeschaltet ist. Diese Leuchte ist aus, wenn das Gerät ausgeschaltet
wird.
8.
POWER SWITCH: Ein/Aus-Schalter für die Hauptstromversorgung des Verstärkers.9.
FUNKTION
www.PyleUSA.com
9

PUm das Risiko eines elektrischen Schlages zu vermeiden, setzen
Sie das Gerät nicht Wasser oder Feuchtigkeit aus.
VORSICHT
Um zu verhindern, dass die Schraube den Schalter und den Sicherungshalter
berührt, darf die Schraube nicht größer als 4mm (Durchmesser) x 30mm (Länge)
sein.
1.
Trennen Sie den Verstärker vom Stromnetz, bevor Sie die Sicherung auswechseln.2.
WICHTIG!!!
Stellen Sie immer zuerst Ihr Instrumentenkabel an Ihre Gitarre an, bevor
Sie es an Ihren Verstärker anschließen.
Das Anschließen an Ihren Verstärker zuerst kann möglicherweise den Lautsprecher
beschädigen.
Lassen Sie Ihre Gitarre NICHT mit aufgedrehter Lautstärke unbeaufsichtigt.
Neon- oder Leuchtstoffbeleuchtung in der Nähe des Verstärkers kann leichte Brummschleifen verursachen.
Dies kann häufig durch Ändern der Position Ihres Instruments oder des Verstärkers beseitigt werden.
Um Ihre Ohren nicht zu verletzen oder Ihre Kopfhörer nicht zu beschädigen, reduzieren Sie die Lautstärke des Verstärkers,
bevor Sie Ihre Kopfhörer anschließen.
Das Anschließen eines Kopfhörerpaares schaltet den Verstärkerlautsprecher aus.
Produkt registrieren
Danke, dass Sie sich für PyleUSA entschieden haben. Indem Sie Ihr Produkt registrieren, stellen Sie sicher,
dass Sie alle Vorteile unserer exklusiven Garantie und unseres persönlichen Kundensupports erhalten.
Füllen Sie das Formular aus, um fachkundige Unterstützung zu erhalten und Ihren PyleUSA-Kauf in
perfektem Zustand zu halten.
www.PyleUSA.com
10

Wir sind hier, um Ihnen zu helfen!
Fragen? Kommentare?
PyleUSA.com/ContactUs
(1) 718-535-1800

POLISH
ZESKANUJ MNIE
PyleUSA.com
Strona Internetowa
Gitara elektryczna
6-strunowa
z zestawem akcesoriów

Mostek
Obudowa
Przycisk przedniego paska
Szyjka
Przycisk paska
Gniazdko wejściowe jack
Przyciski kontrolne
Przetworniki
Progi
Główka
www.PyleUSA.com
2
Selektor przetworników
Poświęć trochę czasu na przeczytanie tej broszury. Znajdziesz w niej odpowiedzi na nurtujące Cię pytania
oraz informacje na temat pielęgnacji i konserwacji nowego instrumentu.
ANATOMIA GITARY
Ramię Vibrato lub Tremulo
www.PyleUSA.com
2

Accordare lo strumento utilizzando le chiavi di accordatura per alzare o abbassare l'intonazione.
W gitarze wyposażonej w blokujący system tremolo musisz najpierw poluzować nakrętkę blokującą, zanim będziesz mógł
wyregulować strojenie za pomocą prowadnic. Chociaż blokowane systemy tremolo mają precyzyjne tunery umieszczone na mostku,
pozwalają one tylko na ograniczone strojenie. Obracanie klawiszy strojenia w kierunku przeciwnym do ruchu wskazówek zegara
zwiększa wysokość struny, podczas gdy obracanie ich zgodnie z ruchem wskazówek zegara zmniejsza wysokość struny, którą stroisz.
Nastrój gitarę zaczynając od najniższych strun i przechodząc do najwyższych.
Gdy już to zrobisz, wróć i ponownie sprawdź strojenie. Na niektórych instrumentach będziesz musiał to zrobić kilka razy, zwłaszcza
jeśli struny są nowe lub jeśli gitara ma pływający mostek tremolo. Strojenie jednej struny może mieć wpływ na inne struny i
konieczne jest ponowne sprawdzenie strojenia, aż wszystkie struny osiągną pożądaną wysokość.
Uwaga: lle corde nuove tendono ad allungarsi e a stonare finché non si stabilizzano. È buona norma tendere le corde quando si è
appena montato un nuovo set. Dopo l'accordatura iniziale, si può fare questo piegando le note e allungando fisicamente ogni corda
tirandola dalla tastiera (attenzione a non tirare troppo forte, perché in questo modo si potrebbe rompere). Dopo aver stirato a fondo
le corde, ripetete il processo di accordatura.
CZYSZCZENIE
Regularne czyszczenie gitary jest jednym z najlepszych sposobów na utrzymanie wykończenia i przedłużenie
żywotności strun. Wyczyść gitarę po każdym użyciu, upewniając się, że wycierasz wszystkie obszary, które mają kontakt
z palcami i strunami, a także wszelkie części platerowane, takie jak tunery, przetworniki, mostek itp. Pamiętaj, aby
usuwać pot, ponieważ może on powodować korozję i rdzę na metalowych częściach i strunach.
AKORDEON GITAROWY
www.PyleUSA.com
3
Zdecydowanie zalecamy dość częstą wymianę strun. Jeśli grasz codziennie, zalecamy wymianę co trzy miesiące. Nowy zestaw
strun będzie generował czysty, dokładny dźwięk, podczas gdy stary zestaw strun będzie generował tępy dźwięk i może
powodować nietypowe brzęczenie i martwe dźwięki. Jeśli zauważysz, że twoje struny są brudne, odbarwione lub wydają
nietypowe brzęczenie lub tępy dźwięk, zdecydowanie nadszedł czas, aby zainstalować nowy zestaw strun na gitarze.
Zawsze sprawdzaj nowe struny i upewnij się, że są gładkie i wolne od wad przed ich
zainstalowaniem. Nieregularności, takie jak zmarszczki, zagięcia lub inne wady
produkcyjne powodują brzęczenie i fałszywe dźwięki, a także zniekształcony dźwięk.
Zalecamy wymianę jednej struny na raz, aby napięcie nie zostało całkowicie usunięte
z szyjki. Ułatwi to ponowne strojenie i regulację szyjki.
Podczas nawijania strun na śrubę do strojenia, zawsze dokręcaj je mocno i
równomiernie, aby uniknąć poślizgu, który może wystąpić, jeśli nie są dostrojone.
Zawsze wykonuj co najmniej 2 lub 3 obroty śruby od góry do dołu. Zasadniczo
używaj około 5 cm (2 cale) dodatkowego luzu do nawijania strun gitarowych i około
8 cm (3 cale) do nawijania strun basowych. W przypadku nienawiniętych lub płaskich
strun postępuj zgodnie ze schematem (rysunek 1), który wyjaśnia, jak dopasować te
struny do śruby, aby zapobiec ich ześlizgiwaniu się.
1. Włóż koniec struny do śruby strojenia (upewnij się, że pozostawiłeś wystarczająco
dużo luzu, aby wykonać kilka obrotów wokół śruby).
2. Owiń koniec struny zgodnie z ruchem wskazówek zegara wokół kołka i pod struną
w miejscu, w którym wchodzi ona w kołek (przeciwnie do ruchu wskazówek zegara w
przypadku tunerów po ostrej stronie śruby).
ZMIANA STRUN
Rysunek 1: Proste mocowanie strun
www.PyleUSA.com
4
Pływający mostek składa się z łukowatej drewnianej lub metalowej podstawy, która jest
utrzymywana w pozycji na górze instrumentu wyłącznie przez nacisk strun w dół. Jeśli
mostek przesunie się nawet nieznacznie podczas wymiany strun, intonacja nie będzie
już wierna (instrumenty Sorne mają "kołkowane" mostki, które eliminują taką możliwość).
Aby wyregulować intonację pływającego mostka gitary, najpierw sprawdź harmoniczną
12 progu i strojenie 12 progu obu strun E (wysokich i niskich). Jeśli intonacja jest
prawidłowa, progi i harmoniczne 12 progu dwóch strun E będą równe, a żadna struna
nie będzie ostra ani płaska.
Jeśli wysokość nuty na 12 progu jest wysoka w porównaniu do wysokości harmonicznej na 12 progu, stuknij nóżkę mostka, aby przesunąć
ją w kierunku strunnika, aż obie wysokości będą do siebie pasować. Jeśli wysokość 12. progu jest płaska w stosunku do wysokości 12.
progu harmonicznego, dotknij nóżki mostka, aby przesunąć ją w kierunku strunnika, aż obie wysokości będą do siebie pasować. Aby
nastroić w pełni regulowane mostki, wyreguluj każde siodełko do przodu lub do tyłu za pomocą poszczególnych śrub strojenia, sprawdzając
jednocześnie, czy harmoniczna 12. progu jest zgodna z wysokością 12. progu.
WAŻNA UWAGA: Podczas nawijania strun na gitarze wyposażonej w pływający mostek, zmień je tylko raz. Nie zdejmuj wszystkich strun
na raz, ponieważ mostek jest utrzymywany w prawidłowej pozycji tylko przez nacisk strun w dół.
3. Przeciągnij koniec sznurka na siebie, tworząc rodzaj węzła (koniec sznurka można zgiąć i przeciąć w pobliżu węzła).
4. Dostrój go do kamertonu, upewniając się, że spirale są idealnie owinięte wokół śruby strojenia.
Ważne: Struny są zawsze nawijane zgodnie z ruchem wskazówek zegara wokół śrub po stronie basów i przeciwnie do
ruchu wskazówek zegara wokół śrub po stronie tonów wysokich.
REGULACJA MOSTKA PŁYWAJĄCEGO
www.PyleUSA.com
5
REGULACJA PRĘTU NAPINAJĄCEGO
Aby dokręcić napinacz, najpierw znajdź dostęp do niego przy głowicy (Rysunek 2) lub na końcu przegubu szyjki w pobliżu
uchwytu (Rysunek 3), zdejmij osłonę napinacza i włóż klucz imbusowy (4 mm) lub klucz nasadowy (8 mm) odpowiedniego
rozmiaru, aby dokręcić napinacz.
Uwaga: Jeśli śruba pręta nie jest widoczna, może ona znajdować się wewnątrz
kieszeni uchwytu (Rysunek 4), co wymaga demontażu z obudowy w celu
wyregulowania pręta.
Regulacja pręta napinającego powinna być przeprowadzana wyłącznie przez
wykwalifikowanego technika. Zbyt mocne dokręcenie lub nadmierna regulacja
pręta napinającego może spowodować uszkodzenie szyjki gitary i nie jest objęte
gwarancją.
Rysunek 2:
Pręt na skrzynce na kołki
Rysunek 3:
Pręt podstawy zintegrowany z uchwytem
Rysunek 4:
Kieszeń boczna na zacisk wspornika
Poluzować
Prasa
www.PyleUSA.com
6

ELEMENTY STERUJĄCE I FUNKCJE
Poniżej znajduje się krótki opis podstawowych elektronicznych elementów sterujących i terminologii. Aby uzyskać bardziej
szczegółowe informacje na temat swojego modelu, odwiedź naszą stronę internetową pod adresem www.PyleUSA.com.
Uwaga: Większość pokręteł sterowania można łatwo dokręcić lub zdjąć, używając klucza imbusowego 2,0 mm lub płaskiego
śrubokręta do dokręcenia śruby ustalającej z boku pokrętła. Jeśli pokrętło poluzuje się, należy je najpierw zdjąć i sprawdzić, czy
element sterujący jest prawidłowo dokręcony do korpusu przed ponownym dokręceniem pokrętła na wale sterującym. Poluzowany
wałek sterujący można łatwo dokręcić za pomocą klucza. Będziesz musiał zdjąć tylną płytę z elektroniki i przytrzymać regulator z
tyłu gitary podczas dokręcania nakrętki na górze korpusu. Zapewni to, że nie przesuniesz elementów sterujących i nie uszkodzisz lub
nie przerwiesz połączeń kablowych.
Regulacja głośności
Kontroluje główny poziom wyjściowy gitary. Obracanie pokrętła zgodnie z ruchem wskazówek zegara zwiększa głośność, a
obracanie go w kierunku przeciwnym do ruchu wskazówek zegara zmniejsza głośność. Niektóre instrumenty mają wiele
regulatorów głośności, w którym to przypadku istnieje regulacja głośności dla każdego przetwornika.
Uwaga: W przypadku wielu regulatorów głośności, gdy jeden z regulatorów głośności jest wyłączony, a przełącznik mikrofonu
znajduje się w położeniu środkowym z włączonymi obydwoma mikrofonami, cały sygnał instrumentu jest wyłączony.
Regulacja barwy dźwięku
To pokrętło reguluje wysokie częstotliwości obecne w sygnale pochodzącym z twojej gitary. Gdy pokrętło jest obrócone całkowicie
w prawo, wszystkie częstotliwości są obecne. Obracanie pokrętła w kierunku przeciwnym do ruchu wskazówek zegara zmniejsza
wysokie częstotliwości.
Złącze wyjściowe
Jest to miejsce, w którym wyjście gitary jest wysyłane do wzmacniacza poprzez podłączenie dowolnego standardowego kabla
gitarowego 1/4". Większość gniazd wyjściowych znajduje się w dolnym rogu gitary, poniżej wnęki elektroniki.
www.PyleUSA.com
7
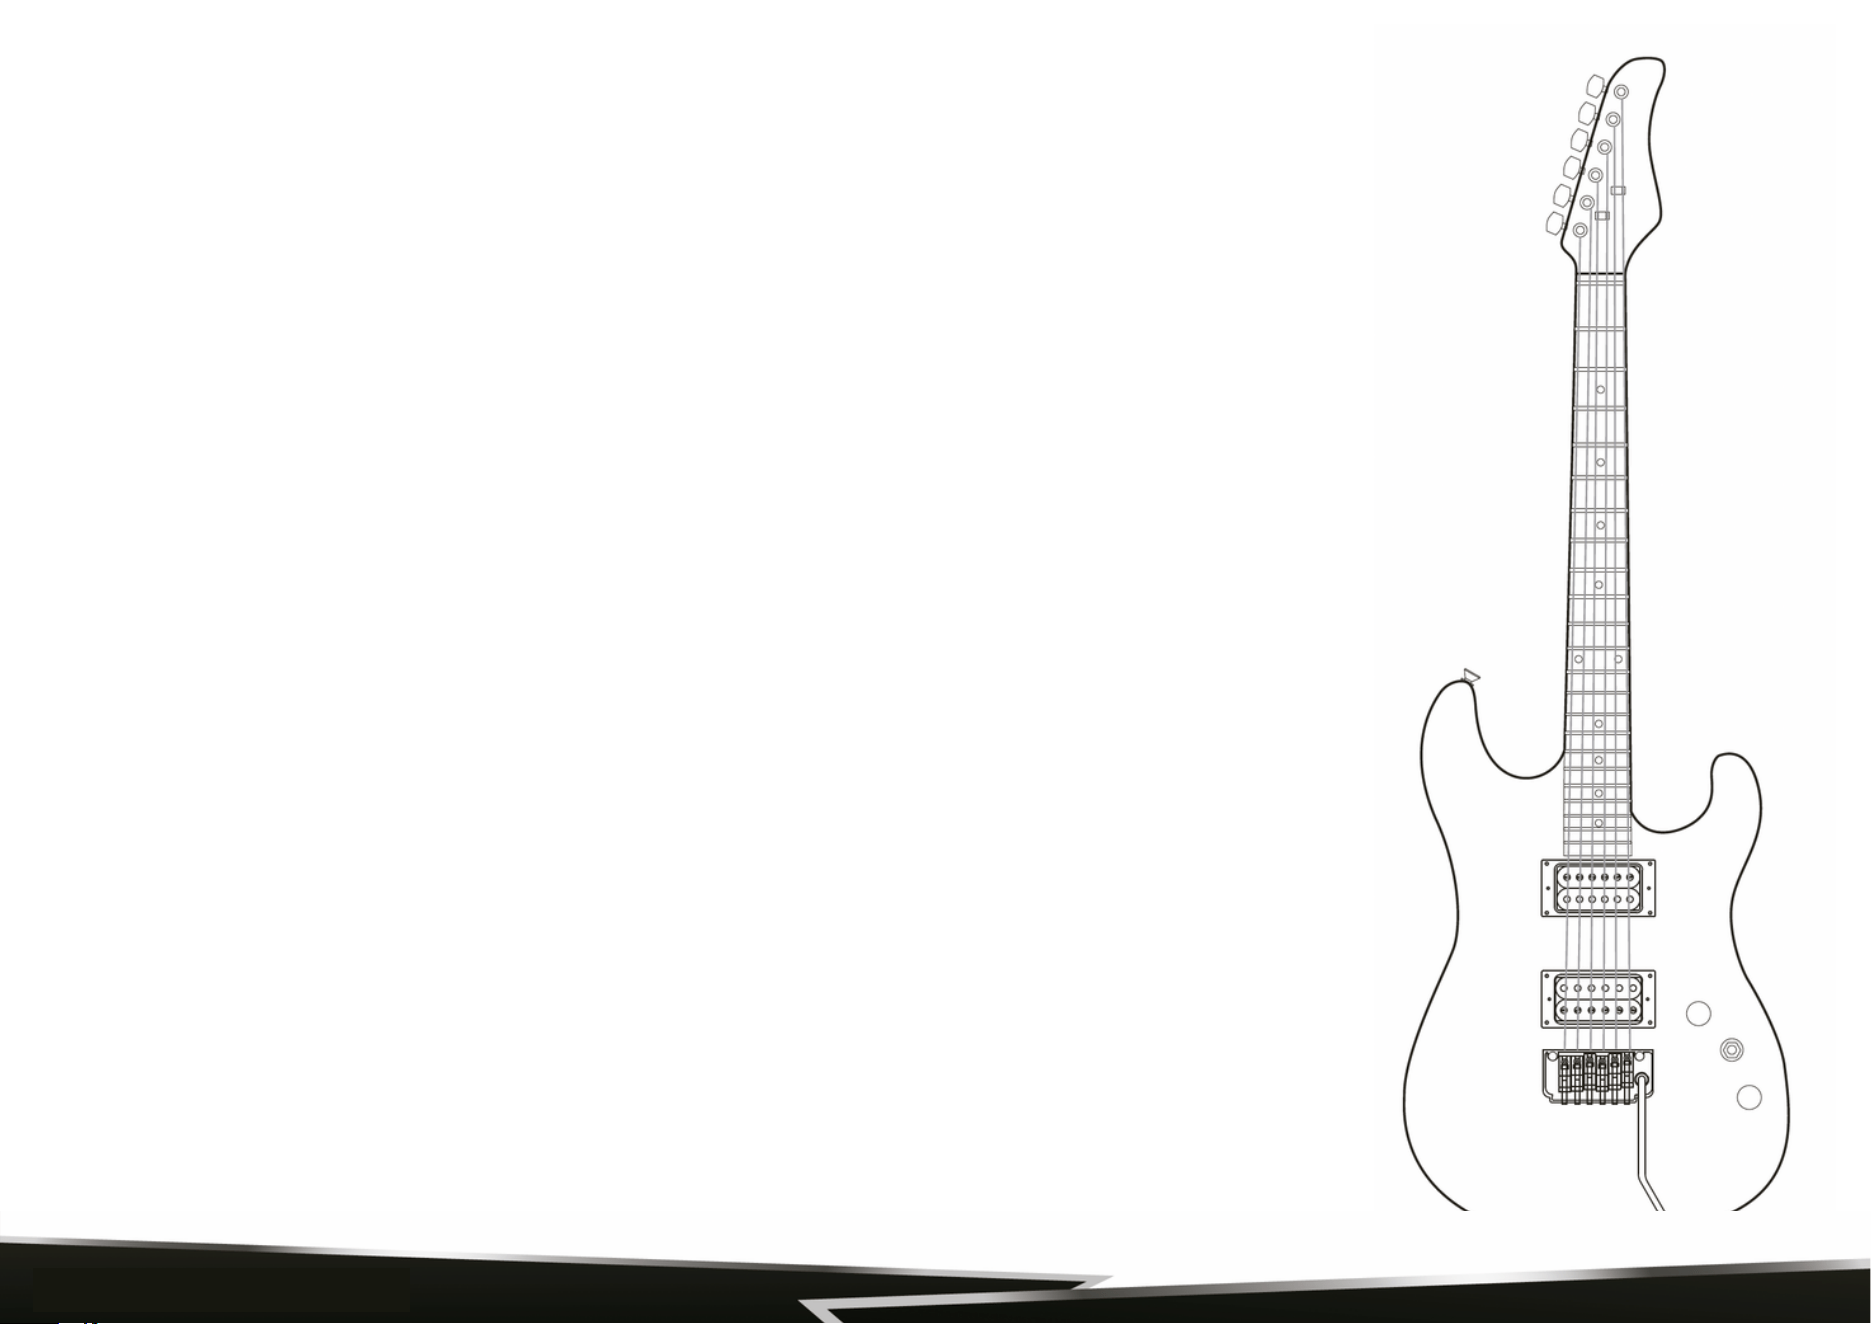
Uwaga:
Jeśli twoja gitara jest wyposażona w aktywną elektronikę, zawsze odłączaj kabel po zakończeniu
gry. Pozostawienie kabla podłączonego do instrumentu spowoduje rozładowanie baterii.
Jeśli złącze się poluzuje, nie dokręcaj go bez uprzedniego usunięcia płytki i zabezpieczenia wnętrza
złącza, w przeciwnym razie ryzykujesz przerwanie przewodów i utratę mocy wyjściowej gitary.
Pickupy
Przetworniki w twojej gitarze przekształcają wibracje strun w sygnał elektroniczny, który jest
wysyłany do wzmacniacza. Przetworniki składają się z magnesów i cewek z drutu.
Istnieją dwa rodzaje przetworników magnetycznych stosowanych w większości gitar
elektrycznych: single-coil i humbucker. Przetwornik z pojedynczą cewką składa się z pojedynczego
zwoju drutu i generalnie ma niską moc wyjściową.
Ze względu na swoją konstrukcję, pojedyncze cewki są głośne, ponieważ nie mogą blokować
szumów i zakłóceń radiowych. Z drugiej strony, humbuckery skutecznie "eliminują szumy" ze
względu na ich konstrukcję z dwoma cewkami obok siebie. Sygnały z każdej cewki są łączone w
sposób, który eliminuje szumy i zakłócenia radiowe, które są powszechne w przypadku
mikrofonów z pojedynczą cewką. Humbuckery generalnie mają wyższy sygnał wyjściowy niż
pojedyncze cewki.
Przełącznik wyboru mikrofonu
Selektor umożliwia przełączanie z jednego przetwornika na inny lub z jednej kombinacji
przetworników na inną (w gitarach z dwoma lub więcej przetwornikami)
www.PyleUSA.com
8
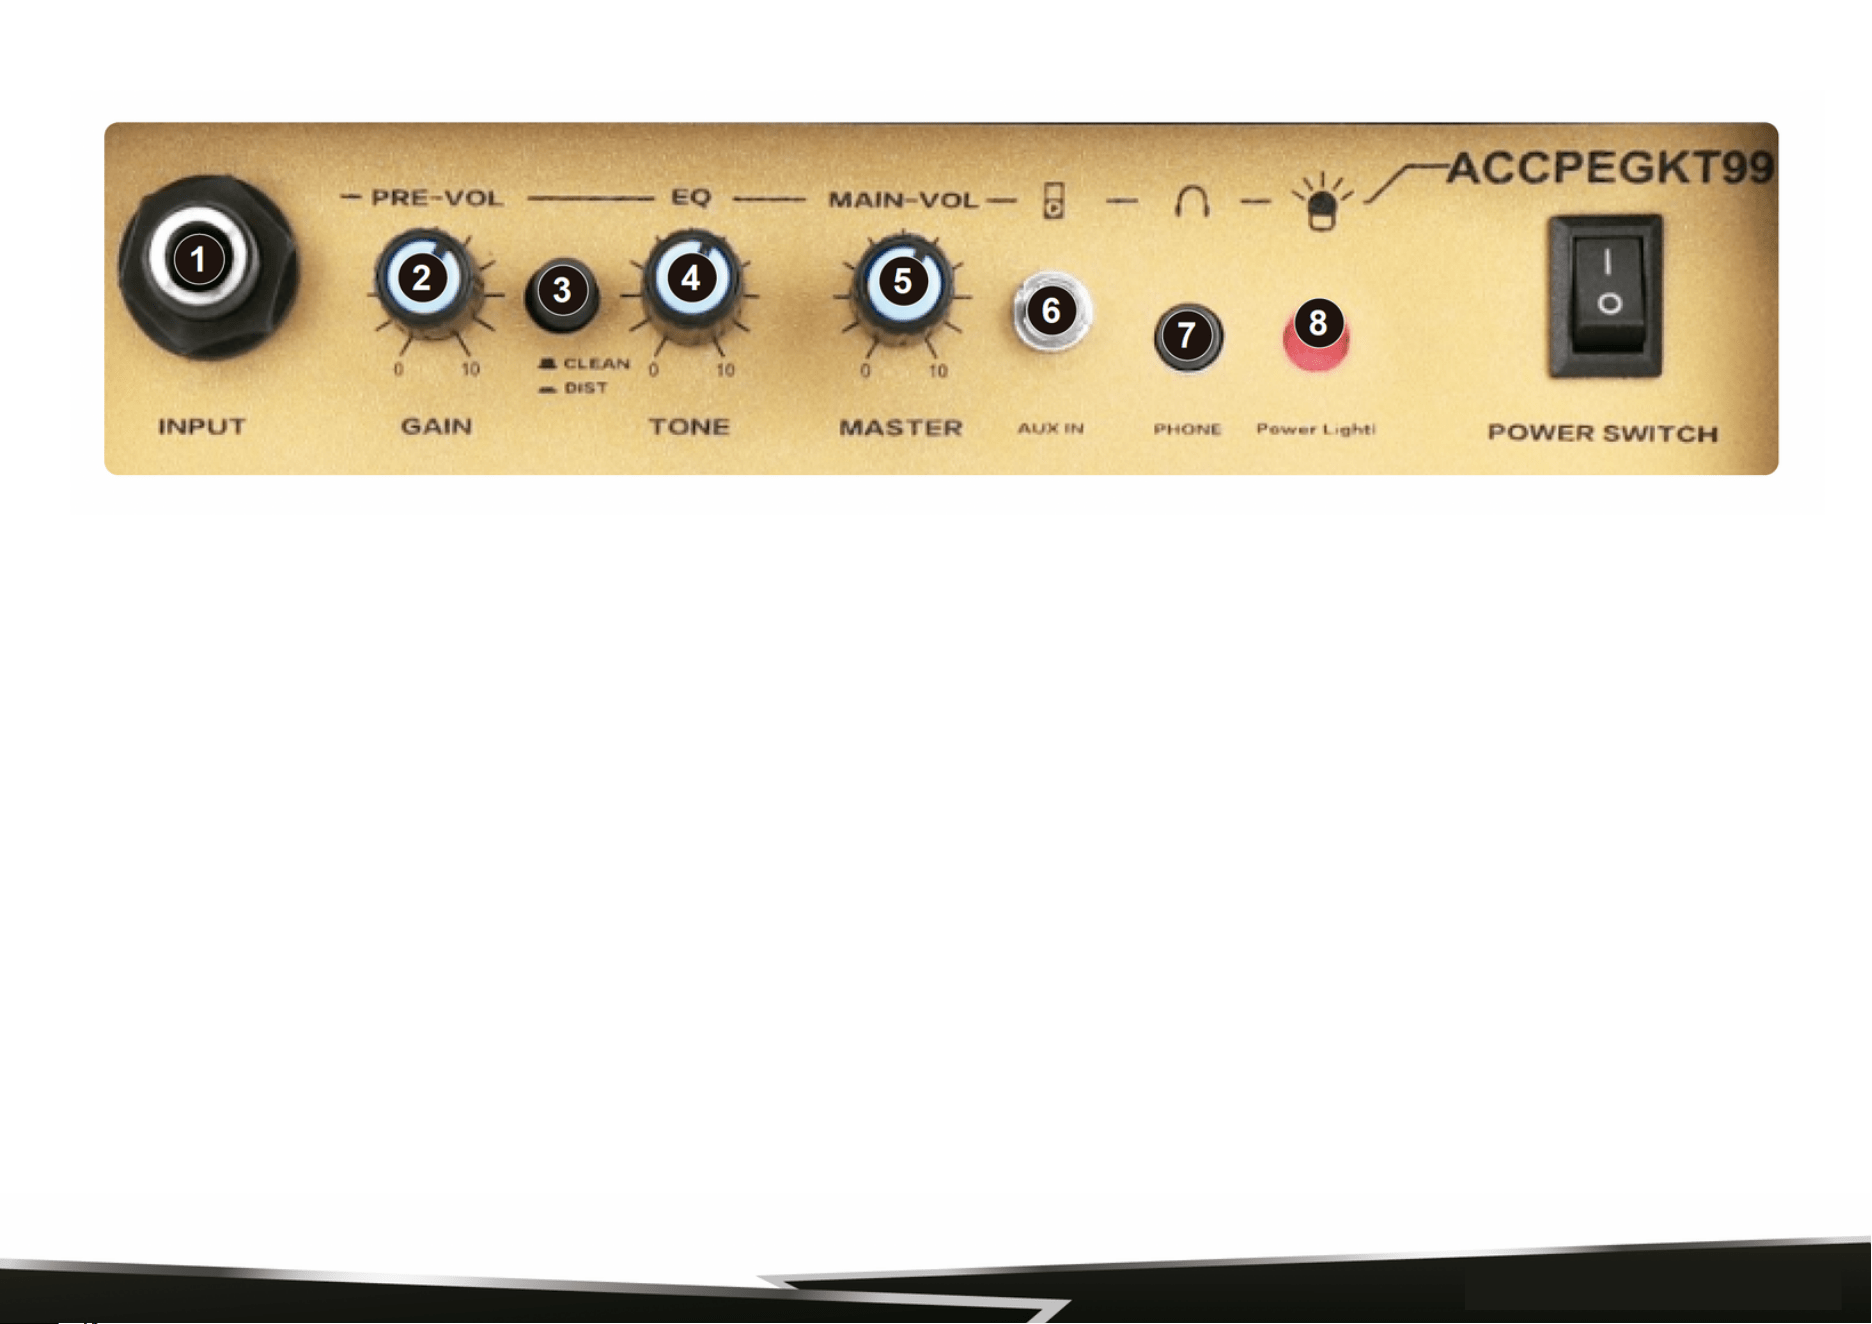
PRZEWODNIK REGULACJI WZMACNIACZY GITAROWYCH
NPUT: Tutaj podłącz gitarę elektryczną.1.
GAIN: Kontroluje poziom wzmocnienia przesterowania. Wraz ze wzrostem wzmocnienia wzrasta poziom zniekształceń Twojego
dźwięku.
2.
DRIVE ON/OFF: Włącza/wyłącza funkcję overdrive.3.
TONE: Kontroluje zakres niskich, średnich i wysokich częstotliwości.4.
VOLUME: Jest to pokrętło ogólnego poziomu dla kanału czystego lub przesterowanego.5.
AUX IN: Akceptuje martfony, komputery, iPady, telewizory, odtwarzacze CD, odtwarzacze MP3 i inne urządzenia audio.6.
PHONE: Jest to standardowe gniazdo słuchawkowe stereo 3,5 mm do podłączania słuchawek.7.
WSKAŹNIK ZASILANIA: Wskaźnik ten świeci się normalnie, gdy urządzenie jest włączone. Wskaźnik gaśnie, gdy urządzenie jest
wyłączone.
8.
PRZEŁĄCZNIK ZASILANIA: Włącznik/wyłącznik głównego źródła zasilania wzmacniacza.9.
FUNKCJA
www.PyleUSA.com
9

Aby uniknąć ryzyka porażenia prądem, nie wystawiaj wzmacniacza na
działanie wody lub wilgoci.
UWAGA
Aby zapobiec dotknięciu wyłącznika i uchwytu bezpiecznika przez stały trzpień,
jego wymiary nie mogą przekraczać 4 mm (średnica) x 30 mm (długość).
1.
Przed wymianą bezpiecznika odłącz wzmacniacz od zasilania. wymień
bezpiecznik.
2.
WAŻNE!!!
Zawsze podłączaj kabel instrumentu do gitary przed podłączeniem go
do wzmacniacza.
Jeśli najpierw podłączysz go do wzmacniacza, ryzykujesz uszkodzenie głośnika.
Nie zostawiaj gitary bez nadzoru z włączoną głośnością.
Neonowe lub fluorescencyjne oświetlenie w pobliżu wzmacniacza może powodować lekki szum.
Często można to wyeliminować, zmieniając położenie instrumentu lub wzmacniacza.
Aby uniknąć uszkodzenia uszu lub słuchawek, zmniejsz głośność wzmacniacza przed jego podłączeniem.
Podłączenie słuchawek wyłącza głośnik wzmacniacza.
Zarejestruj produkt
Dziękujemy za wybranie PyleUSA. Rejestrując swój produkt, zapewniasz sobie pełne korzyści wynikające z
naszej wyłącznej gwarancji i spersonalizowanej obsługi klienta.
Wypełnij formularz, aby uzyskać dostęp do pomocy ekspertów i utrzymać zakupiony produkt PyleUSA w
idealnym stanie..
www.PyleUSA.com
10

Jestesmy tutaj, aby Ci pomóc!
Pytania? Komentarze?
PyleUSA.com/ContactUs
(1) 718-535-1800

TURKISH
6 Telli Elektro Gitar
ve Aksesuar Kiti
BENI TARA
PyleUSA.com
Web Sitesi
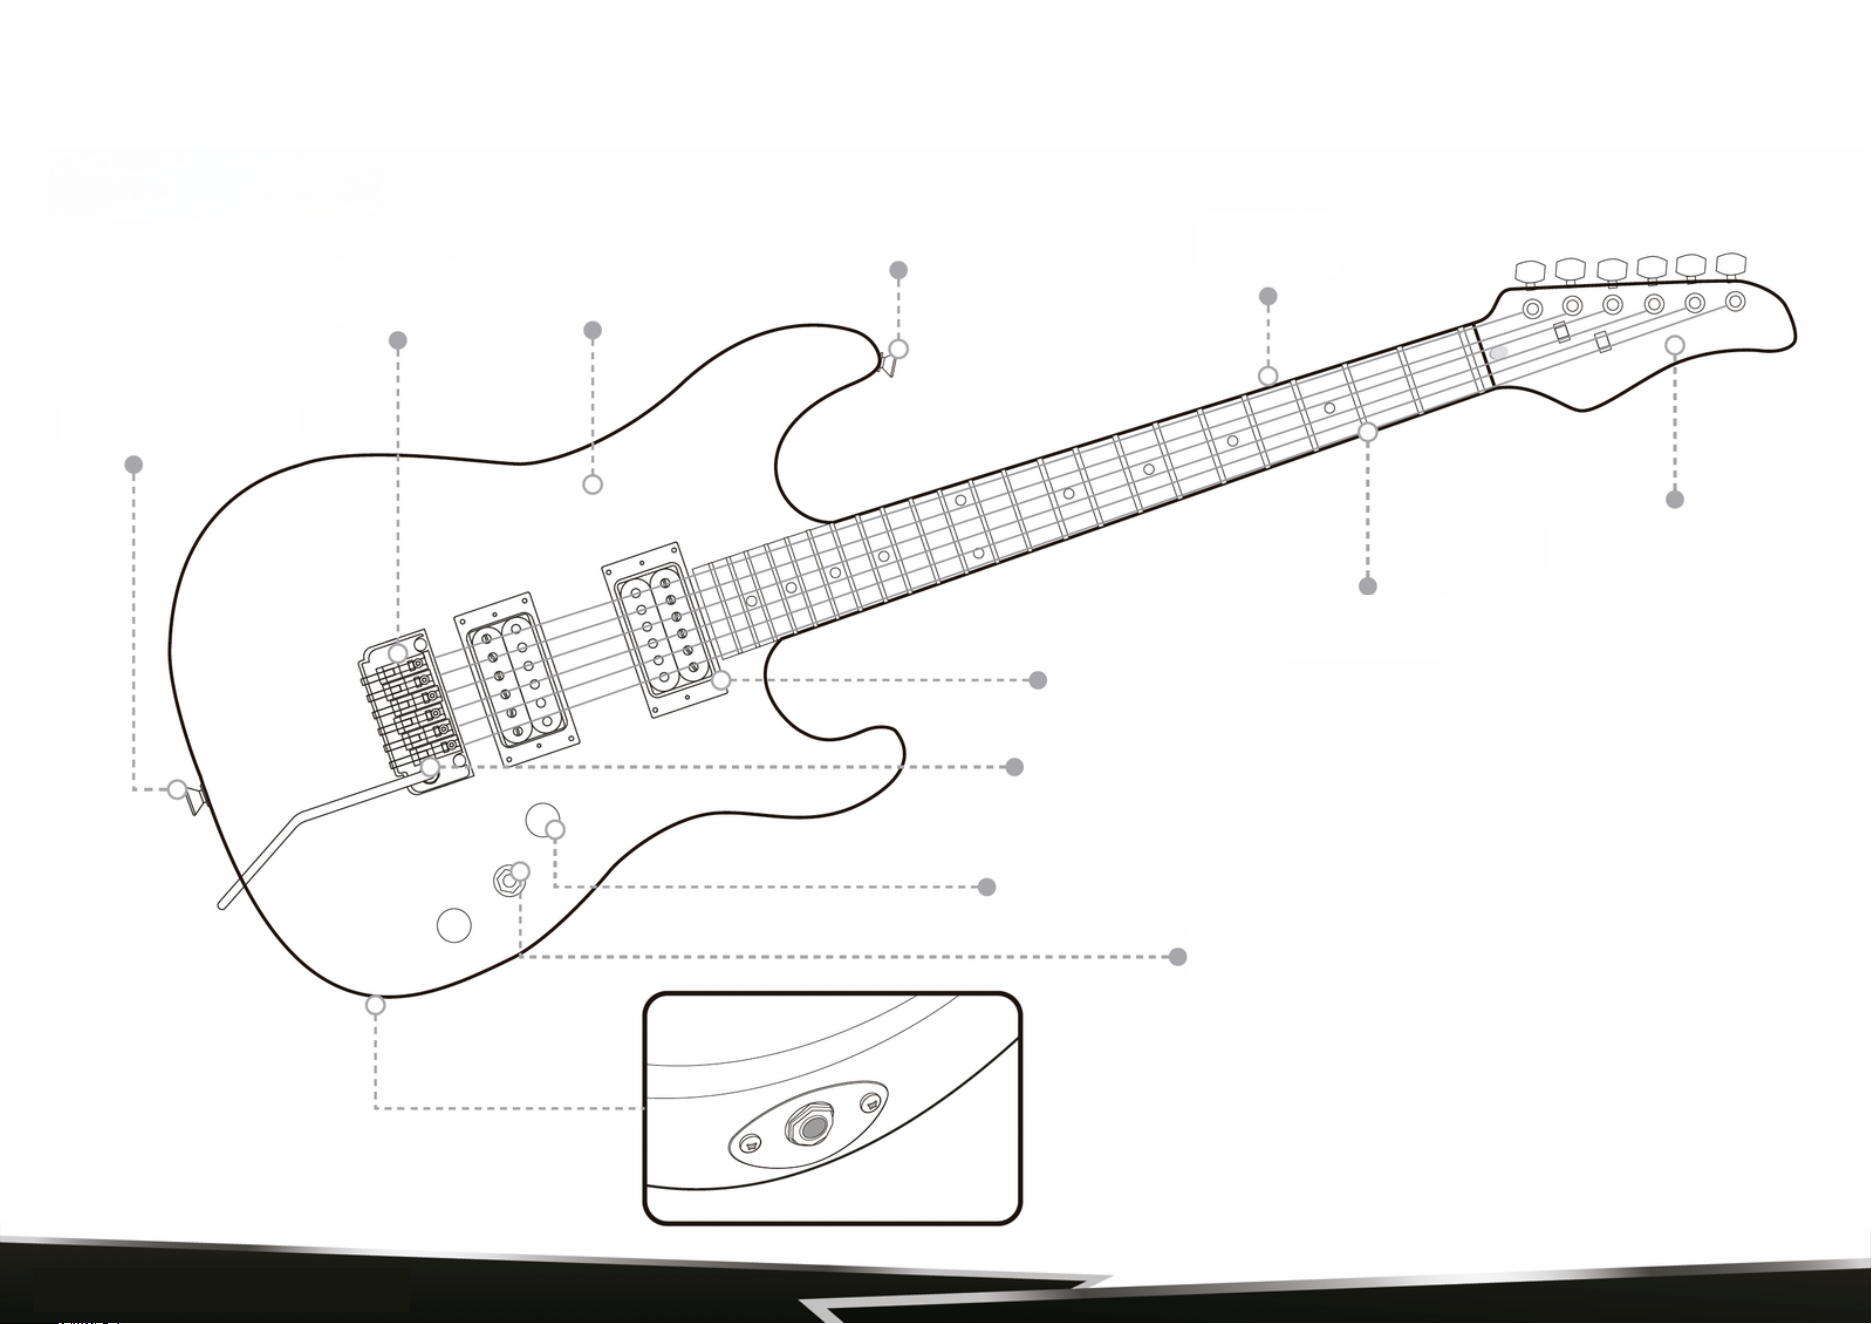
Köprü
Beden
Ön kayış düğmesi
Szyjka
Kayış düğmesi
iriş Jakı soketi
Kontrol düğmeleri
Pickup
Perdeler
aaaaBaş
www.PyleUSA.com
2
Ped Seçici
Lütfen bu kılavuzu okumak için birkaç dakikanızı ayırın. Sorularınızın çoğuna yanıt vermenin yanı sıra yeni
cihazınızın bakımı ve onarımı hakkında sizi bilgilendirecektir.
GİTARIN ANATOMİSİ
Vibrato veya Tremulo Kolu
www.PyleUSA.com
2

Perdeyi yükseltmek veya alçaltmak için akort tuşlarını kullanarak enstrümanınızı akort edin.
Perdeyi yükseltmek veya alçaltmak için akort tuşlarını kullanarak enstrümanınızı akort edin.
Kilitli tremolo sistemine sahip bir gitarda, akort makineleriyle akort ayarı yapabilmeniz için önce kilit somununu gevşetmeniz gerekir.
Kilitli tremolo sistemlerinde köprü üzerinde ne tuner bulunmasına rağmen, sadece sınırlı (ince) akort yapılmasına izin verirler. Akort
tuşlarının saat yönünün tersine çevrilmesi telin perdesini yükseltirken, saat yönünde çevrilmesi akort ettiğiniz telin perdesini alçaltır.
Gitarınızı en düşük telden başlayarak en yüksek tele doğru akort edin. Bunu bir kez yaptıktan sonra, geri dönün ve akortu tekrar
kontrol edin. Bazı enstrümanlarda, özellikle teller yeniyse veya yüzer tremolo köprüsü olan bir gitarınız varsa, bunu birkaç kez
yapmanız gerekecektir. Bir telin akortlanması diğer telleri etkileyebilir ve tüm teller istenen perdede kalana kadar akortlamayı tekrar
kontrol etmek gerekir.
Not: Yeni teller yerleşene kadar esneme ve akordunu bozma eğilimindedir. Yeni bir set taktığınızda telleri germek iyi bir fikirdir. Bunu
ilk akorttan sonra notaları bükerek ve her bir teli klavyeden çekerek fiziksel olarak gererek yapın (bu şekilde bir teli kırabileceğiniz için
çok sert çekmemeye dikkat edin). Telleri iyice gerdikten sonra akort işlemini tekrarlayın.
TEMIZLIK
Gitarınızı düzenli olarak temizlemek, cilayı korumanın ve tel ömrünü uzatmanın en iyi yollarından biridir. Her kullanımdan
sonra gitarınızı temizleyin, klavye ve tellerin yanı sıra akort aletleri, manyetikler, köprü vb. gibi kaplamalı parçaları da
sildiğinizden emin olun. Metal donanım ve tellerde korozyon ve paslanmaya yol açabileceğinden, tüm teri
temizlediğinizden emin olun.
GITARINIZI AKORT ETMEK
www.PyleUSA.com
3
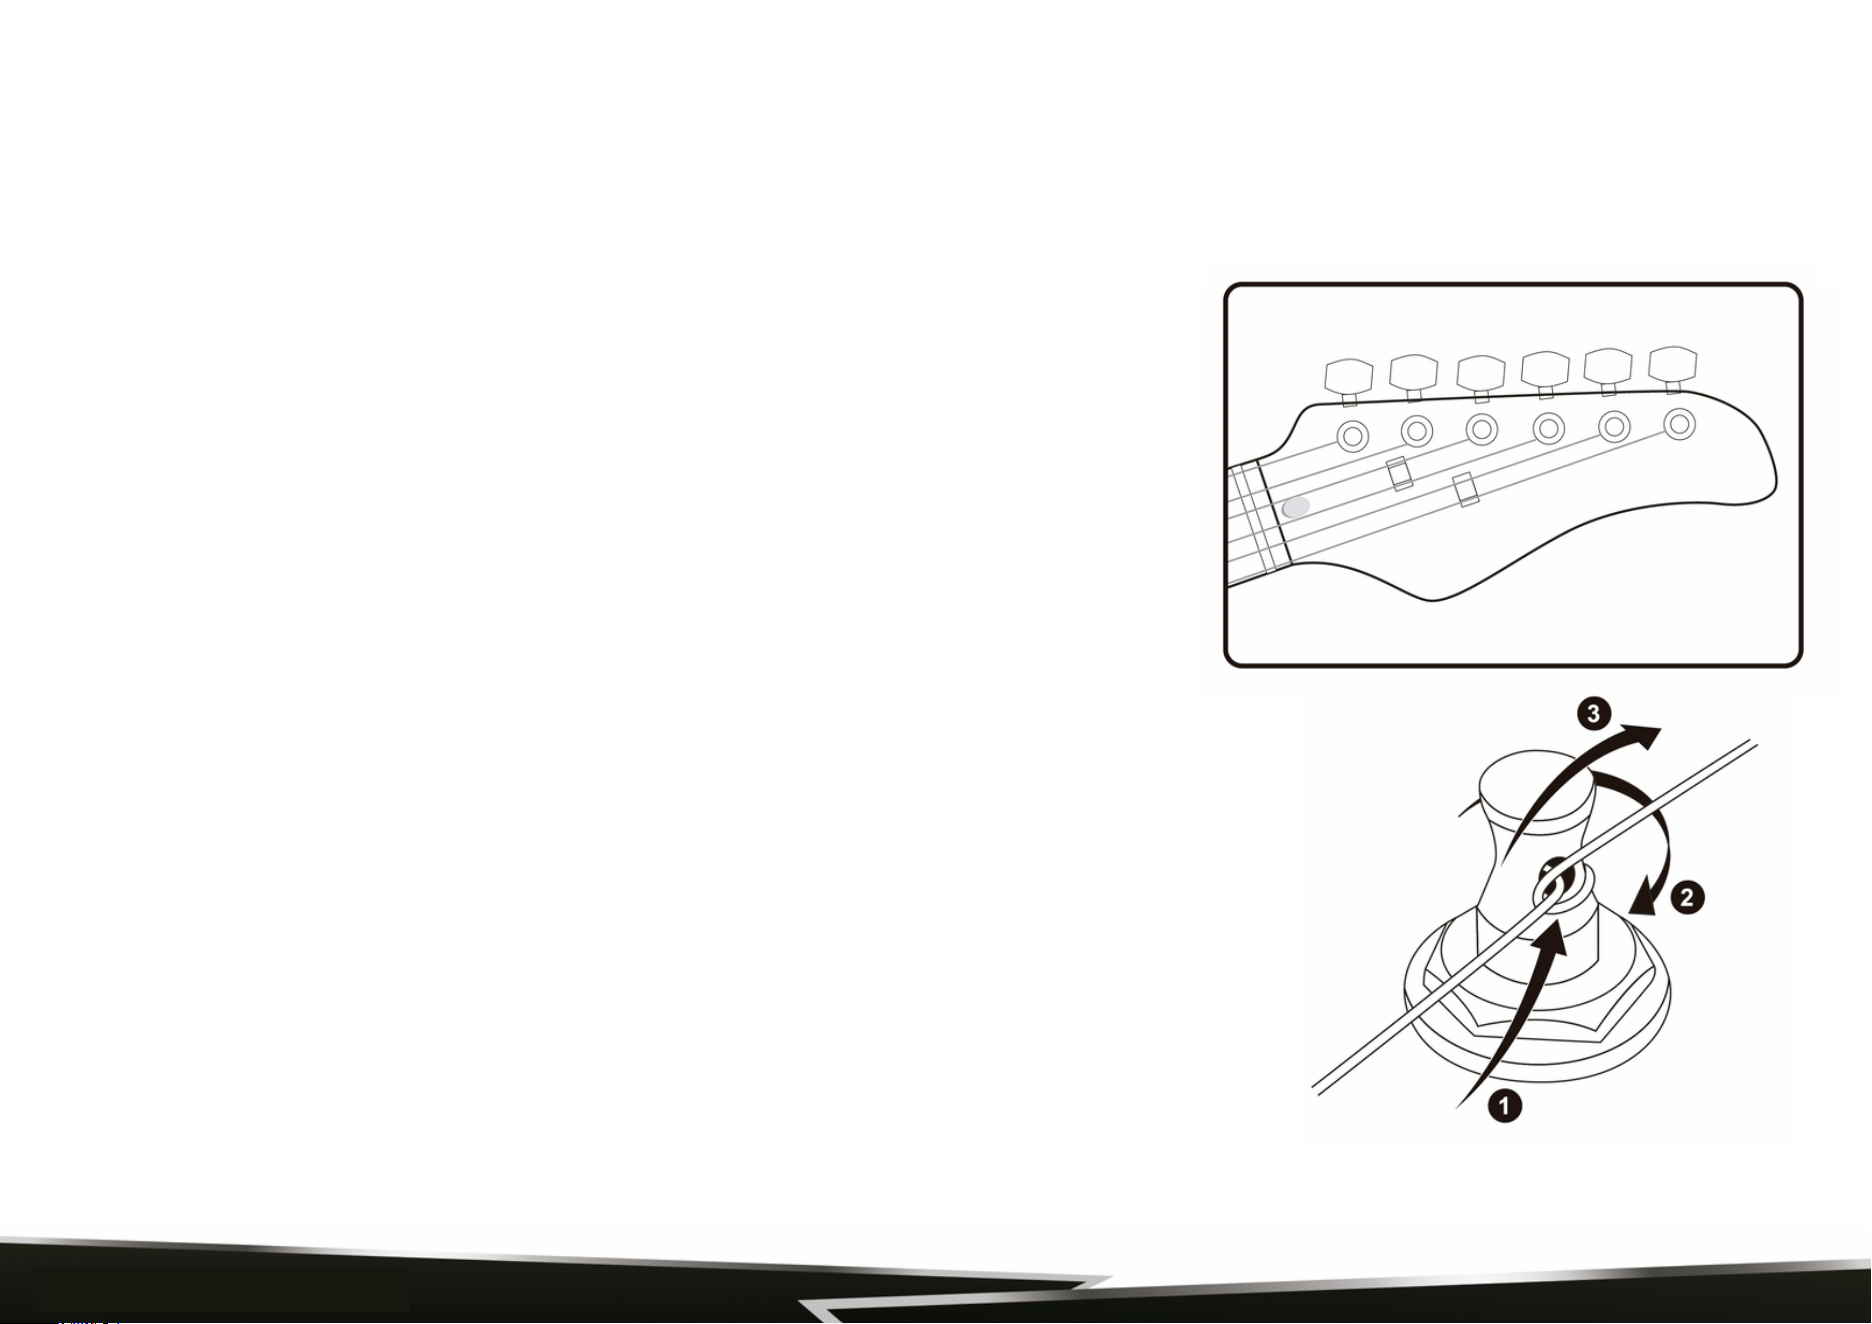
Tellerinizi oldukça sık değiştirmenizi şiddetle tavsiye ederiz. Eğer her gün çalıyorsanız, tellerinizi 3 ayda bir değiştirmenizi
öneririz. Yeni bir tel seti net ve hassas bir ses çıkarırken, eski bir set donuk ses çıkarır ve alışılmadık uğultular ve ölü notalar
üretebilir. Tellerinizin kirlendiğini, renginin solduğunu veya alışılmadık bir uğultu ya da donuk ses çıkardığını fark ederseniz,
gitarınıza kesinlikle yeni bir tel seti takmanın zamanı gelmiş demektir.
Yeni tellerinizi takmadan önce her zaman kontrol edin ve pürüzsüz olduklarından ve
kusur içermediklerinden emin olun. Bükülme, bükülme veya diğer üretim kusurları
gibi herhangi bir düzensizlik varsa, ses bozulmasının yanı sıra vızıltıya ve doğru
olmayan notalara neden olurlar. Boyundaki tüm gerginliğin alınmaması için her s
eferinde bir tel değiştirmenizi öneririz. Bu, sapın yeniden akort edilmesini ve
ayarlanmasını kolaylaştıracaktır.
Telleri akort makinesi direğine sararken, herhangi bir boşluk olması durumunda
oluşabilecek kaymaları önlemek için her zaman sıkı ve eşit bir şekilde sarın. Her
zaman yukarıdan aşağıya doğru direğin etrafında en az 2 veya 3 sarım kullanın. Genel
bir kural olarak, bir gitarı yeniden bağlarken yaklaşık 5 cm (2 inç) ve bir bası yeniden
bağlarken yaklaşık 8 cm (3 inç) gevşeklik kullanın. Sarılmamış veya düz teller için,
kaymalarını önlemek amacıyla bu tellerin direğe nasıl takılacağını açıklayan şemayı
(Şekil 1) izleyin.
1. Telin ucunu akort direğine takın (direğin etrafında birkaç sarım için yeterli
gevşeklik bıraktığınızdan emin olun).
2. Telin ucunu saat yönünde direğin etrafına ve direğe girdiği yerde telin
altına sarın (başlığın tiz tarafındaki akort aletlerini tellerken saat yönünün tersine).
TELLERI DEĞIŞTIRMEK
Şekil 1: Düz Tellerin Dizilmesi
www.PyleUSA.com
4
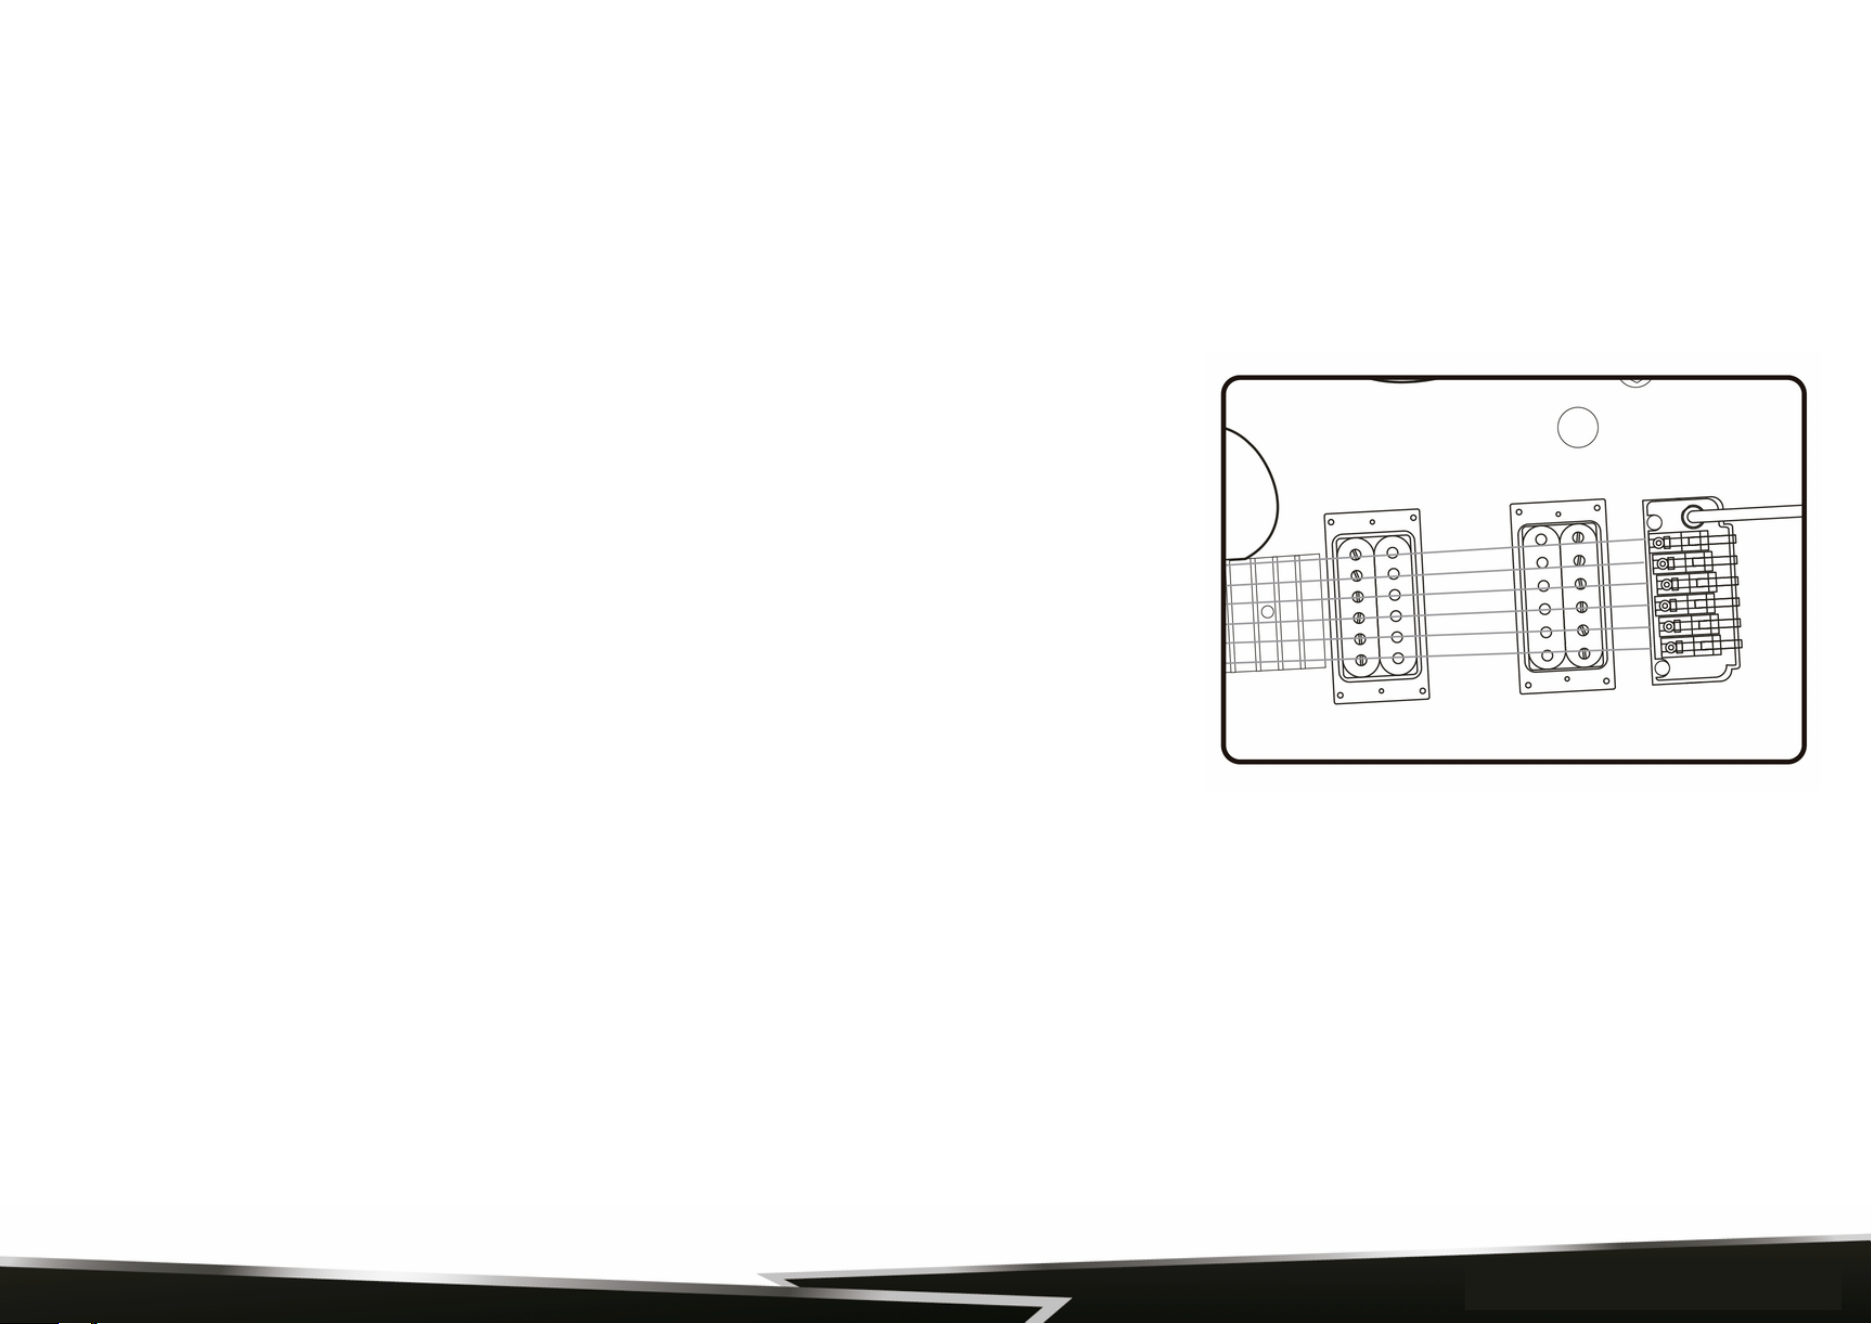
Yüzer köprü, yalnızca tellerin aşağıya doğru baskısıyla enstrümanın üst kısmındaki
pozisyonda tutulan kemerli ahşap veya metal bir tabana sahiptir. Yeniden tel takarken
köprü hafifçe bile hareket ettirilirse, entonasyon artık doğru olmayacaktır (bazı
enstrümanlarda bu olasılığı ortadan kaldıran "sabitlenmiş" köprüler bulunur).
Bir gitarda yüzer köprü entonasyonunu ayarlamak için önce 12 perde armoniğini ve her
iki Mi telinin (yüksek ve alçak) 12 perde akordunu kontrol edin. Doğru şekilde entonasyon
yapıldıysa, her iki Mi telinin perdeli ve harmonik 12 perde sesleri aynı olacaktır ve hiçbiri
diyez veya bemol olmayacaktır.
Eğer 12 perde notasının perdesi 12 perde armoniğinin perdesine göre pes ise, köprünün ayağına hafifçe vurarak her iki perde birbirine uyana
kadar kuyruk kısmına doğru geri hareket ettirin. Eğer 12 perde notasının perdesi 12 perde armoniğinin perdesine göre pest ise, iki perde
birbirine uyana kadar köprünün ayağına hafifçe vurarak köprüyü sapa doğru ilerletin. Tamamen ayarlanabilir köprülerin akordunu düzeltmek
için, 12 perde armoniğinin perdelenmiş 12 perde perdesine göre akordunu kontrol ederken, her bir seleyi ayrı entonasyon vidalarını
kullanarak ileri veya geri ayarlayın.
ÖNEMLİ NOT: Yüzer köprülü bir gitarı yeniden tellerken, telleri teker teker değiştirin. Köprü sadece tellerin aşağı doğru baskısı ile doğru
pozisyonda tutulduğundan, tüm telleri bir kerede çıkarmayın.
3. Telin ucunu kendi üzerine sıkıca çekerek bir tür düğüm yapın (telin ucu daha sonra aşağı doğru bükülebilir ve düğümün
yakınında temiz bir şekilde kesilebilir).
4. Sargıların akort direğine düzgün bir şekilde sarıldığından emin olarak akort edin.
Not: Teller her zaman bas tarafındaki direklerin etrafına saat yönünde ve başlığın tiz tarafındaki direklerin etrafına saat
yönünün tersine sarılır.
YÜZER KÖPRÜ AYARI
www.PyleUSA.com
5
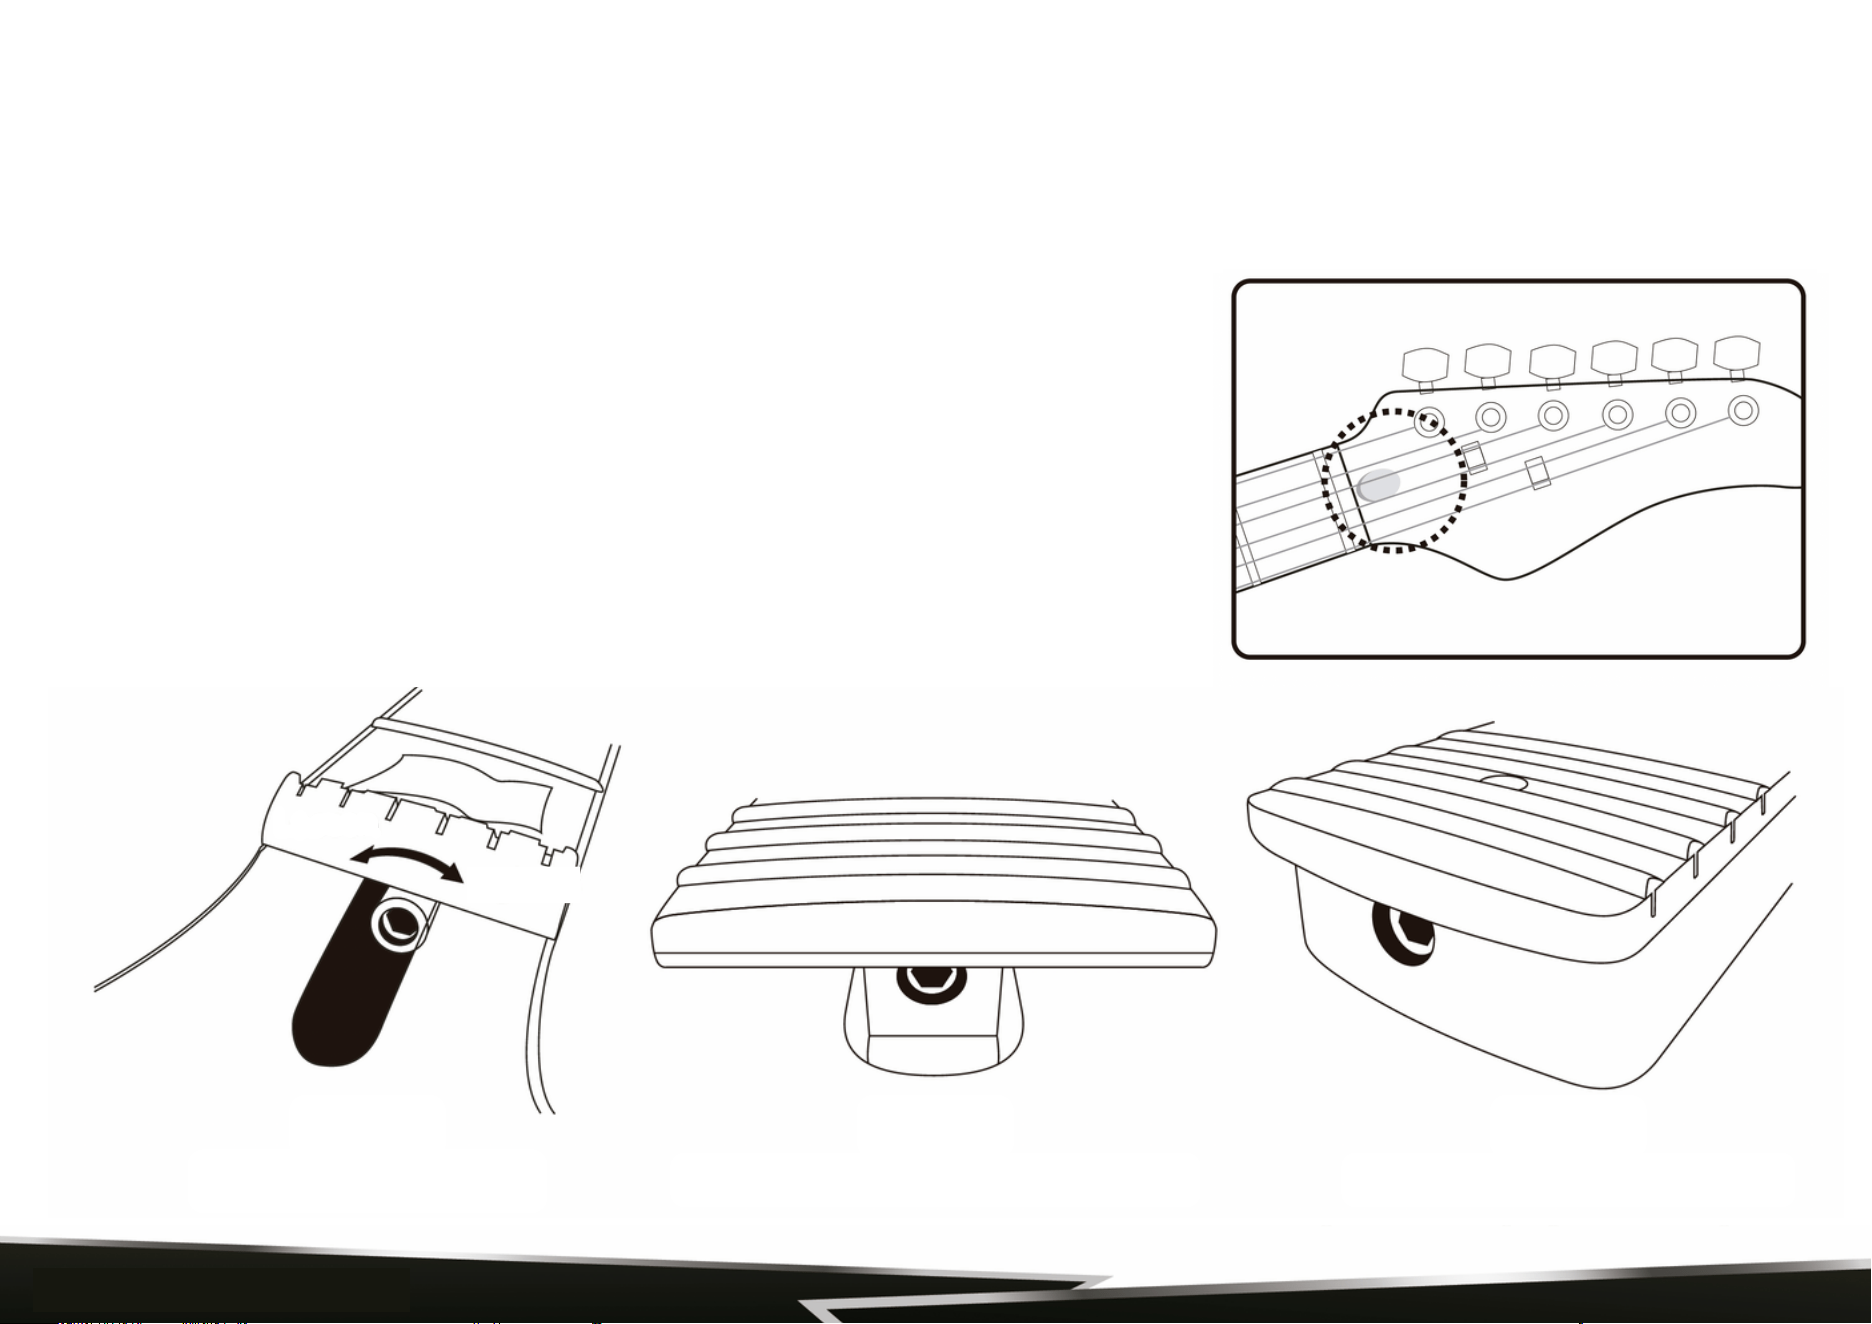
MAKAS ÇUBUĞUNUN AYARLANMASI
Ağı sıkmak için, önce kafadaki (Şekil 2) veya gövdedeki boyun ekleminin ucundaki (Şekil 3) ağ erişimini bulun, ağ kapağını
çıkarın ve ağı sıkmak için doğru boyuttaki Alyen anahtarı (4 mm) veya lokma anahtarı (8 mm) takın. Gevşetmek için saat
yönünün tersine, sıkmak için saat yönünde çevirin.
Not: Ağ somununa erişim görünür değilse, boyun cebinin içine yerleştirilmiş
olabilir (Şekil 4), bu durumda ağ çubuğunu ayarlamak için gövdenin çıkarılması
gerekecektir.
Ağ ayarlamaları yalnızca kalifiye bir teknisyen tarafından yapılmalıdır, ağ
çubuğunun aşırı sıkılması veya ayarlanması gitarın sapına zarar verebilir ve
garanti kapsamında değildir.
Şekil 2:
Pim kutusundaki ruh
Şekil 3:
Gövde eklemi başına çekirdek çubuk
Şekil 4:
İç boyun cebi için truss çubuğu
Gevşet
Sıkılaştır
www.PyleUSA.com
6
KONTROLLER VE ÖZELLİKLER
Aşağıda temel elektronik kontrollerin ve terminolojinin bazı kısa açıklamaları yer almaktadır. Modeliniz hakkında daha
spesifik bilgi için lütfen www.PyleUSA.com adresindeki web sitemizi ziyaret edin.
Not: Çoğu kontrol düğmesi, düğmenin yan tarafındaki ayar vidasını ayarlamak için 2,0 mm alyan anahtarı veya yağlı tornavida
kullanılarak kolayca sıkılır veya çıkarılır. Bir düğme gevşerse, önce düğmeyi çıkarmalı ve düğmeyi kontrol miline yeniden sıkmadan
önce gövdeye düzgün şekilde sıkıldığından emin olmak için kontrolü kontrol etmelisiniz. Gevşek bir kontrol mili herhangi bir
ayarlanabilir anahtar kullanılarak kolayca sıkılabilir. Elektronik arka plakayı çıkarmanız ve somunu gövdenin üstünden sıkarken
kumandayı gitarın arkasından tutmanız gerekecektir. Bu, kontrolleri hareket ettirmemenizi veya kablo bağlantılarından herhangi
birine zarar vermemenizi/kırmamanızı sağlayacaktır.
Ses Kontrolü
Gitarın ana çıkış seviyesini kontrol eder. Düğmeyi saat yönünde çevirmek ses seviyesini artırırken, saat yönünün tersine çevirmek ses
seviyesini azaltır. Bazı enstrümanlarda birden fazla ses kontrolü bulunur, bu durumda her manyetik için bir ses kontrolü olduğunu
görürsünüz.
Not: Birden fazla ses kontrolü olması durumunda, ses kontrollerinden biri o konumuna getirildiğinde ve manyetik seçme düğmesi her
iki manyetik açıkken orta konumda olduğunda, enstrümanın tüm sinyali kapatılacaktır.
Ton Kontrolü
Bu, gitarınızdan gelen sinyalde bulunan yüksek frekansları ayarlar. Düğme tamamen saat yönünde çevrildiğinde, tüm frekanslar
mevcuttur. Düğmeyi saat yönünün tersine çevirmek yüksek frekansları azaltır.
Çıkış Jakı
Burası, gitarın çıkış sinyalinin herhangi bir standart ⁄" gitar kablosu takılarak amplifikatöre gönderildiği yerdir. Çoğu çıkış jakı gitarın
alt köşesine yakın bir yerde, elektronik boşluğunun altında bulunur.
www.PyleUSA.com
7

Not: Gitarınızda aktif elektronik aksam varsa, çaldıktan sonra kablonuzu her zaman
çıkarmalısınız. Kablonuzu enstrümanınıza takılı bırakmak pili tüketecektir.
Jakınız gevşerse, önce jak plakasını çıkarmadan ve jakın içini sabitlemeden sıkmayın, aksi
takdirde telleri kırabilir ve gitarınızın çıkışını kaybedebilirsiniz.
Manyetikler
Gitarınızdaki manyetikler, tel titreşimlerini amplifikatörünüze gönderilen elektronik bir
sinyale dönüştürür. Manyetikler mıknatıslardan ve tel bobinlerden oluşur.
Çoğu elektro gitarda kullanılan 2 tip manyetik vardır - Single Coil ve Humbucker. Tek
Bobinli manyetik sadece 1 tel bobinden oluşur ve genellikle zayıf bir çıkışa sahiptir. Yapısı
nedeniyle, tek bobin uğultuyu ve RF parazitini engelleyemediği için gürültülü olacaktır.
Öte yandan
Humbucker'lar, yan yana 2 bobin kullanan yapıları nedeniyle aslında "uğultu önleyicidir".
Her bir bobinden gelen sinyaller, tek bobinli manyetiklerde yaygın olan uğultu ve RF
parazitini iptal eden belirli bir şekilde birleştirilir. Humbuckerlar genellikle tek bobinlilere
kıyasla daha yüksek çıkış sinyaline sahiptir.
Manyetik seçici anahtar
Seçici, farklı manyetikler veya manyetik kombinasyonları (iki veya daha fazla manyetikli
gitarlarda) arasında geçiş yapmak için kullanılır.
www.PyleUSA.com
8

GİTAR AMPLİSİ AYARLARI KILAVUZU
GİRİŞ: Elektro gitarınızı buraya takın.1.
GÜÇ: Aşırı hız için güç seviyesini kontrol eder. Kazanç miktarı arttıkça sesinizdeki distorsiyon seviyesi de artacaktır.2.
HIZ AÇMAK/KAPATMAK: Bu, aşırı yüklemeyi AÇMAK/KAPATMAK için kullanılır.3.
TON: Düşük-orta-yüksek frekans aralığını kontrol eder.4.
SES: Bu, temiz kanal veya distortion kanalı için genel seviye kontrolüdür.5.
AUX GİRİŞİ: Cep telefonu, bilgisayar, iPad, TV kutusu, CD çalar, MP3 çalar ve diğer ses cihazlarını kabul eder.6.
TELEFON: Bu, kulaklık takmak için 3,5 mm standart stereo kulaklık jakıdır.7.
GÜÇ IŞIĞI: Bu ışık normalde güç açıldığında yanar. Güç KAPALI konuma getirildiğinde bu ışık söner.8.
GÜÇ KUVVETİ: Amplifikatörün ana gücü için AÇMA/KAPAMA anahtarı9.
FONKSİYON
www.PyleUSA.com
9

Elektrik çarpması riskini önlemek için suya veya neme maruz
bırakmayın.
DİKKAT
Sabit cıvatanın anahtara ve sigorta tutucusuna temas etmesini
önlemek için, sabit cıvata 4 mm (Çap) x 30 mm'den (uzunluk) fazla
olamaz.
1.
Sigortayı değiştirmeden önce ampulün fişini prizden çekin.2.
ÖNEMLİ!!!
Amplifikatörünüze bağlamadan önce daima enstrüman kablosunu
gitarınıza bağlayın.
Önce amplifikatörünüze bağlamak hoparlöre zarar verebilir.
Gitarınızı sesi açık bir şekilde gözetimsiz BIRAKMAYIN.
Amplifikatörün yakınındaki neon veya floresan aydınlatma hafif uğultuya neden olabilir.
Bu genellikle enstrümanınızın veya amplifikatörün konumunu değiştirerek ortadan kaldırılabilir.
Kulaklarınızı yaralamaktan veya kulaklıklarınıza zarar vermekten kaçınmak için, kulaklıklarınızı takmadan önce
amplifikatörün sesini azaltın.
Bir çift kulaklık takmak amplifikatör hoparlörünüzü kapatacaktır.
Ürün Kaydı
PyleUSA'yı seçtiğiniz için teşekkür ederiz. Ürününüzü kaydettirerek, özel garantimizin ve kişiselleştirilmiş
müşteri desteğimizin tüm avantajlarından yararlanmanızı sağlarsınız.
Uzman desteğine erişmek ve PyleUSA satın alma işleminizi mükemmel durumda tutmak için formu doldurun..
www.PyleUSA.com
10

Yardım etmek için buradayız!
Sorularınız? Yorumlarınız?
PyleUSA.com/ContactUs
(1) 718-535-1800
