Microphone Audio/Speaker Control Amp,
1/4'' Mic Inputs, 40 Watt
25V/70V Power Amplifier
PCM20AEU - PCM20AUK
USER GUIDE
Visit Our Website
SCAN ME
PyleUSA.com
ENG UK

About PyleUSA
Pyle, founded in the 1960s, has evolved into a renowned manufacturer of
high-quality advanced woofers. Our journey started with the iconic Pyle
Driver, becoming a household name in original speakers. In the late 20th
century, we expanded into replacement speakers, car audio, home audio,
marine audio, and professional audio & musical instruments with our
Pyle Pro line.
Pyle Car:
Transform your car into a perfect listening environment with our com-
petitively priced speakers, ampliers, and head units. Upgrade from
factory speakers to enhance your music experience. Explore accessories
like navigation systems, DVD players, iPod interfaces, and safety-focused
cameras.
Pyle Home:
Discover a range of home entertainment products, including projectors,
TVs, mounts, stands, and HD technology. Pyle Home oers bass-expand-
ing mini speakers, headphones, vintage turntables, power ampliers,
horn speakers, and more for an enriched media experience at home and
on the go.
Pyle Pro:
As the leading source of audio equipment worldwide, Pyle Pro caters to
musicians, studio engineers, and amateurs. Our PA Systems, featuring
wireless microphones, rechargeable batteries, and iPod/iPhone docks,
are ideal for various events. Explore our emerging guitar line, eects
pedals, and USB-to-analog converters without compromising on quality.
www.PyleUSA.com
2

IMPORTANT SAFETY INSTRUCTIONS
1. Read Instructions - All the safety and operating instructions should be read
before operating the appliance.
2. Retain Instructions - The safety and operating instructions should be
retained for future reference.
3. Head Warnings - All warnings on the appliance and in the operating
instructions should be adhered to.
4. Follow Instructions
5. Water and Moistunt - The appliance should not be used near water for
example, near a bathtub, washbowl, kitchen sink, laundry tub, swimming
pool, or a wet basement.
6. Ventilation - The appliance should be situated so that its location or position
does not interfere with its proper ventilation. For example, the appliance
should not be situated on a bed, sofa, rug, or similar surface that may block
the ventilation openings or placed in a built-in installation, such as a bookcase
or cabinet that may impede the ow of air through the ventilation openings.
7. Heat - The appliance should be situated away from heat sources such as
radiators, heat registers, stoves, or other appliances including ampliers that
produce heat.
8. Power Sources - The unit should be connected to a power supply only of the
type described in the operating instructions or as marked on the appliance.
9. Grounding or Polarization - Precaution should be taken to insure that the
grounding or polarization means of an appliance is not defeated.
10. Power-Cord Protection - Power supply cords should be routed so that they
are not likely to be walked on or pinched by items placed upon or against
them, paying particular attention to cords at plugs, convenience receptacles,
and the point at which they exit from the appliance.
11. Cleaning - The appliance should be cleaned only as recommended by the
manufacturer.
12. Power Lines - An outside antenna system should not be located in the
vicinity of overhead power lines or other electric light or power circuits or
where it can fail into such power lines or circuits. When installing an outside
antenna system, extreme care should be taken to keep from touching such
power lines or circuits as contact with them might be fatal.
13. Non-Use Periods - The power cord of the appliance should be unplugged
from the outlet when the appliance is to be left unused for a long period of time.
www.PyleUSA.com
3

14. Obiect and Uquid Entry - Care should be taken so that objects do not fall
and liquids are not spilled into the enclosure through openings.
15. Carts and Stands - If the appliance is used with a cart or stand,
the cart or stand should be a type recommended by the
manufacturer. An appliance and cart combination should be
moved with care. Quick stops, excessive force, and uneven surfaces cause
the appliance and cart combination to overturn.
16. Mounting - The appliance should be mounted only as recommended by the
manufacturer.
17. Damage Requiring Service - The appliance should be serviced by qualied
service personnel when:
A. The power-supply cord or plug has been damaged.
B. Objects have failen into, or liquid has been spilled into the appliance
enclosure.
C. The appliance has been exposed to rain.
D. The appliance has been dropped, or the enclosure has been damaged.
E. The appliance does not appear to operate normally or exhibits a marked
change in performance.
18. Servicing - The user should not attempt to service the appliance beyond
that deecribed in the user's operating instructions. All other servicing
should be referred to qualied personnel.
19. Overloading - Do not overload wall outlets and extension cords as this can
result in a risk of re or electric shock.
20. Replacement Parts - When replacement parts are required, be sure the
service technician has used replacement parts specied by the manufacturer
or have the same characteristics as the original part.
Unauthorized substitutions may result in re, electric shock or other hazards.
21. Safety Check - Upon completion of any service or repairs to this appliance,
ask the service technician to perform safety chec ks to determine that the
appliance is in proper operating condition.
www.PyleUSA.com
4
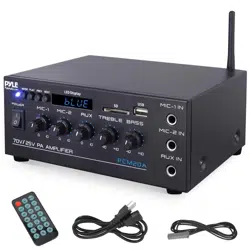
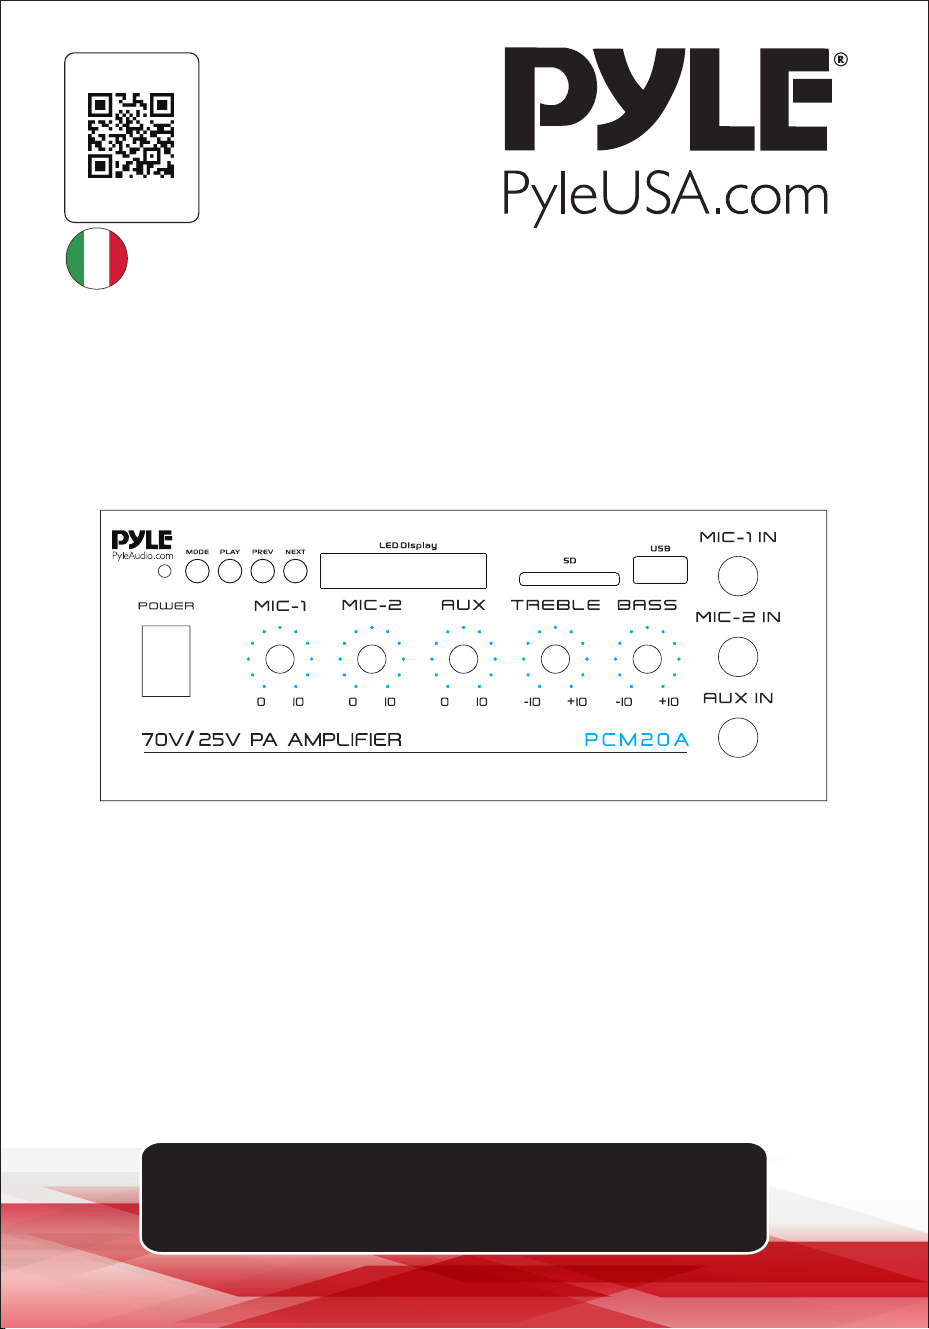
Your new PCM20A Stereo Power Amplier
gives you the power and versatility that you need in a professional sound
system. The wide frequency response is perfect for the amplication of vocals
and music. The talkover function for the Mic 1 and Aux Input located on the front
panel make it perfect meeting halls, auditoriums, sports events, schools and
oce paging systems. Great for anywhere you need to deliver a special
announcement with excellent sound quality.
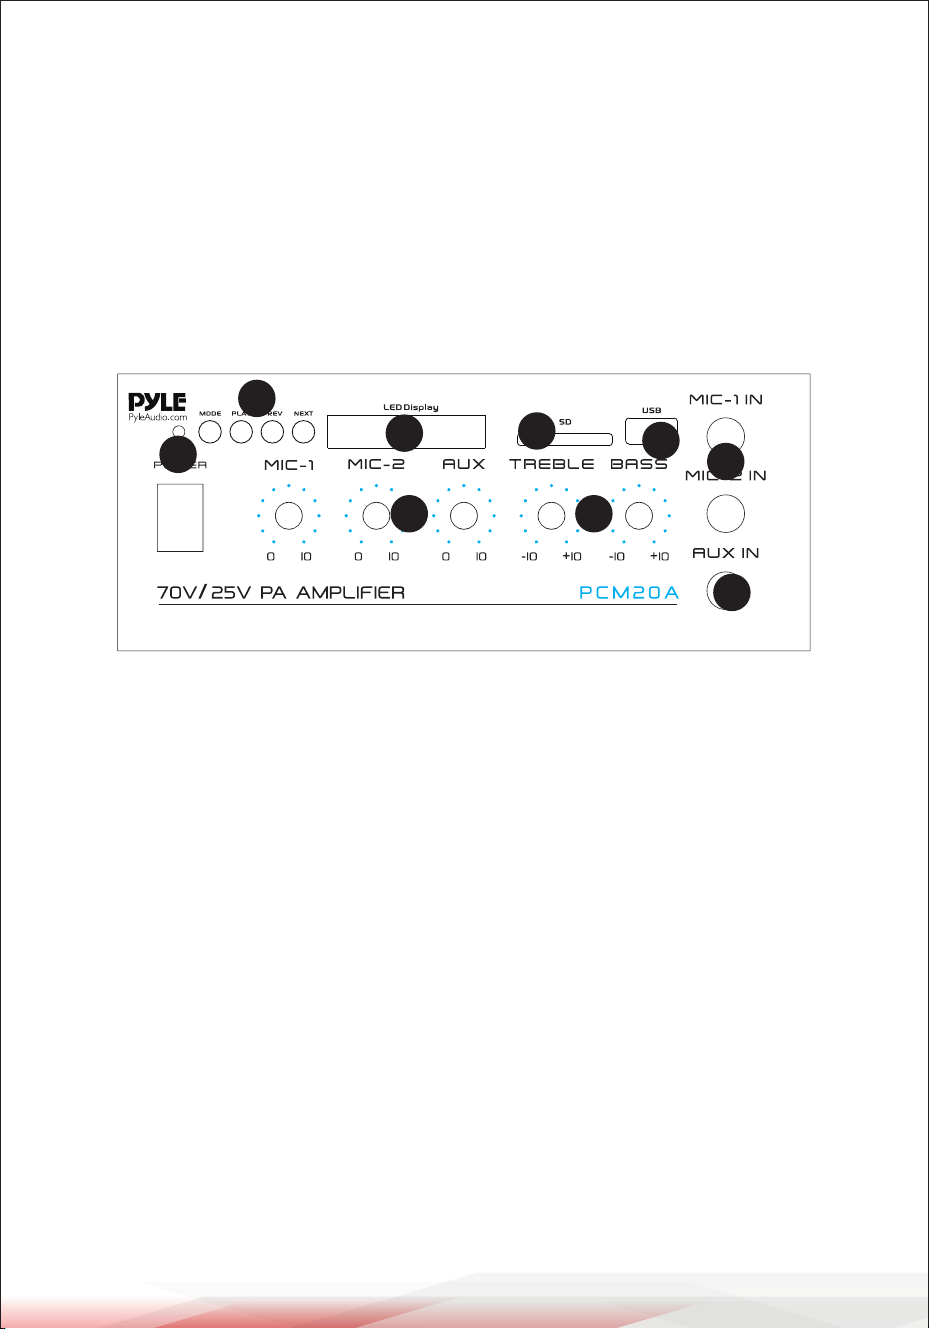
FEATURES AND CONTROLS
FRONT PANEL
1. Power ON/OFF and Indicator: Main power switch, the indicator lights when
the amplier is turned ON
2. MIC 1 and MIC 2/AUX Volume Controls: Adjust the output signal level of the
corresponding inputs.
3. BASS and TREBLE Tone Controls: Adjust the bass and treble of the
corresponding output signals.
4. MODE, PLAY, PREV and NEXT Function Control buttons:
• MODE Button: For audio selection like WIRELESS BT/SD/LINE IN
• PLAY/PAUSE BUTTON: Play and Pause control button
• PREV/NEXT: Quick backward or next song
5. LED Display
6. SD/MMC Socket for playing SD/MMC cards
7. USB Charge Port: USB port for smartphone charging only, no USB reader
function
8. AUX Input: To connect the high impedance audio source such as Tape Deck,
CD player, or Tuner with 1/4" plug via audio plug adapter (two phono RCA
plugs into 1/4" mono jack).
www.PyleUSA.com
5
1
2
3
4
5
6
7
8
9

9. MIC1 and MIC2 Inputs: To connect the low impedance microphone with 1/4"
plug. The MIC 1 is a " Priority" source, the signals from AUX will be attenuated
automatically by -40dB, the signal from MIC 1 will override to page (auto talk-
over). it is good for paging system.
BACK PANEL
1. Wireless BT Antenna: Wireless BT Streaming receiver
2. Speaker Connection: One or more speakers (4,8 or 16 Ohms) can be
connected to the amplier with or without transformers. However, before you
connect any speakers to the amplier, the total impedance must be calculated
in order to avoid damage to the amplier. A total speaker impedance greater
than 8 Ohms or less than 8 Ohms can cause this damage to occur.
3. Voltage Switch: This PA amplier has selectable input voltage from
110V/60Hz (the standard in USA and CANADA) to 220V/50Hz (for EUROPEAN
operation). Please make sure the switch is in the proper position before
operating, otherwise severe damage will be incurred and not covered by
warranty.
4. AC Input: Plug the included power cord into the unit while the power is
switched o, then plug the AC power cord into a porper power outlet.
Please also replace the fuse only with proper rating if needed (see the fuse
rating of T 1.2AL 250V for 110-120V and T0.63AL 250V for 220V/240V
printed at power inlet)
5. FM ANTENNA CONNECTOR: Connect for FM antenna
www.PyleUSA.com
6
1
2
3
4
5

1
2
3
4
5
6
7
8
9
www.PyleUSA.com
7
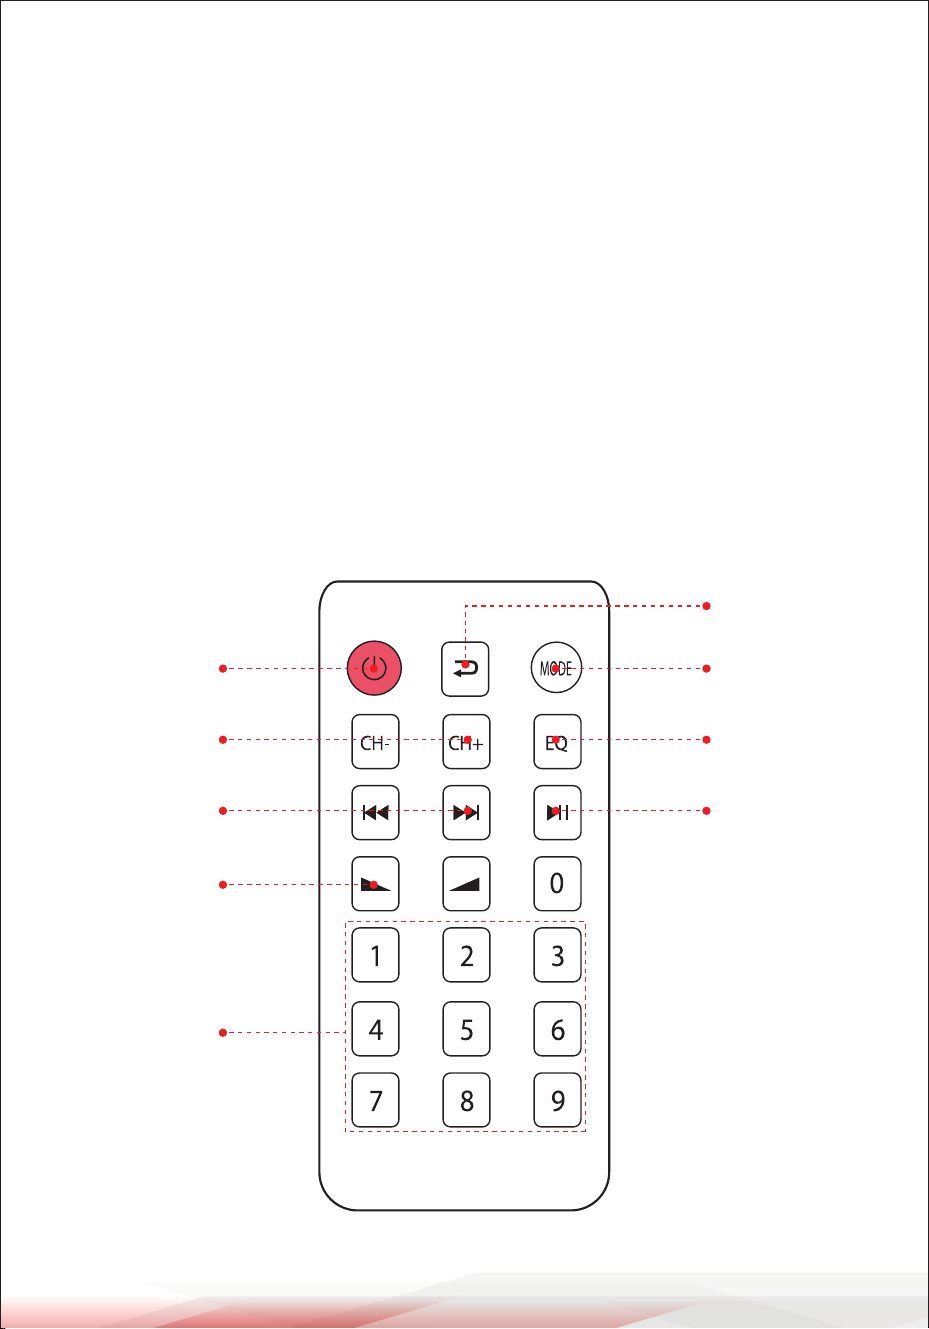
REMOTE CONTROL
1. Press this button to turn ON or OFF the MP3
2. When in the FM mode, press this two buttons to select previous or next
channel.
3. Press these two buttons to select the previous or next track in USB or SD or
Wireless BT mode
4. Volume up or down
5. Press the numbers to select the tracks directly.
The unit takes 1-2 seconds to response in USB or SD mode.
6. Press this button to repeat mode.
7. Press this button to select the playing mode, such as USB/SD/FM/WIRELESS BT
8. EQ function: Select a pre-set mode of the equalizer that is designed accordingly.
9. Play and Pause function for MP3
www.PyleUSA.com
8
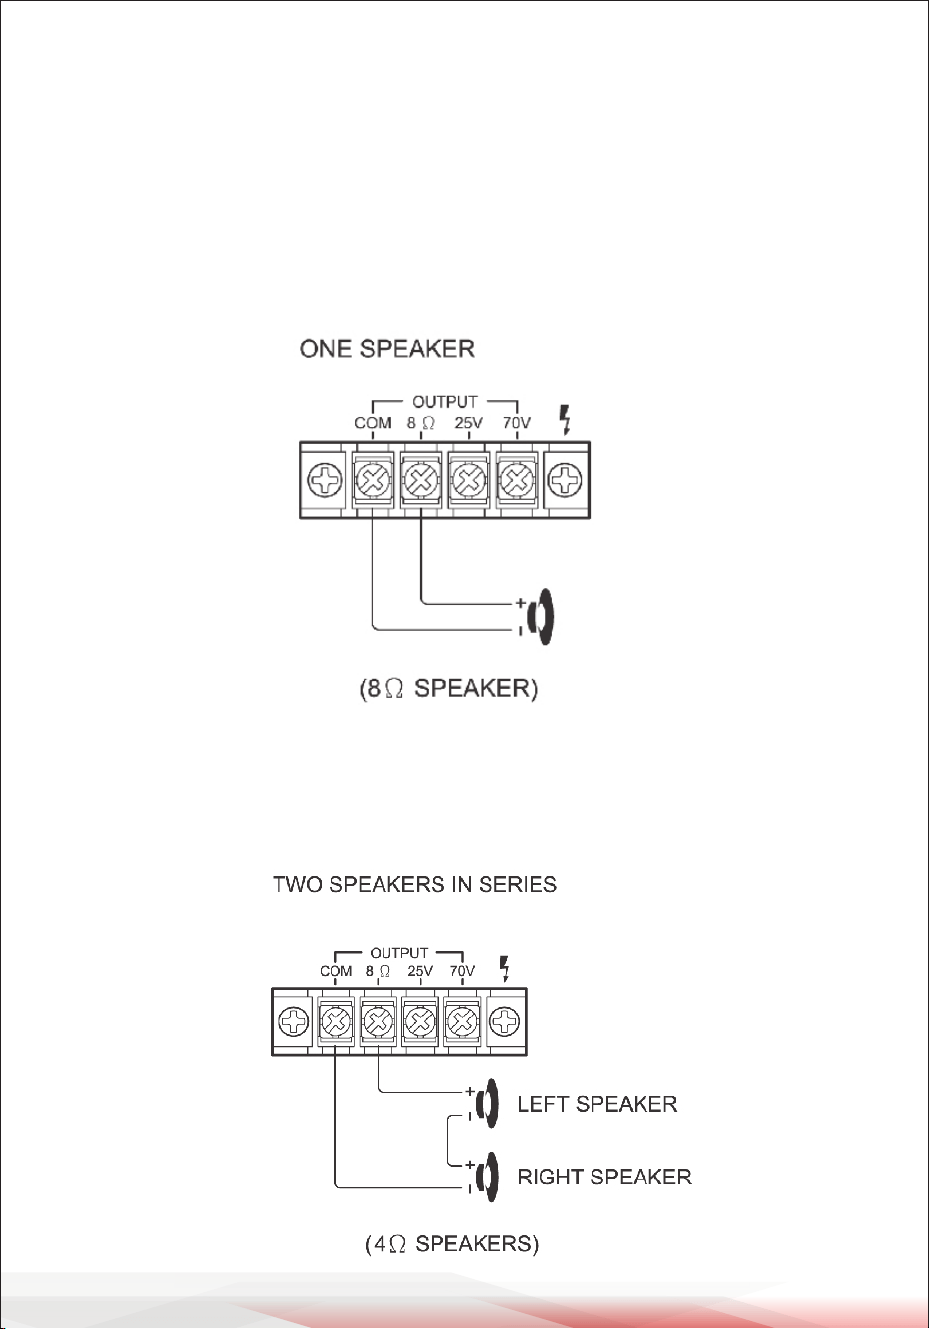
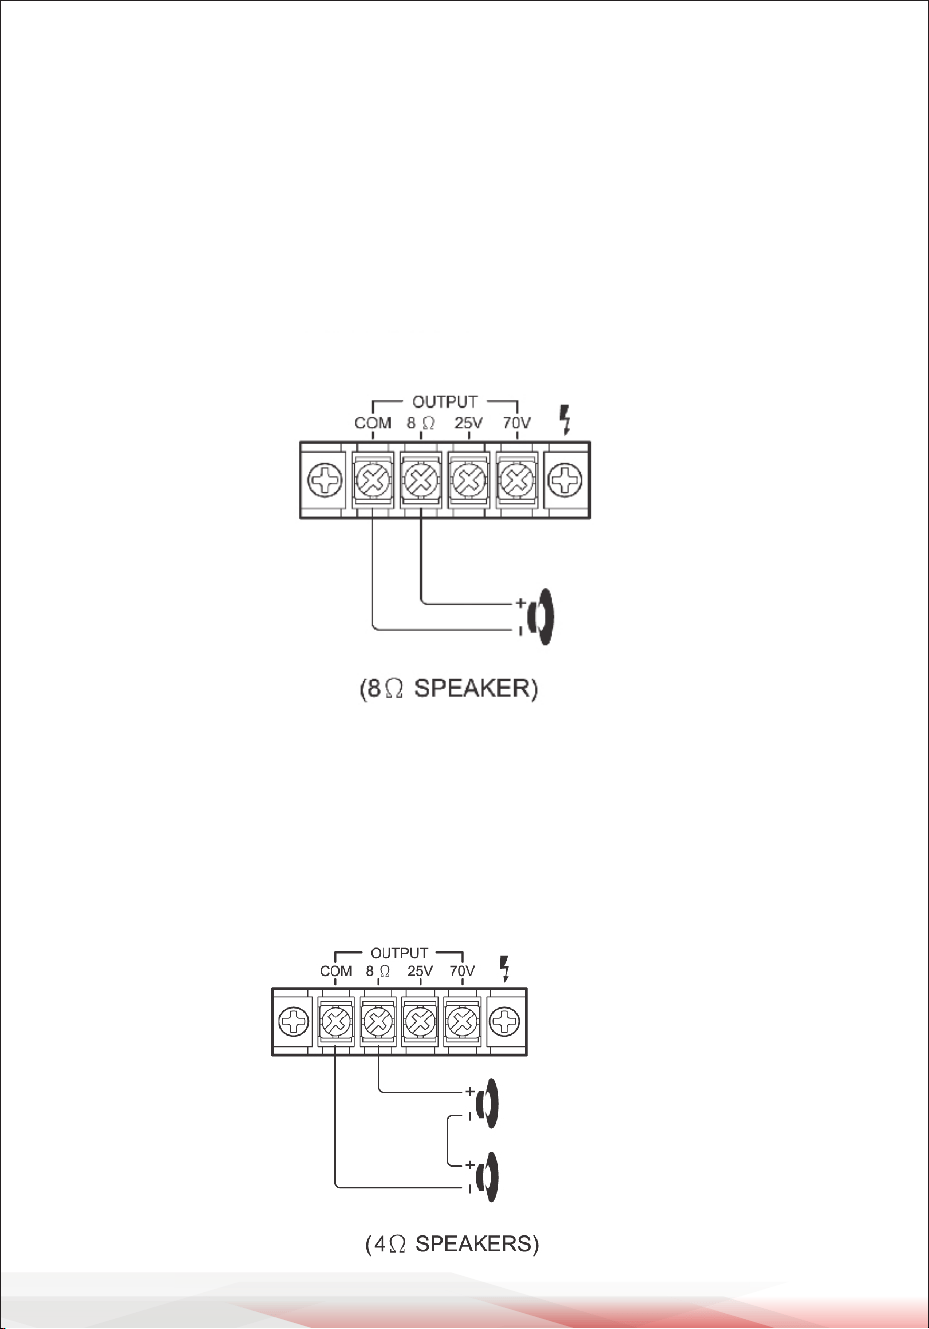
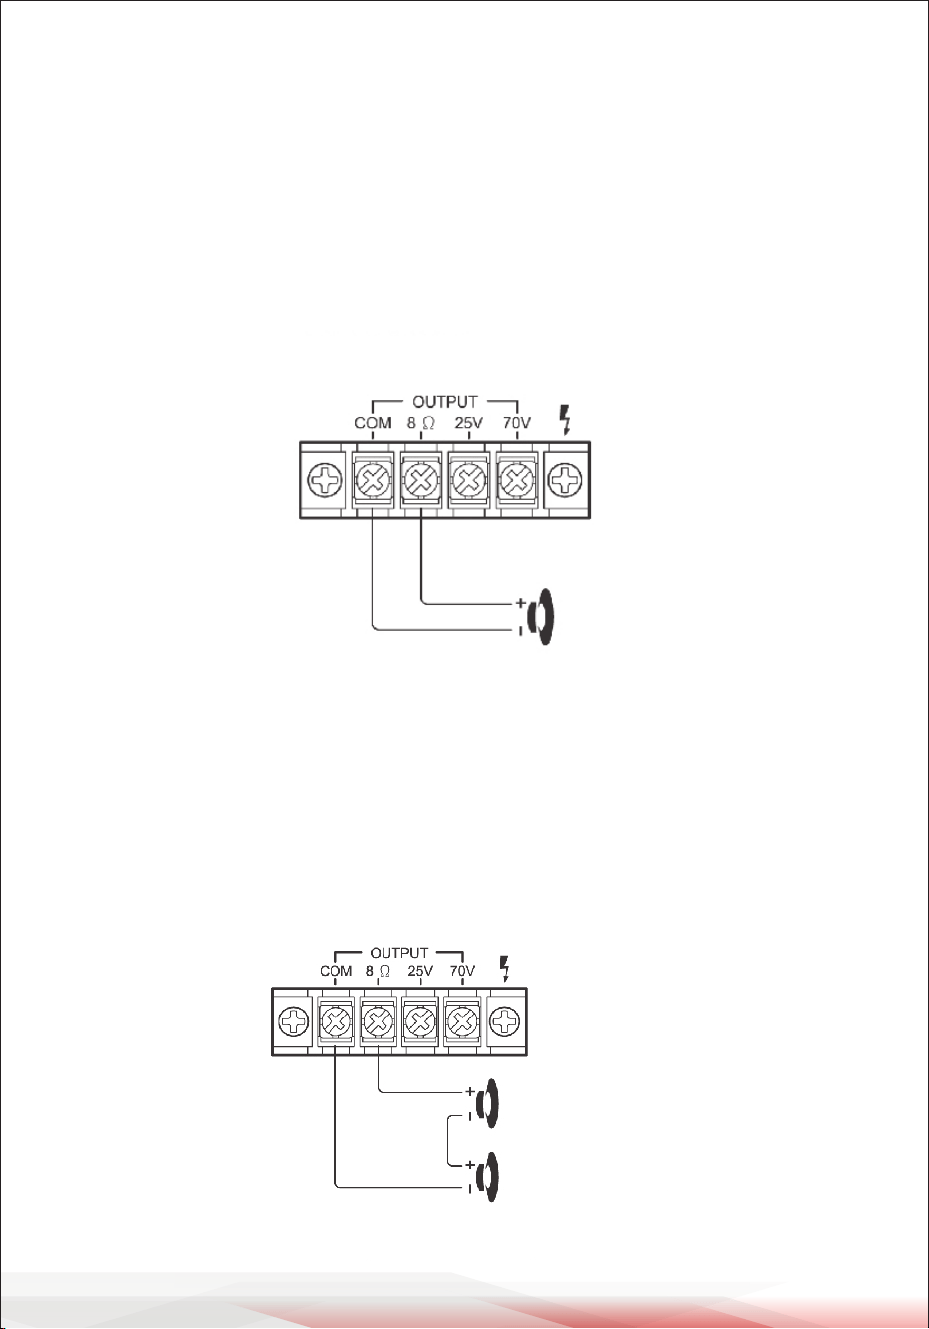
SPEAKER CONNECTION
One or more speakers (4, 8 or 16 Ohms) can be connected to the amplier with
or without transformers. However, before you connect any speakers to the
amplier, the total impedance must be calculated in order to avoid damage to
the amplier. A total speaker impedance greater than 8 Ohms or less than 8
Ohms can cause this damage to occur.
SYSTEM 1: Single Speaker System
NOTE: Connect the speaker (+) to the amplier's 8-Ohm terminal.
SYSTEM 2 : Two (or more) Speakers in Series
NOTE: Connect the speaker (+) to the amplier's 8-Ohm terminal, depending
on the TOTAL IMPEDANCE of the two speakers. If each speaker has an impedance
of 4-Ohm, the total speaker impedance in this series conguration is 8 ohms.

www.PyleUSA.com
9
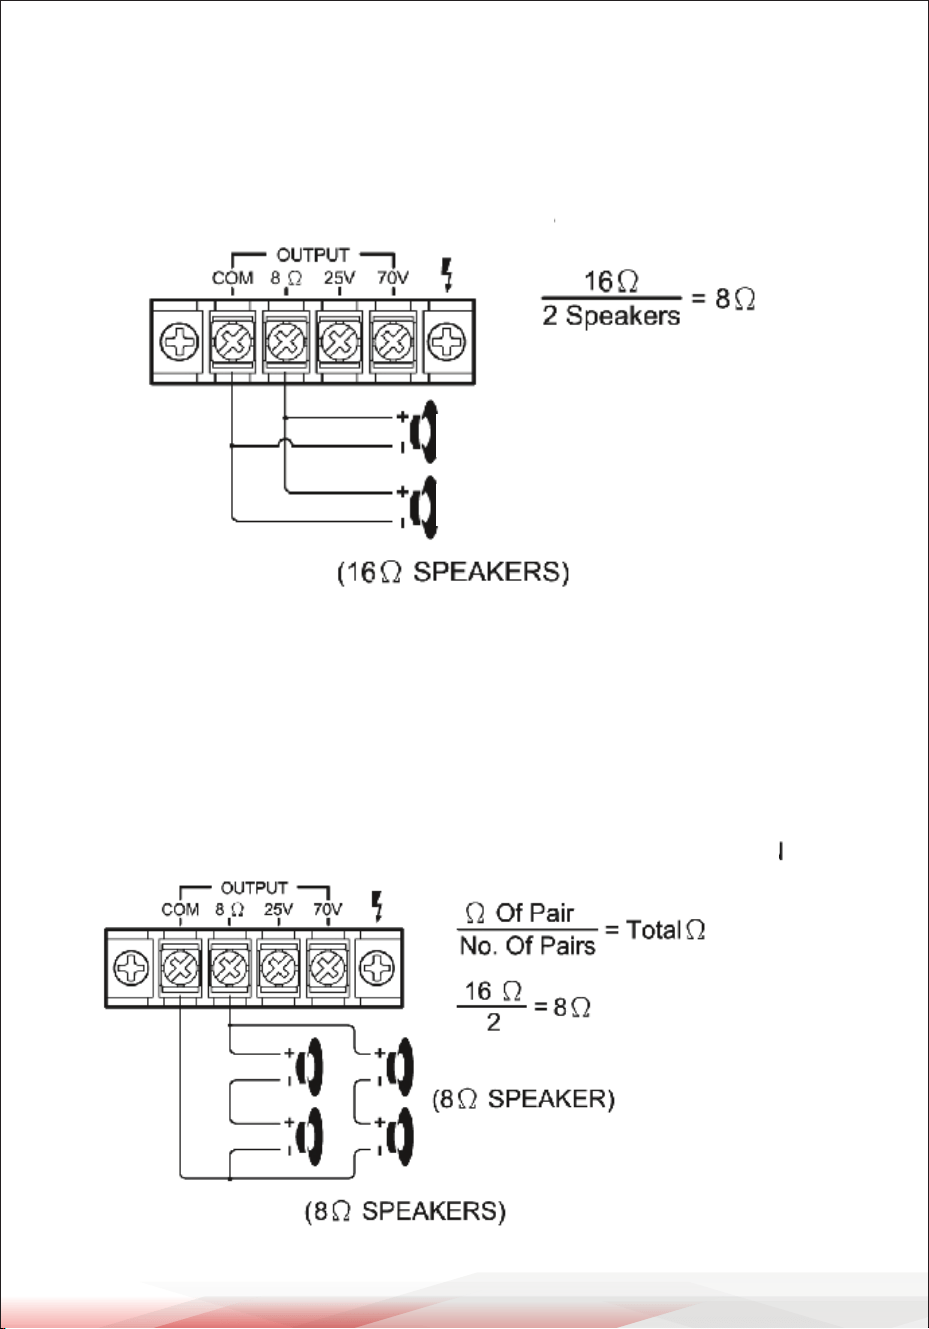
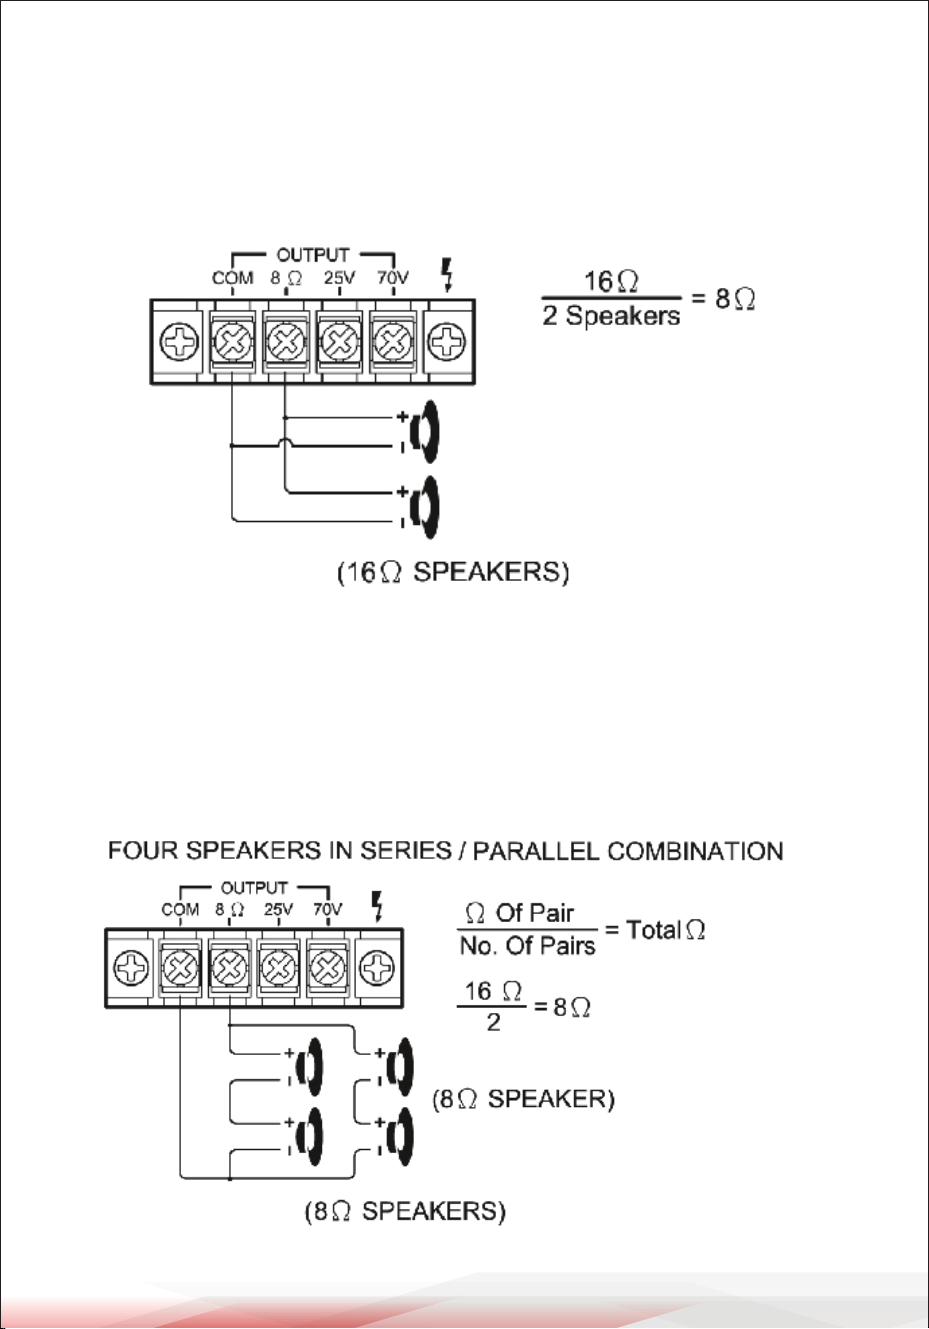
SYSTEM 3 : Two (or more) Speakers in Parallel
NOTE: Connect the speaker (+) to the amplier's 8-Ohm terminal, depending on
the TOTAL IMPEDANCE of the two speakers. If each speaker has an impedance
of 16-Ohm, the total speaker impedance in this series conguration is 8 ohms.
SYSTEM 4: Four Speakers in Series and Parallel
NOTE: Although the description above is for connecting two series pairs of 8
Ohms speakers in a parallel hook up, you may also select to combine a series
pair and a parallel pair in a parallel hook up, simply be sure you have calculated
the total impedance, and attach the speaker (+) circuit wire to the proper amp
terminal.

www.PyleUSA.com
10
SYSTEM 5: Connecting Speakers with Transformers
NOTE: When the 25V or 70V constant line voltages are used, a line matching
transformer must be used with each speaker. All transformers must be connect-
ed in parallel, never connect line transformers in series.
WIRELESS BT OPERATION INSTRUCTION
External devices which have a built-in Wireless BT feature can be connected
to this amplier wirelessly to play through the amplier's speakers. If your
amp is connected to speakers, you will hear audible tones which will help for
connecting.
1. At rst be sure that the amplier is powered on, and turn the volume to low.
Please remember to connect the BT Antenna at the back panel for better
receiving signal
2. Press the BT/Line button switch in on the front panel, you will hear the voice
"POWER ON" and also "PAIRING", and then the unit is automatically ready to
pair with your external device.
3. Turn ON the BT on your external device.

www.PyleUSA.com
11
California Prop 65 Warning
WARNING:
This product may expose you to chemicals, which is known to
the state of California to cause cancer, birth defects and other
reproductive harm. Do not ingest.
For more info go to: www.P65warnings.ca.gov
4. Search for available Wireless BT devices and make sure to be within range of
your amp, and wait for your device to select "PYLEUSA" on the pairing
devices lists of Wireless BT networks.
5. Once connected you will hear a voice say, “Your Device is Connected", then
the BT pairing is successful and your have established a WIreless BT connection.
6. You can now play music on your external device through the amplier.
Care and Maintenance
Your Pyle Amplier is an example of superior design and craftsmanship.
The following suggestions will help you care for your amplier so you can
enjoy years of use:
• Keep the amplier dry. If it gets wet, wipe immediately.
• Use the amplier only in well-ventilated installations.
• Handle the amplier away from dust and dirt.
• Wipe occasionally with a damp cloth to keep it looking new.
• Do not use harsh chemical, solvents or detergents!

www.PyleUSA.com
12
Features:
• Compact Power Amplier Design
• Automatic Mic-Talkover Priority Function (Mic 1)
• (2) 1/4'' Microphone Inputs
• Aux (1/4'') Input Connector Jack
• Ability to Connect External Devices
• Speaker Terminal Outputs: COM/8-Ohm/25V/70V
• Independent Microphone/Aux Volume Controls
• Connect up to (4) Speakers
• Speaker Transformer Compatibility
• Bass and Treble Tone Controls
• Includes Detachable AC Power Cable
• Convenient Audio Control Amp
• USB/SD/FM/Wireless BT Playing
• Blue LED Display for Playing Information
• Extend Wireless BT Antenna
Wireless BT Connectivity:
• Works with All of Your Favorite Wireless BT Devices
(iPhones, Androids, Smartphones, iPad, Tablet, PC, etc.)
• Wireless BT Network Name: ‘PYLEUSA’
• Wireless BT Version: 4.0
• Wireless Range up to 30’+ ft.

Start Here
Model Number:
PCM20A
PyleUSA.com/pages/register
Register Product
Thank you for choosing PyleUSA. By registering your product, you
ensure that you receive the full benets of our exclusive warranty
and personalized customer support. Complete the form to access
expert support and to keep your PyleUSA purchase in perfect
condition.
www.PyleUSA.com
13
What's in the Box:
• PA Amplier
•
FM Antenna
• Remote Control
Technical Specs:
• MAX Power Output: 40 Watt
• Construction Material: Iron
• Bass/Treble: +/-10dB, 100-10kHz
• Frequency Response: 50-15kHz
• Attenuation (Mic): 61dB
• T.H.D.: <1%
• Battery Operated Remote, Requires (1) x CR-2025 Button Cell Battery, Included
• Replaceable Fuse
• Power: 120/240 Voltage Selector
• Dimensions (L x W x H): 5.9'' x 7.87'' x 3.15'' -inc / 15 x 20 x 8.1 -cm

Questions? Comments?
We are here to help!
Phone: (1) 718-535-1800
PyleUSA.com/ContactUs
Amplificador de control de audio/altavoz del micrófono,
Entradas de micrófono de 1/4", 40 vatios
Amplificador de potencia de 25 V/70 V
PCM20AEU - PCM20AUK
MANUAL DE USUARIO
Visite nuestro
sitio web
ESCANÉAME
PyleUSA.com
SPA

Acerca de PyleUSA
Pyle, fundada en la década de 1960, ha evolucionado hasta convertirse
en un reconocido fabricante de altavoces de graves (“woofers”) avanza-
dos de alta calidad. Nuestro viaje comenzó con el icónico Pyle Driver,
convirtiéndose en un nombre muy conocido en altavoces originales. A
nales del siglo XX, nos expandimos a los altavoces de repuesto, audio
para automóviles, audio doméstico, audio marino y audio profesional e
instrumentos musicales con nuestra línea Pyle Pro.
Pyle Automóvil:
Transforme su automóvil en un entorno auditivo perfecto con nuestros
altavoces, amplicadores y unidades principales a precios competitivos.
Actualice los altavoces de fábrica para mejorar su experiencia musical.
Explore accesorios como sistemas de navegación, reproductores de DVD,
interfaces para iPod y cámaras orientadas a la seguridad.
Pyle Hogar:
Descubra una gama de productos de entretenimiento doméstico, como
proyectores, televisores, soportes, bases y tecnología HD. Pyle Hogar
ofrece minialtavoces con expansión de graves, auriculares, giradiscos
vintage, amplicadores de potencia, altavoces de bocina y mucho más
para enriquecer la experiencia multimedia en casa y fuera de ella.
Pyle Pro:
Como proveedor líder mundial de equipos de audio, Pyle Pro atiende a
músicos, ingenieros de estudio y acionados. Nuestros sistemas de
megafonía, con micrófonos inalámbricos, baterías recargables y bases
para iPod/iPhone, son ideales para diversos eventos. Explore nuestra
línea emergente de guitarras, pedales de efectos y convertidores de USB
a analógico sin renunciar a la calidad.
www.PyleUSA.com
2

INSTRUCCIONES DE SEGURIDAD IMPORTANTES
1. Lea las instrucciones - Todas las instrucciones de seguridad y funcionamien
to deben leerse antes de utilizar el aparato.
2. Conserve las instrucciones - las instrucciones de seguridad y funcionamien
to deben conservarse para futuras consultas.
3. Advertencias de cabeza - se deben cumplir todas las advertencias del
aparato y de las instrucciones de funcionamiento.
4. Siga las instrucciones
5. Agua y humedad - el aparato no debe usarse cerca del agua, por ejemplo,
cerca de una bañera, un lavabo, un fregadero de cocina, una tina de
lavandería, una piscina o un sótano húmedo.
6. Ventilación - el aparato debe colocarse de manera que su ubicación o
posición no interera con su ventilación adecuada. Por ejemplo, el aparato no
debe colocarse sobre una cama, sofá, alfombra o supercie similar que pueda
bloquear las aberturas de ventilación o colocarse en una instalación empotrada,
como una estantería o un armario que pueda impedir el ujo de aire a través
de las aberturas de ventilación.
7. Calor - el aparato debe colocarse lejos de fuentes de calor como radiadores,
rejillas de calefacción, estufas u otros electrodomésticos, incluidos los ampli
cadores que producen calor.
8. Fuentes de alimentación - La unidad debe conectarse únicamente a una
fuente de alimentación del tipo descrito en las instrucciones de funcionamiento
o como se indica en el aparato.
9. Conexión a tierra o polarización - se debe tomar precauciones para asegurarse
de que los medios de conexión a tierra o polarización de un aparato no se anulen.
10. Protección del cable de alimentación - los cables de alimentación deben
colocarse de manera que no sea probable que se pisen o pellizquen con elementos
colocados sobre ellos o contra ellos, prestando especial atención a los cables en
los enchufes, receptáculos de conveniencia y el punto en el que salen del aparato.
11. Limpieza - El aparato debe limpiarse solo según lo recomendado por el fabricante.
12. Líneas eléctricas - un sistema de antena exterior no debe ubicarse cerca de
líneas eléctricas aéreas u otros circuitos de luz eléctrica o energía, o donde
pueda fallar en dichas líneas o circuitos eléctricos. Al instalar un sistema de
antena exterior, se debe tener mucho cuidado para evitar tocar dichas líneas
o circuitos eléctricos, ya que el contacto con ellos podría ser fatal.
13. Períodos de inactividad - el cable de alimentación del aparato debe
desenchufarse de la toma de corriente cuando el aparato se va a dejar sin
usar durante un largo período de tiempo.
www.PyleUSA.com
3

14. 14. Líquidos y otro objetos - Se debe tener cuidado para que no caigan
objetos y no se derramen líquidos en el recinto a través de las aberturas.
15. Carros y soportes - si el aparato se usa con un carro o soporte,
el carro o soporte debe ser del tipo recomendado por el fabricante.
Una combinación de electrodoméstico y carro debe ser movido con
cuidado. Las paradas rápidas, la fuerza excesiva y las supercies irregulares
hacen que la combinación del aparato y el carro se vuelque.
16. Montaje - El aparato debe montarse únicamente según lo recomendado
por el fabricante.
17. Daños que requieren servicio - El aparato debe ser reparado por personal
de servicio calicado cuando:
A. El cable de alimentación o el enchufe se han dañado.
B. Los objetos han fallado o se ha derramado líquido en la carcasa del aparato.
C. El aparato ha estado expuesto a la lluvia.
D. El aparato se ha caído o la carcasa se ha dañado.
E. El aparato no parece funcionar normalmente o muestra un cambio
marcado en el rendimiento.
18. Mantenimiento - el usuario no debe intentar reparar el aparato más allá de
lo descrito en las instrucciones de funcionamiento del usuario. Todos los
demás servicios deben remitirse a personal calicado.
19. Sobrecarga - No sobrecargue los tomacorrientes de pared y los cables de
extensión, ya que esto puede resultar en un riesgo de incendio o descarga eléctrica.
20. Piezas de repuesto - cuando se requieran piezas de repuesto, asegúrese de
que el técnico de servicio haya utilizado piezas de repuesto especicadas
por el fabricante o que tengan las mismas características que la pieza original.
Las sustituciones no autorizadas pueden provocar incendios, descargas
eléctricas u otros peligros.
21. Comprobación de seguridad - al nalizar cualquier servicio o reparación de este
aparato, pídale al técnico de servicio que realice comprobaciones de seguridad para
determinar que el aparato está en condiciones de funcionamiento adecuadas.
www.PyleUSA.com
4
ADVERTENCIA: Para reducir el riesgo de incendio o corto circuito,
no exponga este producto a la lluvia ni a la humedad.
PRECAUCIÓN: Para reducir el riesgo de descarga eléctrica, no
retire la cubierta ni la parte posterior. No hay partes que se puedan
repararen el interior. Reera el servicio a personal calicado.
RIESGO DE DESCARGA ELÉCTRICA,
NO ABRA
PRECAUCIÓN
Este símbolo está destinado a alertarle sobre la presencia de
voltaje peligroso no aislado dentro de la carcasa del producto
que podría ser de magnitud suciente para constituir un
riesgo de descarga eléctrica. No abra la caja del producto.
Este símbolo tiene por objeto informarle de que en
el Bibliografía que acompaña a este producto.

Su nuevo amplicador de potencia estéreo PCM20A
Le da la potencia y versatilidad que necesita en un sistema de sonido profesion-
al. La amplia respuesta de frecuencia es perfecta para la amplicación de voces y
música. La función talkover para el Mic 1 y la entrada auxiliar ubicada en el panel
frontal lo hacen perfecto para salas de reuniones, auditorios, eventos deportivos,
escuelas y sistemas de localización de ocinas. Ideal para cualquier lugar en el
que necesite entregar un anuncio especial con una excelente calidad de sonido.
CARACTERÍSTICAS Y CONTROLES
PANEL FRONTAL
1. Encendido / apagado e indicador: interruptor de alimentación principal,
el indicador se enciende cuando se enciende el amplicador.
2. Controles de volumen MIC 1 y MIC 2/AUX: Ajusta el nivel de la señal de
salida de las entradas correspondientes.
3. Controles de tono BASS y TREBLE: Ajusta los graves y agudos de las señales
de salida correspondientes.
4. Botones de control de funciones MODE, PLAY, PREV y NEXT:
• Botón de modo: para la selección de audio como WIRELESS BT / SD / LINE IN
• BOTÓN PLAY/PAUSE: Botón de control de reproducción y pausa
• PREV/NEXT: Retroceso rápido o siguiente canción
5. Pantalla LED
6. Zócalo SD/MMC para reproducir tarjetas SD/MMC
7. Puerto de carga USB: puerto USB solo para cargar teléfonos inteligentes, sin
función de lector USB
8. Entrada AUX: Para conectar la fuente de audio de alta impedancia, como la
platina de cintas, el reproductor de CD o el sintonizador con un conector de
1/4" a través del adaptador de conector de audio (dos enchufes RCA de
teléfono en un conector mono de 1/4").
www.PyleUSA.com
5
1
2
3
4
5
6
7
8
9

9. Conexiones MIC1 y MIC2: Para conectar el micrófono de baja impedancia
con enchufe de 1/4". El MIC 1 es una fuente de "Prioridad", las señales de AUX
se atenuarán automáticamente en -40 dB, la señal del MIC 1 se anulará a la
página (conversación automática). Es bueno para el sistema de paginación.
PANEL TRASERO
1. Antena BT inalámbrica: Receptor de transmisión BT inalámbrico
2. Conexión de altavoces: Uno o más altavoces (4,8 o 16 ohmios) pueden ser
conectado al amplicador con o sin transformadores. Sin embargo, antes de
conectar cualquier altavoz al amplicador, se debe calcular la impedancia
total para evitar daños en el amplicador. Una impedancia total del altavoz
superior a 8 ohmios o inferior a 8 ohmios puede provocar este daño.
3. Interruptor de voltaje: este amplicador de PA tiene un voltaje de entrada
seleccionable de 110 V / 60 Hz (el estándar en EE. UU. y CANADÁ)
a 220 V / 50 Hz (para operación EUROPEA). Asegúrese de que el interruptor esté
en la posición correcta antes de operar, de lo contrario se incurrirá en daños
graves que no estarán cubiertos por la garantía.
4. Entrada de CA: Enchufe el cable de alimentación incluido en la unidad
mientras la alimentación está apagada, luego enchufe el cable de
alimentación de CA en una toma de corriente. Reemplace también el fusible
solo con la clasicación adecuada si es necesario (consulte la clasicación del
fusible de Tl .2AL 250V para 110-120V y T0.63AL 250V para 220V / 240V
impreso en la entrada de alimentación)
5. CONECTOR DE ANTENA FM: Conéctese para antena FM
www.PyleUSA.com
6
1
2
3
4
5
1
2
3
4
5
6
7
8
9
www.PyleUSA.com
7
CONTROL REMOTO
1. Presione este botón para encender o apagar el MP3
2. Cuando esté en el modo FM, presione estos dos botones para seleccionar el
canal anterior o siguiente.
3. Presione estos dos botones para seleccionar la pista anterior o siguiente en
modo USB o SD o Wireless BT
4. Subir o bajar el volumen
5. Presione los números para seleccionar las pistas directamente.
La unidad tarda entre 1 y 2 segundos en responder en modo USB o SD.
6. Presione este botón para repetir el modo.
7. Presione este botón para seleccionar el modo de reproducción, como USS /
SD / FM / WIRELESS BT
8. Función de ecualización: Seleccione un modo preestablecido del ecualizador
que esté diseñado en consecuencia.
9. Función de reproducción y pausa para MP3
www.PyleUSA.com
8
CONEXIÓN DE ALTAVOCES
Se pueden conectar uno o más altavoces (4, 8 o 16 ohmios) al amplicador con
o sin transformadores. Sin embargo, antes de conectar cualquier altavoz al
amplicador, se debe calcular la impedancia total para evitar daños en el
amplicador. Una impedancia total del altavoz superior a 8 ohmios o inferior a 8
ohmios puede provocar este daño.
SISTEMA 1: Sistema de un solo altavoz
NOTA: Conecte el altavoz (+) al terminal de 8 ohmios del amplicador.
SISTEMA 2 : Dos (o más) altavoces en serie
NOTA: Conecte el altavoz (+) al terminal de 8 ohmios del amplicador, dependi-
endo de en la IMPEDDANCIA TOTAL de los dos altavoces. Si cada altavoz tiene
una impedancia de 4 ohmios, la impedancia total del altavoz en esta congura-
ción de serie es de 8 ohmios.
UN ALTAVOZ
DOS ALTAVOCES
ALTAVOZ IZQUIERDO
ALTAVOZ DERECHO
www.PyleUSA.com
9
SISTEMA 3 : Dos (o más) altavoces en paralelo
NOTA: : Conecte el altavoz (+) al terminal de 8 ohmios del amplicador, depen-
diendo de la IMPEDANCIA TOTAL de los dos altavoces. Si cada altavoz tiene una
impedancia de 16 ohmios, la impedancia total del altavoz en esta conguración
de serie es de 8 ohmios.
SISTEMA 4: Cuatro altavoces en serie y en paralelo
NOTA: Aunque la descripción anterior es para conectar dos pares en serie de
altavoces de 8 ohmios en una conexión paralela, también puede seleccionar
combinar un par en serie y un par paralelo en una conexión paralela, simple-
mente asegúrese de haber calculado la impedancia total y conecte el cable del
circuito del altavoz (+) al terminal de amplicador adecuado.
DOS ALTAVOVES EN PARALELO
ALTAVOZ 1
ALTAVOZ 2
CUATRO ALTAVOCES EN COMBINACIÓN SERIE/PARALELO

www.PyleUSA.com
10
SISTEMA 5: Conexión de altavoces con transformadores
NOTA: Cuando se utilizan voltajes de línea constantes de 25 V o 70 V, se debe
usar un transformador de coincidencia de línea con cada altavoz. Todos los
transformadores deben conectarse en paralelo, nunca conecte transformadores
de línea en serie.
INSTRUCCIONES DE OPERACIÓN INALÁMBRICA DE BT
Los dispositivos externos que tienen una función BT inalámbrica incorpora-
da se pueden conectar a este amplicador de forma inalámbrica para repro-
ducir a través de los altavoces del amplicador. Si su amplicador está
conectado a altavoces, escuchará tonos audibles que ayudarán a conectarse.
1. Al principio, asegúrese de que el amplicador esté encendido y baje el
volumen. Recuerde conectar la antena BT en el panel posterior para recibir
mejor la señal
2. Presione el interruptor del botón BT / Line en el panel frontal, escuchará la voz
"POWER ON" y también "PAIRING" y luego la unidad estará automáticamente
lista para emparejarse con su dispositivo externo.
3. Encienda (ON) el BT en su dispositivo externo.
CONEXIÓN DE ALTAVOCES

www.PyleUSA.com
11
4. Busque dispositivos BT inalámbricos disponibles y asegúrese de estar dentro
del alcance de su amplicador, y espere a que su dispositivo seleccione "PYLEUSA"
en las listas de dispositivos de emparejamiento de las redes BT inalámbricas.
5. Una vez conectado, escuchará una voz que dice: "Su dispositivo está conecta
do". entonces el emparejamiento BT es exitoso y ha establecido una conexión
BT inalámbrica.
6. Ahora puede reproducir música en su dispositivo externo a través del amplicador.
Cuidado y mantenimiento
Su amplicador Pyle es un ejemplo de diseño y artesanía superiores. Las
siguientes sugerencias te ayudarán a cuidar su amplicador para que
pueda disfrutar de años de uso:
• Mantenga el amplicador seco. Si se moja, límpielo inmediatamente.
• Utilice el amplicador solo en instalaciones bien ventiladas.
• Manipule el amplicador lejos del polvo y la suciedad.
• Limpie de vez en cuando con un paño húmedo para que luzca como nuevo.
• ¡No utilice productos químicos, disolventes o detergentes agresivos!
Advertencia de la Proposición 65 de California
ADVERTENCIA:
Este producto puede exponerlo a sustancias químicas, que el
estado de California reconoce como causantes de cáncer,
defectos congénitos y otros daños reproductivos. No ingerir.
Para obtener más información, visite: www.P65warnings.ca.gov

www.PyleUSA.com
12
Características:
• Diseño compacto del amplicador de potencia
• Función automática de prioridad Mic-Talkover (Mic 1)
• (2) Entradas de micrófono de 1/4"
• Conector de entrada auxiliar (1/4")
• Posibilidad de conectar dispositivos externos
• Salidas de terminal de altavoz: COM / 8-Ohm / 25V / 70V
• Micrófono independiente/controles de volumen auxiliar
• Conecta hasta (4) altavoces
• Compatibilidad con el transformador del altavoz
• Controles de tono de graves y agudos
• Incluye cable de alimentación de CA desmontable
• Práctico amplicador de control de audio
• Reproducción de BT USB/SD/FM/inalámbrica
• Pantalla LED azul para información de reproducción
• Extender la antena BT inalámbrica
Conectividad BT inalámbrica:
• Funciona con todos sus dispositivos BT inalámbricos favoritos (iPhones,
Androids, teléfonos inteligentes, iPad, tableta, PC, etc.)
• Nombre de la red BT inalámbrica: 'PYLEUSA'
• Versión BT inalámbrica: 4.0
• Alcance inalámbrico de hasta 30'+

COMIENCE AQUI
Model Number:
PCM20A
PyleUSA.com/pages/register
Registrar Producto
Gracias por elegir PyleUSA. Al registrar su producto, se asegura de
recibir todos los benecios de nuestra garantía exclusiva y
atención al cliente personalizada. Completa el formulario para
acceder al soporte de expertos y mantener en perfectas condi-
ciones tu compra de PyleUSA.
www.PyleUSA.com
13
Contenido de la caja:
• Amplicador de PA
• Antena FM
• Mando a distancia
Especicaciones técnicas:
• Potencia máxima de salida: 40 vatios
• Material de construcción: Hierro
• Graves/agudos: +/-10 dB, 100-10 kHz
• Respuesta de frecuencia: 50-15kHz
• Atenuación (micrófono): 61dB
• T.H.D.: <1%
• Control remoto que funciona con baterías, requiere (1) batería de botón CR-2025,
incluida
• Fusible reemplazable
• Potencia: Selector de voltaje 120/240
• Dimensiones (largo x ancho x alto):
5.9" x 7.87" x 3.15" -pulgadas / 15 x 20 x 8.1 -centímetro

Preguntas o comentarios
¡Estamos aquí para ayudar!
Phone: (1) 718-535-1800
PyleUSA.com/ContactUs
Microphone Audio/Amplificateur de contrôle de l’enceinte
Mic 1/4", 40 Watt
Amplificateur de puissance 25 V/70 V
PCM20AEU - PCM20AUK
MODE D’EMPLOI
Visitez notre site
Internet
SCANNE MOI
PyleUSA.com
FRE

À propos de PyleUSA
Fondée dans les années 1960, Pyle est devenue un fabricant renommé
de woofers avancés et de haute qualité. Notre aventure a commencé
avec le célèbre Pyle Driver, qui est rapidement devenu un nom incon-
tournable dans le domaine des haut-parleurs d'origine. À la n du 20e
siècle, nous avons élargi notre gamme pour inclure des haut-parleurs de
remplacement, des équipements audios pour voiture, audio domestique,
audio marin ainsi que des instruments de musique et équipements audio
professionnels sous la marque Pyle Pro.
Pyle Car:
Transformez votre voiture en un environnement d'écoute parfait grâce à
nos haut-parleurs, amplicateurs et unités principales à des prix
compétitifs. Améliorez les haut-parleurs d'usine pour une meilleure
expérience musicale. Découvrez également nos accessoires comme les
systèmes de navigation, lecteurs DVD, interfaces iPod et caméras axées
sur la sécurité.
Pyle Home:
Explorez une gamme de produits pour le divertissement à domicile, y
compris des projecteurs, téléviseurs, supports, et technologies HD.
Pyle Home propose également des mini haut-parleurs à basses améliorées,
des casques, des tourne-disques vintages, des amplicateurs de puissance,
des haut-parleurs à pavillon et bien plus encore pour une expérience
multimédia enrichie, que ce soit à la maison ou en déplacement.
Pyle Pro:
En tant que leader mondial des équipements audio, Pyle Pro répond aux
besoins des musiciens, ingénieurs de studio et amateurs. Nos systèmes de
sonorisation, équipés de microphones sans l, batteries rechargeables et
stations d'accueil pour iPod/iPhone, sont idéaux pour divers événements.
Découvrez notre nouvelle gamme de guitares, pédales d'eet et conver-
tisseurs USB-analogique, le tout sans jamais compromettre la qualité.
www.PyleUSA.com
2

INSTRUCTIONS IMPORTANTES EN MATIÈRE DE SÉCURITÉ
1. Lire les instructions - Toutes les instructions de sécurité et d'utilisation
doivent être lues avant d'utiliser l'appareil.
2. Conserver les instructions - Les instructions de sécurité et d'utilisation
doivent être conservées pour référence ultérieure.
3. Avertissements - Les avertissements gurant sur l'appareil et dans le mode
d'emploi doivent être respectés.
4. Suivre les instructions
5. Eau et humidité - L'appareil ne doit pas être utilisé à proximité de l'eau, par
exemple près d'une baignoire, d'un lavabo, d'un évier de cuisine, d'un bac à
linge, d'une piscine ou d'un sous-sol humide.
6. Ventilation - L'appareil doit être placé de manière à ce que son emplacement
ou sa position n'entrave pas sa bonne ventilation. Par exemple, l'appareil ne
doit pas être placé sur un lit, un canapé, un tapis ou toute autre surface
similaire susceptible d'obstruer les orices de ventilation, ni dans une
installation encastrée, telle qu'une bibliothèque ou une armoire, qui pourrait
empêcher l'air de circuler à travers les orices de ventilation.
7. Chaleur - L'appareil doit être éloigné des sources de chaleur telles que les
radiateurs, les bouches d’aération, les poêles ou d'autres appareils, y compris
les amplicateurs, qui produisent de la chaleur.
8. Sources d'alimentation - L'appareil doit être raccordé à une source
d'alimentation du type décrit dans le mode d'emploi ou indiqué sur l'appareil.
9. Mise à la terre ou polarisation - Des précautions doivent être prises pour
s'assurer que les moyens de mise à la terre ou de polarisation d'un appareil ne
sont bien eectués.
1O. Protection des câbles d'alimentation - Les câbles d'alimentation doivent
être placés de manière à ne pas risquer d'être piétinés ou pincés par des
objets placés sur ou contre eux, en accordant une attention particulière aux
câbles au niveau des prises de courant et de l'endroit où ils sortent de l'appareil.
11. Nettoyage - L'appareil ne doit être nettoyé que selon les recommandations
du fabricant.
12. Lignes électriques - Un système d'antenne extérieure ne doit pas être placé à
proximité de lignes électriques aériennes ou d'autres circuits d'éclairage ou
d'alimentation électrique, ni à un endroit où il pourrait tomber sur ces lignes ou
circuits. Lors de l'installation d'un système d'antenne extérieure, il faut faire très
attention à ne pas toucher ces lignes ou circuits électriques, car le contact peut être fatal.
13. Périodes d'inutilisation - Le cordon d'alimentation de l'appareil doit être
débranché de la prise lorsque l'appareil doit rester inutilisé pendant une longue période.
www.PyleUSA.com
3

14. Pénétration d’objets ou des liquides - Il faut veiller à ce que les objets ne
tombent pas et les liquides ne se répandent pas dans l'enceinte
par les ouvertures.
15.Chariots et supports - Si l'appareil est utilisé avec un chariot ou
un support, le chariot ou le support doit être du type recommandé
par le fabricant. L’appareil et le chariot doivent être déplacés avec précaution.
Des arrêts rapides, une force excessive ou des surfaces instables peuvent
entraîner le renversement de l'appareil et du chariot.
16. Montage - L'appareil ne doit être monté que selon les recommandations
du fabricant.
17. Dommages nécessitant une intervention - L'appareil doit être réparé par
un personnel qualié dans les cas suivants :
A. Le câble d'alimentation ou la prise sont endommagés.
B. Des objets sont tombés ou du liquide s'est répandu dans le boîtier de l'appareil.
C. L'appareil a été exposé à la pluie.
D. L'appareil est tombé ou le boîtier a été endommagé.
E. L'appareil ne semble pas fonctionner normalement ou présente un
changement marqué dans ses performances.
18. Entretien - L'utilisateur ne doit pas essayer de réparer l'appareil au-delà de ce
qui est décrit dans le mode d'emploi. Tout autre entretien doit être coné à un
personnel qualié.
19. Surcharge - Ne surchargez pas les prises murales et les rallonges, car cela
peut entraîner un risque d'incendie ou d'électrocution.
20. Pièces de rechange - Lorsque des pièces de rechange sont nécessaires,
assurez-vous que le technicien a utilisé des pièces de rechange spéciées par
le fabricant ou ayant les mêmes caractéristiques que la pièce d'origine.
Les substitutions non autorisées peuvent entraîner des incendies, des chocs
électriques ou d'autres dangers.
21. Contrôle de sécurité - Après toute opération d'entretien ou de réparation de
l'appareil, demandez au technicien d'eectuer des contrôles de sécurité pour
vérier que l'appareil est en bon état de fonctionnement.
www.PyleUSA.com
4
AVERTISSEMENT: Pour réduire le risque d'incendie ou de choc,
ne pas exposer ce produit à la pluie ou à l'humidité.
ATTENTION: Pour réduire le risque d'électrocution, ne pas retirer
l’arrière de l'appareil. Il n'y a pas de pièces réparables par
l'utilisateur à l'intérieur. Coner l'entretien à un personnel qualié.
RISQUE DE CHOC ÉLECTRIQUE
NE PAS OUVRIR
CAUTION
Ce symbole est destiné à vous alerter sur la présence d'une
tension dangereuse non isolée à l'intérieur du produit,
d'une magnitude susante pour constituer un risque
d'électrocution. N'ouvrez pas le boîtier du produit.
Ce symbole est destiné à vous informer que d'importantes
instructions d'utilisation et d'entretien sont incluses dans
la documentation accompagnant ce produit.

Votre nouvel amplicateur de puissance stéréo PCM20A
vous ore la puissance et la polyvalence dont vous avez besoin dans un système
audio professionnel. La réponse en fréquence étendue est parfaite pour l'ampli-
cation des voix et de la musique. La fonction talkover du Mic 1 et l'entrée auxilia-
ire située sur le panneau avant en font un outil idéal pour les salles de réunion, les
auditoriums, les événements sportifs, les écoles et les systèmes d’annonce vocale
dans les bureaux. Il est idéal partout où vous devez faire des annonces spéciales
avec un système d‘une excellente qualité sonore.
CARACTÉRISTIQUES ET BOUTONS
PANNEAU AVANT
1. Power et voyant: Interrupteur principal d'alimentation, l'indicateur s'allume
lorsque l'amplicateur est allumé.
2. MIC 1 et MIC 2/Contrôle du volume AUX: Permet de régler le niveau du
signal de sortie des entrées correspondantes.
3. Contrôle des BASS et TREBLE : Ajuste les graves et les aigus des signaux de
sortie correspondante.
4. MODE, PLAY, PREV et NEXT - Boutons de commande des fonctions :
• Bouton MODE: Pour la sélection audio comme BT SANS FIL/SD/LINE IN
• BOUTON PLAY/ PAUSE: Bouton de contrôle de la lecture et de la pause.
• PREV/NEXT: Retour rapide en arrière ou chanson suivante
5. Achage LED
6. Prise SD/MMC pour lire les cartes SD/MMC
7. Port de charge USB: Port USB pour la charge des smartphones uniquement,
pas de fonction de lecteur USB
8. Entrée AUX: Pour connecter une source audio à haute impédance telle qu'un
magnétophone, Lecteur CD ou syntoniseur avec prise 1/4" via un adaptateur
audio (deux ches RCA phono dans une prise mono 1/4").
www.PyleUSA.com
5
1
2
3
4
5
6
7
8
9

9. Entrées MIC1 et MIC2 : Pour connecter le microphone à basse impédance
avec une che de 1/4". Le MIC 1 est une source "prioritaire", le signal
provenant d’AUX sera automatiquement atténué de -40dB, le signal prove
nant de MIC 1 sera prioritaire sur la page (auto talk).
PANNEAU
1. Antenne BT sans l: Récepteur de streaming BT sans l
2. Connexion des enceintes: Un ou plusieurs enceintes (4, 8 ou 16 Ohms) peuvent
être connectés à l'amplicateur avec ou sans transformateur. Toutefois, avant de
raccorder des enceintes à l'amplicateur, l'impédance totale doit être calculée an
d'éviter d'endommager l'amplicateur. Une impédance totale des enceintes
supérieure à 8 Ohms ou inférieure à 8 Ohms peut provoquer ces dommages.
3. Commutateur de tension: Cet amplicateur PA a une tension d'entrée
sélectionnable de 110 V/60 Hz (la norme aux Etats-Unis et au Canada) à 220 V/50
Hz (pour le fonctionnement en Europe). Veuillez-vous assurer que l'interrupteur
est dans la bonne position avant d'utiliser l'appareil, faute de quoi vous subirez de
graves dommages qui ne seront pas couverts par la garantie.
4. Entrée CA: Branchez le câble d'alimentation fourni sur l'appareil éteint, puis
branchez le câble d'alimentation CA sur une prise de courant appropriée.
Remplacez également le fusible par un fusible de calibre approprié si
nécessaire (voir le calibre du fusible Tl .2AL 250 V pour 110-12 0 V et T0.63AL
250 V pour 220 V/240 V imprimé sur l'entrée d'alimentation).
5. CONNECTEUR D'ANTENNE FM: Connexion pour l'antenne FM
www.PyleUSA.com
6
1
2
3
4
5

1
2
3
4
5
6
7
8
9
www.PyleUSA.com
7
TÉLÉCOMMANDE
1. Appuyez sur cette touche pour activer ou désactiver le lecteur MP3.
2. En mode FM, appuyez sur ces deux boutons pour sélectionner le canal
précédent ou suivant.
3. Appuyez sur ces deux boutons pour sélectionner la piste précédente ou
suivante en mode USB, SD ou BT sans l.
4. Augmentation ou diminution du volume
5. Appuyez sur les numéros pour sélectionner directement les pistes.
L'appareil prend 1 à 2 secondes pour répondre en mode USB ou SD.
6. Appuyez sur cette touche pour passer en mode répétition.
7. Appuyez sur cette touche pour sélectionner le mode de lecture, par exemple
USB/SD/FM/BT sans l
8. Fonction EQ : Sélectionnez un mode prédéni de l'égaliseur conçu en conséquence.
9. Fonctions de lecture et de pause pour les MP3

www.PyleUSA.com
8
SPEAKER CONNECTION
One or more speakers (4, 8 or 16 Ohms) can be connected to the amplier with
or without transformers. However, before you connect any speakers to the
amplier, the total impedance must be calculated in order to avoid damage to
the amplier. A total speaker impedance greater than 8 Ohms or less than 8
Ohms can cause this damage to occur.
SYSTEM 1: Single Speaker System
NOTE: Connect the speaker (+) to the amplier's 8-Ohm terminal.
SYSTEM 2 : Two (or more) Speakers in Series
NOTE: Connect the speaker (+) to the amplier's 8-Ohm terminal, depending
on the TOTAL IMPEDANCE of the two speakers. If each speaker has an impedance
of 4-Ohm, the total speaker impedance in this series conguration is 8 ohms.
www.PyleUSA.com
9
SYSTÈME 3 : Deux enceintes (ou plus) en parallèle
REMARQUE: Connectez l’enceinte (+) à la borne 8 ohms de l'amplicateur, en
fonction de l'IMPÉDANCE TOTALE des deux enceintes. Si chaque enceinte a une
impédance de 16 ohms, l'impédance totale de l'enceinte dans cette congura-
tion en série est de 8 ohms.
SYSTÈME 4 : Quatre enceintes en série et en parallèle
REMARQUE: Bien que la description ci-dessus concerne la connexion de deux
paires d’enceintes de 8 Ohms en série dans un branchement parallèle, vous
pouvez également choisir de combiner une paire en série et une paire en
parallèle dans un branchement parallèle, assurez-vous simplement d'avoir
calculé l'impédance totale et de connecter le l du circuit de l’enceinte (+) à la
borne appropriée de l'amplicateur.
DEUX ENCEINTES EN PARALLÈLE
ENCEINTES 1
ENCEINTES 2

www.PyleUSA.com
10
SYSTÈME 5 : Connexion d’enceintes avec transformateurs
REMARQUE: Lorsque les tensions de ligne constantes de 25 V ou 70 V sont
utilisées, un transformateur d'adaptation de ligne doit être utilisé avec chaque
enceinte. Tous les transformateurs doivent être connectés en parallèle, ne
jamais connecter les transformateurs de ligne en série.
INSTRUCTIONS D'UTILISATION DU BT SANS FIL
Les appareils externes dotés d'une fonction BT sans l intégrée peuvent être
connectés à cet amplicateur sans l pour être diusés par les enceintes de
l'amplicateur. Si votre amplicateur est connecté à des enceintes, vous
entendrez des tonalités qui vous aideront à vous connecter.
1. Assurez-vous d'abord que l'amplicateur est sous tension et réglez le volume
à un niveau bas. N'oubliez pas de connecter l'antenne BT sur le panneau
arrière pour une meilleure réception du signal.
2. Appuyez sur le bouton BT/Line sur le panneau avant, vous entendrez la voix
dire "POWER ON" et "PAIRING" et l'appareil sera automatiquement prêt à
s'appairer avec votre appareil externe.
3. Allumez le BT sur votre appareil externe.
CONNEXION DU HAUT-

www.PyleUSA.com
11
4. Recherchez les appareils BT sans l disponibles, assurez-vous d'être à portée
de votre ampli, et attendez que votre appareil sélectionne "PYLEUSA" dans la
liste des appareils d'appairage des réseaux BT sans l.
5. Une fois la connexion établie, vous entendrez le message "Votre appareil est
connecté". L'appairage BT est alors réussi et vous avez établi une connexion
BT sans l.
6. Vous pouvez maintenant écouter de la musique sur votre appareil externe
via l'amplicateur.
Entretien et maintenance
Votre amplicateur Pyle est un exemple de design et de fabrication de
qualité supérieure. Les suggestions suivantes vous aideront à prendre soin de
votre amplicateur an que vous puissiez l'utiliser pendant de nombreuses
années:
• Gardez l'amplicateur sec. S'il est mouillé, essuyez-le immédiatement.
• N'utilisez l'amplicateur que dans des installations bien ventilées.
• Manipulez l'amplicateur à l'abri de la poussière et de la saleté.
• Essuyez-le de temps en temps avec un chion humide pour qu'il
conserve son aspect neuf.
• Ne pas utiliser de produits chimiques, de solvants ou de détergents agressifs!
Avertissement Californie Prop 65
AVERTISSEMENT:
Ce produit peut vous exposer à des produits chimiques qui,
selon l'État de Californie, provoquent des cancers, des
anomalies congénitales et d'autres troubles de la
reproduction. Ne pas ingérer.
Pour plus d'informations, voir : www.P65warnings.ca.gov

www.PyleUSA.com
12
Caractéristiques :
• Amplicateur puissant et compact
• Fonction de priorité à la commutation automatique Mic-Talkover (Mic 1)
• (2) Entrées microphones 1/4
• Prise de connexion d'entrée auxiliaire (1/4")
• Possibilité de connecter des appareils externes
• Sorties des bornes de enceintes : COM/8-Ohm/25 V/70 V
• Commandes de volume indépendantes pour le microphone et les auxiliaires
• Connecter jusqu'à (4) enceintes
• Compatibilité des transformateurs d’enceintes
• Commandes de tonalité des graves et des aigus
• Inclus un câble d'alimentation CA détachable
• Amplication de contrôle audio pratique
• Lecture USB/SD/FM/BT sans l
• Achage LED bleu pour les informations de lecture
• Extension de l'antenne BT sans l
Connectivité BT sans l:
• Fonctionne avec tous vos appareils BT sans l préférés (iPhones, Android,
Smartphones, iPad, Tablette, PC, etc.)
• Nom du réseau BT sans l : PYLEUSA
• Version BT sans l : 4.0
• Portée sans l jusqu'à 30'+ ft.

COMMENCEZ ICI
Model Number:
PCM20A
PyleUSA.com/pages/register
Enregistrer le produit
Merci d'avoir choisi PyleUSA. En enregistrant votre produit,
vous vous assurez de bénécier de tous les avantages de notre
garantie exclusive et de notre support client personnalisé.
Remplissez le formulaire pour accéder à l'assistance d'experts et
conserver votre achat PyleUSA en parfait état.
www.PyleUSA.com
13
Inclus dans le paquet :
• Amplicateur PA
• Antenne FM
• Télécommande
Caractéristiques techniques:
• Puissance de sortie MAX : 40 Watt
• Matériau : Fer
• Basses et aigus : +/-10 dB, 100-10 kHz
• Réponse en fréquence : 50-15 kHz
• Atténuation (Mic) : 61 dB
• T.H.D. : <1%
• Télécommande à piles, nécessite (1) x pile bouton CR-2025, incluse
• Fusible remplaçable
• Alimentation : Sélecteur de tension 120/240
• Dimensions (Lx L x H) :
5,9" x 7,87" x 3,15" - pouces / 15 x 20 x 8.1 - centimètre

Questions ? Commentaires ?
Nous sommes là pour vous aider !
Téléphone: (1) 718-535-1800
PyleUSA.com/ContactUs
Amplificatore audio microfonico/di controllo dei diffusori,
Ingressi microfoni da 1/4", 40 Watt
Amplificatore di potenza 25V/70V
PCM20AEU - PCM20AUK
MANUALE UTENTE
VISITA IL
NOSTRO SITO
SCANSIONAMI
PyleUSA.com
ITA

Informazioni su PyleUSA
Pyle è un’Azienda fondata negli anni '60 che si è evoluta no a diventare
uno dei punti di riferimento nel mercato audio di alta qualità, in particolare
nel campo dei Woofers. Il nostro viaggio è iniziato con l'iconico Pyle Driver,
diventato un nome noto nel settore degli altoparlanti. Alla ne degli anni
2000, abbiamo ampliato la nostra gamma includendo parti di ricambio,
audio per auto, intrattenimento domestico, impianti di bordo inne audio
professionale e strumenti musicali, nella nostra linea Pyle Pro.
Pyle Auto:
Trasforma la tua auto in un ambiente perfetto per un ascolto ai massimi
livelli con i nostri altoparlanti, gli amplicatori ed autoradio a prezzi
competitivi. Porta la tua esperienza musicale a un altro livello sostituen-
do gli altoparlanti di serie con i nostri prodotti di altissima qualità.
Esplora la nostra selezione di accessori, tra cui sistemi di navigazione,
lettori DVD, interfacce per iPod e telecamere di sicurezza.
Pyle Casa:
Immergiti in una nuova dimensione e scopri una vasta gamma di prodot-
ti per l'intrattenimento domestico, tra cui proiettori, TV, supporti e
tecnologie HD. Pyle Home ore mini altoparlanti ad alte prestazioni con
bassi potenti. Inoltre, potrai arricchire la tua esperienza multimediale con
cue, giradischi vintage, amplicatori, altoparlanti a tromba e molto
altro per avere sempre il meglio, sia a casa che in viaggio.
Pyle Pro:
Come leader globale nel settore delle attrezzature audio, Pyle Pro ha
pensato specicatamente a musicisti, tecnici del suono ed appassionati
dilettanti. I nostri sistemi PA, dotati di microfoni wireless, batterie ricarica-
bili e dock per iPod/iPhone, sono ideali per l’organizzazione di eventi di
ogni genere e tipologia. Scopri anche la nostra nuovissima linea di
chitarre, pedali per eetti e convertitori da USB ad analogico, sempre con
la massima attenzione alla qualità.
www.PyleUSA.com
2

IMPORTANTI ISTRUZIONI DI SICUREZZA
1. Leggere le istruzioni - Prima di utilizzare l'apparecchio, leggere tutte le
istruzioni di sicurezza e di funzionamento.
2. Conservare le istruzioni - Le istruzioni di sicurezza e di funzionamento
devono essere conservate per future consultazioni.
3. Attenzione alle avvertenze - Tutte le avvertenze riportate sull'apparecchio
e nelle istruzioni per l'uso devono essere rispettate.
4. Seguire le istruzioni
5. Acqua e umidità - L'apparecchio non deve essere utilizzato in prossimità di
acqua, ad esempio, vicino a una vasca da bagno, un lavabo, un lavello della
cucina, una vasca per il bucato, una piscina, o in un seminterrato umido.
6. Ventilazione - L'apparecchio deve essere collocato in modo che la sua
posizione non interferisca con la sua corretta ventilazione. Ad esempio,
l'apparecchio non deve essere collocato su un letto, un divano, un tappeto o
una supercie simile che possa ostruire le aperture di ventilazione, né deve
essere installato ad incasso, come una libreria o un o un mobile che potrebbe
ostacolare il usso d'aria attraverso le aperture di ventilazione.
7. Calore - L'apparecchio deve essere collocato lontano da fonti di calore,
come ad esempio radiatori, stufe o altri apparecchi, compresi gli amplicatori,
che producono calore.
8. Fonti di alimentazione - L'apparecchio deve essere collegato solo a un'alimen
tazione del tipo descritto nelle istruzioni per l'uso o indicato sull'apparecchio.
9. Messa a terra o polarizzazione - È necessario prestare attenzione anché il
mezzo di messa a terra o di polarizzazione di un apparecchio non venga annullato.
10. Protezione del cavo di alimentazione - I cavi di alimentazione devono
essere disposti in modo da non essere calpestati o schiacciati da oggetti
posizionati sopra o contro di essi, prestando particolare attenzione ai cavi in
corrispondenza delle spine, delle prese e del punto in cui escono dall'apparecchio.
11. Pulizia - L'apparecchio deve essere pulito solo come raccomandato dal produttore.
12. Linee elettriche - Un sistema di antenna esterna non deve essere collocato
nelle in prossimità di linee elettriche aeree o di altri circuiti di luce o di energia
elettrica o dove può entrare in contatto con tali linee o circuiti. Quando si installa
un sistema di antenna esterna, occorre prestare la massima attenzione a non
toccare tali linee o circuiti elettrici, poiché il contatto con essi potrebbe essere fatale.
13. Periodi di non utilizzo - Il cavo di alimentazione dell'apparecchio deve
essere scollegato dalla presa di corrente quando l'apparecchio non viene
utilizzato per un lungo periodo di tempo.
www.PyleUSA.com
3

14. Entrata di oggetti e liquidi - È necessario prestare attenzione anché gli oggetti
non cadano e i liquidi non si riversino nell'involucro attraverso le aperture.
15. Carrelli e supporti - Se l'apparecchio viene utilizzato con un
carrello o un supporto, carrello o supporto, questo deve essere
del tipo raccomandato dal produttore. L’utilizzo combinato dell’
apparecchio con un carrello deve essere eseguito con cautela. Arresti rapidi,
forza eccessiva e superci irregolari possono causare il ribaltamento
dell'apparecchio e del carrello.
16. Montaggio - L'apparecchio deve essere montato solo come raccomandato
dal produttore.
17. Danni che richiedono assistenza - L'apparecchio deve essere sottoposto a
manutenzione da parte di personale qualicato quando:
A. Il cavo di alimentazione o la spina sono stati danneggiati.
B. L'apparecchio è stato danneggiato da oggetti o è stato versato del liquido
all'interno del suo involucro.
C. L'apparecchio è stato esposto alla pioggia.
D. L'apparecchio è caduto o l'involucro è stato danneggiato.
E. L'apparecchio non sembra funzionare normalmente o presenta
una marcata variazione delle prestazioni.
18. Manutenzione - L'utente non deve tentare di eettuare interventi di manutenzione
sull'apparecchio oltre a quelli descritti nelle istruzioni per l'uso. Tutti gli altri
interventi di manutenzione devono essere adati a personale qualicato.
19. Sovraccarico - Non sovraccaricare le prese a muro e le prolunghe per non
rischiare incendi o scosse elettriche.
20. Parti di ricambio - Quando sono necessarie parti di ricambio, accertarsi che il
tecnico dell'assistenza abbia utilizzato le parti di ricambio specicate dal
produttore o che abbiano le stesse caratteristiche di quelle originali.
Le sostituzioni non autorizzate possono provocare incendi, scosse elettriche
o altri rischi.
21. Controllo di sicurezza - Al termine di qualsiasi intervento di assistenza o
riparazione su questo apparecchio, chiedere al tecnico dell'assistenza di
eseguire i controlli di sicurezza per determinare che l'apparecchio sia in
condizioni operative corrette.
www.PyleUSA.com
4
AVVERTENZA: :" Per ridurre il rischio di incendio o di scossa,
non esporre questo prodotto alla pioggia o all'umidità.
ATTENZIONE: Per ridurre il rischio di scosse elettriche, non rimuovere
il coperchio o la parte posteriore. All'interno non vi sono parti riparabili
dall'utente. Rivolgersi a personale qualicato per la manutenzione.
RISCHIO DI SCOSSE ELETTRICHE
NON APRIRE
ATTENZIONE
Questo simbolo avverte della presenza di tensioni pericolose
non isolate all'interno del prodotto, che potrebbero essere di
entità tale da costituire un rischio di scossa elettrica.
Non aprire l'involucro del prodotto.
Questo simbolo segnala la presenza di importanti istruzioni
per l'uso e la manutenzione incluse nella documentazione
che accompagna questo prodotto.

Il nuovo amplicatore di potenza stereo PCM20A
ore la potenza e la versatilità necessarie in un sistema audio professionale.
L'ampia risposta in frequenza è perfetta per l'amplicazione di voci e musica.
La funzione di talkover per l'ingresso Mic 1 e Aux, situata sul pannello frontale, lo
rende perfetto per le sale riunioni, gli auditorium, eventi sportivi, scuole e sistemi
di paging per uci. Ottimo per qualsiasi luogo in cui sia necessario trasmettere
un annuncio speciale con eccellente qualità del suono.
CARATTERISTICHE E CONTROLLI
PANNELLO ANTERIORE
1. Accensione e spegnimento e indicatore: Interruttore di alimentazione
principale, l'indicatore si accende quando l'amplicatore è acceso
2. Controlli di volume MIC 1 e MIC 2/AUX: Regolano il livello del segnale di
uscita degli ingressi corrispondenti.
3. Controlli di tono BASS e TREBLE: Regolano i bassi e gli acuti dei segnali
di uscita corrispondenti.
4. Pulsanti di controllo delle funzioni MODE, PLAY, PREV e NEXT:
• Pulsante MODE: Per la selezione dell'audio come WIRELESS BT/SD/LINE IN
• PULSANTE PLAY/PAUSE: pulsante di controllo della riproduzione e della pausa.
• PREV/NEXT: Indietro veloce o brano successivo
5. Display a LED
6. Presa SD/MMC per la riproduzione di schede SD/MMC
7. Porta di ricarica USB: Porta USB solo per la ricarica dello smartphone, senza
lettore USB.
8. Ingresso AUX: Per collegare una sorgente audio ad alta impedenza come un
registratore a nastro, un lettore CD o un sintonizzatore con connettore da 1/4"
tramite un adattatore audio (due spinotti RCA in un jack mono da 1/4").
www.PyleUSA.com
5
1
2
3
4
5
6
7
8
9

9. Ingressi MIC1 e MIC2: Per collegare il microfono a bassa impedenza con
connettore da 1/4". MIC 1 è una sorgente "prioritaria", i segnali provenienti da AUX
saranno attenuati automaticamente di -40 dB, il segnale proveniente da MIC 1 sarà
sostituito da quello della pagina (auto talkover). E’ ottimo per i sistemi di paging.
PANNELLO POSTERIORE
1. Antenna BT senza li: Ricevitore BT wireless per lo streaming
2. Collegamento degli altoparlanti: È possibile collegare all'amplicatore uno o
più altoparlanti (4, 8 o 16 Ohm) con o senza trasformatori. Tuttavia, prima di
collegare i diusori all'amplicatore, è necessario calcolare l'impedenza totale
per evitare di danneggiare l'amplicatore. Un'impedenza totale dei diusori
superiore a 8 Ohm o inferiore a 8 Ohm può causare danni.
3. Interruttore di tensione: Questo amplicatore PA ha una tensione d'ingresso
selezionabile da 110V/60Hz (standard negli USA e in CANADA) a 220V/50Hz
(per il funzionamento in Europa). Assicurarsi che l'interruttore sia nella
posizione corretta prima del funzionamento, altrimenti si vericheranno gravi
danni non coperti da garanzia.
4. Ingresso CA: Collegare il cavo di alimentazione in dotazione all'unità mentre
l'alimentazione è spenta, quindi collegare il cavo di alimentazione CA a una presa
di corrente. Si prega di sostituire il fusibile solo con un valore adeguato, se
necessario (vedere il valore del fusibile di T 1.2AL 250V per 110-120V e T0.63AL
250V per 220V/240V stampato sull'ingresso di alimentazione).
5. CONNETTORE ANTENNA FM: : Collegare l'antenna FM.
www.PyleUSA.com
6
1
2
3
4
5

1
2
3
4
5
6
7
8
9
www.PyleUSA.com
7
TELECOMANDO
1. Premere questo pulsante per accendere o spegnere l'MP3.
2. In modalità FM, premere i due pulsanti per selezionare il canale precedente o successivo.
3. Premere questi due pulsanti per selezionare il brano precedente o successivo
in modalità USB o SD o modalità BT senza li
4. alzare o abbassare il volume
5. Premere i numeri per selezionare direttamente i brani.
L'unità impiega 1-2 secondi per rispondere in modalità USB o SD.
6. Premere questo pulsante per passare alla modalità di ripetizione.
7. Premere questo pulsante per selezionare la modalità di riproduzione, ad
esempio USB/SD/FM/WIRELESS BT.
8. Funzione EQ: Seleziona una modalità preimpostata dell'equalizzatore,
progettata di conseguenza.
9. Funzione di riproduzione e pausa per MP3
www.PyleUSA.com
8
COLLEGAMENTO DEI DIFFUSORI
All'amplicatore possono essere collegati uno o più diusori (4, 8 o 16 Ohm)
con o senza trasformatori. Tuttavia, prima di collegare i diusori all'amplica-
tore, è necessario calcolare l'impedenza totale per evitare di danneggiare
l'amplicatore. Un'impedenza totale dei diusori superiore a 8 Ohm o inferiore
a 8 Ohm può causare danni.
SISTEMA 1: Sistema a un diusore
NOTA: collegare il diusore (+) al terminale da 8 Ohm dell'amplicatore.
SISTEMA 2 : Due (o più) diusori in serie
NOTA: Collegare il diusore (+) al terminale da 8 Ohm dell'amplicatore, a seconda
dell'IMPEDENZA TOTALE dei due diusori. Se ogni diusore ha un'impedenza di 4
Ohm, l'impedenza totale dei diusori in questa congurazione in serie è di 8 Ohm.
UNO SPEAKER
8 Ohm SPEAKER
4 Ohm SPEAKER
DUE DIFFUSORI IN SERIE
ALTOPARLANTE SINISTRO
ALTOPARLANTE DESTRO

www.PyleUSA.com
9
SISTEMA 3: Due (o più) diusori in parallelo
NOTA: collegare il diusore (+) al terminale da 8 Ohm dell'amplicatore, a seconda
dell'impedenza totale dei due diusori. Se ogni diusore ha un'impedenza di 16
Ohm, l'impedenza totale dei diusori in questa congurazione in serie è di 8 Ohm.
SISTEMA 4: Quattro diusori in serie e in parallelo
NOTA: Sebbene la descrizione di cui sopra riguardi il collegamento di due coppie
di diusori da 8 Ohm in serie, si può anche scegliere di combinare una serie di
diusori in parallelo, si può anche scegliere di combinare una coppia in serie e una
in parallelo, assicurandosi semplicemente di aver calcolato l'impedenza totale e di
collegare il lo del circuito dei diusori (+) al terminale corretto dell'amplicatore.
ALTOPARLANTE 1
ALTOPARLANTE 2
QUATTRO DIFFUSORI IN SERIE / COMBINAZIONE PARALLELA
DUE ALTOPARLANTI IN PARALLELO

www.PyleUSA.com
10
SISTEMA 5: Collegamento di diusori con trasformatori
NOTA: Quando si utilizzano le tensioni di linea costanti di 25V o 70V, è necessar-
io utilizzare un trasformatore di linea per ogni diusore. trasformatore di linea
per ogni diusore. Tutti i trasformatori devono essere collegati in parallelo; non
collegare mai i trasformatori di linea in serie.
ISTRUZIONI PER L'USO DEL BT WIRELESS
I dispositivi esterni dotati di funzione Wireless BT integrata possono essere
collegati a questo amplicatore in modalità wireless per essere riprodotti
attraverso i diusori dell'amplicatore. Se l'amplicatore è collegato ai
diusori, si sentiranno dei toni acustici che aiuteranno il collegamento.
1. Per prima cosa assicuratevi che l'amplicatore sia acceso e abbassate il
volume. Ricordarsi di collegare l'antenna BT sul pannello posteriore per una
migliore ricezione del segnale.
2. Premere il pulsante BT/Linea sul pannello frontale, si sentirà la voce "POWER
ON" e "PAIRING". "POWER ON" e "PAIRING", quindi l'unità è automaticamente
pronta per l'accoppiamento con il dispositivo esterno. accoppiamento con il
dispositivo esterno.
3. Accendere il BT sul dispositivo esterno.
COLLEGAMENTO DELL'ALTOPARLANTE

www.PyleUSA.com
11
4. Cercare i dispositivi Wireless BT disponibili e assicurarsi di essere nel raggio
d'azione dell'amplicatore e attendere che il dispositivo selezioni "PYLEUSA"
nell'elenco dei dispositivi di accoppiamento delle reti Wireless BT..
5. Una volta collegato, si sentirà una voce che dice: "Il dispositivo è collegato".
l'accoppiamento BT è riuscito e si è stabilita una connessione Wireless BT.
6. Ora è possibile riprodurre la musica sul dispositivo esterno
attraverso l'amplicatore.
Cura e manutenzione
L'amplicatore Pyle è un esempio di design e artigianato di qualità superi-
ore. I seguenti suggerimenti vi aiuteranno a prendervi cura del vostro ampli-
catore in modo da poterlo utilizzare per anni:
• Mantenere l'amplicatore asciutto. Se si bagna, pulirlo immediatamente.
• Utilizzate l'amplicatore solo in installazioni ben ventilate.
• Maneggiare l'amplicatore lontano da polvere e sporcizia.
• Pulire di tanto in tanto con un panno umido per mantenere l'aspetto nuovo.
• Non utilizzare prodotti chimici, solventi o detergenti aggressivi!
Avvertenza California Prop 65
AVVERTENZA:
Questo prodotto può esporre l'utente a sostanze chimiche,
che sono note allo Stato della California per causare cancro,
difetti alla nascita e altri danni alla danni alla riproduzione.
Non ingerire.
Per maggiori informazioni: www.P65warnings.ca.gov

www.PyleUSA.com
12
Caratteristiche:
• Design compatto dell'amplicatore
• Funzione di priorità automatica del talkover del microfono (Mic 1)
• (2) Ingressi microfonici da 1/4
• Connettore d'ingresso Aux (1/4") Jack
• Possibilità di collegare dispositivi esterni
• Uscite con terminali per altoparlanti: COM/8-Ohm/25V/70V
• Controlli di volume microfono/ux indipendenti
• Possibilità di collegare no a (4) altoparlanti
• Compatibilità con i trasformatori per altoparlanti
• Controlli di tono per bassi e alti
• Include un cavo di alimentazione AC staccabile
• Comodo amplicatore per il controllo audio
• Riproduzione USB/SD/FM/Wireless BT
• Display a LED blu per informazioni sulla riproduzione
• Antenna BT wireless estensibile
Connettività BT senza li:
• Funziona con tutti i dispositivi wireless BT preferiti
(iPhone, Android, smartphone, iPad, tablet, ecc.).
• Nome della rete wireless BT: 'PYLEUSA'
• Versione Wireless BT: 4.0
• Portata wireless no a 9+ mt.

INIZIA DA QUI
Model Number:
PCM20A
PyleUSA.com/pages/register
Registra il prodotto
Grazie per aver scelto PyleUSA. Registrando il vostro prodotto, vi
assicurate di ricevere tutti i vantaggi della nostra garanzia
esclusiva e dell'assistenza clienti personalizzata.
Completate il modulo per accedere all'assistenza di esperti e per
mantenere il vostro acquisto PyleUSA in perfette condizioni.
www.PyleUSA.com
13
Contenuto della confezione:
• Amplicatore PA
• Antenna FM
• Telecomando
Speciche tecniche:
• Potenza di uscita MAX: 40 Watt
• Materiale di costruzione: Ferro
• Bassi/alti: +/-10dB, 100-10kHz
• Risposta in frequenza: 50-15kHz
• Attenuazione (microfono): 61dB
• TH.D.: <1%
• Telecomando a batteria, richiede (1) x batteria a bottone CR-2025, in dotazione
• Fusibile sostituibile
• Alimentazione: selettore di tensione 120/240
• Dimensioni (L x P x A):
15 x 20 x 8.1 -centimetro / 5.9'' x 7.87'' x 3.15'' -pollici

Domande o Commenti?
Siamo qui per aiutarti!
Phone: (1) 718-535-1800
PyleUSA.com/ContactUs
Mikrofon-Audio/Lautsprecher-Steuerungsverstärker,
1/4" Mikrofoneingänge, 40 Watt
25V/70V Leistungsverstärker
PCM20AEU - PCM20AUK
BENUTZERHANDBUCH
Besuchen Sie
unsere Webseite
SCANNEN
SIE MICH
PyleUSA.com
GER

Über PyleUSA
Pyle, gegründet in den 1960er Jahren, hat sich zu einem renommierten
Hersteller von hochwertigen, fortschrittlichen Tieftönern entwickelt.
Unsere Reise begann mit dem kultigen Pyle Driver, der zu einem
bekannten Namen für Originallautsprecher wurde. Ende des 20.
Jahrhunderts expandierten wir in die Bereiche Ersatzlautsprecher, Car
Audio, Home Heim-Audio, Marine-Audio und professionelle Audio- und
Musikinstrumente mit unserer unserer Pyle Pro Linie.
Pyle Auto:
Verwandeln Sie Ihr Auto in eine perfekte Hörumgebung mit unseren
preisgünstigen Lautsprechern, Verstärkern und Hauptgeräten. Upgrade
von Werkslautsprechern, um Ihr Musikerlebnis zu verbessern. Entdecken
Sie Zubehör wie Navigationssysteme, DVD-Player, iPod-Schnittstellen
und sicherheitsrelevante Kameras.
Pyle Home:
Entdecken Sie eine Reihe von Home Entertainment-Produkten, darunter
Projektoren, TV-Geräte, Halterungen, Ständer und HD-Technologie.
Pyle Home bietet bassverstärkende Mini-Lautsprecher, Kopfhörer,
Vintage Vintage-Plattenspieler, Leistungsverstärker, Hornlautsprecher
und mehr für ein bereicherndes Medienerlebnis zu Hause und unterwegs.
Pyle Pro:
Als weltweit führender Anbieter von Audiogeräten richtet sich Pyle Pro
an Musiker, Studiotechniker und Amateure. Unsere PA-Systeme,
bestehend aus drahtlose Mikrofone, wiederauadbare Batterien und
iPod/iPhone-Docks, sind ideal für verschiedene Veranstaltungen.
Entdecken Sie unsere neue Gitarrenlinie, Eektgeräte Pedale und
USB-Analog-Wandler, ohne Kompromisse bei der Qualität einzugehen.
www.PyleUSA.com
2

WICHTIGE SICHERHEITSHINWEISE
1. Anweisungen lesen - Alle Sicherheits und Betriebsanweisungen sollten vor
dem Betrieb des Geräts gelesen werden.
2. Anweisungen aufbewahren - Die Sicherheits- und Betriebsanweisungen
sollten für zukünftige Referenzen aufbewahrt werden.
3. Warnungen beachten - Alle Warnungen am Gerät und in den Betriebsanlei
tungen sollten befolgt werden.
4. Anweisungen befolgen
5. Wasser und Feuchtigkeit - Das Gerät sollte nicht in der Nähe von Wasser verwen
det werden, zum Beispiel in der Nähe einer Badewanne, eines Waschbeckens, einer
Küchenspüle, einer Waschwanne, eines Schwimmbads oder eines feuchten Kellers.
6. Belüftung - Das Gerät sollte so aufgestellt werden, dass seine Position oder
Lage seine ordnungsgemäße Belüftung nicht behindert. Beispielsweise sollte
das Gerät nicht auf einem Bett, Sofa, Teppich oder einer ähnlichen Oberäche
aufgestellt werden, die die Belüftungsönungen blockieren könnte, oder in
einem Einbau, wie einem Bücherregal oder Schrank, der den Luftstrom durch
die Belüftungsönungen behindern könnte.
7. Hitze - Das Gerät sollte von Wärmequellen wie Heizkörpern, Heizregistern,
Ofen oder anderen Geräten, einschließlich Verstärkern, die Wärme erzeugen,
entfernt aufgestellt werden.
8. Stromquellen - Das Gerät sollte nur an eine Stromquelle angeschlossen werden,
die in den Betriebsanleitungen beschrieben ist oder wie am Gerät angegeben.
9. Erdung oder Polarisation - Vorsichtsmaßnahmen sollten getroen werden,
um sicherzustellen, dass die Erdungs- oder Polarisationseinrichtung des
Geräts nicht außer Kraft gesetzt wird.
10. Schutz des Netzkabels - Netzkabel sollten so verlegt werden, dass sie nicht
wahrscheinlich darauf getreten werden oder durch darauf abgestellte oder
dagegen gelehnte Gegenstände gequetscht werden, wobei besonders auf
Kabel an Steckern, Anschlussdosen und der Stelle, an der sie aus dem Gerät
austreten, geachtet werden sollte.
11. Reinigung - Das Gerät sollte nur gemäß den Empfehlungen des Herstellers
gereinigt werden.
12. Stromleitungen - Ein Außenantennensystem sollte nicht in der Nähe von
Überlandstromleitungen oder anderen elektrischen Licht- oder Stromkreisen
oder dort, wo es in solche Stromleitungen oder Schaltkreise fallen könnte,
aufgestellt werden. Bei der Installation eines Außenantennensystems sollte
äußerste Vorsicht walten gelassen werden, um nicht solche Stromleitungen
oder Schaltkreise zu berühren, da der Kontakt damit tödlich sein könnte.
13. Zeiten der Nichtbenutzung - Das Netzkabel des Geräts sollte aus der Steckdose
gezogen werden, wenn das Gerät über einen längeren Zeitraum nicht benutzt wird.
www.PyleUSA.com
3

14. Gegenstands und Flüssigkeitseintritt - Vorsicht sollte geboten werden,
damit keine Gegenstände fallen und keine Flüssigkeiten durch
Önungen in das Gehäuse verschüttet werden.
15. Wagen und Ständer - Wird das Gerät mit einem Wagen oder
Ständer benutzt, sollte der Wagen oder Ständer vom Hersteller
empfohlen sein. Eine Kombination aus Gerät und Wagen sollte vorsichtig
bewegt werden. Schnelle Stopps, übermäßige Kraft und unebene Flächen
können dazu führen, dass die Kombination aus Gerät und Wagen umkippt.
16. Montage - Das Gerät sollte nur wie vom Hersteller empfohlen montiert werden.
17. Schäden, die eine Wartung erfordern - Das Gerät sollte von qualiziertem
Servicepersonal gewartet werden, wenn:
A. Das Netzkabel oder der Stecker beschädigt wurde.
B. Objekte sind hineingefallen oder Flüssigkeit wurde in das
Gerätegehäuse verschüttet.
C. Das Gerät war Regen ausgesetzt.
D. Das Gerät ist heruntergefallen oder das Gehäuse wurde beschädigt.
E. Das Gerät scheint nicht normal zu funktionieren oder zeigt eine
deutliche Veränderung in der Leistung.
18. Wartung - Der Benutzer sollte nicht versuchen, das Gerät über das in der
Bedienungsanleitung Beschriebene hinaus zu warten. Alle weiteren
Wartungsarbeiten sollten qualiziertem Fachpersonal überlassen werden.
19. Überlastung - Überlasten Sie Wandsteckdosen und Verlängerungskabel
nicht, da dies ein Brand- oder Stromschlagrisiko darstellen kann.
20. Ersatzteile - Wenn Ersatzteile benötigt werden, stellen Sie sicher, dass der
Servicetechniker Ersatzteile verwendet hat, die vom Hersteller angegeben sind
oder die gleichen Eigenschaften wie das Originalteil haben. Unautorisierte
Ersatzteile können Brände, elektrische Schläge oder andere Gefahren verursachen.
21. Sicherheitsprüfung - Nach Abschluss von Wartungs- oder Reparaturarbeiten
an diesem Gerät sollte der Servicetechniker Sicherheitsprüfungen durchführen,
um festzustellen, dass das Gerät in einwandfreiem Betriebszustand ist.
www.PyleUSA.com
4
WARNUNG: Um die Gefahr von Bränden oder Stromschlägen zu
verringern, setzen Sie dieses Produkt nicht Regen oder Feuchtigkeit aus.
VORSICHT: Um das Risiko eines elektrischen Schlages zu verringern, entfernen Sie
nicht die Abdeckung oder Rückseite. Keine vom Benutzer wartbaren Teile im Inneren.
Wartungsarbeiten sollten qualiziertem Fachpersonal überlassen werden.
GEFAHR EINES ELEKTRISCHEN SCHLAGS
NICHT ÖFFNEN
VORSICHT
Dieses Symbol soll Sie darauf hinweisen, dass im Inneren des
Produkts gefährliche, nicht isolierte Spannungen vorhanden
sein können, die stark genug sind, um ein Risiko eines
elektrischen Schlages darzustellen. Önen Sie nicht das
Gehäuse des Produkts.
Dieses Symbol soll Sie darüber informieren, dass wichtige
Betriebs- und Wartungsanweisungen in der dem Produkt
beiliegenden Literatur enthalten sind.

Ihr neuer PCM20A Stereo-Leistungsverstärker
bietet Ihnen die Leistung und Vielseitigkeit, die Sie in einem professionellen
Soundsystem benötigen. Der breite Frequenzgang ist perfekt für die Verstärkung
von Gesang und Musik. Die Talkover-Funktion für Mic 1 und den Aux-Eingang an
der Frontplatte machen ihn perfekt für Versammlungssäle, Auditorien, Sportver-
anstaltungen, Schulen und Büro-Durchsagesysteme. Ideal für überall dort, wo
Sie eine spezielle Durchsage mit exzellenter Klangqualität übermitteln müssen.
MERKMALE UND STEUERELEMENTE
FRONTPLATTE
1. Ein-/Ausschalter und Anzeige: Hauptschalter, die Anzeige leuchtet, wenn
der Verstärker eingeschaltet ist.
2. MIC 1 und MIC 2/AUX Lautstärkeregler: Regeln Sie den Ausgangspegel
der Eingänge.
3. BASS- und TREBLE-Klangregelung: Regeln Sie die Bässe und Höhen der
entsprechenden Ausgangssignale.
4. MODE, PLAY, PREV und NEXT Funktionstasten:
• MODE-Taste: Für die Audioauswahl wie DRAHTLOSER BT/SD/LINE IN
• PLAY/PAUSE-Taste: Wiedergabe- und Pausensteuerungstaste
• PREV/NEXT: Schneller Rücklauf oder nächstes Lied
5. LED-Anzeige
6. SD/MMC-Steckplatz für die Wiedergabe von SD/MMC-Karten
7. USB-Ladeanschluss: USB-Anschluss nur zum Laden von Smartphones, keine
USB-Lesefunktion
8. AUX-Eingang: Zum Anschluss der hochohmigen Audioquelle wie
Kassettendeck, CD-Spieler oder Tuner mit 1/4"-Stecker über einen
Audio-Steckeradapter (zwei Phono-RCA-Stecker in 1/4"-Mono-Klinkenstecker).
www.PyleUSA.com
5
1
2
3
4
5
6
7
8
9

9. MIC1 und MIC2 Eingänge: Zum Anschluss von Mikrofonen mit niedriger
Impedanz und 1/4"-Stecker. MIC 1 ist eine „Prioritätsquelle“; die Signale von AUX
werden automatisch um -40dB abgeschwächt, das Signal von MIC 1 hat Vorrang
für Durchsagen (automatische Talk-Over-Funktion). Das ist gut für Durchsagesysteme.
RÜCKSEITE
1. Drahtlose BT-Antenne: Empfänger für drahtloses BT-Streaming
2. Lautsprecheranschluss: Ein oder mehrere Lautsprecher (4, 8 oder 16 Ohm)
können mit oder ohne Transformatoren an den Verstärker angeschlossen werden. Vor
dem Anschluss von Lautsprechern an den Verstärker muss jedoch die Gesamtimpe
danz berechnet werden, um Schäden am Verstärker zu vermeiden. Eine Gesamtlaut
sprecherimpedanz, die größer oder kleiner als 8 Ohm ist, kann Schäden verursachen.
3. Spannungswähler: Dieser PA-Verstärker hat eine wählbare Eingangsspannung von
110V/60Hz (Standard in USA und Kanada) bis 220V/50Hz (für den Betrieb in Europa).
Stellen Sie sicher, dass der Schalter vor dem Betrieb in der richtigen Position ist, da
sonst schwere Schäden entstehen können, die nicht durch die Garantie abgedeckt sind.
4. AC-Eingang: Stecken Sie das mitgelieferte Netzkabel in das Gerät, während der
Strom ausgeschaltet ist, und stecken Sie dann das AC-Netzkabel in eine
geeignete Steckdose. Ersetzen Sie die Sicherung auch nur mit der richtigen
Bewertung, falls nötig (siehe die Sicherungsbewertung von T 1.2AL 250V für
110-120V und TO.63AL 250V für 220V/240V, die am Stromanschluss aufgedruckt ist).
5. FM-ANTENNENANSCHLUSS: Anschluss für FM-Antenne
www.PyleUSA.com
6
1
2
3
4
5

1
2
3
4
5
6
7
8
9
www.PyleUSA.com
7
FERNBEDIENUNG
1. Drücken Sie diese Taste, um den MP3-Player EIN- oder AUSZUSCHALTEN.
2. Im FM-Modus drücken Sie diese beiden Tasten, um den vorherigen oder
nächsten Kanal auszuwählen.
3. Drücken Sie diese beiden Tasten, um im USB-, SD- oder drahtloser BT-Modus
den vorherigen oder nächsten Titel auszuwählen.
4. Lautstärke erhöhen oder verringern.
5. Drücken Sie die Zahlen, um die Titel direkt auszuwählen. Das Gerät reagiert in
1-2 Sekunden im USB- oder SD-Modus.
6. Drücken Sie diese Taste, um den Wiederholungsmodus zu aktivieren.
7. Drücken Sie diese Taste, um den Wiedergabemodus auszuwählen,
wie USB/SD/FM/DRAHTLOSER BT.
8. EQ-Funktion: Wählen Sie einen voreingestellten Modus des Equalizers,
der entsprechend gestaltet ist.
9. Wiedergabe- und Pausenfunktion für MP3.

www.PyleUSA.com
8
LAUTSPRECHERANSCHLUSS
Ein oder mehrere Lautsprecher (4, 8 oder 16 Ohm) können mit oder ohne
Transformatoren an den Verstärker angeschlossen werden. Bevor Sie jedoch
Lautsprecher an den Verstärker anschließen, muss die Gesamtimpedanz
berechnet werden, um Schäden am Verstärker zu vermeiden. Eine Gesamtlaut-
sprecherimpedanz, die größer oder kleiner als 8 Ohm ist, kann zu Schäden führen.
SYSTEM 1: Einzellautsprechersystem
HINWEIS: Verbinden Sie den Lautsprecher (+) mit dem 8-Ohm-Anschluss des
Verstärkers.
SYSTEM 2: Zwei (oder mehr) Lautsprecher in Serie
HINWEIS: Verbinden Sie den Lautsprecher (+) mit dem 8-Ohm-Anschluss des
Verstärkers, abhängig von der GESAMTIMPEDANZ der beiden Lautsprecher.
Wenn jeder Lautsprecher eine Impedanz von 4 Ohm hat, beträgt die Gesamtim-
pedanz der Lautsprecher in dieser Serienschaltung 8 Ohm.
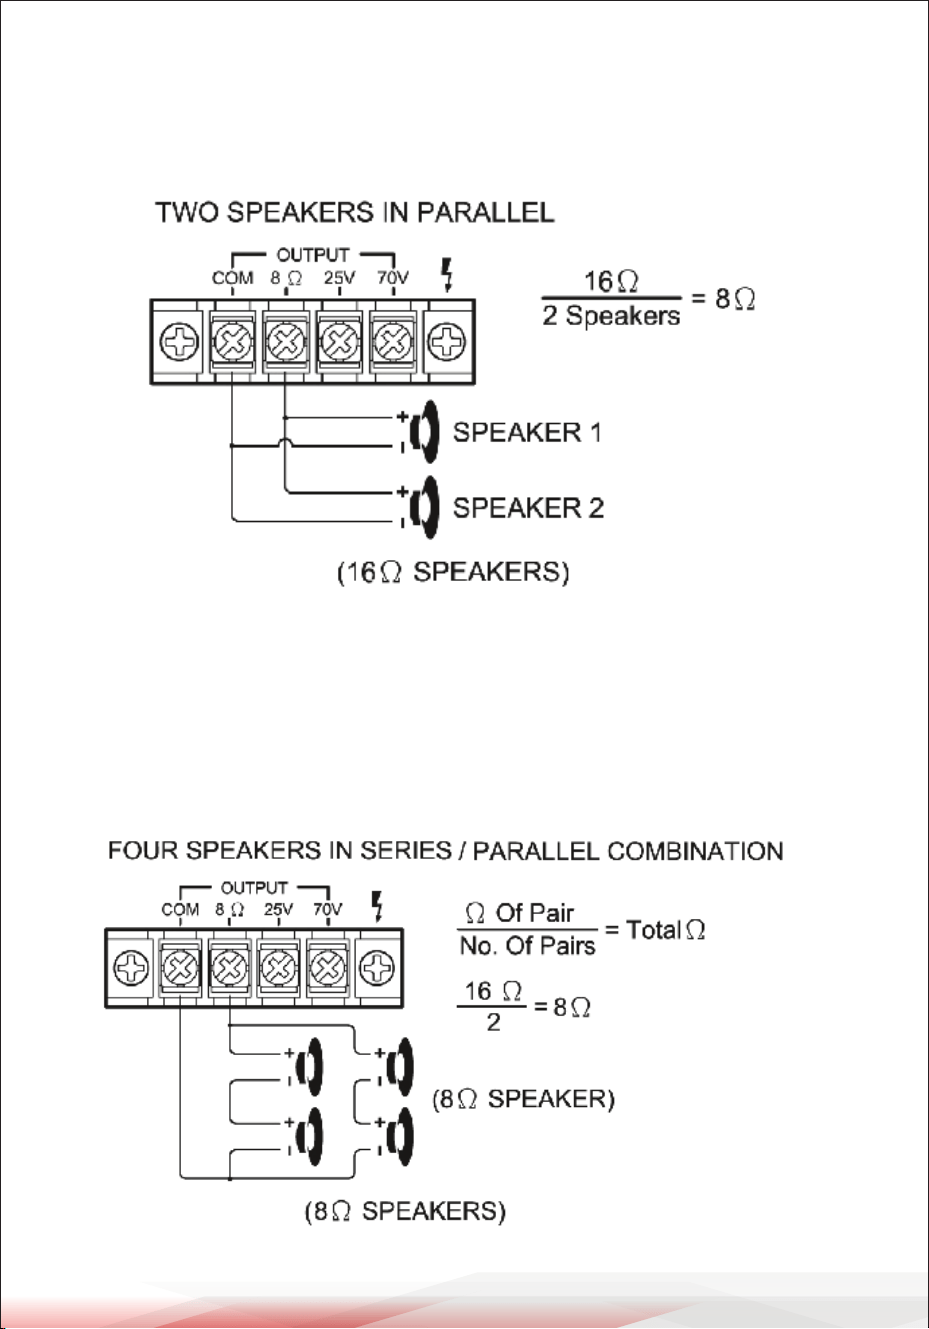
www.PyleUSA.com
9
SYSTEM 3: Zwei (oder mehr) Lautsprecher parallel
HINWEIS: CVerbinden Sie den Lautsprecher (+) mit dem 8-Ohm-Anschluss des
Verstärkers, abhängig von der GESAMTIMPEDANZ der beiden Lautsprecher. Hat
jeder Lautsprecher eine Impedanz von 16 Ohm, ergibt sich eine Gesamt-Laut-
sprecherimpedanz in dieser Parallelschaltung von 8 Ohm.
SYSTEM 4: Vier Lautsprecher in Serie und parallel
HINWEIS: Obwohl die obige Beschreibung für den Anschluss von zwei in Serie
geschalteten Paaren von 8-Ohm-Lautsprechern in einer Parallelschaltung gilt,
können Sie auch ein Paar in Serie und ein Paar parallel in einer Parallelschaltung
verbinden. Stellen Sie einfach sicher, dass Sie die Gesamtimpedanz berechnet
haben und verbinden Sie den Lautsprecher (+) Leitungsdraht mit dem richtigen
Anschluss des Verstärkers.
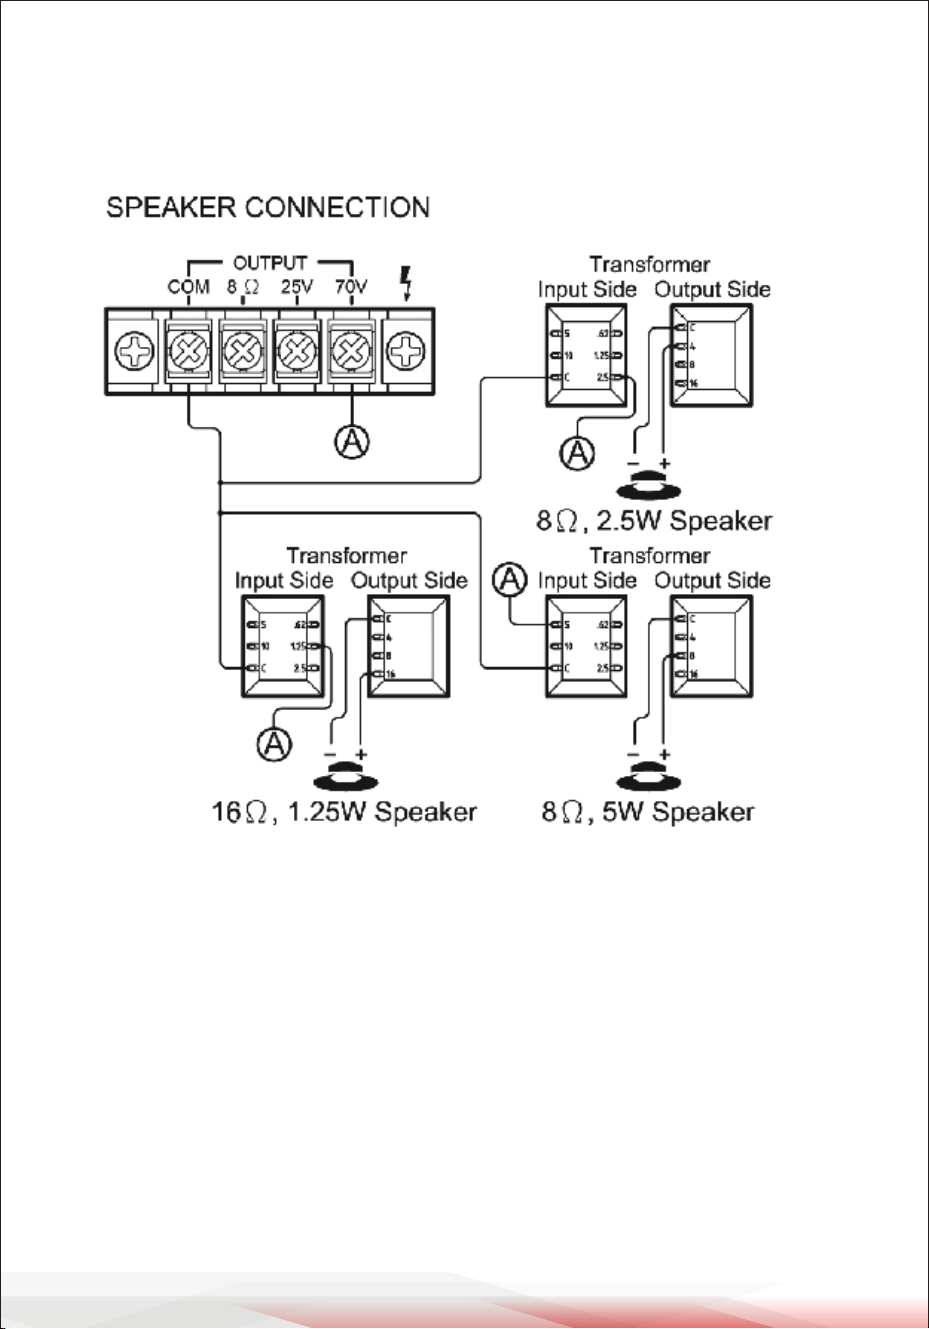
www.PyleUSA.com
10
SYSTEM 5: Lautsprecher mit Transformatoren anschließen
HINWEIS: Wenn die konstanten Leitungsspannungen von 25V oder 70V
verwendet werden, muss mit jedem Lautsprecher ein Leitungstransformator
verwendet werden. Alle Transformatoren müssen parallel geschaltet werden,
niemals Leitungstransformatoren in Serie schalten.
ANLEITUNG FÜR DEN BETRIEB MIT DRAHTLOSER BT
Externe Geräte mit eingebauter drahtloser-BT-Funktion können drahtlos mit
diesem Verstärker verbunden werden, um über die Lautsprecher des
Verstärkers abzuspielen. Wenn Ihr Verstärker mit Lautsprechern verbunden
ist, werden Sie hörbare Töne hören, die beim Verbinden helfen.
1. Stellen Sie zunächst sicher, dass der Verstärker eingeschaltet ist, und drehen
Sie die Lautstärke herunter. Bitte denken Sie daran, die BT-Antenne am
hinteren Panel anzuschließen, um ein besseres Empfangssignal zu erhalten.
2. Drücken Sie die BT/Line-Taste auf der Frontplatte, Sie werden die Stimme
“POWER ON“ und auch „PAIRING“ hören, und dann ist das Gerät automatisch
bereit, mit Ihrem externen Gerät zu koppeln.
3. Schalten Sie das BT auf Ihrem externen Gerät ein.

www.PyleUSA.com
11
4. Suchen Sie nach verfügbaren Drahtloser-BT-Geräten und stellen Sie sicher,
dass Sie sich in Reichweite Ihres Verstärkers benden, und warten Sie, bis Ihr
Gerät “PYLEUSA“ in der Liste der zu koppelnden BT-Netzwerke auswählt.
5. Einmal verbunden, werden Sie eine Stimme hören, die sagt: „Your Device is
Connected“, dann ist das BT-Pairing erfolgreich, und Sie haben eine
Drahtloser-BT-Verbindung hergestellt.
6. Sie können nun Musik auf Ihrem externen Gerät über den Verstärker abspielen.
Pege und Wartung
Ihr Pyle-Verstärker ist ein Beispiel für hervorragendes Design und Handw-
erkskunst. Die folgenden Vorschläge helfen Ihnen, Ihren Verstärker zu
pegen, sodass Sie viele Jahre Freude daran haben:
• Halten Sie den Verstärker trocken. Wenn er nass wird, wischen Sie ihn sofort ab.
• Verwenden Sie den Verstärker nur in gut belüfteten Installationen.
• Schützen Sie den Verstärker vor Staub und Schmutz.
• Wischen Sie gelegentlich mit einem feuchten Tuch ab, um ihn neu aussehen zu lassen.
• Verwenden Sie keine scharfen Chemikalien, Lösungsmittel oder Reinigungsmittel!
Warnung zu California Prop 65
WARNUNG:
Dieses Produkt kann Sie Chemikalien aussetzen, von denen im
Bundesstaat Kalifornien bekannt ist, dass sie krebsartige
Geburtsfehler und andere Fortpflanzungsschäden verursachen.
Nicht einnehmen.
Weitere Informationen finden Sie unter: www.P65warnings.ca.gov

www.PyleUSA.com
12
Merkmale:
• Kompaktes Leistungsverstärkerdesign
• Automatische Mikrofon-Vorrangschaltung (Mic 1)
• (2) 1/4" Mikrofoneingänge
• Aux (1/4") Eingangsbuchse
• Möglichkeit zum Anschluss externer Geräte
• Lautsprecheranschlüsse: COM/8-Ohm/25V/70V
• Unabhängige Mikrofon-/Aux-Lautstärkeregler
• Anschluss von bis zu (4) Lautsprechern möglich
• Kompatibilität mit Lautsprechertransformatoren
• Bass- und Höhenregelung
• Inklusive abnehmbarem AC-Netzkabel
• Praktischer Audio-Steuerungsverstärker
• USB/SD/FM/Drahtloser BT Wiedergabe
• Blaue LED-Anzeige für Wiedergabeinformationen
• Ausziehbare Drahtloser BT-Antenne
Drahtloser BT-Konnektivität:
• Funktioniert mit all Ihren bevorzugten Drahtloser BT-Geräten (iPhones,
Androids, Smartphones, iPad, Tablet, PC usw.)
• Drahtloser BT-Netzwerkname: 'PYLEUSA'
• Drahtloser BT-Version: 4.0
• Drahtlose Reichweite bis zu 30'+ ft.

STARTEN SIE HIER
Model Number:
PCM20A
PyleUSA.com/pages/register
Produktregistrierung
Vielen Dank, dass Sie sich für PyleUSA entschieden haben. Durch
die Registrierung Ihres Produkts stellen Sie sicher, dass Sie die
vollen Vorteile unserer exklusiven Garantie und persönlichen
Kundenunterstützung erhalten. Füllen Sie das Formular aus, um
Zugang zu Expertenunterstützung zu erhalten und Ihren
PyleUSA-Kauf in perfektem Zustand zu halten.
www.PyleUSA.com
13
Inhalt der Verpackung:
• PA-Verstärker
• FM-Antenne
• Fernbedienung
Technische Daten:
• Maximale Leistungsausgabe: 40 Watt
• Material: Eisen
• Bass/Höhen: +/-10dB, 100-10kHz
• Frequenzgang: 50-15kHz
• Dämpfung (Mic): 61dB
• T.H.D.: <1%
• Batteriebetriebene Fernbedienung, benötigt (1) x
CR-2025-Knopfzellenbatterie, enthalten
• Austauschbare Sicherung
• Stromversorgung: 120/240 Spannungswähler
• Abmessungen (L x B x H): 5,9" x 7,87" x 3,15" -Zoll / 15 x 20 x 8.1 -Zentimeter

Fragen oder Kommentare?
Wir sind hier, um zu helfen!
Telefon: (1) 718-535-1800
PyleUSA.com/ContactUs
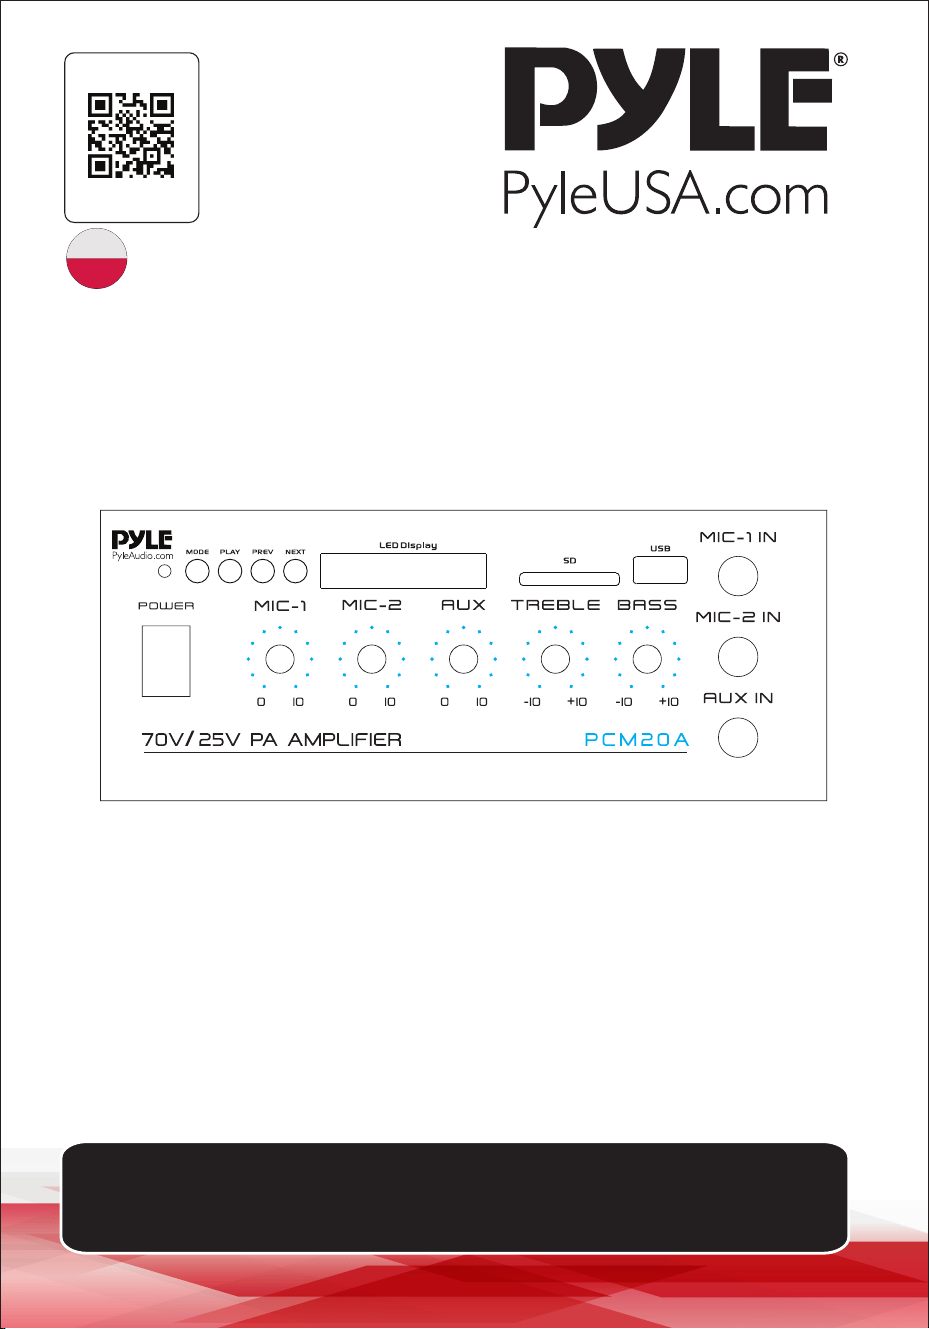
Wzmacniacz sterujący mikrofonem/głośnikiem audio,
Wejścia mikrofonowe 1/4", 40 W
Wzmacniacz mocy 25V/70V
PCM20AEU - PCM20AUK
INSTRUKCJA OBSŁUGI
ODWIEDŹ NASZĄ
STRONĘ
ZESKANUJ MNIE
PyleUSA.com
POL

O PyleUSA:
Firma Pyle, założona w latach 60-tych XX wieku, stała się renomowanym
producentem wysokiej jakości zaawansowanych głośników niskoto-
nowych. Nasza podróż rozpoczęła się od kultowego głośnika Pyle Driver,
który stał się powszechnie znaną marką oryginalnych głośników. Pod
koniec XX wieku rozszerzyliśmy naszą działalność o głośniki zamienne,
głośniki samochodowe, sprzęt audio do domu, marine audio oraz
profesjonalne audio i instrumenty muzyczne z naszą linią Pyle Pro.
Pyle Car:
Przekształć swój samochód w idealne środowisko odsłuchowe dzięki
naszym konkurencyjnym cenowo głośnikom, wzmacniaczom i radiood-
twarzaczom. Zmodernizuj fabryczne głośniki, aby poprawić swoje wraże-
nia muzyczne. Zapoznaj się z akcesoriami, takimi jak systemy nawigacji,
odtwarzacze DVD, interfejsy iPoda i kamery bezpieczeństwa.
Pyle Home:
Odkryj gamę produktów do domowej rozrywki, w tym projektory, telewi-
zory, uchwyty, stojaki i technologię HD.
Pyle Home oferuje basowe mini głośniki, słuchawki, gramofony vintage,
wzmacniacze mocy, głośniki tubowe i wiele więcej, aby wzbogacić Twoje
wrażenia multimedialne w domu i w podróży.
Pyle Pro:
Jako wiodący dostawca sprzętu audio na świecie, Pyle Pro zaspokaja
potrzeby muzyków, inżynierów studyjnych i amatorów. Nasze systemy
PA, wyposażone w mikrofony bezprzewodowe, akumulatory i stacje
dokujące do iPoda/iPhone'a, są idealne na różne imprezy. Poznaj naszą
nową linię gitar, efektów gitarowych i konwerterów USB-analog. Bez
kompromisów w zakresie jakości.
www.PyleUSA.com
2

WAŻNE INSTRUKCJE BEZPIECZEŃSTWA
1. Przeczytaj instrukcję - Przed użyciem urządzenia przeczytaj wszystkie
instrukcje dotyczące bezpieczeństwa i obsługi.
2. Zachowaj instrukcje - Instrukcje bezpieczeństwa i obsługi należy zachować
do wykorzystania w przyszłości.
3. Przestrzegaj ostrzeżeń - Należy przestrzegać wszystkich ostrzeżeń
umieszczonych na urządzeniu i w instrukcji obsługi.
4. Postępuj zgodnie z instrukcjami
5. Woda i wilgoć - Urządzenie nie może być używane w pobliżu wody, na przykład w
pobliżu wanny, umywalki, zlewu kuchennego, pralni, basenu lub w wilgotnej piwnicy.
6. Wentylacja - Urządzenie musi być ustawione w taki sposób, aby jego
lokalizacja nie zakłócała prawidłowej wentylacji. Na przykład, urządzenie nie
powinno być umieszczone na łóżku, soe, dywanie lub podobnej powierzchni,
która może blokować otwory wentylacyjne, ani nie powinno być instalowane
w zabudowie, takiej jak regał na książki lub mebel, który może utrudniać wentylację.
lub mebla, który mógłby utrudniać przepływ powietrza przez otwory wentylacyjne.
7. Ciepło - Urządzenie musi być umieszczone z dala od źródeł ciepła, takich jak
grzejniki, piece lub inne urządzenia, w tym wzmacniacze, które wytwarzają ciepło.
8. Źródła zasilania - Urządzenie powinno być podłączone wyłącznie do źródła
zasilania typu opisanego w instrukcji obsługi lub wskazanego na urządzeniu.
9. Uziemienie lub polaryzacja - Należy upewnić się, że uziemienie lub polary
zacja urządzenia nie zostały naruszone.
10. Zabezpieczenie przewodu zasilającego - przewody zasilające powinny być
ułożone w taki sposób, aby nie było możliwości nadepnięcia na nie lub
przytrzaśnięcia ich przedmiotami umieszczonymi na nich lub przy nich,
zwracając szczególną uwagę na przewody przy wtyczkach, gniazdach i w
miejscu, w którym wychodzą z urządzenia.
11. Czyszczenie - Urządzenie należy czyścić wyłącznie zgodnie z zaleceniami
producenta.
12. Linie energetyczne - Zewnętrzny system antenowy nie może znajdować się
w pobliżu napowietrznych linii energetycznych lub innych obwodów
oświetleniowych lub energetycznych, lub w miejscach, w których może wejść
w kontakt z takimi liniami lub obwodami. Podczas instalacji zewnętrznego
systemu antenowego należy zachować szczególną ostrożność, aby nie
dotknąć takich linii energetycznych lub obwodów. ponieważ kontakt z nimi
może być śmiertelny.
13. Okresy nieużywania - Przewód zasilający urządzenia musi być odłączony od
gniazda ściennego, gdy urządzenie nie jest używane przez dłuższy czas.
www.PyleUSA.com
3

14. Przedostawanie się przedmiotów i płynów - Należy uważać, aby
przedmioty nie spadły, a płyny nie wlały się do obudowy przez otwory.
15. Wózki i stojaki - Jeśli urządzenie jest używane z wózkiem lub
stojakiem, Wózek lub stojak musi być typu zalecanego przez
producenta. Połączone użytkowanie urządzenia z wózkiem musi
odbywać się z zachowaniem ostrożności. Gwałtowne zatrzymania, nadmierna
siła i nierówne powierzchnie mogą spowodować przewrócenie się urządzenia i wózka.
16. Montaż - Urządzenie może być montowane wyłącznie w sposób zalecany
przez producenta.
17. Uszkodzenia wymagające serwisu - Urządzenie musi być serwisowane
przez wykwalikowany personel, gdy:
A. Kabel zasilający lub wtyczka zostały uszkodzone.
B. Urządzenie zostało uszkodzone przez przedmioty lub płyn został rozlany
wewnątrz jego obudowy.
C. Urządzenie zostało wystawione na działanie deszczu.
D. Urządzenie zostało upuszczone lub jego obudowa została uszkodzona.
E. Urządzenie nie działa normalnie lub wykazuje wyraźne zmiany w działaniu.
18. Konserwacja - Użytkownik nie może podejmować żadnych prac
konserwacyjnych urządzenia innych niż opisane w instrukcji obsługi. Wszelkie
inne prace konserwacyjne należy powierzyć wykwalikowanemu personelowi.
19. Przeciążenie - Nie przeciążaj gniazdek ściennych i przedłużaczy, ponieważ
może to spowodować ryzyko pożaru lub porażenia prądem.
20. Części zamienne - Jeśli wymagane są części zamienne, upewnij się, że technik
serwisowy użył części zamiennych określonych przez producenta lub
mających takie same właściwości jak części oryginalne. Nieautoryzowane
zamienniki mogą spowodować pożar, porażenie prądem elektrycznym
lub inne zagrożenia.
21. Kontrola bezpieczeństwa - Po zakończeniu jakichkolwiek prac
serwisowych lub naprawczych na tym urządzeniu, poproś technika
serwisu o przeprowadzenie kontroli bezpieczeństwa w celu ustalenia,
czy urządzenie jest w prawidłowym stanie technicznym.
www.PyleUSA.com
4
OSTRZEŻENIE: Aby zmniejszyć ryzyko pożaru lub porażenia prądem,
nie wystawiaj tego produktu na działanie deszczu lub wilgoci.
UWAGA: Aby zmniejszyć ryzyko porażenia prądem, nie zdejmuj pokrywy ani tylnej
części urządzenia. Wewnątrz urządzenia nie ma części, które mogą być naprawiane
przez użytkownika. Serwisowanie powierz wykwalikowanemu personelowi.
RYZYKO PORAŻENIA PRĄDEM
NIE OTWIERAJ
UWAGA
Ten symbol ostrzega o obecności
nieizolowanych niebezpiecznych napięć wewnątrz produktu,
które mogą mieć taką wielkość, że
stwarzać ryzyko porażenia prądem elektrycznym.
Nie otwieraj obudowy produktu.
! Ten symbol oznacza obecność
ważnych instrukcji obsługi i konserwacji
instrukcje konserwacji zawarte w dokumentacji
dołączonej do tego produktu.

Nowy stereofoniczny wzmacniacz mocy PCM20A
oferuje moc i wszechstronność potrzebną w profesjonalnym systemie audio.
Szerokie pasmo przenoszenia jest idealne do wzmacniania głosu i muzyki.
Funkcja talkover dla wejścia Mic 1 i Aux, umieszczona na przednim panelu,
sprawia, że jest to idealne rozwiązanie dla sal konferencyjnych, audytoriów,
wydarzeń sportowych, szkół i biurowych systemów przywoławczych.
Świetnie nadaje się do każdego miejsca, w którym konieczne jest nadanie
specjalnego komunikatu z doskonałą jakością dźwięku.
FUNKCJE I ELEMENTY STERUJĄCE
PANEL PRZEDNI
1. Włączanie/wyłączanie zasilania i wskaźnik: Główny przełącznik zasilania,
wskaźnik świeci się, gdy wzmacniacz jest włączony
2. Regulatory głośności MIC 1 i MIC 2/AUX: Dostosuj poziom sygnału
wyjściowego odpowiednich wejść.
3. Regulatory tonów BASS i TREBLE: Dostosuj tony niskie i wysokie
odpowiednich sygnałów wyjściowych.
4. Przyciski sterowania funkcjami MODE, PLAY, PREV i NEXT:
• Przycisk MODE: Do wyboru dźwięku jako WIRELESS BT/SD/LINE IN.
• PRZYCISK ODTWARZANIA/PAUZY: Przycisk sterowania odtwarzaniem i pauzą
• PREV/NEXT: Szybkie przewijanie do tyłu lub do następnej ścieżki
5. Wyświetlacz LED
6. Gniazdo SD/MMC do odtwarzania kart SD/MMC
7. Port ładowania USB: port USB służy wyłącznie do ładowania smartfona,
nie ma czytnika USB.
8. Wejście AUX: Do podłączania źródła dźwięku o wysokiej impedancji, takiego
jak magnetofon, odtwarzacz CD lub tuner ze złączem 1/4" za pomocą
adaptera audio (dwie wtyczki RCA do jednego gniazda mono 1/4").
www.PyleUSA.com
5
1
2
3
4
5
6
7
8
9
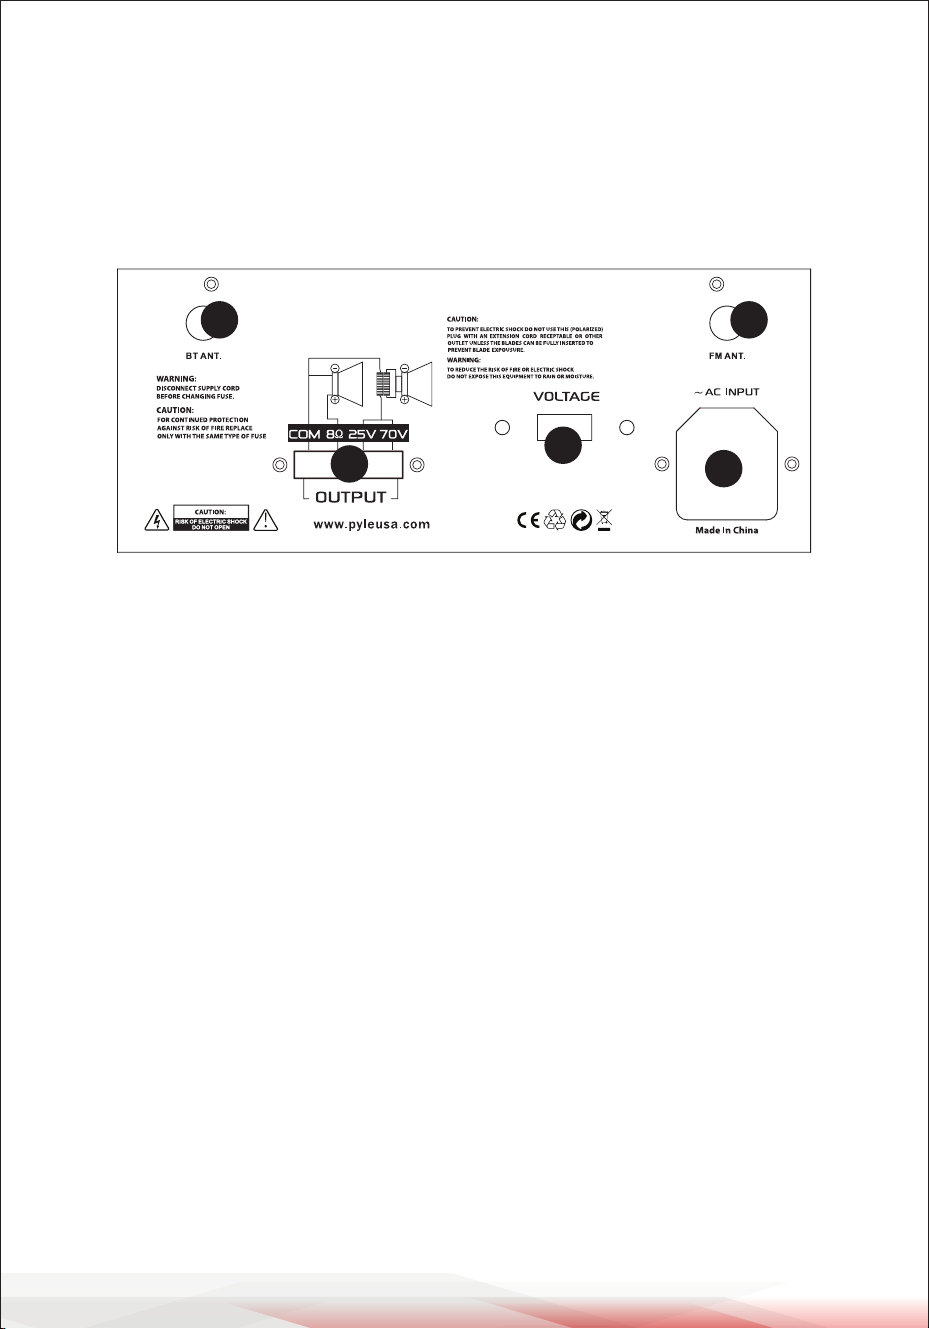
9. Wejścia MIC1 i MIC2: Do podłączenia mikrofonu o niskiej impedancji ze
złączem 1/4". MIC 1 jest źródłem "priorytetowym", sygnały pochodzące z AUX
będą automatycznie tłumione o -40 dB, sygnał pochodzący z MIC 1 zostanie
zastąpiony sygnałem strony (auto talkover). Jest to świetne rozwiązanie dla
systemów przywoławczych.
TYLNY PANEL
1. Bezprzewodowa antena BT: Bezprzewodowy odbiornik BT do przesyłania
strumieniowego.
2. Podłączenie głośników: Do wzmacniacza można podłączyć jeden lub więcej
głośników (4, 8 lub 16 Ohm) z transformatorami lub bez. Przed podłączeniem
głośników do wzmacniacza należy jednak obliczyć całkowitą impedancję,
aby uniknąć uszkodzenia wzmacniacza. Całkowita impedancja głośników
wyższa niż 8 Ohm lub niższa niż 8 Ohm może spowodować uszkodzenie.
3. Przełącznik napięcia: Ten wzmacniacz PA ma napięcie wejściowe wybierane
od 110 V/60 Hz (standard w USA i KANADZIE) do 220 V/50 Hz (do pracy w
Europie). Upewnij się, że przełącznik jest w prawidłowej pozycji przed
rozpoczęciem pracy, W przeciwnym razie może dojść do poważnych
uszkodzeń nieobjętych gwarancją.
4. Wejście AC: Podłącz dostarczony przewód zasilający do urządzenia,
gdy zasilanie jest wyłączone, a następnie podłącz przewód zasilający AC do
gniazdka elektrycznego. W razie potrzeby wymień bezpiecznik na bezpiecznik
o odpowiedniej wartości (patrz wartość bezpiecznika T 1.2AL 250V dla
110-120V i T0.63AL 250V dla 220V/240V wydrukowana na wejściu zasilania).
5. ZŁĄCZE ANTENY FM: Podłącz antenę FM.
www.PyleUSA.com
6
1
2
3
4
5

1
2
3
4
5
6
7
8
9
www.PyleUSA.com
7
ŁĄCZNOŚĆ
1. Naciśnij ten przycisk, aby włączyć lub wyłączyć MP3.
2. W trybie FM naciśnij dwa przyciski, aby wybrać poprzedni lub następny kanał.
3. Naciśnij te dwa przyciski, aby wybrać poprzedni lub następny utwór w trybie
USB, SD lub bezprzewodowym BT
4. Zwiększ lub zmniejsz głośność
5. Naciśnij cyfry, aby bezpośrednio wybrać utwory.
Odpowiedź urządzenia w trybie USB lub SD zajmuje 1-2 sekundy.
6. Naciśnij ten przycisk, aby przełączyć na tryb powtarzania.
7. Naciśnij ten przycisk, aby wybrać tryb odtwarzania, np. USB/SD/FM/WIRELESS BT.
8. Funkcja EQ: Wybór wstępnie ustawionego trybu korektora dźwięku,
odpowiednio zaprojektowanego.
9. Funkcja odtwarzania i pauzy dla MP3

www.PyleUSA.com
8
POŁĄCZENIA GŁOŚNIKÓW
Do wzmacniacza można podłączyć jeden lub więcej głośników (4, 8 lub 16
omów) z transformatorami lub bez. Przed podłączeniem głośników do wzmac-
niacza należy jednak obliczyć całkowitą impedancję, aby uniknąć uszkodzenia
wzmacniacza. Całkowita impedancja głośników wyższa niż 8 omów lub niższa
niż 8 omów może spowodować uszkodzenie.
SYSTEM 1: System z jednym głośnikiem
UWAGA: : Podłącz głośnik (+) do zacisku 8 Ohm wzmacniacza.
SYSTEM 2: Dwa (lub więcej) głośniki połączone szeregowo
UWAGA: Podłącz głośnik (+) do zacisku 8 Ohm wzmacniacza, w zależności od
CAŁKOWITEJ IMPEDANCJI dwóch głośników. Jeśli każdy głośnik ma impedancję 4
Ohm, całkowita impedancja głośników w tej konguracji szeregowej wynosi 8 Ohm.
JEDEN GŁOŚNIK
8 Ohm GŁOŚNIK
GŁOŚNIKI 4 Ohm
DWA GŁOŚNIKI POŁĄCZONE SZEREGOWO
LEWY GŁOŚNIK
PRAWY GŁOŚNIK

www.PyleUSA.com
9
SYSTEM 3: Dwa (lub więcej) głośniki połączone równolegle
UWAGA: Podłącz głośnik (+) do zacisku 8 Ohm wzmacniacza, w zależności od
całkowitej impedancji dwóch głośników. Jeśli każdy głośnik ma impedancję 16
Ohm, całkowita impedancja głośników w tej konguracji szeregowej wynosi 8 Ohm.
SYSTEM 4: Cztery głośniki połączone szeregowo i równolegle
UWAGA: : Chociaż powyższy opis obejmuje połączenie dwóch par głośników 8
Ohm szeregowo, możesz również wybrać połączenie jednej pary szeregowo i
jednej pary równolegle, po prostu pamiętaj o obliczeniu całkowitej impedancji i
podłączeniu przewodu obwodu głośnika (+) do odpowiedniego zacisku
wzmacniacza.
DWA GŁOŚNIKI RÓWNOLEGLE
CZTERY GŁOŚNIKI W POŁĄCZENIU SZEREGOWYM/RÓWNOLEGŁYM
GŁOŚNIK 1
GŁOŚNIK 2
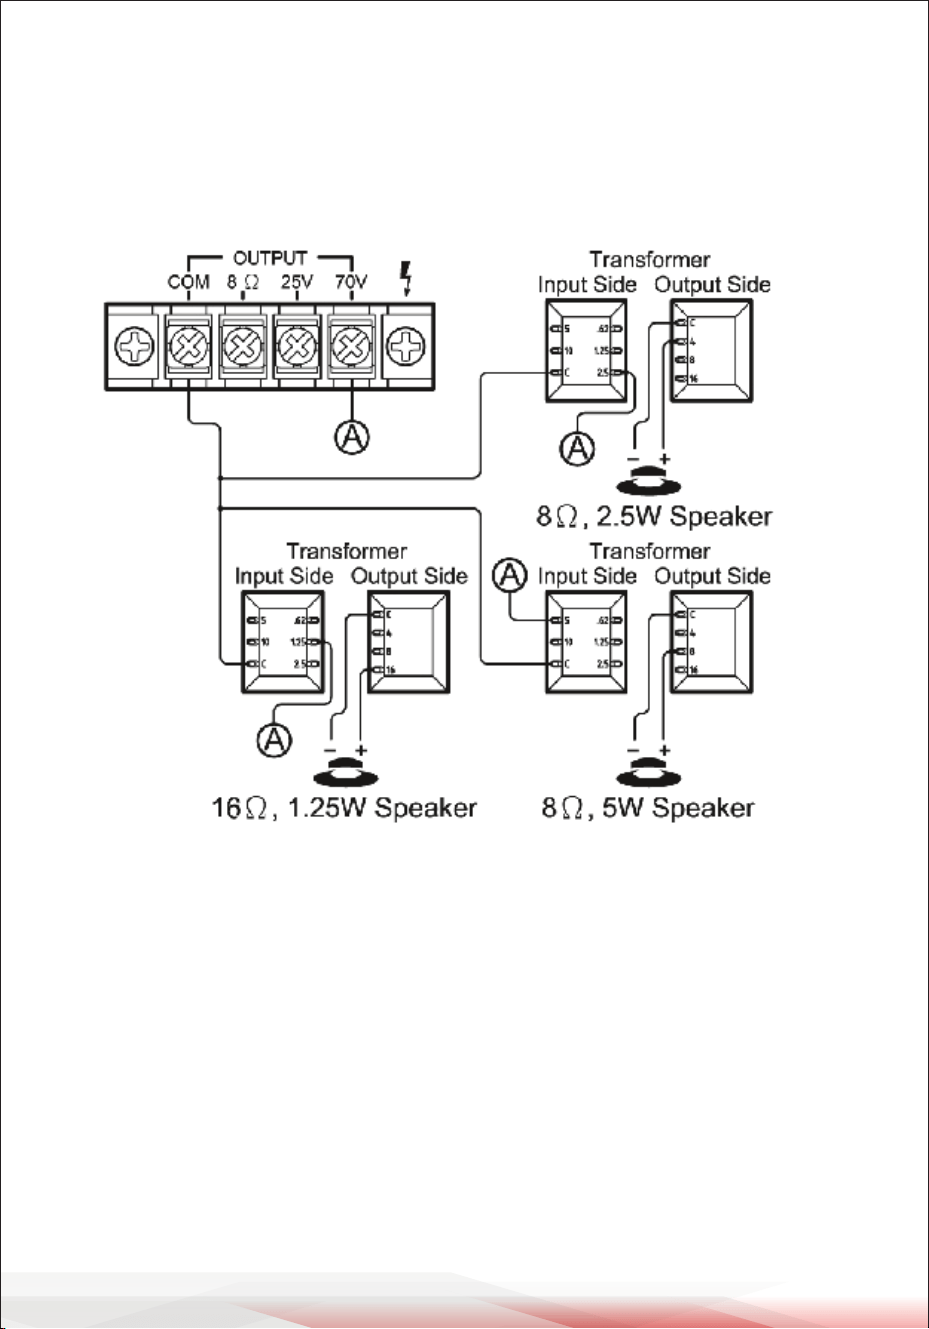
www.PyleUSA.com
10
SYSTEM 5: Podłączanie głośników za pomocą transformatorów
UWAGA: W przypadku korzystania ze stałego napięcia sieciowego 25 V lub 70 V,
dla każdego głośnika należy zastosować transformator sieciowy.
transformator liniowy dla każdego głośnika. Wszystkie transformatory muszą być
połączone równolegle; nigdy nie łącz transformatorów liniowych szeregowo.
INSTRUKCJE KORZYSTANIA Z BEZPRZEWODOWEGO BT
Urządzenia zewnętrzne z wbudowaną funkcją BT Wireless można podłączyć
do tego wzmacniacza bezprzewodowo, aby odtwarzać je przez głośniki
wzmacniacza. Jeśli wzmacniacz jest podłączony do głośników, usłyszysz
sygnały dźwiękowe ułatwiające połączenie.
1. Najpierw upewnij się, że wzmacniacz jest włączony i zmniejsz głośność. Pamiętaj o
podłączeniu anteny BT na tylnym panelu, aby uzyskać lepszy odbiór sygnału.
2. Naciśnij przycisk BT/Line na panelu przednim, usłyszysz "POWER ON" i "PAIRING".
Naciśnij przycisk "POWER ON" i "PAIRING", po czym urządzenie będzie
automatycznie gotowe do sparowania z urządzeniem zewnętrznym.
parowania z urządzeniem zewnętrznym.
3. Włącz BT na urządzeniu zewnętrznym.
PODŁĄCZENIE GŁOŚNIKÓW

www.PyleUSA.com
11
4. Wyszukaj dostępne urządzenia bezprzewodowe BT i upewnij się, że znajdu
jesz się w zasięgu wzmacniacza i poczekaj, aż urządzenie wybierze "PYLEUSA"
na liście urządzeń do parowania sieci bezprzewodowej BT.
5. Po nawiązaniu połączenia usłyszysz komunikat głosowy: "Urządzenie jest
podłączone. Parowanie BT powiodło się i ustanowiono bezprzewodowe
połączenie BT.
6. Możesz teraz odtwarzać muzykę z urządzenia zewnętrznego za
pośrednictwem wzmacniacza
Pielęgnacja i konserwacja
Wzmacniacz Pyle jest przykładem doskonałej konstrukcji i wykonania.
Poniższe wskazówki pomogą Ci zadbać o wzmacniacz, abyś mógł z niego
korzystać przez wiele lat:
• Utrzymuj wzmacniacz w stanie suchym. Jeśli ulegnie zamoczeniu,
natychmiast go wyczyść.
• Używaj wzmacniacza wyłącznie w dobrze wentylowanych pomieszczeniach.
• Trzymaj wzmacniacz z dala od kurzu i brudu.
• Czyść od czasu do czasu wilgotną szmatką, aby zachować nowy wygląd.
• Nie używaj chemikaliów, rozpuszczalników ani agresywnych środków
czyszczących!
Ostrzeżenie California Prop 65
OSTRZEŻENIE:
Ten produkt może narazić użytkownika na kontakt z substancjami
chemicznymi, o których wiadomo, że Stanu Kalifornia, że
powodują raka, wady wrodzone i inne szkodliwe działanie na
rozrodczość. Nie połykaj.
Więcej informacji: www.P65warnings.ca.gov

www.PyleUSA.com
12
Charakterystyka:
• Kompaktowa konstrukcja wzmacniacza
• Funkcja automatycznego priorytetu mikrofonu (Mic 1)
• (2) Wejścia mikrofonowe 1/4"
• Złącze wejściowe Aux (1/4") Jack
• Możliwość podłączenia urządzeń zewnętrznych
• Wyjścia z zaciskami głośnikowymi: COM/8-Ohm/25V/70V
• Niezależne regulatory głośności mikrofonu/ux
• Możliwość podłączenia do (4) głośników
• Kompatybilność z transformatorami głośnikowymi
• Regulacja tonów niskich i wysokich
• Zawiera odłączany przewód zasilający AC
• Wygodny wzmacniacz do sterowania dźwiękiem
• Odtwarzanie USB/SD/FM/Bezprzewodowe BT
• Niebieski wyświetlacz LED informujący o odtwarzaniu
• Wysuwana antena bezprzewodowa BT
Bezprzewodowa łączność BT:
• Działa ze wszystkimi preferowanymi urządzeniami bezprzewodowymi BT
(iPhone, Android, smartfony, iPad, tablety itp.).
• Nazwa sieci bezprzewodowej BT: "PYLEUSA
• Wersja sieci bezprzewodowej BT: 4.0
• Zasięg bezprzewodowy do ponad 9 metrów

ZACZNIJ TUTAJ
Model Number:
PCM20A
PyleUSA.com/pages/register
Zarejestruj swój produkt
Dziękujemy za wybranie PyleUSA. Rejestrując swój
produkt, zapewniasz sobie wszystkie korzyści płynące z naszej
ekskluzywnej ekskluzywnej gwarancji i spersonalizowanej
obsługi klienta. Wypełnij formularz, aby uzyskać dostęp do
pomocy ekspertów i utrzymać swój zakup PyleUSA w
idealnym stanie.
www.PyleUSA.com
13
Zawartość opakowania:
• Wzmacniacz PA
• Antena FM
• Pilot zdalnego sterowania
Specykacje techniczne:
• Maks. moc wyjściowa: 40 W
• Materiał konstrukcyjny: żelazo
• Bass/Treble: +/-10dB, 100-10kHz
• Pasmo przenoszenia: 50-15kHz
• Tłumienie (mikrofon): 61dB
• TH.D.: <1%.
• Pilot zdalnego sterowania na baterie, wymaga (1) x bateria guzikowa
CR-2025, w zestawie
• Wymienny bezpiecznik
• Zasilanie: przełącznik napięcia 120/240
• Wymiary (szer. x gł. x wys.): 15 x 20 x 8.1 -centymetr / 5.9'' x 7.87'' x 3.15'' -cale

Masz pytania lub uwagi?
Jesteśmy tutaj, aby Ci pomóc!
Phone: (1) 718-535-1800
PyleUSA.com/ContactUs
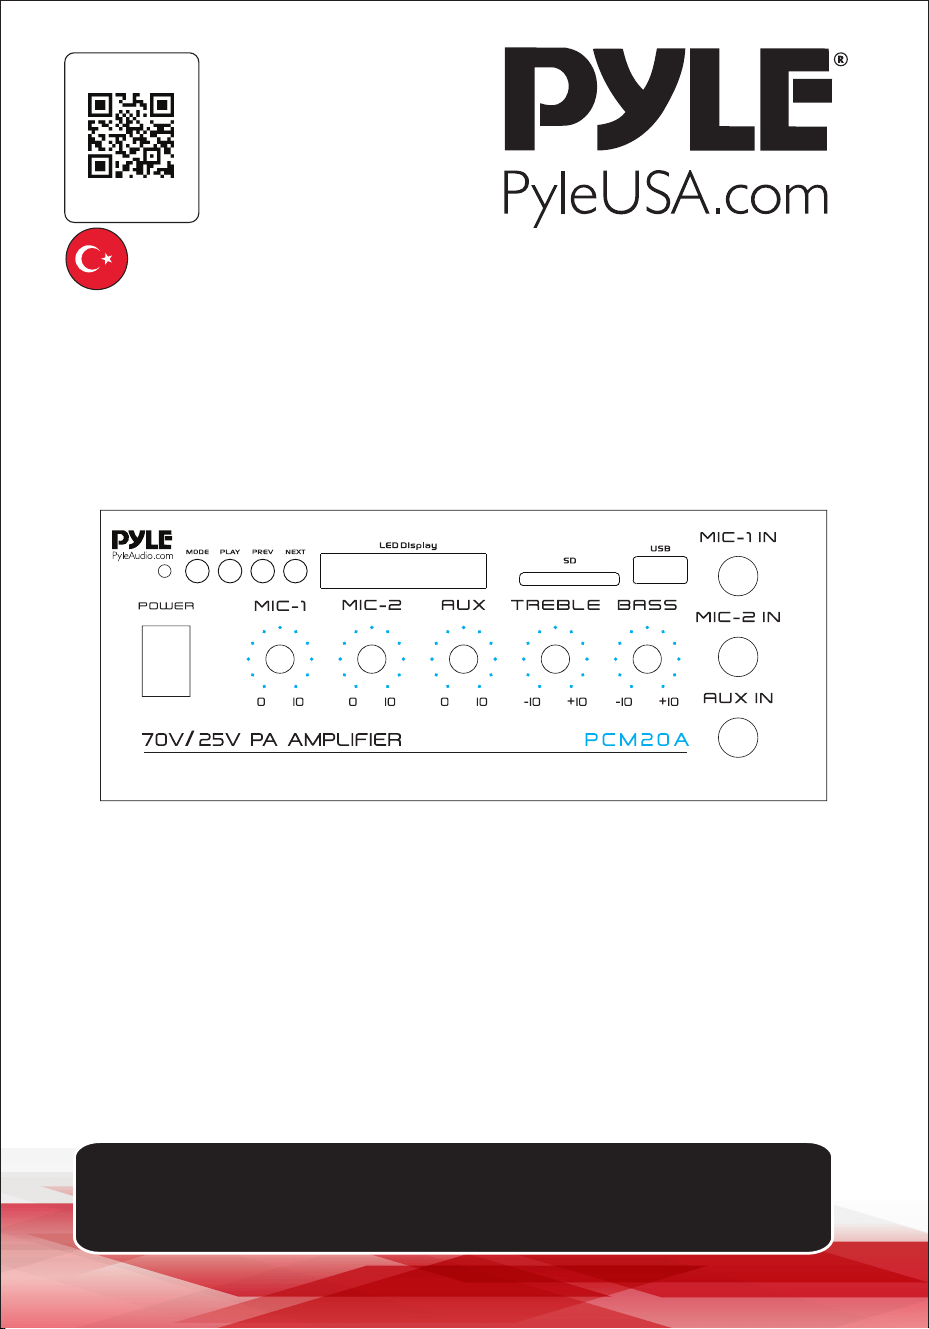
Mikrofon ses/hoparlör kontrol amplifikatörü,
1/4 Mikrofon girişi, 40 Watt
25V / 70V Güç Amplifikatörü
PCM20AEU - PCM20AUK
KULLANICI KILAVUZU
Web Sitemizi
Ziyaret Edin
BENİ TARA
PyleUSA.com
TUR

PyleUSA Hakkında
1960'larda kurulan Pyle, yüksek kaliteli modern woofer'ların tanınmış bir
üreticisi haline geldi. Yolculuğumuz, orijinal hoparlör alanında tanınmış
bir isim haline gelen ikonik Pyle Driver ile başladı. 20'nci yüzyılın sonların-
da, Pyle Pro serimizle yedek hoparlörler, araç ses sistemi, ev ses sistemi,
deniz ses sistemi ve profesyonel ses ve müzik enstrümanlarına doğru
genişledik.
Pyle Car:
Uygun yatlı hoparlörlerimiz, amplikatörlerimiz ve ana ünitelerimizle
aracınızı müzik dinlemek için mükemmel bir yere dönüştürün. Müziğiniz-
in kalitesini artırmak için fabrika hoparlörlerinizi yükseltin. Navigasyon
sistemleri, DVD oynatıcılar, iPod arayüzleri ve güvenlik odaklı kameralar
gibi aksesuarları keşfedin.
Pyle Home:
Projektörler, TV'ler, montaj aparatları, standlar ve HD teknolojisi dahil
olmak üzere bir dizi ev eğlence ürününü keşfedin.
Pyle Home, evde ve hareket halindeyken zenginleştirilmiş bir medya
deneyimi için bas genişlemeli mini hoparlörler, kulaklıklar, vintage
pikaplar, güç amplikatörleri, horn hoparlörler ve daha fazlasını sunar.
Pyle Pro:
Dünya çapında lider ses ekipmanı kaynağı olan Pyle Pro, müzisyenlere,
stüdyo mühendislerine ve amatörlere hitap etmektedir. Kablosuz mikro-
fonlar, şarj edilebilir piller ve iPod/iPhone yuvaları içeren PA Sistemlerimiz
çeşitli etkinlikler için idealdir. Kaliteden ödün vermeden gelişmekte olan
gitar serimizi, efekt pedallarımızı ve USB-analog dönüştürücülerimizi
keşfedin.
www.PyleUSA.com
2

ÖNEMLİ GÜVENLİK TALİMATLARI
1. Talimatları Okuyun - Cihazı çalıştırmadan önce tüm güvenlik ve çalıştırma
talimatları okunmalıdır.
2. Talimatları Saklayın - Güvenlik ve çalıştırma talimatları ileride başvurmak
üzere saklanmalıdır.
3. Uyarılara Dikkat Edin - Cihazın üzerindeki ve kullanım talimatlarındaki tüm
uyarılara uyulmalıdır.
4. Talimatları Takip Edin
5. Su ve Nem - Cihaz, küvet, lavabo, mutfak lavabosu, çamaşır küveti,
yüzme havuzu veya ıslak bir bodrum gibi su yakınında kullanılmamalıdır.
6. Havalandırma - Cihaz, konumu veya pozisyonu uygun havalandırmayı
engellemeyecek şekilde yerleştirilmelidir. Örneğin, cihaz havalandırma
deliklerini tıkayabilecek bir yatak, kanepe, halı veya benzeri bir yüzey üzerine
yerleştirilmemeli veya havalandırma deliklerinden hava akışını engelleyebi
lecek bir kitaplık veya dolap gibi ankastre bir kurulum içine yerleştirilmemelidir.
7. Isı - Cihaz, radyatör, kalorifer peteği, soba gibi ısı kaynaklarından veya
amplikatörler de dahil olmak üzere ısı üreten diğer cihazlardan uzağa
yerleştirilmelidir.
8. Güç Kaynakları - Cihaz, yalnızca kullanım talimatlarında açıklanan veya cihaz
üzerinde işaretlenen tipte bir güç kaynağına bağlanmalıdır.
9. Topraklama veya Kutuplama - Bir cihazın topraklama veya kutuplama
araçlarının bozulmadığından emin olmak için önlem alınmalıdır.
10. Güç Kablosunun Korunması - Güç kaynağı kabloları, şlerdeki, prizlerdeki
ve cihazdan çıktıkları noktalardaki kablolara özellikle dikkat edilerek,
üzerlerine basılmayacak veya üzerlerine veya karşılarına konulan nesneler
tarafından sıkıştırılmayacak şekilde yönlendirilmelidir.
11. Temizlik - Cihaz sadece üretici tarafından tavsiye edildiği şekilde temizlenmelidir.
12. Güç Hatları - Bir dış anten sistemi, havai güç hatlarının veya diğer elektrik
ışık veya güç devrelerinin yakınına veya bu tür güç hatlarına veya devrelere
arızalanabileceği yerlere yerleştirilmemelidir. Bir dış anten sistemi kurarken,
bu tür elektrik hatlarına veya devrelerine dokunmamak için çok dikkatli
olunmalıdır, çünkü bunlarla temas ölümcül olabilir.
13. Kullanılmayan Dönemler - Cihaz uzun bir süre kullanılmadan bırakılacaksa,
cihazın güç kablosu prizden çıkarılmalıdır.
www.PyleUSA.com
3

14. Nesne ve Sıvı Girişi - Nesnelerin düşmemesi ve sıvıların açıklıklardan
muhafaza içine dökülmemesi için dikkatli olunmalıdır.
15. Arabalar ve Standlar - Cihaz bir araba veya stand ile
kullanılıyorsa, araba veya stand üretici tarafından önerilen tipte
olmalıdır. Cihaz ve araba kombinasyonu dikkatli bir şekilde
hareket ettirilmelidir. Hızlı duruşlar, aşırı güç ve düz olmayan yüzeyler
cihaz ve araba kombinasyonunun devrilmesine neden olur.
16. Montaj - Cihaz sadece üretici tarafından tavsiye edildiği şekilde monte edilmelidir.
17. Servis Gerektiren Hasarlar - Cihaz aşağıdaki durumlarda yetkili servis
personeli tarafından servise alınmalıdır:
A. Güç kaynağı kablosu veya şi hasar görmüşse.
B. Cihazın muhafazasına bir nesne girmişse veya içine sıvı dökülmüşse.
C. Cihaz yağmura maruz kalmıştır.
D. Cihaz düşürüldü veya muhafaza hasar gördü.
E. Cihaz normal çalışmıyor gibi görünüyorsa veya performansında
belirgin bir değişiklik varsa.
18. Servis - Kullanıcı, kullanıcı kullanım talimatlarında belirtilenler dışında cihaza
servis yapmaya çalışmamalıdır. Diğer tüm servis işlemleri kaliye personel
tarafından yapılmalıdır.
19. Aşırı Yükleme - Yangın veya elektrik çarpması riskine neden olabileceğinden
duvar prizlerine ve uzatma kablolarına aşırı yükleme yapmayın.
20. Yedek Parçalar - Yedek parça gerektiğinde, servis teknisyeninin üretici
tarafından belirtilen veya orijinal parçayla aynı özelliklere sahip yedek
parçaları kullandığından emin olun. Yetkisiz ikameler yangın, elektrik
çarpması veya diğer tehlikelere neden olabilir.
21. Güvenlik Kontrolü - Bu cihazdaki herhangi bir servis veya onarım işleminin
tamamlanmasının ardından, servis teknisyeninden cihazın düzgün çalışır
durumda olduğunu belirlemek için güvenlik kontrolleri yapmasını isteyin.
www.PyleUSA.com
4
UYARI: Yangın veya şok tehlikesi riskini azaltmak için bu ürünü
yağmura veya neme maruz bırakmayın
DİKKAT: Elektrik çarpması riskini azaltmak için kapağı veya arka
kısmı çıkarmayın. İçinde kullanıcı tarafından bakımı yapılabilecek
parça yok. Servis için kaliye personele başvurun
ELEKTRİK ÇARPMASI RİSKİ
AÇMAYIN
DİKKAT
Bu sembol, ürünün muhafazası içinde elektrik çarpması riski
oluşturabilecek büyüklükte yalıtılmamış tehlikeli
voltajın - 6 varlığı konusunda sizi uyarmak için tasarlanmıştır.
Ürünün kasasını açmayın.
Bu sembol, önemli çalıştırma ve bakım talimatlarının bu
ürünle birlikte gelen literatürde yer aldığını bildirmek için
tasarlanmıştır.

Yeni PCM20A Stereo Güç Amplikatörünüz
profesyonel bir ses sisteminde ihtiyacınız olan gücü ve çok yönlülüğü sağlar.
Geniş frekans tepkisi, vokal ve müzik amplikasyonu için mükemmeldir.
Ön panelde bulunan Mikrofon 1 ve Aux Girişi için talkover işlevi, onu toplantı
salonları, oditoryumlar, spor etkinlikleri, okullar ve os çağrı sistemleri için
mükemmel hale getirir. Mükemmel ses kalitesiyle özel bir duyuru yapmanız
gereken her yer için idealdir.
ÖZELLİKLER VE KONTROLLER
ÖN PANEL
1. Güç AÇMA/KAPAMA ve Gösterge: Ana güç anahtarı, amplikatör AÇIK
konuma getirildiğinde gösterge yanar
2. MIC 1 ve MIC 2/AUX Ses Kontrolleri: İlgili girişlerin çıkış sinyali seviyesini ayarlar.
3. BASS ve TREBLE Ton Kontrolleri: İlgili çıkış sinyallerinin bas ve tiz seslerini ayarlar.
4. MODE, PLAY, PREV ve NEXT Fonksiyon Kontrol düğmeleri:
• MOD Düğmesi: WIRELESS BT/SD/LINE IN gibi ses seçimi için
• PLAY/PAUSE DÜĞMESİ: Oynat ve Duraklat kontrol düğmesi
• PREV/NEXT: Hızlı geri veya sonraki şarkı
5. LED Ekran
6. SD/MMC kartlarını oynatmak için SD/MMC Soketi
7. USB Şarj Portu: USB bağlantı noktası yalnızca akıllı telefon şarjı içindir,
USB okuyucu işlevi yoktur
8. AUX Girişi: Ses şi adaptörü (iki fono RCA şi 1/4" mono jaka) aracılığıyla 1/4"
şli Teyp Deck, (D çalar veya Tuner gibi yüksek empedanslı ses kaynağını
bağlamak için.
www.PyleUSA.com
5
1
2
3
4
5
6
7
8
9

9. MIC1 ve MIC2 Girişleri: 1/4" şli düşük empedanslı mikrofonu bağlamak için.
MIC 1 "Öncelikli" bir kaynaktır, AUX'tan gelen sinyaller otomatik olarak -40dB
zayıatılacaktır, MIC 1'den gelen sinyal sayfaya geçecektir (otomatik konuşma).
çağrı sistemi için iyidir.
ARKA PANEL
1. Kablosuz BT Anteni: : Kablosuz BT Akış alıcısı
2. Hoparlör Bağlantısı: Bir veya daha fazla hoparlör (4,8 veya 16 Ohm)
transformatörlü veya transformatörsüz olarak amplikatöre bağlanabilir.
Ancak, amplikatöre herhangi bir hoparlör bağlamadan önce, amplikatöre
zarar gelmesini önlemek için toplam empedans hesaplanmalıdır. Toplam
hoparlör empedansının 8 Ohm'dan büyük veya 8 Ohm'dan küçük olması bu
hasarın oluşmasına neden olabilir.
3. Voltaj Anahtarı: Bu PA amplikatörü 110V/60Hz
(ABD ve KANADA'da standart) ile 220/50Hz (AVRUPA çalışması için)
arasında seçilebilir giriş voltajına sahiptir. Lütfen çalıştırmadan önce anahtarın
doğru konumda olduğundan emin olun, aksi takdirde ciddi hasar meydana
gelir ve garanti kapsamına girmez.
4. AC Girişi: Güç kapalıyken ürünle birlikte verilen güç kablosunu üniteye takın,
ardından AC güç kablosunu bir elektrik prizine takın. Lütfen gerekirse
sigortayı yalnızca uygun değerle değiştirin (güç girişinde basılı olan 110-120V
için T 1.2AL 250V ve 220V/240V için TO.63AL 250V sigorta değerine bakın)
5. FM ANTEN KONNEKTÖRÜ: FM anteni için bağlayın
www.PyleUSA.com
6
1
2
3
4
5

1
2
3
4
5
6
7
8
9
www.PyleUSA.com
7
UZAKTAN KUMANDA
1. MP3'ü açmak veya kapatmak için bu düğmeye basın
2. FM modundayken, önceki veya sonraki kanalı seçmek için bu iki düğmeye basın.
3. USB veya SD'de önceki veya sonraki parçayı seçmek için bu iki düğmeye basın
veya Kablosuz BT modu
4. Ses açma veya kısma
5. Parçaları doğrudan seçmek için numaralara basın.
Ünitenin USB veya SD modunda yanıt vermesi 1-2 saniye sürer.
6. Tekrarlama modu için bu düğmeye basın.
7. USB/SD/FM/WIRELESS BT gibi çalma modunu seçmek için bu düğmeye basın.
8. EQ işlevi: Buna göre tasarlanmış ekolayzerin önceden ayarlanmış bir modunu seçin.
9. MP3 için Çalma ve Duraklatma işlevi
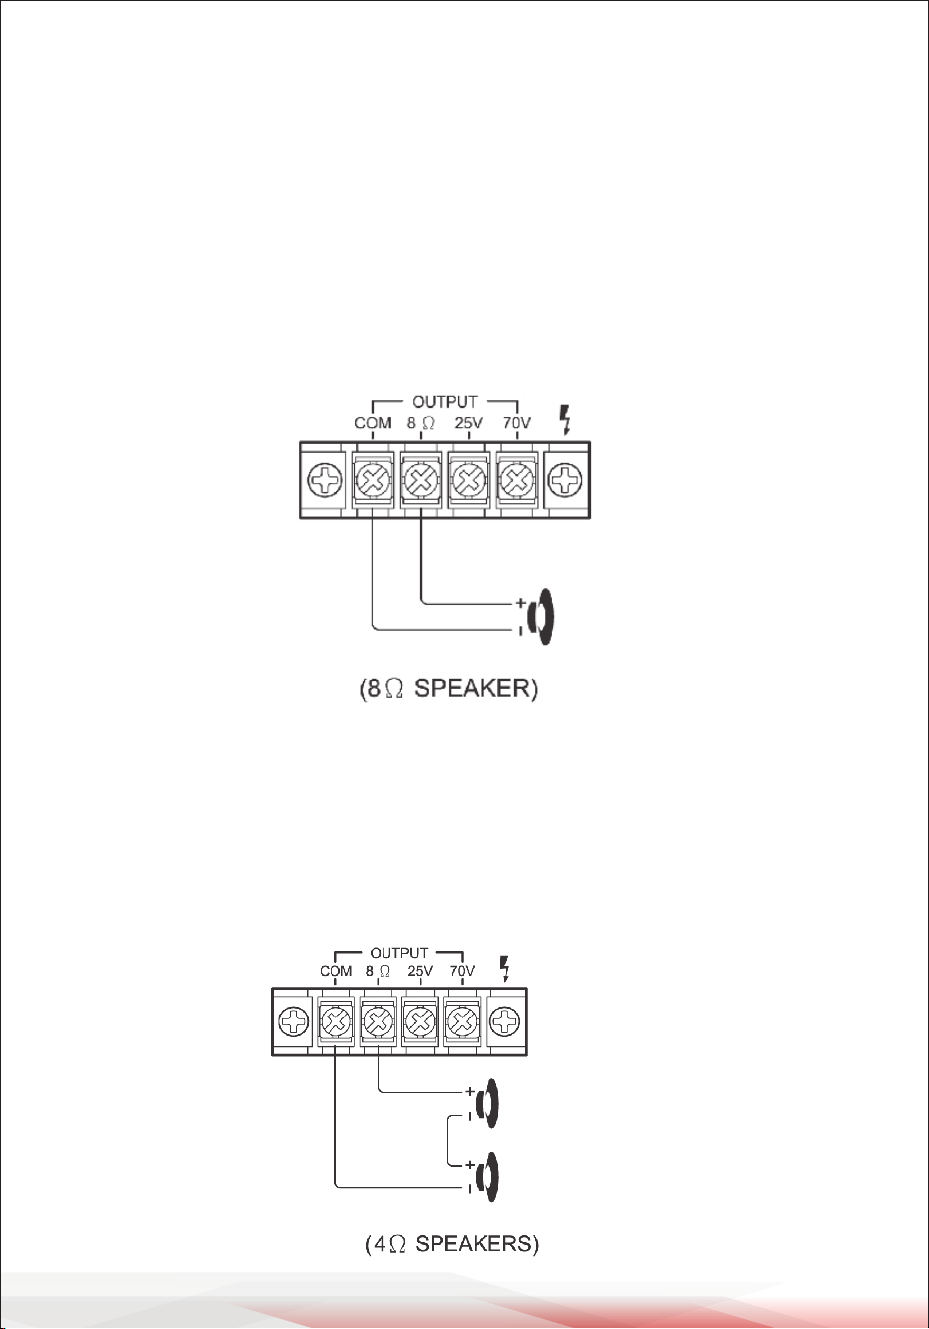
www.PyleUSA.com
8
HOPARLÖR BAĞLANTISI
Bir veya daha fazla hoparlör (4, 8 veya 16 Ohm) transformatörlü veya transfor-
matörsüz olarak amplikatöre bağlanabilir. Ancak, amplikatöre herhangi bir
hoparlör bağlamadan önce, amplikatöre zarar gelmesini önlemek için toplam
empedans hesaplanmalıdır. Toplam hoparlör empedansının 8 Ohm'dan büyük
veya 8 Ohm'dan küçük olması bu hasarın oluşmasına neden olabilir.
SİSTEM 1: Tek Hoparlör Sistemi
NOT: Hoparlörü (+) amplikatörün 8-Ohm terminaline bağlayın.
SİSTEM 2: Seri Halinde İki (veya daha fazla) Hoparlör
NOT: İki hoparlörün TOPLAM EMPEDANSINA bağlı olarak hoparlörü (+) ampli-
katörün 8-Ohm terminaline bağlayın. Her hoparlörün empedansı 4-Ohm ise,
bu seri kongürasyondaki toplam hoparlör empedansı 8 ohm'dur.
BİR HOPARLÖR
İKİ SERİ HOPARLÖR
SOL HOPARLÖR
SAĞ HOPARLÖR
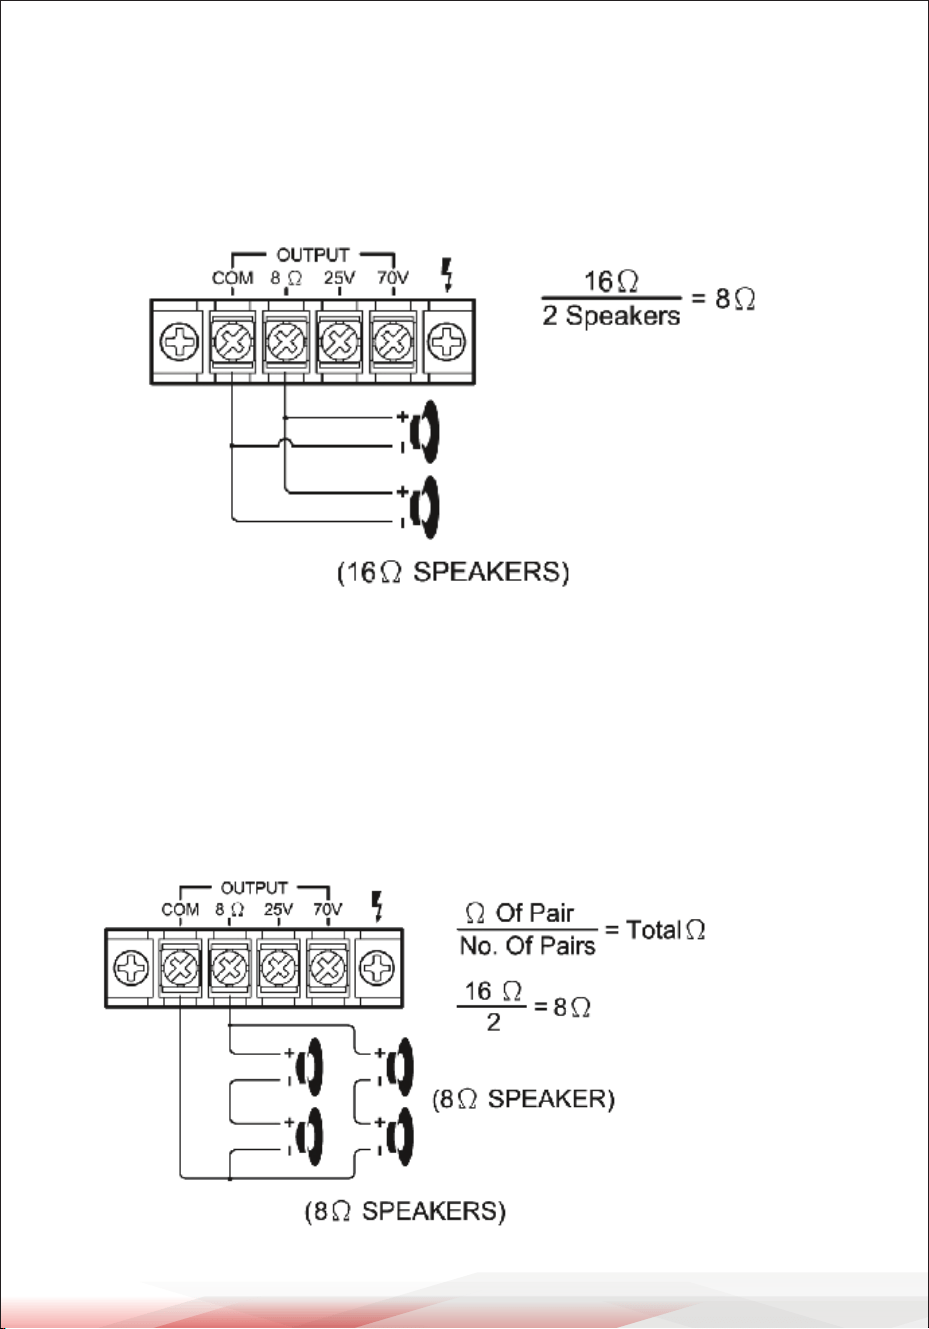
www.PyleUSA.com
9
SİSTEM 3 : Paralel İki (veya daha fazla) Hoparlör
NOT: İki hoparlörün TOPLAM EMPEDANSINA bağlı olarak hoparlörü (+) ampli-
katörün 8-Ohm terminaline bağlayın. Her hoparlörün empedansı 16 Ohm ise,
bu seri kongürasyondaki toplam hoparlör empedansı 8 ohm'dur.
SİSTEM 4: Seri ve Paralel Dört Hoparlör
NOT: Yukarıdaki açıklama iki seri 8'li çift bağlamak için olsa da
Ohm hoparlörleri paralel bir bağlantıda, bir seri çifti ve bir paralel çifti paralel bir
bağlantıda birleştirmeyi de seçebilirsiniz, sadece toplam empedansı hesap-
ladığınızdan emin olun ve hoparlör (+) devre kablosunu uygun am terminaline
bağlayın.
PARALEL OLARAK IKI HOPARLÖR
SERİ / PARALEL KOMBİNASYONDA DÖRT HOPARLÖR
HOPARLÖR
HOPAR

www.PyleUSA.com
10
SİSTEM 5: Hoparlörlerin Transformatörlerle Bağlanması
NOT: 25V veya 70V sabit hat gerilimleri kullanıldığında, her hoparlörle birlikte
bir hat eşleştirme transformatörü kullanılmalıdır. Tüm transformatörler paralel
bağlanmalıdır, hat transformatörlerini asla seri bağlamayın.
KABLOSUZ BT ÇALIŞTIRMA TALİMATI
Dahili Kablosuz BT özelliğine sahip harici cihazlar, amplikatörün hoparlörl-
erinden çalmak için bu amplikatöre kablosuz olarak bağlanabilir. Ampli-
katörünüz hoparlörlere bağlıysa, bağlantı için yardımcı olacak sesli tonlar
duyacaksınız.
1. İlk önce amplikatörün açık olduğundan emin olun ve sesi kısın.
Daha iyi sinyal almak için lütfen BT Antenini arka panele bağlamayı unutmayın
2. Ön paneldeki BT/Line düğmesi anahtarına basın, sesi duyacaksınız
"POWER ON" (GÜÇ AÇIK) ve ayrıca "PAIRING" (EŞLEŞTİRME), ardından ünite
otomatik olarak harici cihazınızla eşleşmeye hazır hale gelir.
3. Harici cihazınızdaki BT'YI AÇIN.
HOPARLÖR BAĞLANTISI

www.PyleUSA.com
11
4. Mevcut Kablosuz BT cihazlarını arayın ve amnizin kapsama alanında
olduğundan emin olun ve cihazınızın Kablosuz BT ağlarının eşleştirme
cihazları listesinde "PYLEUSA"yı seçmesini bekleyin.
5. Bağlandıktan sonra bir sesin "Cihazınız Bağlandı" dediğini duyacaksınız,
o zaman BT eşleştirmesi başarılıdır ve Kablosuz BT bağlantısı kurmuş olursunuz.
6. Artık harici cihazınızdaki müziği amplikatör üzerinden çalabilirsiniz.
Bakım ve Onarım
Pyle Amplikatörünüz üstün tasarım ve işçiliğin bir örneğidir.
Aşağıdaki öneriler amplikatörünüzün bakımını yapmanıza yardımcı
olacak, böylece yıllarca kullanımın keyni çıkarabileceksiniz:
• Amplikatörü kuru tutun. Islanırsa hemen silin.
• Amplikatörü yalnızca iyi havalandırılan kurulumlarda kullanın.
• Amplikatörü toz ve kirden uzak tutun.
• Yeni görünmesini sağlamak için ara sıra nemli bir bezle silin.
• Sert kimyasallar, çözücüler veya deterjanlar kullanmayın!
Kaliforniya Prop 65 Uyarısı
UYARI:
Bu ürün sizi Kaliforniya eyaleti tarafından kansere bağlı doğum
kusurlarına ve üremeyle ilgili diğer zararlara neden olduğu
bilinen kimyasallara maruz bırakabilir. Yemeyin.
Daha fazla bilgi için şu adrese gidin: www.P65warnings.ca.gov

www.PyleUSA.com
12
Özellikler
• Kompakt Güç Amplikatörü Tasarımı
• Otomatik Mikrofon-Konuşma Önceliği İşlevi (Mikrofon 1)
• (2) 1/4" Mikrofon Girişleri
• Aux (1/4") Giriş Konnektör Jakı
• Harici Cihazları Bağlayabilme
• Hoparlör Terminal Çıkışları: COM/8-Ohm/25V/70V
• Bağımsız Mikrofon/Aux Ses Kontrolleri
• (4) Hoparlöre kadar bağlayın
• Hoparlör Transformatörü Uyumluluğu
• Bas ve Tiz Ton Kontrolleri
• Çıkarılabilir AC Güç Kablosu içerir
• Kullanışlı Ses Kontrol Amsi
• USB/SD/FM/Kablosuz BT Çalma
• Çalma Bilgileri için Mavi LED Ekran
• Kablosuz BT Antenini Uzat
Kablosuz BT Bağlantısı:
• Tüm Favori Kablosuz BT Cihazlarınızla Çalışır
(iPhone'lar, Android'ler, Akıllı Telefonlar, iPad, Tablet, PC, vb.)
• Kablosuz BT Ağ Adı: 'PYLEUSA'
• Kablosuz BT Sürümü: 4.0
• 30'+ ft'ye kadar Kablosuz Menzil.

BURADAN BAŞLAYIN
Model Number:
PCM20A
PyleUSA.com/pages/register
Ürünü Kaydet
PyleUSA'ı seçtiğiniz için teşekkür ederiz. Ürününüzü kaydettir-
erek özel garantimizin ve kişiselleştirilmiş müşteri desteğimizin
tüm avantajlarından yararlandığınızdan emin olursunuz. Uzman
desteğine erişmek ve PyleUSA satın alımınızı mükemmel
durumda tutmak için formu doldurun.
www.PyleUSA.com
13
Kutunun içinde ne var:
• PA Amplikatör
• FM Anteni
• Uzaktan Kumanda
Teknik Özellikler:
• MAKS Güç Çıkışı: 40 Watt
• İnşaat Malzemesi: Demir
• Bas/Tiz: +/-10dB, 100-10kHz
• Frekans Tepkisi: 50-15kHz
• Zayıama (Mikrofon): 61dB
• T.H.D: <1%
• Pille Çalışan Uzaktan Kumanda, (1) × CR-2025 Düğme Hücre Pil Gerektirir, Dahil
• Değiştirilebilir Sigorta
• Güç: 120/240 Voltaj Seçici
• Boyutlar (U x G x Y): 5.9'' x 7.87'' x 3.15'' -inç / 15 x 20 x 8.1 -santimetre

Sorularınız veya yorumlarınız var mı?
Yardım etmek için buradayız!
Phone: (1) 718-535-1800
PyleUSA.com/ContactUs