www.impecca.com
v 1.1
14.9 CU FT Multi Door Refrigerator
USER MANUAL - Model: RM-4152
4
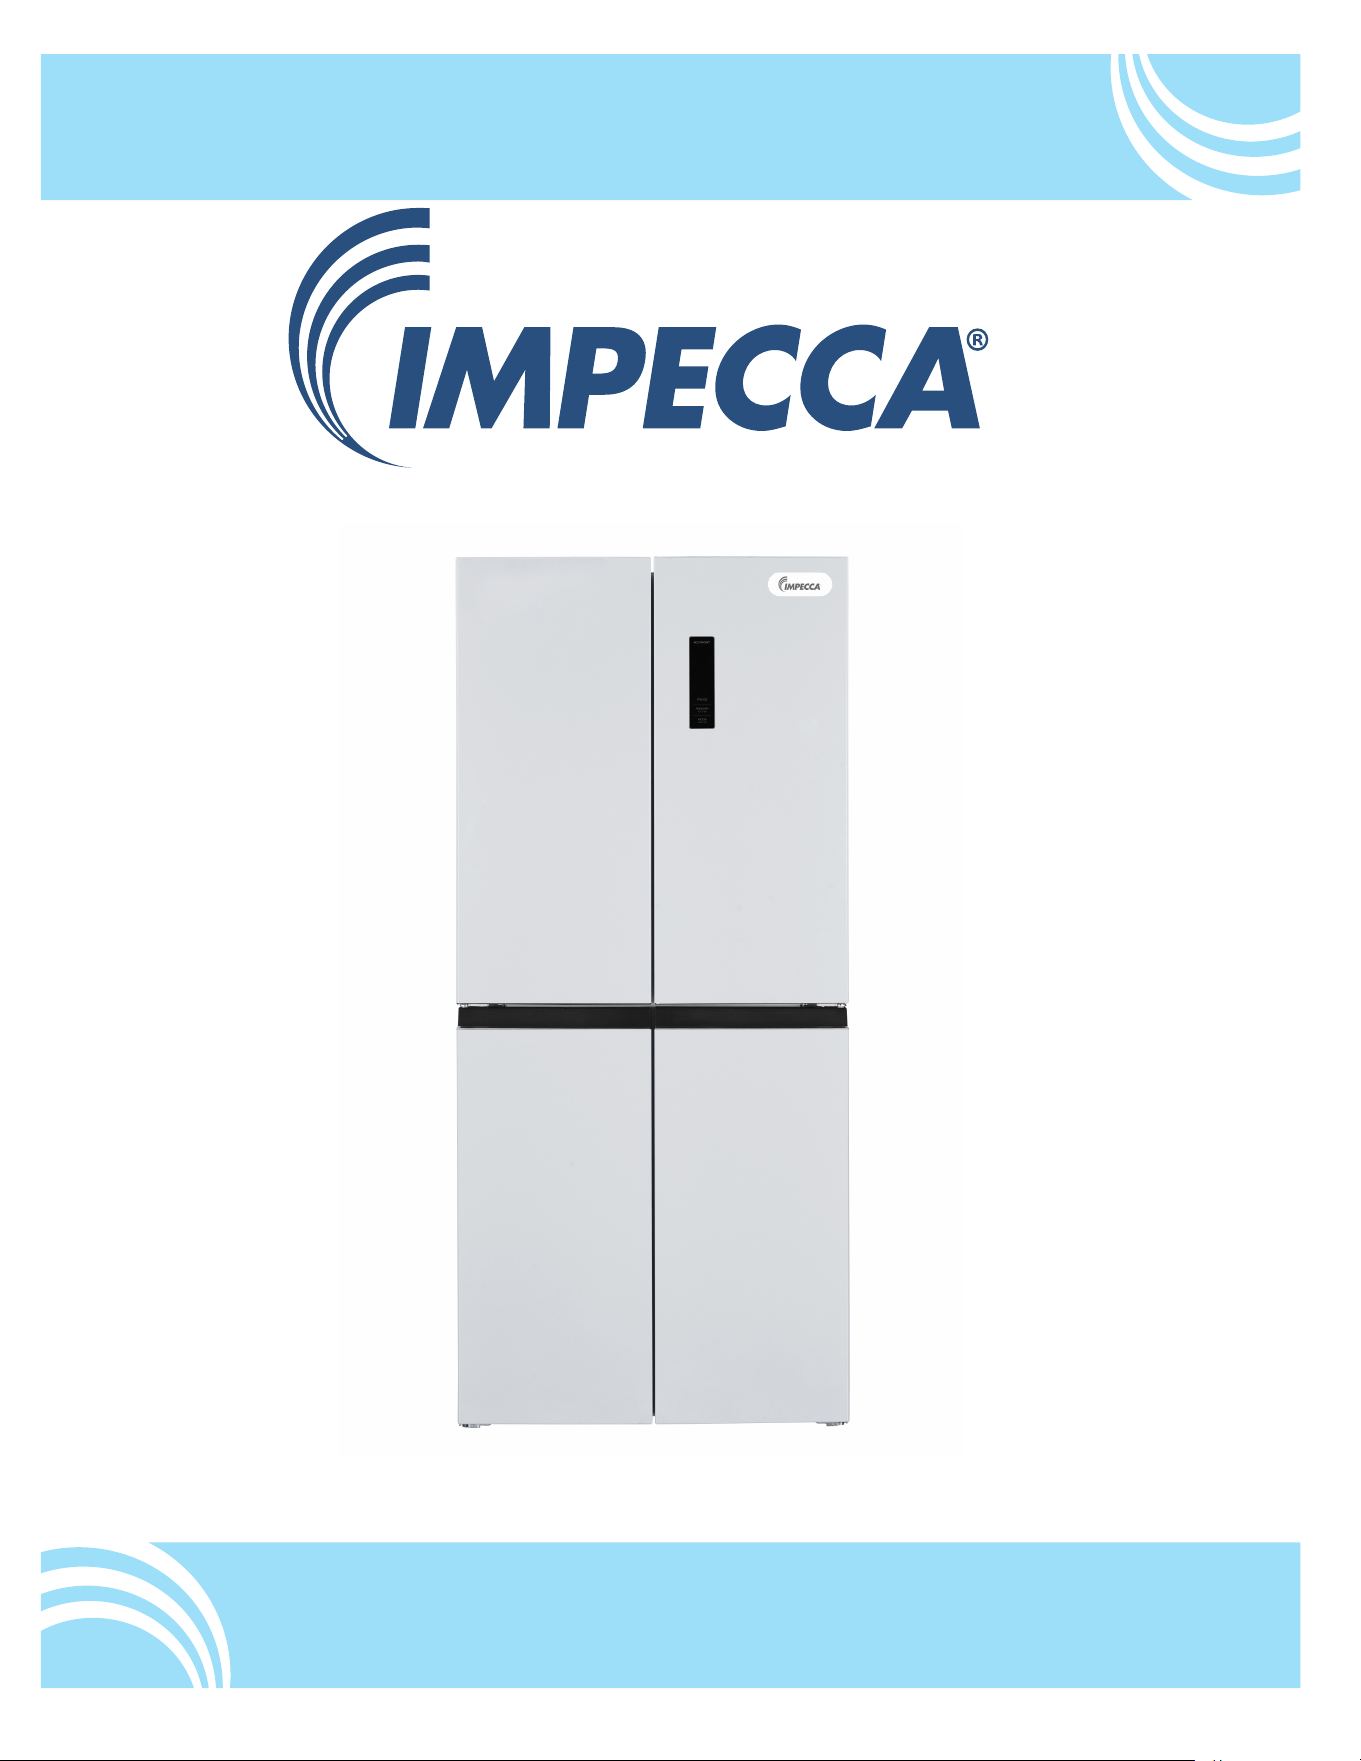
LED
Light
Refrigerator
Shelves
Crisper Cover
Chiller
Zone
Sliding
Tray
Leveling
Feet
Freezer
Drawer
Door
Balcony
Crisper
Zone
Unit Overview
5
WARNING
What you need to know about Safety
Instructions:
Warnings and Important Safety Instructions in
this manual DO NOT cover all possible
conditions and situations that may occur. It is
your responsibility to use common sense,
caution and care when installing, maintaining
and operating this appliance.
Important Safety Symbols &
Precaution Warnings:
WARNING
This symbol indicates that hazards or unsafe
practices may cause serious personal injury or
death. To reduce the risk of re, explosion,
electric shock, or personal injury when using
your appliance, these basic safety precautions
MUST be followed. These warnings are to
prevent injury to you and to others, please
follow them explicitly. After reading this section,
keep it in a safe place for future reference.
State of California Proposition 65
Warnings:
WARNING
The California Safe Drinking Water and Toxic
Enforcement Act requires the Governor of
California to publish a list of substances known
to the State of California to cause cancer, birth
defects, or other reproductive harm, and
requires the business to warn of potential
exposure to such substances. This product
contains a chemical known to the State of
California to cause cancer, birth defects, or
other reproductive harm. This appliance can
cause low-level exposure to some of the
substances listed, including benzene,
formaldehyde, and carbon monoxide.
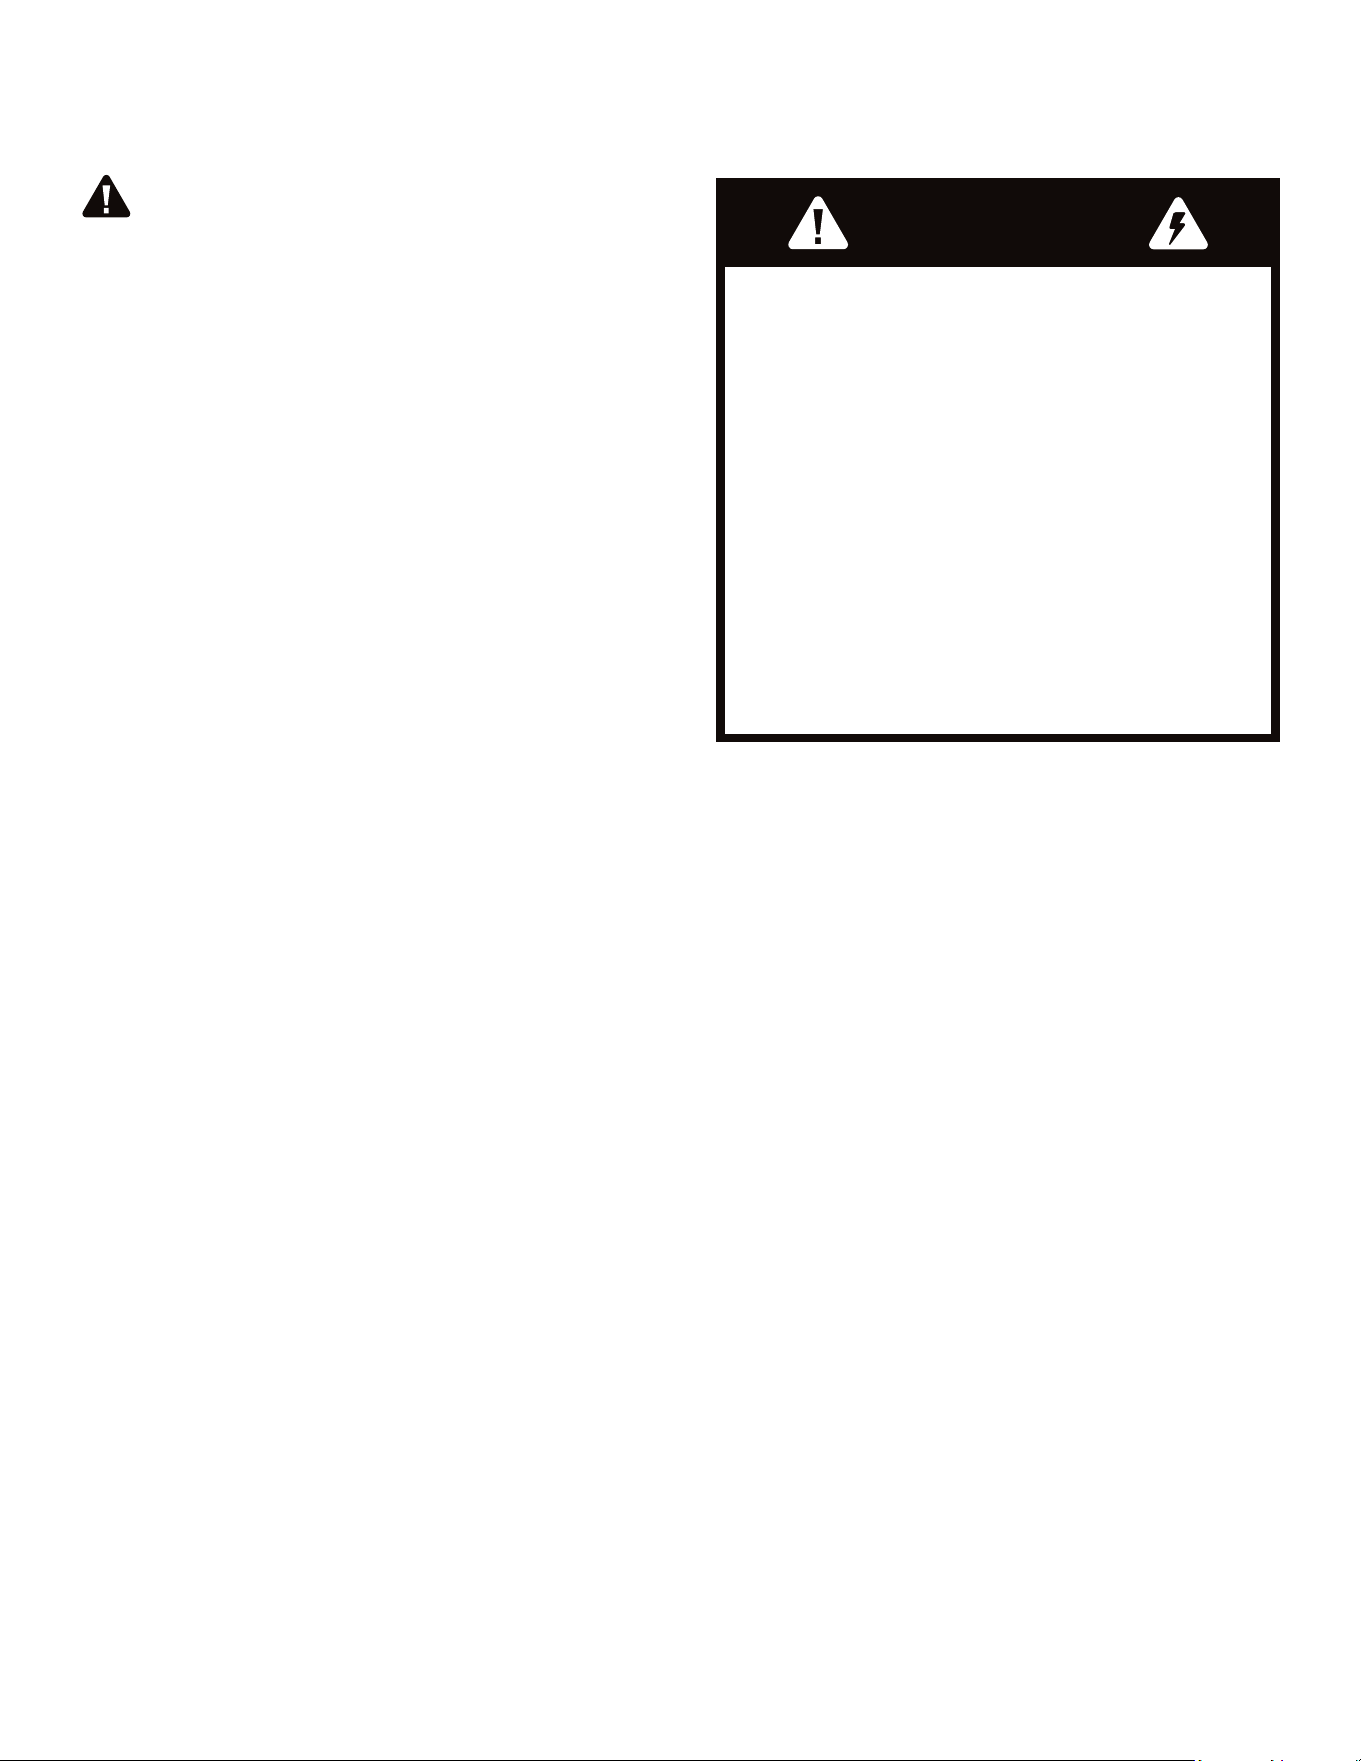
IMPORTANT SAFETY & PRECAUTIONS
Important Safety &
Precautions
Risk of re or electric shock
do not open.
To reduce the risk of re or electric
shock, do not remove cover (or back).
No-user- serviceable parts inside.
Repair should be done by authorized
service personnel only.
6
IMPORTANT SAFETY & PRECAUTIONS
WARNING
To reduce the risk of fire, electric shock, burns
or injury to people when using the refrigerator,
follow basic precautions, including the
following:
• Read all instructions before using this
appliance.
• Plug into a grounded 3 prong outlet.
• DO NOT remove ground prong.
• DO NOT use an adapter.
• DO NOT use an extension cord.
• Disconnect power before servicing.
• Replace all parts and panels before operating.
• Remove doors from your old refrigerator.
• Use nonammable cleaner.
• Keep ammable materials and vapors, such
as gasoline away from refrigerator.
• Use two or more people to move and install
refrigerator.
• DO NOT store explosive substances such as
aerosol cans with a ammable propellant in
this appliance.
• The refrigerant isobutane (R600a) is
contained within the refrigerant circuit of the
appliance, a natural gas with a high level of
environmental compatibility, which is
nevertheless ammable.
• During transportation and installation of the
appliance, be certain that none of the
components of the refrigeration circuit
become damaged.
1. Avoid open ames and sources of ignition.
2. Thoroughly ventilate the room in which
the appliance is situated.
• It is dangerous to alter the specications or
modify this product in any way. Any damage
to the cord may cause a short circuit, re and/
or electric shock.
• This appliance is intended to be used in
household and similar applications such as:
1. Staff kitchen areas in shops, ofces and
other working environments.
2. Clients in hotels, motels and other
residential type environments.
3. Catering and similar non-retail applications.
WARNING
Keep ventilation openings, in the appliance
enclosure or in the built-in structure clear of
obstruction(s).
WARNING
Do not use mechanical devices or other
means to accelerate the defrosting process,
other than those recommended by the
manufacturer.
WARNING
Do not damage the refrigerant circuit.
Important Safety &
Precautions

7
IMPORTANT SAFETY & PRECAUTIONS
WARNING
Any electrical components (plug, power cord,
compressor, etc) must be replaced by a
certified service agent or qualified service
technician.
WARNING
DANGER: Never allow children to play with,
operate, or crawl inside the refrigerator.
• Risk of child entrapment. Before you throw
away your old refrigerator or freezer:
1. Take off the doors
2. Leave the shelves in place so that children
may not easily climb inside
• The appliance has to be unplugged before
carrying out user maintenance on the
appliance.
• This appliance can be used by children age
8-years and above and individuals with
reduced physical sensory or mental
capabilities or lack of experience and
knowledge if they have been given
supervision or instruction concerning use of
the appliance in a safe way and understand
the hazards involved. Children should not play
with the appliance. Cleaning and
maintenance should not be made by children
without supervision.
• If a component part is damaged, it must be
replaced by the manufacturer, an authorized
service technician or qualied person in order
to avoid hazard.
• Dispose of refrigerator in accordance with
Federal and Local regulations. Refrigerants
must be evacuated by a licensed, EPA
certied refrigerant technician in accordance
with established procedures as the unit
contains ammable blowing gas and
refrigerant.
• All refrigerator products contain, refrigerants,
which under the guidelines of Federal law
must be removed before disposal. It is the
consumer’s responsibility to comply with
Federal and local regulations when disposing
of this product.
• DO NOT store or use gasoline or any
inammable liquors and liquids inside or in
the vicinity of refrigerator.
• DO NOT use an extension cord with this
appliance. If the power cord is too short, have
a qualied electrician install an outlet near
the appliance. Use of an extension cord can
negatively affect the unit’s performance.
WARNING
Do not use other electrical appliances (such as
ice cream makers) inside of refrigerating
appliances, unless they are approved for this
purpose by the manufacturer.
WARNING
It is hazardous for anyone other than
authorized service personnel to carry out
service or repairs involving the removal of
covers.
WARNING
To avoid the risk of an electrical shock do not
attempt repairs yourself.

8
INSTALLATION INSTRUCTIONS
WARNING
Critical Installation Warnings:
The installation of this appliance MUST be
performed by a qualied technician or service
company.
Failing to have a qualied technician or service
company install the refrigerator may result in
electric shock, re, an explosion, problems with
the product or injury.
Before Using Your Refrigerator:
• Remove all of the exterior and interior
packaging.
• Before connecting the refrigerator to the
power source, let it stand upright for
approximately 4-hours. This will reduce the
possibility of a malfunction in the cooling
system from improper handling during
transportation.
• Clean the interior surface using lukewarm
water and a soft cloth.
Installing Your Refrigerator:
• Place your refrigerator on a oor that is strong
enough to support the refrigerator when it is
fully loaded.
• We recommend you allow 2-inches of space
between the back of the refrigerator for
proper air ventilation. Adjust the feet to keep
the refrigerator level.
• Locate the refrigerator away from direct
sunlight and sources of heat. Direct sunlight
may affect the coating and heat sources may
increase electrical consumption.
• Avoid locating the refrigerator in moist areas.
• Plug refrigerator into a dedicated, properly
installed-grounded wall outlet. DO NOT under
any circumstances cut or remove the third
(ground) prong from the power cord. Any
questions concerning power and/or
grounding should be directed toward a
certied electrician or an authorized service
center.
• After plugging in the appliance into a wall
outlet, turn the unit on and allow the unit to
cool down for 2-3 hours before placing food
in the refrigerator or freezer compartment.
Installation Instructions
9
INSTALLATION INSTRUCTIONS
WARNING
Electrical Connection & Requirements:
Improper use of the grounded plug can result
in the risk of electrical shock. If the power cord
is damaged, have it replaced by an authorized
service center.
• This refrigerator should be properly grounded
for your safety. The power cord of this
refrigerator is equipped with a three-prong
plug which mates with standard three-prong
wall outlets to minimize the possibility of
electrical shock.
• DO NOT, under any circumstances, cut or
remove the third ground prong from the
power cord supplied. This refrigerator requires
a standard 115-Volt AC / 60 HZ electrical outlet
with three-prong ground.
• The cord should be secured behind the
refrigerator and not left exposed or dangling
to prevent accidental injury.
• Never unplug the refrigerator by pulling the
power cord. Always grip the plug rmly and
pull straight out from the receptacle.
• DO NOT use an extension cord with this
appliance. If the power cord is too short, have
a qualied electrician or service technician
install an outlet near the appliance. Use of an
extension cord can negatively affect the
performance of the unit.
• All servicing should be referred to a qualied
technician, so as to minimize the risk of
possible ignition due to incorrect parts or
improper service.
WARNING
Electrical Shock Hazard
Plug into a grounded 3 prong outlet.
Do not remove ground prong.
Do not use an adapter.
Do not use an extension cord.
Failure to follow these instructions can
result in death, re or electrical shock.

10
INSTALLATION INSTRUCTIONS
Location Requirements:
IMPORTANT: This refrigerator is designed for
indoor, household use, not commercial.
To ensure proper ventilation for your refrigerator,
allow ¹⁄₂” (1.25 cm) of space on each side and
between the top of the refrigerator and
overhead cabinets. Allow 2” (5 cm) of space
behind the refrigerator. If your refrigerator has
an ice maker, allow extra space at the back for
the water line connections. When installing your
refrigerator next to a xed wall, leave a 3¹⁄₈”
(8 cm) minimum space on the hinge side to
allow the door to swing open.
NOTE: This refrigerator is intended for use in a
location where the temperature ranges from a
minimum of 55°F (13°C) to a maximum of 110°F
(43°C). The preferred room temperature range
for optimum performance, which reduces
electricity usage and provides superior cooling,
is between 60°F (15°C) and 90°F (32°C). It is
recommended that you do not install the
refrigerator near a heat source, such as an oven
or radiator.
WARNING
Explosion Hazard
Use nonammable cleaner.
Keep ammable materials and
vapors, such as gasoline, away from
refrigerator.
Failure to do so can result in death,
explosion or re.
At least 50mm
At least 50mm
130°
1380mm
1030mm
Installation Instructions
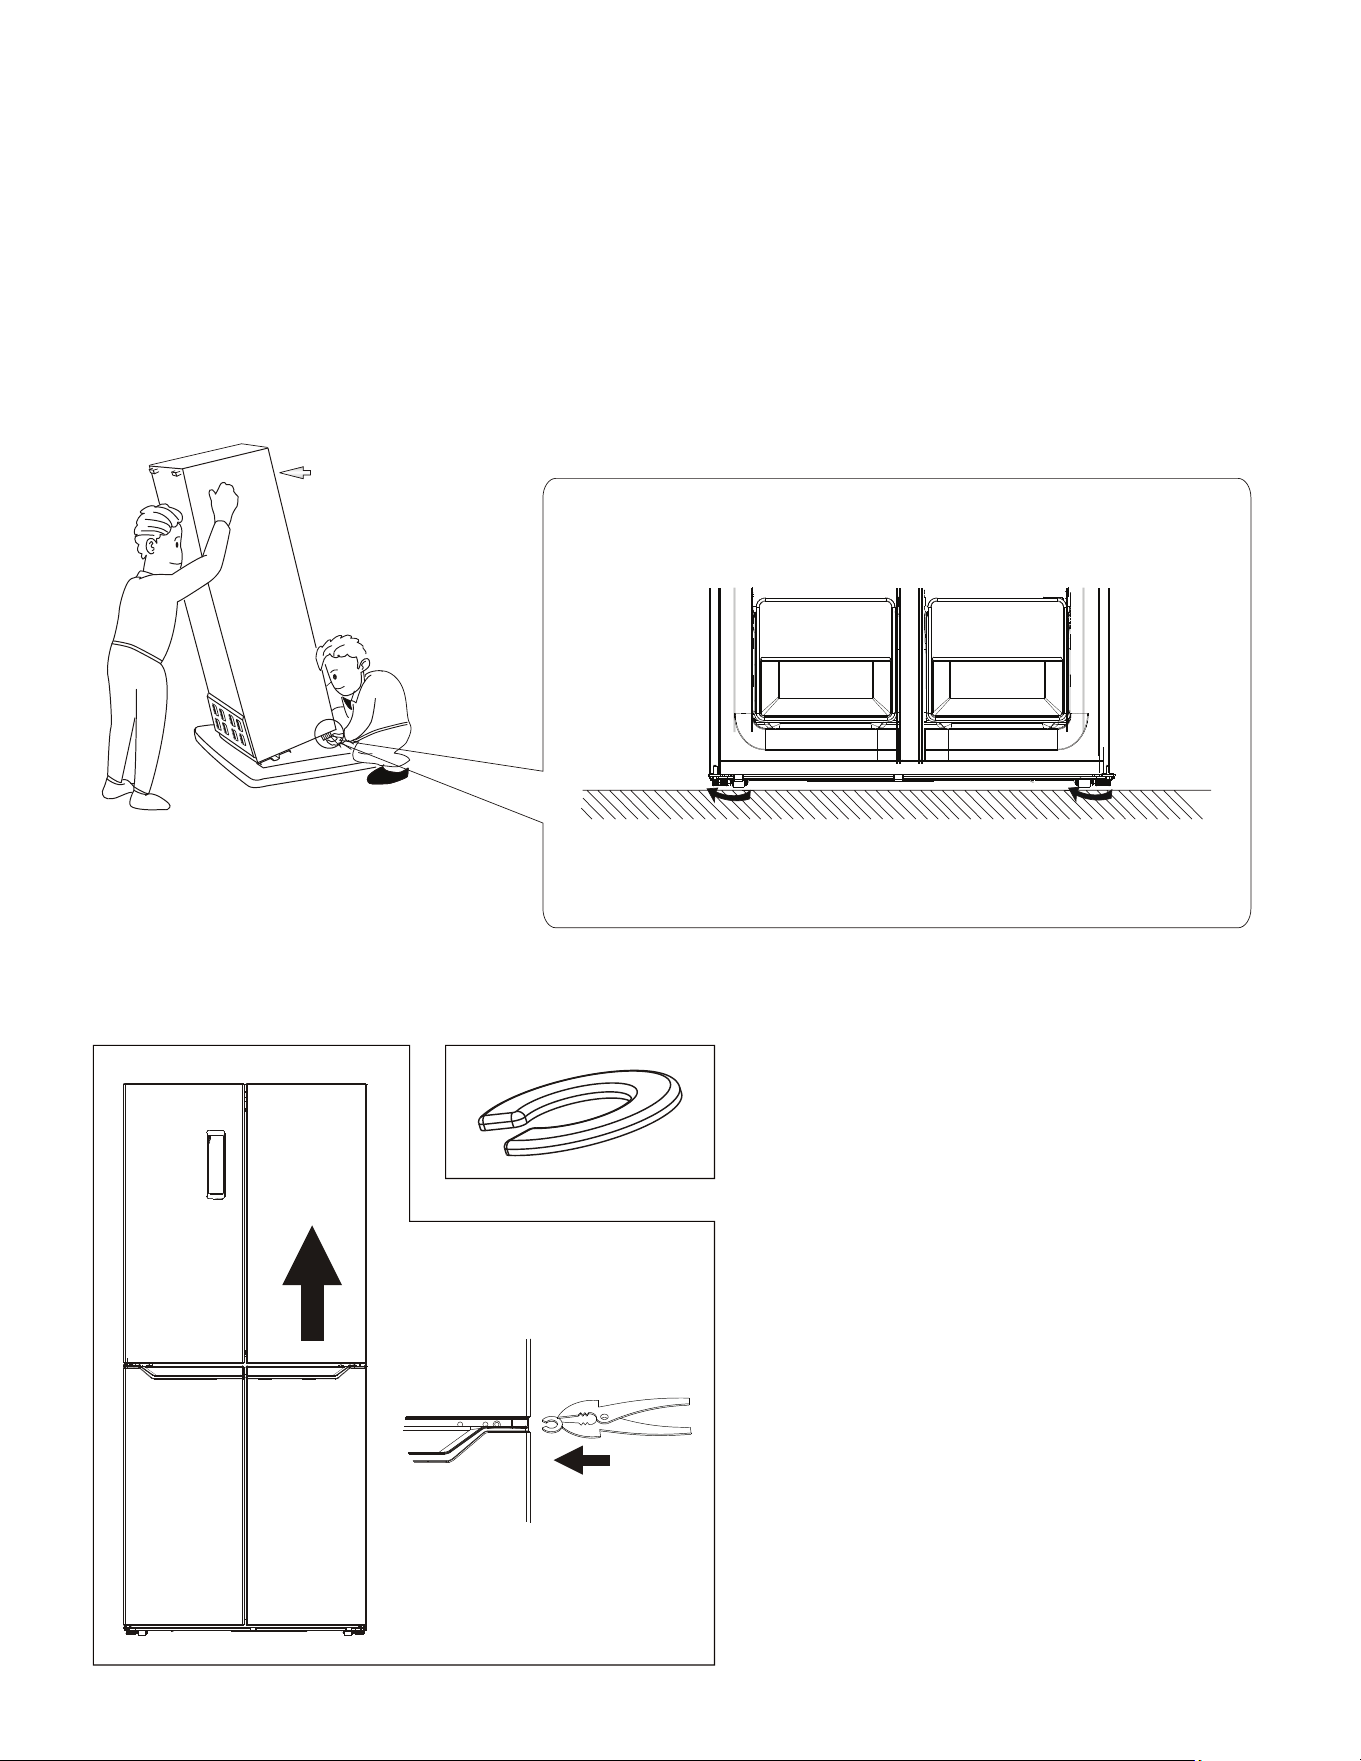
Leveling and Anchoring the Refrigerator:
• You can easily level and anchor your refrigerator by adjusting the feet on the unit.
• To heighten the feet, rotate them clockwise, by hand.
• To lower the feet, rotate them counterclockwise, by hand.
Leveling Refrigerator Doors:
• If your refrigerator doors become mis-
aligned you can quickly and easily adjust
them. Materials Required: 3 C-Type
Washers
• Ensure the refrigerator is unplugged and
empty.
• Prior to alignment of refrigerator doors,
check to make sure the refrigerator is level.
• If one of the upper two refrigerator doors is
not in line, slightly lift the lower door and
insert one of the c-type washers between
the bottom of the door the middle hinge.
If you need assistance, please refer to the
diagram below.
12
WARNING
INSTALLATION INSTRUCTIONS
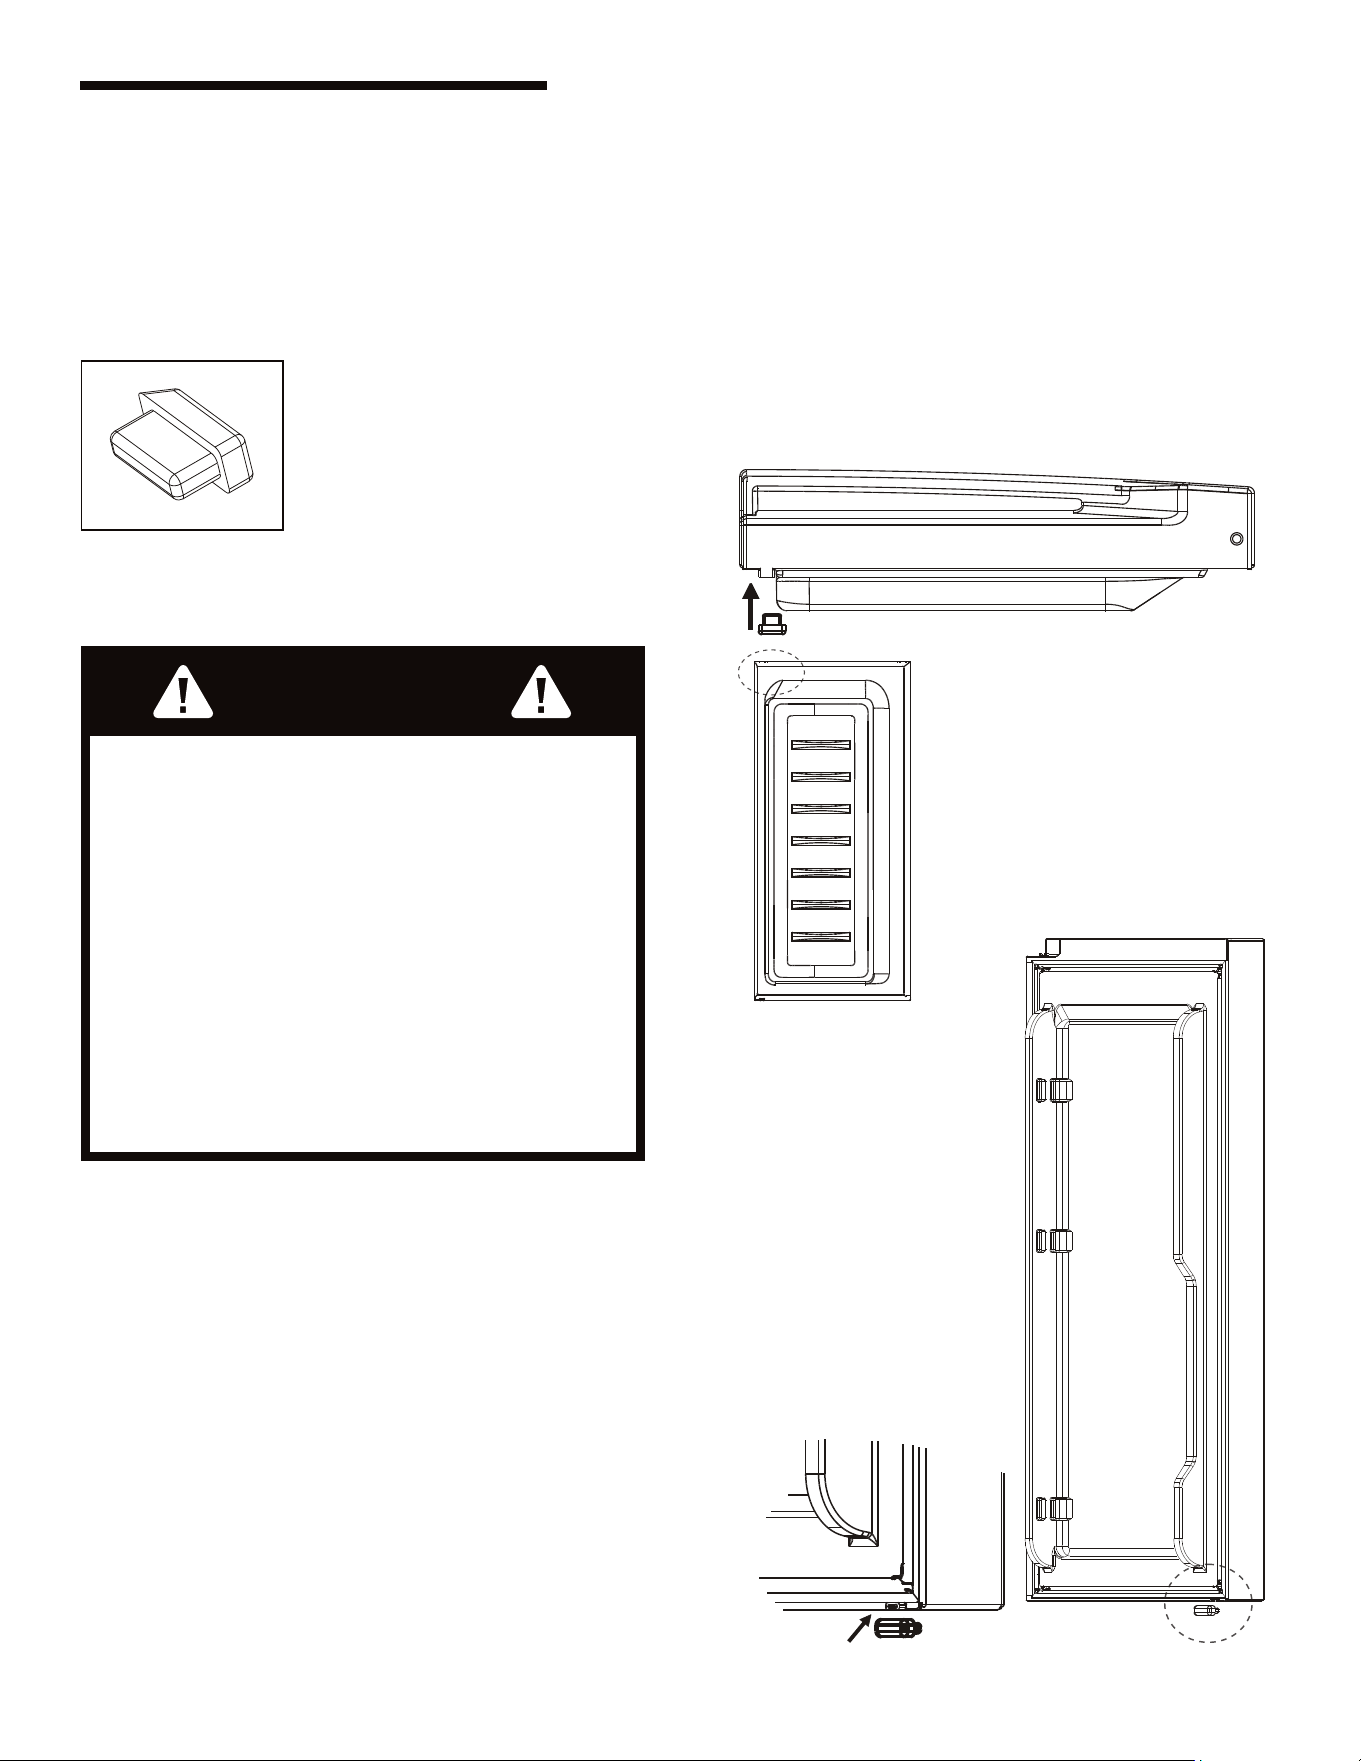
Rubber Door Blocks:
• Each door contains one rubber block that
functions as a spring to reduce the impact of
the door as it closes.
Installation Instructions
• Please Use Caution to Avoid Getting
your Fingers Clipped by the Door.
• Keep C-Type Washers and Tools
Away from Children to Avoid
Choking Hazards.
• Keep Rubber Blocks Away from
Children to Avoid Choking Hazards.
• DO NOT pull on the rubber blocks.
• If you are missing a rubber block, please
replace it with another one that comes
inside your accessory bag. If you need
assistance, please refer to the diagram below.
13
OPERATING YOUR REFRIGERATOR
Operating Your Refrigerator
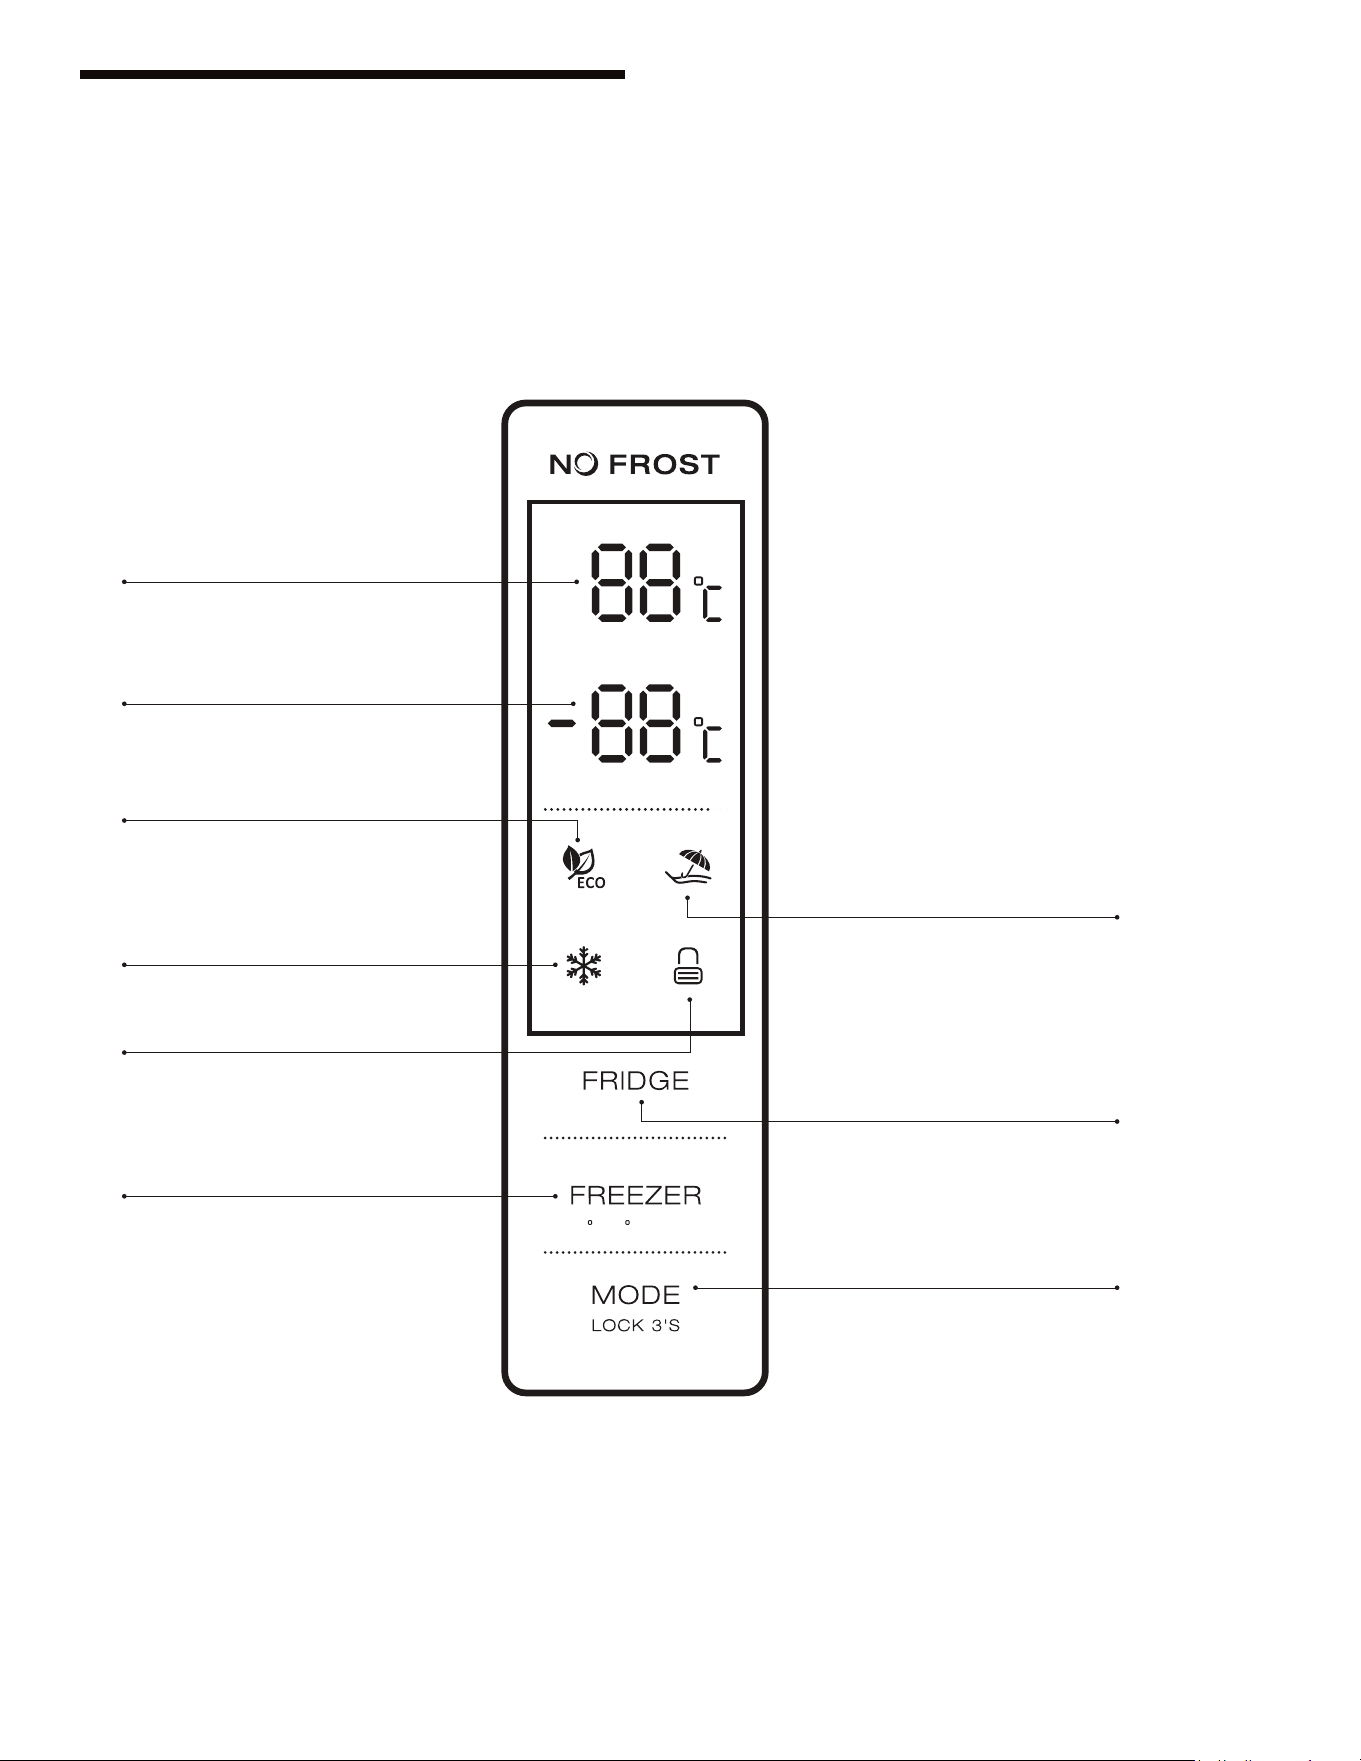
Control Panel & Features:
Please reference the diagram below to help
understand the features and functions on the
control panel.
1
Temperature of Refrigerator
Compartment
2
Temperature of Freezer
Compartment
3
ECO Mode
5
Super Mode
4
Holiday Mode
A
Temperature
Control of Fridge
Compartment
C
Mode / Locking /
Unlocking
6
Locking / Unlocking
B
Temperature Control of
Freezer Compartment/
Switching C - F
C / F 3s

14
OPERATING YOUR REFRIGERATOR
Operating Your Refrigerator
Operating your Refrigerator:
• The control panel is 100% lit up for 3 seconds
and operates exactly as per the setting (mode
and temperature) before the power off.
• The system will be automatically locked after
25 seconds after the last key operation. After
locking, the panel light will shut-off after 120
seconds after the last keyed in operation.
• Both preset temperatures of refrigerator
compartment and freezer compartment will
be shown on the display.
Display:
• The display panel will be lit up for 2 minutes
once the door of the refrigerator
compartment or freezer compartment is
opened.
• The panel light will go out after 2-minutes
after the last operation.
• The temperature display for the refrigerator
compartment will indicate the temperature
of the current setting.
• The temperature display for the freezer
compartment will indicate the temperature
of the current setting.
Temperature Control, Freezer:
After entering the temperature control of the
freezer compartment, the key ashes. By
touching the key consecutively, the
temperature will change in a cycle from -1º to
-22º, after 5-seconds ashing the desired
temperature is selected.
Temperature Control, Refrigerator:
• After entering the temperature control of the
refrigerator compartment, this key ashes. By
touching the key consecutively, the
temperature will change in a cycle of “2º, 3º, 4º,
5º, 6º, 7º, 8º ” after 5-seconds ashing the
desired temperature is selected.
Locking & Unlocking:
• By touching the “lock” key consecutively, the
operation mode of the refrigerator will
change in a circle of “ECO Mode, Holiday
Mode, Super Mode and User Dened Mode. A
5-second ashing means the selection of
temperature mode has been selected.
• Hold down the “lock” icon to enter / exit
locking mode.
• To unlock functions, hold down the lock key
for 3-seconds. All keys will be unlocked, and
an indicator beep will sound. • To lock
functions, hold down the lock key for
3-seconds in unlock mode. All keys will be
locked after a beep.
• If no operation is selected after 25-seconds
the display will lock automatically.

15
Switching between C and F:
Press and hold the freezer button for 3-seconds,
the display will automatically change between
Celsius and Fahrenheit.
ECO Mode:
• Press “mode” to choose ECO Mode, the ECO
icon will stay lit after 5 seconds ashing.
• In ECO mode the refrigerator is set at 5
degrees Celsius and the freezer at -18 degrees
Celsius. You cannot adjust the refrigerator or
freezer temperature when in ECO Mode. An
error signal will ash three times if you try to
alter them.
• If you want to change or adjust the
temperatures you should exit ECO mode by
pressing “mode” again and waiting 5-seconds
to enter your desired temperature mode.
Holiday Mode:
• Press “mode” to choose Holiday Mode, the
Holiday icon will stay lit after 5 seconds
ashing.
• In Holiday mode the refrigerator is set at 17
degrees Celsius. You cannot adjust the
refrigerator temperature when it is in holiday
mode.
• If you want to change or adjust the
temperatures you should exit Holiday mode
by pressing “mode” again and waiting
5-seconds to enter your desired temperature
mode.
Freezing Mode:
• Press “mode” to choose Freezer Mode, the
Freezer icon will stay lit after 5 seconds
ashing.
• You cannot adjust the freezer temperature
when in Super Freezing Mode. The appliance
will automatically exit “Super Freezing Mode”
after 50-hours of freezing.
OPERATING YOUR REFRIGERATOR
16
OPERATING YOUR REFRIGERATOR
Operating Your Refrigerator
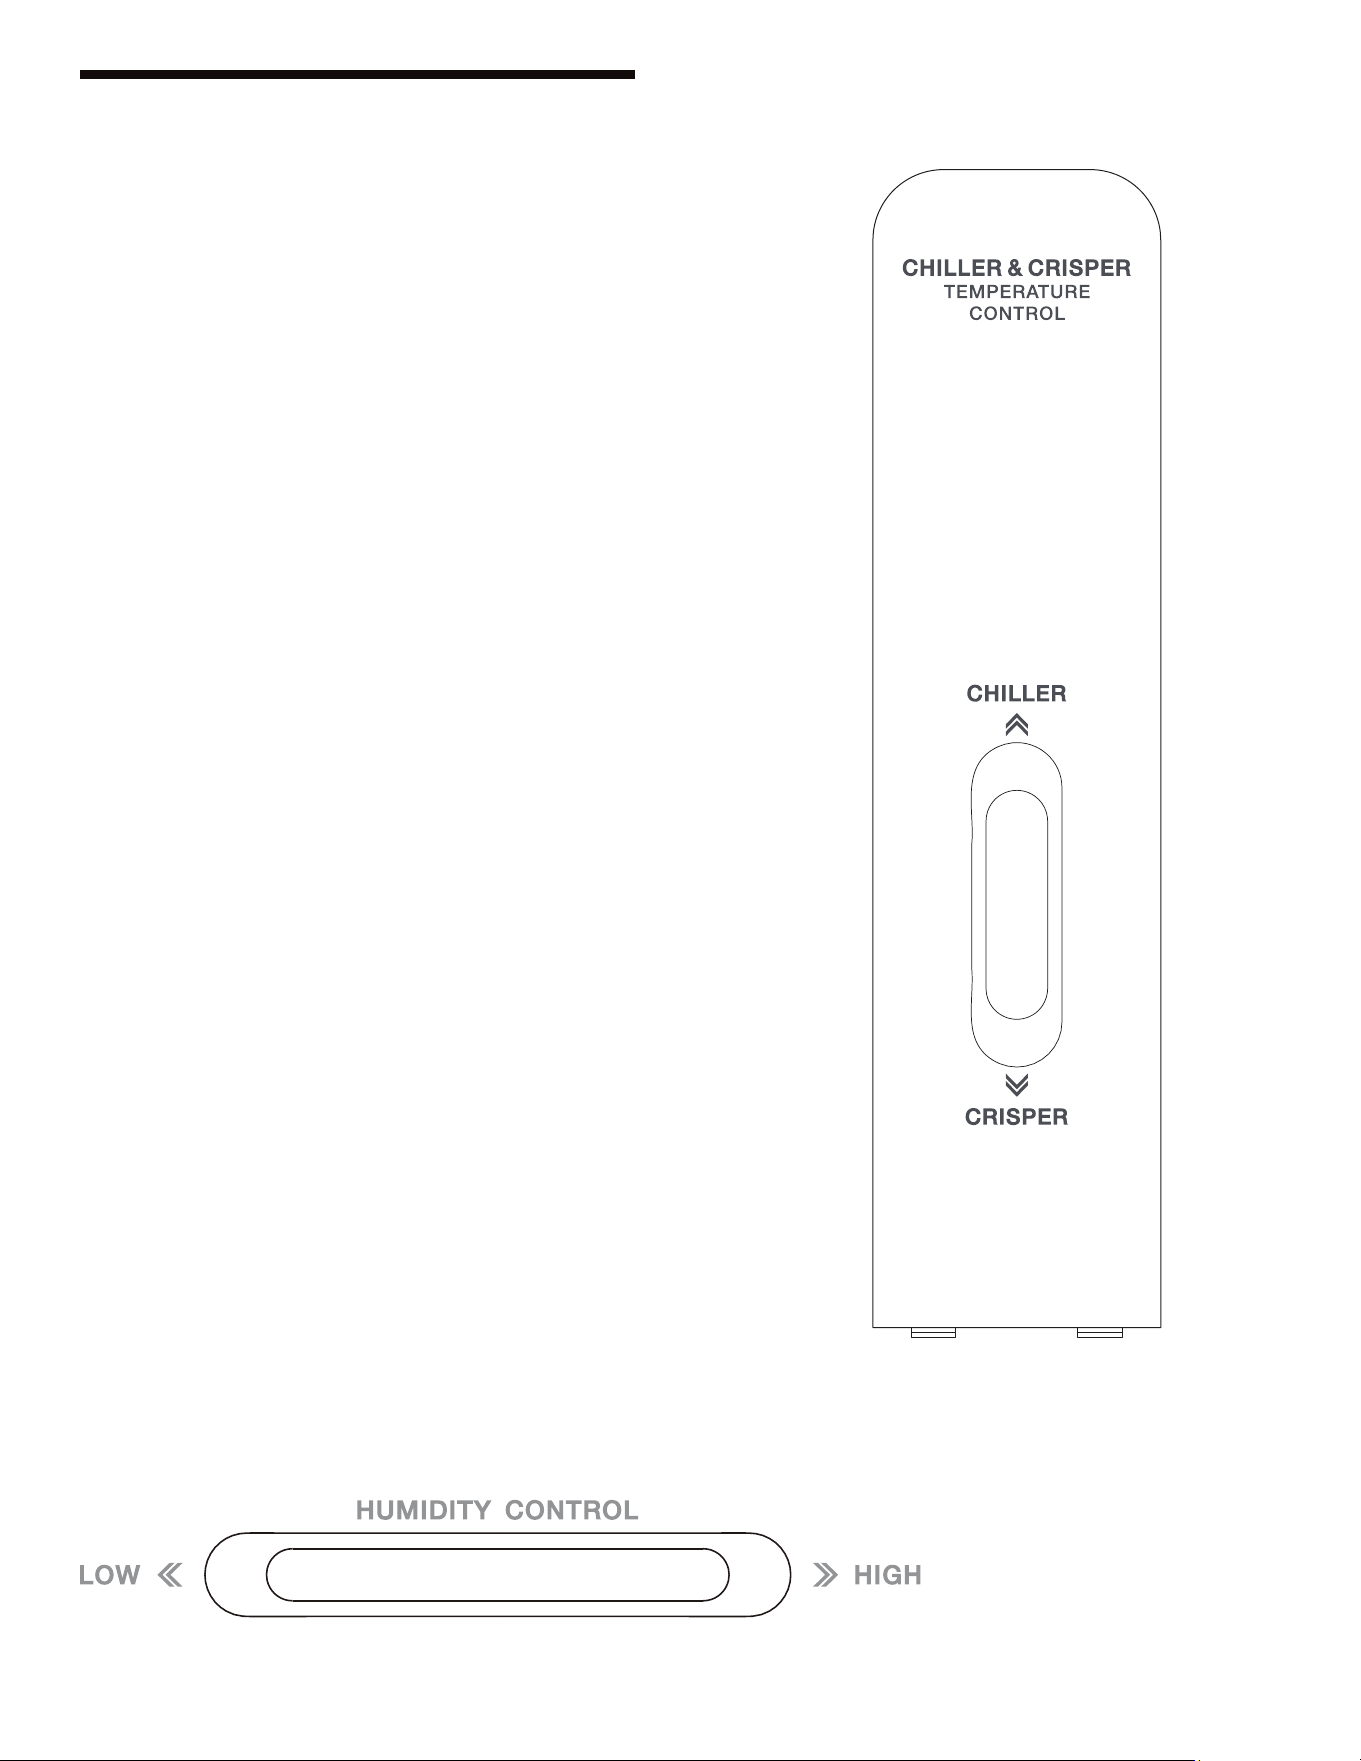
Using the Temperature Controls
• To adjust the temperature level push the
knob upward from the bottom and the
temperature level will gradually decrease.
• When the knob is in the “CRISPER” position,
the fresh zone will function as a crisper zone
and automatically maintain the appropriate
temperature and humidity levels for fruits and
vegetables.
• When the knob is placed in the “CHILLER”
position, the food will stay fresh but NOT
frozen. This is ideal for storing fresh food.
• If you select the “CHILLER” function we
recommend setting the refrigerator
temperature below 4-degrees Celsius. In order
to maintain fresh food, we recommend you
do not leave food past 3-days.
Adjusting the Crisper Zone
• When the key is placed in the “HIGH” position,
the crisper humidity level is high. A High
humidity level is ideal for vegetables.
• When the key is placed in the “LOW” position,
the crisper humidity level is low. A low
humidity level is ideal for fruits.

17
OPERATING YOUR REFRIGERATOR
Cleaning the Interior:
Before using the appliance for the rst time,
wash the interior and all internal accessories
with lukewarm water and a cloth. This will
remove the typical “new product smell.” Be sure
to dry thoroughly.
IMPORTANT:
DO NOT use detergents or abrasive powders
to clean your appliance, this will damage the
finish.
Freezing Foods:
• The freezer compartment is ideal for freezing
fresh food and storing frozen food for
extended periods of time.
• To ensure this appliance is used properly,
please make sure food is adequately packed,
frozen according to correct temperature
indications on packaging, and proper hygienic
precautions are taken.
• If storing fresh food that you intend to freeze,
use the bottom compartment.
• The storage life of frozen food will vary. The
recommended storage times, indicated on
packaging, should not be exceeded.
• Commercially frozen food should be stored in
accordance with the guidelines provided by
the frozen food manufacturer.
• If you overload the freezer, the quality of
freezing will be reduced. This will affect the
quality of the frozen food.
• We suggest you mark frozen food packages
with the following data: kind of food being
stored, date of rst storage.
• Use the correct packaging when freezing
foods. Wrap food tightly prior to freezing.
• Packaging should be airtight and should not
leak.
• When you are about to prepare frozen foods,
make sure to take sanitary precautions.
• Lean foods will store better and longer than
fatty foods.
• Salt will reduce the storage life of food.
• Only freeze top quality, fresh and thoroughly
cleaned foods.
• Make sure frozen foods are transferred from
the store to the freezer in the shortest time
period possible.
• For best performance, do not open the door
frequently or leave it open longer than
needed.
• DO NOT exceed the storage period indicated
by the food manufacturer.
• Once food has been defrosted, food quality
deteriorates rapidly and cannot be re-frozen.
IMPORTANT:
In the event of accidental defrosting, loss of
power, etc. the defrosted food must be
inspected and consumed, if possible, or
cooked immediately and then re-frozen only
after cooked.
18
OPERATING YOUR REFRIGERATOR
Refrigerating Foods:
• For best results, DO NOT store warm food or
evaporating liquids in the refrigerator.
• Make sure to cover foods that have strong
avors and odors.
• Cooked foods and cold dishes should be
covered prior to placing them on any shelf.
• Fruit and vegetables should be thoroughly
cleaned and placed in the ForeverFresh
crisper drawers.
• Butter and cheeses should be placed in
special airtight containers or wrapped in
aluminum foil or polythene bags to exclude
as much air as possible.
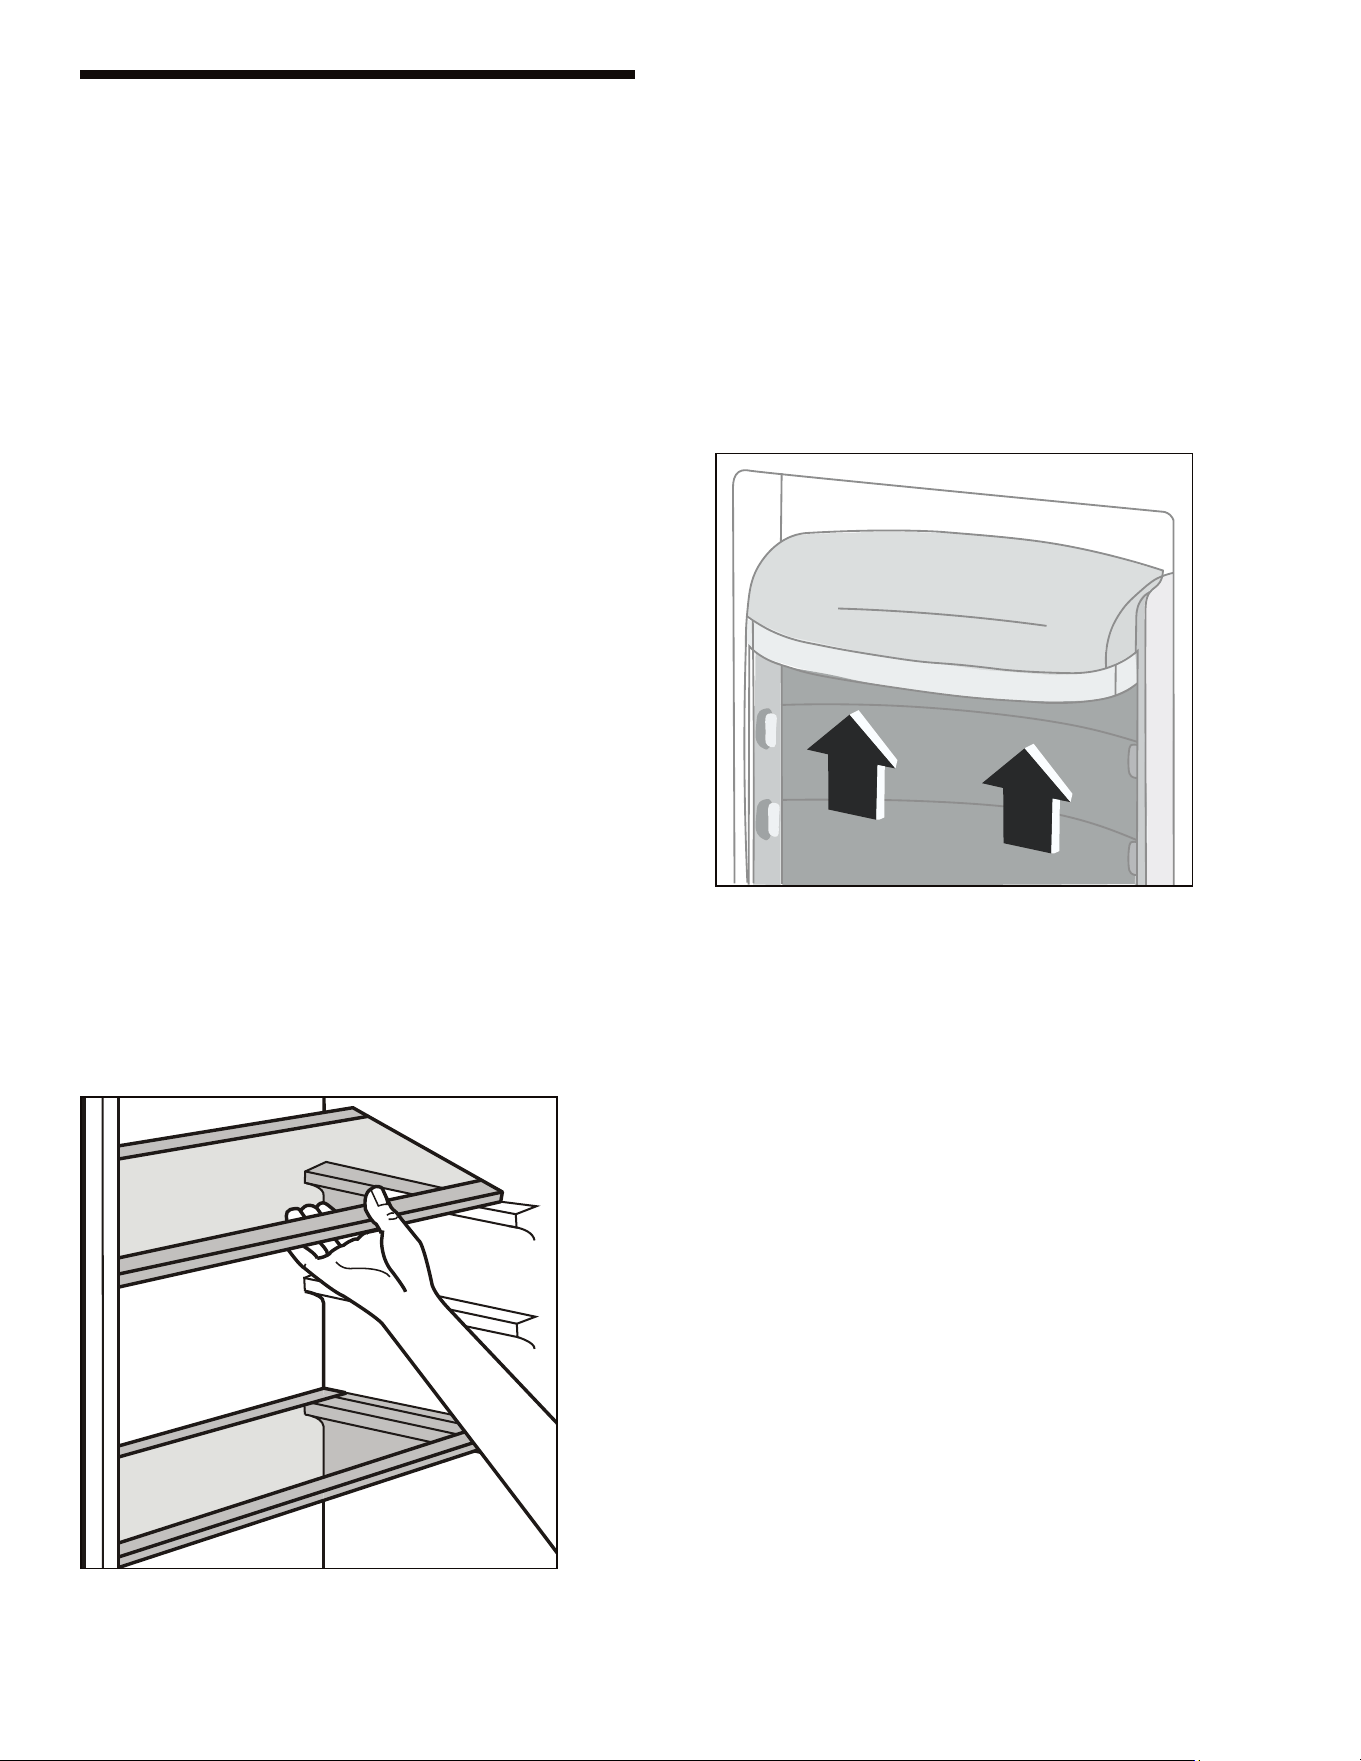
Refrigerator Storage:
• This refrigerator comes with glass shelves. The
walls of the refrigerator are equipped with a
series of runners so that the shelves can be
positioned as desired.
• For added storage, the door balconies can be
placed at different heights to accommodate
food packages of various sizes.
• To make these adjustments gradually pull the
door balcony in the direction of the arrows
until it comes free, then reposition as required.
Operating Your Refrigerator

19
CARE & MAINTENANCE
Care & Maintenance
Cleaning:
For hygienic reasons the appliance interior,
including accessories, should be cleaned
regularly.
WARNING
CAUTION: This appliance may NOT be
connected during cleaning. Danger of
electrical shock! Before cleaning switch the
appliance off and remove the plug from the
outlet, or switch off or pull out the Circuit
Breaker or fuse. NEVER clean the appliance
with a steam cleaner. Moisture could
accumulate in electrical components, causing
danger of electrical shock! Hot vapors can lead
to the damage of plastic parts. The appliance
must be dry prior to plugging it back in.
IMPORTANT: Ethereal oils and organic solvents
can attack plastic parts and should be
avoided.
• DO NOT allow such substances to come into
contact with appliance parts.
• DO NOT use any abrasive cleaners.
• Remove the food from the freezer. Store it in a
cool, well covered, place.
• Switch the appliance off and remove the plug
from the outlet or switch off the circuit
breaker fuse.
• Clean the appliance and the interior
accessories with a cloth and lukewarm water.
After cleaning wipe with fresh water and rub
dry.
• After everything is dry, plug the appliance in
to the main power supply and you may use
the appliance.
Preparing for Vacation:
• Turn the refrigerator off and then unplug from
the wall outlet.
• Remove all the food and clean the
refrigerator.
• Leave the door slightly open to avoid possible
mold or odor from forming.
• In case of children, use extreme caution, this
unit should NOT be accessible to child’s play.
• If you will be on vacation for less than three
weeks you may decide to leave the
refrigerator operating.
• If the refrigerator will not be used for several
months, remove all the food, unplug the
power cord, clean and dry the interior
thoroughly and crack the door open slightly.
Relocating your Refrigerator:
• Turn the refrigerator off and then unplug from
the wall outlet.
• Remove all the food and clean the
refrigerator.
• Securely tape down all loose items inside your
refrigerator.
• Tape both doors shut.
• Be sure to keep the refrigerator in upright
position during transportation

20
CARE & MAINTENANCE
• Locate this refrigerator in a cool area, away
from direct exposure to heat producing
appliances and/or out of direct sunlight.
• Let hot foods cool to room temperature prior
to placing them inside the refrigerator.
• Keep your refrigerator organized to reduce
the amount of time you open and close the
door.
• When removing items from refrigerator or
freezer remove as many at one time and shut
the door as quickly as possible.
• To reduce frost build-up be sure to wipe
down containers prior to placing them in the
refrigerator.
You can store different foods in different compartments according to the recommendations below:
Daily Use Suggestions:
Energy Saving Suggestions:
Refrigerator
Compartment
Type of Food
Door or balconies of
fridge compartment
• Foods with natural preservatives, such as jams, juices, drinks, condiments.
• Do not store perishable foods.
Crisper drawer (salad
drawer)
• Fruits, herbs and vegetables should be placed separately in the crisper bin.
• Do not store bananas, onions, potatoes, garlic in the refrigerator.
Fridge Shelf – Bottom
Chiller (box/drawer)
Raw meat, poultry, sh (for short-term storage).
Fridge Shelf – Middle Dairy products, eggs.
Fridge Shelf - Top
Foods that do not need cooking, such as ready-to-eat foods, deli meats,
leftovers.
Freezer Drawer(s)
/ shelf
• Foods for long-term storage.
• Bottom drawer/shelf for raw meat, poultry, sh.
• Middle drawer/shelf for frozen vegetables, chips.
• Top drawer/shelf for ice cream, frozen fruit, frozen baked goods.
Care & Maintenance

21
TROUBLE SHOOTING GUIDE
Trouble Shooting Guide
First try the solutions suggested here prior to a service call.
Symptom
Possible Cause and/or
Recommended Solutions
Refrigerator not
operating
Not connected to an electrical supply – Plug the power cord
into a grounded 3-prong outlet. Do not use an extension
cord.
NO power to the electrical outlet – Plug in a lamp to see if
the outlet is working.
Household fuse blown or circuit breaker tripped – Replace
the fuse or reset the circuit breaker. If the problem
continues, contact a qualied technician.
Control is not turned on – Turn the refrigerator control on.
New Installation – Allow 24-hours following installation for
the refrigerator to cool down completely. NOTE: Adjusting
the temperature control(s) to the coldest setting will not
cool the refrigerator more quickly.
Compressor turns on
and off frequently
The room temperature is hotter than normal.
A large amount of food has been added to the refrigerator.
The door is opened too frequently.
The door is not closed completely.
The door gasket is not sealed properly.
The refrigerator does not have the correct clearances.
The refrigerator has recently been disconnected for a period
of time (4 hours is recommended to cool down completely).

22
TROUBLE SHOOTING GUIDE
Symptom
Possible Cause and/or
Recommended Solutions
Temperature inside
the refrigerator
is too warm:
Temperature control is set too warm. Turn the control to a
cooler setting and allow several hours for the temperature
to stabilize.
Door is kept open too long or is opened too frequently.
Warm air enters the refrigerator every time the door is
opened. Open the door less often.
The door is not closed completely.
The door gasket does not seal properly.
A large amount of warm or hot food might have been
stored recently. Wait until the refrigerator has had a chance
to reach its selected temperature.
The refrigerator has recently been disconnected for a period
of time. 4-hours are required for the refrigerator to cool
down completely.
Temperature inside
the refrigerator
is too cold:
Temperature control is set too cold. Turn the control to a
warmer setting and allow several hours for the temperature
to stabilize.
Temperature of
external refrigerator
surface is warm:
The exterior refrigerator walls can be as much as 30°F
warmer than room temperature. This is normal while the
compressor works to transfer heat from inside the
refrigerator cabinet.
Trouble Shooting Guide

23
TROUBLE SHOOTING GUIDE
Symptom
Possible Cause and/or
Recommended Solutions
Popping or cracking
sound when
compressor comes on:
Metal parts undergo expansion and contraction, as in hot
water pipes. This is normal. Sound will level off or disappear
as refrigerator continues to run.
Bubbling or Gurgling
sound:
Refrigerant is circulating throughout the system.
This is normal.
Vibrations:
Check to assure that the refrigerator is on a level surface.
Floor is uneven or weak. Refrigerator rocks on the oor
when it is moved slightly – Be sure the oor can adequately
support the refrigerator.
Level the refrigerator by putting wood or metal shims under
parts of the refrigerator.
The refrigerator is touching the wall. – Re-level the
refrigerator and move it away from the wall.
Moisture forms on the
inside refrigerator
walls:
Weather is hot and humid, which increases the internal rate
of frost build-up. This is normal.
Door is slightly open.
Door is kept open too long or is opened too frequently.
Open the door less often.
The door is not sealed properly.
Moisture forms on
outside of refrigerator:
Door is slightly open, causing cold air from inside the
refrigerator to meet warm moist air from outside.

CUSTOMER SUPPORT
Before contacting customer support, please see the trouble- shooting guide above.
Visit our website to contact us, find answers to Frequently Asked Questions, and for other resources which may include an updated
version of this user's manual.
D
WWW.IMPECCA.COM
If you wish to contact us by phone, please be sure to have your model number and serial number ready and call us between 9:00am and
6:00pm ET, at+ 1 866-954-4440.
Keep tabs on lmpecca's newest innovations & enter contests via our social network feeds:
www.facebook.com/lmpecca/
� www.instagram.com/impecca/
W @impeccausa
–13–
ENGLISHESPAÑOLFRANÇAIS
Impecca
®
warrants this product against defects in
material and workmanship to the original purchaser as
specified below. Please register your product online
within fourteen (14) days of purchase.
PARTS – if the product is determined to have a
manufacturing defect, within a period of six (6) months
from the date of the original purchase, Impecca
®
will
repair or replace the product parts at no charge (for
parts) to consumers in the U.S.A. and Canada.
LABOR – if the product is determined to have a
manufacturing defect, within a period of thirty (30)
Days from the date of the original purchase, Impecca
®
will repair or replace the product at no charge to
consumers in the U.S.A. and Canada. After thirty (30)
Days, it will be the responsibility of the consumer.
Shipping costs to and from our warranty service center are
the sole responsibility of the consumer.
To obtain warranty service by an authorized
Impecca
®
service center,
please email us
and Maintenance Authorization (RMA) number and to
locate the Warranty Service Center nearest
you. Once authorized, you must mail the
product to the authorized Impecca
®
service
center in its original product packaging materials or
equivalent, to prevent damage while in transit.
Further, should Impecca
®
determine that the product is
outside of the Warranty terms, Impecca
®
will return the
product to sender at sender’s expense without being
repaired or replaced, unless authorized by the consumer
to service the out-of-warranty product at consumer’s
expense. All handling or restocking charges for returns
and/or replacements shall be non-refundable.
Impecca
®
specifically excludes from this warranty any non-
electric/mechanical attachments, accessories, and disposable
parts including, but not limited to, outside case,
connecting cables, batteries, and AC adapters.
Impecca
®
reserves the right to repair or replace
defective products with the same, equivalent, or
newer models.
We reserve the right to either repair or replace
product at our discretion. Replacement may be either new
or refurbished and while every endeavor will be made to
ensure it is the same model, if same model is not available,
it will be replaced with a model of equal or higher
specification.
Normal “Wear and Tear” is not covered by this, or any
other, warranty. Further, Impecca
®
hereby reserves the right
to determine “Wear and Tear” on any and
all products. Tampering or opening the product casing or
shell will void this warranty in its entirety.
In addition, this warranty does not apply if the product
has been damaged by accident, abuse, misuse, or
misapplication; has been altered or modified without
the written permission of Impecca
®
; has been
serviced by a non-authorized repair center of
Impecca
®
; has not been properly maintained or operated
according to the operation manual; has been used
for commercial, non-household purposes; has
been cosmetically damaged; was not imported by
Impecca
®
; was not manufactured according to specification
of the United States market; was damaged due to
improper installation or neglect by the consumer;
was damaged due to improper packaging in shipment
to the Warranty Service Center; was damaged due to
natural disasters; or if the serial number for the
product has been removed or defaced.
ALL IMPLIED WARRANTIES, INCLUDING IMPLIED
WARRANTIES OF MERCHANTABILITY AND FITNESS FOR A
PARTICULAR PURPOSE ARE LIMITED IN DURATION TO SIX (6)
MONTHS PARTS AND THIRTY (30) DAYS LABOR FROM THE DATE
OF THE ORIGINAL RETAIL PURCHASE OF THIS PRODUCT.
THESE WARRANTIES AND REMEDIES ARE THE SOLE AND
EXCLUSIVE WARRANTIES AND REMEDIES IN CONNECTION WITH
THE SALE AND USE OF THE PRODUCT. NO OTHER WARRANTIES,
ORAL OR WRITTEN, EXPRESSED OR IMPLIED, ARE GIVEN.
IMPECCA
®
IS NOT RESPONSIBLE OR LIABLE FOR ANY
DAMAGE, WHETHER SPECIAL, INCIDENTAL,
CONSEQUENTIAL, DIRECT OR OTHERWISE, OR WHETHER KNOWN
OR SHOULD HAVE BEEN KNOWN TO IMPECCA
®
, INCLUDING LOST
PROFITS, GOODWILL, AND PROPERTY AND PERSONAL INJURY
RESULTING FROM ANY BREACH OF WARRANTY, THE INABILITY TO
USE THE PRODUCT OR UNDER ANY LEGAL THEORY IN
CONTRACT OR TORT. IMPECCA LIABILITY IS LIMITED TO
THE ACTUAL PURCHASE PRICE PAID TO THE RETAIL SELLER
OF THE DEFECTIVE PRODUCT.
No Impecca
®
dealer, agent, or employee is
authorized to make any modification,
extension, change or amendment to this warranty without
the written consent and authorization from Impecca
®
.
Some states do not allow the exclusion or limitation of
implied warranties or liability for incidental or
consequential damages, or do not allow a limitation
on how long an implied warranty lasts, so the above
limitations or exclusions may not apply to you. This
warranty gives you specific legal rights, and you may have
other rights, which vary from state to state.
Note: Our Warranty Service Center ships only within
Continental U.S.A., excluding Alaska and Hawaii.
Important: Be Sure to Register Your Product at WWW.IMPECCA.COM within 14 Days
Impecca® USA
PA 18711 www.impecca.com
*Do not send any returns to this address, as they may be lost and this will delay your repair and service process.
SIX MONTH LIMITED WARRANTY {36590}
SIX MONTH LIMITED WARRANTY
