
OWNER’S MANUAL AND SAFETY INSTRUCTIONS
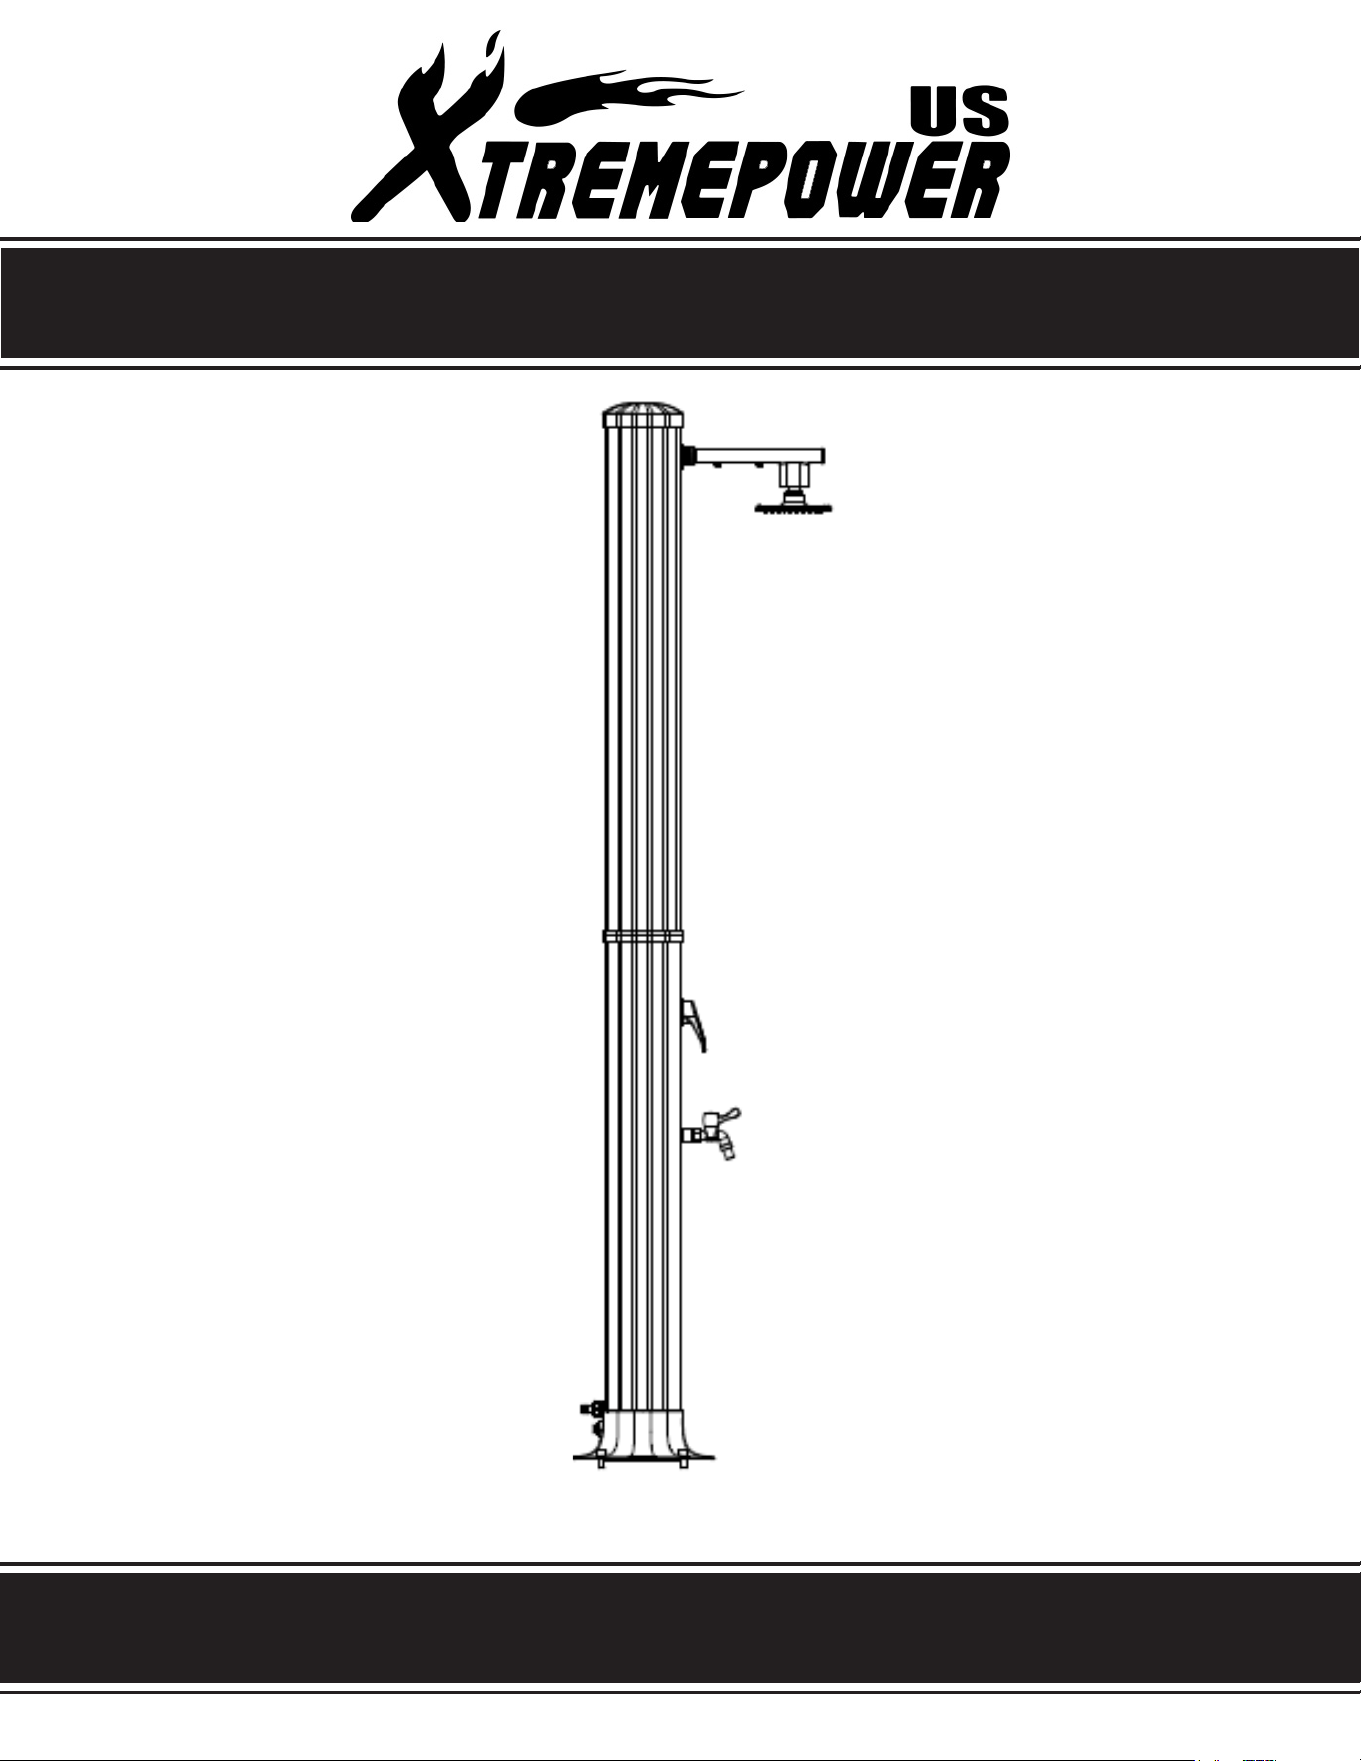
10 GALLON POOL SOLAR SHOWER
ITEM # 75029
SAVE THIS MANUAL. KEEP THIS MANUAL FOR SAFETY WARNINGS, PRECAUTIONS, ASSEMBLY, OPERATION, INSPECTION,
MAINTENANCE AND CLEANING PROCEDURES. WRITE THE PRODUCT’S SERIAL NUMBER ON THE BACK OF THE MANUAL, OR
THE MONTH AND YEAR OF PURCHASE IF PRODUCT HAS NO SERIAL NUMBER
FOR QUESTIONS, PLEASE CALL CUSTOMER SERVICE: 909.628.0880
SAFETY WARNINGS / ASSEMBLY
Read all safety warnings and instructions. Failure to follow the warnings and
instructions may result in injury and/or property damage. Save all warnings and
instructions for future reference.
The warning and safety instructions in this manual are not meant to cover all possible conditions and
situations that may occur. Common sense, caution and care must be exercised when operating or
cleaning tools and equipment. Always contact your dealer, distributor, service agent or manufacturer
about problems or conditions you do not understand before operating the product.
WARNING: WATER TEMPERATURE IN SHOWER MAY REACH OVER 130ºF (55ºC)! WE RECOMMEND
OPENING HANDLE IN THE MIDDLE POSITION BETWEEN HOT AND COLD, THEN SETTING TO DESIRED
TEMPERATURE.
WARNING: IF SHOWER HAS NOT BEEN USED FOR MORE THAN THREE DAYS, WE RECOMMEND
RUNNING SOLAR SHOWER FOR 2 MINUTES TO REMOVE STAGNANT WATER. STAGNANT WATER IN
WARM ENVIRONMENT CAN PROVIDE A GROWTH ENVIRONMENT FOR HAZARDOUS BACTERIA.
CAUTION: ALWAYS START YOUR SHOWER COOL TO AVOID INJURY
SAVE THESE WARNINGS.
1
When temperatures are high, especially in the summer
, the water inside the tube will be hot, do not stand
under the solar head when rst using the shower. Test the water with your nger to make sure the water is at
a comfortable temperature.
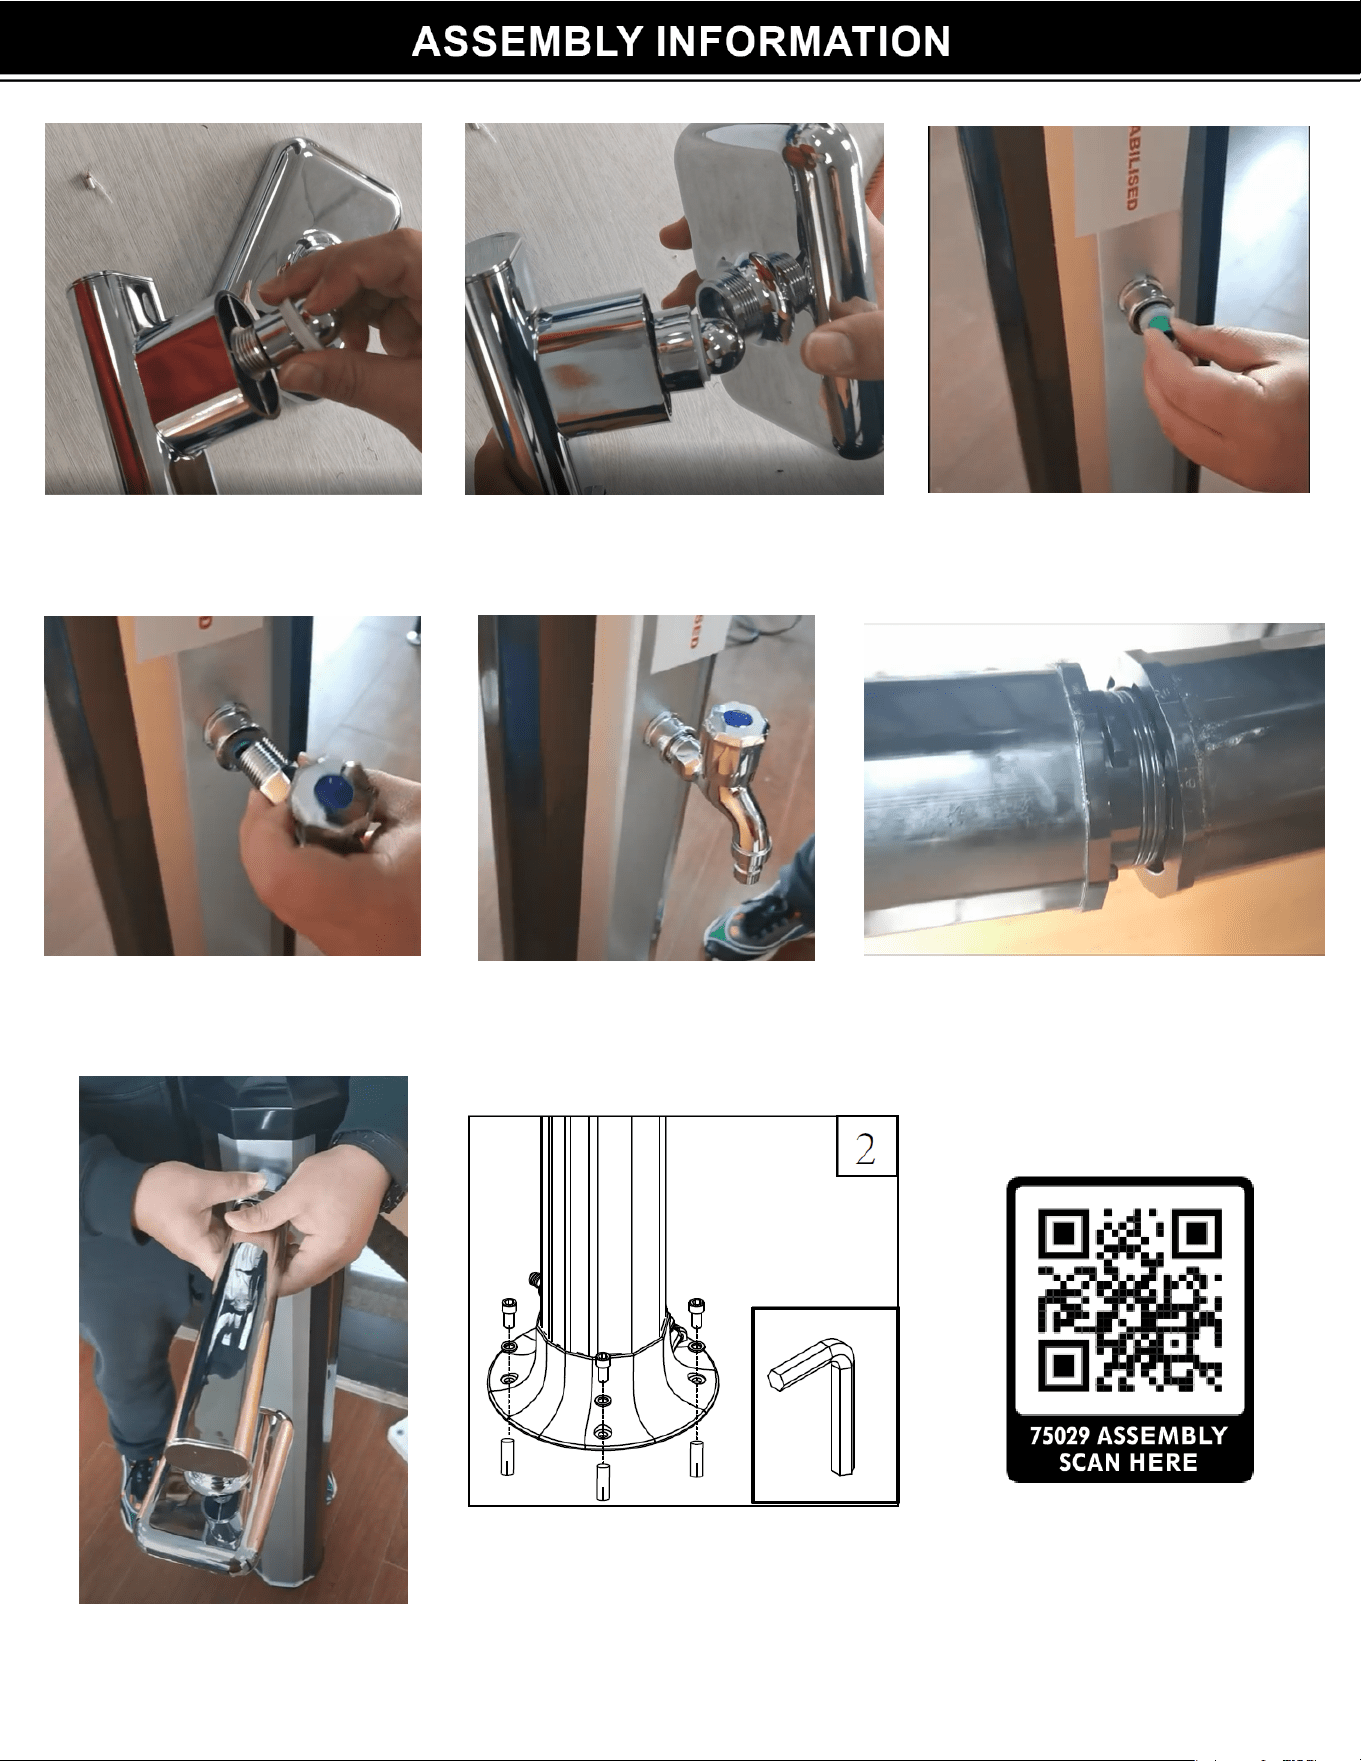
Screw in the connector piece inside the shower head base. Attach the shower
head and screw into place.
Screw in the faucet piece. Make sure the spigot part where water comes
out is facing downward.
Screw in the green gasket piece into
the faucet.
Attach the shower head assembly to
the shower body. Tighten securely.
1
Connect the two shower body pieced and
tighten them securely.
Mount the shower base to concrete slab
or wood base with four bolts, nuts and
gaskets. Using a Hex key and wrench.
Scan the QR code above to
watch the full assembly video.

SAFETY WARNINGS / ASSEMBLY ASSEMLY / OPERATION
SAVE THESE WARNINGS.
1 2
Set up your solar shower in a place that is exposed to direct sunlight as long as possible.
1. Connect the shower head to shower body tube. Do not use a wrench. Secure the gasket.
2. Mount the shower base to concrete slab or wood base with four bolts, nuts and gaskets. Use a wrench for
this process.
3. Connect the footwash to the shower.
4. Put an O-ring on the slot of the lower tube. Lift the shower upper tube on to the lower tube. Turn the locking
ring clockwise to securely connect the upper tube to the lower tube.
NOTE: The handle and shower head need to face in the same direction.
5. Connect the hose adaptor to the inlet of the shower, then connect the garden hose to the hose adaptor and
water supply.
OPERATION
FIRST USE
1. Turn the shower handle to the ON HOT position.
NOTE: Filling the tube with the valve in the hot position ensures no air pockets are trapped in shower.
This procedure is for rst use only.
2. Turn on the water supply to the garden hose to ll the shower. It will take 5 to 6 minutes to ll up the shower.
3. When the water ows from the shower head, turn the shower handle o. Turning the shower handle o
makes water begin heating in tube.
4. Depending on sunlight and outside temperature, the shower will take two to three hours to fully heat water.
WARNING: To avoid scald, always turn the shower handle to the cold water (blue) direction before using the
shower. Then set to the desired temperature.
WINTERIZATION
1. Turn o and disconnect the garden hose.
2. Open the handle to the full on hot position and allow the water to drain from the hose adaptor (about 7 to 8
minutes).
NOTE: Don’t tough or turn shower handle while draining water, otherwise water will stop draining.
3. Turn the locking ring counterclockwise to separate the upper tube and the lower tube. Unbolt the lower
shower tube and pour the remaining water out of tube.
4. Clean and dry the shower parts and move shower from outdoors to indoors. Store it in dry and warm place
during winter season.
WARNING
1. DO NOT USE SALT WATER OR ANTI-FREEZINE METHODS.
2. WATER PRESSURE: MAX 3.5BARS
3. ALWAYS START YOUR SHOWER FROM COOL TO AVOID SCALD.
ASSEMBLY

DISCLAIMER
3
PLEASE READ THE FOLLOWING CAREFULLY
THE MANUFACTURER AND/OR DISTRIBUTOR HAS PROVIDED THE PARTS LIST AND ASSEMBLY
DIAGRAM IN THIS MANUAL AS A REFERENCE TOOL ONLY. NEITHER THE MANUFACTURER OR
DISTRIBUTOR MAKES ANY REPRESENTATION OR WARRANTY OF ANY KIND TO THE BUYER THAT HE
OR SHE IS QUALIFIED TO MAKE ANY REPAIRS TO THE PRODUCT, OR THAT HE OR SHE IS QUALIFIED
TO REPLACE ANY PARTS OF THE PRODUCT. IN FACT, THE MANUFACTURER AND/OR DISTRIBUTOR
EXPRESSLY STATES THAT ALL REPAIRS AND PARTS REPLACEMENTS SHOULD BE UNDERTAKEN
BY CERTIFIED AND LICENSED TECHNICIANS, AND NOT BY THE BUYER. THE BUYER ASSUMES
ALL RISK AND LIABILITY ARISING OUT OF HIS OR HER REPAIRS TO THE ORIGINAL PRODUCT OR
REPLACEMENT PARTS THERETO, OR ARISING OUT OF HIS OR HER INSTALLATION OF REPLACEMENT
PARTS THERETO.
Record Product’s Serial Number Here:
Note: If product has no serial number, record month and year of purchase instead.
Note: Some parts are listed and shown for illustration purposes only and are not available
individually as replacement parts.
MADE IN CHINA
