日本語
EnglishDeutschFrançaisEspañol
简体中文
Русский
한국어
オーボ エ
取扱説明書
Oboe
Owner’s Manual
Oboe
Benutzerhandbuch
Hautbois
Mode d’emploi
Oboe
Manual de instrucciones
Oboé
Manual de instruções
双簧管
使用说明书
Го б о й
Руководство пользователя
Oboe
사용설명서
雙簧管
使用說明書
Português
繁體中文
JA EN DE FR ES PT ZH-CH RU KO ZH-TW
2
P. 3
P. 3
P. 3
P. 3
P. 3
P. 3
P. 3
P. 3
P. 3
P. 3
このたびは、ヤマハ管楽器をお買い上げいただき、まことにありがとうございます。
楽器を正しく組み立て性能をフルに発揮させるため、また永く良い状態で楽器を
お使いいただくために、この取扱説明書をよくお読みください。
You are now the owner of a high quality musical instrument. ank you for choosing Yamaha.
For instructions on the proper assembly of the instrument, and how to keep the instrument in optimum
condition for as long as possible, we urge you to read this Owner’s Manual thoroughly.
Sie sind nun der stolze Besitzer eines hochwertigen Musikinstruments. Vielen Dank, dass Sie sich für ein
Instrument der Marke Yamaha entschiedenen haben. Um mit den Handgri en zum Zusammensetzen
und Zerlegen des Instruments vertraut zu werden und dieses über Jahre hinweg in optimalem Zustand
halten zu können, raten wir Ihnen, diese Anleitung aufmerksam durchzulesen.
Usted es ahora propietario de un instrumento musical de alta calidad. Le agradecemos su elección de un
instrumento Yamaha. Le aconsejamos que lea todo este manual de instrucciones para ver las instruc-
ciones para el montaje correcto del instrumento y para aprender a conservar el instrumento en óptimas
condiciones durante tanto tiempo como sea posible.
Agora você é o proprietário de um instrumento musical de alta qualidade. Obrigado por escolher a marca
Yamaha. Aconselhamos que leia cuidadosamente todo o manual do proprietário para ver as instruções de
montagem adequada do instrumento, bem como manter em ótimas condições de uso pelo máximo de
tempo possível.
现在您已经是高品质乐器的主人了 ! 在此 , 我们衷心感谢您选择雅马哈乐器 ,
同时也恳请您完整阅读该使用说明书 , 从而可以充分了解有关乐器正确组装
及如何使您的乐器尽可能长久地处于最佳状况的使用说明。
야마하 악기를 구입해 주셔서 감사합니다 . 악기의 알맞은 조립 방법 및 보관을 위해
본 사용설명서를 반드시 읽어주시기 바랍니다 .
Вы стали обладателем высококачественного музыкального инструмента. Благодарим Вас
за выбор продукции Yamaha. Для получения инструкций по правильной сборке данного
инструмента и его длительном хранении в оптимальных условиях мы настоятельно
рекомендуем Вам внимательно прочитать настоящее руководство.
您現在擁有高品質的樂器。感謝您選擇 Yamaha。
我們強烈建議您完整閱讀本使用說明書,以便了解如何正確組裝樂器,並且
使樂器盡可能長時間保持在最佳狀態。
Vous êtes dès à présent le propriétaire d’un instrument de musique de haute qualité.
Nous vous remercions d’avoir choisi Yamaha. En ce qui concerne les instructions relatives à un assem-
blage adéquat de l’instrument et sur la façon de garder l’instrument dans des conditions optimales aussi
longtemps que possible, nous vous conseillons vivement de lire entièrement le présent Mode d’emploi.
3
Oboe
Owner’s Manual
Precautions —
Please read before using the instrument.
The precautions below cover the proper and safe use of the instrument and are designed to protect you and
others from damage or injury. Please observe all precautions carefully!
If a child will use the instrument, a guardian should clearly explain these precautions to the child and make sure they are fully
understood and observed.
About the icons
:
This icon indicates points worthy of your attention.
: This icon indicates prohibited actions.
Caution
Failure to obey the points indicated with this mark may lead to injury.
Do not throw or swing the instrument toward oth-
ers.
Parts may possibly strike other people. Always handle
the instrument gently.
Keep oil, polish, etc., out of reach of children –
especially their mouths! Oils and polishes can be
harmful or fatal if swallowed!
Keep oil, polish, etc. out of reach of children and perform
care and maintenance only when children are not pres-
ent.
Keep small parts out of the reach of infants.
Your children may accidentally swallow them.
Be careful not to touch the pin springs during
maintenance or on any occasion.
The ends of pin springs on high-end models are sharp-
ened to provide greater key action.
NOTICE
Be aware of climatic conditions such as temperature and humidity. Keep the instrument away from heat sources, such as stoves,
furnaces or heaters. Do not use or store the instrument under any extreme of temperature or humidity. Doing so may damage the key
balance, linkage or pads and result in performance problems.
Do not use benzene or thinner for maintenance on instruments that feature a lacquer nish. Doing so may damage the nish top coat.
Take care not to dis gure the instrument. Placing the instrument on an unstable surface may cause the instrument to fall or drop,
resulting in dis gurement. Take care as to where and how you place the instrument.
Do not modify the instrument. Modi cation to the instrument voids the warranty and may make repairs impossible.
In regard to brass instruments with plate nishes: The color of the nish may change over time. However, this does not
affect the instrument’s performance. Discoloration in its early stages can be removed easily by routine maintenance. (As
discoloration progresses, it may become more dif cult to remove.)
* Please use the accessories speci ed for the particular type of nish on your instrument. Also, note that metal polishes remove a
thin layer of the nish top coat, resulting in a thinner nish. Please consider this before you apply metal polish.
Etiquette during practice
Although this instrument creates beautiful sounds, some people may be bothered by the repetitive or awkward nature of
practice. Please be considerate of your neighbors.

4
Precautions f or Wooden Bodies
e wooden body of a Yamaha oboe is made of from natural grenadilla, etc. For this reason,
the instrument is more susceptible to changes in temperature and humidity than are metal
or resin instruments. In particular, sudden changes in temperature or humidity may distort
the wood, resulting in body cracks or key malfunction. e body of the oboe is thicker and
more delicate than many other woodwind instruments.
To keep your instrument in optimal condition for a long period of time, please observe the
following precautions:
In cold weather, before you play the oboe, allow it to adjust to room temperature. Never warm up
the instrument by blowing into it. Otherwise, drastic changes in temperature inside the body may
cause cracking or other damage.
When the instrument is new, especially during the rst month or two, set it aside for extended pe-
riods of time. Play it little by little, for only about 20 to 30 minutes per day for the rst week, then
extend the duration gradually by about 10 minutes per day.
After you play the instrument, remove moisture and dirt from inside the instrument using the
included cleaning swabs.
After you play the instrument, store it in its case. Do not store it in places exposed to high tempera-
ture or humidity.
Before you set the instrument down for a short time, remove moisture and dirt from it using a clean-
ing swab, and then place it on a stable surface with the keys facing up.
Never leave damp gauze or cloth in the case.
e oboe is a very delicate instrument. Do not use it under the following conditions. Oth-
erwise, damage to the body may result.
Do not expose the instrument to:
Direct sunlight for an extended period of time
* Refer to page 7, “Maintenance After Performance.”
Rain or excessive humidity
* Refer to page 10, “Caution: Storing the Oboe.”
Heat sources, such as stoves or fan heaters
Cool air, such as from an air-conditioner
5
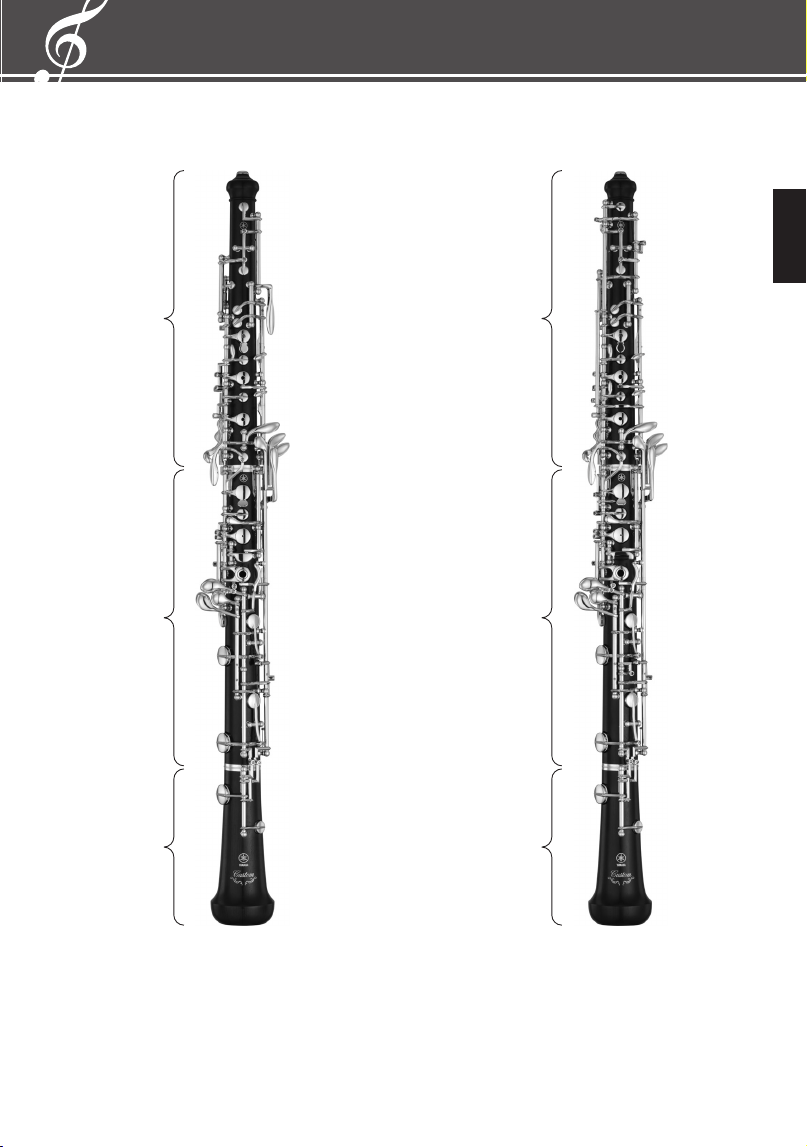
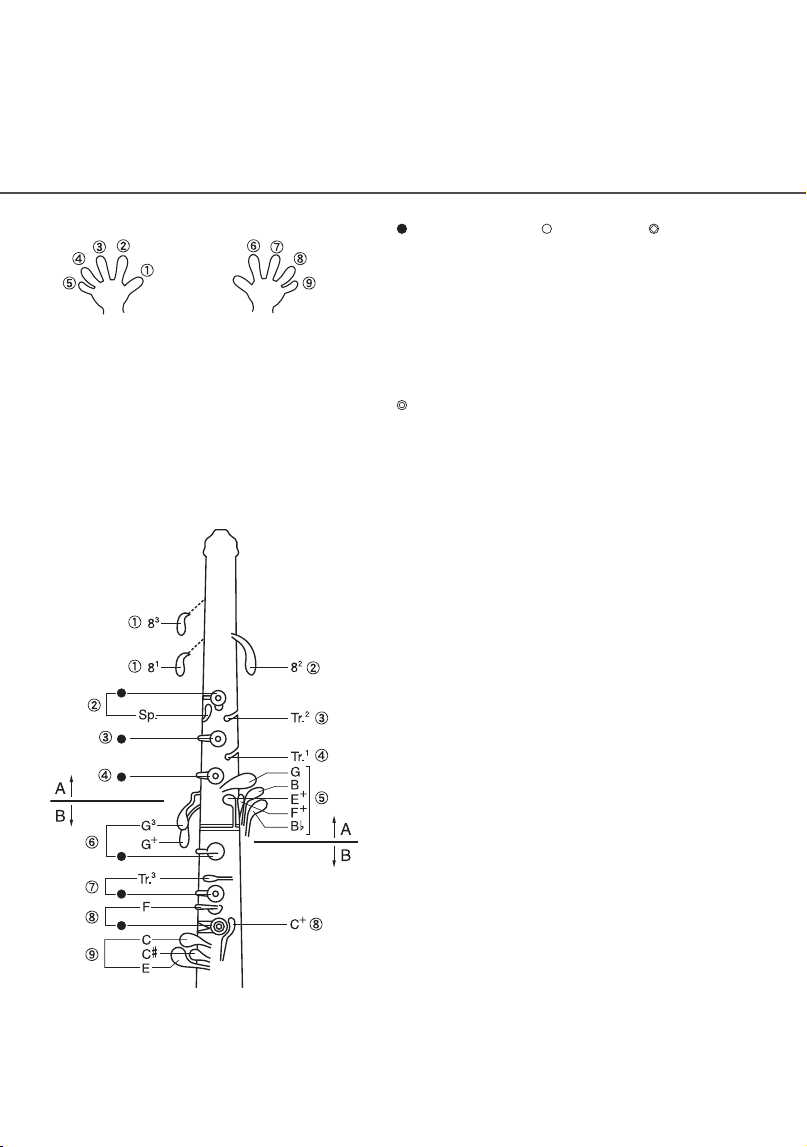
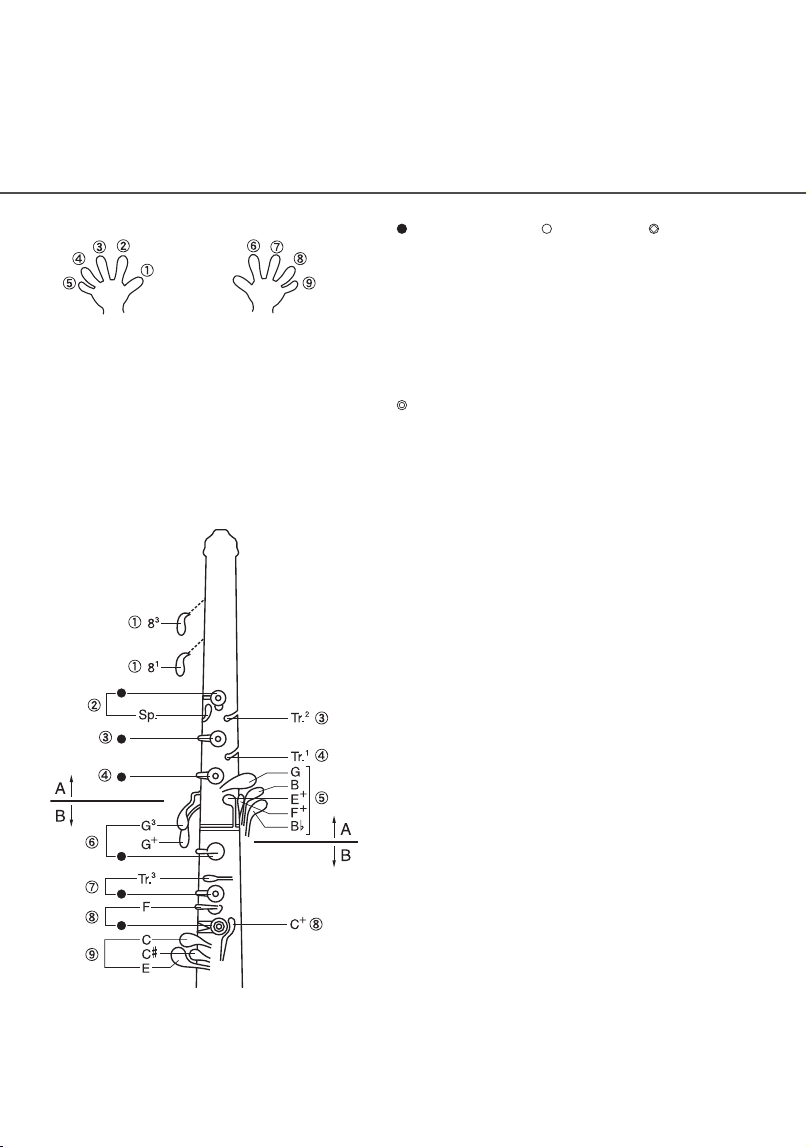
Nomenclature
Semi-automatic octave system
Upper Joint
Full-automatic octave system
Lower Joint
Bell
Upper Joint
Lower Joint
Bell
6
Assembly and Tuning
Before assembling the instrument, please observe the following:
When holding and assembling the instrument, take care not to apply excessive force to the keys.
Applying excessive force may bend the keys, resulting in unbalanced adjustment.
When you assemble the instrument for the rst time, you may have di culty connecting the joints
due to tightness. In this case, apply a thin coat of the included cork grease to the joint cork, and try
again to connect the joints. If the joints still do not t together smoothly, apply a thin coat of cork
grease to the receiver side as well. When applying cork grease, be careful not to apply too much.
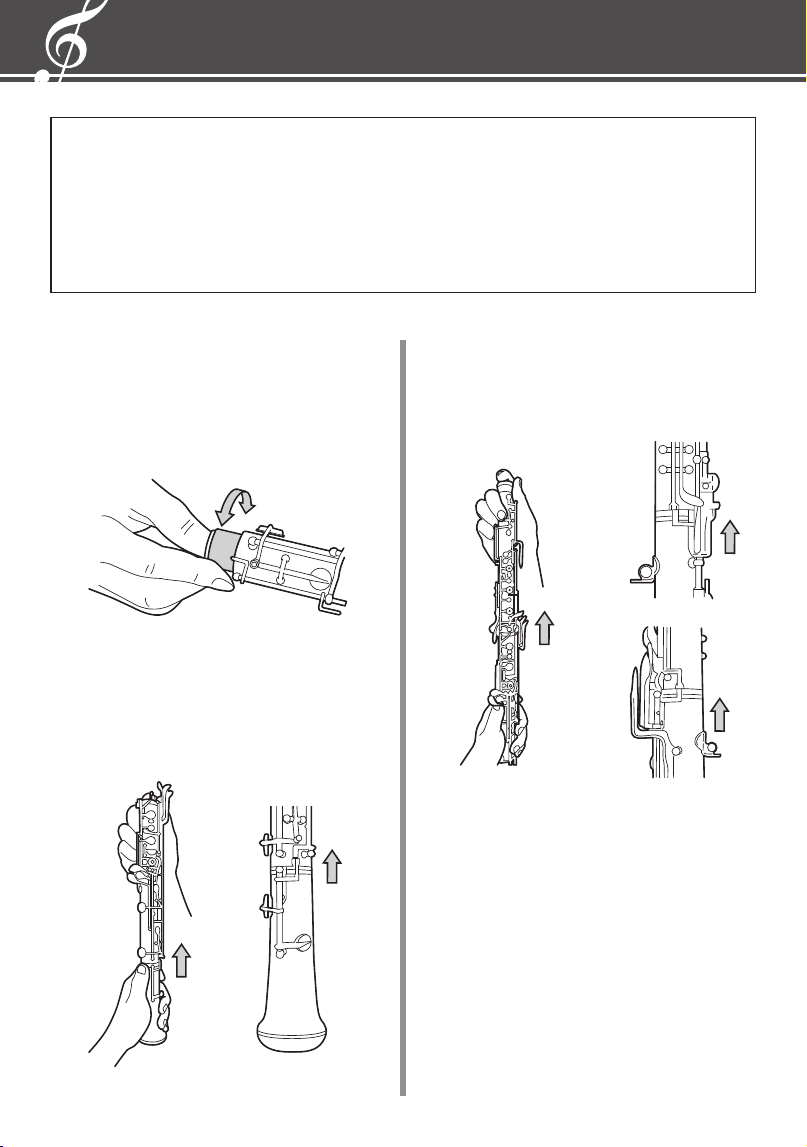
Assembling the Oboe
1.
Apply cork grease.
Before assembling the oboe, apply a thin coat
of cork grease to the joint cork and around the
lower part of the reed tube.
2.
Attach the bell to the lower joint.
Hold the bell in your left hand and check the
position of the connection keys for the lower
joint and the bell. Slide the bell into the lower
joint.
3.
Connect the upper and lower joints.
Hold the lower joint in your left hand and
check the position of the connection keys.
Slide the lower joint into the upper joint.
Hints on Tuning the Oboe
e pitch of an oboe is a ected by the length and
type of the reed tube, and the length, width, scrape
and gouge of the reed. If you have di culty tuning
the oboe, experiment and adjust these elements.
In addition, the temperature in the room and
inside the oboe a ect the pitch of the instrument.
Before you start to tune, allow the instrument to
adjust to room temperature, or warm the instru-
ment by holding it in your hands.
7
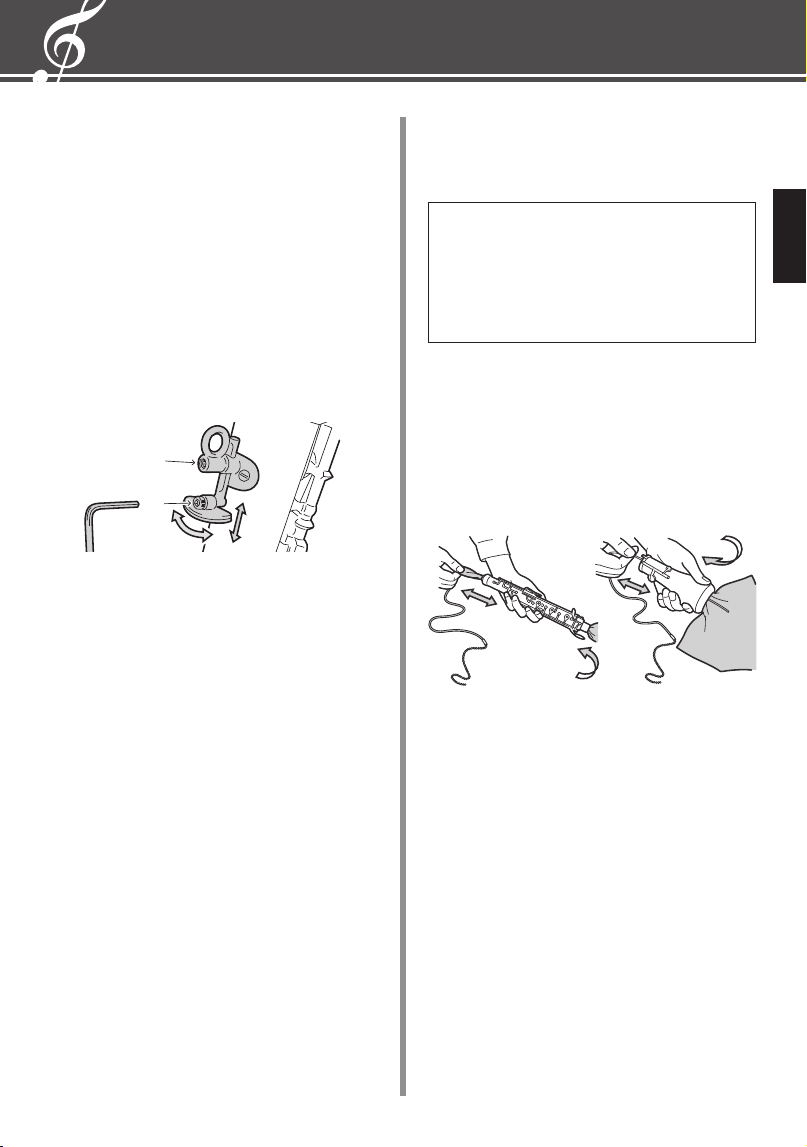
Setting the Adjustable umb
Rest
(Only for instruments with an
adjustable thumb rest)
In addition to the vertical position, the angle
can also be adjusted to better t the shape of the
player’s thumb.
Adjustment
Using the supplied hex wrench (1.5mm) loosen
the screws and adjust the thumb rest to the
preferred position. In the diagram below,
q
sets the vertical position while
w
sets the angle.
* To prevent loss of parts, do not remove the
screws.
During Performance
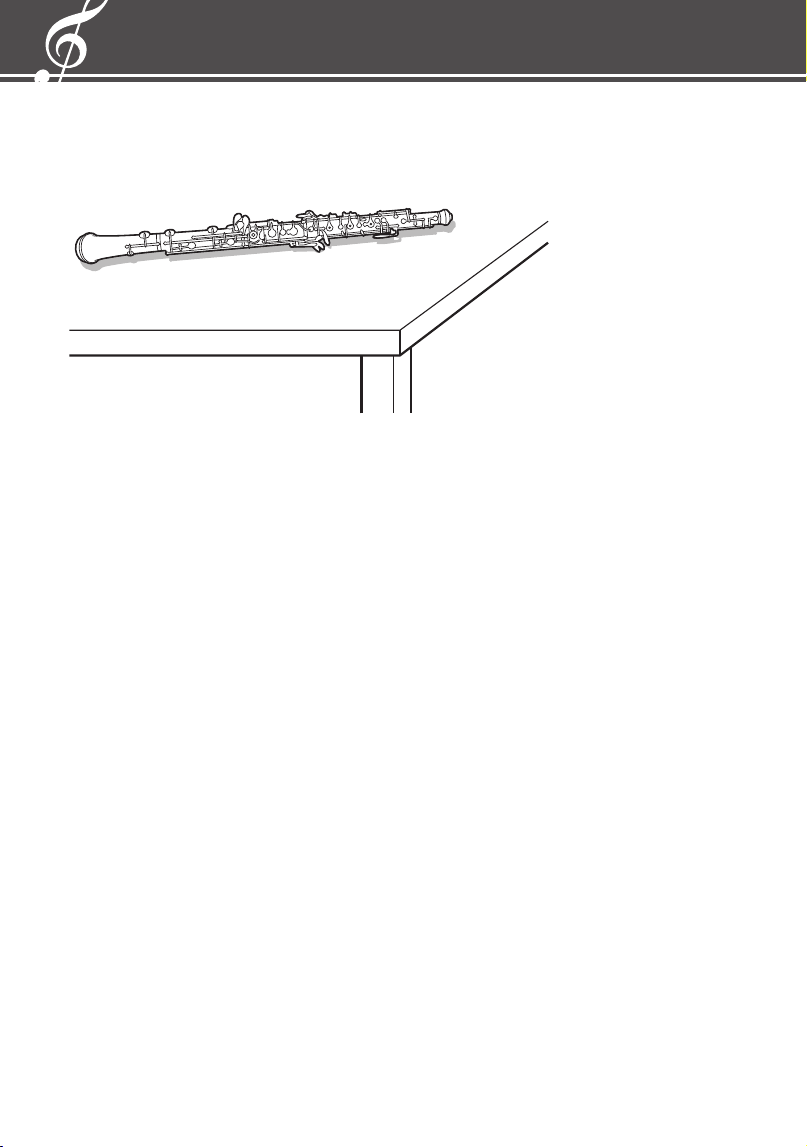
Do not place the oboe on a table with its tone
holes facing down. Do not lean the oboe against
a wall with its tone holes facing down diago-
nally. In this way, you can reduce the chance of
moisture dripping from the tone holes during
performance, which could increase the risk of
body cracks.
If you leave the instrument – even for a short
period of time – place it in its case for protec-
tion and to avoid tripping others.
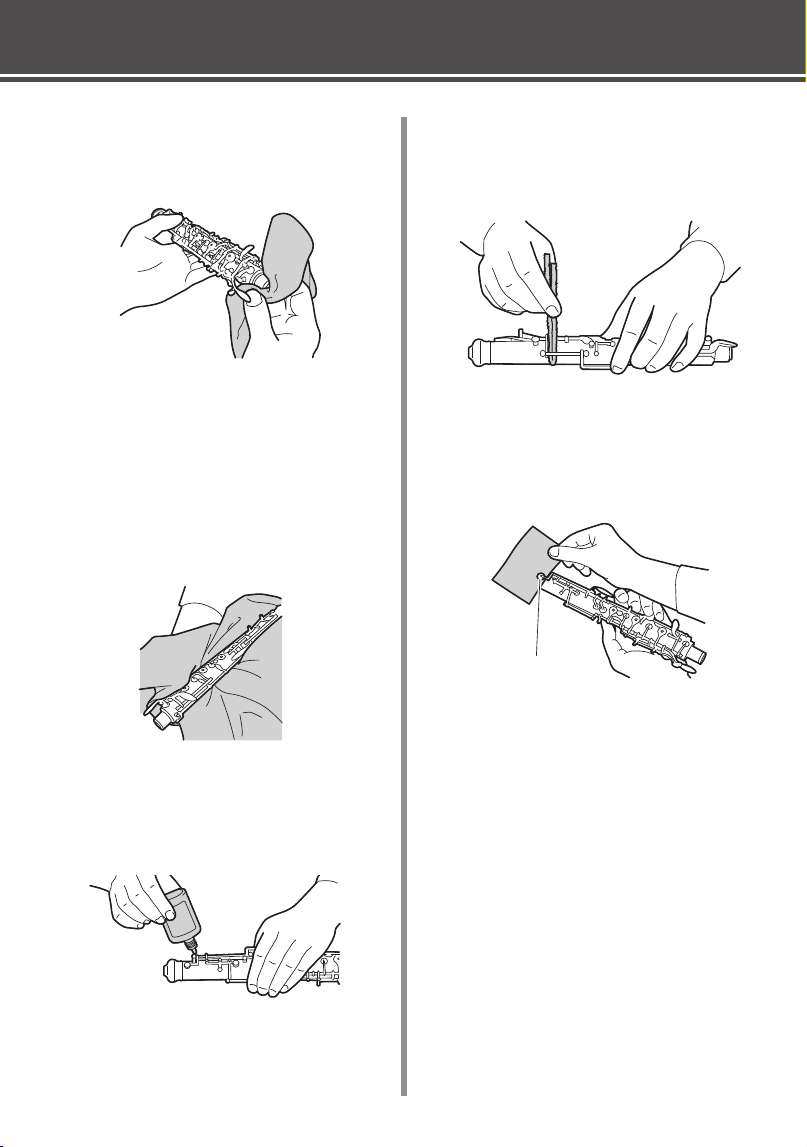
Maintenance After Performance
After you play your oboe, follow the procedure
below to clean the instrument.
Caution: Disassembling the Oboe
If you plan to disassemble the oboe into its
upper and lower joints and bell, do not hold
the instrument close to your face or near other
people. If a part detaches unexpectedly, it may
cause injury or damage.
umb Rest Adjustment and Instrument Maintenance
NOTICE
is cleaning swab is intended to be inserted and
removed from the bell side. It cannot be pulled out
from the top of the upper joint. When you feel the
resistance of the cleaning swab, pull it back to the
bell side. If pulled too strongly, the cleaning swab
may get stuck inside the instrument.
q
w
Remove the reed tube, use a piece of gauze to
wipe away the moisture, then store it in a reed
case.
Use the supplied cleaning swab to clean inside
the main body. If moisture is left inside the
tube, it may result in cracking.
8
umb Rest Adjustment and Instrument Maintenance
e joint sections in particular tend to collect
moisture, which can cause cracking. Dry the
joints carefully with gauze.
If you feel the keys are not moving well, use a
special key oil (sold separately). Do not apply
too much oil. Completely wipe any excess oil
from the key surfaces.
Use a tone hole cleaner to remove dirt from in-
side the tone holes and the spaces between and
underneath the keys. Be careful not to damage
the springs or pads.
Use cleaning paper to remove dirt and moisture
from the pads. In particular, the octave tone
holes tend to collect moisture, which should be
removed as soon as possible.
* Even during playing sessions, remove moisture
from the body interior as frequently as pos-
sible.
Keep the cleaning swab clean and dry.
Once or twice a month, wipe the surface of the
instrument using a polishing cloth. Be careful
not to damage the keys or other parts.
* Do not apply too much key oil.
* If you are unsure of where to apply the key oil,
consult the store where you purchased it.
Octave key
NOTICE
Do not pull out the cleaning paper with the keys
closed. e cleaning paper may break and leave
pieces of paper, causing unbalanced adjustment.
9
Troubleshooting
Cannot assemble because the joints are
too tight or too loose.
e joint cork may have shrunk or ex-
panded due to changes in temperature or
humidity.
e joint cork may be worn.
e tone is not clear or the instrument
plays out of tune.
If pads are deformed or the body is crack-
ing, take the instrument to your dealer for
repair.
e keys are sti . e keys do not move.
A spring may have been dislodged or the
keys may be deformed.
e keys are noisy.
e keys may lack oil or the screws may be
loose.
e cork or felt on the keys is worn or has
fallen o . Or, the keys may have come in
contact with the body or other keys.
10
Caution: Storing the Oboe
Do not place the oboe on a table with its tone holes facing down.
e oboe features perhaps the most complicated mechanism of all wind
instruments. A subtle change in temperature or humidity or the slightest
external pressure may damage keys or pad balance or precipitate changes
in key touch. We recommend that you take the instrument to your dealer
for adjustment once every two or three months.
Do not place any object in the case that might apply pressure to the keys.
Do not apply excessive force to the instrument or case.
When you are not using the instrument, store it in its case and case cover.
To protect the instrument from changes in temperature and humidity,
store the case in a bag.
Do not place the instrument in the vicinity of cooling or heating devices,
such as air conditioners or heaters.
Correct placement
11
Maintenance Accessories for Your Oboe
Silver cloth
Removes discoloration and stains on the surface of
silver and silver-plated musical instruments, and
produces a ne and beautiful luster.
Polishing cloth
A soft, dense cloth suitable for polishing the
instrument surface.
umb rest cushion
A soft and ne texture cloth suitable for polishing
the surface of musical instruments.
Polishing gauze
Removes dirt from the instrument surface to
restore the luster to the nish.
Cleaning paper
Place a cleaning paper between the pad and the
tone hole and open/close the keys to completely
absorb moisture and grease.
Cork grease
Helps to keep joints smooth and the tube airtight.
Remove any dirt from the joint cork, apply a small
amount of cork grease to the cork, then join the
upper and lower tubes and distribute the grease.
Key oil
Apply a small amount of key oil between the
key post and key tube, or inside the key tube, to
prevent rust and wear.
Tone hole cleaner
is cleaner is suitable for removing dirt from the
tone holes and corners on the keys.
Cleaning swab
is swab is absorptive and can remove moisture
and dirt from inside the body of the instrument.
Silver polish
Use this polish to treat discoloration or remove dirt
fromthe silver or silver-plate nish of your instru-
ment. Apply a small amount to polishing gauze
or a polishing cloth, then polish the instrument
surface.
Bore oil
is oil is to prevent deformation and cracking
of wooden musical instruments due to moisture.
Wipe o the water and dirt on the inner surface of
the pipe, soak a cleaning swab (or the like) with a
very small amount of oil, and then apply it to the
inside of the pipe.
12
セミ・オートマティック・キイの運指表
/ Fingering chart for semi-automatic keys /
Tableau de doigté pour mécanisme semi-automatiques / Tabla de distribución
Tabela de digitação para chaves semi-automáticas /
半自动音键的指法图
/
세미 오토매틱 키의 운지표
/
半自動按鍵 指法 表
A 左手
Left hand
Linke Hand
Main gauche
Mano izquierda
Mão esquerda
左手
Левая рука
왼손
左手
B 右手
Right hand
Rechte Hand
Main droite
Mano derecha
Mão direita
右手
Правая рука
오른손
右手
閉じる
Close
Geschlossen
Fermé
Cerrar
Fechado
闭口
Закрыто
닫는다
閉孔
開く
Open
Offen
Ouvert
Abrir
Aberto
开口
Открыто
연다
開孔
ハーフホール
Half hole
Halbe Öffnung
Demi-trou
Orificio medio
Meio buraco
半孔
Полуоткрыто
하프홀
半孔
左手人差し指のオープンキイ
Left index finger open key
Klappe des linken Zeigefingers offen
Clé ouverte de l’index gauche
Llave de abertura con el dedo índice izquierdo
Indicador esquerdo abre a chave
左食指开口键
Открытая клавиша для левого указательного пальца
왼쪽 검지 손가락의 오픈 키
左手食指開口鍵
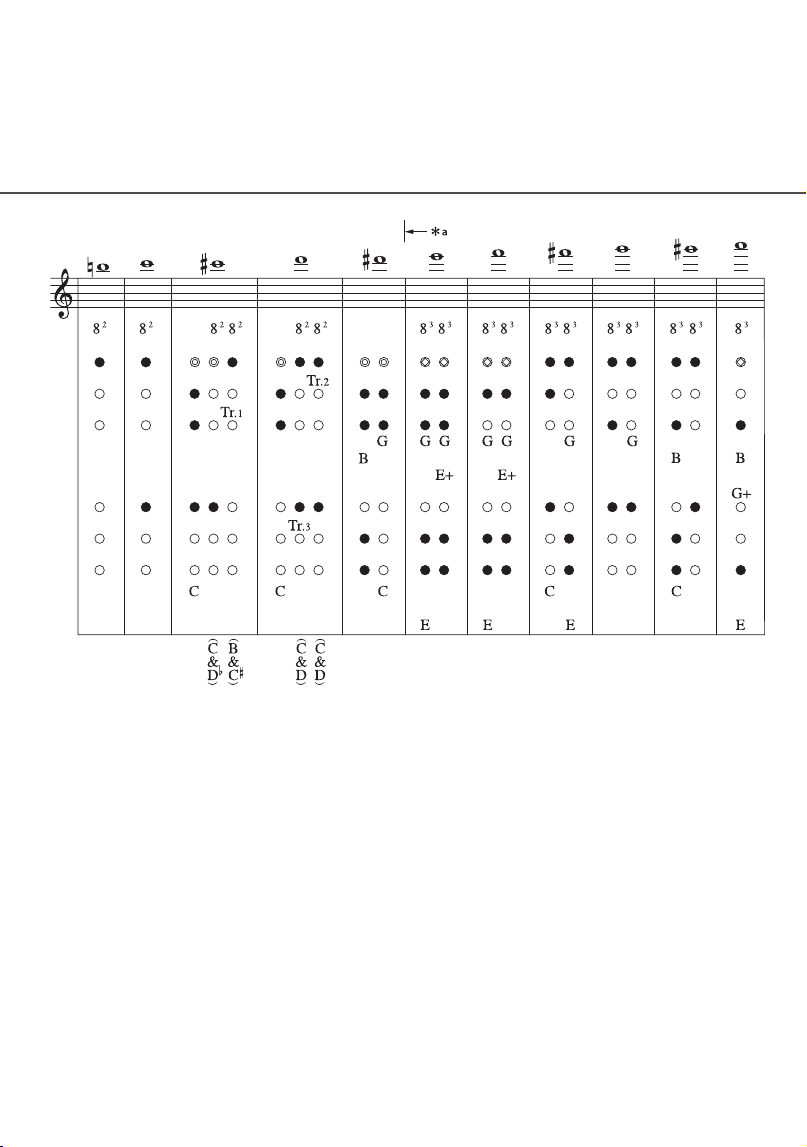
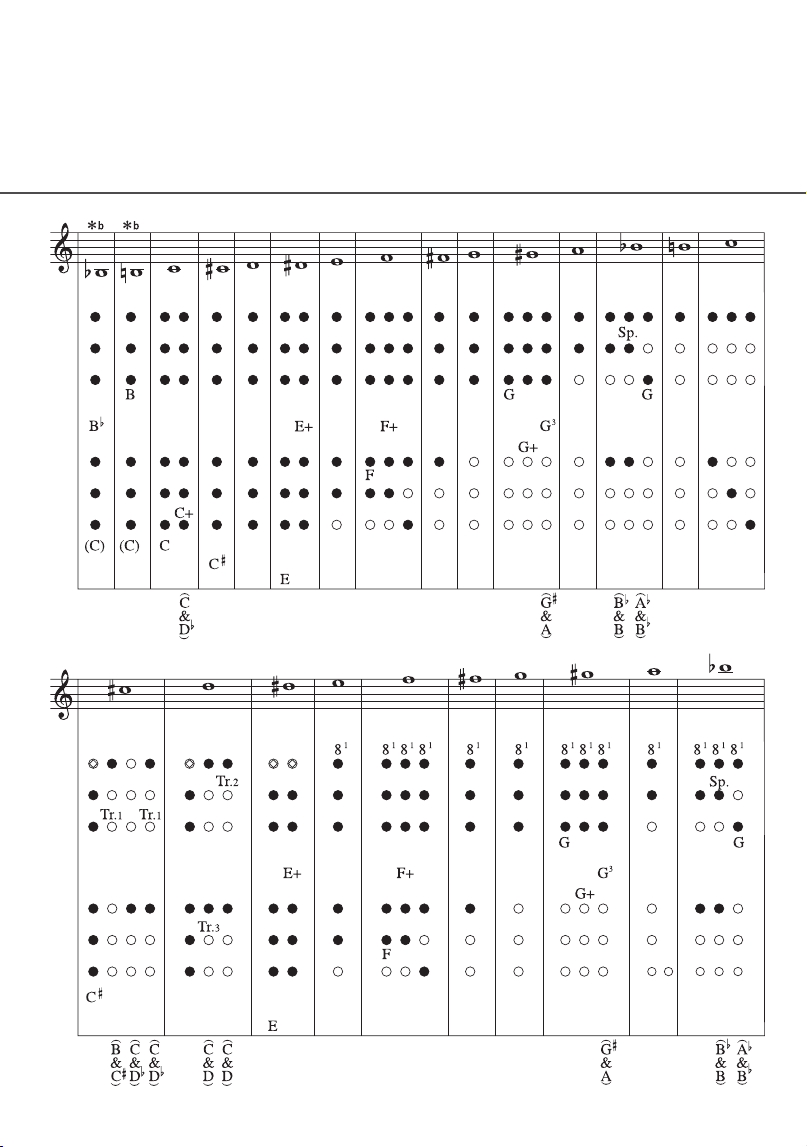
G、G
+
、G
3
はG
#
の音のキイ。E、E
+
はE
b
の音のキイ。8
1
は第 1 オクターブ・キイ、8
2
は第 2 オクターブ・キイ、8
3
は第 3 オクターブ・キイ、Sp. はスパチュラ・キイを意味する。
G, G
+
, and G
3
are G
#
keys. E and E
+
are E
b
keys. 8
1
is the first
octave key. 8
2
is the second octave key. 8
3
is the third octave
key. Sp. is a spatula key.
G, G
+
und G
3
sind Gis-Klappen. E und E
+
sind E
b
-Klappen. 8
1
ist die erste, 8
2
die zweite und 8
3
die dritte Oktavklappe. Sp. ist
eine Hilfsklappe.
G, G
+
et G
3
sont des clés Sol
#
. E et E
+
sont des clés Mi
b
. 8
1
est la clé de première octave. 8
2
est la clé de deuxième octave.
8
3
est la clé de troisième octave. Sp. est une spatule.
G, G
+
, y G
3
son llaves G
#
. E y E
+
son llaves E
b
, 8
1
es la pri-
mera llave de octava. 8
2
es la segunda llave de octava. 8
3
es la
tercera llave de octava. Sp. es una llave de espátula.
G, G
+
, e G
3
são chaves de sol sustenido. E e E
+
são chaves
de mí bemol. 8
1
é a primeira chave de oitava. 8
2
é a segunda
chave de oitava. 8
3
é a terceira chave de oitava. Sp. é a chave
de espátula.
G、G
+
和G
3
属于 G
#
音键。E和E
+
属于 E
b
音键。8
1
是第一个
八度键。8
2
是第二个八度音键。8
3
是第三个八度音键。Sp. 是
一个调音键。
G, G
+
и G
3
являются клавишауми G
#
. E и E
+
являются
клавишами E
b
. 8
1
– клавиша первой октавы. 8
2
– клавиша
второй октавы. 8
3
– клавиша третей октавы. Sp. – лан-
цетнаяклавиша.
G, G
+
, G
3
은 G
#
음의 키. E, E
+
은 E
b
음의 키. 8
1
은 제1 옥타브
키, 8
2
는 제2 옥타브 키, 8
3
은 제3 옥타브 키, Sp.는 스파츄라
키를 의미합니다.
G、G
+
和 G
3
屬於 G
#
音鍵。E 和 E
+
屬於 E
b
音鍵。8
1
是
第一個八度音鍵。8
2
是第二個八度音鍵。8
3
是第三個八度音
鍵。Sp. 是調音鍵。
13
Grifftabelle für halbautomatische klappen /
de los dedos para llaves semi-automáticas /
Схема аппликатуры для полуавтоматической клавиатуры
/
14
セミ・オートマティック・キイの運指表
/ Fingering chart for semi-automatic keys / Grif f tabelle für
halbautomatische klappen / Tableau de doigté pour mécanisme semi-automatiques /
Tabla de distribución de los dedos para llaves semi-automáticas / Tabela de digitação para chaves
semi-automáticas /
半自动音键的指法图
/
Схема аппликатуры для полуавтоматической
клавиатуры
/
세미 오토매틱 키의 운지표
/
半自動 按 鍵指法表
*a: ここより 8
3
の無い場合は、8
1
を使用する。
If there is no 8
3
, 8
1
will be used.
Wenn 8
3
fehlt, wird 8
1
verwendet.
Si 8
3
n’existe pas 8
1
est utilisé.
Si no existe una 8
3
, la 8
1
se utilizará.
Se não houver 8
3
, 8
1
deve ser usado.
如果没有 8
3
,则使用 8
1
。
Если отсутствует клавиша 8
3
, можно использовать клавишу 8
1
.
여기부터는 8
3
이 없는 경우에는 8
1
을 사용합니다.
如果沒有 8
3
,則使用 8
1
。
15
フル・オートマティック・キイの運指表
/ Fingering chart for full-automatic keys /
Grif f tabelle f ür Vollautomatische Klappen / Tableau de doigté pour mécanisme
automatique / Tabla de distribución de los dedos para llaves automáticas /
Tabela de digitação para chaves automáticas /
全自动音键的指法图
/
Схема аппликатуры для полностью автоматической клавиатуры
/
풀 오토매틱 키의 운지표
/
全自動按鍵指法表
A 左手
Left hand
Linke Hand
Main gauche
Mano izquierda
Mão esquerda
左手
Левая рука
왼손
左手
B 右手
Right hand
Rechte Hand
Main droite
Mano derecha
Mão direita
右手
Правая рука
오른손
右手
閉じる
Close
Geschlossen
Fermé
Cerrar
Fechado
闭口
Закрыто
닫는다
閉孔
開く
Open
Offen
Ouvert
Abrir
Aberto
开口
Открыто
연다
開孔
ハーフホール
Half hole
Halbe Öffnung
Demi-trou
Orificio medio
Meio buraco
半孔
Полуоткрыто
하프홀
半孔
左手人差し指のオープンキイ
Left index finger open key
Klappe des linken Zeigefingers offen
Clé ouverte de l’index gauche
Llave de abertura con el dedo índice izquierdo
Indicador esquerdo abre a chave
左食指开口键
Открытая клавиша для левого указательного пальца
왼쪽 검지 손가락의 오픈 키
左手食指開口鍵
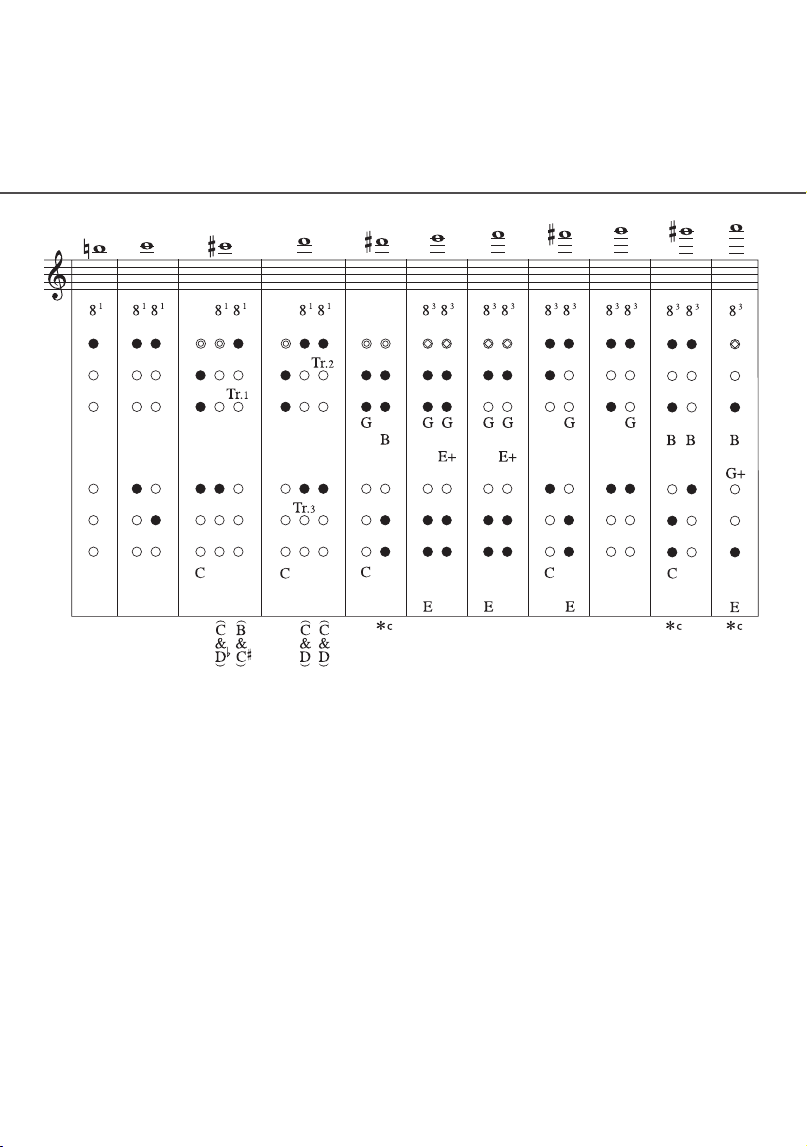
G、G
+
、G
3
はG
#
の音のキイ。E、E
+
はE
b
の音のキイ。8
1
は第 1 オクターブ・キイ、8
2
は第 2 オクターブ・キイ、8
3
は第 3 オクターブ・キイ、Sp. はスパチュラ・キイを意味する。
G, G
+
, and G
3
are G
#
keys. E and E
+
are E
b
keys. 8
1
is the first
octave key. 8
2
is the second octave key. 8
3
is the third octave
key. Sp. is a spatula key.
G, G
+
und G
3
sind Gis-Klappen. E und E
+
sind E
b
-Klappen. 8
1
ist die erste, 8
2
die zweite und 8
3
die dritte Oktavklappe. Sp. ist
eine Hilfsklappe.
G, G
+
et G
3
sont des clés Sol
#
. E et E
+
sont des clés Mi
b
. 8
1
est la clé de première octave. 8
2
est la clé de deuxième octave.
8
3
est la clé de troisième octave. Sp. est une spatule.
G, G
+
, y G
3
son llaves G
#
. E y E
+
son llaves E
b
, 8
1
es la pri-
mera llave de octava. 8
2
es la segunda llave de octava. 8
3
es la
tercera llave de octava. Sp. es una llave de espátula.
G, G
+
, e G
3
são chaves de sol sustenido. E e E
+
são chaves
de mí bemol. 8
1
é a primeira chave de oitava. 8
2
é a segunda
chave de oitava. 8
3
é a terceira chave de oitava. Sp. é a chave
de espátula.
G、G
+
和G
3
属于 G
#
音键。E和E
+
属于 E
b
音键。8
1
是第一个
八度键。8
2
是第二个八度音键。8
3
是第三个八度音键。Sp. 是
一个调音键。
G, G
+
и G
3
являются клавишауми G
#
. E и E
+
являются
клавишами E
b
. 8
1
– клавиша первой октавы. 8
2
– клавиша
второй октавы. 8
3
– клавиша третей октавы. Sp. – лан-
цетнаяклавиша.
G, G
+
, G
3
은 G
#
음의 키. E, E
+
은 E
b
음의 키. 8
1
은 제1 옥타브
키, 8
2
는 제2 옥타브 키, 8
3
은 제3 옥타브 키, Sp.는 스파츄라
키를 의미합니다.
G、G
+
和 G
3
屬於 G
#
音鍵。E 和 E
+
屬於 E
b
音鍵。8
1
是
第一個八度音鍵。8
2
是第二個八度音鍵。8
3
是第三個八度音
鍵。Sp. 是調音鍵。
16
フル・オートマティック・キイの運指表
/ Fingering chart for full-automatic keys /
Grif f tabelle f ür Vollautomatische Klappen / Tableau de doigté pour mécanisme automatique /
Tabla de distribución de los dedos para llaves automáticas / Tabela de digitação para chaves
automáticas /
全自动音键的指法图
/
Схема аппликатуры для полностью автоматической
клавиатуры
/
풀 오토매틱 키의 운지표
/
全自動 按 鍵 指法表
17
フル・オートマティック・キイの運指表
/ Fingering chart for full-automatic keys /
Grif f tabelle f ür Vollautomatische Klappen / Tableau de doigté pour mécanisme automatique /
Tabla de distribución de los dedos para llaves automáticas / Tabela de digitação para chaves
automáticas /
全自动音键的指法图
/
Схема аппликатуры для полностью автоматической
клавиатуры
/
풀 오토매틱 키의 운지표
/
全自動 按 鍵 指法表
*b: LowB-C 連結が有効な時は C キー省略可能。
When Low B-C is linked, C key is unnecessary.
Wenn die tiefen H-C-Klappen miteinander verbunden sind, ist C nicht notwendig.
Lorsque le Si-Do graves sont liés, le Do est inutile.
Cuando los B-C bajos están enlazados, no es necesaria la tecla C.
Quando B-C graves estiverem conectado, o chave C è desnecessària.
当连接了低音 B-C 调时,无需使用 C 键。
Если нижние клавиши B-C связаны, клавиша C не нужна.
Low B-C연결이 유효한 경우에는 C키 생략 가능
連接低音 B-C 調時,則可省略 C 音鍵。
*c: LowB-C 連結が有効な時は使用不可。
When Low B-C is linked, this fingering is not possible.
Wenn die tiefen H-C-Klappen miteinander verbunden sind, ist dieser Griff unmöglich.
Lorsque le Si-Do graves sont liés, ce doigté est impossible.
Cuando los B-C bajos están enlazados, no es posible la digitación.
Quando B-C estiverem conectado, não é possível esta digitação.
当连接了低音 B-C 调时,该指法不可用。
Если нижние клавиши B-C связаны, такая аппликатура невозможна.
Low B-C연결이 유효한 경우에는 사용 불가
連接低音 B-C 調時,此指法不可用。

Manual Development Group
© 2013 Yamaha Corporation
Published 05/2022
2022
年
5
月
发行
POCP-B0
VDE1640
〒430-8650 静岡県浜松市中区中沢町 10-1