Adult assembly required.
Small parts may present choking hazard prior to assembly.
Enclosed please find simple step-by-step instructions to help you
quickly assemble your products. Before you begin we recommend
that you following the steps below:
1. Please read the instructions thoroughly.
2. Identify all parts and hardwares.
3. You will need the following tools:
Philips head screw driver
Flat head screw driver
Hammer
Do Not Use Power Drills or Drivers
To protect your parts during assembly please place them on a soft
surface.
To clean surface use only water on a damp cloth. Do not use
window cleaners or cleaning abrasives as it will scratch the surface
and could damage the protective coating.
ASSEMBLY INSTRUCTIONS
ITEM NO: 642
NUMÉRO DU MODÈLE : 642
INSTRUCTIONS D'ASSEMBLAGE.
Notez s'il vous plaît que l'avertissement sur la table à langer
est exigé par la loi de la CPSC et l'ASTM, qui nous oblige d'in-
former les parents et les personnes en charge des enfants.
Nous nous excusons pour toute inconvenance que cela pour-
rait vous causer.
L'assemblage par un adulte de ce meuble est nécessaire.
Les petites pièces non-assemblées présentent le risque d'étouffement.
Pour vous aider pendant l'assemblage de votre produit, veuillez trouver
en bas des instructions simples, en étape. Avant de commencer
1
Dream On Me Inc.
1532 S WASHINGTON AVE
PISCATAWAY TWP NJ 08854
Email: [email protected]
www.dreamonme.com
l'assemblage, les étapes suivantes sont vivement recommandées :
1. Lisez attentivement les instructions.
2. Identifiez toutes les pièces et les outils.
3. Vous avez besoin des outils suivants :
Tournevis cruciforme
Tournevis plat
Marteau
N'utilisez pas d'outils électriques.
Pour protéger les pièces pendant l'assemblage, placez-les sur une
surface souple.
Pour nettoyer la surface du meuble n'utilisez que de l'eau sur une
lingette humide. N'utilisez pas des nettoyants à vitre ou des nettoyants
abrasifs, car ils vont égratigner cette surface et endommager le fini.
2
Scan the QR code to register your product
https://dreamonme.com/customercare/registration/

3
WARNING !
· FAILURE TO FOLLOW THESE WARNINGS AND THE ASSEMBLY INSTRUCTIONS
COULD RESULT IN SERIOUS INJURY OR DEATH.
· READ ALL INSTRUCTIONS BEFORE ASSEMBLING CRIB. KEEP INSTRUCTIONS
FOR FUTURE USE.
· UPON COMPLETION OF ASSEMBLY, MAKE SURE ALL SCREWS,BOLTS AND
FASTENERS HAVE BEEN SECURELY TIGHTENED.
A FREQUENT AND PEDRIODICALLY CHECK SHOULD BE MADE TO CONFIRM ALL
THE SCREWS AND NUTS REMAIN TIGHT.
· NEVER USE THIS PRODUCT IF THERE ARE ANY LOOSE, MISSING FASTENERS,
LOOSE JOINTS,BROKEN PARTS, OR TORN MESH/FABRIC.CONTACT DREAM ON ME
1532 S WASHINGTON AVE PISCATAWAY TWP NJ 08854 732-366-1788
FOR REPLACEMENT PARTS AND INSTRUCTIONAL LITERATURE IF NEEDED.
· NEVER SUBSTITUTE PARTS, THE PRODUCT INCLUDING SIDE RAILS,MUST BE
FULLY ERECTED PRIOR TO USE.
· NEVER USE BED FOR INFANTS, THIS TODDLER BED IS NOT A SUBSITITUTE FOR A
CRIB,THE TODDLER BED IS USED FOR A CHILD BETWEEN THE AGE OF 15MONTHS
TO 5 YEARS WITH A MAXIMUM WEIGHT OF 50 POUNDS(22.7KG).
· NEVER USE PLASTIC SHIPPING BAGOR OTHER PLASTIC FILM AS A MATTRESS
COVERS NOT SOLD AND INTENDED FOR THAT PURPOSE,THEY CAN CAUSE
SUFFOCATION.
· CAUTION ENTRAPMENT HAZARD:TO AVOID DANGEROUS GAPS,ANY MATTRESS
USED IN THIS BED SHALL BE FULL SIZE CRIB MATTRESS AT LEAST 51-58IN
(1310MM) IN LENGTH, 27-1/4IN(690MM) IN WIDTH AND 4IN(100M) IN THICKNESS,OR
GREATER,BUT NOT EXCEED 5IN.
· NEVER USE A WATER MATTRESS WITH THIS TODDLER BED.
· WARNING STRANGULATION HAZARD:STRINGS CAN CAUSE STRANGULATION!
NEVER PLACE BED NEAR WINDOW WHERE CORDS FROM BLINDS OR DRAPES
MAY STRANGLE A CHILD.NEVER SUSPEND STRINGS OVER BED.
NEVER PLACE ITEMS WITH A STRING CORD,OR RIBBON,SUCH AS HOOD STRINGS,
PACIFIER CORDS AOUND A CHILS’S NECK.THESES ITEMS MAY CATCH ON BED
PARTS.
· WARNING: INFANTS HAVE DIED IN TODDLER BEDS FROM ENTRAPMENT.
OPENINGS IN AND BETWEEN BED PARTS CAN ENTRAP HEAD AND NECK OF A
SMALL CHILD. NEVER USE BED WITH CHILDREN UNDER 15MONTHS.ALWAYS
FOLLOW THE ASSEMBLY INSTRUCTIONS.
· TO REDUCE THE RISK OF SIDS,PEDIASTRICIANS RECOMMED HEALTHY INFANTS
BE PLACED ON THEIRE BACK TO SLEEP,OR ADVISED BY YOUR PHYSICIAN.
· DO NOT USE BED IF THE SPACE BETWEEN BED AND SOLID OBJECTS IS LESS
THAN 12IN(31CM), A CHILD COULD SLID INTO THE SPACE AND SUFFOCATE.
· IF REFINISHING,USE A NON-TOXIC FINISH SPECIFIED FOR CHILDREN’S PRODUCTS.
TO WASH,CLEAN WITH MILD SOAP AND DAMP CLOTH.
TO STORE,PLEASE KEEP IN A COOL PLACE.
MADE IN CHINA

4
MISE EN GARDE !
FABRIQUÉ EN CHINE
LE NON-RESPECT DES AVERTISSEMENTS ET DES INSTRUCTIONS D'ASSEMBLAGE PEUT CON-
DUIRE À DES BLESSURES GRAVES OU À LA MORT.
LISEZ TOUTES LES INSTRUCTIONS AVANT L'ASSEMBLAGE DU LIT. GARDEZ LE MANUEL POUR
UNE UTILISATION FUTURE.
APRÈS AVOIR FINI L'ASSEMBLAGE DU LIT DE BÉBÉ, VÉRIFIEZ QUE TOUS LES ÉCROUS, LES
BOULONS ET LES VIS SONT FERMEMENT SERRÉS.
DES INSPECTIONS RÉGULIÈRES ET FRÉQUENTES POUR VÉRIFIER QUE TOUTES LES VIS ET
ÉCROUS SONT SERRÉES SERONT NÉCESSAIRES.
NE PAS UTILISER CE PRODUIT SI DES FIXATIONS SONT DESSERRÉES OU MANQUANTES, DES
JOINTS SONT LÂCHES, SI DES PIÈCES SONT FAUTIVES OU SI LE TISSU PRÉSENTE DES DÉCHIRU-
RES. POUR DES PIÈCES DE REMPLACEMENT ET DES INSTRUCTIONS D’ASSEMBLAGE, CONTAC-
TEZ DREAM ON ME 1532 S WASHINGTON AVE PISCATAWAY TWP NJ 08854 732-366-1788.
NE PAS SUBSTITUER DE PIÈCES. CE PRODUIT, Y COMPRIS LES REBORDS, DOIT ÊTRE ENTIÈRE-
MENT ASSEMBLÉ AVANT DE L'UTILISATION.
NE PAS UTILISER CE LIT POUR LES NOURRISSONS. CE LIT D'ENFANT NE REMPLACE PAS UN
BERCEAU; LE LIT D'ENFANT EST POUR LES ENFANTS ÂGÉS DE 15 MOIS À 5 ANS, AVEC UN POIDS
MAXIMAL DE 22.7KG (50 LIVRES).
NE JAMAIS UTILISER LES SACS D'EXPEDITION EN PLASTIQUE OU TOUT AUTRE FILM EN PLAS-
TIQUE, POUR COUVRIR LE MATELAS, S'ILS NE SONT PAS DESTINÉS À CET USAGE, CAR ILS PEU-
VENT CAUSER LA SUFFOCATION.
ATTENTION RISQUE DE PIÉGEAGE : POUR ÉVITER LES ESPACES DANGEREUX, LES MATELAS
UTILISÉS AVEC CE LIT DOIVENT ÊTRE DE TAILLE STANDARD ET MESURER AU MOINS 1310 MM (51
5/8 POUCES) PAR 690 MM (27 1/4 POUCES) POUR UNE ÉPAISSEUR D'AU MOINS 100 MM (4
POUCES). L'ÉPAISSEUR DU MATELAS NE DOIT PAS DÉPASSER 5 POUCES.
NE PAS UTILISER UN MATELAS À EAU AVEC CE LIT.
MISE EN GARDE RISQUE D'ÉTRANGLEMENT : DES CORDES PEUVENT CAUSER LA STRANGULA-
TION ! NE PLACEZ PAS LE LIT AUPRÈS D'UNE FENÊTRE LÀ OÙ LES CORDES DES STORES OU
DRAPERIES POURRONT ÉTRANGLER UN BÉBÉ. NE PAS SUSPENDRE DES CORDES EN DESSUS
DU LIT.
NE JAMAIS PLACER DES OBJETS ATTACHÉS PAR UNE CORDE AUTOUR DU COU DE VOTRE BÉBÉ,
COMME PAR EXEMPLE CELLE D'UN CAPUCHON OU D'UNE SUCETTE. CES OBJETS POURRAIENT
SE COINCER DANS DES PIÈCES DU LIT.
MISE EN GARDE : DES ACCIDENTS MORTELS PAR COINCEMENT SONT DÉJÀ SURVENUS DANS
DES LITS D'ENFANTS. UN PETIT ENFANT PEUT COINCER SA TÊTE ET SON COU DANS LES OUVER-
TURES SITUÉES DANS ET ENTRE LES PARTIES DU LIT D'ENFANT. N’UTILISEZ JAMAIS LE LIT
D'ENFANT POUR DES ENFANTS DE MOINS DE 15 MOIS. SUIVEZ TOUJOURS LES INSTRUCTIONS DE
MONTAGE.
POUR RÉDUIRE LES RISQUES DU SYNDROME DE LA MORT SUBITE DU NOURRISON, LES
MÉDECINS PÉDIATRES VOUS RECOMMANDENT DE PLACEZ SUR LE DOS LE BÉBÉ PENDANT LE
SOMMEIL, EXCEPTÉ DANS LES CAS OÙ VOTRE MÉDECIN ÉMET UN AVIS DIFFÉRENT.
LE LIT D'ENFANT DOIT ÊTRE PLACÉ À UNE DISTANCE DE PLUS DE 31CM (12 PO) DE N’IMPORTE
QUEL OBJET SOLIDE. L’ENFANT POURRAIT GLISSER DANS DES ESPACES ÉTROITS ET SUFFO-
QUER.
SI VOUS VOULEZ RENOUVELER LA COUCHE DE FINITION, UTILISEZ UN FINI NON TOXIQUE
RECOMMANDÉ POUR DES PRODUITS DESTINÉS AUX ENFANTS. NETTOYEZ AVEC UN SAVON
DOUX ET UN CHIFFON MOITE. POUR ENTREPOSER LE LIT, GARDEZ-LE DANS UN ENDROIT FRAIS.
•
•
•
•
•
•
•
•
•
•
•
•
•
•
5
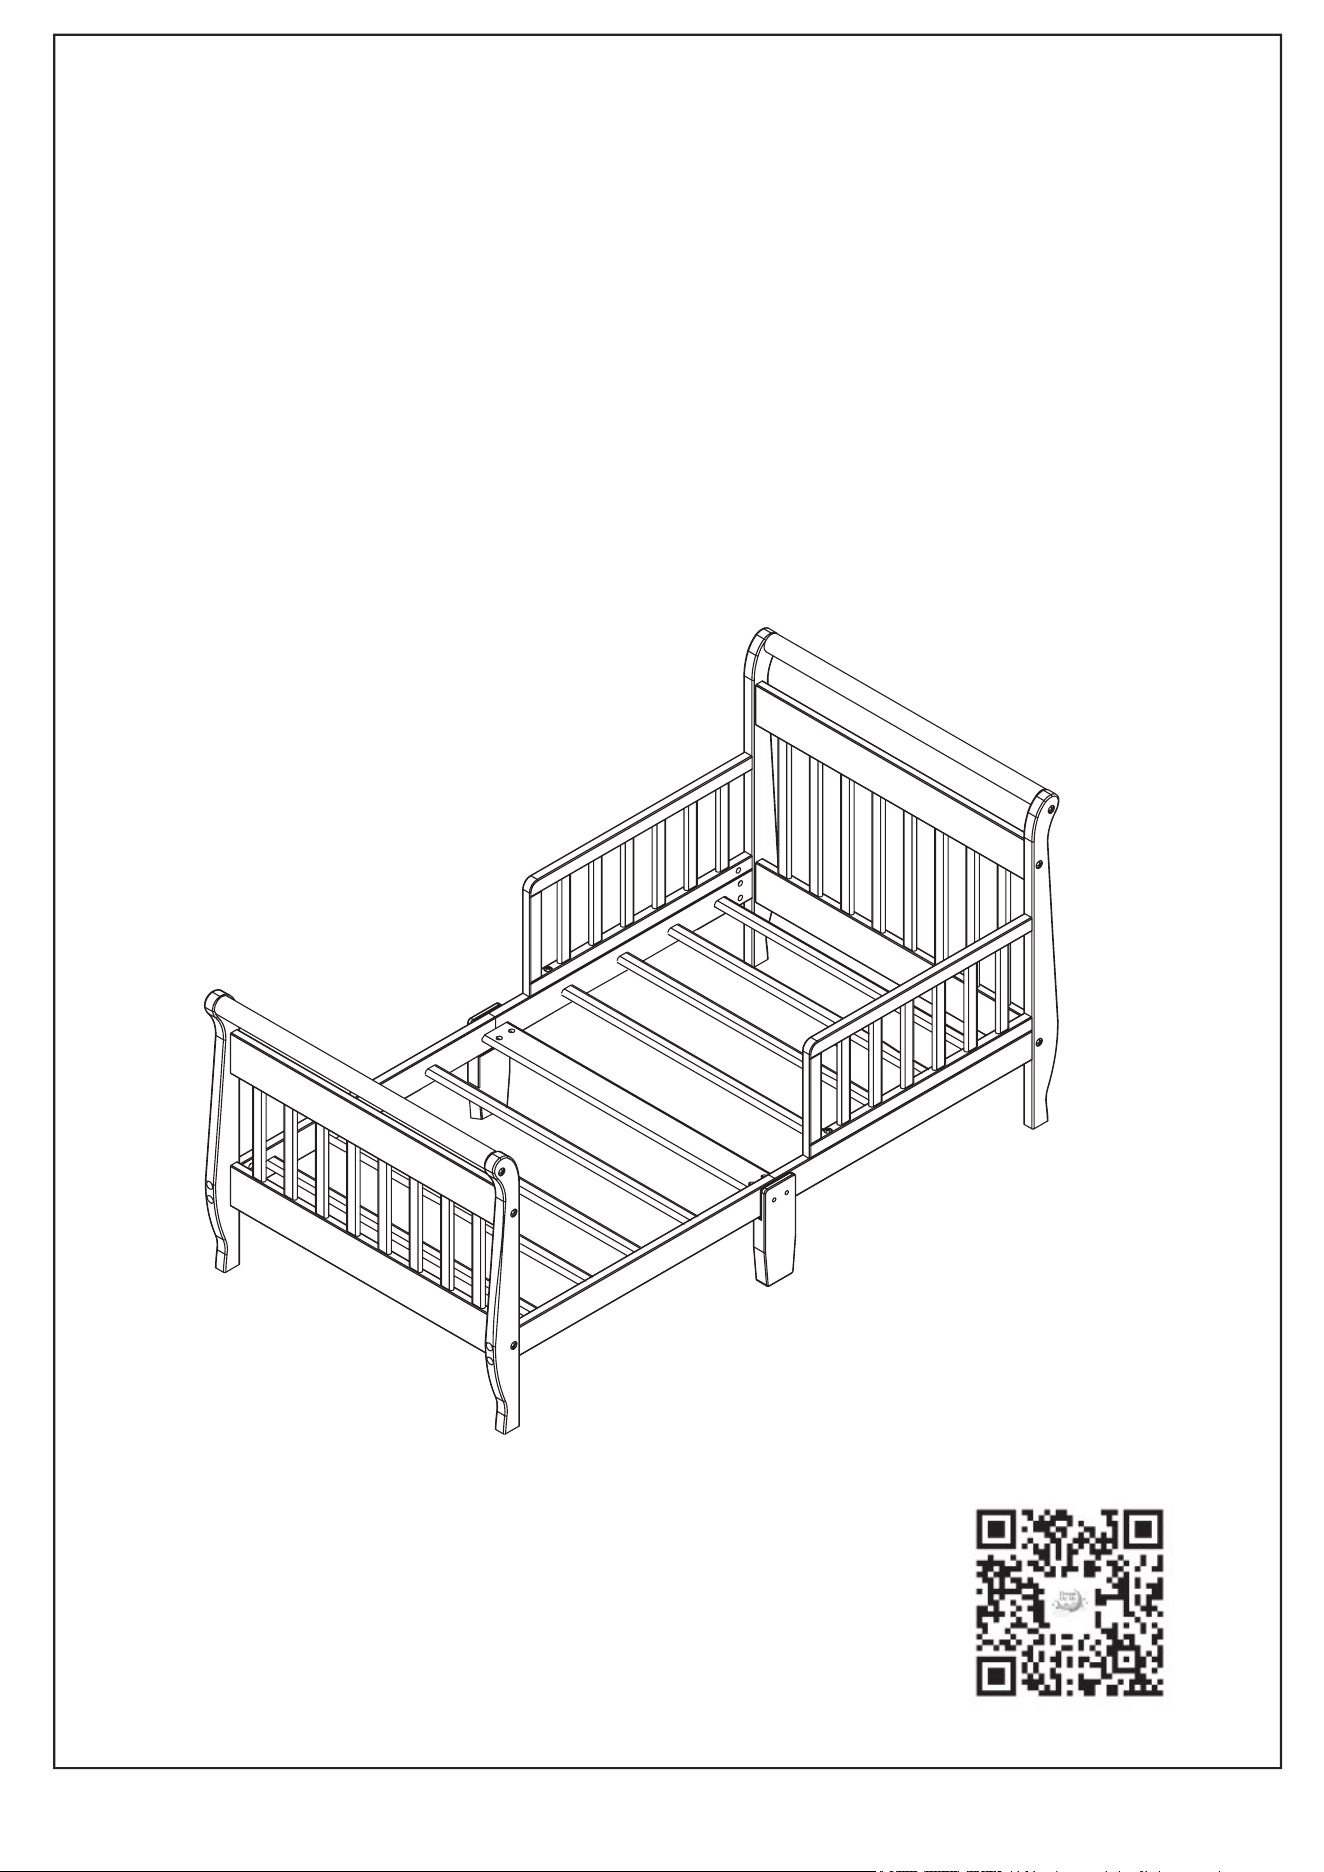
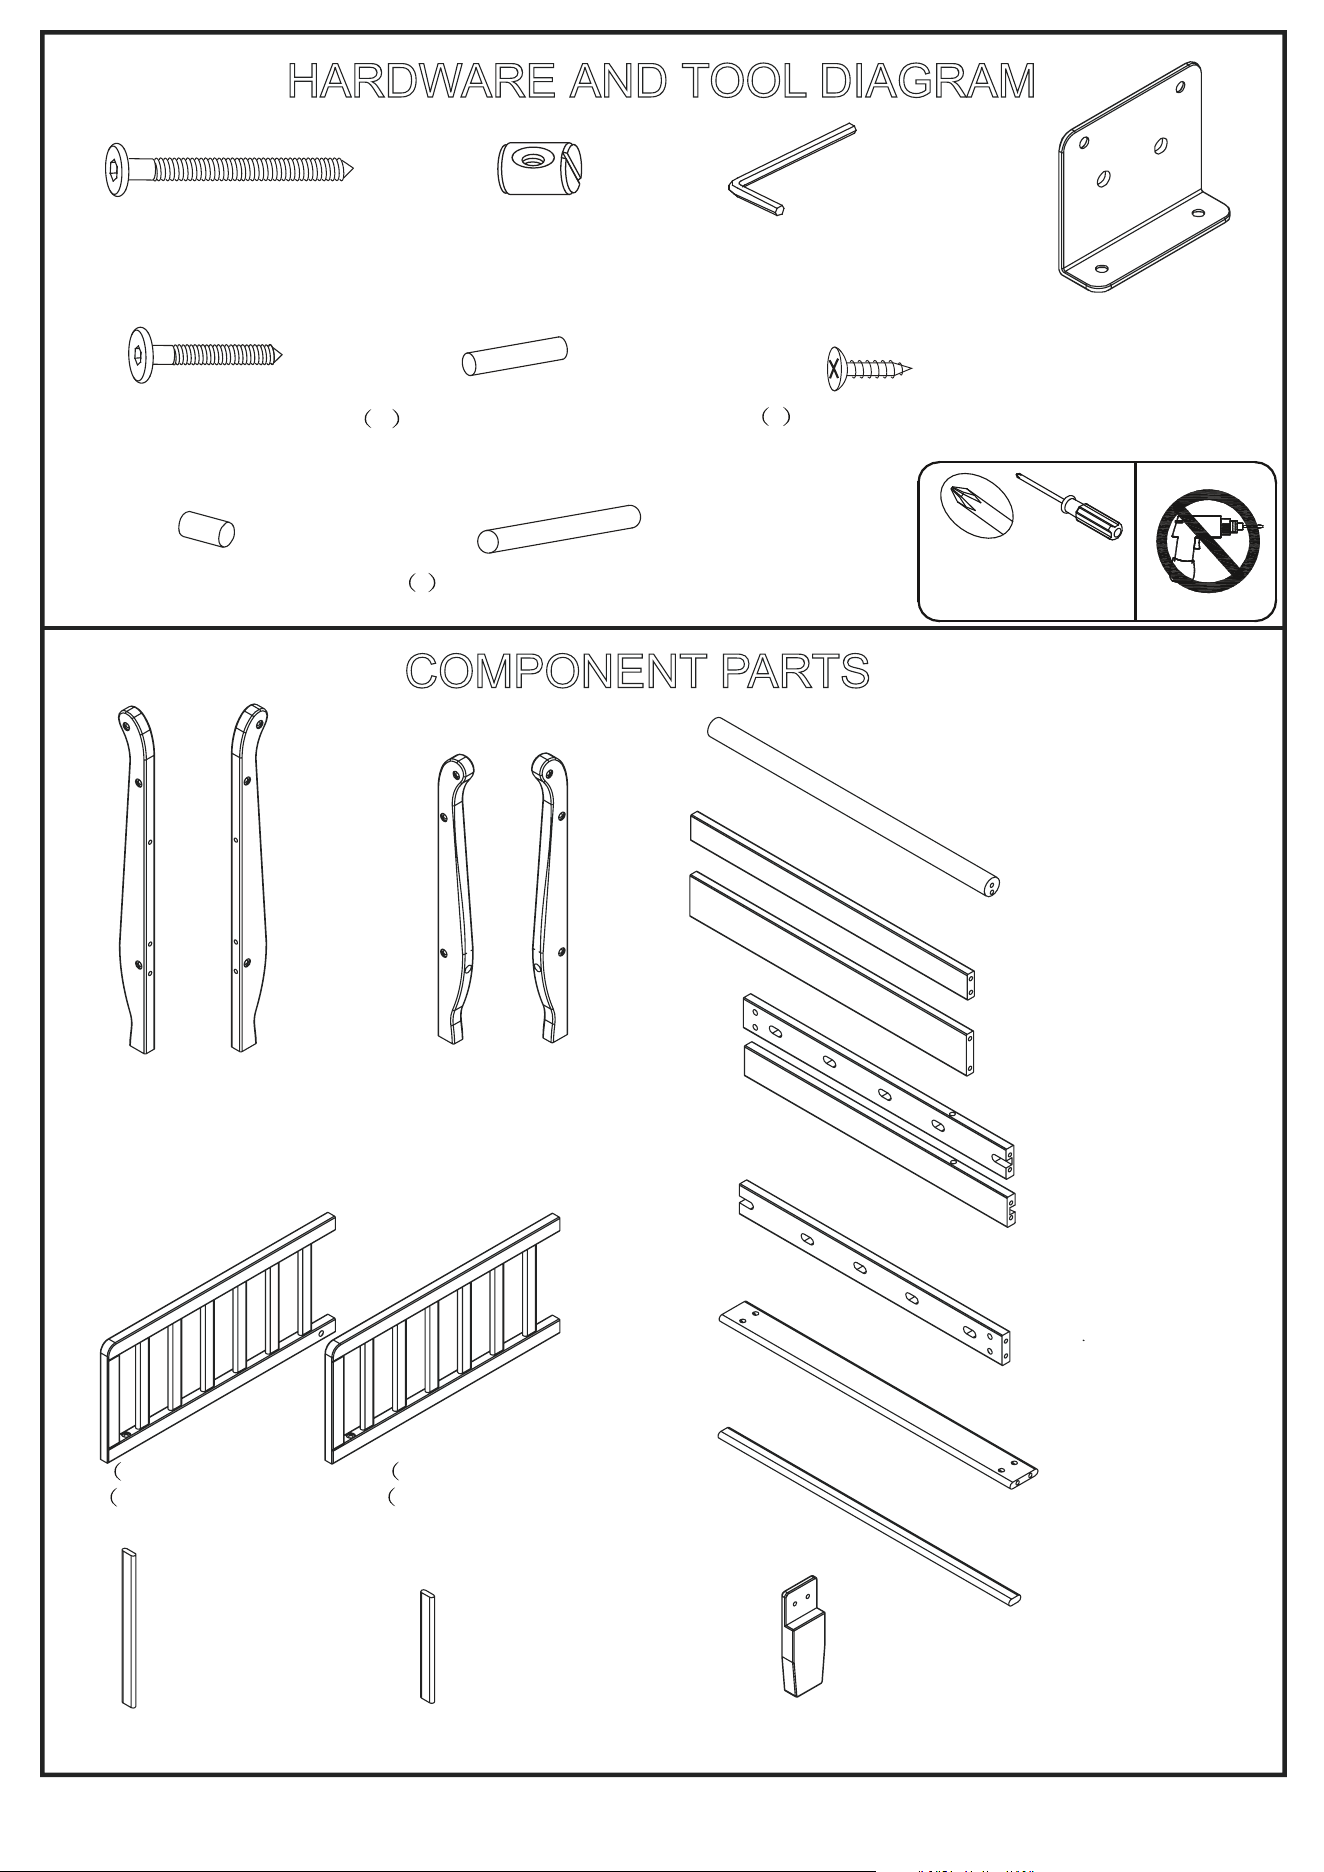
(A) Headboard Leg 2PCS
(B) Footboard Leg 2PCS
(C) Bed Rail 2 PCS
(M) Cross Middle Bar 1 PC
(N) Cross Bar 8PCS
(K) Side Bar
2 PCS
HARDWARE AND TOOL DIAGRAM
(a) Bolt 3” 18 PCS
(b) Barrel Nut 18 PCS
(c) Allen Wrench 1 PC
(d) Bolt 1-5/8” 12 PCS
e 1-3/16” Wood Dowel 12 PCS
(h) L Metal Plate 2PCS
C1)Left Bed Rail
C2)Right Bed Rail
COMPONENT PARTS
(L) Side Bar
2 PCS
(F) Split leg 2PCS
(g) Stopper 16PCS
(A2) Right
(A1) Left
(B2) Right
(B1) Left
(D) Headboard slat 8 PCS
(E) Footboard slat 8 PCS
(K2) Right
(K1) Left
j 2-3/8” Wood Dowel 4 PCS
PHILLIPS--HEAD SCREWDRIVER
REQUIRED FOR ASSEMBLY
----NOT INCLUDE
Do Not Use Power Drills or Drivers
(H1) Middle rail 2 PCS
(G) Top rail 2 PCS
(H2) Bottom rail 2 PCS
f Selfdrilling
screw 8 PCS
(A) Pied du panneau de
tête de lit 2PCS
(B) Pied du panneau de
pied 2PCS
(C) Barrière de lit 2 PCS
(M) Barre transversale
centrale 1PC
(N) Barre transversale 8 PCS
(K) Barre latérale 2 PCS
(a) Boulon 3" 18 PCS
(b) Écrou manchon 18 PCS
(c) Clé Allen 1 PC
(d) Boulon 1-5/8" 12PCS
(e) Goujon en bois 1-3/16" 12 PCS
(f) Vis autoperceuse
8 PCS
(h) Plaque métallique en L 2PCS
C1)Barrière de lit droite
C2)Barrière de lit droite
(L) Barre latérale 2PCS
(F) Pied divisé 2PCS
(g) Bouchon 16PCS
(A2) droit(A1) Gauche
(B2) droit
(B1) Gauche
(D) Latte de tête
de lit 8 PCS
(E) Latte de pied de lit 8 PCS
(G) Rail supérieur 2 PCS
(K2) Droit
(K1) Gauche
(j) Goujon en bois 2-3/8" 4 PCS
(H1) Rail inférieur 2 PCS
(H2) Rail inférieur 2 PCS
6
(H1)
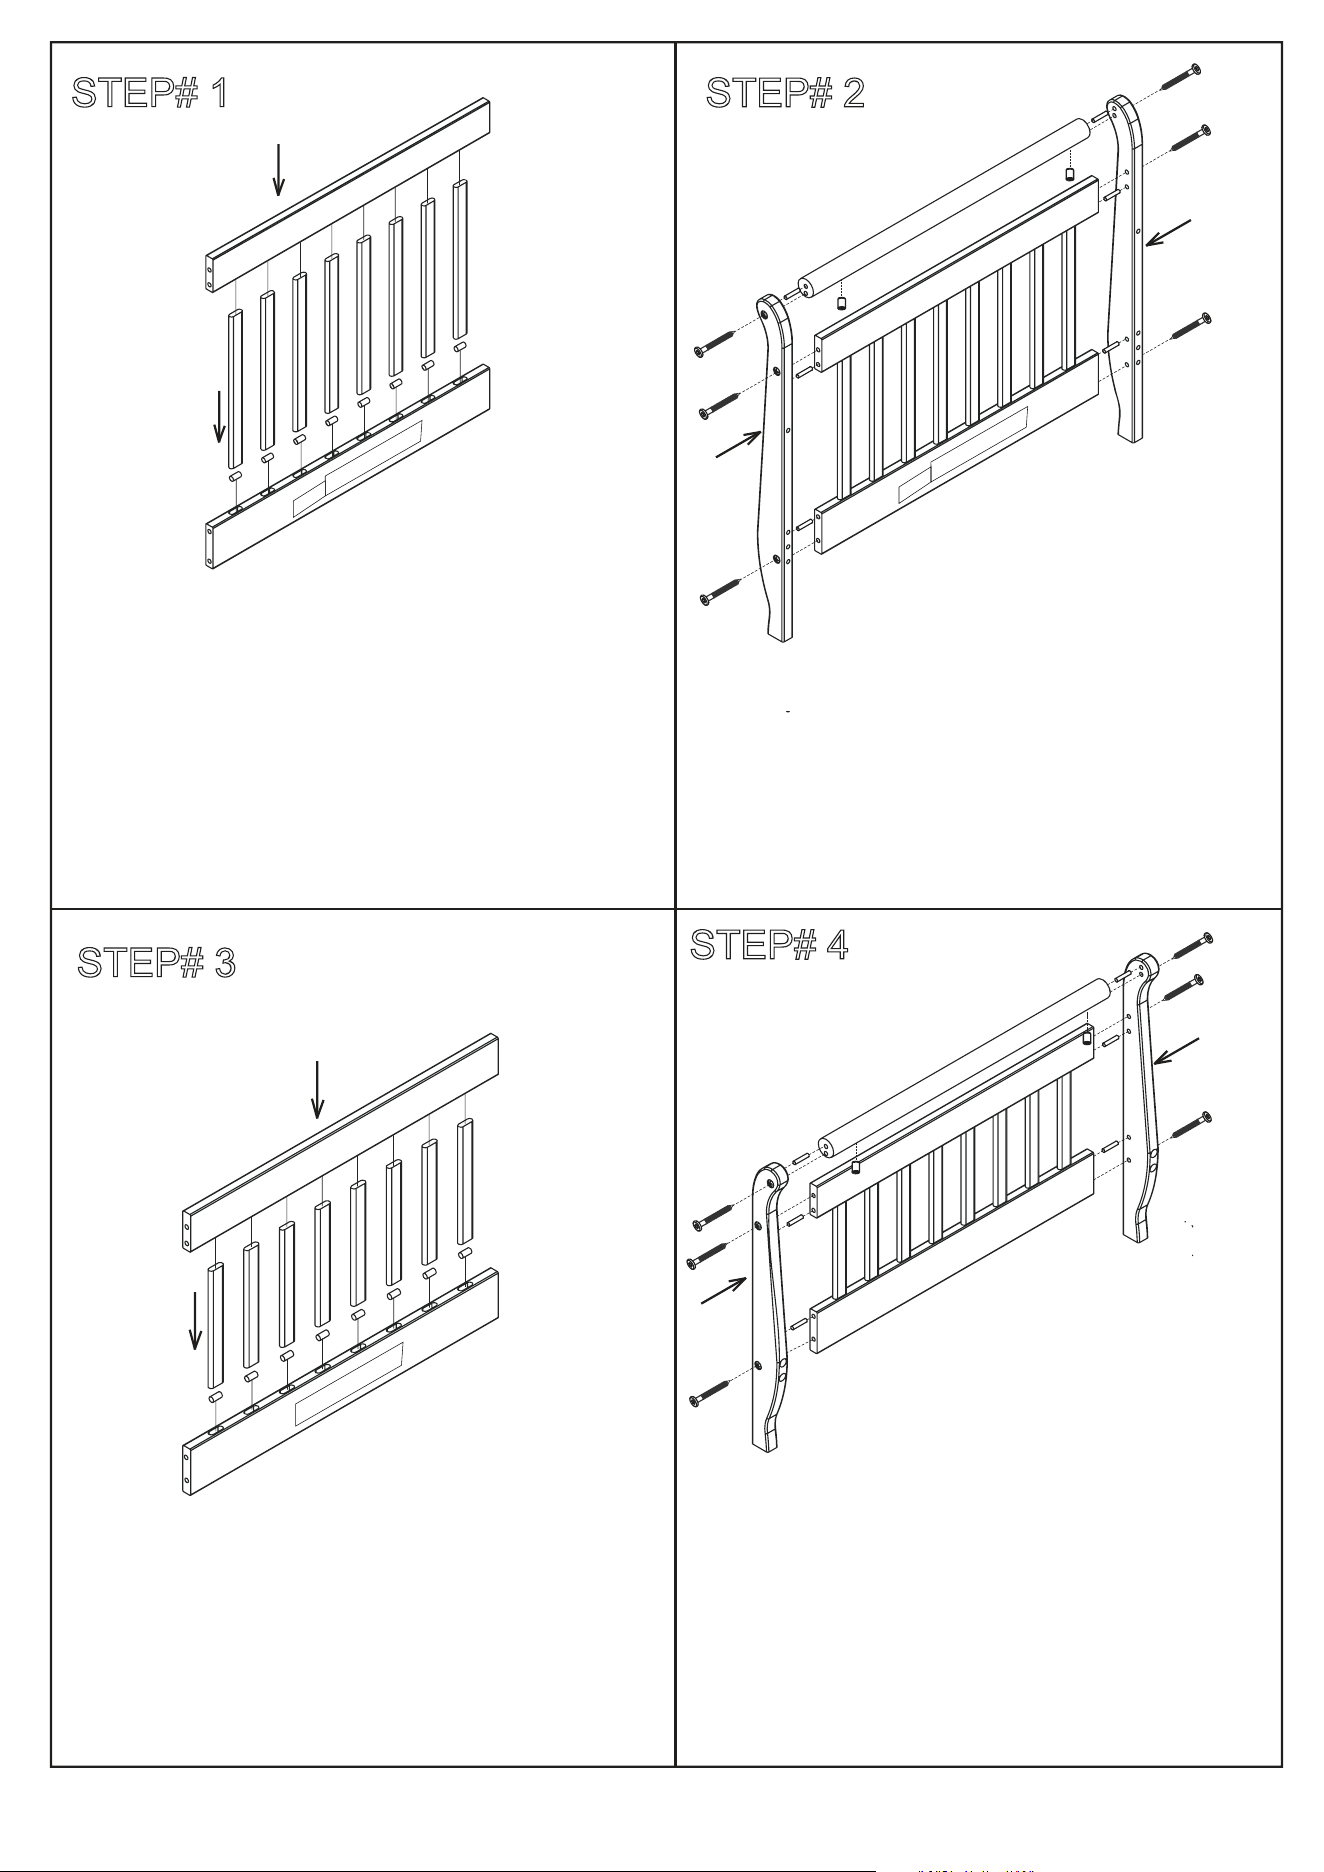
STEP# 1
STEP# 3
STEP# 2
STEP# 4
(H2)
(D)
(g)
(H1)
(H2)
(E)
(g)
Press the stopper(g) into the bottom
rail (H2) with slat (D), connect the
slat(D) to the middle rail (H1).
Using the bolt (d) and the wood dowel
(e) to connect the left leg (A1) and right
leg (A2) to top rail(G) and middle&
bottom rail (H1;H2);
Note: put the rail with waring label down
and inside that makes your crib better.
Press the stopper(g) into the bottom
rail (H2) with slat (E), connect the slat
(E) to the middle rail (H1).
Using the bolt (d) and the wood dowel
(e) to connect the left leg (B1) and right
leg (B2) to top rail(G) and middle&bottom
rail (H1;H2);
Note: put the rail with waring label down
and inside that makes your crib better.
ÉTAPE 1
ÉTAPE 2
ÉTAPE 3
ÉTAPE 4
Insérez le bouchon (g) dans le rail
inférieur avec l'étiquette d'avertissement
(H2) en utilisant la latte (D). Connectez la
latte (D) au rail sans étiquette
d'avertissement (H1).
En utilisant les boulons (d) et les goujons en bois (e),
connectez le pied gauche
(A1) et le pied droit (A2) au
(G) et au rail (H1;H2);
Note : placez le rail avec l'étiquette d'avertissement
en bas et orienté vers l'intérieur.
Insérez le bouchon (g) dans le rail inférieur
(H2) en utilisant la latte (E). Connectez la
latte (E) au rail (H1).
En utilisant les boulons (d) et les goujons en bois
(e), connectez le pied gauche (B1) et le pied droit
(B2) au rail supérieur (G) et au rail (H1;H2);
Note : placez le rail avec l'étiquette d'avertissement
en bas et orienté vers l'intérieur.
(A1)
(A2)
(G)
(H2)
(H1)
(d)
(a)
(d)
(d)
(d)
(a)
(e)
(e)
(e)
(e)
(e)
(e)
(b)
(b)
rail supérieur
(B1)
(B2)
(G)
(H2)
(H1)
(d)
(d)
(d)
(a)
(d)
(d)
(e)
(e)
(e)
(e)
(a)
(b)
(b)
7
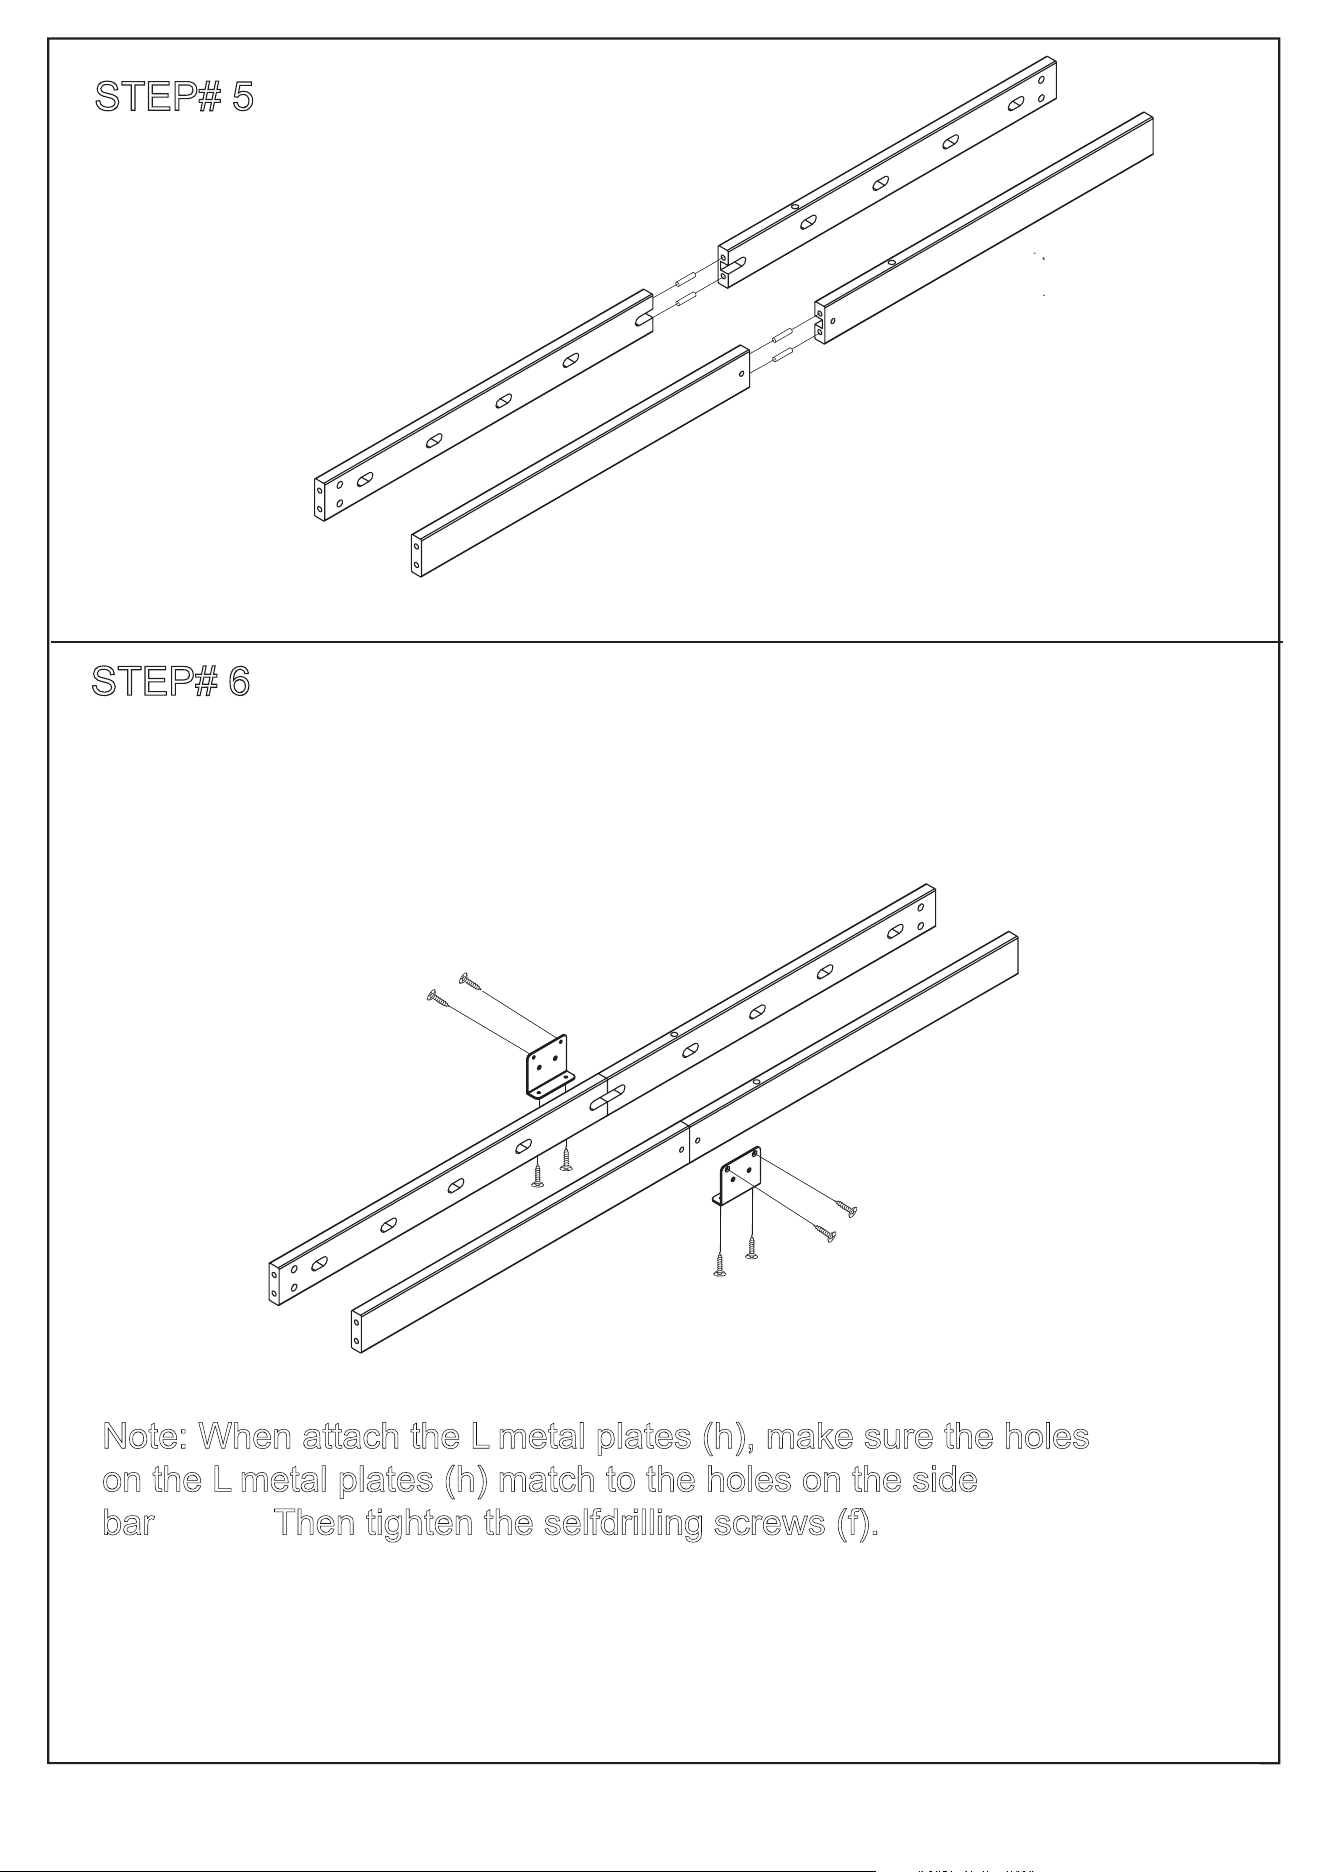
STEP# 6
Connect the side bar (K1&K2) to the side bar (L) by L metal plates
(h) and selfdrilling screws (f).
Note: When attach the L metal plates (h), make sure the holes
on the L metal plates (h) match to the holes on the side
bar (K&L). Then tighten the selfdrilling screws (f).
(K1)
(L)
(f)
(f)
(f)
(f)
(K2)
(L)
(h)
(h)
STEP# 5
Connect the side bar (K1&K2)
to the side bar (L) by wood dowels (j).
ÉTAPE 5
Connectez la barre latérale (K1 et K2) à la barre latérale
(L) en utilisant des goujons en bois (j).
ÉTAPE 6
Connectez la barre latérale (K1 et K2) à la barre latérale (L) en utilisant des
plaques métalliques en L (h) et des vis autoperceuses (f).
Note : Quand vous attachez les plaques métalliques en L (h),
assurez-vous que les trous sur les plaques métalliques en L (h)
sont alignés avec les trous sur la barre latérale (K et L). Ensuite,
serrez à fond les vis autoperceuses (f).
(K2)
(j)
(j)
(K1)
(L)
(L)
8
Insert the cross bar (M&N) to the right side
bar (K2&L) .
then attach the split
legs (F) to the cross middle bar(M)
by bolts (a) and barrel nuts (b).
STEP# 7
Insert the cross bar (M&N) to the left side bar (K1&L).
then attach the split legs (F) to the cross middle bar(M)
by bolts (a) and barrel nuts (b).
(K1)
(L)
(M)
(N)
(N)
(F)
(a)
(b)
STEP# 8
(N)
(N)
(N)
(N)
(N)
(N)
(K2)
(L)
(N)
(M)
(N)
(F)
(a)
(b)
(N)
(N)
(N)
(N)
(N)
(N)
ÉTAPE 7
Insérez la barre transversale (M et N) à la barre latérale
gauche (K1 et L). Ensuite, attachez les pieds divisés
(F) à la barre transversale centrale (M) en utilisant des boulons
(a) et des écrous manchon (b).
ÉTAPE 8
Insérez la barre transversale (M et N) à la barre transversale droite
(K2 et L). Ensuite, attachez les pieds divisés (F) à la barre transversale centrale
(M) en utilisant des boulons (a) et des écrous manchon (b).
9
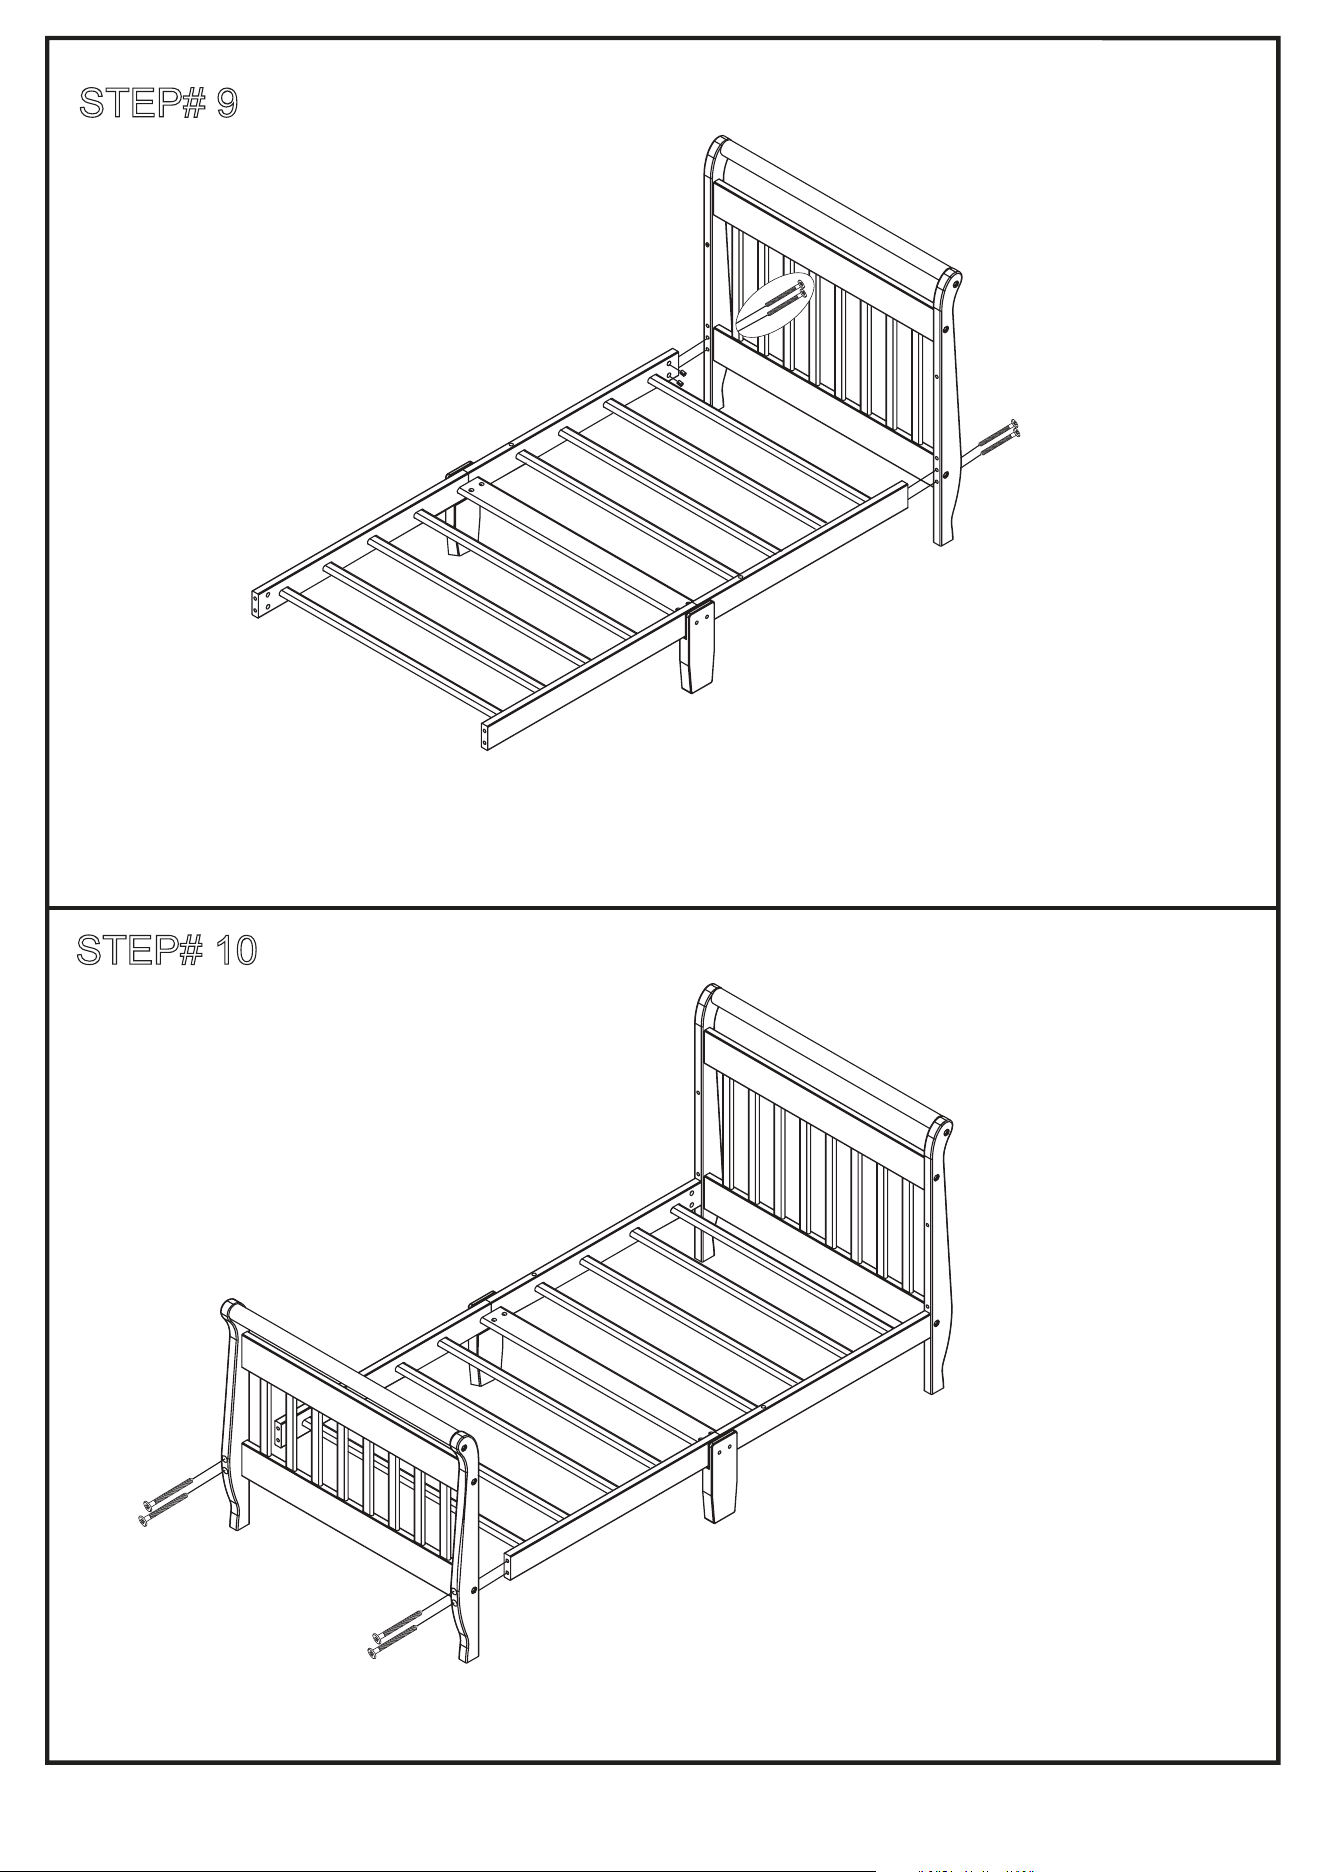
STEP# 10
Connect the side bar (L) to the footboard
Leg (B1) by using bolts (a) and barrel
nuts (b) .The footboard leg (B2) use the
same way.
(B2)
(B1)
(L)
(L)
(a)
(a)
STEP# 9
Connect the headboard Leg (A1) to the
left side bar (K1) using bolts (a) and
Barrel Nuts(b).The right side bar (K2)
use the same way.
(b)
(a)
(K2)
(K1)
(A2)
(A1)
(a)
ÉTAPE 9
Connectez le pied gauche (A1) à la barre latérale
gauche (K1) en utilisant des boulons (a) et
des écrous manchon (b). Attachez la barre
latérale droite (K2) de la même façon.
ÉTAPE 10
Connectez la barre latérale (L) au pied gauche (B1)
en utilisant des boulons (a) et des écrous
manchon (b). Attachez le pied droit
(B2) de la même façon.

10
STEP# 11
1.Connect left bed rail (C1) to the left side bar (K1)
using bolt (d),Then connect the left bed rail (C1)
to the headboard leg (A1) by using bolts (a)&(d)
and barrel nut (b).
(a)
(A1)
(a)
(d)
(d)
(A2)
(C1)
(C2)
(b)
(d)
(d)
(K1)
(K2)
2.Connect right bed rail (C2) to the right
side bar (K2) using bolt (d),Then connect
the right bed rail (C2) to the headboard
leg (A2) by using bolts (a)&(d)
and barrel nut (b).
ÉTAPE 11
1. Connectez la barrière de lit gauche (C1) à la barre
latérale gauche (K1) en utilisant un boulon (d).
Ensuite, connectez la barrière de lit gauche (C1)
au pied gauche (A1) en utilisant des boulons (a)
et (d) et un écrou manchon (b).
2. Connectez la barrière de lit droite
(C2) à la barre
(K2) en utilisant un boulon
(d). Ensuite, connectez la
barrière de lit droite
(C2) au pied droit
(A2) en utilisant des
boulons (a) et (d)
et un écrou
manchon (b).
latérale droite

11
LIMITED WARRANTY
workmanship and agrees to remedy any such defect.
This is solely limited to the repair or replacement of defective furniture
components and no assembly labor is included.
assembled, subjected to misuse or abuse or which has been altered or
repaired in any way.
rights which vary from State to State.
WARNING: Should this product become damaged, and/or components
are broken or missing, DO NOT USE
Enter our monthly giveaway!
Simply scan the QRcode to register.
Chat with us!
For any questions or concerns or feedback.
1532, S. Washington Avenue
Piscataway, NJ 08854
E-mail: [email protected]
www.dreamonme.com
Follow us on
to get your nursery featured on our social media.
@dreamonmeinc
@dreamonmeinc
