4-Device
Rechargeable
Universal Remote
User Manual
See reverse for easy-to-follow
instructions and exclusive deals.
Charging the Universal Remote
Your rechargeable universal remote’s integrated
lithium polymer battery keeps your remote powered
for months on a single charge. Before use, make sure
the remote is fully charged by connecting the remote
to a power source using the included USB-C to USB-A
cable. The charging indicator light next to the remote’s
USB-C port will glow blue during charging and then
turn green once the remote is fully charged.
Battery Saver
Your remote will automatically turn off if the buttons
are held down for more than 8 seconds. This will save
your battery should your remote get stuck in a place
where the buttons remain depressed (e.g., between
sofa cushions).
Low-Battery Indicator Light
When the remote’s battery is too low to function
properly, the power button will blink twice when any
button is pressed. To charge the remote, connect it to
a power source using the included USB-C to USB-A
cable. The remote can be used to operate your devices
after 70 seconds of being connected to a power
source.
Remote does not operate your device
• Make sure the remote is charged.
• Aim the remote directly at your device and make
sure there are no obstructions between the
remote and the device.
• Make sure you select the appropriate device on
the remote you wish to control (TV for TV, AUD for
audio, etc.).
• Try programming the remote with a different code.
See Direct Code Entry section.
• Remote may not be compatible with your device.
• Remote’s battery may have been depleted
for a long time. After recharging the remote,
reprogramming may be necessary.
Remote does not operate some features of
your device
• Sometimes a particular code might operate a few
features but not all. Try programming the remote
with a different code from the code list. See
Direct Code Entry section.
• Remote may not be able to operate all features
of your device or button names may be different
than that of your original remotes.
Direct code entry is recommended for quick and
easy programming.
Note: The TV device button is preprogrammed
for Samsung TVs, and the STR device button is
preprogrammed for Roku boxes.
1. In the code list included with your remote, circle
the 4-digit codes for the type and brand of device
you wish to control.
2. Press and hold down the SETUP button until
the remote’s power button lights up. Release the
SETUP button. The power button will remain lit.
3. Press and release the chosen device button (TV,
STR, B-RAY or AUD). The power button will blink
once and then remain lit.
4. Enter the rst 4-digit code circled in Step 1. The
power button light will turn off.
5. Point the remote at the device and test the buttons.
If they don’t work as expected, repeat Steps 2-5
with the next circled code.
6. Repeat the process for each device you wish to
control.
Programming Notes
• Some codes may operate only a few device
functions, so test other codes for more functionality.
• Trouble nding a code? Program the remote using
the auto code search method.
• For combination devices, such as a TV/DVD
combo or TV/VCR combo, you may have to enter a
code for each device.
• Keep your device codes for future reference.
The RESET button is located to the left of the remote’s
charging port (see Button Functions section). Use a
paper clip to press and hold the RESET button for 1
second. If the remote is unresponsive, make sure the
remote is fully charged, then try again.
Alternate reset instructions
1. Press and hold the SETUP button until the red
light stays on, then release it. The red light will
remain on.
2. Press and release the MUTE button.
3. Press and release 0 (zero). The red light will
blink twice.
Code identication lets you retrieve the 4-digit code
used to program each of your device buttons.
1. Press and hold the SETUP button until the power
button light turns on, then release it. The power
button will remain lit.
2. Press and release the device button for the code
you seek.
3. Press and release ENTER.
4. Press and release #1 and count how many times
the power button blinks. This is the rst digit in your
code. Repeat the process by pressing #2, #3 and
#4 for the remaining digits.
5. Press and release ENTER to exit this mode.
Master volume control lets you select an audio
device to control the volume no matter which
component you’re operating.
Enabling Master Volume Control
1. Press and hold the SETUP button until the power
button light turns on, then release it. The power
button will remain lit.
2. Press and release the device button for the audio
component you wish to use.
3. Press and release the MUTE button.
4. Press and release VOL+. The power button will
blink twice and turn off.
Disabling Master Volume Control
1. Press and hold the SETUP button until the power
button light turns on, then release it. The power
button will remain lit.
2. Press and release the device button previously
programmed for master volume control.
3. Press and release the MUTE button.
4. Press and release VOL
-
. The power button will
blink twice and turn off.
Auto code search cycles through all codes in the
remote to nd one for your device.
Before you begin, read through the steps below to
familiarize yourself with the auto code search process.
1. Manually turn on the device you wish to control.
(Use direct code entry method for devices without
ON/OFF capability.)
2. Press and hold the SETUP button until the
remote’s power button lights up. Release the
SETUP button. The power button will remain lit.
3. Press and release the chosen device button (TV,
STR, B-RAY or AUD). The power button will blink
once and remain lit.
4. Point the remote at the device, then press and
release the power button. The power button will
blink and then remain lit after cycling through 10
codes.
Did the device turn off?
YES – Go to Step 5.
NO – Repeat Step 4 to test the next 10 codes.
5. Manually turn on the device.
6. Point the remote at the device, then press and
release VOL+. The power button will blink once
and then remain lit.
Did the device turn off?
YES – Press and release the same device
button pressed in Step 3. This stores the code in
the remote. Then go to Step 7.
NO – Repeat Step 6 until the device turns off.
Wait 3 seconds between each VOL+
button press.
7. Use the remote to turn on the device. Test the
remote’s buttons. If they don’t work as expected,
repeat Steps 2-7.
8. Repeat the process for each device you wish
to control.
4
5
7
13
18
14
2 31
6
8
11
9
10
12
15
16
19
17
2022 21
3
4
2
3
74
6
2
2
4
3 5
1
2
3
4
1
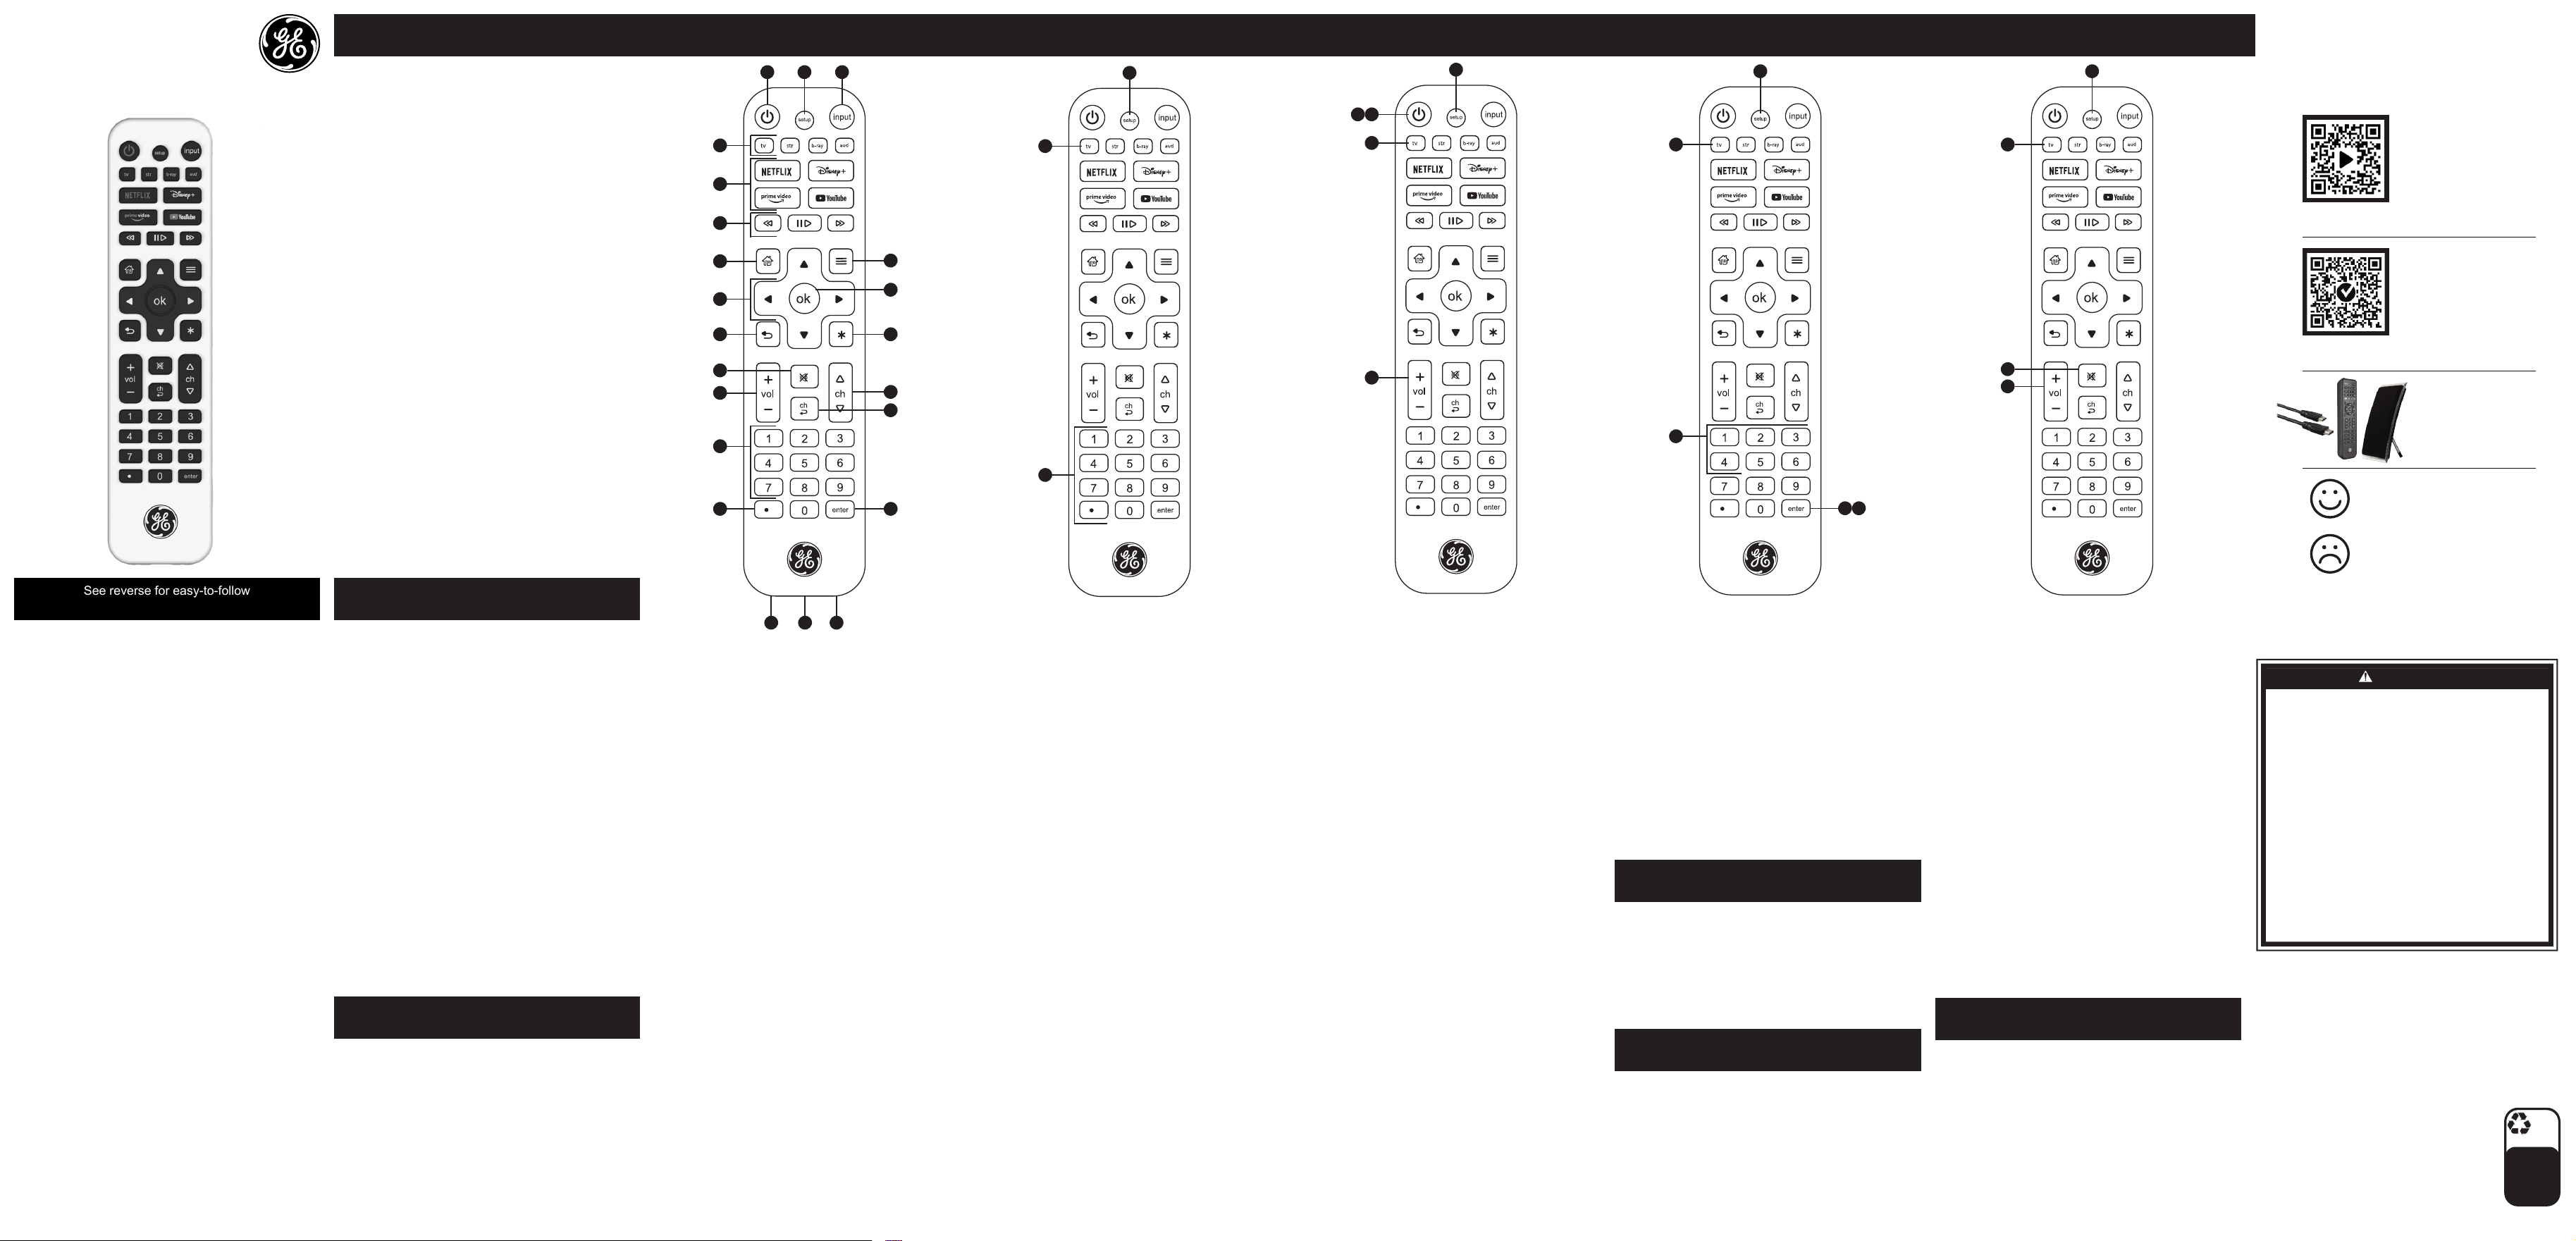
SETUP BUTTON FUNCTIONS DIRECT CODE ENTRY AUTO CODE SEARCH CODE IDENTIFICATION MASTER VOLUME CONTROL
1. Power – Turns devices ON/OFF
2. Setup – Used to program the remote
3. Input – Selects video input
4. TV, STR, B-RAY, AUD – Select the device to control
5. Record, play, stop, rewind, fast forward, pause
6. Streaming app hotkeys – Preprogrammed for
direct access to Netix, Prime Video, Disney+ and
YouTube
7. Home/guide – Accesses streaming device features
or guide for cable/satellite receivers
8. Up/down/left/right – Menu navigation
9. OK – Selects menu items for the controlled device
10. Menu – Displays the on-screen menu
11. Back – Returns to previous screen
12. Info (
*
) – Displays on-screen show/content
information
13. Volume up/down
14. Mute – Mutes sound
15. Last channel – Returns to the previously selected
channel
16. Channel up/down
17. Numbers – For direct channel selection
18. Dot (•) – Use to select digital channels, e.g., 4.1
19. Enter – For devices that require Enter to be pressed
after channel selection
20. USB-C charging port – Use with included USB
cable to charge the remote
21. Charging indicator light – Blue (charging in
progress); green (fully charged)
22. Reset – Reset remote to factory settings
TROUBLESHOOTING
RESET TO FACTORY SETTINGS
MADE IN CHINA
GE is a trademark of General Electric Company
and is under license by Jasco Products Company
LLC, 10 E. Memorial Rd., Oklahoma City, OK 73114.
This Jasco product has a limited-lifetime
warranty. Visit www.byjasco.com for
warranty details.
Questions? Contact our U.S.-based Consumer
Care at 1-800-654-8483, M-F, 7AM-8PM
Central Time.
For product patent information,
visit www.byjasco.com/patents.
80984 v2
2/24
The app hotkeys are preprogrammed for direct access
to Netix, Prime Video, Disney+ and YouTube. These
app hotkeys cannot be reprogrammed for use with
other apps. When using a compatible streaming media
player rather than a smart TV, press the STR button
before using the app hotkeys.
Some combo devices (e.g., TV/VCR, B-RAY/VCR,
etc.) require use of a separate mode button for each
part of the combo device. For example, if you have a
TV/B-RAY combo, you might need to set up a TV code
under the TV button and a separate B-RAY code under
the B-RAY button to control each component.
This rechargeable universal remote contains a lithium
polymer battery. Follow all applicable state and federal
laws for battery disposal and recycling. Do not dispose
of the remote in the garbage. Take it to your local
battery recycling center.
STREAMING APP HOTKEYS
COMBO DEVICES
BATTERY DISPOSAL
100%
recyclable
Separate
paper
from plastic
before
recycling
byjasco.com/recycle
paper made from 25%
post consumer waste
• AVOID PLACING THE REMOTE IN DIRECT SUNLIGHT,
NEAR A HEATER OR OTHER LOCATIONS OF EXTREME
TEMPERATURES.
• DO NOT CONTINUE USING OR ATTEMPT TO CHARGE
THE REMOTE IF IT HAS BEEN PUNCTURED, CRUSHED,
DEFORMED, DAMAGED OR IF IT EXHIBITS ANY
ABNORMAL CHARACTERISTICS SUCH AS EXCESSIVE
HEATING, SWELLING OR IF IT EMITS AN ODOR.
• USE ONLY IN DRY LOCATIONS. NEVER IMMERSE THE
UNIT IN LIQUID.
• DO NOT OPERATE THE REMOTE NEAR FLAMMABLE
MATERIALS, FUMES OR GASES.
• USE ONLY A USB POWER SUPPLY TO CHARGE
THE REMOTE.
• DO NOT OPEN THE REMOTE. THERE ARE NO USER
SERVICEABLE PARTS.
• TO AVOID AN EXPLOSION OR EXPOSURE TO TOXIC
FUMES, DO NOT DISPOSE OF THE REMOTE IN A FIRE.
• USE A MILD SOAP AND WATER SHOULD THE BATTERY
CONTENTS COME INTO CONTACT WITH THE SKIN.
• RINSE EYES WITH CLEAN RUNNING WATER SHOULD
THE BATTERY CONTENTS COME INTO CONTACT WITH
THE EYES. SEEK MEDICAL ATTENTION.
• DO NOT DROP THE REMOTE.
WARNING
• EVITE COLOCAR EL CONTROL REMOTO BAJO LA LUZ
SOLAR DIRECTA, CERCA DE UN CALENTADOR U
OTROS LUGARES DE TEMPERATURAS EXTREMAS.
• NO CONTINÚE UTILIZANDO NI INTENTE CARGAR EL
MANDO A DISTANCIA SI HA SIDO PERFORADO,
APLASTADO, DEFORMADO, DAÑADO O SI PRESENTA
ALGUNA CARACTERÍSTICA ANORMAL COMO
CALENTAMIENTO EXCESIVO, HINCHACIÓN O SI EMITE
UN OLOR.
• UTILICE SÓLO EN LUGARES SECOS. NUNCA SUMERJA
LA UNIDAD EN LÍQUIDO.
• NO OPERE EL CONTROL REMOTO CERCA DE
MATERIALES, VAPORES O GASES INFLAMABLES.
• UTILICE SOLO UNA FUENTE DE ALIMENTACIÓN USB
PARA CARGAR EL CONTROL REMOTO.
• NO ABRA EL CONTROL REMOTO. NO HAY PIEZAS
REPARABLES POR EL USUARIO.
• PARA EVITAR UNA EXPLOSIÓN O EXPONERSE A
HUMOS TÓXICOS, NO DESECHE EL CONTROL
REMOTO EN EL FUEGO.
• UTILICE UN JABÓN SUAVE Y AGUA SI EL CONTENIDO
DE LA BATERÍA ENTRA EN CONTACTO CON LA PIEL.
• ENJUÁGUESE LOS OJOS CON AGUA CORRIENTE
LIMPIA SI EL CONTENIDO DE LAS PILAS ENTRA EN
CONTACTO CON LOS OJOS. BUSQUE ATENCIÓN
MÉDICA.
• NO DEJE CAER EL CONTROL REMOTO.
ADVERTENCIA
Thank you for
your purchase!
Like our product?
Leave a review on your favorite
retailer website or amazon.com.
Having problems?
Let us know how we can help.
Call 1-800-654-8483, M-F,
7AM-8PM Central Time.
Instructions
made easy
Read instructions
or watch an
easy-to-follow video.
Scan code or visit byjasco.com/80984i.
Register your
product
Receive exclusive
deals and register
your product.
Scan code or visit byjasco.com/deals.
Enhance your home
entertainment
experience at
byjasco.com/ce.
Carga del control remoto universal
La batería de polímero de litio integrada de su control remoto
universal recargable lo mantiene encendido durante meses
con una sola carga. Antes de usarlo, asegúrese de que el
control remoto esté completamente cargado conectándolo a
una fuente de alimentación mediante el cable USB-C a USB-A
incluido. La luz indicadora de carga junto al puerto USB-C
del control remoto se iluminará en azul durante la carga y
luego se volverá verde una vez que el control remoto esté
completamente cargado.
Ahorro de batería
Su control remoto se apagará automáticamente si los botones
se mantienen presionados durante más de 8 segundos. Esto
ahorrará baterías en caso de que el control remoto se atasque
en un lugar donde los botones permanecen presionados (por
ejemplo, entre los cojines del sofá).
Luz de indicador de batería baja
Cuando la batería del control remoto está demasiado
baja para funcionar correctamente, el botón de encendido
parpadeará dos veces cuando se presione cualquier botón.
Para cargar el control remoto, conéctelo a una fuente de
alimentación usando el cable USB-C a USB-A incluido. El
control remoto se puede usar para operar sus dispositivos
después de 70 segundos de estar conectados a una fuente
de alimentación.
El control remoto no opera su dispositivo
• Asegúrese de que el control remoto esté cargado.
• Apunte el control remoto directamente a su dispositivo y
asegúrese de que no haya obstrucciones entre el control
remoto y el dispositivo.
• Asegúrese de seleccionar el dispositivo apropiado en el
control remoto que desea controlar (TV para TV, AUD
para audio, etc.).
• Intente programar el control remoto con un código
diferente. Consulte la sección Entrada directa de
código.
• Es posible que el control remoto no sea compatible con
su dispositivo.
• Es posible que la pila del mando haya estado agotada
durante mucho tiempo. Después de recargar el mando,
puede ser necesario reprogramarlo.
El control remoto no opera algunas funciones de su
dispositivo
• A veces, un código en particular puede operar algunas
funciones, pero no todas. Intente programar el control
remoto con un código diferente de la lista de códigos.
Consulte la sección Entrada directa de código.
• Es posible que el control remoto no pueda operar todas
las funciones de su dispositivo o que los nombres de
los botones sean diferentes a los de sus controles
remotos originales.
Se recomienda la entrada directa de código para una
programación rápida y sencilla.
Nota: El botón del dispositivo TV está preprogramado para
televisores Samsung y el botón del dispositivo STR está
preprogramado para cajas Roku.
1. En la lista de códigos incluida con tu control remoto,
encierra en un círculo los códigos de 4 dígitos para el tipo
y marca del dispositivo que deseas controlar.
2. Mantenga presionado el botón SETUP hasta que
se ilumine la luz del botón de encendido del control
remoto. Suelte el botón CONFIGURACIÓN . El botón de
encendido seguirá iluminado.
3. Presione y suelte el botón del dispositivo elegido (TV,
STR, B-RAY o AUD). El botón de encendido parpadeará
una vez y luego seguirá iluminado.
4. Ingrese el primer código de 4 dígitos que encerró en un
círculo en el Paso 1. El botón de encendido se apagará.
5. Apunte el control remoto al dispositivo y pruebe los
botones. Si no funcionan como se esperaba, repita los
pasos 2 a 5 con el siguiente código encerrado en un
círculo.
6. Repita el proceso para cada dispositivo que desee
controlar.
Notas de programación
• Es posible que algunos códigos operen solo algunas
funciones del dispositivo, así que pruebe otros códigos
para obtener más funciones.
• ¿Tiene problemas para encontrar un código? Programe el
control remoto usando el método de búsqueda de código
automático.
• Para dispositivos combinados como una combinación
de TV y DVD o TV y VCR, puede tener que ingresar un
código para cada dispositivo.
• Guarde los códigos de su dispositivo para
referencia futura.
El botón RESET está ubicado a la izquierda del puerto de
carga del control remoto (consulte la sección Funciones de
los botones). Utilice un clip para mantener presionado el
botón “RESET” (Restablecer) durante 1 segundo. Si el control
remoto no responde, asegúrese de que esté completamente
cargado y luego inténtelo nuevamente.
Instrucciones de reinicio alternativas
1. Mantenga presionado el botón SETUP hasta que la luz
roja permanezca encendida, luego suéltelo. La luz roja
permanecerá encendida.
2. Presione y suelte el botón MUDO.
3. Presione y suelte 0 (cero). La luz roja parpadeará
dos veces.
La identicación de códigos le permite recuperar el código
de 4 dígitos utilizado para programar cada uno de los botones
de su dispositivo.
1. Mantenga presionado el botón SETUP hasta que se
ilumine la luz del botón de encendido, luego suéltelo. El
botón de encendido seguirá iluminado.
2. Presione y suelte el botón del dispositivo para el código
que busca.
3. Presione y suelte ENTER.
4. Presione y suelte #1 y cuente cuántas veces parpadea el
botón de encendido. Este es el primer dígito de su código.
Repita el proceso presionando #2, #3 y #4 para los dígitos
restantes.
5. Presione y suelte ENTER para salir de este modo.
El control de volumen maestro te permite seleccionar un
dispositivo de audio para controlar el volumen sin importar qué
componente esté utilizando.
Habilitación del control de volumen maestro
1. Mantenga presionado el botón SETUP hasta que se
ilumine la luz del botón de encendido, luego suéltelo. El
botón de encendido seguirá iluminado.
2. Presione y suelte el botón del dispositivo para el
componente de audio que desea usar.
3. Presione y suelte el botón de SILENCIO.
4. Presione y suelte VOL+. El botón de encendido
parpadeará dos veces y se apagará.
Deshabilitar el control de volumen maestro
1. Mantenga presionado el botón SETUP hasta que se
ilumine la luz del botón de encendido, luego suéltelo. El
botón de encendido seguirá iluminado.
2. Presione y suelte el botón del dispositivo previamente
programado para el control de volumen maestro.
3. Presione y suelte el botón de SILENCIO.
4. Presione y suelte VOL-. El botón de encendido
parpadeará dos veces y se apagará.
La búsqueda automática de códigos recorre todos los
códigos del control remoto hasta encontrar uno para su
dispositivo.
Antes de comenzar, lea los pasos a continuación para
familiarizarse con el proceso de búsqueda automática de
códigos.
1. Encienda manualmente el dispositivo que desea controlar.
(Utilice el método de entrada de código directo para
dispositivos sin capacidad de encendido/apagado).
2. Mantenga presionado el botón SETUP hasta que
se ilumine la luz del botón de encendido del control
remoto. Suelte el botón CONFIGURACIÓN . El botón de
encendido seguirá iluminado.
3. Presione y suelte el botón del dispositivo elegido (TV,
STR, B-RAY o AUD). El botón de encendido parpadeará
una vez y permanecerá encendido.
4. Apunte el control remoto al dispositivo, luego presione
y suelte el botón de encendido. El botón de encendido
parpadeará y luego permanecerá encendido después de
recorrer 10 códigos.
¿Se apagó el dispositivo?
SÍ: Vaya al paso 5.
NO: Repita el paso 4 para probar los siguientes
10 códigos.
5. Encienda manualmente el dispositivo.
6. Apunte el control remoto al dispositivo, luego presione y
suelte VOL+. El botón de encendido parpadeará una vez
y luego seguirá iluminado.
¿Se apagó el dispositivo?
SÍ: Presione y suelte el mismo botón del
dispositivo que presionó en el paso 3. Esto almacena el
código en el control remoto. Vaya al paso 7.
NO: Repita el paso 6 hasta que el dispositivo se
apague. Espere 3 segundos entre cada
pulsación del botón VOL+.
7. Use el control remoto para encender el dispositivo. Pruebe
los botones del control remoto. Si no funcionan como se
esperaba, repita los pasos 2 a 7.
8. Repita el proceso para cada dispositivo que desee
controlar.
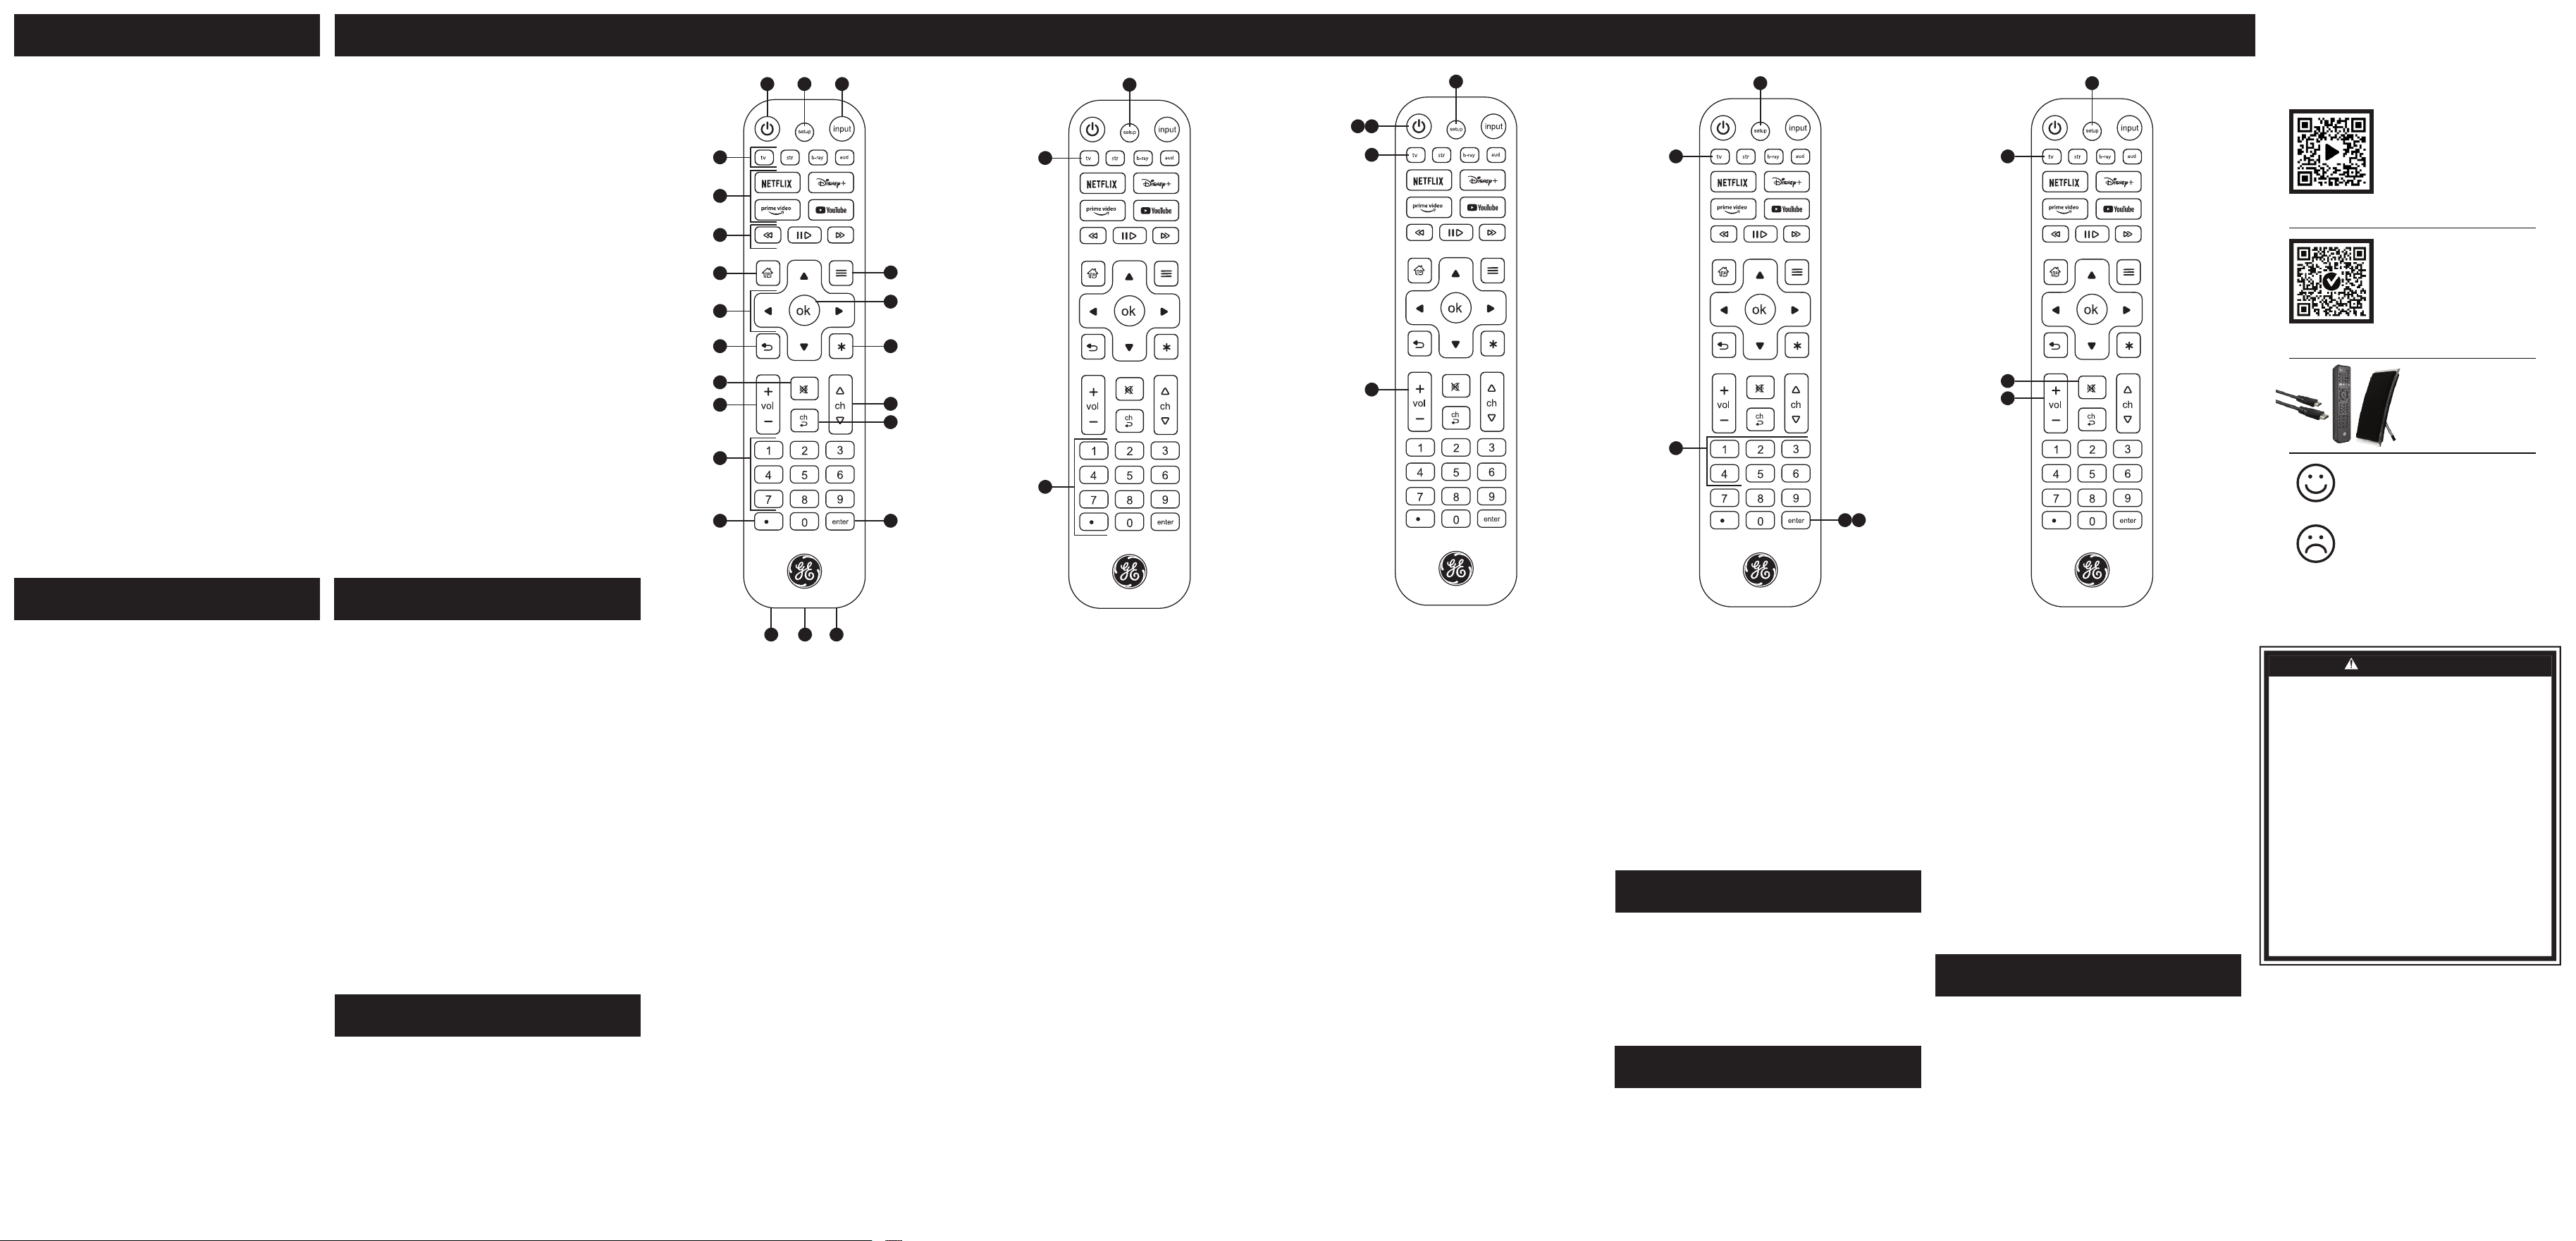
PREPARACIÓN FUNCIONES DE LOS BOTONES ENTRADA DE CÓDIGO DIRECTA
BÚSQUEDA AUTOMÁTICA DE CÓDIGOS
CÓDIGO DE IDENTIFICACIÓN
CONTROL DE VOLUMEN MAESTRO
1. Encendido/Apagado – Enciende/apaga los dispositivos
2. Setup – Se usa para programar el control remoto
3. Input – Selecciona la entrada de video
4. TV, STR, B-RAY, AUD – Seleccione el dispositivo
a controlar
5. Grabar, reproducir, detener, rebobinar, avanzar rápido,
pausar
6. Teclas de acceso rápido de aplicaciones de streaming
– Preprogramadas para acceso directo a Netix, Prime
Video, Disney+ y YouTube
7. Home/guide – Accede a las funciones de los dispositivos
de transmisión o guide para los receptores de cable
y satélite
8. Flechas arriba, abajo, izquierda, derecha – Navegación
del menú
9. OK – Selecciona elementos del menú del dispositivo
controlado
10. Menú – Muestra el menú en pantalla
11. Back – Vuelve a la pantalla anterior
12. Info (*) – Muestra información de contenido o programas
en pantalla
13. Subir/bajar el volumen
14. Silenciar – Silencia el sonido
15. Último canal – Vuelve al canal seleccionado previamente
16. Canal arriba/abajo
17. Números – Para selección directa de canal
18. Punto (.) – Se utiliza para seleccionar canales digitales, por
ejemplo, 4.1
19. Enter – Para dispositivos que requieren que se presione
Enter después de seleccionar el canal
20. Puerto de carga USB-C – Utilícelo con el cable USB
incluido para cargar el control remoto
21. Luz indicadora de carga – Azul (carga en curso); verde
(completamente cargado)
22. Reset – Restablece el mando a distancia a los valores
de fábrica
SOLUCIÓN DE PROBLEMAS
FCC STATEMENT
DECLARACIÓN DE LA FCC
RESTABLECER A LA
CONFIGURACIÓN DE FÁBRICA
HECHO EN CHINA
GE es una marca comercial de General Electric Company
con licencia otorgada a Jasco Products Company LLC,
10 E. Memorial Rd., Oklahoma City, OK 73114.
Este producto de Jasco tiene una garantía de por vida
limitada. Visite www.byjasco.com para conocer los detalles
de la garantía.
¿Tiene Preguntas? Comuníquese con nuestro servicio de
atención al consumidor de EE. UU. al 1-800-654-8483 de
lunes a viernes, de 7AM a 8PM (hora central).
Visite www.byjasco.com/patents para información sobre la
patente del producto.
Suppliers Declaration of Conformity | Model #: 80984 | Jasco
Products Co., 10 E. Memorial Rd., Oklahoma City, OK 73114,
www.byjasco.com
This device complies with Part 15 of the FCC Rules. Operation
is subject to the following two conditions: (1) this device may
not cause harmful interference, and (2) this device must accept
any interference received, including interference that may
cause undesired operation.
FCC NOTE: The manufacturer is not responsible for any radio
or TV interference caused by unauthorized modications to this
equipment. Such modications could void the user’s authority
to operate the equipment.
NOTE: This equipment has been tested and found to comply
with the limits for a Class B digital device, pursuant to Part
15 of the FCC Rules. These limits are designed to provide
reasonable protection against harmful interference in a
residential installation. This equipment generates, uses and
can radiate radio frequency energy and, if not installed and
used in accordance with the instructions, may cause harmful
interference to radio communications. However, there is
no guarantee that interference will not occur in a particular
installation. If this equipment does cause harmful interference
to radio or television reception, which can be determined by
turning the equipment off and on, the user is encouraged to
try to correct the interference by one or more of the following
measures:
• Reorient or relocate the receiving antenna.
• Increase the separation between the equipment
and receiver.
• Connect the equipment into an outlet on a circuit different
from that to which the receiver is connected.
• Consult the dealer or an experienced radio/TV technician
for help.
ICES-3(B)/NMB-3(B)
Declaración de conformidad de proveedores | Modelo n.º:
80984 | Jasco Products Co., 10 E. Memorial Rd., Oklahoma
City, OK 73114, www.byjasco.com
Este dispositivo cumple con la Parte 15 de las normas de
la FCC. Su funcionamiento está sujeto a las siguientes dos
condiciones: (1) este dispositivo no podrá causar interferencias
perjudiciales, y (2) este dispositivo debe aceptar cualquier
interferencia recibida, incluidas las interferencias que puedan
causar un funcionamiento no deseado.
NOTA DE LA FCC: El fabricante no se responsabiliza
por ninguna interferencia de radio o TV causada por
modicaciones no autorizadas a este equipo. Tales
modicaciones podrían anular el derecho del usuario a hacer
uso del equipo.
NOTA: Este equipo se sometió a pruebas y cumple con los
límites establecidos para un dispositivo digital Clase B de
acuerdo con la Sección 15 de las Normas de la FCC. Dichos
límites están diseñados para proporcionar una protección
razonable contra la interferencia perjudicial en una instalación
residencial. Este equipo genera, usa y puede irradiar energía
de radiofrecuencia y, si no se instala y usa de acuerdo
con estas instrucciones, podría causar una interferencia
perjudicial en las radiocomunicaciones. No obstante, no es
posible garantizar que no ocurrirán interferencias en una
instalación en particular. Si este equipo causa interferencias
perjudiciales en la recepción de radio o televisión, las cuales
pueden comprobarse encendiendo y apagando el equipo,
se recomienda al usuario que intente corregir la interferencia
mediante una o más de las siguientes medidas:
• Reoriente o reubique la antena receptora.
• Aumente la distancia entre el equipo y el receptor.
• Conecte el equipo a una toma de corriente en un circuito
diferente al que está conectado el receptor.
• Consulte al distribuidor o a un técnico experimentado de
radio/TV para obtener ayuda.
ICES-3(B)/NMB-3(B)
Algunos dispositivos combinados (por ejemplo, TV/VCR,
B-RAY/VCR, etc.) requieren el uso de un botón de modo
separado para cada parte del dispositivo combinado. Por
ejemplo, si tiene un dispositivo combinado para TV y B-RAY,
es posible que deba congurar un código de TV con el botón
TV y un código de B-RAY distinto con el botón B-RAY para
controlar cada componente.
DISPOSITIVOS COMBINADOS
Este control remoto universal recargable contiene una batería
de polímero de litio. Siga todas las leyes estatales y federales
aplicables para la eliminación y el reciclaje de baterías. No
deseche el control remoto en la basura. Llévelo a su centro de
reciclaje de baterías local.
ELIMINACIÓN DE LA BATERÍA
• AVOID PLACING THE REMOTE IN DIRECT SUNLIGHT,
NEAR A HEATER OR OTHER LOCATIONS OF EXTREME
TEMPERATURES.
• DO NOT CONTINUE USING OR ATTEMPT TO CHARGE
THE REMOTE IF IT HAS BEEN PUNCTURED, CRUSHED,
DEFORMED, DAMAGED OR IF IT EXHIBITS ANY
ABNORMAL CHARACTERISTICS SUCH AS EXCESSIVE
HEATING, SWELLING OR IF IT EMITS AN ODOR.
• USE ONLY IN DRY LOCATIONS. NEVER IMMERSE THE
UNIT IN LIQUID.
• DO NOT OPERATE THE REMOTE NEAR FLAMMABLE
MATERIALS, FUMES OR GASES.
• USE ONLY A USB POWER SUPPLY TO CHARGE
THE REMOTE.
• DO NOT OPEN THE REMOTE. THERE ARE NO USER
SERVICEABLE PARTS.
• TO AVOID AN EXPLOSION OR EXPOSURE TO TOXIC
FUMES, DO NOT DISPOSE OF THE REMOTE IN A FIRE.
• USE A MILD SOAP AND WATER SHOULD THE BATTERY
CONTENTS COME INTO CONTACT WITH THE SKIN.
• RINSE EYES WITH CLEAN RUNNING WATER SHOULD
THE BATTERY CONTENTS COME INTO CONTACT WITH
THE EYES. SEEK MEDICAL ATTENTION.
• DO NOT DROP THE REMOTE.
WARNING
• EVITE COLOCAR EL CONTROL REMOTO BAJO LA LUZ
SOLAR DIRECTA, CERCA DE UN CALENTADOR U
OTROS LUGARES DE TEMPERATURAS EXTREMAS.
• NO CONTINÚE UTILIZANDO NI INTENTE CARGAR EL
MANDO A DISTANCIA SI HA SIDO PERFORADO,
APLASTADO, DEFORMADO, DAÑADO O SI PRESENTA
ALGUNA CARACTERÍSTICA ANORMAL COMO
CALENTAMIENTO EXCESIVO, HINCHACIÓN O SI EMITE
UN OLOR.
• UTILICE SÓLO EN LUGARES SECOS. NUNCA SUMERJA
LA UNIDAD EN LÍQUIDO.
• NO OPERE EL CONTROL REMOTO CERCA DE
MATERIALES, VAPORES O GASES INFLAMABLES.
• UTILICE SOLO UNA FUENTE DE ALIMENTACIÓN USB
PARA CARGAR EL CONTROL REMOTO.
• NO ABRA EL CONTROL REMOTO. NO HAY PIEZAS
REPARABLES POR EL USUARIO.
• PARA EVITAR UNA EXPLOSIÓN O EXPONERSE A
HUMOS TÓXICOS, NO DESECHE EL CONTROL
REMOTO EN EL FUEGO.
• UTILICE UN JABÓN SUAVE Y AGUA SI EL CONTENIDO
DE LA BATERÍA ENTRA EN CONTACTO CON LA PIEL.
• ENJUÁGUESE LOS OJOS CON AGUA CORRIENTE
LIMPIA SI EL CONTENIDO DE LAS PILAS ENTRA EN
CONTACTO CON LOS OJOS. BUSQUE ATENCIÓN
MÉDICA.
• NO DEJE CAER EL CONTROL REMOTO.
ADVERTENCIA
¡Gracias por
su compra!
¿Le gusta nuestro producto?
Deje una reseña en el sitio web de
su distribuidor favorito o en
amazon.com.
¿Tiene algún problema?
Díganos cómo podemos ayudar.
Llame al 1-800-654-8483,
de lunes a viernes, de 7 a. m.
a las 8 p. m., hora central.
Instrucciones
fáciles
Lea las instrucciones o mire
el video con el paso a paso.
Escanee el código o visite byjasco.com/80984i.
Registre su
producto
Recibe ofertas exclusivas
y registra tu producto.
Escanee el código o visite byjasco.com/deals.
Mejore su experiencia
de entretenimiento en
casa en
byjasco.com/ce.
4
5
7
13
18
14
2 31
6
8
11
9
10
12
15
16
19
17
2022 21
3
4
2
3
74
6
2
2
4
3 5
1
2
3
4
1
Las teclas de acceso directo a las aplicaciones de streaming
están preprogramadas para acceder directamente a Netix,
Prime Video, Disney+ y YouTube. Estas teclas de acceso
directo no se pueden reprogramar para utilizarlas con otras
aplicaciones. Cuando utilice un reproductor multimedia de
transmisión compatible en lugar de un televisor inteligente,
presione el botón STR antes de usar las teclas de acceso
rápido de la aplicación.
TECLAS DE ACCESO RÁPIDO
DE APLICACIONES DE STREAMING
