4
1. 3RVLWLRQWKHZKHHODQGWLUHÀDWRQDWLUHVWDQGVRWKDWWKHORZHUVLGHZDOOLVVOLJKWO\RIIWKHÀRRU
OPERATION
2. %HVXUHWRVHDWWKHORZHUWLUHEHDGRQWKHERWWRPÀDQJHRIWKHZKHHO
3. %HIRUHDWWHPSWLQJWRVHDWWKHEHDGPDNHVXUHEDUUHOÀDQJHLVRQWRSRQWKHVDPHVLGHDVWKHDLU
release handle) Rotate barrel to this position id necessary before proceeding.
4. Firmly hold the bead seater by the handle and position the barrel at an approximate 45 degree
GRZQZDUGDQJOHDQGSODFHWKHEDUUHOÀDQJHRQWKHXSSHUHGJHRIWKHZKHHOULPRSSRVLWHWKHWLUH
valve into the opening between the tire and rim.
5. Take the other hand and quickly turn the air release valve to open, releasing air into the tire.
6. Once you have successfully seated the tire, connect an air supply line to the tire valve to complete
WLUHLQÀDWLRQWRFRUUHFWSUHVVXUH
USING THE BEAD SEATER FOR HORIZONTAL POSITION FOR TIRE/WHEEL:
USING THE BEAD SEATER FOR VERTICAL POSITION FOR TIRE/WHEEL:
CAUTION: This method should only be used when there is a large gap between the wheel rim
and tire bead or if the tire is too heavy.
1. Position the tire and wheel so that it is tilted slightly back and secure it with a tire wedge. Make
VXUHWKHWLUHDQGZKHHODUHVXSSRUWHGDZD\IURPWKHZDOOWREHVXUHRQFHLQÀDWHGWKHWLUHDQGZKHHO
do not fall forward, causing injury.
2. The back bead of the tire (furthest from operator) should be seated against the wheel rim trapping
RXWDQ\DLU7KHIURQWRUZLGHÀDQJHRIWKHZKHHOVKRXOGEHIDFLQJWKHRSHUDWRUZLWKWKHWLUHYDOYH
stem positioned at the bottom of the tire.
3. 5RWDWHWKHEDUUHOVRWKHEDUUHOÀDQJHLVXQGHUQHDWKRQWKHRSSRVLWHVLGHLIWKHDLUUHOHDVHKDQGOH
4. Firmly hold the bead seater by the handle and position barrel at an approximate 45 degree
GRZQZDUGDQJOHDQGSODFHWKHEDUUHOÀDQJHRQWKHHGJHRIWKHZKHHORSSRVLWHWKHWLUHYDOYHLQWRWKH
opening between the tire and rim.
5. Take the other hand and quickly turn the air release valve to open, releasing air into the tire.
6. Once you have successfully seated the tire, connect an air supply line to the tire valve to complete
WLUHLQÀDWLRQWRFRUUHFWSUHVVXUH
USING THE BEAD SEATER FOR HORIZONTAL
POSITION FOR TIRE/WHEEL
USING THE BEAD SEATER FOR
VERTICAL POSITION FOR TIRE/
WHEEL
4
Safety Precautions
CAUTION: To prevent personal injury and/ or property damage,
Study, understand, and follow all safety precautions and operating instructions before using
the Tire Bead Seating Tool. If the operator cannot read instructions, operating instructions
and safety precautions must be read and discussed in the operatorÕs native language.
2QO\TXDOLILHGRSHUDWRUVPD\LQVWDOORSHUDWHDGMXVWPDLQWDLQFOHDQUHSDLULQVSHFWRU
transport this tool.
Inspect the condition of the tool before each use; do not use if damaged, altered, or in poor
condition.
Wear ear and eye protection that meet ANSI and OSHA standards.
'RQRWH[FHHGWKHPD[LPXPDLUSUHVVXUHUDWLQJRISVL2YHUILOOLQJWKHDLUWDQNPD\
result in an explosion. Recommended operating air pressure is psi to 1 psi.
Do not point the air nozzle at a person.
Hold the nozzle securely against the wheel rim with both hands during the burst of air.
'LVFKDUJHWKHDLUWDQNZKHQLWLVQRWLQXVH
'RQRWWLJKWHQRUORRVHQILWWLQJVZKHQWKHWDQNLVFKDUJHG
'UDLQWKHWDQNSHULRGLFDOO\EXWQHYHUUHPRYHWKHGUDLQSOXJZKHQWKHWDQNLVFKDUJHG
Do not use this tool for anything other than its intended purpose.
'RQRWLQIODWHGDPDJHGWLUHVRUWLUHVRQGDPDJHGULPV
No alteration shall be made to this product.
Use only those repair parts called out in the parts list in this document. Items found in the
parts list have been carefully tested and selected
Inspection and Maintenance
CAUTION: To prevent personal injury,
2QO\TXDOLILHGSHUVRQQHOVKDOOSHUIRUPLQVSHFWLRQVDQGUHSDLUVWRWKH7LUH%HDG6HDWHU
Inspect the condition of the tool before each use; do not use if damaged, altered, or in poor condition.
If damage is found, discontinue use.
Use only those repair parts called out in the parts list in this document. Items found in the parts
list have been carefully tested and selected .
Inspection
Before each use, an approved inspector must inspect the condition of the tool; do not use if damaged,
altered, or in poor condition.&KHFNWKHDLUWDQNDQGÀWWLQJIRUFUDFNV,IGDPDJHLVIRXQGGLVFRQWLQXHXVH
Maintenance
Store the Tire Bead Seater in the vertical position with the drain plug removed. Never remove the drain
plug when the tank is charged. Never store or transport a charged tank.
Repair
When repairing the Tire Bead Seater, use only those repair parts called out in the parts list in this
document. Items found in the parts list have been carefully tested and selected .
Disposal
At the end of the useful life of the Tire Bead Seater, dispose of the components according to all state,
federal, and local regulations.
Operating Instructions
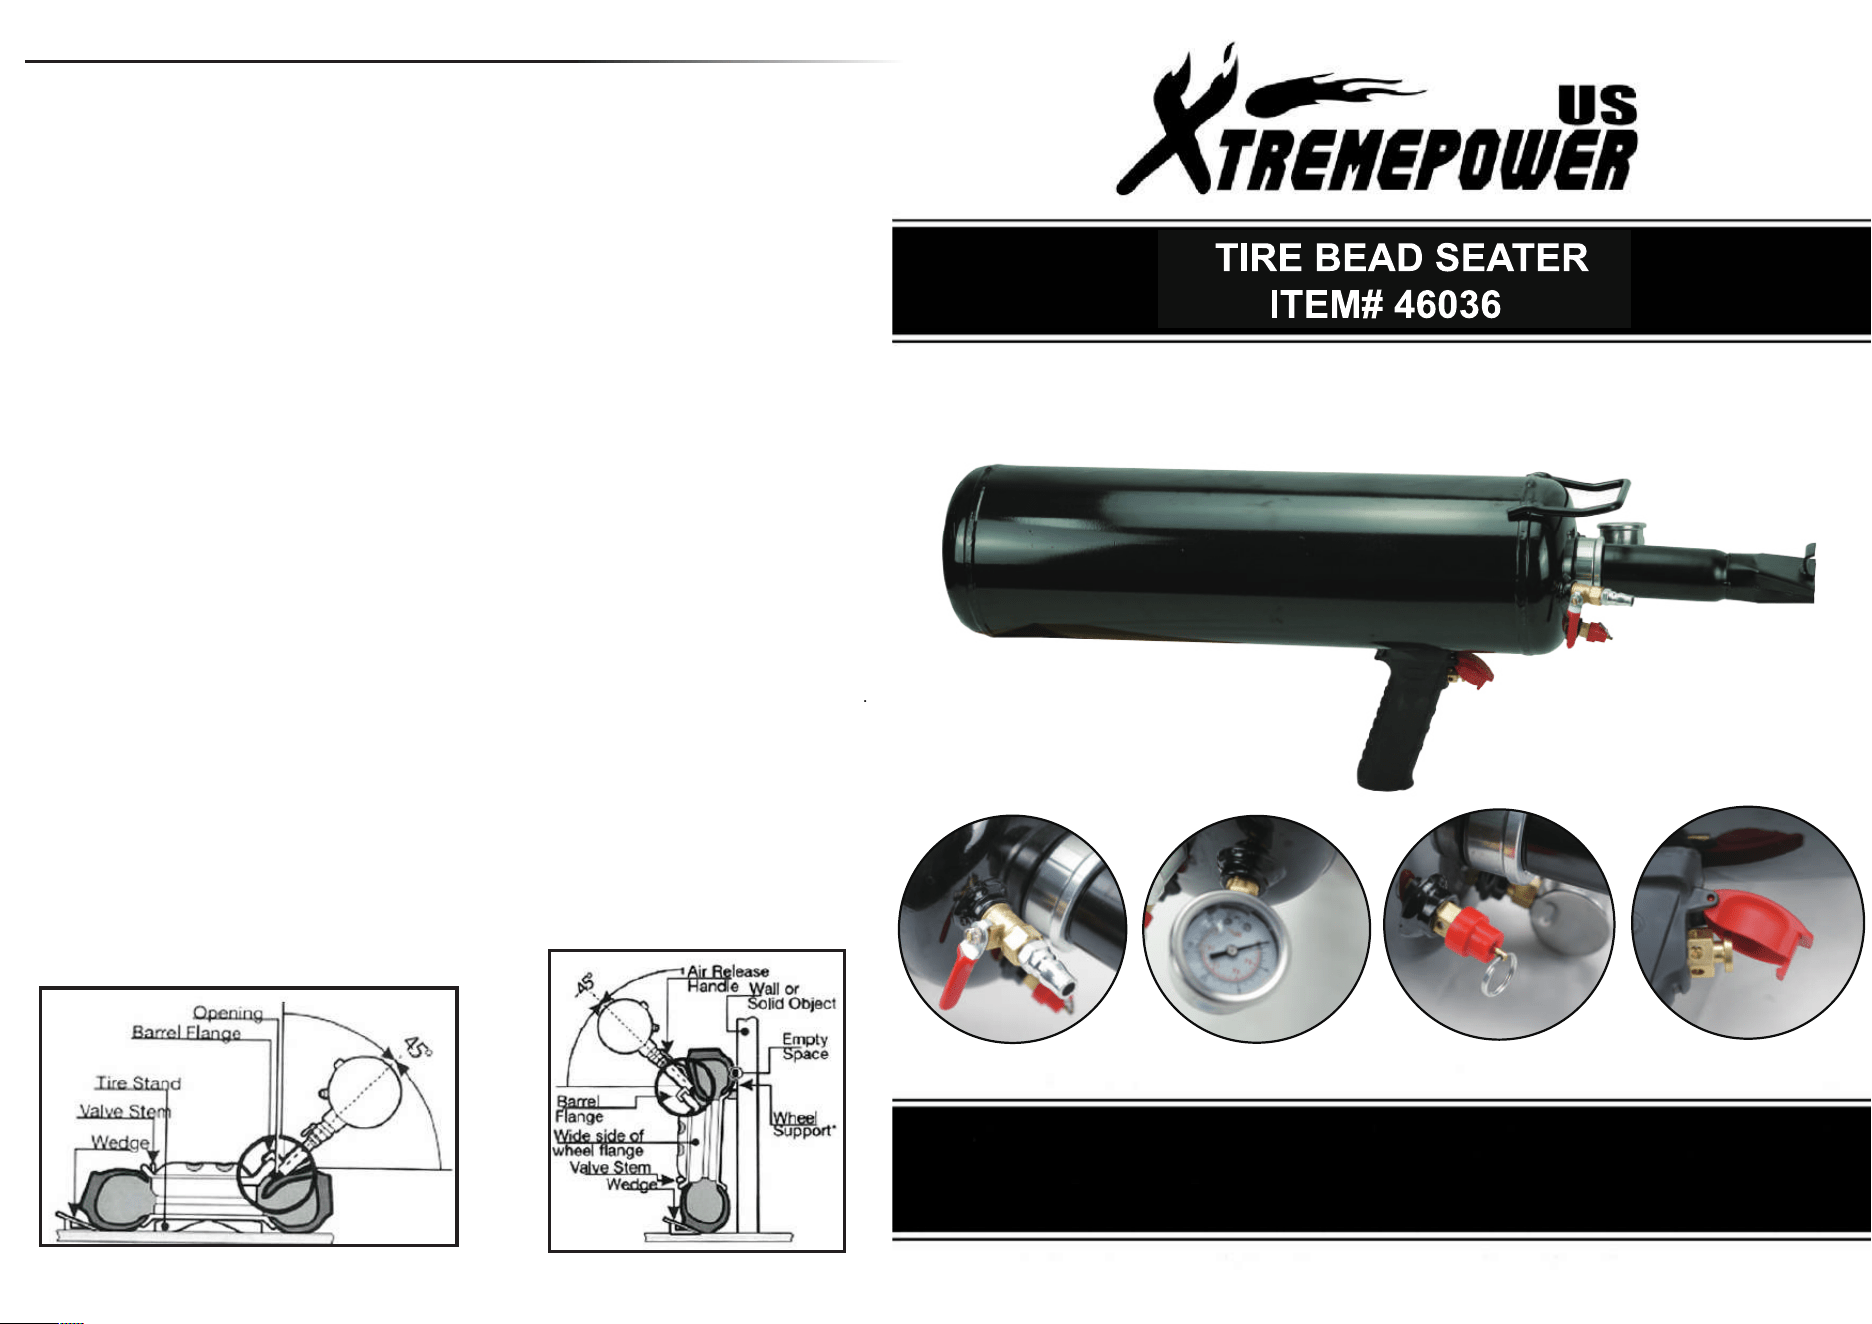
Position the tire with the narrow bead on top and the tire valve facing up, if possible. It may be necessary
to supply air through the valve while seating the bead.
&RQQHFWVKRSDLUWRWKHDLUILWWLQJRQWKH7LUH%HDG6HDWHU7KHDLUVXSSO\PXVWEHFOHDQGU\RLOIUHHDQG
regulated.
Open the air valve until the gauge on the air tank reads a minimum of psi. Air pressure must be between
90 psi and psi. Close the air valve.
Disconnect shop air from the air tank and connect it to the tire
valve.
Apply tire lubricant around the rim and tire bead.
Place the nozzle on the wheel, opposite the tire valve, catching
the rim with the two locating bosses on the bottom of the
nozzle.
Use the handle on the tank to hold the nozzle on the rim, with
the rear of the nozzle tilted at a slight upward angle. The nozzle
VKRXOGQRWWRXFKWKHWLUHVLGHZDOOGXULQJLQIODWLRQ
Place your other hand on the air valve assembly . Fully open
and release the air valve to apply a quickblast of air to seat
the tire bead.
Completely seat the tire by applying air through the tire
valve.
Note: If the valve core was removed, reinstall the valve core
DQGÀQLVKLQÁDWLQJWKHWLUHWRWKHPDQXIDFWXUHUVUHFRPPHQGHG
operating procedure.
2 3
1
