AIR BEAD SEATER BLASTER TIRE WHEEL PUMP
ITEM: 46023 / 46024 / 46028
OWNER’S MANUAL AND SAFETY INSTRUCTIONS
FOR QUESTIONS PLEASE CALL OUR CUSTOMER SUPPORT: (909) 628 0880 MON-FRI 9AM TO 3PM PST
SAVE THIS MANUAL: KEEP THIS MANUAL FOR SAFETY WARNINGS, PRECAUTIONS, ASSEMBLY,
OPERATING, INSPECTION, MAINTENANCE AND CLEANING PROCEDURES. WRITE THE PRODUCT’S
SERIAL NUMBER ON THE BACK OF THE MANUAL NEAR THE ASSEMBLY DIAGRAM (OR MONTH
AND YEAR OF PURCHASE IF PRODUCT HAS NO NUMBER).

GENERAL SAFETY WARNINGS
Read all safety warnings and instructions. Failure to follow the warnings and instructions may
result in serious injury. Save all warnings and instructions for future reference.
SAFETY
The warnings, precautions, and instructions discussed in this instruction manual cannot cover all possible
conditions and situations that may occur. It must be understood by the operator that common sense and
caution are factors which cannot be built into this product, but must be supplied by the operator. Read
carefully and understand all ASSEMBLY AND OPERATION INSTRUCTIONS before operating. Failure to
follow the safety rules and other basic safety precautions may result in serious personal injury.
1
SAVE THESE WARNINGS
Read and understand all instructions. Failure to follow all instructions may result in
serious injury or property damage.
DO NOT allow persons to operate or assemble the product until they have read this
manual and have developed a thorough understanding of how it works.
DO NOT modify this product in any way. Unauthorized modification may impair
the function and/or safety and could affect the life of the product. There are specific
applications for which the product was designed.
Wear the proper personal protective equipment when necessary. Use ANSI
Z87.1 compliant safety goggles (not safety glasses) with side shields, or when needed,
a face shield. Use a dust mask in dusty work conditions. Also use non-skid safety
shoes, hard-hat, gloves, dust collection systems, and hearing protection when
appropriate. This applies to all persons in the work area.
Keep children and bystanders away from the work area while operating the tool.
DO NOT allow children to handle the product.
WARNING: Before initial use of the Bead Seater, it is necessary to purge the nozzle
prior to first operation. This is to rid the machine of internal metal shavings that settle
within the interior of the drum during storage and transportation from the factory.
IMPORTANT SAFETY INFORMATION
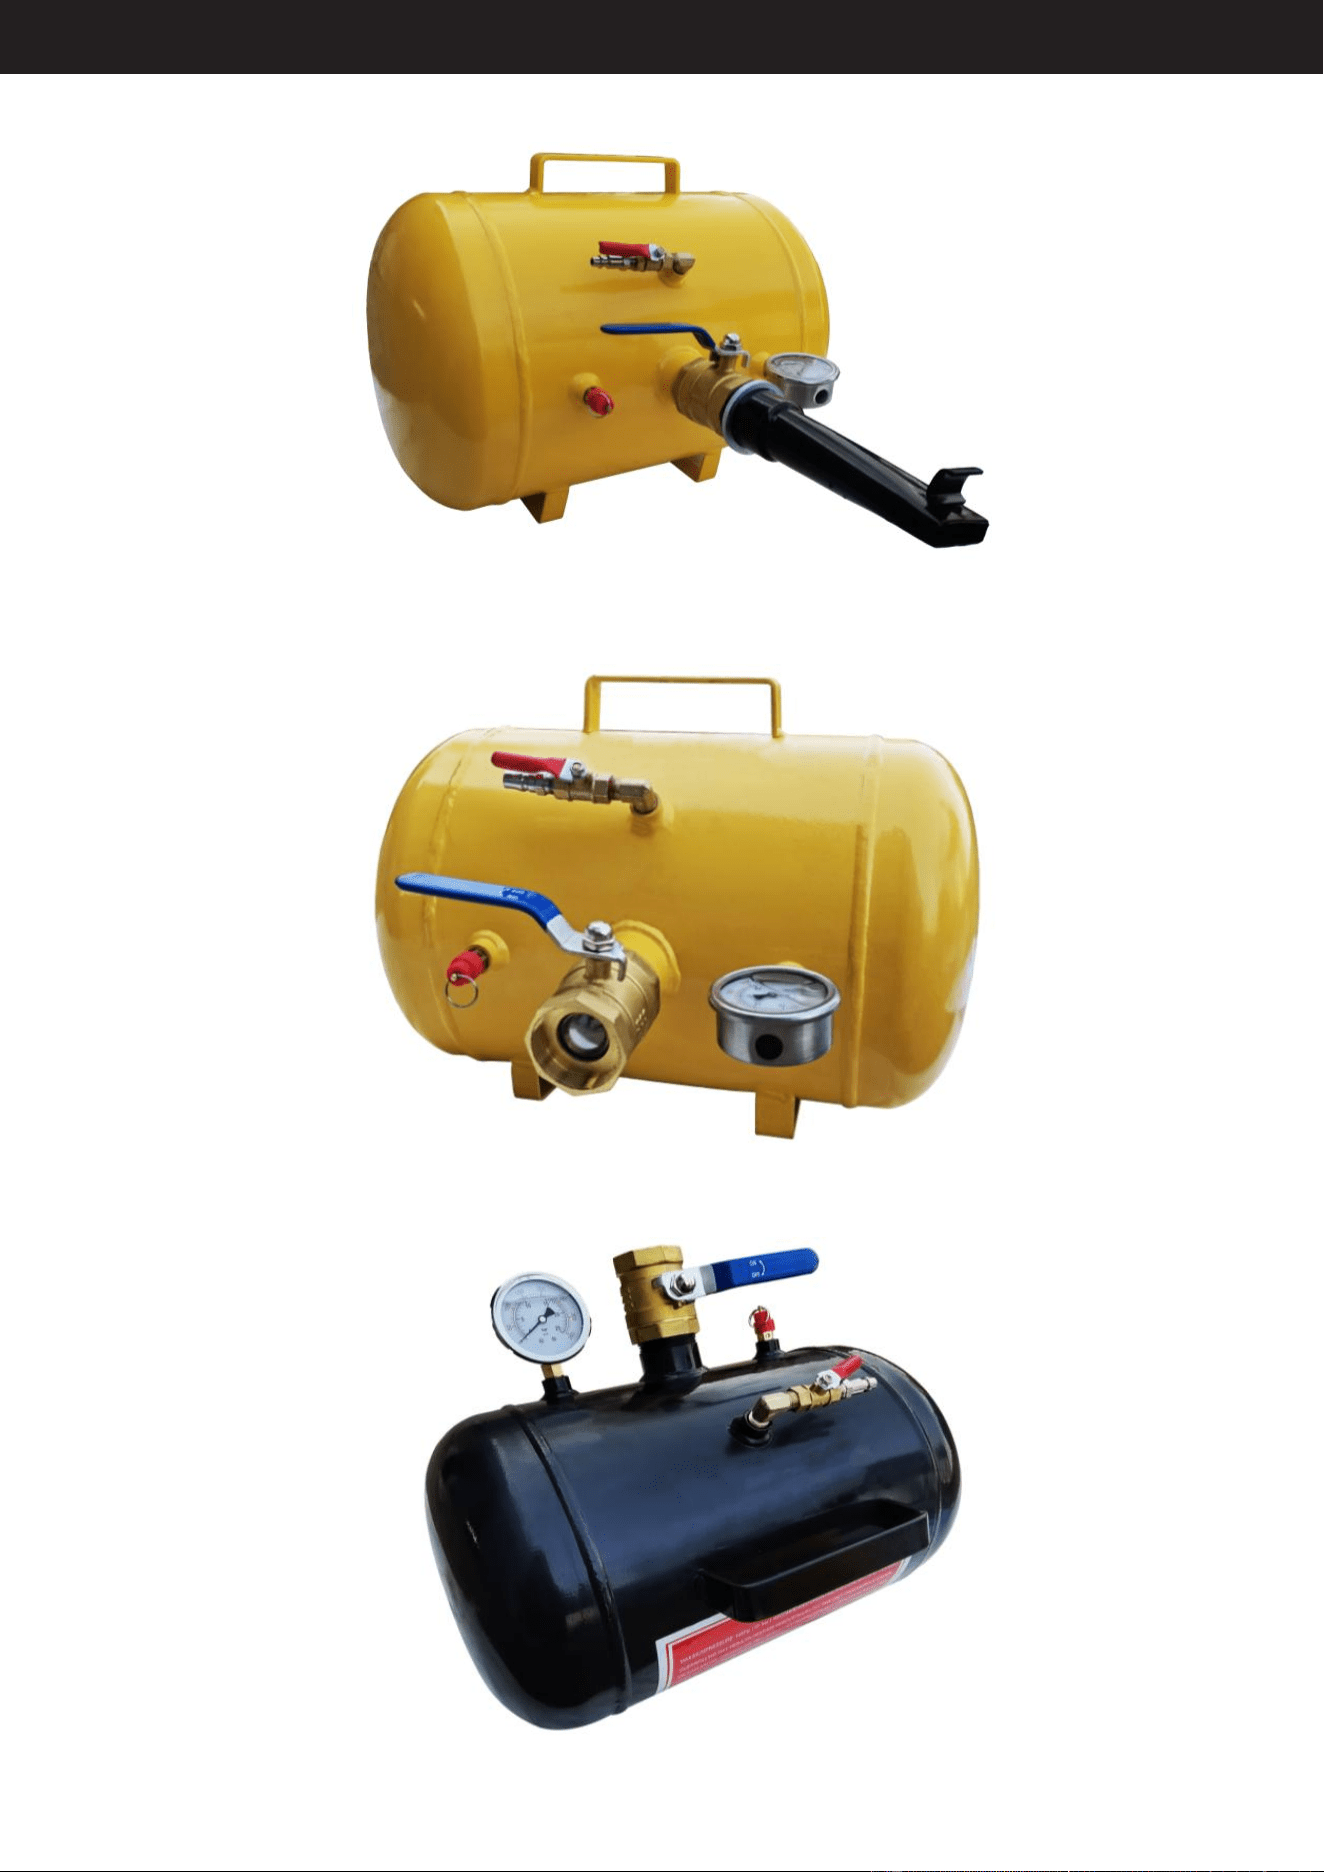
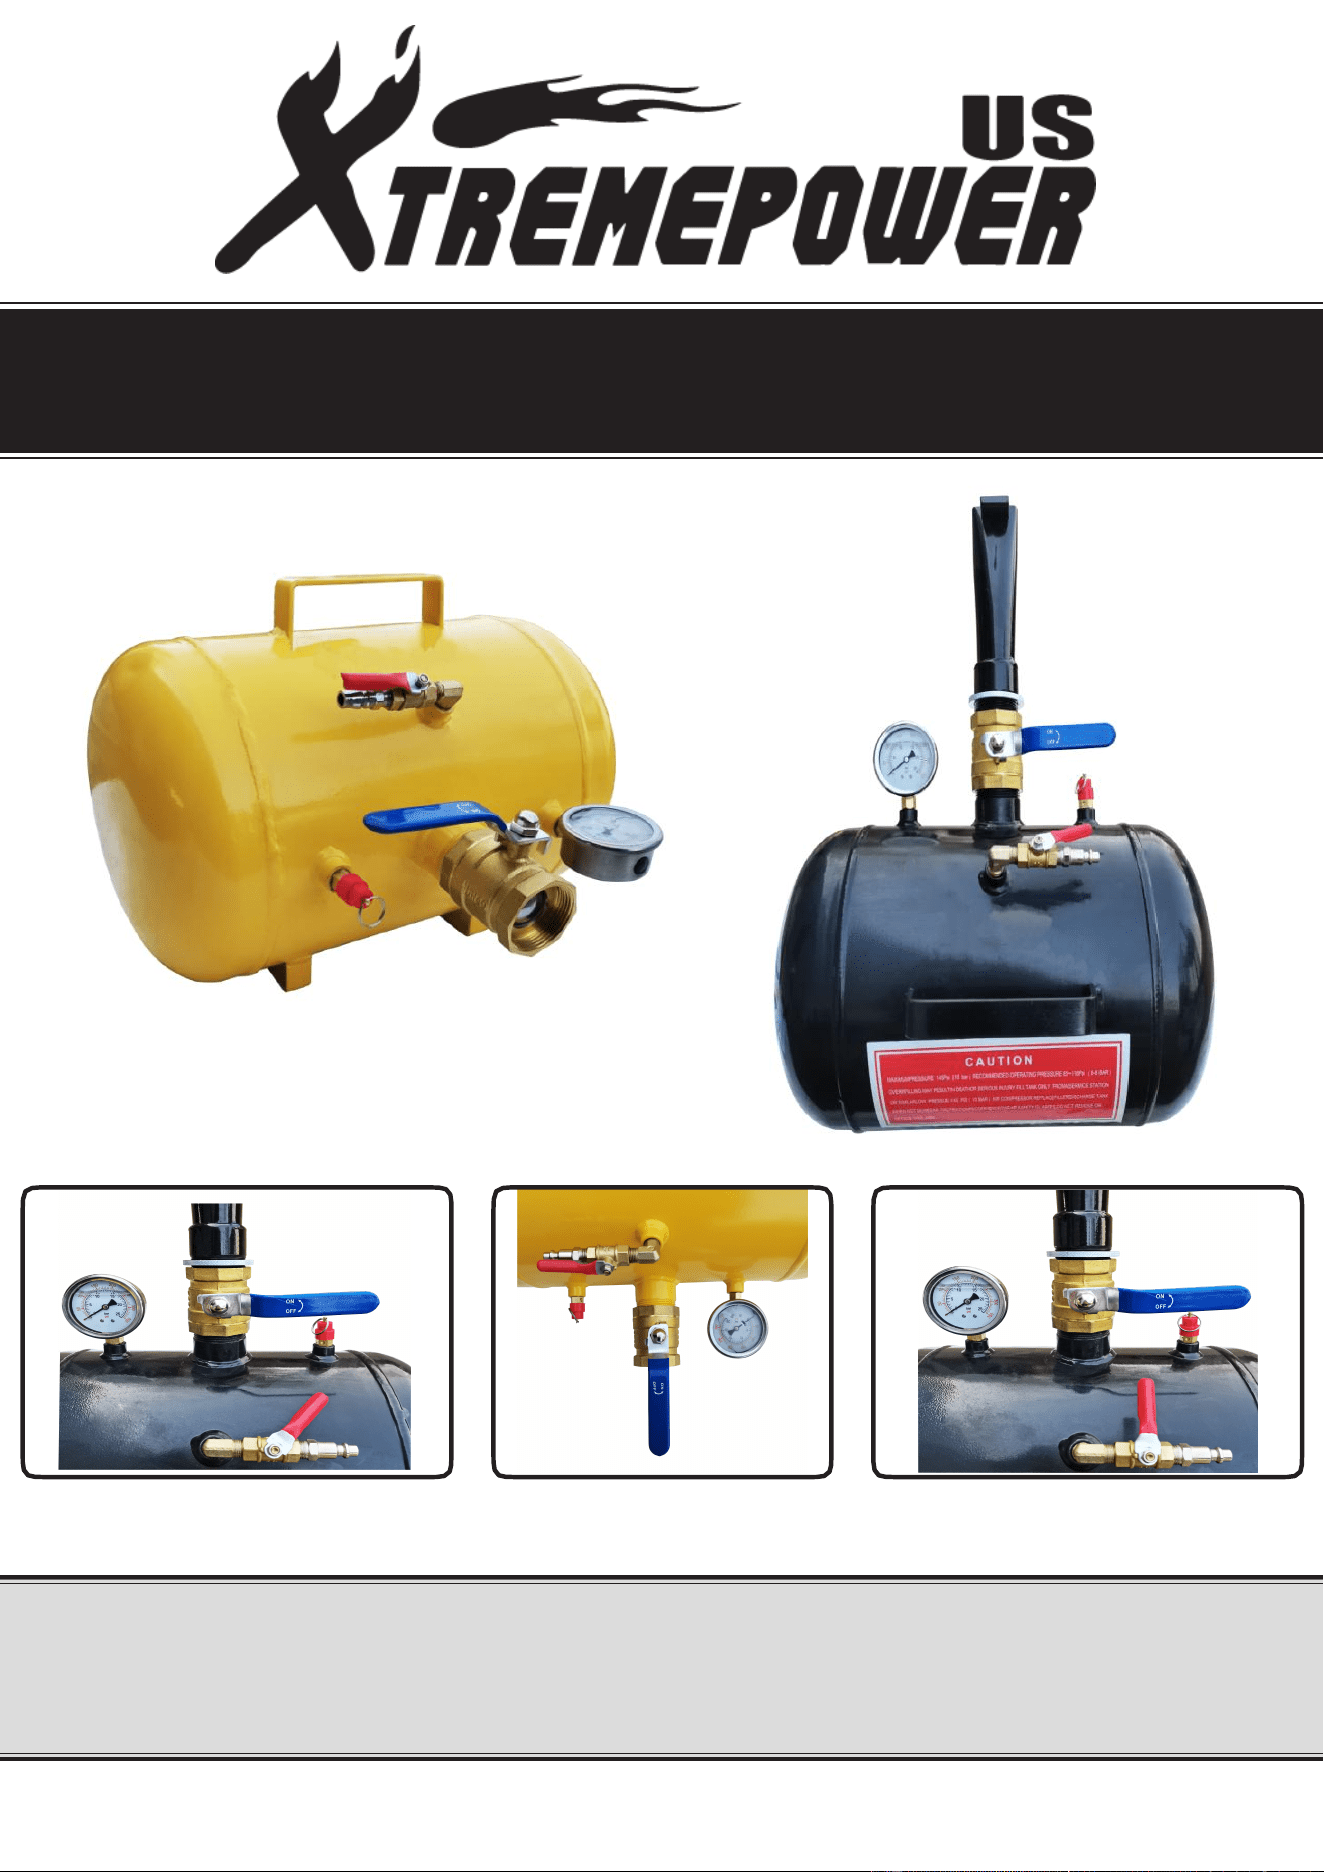
BEAD SEATER PUMP MODEL
10GAL TIRE BEAD SEATER INFLATOR BLASTER ATV 165PSI PNEUMATIC #46023
5GAL TIRE BEAD SEATER INFLATOR BLASTER ATV 165PSI PNEUMATIC #46024
AIR BEAD SEATER 5GAL BLACK #46028
2
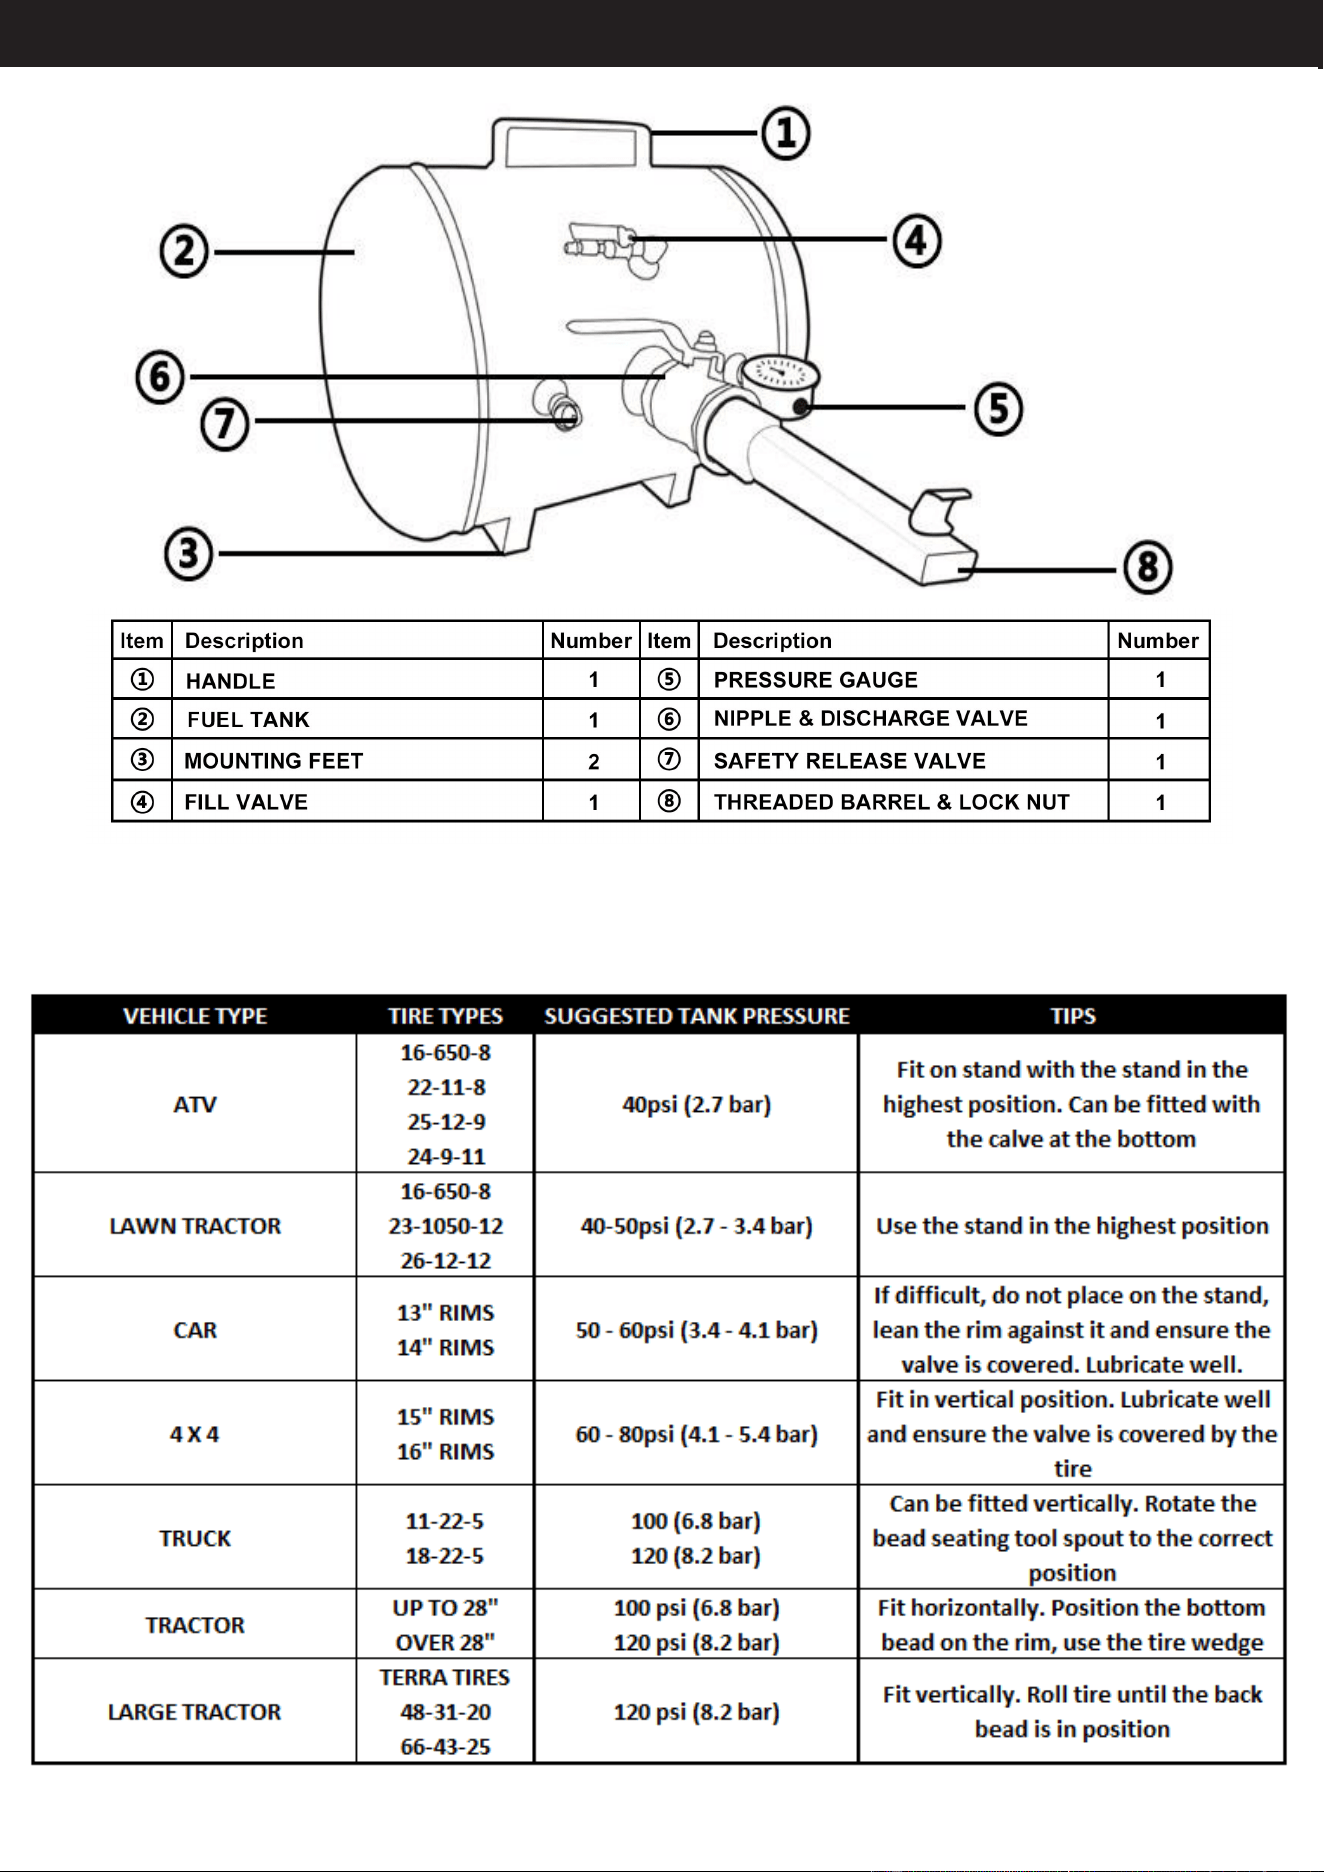
DIAGRAM AND SPECIFICATIONS
3
TANK PRESSURE TABLE: Use the tank pressure table below as a guide for recommended
starting pressures; individual circumstances may require higher or lower pressures. Increase pressure if
the bead seating tool does not lift the tire bead far enough. Decrease pressure if the tire bead appears to
seat at first and then falls off again.
4
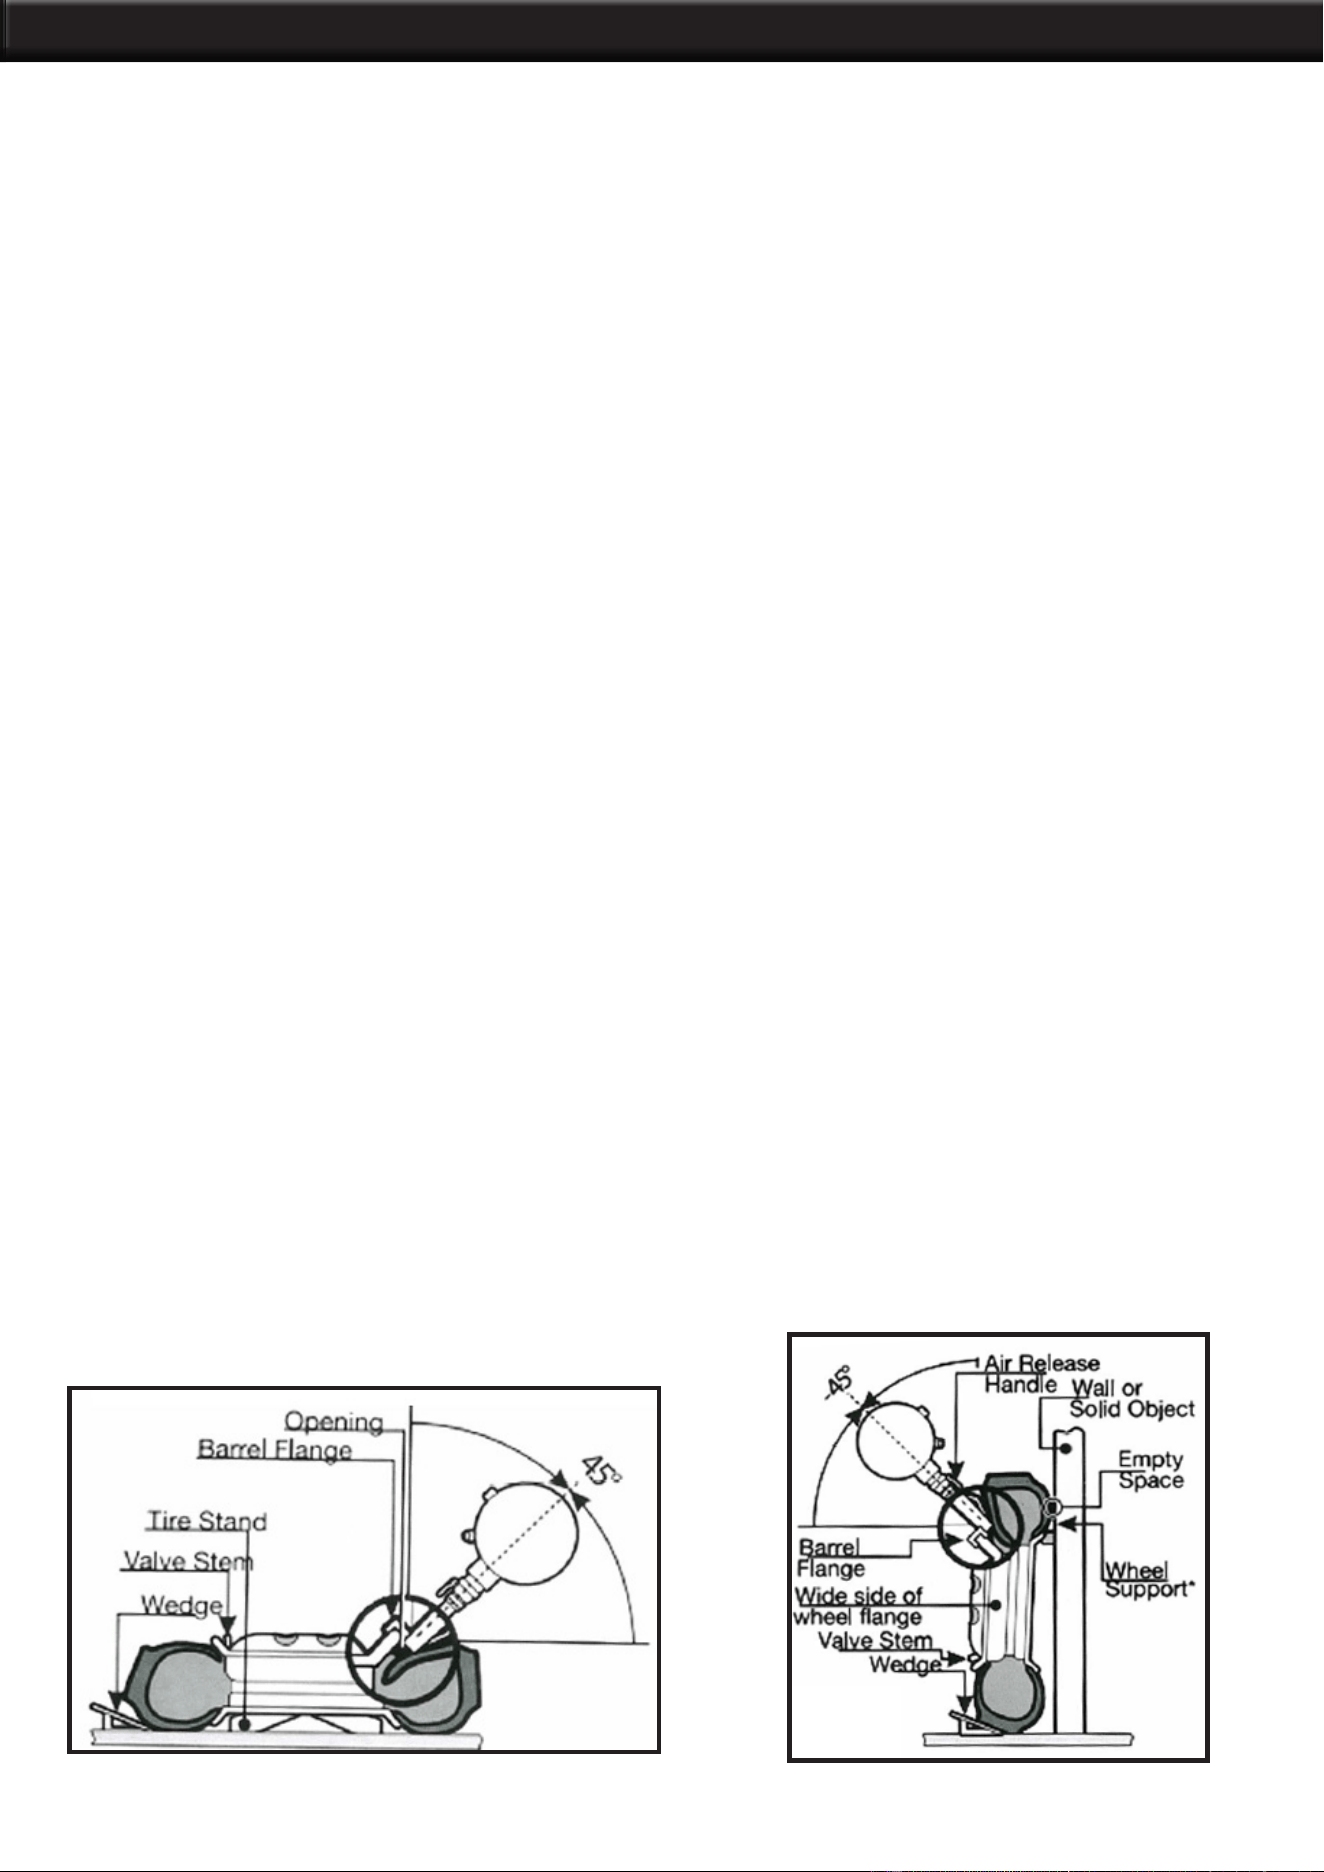
1. Position the wheel and tire flat on a tire stand so that the lower side wall is slightly off the floor.
2. Be sure to seat the lower tire bead on the bottom flange of the wheel.
3. Before attempting to seat the bead, make sure barrel flange is on top (on the same side as the air
release handle) Rotate barrel to this position id necessary before proceeding.
4. Firmly hold the bead seater by the handle and position the barrel at an approximate 45 degree downward
angle and place the barrel flange on the upper edge of the wheel rim opposite the tire valve into the
opening between the tire and rim.
5. Take the other hand and quickly turn the air release valve to open, releasing air into the tire.
6. Once you have successfully seated the tire, connect an air supply line to the tire valve to complete tire
inflation to correct pressure.
USING THE BEAD SEATER FOR HORIZONTAL POSITION FOR TIRE/WHEEL:
USING THE BEAD SEATER FOR VERTICAL POSITION FOR TIRE/WHEEL:
CAUTION: This method should only be used when there is a large gap between the wheel rim
and tire bead or if the tire is too heavy.
1. Position the tire and wheel so that it is tilted slightly back and secure it with a tire wedge. Make sure
the tire and wheel are supported away from the wall to be sure once inflated the tire and wheel do not fall
forward, causing injury.
2. The back bead of the tire (furthest from operator) should be seated against the wheel rim trapping
out any air. The front or wide flange of the wheel should be facing the operator with the tire valve stem
positioned at the bottom of the tire.
3. Rotate the barrel so the barrel flange is underneath (on the opposite side if the air release handle).
4. Firmly hold the bead seater by the handle and position barrel at an approximate 45 degree downward
angle and place the barrel flange on the edge of the wheel, opposite the tire valve, into the opening
between the tire and rim.
5. Take the other hand and quickly turn the air release valve to open, releasing air into the tire.
6. Once you have successfully seated the tire, connect an air supply line to the tire valve to complete tire
inflation to correct pressure.
USING THE BEAD SEATER FOR HORIZONTAL
POSITION FOR TIRE/WHEEL
USING THE BEAD SEATER FOR
VERTICAL POSITION FOR TIRE/
WHEEL
OPERATION

5
OPERATING THE AIR RELEASE HANDLE
Always turn the air release valve handle quickly and fully in one uid motion during seating operation.
LUBRICATE
Lubricating all tire beads properly before using the bead seating tool is vital to proper functionality. Failing
to lubricate beads may result in poor seating.
BEAD SEATING ANGLE
Always hold the bead seating tool at an angle so that the barrel points directly into the gap between the
tire and rim, about 45 degrees from vertical or horizontal depending on tire wheel position. This is to
ensure proper seating so air does not hit the outside of the tire pushing the tire away or the inside of the
rim, not allowing air to enter the tire.
BEAD SEATING TOOL APPLICATION
The most effective position to apply the bead seating tool is opposite the tire valve and where the gap
is the largest. This results in both sides of the tire receiving air supply and ensures that the maximum
amount of air enters the tire, creating maximum lift. If a wedge has been properly used, the largest gap
should be opposite the valve.
STORAGE
Always store the bead seater in a cool, dry place, hanging by the handle with the air release valve open
to ensure any built-up moisture drains from the tank. This also protects the barrel and attachments from
damage.
CONSTRUCTION
The barrel is threaded onto the air intake valve to allow for rotation. Before operating, the barrel must be
orientated and tightened in accordance with the manual. Pressure gauge accuracy is +/- 10%.
AIR SUPPLY / CHANGING
The bead seater has been tested to ensure quality. The pressure release valve cannot exceed 165 psi (11
bar) Ensure that the bead seating tool is only charged immediately before use. The bead seating tool must
be charged from a clean, oil-free, dry air supply and should only be charged from a low pressure airline
system (up to 165 psi 11 bar). Never ll with anything other than air at ambient temperature.
HEARING PROTECTION
The barrel is threaded on to the air intake valve to allow for rotation. Check when operating the bead
seating tool the barrel is orientated in accordance with the manual and the barrel had been tightened.
Note the pressure gauge accuracy is +/- 10%.
NOISE SPECIFICATIONS
Assuming the bead seating tool is used on average of 6-10 times a day, Average noise level equivalent
is approximately L/AEq<70dB. Peak C weighted instantaneous sound pressure = 135dB=112.46
(measurements were taken discharging the bead seating tool into free air. The noise level is reduced
when discharged at a tire and rim).
EYE PROTECTION
Always wear OSHA and ANSI Z87. 1-2003 approved safety goggles when operating this tool.
TIRE EXPLOSION RISK
Before using the bead seating tool on a tire or inating any tire:
ALWAYS inspect the tire for damage.
ALWAYS ensure that any locking ring is secured in place.
ALWAYS use a safety cage for inating large tires or tires at high pressure.
DIAGRAM AND SPECIFICATIONS

6
DO NOT over in
ate the tire.
DO NOT inate damaged tires.
OTHER USES:
DO NOT use the bead seater for any other purpose than what it is designed for.
DO NOT store or transport a charged tank.
DO NOT use it for dusting equipment nor people.
DO NOT discharge the bead seater towards anyone.
DO NOT clean a tire with a ammable solvent before using.
DO NOT subject the tank to any stress or impact that might weaken it.
NEVER STORE OR TRANSPORT A CHARGED BEAD SEATER. ALWAYS CHARGE BEFORE USE
AND DISCHARGE AIR AFTER USE.
BE CAUTIOUS OF COMPRESSED AIR HAZARDS AND KEEP AWAY FROM FLAMMABLE MATERIALS
AND VAPORS.
MAINTENANCE
Check the bead seating tool is regularly for damage or signs of wear and ensure the tank is inspected
inside and out on a yearly basis.
NEVER TIGHTEN OR LOOSEN FITTINGS WHILE THE CYLINDER IS CHARGED.
Check for the following: Make sure there are no cracks in the tank or ttings. Make sure the barrel is not
damaged or bent and there are no obstructions to the barrel.
DRAINING
Drain the bead seating tool regularly. To do this, hang the bead seater up with the barrel positioned
downward and open the air release valve
AIR LINE SAFETY
An air line is designed to deliver maximum air volume and control by allowing the user to be hands free
(from air line) during bead seating operation. Always use an appropriate air line for the type if tire you are
inating.
ACCESSORIES (NOT INCLUDED)
TIRE STAND ACCESSORY
A tire stand is designed to hold the wheel and tire in the best position for applying the bead seating tool
is also available.
TIRE WEDGE
The tire wedge is used to support the tire to maximize bead contact with the rim. Place the wedge under
the side of the tire near to the valve. This ensures that air entering through the valve goes into the tire and
does not escape.
LOW PRESSURE AIR LINE
This ball-valve operated airline which enables the tter to operate the airline connected to the tire valve
stem easily while handling the bead seating tool. This improves the safety of the product as the operator
is in full control of the air supply.
OPERATION AND MAINTENANCE
7
THE MANUFACTURER AND/OR DISTRIBUTOR HAS PROVIDED THE PARTS LIST AND ASSEMBLY
DIAGRAM IN THIS MANUAL AS A REFERENCE TOOL ONLY. NEITHER THE MANUFACTURER OR
DISTRIBUTOR MAKES ANY REPRESENTATION OR WARRANTY OF ANY KIND TO THE BUYER THAT
HE OR SHE IS QUALIFIED TO MAKE ANY REPAIRS TO THE PRODUCT, OR THAT HE OR SHE IS
QUALIFIED TO REPLACE ANY PARTS OF THE PRODUCT. IN FACT, THE MANUFACTURER AND/OR
DISTRIBUTOR EXPRESSLY STATES THAT ALL REPAIRS AND PARTS REPLACEMENTS SHOULD BE
UNDERTAKEN BY CERTIFIED AND LICENSED TECHNICIANS, AND NOT BY THE BUYER. THE BUYER
ASSUMES ALL RISK AND LIABILITY ARISING OUT OF HIS OR HER REPAIRS TO THE ORIGINAL
PRODUCT OR REPLACEMENT PARTS THERETO, OR ARISING OUT OF HIS OR HER INSTALLATION
OF REPLACEMENT PARTS THERETO.
Record Product’s Serial Number Here:
Note: If product has no serial number, record month and year of purchase instead.
Note: Some parts are listed and shown for illustration purposes only and are not available individually
as replacement parts.
PLEASE READ THE FOLLOWING CAREFULLY
DISCLAIMER
PRODUCT MADE IN CHINA
