
Icon Description
Product Introduction
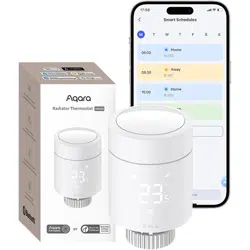
Radiator Thermostat W600 is a smart valve thermostat with a built-in low-power wireless communication module, Zigbee/Thread
dual protocol support, an LED display, and is powered by 2 AA batteries. The device can be used on its own, or can be added to
the Aqara Home app through a hub, transforming it into a smart home thermostat with advanced features and controls. Installing
the thermostat for water-heated radiators is uncomplicated, and it maintains comfortable temperatures while reducing energy
waste. When linked to temperature, humidity, door and window sensors, it can integrate into a full house automated climate
control system.
Warnings
1. This product is not a toy, please keep this product away from children.
2. This product is designed for indoor use only. Do not use in humid environments or outdoors.
3. Beware of moisture, do not spill water or other liquids onto the product.
4. Do not place this product near a heat source.
5. Do not attempt to repair the product by yourself. All repairs should be performed by authorized personnel.
6. This product is designed only for improving the convenience of household life, and for sending notifications. If the user violates
the product instructions and this warning, the manufacturer is not responsible for any risks and property losses caused thereby.
Product Specifications
Radiator Thermostat W600
Model:WT-A03E, WT-A03D
Wireless Protocols: Thread, Zigbee, BLE
Dimensions:⌀57×90 mm (⌀2.24×3.54 in.)
Battery: 3V (2 × 1.5V AA,Alkalinity)
Threaded Connection: M30 × 1.5 mm
Operating Temperature: T40(0 ~ 40 ℃)
Operating Humidity: 0 ~ 95% RH, no condensation
Made in China
What's in the Box: Radiator Thermostat W600 × 1, UserManual × 1, 1.5V AA Battery × 2, Adapter (RA/RAV/RAVL/Caleffi/Giacom-
ini/M28×1.5) × 6
Notice
Use of the Works with Apple badge means that an accessory has been designed to work specifically with the technology identified
in the badge and has been certified by the developer to meet Apple’s performance standards. Apple is not responsible for the
operation of this device or its compliance with safety and regulatory standards.
TheBluetooth®word mark and logos are registered trademarks owned by Bluetooth SIG, Inc. and any use of such marks by
【Lumi United Technology Co., Ltd.】is under license. Othertrademarks and trade names are those of their respective owners.
Manufacturer: Lumi United Technology Co., Ltd.
Address: Room 801-804, Building 1, Chongwen Park, Nanshan iPark, No. 3370, Liuxian Avenue, Fuguang Community,
Taoyuan Residential District, Nanshan District, Shenzhen, China
Online Customer Service:www.aqara.com/support
Email:[email protected]om
Device Installation
1. Before use, pull out the battery tab and confirm that the device is turned on.
2.It is recommended to install the thermostat on the radiator valve within 5 minutes aer the device starts.
Quick Setup
How to Use
Device Interface
Resetting the Device
Indicator Descriptions
(1) Access toAqara Home
1. Download the Aqara Home app
Search for "Aqara Home" in the app store or scan the QR code below to download the "Aqara Home" app.
2. Power on
Follow the instructions to install the thermostat correctly and wait for the device to power on.
3. Add device
Open the Aqara Home app, click "+" in the upper right corner of the home page, and select the device accordingly.
* If the addition fails, move the device closer to the hub and try again.
* Make sure that there is a hub that supports this device (such as, Hub M3) under the Aqara account, and it is within the
connection range when using it.
(2) Access toa 3rd-Party Matter ecosystem
Method 1:
1. Please make sure you have installed the Matter-compatible app and have a Matter-compatible Thread border router.
2. Aer the device is powered on, the indicator light will begin to flash slowly, indicating that the device has entered pairing mode.
3. Open the Matter-enabled app, scan the Matter QR code on the user manual or product, or enter the setup code to add the
device to the app.
Method 2:
Aer adding the device to the Aqara Home app, select "Matter Ecosystem" on the settings page, and follow the prompts to join.
Synchronize device-specific actions (such as single press, long press) to the Matter platform that supports "wireless switch" and
"temperature and humidity sensor" device types (such as Apple Home, Home Assistant), and trigger automation and scenes.
*For help, please visit: www.aqara.com/support.
Preset
Home The default temperature is 26℃, but can be customized
The default temperature is 18℃, but can be customized
The default temperature is 24℃, but can be customized
The default temperature is 20℃, but can be customized
The default temperature is 10℃, but can be customized。
(Tip:If you are unsure about the duration of your vacation,
we recommend setting the hold duration to permanent.)
Away
Go to Sleep
Sleep
Vacation
Description
Function
Reset
Press and hold for 10 seconds
Double-click then press
and hold for 10 seconds
Factory Reset
Operation Description
Dial and Button
Screen
Valve interface
Note: Short press, long press, and rotation operations are
available.
Reset and enter pairing mode:pressing and holding the device
button for 10 seconds to reset the device.
Reset to factory settings: Press 2 times and hold for more than 10
seconds
Child lock
Style 1 Style 2
Low Battery
Pairing
Set Temperature
Temperature Control Error
Smart Schedule
Manual Mode
Aqara Home
1.Horizontal installation
2.Vertical installation
Installation Instructions
a. The thermostat supports both horizontal and vertical installation. However, vertical installation may lead to inaccurate
temperature readings because the built-in temperature sensor is close to the radiator.
c.When the screen displays the number [F1], press the thermostat button 3 times continuously to calibrate the valve. During
calibration, the screen will show the [F2] symbol. ( Note: If [F1] is not displayed, you can try pressing and holding the device
button for 10 seconds to reset the device.)
1. Frost Protection
When the built-in temperature sensor detects a temperature of ≤ 5℃, the device will automatically activate its anti-freeze
protection and initiate heating; when the built-in temperature sensor detects a temperature of > 8° C, the device will turn off
anti-freeze protection and resume normal operation. (The anti-freeze mode in Zigbee is adjustable, with an adjustment
range of 5~15℃. Under the Thread protocol, it is defaulted to 5℃ and cannot be adjusted.)
2. Open Window Detection
Once Window Detection is enabled:
No door/window sensor bound: If the temperature drops by 3 °C within 5 minutes, Heating mode will automatically pause
for 30 minutes.
With a bound door/window sensor: If the sensor detects that a door or window has been open for more than 3 minutes,
Heating mode will automatically pause for 30 minutes.
d.The [F2] symbol will disappear aer approximately 10 seconds, and the screen will display the current set temperature,
indicating that the installation is complete.
Note: Regardless of the installation method, an external Aqara temperature and humidity sensor is recommended to ensure a more precise
temperature control.
b. Align the thermostat interface nut with the radiator valve, and rotate the nut until it is tight.
Note: The installation of the [M30*1.5 mm] valve interface is as shown in the diagram.
Note: You can deactivate the window detection function on the W600 device itself.
3. Schedule
The device will automatically control the heating system according to the preset time period and temperature, allowing
different temperatures to be set for the morning, daytime, evening and night time periods for each day of the week. A single
schedule supports up to 7 time periods, each of which is at least 15 minutes.
4. Manual Control
Turn the heating on or off by manually to adjust the target temperature, or select a comfortable heating temperature by
manually switching presets (if a schedule is created, the device will follow the schedule aer the Hold time ends).
6. Calibration
Supports calibration of built-in temperature and humidity sensors, with an adjustment range of -5~+5℃ and an adjusting
increment of 0.5℃
7. Fully on and fully off the modes
When you rotate the device beyond the minimum temperature adjustment range (continue rotating when the set
temperature is below 5℃), the device valve will be fully closed, and the screen will display OF at this time.
When you rotate beyond the maximum temperature adjustment range (continue rotating when the set temperature is
above 30℃), the device valve will be fully open, and the screen will display ON at this time.
5. Presets
1
2
×3
Deletes network configuration information;
time-related functions and operations will
no longer be executed.
Deletes all information and restores the
device to the factory default state.
Status
Always:
(except when anti-deletion is enabled)
After Installation
Press and hold
for 10 seconds
Press the button
3 times in a row
Single press
Rotation
Press and hold for
3 seconds
Press 5 times
in a row
Before Installation:
(in the installation interface [F1])
Button Result
Resets the device's network information,
enters pairing mode, and the network
configuration icon flashes
Enters calibration state: switches from [F1]
to [F2] calibration interface
When the screen is off, a single press lights
up the screen to display the current indoor
temperature
Set target temperature
Enables child lock (child lock icon lights up)
/ disables child lock (child lock icon goes
off)
Flip the temperature number display on
the device
Function Description
Pairing Successful
Pairing Failed
Insert Battery
Reset /
Restore Factory Settings
No operation for 10s
after screen lights up
Before Installation
Screen displays 【F1】
Screen displays 【F2】
Screen displays 【ON】
Screen displays 【OF】
Calibration
Device Valve Fully Open
Device Valve Fully Closed
Interaction Method
[Pairing] icon is displayed
[Pairing] icon turns off
LED screen fully lights up for 2 seconds then turns off
LED screen fully lights up for 2 seconds then turns off
LED screen turns off and enters standby mode