
Please read this manual carefully and keep it
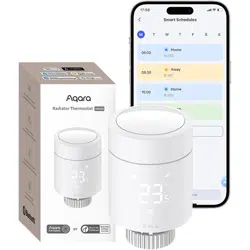
Smart Radiator Thermostat E1
User Manual

Smart Radiator Thermostat E1 User Manual
01
Терморегулятор батареи E1 Руководство пользователя28
Manuale d'uso del Termostato da radiatore E1
56
Manuel d'utilisation de la Tête Thermostatique Intelligente E1
84
111
Smart Heizkörperthermostat E1 Benutzerhandbuch
Manual de usuario del Cabezal Termostático Inteligente E1
Smart Radiatortermostat E1 Användarmanual
164
138
Głowica Termostatyczna E1 Instrukcja obsługi
190
216
Slimme Radiatorknop E1 Gebruikershandleiding

Smart Radiator Thermostat E1 is a thermostatic radiator valve (TRV) powered
by dry (alkaline) batteries applicable to water heating radiators, featuring no
wiring and convenient installation. It can realize satisfactory temperature
control effects. This product, with a built-in low-power Zigbee wireless
communication module and an LCD display, can be used alone or added to
the Aqara Home app through the Aqara hub, becoming an intelligent
thermostat that can be set and checked in the app. It can realize automatic
temperature adjustment and window-open detection supported with the
Aqara Temperature and Humidity Sensor and the Aqara Door and Window
Sensor.
Product Introduction
-01-

* An Aqara Zigbee 3.0 hub is required for smart functionality.
* To work with HomeKit, a specific hub is required. Visit www.aqara.com/support for more
details.
* This product is for indoor use only.
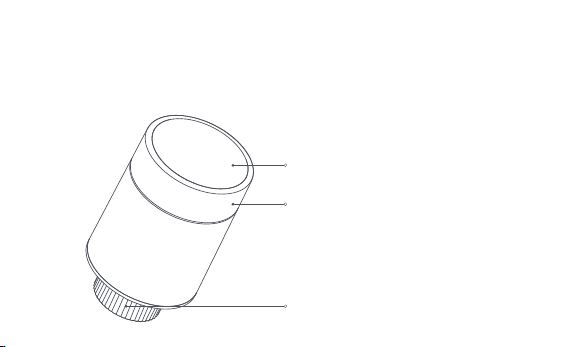
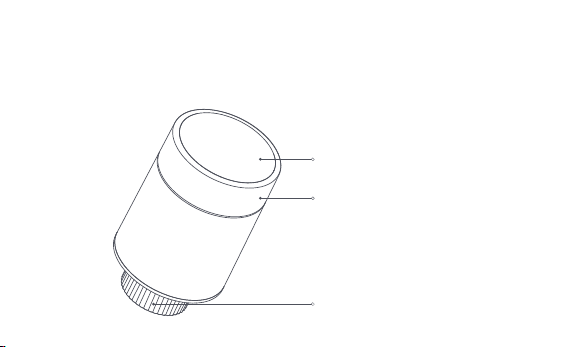
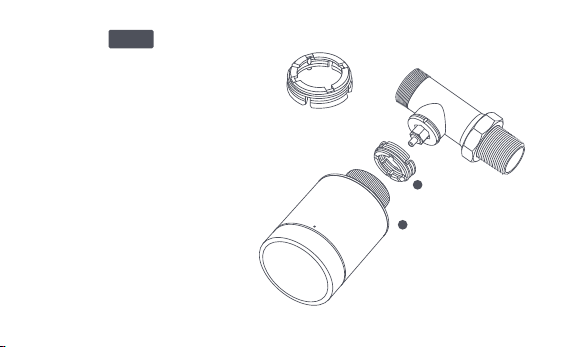
LCD screen
Knob button
Note: Short press, long press, and rotation
operations are available.
Valve interface
-02-

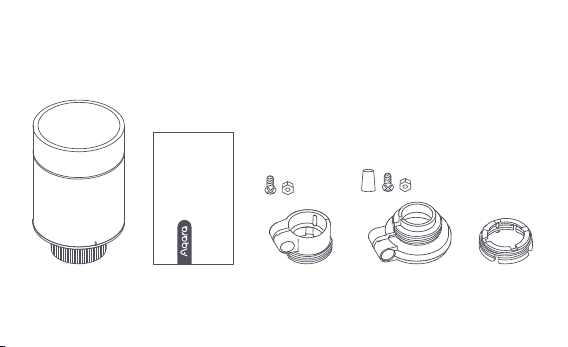
Smart Radiator Thermostat E1 × 1, User Manual × 1, 1.5V AA Battery × 2,
Adapter (RA/RAV/RAVL) × 3
Note: Batteries have been installed before leaving the factory. Please pull out the insulating
tab before use.
What's in the Box
Please read this manual carefully and keep it
Smart Radiator Thermostat E1
User Manual
-03-

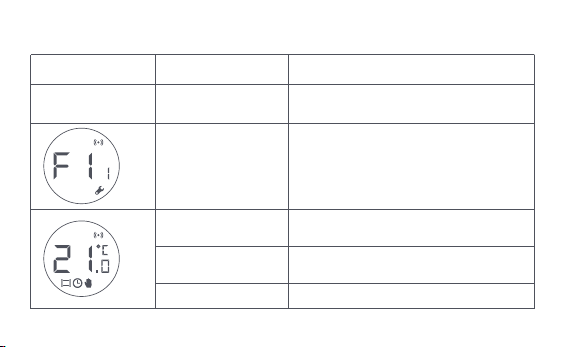
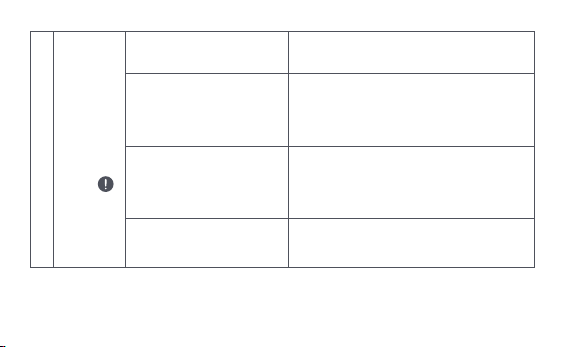
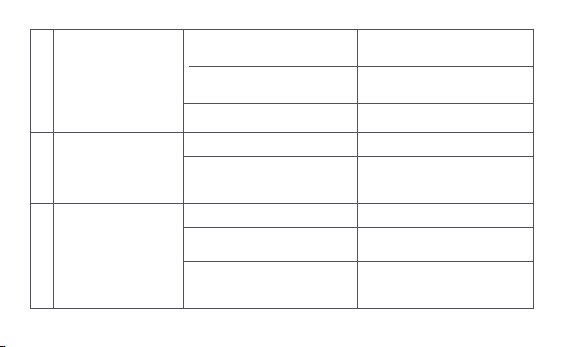
Description of Knob Button Functions
Screen status
Any status Long press for 10 seconds
Press for 3
consecutive times
Short press for 1 time
Switch module
Enable/disable child lock function
Adjust temperature
Long press for 3 seconds
Rotate
Valve calibration (before calibration,
ensure that the thermostat has been
properly installed on the valve
interface)
Network joining/network resetting
Function Description
-04-
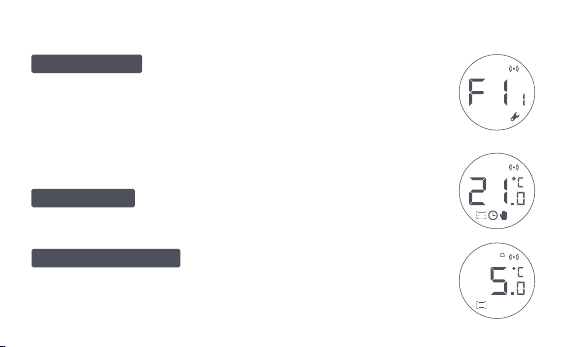
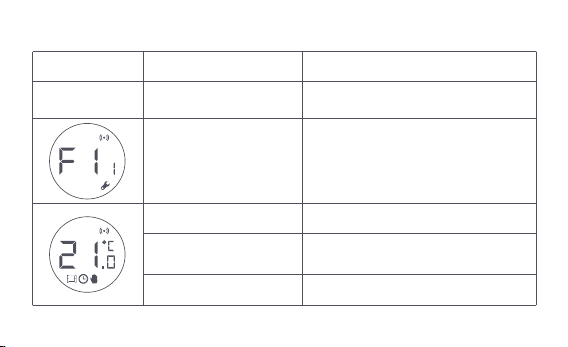
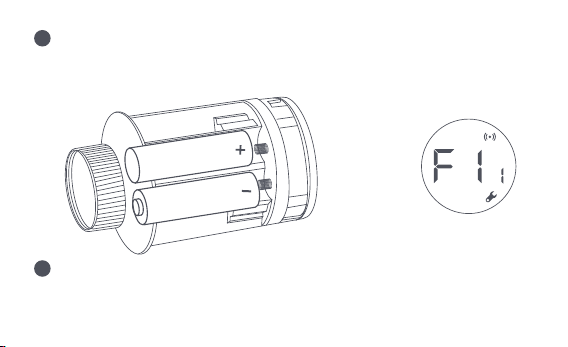
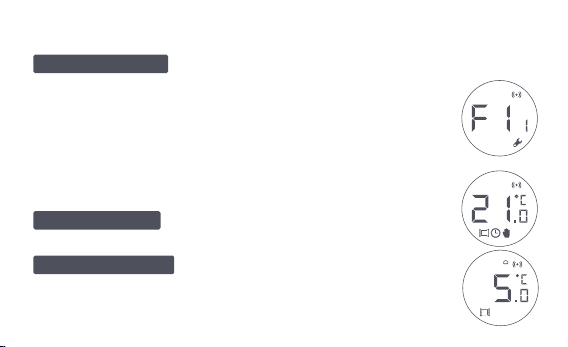
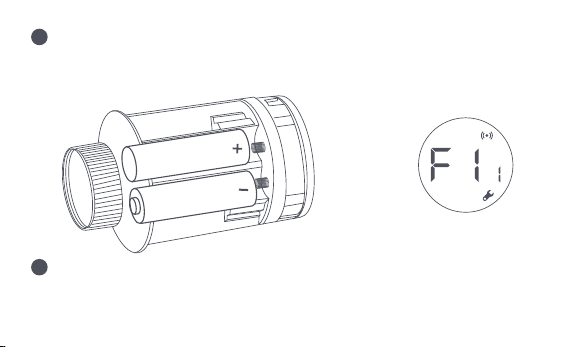
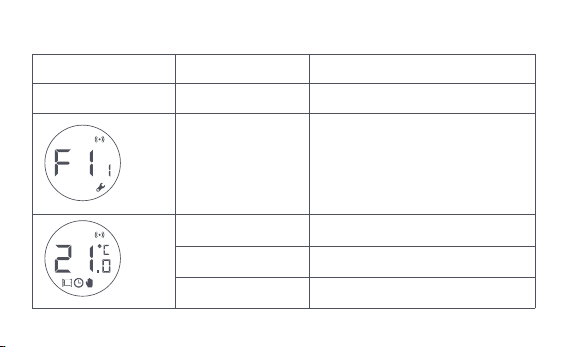
Screen Status Description
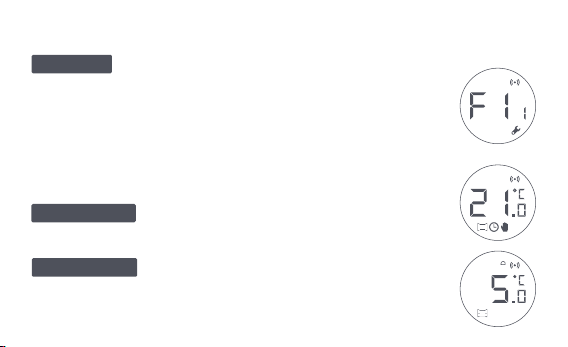
The screen will display the status as shown in
the figure every time batteries are loaded. At this time, install the
thermostat into the valve interface as soon as possible, and then
press the button 3 consecutive times or click "More Settings" in
the app to calibrate the valve.
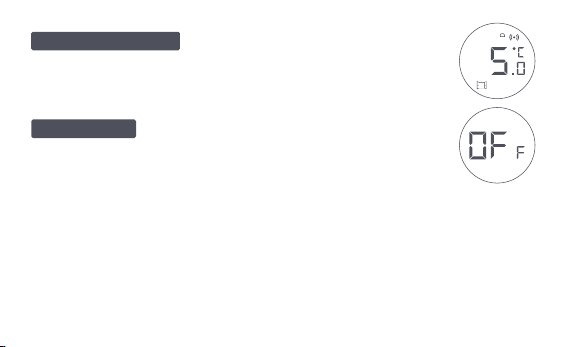
This is designed for usage when you are
away for an extended period, to protect the water pipe from
freezing at low temperature.
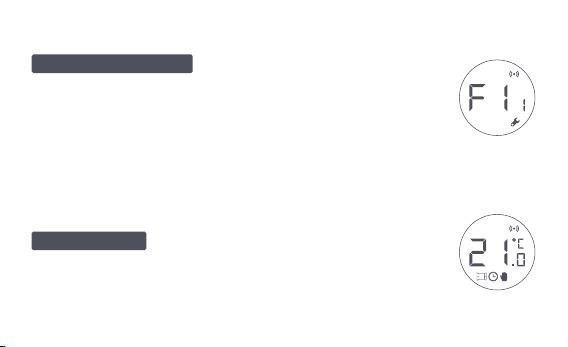
The user can rotate the knob or set the target
temperature on the app as needed.
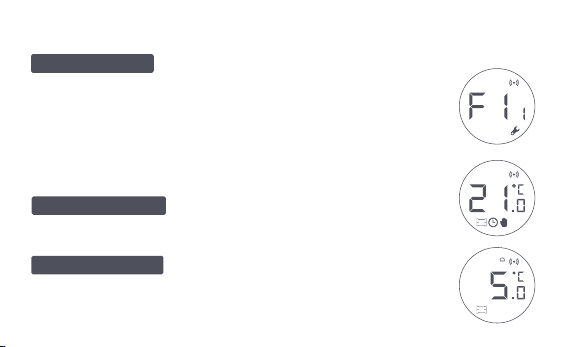
To Be Installed
Anti-Freezing Mode
Manual Mode
Note: Ensure that the thermostat is properly installed on the valve interface
before calibration.
-05-
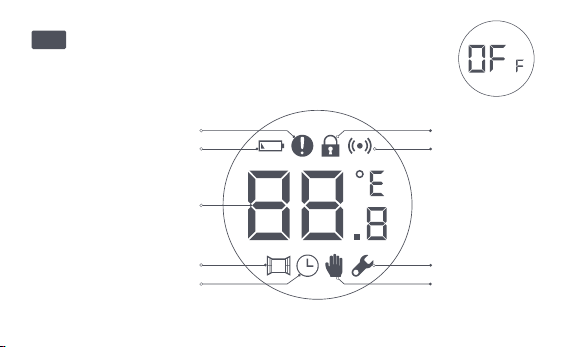
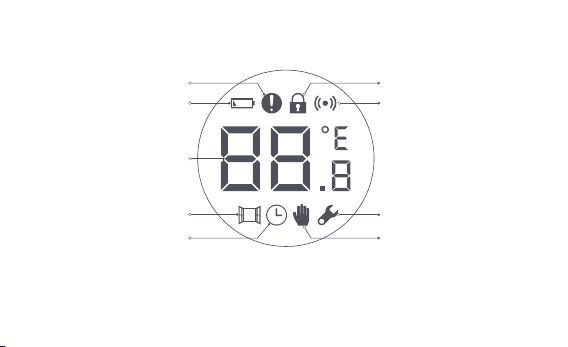
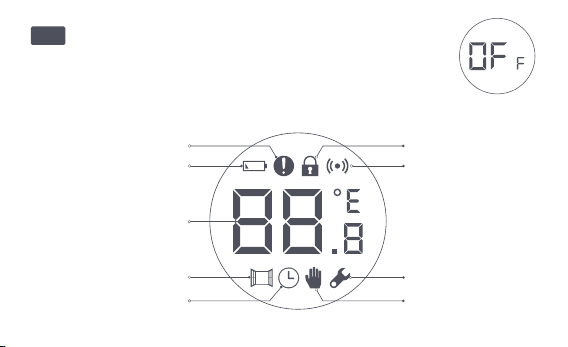
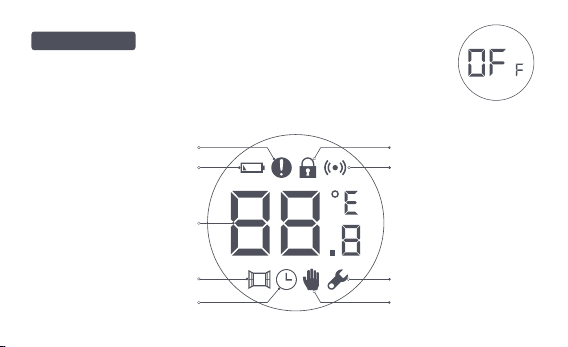
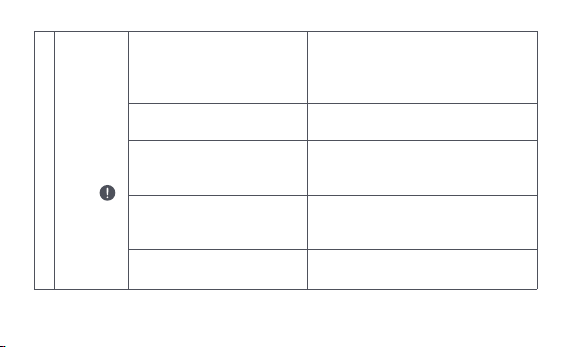
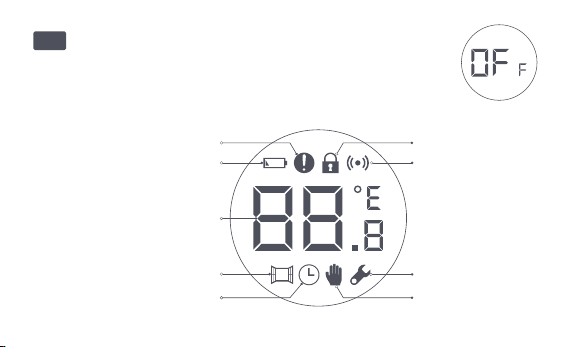
Icon Description
The valve will be closed to stop heating, which is suitable
for service in the summer when there is no heating needed.
Temperature control fault
Low battery
Set temperature
Window-open detection
Intelligent schedule
Manual mode
Installation
Networking
Child lock
Off
-06-
Low battery
Set temperature
Window-open detection
Intelligent schedule
Manual mode
Installation
Networking
Child lock
In case of low battery. Replace the batteries as soon as possible.
Display the set temperature.
When the window-open detection function is activated.
When the intelligent schedule function is activated.
When the thermostat is in manual mode.
When the thermostat is in installation status.
Status of networking:
*Icon normally on: normal network connection
*Icon off: offline/disconnected.
To prevent children from touching by mistake, long press
for 3 seconds to enable or disable the function.
Temperature control fault
In case of abnormal temperature control. Refer to the
"Troubleshooting" in the manual for troubleshooting.
-07-
Installation Instructions
1. Please pull out the insulating tab before use, and confirm that the device is
turned on.
-08-

2. It is recommended to install the thermostat on the radiator valve interface
within 5 minutes aer the TRV starts up.
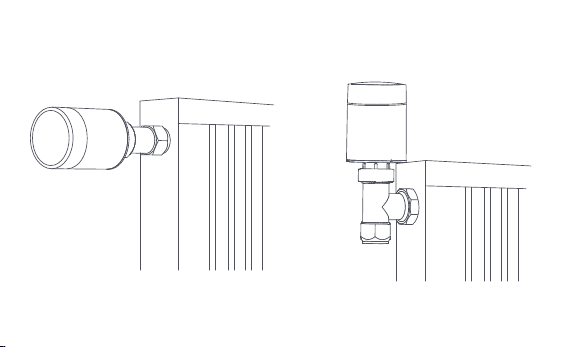
1.Horizontal installation 2.Vertical installation
-09-
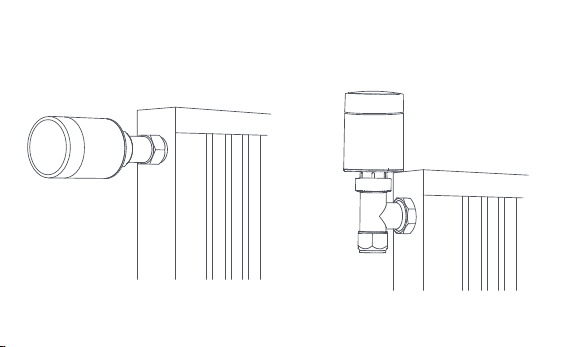
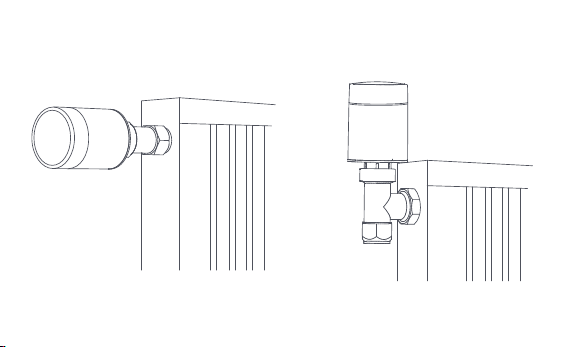
a. The Thermostat supports both horizontal and vertical installation methods.
However, the vertical installation method may result in inaccurate
temperature readings caused by the built-in temperature sensor being
close to the radiator.
Note: in any of these methods, an external Aqara Temperature and Humidity Sensor is
required to make temperature control more accurate.
1
2
-10-
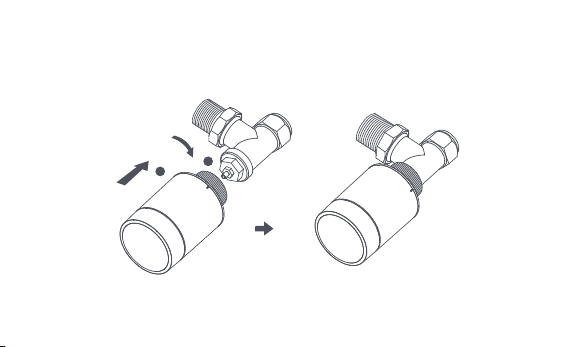
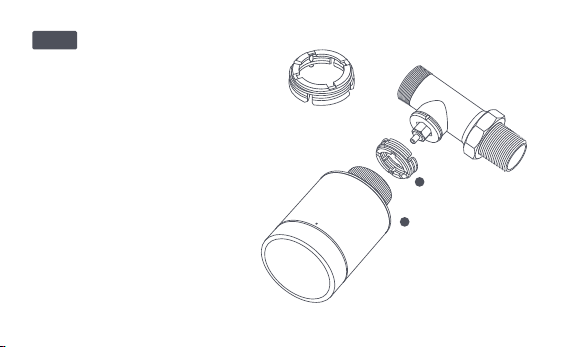
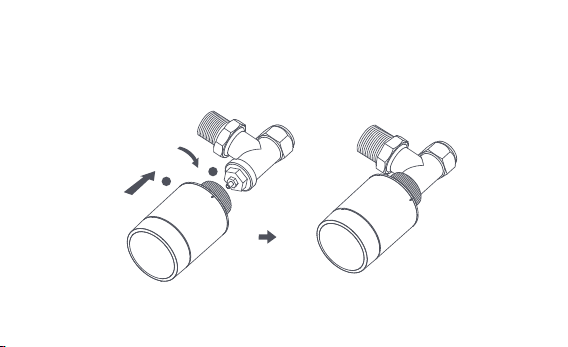
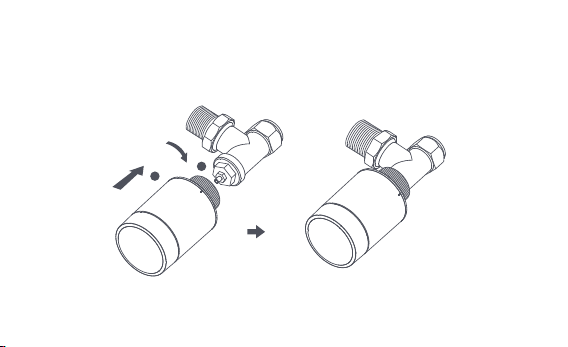
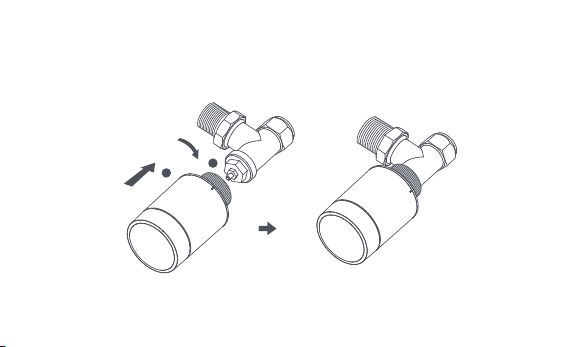
b. Align the thermostat interface nut with the radiator valve, and rotate the
nut until it is tightened.
Note: Installation of [M30*1.5 mm] valve interface is shown in the figure.
-11-

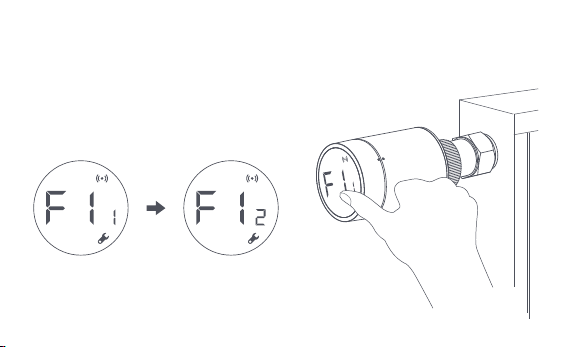
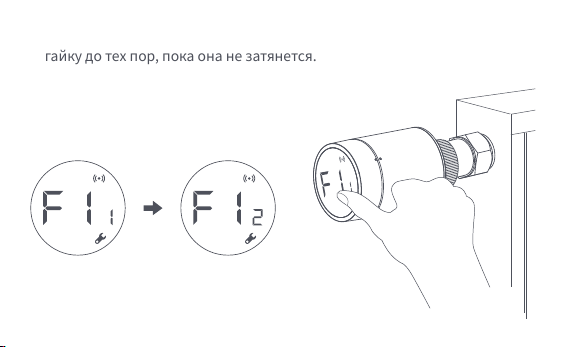
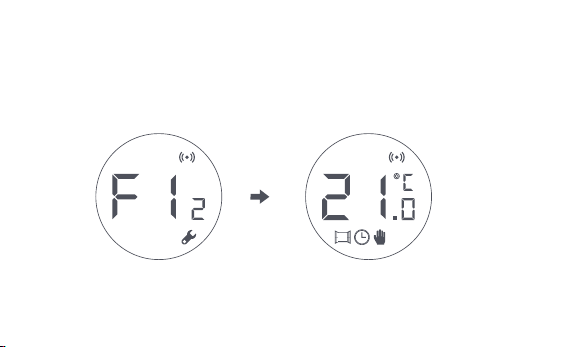
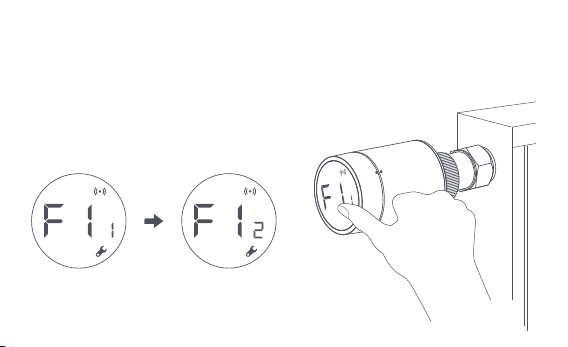
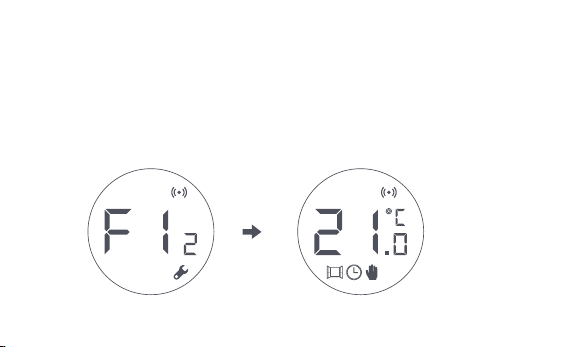
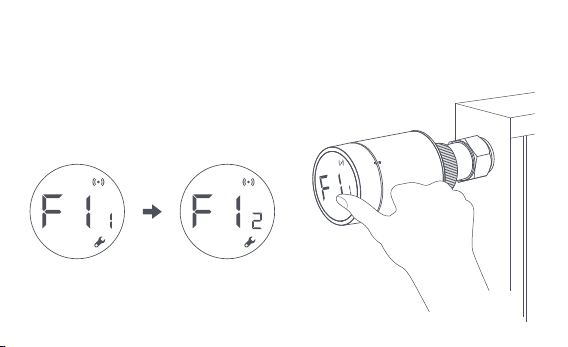
c. Press the thermostat button 3 consecutive times to calibrate the valve.
During calibration, the screen displays the [F12] symbol.
d. The [F12] symbol disappears in about 10 seconds, and the screen displays
the currently set temperature, indicating the completion of installation.
Note: the valve must be calibrated; otherwise it may cause abnormal temperature
control. Follow the above steps or click "More Settings" in the app to calibrate the valve.
-12-
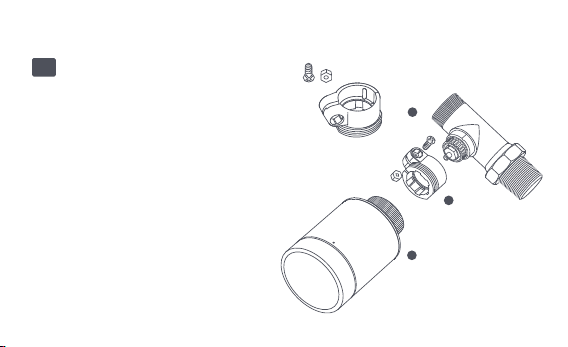
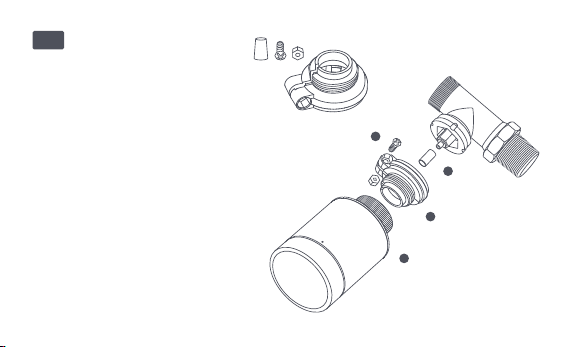
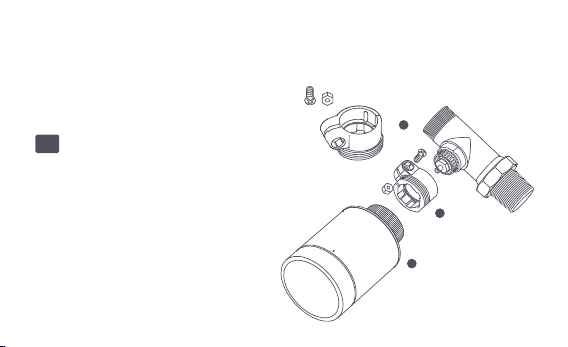
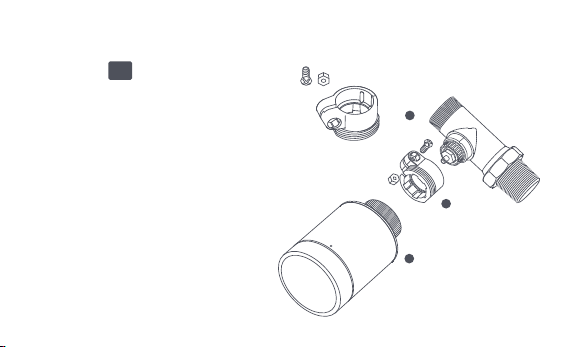
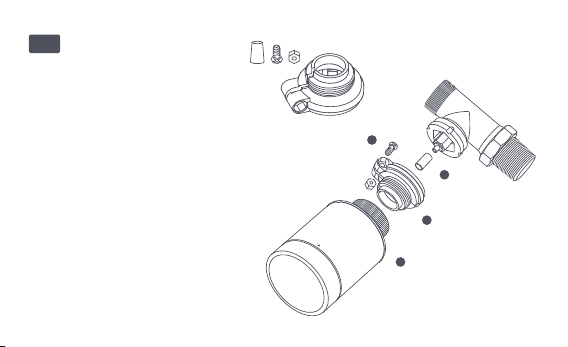
Installation with Other Adapters:
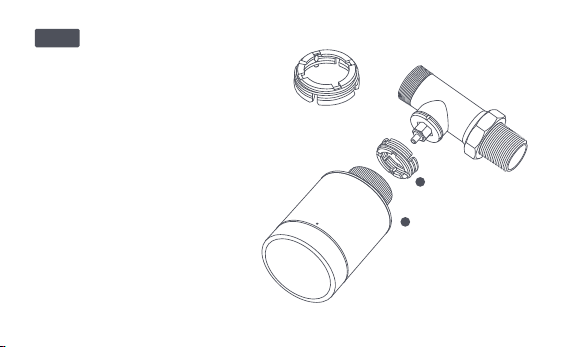
Adapter:
RA
Connect the RA adapter with the
valve, tighten the screw to
complete the connection, then
align the thermostat interface nut
with the RA adapter, and rotate
the interface nut until it is
tightened.
1
2
3
-13-
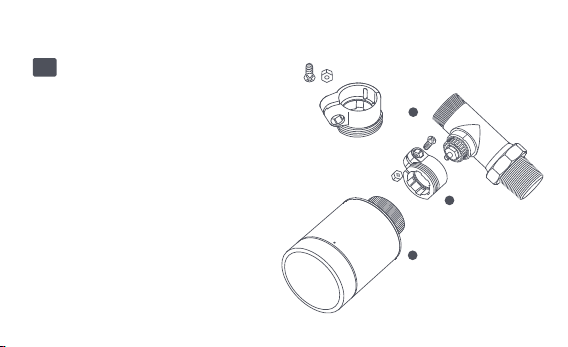
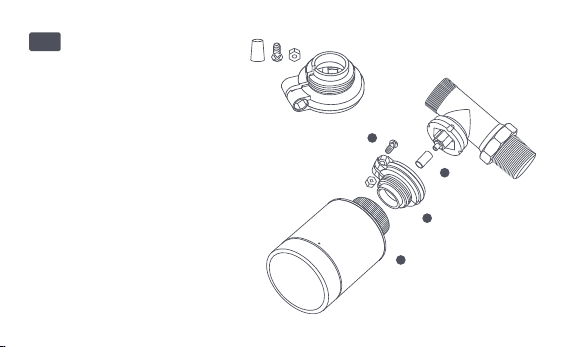
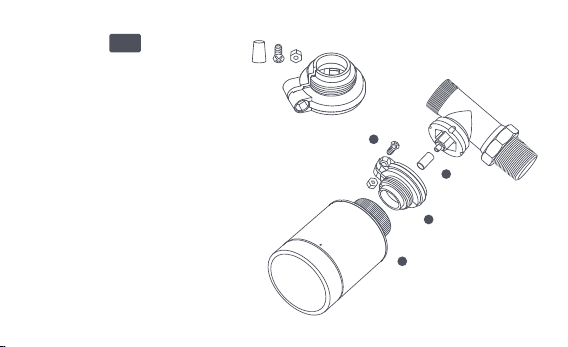
Adapter:
RAV
Connect the RAV adapter with
the valve, tighten the screw,
insert the pushrod into the valve
thimble to complete the
connection, then align the
thermostat interface nut with
the RAV adapter, and rotate the
interface nut until it is tightened.
1
2
3
4
-14-
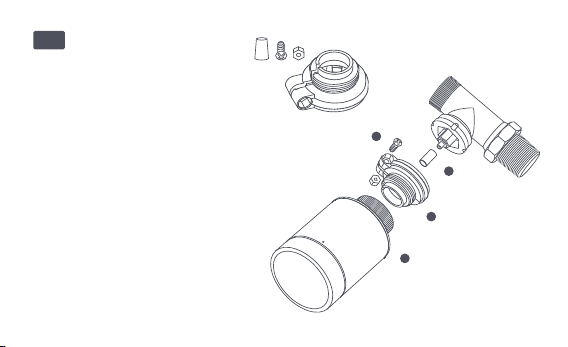
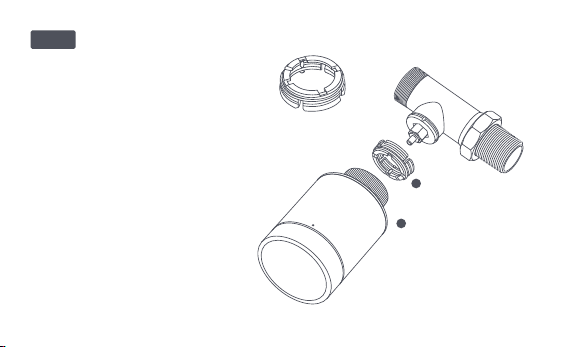
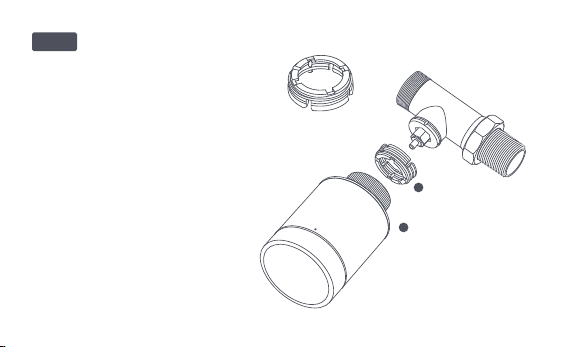
Adapter:
Connect the RAV adapter with the
valve, tighten the screw, insert the
pushrod into the valve thimble to
complete the connection, then
align the thermostat interface nut
with the RAV adapter, and rotate
the interface nut until it is
tightened.
1
2
RAVL
-15-

Quick Setup
Adding the Device to the Aqara Home app:
Before using the product, please ensure that the Aqara Home app has
been downloaded and an Aqara Zigbee 3.0 hub has been installed.
Start the app, click "+" in the upper-right corner of the home page to enter
the "Add Device (Accessories)" page, select "Smart Radiator Thermostat
E1", and operate according to the prompts on the page.
Effective distance verification: aer the successful network configuration,
adjust the thermostat at the preselected installation position and observe
whether the status in the app is synchronized.
* If the device is not added, please move it closer to the hub and try again.
1
2
-16-
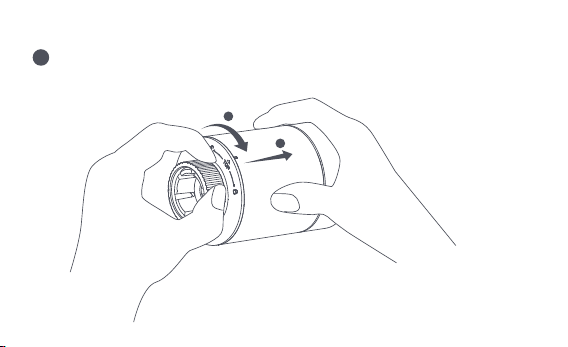
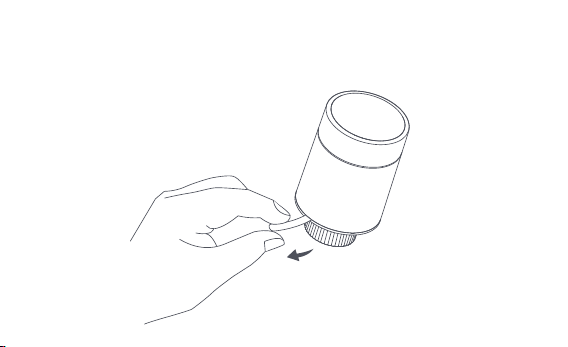
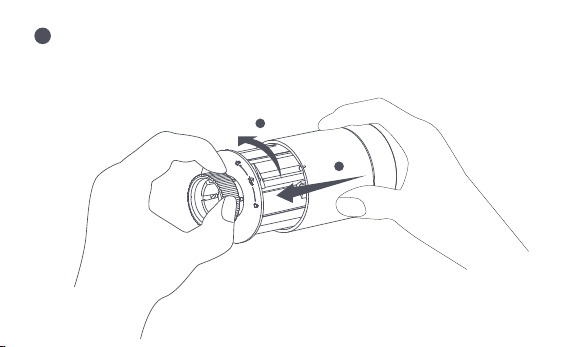
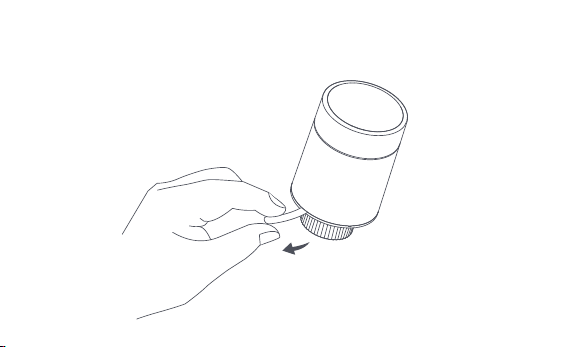
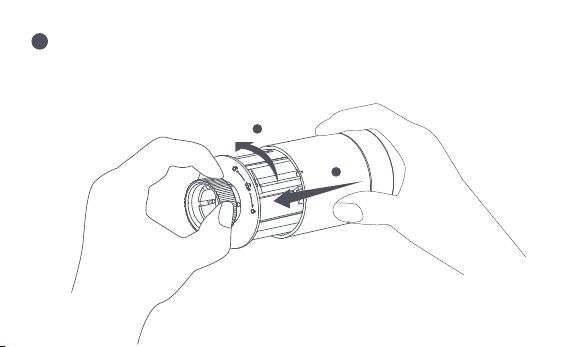
Battery Replacement
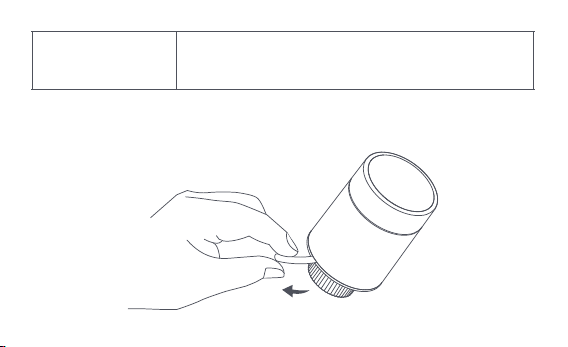
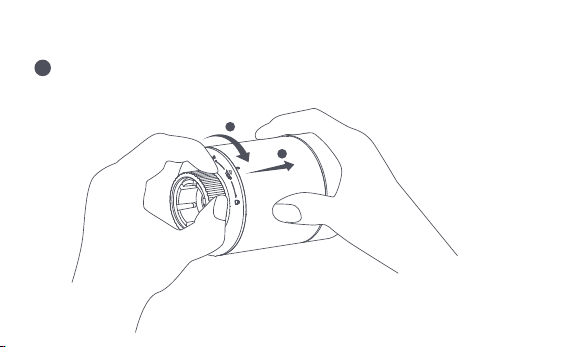
Rotate the housing in the direction of the arrow at the bottom and pull it
out until it is unlocked.
1
2
1
-17-
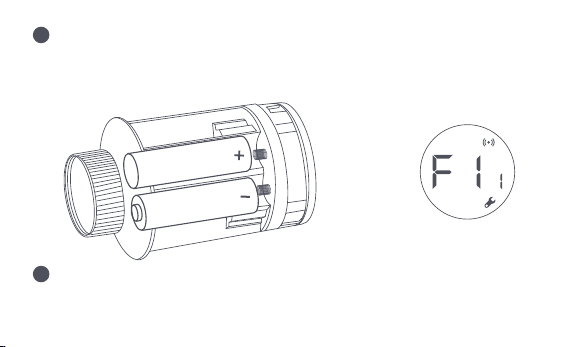
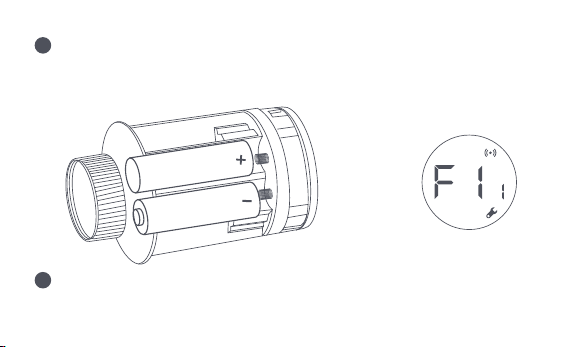
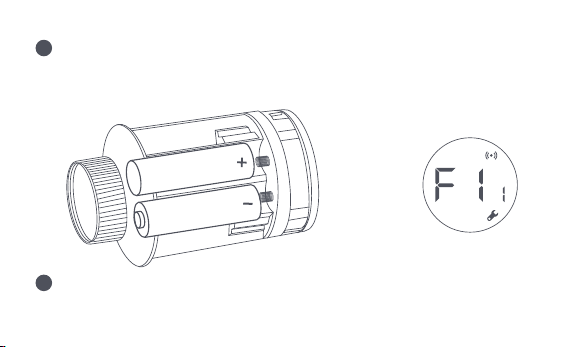
Referring to the polarity marks in the battery compartment, put in 2 AA
alkaline batteries as shown in the figure.
With batteries loaded, the thermostat starts automatically, and the screen
displays the symbol [F11] as shown in the figure.
Note: Rechargeable batteries should not be used.
+
2
3
-18-
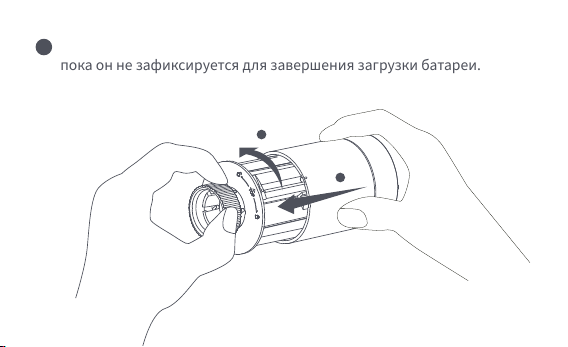
Place the housing, and rotate it in the direction of the arrow at the bottom
until it is locked, to complete the battery loading.
Note: Please replace the batteries as soon as possible in case of a low battery warning.
1
2
4
-19-
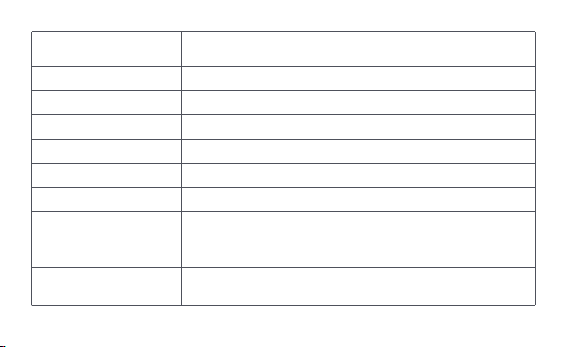
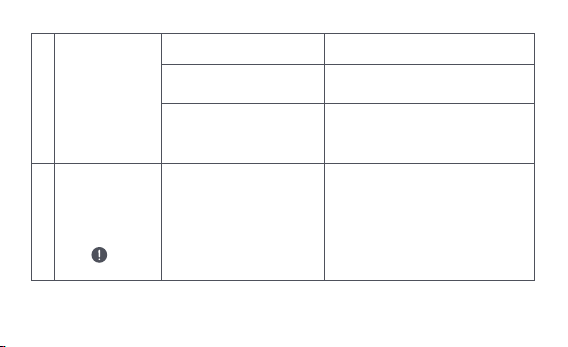
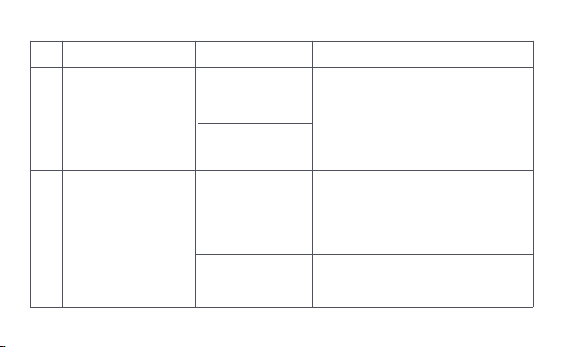
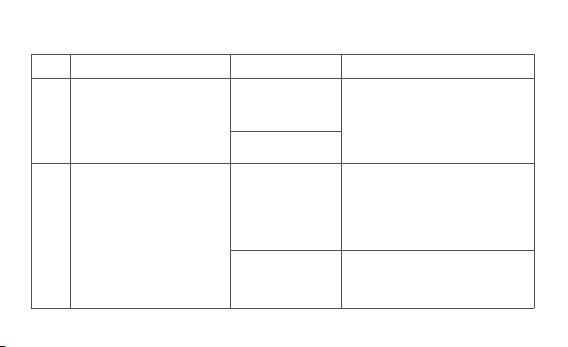
No.
1
The thermostat works
normally, but the
room temperature is
evidently higher than
the set temperature
The thermostat
works normally, but
the room
temperature is
evidently lower than
the set temperature
Replace the valve, take out the
batteries and put them back
aer 30 seconds, and then
reinstall the thermostat.
Contact professionals to repair
the hot water pipeline.
Remove the thermostat from
the valve, take out the
batteries, and put them back
aer 30 seconds. Reinstall the
thermostat and observe
whether the fault persists.
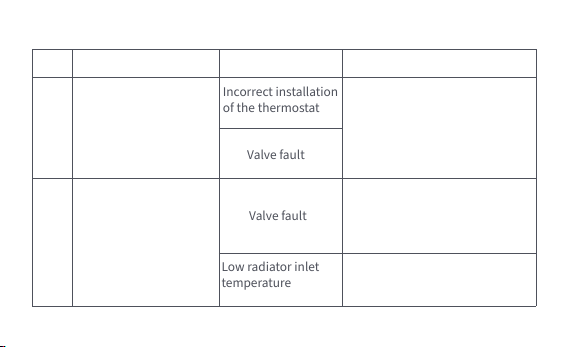
Incorrect installation
of the thermostat
Low radiator inlet
temperature
Valve fault
Valve fault
2
Fault Possible cause Solution
Troubleshooting
-20-
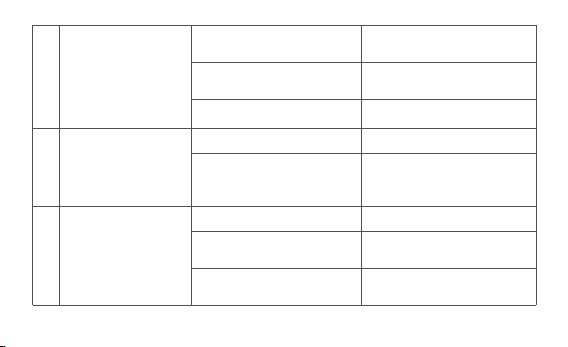
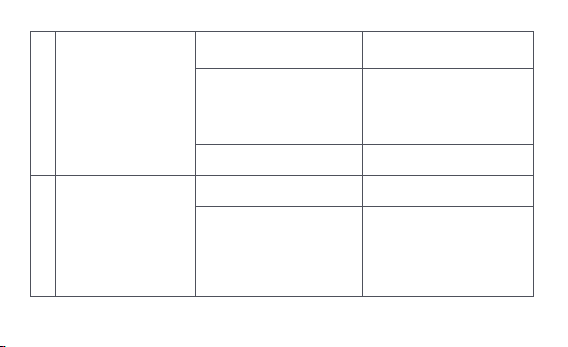
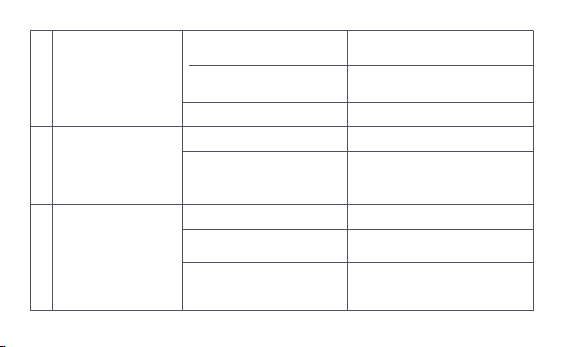
The thermostat
can't be operated
via the app
The thermostat works
normally, but the
room temperature is
not constant
The thermostat
shows no response
when batteries are
loaded
The room is over-ventilat-
ed, and the heat is lost
Check whether the doors
or windows are open or
not fastened.
The thermostat is not
connected to the app
Check network configuration.
Adjust the distance or add
another hub.
Replace the batteries.
Replace the batteries.
The thermostat is located
far or blocked from the hub
Battery low
Battery low
3
4
5
Replace the batteries.
Replace the batteries.
Battery low
Product failure
The batteries are loaded in
the wrong polarity direction.
Contact aer-sales for
repair or replacement.
-21-
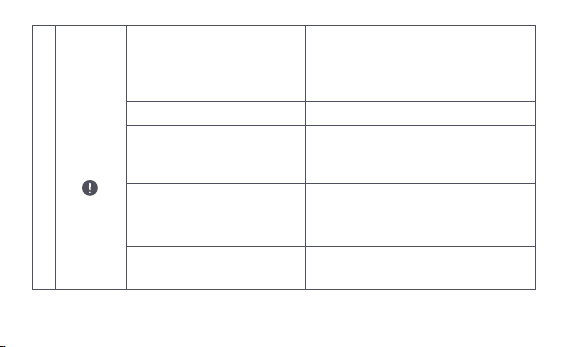
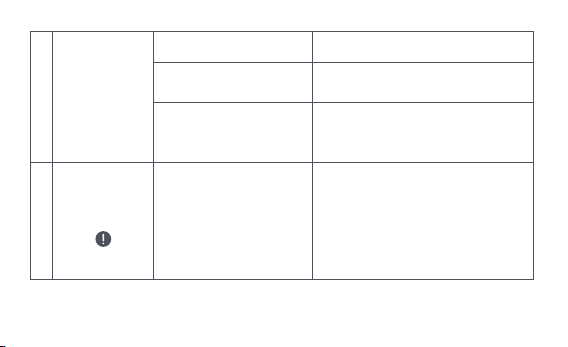
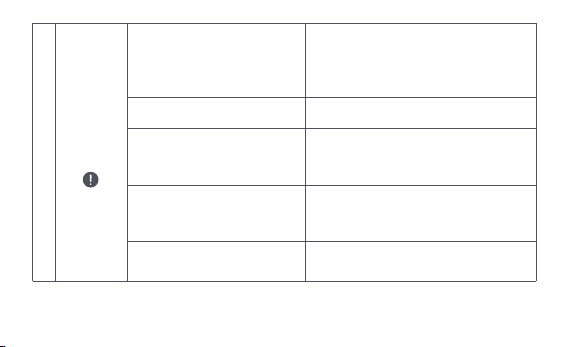
LCD screen
displays a
fault icon
6
Incorrect installation
of the thermostat
The temperature is set too high
Valve fault
The room is too large
(the radiator does not
match it) or over-ventilated
Low water inlet pressure
or temperature
Remove the thermostat from the valve,
take out the batteries and put them back
aer 30 seconds, reinstall the thermostat
and observe whether the fault persists.
Replace the batteries.
Replace the valve, take out the batteries
and put them back aer 30 seconds, and
then reinstall the thermostat.
Replace the radiator or check
whether the doors or windows are
open or not fastened.
Check the water inlet pressure and
temperature.
Note: In case of any issue not resolved, please contact the aer-sales department -
-22-
EU Declaration of Conformity
Hereby, [Lumi United Technology Co., Ltd] declares that the radio equipment
type [Smart Radiator Thermostat E1,SRTS-A01] is in compliance with Directive 2014/53/EU.
Specifications
Model: SRTS-A01
Battery: 3V (2 × 1.5V AA)
Wireless Protocols: Zigbee 3.0
Dimensions: Ø 57×89 mm (Ø 2.24×3.5 in.)
Operating Temperature: 0°C ~ 40°C (32°F ~ 104°F)
Operating Humidity: 0 ~ 95% RH, no condensation
Threaded Connection: M30×1.5 mm
Zigbee Maximum Output Power: <10 dBm
Zigbee Operation Frequency: 2405-2480 MHz
Under normal use, this device should be kept at a separation distance of at least 20 cm
between the antenna and the body of the user.
-23-

All products bearing this symbol are waste electrical and electronic equipment
(WEEE as in directive 2012/19/EU) which should not be mixed with unsorted
UK Declaration of Conformity
Hereby, Lumi United Technology Co., Ltd declares that the radio equipment type
Hub E1, HE1-G01 is in compliance with Directive 2017 (SI 2017 No. 1206, as amended by SI
2019 No. 696).
The full text of the UK declaration of conformity is available at the following internet
address: http://www.aqara.com/DoC/.
WEEE Disposal and Recycling Information
household waste. Instead, you should protect human health and the environment by
handing over your waste equipment to a designated collection point for the recycling of
waste electrical and electronic equipment, appointed by the government or local
The full text of the EU declaration of conformity is available at the following internet
address: http://www.mi.com/global/service/support/declaration.html
-24-
Symbol on the product or on its packaging indicates that this product may not
be treated as household waste. Instead it shall be handed over to the
applicable collection point for the recycling of electrical and electronic
equipment.
1. This product is NOT a toy. Please keep children away from this product.
2. This product is designed for indoor use only. Do NOT use it in humid environments or
outdoors.
3. Beware of moisture, do NOT spill water or other liquids onto the product.
4. Do NOT place this product near a heat source. Do NOT place it in an enclosure unless
there is normal ventilation.
Warnings
authorities. Correct disposal and recycling will help prevent potential negative
consequences to the environment and human health. Please contact the installer or local
authorities for more information about the location as well as terms and conditions of
such collection points.
-25-

5. Do NOT attempt to repair this product by yourself. All repairs should be performed by an
authorized professional.
6. This product is only suitable for improving the entertainment, convenience of your home
life, and reminding you about the device status. It should NOT be used as security
equipment for homes, buildings, warehouses, or any other places. If a user violates the
product use instructions, the manufacturer will NOT be liable for any risks and property
losses.
7. Replacement with batteries of the wrong model may cause a fire or explosion. Only
batteries of the same or equivalent model are allowed for replacement.
8. Do not put any battery into fire, oven, or microwave oven, to avoid explosion.
9. Do not disassemble, impact, squeeze, cut, or mechanically damage the battery in any
way, to avoid explosion.
10. Do not expose the batteries to extremely low air pressure or extremely high
temperature, which may cause battery explosion and flammable liquid or gas leakage.
11. Do not discard the waste batteries, and dispose of them properly in accordance with
relevant national and regional regulations.
-26-

Lumi United Technology Co., Ltd
Room 801-804, Building 1, Chongwen Park, Nanshan iPark, No. 3370, Liuxian Avenue,
Fuguang Community, Taoyuan Residential District, Nanshan District, Shenzhen, China
Online Customer Service: www.aqara.com/support
Email: [email protected]om
-27-
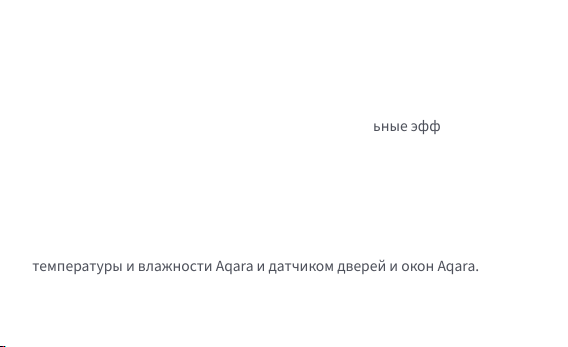
Терморегулятор батареи E1 – термостатический клапан радиатора (TRV),
работающий на сухих (щелочных) батареях, применимый к батареям
водяного отопления, отличающийся отсутствием проводки и удобным
монтажом. Способен обеспечить удовлетворительные эффекты
контроля температуры. Данный продукт со встроенным низкомощным
модулем можно использовать самостоятельно или добавить в
приложение Aqara Home через концентратор Aqara, чтобы превратить
его в умный терморегулятор, который можно устанавливать и проверять
в приложении. Он может обеспечивать автоматическое регулирование
температуры и обнаружение открытого окна, поддерживается датчиком
температуры и влажности Aqara и датчиком дверей и окон Aqara.
Обзор продукта
-28-
* Для умной функциональности необходим концентратор Aqara Zigbee 3.0.
* Для работы с HomeKit необходим специальный концентратор. Посетите
www.aqara.com/support для получения более подробной информации.
* Продукт предназначен только для использования в помещении.
ЖК-экран
Рычажная кнопка
Примечание: доступны операции короткого
нажатия, длительного нажатия и поворота.
Интерфейс клапана
-29-

Терморегулятор батареи E1 × 1, Руководство пользователя × 1, батарея
AA 1,5 В × 2, адаптер (RA/RAV/RAVL) × 3
Примечание: батареи были установлены перед отправкой с завода. Пожалуйста,
извлеките изоляционную вкладку перед использованием.
Комплектация:
Please read this manual carefully and keep it
Smart Radiator Thermostat E1
User Manual
-30-
Описание функций рычажных кнопок
Статус экрана
Любой статус
Длительное нажатие в
течение 10 секунд
Нажатие 3
раза подряд
Короткое нажатие 1 раз
Переключение модуля
Включить/отключить функцию
блокировки от детей
Регулировка температуры
Длительное нажатие в
течение 3 секунд
Поворот
Калибровка клапана (перед
калибровкой убедитесь, что
терморегулятор установлен
правильно на интерфейсе клапана)
Подключение к сети/сброс сети
Функция Описание
-31-
Описание статуса экрана
Экран будет отображать статус, как
показано на рисунке, каждый раз при установке батарей. В
это время как можно скорее установите терморегулятор в
интерфейс клапана, после чего нажмите кнопку 3 раза
подряд или нажмите «Дополнительные настройки» в
приложении для калибровки клапана.
Пользователь может повернуть рычаг или
устанавливать целевую температуру в приложении по мере
необходимости.
Подлежит установке
Ручной режим
Примечание: перед калибровкой убедиться в том, что терморегулятор установлен
правильно на интерфейсе клапана.
-32-
Предназначен для использования во
время длительного отсутствия, чтобы защитить водопровод
от замерзания при низкой температуре.
Клапан закрывается для прекращения
нагрева, что подходит для эксплуатации летом, когда нет
необходимости в отоплении.
Режим антифриза
Выключение
-33-
Описание значков
Ошибка контроля
температуры
Низкий заряд батареи
Установленная
температура
Обнаружение
открытого окна
Умное расписание
Ручной режим
Установка
Сеть
Блокировка от детей
-34-
Ошибка контроля
температуры
В случае аномального контроля температуры. См.
раздел «Устранение неисправностей» в
руководстве для устранения неисправностей.
Низкий заряд батареи
В случае низкого заряда батареи. Замените
батареи как можно скорее.
Установленная температура Отображение установленной температуры.
Обнаружение открытого окна
Когда активирована функция обнаружения
открытого окна.
Умное расписание Когда активирована функция умного расписания.
Ручной режим Когда терморегулятор находится в ручном режиме.
Установка
Когда терморегулятор находится в статусе установки.
Сеть
Статус сети:
*Значок обычно горит: нормальное сетевое соединение
*Значок не горит: не в сети/отключено.
-35-

Блокировка от детей
Для предотвращения случайного прикосновения
детьми, нажмите и удерживайте в течение 3
секунд, чтобы включить или отключить функцию.
Инструкции по установке
1. Пожалуйста, извлеките изоляционную вкладку перед использованием
и убедитесь, что устройство включено.
-36-
2. Терморегулятор на интерфейсе клапанарадиатора рекомендуется
устанавливать в течение 5 минут после запуска TRV.
1.Горизонтальная установка 2.Вертикальная установка
-37-
а. Терморегулятор поддерживает как горизонтальные, так и вертикальные
методы установки. Однако вертикальный метод установки может
привести к неточностям в показаниях температуры, обусловленным
близостью встроенного датчика температуры к батарее.
Примечание: в любом из этих методов для повышения точности регулирования
температуры требуется внешний датчик температуры и влажности Aqara.
1
2
-38-
b. Установите терморегулятор с клапаном радиатора и поворачивайте
гайку до тех пор, пока она не затянется.
Примечание: установка интерфейса клапана [М30*1,5 мм] показана на рисунке.
-39-
c. Нажмите кнопку терморегулятора 3 раза подряд для калибровки
клапана. Во время калибровки на экране отображается символ [F12].
d. Символ [F12] исчезает примерно через 10 секунд, и на экране
отображается текущая установленная температура, указывающая на
завершение установки.
Примечание: клапан должен быть откалиброван; в противном случае он может
привести к аномальному контролю температуры. Следуйте приведенным выше
шагам или нажмите «Дополнительные настройки» в приложении для калибровки
клапана.
-40-
Установка с другими адаптерами:
Адаптер:
RA
Соедините адаптер RA с клапаном,
затяните винт для завершения
соединения, затем выровняйте
гайку интерфейса
терморегулятора с адаптером RA и
поворачивайте гайку интерфейса,
пока она не будет затянута.
1
2
3
-41-
Адаптер:
RAV
Соедините адаптер RAV с
клапаном, затяните винт,
вставьте толкатель в наперсток
клапана для завершения
соединения, затем выровняйте
гайку интерфейса
терморегулятора с адаптером
RAV и поворачивайте гайку
интерфейса, пока она не будет
затянута.
1
2
3
4
-42-
Адаптер:
Соедините адаптер RAV с
клапаном, затяните винт, вставьте
толкатель в наперсток клапана для
завершения соединения, затем
совместите гайку интерфейса
терморегулятора с адаптером RAV
и поворачивайте гайку
интерфейса, пока она не будет
затянута.
1
2
RAVL
-43-

Быстрая установка
Добавление устройства в приложение Aqara Home:
Перед использованием продукта, пожалуйста, убедитесь, что
приложение AqaraHomeзагружено и установлен концентратор Aqara
Запустите приложение, нажмите «+» в правом верхнем углу главной
страницы для перехода на страницу «Добавить устройство
(аксессуары)», выберите «Терморегулятор батареи E1» и действуйте в
соответствии с подсказками на странице.
Проверка эффективного расстояния: после успешной настройки сети
отрегулируйте термостат в предварительно выбранном положении
установки и проверьте, синхронизирован ли статус в приложении.
* Если устройство не добавлено, переместите его ближе к концентратору и
попробуйте еще раз.
1
2
-44-

Замена батареи
Поверните корпус в направлении стрелки внизу и вытяните его, пока
он не будет разблокирован.
1
2
1
-45-
Соблюдая полярность в батарейном отсеке, вставьте 2 щелочные
батареи типа АА, как показано на рисунке.
При установленных батареях терморегулятор запускается
автоматически, и на экране отображается символ [F11], как показано
на рисунке.
Примечание: не используйте перезаряжаемые батареи.
+
2
3
-46-
Установитекорпуси поверните его в направлении стрелки внизу,
пока он не зафиксируется для завершения загрузки батареи.
Примечание: в случае предупреждения о низком заряде батареи замените
батареи как можно скорее.
1
2
4
-47-
№
1
Терморегулятор
работает нормально,
но температура в
помещении явно
выше установленной.
Терморегулятор
работает нормально,
но температура в
помещении явно
ниже установленной.
Замените клапан, извлеките
батареи и вставьте их
обратно через 30 секунд, а
затем переустановите
терморегулятор.
Обратитесь к профессионалам
для ремонта трубопровода
горячей воды.
Снимите терморегулятор с
клапана, извлеките батареи
и вставьте их обратно через
30 секунд. Переустановите
терморегулятор и проверьте,
решена ли неисправность.
Неправильная
установка
терморегулятора
Низкая
температура на
входе в батарею
Неисправность
клапана
Неисправность
клапана
2
Неисправность Возможная причина Решение
-48-
Терморегулятор
ом нельзя
управлять через
приложение
Терморегулятор
работает нормально,
но температура в
помещении не
постоянна
Комната чрезмерно
проветривается, и тепло
теряется
Проверьте, не открыты
или не заперты ли двери
и окна
Терморегулятор не
подключен к приложению
Проверьте
конфигурацию сети.
Отрегулируйте
расстояние или добавьте
еще один концентратор
Замените батареи.
Терморегулятор
расположен далеко или
заблокирован от
концентратора
Низкий заряд батареи
Замените батареи.Низкий заряд батареи
3
4
-49-
На ЖК-экране
отображается
значок
неисправности
6
Неправильная установка
терморегулятора
Снимите терморегулятор с
клапана, извлеките батарейки и
вставьте их обратно через 30
секунд, переустановите
терморегулятор и проверьте,
решена ли неисправность.
Терморегулятор
не реагирует на
вставленные
батареи
5
Замените батареи.
Замените батареи.
Низкий заряд батареи
Сбой изделия
Батареи установлены без
соблюдения полярности.
Обратитесь в отдел
послепродажного обслуживания
для ремонта или замены.
-50-
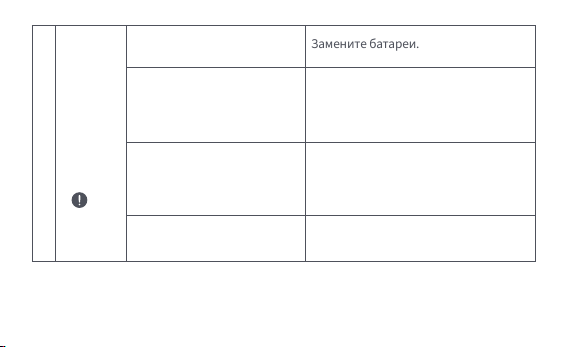
На
ЖК-экране
отобража
ется
значок
неисправ
ности
6
Установлена слишком
высокая температура
Неисправность клапана
Комната слишком большая
(батарея не соответствует
ей) или чрезмерно
проветривается
Низкое давление или
температура воды на входе
Замените батареи.
Замените клапан, извлеките батареи
и вставьте их обратно через 30
секунд, а затем переустановите
терморегулятор.
Замените радиатор или проверьте,
не открыты или не заперты ли
двери и окна
Проверьте давление и
температуру воды на входе.
Примечание: если какая-либо проблема не решена, пожалуйста, свяжитесь с отделом
послепродажного обслуживания - support@aqara.com
-51-

Оборудование должно быть защищено от внешних воздействий.
Допустимая температура окружающего воздуха -20° – +60°C (-4° – 140°F)
Спецификации
Правила и условия хранения и транспортировки
Модель: SRTS-A01
Батарея: 3 В (2 × 1,5 В AA)
Беспроводные протоколы: Zigbee 3.0
Размеры: Ø 57×89 мм (Ø 2,24×3,5 дюйма)
Рабочая температура: 0°C ~ 40°C (32°F ~ 104°F)
Рабочая влажность: 0 ~ 95% относительной влажности, без конденсации
Резьбовое соединение: M30×1,5 мм
Максимальная выходная мощность Zigbee: <10 дБм
Рабочая частота Zigbee: 2405-2480 МГц
-52-

Информация о мерах при неисправности оборудования
В случае обнаружения неисправности оборудования:
1. Этот прибор - НЕ игрушка. Пожалуйста, не допускайте к нему детей.
2. Данный прибор предназначен только для использования внутри помещений. Не
используйте его во влажных средах или на открытом воздухе.
3. Оберегайте прибор от воздействия влаги, не допускайте попадания воды или
других жидкостей на устройство.
4. Не размещайте прибор вблизи источников тепла.
1. Извлеките элемент питания;
2. Обратитесь в сервисный центр для получения консультации или
ремонта оборудования.
Предупреждения
* Оборудование не нуждается в периодическом обслуживании в течение срока службы
-53-

5. Не помещайте прибор в закрытый корпус, если там нет нормальной вентиляции.
6. Не пытайтесь отремонтировать прибор самостоятельно. Все ремонтные работы
должны выполняться авторизованным специалистом. Этот прибор предназначен
только для повышения удобства, качества домашних развлечений и
напоминания о статусе устройства. Он не предназначен для использования в
качестве охранного оборудования для дома, здания, склада или любых других
мест. Если пользователь нарушает инструкции по использованию прибора,
производитель не несет никакой ответственности за риски и повреждения
имущества.
7. Замена на батареи другой модели может привести к пожару или взрыву. Для
замены допускаются только батареи той же или эквивалентной модели.
8. Не бросайте батареи в огонь, духовку или микроволновую печь во избежание
взрыва.
-54-

9. Не разбирайте, не подвергайте ударам, не сжимайте, не разрезайте и не
повреждайте батарею каким-либо образом во избежание взрыва.
10. Не подвергайте батареи воздействию чрезвычайно низкого давления воздуха
или чрезвычайно высокой температуры, что может привести к взрыву батареи и
утечке легковоспламеняющейся жидкости или газа.
11. Не выбрасывайте использованные батареи и утилизируйте их надлежащим
образом согласно соответствующим национальным и региональным правилам.
Lumi United Technology Co., Ltd
Офис 801-804, здание 1, парк Чонгвен, Наньшань iPark, №3370, проспект Люсянь,
микрорайон Фугуан, жилой район Таоюань, р-н Наньшань, г. Шэньчжэнь, Китай.
Онлайн-служба поддержки: www.aqara.com/support
Эл.почта: support@aqara.com
Сделано в Китае
Дата производства указана на упаковке
-55-

Smart Heizkörperthermostat E1 ist ein thermostatisches Heizkörperventil
(TRV), das mit Trockenbatterien (Alkalibatterien) betrieben wird und für
Heizkörper mit Warmwasserbereitung geeignet ist, ohne Verkabelung und mit
bequemer Installation. Es kann zufriedenstellende
Temperaturregelungseffekte erzielen. Dieses Produkt, das über ein
eingebautes drahtloses Zigbee-Kommunikationsmodul mit geringem
Stromverbrauch und ein LCD-Display verfügt, kann allein verwendet oder
über den Aqara-Hub zur Aqara-Home-App hinzugefügt werden, wodurch es zu
einem intelligenten Thermostat wird, das über die App eingestellt und
überprü werden kann. Es kann die automatische Temperaturanpassung und
die Erkennung von geöffneten Fenstern realisieren, unterstützt durch den
Aqara Temperatur- und Feuchtigkeitssensor und den Aqara Tür- und
Fenstersensor.
Produkteinführung
-56-
* Für die Smart-Funktionalität ist ein Aqara Zigbee 3.0 Hub erforderlich.
* Um mit HomeKit zu arbeiten, ist ein spezieller Hub erforderlich. Besuchen Sie
www.aqara.com/support für weitere Details.
* Dieses Produkt ist nur für den Innenbereich geeignet.
LCD-Bildschirm
Drehknopf
Hinweis: Kurzes Drücken, langes Drücken und
Drehen sind möglich.
Ventilschnittstelle
-57-
Smart Heizkörperthermostat E1 × 1, Benutzerhandbuch × 1, 1,5 V AA-Batterie
× 2, Adapter (RA/RAV/RAVL) × 3
Hinweis: Die Batterien wurden vor dem Verlassen des Werks eingebaut. Bitte ziehen Sie die
Isolierlasche vor dem Gebrauch heraus.
Was ist in der Schachtel:
Please read this manual carefully and keep it
Smart Radiator Thermostat E1
User Manual
-58-
Beschreibung der Funktionen der Drehtasten
Bildschirmstatus
Jeder Status
Langes Drücken für
10 Sekunden
3 Mal hintereinander
drücken
Kurzes Drücken
für 1 Mal
Schaltmodul
Aktivieren/Deaktivieren der
Kindersicherungsfunktion
Temperatur einstellen
Langes Drücken
für 3 Sekunden
Drehen Sie
Kalibrierung des Ventils (vor der
Kalibrierung ist sicherzustellen, dass
der Thermostat ordnungsgemäß an der
Ventilschnittstelle installiert wurde)
Netzanschluss/Netzrücksetzung
Funktion Beschreibung
-59-
Bildschirmstatus Beschreibung
Der Bildschirm zeigt jedes Mal, wenn die
Batterien geladen werden, den in der Abbildung gezeigten Status
an. Installieren Sie zu diesem Zeitpunkt den Thermostat so
schnell wie möglich in die Ventilschnittstelle und drücken Sie
dann dreimal hintereinander die Taste oder klicken Sie in der App
auf „Weitere Einstellungen“, um das Ventil zu kalibrieren.
Dieser Modus ist für die Verwendung bei
längerer Abwesenheit vorgesehen, um die Wasserleitung vor
dem Einfrieren bei niedrigen Temperaturen zu schützen.
Installiert werden
Frostschutzmodus
Der Benutzer kann den Drehknopf drehen
oder die Zieltemperatur in der App nach Bedarf einstellen.
Manueller Modus
Hinweis: Vergewissern Sie sich vor der Kalibrierung, dass der Thermostat
ordnungsgemäß an der Ventilschnittstelle installiert ist.
-60-
Störung der
Temperaturregelung
Schwache Batterie
Temperatur einstellen
Erkennung geöffneter
Fenster
Intelligenter Zeitplan
Manueller Modus
Einrichtung
Vernetzung
Kindersicherung
Symbolbeschreibung
Das Ventil wird geschlossen, um die Heizung zu stoppen,
was für den Betrieb im Sommer geeignet ist, wenn keine Heizung
benötigt wird.
Aus
-61-
Störung der
Temperaturregelung
Im Falle einer abnormalen Temperaturregelung. Siehe
„Fehlersuche“ im Handbuch zur Fehlersuche.
Schwache Batterie
Bei schwacher Batterie. Ersetzen Sie die Batterien so
bald wie möglich.
Temperatur einstellen Anzeige der eingestellten Temperatur.
Erkennung geöffneter Fenster
Wenn die Funktion zur Erkennung des offenen
Fensters aktiviert ist.
Intelligenter Zeitplan Wenn die intelligente Zeitplanfunktion aktiviert ist.
Manueller Modus Wenn sich der Thermostat im manuellen Modus befindet.
Einrichtung Wenn sich der Thermostat im Installationsstatus befindet.
Vernetzung
Status der Vernetzung:
*Symbol normal an: normale Netzwerkverbindung
*Symbol aus: offline/getrennte Verbindung.
-62-
Kindersicherung
Um zu verhindern, dass Kinder das Gerät versehentlich
berühren, halten Sie die Taste 3 Sekunden lang gedrückt,
um die Funktion zu aktivieren oder zu deaktivieren.
Installationsanleitung
1. Bitte ziehen Sie vor der Benutzung die Isolierlasche heraus und vergewissern
Sie sich, dass das Gerät eingeschaltet ist.
-63-
2. Es wird empfohlen, den Thermostat innerhalb von 5 Minuten nach dem
Einschalten des Heizkörperventils an der Schnittstelle zu installieren.
1.Horizontale Installation 2.Vertikale Installation
-64-
a. Der Thermostat unterstützt sowohl horizontale als auch vertikale
Installationsmethoden. Die vertikale Installationsmethode kann jedoch zu
ungenauen Temperaturmesswerten führen, da sich der eingebaute
Temperatursensor in der Nähe des Heizkörpers befindet.
Hinweis: Bei jeder dieser Methoden ist ein externer Aqara Temperatur- und
Lufeuchtigkeitssensor erforderlich, um die Temperaturregelung genauer zu machen.
1
2
-65-
b. Richten Sie die Überwurfmutter des Thermostats auf das Heizkörperventil
aus, und drehen Sie die Mutter, bis sie fest angezogen ist.
Hinweis: Die Abbildung zeigt die Installation der Ventilschnittstelle [M30*1,5 mm].
-66-
c. Drücken Sie die Thermostat-Taste 3 Mal hintereinander, um das Ventil zu
kalibrieren. Während der Kalibrierung erscheint auf dem Bildschirm das
Symbol [F12].
Hinweis: Das Ventil muss kalibriert werden, da es sonst zu einer abnormalen
Temperaturregelung kommen kann. Folgen Sie den obigen Schritten oder klicken Sie in
der App auf "Weitere Einstellungen", um das Ventil zu kalibrieren.
-67-
d. Das Symbol [F12] verschwindet nach etwa 10 Sekunden, und auf dem
Bildschirm wird die aktuell eingestellte Temperatur angezeigt, was den
Abschluss der Installation bedeutet.
Installation mit anderen Adaptern:
Adapter:
RA
Verbinden Sie den RA-Adapter mit
dem Ventil, ziehen Sie die Schraube
an, um die Verbindung zu
vervollständigen, richten Sie dann
die Überwurfmutter des Thermostats
mit dem RA-Adapter aus und drehen
Sie die Überwurfmutter, bis sie fest
angezogen ist.
1
2
3
-68-
Adapter:
RAV
Verbinden Sie den RAV-Adapter
mit dem Ventil, ziehen Sie die
Schraube an, stecken Sie den
Stößel in die Ventilkausche, um
die Verbindung zu vervollständi-
gen, richten Sie dann die
Überwurfmutter des Thermostats
auf den RAV-Adapter aus und
drehen Sie die Überwurfmutter,
bis sie fest angezogen ist.
1
2
3
4
-69-
Adapter:
Verbinden Sie den RAV-Adapter mit
dem Ventil, ziehen Sie die Schraube
an, stecken Sie den Stößel in die
Ventilkausche, um die Verbindung
zu vervollständigen, richten Sie
dann die Überwurfmutter des
Thermostats auf den RAV-Adapter
aus und drehen Sie die
Überwurfmutter, bis sie fest
angezogen ist.
1
2
RAVL
-70-

Schnelleinstellung
Hinzufügen des Geräts zur Aqara Home App:
Bevor Sie das Produkt verwenden, stellen Sie bitte sicher, dass die Aqara
Home App heruntergeladen und ein Aqara Zigbee 3.0 Hub installiert wurde.
Starten Sie die App, klicken Sie auf „+“in der oberen rechten Ecke der
Startseite, um die Seite „Gerät hinzufügen (Zubehör)“aufzurufen, wählen Sie
„Smart Heizkörperthermostat E1“ und bedienen Sie es gemäß den
Anweisungen auf der Seite.
Überprüfung der effektiven Entfernung: Nach der erfolgreichen Netzwerkkon-
figuration stellen Sie den Thermostat an der vorgewählten Installationsposi-
tion ein und beobachten, ob der Status in der App synchronisiert ist.
* Wenn das Gerät nicht hinzugefügt wird, bewegen Sie es bitte näher zum Hub und
versuchen Sie es erneut.
1
2
-71-

Austausch der Batterie
Drehen Sie das Gehäuse in Pfeilrichtung am Boden und ziehen Sie es
heraus, bis es entriegelt ist.
1
2
1
-72-
Legen Sie unter Beachtung der Polaritätsmarkierungen im Batteriefach 2
AA-Alkalibatterien wie in der Abbildung gezeigt ein.
Wenn die Batterien eingelegt sind, startet der Thermostat automatisch,
und auf dem Bildschirm erscheint das Symbol [F11], wie in der Abbildung
dargestellt.
Hinweis: Wiederaufladbare Batterien sollten nicht verwendet werden.
+
2
3
-73-

Setzen Sie das Gehäuse auf und drehen Sie es in Pfeilrichtung, bis es
einrastet, um das Laden der Batterie abzuschließen.
Hinweis: Bitte tauschen Sie die Batterien so bald wie möglich aus, wenn eine Warnung
über schwache Batterien erscheint.
1
2
4
-74-
Nein.
1
Der Thermostat
funktioniert normal,
aber die
Raumtemperatur ist
deutlich höher als die
eingestellte Temperatur
Der Thermostat
funktioniert normal,
aber die
Raumtemperatur ist
offensichtlich niedriger
als die eingestellte
Temperatur
Setzen Sie das Ventil wieder ein,
nehmen Sie die Batterien heraus und
setzen Sie sie nach 30 Sekunden
wieder ein, und setzen Sie dann den
Thermostat wieder ein.
Wenden Sie sich an Fachleute, um
die Warmwasserleitung zu
reparieren.
Entfernen Sie den Thermostat vom
Ventil, nehmen Sie die Batterien heraus
und legen Sie sie nach 30 Sekunden
wieder ein. Setzen Sie den Thermostat
wieder ein und beobachten Sie, ob die
Störung weiterhin besteht.
Falsche Installation
des Thermostats
Niedrige
Kühlereintrittstempe
ratur
Ventilstörung
Ventilstörung
2
Störung Mögliche Ursache Lösung
Fehlersuche
-75-
Das Thermostat
kann nicht über
die App bedient
werden
Der Thermostat
funktioniert normal,
aber die
Raumtemperatur ist
nicht konstant
Der Raum ist überbelüet,
und die Wärme geht
verloren
Überprüfen Sie, ob die Türen
oder Fenster offen oder
nicht verschlossen sind.
Der Thermostat ist nicht mit
der App verbunden
Überprüfen Sie die
Netzwerkkonfiguration.
Passen Sie den Abstand an
oder fügen Sie eine weitere
Nabe hinzu.
Ersetzen Sie die Batterien.
Der Thermostat ist weit
von der Nabe entfernt
oder blockiert
Batterie schwach
Ersetzen Sie die Batterien.Batterie schwach
3
4
-76-
LCD-Bildschirm
zeigt ein
Fehlersymbol an
6
Falsche Installation des
Thermostats
Entfernen Sie den Thermostat vom
Ventil, nehmen Sie die Batterien heraus
und legen Sie sie nach 30 Sekunden
wieder ein, setzen Sie den Thermostat
wieder ein und beobachten Sie, ob der
Fehler weiterhin besteht.
Der Thermostat
reagiert nicht,
wenn die
Batterien
eingelegt sind
5
Ersetzen Sie die Batterien.
Ersetzen Sie die Batterien.
Batterie schwach
Produktausfall
Die Batterien sind mit
falscher Polarität eingelegt.
Wenden Sie sich zur Reparatur
oder zum Austausch an den
Kundendienst.
-77-
LCD-Bildsc
hirm zeigt
ein
Fehlersym
bol an
6
Die Temperatur ist zu hoch
eingestellt
Ventilstörung
Der Raum ist zu groß
(der Heizkörper passt nicht
dazu) oder überbelüet
Niedriger
Wassereingangsdruck
oder -temperatur
Ersetzen Sie die Batterien.
Setzen Sie das Ventil wieder ein, nehmen
Sie die Batterien heraus und setzen Sie sie
nach 30 Sekunden wieder ein, und setzen
Sie dann den Thermostat wieder ein.
Tauschen Sie den Heizkörper aus
oder überprüfen Sie, ob die Türen
oder Fenster offen oder nicht
verschlossen sind.
Überprüfen Sie den Druck und die
Temperatur des Wassereingangs.
Hinweis: Falls ein Problem nicht gelöst werden kann, wenden Sie sich bitte an die
Kundendienstabteilung - support@aqara.com
-78-
EU-Konformitätserklärung
Hiermit erklärt [Lumi United Technology Co., Ltd], dass das Funkgerät vom Typ
[Smart Heizkörperthermostat E1, SRTS-A01] der Richtlinie 2014/53/EU entspricht. Der
Spezifikationen
Modell: SRTS-A01
Batterie: 3V (2 × 1,5V AA)
Drahtlose Protokolle: Zigbee 3.0
Abmessungen: Ø 57×89 mm (Ø 2.24×3.5 in.)
Betriebstemperatur: 0°C ~ 40°C (32°F ~ 104°F)
Lufeuchtigkeit im Betrieb: 0 ~ 95% RH, keine Kondensation
Gewindeverbindung: M30×1,5 mm
Zigbee Maximale Ausgangsleistung: <10 dBm
Zigbee-Betriebsfrequenz: 2405-2480 MHz
Bei normalem Gebrauch sollte dieses Gerät in einem Abstand von mindestens 20 cm
zwischen der Antenne und dem Körper des Benutzers gehalten werden.
-79-
Alle Produkte, die dieses Symbol tragen, sind Elektro- und Elektronik-Altgeräte
(WEEE gemäß Richtlinie 2012/19/EU), die nicht mit unsortiertem Hausmüll vermischt
werden dürfen. Stattdessen sollten Sie die menschliche Gesundheit und die Umwelt
schützen, indem Sie Ihre Altgeräte bei einer ausgewiesenen Sammelstelle für das
Recycling von Elektro- und Elektronik-Altgeräten abgeben, die von der Regierung oder
den lokalen Behörden bestimmt wurde. Die ordnungsgemäße Entsorgung und
Wiederverwertung trägt dazu bei, mögliche negative Folgen für die Umwelt und die
menschliche Gesundheit zu vermeiden. Bitte wenden Sie sich an den Installateur oder die
örtlichen Behörden, um weitere Informationen über den Standort und die Bedingungen
solcher Sammelstellen zu erhalten.
Informationen zu Entsorgung und Recycling von Elektro- und
Elektronik-Altgeräten
vollständige Text der EU-Konformitätserklärung ist unter der folgenden Internetadresse
verfügbar: http://www.mi.com/global/service/support/declaration.html
-80-
Ein Symbol auf dem Produkt oder seiner Verpackung weist darauf hin, dass
dieses Produkt nicht mit dem Hausmüll entsorgt werden darf. Stattdessen
muss es bei der entsprechenden Recyclingstelle für elektrische und
elektronische Geräte abgegeben werden.
1. Dieses Produkt ist KEIN Spielzeug. Bitte halten Sie Kinder von diesem Produkt fern.
2. Dieses Produkt ist nur für den Gebrauch in Innenräumen bestimmt. Verwenden Sie es
NICHT in feuchten Umgebungen oder im Freien.
3. Achten Sie auf Feuchtigkeit, schütten Sie KEIN Wasser oder andere Flüssigkeiten auf das
Produkt.
4. Stellen Sie dieses Produkt NICHT in der Nähe einer Wärmequelle auf. Stellen Sie es
NICHT in einem Gehäuse auf, es sei denn, es besteht eine normale Belüung.
5. Versuchen Sie NICHT, dieses Produkt selbst zu reparieren. Alle Reparaturen sollten von
einem autorisierten Fachmann durchgeführt werden.
6. Dieses Produkt ist nur für die Verbesserung der Unterhaltung, Bequemlichkeit Ihres
Warnungen
-81-

Lebens zu Hause und zur Erinnerung an den Gerätestatus geeignet. Es sollte NICHT als
Sicherheitsausrüstung für Häuser, Gebäude, Lagerhäuser oder andere Orte verwendet
werden. Wenn ein Benutzer gegen die Gebrauchsanweisung des Produkts verstößt,
haet der Hersteller NICHT für etwaige Risiken und Eigentumsverluste.
7. Der Austausch gegen Batterien des falschen Modells kann einen Brand oder eine
Explosion verursachen. Es dürfen nur Batterien des gleichen oder eines gleichwertigen
Modells ausgetauscht werden.
8. Legen Sie die Batterie nicht ins Feuer, in den Ofen oder in die Mikrowelle, um eine
Explosion zu vermeiden.
9. Um eine Explosion zu vermeiden, darf die Batterie nicht zerlegt, geschlagen,
gequetscht, geschnitten oder in irgendeiner Weise mechanisch beschädigt werden.
10. Setzen Sie die Batterien nicht extrem niedrigem Ludruck oder extrem hohen
Temperaturen aus, da dies zur Explosion der Batterien und zum Auslaufen brennbarer
Flüssigkeiten oder Gase führen kann.
11. Werfen Sie die Altbatterien nicht weg, sondern entsorgen Sie sie ordnungsgemäß in
Übereinstimmung mit den einschlägigen nationalen und regionalen Vorschrien.
-82-

Lumi United Technology Co, Ltd.
801-804, Gebäude 1, Chongwen Park, Nanshan Zhiyuan, Nr. 3370, Liuxian Avenue, Fuguang
community, Taoyuan Straße, Nanshan Bezirk, Shenzhen, China
Online-Kundendienst: www.aqara.com/support
E-Mail: [email protected]om
-83-

Termostato da radiatore E1 è una valvola termostatica per radiatori (TRV)
alimentata da batterie a secco (alcaline) applicabili ai radiatori per il
riscaldamento dell'acqua, senza cablaggio e con una comoda installazione.
Può realizzare effetti di controllo della temperatura soddisfacenti. Questo
prodotto, con un modulo di comunicazione wireless Zigbee a bassa potenza
integrato e un display LCD, può essere utilizzato da solo o aggiunto all'app
Aqara Home attraverso l'hub Aqara, diventando un termostato intelligente
che può essere impostato e controllato nell'app. Può realizzare la regolazione
automatica della temperatura e il rilevamento dell'apertura delle finestre
supportato dal sensore di temperatura e umidità Aqara e dal sensore di porte
e finestre Aqara.
Introduzione al prodotto
-84-

* Un hub Aqara Zigbee 3.0 è necessario per la funzionalità intelligente.
* Per funzionare con HomeKit, è necessario un hub specifico. Visita
www.aqara.com/support per maggiori dettagli.
* Questo prodotto è solo per uso interno.
Schermo LCD
Pulsante della manopola
Nota: sono disponibili le operazioni di
pressione breve, pressione lunga e rotazione.
Interfaccia della valvola
-85-

Termostato da radiatore E1 × 1, × 1 del manuale dell'utente, × 2 della batteria
AA 1.5V, × 3 dell'adattatore (RA/RAV/RAVL)
Nota: Le batterie sono state installate prima di lasciare la fabbrica. Si prega di estrarre la
linguetta isolante prima dell'uso.
Cosa c'è nella scatola:
Please read this manual carefully and keep it
Smart Radiator Thermostat E1
User Manual
-86-
Descrizione delle funzioni dei pulsanti della manopola
Stato dello schermo
Qualsiasi stato
Premere a lungo per
10 secondi
Premere per 3 volte
consecutive
Premere brevemente
per 1 volta
Modulo di commutazione
Abilita/disabilita la funzione di
blocco per bambini
Regolare la temperatura
Premere a lungo
per 3 secondi
Ruota
Taratura della valvola (prima della
taratura, assicurarsi che il termostato
sia stato installato correttamente
sull'interfaccia della valvola)
Unirsi alla rete/risistemare la rete
Funzione Descrizione
-87-
Stato dello schermo Descrizione
Lo schermo visualizzerà lo stato come
mostrato in figura ogni volta che le batterie vengono caricate. A
questo punto, installare il termostato nell'interfaccia della valvola
il prima possibile, e poi premere il pulsante 3 volte consecutive o
cliccare "Più Impostazioni" nell'app per calibrare la valvola.
Questo è progettato per l'uso quando si è
lontani per un lungo periodo, per proteggere il tubo dell'acqua
dal congelamento a bassa temperatura.
L'utente può ruotare la manopola o
impostare la temperatura target sull'app secondo necessità.
Essere installato
Modalità antigelo
Modalità manuale
Nota: Assicurarsi che il termostato sia correttamente installato sull'interfaccia
della valvola prima della calibrazione.
-88-
Guasto del controllo della
temperatura
Batteria scarica
Impostare la temperatura
Rilevamento di finestre
aperte
Programma intelligente
Modalità manuale
Installazione
Rete
Serratura per bambini
Descrizione dell'icona
La valvola sarà chiusa per fermare il
riscaldamento, che è adatto per il servizio in estate quando
non c'è bisogno di riscaldamento.
Spegnimento
-89-
Descrizione dell'icona
Guasto del controllo
della temperatura
Batteria scarica
Impostare la temperatura
Rilevamento di finestre
aperte
Programma intelligente
Modalità manuale
Installazione
In caso di controllo anomalo della temperatura. Fare
riferimento alla "Risoluzione dei problemi" nel manuale per la
risoluzione dei problemi.
In caso di batteria scarica. Sostituire le batterie il prima possibile.
Visualizza la temperatura impostata.
Quando la funzione di rilevamento dell'apertura della
finestra è attivata.
Quando la funzione di pianificazione intelligente è attivata.
Quando il termostato è in modalità manuale.
Quando il termostato è in stato di installazione.
Rete
Stato della rete:
*Icona normalmente accesa: connessione di rete normale
*Icona spenta: offline/disconnesso.
-90-

Istruzioni per l'installazione
Serratura per bambini
Per evitare che i bambini tocchino per sbaglio, premere a
lungo per 3 secondi per attivare o disattivare la funzione.
1. Si prega di estrarre la linguetta isolante prima dell'uso, e confermare che il
dispositivo è acceso.
-91-
2. Si raccomanda di installare il termostato sull'interfaccia della valvola del
radiatore entro 5 minuti dall'avvio del TRV.
1.Installazione orizzontale 2.Installazione verticale
-92-
a. Il termostato supporta entrambi i metodi di installazione orizzontale e
verticale. Tuttavia, il metodo di installazione verticale può risultare in letture
di temperatura imprecise causate dalla vicinanza del sensore di temperatu-
ra integrato al radiatore.
1
2
Nota: in ognuno di questi metodi, è necessario un sensore esterno di temperatura e umidità
Aqara per rendere più preciso il controllo della temperatura.
-93-

b. Allineare il dado dell'interfaccia del termostato con la valvola del radiatore
e ruotare il dado fino a quando non è stretto.
Nota: L'installazione dell'interfaccia della valvola [M30*1.5 mm]
è mostrata nella figura.
-94-

c. Premere il pulsante del termostato 3 volte consecutive per calibrare la
valvola. Durante la calibrazione, lo schermo visualizza il simbolo [F12].
d. Il simbolo [F12] scompare in circa 10 secondi e lo schermo visualizza la
temperatura attualmente impostata, indicando il completamento
dell'installazione.
Nota: la valvola deve essere calibrata, altrimenti potrebbe causare un controllo
anomalo della temperatura. Seguire i passaggi precedenti o cliccare su "More Settings"
nell'app per calibrare la valvola.
-95-
Installazione con altri adattatori:
Adattatore :
RA
Collegare l'adattatore RA con la
valvola, stringere la vite per
completare il collegamento, quindi
allineare il dado di interfaccia del
termostato con l'adattatore RA e
ruotare il dado di interfaccia fino a
quando è serrato.
1
2
3
-96-
Adattatore :RAV
Collegare l'adattatore RAV con la
valvola, stringere la vite, inserire
l'asta di spinta nel ditale della
valvola per completare il
collegamento, quindi allineare il
dado di interfaccia del
termostato con l'adattatore RAV,
e ruotare il dado di interfaccia
fino a quando è serrato.
1
2
3
4
-97-
Adattatore :
Collegare l'adattatore RAV con la
valvola, stringere la vite, inserire
l'asta di spinta nel ditale della valvola
per completare il collegamento,
quindi allineare il dado di interfaccia
del termostato con l'adattatore RAV,
e ruotare il dado di interfaccia fino a
quando è serrato.
1
2
RAVL
-98-

Impostazione rapida
Aggiungere il dispositivo all'app Aqara Home:
Prima di utilizzare il prodotto, assicurarsi che l'app Aqara Home sia stata
scaricata e che sia stato installato un hub Aqara Zigbee 3.0.
Avviare l'app, fare clic su "+" nell'angolo superiore destro della home page
per accedere alla pagina "Aggiungi dispositivo (accessori)", selezionare
"Termostato da radiatore E1", e operare secondo le indicazioni della pagina.
Verifica della distanza effettiva: dopo l'avvenuta configurazione della rete,
regolare il termostato nella posizione di installazione preselezionata e
osservare se lo stato nell'app è sincronizzato.
* Se il dispositivo non viene aggiunto, spostarlo più vicino all'hub e riprovare.
1
2
-99-
Sostituzione della batteria
Ruotare l'alloggiamento nella direzione della freccia in basso ed estrarlo
fino a sbloccarlo.
1
2
1
-100-
Facendo riferimento ai segni di polarità nel vano batterie, inserire 2
batterie alcaline AA come mostrato in figura.
Con le batterie caricate, il termostato si avvia automaticamente e lo
schermo visualizza il simbolo [F11] come mostrato in figura.
Nota: le batterie ricaricabili non devono essere utilizzate.
+
2
3
-101-

Posizionare l'alloggiamento e ruotarlo nella direzione della freccia in
basso fino a quando non è bloccato, per completare il caricamento della
batteria.
Nota: Si prega di sostituire le batterie il più presto
possibile in caso di avviso di batteria scarica.
1
2
4
-102-
Risoluzione dei problemi
No.
1
Il termostato funziona
normalmente, ma la
temperatura della
stanza è
evidentemente più alta
di quella impostata
Il termostato funziona
normalmente, ma la
temperatura della
stanza è
evidentemente più
bassa di quella
impostata
Sostituire la valvola, togliere le
batterie e rimetterle dopo 30
secondi, e poi reinstallare il
termostato.
Contattate dei professionisti per
riparare la conduttura dell'acqua
calda.
Rimuovere il termostato dalla
valvola, togliere le batterie e
rimetterle dopo 30 secondi.
Reinstallare il termostato e
osservare se il guasto persiste.
Installazione errata
del termostato
Bassa temperatura di
ingresso del radiatore
Guasto della valvola
Guasto della valvola
2
Guasto Possibile causa Soluzione
-103-
Il termostato non
può essere azionato
tramite l'app
Il termostato funziona
normalmente, ma la
temperatura della
stanza non è costante
Il termostato non
mostra alcuna
risposta quando le
batterie sono
caricate
La stanza è troppo ventilata
e il calore si perde
Controllare se le porte o le
finestre sono aperte o non
fissate.
Il termostato non è
collegato all'app
Controllare la configurazione
della rete.
Regolare la distanza o
aggiungere un altro mozzo.
Sostituire le batterie.
Sostituire le batterie.
Il termostato si trova
lontano o bloccato dall'hub
Batteria scarica
Batteria scarica
3
4
5
Sostituire le batterie.
Sostituire le batterie.
Batteria scarica
Guasto del prodotto
Le batterie sono caricate nella
direzione di polarità sbagliata.
Contattare il servizio
post-vendita per la
riparazione o la sostituzione.
-104-
Lo schermo
LCD
visualizza
un'icona di
guasto
6
Installazione errata
del termostato
La temperatura è impostata
troppo alta
Guasto della valvola
La stanza è troppo grande
(il radiatore non è adatto) o
troppo ventilata
Bassa pressione o temperatura
dell'acqua in entrata
Togliere il termostato dalla valvola,
togliere le batterie e rimetterle dopo 30
secondi, reinstallare il termostato e
osservare se il guasto persiste.
Sostituire le batterie.
Sostituire la valvola, togliere le batterie e
rimetterle dopo 30 secondi, e poi
reinstallare il termostato.
Sostituire il radiatore o controllare
se le porte o le finestre sono aperte o
non fissate.
Controllare la pressione e la
temperatura dell'acqua in entrata.
Nota: in caso di problemi non risolti, si prega di contattare il dipartimento post-vendita -
-105-

Specifiche
Modello: SRTS-A01
Batteria: 3V (2 × 1.5V AA)
Protocolli wireless: Zigbee 3.0
Dimensioni: Ø 57×89 mm (Ø 2.24×3.5 in.)
Temperatura di funzionamento: 0°C ~ 40°C (32°F ~ 104°F)
Umidità di funzionamento: 0 ~ 95% RH, nessuna condensa
Connessione filettata: M30×1.5 mm
Potenza di uscita massima Zigbee: <10 dBm
Frequenza di funzionamento Zigbee: 2405-2480 MHz
In condizioni di uso normale, questo dispositivo dovrebbe essere tenuto a una distanza di
separazione di almeno 20 cm tra l'antenna e il corpo dell'utente.
-106-
Dichiarazione di conformità UE
Con la presente, [Lumi United Technology Co., Ltd] dichiara che l'apparecchio
radio tipo [Termostato da radiatore E1,SRTS-A01] è conforme alla direttiva 2014/53/UE. Il
Tutti i prodotti con questo simbolo sono rifiuti di apparecchiature elettriche ed
elettroniche (WEEE come nella direttiva 2012/19/EU) che non dovrebbero essere
mescolati con i rifiuti domestici non differenziati. Invece, si dovrebbe proteggere la salute
umana e l'ambiente consegnando le apparecchiature di scarto a un punto di raccolta
designato per il riciclaggio dei rifiuti di apparecchiature elettriche ed elettroniche,
nominato dal governo o dalle autorità locali. Un corretto smaltimento e riciclaggio aiuterà
a prevenire potenziali conseguenze negative per l'ambiente e la salute umana. Si prega di
contattare l'installatore o le autorità locali per ulteriori informazioni sull'ubicazione
nonché sui termini e le condizioni di tali punti di raccolta.
Informazioni sullo smaltimento e il riciclaggio dei WEEE
testo completo della dichiarazione di conformità UE è disponibile al seguente indirizzo
internet: http://www.mi.com/global/service/support/declaration.html
-107-
Il simbolo sul prodotto o sulla sua confezione indica che il prodotto non può
essere trattato come rifiuto domestico. Al contrario, deve essere consegnato a
un punto di raccolta autorizzato al riciclaggio di rifiuti di apparecchiature
elettriche ed elettroniche.
1. Questo prodotto NON è un giocattolo. Si prega di tenere i bambini lontani da questo
prodotto.
2. Questo prodotto è progettato solo per uso interno. NON usarlo in ambienti umidi o
all'aperto.
3. Attenzione all'umidità, NON versare acqua o altri liquidi sul prodotto.
4. NON mettere questo prodotto vicino a una fonte di calore. NON metterlo in un recinto a
meno che non ci sia una normale ventilazione.
5. NON tentare di riparare questo prodotto da soli. Tutte le riparazioni devono essere
eseguite da un professionista autorizzato.
6. Questo prodotto è adatto solo per migliorare l'intrattenimento, la comodità della vostra
Avvertenze
-108-

vita domestica e per ricordarvi lo stato del dispositivo. NON deve essere usato come
attrezzatura di sicurezza per case, edifici, magazzini o qualsiasi altro luogo. Se un utente
viola le istruzioni d'uso del prodotto, il produttore NON sarà responsabile di eventuali
rischi e perdite di proprietà.
7. La sostituzione con batterie del modello sbagliato può causare un incendio o
un'esplosione. Solo le batterie dello stesso modello o di un modello equivalente possono
essere sostituite.
8. Non mettere nessuna batteria nel fuoco, nel forno o nel forno a microonde, per evitare
l'esplosione.
9. Non smontare, urtare, schiacciare, tagliare o danneggiare meccanicamente la batteria in
nessun modo, per evitare un'esplosione.
10. Non esporre le batterie a pressioni d'aria estremamente basse o a temperature
estremamente alte, che possono causare l'esplosione delle batterie e la fuoriuscita di
liquidi o gas infiammabili.
11. Non gettare le batterie di scarto, e smaltirle correttamente in conformità con le norme
nazionali e regionali pertinenti.
-109-

Lumi United Technology Co., Ltd
801-804, Edificio 1, Parco Chongwen, Nanshan Zhiyuan, Viale Liuxian, Comunità Fuguang,
Quartiere Taoyuan, Distretto di Nanshan, Città di Shenzhen, Cina
Servizio clienti in linea: www.aqara.com/support
E-mail: [email protected]om
-110-

La Tête Thermostatique Intelligente E1 est un robinet thermostatique pour
radiateur (RT) alimenté par des piles sèches (alcalines) applicable aux
radiateurs de chauffage à eau, sans câblage et facile à installer. Il peut
accomplir des effets de contrôle de température satisfaisants. Ce produit,
doté d'un module de communication sans fil Zigbee à faible puissance intégré
et d'un écran LCD, peut être utilisé seul ou avec l'application Aqara Home via
le hub Aqara, devenant ainsi un thermostat intelligent qui peut être réglé et
contrôlé via l'application. Il peut réaliser un ajustement automatique de la
température et une détection de l'ouverture des fenêtres grâce au capteur de
température et d'humidité Aqara et au capteur de porte et de fenêtre Aqara.
Présentation du produit
-111-

* Un hub Aqara Zigbee 3.0 est requis pour une fonctionnalité intelligente.
* Pour fonctionner avec HomeKit, un hub spécifique est nécessaire. Visitez
www.aqara.com/support pour plus de détails.
* Ce produit est destiné à un usage intérieur uniquement.
L'écran LCD
Interface de la robinet
Bouton-poussoir
Remarque : les opérations de pression
courte, de pression longue et de rotation sont
disponibles.
-112-

Tête Thermostatique Intelligente E1 × 1, Manuel d'utilisation × 1, Batterie AA
1,5V × 2, Adaptateur (RA/RAV/RAVL) × 3
Remarque : Les piles ont été installées avant de quitter l'usine. Veuillez retirer la languette
isolante avant de les utiliser.
Ce quʼil y a dans la boite :
Please read this manual carefully and keep it
Smart Radiator Thermostat E1
User Manual
-113-

Description des Fonctions des Bouton-poussoir
État de l'écran
Tous les statuts
Appui long pendant
10 secondes
Appuyez 3 fois de suite
Appui court pour 1 fois Module de commutation
Activer/désactiver la fonction
de sécurité enfant
Ajustez la température
Appui long pendant
3 secondes
Rotation
Étalonnage de la robinet (avant
l'étalonnage, assurez-vous que le
thermostat a été correctement
installé sur l'interface de la robinet)
Adhésion au
réseau/réinitialisation du réseau
Fonction Description
-114-
Description de l'état de l'écran
L'écran affichera l'état comme indiqué sur la figure
chaque fois que les piles sont chargées. À ce moment, installez le
thermostat dans l'interface de la robinet dès que possible, puis
appuyez sur le bouton 3 fois de suite ou cliquez sur "Plus de
paramètres" dans l'application pour calibrer la robinet.
Ce mode est conçu pour être utilisé dʼune
absence prolongée, afin de protéger la conduite d'eau contre le
gel à basse température.
L'utilisateur peut tourner le bouton ou régler
la température désirée sur l'application selon ses besoins.
À installer
Mode antigel
Mode manuel
Remarque : Assurez-vous que le thermostat est correctement installé sur
l'interface de la robinet avant l'étalonnage.
-115-
Défaut de contrôle de
la température
Batterie faible
Réglez la température
Détection de l'ouverture
des fenêtres
Programme intelligent
Mode manuel
Installation
Mise en réseau
Sécurité enfants
Description de l'icône
Le robinet sera fermé pour arrêter le chauffage, ce qui
convient à la maintenance en été lorsqu'aucun chauffage n'est
nécessaire.
Off
-116-
Défaut de contrôle de
la température
Batterie faible
Réglez la température
Détection de
l'ouverture des fenêtres
Programme intelligent
Mode manuel
Installation
En cas de contrôle anormal de la température. Referrez-vous à
la section "Dépannage" du manuel pour le dépannage.
En cas de batterie faible. Remplacez les piles dès que possible.
Affichez la température réglée.
Lorsque la fonction de détection d'ouverture de fenêtre est activée.
Lorsque la fonction de programmation intelligente est activée.
Lorsque le thermostat est en mode manuel.
Lorsque le thermostat est en état d'installation.
Mise en réseau
État de la mise en réseau :
*Icône normalement allumée : connexion réseau normale
*Icône désactivée : hors ligne/déconnecté.
Sécurité enfants
Pour empêcher les enfants de toucher par erreur, appuyez longuement
pendant 3 secondes pour activer ou désactiver la fonction.
-117-
Instructions d'installation
1. Veuillez enlever la languette isolante avant l'utilisation, et confirmer que
l'appareil est allumé.
-118-

2. Il est recommandé d'installer le thermostat sur l'interface de la robinet de
radiateur dans les 5 minutes qui suivent le démarrage du RT.
1.Installation horizontale 2.Installation verticale
-119-

a. Le thermostat prend en charge les méthodes d'installation horizontale et
verticale. Cependant, la méthode d'installation verticale peut entraîner des
lectures de température inexactes, car le capteur de température intégré
est proche du radiateur.
Remarque : dans toutes ces méthodes, un capteur externe de température et d'humidité
Aqara est nécessaire pour rendre le contrôle de la température plus précis.
1
2
-120-
b. Alignez l'écrou d'interface du thermostat avec le robinet du radiateur, et
tournez l'écrou jusqu'à ce qu'il soit serré.
Remarque : l'installation de l'interface du robinet [M30*1.5 mm]
est illustrée sur la figure.
-121-

c. Appuyez sur le bouton du thermostat 3 fois de suite pour étalonner le
robinet. Pendant l'étalonnage, l'écran affiche le symbole [F12].
d. Le symbole [F12] disparaît au bout de 10 secondes environ, et l'écran
affiche la température actuellement réglée, indiquant la fin de l'installation.
Remarque : le robinet doit être calibré, sinon il peut provoquer une régulation anormale
de la température. Suivez les étapes ci-dessus ou cliquez sur "Plus de paramètres" dans
l'application pour calibrer le robinet.
-122-

Installation avec d'autres adaptateurs :
Adaptateur:
RA
Connectez l'adaptateur RA au robinet,
serrez la vis pour compléter la
connexion, puis alignez l'écrou
d'interface du thermostat avec
l'adaptateur RA, et tournez l'écrou
d'interface jusqu'à ce qu'il soit serré.
1
2
3
-123-
Adaptateur:RAV
Connectez l'adaptateur RAV au
robinet, serrez la vis, insérez la
tige de poussée dans la cosse du
robinet pour compléter la
connexion, puis alignez l'écrou
d'interface du thermostat avec
l'adaptateur RAV, et tournez
l'écrou d'interface jusqu'à ce
qu'il soit serré.
1
2
3
4
-124-
Adaptateur:
Connectez l'adaptateur RAV au
robinet, serrez la vis, insérez la tige
de poussée dans la cosse du robinet
pour compléter la connexion, puis
alignez l'écrou d'interface du
thermostat avec l'adaptateur RAV, et
tournez l'écrou d'interface jusqu'à ce
qu'il soit serré.
1
2
RAVL
-125-

Configuration rapide
Ajout de l'appareil à l'application Aqara Home :
Avant d'utiliser le produit, veuillez-vous assurer que l'application Aqara
Home a été téléchargée et qu'un hub Aqara Zigbee 3.0 a été installé.
Lancez l'application, cliquez sur "+" dans le coin supérieur droit de la page
d'accueil pour accéder à la page "Ajouter un appareil (accessoires)",
sélectionnez "Tête thermostatique intelligente E1", et utilisez-le en suivant
les instructions de la page.
Vérification efficace de la distance : après la configuration réussie du réseau,
ajustez le thermostat à la position d'installation présélectionnée et observez
si le statut dans l'appli est synchronisé.
* Si l'appareil n'est pas ajouté, veuillez le rapprocher du hub et réessayez.
1
2
-126-

Remplacement de la batterie
Tournez le boîtier dans le sens de la flèche en bas et tirez-le jusqu'à ce
qu'il soit déverrouillé.
1
2
1
-127-
En vous référant aux marques de polarité dans le compartiment des piles,
mettez 2 piles alcalines AA comme indiqué sur la figure.
Avec les piles chargées, le thermostat démarre automatiquement et l'écran
affiche le symbole [F11] comme illustré sur la figure.
Remarque : les piles rechargeables ne doivent pas être utilisées.
+
2
3
-128-
Placez le boîtier, et tournez-le dans le sens de la flèche en bas jusqu'à ce
qu'il soit verrouillé, pour terminer le chargement de la batterie.
Remarque : Veuillez remplacer les piles dès que possible en cas d'alerte de pile faible.
1
2
4
-129-
Dépannage
Num.
1
Le thermostat fonctionne
normalement, mais la
température de la pièce est
manifestement plus élevée
que la température réglée.
Le thermostat fonctionne
normalement, mais la
température ambiante est
manifestement inférieure
à la température réglée.
Retirez le thermostat du robinet,
enlevez les piles et remettez-les
après 30 secondes, réinstallez le
thermostat et observez si le
défaut persiste.
Contactez des professionnels
pour réparer la canalisation
d'eau chaude.
Retirez le thermostat du robinet,
enlevez les piles et remettez-les
après 30 secondes. Réinstallez le
thermostat et observez si le
défaut persiste.
Installation
incorrecte du
thermostat
Faible température
dʼalimentation du
radiateur
Défaut du robinet
Défaut du robinet
2
Défauts Cause possible Solution
-130-
Le thermostat ne
peut pas être
commandé via
l'application.
Le thermostat
fonctionne
normalement, mais la
température ambiante
n'est pas constante.
Le thermostat ne
réagit pas lorsque les
piles sont chargées.
La pièce est trop ventilée,
et la chaleur se perd
Vérifiez si les portes ou les
fenêtres sont ouvertes ou
non fixées.
Le thermostat n'est pas
connecté à l'application
Vérifiez la configuration
du réseau.
Ajustez la distance ou
ajoutez un autre hub.
Remplacez les piles.
Remplacez les piles.
Le thermostat est éloigné
ou bloqué du hub
Batterie faible
Batterie faible
3
4
5
Remplacez les piles.
Replacez les piles correctement.
Batterie faible
Défaillance du produit
Les piles sont chargées dans
le mauvais sens de polarité.
Contactez le service après-vente
pour une réparation ou un
remplacement.
-131-
L'écran
LCD affiche
une icône
de défaut
6
Installation incorrecte du
thermostat
La température est trop élevée
Défaut du robinet
La pièce est trop grande (le
radiateur n'y correspond
pas) ou trop ventilée
Faible pression ou
température d'entrée d'eau
Retirez le thermostat du robinet, enlevez
les piles et remettez-les après 30
secondes, réinstallez le thermostat et
observez si le défaut persiste.
Remplacez les piles.
Remplacez le robinet, retirez les piles et
remettez-les après 30 secondes, puis
réinstallez le thermostat.
Remplacez le radiateur ou vérifiez si
les portes ou les fenêtres sont
ouvertes ou non fixées.
Vérifiez la pression et la température
de l'arrivée d'eau.
Remarque : En cas de problème non résolu, veuillez contacter le service après-vente -
-132-

Spécifications
Modèle: SRTS-A01
Piles: 3V (2 × 1,5V AA)
Protocoles sans fil: Zigbee 3.0
Dimensions: Ø 57×89 mm (Ø 2,24×3,5 in.)
Température de fonctionnement : 0°C ~ 40°C (32°F ~ 104°F)
Humidité de fonctionnement : 0 ~ 95% RH, pas de condensation
Raccordement fileté: M30×1,5 mm
Puissance maximale de Zigbee : <10 dBm
Fréquence de fonctionnement de Zigbee : 2405-2480 MHz
Dans des conditions normales d'utilisation, cet appareil doit être maintenu à une distance
d'au moins 20 cm entre l'antenne et le corps de l'utilisateur.
Déclaration de conformité UE
Par la présente, [Lumi United Technology Co., Ltd] déclare que le type
d'équipement radio [Tête Thermostatique Intelligente E1, SRTS-A01] est conforme à la
-133-
Tous les produits portant ce symbole sont des déchets d'équipements électriques et
électroniques (DEEE selon la directive 2012/19/UE) qui ne doivent pas être mélangés
aux déchets ménagers non triés. Vous devez plutôt protéger la santé humaine et
l'environnement en remettant vos déchets d'équipements à un point de collecte désigné
pour le recyclage des déchets d'équipements électriques et électroniques, nommé par le
gouvernement ou les autorités locales. Une élimination et un recyclage corrects
permettront d'éviter les conséquences négatives potentielles sur l'environnement et la
santé humaine. Veuillez contacter l'installateur ou les autorités locales pour plus
d'informations sur l'emplacement et les conditions de ces points de collecte.
Informations sur l'élimination et le recyclage des DEEE
directive 2014/53/UE. Le texte complet de la déclaration de conformité de l'UE est
disponible à l'adresse Internet suivante :
http://www.mi.com/global/service/support/declaration.html
-134-

Le symbole sur le produit ou son emballage indique que le présent produit ne
peut pas être considéré comme un déchet ménager. Il doit être remis à un
point de collecte approprié pour le recyclage des équipements électriques et
électroniques.
1. Ce produit n'est PAS un jouet. Veuillez tenir les enfants à l'écart de ce produit.
2. Ce produit est conçu pour une utilisation en intérieur uniquement. Ne l'utilisez PAS dans
des environnements humides ou à l'extérieur.
3. Faites attention à l'humidité, ne renversez PAS d'eau ou d'autres liquides sur le produit.
4. Ne placez PAS ce produit à proximité d'une source de chaleur. Ne le placez PAS dans une
enceinte à moins qu'il n'y ait une ventilation normale.
5. N'essayez PAS de réparer ce produit par vous-même. Toutes les réparations doivent être
effectuées par un professionnel agréé.
6. Ce produit est uniquement destiné à améliorer le divertissement et la commodité de
votre vie domestique, et à vous rappeler l'état de l'appareil. Il ne doit PAS être utilisé
Avertissements
-135-

comme équipement de sécurité pour les maisons, les bâtiments, les entrepôts ou tout
autre endroit. Si un utilisateur enfreint les instructions d'utilisation du produit, le
fabricant NE sera PAS responsable des risques et des pertes matérielles.
7. Le remplacement par des piles d'un modèle incorrect peut provoquer un incendie ou une
explosion. Seules les piles du même modèle ou d'un modèle équivalent sont autorisées
pour le remplacement.
8. Ne mettez pas de pile dans un feu, un four ou un four à micro-ondes, pour éviter toute
explosion.
9. Ne pas démonter, percuter, presser, couper ou endommager mécaniquement la pile de
quelque manière que ce soit, afin d'éviter toute explosion.
10. N'exposez pas les piles à une pression d'air extrêmement basse ou à une température
extrêmement élevée, ce qui pourrait provoquer une explosion des piles et une fuite de
liquide ou de gaz inflammable.
11. Ne jetez pas les piles usagées, et jetez-les correctement conformément aux
réglementations nationales et régionales en vigueur.
-136-

Lumi United Technology Co., Ltd
801-804, bâtiment 1, parc de Chongwen, Nanshan Zhiyuan, n° 3370, avenue de Liuxian,
communauté de Fuguang, rue de Taoyuan, district de Nanshan, Shenzhen,
ChineOnline Customer
Service clientèle en ligne : www.aqara.com/support
Email: [email protected]om
-137-

Głowica Termostatyczna E1, to termostatyczny zawór grzejnikowy (TRV)
zasilany suchymi bateriami alkalicznymi, przeznaczony do wodnych
grzejników grzewczych, nie wymagający okablowania i wygodny w montażu.
Może osiągnąć zadowalające efekty kontroli temperatury.Produkt ten, z
wbudowanym modułem komunikacji bezprzewodowej Zigbee o niskim
poborze mocy i wyświetlaczem LCD, może być używany samodzielnie lub
dodany do aplikacji Aqara Home poprzez urządzenie sieciowe Aqara, stając
się inteligentnym termostatem, który można ustawić i kontrolować w
aplikacji. Pozwala on na automatyczną regulację temperatury i wykrywanie
otwarcia okna, wspierane przez czujnik temperatury i wilgotności Aqara oraz
czujnik drzwi i okien Aqara.
Wprowadzenie do produktu
-138-
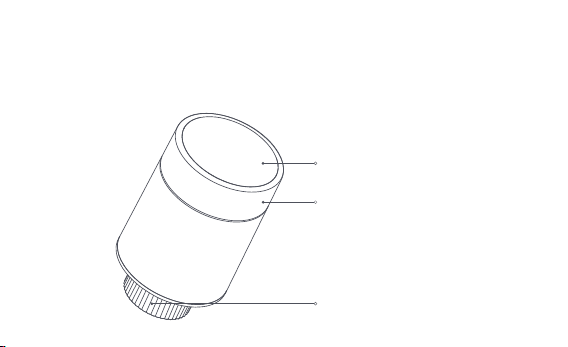
* Do korzystania z funkcji smart wymagane jest urządzenie sieciowe Aqara Zigbee 3.0.
* Do współpracy z HomeKit wymagane jest specjalne urządzenie sieciowe. Odwiedź
www.aqara.com/support, aby uzyskać więcej szczegółów.
* Ten produkt jest przeznaczony wyłącznie do użytku wewnętrznego.
Ekran LCD
Interfejs zaworu
Przycisk z pokrętłem
Uwaga: Dostępne są funkcje krótkiego i
długiego naciśnięcia oraz obracania.
-139-

Głowica Termostatyczna E1× 1, instrukcja obsługi × 1, bateria 1,5 V AA × 2,
adapter (RA/RAV/RAVL) × 3
Uwaga: Baterie zostały zainstalowane przed wysyłką z fabryki. Przed użyciem należy
wyciągnąć zakładkę izolacyjną.
Co jest w zestawie:
Please read this manual carefully and keep it
Smart Radiator Thermostat E1
User Manual
-140-
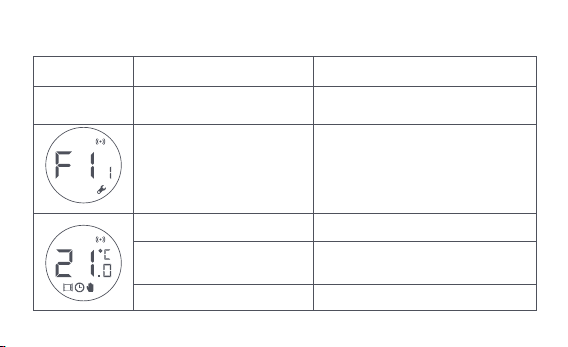
Opis funkcji przycisków pokrętła
Tryb ekranu
Tryb dowolny
Naciśnij przycisk i
przytrzymaj przez 10 sekund.
Naciśnij 3 razy z rzędu
Naciśnij krótko 1 raz Moduł przełącznika
Włączanie/wyłączanie funkcji
blokady przed dziećmi
Regulacja temperatury
Naciśnij przycisk i
przytrzymaj przez 3 sekundy.
Obróć
Kalibracja zaworu (przed kalibracją
należy upewnić się, że termostat
został prawidłowo zainstalowany
na interfejsie zaworu)
Przyłączanie się do
sieci/resetowanie sieci
Funkcja Opis
-141-
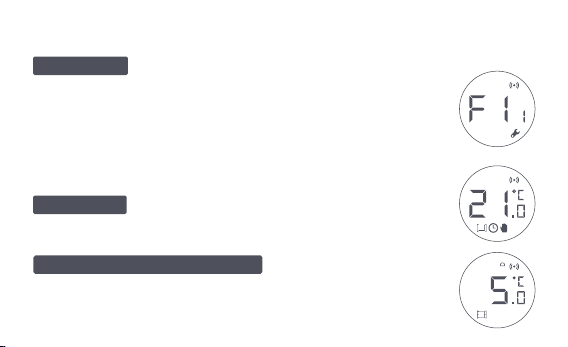
Opis trybu ekranu
Ekran będzie wyświetlał tryb jak na rysunku po
każdym załadowaniu baterii.
W tym czasie należy jak najszybciej zainstalować termostat w
interfejsie zaworu, a następnie nacisnąć przycisk 3 razy z rzędu
lub kliknąć " Więcej ustawień" w aplikacji, aby skalibrować zawór.
Ten tryb jest przeznaczony do
użytku podczas dłuższej nieobecności użytkownika, aby chronić
przewód wodny przed zamarzaniem w niskich temperaturach.
Użytkownik może obracać pokrętłem lub ustawiać
temperaturę docelową w aplikacji w zależności od potrzeb.
Do instalacji
Tryb zapobiegający zamarzaniu
Tryb ręczny
Uwaga: Przed kalibracją należy upewnić się, że termostat jest prawidłowo
zainstalowany na interfejsie zaworu.
-142-
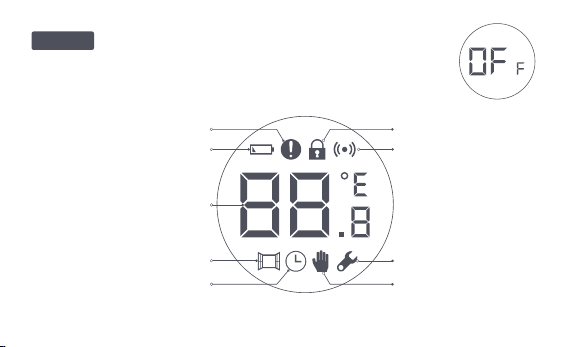
Błąd regulacji temperatury
Niski poziom baterii
Ustawienie temperatury
Wykrywanie otwartego okna
Inteligentny harmonogram
Tryb ręczny
Instalacja
Praca w sieci
Blokada przed dziećmi
Opis ikon
Zawór zostanie zamknięty, aby zatrzymać ogrzewanie, co
jest przydatne w okresie letnim, gdy nie ma potrzeby ogrzewania.
Wyłącz
-143-
Błąd regulacji temperatury
Niski poziom baterii
Ustawienie temperatury
Wykrywanie otwartego okna
Inteligentny harmonogram
Tryb ręczny
Instalacja
W przypadku nieprawidłowej regulacji temperatury. Patrz
"Rozwiązywanie problemów" w instrukcji obsługi w celu
rozwiązania problemu.
W przypadku niskiego poziomu baterii, wymień baterie tak
szybko, jak to możliwe.
Wyświetlanie ustawionej temperatury.
Gdy aktywna jest funkcja wykrywania otwartego okna.
Gdy włączona jest funkcja inteligentnego harmonogramu.
Gdy termostat jest w trybie ręcznym.
Gdy termostat jest w trybie instalacji.
Praca w sieci
Stan połączenia sieciowego:
*Ikona włączona normalnie: prawidłowe połączenie sieciowe
*Ikona wyłączona: połączenie offline/rozłączenie.
-144-
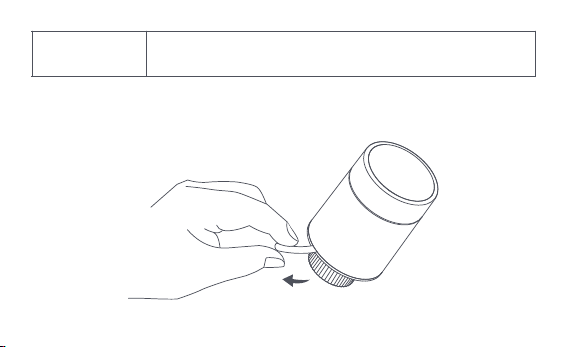
Instrukcja montażu
1. Przed użyciem należy wyciągnąć zakładkę izolacyjną i sprawdzić, czy
urządzenie jest włączone.
Blokada przed
dziećmi
Aby zapobiec dotknięciu przez dzieci, należy nacisnąć i przytrzymać
przycisk przez 3 sekundy, aby włączyć lub wyłączyć tę funkcję.
-145-
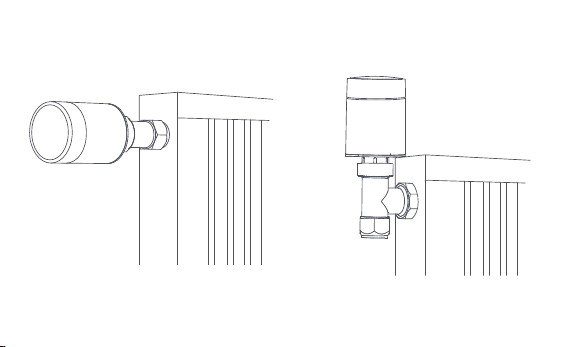
2. Zaleca się zamontowanie termostatu na złączu zaworu grzejnikowego w
ciągu 5 minut od uruchomienia TRV.
1.Instalacja pozioma 2.Instalacja pionowa
-146-
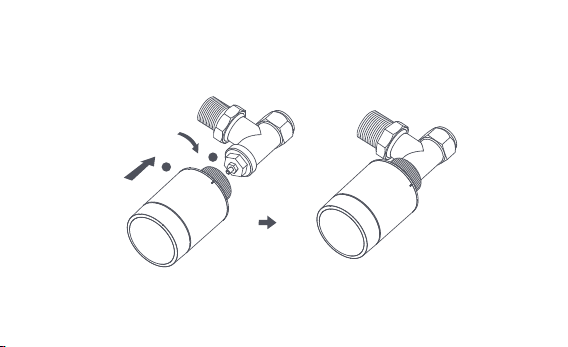
a. Termostat obsługuje zarówno poziomy, jak i pionowy sposób instalacji. Pionowy
sposób instalacji może powodować niedokładne odczyty temperatury
spowodowane tym, że wbudowany czujnik temperatury znajduje się blisko
grzejnika.
Uwaga: w każdej z tych metod wymagany jest zewnętrzny czujnik temperatury i wilgotności
Aqara, aby kontrola temperatury była dokładniejsza.
1
2
-147-

b. Wyrównaj nakrętkę interfejsu termostatu z zaworem grzejnika, a następnie
obróć nakrętkę do momentu jej dokręcenia.
Uwaga: Montaż interfejsu zaworu [M30*1,5 mm] pokazano na rysunku.
-148-
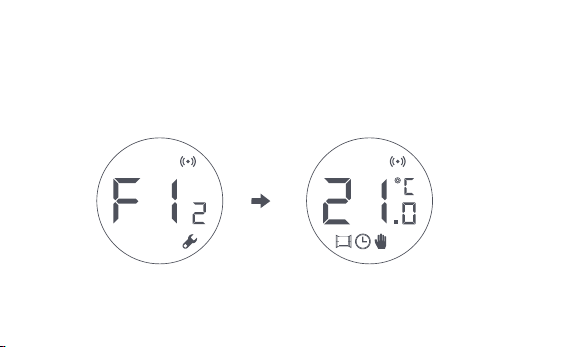
c. Naciśnij przycisk termostatu 3 razy z rzędu, aby skalibrować zawór. Podczas
kalibracji na ekranie wyświetlany jest symbol [F12].
d. Symbol [F12] zniknie po około 10 sekundach, a na ekranie zostanie
wyświetlona aktualnie ustawiona temperatura, co oznacza zakończenie
instalacji.
Uwaga: zawór musi być skalibrowany; w przeciwnym razie może powodować
nieprawidłową regulację temperatury. Wykonaj powyższe kroki lub kliknij "Więcej
ustawień" w aplikacji, aby skalibrować zawór.
-149-
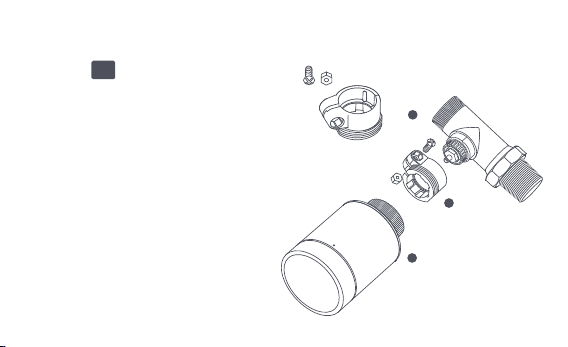
Instalacja z innymi adapterami:
Adapter :
RA
Połącz adapter RA z zaworem, dokręć
śrubę, aby zakończyć połączenie, a
następnie wyrównaj nakrętkę
interfejsu termostatu z adapterem RA i
obróć nakrętkę interfejsu, aż do jej
dokręcenia.
1
2
3
-150-
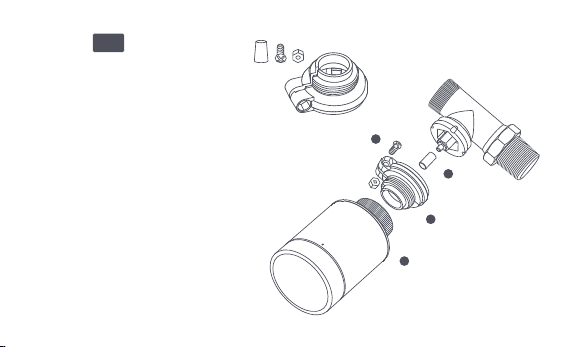
Adapter :
RAV
Podłącz adapter RAV do zaworu,
dokręć śrubę, włóż popychacz
do gilzy zaworu, aby zakończyć
połączenie, następnie ustaw
nakrętkę interfejsu termostatu w
jednej linii z adapterem RAV i
obróć nakrętkę interfejsu, aż
zostanie dokręcona.
1
2
3
4
-151-
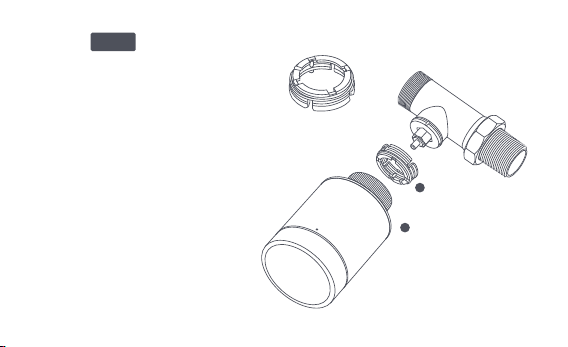
Adapter :
Podłącz adapter RAV do zaworu,
dokręć śrubę, włóż popychacz do
gilzy zaworu, aby zakończyć
połączenie, następnie ustaw
nakrętkę interfejsu termostatu w
jednej linii z adapterem RAV i obróć
nakrętkę interfejsu, aż zostanie
dokręcona.
1
2
RAVL
-152-

Szybka konfiguracja
Dodawanie urządzenia do aplikacji Aqara Home:
Przed użyciem produktu należy upewnić się, że aplikacja Aqara Home została
pobrana i zainstalowane zostało urządzenie sieciowe Aqara Zigbee 3.0.
Uruchom aplikację, kliknij "+" w prawym górnym rogu strony głównej, aby
przejść do strony "Dodaj urządzenie (akcesoria)", wybierz "Głowica
Termostatyczna E1" i działaj zgodnie z instrukcją podaną na stronie.
Skuteczna weryfikacja odległości: po pomyślnej konfiguracji sieci, ustaw
termostat w wybranym miejscu instalacji i obserwuj, czy status w aplikacji jest
zsynchronizowany.
* Jeśli urządzenie nie zostanie dodane, przesuń je bliżej urządzenia sieciowego i spróbuj
ponownie.
1
2
-153 -
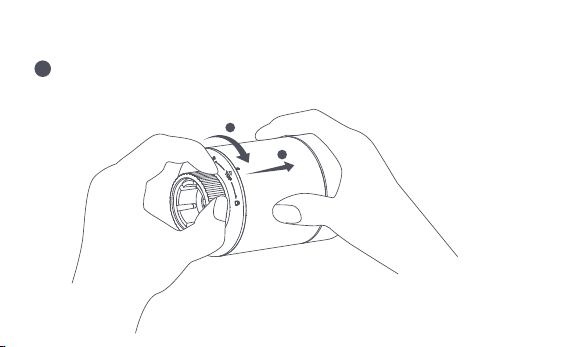
Wymiana baterii
Obróć obudowę w kierunku strzałki na dole i wyciągnij ją aż się odblokuje.
1
2
1
-153-
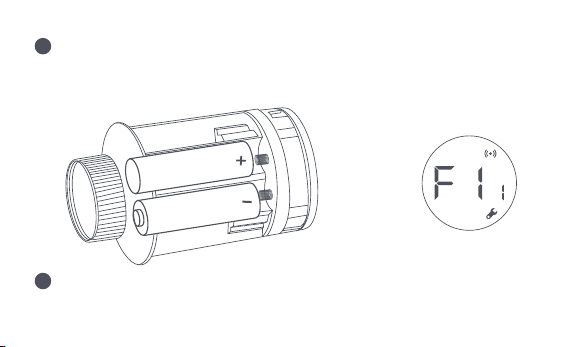
Odwołując się do znaków polaryzacji w komorze baterii, włóż 2 baterie
alkaliczne AA, jak pokazano na rysunku.
Po włożeniu baterii termostat uruchamia się automatycznie, a na ekranie
pojawia się symbol [F11], jak pokazano na rysunku.
Uwaga: Nie należy używać baterii wielokrotnego ładowania.
+
2
3
-154-
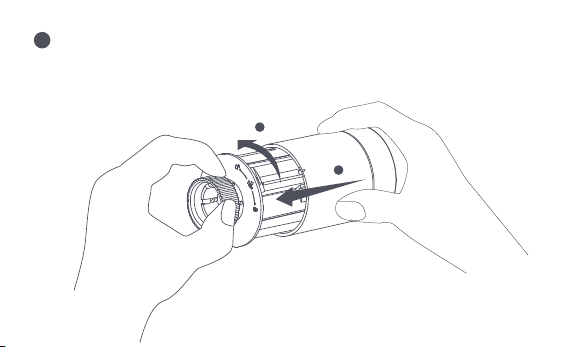
Umieść obudowę i obróć ją w kierunku strzałki na dole, aż zostanie
zablokowana, aby zakończyć ładowanie baterii.
Uwaga: W przypadku pojawienia się ostrzeżenia o niskim poziomie baterii należy jak
najszybciej wymienić baterie.
1
2
4
-155-
Rozwiązywanie problemów
Nr
1
Termostat działa
prawidłowo, ale
temperatura w
pomieszczeniu jest wyraźnie
wyższa niż ustawiona
Termostat działa normalnie,
ale temperatura w
pomieszczeniu jest wyraźnie
niższa od ustawionej
Wymień zawór, wyjmij baterie i
włóż je z powrotem po 30
sekundach, a następnie
ponownie zainstaluj termostat
Należy skontaktować się z
ekspertami w celu naprawy
rurociągu ciepłej wody
Odłącz termostat od zaworu,
wyjmij baterie i włóż je z powrotem
po 30 sekundach. Zamontuj
ponownie termostat i obserwuj, czy
usterka nadal występuje
Nieprawidłowa
instalacja
termostatu
Niska temperatura
na wlocie do
chłodnicy
Usterka zaworu
Usterka zaworu
2
Usterka
Możliwa
przyczyna
Rozwiązanie
-156-
Termostat nie
działa za przy
użyciu aplikacji
Termostat działa
prawidłowo, ale
temperatura w
pomieszczeniu
nie jest stała
Termostat nie
reaguje, gdy
baterie są
włożone.
Pomieszczenie jest
nadmiernie wentylowane,
a ciepło jest wytracane
Sprawdź, czy drzwi lub
okna nie są otwarte lub nie
są zamknięte.
Termostat nie jest
połączony z aplikacją
Sprawdź konfigurację
sieci.
Dostosuj odległość lub dodaj
kolejne urządzenie sieciowe.
Wymień baterie.
Wymień baterie.
Termostat jest oddalony lub nie ma
dostępu do urządzenia sieciowego
Niski poziom baterii
Niski poziom baterii
3
4
5
Wymień baterie.
Wymień baterie.
Niski poziom baterii
Uszkodzenie produktu
Baterie zostały włożone w
niewłaściwym kierunku polaryzacji.
Skontaktuj się z działem obsługi
klienta w sprawie wymiany lub
naprawy.
-157-
Na ekranie
LCD
wyświetlan
a jest ikona
usterki
6
Nieprawidłowa instalacja
termostatu
Temperatura jest ustawiona
zbyt wysoko
Usterka zaworu
(grzejnik nie pasuje do
niego) lub zbyt mocno
wentylowane
Niskie ciśnienie lub
temperatura wody na wlocie
Odłącz termostat od zaworu, wyjmij
baterie i włóż je z powrotem po 30
sekundach, zamontuj ponownie termostat
i obserwuj, czy usterka nadal występuje
Wymień baterie
Wymień zawór, wyjmij baterie i włóż je z
powrotem po 30 sekundach, a następnie
ponownie zainstaluj termostat
Wymień grzejnik lub sprawdź, czy drzwi
lub okna nie są otwarte lub nie są
zamknięte
Sprawdzić ciśnienie i temperaturę
wody na wlocie
Uwaga: W przypadku jakichkolwiek problemów, które nie zostały rozwiązane, prosimy o
kontakt z działem obsługi klienta - support@aqara.com.
-158-

Specyfikacje
Model: SRTS-A01
Bateria: 3V (2 × 1.5V AA)
Protokoły bezprzewodowe: Zigbee 3.0
Wymiary: Ø 57×89 mm (Ø 2,24×3,5 cala)
Temperatura pracy: 0°C ~ 40°C (32°F ~ 104°F)
Wilgotność robocza: 0 ~ 95% RH, bez kondensacji
Połączenie gwintowe: M30×1,5 mm
Zigbee Maksymalna moc wyjściowa: <10 dBm
Zigbee Częstotliwość pracy: 2405-2480 MHz
W normalnych warunkach użytkowania, urządzenie to powinno znajdować się w odległości
co najmniej 20 cm od anteny i ciała użytkownika.
-159-
Deklaracja Zgodności UE
Niniejszym, [Lumi United Technology Co., Ltd] oświadcza, że urządzenie radiowe
typu [Głowica Termostatyczna E1,SRTS-A01] jest zgodne z dyrektywą 2014/53/UE. Pełny
tekst deklaracji zgodności UE jest dostępny pod następującym adresem internetowym:
http://www.mi.com/global/service/support/declaration.html
Wszystkie produkty oznaczone tym symbolem są zużytym sprzętem elektrycznym i
elektronicznym (WEEE zgodnie z dyrektywą 2012/19/UE), których nie należy
mieszać z niesegregowanymi odpadami domowymi.
Zamiast tego należy chronić zdrowie ludzkie i środowisko, oddając zużyty sprzęt do
wyznaczonego przez rząd lub władze lokalne punktu zbiórki zużytego sprzętu
elektrycznego.
Prawidłowa utylizacja i recykling pomogą zapobiec potencjalnym negatywnym skutkom
dla środowiska i zdrowia ludzi. Aby uzyskać więcej informacji na temat lokalizacji oraz
Informacje o utylizacji i recyklingu ZSEE
-160-
Symbol na produkcie lub na jego opakowaniu oznacza, że tego produktu nie
wolno traktować jako odpadu domowego. Zamiast tego należy go przekazać
do odpowiedniego punktu zbiórki w celu recyklingu sprzętu elektrycznego i
elektronicznego.
1. Ten produkt NIE jest zabawką. Trzymaj dzieci z dala od produktu.
2. Ten produkt jest przeznaczony wyłącznie do użytku wewnątrz pomieszczeń. NIE używaj
go w wilgotnym środowisku lub na zewnątrz.
3. Uważaj na wilgoć, NIE wylewaj wody ani innych płynów na produkt.
4. NIE umieszczaj tego produktu w pobliżu źródeł ciepła. NIE umieszczaj go w obudowie,
chyba że jest tam zapewniona prawidłowa wentylacja.
5. NIE próbuj samodzielnie naprawiać tego produktu. Wszystkie naprawy powinny być
wykonywane przez autoryzowanego specjalistę.
Ostrzeżenia
zasad i warunków funkcjonowania takich punktów zbiórki, należy skontaktować się z
instalatorem lub władzami lokalnymi.
-161-

6. Produkt ten jest przeznaczony wyłącznie do poprawy komfortu życia, wygody w domu i
służy do przypominania o stanie urządzenia. Nie powinien być stosowany jako
wyposażenie zabezpieczające w domach, budynkach, magazynach lub innych
miejscach.W przypadku naruszenia przez użytkownika instrukcji użytkowania produktu,
producent NIE ponosi odpowiedzialności za jakiekolwiek zagrożenia i straty materialne.
7. Wymiana na niewłaściwe baterie może spowodować pożar lub wybuch. Można
wymieniać tylko baterie tego samego lub analogicznego modelu.
8. Nie wkładaj żadnej baterii do ognia, piekarnika lub kuchenki mikrofalowej, aby uniknąć
eksplozji.
9. Nie należy w żaden sposób demontować, uderzać, ściskać, przecinać ani uszkadzać
mechanicznie baterii, aby uniknąć eksplozji.
10. Nie należy poddawać baterii działaniu skrajnie niskiego ciśnienia powietrza lub skrajnie
wysokiej temperatury, gdyż może to spowodować eksplozję baterii i wyciek łatwopalnej
cieczy lub gazu.
11. Zużytych baterii nie należy wyrzucać, trzeba je zutylizować zgodnie z odpowiednimi
przepisami krajowymi i regionalnymi.
-162-

Lumi United Technology Co., Ltd
Pokój 801-804, Budynek 1, Chongwen Park, Nanshan iPark, nr 3370, Aleja Liuxian,
Gmina Fuguang, Dzielnica mieszkaniowa Taoyuan, Dzielnica Nanshan, Shenzhen, Chiny
Obsługa klienta online: www.aqara.com/support
E-mail: [email protected]om
-163-

Smart Radiatortermostat E1 är en termostatisk radiatorventil (TRV) som drivs
av alkaliska batterier, och kan användas i vattenvärmare. Den saknar
ledningar och har en simpel installation. Det skapar perfekta kontrolleffekter
för temperaturen. Denna produkt, som har en inbyggd trådlös
kommunikationsmodul från Zigbee, med låg effekt och en LCD-skärm, kan
användas som en ensam produkt, eller läggas till i Aqara Home-appen via
Aqara-hubben. Då blir det en så kallad smart termostat, som kan ställas in och
kontrolleras genom appen. Den kan skapa automatiska
temperaturjusteringar, och har en detektor för fönsteröppningar, som stöds av
Aqara temperatur- och fuktsensor, och Aqara dörr- och fönstersensor.
Produktintroduktion
-164-

* En Aqara Zigbee 3.0-hub krävs för att få smart-funktionalitet
* Om du vill veta mer om hur du jobbar med HomeKit krävs en specifik hubb. Besök
www.aqara.com/support för mer information.
* Denna produkt är endast för inomhusbruk.
LCD-skärm
Vridknapp
Obs: Kort tryckning, lång tryckning och
rotation är tillgängliga.
Ventilgränssnitt
-165-
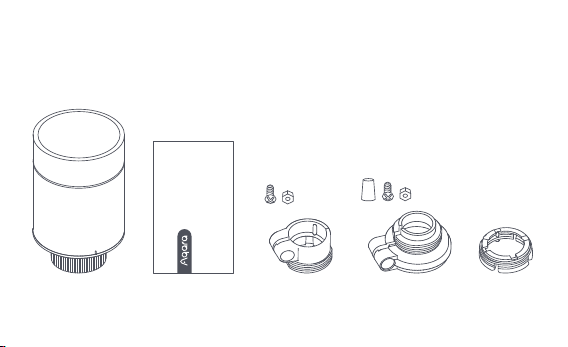
Smart Radiatortermostat E1 × 1, Användarmanual × 1, 1,5V AA-batteri × 2,
Adapter (RA/RAV/RAVL) × 3
Obs: Batterier är installerade innan de lämnade fabriken. Dra av isoleringsfliken före
användning.
Vad finns i Lådan:
Please read this manual carefully and keep it
Smart Radiator Thermostat E1
User Manual
-166-
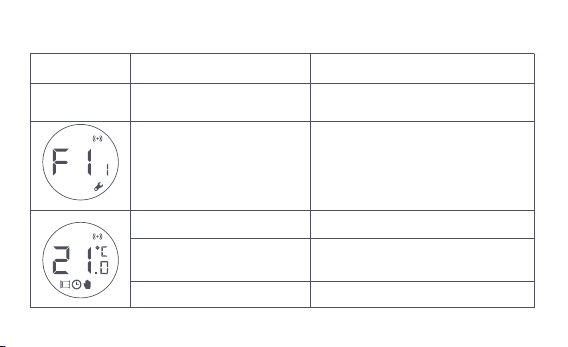
Beskrivning av rattknappsfunktioner
Skärmstatus
All status
Tryck i länge i 10 sekunder
Tryck 3 gånger i följd
Kort tryck 1 gång Byt modul
Aktivera/inaktivera barnlåsfunktion
Justera temperaturen
Tryck och håll inne i
tre sekunder
Rotera
Ventilkalibrering (före kalibrering,
se till att termostaten har
installerats korrekt på
ventilgränssnittet)
Nätverksanslutning
/nätverksåterställning
Funktion Beskrivning
-167-
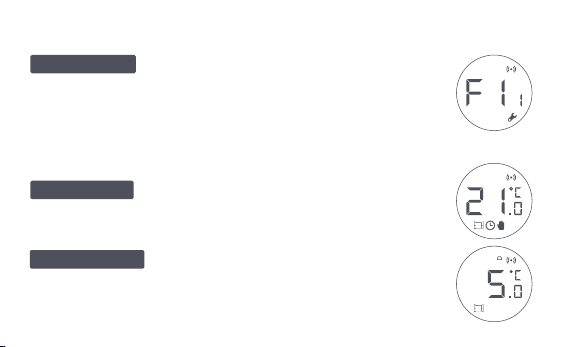
Beskrivning Av Skärmstatus
Skärmen visar nu den status som ses varje gång
batterier laddas. Installera nu termostaten i själva ventilgränssnittet
så snart som möjligt, och tryck sedan på knappen 3 gånger i följd,
eller klicka på "Fler inställningar" i appen för att kalibrera ventilen.
Denna funktion är gjord för perioder när du
är borta en längre tid. Detta är för att skydda vattenröret från
att frysa vid låg temperatur.
Användaren kan vrida ratten eller ställa in den
önskade temperaturen på appen eer behov.
Att installeras
Antifrys-mode
Manuellt läge
Obs: Se till att termostaten är korrekt installerad i ventilgränssnittet innan själva kalibreringen.
-168-
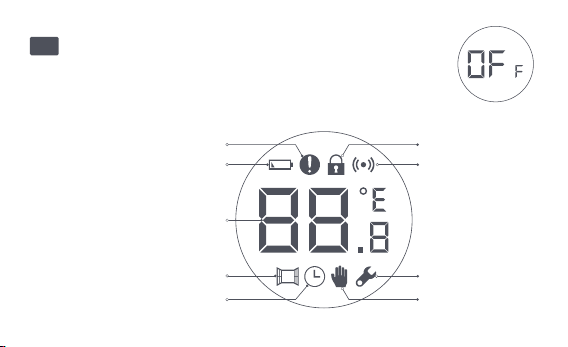
Temperatur kontrollfel
Låg batterinivå
Ställ in temperaturen
Detektering av öppet fönster
Smart schema Manuellt läge
Installation
Nätverk
Barnlås
Ikonbeskrivning
Ventilen kommer att stängas för att stoppa uppvärmningen,
vilket är lämpligt för sommaren när uppvärmning inte längre än
nödvändig.
Av
-169-
Temperatur kontrollfel
Låg batterinivå
Ställ in temperaturen
Detektering av öppet fönster
Smart schema
Manuellt läge
Installation
Vid onormal temperaturhantering. Se "Felsökning" i
manualen för felsökning.
Vid lågt batteri. Byt ut batterierna så snart som möjlig.
Visa den bestämda temperaturen.
När detekteringsfunktionen för öppet fönster är aktiverad.
När den smarta schemafunktionen är aktiverad.
När termostaten är i manuellt läge.
När termostaten är i installationsstatus.
Nätverk
Status för nätverk:
*Ikon normalt på: normal nätverksanslutning
*Ikon avstängd: offline/bortkopplad.
-170-
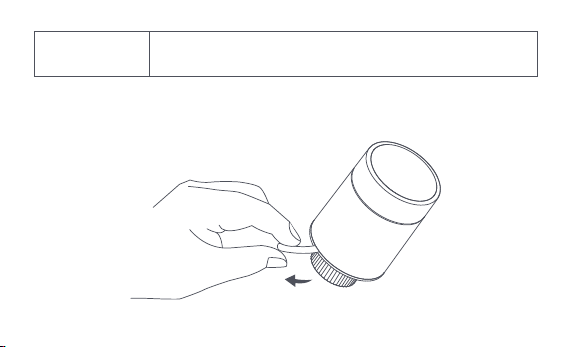
Installationsinstruktioner
1. Dra av isoleringsfliken före användning och bekräa att termostaten är
påslagen.
Barnlås
För att förhindra att barn rör vid den av misstag, tryck länge i 3
sekunder för att aktivera eller inaktivera barnlåsfunktionen.
-171-
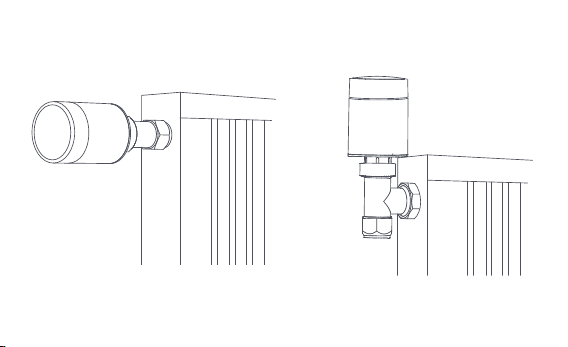
2. Det rekommenderas att installera termostaten i radiatorventilens gränssnitt
inom 5 minuter eer att TRV har startat.
1.Horisontell installation 2.Vertikal installation
-172-
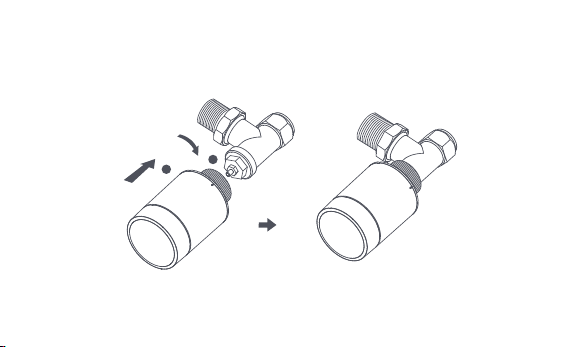
a. Termostaten kan installeras på både horisontella och vertikala lägen. Att
installera den vertikalt kan dock resultera i felaktiga temperaturavläsningar,
vilket är orsakade av att den inbyggda temperatursensorn är för nära
radiatorn.
Obs: i någon av dessa metoder krävs en extern Aqara temperatur- och fuktighetssensor för
att göra kontrollen av tempteratur mer korrekt.
1
2
-173-
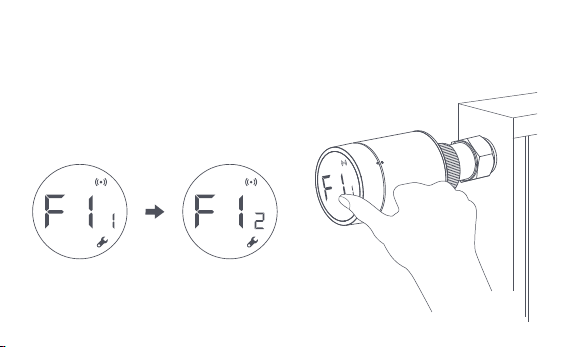
b. Rikta in termostatens gränssnittsmutter med radiatorventilens position,
och vrid muttern tills den är ordentligt åtdragen.
Obs: Installation av [M30*1,5 mm]-ventilgränssnittet visas i figuren.
-174-
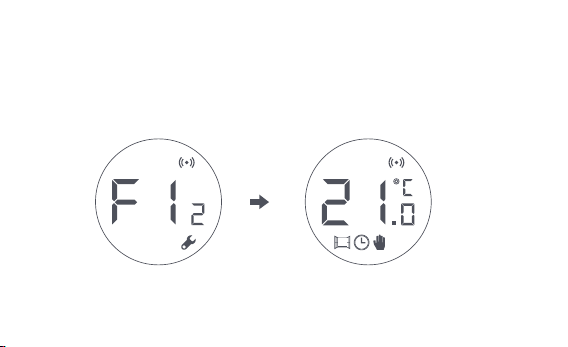
d. Symbolen [F12] försvinner eer cirka 10 sekunder, och skärmen visar den
aktuella temperaturen, vilket visar att installationen är klar.
c. Tryck på termostat-knappen 3 gånger i följd för att kunna kalibrera ventilen.
Under kalibreringen visar skärmen [F12]-symbolen.
Obs: ventilen måste kalibreras; annars kan det åstadkomma onormala kontroller av
temperaturen. Följ stegen ovan, eller klicka på "Fler inställningar" i appen, för att
kalibrera ventilen.
-175-
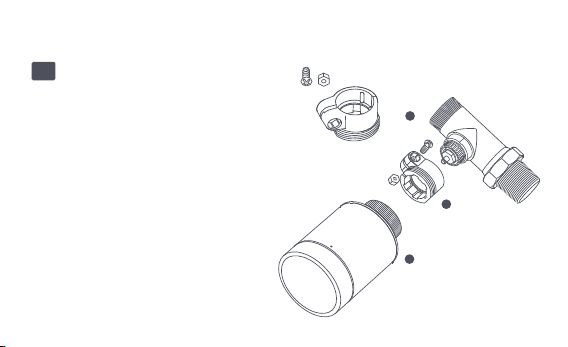
Installation med andra adaptrar:
Adapter:
RA
Anslut RA-adaptern till ventilen, dra åt
skruven för att slutföra anslutningen,
och rikta sedan in termostatens
gränssnittsmutter mot RA-adaptern.
Slutligen, vrid gränssnittsmuttern tills
den är säkert åtdragen.
1
2
3
-176-
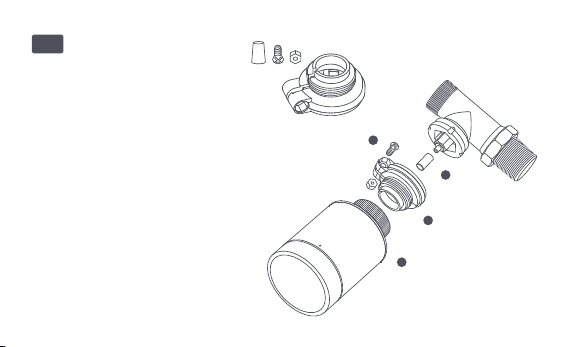
Adapter:
RAV
Anslut RAV-adaptern till
ventilen, dra åt skruven, och sätt
in tryckstången i ventilhylsan för
att slutföra anslutningen. Rikta
sedan in termostatens
gränssnittsmutter med
RAV-adaptern. Slutligen, vrid
gränssnittsmuttern tills den är
åtdragen.
1
2
3
4
-177-
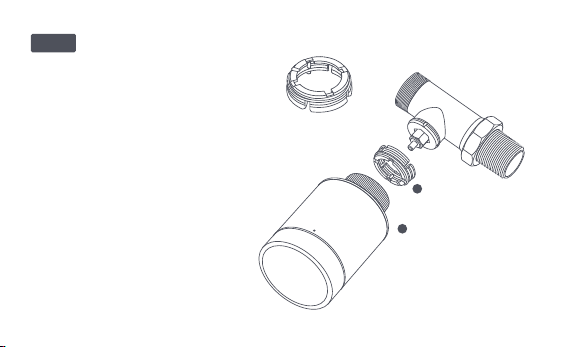
Adapter:
Anslut RAV-adaptern till ventilen,
dra åt skruven, sätt in tryckstången
i ventilhylsan för att slutföra
anslutningen, rikta sedan in
termostatenss gränssnittsmutter
med RAV-adaptern och vrid
gränssnittsmuttern tills den är
ordentligt åtdragen.
1
2
RAVL
-178-

Snabb Setup
Lägga till enheten i Aqara Home-appen:
Innan du använder produkten, se till att Aqara Home-appen har laddats ner
och en Aqara Zigbee 3.0-hub har installerats.
Starta appen, klicka på "+" i det övre högra hörnet på startsidan för att gå till
sidan "Lägg till enhet (tillbehör)", välj "Smart Radiatortermostat E1" och kör
enligt instruktionerna på sidan.
Effektiv avståndsverifiering: eer den lyckade nätverkskonfigurationen, justera
termostaten vid den bestämda installationspositionen och observera om
statusen i appen är synkroniserad.
* Om enheten inte läggs till, flytta den närmare hubben och försök igen.
1
2
-179-
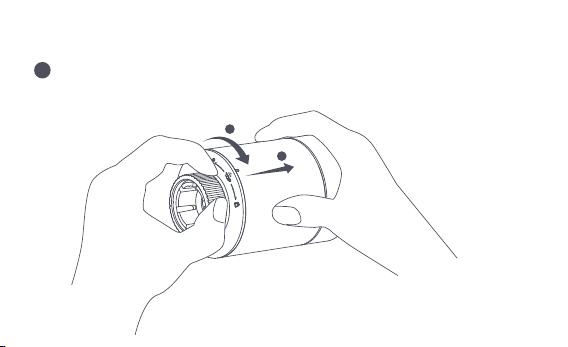
Batteribyte
Vrid skruven i pilens riktning längst ner och dra ut det tills det låses upp.
1
2
1
-180-
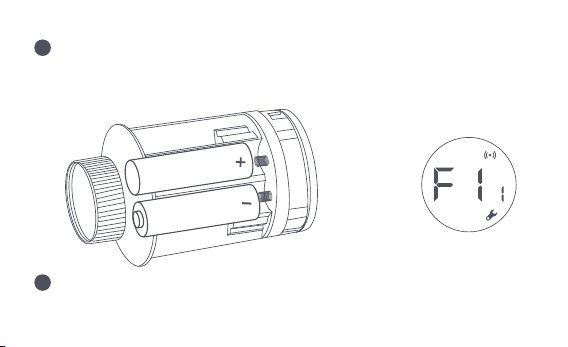
Med hänvisning till polaritetsmarkeringarna i batterifacket, sätt i 2
AA-batterier enligt bilden.
Med batterierna i plats kommer termostaten starta automatiskt och
skärmen visar symbolen [F11], som kan ses i figuren.
Obs: Uppladdningsbara batterier bör inte användas.
+
2
3
-181-
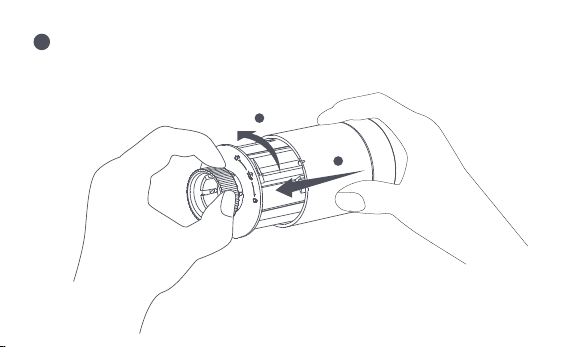
Placera höljet och vrid det i pilens riktning tills det låses för att slutföra
batteriladdningen.
Obs: Byt ut batterierna så snart som möjligt ifall en varning för lågt batteri uppstår.
1
2
4
-182-
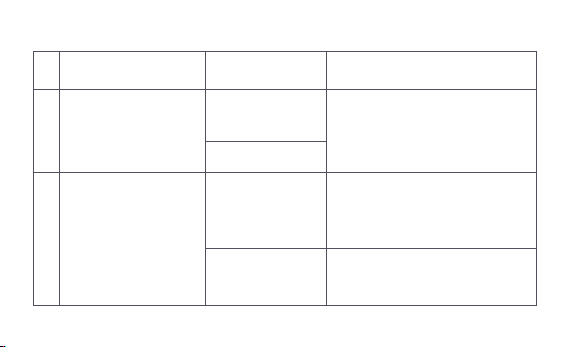
Felsökning
No.
1
Termostaten fungerar
normalt, men
rums-temperaturen är
högre än den bestämda
temperaturen
Termostaten fungerar
normalt, men
rums-temperaturen är
lägre än den bestämda
temperaturen
Byt ut ventilen, ta ut batterierna
och sätt tillbaka dem eer 30
sekunder, och ställ sedan tillbaka
termostaten.
Kontakta en tekniker för att
reparera varmvattenledningen.
Ta bort termostaten från ventilen,
ta ut batterierna och sätt tillbaka
dem eer 30 sekunder. Ställ
tillbaka termostaten och kolla om
felet kvarstår.
Felaktig
installation av
termostaten
Låg
radiator-temperatur
Ventilfel
Ventilfel
2
Fel
Möjlig orsak
Lösning
-183-
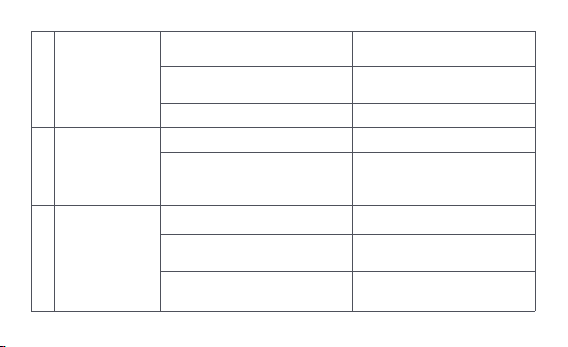
Termostaten kan
inte styras via
appen.
Termostaten
fungerar normalt,
men
rums-temperaturn
är inte konstant.
Termostaten
fungerar inte när
batterierna är
laddade.
Rummet är överventilerat
och värmen går förlorad
Kontrollera om dörrarna eller
fönstren är öppna eller inte
ordentligt fastskruvade.
Termostaten är inte
ansluten till appen
Kontrollera
nätverks-konfigurationen.
Justera avståndet eller lägg till
en annat hubb.
Byt ut batterierna.
Termostaten är placerad för långt
bort eller hubben är blockerad
Svagt batteri
Byt ut batterierna.Svagt batteri
3
4
5
Byt ut batterierna.
Byt ut batterierna.
Svagt batteri
Produktfel
Batterierna är placerade i fel
polaritets-riktning
Kontakta kundavdelningen för
reparation eller utbyte.
-184-
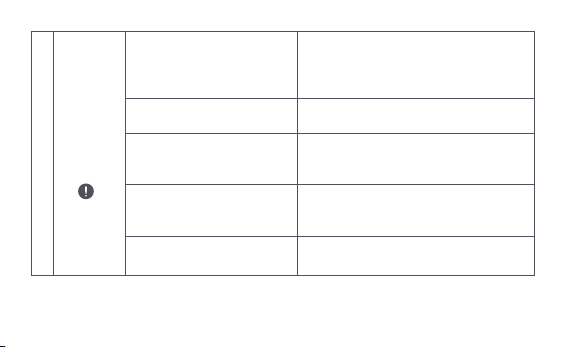
LCD-skärm
en visar en
fel-ikon.
6
Felaktig installation
av termostaten
Temperaturen är för
högt inställd
Ventilfel
Rummet är för stort
(radiatorn passar inte in) eller
rummet är överventilerat
Lågt vatteninlopps-tryck
eller temperatur
Ta bort termostaten från ventilen, ta ut
batterierna och sätt tillbaka dem eer 30
sekunder, sätt tillbaka termostaten och
observera om felet kvarstår.
Byt ut batterierna.
Byt ut ventilen, ta ut batterierna och sätt
tillbaka dem eer 30 sekunder, och sätt
sedan tillbaka termostaten.
Byt ut radiatorn, eller kontrollera om
dörrarna eller fönstren är öppna, eller
felaktigt fastskruvade.
Kontrollera vatteninloppstrycket och
temperaturen.
Obs: Om något problem inte är löst, vänligen kontakta kundavdelningen -
-185-
Specifikationer
Modell: SRTS-A01
Batteri: 3V (2 × 1,5V AA)
Trådlösa protokoll: Zigbee 3.0
Mått: Ø 57×89 mm (Ø 2,24×3,5 tum)
Temperatur vid dri: 0°C ~ 40°C (32°F ~ 104°F)
Lufuktighet vid dri: 0 ~ 95 % relativ lufuktighet, ingen kondensation
Gängad anslutning: M30×1,5 mm
Zigbee Maximal uteffekt: <10 dBm
Zigbee Drisfrekvens: 2405-2480 MHz
Vid normal användning bör denna enhet hållas på ett avstånd på minst 20 cm mellan
antennen och användarens kropp.
EU-försäkran om överensstämmelse
Härmed deklarerar[Lumi United Technology Co., Ltd] att radioutrustningen
[Smart Radiatortermostat E1,SRTS-A01] är i enlighet med direktiv 2014/53/EU. Den
fullständiga texten till EU-försäkran finns tillgänglig i följande länk:
-186-
Alla produkter som bär denna symbol är avfall av elektrisk och elektronisk
utrustning (WEEE enligt Direktiv 2012/19/EU) som inte får blandas med osorterat
hushållsavfall. Istället bör du skydda människors hälsa, samt miljön, genom att lämna
över din använda utrustning till en bestämd soptipp där det finns återvinning av avfall
från elektrisk och elektronisk utrustning. Denna soptipp ska vara utsedd av regeringen,
eller kommunala myndigheter. Korrekt kassering och återvinning hjälper till att förebygga
potentiella negativa konsekvenser för miljön och människors hälsa. Kontakta tillverkaren,
eller lokala myndigheter, för mer information om soptippen, samt villkoren för sådana
soptippar.
Symbolen på produkten eller på dess förpackning anger att denna produkt
inte får behandlas som hushållsavfall. Istället ska den lämnas till lämplig
insamlingsplats för återvinning av elektrisk och elektronisk utrustning.
WEEE - Information om kassering och återvinning
http://www.mi.com/global/service/support/declaration.html
-187-

1. Denna produkt är INTE en leksak. Håll barn borta från denna produkt.
2. Denna produkt är endast avsedd för inomhusbruk. Använd den INTE i fuktiga miljöer,
eller utomhus över huvud taget.
3. Var vaksam för fukt. Spill INTE vatten eller andra vätskor på produkten.
4. Placera INTE denna produkt nära en värmekälla. Placera den INTE i en inneslutning
såvida det inte finns normal ventilation.
5. Försök INTE att reparera denna produkt själv. Alla reparationer ska utföras av en
auktoriserad fackman.
6. Denna produkt är endast gjord för att förbättra bekvämligheten i ditt hemliv, och för att
påminna dig om enhetens status. Den ska INTE användas som en säkerhetsutrustning
för hem, byggnader, lager eller andra platser. Om en användare bryter mot produktens
bruksanvisning, kommer tillverkaren INTE att hållas ansvarig för några risker och
egendomsförluster.
7. När du byter batterierna och råkar använda fel modell kan det leda till brand eller
explosion. Endast batterier av samma modell får bytas ut.
Varningar
-188-

8. Placera inte något batteri i eld, ugn eller mikrovågsugn. Detta är för att undvika explosion.
9. Du ska inte ta isär, slå, kläm, skära eller skada batteriet på något sätt. Detta är för att
undvika explosion.
10. Utsätt inte batterierna för extremt lågt lutryck, eller extremt höga temperaturer. Detta
kan orsaka batteriexplosion på grund av den brandfarliga vätskan, eller gasläckage.
11. Tänk på återvinningen av dina använda batterier. Du ska kassera dem på rätt sätt, i
enlighet med de nationella och kommunala lagar som är relevanta för dig.
Lumi United Technology Co., Ltd
Rum 801-804, Byggnad 1, Chongwen-parken, Nanshan iPark, No. 3370, Liuxian Avenue,
Fuguang, Taoyuan bostadsdistrikt, Nanshan-distriktet, Shenzhen, Kina
Kundtjänst online: www.aqara.com/support
Email: [email protected]om
-189-

De Slimme Radiatorknop E1 is een thermostatische radiatorkraan (TRV) die
door droge (alkalische) batterijen wordt aangedreven en voor
waterverwarmingsradiatoren wordt gebruikt, zonder bedrading en met
geschikte installatie. Het kan bevredigende temperatuurcontrolegevolgen
realiseren. Dit product, met een ingebouwde draadloze
Zigbee-communicatiemodule met laag stroomverbruik en een LCD-display,
kan alleen worden gebruikt of worden toegevoegd aan de Aqara Home-app
via de Aqara-hub, waardoor het een intelligente thermostaat wordt die in de
app kan worden ingesteld en gecontroleerd. Het kan automatische
temperatuurregeling en raam-open detectie realiseren ondersteund met de
Aqara Temperatuur en Vochtigheid Sensor en de Aqara Deur en Raam Sensor.
Productintroductie
-190-

* Een Aqara Zigbee 3.0 hub is vereist voor slimme functionaliteit.
* Om met HomeKit te werken, is een specifieke hub vereist. Bezoek
www.aqara.com/support voor meer details.
* Dit product is alleen voor gebruik binnenshuis.
LCD-scherm
Knop
Opmerking: Kort indrukken, lang indrukken
en draaien zijn mogelijk.
Klepinterface
-191-

Slimme Radiatorknop E1 × 1, Gebruikershandleiding × 1, 1.5V AA Batterij × 2,
Adapter (RA/RAV/RAVL) × 3
Opmerking: De batterijen zijn geïnstalleerd voordat ze de fabriek verlaten. Trek voor
gebruik het isolatielipje uit.
Wat zit er in de doos:
Please read this manual carefully and keep it
Smart Radiator Thermostat E1
User Manual
-192-
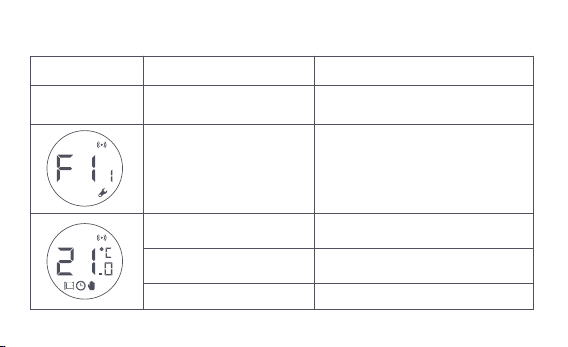
Beschrijving van de functies van de knoppen
Scherm status
Elke status
Lang indrukken
gedurende 10 seconden
3 keer na elkaar indrukken
Kort indrukken
gedurende 1 keer
Schakelmodule
Inschakelen/uitschakelen
kinderslotfunctie
Temperatuur instellen
Lang indrukken
gedurende 3 seconden
Draaien
Kalibratie van de klep (vóór de
kalibratie moet u controleren of de
thermostaat correct op de
klepinterface is geïnstalleerd)
Netwerkverbinding/netwerk
resetten
Functie Beschrijving
-193-
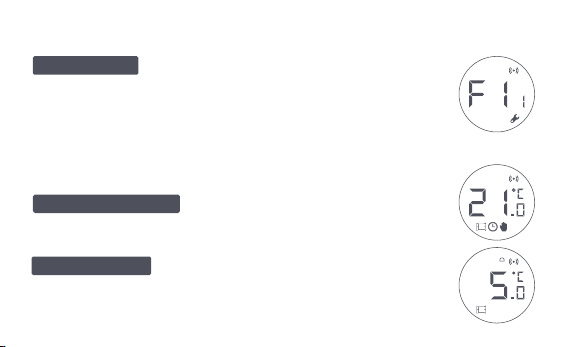
Statusbeschrijving Scherm
Het scherm zal de status weergeven zoals in de
figuur telkens wanneer de batterijen worden geladen. Installeer
de thermostaat op dat moment zo snel mogelijk op de
klepinterface en druk vervolgens 3 keer achter elkaar op de knop
of klik op "Meer instellingen" in de app om de klep te kalibreren.
Deze is ontworpen voor gebruik wanneer u
langere tijd weg bent, om de waterleiding te beschermen tegen
bevriezing bij lage temperatuur.
De gebruiker kan naar behoee aan de
knop draaien of de doeltemperatuur op de app instellen.
Te Installeren
Antivriesmodus
Handmatige modus
Opmerking: Zorg ervoor dat de thermostaat goed op de klepinterface is
geïnstalleerd voordat u gaat kalibreren.
-194-
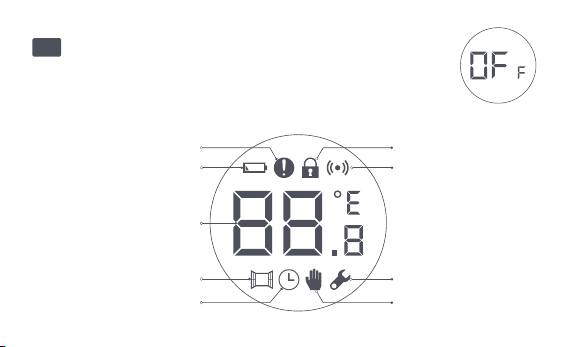
De fout van de
temperatuurcontrole
Batterij bijna leeg
Ingestelde temperatuur
Venster-open opsporing
Intelligent schema Handmatige modus
Installatie
Netwerken
Kinderslot
Pictogrambeschrijvingen
De klep wordt gesloten om de verwarming te stoppen, wat
geschikt is voor service in de zomer wanneer er geen verwarming
nodig is.
Uit
-195-
De fout van de
temperatuurcontrole
Batterij bijna leeg
Ingestelde temperatuur
Venster-open opsporing
Intelligent schema
Handmatige modus
Installatie
In geval van abnormale temperatuurregeling. Raadpleeg "Problemen
oplossen" in de handleiding voor het oplossen van problemen.
In geval van lege batterijen. Vervang de batterijen zo snel mogelijk.
Geef de ingestelde temperatuur weer.
Wanneer de raam-open detectie functie is geactiveerd.
Wanneer de intelligente schema functie is geactiveerd.
Als de thermostaat in de handmatige modus staat.
Wanneer de thermostaat in installatiestatus is.
Netwerken
Status van de netwerkverbinding:
*Icoon normaal aan: normale netwerkverbinding
*Icoon uit: offline/losgekoppeld.
-196-
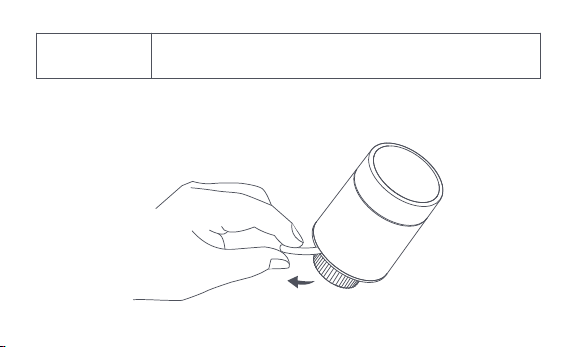
Installatie-instructies
1. Trek voor gebruik het isolatielipje uit en controleer of het apparaat is
ingeschakeld.
Kinderslot
Om te voorkomen dat kinderen elkaar per ongeluk aanraken, houdt
u 3 seconden lang ingedrukt om de functie in of uit te schakelen.
-197-
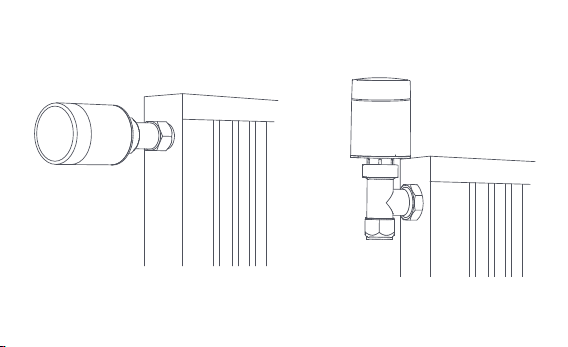
2. Het wordt aanbevolen om de thermostaat op de interface van de
radiatorkraan te installeren binnen 5 minuten nadat de TRV is opgestart.
1.Horizontale installatie 2.Verticale installatie
-198-
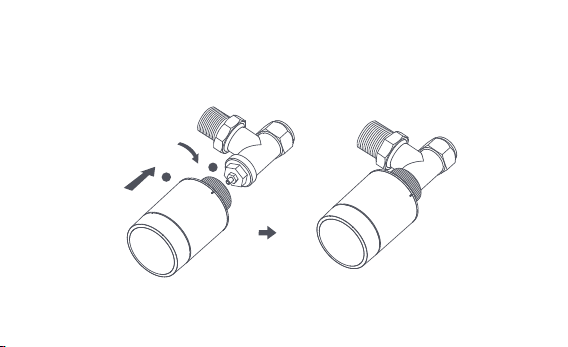
a. De Thermostaat ondersteunt zowel horizontale als verticale
installatiemethoden. De verticale installatiemethode kan echter
onnauwkeurige temperatuurmetingen tot gevolg hebben doordat de
ingebouwde temperatuursensor zich dicht bij de radiator bevindt.
Opmerking: bij elk van deze methodes is een externe Aqara temperatuur- en vochtigheids-
sensor vereist om de temperatuurregeling nauwkeuriger te maken.
1
2
-199-
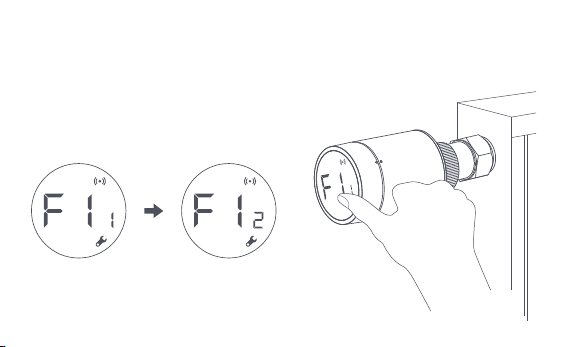
b. Lijn de thermostaat-interfacemoer uit met de radiatorkraan, en draai de
moer tot hij vastzit.
Opmerking: Installatie van [M30*1,5 mm] ventielinterface wordt
getoond in de figuur.
-200-
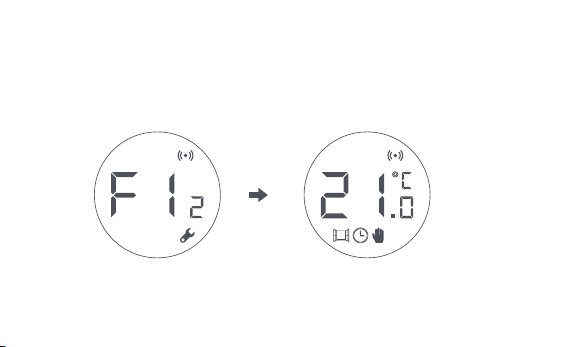
d. Het [F12]-symbool verdwijnt na ongeveer 10 seconden en het scherm gee
de momenteel ingestelde temperatuur weer, wat aangee dat de installatie
is voltooid.
c. Druk 3 opeenvolgende keren op de thermostaatknop om de klep te
kalibreren. Tijdens de kalibratie toont het scherm het symbool [F12].
Opmerking: de klep moet worden gekalibreerd, anders kan dit een abnormale
temperatuurregeling veroorzaken. Volg de bovenstaande stappen of klik op "Meer
instellingen" in de app om de klep te kalibreren.
-201-
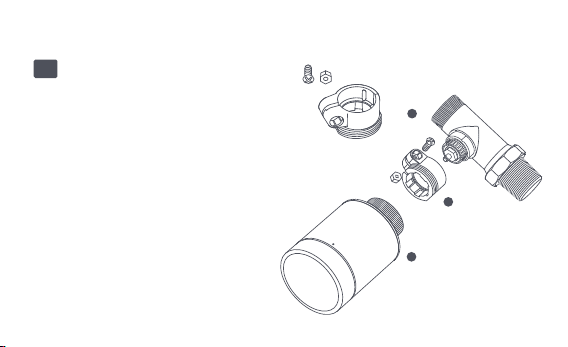
Installatie met andere adapters:
Adapter:
RA
Sluit de RA-adapter aan op de
klep, draai de schroef vast om de
aansluiting te voltooien, lijn
vervolgens de
thermostaatinterfacemoer uit
met de RA-adapter, en draai de
interfacemoer totdat deze
vastzit.
1
2
3
-202-

Adapter:RAV
Sluit de RAV-adapter aan op de
klep, draai de schroef vast, steek
de drijfstang in de kleptrommel
om de aansluiting te voltooien,
lijn vervolgens de
thermostaatinterfacemoer uit
met de RAV-adapter, en draai de
interfacemoer tot hij vastzit.
1
2
3
4
-203-
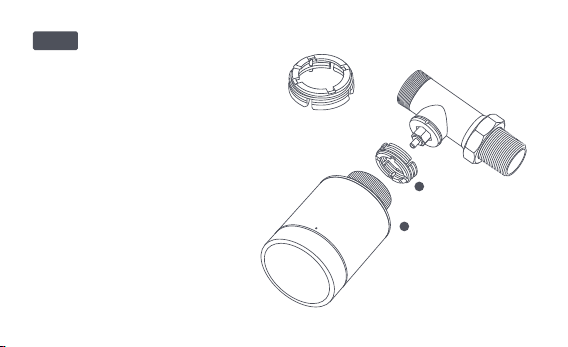
Adapter:
Sluit de RAV-adapter aan op het
ventiel, draai de schroef vast, steek
de drijfstang in de ventielhuls om
de aansluiting te voltooien, lijn
vervolgens de
thermostaatinterfacemoer uit met
de RAV-adapter, en draai de
interfacemoer tot hij vastzit.
1
2
RAVL
-204-

Snelle installatie
Het apparaat toevoegen aan de Aqara Home app:
Voordat u het product gebruikt, moet u ervoor zorgen dat de Aqara
Home-app is gedownload en een Aqara Zigbee 3.0-hub is geïnstalleerd.
Start de app, klik op "+" in de rechterbovenhoek van de startpagina om de
pagina "Add Device (Accessories)" te openen, selecteer "Slimme Radiator-
knop E1", en bedien volgens de aanwijzingen op de pagina.
Controle van de effectieve afstand: stel na de succesvolle netwerkconfiguratie
de thermostaat in op de voorgeselecteerde installatiepositie en kijk of de
status in de app gesynchroniseerd is.
* Als het apparaat niet wordt toegevoegd, verplaats het dan dichter naar de hub en probeer
het opnieuw.
1
2
-205-

Vervangen van de batterij
Draai de behuizing in de richting van de pijl aan de onderkant en trek hem
eruit tot hij ontgrendeld is.
1
2
1
-206-
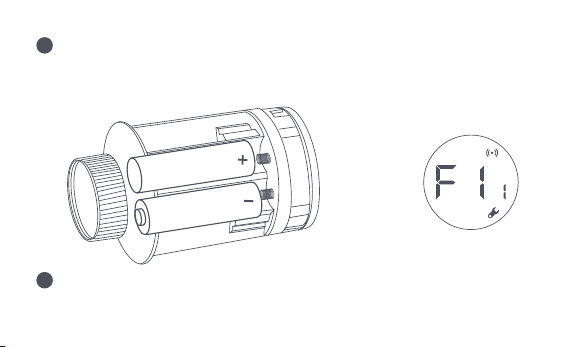
Verwijzend naar de polariteitsmarkeringen in het batterijvak, plaatst u 2
AA alkalinebatterijen zoals aangegeven in de afbeelding.
Als de batterijen geplaatst zijn, start de thermostaat automatisch, en het
scherm toont het symbool [F11] zoals getoond in de figuur.
Opmerking: Herlaadbare batterijen mogen niet worden gebruikt.
+
2
3
-207-

Plaats de behuizing, en draai deze in de richting van de pijl aan de onderkant
totdat deze vergrendeld is, om het laden van de batterijen te voltooien.
Opmerking: Vervang de batterijen zo snel mogelijk in geval van een waarschuwing
dat de batterijen bijna leeg zijn.
1
2
4
-208-
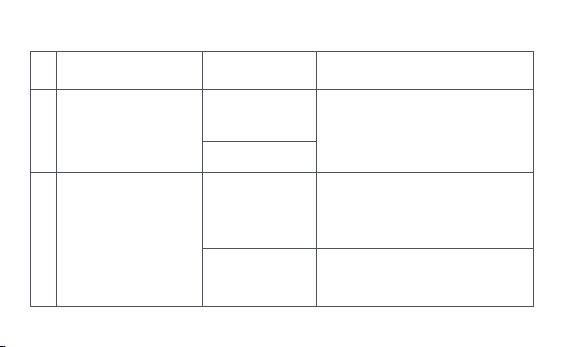
Problemen oplossen
Nr.
1
De thermostaat werkt
normaal, maar de
kamertemperatuur is
duidelijk hoger dan de
ingestelde temperatuur
De thermostaat werkt
normaal, maar de
kamertemperatuur is
duidelijk lager dan de
ingestelde temperatuur
Plaats de kraan terug, verwijder
de batterijen en plaats ze na 30
seconden terug, en installeer de
thermostaat opnieuw.
Neem contact op met
professionals om de
warmwaterleiding te repareren.
Verwijder de thermostaat van de klep,
haal de batterijen eruit en plaats ze na
30 seconden weer terug. Installeer de
thermostaat opnieuw en controleer of
de storing blij bestaan.
Onjuiste
installatie van de
thermostaat
Lage
inlaattemperatuur
radiator
Fout in de klep
Fout in de klep
2
Fout
Mogelijke Oorzaak
Oplossing
-209-
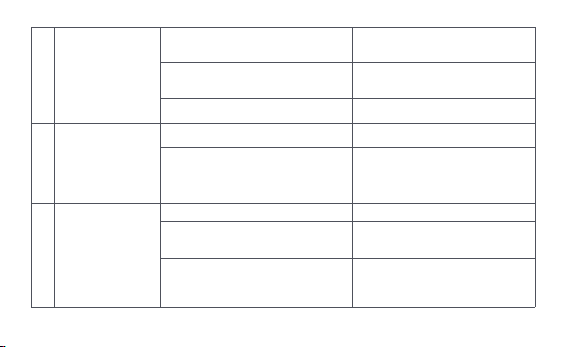
De thermostaat
kan niet bediend
worden via de
app
De thermostaat
werkt normaal,
maar de
kamertemperatu
ur is niet constant
De thermostaat
reageert niet
wanneer de
batterijen
geladen zijn
De kamer is overgeventileerd,
en de warmte gaat verloren
Controleer of de deuren of
ramen open staan of niet
vastzitten.
De thermostaat is niet
aangesloten op de app
Controleer de
netwerkconfiguratie.
Pas de afstand aan of voeg een
andere hub toe.
Vervang de batterijen.
De thermostaat bevindt zich ver
of is geblokkeerd van de hub
Batterij bijna leeg
Vervang de batterijen.Batterij bijna leeg
3
4
5
Vervang de batterijen.
Vervang de batterijen.
Batterij bijna leeg
Productstoring
De batterijen zijn in de verkeerde
polariteitsrichting geplaatst.
Neem contact op met de
klantenservice voor reparatie
of vervanging.
-210-
Op het
LCD-scherm
verschijnt een
storingspicto
gram
6
Onjuiste installatie
van de thermostaat
De temperatuur is
te hoog ingesteld
Storing in de klep
De kamer is te groot (de
radiator past er niet bij)
of overgeventileerd
Lage watertoevoerdruk
of -temperatuur
Verwijder de thermostaat van de klep, neem
de batterijen eruit en plaats ze na 30 seconden
weer terug, installeer de thermostaat weer en
kijk of de storing blij bestaan.
Vervang de batterijen.
Vervang de klep, haal de batterijen eruit
en plaats ze na 30 seconden terug, en
installeer de thermostaat opnieuw.
Vervang de radiator of controleer of de
deuren of ramen open staan of niet
vastzitten.
Controleer de watertoevoerdruk en
de temperatuur.
Opmerking: In het geval van om het even welk probleem dat niet wordt opgelost, gelieve de
naverkoopafdeling te contacteren - support@aqara.com
-211-

Specificaties
Model: SRTS-A01
Batterij: 3V (2 × 1,5V AA)
Draadloze Protocollen: Zigbee 3.0
Afmetingen: Ø 57×89 mm (Ø 2,24×3,5 in.)
Werkende Temperatuur: 0°C ~ 40°C (32°F ~ 104°F)
Vochtigheid: 0 ~ 95% RH, geen condensatie
Schroefdraad Aansluiting: M30×1.5 mm
Zigbee Maximum Outputmacht: <10 dBm
Zigbeeverrichtingsfrequentie: 2405-2480 MHz
Bij normaal gebruik moet dit apparaat op een afstand van ten minste 20 cm tussen de
antenne en het lichaam van de gebruiker worden gehouden.
EU Conformiteitsverklaring
Hierbij verklaart [Lumi United Technology Co, Ltd] dat de radioapparatuur van
het type [Slimme Radiatorknop E1,SRTS-A01] in overeenstemming is met Richtlijn
2014/53/EU. De volledige tekst van de EU-conformiteitsverklaring is beschikbaar op het
-122-
Alle producten met dit symbool zijn afgedankte elektrische en elektronische
apparaten (AEEA zoals in richtlijn 2012/19/EU) die niet mogen worden gemengd met
ongesorteerd huishoudelijk afval. In plaats daarvan dient u de volksgezondheid en het
milieu te beschermen door uw afgedankte apparatuur in te leveren bij een aangewezen
inzamelpunt voor de recycling van afgedankte elektrische en elektronische apparatuur, dat
is aangewezen door de overheid of lokale autoriteiten. Een correcte verwijdering en
recycling zal helpen mogelijke negatieve gevolgen voor het milieu en de volksgezondheid te
voorkomen. Neem contact op met de installateur of de plaatselijke autoriteiten voor meer
informatie over de locatie en de voorwaarden van dergelijke inzamelpunten.
Symbool op het product of op de verpakking gee aan dat dit product niet als
huishoudelijk afval mag worden behandeld. In plaats daarvan moet het
worden ingeleverd bij het desbetreffende inzamelpunt voor de recycling van
elektrische en elektronische apparatuur.
Informatie over WEEE-verwijdering en recycling
volgende internetadres: http://www.mi.com/global/service/support/declaration.html
-213-

1. Dit product is GEEN speelgoed. Houd kinderen uit de buurt van dit product.
2. Dit product is uitsluitend ontworpen voor gebruik binnenshuis. Gebruik het NIET in
vochtige omgevingen of buitenshuis.
3. Pas op voor vocht, mors GEEN water of andere vloeistoffen op het product.
4. Plaats dit product NIET in de buurt van een warmtebron. Plaats het NIET in een
behuizing, tenzij er normale ventilatie is.
5. Probeer dit product NIET zelf te repareren. Alle reparaties moeten worden uitgevoerd
door een erkende vakman.
6. Dit product is uitsluitend geschikt voor het verbeteren van het amusement en het
gemak van uw huiselijk leven, en om u te herinneren aan de status van het apparaat.
Het mag NIET worden gebruikt als beveiligingsapparatuur voor huizen, gebouwen,
magazijnen of andere plaatsen. Als een gebruiker de gebruiksinstructies van het product
overtreedt, zal de fabrikant NIET aansprakelijk zijn voor eventuele risico's en
eigendomsverliezen.
Waarschuwingen
-214-

7. Vervanging door batterijen van het verkeerde model kan brand of een explosie
veroorzaken. Alleen batterijen van hetzelfde of gelijkwaardig model zijn toegestaan voor
vervanging.
8. Plaats geen batterijen in het vuur, de oven of de magnetron, om explosie te voorkomen.
9. Haal de batterij niet uit elkaar, sla er niet op, knijp er niet in, snijd er niet in en beschadig
de batterij op geen enkele manier mechanisch, om explosie te voorkomen.
10. Stel de batterijen niet bloot aan extreem lage luchtdruk of extreem hoge temperatuur,
dit kan explosie van de batterij en lekkage van brandbare vloeistoffen of gassen
veroorzaken.
11. Gooi de afgedankte batterijen niet weg, en gooi ze op de juiste manier weg in
overeenstemming met de relevante nationale en regionale regelgeving.
Lumi United Technology Co, Ltd
Kamer 801-804, Building 1, Chongwen Park, Nanshan iPark, No. 3370, Liuxian Avenue,
Fuguang Gemeenschap, Taoyuan Residential District, Nanshan District, Shenzhen, China
Online klantendienst: www.aqara.com/support
E-mail: [email protected]om
-215-

El Cabezal Termostático Inteligente E1 es una válvula termostática de radiador
(TRV) alimentada por pilas secas (alcalinas) aplicable a radiadores de
calentamiento de agua, sin cableado y de cómoda instalación. Puede realizar
efectos de control de temperatura satisfactorios. Este producto, con un
módulo de comunicación inalámbrica Zigbee de baja potencia incorporado y
una pantalla LCD, puede usarse solo o agregarse a la aplicación Aqara Home a
través del cubo Aqara, convirtiéndose en un termostato inteligente que se
puede configurar y verificar en la aplicación. Puede realizar el ajuste
automático de la temperatura y la detección de ventanas abiertas compati-
bles con el sensor de Temperatura y Humedad de Aqara y el sensor de Puertas
y Ventanas de Aqara.
Introducción del producto
-216-
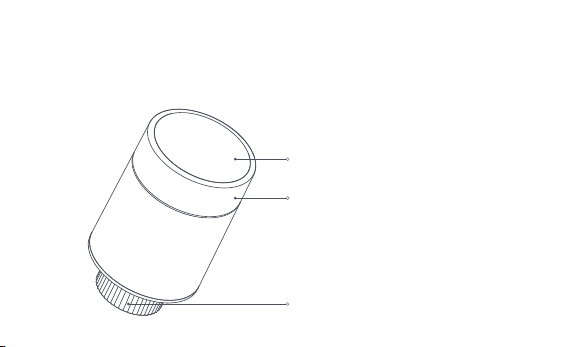
* Se requiere un cubo Aqara Zigbee 3.0 para la funcionalidad inteligente.
* Para trabajar con HomeKit, se requiere un cubo específico. Visite
www.aqara.com/support para obtener más detalles.
* Este producto es solo para uso en interiores.
Pantalla LCD
Botón de perilla
Nota: Las operaciones de pulsación corta,
pulsación larga y rotación están
disponibles.
Interfaz de válvula
-217-
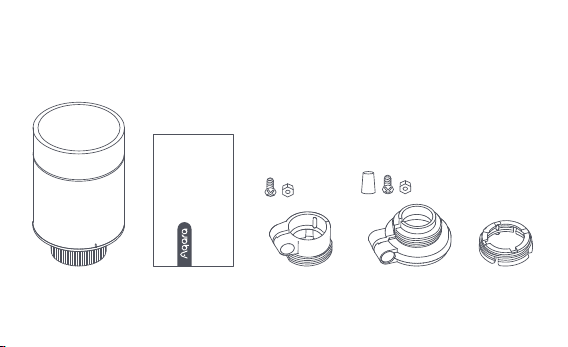
Cabezal Termostático Inteligente E1 × 1, Manual de Usuario × 1, Batería AA de
1.5V × 2, Adaptador (RA/RAV/RAVL) × 3
Nota: Las baterías se han instalado antes de salir de fábrica. Saque la chapita aislante antes
de usar.
Qué hay en la caja:
Please read this manual carefully and keep it
Smart Radiator Thermostat E1
User Manual
-218-
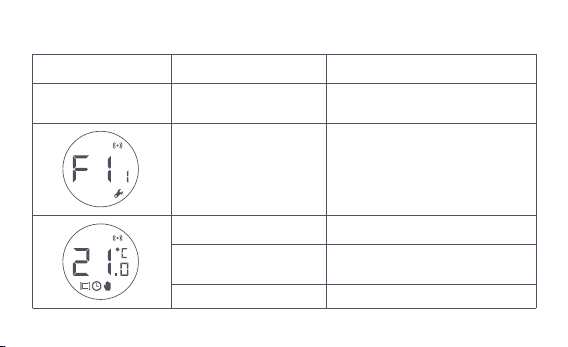
Descripción de las funciones de los botones de perilla
Estado de pantalla
Cualquier estado
Pulsación larga
durante 10 secundos
Presione por 3 veces
consecutivas
Presión corta por 1 vez
Módulo de interruptor
Habilitar/deshabilitar la
función de bloqueo para niños
Ajustar temperatura
Pulsación larga durante
3 segundos
Girar
Calibración de la válvula (antes
de la calibración, asegúrese de
que el termostato se haya
instalado correctamente en la
interfaz de la válvula)
Unión a la red/restablecimiento
de la red
Función Descripción
-219-
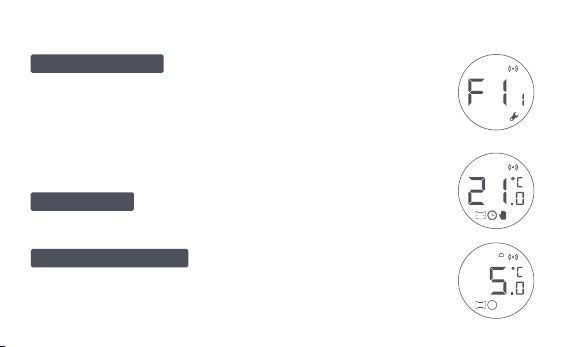
Descripción del estado de la pantalla
La pantalla mostrará el estado como se
muestra en la figura cada vez que se carguen las baterías. En este
momento, instale el termostato en la interfaz de la válvula lo antes
posible y luego presione el botón 3 veces consecutivas o haga clic en
"Más configuraciones" en la aplicación para calibrar la válvula.
Está diseñado para usarse cuando
usted está fuera por un período prolongado, es para proteger la
tubería de agua de la congelación por baja temperatura.
El usuario puede girar la perilla o establecer la
temperatura objetivo en la aplicación según sea necesario.
Para ser instalado
Modo anticongelante
Modo manual
Nota: Asegúrese de que el termostato esté correctamente instalado en la
interfaz de la válvula antes de la calibración.
-220-
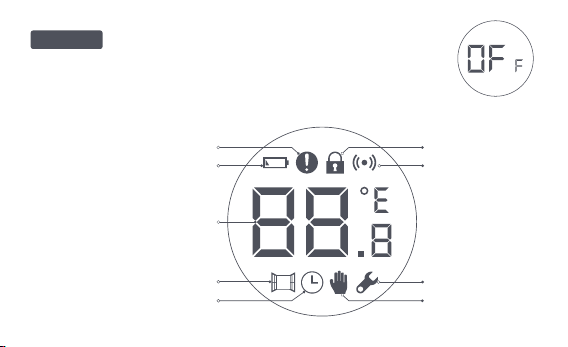
Descripción de icono
La válvula se cerrará para detener la calefacción, que
es adecuado para el servicio en el verano cuando no se necesita
calefacción.
Falla de control de
temperatura
Batería baja
Temperatura establecida
Detección de ventana abierta
Horario inteligente
Bloqueo de niño
Red
Instalación
Modo manual
Apagado
-221-
Batería baja
Temperatura establecida
Detección de
ventana abierta
Horario inteligente
Modo manual
Instalación
Red
Bloqueo de niño
En caso de batería baja. Reemplace las baterías lo antes posible.
Muestra la temperatura establecida.
Cuando la función de detección de ventana abierta está activada.
Cuando la función de horario inteligente está activada.
Cuando el termostato está en modo manual.
Cuando el termostato está en estado de instalación.
Estado de la red:
*Icono normalmente encendido: conexión de red normal
*Icono apagado: sin conexión/desconectado.
Para evitar que los niños toquen por error, mantenga presionado
durante 3 segundos para habilitar o deshabilitar la función.
Falla de control de
temperatura
En caso de control de temperatura anormal. Consulte la sección
"Resolución de problemas" en el manual para la resolución de
problemas.
-222-

Instrucciones sobre la instalación
1. Saque la chapita aislante antes de usar y confirme que el dispositivo está
encendido.
-223-
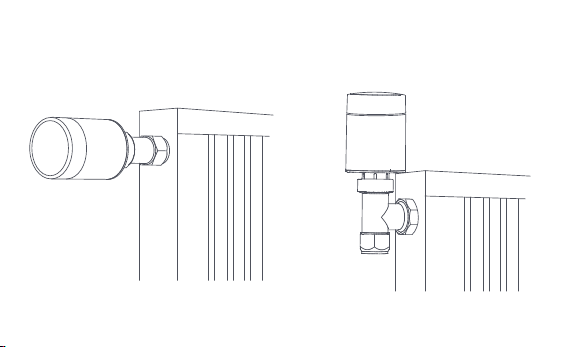
2. Se recomienda instalar el termostato en la interfaz de la válvula del
radiador dentro de los 5 minutos posteriores al arranque del TRV.
1.Instalación horizontal 2.Instalación vertical
-224-
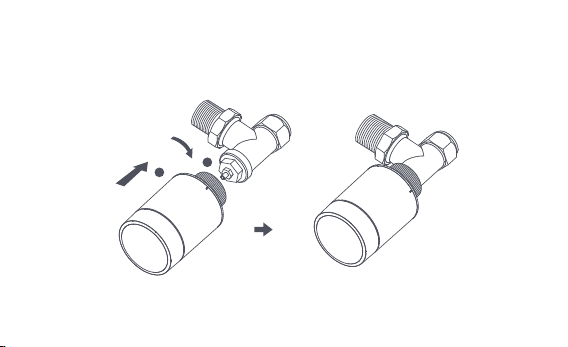
a. El termostato admite métodos de instalación tanto horizontales como
verticales. Sin embargo, el método de instalación vertical puede generar
lecturas de temperatura imprecisas debido a que el sensor de temperatura
incorporado está cerca del radiador.
Nota: En cualquiera de estos métodos, se requiere un sensor externo de temperatura y
humedad Aqara para que el control de temperatura sea más preciso.
1
2
-225-
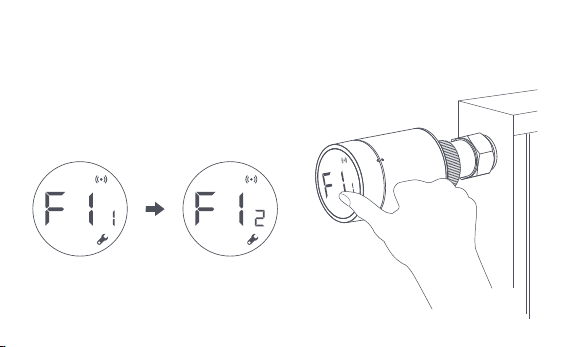
b. Alinee la tuerca de la interfaz del termostato con la válvula del radiador y
gire la tuerca hasta que quede apretada.
Nota: La instalación de la interfaz de válvula [M30*1,5 mm]
se muestra en la figura.
-226-

c. Presione el botón del termostato 3 veces consecutivas para calibrar la
válvula. Durante la calibración, la pantalla muestra el símbolo [F12].
d. El símbolo [F12] desaparece en aproximadamente 10 segundos y la
pantalla muestra la temperatura configurada actualmente, esto indica que
se completó la instalación.
Nota: La válvula debe estar calibrada; de lo contrario, puede causar un control de
temperatura anormal. Siga los pasos anteriores o haga clic en "Más configuraciones" en
la aplicación para calibrar la válvula.
-227-

Instalación con otros adaptadores:
Adaptador:
RA
Conecte el adaptador RA con la
válvula, apriete el tornillo para
completar la conexión, luego
alinee la tuerca de la interfaz del
termostato con el adaptador RA y
gire la tuerca de la interfaz hasta
que quede apretada.
1
2
3
-228-
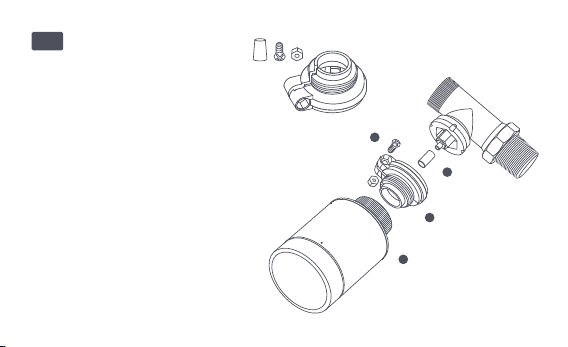
Adaptador:
RAV
Conecte el adaptador RAV con la
válvula, apriete el tornillo,
inserte la varilla de empuje en el
dedal de la válvula para
completar la conexión, luego
alinee la tuerca de la interfaz del
termostato con el adaptador RAV
y gire la tuerca de la interfaz
hasta que quede apretada.
1
2
3
4
-229-
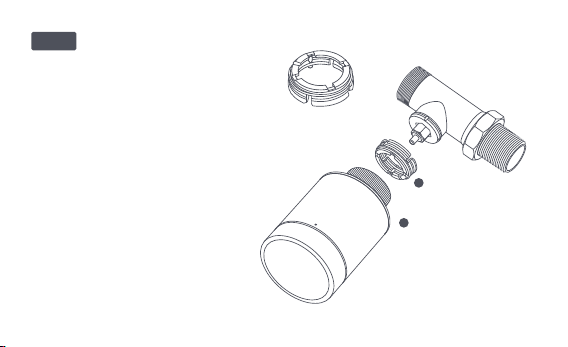
Adaptador:
Conecte el adaptador RAV con la
válvula, apriete el tornillo, inserte la
varilla de empuje en el dedal de la
válvula para completar la conexión,
luego alinee la tuerca de la interfaz
del termostato con el adaptador
RAV y gire la tuerca de la interfaz
hasta que quede apretada.
1
2
RAVL
-230-

Configuración rápida
Agrega el dispositivo a la aplicación Aqara Home:
Antes de usar el producto, asegúrese de que se haya descargado la
aplicación Aqara Home y se haya instalado un cuboAqara Zigbee 3.0.
Inicie la aplicación, haga clic en "+" en la esquina superior derecha de la
página de inicio para ingresar a la página "Agregar dispositivo (accesorios)",
seleccione "Cabezal Termostático Inteligente E1" y opere de acuerdo con las
indicaciones de la página.
Verificación de distancia efectiva: Después de la configuración exitosa de la
red , ajuste el termostato en la posición de instalación preseleccionada y
observe si el estado en la aplicación está sincronizado.
* Si no se agrega el dispositivo, acérquelo al cubo y vuelva a intentarlo.
1
2
-231-
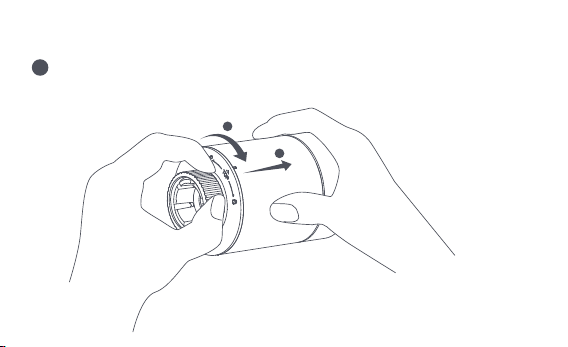
Reemplazo de batería
Gire la tapaen la dirección de la flecha en la parte inferior y tírelahasta que
quede desbloqueada.
1
2
1
-232-
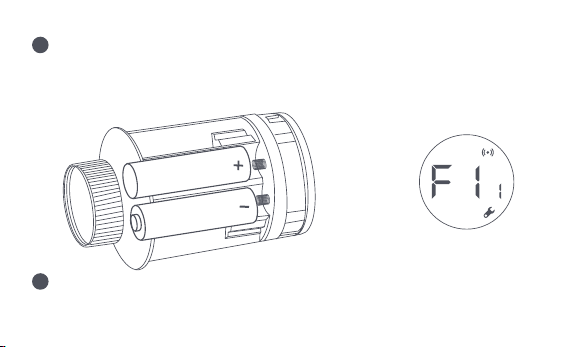
Tomando como referencia las marcas de polaridad en el compartimento
de las pilas, coloque 2 pilas alcalinas AA como se muestra en la figura.
Nota: No se deben usar baterías recargables.
+
2
Con las baterías cargadas, el termostato se enciende automáticamente y
la pantalla muestra el símbolo [F11] como se muestra en la figura.
3
-233-
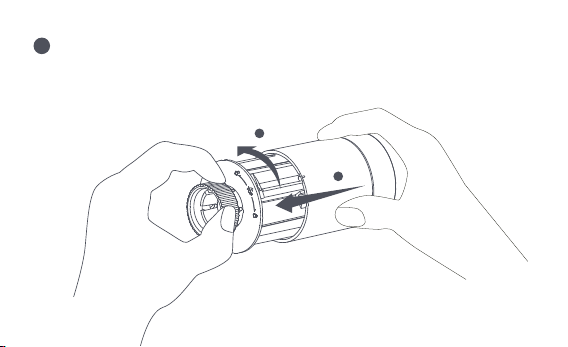
Coloque la tapa y gírela en la dirección de la flecha en la parte inferior
hasta que quede bloqueada para completar la carga de la batería.
Nota: Reemplace las baterías lo antes posible en caso de una advertencia de batería baja.
1
2
4
-234-
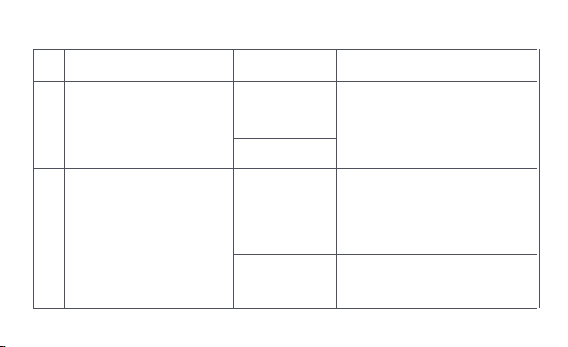
Resolución de problemas
No.
1
El termostato funciona
normalmente, pero la
temperatura ambiente es
evidentemente superior a
la temperatura configurada
El termostato funciona
normalmente, pero la
temperatura ambiente
es evidentemente
inferior a la
temperatura
configurada
Vuelva a colocar la válvula,
saque las baterías y vuelva a
colocarlas después de 30
segundos, y luego vuelva a
instalar el termostato.
Póngase en contacto con
profesionales para reparar la
tubería de agua caliente.
Retire el termostato de la válvula,
saque las baterías y vuelva a
colocarlas después de 30 segundos.
Vuelva a instalar el termostato y
observe si la falla persiste.
Instalación
incorrecta del
termostato.
Baja temperatura
de entrada del
radiador
Falla de válvula
Falla de válvula
2
Falla Causa posible Resolución
-235-

El termostato no se
puede operar a través
de la aplicación.
El termostato funciona
normalmente, pero la
temperatura ambiente
no es constante
El termostato no
muestra respuesta
cuando las baterías
están cargadas
La habitación está
demasiado ventilada y se
pierde el calor.
Compruebe si las puertas
o ventanas están abiertas
o no cerradas bien.
El termostato no está
conectado a la aplicación.
Compruebe la configuración
de la red.
Ajuste la distancia o
agregue otro concentrador.
Cambiar la batería
Cambiar la batería
El termostato está ubicado lejos
o bloqueado desde el centro
Bateria baja
Bateria baja
3
4
5
Cambiar la batería
Cambiar la batería
Batería baja
Falla del producto
Las baterías fueron cargadas en la
dirección de polaridad incorrecta.
Póngase en contacto con el
servicio posventa para
repararlo o reemplazarlo.
-236-
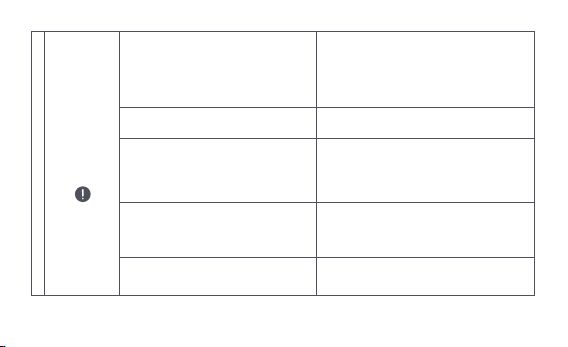
La pantalla
LCD muestra
un icono de
falla
6
Instalación incorrecta del
termostato.
La temperatura está configurada
demasiado alta
Falla de válvula
La habitación es demasiado grande
(el radiador no le corresponde) o
sobreventilado
Presión o temperatura de
entrada de agua baja
Retire el termostato de la válvula, saque
las pilas y vuelva a colocarlas después
de 30 segundos, vuelva a instalar el
termostato y observe si la falla persiste.
Cambiar la batería
Vuelva a colocar la válvula, saque las
baterías y vuelva a colocarlas después
de 30 segundos, y luego vuelva a
instalar el termostato.
Reemplace el radiador o verifique si
las puertas o ventanas están
abiertas o no sujetas.
Compruebe la presión y la
temperatura de entrada del agua.
Nota: En caso de que no se resuelva algún problema, comuníquese con el departamento
de posventa: support@aqara.com
-237-
Declaración de conformidad de la Unión Europea
Por la presente, [Lumi United Technology Co., Ltd] declara que el tipo de equipo
de radio [Cabezal Termostático Inteligente E1,SRTS-A01] cumple con la Directiva
Especificaciones
Modelo: SRTS-A01
Batería: 3V (2 × 1,5 V AA)
Protocolos inalámbricos: Zigbee 3.0
Dimensiones: Ø 57×89 mm (Ø 2,24×3,5 pulg.)
Temperatura de funcionamiento: 0 °C ~ 40 °C (32 °F ~ 104 °F)
Humedad de funcionamiento: 0 ~ 95 % HR, sin condensación
Conexión roscada: M30 × 1,5 mm
Potencia máxima de salida Zigbee: <10 dBm
Frecuencia de operación Zigbee: 2405-2480 MHz
En condiciones normales de uso, este dispositivo debe mantenerse a una distancia de
separación de al menos 20 cm entre la antena y el cuerpo del usuario.
-238-

Todos los productos que llevan este símbolo son residuos de aparatos eléctricos y
electrónicos (RAEE según la directiva 2012/19/UE) que no deben mezclarse con los
Información sobre reciclaje y eliminación de WEEE
residuos domésticos sin clasificar. En su lugar, debe proteger la salud humana y el medio
ambiente entregando su equipo de desecho a un punto de recolección designado para el
reciclaje de equipos eléctricos y electrónicos de desecho designado por el gobierno o las
autoridades locales. La eliminación y el reciclaje correctos ayudarán a prevenir posibles
consecuencias negativas para el medio ambiente y la salud humana. Comuníquese con el
instalador o las autoridades locales para obtener más información sobre la ubicación y los
términos y condiciones de dichos puntos de recolección.
2014/53/EU. El texto completo de la declaración de conformidad de la UE está disponible
en la siguiente dirección de web:
http://www.mi.com/global/service/support/declaration.html
-239-
1. Este producto NO es un juguete. Mantenga a los niños alejados de este producto.
2. Este producto está diseñado solo para uso en interiores. NO lo use en ambientes
húmedos o al aire libre.
3. Tenga cuidado con la humedad, NO derrame agua u otros líquidos sobre el producto.
4. NO coloque este producto cerca de una fuente de calor. NO lo coloque en un recinto
cerrado a menos que haya ventilación normal.
5. NO intente reparar este producto usted mismo. Todas las reparaciones deben ser
realizadas por un profesional autorizado.
6. Este producto solo es adecuado para mejorar el entretenimiento, la comodidad de su
vida hogareña y recordarle el estado del dispositivo. NO debe usarse como equipo de
Advertencias
El símbolo en el producto o en su embalaje indica que no puede ser tratado
como basura doméstica. En su lugar, se depositará en el punto de recogida
correspondiente para el reciclado de aparatos eléctricos y electrónicos.
-240-

seguridad para hogares, edificios, almacenes o cualquier otro lugar. Si un usuario viola
las instrucciones de uso del producto, el fabricante NO será responsable de los riesgos y
pérdidas materiales.
7. El reemplazo con baterías del modelo incorrecto puede provocar un incendio o una
explosión. Solo se permite el reemplazo de baterías del mismo modelo o equivalente.
8. No coloque ninguna batería en el fuego, el horno o el horno de microondas para evitar
explosiones.
9. No desmonte, golpee, apriete, corte ni dañe mecánicamente la batería de ninguna
manera para evitar una explosión.
10. No exponga las baterías a una presión de aire extremadamente baja oa una
temperatura extremadamente alta, lo que puede provocar una explosión de la batería y
una fuga de líquido o gas inflamable.
11. No deseche las baterías usadas y deséchelas de manera adecuada de acuerdo con las
reglamentaciones nacionales y regionales pertinentes.
-241-

Lumi United Technology Co., Ltd
Habitación 801- 804, Edificio 1, Parque Chongwen, iPark Nanshan, No. 3370, Avenida
Liuxian, Comunidad Fuguang, Distrito Residencial de Taoyuan, Distrito de Nanshan,
Ciudad de Shenzhen, China.
Servicio de atención al cliente en línea: www.aqara.com/support
Correo electrónico: [email protected]om
-242-

Scatola ManualeScatola
PAP 21
Carta
RACCOLTA DIFFERENZIATA
Verifica le disposizioni del tuo Comune.
Separa le componenti e conferiscile in modo corretto.
Carta Carta
PAP 20 PAP 22
Pellicola
Plastica Plastica
HDPE 2
Borsa
CPE 7
PAP
22