DE
ES
FR
EN
Owner’s Manual
Mode d’emploi
Manual de instrucciones
Benutzerhandbuch
EnglishFrançaisEspañolDeutsch
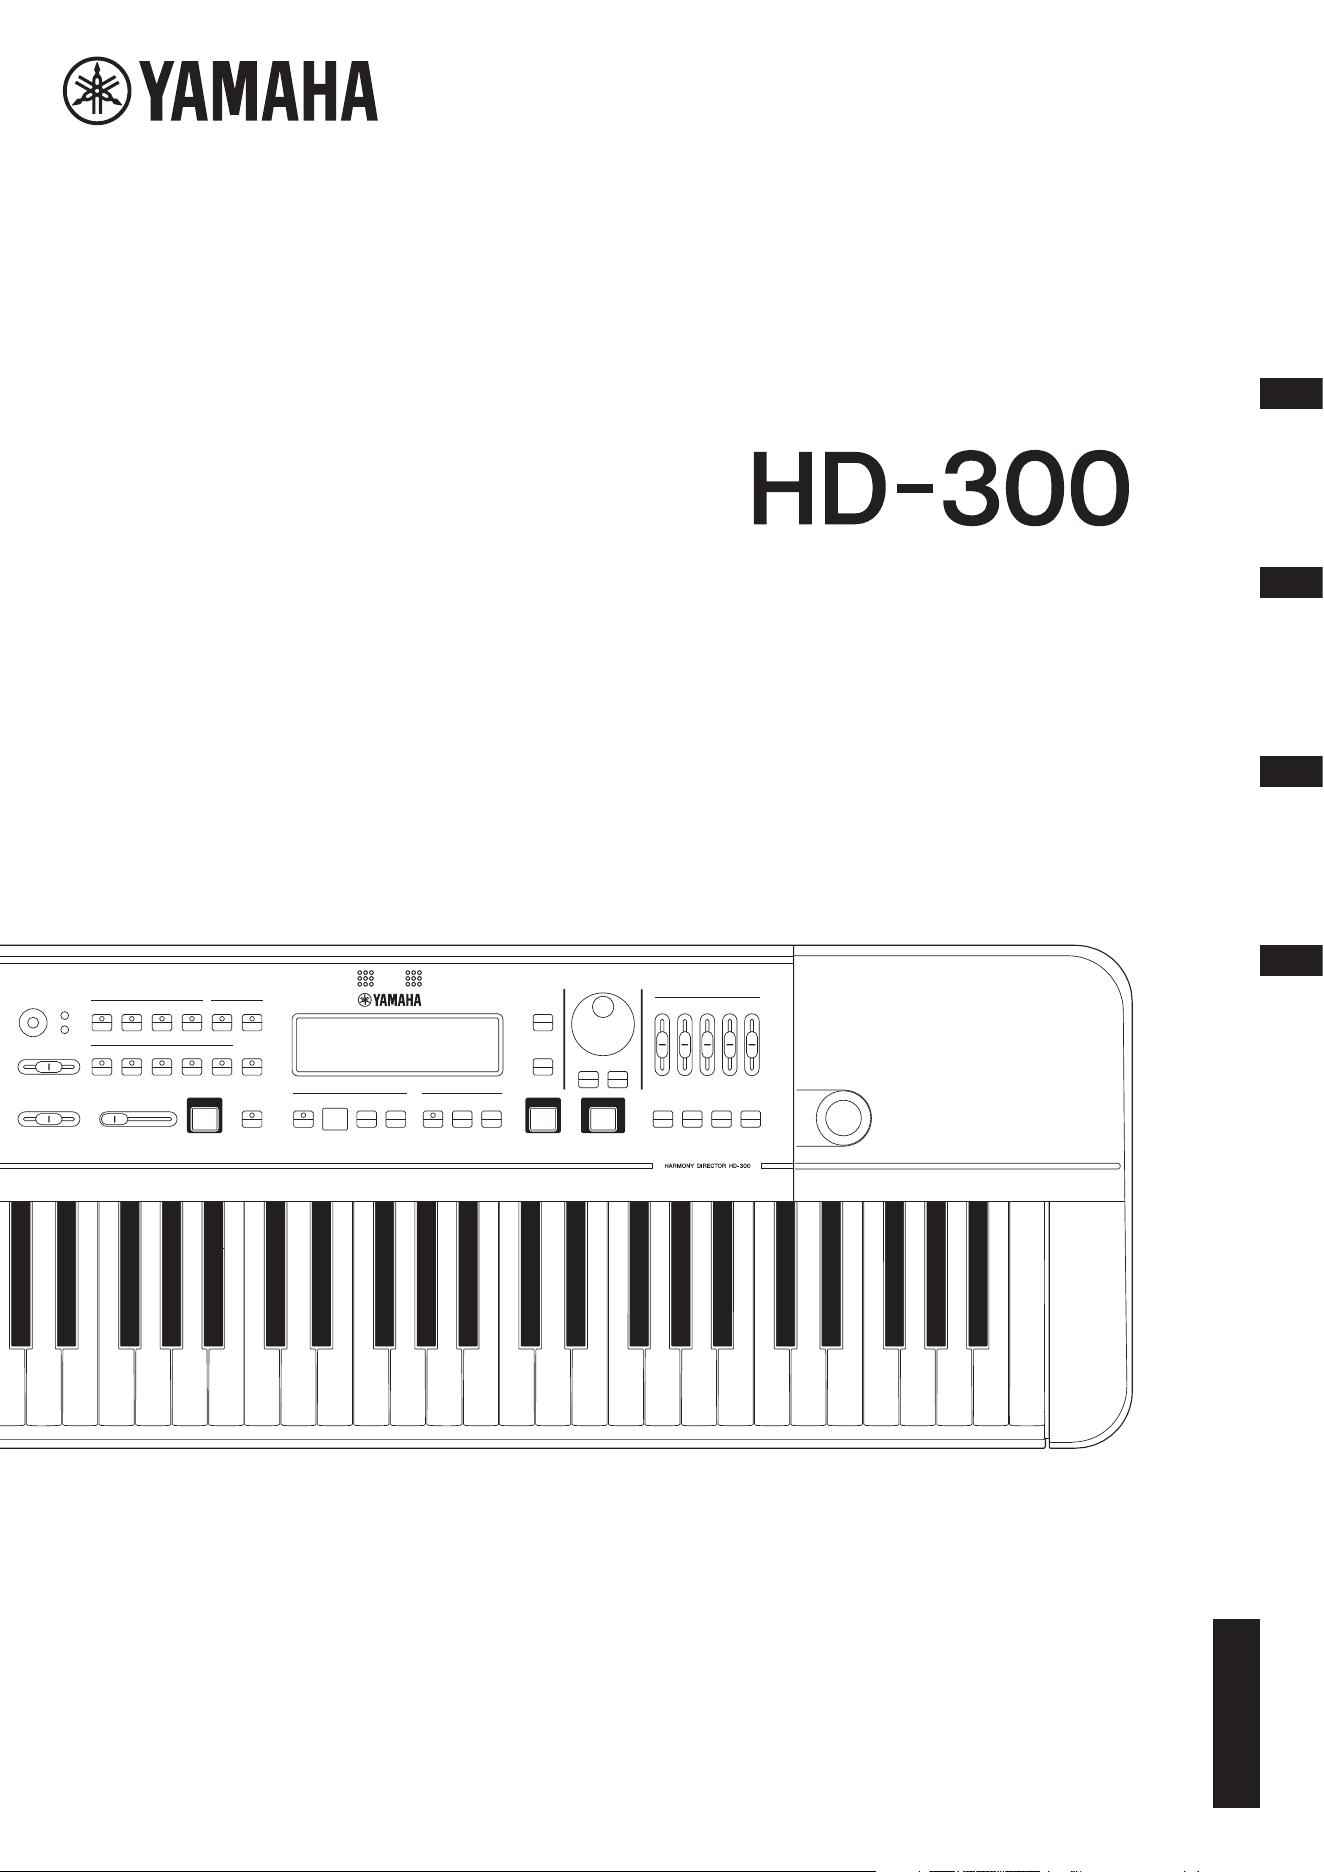
HARMONY DIRECTOR™
HD-300 Owner’s Manual
2
The model number, serial number, power requirements, etc., may be
found on or near the name plate, which is at the bottom of the unit.
You should note this serial number in the space provided below and
retain this manual as a permanent record of your purchase to aid iden-
tification in the event of theft.
Model No.
Serial No.
(bottom_en_01)
1. IMPORTANT NOTICE: DO NOT MODIFY THIS UNIT!
This product, when installed as indicated in the instructions
contained in this manual, meets FCC requirements. Modifica-
tions not expressly approved by Yamaha may void your
authority, granted by the FCC, to use the product.
2. IMPORTANT: When connecting this product to accessories
and/or another product use only high quality shielded cables.
Cable/s supplied with this product MUST be used. Follow all
installation instructions. Failure to follow instructions could
void your FCC authorization to use this product in the USA.
3. NOTE: This product has been tested and found to comply
with the requirements listed in FCC Regulations, Part 15 for
Class “B” digital devices. Compliance with these require-
ments provides a reasonable level of assurance that your
use of this product in a residential environment will not result
in harmful interference with other electronic devices. This
equipment generates/uses radio frequencies and, if not
installed and used according to the instructions found in the
users manual, may cause interference harmful to the opera-
tion of other electronic devices. Compliance with FCC regula-
tions does not guarantee that interference will not occur in all
installations. If this product is found to be the source of inter-
ference, which can be determined by turning the unit “OFF”
and “ON”, please try to eliminate the problem by using one of
the following measures:
Relocate either this product or the device that is being
affected by the interference.
Utilize power outlets that are on different branch (circuit
breaker or fuse) circuits or install AC line filter/s.
In the case of radio or TV interference, relocate/reorient the
antenna. If the antenna lead-in is 300 ohm ribbon lead,
change the lead-in to co-axial type cable.
If these corrective measures do not produce satisfactory
results, please contact the local retailer authorized to distrib-
ute this type of product. If you can not locate the appropriate
retailer, please contact Yamaha Corporation of America,
6600 Orangethorpe Ave, Buena Park, CA90620, USA
The above statements apply ONLY to those products distrib-
uted by Yamaha Corporation of America or its subsidiaries.
* This applies only to products distributed by Yamaha Corporation of America. (class B)
FCC INFORMATION (U.S.A.)
* This applies only to products distributed by Yamaha Corporation of America.
COMPLIANCE INFORMATION STATEMENT (Supplierʼs declaration of conformity procedure)
Responsible Party: Yamaha Corporation of America
Address: 6600 Orangethorpe Ave., Buena Park, Calif. 90620
Telephone: 714-522-9011
Type of Equipment: HARMONY DIRECTOR
Model Name: HD-300
This device complies with Part 15 of the FCC Rules.
Operation is subject to the following two conditions:
1) this device may not cause harmful interference, and
2) this device must accept any interference received including interference that may cause undesired operation.
(FCC SDoC)
HD-300 Owner’s Manual
3
(weee_battery_eu_en_02)
Information for users on collection and disposal of old equipment and used batteries
These symbols on the products, packaging, and/or accompanying documents mean that used electrical and electronic
products and batteries should not be mixed with general household waste.
For proper treatment, recovery and recycling of old products and used batteries, please take them to applicable collection
points, in accordance with your national legislation.
By disposing of these products and batteries correctly, you will help to save valuable resources and prevent any potential
negative effects on human health and the environment which could otherwise arise from inappropriate waste handling.
For more information about collection and recycling of old products and batteries, please contact your local municipality, your
waste disposal service or the point of sale where you purchased the items.
For business users in the European Union:
If you wish to discard electrical and electronic equipment, please contact your dealer or supplier for further information.
Information on Disposal in other Countries outside the European Union:
These symbols are only valid in the European Union. If you wish to discard these items, please contact your local authorities
or dealer and ask for the correct method of disposal.
Note for the battery symbol (bottom two symbol examples):
This symbol might be used in combination with a chemical symbol. In this case it complies with the requirement set by the EU
Battery Directive for the chemical involved.
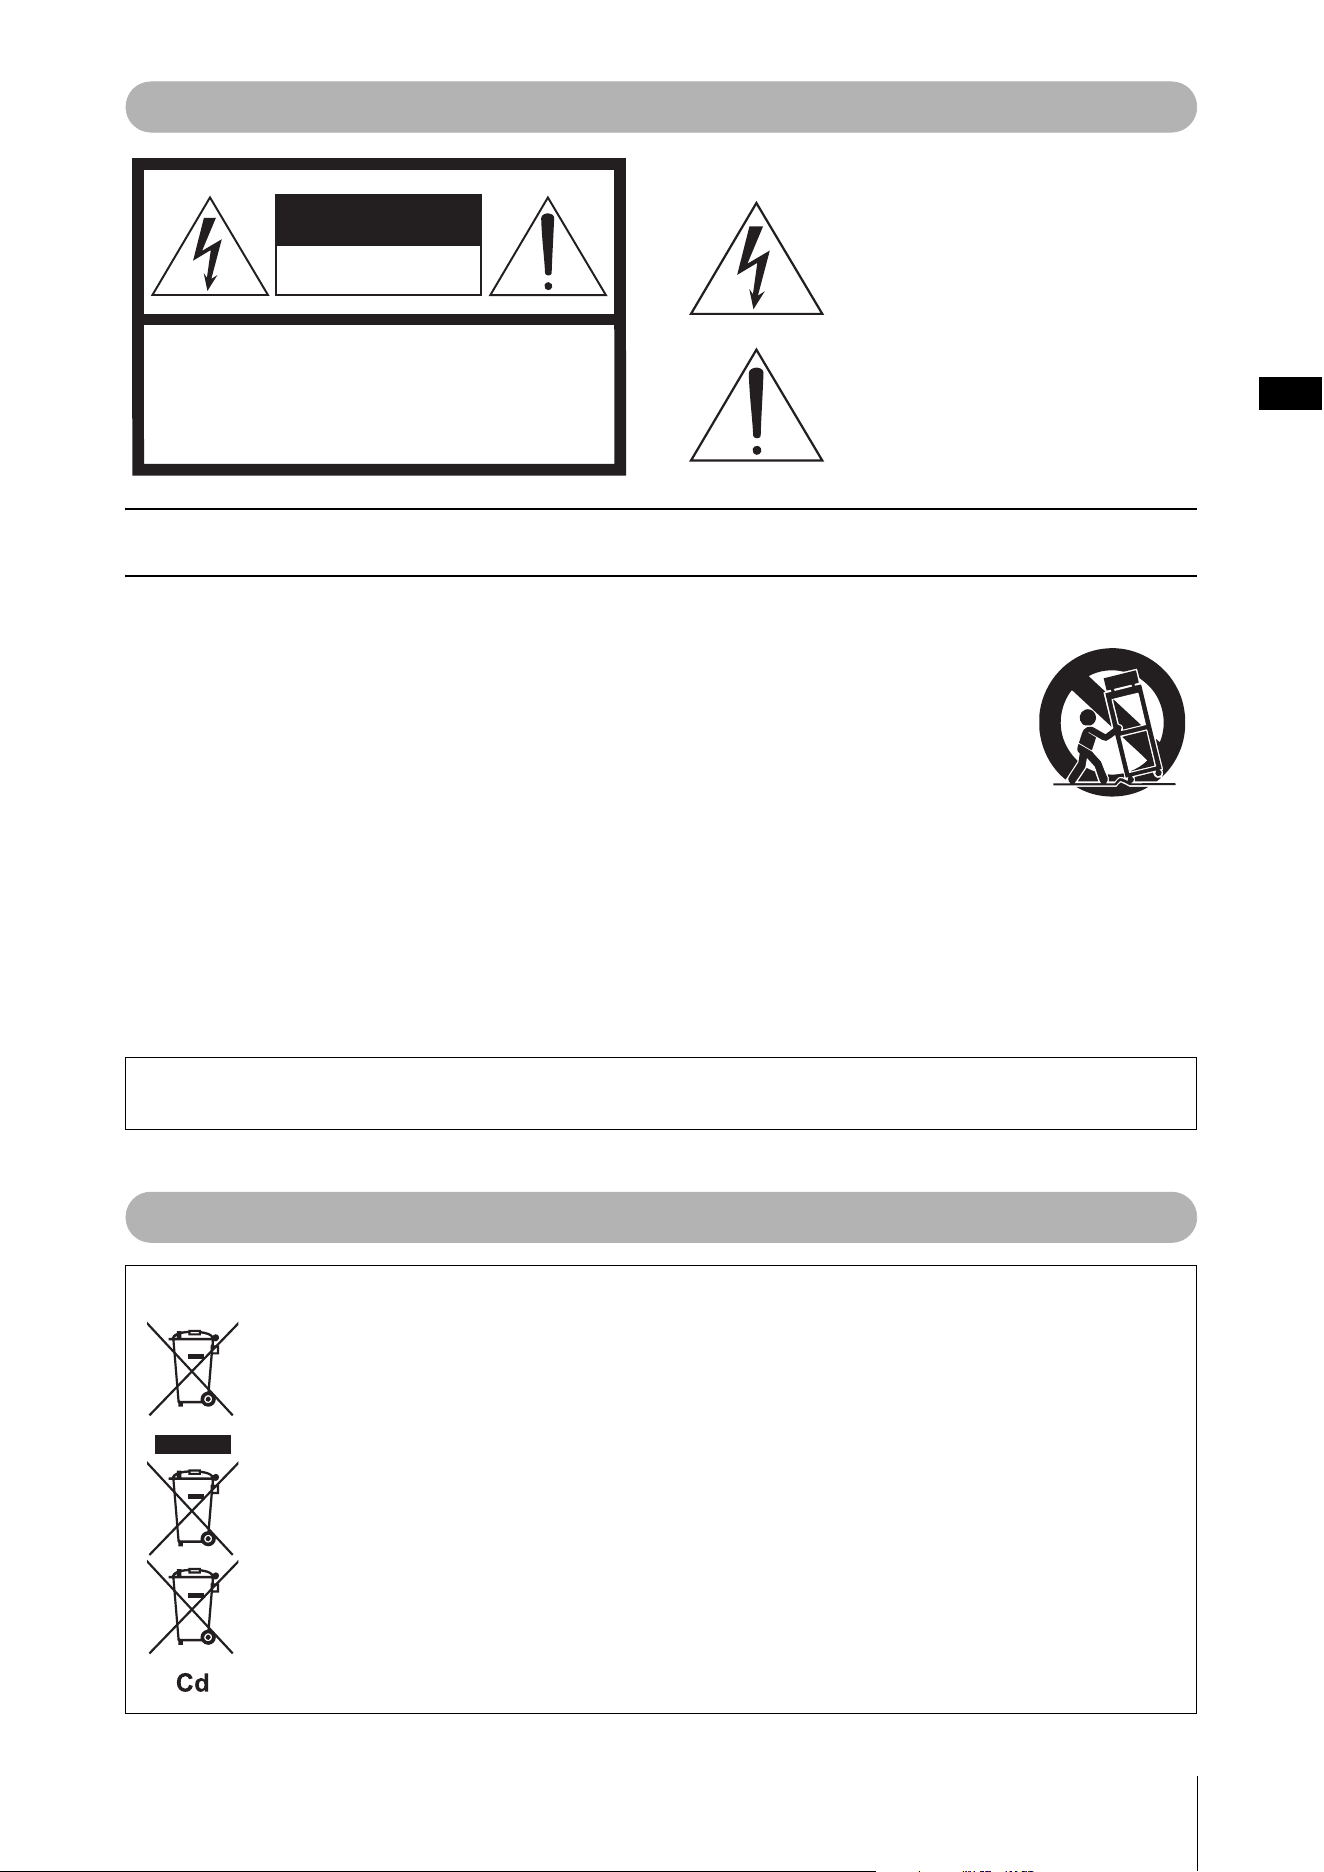
Explanation of Graphical Symbols
The lightning flash with arrowhead symbol
within an equilateral triangle is intended to alert
the user to the presence of uninsulated
“dangerous voltage” within the product’s
enclosure that may be of sufficient magnitude to
constitute a risk of electric shock to persons.
The exclamation point within an equilateral
triangle is intended to alert the user to the
presence of important operating and
maintenance (servicing) instructions in the
literature accompanying the product.
IMPORTANT SAFETY INSTRUCTIONS
1 Read these instructions.
2 Keep these instructions.
3 Heed all warnings.
4 Follow all instructions.
5 Do not use this apparatus near water.
6 Clean only with dry cloth.
7 Do not block any ventilation openings. Install in
accordance with the manufacturer’s instructions.
8 Do not install near any heat sources such as radiators,
heat registers, stoves, or other apparatus (including
amplifiers) that produce heat.
9 Do not defeat the safety purpose of the polarized or
grounding-type plug. A polarized plug has two blades
with one wider than the other. A grounding type plug has
two blades and a third grounding prong. The wide blade
or the third prong are provided for your safety. If the
provided plug does not fit into your outlet, consult an
electrician for replacement of the obsolete outlet.
10 Protect the power cord from being walked on or pinched
particularly at plugs, convenience receptacles, and the
point where they exit from the apparatus.
11 Only use attachments/accessories specified by the
manufacturer.
12 Use only with the cart, stand,
tripod, bracket, or table
specified by the manufacturer,
or sold with the apparatus.
When a cart is used, use caution
when moving the cart/apparatus
combination to avoid injury from
tip-over.
13 Unplug this apparatus during lightning storms or when
unused for long periods of time.
14 Refer all servicing to qualified service personnel.
Servicing is required when the apparatus has been
damaged in any way, such as power-supply cord or plug
is damaged, liquid has been spilled or objects have
fallen into the apparatus, the apparatus has been
exposed to rain or moisture, does not operate normally,
or has been dropped.
(UL60065_03)
CAUTION: TO REDUCE THE RISK OF
ELECTRIC SHOCK, DO NOT REMOVE
COVER (OR BACK). NO USER-SERVICEABLE
PARTS INSIDE. REFER SERVICING TO
QUALIFIED SERVICE PERSONNEL.
CAUTION
RISK OF ELECTRIC SHOCK
DO NOT OPEN
WARNING
TO REDUCE THE RISK OF FIRE OR ELECTRIC SHOCK, DO NOT EXPOSE THIS APPARATUS TO RAIN OR MOISTURE.
English
For AC adaptor
For AC adaptor and the instrument
HD-300 Owner’s Manual
4
PRECAUTIONS
PLEASE READ CAREFULLY BEFORE PROCEEDING
Please keep this manual in a safe and handy place for future reference.
WARNING
• This AC adaptor is designed for use with only Yamaha
electronic instruments. Do not use for any other purpose.
• Indoor use only. Do not use in any wet environments.
CAUTION
• When setting up, make sure that the AC outlet is easily
accessible. If some trouble or malfunction occurs, immediately
turn off the power switch of the instrument and disconnect the
AC adaptor from the outlet. When the AC adaptor is connected
to the AC outlet, keep in mind that electricity is flowing at the
minimum level, even if the power switch is turned off. When you
are not using the instrument for a long time, make sure to
unplug the power cord from the wall AC outlet.
WARNING
Always follow the basic precautions listed below to avoid the possibility of serious injury or even death from
electrical shock, short-circuiting, damages, fire or other hazards. These precautions include, but are not limited
to, the following:
• Do not place the power cord near heat sources such as heaters
or radiators. Also, do not excessively bend or otherwise damage
the cord, or place heavy objects on it.
• Only use the voltage specified as correct for the instrument. The
required voltage is printed on the name plate of the instrument.
• Use the specified adaptor (page 40) only. Using the wrong
adaptor can result in damage to the instrument or overheating.
• Check the electric plug periodically and remove any dirt or dust
which may have accumulated on it.
• This instrument contains no user-serviceable parts. Do not
open the instrument or attempt to disassemble or modify the
internal components in any way. If it should appear to be
malfunctioning, discontinue use immediately and have it
inspected by qualified Yamaha service personnel.
• Do not expose the instrument to rain, use it near water or in
damp or wet conditions, or place on it any containers (such as
vases, bottles or glasses) containing liquids which might spill
into any openings. If any liquid such as water seeps into the
instrument, turn off the power immediately and unplug the
power cord from the AC outlet. Then have the instrument
inspected by qualified Yamaha service personnel.
• Never insert or remove an electric plug with wet hands.
• Do not put burning items, such as candles, on the unit.
A burning item may fall over and cause a fire.
• Radio waves may affect electro-medical devices.
- Do not use this product near medical devices or inside areas
in which the use of radio waves is restricted.
- Do not use this product within 15cm (6 in.) of persons with a
heart pacemaker or defibrillator implant.
For AC adaptor
For the instrument
Power supply/AC adaptor
Do not open
Water warning
Fire warning
Influences on electro-medical devices
DMI-7 1/2
HD-300 Owner’s Manual
5
• Follow the precautions below. Failure to do so might result in
explosion, fire, overheating or battery fluid leakage.
- Do not tamper with or disassemble batteries.
- Do not dispose of batteries in fire.
- Do not attempt to recharge batteries that are not designed to
be charged.
- Keep the batteries separate from metallic objects such as
necklaces, hairpins, coins, and keys.
- Use the specified battery type (page 40) only.
- Use new batteries, all of which are the same type, same model,
and made by the same manufacturer.
- Always make sure all batteries are inserted in conformity with
the +/- polarity markings.
- When the batteries run out, or if the instrument is not to be
used for a long time, remove the batteries from the instrument.
- When using Ni-MH batteries, follow the instructions that came
with the batteries. Use only the specified charger device when
charging.
• Keep batteries away from small children who might accidentally
swallow them.
• If the batteries do leak, avoid contact with the leaked fluid. If the
battery fluid should come in contact with your eyes, mouth, or
skin, wash immediately with water and consult a doctor. Battery
fluid is corrosive and may possibly cause loss of sight or
chemical burns.
• When one of the following problems occur, immediately turn off
the power switch and disconnect the electric plug from the
outlet. (If you are using batteries, remove all batteries from the
instrument.) Then have the device inspected by Yamaha service
personnel.
- The power cord or plug becomes frayed or damaged.
- It emits unusual smells or smoke.
- Some object has been dropped into the instrument.
- There is a sudden loss of sound during use of the instrument.
- If any cracks or breakages exist on the instrument.
CAUTION
Always follow the basic precautions listed below to avoid the possibility of physical injury to you or others, or
damage to the instrument or other property. These precautions include, but are not limited to, the following:
• Do not connect the instrument to an electrical outlet using a
multiple-connector. Doing so can result in lower sound quality,
or possibly cause overheating in the outlet.
• When removing the electric plug from the instrument or an
outlet, always hold the plug itself and not the cord. Pulling by
the cord can damage it.
• Remove the electric plug from the outlet when the instrument is
not to be used for extended periods of time, or during electrical
storms.
• Do not place the instrument in an unstable position where it
might accidentally fall over.
• Before moving the instrument, remove all connected cables, to
prevent damage to the cables or injury to anyone who might trip
over them.
• When setting up the product, make sure that the AC outlet you
are using is easily accessible. If some trouble or malfunction
occurs, immediately turn off the power switch and disconnect
the plug from the outlet. Even when the power switch is turned
off, electricity is still flowing to the product at the minimum
level. When you are not using the product for a long time, make
sure to unplug the power cord from the wall AC outlet.
• Before connecting the instrument to other electronic
components, turn off the power for all components. Before
turning the power on or off for all components, set all volume
levels to minimum.
• Be sure to set the volumes of all components at their minimum
levels and gradually raise the volume controls while playing the
instrument to set the desired listening level.
• Do not insert a finger or hand in any gaps on the instrument.
• Never insert or drop paper, metallic, or other objects into the
gaps on the panel or keyboard. This could cause physical injury
to you or others, damage to the instrument or other property, or
operational failure.
• Do not rest your weight on, or place heavy objects on the
instrument, and do not use excessive force on the buttons,
switches or connectors.
• Do not use the instrument/device or headphones for a long
period of time at a high or uncomfortable volume level, since
this can cause permanent hearing loss. If you experience any
hearing loss or ringing in the ears, consult a physician.
Yamaha cannot be held responsible for damage caused by
improper use or modifications to the instrument, or data that
is lost or destroyed.
Always turn the power off when the instrument is not in use.
Even when the [P] (Standby/On) switch is in standby status
(display is off), electricity is still flowing to the instrument at the
minimum level.
When you are not using the instrument for a long time, make sure
you unplug the power cord from the wall AC outlet.
Make sure to discard used batteries according to local regulations.
Battery
If you notice any abnormality
Power supply/AC adaptor
Location
Connections
Handling
DMI-7 2/2

HD-300 Owner’s Manual
6
NOTICE
To avoid the possibility of malfunction/ damage to the
product, damage to data, or damage to other property,
follow the notices below.
Handling
• Do not use the instrument in the vicinity of a TV, radio,
stereo equipment, mobile phone, or other electric
devices. Otherwise, the instrument, TV, or radio may
generate noise. When you use the instrument along
with an application on your smart device such as a
smartphone or tablet, we recommend that you set
Bluetooth to on after enabling “Airplane Mode” on that
device in order to avoid noise caused by
communication.
• Do not expose the instrument to excessive dust or
vibrations, or extreme cold or heat (such as in direct
sunlight, near a heater, or in a car during the day) to
prevent the possibility of panel disfiguration, damage
to the internal components or unstable operation.
• Do not place vinyl, plastic or rubber objects on the
instrument, since this might discolor the panel or
keyboard.
Maintenance
• When cleaning the instrument, use a soft cloth. Do not
use paint thinners, solvents, alcohol, or chemical-
impregnated wiping cloths.
Saving data
• Some of settings of this instrument are retained when
the power is turned off. However, the saved settings
may be lost due to some failure, an operation mistake,
etc.
Information
About copyrights
• Copying of the commercially available musical data
including but not limited to MIDI data and/or audio
data is strictly prohibited except for your personal use.
• This product incorporates and bundles contents in
which Yamaha owns copyrights or with respect to
which Yamaha has license to use others’ copyrights.
Due to copyright laws and other relevant laws, you are
NOT allowed to distribute media in which these
contents are saved or recorded and remain virtually the
same or very similar to those in the product.
* The contents described above include a computer
program, MIDI data, WAVE data, voice recording
data, a score, score data, etc.
* You are allowed to distribute medium in which your
performance or music production using these
contents is recorded, and the permission of Yamaha
Corporation is not required in such cases.
About functions/data bundled with the
instrument
• This device is capable of using various types/formats of
music data by optimizing them to the proper format
music data for use with the device in advance. As a
result, this device may not play them back precisely as
their producers or composers originally intended.
About this manual
• The illustrations and LCD screens as shown in this
manual are for instructional purposes only, and may
appear somewhat different from those on your
instrument.
• Windows is a registered trademark of Microsoft®
Corporation in the United States and other countries.
• Mac, iPhone, and iPad are trademarks of Apple Inc.,
registered in the U.S. and other countries.
• The Bluetooth® word mark and logos are registered
trademarks owned by Bluetooth SIG, Inc. and any use
of such marks by Yamaha Corporation is under license.
• Sound Back is trademark of Korg Inc.
• The company names and product names in this
manual are the trademarks or registered trademarks of
their respective companies.
HD-300 Owner’s Manual
7
Precautions when using the USB
[TO DEVICE] terminal
This instrument features a built-in USB [TO
DEVICE] terminal. When connecting a USB device
to the USB [TO DEVICE] terminal, be sure to handle
the USB device with care. Follow the important
precautions below.
NOTE
For more information about the handling of USB devices,
refer to the owner’s manual of the USB device.
Compatible USB devices
• USB flash drive
Other USB devices such as a USB hub, computer
keyboard or mouse cannot be used.
The instrument does not necessarily support all
commercially available USB devices. Yamaha cannot
guarantee operation of USB devices that you purchase.
Before purchasing a USB device for use with this
instrument, please visit the following web page:
https://download.yamaha.com/
Although USB devices 1.1 to 3.0 can be used on this
instrument, the amount of time for saving to or loading
from the USB device may differ depending on the type
of data or the status of the instrument.
NOTICE
The rating of the USB [TO DEVICE] terminal is a
maximum of 5V/500mA. Do not connect USB devices
having a rating above this, since this can cause damage
to the instrument itself.
Connecting a USB device
When connecting a USB device to the USB [TO
DEVICE] terminal, make sure that the connector on the
device is appropriate and that it is connected in the
proper direction.
NOTICE
• Avoid connecting or disconnecting the USB device
during playback/recording and file management
operations (such as Delete), or when accessing the
USB device. Failure to observe this may result in
“freezing” of the operation of the instrument or
corruption of the USB device and the data.
• When connecting then disconnecting the USB device
(and vice versa), make sure to wait a few seconds
between the two operations.
• Do not use an extension cable when connecting a
USB device.
Using USB flash drives
By connecting the instrument to a USB flash drive, you
can save data you’ve created to the connected device, as
well as read data from the connected device.
• Number of USB flash drives that can be used
Only one USB flash drive can be connected to the
[USB TO DEVICE] terminal.
Formatting a USB flash drive
A USB flash drive cannot be formatted with this
instrument. If necessary, please format it on your
computer to FAT32 format.
NOTICE
The format operation overwrites any previously existing
data. Make sure that the drive you are formatting does
not contain important data.
To protect your data (write-protect)
To prevent important data from being inadvertently
erased, apply the write-protect provided with each USB
flash drive. If you are saving data to the USB flash drive,
make sure to disable write-protect.
Turning off the instrument
When turning off the instrument, make sure that the
instrument is NOT accessing the USB flash drive by file
management (such as during the Delete operation).
Failure to do so may corrupt the USB flash drive and the
data.
Precautions when using the USB
[TO HOST] terminal
When connecting the computer to the USB [TO
HOST] terminal, make sure to observe the following
points to avoid freezing the computer and corrupting
or losing the data.
NOTICE
• Use an AB type USB cable of less than 3 meters.
USB 3.0 cables cannot be used.
• Execute the following before turning the power to the
instrument on/off or plugging/unplugging the USB
cable to/from the USB [TO HOST] terminal.
- Quit any open application software on the computer.
- Make sure that data is not being transmitted from the
instrument. (Data is transmitted only by playing
notes on the keyboard.)
• While the computer is connected to the instrument,
you should wait for six seconds or more between
these operations: (1) when turning the power of the
instrument off then on again, or (2) when alternately
connecting/disconnecting the USB cable.
If the computer or the instrument freezes, restart the
application software or the computer OS, or turn the
power to the instrument off and then on again.
HD-300 Owner’s Manual
8
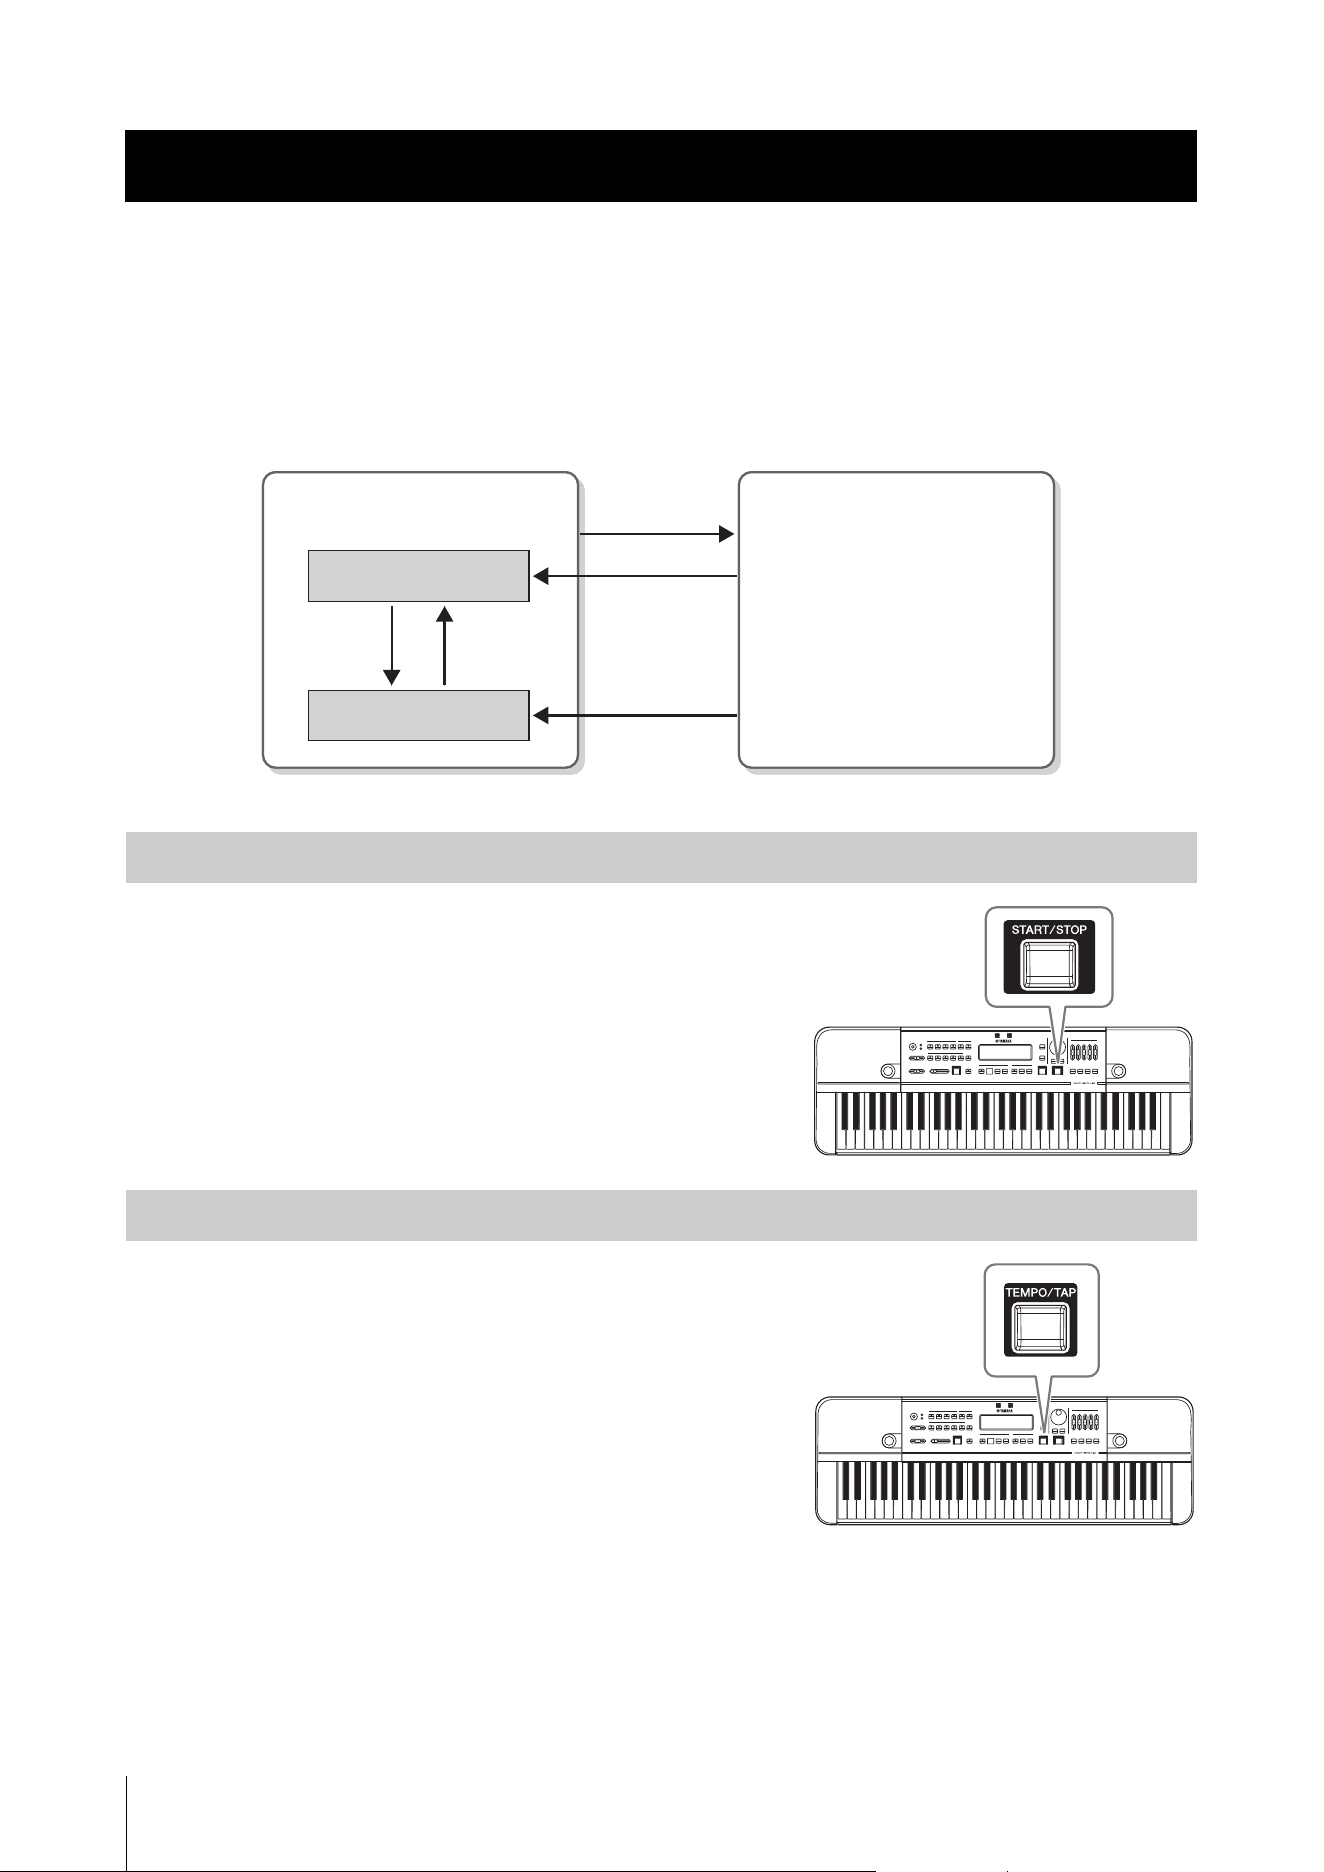
Introduction
Thank you for purchasing the Yamaha Harmony Director.
The Harmony Director is a general training instrument that facilitates harmony and rhythm training by reproducing an
accurate reference tone at a user-specified temperament and playing complex rhythms at any tempo. It also features the
ability to record performances and play time-shifted recordings to help improve your playing. The Harmony Director is a
powerful tool for anyone—from performers wanting to play in perfect tune with an ensemble of wind instruments or a
group of singers, to instructors looking to train students within a limited time span.
Please read through the contents of this manual thoroughly to fully understand and make use of the features included on
this instrument. After reading, carefully store this manual in a location where you can easily and quickly refer to it.
Included Accessories
• Owner’s Manual (this manual) × 1
• Utilization Guide/Feature Introduction × 1
•AC adaptor × 1
• Warranty information × 1
• Online Member Product Registration × 1
About this Manual
This instrument comes with the following manuals.
Owner’s Manual (This Manual)
This manual describes how to use the HD-300.
Use Guide/Feature Basics
Use Guide: This introduces features that aid a deeper level of self-directed learning.
Feature Basics: This introduces the HD-300 features suited for a range of learning situations.
These are also available from the “Manual Library” page on the following website.
Yamaha downloads
https://download.yamaha.com/
Harmony Director™ is a trademark or registered trademark of the Yamaha Corporation.

HD-300 Owner’s Manual
9
Contents
PRECAUTIONS..................................................................4
NOTICE ...............................................................................6
Information..........................................................................6
Introduction.........................................................................8
Included Accessories...........................................................8
About this Manual ..............................................................8
Component Names 10
Front Panel ....................................................................... 10
Rear Panel.......................................................................... 12
Setting Up 13
Power Requirements........................................................ 13
Turning the Power On/Off ............................................. 14
Adjusting the Volume and Screen Contrast................. 16
Screen Configuration and Basic Operation17
Home Screen..................................................................... 17
Producing Reference Tones for Playing
Harmony (Voice, Temperament, Hold,
Octave, Transpose) 18
Basic Operation ................................................................ 18
Temperaments.................................................................. 20
Demonstrating Tempo and Rhythm
(Metronome, Rhythm Style) 22
Basic Operation ................................................................ 22
Metronome (Simple) ....................................................... 23
Metronome (Beat • Tempo Memory) ........................... 24
Rhythm Style..................................................................... 25
Sharing Performances
(Recording/Playback) 26
Basic Operation ................................................................ 26
Recording/Playback ......................................................... 26
Playing Back Previously Recorded Files and Files Created
on a Computer (USB)...................................................... 28
Enhancing Basic Practice
(Sound Back, Training) 29
Training Your Ability to Imagine the Correct Pitch
(Sound Back)..................................................................... 29
Playing Training Examples and Accompaniments
(Training) .......................................................................... 30
Restoring Factory Settings 30
Advanced Settings (Settings) 31
Connecting External Devices 32
Connecting Amplifiers or Other Equipment
(OUTPUT [L/MONO], [R] jacks) ................................. 32
Connecting a Microphone
(MIC [INPUT] jack, MIC [GAIN] knob)..................... 32
Using a Pedal ([FOOT PEDAL] jack) ........................... 33
Connecting a USB Flash Drive
(USB [TO DEVICE] terminal) ....................................... 33
Connecting to a Computer
(USB [TO HOST] terminal) ........................................... 33
Using the “HD-300 Assistant” iPhone/iPad App
(Bluetooth) ........................................................................ 35
Listening on the HD-300 to Audio Playback from an
iPhone/iPad (Bluetooth) ................................................. 35
Appendix 36
Error Messages.................................................................. 36
Troubleshooting ............................................................... 37
About the Temperaments Used in This Instrument... 38
Specifications .................................................................... 40
Data List............................................................................. 41
HD-300 Owner’s Manual
10
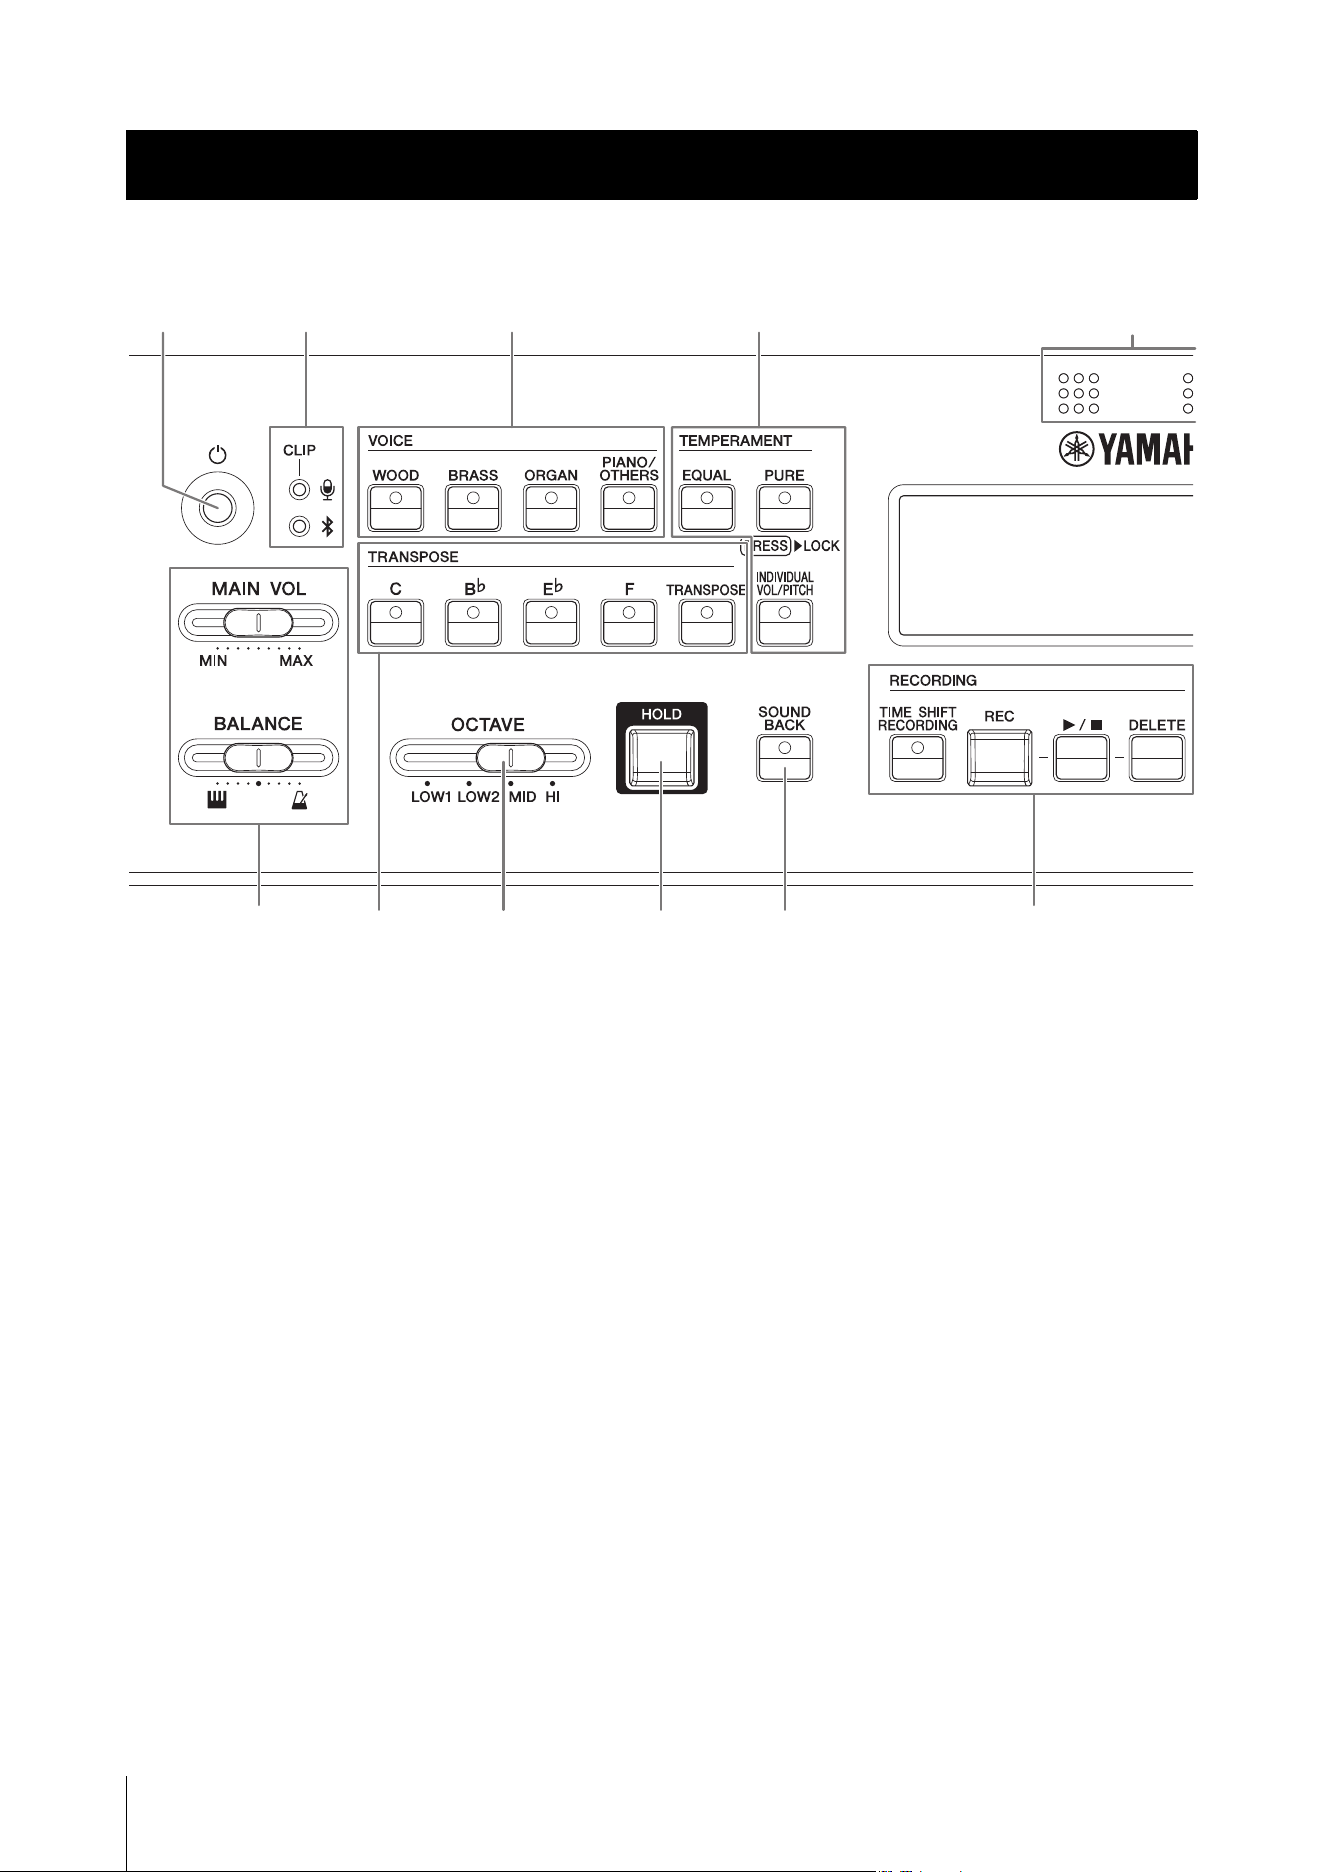
Front Panel
1 [P] (Standby/On) switch..............page14
Switches the instrument between standby/on modes.
2 [MAIN VOL] slider.........................page16
Adjusts the main volume of the instrument.
[BALANCE] slider......................... page16
Adjusts the volume balance between the sounds
played with the keyboard and the rhythm style/
metronome playback.
3 LCD display...................................page17
Shows the instrument status, settings, and other
information.
4 Internal microphone.....................page16
Used for recording and the Sound Back functions.
5 Microphone volume LED .............page16
Lights when the microphone input level is too high.
This is used when adjusting the sensitivity of the
microphone.
Bluetooth status LED...................page35
Indicates the Bluetooth connection status. This is
used when connecting to an iPhone or iPad.
6 VOICE buttons ............................. page18
Selects the Voice for use when playing the keyboard,
or when playing back the contents for training.
7 TEMPERAMENT buttons..... pages 18, 21
These set the temperament (equal/pure/individual)
and lock/unlock the root key auto detection.
8 TRANSPOSE buttons .................. page19
These configure the keyboard transpose settings and
are used when playing a music score for a transposing
instrument as notated.
9 [OCTAVE] slider........................... page19
Adjusts the keyboard octave.
) [HOLD] button .............................. page19
Used to keep the played notes sounding even after the
keys are released.
! [SOUND BACK] button................ page29
Switches the Sound Back function on and off.
@ RECORDING buttons................... page26
Used for recording and playback.
Component Names
15 6 7
2@89 )!
4
3
Component Names
HD-300 Owner’s Manual
11
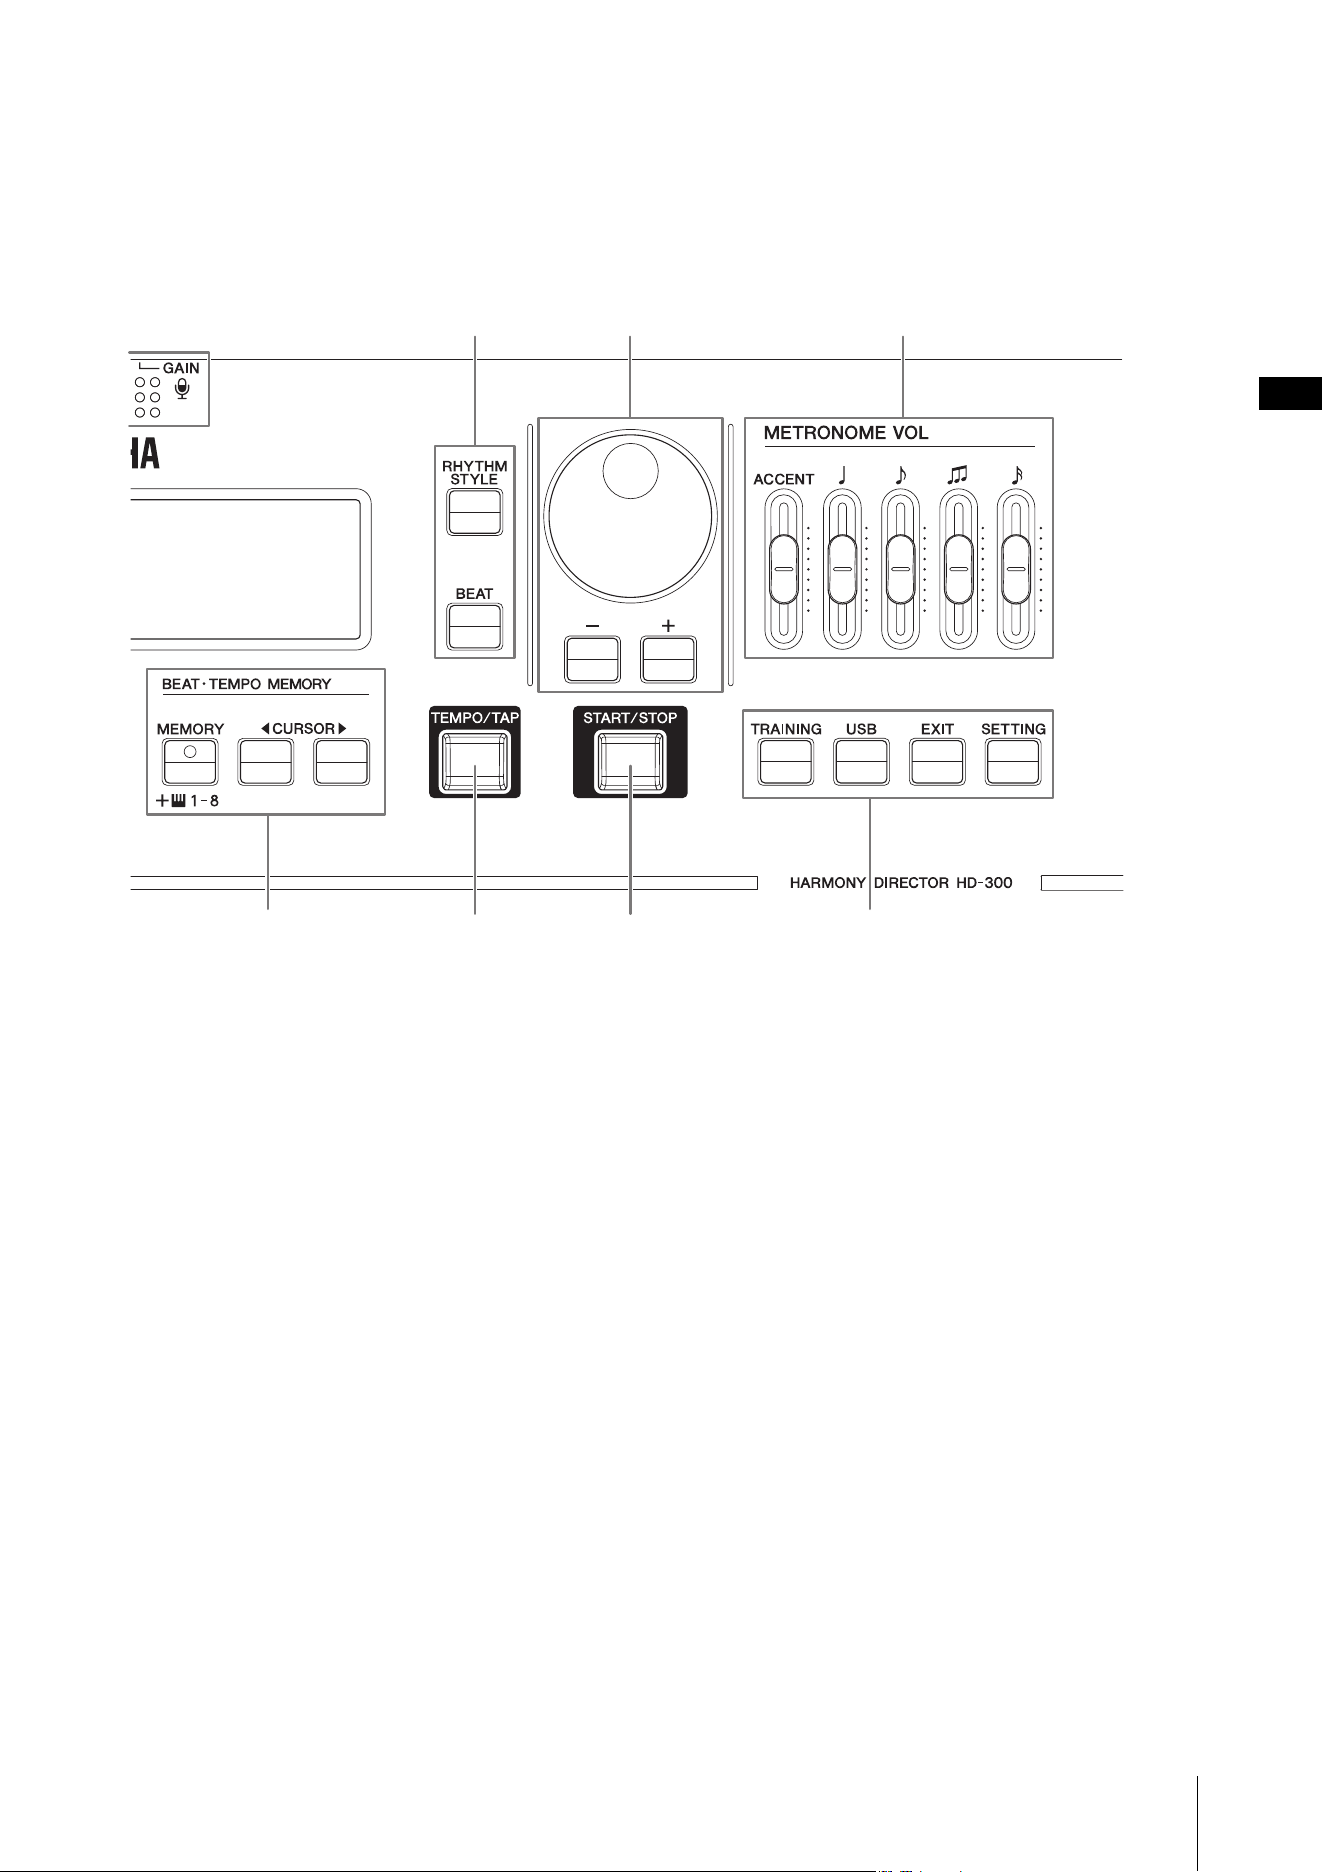
# [RHYTHM STYLE] button.....pages 22, 25
Sets the rhythm playback to the Rhythm Style mode.
[BEAT] button.................pages 22, 23, 24
Sets the rhythm playback to the Metronome mode.
$ Dial, [-]/[+] buttons .......................page17
Used to change settings and select files.
% [START/STOP] button.... pages 22, 28, 30
Starts/stops the rhythm style, metronome, training
content playback, or playback of a file on a USB flash
drive.
^ [TEMPO/TAP] button....................page22
Adjusts the playback tempo.
& BEAT • TEMPO MEMORY buttons
...............................................pages 22, 24
Used to enter, store, and load special metronome
beats.
NOTE
The CURSOR [L][R] buttons are also used to move the
cursor for other functions.
*
[METRONOME VOL] slider
... pages 16, 23
Adjusts the volume for each metronome note type.
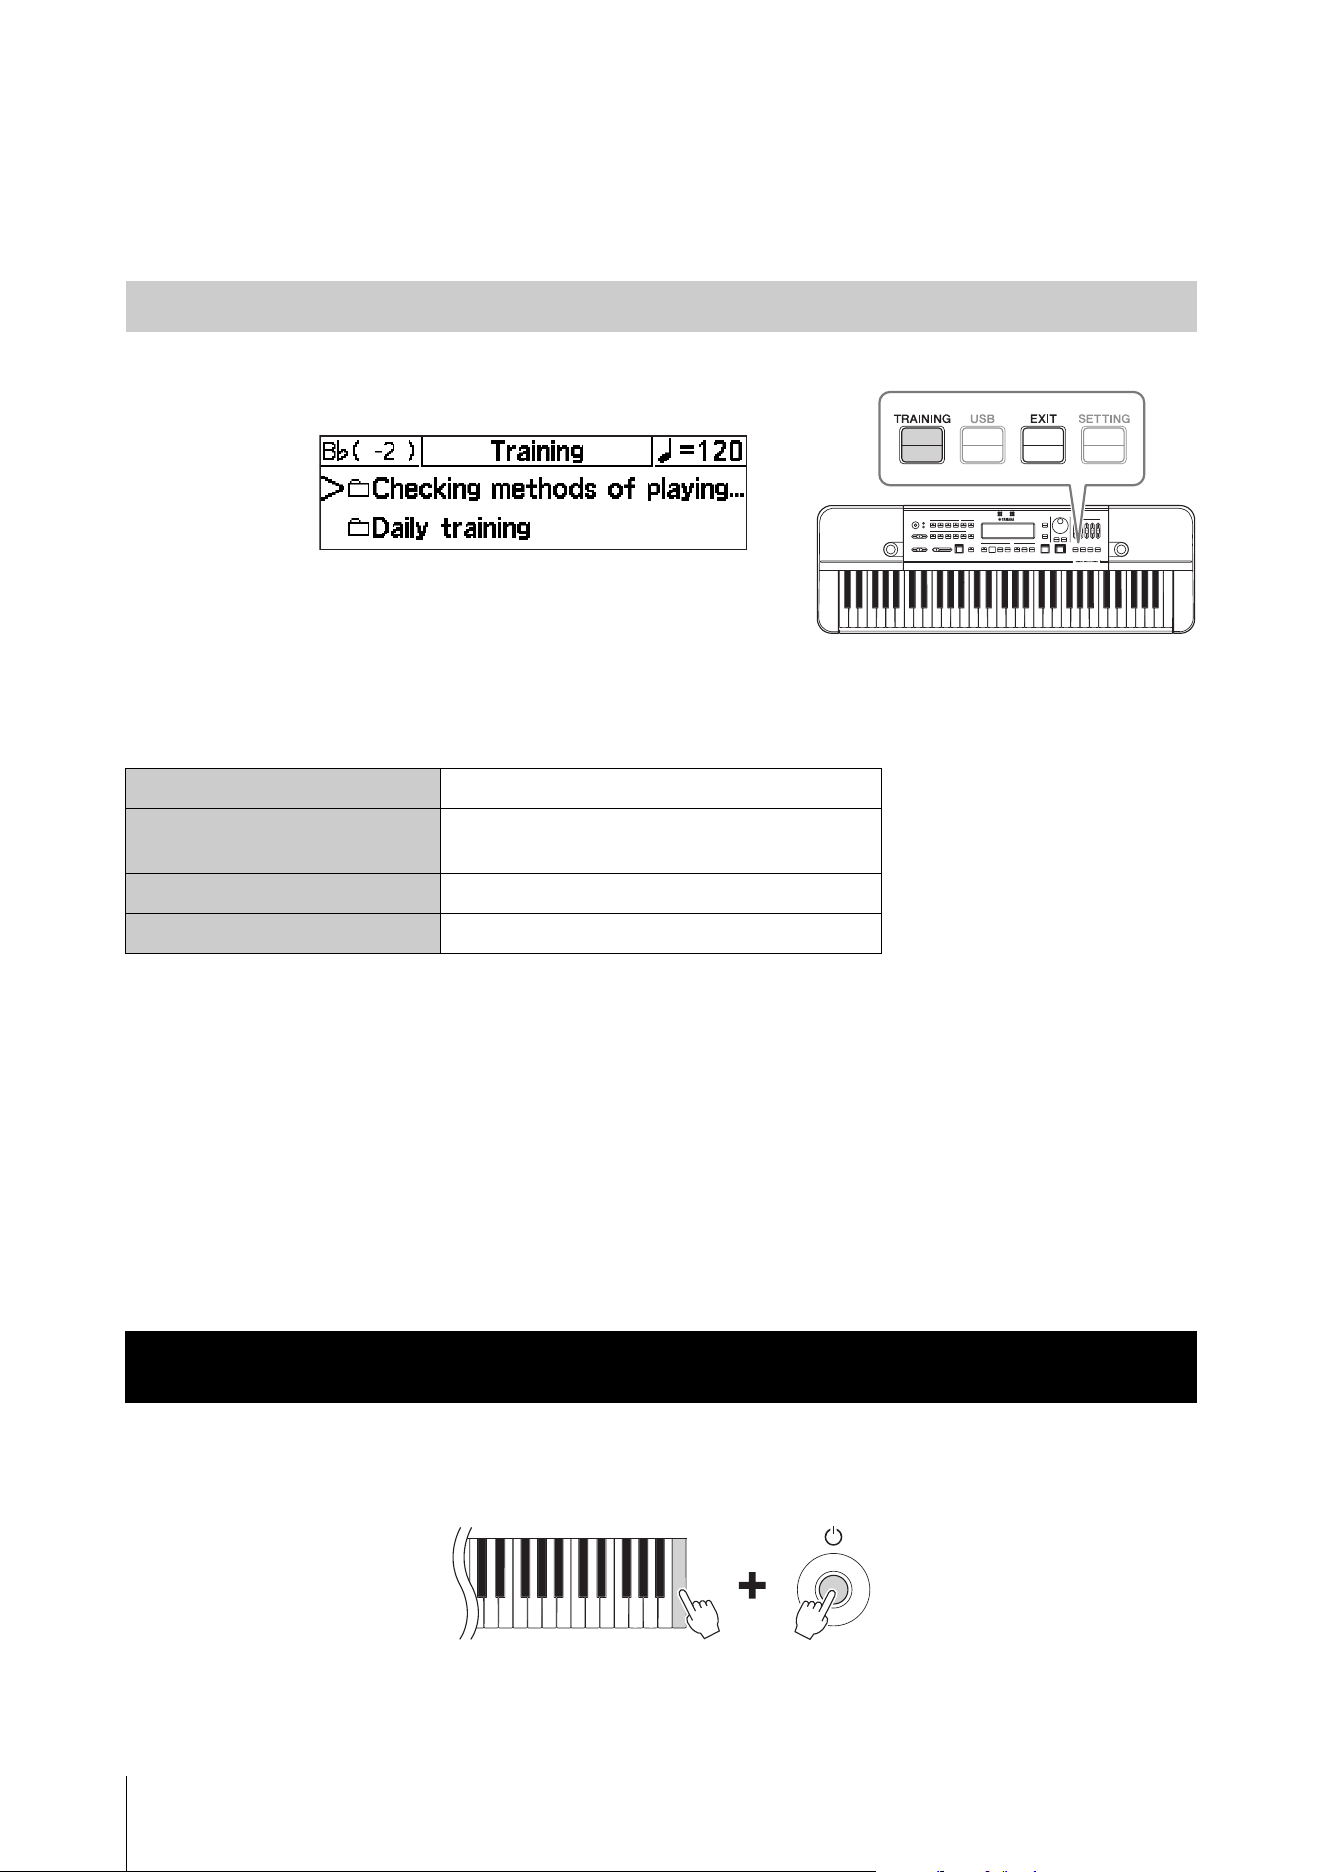
( [TRAINING] button....................... page30
This sets the instrument to the training content (JBS
content) playback mode.
[USB] button................................. page28
Sets the instrument to the USB file playback mode.
[EXIT] button .................. pages 28, 30, 31
Moves up one hierarchy level on the screens, such as
training, USB file playback, and advanced settings, or
exits from it.
[SETTING] button......................... page31
Enters the advanced settings screen.
#$ *
(&^%
Component Names
HD-300 Owner’s Manual
12
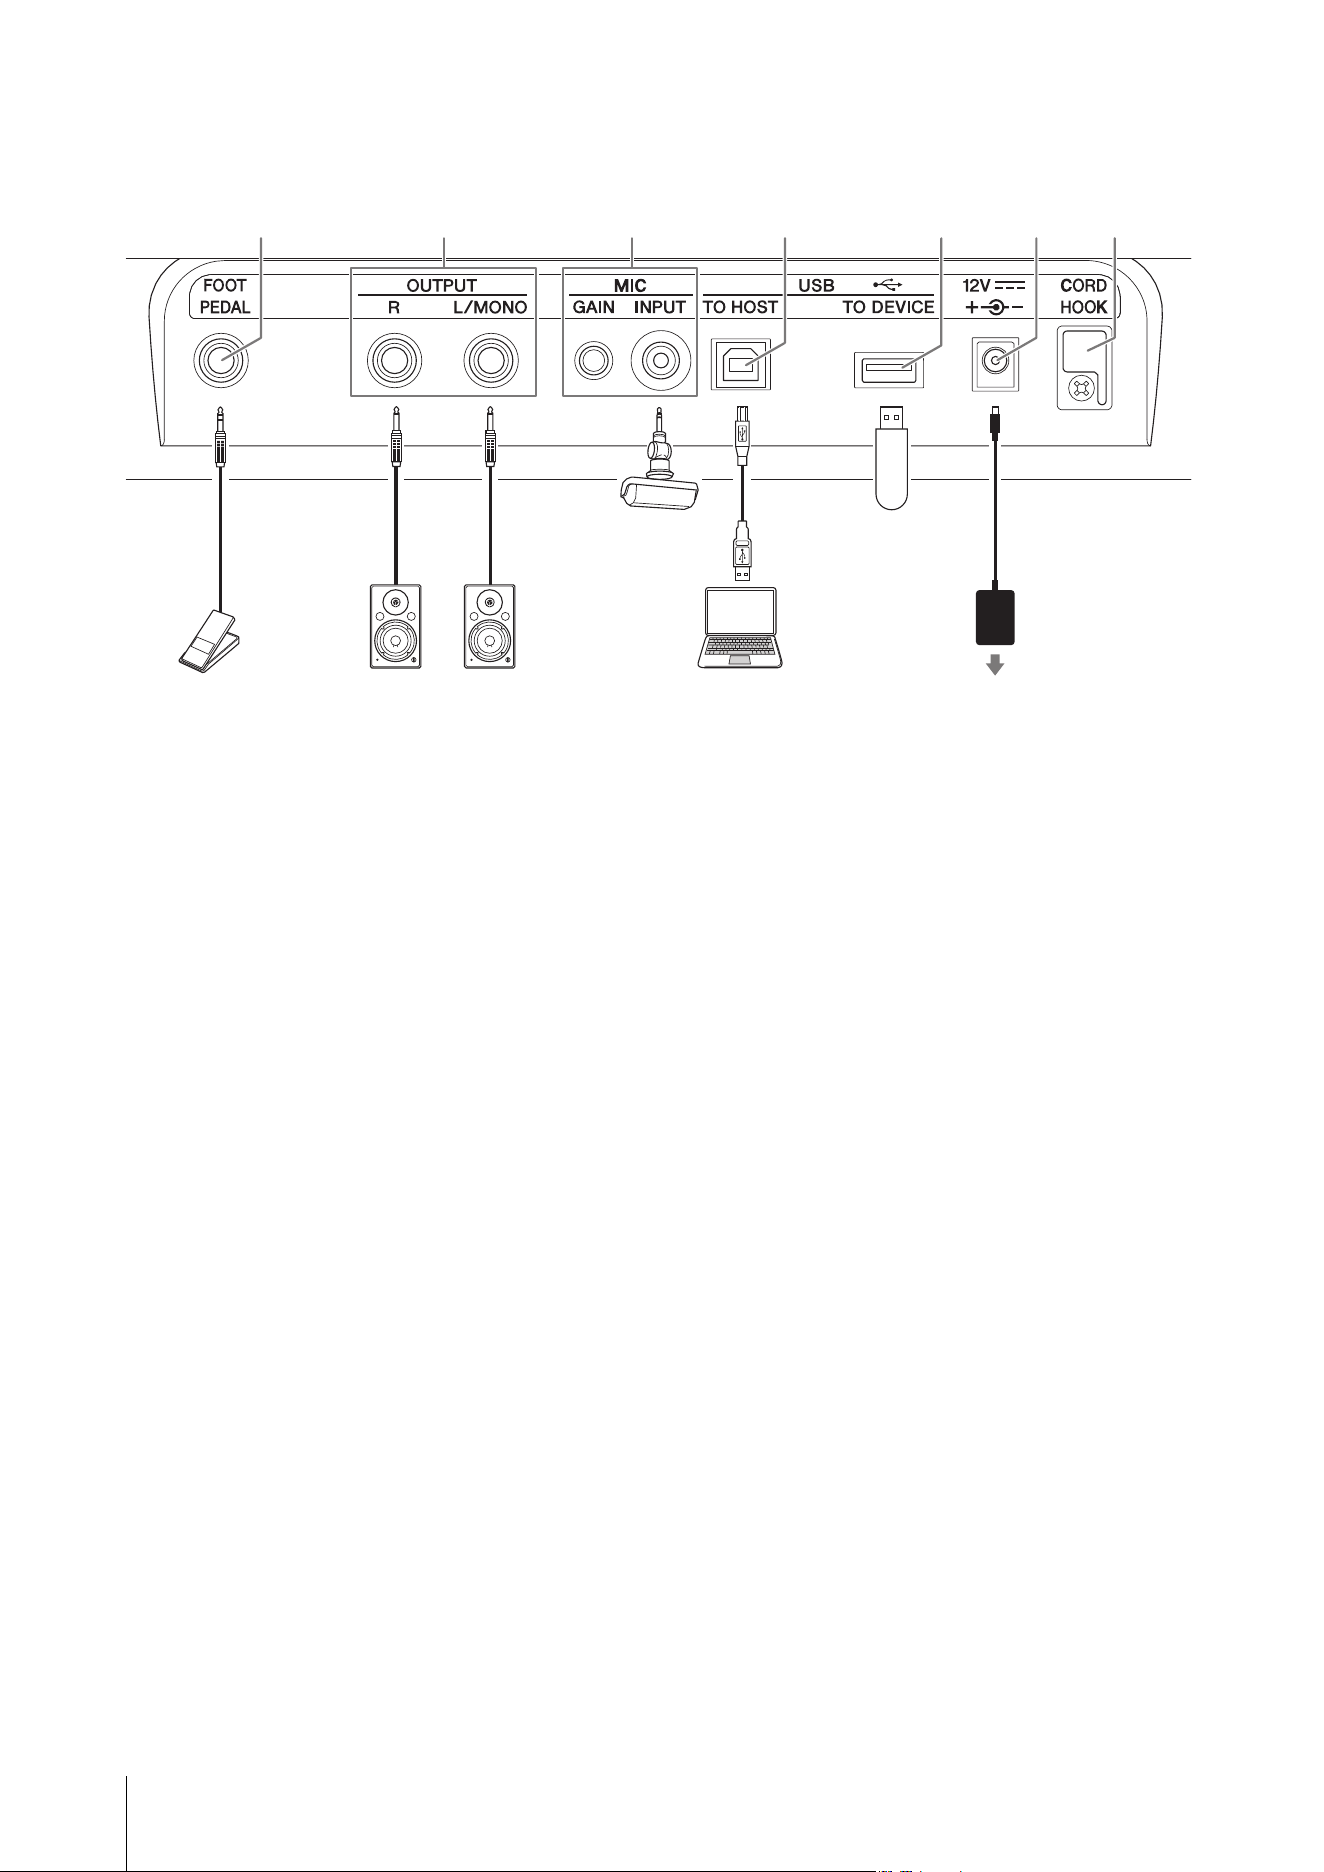
Rear Panel
1 [FOOT PEDAL] jack..............pages 31, 33
For connecting the Foot Controller FC7 (sold
separately). You can control the function with your
foot, by assigning either the main volume, hold, start/
stop or record/stop function to the FC7.
2 OUTPUT [L/MONO]/[R] jack.........page32
This is a standard phone jack that outputs audio
signals. Connect these to an external amplifier or
speaker for outputting the audio at loud levels.
To use with and mono amplifier, only connect to the
[L/MONO] jack.
3 MIC [INPUT] jack, MIC [GAIN] knob
...............................................pages 16, 32
For connecting a commercially available microphone
(with a stereo mini-phone jack and plug-in power
compatibility). When an external microphone is
connected, the internal microphone will be disabled.
Turn the [GAIN] knob to adjust the sensitivity of the
internal microphone and the external microphone.
4 USB [TO HOST] terminal....... pages 7, 33
For connecting to a computer using a commercially
available USB cable. When connected, you can send
and receive MIDI and audio data.
5 USB [TO DEVICE] terminal ... pages 7, 33
For connecting a USB flash drive required to use the
recording and file playback functions.
6 DC IN jack ..................................... page13
For connecting the power adaptor that comes with
this instrument, or one sold separately.
7 Cord hook..................................... page13
Used to prevent damage to the cord of the AC
adaptor.
1567243
FC7
Keyboard amplifier or
monitor speaker
Computer
Microphone USB flash drive
Power outlet
AC adaptor
HD-300 Owner’s Manual
13
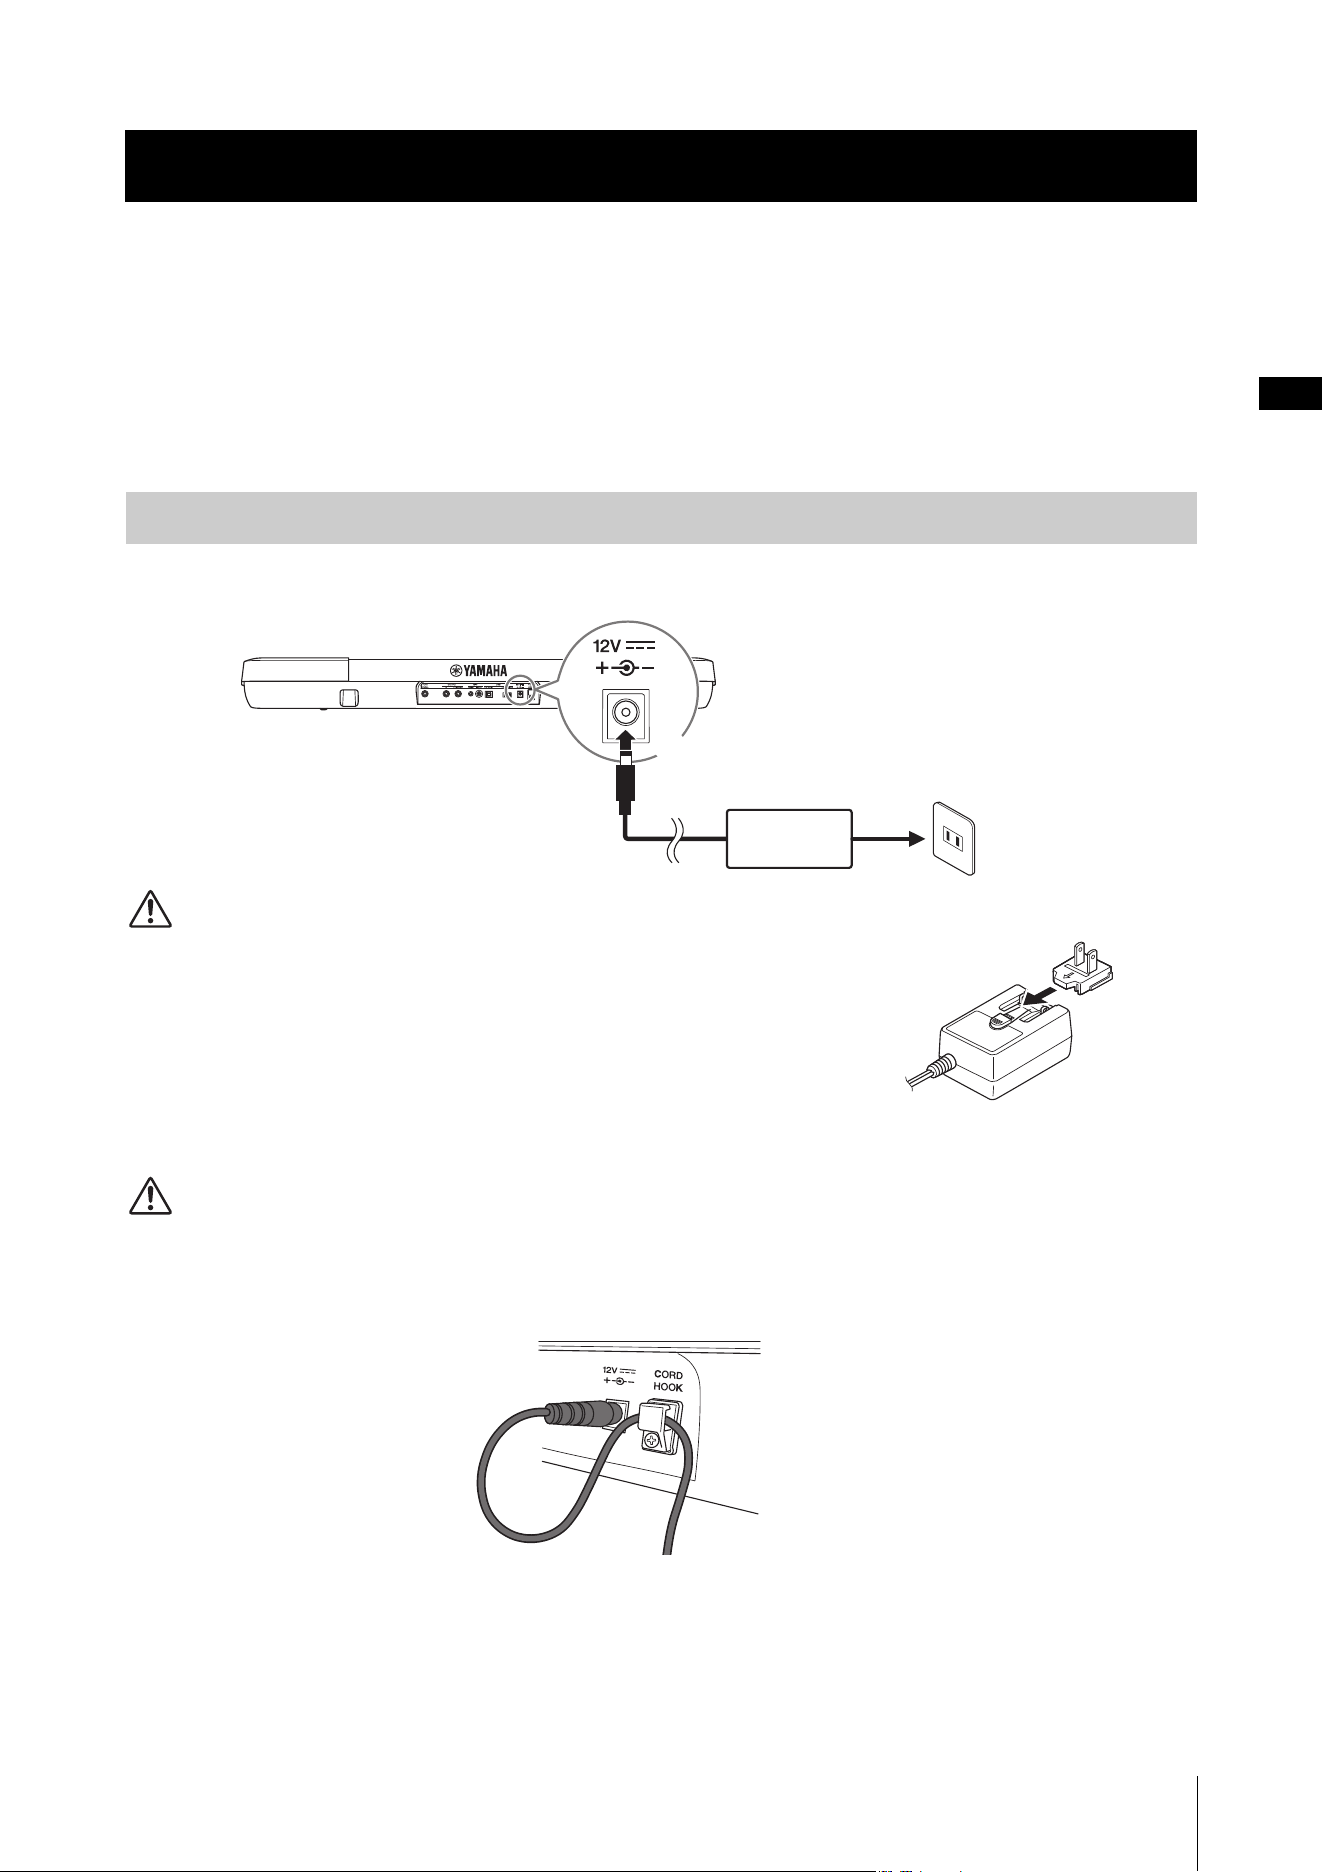
Power Requirements
This instrument can be operated either from an AC adaptor or batteries. Yamaha recommends use of an AC adaptor
whenever possible, since an AC adaptor is more environmentally friendly than batteries and does not deplete resources.
NOTICE
You should use an AC adaptor when using a USB flash memory drive. Using battery power could cause the power to go out
during operation, resulting in data loss.
Connect the AC adaptor in the order shown in the illustration.
WARNING
• Only use the specified AC adaptor (page 40). Using the wrong AC adaptor can result in
damage to the instrument, overheating, or fire accidents. Note that an accident caused
by incorrect usage may void the warranty even if the instrument is still within the
warranty period.
• When using an AC adaptor with a removable plug, make sure to keep the plug attached
to the AC adaptor during use or storage. Inserting the plug alone into the AC outlet can
cause electric shock or fire.
•If the plug is accidentally removed from the AC adaptor, insert the plug all the way in
until you hear a click, taking care to avoid touching any internal metal parts. To avoid electric shock, short circuit, or damage
to the instrument, also be careful that there is no dust between the AC adaptor and plug.
CAUTION
When setting up the product, make sure that the power outlet you are using is easily accessible. If some trouble or malfunction
occurs, immediately turn the power off and disconnect the plug from the outlet.
NOTICE
Hook the cable of the AC adaptor on the cord hook to prevent damage to the cable.
NOTE
To remove the AC adaptor, turn the power off first, and then follow the above instructions in reverse order.
Setting Up
Using an AC Adaptor
2
1
AC adaptor
DC IN jack (page 12)
AC outlet
Plug
Slide in the
plug as
indicated
Setting Up
HD-300 Owner’s Manual
14
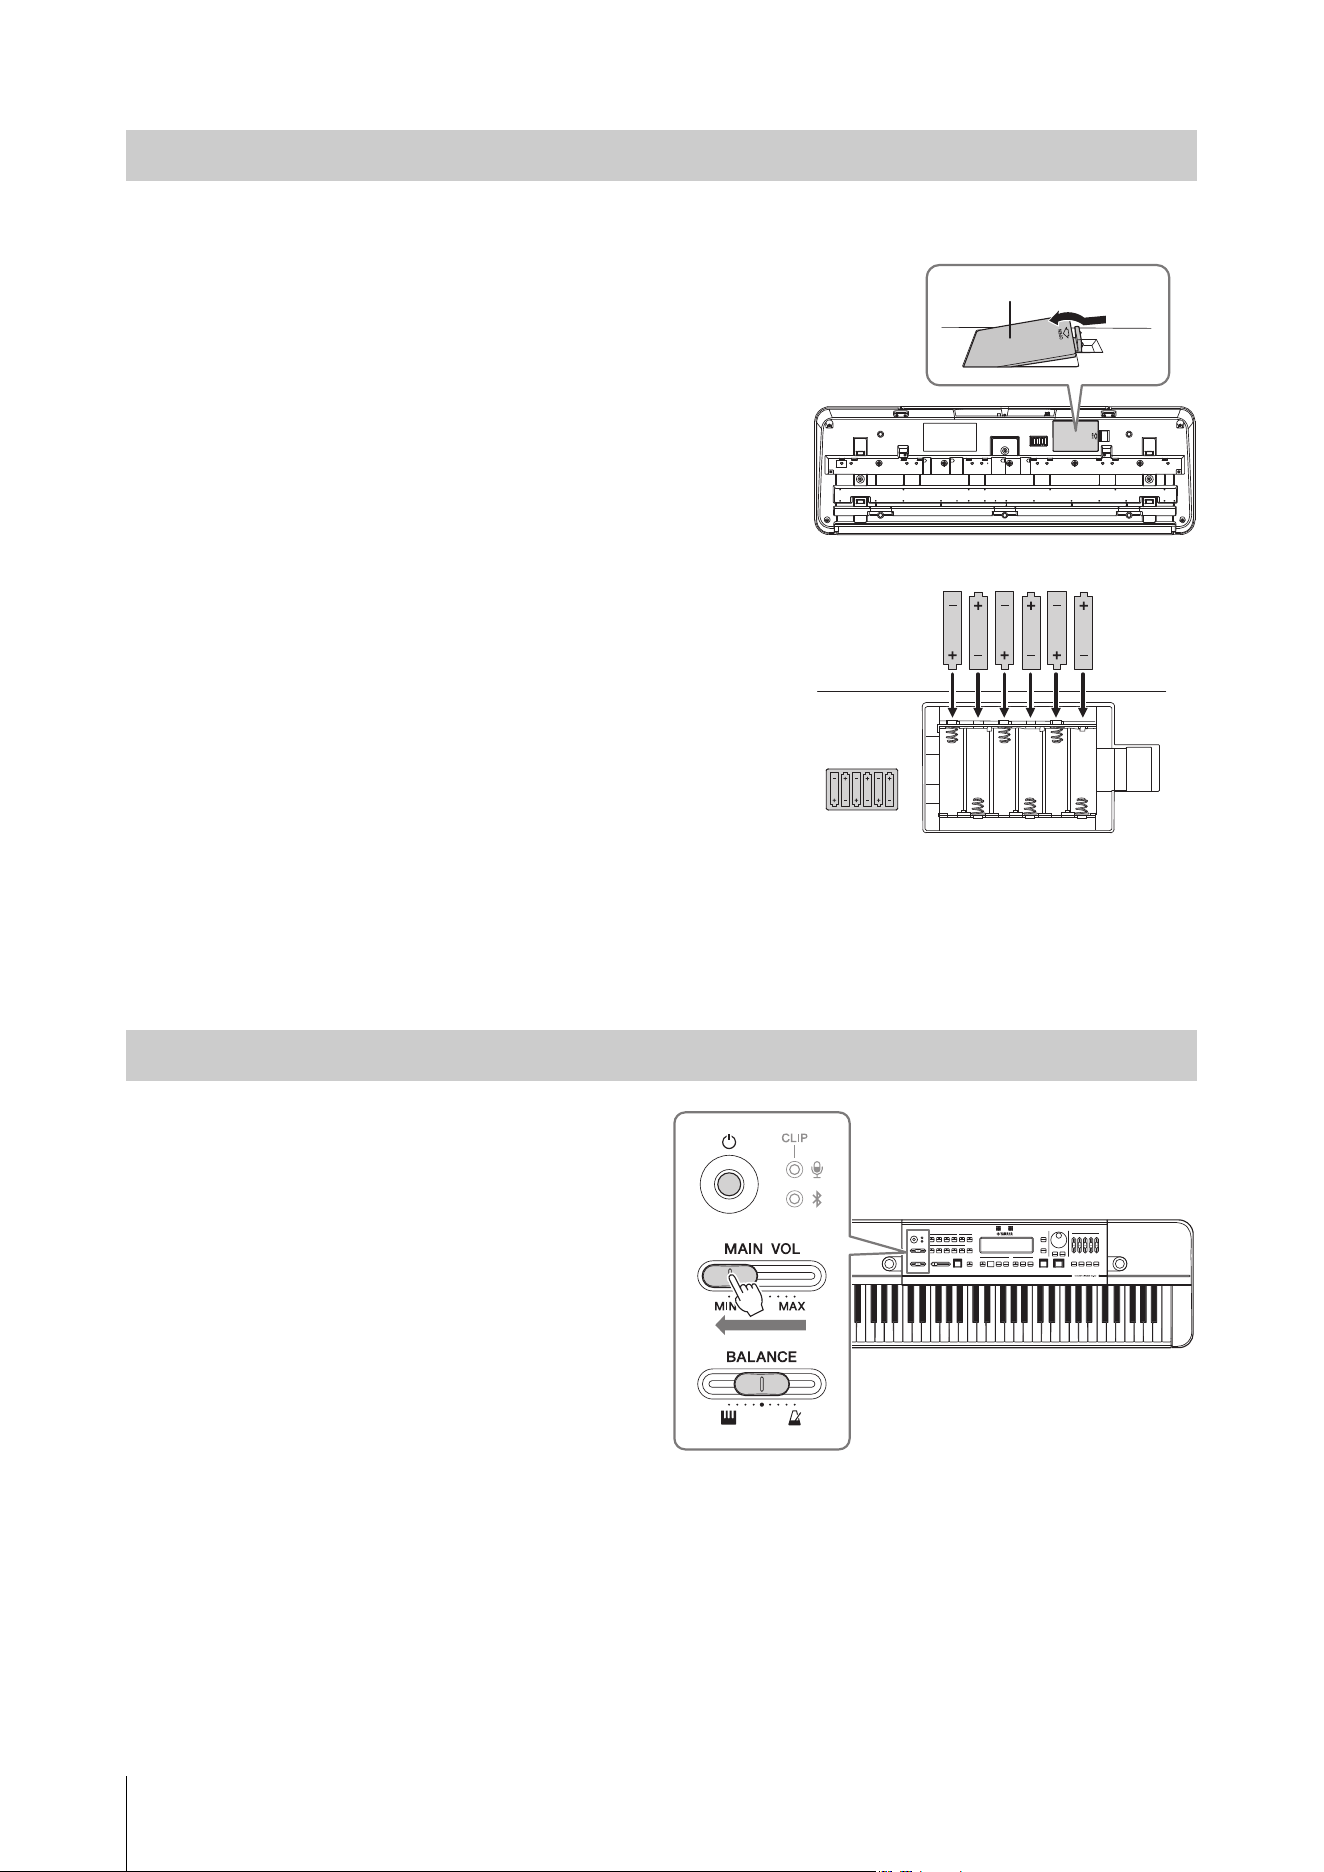
This instrument accepts AA alkaline batteries and rechargeable Ni-MH (Nickel-Metal Hydride) batteries.
1. Make sure that the power of the instrument is off.
2. Turn the instrument over and place it on a soft cloth.
Open the battery compartment cover located on the
instrument’s bottom panel.
3. Insert six new batteries. Make sure that they are
orientated correctly according to the illustration.
4. Close the battery compartment with the cover.
NOTICE
• Do not connect or disconnect the DC plug of the AC adaptor while the
power is on, even if the batteries are installed. Doing so, the power will
suddenly turned off and this result in the loss of data being recorded
or transferred at the time.
• When battery power becomes low, a message saying “Low Battery”
will appear on the screen. When this happens, either replace or
recharge all batteries. If you continue to use the instrument in this
condition, it may not work properly, or the power will suddenly and
automatically turn off because of insufficient power.
NOTE
• Use only the specified charger device for charging rechargeable batteries.
This instrument cannot be used to recharge batteries.
• Power will be automatically drawn from the AC adaptor when an AC
adaptor is connected even if batteries are installed in the instrument.
Turning the Power On/Off
1. Move the [MAIN VOL] slider to the left to
reduce the volume to the minimum setting.
2. If necessary, connect any external devices
(amplifiers for digital instrument, etc.) to
the instrument.
For details on how to connect these devices, refer
to “Connecting External Devices” (page 32).
3. Press the [P] (Standby/On) switch to turn
the power on.
The screen on the instrument will appear.
4. Turn the power on to any external devices,
and then adjust the volume and other
settings on the external device.
5. Adjust the volume on the instrument.
5-1. Center the [BALANCE] slider.
5-2. Gradually shift the [MAIN VOL] slider to the right to raise the volume while playing the
keyboard.
NOTICE
Do not attempt to use the instrument (press any keys or buttons, or step on pedals, etc.) after turning on the power until the
instrument has completely started up (the Home screen appears). Doing so may cause the instrument to malfunction.
Using Batteries
Turning the Power On
Bottom of the instrument
Battery compartment cover
Setting Up
HD-300 Owner’s Manual
15
1. When an external device is connected, first turn the volume down on the external device and then
turn off the power of the external device.
2. Move the [MAIN VOL] slider to the minimum setting.
3. Press and hold the [P] (Standby/On) switch for one second, and then release it.
A message will appear on the display, and the power will be turned off after a few seconds.
CAUTION
Even when the power is off, a small amount of electricity is still flowing through the instrument. Make sure to unplug the AC
adaptor from the power outlet when you intend not to use the instrument for an extended period of time or during electrical
storms. When using batteries, remove the batteries from the instrument.
To prevent unnecessary power consumption, this instrument features an Auto Power Off function that automatically
turns the power off if the instrument is not operated for a specific period of time. The amount of time that elapses before
the power is automatically turned off depends on the type of power being used. This is set to 30 minutes for battery
power, and two hours when using an AC adaptor.
The Auto Power Off function can be enabled/disabled on the Settings screen (page 31).
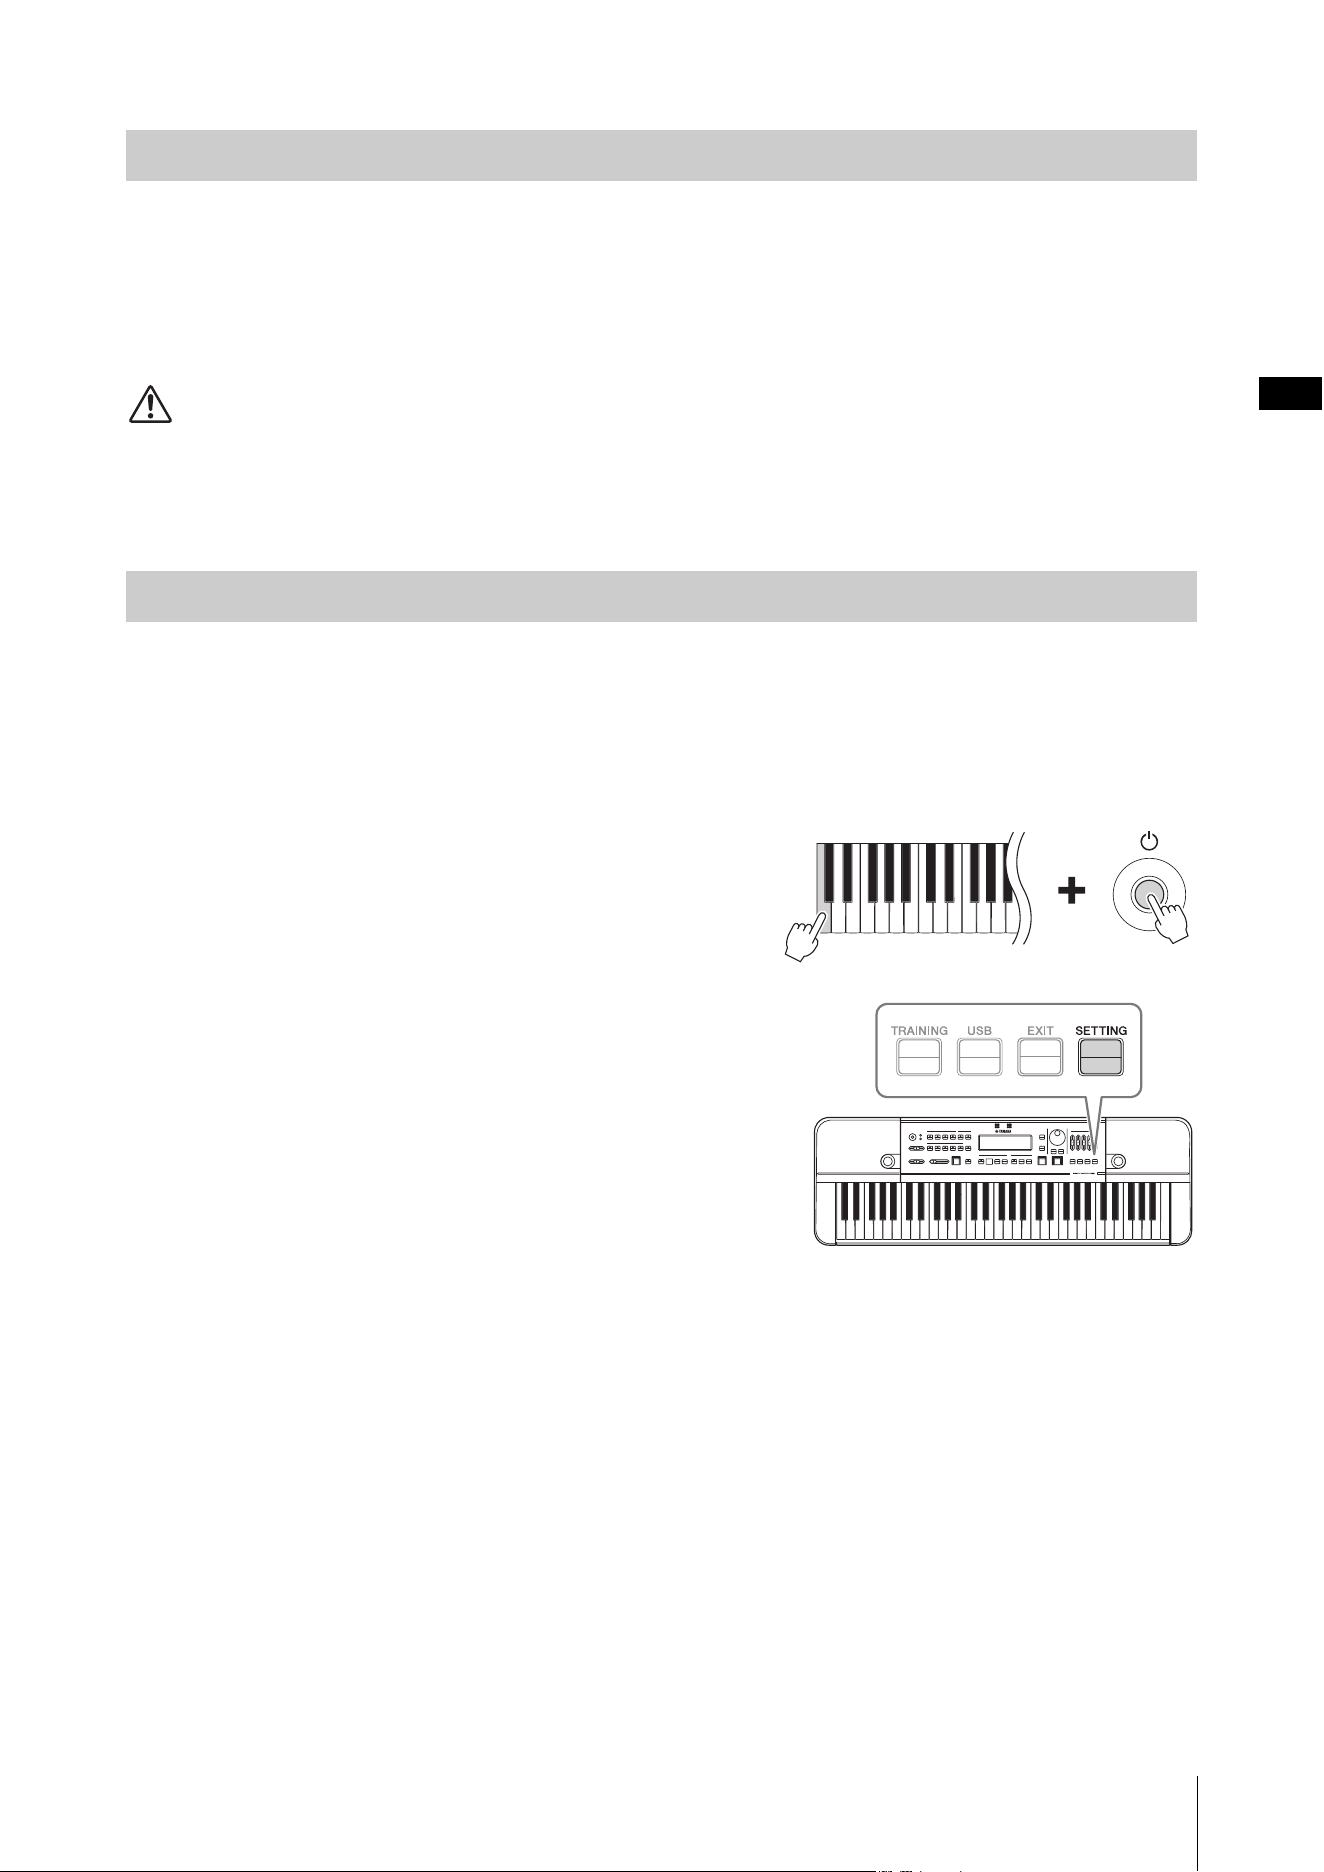
Disabling Auto Power Off
• When the power is off
Turn the power on while holding down the lowest key on the
keyboard.
•When the power is on
Press the [SETTING] button to call up the Settings screen, and then
set “AutoPowerOff ” to “Disable.”
Enabling Auto Power Off
Press the [SETTING] button to call up the Settings screen, and then set
“AutoPowerOff” to “Enable.”
NOTICE
When you intend not to operate this instrument for a specific period of time
while connecting to an external device such as an amplifier, speaker, or
computer, make sure to follow the instructions in the Owner’s Manual to turn off the power to the instrument and the connected
external devices in order to protect the devices from damage. If you do not want the power to turn off automatically when a
device is connected, disable the Auto Power Off function.
NOTE
To move the cursor on the Settings screen, use the BEAT • TEMPO MEMORY CURSOR [L][R] buttons. To change values, use the [-]/
[+] buttons.
Turning the Power Off
Auto Power Off Function
Setting Up
HD-300 Owner’s Manual
16
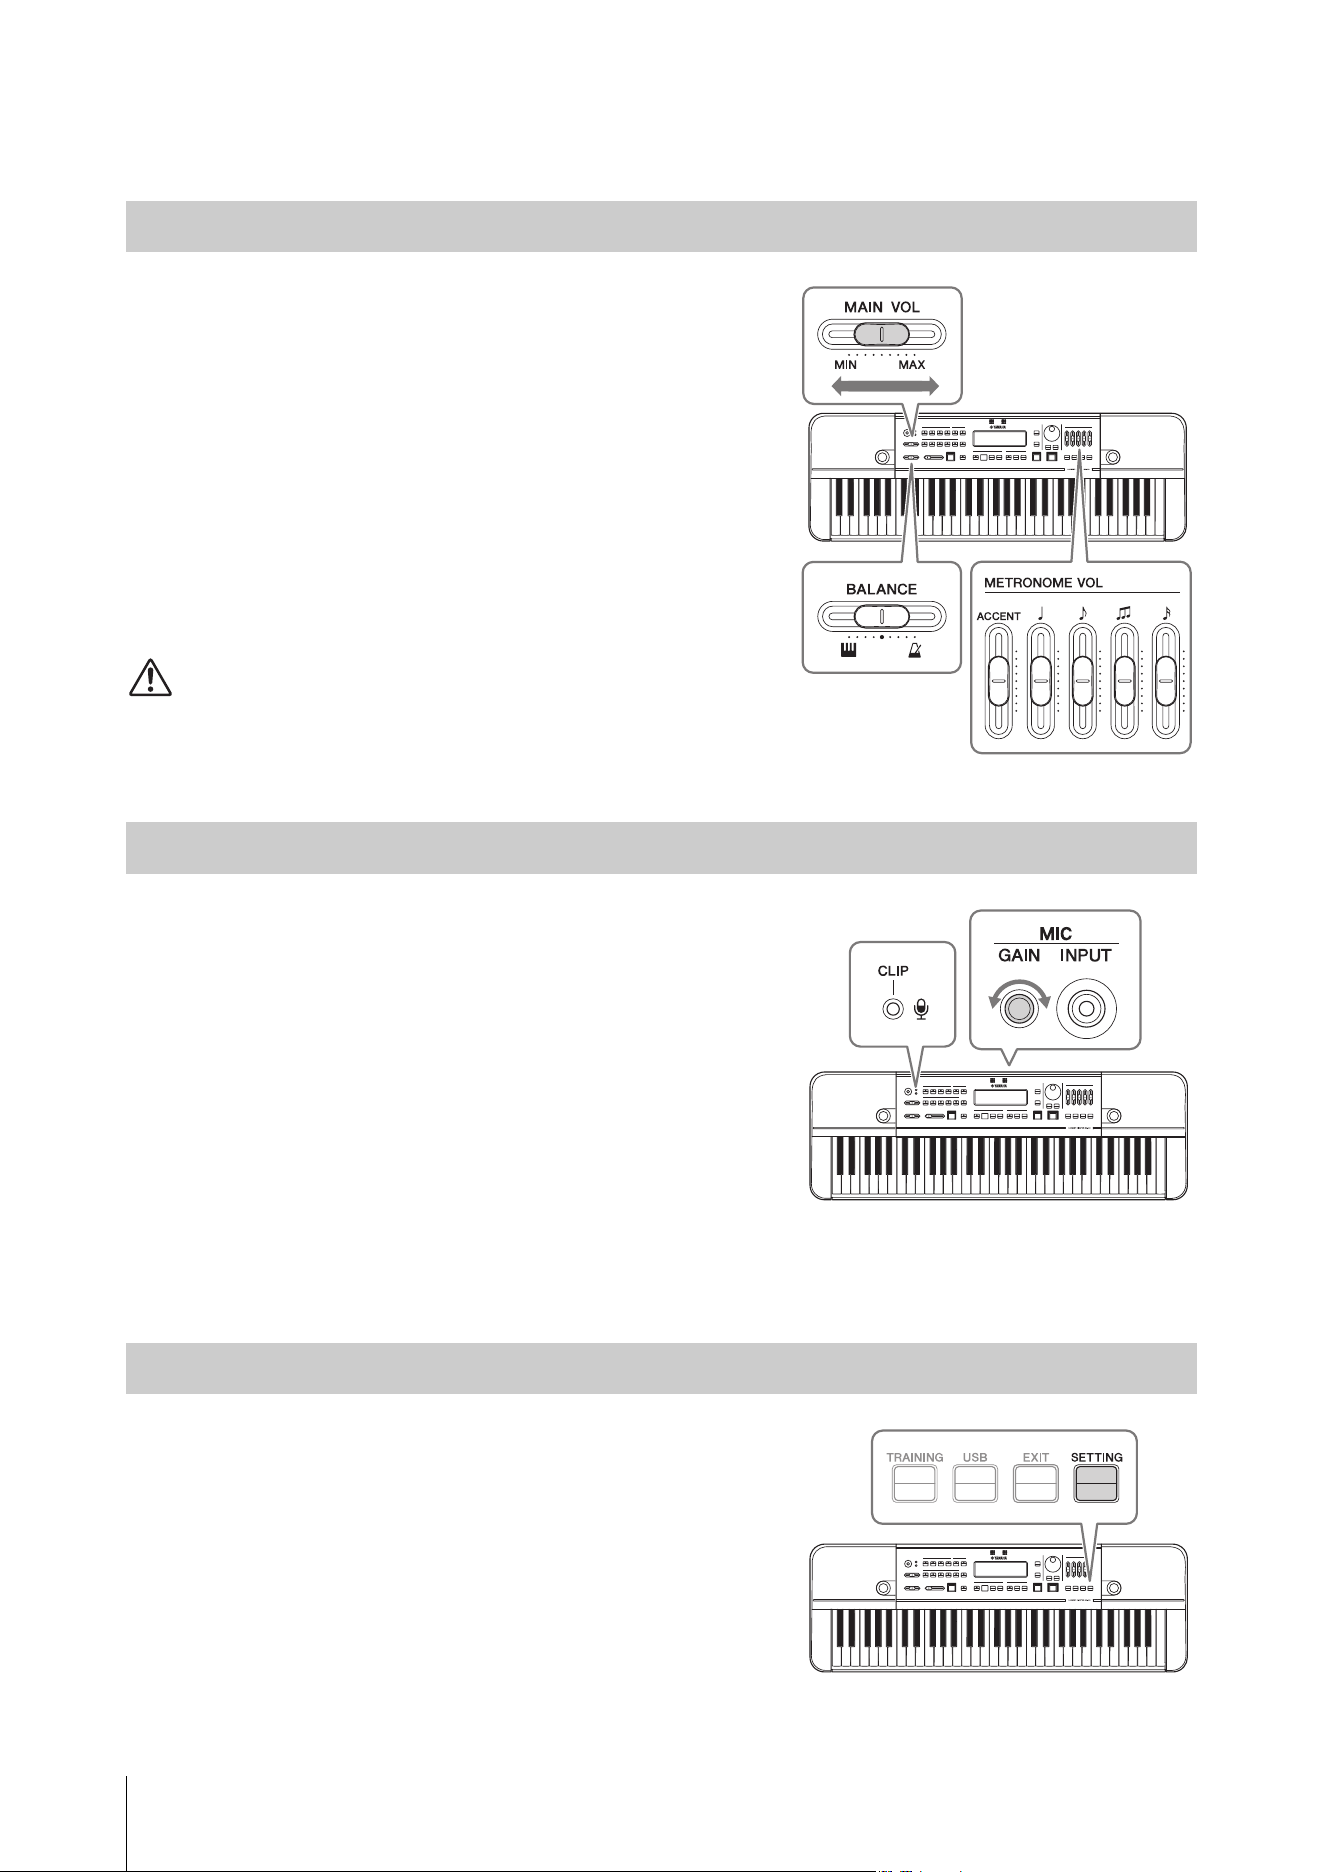
Adjusting the Volume and Screen Contrast
To adjust the volume of the entire sound of this instrument, use the
[MAIN VOL] slider while playing the keyboard.
In addition, the following volume sliders are also available.
•
[BALANCE] slider: Adjusts the volume balance between the
keyboard and rhythm playback.
Turn this left to increase the volume of the keyboard.
Turn this right to increase the volume of the rhythm playback
(metronome, Rhythm Style, etc.).
•
[METRONOME VOL] slider: Adjusts the volume of each
metronome note type individually.
CAUTION
Do not use the instrument at a high volume level for a long period of time.
Doing so can cause hearing loss.
Use the MIC [GAIN] knob on the rear panel to adjust the
microphone sensitivity while speaking or singing into the microphone.
Configure this so the microphone volume (CLIP) LED at the top left of
the panel does not light up even when the sound you want to record is
at maximum volume.
NOTE
• You can also check the volume of input sounds on the input level meter on
the bottom left of the LCD display. When using this to adjust settings, adjust
the sensitivity until “Clip!” no longer appears on the screen.
• If the microphone volume indicator (CLIP) LED lights even when the MIC
[GAIN] knob is turned down, adjust by increasing the distance between this
unit and the sound source.
• Sound input from the microphone is used only for recording and the Sound
Back function. It will not be output from the line output or speaker.
Press the [SETTING] button to call up the Settings screen, and then
change the “LCD Contrast” value.
NOTE
To move the cursor on the Settings screen, use the BEAT • TEMPO MEMORY
CURSOR [L][R] buttons. To change values, use the [-]/[+] buttons.
Adjusting the Volume
Adjusting the Sensitivity of the Microphone
Adjusting the Screen Contrast
HD-300 Owner’s Manual
17
Turn the power on to display the Home screen.
Home Screen
Items 1 – 4 relate to tuning, 5 to recording, and 6 and 7 relate to rhythm playback.
1 Voice
Shows the voice option currently selected. (Page 18)
2 Standard pitch
Shows the standard pitch. (Pages 20, 31)
3 Transpose
Shows the transpose settings. (Page 19)
4 Temperament, root key, chord
Shows the current temperament settings
(temperament and root key), and the chord detected.
(Pages 18 – 21)
5 Recording, microphone input
Shows the recording status, and the microphone input
level. (Pages 16, 26, 29)
6 Tempo, reference note
Shows the tempo, and the tempo reference note.
(Page 22)
7 Beat, memory number
Shows the beat, or the beat • tempo memory (irregular
meter). (Pages 22 – 25)
• The location of the cursor is highlighted, and the cursor can be
controlled with the [-]/[+] buttons and the dial. In the image above,
the cursor is on “M1.”
•Press the panel buttons (CURSOR [L][R] buttons, etc.) to move
the cursor and change items/settings in the screen display.
• Press the [INDIVIDUAL VOL/PITCH] button (page 21),
[TRAINING] button (page 30), [USB] button (page 28), or the
[SETTING] button (page 31) to call up their respective screens.
Each screen is described in greater detail in the above pages.
NOTE
When the [-] and [+] buttons are pressed simultaneously, the value currently
focused will reset to the default value.
Screen Configuration and Basic Operation
Screen Elements
1
3
5
2
6
7
4
Basic Operation
HD-300 Owner’s Manual
18
Basic Operation
The HD-300 can be used to produce reference tones to play along with as a way of developing your sense for playing your
instrument in the correct pitch.
This chapter provides detailed instructions for the necessary operations shown below:
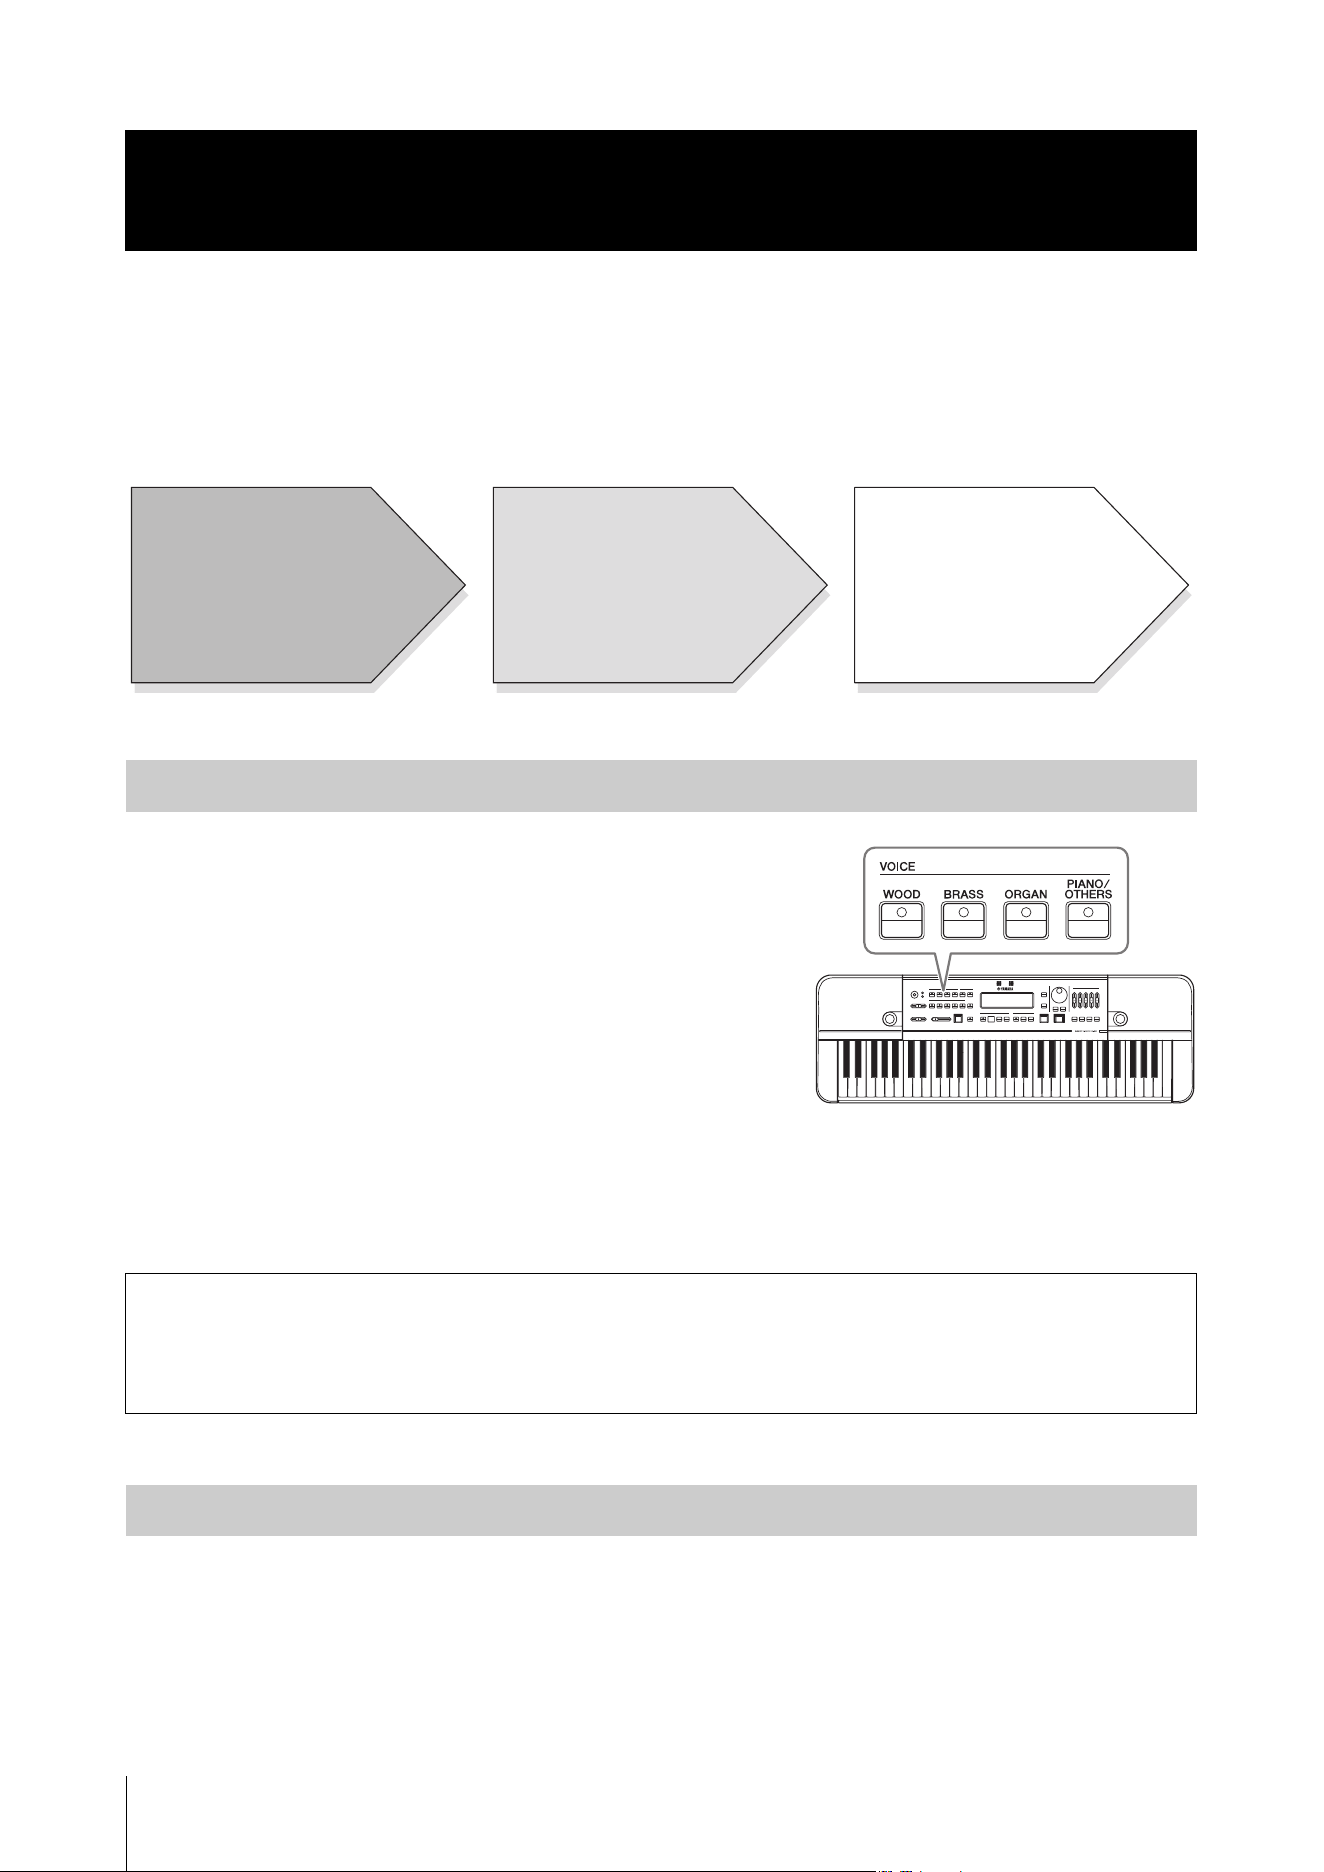
You can select the sounds produced when playing the keyboard.
Press one of the VOICE buttons to select a category, and then select the
desired Voice within the category by using the dial, or the [-]/[+]
buttons.
Available Voices are divided into two types: one using FM tone
generation and the other using the PCM tone generation. The VOICE
buttons correspond to the following tone generation systems.
•
[WOOD]/[BRASS]/[ORGAN] buttons: FM tone generation
•
[PIANO/OTHERS] button: PCM tone generation
FM tone generation Voices are compatible with the Equal, Pure, and
Individual temperaments in the temperament setting function, and so are suitable for producing reference tones for
harmony. PCM tone generation Voices can only be used Equal temperament, but are useful since there are a variety of
available sounds.
For details on the Voices of each category, refer to page 41.
You can configure advanced settings, such as the root key and temperament (Equal/Pure/Individual temperament) of the
song.
•
Setting the root key: See the page 20.
•
Setting the temperament: Use the TEMPERAMENT [EQUAL]/[PURE]/[INDIVIDUAL VOL/PITCH] buttons to
select a temperament mode out of the three available. The lamp of the selected temperament mode will light. The
corresponding screen displays are listed below.
Producing Reference Tones for Playing Harmony (Voice,
Temperament, Hold, Octave, Transpose)
Selecting a Voice
Voice settings for tuning
While there is no specific rule-of-thumb on which reference sound to use, you should select a Voice that is easily
recognizable for both the conductor and performers. (Generally, organ or string-type sounds are ideal for
distinguishing slight differences in pitch, due to their rich harmonic tone.)
Setting the Temperament
Preparation Producing the reference tone(s) Playing the instrument(s)
• Selecting a Voice
• Setting the temperament
• Setting hold on/off
• Selecting an octave
• Setting transpose
Playing the keyboard
Playing wind instrument(s) etc.
to match the reference tone
Producing Reference Tones for Playing Harmony (Voice, Temperament, Hold, Octave, Transpose)
HD-300 Owner’s Manual
19
NOTE
• When the [PIANO/OTHERS] button is pressed, Equal temperament is automatically selected.
• When you select Pure or Individual temperament mode, the Voice type using the FM tone generator is automatically selected.
• For details on setting the Individual temperament (individual volume/pitch), see page 21.
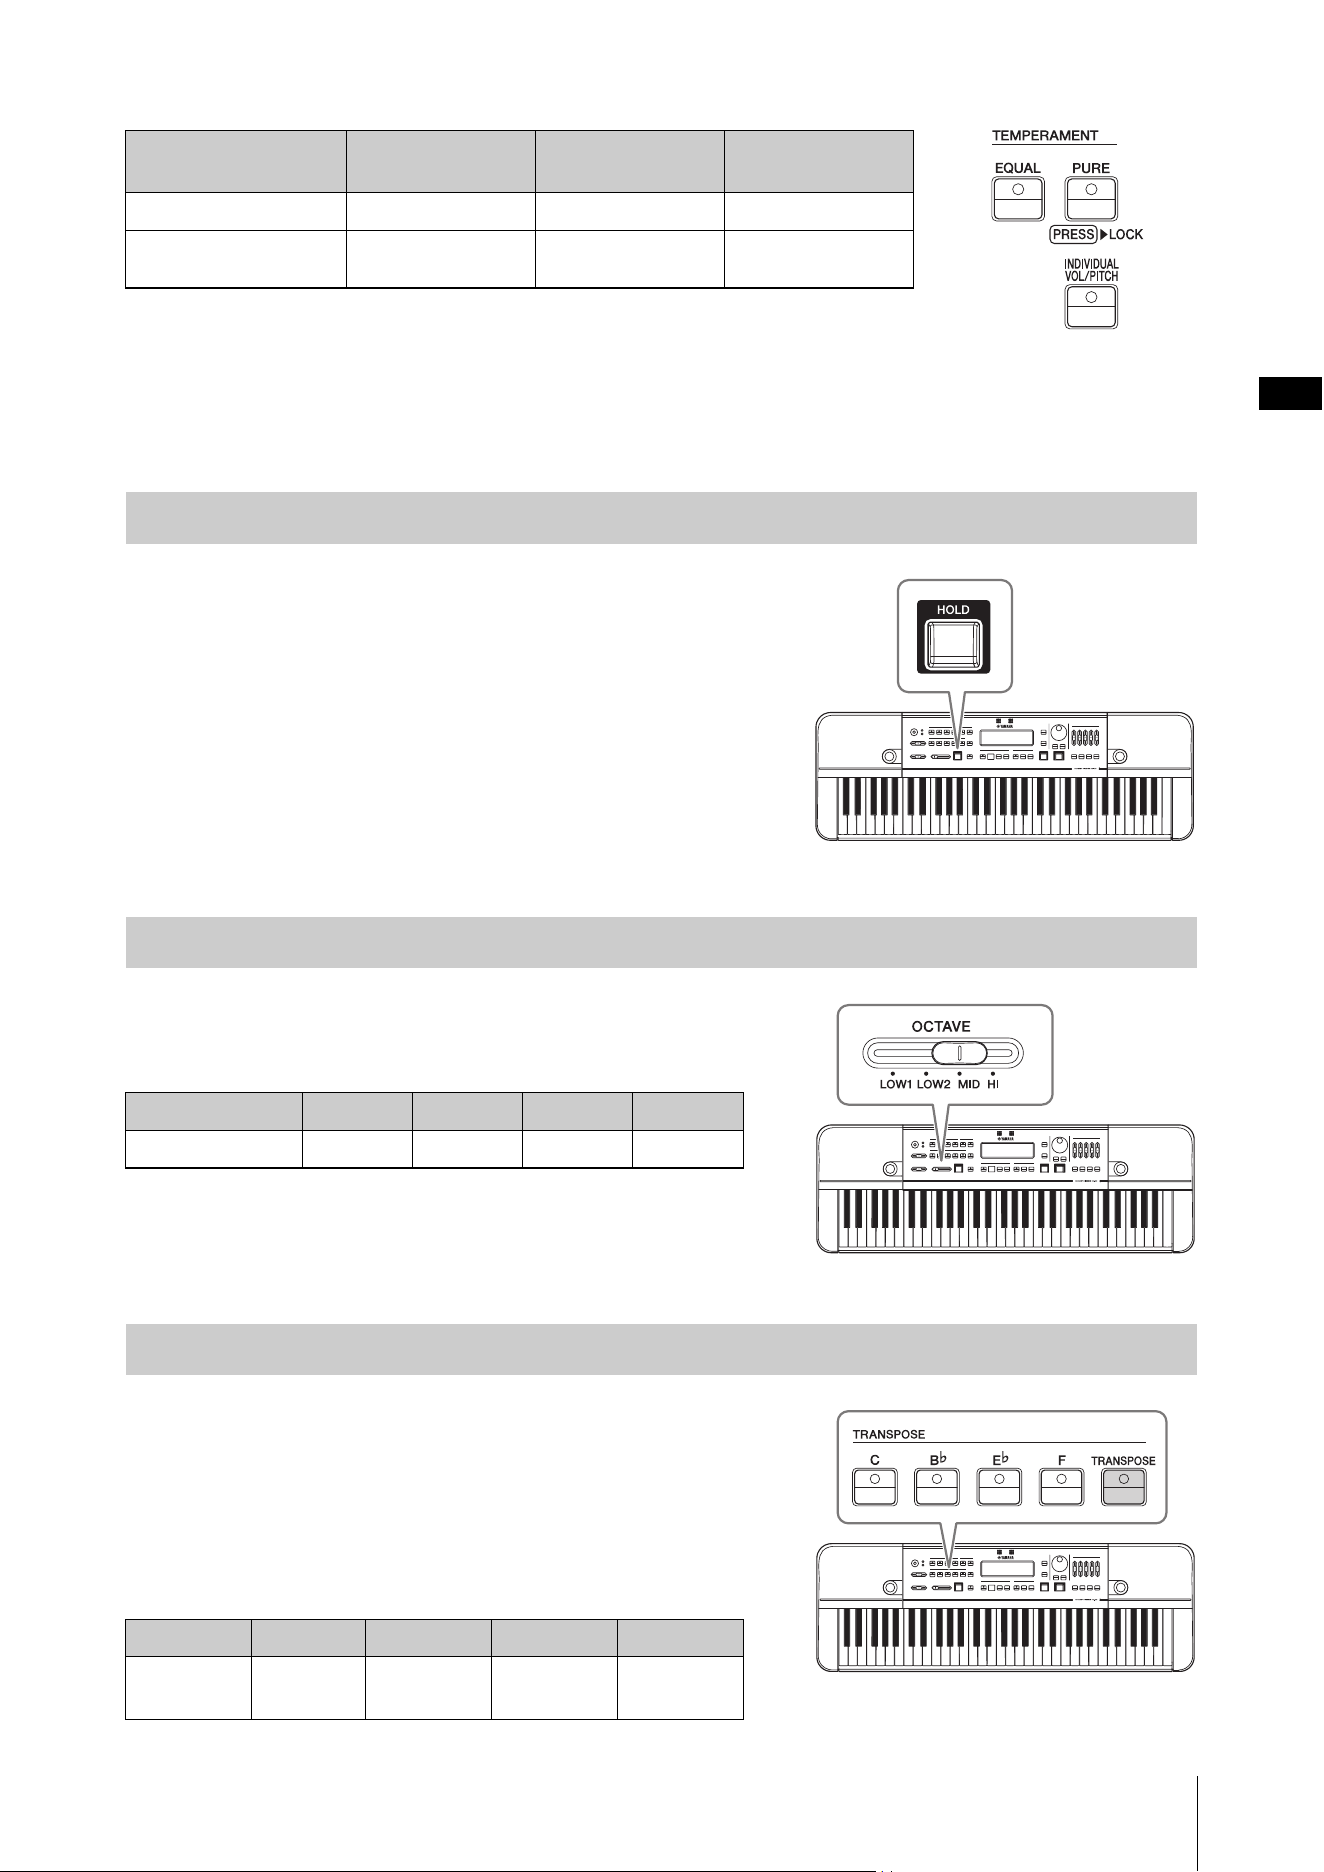
Turn the hold function on to continue playing a note even after your
finger leaves the keyboard.
Press the
[HOLD] button to have the lamp light up and turn the hold
function on. When a note is continually played with the hold function,
pressing a different note on the keyboard will stop the previous sound
and start to continually play the sound for the newly pressed note.
To stop the sound being produced, press the [HOLD] button again and
turn the hold function off.
Use the
[OCTAVE] slider to select the octave of notes played with
the keyboard.
The relationship between the slider position and octave is as follows.
This function is used to match the keyboard sound to a transposing
instrument. With this function, you can play the sounds at the same
pitch as the transposing instrument by playing the keyboard, while
using the musical score written for the transposing instrument,
without having to transpose it to the score for the keyboard.
Press the [C]/[B
b
]/[E
b
]/[F] buttons to set the transpose value directly
without moving the cursor.
Button [EQUAL] [PURE] [INDIVIDUAL
VOL/PITCH]
Display on screen
Equal Pure User
Temperament mode
Equal temperament Pure temperament Individual (custom)
temperament
Setting Hold On/Off
Selecting an Octave
Slider position LOW1 LOW2 MID HI
Octave
C-1 – C4 C0 – C5 C1 – C6 C2 – C7
Setting Transpose
Button [C] [B
b
] [E
b
] [F]
Transpose
value
0 -2 semitones +3 semitones +5 semitones
Producing Reference Tones for Playing Harmony (Voice, Temperament, Hold, Octave, Transpose)
HD-300 Owner’s Manual
20
You can also press the [TRANSPOSE] button and move the cursor to the transpose area to adjust the transpose value.
Adjust the transpose value using the dial or the [-]/[+] buttons. The transpose value range is -2 – +12 semitones. Press
both [-]/[+] buttons simultaneously to return the transpose value to 0.
Temperaments
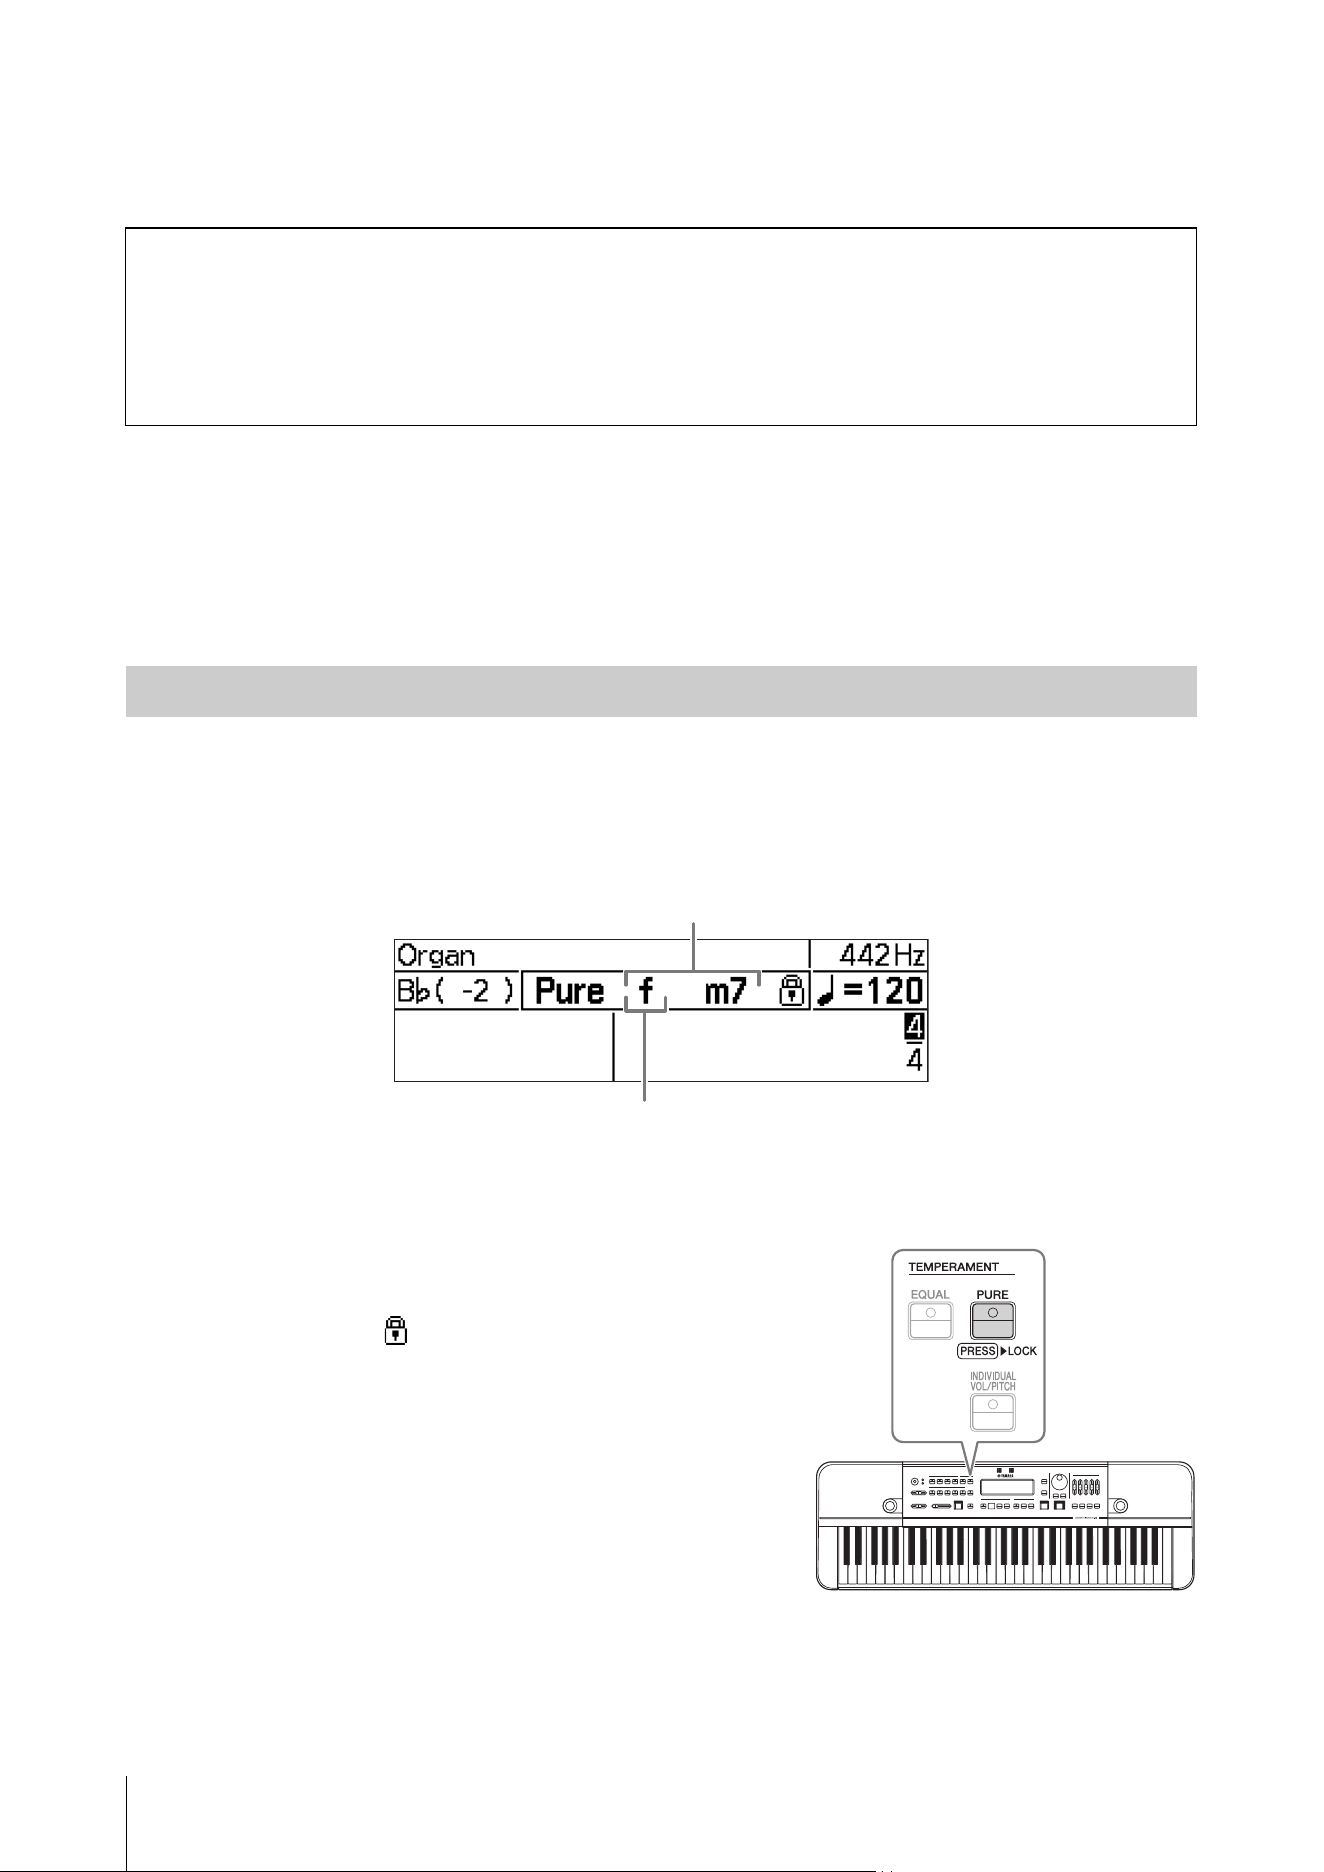
Users can configure advanced settings, such as the root key and temperament (Equal/Pure/Individual temperament)
settings, using this function.
The root key is primarily used to determine the keynote for the “Pure” and “Individual” settings.
To set the root key, play a chord on the keyboard.
The instrument will recognize the chord pressed and change the root key accordingly. For major chords this will be set to
major (displayed in upper case letter), and for minor chords this will be set to minor (displayed in lower case letter). The
recognized chord and the root key will appear on the screen.
NOTE
If the chord cannot be determined, the root key will not change.
Chord detection and root key changes continue with each key pressed
on the keyboard. To lock (fix) the current root key, press and hold the
[PURE] button.
When a root key is locked, a icon will appear to the right of the
chord name on the screen. Additionally, if a pure temperament is
selected, the [PURE] button lamp will light up in green.
NOTE
Chord detection will stop when the root key is locked.
Changing the standard pitch
To change the standard pitch from 442Hz, call up the Settings screen by pressing the [SETTING] button, and change
the “Standard Pitch” value.
NOTE
To move the cursor on the Settings screen, use the BEAT • TEMPO MEMORY CURSOR [L][R] buttons. To change values, use the
dial or [-][+] buttons. To exit from the menu, press the [EXIT] button.
Setting the Root Key
Name of the recognized chord
Name of the current root key. Upper case letter means major,
and lower case letter means minor.
Producing Reference Tones for Playing Harmony (Voice, Temperament, Hold, Octave, Transpose)
HD-300 Owner’s Manual
21
For details on what chords can be recognized, refer to the chart below.
Use the TEMPERAMENT [EQUAL]/[PURE]/[INDIVIDUAL VOL/PITCH] buttons to select a temperament mode out
of the three available (pages 18-19).
This section covers about the detailed setting in the Individual temperament mode.
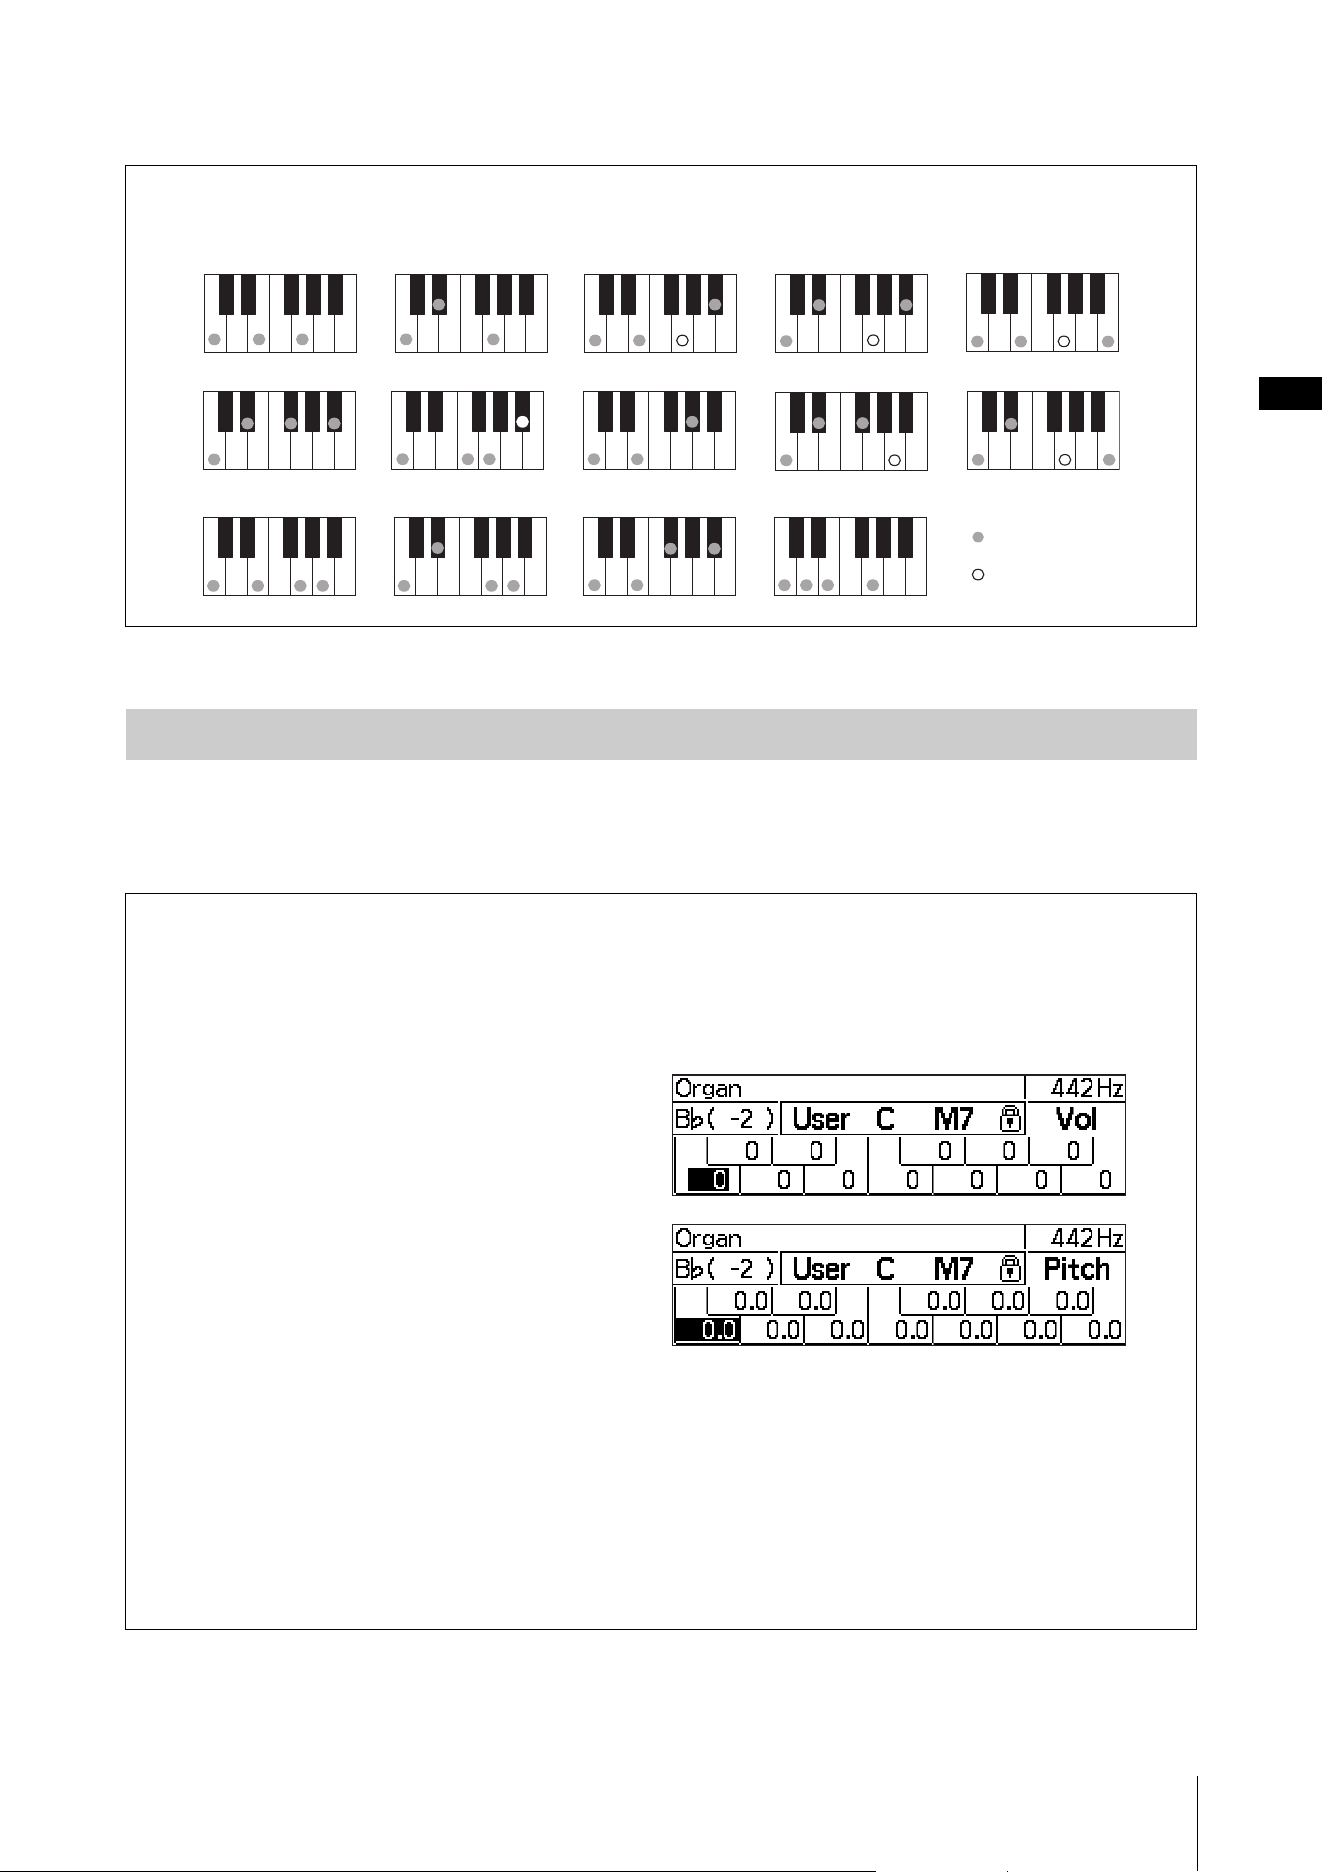
Chord types recognized
These shows examples in case of the root key “C.” The inversion of each fingering is also recognized.
Selecting and Setting a Temperament
Setting the Individual Volume and Pitch (for each of 12 notes in an octave)
In the Individual temperament mode, you can set the volume and pitch for all 12 notes (“C”–“B”) in an octave.
While in Individual temperament mode, each press of the [INDIVIDUAL VOL/PITCH] button alternates among
the three screens in order (as below).
Home screen → Individual Volume screen → Individual Pitch screen → Home screen → ...
•
Individual Volume screen:
This screen is used to set the volume of each of the
12 notes individually.
The volume setting range is -15 – +5.
•
Individual Pitch screen:
This screen is used to set the pitch of each of the
12 notes individually.
The pitch setting range is -55 – +55 cents (0.1 cent
increments).
Select the note with the CURSOR [L][R] buttons. Use the dial or [-]/[+] buttons to change the setting for the
selected note. Press both [-]/[+] buttons simultaneously to return the set value to 0.
NOTE
• While on the Individual Volume screen and Individual Pitch screen, certain functions not relating to the temperament will be
unavailable. Return to the Home screen when you are no longer adjusting individual temperament settings.
• The settings of the Individual temperament mode will be saved to the instrument and kept in memory even after the power is
turned off.
• By using the “HD-300 Assistant” iPhone/iPad app, you can create and switch between multiple individual temperament setting
configurations. For details, refer to page 35.
Maj
M7
dim mM7
C add9
m7
b
5
7
b
5
m7
(7)sus4
m7
aug
6m6
:
:
Required notes
Optional notes
HD-300 Owner’s Manual
22
Basic Operation
You can practice alongside a rhythm played by the HD-300 as a way of developing your sense of rhythm.
Rhythm playback is divided broadly into two separate modes:
Metronome and Rhythm Style. Moreover, the
metronome includes two sub modes — a “Simple” mode for playing a simple beat, and a “Beat • Tempo Memory” for
creating and playing complex beats. To switch between these modes, operate the buttons as shown below.
Rhythm playback modes
Press the [START/STOP] button to start and stop rhythm playback.
Press the
[TEMPO/TAP] button to move the cursor to the tempo area.
Enter a tempo for the reference note using the dial or the [-]/[+] buttons.
The tempo range is 32 – 280 (for quarter notes). Press both [-]/[+] buttons
simultaneously to return the value to 120.
You can also change the reference note length for displaying tempo. To do
this, press the CURSOR [L] button while the cursor is over the tempo
value to move the cursor, and then press the [-]/[+] buttons. When the
reference note length is changed, the tempo value will be converted
automatically to represent the same actual speed as before changing the
note length.
NOTE
Pressing keys B
b
5 – C6 on the keyboard while the cursor is over the tempo display area (tempo, reference note length) will trigger the
sound of the Claves, Side Stick, or Cowbell.
Tap Function
With this function, you can set the metronome tempo by tapping the button rhythmically. Press (tap) the [TEMPO/
TAP] button three times according to the desired tempo, and the tempo is automatically changed to match your tapped
tempo. When rhythm playback is stopped, rhythm playback will automatically start at the newly set tempo.
Demonstrating Tempo and Rhythm (Metronome, Rhythm Style)
Starting and Stopping
Changing the Tempo
Metronome Rhythm Style
[RHYTHM
STYLE]
[BEAT]
[MEMORY]
Simple
Beat • Tempo Memory
[MEMORY]
on
[MEMORY]
off
Demonstrating Tempo and Rhythm (Metronome, Rhythm Style)
HD-300 Owner’s Manual
23
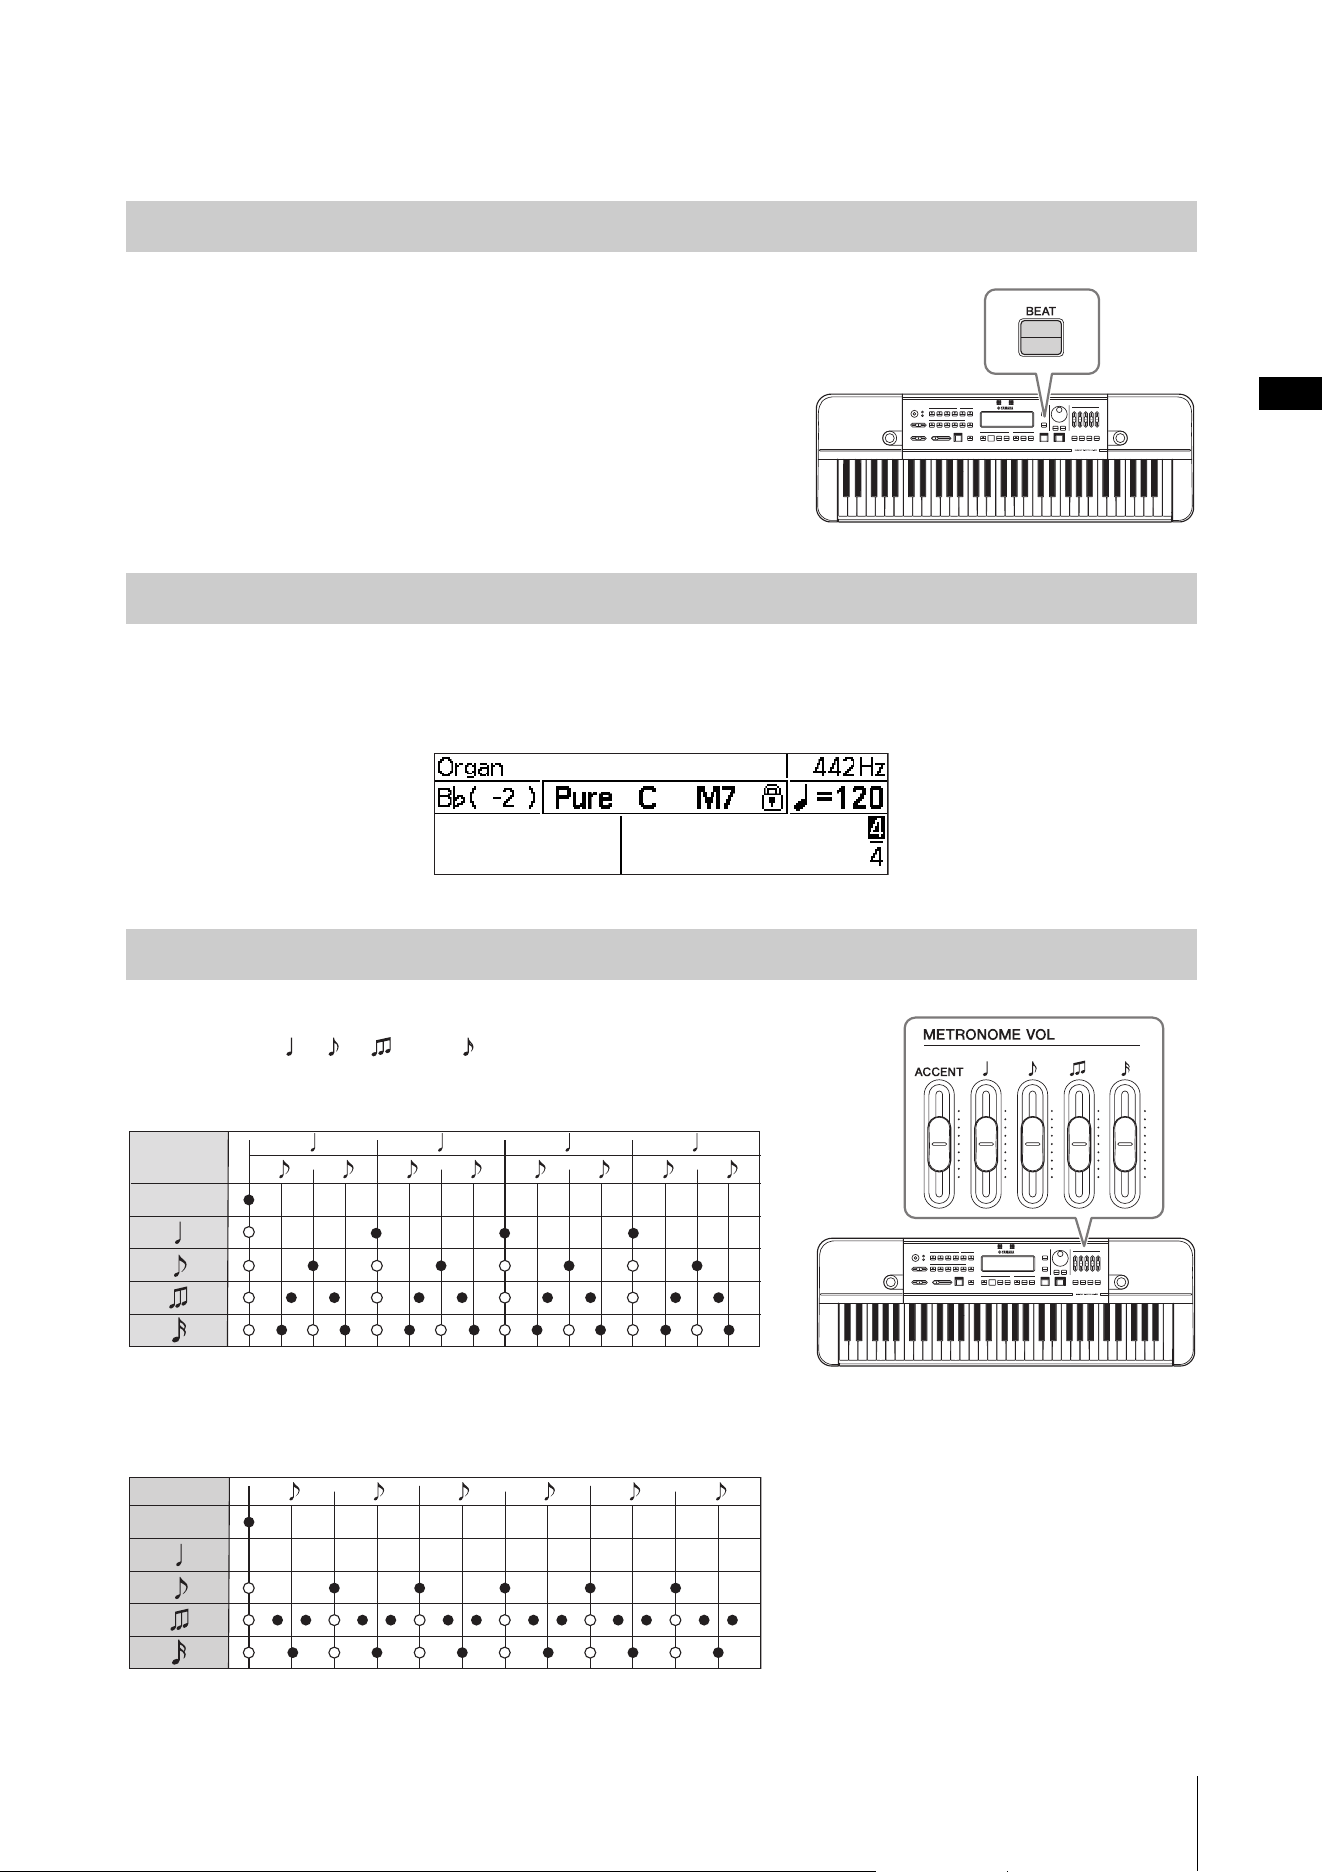
Metronome (Simple)
Press the [BEAT] button to change rhythm playback to metronome
mode.
When in “Beat • Tempo Memory” mode, press the BEAT • TEMPO
MEMORY [MEMORY] button to turn Beat • Tempo Memory off.
Press the [BEAT] button to move the cursor to the beat area.
Use the CURSOR [L][R] buttons to move the cursor to the value you want to change. Change the value with the [-]/[+]
buttons, or the dial. The numerator can be set from 1 – 9, while the denominator can be set to 4 or 8.
You can adjust the volume of each note type of the metronome, by using
the [ACCENT], [ ], [ ], [ ], and [ ] sliders.
Sounding Timing Chart (4/4)
Notes marked are not played when the “Metronome Pattern” (page 31) is set to
“Alternate.”
Sounding Timing Chart (6/8)
The quarter notes do not sound and the triplets sound at a double tempo of the triplet.
Notes marked are not played when the “Metronome Pattern” (page 31) is set to “Alternate.”
Using a Simple Metronome
Setting the Beat
Adjusting the Metronome Volume
ACCENT
ACCENT
Demonstrating Tempo and Rhythm (Metronome, Rhythm Style)
HD-300 Owner’s Manual
24
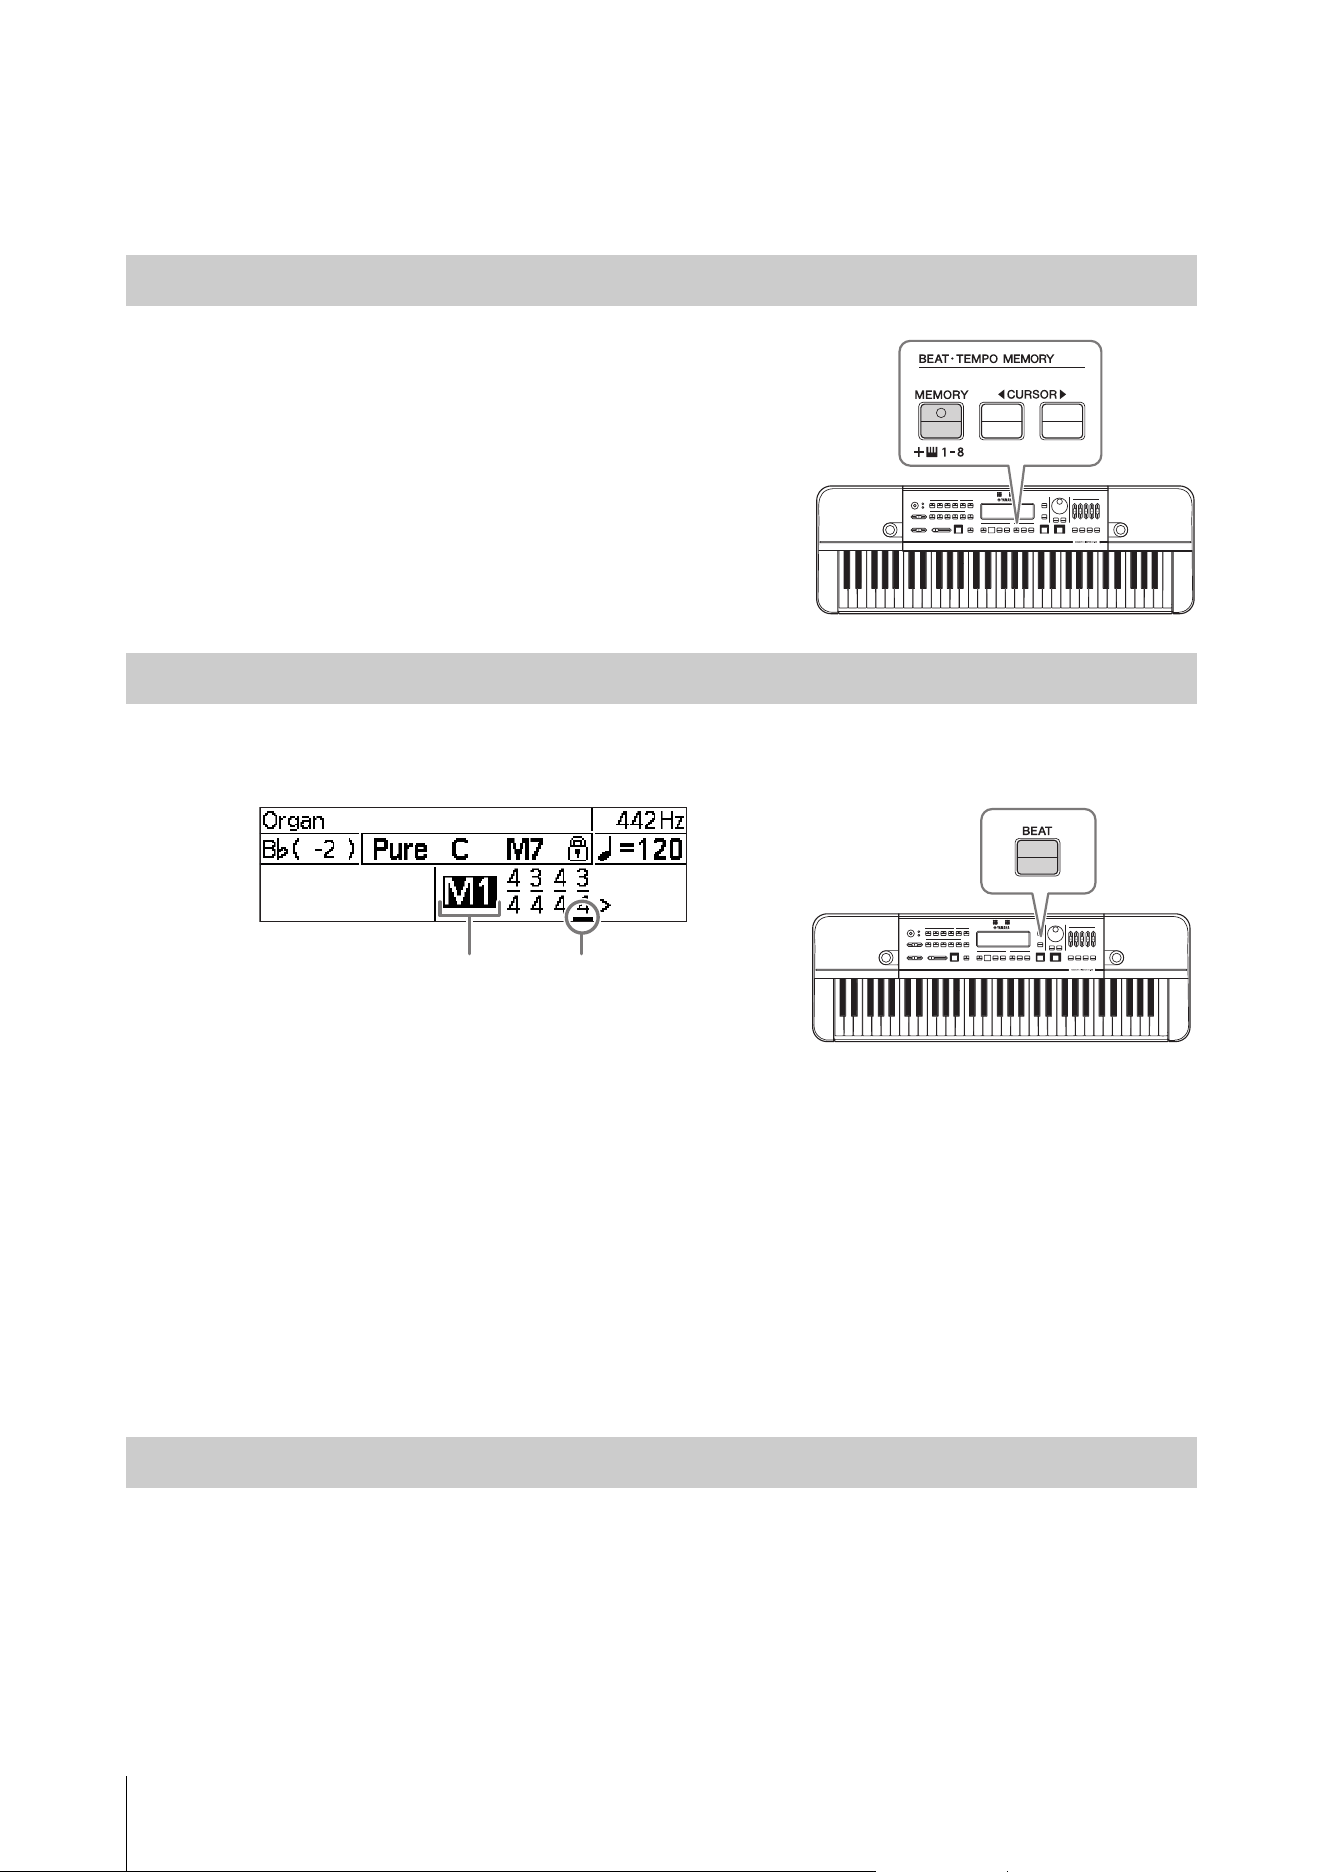
Metronome (Beat • Tempo Memory)
You can create and save irregular meters by using Beat • Tempo Memory function.
Press the
BEAT • TEMPO MEMORY [MEMORY] button to set the
rhythm style to the “Beat • Tempo Memory” metronome mode. This will
move the cursor to the memory number.
Press the
[BEAT] button to move the cursor to the beat area.
Use the CURSOR [L][R] buttons to move the cursor and edit the memory.
• “M1”–“M8”: Selects between memory numbers while the cursor is on this. Either change this with the [-]/[+] buttons,
or select the number directly by pressing one of the keys (D5 – A5) corresponding to the numbers.
• A single memory can contain irregular meters with up to eight measures. The variable range for the numerator is 1 – 9
for the first measure, and 0 – 9 for the second and subsequent measures. If the numerator is 0, the metronome will not
proceed to the next measure. The variable value for the denominator is 4 or 8.
• There are no special operations required to save or load memories. A memory being edited will be saved automatically.
Selecting a memory number will load it automatically.
• To initialize the contents of the selected memory number, press the [DELETE] button while during editing.
NOTE
• When using Beat • Tempo Memory, the playback position will be underlined.
• Use the “HD-300 Assistant” iOS app (page 35) to create and send irregular meters using the touch screen on the smart device.
Operation is the same as in the simple metronome mode (page 23).
Using Beat • Tempo Memory
Setting the Beat (Irregular Meter)
Adjusting the Metronome Volume
Memory number Playback position
Demonstrating Tempo and Rhythm (Metronome, Rhythm Style)
HD-300 Owner’s Manual
25
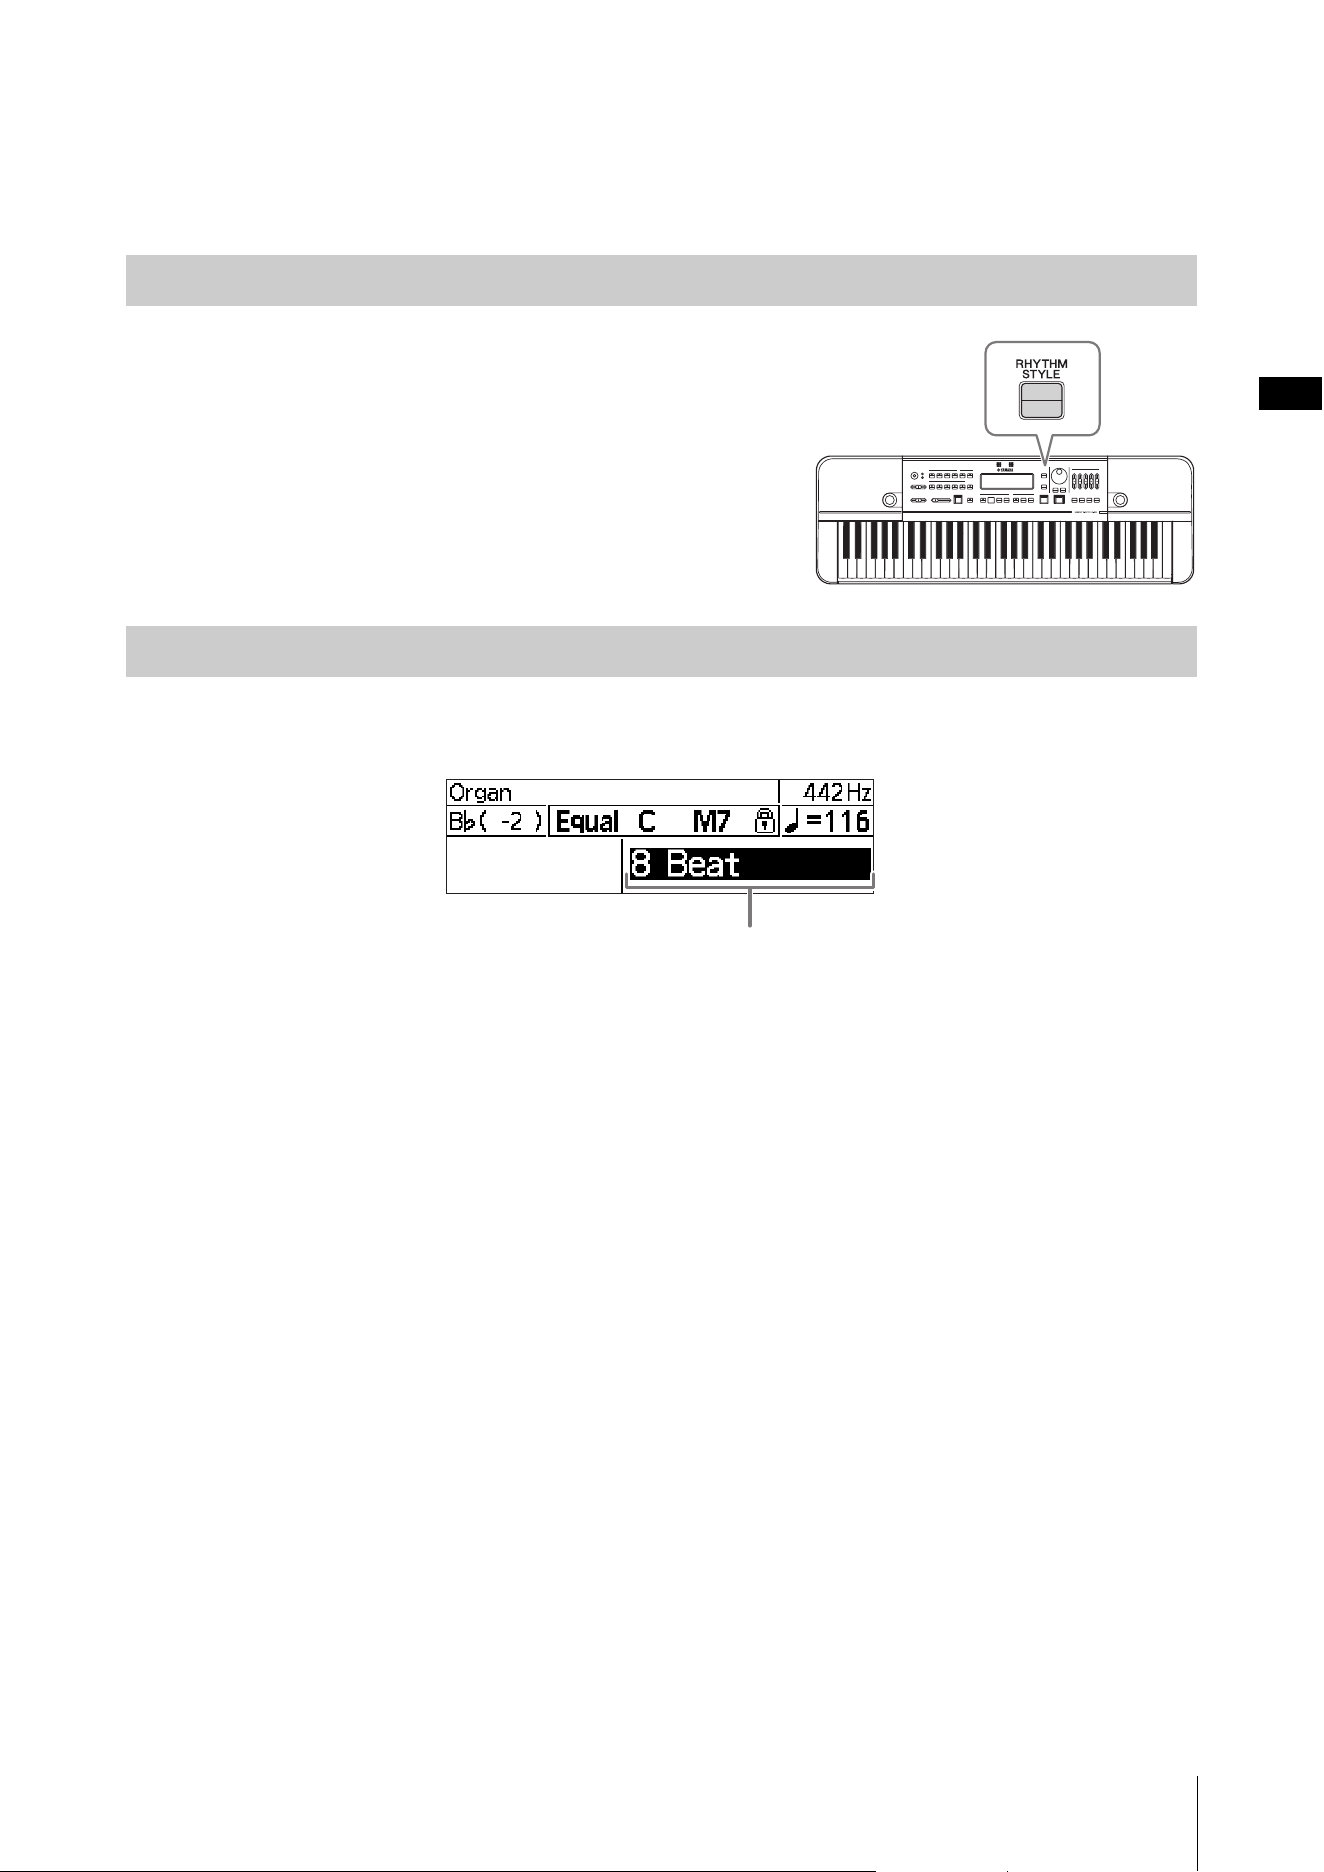
Rhythm Style
With Rhythm Style, you can select and play back eight-beat, swing, and other popular rhythms.
Press the
[RHYTHM STYLE] button to switch rhythm playback to
Rhythm Style mode.
Press the [RHYTHM STYLE] button to move the cursor to the Rhythm Style name.
Use the [-]/[+] buttons, or the dial to change the Rhythm Style.
NOTE
• The operation for starting/stopping playback and changing the tempo is the same as for the metronome. For details, see page 23.
• If you select “Custom” as the type of Rhythm Style, you can set the tempo, time signature, and number of measures using the
dedicated app “HD-300 Assistant” for iPhone and iPad.
Using Rhythm Style
Selecting the Type of Rhythm Style
Rhythm Style name
HD-300 Owner’s Manual
26
Basic Operation
You can record a performance using the internal/external microphone to
a commercially available USB flash drive and immediately play it back.
In addition to conventional recording capability, the instrument has a
convenient Time Shift Recording function that allows you to capture up
to 10 seconds of your performance before you actually started recording
(by pressing the [REC] button). Both recording options save the
recording results as a file that can be later played back from the [USB]
button menu.
Important
• Connect an AC adaptor to use the recording function.
• A USB flash drive should be connected to use the recording function.
For details on how to connect a USB flash drive, refer to page 33.
NOTE
Adjust the microphone sensitivity (page 16) before recording.
Recording/Playback
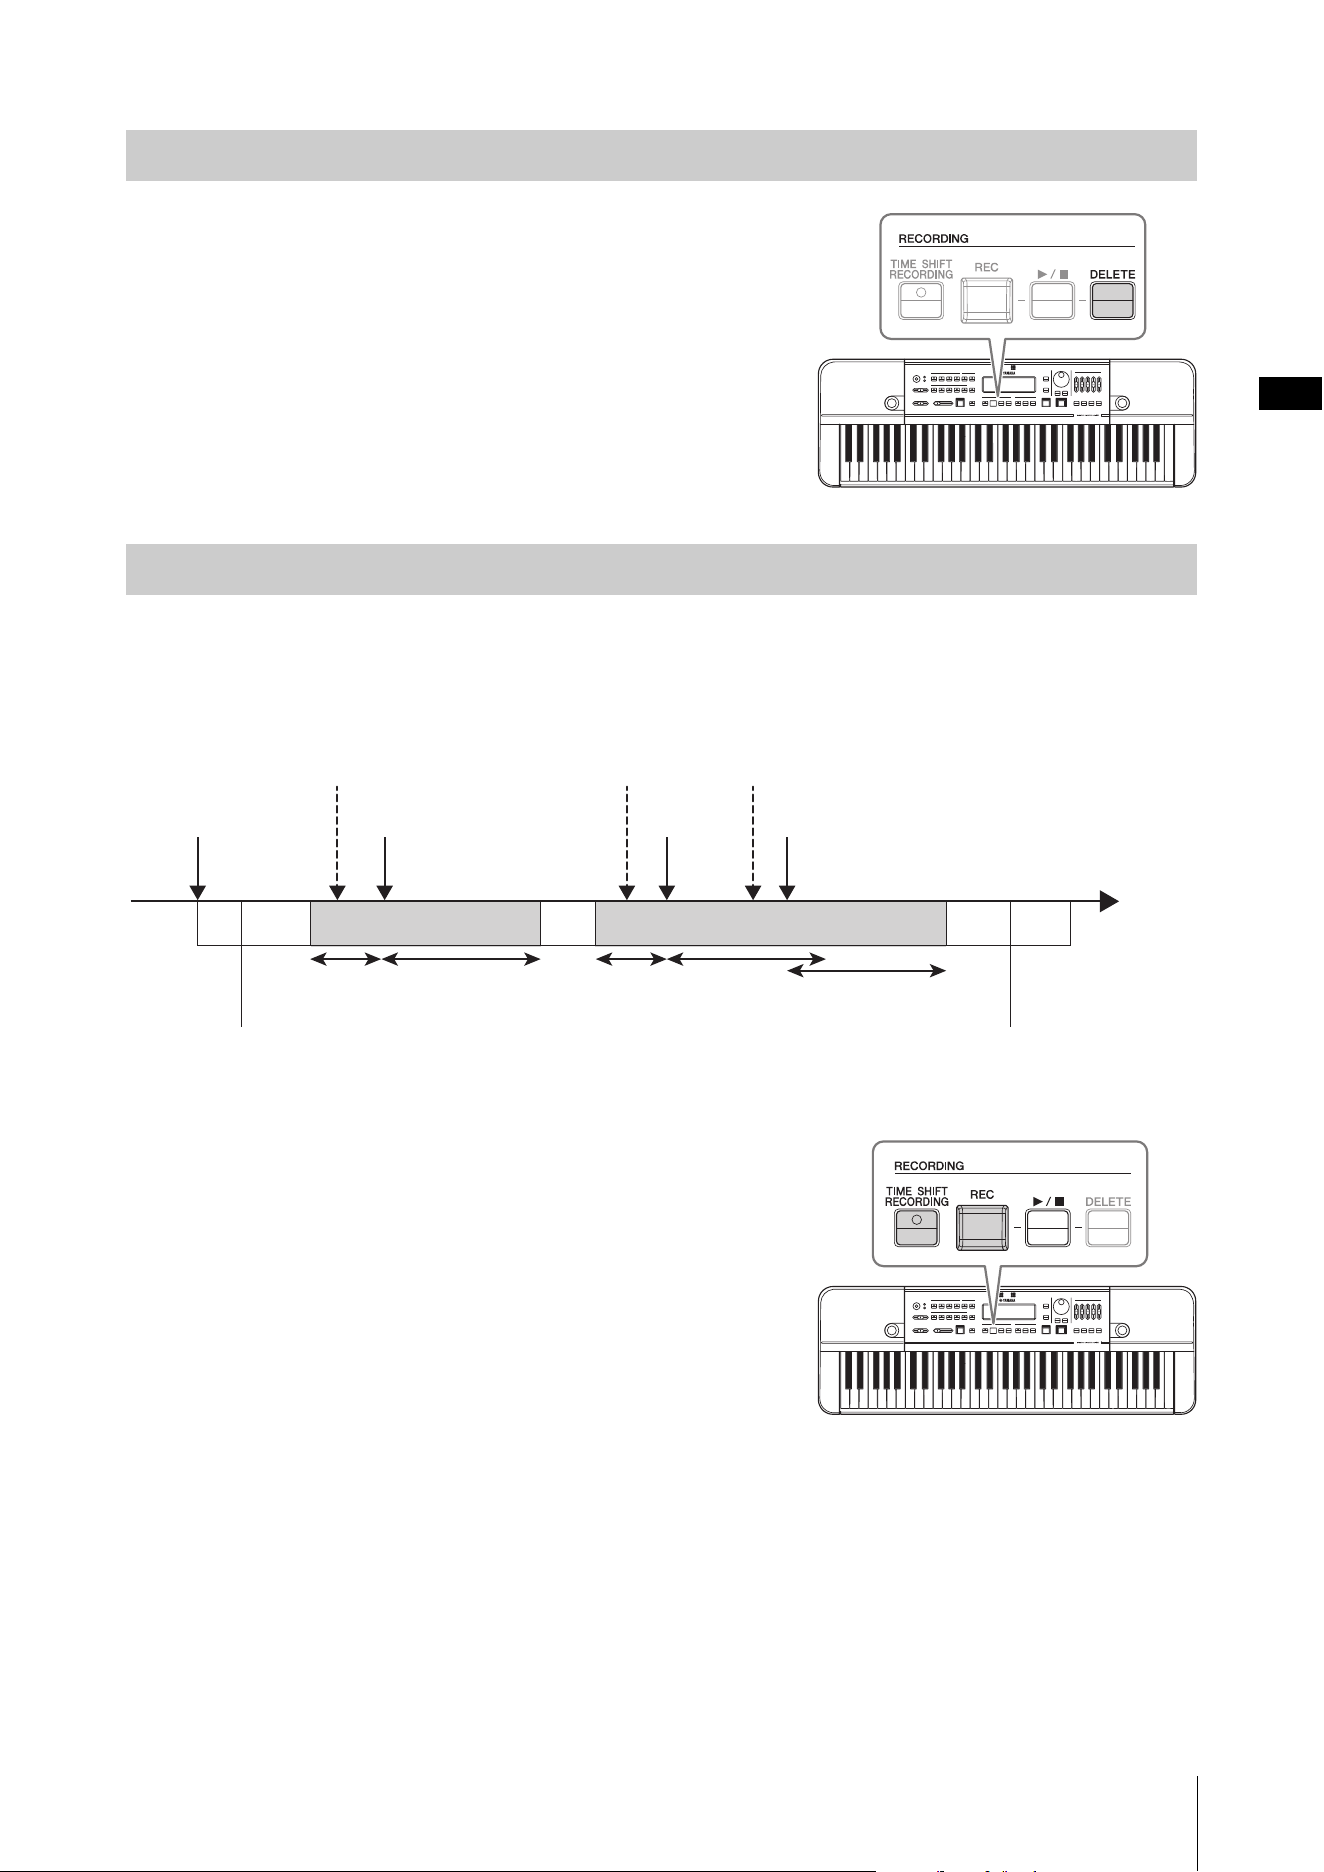
Press the [REC] button to start recording. Recording will start automatically under a new file name.
Press the [REC] or [R/J] button to stop recording.
You can easily play back a recording immediately after the recording stops.
Use the [-]/[+] buttons to select a file, and then press the
[R/J] button to play/stop the recording.
NOTE
• If the cursor has moved away from the recording number, you can move the cursor back to the file name with the [R/J] button.
• Note that once the recording number has been reset (when the recording folder has changed due to switching in and out of Time Shift
Recording mode, or when turning the power off and on), you will no longer be able to select and play back recordings in this way. To
play back previous recordings, enter the USB File Selection mode by pressing the [USB] button, and select the file (page 28).
Sharing Performances (Recording/Playback)
Recording
Playing Back the Most Recent Recordings
Recording display
Level meter
Sharing Performances (Recording/Playback)
HD-300 Owner’s Manual
27
You can delete an unwanted recording result immediately after the
recording stops. Use the [-]/[+] buttons to select the file, and then press the
[DELETE] button. Follow the confirmation prompt that appears to
either cancel or delete the recording result.
NOTE
• If the cursor has moved away from the recording number, you can move the cursor
back to the file name with the [R/J] button.
• If the recording number has disappeared due to transitioning between screens or
turning the power off and on, the recording result files are treated as past recorded
data and can no longer be deleted on the instrument itself. Past files can be
deleted on a computer or other devices that allows access to the USB flash drive.
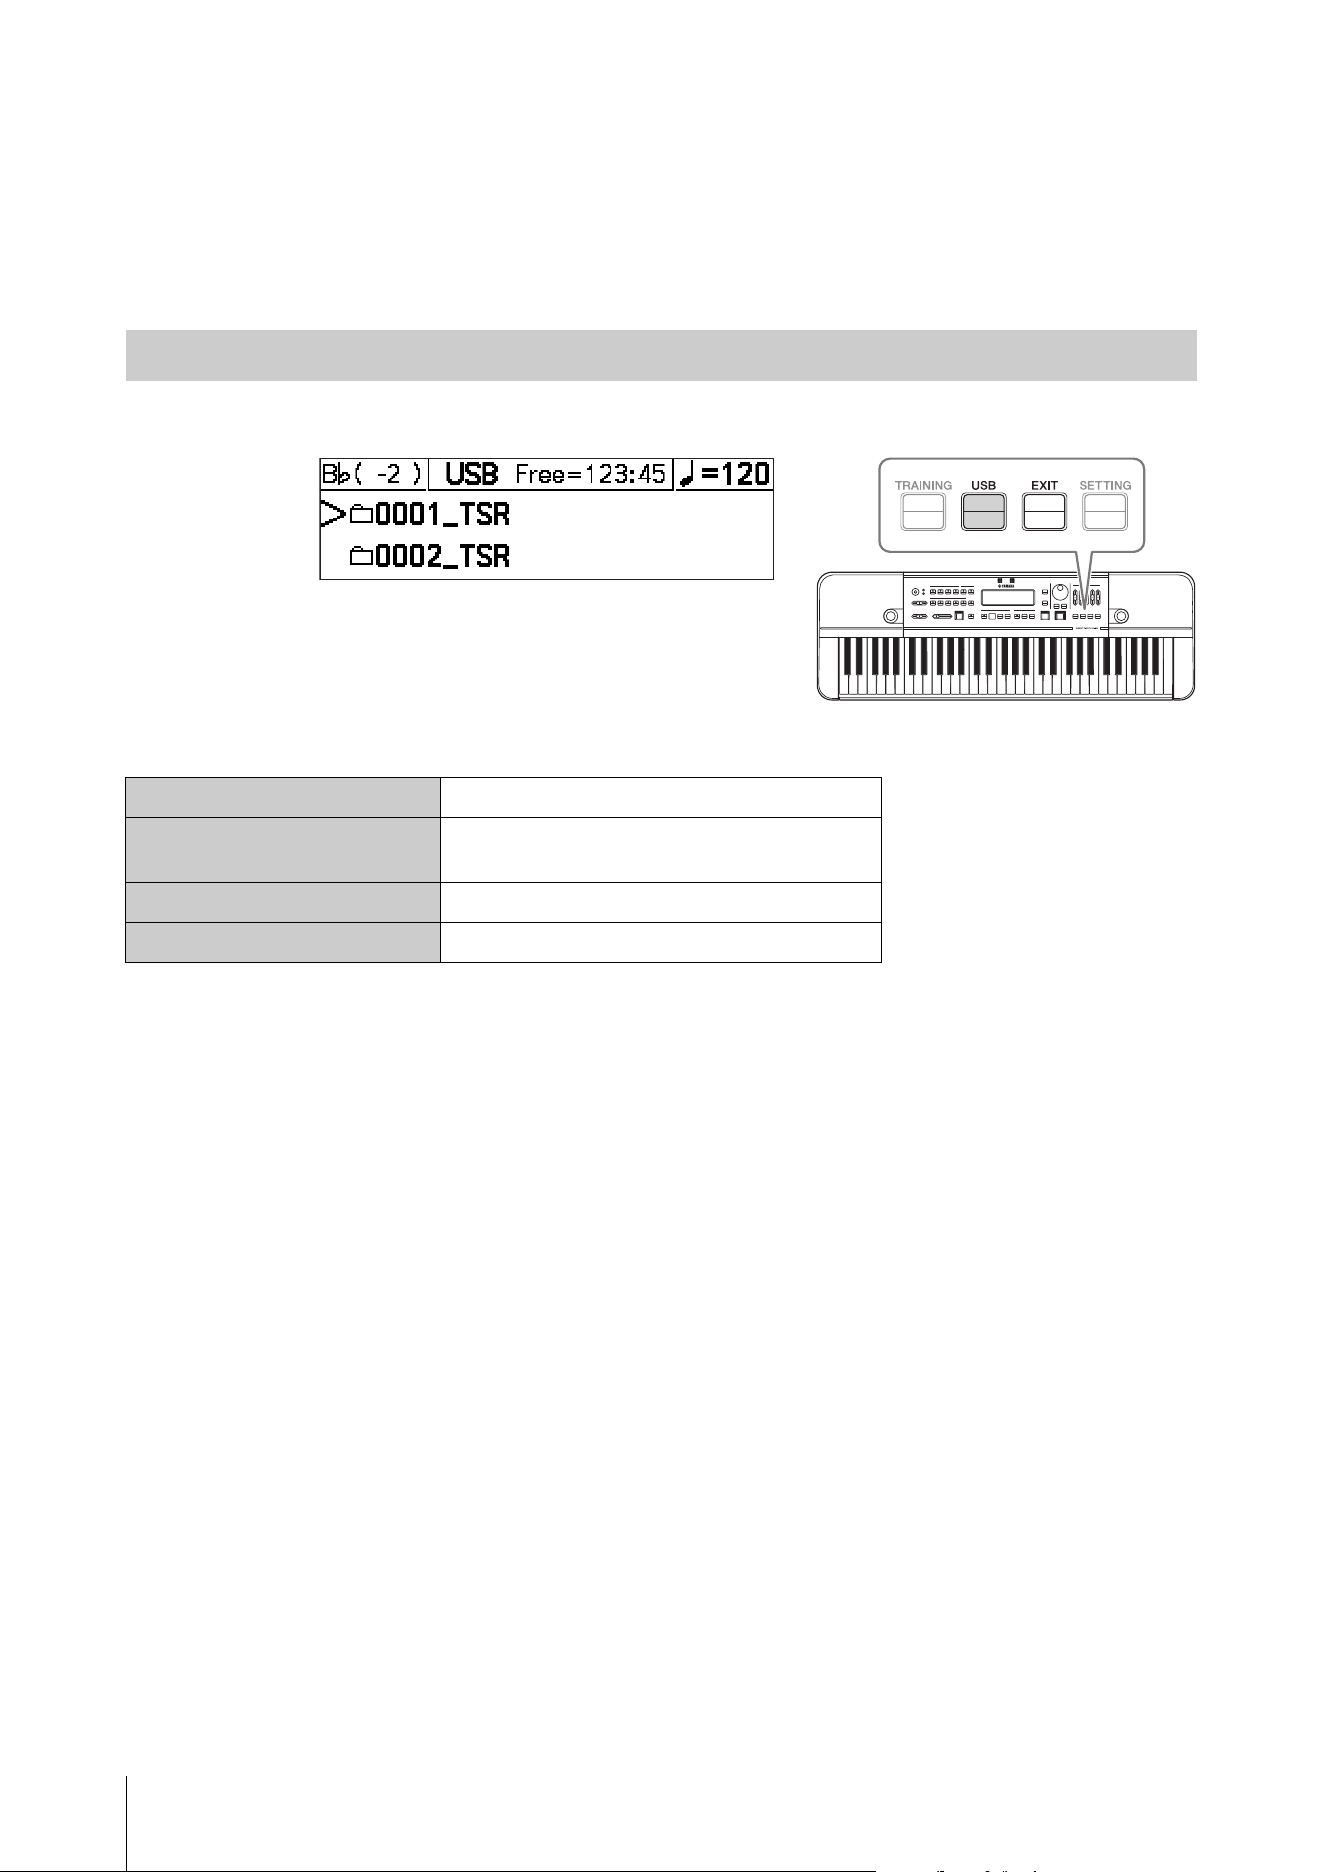
You can capture an “unrecorded” part with the Time Shift Recording function; in other words, the instrument has the
capability of recording your performance, including even up to 10 seconds before you press the [REC] button.
Example of Time Shift Recording
How to use Time Shift Recording
1. Press the [TIME SHIFT RECORDING] button to put the
HD-300 into Time Shift Recording standby mode.
A “Ready” message will appear on the screen.
2. Start performing.
3. When you feel like you want to record the section during a
performance, press the [REC] button.
This will start recording at the specified number of seconds (3 – 10
seconds) before the [REC] button is pressed.
4. To extend the recording time, press the [REC] button again.
5. Without further operation for the specified number of seconds (5 – 20 sec) after the [REC] button is
pressed, the recording will automatically stop.
You can also stop the recording immediately by pressing the [R/J] button, without waiting for the recording time
to run out.
NOTE
• You can change the length of the following times on the Settings screen.
“Pre Time Shift Rec”: number of seconds recorded before the [REC] button is pressed in step 3
“Post Time Shift Rec”: number of seconds until the recording ends automatically in step 5
For details, refer to page 31.
• The operation for playing back the result of Time Shift Recording is the same as for regular recording. For details, see the “Playing
Back the Most Recent Recordings” (page 26).
Deleting the Most Recent Recording Results
Recording a Particular Section (Time Shift Recording)
TSR_01. wa v TSR_02.wa v
[TIME SHIFT
RECORDING]
on
You want to record
this section
[REC] [REC]
(Extended recording)
[REC]
You want to record
this section
You want to record
a little longer
Time
Start performance End of performance
Pre
3sec
Post
10 sec
Pre
3sec
Post
10 sec
Post
10 sec
Sharing Performances (Recording/Playback)
HD-300 Owner’s Manual
28
Playing Back Previously Recorded Files and Files Created on a
Computer (USB)
You can select and play back previously recorded performances saved to a USB flash drive, as well as audio files and
MIDI files created on a computer.
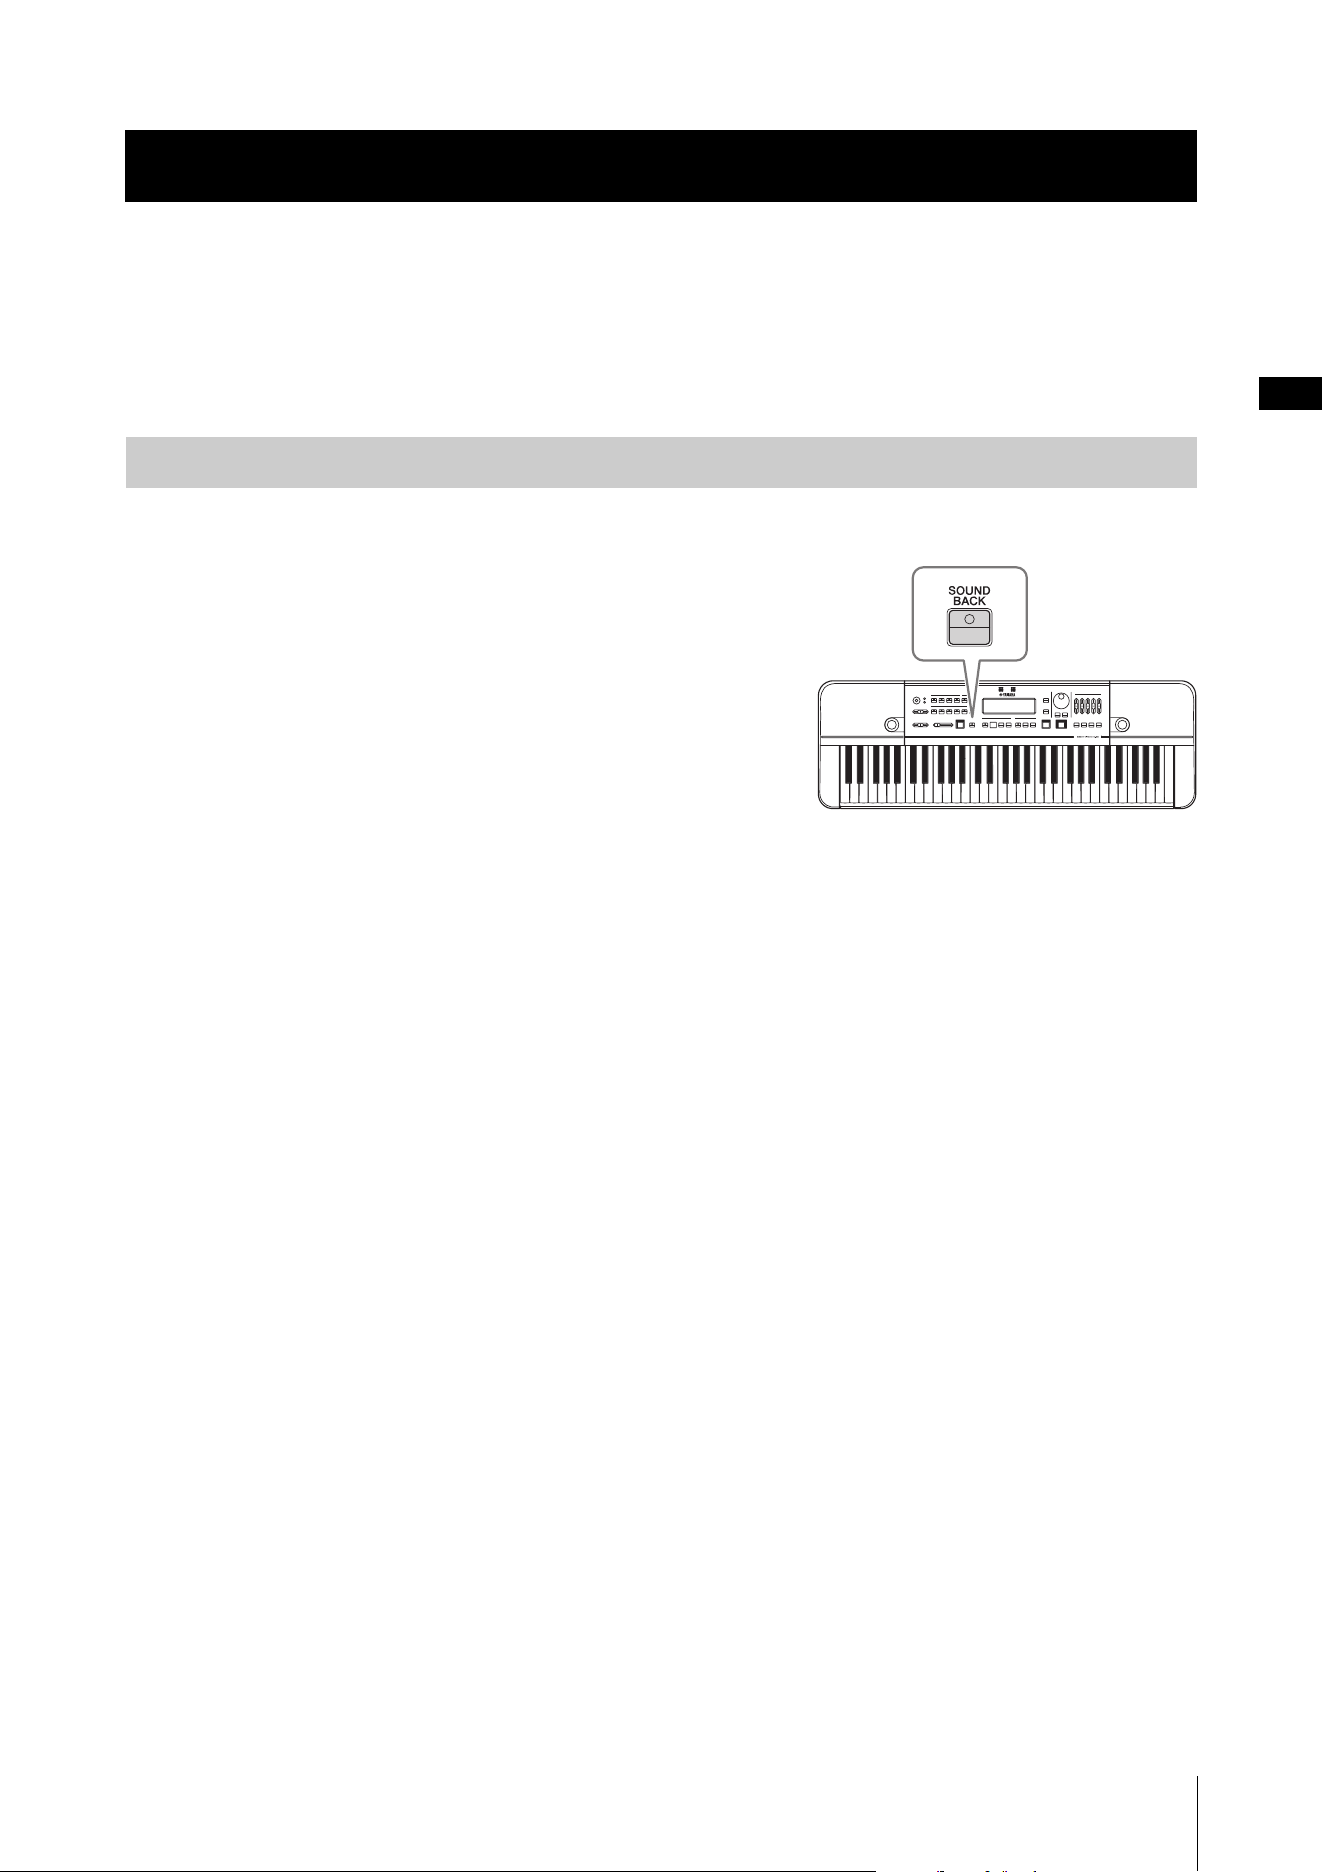
Press the
[USB] button to enter the USB File Selection mode.
Operation method when using USB File Selection mode
NOTE
• Past files recorded with the HD-300 are saved in ascending order by time as “****_REC/TSR” folder names immediately below the root
directory of the USB flash drive. “****” denotes a number from 0001 – 9999, “REC” is used for regular recordings, and “TSR” for time
shift recordings.
• Supported formats include WAV (44.1 kHz, Stereo/Mono), and MIDI (GM, XG Lite).
• Past data cannot be deleted on the HD-300. All file operations besides playback must be performed on a computer.
To exit the USB File Selection mode, press the [EXIT] button when at the uppermost level.
You can also stop playback, exit the USB File Selection mode and then return to the Home screen, by pressing one of
these buttons: [BEAT], [RHYTHM STYLE], [REC], or [TIME SHIFT RECORDING].
Using the USB File Selection mode
Selecting folders and files
[-]/[+] buttons, dial
Confirming folders
(descending a level)
[START/STOP] button, CURSOR [R] button
Ascending a level
[EXIT] button, CURSOR [L] button
Playing and stopping files
[START/STOP] button
HD-300 Owner’s Manual
29
Training Your Ability to Imagine the Correct Pitch (Sound Back)
You can use the sound back function to help train your ability to imagine pitch. With this function, the HD-300 detects
the pitch of the input sound and returns the nearest reference tone within the currently set temperament. So, you can
confirm whether sounds are performed at the correct pitch from a soundless state.
1. Set the temperament (page 18) to a note you want to try and match.
2. Adjust the microphone settings (page 16).
3. Turn the [SOUND BACK] button on.
NOTE
While the Sound Back function is on, there will be no sound even when you
play the keyboard.
4. Practice to play at a correct pitch using the Sound Back
function.
4-1. Perform on your instrument with the pitch you
imagined and input the sound into the HD-300.
The HD-300 will play the note in the correct pitch that is nearest to the sound you have played.
4-2. Adjust your performance to match the pitch to the note played back by the HD-300.
The HD-300 continues playing the sound, unless you stop performing.
4-3. Stop your performance and wait a while.
The HD-300 stops sounding automatically after a specified length of time.
NOTE
You can set the duration that the sound continues in “Sound Back Time” in the Setting screen (page 31).
5. When finished practicing, turn the [SOUND BACK] button off.
Enhancing Basic Practice (Sound Back, Training)
Using the Sound Back Function
Restoring Factory Settings
HD-300 Owner’s Manual
30
Playing Training Examples and Accompaniments (Training)
The HD-300 contains music data based on the “JBC Band Method” compiled by the JBC (Japan Band Clinic), which can
be used as training examples or accompaniments. This is a great practice aid to use when an accompanist is absent.
Press the
[TRAINING] button to enter the Training mode.
For details on training content included, refer to the Data List (page 41).
Operation method when using the Training mode
NOTE
• In the training mode, the Voices of the [PIANO/OTHERS] button cannot be selected.
• Each song file has a default temperament and tempo. The temperament is set automatically when playback starts, and the tempo is
set automatically when a file is selected or playback is stopped.
• The tempo can be changed in the same way as the metronome (page 23). Set the tempo as necessary, immediately before or during
playback. If you want to select another file after changing the tempo, press the [TRAINING] button so that the cursor moves to the file
selection area.
To exit the Training mode, press the [EXIT] button when at the uppermost level.
You can also stop playback, exit the Training mode and then return to the Home screen, by pressing one of these buttons:
[BEAT], [RHYTHM STYLE], [REC], or [TIME SHIFT RECORDING].
Press the [P] (Standby/On) switch to turn on the power while pressing down the highest note of the keyboard (white
key). This restores all settings of the HD-300 to their default settings, and the “Clear Backup” message will appear on the
LCD screen.
Restoring default settings will delete all user-made temperaments and Beat • Tempo memories. It is recommended that
you take notes on any settings you’ve made before restoring the factory settings.
Using the Training Mode
Selecting folders and files
[-]/[+] buttons, dial
Confirming folders
(descending a level)
[START/STOP] button, CURSOR [R] button
Ascending a level
[EXIT] button, CURSOR [L] button
Playing and stopping files
[START/STOP] button
Restoring Factory Settings
HD-300 Owner’s Manual
31
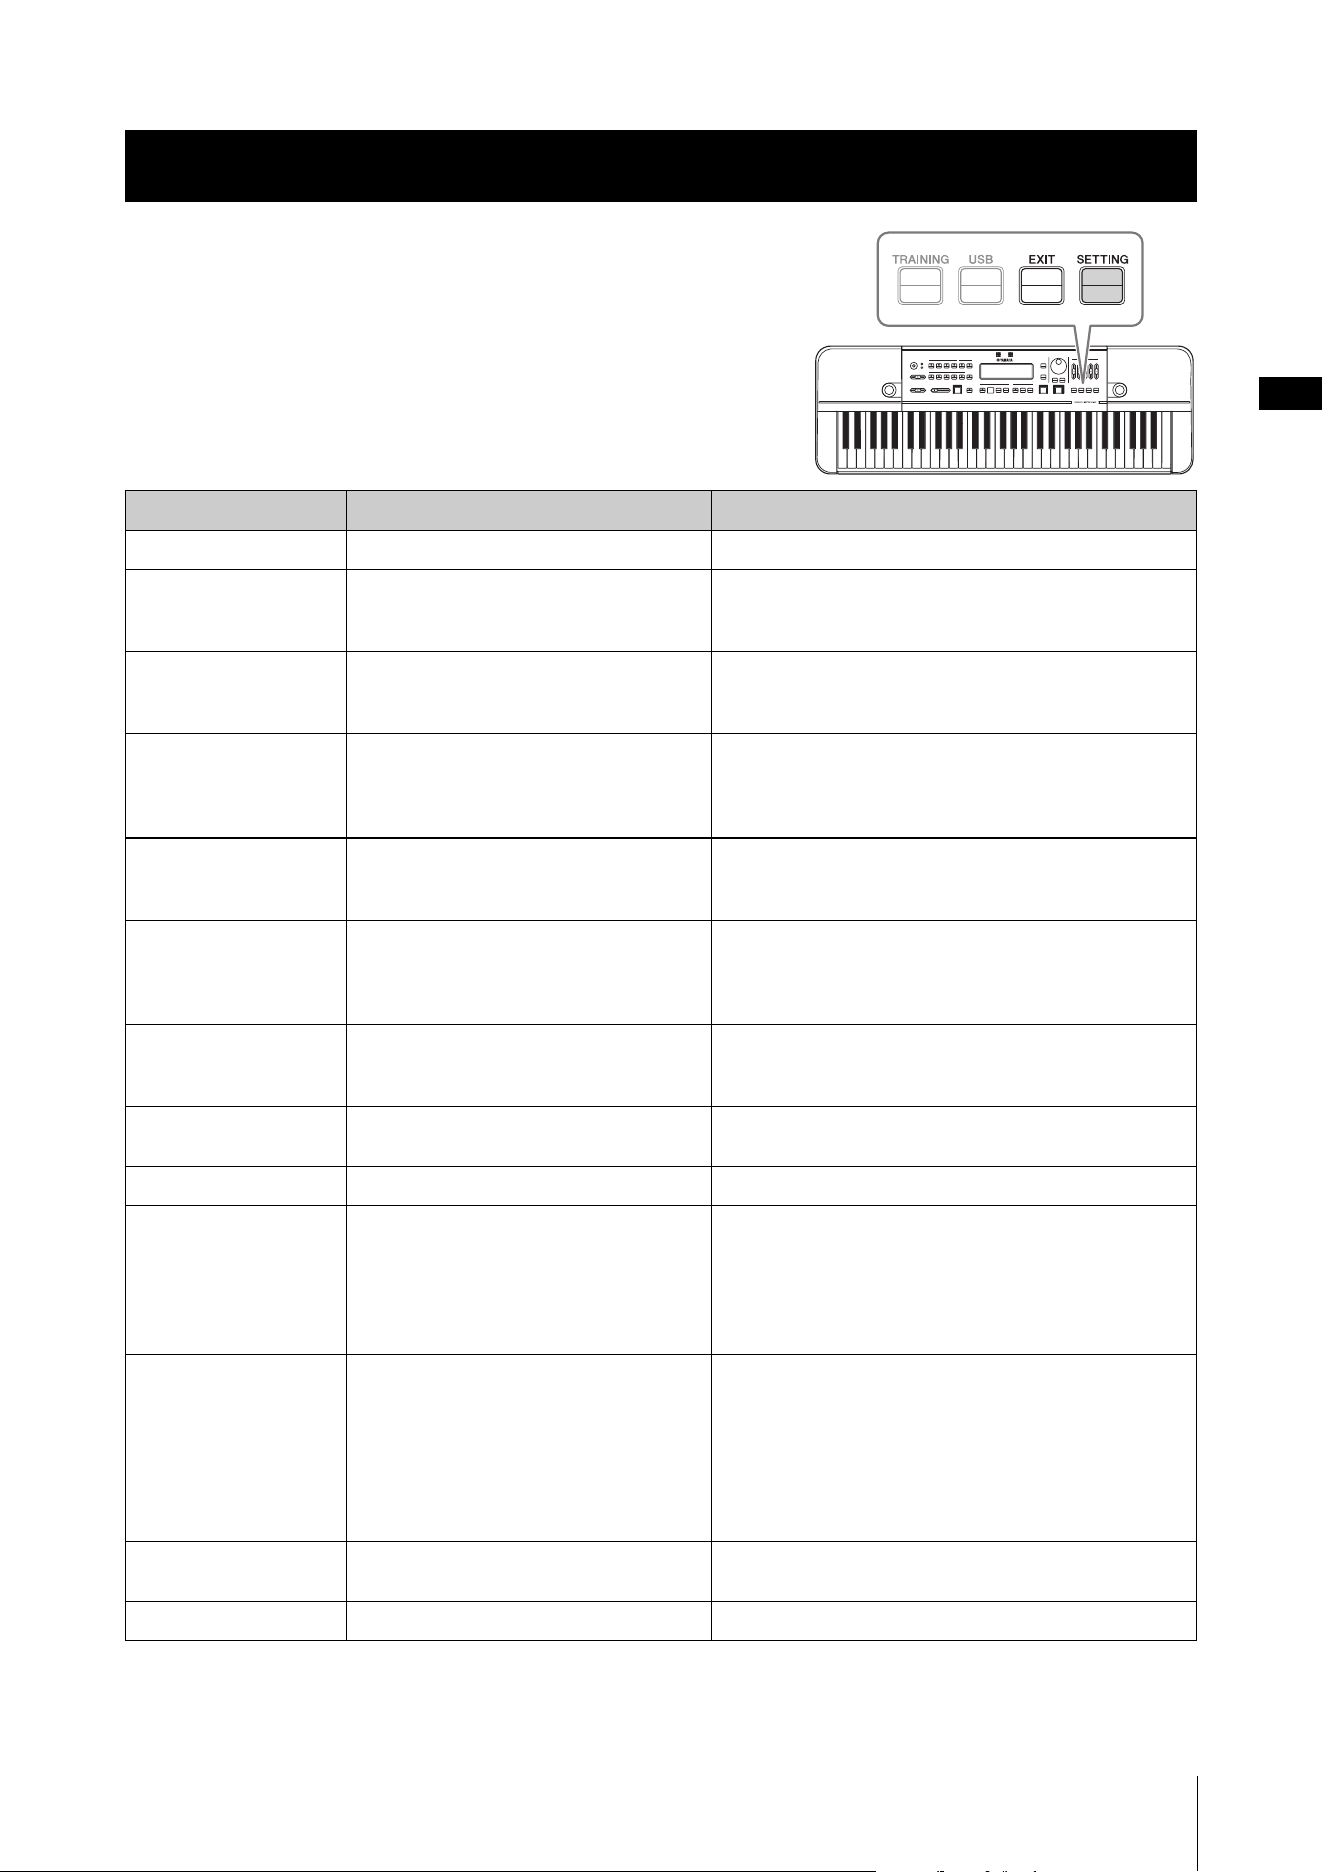
You can change advanced settings on the Settings screen.
Press the [SETTING] button to call up the Settings screen. Press
the [EXIT] button to exit from the screen.
Select an item using the CURSOR [L][R] buttons, and then use
the [-]/[+] buttons, or the dial to change values.
To return the selected item to its default value, press both [-]/[+]
buttons simultaneously.
Items in the Settings screen are as follows.
(*) Items with this mark are for display only and cannot be changed.
Advanced Settings (Settings)
Name Description Settings
Standard Pitch
Sets the standard pitch. 430.0 – 450.0 Hz
Metronome Sound
Sets the metronome sound. Peck: This is the same tone used by the HD-200.
Click: This is a mechanical metronome tone.
Beep: This is an electronic metronome tone.
Metronome Pattern
Sets the metronome pattern (page 23). All: The metronome plays back all beats.
Alternate: The metronome plays back beats so that
multiple click sounds are not doubled at the same timing.
Sound Back Time
Specifies the duration until the sound
produced by the HD-300 turns off after
there are no more input sounds when the
Sound Back feature is turned on.
Short: approx. 2 sec.
Long: approx. 4 sec.
Pre Time Shift Rec
Specifies the number of seconds recorded
before the [REC] button is pressed while in
Time Shift Recording mode.
3 – 10 sec.
Post Time Shift Rec
Specifies the number of seconds until a
recording automatically stops after starting
or extending a recording in Time Shift
Recording mode.
5 – 20 sec.
Bluetooth
Sets the Bluetooth communication mode. Off: Use this to disable Bluetooth communication.
On: Use this to connect to a paired device.
Pairing: Use this to switch to pairing mode.
BD Address (*)
Displays the MAC address for the HD-300
as a Bluetooth device.
—
LCD Contrast
Adjusts the contrast of the LCD. 0 – 20
Foot Pedal
Sets functions of the pedal connected to the
[FOOT PEDAL] jack.
Volume: This adjusts the main volume.
Hold: This produces the same effect as the [HOLD]
button.
Start/Stop: This produces the same effect as the [START/
STOP] button.
Rec: This produces the same effect as the [REC] button.
Auto Power Off
Enables/disables the Auto Power Off
function.
Disable: This disables the Auto Power Off function.
Enable: This enables the Auto Power Off function.
NOTE
The amount of time that elapses before the power is
automatically turned off depends on the type of power
being used. This is set to 30 minutes for battery power, and
two hours when using an AC adaptor.
Language
Sets the language of alert messages and
file names that appear in training mode.
English, Japanese
Firmware Version (*)
Displays the firmware version. —
HD-300 Owner’s Manual
32
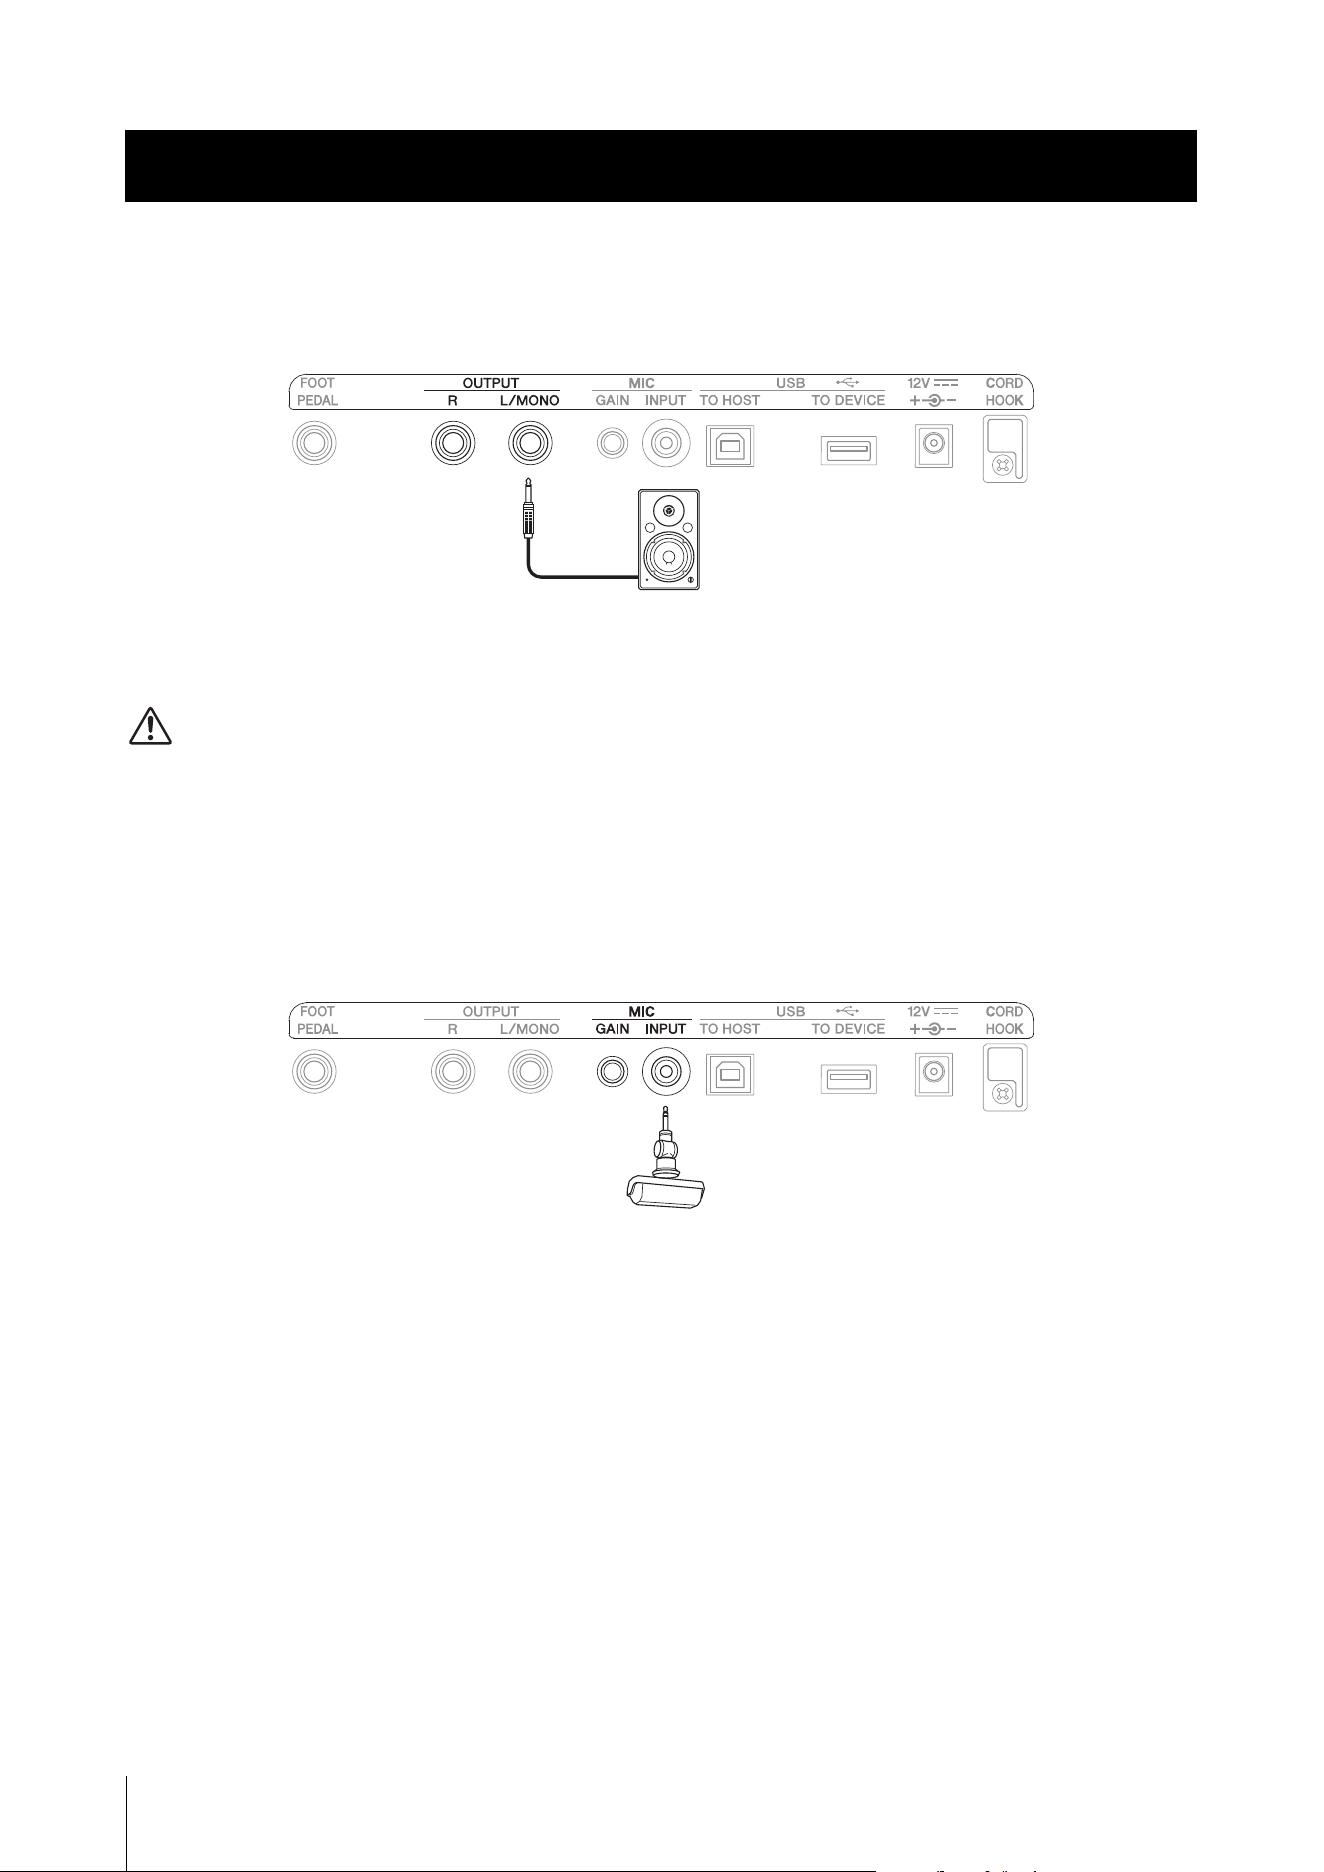
Connecting Amplifiers or Other Equipment (OUTPUT [L/MONO],
[R] jacks)
Connect a speaker with an internal amplifier to the OUTPUT jack.
For mono sound, only connect the [L/MONO] jack. For stereo sound, connect both the [L/MONO] jack and the [R] jack.
When an external device is connected, sound will no longer be produced by the instrument’s speakers.
CAUTION
Make sure to turn off all devices when connecting external devices. Additionally, reduce the volume of each device to the
minimum before turning the power on or off. Failure to do so may cause electric shock or damage the device.
NOTICE
When outputting sound from the instrument to an external device, first turn on the power to the instrument, and then turn the
external device on. When turning the power off, follow the procedure in reverse order. Failure to do so may damage the device.
Connecting a Microphone (MIC [INPUT] jack, MIC [GAIN] knob)
Connect a commercially available external microphone to the MIC [INPUT] jack.
Use a microphone with a stereo mini phone jack and plug-in power compatibility.
Connecting an external microphone will automatically disable the internal microphone.
NOTE
When an external microphone is connected, the MIC [GAIN] knob controls the volume of the external microphone.
Connecting External Devices
Standard phone plug
Stereo mini phone plug
Connecting External Devices
HD-300 Owner’s Manual
33
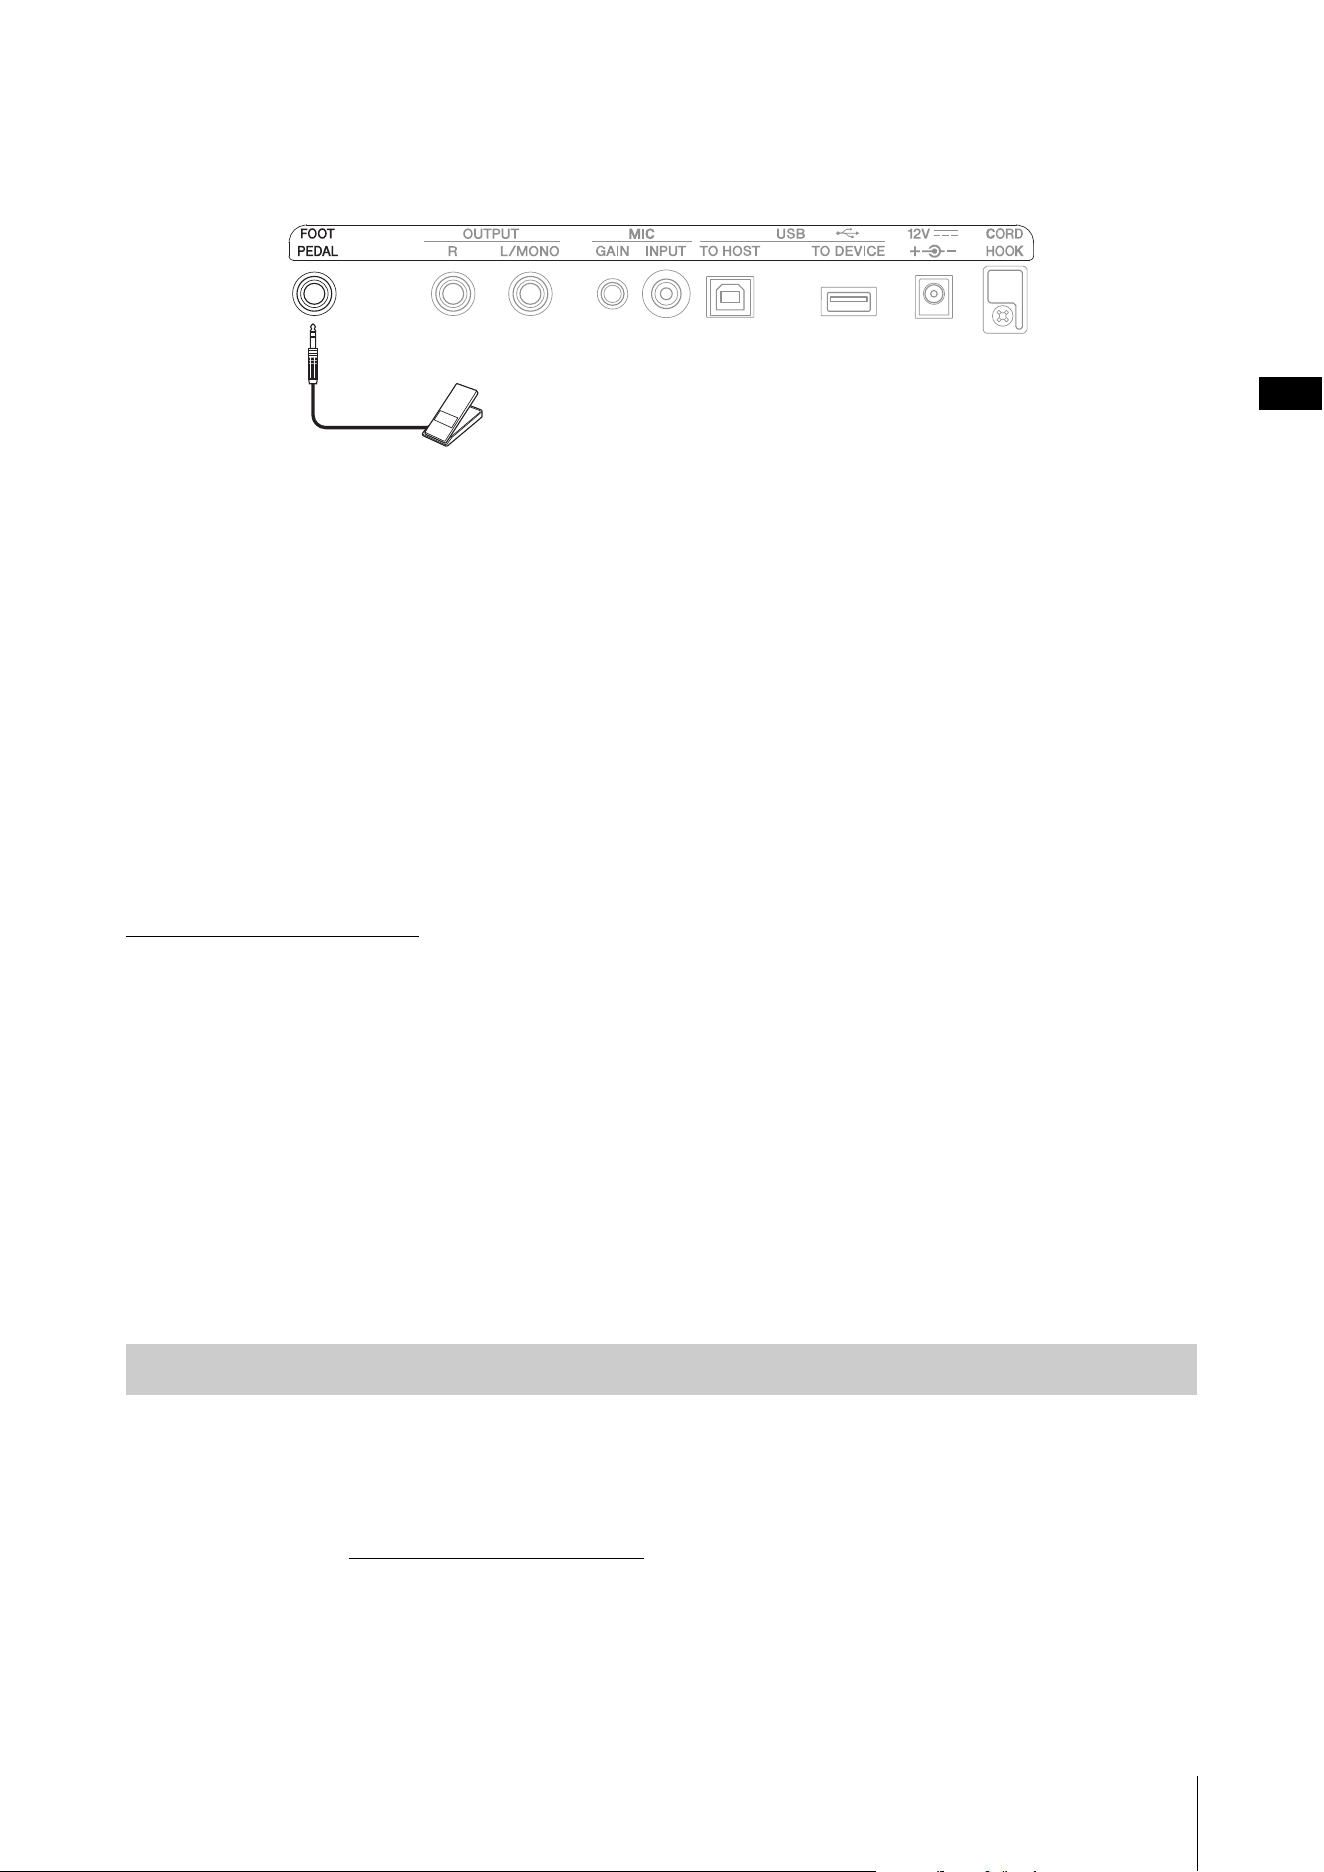
Using a Pedal ([FOOT PEDAL] jack)
You can connect a volume-type pedal (FC7, sold separately) to the HD-300 to control certain functions.
One of these functions can be assigned to the foot pedal: volume control, [HOLD] button, [START/STOP] button or
[REC] button.
To assign the function to the pedal, change the value of the [SETTING] button → “Foot Pedal” (page 31).
NOTE
• A switch-type foot pedal cannot be used.
• Always turn off the power before inserting or removing plug.
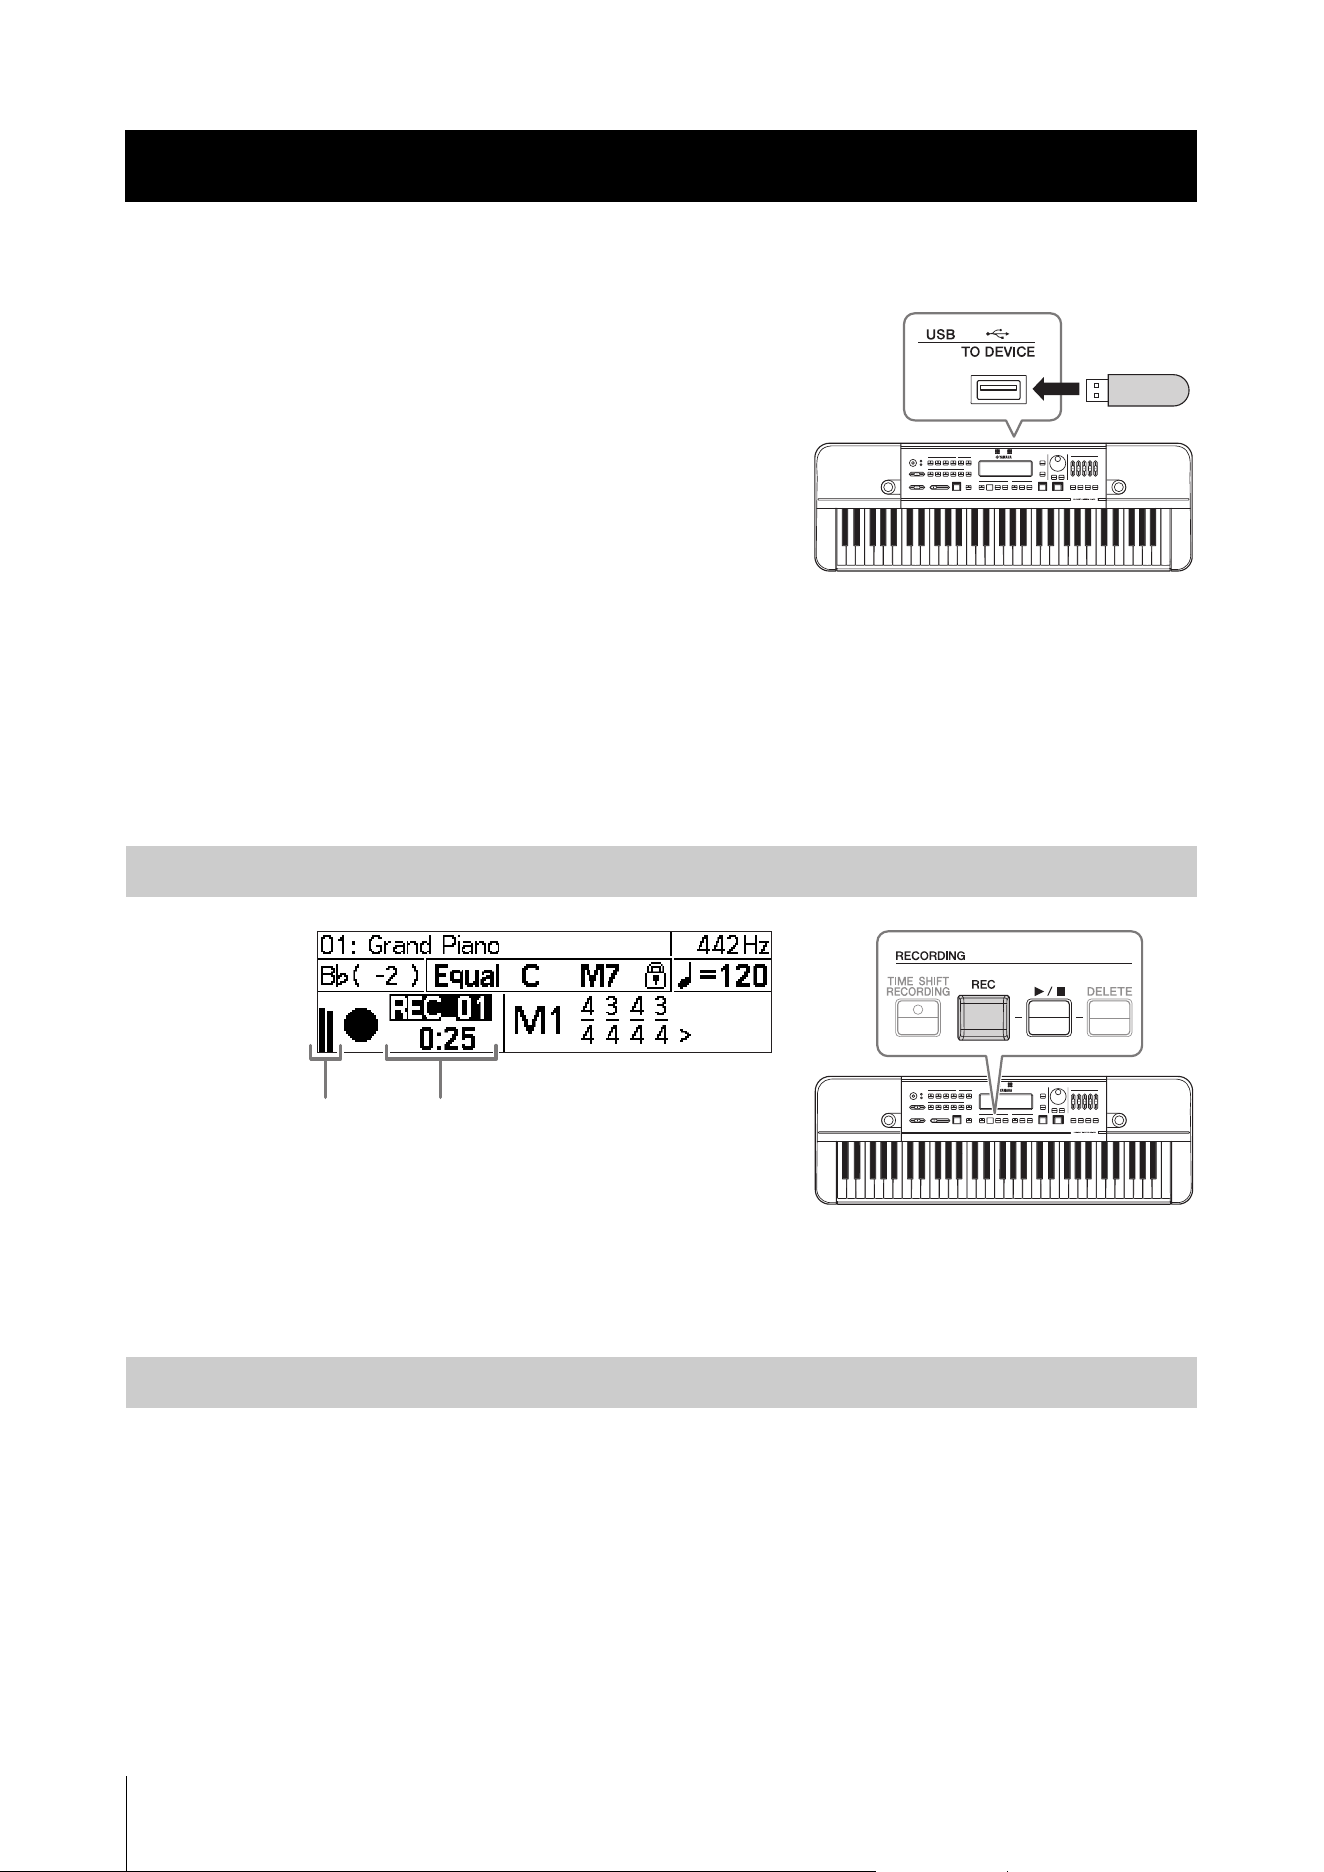
Connecting a USB Flash Drive (USB [TO DEVICE] terminal)
NOTICE
Before using a USB flash drive, make sure to read through “Precautions when using the USB [TO DEVICE] terminal” on page7.
When connecting a USB flash drive to the instrument, the recording function (page 26) will be available for use.
You can obtain a list of tested devices from the website below. At the website’s “Support” page, select your country, click
on “Document and Data,” and then search for “HD-300.”
https://download.yamaha.com
NOTE
A USB flash drive cannot be formatted on the instrument. If the USB flash drive needs formatting, format it in FAT32 format on a
computer.
Connecting to a Computer (USB [TO HOST] terminal)
Use the USB [TO HOST] terminal to connect to a computer and transmit audio and MIDI signals to and from the
computer. You can use this to record audio from the HD-300 in high quality, and control the HD-300 by sending MIDI
signals from a PC.
NOTE
Before connecting to a computer using the USB [TO HOST] terminal, make sure to read the “Precautions when using the USB [TO
HOST] terminal” on page 7.
Windows
Windows users need to use the “Yamaha Steinberg USB Driver.” Download the driver from the following website and
install it on your computer.
Yamaha Downloads: https://download.yamaha.com
* After selecting your country and clicking on “Firmware/Software Updates” from the “Support” page, set the “-” on the
product category and enter “Steinberg” to perform a search.
Refer to the website above for information on system requirements.
For details on installation and computer settings, refer to the Installation Guide that comes with the download file
package.
Preparations
FC7 (sold separately)
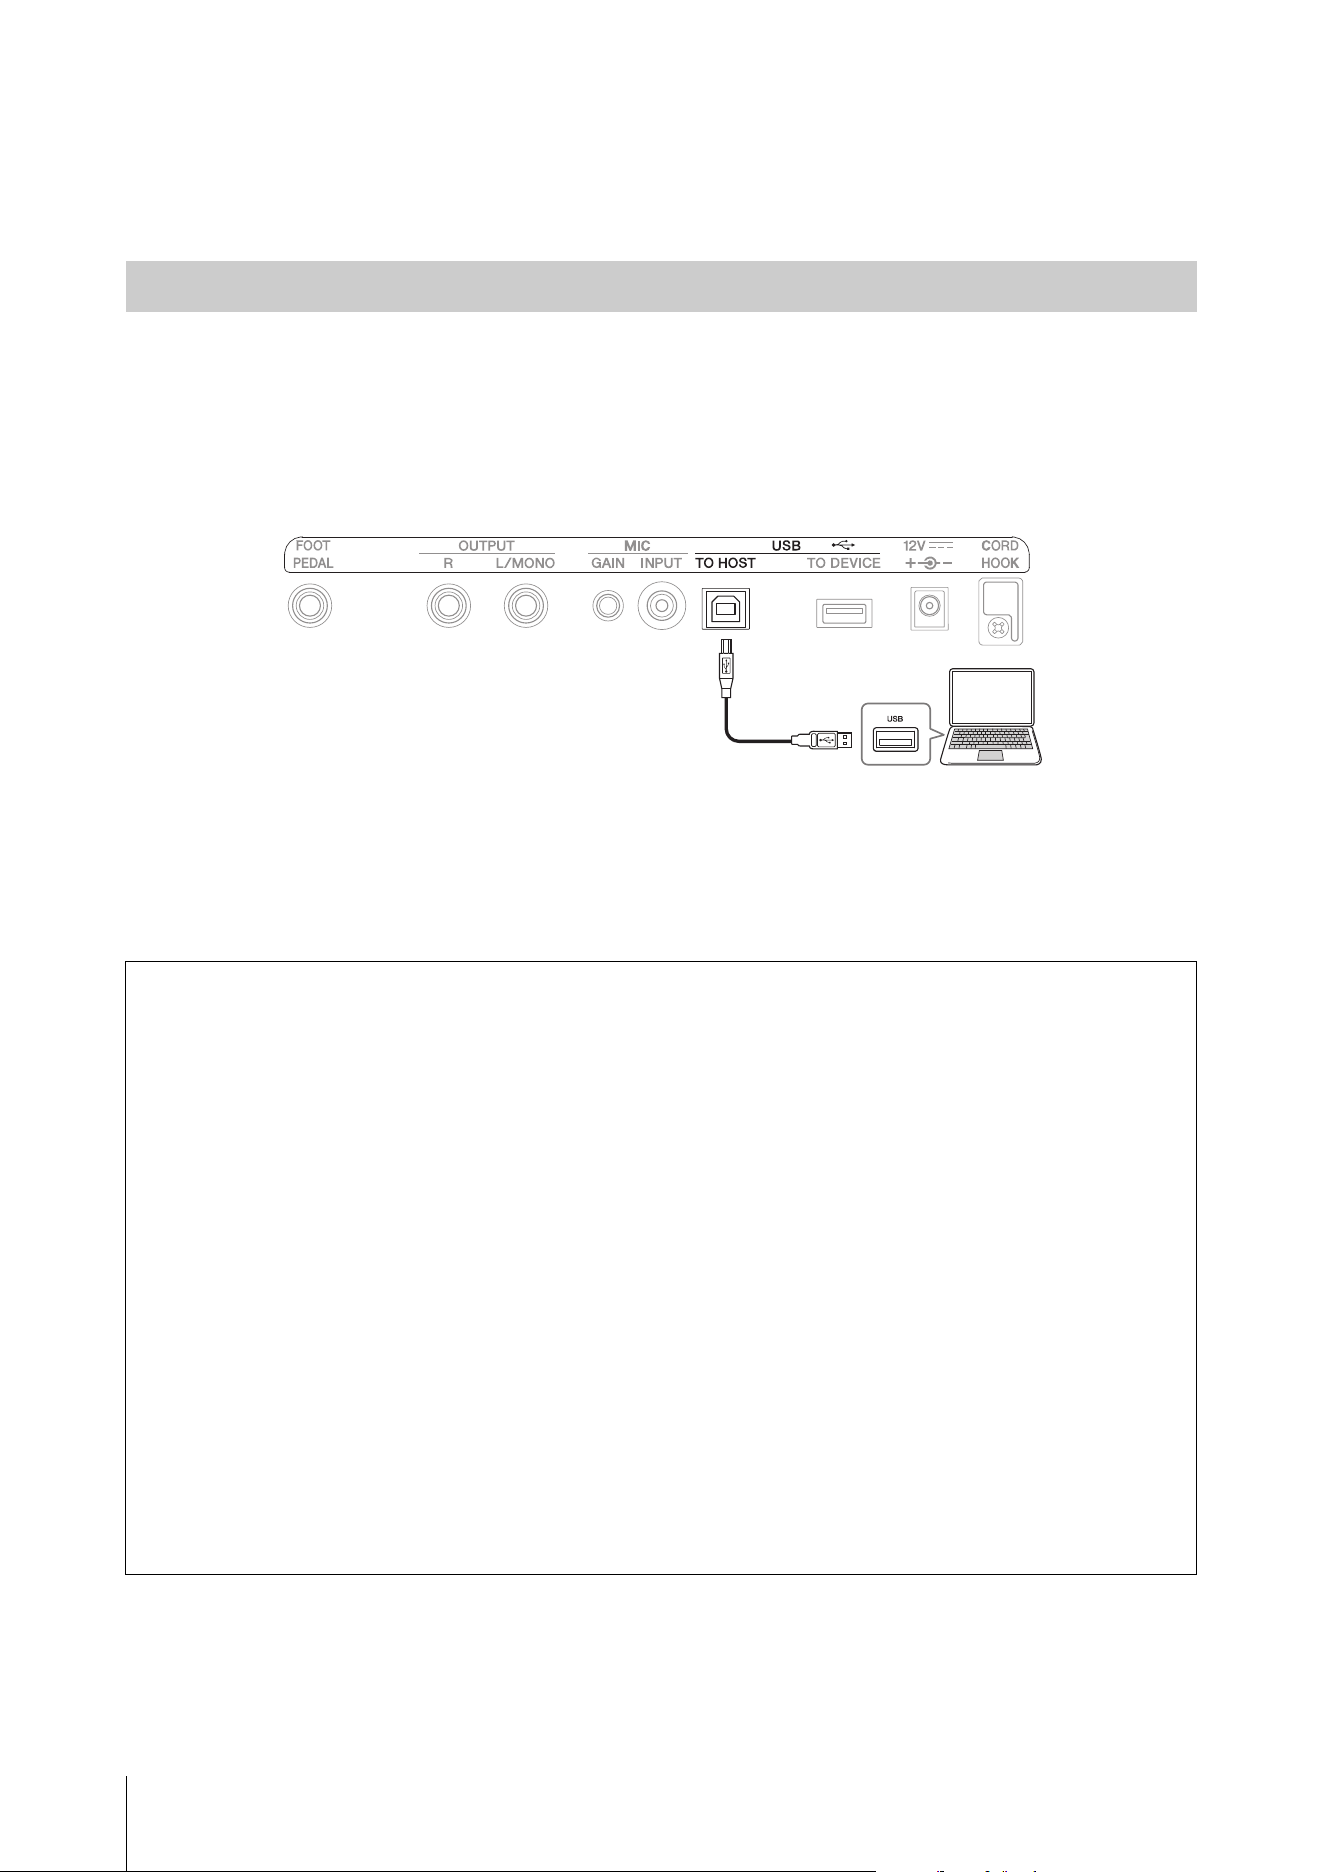
Connecting External Devices
HD-300 Owner’s Manual
34
Mac
Standard driver on Mac OS can be used; there is no need to install another driver.
1. Turn the instrument off.
2. Start up the computer.
Close all applications on the computer.
3. Connect the USB cable to the USB [TO HOST] terminal on the instrument, and then connect the USB
cable to the computer.
4. Turn the instrument on.
The computer and instrument are now able to communicate with each other.
NOTE
Use an AB type USB cable to connect. Additionally, use a cable less than three meters in length. A USB 3.0 cable cannot be used.
Connecting
What you can do by connecting to a computer (examples)
Send and receive performance information (MIDI data)
• Play a song in MIDI format
You can play a MIDI file on the computer and produce the sounds on the instrument.
• Record a performance as MIDI data
Once a performance is recorded as MIDI data, you can then change the Voice, note numbers and make other edits
using music production software.
• Use the instrument as a keyboard for entering data into music production software or music
notation software
You can use the HD-300 keyboard to program music in music production software, or add notes in music notation
software.
Sending and receiving audio data digitally
• Playing audio data in high quality
You can enjoy clearer audio with less sound quality degradation.
• Record instrumental performances as audio data in recording software and music production
software
Recorded data can be played back on a computer or smart device. Use this to create tracks for practicing.
2
1
USB cable
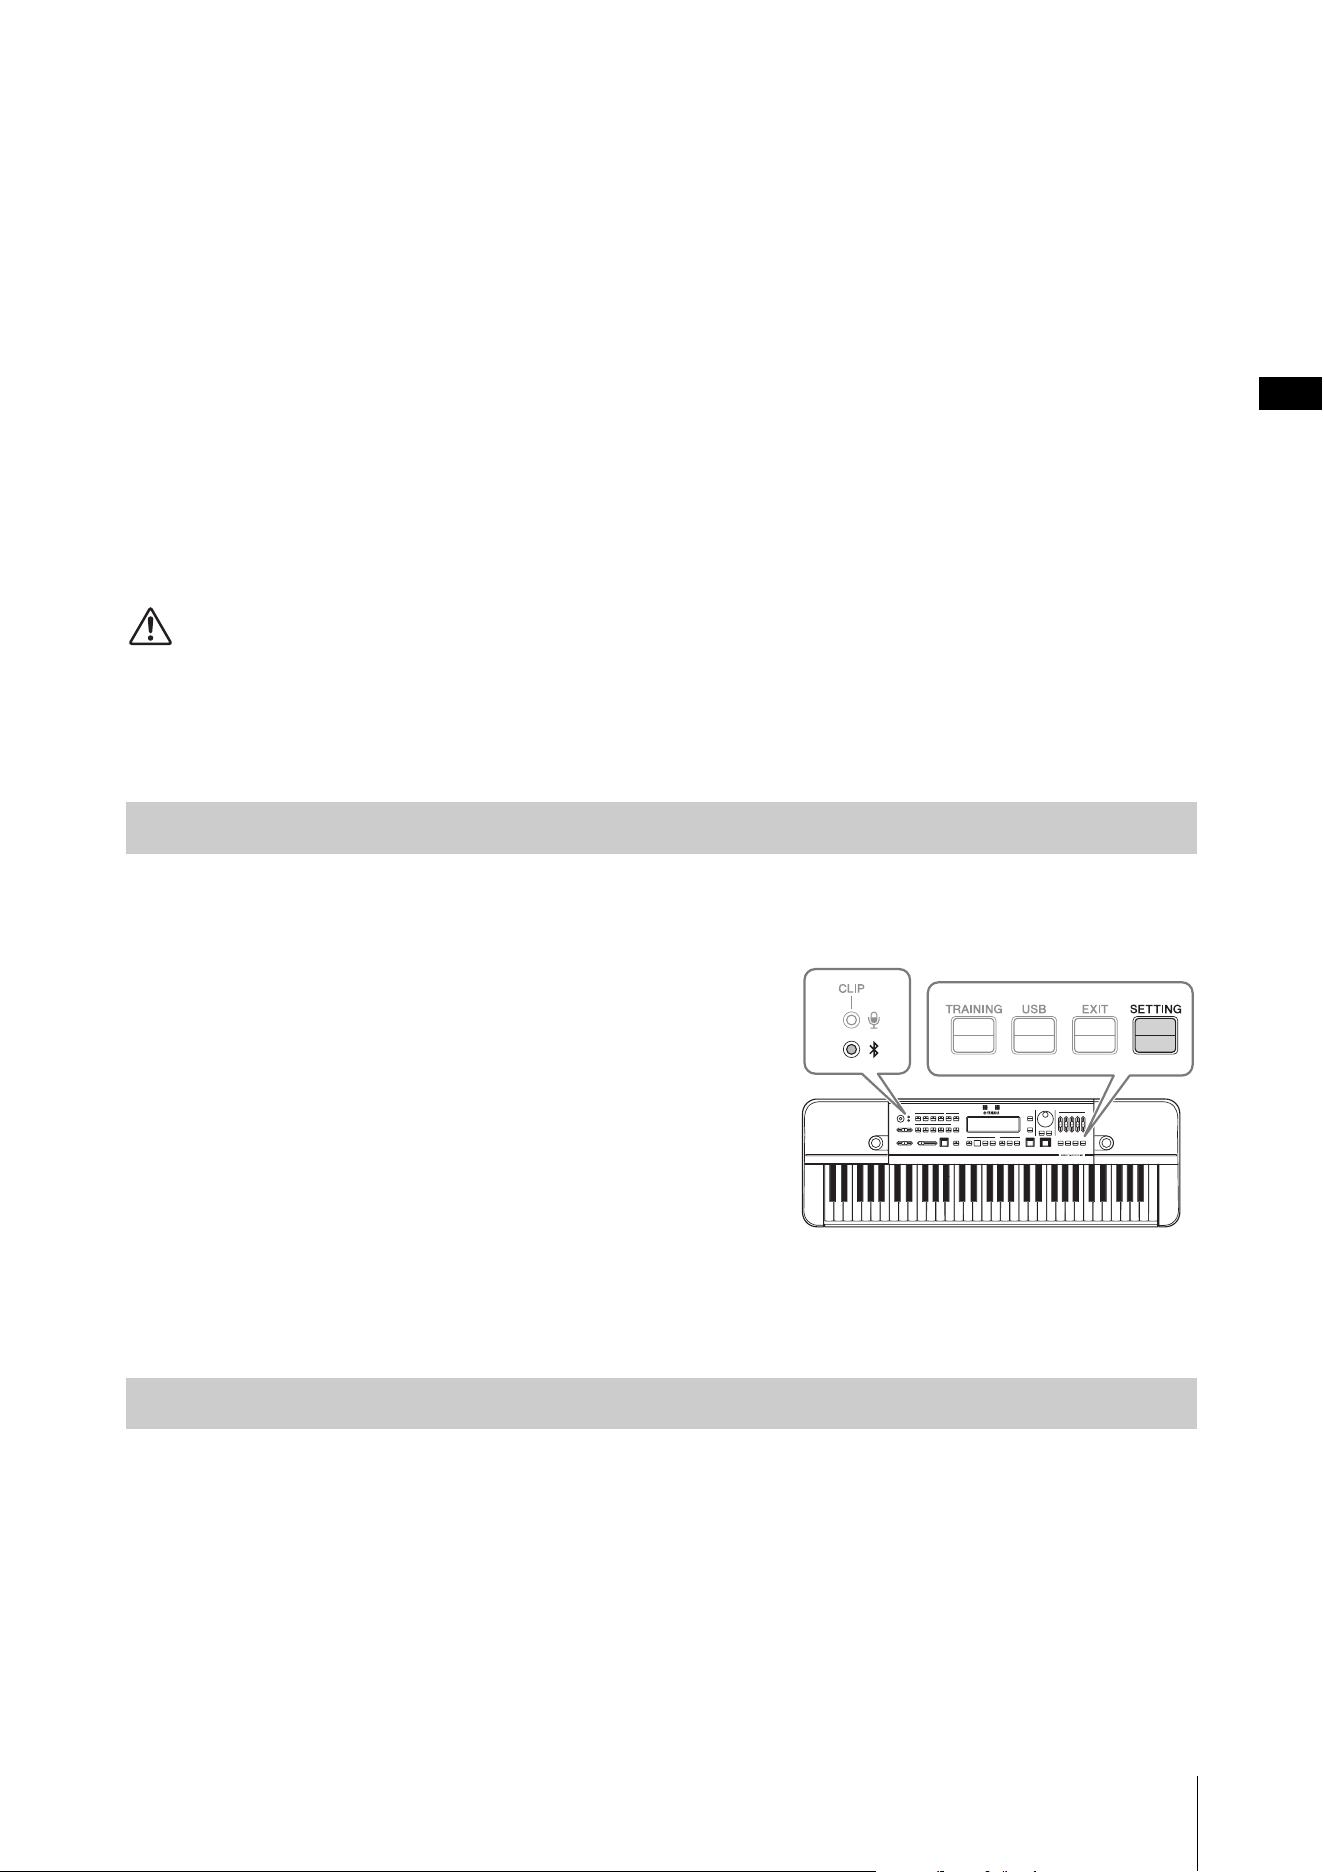
Connecting External Devices
HD-300 Owner’s Manual
35
Using the “HD-300 Assistant” iPhone/iPad App (Bluetooth)
You can use the “HD-300 Assistant” iPhone/iPad app to control the instrument remotely, demonstrate minutely out-of-
tune sounds (interference beats) using the instrument, play rhythms created with the app on the instrument, and much
more. The app also comes with useful standalone functions, such as a tuner and a chord detector.
When using the HD-300 Assistant, you will need to connect to the HD-300 from the HD-300 Assistant via Bluetooth,
using a different method than the “Pairing” that is used to connect to output audio of an iPhone/iPad. For details on the
connection procedure, refer to the HD-300 Assistant instruction manual.
To get the HD-300 Assistant, search for “HD-300 Assistant” in the iPhone/iPad App Store.
Listening on the HD-300 to Audio Playback from an iPhone/
iPad (Bluetooth)
You can connect to an iPhone/iPad via Bluetooth to output audio played back on the iPhone/iPad from the HD-300.
CAUTION
Adjust the volume on the iPhone or the iPad side before playing the music, to avoid possible hearing impairment or damage to
the equipment.
NOTE
It is not possible to play the audio output of the HD-300 from a Bluetooth speaker.
When connecting the instrument to an iPhone/iPad via Bluetooth for the first time, you will need to “pair” the two
devices. To do this, follow the operation steps below.
1. Press the [SETTING] button on the HD-300 to open
the Settings screen.
2. Set “Bluetooth” to “Pairing.”
The Bluetooth status LED will start flashing to show the
HD-300 is in pairing standby mode.
3. Search for Bluetooth devices on your iPhone/iPad,
and then select “HD-300 *******” (where * is the BD
Address).
The two devices are now paired and can communicate with
one another.
• The Bluetooth status LED lights up.
• “Bluetooth” on the Settings screen turns to “On” automatically.
The instrument will automatically reconnect to a paired device at the following intervals.
• When turning the HD-300 on
• When changing “Bluetooth” from “Off” to “On”
When the connection process is complete and the two devices are able to communicate, the Bluetooth status LED will
light up.
Initial connection
Connecting to a paired device
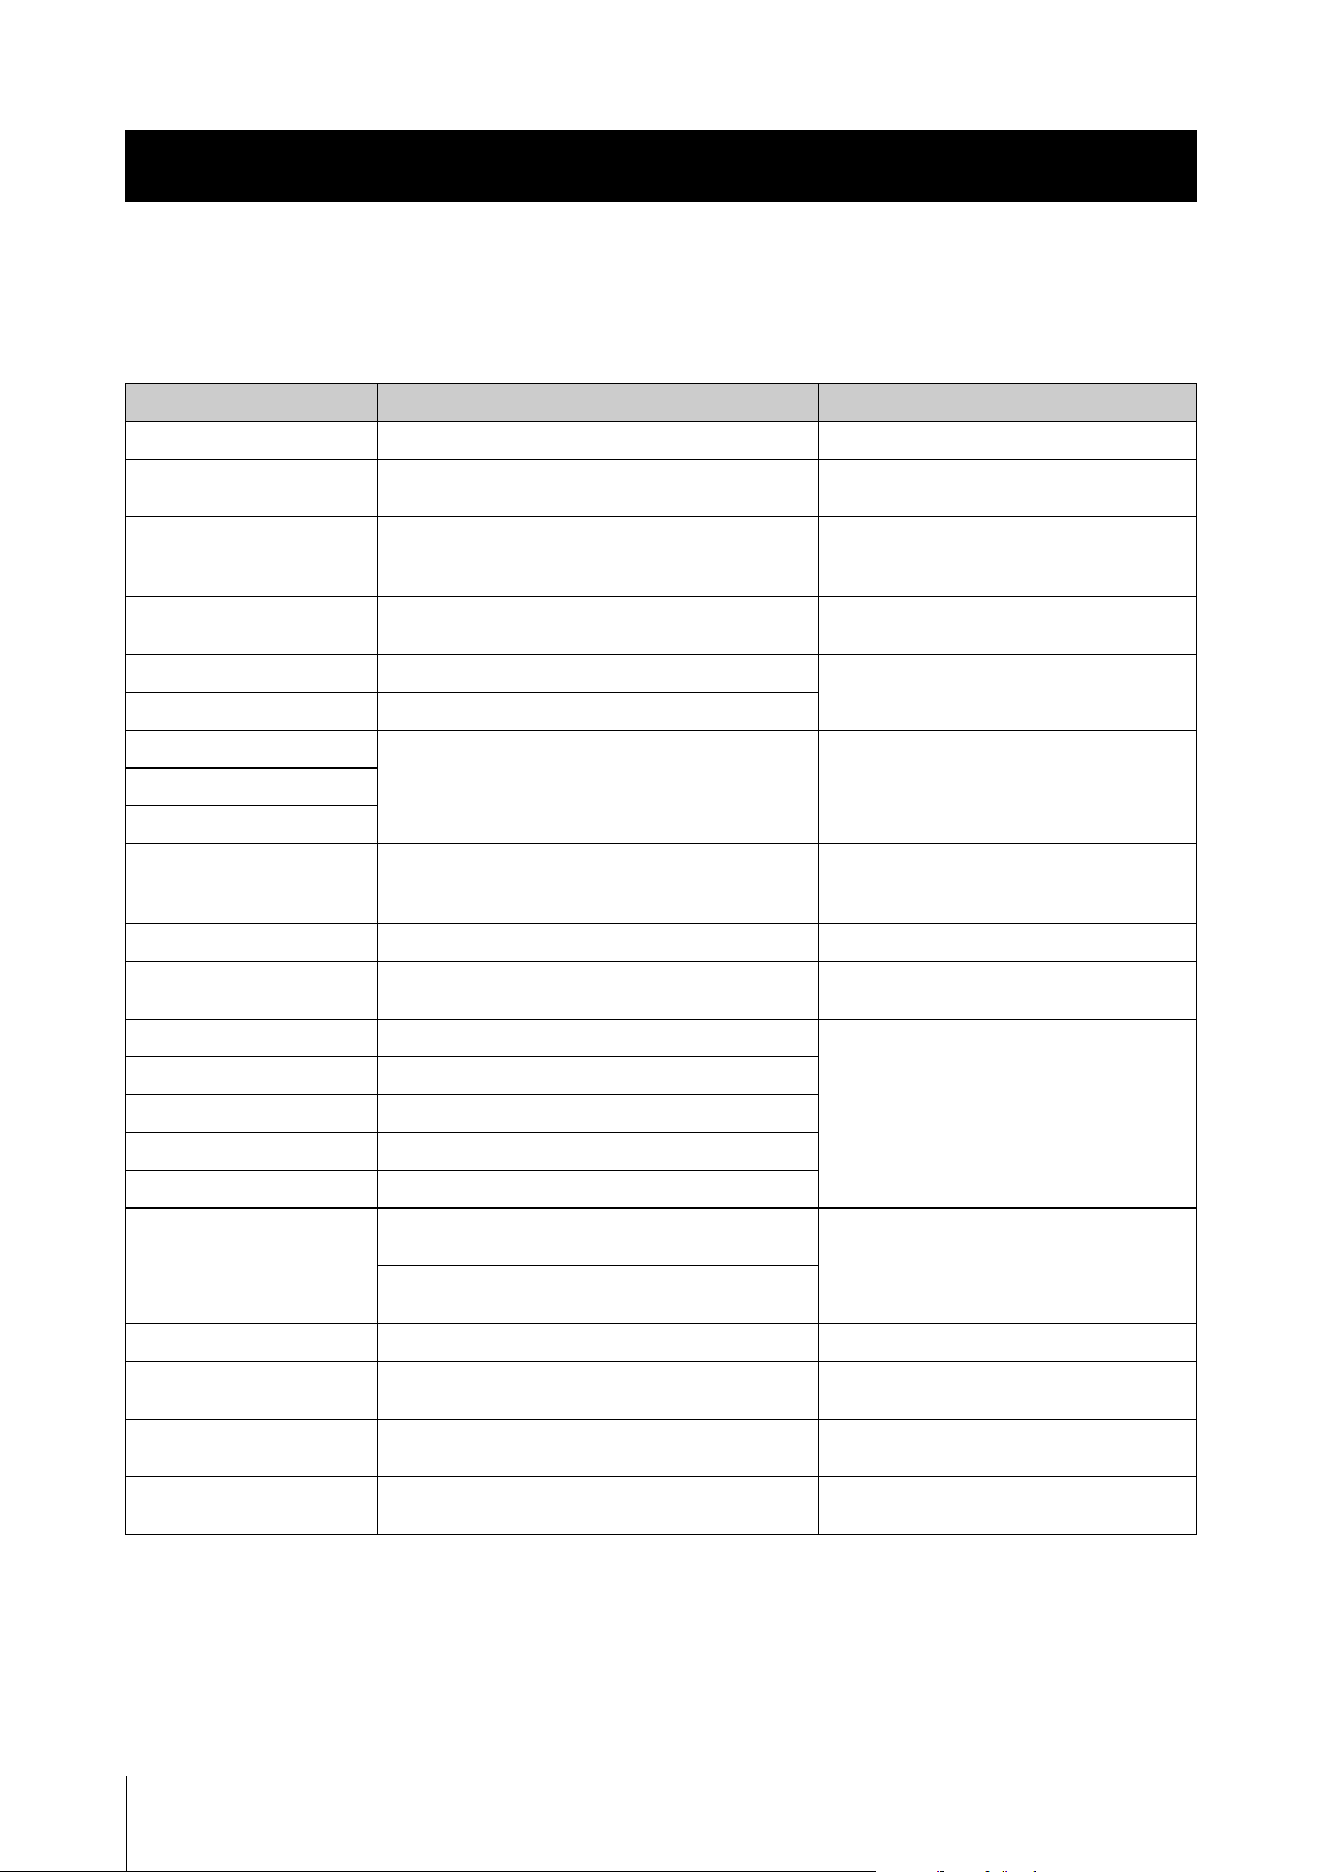
HD-300 Owner’s Manual
36
Error Messages
If an error occurs, a message will appear on the display. Use the following chart to confirm the problem and find an
appropriate solution.
Appendix
Message Cause Solution
Battery Power is Low.
The battery power is low. Replace all 6 batteries.
Connect AC Adaptor
The function cannot be used, since now power is
being drawn from batteries.
Turn off the power, connect the AC adapter,
and then turn it on again (pages 13, 14).
Backup Error
An error occurred reading the settings. Do not remove the power adapter or batteries
until the screen display disappears when
turning off the power.
MIDI Error
An error occurred while transmitting and receiving
MIDI data.
Check the connection status with the
computer or iPhone/iPad.
Update Error
An error occurred during the update. Turn off the power and then turn it on again
(pages 14, 15).
Please Reboot.
The instrument needs to be restarted.
File Open Error
An error occurred while reading the file. Check the connection status of the USB
device and the content data of the device.
File Read Error
File Close Error
File Write Error
An error occurred while writing the file. Check the USB device connection status,
device data contents, and write protect
status.
Connect USB Memory.
No USB device is connected. Connect a USB device (page 33).
Cannot Record.
The USB device is write-protected. Check the write protect status of the USB
device.
Cannot Play.
Failed to play back the file. Check the USB device connection status,
device data contents, and write protect
status.
Operation Failed.
File deletion failed.
USB Device Error
An error occurred while accessing the USB device.
System File Error
An error occurred while accessing the system file.
File Error
An error occurred while accessing the file.
Disk Full Error
During recording, the recording data size has
exceeded the remaining capacity of the USB device.
Delete unnecessary files of the USB device,
on your computer.
The remaining capacity of the USB device has run
out while writing a file.
File is too Large.
The selected file was too large to read. Reduce the size of the file.
USB Connection Error
Failed to connect the USB device. Check the USB device status, and then
reconnect the device.
USB Overcurrent Error
An abnormal current has flowed through the USB
device. (The USB device is defective.)
Unplug the USB device and use another USB
device.
Format Error
An unformatted USB device is inserted. Check the format of the USB device. This
instrument only supports FAT32 format.
Appendix
HD-300 Owner’s Manual
37
Troubleshooting
If you encounter any problems, first check the items listed below. If the solution provided below does not solve the
problem, or you are experiencing a problem other than those mentioned in the list, turn the power OFF by pressing and
holding the [P] (Standby/On) switch, disconnect the AC adaptor and contact the dealer whom you purchased the
instrument to have the instrument repaired.
Problem Cause Solution
The instrument does not
turn on.
The AC adaptor is not connected. Make sure to connect the AC adaptor to the
instrument and the AC outlet (page 13).
Noise is emitted from the
instrument.
A mobile phone is being used near this unit. Do not put a mobile phone near this unit.
Noise occurs from the
radio or TV, etc.
The radio or TV is positioned too close to the
instrument.
Position the radio or TV as far away as possible
from the instrument.
The sound is low overall, or
there is no sound at all.
The volume setting is too low. Increase the volume by moving the
[MAIN VOL] slider.
The external amplifier is connected, and the
volume of the external amplifier is set to the
minimum.
Turn up the volume of the external amplifier.
The sound is distorted,
resonating, or clipping.
The sound of the instrument is resonant with
the main unit or other objects close to the
instrument, because the volume is too high.
Reduce the volume.
Remove the objects that are resonating.
A low-power rated speaker is connected. Connect a high-power rated speaker. A
speaker rated 100 W or more is recommended
when using this instrument with a concert band.
The sound is interrupted
momentarily.
The protection circuit was activated because
the volume was raised too high.
Reduce the volume.
The LCD display is hard to
read.
The contrast settings are not appropriate. Adjust the “LCD Contrast” setting value
(page 16).
The recorded data cannot
be erased.
This instrument only can delete data
immediately after it was recorded.
Connect the USB flash memory to the
computer and delete the files.
Communication with the
USB device has stopped.
An incompatible USB device is being used. Check the USB devices that can be used with
the instrument (page 7).
The operation of the USB
storage device is unstable.
An error has occurred in the communication
processing with the USB device.
Disconnect the USB device, wait at least
6 seconds, and then reconnect it.
There is no sound from the
HD-300 even though the
Sound Back function is
turned on and sound is
input.
The microphone sensitivity setting is too low. Adjust the microphone sensitivity (page 16).
The volume setting is too low. Increase the volume with the [MAIN VOL] slider
and set the [BALANCE] slider to the center
(page 16).
The audio playback sound
does not come out of the
HD-300 even though the
instrument is connected to
an iPhone/iPad via
Bluetooth.
The distance is too far. Reduce the distance between the iPhone/iPad
and the HD-300.
Connection has failed. Turn the power of the HD-300 off and then on
again (pages 14, 15).
Restart your iPhone/iPad.
Try deleting once the HD-300 registration on
the Bluetooth setting screen on your iPhone/
iPad, and then perform the “Initial connection”
setting procedure again (page 35).
There is no sound even
when playing the keyboard.
The [BALANCE] slider is set to the far right. Set the [BALANCE] slider to the center
(page 16).
The Sound Back function is turned on. Turn off the Sound Back function (page 29).
The keys being played are outside the range of
the FM Voice.
Play keys inside the range of the FM Voice, or
select a PCM Voice.
There is no sound for
rhythm playback.
The [BALANCE] slider is set to the far left. Set the [BALANCE] slider to the center
(page 16).
Appendix
HD-300 Owner’s Manual
38
About the Temperaments Used in This Instrument
Unit of interval
A cent is a unit used to measure musical intervals. The logarithm of the frequency ratio of two sounds is taken, and a
semitone of equal temperament is defined as 100 cents. Using cents to measure intervals, we can calculate the interval
using simple addition/subtraction rather than multiplication/division. For this reason, the cent is commonly and
internationally used in fields such as music and acoustics as a standard for measuring intervals.
(value in cents) = × log (frequency ratio)
(frequency ratio) = 10
× (value in cents)
Frequency Ratio and Cent Values for the Main Intervals
Interval
Interval Frequency Ratio Cent Value Comments
Octave 2 1200.000
Pure Perfect 5th 3/2 701.955
Pure Perfect 4th 4/3 498.045
Pure Major 3rd 5/4 386.314
Pure Minor 3rd 6/5 315.641
Pure Large Interval Whole Tone 9/8 203.910
Pure Small Interval Whole Tone 10/9 182.404
Pure Diatonic Scale Semi-tone 16/15 111.731 Difference between the perfect 4th and major 3rd
Pure Chromatic Scale Semi-tone 25/24 70.672 Difference between the major 3rd and minor 3rd
Meantone /2 193.157 Average between large and small interval whole
tones
Syntonic-Comma (S.C.) 81/80 21.506 Difference between large and small interval
whole tones
Pythagorean Comma (P.C.) – 23.460 Difference between the pure 5th ×12 and
7 octaves
Schisma – 1.954 Difference between P.C. and S.C.
Equal Semi-tone 100.000
1200
2log
-----------
2log
1200
-----------
5
2
12
Appendix
HD-300 Owner’s Manual
39
Equal and Pure Temperaments
Preset Temperaments Cent List (for C MAJOR/a minor)
Other Temperaments Cent List (for reference)
The following temperaments can be set in the individual temperament mode.
Temperaments
Temperament Description
Equal Temperament that divides one octave into 12 equal steps. The frequency ratio between neighboring notes is
(= 1.0594631).
Pure (Major) The tuning preserves the pure mathematical intervals of the major scale, especially for the triad chords (in case of
the “C Major”; CEG, FAC, and GBD). Since this tuning includes the pure perfect 5th and pure major 3rd, both large
and small interval whole tones, and chromatic scale semi-tones, changing keys requires changing the pitch ratio of
every note in the scale, making it impractical for keyboard or fretted instruments.
Pure (minor) Like the pure major, this tuning preserves the pure mathematical intervals of the minor scale (in case of “a minor”;
ACE, DFA, EGB). Changing keys also requires changing the pitch of every note in the scale, making it impractical
for keyboard or fretted instruments.
Display Temper-
ament
Type
Difference from the equal temperament (cent)
C D
b
D E
b
E F F
b
G A
b
A B
b
B
Equal
Equal 0.0 0.0 0.0 0.0 0.0 0.0 0.0 0.0 0.0 0.0 0.0 0.0
Pure C
Pure
Major (C)
0.0 -29.3 3.9 15.6 -13.7 -2.0 -31.3 2.0 -27.4 -15.6 17.6 -11.7
Pure a
Pure
Minor (a)
15.6 -13.7 -2.0 31.3 2.0 13.7 -15.6 17.6 -11.7 0.0 33.2 3.9
Temperament Difference from the equal temperament (cent): When the root key is C
C D
b
D E
b
E F F
b
G A
b
A B
b
B
Meantone
0 -24.0 -6.8 10.3 -13.7 3.4 -20.5 -3.4 -27.4 -10.3 6.8 -17.1
Pythagoras
0 13.7 3.9 -5.9 7.8 -2.0 11.7 2 15.6 5.9 -3.9 9.8
Werkmeister I 3rd
Variant
0 -9.8 -7.8 -5.9 -9.8 -2.0 -11.7 -3.9 -7.8 -11.7 -3.9 -7.8
Kirnberger III
0 -9.8 -6.8 -5.9 -13.7 -2.0 -9.8 -3.4 -7.8 -10.3 -3.9 -11.7
Valloti & Young
0 -9.8 -3.9 -5.9 -7.8 -2.0 -11.7 -2.0 -7.8 -5.9 -3.9 -9.8
2
12
Appendix
HD-300 Owner’s Manual
40
Specifications
The contents of this manual apply to the latest specifications as of the printing date. Since Yamaha makes continuous improvements to the product, this
manual may not exactly match the specifications of your particular product. To obtain the latest manual, access the Yamaha website, and then download the
manual file.
HD-300
Product Name Harmony Director
Tone Generator
and Polyphony
Tone Generation Technology
FM, AWM
Polyphony (max.) FM: 8 (WOOD, BRASS, ORGAN categories)
AWM: 48 (PIANO/OTHERS category, Metronome, Rhythm Style)
Keyboard 61 keys (with touch response)
Panel Controls Buttons (with tactile feedback), sliders, dial
Display LCD (with contrast adjustment)
Voices FM: 9 Voices (WOOD, BRASS, ORGAN categories)
AWM: 70 Voices (PIANO/OTHERS category, Metronome)
Hold Yes
Transposition Transpose: 12 semitones
Octave Shift: 4 octaves
Temperaments Temperament: Equal, Pure, Individual Volumes/Pitches
Reference Pitch: 430.0 – 450.3 Hz
Root Key: Automatically detected from keyboard input, lock function available
Metronome Tempo: 32 – 280 (for quarter notes), Tap tempo input function
Reference note selection: eighth note, quarter note, dotted quarter note
Tempo Memory: 8 memories, up to 8 measures in 1 memory
Volume control of each note type (by 5 sliders)
Sound selection (Peck, Click, Beep)
Pattern selection (All, Alternate)
Rhythm Style 9 Rhythm Styles
Recording/Playback Microphone: Internal stereo microphone, or commercially available external microphone
Recording Time (max.) 80 minutes (approx. 0.9 GB) for each file
Format: WAV (44.1 kHz, 16 bit, stereo)
Time Shift Recording function: Yes
Sound Back Yes, Sound Back Time Setting (Short/Long)
Training 167 Songs
Other Settings Foot pedal function assignment (Volume, Hold, Start/Stop, Rec)
Message display language (English, Japanese)
External Input/Output Jacks DC IN 12V
[FOOT PEDAL] (FC7; sold separately)
OUTPUT [L/MONO]/[R] (standard mono phone jack × 2)
MIC [INPUT] (mini stereo phone jack, plug-in power)
USB [TO HOST]/[TO DEVICE]
Bluetooth Bluetooth Version: 4.2
Supported Profile: A2DP
Functions: Bluetooth Audio, MIDI over BLE
Wireless Output: Bluetooth Class 2
Maximum communication distance: about 10 m
Operating Radio Frequency: 2,402 – 2,480 MHz
Maximum Output Power (EIRP): 6 dBm
Type of Modulation: GFSK, π/4 DQPSK, 8 DPSK
Power Amplifier 3.0 W × 3.0 W
Speaker 12 cm (6 Ω) × 2
Power Supply Rated Power Supply AC Adaptor:
For EU countries: PA-150B or an equivalent specified by Yamaha (Output: DC 12 V, 1.5 A)
For other countries: PA-150 or an equivalent recommended by Yamaha (Output: DC 12 V, 1.5 A)
Batteries: Six “AA” size alkaline (LR6), or Ni-MH rechargeable (HR6) batteries (sold separately)
Power Consumption 9 W (when using PA-150 AC adaptor)
Auto Power Off Yes
Size/Weight Dimensions (W × D × H) 940 mm × 317 mm × 106 mm (37" × 12-1/2" × 4-3/16")
Weight 4.0 kg (8 lb 13 oz) (not including batteries)
Included Accessories Owner’s Manual (this manual), Use Guide, Warranty Information, Online Member Product
Registration, AC adaptor*
* May not be included depending on your area. Check with your Yamaha dealer.
HD-300 Owner’s Manual
41
Data List
FM Voices
NOTE
The playable range of FM Voices is E-1 to C7.
PCM Voices ([PIANO/OTHERS] button)
* The page numbers of the JBC Band Method—Conductor
Voice L ist
Buttons Voice Name Program
Change No.
WOOD Flute 1
Oboe 2
Clarinet 3
Saxophone 4
BRASS Trumpet 5
Horn 6
Brass 7
ORGAN Organ 8
Strings 9
No. Voice Name No. Voice Name
1 Grand Piano 36 Timpani
2 Harpsichord 37 Glockenspiel
3 Celesta 38 Xylophone
4 CP80 39 Vibraphone
5 Suitcase E.Piano 40 Marimba
6 DX Modern E.Piano 41 Tubular Bells
7 Clavi 42 Music Box
8 Pipe Organ 43 Violin
9 Reed Organ 44 Cello
10 Jazz Organ 45 Contrabass
11 Rock Organ 46 Strings Section
12 Accordion 47 Synth Strings
13 Bandoneon 48 Pizzicato Strings
14 Harmonica 49 Harp
15 Piccolo 50 Nylon Guitar
16 Flute 51 Steel Guitar
17 Oboe 52 Electric Guitar
18 English Horn 53 Distortion Guitar
19 Bassoon 54 Finger Bass
20 Clarinet 55 Acoustic Bass
21 Soprano Sax 56 Pick Bass
22 Alto Sax 57 Slap Bass
23 Tenor Sax 58 Synth Bass
24 Baritone Sax 59 Orchestra Hit
25 Pan Flute 60 Choir
26 Recorder 61 Gemini
27 Ocarina 62 Sweet Heaven
28 Trumpet 63 Square Lead
29 Muted Trumpet 64 Sawtooth Lead
30 French Horn 65 Bell Pad
31 Trombone 66 Banjo
32 Euphonium 67 Steel Drums
33 Tuba 68 Bagpipe
34 Brass Section 69 Shamisen
35 Synth Brass 70 Koto
Rhythm Style List
Name Tempo Time
Signature
Number of
measures
8 Beat 116 4/4 2
16 Beat 80 4/4 2
Swing 118 4/4 2
March 116 4/4 2
6/8 March 120 6/8 4
Waltz 180 3/4 2
Samba 110 4/4 2
Bossa Nova 140 4/4 2
Qtr Triplet 120 4/4 2
Custom You can set the tempo, time signature, and
number of measures using the dedicated
app “HD-300 Assistant” for iPhone and iPad.
Training Contents
(JBC Band Method) List
Folder Name Pages (*)
Checking method of playing... 21 – 28
Daily training 39
Chromatic scale practice 47
Rhythm 60 – 63
Option Lip slur 1 47
Option Lip slur 2 48
Option Preparation for major scale A 49
Option Major scale and cadence 51
Option Minor scale and cadence 51
Option Unison 56
Option Chorale 64
HD-300 Owner’s Manual
42
NOTE
“HEX” means hexadecimal.
Program Change
Changes the FM Voice of the specified channel.
System Exclusive Messages
Quantity of FM Voice channels
Specifies the quantity of channels used for FM Voices
out of 16 channels.
Temperament mode
Specifies which of the three temperament modes to use.
Chord
Specifies the chord directly instead of auto-detected.
Individual pitches
Specifies the 12 pitches of the individual temperament.
Upon receiving this message, the HD-300 will
automatically enter the individual temperament mode.
Individual volumes
Specify the 12 volumes of the individual temperament.
Upon receiving this message, the HD-300 will
automatically enter the individual temperament mode.
Beat, Tempo memory
Rewrites the contents of the specified memory number
on the Beat/tempo memory.
MIDI Messages
Data (HEX) Cn prog
Parameters
n: Channel Number (0 – (Quantity of FM Voice
channels – 1))
prog: Program Change No. (Refer to the Voice
List (page 41))
Data (HEX) F0 43 77 10 00 <track> <accept> F7
Parameters
track: Quantity of channels used for FM Voices
(0 – 6)
accept: Whether to change the FM Voice that
produces sound by receiving a MIDI message,
by operating from the panel. (0 = disable, 1 =
enable)
Data (HEX) F0 43 77 10 01 <temp> F7
Parameters
temp: Temperament mode (0 = Equal, 1 = Pure,
2 = User)
Data (HEX) F0 43 77 10 02 <root> <chord> F7
Parameters
root: Root key. The meaning of the numbers
changes depending on whether they are in major
or minor. (See table following)
chord: Chord. This also specifies major/minor at
the same time. (See table following)
root
(HEX)
Key signature
(for reference)
Major Minor
00 0 C A
01
b
5D
b
B
b
02
#
2DB
03
b
3E
b
C
04
#
4EC
#
05
b
1FD
06
b
6 /
#
6F
#
E
b
07
#
1GE
08
b
4A
b
F
09
#
3AF
#
0A
b
2B
b
G
0B
#
5BG
#
chord (HEX) Chord Major/Minor
00 Maj Major
01 m Minor
02 7 Major
03 m7 Minor
04 M7 Major
05 m7
b
5Minor
06 sus4 Major
07 aug Major
08 dim Minor
09 mM7 Minor
0A 6 Major
0B m6 Minor
0C 7
b
5 Major
0D add9 Major
Data (HEX) F0 43 77 10 03 <cent1_l> <cent1_u>
… <cent12_l> <cent12_u> F7
Parameters
centx_l, centx_u (x = 1 – 12): The individual
pitch (a set of two bytes for each).
(cent value: -55.0 – 0 – 55.0)
Method of calculation from the cent value
to 2 bytes of messages
1. Convert ten times of the cent value to hexa-
decimal, and then add 0x2000 (HEX).
2. Of the lower 14 bits of the calculation result,
sends the lower 7 bits (centx_l) and the upper
7 bits (centx_u) in that order.
Data (HEX) F0 43 77 10 04 <vol1> … <vol12> F7
Parameters
vol1 – 12: The individual volume (one byte each).
(00 – 15(HEX) = 0 – 20)
Data (HEX) F0 43 77 10 05 <num> <note>
<tempo_l> <tempo_u> <step>
<numer1> … <numer8> <denom1> …
<denom8> F7
Parameters
num: Memory number (0 – 7 = M1 – M8)
note: Tempo reference note (0 = 8th note, 1 =
quarter note, 2 = dotted quarter note)
tempo_l, tempo_u: A set of two bytes data;
among the lower 14 bits of the tempo value, the
lower 7 bits and the upper 7 bits
step: Number of effective steps in the beat
memory – 1 (0 – 7)
numer1 – 8: numerator (0 – 9)
denom1 – 8: denominator (0 = quarter, 1 = 8th)
NOTE
Make sure that the numerator next to the number
of valid steps is 0. For example, if the number of
valid steps is 4 (step = 3), set numer5 = 0.

HD-300 Owner’s Manual
43
TransmittedFunction... Recognized Remarks
Basic
Channel
Note
Number : True voice
Velocity
After
Touch
Pitch Bend
Control
Change
Prog
Change : True #
System Exclusive
: Song Pos.
Common : Song Sel.
: Tune
System : Clock
Real Time: Commands
: All Sound Off
Aux : Reset All Cntrls
: Local On/Off
Mes- : All Notes Off
sages: Active Sense
: Reset
Notes:
Mode
Default
Changed
Note On
Note Off
Key's
Ch's
0,32
1
6
38
7
10
11
64
71-74
84
91,93
96,97
100,101
1 - 16
X
O 9nH,v=1-127
X
X
X
O
X
X
X
O
X
X
X
X
X
O
X
X
O 0 - 127
**************
X
X
X
O
O
O
O
X
X
X
X
O
X
O (120,126,127)
O (121)
O (122)
O (123-125)
O
X
3
X
**************
0 - 127
**************
O
Mode 1 : OMNI ON , POLY Mode 2 : OMNI ON ,MONO
Mode 3 : OMNI OFF, POLY Mode 4 : OMNI OFF,MONO
X
1 - 16
X
O 9nH,v=1-127
X
X
X
O
O
O
O
O
O
O
O
O
O
O
O
O
X
X
X
3
X
X
0 - 127
0 - 127
O
O
O : Yes
X : No
Default
Messages
Altered
YAMAHA [Harmony Director] Date: 01-Nov-2020
Model HD-300 MIDI Implementation Chart Version: 1.00
Bank Select
Modulation
Data Entry (MSB)
Data Entry (LSB)
Main Volume
Pan
Expression
Sustain
Sound Control
Portamento Control
Effect Depth
RPN Inc, Dec
RPN LSB, MSB
O 0 - 127

HD-300 Owner’s Manual
44
LIMITED 1-YEAR WARRANTY ON
HD-300 HARMONY DIRECTOR
Thank you for selecting a YAMAHA product. YAMAHA products are designed and manufactured to provide a high level of defect-
free performance. Yamaha Corporation of America (“YAMAHA”) is proud of the experience and craftsmanship that goes into each
and every YAMAHA product. YAMAHA sells its products through a network of reputable, specially authorized dealers and is
pleased to offer you, the Original Owner, the following Limited Warranty, which applies only to products that have been (1) directly
purchased from YAMAHA’s authorized dealers in the fifty states of the USA and District of Columbia (the “Warranted Area”) and (2)
used exclusively in the Warranted Area. YAMAHA suggests that you read the Limited Warranty thoroughly and invites you to
contact your authorized YAMAHA dealer or YAMAHA Customer Service if you have any questions.
THIS WARRANTY COVERS THE LISTED PRODUCTS AGAINST DEFECTS IN MATERIALS OR
WORKMANSHIP FOR 1 YEAR.
Coverage: YAMAHA will, at its option, repair or replace the product covered by this warranty if it becomes defective, malfunctions
or otherwise fails to conform with this warranty under normal use and service during the term of this warranty, without charge for
labor or materials. Repairs may be performed using new or refurbished parts that meet or exceed YAMAHA specifications for new
parts. If YAMAHA elects to replace the product, the replacement may be a reconditioned unit. You will be responsible for any
installation or removal charges and for any initial shipping charges if the product(s) must be shipped for warranty service. However,
YAMAHA will pay the return shipping charges to any destination within the USA if the repairs are covered by the warranty. This
warranty does not cover (a) damage, deterioration or malfunction resulting from accident, negligence, misuse, abuse, improper
installation or operation or failure to follow instructions according to the Owner’s Manual for this product; any shipment of the
product (claims must be presented to the carrier); repair or attempted repair by anyone other than YAMAHA or an authorized
YAMAHA Service Center; (b) any unit which has been altered or on which the serial number has been defaced, modified or
removed; (c) normal wear and any periodic maintenance; (d) deterioration due to perspiration, corrosive atmosphere or other
external causes such as extremes in temperature or humidity; (e) damages attributable to power line surge or related electrical
abnormalities, lightning damage or acts of God; or (f) RFI/EMI (Interference/noise) caused by improper grounding or the improper
use of either certified or uncertified equipment, if applicable. Any evidence of alteration, erasing or forgery of proof-of-purchase
documents will cause this warranty to be void. This warranty covers only the Original Owner and is not transferable.
In Order to Obtain Warranty Service: Warranty service will only be provided for defective products within the Warranted
Area. Contact your local authorized YAMAHA dealer who will advise you of the procedures to be followed. If this is not successful,
contact YAMAHA at the address, telephone number or website shown below. YAMAHA may request that you send the defective
product to a local authorized YAMAHA Servicer or authorize return of the defective product to YAMAHA for repair. If you are
uncertain as to whether a dealer has been authorized by YAMAHA, please contact YAMAHA’s Service Department at the number
shown below or check YAMAHA’s website at www.usa.yamaha.com
. Product(s) shipped for service should be packed securely and
must be accompanied by a detailed explanation of the problem(s) requiring service, together with the original or a machine
reproduction of the bill of sale or other dated, proof-of-purchase document describing the product, as evidence of warranty
coverage. Should any product submitted for warranty service be found ineligible therefore, an estimate of repair cost will be
furnished, and the repair will be accomplished only if requested by you and upon receipt of payment or acceptable arrangement for
payment.
Limitation of Implied Warranties and Exclusion of Damages: ANY IMPLIED WARRANTIES, INCLUDING
WARRANTIES OF MERCHANTABILITY AND FITNESS FOR A PARTICULAR PURPOSE SHALL BE LIMITED IN DURATION TO
THE APPLICABLE PERIOD OF TIME SET FORTH ABOVE. YAMAHA SHALL NOT BE RESPONSIBLE FOR INCIDENTAL OR
CONSEQUENTIAL DAMAGES OR FOR DAMAGES BASED UPON INCONVENIENCE, LOSS OF USE, DAMAGE TO ANY
OTHER EQUIPMENT OR OTHER ITEMS AT THE SITE OF USE OR INTERRUPTION OF PERFORMANCES OR ANY
CONSEQUENCES. YAMAHA’S LIABILITY FOR ANY DEFECTIVE PRODUCT IS LIMITED TO REPAIR OR REPLACEMENT OF
THE PRODUCT, AT YAMAHA’S OPTION. SOME STATES DO NOT ALLOW LIMITATIONS ON HOW LONG AN IMPLIED
WARRANTY LASTS OR THE EXCLUSION OR LIMITATION OF INCIDENTAL OR CONSEQUENTIAL DAMAGES, SO THE
ABOVE LIMITATION OR EXCLUSION MAY NOT APPLY TO YOU. This Warranty gives you specific legal rights, and you may also
have other rights which vary from state to state. This is the only express warranty applicable to the product specified herein;
YAMAHA neither assumes nor authorizes anyone to assume for it any other express warranty.
If you have any questions about service received or if you need assistance in locating an authorized YAMAHA Servicer, please
contact:
CUSTOMER SERVICE
Yamaha Corporation of America
6600 Orangethorpe Avenue, Buena Park, California 90620-1373
Telephone: 800-854-1569
www.usa.yamaha.com
Do not return any product to the above address without a written Return Authorization issued by YAMAHA.
© 2020 Yamaha Corporation of America. Printed in U.S.A.
HD-300 Owner’s Manual
45
FCC and IC Information
For U.S.A.
For CANADA
This transmitter must not be co-located or operated in conjunction with any other antenna or transmitter.
This equipment complies with FCC radiation exposure limits set forth for an uncontrolled environment and meets the FCC radio
frequency (RF) Exposure Guidelines. This equipment has very low levels of RF energy that is deemed to comply without testing of
specific absorption rate (SAR).
This device contains licence-exempt transmitter(s)/receiver(s) that comply with Innovation, Science and Economic Development
Canada’s licence-exempt RSS(s). Operation is subject to the following two conditions:
1. This device may not cause interference.
2. This device must accept any interference, including interference that may cause undesired operation of the device.
L’émetteur/récepteur exempt de licence contenu dans le présent appareil est conforme aux CNR d’Innovation, Sciences et
Développement économique Canada applicables aux appareils radio exempts de licence. L’exploitation est autorisée aux deux
conditions suivantes :
1. L’appareil ne doit pas produire de brouillage;
2. L’appareil doit accepter tout brouillage radioélectrique subi, même si le brouillage est susceptible d’en compromettre le
fonctionnement.
This equipment complies with ISED radiation exposure limits set forth for an uncontrolled environment and meets RSS-102 of the
ISED radio frequency (RF) Exposure rules as this equipment has very low levels of RF energy.
Cet équipement est conforme aux limites d’exposition aux rayonnements énoncées pour un environnement non contrôlé et respecte
les règles d’exposition aux fréquences radioélectriques (RF) CNR-102 de l’ISDE puisque cet appareil a une niveau tres bas
d'energie RF.
HD-300 Owner’s Manual
46
For EU countries
BG Bulgarian
ОПРОСТЕНА ЕС ДЕКЛАРАЦИЯ ЗА СЪОТВЕТСТВИЕ
С настоящото Yamaha Music Europe GmbH декларира, че този тип
радиосъоръжение [HD-300] е в съответствие с Директива 2014/53/ЕС.
Цялостният текст на ЕС декларацията за съответствие може да се намери
на следния интернет адрес:
https://europe.yamaha.com/en/support/compliance/doc.html
ES Spanish
DECLARACIÓN UE DE CONFORMIDAD SIMPLIFICADA
Por la presente, Yamaha Music Europe GmbH declara que el tipo de equipo
radioeléctrico [HD-300] es conforme con la Directiva 2014/53/UE. El texto
completo de la declaración UE de conformidad está disponible en la dirección
Internet siguiente:
https://europe.yamaha.com/en/support/compliance/doc.html
CS Czech
ZJEDNODUŠENÉ EU PROHLÁŠENÍ O SHODĚ
Tímto Yamaha Music Europe GmbH prohlašuje, že typ rádiového zařízení
[HD-300] je v souladu se směrnicí 2014/53/EU. Úplné znění EU prohlášení o
shodě je k dispozici na této internetové adrese:
https://europe.yamaha.com/en/support/compliance/doc.html
DA Danish
FORENKLET EU-OVERENSSTEMMELSESERKLÆRING
Hermed erklærer Yamaha Music Europe GmbH, at radioudstyrstypen [HD-300]
er i overensstemmelse med direktiv 2014/53/EU.
EU-overensstemmelseserklæringens fulde tekst kan findes på følgende
internetadresse:
https://europe.yamaha.com/en/support/compliance/doc.html
DE German
VEREINFACHTE EU-KONFORMITÄTSERKLÄRUNG
Hiermit erklärt Yamaha Music Europe GmbH, dass der Funkanlagentyp
[HD-300] der Richtlinie 2014/53/EU entspricht. Der vollständige Text der
EU-Konformitätserklärung ist unter der folgenden Internetadresse verfügbar:
https://europe.yamaha.com/en/support/compliance/doc.html
ET Estonian
LIHTSUSTATUD ELI VASTAVUSDEKLARATSIOON
Käesolevaga deklareerib Yamaha Music Europe GmbH, et käesolev
raadioseadme tüüp [HD-300] vastab direktiivi 2014/53/EL nõuetele.
ELi vastavusdeklaratsiooni täielik tekst on kättesaadav järgmisel
internetiaadressil:
https://europe.yamaha.com/en/support/compliance/doc.html
EL Greek
ΑΠΛΟΥΣΤΕΥΜΕΝΗ ΔΗΛΩΣΗ ΣΥΜΜΟΡΦΩΣΗΣ ΕΕ
Με την παρούσα ο/η Yamaha Music Europe GmbH, δηλώνει ότι ο
ραδιοεξοπλισμός [HD-300] πληροί την οδηγία 2014/53/ΕΕ. Το πλήρες κείμενο
της δήλωσης συμμόρφωσης ΕΕ διατίθεται στην ακόλουθη ιστοσελίδα στο
διαδίκτυο:
https://europe.yamaha.com/en/support/compliance/doc.html
EN English
SIMPLIFIED EU DECLARATION OF CONFORMITY /
SIMPLIFIED UK DECLARATION OF CONFORMITY
Hereby, Yamaha Music Europe GmbH declares that the radio equipment type
[HD-300] is in compliance with Directive 2014/53/EU and the radio equipment
regulations of UK. The full texts of the EU declaration of conformity and the UK
declaration of conformity are available at the following internet address:
https://europe.yamaha.com/en/support/compliance/doc.html
FR French
DECLARATION UE DE CONFORMITE SIMPLIFIEE
L
e soussigné, Yamaha Music Europe GmbH, déclare que l'équipement
radioélectrique du type [HD-300] est conforme à la directive 2014/53/UE.
Le texte complet de la déclaration UE de conformité est disponible à l'adresse
internet suivante:
https://europe.yamaha.com/en/support/compliance/doc.html
HR Croatian
POJEDNOSTAVLJENA EU IZJAVA O SUKLADNOSTI
Yamaha Music Europe GmbH ovime izjavljuje da je radijska oprema tipa
[HD-300] u skladu s Direktivom 2014/53/EU. Cjeloviti tekst EU izjave o
sukladnosti dostupan je na sljedećoj internetskoj adresi:
https://europe.yamaha.com/en/support/compliance/doc.html
IT Italian
DICHIARAZIONE DI CONFORMITÀ UE SEMPLIFICATA
Il fabbricante, Yamaha Music Europe GmbH, dichiara che il tipo di
apparecchiatura radio [HD-300] è conforme alla direttiva 2014/53/UE.
Il testo completo della dichiarazione di conformità UE è disponibile al seguente
indirizzo Internet:
https://europe.yamaha.com/en/support/compliance/doc.html
LV Latvian
VIENKĀRŠOTA ES ATBILSTĪBAS DEKLARĀCIJA
Ar šo Yamaha Music Europe GmbH deklarē, ka radioiekārta [HD-300] atbilst
Direktīvai 2014/53/ES. Pilns ES atbilstības deklarācijas teksts ir pieejams šādā
interneta vietnē:
https://europe.yamaha.com/en/support/compliance/doc.html
LT Lithuanian
SUPAPRASTINTA ES ATITIKTIES DEKLARACIJA
Aš, Yamaha Music Europe GmbH, patvirtinu, kad radijo įrenginių tipas [HD-300]
atitinka Direktyvą 2014/53/ES. Visas ES atitikties deklaracijos tekstas
prieinamas šiuo interneto adresu:
https://europe.yamaha.com/en/support/compliance/doc.html
HU Hungarian
EGYSZERŰSÍTETT EU-MEGFELELŐSÉGI NYILATKOZAT
Yamaha Music Europe GmbH igazolja, hogy a [HD-300] típusú
rádióberendezés megfelel a 2014/53/EU irányelvnek. Az EU-megfelelőségi
nyilatkozat teljes szövege elérhető a következő internetes címen:
https://europe.yamaha.com/en/support/compliance/doc.html
NL Dutch
VEREENVOUDIGDE EU-CONFORMITEITSVERKLARING
Hierbij verklaar ik, Yamaha Music Europe GmbH, dat het type radioapparatuur
[HD-300] conform is met Richtlijn 2014/53/EU. De volledige tekst van de
EU-conformiteitsverklaring kan worden geraadpleegd op het volgende
internetadres:
https://europe.yamaha.com/en/support/compliance/doc.html
PL Polish
UPROSZCZONA DEKLARACJA ZGODNOŚCI UE
Yamaha Music Europe GmbH niniejszym oświadcza, że typ urządzenia
radiowego [HD-300] jest zgodny z dyrektywą 2014/53/UE. Pełny tekst
deklaracji zgodności UE jest dostępny pod następującym adresem
internetowym:
https://europe.yamaha.com/en/support/compliance/doc.html
PT Portuguese
DECLARAÇÃO UE DE CONFORMIDADE SIMPLIFICADA
O(a) abaixo assinado(a) Yamaha Music Europe GmbH declara que o presente
tipo de equipamento de rádio [HD-300] está em conformidade com a Diretiva
2014/53/UE. O texto integral da declaração de conformidade está disponível no
seguinte endereço de Internet:
https://europe.yamaha.com/en/support/compliance/doc.html
RO Romanian
DECLARAȚIA UE DE CONFORMITATE SIMPLIFICATĂ
Prin prezenta, Yamaha Music Europe GmbH declară că tipul de echipamente
radio [HD-300] este în conformitate cu Directiva 2014/53/UE. Textul integral al
declarației UE de conformitate este disponibil la următoarea adresă internet:
https://europe.yamaha.com/en/support/compliance/doc.html
SK Slovak
ZJEDNODUŠENÉ EÚ VYHLÁSENIE O ZHODE
Yamaha Music Europe GmbH týmto vyhlasuje, že rádiové zariadenie typu
[HD-300] je v súlade so smernicou 2014/53/EÚ. Úplné EÚ vyhlásenie o zhode
je k dispozícii na tejto internetovej adrese:
https://europe.yamaha.com/en/support/compliance/doc.html
SL Slovenian
POENOSTAVLJENA IZJAVA EU O SKLADNOSTI
Yamaha Music Europe GmbH potrjuje, da je tip radijske opreme [HD-300]
skladen z Direktivo 2014/53/EU. Celotno besedilo izjave EU o skladnosti je na
voljo na naslednjem spletnem naslovu:
https://europe.yamaha.com/en/support/compliance/doc.html
FI Finnish
YKSINKERTAISTETTU EU-
VAATIMUSTENMUKAISUUSVAKUUTUS
Yamaha Music Europe GmbH vakuuttaa, että radiolaitetyyppi [HD-300] on
direktiivin 2014/53/EU mukainen. EU-vaatimustenmukaisuusvakuutuksen
täysimittainen teksti on saatavilla seuraavassa internetosoitteessa:
https://europe.yamaha.com/en/support/compliance/doc.html
SV Swedish
FÖRENKLAD EU-FÖRSÄKRAN OM ÖVERENSSTÄMMELSE
Härmed försäkrar Yamaha Music Europe GmbH att denna typ av
radioutrustning [HD-300] överensstämmer med direktiv 2014/53/EU. Den
fullständiga texten till EU-försäkran om överensstämmelse finns på följande
webbadress:
https://europe.yamaha.com/en/support/compliance/doc.html
TR Turkey
BASİTLEŞTİRİLMİŞ AVRUPA BİRLİĞİ UYGUNLUK BİLDİRİMİ
İşbu belge ile, Yamaha Music Europe GmbH, radyo cihaz tipinin [HD-300],
Direktif 2014/53/AB'ye uygunluğunu beyan eder. AB uyumu beyanının tam
metni aşağıdaki internet adresinden edinilebilir:
https://europe.yamaha.com/en/support/compliance/doc.html


10-1 Nakazawa-cho, Naka-ku, Hamamatsu, 430-8650 Japan
© 2020 Yamaha Corporation
Published 04/2022
MWES-C0
VGA3990
Yamaha Global Site
https://www.yamaha.com/
Yamaha Downloads
https://download.yamaha.com/