ESPRESSO
MACHINE
User Manual
Model: JH-C5010
14
CUSTOMER SERVICE SUPPORT
Be A Better Coffee World
Chulux Css@Chulux01
ON
OFF

Important Safeguards
Product Features
Before First Use
Adjust Espresso Volume
Get a Hotter Espresso
Milk Frothing
Hot Water
Cleaning
Frequently Asked Questions
Table of Contents
. . . . . . . . . . . . . . . . . . . . . . . . . . . . . . . 01
. . . . . . . . . . . . . . . . . . . . . . . . . . . . . . . . . . . . . . . . . . . . . . . . . . . 14
. . . . . . . . . . . . . . . . . . . . . . . . . . . . . . . . . . . . . . . . . . 03
. . . . . . . . . . . . . . . . . . . . . . . . . . . . . . . . . . . . . . . . . . . 05
10
11
Making Espresso
. . . . . . . . . . . . . . . . . . . . . . . . . . . . . . . . . . . . . . . . . . 07
.
. . . . . . . . . . . . . . . . . . . . . . . . . . . . . . . . . . . . . . . . . . . . . . . . 14
. . . . . . . . . . . . . . . . . . . . . . . . . . . . . . . 17
Maintenance & Service
. . . . . . . . . . . . . . . . . . . . . . . . . . . . . . . . . . . .
. . . . . . . . . . . . . . . . . . . . . . . . . . . . . . . . . . . .
. . . . . . . . . . . . . . . . . . . . . . . . . . . . . . . . . . . .
19
Guarantee
. . . . . . . . . . . . . . . . . . . . . . . . . . . . . . . . . . . . . .
. . . . . . . . . . . 20
Approval Information
. . . . . . . . . . . . . . . . . . . . . . . . . . . . . . . . . . . . . 20
. . . . . . . . . . . . . . . . . . . . . . . . . . . . . . . . . . . . . . . . . . . . . . 12
1. When first using the machine, some clear water inside is normal, other-
wise the dry pump may not be able to pump water.
★ Please be sure to read the following carefully, as it will solve most
of the troubles you may encounter while using machine:
3. When first using the machine or after a long period of non-use, the
machine may be unable to pump water. Please don't worry, this is caused
by the water inside pump has evaporated and dried up, and see the below
method will solve this.
a. Ensure the tank has enough water and installed correctly.
b. After machine has finished preheating, place a container under steam
wand and turn the knob to ON (MAX), then wait 5-10s and turn it to OFF.
2. When you first time turn on the machine, there may be a slight burning
smell. This is normal for a new product and will disappear after a few uses
or cleaning with vinegar water.
c. Thereafter turn to ON (MAX) again and wait 5-10s then turn to OFF.
d. Repeat the process a few times until the machine start to dispense hot
water and shows a straight line, which it is back to normal.
4. If you used the machine when the tank was low or empty, this will cause it
to pump in a lot of air and may not pump water next time. If this occurs, pls
also use the above method to solve this. [That not a malfunction, it's caused
by the pump filling up with air, machine recognizes that no water has been
pumped and auto disconnect pumping program.]
5. After extracting your coffee, if there is more water left on ground coffee,
means your ground coffee may be too little or not tamped strongly enough.
a. Please try adding ground coffee to the same height as filter or higher,
then tamping with a higher tamping strength.
Tip: Using the metal tamper will be easier to tamp ground coffee. Using
the coffee dispenser will allow you to distribute ground coffee more
evenly and minimize the channeling effect.
6. If your ground coffee is too fine, as the huge resistance, the water flow
may not get through, or create unfavorable channeling effects.
8. Come with machine is dual wall filters, they only have one hole at bottom
and using it will be able to get richer espresso crema than single wall filters.
9. If you may need another accessories, such as the single wall filter, metal
tamper, SUS304 milk frothing pitcher, etc.. Please visit our website at
www.chulux.com, and forgive us for not including them due to the cost.
10. If you would like to learn more about this machine, you are welcome to
communicate with us at [email protected]
Channeling effect: a situation where during the extraction process, water
flows unevenly through the coffee grounds, creating a specific channel or
path. This can lead to inconsistent extraction and affect the flavor.
7. When you turn knob to open steam, at first some cooling water will come
out which is normal. After a few secs the steam will maximize output (Ensure
the knob is in ON position, not the dotted range).

1 2
Important Safeguards Important Safeguards
CAUTION:When using an electrical appliance, basic safety precautions
should always be followed to reduce the risk of fire, electric shock and/or
injury to persons, including the followings:
1.To ensure safety, please read the instructions carefully and grasp the correct
use method. Save these instructions booklet for future reference.
11.Regularly clean and maintain the coffee machine parts to ensure the
quality of coffee and extend the service life of the coffee machine.
12.Do not move or turn off the power when the coffee machine is working.
13.Do not operate without water.
14.Do not wash the coffee machine or power cord in water or other liquids.
15.Household use only , don’t use outdoors.
16.Before using the coffee machine for the first time, please boil it twice with
clean water to remove the odor.
17.The coffee machine shall not be placed in a cabinet when in working.
18.Cleaning and user maintenance shall not be made by children without
supervision.
19.This appliance can be used by children aged from 18 years and above if
they have been given supervision or instruction concerning use of the
appliance in a safe way and if they understand the hazards involved.
Cleaning and user maintenance shall not be made by children unless they
are older than 18 and supervised. Keep the appliance and its cord out of
reach of children aged less than 18 years.
20.Appliances can be used by persons with reduced physical, sensory or
mental capabilities or lack of experience and knowledge if they have been
given supervision or instruction concerning use of the appliance in a safe
way and understand the hazards involved.
21.Children shall not play with the appliance.
22.WARNING: Misuse may cause potential injury. The heating element
surface is subject to residual heat after use.
2.Before using, checks that the voltage of wall outlet corresponds to the rating
label on the bottom of coffee machine.
3.Close supervision is necessary when your appliance is being used near children.
4.To protect against fire, electric shock and injury to persons, do not put the
power cord and plug into water or any other liquid; Do not damage, over bend
or stretch the power cord; Do not place heavy objects on the cord.
5.Do not use the equipment in high temperature, high magnetic field and damp
environment. Do not put the coffee machine on a hot surface, near the fire source
or other electrical appliances, such as refrigerator.
6.Please do not turn on machine when the wire or plug is damaged, the coffee
machine is out of order or damaged in any way, please contact the CHULUX
customer service support by [email protected] for assistance.
7.Please use original accessories.
8.This machine is only used for making coffee, do not use it for other purposes,
and keep it in a dry environment.
9.Place the coffee machine on a flat surface or on a table. Do not hang the
power cord on the edge of the table or countertop.
10.When operating the coffee machine, do not directly touch the hot parts on
the surface.
3 4
Product Features
Model: JH-C5010
Voltage: 120V~ 60Hz Wattage: 1350W
5
6
7
8
9
10
11
12
13
14
4 5 6 7
1 2 3 4
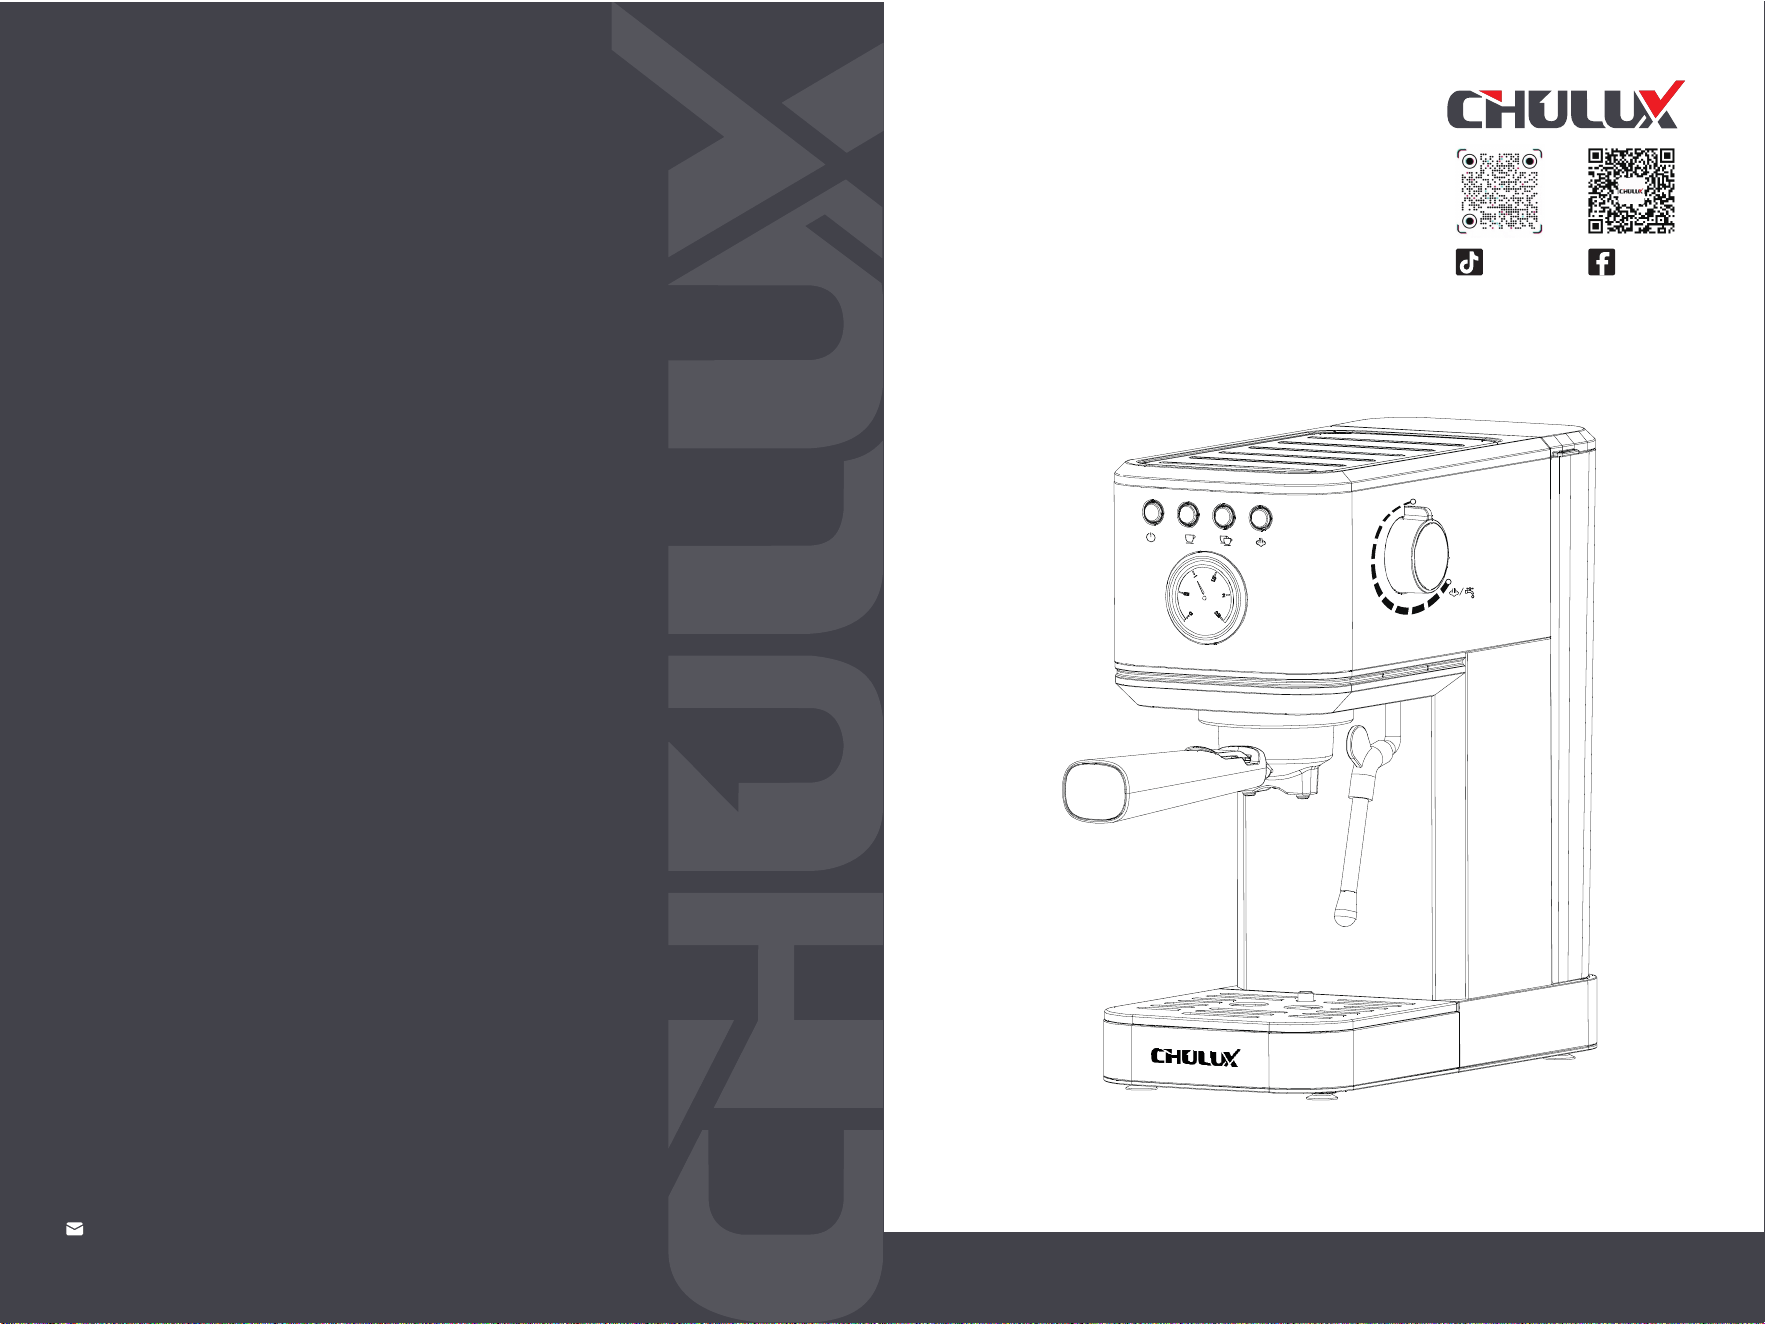
No.
1
2
3
4
5
6
7
8
9
10
11
12
13
14
Description
Power Button
Single Cup Button
Double Cup Button
Tank Cover
Steam Button
40oz Water Tank
Control Knob
Group Head
Pressure Gauge
Drip Tray
Steam Wand
Portafilter
Spoon & Tamper
Press to turn machine ON or OFF.
Make a single cup espresso.
Press to enter or exit steam mode.
Make a double cup espresso.
Prevent dust or other objects falling
into the tank.
Add only normal temp drinking water,
not less the MIN line or exceed MAX
line. Must be installed correctly.
OFF - When not using hot water or
steam, ensure in OFF position.
ON - When using hot water or steam,
turn to ON, not the dotted range.
Real-time show the current extraction
pressure value.
The machine's water outlet.
Installation place of portafilter.
Move steam wand via the silicon cover
to your desired position, hot water and
steam will come out of here.
Household 51mm size, the built-in filter
keep water flow more even and create
richer crema. Not dishwasher safe.
Collect residual coffee liquid, and fits
taller cups when removed.
2-in-1 tool for scooping and tamping
ground coffee.
Dual Wall Filter
51mm size, suggest amount of
coffee powder: 9g for single cup,
15g for double cup.
Specification
Product Features
5 6
Before First Use Before First Use
1.Remove Packaging
Ensure all packaging has been removed.
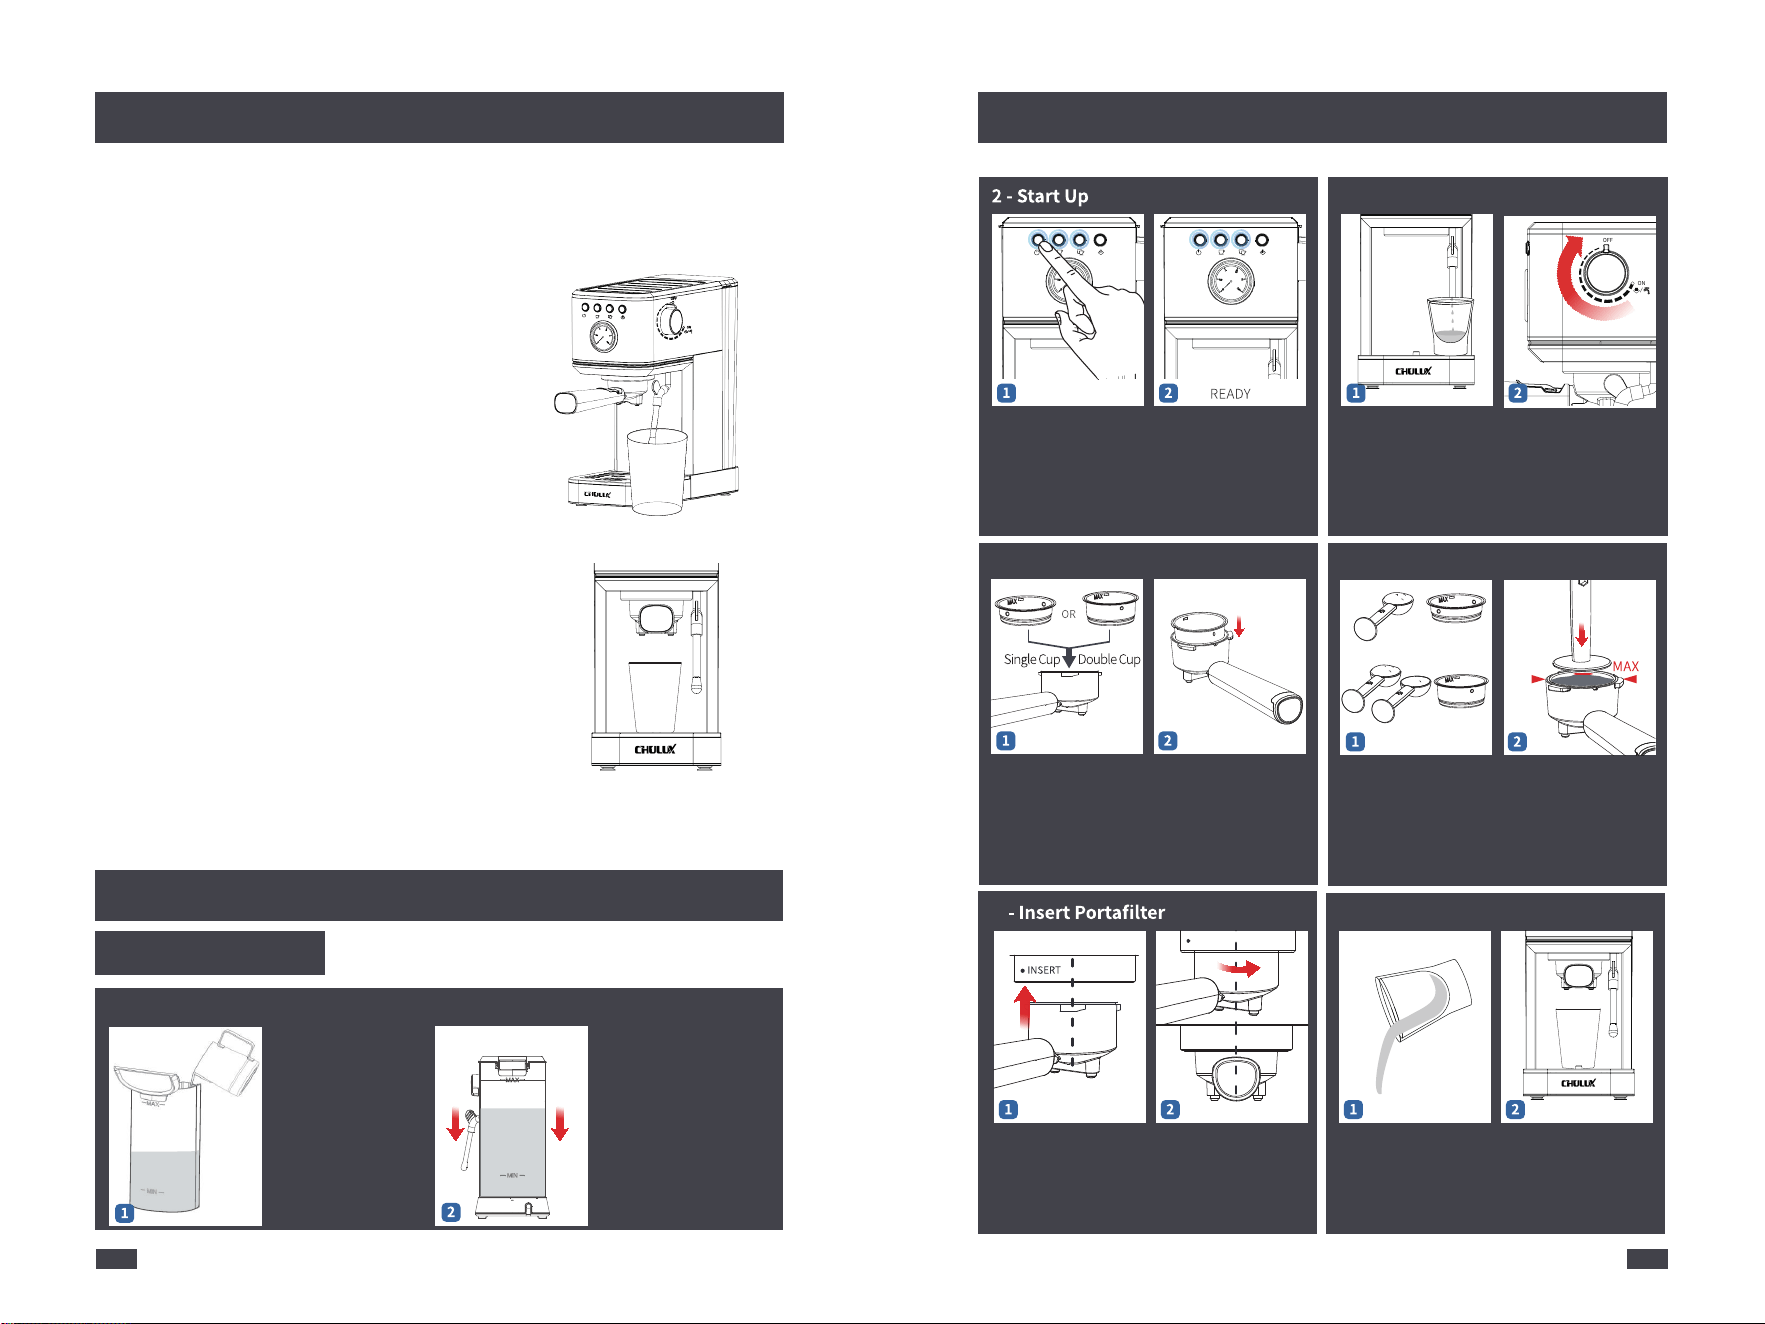
5.Power On
6.Insert Portafilter
A. Make sure the control knob is in OFF position.
B. Insert the Power Plug into a 120V AC outlet.
C. Press the button to start and preheat machine.
- Both Single and Double Cup button lights will
flash slow, means machine is in preheating.
- When them button lights are not flashing, so
machine is in READY state.
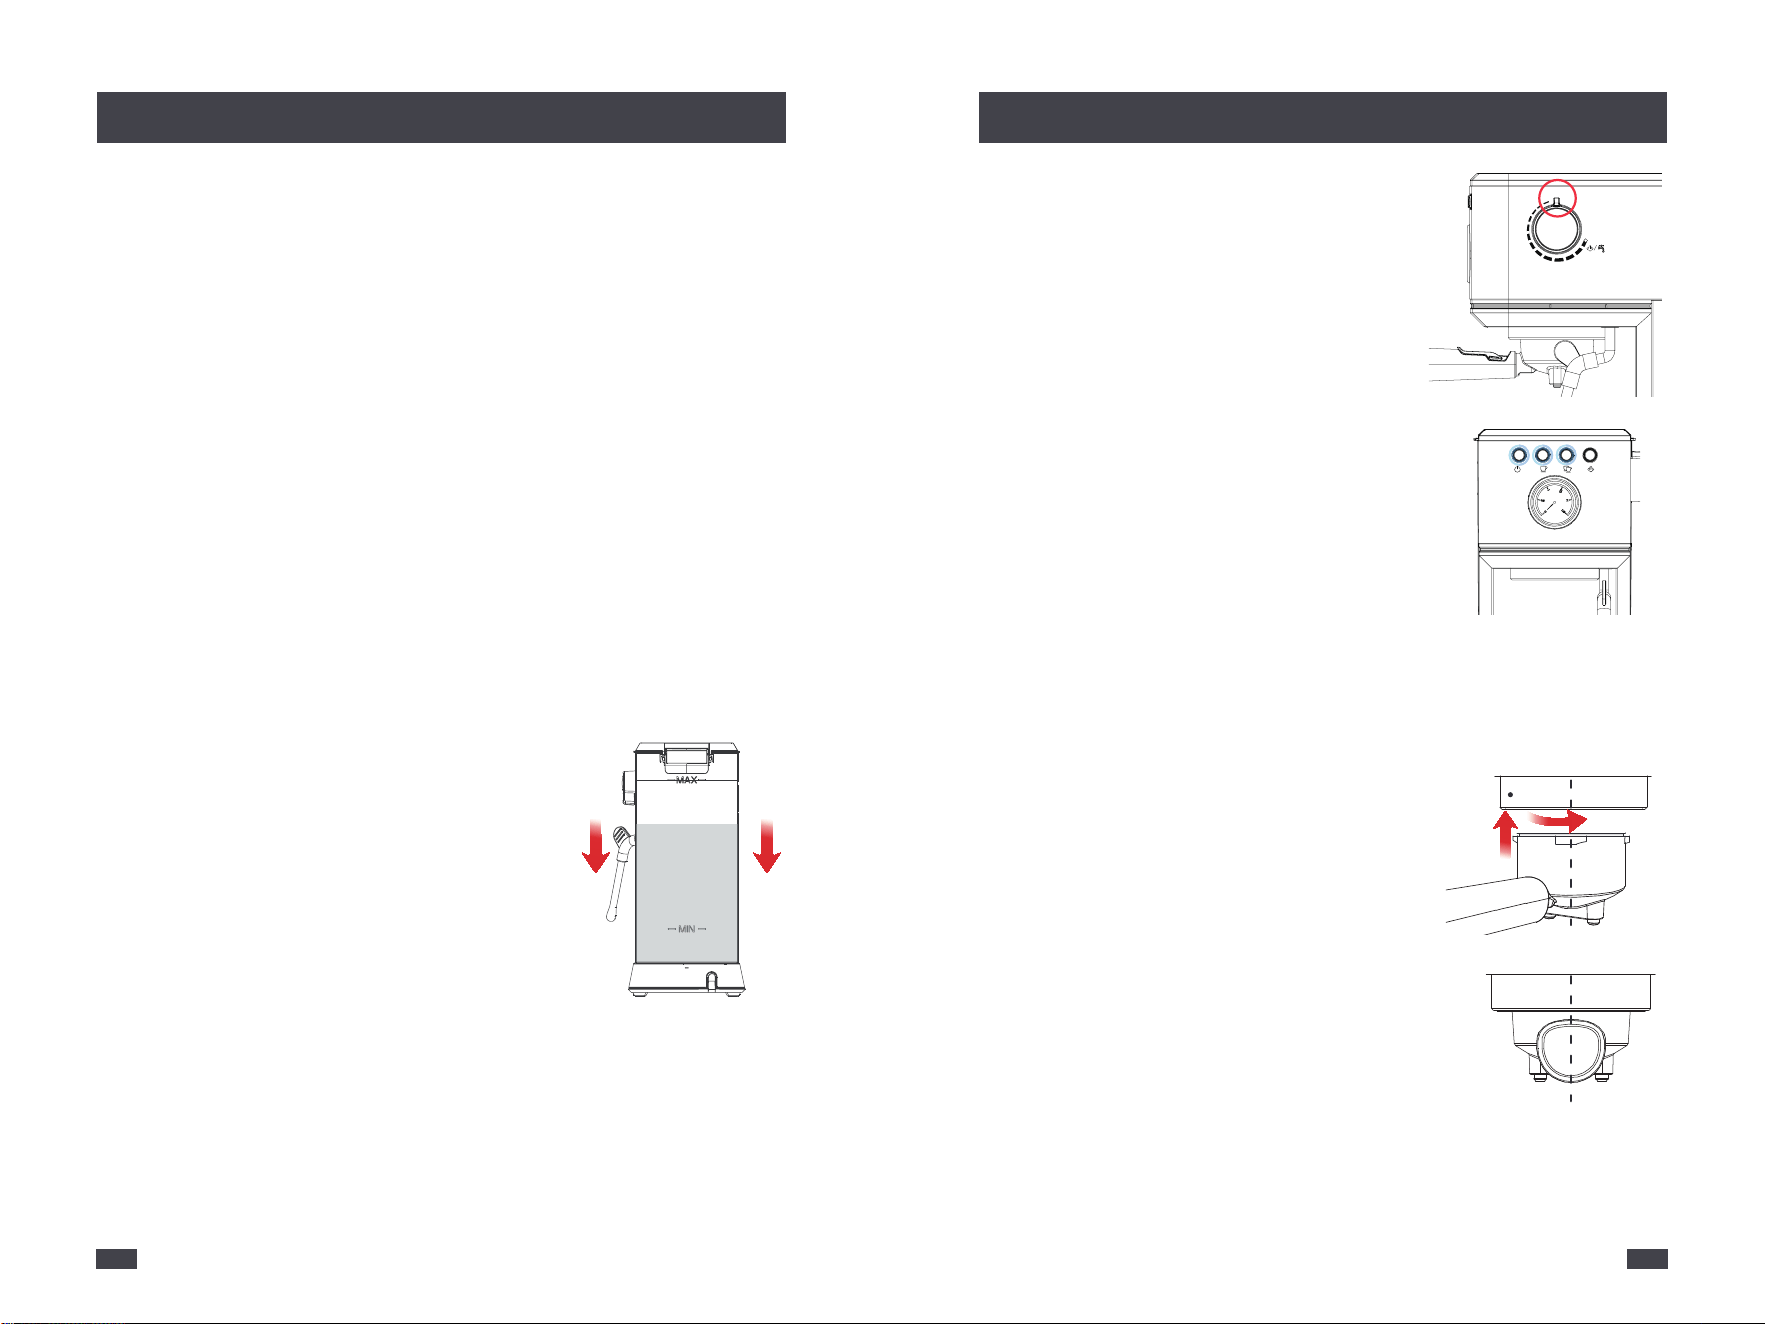
A. Align the notch in portafilter with filter
protrusion, then install and turn to secure
it in place.
INSERT
CENTER
2.TURN
1.ALIGN
& INSERT
B. Hold machine in one hand and portafilter
in the other.
C. Place portafilter under the group head,
align handle at unlocked icon.
D. Insert portafilter into the group head and
rotate handle toward center until vertical to
the lock icon position.
NOTE: When first few uses, as the new tool need to break in, turning the
portafilter to locked position will a little tight.
NOTE: If the knob is in ON position when
press Power button, the four lights will
flash 3 times together and "beep" 3 sound
at same time, machine will not work.
2.Position Machine
Ensure the espresso machine is always positioned onto a dry, stable, flat
horizontal counter top.
3.Wash & Dry Parts
4.Install Removable Water Tank
Wash the parts listed below in warm water, rinse & allow thorough air
drying:
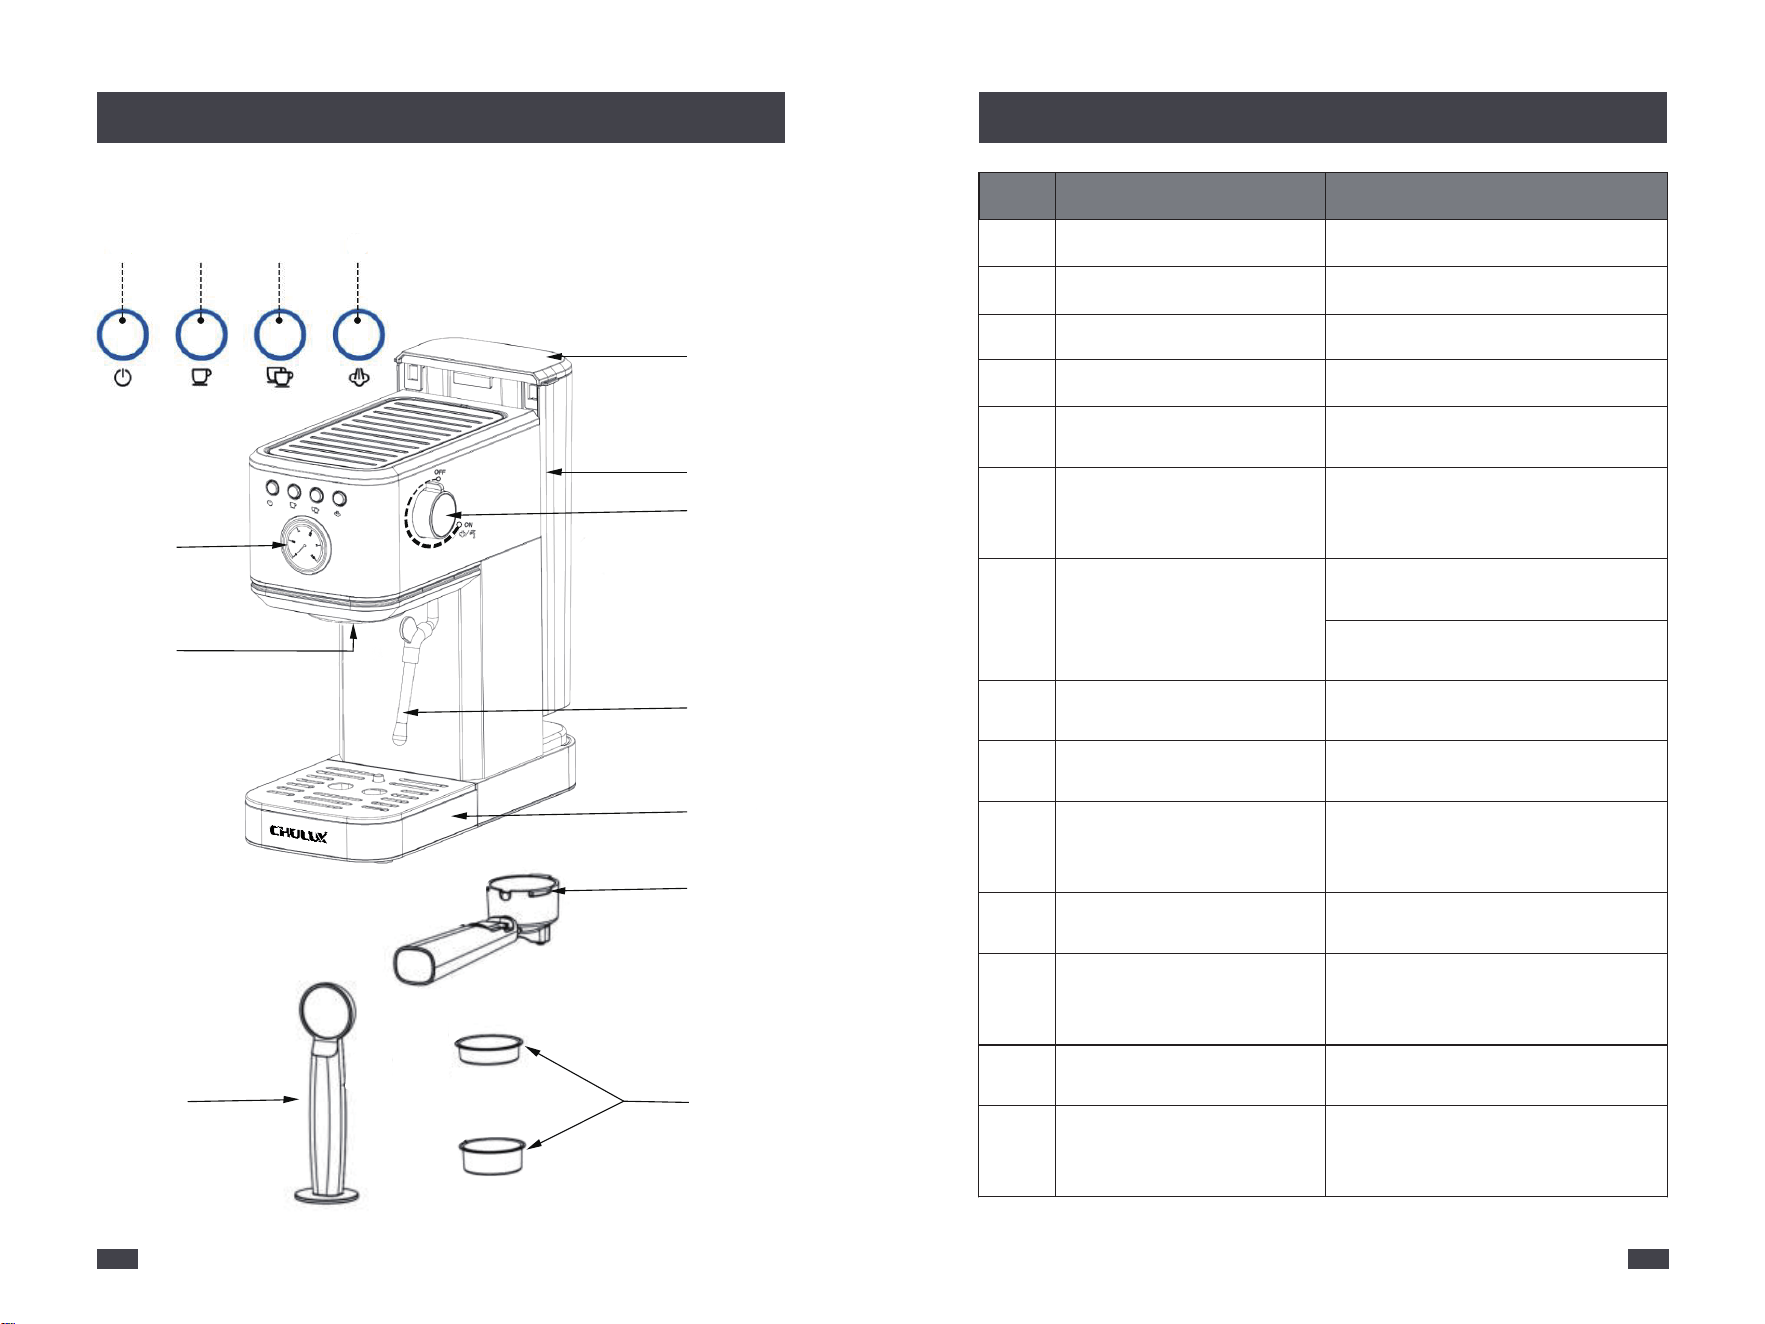
A. Lift the water tank vertically.
C. Place water tank vertically and align the buckle
to hole, then press down to parallel machine's top.
B. Open cover and fill pure water, but not exceed
the MAX line of water tank. Make sure the tank has
enough water inside, otherwise the machine will
idle when water runs out thus causing damage to
the water pump.
NOTE: Do not clean or soak the portafilter in any descaling solution,
otherwise, it would be damaged.
NOTE:
1. Filling the tank directly when it's fixed on machine will be more easier,
but be careful not let water splash on the plug or socket.
2. When lifting the tank, a slight water spill is normal as there is some
pressure inside the machine.
NOTE: If the water tank is empty or installed improperly, the machine will
unable to finish preheating.
- Stainless Steel Single Cup Filter - Portafilter
- Stainless Steel Double Cup Filter - Drip Tray
- Removable Water Tank - Coffee Spoon & Tamper
CENTRE
ON
OFF
7 8
Before First Use
Making Espresso
Making Espresso
Usage Steps
6
1 - Add Water
Plug in then press the
Power button to start
and preheat machine,
both Single and Double
Cup button lights will
flash slow.
When two button lights
are not flashing, means
machine is in READY
state.
Place the cup you use for
espresso under steam
wand, then turn the
knob to ON position.
Fill approx a half to warm
cup, then return knob to
OFF position. Let the hot
water remain in your cup
for a short time.
Select single or double
cup filter to place in
portafilter. The dual wall
filters bottom has only
one hole is normal.
Align the notch in
portafilter with filter
protrusion, then install
and turn to secure it
in place.
One flat spoon for the
single cup filter, two flat
spoons for double cup
filter. We suggest 9g for
single filter and 15g for
double filter.
Tamp the ground coffee
with the other end of
spoon to squeeze out the
air between powder.
Place portafilter under
the group head, align
handle at unlocked icon.
Open cover and fill the
pure water into water
tank (Not less the MIN
line and exceed MAX
line).
Place water tank vertically
and align the buckle to hole,
then press down to parallel
machine's top.
Insert portafilter into
the group head and turn
handle toward center
until vertical to the lock
icon position.
Empty your cup with
hot water in it.
Place the cup on drip tray,
and vertically under
portafilter outlet. If your
cup is higher, pls remove
drip tray cover.
Preheating 20-30s
CENTER
5 - Spoon & Tamper
7 - Place Cup
3 - Warm Cup
4 - Select Filter
TURN
ON
OFF
9g for Single Cup
15g for Double Cup
When adding ground
coffee don't press, after
it exceed the height of
filter a little and form a
hill then stop.
Not too
fine powder.
Tap & shake portafilter
to evenly distribute the
ground coffee, then use
the other end of spoon
to tamp.
Not too little
coffee powder.
5 - Ground Coffee [Core Step]
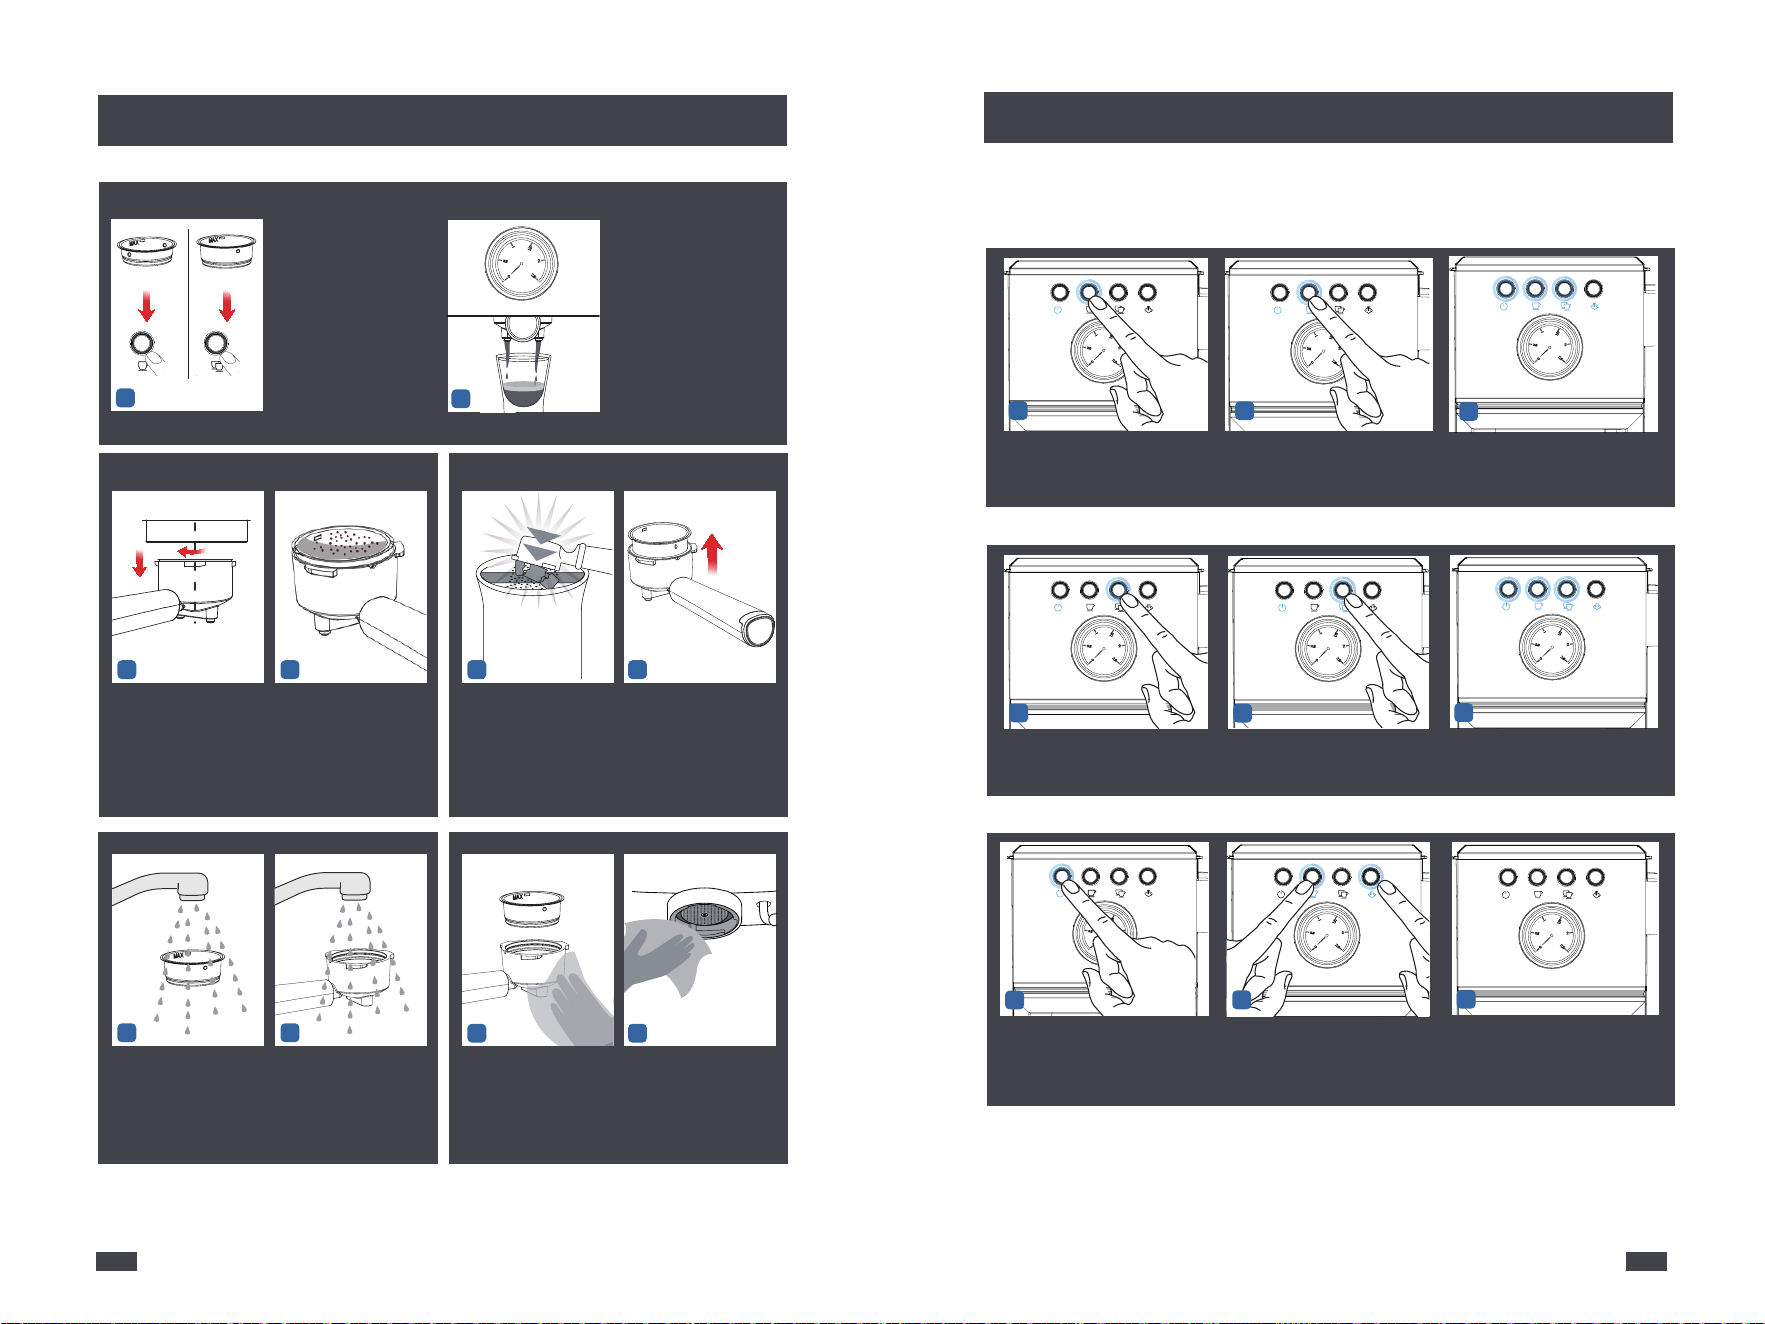
7.Cleaning
Clean the Group Head
A. Place a container under the group head.
NOTE: When the filter is empty or portaf-
ilter is not installed to run the coffee program, the water flow will be
greater than when using ground coffee due to less resistance.
NOTE: When the Steam button is lit alone,
it means in steam mode. Turn the knob is
for steam. Otherwise, for hot water.
B. Press once the Double Cup button to
make group head dispense water.
Clean the Steam Wand & Wake Up Pump
[VERY IMPORTANT STEP! Please be sure to follow this]
A. Place a container with a min 8oz capacity
under the steam wand.
B. Turn knob to ON, wait 10 secs, then turn
to OFF position. Repeat this cycle 3 times.
- This will effectively pump the air out of the
water pump and let it contain water again.
9 10
Single Cup
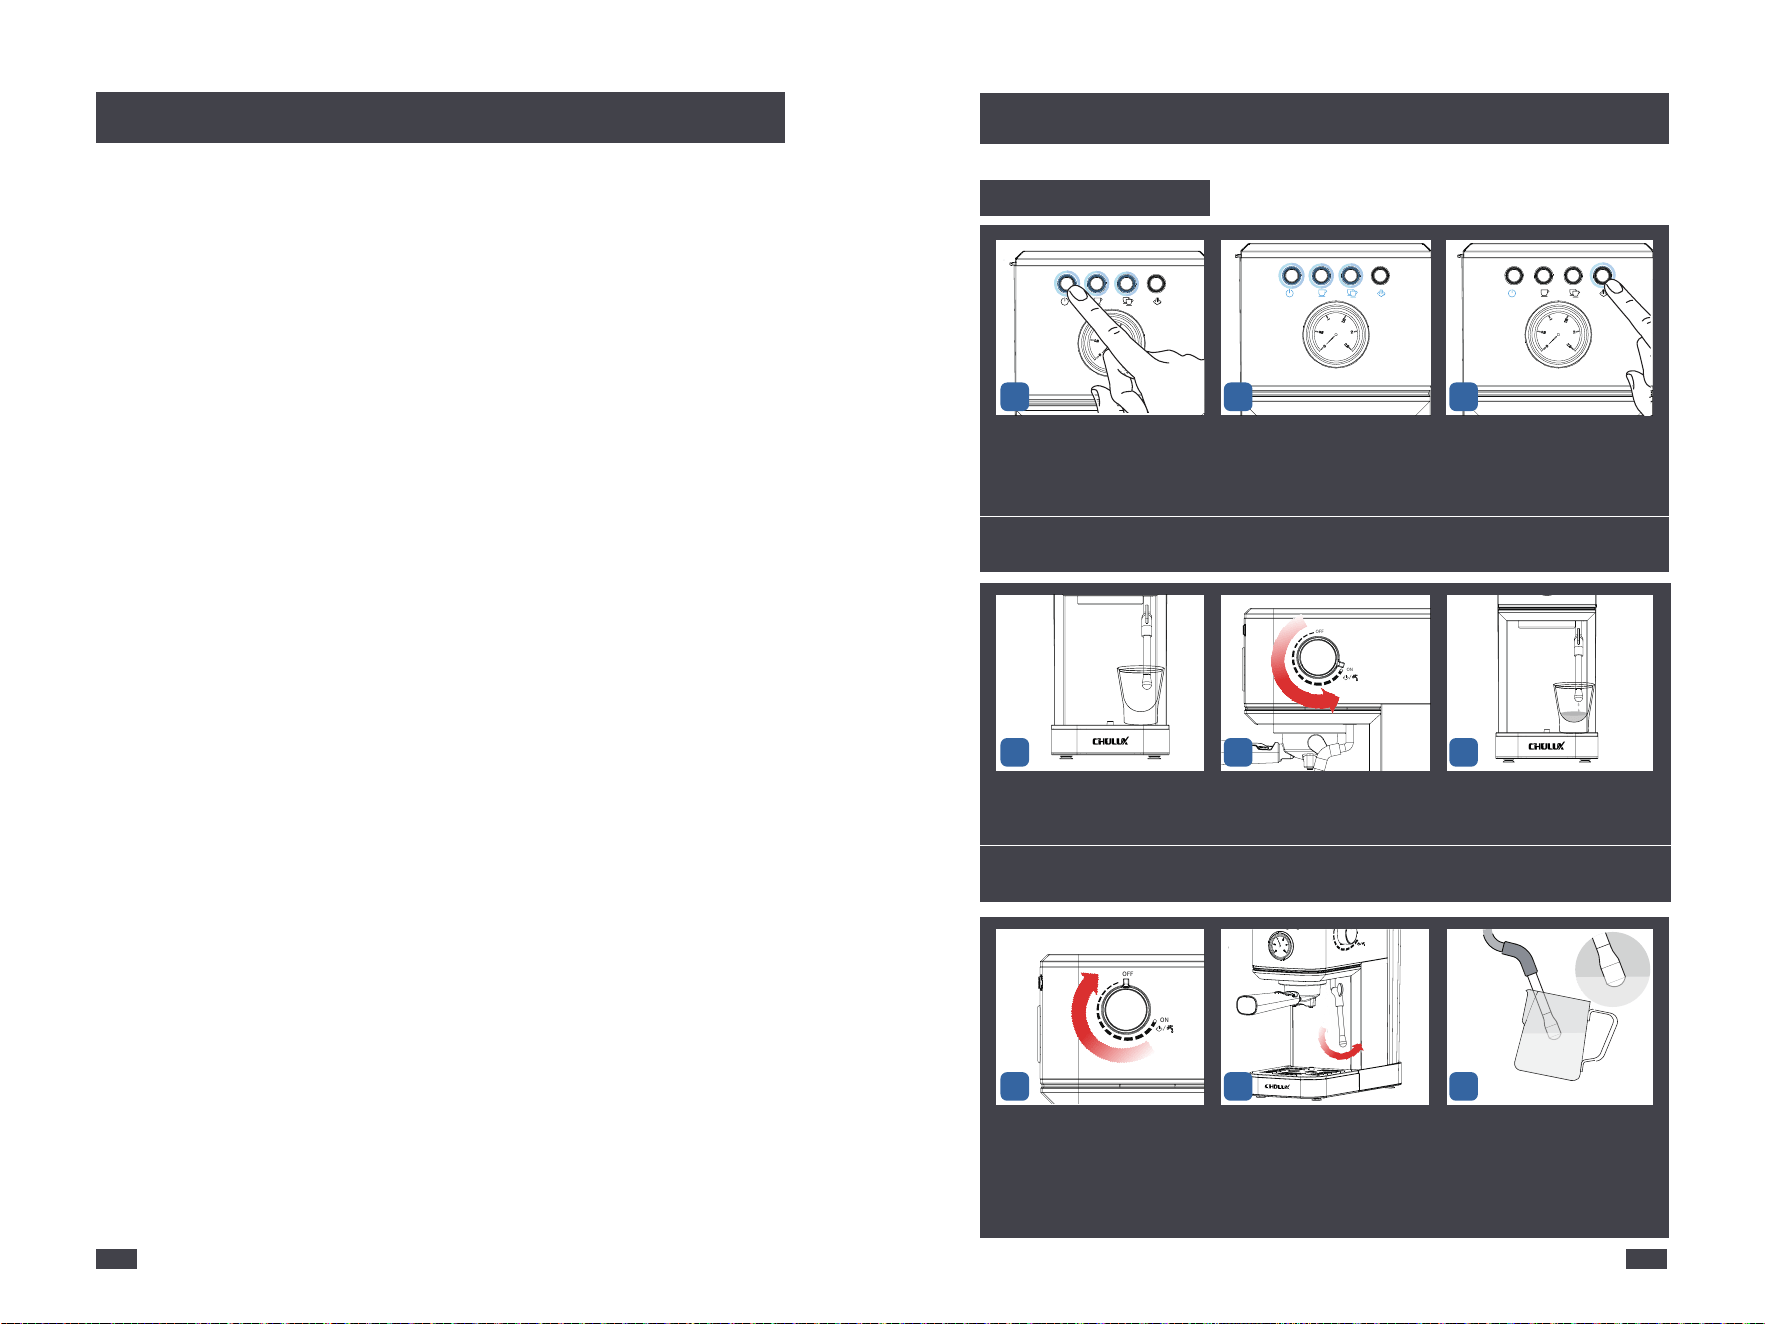
After machine is preheated, you can adjust the espresso volume by Single
and Double Cup buttons for your personal preference.
Adjusting Espresso Volume
Making Espresso
1
8 - Espresso Extraction
NOTE: If your ground coffee
is too fine, the water flow
may not get through.
Press once Single or Double
Cup button depending on
the filter you are using.
The pressure gauge is real-
time showing current pres-
sure, and machine will low
pressure to evenly moisten
ground coffee first, then
high pressure to extract.
If the gauge hand is not in
ESPRESSO RANGE, please
refer to page 18.
2
When reach your desired volume
(Range 1-2oz), then press the Single
Cup button again to stop machine.
2
The new Single Cup espresso volume
has been saved and machine will
return to READY state.
Press and hold the Single Cup
button for 3-5 secs, then machine
will start to dispense water.
1
2
3
1
Press and hold the Double Cup
button for 3-5 secs, then machine
will start to dispense water.
When reach your desired volume
(Range 2-3oz), then press Double
Cup button again to stop machine.
The new Double Cup espresso
volume has been saved and machine
will return to READY state.
3
2
1
Double Cup
Reset Default Volume
2
Press the Power button to turn off
machine, but not to unplug.
Press and hold Single Cup and
Steam button for 3-5 secs, both
buttons will light up and machine
will beep 1 sound at the same time.
After reset done, machine will back
to factory default setting volume
for 1 and 2 Cup, and machine will
return to READY state.
3
1
2
NOTE: Please ensure that the variables when you adjust the cup volume
are the same as when you make coffee on a daily basis. E.g. the same
amount of ground coffee, same grinding level, same tamping strength,
which will enable you to set it more accurately to the amount you desired.
Single Cup Double Cup
5
Same rinse the
portafilter front and
back under faucet, but
not dishwasher safe.
6
Use a clean cloth to
wipe the filter and
portafilter dry.
Same use the cloth to
wipe group head of
ground coffee residue.
4
Turn filter to align protr-
usion with notch in
portafilter, then remove
upward (Careful the high
temp).
Rinse filter front and
back under the faucet,
stainless steel filter is
dishwasher safe.
1
9 - Clean
Wait 20 secs to let mac-
hine auto-drain pressure.
Then turn left to remove
the portafilter.
Flip up and hold the small
black piece on handle,
then knock to discard the
coffee puck.
1.TURN
2.REMOVE
CENTRE
NOTE: Portafilter is made of aluminum will be oxidized by high temp,
humidity and descaling solution, which is normal.
7
Important Note
8
LOCK
2 3
If there is some water on
the ground coffee after
use, please increase the
powder amount and tamp
-ing strength, try using
different grinds powder.
122111
Get a Hotter Espresso
Milk Frothing
Usage Steps
6
7 9
ON
OFF
Plug in then press the Power
button to start and preheat
machine, both Single and Double
Cup button lights will flash slow.
When two button lights are not
flashing, means machine is in
READY state.
Press the Steam button to enter
steam mode. The button light will
blink slowly, and when it stops
blinking means the steam is READY.
Place your cup under the steam
wand.
Turn the control knob to ON position. Release the cool water droplets
inside steam wand will get a better
foaming effect.
NOTE: In steam mode, turn the knob to ON (MAX) position, a small amount of water will come out at first is normal
and after a few secs the steam will be at maximum output.
After 5-10 secs, steam will maximize
outlet, then return knob to OFF posi-
tion.
Use the black rubber handrail on the
steam wand to move it to your
desired position.
Move the milk foam cup with 6 to
8oz whole milk under steam wand,
cup spout stick close to wand body.
Keep milk liquid covering approx
one-half of wand head. Don't let
it get fully submerged or exposed.
1 2 3
4
8
ON
OFF
ON
OFF
5
ON
OFF
OFF
ON
OFF
ON
If the group head, portafilter, filter, and cup are cold, then they will lower
the temperature of coffee, pls refer to below steps to preheat them:
At this time, they are all preheated. If you still want much higher temper-
ature, continue with below step:
A. Plug in then press once Power button to start and preheat machine.
B. Install empty 1 or 2 cup filter inside portafilter, then install on machine.
C. Place the cup you use for espresso under the portafilter.
D. After machine is preheated, press once the Double Cup button.
E. Press once Steam button and wait until the light stop flashing, then
press once the Steam button again to exit this mode.
F. Add ground coffee, press your desired option, and enjoy delicious
hot espresso.
NOTE: After pressing the steam button, the pressure gauge may not react which is normal. As its main function is
to show the value of pressure when extracting coffee.

142113
Milk Frothing
12
13
1514
1 - Add Water
2
2 - Start Up
1 2
Preheating 20-30s READY
3 - Hot Water
1
Hot Water
Cleaning
Keep the milk foam cup in place
with your one hand and turn the
control knob to ON with your
other hand. Ensure the knob in
ON position, not dotted range.
Open cover and fill the
pure water into water
tank (Not less the MIN
line and exceed MAX line).
Place water tank vertically
and align the buckle to
hole, then press down to
parallel machine's top.
Place your cup under
the steam wand.
Turn the control knob to
ON position and release
hot water.
Return knob to OFF position, and machine will back in
READY state. The hot water function is available for
warming cup and making Americano. For Americano,
we recommend adding your desired hot water to cup
first, then making the coffee.
Plug in then press the
Power button to start
and preheat machine,
both Single and Double
Cup button lights will
flash slow.
When two button lights
are not flashing, means
machine is in READY
state.
Steam wand starts to output steam
into milk, the hissing sound means
steam is cutting down milk. A harsh
sound at first is normal and will dim-
inish with time.
Cup spout stick close to wand body
as a pivot and fix point, just by lightly
adjust the cup's position, watch to
see if the milk is swirling in it. If steam
wand is right in middle of cup, the
milk will not form a swirl.
As the milk level rises, lower the milk
foam cup to keep steam wand head
covered by one-half. When reaching
your desired microfoam, lift the cup
to fully submerge steam wand head,
letting the milk be heated better.
Touch the outside of cup with your
hand to feel the cup's temperature,
the longer steam time, the hotter
milk will be. When milk is reached
your desired temperature, return
the knob to OFF position.
Use the black rubber handrail on
steam wand to move it back to origi-
nal position, then point the steam
head towards the drip tray hole.
Turn the knob to ON position for 3-5
seconds to release the any milk left
inside the steam wand.
16
Move the milk foam cup from steam
wand, and immediately use a wet
cloth to wipe the steam wand.
Be careful to avoid any burns.
NOTE: Hot water will gradually reduce temperature as
the release time increases.
NOTE: After steam, only a very small portion of milk is water, which does not water down your milk. At this time,
milk is mixed with rich microfoam, which is the main reason for the rise of milk liquid level.
10
3 O CLOCK
,
At this time, steam wand is at 12 o'
clock position, then turn cup left so
that steam wand head is at 3 o'clock
position. But don't let it get too close
to wall or bottom of your cup, other-
wise it will make a loud, harsh noise
when steaming.
17
ON
OFF
18
ON
OFF
2
4
ON
OFF
OFF
OFF
ON
ON
OFF
ON
ON
OFF
ON
OFF
ON
OFF
OFF
ON
ON
OFF
11
ON
OFF
3
4 - Americano
1
The boiler, group head and steam wand are all made of food-safe 304
stainless steel. The inside water pipes are made of food-safe silicone.
After long-term high-temperature operation, minerals in water can cause
white alkaline substances to form on inner walls. Without regular
descaling, cleaning and maintenance, effects include prolonged preh-
eating time, abnormal taste, reduced water flow (e.g., through steam
wand), and increased noise.
When the machine has worked for 300 cycles, it will run a descaling
reminder. All lights flash and beep 5 times simultaneously, then it
continues to preheat. If ignored, reminder runs each time it starts.
162115
Cleaning
Cleaning
Descaling Cycle
1.TURN
2.REMOVE
CENTRE
1 2 3
8
ESPRESSO
MACHINE
CLEANING
TABLETS
PLEASE EMPTY TRAY
REMOVE
STEAM
FI
L
TER
UNSCREW
INSERT
INSERT
D
U
A
L
W
A
L
L
LOCK
11 11
12
13 14
15
18
17
16
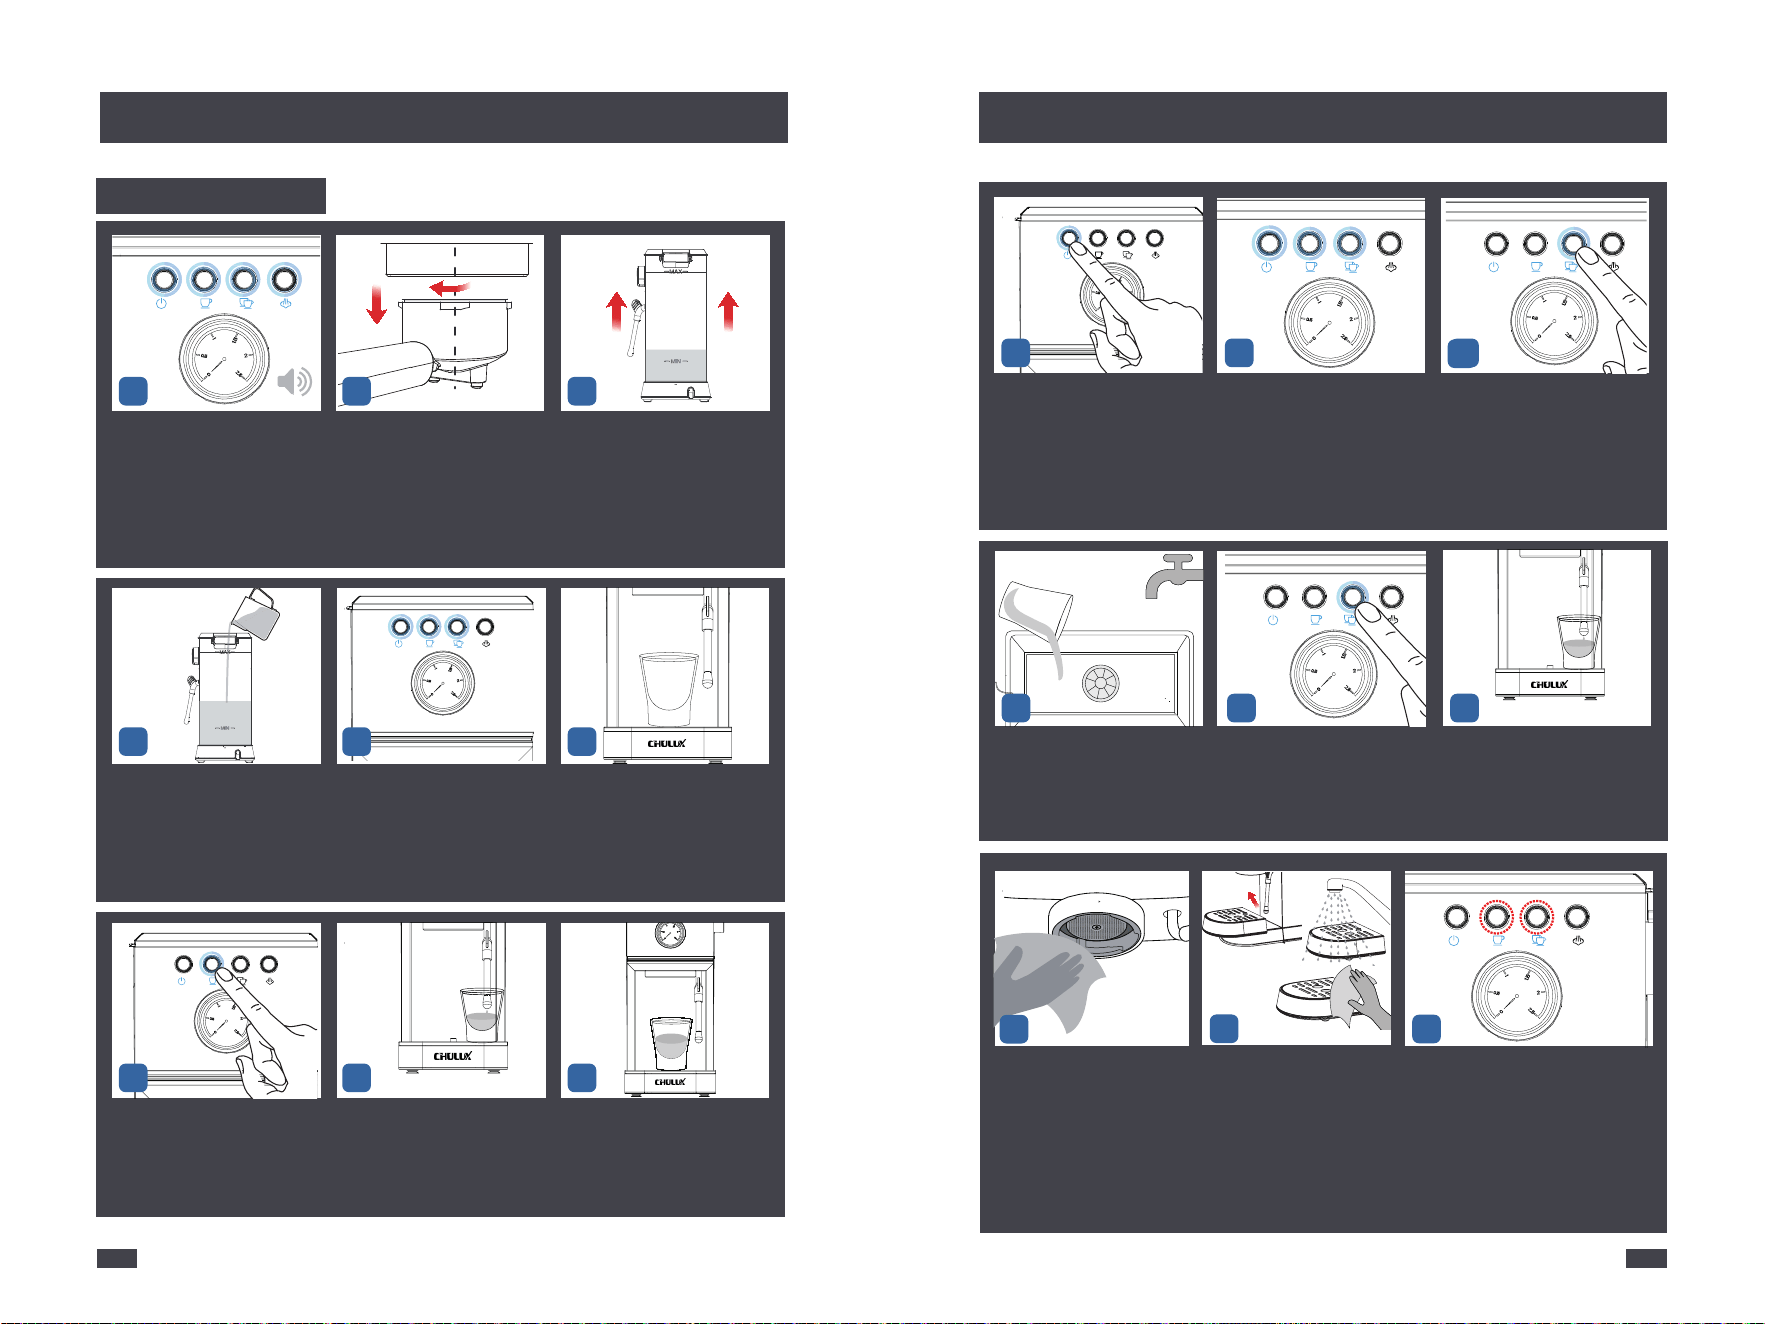
Turn left to remove portafilter, then
use brush to clean the portafilter and
filters, and wipe dry to place separately.
Empty the remaining water from
water tank.
When Single and Double Cup button
lights are not flashing, so machine is
in READY state.
Repeat run the Double Cup program
3 times to make group head dispense
descaling water.
Empty the remaining descaling
water in the water tank and the
container.
Rinse water tank and add 20oz pure
water, then run the Double Cup
program 3 times to eliminate the
descaling water smell.
Move the container under steam
wand. Turn knob to ON position
and release approx 6oz hot water,
then turn back to OFF position.
Use the cloth to wipe group
head of ground coffee residue.
Lift to remove and empty the
drip ray, rinse under faucet and
use cloth to dry, then put it back.
After the descaling is finished, pls press &
hold the Single and Double Cup buttons for
5 secs at same time to cancel the descaling
reminder.
Place a container with min 12oz
capacity under the group head.
When Single and Double Cup button
lights are not flashing, so machine
is in READY state.
Press the Single Cup button to
make group head dispense
descaling water.
Move container back under the
group head and wait for descaling
water to dissolve the scale in
machine about 30 mins.
Place the container under steam
wand, then turn knob to ON position
and release approx 3oz hot descaling
water. Final turn back to OFF position.
After 30 mins, as the machine will
auto shut down after 25 mins, so
pls press once the Power button
to start and preheat machine.
Add 20oz of pre-made descaling
water to the water tank.
4 6
9
When the machine has cumulatively
worked 300 cycles, all indicator lights
will flash and sound for 5s, which
means that descaling is required.
10
7
5

1. Clean and dry the portafilter and group head promptly after each brew.
2. Wipe steam wand with wet cloth immediately after each steam milk.
3. When the collected water in drip tray reaches a certain amount, the red
marker will float up, means it needs to be emptied and clean.
5. We recommend rinsing the water tank at least once a week.
NOTE: Do not use alcohol or solvent cleaner, and not immerse the machine
in water to clean. Water tank and drip tray container are not dishwasher safe.
4. If the machine body has stains such as coffee stains or milk stains, using
wet cloth for wiping will be easier to remove them.
182117
Cleaning
Frequently Asked Questions
Frequently Asked Questions
Why is there some water in the machine I just received?
Don't worry, it's just clear water from steam and release water
tests during the quality control period. We recommend refer to
"Before First Use" section on page 5.
Question:
Answer:
After lifting water tank, some water come out of the input
A slight spill is normal. As the machine is under pressure, lifting
the tank will relieve pressure, so water come out.
Question:
Answer:
Both filters have only one hole in the bottom
As they are dual wall filters, different from single wall filter.
Using them will get richer espresso crema than single wall filter.
Question:
Answer:
After making espresso, there is some water within portafilter
Please refer to the 5th tip on the contents page, which will help
you out nicely.
Question:
Answer:
Icon flash & beep 3 times and no coffee come out, hot water
and steam function also no water come out
Please refer to the 3rd and 4th tips on the contents page. If still
not working, please contact us at [email protected]
Question:
Answer:
Steam wand come out water but not steam in steam mode
Ensure the knob is in ON position, not the dotted range. At first
some cooling water out which is normal, after 5-10 secs, steam
will maximize outlet.
Question:
Answer:
Milk doesn't foam well
Before steam milk, release the cooling water from steam wand
and use cold whole milk for steaming. Getting the milk to foam
richly with microfoam also will take some skill, so a bit of
practice is important.
Question:
Answer:
Filter cannot be installed or removed
Turn filter to align protrusion with notch in portafilter, then
install or remove.
Question:
Answer:
Portafilter hard to install
Place the machine on a sturdy and non-smooth countertop,
hold machine with one hand and install with other. As during
the break-in period, first few times will a little difficult.
Question:
Answer:
How to get better pressure?
If pressure is low, try using a finer powder, increase the amount
or tamping strength. Conversely, if pressure is high, please try
using a coarser powder, reduce the amount or tamping strength.
Question:
Answer:
Single and Double Cup button lights flash slowly
Means machine is preheating, take 30 secs. lf time out occur,
please check the water tank is filled and in place.
Question:
Answer:
No or less coffee come out, but hot water and steam function
come out water normally
Which is caused by the coffee powder is too fine, try to use a
coarser powder.
Question:
Answer:

1. This product is guaranteed for 1 year from the date of original purchase
against mechanical and electrical defects.
2. This guarantee is only valid if the appliance is used for domestic purposes
only, complies with the instructions for use, not connected to an unsuitable
electrical supply, not disassembled or interfered with in any way, or
damaged by misuse.
3. Consumables such as plugs and fuses are not covered by the guarantee.
4. In line with our policy of continuous development, we reserve the right
to change this product, packaging and documentation specifications
without prior notice.
5. Guarantee inquiry: please provide your order number and describe the
issue to our customer service support team by email at [email protected]
Approval Information
FOR HOUSEHOLD USE ONLY
5025664
202119
Frequently Asked Questions
Guarantee
1. If you encounter any trouble when using our products, pls contact us at
any time by email [email protected] We will respond your email and provide
assistance to you within 24 hours. When you contact our customer support,
pls describe the issue and provide your order number, this will let us solve
it for you more quickly (attaching photos and video of the issue will further
quicken resolution).
2. Maintenance will not be provided under the following conditions:
- Misuse, such as improper installation or failure to follow instructions.
- Disassembly of the appliance by unauthorized personnel.
- Damage caused by nature. Wear and tear under normal use.
3. For more product information, pls visit our website: www.chulux.com
Maintenance & Service
After pressing Power button once, all lights flash and beep
3 times then machine turn off
Turn the knob to OFF position. Then press the Power icon
once again and the machine will return to normal.
Question:
Answer:
After press Power button, all lights flash 5 times and beep
5 sound then machine continue to preheat
It's a descaling reminder, means machine require descaling.
Pls refer to "Cleaning" section on page 14.
Question:
Answer:
After some use, the portafilter surface has some things that
cannot be cleared
As the portafilter is made of aluminum will be oxidized by high
temp, humidity and descaling solution, which is normal.
Question:
Answer:
When extracting the coffee, the steam wand also come out
water at the same time
This is caused by the knob in dotted range. Turn the knob fully
to OFF position will return to normal.
Question:
Answer:
