

2
FROM THE DESK OF OUR PRESIDENT
Dear new owner of a Bertazzoni appliance,
I want to thank you for choosing one of our beautiful products for your home.
My family started manufacturing kitchen appliances in Italy in 1882, building a
reputation for quality of engineering and passion for good food.
Today, our products stand out because of their unique blend of authentic Italian
design and superior appliance technology. It is our mission to make products that
function perfectly and bring joy to their owners.
By making beautiful products we respond to our customers’ flair for good design. By
making them versatile and easy-to-use, cooking with Bertazzoni becomes a real
pleasure.
This manual will help you learn to use and care for your Bertazzoni appliance in the
safest and most effective way, so that it can give you the highest satisfaction for
years to come.
Enjoy!
Paolo Bertazzoni
President
3

4

MANUAL VALIDITY
The following manual is valid for all the product codes mentioned below:
• REF24BMFIXNV
• RBM24F4FXNV
5

6
CONTENTS
GENERAL INFORMATION . . . . . . . . . . . . . . . . . . . . . . . . . . . . . . . . . . . . . . . . . . . . . . . . . . . . . . . . . . . . . . . . . . . . . . . . . . 7
READING THE MANUAL . . . . . . . . . . . . . . . . . . . . . . . . . . . . . . . . . . . . . . . . . . . . . . . . . . . . . . . . . . . . . . . . . . . . . . . 7
INTRODUCTION AND SAFETY . . . . . . . . . . . . . . . . . . . . . . . . . . . . . . . . . . . . . . . . . . . . . . . . . . . . . . . . . . . . . . . . . . 7
SAFETY INFORMATION . . . . . . . . . . . . . . . . . . . . . . . . . . . . . . . . . . . . . . . . . . . . . . . . . . . . . . . . . . . . . . . . . . . . . . . . 8
HYDROCARBON (HC) WARNING . . . . . . . . . . . . . . . . . . . . . . . . . . . . . . . . . . . . . . . . . . . . . . . . . . . . . . . . . . . . . . . . 9
DISPOSAL OF OLD APPLIANCE . . . . . . . . . . . . . . . . . . . . . . . . . . . . . . . . . . . . . . . . . . . . . . . . . . . . . . . . . . . . . . . . . 9
ENERGY SAVING . . . . . . . . . . . . . . . . . . . . . . . . . . . . . . . . . . . . . . . . . . . . . . . . . . . . . . . . . . . . . . . . . . . . . . . . . . . . . 9
BEFORE FIRST USE . . . . . . . . . . . . . . . . . . . . . . . . . . . . . . . . . . . . . . . . . . . . . . . . . . . . . . . . . . . . . . . . . . . . . . . . . . 10
USE . . . . . . . . . . . . . . . . . . . . . . . . . . . . . . . . . . . . . . . . . . . . . . . . . . . . . . . . . . . . . . . . . . . . . . . . . . . . . . . . . . . . . . . . . . . . 11
USING THE FRIDGE . . . . . . . . . . . . . . . . . . . . . . . . . . . . . . . . . . . . . . . . . . . . . . . . . . . . . . . . . . . . . . . . . . . . . . . . . . 11
USING THE FREEZER . . . . . . . . . . . . . . . . . . . . . . . . . . . . . . . . . . . . . . . . . . . . . . . . . . . . . . . . . . . . . . . . . . . . . . . . 11
FRESCO ZONE DRAWER . . . . . . . . . . . . . . . . . . . . . . . . . . . . . . . . . . . . . . . . . . . . . . . . . . . . . . . . . . . . . . . . . . . . . 11
STORAGE . . . . . . . . . . . . . . . . . . . . . . . . . . . . . . . . . . . . . . . . . . . . . . . . . . . . . . . . . . . . . . . . . . . . . . . . . . . . . . . . . . 12
TECHNICAL SPECIFICATIONS . . . . . . . . . . . . . . . . . . . . . . . . . . . . . . . . . . . . . . . . . . . . . . . . . . . . . . . . . . . . . . . . . 12
CONTROL PANEL . . . . . . . . . . . . . . . . . . . . . . . . . . . . . . . . . . . . . . . . . . . . . . . . . . . . . . . . . . . . . . . . . . . . . . . . . . . . 13
AUTOMATIC ICE MAKER (DEPENDING ON MODEL) . . . . . . . . . . . . . . . . . . . . . . . . . . . . . . . . . . . . . . . . . . . . . . 14
CARE AND MAINTENANCE . . . . . . . . . . . . . . . . . . . . . . . . . . . . . . . . . . . . . . . . . . . . . . . . . . . . . . . . . . . . . . . . . . . . . . . 15
LED LIGHT REPLACEMENT INSTRUCTIONS . . . . . . . . . . . . . . . . . . . . . . . . . . . . . . . . . . . . . . . . . . . . . . . . . . . . . 15
CARE AND CLEANING . . . . . . . . . . . . . . . . . . . . . . . . . . . . . . . . . . . . . . . . . . . . . . . . . . . . . . . . . . . . . . . . . . . . . . . . 15
CLEANING THE INTERIOR SURFACES . . . . . . . . . . . . . . . . . . . . . . . . . . . . . . . . . . . . . . . . . . . . . . . . . . . . . . . . . . 15
STAINLESS STEEL EXTERIOR SURFACES . . . . . . . . . . . . . . . . . . . . . . . . . . . . . . . . . . . . . . . . . . . . . . . . . . . . . . 15
CLEANING THE DOOR SEALS . . . . . . . . . . . . . . . . . . . . . . . . . . . . . . . . . . . . . . . . . . . . . . . . . . . . . . . . . . . . . . . . . 16
DEFROSTING . . . . . . . . . . . . . . . . . . . . . . . . . . . . . . . . . . . . . . . . . . . . . . . . . . . . . . . . . . . . . . . . . . . . . . . . . . . . . . . 16
TROUBLESHOOTING . . . . . . . . . . . . . . . . . . . . . . . . . . . . . . . . . . . . . . . . . . . . . . . . . . . . . . . . . . . . . . . . . . . . . . . . . 16
INSTALLATION INSTRUCTIONS . . . . . . . . . . . . . . . . . . . . . . . . . . . . . . . . . . . . . . . . . . . . . . . . . . . . . . . . . . . . . . . . . . . . 18
PREPARING FOR INSTALLATION . . . . . . . . . . . . . . . . . . . . . . . . . . . . . . . . . . . . . . . . . . . . . . . . . . . . . . . . . . . . . . . 18
VENTILATION . . . . . . . . . . . . . . . . . . . . . . . . . . . . . . . . . . . . . . . . . . . . . . . . . . . . . . . . . . . . . . . . . . . . . . . . . . . . . . . 18
CUTOUT DIMENSIONS . . . . . . . . . . . . . . . . . . . . . . . . . . . . . . . . . . . . . . . . . . . . . . . . . . . . . . . . . . . . . . . . . . . . . . . 18
PRODUCT DIMENSIONS . . . . . . . . . . . . . . . . . . . . . . . . . . . . . . . . . . . . . . . . . . . . . . . . . . . . . . . . . . . . . . . . . . . . . . 19
TOP VIEW . . . . . . . . . . . . . . . . . . . . . . . . . . . . . . . . . . . . . . . . . . . . . . . . . . . . . . . . . . . . . . . . . . . . . . . . . . . . . . . 19
FRONT VIEW . . . . . . . . . . . . . . . . . . . . . . . . . . . . . . . . . . . . . . . . . . . . . . . . . . . . . . . . . . . . . . . . . . . . . . . . . . . . 19
SIDE VIEW . . . . . . . . . . . . . . . . . . . . . . . . . . . . . . . . . . . . . . . . . . . . . . . . . . . . . . . . . . . . . . . . . . . . . . . . . . . . . . 19
ELECTRICAL REQUIREMENTS . . . . . . . . . . . . . . . . . . . . . . . . . . . . . . . . . . . . . . . . . . . . . . . . . . . . . . . . . . . . . . . . 20
PLUMBING REQUIREMENTS (DEPENDING ON MODEL) . . . . . . . . . . . . . . . . . . . . . . . . . . . . . . . . . . . . . . . . . . . 20
REVERSING THE APPLIANCE DOORS . . . . . . . . . . . . . . . . . . . . . . . . . . . . . . . . . . . . . . . . . . . . . . . . . . . . . . . . . . 21
ENSURING THE DOOR SEALS CORRECTLY . . . . . . . . . . . . . . . . . . . . . . . . . . . . . . . . . . . . . . . . . . . . . . . . . . . . . 23
CUSTOMER CARE . . . . . . . . . . . . . . . . . . . . . . . . . . . . . . . . . . . . . . . . . . . . . . . . . . . . . . . . . . . . . . . . . . . . . . . . . . . . . . . 24
GENERAL INFORMATION
Thank you for purchasing this product.
In order to get the most out of your refrigerator, please read
this instruction manual carefully before use. Keep all
documentation for use at a later date or for future owners.
This product is intended solely for residential use or similar
applications, such as:
The staff kitchen areas of shops, offices and other working
environments; on farms, by guests at hotels, motels, bed
and breakfasts (B&Bs) and other residential-type
environments.
It may be used for catering services and similar
applications, provided it is not used to store products for
retail sale.
This appliance must be used only for purposes of food
storage; any other use is considered hazardous and the
manufacturer will not be held liable in the event of such
use. Also, it is recommended that you take note of the
warranty conditions.
READING THE MANUAL
These instructions are suitable for different types of
appliances, so they may contain descriptions of functions
which your appliance may not contain or support.
The images and illustrations in this document refer to
various models and may differ slightly from the product
purchased.
The manufacturer does not accept any responsibility for
personal injury or damage to property arising from incorrect
installation or misuse of the appliance.
The manufacturer reserves the right to modify the various
models as required to comply with the technical regulations
in force.
In the event of complaints, please contact the customer
service.
INTRODUCTION AND SAFETY
Read the instructions provided in this manual carefully
before installing and/or using the appliance.
This will help you to get to know your new device.
Keep this document to hand so that you consult it at any
moment, and hand it on to any subsequent owners.
Read the safety messages provided in the introduction to
this manual and give due consideration to the safety notes
such as: “Attention”, “Warning” and “Danger” which appear
in the text.
DANGER
This symbol indicates a situation that is a
danger to you and others. Read it carefully
and make sure that you have perfectly
understood the causes of potential
dangerous or fatal accidents.
WARNING
This symbol indicates safety information.
Read it carefully and make sure that you
have perfectly understood the causes of
potential dangerous accidents.
CAUTION
This symbol indicates a procedure which
could put the appliance’s structure or
components at risk. Take particular care
over these procedures.
NOTE
This symbol indicates useful advice and
draws your attention to correct procedures
and practices. Complying with the
instructions marked with this symbol will
avoid problems for you.
The symbol highlights methods or
procedures for correct use of the appliance.
7
GENERAL INFORMATION
SAFETY INFORMATION
WARNING
Risk of fire / Flammable materials
This appliance is not intended for use by
persons (including children) with reduced
physical, sensory or mental capabilities or lack
of experience and knowledge unless they are
supervised or have been given instruction
concerning the use of the appliance by a
person responsible for their safety.
Children should be supervised to ensure that
they do not play with the appliance.
If the power cord is damaged, it must be
replaced by the manufacturer, its service agent
or a similarly qualified person in order to ensure
against hazards.
WARNING
Keep ventilation openings in the enclosure
or built-in structure where the appliance is
housed free of obstructions.
WARNING
Do not use mechanical devices or other
means to accelerate the defrosting process
unless they are recommended by the
manufacturer.
WARNING
Do not damage the refrigerant circuit.
WARNING
Do not use electrical appliances inside the
unit's food storage compartments unless
these are of a type recommended by the
manufacturer.
WARNING
When positioning the appliance, make sure
that the power cord does not become
trapped or damaged.
WARNING
Do not place multi-outlet power strips or
portable power supplies at the rear of the
appliance.
Do not store explosive substances, such as aerosol cans
with a flammable propellant, inside this appliance.
This appliance is intended to be used in residential and
other similar applications, such as:
• staff kitchen areas in shops, offices and other working
environments;
• in farm houses and by guests at hotels, motels and other
residential type environments;
• bed and breakfast type environments;
• catering and similar non-retail applications.
Please comply with local regulations when disposing of the
appliance, due to its flammable refrigerant and insulation-
blowing gas.
If the LED lamp is damaged, it must be replaced by the
manufacturer, its service agent or a similarly qualified
person in order to avoid hazards.
WARNING
To prevent hazards associated with
appliance instability, the appliance must be
anchored according to the instructions.
Component parts shall be replaced with like components
and that servicing shall be done by factory authorized
service personnel, so as to minimize the risk of possible
ignition due to incorrect parts or improper service
DANGER
Risk of fire or explosion: flammable
refrigerant used
• Do not use mechanical devices to
defrost refrigerator.
• Do not puncture refrigerant tubing.
The maximum loading of shelves is 22 lbs each.
8
GENERAL INFORMATION
HYDROCARBON (HC) WARNING
Your product’s cooling system contains R600a. This gas is
flammable. Therefore, be careful not to damage the cooling
system or the tubing during use or transportation. If
damaged, keep the appliance away from potential sources
of ignition, which could cause it to catch fire, and ventilate
the room where the appliance is placed.
NOTE
If the appliance is damaged or if you see a
gas leak, please keep away from the gas
as it may cause ice burn if it comes into
contact with the skin. Thoroughly ventilate
the room in which the appliance is situated.
NOTE
The type of gas used in the product is listed
on the rating label, which is located on the
left interior wall of the refrigerator.
WARNING
Never attempt to burn the product as a
means of disposal.
DISPOSAL OF OLD APPLIANCE
Properly dispose of your appliance packaging. Ensure that
refrigeration equipment is disposed of in an
environmentally friendly way, including both your old and
new appliances at the end of their service life. Follow local
regulations for the disposal of appliances with flammable
refrigerants and blowing gas.
WARNING
Before disposal, make old, worn appliances
unusable by removing the plug, cutting the
power cable, and destroying any snap
fastenings or bolts. This prevents children
from locking themselves inside the
appliance during play (risk of suffocation) or
causing other dangers.
WARNING
Do not dispose of the appliance with
normal household waste. Avoid damaging
the coolant circuit, especially the heat
exchanger at the back or bottom of the unit.
The symbol on the product or packaging indicates that this
product should not be treated as normal household waste.
Instead, take it to a recycling collection point for electrical
and electronic goods. Correct disposal protects the
environment and public health. For more information on
recycling, contact your local authorities or waste collection
services.
ENERGY SAVING
For optimal energy saving, we recommend the following:
• Install the appliance away from heat sources, out of
direct sunlight and in a well-ventilated room.
• Avoid putting hot food into the refrigerator, which would
raise the internal temperature, thus causing the
compressor to run continuously.
• Do not overfill the compartments, as this prevents air
from circulating properly.
• If ice should form, defrost the appliance in order to
facilitate the transfer of cold.
• In the event of an electrical power failure, it is advisable
to keep the refrigerator door closed.
• Open the appliance doors as infrequently and for the
briefest amounts of time possible.
• Do not adjust the settings to extremely cold
temperatures.
• Remove any dust that accumulates on the back of the
appliance
9

GENERAL INFORMATION
BEFORE FIRST USE
You must allow the fridge to settle for at least four
hours prior to switching the power on.
It is recommended that you clean the interior of the
appliance prior to first use using a solution of bicarbonate of
soda and warm water, then thoroughly dry the interior. The
fridge may have an odour to it at first use. This will
disappear as the appliance cools.
NOTE
The appliance will start operating at 41 ℉
for the fridge and 0 ℉ for the freezer and
work continuously until it comes down to
the correct temperatures. If the appliance is
switched off, you should allow five minutes
before switching it on again in order to
prevent unnecessary damage to the
compressor. Never store inflammable or
explosive items, strong corrosive acids or
alkalis in the appliance. This fridge cools
your food by making the inside back of the
cavity cold. It is normal for frost to build up
on this surface; it then dissipates and
drains through a small drain at the bottom,
where it evaporates harmlessly. The
presence of frost at the back does not
mean that the fridge is malfunctioning.
10

USE
USING THE FRIDGE
• Never put liquids into the refrigerator uncovered
• Never put hot foods into the refrigerator. Warm food
should be allowed to cool to room temperature before
being put into the refrigerator.
• Nothing should rest against the rear wall of the
refrigerator, as this will cause the formation of frost,
which will be difficult to remove, and possible
condensation problems.
• Make sure food is clean and that any excess water is
wiped off before putting it into the fridge.
• Wrap or cover food before putting it into the fridge. This
will help impede the loss of moisture, keep food fresh
and prevent unpleasant odours.
• Sort foods prior to storing. Any foods to be used soon
should be stored at the front of the shelves. This will help
to prevent deterioration, which could occur when the
door is kept open for long periods of time.
• Do not overfill the fridge. There should be sufficient
space between foods to allow cool air to circulate.
• Thawing frozen foods in the fridge compartment will help
to keep the temperature low and save energy.
• Never store raw meats on shelves above cooked meats
or produce. This will help to prevent juices from raw
meat from contaminating other foodstuffs.
USING THE FREEZER
• The freezer compartments are designed to store frozen
food only.
• Never put hot or warm foods into the freezer; allow them
to cool fully before putting them into the freezer.
• When storing frozen food, follow the instructions on the
food packaging. If no information is provided, foods
should not be stored for longer than three months after
the purchase date.
• Store food in small packages (ideally less than 2.2 lbs).
This reduces freezing time and improves the quality of
the food after thawing.
• Wrap food before putting it into the freezer. To stop the
wrapping from sticking together, ensure it is dry.
• Label food before freezing, with information including
type of food and dates of storage and expiration.
• Once food is thawed, it must not be refrozen. In order to
prevent wastage, only defrost as much food as is
required.
• Bottled or canned drinks should not be stored in the
freezer compartments, as they could explode.
• The maximum amount of fresh food that can be frozen
within a 24-hour period is 5.8 lbs.
• Do not attempt to freeze more than the maximum
amount.
FRESCO ZONE DRAWER
• The temperature inside the Fresco drawer can be
regulated within a range of between +37 ℉ and 27 ℉.
This is the ideal drawer for storing meat and fish.
11
USE
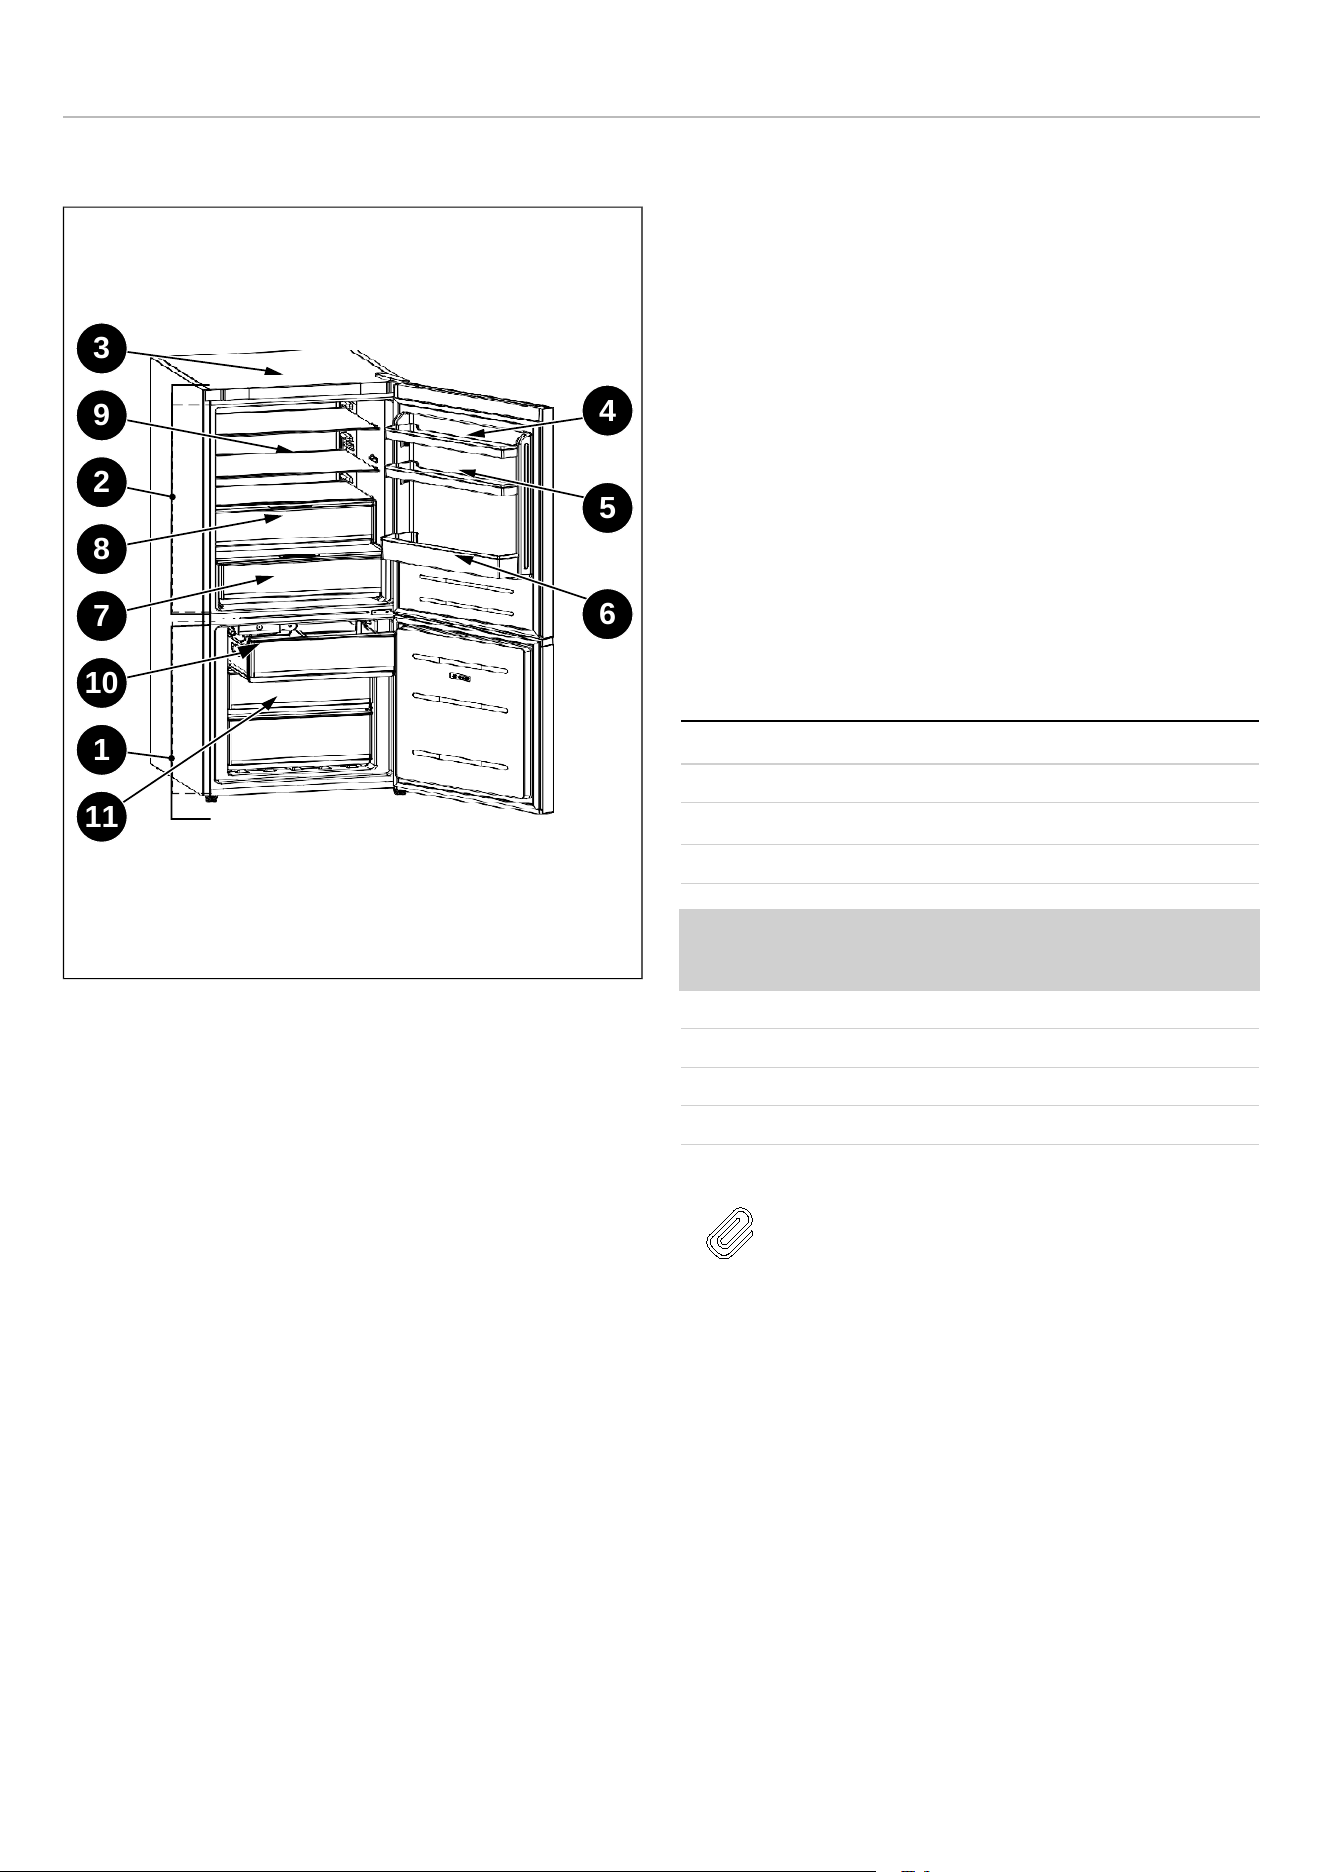
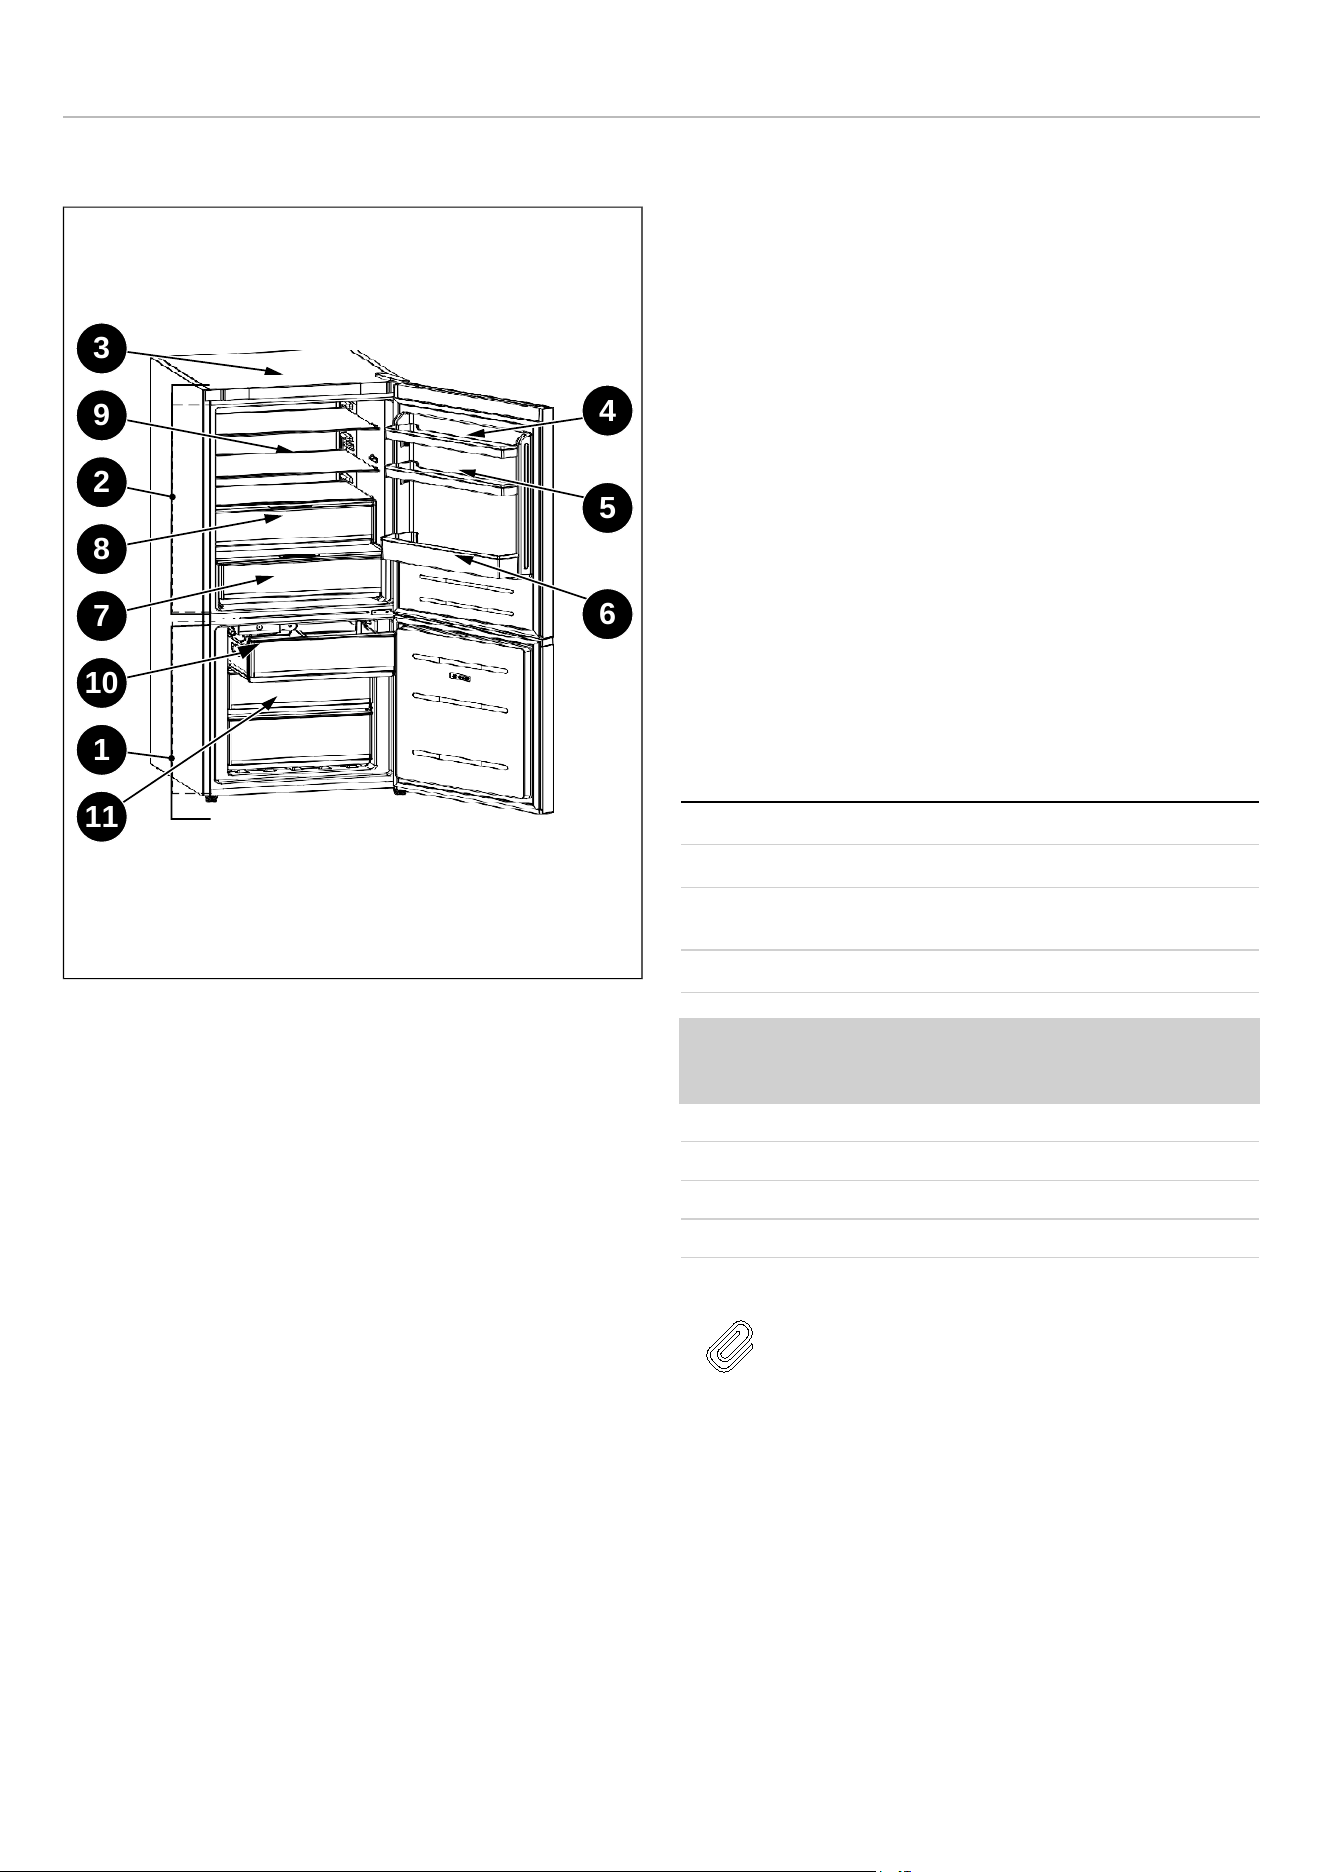
STORAGE
Fig. 1
1 Freezer compartment
2 Refrigerator compartment
3 Display
4 Butter, cheeses, etc.
5 Food in jars and bottles
6 Beverages, e.g. milk
7 Fresco drawer for fresh meat and fish or fruit and
vegetables
8 Crisper for fruit and vegetables
9 Yoghurt, preserves, etc
10 Ice cubes storage (depending on model)
11 Freezer drawer
The fridge section is for short-term food storage. Although
low temperatures can be maintained, it is not
recommended to store food for extended periods.
The temperature can vary between the different sections as
the cold air circulates within the fridge. For this reason,
foods should be stored in different sections according to
type.
The fridge shelves can be moved within the refrigerator
compartment depending on storage requirements. To move
a shelf, lift up the rear section and then pull it outwards.
To replace, slide the shelf back into the slot and then lower
the rear section.
The most energy-saving configuration requires the
drawers, door bins and shelves to be installed in the
appliance; please see the pictures above.
TECHNICAL SPECIFICATIONS
Permissible water pressure
25-80 psi (207-552 kPa)
Electrical connection
115 V/60 Hz
Rated input power 175 W
Climate class SN-N-ST-T
CLIMATE CLASS
AMBIENT
TEMPERATURE
SN 50℃ to +89℃
N
+16℃ to +32℃
ST +61℃ to +100℃
T
+61℃ to +109℃
NOTE
This appliance may not work properly if
being left at a temperature above or below
the indicated climate class range for a long
period of time.
0
11
9
10
2
5
3
1
4
7
6
8
12

USE
CONTROL PANEL
Fig. 2
1) When the appliance is switched on for the first time, it will
be operating at the following settings: 41℉ for the fridge,
32℉ for the Fresco and 0℉ for the freezer. If you wish to
adjust the temperature or functions manually, use the
appropriate button to perform the desired operation. The
temperature range for the Fresco is from 27℉ to 37℉.
2) Fridge temperature adjustment: Press the button on
the left-hand side of the control panel to adjust the
temperature within a range of between 36℉ and 46℉.
3) Freezer temperature adjustment: Press the button on
the right-hand side of the control panel to adjust the
temperature within a range of between 5℉ and -13℉.
4) Fresco drawer temperature adjustment: The button
controls temperature. By pressing on this button, you
can adjust the temperature within a range of between
27℉ and 37℉. This function can be turned on/off by
pressing and holding the button for three seconds (OFF
is displayed).
5) Super Cool: Press the button; the button lights up
and the fast cooling function is turned on. The fridge
automatically begins running at a temperature setting of
36℉ and continues for 24 hours, after which it returns to
its normal setting and the symbol is no longer lit.
6) Holiday Mode: Press the button; the button lights up,
the holiday function is turned on and the whole
appliance automatically begins running at the following
settings: fridge at 63 ℉ and freezer at 0 ℉.
7) Eco Mode: Press the button on the control panel; the
Eco function is turned on and the button lights up. The
fridge compartment runs at a setting of 41℉ and the
freezer compartment runs at a setting of 0℉. The Fresco
works at a setting of 37℉.
8) Super Freeze: Press the button; the button lights up
and the freezer begins to run the fast freezing function,
with a temperature setting of -13℉. After 24 hours, the
fast freezing function quits automatically.
9) Press and hold the power button for 3 seconds to switch
off your appliance. The button lights up and the power is
shut off. The interior lamps switch off and the
compressor stops operating. Press and hold the
button for 3 seconds to switch on your appliance. The
symbol lights up and power is restored.
10) No Frost models are equipped with a manual defrosting
function. Press and hold buttons + for 5 seconds
to switch on the manual defrosting function to clean the
freezer evaporator. The freezer temperature symbol
remains steadily lit. Press and hold buttons + for
3 seconds to switch off the manual defrosting function.
The freezer temperature symbol goes dark.
11) Fault Display: This appliance has a "Fault Display &
Alarm" function. Once the sensors detect a fault, alerts
are shown on the temperature display; the appliance still
cools, but a professional service engineer should be
called in to check it.
• F2 – Fresco sensor
• F3 – Fridge compartment sensor
• F4 – Freezer compartment sensor
• F5 – Defrosting sensor
• 2E – Freezer fan/motor fault
• CE– Communication fault between main board and
display panel
13
USE
The above Faults are only shown on the display; there
is no audible alarm signal.
Maximum freezer temperature exceeded alarm: If, after the
freezer reaches the set temperature, the temperature rises
to above 30℉, the alarm will sound, accompanied by
simultaneous flashing of the freezer temperature display.
Press any button to cancel the audible alarm. The flashing
will continue until the temperature falls below 30℉.
NOTE
The main board is located in the
compressor compartment.
POSITION CONDITIONS
41℉ / 0℉ Summer or ambient
temperature
between 77℉ - 95℉
41℉ / 0℉ Spring, autumn or ambient
temperature
between 59℉ - 77℉
41℉ / 0℉
Winter or ambient
temperature
between 41℉ - 59℉
Super Freezing function Super Freeze
Super Cooling function Super Cool
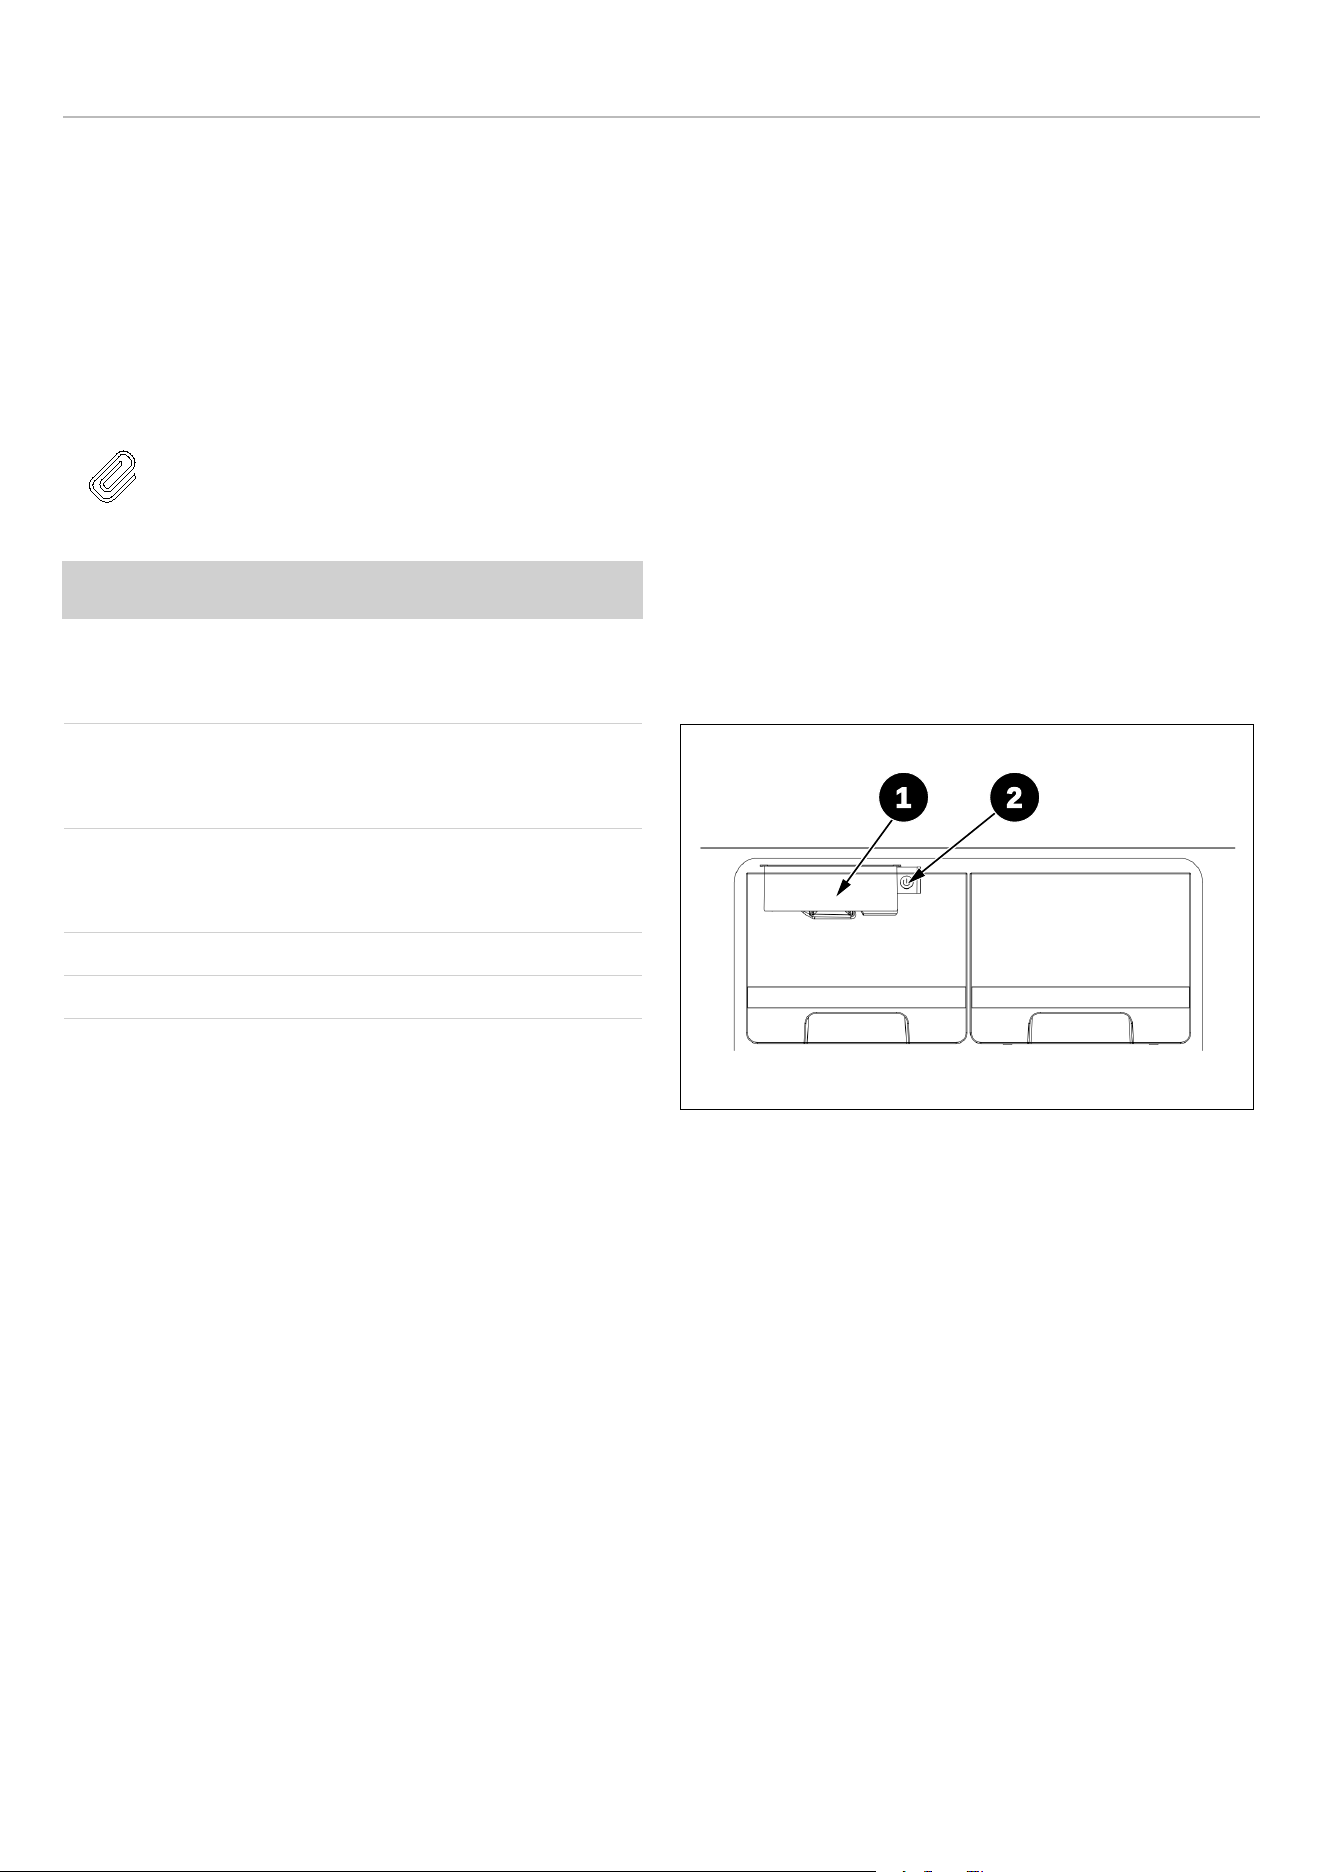
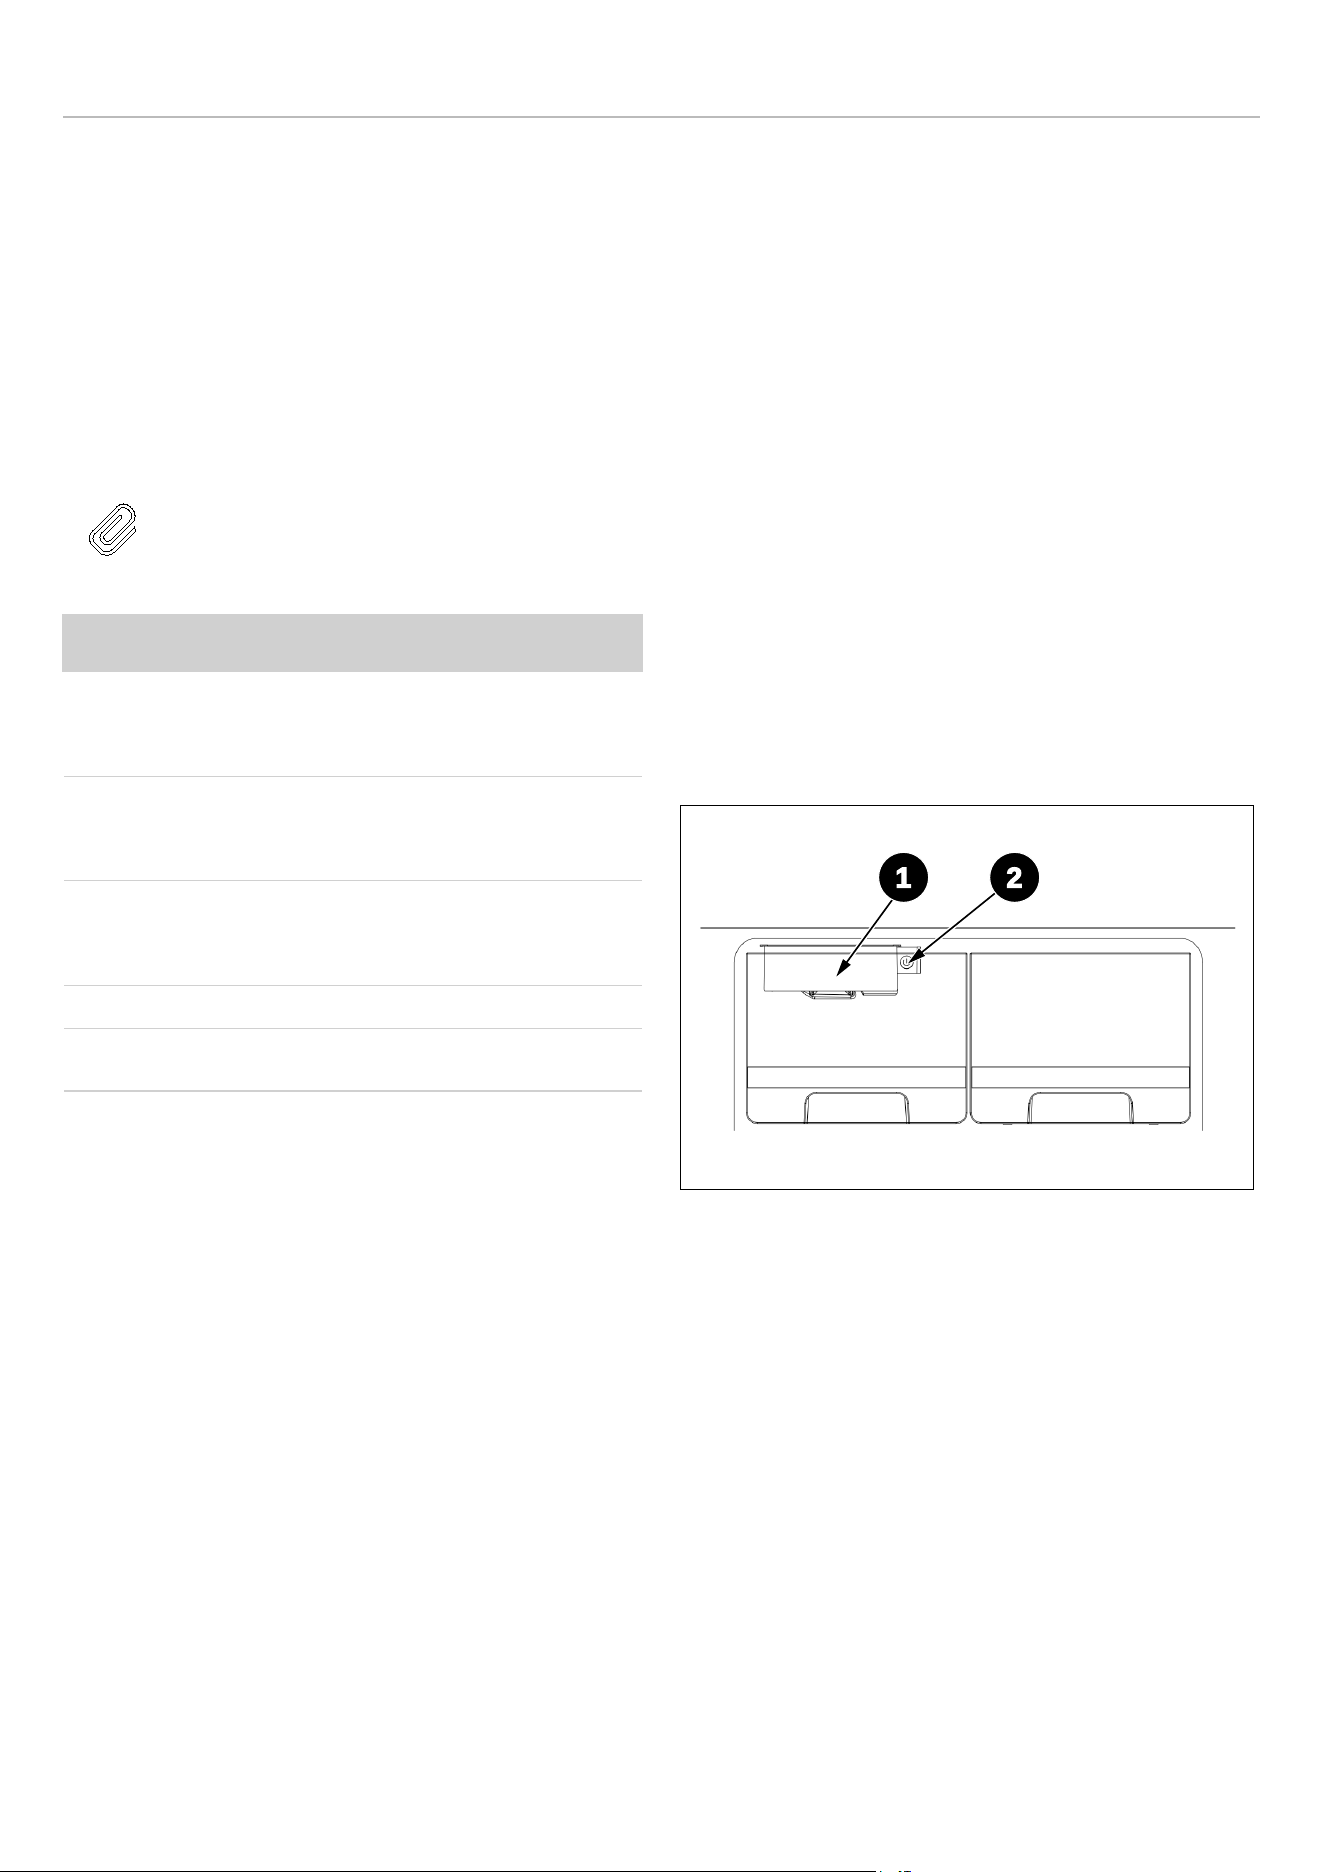
AUTOMATIC ICE MAKER (DEPENDING ON
MODEL)
Key Operation Instructions:
1) Short press the button to switch the ice machine on or
off.
2) When the machine is on, press and hold the button for
10 seconds to manually de-ice.
Lamp Status Description:
1) Switch On State: the light will fade on and then fade off.
2) Switch Off State: the light remains off.
3) Ice Full State: the light stays on continuously.
4) Drawer Removal: the light flashes slowly once every 0.5
seconds (1Hz)
Fault Status:
1) Ice Jam: the light flashes quickly once every 200 ms.
Fig. 3
1 Ice Maker
2 Ice Maker Switch
1 2
14
CARE AND MAINTENANCE
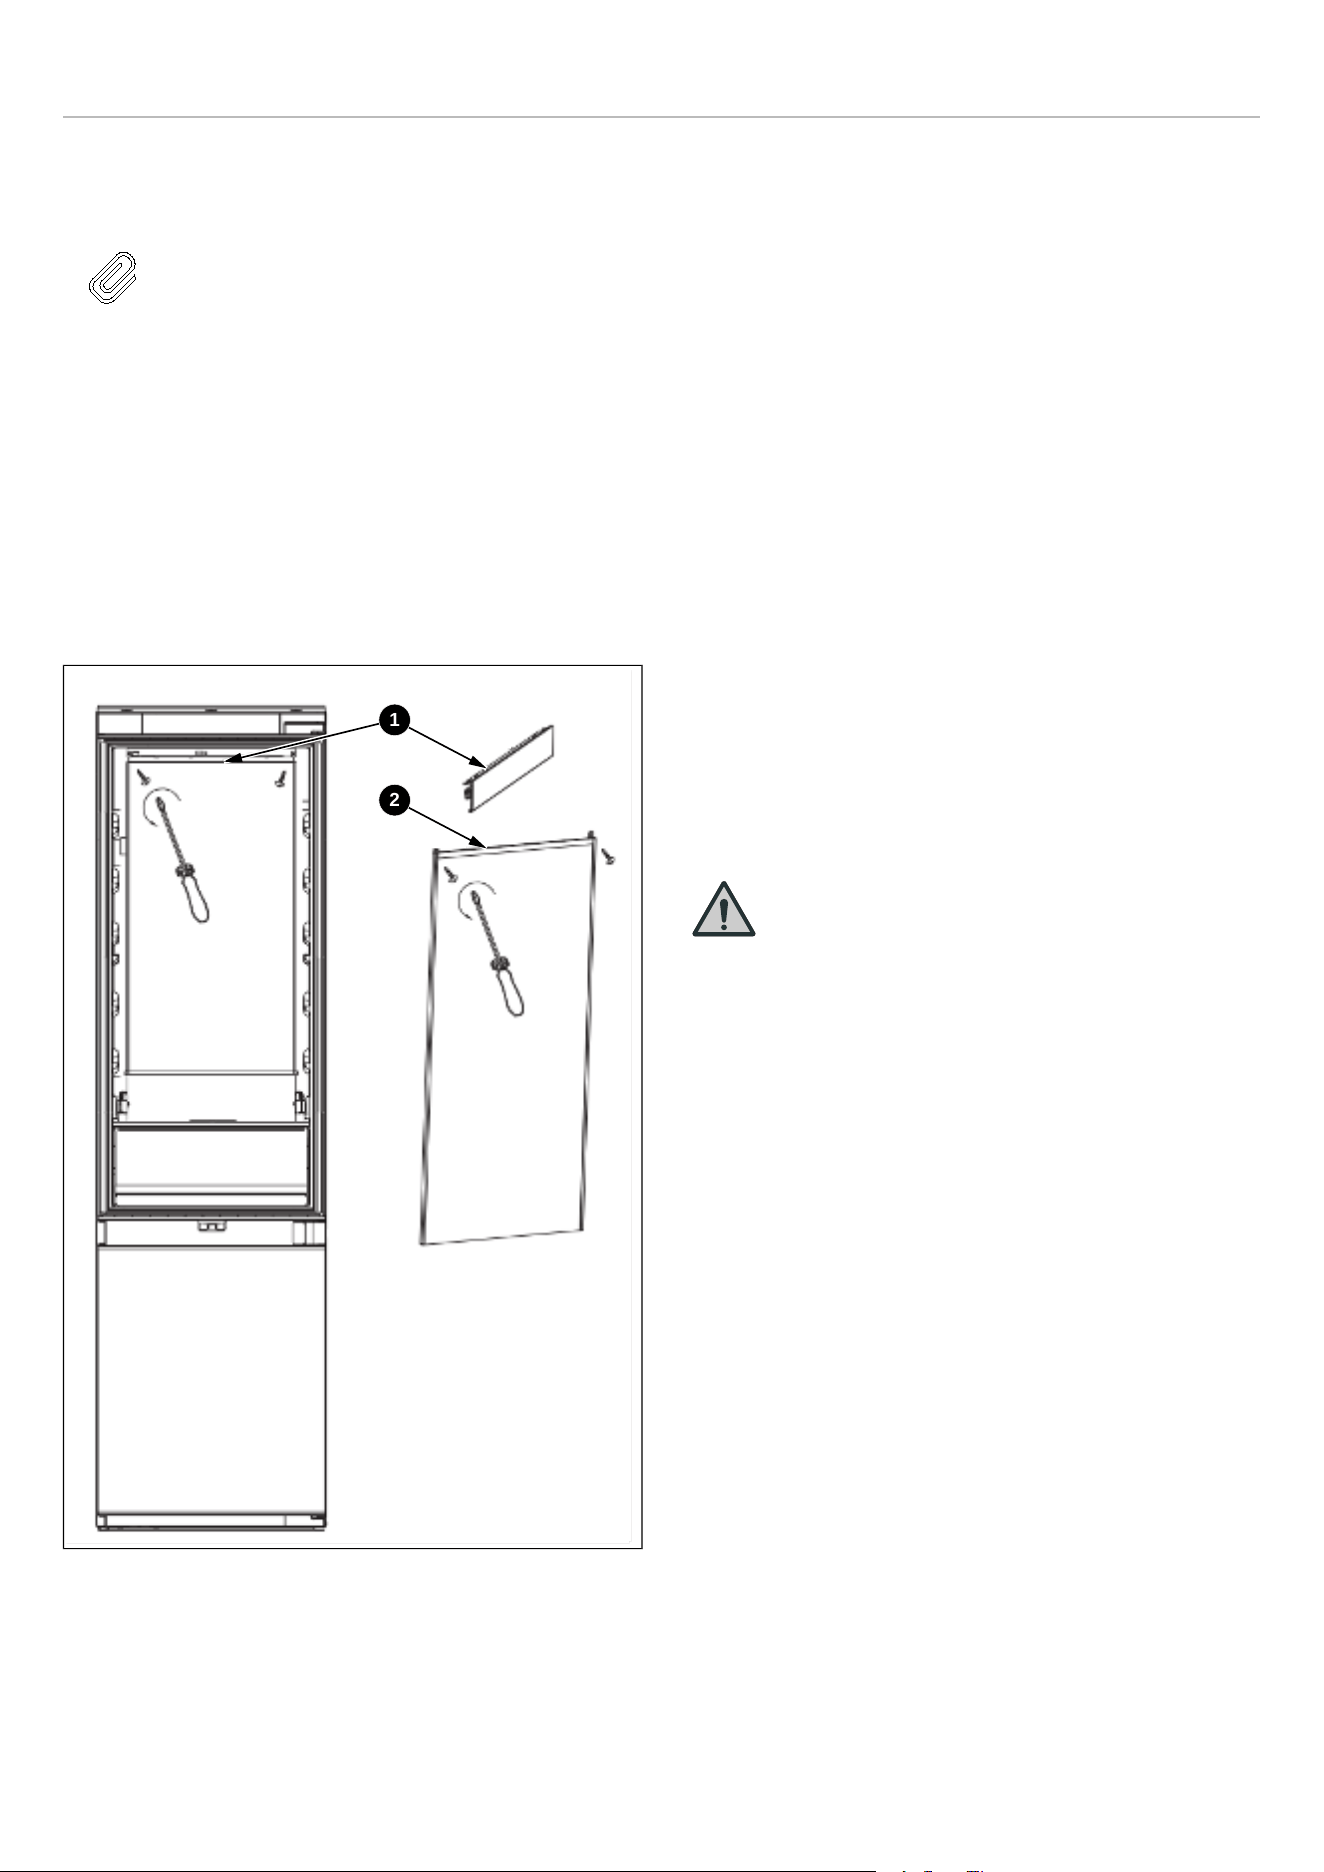
LED LIGHT REPLACEMENT INSTRUCTIONS
NOTE
The LED light is intended to be non-
replaceable by the user; it needs to be
replaced by a service professional.
Lighting parameters: 12V / 10W
1) Unplug the power plug.
2) Remove the aluminium alloy trim strip on the top of the
LED surface light source, then remove the left and right
mounting screws.
Steps 1 and 2 are shown below.
3) Install the new LED light board.
4) Finally, replace the aluminium alloy trim strip.
Fig. 4
CARE AND CLEANING
Always disconnect the appliance from the mains power
before performing any cleaning or maintenance.
The fridge and freezer sections should be cleaned using a
solution of bicarbonate of soda and lukewarm water. Do not
use abrasive products or detergents. After washing, rinse
and dry thoroughly.
Clean the shelves and door bins separately by hand with a
mild solution of washing-up liquid and water. Do not put
them in the dishwasher.
If the appliance is not going to be used for an extended
period of time, unplug and clean the appliance. The doors
should be left slightly ajar to prevent the formation of
mildew and unpleasant odours.
CLEANING THE INTERIOR SURFACES
To clean the interior surfaces and all removable parts, wash
them with a mild solution of dishwasher soap, water, and
sodium bicarbonate. Rinse and dry thoroughly.
Do not allow the water to come into contact with the lighting
equipment or control panel.
WARNING
Do not use vinegar, rubbing alcohol or any
alcohol-based cleaning agent on any of the
interior surfaces.
Although this appliance automatically defrosts, a layer of
frost may occur on the freezer compartment's interior walls
if the freezer door is opened frequently or kept open too
long.
If the frost is too thick, choose a time when the freezer is
nearly empty and proceed as follows:
1) Remove existing food and accessories baskets, unplug
the appliance from the mains power and leave the doors
open.
Ventilate the room thoroughly to accelerate the process.
2) When defrosting is completed, clean your freezer as
described above.
STAINLESS STEEL EXTERIOR SURFACES
Use a non-abrasive stainless-steel cleaning agent; apply it
with a soft, lint-free cloth.
For polishing, wipe the surface gently with a damp micro
fibre cloth and follow with dry wash leather.
Always rub in the direction of the grain of the stainless
steel.
1
2
15

CARE AND MAINTENANCE
CLEANING THE DOOR SEALS
Take care to keep door seals clean. Sticky food and drinks
can cause seals to stick to the cabinet and tear when you
open the door. Wash the seals with a mild detergent and
warm water. Rinse and dry them thoroughly after cleaning.
DEFROSTING
The product has a No Frost system, which is designed to
prevent heavy build-up of ice. Under normal conditions of
use, there should be no need to regularly defrost the
freezer system.
NOTE
If you are regularly finding a heavy build-up
of ice or puddles of water in the freezer
section, then it is likely that the door is not
sealing properly. This could be due to a
defective door seal or an incorrectly fitted
or overly heavy cabinet door panel. For
more information, see the troubleshooting
section about ice.
TROUBLESHOOTING
If you have any problems with your appliance, you should
check this troubleshooting section prior to calling Customer
Care.
If the appliance is not working, check that:
• The appliance is receiving electrical power.
• The fuses in the home are intact and the fuse in the plug
has not blown.
• The fridge has not been turned off.
• The electrical outlet is functioning properly. To check
this, plug another electrical appliance into it to see if the
outlet is faulty.
If the appliance is working, but not very well, check
that:
• The appliance is not overloaded.
• The thermostat is set to an appropriate temperature.
• The doors are closing properly.
• The cooling system on the back of the appliance is clean
and free of dust and is not touching the rear wall.
• There is enough ventilation around the side and rear
walls.
If the appliance is noisy, check that:
• The appliance is level and stable.
• The side and rear walls are clear and there is nothing
resting against the appliance.
NOTE
The coolant gas in the refrigerator may
make a slight bubbling or gurgling noise,
even when the compressor is not running.
If the appliance is beeping, check that:
• The doors are closed. An alarm will sound after a door
has been open for 60 seconds.
If ice has formed on the back wall of the fridge:
• It is normal for some ice droplets to form on the back
wall of the fridge. This does not constitute a fault with the
appliance.
• Ensure that no items inside the fridge are in contact with
the back wall.
• Check that there is some resistance when opening the
appliance door. If it opens at the slightest touch, it may
mean that the door seal needs to be replaced.
• Check the door seal for any kinks, debris or damage. If
you notice any, and are unable to resolve the issue
yourself, contact Customer Care so that the seal can be
replaced.
16

CARE AND MAINTENANCE
• This can be due to the cabinet door(s) not being properly
fitted. If you are at all unsure, ask your installer to check
the cabinet doors.
If excessive ice has formed in the freezer:
• Check that there is some resistance when opening the
appliance door. If it opens at the slightest touch, it may
mean that the door seal needs to be replaced.
• Check the door seal for any kinks, debris or damage. If
you notice any, and are unable to resolve the issue
yourself, contact Customer Care so that the seal can be
replaced.
• This can be due to the cabinet door(s) not being properly
fitted. If you are at all unsure, ask your installer to check
the cabinet doors.
If one or more of the LED units inside the appliance is
not working:
• Contact Customer Care to arrange a service visit.
17
INSTALLATION INSTRUCTIONS
PREPARING FOR INSTALLATION
This appliance must not be installed close to heat
sources, e. g. heating elements or cookers, or in a
damp location.
Seek the help of one or two other individuals when
installing this appliance. This appliance may have
sharp edges. Wear PPE appropriate to the task and the
environment.
• Use the height-adjustable feet at the front of the
appliance to ensure that the appliance is level.
• The cooling system on the back of the appliance must
not touch the rear wall. The larger the gap, the better.
• The appliance must be installed with adequate
ventilation. Ensure that there is clearance above the
appliance to allow air to escape and that there is space
between the rear of the appliance and the wall.
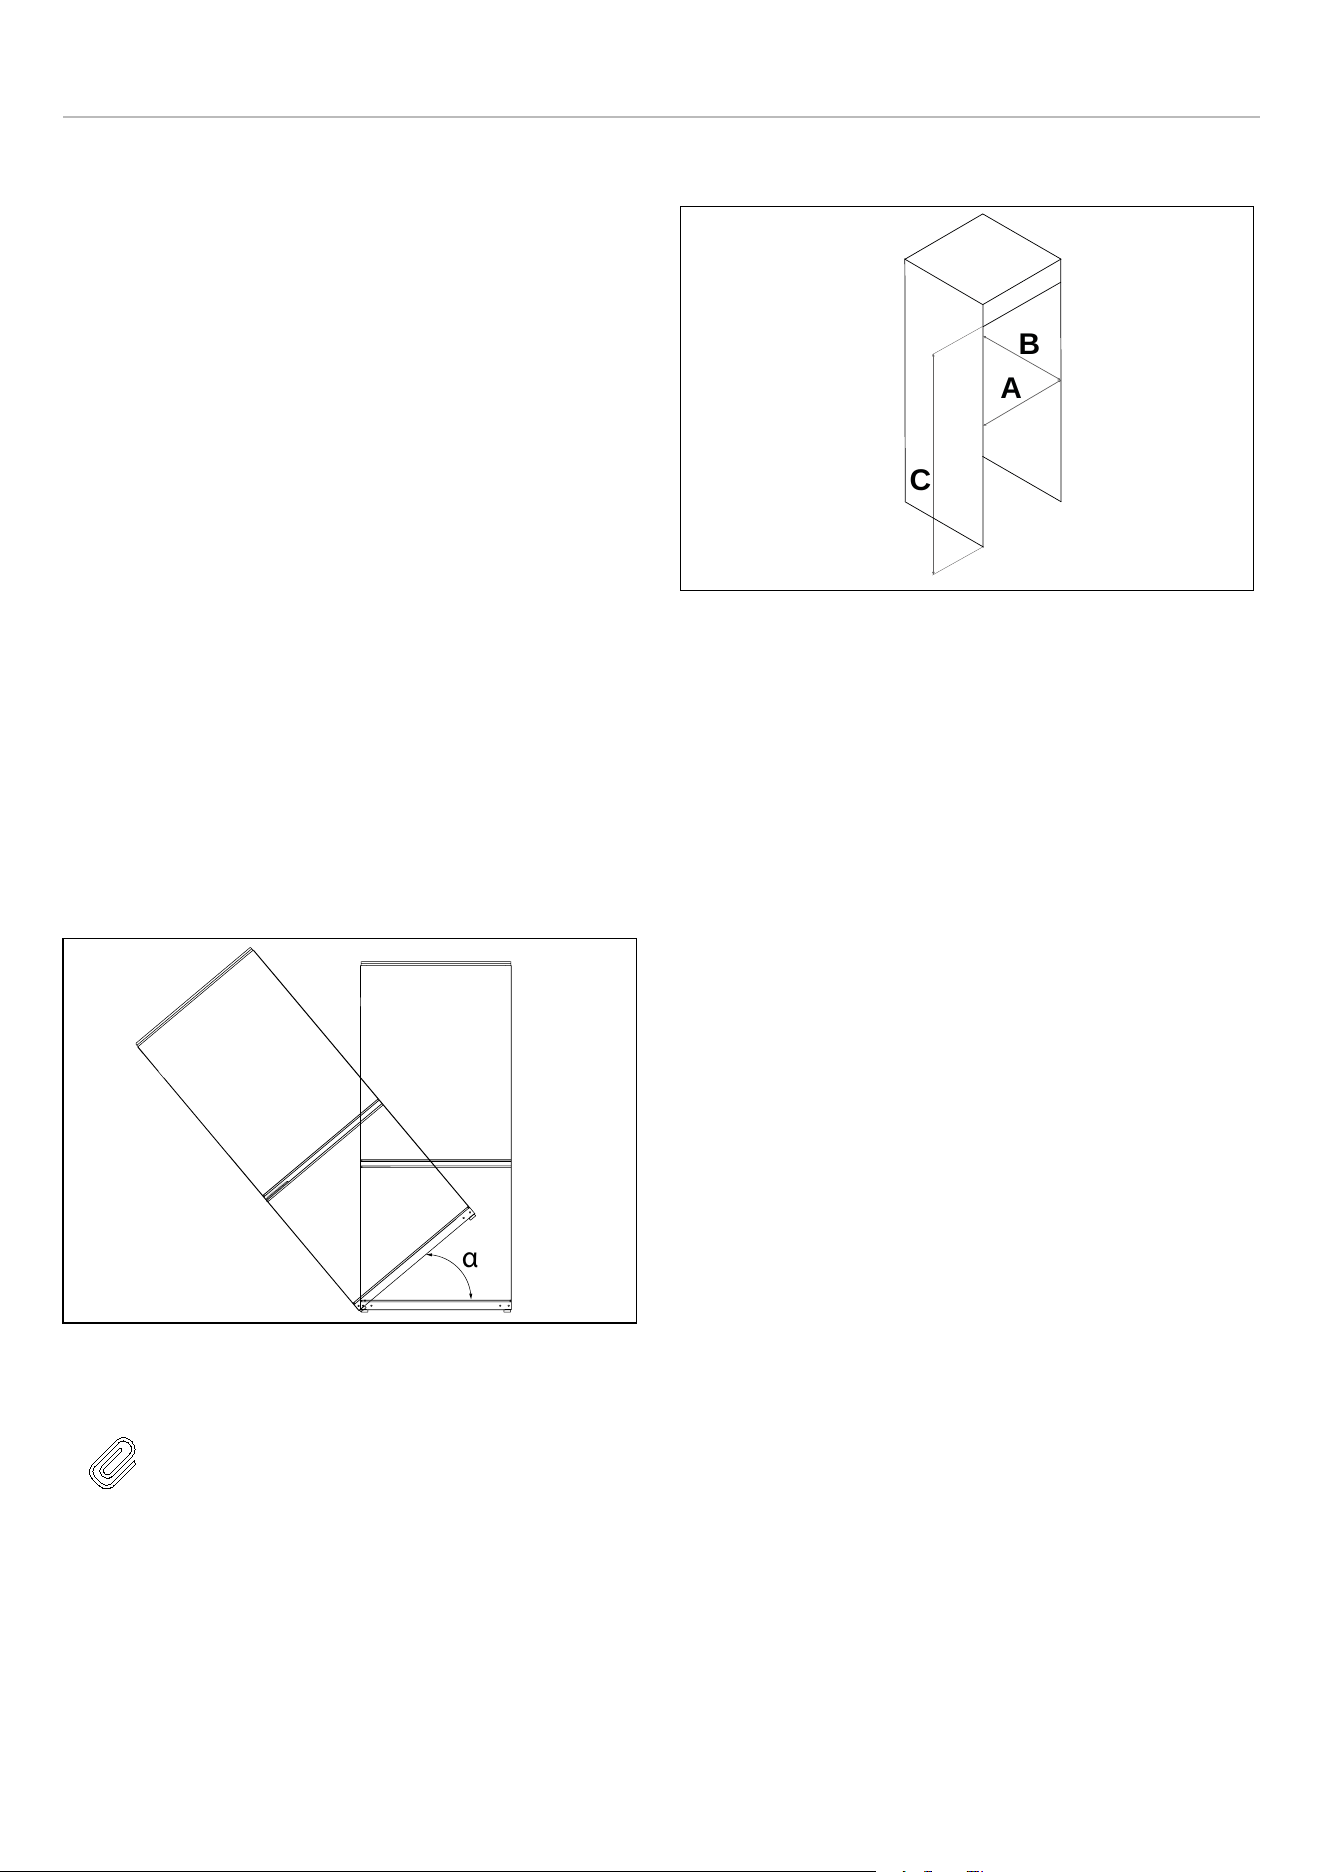
VENTILATION
The main consideration when installing any refrigeration
unit into a fitted kitchen is ventilation. The heat removed
from the cooling compartment needs to be dissipated into
the air around the appliance. Incorrect ventilation can lead
to premature compressor failure, excessive power
consumption and total system failure, and it may invalidate
the warranty provided with the appliance.
Fig. 5
NOTE
Do not tilt beyond α=40°
CUTOUT DIMENSIONS
Fig. 6
A. 24″ (610 mm)
B. 25″ (635 mm)
C. 74 3/16″ (1885 mm)
α
A
B
C
18
INSTALLATION INSTRUCTIONS
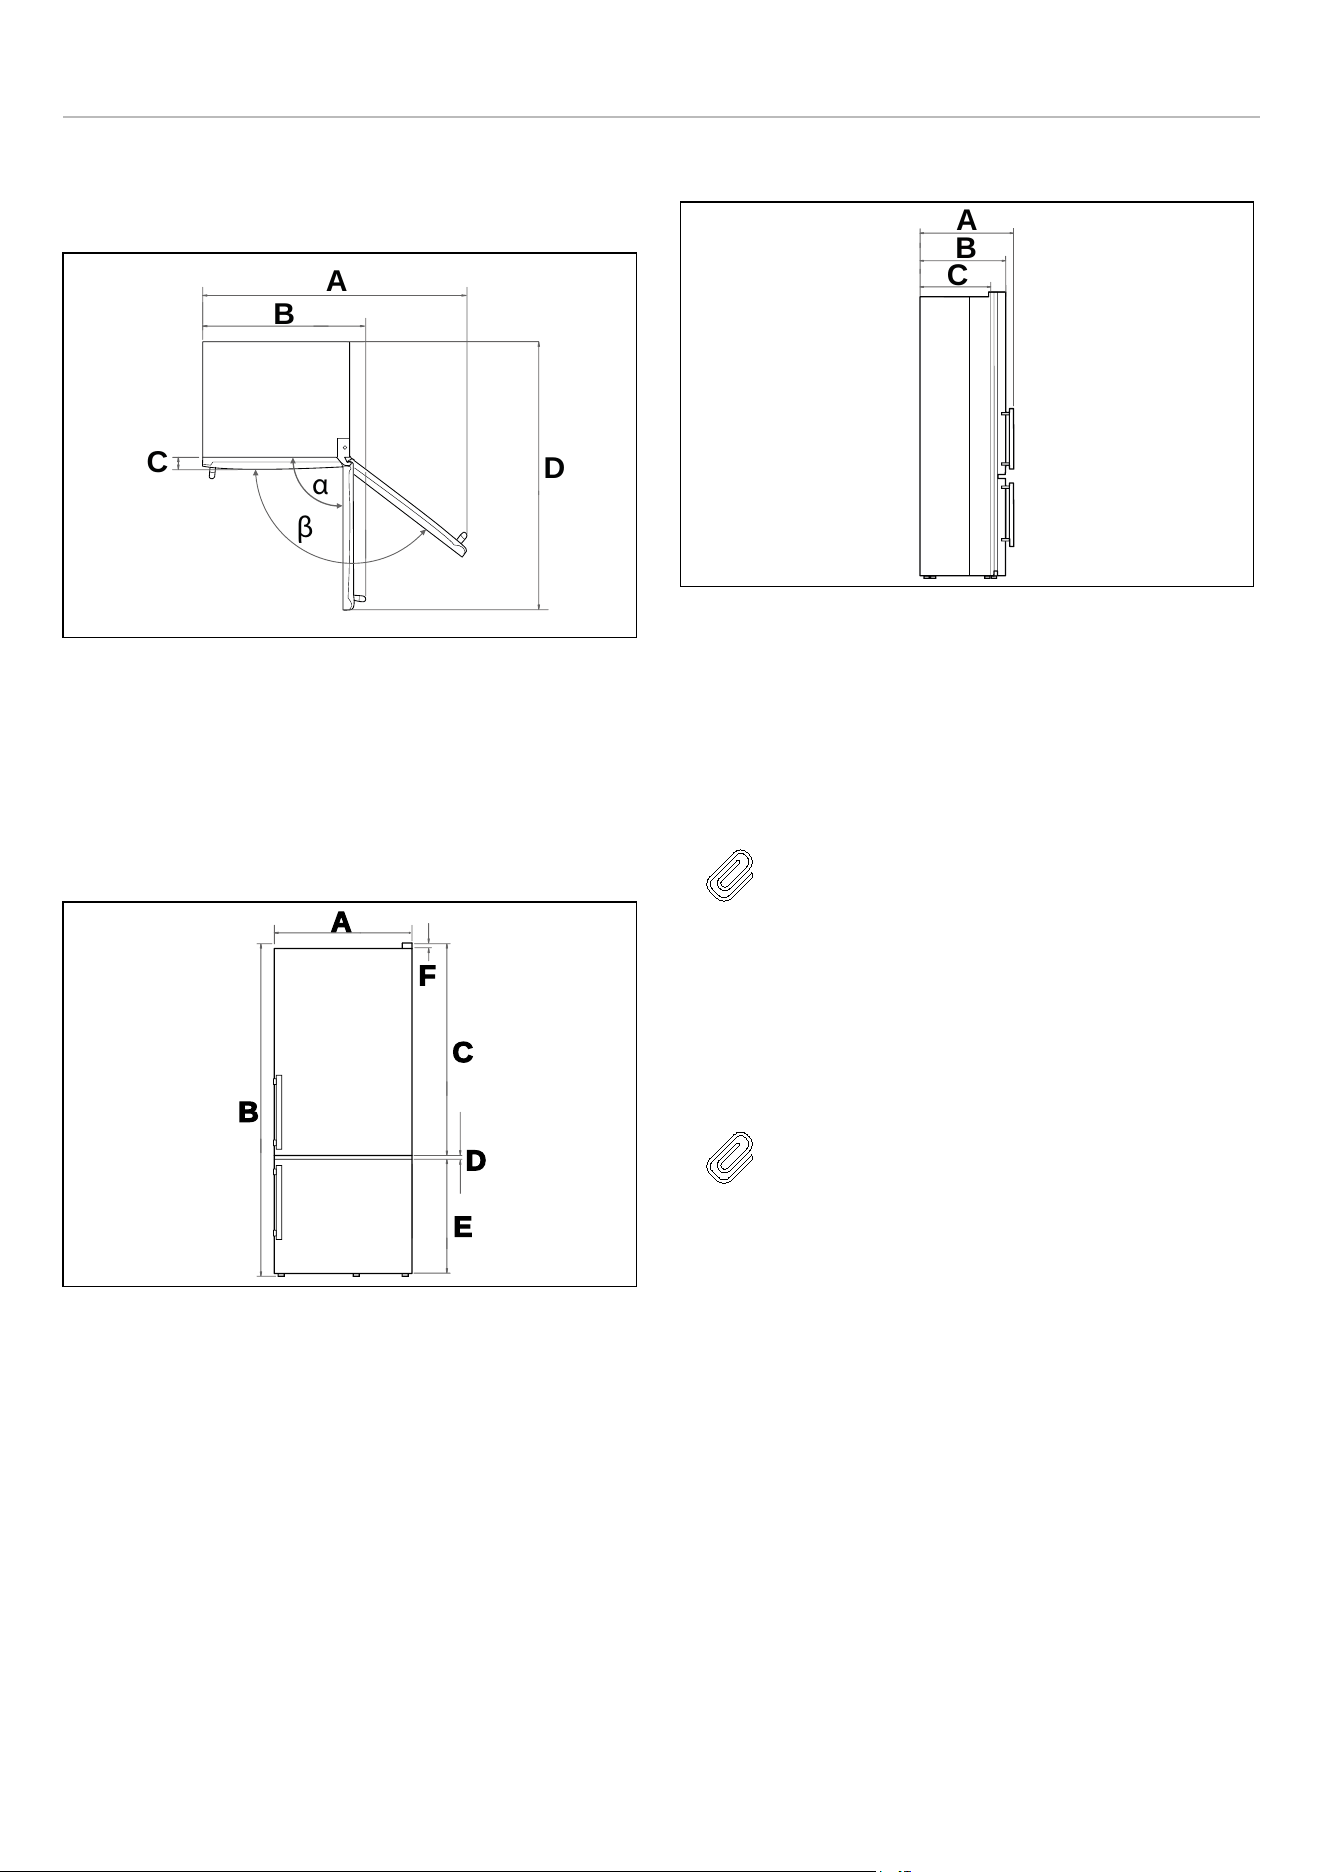
PRODUCT DIMENSIONS
TOP VIEW
Fig. 7
A. 38 3/4″ (983.4 mm)
B. 25 3/4″ (654.2 mm)
C. 2 3/8″(60 mm)
D. 47 13/16″ (1214.5 mm)
E. 90°
F. 130°
FRONT VIEW
Fig. 8
A. 23 7/16″ (595 mm)
B. 73 1/4″ (1860 mm)
C. 40 3/8″(1025 mm)
D. 3/8″ (10 mm)
E. 30 3/4″ (781 mm)
F. 9/16″ (14 mm)
SIDE VIEW
Fig. 9
A. 28 1/16″ (713.2 mm)
B. 25 9/16″ (650 mm)
C. 23 1/4″ (590 mm)
NOTE
To improve the efficiency of the of the
cooling system and save energy, it is
necessary to maintain a good ventilation
around the appliance appliance for heat
dissipation. For this reason, it is necessary
to have sufficient free space around the
around the refrigerator.
NOTE
It is recommended to leave a clearance of
at least 1 3/4″ from the wall, at least 1″ from
the top, at least 5/16″ from the sides to the
walls, and a clearance in front to allow the
door to open 130°.
C
D
A
B
α
β
A
B
C
E
D
F
A
B
C
19
INSTALLATION INSTRUCTIONS
ELECTRICAL REQUIREMENTS
Please check the electrical standards and local codes
before installing the appliance.
The appliance must be applied with single phase
alternating current of 115 V (Volts), 60 Hz (Hertz). If the
voltage fluctuates exceeding the upper limit, A.C. automatic
voltage regulator of more than 350 W should be applied to
the refrigerator for safety use.
WARNING
Do not use any extension cord or multiple
sockets which could cause overloading of
wiring circuits and could cause a fire.
Always plug the appliance in its own
individual electrical socket that has a
voltage corresponding to that indicated on
the rating plate.
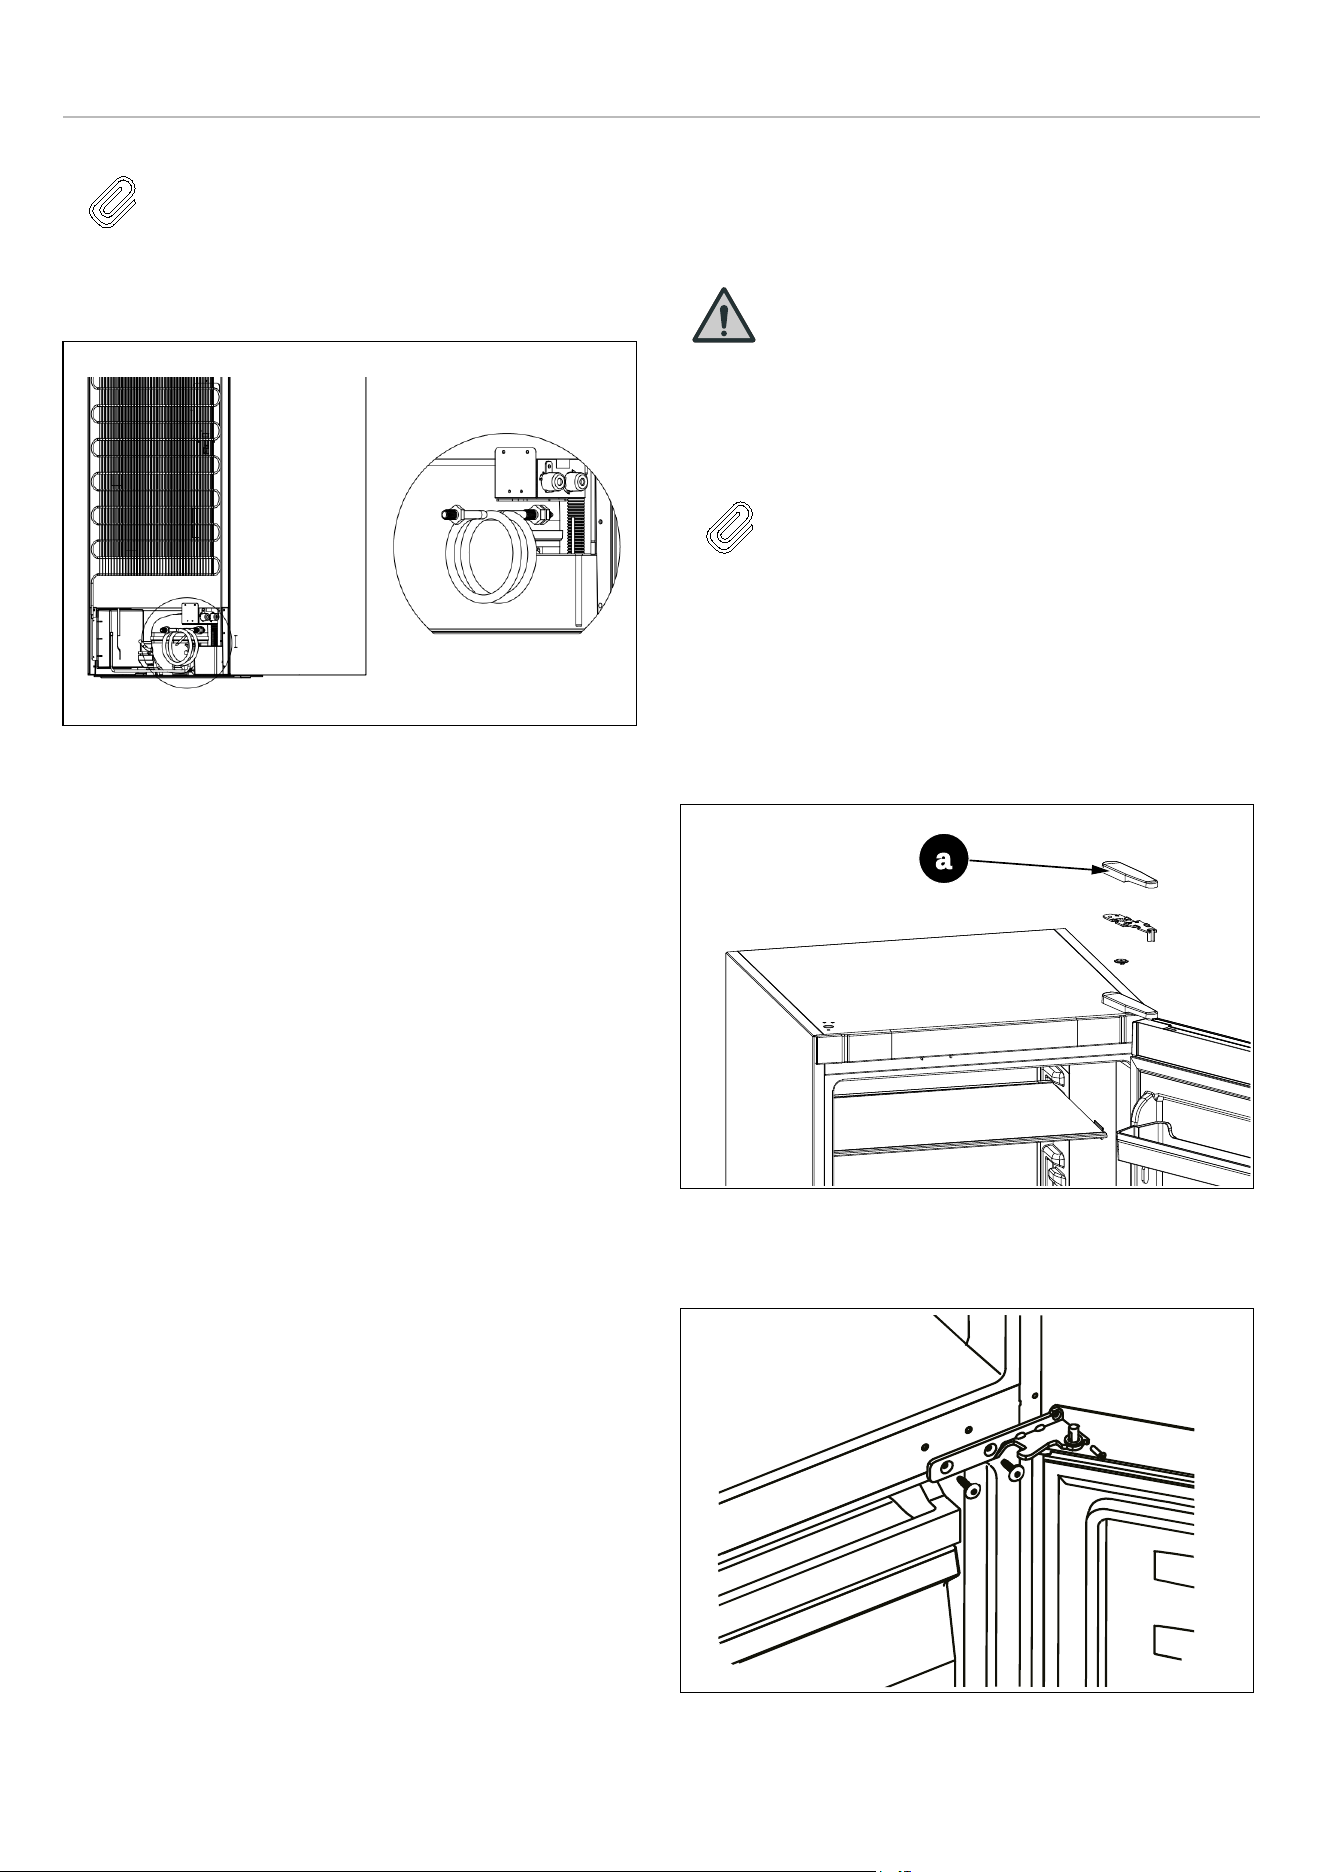
PLUMBING REQUIREMENTS (DEPENDING
ON MODEL)
The refrigerator is equipped with a 59″ long water hose (
1/4″ diameter) that includes a female 1/4″ compression
fitting nut, provided in the accessory bag inside the
refrigerator packaging.
Before installation, the refrigerator’s water system must be
connected to the house's main water supply. To do this,
connect the water hose to the rear of the refrigerator and
then to your home's water supply.
The refrigerator does not come with a water filter. However,
a third-party water filter can be installed if desired. The
water supply line must be located either inside the cabinet
where the appliance is installed or in an adjacent cabinet,
with an opening at the rear of one of these cabinets.
The refrigerator's water system must be connected to the
house's main water supply.
The pressure of the water system must be between 25-80
psi (1.7-5.5 bar). If the water pressure exceeds 80 psi (5.5
bar) but remains below 120 psi (8 bar), install a pressure
limiting device or water impact protector to the inlet valve.
WARNING
Do not install or operate the appliance if the
water pressure exceeds 120 psi (8 bar).
Objects that might pierce the water hose or
cause them to twist must not be present
where the water line is installed
WARNING
The hose that runs from the water supply
must be one piece. Do not use extension
hoses.
WARNING
Make sure that the power is cut off when
establishing the appliance's water
connection.
WARNING
The water valve must be closed when
connecting the water hose.
WARNING
It is strongly recommended to keep the
water valve accessible after product
installation.
WARNING
This appliance is suitable for use with a
cold potable water supply only.
20
INSTALLATION INSTRUCTIONS
NOTE
Once the connection is complete, open the
water valve and make sure that there is no
leakage. Otherwise, water may damage the
cabinetry.
Fig. 10
REVERSING THE APPLIANCE DOORS
The opening side of the door can be changed, switching
from the right side (as supplied) to the left side if necessary.
WARNING
When reversing the door, the appliance
must not be connected to the power supply.
Ensure that the plug is removed from the
power socket.
NOTE
If required, you may lay the refrigerator on
its back in order to gain access to the base,
you should rest it on soft foam packaging or
similar material to avoid damaging the
backboard of the refrigerator.
To reverse the door, proceed as follows:
1) Disassemble the upper hinge [a] cover and upper hinge
and remove the upper door
Fig. 11
2) Remove the middle hinge and the freezer door.
Fig. 12
a
21
INSTALLATION INSTRUCTIONS
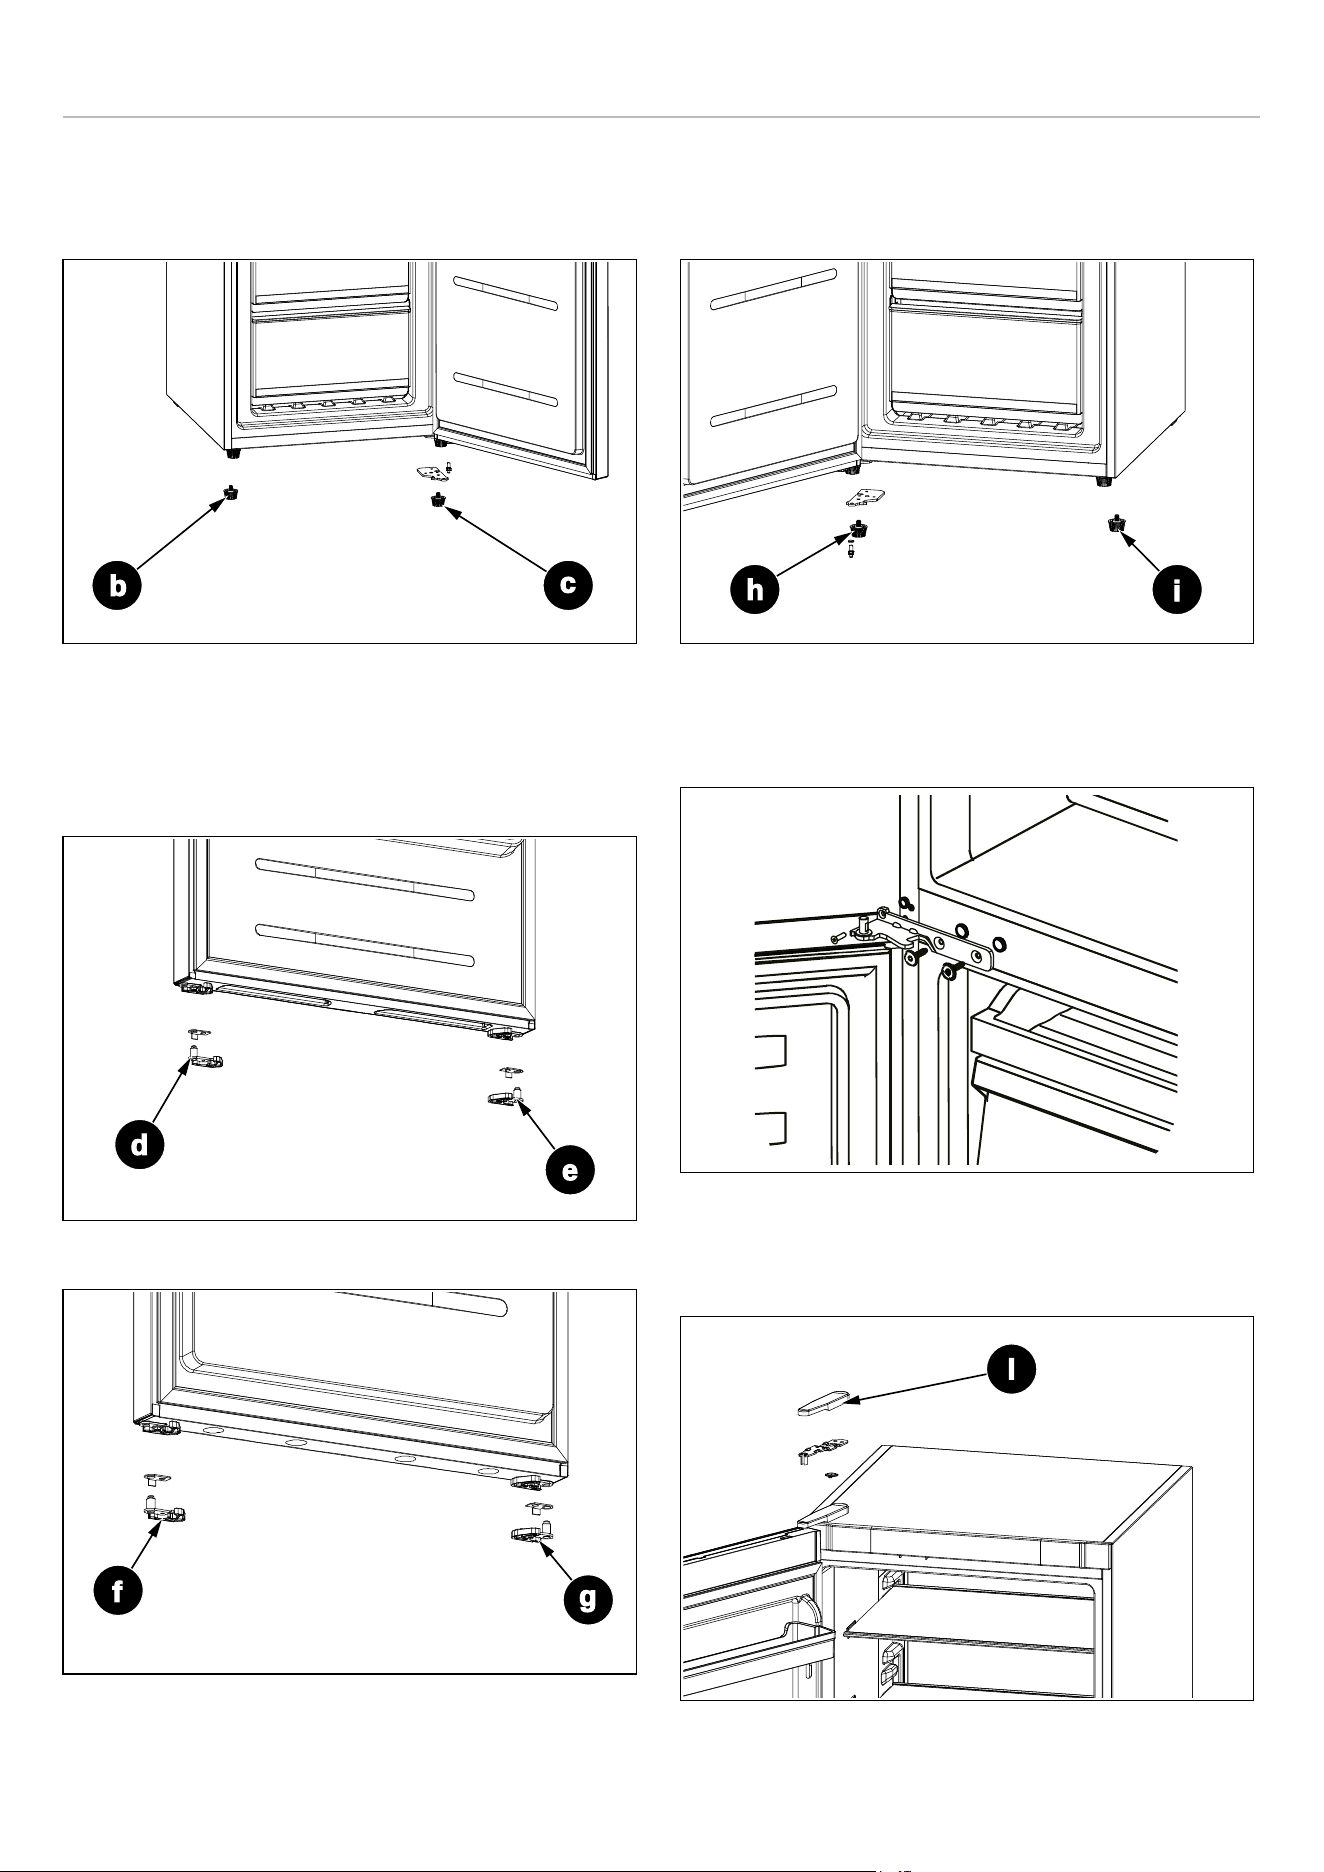
3) Remove the left leg [b] from the bottom of the
refrigerator and the right leg [c] from the bottom of the
refrigerator and the lower hinge.
Fig. 13
4) Remove the door hinge assemblies [d], [e], [f], [g] from
the two doors and install the door hinge assemblies.
present in the bag of accessory components inside the
refrigerator on the other side of the doors
Fig. 14
Fig. 15
5) Install the legs and lower hinge [h], [i], on the opposite
sides from where they were removed at the bottom of
the refrigerator.
Fig. 16
6) Install middle hinge-left (provided in the plastic
accessory bag) and ensure the freezer door in place.
Fig. 17
7) Install the upper door and fix the upper hinge [l] and
hinge cover on the left side.
Fig. 18
b
c
d
e
f
g
h
i
l
22

INSTALLATION INSTRUCTIONS
ENSURING THE DOOR SEALS CORRECTLY
It is normal for the seal to be compressed after the door has
been reversed. With the door closed, use a hair dryer to
expand the seal and fill the gap between the door and the
body of the appliance. Take care not to hold the hair dryer
too close to the appliance, which could damage the seal.
A distance of approximately 3 15/16″ should be suitable.
When completed, allow the seal and door to cool before
touching them. Once done, the seal should remain in
position.
23


DU BUREAU DE NOTRE PRÉSIDENT
Cher nouveau propriétaire d’un appareil Bertazzoni,
Je tiens à vous remercier d’avoir choisi l’un de nos beaux produits pour votre
maison.
Ma famille a commencé à fabriquer des appareils électroménagers en Italie en 1882,
bâtissant une réputation de qualité d’ingénierie et de passion pour la bonne cuisine.
Aujourd’hui, nos produits se distinguent par leur mélange unique de design italien
authentique et de technologie d’électroménager supérieure. Notre mission est de
fabriquer des produits qui fonctionnent parfaitement et qui apportent de la joie à leurs
propriétaires.
En fabriquant de beaux produits, nous répondons au goût de nos clients pour un joli
design. En les rendant polyvalents et faciles à utiliser, cuisiner avec Bertazzoni
devient un réel plaisir.
Ce manuel vous aidera à apprendre à utiliser et à entretenir votre appareil
Bertazzoni de la manière la plus sûre et la plus efficace, afin qu’il puisse vous donner
la plus grande satisfaction pour les années à venir.
Profitez !
Paolo Bertazzoni
Président
25


VALIDITÉ DU MANUEL
Le manuel suivant est valable pour tous les codes produits mentionnés ci-dessous :
• REF24BMFIXNV
• RBM24F4FXNV
27

28
SOMMAIRE
INFORMATIONS GÉNÉRALES . . . . . . . . . . . . . . . . . . . . . . . . . . . . . . . . . . . . . . . . . . . . . . . . . . . . . . . . . . . . . . . . . . . . . 29
LECTURE DU MANUEL . . . . . . . . . . . . . . . . . . . . . . . . . . . . . . . . . . . . . . . . . . . . . . . . . . . . . . . . . . . . . . . . . . . . . . . 29
INTRODUCTION ET SÉCURITÉ . . . . . . . . . . . . . . . . . . . . . . . . . . . . . . . . . . . . . . . . . . . . . . . . . . . . . . . . . . . . . . . . 29
INFORMATIONS DE SÉCURITÉ . . . . . . . . . . . . . . . . . . . . . . . . . . . . . . . . . . . . . . . . . . . . . . . . . . . . . . . . . . . . . . . . 30
AVERTISSEMENT CONCERNANT LES HYDROCARBURES (HC) . . . . . . . . . . . . . . . . . . . . . . . . . . . . . . . . . . . . 31
MISE AU REBUT DE L’ANCIEN APPAREIL . . . . . . . . . . . . . . . . . . . . . . . . . . . . . . . . . . . . . . . . . . . . . . . . . . . . . . . 31
ÉCONOMIE D’ÉNERGIE . . . . . . . . . . . . . . . . . . . . . . . . . . . . . . . . . . . . . . . . . . . . . . . . . . . . . . . . . . . . . . . . . . . . . . . 32
AVANT LA PREMIÈRE UTILISATION . . . . . . . . . . . . . . . . . . . . . . . . . . . . . . . . . . . . . . . . . . . . . . . . . . . . . . . . . . . . 32
UTILISATION . . . . . . . . . . . . . . . . . . . . . . . . . . . . . . . . . . . . . . . . . . . . . . . . . . . . . . . . . . . . . . . . . . . . . . . . . . . . . . . . . . . . 33
UTILISATION DU RÉFRIGÉRATEUR . . . . . . . . . . . . . . . . . . . . . . . . . . . . . . . . . . . . . . . . . . . . . . . . . . . . . . . . . . . . 33
UTILISATION DU CONGÉLATEUR . . . . . . . . . . . . . . . . . . . . . . . . . . . . . . . . . . . . . . . . . . . . . . . . . . . . . . . . . . . . . . 33
TIROIR ZONE FRESCO . . . . . . . . . . . . . . . . . . . . . . . . . . . . . . . . . . . . . . . . . . . . . . . . . . . . . . . . . . . . . . . . . . . . . . . 33
RANGEMENT . . . . . . . . . . . . . . . . . . . . . . . . . . . . . . . . . . . . . . . . . . . . . . . . . . . . . . . . . . . . . . . . . . . . . . . . . . . . . . . . 34
CARACTÉRISTIQUES TECHNIQUES . . . . . . . . . . . . . . . . . . . . . . . . . . . . . . . . . . . . . . . . . . . . . . . . . . . . . . . . . . . . 34
PANNEAU DE COMMANDE . . . . . . . . . . . . . . . . . . . . . . . . . . . . . . . . . . . . . . . . . . . . . . . . . . . . . . . . . . . . . . . . . . . . 35
MACHINE À GLAÇONS AUTOMATIQUE (SELON LE MODÈLE) . . . . . . . . . . . . . . . . . . . . . . . . . . . . . . . . . . . . . . 36
PRÉCAUTIONS ET MAINTENANCE . . . . . . . . . . . . . . . . . . . . . . . . . . . . . . . . . . . . . . . . . . . . . . . . . . . . . . . . . . . . . . . . . 37
INSTRUCTIONS DE REMPLACEMENT DE L’ÉCLAIRAGE À LED . . . . . . . . . . . . . . . . . . . . . . . . . . . . . . . . . . . . 37
PRÉCAUTIONS ET NETTOYAGE . . . . . . . . . . . . . . . . . . . . . . . . . . . . . . . . . . . . . . . . . . . . . . . . . . . . . . . . . . . . . . . 37
NETTOYAGE DES SURFACES INTÉRIEURES . . . . . . . . . . . . . . . . . . . . . . . . . . . . . . . . . . . . . . . . . . . . . . . . . . . . 37
SURFACES EXTÉRIEURES EN ACIER INOXYDABLE . . . . . . . . . . . . . . . . . . . . . . . . . . . . . . . . . . . . . . . . . . . . . . 38
NETTOYAGE DES JOINTS DE PORTE . . . . . . . . . . . . . . . . . . . . . . . . . . . . . . . . . . . . . . . . . . . . . . . . . . . . . . . . . . . 38
DÉCONGÉLATION . . . . . . . . . . . . . . . . . . . . . . . . . . . . . . . . . . . . . . . . . . . . . . . . . . . . . . . . . . . . . . . . . . . . . . . . . . . 38
RÉSOLUTION DE PROBLÈMES . . . . . . . . . . . . . . . . . . . . . . . . . . . . . . . . . . . . . . . . . . . . . . . . . . . . . . . . . . . . . . . . 38
INSTRUCTIONS D’INSTALLATION . . . . . . . . . . . . . . . . . . . . . . . . . . . . . . . . . . . . . . . . . . . . . . . . . . . . . . . . . . . . . . . . . . 40
PRÉPARATION POUR L’INSTALLATION . . . . . . . . . . . . . . . . . . . . . . . . . . . . . . . . . . . . . . . . . . . . . . . . . . . . . . . . . 40
VENTILATION . . . . . . . . . . . . . . . . . . . . . . . . . . . . . . . . . . . . . . . . . . . . . . . . . . . . . . . . . . . . . . . . . . . . . . . . . . . . . . . 40
DIMENSIONS DE L’OUVERTURE . . . . . . . . . . . . . . . . . . . . . . . . . . . . . . . . . . . . . . . . . . . . . . . . . . . . . . . . . . . . . . . 40
DIMENSIONS DU PRODUIT . . . . . . . . . . . . . . . . . . . . . . . . . . . . . . . . . . . . . . . . . . . . . . . . . . . . . . . . . . . . . . . . . . . . 41
VUE DU DESSUS . . . . . . . . . . . . . . . . . . . . . . . . . . . . . . . . . . . . . . . . . . . . . . . . . . . . . . . . . . . . . . . . . . . . . . . . . 41
VUE AVANT . . . . . . . . . . . . . . . . . . . . . . . . . . . . . . . . . . . . . . . . . . . . . . . . . . . . . . . . . . . . . . . . . . . . . . . . . . . . . . 41
VUE LATÉRALE . . . . . . . . . . . . . . . . . . . . . . . . . . . . . . . . . . . . . . . . . . . . . . . . . . . . . . . . . . . . . . . . . . . . . . . . . . 41
EXIGENCES ÉLECTRIQUES . . . . . . . . . . . . . . . . . . . . . . . . . . . . . . . . . . . . . . . . . . . . . . . . . . . . . . . . . . . . . . . . . . . 42
EXIGENCES DE PLOMBERIE (SELON LE MODÈLE) . . . . . . . . . . . . . . . . . . . . . . . . . . . . . . . . . . . . . . . . . . . . . . . 42
INVERSION DES PORTES DE L’APPAREIL . . . . . . . . . . . . . . . . . . . . . . . . . . . . . . . . . . . . . . . . . . . . . . . . . . . . . . . 43
ASSURER LA BONNE ÉTANCHÉITÉ DE LA PORTE . . . . . . . . . . . . . . . . . . . . . . . . . . . . . . . . . . . . . . . . . . . . . . . 45
SERVICE CLIENTÈLE . . . . . . . . . . . . . . . . . . . . . . . . . . . . . . . . . . . . . . . . . . . . . . . . . . . . . . . . . . . . . . . . . . . . . . . . . . . . 46
INFORMATIONS GÉNÉRALES
Nous vous remercions d’avoir acheté ce produit.
Afin de tirer le meilleur parti de votre réfrigérateur, veuillez
lire attentivement ce mode d’emploi avant utilisation.
Conservez toute la documentation pour une utilisation
ultérieure ou pour les futurs propriétaires. Ce produit est
destiné uniquement à un usage résidentiel ou à des
applications similaires, telles que :
Les cuisines du personnel de magasins, bureaux et autres
environnements de travail ; dans des fermes, par des
clients d’hôtels, de motels, de chambres d’hôtes (B&B) et
d’autres environnements de type résidentiel.
Il peut être utilisé pour des services de restauration et des
applications similaires, à condition qu’il ne soit pas utilisé
pour stocker des produits destinés à la vente au détail.
Cet appareil doit être utilisé uniquement à des fins de
conservation des aliments ; toute autre utilisation est
considérée comme dangereuse et le fabricant décline toute
responsabilité en cas de pareille utilisation. Aussi, il est
recommandé de prendre connaissance des conditions de
garantie.
LECTURE DU MANUEL
Ces instructions s’appliquent à différents types d’appareils.
Elles peuvent donc contenir des descriptions de fonctions
qui ne sont pas disponibles sur votre appareil, ou que celui-
ci ne supporte pas.
Les images et illustrations du présent document se réfèrent
à différents modèles et peuvent différer légèrement du
produit acheté.
Le fabricant décline toute responsabilité en cas de
blessures corporelles ou de dommages matériels résultant
d’une installation incorrecte ou d’une mauvaise utilisation
de l’appareil.
Le fabricant se réserve le droit d’apporter les modifications
requises aux différents modèles afin de se conformer à la
réglementation technique en vigueur.
En cas de réclamation, veuillez contacter le service client.
INTRODUCTION ET SÉCURITÉ
Lisez attentivement les instructions fournies dans ce
manuel avant d’installer et/ou d’utiliser l’appareil.
Cela vous aidera à connaître votre nouvel appareil.
Conservez ce document à portée de main afin de pouvoir
le consulter à tout moment et le transmettre à d’éventuels
propriétaires ultérieurs.
Lisez les messages de sécurité fournis dans l’introduction
du présent manuel et tenez dûment compte des notes de
sécurité, telles que : « Attention », « Avertissement » et «
Danger » qui apparaissent dans le texte.
DANGER
Ce symbole indique une situation qui
constitue un danger pour vous-même et
autrui. Lisez-le attentivement et assurez-
vous d’avoir parfaitement compris les
causes d’accidents potentiellement
dangereux ou mortels.
MISE EN GARDE
Ce symbole indique des informations de
sécurité. Lisez-le attentivement et assurez-
vous d’avoir parfaitement compris les
causes d’accidents potentiellement
dangereux.
ATTENTION !
Ce symbole indique une procédure qui
pourrait compromettre la structure ou les
composants de l’appareil. Faites
particulièrement attention à ces
procédures.
NOTE
Ce symbole indique des conseils utiles et
attire votre attention sur les bonnes
procédures et pratiques. Le respect des
instructions marquées de ce symbole vous
évitera des problèmes.
Le symbole met en évidence les méthodes
ou procédures d’utilisation correcte de
l’appareil.
29
INFORMATIONS GÉNÉRALES
INFORMATIONS DE SÉCURITÉ
AVERTISSEMENT
Risque d’incendie / Matériaux inflammables
Cet appareil n’est pas destiné à être utilisé par
des personnes (y compris des enfants) ayant
une déficience physique, sensorielle ou
mentale ou un manque d’expérience et de
connaissances, à moins qu’elles n’aient été
supervisées ou instruites sur l’utilisation de
l’appareil par une personne responsable de
leur sécurité.
Les enfants doivent être surveillés pour
s’assurer qu’ils ne jouent pas avec l’appareil.
Si le cordon d’alimentation est endommagé, il
doit être remplacé par le fabricant, son
technicien d’entretien ou toute autre personne
qualifiée afin d’éviter tout danger.
MISE EN GARDE
Garder les ouvertures de ventilation dans
l’enceinte ou la structure intégrée où
l’appareil est logé exemptes de toute
obstruction.
MISE EN GARDE
Ne pas utiliser d’appareils mécaniques ou
d’autres moyens pour accélérer le
processus de dégivrage à moins qu’ils ne
soient recommandés par le fabricant.
MISE EN GARDE
Veiller à ne pas endommager le circuit de
refroidissement.
MISE EN GARDE
Ne jamais utiliser d’appareils électriques à
l’intérieur des compartiments de rangement
des aliments de l’appareil, à moins qu’ils ne
soient du type recommandé par le
fabricant.
MISE EN GARDE
Lors du placement de l’appareil, assurez-
vous que le cordon d’alimentation ne soit
pas coincé ou endommagé.
MISE EN GARDE
Ne pas placer de barrettes multiprises ou
d’alimentations portables à l’arrière de
l’appareil.
Ne pas ranger de substances explosives telles que des
bombes aérosols contenant un propulseur inflammable
dans cet appareil.
Cet appareil a été conçu pour un usage résidentiel et dans
le cadre d’applications similaires, notamment :
• les cuisines du personnel dans les magasins, bureaux et
autres environnements de travail ;
• dans les fermes et par les clients d’hôtels, motels et
autres environnements de type résidentiel ;
• environnements de type bed and breakfast ;
• restauration et autres applications similaires non
commerciales.
Veuillez respecter les réglementations locales lors de la
mise au rebut de l’appareil, en raison de son réfrigérant
inflammable et de son gaz isolant.
Si la lampe LED est endommagée, elle doit être remplacée
par le fabricant, son technicien d’entretien ou toute autre
personne qualifiée pour éviter les dangers.
MISE EN GARDE
Pour éviter les dangers associés à
l’instabilité de l appareil, il doit être ancré
conformément aux instructions.
Les composants doivent être remplacés par des
composants similaires et l’entretien doit être effectué par un
personnel de maintenance agréé par l’usine, afin de
minimiser le risque d’inflammation possible due à des
pièces incorrectes ou à un entretien inapproprié.
DANGER
Risque d’incendie ou d’explosion :
réfrigérant inflammable utilisé
• Ne pas utiliser de dispositifs mécaniques
pour décongeler le réfrigérateur.
• Ne pas percer les tuyaux de
réfrigération.
La charge maximale des étagères est de 22 lb chacune.
30
INFORMATIONS GÉNÉRALES
AVERTISSEMENT CONCERNANT LES
HYDROCARBURES (HC)
Le système de refroidissement de votre produit contient du
R600a. Ce gaz est inflammable. Par conséquent, veillez à
ne pas endommager le système de refroidissement ou le
tube pendant l’utilisation ou le transport. S’il est
endommagé, éloigner le produit des sources de feu
potentielles qui pourraient l’enflammer et ventiler la pièce
où il est placé.
NOTE
Si l’appareil est endommagé ou si vous
constatez une fuite de gaz, veuillez vous
tenir à l’écart du gaz, car il pourrait
provoquer des brûlures de glace s’il entre
en contact avec la peau. Aérer
soigneusement la pièce dans laquelle se
trouve l’appareil.
NOTE
Le type de gaz utilisé dans le produit est
indiqué sur l’étiquette signalétique située
sur la paroi intérieure gauche du
réfrigérateur.
MISE EN GARDE
Ne tentez jamais d’éliminer le produit en le
brûlant.
MISE AU REBUT DE L’ANCIEN APPAREIL
Éliminez correctement l’emballage de votre appareil.
Veillez à ce que les équipements de réfrigération soient
éliminés de manière écologique, y compris vos anciens et
nouveaux appareils en fin de vie. Respectez les
réglementations locales concernant l’élimination des
appareils contenant des réfrigérants inflammables et du
gaz de soufflage.
MISE EN GARDE
Avant toute mise au rebut, rendez les
appareils usés inutilisables en retirant la
fiche, en coupant le câble d’alimentation et
en détruisant les attaches à pression ou les
boulons. Cela évitera que les enfants ne
s’enferment dans l’appareil pendant qu’ils
jouent (risque d’étouffement) ou que cela
ne cause tout autre danger.
MISE EN GARDE
Ne jetez pas l’appareil avec les ordures
ménagères. Évitez d’endommager le circuit
de refroidissement, en particulier
l’échangeur de chaleur situé à l’arrière ou
au bas de l’appareil.
Ce symbole sur le produit ou sur l’emballage indique que
ce produit ne doit pas être traité comme les ordures
ménagères classiques. Apportez-le plutôt à un point de
collecte pour le recyclage des appareils électriques et
électroniques. Une élimination appropriée protège
l’environnement et la santé publique. Pour plus
d’informations sur le recyclage, contactez les autorités
locales ou les services de collecte des déchets.
31

INFORMATIONS GÉNÉRALES
ÉCONOMIE D’ÉNERGIE
Pour une économie d’énergie optimale, nous
recommandons ce qui suit :
• Installez l’appareil loin des sources de chaleur, à l’abri
de la lumière directe du soleil et dans une pièce bien
aérée.
• Évitez de mettre des aliments chauds dans le
réfrigérateur, ce qui augmenterait la température interne,
provoquant ainsi le fonctionnement continu du
compresseur.
• Ne remplissez pas trop les compartiments, car cela
empêche l’air de circuler correctement.
• En cas de formation de glace, dégivrez l’appareil afin de
faciliter le transfert du froid.
• En cas de panne d’électricité, il est conseillé de garder la
porte du réfrigérateur fermée.
• Ouvrez les portes de l’appareil le moins souvent et le
moins longtemps possible.
• N’ajustez pas les réglages à des températures
extrêmement froides.
• Retirez la poussière qui s’accumule à l’arrière de
l’appareil
AVANT LA PREMIÈRE UTILISATION
Vous devez laisser le réfrigérateur reposer pendant au
moins quatre heures avant de le mettre sous tension.
Il est recommandé de nettoyer l’intérieur de l’appareil avant
la première utilisation à l’aide d’une solution de bicarbonate
de soude et d’eau tiède, puis de bien sécher l’intérieur. Le
réfrigérateur peut avoir une odeur à la première utilisation.
Cela disparaîtra au fur et à mesure que l’appareil refroidit.
NOTE
L’appareil commencera à fonctionner à
41 ℉ pour le réfrigérateur et à 0 ℉ pour le
congélateur et fonctionnera en continu
jusqu’à ce qu’il atteigne les bonnes
températures. Si l’appareil est éteint,
attendez cinq minutes avant de le rallumer
afin d’éviter d’endommager inutilement le
compresseur. Ne stockez jamais d’objets
inflammables ou explosifs, d’acides ou
d’alcalis fortement corrosifs dans l’appareil.
Ce réfrigérateur refroidit vos aliments en
refroidissant l’intérieur de la cavité. Il est
normal que du givre s’accumule sur cette
surface ; il se dissipe ensuite et s’écoule
par un petit drain au fond, où il s’évapore
sans danger. La présence de givre à
l’arrière ne signifie pas que le réfrigérateur
fonctionne mal.
32

UTILISATION
UTILISATION DU RÉFRIGÉRATEUR
• Ne mettez jamais de liquides dans le réfrigérateur sans
couvercle
• Ne placez jamais d’aliments chauds dans le
réfrigérateur. Laissez refroidir les aliments chauds à
température ambiante avant de les placer dans le
réfrigérateur.
• Rien ne doit reposer contre la paroi arrière du
réfrigérateur, car cela entraînerait la formation de givre
difficile à éliminer et d’éventuels problèmes de
condensation.
• Assurez-vous que les aliments sont propres et que tout
excès d’eau est essuyé avant de les mettre au
réfrigérateur.
• Enveloppez ou couvrez les aliments avant de les mettre
au réfrigérateur. Cela aidera à empêcher la perte
d’humidité, à garder les aliments frais et à prévenir les
odeurs désagréables.
• Triez les aliments avant de les ranger. Tous les aliments
à utiliser prochainement doivent être rangés à l’avant
des étagères. Cela aidera à prévenir la détérioration, qui
pourrait se produire lorsque la porte est maintenue
ouverte pendant de longues périodes.
• Ne remplissez pas trop le réfrigérateur. Il doit y avoir
suffisamment d’espace entre les aliments pour
permettre à l’air frais de circuler.
• La décongélation des aliments surgelés dans le
compartiment réfrigérateur permet de maintenir la
température basse et d’économiser de l’énergie.
• Ne stockez jamais de viandes crues sur des étagères
au-dessus de viandes ou de produits cuits. Cela
empêchera les jus de viande crue de contaminer les
autres denrées alimentaires.
UTILISATION DU CONGÉLATEUR
• Les compartiments congélateur sont conçus pour
stocker uniquement des aliments surgelés.
• Ne placez jamais d’aliments chauds ou tièdes dans le
congélateur ; laissez-les refroidir complètement avant de
les mettre au congélateur.
• Lorsque vous stockez des aliments congelés, suivez les
instructions sur l’emballage des aliments. Si aucune
information n’est fournie, les aliments ne doivent pas
être conservés plus de trois mois après la date d’achat.
• Conservez les aliments dans de petits emballages
(idéalement moins de 2,2 lbs) Cela réduit le temps de
congélation et améliore la qualité des aliments après
décongélation.
• Enveloppez les aliments avant de les mettre au
congélateur. Pour empêcher l’emballage de coller
ensemble, assurez-vous qu’il est sec.
• Étiquetez les aliments avant de les congeler, avec des
informations telles que le type d’aliment et les dates de
stockage et de péremption.
• Une fois décongelés, les aliments ne doivent pas être
recongelés. Afin d’éviter le gaspillage, ne décongelez
que la quantité d’aliments nécessaire.
• Les boissons en bouteille ou en canette ne doivent pas
être stockées dans les compartiments du congélateur,
car elles pourraient exploser.
• La quantité maximale d’aliments frais pouvant être
congelés en 24 heures est de 5.8 lbs.
• N’essayez pas de congeler plus que la quantité
maximale.
TIROIR ZONE FRESCO
• La température à l’intérieur du tiroir Fresco peut être
réglée dans une plage comprise entre +37 ℉ et 27 ℉.
C'est le tiroir idéal pour conserver la viande et le
poisson.
33
UTILISATION
RANGEMENT
Fig. 1
1 Compartiment de congélation
2 Compartiment de réfrigérateur
3 Afficheur
4 Beurre, fromages, etc.
5 Nourriture en bocaux et bouteilles
6 Boissons, par ex. le lait
7 Tiroir Fresco pour viandes et poissons frais ou fruits
et légumes
8 Bac à légumes pour fruits et légumes
9 Yaourts, conserves, etc.
10 Stockage des glaçons (selon modèle)
11 Tiroir du congélateur
La section réfrigérateur est destinée au rangement des
aliments à court terme. Bien que des températures basses
puissent être maintenues, il n’est pas recommandé de
conserver les aliments pendant de longues périodes.
La température peut varier entre les différentes sections,
car l’air froid circule dans le réfrigérateur. Pour cette raison,
les aliments doivent être stockés dans des sections
différentes selon le type.
Les étagères du réfrigérateur peuvent être déplacées dans
le compartiment réfrigérateur en fonction des besoins de
rangement. Pour déplacer une étagère, soulevez la partie
arrière, puis tirez-la vers l’extérieur.
Pour remettre en place, faites glisser l’étagère dans la
fente, puis abaissez la section arrière.
La configuration la plus économe en termes d’énergie
nécessite l’installation de tiroirs, bacs de porte et étagères
dans l’appareil ; veuillez vous référer aux images ci-
dessus.
CARACTÉRISTIQUES TECHNIQUES
Pression d’eau autorisée 25-80 psi [207-552 kpa]
Branchement électrique 115 V/60 Hz
Puissance d’entrée
nominale
175 W
Classe climatique SN-N-ST-T
CLASSE CLIMATIQUE
TEMPÉRATURE
AMBIANTE
SN +50℃ à +89℃
N
+16℃ à +32℃
ST +61℃ à +100℃
T
+61℃ à +109℃
NOTE
Cet appareil peut ne pas fonctionner
correctement s’il est laissé à une
température supérieure ou inférieure à la
plage de classe climatique indiquée
pendant une longue période.
0
11
9
10
2
5
3
1
4
7
6
8
34

UTILISATION
PANNEAU DE COMMANDE
Fig. 2
1) Lorsque l’appareil est allumé pour la première fois, il
fonctionnera selon les réglages suivants : 41℉ pour le
réfrigérateur, 32℉ pour le Fresco et 0℉ pour le
congélateur. Si vous souhaitez régler la température ou
les fonctions manuellement, utilisez le bouton approprié
pour effectuer l’opération souhaitée. La plage de
température pour Fresco est de 27℉ à 37℉.
2) Réglage de la température du réfrigérateur : Appuyez
sur le bouton sur le côté gauche du panneau de
commande pour régler la température dans une plage
comprise entre 36℉ et 46℉.
3) Réglage de la température du congélateur : Appuyez sur
le bouton sur le côté droit du panneau de commande
pour régler la température dans une plage comprise
entre 5℉ et -13℉.
4) Réglage de la température du tiroir Fresco : Le bouton
contrôle la température. Ce bouton permet de régler
la température dans une plage comprise entre 27℉ et
37℉. Cette fonction peut être activée/désactivée en
appuyant sur le bouton et en le maintenant enfoncé
pendant trois secondes (« OFF » s’affiche).
5) Super Cool : Appuyez sur le bouton ; le bouton
s’allume et la fonction de refroidissement rapide s’active.
Le réfrigérateur commence automatiquement à
fonctionner à une température de réglage de 36℉ et
continue pendant 24 heures, après quoi il revient à son
réglage normal et le symbole n’est plus allumé.
6) Mode Holiday : Appuyez sur le bouton ; le bouton
s’allume, la fonction « Vacances » est activée et
l’ensemble de l’appareil se met automatiquement en
marche aux réglages suivants : réfrigérateur à 63 ℉ et
congélateur à 0 ℉.
7) Mode Éco : Appuyez sur le bouton sur le panneau de
commande ; la fonction Éco est activée et la touche
s’allume. Le compartiment réfrigérateur fonctionne à une
température de 41℉ et le compartiment congélateur
fonctionne à une température de 0℉. Le tiroir Fresco
fonctionne à une température de 37℉.
8) Super Freeze : Appuyez sur le bouton ; le bouton
s’allume et le congélateur commence à exécuter la
fonction de congélation rapide, avec un réglage de
température de -13℉. Après 24 heures, la fonction de
congélation rapide s’arrête automatiquement.
9) Appuyez sur le bouton d’alimentation et maintenez-le
enfoncé pendant 3 secondes pour éteindre votre
appareil. Le bouton s’allume alors que l’alimentation est
coupée. Les lampes intérieures s’éteignent et le
compresseur cesse de fonctionner. Appuyez et
maintenez enfoncé le bouton pendant 3 secondes
pour allumer votre appareil. Le symbole s’allume et le
courant est rétabli.
10) Les modèles No Frost sont équipés d’une fonction de
dégivrage manuel. Appuyez et maintenez les boutons
+ pendant 5 secondes pour activer la fonction de
dégivrage manuel afin de nettoyer l’évaporateur du
congélateur. Le symbole de température du congélateur
reste allumé en continu. Appuyez et maintenez les
boutons + pendant 3 secondes pour désactiver la
fonction de dégivrage manuel. Le symbole de
température du congélateur s’éteint.
11) Affichage de défaut : Cet appareil dispose d’une
fonction « Affichage des défauts et alarme ». Une fois
que les capteurs détectent un défaut, des alertes
s’affichent sur l’écran de température ; l’appareil refroidit
encore, mais vous devez appeler un technicien de
service professionnel pour le vérifier.
• F2 – capteur du tiroir Fresco
• F3 – capteur du compartiment réfrigérateur
• F4 – capteur du compartiment congélateur
• F5 – capteur de dégivrage
• 2E – Défaillance du ventilateur/moteur du
congélateur
• CE– Défaut de communication entre la carte
principale et le panneau d’affichage
35
UTILISATION
Les défauts ci-dessus sont uniquement affichés à
l’écran ; il n’y a aucun signal sonore d’alarme.
Alarme de dépassement de la température maximale du
congélateur : Si, après que le congélateur ait atteint la
température réglée, la température monte au-dessus de
30℉, l’alarme retentit, accompagnée du clignotement
simultané de l’affichage de la température du congélateur.
Appuyez sur n’importe quel bouton pour annuler l’alarme
sonore. Le clignotement continuera jusqu’à ce que la
température descende en dessous de 30℉.
NOTE
La carte principale est située dans le
compartiment du compresseur.
POSITION CONDITIONS
41℉ / 0℉ Température estivale ou
ambiante
entre 77℉ - 95℉
41℉ / 0℉
Température hivernale,
automnale ou ambiante
entre 59℉ - 77℉
41℉ / 0℉ Température hivernale ou
ambiante
Entre 41℉ - 59℉
Fonction super congélation
Super Freeze
Fonction de super
refroidissement
Super Cool
MACHINE À GLAÇONS AUTOMATIQUE
(SELON LE MODÈLE)
Instructions de fonctionnement des touches :
1) Appuyez brièvement sur le bouton pour allumer ou
éteindre la machine à glaçons.
2) Lorsque la machine est allumée, appuyez sur le bouton
et maintenez-le enfoncé pendant 10 secondes pour
dégivrer manuellement.
Description de l’état de la lampe :
1) État de mise sous tension : la lumière s’allume, puis
s’éteint progressivement.
2) État d’arrêt : le voyant reste éteint.
3) État de glace pleine : le voyant reste allumé en continu.
4) Retrait du tiroir : le voyant clignote lentement une fois
toutes les 0,5 seconde (1 Hz)
État de panne :
1) Bourrage de glace : le voyant clignote rapidement une
fois toutes les 200 ms.
Fig. 3
1 Machine à glace
2 Interrupteur de machine à glaçons
1 2
36

PRÉCAUTIONS ET MAINTENANCE
INSTRUCTIONS DE REMPLACEMENT DE
L’ÉCLAIRAGE À LED
NOTE
La lampe LED ne doit pas être remplacée
par l’utilisateur, mais par un professionnel
du service.
Paramètres d’éclairage : 12 V / 10 W
1) Débranchez la fiche d’alimentation.
2) Retirez la bande de garniture en alliage d’aluminium au-
dessus de la source lumineuse de surface à LED, puis
retirez les vis de montage gauche et droite.
Les étapes 1 et 2 sont illustrées ci-dessous.
3) Installez le nouveau panneau d’éclairage LED.
4) Enfin, remplacez la baguette décorative en alliage
d’aluminium.
Fig. 4
PRÉCAUTIONS ET NETTOYAGE
Débranchez toujours l’appareil de l’alimentation secteur
avant d’effectuer tout nettoyage ou entretien.
Les parties réfrigérateur et congélateur doivent être
nettoyées avec une solution de bicarbonate de soude et de
l’eau tiède. N’utilisez pas de produits abrasifs ou
détergents. Après le lavage, rincez et séchez
soigneusement.
Nettoyez les étagères et les bacs de porte séparément à la
main avec une solution douce de liquide vaisselle et d’eau.
Ne les mettez pas au lave-vaisselle.
Si l’appareil ne va pas être utilisé pendant une période
prolongée, débranchez et nettoyez l’appareil. Les portes
doivent être laissées légèrement entrouvertes pour éviter la
formation de moisissures et d’odeurs désagréables.
NETTOYAGE DES SURFACES INTÉRIEURES
Pour nettoyer les surfaces intérieures et toutes les parties
amovibles, les laver avec une solution douce composée de
produit pour lave-vaisselle, d’eau et de bicarbonate. Rincer
et essuyer soigneusement.
Éviter que l’eau n’entre en contact avec les dispositifs
d’éclairage et le panneau de commande.
MISE EN GARDE
Ne pas utiliser de vinaigre, d’alcool à brûler
ou d’autres produits de nettoyage à base
d’alcool sur les surfaces intérieures.
Bien que cet appareil dégivre automatiquement, une
couche de givre peut se former sur les parois intérieures du
compartiment congélateur si la porte du congélateur est
ouverte fréquemment ou si elle reste ouverte trop
longtemps.
Si le givre est trop épais, choisissez un moment où le
congélateur est presque vide et procédez comme suit :
1) Retirez les bacs de nourriture et accessoires existants,
débranchez l’appareil du secteur et laissez les portes
ouvertes.
Aérez soigneusement la pièce pour accélérer le
processus.
2) Une fois le dégivrage terminé, nettoyez votre
congélateur comme décrit ci-dessus.
1
2
37

PRÉCAUTIONS ET MAINTENANCE
SURFACES EXTÉRIEURES EN ACIER
INOXYDABLE
Utiliser un produit de nettoyage pour l’acier inoxydable non
abrasif et l’appliquer avec un chiffon doux non pelucheux.
Pour le polissage, essuyez délicatement avec un chiffon en
microfibre humide et continuez avec un linge sec en cuir.
Toujours suivre le grainage de l’acier inoxydable.
NETTOYAGE DES JOINTS DE PORTE
Prenez soin de garder les joints de porte propres. Les
aliments et boissons collants peuvent faire adhérer les
joints à l’armoire et se déchirer lorsque vous ouvrez la
porte. Lavez les joints avec un détergent doux et de l’eau
tiède. Rincez-les et séchez-les soigneusement après le
nettoyage.
DÉCONGÉLATION
Le produit est doté d’un système No Frost, conçu pour
empêcher une importante accumulation de glace. Dans
des conditions normales d’utilisation, il ne devrait pas être
nécessaire de dégivrer régulièrement le système de
congélation.
NOTE
Si vous constatez régulièrement une
importante accumulation de glace ou des
flaques d’eau dans la section congélateur,
il est probable que la porte ne se ferme pas
correctement. Cela peut être dû à un joint
de porte défectueux ou à un panneau de
porte d’armoire mal monté ou trop lourd.
Pour plus d’informations, consultez la
section Résolution de problèmes relative à
la glace.
RÉSOLUTION DE PROBLÈMES
Si vous rencontrez des problèmes avec votre appareil,
vous devez consulter cette section de Résolution de
problèmes avant d’appeler le service client.
Si l’appareil ne fonctionne pas, vérifiez que :
• L’appareil est sous tension.
• Les fusibles de la maison sont intacts et le fusible de la
prise n’a pas sauté.
• Le réfrigérateur n’a pas été éteint.
• La prise électrique fonctionne correctement. Pour le
vérifier, branchez-y un autre appareil électrique pour voir
si la prise est défectueuse.
Si l’appareil fonctionne, mais pas très bien, vérifiez
que :
• L’appareil n’est pas en surcharge.
• Le thermostat est réglé sur une température appropriée.
• Les portes se ferment correctement.
• Le système de refroidissement à l’arrière de l’appareil
est propre et sans poussière et ne touche pas la paroi
arrière.
• Il y a suffisamment de ventilation autour des parois
latérales et arrière.
Si l’appareil est bruyant, vérifiez que :
• L’appareil est de niveau et stable.
• Les parois latérales et arrière sont dégagées et aucun
élément ne repose contre l’appareil.
NOTE
Le gaz réfrigérant dans le réfrigérateur peut
faire un léger bruit de bouillonnement ou de
gargouillis, même lorsque le compresseur
ne fonctionne pas.
Si l’appareil émet un bip, vérifiez que :
• Les portes sont fermées. Une alarme retentit après
qu’une porte a été ouverte pendant 60 secondes.
Si de la glace s’est formée sur la paroi arrière du
réfrigérateur :
• Il est normal que des gouttelettes de glace se forment
sur la paroi arrière du réfrigérateur. Cela ne constitue
pas un défaut de l’appareil.
• Assurez-vous qu’aucun élément à l’intérieur du
réfrigérateur n’est en contact avec la paroi arrière.
• Vérifiez qu’il y a une certaine résistance lors de
l’ouverture de la porte de l’appareil. S’il s’ouvre au
moindre contact, cela peut signifier que le joint de la
porte doit être remplacé.
38

PRÉCAUTIONS ET MAINTENANCE
• Vérifiez pour tout pli, débris ou dommage au niveau du
joint de la porte. Si vous en remarquez et que vous ne
parvenez pas à résoudre le problème vous-même,
contactez le service client afin que le joint puisse être
remplacé.
• Cela peut être dû au fait que la ou les portes de l’armoire
ne sont pas correctement installées. En cas de doute,
demandez à votre installateur de vérifier les portes de
l’armoire.
Si une quantité excessive de glace s’est formée dans le
congélateur :
• Vérifiez qu’il y a une certaine résistance lors de
l’ouverture de la porte de l’appareil. S’il s’ouvre au
moindre contact, cela peut signifier que le joint de la
porte doit être remplacé.
• Vérifiez pour tout pli, débris ou dommage au niveau du
joint de la porte. Si vous en remarquez et que vous ne
parvenez pas à résoudre le problème vous-même,
contactez le service client afin que le joint puisse être
remplacé.
• Cela peut être dû au fait que la ou les portes de l’armoire
ne sont pas correctement installées. En cas de doute,
demandez à votre installateur de vérifier les portes de
l’armoire.
Si une ou plusieurs des unités LED à l’intérieur de
l’appareil ne fonctionnent pas :
• Contactez le service client pour organiser une visite de
service.
39
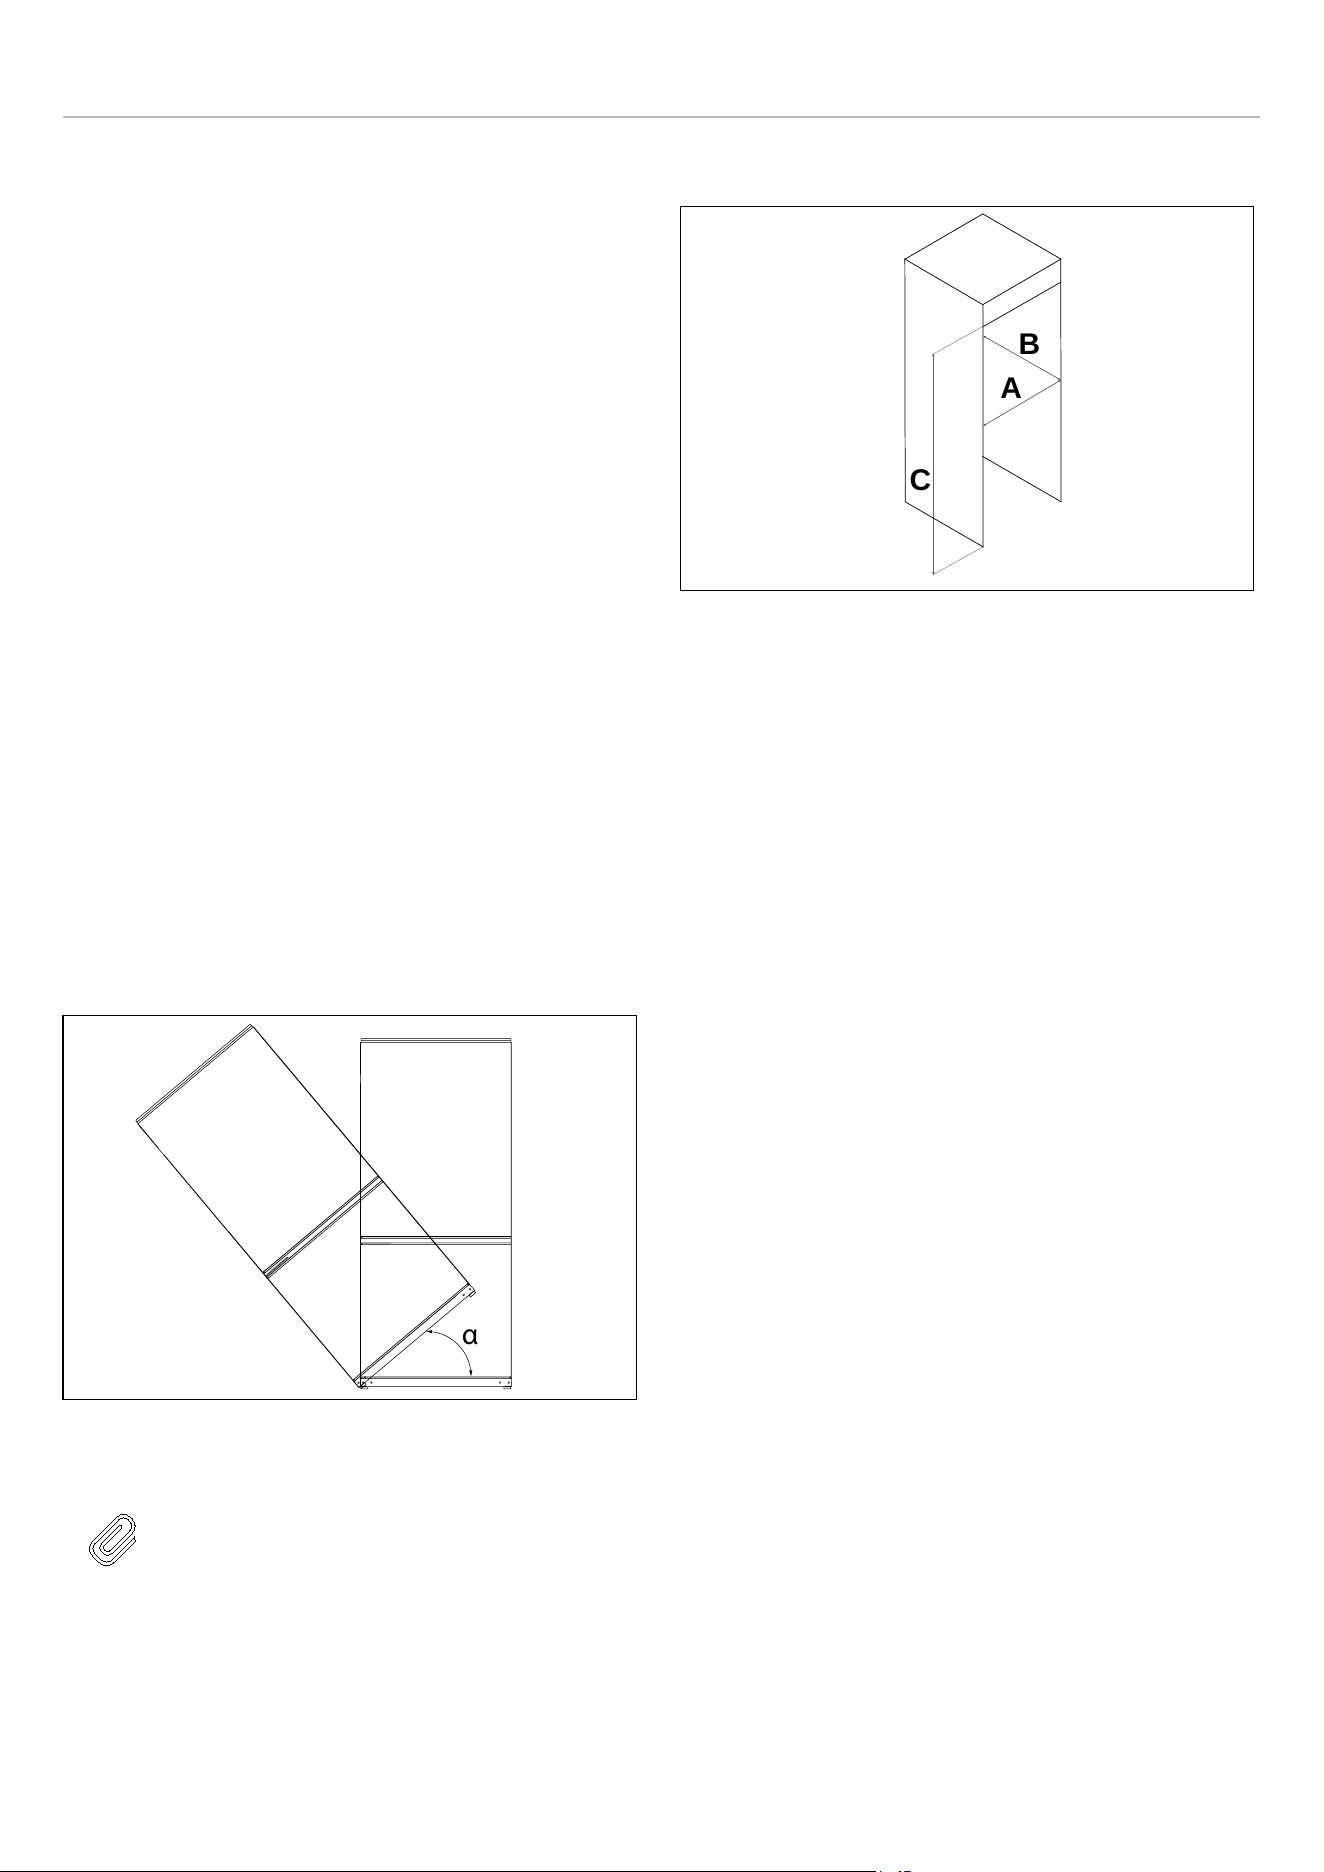
INSTRUCTIONS D’INSTALLATION
PRÉPARATION POUR L’INSTALLATION
Cet appareil ne doit pas être installé à proximité de
sources de chaleur, par ex. des éléments chauffants ou
des cuisinières, ou dans un endroit humide.
Demandez l’aide d’une ou de deux autres personnes
lors de l’installation de cet appareil. Ce dernier peut
avoir des arêtes vives. Portez un EPI adapté à la tâche
et à l’environnement.
• Utilisez les pieds réglables en hauteur à l’avant de
l’appareil pour vous assurer que l’appareil est de niveau.
• Le système de refroidissement à l’arrière de l’appareil ne
doit pas toucher la paroi arrière. Plus l’écart est grand,
mieux c’est.
• L’appareil doit être installé avec une ventilation
adéquate. Assurez-vous d’avoir un dégagement au-
dessus de l’appareil afin de permettre à l’air de
s’échapper et qu’il y ait un espace entre l’arrière de
l’appareil et le mur.
VENTILATION
La principale considération lors de l’installation d’un groupe
frigorifique dans une cuisine équipée est la ventilation. La
chaleur retirée du compartiment de refroidissement doit
être dissipée dans l’air autour de l’appareil. Une ventilation
incorrecte peut entraîner une panne prématurée du
compresseur, une consommation électrique excessive et
une panne totale du système, et peut annuler la garantie
fournie avec l’appareil.
Fig. 5
NOTE
Ne pas incliner au-delà de α=40°
DIMENSIONS DE L’OUVERTURE
Fig. 6
A. 24″ (610 mm)
B. 25″ (635 mm)
C. 74 3/16″ (1 885 mm)
α
A
B
C
40

INSTRUCTIONS D’INSTALLATION
DIMENSIONS DU PRODUIT
VUE DU DESSUS
Fig. 7
A. 38 3/4″ (983,4 mm)
B. 25 3/4″ (654,2 mm)
C. 2 3/8″ (60 mm)
D. 47 13/16″ (1214,5 mm)
E. 90°
F. 130°
VUE AVANT
Fig. 8
A. 23 7/16″ (595 mm)
B. 73 1/4″ (1860 mm)
C. 40 3/8″ (1025 mm )
D. 3/8″ (10 mm)
E. 30 3/4″ (781 mm)
F. 9/16″ (14 mm)
VUE LATÉRALE
Fig. 9
A. 28 1/16″ (713,2 mm)
B. 25 9/16″ (650 mm)
C. 23 1/4″ (590 mm)
NOTE
Pour améliorer l’efficacité du système de
refroidissement et économiser de l’énergie,
il est nécessaire de maintenir une bonne
ventilation autour de l’appareil pour dissiper
la chaleur. Pour cette raison, il est
nécessaire de disposer de suffisamment
d’espace libre autour du réfrigérateur.
NOTE
Il est recommandé de laisser un
dégagement d’au moins 1 3/4″ du mur, au
moins 1″ du haut, au moins 5/16″ des côtés
aux murs, et un dégagement en façade
pour permettre à la porte de s’ouvrir à
130°..
C
D
A
B
α
β
A
B
C
E
D
F
A
B
C
41
INSTRUCTIONS D’INSTALLATION
EXIGENCES ÉLECTRIQUES
Veuillez vérifier les normes électriques et les codes locaux
avant d’installer l’appareil.
L’appareil doit être appliqué avec un courant alternatif
monophasé de 115 V (Volts), 60 Hz (Hertz). Si la tension
fluctue au-delà de la limite supérieure, un régulateur de
tension automatique CA de plus de 350 W doit être
appliqué au réfrigérateur pour une utilisation en toute
sécurité.
MISE EN GARDE
N’utilisez pas de rallonge ou de multiprises
qui pourraient provoquer une surcharge
des circuits de câblage et provoquer un
incendie. Branchez toujours l’appareil sur
sa propre prise électrique individuelle ayant
une tension correspondant à celle indiquée
sur la plaque signalétique.
EXIGENCES DE PLOMBERIE (SELON LE
MODÈLE)
Le réfrigérateur est équipé d’un tuyau d’eau de 59″ de long
(1/4″ de diamètre) qui comprend un écrou de raccord à
compression femelle 1/4″, fourni dans le sac d’accessoires
à l’intérieur de l’emballage du réfrigérateur.
Avant l’installation, le système d’approvisionnement en eau
du réfrigérateur doit être raccordé à l’alimentation en eau
principale de l’habitation. Pour ce faire, raccordez le tuyau
d’eau à l’arrière du réfrigérateur, puis à l’alimentation en
eau de votre domicile.
Le réfrigérateur n’est pas équipé d’un filtre à eau.
Cependant, un filtre à eau tiers peut être installé, si vous le
souhaitez. La conduite d’alimentation en eau doit être
située soit à l’intérieur de l’armoire où est installé l’appareil,
soit dans une armoire adjacente, avec une ouverture à
l’arrière de l’une de ces armoires.
Le système d’approvisionnement en eau du réfrigérateur
doit être raccordé à l’alimentation en eau principale de
l’habitation.
La pression du système d’approvisionnement en eau doit
être comprise entre 25 et 80 psi (1,7-5,5 bar). Si la pression
de l’eau dépasse 80 psi (5,5 bar), mais reste inférieure à
120 psi (8 bar), installez un limiteur de pression ou une
protection contre les chocs de l’eau à la vanne d’admission.
MISE EN GARDE
N’installez pas et n’utilisez pas l’appareil si
la pression de l’eau dépasse 120 psi
(8 bar). Les objets susceptibles de percer
le tuyau d’eau ou de provoquer leur torsion
ne doivent pas être présents à l’endroit où
la conduite d’eau est installée.
MISE EN GARDE
Le tuyau qui part de l’alimentation en eau
doit être d’une seule pièce. N’utilisez pas
de tuyaux d’extension
MISE EN GARDE
Assurez-vous que l’alimentation est
coupée lors de l’a réalisation du
raccordement à l’eau de l’appareil.
MISE EN GARDE
La vanne d’eau doit être fermée lors du
raccordement du tuyau d’eau.
MISE EN GARDE
Il est fortement recommandé de maintenir
la valve d’eau accessible après l’installation
du produit.
42
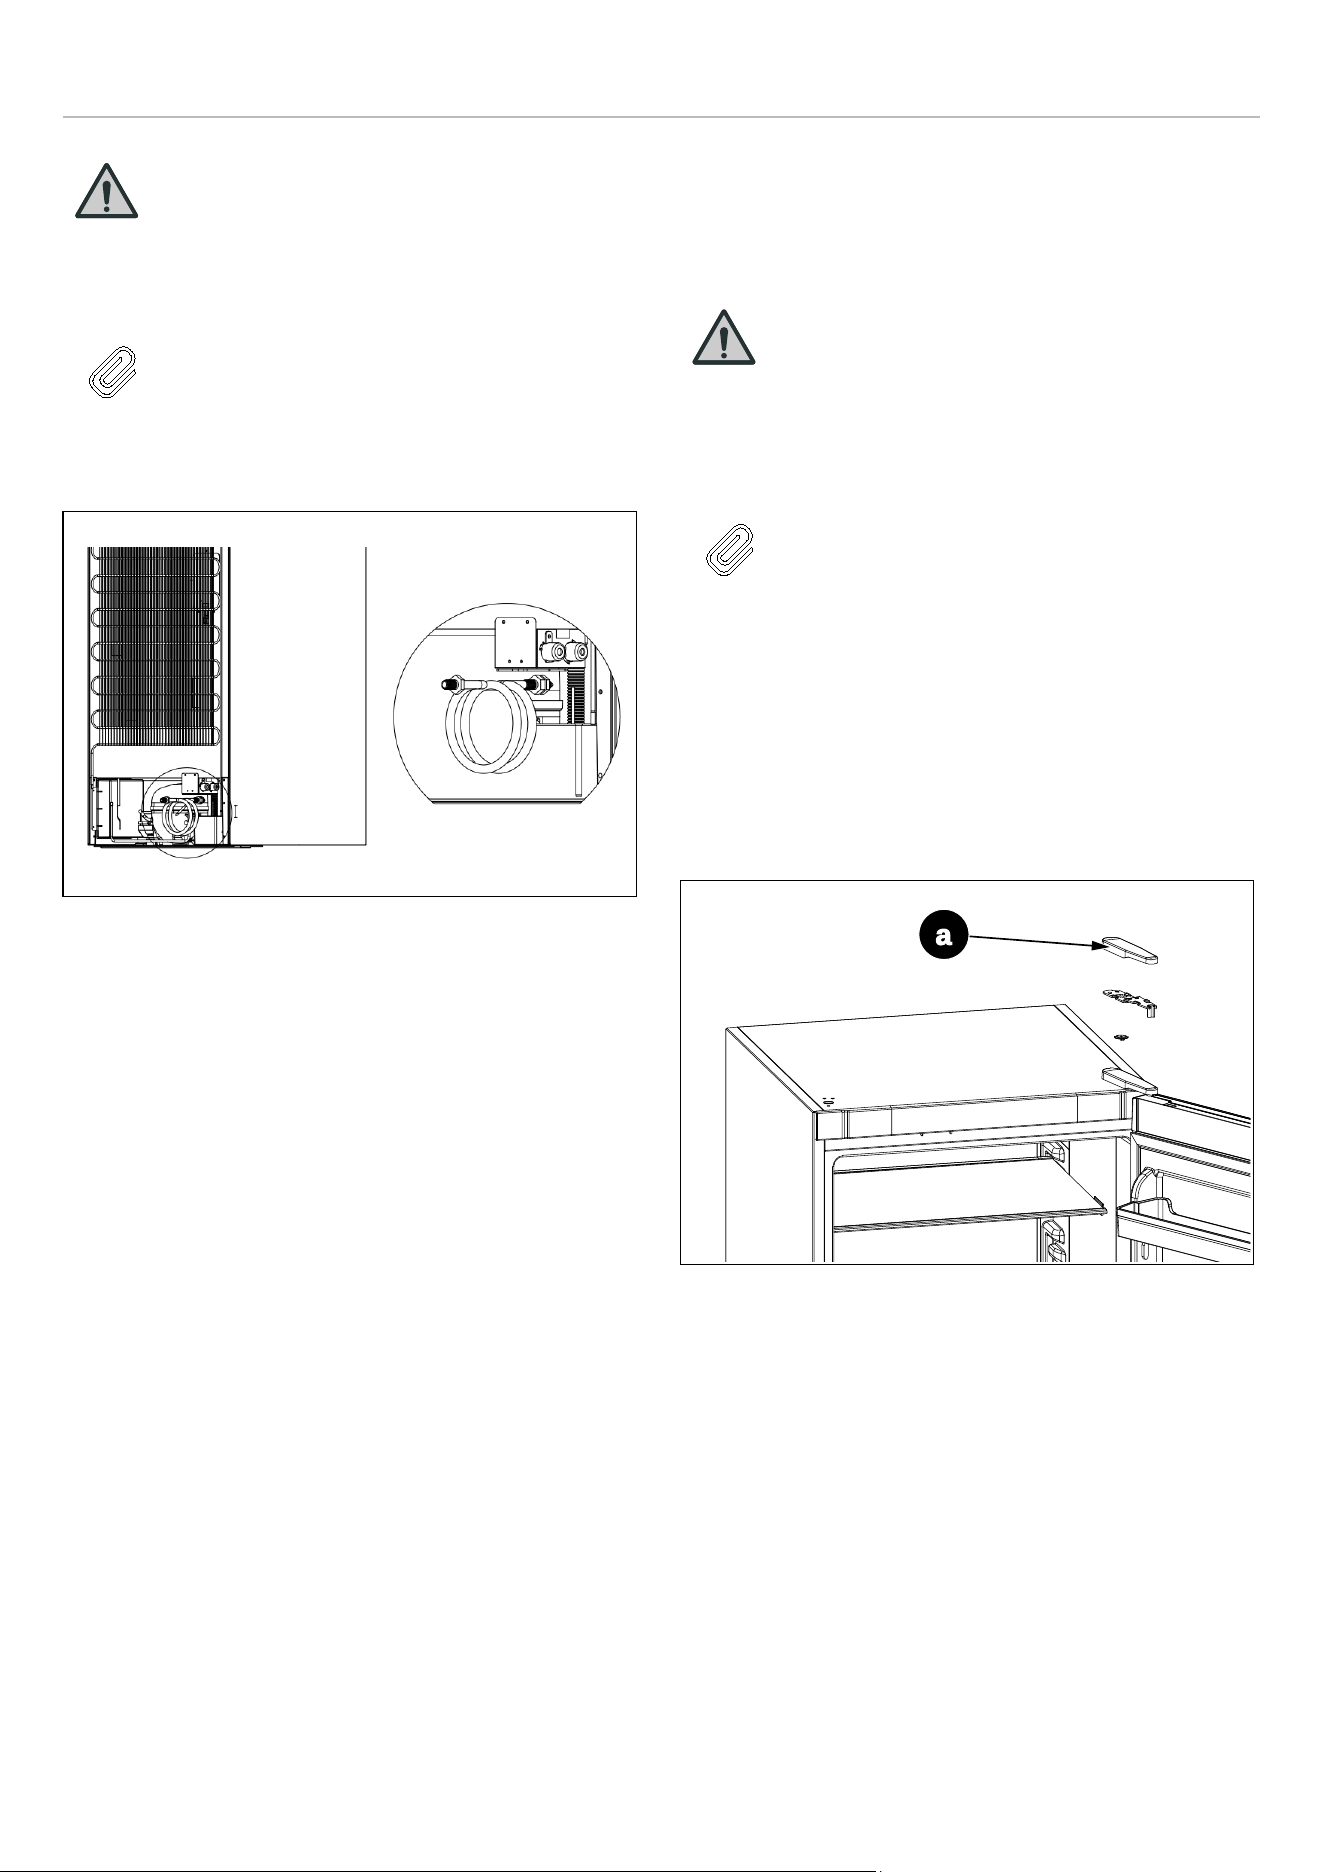
INSTRUCTIONS D’INSTALLATION
MISE EN GARDE
Cet appareil doit être utilisé uniquement
avec une alimentation en eau potable
froide.
NOTE
Une fois la connexion terminée, vous
devez ouvrir la vanne d’eau et vous assurer
qu’il n’y a pas de fuite. Toute fuite d’eau
risquerait d’endommager les armoires.
Fig. 10
INVERSION DES PORTES DE L’APPAREIL
Le côté d’ouverture de la porte peut être modifié, en
passant du côté droit (tel que fourni) au côté gauche, si
nécessaire.
MISE EN GARDE
Lors de l’inversion de la porte, l’appareil ne
doit pas être branché à l’alimentation
électrique. Assurez-vous que la fiche est
retirée de la prise de courant.
NOTE
Si nécessaire, vous pouvez poser le
réfrigérateur sur le dos afin d’accéder à la
base. Vous devez le poser sur un
emballage en mousse souple ou un
matériau similaire pour éviter
d’endommager le panneau arrière du
réfrigérateur.
Pour inverser la porte, procédez comme suit :
1) Démontez le couvercle de la charnière supérieure [a] et
la charnière supérieure et retirez la porte supérieure
Fig. 11
a
43
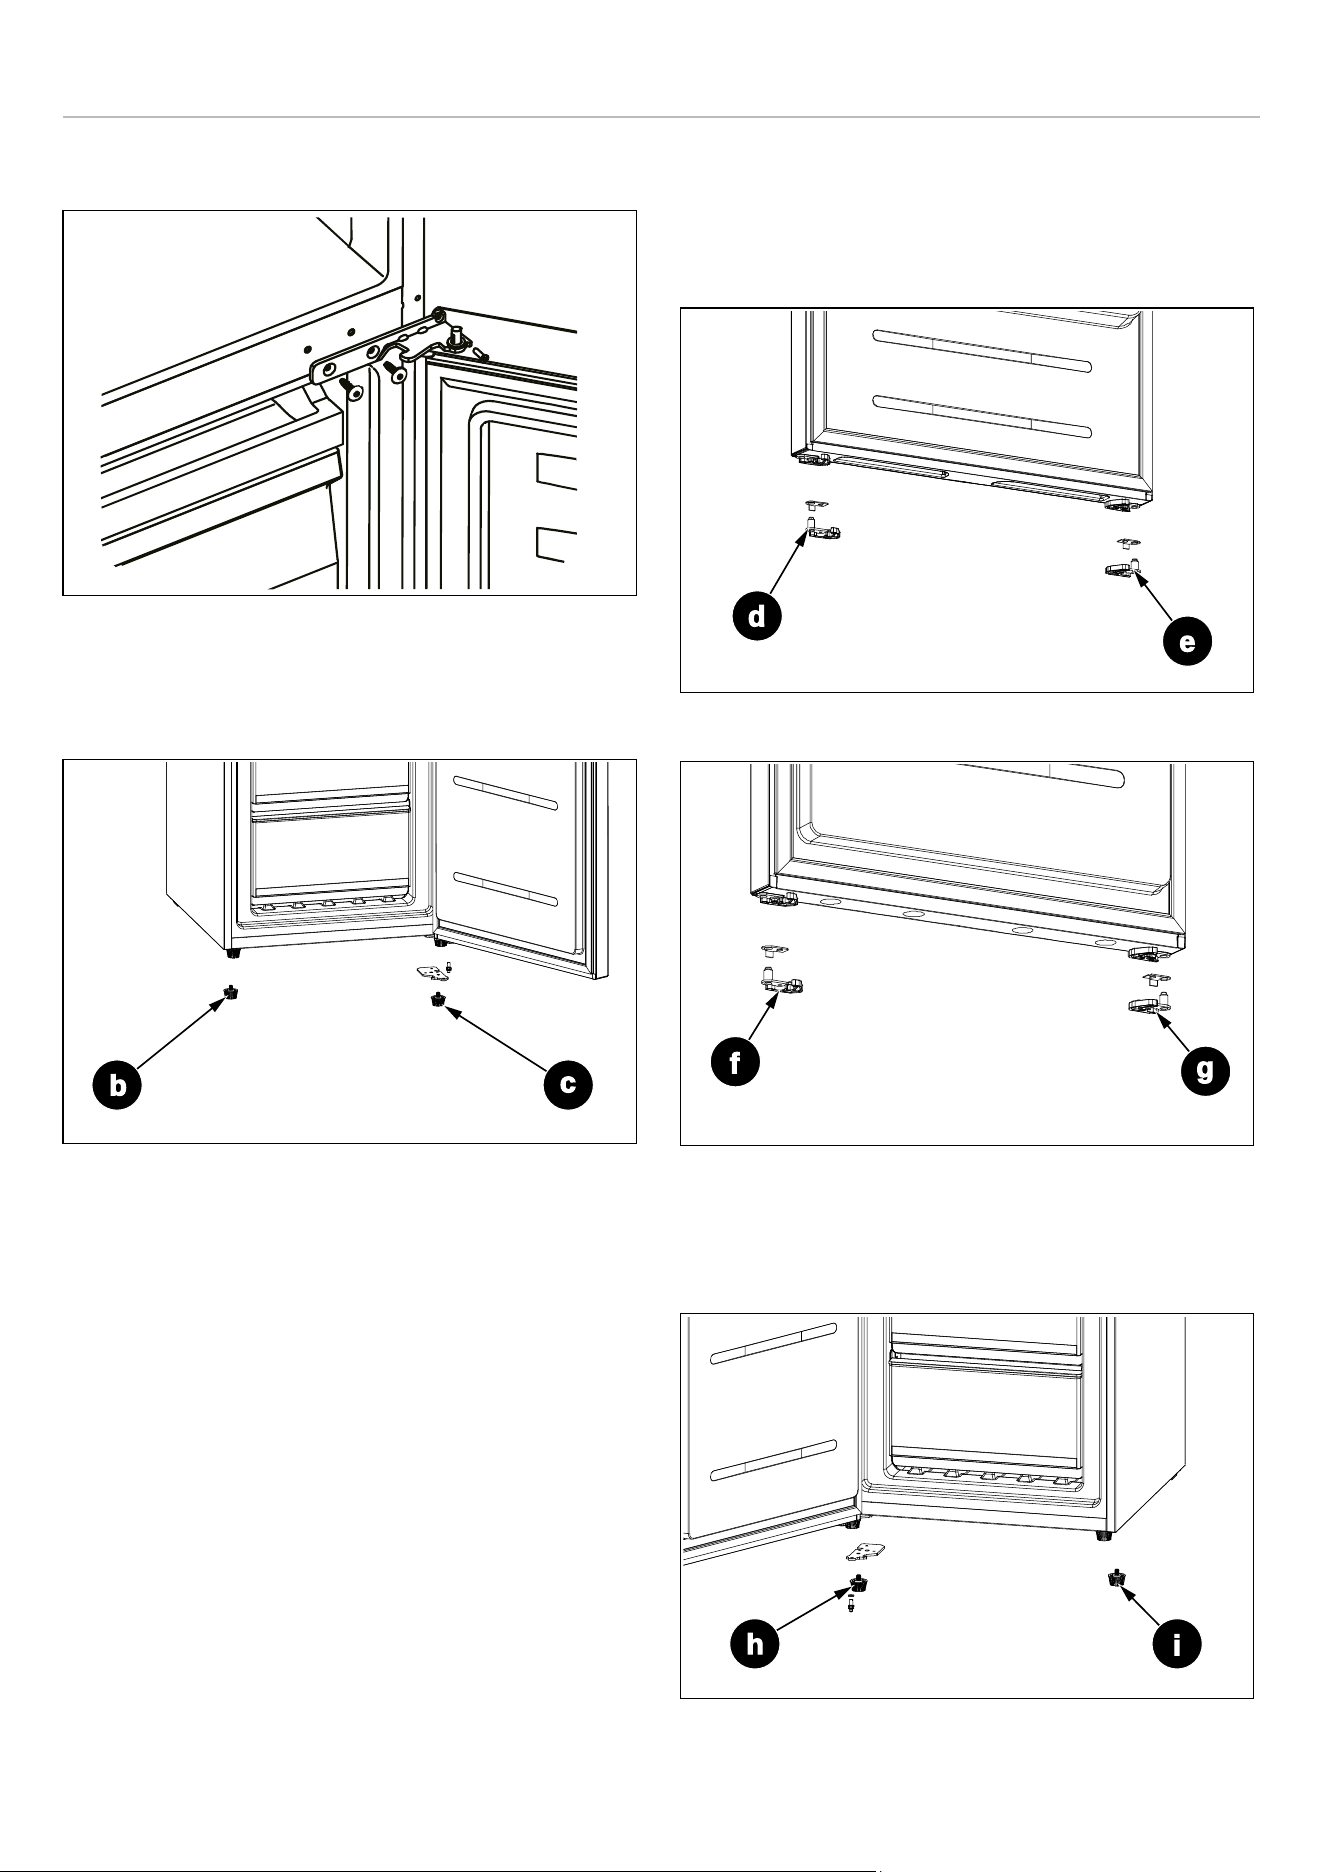
INSTRUCTIONS D’INSTALLATION
2) Retirez la charnière centrale et la porte du congélateur.
Fig. 12
3) Retirez le pied gauche [b] du bas du réfrigérateur et le
pied droit [c] du bas du réfrigérateur et la charnière
inférieure.
Fig. 13
4) Retirez les ensembles de charnières de porte [d], [e], [f]
et [g] des deux portes et installez les ensembles de
charnières de porte présents dans le sac de composants
accessoires à l’intérieur du réfrigérateur de l’autre côté
des portes
Fig. 14
Fig. 15
5) Installez les pieds et la charnière inférieure [h] et [i], sur
les côtés opposés à ceux où ils ont été retirés au bas du
réfrigérateur.
Fig. 16
b
c
d
e
f
g
h
i
44
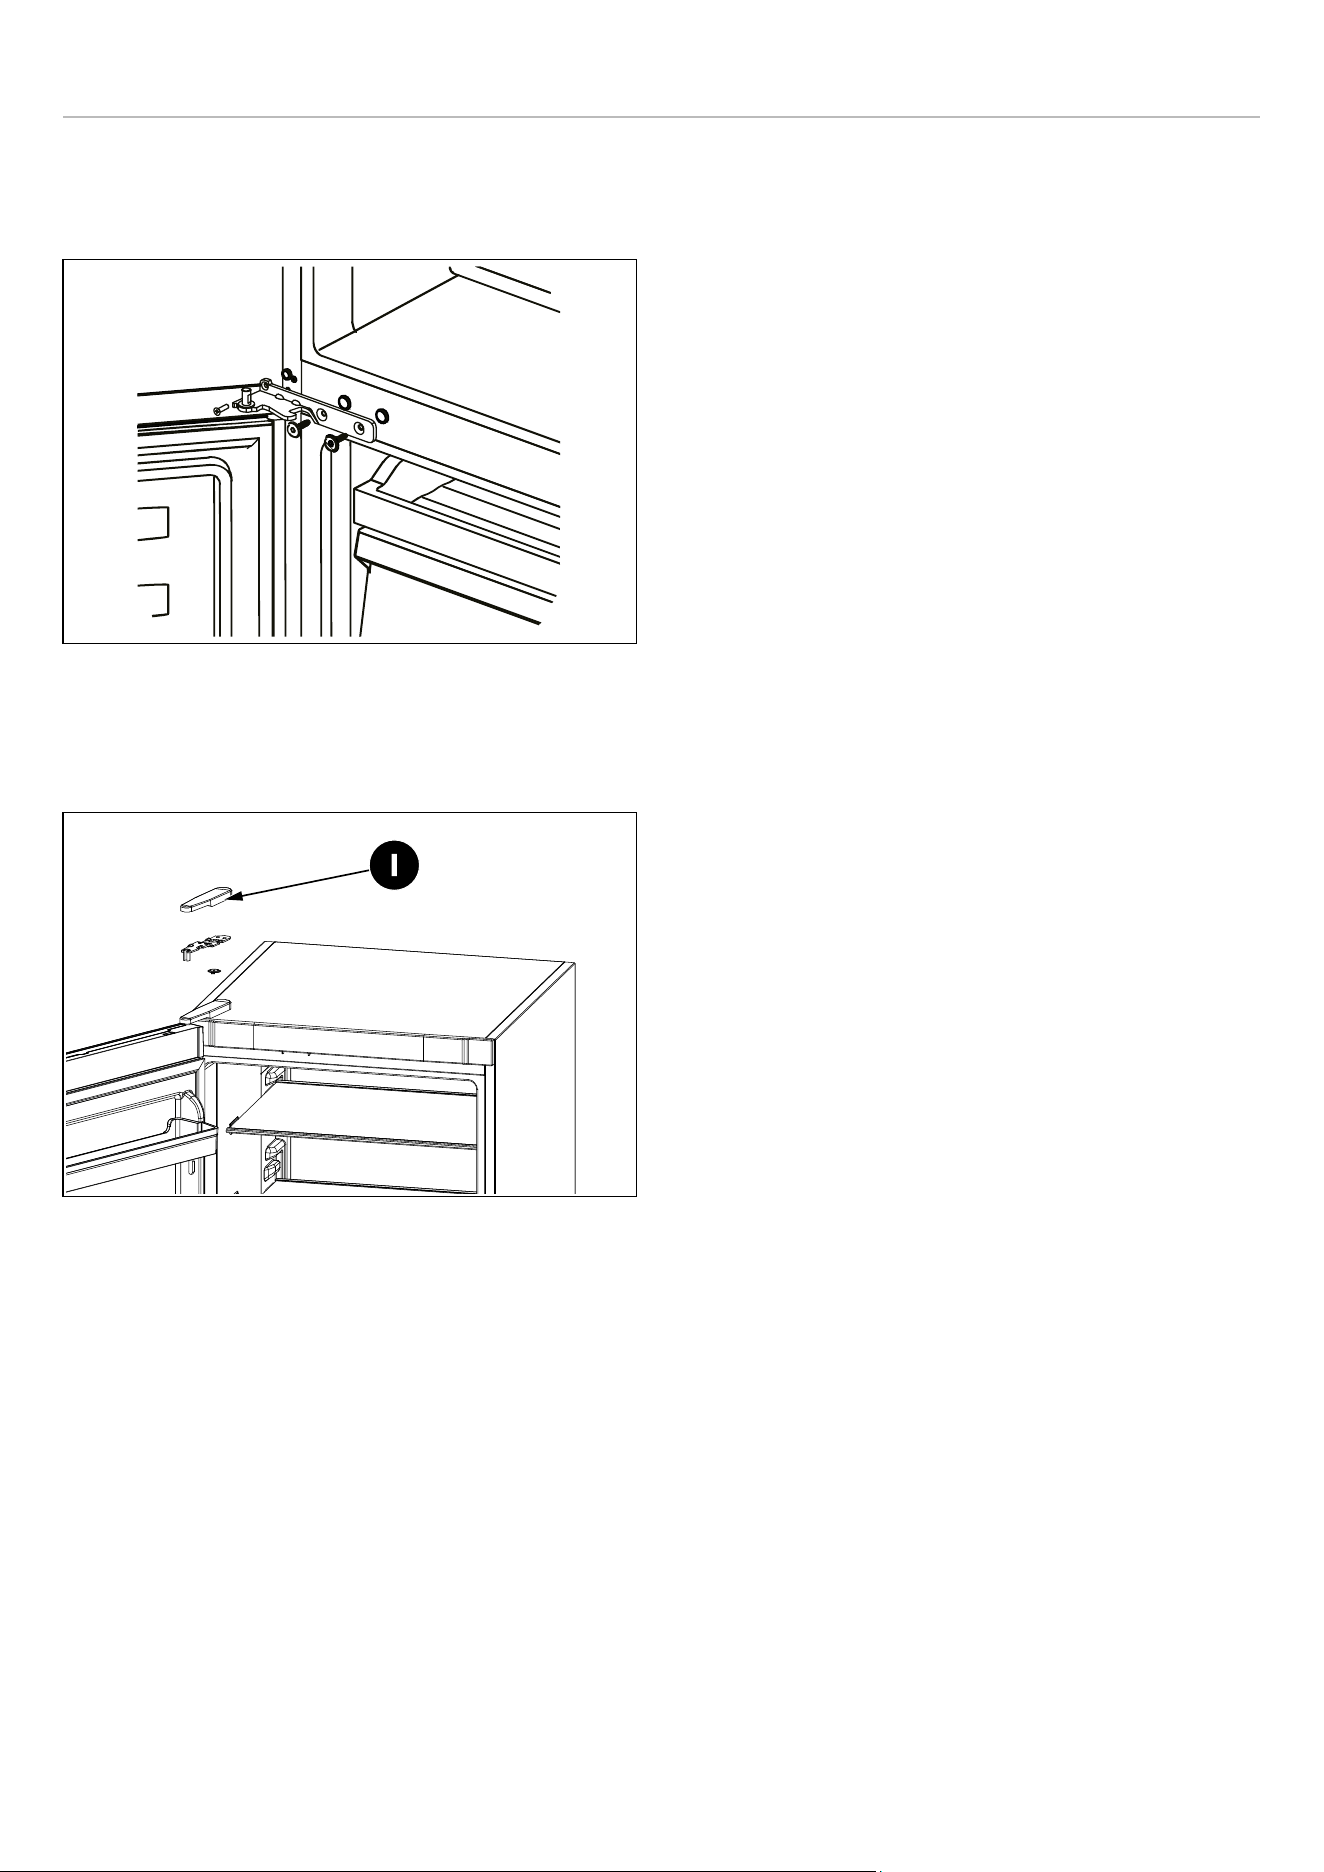
INSTRUCTIONS D’INSTALLATION
6) Installez la charnière centrale gauche (fournie dans le
sac en plastique d’accessoires) et assurez-vous que la
porte du congélateur est en place.
Fig. 17
7) Installez la porte supérieure et fixez la charnière
supérieure [l] et le couvercle de charnière sur le côté
gauche.
Fig. 18
ASSURER LA BONNE ÉTANCHÉITÉ DE LA
PORTE
Il est normal que le joint soit compressé après l’inversion
de la porte. Avec la porte fermée, utilisez un sèche-
cheveux pour dilater le joint et remplir l’espace entre la
porte et le bâti de l’appareil. Veillez à ne pas tenir le sèche-
cheveux trop près de l’appareil, ce qui pourrait
endommager le joint.
Une distance d’environ 3 15/16″ devrait convenir. Une fois
terminé, laissez le joint et la porte refroidir avant de les
toucher. Une fois cela fait, le joint doit rester en place.
l
45


www.bertazzoni.com
Via Palazzina, 8,
42016 Guastalla RE
© 2024 BERTAZZONI. All rights reserved.
REF24BMFIXNV_RBM24F4FXNV_US-CA_v.01
