Read these instructions carefully before using your appliance, and keep it carefully.
11/2024
If you follow the instructions, your appliance will provide you with many years of good service.
INSTRUCTION MANUAL
ENGLISH
Abruzzo 48 inches Wine Cellar Stainless Steel 2 Zones
MODEL NUMBER: FWCDR6610-48S
/FWCDR6611-48S
®
Conforms to UL Std.60335-1 and 60335-2-24
Cerified to CSA Std.C22.2 No.60335-1 and 60335-2-24
5030816

TABLE OF CONTENTS
4
5
7
9
11
12
14
15
16
Customer Care
Warning
Important Safety
Product Dimension
Name of Parts and Accessories
Installation
Operating Instruction
Care and maintenance
Troubleshooting

Abruzzo 48 inches Wine Celler
Stainless Steel 2 Zones
MODEL NUMBER: FWCDR6610-48S/FWCDR6611-48S
3
4
Thank you for purchasing a Forno product. Please read the entire instruction manual before operating your new appliance
for the first time. Whether you are an occasional user or an expert, it will be beneficial to familiarize yourself with the safety
practices, features, operation and care recommendations of your appliance.
Both the model and serial number are listed inside the product. For warranty purposes, you will also need the date of
purchase .
Record this information below for future reference.
Product Information Service Information
Use these numbers in any
correspondence or services calls
concerning your product.
If you received a damaged product,
immediately contact Forno.
To save time and money, before you
call for serviced, check the
troubleshooting guide. It listed the
causes of minor operation problems
that you can correct yourself.
Customer Care
Product Information Service Information
Model Number : _________________________________________
Serial Number :
Date of Purchase :________________________________________
Purchase Address And Phone:
_______________________________________________________
_______________________________________________________
_____________________
“Need some quick help? Simply scan the qr code and get access
to our fast support form. We’re always here to assist you with any
questions or concerns you may have. So, don’t hesitate to reach out!”
Services in Canada and Untied States
Keep the instruction manual handy to answer your questions. If you don’t understand something or need more
assistance, please visit our website for fast support. Please provide us your name, number, address,serial number
of the product that troubleshooting, proof of purchase, and a short description of the issue. A customer service
representative will contact you as soon as possible. All warranty work needs to be authorized by FORNO customer
service. All our authorized service providers are carefully selected and rigorously trained by us.
5
WARNING
FOR YOUR SAFETY
Your safety and the safety of others are very important.
We have provided many important safety messages in this manual and on your appliance. Always read and obey all
safety messages.
This is the safety alert symbol. This symbol alerts you to potential hazards that can kill or hurt you
and others. Al I safety messages will follow the safety alert symbol and either the word
"DANGER," "WARNING" or "CAUTION." These words mean:
•
You can be killed or seriously injured if you don’t immediately follow instructions.
•
You can be killed or seriously injured if you don’t follow instructions.
•
A potentially hazardous situation which, if not avoided, could result in minor or
moderate injury.
All safety messages will tell you what the potential hazard is, tell you how to reduce the chance of injury, and tell you
what can happen if the instructions are not followed.
DANGER
WARNING
CAUTION
WARNING : This product can expose you to chemicals including [Lead, lead
and lead compound, which is [are] known to the state of California to cause
cancer and birth defects or other reproductive harm. For more information go
to www.P65Warning.ca.gov.
6
WARNING
FOR YOUR SAFETY
This chapter provides you with important safety notices when handling the device.
The device corresponds with the required safety regulations. Improper use can result in personal or property
damages.
Please read the information contained herein so that you can become familiar with your device quickly and take
advantage of the full scope of its functions.
A warning notice of this level of danger indicates a possible dangerous situation.
If the dangerous situation is not avoided, this can lead to serious injuries.
▪ Observe the instructions in this warning notice in order to avoid the personal injuries.
A warning notice of this level of danger indicates a possible dangerous situation.
If the dangerous situation is not avoided, this can lead to slight or moderate injuries.
▪ Observe the instructions in this warning notice in order to avoid the personal injuries.
PLEASE NOTE
A notice of this kind indicates additional information, which will simplify the handling of the machine.
1. The earth wire has been connected to the power plug, please do not alter the power plug
without authorization. It must uses reliable power outlet when connecting the power supply
2. Do not put the power socket and other equipment on the top of the unit, do not put
packaging and any combustible around the unit, so as to avoid accidental fire.
3. Do not operate this device if its power cable or plug is damaged, if it does not work properly
or if it is damaged or has been dropped. If the power cable is damaged, it will need to be
replaced by the manufacturer or his service agency or a similar qualified person, to avoid
any dangers.
4. Do not open the housing on the device under any circumstances. There is a danger of an
electrical shock if live connections are touched and the electrical or mechanical structures
altered. In addition, functional faults on the device can also occur.
5. The equipment must be maintained by professional maintenance personnel, there is no
repair parts inside the unit
6. Used product need to be recycled by specialized companies, do not arbitrarily discarded.
The door and shelf need to be disassembled before discard.
7. Please use the product at the appropriate ambient temperature according to the climate type
on the product nameplate. Abnormal temperature and frost may occur when the tempera-
ture range of the corresponding climate type is exceeded.
WARNING
WARNING
SN +10° C~+32° C (+50° F~89° F)
N +16° C~+32° C (+61° F~89° F)
ST +16° C~+38° C (+61° F~100° F)
T +16° C~+43° C (+61° F~109° F)
SN-ST +10° C~+38° C (+50° F~100° F)
SN-T +10° C~+43° C (+50° F~109° F)

7
Important Safety Instructions
Before using the appliance, please properly position and install it as described in this manual.To avoid the risk of
re,electrical shock,or injury when using the appliance,follow this these basic precautions:
*This appliance is for domestic purposes only and is intended to be used exclusively for the storage of sealed
bottled wines and beverages.
*The appliance must be positioned so that the plug is accessible.
*Make sure the voltage/current marked on the rating label corresponds with your supply voltage. Plug into a
grounded 3-pin outlet, do not remove grounding pin, do
not use an adapter, and do not use an extension cord.
*Do not connect or disconnect the electric plug with wet hands.
*To disconnect the appliance, grip the plug and pull it from the wall outlet. Never pull out by the cord.
*It is recommended that a separate circuit, serving only your appliance be provided.
*Unplug the appliance or disconnect power before cleaning, maintenance or servicing. Failure to do so can
result in electrical shock or death.
*If the supply cord is damaged, it must be replaced by the manufacturer or its service agent or a similarly
qualied person in order to avoid a hazard.
*The fuse (or circuit breaker) size should be 10 amps or higher.
*This appliance can be used by children aged from 8 years and persons with reduced physical, sensory or
mental capabilities or lack of experience and knowledge if they have been given supervision or instruction
concerning use of the appliance in a safe way and understand the hazards involved. Children shall not play
with the appliance. Cleaning and user maintenance shall not be made by children without supervision.
*This appliance is not intended for use by persons (including children) with reduced physical, sensory or mental
capabilities, or lack of experience and knowledge, unless they have been given supervision or instruction
concerning use of the appliance by a person responsible for their safety.
*Children should be supervised to ensure that they do not play with the appliance.
*To ensure proper ventilation for the appliance, the front of the unit must be completely unobstructed. Locate
the unit away from direct sunlight and sources of heat (stove, heater, radiator, etc.).
*Do not attempt to repair or replace any part of the appliance unless it is specically recommended in this
manual. All other servicing should be referred to a qualiedtechnician.
*Ensure enough peoples to move and install the appliance to avoid any damage to the appliance or injury to
the peoples.
*It is important for the appliance to be leveled in order to work properly. You may adjust the appliance’s feet to
level it.
*Never clean the appliance parts with ammable uids which may create a re hazard or explosion. And do not
store or use gasoline or other ammable vapors and liquids in the vicinity of the appliance.
*Do not use solvent-based cleaning agents of abrasives on the interior. These cleaners may damage or discolor
the interior.
*Do not use this appliance for other than its intended purpose.
* Do not use electrical appliance inside the appliance.
*The use of attachments not recommended by the manufacturer may be hazardous.
*Please keep the products away from the re or similar glowing substance before you dispose the appliance.
*When you dispose the appliance, take o the door and leave the shelves in place so that children may not
easily climb inside. And make sure the coolant circuit, particularly the heat exchanger at the back/bottom of
the unit is not be damaged.
*The recycle symbol on the product or its packaging indicates that this product is not to be handled as normal
household waste and it is to be taken to a recycling collection point for electrical and electronic goods.

8
Important Safety Instructions
Before using the appliance, please properly position and install it as described in this manual.To avoid the risk of
re,electrical shock,or injury when using the appliance,follow this these basic precautions:
*WARNING:Keep ventilation openings,in the appliance enclosure or in the built-instructure,clear of
obstruction.
*WARNING:Do not use mechanical devices or other means to accelerate the defrosting process,other than
those recommended by the manufacturer.
*WARNING:Do not damage the refrigerant circuit.This warning is only applicable for appliances
with refrigerating circuits which are accessible by the user .
*WARNING:Do not use electric appliances inside the food storage compartments of the appliance,unless
they are of the type recommended by the manufacturer.
Do not store explosive substances such as aerosol cans with a flammable propellant in this appliance.
*WARNING:When positioning the appliance,ensure the supply cord is not trapped or damaged.
*WARNING:Do not locate multiple portable socket-outlets or portable power supplies at the rear
of the appliance.
*WARNING:Risk of child entrapment.Before you throw away your old refrigerator or freezer:
*Take off the doors.
*Leave the shelves in place so that children may not easily climb inside.
9
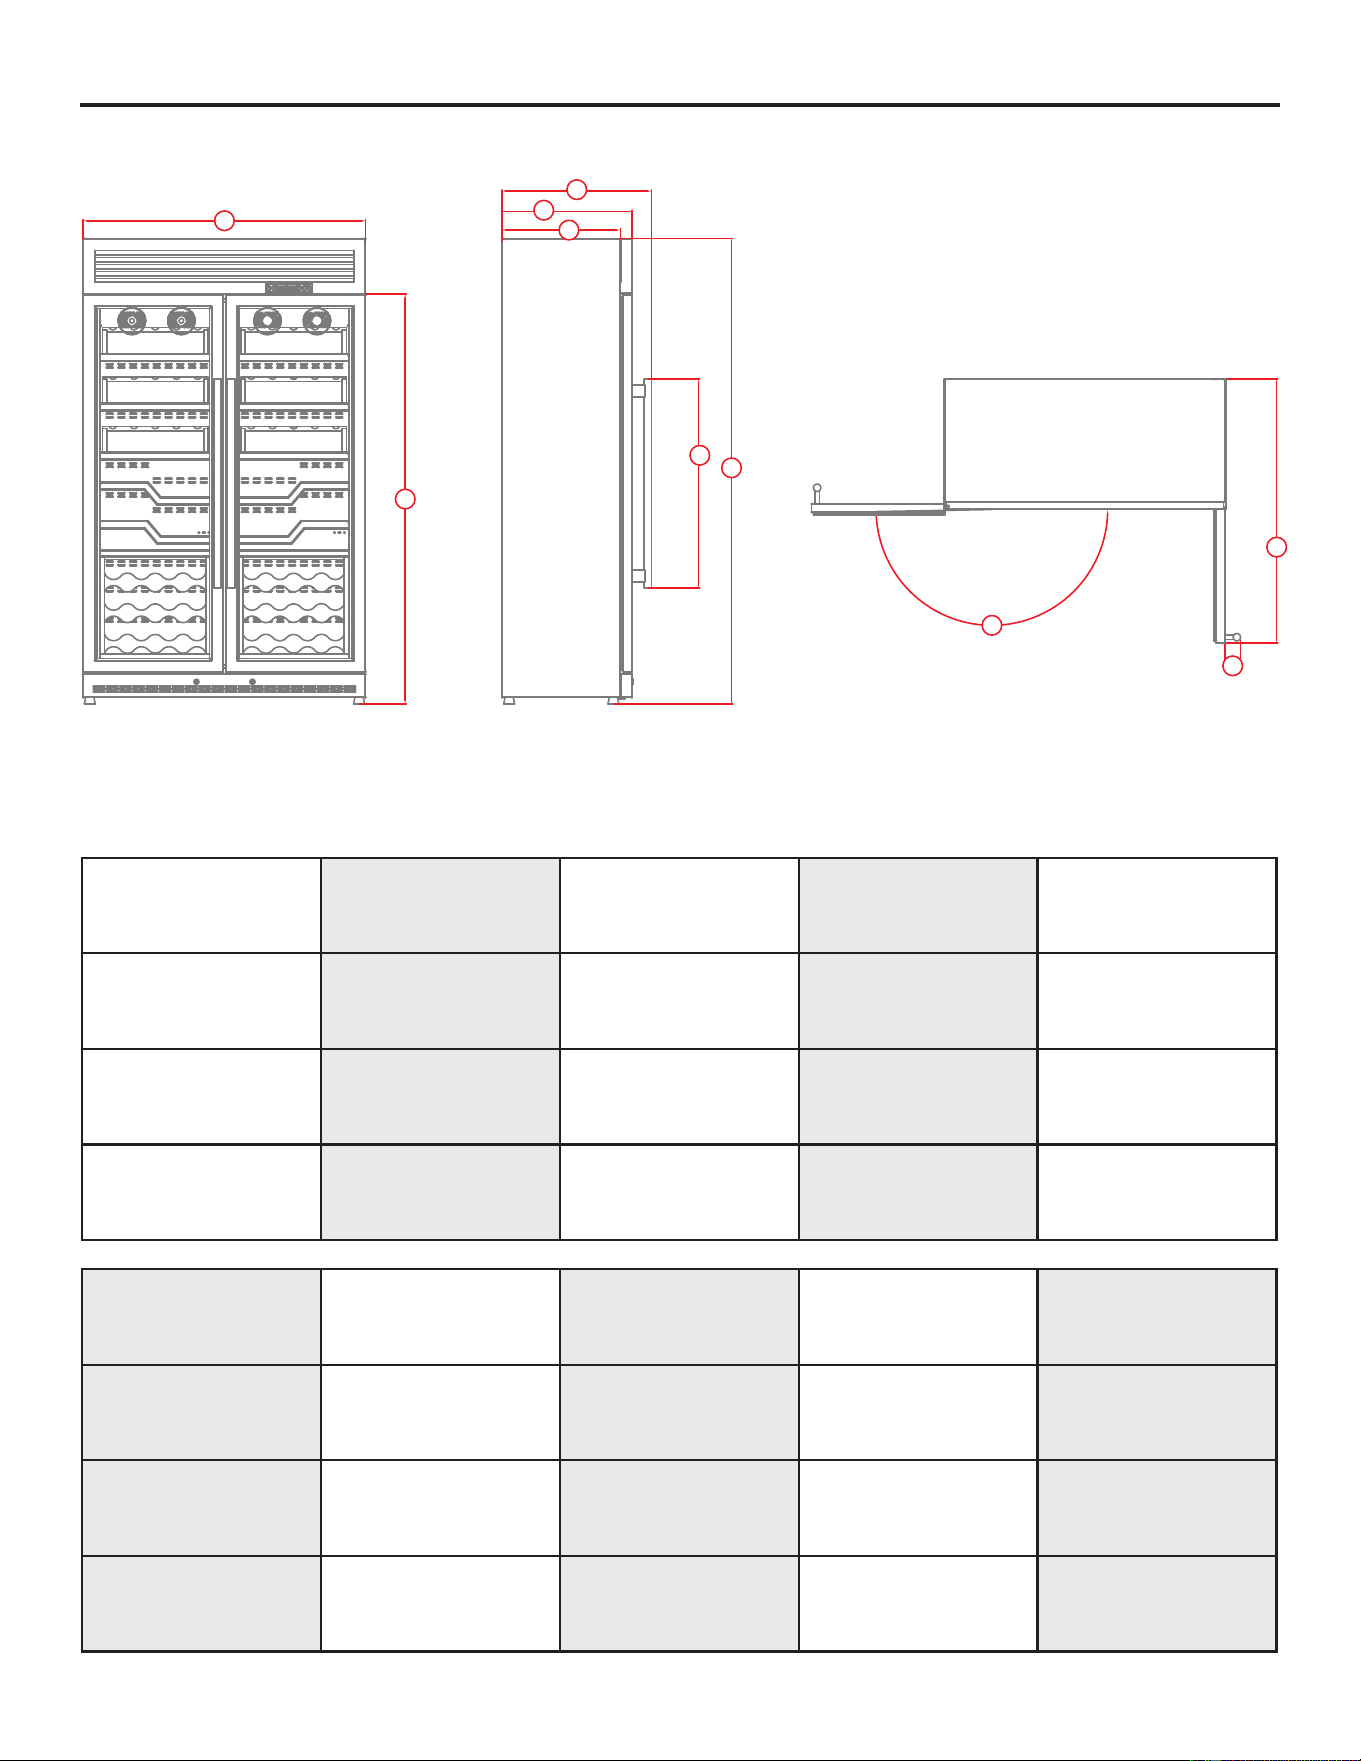
Product Dimension
A B C D E
Overall Width
Overall Height
Hinge to Foot
(on maximum)
Height
Top to Bottom
Overall Depth
Handle to Back
Depth
Door to Back
F G H I J
180°
-
67mm 1120mm500mm 886mm
550mm1980mm 637mm1200mm 1745mm
A
D
E
F
C
J
I
H
G
B
19 11/16″ 34 7/8″ 2 5/8″ 44 1/8″ -
47 1/4″ 68 11/16″ 2 5/8″ 77 15/16″ 21 21/32″
Depth
Front Frame to Back
Handle Height Handle Width
Depth with
Door Fully Open
Opening
Cutout
Built-in installation
10
E
F
G
H
I
J
A
B
C
D
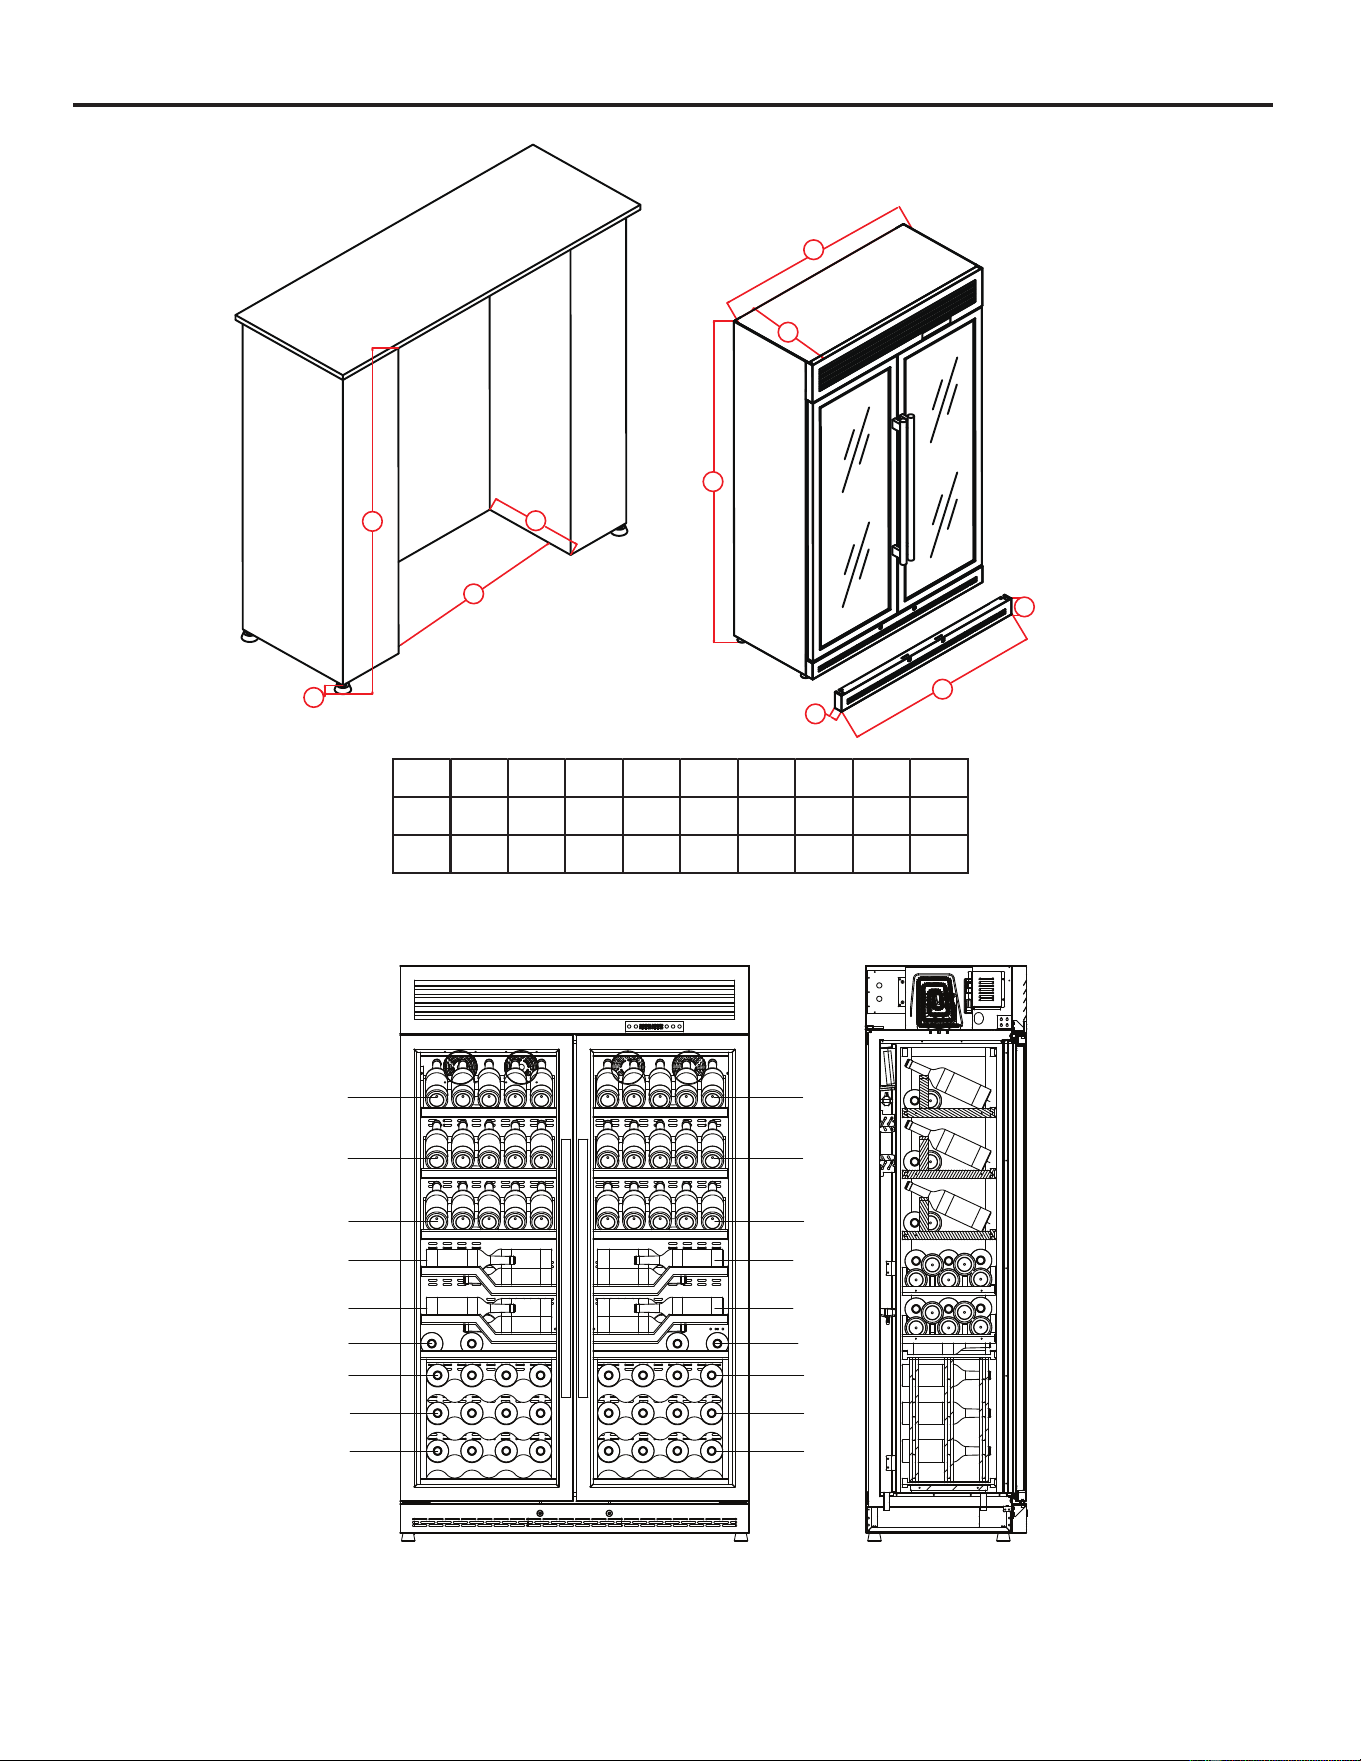
Bottle loading guide
Total 102 Bottles
7
7
7
8
8
2
4
4
4
7
7
7
8
8
2
4
4
4
A B C D E F G H I J
1995mm 30mm 1215mm 525mm 1200mm 550mm 1980mm 50mm 1200mm 100mm
78 9/16″ 1 3/16″ 47 13/16” 20 21/32″ 47 1/4″ 21 5/8″ 77 15/16″ 1 15/16″ 47 1/4″ 3 15/16″
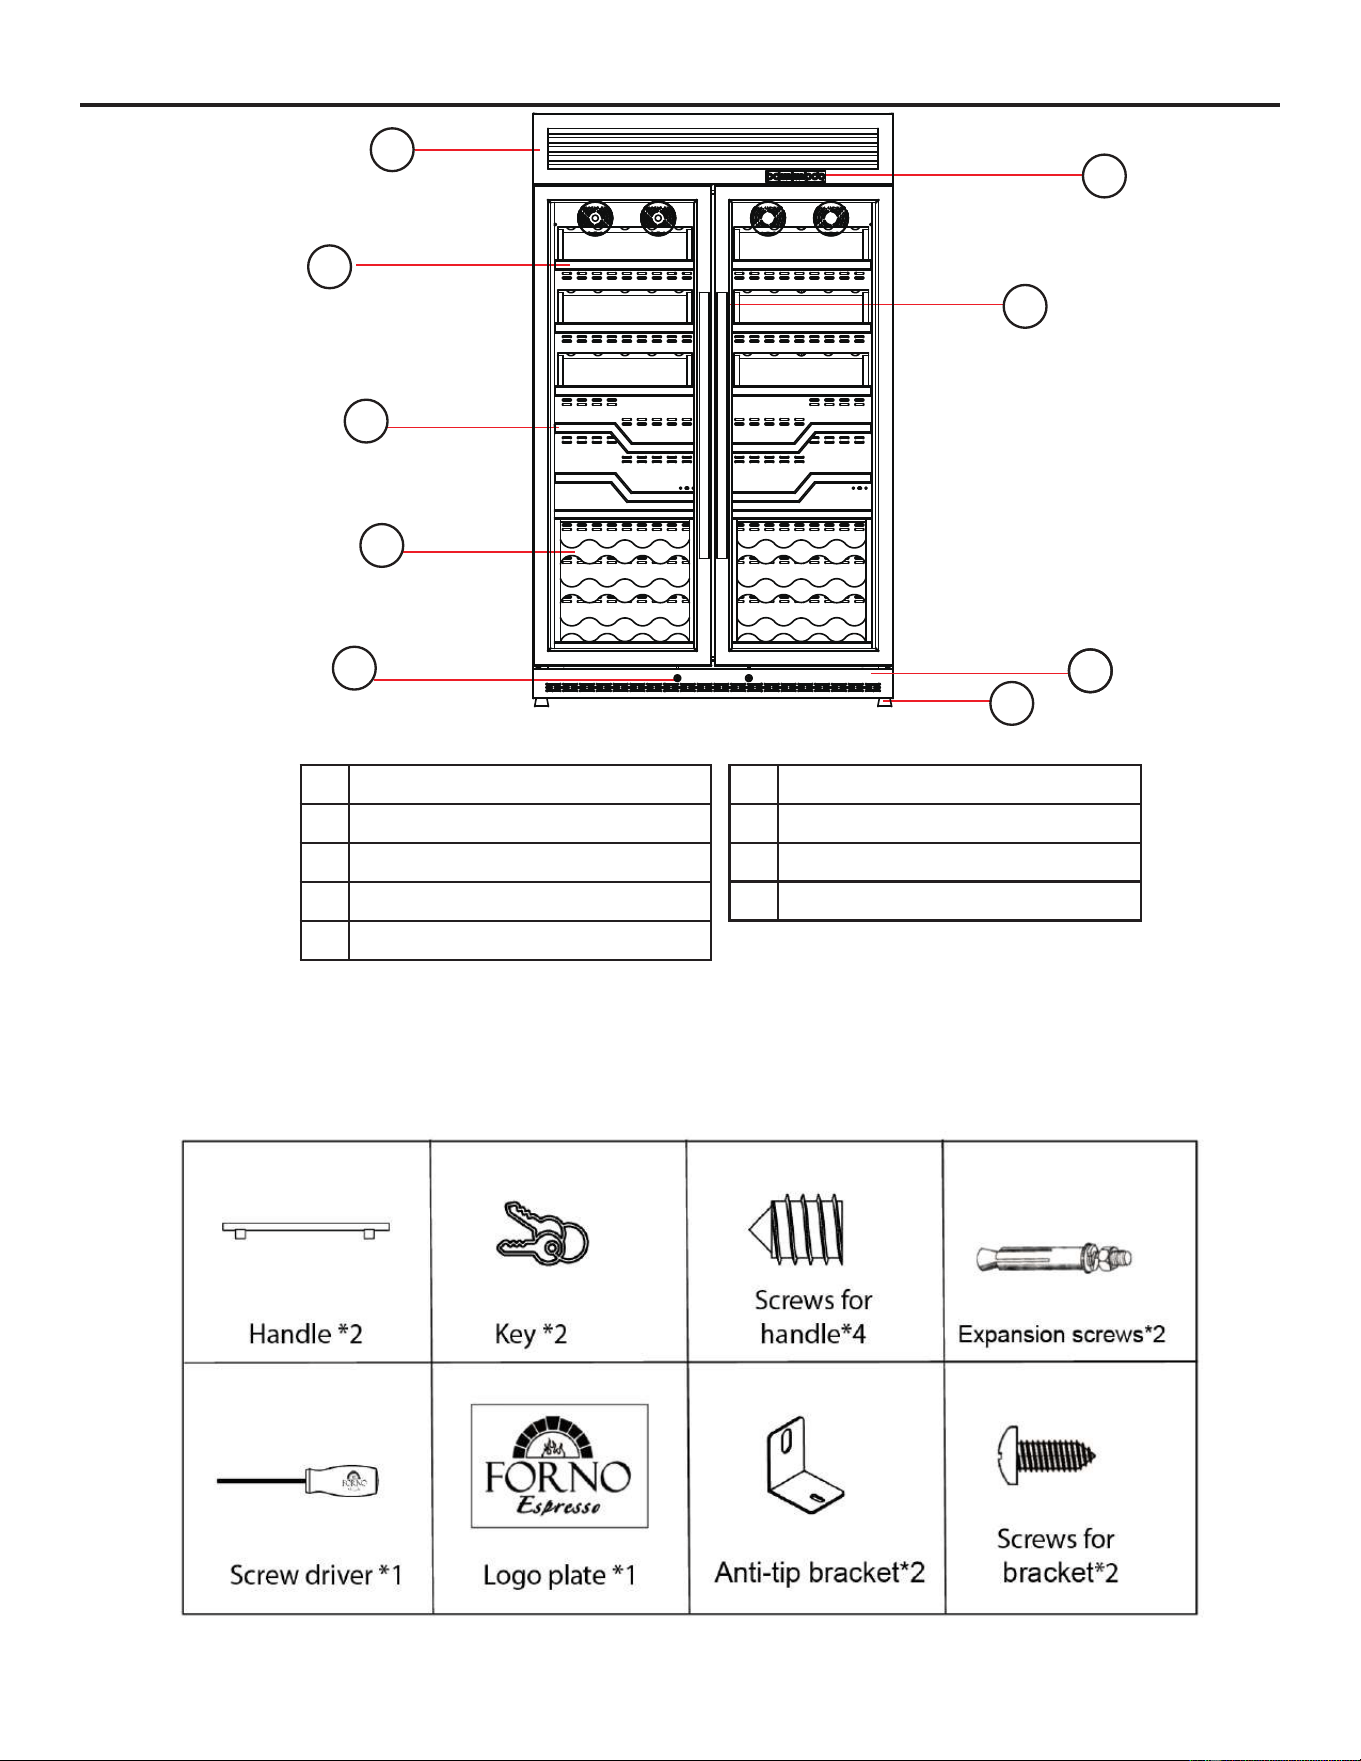
Names of Parts and
11
Accessories
1 Control panel
2 Forno Handle
3 Bottom front grill
4 Adjustable Foot
5 Key lock
Supplied Parts
2
1
6
7
9
8
4
5
3
6 Acrylic shelf
7 Label-view shelf
8 Display shelf
9 Top front grill
12
Installation
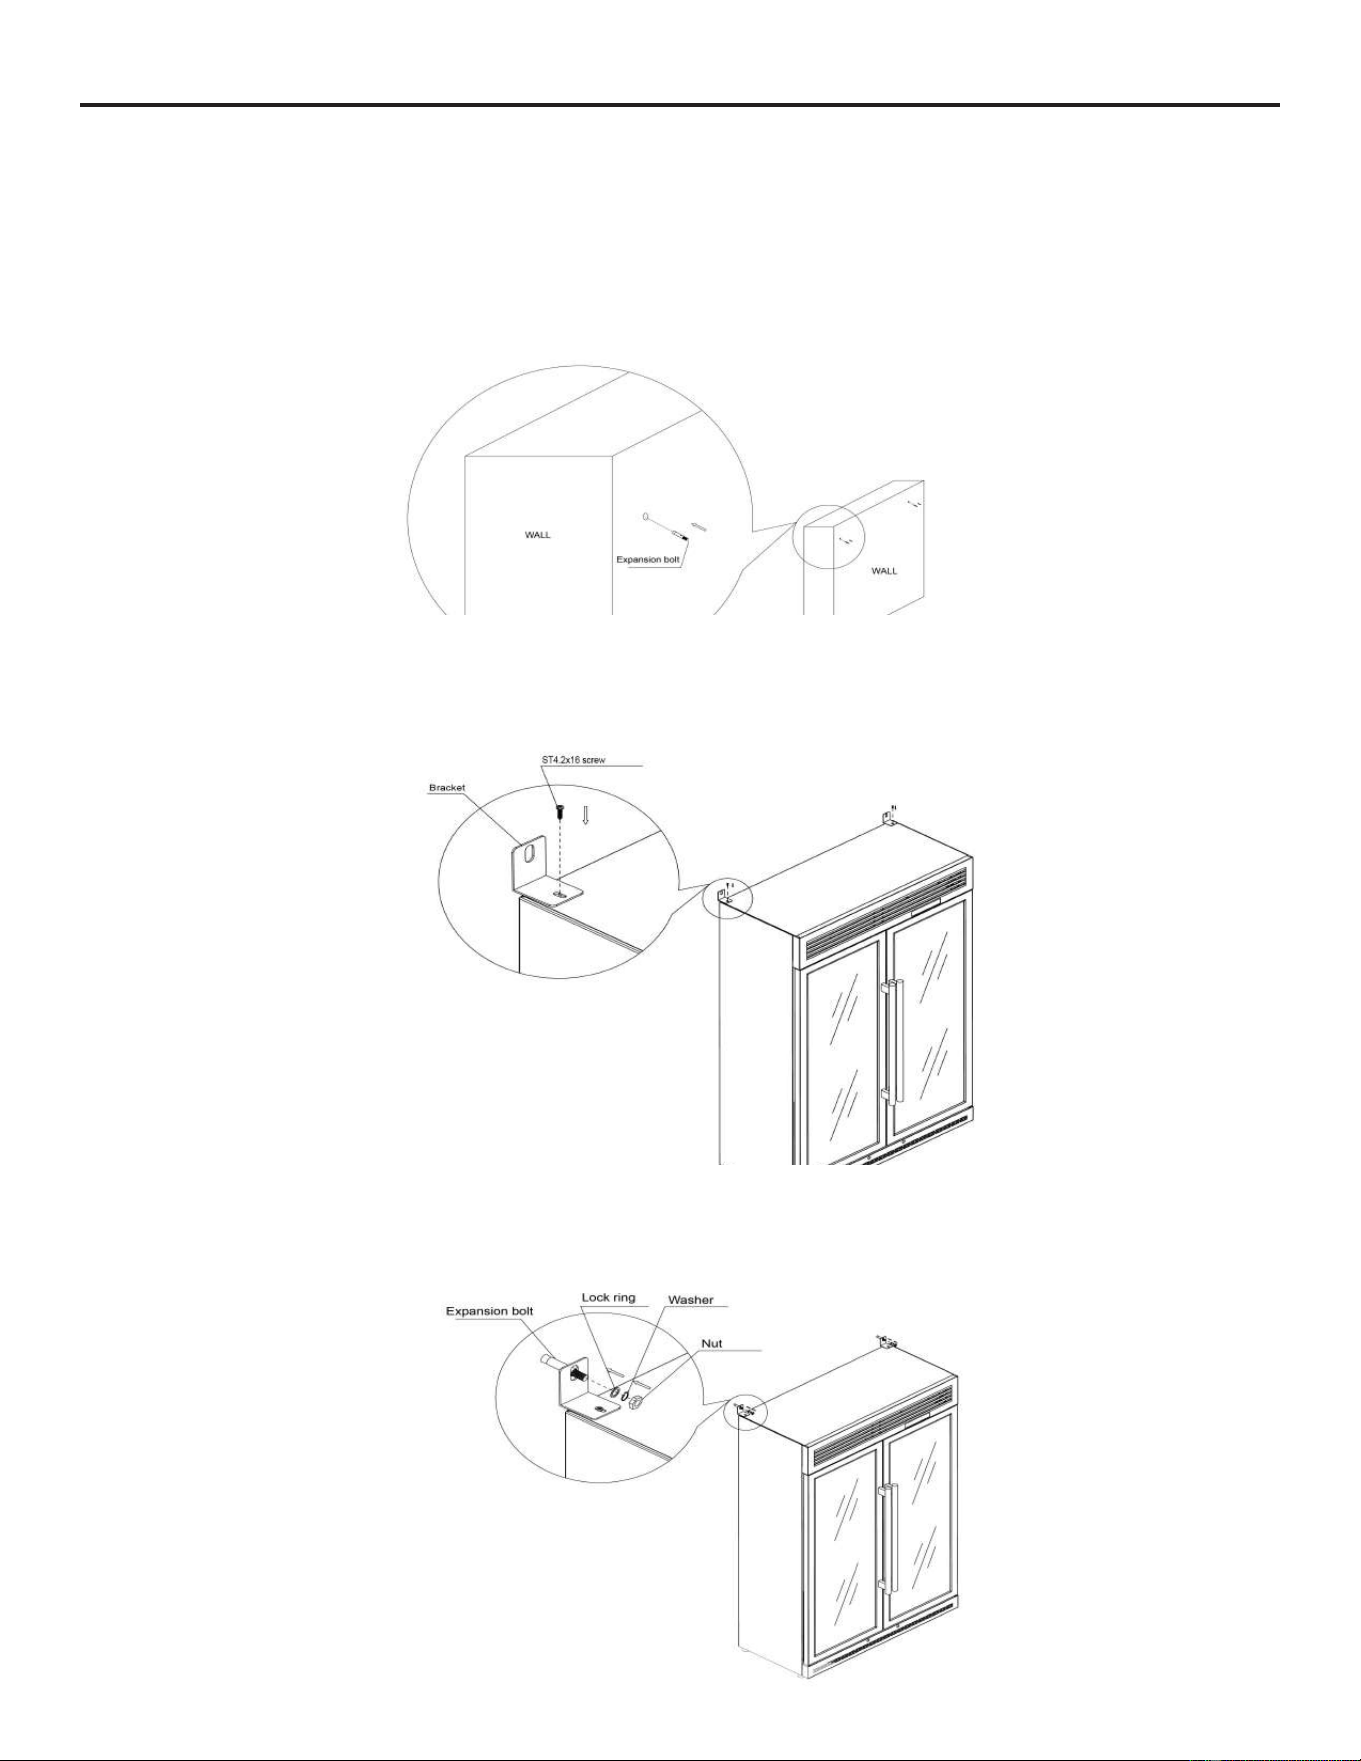
Anti-tip bracket installation
To avoid the risk of serious personal injury or damage to the appliance due to the instability of the appliance, it must be fixed
to the floor with anti-tip brackets and screws(supplied). Before installing, carefully read these instructions.
1.Take the fixing brackets(2pcs) and the expansion bolts(2pcs) out of the instruction packet.
2.Drill holes into the wall 45mm depth. This will allow you to fix the expansion bolt to the wall.According to the size and
location, the holes on the wall should be Æ12.
4.Align the bracket hole with the expansion bolt and reattach the washer and lock ring. Finally, tighten the nut with awrench
3.Loosen the original screw,then use ST4.2 screws(suppiled in the manual bag) to secure the bracket to the designated
position on the top of the wine cooler.
or socket to the maximum.
Installation
13
Handle installation
The wine cooler comes with two metal stainless steel handles. To install simply screw them to the door with the supplied screws.
1.Locate the handle over the pins on the door panel.
2.Fix the handle by tighten the screws.
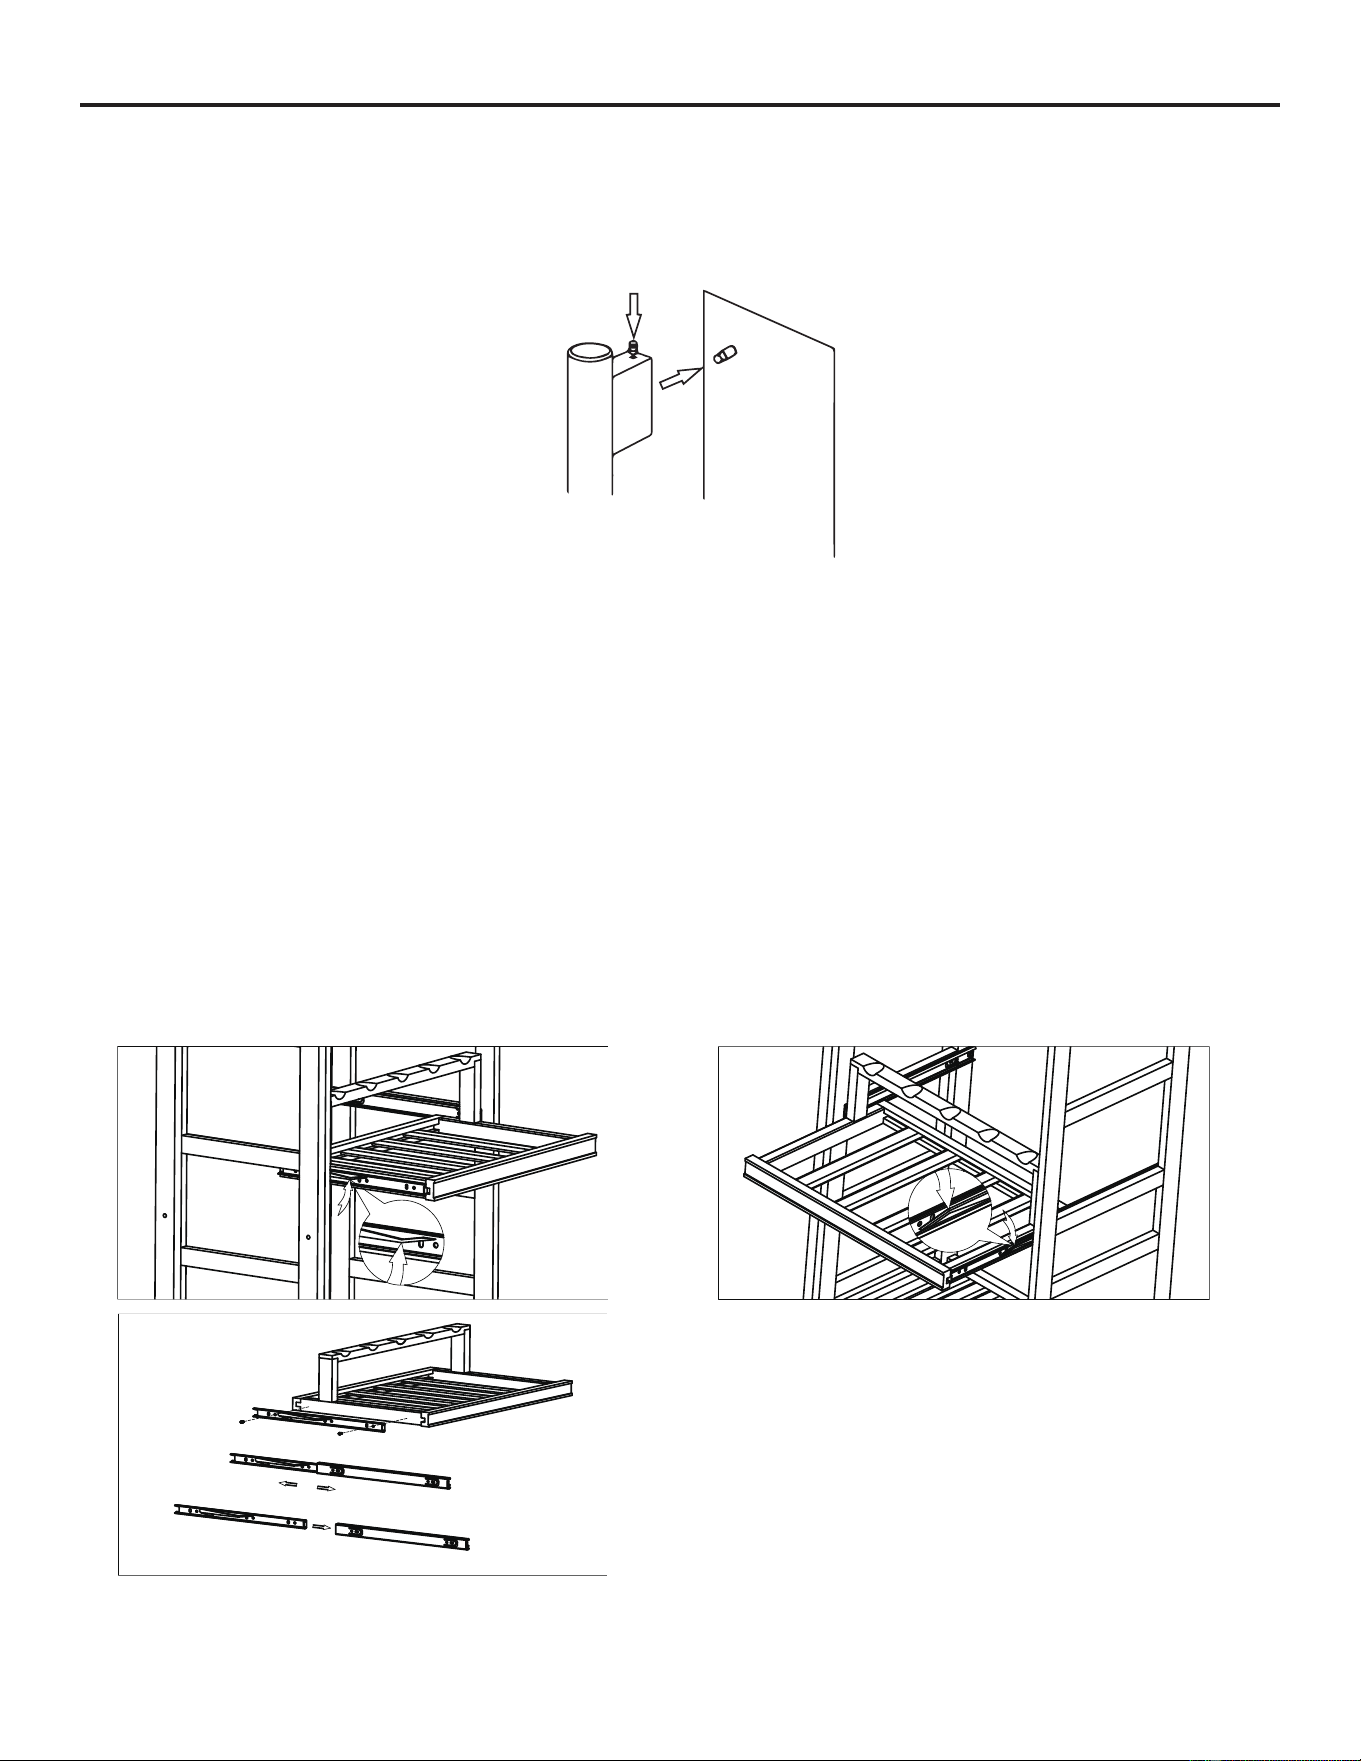
Shelf remove
To ensure that the wine contionues to mature quietly and calmly during its storge period, the wine cabinet is equipped with
professional tiered shelves that can be pulled out to aviod the resonance of stacked bottles and to ensure smooth airow inside the
cabinet.
The method of assembling and disassembling the shelves is as follow:
1.Take out all the wines
2.Pull out the shelf to the maximum distance
3.Lift the toggle on the left rail upwards and leave it there, at the same time press the toggle on the right rail downwards and leave it
there, then pull out the shelf at the same time.(see picture below)
4.To put the shelf back on, follow step 3 and push the shelf in rmly against the rails.
Operating Instructions
14
Unpacking and clean the wine cooler
• Remove the exterior and interior packing materials.
• Let the appliance stand upright for approximately 24 hours before connecting it to the power source, which helps to reduce the
possibility of a cooling-system malfunction from handling during transportation.
• Use a soft cloth to clean the interior surface with lukewarm water.
SN 10 - 32 °C (50
ºF-90ºF)
N 16 - 32 °C (61
ºF-90ºF)
ST 18 - 38 °C (64
ºF-100ºF)
T 18 - 43 °C (64
ºF-109ºF)
Climate Class
Ambient Temperature
Working Climate
The appliance is designed for operating from SN to N climate (see below climate class chart). It is recommended to maintain the
ambient around 22-25°C which helps the appliance working with low power consumption.
If the ambient temperature is above or below the designed climate range, the performance of the unit may be aected. For
example, the appliance operating in extreme cold or hot conditions may cause interior temperatures to uctuate, and the
temperature set 8-22°C may not be reached sometimes.
Lock or unlock the door
Insert the key into the lock and turn it counter-clockwise to unlock the door. To lock it, please turn clockwise. Please save the key
well.
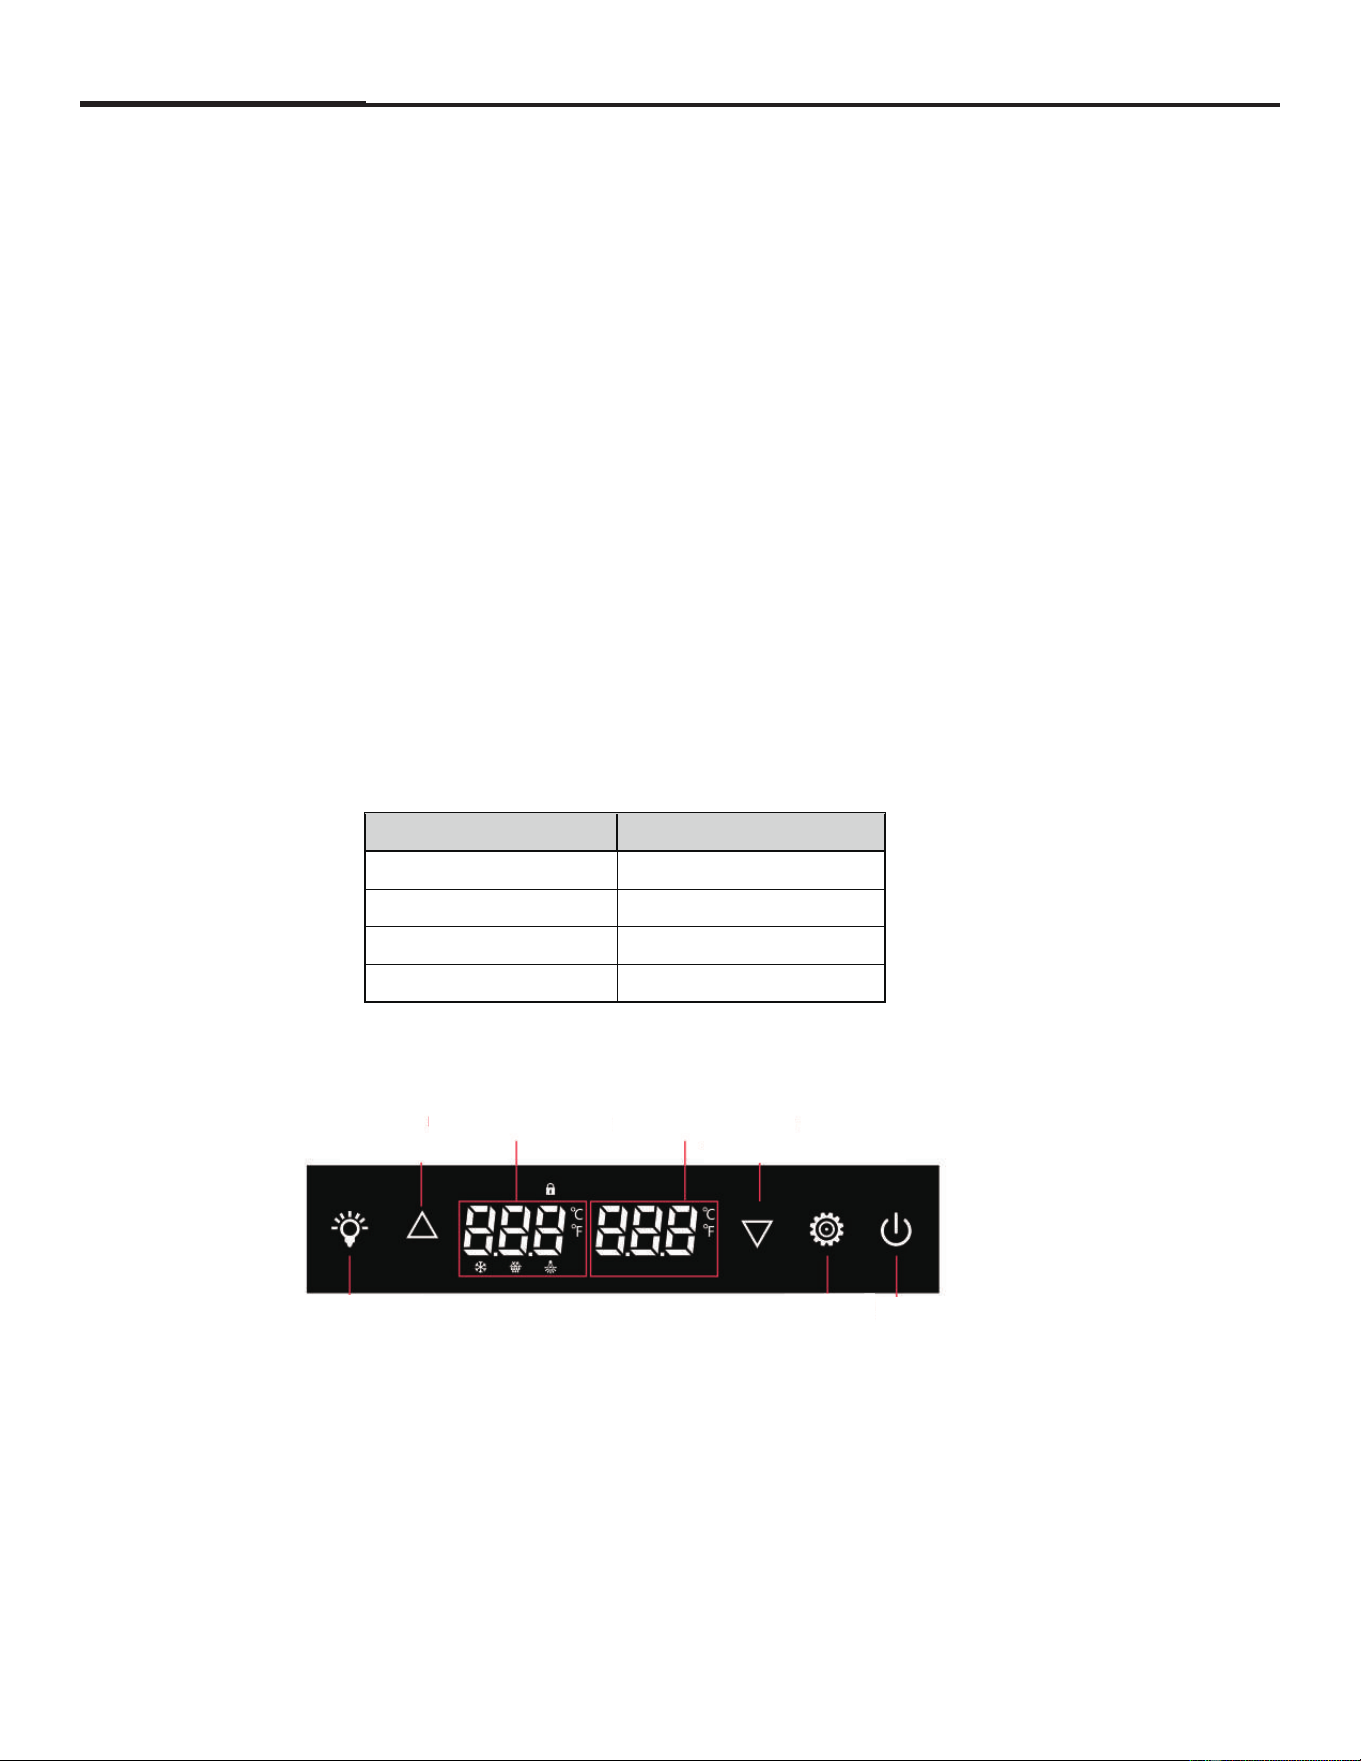
Operater the wine cooler
Power: Turns the Wine Cellar System ON and OFF (Hold for 3 sec.).
Zone Select: Press to Select Left Zone (Left digits) or Right Zone (Right Digits) before
Temp. Down: Decreases Set Temperature 1°F with Each Push of the Button.
Display Window: Displays Set and Actual Temperature.
Temp. Up: Increases Set Temperature 1°F with Each Push of the Button.
setting the Temperatures.The temperature range is Left zone 8-22°C/Right zone 8-22°C.
Lighting: Turns the Interior Light ON and OFF .
Control Panel Lock: Press the lighting and Zone Select Icon for 3 Seconds to Lock or Unlock the Control Panel.
C°/F° excharge: Pressing temp.down and up icon for 3 seconds simultaneously when Controls are Locked.
Light ON/OFF
Zone
Selections
Power
Temperature Up
Temperature Down
Left zone display Right zone display
Care and maintenance
15
Cleaning the wine cooler
• Turn o the power, unplug the appliance, and remove all items including shelves.
• Wipe the inside surfaces with a sponge and baking soda solution. The solution should be about 2 tablespoons of baking soda
to 1 quart (approx. 1 litre) of warm water.
• Wash the shelves with a mild detergent solution. Allow wooden shelves to dry before placing back into the wine cooler.
• Wring excess water out of the sponge or cloth when cleaning area of the controls, or any electrical parts.
• Wipe the outside cabinet with warm water and mild liquid detergent. Wipe dry with a clean soft cloth.
• Do not use steel wool or steel brush on the stainless steel. These will scratch the stainless steel with steel particles and rusting
may occur.
Power failure
Most power failures are corrected within a few hours and should not aect the temperature of your appliance if you minimize
the number of door openings. If the power is going to be o for a longer period of time, you need to take the proper steps
to protect your wines.
Moving the wine cooler
• Remove all items.
• Securely tape down all loose items (shelves) inside your appliance.
• Turn the adjustable leg up to the base to avoid damage.
• Tape the door shut.
• Be sure the appliance stays secure in the upright position during transportation. Also protect outside of appliance with a
blanket, or similar item.
Energy saving tips
• The appliance should be located away from heat producing appliances, and away from direct sunlight.
• Ensure that the unit is adequately ventilated. Never cover air vents.
• Only open the door when necessary. Avoid leaving the door open for long periods or opening/closing the door frequently
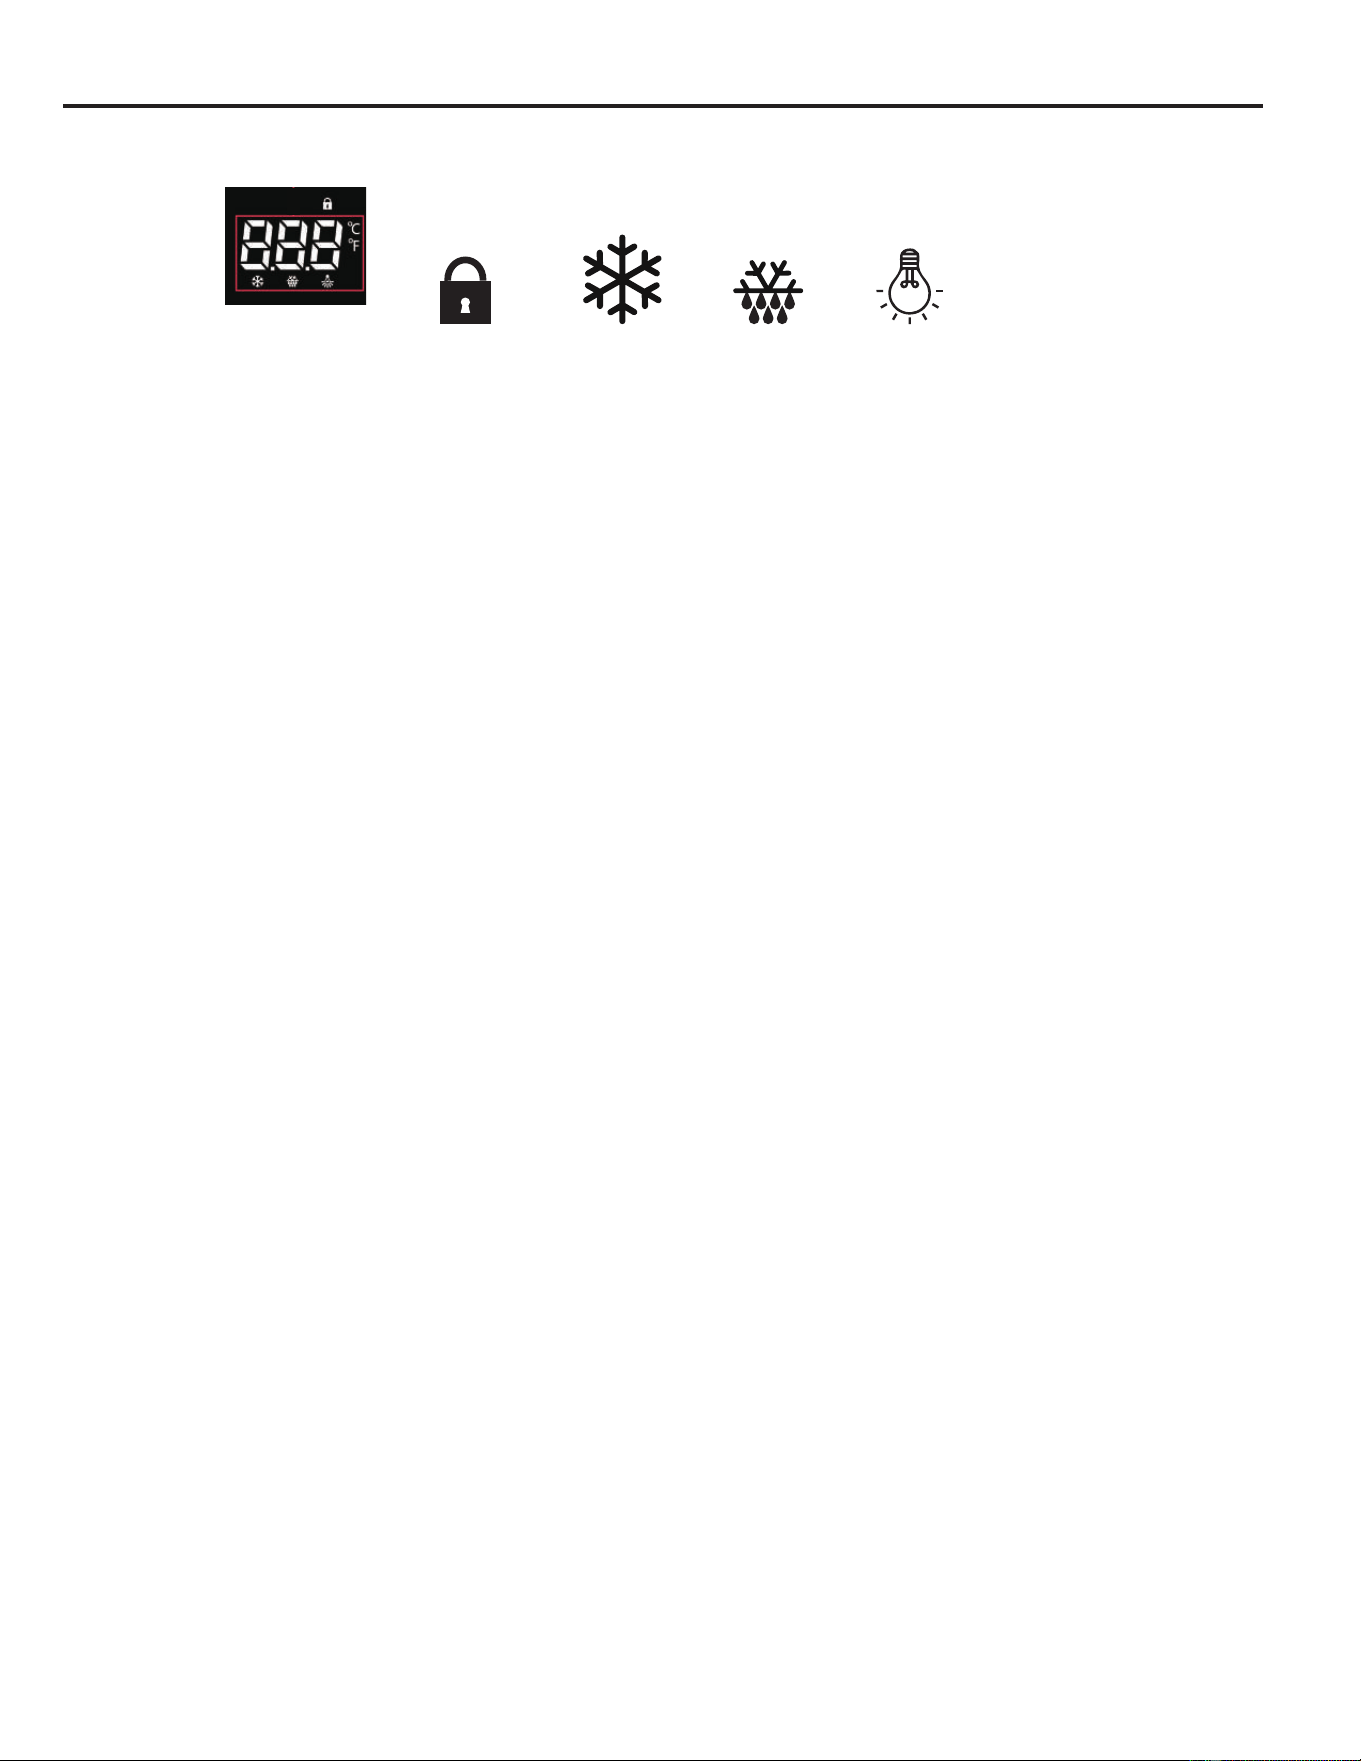
Control panel display
Control Panel
Lock
COMPRESSOR
ACTIVE
DEFROSTING
ACTIVE
LIGHTON
Care and maintenance
Care and maintenance
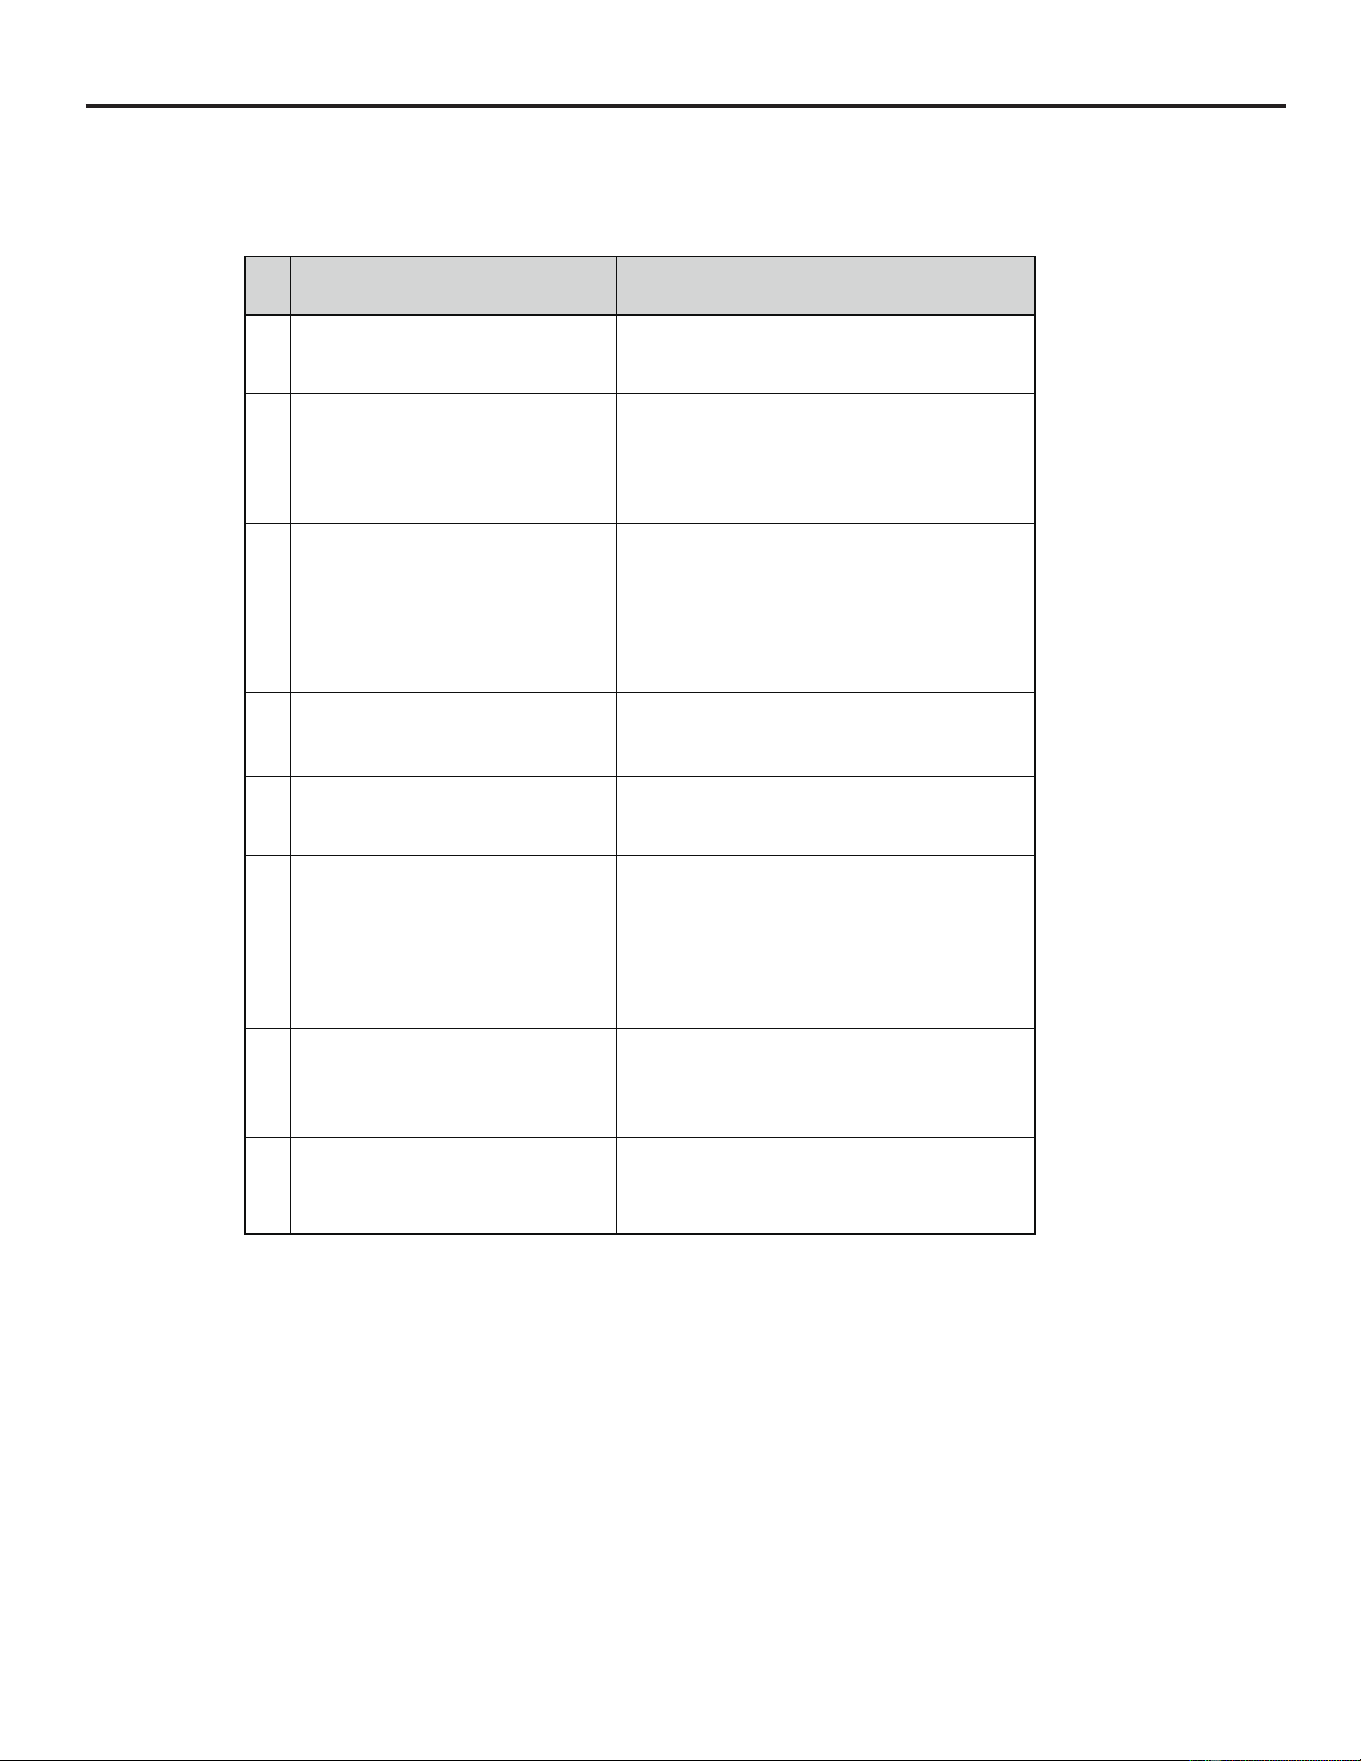
Troubleshooting
If you feel the appliance is not working properly, follow these instructions to try to see.
if you can solve the problem simply by yourself before calling for service.
1 The wine cooler does not operate
Not plugged in.
The appliance is turned o.
The circuit breaker tripped or a blown fuse.
2 The wine cooler is not cold enough
Check the temperature control setting.
External environment may require a higher setting.
The door is opened too frequently.
The door is not closed completely.
The door gasket does not seal properly.
3
Automatically turn-on and
turn-o frequently
The room temperature is hotter than normal.
A large amount of contents has been added to the wine
cooler.
The door is opened too frequently.
The door is not closed completely.
The temperature control is not set correctly.
The door gasket does not seal properly.
4 The lighting does not work
Not plugged in.
The circuit breaker tripped or a blown fuse.
The lighting is turned o.
5 Too much vibration
Check to assure that the appliance is
Check to assure no parts inside the cabinet or in the
compressor chamber are loose.
6
The wine cooler seems to make
too much noise
The rattling noise may come from the ow of the
refrigerant, which is normal.
As each cycle ends, you m
ay hear gurgling sounds
caused by the ow of refrigerant.
Contraction and expansion of the inside walls may
cause popping and crackling
The appliance is not level.
7 The door will not close properly.
The wine cooler is not level.
The door was reversed and not properly installed.
The gasket is dirty.
The shelves are out of position.
8
The display window is shown with “HH”
or “LL” instead of a digital gure,
and/or with continuous buzz sound.
The temperature probe is out of order.
PROBLEM NONOPROBLEM POSSIBLE CAUSE/MEA-
SURE
NO.
16

Customer Support: Call 1-866-231-8893 or email: [email protected]

