www.klarstein.com
ARCTIC BLEND
Eiswürfelbereiter
Ice Cube Maker
Machine à glaçons
Fabbricatore di cubetti di ghiaccio
Cubitera
10046192


1
DE
TECHNISCHE DATEN
Artikelnummer 10046192
Klimatyp SN/N/ST
Schutzklasse I
Stromversorgung 220-240 V – 50/60 Hz
Nennstrom 0.85 A
Leistung 130 W
Kältemittel R290/ 28g
Vesikant C
5
H
12
Isolierung EPS
Nettogewicht 13.7 kg
Bruttogewicht 15,2 kg
Gehäuse Edelstahl
Produktgröße 464x277x480 mm
Eiswürfelform Kugelförmig
Ausgabe von Eis pro Produktionszyklus 12 Stück
INHALT
Technische Daten 1
Sicherheitshinweise 2
Geräteübersicht 5
Gebrauchsanweisung 8
Reinigung und Wartung 12
Fehlersuche und Fehlerbehebung 14
Spezielle Entsorgungshinweise für Verbraucher in Deutschland 15
Hinweise zur Entsorgung 17
Hersteller & Importeur (UK) 17
Sehr geehrter Kunde,
wir gratulieren Ihnen zum Erwerb Ihres Gerätes.
Lesen Sie die folgenden Hinweise sorgfältig durch und
befolgen Sie diese, um möglichen Schäden vorzubeugen.
Für Schäden, die durch Missachtung der Hinweise und
unsachgemäßen Gebrauch entstehen, übernehmen wir
keine Haftung. Scannen Sie den QR-Code, um Zugriff
auf die aktuellste Bedienungsanleitung und weitere
Informationen rund um das Produkt zu erhalten.

2
DE
SICHERHEITSHINWEISE
• Um Schäden durch unsachgemäßen Gebrauch zu vermeiden, lesen Sie bitte
die Bedienungsanleitung sorgfältig durch, bevor Sie dieses Produkt verwen-
den, und verwenden Sie dieses Produkt nur entsprechend dem in der Bedie-
nungsanleitung angegebenen Zweck.
• Stellen Sie das Gerät auf eine ebene Fläche.
• Verwenden Sie das Gerät ausschließlich in Innenräumen.
• Ziehen Sie den Netzstecker aus der Steckdose, wenn das Gerät nicht in Ver-
wendung ist.
• Tauchen Sie das Netzkabel niemals in Wasser oder andere Flüssigkeiten ein.
• Verwenden Sie nur Zubehör, das vom Hersteller ausdrücklich für dieses Gerät
empfohlen wird.
• Stellen Sie das Gerät nicht direkt unter eine Steckdose.
• Lassen Sie das Netzkabel nicht über die Arbeitsäche hängen, sodass Kinder
nicht daran ziehen können.
• Überfüllen Sie das Gerät nicht, da es sonst zu Kurzschlüssen und Stromschlä-
gen kommen könnte.
• Achten Sie darauf, dass der Deckel während des Betriebs immer geschlossen
ist.
• Ziehen Sie den Stecker nicht am Kabel aus der Steckdose, sondern halten Sie
ihn beim Ausstecken mit der Hand fest.
• Verwenden Sie dieses Gerät nur für den vorgesehenen Zweck. Für Schäden,
die durch Nichtbeachtung der Anleitung und unsachgemäßen Gebrauch
entstehen, wird keine Haftung übernommen. Verwenden Sie das Gerät aus-
schließlich im Haushalt.
• Schließen Sie das Gerät nicht an einen Timer oder eine Funksteckdose an.
• Tauchen Sie das Gerät nicht in Wasser ein.
• Wir raten von der Verwendung eines Verlängerungskabels ab, weil dieses
überhitzen und ein Brandrisiko darstellen könnte.
• Wenn das Netzkabel beschädigt ist, muss es durch den Hersteller, den Kun-
dendienst oder eine ähnlich qualizierte Person ersetzt werden, um Gefahren
zu vermeiden.
• Befolgen Sie die örtlichen Vorschriften für die Entsorgung von Geräten, die
brennbare Gase enthalten.
• Lagern Sie keine leicht entzündlichen oder explosiven Stoffe in dem Gerät.
• Berühren Sie niemals die Verdampferoberäche mit der Hand, wenn der Eis-
bereiter in Betrieb ist. Dies kann zu Erfrierungen auf der Haut führen.
• Kippen Sie den Eiswürfelbereiter nicht um. Wenn die Maschine umgekippt
sein sollte, lassen Sie sie 2 Stunden lang stehen, bevor Sie sie wieder einschal-
ten.
• Wurde der Eisbereiter im Winter von draußen nach drinnen gebracht, warten
Sie vor dem Einschalten einige Stunden, bis er sich auf Raumtemperatur
erwärmt hat.
• Entsorgen Sie das Gerät nur bei einer zugelassenen Abfallentsorgungseinrich-
tung. Setzen Sie das Gerät keinen offenen Flammen aus.
• Dieses Gerät ist nicht für die Benutzung durch Personen (einschließlich

3
DE
Kindern) mit eingeschränkten physischen, sensorischen oder geistigen Fähig-
keiten oder denen es an Erfahrung und/oder Kenntnissen mangelt bestimmt,
außer diese werden von einer verantwortlichen Person beaufsichtigt oder
unterwiesen, die dafür sorgt, dass sie das Gerät sicher benutzen können.
• Kinder dürfen mit dem Gerät nicht spielen. Die Reinigung und Benutzer-War-
tung darf nicht von Kindern ohne Aufsicht durchgeführt werden.
• Kinder im Alter von 3 bis 8 Jahren dürfen keine Kühlgeräte be- und entladen.
• Dieses Gerät ist für die Verwendung in Haushalten und ähnlichen Anwendun-
gen vorgesehen, wie z. B.:
– Küchenbereiche für Personal in Geschäften, Büros und anderen
Arbeitsumgebungen;
– von Kunden in Hotels, Motels und anderen Wohnumgebungen;
– Umgebungen wie Bed & Breakfasts.
– Catering und ähnliche nicht-einzelhandelsbezogene Bereiche.
Dieses Gerät enthält das Kältemittel Propan (R290), ein natürliches,
umweltfreundliches Gas. Obwohl es brennbar ist, schädigt es die Ozonschicht
nicht und trägt nicht zum Treibhauseffekt bei. Die Verwendung dieses
Kältemittels hat jedoch zu einem leichten Anstieg des Geräuschpegels des
Geräts geführt. Zusätzlich zu den Geräuschen des Kompressors können Sie
möglicherweise auch das Kältemittel hören, das durch das System ießt. Dies
ist unvermeidlich und hat keine nachteiligen Auswirkungen auf die Leistung des
Geräts. Dies ist unvermeidlich und hat keine negativen Auswirkungen auf die
Leistung des Geräts. Während des Transports und der Aufstellung des Geräts
muss darauf geachtet werden, dass keine Teile des Kühlsystems beschädigt
werden. Auslaufendes Kältemittel kann zu Augenschäden führen.
WARNUNG
Brandgefahr durch unsachgemäße Entsorgung! Beachten Sie die
örtlichen Vorschriften für die Entsorgung von Geräten, die
brennbare Kältemittel und Gase enthalten.
• Halten Sie die Lüftungsöffnungen im Gerätegehäuse frei von Hindernissen.
• Der Kältemittelkreislauf darf nicht beschädigt werden.
• Das Kühlsystem enthält eine Hochdruck-Kältemittel. Beschädigen Sie das
Kühlsystem nicht.
• Die Wartung des Kühlsystems sollte von Fachleuten durchgeführt werden.
• Verwenden Sie keine mechanischen Vorrichtungen oder andere Mittel zur
Beschleunigung des Abtauvorgangs oder der Eisrückgewinnung.
• Verwenden Sie keine elektrischen Geräte in den Lebensmittelaufbewah-
rungsfächern des Geräts, es sei denn, es handelt sich um den vom Hersteller
empfohlenen Typ.
• Ziehen Sie den Stecker des Eisbereiters aus der Steckdose, bevor Sie diesen
reinigen oder Reparaturen oder Wartungsarbeiten durchführen.

4
DE
• Reinigen Sie den Eisbereiter nicht mit brennbaren Flüssigkeiten, weil dies zu
einem Brand oder einer Explosion führen kann.
• Kältemittel und Isoliergas sind entammbar.
Spezielle Hinweise
• Achten Sie beim Aufstellen des Geräts darauf, dass das Netzkabel nicht einge-
klemmt oder beschädigt wird.
• Vergewissern Sie sich, dass sich auf der Rückseite des Geräts keine Mehrfach-
steckdosen oder Netzteile benden.
Um eine Kontamination von Lebensmitteln zu vermeiden, beachten Sie bitte
die nachstehenden Anweisungen:
• Reinigen Sie regelmäßig Oberächen, die mit Lebensmitteln in Berührung
kommen können. Reinigen Sie den Wasserablauf regelmäßig.
• Füllen Sie das Gerät ausschließlich mit Trinkwasser.
• Wenn das Gerät einen Wassertank enthält, reinigen Sie diesen, wenn er 48
Stunden lang nicht benutzt worden ist. Wenn das Gerät einen Wassertank
enthält, reinigen Sie diesen, wenn das Gerät mehr als 48 Stunden lang nicht
verwendet wurde.
WARNUNG
Achten Sie beim Gebrauch, bei der Wartung und bei der Entsorgung
des Geräts auf das linke Symbol auf der Rückseite des Geräts oder
auf dem Kompressor. Dieses Symbol warnt vor möglichen Bränden.
In den Kältemittelleitungen und im Kompressor benden sich
brennbare Stoffe. Halten Sie das Gerät während des Gebrauchs, der
Wartung und der Entsorgung von Brandquellen fern.

5
DE
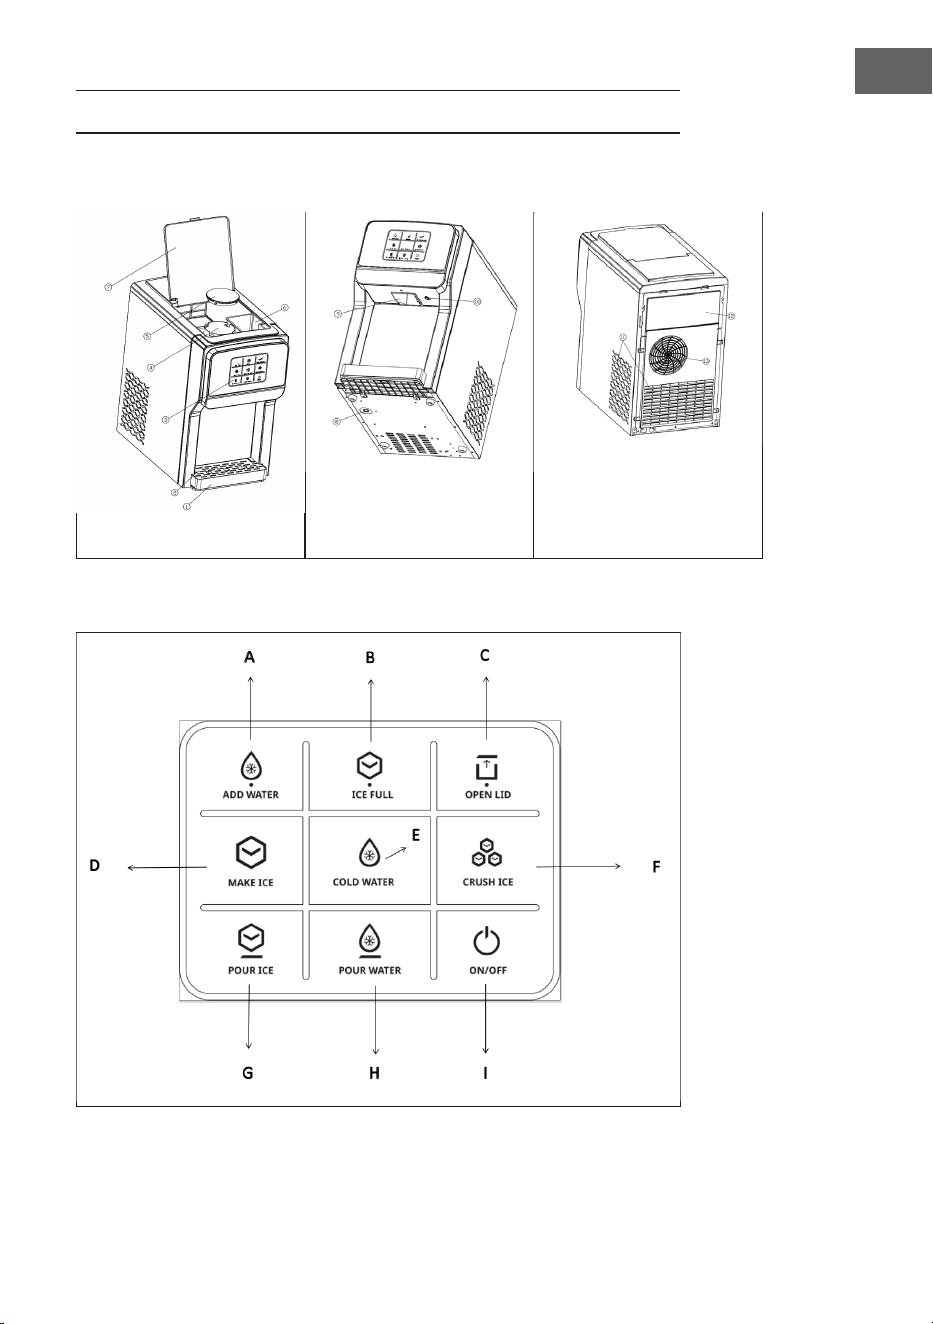
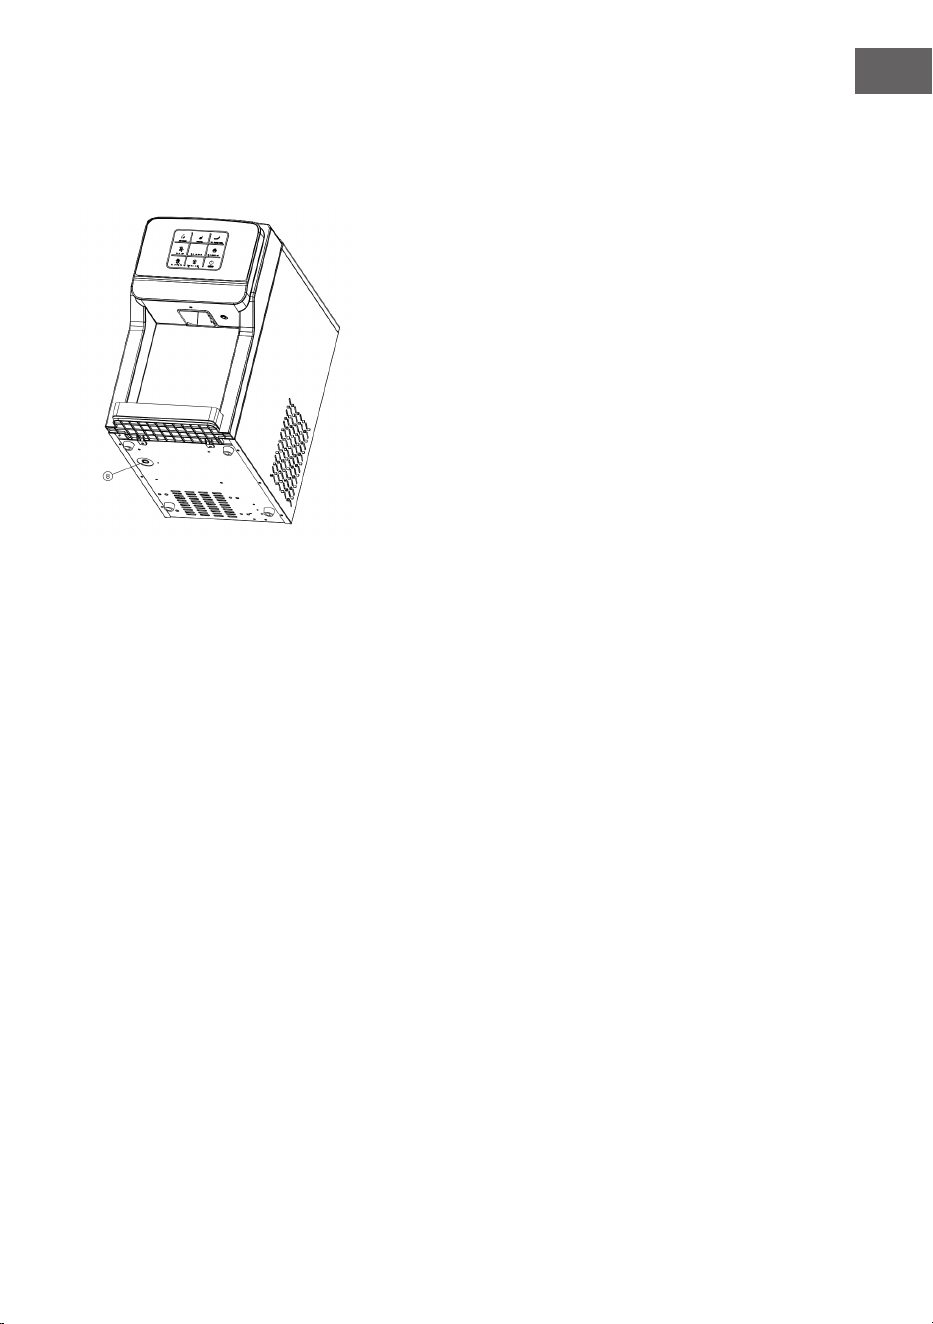
GERÄTEÜBERSICHT
Gerät
Bedienfeld

6
DE
1 Wasserbehälter
2 Wasserbehälterabdeckung
3 Bedienfeld
4 Crushed Ice Behälter: Dieser Behälter sollte vor dem Zerkleinern mit Eis
gefüllt werden
5 Deckel des Crushed Ice Behälters: Der Deckel muss nach dem Befüllen mit
Eiswürfeln geschlossen werden.
6 Manuelle Wasserbefüllung: Wenn es keine externe Wasserquelle gibt,
können Sie manuell Wasser in den Wasserbehälter gießen, bis der
Wasserstand nicht mehr sinkt
7 Abdeckung: Die Eiszerkleinerungsfunktion kann erst verwendet werden,
wenn die obere Abdeckung geschlossen ist.
8 Ablassstopfen des unteren Wassertanks: Ziehen Sie beim Reinigen des
Wasserbehälters und des Kaltwassertanks den Ablassstopfen an der
Unterseite des Geräts heraus, lassen Sie das Wasser ab und setzen Sie den
Ablassstopfen nach dem Ablassen wieder ein.
9 Pour ice: Eiswürfel-/ Crushed Ice-Ausgabe
10 Pour water: Wasserausgabe
11 Lufteinlass: Der Abstand zwischen Lufteinlass und umliegenden
Gegenständen muss größer als 10 cm sein.
12 Rückseite
13 Luftauslass: Der Abstand zwischen dem Luftauslass und eventuellen
Hindernissen muss größer als 15 cm sein, um eine gute Belüftung des
Geräts zu gewährleisten.
A ADD WATER: Wassermangelanzeigeleuchte
B ICE FULL: Anzeige für vollen Eisbehälter
C ICE WATER: Taste zur Herstellung von eiskaltem Wasser drücken
D MAKE ICE: Taste zur Herstellung von Eiswürfeln drücken
E COLD WATER: Taste zur Herstellung von kaltem Wasser drücken
F CRUSH ICE: Taste zum Zerkleinern von Eiswürfeln drücken
G Pour Ice: Taste zur Ausgabe von Eiswürfeln drücken
H Pour water: Taste zur Ausgabe von kaltem Wasser drücken
I ON/OFF: Taste zum Ein- und Ausschalten des Geräts drücken
7
DE
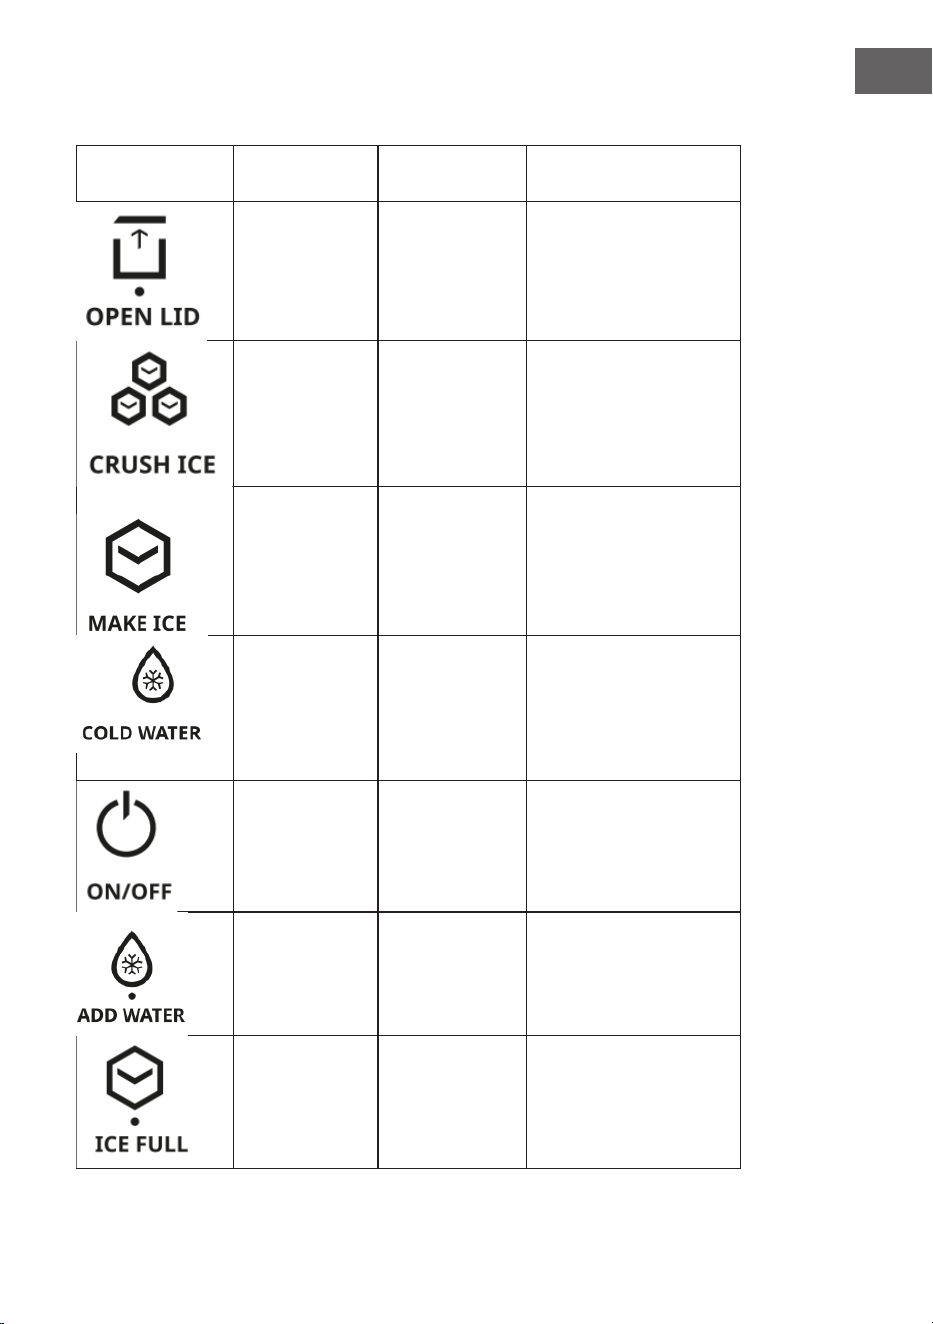
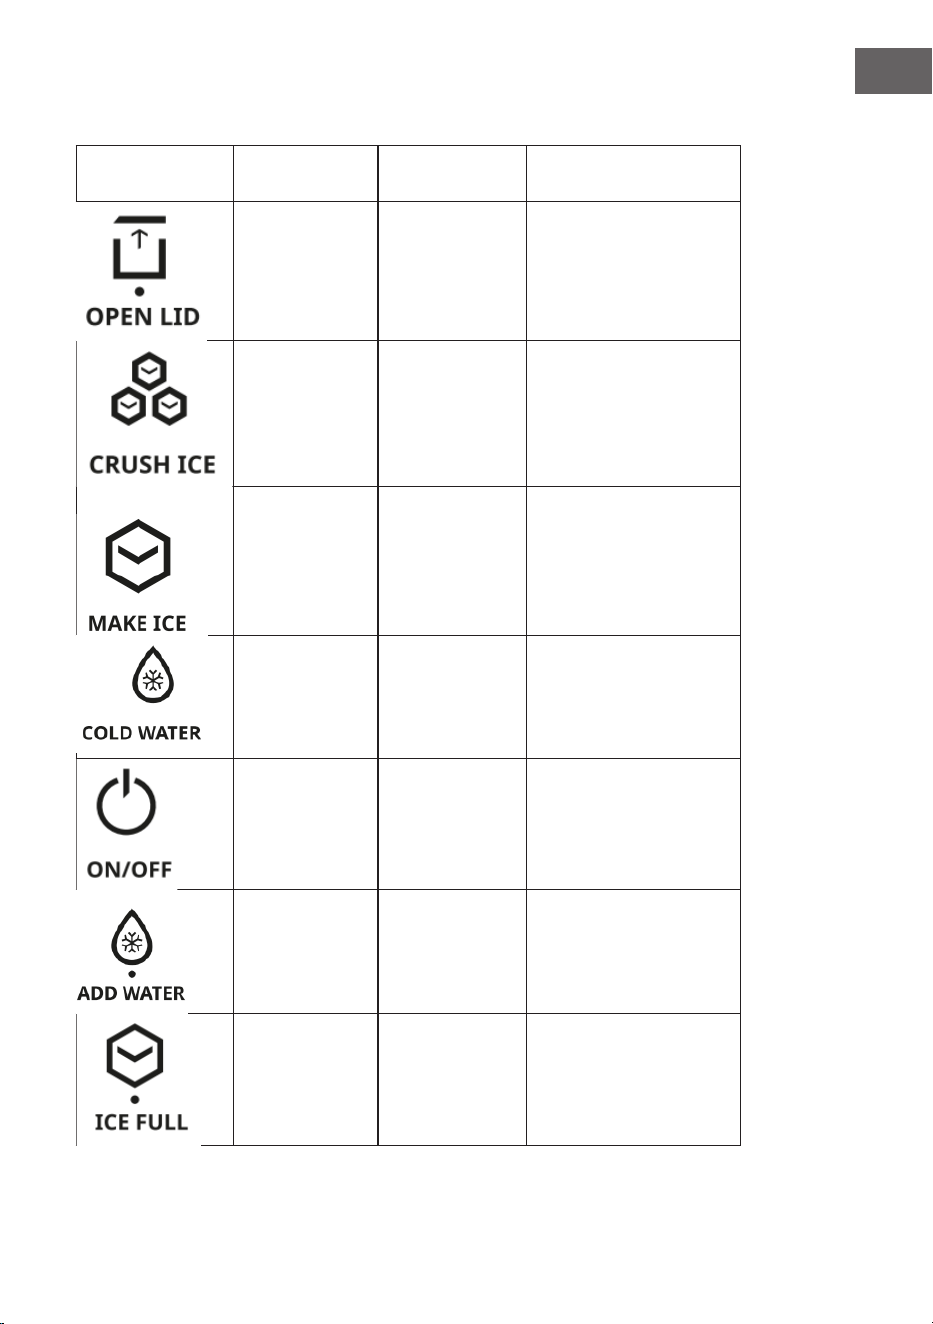
Tastenübersicht
Symbol Bedeutung Symbol
erleuchtet
Symbol blinkt
Abdeckung ist
offen
Die obere
Abdeckung ist
offen
Eiswürfel-
zerkleinerung
Das Gerät
zerkleinert Eis
Eis herstellen Das Gerät stellt
Eiswürfel her
1. Die Eisherstellung ist
deaktiviert
2. Die Eisherstellungs-
funkion ist bereit
Kaltes Wasser
herstellen
Das Gerät stellt
kaltes Wasser her
1. Die Herstellung
von kaltem Wasser ist
deaktiviert
2. Die Kaltwasser-
herstellungsfunkion ist
bereit
Ein/ aus Das Gerät ist
eingeschaltet.
DAs Gerät ist
ausgeschaltet
Wasser
hinzufügen
Der Wassertank
hat zu wenig
Wasser; Wasser
nachfüllen
Eiskorb voll Der Eisbehälter
ist voll und
der Eisbereiter
produziert keine
Eiswürfel mehr

8
DE
GEBRAUCHSANWEISUNG
1. Entfernen Sie alle inneren und äußeren Verpackungen, um zu prüfen, ob
Schläuche und Wasserhahnadapter fehlen. Sollte eines der Zubehörteile
fehlen, wenden Sie sich bitte an den Kundendienst.
2. Die Steckdose des Geräts muss sicher geerdet sein und über einen separaten
Stecker verfügen.
3. Stellen Sie das Gerät an einem gut belüfteten Ort mit einer relativ niedrigen
Umgebungstemperatur auf und legen Sie es waagerecht hin. Der Abstand
zwischen dem Luftauslass und dem Hindernis muss mehr als 15 cm betragen,
und der Abstand zwischen den beiden Seiten und dem Hindernis darf nicht
weniger als 10 cm betragen.
4. Wenn das Gerät während des Transports oder der Handhabung auf den Kopf
gestellt wurde, wird empfohlen, das Gerät mehr als 2 Stunden stehen zu
lassen, bevor es eingeschaltet wird.
5. Es wird dringend empfohlen, das gesamte Gerät vor dem Gebrauch gründlich
zu reinigen. Befolgen Sie die Reinigungsanweisungen unter "Reinigung und
Wartung", um das Gerät zu reinigen.
WARNUNG
Füllen Sie zum Nachfüllen des Geräts bitte nur Trinkwasser,
vorzugsweise reines Wasser aus einem Kanister oder einer Flasche,
ein. Die Qualität des Wassers wirkt sich direkt auf die Klarheit der
Eiswürfel und die Lebensdauer des Geräts aus.
1. Wasser hinzufügen
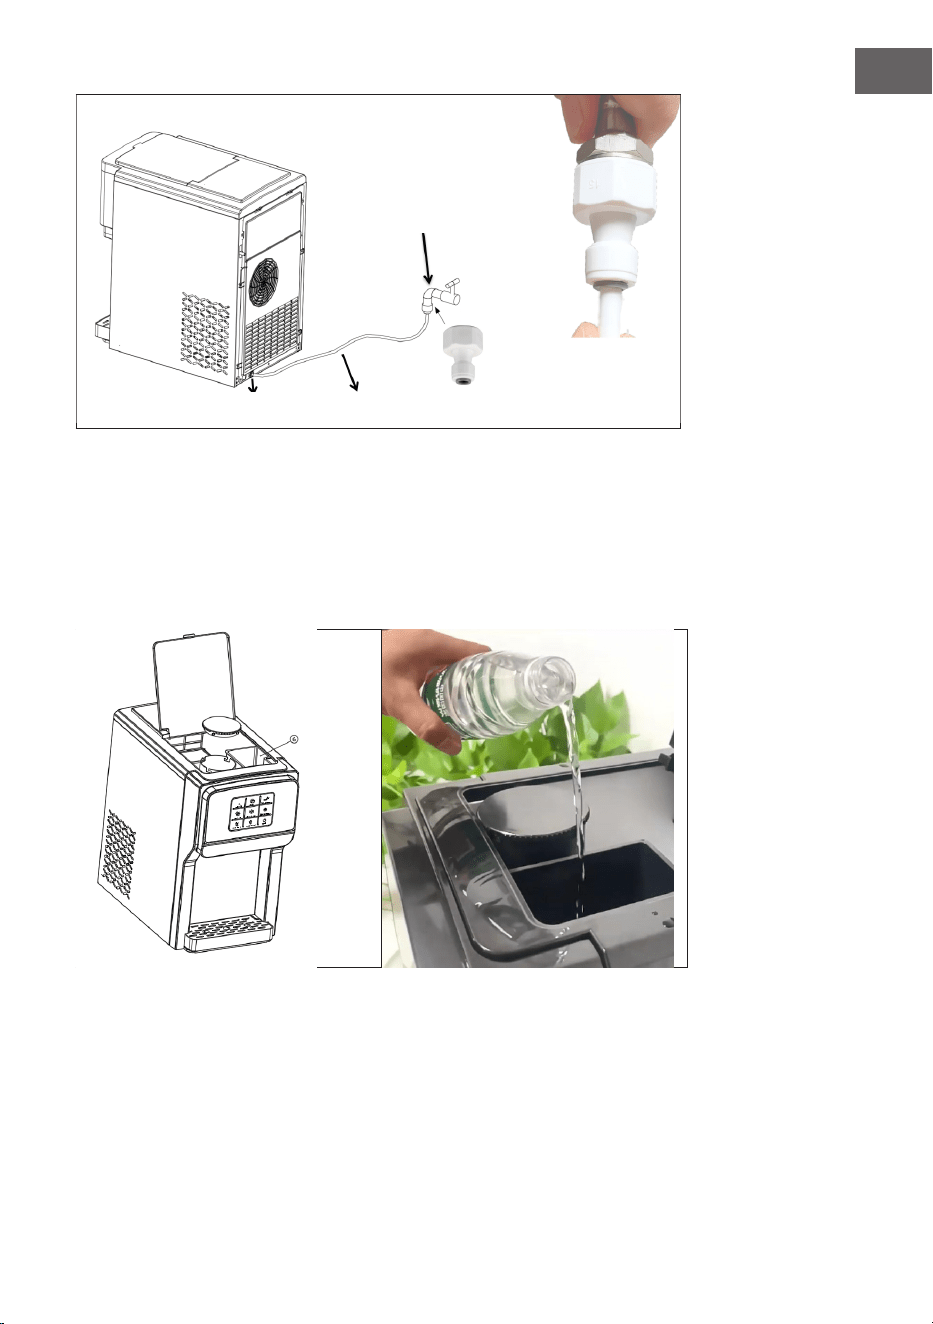
Automatisches Hinzufügen von Wasser (externe Wasserquelle)
Schritt 1: Schließen Sie eine Seite (20 mm) des Adapters an den Wasserhahn an.
Schritt 2: Verbinden Sie das eine Ende des weißen PE-Schlauchs mit dem anderen
Ende (Ø 6,5 mm) des Adapters.
Schritt 3: Schließen Sie das andere Ende des weißen PE-Schlauchs an den
Leitungswassereinlass an.

9
DE
Wasser manuell hinzufügen
Öffnen Sie die obere Klappe der Maschine und füllen Sie Trinkwasser in den
Wasserbehälter ⑥ , bis der Wasserstand nicht mehr sinkt.
Vorsicht! Trinkwasser mit hohem Säure- und Alkaligehalt kann die Gefriersäule
korrodieren.
Leitungswas-
sereinlass
Weißer PE-Schlauch
Adapter
Wasserhahn

10
DE
2. Eis herstellen
• Schließen Sie das Gerät an und drücken Sie leicht auf die Taste ON/OFF auf
dem Bedienfeld. Das Gerät erkennt automatisch den Wasserstand und weist
darauf hin, dass es mit Wasser befüllt werden muss. Drücken Sie die Taste
„MAKE ICE“, um mit der Eiswürfelherstellung zu beginnen. Die Leuchte „MAKE
ICE bleibt während der Eiswürfelherstellung eingeschaltet. Ein Eiswürfelberei-
tungszyklus dauert etwa 9 Minuten und kann 12 runde Eiswürfel produzieren.
Die Eiswürfelbereitungszeit hängt von der Umgebungstemperatur ab; je höher
die Temperatur, desto länger die Eiswürfelbereitungszeit. Während der Eiswür-
felbereitung leuchtet das Symbol „MAKE ICE“ permanent.
• Wenn Sie zuerst die Taste „COLD WATER“ und dann die Taste „IMAKE ICE“
berühren, blinkt das Symbol „MAKE ICE“ weiter. Es zeigt an, dass die Eiswürfel-
herstellung nach Beendigung der Eiswasserherstellung ausgeführt wird. Die
Eisherstellungsfunkion ist bereit
• Wenn das Symbol „ICE FULL“ dauerhaft leuchtet, stoppt das Gerät die Eiswür-
felherstellung. Er produziert jedoch weiterhin Eiswürfel, nachdem die Eiswürfel
aus der Eisschale entnommen wurden.
• Wenn das Symbol „ADD WATER“ (Wasser nachfüllen) dauerhaft leuchtet, ist der
Wasservorrat des Geräts gering und muss aufgefüllt werden. Das Gerät setzt
den Betrieb automatisch fort, sobald das Wasser nachgefüllt wurde.
• Berühren Sie während der Eiswürfelbereitung die Taste „MAKE ICE“, um die
Eiswürfelbereitung zu beenden.
3. Kaltes Wasser herstellen
• Schließen Sie das Gerät an und drücken Sie leicht auf die Taste ON/OFF auf
dem Bedienfeld. Das Gerät erkennt automatisch den Wasserstand und weist
darauf hin, dass es mit Wasser befüllt werden muss. Berühren Sie die Taste
„COLD WATER“, das Gerät ermittelt die Wassertemperatur. Wenn die Tempe-
ratur die eingestellte Starttemperatur erreicht, leuchtet die Anzeige „COLD
WATER“ auf und die Maschine beginnt mit der Herstellung von kaltem Wasser.
Andernfalls blinkt die Anzeige „COLD WATER“ und das Gerät wartet auf seinen
Einsatz. Wenn die Wassertemperatur während der Herstellung von kaltem
Wasser die eingestellte Temperatur erreicht, blinkt das Symbol „COLD WATER“
weiter.
• Wenn Sie zuerst die Taste „MAKE ICE“ und dann die Taste „COLD WATER“ be-
rühren, blinkt das Symbol „COLD WATER“ weiter. Es zeigt an, dass die Herstel-
lung von kaltem Wasser nach Beendigung der Eiswürfelbereitung fortgesetzt
wird. Die Herstellung von kaltem Wasser ist bereit.
• Berühren Sie während der Herstellung von kaltem Wasser die Taste „COLD
WATER“, um die Herstellung von kaltem Wasser zu beenden.
4. Eiswürfelzerkleinerung
• Öffnen Sie die Abdeckung und entfernen Sie die Abdeckung der Crushed-Ice-
Schale. Füllen Sie die Eiswürfel manuell in den Crushed-Ice-Behälter schließen
Sie den Deckel des Crushed-Ice-Behälters fest und drücken Sie die Taste

11
DE
„CRUSH ICE“, um die Eiswürfel zu zerkleinern. Die zerkleinerten Eiswürfel
werden automatisch ausgegeben und können aus der Crushed-Ice-Ausgabe
entnommen werden.
• Drücken Sie während des Zerkleinerns von Eiswürfeln die Taste "CRUSH ICE"
am Eiswürfelbereiter.
5. Ausgabe von Eiswürfeln/ kaltem Wasser
• Drücken Sie sanft die Taste „POUR ICE“ , das Flügelrad im Eisbehälter beginnt
sich zu drehen und die Eiswürfel fallen aus der Position „POUR ICE“ heraus.
Wenn Sie die Taste „POUR ICE“ erneut drücken, hört das Laufrad auf, sich zu
drehen, und der Eiswürfelausgabevorgang wird beendet. Um eine optimale
Eiswürfelabgabe zu gewährleisten, stellen Sie sicher, dass sich genügend Eis-
würfel in der Eisschale benden und ein Becher bereitsteht, der mit Eiswürfeln
gefüllt werden kann.
• Drücken Sie leicht auf die Taste „POUR WATER“ und das Wasser ießt aus
der Position „POUR WATER“ heraus. Drücken Sie erneut auf die Taste „POUR
WATER“, um die Ausgabe von kaltem Wasser zu unterbrechen.
Hinweis: Wenn Sie die Taste „POUR WATER“ drücken, ohne vorher die Tasten
„MAKE ICE“ oder „COLD WATER“ zu betätigen, ist das abgegebene Wasser kein
kaltes Wasser. Die Funktion „POUR WATER“ wird automatisch deaktiviert, wenn
sie länger als 10 Sekunden am Stück verwendet wird.
Wichtige Informationen
• Überprüfen Sie die Sauberkeit des Wassertanks und des Eiswürfelbehälters.
Reinigen und wechseln Sie das Wasser regelmäßig.
• Die Temperatur des zugeführten Wassers wirkt sich direkt auf die Eiswür-
felbereitung aus. Je niedriger die Wassertemperatur ist, desto größer ist die
Eiswürfelproduktion.
• Je niedriger die Umgebungstemperatur ist, desto größer ist die Eiswürfelpro-
duktion.
• Die Qualität des verwendeten Wassers beeinusst die Lebensdauer der Was-
serpumpe des Geräts. Am besten ist es, enthärtetes Wasser, reines Wasser
oder destilliertes Wasser zu verwenden. Einige ungewöhnliche Geräusche
während des Betriebs der Wasserpumpe werden durch Verunreinigungen im
Wasser verursacht. Dies ist ein normaler Vorgang und hat keinen Einuss auf
die Nutzung des Geräts.
12
DE
REINIGUNG UND WARTUNG
• Entpacken Sie das Gerät.
• Verwenden Sie ein neutrales Reinigungsmittel, warmes Wasser und ein
weiches Tuch, um den Wassertank, die Crushed-Ice-Schale, die Abdeckung der
Crushed-Ice-Schale und den Silikonschlauch abzuwischen und zu reinigen.
• Das Gehäuse des Geräts kann bei ausgeschaltetem Gerät gereinigt werden.
Wischen Sie es am besten mit einem trockenen Tuch ab.
• Sie können auch Wasser hinzufügen, um Eiswürfel für 1–2 Zyklen zu machen
und dann alle Eiswürfel und das Wasser zu verwerfen.
• Bringen Sie nach der Reinigung den Ablassstopfen an der Unterseite des
Geräts wieder an.
• Wenn das Gerät längere Zeit nicht verwendet wurde, lassen Sie das Wasser im
Wassertank ab.
Hinweis: Wenn das Gerät lange Zeit verwendet wurde, reinigen Sie das Innere
des Geräts gemäß den folgenden Anweisungen.
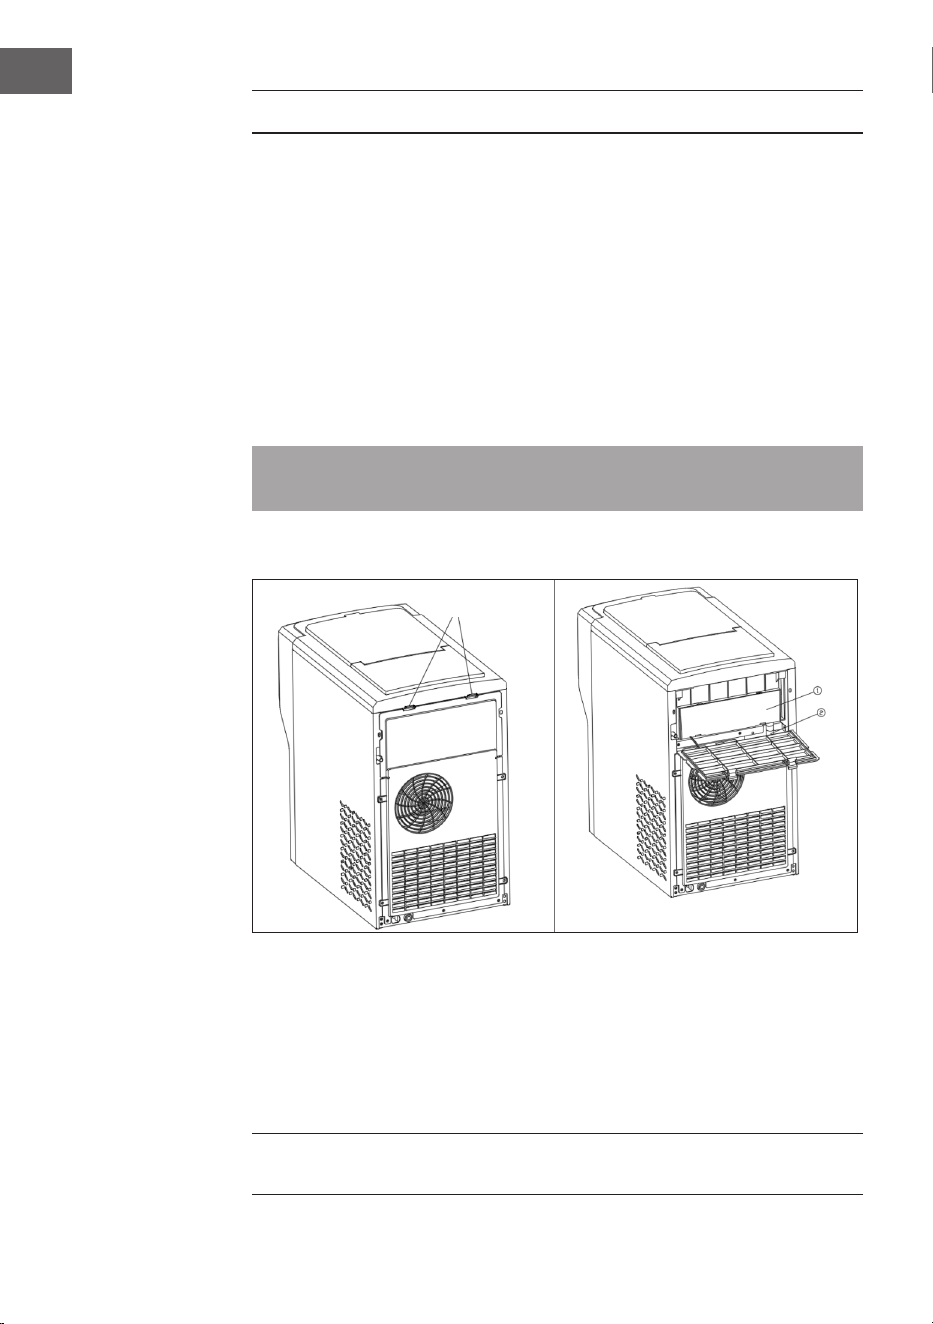
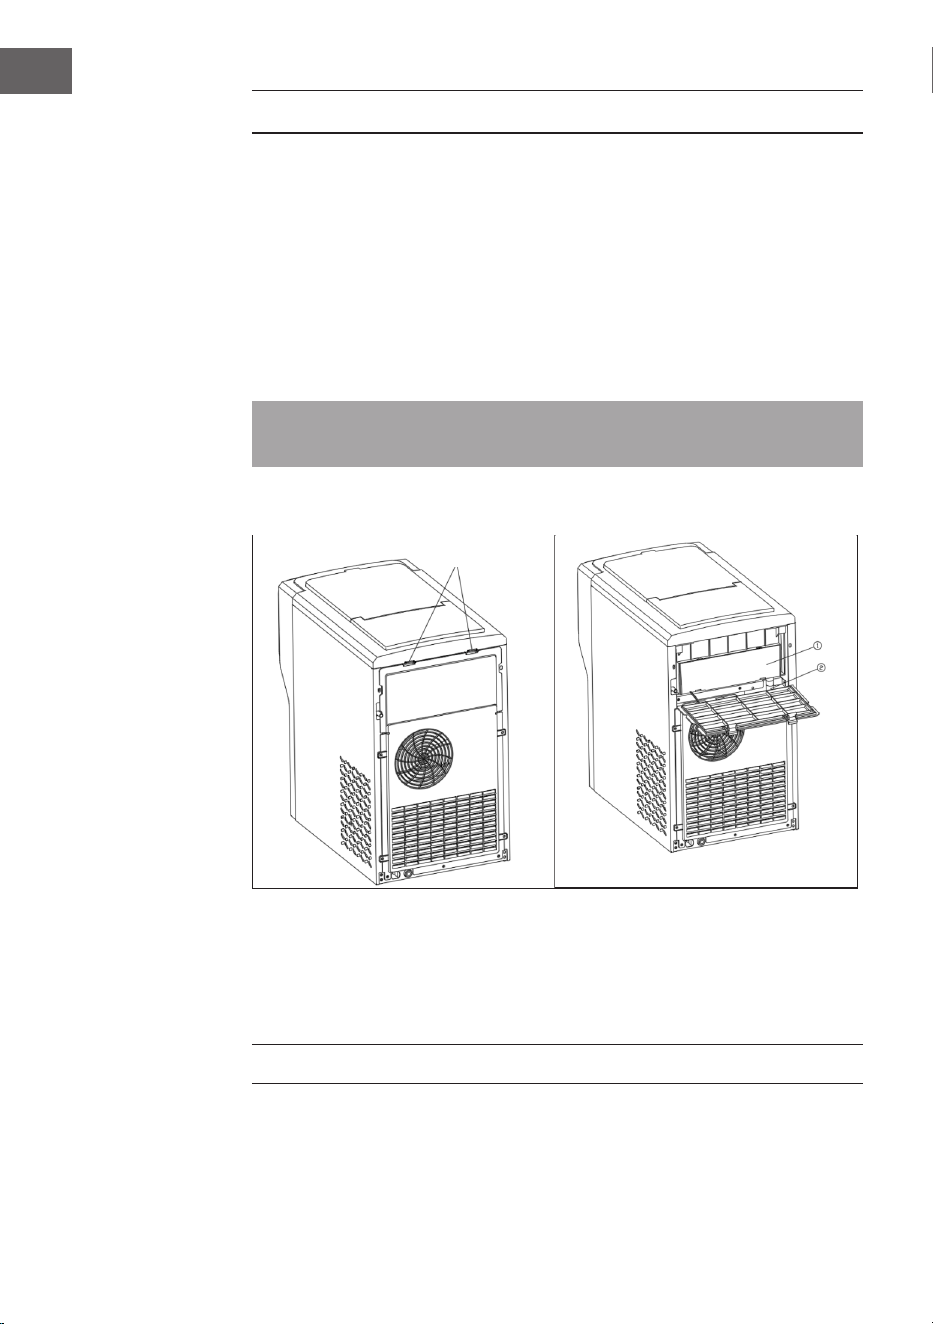
Öffnen der Rückseite
1. Ziehen Sie den Netzstecker aus der Steckdose, stellen Sie das Gerät auf eine
ebene Fläche, drücken Sie die beiden "Rückwandverschlüsse" auf der Rückseite
des Geräts und öffnen Sie die Rückwand nach unten.
2. Ziehen Sie zuerst den Silikon-Ablaufschlauch ② heraus. Ziehen Sie den Eis- und
Wasserbehälter ① heraus.
3. Verwenden Sie Reinigungswerkzeuge, um den Wasserbehälter des Eisbereiters
und den Silikonschlauch zu reinigen.
Hinweis: Nach der Reinigung müssen alle Teile wieder in ihre ursprüngliche
Position gebracht werden.
Rückwandplatten-
schnalle
13
DE
Entwässerungsvorgang
An der Unterseite des Geräts bendet sich ein Ablassstopfen ⑧.
Stellen Sie das Gerät auf eine stabile Unterlage und entfernen Sie den
Ablassstopfen.
Lassen Sie unverzüglich das Wasser aus dem Gerät ab.

14
DE
FEHLERSUCHE UND FEHLERBEHEBUNG
Problem Mögliche Ursache Lösung
Die „Add Water“ Kont-
rollleuchte ist an
Wassermangel im Was-
sertank
Wassertank manuell
nachfüllen
Der Schwimmer des
Niveauschalters im Kalt-
wassertank sitzt fest und
steigt nicht an
Reinigen Sie den Kalt-
wassertank und den
Niveauschalter
Die Eiswürfel sind zu
klein
Die Umgebungstempe-
ratur ist zu hoch
Stellen Sie die Maschine
an einen kühleren Ort
Schlechte Belüftung Der Abstand zwischen
der Rückseite, der linken
und rechten Seite des
Gerätes und umliegen-
den Gegenständen muss
größer als 15 cm sein
Die Eiswürfel sind zu
groß
Die Umgebungstempe-
ratur ist zu niedrig
Stellen Sie das Gerät an
einen wärmeren Ort
Der Eiswürfelbereitungs-
zyklus ist normal, aber es
werden keine Eiswürfel
produziert
Die Umgebungstempe-
ratur ist zu hoch oder die
Wassertemperatur im
Wassertank ist zu hoch
Gehen Sie an einen Ort,
an dem die Umgebungs-
temperatur weniger als
32 °C beträgt, und fügen
Sie kaltes Wasser hinzu
Kältemittelleck Erfordert professionelle
Reparaturen
Kältemittelleitung
blockiert
Erfordert professionelle
Reparaturen
Das Gerät erzeugt kein
kaltes Wasser
Wassermangel im Was-
sertank
Prüfen Sie den Wasser-
druck des Einlaufkanals
und die Sauberkeit des
Kanals
Das Gerät erzeugt keine
Eiswürfel
Die Eisbereitungszeit ist
zu kurz und es sind keine
oder wenig Eiswürfel im
Behälter
Ein Eiswürfelbereitungs-
zyklus dauert etwa 9
Minuten Nach ein paar
weiteren Eisbereitungs-
zyklen normalisiert sich
das
15
DE
SPEZIELLE ENTSORGUNGSHINWEISE FÜR
VERBRAUCHER IN DEUTSCHLAND
Entsorgen Sie Ihre Altgeräte fachgerecht. Dadurch wird gewährleistet, dass die
Altgeräte umweltgerecht verwertet und negative Auswirkungen auf die Umwelt
und menschliche Gesundheit vermieden werden. Bei der Entsorgung sind
folgende Regeln zu beachten:
• Jeder Verbraucher ist gesetzlich verpichtet, Elektro- und Elek-
tronikaltgeräte (Altgeräte) sowie Batterien und Akkus getrennt
vom Hausmüll zu entsorgen. Sie erkennen die entsprechenden
Altgeräte durch folgendes Symbol der durchgestrichenen
Mülltonne (WEEE-Symbol).
• Sie haben Altbatterien und Altakkumulatoren, die nicht vom Altgerät um-
schlossen sind, sowie Lampen, die zerstörungsfrei aus dem Altgerät entnom-
men werden können, vor der Abgabe an einer Entsorgungsstelle vom Altgerät
zerstörungsfrei zu trennen.
• Bestimmte Lampen und Leuchtmittel fallen ebenso unter das Elektro- und
Elektronikgesetz und sind dementsprechend wie Altgeräte zu behandeln. Aus-
genommen sind Glühbirnen und Halogenlampen. Entsorgen Sie Glühbirnen
und Halogenlampen bitte über den Hausmüll, sofern sie nicht das WEEE-
Symbol tragen.
• Jeder Verbraucher ist für das Löschen von personenbezogenen Daten auf dem
Elektro- bzw. Elektronikgerät selbst verantwortlich.
Rücknahmepicht der Vertreiber
Vertreiber mit einer Verkaufsäche für Elektro- und Elektronikgeräte von
mindestens 400 Quadratmetern sowie Vertreiber von Lebensmitteln mit einer
Gesamtverkaufsäche von mindestens 800 Quadratmetern, die mehrmals im
Kalenderjahr oder dauerhaft Elektro- und Elektronikgeräte anbieten und auf dem
Markt bereitstellen, sind verpichtet,
1. bei der Abgabe eines neuen Elektro- oder Elektronikgerätes an einen Endnutzer
ein Altgerät des Endnutzers der gleichen Geräteart, das im Wesentlichen die
gleichen Funktionen wie das neue Gerät erfüllt, am Ort der Abgabe oder in
unmittelbarer Nähe hierzu unentgeltlich zurückzunehmen und
2. auf Verlangen des Endnutzers Altgeräte, die in keiner äußeren Abmessung
größer als 25 Zentimeter sind, im Einzelhandelsgeschäft oder in unmittelbarer
Nähe hierzu unentgeltlich zurückzunehmen; die Rücknahme darf nicht an den
Kauf eines Elektro- oder Elektronikgerätes geknüpft werden und ist auf drei
Altgeräte pro Geräteart beschränkt.

16
DE
• Bei einem Vertrieb unter Verwendung von Fernkommunikationsmitteln ist die
unentgeltliche Abholung am Ort der Abgabe auf Elektro- und Elektronikgeräte
der Kategorien 1, 2 und 4 gemäß § 2 Abs. 1 ElektroG, nämlich „Wärmeüberträ-
ger“, „Bildschirmgeräte“ (Oberäche von mehr als 100 cm²) oder „Großgerä-
te“ (letztere mit mindestens einer äußeren Abmessung über 50 Zentimeter)
beschränkt. Für andere Elektro- und Elektronikgeräte (Kategorien 3, 5, 6) ist
eine Rückgabemöglichkeit in zumutbarer Entfernung zum jeweiligen Endnut-
zer zu gewährleisten.
• Altgeräte dürfen kostenlos auf dem lokalen Wertstoffhof oder in folgenden
Sammelstellen in Ihrer Nähe abgegeben werden: www.take-e-back.de
• Für Elektro- und Elektronikgeräte der Kategorien 1, 2 und 4 bieten wir auch die
Möglichkeit einer unentgeltlichen Abholung am Ort der Abgabe. Beim Kauf
eines Neugeräts haben Sie die Möglichkeit, eine Altgerätabholung über die
Webseite auszuwählen.
• Batterien können überall dort kostenfrei zurückgegeben werden, wo sie
verkauft werden (z. B. Super-, Bau-, Drogeriemarkt). Auch Wertstoff- und
Recyclinghöfe nehmen Batterien zurück. Sie können Batterien auch per Post
an uns zurücksenden. Altbatterien in haushaltsüblichen Mengen können Sie
direkt bei uns von Montag bis Freitag zwischen 08:00 und 16:00 Uhr unter der
folgenden Adresse unentgeltlich zurückgeben:
Chal-Tec Fulllment GmbH
Norddeutschlandstr. 3
47475 Kamp-Lintfort
• Wichtig zu beachten ist, dass Lithiumbatterien aus Sicherheitsgründen vor der
Rückgabe gegen Kurzschluss gesichert werden müssen (z. B. durch Abkleben
der Pole).
• Finden sich unter der durchgestrichenen Mülltonne auf der Batterie zusätzlich
die Zeichen Cd, Hg oder Pb ist das ein Hinweis darauf, dass die Batterie ge-
fährliche Schadstoffe enthält (»Cd« steht für Cadmium, »Pb« für Blei und »Hg«
für Quecksilber).
Hinweis zur Abfallvermeidung
Indem Sie die Lebensdauer Ihrer Altgeräte verlängern, tragen Sie dazu bei,
Ressourcen ezient zu nutzen und zusätzlichen Müll zu vermeiden. Die
Lebensdauer Ihrer Altgeräte können Sie verlängern, indem Sie defekte Altgeräte
reparieren lassen. Wenn sich Ihr Altgerät in gutem Zustand bendet, könnten Sie
es spenden, verschenken oder verkaufen.
17
DE
HINWEISE ZUR ENTSORGUNG
Wenn es in Ihrem Land eine gesetzliche Regelung
zur Entsorgung von elektrischen und elektronischen
Geräten gibt, weist dieses Symbol auf dem Produkt oder
auf der Verpackung darauf hin, dass dieses Produkt
nicht im Hausmüll entsorgt werden darf. Stattdessen
muss es zu einer Sammelstelle für das Recycling von
elektrischen und elektronischen Geräten gebracht
werden. Durch regelkonforme Entsorgung schützen
Sie die Umwelt und die Gesundheit Ihrer Mitmenschen
vor negativen Konsequenzen. Informationen zum
Recycling und zur Entsorgung dieses Produkts,
erhalten Sie von Ihrer örtlichen Verwaltung oder Ihrem
Hausmüllentsorgungsdienst.
Dieses Produkt enthält Batterien. Wenn es in Ihrem
Land eine gesetzliche Regelung zur Entsorgung von
Batterien gibt, dürfen die Batterien nicht im Hausmüll
entsorgt werden. Informieren Sie sich über die örtlichen
Bestimmungen zur Entsorgung von Batterien. Durch
regelkonforme Entsorgung schützen Sie die Umwelt
und die Gesundheit Ihrer Mitmenschen vor negativen
Konsequenzen.
HERSTELLER & IMPORTEUR (UK)
Hersteller:
Chal-Tec GmbH, Wallstraße 16, 10179 Berlin, Deutschland.
Importeur für Großbritannien:
Berlin Brands Group UK Limited
PO Box 42
272 Kensington High Street
London, W8 6ND
United Kingdom

19
EN
TECHNICAL DATA
Article number 10046192
Climate Type SN/N/ST
Safety Level I
Power supply 220-240 V – 50/60 Hz
Rated current 0.85 A
Rated power 130 W
Refrigerant R290/ 28g
Vesicant C
5
H
12
Insulation EPS
Net Weight 13.7 kg
Gross Weight 15.2kg
Housing shell Stainless steel
Product size 464x277x480 mm
Type of ice Bullet ice
Output ice per cycle 12 pcs.
CONTENTS
Technical Data 19
Safety Instructions 20
Product Overview 23
Instructions for use 26
Cleaning and Maintenance 30
Troubleshooting 32
Disposal Considerations 33
Manufacturer & Importer (UK) 33
Dear Customer,
Congratulations on purchasing this equipment. Please
read this manual carefully and take care of the following
hints on installation and use to avoid technical damages.
Any failure caused by ignoring the items and cautions
mentioned in the operation and installation instructions
are not covered by our warranty and any liability. Scan
the QR code to get access to the latest user manual and
more product information.

20
EN
SAFETY INSTRUCTIONS
• In order to avoid harm caused by misuse, please read the instruction manual
carefully before using this product and use this product strictly in accordance
with the purpose stated in the instruction manual.
• Place the device on a level surface.
• Use the device indoors only.
• Unplug the device from the power outlet when not in use.
• Never immerse the power cord and plug in water or other liquids.
• Only use accessories that are expressly recommended by the manufacturer
for this device.
• Do not place the device directly under an electrical outlet.
• Do not let the power cord hang from the work surface so that children cannot
pull on it.
• Do not overll the unit, otherwise short circuits and electric shocks may occur.
• Make sure that the lid is always closed during operation.
• Do not pull the plug out of the outlet by the cord, but hold it by hand when
unplugging.
• Use this device only for its intended purpose. We accept no liability for
damage caused by disregarding the instructions and improper use. Only use
the device in the household.
• Do not connect the device to a timer or remote-controlled socket.
• Do not immerse the device in water.
• The use of an extension cord is not recommended, as it may overheat and
become a risk of re.
• If the power cord or plug is damaged, it must be replaced by the
manufacturer, an authorized service centre, or a similarly qualied person.
• Follow local regulations for disposal of equipment containing ammable gas.
• Do not store highly ammable or explosive substances in the device.
• Never touch the evaporator surface by hand when the ice maker is working. It
may cause frostbite to your skin.
• Do not overturn the Ice Maker. If the machine is overturned, leave it to stand
for 2 hours before switching it on.
• If the Ice Maker is brought in from outside in winter, allow it to warm up to
room temperature for a few hours before switching it on.
• Dispose of the appliance only at an authorised waste disposal facility. Do not
expose to ame.
• This appliance is not intended for use by persons (including children) with
reduced physical, sensory or mental capabilities, or lack of experience and
knowledge, unless they have been given supervision or instruction concerning
use of the appliance by a person being responsible for their safety.
• Children shall not play with the appliance. Cleaning and user maintenance
shall not be made by children without supervision.
• Children between the ages of 3 and 8 are not allowed to load and unload
refrigeration equipment.
21
EN
• This appliance is intended to be used in household and similar applications
such as
– staff kitchen areas in shops, oces and other working environments;
– farm houses and by clients in hotels, motels and other residential type
environments;
– bed and breakfast type environments;
– catering and similar non-retail applications.
This appliance contains the refrigerant propane (R290), a natural gas which is
environmentally friendly. Although it is ammable, it does not damage the ozone
layer and does not increase the greenhouse effect. The use of this coolant has,
however, led to a slight increase in the noise level of the appliance. In addition
to the noise of the compressor, you might be able to hear the coolant owing
around the system. This is unavoidable and does not have any adverse effect on
the performance of the appliance. Care must be taken during the transportation
and setting up of the appliance that no parts of the cooling system are damaged.
Leaking coolant can damage the eyes.
WARNING
Fire hazard due to improper disposal! Please observe the local
regulations for the disposal of appliances containing ammable
refrigerants and gases.
• Keep ventilation openings in the unit housing free of obstacles.
• Do not damage the refrigerant circuit.
• The refrigeration system contains a high-pressure refrigerant. Do not damage
the refrigeration system.
• The maintenance of the refrigeration system shall be done by professionals.
• Do not use any mechanical devices or other means to accelerate the
defrosting process or the ice recovery process.
• Do not use electrical appliances inside the food storage compartments of the
appliance, unless they are of the type recommended by the manufacturer.
• Unplug the ice maker before cleaning or making any repairs or servicing.
• Do not clean the ice maker with ammable liquids, as this could cause a re or
explosion.
• Refrigerant and insulation blowing gas are ammable.
Special Notes
• When positioning the unit, make sure that the power cord is not pinched or
damaged.
• Make sure that there are no multiple sockets or power supplies on the back of
the unit.

22
EN
To avoid contamination of food, please follow the instructions below:
• Regularly clean surfaces that may come into contact with food. Clean the
water drain regularly.
• Fill the device with potable water only.
• If the appliance contains a water tank, clean it if it has not been used for 48
hours. Rinse the tank if no water has been removed for 5 days.
WARNING
When using, servicing and disposing of the unit, pay attention to the
left symbol on the rear of the unit or on the compressor. This symbol
warns of possible res. There are ammable substances in the
refrigerant lines and in the compressor. Keep the appliance away
from sources of re during use, maintenance and disposal.
23
EN
PRODUCT OVERVIEW
Appliance
Control panel
24
EN
1 Water box
2 Water box cover
3 Operation panel
4 Crushed ice box: This box should be lled with ice before crushing
5 Crushed ice box lid: The lid must be closed after lling with ice
6 Manual water addition box: If there is no external water source, you can
manually pour water into the water addition box until the water level does
not drop
7 Flip cover: The ice crushing function cannot be used until the top ip cover
is closed
8 Lower water tank drain plug: When cleaning the machine's reservoir and
cold water tank, pull out the drain plug at the bottom of the machine,
drain the water and replace the drain plug after draining
9 Pour ice: Ice outlet / crushed ice outlet
10 Pour water: Water outlet
11 Air inlet: The distance between the air inlet and obstacles must be greater
than 10 cm
12 Rear panel
13 Air outlet: The distance between the air outlet and any obstructions must
be greater than 15 cm in order to ensure proper ventilation of the unit
A ADD WATER: Add water indicator
B ICE FULL: Ice full indicator
C ICE WATER: Press to start making ice water
D MAKE ICE: Press to start making ice
E COLD WATER: Press to start making cold water
F CRUSH ICE: Press to start crushing ice
G Pour Ice: Press to dispense ice cubes
H Pour water: Press to dispense water
I ON/OFF: Press to switch the appliance on/off

25
EN
Icon overview
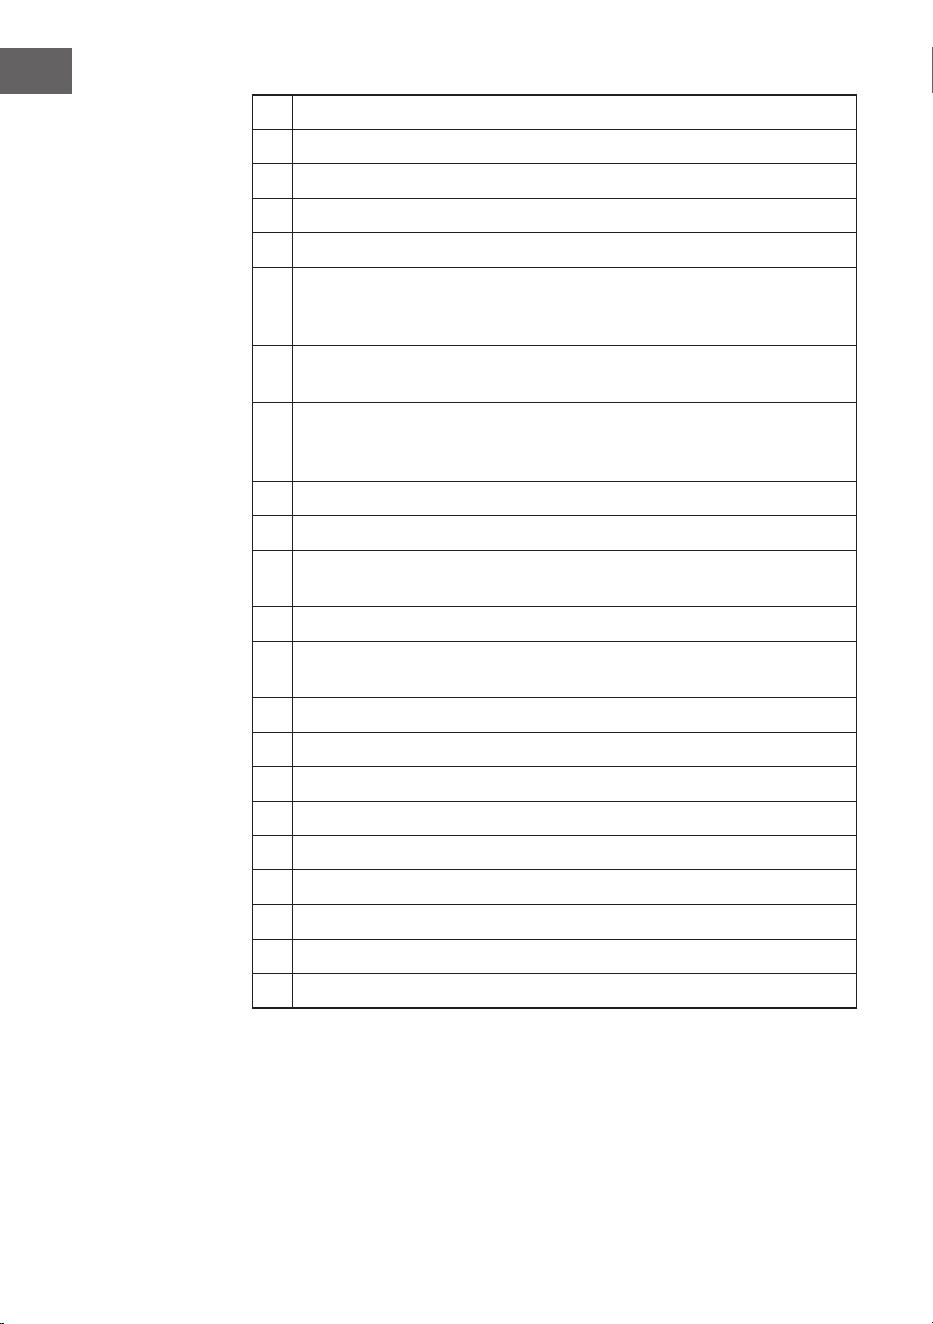
Icon Meaning Icon lit Icon is blinking
Open lid The upper lid is
open
Crush ice The machine is
crushing ice
Make ice The machine is
making ice
1. Ice-making
is off
2, "Make ice"
function is
waiting to start
Make cold water The machine
is making cold
water
1. Ice-water-
making is off
2. "Make ice
water" function is
waiting to start
On/Off The machine is
powered on
The machine is
powered off
Add water The water
storage tank is
short of water;
rell water
Ice full The ice storage
is full of ice and
the ice making
machine has
stopped making
ice

26
EN
INSTRUCTIONS FOR USE
1. Remove all internal and external packaging to check for missing hoses and tap
adapters. If any of the accessories are missing, contact the customer service
department.
2. The machine's power socket must be securely grounded and supplied by a
separate plug.
3. Place the machine in a well ventilated place with a relatively low ambient
temperature and position it horizontally. The distance between the air outlet
and the obstacle must be more than 15 cm, and the distance between the two
sides and the obstacle must be not less than 10 cm.
4. If the machine has been turned upside down during transport and handling,
it is recommended to let the machine stand for more than 2 hours before
turning it on.
5. It is strongly recommended that the entire machine is thoroughly cleaned
before use. Please follow the cleaning instructions in "Cleaning and
Maintenance" to clean the machine.
WARNING
When adding water to rell the machine, please add potable water,
preferably pure water from a barrel or bottle. The quality of the
water directly affects the clarity of the ice cubes and the life of the
machine.
1. Add water
Automatically adding water(External water source)
Step 1: Connect one side (20mm) of the adapter to the tap.
Step 2: Connect one end of the white PE hose to the other end (Ø 6.5 mm) of the
adapter.
Step 3: Connect the other end of the white PE hose to the Tap Water Inlet.

27
EN
Adding water manually
Open the upper ap of the machine and pour drinking water into ⑥ "manual
water addition box" until the water level does not drop any more.
Caution: Drinking water with high acidity and alkalinity will corrode the frozen
column.
Tap water
inlet
White PE hose
adapter
faucet

28
EN
2. Make Ice
• Connect the machine and press the ON/OFF button on the control panel
lightly. The machine will start to detect the water level and will request to be
lled with water. Press the "MAKE ICE" button to start making ice. The "MAKE
ICE" light remains on during the ice making process. One ice making cycle
takes approximately 9 minutes and can produce 12 bullet shaped ice cubes.
The ice making time will vary depending on the ambient temperature, the
higher the temperature, the longer the ice making time. During ice making, the
"MAKE ICE" icon will always be lit.
• If you rst touch the "COLD WATER" button and then touch the "MAKE ICE"
button, the "MAKE ICE" icon will keep ashing. It indicates that the "Making
Ice" function will be performed after the Make Ice Water function is nished.
"MAKE ICE" is waiting to start.
• If the "ICE FULL" icon is always lit, the machine will stop making ice. However,
it will continue to make ice after the ice cubes have been removed from the ice
tray.
• If the "ADD WATER" icon is always lit, the machine is low on water and
needs to be relled. The machine will automatically start working once it has
replenished the water.
• In the process of making ice, touch the "MAKE ICE" button to stop making ice.
3. Make cold ice water
• Plug in the machine and lightly press the ON/OFF button on the control
panel. Then the machine will start to detect the water level and request to be
lled with water. Touch the "COLD WATER" button, the machine detects the
temperature of water, when the temperature is reach the set temperature to
start, the "COLD WATER" keeps lit and the machine starts making ice water,
otherwise "COLD WATER" keeps ashing and waiting to start. In the process of
ice water making, the temperature of water reach the setting temperature to
stop ice water making, the "COLD WATER" icon keeps ashing.
• If you rst touch the "MAKE ICE" button and then the "COLD WATER" button,
the "COLD WATER" icon will continue to ash. It indicates that the "Making Ice
Water" function will continue after the "Making Ice" function is nished. "Make
cold ice water" is waiting to start.
• In the process of making cold ice water, touch the "COLD WATER" button to
stop making ice water.
4. Crush ice
• Open the ip cover and remove the crushed ice tray cover. Manually add ice
cubes to the "crushed Ice box", close the "crushed ice box cover" and ip it
tightly, then press the "CRUSH ICE" button to crush the ice. The ice cubes are
automatically dispensed and ejected from the Crushed Ice dispenser.
• In the process of crushing ice, press the "CRUSH ICE" button from the ice
crusher.

29
EN
5. Dispense ice cubes/ ice water
• Gently press the "POUR ICE" button, the impeller in the ice bin will begin
to rotate and the ice cubes will begin to fall from the "POUR ICE" position.
Press the "POUR ICE" button again and the impeller will stop rotating, ending
the ice dispensing process. For optimal ice dispensing, make sure there are
enough ice cubes in the ice tray and a cup ready to be lled with ice cubes.
• Gently press the "POUR WATER" button, water will ow from the "POUR
WATER"position. Press the "POUR WATER" button again to stop the ice water
coming out.
Note: If you press the "POUR WATER" button without rst operating the "MAKE
ICE" or "COLD WATER" buttons, the water that comes out will not be ice water.
The "POUR WATER" function is automatically deactivated if it is used for more than
10 seconds.
Important information
• Check the cleanliness of the water tank and ice bin. Please clean and change
the water regularly.
• The temperature of the added water directly affects the ice production. The
lower the water temperature, the greater the ice production.
• The lower the ambient temperature where the machine is placed, the greater
the ice production.
• The quality of the water used will affect the life of the machine's water pump.
It is best to use softened water, pure water or drinking distilled water. Some
abnormal noises during the operation of the water pump are caused by
impurities in the water. This is a normal phenomenon and does not affect the
use of the machine.
30
EN
CLEANING AND MAINTENANCE
• Unpack the unit.
• Use a neutral detergent, warm water and a soft cloth to scrub and clean the
water tank, crushed ice tray, crushed ice tray cover and silicone hose.
• The machine cabinet can be cleaned with the machine switched off. It is best to
wipe with a dry cloth.
• You can also add water to make ice for 1–2 cycles, then throw away all ice
cubes and water.
• After cleaning, replace the drain plug at the bottom of the machine.
• If the machine has not been used for a long time, drain the water in the water
tank.
Note: When the machine has been used for a long time, please clean the inside of
the machine according to the following instructions.
Opening the rear panel
1. Disconnect the power plug, place the machine on a level surface, press the
two "Rear panel buckles" on the back of the machine and open the rear panel
downwards.
2. Pull out the ② "Silicone Drain Tube" rst. Pull out the ① "Ice and water box".
3. Use cleaning tools to clean the Ice Maker Water Box and Silicone Hose.
Note: After cleaning, all parts must be returned to their original positions.
Rear wall plate
buckle

31
EN
Drainage operation
There is a drain plug ⑧ at the bottom of the machine.
Place the machine on a stable surface and remove the drain plug.
Drain the water from the machine immediately.
32
EN
TROUBLESHOOTING
Problem Possible Cause Solution
"Add water" indicator
light always on
Lack of water in the
water tank
Manually rell water
tank.
The level switch oat in
the cold water tank is
stuck and will not rise.
Clean the cold water
tank and level switch.
Ice cubes are too thin Ambient temperature
too high
Move the machine to a
cooler location
Poor ventilation The distance between
the back, left and right
sides of the machine and
the obstacle is greater
than 15cm
Ice too thick Ambient temperature
too low
Move the machine to a
warmer place
The ice cycle is normal,
but no ice is produced
The ambient tempera-
ture is too high or the
water temperature in the
water tank is too high.
Move to a location where
the ambient tempera-
ture is less than 32°C
and add cold water
Refrigerant leak Requires professional
repair
Refrigerant pipe blocked Requires professional
repair
The machine does not
produce cold water
Lack of water in the
water tank
Check the water pressu-
re of the inlet channel
and the smoothness of
the channel
The machine does not
produce ice
The ice making time is
too short and there is
no ice or less ice in the
fridge
One ice-making cycle
takes approximately 9
minutes. A few more ice-
making cycles will make
it normal.

33
EN
DISPOSAL CONSIDERATIONS
If there is a legal regulation for the disposal of electrical
and electronic devices in your country, this symbol on the
product or on the packaging indicates that this product
must not be disposed of with household waste. Instead,
it must be taken to a collection point for the recycling
of electrical and electronic equipment. By disposing of
it in accordance with the rules, you are protecting the
environment and the health of your fellow human beings
from negative consequences. For information about the
recycling and disposal of this product, please contact your
local authority or your household waste disposal service.
MANUFACTURER & IMPORTER (UK)
Manufacturer:
Chal-Tec GmbH, Wallstrasse 16, 10179 Berlin, Germany.
Importer for Great Britain:
Berlin Brands Group UK Limited
PO Box 42
272 Kensington High Street
London, W8 6ND
United Kingdom

35
ES
DATOS TÉCNICOS
Número del artículo 10046192
Tipo de clima SN/N/ST
Clase de protección I
Suministro eléctrico 220-240 V ~ 50/60 Hz
Corriente nominal 0.85 A
Potencia 130 W
Refrigerante R290/ 28g
Vesicante C
5
H
12
Aislamiento EPS
Peso neto 13.7 kg
Peso bruto 15,2 kg
Carcasa Acero inoxidable
Tamaño del producto 464x277x480 mm
Forma de cubitos de hielo Forma esférica
Dispensación de hielo por ciclo de
producción
12 unidades
CONTENIDO
Datos técnicos 35
Indicaciones de seguridad 36
Descripción general del aparato 39
Instrucciones de uso 42
Limpieza y mantenimiento 46
Detección y reparación de anomalías 48
Indicaciones sobre la retirada del aparato 49
Fabricante e importador (Reino Unido) 49
Estimado cliente:
Le felicitamos por la adquisición de este producto. Lea
atentamente el siguiente manual y siga cuidadosamente
las instrucciones de uso con el n de evitar posibles
daños. La empresa no se hace responsable de los daños
causados por el incumplimiento de las instrucciones y
el uso indebido del aparato. Escanee el siguiente código
QR para obtener acceso al manual de usuario más
reciente y otra información sobre el producto.

36
ES
INDICACIONES DE SEGURIDAD
• Para evitar daños debidos a un uso inadecuado, lea atentamente el manual de
instrucciones antes de utilizar este producto y utilícelo únicamente para el n
especicado.
• Coloque el aparato en una supercie plana.
• Utilice el aparato sólo en interiores.
• Desenchufe el aparato de la toma de corriente cuando ya no lo use.
• No sumerja el cable de alimentación en agua ni en ningún otro líquido.
• Emplee únicamente los accesorios expresamente recomendados por el fabri-
cante para este aparato.
• No coloque el aparato directamente debajo de una toma de corriente.
• No deje que el cable de alimentación cuelgue sobre la supercie de trabajo de
manera que los niños no puedan tirar de él.
• No llene el aparato en exceso, pues podrían producirse cortocircuitos y des-
cargas eléctricas.
• Asegúrese de que la tapa esté siempre cerrada durante el funcionamiento.
• No desconecte el enchufe tirando del cable, sino del cuerpo del enchufe.
• Utilice este aparato solo para el n al que está destinado. La empresa no
se hace responsable de los daños causados por el incumplimiento de las
instrucciones y el uso indebido del aparato. Utilice el aparato sólo para uso
doméstico.
• No conecte el aparato a un temporizador o una toma de corriente con control
remoto.
• No sumerja el aparato en agua.
• Le aconsejamos evitar el uso de un cable alargador, ya que puede sobrecalen-
tarse y provocar un incendio.
• Si el cable de alimentación está dañado, debe ser sustituido por el fabricante,
el servicio técnico o una persona con cualicación similar para evitar peligros.
• Respete la normativa local para la eliminación de aparatos que contengan
refrigerantes y gases inamables.
• No almacene sustancias inamables o explosivas en el aparato.
• Nunca toque la supercie del evaporador con la mano cuando la máquina de
hielo esté en funcionamiento. Esto puede provocar congelaciones en la piel.
• No vuelque la máquina de cubitos de hielo. Si la máquina se ha volcado, déjela
2 horas antes de volver a encenderla.
• Si la máquina de cubitos se ha traído del exterior al interior en invierno, espe-
re unas horas a que se caliente a temperatura ambiente antes de encenderla.
• Elimine el aparato únicamente en un punto de recogida de residuos autoriza-
do. No exponga el aparato a llamas abiertas.
• Este aparato no está destinado a ser utilizado por personas (incluidos niños)
con capacidades físicas, sensoriales o mentales reducidas, o con falta de expe-
riencia y/o conocimientos, a menos que hayan sido supervisadas o instruidas
acerca del uso del aparato por una persona responsable de su seguridad.
• No permita que los niños jueguen con el aparato. La limpieza y el manten-
imiento del usuario no deben ser realizados por niños sin supervisión.
• Los niños de 3 a 8 años no deben llenar o vaciar frigorícos.
37
ES
• Este aparato está destinado al uso en hogares y lugares similares, como por
ejemplo
- Áreas de cocina para el personal en tiendas, ocinas y otros entornos de
trabajo;
- Para clientes en hoteles, moteles y otros entornos residenciales;
- Entornos como Bed & Breakfast.
- Restauración y áreas no comerciales similares.
Este aparato contiene el refrigerante propano (R290), un gas natural y respetuoso
con el medio ambiente. Aunque sea inamable, no es perjudicial para la capa de
ozono ni aumenta el efecto invernadero. Sin embargo, el uso de este refrigerante
provoca un ligero aumento del nivel de ruido del aparato. Además del sonido
del compresor, es posible que también pueda oír el refrigerante uyendo por
el sistema. Este hecho es inevitable y no produce ningún efecto negativo en el
rendimiento del aparato. Este hecho es inevitable y no produce ningún efecto
negativo en el rendimiento del aparato. Durante el transporte y la instalación del
aparato, debe prestarse atención a que no se dañe ninguna pieza del sistema de
refrigeración. Las fugas de refrigerante pueden causar lesiones oculares.
ADVERTENCIA
¡Peligro de incendio por eliminación inadecuada! Tenga en cuenta la
normativa local para la eliminación de aparatos que contengan
refrigerantes y gases inamables.
• Mantenga las aberturas de ventilación de la carcasa del aparato libres de
obstrucciones.
• El circuito del refrigerante no debe estar dañado
• El sistema de refrigeración contiene un refrigerante de alta presión. No dañe
el sistema de refrigeración.
• El mantenimiento del sistema de refrigeración debe ser realizado por especial-
istas.
• No utilice dispositivos mecánicos u otros medios para acelerar el proceso de
descongelación o recuperación de hielo.
• No utilice aparatos eléctricos en los compartimentos de almacenamiento
de alimentos del aparato a menos que sean del tipo recomendado por el
fabricante.
• Desenchufe la máquina de hielo de la toma de corriente antes de limpiarlo o
realizar reparaciones o trabajos de mantenimiento.
• No limpie la máquina de hielo con líquidos inamables, ya que podría provo-
car un incendio o una explosión.
• El refrigerante y el gas aislante son inamables.

38
ES
Instrucciones especiales
• Al colocar el aparato, procure no doblar o dañar el cable de alimentación.
• Asegúrese de que no haya varios enchufes o fuentes de alimentación en la
parte posterior del dispositivo.
Para evitar la contaminación de los alimentos, siga las estas instrucciones:
• Limpie regularmente las supercies que puedan estar en contacto con los
alimentos. Limpie el drenaje de agua regularmente.
• Llene el aparato solo con agua potable.
• Si el dispositivo contiene un tanque de agua, límpielo si no se ha utilizado du-
rante más de 48 horas. Si el dispositivo contiene un tanque de agua, límpielo
si no se ha utilizado durante más 48 horas.
ADVERTENCIA
Cuando utilice, repare o deseche el aparato, busque el símbolo de la
izquierda situado en la parte posterior o en el compresor del
aparato. Este símbolo advierte de posibles incendios. Hay sustancias
inamables en los conductos de refrigerante y en el compresor.
Mantenga el dispositivo alejado de fuentes de incendio durante el
uso, mantenimiento y eliminación.

39
ES
DESCRIPCIÓN GENERAL DEL APARATO
Aparato
Panel de control
40
ES
1 Depósito de agua
2 Tapa del depósito de agua
3 Panel de control
4 Recipiente para hielo picado (crushed ice): Este recipiente debe llenarse
con hielo antes de picarlo
5 Tapa del recipiente de hielo picado (crushed ice): La tapa debe cerrarse
después de llenarla con cubitos de hielo.
6 Llenado manual de agua: Si no hay una fuente de agua externa, puede
verter agua manualmente en el depósito de agua hasta que el nivel de
agua deje de bajar
7 Tapa: La función de picado de hielo sólo puede utilizarse cuando la tapa
superior está cerrada.
8 Tapón de vaciado del depósito de agua inferior: Cuando limpie el depósito
de agua y el depósito de agua fría, extraiga el tapón de vaciado situado en
la parte inferior del aparato, vacíe el agua y vuelva a colocar el tapón de
vaciado después de vaciar.
9 Pour ice: Dispensador de cubitos de hielo / hielo picado (crushed ice)
10 Pour water: Dispensador de agua
11 Entrada de aire: La distancia entre la entrada de aire y los objetos
circundantes debe ser superior a 10 cm.
12 Parte trasera
13 Salida de aire: La distancia entre la salida de aire y cualquier obstáculo
debe ser superior a 15 cm para garantizar una buena ventilación del
aparato.
A ADD WATER: Indicador luminoso de bajo nivel de agua
B ICE FULL: Indicador de advertencia de bandeja de hielo llena.
C ICE WATER: Pulse el botón para producir agua helada
D MAKE ICE: Pulse el botón para hacer cubitos de hielo
E COLD WATER: Pulse el botón para producir agua fría
F CRUSH ICE: Pulse el botón para triturar cubitos de hielo
G Pour ice: Pulse el botón para dispensar cubitos de hielo
H Pour water: Pulse el botón para dispensar agua fría
I ON/OFF: Pulse el botón para encender y apagar el dispositivo
41
ES
Descripción general de las teclas
Símbolo Signicado Símbolo
iluminado
El símbolo parpadea
La tapa está
abierta
La tapa superior
está abierta
Trituración de
cubitos de hielo
El aparato tritura
hielo
Producir hielo El aparato
produce hielo
1. La producción de hielo
está desactivada
2. La función de
producción de hielo está
lista
Producir agua
fría
El aparato
produce agua fría
1. La producción de agua
fría está desactivada
2. La función de
producción de agua fría
está lista
Encendido/
apagado
El aparato está
encendido.
El aparato está apagado
Añadir agua El depósito de
agua tiene muy
poca agua;
rellene con agua
Cesta de hielo
llena
El depósito de
hielo está lleno
y el fabricador
de hielo ya no
produce cubitos
42
ES
INSTRUCCIONES DE USO
1. Retire todos los embalajes interiores y exteriores para comprobar si faltan
mangueras y adaptadores de grifo. Si falta alguna pieza, póngase en contacto
con el servicio técnico.
2. La toma de corriente del aparato debe estar conectada a tierra de forma
segura y disponer de un enchufe independiente.
3. Coloque el aparato en un lugar bien ventilado, con una temperatura ambiente
relativamente baja y en posición horizontal. La distancia entre la salida de aire
y el obstáculo debe ser superior a 15 cm, y la distancia entre los dos lados y el
obstáculo no debe ser inferior a 10 cm.
4. Si el aparato se ha puesto boca abajo durante el transporte o la manipulación,
se recomienda dejarlo reposar más de 2 horas antes de encenderlo.
5. Se recomienda encarecidamente limpiar el aparato y los accesorios antes de
usarlos. Para limpiar el aparato, siga las instrucciones del apartado "Limpieza y
mantenimiento".
ADVERTENCIA
Llene el aparato sólo con agua potable, preferiblemente agua pura
de bidón o botella. La calidad del agua inuye directamente en la
claridad de los cubitos de hielo y en la vida útil del aparato.
1. Añadir agua
Adición automática de agua (fuente de agua externa)
Paso 1: Conecte un lado (20 mm) del adaptador al grifo.
Paso 2: Conecte un extremo de la manguera blanca de PE al otro extremo (Ø 6,5
mm) del adaptador.
Paso 3: Conecte el otro extremo de la manguera blanca de PE a la entrada de agua
del grifo.
43
ES
Añadir agua manualmente
Abra la tapa superior de la máquina y llene de agua potable el depósito de agua ⑥
hasta que el nivel de agua deje de bajar.
¡Atención! El agua potable con un alto contenido en ácidos y álcalis puede corroer
la columna de congelación.
Entrada de
agua del grifo
Manguera blanca de PE
Adaptador
Grifo

44
ES
2. Producir hielo
• Conecte el aparato y pulse ligeramente el botón ON/OFF del panel de control.
El aparato reconoce automáticamente el nivel de agua e indica que es necesa-
rio llenarlo de agua. Pulsa el botón "MAKE ICE" para empezar a hacer cubitos
de hielo. El piloto "MAKE ICE" permanece encendido durante la producción
de cubitos de hielo. Un ciclo de preparación de cubitos de hielo dura unos 9
minutos y puede producir 12 cubitos de hielo. El tiempo de preparación de los
cubitos de hielo depende de la temperatura ambiente; cuanto mayor sea la
temperatura, mayor será el tiempo de preparación de los cubitos. Durante la
preparación de cubitos de hielo, el símbolo "MAKE ICE" se ilumina permanen-
temente.
• Si toca primero el botón "COLD WATER" y luego el botón "MAKE ICE", el sím-
bolo "MAKE ICE" seguirá parpadeando. Indica que la producción de cubitos de
hielo se está llevando a cabo una vez nalizada la producción de agua helada.
La función de producción de hielo está lista
• Si el símbolo "ICE FULL" se enciende de forma continua, el aparato deja de
fabricar cubitos de hielo. Sin embargo, sigue produciendo cubitos de hielo
después de sacarlos de la cubitera.
• Si el símbolo "ADD WATER" se enciende de forma continua, el suministro de
agua del aparato es bajo y es necesario rellenarlo. El aparato vuelve a funcio-
nar automáticamente en cuanto se llena de agua.
• Durante la preparación de cubitos de hielo, toque el botón "MAKE ICE" para
nalizar la preparación de cubitos.
3. Producir agua fría
• Conecte el aparato y pulse ligeramente el botón ON/OFF del panel de control.
El aparato reconoce automáticamente el nivel de agua e indica que es nece-
sario llenarlo de agua. Toque el botón "COLD WATER", el aparato determina
la temperatura del agua. Cuando la temperatura alcanza la temperatura de
inicio ajustada, se enciende el indicador "COLD WATER" y la máquina empieza
a producir agua fría. De lo contrario, la indicación "COLD WATER" parpadea y el
aparato espera a ser utilizado. Si la temperatura del agua alcanza la tempera-
tura ajustada durante la producción de agua fría, el símbolo "COLD WATER"
sigue parpadeando.
• Si toca primero el botón "COLD WATER" y luego el botón "MAKE ICE", el sím-
bolo "MAKE ICE" seguirá parpadeando. Indica que la producción de agua fría
continuará una vez nalizada la producción de cubitos de hielo. La producción
de agua fría está lista
• Toque el botón „COLD WATER“ durante la producción de agua fría para detener
la producción de agua fría.
4. Trituración de cubitos de hielo
• Abra la cubierta y retire la tapa de la bandeja de hielo picado. Introduzca man-
ualmente los cubitos de hielo en el recipiente de hielo picado, cierre bien la
tapa del recipiente de hielo picado y pulse el botón "CRUSH ICE" para triturar

45
ES
los cubitos. Los cubitos de hielo picado se dispensan automáticamente y
pueden retirarse del dispensador de hielo picado.
• Pulse el botón "CRUSH ICE" del fabricador de cubitos de hielo mientras se
trituran los cubitos.
5. Dispensación de cubitos de hielo/ agua fría
• Pulse suavemente el botón "POUR ICE", el impulsor del contenedor de hielo
empieza a girar y los cubitos caen por la posición "POUR ICE". Si vuelve a
pulsar el botón "POUR ICE", el impulsor dejará de girar y nalizará el proceso
de dispensación de cubitos de hielo. Para garantizar una dispensación óptima
de cubitos de hielo, asegúrese de que hay sucientes cubitos en la bandeja y
de que hay un vaso listo para ser llenado con cubitos de hielo.
• Pulse ligeramente el botón "POUR WATER" y el agua saldrá por la posición
"POUR WATER". Pulse de nuevo el botón "POUR WATER" para interrumpir el
suministro de agua fría.
Nota: Si pulsa el botón "POUR WATER" sin pulsar antes los botones "MAKE ICE" o
"COLD WATER", el agua dispensada no será agua fría. La función "POUR WATER"
se desactiva automáticamente si se utiliza durante más de 10 segundos seguidos.
Informaciones importantes
• Compruebe que el depósito de agua y la cubitera estén limpios. Limpie y
cambie el agua periódicamente.
• La temperatura del agua suministrada tiene un efecto directo en la produc-
ción de cubitos de hielo. Cuanto menor sea la temperatura del agua, mayor
será la producción de cubitos de hielo.
• Cuanto menor sea la temperatura ambiente, mayor será la producción de
cubitos de hielo.
• La calidad del agua utilizada inuye en la vida útil de la bomba de agua del
aparato. Lo mejor es utilizar agua descalcicada, agua pura o agua destilada.
Algunos ruidos inusuales durante el funcionamiento de la bomba de agua
son causados por impurezas en el agua. Se trata de un proceso normal y no
inuye en el uso del aparato.
46
ES
LIMPIEZA Y MANTENIMIENTO
• Desembale el aparato.
• Utilice un detergente neutro, agua tibia y un paño suave para frotar y limpiar
el depósito de agua, la bandeja de hielo picado, la tapa de la bandeja de hielo
picado y el tubo de silicona.
• La carcasa del aparato puede limpiarse con el aparato apagado. Limpie el
exterior con un paño seco.
• También puede añadir agua para hacer cubitos de hielo durante 1-2 ciclos y
luego desechar todos los cubitos y el agua.
• Después de la limpieza, vuelva a colocar el tapón de vaciado en la parte inferior
del aparato.
• Si el aparato no se ha utilizado durante mucho tiempo, vacíe el agua del de-
pósito de agua.
Nota: Si el aparato se ha utilizado durante mucho tiempo, limpie el interior del
aparato de acuerdo con las siguientes instrucciones.
Abrir la parte trasera
1. Desconecte el enchufe de la toma de corriente, coloque el aparato sobre una
supercie plana, presione los dos "cierres del panel trasero" situados en la
parte posterior del aparato y abra el panel trasero hacia abajo.
2. Primero saque la manguera de drenaje de silicona ②. Saque el contenedor de
hielo y agua ①.
3. Utilice herramientas de limpieza para limpiar el depósito de agua de la
máquina de hacer hielo y la manguera de silicona.
Nota: Después de la limpieza, todas las piezas deben volver a su posición original.
Hebilla de placa
trasera
47
ES
Proceso de drenaje
Hay un tapón de vaciado ⑧ en la parte inferior del aparato.
Coloque el aparato sobre una supercie estable y retire el tapón de vaciado.
Vacíe inmediatamente el agua del aparato.

48
ES
DETECCIÓN Y REPARACIÓN DE ANOMALÍAS
Anomalía Posible causa Solución
El indicador luminoso
"Add Water" está en-
cendido.
Falta de agua en el
depósito
Llenar el depósito de
agua manualmente
El otador del interrup-
tor de nivel del depósito
de agua fría está jo y
no sube
Limpiar el depósito de
agua fría y el interruptor
de nivel
Los cubitos de hielo son
demasiado pequeños
La temperatura ambi-
ente es demasiado alta.
Coloque la unidad en un
lugar más fresco.
Ventilación deciente La distancia entre la
parte trasera, izquierda
y derecha del aparato y
los objetos circundantes
debe ser superior a 15
cm
Los cubitos de hielo son
demasiado grandes
La temperatura ambi-
ente es demasiado baja
Reubique el aparato en
un lugar más templado
El ciclo de preparación
de cubitos de hielo es
normal, pero no se
producen cubitos
La temperatura ambi-
ente es demasiado alta o
la temperatura del agua
en el depósito de agua
es demasiado alta.
Traslade el aparato a
un lugar donde la tem-
peratura ambiente sea
inferior a 32 °C y añada
agua fría
Fuga de refrigerante Requiere reparaciones
profesionales
Línea de refrigerante
bloqueada
Requiere reparaciones
profesionales
El aparato no produce
agua fría
Falta de agua en el
depósito
Comprobar la presión
del agua del canal de
entrada y la limpieza del
canal
El aparato no produce
cubitos de hielo
El tiempo de preparación
del hielo es demasiado
corto y no hay cubi-
tos o hay pocos en el
recipiente
Un ciclo de fabricación
de cubitos de hielo dura
aproximadamente 9
minutos. Después de
algunos ciclos más de
fabricación de hielo,
todo vuelve a la normal-
idad.
49
ES
INDICACIONES SOBRE LA RETIRADA DEL
APARATO
Si en su país existe una disposición legal relativa a la
eliminación de aparatos eléctricos y electrónicos, este
símbolo estampado en el producto o en el embalaje
advierte que no debe eliminarse como residuo doméstico.
En lugar de ello, debe depositarse en un punto de
recogida de reciclaje de aparatos eléctricos y electrónicos.
Una gestión adecuada de estos residuos previene
consecuencias potencialmente negativas para el medio
ambiente y la salud de las personas. Puede consultar más
información sobre el reciclaje y la eliminación de este
producto contactando con su administración local o con
su servicio de recogida de residuos.
FABRICANTE E IMPORTADOR (REINO UNIDO)
Fabricante:
Chal-Tec GmbH, Wallstraße 16, 10179 Berlín, Alemania.
Importador para Gran Bretaña:
Berlin Brands Group UK Limited
PO Box 42
272 Kensington High Street
London, W8 6ND
United Kingdom


51
FR
FICHE TECHNIQUE
Numéro d'article 10046192
Type de climat SN/N/ST
Norme de protection I
Alimentation 220-240 V – 50/60 Hz
Courant nominal 0,85 A
Puissance 130 W
Réfrigérant R290 / 28 g
Vésicant C
5
H
12
Isolation EPS
Poids net 13,7 kg
Poids brut 15,2 kg
Boîtier Acier inoxydable
Dimensions du produit 464 x 277 x 480 mm
Forme des glaçons Sphérique
Distribution de glace par cycle de
production
12 pièces
SOMMAIRE
Fiche technique 51
Consignes de sécurité 52
Descriptif de l'appareil 55
Mode d'emploi 58
Nettoyage et maintenance 61
Identication et résolution des problèmes 64
Informations sur le recyclage 65
Fabricant et importateur (UK) 65
Cher client, chère cliente,
Toutes nos félicitations pour l’acquisition de ce nouvel
appareil. Lisez attentivement les consignes suivantes et
suivez-les pour éviter d'éventuels dommages. Nous ne
saurions être tenus pour responsables des dommages
dus au non-respect des consignes et à la mauvaise
utilisation de l’appareil. Scannez le QR-Code pour
obtenir la dernière version du mode d'emploi ainsi que
d'autres informations concernant le produit

52
FR
CONSIGNES DE SÉCURITÉ
• Pour éviter tout dommage dû à une mauvaise utilisation, veuillez lire at-
tentivement le mode d'emploi avant d'utiliser ce produit et ne l'utiliser que
conformément à l'objectif indiqué dans le mode d'emploi.
• Placez l'appareil sur une surface horizontale.
• Utilisez l'appareil uniquement à l'intérieur.
• Lorsque vous n'utilisez plus l'appareil, débranchez la che de la prise.
• Ne plongez jamais l'appareil dans l'eau ou dans d'autres liquides.
• Utilisez uniquement des accessoires expressément recommandés par le
fabricant pour cet appareil.
• Ne placez pas l'appareil directement sous une prise de courant.
• Ne laissez pas le cordon d'alimentation pendre du plan de travail, pour éviter
que les enfants ne puissent le tirer.
• Ne remplissez pas trop l'appareil pour éviter de provoquer un court-circuit ou
un choc électrique.
• Veillez à ce que le couvercle soit toujours fermé pendant le fonctionnement.
• Ne tirez pas sur le câble pour le débrancher de la prise, mais tirez sur la che
elle-même.
• Utilisez l'appareil aux ns prévues uniquement. Nous ne saurions être tenus
pour responsables des dommages causés par le non-respect des instructions
et une utilisation inappropriée. Utilisez l'appareil exclusivement à l'intérieur.
• Ne connectez pas l'appareil à une minuterie ou à une prise radiocommandée.
• Ne plongez pas l'appareil dans l'eau.
• Nous vous déconseillons d'utiliser une rallonge car elle pourrait surchauffer et
présenter un risque d'incendie.
• Si le cordon d'alimentation est endommagé, il doit être remplacé par le fabri-
cant, le service client ou une personne de qualication similaire pour éviter
tout danger.
• Respectez la réglementation locale pour l'élimination des équipements conte-
nant des gaz inammables.
• Ne conservez pas de substances facilement inammables ou explosives dans
l'appareil.
• Ne touchez jamais la surface de l'évaporateur avec la main lorsque la machine
à glaçons est en marche. Cela peut entraîner des gelures sur la peau.
• Ne renversez pas la machine à glaçons. Si la machine s'est renversée, lais-
sez-la reposer pendant 2 heures avant de la remettre en marche.
• Si la machine à glaçons a été déplacée de l'extérieur vers l'intérieur en hiver,
attendez quelques heures qu'elle se réchauffe à la température ambiante
avant de la mettre en marche.
• Ne vous débarrassez de l'appareil que dans un centre de traitement des
déchets agréé. N'exposez pas l'appareil à des ammes nues.
• Cet appareil n'est pas destiné à être utilisé par des personnes (enfants y
compris) ayant des capacités physiques, sensorielles ou mentales réduites
ou manquant d'expérience et/ou de connaissances, à moins d'être sous sur-
veillance ou d'avoir été formés par une personne responsable pour s'assurer
qu'elles peuvent utiliser l'appareil en toute sécurité.

53
FR
• Les enfants ne sont pas autorisés à jouer avec l'appareil. Le nettoyage et la
maintenance utilisateur ne doivent pas être réalisés par des enfants sans
surveillance.
• Les enfants âgés de 3 à 8 ans ne sont pas autorisés à charger ou décharger les
réfrigérateurs.
• Cet appareil est destiné aux environnements domestiques et similaires telles
que par exemple :
- les cuisines du personnel dans les magasins, bureaux et autres
environnements de travail,
- les clients des hôtels, motels et autres lieux d'hébergement ;
- Des environnements comme les chambres d'hôtes.
- la restauration et les secteurs similaires non liés à la vente au détail.
Cet appareil contient le réfrigérant propane (R290), un gaz naturel et respectueux
de l'environnement. Bien qu’inammable, il n’endommage pas la couche d’ozone
et ne contribue pas à l’effet de serre. L'utilisation de ce réfrigérant a toutefois
entraîné une légère augmentation du niveau sonore de l'appareil. En plus du
bruit du compresseur, vous pourrez peut-être également entendre le réfrigérant
circuler dans le système. Ceci est inévitable et n'a aucune conséquence négative
sur les performances de l'appareil. Ceci est inévitable et n'a aucun effet
négatif sur les performances de l'appareil. Pendant le transport et l'installation
de l'appareil, veillez à ce qu'aucune pièce du système réfrigérant ne soit
endommagée. Une fuite de réfrigérant peut provoquer des lésions oculaires.
MISE EN GARDE
Risque d'incendie en cas d'élimination incorrecte ! Veuillez respecter
la réglementation locale en matière d'élimination des appareils
contenant des réfrigérants et des gaz inammables.
• Maintenez les ouvertures d'aération du boîtier de l'appareil libres de tout
obstacle.
• Le circuit du réfrigérant ne doit pas être endommagé.
• Le système réfrigérant contient un uide frigorigène à haute pression. N'en-
dommagez pas le système réfrigérant.
• L'entretien du système réfrigérant doit être effectué par des professionnels.
• N'utilisez pas de dispositifs mécaniques ou autres moyens pour accélérer le
dégivrage ou la récupération de la glace.
• N'utilisez pas d'appareils électriques dans les compartiments de conservation
des aliments de l'appareil, à moins qu'il ne s'agisse du type recommandé par
le fabricant.
• Débranchez la machine à glaçons de la prise de courant avant de la nettoyer
ou d'effectuer des réparations ou des travaux d'entretien.
• Ne nettoyez pas la machine à glaçons avec des liquides inammables, car cela
pourrait provoquer un incendie ou une explosion.

54
FR
• Le uide frigorigène et le gaz isolant sont inammables.
Remarques spéciques
• Au moment d'installer l'appareil, assurez-vous de ne pas pincer ni endomma-
ger le cordon d'alimentation.
• Assurez-vous qu'il n'y a pas de multiprises ou d'adaptateurs secteur à l'ar-
rière de l'appareil.
Pour éviter de contaminer les aliments, respectez les consignes suivantes :
• Nettoyez régulièrement les surfaces pouvant entrer en contact avec les ali-
ments. Nettoyez régulièrement l'évacuation de l'eau.
• Remplissez l'appareil avec de l'eau potable uniquement.
• Si l'appareil contient un réservoir d'eau, nettoyez-le après 48 heures sans uti-
lisation. Si l'appareil contient un réservoir d'eau, nettoyez-le après 48 heures
sans utilisation.
MISE EN GARDE
Lors de l'utilisation, de l'entretien et de la mise au rebut de
l'appareil, soyez attentif au symbole à gauche à l'arrière ou sur le
compresseur de l'appareil. Ce symbole met en garde contre les
risques d'incendie. Les conduites de réfrigérant et le compresseur
contiennent des substances inammables. Tenez l'appareil à l'écart
des sources de ammes pendant son utilisation, sa maintenance et son
élimination.

55
FR
DESCRIPTIF DE L'APPAREIL
Appareil
Panneau de commande
56
FR
1 Réservoir d'eau
2 Couvercle du réservoir d'eau
3 Panneau de commande
4 Bac à glace pilée : Ce bac doit être rempli de glace avant le broyage
5 Couvercle du bac à glace pilée : le couvercle doit être fermé après le
remplissage avec des glaçons.
6 Remplissage manuel de l'eau : s'il n'y a pas de source d'eau externe, vous
pouvez verser manuellement de l'eau dans le réservoir d'eau jusqu'à ce
que le niveau d'eau ne baisse plus
7 Couvercle : la fonction de broyage de la glace ne peut être utilisée que si le
couvercle supérieur est fermé.
8 Bouchon de vidange du réservoir d'eau inférieur : lorsque vous nettoyez le
réservoir d'eau et le réservoir d'eau froide, retirez le bouchon de vidange
situé en bas de l'appareil, videz l'eau et remettez le bouchon de vidange
en place une fois la vidange terminée.
9 Pour ice : Distribution de glaçons/glace pilée
10 Pour water : distribution d'eau
11 Entrée d'air : la distance entre l'entrée d'air et les objets environnants doit
être supérieure à 10 cm.
12 Dos de l'appareil
13 Sortie d'air : la distance entre la sortie d'air et les éventuels obstacles
doit être supérieure à 15 cm an de garantir une bonne ventilation de
l'appareil.
A ADD WATER (AJOUTER DE L'EAU) : Témoin de manque d'eau
B ICE FULL : Témoin de bac à glace plein.
C ICE WATER : appuyer sur la touche pour obtenir de l'eau glacée
D MAKE ICE : appuyer sur la touche pour fabriquer des glaçons
E COLD WATER : appuyer sur la touche pour obtenir de l'eau froide
F CRUSH ICE : appuyer sur la touche pour piler les glaçons
G Pour Ice : appuyer sur la touche pour distribuer des glaçons
H Pour water : appuyer sur la touche pour distribuer de l'eau froide
I ON/OFF : appuyer sur la touche pour allumer ou éteindre l'appareil
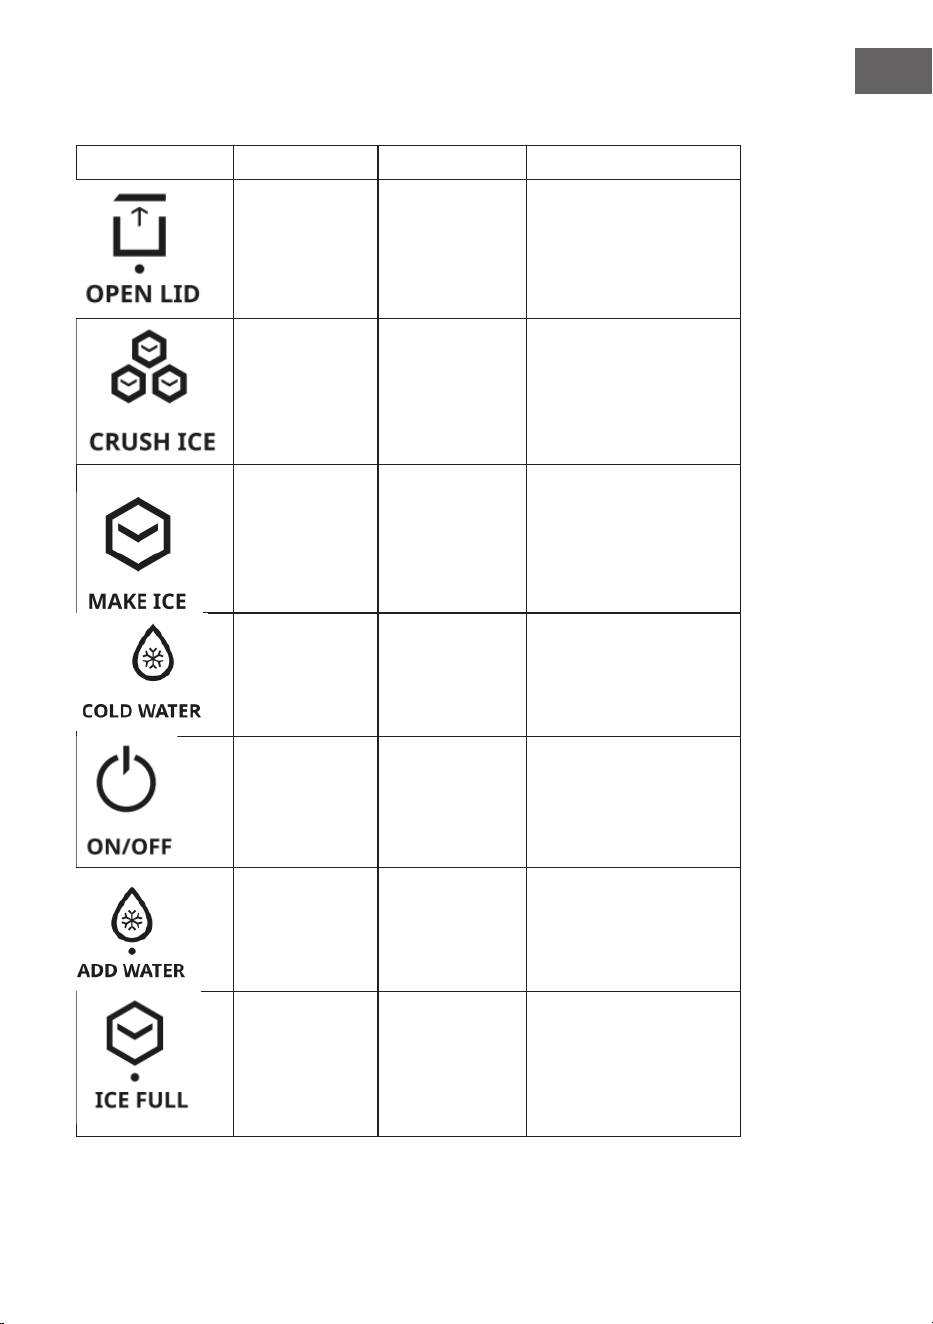
57
FR
Aperçu des touches
Icône Signication Icône éclairée Icône clignotante
Le couvercle est
ouvert
Le couvercle
supérieur est
ouvert
Broyage de
glaçons
L'appareil broie
la glace
Fabrication de
glace
L'appareil produit
des glaçons
1. La fabrication de glace
est désactivée
2. La fonction de
fabrication de glace est
prête
Production d'eau
froide
L'appareil produit
de l'eau froide
1. La production d'eau
froide est désactivée
2. La fonction de
production d'eau froide
est prête
Marche/arrêt L'appareil est
allumé.
L'appareil est éteint
Ajouter de l'eau Le réservoir
d'eau contient
trop peu d'eau ;
ajouter de l'eau
panier à glaçons
plein
Le bac à glaçons
est plein et
la machine
à glaçons ne
produit plus de
glaçons

58
FR
MODE D'EMPLOI
1. Retirez tous les emballages intérieurs et extérieurs pour vérier qu'il
ne manque pas de tuyaux et d'adaptateurs de robinet. S'il manque des
accessoires, merci de contacter notre service client.
2. La prise de courant de l'appareil doit être mise à la terre de manière sûre et
disposer d'une che séparée.
3. Installez l'appareil dans un endroit bien ventilé, à une température ambiante
relativement basse, et placez-le à l'horizontale. La distance entre la sortie d'air
et l'obstacle doit être supérieure à 15 cm et la distance entre les deux côtés et
l'obstacle ne doit pas être inférieure à 10 cm.
4. Si l'appareil a été retourné pendant le transport ou la manipulation, il est
recommandé de le laisser reposer plus de 2 heures avant de le mettre en
marche.
5. Il est fortement recommandé de nettoyer soigneusement l'appareil au complet
avant utilisation. Suivez les instructions de nettoyage dans « Nettoyage et
entretien » pour nettoyer l'appareil.
MISE EN GARDE
Pour remplir l'appareil, veuillez n'utiliser que de l'eau potable, de
préférence de l'eau pure provenant d'un bidon ou d'une bouteille.
La qualité de l'eau a un impact direct sur la clarté des glaçons et la
durée de vie de l'appareil.
1. Ajouter de l'eau
Ajout automatique d'eau (source d'eau externe)
Étape 1 : Raccordez un côté (20 mm) de l'adaptateur au robinet.
Étape 2 : Raccordez une extrémité du tuyau PE blanc à l'autre extrémité (Ø 6,5 mm)
de l'adaptateur.
Étape 3 : Raccordez l'autre extrémité du tuyau PE blanc à l'entrée d'eau du robinet.

59
FR
Ajouter de l'eau manuellement
Ouvrez la trappe supérieure de la machine et versez de l'eau potable dans le
réservoir d'eau ⑥, jusqu'à ce que le niveau d'eau ne baisse plus.
Attention ! L'eau potable à forte teneur en acide et en alcali peut corroder la
colonne de congélation.
Entrée d'eau
du robinet
Tuyau PE blanc
Adaptateur
Robinet d'eau

60
FR
2. Fabrication de glace
• Branchez l'appareil et appuyez légèrement sur la touche ON/OFF du panneau
de commande. L'appareil détecte automatiquement le niveau d'eau et indique
qu'il doit être rempli d'eau. Appuyez sur la touche MAKE ICE pour commencer
à fabriquer des glaçons. Le voyant MAKE ICE reste allumé pendant la fabrica-
tion des glaçons. Un cycle de fabrication de glaçons dure environ 9 minutes
et peut produire 12 glaçons. Le temps de fabrication des glaçons dépend de
la température ambiante ; plus la température est élevée, plus le temps de
fabrication des glaçons est long. Pendant la fabrication de glaçons, le symbole
MAKE ICE est allumé en permanence.
• Si vous appuyez d'abord sur la touche COLD WATER puis sur la touche MAKE
ICE, l'icône MAKE ICE continue de clignoter. Elle indique que la fabrication de
glaçons sera effectuée une fois la fabrication d'eau glacée terminée. La fonc-
tion de fabrication de glace est prête
• Lorsque le symbole ICE FULL reste allumé en permanence, l'appareil cesse de
fabriquer des glaçons. Cependant, il continue à produire des glaçons après que
les glaçons ont été retirés du bac à glaçons.
• Si le symbole ADD WATER (ajouter de l'eau) est allumé en permanence, la
réserve d'eau de l'appareil est faible et doit être complétée. L'appareil reprend
automatiquement son fonctionnement dès que l'eau a été rajoutée.
• Pendant la préparation des glaçons, appuyez sur la touche MAKE ICE pour
arrêter la préparation des glaçons.
3. Production d'eau froide
• Branchez l'appareil et appuyez légèrement sur la touche ON/OFF du pan-
neau de commande. L'appareil détecte automatiquement le niveau d'eau
et indique qu'il doit être rempli d'eau. Appuyez sur la touche COLD WATER,
l'appareil détermine la température de l'eau. Lorsque la température atteint la
température de départ réglée, le voyant COLD WATER s'allume et la machine
commence à produire de l'eau froide. Dans le cas contraire, l'indication COLD
WATER clignote et l'appareil attend d'être utilisé. Si la température de l'eau
atteint la température réglée pendant la production d'eau froide, le symbole
COLD WATER continue de clignoter.
• Si vous appuyez d'abord sur la touche MAKE ICE puis sur la touche COLD WA-
TER, l'icône COLD WATER continue de clignoter. Elle indique que la production
d'eau froide se poursuit une fois la fabrication de glaçons terminée. La produc-
tion d'eau froide est prête.
• Pendant la production d'eau froide, appuyez sur la touche COLD WATER pour
arrêter la production d'eau froide.
4. Broyage de glaçons
• Ouvrez le couvercle et retirez le couvercle du bac de glace pilée. Remplissez
manuellement les glaçons dans le bac à glace pilée fermez bien le couvercle
du bac à glace pilée et appuyez sur la touche CRUSH ICE pour piler les glaçons.
Les glaçons broyés sont distribués automatiquement et peuvent être retirés du

61
FR
distributeur de glace pilée.
• Pendant le broyage des glaçons, appuyez sur la touche CRUSH ICE de la
machine à glaçons.
5. Distribution de glaçons / d'eau froide
• Appuyez doucement sur la touche « POUR ICE », la roue à ailettes du bac à
glaçons se met à tourner et les glaçons tombent de l'emplacement « POUR
ICE. » Si vous appuyez à nouveau sur la touche « POUR ICE », la roue s'arrête
de tourner et le processus de distribution de glaçons s'arrête. Pour garantir
une distribution optimale des glaçons, assurez-vous qu'il y a susamment de
glaçons dans le bac à glaçons et qu'un gobelet est prêt à recevoir les glaçons.
• Appuyez légèrement sur la touche « POUR WATER » pour que l'eau s'écoule
de l'emplacement « POUR WATER. » Appuyez à nouveau sur la touche « POUR
WATER » pour interrompre la distribution d'eau froide.
Remarque : si vous appuyez sur la touche « POUR WATER » sans avoir
préalablement appuyé sur les touches MAKE ICE ou COLD WATER, l'eau distribuée
ne sera pas froide. La fonction « POUR WATER » est automatiquement désactivée
si elle est utilisée pendant plus de 10 secondes d'alée.
Informations importantes
• Vériez la propreté du réservoir d'eau et du bac à glaçons. Nettoyez ou chan-
gez régulièrement l'eau.
• La température de l'eau ajoutée a un effet direct sur la fabrication de glaçons.
Plus la température de l'eau est basse, plus la production de glaçons est
importante.
• Plus la température ambiante est basse, plus la production de glaçons est
importante.
• La qualité de l'eau utilisée inuence la durée de vie de la pompe à eau de l'ap-
pareil. Il est préférable d'utiliser de l'eau adoucie, pure ou distillée. Certains
bruits inhabituels pendant le fonctionnement de la pompe à eau sont dus à
la présence d'impuretés dans l'eau. Il s'agit d'un processus normal qui n'a
aucune incidence sur l'utilisation de l'appareil.
NETTOYAGE ET MAINTENANCE
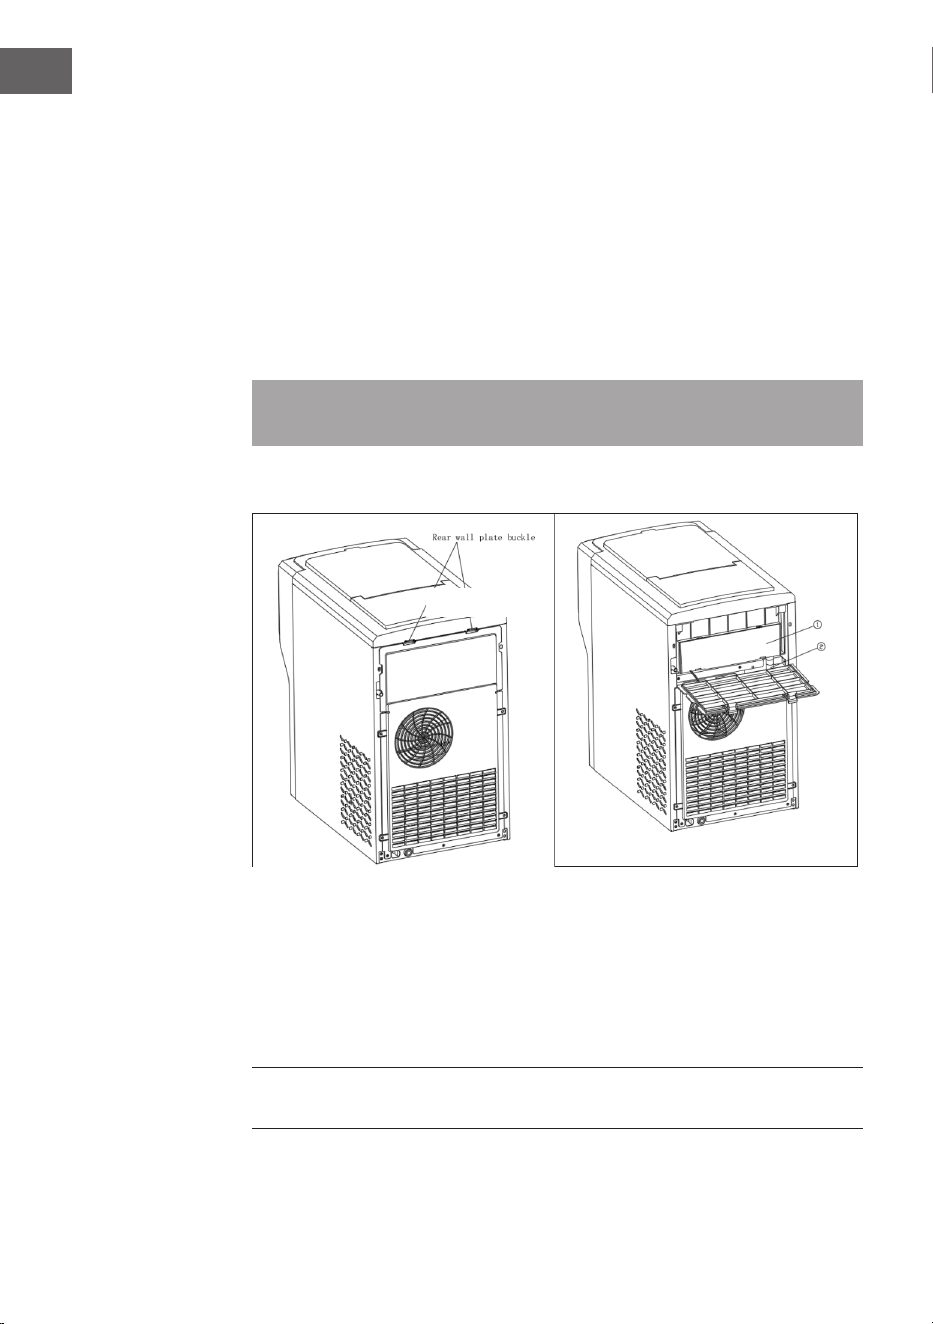
62
FR
• Déballez l'appareil.
• Utilisez un détergent neutre, de l'eau chaude et un chiffon doux pour essuyer
et nettoyer le réservoir d'eau, le bol de glace pilée, le couvercle du bol de glace
pilée et le tuyau en silicone.
• Le boîtier de l'appareil peut être nettoyé lorsque l'appareil est éteint. Essuyez
l'extérieur de l'appareil avec un chiffon sec de préférence.
• Vous pouvez également ajouter de l'eau pour faire des glaçons pendant 1 à 2
cycles, puis jeter tous les glaçons et l'eau.
• Après le nettoyage, remettez le bouchon de vidange en place sur la partie
inférieure de l'appareil.
• Si l'appareil n'a pas été utilisé pendant une longue période, videz l'eau du
réservoir d'eau.
Remarque : si l'appareil a été utilisé pendant une longue période, nettoyez
l'intérieur de l'appareil en suivant les instructions ci-dessous.
Ouverture de la face arrière
1. Débranchez l'appareil, placez-le sur une surface plane, appuyez sur les deux
fermetures du panneau arrière à l'arrière de l'appareil et ouvrez le panneau
arrière vers le bas.
2. Retirez d'abord le tuyau d'évacuation en silicone ②. Retirez le réservoir de
glace et d'eau ①.
3. Utilisez des outils de nettoyage pour nettoyer le réservoir d'eau de la machine
à glaçons et le tuyau en silicone.
Remarque : après le nettoyage, toutes les pièces doivent être remises dans leur
position initiale.
Processus de vidange
Un bouchon de vidange ⑧ se trouve sur la partie inférieure de l'appareil.
Boucle de plaque
arrière
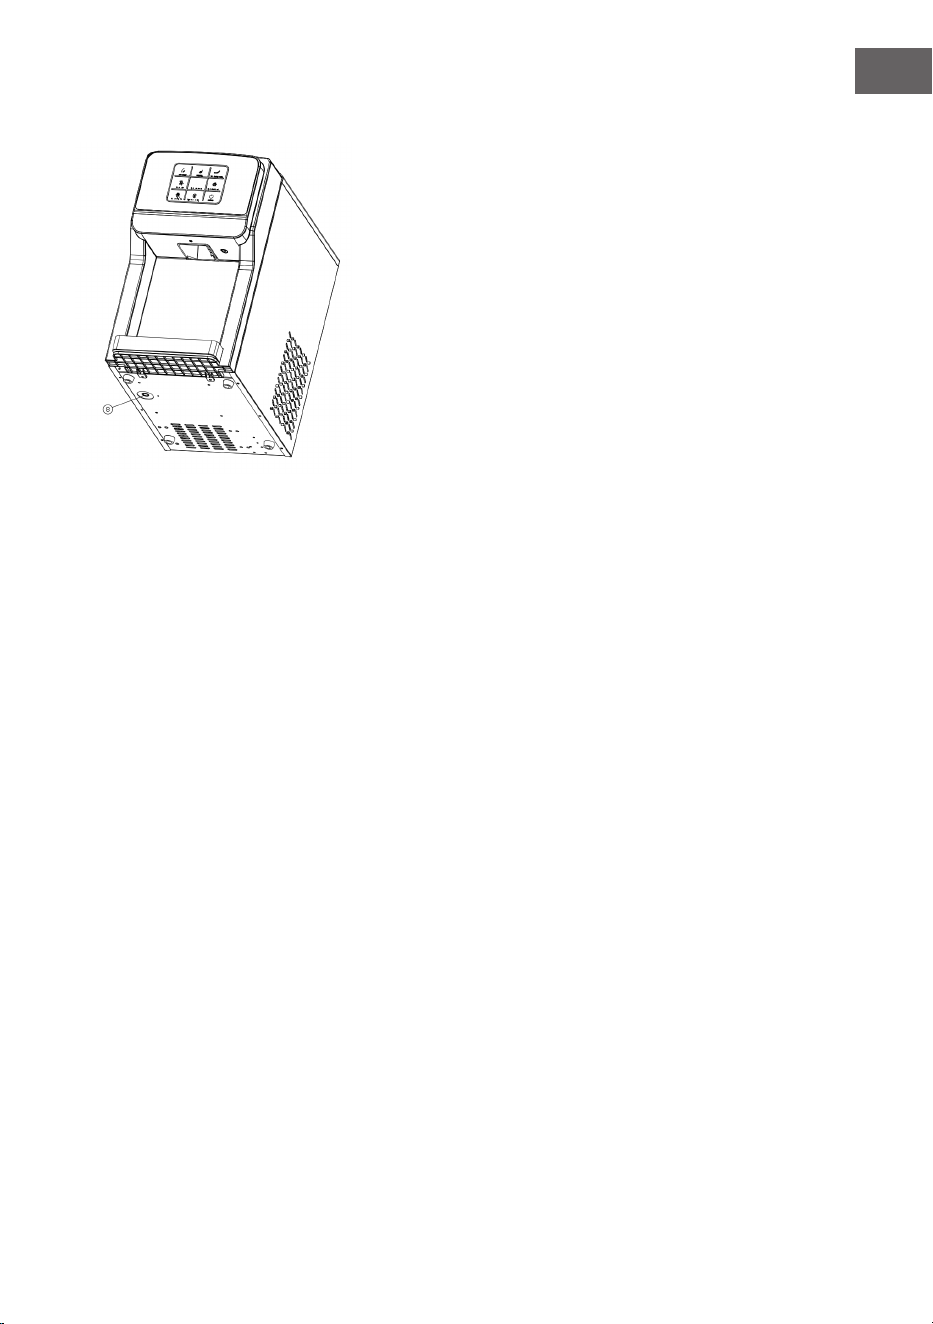
63
FR
Placez l'appareil sur une surface stable et retirez le bouchon de vidange.
Vidangez immédiatement l'eau de l'appareil.
64
FR
IDENTIFICATION ET RÉSOLUTION DES
PROBLÈMES
Problème Cause possible Solution
Le voyant « Add Water »
est allumé
Manque d'eau dans le
réservoir d'eau
Remplir le réservoir
d'eau manuellement
Le otteur du contacteur
de niveau dans le ré-
servoir d'eau froide est
bloqué et ne monte pas
Nettoyez le réservoir
d'eau froide et le contac-
teur de niveau
Les glaçons sont trop
petits
La température am-
biante est trop élevée
Déplacez l'appareil à un
endroit plus frais
Mauvaise ventilation La distance entre l'ar-
rière, les côtés gauche et
droit de l'appareil et les
objets environnants doit
être supérieure à 15 cm
Les glaçons sont trop
grands
La température am-
biante est trop basse
Déplacez l'appareil vers
un endroit plus chaud.
Le cycle de fabrication
de glaçons est normal,
mais aucun glaçon n'est
produit
La température am-
biante est trop élevée ou
la température de l'eau
est trop élevée
Allez dans un endroit où
la température ambiante
est inférieure à 32 °C et
ajoutez de l'eau froide
Fuite de uide frigori-
gène
Nécessite des répara-
tions professionnelles
Conduite de frigorigène
bloquée
Nécessite des répara-
tions professionnelles
L'appareil ne produit pas
d'eau froide
Manque d'eau dans le
réservoir d'eau
Vériez la pression de
l'eau et la propreté du
canal d'entrée
L'appareil ne produit pas
de glaçons
Le temps de fabrication
des glaçons est trop
court et il n'y a pas ou
peu de glaçons dans
le bac
Un cycle de fabrica-
tion de glaçons dure
environ 9 minutes Après
quelques cycles de
fabrication de glaçons
supplémentaires, la tem-
pérature se normalise
65
FR
INFORMATIONS SUR LE RECYCLAGE
S‘il existe une réglementation pour l‘élimination ou le
recyclage des appareils électriques et électroniques dans
votre pays, ce symbole sur le produit ou sur l‘emballage
indique que cet appareil ne doit pas être jeté avec les
ordures ménagères. Vous devez le déposer dans un point
de collecte pour le recyclage des équipements électriques
et électroniques. La mise au rebut conforme aux règles
protège l‘environnement et la santé de vos semblables
des conséquences négatives. Pour plus d‘informations
sur le recyclage et l‘élimination de ce produit, veuillez
contacter votre autorité locale ou votre service de
recyclage des déchets ménagers.
FABRICANT ET IMPORTATEUR (UK)
Fabricant :
Chal-Tec GmbH, Wallstraße 16, 10179 Berlin, Allemagne.
Importateur pour la Grande Bretagne :
Berlin Brands Group UK Limited
PO Box 42
272 Kensington High Street
London, W8 6ND
United Kingdom


67
IT
DATI TECNICI
Numero articolo 10046192
Classe climatica SN/N/ST
Grado di protezione I
Alimentazione 220-240 V – 50/60 Hz
Tensione nominale 0.85 A
Potenza 130 W
Refrigerante R290/28 g
Vescicante C
5
H
12
Isolamento EPS
Peso netto 13,7 kg
Peso lordo 15,2 kg
Alloggiamento Acciaio inox
Dimensioni del prodotto 464x277x480 mm
Stampo per cubetti di ghiaccio A forma di sfera
Erogazione di ghiaccio per ogni ciclo di
produzione
12 pezzi
INDICE
Dati tecnici 67
Avvertenze di sicurezza 68
Descrizione del dispositivo 71
Istruzioni per l'uso 74
Pulizia e manutenzione 77
Ricerca e correzione degli errori 80
Avviso di smaltimento 81
Produttore e importatore (UK) 81
Gentile cliente,
La ringraziamo per l'acquisto del dispositivo. La
preghiamo di leggere attentamente le seguenti
indicazioni e di seguirle per evitare eventuali danni. Non
ci assumiamo alcuna responsabilità per danni scaturiti
da una mancata osservanza delle avvertenze di sicurezza
e da un uso improprio del dispositivo. Scansionare il
codice QR seguente per accedere al manuale d’uso più
attuale e per ricevere informazioni sul prodotto.

68
IT
AVVERTENZE DI SICUREZZA
• Per evitare danni dovuti a un uso improprio, leggere attentamente le istruzio-
ni prima di utilizzare il prodotto e utilizzarlo solo per lo scopo specicato nel
manuale.
• Posizionare il dispositivo su una supercie piana.
• Utilizzare il dispositivo solo in ambienti chiusi.
• Quando non si usa il dispositivo, staccare la spina dalla presa.
• Non immergere il cavo di alimentazione in acqua o altri liquidi.
• Utilizzare solo accessori espressamente consigliati dal produttore per questo
dispositivo.
• Non posizionare il dispositivo direttamente sotto a una presa elettrica.
• Non lasciare che il cavo di alimentazione penda dalla supercie di lavoro, per
evitare che i bambini possano tirarlo.
• Non riempire eccessivamente il dispositivo, altrimenti potrebbero vericarsi
cortocircuiti e scosse elettriche.
• Assicurarsi che il coperchio sia sempre chiuso durante il funzionamento.
• Non tirare il cavo per staccare la spina, ma impugnare saldamente la spina
stessa.
• Utilizzare il dispositivo esclusivamente per lo scopo previsto. Non ci assumia-
mo alcuna responsabilità per danni scaturiti da una mancata osservanza del
manuale e da un uso improprio. Utilizzare il dispositivo solo in casa.
• Non collegare il dispositivo a un timer o a prese elettriche con comando radio.
• Non immergere il dispositivo in acqua.
• Si sconsiglia l'utilizzo di prolunghe, dato che potrebbero surriscaldarsi e
causare incendi.
• Se il cavo di alimentazione è danneggiato, deve essere sostituito dal produt-
tore, dal servizio di assistenza ai clienti o da una persona con qualica equiva-
lente, in modo da evitare pericoli.
• Si prega di rispettare le norme locali per lo smaltimento di dispositivi conte-
nenti gas inammabili.
• Non conservare sostanze facilmente inammabili o esplosive nel dispositivo.
• Non toccare mai la supercie dell'evaporatore con le mani quando la macchi-
na del ghiaccio è in funzione. Questo può portare al congelamento della pelle.
• Non rovesciare la macchina del ghiaccio. Se la macchina si è ribaltata, posizio-
narla correttamente e attendere 2 ore prima di riaccenderla.
• Se la macchina del ghiaccio è stata portata al chiuso dall'esterno durante
l'inverno, attendere qualche ora anché si riscaldi a temperatura ambiente
prima di accenderla.
• Smaltire il dispositivo solo presso un centro autorizzato. Non esporre il dispo-
sitivo a amme libere.
• Questo dispositivo non è progettato per essere utilizzato da persone (inclusi
bambini) con limitate facoltà siche, psichiche e sensoriali o carenza di
esperienza e/o conoscenze, a meno che siano supervisionate da una persona
responsabile del loro controllo o abbiano ricevuto istruzioni, in modo da poter
usare il dispositivo in sicurezza.
• I bambini non devono giocare con il dispositivo. Pulizia e manutenzione da

69
IT
parte dell'utente non possono essere realizzate da bambini senza la dovuta
supervisione.
• I bambini di età compresa tra 3 e 8 anni non possono caricare o scaricare il
dispositivo.
• Questo dispositivo è destinato all'uso domestico e in contesti simili, come ad
esempio:
- cucine per il personale presso negozi, uci e altri contesti lavorativi;
- dai clienti di alberghi, motel e altri tipi di alloggio;
- ambienti come i bed & breakfast;
- catering e contesti analoghi non al dettaglio.
Questo dispositivo contiene il refrigerante propano (R290), un gas naturale
ed ecologico. Sebbene sia inammabile, non è dannoso per lo strato di ozono
e non incrementa l’effetto serra. Tuttavia, l'utilizzo di questo refrigerante ha
comportato un leggero aumento del livello di rumorosità del dispositivo. Oltre al
rumore del compressore, è possibile sentire il usso del refrigerante nel sistema
di raffreddamento. Questo è inevitabile e non interferisce con le prestazioni
del dispositivo. Questo è inevitabile e non ha conseguenze negative sulle
prestazioni del dispositivo. Durante il trasporto e l'installazione del dispositivo,
è necessario prestare attenzione a non danneggiare alcuna parte del sistema di
raffreddamento. Le perdite di refrigerante possono causare danni agli occhi.
AVVERTENZA
Pericolo di incendio a causa di uno smaltimento improprio!
Rispettare le norme locali per lo smaltimento di dispositivi
contenenti refrigeranti e gas inammabili.
• Mantenere le aperture di ventilazione nell'alloggiamento del dispositivo libere
da ostruzioni.
• Non danneggiare il circuito del refrigerante.
• Il sistema di raffreddamento contiene un refrigerante ad alta pressione. Non
danneggiare il sistema di raffreddamento.
• La manutenzione del sistema di raffreddamento deve essere eseguita da
specialisti.
• Non usare dispositivi meccanici o altri mezzi per accelerare il processo di
sbrinamento o il recupero di ghiaccio.
• Non utilizzare apparecchi elettrici nei vani di conservazione degli alimenti del
dispositivo, a meno che non siano del tipo raccomandato dal produttore.
• Scollegare la macchina del ghiaccio dalla presa di corrente prima di pulirla o di
eseguire lavori di riparazione o manutenzione.
• Non pulire la macchina del ghiaccio con liquidi inammabili per evitare incendi
o esplosioni.
• Il refrigerante e il gas isolante sono inammabili.
70
IT
Note speciali
• Durante il posizionamento del dispositivo, assicurarsi di non schiacciare o
danneggiare il cavo di alimentazione.
• Assicurarsi che non ci siano prese multiple o alimentatori sul retro del dispo-
sitivo.
Per evitare la contaminazione di alimenti, seguire queste indicazioni:
• Pulire regolarmente le superci che potrebbero entrare in contatto con gli
alimenti. Pulire regolarmente lo scarico dell'acqua.
• Riempire il dispositivo solo con acqua potabile.
• Se il dispositivo ha un serbatoio dell'acqua, pulirlo se il dispositivo non è stato
usato per 48 ore. Se il dispositivo ha un serbatoio dell'acqua, pulirlo se il
dispositivo non viene utilizzato per 48 ore.
AVVERTIMENTO
Durante l’utilizzo, la manutenzione e lo smaltimento del dispositivo,
fare attenzione al simbolo a sinistra, che si trova sul retro del
dispositivo o sul compressore. Questo simbolo avverte della
possibilità di eventuali incendi. Nei condotti del refrigerante e nel
compressore si trovano sostanze inammabili. Tenere il dispositivo
lontano da fonti inammabili durante l'utilizzo, la manutenzione e lo
smaltimento.

71
IT
DESCRIZIONE DEL DISPOSITIVO
Dispositivo
Pannello di controllo

72
IT
1 Contenitore dell'acqua
2 Copertura del contenitore dell'acqua
3 Pannello di controllo
4 Contenitore per il ghiaccio tritato: questo contenitore deve essere
riempito di ghiaccio da tritare.
5 Coperchio del contenitore per il ghiaccio tritato: il coperchio deve essere
posizionato dopo aver aggiunto i cubetti di ghiaccio da tritare.
6 Riempimento dell'acqua manuale: se non ci sono fonti d'acqua esterne,
è possibile versare acqua manualmente nel contenitore no a quando il
livello non si abbassa più.
7 Copertura: la funzione per tritare il ghiaccio può essere utilizzata solo
quando la copertura superiore è chiusa.
8 Tappo di scarico del serbatoio dell'acqua inferiore: durante la pulizia del
contenitore dell'acqua e del serbatoio dell'acqua fredda, rimuovere il
tappo sul lato inferiore del dispositivo, scaricare l'acqua e riposizionare il
tappo.
9 Pour ice: erogazione di cubetti di ghiaccio/ghiaccio tritato
10 Pour water: erogazione d'acqua
11 Ingresso dell'aria: la distanza tra l'ingresso dell'aria e gli oggetti
circostanti deve essere superiore a 10 cm.
12 Lato posteriore
13 Uscita dell'aria: la distanza tra l'uscita dell'aria ed eventuali ostacoli
deve essere superiore a 15 cm per garantire una buona ventilazione del
dispositivo.
A ADD WATER: spia per il livello insuciente dell'acqua
B ICE FULL: spia per il contenitore del ghiaccio pieno
C ICE WATER: premere il tasto per produrre acqua ghiacciata
D MAKE ICE: premere il tasto per produrre cubetti di ghiaccio
E COLD WATER: premere il tasto per produrre acqua fredda
F CRUSH ICE: premere il tasto per tritare i cubetti di ghiaccio
G Pour Ice: premere il tasto per erogare i cubetti di ghiaccio
H Pour water: premere il tasto per erogare acqua fredda
I ON/OFF: premere il tasto per accendere e spegnere il dispositivo

73
IT
Panoramica del dispositivo
Simbolo Signicato Simbolo
illuminato
Simbolo lampeggiante
La copertura è
aperta
La copertura
superiore è
aperta
Tritare i cubetti
di ghiaccio
Il dispositivo trita
il ghiaccio
Produrre il
ghiaccio
Il dispositivo
produce cubetti
di ghiaccio
1. La produzione di
ghiaccio è disattivata
2. La funzione di
produzione del ghiaccio è
pronta
Produrre acqua
fredda
Il dispositivo
produce acqua
fredda
1. La produzione di acqua
fredda è disattivata
2. La funzione di
produzione dell'acqua
fredda è pronta
On/off Il dispositivo è
acceso.
Il dispositivo è spento.
Aggiungere
acqua
L'acqua nel
serbatoio è
insuciente;
aggiungere
acqua
Cestello del
ghiaccio pieno
Il contenitore del
ghiaccio è pieno
e il dispositivo
non produce più
cubetti
74
IT
ISTRUZIONI PER L'USO
1. Rimuovere tutti i materiali d'imballaggio interni ed esterni per controllare se
mancano i tubi essibili e l'adattatore per il rubinetto. Se manca uno degli
accessori, rivolgersi al servizio di assistenza ai clienti.
2. La presa elettrica del dispositivo deve essere dotata di messa a terra e di una
spina separata.
3. Posizionare il dispositivo in un luogo ben ventilato, in piano e con una
temperatura ambiente relativamente bassa. La distanza tra l'uscita dell'acqua
e l'eventuale ostacolo deve essere superiore a 15 cm e la distanza tra i due lati
e l'ostacolo non deve essere inferiore a 10 cm.
4. Se il dispositivo è stato rovesciato durante il trasporto o lo spostamento, si
consiglia di lasciarlo in posizione per 2 ore prima di accenderlo.
5. Si consiglia vivamente di pulire a fondo tutto il dispositivo prima dell'uso. Per
pulire il dispositivo, seguire le indicazioni al capitolo "Pulizia e manutenzione".
AVVERTIMENTO
Utilizzare solo acqua potabile per riempire il dispositivo, idealmente
acqua pura da una tanica o una bottiglia. La qualità dell'acqua
inuisce direttamente sulla trasparenza dei cubetti di ghiaccio e sulla
vita utile del dispositivo.
1. Aggiungere acqua
Riempimento automatico dell'acqua (fonte d'acqua esterna)
1° passaggio: collegare un lato (20 mm) dell'adattatore al rubinetto dell'acqua.
2° passaggio: collegare l'estremità del tubo essibile in PE bianco con l'altra
estremità (Ø 6,5 mm) dell'adattatore.
3° passaggio: collegare l'altra estremità del tubo essibile in PE bianco all'ingresso
dell'acqua del rubinetto.
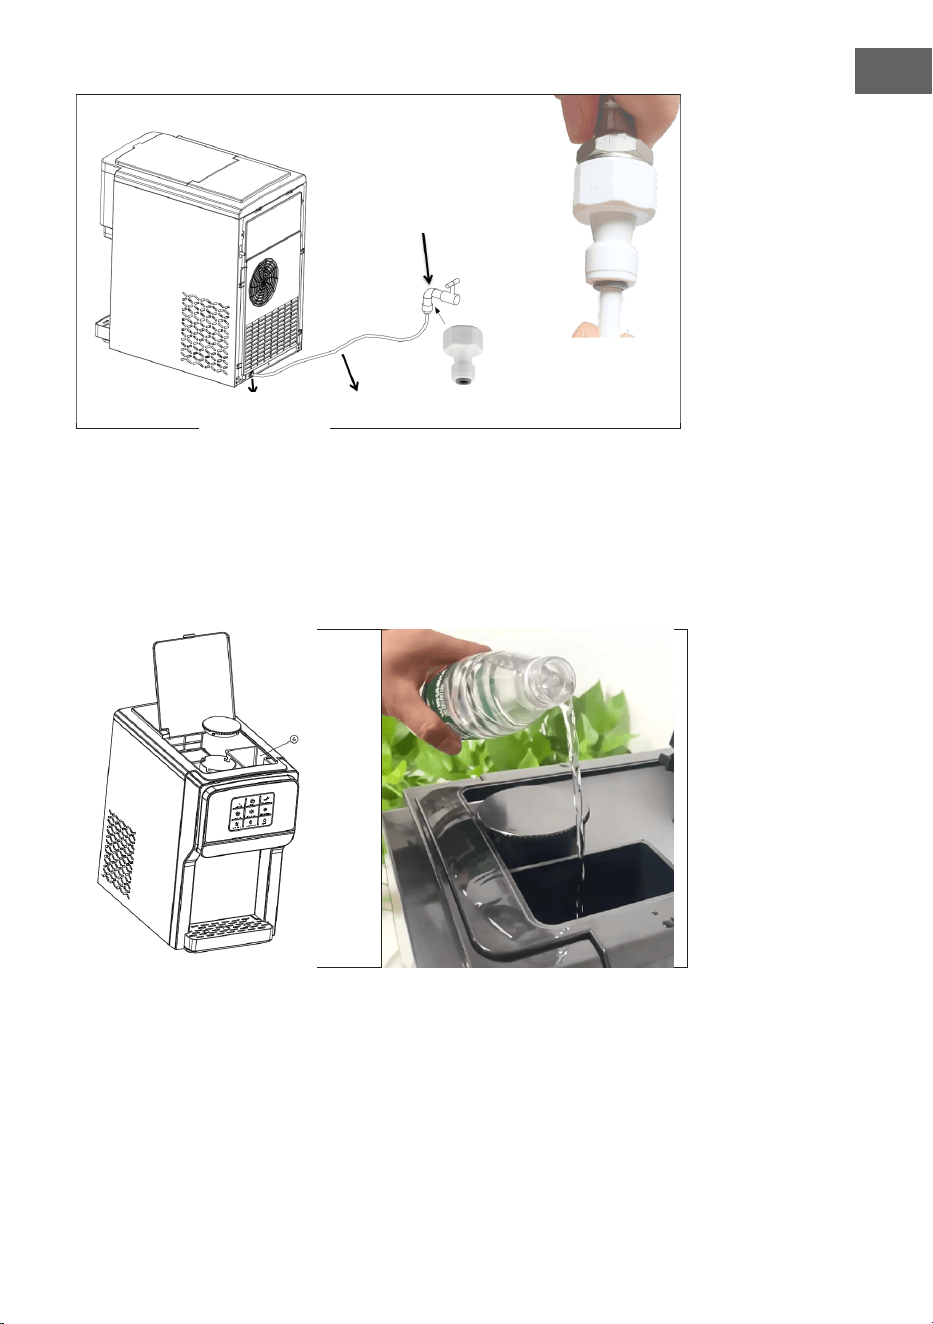
75
IT
Riempimento manuale dell'acqua
Aprire lo sportello superiore del dispositivo e aggiungere acqua nel contenitore ⑥
no a quando il livello non si abbassa più.
Attenzione! L'acqua potabile con elevato contenuto acido e alcalino può
corrodere il modulo di congelamento.
Ingresso dell'ac-
qua del rubinetto
Tubo in PE bianco
Adattatore
Rubinetto

76
IT
2. Produrre il ghiaccio
• Collegare il dispositivo e premere leggermente il tasto ON/OFF sul pannello di
controllo. Il dispositivo rileva automaticamente il livello di riempimento e indica
la necessità di aggiungere acqua. Premere il tasto "MAKE ICE" per avviare la
produzione di cubetti di ghiaccio. La spia "MAKE ICE" resta accesa durante la
produzione dei cubetti. Un ciclo dura circa 9 minuti e produce 12 sfere di ghiac-
cio. La durata del ciclo di produzione dipende dalla temperatura ambiente; più
è alta la temperatura, maggiore sarà la durata. Il simbolo "MAKE ICE" resta
acceso durante la produzione dei cubetti.
• Se si preme prima il tasto "COLD WATER" e poi "MAKE ICE", il simbolo "MAKE
ICE" continua a lampeggiare. Indica che la produzione del ghiaccio inizierà
al termine della produzione di acqua fredda. La funzione di produzione del
ghiaccio è pronta
• Quando il simbolo "ICE FULL" resta acceso, il dispositivo smette di produrre
cubetti. Quando i cubetti vengono tolti dal contenitore, riprende la produzione.
• Quando il simbolo "ADD WATER" (aggiungere acqua) resta acceso, c'è poca
acqua nel dispositivo ed è necessario aggiungerne. Non appena viene aggiunta
l'acqua, il dispositivo riprende automaticamente a funzionare.
• Premere "MAKE ICE" durante la produzione di cubetti per arrestarla.
3. Produrre acqua fredda
• Collegare il dispositivo e premere leggermente il tasto ON/OFF sul pannello di
controllo. Il dispositivo rileva automaticamente il livello di riempimento e indica
la necessità di aggiungere acqua. Quando si preme il tasto "COLD WATER",
il dispositivo misura la temperatura dell'acqua. Quando la temperatura rag-
giunge il livello di avvio, l'indicazione "COLD WATER" si accende e il dispositivo
inizia la produzione di acqua fredda. In caso contrario, l'indicazione "COLD
WATER" lampeggia e il dispositivo attende. Quando la temperatura dell'acqua
raggiunge il livello impostato durante la produzione di acqua fredda, il simbolo
"COLD WATER" continua a lampeggiare.
• Se si preme prima il tasto "MAKE ICE" e poi "COLD WATER", il simbolo "COLD
WATER" continua a lampeggiare. Indica che la produzione di acqua fredda
procederà al termine della produzione di cubetti di ghiaccio. La produzione di
acqua fredda è pronta.
• Premere "COLD WATER" durante la produzione di acqua fredda per arrestarla.
4. Tritare i cubetti di ghiaccio
• Aprire la copertura e togliere la copertura del contenitore per tritare il ghiaccio.
Riempire manualmente il contenitore con i cubetti, chiudere il coperchio e
premere "CRUSH ICE" per tritare i cubetti. Il ghiaccio tritato viene erogato
dall'apposito punto di uscita.
• Premere "CRUSH ICE" sul dispositivo mentre i cubetti vengono tritati per
arrestare la procedura.
5. Erogazione di cubetti di ghiaccio/acqua fredda

77
IT
• Premere leggermente il tasto "POUR ICE", l'elica del dispositivo inizia a girare
e i cubetti cadono dalla posizione "POUR ICE". Se si preme di nuovo "POUR
ICE", l'elica smette di girare e viene terminata l'erogazione dei cubetti. Per
garantire un'erogazione ottimale dei cubetti, assicurarsi che ci sia ghiaccio
a sucienza nel contenitore di raccolta e che ci sia un recipiente adatto da
riempire con i cubetti.
• Premere leggermente il tasto "POUR WATER" e l'acqua viene erogata dalla
posizione "POUR WATER". Premere nuovamente "POUR WATER" per interrom-
pere l'erogazione di acqua fredda.
Nota: se si preme il tasto "POUR WATER" senza aver prima premuto "MAKE ICE" o
"COLD WATER", l'acqua erogata non è fredda. La funzione "POUR WATER" viene
disattivata automaticamente se viene utilizzata per oltre 10 secondi consecutivi.
Informazioni importanti
• Controllare se il serbatoio dell'acqua e il contenitore dei cubetti di ghiaccio
sono puliti. Pulirli e cambiare l'acqua regolarmente.
• La temperatura dell'acqua inserita nel dispositivo inuisce direttamente sulla
produzione dei cubetti di ghiaccio. Più bassa è la temperatura dell'acqua,
maggiore sarà la produzione di cubetti.
• Più bassa è la temperatura ambiente, maggiore sarà la produzione di cubetti.
• La qualità dell'acqua utilizzata inuisce sulla vita utile della pompa dell'acqua
del dispositivo. L'ideale è utilizzare acqua addolcita, acqua pura o acqua distil-
lata. La presenza di impurità nell'acqua può causare rumori insoliti durante il
funzionamento della pompa dell'acqua. Questo è normale e non inuisce sul
funzionamento del dispositivo.
PULIZIA E MANUTENZIONE
• Disimballare il dispositivo.
• Utilizzare un detergente neutro, acqua calda e un panno morbido per pulire il
serbatoio dell'acqua, il contenitore del ghiaccio tritato, la copertura del conte-
nitore del ghiaccio tritato e il tubo in silicone.
• L'alloggiamento può essere pulito a dispositivo spento. Consigliamo di passa-
re uno straccio asciutto per pulirlo.
• Si può anche aggiungere acqua per 1-2 cicli di produzione e buttare via tutti i
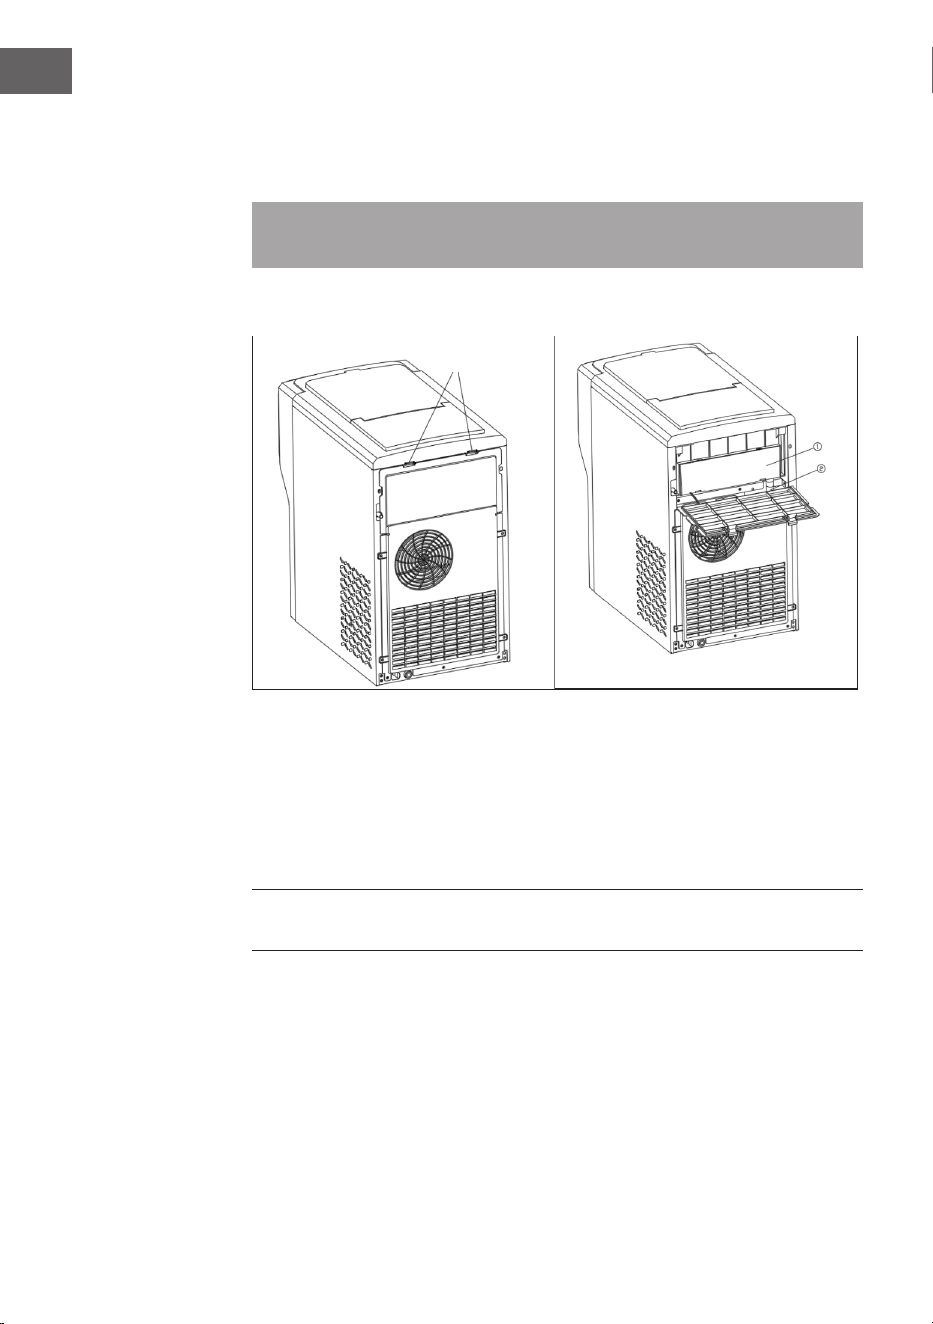
78
IT
cubetti e l'acqua.
• Dopo la pulizia, riposizionare il tappo di scarico sul lato inferiore del dispositivo.
• Se il dispositivo non viene usato per diverso tempo, scaricare l'acqua dal
serbatoio.
Nota: se il dispositivo non viene utilizzato a lungo, pulire l'interno del dispositivo
seguendo le indicazioni.
Aprire il lato posteriore
1. Staccare la spina dalla presa, posizionare il dispositivo su una supercie
piana, premere entrambe le "chiusure della parete posteriore" sul retro del
dispositivo e aprire la parete posteriore verso il basso.
2. Togliere prima il tubo di scarico in silicone ②. Togliere i contenitori del ghiaccio
e dell'acqua ①.
3. Utilizzare appositi utensili per pulire il contenitore dell'acqua della macchina
del ghiaccio e il tubo in silicone.
Nota: dopo la pulizia, tutti i componenti devono essere rimessi nella loro posizione
originaria.
Procedura di scarico dell'acqua
Sul lato inferiore del dispositivo c'è un tappo di scarico ⑧.
Posizionare il dispositivo su un fondo stabile e togliere il tappo di scarico.
Scaricare l'acqua dal dispositivo.
Chiusura del pan-
nello della parete
posteriore
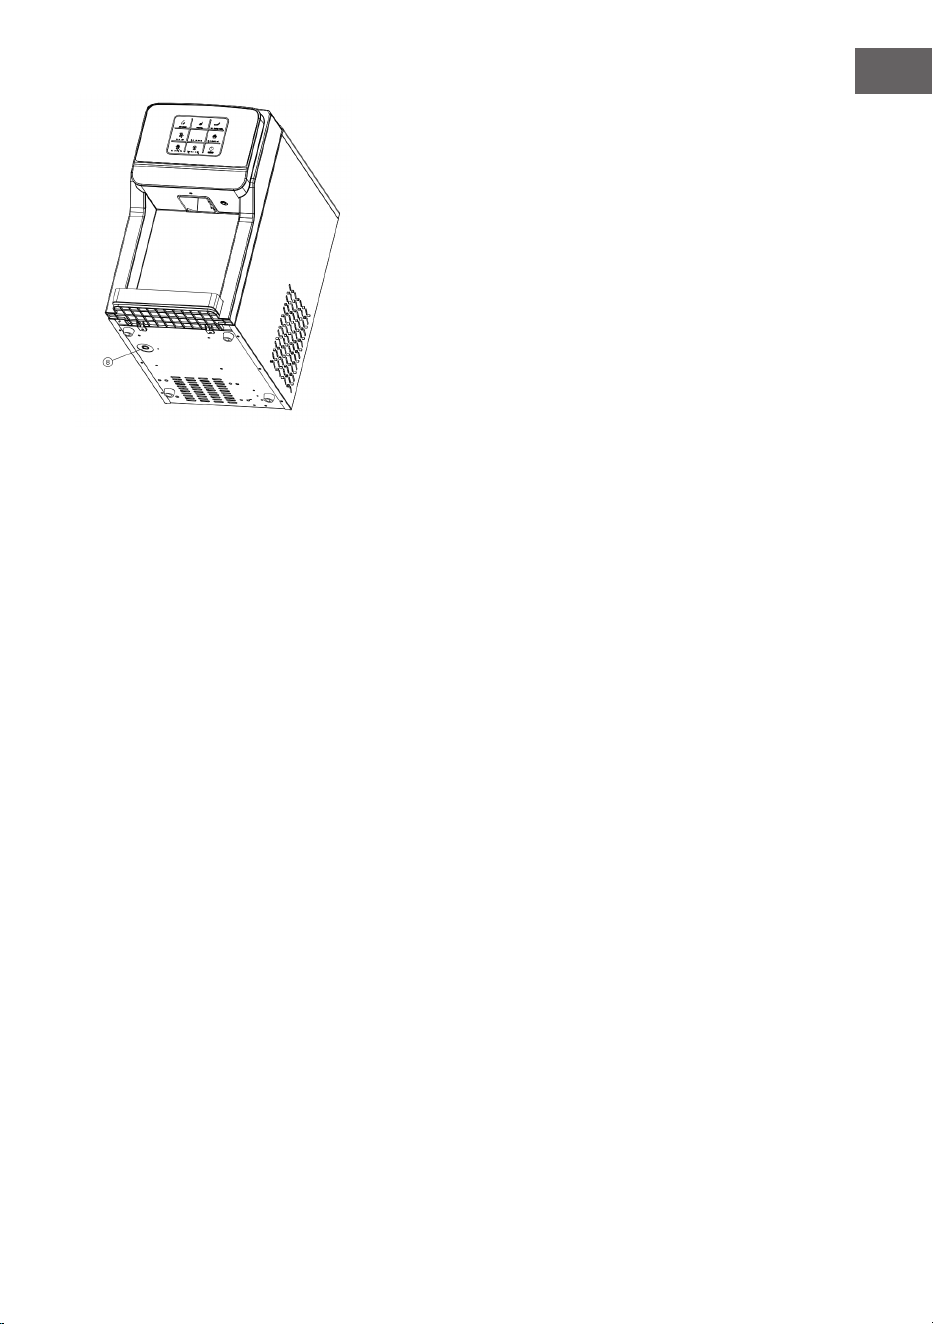
79
IT
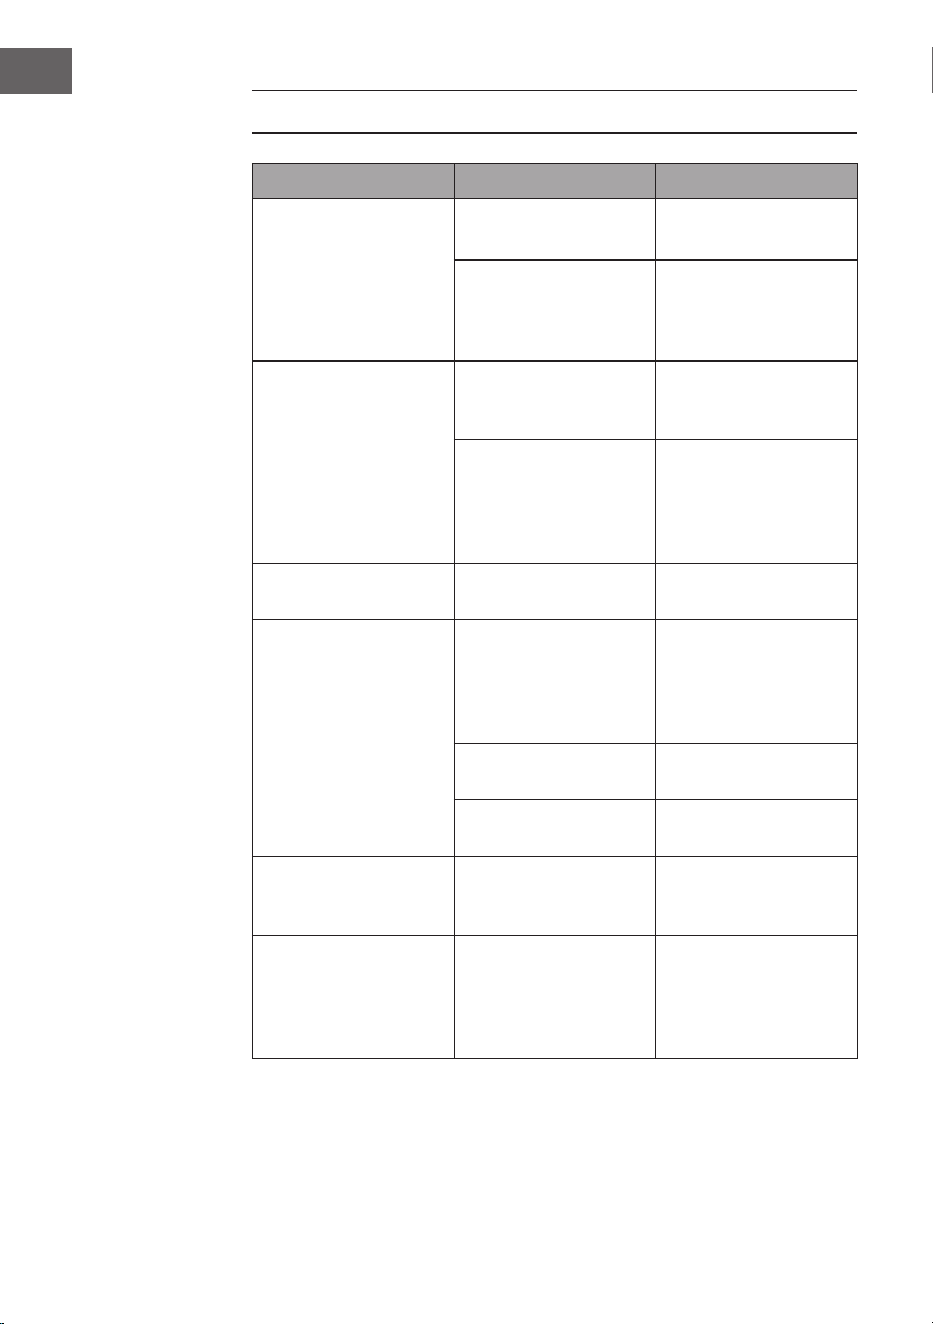
80
IT
RICERCA E CORREZIONE DEGLI ERRORI
Problema Possibile causa Soluzione
La spia di controllo "Add
Water" è accesa.
L'acqua nel serbatoio è
insuciente
Aggiungere acqua nel
serbatoio manualmente
Il galleggiante dell'in-
terruttore del livello nel
serbatoio dell'acqua
fredda è bloccato
Pulire il serbatoio
dell'acqua fredda e il
galleggiante del livello
I cubetti di ghiaccio sono
troppo piccoli
La temperatura ambien-
te è troppo alta
Spostare il dispositivo in
un luogo più fresco
Cattiva ventilazione La distanza tra il retro, i
lati destro e sinistro del
dispositivo e gli oggetti
circostanti deve essere
superiore a 15 cm
I cubetti di ghiaccio sono
troppo grandi
La temperatura ambien-
te è troppo bassa
Spostare il dispositivo in
un luogo più caldo
Il ciclo di produzione è
normale, ma non ven-
gono prodotti cubetti di
ghiaccio
La temperatura am-
biente o dell'acqua nel
serbatoio è troppo alta
Spostarsi in un luogo
con una temperatura
ambiente inferiore a 32
°C e aggiungere acqua
fredda
Perdita di refrigerante Sono necessarie ripara-
zioni professionali
Condotto del refrigeran-
te bloccato
Sono necessarie ripara-
zioni professionali
Il dispositivo non produ-
ce acqua fredda
L'acqua nel serbatoio è
insuciente
Controllare la pressione
dell'acqua e la pulizia del
condotto di ausso
Il dispositivo non produ-
ce cubetti di ghiaccio
La durata di produzione
è troppo breve e non ci
sono cubetti nel conteni-
tore o ce ne sono troppo
pochi
Un ciclo di produzione
dura circa 9 minuti e
dopo un paio di cicli la
situazione si normalizza
81
IT
AVVISO DI SMALTIMENTO
Se nel proprio paese si applicano le regolamentazioni
inerenti lo smaltimento di dispositivi elettrici ed
elettronici, questo simbolo sul prodotto o sulla confezione
segnala che questi prodotti non possono essere
smaltiti con i riuti normali e devono essere portati a
un punto di raccolta di dispositivi elettrici ed elettronici.
Grazie al corretto smaltimento dei vecchi dispositivi si
tutela il pianeta e la salute delle persone da possibili
conseguenze negative. Informazioni riguardanti il riciclo
e lo smaltimento di questi prodotti si ottengono presso
l’amministrazione locale oppure il servizio di gestione dei
riuti domestici.
PRODUTTORE E IMPORTATORE (UK)
Produttore:
Chal-Tec GmbH, Wallstraße 16, 10179 Berlino, Germania.
Importatore per la Gran Bretagna:
Berlin Brands Group UK Limited
PO Box 42
272 Kensington High Street
London, W8 6ND
United Kingdom

www.klarstein.com