QUICK START GUIDE
FIELDSENTINEL
™
825/1825
with
2
WWW.SPORTDOG.COM
Read all the safety information contained in included Safety Information Insert before
using the product.
To avoid serious risk or injury to your dog, it is important you complete the following
steps in order before you begin using this system.
WELCOME
Thank you for choosing the SportDOG® Brand FieldSentinel™ Remote
Training System. With proper use, this system will help you train your dog
efficiently and safely.
The Quick Start Guide will get you and your dog started with this remote
training system. For the best experience, review this guide thoroughly.
For more detailed information, we recommend visiting our
online support page which provides guidance for pairing
your Collar and Handheld, changing the Handheld’s button
programming, information on the Collar stim ranges,
battery replacement, etc. You can easily access it by
scanning the QR code provided.
To get the most protection out of your warranty and to be notified for critical
updates, please register your product within 30 days at www.sportdog.com.
By registering and keeping your receipt you will enjoy the product’s full
warranty and, should you ever need to call the Customer Care Center, we will
be able to help you faster. Most importantly, your valuable information will
never be given or sold to anyone. Complete warranty information is available
online at www.sportdog.com.
OTHER IMPORTANT INFORMATION
Use of this product implies acceptance of any and all terms, conditions, and
notices related to this product including, but not limited to, those found
in this Quick Start Guide and the Insert containing important Regulatory
Compliance and Safety information.
When storing the device for an extended time, store within the temperature
range of 32°F to 77°F (from 0° to 25°C).
Do not leave the device exposed to a heat source or in a high-temperature
location, such as in the sun in an unattended vehicle. To prevent damage,
remove the device from the vehicle or store it out of direct sunlight, such as
in the glove box.
3
WWW.SPORTDOG.COM
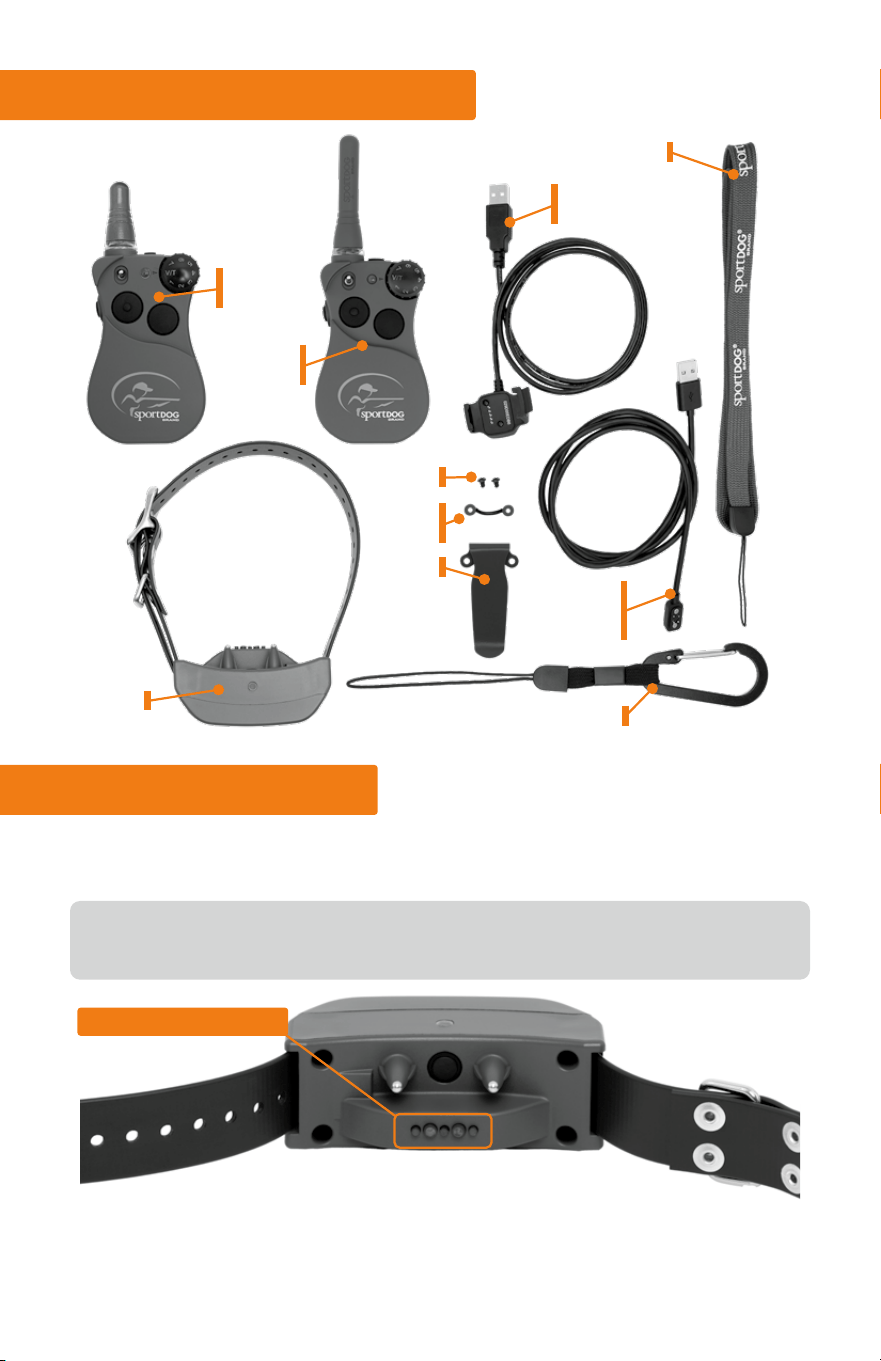
WHAT’S IN THE BOX?
HEALTH SENSORS
This will allow you to know how your dog is doing, even if he is not
within eyesight, and quickly address any potentially dangerous health
situations.
COLLAR
CARABINER
FS-1825
HANDHELD
COLLAR
CHARGING CORD
HANDHELD
CHARGING
CORD
LANYARD
SCREWS
LANYARD
CLIP
BELT CLIP
or
HOW IT WORKS
In addition to being a fully functional training e-collar, this system also
monitors your dog’s health.
The Collar’s built-in health sensors will detect your dog’s vitals and the
Handheld will alert you when there has been a serious change.
FS-825
HANDHELD
4
WWW.SPORTDOG.COM
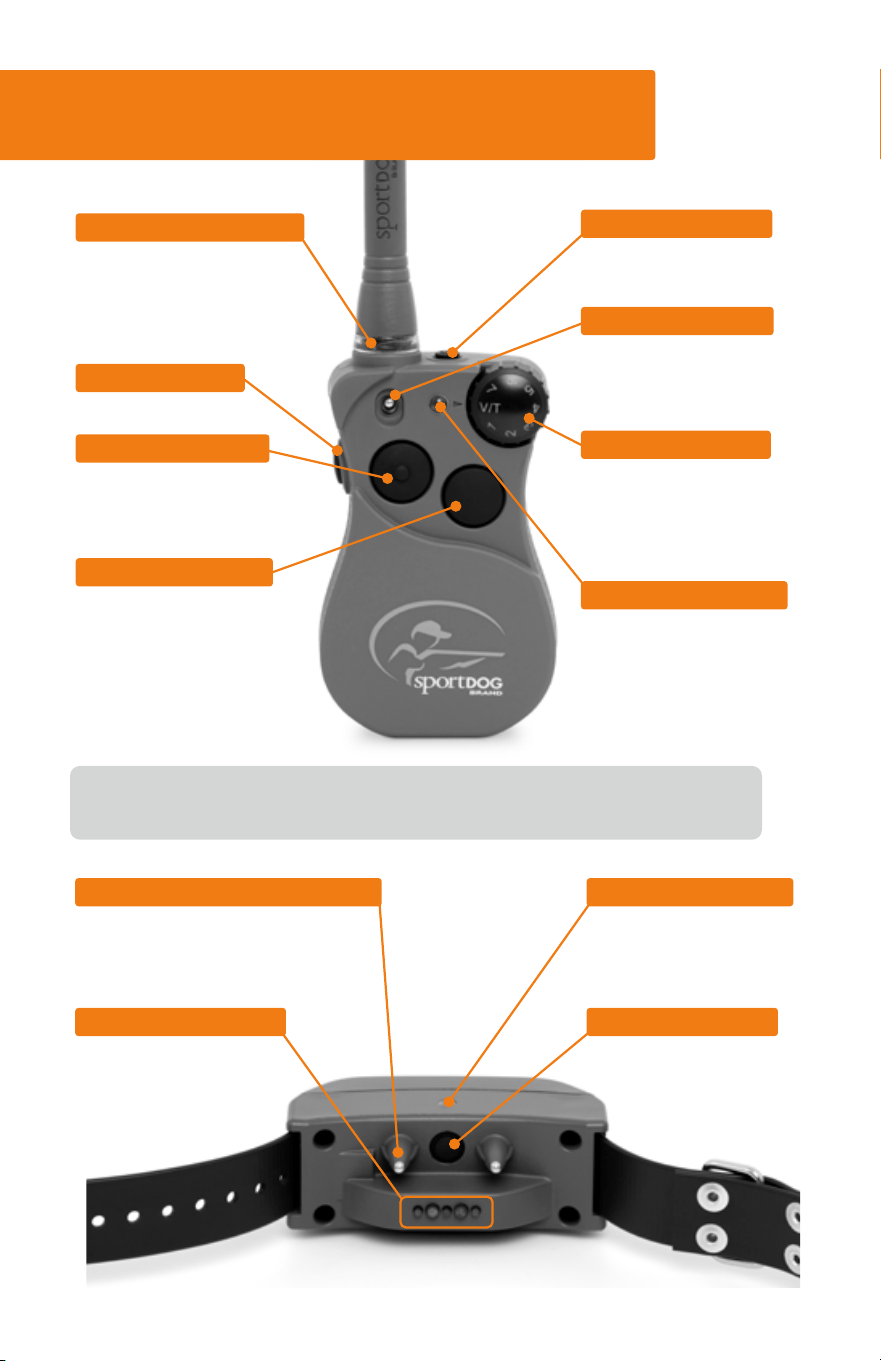
HEALTH SENSORS
Monitor your dog’s
health by detecting
vitals during use.
POWER BUTTON
Powers the Collar ON
or OFF.
PROBES/CONTACT POINTS
Administers the stimulation
to your dog. These are not
interchangeable.
*You are able to change the button programming to best fit your training
needs. Detailed information and instruction provided on our support site.
POWER BUTTON
Powers the Handheld ON
or OFF and silences alerts.
TOGGLE SWITCH
Allows for quickly
switching between Dog 1
and Dog 2.
INTENSITY DIAL
Adjusts the intensity level
of static stimulation or
sets the collar function to
Vibe or Tone.
INDICATOR LIGHT
Indicates battery status
(slow blink) or lights
accordingly when button
pressed.
HEALTH ALERT LED
Begins flashing when your
dog’s composite health score
reaches its threshold (for
more info see page 9).
SIDE BUTTON
*
Tone
UPPER BUTTON
*
Continuous Stim equal to
level on Dial (1 is low)
Vibe if dial is set to V/T
LOWER BUTTON
*
Momentary (nick) Stim
equal to level on Dial
(1 is low)
Vibe if dial is set to V/T
GET TO KNOW THE HANDHELD
& COLLAR
INDICATOR LIGHT
Indicates battery status
or lights when a button is
pressed on the Handheld.
5
WWW.SPORTDOG.COM
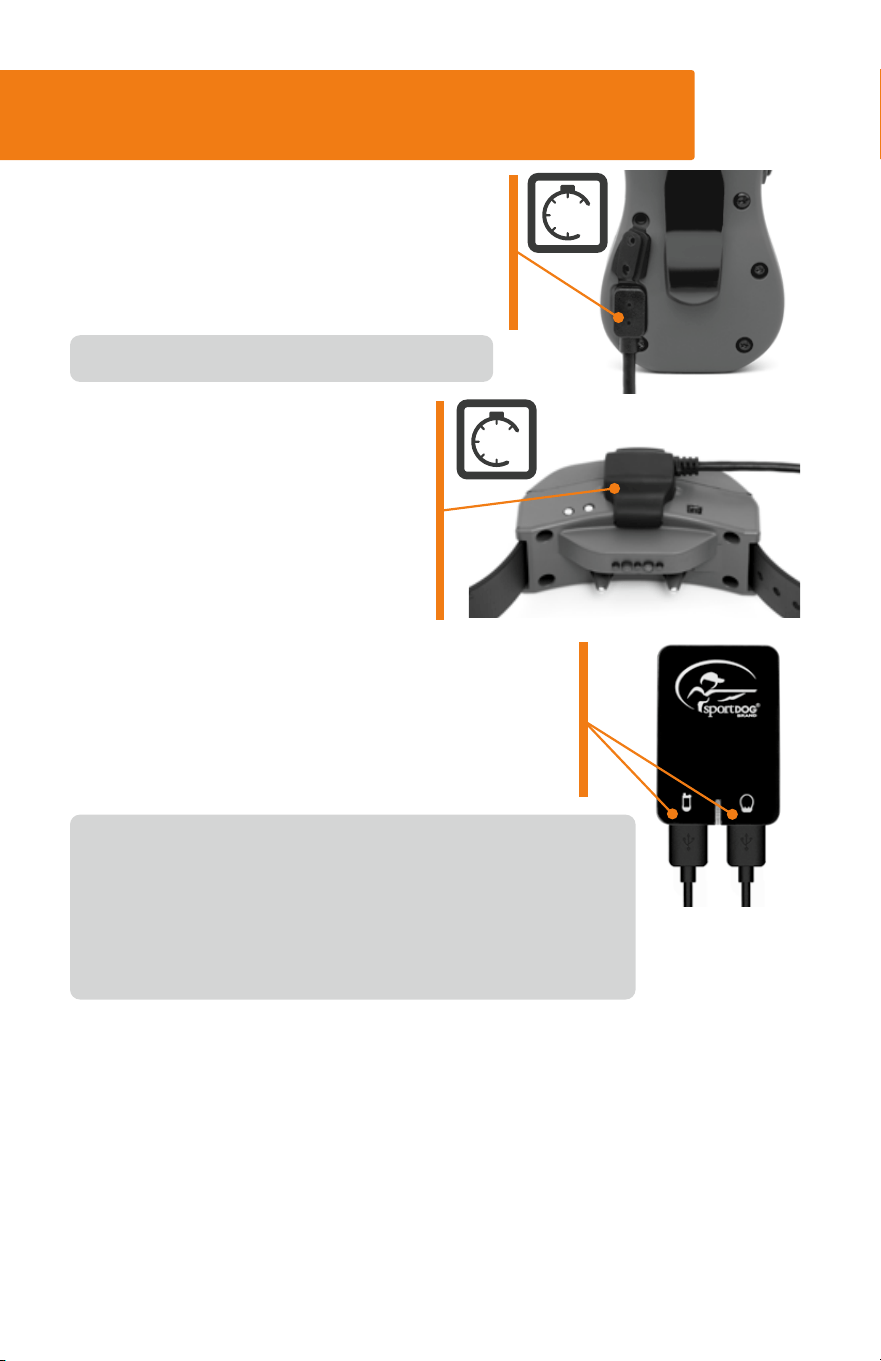
STEP 1: CHARGE THE HANDHELD
& COLLAR
Only use the included UL certified adapter for charging.
Approximate battery life between charges is 24 hours
for both the Collar and Handheld, depending on
frequency of use. Power off the Collar and Handheld
between uses to maximize battery life.
1. Lift the charge cover and connect the
magnetic charger to the back of the
Handheld by aligning the two and
letting it snap into place. The Handheld
takes 3 hours to fully charge.
2. Snap the charging clip on the
Collar by aligning the brass
contacts on the clip to the
connection points on the Collar
and matching up the SportDOG
®
logos. The Collar takes 4 hours
to charge.
3. Connect each of the USB ends on the charging
cables to the wall adapter and plug into a
standard wall outlet. The Collar and Handheld
Indicator Lights will be solid green while
charging and flash green when fully charged.
Close the charge cover between charges.
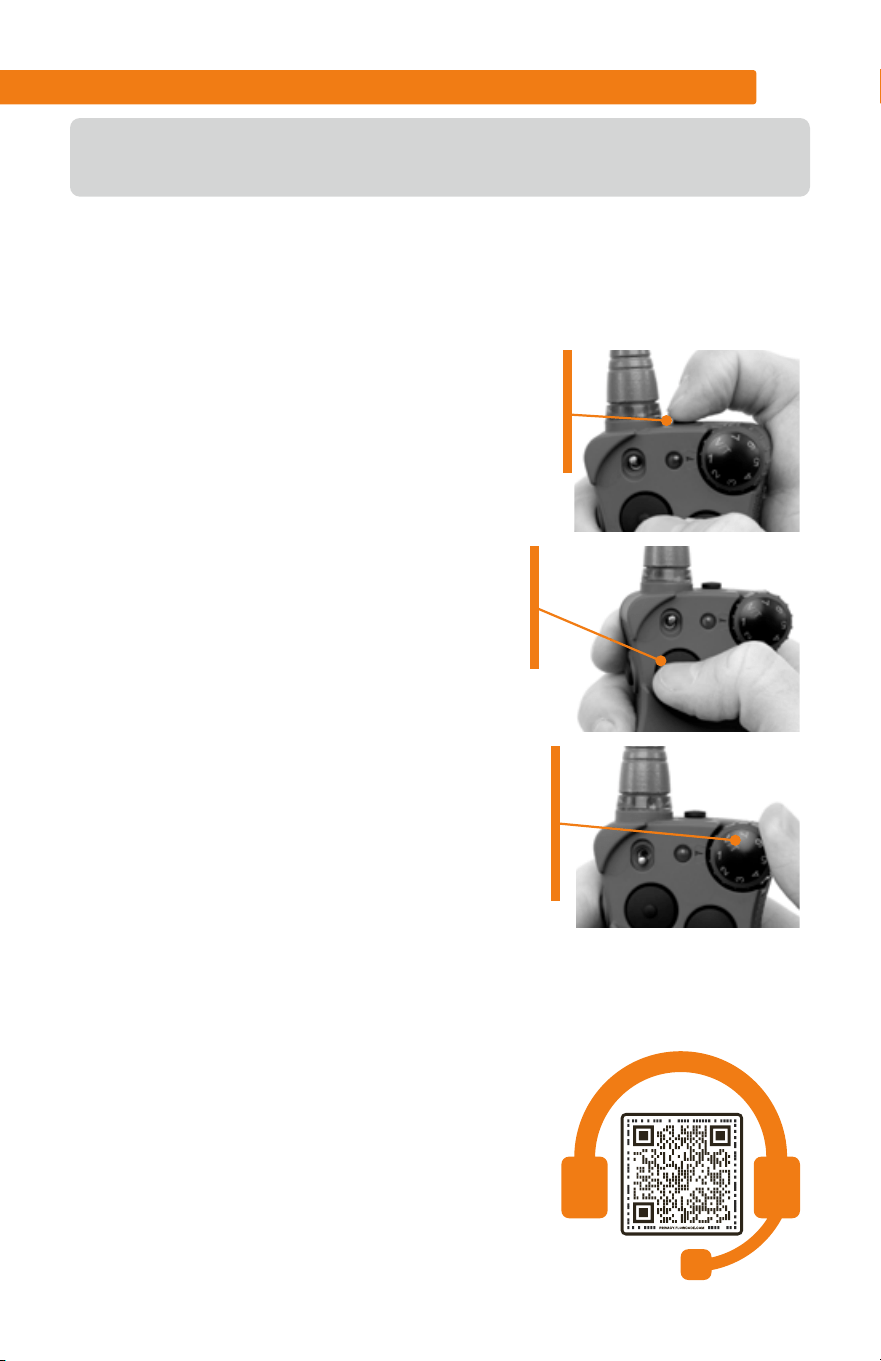
HANDHELD: To power the Handheld ON or OFF, press and hold the
power button until it beeps.
COLLAR: To power the Collar ON, press and release the power button.
The Collar will beep and the Indicator Light will flash blue, indicating it’s
attempting to connect to the SportDOG® App (STEP 2). It will then flash
green or red depending on the battery status. After several seconds, the
health sensor lights will glow steady green.
To power OFF, press and hold the button until the Collar beeps and light is red.
4
hrs
3
hrs
6
WWW.SPORTDOG.COM
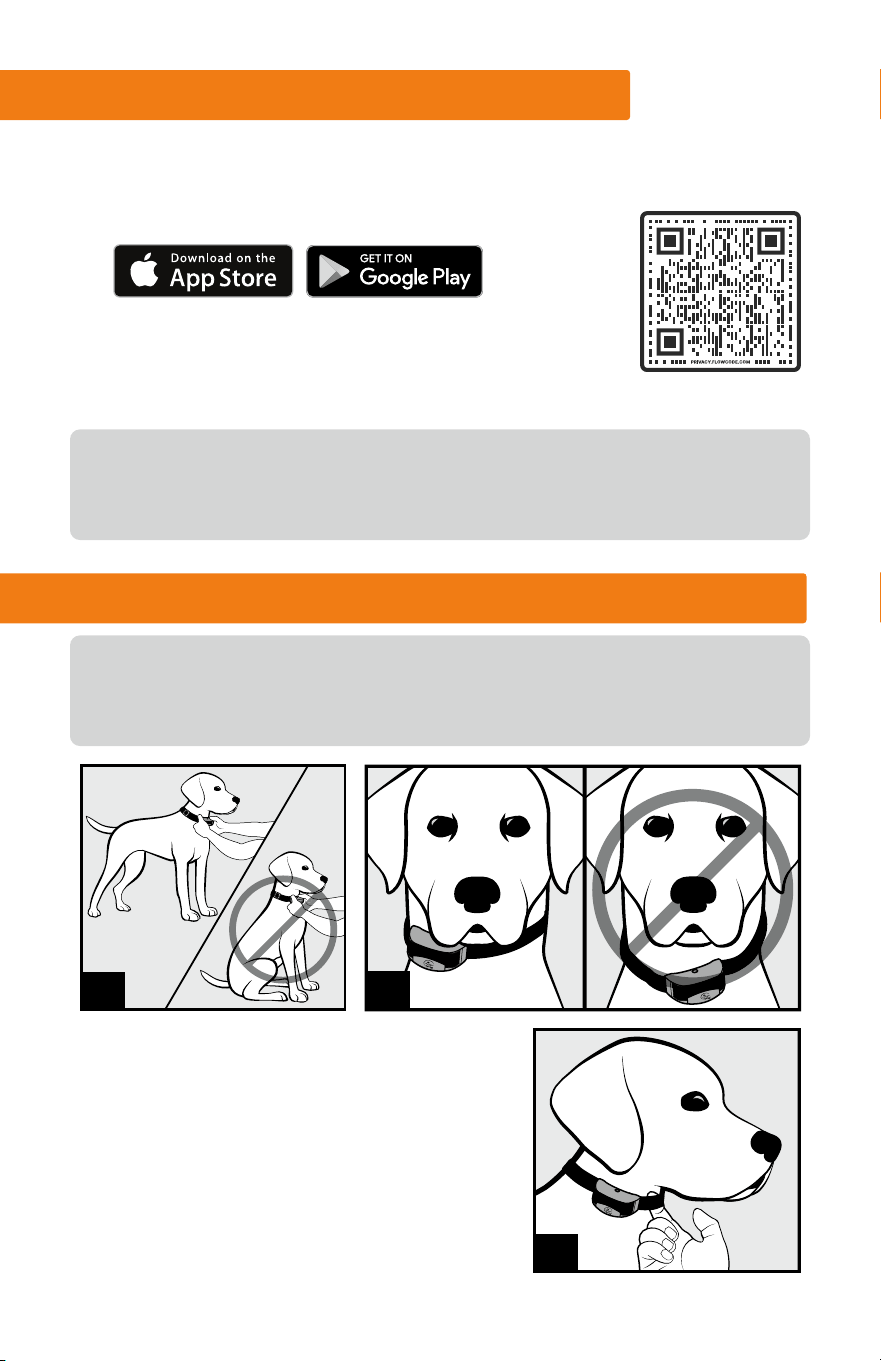
1. Your dog should be standing
comfortably while fitting the collar.
2. Position the collar as high as possible
on your dog’s neck and slightly to either
side, not directly centered. Buckle the
collar so that it fits snuggly.
STEP 2: CHECK FOR UPDATES
Once your system is fully charged, follow the steps below to pair it with a
smartphone to ensure your system has the most up-to-date software.
1. Download the SportDOG® Brand App via the QR code.
2. Follow the in-app instructions to connect your
Handheld and Collar, and ensure your software is
up-to-date.
Once you’ve paired your system with the app we can notify you of any
future updates. Although it’s not necessary to connect to the app to use
your FieldSentinel, it is highly recommended.
STEP 3: FIT THE COLLAR ON YOUR DOG
PROPER FIT AND PLACEMENT OF THE COLLAR IS IMPERATIVE FOR
EFFECTIVE TRAINING AND USE. THE HEALTH SENSORS AND CONTACT
POINTS MUST HAVE DIRECT CONTACT WITH YOUR DOG’S SKIN.
1
2
3
7
WWW.SPORTDOG.COM
3. You should only be able to fit one finger between the strap and your
dog’s neck. This will help ensure the health sensor and the contact
points are both touching your dog’s skin. If your dog has a long or
thick coat, trim the hair around the contact points to ensure contact
with the skin.
4. Check the fit again after your dog becomes more comfortable wearing
it and adjust as necessary.
NOTE: If using an additional Collar (such as GPS), it should be located
further down your dog’s neck from this training collar.
STEP 4: ALLOW THE COLLAR TO
CALIBRATE
Power on your Handheld and Collar. Once the Collar is
fitted on your dog, it needs up to 5 MINUTES to calibrate
to your dog and start tracking vitals allowing your hunt/
training session to start with a valid heart rate. Do not
remove the collar or turn it off during this time.
The Handheld alert light will blink yellow during this time frame and will
beep when ready.
Every time you put the collar on your dog, it is important to make sure you
wait 5 minutes for the collar to calibrate before use. Also, keep the health
monitor sensors clean by using soap, warm water, and a microfiber cloth.
Do not leave the collar on your dog longer than 12 hours.
STEP 5: FIND YOUR DOG’S
RECOGNITION LEVEL
For effective training, it is important to find the best level of static
stimulation for your dog.
RECOGNITION LEVEL: The lowest level of static stimulation at which
your dog acknowledges feeling the stimulation through a reaction. This
reaction can be flicking his ears, looking around in curiosity, or standing
up from a sitting or lying position.
5
mins
8
WWW.SPORTDOG.COM
4. If you have progressed to the highest level on the dial (7) while
searching for your dog’s Recognition Level and your dog continues
to show no response, check to make sure the fit of the Collar is snug
against your dog’s neck. Then go back to
Level 1 and repeat the process. If your dog
still does not indicate he is feeling the static
stimulation, you may need to trim the hair
beneath the Contact Points or scan the QR
code for detailed instructions on how to
change the stim range setting on your collar.
IMPORTANT: Your dog should not vocalize or panic when receiving static
stimulation.
Always start at the lowest level and slowly increase as needed. Every
dog is different, and their recognition level is not correlated to size or
breed. Therefore, it is important to watch closely for any slight changes in
behavior that demonstrates your dog is feeling the static stimulation.
STEP 5: FINDING YOUR DOG’S RECOGNITION LEVEL
(
CONT.
)
1. Starting with the Collar powered on and
properly fitted on your dog, set the Handheld
dial to Level 1. Power your Handheld on by
pressing the button as shown.
2. While watching your dog, press the Upper
Button for 1 to 2 seconds. Look for any
indication that your dog feels the static
stimulation.
3. If your dog shows no reaction, increase
the Intensity Dial to Level 2 and repeat this
process until you find your dog’s Recognition
Level. This is the level you should use when
you begin a training exercise.
9
WWW.SPORTDOG.COM
We recommend if your Handheld
alerts you, go to your dog to assist
him (e.g. put eyes on your dog and
observe them, take a break, give
your dog water).
NOTE: Alerts are transmitted to
the Handheld via radio frequency.
If your dog is beyond signal range
from the Handheld or within field conditions where signal is reduced or
disrupted, alerts may not be properly transmitted.
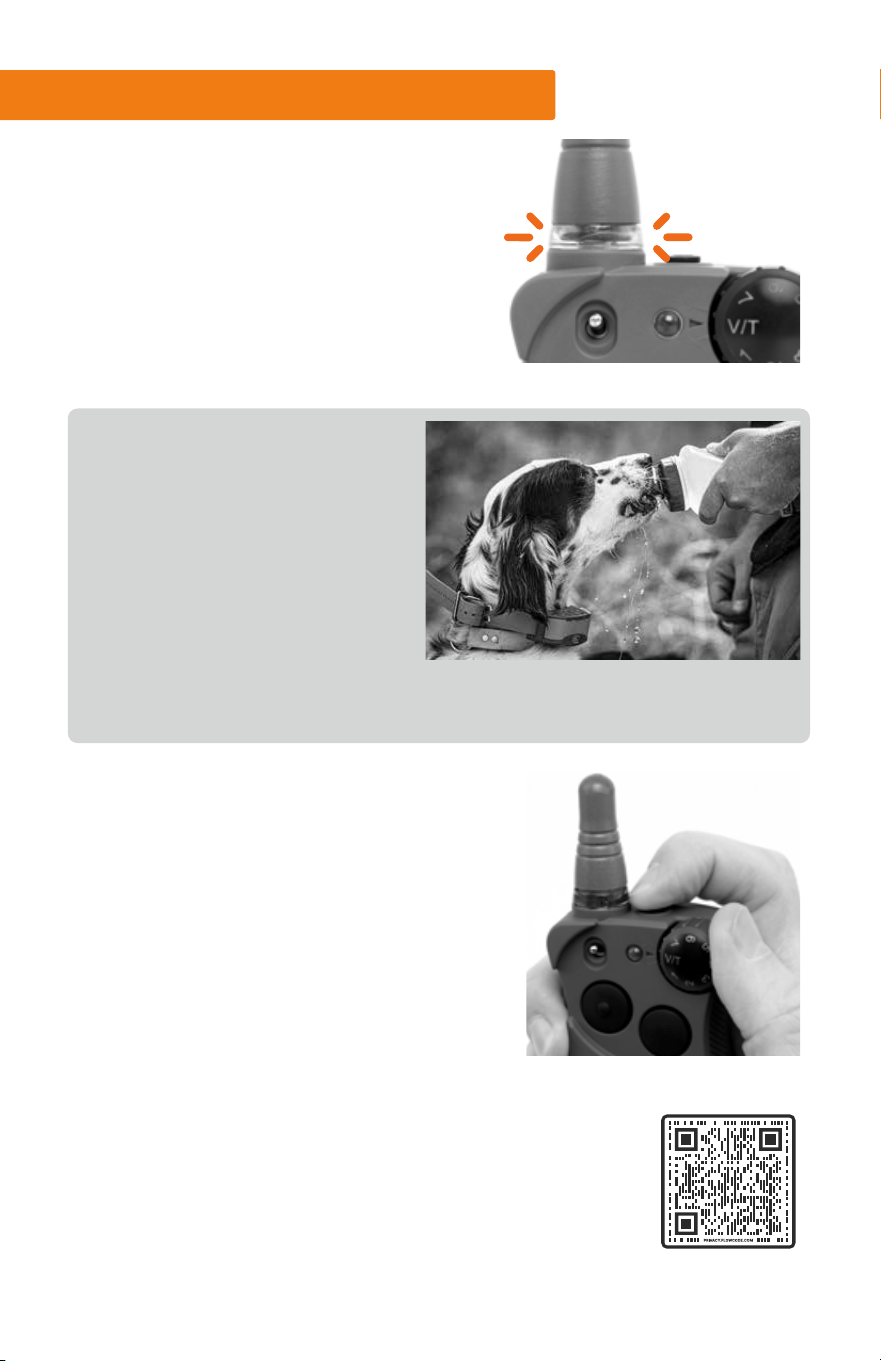
HEALTH SENSOR ALERTS
If the Collar detects a significant,
potentially dangerous change in your
dog’s vitals, your Handheld will alert you
by flashing a red light at the base of the
antenna as well as emitting a tone and
vibration. Your Collar Indicator Light will
quickly flash red.
To silence the alert, quickly press and
release the power button on the Handheld.
The tone and vibration will stop, but the
Alert LED will continue to flash until
your dog’s vitals return to normal. If you
accidentally turn off the Handheld, simply
turn back on. You will not need to wait the
5-minute initializing period. When your
dog returns to a normal state, the alert will
automatically turn off.
To access more information about heat-related illnesses,
refer to the adjacent QR code for tips on what to do if you
notice your dog exhibiting certain signs.
10
WWW.SPORTDOG.COM
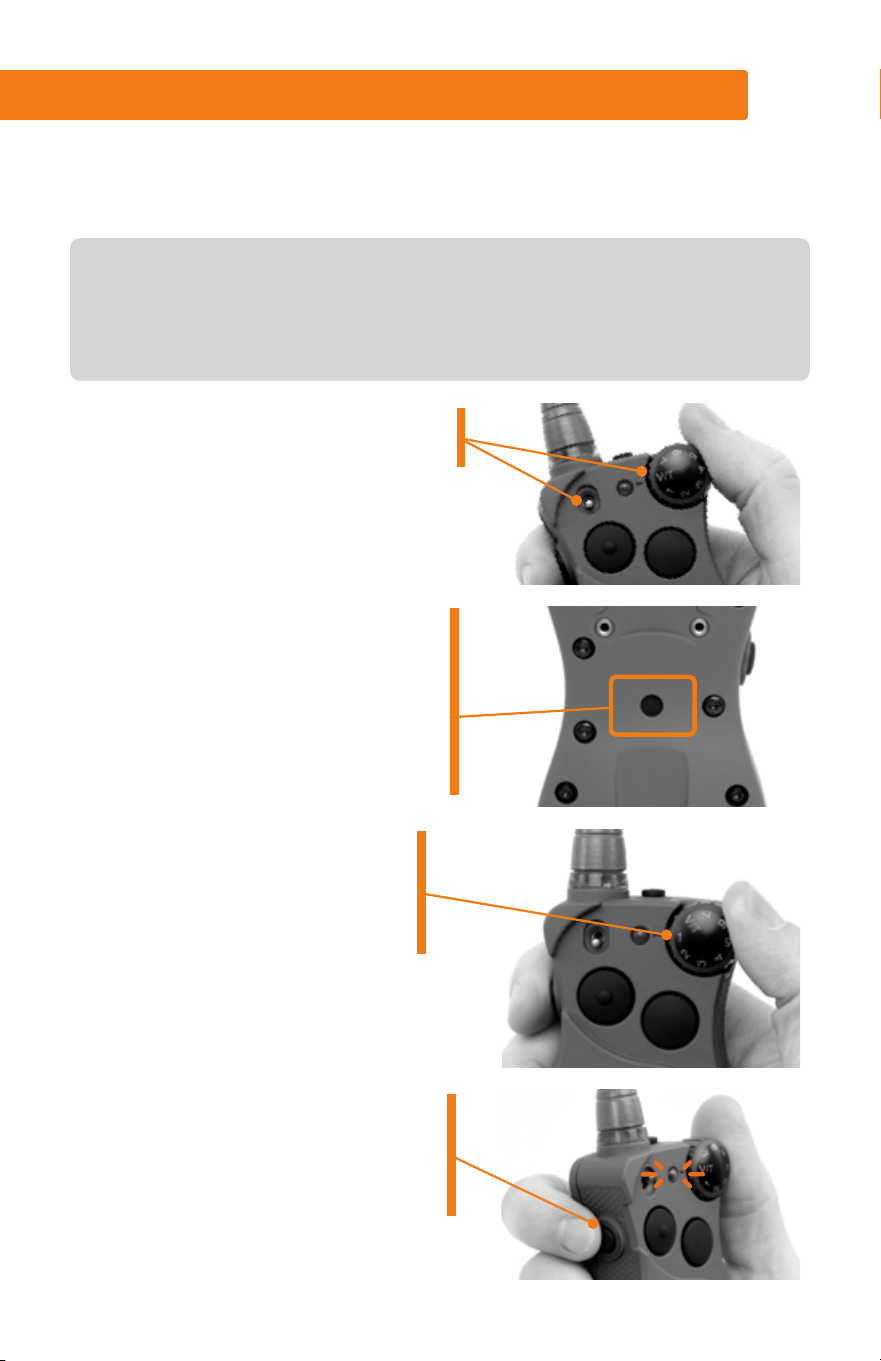
CHANGING THE ALERT THRESHOLD
If you find the Handheld is alerting you frequently when your dog’s
condition is at a normal state, you can adjust the sensitivity of the alert
either in the SportDOG® App, or by following the steps below:
IMPORTANT: Only adjust the threshold one level at a time, then testing
that level several times with your dog before making any further
adjustments. This will help avoid missing important health notifications
while your dog is in the field.
1. Begin with the toggle switch down
and the intensity dial set to V/T
2. If your belt clip is attached, it will
need to be removed. Press the
mode button on the back of the
Handheld with the tip of a pen.
The Indicator Light will be solid
green for 15 seconds.
3. Turn the Intensity Dial to your
desired threshold (1-4).
The Handheld is factory set to
threshold Level 1.
4. Press the left side button on your
Handheld to set the new level.
The Indicator Light will flash 5
times to confirm selection.

11
WWW.SPORTDOG.COM
SKU numbers: FS-825, FS-1825, FS-AD
Collar - FCC ID: KE3-3003444
IC: 2721A-3003444
Handheld - FCC ID: KE3-30034451
IC:2721A-30034451
Contains: FCC ID: QOQ-GM240S, IC: 5123A-GM240S
This equipment complies with FCC and RSS-102 radiation exposure limits set forth for an uncontrolled environment and meets
the FCC and RSS-102 radio frequency (RF) Exposure Guidelines. This equipment should be installed and operated keeping the
radiator at least 20 cm or more away from person’s body.
Cet équipement est conforme aux limites d’exposition aux rayonnements de la FCC et RSS-102 établies pour un environnement
non contrôlé et respecte les directives d’exposition aux radiofréquences (RF) de la FCC et RSS-102. Lors de l’installation ou de
l’utilisation de cet équipement, tenez-vous à plus de 20 cm de distance du radiateur.
FCC
This device complies with part 15 of the FCC Rules. Operation is subject to the following two conditions: (1) This device may not
cause harmful interference, and (2) this device must accept any interference received, including interference that may cause
undesired operation.
NOTE: This equipment has been tested and found to comply with the limits for a Class B digital device, pursuant to part 15
of the FCC Rules. These limits are designed to provide reasonable protection against harmful interference in a residential
installation. This equipment generates, uses, and can radiate radio frequency energy and, if not installed and used in
accordance with the instructions, may cause harmful interference to radio communications. However, there is no guarantee
that interference will not occur in a specific installation. If interference does occur to radio or television reception, which can
be determined by turning the equipment off and on, the user is encouraged to try to correct the interference by one or more of
the following measures:
• Reorient or relocate the receiving antenna.
• Increase the separation between the equipment and the receiver.
• Connect the equipment to an outlet on a circuit different from that to which the receiver is connected.
• Consult customer care, the dealer, or an experienced radio/TV technician for help.
CAUTION: Modification or changes to this equipment not expressly approved by Radio Systems Corporation may void the user’s
authority to operate the equipment.
IC
This device complies with Industry Canada licence-exempt RSS standard(s). Operation is subject to the
following two conditions: (1) this device may not cause interference, and (2) this device must accept any
interference, including interference that may cause the undesired operation thereof.
Le présent appareil est conforme aux CNR d’Industrie Canada applicables aux appareils radio exempts de licence.
L’exploitation est autorisée aux deux conditions suivantes : (1) l’appareil ne doit pas produire de brouillage, et (2) l’utilisateur
de l’appareil doit accepter tout brouillage radioélectrique subi, même si le brouillage est susceptible d’en compromettre le
fonctionnement.
Android, Google Play and the Google Play logo are trademarks of Google Inc.
Apple, the Apple logo, iPhone, iPad, and iPod touch are trademarks of Apple Inc., registered in the U.S. and other countries. App
Store is a service mark of Apple Inc.
12
WWW.SPORTDOG.COM
SUPPORT.SPORTDOG.COM
©2023 RADIO SYSTEMS CORPORATION
Radio Systems Corporation • 10427 PetSafe Way • Knoxville, TN 37932
YU400-2555/1