
Read all instructions before assembling and using product.
IMPORTANT - Keep Instructions for future use.
1224R1-SKU 4650
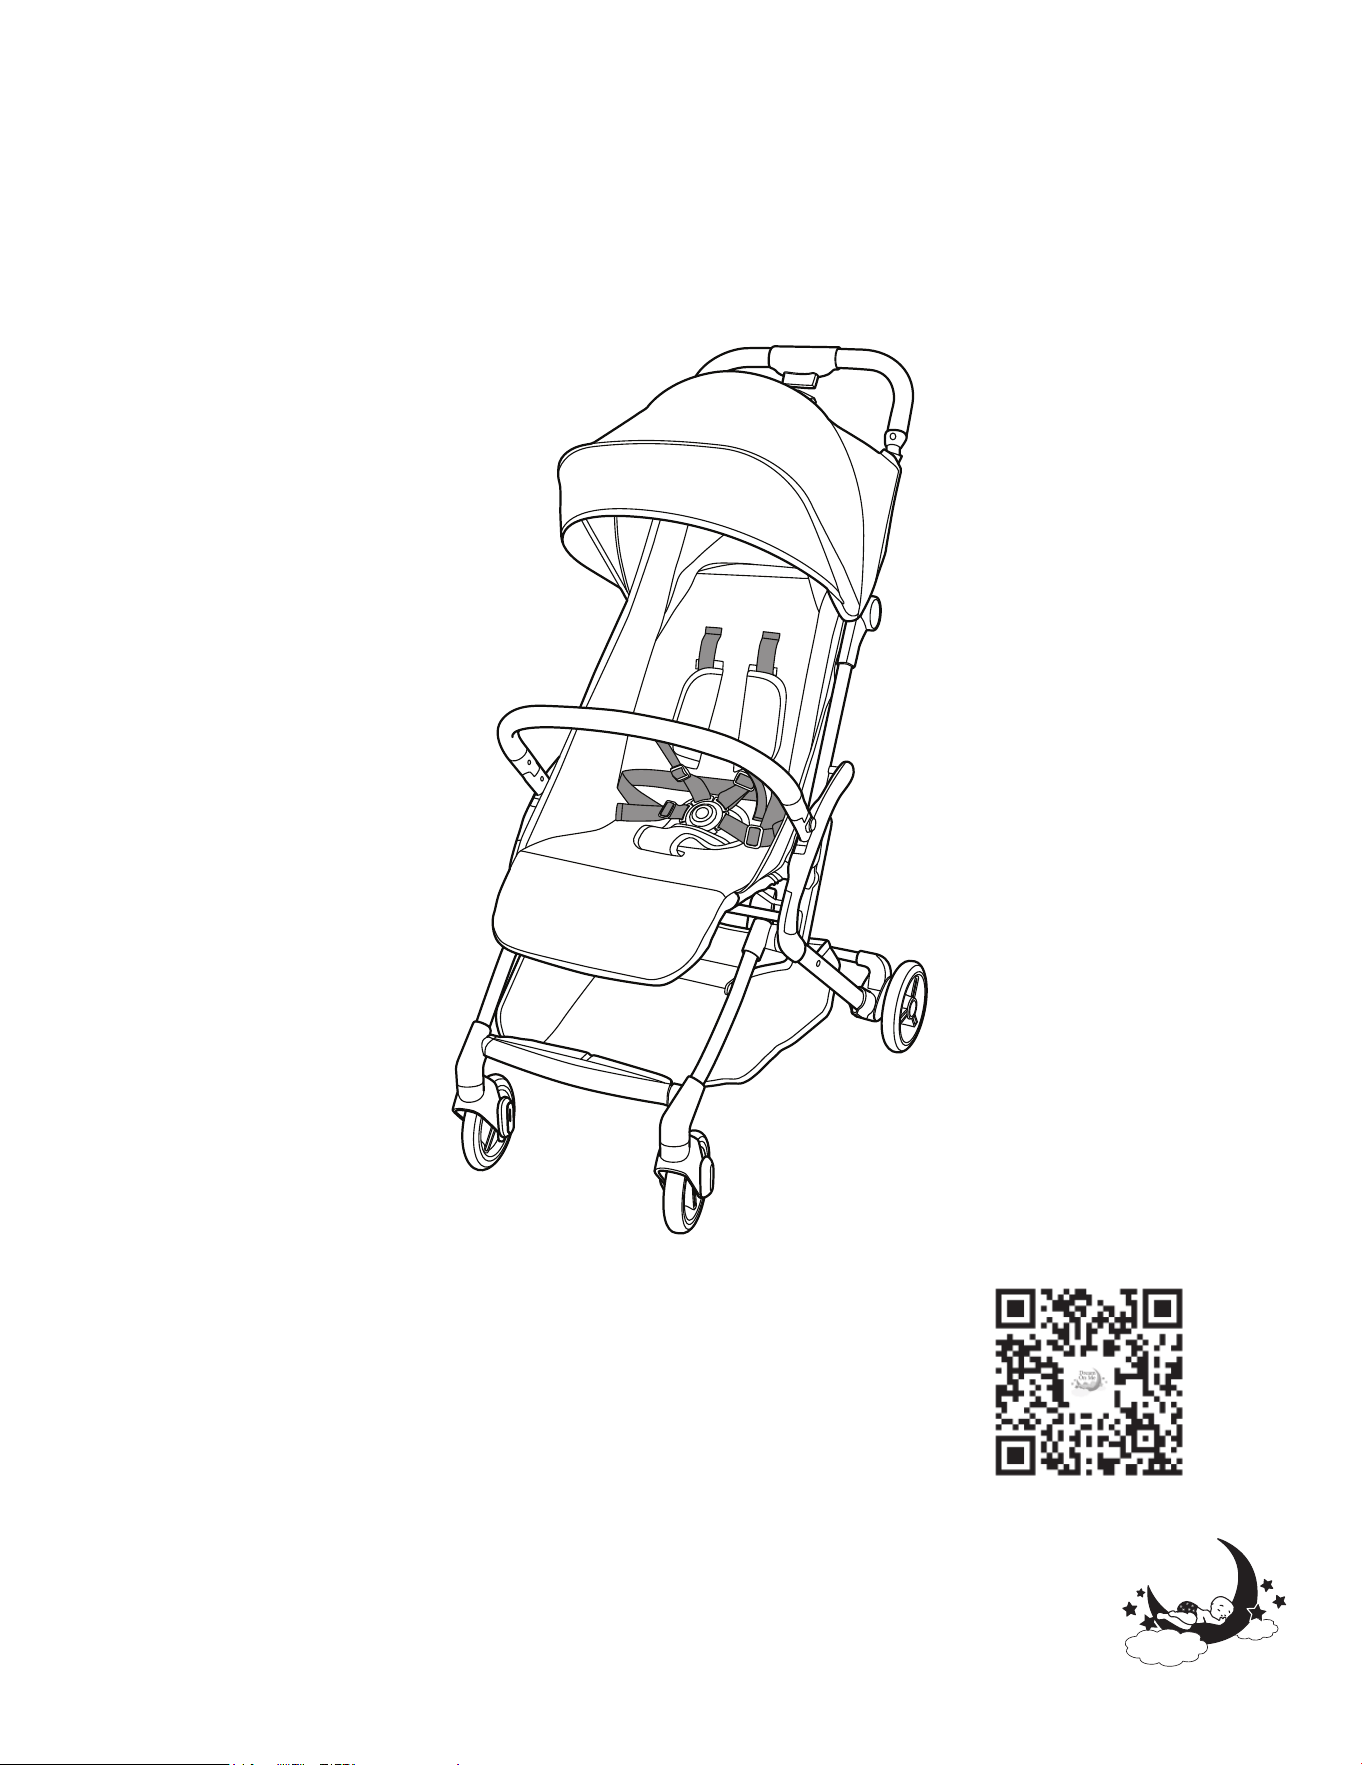
RioGlide Compact Stroller
Scan the QR code to register your product
Scannez le code QR pour enregistrer votre produit
Escanee el código QR para registrar su producto
https://dreamonme.com/customercare/registration/
Lisez toutes les instructions avant avant
d'assembler et d'utiliser le produit.
IMPORTANT - Conservez les instructions
pour pour une utilisation ultérieure.
Lea todas las instrucciones antes de
montar y utilizar el producto.
IMPORTANTE - Guarde las
instrucciones para uso futuro.
Owner’s Manual
Manuel du propriétaire Manual del usuario

2
www.dreamonme.com/help
WARNINGS
• PLEASE READ THE INSTRUCTIONS BEFORE ASSEMBLY AND KEEP THEM FOR
FURTHER REFERENCE.
• PLEASE ALWAYS READ ALL THE INSTRUCTIONS PROVIDED CAREFULLY BEFORE
USE AND REMEMBER YOUR CHILD'S SAFETY MAY BE AFFECTED IF YOU DO NOT
FOLLOW THESE INSTRUCTIONS.
• ADULT ASSEMBLY IS REQUIRED.
• PLEASE READ THE INSTRUCTIONS THOROUGHLY, AND IDENTIFY ALL PARTS AND
HARDWARE.
• THE STROLLER IS SUITABLE FOR 6-36 MONTHS OLD CHILDREN.
• THE MAX LOAD OF THE STROLLER IS 33 LBS, NEVER OVERLOAD.
• NEVER LEAVE THE CHILD UNATTENDED. ALWAYS KEEP THE CHILD IN VIEW WHILE
IN THE STROLLER.
• ALWAYS USE THE SAFETY HARNESS WHEN YOUR CHILD IS IN THE STROLLER.
• ENSURE THAT ALL THE LOCKING DEVICES ARE ENGAGED BEFORE USE.
• MAKE SURE THE BRAKE SYSTEM IS ENGAGED WHEN PUTTING OR TAKING OUT
THE CHILD.
• TO AVOID INJURY ENSURE THAT YOUR CHILD IS KEPT AWAY WHEN UNFOLDING
AND FOLDING THIS PRODUCT.
• DO NOT LET YOUR CHILD PLAY WITH THIS PRODUCT.
• AVOID SERIOUS INJURY FROM FALLING OR SLIDING OUT. ALWAYS USE THE SEAT
BELT.
• IT MAY BE DANGEROUS TO LEAVE YOUR CHILD UNATTENDED.
• ACCESSORIES THAT ARE NOT APPROVED BY THE MANUFACTURER SHALL NOT
BE USED.
• DO NOT USE IF ANY PARTS ARE BROKEN, TORN, OR MISSING.
• ONLY REPLACEMENT PARTS SUPPLIED OR RECOMMENDED BY THE
MANUFACTURER/DISTRIBUTOR SHALL BE USED.
• THIS PRODUCT IS NOT SUITABLE FOR RUNNING OR SKATING.
• DO NOT PLACE THE PARCELS OR ACCESSORY ITEMS OR BOTH ON THE
STROLLER AS IT MAY CAUSE THE UNIT TO BECOME UNSTABLE.
• CONTACT DREAM ON ME IN CASE ANY ASSISTANCE IS REQUIRED.
• AVOID SERIOUS INJURY CAUSED BY FALLING OR SLIDING OUT. ALWAYS SECURE
THE CHILD WITH THE SAFETY HARNESS. AFTER FASTENING THE BUCKLES,
ADJUST THE BELTS/HARNESS TO GET A SNUG FIT AROUND YOUR CHILD.
• AVOID FINGER ENTRAPMENT, BE AWARE AND CAREFUL DURING FOLDING AND
UNFOLDING THE STROLLER. BE CERTAIN THAT THE STROLLER IS FULLY ERECT
AND LATCHED/LOCKED BEFORE ALLOWING YOUR CHILD NEAR THE STROLLER.
• KEEP THE CHILD AWAY FROM THE PINCH POINTS DURING FOLDING AND
UNFOLDING THE STROLLER.
• NEVER USE A STROLLER ON STAIRS OR ESCALATORS AS YOU MAY SUDDENLY

3
www.dreamonme.com/help
WARNINGS (cont.)
• LOSE CONTROL OF THE STROLLER OR YOUR CHILD MAY FALL OUT. ALSO, USE EXTRA
CARE WHEN GOING UP OR DOWN A STEP OR CURB.
• AVOID STRANGULATION; DO NOT PLACE ITEMS WITH A STRING AROUND YOUR
CHILD’S NECK, SUSPEND STRINGS FROM THIS PRODUCT, OR ATTACH STRINGS TO
TOYS.
• PREVENT A HAZARDOUS, UNSTABLE CONDITION. NEVER PLACE PURSES, SHOPPING
BAGS, PARCELS, OR ACCESSORY ITEMS ON THE HANDLE.
• NEVER PLACE A CHILD IN THE STROLLER WITH THEIR HEAD TOWARD THE FOOTREST.
• NEVER ALLOW YOUR STROLLER TO BE USED AS A TOY.
• DISCONTINUE THE USE OF THE STROLLER IF IT IS DAMAGED OR BROKEN.
• THE STROLLER MUST ONLY BE USED AT WALKING SPEED. THE PRODUCT IS NOT
INTENDED FOR USE WHILE JOGGING, SKATING, ETC.
• CAREGIVERS MUST ALWAYS HELP CHILDREN GET INTO AND OUT OF THE STROLLER.
• THE STROLLER IS DESIGNED FOR USE ON FLAT OR GENTLY SLOPING SURFACES AND
MAY BE UNSTABLE ON HIGHER-SLOPING AND UNEVEN SURFACES. USERS SHOULD BE
AWARE OF THE POSSIBILITY OF THE STROLLER ROLLING AWAY OR TIPPING OVER. THE
FRONT WHEELS MAY WOBBLE OR OSCILLATE WHEN WALKING FAST.
• THE STROLLER CAN BE TAKEN UP CURBS BY EITHER PRESSING DOWN ON THE
HANDLES AND RAISING THE FRONT WHEELS AND MOUNTING THE CURB, OR TURNING
THE STROLLER AROUND AND PULLING THE STROLLER UP THE CURB.
• CAUTION IS REQUIRED WHEN PUSHING THE STROLLER ACROSS STEEP SLOPES OR
UNEVEN SURFACES AS THIS MAY CAUSE THE STROLLER TO BECOME UNSTABLE AND
FALL OVER. ALWAYS HOLD THE HANDLES FIRMLY.
• DO NOT RUN WITH THE STROLLER.
• WHENEVER YOU STOP, ALWAYS APPLY THE BRAKES BEFORE YOU LEAVE THE
STROLLER.
• DO NOT HANG BAGS OR GOODS FROM THE HANDLE AS THIS COULD CAUSE THE
STROLLER TO TIP OVER.

4
www.dreamonme.com/help
• VEUILLEZ LIRE LES INSTRUCTIONS AVANT L'ASSEMBLAGE ET LES CONSERVER
POUR RÉFÉRENCE ULTÉRIEURE.
• VEUILLEZ TOUJOURS LIRE ATTENTIVEMENT TOUTES LES INSTRUCTIONS
FOURNIES AVANT L'UTILISATION ET N'OUBLIEZ PAS QUE LA SÉCURITÉ DE VOTRE
ENFANT PEUT ÊTRE COMPROMISE SI VOUS NE SUIVEZ PAS CES INSTRUCTIONS.
• L'ASSEMBLAGE PAR UN ADULTE EST NÉCESSAIRE.
• VEUILLEZ LIRE ATTENTIVEMENT LES INSTRUCTIONS ET IDENTIFIER TOUTES LES
PIÈCES ET LE MATÉRIEL.
• LA POUSSETTE CONVIENT AUX ENFANTS ÂGÉS DE 6 À 36 MOIS.
• LA CHARGE MAXIMALE DE LA POUSSETTE EST DE 33 LIVRES, NE JAMAIS LA
SURCHARGER.
• NE JAMAIS LAISSER L'ENFANT SANS SURVEILLANCE. GARDEZ TOUJOURS
L'ENFANT EN VUE LORSQUE VOUS ÊTES DANS LA POUSSETTE.
• UTILISEZ TOUJOURS LE HARNAIS DE SÉCURITÉ LORSQUE VOTRE ENFANT EST
DANS LA POUSSETTE.
• ASSUREZ-VOUS QUE TOUS LES DISPOSITIFS DE VERROUILLAGE SONT
ENCLENCHÉS AVANT D'UTILISER LA POUSSETTE.
• ASSUREZ-VOUS QUE LE SYSTÈME DE FREINAGE EST ENCLENCHÉ LORSQUE
VOUS METTEZ OU SORTEZ L'ENFANT DE LA POUSSETTE.
• POUR ÉVITER LES BLESSURES, VEILLEZ À CE QUE VOTRE ENFANT SOIT TENU À
L'ÉCART LORS DU DÉPLIAGE ET DU PLIAGE DE CE PRODUIT.
• NE LAISSEZ PAS VOTRE ENFANT JOUER AVEC CE PRODUIT.
• ÉVITEZ LES BLESSURES GRAVES EN CAS DE CHUTE OU DE GLISSEMENT.
UTILISEZ TOUJOURS LA CEINTURE DE SÉCURITÉ.
• IL PEUT ÊTRE DANGEREUX DE LAISSER VOTRE ENFANT SANS SURVEILLANCE.
• LES ACCESSOIRES NON APPROUVÉS PAR LE FABRICANT NE DOIVENT PAS ÊTRE
UTILISÉS.
• N'UTILISEZ PAS L'APPAREIL SI DES PIÈCES SONT CASSÉES, DÉCHIRÉES OU
MANQUANTES.
• SEULES LES PIÈCES DE RECHANGE FOURNIES OU RECOMMANDÉES PAR LE
FABRICANT/DISTRIBUTEUR DOIVENT ÊTRE UTILISÉES.
• CE PRODUIT NE CONVIENT PAS POUR COURIR OU PATINER.
• NE PAS PLACER LES COLIS, LES ACCESSOIRES OU LES DEUX SUR LA
POUSSETTE, CAR CELA POURRAIT RENDRE L'APPAREIL INSTABLE.
• CONTACTEZ DREAM ON ME SI VOUS AVEZ BESOIN D'AIDE.
• ÉVITEZ LES BLESSURES GRAVES CAUSÉES PAR UNE CHUTE OU UN
GLISSEMENT. ATTACHEZ TOUJOURS L'ENFANT AVEC LE HARNAIS DE SÉCURITÉ.
APRÈS AVOIR ATTACHÉ LES BOUCLES, AJUSTEZ LES CEINTURES ET LE HARNAIS
POUR QU'ILS SOIENT BIEN AJUSTÉS À VOTRE ENFANT.
AVERTISSEMENTS

5
www.dreamonme.com/help
• ÉVITEZ DE VOUS COINCER LES DOIGTS, SOYEZ ATTENTIF ET PRUDENT LORS DU
PLIAGE ET DU DÉPLIAGE DE LA POUSSETTE. ASSUREZ-VOUS QUE LA
POUSSETTE EST BIEN DROITE ET VERROUILLÉE AVANT DE LAISSER VOTRE
ENFANT S'APPROCHER DE LA POUSSETTE.
• TENEZ L'ENFANT ÉLOIGNÉ DES POINTS DE PINCEMENT PENDANT LE PLIAGE ET
LE DÉPLIAGE DE LA POUSSETTE.
• N'UTILISEZ JAMAIS UNE POUSSETTE DANS LES ESCALIERS OU LES
ESCALATORS, CAR VOUS POURRIEZ PERDRE SOUDAINEMENT LE CONTRÔLE DE
LA POUSSETTE OU VOTRE ENFANT POURRAIT TOMBER. FAITES ÉGALEMENT
TRÈS ATTENTION LORSQUE VOUS MONTEZ OU DESCENDEZ UNE MARCHE OU
UN TROTTOIR.
• ÉVITEZ LA STRANGULATION ; NE PLACEZ PAS D'OBJETS AVEC UNE FICELLE
AUTOUR DU COU DE VOTRE ENFANT, NE SUSPENDEZ PAS DE FICELLES À CE
PRODUIT ET N'ATTACHEZ PAS DE FICELLES AUX JOUETS.
• NE LAISSEZ JAMAIS VOTRE POUSSETTE ÊTRE UTILISÉE COMME UN JOUET.
• CESSEZ D'UTILISER LA POUSSETTE SI ELLE EST ENDOMMAGÉE OU CASSÉE.
• LA POUSSETTE NE DOIT ÊTRE UTILISÉE QU'À LA VITESSE DE LA MARCHE. LE
PRODUIT N'EST PAS CONÇU POUR ÊTRE UTILISÉ EN FAISANT DU JOGGING, DU
PATINAGE, ETC.
• LES PERSONNES QUI S'OCCUPENT DES ENFANTS DOIVENT TOUJOURS LES
AIDER À MONTER ET À DESCENDRE DE LA POUSSETTE.
• LA POUSSETTE EST CONÇUE POUR ÊTRE UTILISÉE SUR DES SURFACES PLATES
OU LÉGÈREMENT INCLINÉES ET PEUT ÊTRE INSTABLE SUR DES SURFACES PLUS
INCLINÉES ET IRRÉGULIÈRES. LES UTILISATEURS DOIVENT ÊTRE CONSCIENTS
QUE LA POUSSETTE PEUT ROULER OU BASCULER. LES ROUES AVANT PEUVENT
VACILLER OU OSCILLER LORS D'UNE MARCHE RAPIDE.
• LA POUSSETTE PEUT ÊTRE MONTÉE SUR LES TROTTOIRS EN APPUYANT SUR
LES POIGNÉES, EN LEVANT LES ROUES AVANT ET EN MONTANT SUR LE
TROTTOIR, OU EN RETOURNANT LA POUSSETTE ET EN LA TIRANT VERS LE HAUT
DU TROTTOIR.
• IL FAUT ÊTRE PRUDENT LORSQUE L'ON POUSSE LA POUSSETTE SUR DES
PENTES RAIDES OU DES SURFACES INÉGALES, CAR LA POUSSETTE PEUT
DEVENIR INSTABLE ET SE RENVERSER. TENEZ TOUJOURS FERMEMENT LES
POIGNÉES.
• NE COUREZ PAS AVEC LA POUSSETTE.
• LORSQUE VOUS VOUS ARRÊTEZ, FREINEZ TOUJOURS AVANT DE QUITTER LA
POUSSETTE.
• NE PAS ACCROCHER DE SACS OU D'OBJETS À LA POIGNÉE, CAR CELA
POURRAIT FAIRE BASCULER LA POUSSETTE.
AVERTISSEMENTS (suite)

6
www.dreamonme.com/help
• LEA LAS INSTRUCCIONES ANTES DEL MONTAJE Y CONSÉRVELAS PARA
FUTURAS CONSULTAS.
• POR FAVOR, LEA SIEMPRE ATENTAMENTE TODAS LAS INSTRUCCIONES
PROPORCIONADAS ANTES DE SU USO Y RECUERDE QUE LA SEGURIDAD DE SU
HIJO PUEDE VERSE AFECTADA SI NO SIGUE ESTAS INSTRUCCIONES.
• SE REQUIERE EL MONTAJE POR PARTE DE UN ADULTO.
• LEA ATENTAMENTE LAS INSTRUCCIONES E IDENTIFIQUE TODAS LAS PIEZAS Y
HERRAJES.
• LA SILLA DE PASEO ES ADECUADA PARA NIÑOS DE 6 A 36 MESES.
• LA CARGA MÁXIMA DEL COCHECITO ES DE 33 LBS, NUNCA LO SOBRECARGUE.
• NO DEJE NUNCA AL NIÑO DESATENDIDO. MANTENGA SIEMPRE AL NIÑO A LA
VISTA MIENTRAS ESTÉ EN EL COCHECITO.
• UTILICE SIEMPRE EL ARNÉS DE SEGURIDAD CUANDO EL NIÑO ESTÉ EN LA SILLA
DE PASEO.
• ASEGÚRESE DE QUE TODOS LOS DISPOSITIVOS DE BLOQUEO ESTÁN
ACTIVADOS ANTES DE USARLA.
• ASEGÚRESE DE QUE EL SISTEMA DE FRENADO ESTÁ ACTIVADO CUANDO PONGA
O SAQUE AL NIÑO.
• PARA EVITAR LESIONES, ASEGÚRESE DE QUE SU HIJO ESTÉ ALEJADO AL
DESPLEGAR Y PLEGAR ESTE PRODUCTO.
• NO DEJE QUE SU HIJO JUEGUE CON ESTE PRODUCTO.
• EVITE LESIONES GRAVES POR CAÍDAS O DESLIZAMIENTOS. UTILICE SIEMPRE EL
CINTURÓN DE SEGURIDAD.
• PUEDE SER PELIGROSO DEJAR AL NIÑO SIN VIGILANCIA.
• NO UTILICE ACCESORIOS QUE NO ESTÉN HOMOLOGADOS POR EL FABRICANTE.
• NO LO UTILICE SI ALGUNA PIEZA ESTÁ ROTA, DESGARRADA O FALTA.
• SÓLO DEBEN UTILIZARSE PIEZAS DE REPUESTO SUMINISTRADAS O
RECOMENDADAS POR EL FABRICANTE/DISTRIBUIDOR.
• ESTE PRODUCTO NO ES APTO PARA CORRER O PATINAR.
• NO COLOQUE LOS BULTOS, LOS ACCESORIOS O AMBOS SOBRE EL COCHECITO,
YA QUE PODRÍA PROVOCAR LA INESTABILIDAD DE LA UNIDAD.
• PÓNGASE EN CONTACTO CON DREAM ON ME EN CASO DE NECESITAR AYUDA.
• EVITE LESIONES GRAVES CAUSADAS POR CAÍDAS O DESLIZAMIENTOS.
ASEGURE SIEMPRE AL NIÑO CON EL ARNÉS DE SEGURIDAD. DESPUÉS DE
ABROCHAR LAS HEBILLAS, AJUSTE LOS CINTURONES/EL ARNÉS PARA
CONSEGUIR UN AJUSTE CEÑIDO ALREDEDOR DEL NIÑO.
• EVITE PILLARSE LOS DEDOS, SEA CONSCIENTE Y CUIDADOSO AL PLEGAR Y
DESPLEGAR LA SILLA DE PASEO. ASEGÚRESE DE QUE LA SILLA DE PASEO ESTÁ
COMPLETAMENTE ERGUIDA Y CERRADA ANTES DE PERMITIR QUE SU HIJO SE
ACERQUE A ELLA.
ADVERTENCIAS

7
www.dreamonme.com/help
• MANTENGA AL NIÑO ALEJADO DE LOS PUNTOS DE PELLIZCO AL PLEGAR Y
DESPLEGAR EL COCHECITO.
• NUNCA UTILICE UN COCHECITO EN ESCALERAS O ESCALERAS MECÁNICAS, YA
QUE PODRÍA PERDER REPENTINAMENTE EL CONTROL DEL COCHECITO O SU
HIJO PODRÍA CAERSE. ADEMÁS, TENGA MUCHO CUIDADO AL SUBIR O BAJAR
UN ESCALÓN O BORDILLO.
• EVITE EL ESTRANGULAMIENTO; NO COLOQUE OBJETOS CON UNA CUERDA
ALREDEDOR DEL CUELLO DE SU HIJO, NO SUSPENDA CUERDAS DE ESTE
PRODUCTO NI ATE CUERDAS A LOS JUGUETES.
• NUNCA PERMITA QUE SU COCHECITO SE UTILICE COMO JUGUETE.
• DEJE DE UTILIZAR EL COCHECITO SI ESTÁ DAÑADO O ROTO.
• EL COCHECITO SÓLO DEBE UTILIZARSE A VELOCIDAD DE PASEO. EL PRODUCTO
NO ESTÁ DISEÑADO PARA CORRER, PATINAR, ETC.
• LOS CUIDADORES SIEMPRE DEBEN AYUDAR A LOS NIÑOS A SUBIR Y BAJAR DEL
COCHECITO.
• EL COCHECITO ESTÁ DISEÑADO PARA SU USO EN SUPERFICIES PLANAS O
LIGERAMENTE INCLINADAS Y PUEDE SER INESTABLE EN SUPERFICIES MÁS
INCLINADAS E IRREGULARES. LOS USUARIOS DEBEN SER CONSCIENTES DE LA
POSIBILIDAD DE QUE EL COCHECITO RUEDE O VUELQUE. LAS RUEDAS
DELANTERAS PUEDEN TAMBALEARSE U OSCILAR AL CAMINAR RÁPIDO.
• EL COCHECITO PUEDE SUBIRSE A LOS BORDILLOS PRESIONANDO HACIA ABAJO
LAS EMPUÑADURAS Y LEVANTANDO LAS RUEDAS DELANTERAS Y SUBIÉNDOSE
AL BORDILLO, O DANDO LA VUELTA AL COCHECITO Y TIRANDO DE ÉL PARA
SUBIRLO AL BORDILLO.
• ES NECESARIO TENER CUIDADO AL EMPUJAR EL COCHECITO POR PENDIENTES
PRONUNCIADAS O SUPERFICIES IRREGULARES, YA QUE ESTO PUEDE HACER
QUE EL COCHECITO SE VUELVA INESTABLE Y SE CAIGA. SUJETE SIEMPRE LAS
ASAS CON FIRMEZA.
• NO CORRA CON EL COCHECITO.
• SIEMPRE QUE SE DETENGA, ACCIONE LOS FRENOS ANTES DE BAJARSE DEL
COCHECITO.
• NO CUELGUE BOLSAS NI OBJETOS DEL ASA, YA QUE PODRÍA PROVOCAR EL
VUELCO DEL COCHECITO.
ADVERTENCIAS (continuación)
8
www.dreamonme.com/help
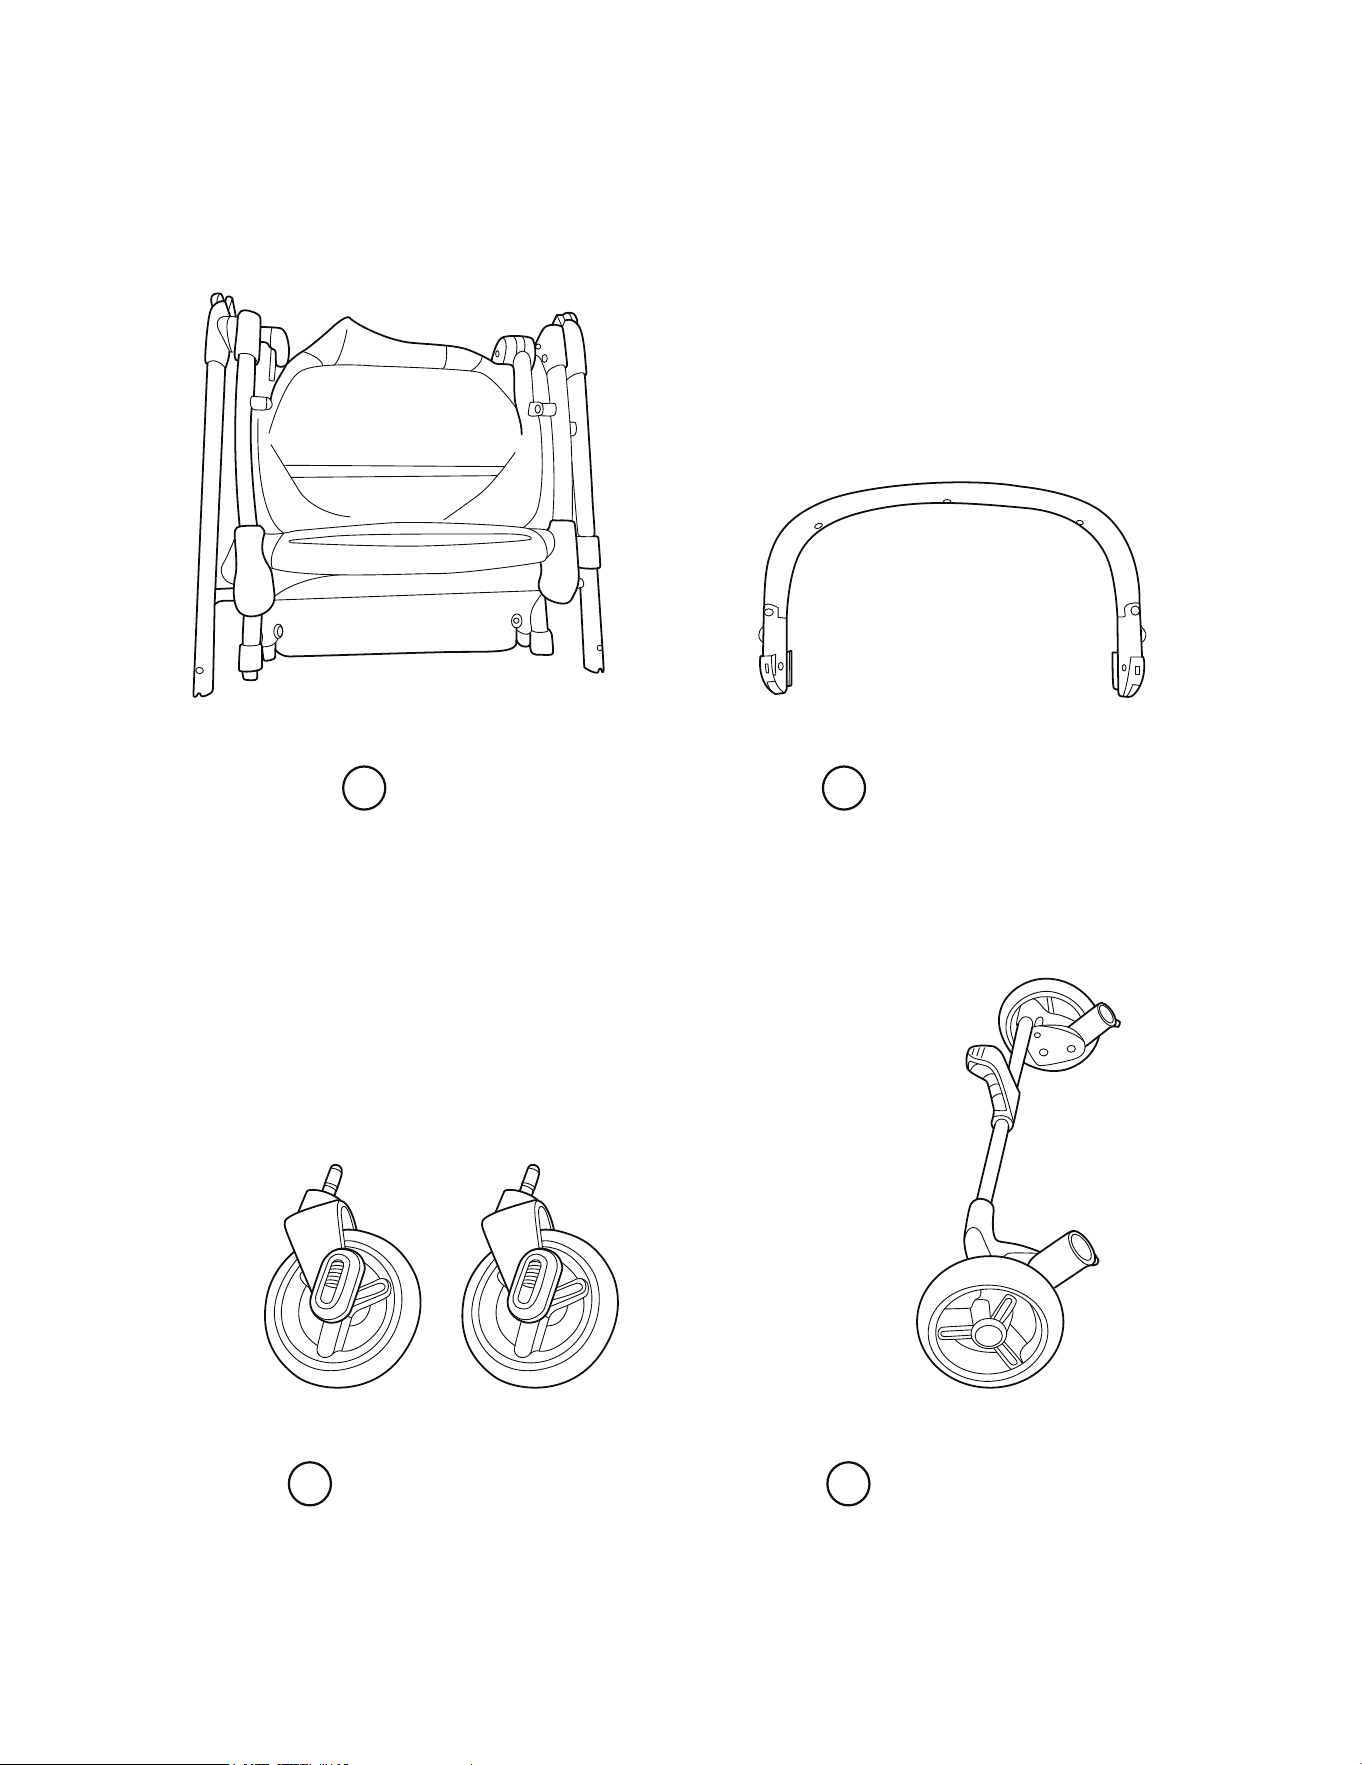
PARTS
PIÈCES `PARTES
If there are any missing parts, please contact Dream On Me before using the product.
S'il y a des pièces manquantes, veuillez contacter Dream On Me avant d'utiliser le produit.
Si falta alguna pieza, póngase en contacto con Dream On Me antes de utilizar el producto.
Frame
Cadre
Marco
1
Hand Rail
Porte-chaise
Titular de la silla
2
Front Wheel (x2)
Roue avant (x2)
Rueda delantera (x2)
3
Rear Wheel Axle
Essieu de roue arrière
Eje de la rueda trasera
4
9
www.dreamonme.com/help
1
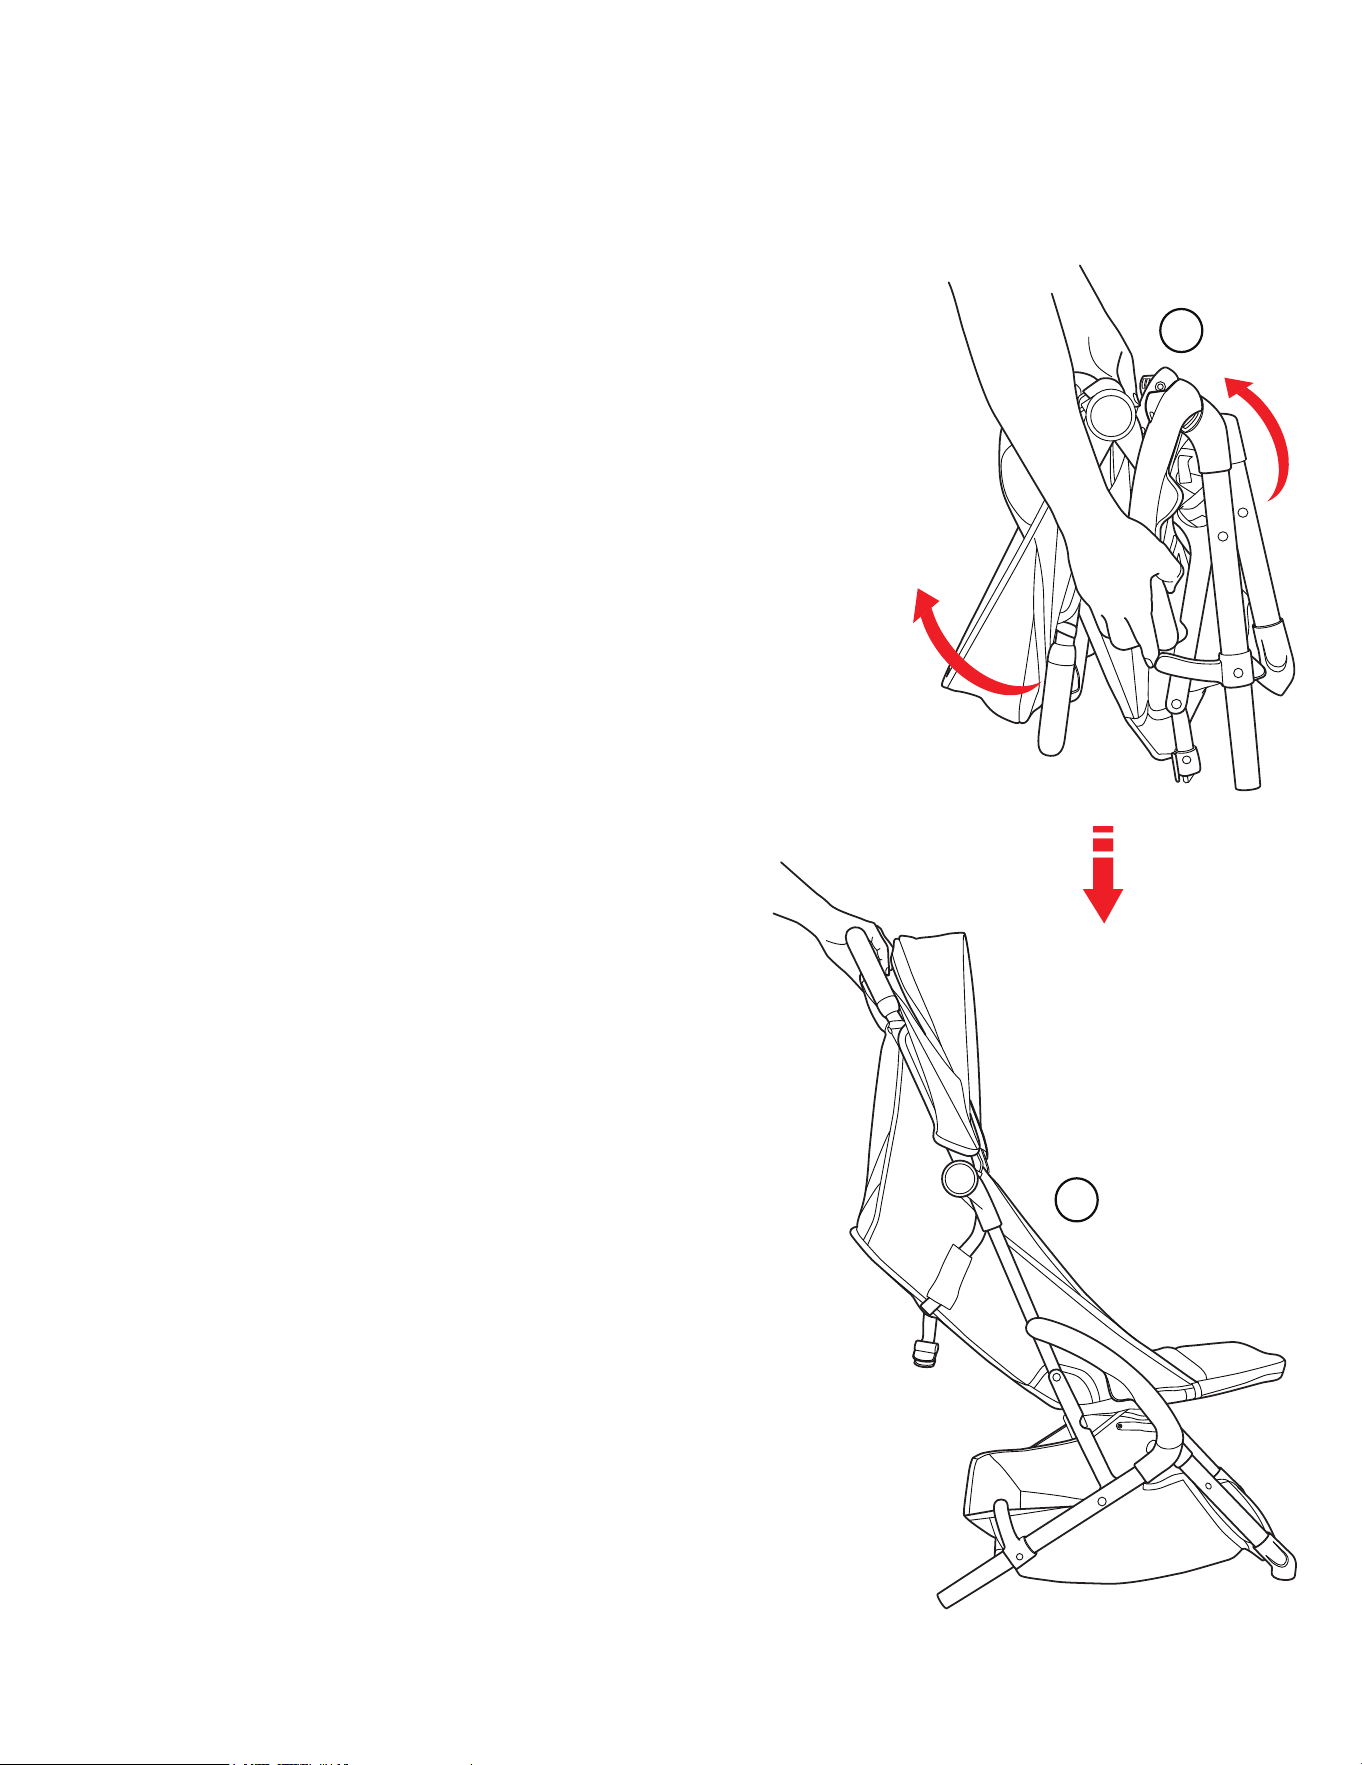
STROLLER ASSEMBLY - OPENING THE FRAME
ASSEMBLAGE DE LA POUSSETTE - OUVERTURE DU CADRE
MONTAJE DEL COCHECITO - APERTURA DEL BASTIDOR
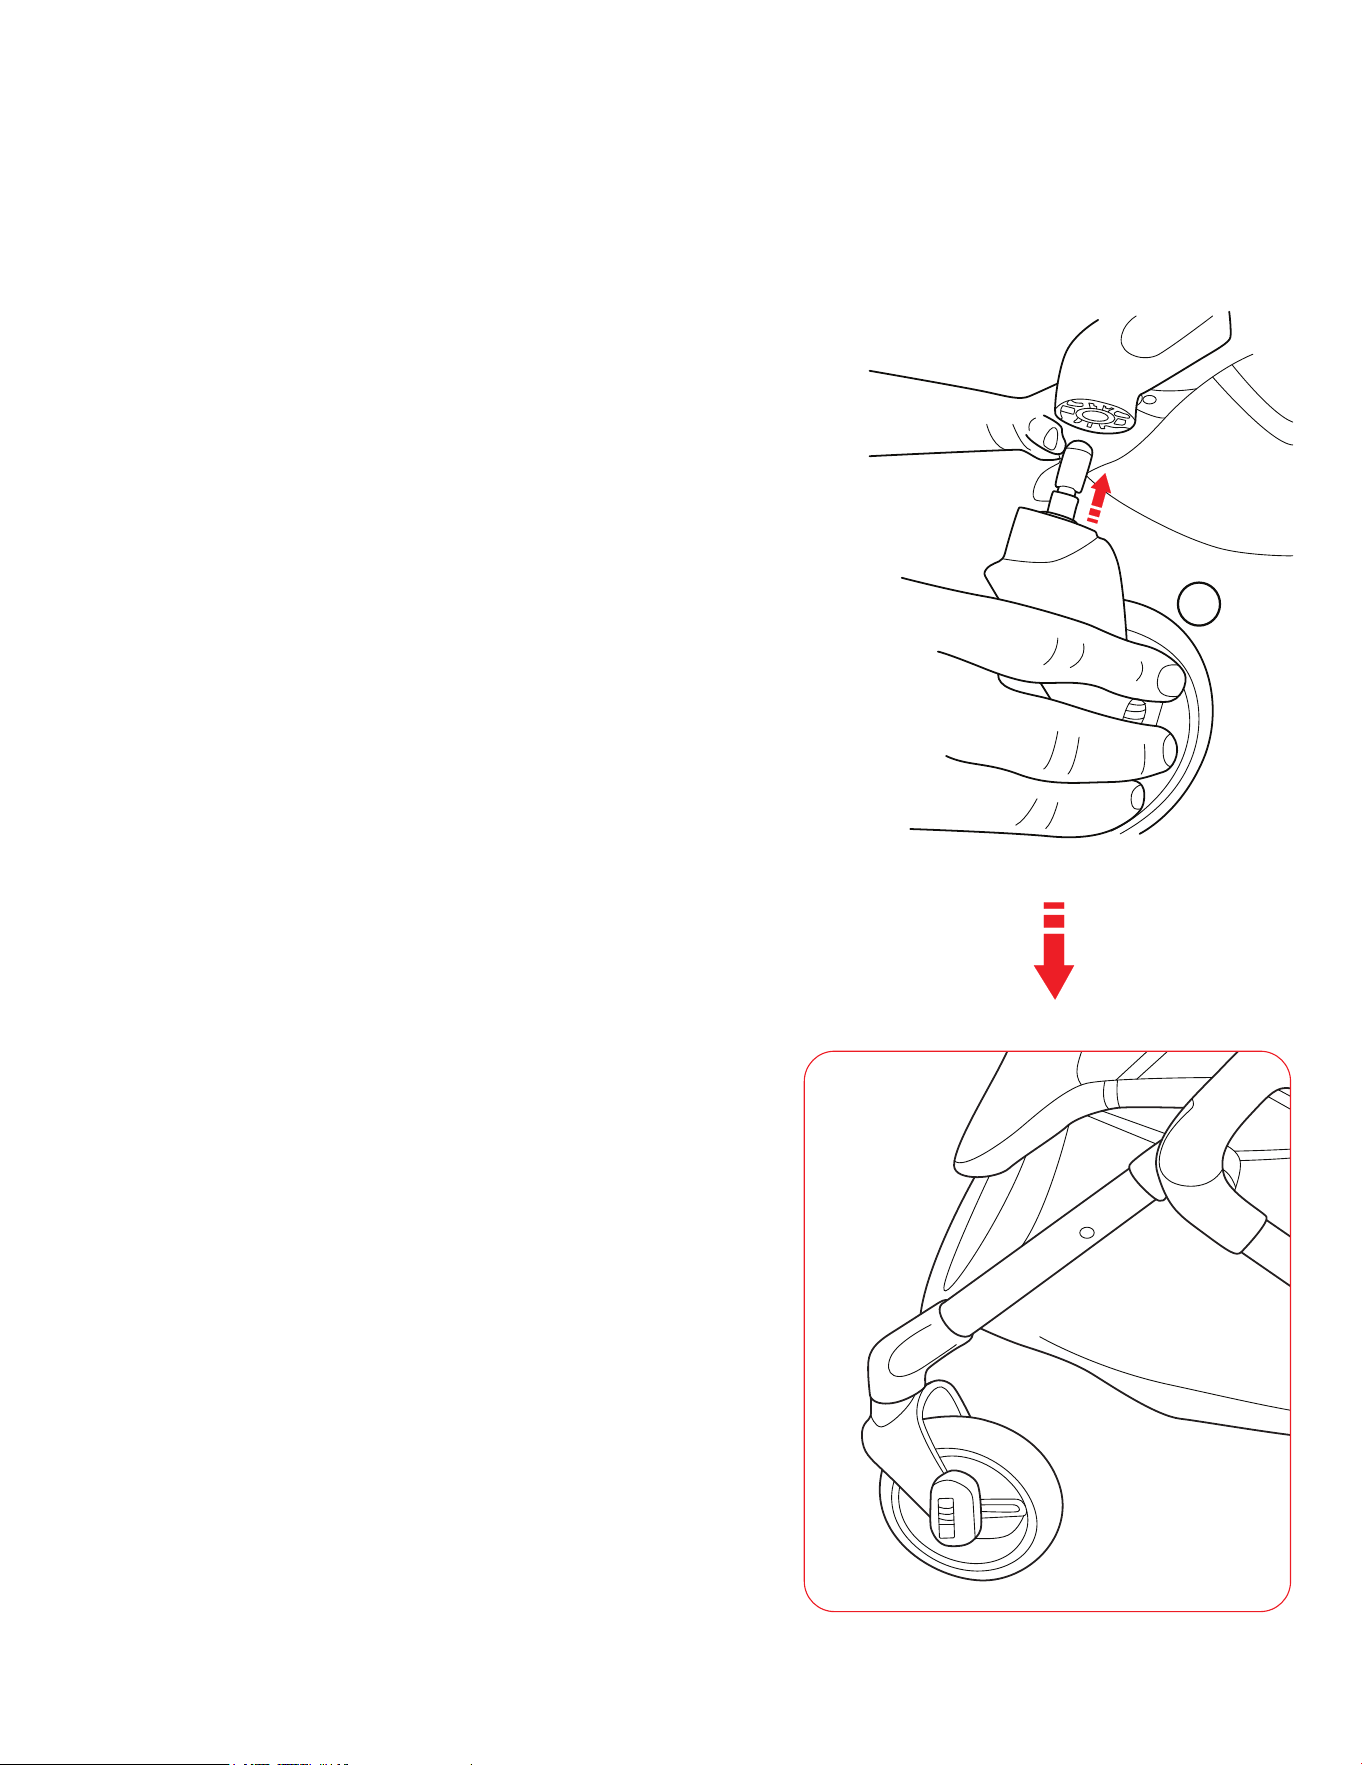
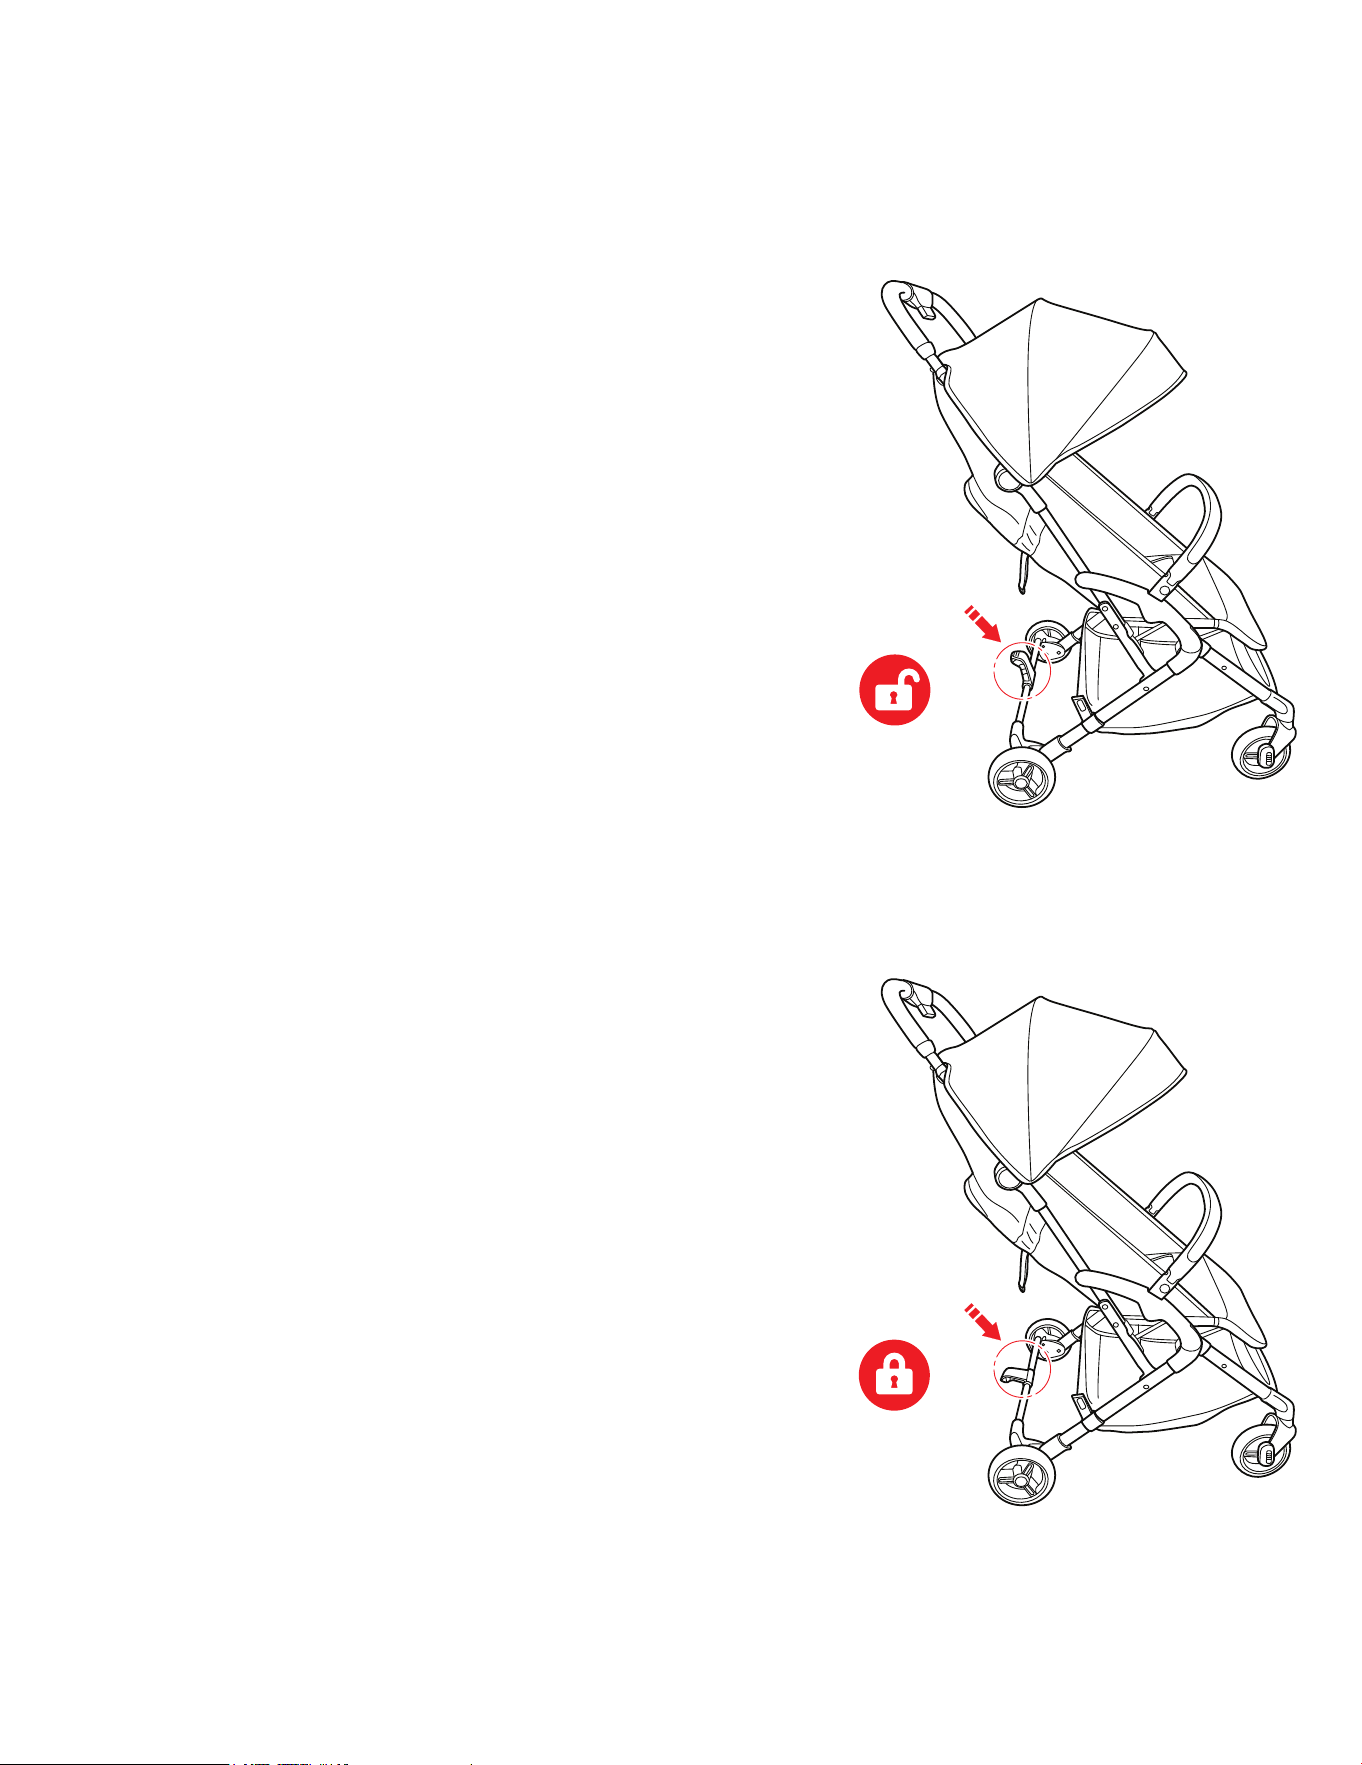
1a. Remove the frame from its storage location.
1b. Release the coupler as shown in the diagram.
1c. Using both hands, lift the grip upward to start
unfolding the frame.
1d. Continue to unfold the frame until fully
extended and stable.
1a. Retirer le cadre de son emplacement de
stockage.
1b. Débloquer le coupleur comme indiqué sur le
schéma.
1c. En utilisant les deux mains, soulever la poignée
vers le haut pour commencer à déplier le cadre.
1d. Continuer à déplier le cadre jusqu'à ce qu'il soit
complètement étendu et stable.
1a. Retire el bastidor de su lugar de almacenamiento.
1b. Suelte el enganche como se muestra en el
diagrama.
1c. Con ambas manos, levante la empuñadura hacia
arriba para empezar a desplegar el bastidor.
1d. Continúe desplegando el bastidor hasta que esté
completamente extendido y estable.
1
1
10
www.dreamonme.com/help
2
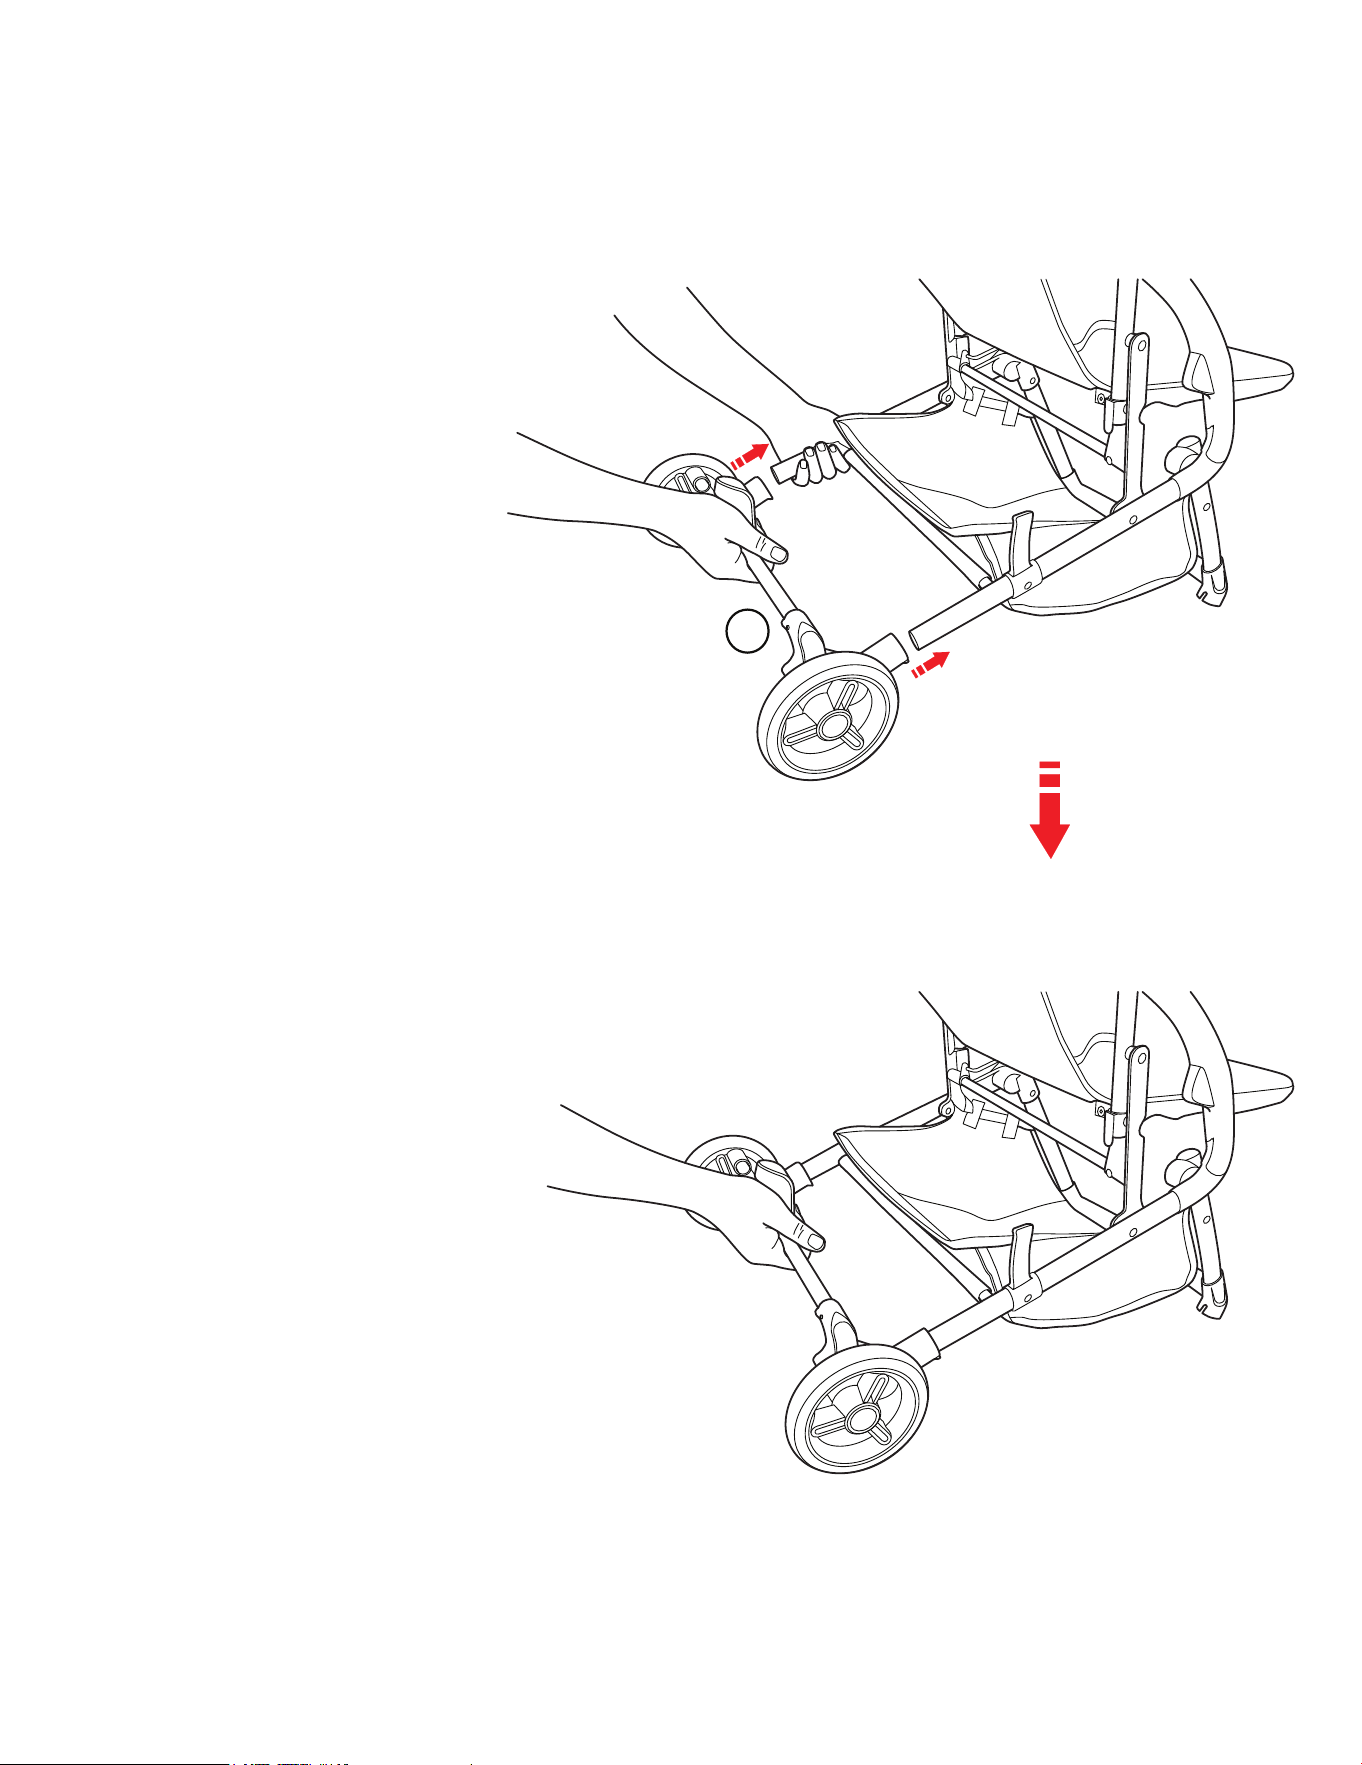
STROLLER ASSEMBLY - REAR WHEEL ASSEMBLY
ASSEMBLAGE DE LA POUSSETTE - ASSEMBLAGE DE LA ROUE ARRIÈRE
CONJUNTO COCHECITO - CONJUNTO RUEDA TRASERA
2a. Position the pre-assembled
rear wheel set at the
designated insertion points
on the stroller frame as
shown in the diagram.
2b. Push the rear wheels into the
frame as shown in the
diagram, until you hear a
"click" sound. This indicates
that the shrapnel has popped
out from the hole, confirming
that the wheels are securely
locked in place.
2a. Positionner le jeu de roues arrière
pré-assemblé aux points d'insertion
désignés sur le châssis de la poussette,
comme indiqué sur le schéma.
2b. Poussez les roues arrière dans le châssis
comme indiqué sur le schéma, jusqu'à ce
que vous entendiez un « clic ». Cela
indique que le shrapnel est sorti du trou,
confirmant que les roues sont bien
bloquées en place.
2a. Coloque el juego de ruedas
traseras premontado en los
puntos de inserción designados
en el chasis del cochecito como
se muestra en el diagrama.
2b. Empuje las ruedas traseras en el
chasis como se muestra en el
diagrama, hasta que oiga un
«clic». Esto indica que la metralla
ha salido del orificio, confirmando
que las ruedas están bien
bloqueadas en su sitio.
4
11
www.dreamonme.com/help
3
STROLLER ASSEMBLY - FRONT WHEEL ASSEMBLY
ASSEMBLAGE DE LA POUSSETTE - ASSEMBLAGE DE LA ROUE AVANT
MONTAJE DEL COCHECITO - MONTAJE DE LA RUEDA DELANTERA
3a. Position the front wheel at the
designated hole at the front of the
stroller frame as shown in the diagram.
3b. Push the wheel firmly into the hole until
you hear a "click" sound, indicating that
the wheel is securely locked in place.
3a. Positionner la roue avant dans le trou
prévu à cet effet à l'avant du châssis de la
poussette, comme indiqué sur le schéma.
3b. Pousser fermement la roue dans le trou
jusqu'à ce que vous entendiez un « clic »,
indiquant que la roue est bien verrouillée
en place.
3a. Coloque la rueda delantera en el orificio
designado en la parte delantera del chasis
del cochecito, como se muestra en el
diagrama.
3b. Empuje la rueda firmemente en el orificio
hasta que oiga un «clic», lo que indica que
la rueda está bien bloqueada en su sitio.
“click”
“cliquez”
“haga clic en”
3

12
www.dreamonme.com/help
4
STROLLER ASSEMBLY - HANDRAIL ASSEMBLY
ASSEMBLAGE DE LA POUSSETTE - ASSEMBLAGE DE LA BARRE DE MAINTIEN
MONTAJE DEL COCHECITO - MONTAJE DE LA BARANDILLA
4a. Position the handrail at the designated
spots on the stroller frame as shown in
the diagram.
4b. Slide the ends of the handrail into the
connection points on the stroller frame.
4c. Once attached, give the handrail a
gentle tug to ensure it is securely in
place and will not move or come loose.
4a. Positionner la main courante aux endroits
désignés sur le châssis de la poussette
comme indiqué sur le schéma.
4b. Glisser les extrémités de la main courante
dans les points de connexion du châssis
de la poussette.
4c. Une fois fixée, tirez légèrement sur la
main courante pour vous assurer qu'elle
est bien en place et qu'elle ne bougera
pas ou ne se détachera pas.
4a. Coloque el pasamanos en los puntos
designados del chasis del cochecito
como se muestra en el diagrama.
4b. Deslice los extremos del pasamanos
en los puntos de conexión del
armazón del cochecito.
4c. Una vez fijada, tire suavemente de la
barandilla para asegurarse de que
está bien sujeta y de que no se
moverá ni se soltará.
2
13
www.dreamonme.com/help
5
FOOT ADJUSTMENT
RÉGLAGE DU PIED
AJUSTE DEL PIE
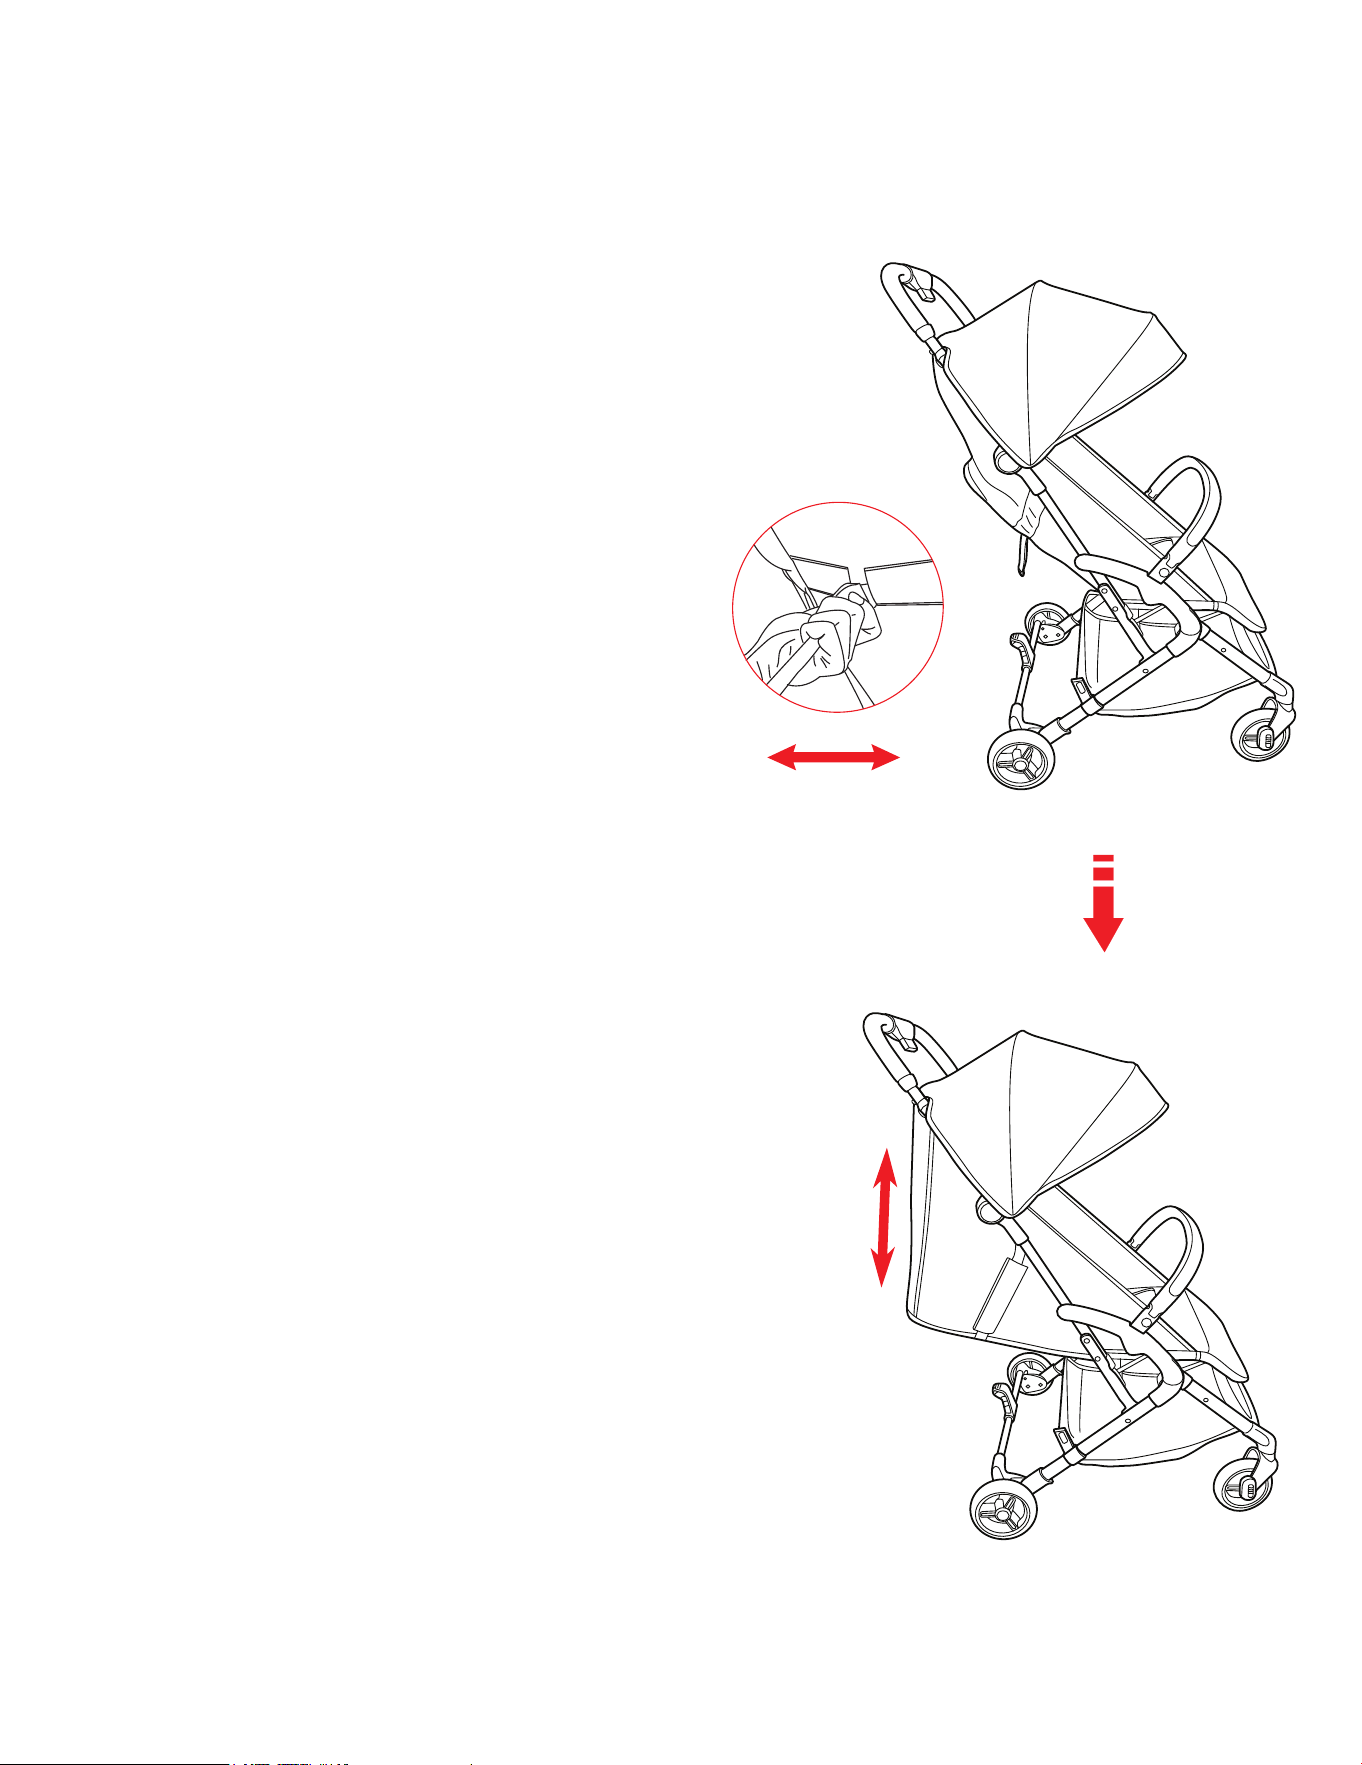
5a. Adjust the position of the footrest up or
down by pinching the adjustment
buttons and pushing the footrest as
shown in the diagram.
5a. Ajustez la position du repose-pieds vers le
haut ou vers le bas en pinçant les boutons
de réglage et en poussant le repose-pieds
comme indiqué sur le schéma.
5a. Ajuste la posición del reposapiés hacia
arriba o hacia abajo apretando los botones
de ajuste y empujando el reposapiés como
se muestra en el diagrama.
14
www.dreamonme.com/help
6
CANOPY ADJUSTMENT
RÉGLAGE DE LA VOILURE
AJUSTE DEL TOLDO
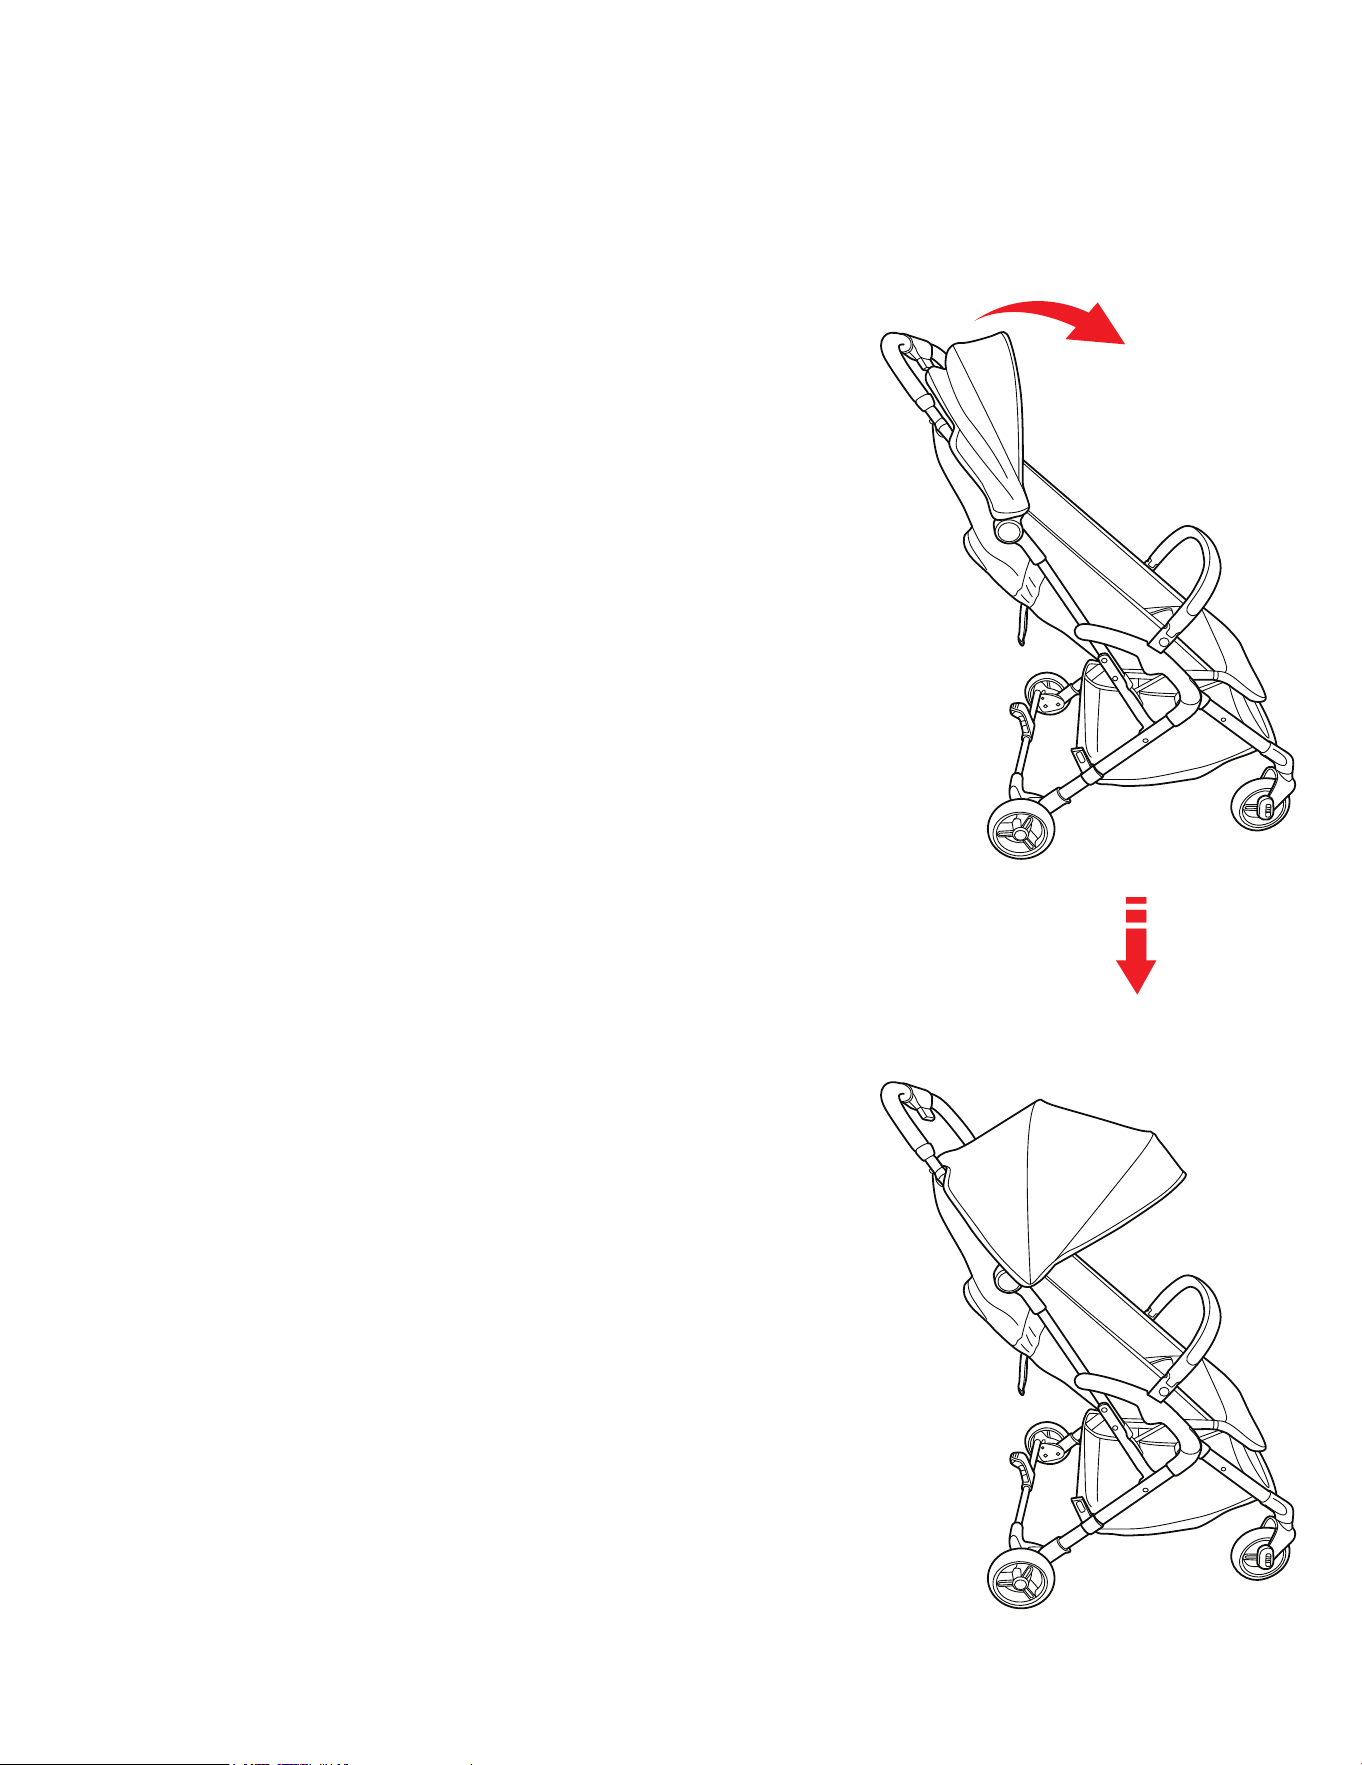
6a. Unfold the canopy by opening it
outwards until it is fully extended.
6b. Gently tug on the canopy to ensure it is
firmly attached and will not shift or
collapse when moving the stroller.
6a. Déployez la canopée en l'ouvrant vers
l'extérieur jusqu'à ce qu'elle soit
complètement étendue.
6b. Tirez doucement sur le canopy pour vous
assurer qu'il est bien fixé et qu'il ne se
déplacera pas ou ne s'affaissera pas
lorsque vous déplacerez la poussette.
6a. Despliegue la capota abriéndola hacia fuera
hasta que quede totalmente extendida.
6b. Tire suavemente de la capota para
asegurarse de que está firmemente sujeta y
de que no se desplazará ni se plegará al
mover el cochecito.
15
www.dreamonme.com/help
7
BACKREST ADJUSTMENT
RÉGLAGE DU DOSSIER
AJUSTE DEL RESPALDO
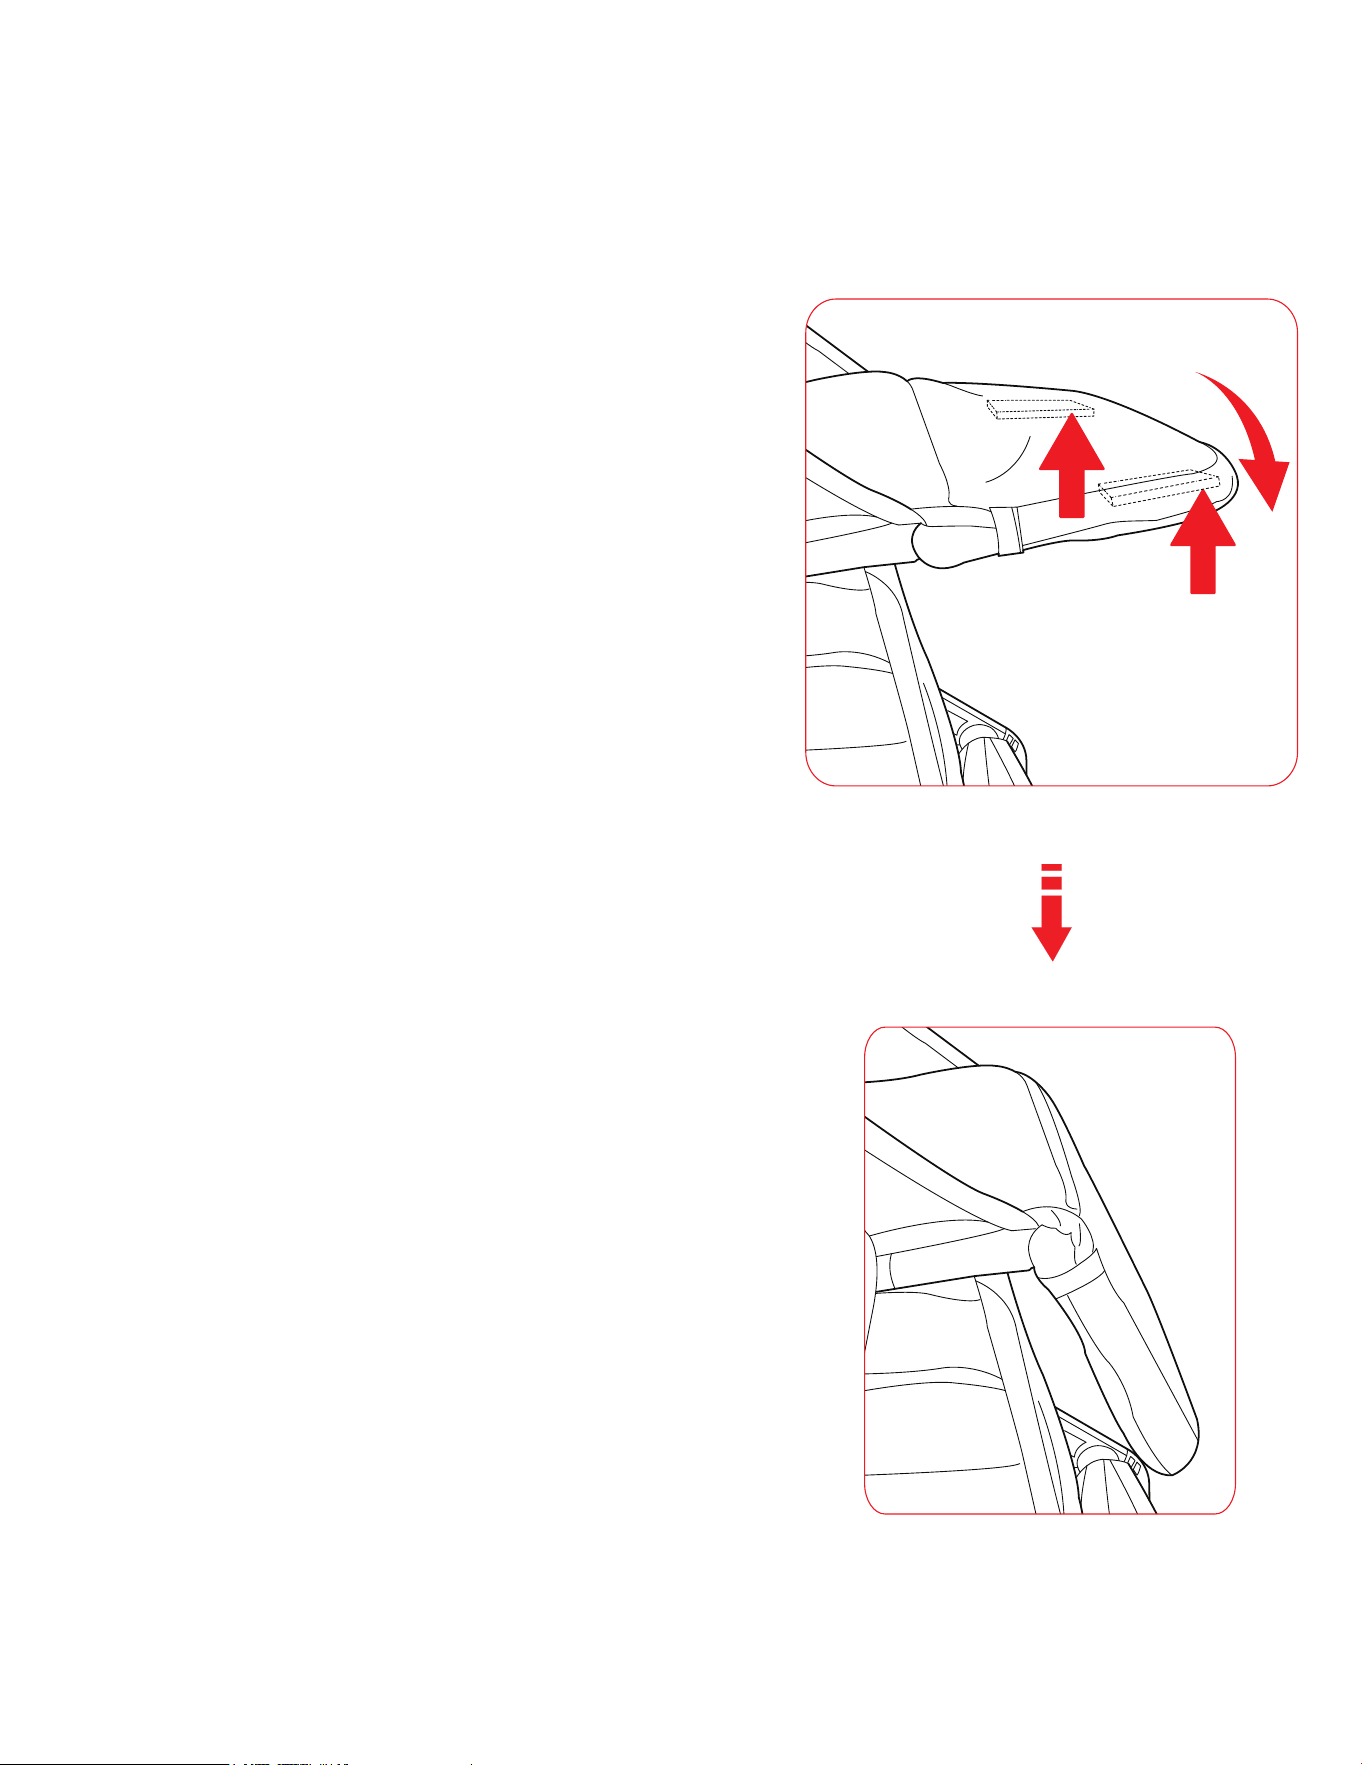
7a. Hold the Backrest Adjuster as shown in
the diagram.
7b. Pull the adjuster to make the backrest
position flatter.
7c. Push the adjuster to make the backrest
position upright.
7a. Tenez le dispositif de réglage du dossier
comme indiqué sur le schéma.
7b. Tirez sur le dispositif de réglage pour
aplanir la position du dossier.
7c. Poussez le dispositif de réglage pour
redresser le dossier.
7a. Sujete el ajustador del respaldo como se
muestra en el diagrama.
7b. Tire del regulador para aplanar la
posición del respaldo.
7c. Empuje el regulador para poner el
respaldo en posición vertical.
16
www.dreamonme.com/help
8
BRAKE FUNCTION
FONCTION DES FREINS
FUNCIÓN DE FRENADO
8a. Press the foot lever down with your foot and
wait to hear a "click”, to ensure it is locked.
8b. Push the pedal lever up with your foot and wait
to hear a "click”, to ensure it is unlocked.
8c. After engaging the brake, try to push the stroller
slightly to ensure that the brake is properly
holding and the stroller does not move.
8a. Appuyez sur le levier avec votre pied et attendez
d'entendre un « clic » pour vous assurer qu'il est
verrouillé.
8b. Poussez le levier de la pédale vers le haut avec
votre pied et attendez d'entendre un « clic » pour
vous assurer qu'il est déverrouillé.
8c. Après avoir engagé le frein, essayez de pousser
légèrement la poussette pour vous assurer que le
frein tient bien et que la poussette ne bouge pas.
8a. Presione la palanca de pie hacia abajo con el
pie y espere a oír un «clic» para asegurarse
de que está bloqueada.
8b. Presione la palanca del pedal hacia arriba
con el pie y espere a oír un «clic», para
asegurarse de que está desbloqueada.
8c. Después de accionar el freno, intente
empujar ligeramente el cochecito para
asegurarse de que el freno está bien sujeto y
el cochecito no se mueve.
17
www.dreamonme.com/help
9
HARNESS ADJUSTMENT
RÉGLAGE DU HARNAIS
AJUSTE DEL ARNÉS
“click”
“cliquez”
“haga clic en”
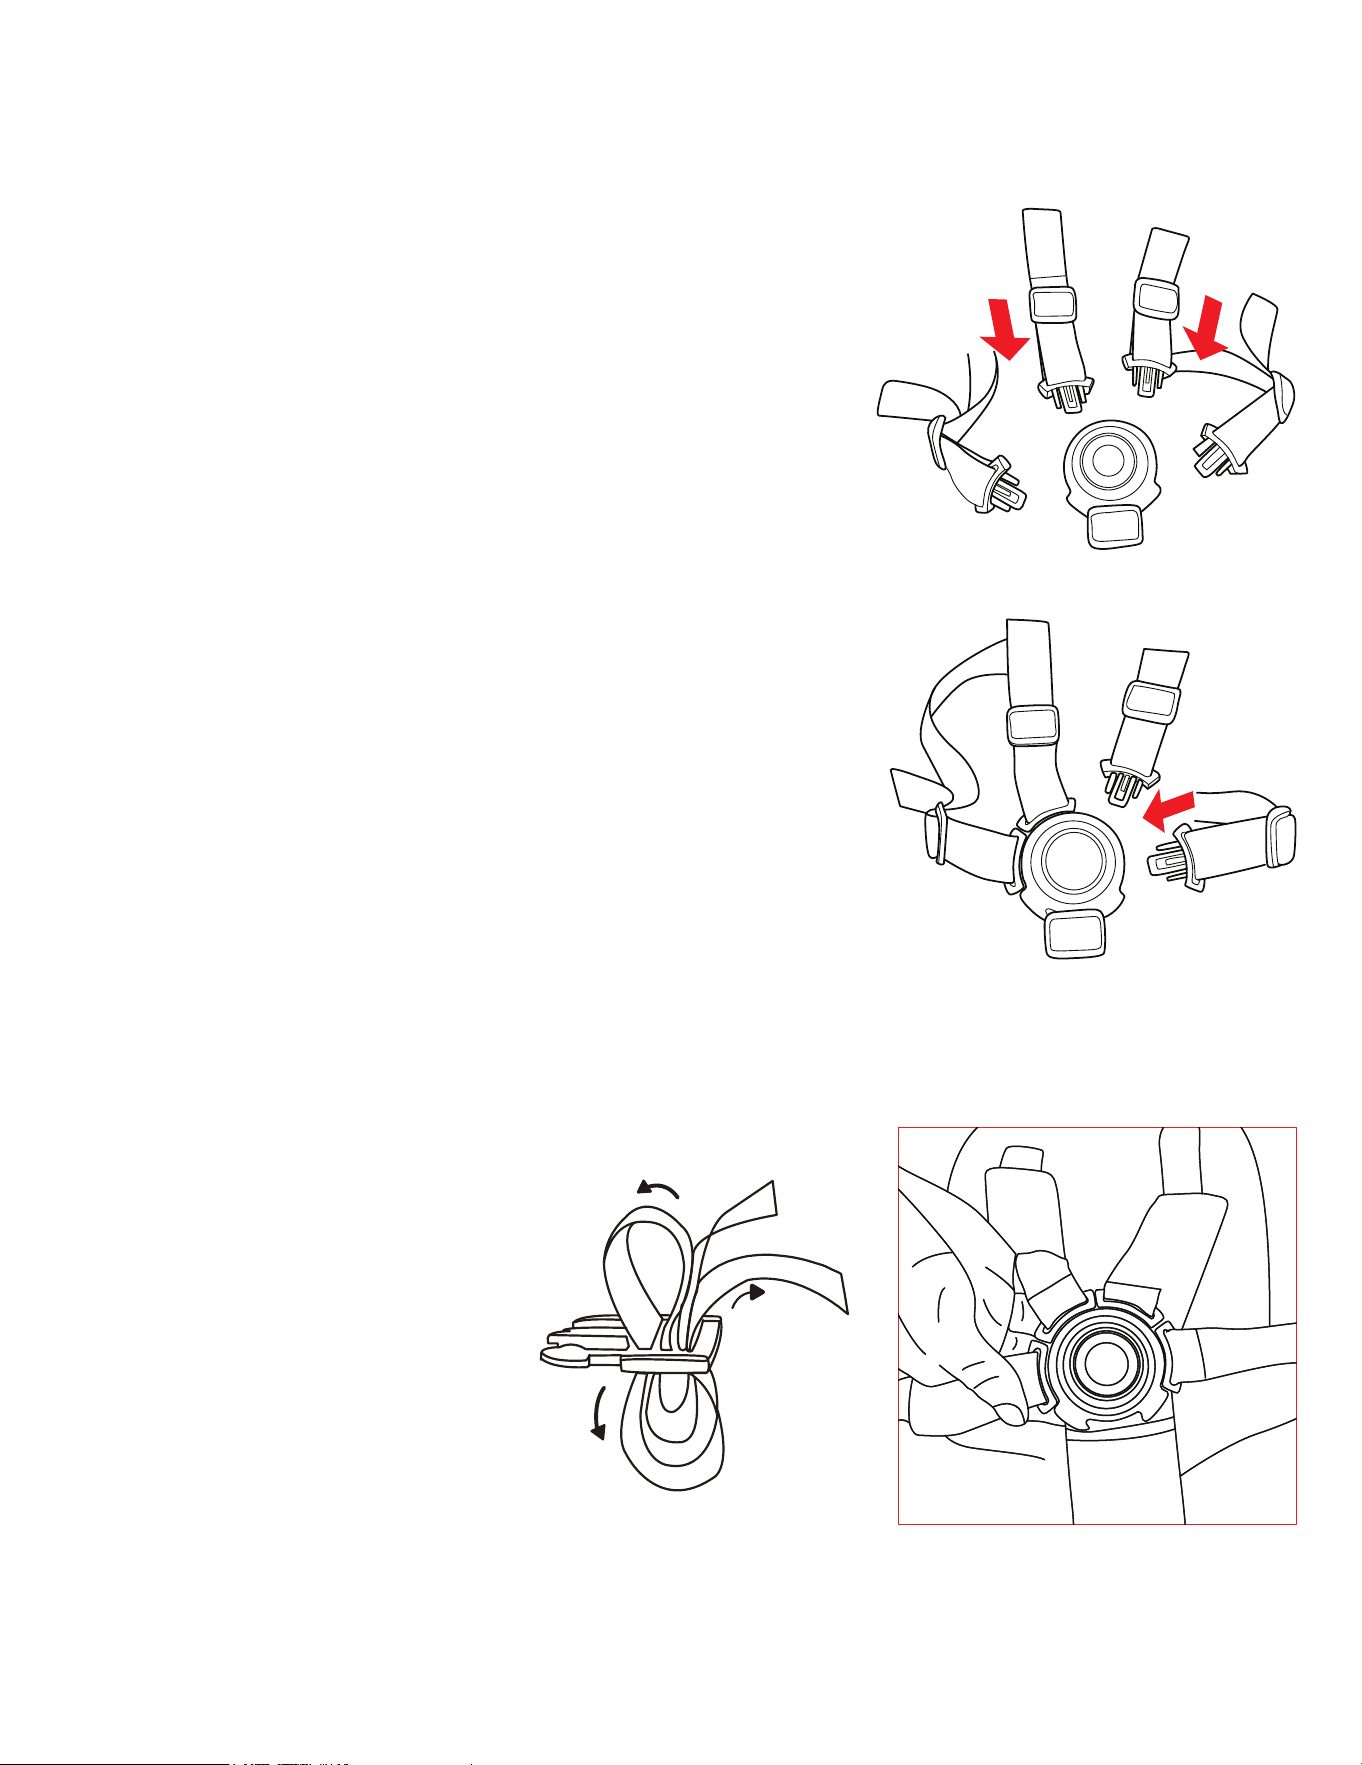
9a. Locate the left and right inserts of the harness.
9b. Insert each into the centre buckle groove on the harness.
9c. Ensure you hear a clear "click" sound to confirm each is
securely locked in place.
9d. Adjust the shoulder, waist, and crotch straps of the
harness, by pulling or pushing the respective straps.
9e. Ensure the harness fits snugly to provide safety without
causing discomfort
9f. To Unbuckle the Harness press the centre release button
on the harness.
9a. Repérez les inserts gauche et droit du harnais.
9b. Insérez chacun d'eux dans la rainure centrale de la boucle du harnais.
9c. Assurez-vous d'entendre un « clic » clair pour confirmer que chacun
est bien verrouillé en place.
9d. Ajustez les sangles d'épaule, de taille et d'entrejambe du harnais en
tirant ou en poussant les sangles respectives.
9e. Assurez-vous que le harnais est bien ajusté afin d'assurer la sécurité
sans causer d'inconfort.
9f. Pour détacher le harnais, appuyez sur le bouton central de
déverrouillage du harnais.
9a. Localice las inserciones izquierda y derecha del arnés.
9b. Inserte cada uno en la ranura de la hebilla central del arnés.
9c. Asegúrese de oír un «clic» claro para confirmar que cada uno está bien
encajado en su sitio.
9d. Ajuste las correas de los hombros, la
cintura y la entrepierna del arnés, tirando o
empujando de las correas respectivas.
9e. Asegúrese de que el arnés quede bien
ajustado para proporcionar seguridad sin
causar incomodidad.
9f. Para desabrochar el arnés, pulse el botón
central de liberación del arnés.
18
www.dreamonme.com/help
10
FOLDING THE STROLLER
PLIER LA POUSSETTE
PLEGAR EL COCHECITO
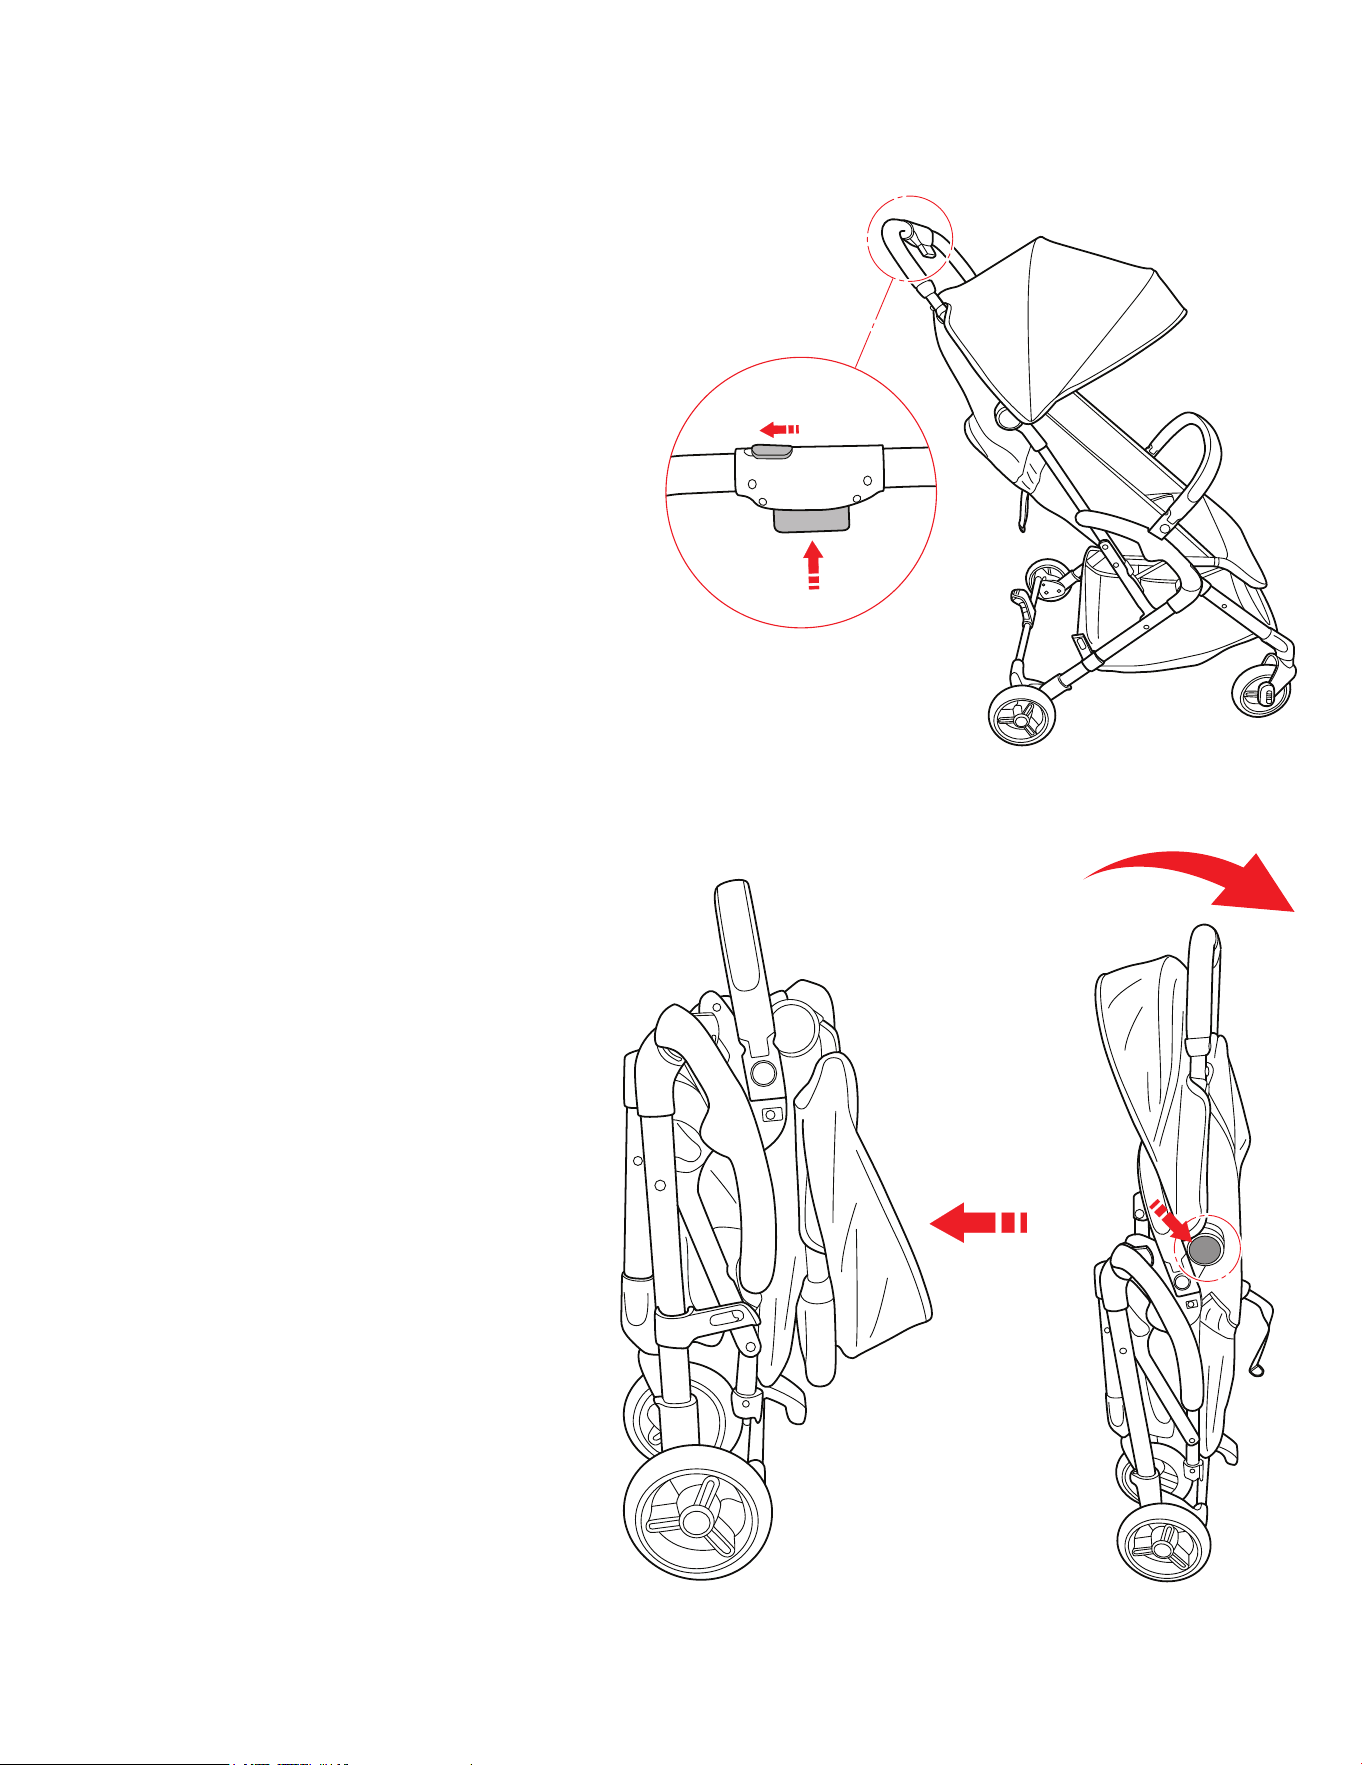
10a. Locate the folding button on the handle, as
shown in the diagram.
10b. Press the button and simultaneously, slide the
retraction button as marked in the diagram.
10c. Push the handle forward and down.
10d. Push the round button marked in the diagram
and fold frame fully.
10e. To ensure the stroller stands independently
while folded, step down on the foot lever with
your feet.
10a. Repérez le bouton de pliage sur la poignée,
comme indiqué sur le schéma.
10b. Appuyez sur le bouton et, simultanément,
faites glisser le bouton de rétraction comme
indiqué sur le schéma.
10c. Poussez la poignée vers l'avant et vers le bas.
10d. Appuyez sur le bouton rond indiqué sur le
schéma et pliez complètement le cadre.
10e. Pour s'assurer que la poussette tient debout
de manière indépendante lorsqu'elle est pliée,
appuyez sur le levier avec vos pieds.
10a. Localice el botón de plegado en la
empuñadura, como se muestra en el
diagrama.
10b. Presione el botón y simultáneamente,
deslice el botón de retracción como se
indica en el diagrama
10c. Empuje la empuñadura hacia delante y
hacia abajo.
10d. Pulse el botón redondo marcado en el
diagrama y pliegue completamente el
armazón.
10e. Para asegurarse de que el cochecito se
mantiene en pie de forma independiente
mientras está plegado, pise la palanca de
pie con los pies.

19
www.dreamonme.com/help
CARE AND MAINTENACE
• Regularly lubricate moving parts, especially the wheels and the lower parts of the
chassis, which tend to accumulate dirt.
• Regularly check for worn parts, torn materials or seams, loose screws, bent or broken
chassis components, and any other damaged or missing pieces.
• If any of the above conditions are evident, do not use the stroller.
• Clean fabric parts according to the care labels.
• To clean the surface use only water or a damp cloth. Do not use any cleaner or cleaning
abrasive as it will scratch the surface and may cause.
• Only hand wash the canopy.
• Do not machine wash or use a hot iron
• Do not leave the stroller exposed to heat, such as next to a radiator or in direct sunlight.
• Do not fold or store the stroller while it is wet, and never store it in a damp environment to
prevent mold formation.
• Lubrifiez régulièrement les pièces mobiles, en particulier les roues et les parties inférieures
du châssis, qui ont tendance à accumuler la saleté.
• Vérifier régulièrement qu'il n'y a pas de pièces usées, de matériaux ou de coutures déchirés,
de vis desserrées, de composants du châssis déformés ou cassés, et toute autre pièce
endommagée ou manquante.
• Si l'une de ces conditions est évidente, ne pas utiliser la poussette.
• Nettoyer les parties en tissu conformément aux étiquettes d'entretien.
• Pour nettoyer la surface, utilisez uniquement de l'eau ou un chiffon humide. N'utilisez pas de
nettoyant ou d'abrasif, car cela rayerait la surface et pourrait causer des dommages.
• Lavez le baldaquin uniquement à la main.
• NE PAS laver en machine ou utiliser un fer à repasser chaud
• Ne pas laisser la poussette exposée à la chaleur, par exemple à côté d'un radiateur ou en
plein soleil.
• Ne pas plier ou ranger la poussette lorsqu'elle est mouillée, et ne jamais la ranger dans un
environnement humide pour éviter la formation de moisissures.
• Lubrique regularmente las piezas móviles, especialmente las ruedas y las partes inferiores del
chasis, que tienden a acumular suciedad.
• Compruebe regularmente si hay piezas desgastadas, materiales o costuras rasgados,
tornillos sueltos, componentes del chasis doblados o rotos y cualquier otra pieza dañada o
que falte.
• Si cualquiera de las condiciones anteriores es evidente, no utilice el cochecito.
• Limpie las piezas de tela de acuerdo con las etiquetas de cuidado.
• Para limpiar la superficie utilice sólo agua o un paño húmedo. No utilice ningún limpiador o
limpiador abrasivo ya que rayará la superficie y puede causar.
• Lave el toldo sólo a mano.
• NO lave a máquina ni utilice una plancha caliente
• No deje la silla de paseo expuesta al calor, como junto a un radiador o a la luz directa del sol.
• No pliegue ni guarde el cochecito mientras esté mojado, y nunca lo guarde en un ambiente
húmedo para evitar la formación de moho.
ENTRETIEN ET MAINTENANCE :
CUIDADO Y MANTENIMIENTO:

Courriel : [email protected]
Suivez-nous @dreamonmeinc
pour que votre crèche soit présentée sur nos médias sociaux.
Participez à notre concours mensuel !
Scannez le code QR pour vous inscrire.
Chattez avec nous !
Scannez le code QR pour accéder au Live Chat.
Siga con nosotros @dreamonmeinc
para que su guardería aparezca en nuestras redes sociales.
Participa en nuestro sorteo mensual.
Escanee el código QR para registrarse.
Chatea con nosotros.
Escanee el código QR para el chat en vivo.
Correo electrónico: [email protected]
45 VERONICA AVENUE
SOMERSET NEW JERSEY 08873
5375 BOUL DES GRANDES-PRAIRIES
SAINT-LEONARD, QC H1R 1B1
www.dreamonme.com
Follow Us @dreamonmeinc
to get your nursery featured on our social media.
Enter our monthly giveaway!
Scan the QR code to register.
Chat with us!
Scan the QR code to Live Chat.
E-mail: [email protected]
