
SIC 5050WS
EN
ICE CREAM MAKER
Translation of the original manual
SIC 5050WS
A
1
13
2
3
4
5
6
7
8
9
10
11
12

B
2
1
3
4
5
7
6 8
C

- 1 -
08/2025
2025, .
EN
Ice cream maker
User Manual
IMPORTANT SAFETY INSTRUCTIONS
READ CAREFULLY AND STORE FOR FUTURE USE.
• This appliance is not to be used by children. Keep this
appliance and its power cable out of the reach of children.
• The appliance may be used by persons with reduced
physical, sensory or mental abilities or lack of experience
and knowledge, provided they are supervised or have
been instructed on the safe use of the appliance and
understand the potential hazards.
• Children must not play with the appliance.
• Cleaning and maintenance must not be carried out by
children.
• If the power cord is damaged, have it replaced in
aprofessional service centre in order to prevent
adangerous situation. Never use the appliance if the
power cord is damaged.
WARNING:
Incorrect use may lead to injury.
• Be careful when handling the chopping disc, especially
when inserting or removing the container and during
cleaning.
• Always clean the parts of the appliance that come into
contact withfood (chopping disc, container) after each use
with warm water withalittle washing-up liquid and asoft
ICE CREAM MAKER

- 2 -
08/2025
2025, .
sponge. Follow the instructions in the “CLEANING AND
MAINTENANCE” section.
• Always disconnect the appliance from the power supply
when leaving it unattended and before assembly,
disassembly or cleaning.
• Before replacing the accessories or accessible movable
parts, please turn the appliance off and disconnect it from
the power supply.
. . . . . . . . . . . . . . . . . . . . . . . . . . . . . . . . . . . . . . . . . . . . . . . . . . . . . . . . . . . . . . . . . . . . . . . . . . . . . . . . . . . . . . . . . . . . . . . . . . . . . . . . . . . . . . . . . . . . . . . . . . . . . . . . . . . . . . . . . . . .
Additional Important Safety Instructions forUse of the Appliance
• This appliance is designed to blend frozen ingredients into ice cream, sorbet, Italian gelato, frozen yogurt, slushi, milkshake or similar frozen
delicacies. Do not use it for crushing ice, ice cubes, grinding spices, nuts or other ingredients, mixing dough, soups or hot ingredients for preparing
baby food, etc. Do not use it for commercial purposes or for purposes other than those for which it is intended.
• Use the appliance and its accessories in accordance with the instructions in this manual.
• The appliance is designed for indoor use. Do not use the appliance in an industrial environment or outdoors.
• It is forbidden to modify the surface of the appliance in any way, e.g. using self-adhesive foil, etc.
• Do not expose the appliance or its accessories to the outdoor environment, extreme temperatures, rapid temperature changes, direct sunlight or
excessive dust.
• Always place the appliance on aclean, flat, dry and stable surface. Do not place it on the edge of the table to prevent it from falling.
• Do not place the appliance and its accessories on or near an electric or gas hob. Keep it at asufficient distance from open fire, heating elements
andother sources of heat.
• Before connecting this appliance to apower socket, make sure the rated voltage stated on the product'srating label corresponds to the voltage in
your power socket.
• Do not place heavy objects on the power cord. Make sure the power cord does not hang over the edge of atable or that it does not touch ahot
surface.
• The use of an extension cable is not recommended.
• Only use the appliance with original accessories from the manufacturer. The use of non-original accessories can lead to adangerous situation.
• Before use, always make sure that no part of the appliance is damaged.
• Do not use the appliance if it is damaged in any way.
• This appliance is not designed to be controlled using an external timer switch or aremote control.
• Do not overfill the container.
• The maximum capacity of the blender container is indicated by the MAX FILL mark.
• Place the container in the blender in avertical position.
• Prior to connecting the appliance to apower socket, make sure that the appliance is properly assembled according to the instructions in this
user'smanual.
• The appliance is equipped with asafety lock that will not allow it to start unless it is properly assembled.
• Do not turn on the appliance when it is empty. Incorrect use may negatively affect the appliance’slifetime.
• Do not loosen the lid while the appliance is in operation. The safety lock is deactivated and the appliance stops running.
• Do not attempt to bypass or disable thesafety lock. There is arisk of irreparable damage to the appliance.
• The maximum continuous operation time is 6 processing cycles. Allow the appliance to cool before further processing.
• If the appliance overheats, Storage will light up on the display and the appliance will stop running. Switch off the appliance, unplug it from the mains
socket and allow it to cool down for at least 10 minutes. The appliance can be used again once it has cooled down.
• If you interrupt the operation of the appliance and the chopping disc remains immersed in thecontainer, do not attempt to remove the container from
the base of the appliance by force. Press Storage or continueoperation.
• Unplug the appliance from the power socket by pulling the plug. Do not pull the power cord. Otherwise, you may damage the power cable or the
socket.
• Do not connect or disconnect the power cord plug to or from the power socket with wet hands.
• None of the components of this appliance are intended for use inamicrowave or electric oven, etc.
• To avoid the risk of electric shock, do not immerse the motor unit, power cord or power cord plug in water or any other liquid, or wash these parts
under running water.
• Do not make any adjustments to the appliance. Do not disassemble the motor unit.
• Do not repair the appliance yourself. All repairs should be carried out by an authorised service centre. Tampering with the appliance during the
warranty period may void the warranty.
• Store the appliance in adry and clean environment out of the reach of children and animals.

- 3 -
08/2025
2025, .
. . . . . . . . . . . . . . . . . . . . . . . . . . . . . . . . . . . . . . . . . . . . . . . . . . . . . . . . . . . . . . . . . . . . . . . . . . . . . . . . . . . . . . . . . . . . . . . . . . . . . . . . . . . . . . . . . . . . . . . . . . . . . . . . . . . . . . . . . . . .
EXPLANATION OF SYMBOLS PLACED ON THE PRODUCT OR INTHE ACCOMPANYING DOCUMENTATION
The product meets all the basic requirements of the applicable EU directives.
This symbol on products or accompanying documents means that used electric or electronic products must not be added to ordinary
municipal waste.
Read the user'smanual.
. . . . . . . . . . . . . . . . . . . . . . . . . . . . . . . . . . . . . . . . . . . . . . . . . . . . . . . . . . . . . . . . . . . . . . . . . . . . . . . . . . . . . . . . . . . . . . . . . . . . . . . . . . . . . . . . . . . . . . . . . . . . . . . . . . . . . . . . . . . .
- 4 -
08/2025
2025, .
• Thank you for purchasing our SENCOR product; we hope it will serve
to your satisfaction.
• Prior to using this appliance, please read the user manual thoroughly,
even in cases when you are already familiar with the use of similar
types of appliances. Use the appliance only as described in this
user manual. Keep the manual for future reference. If you pass the
appliance on to another person, ensure that this user manual is
included.
• Carefully unpack the appliance and make sure not to discard any part
of the packaging material until you have removed all its components.
It is recommended that you keep the original packaging, packing
material, receipt and confirmation of the extent of the seller'sliability
or warranty certificate at least for the duration of the legal right to
file adefect claim or the quality warranty. When transporting the
appliance, we recommend repackaging it in the original box provided
by the manufacturer.
. . . . . . . . . . . . . . . . . . . . . . . . . . . . . . . . . . . . . . . . . . . . . . . . . . . . . . . . . . . . . . . . . . . .
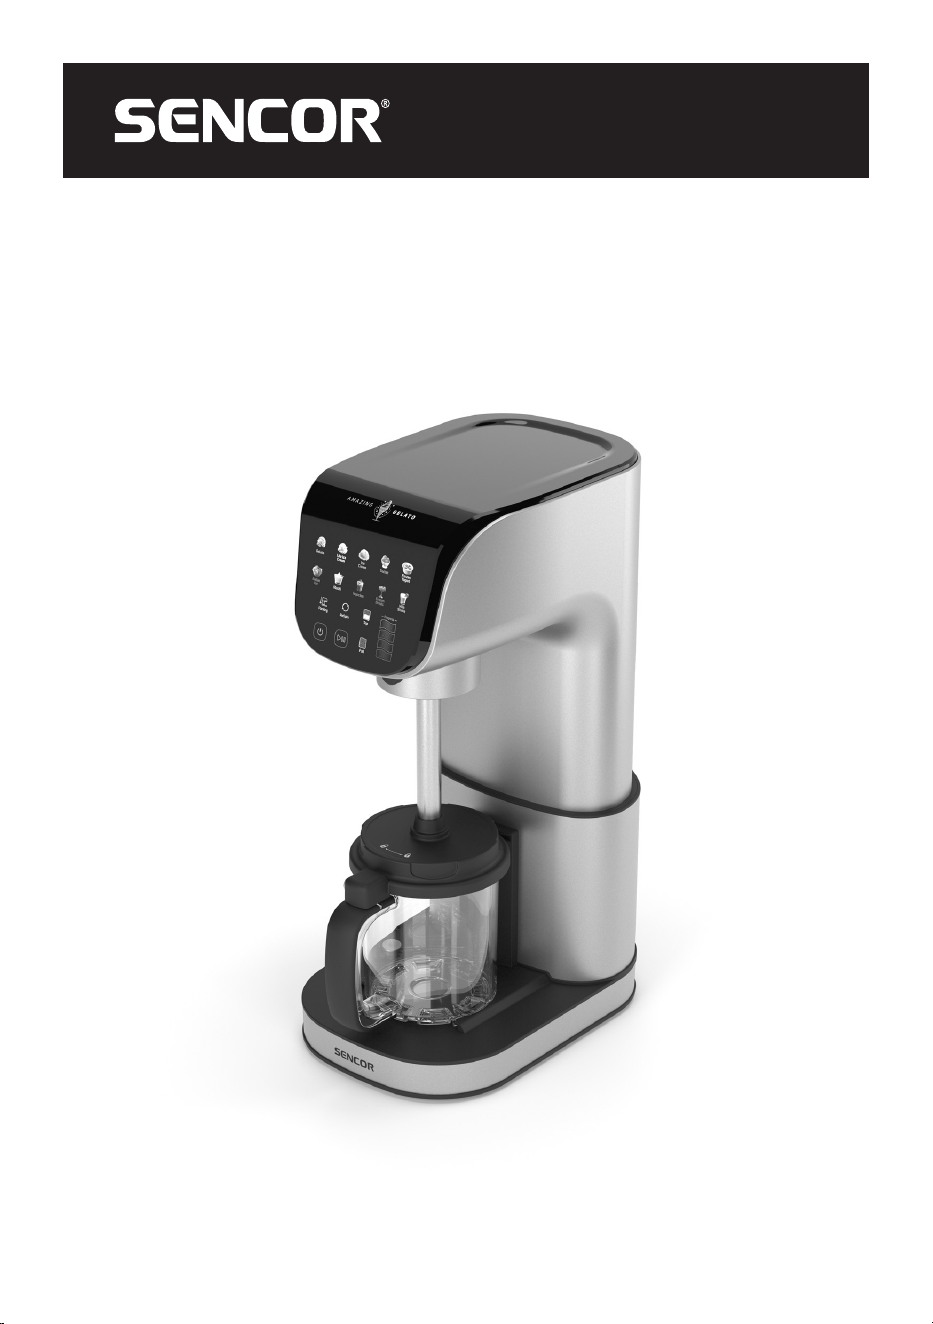
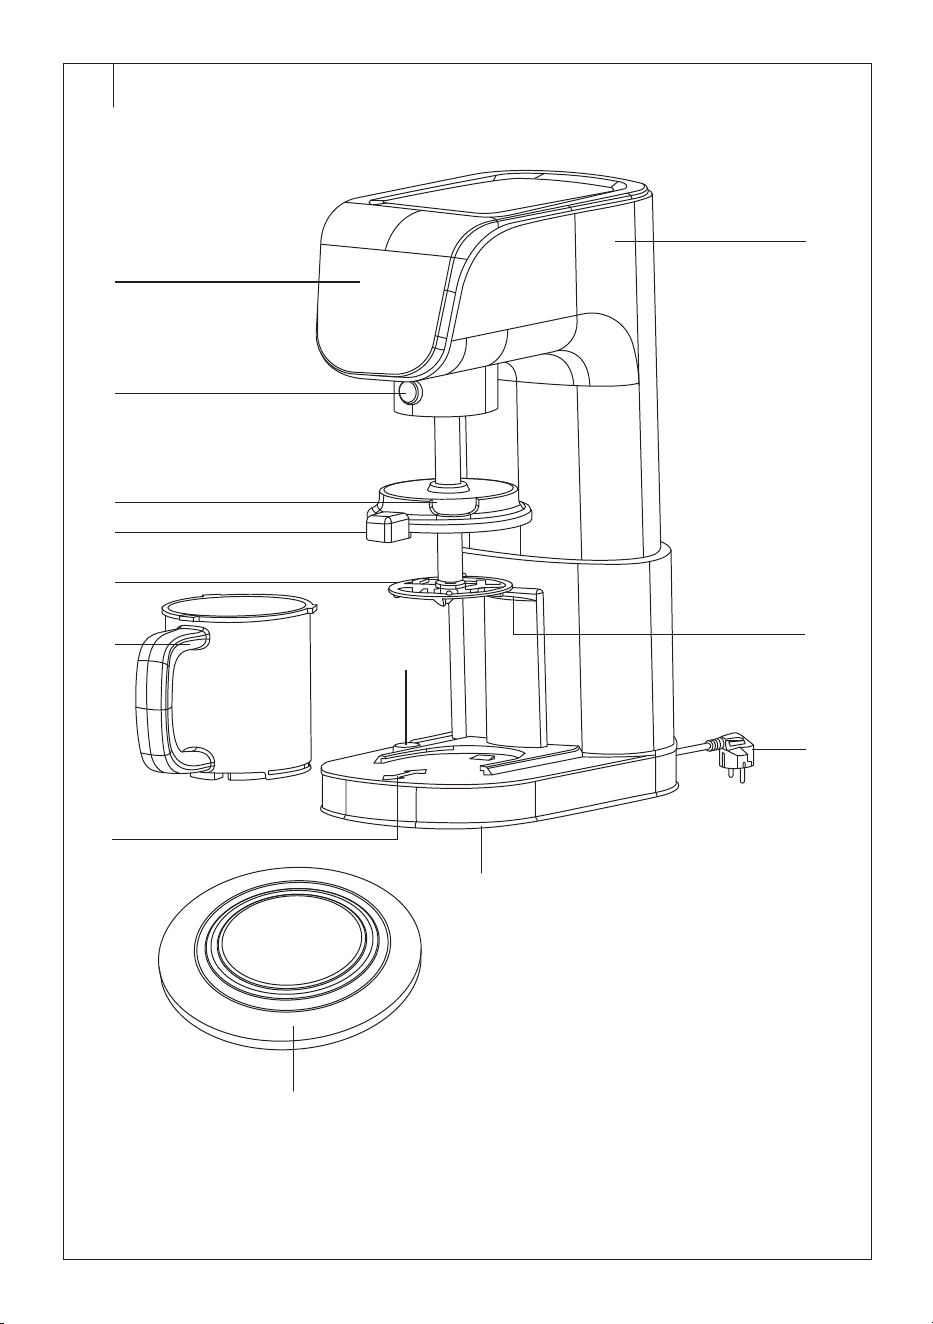
DESCRIPTION OF THE APPLIANCE
A1 Moving head
A2 Control panel
A3 Shaft release button
A4 Lid
A5 Lid release button
A6 Chopping disc
A7 Container
A8 Container release button
A9 Container compartment
A10 Base withnon-slip feet
A11 Power cord
A12 Safety lock
A13 Silicone lid
. . . . . . . . . . . . . . . . . . . . . . . . . . . . . . . . . . . . . . . . . . . . . . . . . . . . . . . . . . . . . . . . . . . .
DESCRIPTION OF THE CONTROL PANEL
B1 Function buttons
B2 Storage button to raise/retract
head
B3 On/Off button
B4 button to start/stop the
selected function
B5 Re-Mix button to mix the
additional ingredients
B6 Full button tomix the entire
contents of the container
B7 Top button tomix the top half
of the container content
B8 Process icons
. . . . . . . . . . . . . . . . . . . . . . . . . . . . . . . . . . . . . . . . . . . . . . . . . . . . . . . . . . . . . . . . . . . .
USE
• This ice cream maker is designed to blend frozen ingredients into
ice cream, sorbet, Italian gelato, frozen yoghurt, slushi, milkshake or
similar frozen delicacies.
. . . . . . . . . . . . . . . . . . . . . . . . . . . . . . . . . . . . . . . . . . . . . . . . . . . . . . . . . . . . . . . . . . . .
BEFORE FIRST USE
• Before first use, remove the appliance and its accessories from the
packaging and discard all promotional labels and tags. Check that
neither the appliance nor any of its components is damaged.
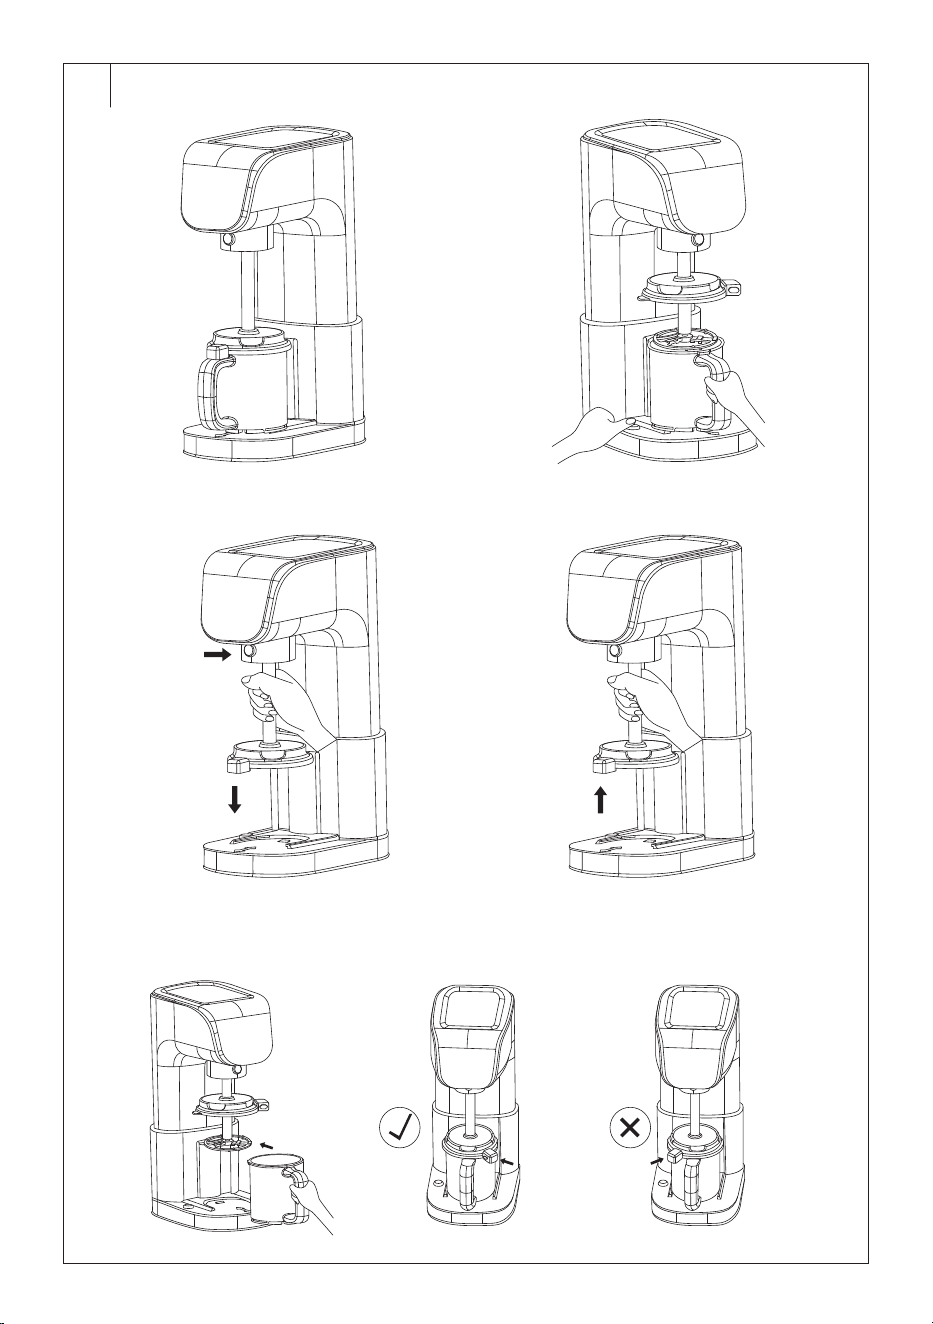
Lifting the Moving Head
1. The machine issupplied with the moving head in thelowest position.
After removing the machine from thepackaging, place it on aflat
andsolid surface andconnect the fork to aproperly grounded power
socket.
2. Turn on the manufacturer with the button
and the Storage button
will flash.
3. Press the Storage button, the machine starts and the moving head
slowly extends back to the operating position. When moving up, the
chopping disc will be inoperation. This is normal.
4. As soon as the moving head is extended to the operating position, the
rotation of the chopping disc will stop and the display will fully light up.
5. Switch off the appliance with the button , disconnect the plug from
the mains socket. Clean the machine according to the instructions in
the CLEANING BEFORE USE section.
Cleaning before use (Fig. C)
1. Before cleaning, make sure the machine is switched off and
disconnected from the power supply.
2. Hold the container handle and press the lid release button A5 with
your thumb. Press the anticlockwise button with your thumb to loosen
the safety lock. The lid turns. Aclick indicates that the safety lock is
released.
3. Slightly lift the lid above the container.
4. Press the container release button A8 with one hand, grasp the
container handle with the other hand andpull the container away from
the ice cream maker. Release the button.
5. Hold the shaft with one hand and press the A3 shaft release button
with the other hand. Pull the shaft downwards to remove it from
theattachment.
6. Wash the container, the silicone lid and the lid with the chopping disc
in warm water with alittle dishwashing liquid using asoft sponge.
Rinse in clean water and wipe dry.
Caution:
When washing the chopping disc, be careful not to
injure the blade.
Caution:
Do not use metal or silicone wire cloths, brushes,
liquid or solid cleaning sands or other abrasive
cleaning agents to wash the shaft. This may cause
scratches anddamage to the surface treatment.
7. Wipe the outer surface of the ice cream maker slightly moistened with
asoft cloth. Wipe dry with aclean cloth.
8. Check that all parts are clean and dry.
9. Insert the shafts from the bottom with the gear wheel first into thehole
in the moving head. Push or turn slightly until you hear aclick.
10. Lift the lid slightly andturn so that the lid release button A5 points to
the right.
11. Insert the container into the space in thebase so that the grooves in
thebase fit into the opening in the bottom part of the container. Push
the container towards the base until you hear aclick.
12. Put the lid on the container andturn the lid clockwise until the lid
release button A5 is perpendicular to the machine andyou hear
aclick. This will activate the safety lock.
Preparation of Ingredients Before Use
• The ingredients to be processed must be frozen in the container for
approximately 24 hours.
• Prepare your ingredients according to the recipe inthe RECIPES
section, blend them properly in the blender, put them in acontainer
and put it in the freezer.
• When filling, always observe the MAX FILL line, which indicates the
maximum filling of the container. Do not overfill the pot.
• Place the container in the freezer in avertical position. The level
should be flat. If the surface is not level, uneven processing could
occur.
Installation Location
• Place the ice cream maker on afirm andflat surface, e.g. on akitchen
counter or table top at asufficient distance from the mains socket.
• Make sure there is sufficient clearance around the ice cream maker.
Setting up Before Use
• Lift the lid slightly andturn so that the lid release button A5 points to
the right.
• Insert the container withfrozen ingredients into the space in thebase
so that the grooves in thebase fit into the opening in the bottom part
EN
Ice cream maker
User Manual
- 5 -
08/2025
2025, .
of the container. Push the container towards the base until you hear
aclick.
• Put the lid on the container andturn the lid clockwise until the lid
release button A5 is perpendicular to the machine andyou hear
aclick. This will activate the safety lock.
Caution:
The ice cream maker will not start unless it is
assembled correctly.
Usage
1. Fully unwind the power cord and plug the plug into aproperly
grounded power outlet.
2. The button will light up.
3. Press the button and the display will light up.
4. Press the button of the selected function – more information
aboutindividual functions can be found inthe section OVERVIEW OF
MACHINE FUNCTIONS.
5. The FULL icon will start to flash (mixing the entire contents of the
container). If you only need to mix the top half of the container, press
the TOP button.
6. Press the button to start the selected function.
7. The chopping disc will spin and the moving head will slowly descend.
As the moving head goes down, the chopping disc will also go down
andprocess the ingredients in thecontainer. The process icons will
gradually flash andlight up.
8. When the chopping disc reaches the bottom of the container (when
selecting FULL) or approximately half of the container (when selecting
TOP), it will stop for awhile andthen start up again. The moving head
begins to slowly extend upwards to the operating position.
9. During the processing, the buttons and the selected functions, the
FULL or TOP and icon will be illuminated.
10. As soon as the moving head reaches the operating position, the
chopping disc will stop running andall the buttons on the display will
light up.
11. Check the processing of the ingredients and repeat the procedure as
needed.
12. When you have finished using the machine, press the button to
switch it off.
13. Take out the container and transfer the processed ice cream or frozen
delicacy to asuitable container andstore in afreezer. Use within
approximately 14 days of processing.
14. Allow the container to warm up to room temperature before washing.
Note:
To ensure proper function andavoid damage, we
recommend using the machine for amaximum of 6 cycles
in arow, then let it rest for 10 minutes.
Interruption of the Operation
• You can interrupt the processing of raw materials at any time by
pressing the
button.
• The
button will flash andthe Storage button will light up on the
display.
• Press the
button to continue processing.
• To cancel the processing, press the Storage button. The chopping disc
lowers and the moving head extends to the operating position. Then
the chopping disc will stop running andall the buttons on the display
will light up.
Caution:
If you interrupt the processing, it will not be possible
to remove the container. This is prevented by
achopping disc that is immersed in thecontainer. If
you need to remove the container, press the Storage
button andwait until the moving head with the
chopping disc extends to the operating position and
the chopping disc stops moving.
Adding Additional Ingredients
• If you need to add ingredients, such as pieces of chocolate, chopped
nuts or dried fruit, etc., to the frozen delicacy, process the ingredients
in the container for the desired function.
• Remove the container andinsert the additional ingredients. Put the
container back into the ice cream maker.
• Turn on the maker andpress the Re-Mix button.
• The processing process starts and the chopping disc mixes the
ingredients into the frozen treat in the container.
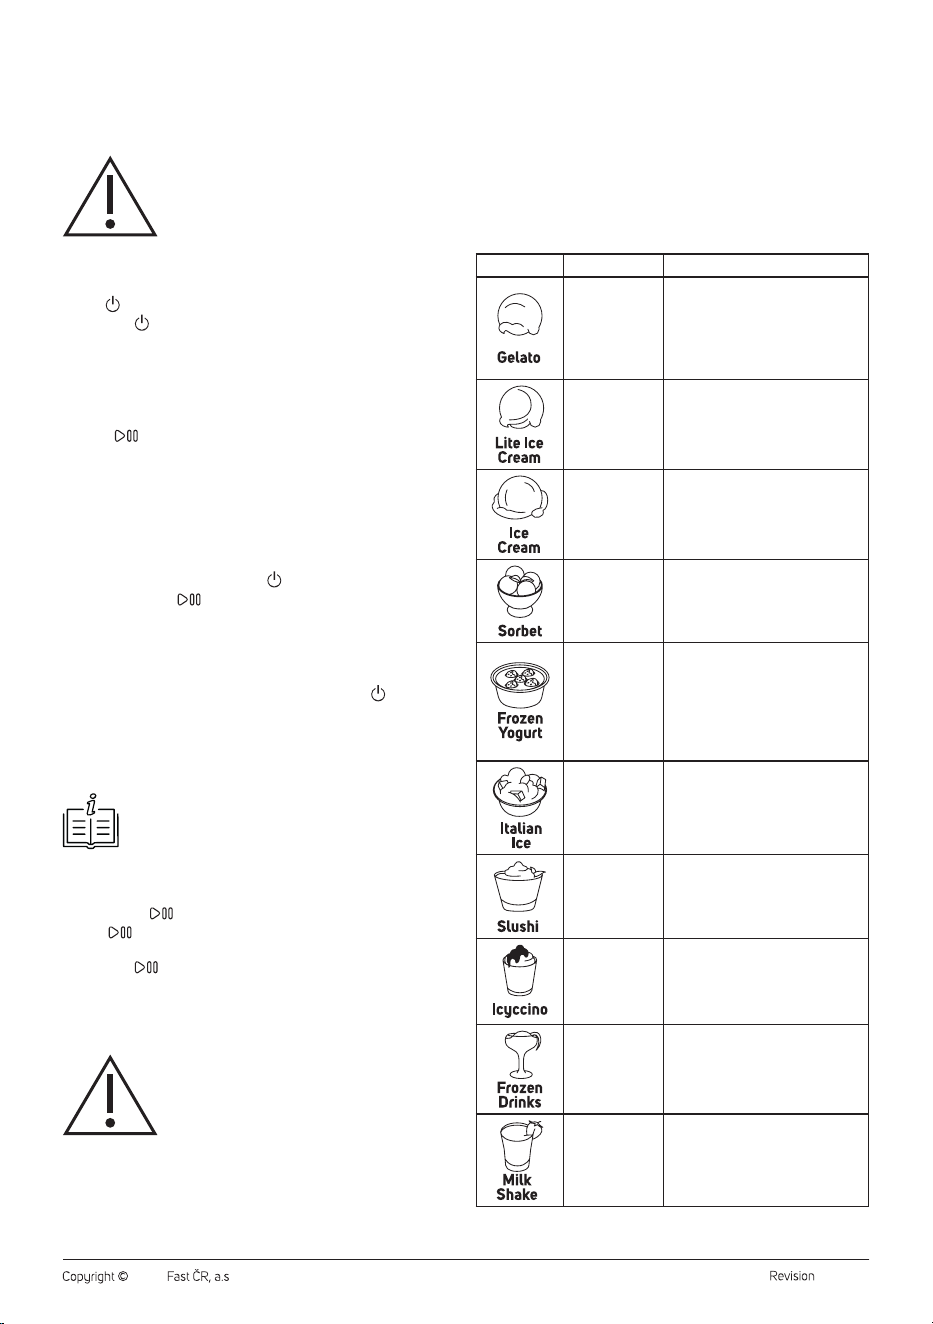
Overview of Functions
FUNCTION NAME DESCRIPTION
Italian gelato ice
cream
Italian ice cream withalower fat
content than regular ice cream, but
with amore intense taste. It has
acreamy consistency andis served
at ahigher temperature than classic
ice cream.
Low-fat
ice cream
withalower
sugar content
Alight version of aclassic ice cream
withalower fat or sugar content.
Traditional ice
cream
Traditional ice cream made
frommilk, cream andsugar. It has
afluffy structure due to the higher
air content.
Sorbet Fruit frozen delicacy without milk,
made fromfruit, water andsugar.
Arefreshing andlight alternative to
ice cream.
Frozen Yoghurt Frozen yoghurt with ataste similar
to ice cream, but withalower fat
content. It is made fromyoghurt, so
it has aslightly sour taste andoften
contains probiotics. Popular as
ahealthier alternative to classic
ice cream.
Italian ice cream Semi-frozen sweetened delicacy
composed offinely granulated ice
andfruit juices or purées.
Crushed ice Crushed ice withflavoured syrup.
Ice cappuccino An iced version of acappuccino or
other coffee drink, often withmilk
andwhipped cream, resembles
afrappé.
Frozen drink/
cocktail
Ageneral term for an iced beverage,
which may be fruit, coffee, or
withalcohol. It contains blended ice.
Milkshake Adrink made frommilk, ice cream
andflavoured (e.g. chocolate,
strawberry). Creamy andsweet,
often with whipped cream on top.
- 6 -
08/2025
2025, .
Overheat Protection
• The ice cream maker is equipped with overheating protection. If
overheated, thermal protection may be activated. In this case, the
power indicator, the Storage button and the processing progress
indicator will flash on the display. Turn the ice cream maker off with
the button , disconnect the fork from the power socket andlet it cool
down for at least 10 minutes before using it again.
. . . . . . . . . . . . . . . . . . . . . . . . . . . . . . . . . . . . . . . . . . . . . . . . . . . . . . . . . . . . . . . . . . . .
CLEANING AND MAINTENANCE
• Before cleaning, disconnect the power plug from the mains socket and
allow the appliance to cool/warm to room temperature.
• Clean the ice cream maker after every use.
Caution:
To prevent the risk of electric shock, do not immerse
the appliance, power cable, or plug into water or any
other liquid.
Caution:
Do not use abrasive cleaning agents, solvents, etc.
to clean any parts of the appliance, as these could
damage the surface.
Disassembly (Fig. C)
1. Before unfolding, make sure the ice cream maker is switched off and
disconnected from the power supply.
2. Hold the container handle and press the lid release button A5 with
your thumb. Press the button counterclockwise with your thumb to
loosen the safety lock. The lid turns. Aclick indicates that the safety
lock is released.
3. Slightly lift the lid above the container.
4. Press the container release button A8 with one hand, grasp the
container handle with the other hand andpull the container away from
the ice cream maker. Release the button.
5. Hold the shaft with one hand and press the A3 shaft release button
with the other hand. Pull the shaft downwards to remove it from
theattachment.
Cleaning the Container, the Lid and the Shaft
• Allow the container to warm up to room temperature before cleaning
and immersing it in warm water.
• Wash the container, the silicone lid and the lid with the chopping disc
in warm water with alittle dishwashing liquid using asoft sponge.
Rinse in clean water and wipe dry.
• The container is dishwasher safe. Place it in the upper rack.
Caution:
When washing the chopping disc, be careful not to
injure the blade.
Caution:
Do not use metal or silicone wire cloths, brushes,
liquid or solid cleaning sands or other abrasive
cleaning agents to wash the shaft. This may cause
scratches anddamage to the surface treatment.
Caution:
Do not expose the container to extreme temperatures
such as by washing cold container inhot water. This
could disrupt the material properties of the vessel,
such as deformation or rupture, which may affect its
proper functioning andservice life.
Cleaning the Outer Surface of the Ice Cream Maker
Wipe the outer surface of the ice cream maker slightly moistened with
asoft cloth. Wipe dry with aclean cloth.
Assembly (Fig. C)
1. Check that all parts are clean and dry.
2. Insert the shaft from below with the gear wheel first into the hole in
themoving head. Push or turn slightly until you hear aclick.
3. Lift the lid slightly andturn so that the lid release button A5 points to
the right.
4. Insert the container into the space in thebase so that the grooves in
thebase fit into the opening in the bottom part of the container. Push
the container towards the base until you hear aclick.
5. Put the lid on the container andturn the lid clockwise until the lid
release button A5 is perpendicular to the machine andyou hear
aclick. This will activate the safety lock.
Storage
• If you plan not to use the appliance for an extended period of time,
unplug it from the mains socket and clean it as instructed above.
Before storing, ensure that the appliance and all accessories are
thoroughly clean and dry.
• To save space, the moving head can be pushed into the lowest
position. Switch on the maker with the button
and press Storage.
The chopping disc will spin and the moving head will slowly descend.
When it reaches the lowest position, the chopping disc stops rotating
and the appliance stops running. Switch the ice cream maker off with
the button
and disconnect the power cord plug from the mains
socket.
• Store the appliance in adry, clean, and well-ventilated place away
from extreme temperatures and out of the reach of children or pets.

- 7 -
08/2025
2025, .
. . . . . . . . . . . . . . . . . . . . . . . . . . . . . . . . . . . . . . . . . . . . . . . . . . . . . . . . . . . . . . . . . . . . . . . . . . . . . . . . . . . . . . . . . . . . . . . . . . . . . . . . . . . . . . . . . . . . . . . . . . . . . . . . . . . . . . . . . . . .
ERROR MESSAGES
• The manufacturer uses indicators on the display and ared LED toindicate various problems. Problems are indicated by fast or slow flashing (fast
flashing mode: Led indicator light flashes once per 0.5 second with 1 second interval; slow flashing mode: Led indicator light flashes once per 1
second withan interval of 2 seconds).
• If the problem cannot be solved, do not attempt to repair the device yourself. Contact an authorised service centre.
PROBLEM MEANING SOLUTION
All the buttons on the screen flash. The safety lock is disconnected. Check that the container is correctly inserted and that
the lid is correctly seated andlocked.
The Storage button is lit.
Overheating protection has been activated.
Turn the machine off with the button, disconnect the
fork from the power socket andlet it cool down for at
least 10 minutes before using it again.
The power light flashes. Malfunction in the internal system. Unplug the fork from the power socket, leave the
machine unplugged for at least 10 minutes. Then
reconnect the unit. If the problem persists, please
contact aservice centre.
The led indicator flashes quickly twice. Automatic control of the internal system. Unplug the fork from the power socket, leave the
machine unplugged for at least 10 minutes. Then
reconnect the unit. If the problem persists, please
contact aservice centre.
The led indicator flashes quickly three
times.
Excessive amount of ingredients in
thecontainer.
Remove the excess raw materials from thecontainer.
When filling, observe the MAX FILL line.
The LED indicator flashes quickly four
times.
Abnormal standby power consumption. Unplug the fork from the power socket, leave the
machine unplugged for at least 10 minutes. Then
reconnect the unit. If the problem persists, please
contact aservice centre.
The LED indicator flashes quickly five
times.
Fault on the internal circuit. Unplug the fork from the power socket, leave the
machine unplugged for at least 10 minutes. Then
reconnect the unit. If the problem persists, please
contact aservice centre.
The LED indicator light blinks slowly twice. The input voltage is higher than the normal
range.
Connect the machine to another electrical circuit in your
home. If the problem persists, please contact aservice
centre.
The LED indicator will flash slowly three
times.
The input voltage is lower than the normal
range.
Connect the machine to another electrical circuit in your
home. If the problem persists, please contact aservice
centre.
The LED indicator will flash slowly four
times.
Excessive amount of ingredients in
thecontainer.
Remove excess ingredients from the container. When
filling, observe the MAX FILL line.
The LED indicator will flash slowly five
times.
The motor is stuck. Unplug the fork from the power socket, leave the
machine unplugged for at least 10 minutes. Then
reconnect the unit. If the problem persists, please
contact aservice centre.
. . . . . . . . . . . . . . . . . . . . . . . . . . . . . . . . . . . . . . . . . . . . . . . . . . . . . . . . . . . . . . . . . . . .
TECHNICAL SPECIFICATIONS
Rated voltage range ..............................................................................220–240 V~
Rated frequency ...........................................................................................50/60 Hz
Rated input power ..............................................................................................500 W
Noise level .........................................................................................................75 dB(A)
The declared noise emission level of the appliance is 75 dB(A), which
represents alevel Aof acoustic power with respect to areference acoustic
power of 1 pW.
. . . . . . . . . . . . . . . . . . . . . . . . . . . . . . . . . . . . . . . . . . . . . . . . . . . . . . . . . . . . . . . . . . . .
Values provided according to Commission Regulation
EU 2023/826
Off mode
Power consumption in off mode 0.3 W
Time needed for the equipment to automatically reach
off mode
0 min
Standby Mode
Power consumption in standby mode –
Time needed for the equipment to automatically reach
standby mode
–
Networked standby mode (Wi-Fi)
Power consumption in networked standby –
Time needed for the equipment to automatically reach
networked standby mode
–

- 8 -
08/2025
2025, .
RECIPES
GELATO
CHOCOLATE ICE CREAM
Ingredients:
200 g milk
50 g granulated sugar
8 g corn starch
10 g cocoa
20 g corn or rice syrup (honey)
60 g dark chocolate 55–65% (good quality, palm fat-free)
150 g whipped cream 31–33%
Preparation:
1. Put the milk, sugar, starch, cocoa and syrup (honey) in a saucepan.
Bring to the boil while stirring constantly and cook for 3 minutes.
2. Heat the whipped cream to approximately 50°C, melt the chopped
chocolate and mix with an immersion blender.
3. Stir the warm chocolate whipped cream thoroughly into the cooked
base mixture (you can use an immersion blender).
4. Transfer to a container, cover the surface with foil and leave to cool in
the fridge.
5. Once cooled, remove the foil, cover with a lid and place in the freezer
for 12 hours.
6. Remove from the freezer and blend on the GELATO program. It is
possible to blend 2 times depending on the chocolate used.
LITE ICE CREAM
VANILLA ICE CREAM
Ingredients:
250 g whipped cream 31–33%
200 g milk
3 egg yolks
30–40 g corn or rice syrup (honey)
1 small vanilla pod
60 g granulated sugar
Preparation:
1. Put all ingredients in a saucepan and heat to 70–80 °C, stirring
constantly.
2. Pour the mixture through a sieve into a container, cover the surface
with foil and leave to cool in the fridge.
3. Once cooled, remove the foil, cover with a lid and place in the freezer
for 12 hours.
4. Remove from the freezer and mix on the LITE ICE CREAM program.
ICE CREAM
CHOCOLATE COTTAGE CHEESE ICE CREAM
Ingredients:
80 g milk
200 g whipped cream 31–33%
60 g granulated sugar
30 g corn or rice syrup (honey)
10 g cornstarch
½ vanilla pod
250 g soft cottage cheese (room temperature)
100 g chocolate for the topping
Preparation:
1. Put the milk, whipped cream, sugar, starch, syrup and vanilla seeds in
a saucepan. Bring to the boil while stirring constantly and cook for 3
minutes.
2. Add the cottage cheese to the mixture and mix together.
3. Transfer the mixture to a container, cover the surface with foil and
leave to cool in the fridge.
4. Once cooled, remove the foil, cover with a lid and place in the freezer
for 12 hours.
5. Remove from the freezer and mix on the ICE CREAM program.
6. Serve with chocolate icing.
QUICK ICE CREAM
Ingredients:
200 g homemade marmalade of your choice
150 g soft cottage cheese
200 g Greek yogurt
Preparation:
1. Put all ingredients in a bowl and mix thoroughly.
2. Transfer the mixture to a container, cover the surface with foil and
leave to cool in the refrigerator.
3. Once cooled, remove the foil, cover with a lid and place in the freezer
for 12 hours.
4. Remove from the freezer and mix on the ICE CREAM program.
SORBET
FRUIT SORBET
Ingredients:
400 g berries (blueberries, currants, raspberries, etc.)
50–60 g granulated sugar
1 tsp lemon juice
5–6 g pectin
30 g corn or rice syrup (honey)
40 g water
Preparation:
1. Put the water with the fruit in a saucepan, mash lightly and bring to
the boil.
2. Mix the sugar with the pectin and add to the cooked fruit. Mix
thoroughly.
3. Add the lemon juice and syrup.
4. Cook for 3–4 minutes, stirring constantly.
5. Mix while hot with an immersion blender
6. Transfer the mixture to a container, cover the surface with foil and
leave to cool in the fridge.
7. Once cooled, remove the foil, cover with a lid and place in the freezer
for 12 hours.
8. Remove from freezer and blend on SORBET program.
FROZEN YOGURT
YOGURT ICE CREAM WITH FRUIT
Ingredients:
250 g stone fruit (apricots, sour cherries, peaches)
100 g whipped cream 31–33%
3 g cornstarch
40 g corn or rice syrup (honey)
50–60 g granulated sugar
250 g Greek yogurt (room temperature)
Preparation:
1. Clean the fruit and cut it into smaller pieces. Place in a saucepan.
2. Add the whipped cream, sugar, syrup and cornstarch. Cook for about
3 minutes, stirring constantly.
3. Blend with an immersion blender.
4. Add the Greek yogurt and mix thoroughly.
5. Transfer the mixture to a container, cover the surface with foil and
leave to cool in the refrigerator.
6. Once cooled, remove the foil, cover with a lid and place in the freezer
for 12 hours.
7. Remove from freezer and blend on FROZEN YOGURT program.
ITALIAN ICE
ORANGE ICE CRUSH
Ingredients:
100 ml orange juice
60 ml maple syrup
200 ml small ice cubes
Preparation:
1. Put all ingredients in a blender jar and blend until smooth.
2. Transfer to a jar, cover with a lid and place in the freezer for 12 hours.
3. Remove from the freezer and blend on the ITALIAN ICE program.
SLUSHI
ICE DRINK
Ingredients:
400 g high-quality orange or mandarin juice
70 g Aperol
50 g vodka
Preparation:
1. Mix the juice with Aperol and vodka with an immersion blender.
2. Transfer to a jar, cover with a lid and place in the freezer for 12 hours.
3. Remove from the freezer and blend 2 times on the SLUSHI program.

- 9 -
08/2025
2025, .
4. Serve with a straw.
ICYCCHINO
ICE COFFEE
Ingredients:
2 servings of espresso coffee
150 ml of milk
A few ice cubes
Sugar to taste
Preparation:
1. Place all the ingredients in the blender container and process until
smooth.
2. Transfer to a jar, cover with a lid and place in the freezer for 12 hours.
3. Remove from the freezer and blend 2 times on the ICYCCHINO
program.
FROZEN DRINK
FROSÉ
Ingredients:
300 ml rosé wine
1–2 tablespoons sugar syrup
Juice of half a lime
A few ice cubes
Preparation:
1. Place all the ingredients in the blender container and process until
smooth.
2. Transfer to a jar, cover with a lid and place in the freezer for 12 hours.
3. Remove from the freezer and blend 2 times on the FROZEN DRINK
program.
MILKSHAKE
CREAMY STRAWBERRY ICE CREAM FOR MILKSHAKE
Ingredients:
350 g strawberries
50 g corn or rice syrup (honey)
60 g granulated sugar
150 g whipped cream 31–33%
7 g cornstarch
50 g milk
Extra milk for serving
Preparation:
1. Put the strawberries and sugar in a saucepan and mash with a fork.
2. Add the milk, whipped cream, cornstarch and syrup (honey). Bring to
the boil while stirring constantly and cook for another 3 minutes. Set
aside.
3. Blend with an immersion blender.
4. Transfer the mixture to a container, cover with foil and leave to cool in
the fridge.
5. Once cooled, remove the foil, cover with a lid and place in the freezer
for 12 hours.
6. Remove from the freezer and blend on the ICE CREAM program.
7. Mix the ice cream with the chilled extra milk using a stick blender.
. . . . . . . . . . . . . . . . . . . . . . . . . . . . . . . . . . . . . . . . . . . . . . . . . . . . . . . . . . . . . . . . . . . .
INSTRUCTIONS AND INFORMATION ON DISPOSAL
OF USED PACKAGING MATERIAL
Dispose of used packaging material at the designated municipal waste
disposal site.
. . . . . . . . . . . . . . . . . . . . . . . . . . . . . . . . . . . . . . . . . . . . . . . . . . . . . . . . . . . . . . . . . . . .
DISPOSAL OF USED ELECTRICAL AND ELECTRONIC
EQUIPMENT
Used electrical andelectronic products must not be disposed of in
ordinary municipal waste. To enable the proper disposal, renewal and
recycling of these products, deliver them to the designated collection
points. Alternatively, in some European Union states or other European
countries the products can be returned to the local retailer when buying
an equivalent new product. By disposing of this product correctly, you
help to conserve valuable natural resources and prevent any potential
adverse impact on the environment and human health that could result
from improper waste disposal. For more details, contact your local
authority or nearest collection point. Fines may be imposed for the
improper disposal of this type of waste as per national regulations.
For business entities in European Union States
If you wish to dispose of electrical and electronic equipment, please
request the necessary information from your retailer or supplier.
Disposal in other countries outside the European Union
To dispose of this product elsewhere, request the necessary information
on the correct disposal method from local authorities or your retailer.
. . . . . . . . . . . . . . . . . . . . . . . . . . . . . . . . . . . . . . . . . . . . . . . . . . . . . . . . . . . . . . . . . . . .
Changes to text and technical parameters are reserved.

- 10 -
08/2025
2025, .