サクソフォン
取扱説明書
Saxophone
Owner’s Manual
Saxo phon
Benutzerhandbuch
Saxophone
Mode d’emploi
Saxof ón
Manual de instrucciones
Saxof one
Manual de instruções
萨克斯管
使用说明书
Саксофон
Руководство пользователя
색소폰
사 용설명서
薩克斯風
使用說明書
日本語
EnglishDeutschFrançaisEspañol
简体中文
Русский
한국어
Português
繁體中文
JA EN DE FR ES PT ZH-CH RU KO ZH-TW
01_saxophone_om_cover1_vdz0080_c0.indd 101_saxophone_om_cover1_vdz0080_c0.indd 1 2022/01/20 14:25:542022/01/20 14:25:54
2
このたびは、ヤマハ管楽器をお買い上げいただき、まことにありがとうございます。
楽器を正しく組み立て性能をフルに発揮させるため、また永く良い状態で楽器を
お使いいただくために、この取扱説明書をよくお読みください。
P. 3
ank you for purchasing this Yamaha Brass Instrument. For instructions on the proper assembly of the
instrument, and how to keep the instrument in optimum condition for as long as possible, we urge you
to read this Owner’s Manual thoroughly.
P. 3
Wir danken Ihnen, daß Sie sich für ein Blechblasinstrument von Yamaha entschieden haben. Lesen
Sie diese Bedienungsanleitung bitte aufmerksam durch, da sie wichtige Anweisungen für das korrekte
Zusammensetzen und die ordnungsgemäße Pege des Instruments enthält.
P. 3
Nous vous remercions d’avoir fait l’achat de cet instrument à cuivre Yamaha. En ce qui concerne les ins-
tructions relatives à un assemblage adéquat de l’instrument et sur la façon de garder l’instrument dans des
conditions optimales aussi longtemps que possible, nous vous conseillons vivement de lire entièrement le
présent Mode d’emploi.
P. 3
P. 3
Muchas gracias por haber adquirido ese instrumento metálico de viento Yamaha.
Le aconsejamos que lea todo este manual de instrucciones, donde encontrará las instrucciones para el
montaje correcto del instrumento así como para mantenerlo en óptimas condiciones durante mucho
tiempo.
Agora você é o proprietário de um instrumento musical de alta qualidade.
Obrigado por escolher a marca Yamaha.
Aconselhamos que leia cuidadosamente todo o manual do proprietário para ver as instruções de montagem
adequada do instrumento, bem como manter em ótimas condições de uso pelo máximo de tempo possível.
P. 3
衷心感谢您购买雅马哈管乐器。为了保证您能够正确组装此乐器,并尽
可能长时间地将您的乐器保持在最佳状态,我们建议您完整地阅读使用
手册。
P. 3
P. 3
야마하 관악기를 구매해주셔서 감사합니다 . 악기의 알맞은 조립 방법 및 최적의 악
기 보관 방법을 위해 본 사용설명서를 모두 읽어주시기 바랍니다 .
P. 3
Благодарим Вас за покупку этого медного духового инструмента Yamaha. Для инструкций
по сборке и хранению инструмента, при оптимальных условиях, как можно дольше, мы
рекомендуем Вам внимательно прочитать Руководство Пользователя.
P. 3
感謝您購買此 Yamaha 銅管樂器。如欲了解正確組裝樂器的指示,以及將
樂器盡可能長時間保持最佳狀態的方法,我們強烈建議您詳閱此使用說明書。
01_saxophone_om_cover1_vdz0080_c0.indd 201_saxophone_om_cover1_vdz0080_c0.indd 2 2022/01/20 14:25:552022/01/20 14:25:55
3
Saxophone
Owner’s Manual
Precautions
Please read before using
Do not throw or swing the instrument when
others are close by.
The mouthpiece or other parts may fall off hitting other
people. Always treat the instrument gently.
Keep the oil, polish, etc., out of children’s
mouths.
Keep the oil, polish, etc., out of children’s reach and do
maintenance when children are not present.
Be careful not to touch the pin springs during
maintenance, etc.
The end of the pin springs found on high-end models
is sharpened to provide greater key action.
Be aware of climatic conditions such as tempera-
ture, humidity, etc.
Keep the instrument away from heat sources such as
heaters, etc. Also, do not use or store the instrument
in any extreme conditions of temperature or humidity.
Doing so may result in damage to key balance, linkage,
or pads, resulting in problems during performance.
Never use benzene or thinner for maintenance on
instruments with a lacquer nish.
Doing so may result in damage to the finish’s top coat.
Take care not to disgure the instrument.
Placing the instrument where it is unstable may cause
the instrument to fall or drop resulting in disfigure-
ment. Take care as to where and how you place the
instrument.
Do not modify the instrument.
Besides voiding the warranty, modification of the
instrument may make repairs impossible.
Keep small parts out of the reach of infants.
Your children may accidentally swallow them.
The precautions given below concern the proper and safe use of the instrument, and are to pro-
tect you and others from any damage or injuries. Please follow and obey these precautions.
If children are using the instrument, a guardian should clearly explain these precautions to the child and make sure
they are fully understood and obeyed. After reading this manual, please keep it in a safe place for future reference.
n
About the Icons
: This icon indicates points which should be paid attention to. : This icon indicates actions that are prohibited.
Caution
Disobeying the points indicated with this mark may lead
to damage or injury.
In regards to brass instruments with a plate nish, the color of the nish may change over time however, it should
be of no concern in regards to the instrument’s performance. Discoloration in its early stage can easily be removed
with maintenance. (As discoloration progresses, it may be difcult to remove.)
* Please use the accessories that are specified for use with the particular type of finish found on the instrument. Also, metal pol-
ishes remove a thin layer of the finish’s top coat which will make the finish thinner. Please be aware of this before using polish.
n To obtain maximum life out of the instrument.
• Before assembling the instrument, use a cloth to remove dust or dirt from the joint section.
• After playing, remove moisture from the instrument. (
g
See “Instrument Maintenance” on page 7.)
• Check and perform maintenance on the instrument regularly. (
g
See “Instrument Maintenance” on page 7.)
• When taking the instrument out of its case, hold the instrument at a position that provides good balance without
placing pressure on the keys.
03_saxophone_om_en_vdz0080_c0.indd 303_saxophone_om_en_vdz0080_c0.indd 3 2022/01/20 15:58:432022/01/20 15:58:43
4
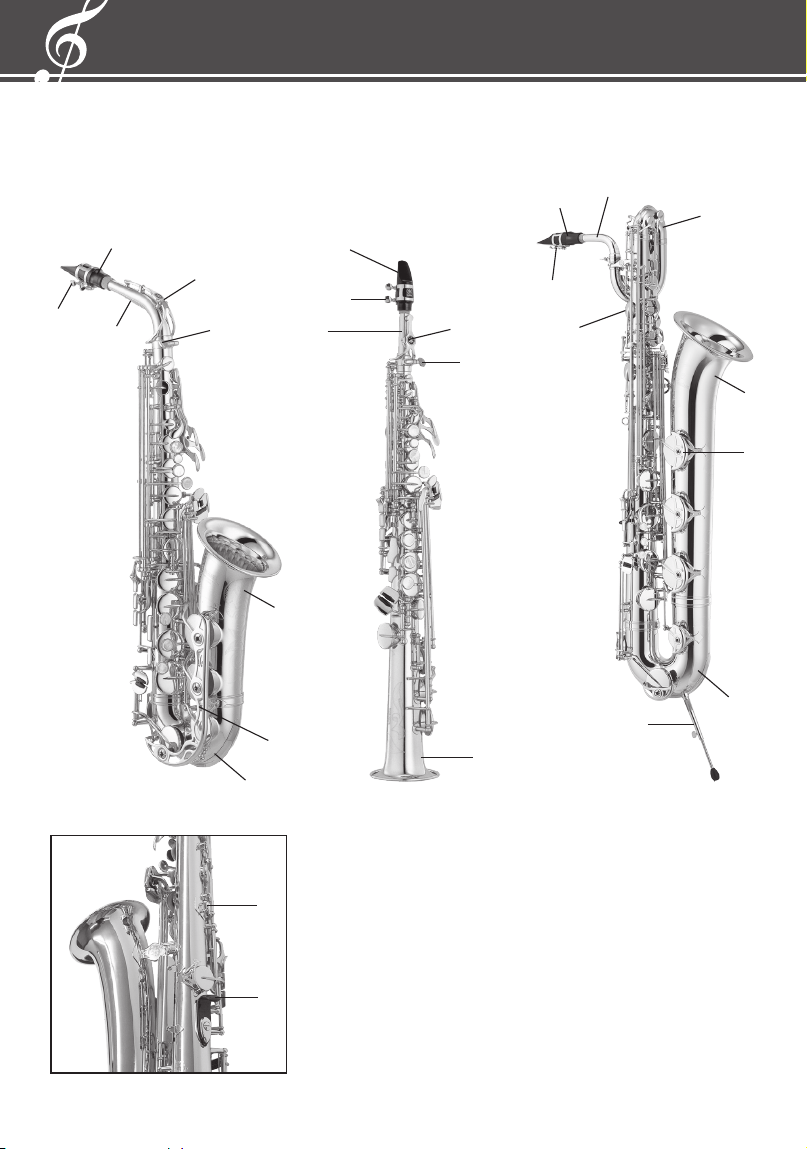
Alto Saxophone
Tenor Saxophone
* An alto saxophone is
shown in the photo.
Baritone Saxophone
Soprano Saxophone
!2
Nomenclature
w
e
r
t
i
q
w
r
y
e
o
y
q
* Improvements may change the design and specications without notice.
q
Ligature
w
Mouthpiece
e
Neck
r
Neck Screw
t
Octave Key
y
Bell
u
Upper Bow
i
Bow
o
Key Guard
!0
Water Key
!1
Endpin
!2
Strap Ring
!3
umb Hook
Reverse Side
!3
t
u
q
w
e
y
o
i
!0
!1
03_saxophone_om_en_vdz0080_c0.indd 403_saxophone_om_en_vdz0080_c0.indd 4 2022/01/20 15:58:442022/01/20 15:58:44
5
Assembly
Before Assembling the Instrument
Since the walls of the saxophone’s body are thin, it is important to remember not to put too
much pressure on the instrument in any particular position when holding it. Also, be careful not
to damage the instrument by using excessive force during assembly or while handling.
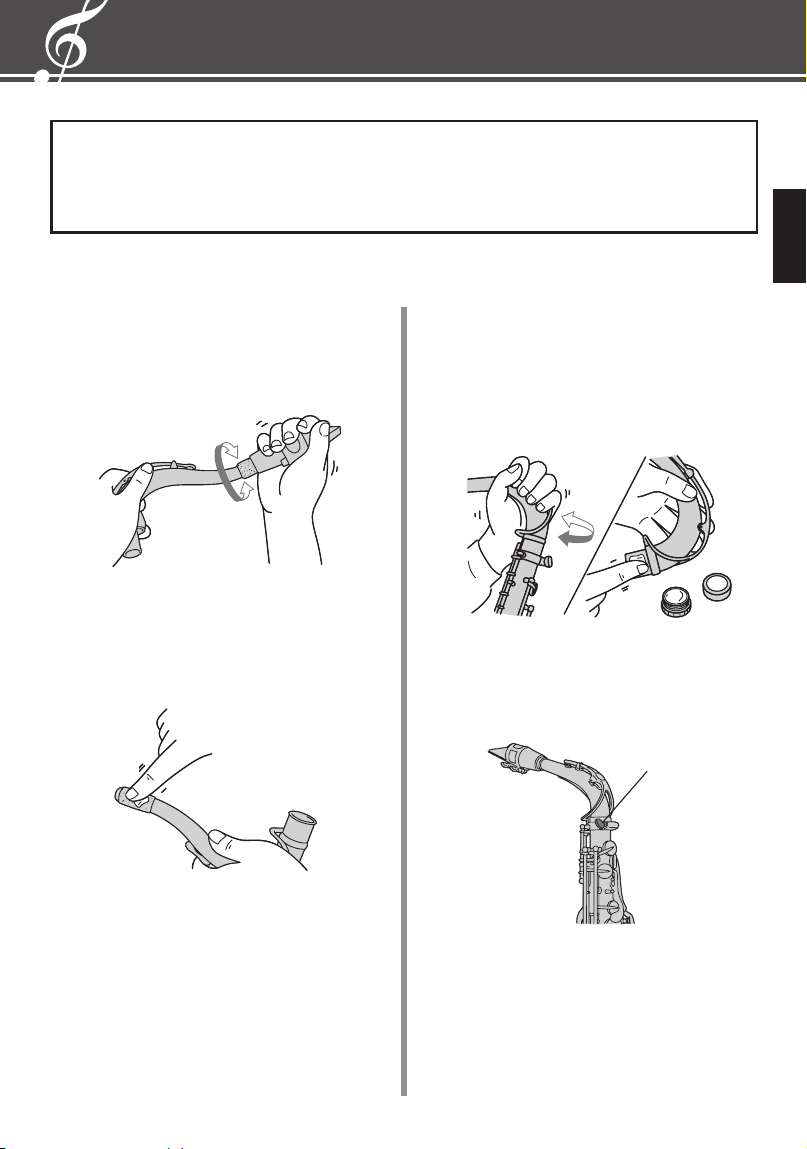
n Assembling the Instrument
3.
After aligning the neck, tighten the neck screw
to secure it.
2. Attach the neck to the body.
Loosen the neck screw, hold the neck then
insert it directly into the neck receiver using a
slow twisting motion.
* If it is dicult to insert into the neck receiver, ap-
ply a little cork grease on the neck’s joint section.
* If it is dicult to attach the mouthpiece, apply
a little cork grease on the neck cork. Be careful
not to use excessive force, which may damage the
instrument.
Neck Screw
Baritone Saxophone
4. Moisten the end of the reed in your mouth (or
in some water).
u
Upper Bow
i
Bow
o
Key Guard
!0
Water Key
!1
Endpin
!2
Strap Ring
!3
umb Hook
1. Attach the mouthpiece to the neck.
Hold the mouthpiece and push it about 3/4
of the way onto the neck cork using a slow
twisting motion.
03_saxophone_om_en_vdz0080_c0.indd 503_saxophone_om_en_vdz0080_c0.indd 5 2022/01/20 15:58:442022/01/20 15:58:44
6
Assembly
6. Place the strap around your neck then hook
the strap onto the strap ring on the instru-
ment.
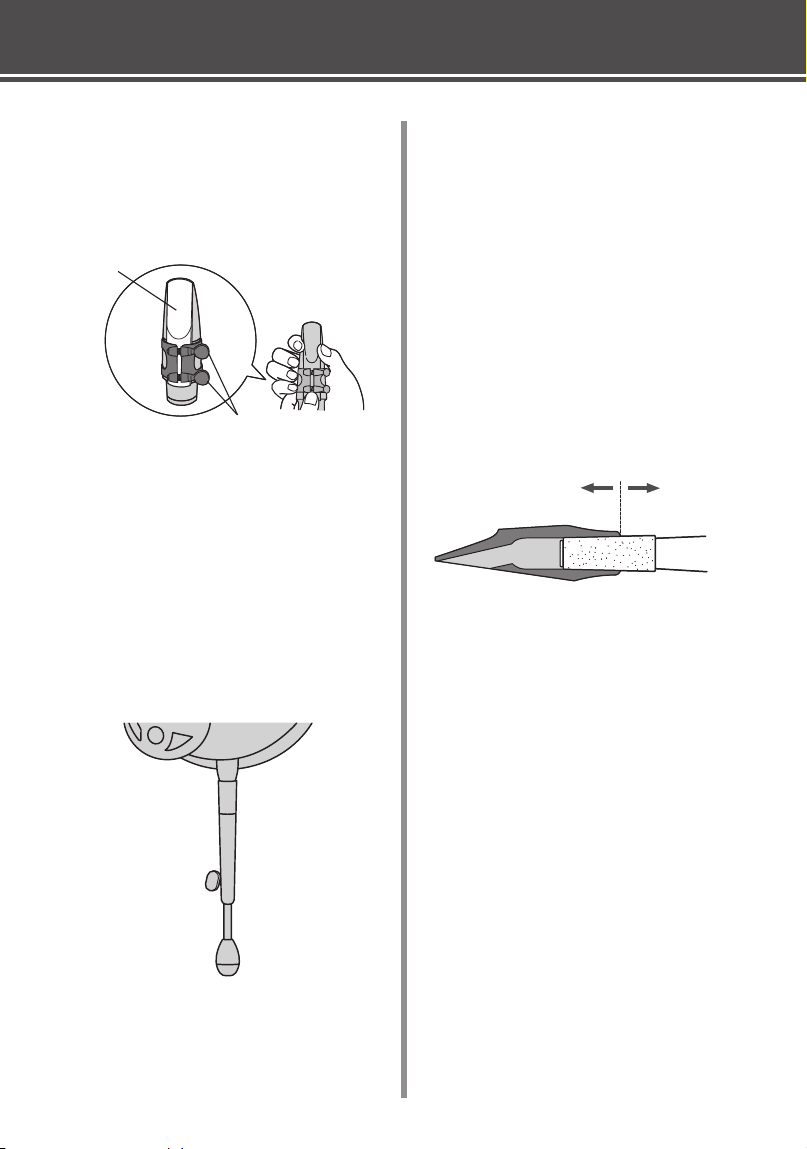
7. While holding the instrument, adjust the
mouthpiece position and strap length.
As for the Baritone Saxophone, adjust the
length of the endpin according to your
posture.
l Tuning the Instrument
Tuning is accomplished by adjusting the
position of the mouthpiece on the neck.
Since air temperature or the temperature
of the instrument will have an eect on
tuning, the instrument should be warmed
up beforehand by blowing into it.
Play a tuning note —
• If the pitch is high, pull the mouth-
piece slightly o of the neck.
• If the pitch is low, push the mouth-
piece a little further onto the neck.
5. Attach the reed onto the mouthpiece.
First, place the reed so that the tip of the
mouthpiece is seen over the end of the reed
then tighten the ligature screws (two screws) to
secure the reed.
When the
pitch is low
Reed
Ligature
Screws
When the
pitch is high
03_saxophone_om_en_vdz0080_c0.indd 603_saxophone_om_en_vdz0080_c0.indd 6 2022/01/20 15:58:452022/01/20 15:58:45
7
Instrument Maintenance
n Instrument Maintenance After Playing
After playing the instrument, use the following procedures to remove moisture and dirt
from the inside of the instrument.
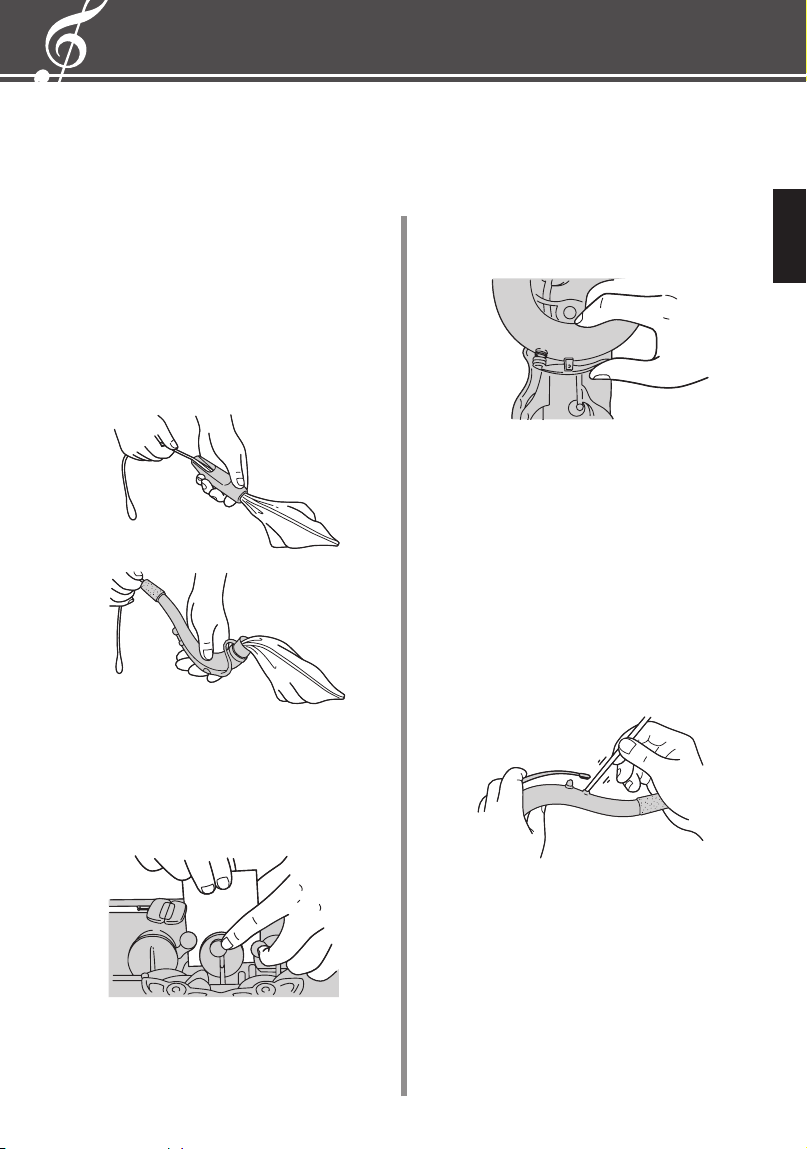
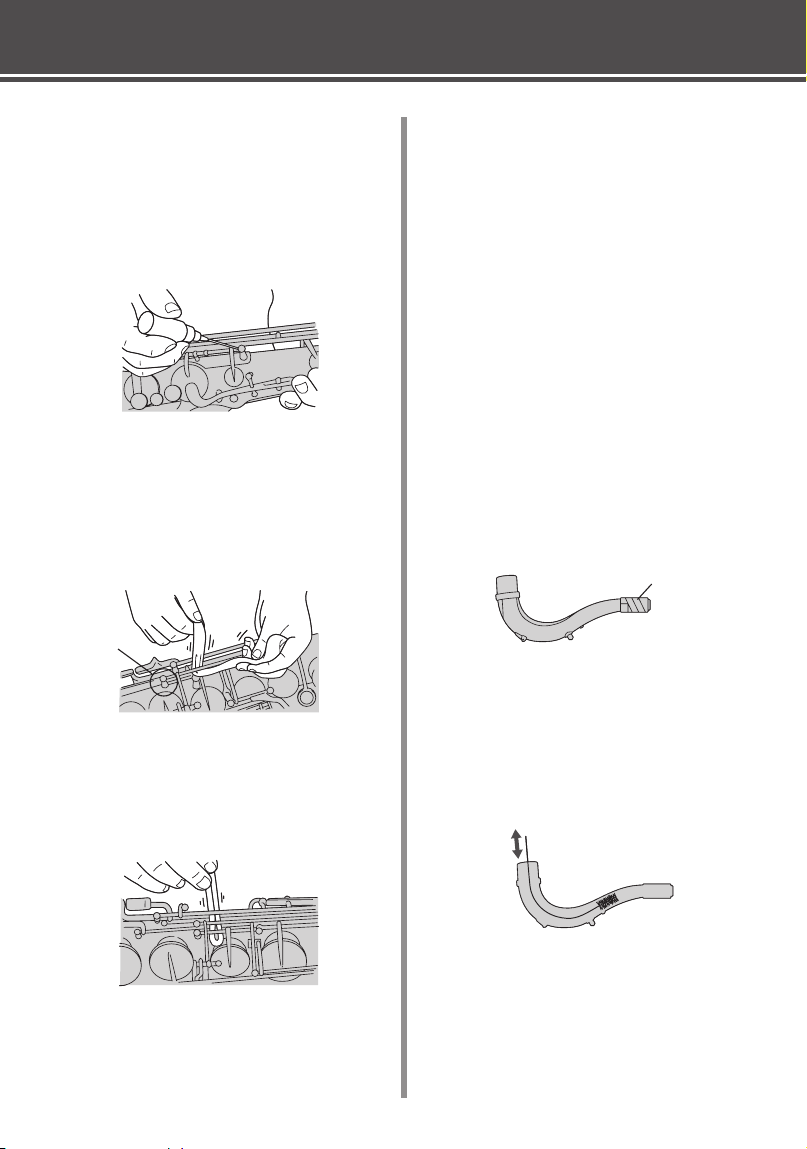
l Remove the reed, then use a cleaning swab
(sold separately) to clean the inside of the
mouthpiece.
e cleaning swab is also used to clean the
inside of the instrument’s neck and body.
* To prevent damage to the end of the mouthpiece,
do not pull the swab all the way through the
mouthpiece.
* Always keep the cleaning swab clean and dry.
l When the pads are wet, place a cleaning paper
(sold separately) between the pad and the tone
hole and press the pads lightly to completely
remove the moisture.
l On baritone saxophones, remove moisture
using the water keys.
l Use a polishing cloth to wipe the instrument’s
surface.
* When wiping be careful not to apply excessive
force on the keys or damage the pads.
* Take care not to let the polishing cloth get caught
on the pin springs, etc.
l Since the tonehole on the octave key is small
and becomes easily clogged, use a tonehole
cleaner (sold separately) to clean the hole
periodically.
03_saxophone_om_en_vdz0080_c0.indd 703_saxophone_om_en_vdz0080_c0.indd 7 2022/01/20 15:58:452022/01/20 15:58:45
8
n Once or Twice a Month Mainte-
nance
l Apply a small amount of key oil (sold separate-
ly) to the mechanism then move the keys to
allow the oil to spread evenly.
* Do not apply too much oil.
* Completely remove any oil on key surfaces.
l Use a tone hole cleaner (sold separately) to
remove ne dirt or dust from between the
keys.
* Be careful not to damage the pads.
l Remove dirt from the side surfaces of keys
and key posts. Use a small piece of gauze to
wipe the surfaces taking care not to place any
excessive pressure on the keys.
* Make sure that the pin springs, key cork, etc., are
not eected when wiping the instrument.
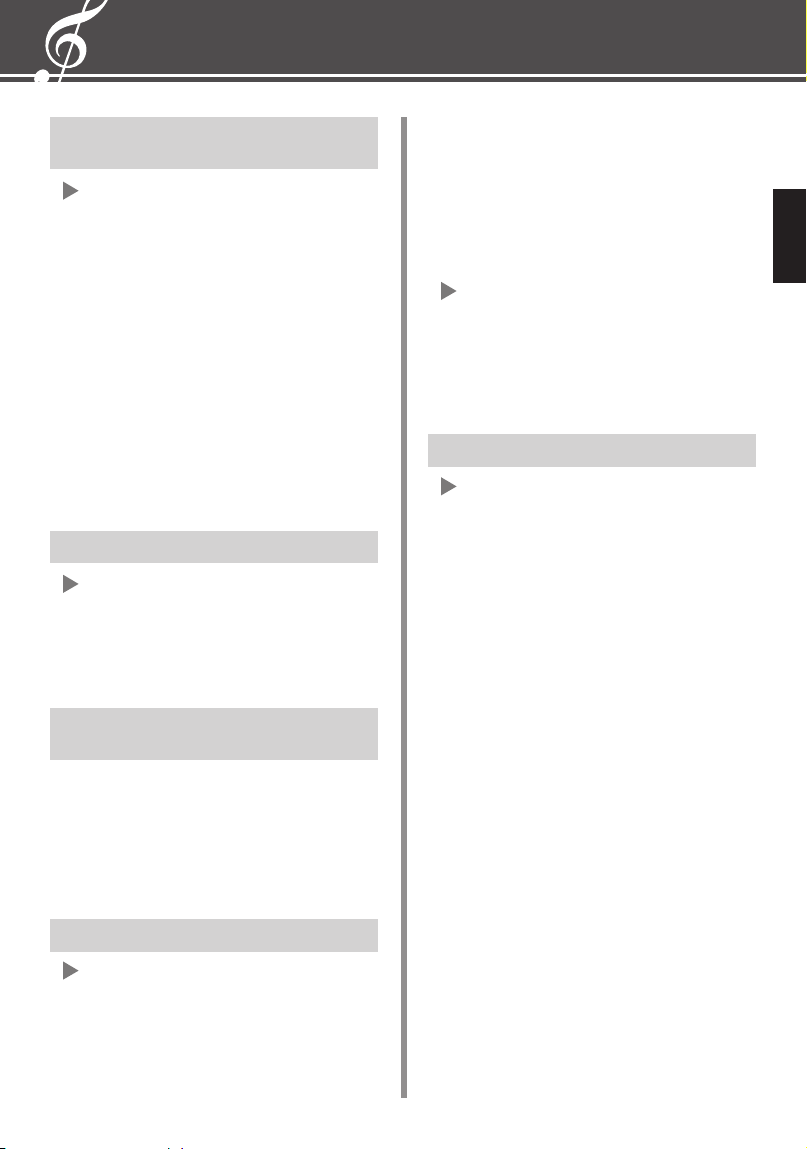
n Cleaning the Neck
(Once Every Six Months)
e neck should be cleaned once about
every six months.
4. Apply some of the soap solution to the saxo-
phone neck brush (sold separately) and scrub
the interior of the neck.
5. After the dirt is removed, apply some clean
water to the brush to remove any remaining
dirt and the brass soap from the neck interior.
6.
After removing all the water from the neck
interior, dry with a cleaning swab drawn through
the neck to remove all moisture.
* e neck on the soprano saxophone is narrow
making it hard to draw the swab all the way
through. Do not force the swab past the point
where it stops in the neck.
1. Make a lukewarm soap solution mixing brass
soap (sold separately) with warm water (30
to 40 degrees Centigrade: 86 to 104 degrees
Fahrenheit) in a soap to water ratio of 1:10 or
1:15.
* Do not put the neck directly into the brass soap/
water solution.
2. Use a screwdriver to remove the key from the
neck.
3. Wrap the cork section with adhesive tape to
protect it from the brass soap/water solution.
* Take care to keep the cork from getting wet which
may result in the cork becoming deformed.
Instrument Maintenance
Wrap with
adhesive tape
Cork Section
Key Post
03_saxophone_om_en_vdz0080_c0.indd 803_saxophone_om_en_vdz0080_c0.indd 8 2022/01/20 15:58:452022/01/20 15:58:45
9
Troubleshooting
e sound is not clear or the instru-
ment plays out of tune
Take the instrument to your dealer for repair.
e problem may be related to the pads.
• e pads may not be aligned with the tone
holes.
g Do not apply pressure to the keys. Also, when
placing the saxophone in the case, make sure
that there is nothing placed on the instrument.
• e pad’s surface is torn.
g Sand or dust can easily collect on pads when
performing outdoors. Clean thoroughly after
playing.
• e pad does not open suciently.
g Excessive pressure on the keys may result in
damage to the keys or removal of the felts un-
der the keys, which can cause the instrument
to play out of tune. Please treat the instrument
with care.
Soldered joints become loose
Take the instrument to your dealer for repair.
Solder can break o if the case is closed when
there is something placed on the key guards, or
from shock due to dropping the instrument, etc.
Be careful and treat the instrument with care.
Mouthpiece is dicult to attach to the
neck
Apply some cork grease to the neck cork, and
try pushing the mouthpiece onto the neck
two or three times. Forcing the mouthpiece
onto the neck without cork grease may result
in damage to the cork. Make sure the cork is
properly greased.
e keys do not move or are sti
If the key is bent, take the instrument to
your dealer for repair.
Keys can become bent if excessive force is
placed on the key mechanism, if the instrument
is dropped, or if the case is closed with some-
thing placed on the instrument.
When you’re nished playing the instrument,
place it in the case making sure that there is
nothing in the case that will apply pressure to
the instrument when the case is closed. During
assembly, do not apply unnecessary pressure on
the keys. Also, be careful how you hold the in-
strument in the intervals between performance.
If a spring has become dislodged, returning
it to its proper position may correct the
problem.
During maintenance, a spring might become
dislodged when wiping the instrument with a
cloth. Please be careful.
e keys are noisy
Take the instrument to your dealer for repair.
One of the following may be the source of the
problem.
• e cork or felt on the keys has fallen o,
torn, or become thin.
g Make sure that corks or felts have not fallen
o.
• e instrument may have been dropped or
bumped causing keys to touch or come into
contact with the body.
g Make sure that the instrument is placed in the
case after playing. Also, be careful how you
hold the instrument in the intervals between
performance.
• Key mechanisms are worn.
g To prevent keys from becoming worn, apply
key oil about once a month (1-2 drops per
place).
• e screws are loose.
g Woodwind instruments have many screws and
they become loose from time to time. Always
check for loose screws and tighten.
03_saxophone_om_en_vdz0080_c0.indd 903_saxophone_om_en_vdz0080_c0.indd 9 2022/01/20 15:58:462022/01/20 15:58:46
1010
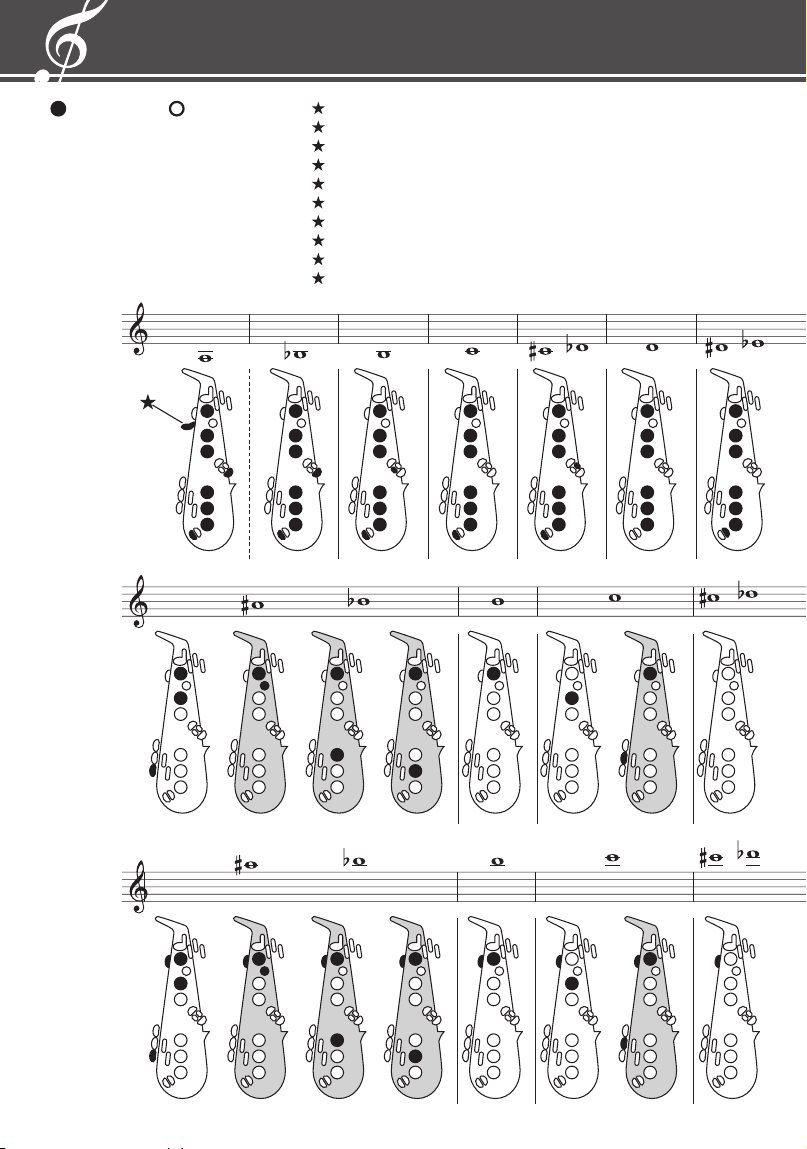
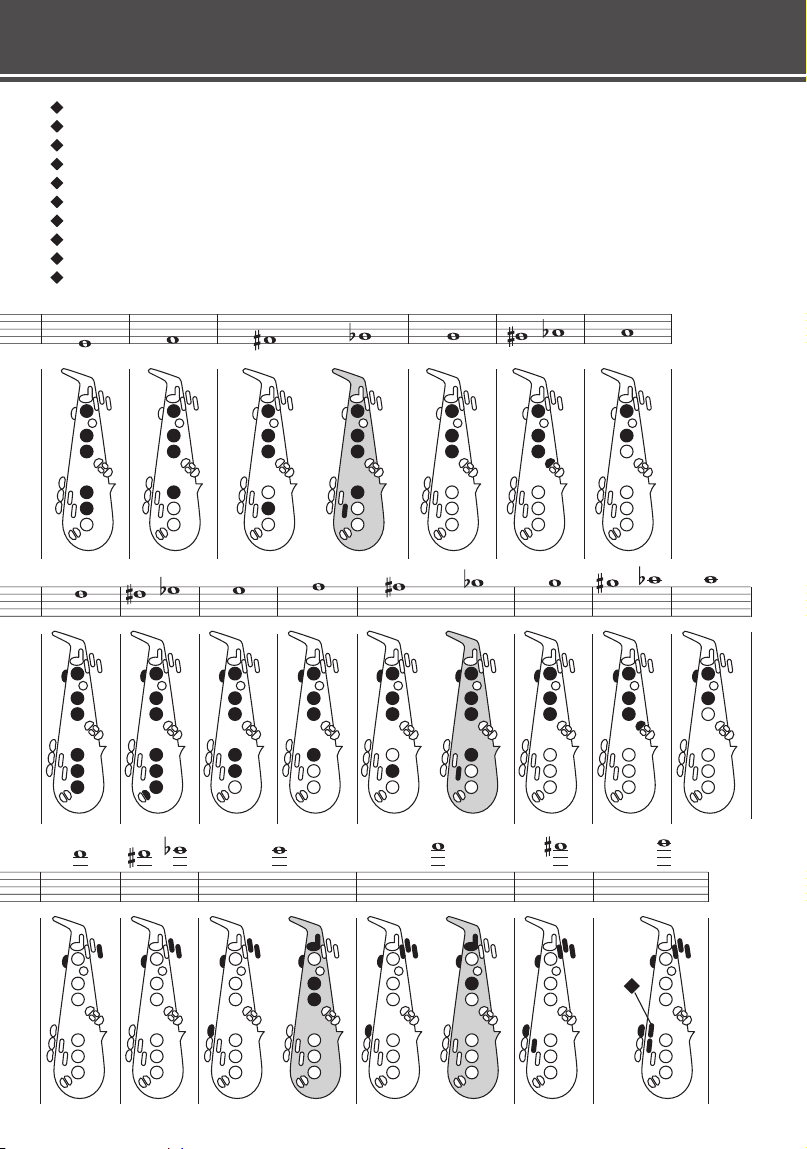
放す
Open
Oen
Ouvert
Abierto
Aberto
开启
Открытый
열림
開啟
押さえる
Close
Geschlossen
Fermé
Cerrado
Fechado
关闭
Закрытый
닫힘
關閉
ロー A キーはバリトンのみ
e low “A” key is available on the baritone saxophone only.
Die Klappe für das tiefe “A” gibt es nur beim Baritonsaxophon.
La clef “A” n’existe que sur le saxophone baryton.
La llave “A” baja sólo está disponible en el saxofón barítono.
A chave de “A” grave está disponível somente no saxofone baritono.
低音“A”键只在上低音萨克斯出现。
Клапан нижнего “A” доступен только на баритон-саксофоне.
낮은“A”키는 바리톤 색소폰에서만 연주가 가능합니다.
只有上低音薩克斯風有低音「A」鍵。
フィンガリングチャート
/ Fingering Chart /
Gritabelle / Tableau des doigtés /
Gráco de digitado / Graco de digitação /
指法表
/
Таблица аппликатуры /
운지법
/
指法表
12_saxophone_om_fingering_vdz0080_c0.indd 1012_saxophone_om_fingering_vdz0080_c0.indd 10 2022/01/20 16:05:382022/01/20 16:05:38
1111
ハイ G キーはソプラノ(YSS-875EXHG)のみ
e high “G” key is available on the soprano saxophone (YSS-875EXHG) only.
Die Klappe für das hohe “G” gibt es nur beim Sopransaxophon (YSS-875EXHG).
La clef “G” n’existe pas sur le saxophone soprano (YSS-875EXHG).
La llave “G” alta sólo está disponible en el saxofón soprano (YSS-875EXHG).
A chave de “G” agúdo está disponível somente no modelo de saxofone soprano (YSS-875EXHG).
只有高音萨克斯管(YSS-875EXHG)有高音“G”音键。
Клапан верхнего “G” доступен только на сопрано-саксофоне (YSS-875EXHG).
높은“G”키는 소프라노 색소폰(YSS-875EXHG)으로만 연주가 가능합니다.
只有高音薩克斯風 (YSS-875EXHG) 有高音「G」鍵。
Gráco de digitado / Graco de digitação /
指法表
/
Таблица аппликатуры /
운지법
/
指法表
12_saxophone_om_fingering_vdz0080_c0.indd 1112_saxophone_om_fingering_vdz0080_c0.indd 11 2022/01/20 16:05:382022/01/20 16:05:38
Manual Development Group
© 2013 Yamaha Corporation
Published 03/2022
2022
年
3
月
发行
POCP-C0
VDZ0080
〒430-8650 静岡県浜松市中区中沢町 10-1
12_saxophone_om_fingering_vdz0080_c0.indd 1212_saxophone_om_fingering_vdz0080_c0.indd 12 2022/01/20 16:05:382022/01/20 16:05:38