inReach
®
Mini 3/3 Plus
Owner’s Manual

© 2025 Garmin Ltd. or its subsidiaries
All rights reserved. Under the copyright laws, this manual may not be copied, in whole or in part, without the written consent of Garmin. Garmin reserves the right to change
or improve its products and to make changes in the content of this manual without obligation to notify any person or organization of such changes or improvements. Go to
www.garmin.com for current updates and supplemental information concerning the use of this product.
Garmin
®
, the Garmin logo, ANT
®
, fēnix
®
, inReach
®
, and TracBack
®
are trademarks of Garmin Ltd. or its subsidiaries, registered in the USA and other countries. Garmin Explore
™
,
Garmin Express
™
, Garmin Messenger
™
, and Garmin Response
SM
are trademarks of Garmin Ltd. or its subsidiaries. These trademarks may not be used without the express permission
of Garmin.
The Bluetooth
®
word mark and logos are owned by the Bluetooth SIG, Inc. and any use of such marks by Garmin is under license. Iridium
®
is a registered trademark of Iridium Satellite
LLC. TORX
®
is a registered trademark of Acument Intellectual Properties, LLC in the United States or other countries. Other trademarks and trade names are those of their respective
owners.

Table of Contents
Introduction......................................1
Getting Started........................................ 1
Device Overview...................................... 1
Buttons................................................. 2
Controls................................................ 4
Action Menu.........................................4
Pairing Your Phone and Activating the
Device...................................................... 5
Garmin Messenger App...................... 5
Garmin Explore.................................... 6
Iridium Satellite Network.....................6
Bluetooth Connected Features........... 6
Testing the Device...................................6
inReach Features..............................6
inReach Tracking.....................................6
Starting Tracking................................. 7
Navigating to the Start of Your Current
Track.................................................... 7
Stopping Tracking............................... 7
Sharing Your Tracking Page............... 7
Messages................................................ 7
Sending a Check-In Message............. 7
Sending a Text Message.....................8
Sending a Post Message.................... 8
Replying to a Message........................ 8
Reacting to a Message....................... 9
Downloading Photo and Voice
Messages.............................................9
Checking for Messages...................... 9
Viewing Message Details....................9
Navigating to a Message Location.... 9
Deleting Messages............................10
Contacts................................................ 10
Adding a Contact............................... 10
Editing a Contact............................... 10
Deleting a Contact............................. 10
SOS.........................................................10
Initiating an SOS Rescue...................11
Sending a Custom SOS Message.... 11
Canceling an SOS Request............... 11
Syncing inReach Data........................... 12
Viewing Plan Details and Usage.......... 12
Apps...............................................12
Garmin Share......................................... 13
Sharing Data with Garmin Share...... 14
Receiving Data with Garmin Share... 14
Saved Data.............................................14
Using the Saved App......................... 15
Viewing Saved Data.......................... 15
Deleting Saved Data.......................... 15
Using Voice Commands....................... 15
Voice Commands.............................. 16
Recording a Voice Note........................ 17
Weather..................................................17
Viewing a Weather Forecast.............17
Adding a Waypoint as a Weather
Location............................................. 17
Setting the Weather Location........... 17
Requesting an inReach Weather
Forecast............................................. 18
Updating an inReach Weather
Forecast............................................. 18
Deleting a Weather Location............ 18
Navigation...................................... 19
Acquiring GPS Satellite Signals............19
Panning and Zooming the Map............ 19
Navigating Using TracBack®............... 19
Navigating to Known Coordinates....... 19
Navigating with Sight 'N Go.................. 20
Stopping Navigation............................. 20
Compass................................................20
Navigating with the Compass.......... 20
Calibrating the Compass.................. 20
Setting the Compass Heading..........20
Compass Settings............................. 20
Map........................................................ 21
Changing the Map Orientation......... 21
Waypoints.............................................. 21
Saving Your Current Location as a
Waypoint............................................ 21
Saving a Message Location as a
Waypoint............................................ 21
Saving a Location on the Map as a
Waypoint............................................ 21
Navigating to a Waypoint..................22
Editing a Waypoint............................ 22
Deleting a Waypoint.......................... 22
Courses.................................................. 22
Navigating a Saved Course...............22
Table of Contents i

Reversing a Course........................... 22
Activities................................................ 23
Starting an Activity............................ 23
Customizing the Current Activity......23
Viewing the Current Activity............. 23
Navigating a Saved Activity.............. 23
Stopping the Current Activity............24
Customizing the Device.................. 24
Sounds Settings.................................... 24
Phone Settings...................................... 24
inReach Remote Settings..................... 24
Tracking Settings.................................. 24
Map Settings......................................... 25
System Settings.................................... 25
Time Settings.................................... 25
Units Settings.................................... 26
Satellite Settings............................... 26
Setting Your Device Passcode......... 26
Device Information......................... 27
Product Updates................................... 27
Setting Up Garmin Express............... 27
Getting More Information................. 27
Specifications........................................27
Battery Information........................... 28
Viewing E-Label Regulatory and
Compliance Information....................... 28
Attaching the Spine Mount Adapter.....29
Attaching the Carabiner Tether............ 29
Attaching a Lanyard.............................. 30
Locking and Unlocking the Device....... 30
Locking and Unlocking the
Touchscreen.......................................... 30
Device Care............................................30
Cleaning the Device...........................30
Cleaning the USB Port....................... 31
Cleaning the Touchscreen................ 31
Troubleshooting.................................... 31
Maximizing Battery Life.................... 31
My device is in the wrong
language............................................ 31
Resetting All Default Settings........... 31
Charging the inReach Device............... 32
Saving Energy While Charging the
Device.................................................32
ii Table of Contents
Introduction
WARNING
See the Important Safety and Product Information guide in the product box for product warnings and other
important information.
Getting Started
When using your inReach satellite communicator the first time, you should complete these tasks to set it up and
get to know the basic features.
1 Press to turn on the device.
2 Follow the on-screen instructions to select your language and begin activating your device.
3 Download the Garmin Messenger
™
app to your phone, and follow the on-screen instructions to pair and
activate your device (Pairing Your Phone and Activating the Device, page5).
You can use the Garmin Messenger app to compose and send messages using your phone.
4 Download the Garmin Explore
™
app to your phone, and log in with the account information you used to
activate a service plan.
You can use the Garmin Explore app for planning adventures, navigating, and backing up data from your
device.
5 If necessary, create a passcode to secure your device (Setting Your Device Passcode, page26).
6 Check for updates (Product Updates, page27).
For the best experience, you should keep the software on your device up to date. Software updates provide
changes and improvements to privacy, security, and features.
7 Sync your satellite communicator with the Garmin Messenger app (Syncing inReach Data, page12).
8 Test your satellite communicator before you begin your trip (Testing the Device, page6).
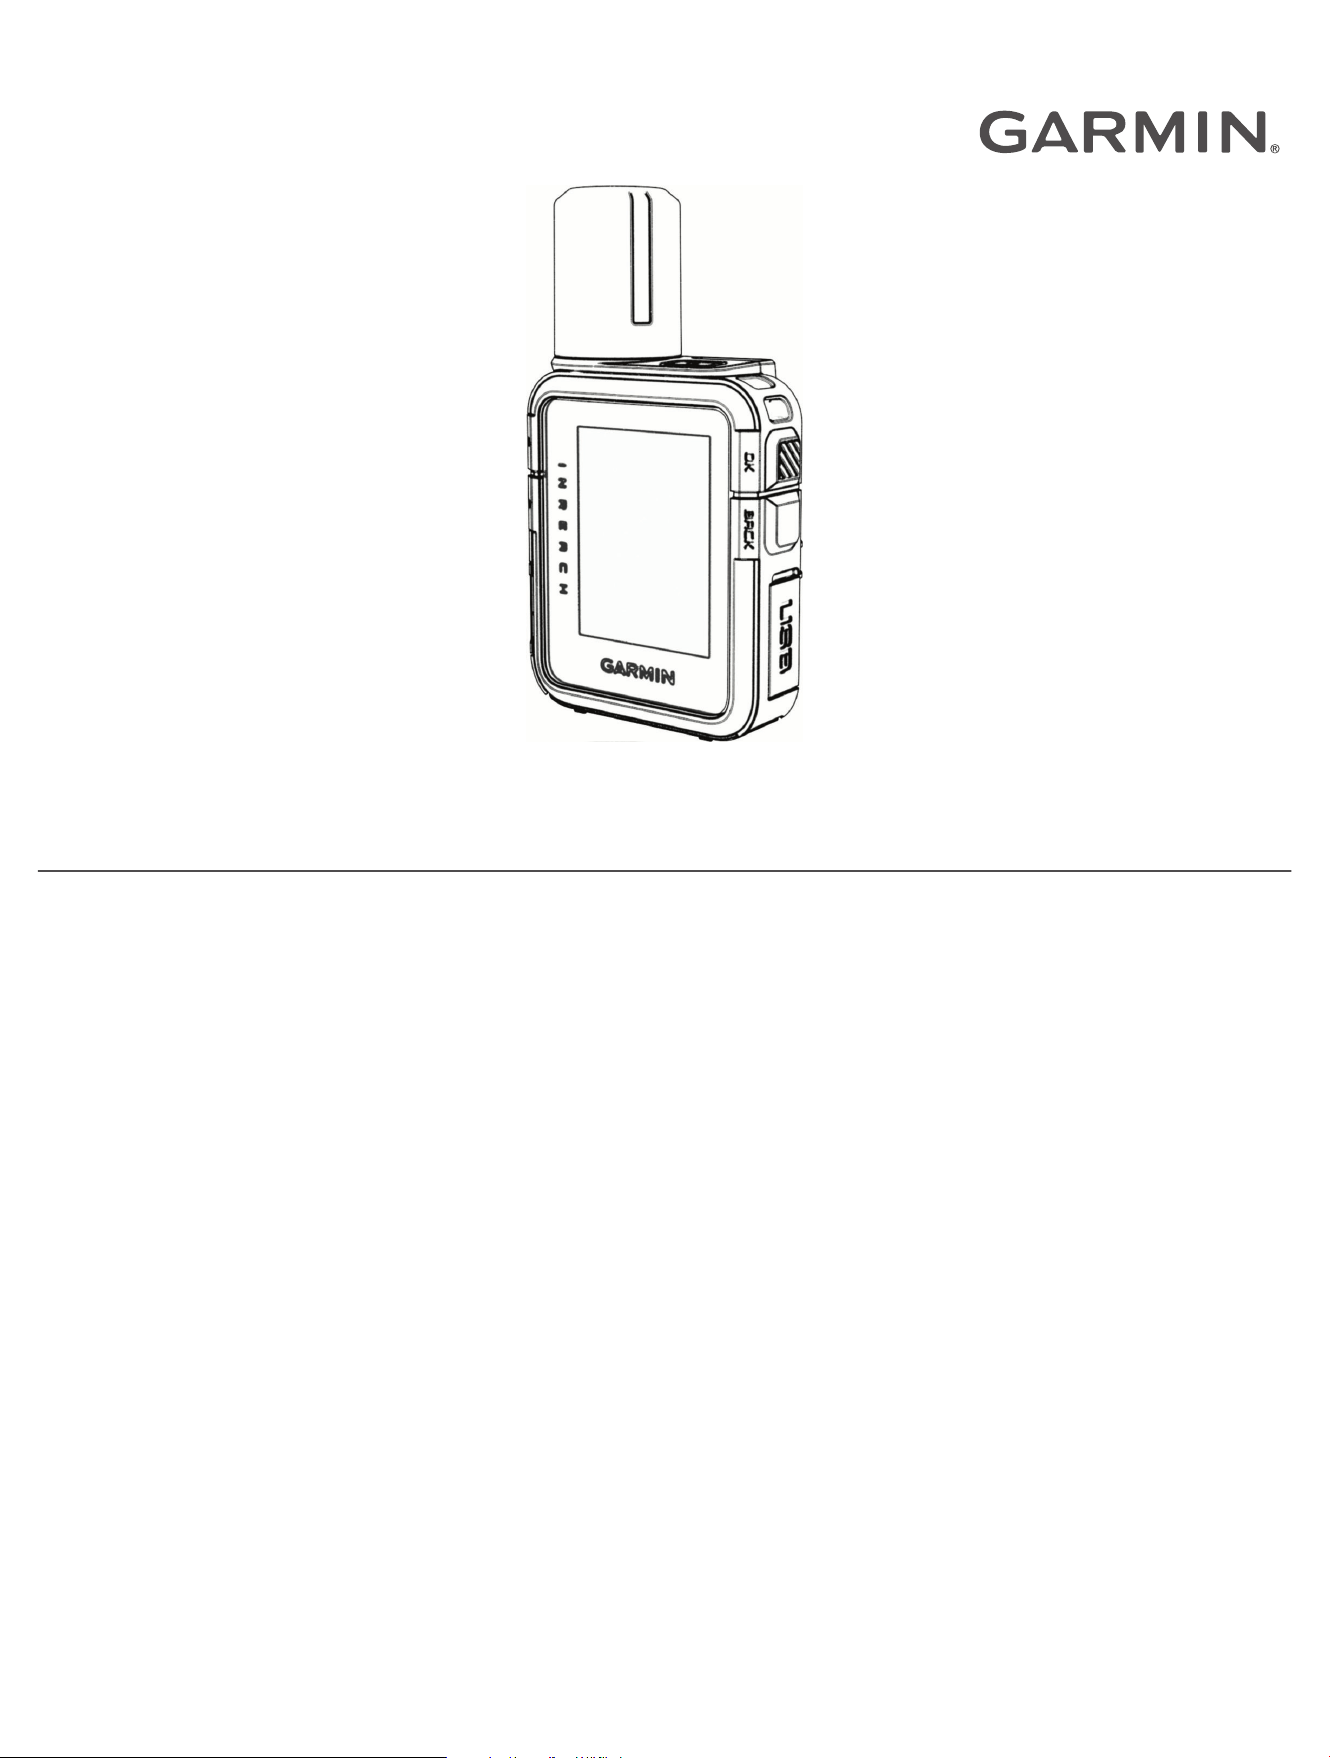
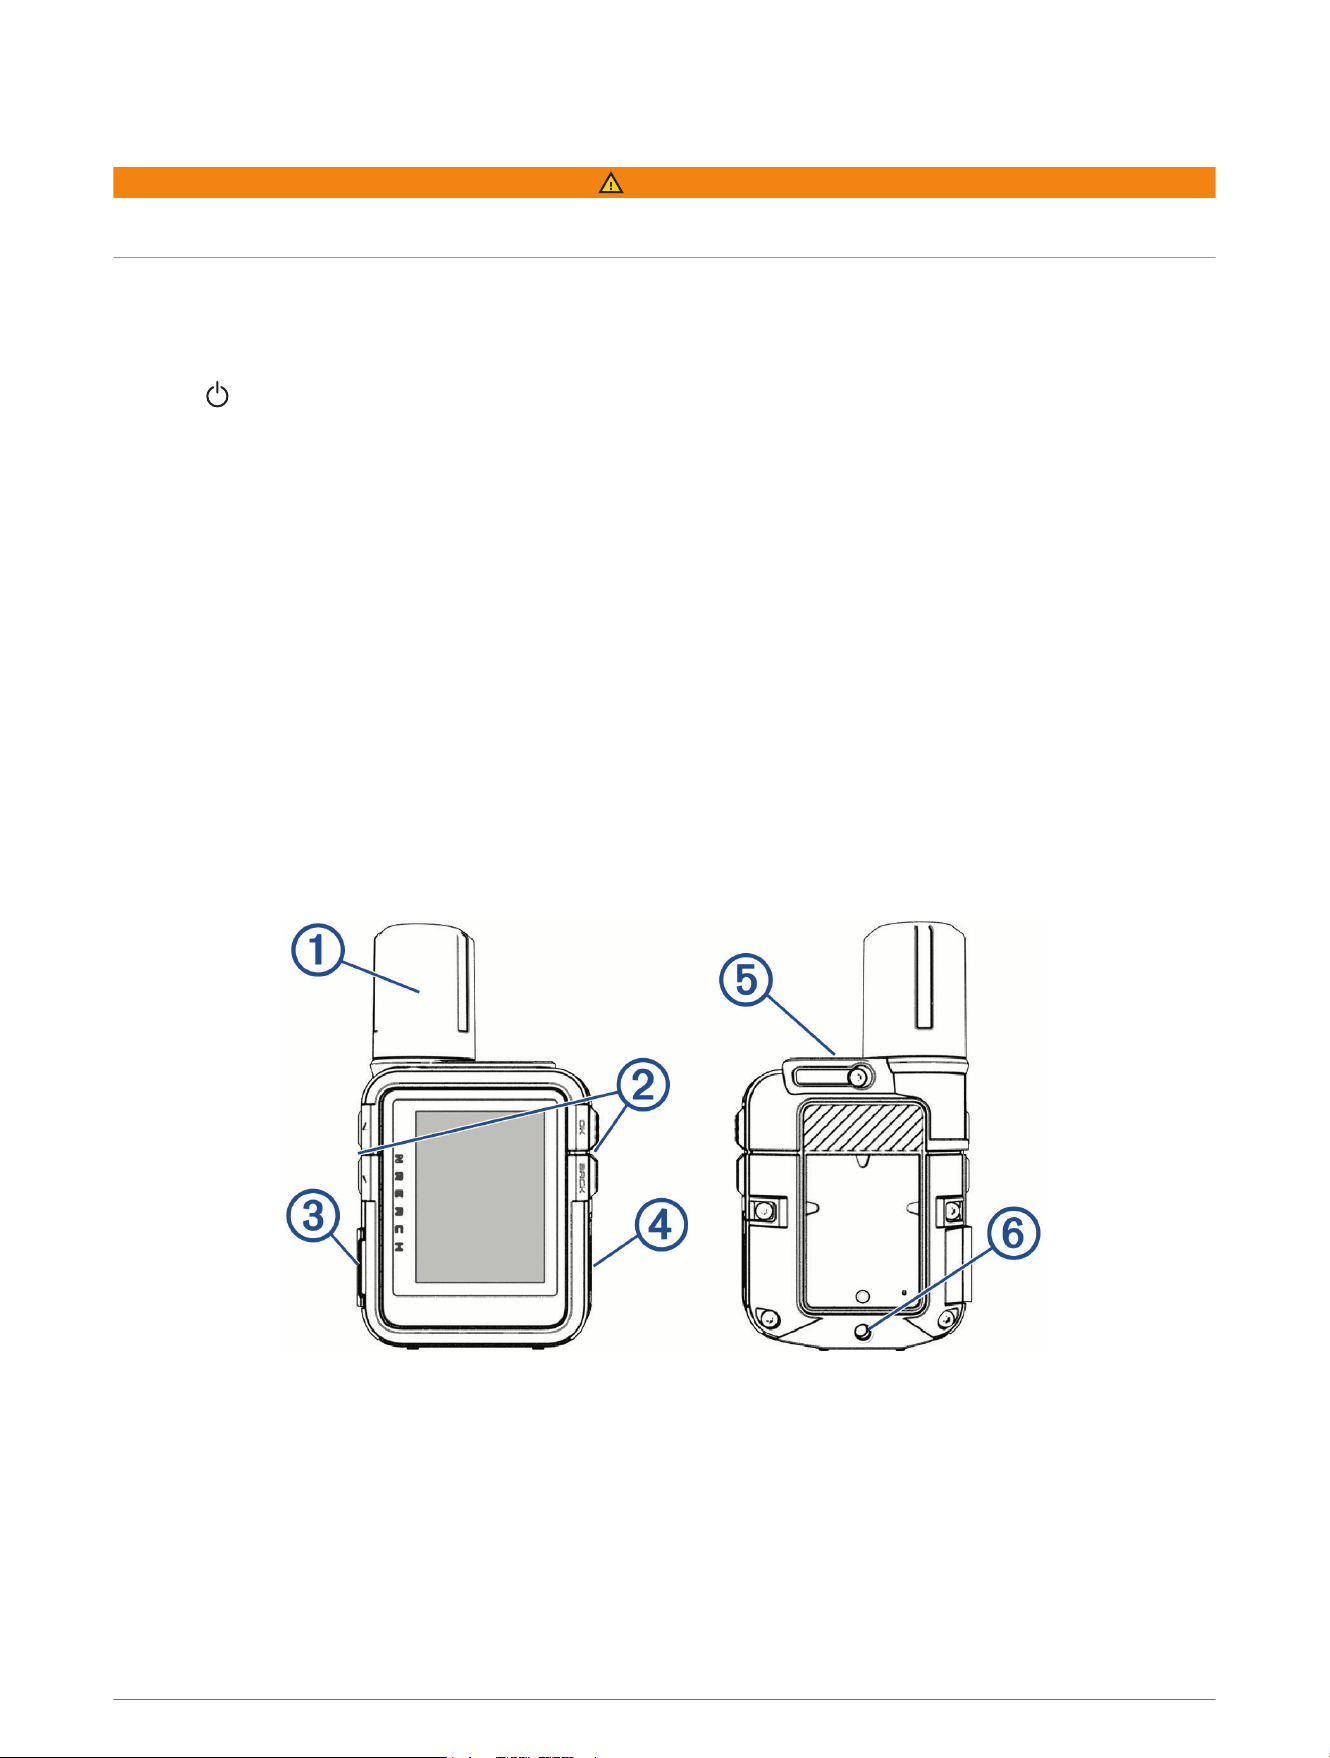
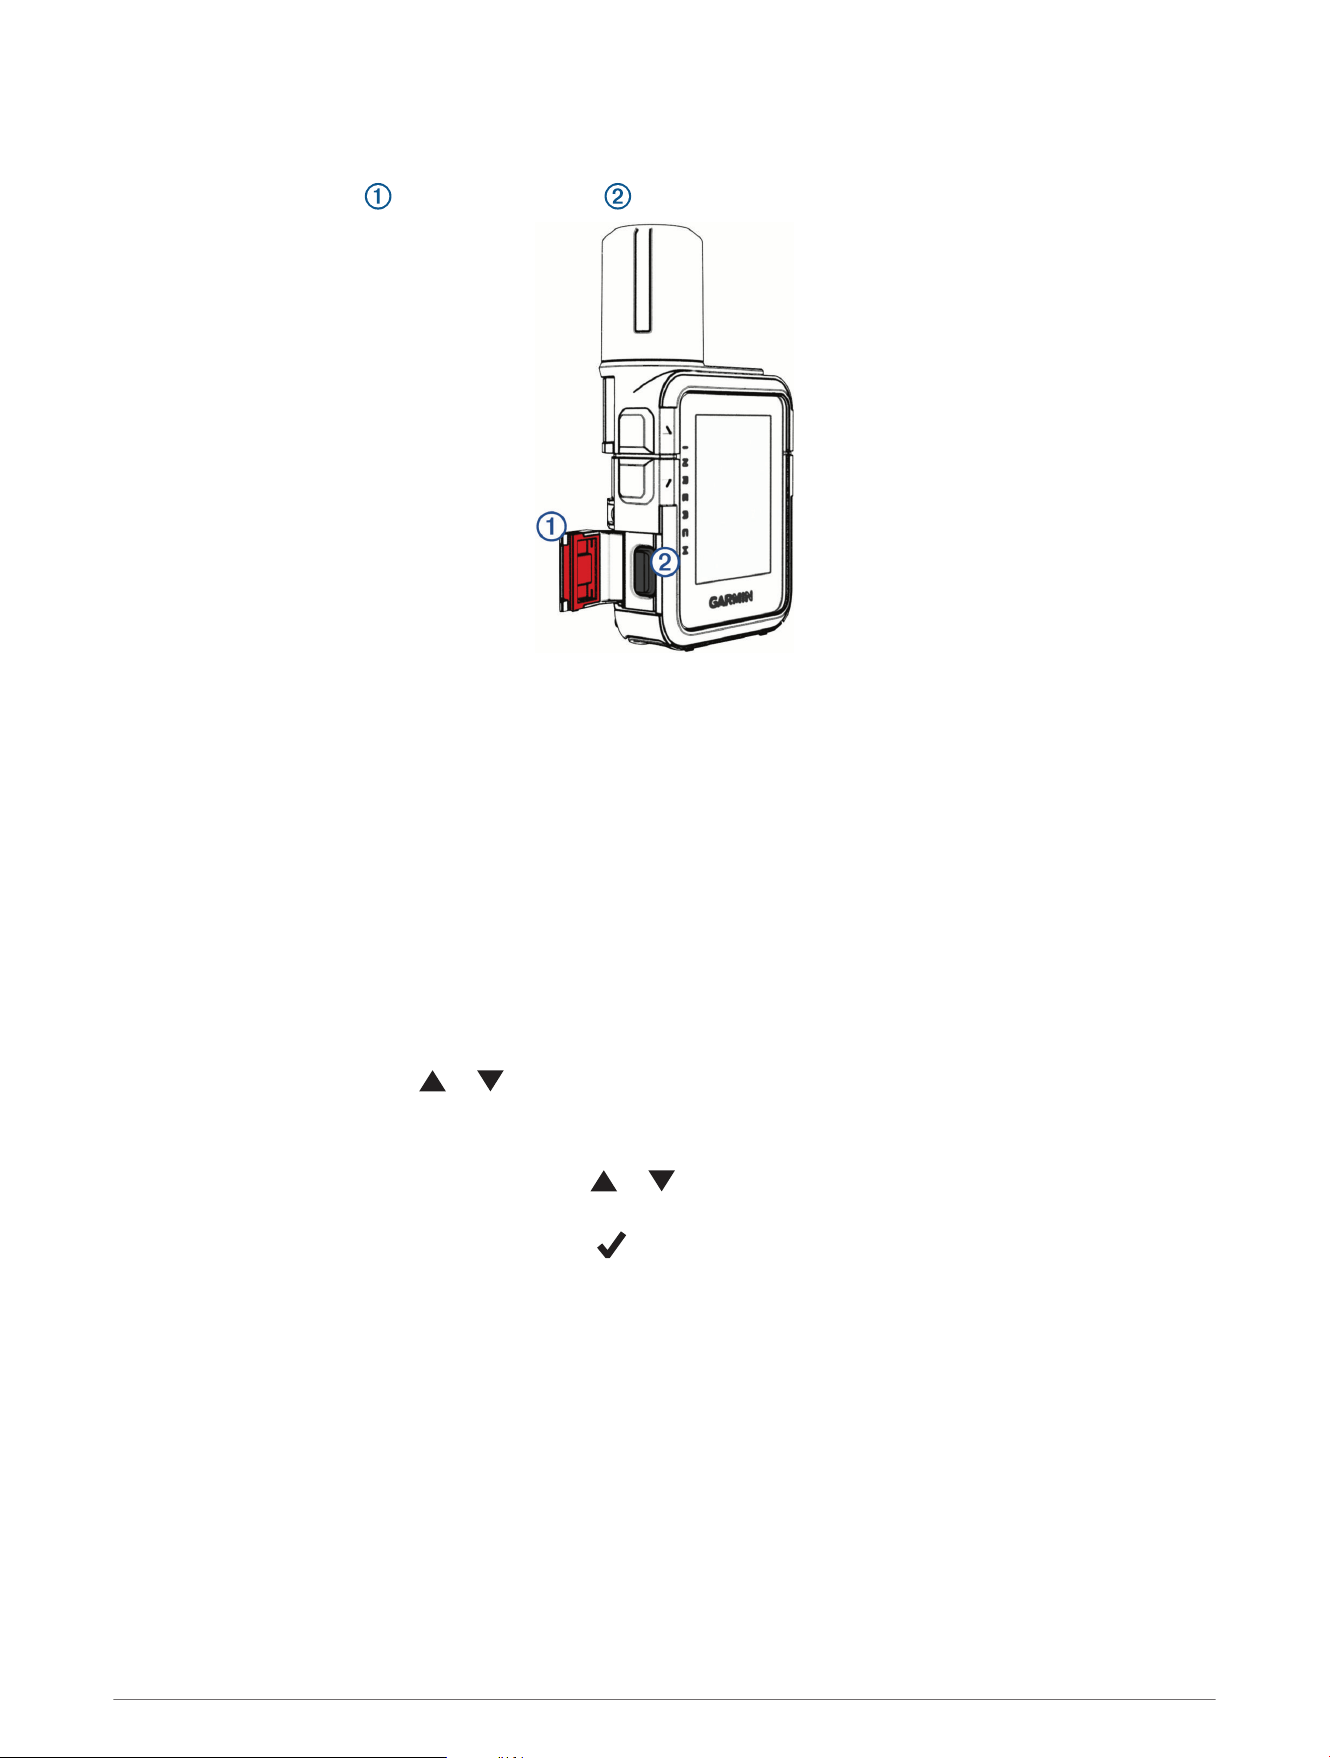
Device Overview
Introduction 1
Internal Iridium
®
antenna
Buttons
SOS button (under protective cap)
USB port (under weather cap)
Power button
Spine mount adapter screw insert
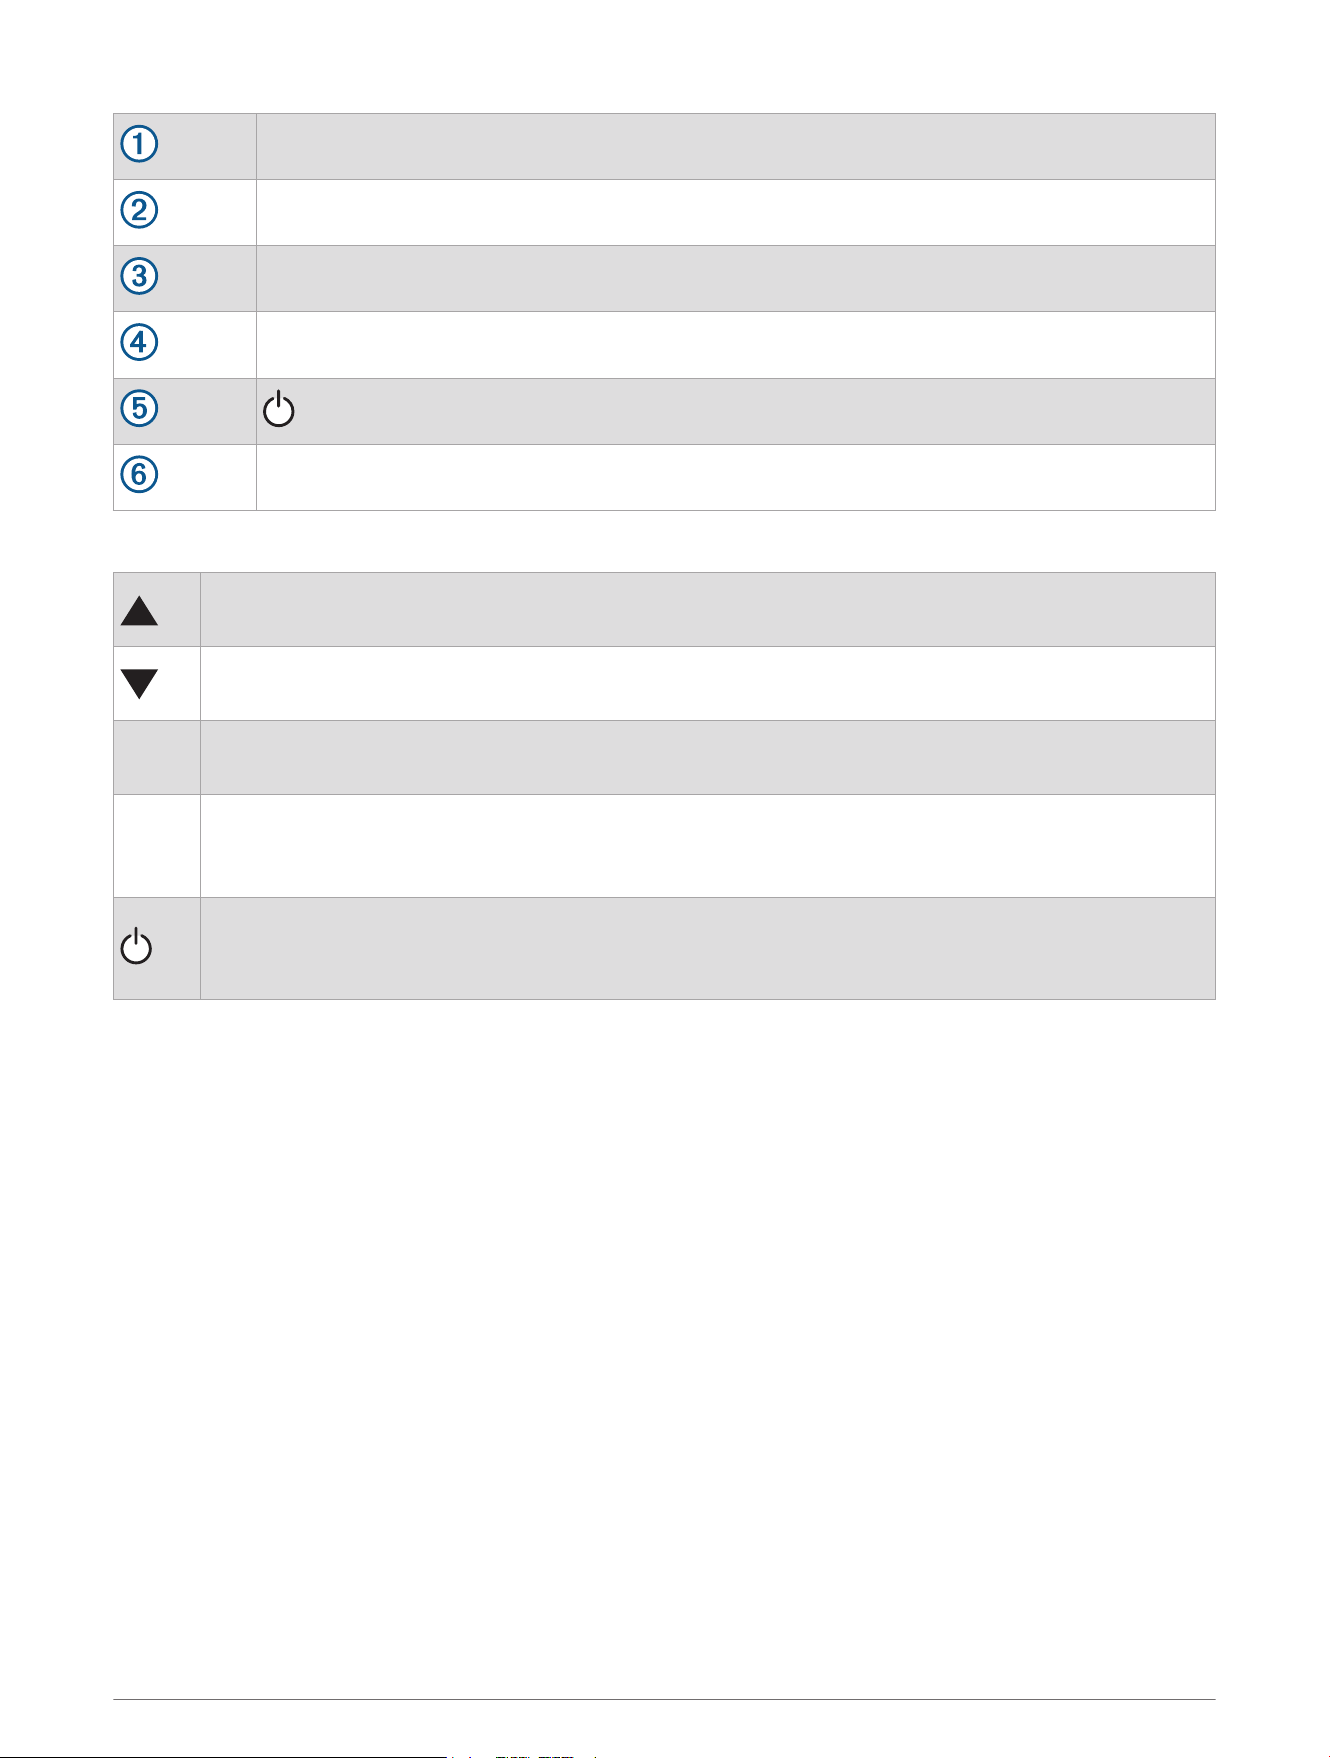
Buttons
Press to scroll through menus, pages, and settings.
From the home page, press to view the apps.
Press to scroll through menus, pages, and settings.
From the home page, press to view the apps.
BACK
Press to cancel or return to the previous page.
Hold to open the action menu.
OK
Press to choose an option or to acknowledge a message.
Press to open the options menu for the page that is currently open (if available).
Hold to open voice commands on the inReach Mini 3 Plus satellite communicator.
Press to turn the device on.
Press to lock the touchscreen.
Hold to open the controls.
2 Introduction

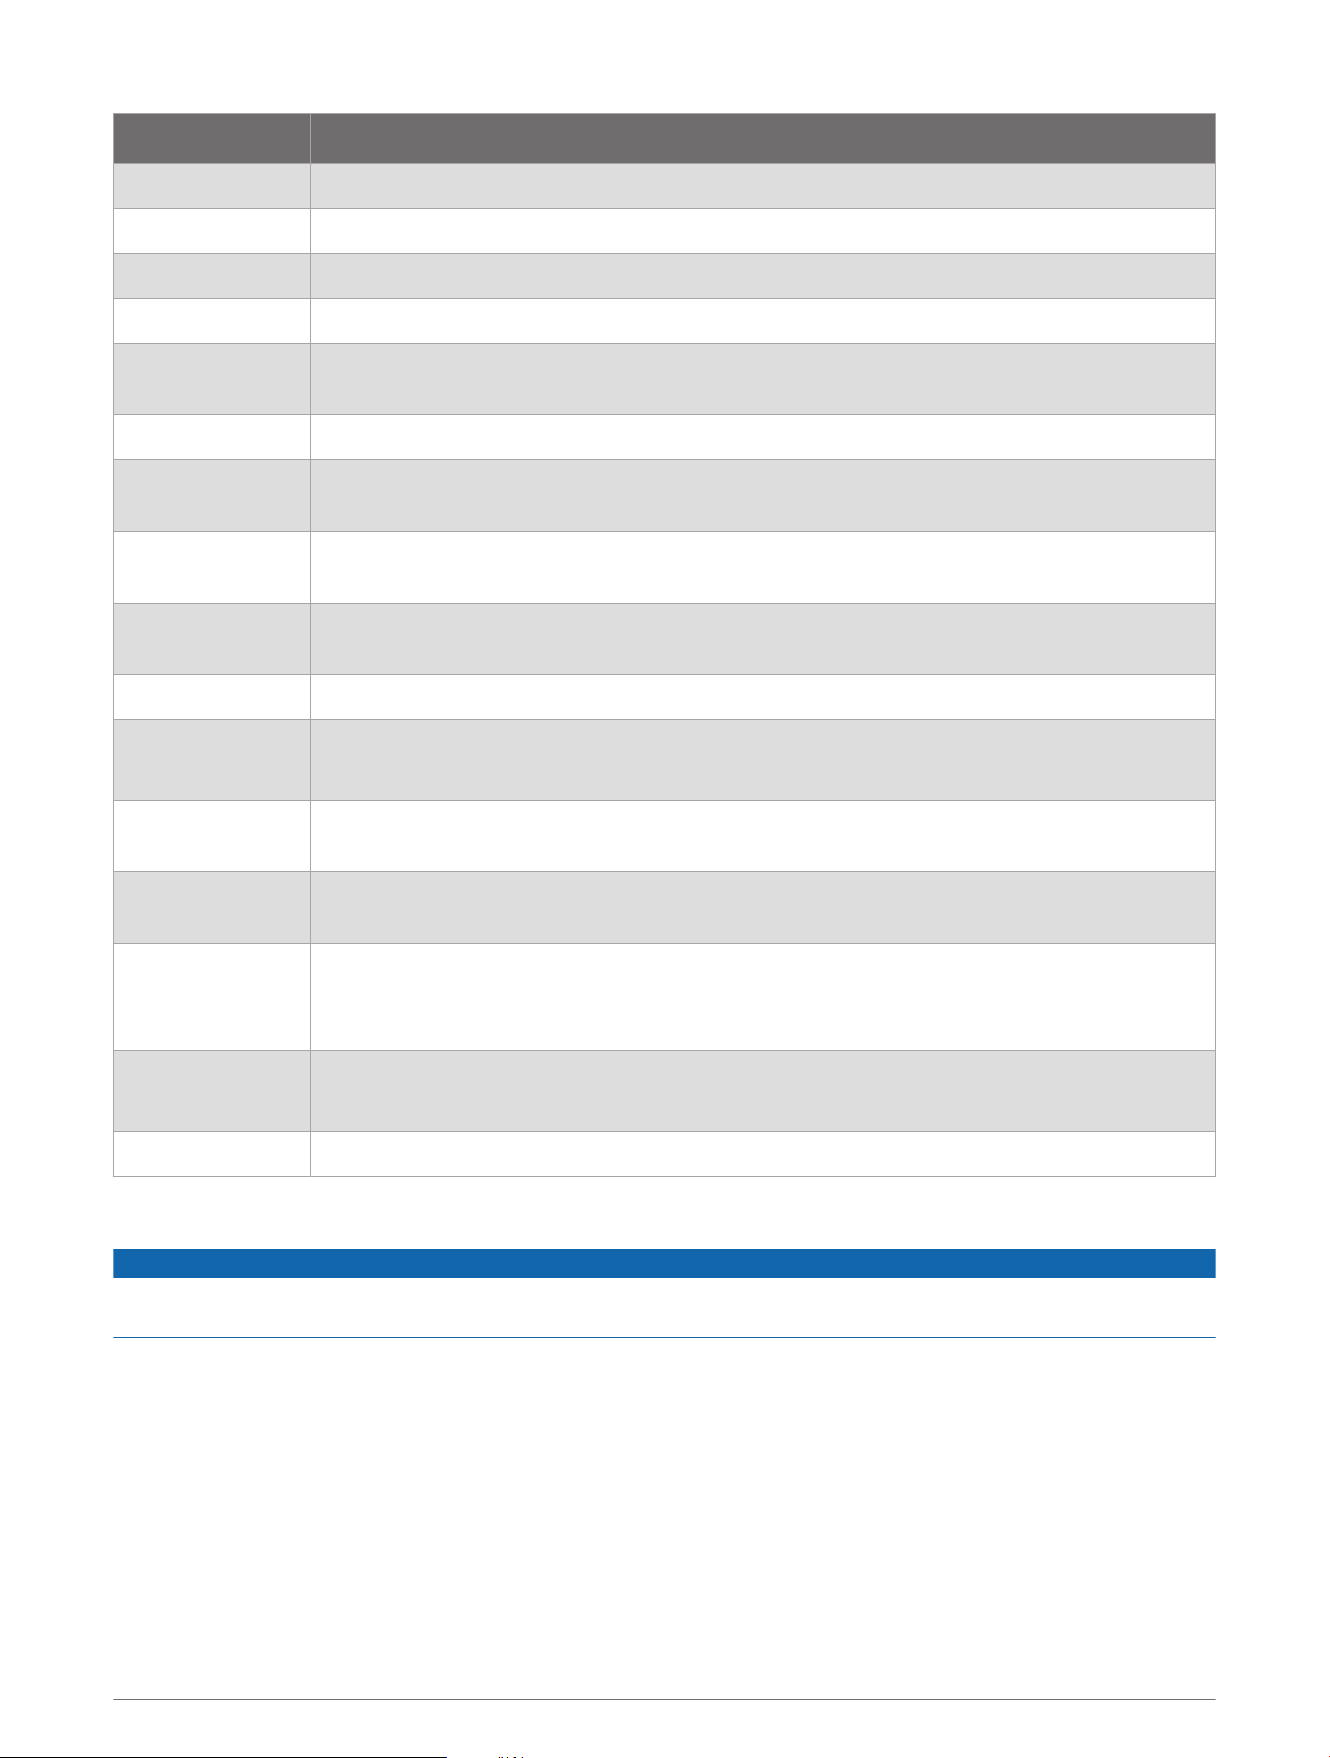
Status Icons
Transmitting data
Tracking enabled
Navigating
Unread messages
Sounds muted
Buttons locked
Charging battery
Charging complete
Exceeding maximum or below minimum charging temperature
Approaching minimum operating temperature
Approaching maximum operating temperature
Exceeding maximum or below minimum operating temperature
Introduction 3
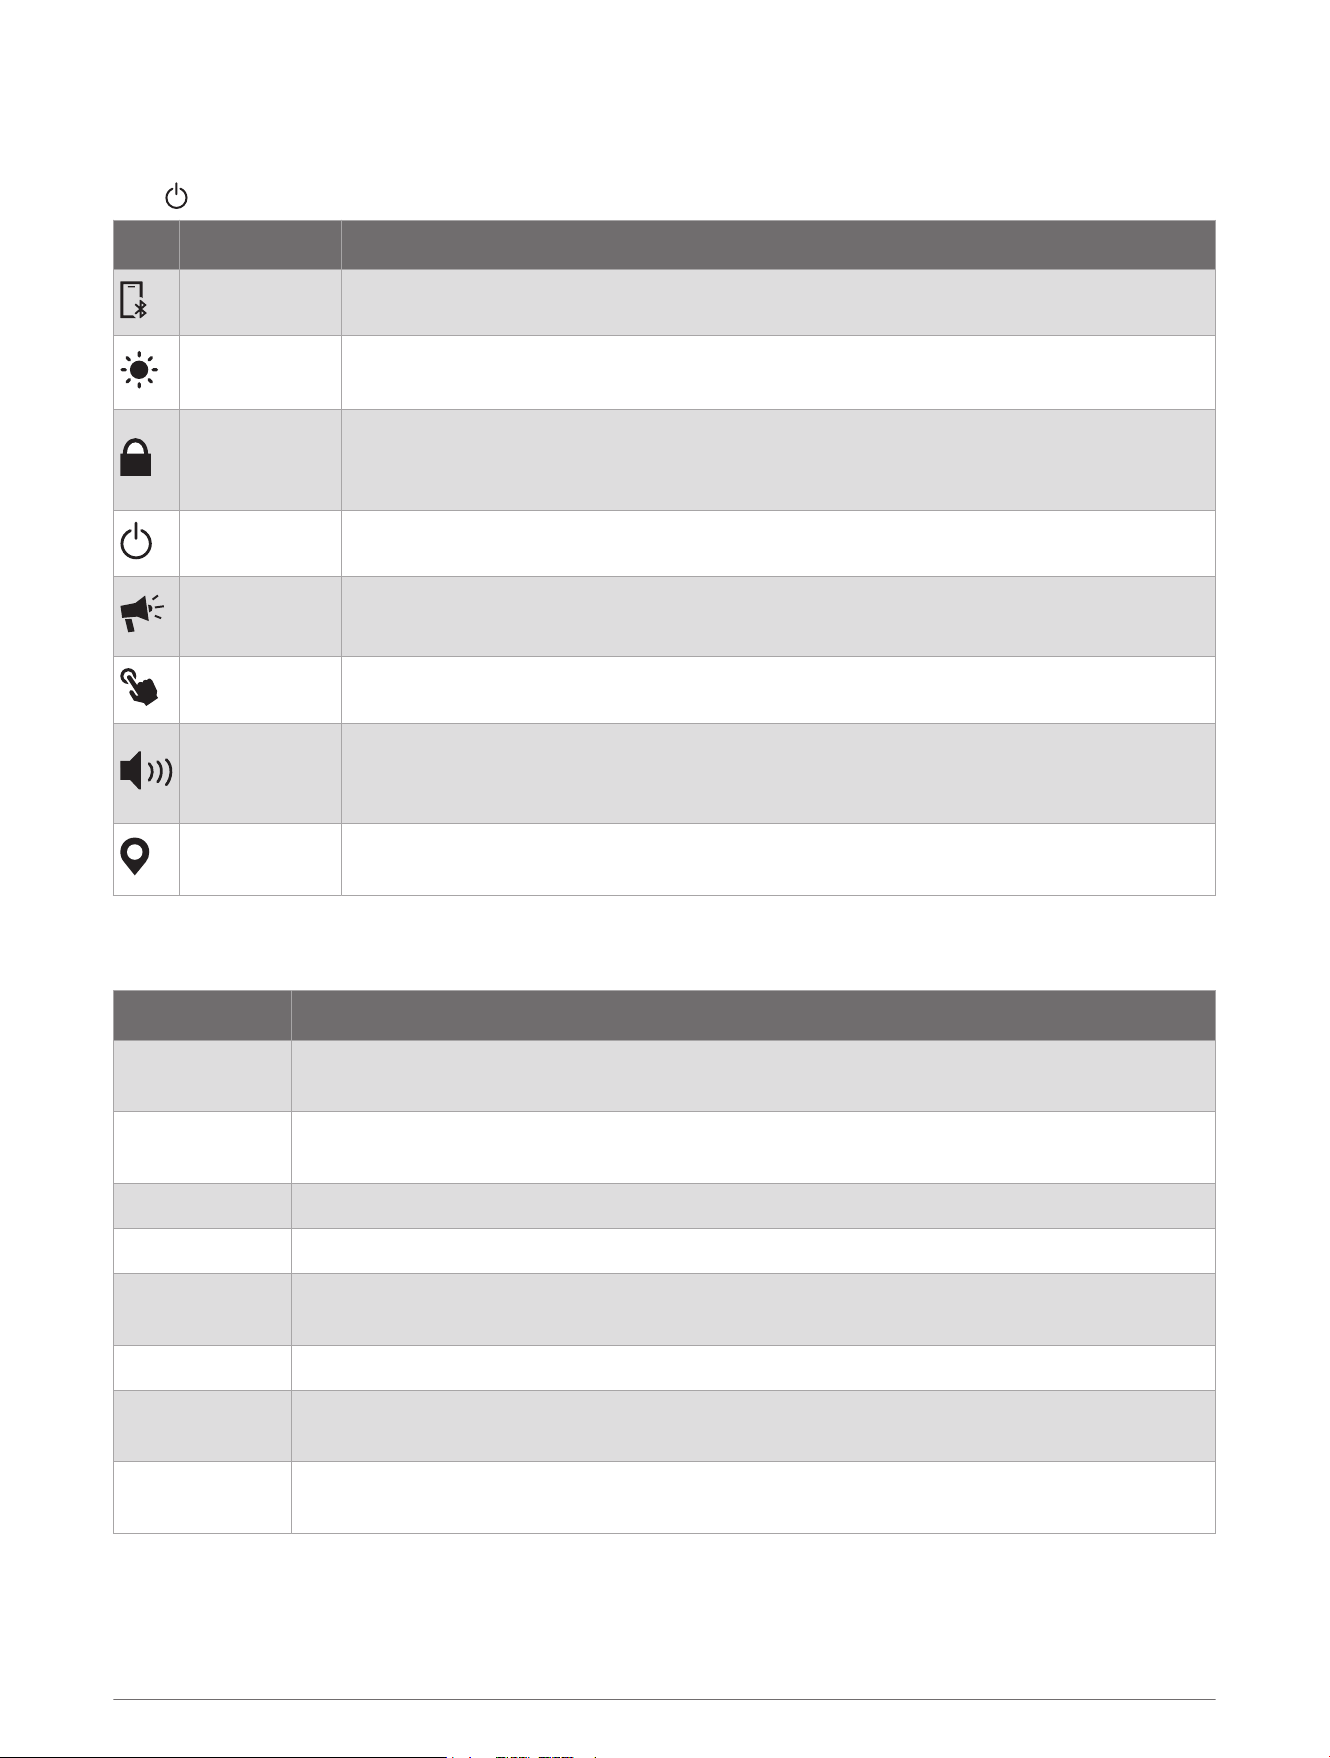
Controls
Controls provide quick access to frequently used functions.
Hold to open the controls.
Icon Name Description
Bluetooth Select to disable Bluetooth
®
technology and your connection to your paired phone.
Brightness
Select the slider bar to adjust the screen brightness.
Tap and hold to access backlight settings.
Lock Device
Select to lock the buttons and the touchscreen to prevent inadvertent presses and
swipes.
You can press the power button to unlock the buttons and touchscreen.
Power Off Select to turn off the device.
Siren
Select to open the siren app and sound an alarm.
This control is available only on the inReach Mini 3 Plus satellite communicator.
Touch Select to disable touchscreen controls.
Volume
Select to mute all device sounds.
Tap and hold to open sound settings on the inReach Mini 3 Plus satellite communi
cator.
Mark Waypoint
Select to mark a waypoint at your current location with your inReach Mini 3 satellite
communicator.
Action Menu
From the home screen, hold BACK to open the action menu.
Name More Information
Activate Device
Pairs your phone with the Garmin Messenger app and activates a service plan (Pairing Your
Phone and Activating the Device, page5).
Start Tracking
Records track points and transmit them over the Iridium satellite network (Starting Tracking,
page7).
Send Message Sends a text or post message (Messages, page7).
Check-In Sends a check-in message (Sending a Check-In Message, page7).
Mark Waypoint
Marks a waypoint at your current location (Saving Your Current Location as a Waypoint,
page21).
Navigate Begins navigating to a destination (Navigation, page19).
Test Device
Tests your device to ensure your satellite subscription is active (Testing the Device,
page6).
Voice Command
Listens for a voice command on your inReach Mini 3 Plus satellite communicator (Using
Voice Commands, page15).
4 Introduction
Pairing Your Phone and Activating the Device
WARNING
Before you can use the inReach features of your satellite communicator, including messaging, SOS, tracking,
and inReach Weather, you must have an active satellite subscription. You must have a valid, unique phone
number that can receive a text message to complete activation and pairing with the Garmin Messenger app.
VOIP numbers are not supported. Always test your satellite communicator outdoors before using it on a trip.
NOTICE
Some jurisdictions regulate or prohibit the use of satellite communications devices. It is the responsibility of the
user to know and follow all applicable laws in the jurisdictions where the device is intended to be used.
The inReach Mini 3 satellite communicator works best when it is paired with the Garmin Messenger app. The
app allows you to compose and send messages using your phone, and to sync inReach data with your satellite
communicator.
1 During the initial setup on your satellite communicator, scan the QR code with the camera on your phone to
download and install the Garmin Messenger app.
NOTE: If you previously skipped the pairing process, you can press or and select Activation. If
you activate the device through the Garmin Explore web interface instead of the Garmin Messenger app,
voice notes can be sent but not received from your inReach Mini 3 Plus satellite communicator and group
messages cannot be sent or received.
2 Follow the on-screen instructions to complete the pairing process and activate a subscription service plan.
To use additional connected features and complete the setup process, download and install the Garmin
Explore app using your phone.
After the satellite communicator and phone are paired, they connect automatically when they are turned on and
within range.
Garmin Messenger App
WARNING
The inReach features of the Garmin Messenger app on your phone, including SOS, tracking, and inReach
Weather, are not available without a connected inReach device and an active inReach service plan. Always test
the app outdoors before using it on a trip.
CAUTION
The non-satellite messaging features of the Garmin Messenger app on your phone should not be solely relied
upon as a primary method to obtain emergency assistance.
NOTICE
The app works over both the internet (using a wireless connection or cellular data on your phone) and the
satellite network. If you are using cellular data, your paired phone must be equipped with a data plan and be in
an area of network coverage where data is available. If you are in an area without network coverage, you must
have an active inReach service plan for your device to use the satellite network.
You can use the app to message other Garmin Messenger app users, including friends and family without
Garmin
®
devices. Anyone can download the app and connect their phone, allowing them to communicate with
other app users over the internet (no login is required). App users can also create group messaging threads
with other SMS phone numbers. New members added to the group message can download the app to see what
others are saying.
Messages sent using a wireless connection or cellular data on your phone do not incur data charges or
additional charges on your inReach service plan. Messages received may incur charges if message delivery is
attempted over both the satellite network and the internet. Standard text messaging rates for your cellular data
plan apply.
You can download the Garmin Messenger app from the app store on your phone (garmin.com/messengerapp).
Introduction 5

Garmin Explore
The Garmin Explore website and app allow you to create courses, waypoints, and collections, plan trips, sync
tracks, upload activities, and use cloud storage. They offer advanced planning both online and offline, allowing
you to share and sync data with your compatible Garmin device. You can use the app to download maps for
offline access, and then navigate anywhere without using your cellular service.
You can download the Garmin Explore app from the app store on your phone (garmin.com/exploreapp), or you
can go to explore.garmin.com.
Iridium Satellite Network
Your device requires a clear view of the sky to transmit messages and track points over the Iridium satellite
network. Without a clear view of the sky, your device attempts to send the information until it acquires satellite
signals.
TIP: For the best connection with satellites, place the device with the antenna pointed toward the sky.
Bluetooth Connected Features
Your device has several Bluetooth connected features for your compatible phone using the Garmin Explore and
Garmin Messenger apps.
Downloadable Features: View downloaded maps, such as satellite imagery and USGS quadrangle maps on your
phone in the Garmin Explore app. You should download maps and charts to your phone in the Garmin Explore
before going on your trip.
Sync: The Garmin Messenger app can sync data with your device, such as plan changes, contacts, and
messages.
Messages: The Garmin Messenger app allows you to read and write messages and access the contacts list on
your phone. Messages appear on both devices.
NOTE: You can have only one phone paired with your inReach device at a time.
Testing the Device
You should test the device outdoors before using it on a trip to ensure your satellite subscription is active.
1 From the home page, press or to scroll through the apps.
2 Select Service Plan.
3 Press OK to open the options menu.
4 Select Test Device > Start Test.
Wait while the device sends a test message. When you receive a confirmation message, your device is ready
to use.
inReach Features
WARNING
Before you can use the inReach features of your inReach Mini 3 device, including messaging, SOS, tracking,
and inReach Weather, you must have an active satellite subscription. Always test your device before you use it
outdoors.
Ensure you have a clear view of the sky when using the messaging, tracking, and SOS functions, because these
features require satellite access to operate properly.
NOTICE
Some jurisdictions regulate or prohibit the use of satellite communications devices. It is the responsibility of the
user to know and follow all applicable laws in the jurisdictions where the device is intended to be used.
inReach Tracking
You can use the tracking feature on your inReach Mini 3 satellite communicator to record track points and
transmit them over the Iridium satellite network at the specified send interval.
6 inReach Features

Starting Tracking
1 From the home screen, hold BACK to open the action menu.
2 Select Start Tracking.
Starting tracking also starts recording your path as an activity.
Navigating to the Start of Your Current Track
1 From the home page, press or to scroll through the apps.
2 Select Saved > Current Activity.
3 Scroll down.
4 Press OK to open the options menu.
5 Select Back to Start.
Stopping Tracking
1 From the home page, press or to scroll through the apps.
2 Select your current activity timer.
3 Scroll down to the last page in the activity loop.
4 Press OK to open the options menu.
5 Select Stop Tracking.
Sharing Your Tracking Page
You can share a link to a tracking webpage with other people. The system automatically adds text, including link
information, to the end of your message.
1 From the home page, press or to scroll through the apps.
2 Select your current tracking timer.
3 Hold BACK.
4 Select Send Message.
5 Select recipients from your contacts list, or select Type Contact to enter each recipient's contact
information.
6 Select Next.
7 Select > Tracking Link.
8 Press BACK.
9 Select the message text to write a custom message (optional).
10 When you have finished your message, select .
11 Select Send to send the message.
Messages
Your inReach Mini 3 satellite communicator sends and receives messages using the Iridium satellite network.
You can send messages to an SMS phone number, an email address, or another device that uses inReach
technology. Each message you send includes your location details where allowed.
Sending a Check-In Message
Check-in messages are messages with predefined text and recipients.
You can customize check-in message recipients in the Garmin Messenger app. From the Device tab in the app,
select Check-In > Edit Check-In Contacts.
1 From the home page, press or to scroll through the apps.
2 Select Check-In.
3 Press or to scroll through the check-in messages.
4 Press OK to send a message.
inReach Features 7

Sending a Text Message
1 From the home page, press or to scroll through the apps.
2 Select Messenger > New Message.
3 Choose recipients from your contacts list, or select Type Contact to enter each recipient's contact
information.
4 Select Next > New Message.
5 Select an option:
• To send a pre-written message, select Quick Texts and select a message.
NOTE: You can add and edit quick text messages in the Garmin Messenger app.
• To write a custom message, type your message and select .
6 Select to open the options menu.
7 Select an option:
• To include your current location with your message, select Message Location.
• To include a link to a tracking webpage with your message, select Tracking Link.
8 Select Add Voice to send a voice note with your message (optional).
NOTE: Voice notes are available only on the inReach Mini 3 Plus satellite communicator and can only be sent
to Garmin Messenger accounts.
9 When you have finished your message, select Send.
Sending a Post Message
You can send a post message to multiple recipients at once, where each recipient receives the message
individually without seeing replies from others. Messages sent to more than five contacts, or to email addresses
and inReach addresses, are sent as post messages.
1 From the home page, press or to scroll through the apps.
2 Select Messenger > New Message.
3 Select a recipient from your contacts list, or select Type Contact and enter each recipient's contact
information using the keyboard.
4 Select Next, and select an option:
• To send a pre-written message, select Quick Texts and select a message.
NOTE: You can add and edit quick text messages in the Garmin Messenger app.
• To write a custom message, type your message and select .
5 Select Add Voice to send a voice note with your message (optional).
Voice notes are available only on the inReach Mini 3 Plus satellite communicator and can only be sent to
Garmin Messenger accounts.
6 When you have finished your message, select Send.
Replying to a Message
1 From the home page, press or to scroll through the apps.
2 Select Messenger, and select a conversation.
3 Select Reply.
4 Select an option:
• To start with a pre-written message, press or to scroll through the quick text messages.
• To write a custom message, select Type Message.
5 When you have finished your message, select .
6 Press OK to send the message.
8 inReach Features

Reacting to a Message
You can react to a message with an emoji.
1 From the home page, press or to scroll through the apps.
2 Select Messenger, and select a conversation.
3 Select a message.
4 Press OK to open the options menu.
5 Select React.
6 Select an emoji.
The device sends an emoji reaction to the message.
Downloading Photo and Voice Messages
You can download photo and voice messages if you do not have the automatic download setting turned on
(System Settings, page25).
1 From the Messenger app, select a message thread.
2 Select the photo or voice message preview.
3 Select Download.
Checking for Messages
On the inReach Mini 3 satellite communicator, when you send a message, your device listens for replies for 10
minutes. On the inReach Mini 3 Plus satellite communicator, your device continuously listens for new messages
in Performance messaging mode. In Low Power messaging mode, when you send a message, your device
listens for replies for 10 minutes. Both the inReach Mini 3 and inReach Mini 3 Plus satellite communicators
check for new messages every hour and, when using the inReach tracking feature, check for messages at your
tracking interval.
You can force a check for messages by manually checking for messages, sending a message, or sending a
track point. During a check, your device connects to satellites and receives messages waiting to be sent to your
device.
1 From the home page, press or to scroll through the apps.
2 Select Messenger.
3 Select > Check for Messages.
Viewing Message Details
1 From the home page, press or to scroll through the apps.
2 Select Messenger, and select a conversation.
3 Select a message.
4 Press OK to open the options menu.
5 Select View Details.
Navigating to a Message Location
When you receive a message from another device with inReach technology, the message may include location
information. For these messages, you can navigate to the location from which the message was sent.
1 From the home page, press or to scroll through the apps.
2 Select Messenger, and select a conversation with location information.
3 Select a message.
4 Press OK to open the options menu.
5 Select Navigate.
inReach Features 9
Deleting Messages
1 From the home page, press or to scroll through the apps.
2 Select Messenger, and select a conversation.
3 Select a message.
4 Select Delete.
Contacts
You can add, delete, and edit contacts for inReach messages on the inReach Mini 3 satellite communicator.
Adding a Contact
1 From the home page, press or to scroll through the apps.
2 Select Contacts > New Contact.
3 Select an item to edit.
4 Enter the new information.
Editing a Contact
1 From the home page, press or to scroll through the apps.
2 Select Contacts.
3 Select a contact.
4 Press OK to open the options menu.
5 Select Edit.
6 Select an item to edit.
7 Enter the new information.
Deleting a Contact
1 From the home page, press or to scroll through the apps.
2 Select Contacts.
3 Select a contact.
4 Press OK to open the options menu.
5 Select Delete.
SOS
WARNING
Before you can use the SOS function, you must have an active satellite subscription. Always test your device
outdoors before using it on a trip.
Ensure you have a clear view of the sky when using the SOS function, because this feature requires satellite
access to operate properly.
NOTICE
Some jurisdictions regulate or prohibit the use of satellite communications devices. It is the responsibility of the
user to know and follow all applicable laws in the jurisdictions where the device is intended to be used.
During an emergency, you can use your inReach Mini 3 device to contact the Garmin Response
SM
center to
request help. Initiating an SOS rescue sends a message to the Garmin Response team, and they notify the
appropriate emergency responders of your situation. You can communicate with the Garmin Response team
during your emergency while you wait for help to arrive. You should only use the SOS function in a real
emergency situation.
10 inReach Features
Initiating an SOS Rescue
You can initiate an SOS rescue with the device turned on or off if the device has battery power.
1 Lift the protective cap from the SOS button .
2 Press and hold the SOS button.
3 Wait for the SOS countdown.
The device sends a default message to the emergency response service with details about your location.
4 Reply to the confirmation message from the emergency response service.
Your reply lets the emergency response service know that you are capable of interacting with them during
the rescue. If you do not reply, the emergency response service will still initiate a rescue.
For the first 10 minutes of your rescue, an updated location is sent to the emergency response service every
minute. To conserve battery power after the first 10 minutes, an updated location is sent every 10 minutes.
TIP: You can also initiate an SOS rescue and interact with the Garmin Response team using the Garmin
Messenger app. You must have an active satellite subscription to use the SOS feature in the app.
Sending a Custom SOS Message
After pressing the SOS button to initiate an SOS rescue, you can reply with a custom message.
1 From the home page, press or to scroll through the apps.
2 Select SOS > Reply to compose a custom SOS message.
3 Select an option:
• To start with a pre-written message, press or to scroll through the quick text messages.
• To write a custom message, select Type Message.
4 When you have finished your message, select .
5 Press OK to send the message.
Your reply lets the emergency response service know that you are capable of interacting with them during the
rescue.
Canceling an SOS Request
If you no longer need assistance, you can cancel an SOS request after it is sent to the emergency response
service.
1 Lift the protective cap, and hold the SOS button.
2 Select Cancel SOS.
3 When prompted to confirm your cancellation request, select Cancel SOS.
Your device transmits the cancellation request. When you receive a confirmation message from the
emergency response service, the device returns to normal operation.
inReach Features 11

Syncing inReach Data
After you make changes to your data, such as plan changes, contacts, or check-in messages, you must sync
your device using the app.
1 Open the paired Garmin Messenger app.
2 Wait while your data syncs.
TIP: You can check the connection status on the Device tab in the app.
Viewing Plan Details and Usage
You can view plan details and data use on the inReach Mini 3 satellite communicator. Data use includes the
number of messages, track points, and check-in messages sent during the billing cycle. The data use counters
reset automatically at the beginning of each billing cycle.
1 From the home page, press or to scroll through the apps.
2 Select Service Plan.
3 If you have made changes to your data plan in the Garmin Messenger app, select Update.
Apps
From the home page, press or to scroll through the apps. You can change the order of the apps by
tapping and holding an app, and dragging it to a new location.
12 Apps
Name More Information
Check-In Select to send a check-in message (Sending a Check-In Message, page7).
Compass Select to view the compass (Compass, page20).
Contacts Select to manage contacts for inReach messages (Contacts, page10).
Garmin Share Select to send or receive data with other Garmin devices (Garmin Share, page13).
inReach Activa
tion
Select to pair your phone and activate a service plan with the Garmin Messenger app
(Pairing Your Phone and Activating the Device, page5).
Map Select to view the map (Map, page21).
Messenger
Select to send messages over the Iridium satellite network, and check for new messages
(Messages, page7).
Saved
Select to view your saved waypoints, courses, activities, and collections (Saved Data,
page14).
Service Plan
Select to view details about your inReach service plan (Viewing Plan Details and Usage,
page12).
Settings Select to open the settings menu (Customizing the Device, page24).
Siren
Select to sound an alarm.
This app is available only on the inReach Mini 3 Plus satellite communicator.
SOS
If an SOS rescue is currently in progress, select to open the SOS message thread (SOS,
page10).
Start Activity
Select to start an activity, record activity points, and send tracking points over the Iridium
satellite network (Starting Tracking, page7).
Voice Command
Select to speak a command for your device to perform (Using Voice Commands,
page15).
This app is available only on the inReach Mini 3 Plus satellite communicator.
Voice Notes
Select to record a voice note (Recording a Voice Note, page17).
This app is available only on the inReach Mini 3 Plus satellite communicator.
Weather Select to view the current weather forecast and conditions (Weather, page17).
Garmin Share
NOTICE
It is your responsibility to use discretion when sharing information with others. Always ensure you are aware of
and comfortable with the individual with whom you share information.
The Garmin Share feature allows you to use Bluetooth technology to wirelessly share your data with other
compatible Garmin devices. With Garmin Share enabled and compatible Garmin devices in range of each
other, you can select saved locations and courses to transfer to another device through a direct, secured
device-to-device connection, without the need for a phone or Wi‑Fi
®
connectivity.
Apps 13

Sharing Data with Garmin Share
Before you can use this feature, you must have Bluetooth technology enabled on both compatible devices, and
they must be within 3m (10 ft.) of each other. When prompted, you must also consent to share your data with
other Garmin devices using Garmin Share.
Your inReach satellite communicator can send and receive data when connected to another compatible Garmin
device (Receiving Data with Garmin Share, page14). You can also transfer your data between different devices.
For example, you can share a favorite course from your inReach satellite communicator to your compatible
Garmin watch.
1 From the home page, press or to scroll through the apps.
2 Select Garmin Share.
3 Select Share.
4 Select one or more items.
5 Select Share.
6 Wait while the device locates compatible devices.
7 Select a device.
8 Confirm the six-digit PIN matches on both devices, and select Accept.
9 Wait while the devices transfer the data.
10 Select Share Again to share the same items with another user (optional).
11 Select Done.
Receiving Data with Garmin Share
Before you can use this feature, you must have Bluetooth technology enabled on both compatible devices, and
they must be within 3m (10 ft.) of each other. When prompted, you must also consent to share your data with
other Garmin devices using Garmin Share.
1 From the home page, press or to scroll through the apps.
2 Select Garmin Share.
3 Wait while the device locates compatible devices in range.
4 Select Accept.
5 Confirm the six-digit PIN matches on both devices, and select Accept.
6 Wait while the devices transfer the data.
7 Select Done.
Saved Data
From the home page, select Saved.
Waypoints: Waypoints are locations you record and store in the device. Waypoints can mark where you are,
where you are going, or where you have been (Waypoints, page21).
Courses: A course is a sequence of waypoints or locations that leads you to your final destination (Courses,
page22).
Activities: You can use your device to record your path as an activity (Starting an Activity, page23).
Collections: You can use the Garmin Explore app to group related waypoints, courses, or activities into
collections (Garmin Explore, page6).
14 Apps

Using the Saved App
1 From the home page, press or to scroll through the apps.
2 Select Saved.
Garmin Explore
3 Select a category, and select a saved item.
4 Select an option:
Not all options are available for all types of saved items.
• To navigate to a saved item, select Navigate.
• To reverse a course, press and select > Reverse Course.
• To delete a saved item, press and select > Delete.
• To edit a waypoint, press and select > Edit Details.
• To navigate back to the start of an activity, press and select > Back to Start.
Viewing Saved Data
1 From the home page, press or to scroll through the apps.
2 Select Saved.
3 Select a saved item.
4 Select View Details or View on Map.
Deleting Saved Data
1 From the home page, press or to scroll through the apps.
2 Select Saved.
3 Select a saved item.
4 Scroll up or down.
5 Press OK to open the options menu.
6 Select Delete.
Using Voice Commands
You can use the integrated microphone in your inReach Mini 3 Plus satellite communicator to say a command
for the device to perform.
NOTE: Voice command is not available for all languages and regions.
1 Hold OK.
2 Say a voice command (Voice Commands, page16).
Apps 15

Voice Commands
The voice command system is designed to detect natural speech. This is a list of commonly used voice
commands, but the inReach Mini 3 Plus satellite communicator does not require these exact phrases. You can
try saying variations of these commands in a way that is natural to you.
Voice Help Command Function
What can I say? Shows a list of common voice commands.
Device and Screen Functions
Voice Command Function
Increase brightness Raises the screen brightness level.
App and Activity Functions
Voice Command Function
Show me the weather
Example of a command to open an app on the device. For example, this one
opens the weather app.
Switch to the compass app
Example of a command to open an app on the device. For example, this one
opens the compass.
Start activity Starts recording an activity.
Start tracking Starts inReach tracking.
NOTE: The apps listed are examples, but you can control all of the default apps and activities with voice
commands (Apps, page12).
Navigation Functions
Voice Command Function
Begin navigation Opens the search menu to search for a destination.
Save location Saves your current location.
Media Functions
Voice Command Function
Change volume to 8 Adjusts the volume to the specified level. Available numbers are 10-100.
Decrease volume Lowers the audio volume.
Mute Silences all audio.
Voice Command Tips
• Speak in a normal voice directed at the microphone.
• Use phrases that the device can recognize (Voice Commands, page16).
• Reduce background noise, such as voices or wind, to increase the accuracy of the voice recognition.
• Hold the device close to your mouth with your back to strong winds for best performance.
16 Apps
Recording a Voice Note
You can record and listen to voice notes using the built-in speaker and microphone in your inReach Mini 3 Plus
device.
1 From the home page, press or to scroll through the apps.
2 Select Voice Notes > New Voice Note.
3 Press OK or select to being recording.
4 Say your voice note.
5 Press OK or select to stop recording.
6 Select an option:
• Select to play the voice note.
• Select and select Rename to rename the voice note.
• Select and select Volume to adjust the playback volume
• Select and select Delete to delete the voice note.
Weather
WARNING
Before you can use the inReach features of your satellite communicator, including messaging, SOS, tracking,
and inReach Weather, you must have an active satellite subscription. You must have a valid, unique phone
number that can receive a text message to complete activation and pairing with the Garmin Messenger app.
VOIP numbers are not supported. Always test your satellite communicator outdoors before using it on a trip.
Viewing a Weather Forecast
While your inReach satellite communicator is connected to your phone and has an active data connection, it can
receive detailed weather information from the internet.
1 From the home page, press or to scroll through the apps.
2 Select Weather.
The satellite communicator automatically downloads a weather forecast for your current location.
3 Select a time interval or a day to view detailed weather information.
Adding a Waypoint as a Weather Location
You can add a saved waypoint as a weather location (Waypoints, page21).
1 From the home page, press or to scroll through the apps.
2 Select Weather.
3 Press OK to open the options menu.
4 Select Change Location > Edit > New Location.
5 Select a waypoint.
Setting the Weather Location
1 From the home page, press or to scroll through the apps.
2 Select Weather.
3 Press OK to open the options menu.
4 Select Change Location.
5 Select an option:
• To set your current location, select My Location.
• To set a previously used location, select the location from the list.
• To add a location, select Edit > New Location.
Apps 17

Requesting an inReach Weather Forecast
While your inReach Mini 3 satellite communicator is connected to your phone and has an active internet
connection, it can receive detailed weather information from the internet. If you are in a location without active
internet access, your inReach Mini 3 satellite communicator can send a message to request a weather forecast
using your inReach service plan. You can receive weather forecasts for your current location, a waypoint, GPS
coordinates, or a location you choose on the map. Weather forecasts incur data charges or additional charges
on your inReach service plan. For the best results, you should ensure your satellite communicator has a clear
view of the sky when you request a weather forecast over satellite.
1 From the home page, press or to scroll through the apps.
2 Select Weather.
3 Press OK to open the options menu.
4 Select Update.
The device sends a request for the forecast. It may take several minutes to receive the weather forecast data.
NOTE: A marine forecast will be included for locations on an ocean or other large body of water, if available. If
you are unable to get a marine forecast, select a location further from the shore.
After the device finishes downloading the data, you can view the forecast at any time until all of the information
in the forecast has expired. You can also update the forecast at any time.
NOTE: Updating a forecast incurs data charges or additional usage charges.
Updating an inReach Weather Forecast
You can update an inReach weather forecast that has expired or contains outdated information. Updating a
forecast incurs the same data charges or additional charges as requesting a forecast.
NOTE: When your inReach Mini 3 satellite communicator is connected to the internet through the Garmin
Explore app, weather forecasts are updated automatically and do not incur an additional charge. A manual
update option is not available.
1 From the home page, press or to scroll through the apps.
2 Select Weather.
3 Press OK to open the options menu.
4 Select Update.
The device requests an updated forecast. If you update the My Location forecast, the device requests an
updated forecast for your current location. It may take several minutes to receive the updated weather forecast
data.
Deleting a Weather Location
You must set the weather location before you can delete it (Setting the Weather Location, page17).
You can delete an expired forecast or a forecast for a location that you no longer need.
1 From the home page, press or to scroll through the apps.
2 Select Weather.
3 Press OK to open the options menu.
4 Select Change Location > Edit > Select a Location > .
18 Apps

Navigation
Acquiring GPS Satellite Signals
Before you can use GPS navigation features, you must acquire satellite signals.
When you turn on your navigation device, the GPS receiver must collect satellite data and establish the current
location. The time required to acquire satellite signals varies based on several factors, including how far you are
from the location where you last used your navigation device, whether you have a clear view of the sky, and how
long it has been since you last used your navigation device. The first time you turn on your navigation device, it
may take several minutes to acquire satellite signals.
1 Turn on the device.
2 Open the map or start an activity.
3 Wait while the device locates satellites.
It may take up to 60 seconds to acquire satellite signals.
4 If necessary, go to an open area, away from tall buildings and trees.
Panning and Zooming the Map
1 From the home page, press or to scroll through the apps.
2 Select Map.
3 Press OK to open the options menu.
4 Select Pan/Zoom.
5 Select an option:
• To toggle between panning up and down, panning left and right, or zooming, press OK.
• Drag the map, or press or to view different areas.
• Pinch or spread two fingers on the touchscreen, or press and to zoom in and out on the map.
TIP: You can double-tap the map to quickly zoom in.
• To quit, press BACK twice.
Navigating Using TracBack
®
While recording an activity, you can navigate back to the beginning of your path.
NOTE: This can be helpful if you get lost and need to find your way back to camp or the trail head.
1 From the home screen, hold BACK to open the action menu.
2 Select Navigate > TracBack.
3 Select Edit TracBack.
4 Select the destination, and select the time interval.
5 Press to scroll through the recorded points.
6 Press OK to select a point to navigate to.
7 Select the Direct Path toggle to take the most direct path back to start.
8 Press BACK.
9 Select Navigate > Start to start navigating.
Navigating to Known Coordinates
1 From the home screen, hold BACK to open the action menu.
2 Select Navigate > Coordinates.
3 Enter the coordinates.
4 Press OK to start navigation.
Navigation 19
Navigating with Sight 'N Go
You can point the device at an object in the distance, lock in the direction, and navigate to the object.
1 From the home screen, hold BACK to open the action menu.
2 Select Navigate > Sight 'N Go.
3 Point the device at an object.
4 Press OK to start navigation.
Stopping Navigation
1 From the home screen, hold BACK to open the action menu.
2 Select Stop Navigation.
Compass
Navigating with the Compass
When navigating to a destination, points to your destination, regardless of the direction you are moving. When
points toward the top of the electronic compass, you are traveling directly toward your destination. If points
any other direction, turn until it points toward the top of the compass.
1 Begin navigating to a destination (Navigation, page19).
2 From the navigation page, turn until points toward the top of the compass, and continue moving in that
direction to the destination.
Calibrating the Compass
NOTICE
Calibrate the electronic compass outdoors. To improve heading accuracy, do not stand near objects that
influence magnetic fields, such as vehicles, buildings, and overhead power lines.
If you experience irregular compass behavior, for example, after moving long distances or after extreme
temperature changes, you can manually calibrate the compass.
1 From the home page, press or to scroll through the apps.
2 Select Compass.
3 Press OK to open the options menu.
4 Select Calibrate.
5 Follow the on-screen instructions.
Setting the Compass Heading
1 From the home page, press or to scroll through the apps.
2 Select Compass.
3 Press OK to open the options menu.
4 Select Lock Heading.
5 Point the top of the device toward your heading, and select Lock Heading.
When you deviate from the heading, the compass displays the direction from the heading and the degree of
deviation.
Compass Settings
From the home page, press or to scroll through the apps, select Compass, and select > Settings.
Bearing: Sets the directional reference.
20 Navigation

Map
represents your location on the map. As you travel, moves and displays your path. Depending on your zoom
level, waypoint names and symbols may appear on the map. You can zoom in on the map to see more detail.
When you are navigating to a destination, your route is marked with a colored line on the map.
Changing the Map Orientation
1 From the home page, press or to scroll through the apps.
2 Select Map.
3 Press OK to open the options menu.
4 Select Orientation.
5 Select an option:
• Select North Up to show north at the top of the map.
• Select Track Up to show your current direction of travel at the top of the map.
Waypoints
Waypoints are locations you record and store in the device. Waypoints can mark where you are, where you are
going, or where you have been.
Saving Your Current Location as a Waypoint
1 From the home screen, hold BACK to open the action menu.
2 Select Mark Waypoint.
Saving a Message Location as a Waypoint
When you send a message or when you receive a message from another device with inReach technology, the
message may include location information. For these messages, you can save the location from which the
message was sent as a waypoint.
1 From the home page, press or to scroll through the apps.
2 Select Messenger, and select a conversation with location information.
3 Select a message.
4 Press OK to open the options menu.
5 Select View on Map.
6 Scroll down to the coordinates page.
7 Press OK to open the options menu.
8 Select Mark Waypoint.
Saving a Location on the Map as a Waypoint
You can save a location on the map as a waypoint.
1 From the home page, press or to scroll through the apps.
2 Select Map.
3 Select an option:
• Tap the screen to select a location.
• Press OK, select Pan/Zoom, move the cursor to a location, and press BACK.
4 Press OK.
5 Select Mark Waypoint.
Navigation 21

Navigating to a Waypoint
1 From the home screen, hold BACK to open the action menu.
2 Select Navigate > Saved > > Waypoints.
3 Select a waypoint.
4 Select Navigate > Start.
Editing a Waypoint
1 From the home page, press or to scroll through the apps.
2 Select Saved > > Waypoints.
3 Select a waypoint.
4 Scroll up or down.
5 Press OK to open the options menu.
6 Select Edit Details.
7 Select an option:
• To change the name of the waypoint, select Name.
• To change the symbol representing the waypoint, select Icon.
• To change the GPS coordinates of the waypoint, select Position.
8 Enter the new information.
Deleting a Waypoint
1 From the home page, press or to scroll through the apps.
2 Select Saved > > Waypoints.
3 Select a saved waypoint.
4 Scroll up or down from the map.
5 Press OK to open the options menu.
6 Select Delete.
Courses
A course can have multiple destinations, and can be navigated point to point or on routable roads. You can
create and save courses in the Garmin Explore app.
Navigating a Saved Course
1 From the home screen, hold BACK to open the action menu.
2 Select Navigate > Saved > > Courses.
3 Select a course.
4 Press OK to open the options menu.
5 Select Go.
Reversing a Course
You can switch the start and end points of your course to navigate in reverse.
1 From the home screen, hold BACK to open the action menu.
2 Select Navigate > Saved > > Courses.
3 Select a course.
4 Scroll down.
5 Press OK to open the options menu.
6 Select Reverse Course.
22 Navigation

Activities
While tracking, your device records your path as an activity. You can view details about your activity, including
distance and time, and view the path of your activity on a map.
Starting an Activity
You can use the Start Activity feature to select your activity options and hit the trail quickly. Your device
remembers your selections and saves them for the next time you start an activity.
1 From the home screen, select Start Activity.
2 Select your activity options:
• Select Tracking, and turn on the toggle switch to enable inReach tracking when you start your activity.
• Select Tracking > Send Interval to set the frequency at which the device records a track point and
transmits it over the satellite network when you are moving.
• Select Navigation to begin navigating to a destination (Navigation, page19).
• Select High Detail to log your location and update the track line more frequently in the device memory
than the default setting.
• Select Auto Start to set the device to start an activity recording when you turn it on or after a previous
activity is saved or discarded.
• Select Activity to select an activity type.
• Select Track Color to change the track log color.
3 Go outdoors to an open area.
4 Select Start, and wait while the device locates satellites.
The device begins recording your path as part of the activity.
Customizing the Current Activity
1 While you are recording an activity, select the current activity, and select > Activity Controls.
2 Select an option:
• To turn inReach tracking on or off, select Tracking.
• To navigate to a destination, select Navigation.
• To log your location and update the track line more frequently than the default, select High Detail.
• To set the device to start an activity recording when you turn it on or after a previous activity is saved or
discarded, select Auto Start.
• To select an activity type, select Activity.
• To set the color of the track on the map, select Track Color.
Viewing the Current Activity
When you start tracking, your device starts recording your path as an activity (Starting Tracking, page7).
1 From the home page, press or to scroll through the apps.
2 Select Saved > Current Activity.
3 Scroll up or down to view activity details.
Navigating a Saved Activity
1 From the home page, press or to scroll through the apps.
2 Select Saved > > Activities.
3 Select an activity.
4 Select Navigate > Start.
Navigation 23

Stopping the Current Activity
1 While you are recording an activity, select the current activity from the home screen, and select > Activity
Controls.
2 Select Stop.
3 Select an option:
• To resume the current activity, select Resume.
• To save the activity, select Save.
• To navigate back to the beginning of your activity, select TracBack (Navigating Using TracBack
®
, page19).
• To discard the activity, select Discard.
Customizing the Device
Sounds Settings
From the home page, press or to scroll through the apps. Select Settings > Sounds.
Mute All: Mutes all device tones.
Volume: Sets the device volume level.
Message Rec.: Sets the tone that sounds when you receive a message.
Message Sent: Sets the tone that sounds when the you send a message.
Critical Alert: Sets the tone that sounds when the device announces a critical alert.
Ring Until Read: Sets the device to ring until you read a new message. This feature is helpful if you are in a noisy
environment.
Phone Settings
From the home page, press or to scroll through the apps. Select Settings > Phone.
Status: Enables Bluetooth wireless technology.
Pair Phone: Pairs your device with a compatible Bluetooth enabled smartphone. This setting allows you to use
Bluetooth connected features using the Garmin Explore app or Garmin Messenger app.
inReach Remote Settings
You can use some inReach Mini 3/3 Plus features using another compatible device with ANT
®
wireless
technology, such as the fēnix
®
watch. You can use the inReach Remote option to view incoming messages,
send check-in messages, start and stop tracking, and initiate or cancel an SOS.
From the home page, press or to scroll through the apps. Select Settings > inReach Remote.
Status: Turns on or off the inReach Remote feature and allows you to access some inReach features using
another compatible device.
Device Number: Displays the device number for the ANT channel.
Verified Devices: Displays a list of verified devices that this device can wirelessly connect to.
Tracking Settings
From the home page, press or to scroll through the apps. Select Settings > Tracking.
Send Interval: Sets the frequency at which the device records a track point and transmits it over the satellite
network.
NOTE: The Send Interval frequency affects battery life (Battery Information, page28).
Activity Recording: Sets the level of detail used in your activity recording. The High Detail option logs your
location and updates the track line more frequently in the device memory than the Standard option.
NOTE: Higher detail recordings decrease battery life (Battery Information, page28).
Auto Start: Sets the device to start tracking when you turn on the device.
24 Customizing the Device

Map Settings
From the home page, press or to scroll through the apps. Select Settings > Map.
Waypoints: Shows or hides waypoints on the map.
Waypoint Labels: Shows or hides waypoint labels on the map.
Tracking Points
Shows or hides tracking points on the map.
Messages: Shows or hides messages on the map.
Auto Zoom: Automatically sets the zoom level for optimal use of your map. When Off is selected, you must
zoom in or out manually.
Orientation: Sets the orientation of the map. The North Up option shows north at the top of the screen. The
Track Up option shows your current direction of travel at the top of the screen.
System Settings
From the home page, press or to scroll through the apps. Select Settings > System.
Display & Brightness: Sets the backlight brightness and the length of time before the backlight turns off.
Language: Sets the text language on the device.
NOTE: Changing the text language does not change the language of user-entered data or map data.
Keyboard Language: Enables keyboard languages.
Default Keyboard: Sets the default keyboard type.
Passcode: Sets a four-digit passcode to secure your device (Setting Your Device Passcode, page26).
Compass Cal.: Calibrates the compass (Calibrating the Compass, page20).
Time: Sets the time format and time zone (Time Settings, page25).
Units: Sets the position format and units of measure for the device (Units Settings, page26).
Auto Download Photo & Voice Messages: Sets the device to automatically download photo and voice
messages.
NOTE: This option is available only on your inReach Mini 3 Plus satellite communicator.
Messaging Mode: Performance mode listens continuously for incoming inReach messages, which reduces
battery life. Low Power mode extends battery life by checking for incoming inReach messages less
frequently (Battery Information, page28).
NOTE: This option is available only on your inReach Mini 3 Plus satellite communicator.
Satellite: Sets the satellite system options (Satellite Settings, page26).
USB Mode: Sets the device to use mass storage mode or Garmin mode when connected to a computer.
External Power: Automatically turns off the device when it is disconnected from external power.
Reset: Resets user data and settings (Resetting All Default Settings, page31)
Software Update: Installs software updates downloaded to your device.
About: Displays the IMEI number, authorization code, software, license, and regulatory information.
Time Settings
From the home page, press or to scroll through the apps. Select Settings > System > Time.
Time Format: Sets the device to show time in a 12-hour or 24-hour format.
Time Zone: Sets the time zone for the device.
Daylight Saving: Sets the device to use daylight saving time. This option is not available when Time Zone is set
to Automatic.
Customizing the Device 25

Units Settings
From the home page, press or to scroll through the apps. Select Settings > System > Units.
Position Format: Sets the format used for geographical position coordinates and the coordinate system used by
the map (Position Format Settings, page26).
Speed/Distance: Sets the unit of measure for distance.
Wind Speed: Sets the unit of measure for wind speed.
Temperature: Sets the temperature unit of measure to Fahrenheit (°F) or Celsius (°C).
Bearing: Sets the north reference used on the compass to true or magnetic north.
Position Format Settings
NOTE: You should not change the position format or the map datum coordinate system unless you are using a
map or chart that specifies a different position format.
From the home page, press or to scroll through the apps. Select Settings > System > Units > Position
Format.
Format: Sets the position format in which a location reading appears.
Datum: Sets the coordinate system on which the map is structured.
Spheroid: Shows the coordinate system the device is using. The default coordinate system is WGS 84.
Satellite Settings
You can change the satellite systems used by the device. For more information about satellite systems, go to
garmin.com/aboutGPS.
From the home page, press or to scroll through the apps. Select Settings > System > Satellite.
GPS Only: Enables the GPS satellite system.
Multi-GNSS: Enables multiple satellite systems. Using multiple satellite systems together offers increased
performance in challenging environments and faster position acquisition than using GPS only. However,
using multiple systems can reduce battery life more quickly than using GPS only.
All + Multi-Band: Enables multiple satellite systems on multiple frequency bands. Multi-band systems use
multiple frequency bands and allow for more consistent track logs, improved positioning, improved multi-
path errors, and fewer atmospheric errors when using the device in challenging environments. However,
using multiple systems can reduce battery life more quickly than using GPS only.
Setting Your Device Passcode
NOTICE
If you enter your passcode incorrectly three times, the device locks temporarily. After five incorrect attempts,
the device locks until you reset your passcode in the Garmin Messenger app. If you have not paired your device
with your phone, the device deletes your data and resets to the factory default settings after five incorrect
attempts.
You can set up a device passcode to prevent unauthorized users from using your device.
1 Select an option:
• During the initial setup, select Create Passcode when prompted.
• Press or to scroll through the apps list, and select Settings > System > Passcode > Set Passcode.
2 Enter a four-digit passcode.
3 Re-enter the passcode.
By default, you must enter the passcode immediately after you turn on the device or when the screen turns back
on. You can set a time interval before a passcode is required using the Require Passcode setting.
26 Customizing the Device

Device Information
Product Updates
On your computer, install Garmin Express
™
(www.garmin.com/express). On your phone, install the Garmin
Explore app.
This provides easy access to these services for Garmin devices:
• Software updates
• Data uploads to Garmin Explore
• Product registration
Setting Up Garmin Express
1 Connect the device to your computer using a USBcable.
2 Go to garmin.com/express.
3 Follow the on-screen instructions.
Getting More Information
You can find more information about this product on the Garmin website.
• Go to support.garmin.com for additional manuals, articles, and software updates.
• Go to buy.garmin.com, or contact your Garmin dealer for information about optional accessories and
replacement parts.
Specifications
Battery type Rechargeable, built-in lithium-ion battery
Battery capacity 1800mAh
Water rating IEC 60529 IP67
1
Operating temperature range From -20° to 60°C (from -4° to 140°F)
Charging temperature range
From -20° to 0°C (from -4° to 32°F) - Slow charging to full capacity
From 0° to 45°C (from 32° to 113°F) - Full speed charging to full capacity
From 45° to 60°C (from 113° to 140°F) - Full speed charging to reduced capacity
Wireless frequency
inReach Mini 3 Plus
2.4 GHz: < -1.1 dBm
1.6GHz: < 36.7dBm
inReach Mini 3
2.4 GHz: < 2.1 dBm
1.6 GHz: < 34.2 dBm
EU SAR (limb)
inReach Mini 3 Plus
0.73 W/kg simultaneous
inReach Mini 3
0.85 W/kg simultaneous
EU SAR (body)
inReach Mini 3 Plus
0.73 W/kg simultaneous
inReach Mini 3
0.85 W/kg simultaneous
1
The device is protected against the ingress of dust and withstands incidental exposure to water of up to 1 m for up to 30 min.
Device Information 27

Battery Information
The actual battery life depends on your device settings and if you are recording a high detail activity or tracking
at a high interval. For optimal battery life, ensure you have a clear view of the sky.
inReach Mini 3
Mode Battery Life
10-minute tracking send interval Up to 350 hours
10-minute tracking send interval and high detail activity recording (GPS mode) Up to 170 hours
10-minute tracking send interval and high detail activity recording (all satellite systems
mode)
Up to 120 hours
2-minute tracking send interval Up to 105 hours
Turned off Up to 1 year
inReach Mini 3 Plus
Mode Battery Life
Low power messaging mode with 10-minute tracking send interval Up to 350 hours
Performance messaging mode with 10-minute tracking send interval Up to 90 hours
Performance messaging mode with 10-minute tracking send interval and high detail activity
recording (GPS mode)
Up to 75 hours
Performance messaging mode with 10-minute tracking send interval and high detail activity
recording (all satellite systems mode)
Up to 60 hours
Performance messaging mode 2-minute tracking send interval Up to 55 hours
Turned off Up to 1 year
Viewing E-Label Regulatory and Compliance Information
The label for this device is provided electronically. The e-label may provide regulatory information, such as
identification numbers provided by the FCC or regional compliance markings, the IMEI number, as well as
applicable product and licensing information.
1 From the main menu, select Settings.
2 Select System.
3 Select About.
28 Device Information
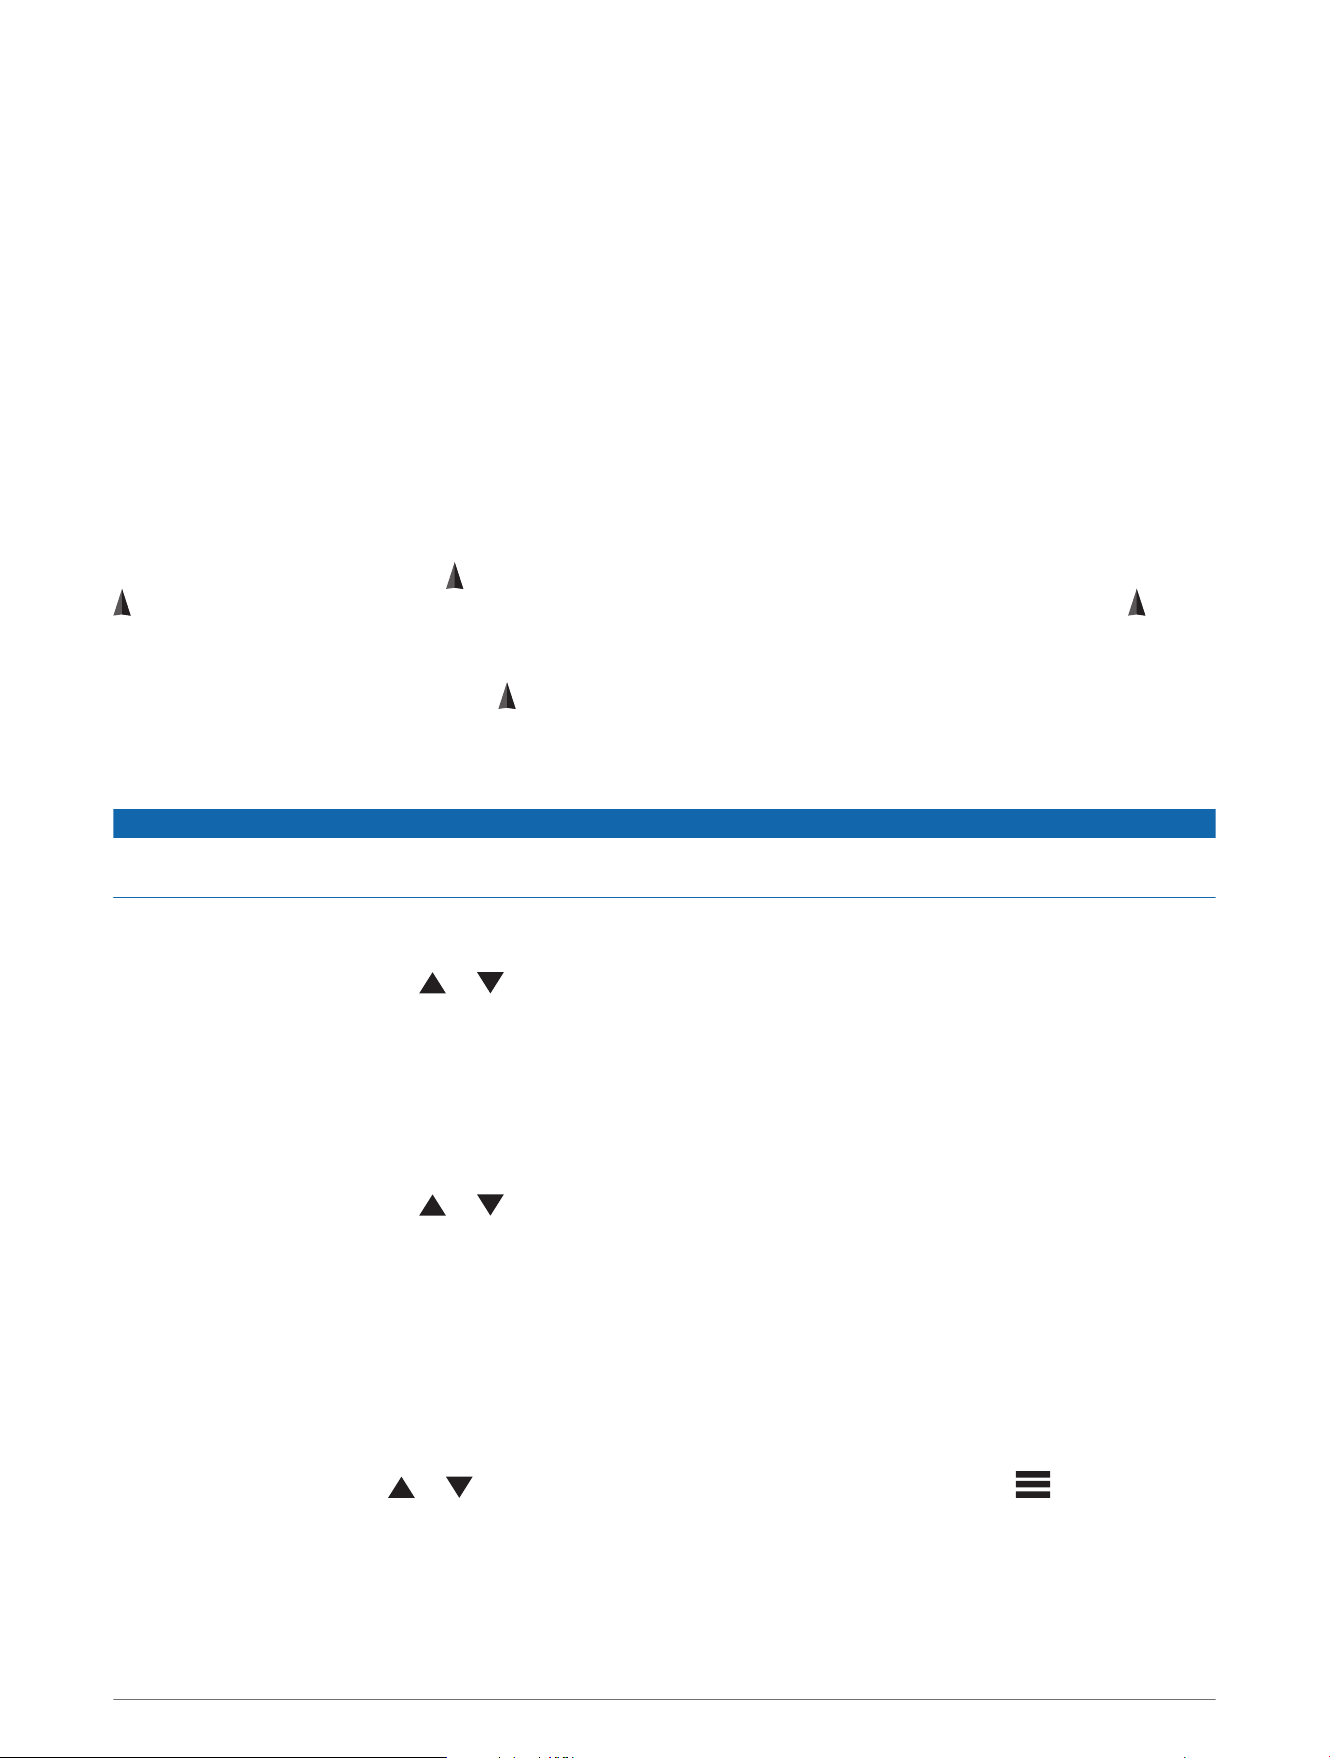
Attaching the Spine Mount Adapter
1 Slide the spine mount adapter clip into the tether loop on top of the device.
2 Using a T10 TORX screwdriver, secure the spine mount adapter over the back of the device using the screw
included with the adapter.
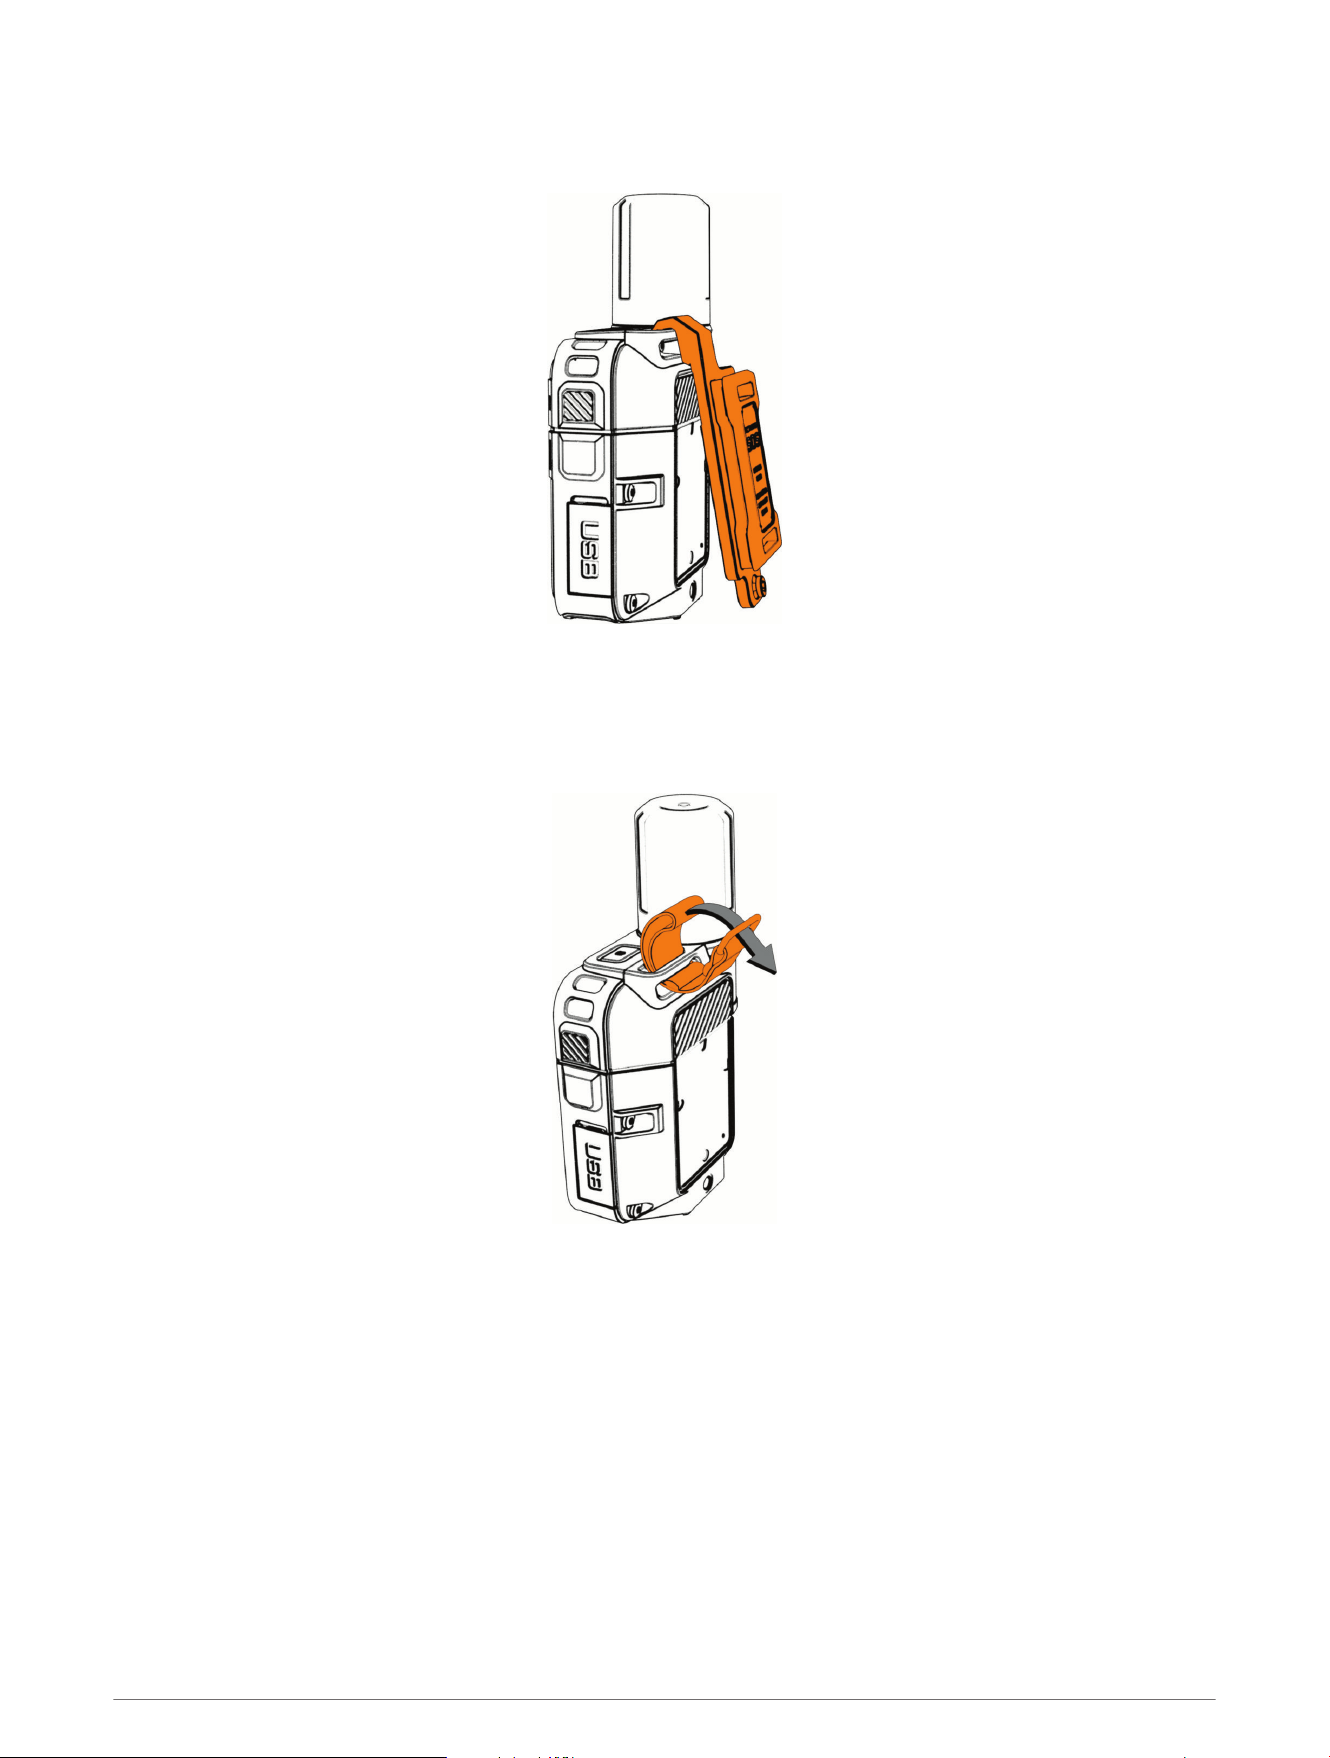
Attaching the Carabiner Tether
1 Insert the loop of the tether through the slot in the device.
2 Thread the other end of the tether through the loop, and pull it tight.
3 Thread the ring through the top of the tether.
4 Clip a carabiner through the ring.
Device Information 29
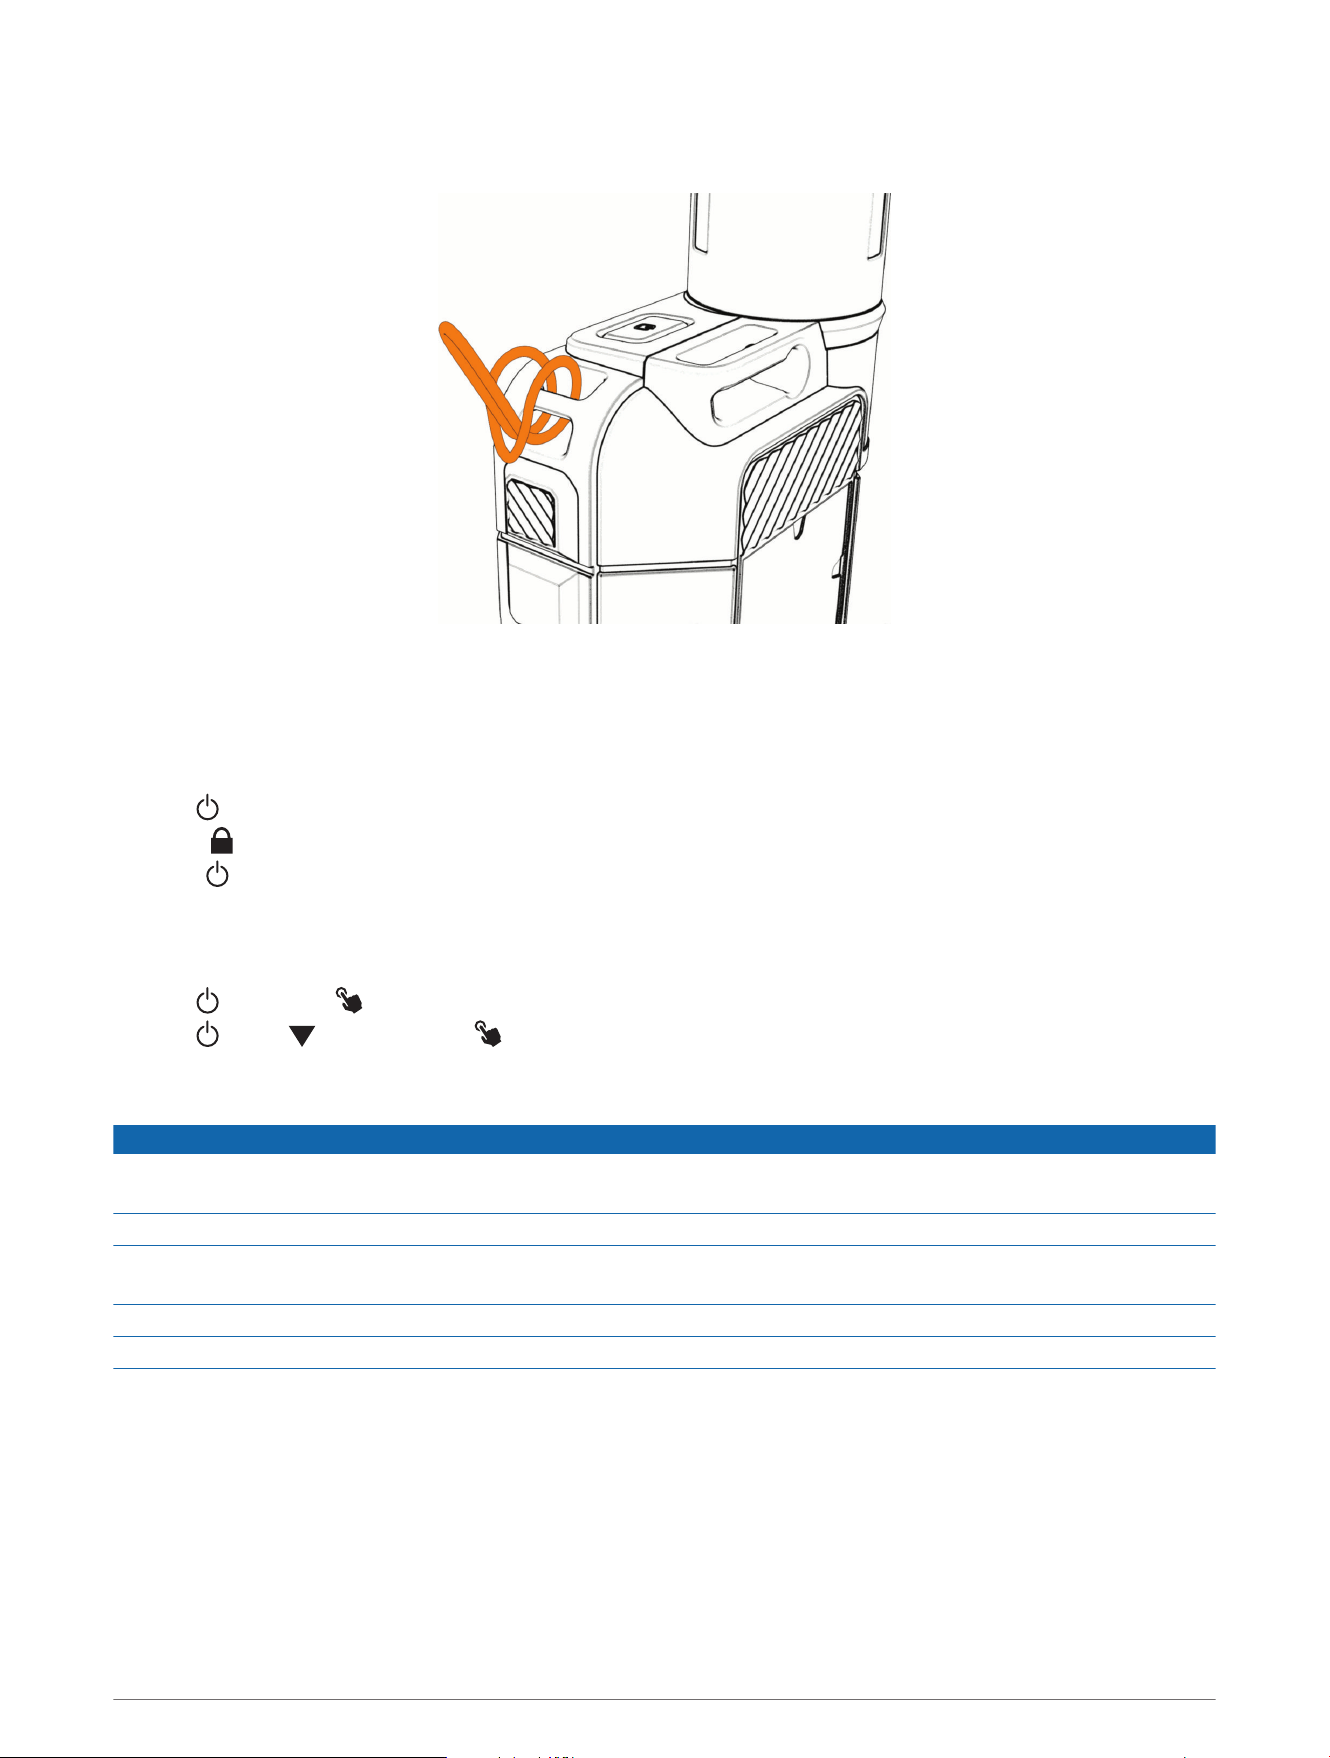
Attaching a Lanyard
1 Insert the loop of the lanyard through the slot in the device.
2 Thread the other end of the lanyard through the loop, and pull it tight.
3 If necessary, attach the lanyard to your clothing or backpack to tether it during an activity.
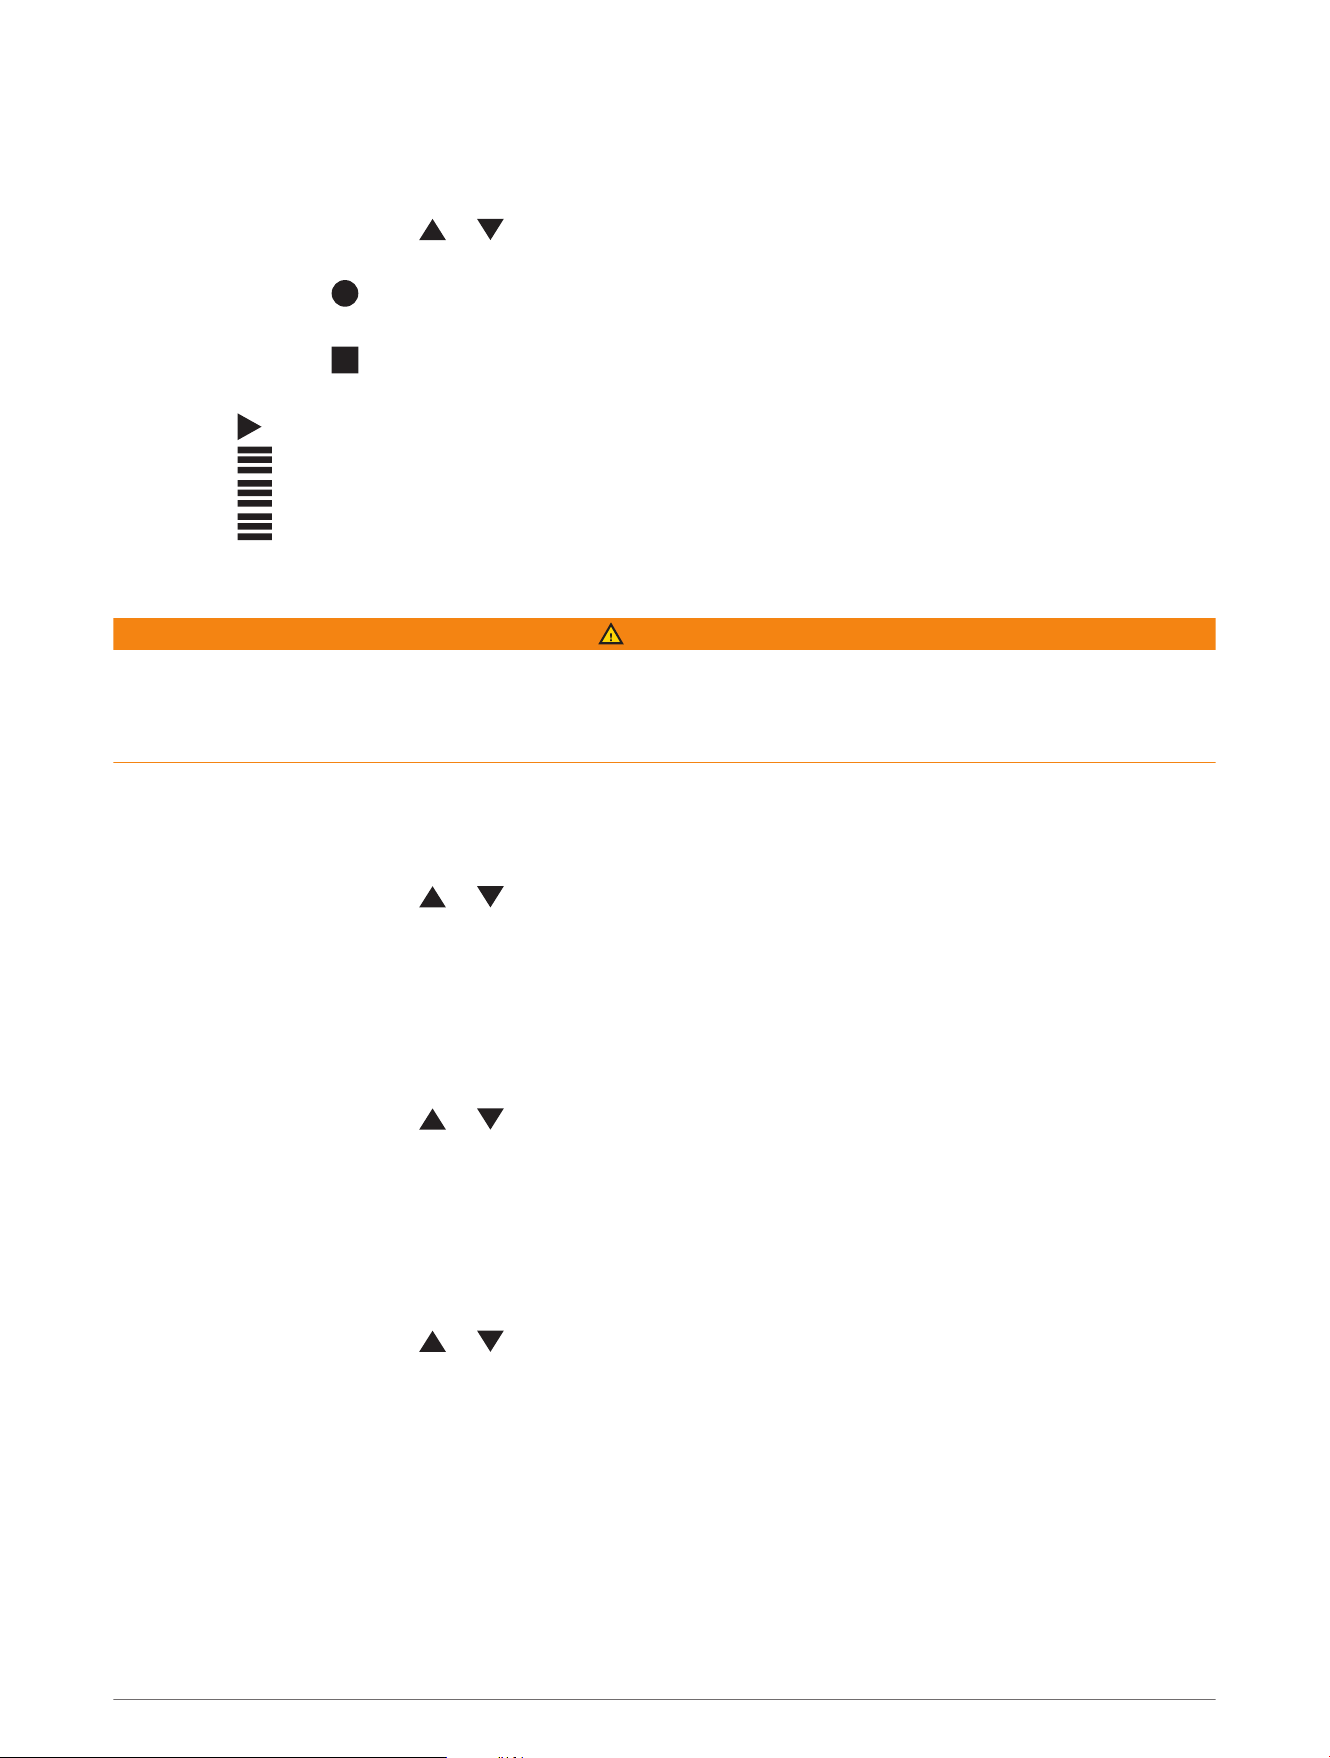
Locking and Unlocking the Device
You can lock the buttons and touchscreen to prevent accidental button presses and swipes.
1 Hold .
2 Select to lock the device.
3 Press to unlock the device.
Locking and Unlocking the Touchscreen
You can lock the screen to prevent inadvertent screen touches.
1 Hold , and select to lock the touchscreen.
2 Hold , press until you select , and press OK to unlock the touchscreen.
Device Care
NOTICE
Do not store the device where prolonged exposure to extreme temperatures can occur, because it can cause
permanent damage.
Never use a hard or sharp object to operate the touchscreen, or damage may result.
Avoid chemical cleaners, solvents, sunscreen, and insect repellents that can damage plastic components and
finishes.
Secure the weather cap tightly to prevent damage to the USB port.
Avoid extreme shock and harsh treatment, because it can degrade the life of the product.
Cleaning the Device
1 Wipe the device using a cloth dampened with a mild detergent solution.
2 Wipe it dry.
30 Device Information

Cleaning the USB Port
1 Turn off the device and disconnect the device from power.
2 Clean the USB port using a soft, clean, lint-free cloth or cotton swab.
NOTE: If necessary, you can lightly dampen the cloth or cotton swab with isopropyl alcohol.
3 Allow the device to dry completely before you connect it to power.
Cleaning the Touchscreen
1 Use a soft, clean, lint-free cloth.
2 If necessary, lightly dampen the cloth with water.
3 If using a dampened cloth, turn off the device and disconnect the device from power.
4 Gently wipe the screen with the cloth.
Troubleshooting
Maximizing Battery Life
• Reduce the backlight timeout and brightness (System Settings, page25).
• Reduce the frequency of the tracking Send Interval setting (Tracking Settings, page24).
• Use the Standard level of detail for activity recordings (Tracking Settings, page24).
• Turn off Bluetooth technology (Phone Settings, page24).
• Use Low Power messaging mode on your satellite communicator (System Settings, page25).
• Turn off additional satellite systems (Satellite Settings, page26).
My device is in the wrong language
You can change the device language selection if you have accidentally selected the wrong language on the
device.
1 From the home page, scroll down and select .
2 Scroll down, and select .
3 Select the second item in the list.
4 Select your language.
Resetting All Default Settings
Before you reset your device, you should sync your device with the Garmin Explore app to upload your activity
data.
You can reset all device settings to the factory default values.
1 From the home page, press or to scroll through the apps.
2 Select Settings > System > Reset.
3 Select an option:
• To reset all of the device settings to the factory default values and save all user-entered information and
activity history, select Reset Default Settings.
• To delete all of the messages on the device, select Delete All Messages.
• To reset all of the device settings to the factory default values and delete all user-entered information and
activity history, select Delete Data and Reset Settings.
Device Information 31
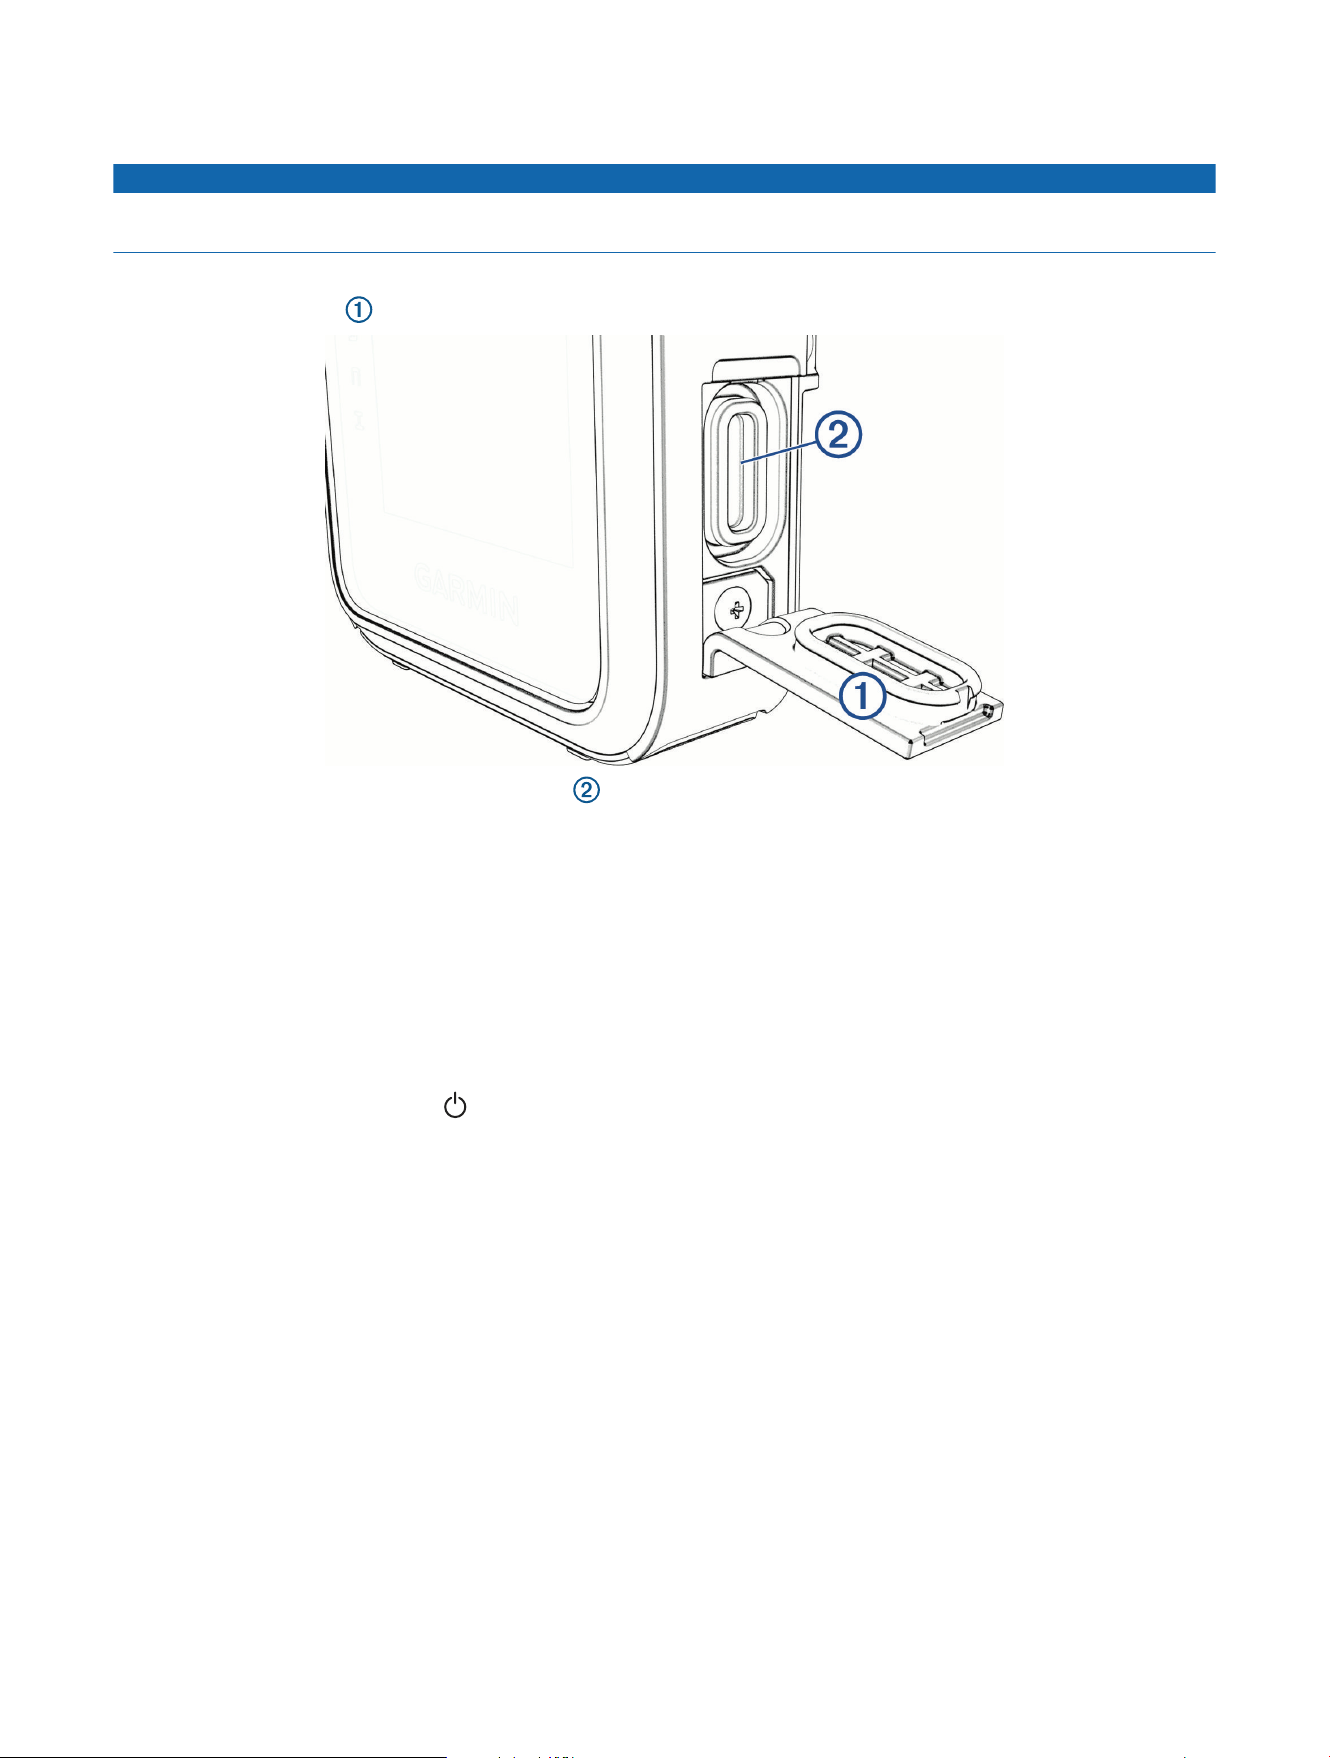
Charging the inReach Device
NOTICE
To prevent corrosion, thoroughly dry the USB port, the weather cap, and the surrounding area before charging or
connecting to a computer.
NOTE: The device does not charge when it is outside the approved temperature range (Specifications, page27).
1 Lift the weather cap .
2 Plug the power cable into the charging port on the device.
3 Plug the other end of the power cable into a compatible AC power adapter.
4 Plug the AC power adapter into a standard wall outlet.
The device displays the current battery charge level.
Saving Energy While Charging the Device
1 Connect your device to an external power source.
2 Hold the power button until the screen turns off.
The device goes into a low power, battery charging mode, and the battery gauge appears.
NOTE: If the charging source is not providing sufficient power, you can turn the device off while charging by
holding the power button until appears.
3 Charge the device completely.


support.garmin.com
GUID-F31CF821-79A9-46E5-A45B-8765F918488F v1December 2025