Product Overview
Product Introduction
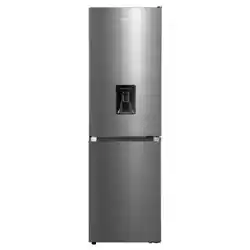
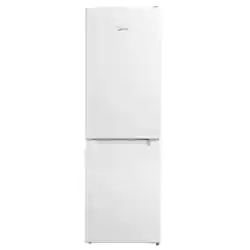
1 LED Lamp 5 Small door tray
2 Temperature control knob 6 Big door tray
3 Shelf 7 Upper freezer drawer
4 Fruits and vegetables box 8 Lower freezer drawer
• For the most ecient use of energy, please keep the all internal
items such as trays, drawers, shelves and ice cube box on the
position supplied by manufacturer.
• This refrigerating appliance needs to be installed independently
and cannot be used as a built-in. Otherwise, it will cause problems
such the performance and life of the appliance are reduced. And
the manufacturer does not provide basic appliance warrant.
• | Attention
Dierences: Due to technical changes and dierent models, some
of the illustrations in this manual may dier from your model.

Product Installation
Space requirement diagram
Too small of a distance from adjacent items may result in the
degradation of freezing capability and increased electricity costs.
Allow over 100 mm of clearance at both sides and the top, and 50-
75 mm at the back when installing the appliance.
B
A C
D
E
135°
A B C D E
470 1500 511 965 1038
Notice: All dimensions in mm
Connecting the appliance
After installing the product, please let it stay
for more than 2 hours before turning on the
power, otherwise it will lead to a decrease
in cooling capacity or a damage to the
product.
Allow the appliance to run empty for 24
hours so the compartment can cool to the
appropriate temperature.
2 h
• | CAUTION
The refrigerator should always be plugged into its own individual
electrical outlet which has a voltage rating that matches the rating
plate.
When positioning the appliance, ensure the supply cord is not
trapped or damaged.
Ambient Temperature
Depending on the climate class, this refrigerator is intended to
be used at an ambient temperature range as specified in the
following table.
The product may not operate properly at temperatures outside
of the specific range.
You can find the climate class on the product label.
Climate Class Ambient Temperature
SN +10 °C to +32 °C
N +16 °C to +32 °C
ST +16 °C to +38 °C
T +16 °C to +43 °C
If you have any doubts regarding installation, please turn
to the vendor, to our customer service or to the nearest
Authorised Service Centre.
• | Tips
The cooling performance and power consumption of the
refrigerator may be aected by the ambient temperature, the
door-opening frequency, and the location of the refrigerator. We
recommend adjusting the temperature settings as appropriate.
Product Operation
Operation Instruction
a |
Use and functions
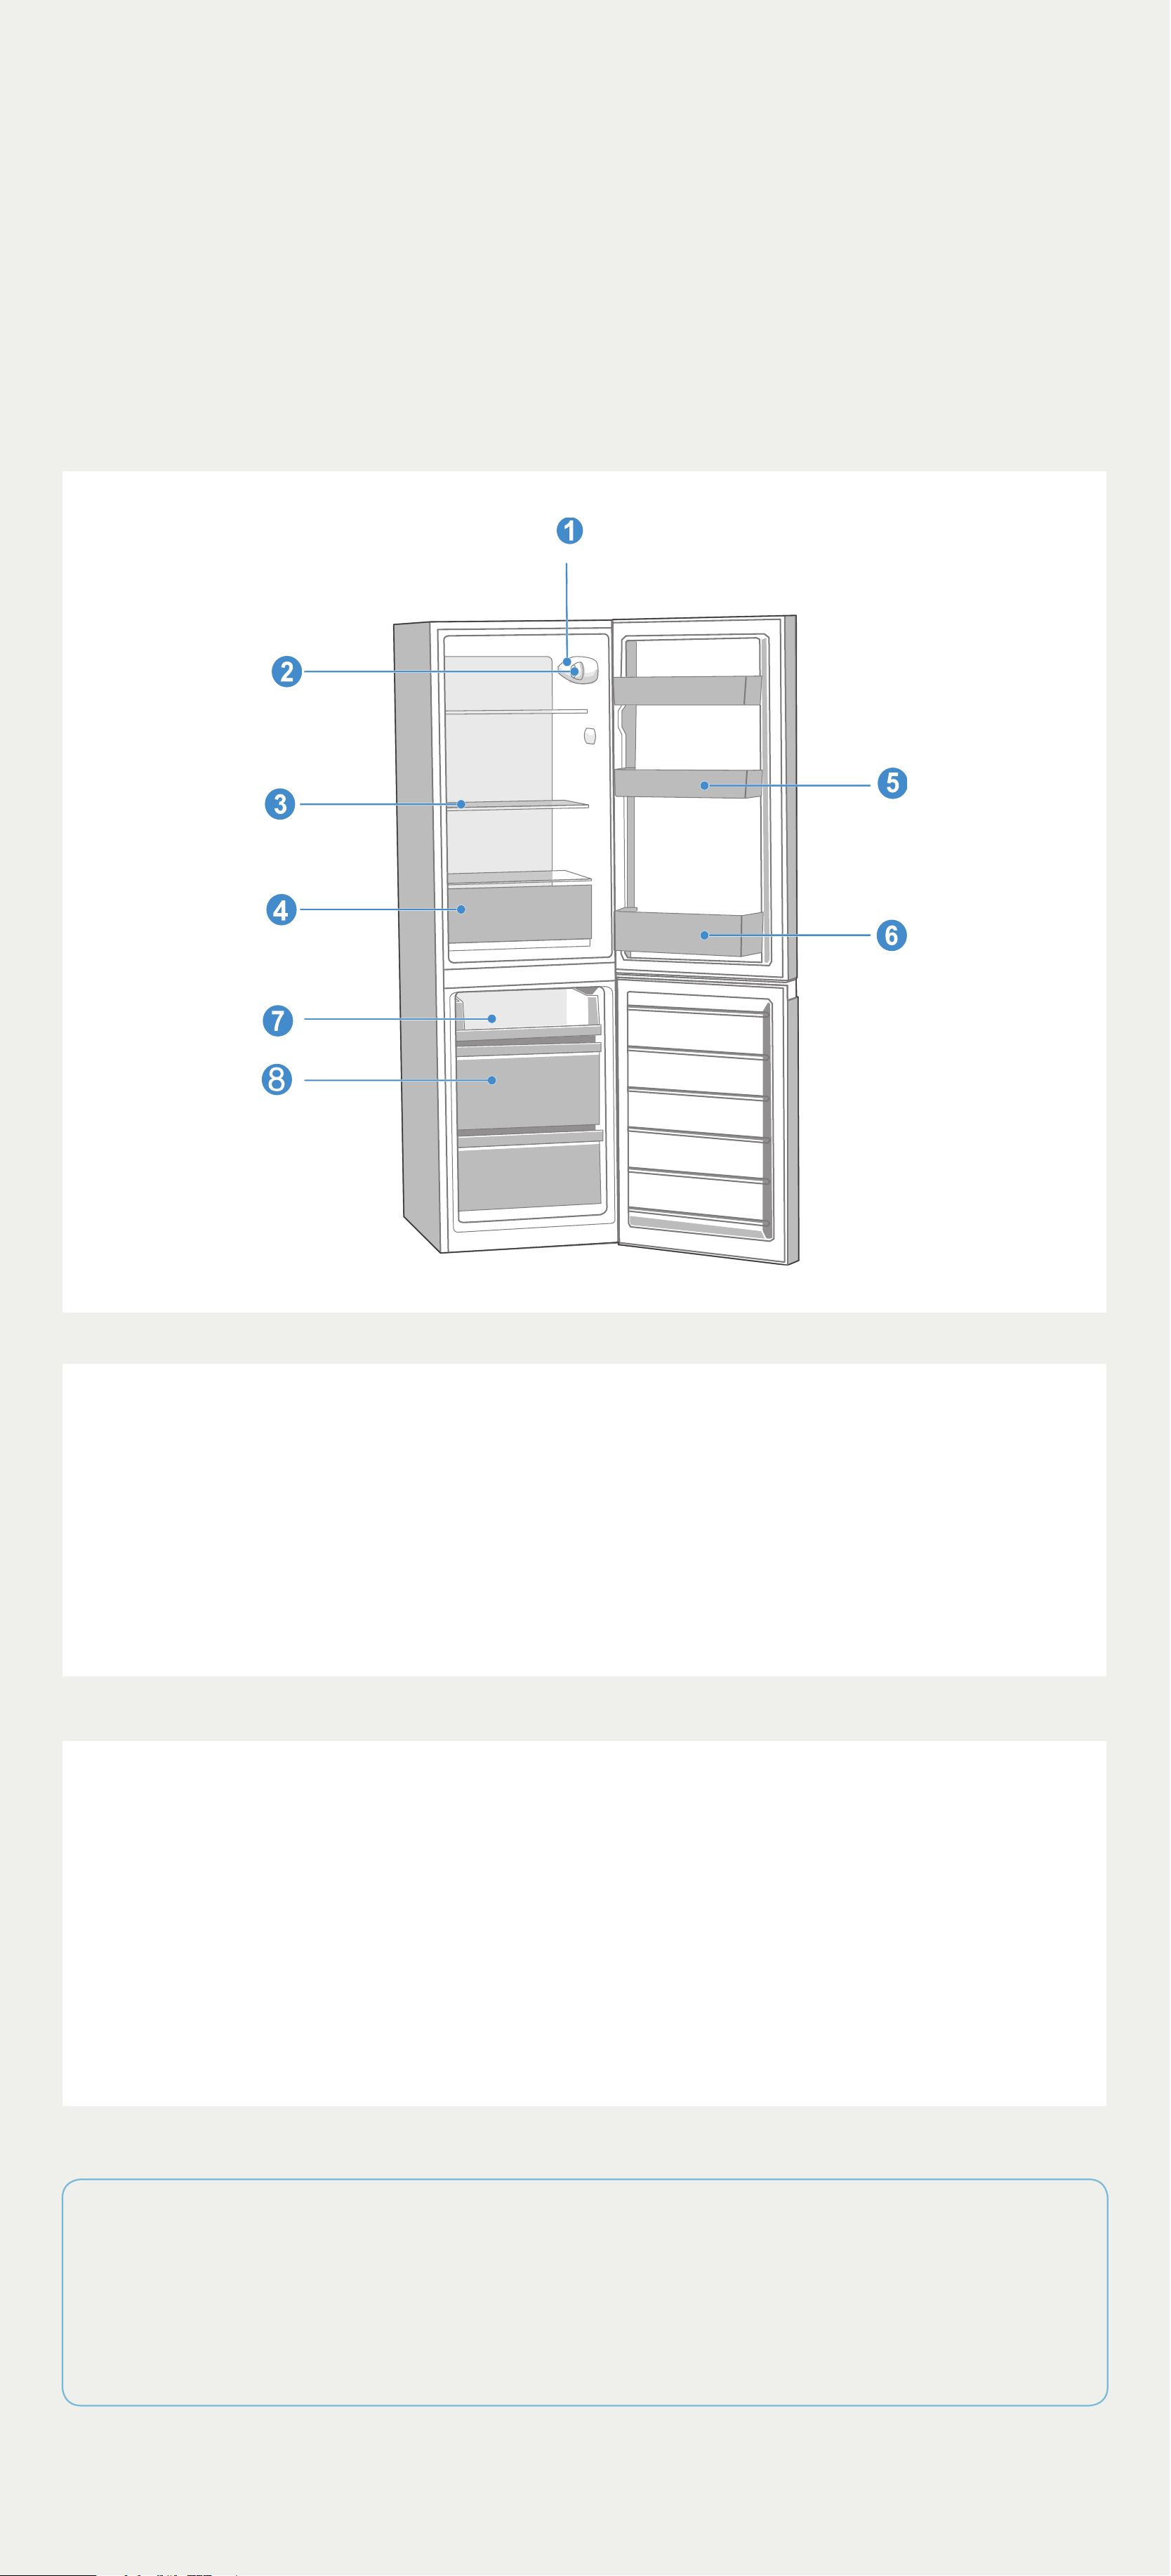
> Turn the temperature control knob
to 3, the internal temperature of the
refrigerator becomes lower.
> Turn the temperature control knob
to 1, the internal temperature of the
refrigerator becomes higher.
> The letter on the knob only represents
the temperature level, but does not mean
the specific temperature, the “0” means
stop working.
• | Tips
The actual control panel may differ from model to model.
Please adjusting and using between “1” and “3”. Above gear 3 will cause
that the internal temperature of the refrigerator is too low, so it is not
recommended for users.
The coldest gear can quickly freeze food in a short period of time. If a
large amount of food is frozen at one time, it is recommended to adjust
the gear to the coldest gear 12 hours in advance before adding the food.
After the food is quickly frozen, please adjust the gear back to the normal
range.
b |
Changing the light
Any replacement or maintenance of the LED lamps is intended to
be made by the manufacturer, its service agent or similar qualified
person.

Maintenance Tips
Overall cleaning
•
Disconnect the appliance from the electrical supply before
undertaking any routine maintenance. Allow at least 5 minutes
before restarting the appliance, as frequent starting may
damage the compressor.
•
Do not use mechanical devices or other means to accelerate
the defrosting process, other than those recommended by the
manufacturer.
•
Do not try to repair, disassemble or modify the appliance by
yourself. In case of repair please contact our customer service.
•
Eliminate the dust on the back of the unit at least once in
the year to avoid hazard by fire, as well as increased energy
consumption.
•
Check the door gasket regularly to make sure there are no
debris. Clean the door gasket with a soft cloth dampened with
soapy water or diluted detergent.
•
The interior of the product should be cleaned regularly to
avoid odor.
•
Use a soft cloth or sponge to clean the inside of the product,
with two tablespoons of baking soda and a quart of warm
water. Then rinse with water and wipe clean. After cleaning,
open the door and let it dry naturally before turning on the
power.
•
For areas that are dicult to clean in the product (such as
narrow sandwiches, gaps or corners), it is recommended to
wipe them regularly with a soft rag, soft brush, etc. and when
necessary, combined with some auxiliary tools (such as thin
sticks) to ensure no contaminants or bacterials accumulation
in these areas.
•
Wipe the outer surface of the product with a soft cloth
dampened with soapy water, detergent, etc., and then wipe
dry.
•
Do not use hard brushes, clean steel balls, wire brushes,
abrasives (such as toothpastes), organic solvents (such as
alcohol, acetone, Isoamyl acetate, etc.), boiling water, acid
or alkaline items, which may damage the fridge surface and
interior. Boiling water and organic solvents such as benzene
may deform or damage plastic parts.
•
Do not rinse directly with water or
other liquids during cleaning to avoid
short circuits or aect electrical
insulation after immersion.
• | Notes:
The appliance shall run continuously once it is started. Generally, the
operation of the appliance shall not be interrupted;otherwise the service
life may be impaired
Defrosting
Refrigerator compartment defrosts fully automatically
•
While the refrigerating unit is running, beads of condensation or
hoarfrost from at the back of the refrigerator compartment. This
is normal. It is not necessary to wipe o the condensation or frost.
The rear panel defrosts automatically. The condensation runs into
the condensation channel and is conveyed to the refrigerating unit
where it evaporates.
• | NOTE
Keep the condensation channel and drainage hole clean, so that the
condensation can run out.
Defrosting the freezer compartment
•
The freezer compartment does not defrost automatically,
otherwise the frozen food would start thawing.
•
A layer of frost in the freezer compartment impairs refrigeration
of the frozen food and increases power consumption. Remove the
layer of hoarfrost regularly.
• | WARNING
Do not scrape off hoarfrost or ice with a knife or pointed object. Doing
this may damage the refrigerant tubes.
1. Remove the frozen food and place temporarily in a cool location.
2. Disconnect the mains plug from the mains socket.
3. To accelerate the defrosting process, place a pan of hot water on a
stand in the freezer compartment.
4. Wipe up condensation with a cloth or sponge.
5. Wipe dry the freezer compartment.
6. Plug in the appliance and adjust the temperature control knob as
desired.
7. Put the frozen food back in the freezer compartment.
Cleaning of door tray
According to the direction arrow in
the figure below, use both hands to
squeeze the tray, and push it upward,
then you can take it out.
After washing the tray having been
taken out, you can adjust its installing
height in accordance with your
requirement.
Cleaning of glass shelf
As the innermost part of the
refrigerator liner where contacting the
shelves has a backstop, you shall raise
the shelves upward, then you can be
able to take it out.
Adjust or clean the shelves according
to your requirement.
Cleaning the vegetable drawer
Remove the contents of the drawer.
Hold the handle of the vegetable
drawer and pull it out completely until
it stops.
Lift the vegetable drawer up and
remove it by pulling it out.
• | Notes:
Differences: Due to technical changes and different models, some of the
illustrations in this manual may differ from your model.
Troubleshooting
You may try to solve the following simple problems by yourself.
If them cannot be solved, please contact the after-sales
department.
Failed
operation
• Check whether the appliance is connected to power
or whether the plug is in well contact
• Check whether the voltage is too low
• Check whether there is a power failure or partial
circuits have tripped
Odor
• Odorous foods shall be tightly wrapped
• Check whether there is any rotten food
• Clean the inside of the refrigerator
Long-time
operation of
the compressor
• Long operation of the refrigerator is normal in
summer
• when the ambient temperature is high It is not
suggestible having too much food in the appliance at
the same time
• Food shall get cool before being put into the
appliance
• The doors are opened too frequently
Light fails to
get lit
• Check whether the refrigerator is connected to power
supply and whether the illuminating light is damaged
• Have the light replaced by a specialist
Door can not
be properly
closed
• The door is stuck by food packages Too much food is
placed
• The refrigerator is tiltedr.
Loud noises
• Check whether the floor is level and whether the
refrigerator is placed stably
• Check whether accessories are placed at proper
locations
Door seal fails
to be tight
• Remove foreign matters on the door seal
• Heat the door seal and then cool it for restoration
• (or blow it with an electrical drier or use a hot towel
for heating)
Water pan
overflows
• There is too much food in the chamber or food stored
contains too much water,resulting in heavy defrosting
• The doors are not closed properly, resulting in
frosting due to entry of air and increased water due
to defrosting
Hot housing
• Heat dissipation of the built-in condenser via the
housing, which is normal When housing becomes
hot due to high ambient temperature, storage of too
much food or shutdown of the compressor is shut
down, provide sound ventilation to facilitate heat
dissipation
Surface
condensation
• Condensation on the exterior surface and door
seals of the refrigerator is normal when the ambient
humidity is too high. Just wipe the condensate with a
clean towel.
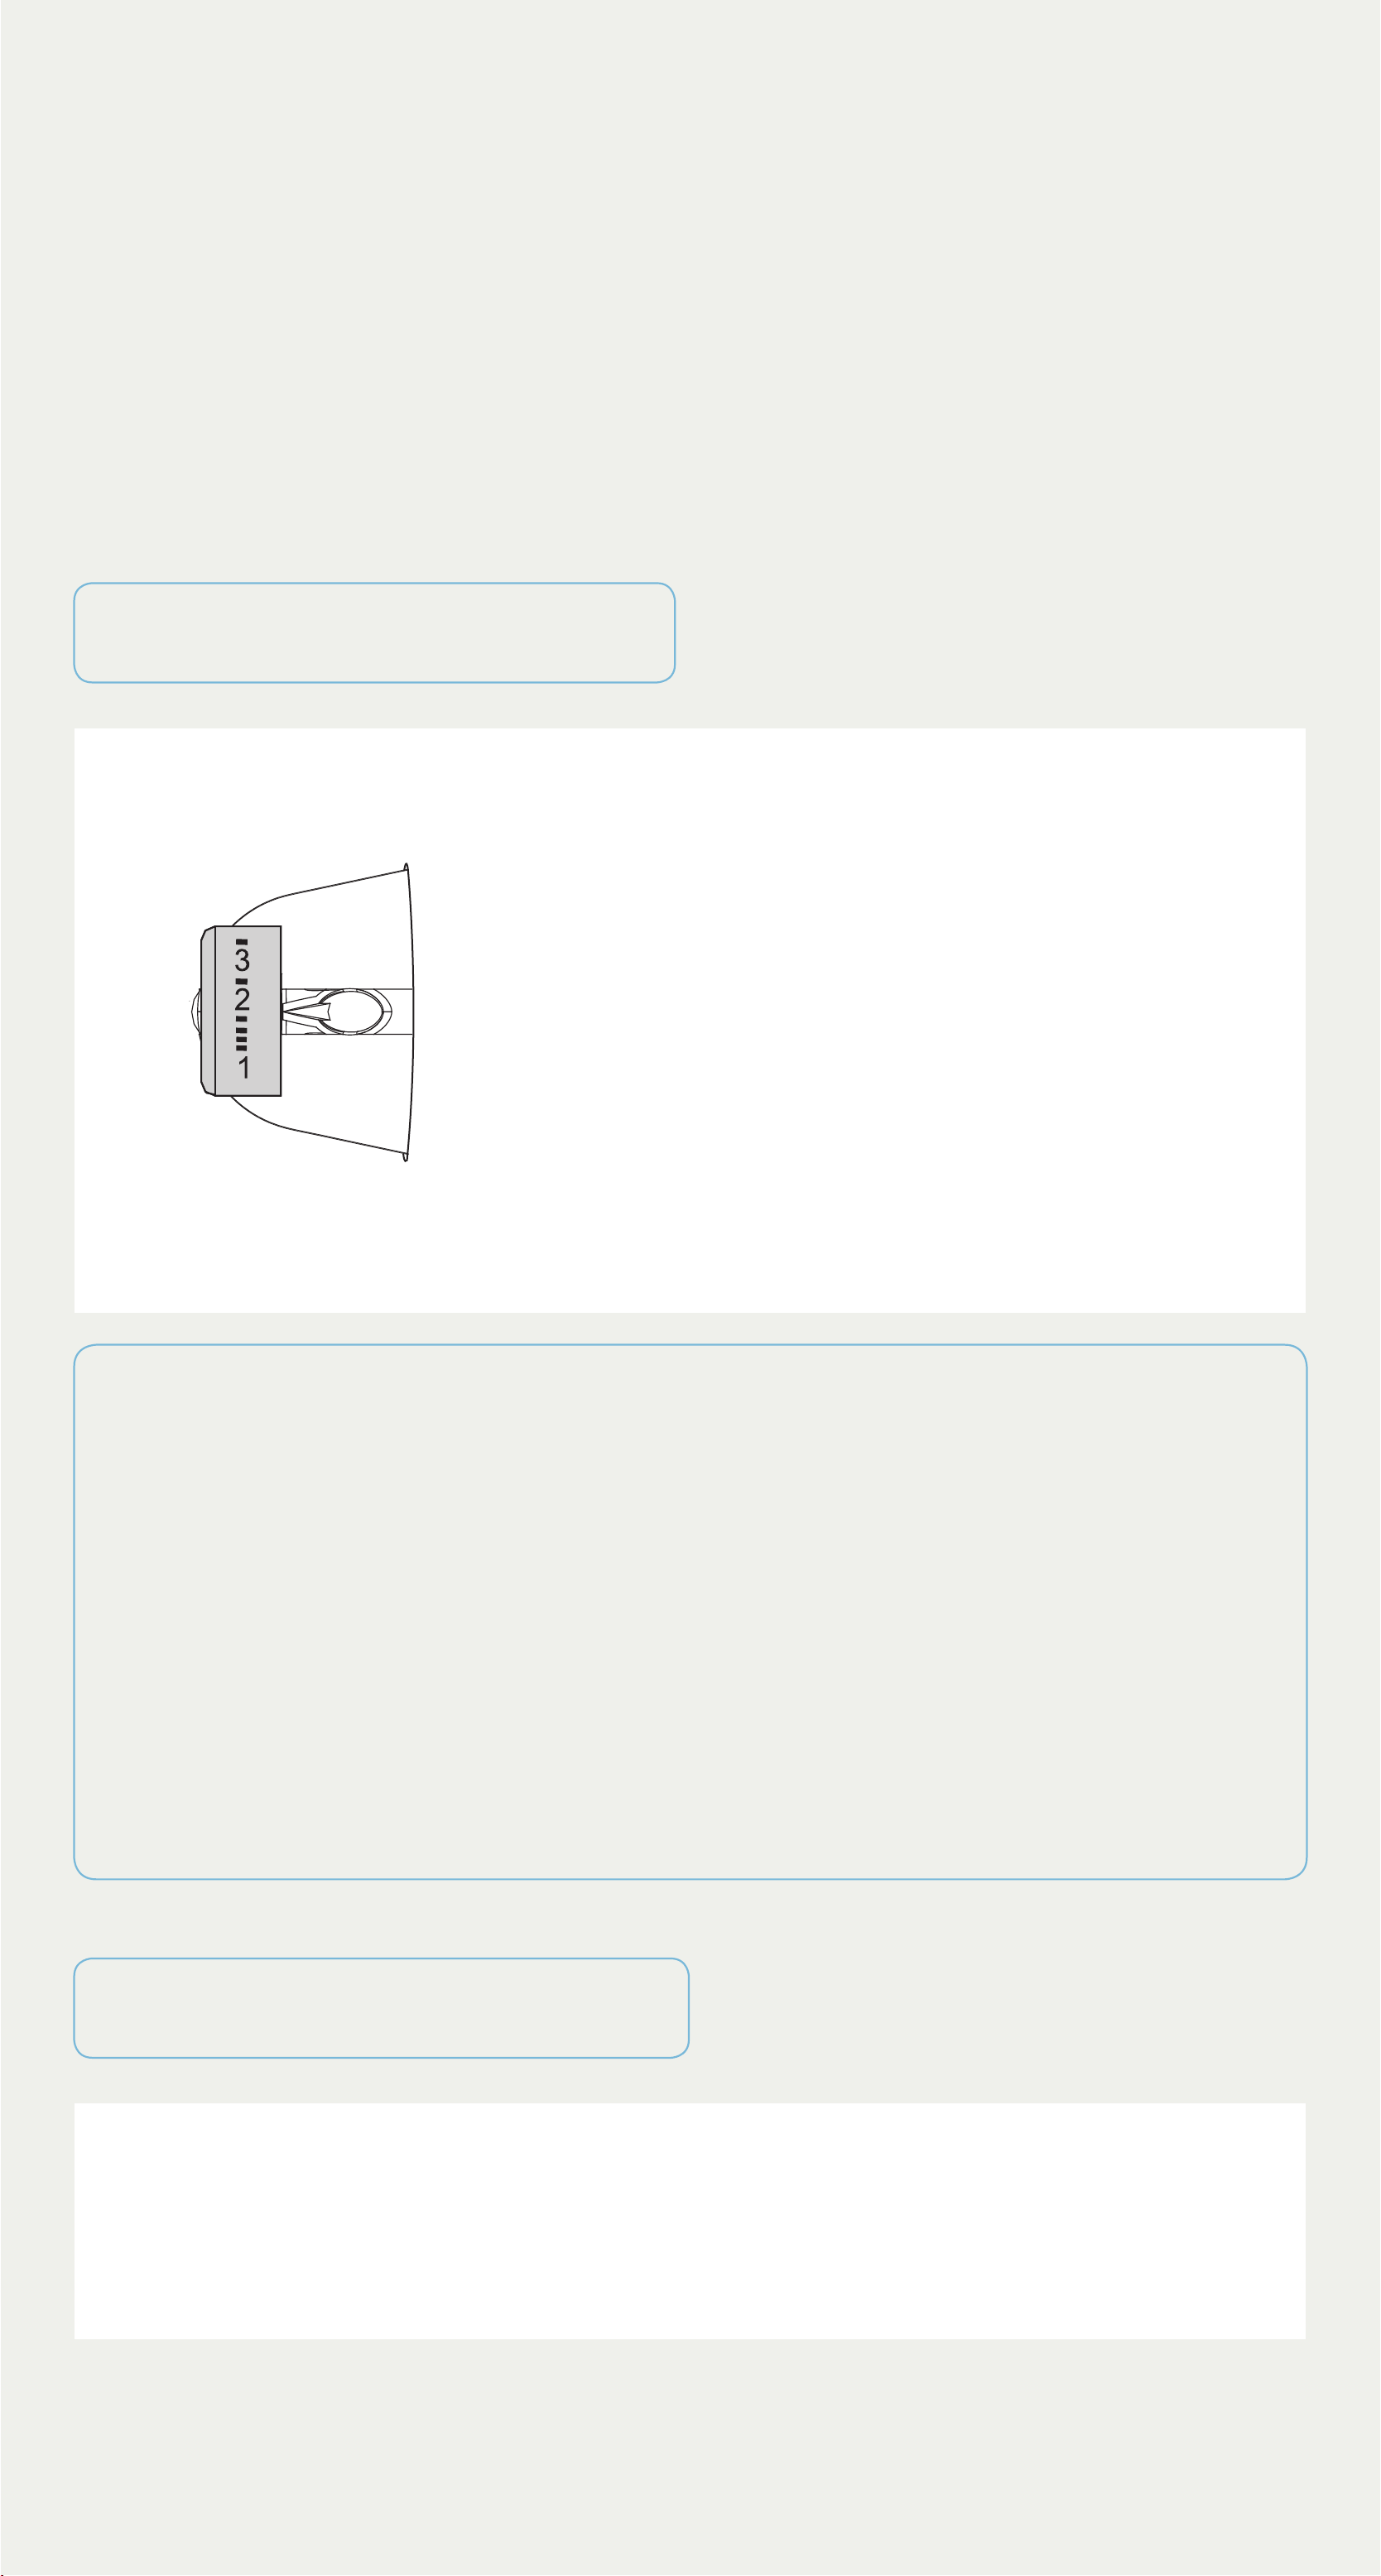
Abnormal noise
• Buzz: The compressor may produce buzzes during
operation, and the buzzes are loud particularly upon
start or stop. This is normal.
• Creak: Refrigerant flowing inside of the appliance
may produce creak, which is normal.
Do you hear these abnormal sounds as below? Usually these sounds
are normal.
S
S
SRR
R
!
HISSS!
BLUBB!
C
L
IC
K
!
BRRR!
CRA
CK!
CLICK: Some electrical parts in
the refrigerator, such as electric
valve will make this noise when
working. This is normal.
HISSS: When the refrigerant
flows into the evaporator, it will
make this noise. This is normal.
CLICK!
CLICK!
HISSS!
HISSS!
BRRR: The compressor will make
this noise when working, and the
buzzes are loud particularly upon
start or stop. This is normal.
SSSRRR: The fan motor in the No
frost refrigerator will make this
noise when working. This is normal.
BRRR!
BRRR!
SSSRRR!
SSSRRR!
SSSRRR!
SSSRRR!
BLUBB: Refrigerant flowing
through the pipes in the
refrigerator will make this noise.
This is normal.
CRACK: Cracking sound or broken
ice sound: the overall structure of
the refrigerator, air duct frost will
be with the thermal expansion
and contraction of the expansion
sound, these are also normal
physical phenomenon.
BLUBB!
BLUBB!
CRACK!
CRACK!

Tips & Tricks
Storing food
Freezer compartment
The freezer compartment is designated for the low-temperature
freezing of food, long-term storage of frozen food, and for the
production of ice cubes.
Do not put fresh and frozen food next to each other. The frozen food
may thaw.
When freezing large amounts of fresh food (such as meat, fish or
chopped meat), please divide them into several small pieces before
putting in, so that they can be quickly frozen and pick up easily.
Abide by the storage times recommended by food manufacturers on
the packages, there is no information on the packaging, food should
not be stored frozen for longer than three months from the date of
purchase.
When purchasing frozen food, make sure that it was frozen at a
suitable temperature and that the packaging is not damaged.
Frozen food should be kept in suitable individual packages to ensure
that adjacent food cannot be contaminated. Consume thawed and
defrosted foods immediately, do not refreeze them.
In case of prolonged power failure or malfunction of the appliance,
remove the stored frozen food and check whether they are still edible,
then store them in a suciently cool place or in another appliance.
To defrost food, remove it from the freezer and let it defrost at room
temperature or in the refrigerator. To defrost food quickly, you can use
the defrost function on your microwave, for example.
If you only want to defrost part of a pack, remove the portion you
need and immediately close the rest of the pack. In this way, you will
avoid “freezer burn” and will reduce ice formation on the remaining
foods.
Refrigerator compartment
The Refrigerator compartment is the ideal storage location for ready
meals, cakes and pastries, preserved food, condensed milk, milk,
cheese, spreads, sauces, dips and eggs.
The freshness at point of purchase is important for the shelf-life of your
food. In principle, the fresher the produce when placed in the crisper
drawers, the longer it stays fresh. Therefore, when buying food, always
pay attention to the degree of freshness.
Never put warm foods in the fridge compartment. These should first
cool down at room temperature and then be placed so as to ensure
adequate air circulation in the fridge compartment.
Meat and clean fish (packed in a package or plastic foil) can be placed
in the fridge compartment, which can be used in 1–2 days.
Fruit and vegetables without packaging can be placed in the part
designated for fresh fruit and vegetables
.
• | Notes:
Storage of too much food during operation after the initial connection to
power may adversely affect the freezing effect of the refrigerator.
Storage times and temperature
Note: Overlong storage or storage at inappropriate freezing
temperature may cause a quality loss or spoiled foods, which causes
food waste, is inedible and may cause food poisoning. The minimum
temperature in most cases should be -18°C or colder. Follow the
maximum recommended storage times below:
•
Stew, ice cream, sausages, bread: 2-6 months.
•
Fish, shrimp, lamb, meat: 4-8 months.
•
Vegetables, fruits, poultry, beef: 6-12 months.
Tips for energy saving
Do not place the appliance near cookers, radiators or other heat sources.
If the ambient temperature is high, the compressor will run more frequently
and for longer, resulting in increased energy consumption.
Ensure that there is sucient ventilation at the base of the appliance, on
the sides of the appliance and at the back of the appliance.
Please also observe the spacing dimensions in the chapter “Installation”.
An evenly filled refrigerator/freezer compartment contributes to optimal
energy use.
Allow warm food to cool before placing it in the refrigerator/freezer
compartment. Food that has already cooled down increases energy
eciency.
Allow frozen food to defrost in the refrigeration compartment The coldness
of the frozen food reduces the energy consumption in the refrigerator
compartment and thus increases the energy eciency.
Setting the temperature no colder than necessary contributes to optimal
energy use.
The door gaskets of your appliance must be perfectly intact so that
the doors close properly and energy consumption is not increased
unnecessarily.
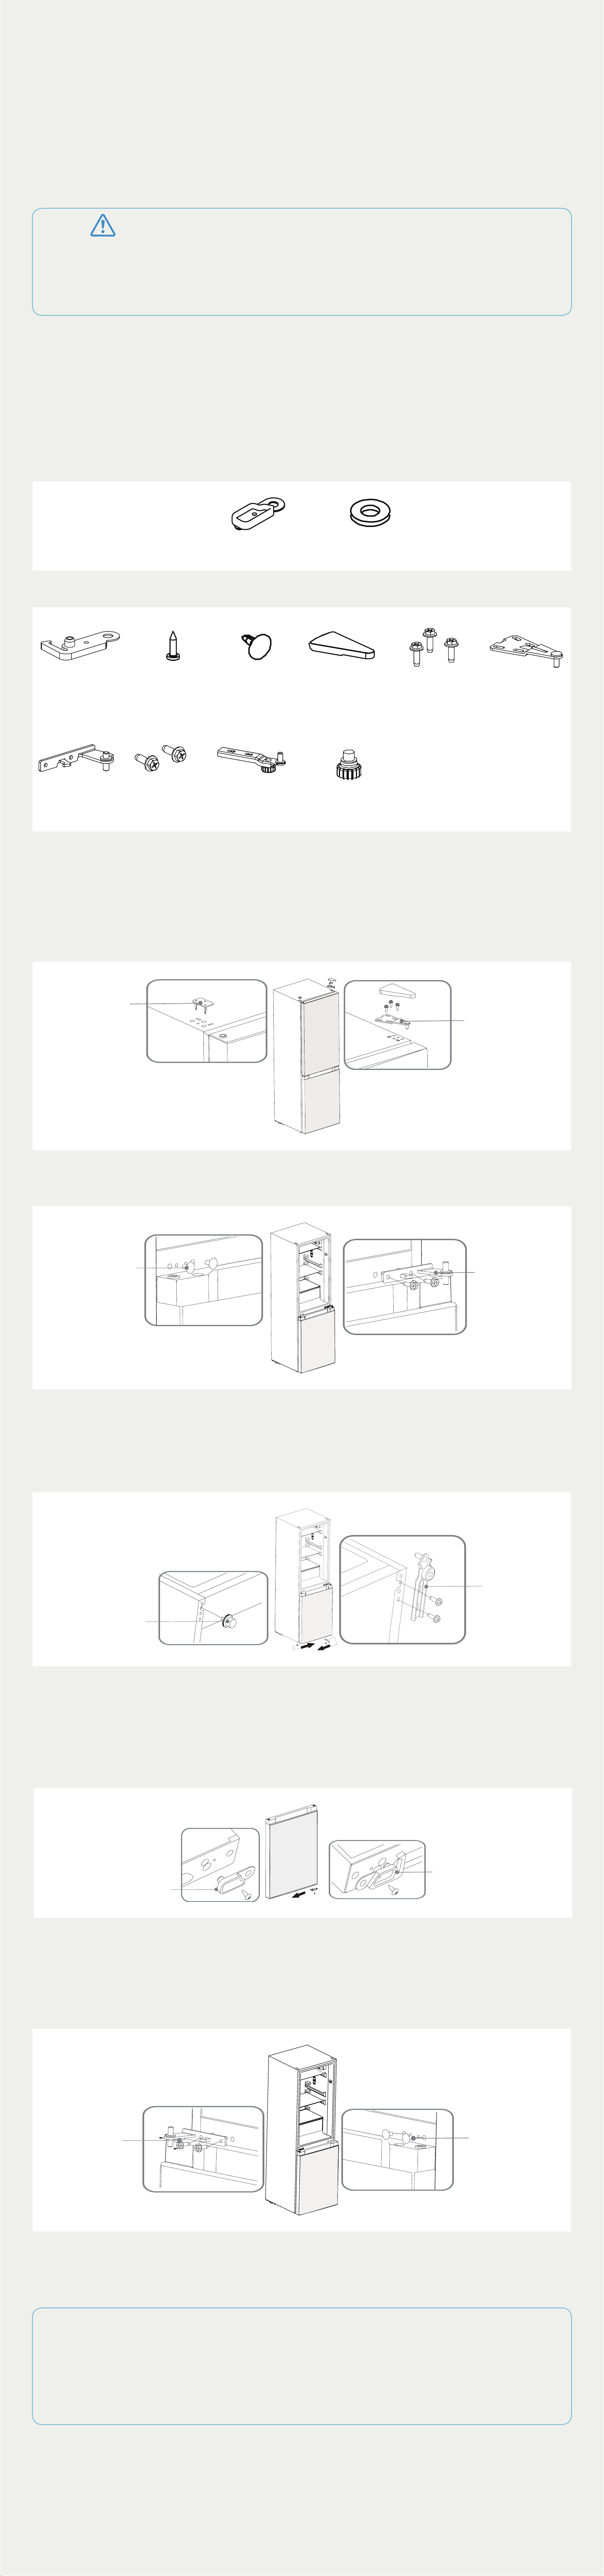
Doors Reversal
Based on the location where you plan to use your refrigerator, you may
find it more convenient to reverse the position of the door.
• |
CAUTION
To avoid injury to yourself or your property, we recommend that
someone assist you during the door reversal process.
Preparing to reverse the door position
• Make sure that your refrigerator is unplugged and empty.
• Have someone available to assist you in the process.
• Keep all of the parts you remove to reuse them later.
Parts included with the hinge kit:
Left stopper
(2) Spacer
Parts already mounted on the refrigerator (as shipped):
Right stopper
Right stopper
screw
Hole cap (2)
Top hinge
cover
Top hinge
screw
Top hinge
Middle hinge
Middle hinge
screw
Bottom hinge
adjustable foot
Steps:
1. Power o the refrigerator, and remove all articles from the door
trays.
2. Remove the top hinge cover, then remove the top hinge screws,
top hinge, and hole cap which is fixed on another side.
top hing
e
h
ole cap
3. Remove the refrigerating door, the middle hinge and the hole
caps.
h
ole cap
middl
e
hinge
4. Remove the freezer door, remove the bottom hinge, and
adjustable foot on another side.
5. Exchange the fixed position of the adjustable foot and the bottom
hinge, then fix them again.
bottom
hinge
a
djustable
f
oot
6. Remove the screws and stoppers which are fixed on the bottom
cover of the refrigerating door and the freezer door.
7. Take out two stoppers from the attached palstic bag, fix the
stoppers with screws on another side of the bottom cover of the
refrigerating door and the freezer door.
Door
stopper
Door
stopper
8. Place the freezer door from top to bottom, take out the spacer
from the attached plastic bag and put it on the axle hole of
another side of the freezer door.
9. Fix the middle hinge with screws and install 2 hole caps.
hole cap
middle
hinge
10. Put the refrigerating door on the middle hinge , assemble the top
hinge on another side, fix the hinge cover on the top hinge and fix
hole cap, as below pictures shows.
• | NOTE
Dierences: Due to technical changes and dierent models, some
of the illustrations in this manual may dier from your model.