NO:G11222431
Quick access filters for easy cleaning
Motherboard back plate opening for quick CPU cooler assembly
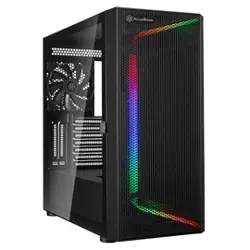
Mesh front panel intake maximizes airflow with side window for viewing system innards (PS11-W)
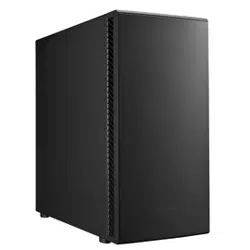
Front-side intake vents with foam padded side panels to minimize noise (PS11-Q)
All black painted interior for stylish look
Support graphics cards up to 16.2 inches
PS11
A versatile ATX tower case for performance or silence
Model No.
Material
Motherboard
Drive Bay
Cooling System
Expansion Slot
Front I/O Port
Power Supply
Expansion Card
Limitation of CPU cooler
Limitation of PSU
Dimension
SST-PS11B-W / SST-PS11B-Q
Mesh front panel, steel body (SST-PS11B-W) / Plastic front panel, steel body (SST-PS11B-Q)
ATX , Micro ATX
External 5.25” x 2
Internal 3.5" x 3 , 2.5” x 2
Front 2 x 120mm/140mm fan slot, included 1x 120mm 1200rpm fan
Rear 1 x 120mm fan slot
Top 2 x 120mm fan slot (PS11-W)
Bottom 1 x 120mm fan slot
7
USB 3.0 x 2 / Audio x 1 / MIC x 1
Optional Standard PS2 (ATX)
Compatible with expansion cards up to 16.2” , width restriction - 6.1”
161mm
225mm
215.3mm (W) x 426.5mm (H) x 481.5mm (D), 44L
Special Features
Specifications
(Q)
(W)
Qff
A
ve
rs
at
il
e
AT
X
to
we
r
ca
se
f
or
p
er
fo
rm
an
ce
o
r
si
le
nc
e
Sp
ecial Feature
s
(Q)
(
W
)
PICTURE ITEM
SCREW-P/W-M3*4-BK
SCREW-I-6-32*5-BK
STANDOFF-6-32*6.5H-6-32
STANDOFF-SOCKET-WRENCH
BUNCH-WIRE-TIES
SECURE 2.5” HDD, 5.25”DRIVE
SECURE PSU, MB, 3.5”HDD
SUPPORT MB
STANDOFF SCREWS
CABLE MANAGEMENT
PURPOSE
This product has a limited 1 year warranty in North America and Australia.
For information on warranty periods in other regions, please contact your reseller or SilverStone authorized distributor.
本产品自购买之日起,于中国地区(不包含澳门,香港特别行政区)享有一年有限责任保固(部分产品为二年,三年或五年)。
详细保固年限请参照官方网站 https://silverstonetek.com.cn/ 公布之产品型号为依据。
Additional info & contacts
For North America ([email protected])
SilverStone Technology in North America may repair or replace defective product with refurbished product that is not new but has been
functionally tested.
Replacement product will be warranted for remainder of the warranty period or thirty days, whichever is longer. All products
should be sent back to the place of purchase if it is within 30 days of purchase, after 30 days, customers need to initiate RMA
procedure with SilverStone Technology in USA by first downloading the “USA RMA form for end-users” form from the below link
and follow its instructions.
http://silverstonetek.com/contactus.php
1. Product component defects or damages resulted from defective production is covered under warranty.
Defects or damages with the following conditions will be fixed or replaced under SilverStone Technology’s jurisdiction.
a) Usage in accordance with instructions provided in this manual, with no misuse, overuse, or other inappropriate actions.
b) Damage not caused by natural disaster (thunder, fire, earthquake, flood, salt, wind, insect, animals, etc…)
c) Product is not disassembled, modified, or fixed. Components not disassembled or replaced.
d) Warranty mark/stickers are not removed or broken.
Loss or damages resulted from conditions other than ones listed above are not covered under warranty.
2. Under warranty, SilverStone Technology’s maximum liability is limited to the current market value for the product (depreciated value, excluding
shipping, handling, and other fees). SilverStone Technology is not responsible for other damages or loss associated with the use of product.
3. Under warranty, SilverStone Technology is obligated to repair or replace its defective products. Under no circumstances will SilverStone
Technology be liable for damages in connection with the sale, purchase, or use including but not limited to loss of data, loss of business, loss of
profits, loss of use of the product or incidental or consequential damage whether or not foreseeable and whether or not based on breach of warranty,
contract or negligence, even if SilverStone Technology has been advised of the possibility of such damages.
4. Warranty covers only the original purchaser through authorized SilverStone distributors and resellers and is not transferable to a second hand
purchaser.
5. You must provide sales receipt or invoice with clear indication of purchase date to determine warranty eligibility.
6. If a problem develops during the warranty period, please contact your retailer/reseller/SilverStone authorized distributors or SilverStone
http://www.silverstonetek.com.
Please note that: (i) You must provide proof of original purchase of the product by a dated itemized receipt; (ii) You shall bear the cost of shipping
(or otherwise transporting) the product to SilverStone authorized distributors. SilverStone authorized distributors will bear the cost of shipping
(or otherwise transporting) the product back to you after completing the warranty service; (iii) Before you send the product, you must be issued a
Return Merchandise Authorization (“RMA”) number from SilverStone. Updated warranty information will be posted on SilverStone’s official website.
Please visit http://www.silverstonetek.com for the latest updates.
Warranty terms & conditions
For Australia only ([email protected])
Our goods come with guarantees that cannot be excluded under the Australian Consumer Law.
You are entitled to a replacement or refund for a major failure and for compensation for any other reasonably foreseeable loss or
damage.
You are also entitled to have the goods repaired or replaced if the goods fail to be of acceptable quality and the failure does not
amount to a major failure.
Please refer to above “Warranty terms & conditions” for further warranty details.
SilverStone Technology Co., Ltd. 12F No. 168 Jiankang Rd., Zhonghe Dist., New Taipei City 235 Taiwan R.O.C.
+ 886-2-8228-1238 (standard international call charges apply)
For Europe ([email protected])
For all other regions ([email protected])
本表格依据 SJ/T 11364 的规定编制。
○ : 表示该有害物质在该部件所有均质材料中的含量均在
GB/T 26572 规定的限量要求以下。
— : 表示该有害物质至少在该部件的某一均质材料中的含量
超出 GB/T 26572 规定的限量要求。且該限用物質為排除項目
产品合格证
检验员:检01
生产日期:见产品条码
Please refer to SilverStone website
for latest specifications updates.
计算机机壳 有毒有害物质/元素及其化学含量表
部件名称
印刷电路板组件
线缆/ 连接器
金属结构件
塑料结构件
风扇
其它
包装材料
辅助材
汞
(Hg)
镉
(Cd)
六价铬
(Cr(VI))
多溴联苯
(PBB)
多溴二苯醚
(PBDE)
铅
(Pb)
○
○
○
○
○
○
○
○
○
○
○
-
○
○
○
-
○
○
○
○
○
○
○
○
○
○
○
○
○
○
○
○
○
○
○
○
○
○
○
○
○
○
○
○
○
○
○
○
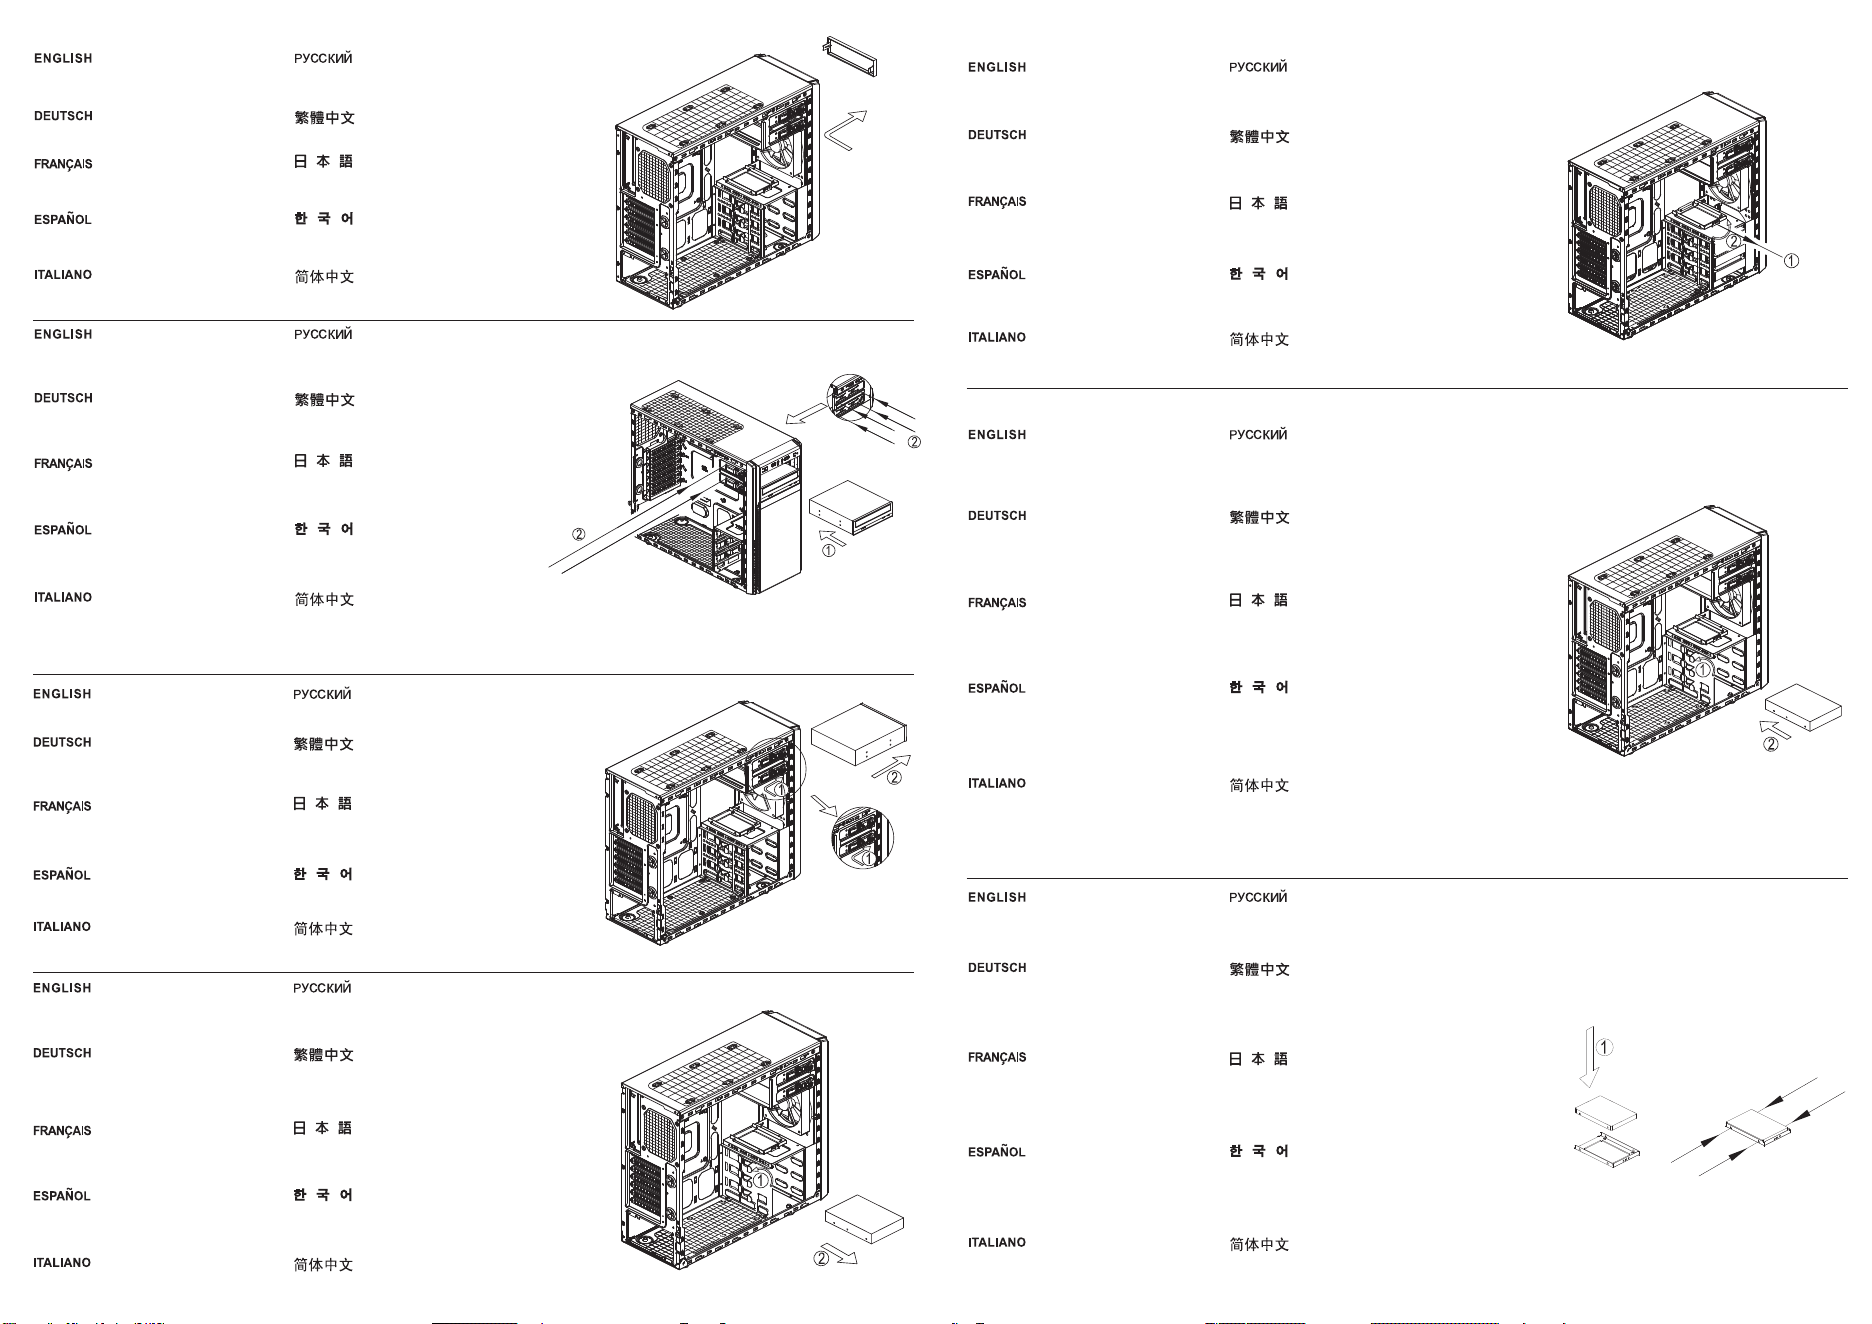
① Slide 5.25" device from the outside into the bay
until it locks into place
② Secure with screws from both side
①5,25-Zoll-Gerät von außen in den Schacht
schieben, bis es einrastet
②Mit Schrauben von beiden Seiten sichern
①Insérez le périphérique 5,25" de l'extérieur dans
la baie jusqu'à ce qu'il s'enclenche
②Fixez avec des vis de chaque côté
①Deslice el dispositivo de 5,25" desde el exterior
hacia la bahía hasta que encaje en su sitio
②Asegure con tornillos desde ambos lados
①Far scorrere il dispositivo da 5.25" dall’esterno
verso l’interno dell’alloggio finché si blocca in
posizione
②Fissare con viti su entrambi i lati
①Установите 5,25-дюймовое устройство в отсек
до его фиксации.
②Закрепите винтами с обеих сторон.
①直接將5.25"裝置推入到定位後會自動鎖上,
②於兩側鎖上螺絲固定
①5.25"デバイスを外側からスライドさせて固定さ
れるまでベイに入れます
②ネジで両側を固定します。
①5.25" 장치를 제자리에 고정될 때까지 바깥쪽에서
베이로 밀어 넣습니다.
②양쪽 나사로 고정합니다.
①直接将5.25"装置推入到定位后会自动锁上,
②于两侧锁上螺丝固定
①Place drive into tray and secure with screws
②Follow above steps in reverse to complete
installation
①Laufwerk in das Fach einsetzen und mit
Schrauben sichern
②Obige Schritte zum Abschließen der
Installation in umgekehrter Reihenfolge befolgen
①Mettez le disque dans le support et attachez-le
avec des vis
②Suivez les étapes ci-dessus dans l'ordre
inverse pour terminer l'installation
①Sitúe el dispositivo en la bandeja y fíjelo
con tornillos
②Siga los pasos anteriores en orden inverso
para completar la instalación
①Collocare l’unità nel cassetto e fissarla con
le viti
②Attenersi alle istruzioni di cui sopra in ordine
inverso per completare l'installazione
①Установите привод в отсек и закрепите винтами.
②Для завершения установки выполните описанные
выше операции в обратном порядке.
①將硬碟放入托盤後用螺絲鎖固
②依照反順序裝回托盤即可
①ドライブをトレイに入れて、ネジで固定します。
②インストールを完了するには、上記のステップ
を逆順に実行します。
①드라이브를 트레이에 넣고 나사로 고정합니다.
②설치를 하려면 위의 단계를 역으로 따라하면
됩니다.
①将硬盘放入托盘后用螺丝锁固
②依照反顺序装回托盘即可
①To remove drive, first pull tool-less tab
outward
②Then pull drive out.
①Zum Entfernen des Laufwerks zunächst die
Nase nach außen ziehen (kein Werkzeug
erforderlich)
②Dann das Laufwerk herausziehen.
①Pour retirer le disque, tirez en premier
l'onglet d'ouverture sans outil vers l'extérieur
②Puis retirez le disque.
①Para retirar el dispositivo, primero tire de la
pestaña sin herramientas hacia fuera
②Luego tire del dispositivo hacia fuera.
①Per rimuovere l'unità, prima tirare verso
l'esterno la linguetta
②Quindi estrarre l’unità.
①Для извлечения диска потяните фиксатор
наружу.
②Затем извлеките привод диска.
①移除時先將扣具扳開
②將硬碟向外抽出
①ドライブを取り出すには、ツール不要ブラケット
のタブを外側へ引きます
②それから、ドライブを引き出します。
①드라이브를 분리하려면, 먼저 공구 사용이 필요
없는 탭을 바깥쪽으로 당깁니다.
②그다음 드라이브를 당겨 뺍니다.
①移除时先将扣具扳开
②将硬盘向外抽出
Remove front panel as indicated in the
diagram
Frontblende wie abgebildet entfernen
Retirez le panneau frontal comme indiqué
dans le diagramme
Retire el panel frontal como se indica en el
diagrama
Rimuovere il pannello frontale come indicato
nella figura
Снимите лицевую панель, как показано на
рисунке
請依圖示由面板正面取下擋版
図示されるようにフロントパネルを取り外します
그림과 같이 전면 패널을 분리합니다
请依图示由面板正面取下挡版
5.25" Device Installation
To remove device, push the tool-less tab
forward and pull device out
Zum Entfernen des Geräts die Nase nach vorne
drücken (kein Werkzeug erforderlich) und
das Gerät herausziehen
Pour retirer le périphérique, poussez l'onglet
d'ouverture sans outil vers l'avant et tirez
pour le faire sortir
Para retirar el dispositivo, empuje hacia delante la
pestaña sin herramientas y tire del dispositivo
Per rimuovere il dispositivo, spingere in avanti la
linguetta ed estrarre il dispositivo
Для извлечения устройства нажмите на фиксатор
и вытащите устройство.
要移除的話將免工具扣具扭頭往前推後將裝置抽出
装置を取り外すには、ツール不要タブを前に押し
て、デバイスを引き出します。
장치를 분리하려면, 공구 사용이 필요 없는
끝부분을 앞쪽으로 민 후 장치를 당겨 뺍니다.
要移除的话将免工具扣具扭头往前推后将装置抽出
①Pull the tab of tool-less bracket outward
②Slide drive in with SATA interface facing
inwards until it locks into place
①Nase der Halterung nach außen ziehen
(kein Werkzeug erforderlich)
②Laufwerk mit der SATA-Schnittstelle nach
innen zeigend bis zum Einrasten hineinschieben
①Tirez l'onglet du support sans outil vers
l'extérieur
②Insérez le disque avec l'interface SATA
tournée vers l'intérieur jusqu'à ce qu'il s'enclenche
①Tire de la pestaña del bracket sin herramientas
hacia fuera
②Deslice el dispositivo en el interfaz SATA
mirando hacia el interior hasta que encaje en
su sitio
①Tirare verso l'esterno la linguetta della staffa
ad incastro
②Far scorrere l’unità con l’interfaccia SATA
rivolta verso l'interno finché non si blocca in
posizione
①Потяните фиксатор кронштейна наружу.
②Установите привод диска таким образом,
чтобы разъем SATA был направлен внутрь,
и нажмите до фиксации привода.
①將免工具支架往外扳開後,
②SATA端朝內放入硬碟,推到底即可被免扣具裝置
固定
①ツール不要ブラケットのタブを外側へ引きます。
②ドライブはSATAインターフェースを内側に向け
て、きちんと固定されるまで中に入れます。
①공구 사용이 필요 없는 브래킷의 끝부분을
바깥쪽으로 당겨 뺍니다.
②SATA 인터페이스를 안쪽으로 향하게 한 채로
드라이브가 제자리에 고정될 때까지 안으로 밀어
넣습니다.
①将免工具支架往外扳开后,
②SATA端朝内放入硬盘,推到底即可被免扣具装置
固定
3.5" Hard Drive Installation
①Remove thumbscrew
②Remove 2.5" tray by lifting it
①Rändelschraube entfernen
②2,5-Zoll-Fach durch Anheben entfernen
①Enlevez les vis à oreilles.
②Enlevez le plateau 2,5" en le soulevant.
①Quite el tornillo mariposa
②Retire la bandeja de 2,5" levantándola
①Rimuovere la vite a testa zigrinata
②Rimuovere il cassetto 2.5" sollevandolo
①Отверните барашковый винт.
②Приподнимите и извлеките 2,5-дюймовый отсек.
①將手扭螺絲取下
②向上提取即可取出2.5" 硬碟架
①つまみネジを取り外します。
②2.5"トレイは上方に取り外します。
①나비 나사를 제거합니다.
②2.5" 트레이를 들어올려 분리합니다.
①将手扭螺丝取下
②向上提取即可取出2.5" 硬盘架
2.5" HDD/SSD Installation