
WARNING! Standard graphic symbols are used
on all machines in order to ensure complete safety of all
parts of the band saw. As these symbols are very important, read the information below attentively.
DANGER! Read the operating instructions to reduce the risk of inquiry
CAUTION! Wear ear-muffs. The impact of noise can cause damage to hearing
CAUTION! Wear a breathing mask. Dust which is injurious
to health can be generated when
working on
wood and other materials. Never use the device to work on any materials containing
asbestos!
CAUTION! Wear safety goggles. Sparks generated during working splinters, chips and dust
emitted by the devic
e can cause loss of sight.
GENERAL SAFETY INSTRUCTIONS
IM
PORTANT! When
using electrical tools, the following safety instructions should be observed to prevent the
risk of electric shock, personal injury and fire. Read and observe these instructions carefully before using the
tool.
1. Keep work area clean
Cluttered areas invite injuries.
2. Consider work area environment
Do not expose power tools to rain. Do not use
power
tools in damp or wet locations. Keep work
area well lit. Do not use power tools near
flammable liquids or gases.
3. Guard against electric shock
Prevent body contact with grounded surfaces (e.g.
pipes, radiators, ranges, refrigerators etc.)
4. Keep children away
Do not let visitors contact tool or extension cord. All
visitors should be kept away from work area.
5. S
tore idle tools
When not
in use, tools should be stored in a dry,
high or locked-up place, out of the reach of
children.
6. Do not force tool
It will do a better job and operate more safety at
the rate for which it was intended.
7. Use right tool
Do not force small tools or attachments to do the
job of a heavy duty tool. Do not use tools for
other than their intended purpose; for example
do not use a circular saw for cutting tree limbs or
logs.
8. Dress properly
Do not wear loose clothing or jewelry. They can
be caught in moving parts.
2

Rubber gloves and non-skid footwear are
recommended when working outdoors. Wear
protection hair covering to contain long hair.
9. Use safety glasses
Also use a dust mask during use and
wear ear
protection. If the noise level exceeds 85 dB (A),
ear protection is obligatory. Indicated noise levels
many be exceeded dependent on the working
environment and the material to be treated.
10. Use dust extraction
If dust extraction and collection devices are
present on the tool, make sure that they are
used properly.
11. Do not abuse cord
Never carry tool by the cord or yank it to
disconnect it from wall outlet. Keep cord from
heat, oil and sharp edges.
12. Secure work
Use clamps or a vise to hold the workpiece. It is
safer and it frees both hands to operate tool.
13. Do not overreach
Keep proper footing and balance at all times.
14. Maintain tools with care
Keep tools sharp and clean for better and safer
performance. Follow instructions for lubricating
and changing accessories. Inspect tools cords
periodically and, if damaged, have them repaired
by an authorized service facility. Inspect
extension cords periodically and replace if
damaged. Keep handles dry, clean and free from
oil and grease.
15. Disconnect tools
When not in use, before servicing, and when
changing accessories such as blades, bits and
cutters.
16. Remove adjusting keys and wrenches
Form the habit of check
ing to see that keys and
adjusting wrenches are removed from the tool
before switching it on.
17. Avoid unintentional starting
Do not
carry plugged-in tools with finger on
switch. Be sure that the tool is switched off
before plugging in.
18. Outdoor use extension cords
When tools are used outdoors, use only
extension cords intended for use outdoors and
so marked.
19. Stay alert
Watch what you are doing. Use common
sense. Do not operate tools when you are
tired.
20. Check damaged parts
Before further use of the tool, a guard or other
part that is damaged should be carefully
checked to determine that it will operate
properly and perform its intended function.
Check for alignment of moving parts, binding
of moving parts, breakage of parts, mounting,
and any other conditions that may affect its
operation. A guard or other part that is
damaged should be properly repaired or
replaced by an authorized service center
unless otherwise indicated elsewhere in the
instruction manual. Do not use tool if switch
does not turn it on and off.
21. Warning
The use of any other accessory or attachment
other than recommended in the instruction
manual may present a risk of personal injury.
22. Have your tool replaced by an expert This
electric appliance is built in accordance with
the relevant safety rules. Repair of electric
appliances must only be carried out by experts
otherwise it may cause considerable danger
for user.
3

1. Firmly clamp or bolt the saw to a work
bench o
r leg stand at approximately hip
height.
2. Never operate the saw on the floor.
3. Avoid awkward operation and hand
positions where a sudden slip could cause
your hand to move into the blade. Always
make sure you have good balance.
4. Allow the motor to come up to full speed
before starting a cut to avoid binding or
stalling.
5. Do not use tool if the switch does not turn
it on and off. Have defective switches
replaced by an authorized service center.
6. Replacement parts. All repairs, whether
electrical or mechanical, should be made by a
qualified service technician at an authorized
service center.
7. When servicing use only identical
replacement parts. Use of any other parts may
create a hazard or cause product damage.
8. Keep hands away from cutting area. Do not
hand hold pieces so small that your fingers go
under the blade guard. Do not reach
underneath work or in blade cutting path with
your hands and fingers for any reason.
9. Never cut more than one piece at a time or
stack more than one workpiece on the saw
table at a time.
10. Do not feed the material too quickly. Do not
force the workpiece against the blade.
11. Use only correct blades. Use the right blade
size and style for the material and the type of
cut. Blade teeth should point down
toward the
table.
12. Always support large workpieces while
cutting to minimize risk of blade pinching and
kickback. Saw may slip, work or slide while
c
utting large or heavy boards.
13. Do not remove jammed cutoff pieces until
blade has stopped.
14. Never touch blade or other moving parts
during use.
15. Before changing the setup and removing
covers, guards or blades, unplug the saw
from the power source.
16. Hold
the workpiece firmly against the saw
table.
17. To avoid accidental blade contact, minimize
blade breakage, and provide maximum blade
support, always adjust the blade guide
assembly to just clear the workpiece.
18. Keep blades clean, sharp, and with
sufficient set. Sharp blades minimize stalling
and kickbacks.
19. Always turn off saw before disconnecting it to
avoid accidental starting when reconnecting to
a power source.
20. Make sure work area has ample lighting to
see the work and that no obstructions will
interfere with safe operation before performing
any work using your saw.
21. The blade guides have been preset at the
factory. These settings are functional for some
applications. We recommended that you check
and adjust blade guide settings before first use
of your saw.
22. Do not use tool to cut metal.
23. This tool should have the following markings:
a) Wear eye protection.
b) Keep fingers away from the blade.
c) Do not remove jammed or cutoff pieces
until the blade has stopped.
4

d) Be sure blade is installed with teeth pointing
down.
e) Maintain proper adjustm
ent of the blade tension,
b
lade guides, and thrust bearings
f) Adjust the upper guide to just clear the
workpieces.
g) Hold the workpiece firmly against the table when
cutting.
24. If the power supply cord is damaged, it must
be replaced only by the manufacturer or by an
authorized service centre to avoid risk.
25. Save these instructions. Refer to them
frequently and use them to instruct other users.
TECHNICA
L SPECIFICATIONS
5
Technical specifications
Voltage
F
requency
Power input
Insulation cla ss
Protection
degre e
Ma
x. Cutting Depth
Max. Cutting Width
120V~
60Hz
0.47HP(35
0W)
Class B
IP 20
3-1/2"
9"
Table S size
300
x300mm
6
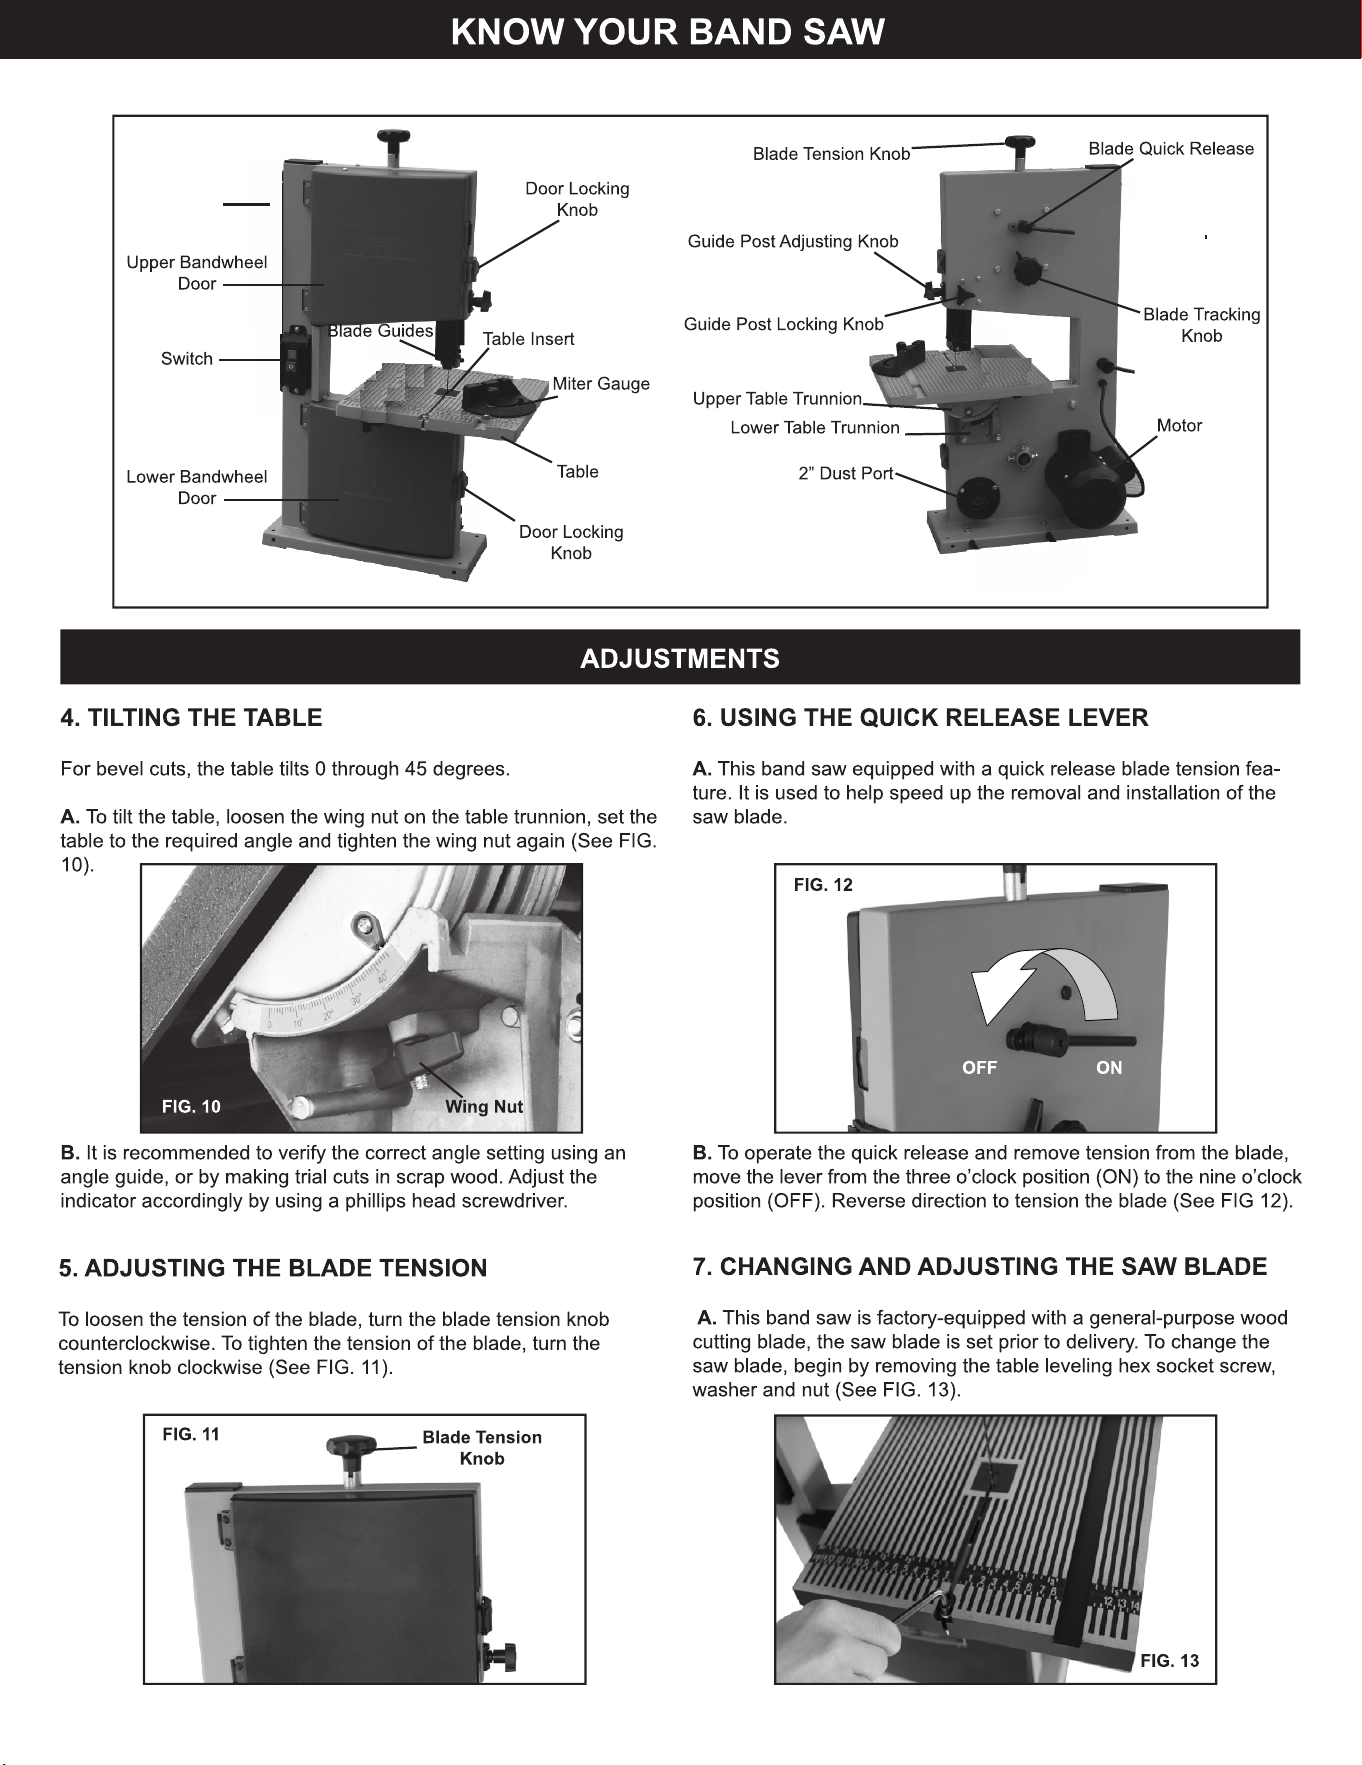
The
7
8
Push Stick
9
10

11
12
7
3
10
3
42
3
6
41
40
39
25
_
24
20
�-
�
15
16
7
�
5
3
54
�
52
_
_
4
9
�
C
�
3
�
i
b
66
65 64
6
3
:
68
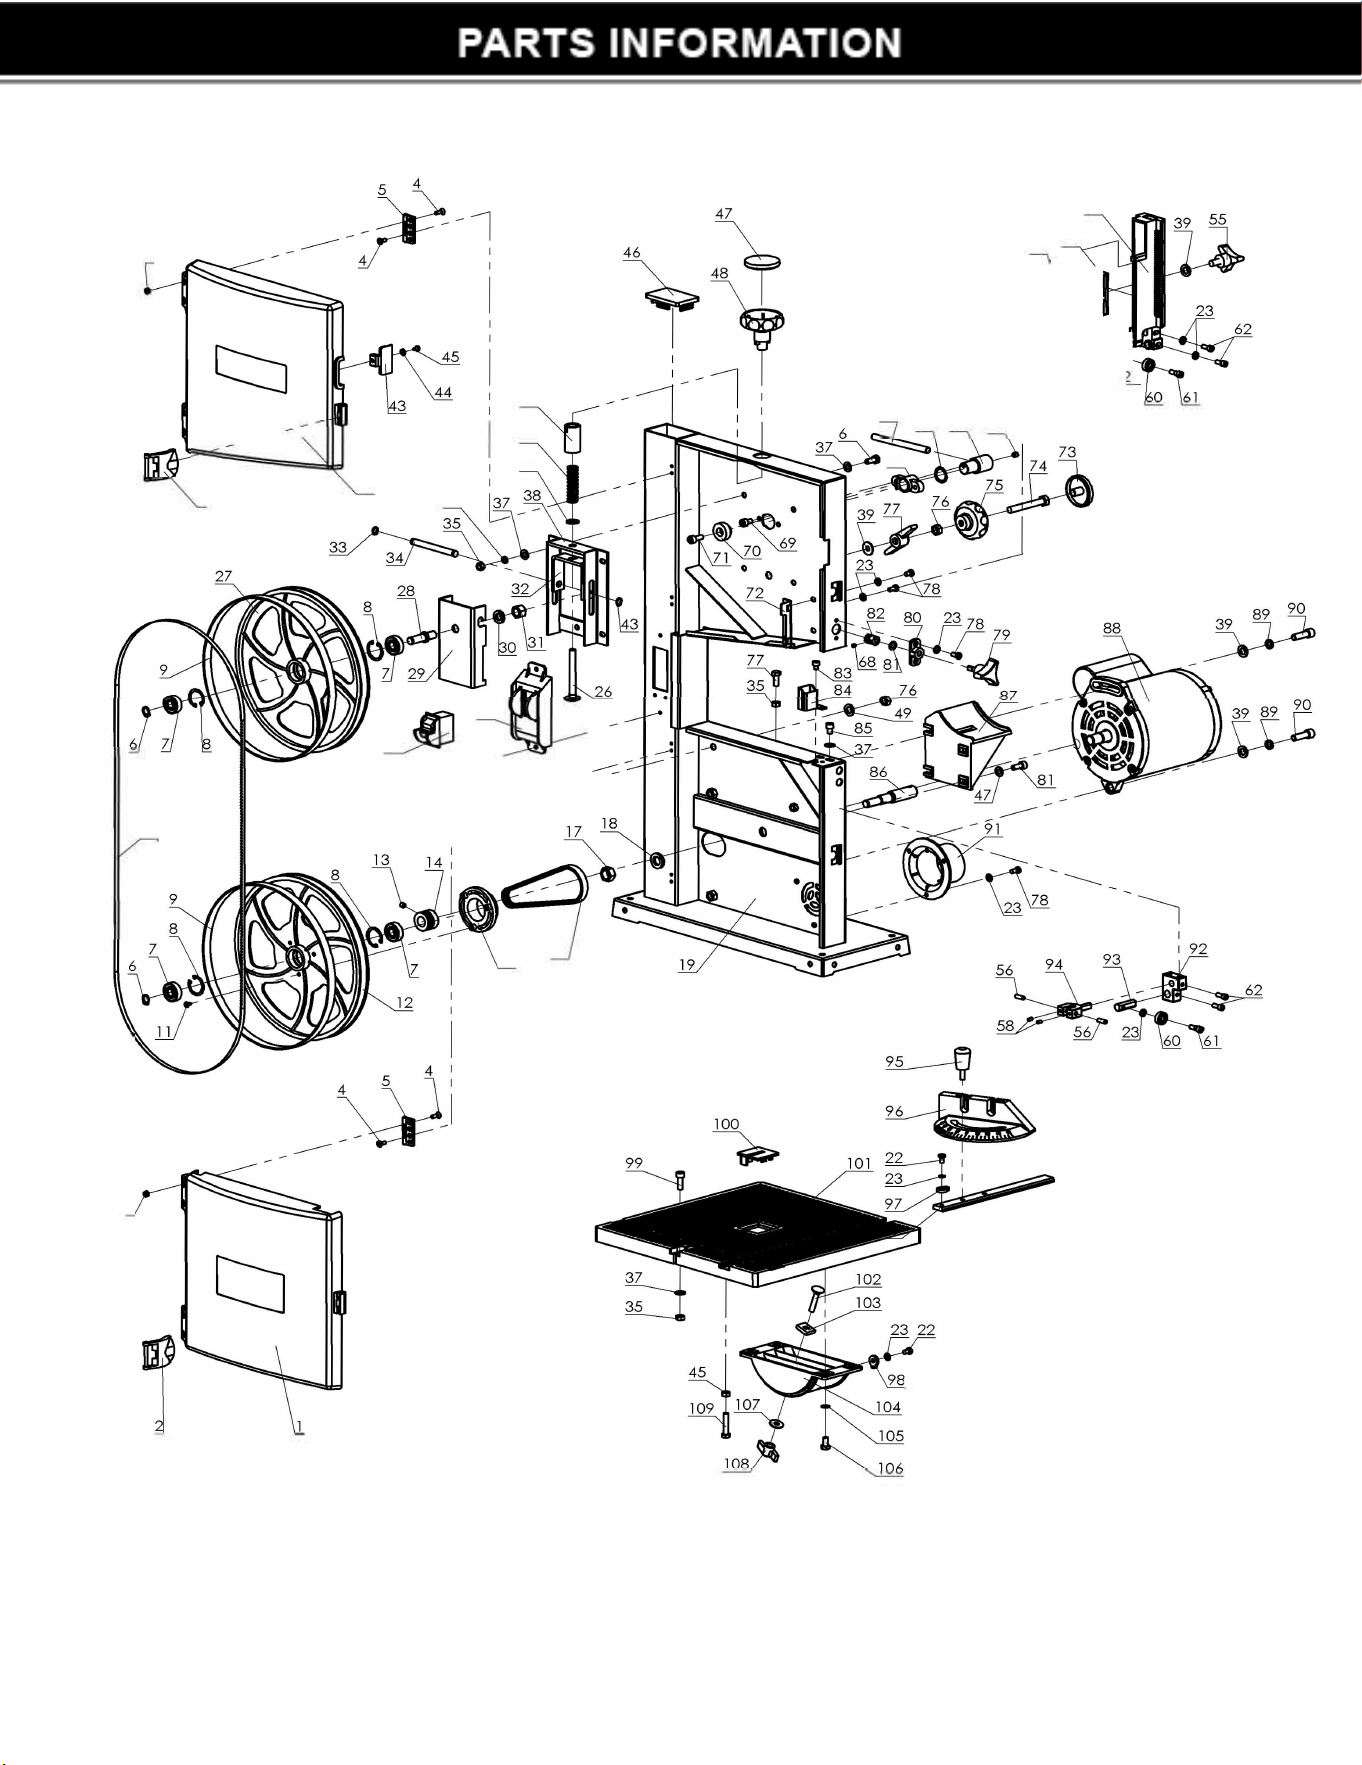
Part No.
Description
Qty. Part No.
Description
Qty.
1
low protection door
1 56
Cylinder Pin
4
2
Door Locking Plate
2 57
Position Shaft-Upper
1
3
Nut
8 58
Screw
5
4
Screw
16 59
Upper Guide Piece
1
5
Door Hinge
4 60
Ball Bearing
2
6
E-Ring
2 61
Screw for Ball Bearing
2
7
ball bearing
4 62
Screw
4
8
Retaing ring
4 63
Screw
1
9
Tire
2 64
Shaft
1
10
Saw Blade
1 65
Washer
1
11
Screw
3 66
Lever
1
12
Lower Wheel
1 67
Bolt
11
13
Screw
1 68
Fix Tube
1
14
Motor Pulley
1 69
Srew
2
15
Drive Pulley
1 70
Shaft Tube
1
16
Drive Belt
1 71
Screw
5
17
Nut
1 72
Baffle
1
18
Elastic Washer
1 73
Adjusting Knob Cap
1
19
Frame
1 74
Bolt
1
20
Brush
1 75
Adjusting Knob
1
21
Coach Bolt
1 76
Nut
3
22
Screw
9 77
Wing Locking Knob
1
23
Flat Washer
14 78
Srew
4
24
Switch
1 79
Operating Knob
1
25
Switch Plate
1 80
Locking Bracket
1
26
Coach Bolt
1 81
Washer
1
27
Upper Wheel
1 82
Gear
1
28
Upper Wheel Shaft
1 83
Screw
2
29
Bracket for Upper Wheel
1 84
Lower Protection Bracket
1
30
Elastic Washer
1 85
Screw
2
31
Nut
1 86
Lower Wheel Shaft
1
32
Blade Tensioner
1 87
Lower Table Trunnion
1
33
E-ring
2 88
Motor
1
34
Key Shaft
1 89
Elastic Washer
2
35
Nut
15 90
Srew
2
36
Elastic Washer
6 91
Dust Port
1
37
Flat Washer
17 92
Lower Support Piece
1
38
Wheel Carrier Bracket
1 93
Lower Position Shaft
1
39
Flat Washer
6 94
Lower Guide Piece
1
40
Spring
1 95
Knob
1
41
Tensioner Tube
1 96
Miter Guage
1
42
Upper Protection Door
1 97
Angle Pointer
2
43
View Window
1 98
Angle Pointer
1
44
Flat Washer
1 99
Screw
1
45
Screw
2 100
Table Insert
1
46
Plastic Insert
1 101
Work Table
1
47
Tension Knob Cap
1 102
Coach Bolt
1
48
Tension Knob
1 103
Slide Plate
1
49
Slide Plate
1 104
Lower Table Trunnion
1
50
Spring
1 105
Teeth Washer
4
51
Cover
1 106
Bolt
6
52
Locking Piece
1 107
Big Flat Washer
1
53
Fix Piece
1 108
Wing Locking Knob
1
54
Upper Guide Bracket
1 109
Bolt
1
55
Locking Knob
1
