
AIR FRYER
OWNER’S MANUAL

TABLE OF CONTENTS
READ ALL INSTRUCTIONS PRIOR TO OPERATING 3
IMPORTANT SAFEGUARDS AND WARNINGS
4
WHAT’S IN THE BOX
7
GETTING TO KNOW YOUR AIR FRYER
7
ASSEMBLY
8
BEFORE THE FIRST USE
11
PRE-PROGRAMMED COOKING SELECTIONS
12
QUICK START GUIDE
13
SPECIAL FUNCTIONS
16
COOKING HINTS
16
CLEANING AND MAINTENANCE
18
ENVEROMENTAL FRIENDLY DISPOSAL
18

READ ALL INSTRUCTIONSPRIOR TO OPERATING
IMPORTANT SAFEGUARDS AND WARNINGS
This manual provides detailed user instructions for the Single or Double
Basket Air Fryer and its components.
It's crucial to read, understand, and adhere to all these instructions.
Keep this manual in a readily accessible location for ongoing reference.
Unplug the Air Fryer from the outlet when NOT in use, before installing or
removing parts, and before cleaning or emptying its contents. Ensure the air
fryer has cooled down for approximately 30 minutes before disconnecting
the plug. Press the ON/OFF control to turn off the air fryer before removing the
power plug from the outlet, grasping the plug and not the cord.
Never leave the air fryer unattended while in use.
Avoid touching the surrounding surfaces directly as they may be hot and
could cause serious burns or injuries.
Use oven mitts to handle basket handles, crisper baking tray, separator, and
when removing food from the air fryer, as hot surfaces can cause serious
burns. Never touch hot food directly.
Always hold the basket by its handles.
Allow the air fryer or oven to cool before cleaning, handling, installing, or
removing parts.
Always ensure the air fryer basket is fully inserted and locked in place before
operation.
The Air Fryer is intended for indoor use ONLY under normal temperature
conditions.
DO NOT use the Air Fryer outdoors, as it could pose serious injury risks if
exposed to moisture.
Before using your Air Fryer, ensure the power source voltage matches the
specifications on the rating plate. Using an incorrect power source may void
the warranty and pose fire, death, or serious injury risks.
Avoid letting the power cord hang over the counter or touch hot surfaces.
Never operate the appliance with a damaged cord or plug, or if it
malfunctions. Seek examination, repair, or adjustment from an authorized
service facility.
Always supervise children when the appliance is in use and keep it out of
their reach.
Use only manufacturer-recommended accessories to prevent fire, electric
shock, or injury.
This appliance is not for children's use. Keep it away from children and pets.
When removing the food basket, ensure the appliance is off to prevent burns
or injuries.
Keep a First-Aid Kit nearby for emergencies.
Always use the air fryer with the basket securely in place.
•
•
•
•
•
•
•
•
•
•
•
•
•
•
•
•
•
•
•
•
•
3

IMPORTANT SAFEGUARDS AND WARNINGS (CONT.)
Properly insert the crisper baking tray(s) into each basket before cooking
and place food on top.
Use oven mitts to partially pull open the basket handles to check food. If
cooked, turn off the air fryer; if not, push the basket back in and continue
cooking.
WARNING: The air fryer will not function unless the basket is fully inserted and
locked.
WARNING: The basket, crisper baking tray(s), and separator will be very hot
after use. Use oven mitts to protect your hands.
Do not use the air fryer for anything other than its intended purpose.
Always unplug the air fryer when not in use or left unattended.
Never immerse the air fryer in water or other liquids to avoid electrical
hazards and damage.
Avoid contact with hot parts to prevent serious burns.
Handle the air fryer with care during use to avoid burns and injuries.
Do not operate the air fryer in an appliance garage. If storing in an appliance
garage, always unplug it from the electrical outlet to prevent fire risks,
especially if the unit touches walls or doors.
After each use, the Air Fryer will remain hot until it cools down. Avoid touching
it with bare hands to prevent serious burns and injuries.
Avoid using the Air Fryer in staff kitchen areas, shops, offices, or any other
non-residential environments.
Do not place the Air Fryer near other appliances that generate heat, such as
fryers or countertop ovens.
Protect the air fryer from direct sunlight, water splashes, and high humidity.
Keep the air fryer away from children and individuals with certain disabilities.
Children should not operate, clean, or maintain the air fryer, as it is not a toy.
The brand owners, manufacturer, and affiliates will not be liable for damages
or voided warranties due to commercial use, mishandling, misuse,
non-professional repairs, or failure to follow the instructions in this manual.
WARNING: Electricity and water together pose a risk of fatal electrical shock
and fire. In case of emergency, immediately unplug the air fryer from the
power outlet.
Only plug the air fryer into suitable, easily accessible, and grounded outlets.
Keep the power cord away from heat, dampness, and moisture.
If the power cord is damaged, do not use the air fryer until it is replaced by
the manufacturer or a qualified technician to avoid fire or personal injury
risks.
Avoid placing the air fryer on or near hot surfaces such as radiators, stoves,
or open flames.
Use handles and oven mitts to avoid touching hot surfaces or steam, which
can cause serious injuries.
Always place the Air Fryer on a horizontal, stable, sturdy, and heat-resistant
surface, keeping it at least 4 inches away from walls and other objects.
Avoid placing the air fryer underneath a cabinet, shelf, or inside a cabinet to
ensure proper air circulation.
•
•
•
•
•
•
•
•
•
•
•
•
•
•
•
•
•
•
•
•
•
•
•
•
•
4

Electrical Power
When disconnecting the power cord, always pull out the plug and avoid
pulling on the cord itself to prevent damage.
Never touch the cord with wet hands.
Except for the crisper tray or basket separator, do not put any part of the air
fryer in the dishwasher.
Avoid using aluminum foil in the air fryer basket.
CAUTION: This air fryer generates heat and may release steam during use.
Take precautions to prevent burns, fires, or injuries.
CAUTION: The air fryer retains heat after turning off.
Do not open the factory-set screws or attempt to look inside the motor, as
there is dangerous voltage inside. Dismantling or opening the air fryer in any
way will void the warranty and may result in fire, death, or serious injury. Do
not insert anything into the openings, as it may cause fire, electric shock,
death, or serious injury.
Using accessory attachments not recommended by the manufacturer will
void the warranty and may result in fire, electric shock, death, or serious injury.
WARNING: Do not use the air fryer if it is damaged, dropped, or not operating
properly. Immediately unplug it from the power outlet.
Use only mild cleaning agents and a damp cloth to clean the surface and
removable parts of the air fryer. Ensure surfaces are dry.
Do not use steam or pressure cleaners, as they may damage the appliance
and pose life-threatening hazards, electric shock, death, or serious injury.
Use only clean cleaning tools to clean the air fryer.
When unpacking the air fryer, remove any plastic film and dispose of it
properly.
Do not let children play with the packing materials, plastic film, or box, as they
pose a choking hazard and may cause death or serious injury.
•
•
•
•
•
•
•
•
•
•
•
•
•
•
If the electrical circuit is overloaded with other appliances, your Air Fryer may
not operate correctly. It should be connected to a separate electrical circuit
from other appliances.
•
WARNING: RISK OF FIRE OR ELECTRIC SHOCK
WARNING
RISK OF FIRE OR ELECTRIC SHOCK
DO NOT OPEN
WARNING: TO REDUCE THE RISK OF FIRE OR ELECTRIC SHOCK,
DO NOT REMOVE COVER (OR BACK)
NO USER-SERVICEABLE PARTS INSIDE
REPAIR SHOULD BE DONE BY AUTHORIZED SERVICE PERSONNEL ONLY
IMPORTANT SAFEGUARDS AND WARNINGS (CONT.)
5

Short Cord Instructions
SAVE THESE INSTRUCTIONS
FOR HOUSEHOLD USE ONLY
To minimize the risk of electric shock, this power cord is designed to fit into a
polarized outlet ONLY one way. If the power cord plug does NOT fully fit into
the power outlet, reverse the plug, and try again. If it still doesn't fit, consult a
qualified electrician, or contact customer service.
Do NOT attempt to modify the power cord plug in any way.
•
•
6
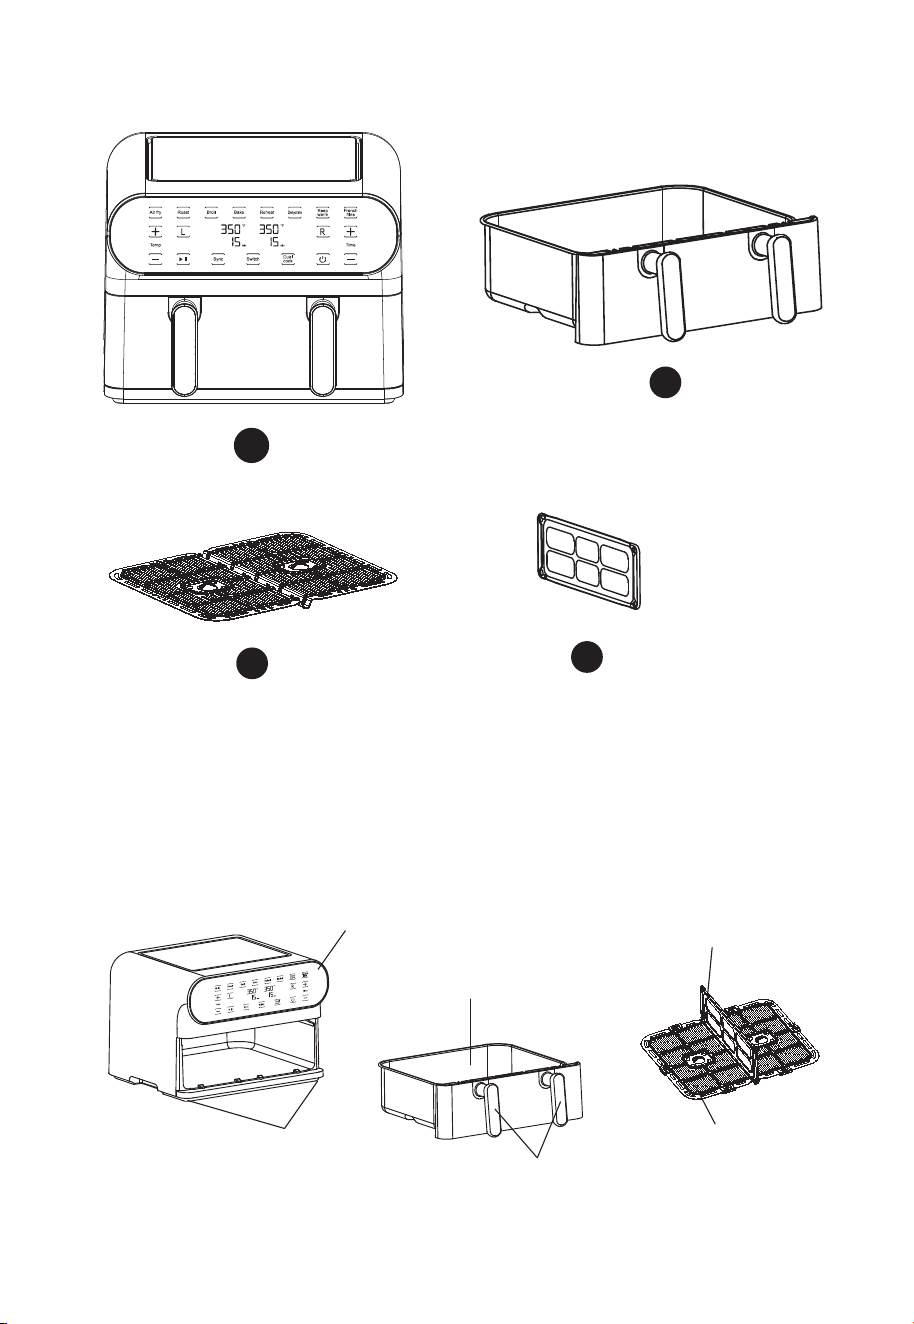
WHAT’S IN THE BOX
GETTING TO KNOW YOUR AIR FRYER
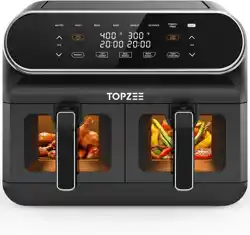
11-QT MULTIFUNCTIONAL AIR FRYER
AIR FRYER
AIR FRYER LINERS
DIVIDER
REMOVEABLE
CRISPER TRAY
C
D
AIR FRYER BASKET
B
A
Digital Touchscreen Time/
Temperature Display
Air Fryer Basket
Air Fryer Basket
Handles
Liners Divider
Crisper Baking Tray
Non-Slip Bottom
7

CONTROL PANEL
Air fry Roast Broil Bake
Sync Switch
Reheat
Dual
cook
Temp Time
Keep
warm
French
fries
Dehydrate
MinM in
1
10 1811 13 14 15 171612
2 3 4 5 6 7 8 9
AIR FRY
ROAST
BROIL
BAKE
DUAL DIGITAL TEMP & TIME DISPLAY
REHEAT
DEHYDRATE
KEEP WARM
FRENCH FRIES
TEMP CONTROL (+ OR -)
• Press + or – on the left side of the control panel to increase or reduce TEMP
in 5-degree increments.
START OR PAUSE
• Once programming is complete, press START and PAUSE to initiate the
cooking process or pause any operation.
Air fry Roast Broil Bake Sync Switch Reheat Dual cook Temp Time Keep warm
French fries Dehydrate MinM in
LEFT BASKET CONTROL
• NOTE: LEFT or RIGHT Baskets may be programmed independently at any
time before or during operation.
• The L or R Control will illuminate steadily on the screen when active. To
adjust or add programming at any time, press the appropriate L or R Basket
Control. When the Control begins to flash, TEMP and TIME can be adjusted.
SYNC FOOD FINISH
• Press SYNC to ensure both baskets will finish cooking together.
• Both LEFT and RIGHT Baskets must be programmed. Then press START and
PAUSE Control to begin operation.
1.
2.
3.
4.
5.
6.
7.
8.
9.
10.
11.
12.
13.
8

• Cooking time will appear on the L and R sides, and the countdown will begin
on the side with more time. When the remaining time on L and R sides is even,
the countdown will proceed on both sides.
• NOTE: Once cooking has started, SYNC function will not be operable.
SWITCH
• Press SWITCH Control to enter Single Basket mode without Separator. The
L/R, SYNC, and DUAL COOK Controls won’t light up. Only one set of TIME and
TEMPERATURE will be displayed.
DUAL COOK
• Press DUAL COOK to effortlessly duplicate settings for both LEFT and RIGHT
Air Fryer Baskets. After pressing DUAL COOK, you can simply adjust the tem-
perature and time for both Baskets simultaneously.
RIGHT BASKET CONTROL
ON/OFF CONTROL
• When the Air Fryer is plugged in, a tone will sound, indicating that the unit is
powered on. The ON/OFF Control will light up.
• When ON/OFF is pressed, a tone will sound, and all the Controls will light up.
• During operation, press ON/OFF Control to turn both LEFT and RIGHT Basket
Controls OFF.
TIME CONTROL (+ OR -)
• Press + or – on the right side of the control panel to increase or decrease
TIME in 1-minute increments.
• NOTE: When using DEHYDRATE, TIME will increase or decrease in 1-hour
increments.
14.
15.
16.
17.
18.
9
FEATURES
Assembly
Dual Digital Touchscreen Controls
Digital Temperature and Time
Display
Removable Air Fryer Basket with
Handles
• 11 Quart or 2 x 5.5 Quart Each
Removable Crisper Baking Tray
Removable Liners Divider
Non-slip Bottom
Control Panel
•Air Fry, Roast, Broil, Bake, Reheat,
Dehydrate, Keep Warm, French Fries
•Sync, Switch, Dual Cook
•
•
•
•
•
•
•
Temperature Controls
Time Controls
Left and Right Basket Controls
ON/OFF
Start and Pause Control
•
•
•
•
•
10
BEFORE FIRST USE
Check that all accessories are included, and the Air Fryer is in perfect
condition. Remove all packaging materials.
Clean all detachable parts thoroughly with mild soap and water.
a.Removable Air Fryer Basket, Crisper Baking Tray, and Separator
3.Use a damp cloth to wipe the inside and outside of the Air Fryer, and a dry
cloth to dry it. DO NOT immerse the Air Fryer Body in water.
After cleaning, dry and place all detachable parts in the Air Fryer.
NOTE: During the first use, the Dual Air Fryer may emit a slight odor. This is
normal and will not affect the flavor of the food.
1.
2.
3.
4.
11

PRE-PROGRAMMED COOKING SELECTIONS
MENU DEFUALT
TEMP
(°F)
DEFAULT
TIME
DUAL COOK
TIME
TEMP RANGE
(°F)
TIME RANGE
Air Fry
400
20 mins
23 mins
170 ~ 400
1 ~ 60 mins
Roast
400
35 mins
37 mins
350 ~ 400
1 ~ 60 mins
Broil
400
10 mins
13 mins
400
1 ~ 30 mins
Bake
350
16 mins
19 mins
170 ~ 400
1 ~ 60 mins
Reheat
250
6 mins
9 mins
170 ~ 400
1 ~ 60 mins
Dehydrate
130
8 hours
8 hours
90 ~ 170
1hr ~ 24 hrs
Keep
Warm
170 60 mins 60 mins 150 ~ 200 1 ~ 60 mins
French
Fries
400 20 mins 30 mins 170 ~ 400 1 ~ 60 mins
12
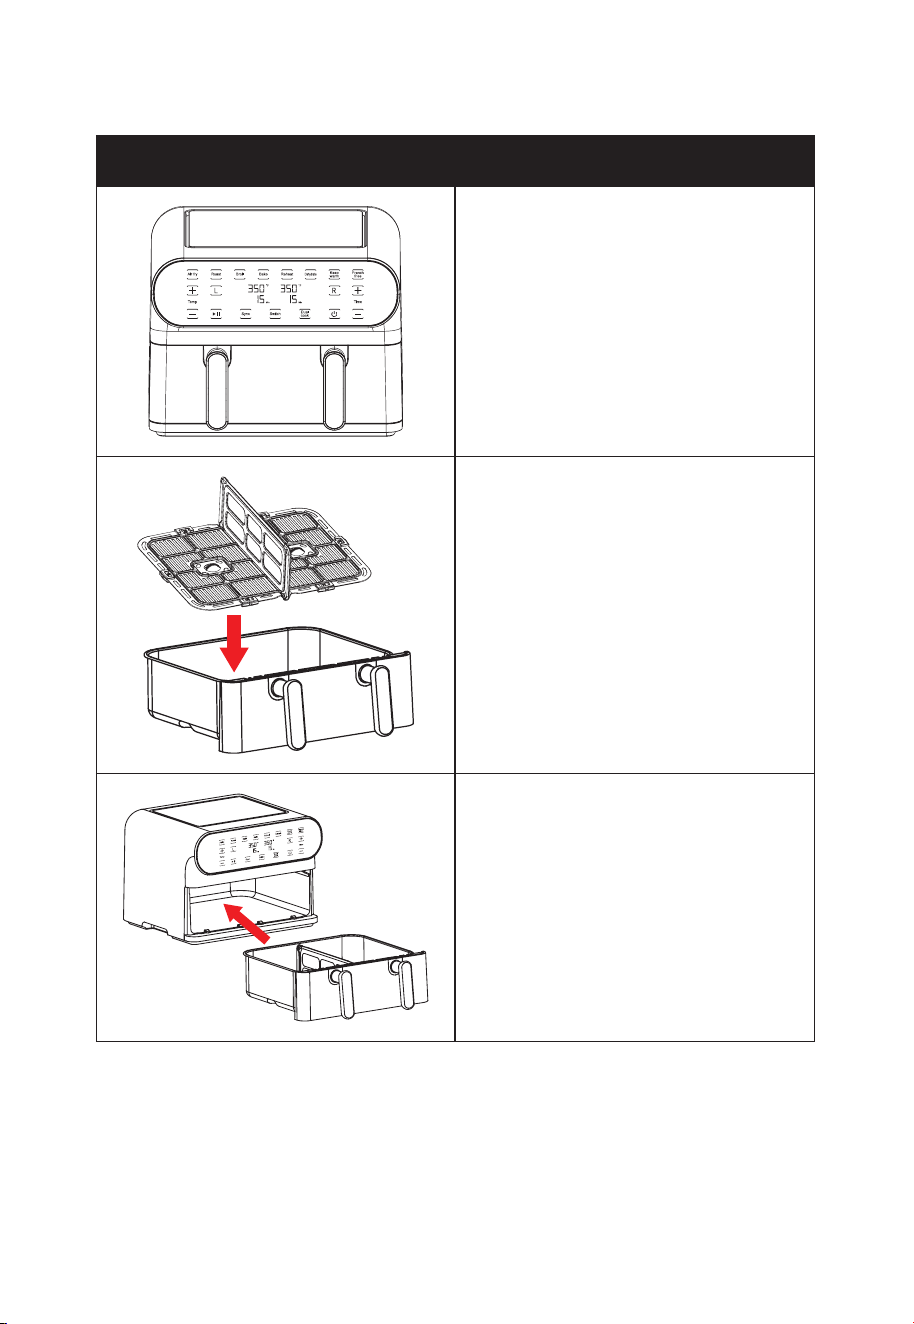
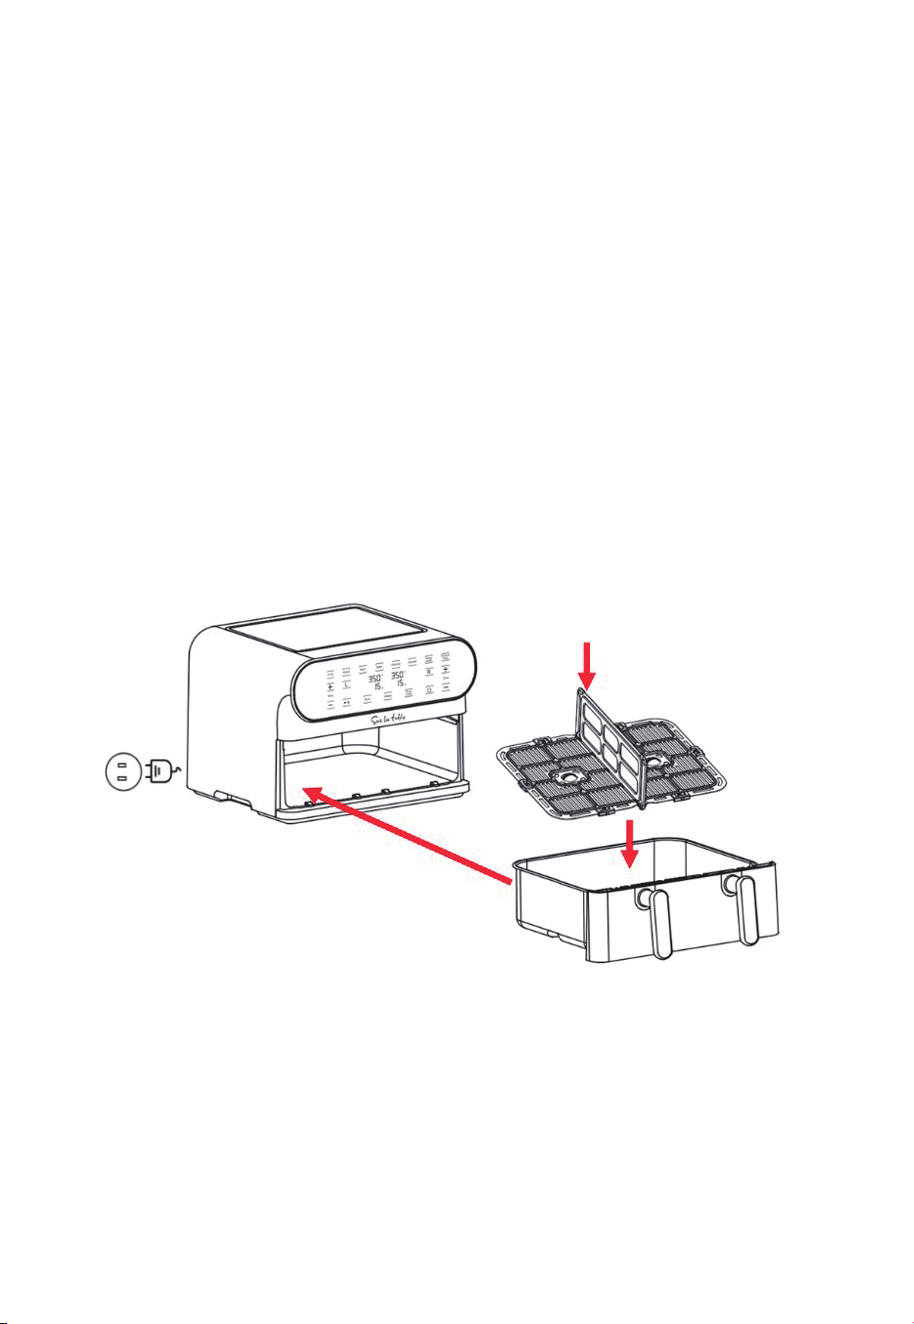
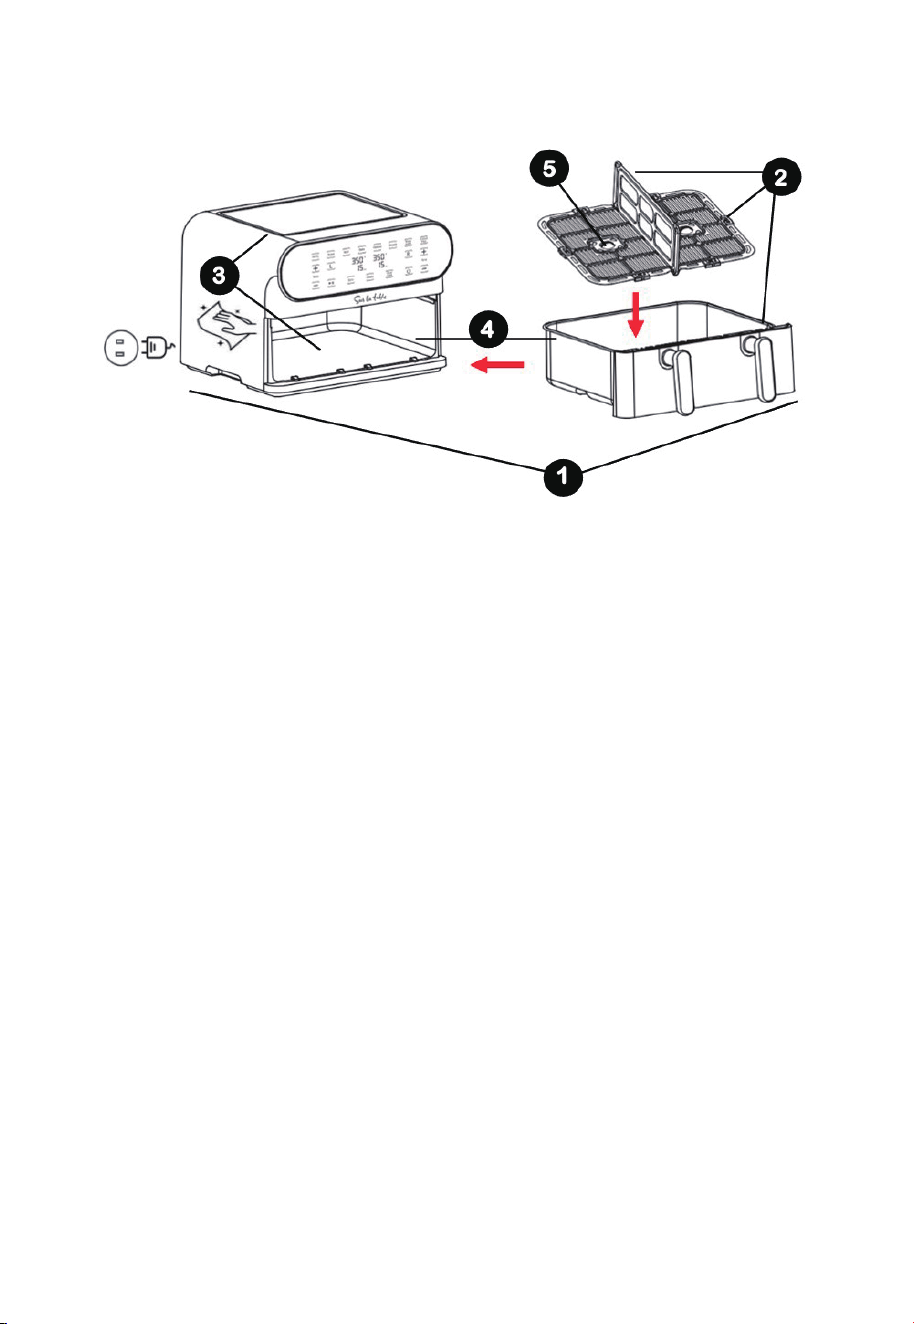
ASSEMBLE YOUR AIR FRYER
1. Place the air fryer on a flat,
stable, heat-resistant surface
close to an electrical outlet.
2. Insert the crisper baking tray
with or without the separator.
3. Insert the basket into the air
fryer and lock it into place.
Warning: Do NOT place the air
fryer underneath cabinets.
QUICK START GUIDE
13

1.
2.
3.
4.
5.
6.
7.
8.
9.
10.
11.
12.
13.
START COOKING
Plug the air fryer cord into an electrical outlet. The ON/OFF control will light
up in white.
Place food on the crisper baking tray in the air fryer basket without the
separator.
WARNING: Do NOT overfill. To ensure proper cooking and air circulation,
NEVER fill any Air Fryer Basket more than 2/3 full.
NOTE: When air frying fresh vegetables, it is not recommended to add
more than 2 to 3 cups of food to the Air Fryer Basket.
IMPORTANT: The maximum food capacity for the air fryer basket is 11 quarts of
food per basket.
1.
2.
Insert the basket into the air fryer and lock it into place.
Press the ON/OFF control. The control panel will illuminate.
Press Switch.
3.
4.
5.
a.
b.
NOTE: The L, R, Sync, and Dual Cook buttons will turn off. Sync buttons will
turn off.
a.
Press the desired cooking function. The default cooking time and
temperature will flash.
If necessary, adjust the cooking time and temperature using the + or –
buttons.
6.
7.
NOTE: In the Dehydrate Setting, time is adjustable in 1-hour increments.
a.
Press the start/pause button to initiate the cooking process.
8.
NOTE: To pause the cooking process, press the start/pause button. To
resume the cooking process, press the start/pause button.
NOTE: Two-thirds through the cooking process, the air fryer will beep, and
the display will show SHK, reminding you it’s time to shake or flip your
food for even cooking.
a.
b.
When the remaining time reaches 00:00, the display will show a countdown
of 20 seconds, and the air fryer will beep 5 times before turning off.
9.
Cook using the full basket:
Plug the air fryer cord into an electrical outlet. The ON/OFF control will light up
in white.
Place food on the crisper baking tray in the air fry basket with the separator.
WARNING: Do NOT overfill. To ensure proper cooking and air circulation,
NEVER fill any Air Fryer Basket more than 2/3 full.
NOTE: When air frying fresh vegetables, it is not recommended to add
more than 2 to 3 cups of food to the Air Fryer Basket.
1.
2.
Insert the basket into the air fryer and lock it into place.
Press the ON/OFF control. The control panel will illuminate.
Press the L button to set up the cooking process for the food on the left
basket.
Press the desired cooking function. The default cooking time and tempera-
ture will flash.
3.
4.
5.
6.
a.
b.
Cook using both baskets:
14

If necessary, adjust the cooking time and temperature using the + or –
buttons.
Press the R button to set up the cooking process for the food on the right
basket.
Press the desired cooking function. The default cooking time and
temperature will flash.
If necessary, adjust the cooking time and temperature using the + or –
buttons.
7.
8.
9.
10.
Press the start/pause button to initiate the cooking process.
11.
When the remaining time reaches 00:00, the display will show a countdown
of 20 seconds, and the air fryer will beep 5 times before turning off.
12.
NOTE: Press the Sync button to synchronize the cooking time in each
basket so both dishes finish cooking at the same time.
a.
NOTE: To pause the cooking process, press the start/pause button. To
resume the cooking process, press the start/pause button.
NOTE: Two-thirds through the cooking process, the air fryer will beep, and
the display will show SHK, reminding you it’s time to shake or flip your food
for even cooking.
a.
b.
15

SPECIAL FUNCTIONS
AIR FRYING TECHNIQUES
Sync Food Finish:
The Sync Finish feature independently adjusts temperature and cooking time in
each basket, allowing two different dishes to finish cooking at the same time. To
set up, simply program both sides, press sync, and start/pause. The cooking
time will appear on both sides, and the countdown will begin on the side with
more time. When the remaining time on both sides is even, the countdown will
proceed on both sides. NOTE: Once cooking has started, the Sync function will
not be operable.
COOKING HINTS
Air Frying Pre-Packed Frozen Foods:
As a rule, depending on the food and amount to be cooked, suggested cooking
times may have to be reduced slightly.
Roast:
Use a meat thermometer inserted into the center of the meat to determine
desired doneness. Cook meats to 5 to 10 degrees below desired doneness
(internal temperature). Allow meat to stand 15 to 20 minutes before serving.
The food temperature will continue to rise while the food is resting. Roast large,
tender cuts of meat and poultry. Seasoning prior to cooking adds to the flavor
and aroma during cooking. A layer of fat on the top of the roast promotes better
browning and provides natural basting. To speed up the browning process,
brush lean cuts of meat, chicken, and fish with oil, margarine, or melted butter.
Dual Cook:
The Dual Cook function allows you to transfer settings from one basket to the
other at the touch of a button. To set up, simply program one of the baskets with
the desired cooking function, time, and temperature. Then, press dual cook to
copy that recipe onto the other basket. Finally, press the start/pause button to
initiate the cooking process.
Shake:
The shake reminder lets you know when it’s time to shake your food. You don’t
have to do anything to set this function up. Two-thirds through the cooking
function, the display will show SHK, reminding you to shake or flip your food for
even cooking.
16

Broil:
Use BROIL to melt cheese or to brown crumb toppings. Typically, BROIL is used
for thinner cuts of meats, marinated meats, chops, poultry, or fish, as well as
fruits and vegetables. Dry marinated meats and fish before broiling. Always pat
meat dry to reduce smoke and promote brownness during broiling. To speed
up browning and add flavor, brush lean cuts of meat, chicken, and fish with oil
or melted butter. Trim excess fat from meat and score edges to prevent curling.
Thaw frozen meats and fish before broiling. Broil time is determined by the
desired doneness. Always use a meat thermometer.
Bake:
Check package directions to determine if the container is suitable for use in an
Air Fryer.
Dehydrate:
NOTE: When manually programming the DEHYDRATE menu selection, TIME will
increase or decrease in 1-hour increments. Dehydrate fresh, ripe foods to
preserve nutrients and enhance flavor.
17

CLEANING AND MAINTENANCE
STORING INSTRUCTIONS
Environmentally Friendly Disposal
This Air Fryer requires very little maintenance. It contains no user-serviceable
parts. Any servicing requiring disassembly other than cleaning must be
performed by a qualified appliance repair technician.
WARNING: Allow the Air Fryer to cool fully before cleaning.
Unplug the Air Fryer.
Remove the Basket from the Air Fryer.
Make sure Air Fryer Basket, Separator, and Crisper Baking Tray have cooled
completely before cleaning.
Wash Air Fryer Basket, Separator, and Crisper Baking Tray in warm soapy
water and rinse well. Hand dry with a soft cloth.
Do not use metal kitchen utensils or abrasive cleaners or cleaning products
as these may damage the non-stick coating.
Only the crisper tray and basket separator are dishwasher safe. For best
results, place them on the top rack.
Wipe the Air Fryer with a soft, non-abrasive damp cloth to clean it. Then use
a dry soft cloth to dry all surfaces.
Make sure the Air Fryer is unplugged and all parts are clean and dry before
storing.
Never store the Air Fryer while it is hot or wet.
Insert the clean Crisper Baking Tray and Separator inside the Air Fryer.
Store Air Fryer in its box or in a clean, dry place.
•
•
•
•
•
•
•
•
•
•
•
•
•
You can help protect the environment! Please remember
to respect the local regulations. Take non-working
electrical equipment to an appropriate waste disposal
center.
18

Power Supply
Rated Power
AC 120V 50/60Hz
1700W
