
Tire Inator Portable Air Compressor ITI001
User Manual
To reduce the risk of injury, read and understand the instruction manual before use.
Note: The illustrations of the product, its accessories, and user interface provided in this manual
are for reference only.
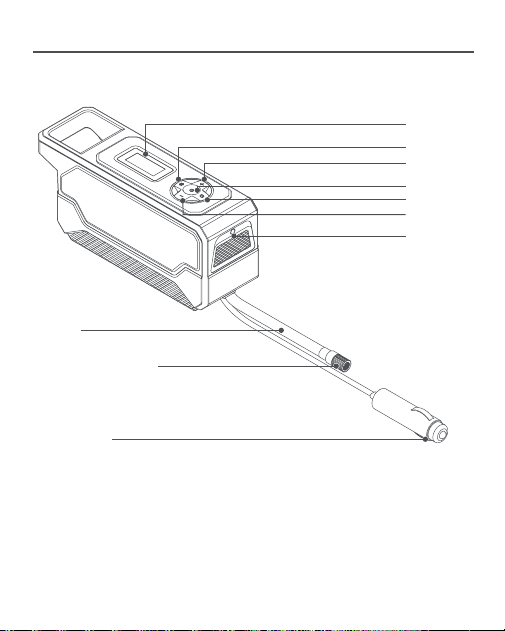
Product Overview
12V Power Plug
Schrader Valve Adapter
Air Hose
Display
+
Light On/O
Start/Stop
Unit
-
Light
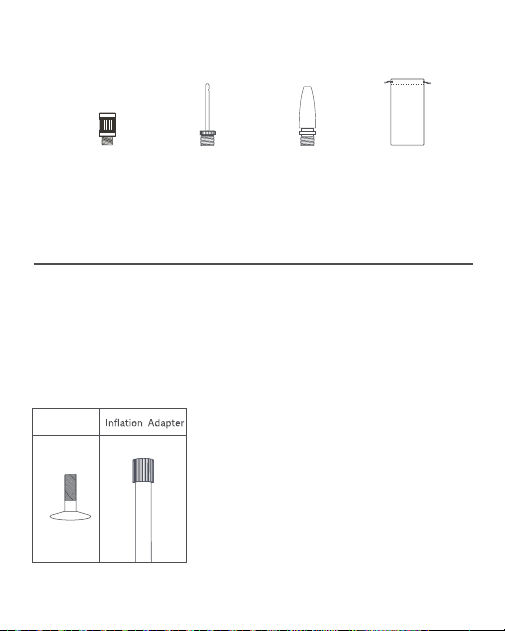
Presta Valve
Adapter × 1
Needle Valve
Adapter × 1
Accessories
Balloon
adapter × 1
Pouch
× 1
How to Use
1. Turning on/o
Turning on: Insert the 12V power plug and the device will turn on automatically.
Turning o: Unplug the 12V power plug, the device will turn o automatically.
2. Connecting the air hose (with the valve adapter) to the tire valve
Schrader Valve
Valve Type
Tires on cars, motorcycles, e-bikes, and most mountain bikes
use a Schrader valve.
To inate: Connect the Schrader valve adapter on the
high-pressure air hose to the Schrader valve to start inating.
To deate: Use an appropriate tool (for example, a 4 mm hex
key) to press the valve stem to release the air.
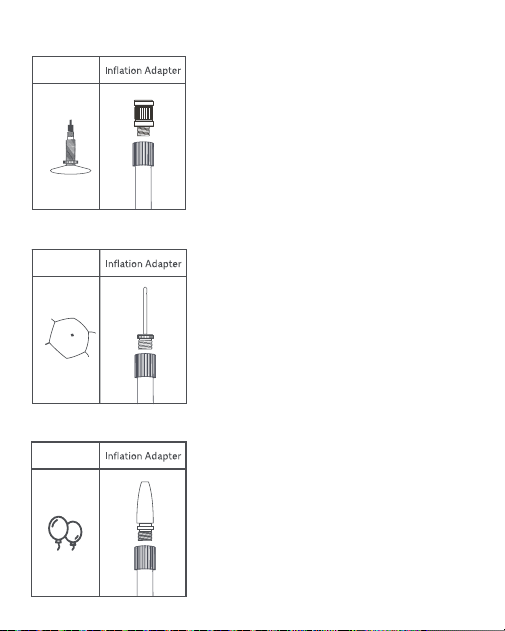
Presta Valve Adapter
Valve Type
Road bicycles and certain mountain bikes require the
included Presta valve adapter to be used.
To inate: 1. Connect the Presta valve adapter to the
Schrader valve adapter on the high-pressure air hose.
2. Unscrew the tire's Presta valve.
3. Connect the Presta valve to the adapter to start inating.
To deate: Unscrew the Presta valve and press the valve stem
down to release air.
Needle Valve Adapter
0
.
8
b
a
r
1
2
p
s
i
Valve Type
To inate balls like basketballs and footballs, the included
needle valve adapter will need to be used.
To inate: Screw the needle valve adapter onto the Schrader
valve adapter, then insert the needle into the ball's valve to
start inating.
To deate: Insert the needle valve adapter into the valve of
the ball, and gently apply pressure to the ball to release air.
Balloon adapter
Valve Type
To inate balloons, swim rings and more, this ballon adapter
will need to be used.
To inate: Screw this balloon adapter onto the Schrader valve
adapter, then insert into balloon's valve to start inating.
To deate: Insert this balloon adapter into the valve of the
ballon, and gently apply pressure to the ballon to release air.

The current air pressure will automatically be displayed after the high-pressure air hose is
connected to an item while the air compressor is turned on. ITI001 oers a pressure measuring
range of 3 to 160 psi.
To ensure safety and to prevent injuries from explosions due to over-ination, always refer to
the instructions or relevant directions accompanying the item to be inated before inating it,
in order to determine the correct air pressure.
3. Detecting Air Pressure
4. Determining the Right Air Pressure
The recommended tire pressure range for cars, bicycles,
e-bikes, and motorcycles is marked on the sidewalls of the
tires.
The recommended tire pressure for cars is also indicated on
the driver's side door jamb.
For details concerning load carrying capacity and
recommended air pressures, refer to your vehicle's
instructions or manual.
The recommended air pressure for footballs, basketballs,
volleyballs, and other balls is indicated near the ball's air
valve.
3
6
p
s
i
/
2
5
0
k
P
a
/
2
.
5
b
a
r
Balls
0
.
8
b
a
r
1
2
p
s
i
Tires
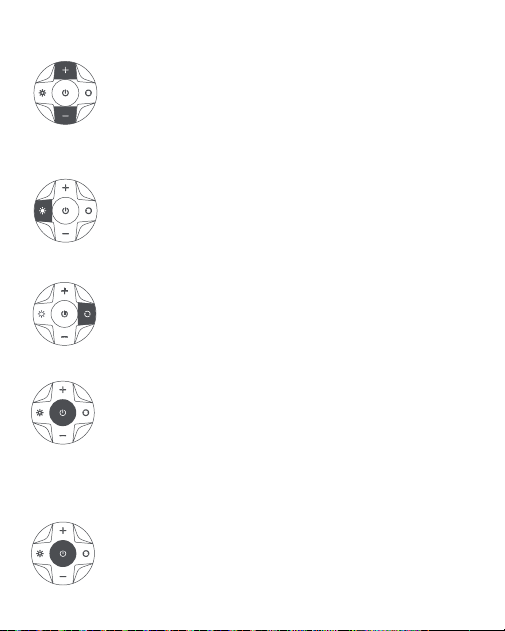
Press + or - to increase or decrease the target pressure value. Press and hold
the + or - button to quickly adjust the pressure value. When adjusting the
pressure, the blinking value indicates the target pressure, and a non-blinking
value indicates the real-time pressure.
Press the start/stop button to start inating. The current pressure is displayed
in real-time while inating. When inating, the air compressor may be as loud
as 75–80 dB. Please take appropriate precautions to protect your hearing. After
prolonged use, the high pressure air hose, air nozzle connector and the body
will have a signicant temperature increase, avoid touching it for a long time.
When the air pressure reaches the target value, the inator will automatically
stop inating. During the ination process, you can also press the start/stop
button to stop the ination.
Press the light on/o button to switch between light on, SOS light, and light o.
Adjusting the Target Pressure
Light
Press the Unit button to switch the pressure unit psi/bar/kPa on the display.
Unit switch
Start Inating
Stop Inating

Troubleshooting
Problem
Make sure that the power cord is connected properly.
Slow ination speed
Solution
Tighten the valve.
Cannot be turned on
Cannot inate or detect
pressure
Air compressor turns on but
does not inate
1. Check whether the air hose is leaking.
2. Check whether both ends of the air hose are securely
connected.
3. Check whether the item that is being inated is leaking.
1. Check if the power cord is properly connected.
2. Check if the current tire pressure is higher than the target
value.
1. Make sure that you are using the correct valve connector.
2. Make sure that the tire valve core is clean and free of foreign
particles such as dirt.
E1/E2 Error
Car Fuse Protection
Deate the target tire below 60 PSI before restarting the
machine.
E6 Error
Vehicle Power System Issue
Check the vehicle’s electrical system (low/dead battery, loose
wiring, excessive load, or alternator failure).
Flashing Light
Incompatible Power Source
Use only a 12V socket (not 24V/48V). Try another car outlet if
available.
Products such as balloons with low inatable pressure are not
within the range of this product.
Air compressor inates
normally but the displayed
air pressure is zero
Air leaks out when
connecting the air hose

Specications
Sensor Accuracy
±1psi
Input Power
130 W
Air Valve
Dimensions
Schrader Valve Adapter 13 × 11.8 mm
Power Supply
Mode
12V Power Supply
Power Cord
Length
3.2 m
Screen size
35.5 × 15 mm
Pressure range 0.2~11 bar/3~160 psi/20~1103 kPa
Length of air hose
600 mm, outer diameter 9.3 mm
219 × 72 × 104.5 mmItem Dimensions
0.2~10.3 bar/3~150 psi/20~1034 kPa
Ination Pressure
Range
ITI001Model
Name
Inzeetor Tire Inator Portable Air Compressor

To reduce the risk of injury, read and understand the instruction manual before use.
CAUTION – Risk of electric shock. Do not expose to rain or wet conditions.
Do not use in explosive atmospheres where ammable liquids, gases, or dust are present.
Keep hands away from moving parts to prevent injury.
Do not operate with safety guards removed.
1) Power tool use and care
Ensure the vehicle engine is running or the ignition is in 'ON' position when using this tool to
avoid draining the battery.
Disconnect the tool when not in use to prevent accidental activation or power drain.
This product is not a toy and should not be used by children.
If the air compressor makes an unusual noise while running or starts to overheat, turn it o
immediately.
Always make sure the correct air pressure unit is selected before setting the air pressure to
prevent accidents such as a burst tire. Common Unit Conversion: 1 bar = 14.5 psi, 1 bar = 100
kPa.
Always monitor the air compressor during usage and never leave it unattended when using it
without presetting a pressure to avoid over-inating.
Check your vehicle owner’s manual before use. Some vehicles may limit power output from the
12V outlet.
The manufacturer is not liable for damage to vehicle electronics or battery caused by improper
use.
2) Electrical safety
The air compressor uses a built-in DC motor which may produce electrical sparks when running
and should never be used in ammable or explosive environments.
Use only with a 12V DC vehicle power outlet. Do not connect to AC power sources or voltages
higher than 12V.
Do not short-circuit the power terminals. Overheating may damage the tool or vehicle wiring.
Do not use if the 12V outlet or plug becomes loose, hot, or shows signs of melting.
3) Personal safety
Please take appropriate precautions to protect your hearing, as the operation of the air
compressor can be noisy.
Additionally, the air compressor and air hose can become very hot after extended use. Do not
touch hot surfaces until they have cooled down to avoid burns.
4) Work area safety
The air compressor is not waterproof and should never be rinsed with water.
Only use the air compressor in a clean, dry environment. Intrusion of dirt and dust may cause
damage to the air compressor.

Read the user manual before using.
Tested to UL 1450:2010 R5.21 by TÜV Rheinland (cTUVus CN25UIQX 001)
This product complies with California Proposition 65 (CP65) requirements and contains no
chemicals listed under CP65 known to cause cancer, birth defects, or other reproductive harm.
This device complies with Part 15 of the FCC Rules. Operation is subject to the
following two conditions:
(1) This device may not cause harmful interference, and
(2) This device must accept any interference received, including interference that
may cause undesired operation.
Note: Changes or modications not expressly approved by the party responsible for
compliance could void the user’s authority to operate the equipment.
All products bearing this symbol are waste electrical and electronic equipment
(WEEE as in directive 2012/19/EU) which should not be mixed with unsorted
household waste. Instead, you should protect human health and the environment
by handing over your waste equipment to a designated collection point for
the recycling of waste electrical and electronic equipment, appointed by the
government or local authorities. Correct disposal and recycling will help prevent
potential negative consequences to the environment and human health. Please
contact the installer or local authorities for more information about the location
as well as terms and conditions of such collection points.
Manufactured by: ZeeYuan (HK) Technology Limited
Address: Unit 1303, 13/F, Grand City Plaza, 1 Sai Lau Kok Road, Tsuen Wan, N.T.
Symbol Descriptions