PARTYCON BASE
EN User Manual Bluetooth Speaker PARTYCON BASE
CZ
Uživatelská příručka BTreproduktor PARTYCON BASE
SK
Používateľská príručka BTreproduktor PARTYCON BASE
HU
Felhasználói kézikönyv PARTYCON BASE BT hangszóró
PL
Podręcznik użytkownika Głośnik BT PARTYCON BASE
EN – 1
PACKAGE CONTENTS
1× PARTYCON BASE Bluetooth Speaker
1× Wireless Microphone
1× USB-C charging cable
1× User Manual
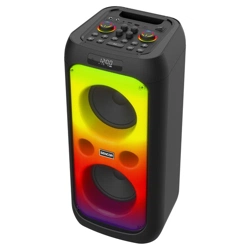
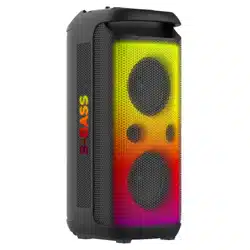
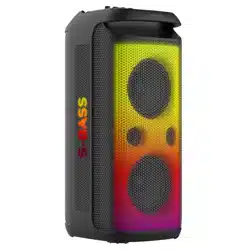
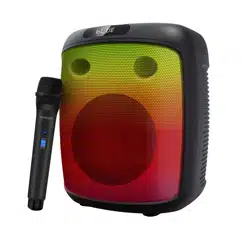
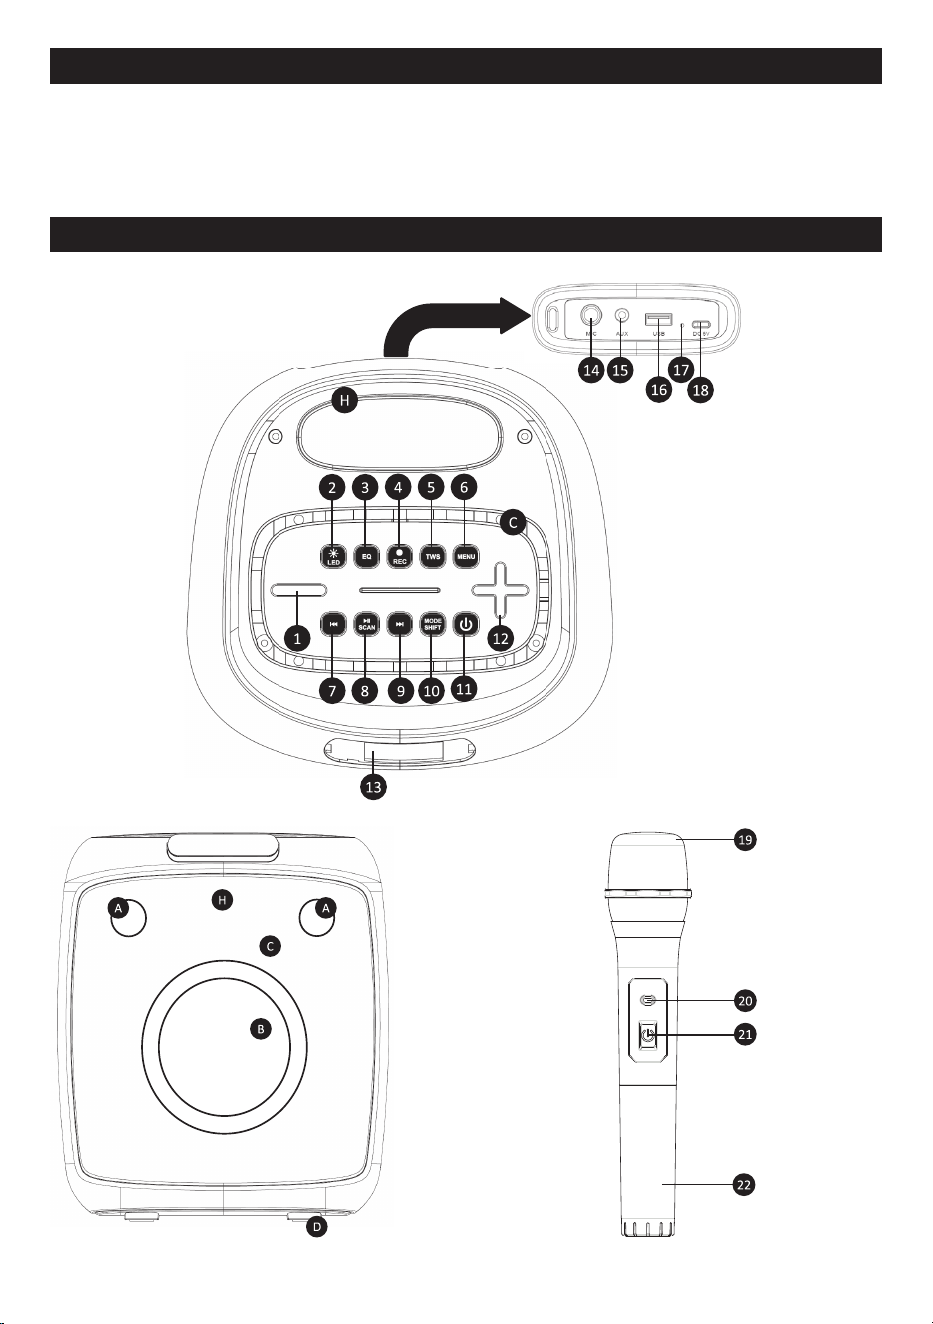
DESCRIPTION OF BLUETOOTH SPEAKER
EN – 2
BASE front side
A Treble speaker
B Wideband speaker
C LED effect
D Bluetooth speaker feet
BASE top side
1 Volume down button – short press / long press
2 Change or switch off LED effects – short press
3 Change preset equalizer – short press
4 Record sound from microphone – short press
Delete recording – press and hold
5 TWS button to connect and disconnect two BT speakers – short press
6 MENU button – short press
Set the bass level
Set the treble level
Set the microphone volume
Set the microphone echo
7 Select previous track or switch to previous FM station – short press
8 PLAY/PAUSE button
Play or pause recorded music – short press
Scan available FM frequencies – long press
Disconnect BT speaker from paired device – long press
9 Select next track or switch to next FM station – short press
10 MODE SHIFT button
change source (Bluetooth, FM, AUX-IN, USB) – short press
11 ON/OFF button – long press
12 Volume up button – short press / long press
13 Display
H BT speaker carrying handle
BASE rear side
14 Jack microphone input (6.3 mm)
15 AUX-IN mini jack audio input (3.5 mm)
16 USB-A for playback from memory device
17 LED charging status indicator
18 USB-C charging input (5 V; 2 A)
Wireless microphone
29 Sound sensor
20 LED indicator (on/off)
21 ON/OFF button
22 Compartment for 2 AA batteries (not included)

EN – 3
SWITCHING THE SPEAKER ON
Before first use, thoroughly read the safety instructions in this user manual.
Before using the BT speaker for the first time, it is recommended to fully charge the batteries.
Press and hold the Power On button to turn on the BT speaker. The speaker makes a sound
to indicate when it is turned on/off. To turn the BT speaker off, press and hold the Power On button.
Change the source of the music by briefly pressing the "MODE (audio input change)" button when the
power is on.
Warning: After a longer period of inactivity, the appliance will turns itself off.
TRANSMISSION AND BT SPEAKER POSITION
– To carry the BT speaker, use the "H" handle on the top.
– After moving the speaker, place it steadily back on the rubber feet.
– The speaker offers 1 positioning option. The correct side for positioning the speaker has rubber feet
and is always on the underside of the BT speaker ("D").
Note: Always position the device so that it does not endanger the health of persons in the vicinity or
cause damage to property.
PAIRING DEVICES VIA BLUETOOTH
Turn on the BT speaker and search for its Bluetooth name "PARTYCON BASE" in the device you want to
pair it with, then start the pairing process. If you are requested to enter a pairing code while your device
and the BT speaker are pairing, use the code: "0000". To disconnect the paired device, end the pairing
session on your mobile device or press and hold the "PLAY / PAUSE" button. The speaker will make
a sound when it disconnects.
Note: To ensure a stable Bluetooth connection, maintain a distance of up to 10 metres between the BT
speaker and the connected device.
TWS FUNCTION
If you purchase another Bluetooth speaker ("PARTYCON BASE"), you can pair them together for an
optimal stereo sound. First, make sure your device is not connected to any of the BT speakers. Turn both
BT speakers on, press the TWS button, and wait for the BT speakers to pair automatically. The speakers
will make a sound when they are successfully paired. Then connect your mobile device to one of the BT
speakers.
Changing the volume level will automatically affect both paired BT speakers simultaneously. To exit
TWS mode, press the TWS button on one of the BT speakers until you hear the sound indicating it has
disconnected.
Warning: The TWS feature is only available in Bluetooth mode. It is not possible to pair devices with
a different type of BT speaker with TWS or within different product editions with different Bluetooth
names.

EN – 4
AUDIO AUX IN
The BT speaker is equipped with a 3.5 mm jack. Switch the "MODE" input source to AUX-IN mode and
connect your device to the BT speaker using an audio cable. First connect the audio plug to your device
and then to the BT speaker’s jack.
Caution: before connecting your device and BT speaker, make sure that the output signal from your
device is set to minimum (minimum output volume). This will prevent damage to the BT speaker. When
the audio cable is connected, the BT speaker is not waterproof.
Note: In this mode, not all functions of the BT speaker are available. The Bluetooth function is not active if
an audio jack is connected to the BT speaker.
MICROPHONE INPUT
The BT speaker is equipped with one input for connecting one 6.3 mm jack microphone on the back of
the BT speaker. When the microphone is connected, the input is active.
Microphone control
Volume control – Press the “MENU” button 3 times, then adjust the volume using the “volume down” and
“volume up” buttons.
ECHO – Press the “MENU” button 4 times, then adjust the echo level using the “volume down” and
“volume up” buttons.
Warning: Avoid feedback by placing the microphone far enough away from the PARTYCON speakers.
If it gets too close it will cause feedback, which may damage the speakers or the hearing of anyone near
the BT speaker.
WIRELESS MICROPHONE
One wireless microphone is included in the package. Before first use, insert batteries into the wireless
microphone. Unscrew the bottom part of the wireless microphone and insert two 1.5 V AA batteries.
Always make sure the battery polarity is correct.
Using the microphone
Turning it on – press the On button on the wireless microphone. The red LED will light up to indicate
that the microphone is on.
Volume control – Press the “MENU” button 3 times, then adjust the volume using the “volume down” and
“volume up” buttons
ECHO – Press the “MENU” button 4 times, then adjust the echo level using the “volume down” and
“volume up” buttons.
Recommendation: if you're not going to be using the microphone, don't forget to turn it off.
Warning: Avoid feedback by keeping the microphone sufficiently far from the speakers of the
PARTYCON device. Approaching may cause feedback, which may result in damage to the speakers or
the hearing of the person near the system.

EN – 5
FM RADIO
Place the BT speaker in a place with good FM signal reception.
Use the “MODE” button to switch the BT speaker to FM radio mode. Press and hold the "PLAY/PAUSE/
FM station search" button to start searching the FM stations.
After finding and saving stations to the memory of the BT speaker, you can switch between the stations
by briefly pressing the "next/previous station" button. The LED effect is not available in FM mode.
VOLUME CONTROL / PLAY AND PAUSE / NEXT AND
PREVIOUS TRACK
To control the BT speaker volume, use the buttons (+/-) on the BT speaker. The volume adjustments do
not affect the microphone volume settings. More information about microphone volume settings can be
found in the Microphone input / Wireless microphone section.
Caution: Before starting to play music, make sure the volume is not set to maximum.
PLAY/PAUSE button – in Bluetooth and USB mode this is used to play/pause the music; in FM mode it is
used to search for available FM stations.
Previous track button – in Bluetooth and USB mode this is used to switch to the previous track; in FM
mode it is used to switch to the previous saved FM station.
Next track button – in Bluetooth and USB mode this is used to switch to the next track; in FM mode it is
used to switch to the next saved FM station.
LIGHTING EFFECTS
The BT speaker is equipped with lighting effects at the front and top of the device ("C"). To turn on the
lighting effects, press the “lighting effects” button. To turn off the lighting effects, press the "change or turn
off LED effect" button repeatedly until OFF appears on the display.
PLAYBACK FROM USB STORAGE MEDIA
USB playback
Insert a USB storage device with audio content in the USB slot. Press the “MODE” button briefly to switch
to USB playback mode. Music from the USB device will start playing automatically. Upload your music to
the USB device in the order you want it to be played by the BT speaker. Supported playback formats are
listed in the technical specifications.
Caution: Due to the variety of devices on the market, compatibility and playback support for all media are
not guaranteed. The memory devices you want to connect should be tested in advance and/or formatted
as FAT32. Not all protected media, files or content stored on the device may play.

EN – 6
RECORDING VOICE TO USB
Insert an empty USB storage device into the "playback from memory device" USB slot. Press the
"REC" button to enter recording mode, then press the "REC" button again to record your voice from the
microphone to the USB device. The recorded audio file will be saved on your USB device in the AB_REC
folder; the latest file will have the highest number. These files do not include system values such as time
and date.
To stop recording, press the "REC" button; recording will stop, and the last track you recorded will start
playing. To view or play all previous tracks, insert the USB device into your computer. The BT speaker is
set not to change the REC folder.
When playing back the last track, press and hold the "REC" button to erase the last recorded track and
start playing the previous track.
Caution: Due to copyright restrictions, only sound from microphones can be recorded to the USB storage
device.
CHARGING THE BT SPEAKER
A fully charged battery provides power for several hours of operation at normal volume levels. A high
volume consumes more battery power; therefore, we recommend listening at normal volume levels. To
charge the BT speaker, connect your own 5 V, 2 A charging adapter. The red LED on the back will light up
to indicate that the speaker is charging. To fully charge the battery, wait until the red LED goes out. The
speaker will make a sound when the battery level is low.
Caution: To get the most life out of the battery, it is advisable to start charging the battery only after
hearing the sound to indicate that the battery is low. Charge continuously until fully charged. If the battery
life is very short, the battery has reached the end of its life and we recommend having it replaced at an
authorised service centre.
Recommendation: If the device is not to be used for an extended period of time, we recommend fully
charging the battery once every two to three months. Store the device with a charged battery to prevent
irreversible damage to the battery (loss of capacity).
WATERPROOFING (IPX4)
The device is waterproof, allowing you to listen to music near water. IPX4 waterproofing –
protection against splashing water. Water splashes on the device from all angles, at a rate of 10 litres per
minute and a pressure of 80–100kN/m2 for 5 minutes.
Warning: Always remember to seal the BT speaker inputs (No. 14–18 in the picture “BT speaker
description”) with the original gasket and make sure that the gasket is not damaged. Never charge/power
the device when it could come into contact with liquids. The device is designed for contact with clean
water only, with no additives. Avoid exposing the device to contaminated or industrially treated liquids
(such as lemonade, sea/salt water, oils, etc.).

EN – 7
TECHNICAL SPECIFICATIONS
PARTYCON BASE
Party speaker
Waterproof speaker with IPX4 protection class
Wireless microphone included
Front LED colour panel with effects
Power bank function 5 V / 1.5 A
Sound:
2XWSXWSRZHU:LPSHGDQFH
3 speakers (8" mid-bass, 2 x 1.5" tweeters)
Frequency response: 100 Hz–20 kHz
7RWDOKDUPRQLFGLVWRUWLRQ
Preset equalizer modes
Bass and treble controls
Lighting:
Front LED colour panel
Option to turn off lighting effects
Wireless microphone
Range up to 10m
Microphone batteries: 2× AA (not included)
Up to 25 hours of operation on a full charge
Inputs:
Bluetooth Audio 5.0
Audio connector (3.5 mm stereo jack)
USB (playback and charging)
Microphone input 6.3 mm
Other:
TWS (True Wireless Stereo)
FM Radio
Built-in rechargeable battery: 8,000 mAh Li-Ion
3OD\EDFNWLPHXSWRKRXUVDWYROXPH
Accessories: microphone, charging cable, 3.5 mm AUX cable, user manual
USB-C charging
Dimensions: 330 x 277 x 277 mm
Weight: 4.1 kg
Wireless microphone Frequency 2.4 GHz
Bluetooth Version 5.0
Maximum transmitter power 100mW at 2.4GHz–2.4835GHz
FM Frequency range 87.5MHz–108MHz
źźňź–źńŃ
ź
W
The power supplied by the charging device shall be between the minimum of 5 watts
required by the radio device and the maximum of 10 watts required to achieve the
maximum charging rate.
The adapter is not included with the accessories.
EN – 8
INSTRUCTIONS AND INFORMATION ON THE DISPOSAL OF PACKAGING MATERIALS
Take the packaging material to a collection centre for recycling.
DISPOSAL OF DISCARDED ELECTRICAL AND ELECTRONIC EQUIPMENT
This symbol on the product, accessory or packaging indicates that the product must not be
treated as ordinary household waste. Please dispose of this product in a collection centre
designated for the recycling of electrical and electronic equipment. In some EU states or
other European countries, you can return your old product to the retailer when purchasing an
equivalent new product. Proper disposal of this product helps to conserve valuable natural
resources and prevent potential negative impacts on the environment and human health that
could result from improper disposal. Further details can be obtained from local authorities or
the nearest collection centre. Failure to dispose of this type of waste properly may result in
legal penalties.
For Companies in European Union Countries
If you want to dispose of electrical or electronic equipment, request necessary information
from your retailer or supplier.
Disposal in Countries Outside the European Union
Request information regarding the proper disposal of this product from local authorities or
your retailer.
This product meets the EU requirements.
)$67ý5DVKHUHE\GHFODUHVWKDWWKHUDGLRGHYLFH3$57<&21%$6(FRPSOLHVZLWK'LUHFWLYH
EU.
For the full version of the EU Declaration of Conformity, please visit: www.sencor.cz
Text, design and technical specifications are subject to change without notice; we reserve the right to
make such changes.
The original version is in Czech.
0DQXIDFWXUHU)$67ý5DV86DQLWDVXětþDQ\&]HFK5HSXEOLF
Authorised service centres: For detailed information on authorised service centres, please visit www.
sencor.com.

EN – 9
EN
Warranty conditions
Warranty card is not apart of the device packaging.
This product is warranted for the period of 24 months from the date of purchase to the end-user. Warranty
is limited to the following conditions. Warranty is referred only to the customer goods using for common
domestic use. The claim for service can be applied either at dealer’sshop where the product was bought, or
at below mentioned authorized service shops. The end-user is obligated to set up aclaim immediately when
the defects appeared but only till the end of warranty period. The end user is obligated to cooperate to certify
the claiming defects. Only completed and clean (according to hygienic standards) product will be accepted.
In case of eligible warranty claim the warranty period will be prolonged by the period from the date of claim
application till the date of taking over the product by end-user, or the date the end-user is obligated to take it
over. To obtain the service under this warranty, end-user is obligated to certify his claim with duly completed
following documents: receipt, certificate of warranty, certificate of installation.
This warranty is void especially if apply as follows:
Defects which were put on sale.
Wear-out or damage caused by common use.
The product was damaged by unprofessional or wrong installation, used in contrary to the applicable
instruction manual, used in contrary to legal enactment and common process of use or used for another
purpose which has been designed for.
The product was damaged by uncared-for or insufficient maintenance.
The product was damaged by dirt, accident of force majeure (natural disaster, fire, and flood).
Defects on functionality caused by low duality of signal, electromagnetic field interference etc.
The product was mechanically damaged (e.g. broken button, fall).
Damage caused by use of unsuitable media, fillings, expendable supplies (batteries) or by unsuitable
working conditions (e.g. high temperatures, high humidity, quakes).
Repair, modification or other failure action to the product by unauthorized person.
End-user did not prove enough his right to claim (time and place of purchase).
Data on presented documents differs from data on products.
Cases when the claiming product cannot be indentified according to the presented documents (e.g. the
serial number or the warranty seal has been damaged).
Manufacturer:
FAST ČR, a.s., U Sanitasu 1621, Říčany 251 01, Czech Republic
info@sencor.com
Authorized service centers:
Visit www.sencor.com for detailed information about authorized service centers.
The original version of the instructions is in the Czech language, other language versions are made by the
appropriate translation.