04/2000 Martin Case Manual Version 7.20 Cue-memories
R&D International NV for Martin Professional AS
91
9. CHAPTER 9: Cue-memories
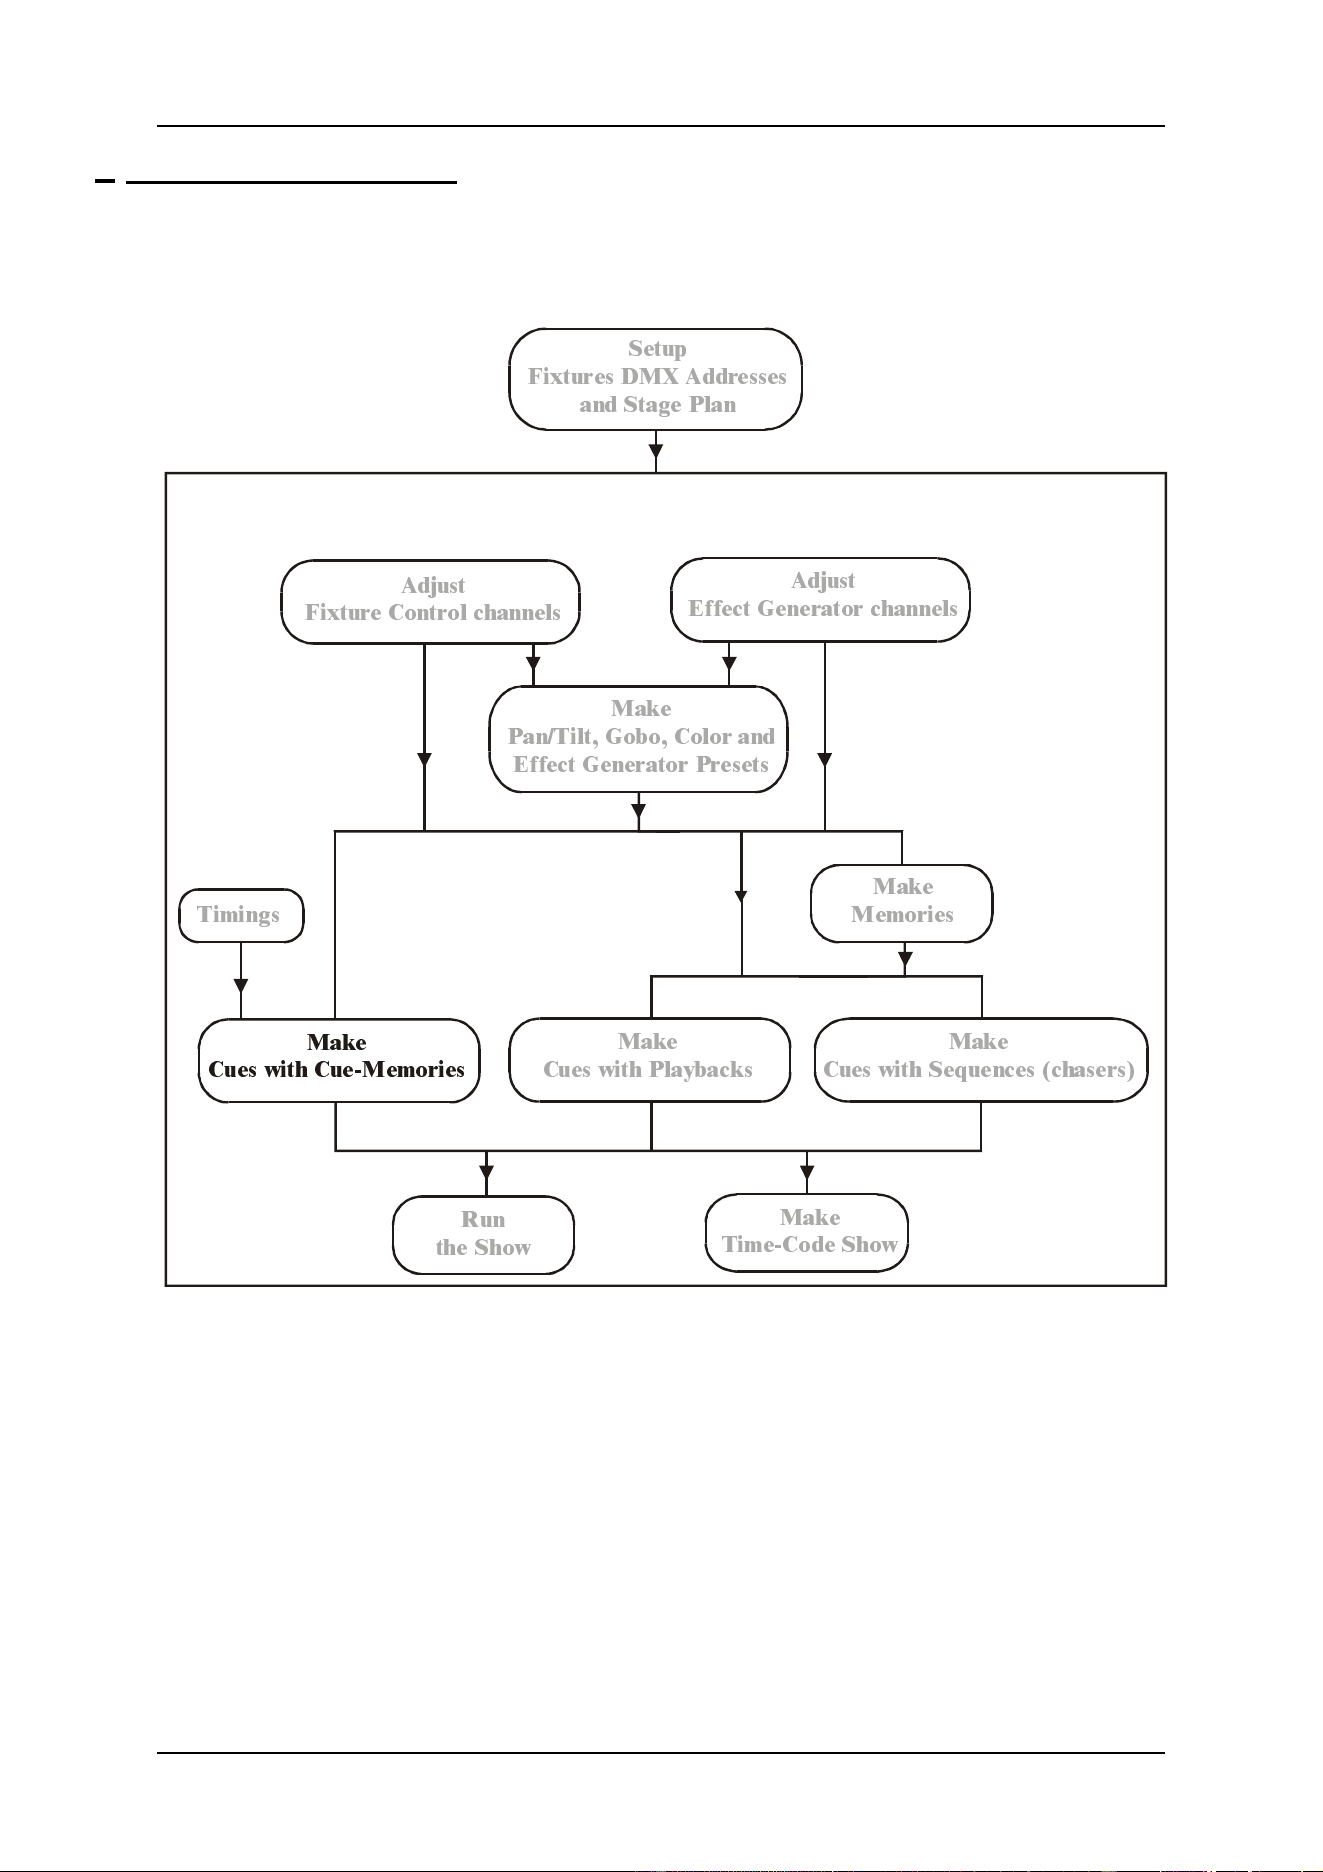
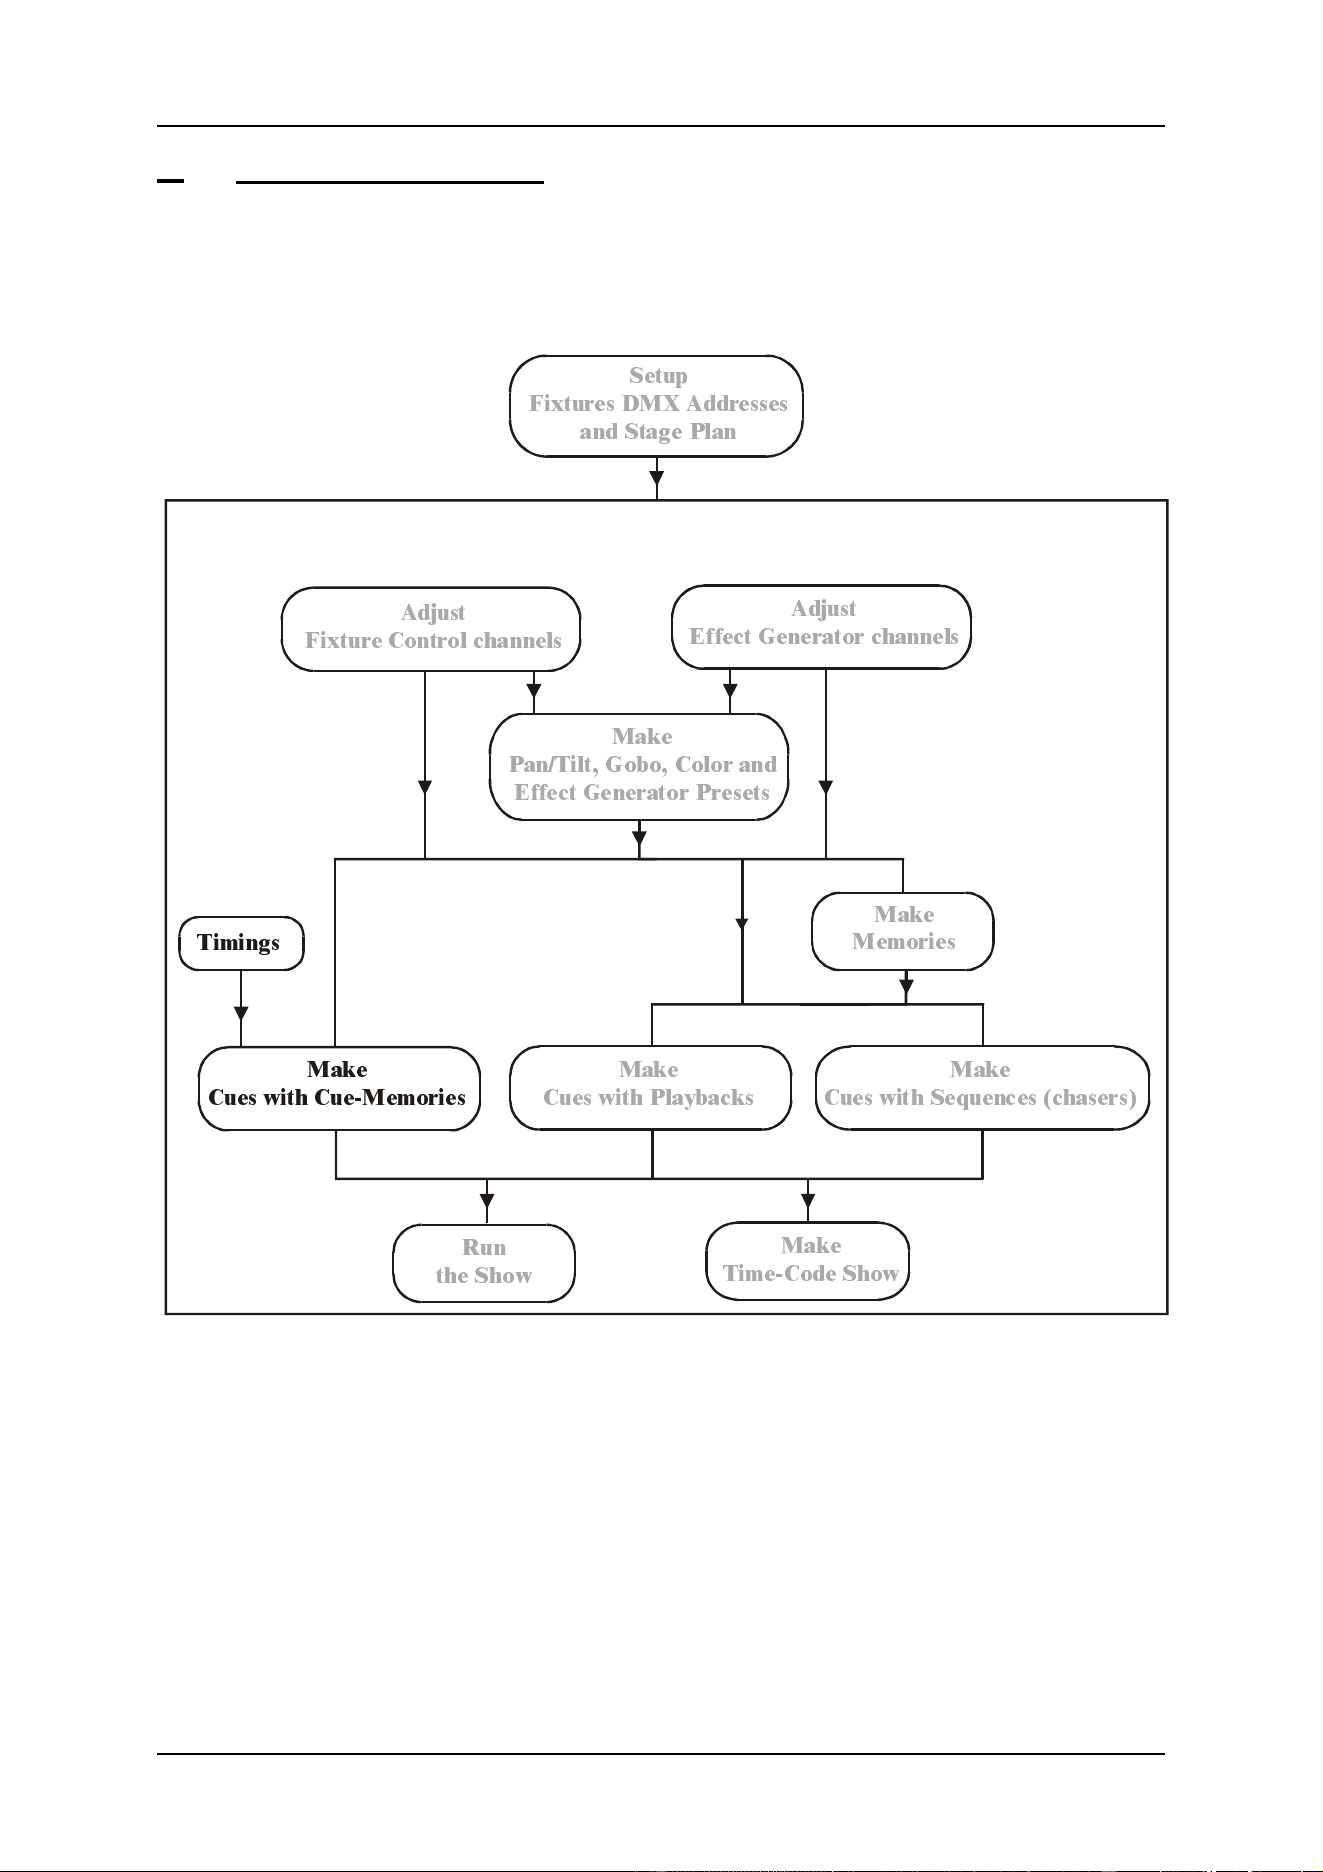
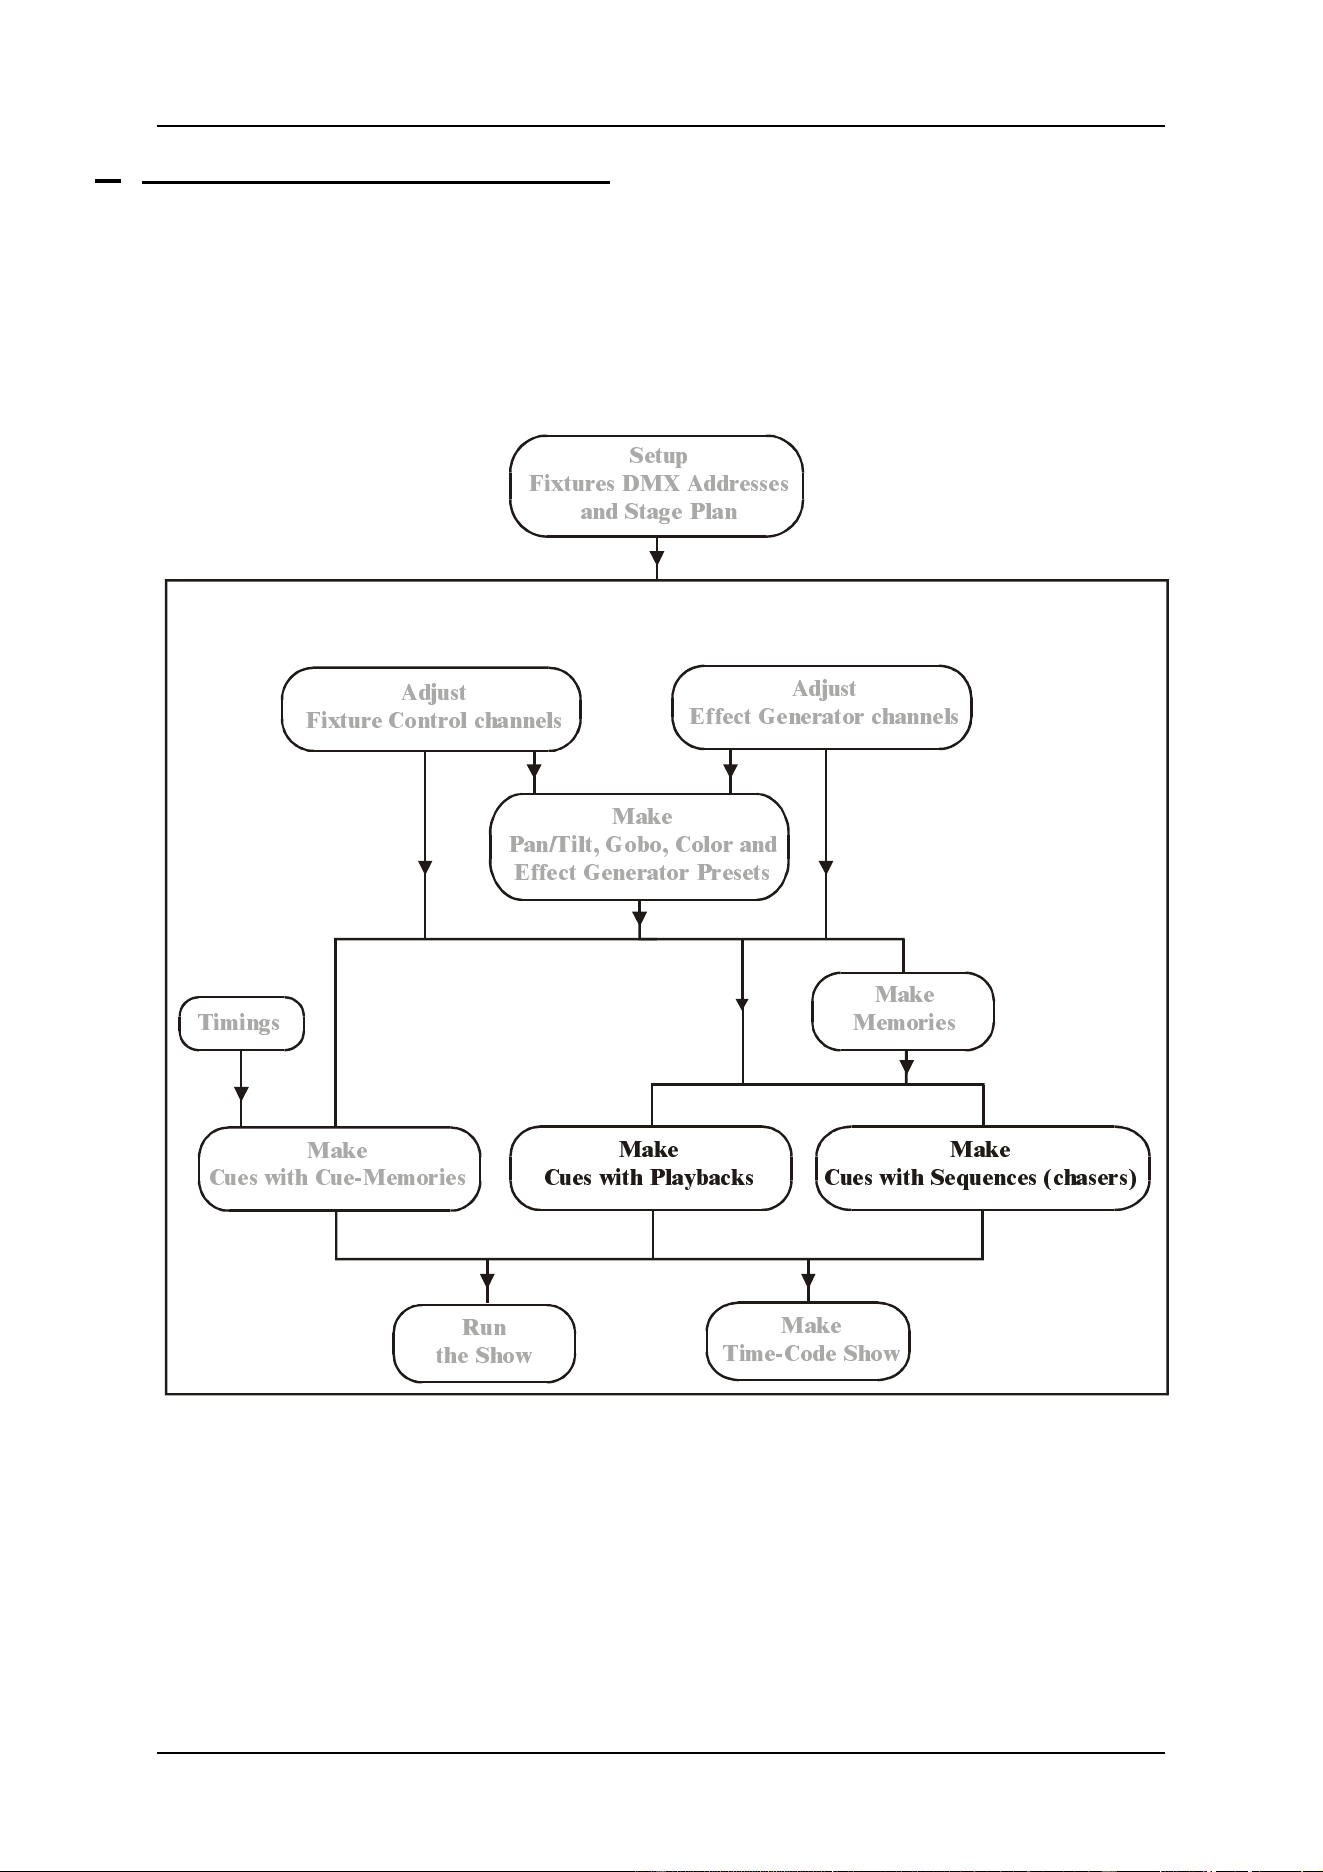
6HWXS
)L[WXUHV '0; $GGUHVVHV
DQG 6WDJH 3ODQ
$GMXVW
)L[WXUH &RQWURO FKDQQHOV
$GMXVW
(IIHFW *HQHUDWRU FKDQQHOV
0DNH
3DQ7LOW *RER &RORU DQG
(IIHFW *HQHUDWRU 3UHVHWV
0DNH
&XHV ZLWK &XH0HPRULHV
5XQ
WKH 6KRZ
0DNH
7LPH&RGH 6KRZ
0DNH
&XHV ZLWK 3OD\EDFNV
0DNH
&XHV ZLWK 6HTXHQFHV FKDVHUV
0DNH
0HPRULHV
7LPLQJV
04/2000 Martin Case Manual Version 7.20 Cue-memories
R&D International NV for Martin Professional AS
92
0DNLQJ FXHPHPRULHV ZLWK DXWRORDG 21
*HWWLQJ YDOXHV RI
FXHPHPRULHV ZLWK DXWRORDG 21
*HWW LQJ YDOXHV RI
FXHPHPRULHV ZLWK DXWRORDG 2))
$FWLYDWLQJ &8(6
0DNLQJ FXHPHPRULHV ZLWK DXWRORDG 2))
6HOHFW D HPSW\ &8(
6HOHFW )L[WXUHV
$GMXVW &RQWURO &KDQQHOV
DQGRU (IIHFW &KDQQHOV
&DOO 3UHVHWV
6HOHFW )L[WXUHV
$GMXVW &RQWURO &KDQQHOV
DQGRU (IIHFW &KDQQHOV
&DOO 3UHVHWV
3UHVV
>72@ >5(7@ >5(7@
&OHDU XQZDQWHG FKDQQHOV
3UHVV
>72@ >&8(@ >6HOHFW &8(@ >5(7@ >5(7@
*R WR &8( PRGH >&8(@
*R WR &8( PRGH >&8(@
6HOHFW &8(3$*( >@
6HOHFW &8( >@ > @
(keypad)
6HOHFW &8(3$*( >@
6HOHFW &8( >@ > @
(keypad)
>*(7@ >&8(@ 6HOHFW &8(3$*( >@
6HOHFW &8( >@ >@ > @ >5(7@
(keypad)
04/2000 Martin Case Manual Version 7.20 Cue-memories
R&D International NV for Martin Professional AS
93
IMPORTANT: Adjustments to be done to follow the examples:
- Please check the start options of the controller, before starting to program
cue-memories. Press the [SETUP] key during 2 secs. and select option [2]
(show settings). Go to AUTOLOAD CUEMEM. with the blinking keys and
select [EDIT] until the option is marked ‘ON’. Select [RET] to save the
settings.
- The CUEFADING should be disabled. Press [CUE] + [ON], until the red box
behind cue-fading at the left of the screen, is black.
9.1. Cues
What are CUEs?
A cue can hold:
- 1 cue-memory
- 4 Sequences (chasers)
- 42 Playbacks
The system can hold up to 11,200 cues (16
pages of 70 cues + 9 point-cues between
every 2 main-cues). Of those 11,200 cues,
2,000 can hold a cue-memory.
Those cue-memories are quick accessible in
run-mode by means of the 1…70 key-
matrix.
9.2. Activating cues
The 1…70 key-matrix is frequently used. An overview:
&8(
CUE MEMORY
MEMORIES
SEQUENCE (chaser)
A B C D
PLAYBACK
1 ...... 42

04/2000 Martin Case Manual Version 7.20 Cue-memories
R&D International NV for Martin Professional AS
94
[Fixture PgUp] or [Fixture PgDn]
Fixture mode:
- Fixture mode is activated with the keys [Fixture PgUp] or [Fixture PgDn].
- In this mode, keys 1 to 70 represent fixtures.
[Direct Access] [Direct Access] [1/17…16/32] or [P&T]…
Direct access mode:
- In this mode, the keys represent possible direct access choices.
[P&T] (presets) or [GOBO] or [COLOR] or [EFF] (presets)
Preset mode:
- The keys represent presets.
[CUE]
Cue mode:
When we select the [CUE] key, the key-matrix represents CUES. When no cues are
programmed, only the LED of key [1] will be lit green. If cues are programmed,
their LEDs will be lit red or orange (orange: when only point-cues are programmed).
The active cue is green.
When we select a key [1…70], we call a main cue. Note that on the keypad, key [0]
will blink. The keypad keys [0] to [9] represent point-cues. Point-cues are
insertions between 2 main cues.
When we wish to activate Cue 5.7, we select [5 (1…70)] and [7 (keypad)]. On the
monitor, this will appear as:
PAGE 1 CUE 5.7 REL 5.7
[1…16] (Groups/Cuepages)
Each cue-page can hold 70 main cues with their point-cues. To change the cue-page,
select a page [1…16] in the Groups/Cuepage keys. Remember, in Fixture mode,
those keys represent fixture groups, in Cue mode they represent cue-pages.
If Cue 60.2 on cue page 2 has to be activated, select first page [2 (1…16)], then [60
(1…70)] [2 (keypad)]. The monitor will show:
PAGE 2 CUE 60.2 REL 130.2
In general, to activate a cue:
( [1…16] ) [1…70] ( [0…9] )

04/2000 Martin Case Manual Version 7.20 Cue-memories
R&D International NV for Martin Professional AS
95
{EXP} REL 130.2 stands for ‘Relative Cue 130.2’; the cue number is taken relative to cue 1.0
on cue-page 1. Cue 60.2 cue-page 2 is relative: 70 (cues of page 1) + 60 (cues of page
2) = 130, and point-cue 2, or 130.2.
[CUE] + [number (keypad)] [.] [digit (keypad)] [RET]
{EXP} If a cue has to be called relative; select and hold the [CUE] key, and type the relative
number on the keypad followed by a [RET].
Example: Cue rel 135.3 has to be called as: [CUE] + [1] [3] [5] [.] [3] [RET].
REMARK: When a point cue is activated using the common way, first the main
cue has to be called and it will be activated, then the point-cue. If we want to
avoid that the main cue is activated too, we have to select it using the relative
way. There is a second way to avoid this:
[CUE] + [1…70] [.] [digit (keypad)] [RET]
This means: select and hold the [CUE] button, while selecting the cue.
[LAST] of [NEXT]
When cues are programmed in order of performance, and the controller is in Cue
mode, the cues can be called in sequence using the [LAST] or [NEXT] key.
9.3. Cue-memories
A cue-memory is a light scene with its own fade, delay and hold times (see next chapter
for the timings).
9.3.1 Programming cue-memories with Autoload parameter ON
Suppose we want to program the default light scene in cue-page 16 cue 1:
- Select cue mode; [CUE], select cue-page 16 [16 (1…16)] and select cue1 [1
(1…70)] to activate an empty cue.
- Put all fixtures in their defaults: go back to fixture mode [FIXT PgUp] [ALL]
[DEFAULT] [DEFAULT] [open all dimmers]
- Save this light scene in the selected empty cue: [TO] [RET] [RET] (on the first
RET, a timing window will open, this will be explained in the next chapter. Select
RET again to save the scene).
In cue 2 of the same cue-page, we want Pan/Tilt preset 2:
- Select empty CUE 2: [CUE] [2 (1…70)]
- [P&T (presets)] + [2 (1…70)]. We don’t have to select all fixtures again, since
they are still selected.
- [TO] [RET] [RET]

04/2000 Martin Case Manual Version 7.20 Cue-memories
R&D International NV for Martin Professional AS
96
We have programmed the default light scene in cue 1 (page 16), and a Pan/Tilt change in cue
2. If both cues must be activated (one by one), we go the cue mode [CUE] and we select CUE
1 [1 (1…70)] or [2 (1…70)] in cue page 16.
[Select an empty cue] [Adjust fixture control channels] [TO] [RET] [RET]
Summary: if we want to program a cue-memory with the autoload parameter ON, we have to
select first an empty cue, and then we adjust the fixture control channels. To save it, we select
[TO] [RET] [RET].
9.3.2 {EXP} Programming Cue-memories with Autoload parameter OFF
If we want to program the same light scenes as in the previous paragraph, but with the
autoload parameter OFF, more keyboard actions have to be taken:
- Select all fixtures in fixture mode [FIXT PgUp] [ALL]
- Default scene for all fixtures [DEFAULT] [DEFAULT] [open the dimmers]
- Save in cue 1 page 16: [TO] + [CUE] [16 (1…16)] [1 (1…70)] [RET] [RET]
- Clear all channels of all fixtures: [CLR (control channels)(double-click)]
- Select P/T preset 2: [P&T (presets)] + [2 (1…70)]
- Save in cue 2: [TO] + [CUE] [16 (1…16)] [2 (1…70)] [RET] [RET]
- To activate the cues, first the CUEFADING parameter has to be activated: [CUE]
+ [ON] until the box behind CUEFADING (left at the screen) colors red. This has
to be deactivated again to proceed with programming.
[Adjust fixture control channels and delete the not-needed channels] [TO] + [Select a cue]
[RET] [RET]
9.3.3 Viewing the values of a cue-memory with Autoload parameter ON
If we want to view the values of a previously stored cue-memory, the ‘Digital Memory-
values’ screen has to be open:
[VALUES] until the screen shows: ‘Digital Memory-values’
The DIGITAL MEMORY-VALUES screen represents the fixtures control channels, as
they are stored in the cue-memory. This is not the output memory, but a memory in
between, showing what was programmed.
( [Select cue-page] ) [select CUE] ( [0…9 (keypad)] )
In ‘Autoload ON’ mode, this is the same as activating a cue. When a cue from another page
has to be viewed, then first the cue-page has to be selected [1…16], then the cue [1…70] and
if necessary a point-cue [0…9].
In ‘Autoload ON’ mode, the stored cue-memory values are directed automatically to the
Digital Memory-values’ memory when the cue is activated. Adjustments can be done
instantly.

04/2000 Martin Case Manual Version 7.20 Cue-memories
R&D International NV for Martin Professional AS
97
9.3.4 {EXP} Viewing the values of a cue-memory with Autoload parameter OFF
[GET] + [CUE] ( [Select cuepage] ) [select CUE] ( [.] [0…9] (keypad) ] [RET]
In ‘autoload OFF mode’, the values stored in the cue-memory are not directed instantly
to the digital memory-values screen, when the cue is activated. Only when the cue-
memory is called with the GET key, the values will be updated.
9.3.5 {EXP} The AUTOLOAD parameter
[SETUP] [2]
In the last 4 paragraphs, it has become clear that the AUTOLOAD parameter is best ON,
when programming. To explain this, open the digital memory-values screen.
Take back example 1 with the AUTOLOAD ON.
- Activate an EMPTY CUE. Since activating is the same as getting the values, in
AUTOLOAD ON mode, all values will be erased when the empty cue is called. If,
for example Pan/Tilt preset 2 is selected, then the values of Pan/Tilt will show up
for the selected fixtures. In fact, the Autoload does the same as a [GET] + [CUE].
If the AUTOLOAD is OFF:
- When activating an empty cue, the values screen won’t change. We are obliged to
clear the values first ([CLR] key).
- On top of this, we MUST activate the CUEFADING to send the values to the
output (and to the fixtures), and DEACTIVATE it later to resume programming.
To avoid the CUEFADING switch, we can work with the [GET] + [CUE] key
combination, but this is a longer way.
The end of the chapter ‘cue-fading’ will give a survey of the possible combinations of
autoload, cue-fading and manual mode.

04/2000 Martin Case Manual Version 7.20 Cue-memories
R&D International NV for Martin Professional AS
98
9.3.6 What should be stored in a cue-memory
A cue-memory has to hold changes, to a previous cue-memory or light scene.
It is possible, but not necessary to store all values of all fixtures in a cue-memory. When, for
example, we want to change only the color of all fixtures, there is no need to store also the
values for Pan/Tilt, dimmer, gobo, …
Example:
- In cue-memory 3 (the next cue), we want all fixtures in green. This means that
only the green color has to be programmed: Select cue 3 (page 16) (autoload
cuemem = on, cuefading=off) and select color preset 5 (green). Press [TO] [RET]
[RET].
- Activate cue 1, everything has color white in default position.
- Activate cue 2, P/T to the center, white.
- Activate cue 3, P/T remains unchanged because we didn’t record Pan/Tilt
information in this cue, but everything will be in green.
- Activate cue 1 again, so everything will be white again in default.
- Skip cue 2 and go instantly to cue 3, only the color will change to green.
Attention, when the effects generator is activated on some channels in a cue-memory, it will
keep running until some cue-memory contains values to stop him.
Example:
- In cue-memory 4, the effects generator is activated on Pan/Tilt of the MAC600s:
[Select cue 4] [Select the MAC600s] [Select P&T and open the effects generator]
[adjust the x and y swing and the speed] [TO] [RET] [RET].
- If cue 4 is activated, the effects generator can only be stopped when cue 1 is
selected, because the default in cue 1 stops all effects. If we just want to stop the
effect in a cue, then we make a cue 5: [Select cue 5] [Select the MAC600s]
[DEFAULT] [EFF] [P&T] [TO] [RET] [RET]
Important remark: Like advised, it is not necessary to record all parameters in a cue-
memory, but it is possible. Cue-memories that hold information for all parameters can
slow down the controller enormously.
04/2000 Martin Case Manual Version 7.20 Cue-memories
R&D International NV for Martin Professional AS
99
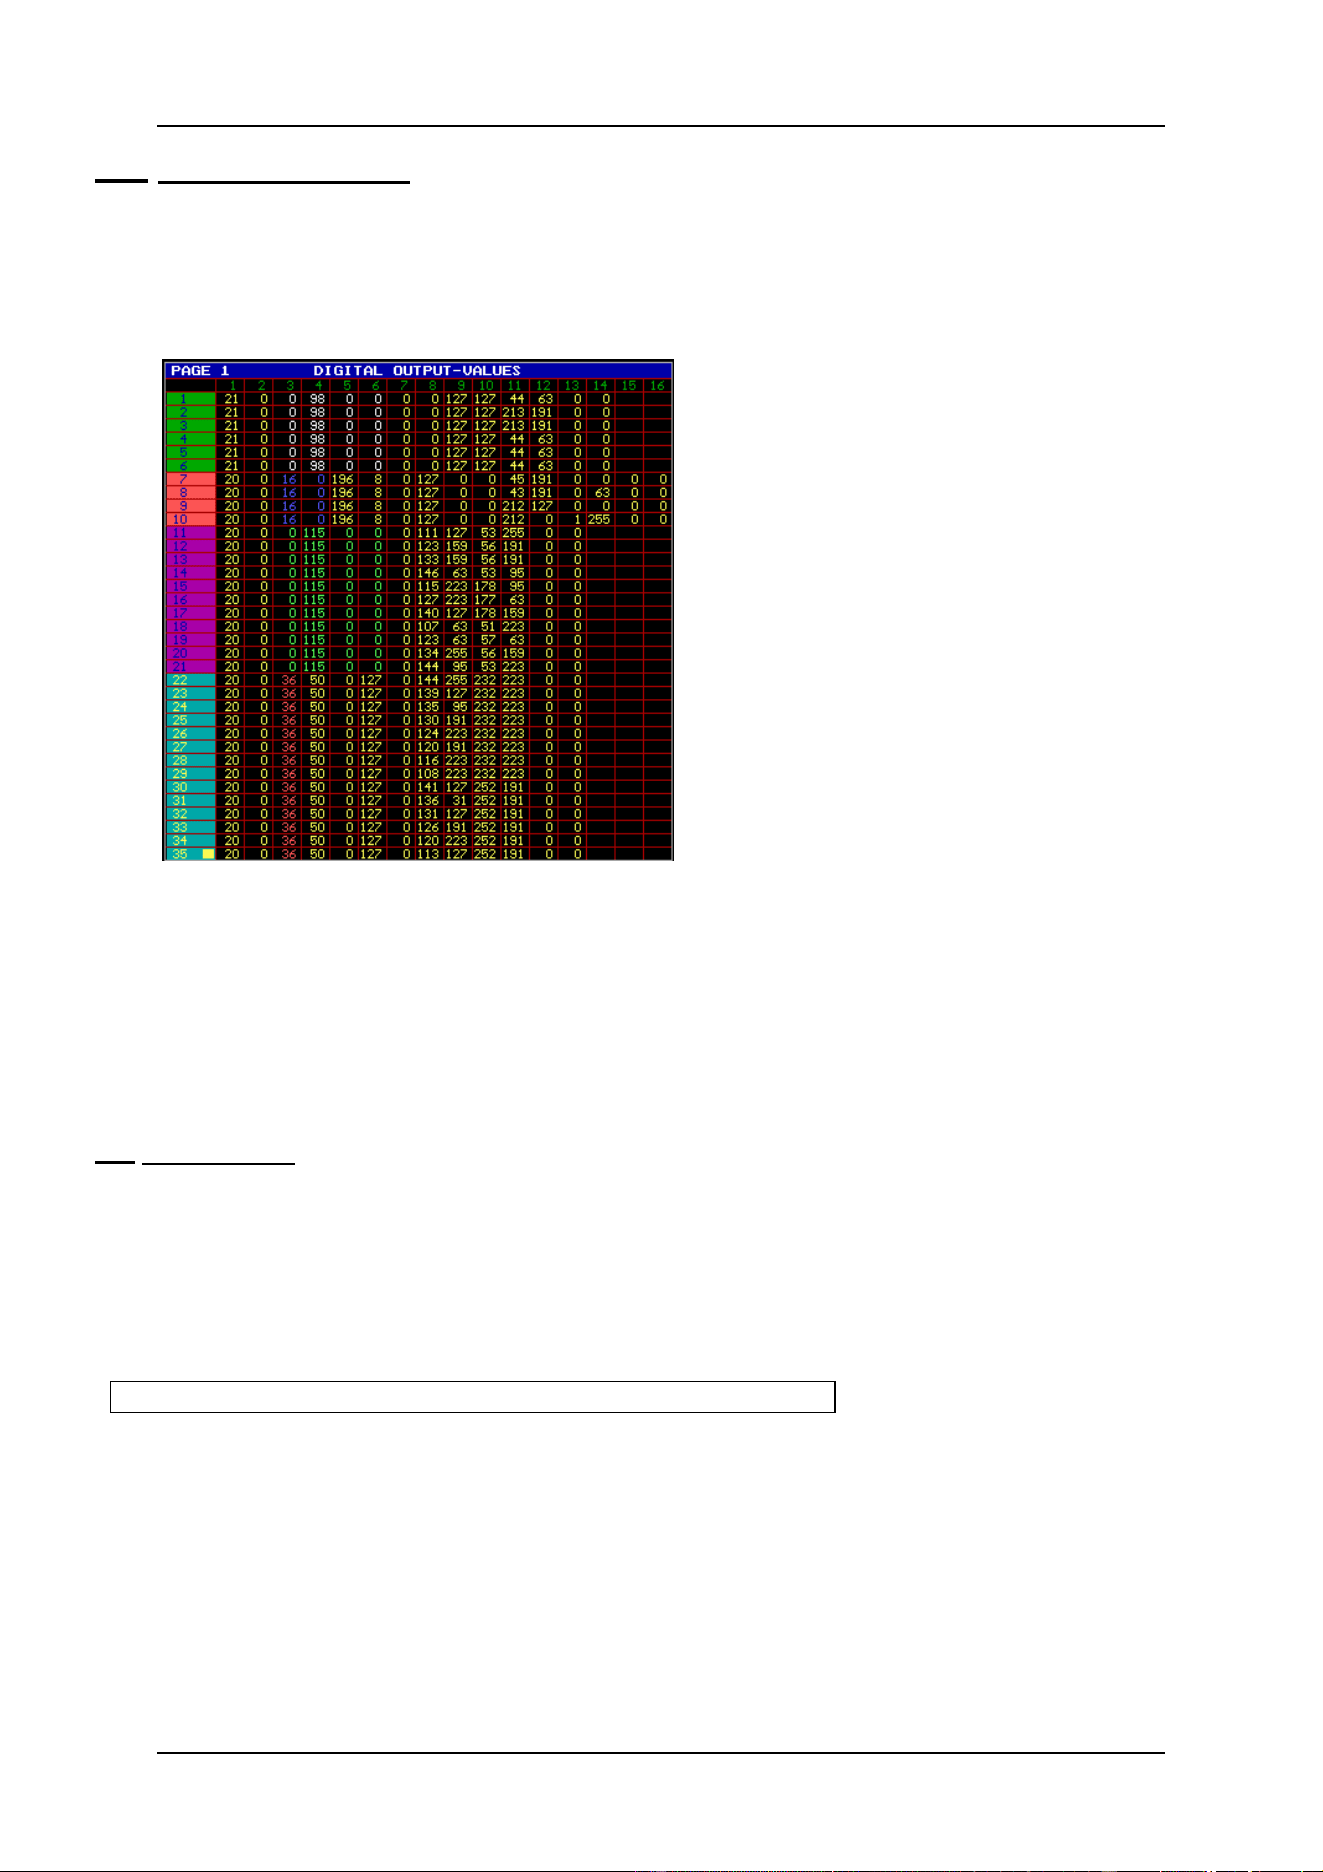
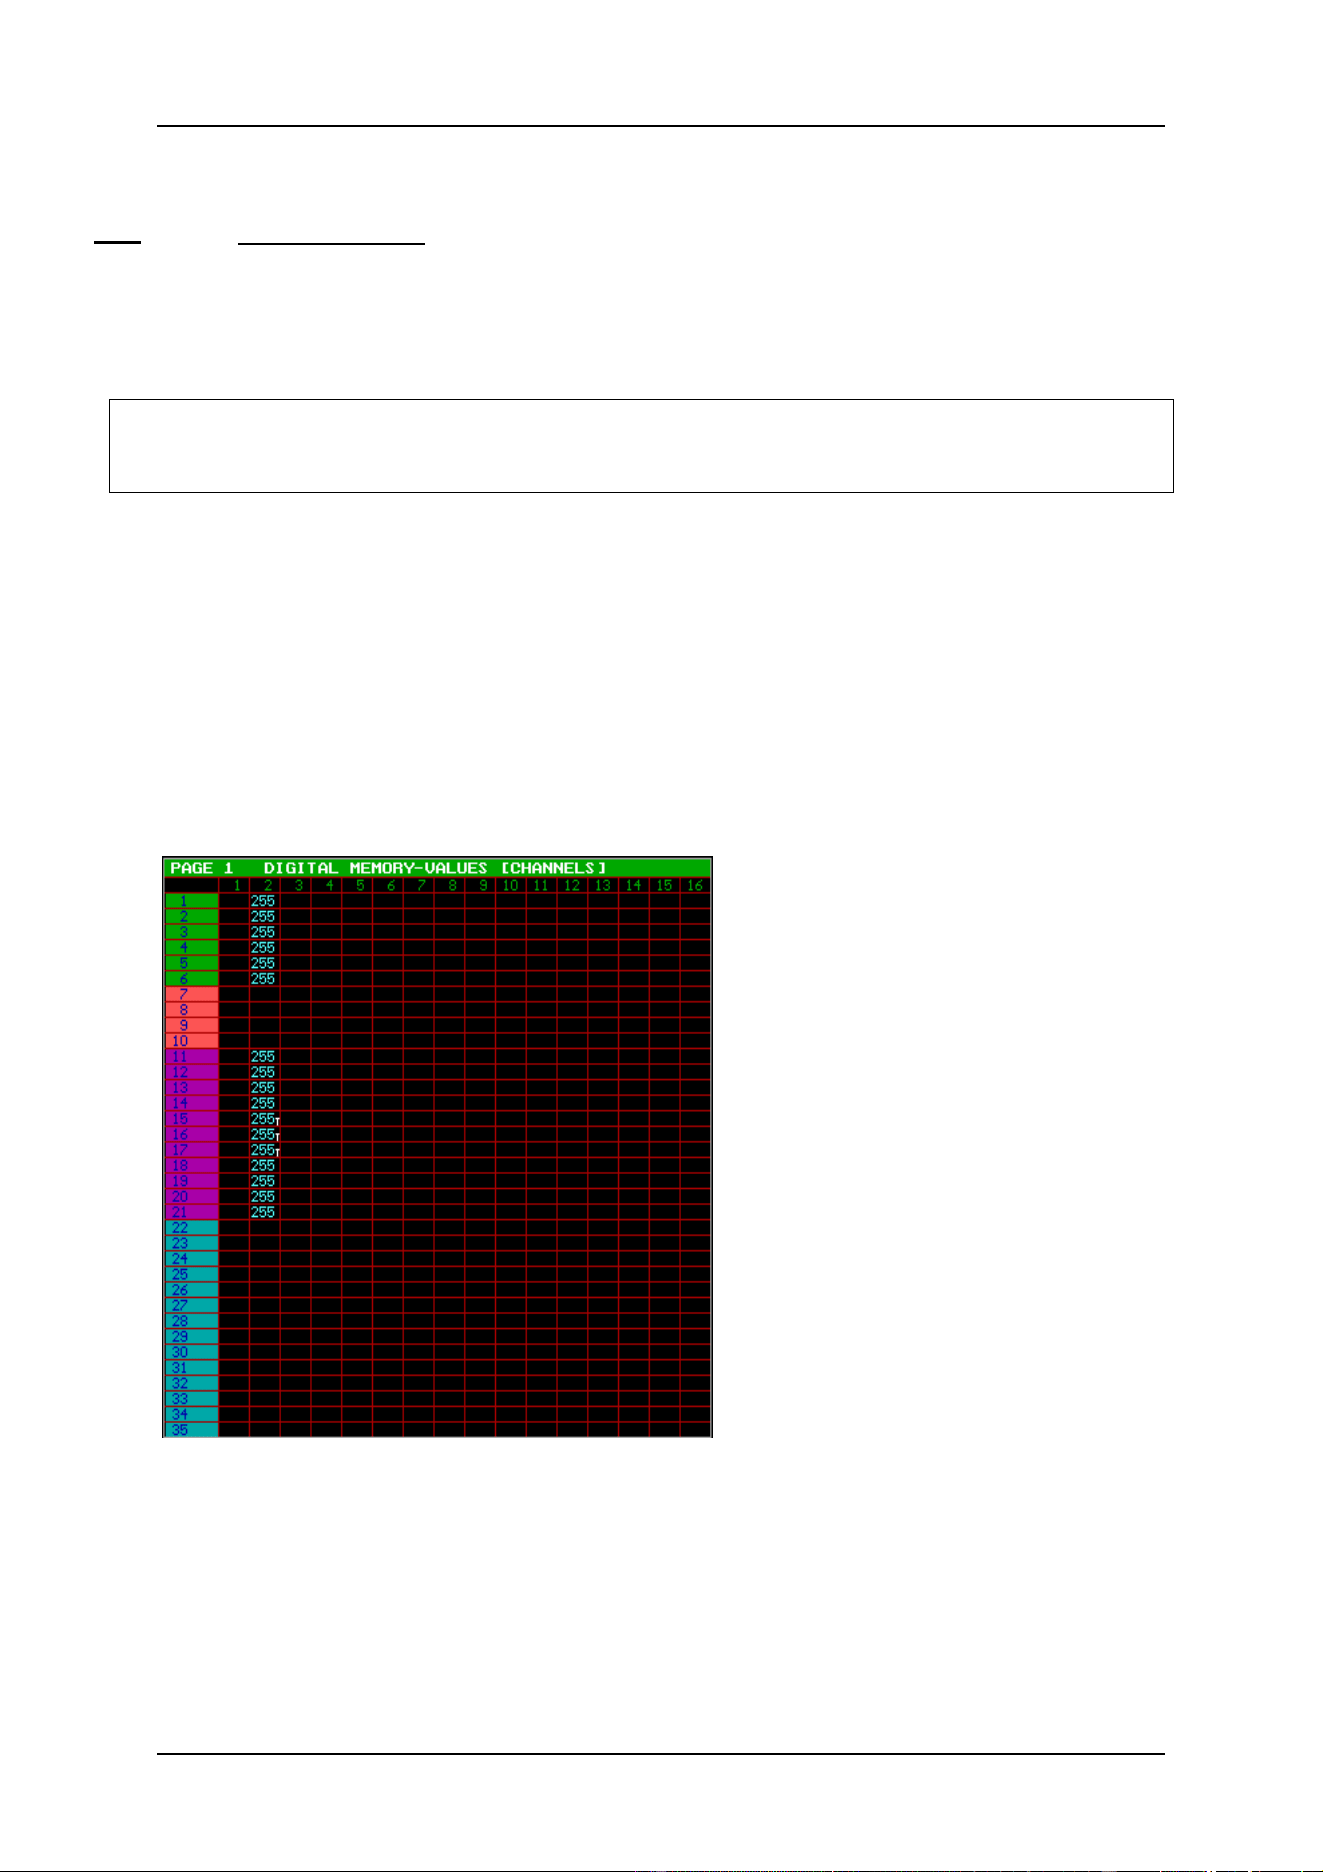
9.4. The values screens
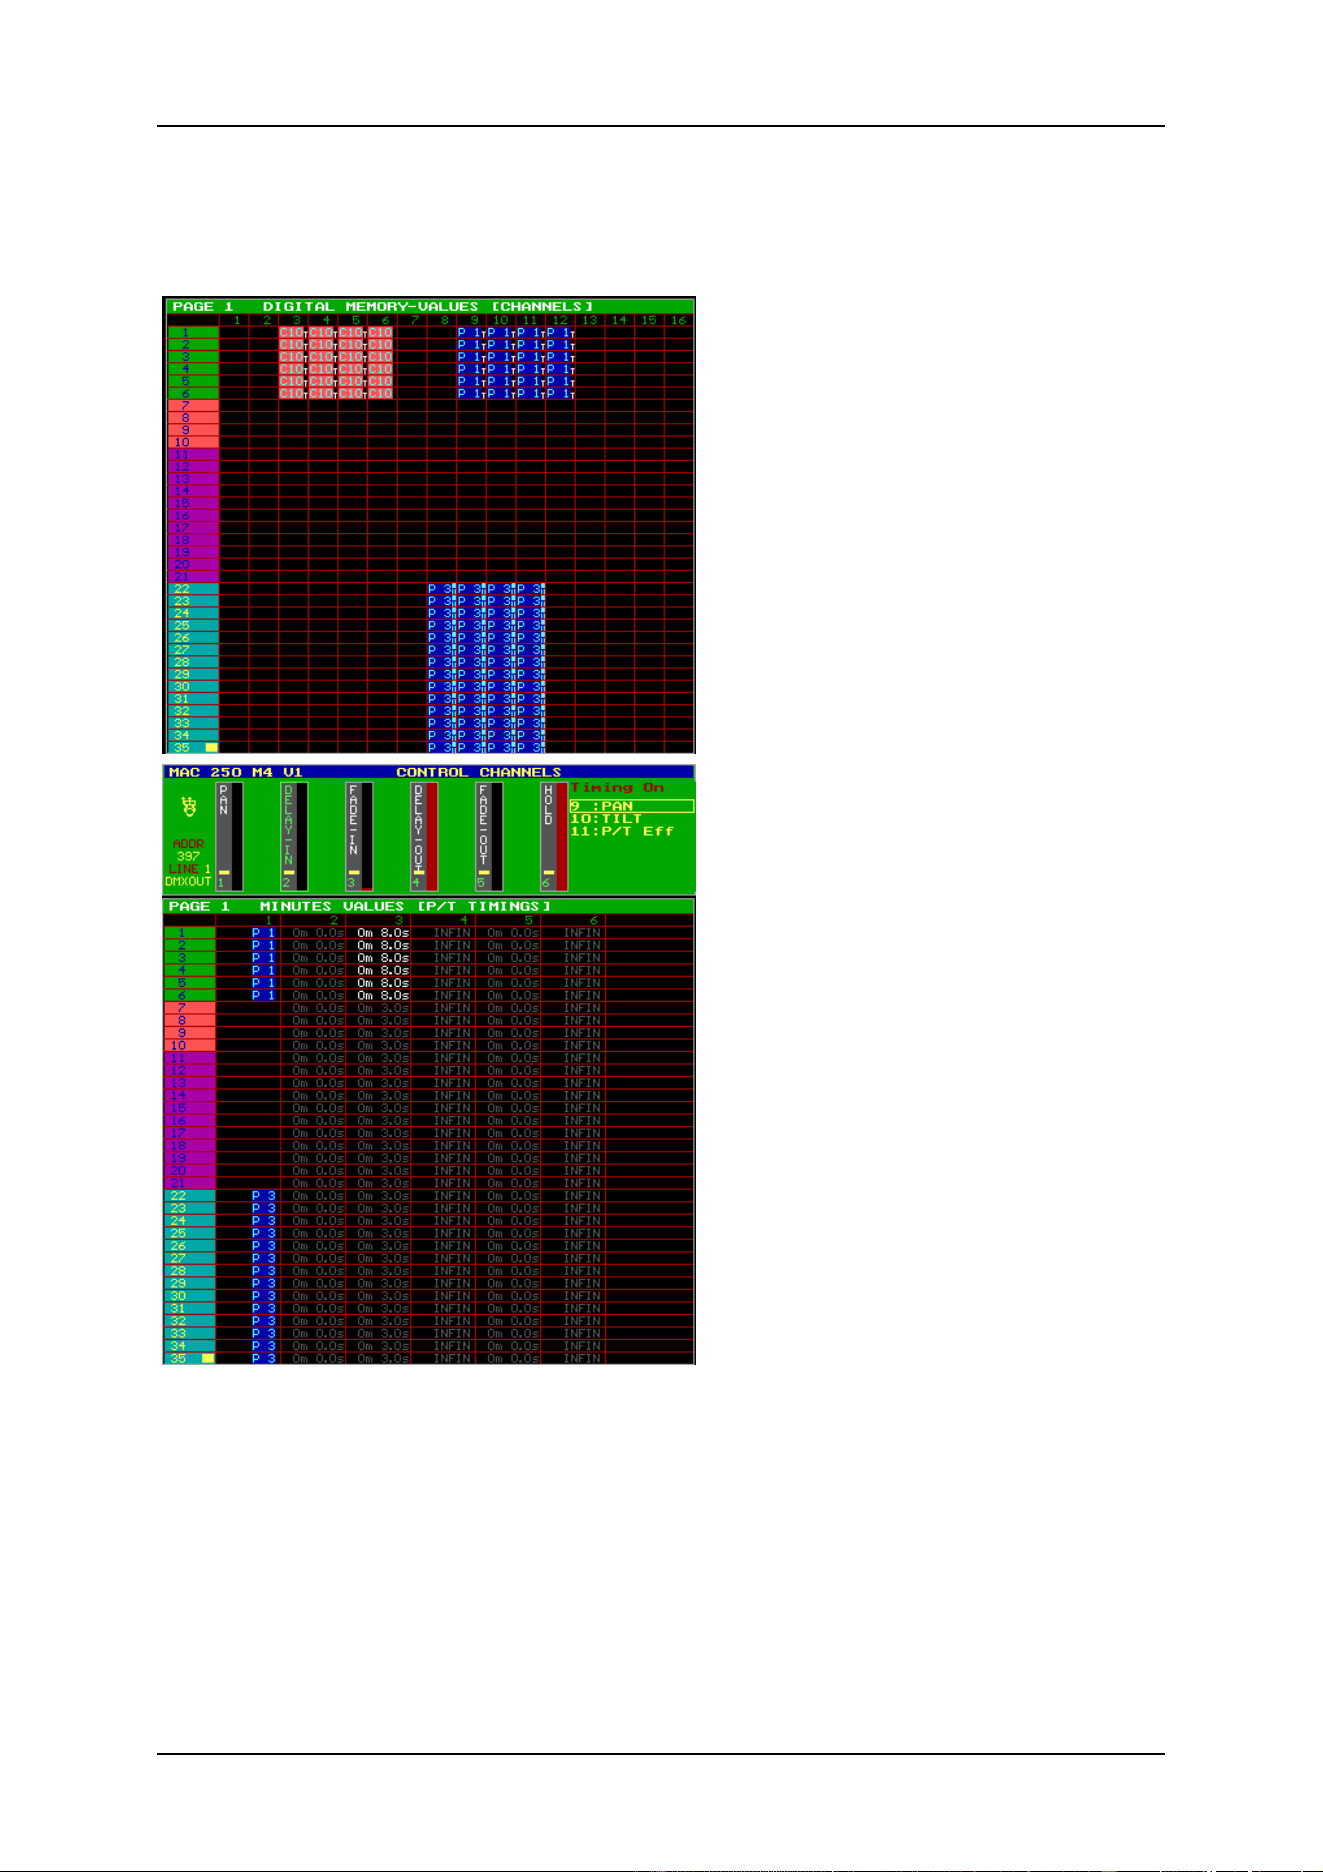
9.4.1 Digital Memory-Values (Channels)
The ‘Digital Memory-Values’
screen represents a memory
showing only the values, which
were or are stored in the cue-
memory.
The rows represent the fixtures
(with their numbers as they
appear in the stage window), the
columns represent the fixture
control channels. With the
[PgUp], [PgDn], [Fixture
PgUp] and [Fixture PgDn] keys,
the values of the other fixtures
can be retrieved.
Keys [Pg<] and [Pg>] will shift
the channels to channels (1-16)
or (17-32).
The different symbols:
Empty field. When calling the cue-memory, the empty field will change
nothing on the fixtures control channel.
Color preset 3. A field like this, calls a preset, in this case color preset 3. The
values for the preset are stored in the preset itself. When the preset is changed,
the values are forwarded automatically to the cue-memories, where it was been
used.
Field with digital memory values. Those values can have 2 colors:
- Blue: the values from the cue-memory
- Yellow: channel values changed in MANUAL MODE
A colored box behind the channel value indicates that some effects generator channels
have values for the concerning channel.
Fields filled only with effect generator channels. If the effects generator box is
blue, it indicates a Pan/Tilt channel. In this case, the Pan/Tilt value is not
changed but its effect generator channels are.
Gobo preset 4 is in use, but there are some timing differences (T) (see next chapter) to
the main cue timing.
9.5.
04/2000 Martin Case Manual Version 7.20 Cue-memories
R&D International NV for Martin Professional AS
100
9.4.2 Digital Output-Values
Contrary to the ‘Digital Memory-Values’ screen, the ‘Digital Output-Values’ screen will
never have empty fields. An empty field in this screen indicates a non-existing channel.
Since the rows represent the fixtures, fields 15 and 16, for example of a MAC600 (fixtures 1
to 6), will remain always blank (MAC600 has 14 channels).
This screen represents the values that are
sent to the fixtures. This screen is slowed
down, because the output takes precedence
over the screen. If one wants to see, on
screen, what happens in real-time, press
and hold the [VALUES] key. In this case,
the screen takes precedence over the output.
Colored boxes in this screen indicate that
effects generator channels are active on
the channels.
{EXP} The values are colored yellow. If they have a different color, then the values are changed by a
sequence (see chapter Playbacks and sequences).
- white: values coming from sequence D
- blue: values coming from sequence C
- green: values coming from sequence B
- red: values coming from sequence A
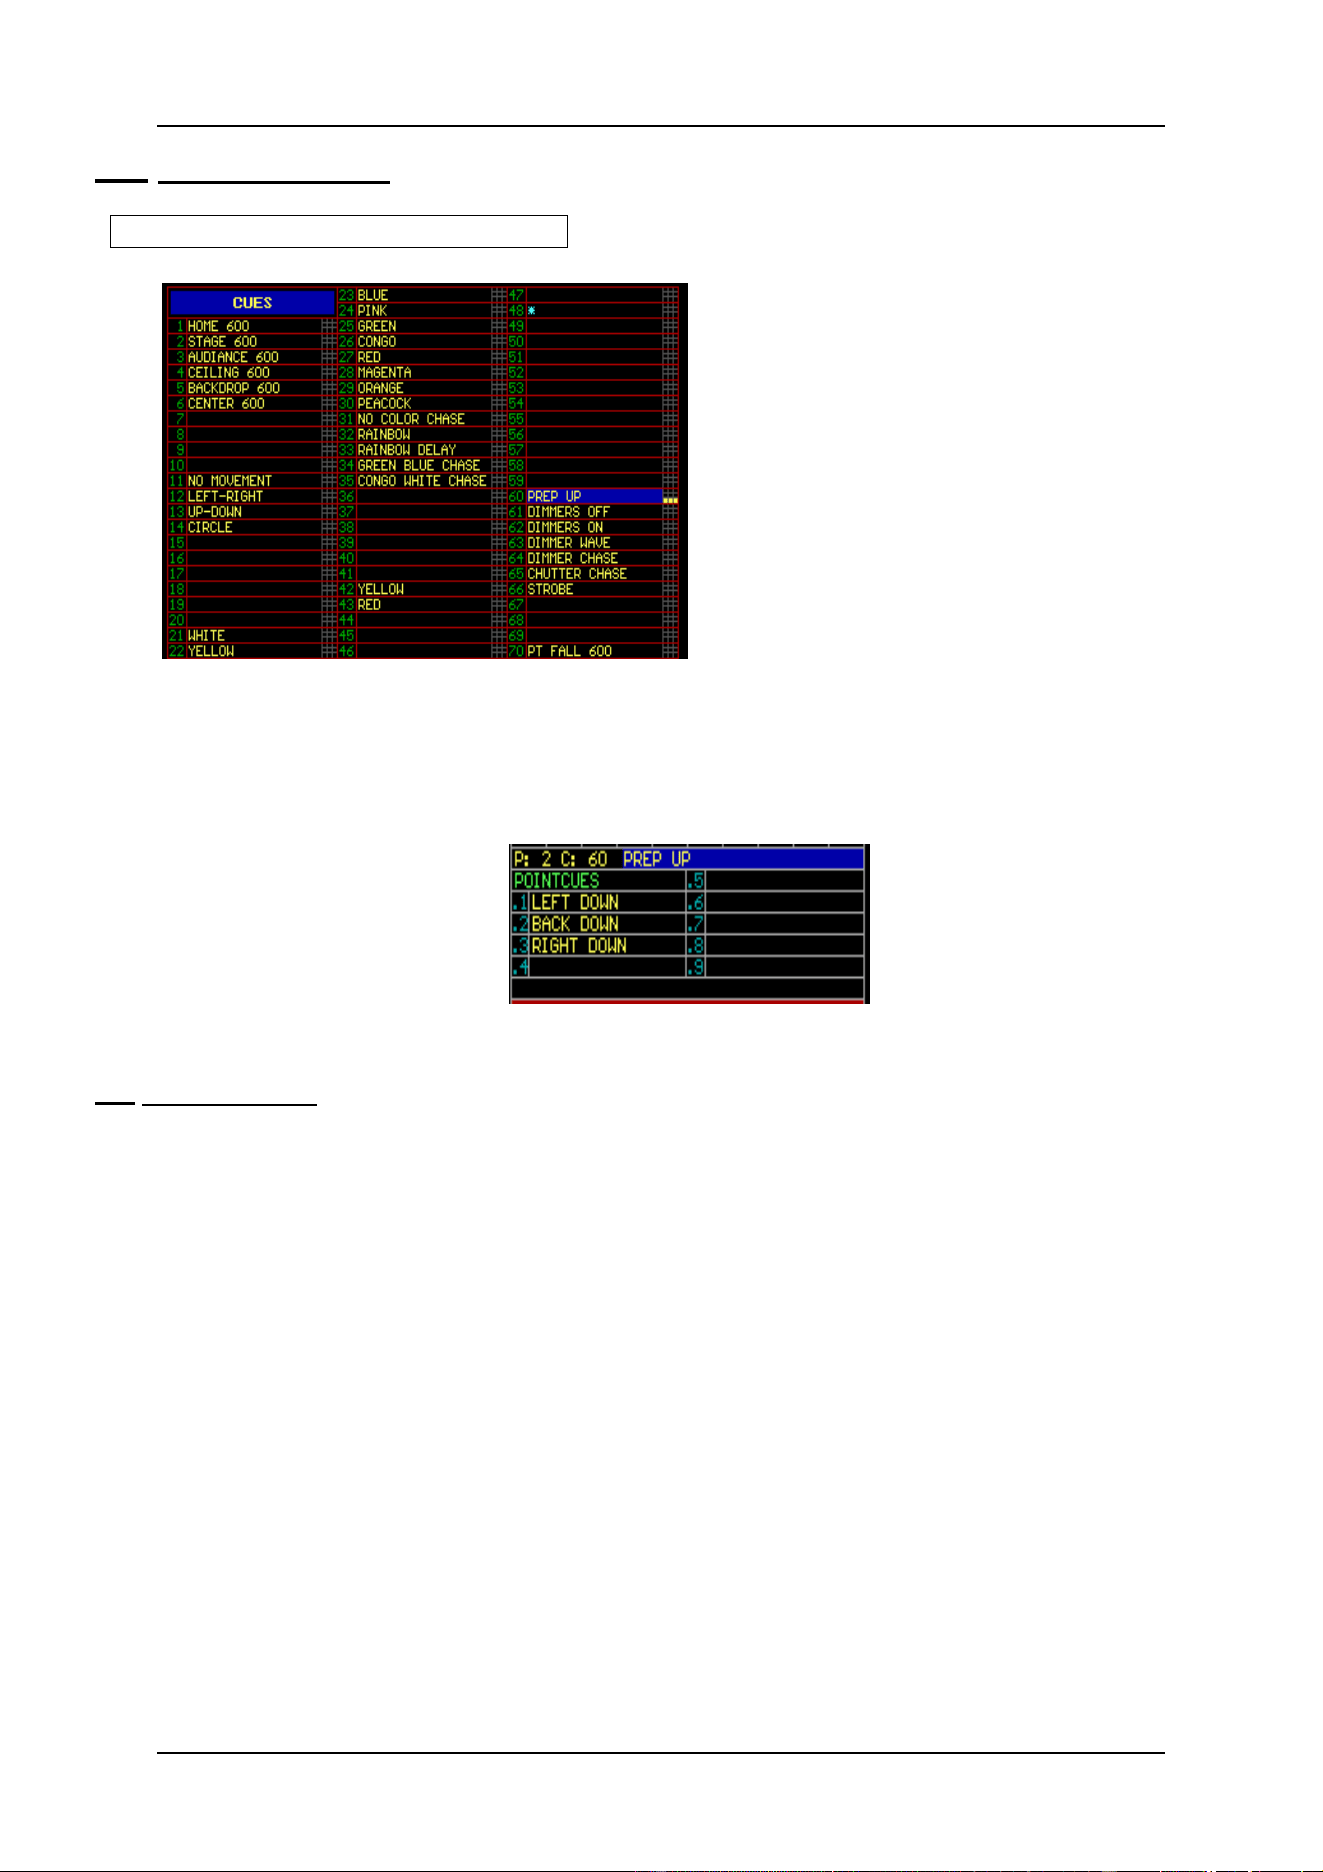
9.5. Naming Cues
To keep everything well organized, it is important to give the cues a name. If in the ‘start
options ( [SETUP] [2]) the ‘automatic cuename’ setting is ‘ON’, a name will be asked
automatically when saving a cue-memory ( [TO] [RET] [RET] [name] [RET]).
When the setting is ‘OFF’, you can give a cue a name by:
[Activate a cue] [TXT EDIT] + [CUE] [Type name] [RET]
04/2000 Martin Case Manual Version 7.20 Cue-memories
R&D International NV for Martin Professional AS
101
9.5.1 ‘Cuenames’ window
[Select CUE-mode] [TEXT (view)]
A name-field only marked with a *
indicates that the cue has been
programmed, but didn’t get a name (for
example cue 48).
Some yellow boxes appear after CUE 60 in the picture. This means that the cue holds also
some point-cues. The point-cue names appear on the left of the screen:
9.6. Arranging cues
Since cue-memories can hold a variety of values, many combinations are possible. Cue-
memories can hold values for:
- all fixtures and all their channels (don’t use that too much)
- one single function of one or more fixtures
- one single channel of one or more fixtures
- all channels of 1 type of fixture
- only effects generator channels
- etc…
Therefor cues can be programmed in many different ways:
- Programming for performances or for a theater show. In this case, the cues will be
programmed in order of performance.
- Programming for performances or discos where the programmer doesn’t have a
clue of what will happen.
04/2000 Martin Case Manual Version 7.20 Cue-memories
R&D International NV for Martin Professional AS
102
9.6.1 Cue arrangement for shows with a defined cue-sequence
The start-cue in this case will be a cue that holds all values for all fixtures. The next cues will
hold only the changes to the previous cues or light scenes.
[LAST] of [NEXT]
Cues that are programmed on this base can be called in sequence by hitting the [LAST] (go
back) or [NEXT] (go forward) buttons (!!! The controller must be in CUE MODE).
An example of this is given in the show ‘MANUAL72: Cuepage 1 cues 1 to 7.
- The first cue ‘BLACKOUT’ holds all values for all fixtures
- Cue 2 ‘MAC300 ON’ opens the dimmers of the MAC300s and MAC600s
- Cue 3 ‘MAC250 ON+MOVE’ opens the MAC250s and sets them in P/T preset 4
- Cue 4 ‘MAC300+250’ sets the MAC300s in color preset 6 and some of them have
also a P/T preset 6
- Cue 5 ‘MAC250 Stage Pink’ opens PRO918s, closes Mac300s and sets color
preset 4, gobo preset 32 and P/T preset 1 for the MAC250s
- Cue 6 ‘Mac600 Down’ puts the MAC600s in color preset 10 and P/T preset 1 and
starts an effect on P/T preset 3 of the MAC250s
- Cue 7 ‘MAC250 chase’: the dimmers of the MAC600s and the PRO918s will
close, those of the MAC300s will open in color preset 6 and P/T preset 4 and a
dimmer chase in color white will start on the MAC250s. In addition a P/T effect
will start. Since there is no sign of Pan/Tilt values here, the effect will start on the
values of a previous cue (in this case cue 6 with pan/tilt preset 3).
&8(
$OOFKDQQH OYDOXHVIRUDOOIL[WXUHV
&8(
2QO\FKDQJHVLQWKHFXHPHPRU\WRFXH
&8(
2QO\FKDQJHVLQWKHFXHPHPRU\WRFXH
&8(Q
2QO\FKDQJHVLQWKHFXHPHPRU\WRFXHQ

04/2000 Martin Case Manual Version 7.20 Cue-memories
R&D International NV for Martin Professional AS
103
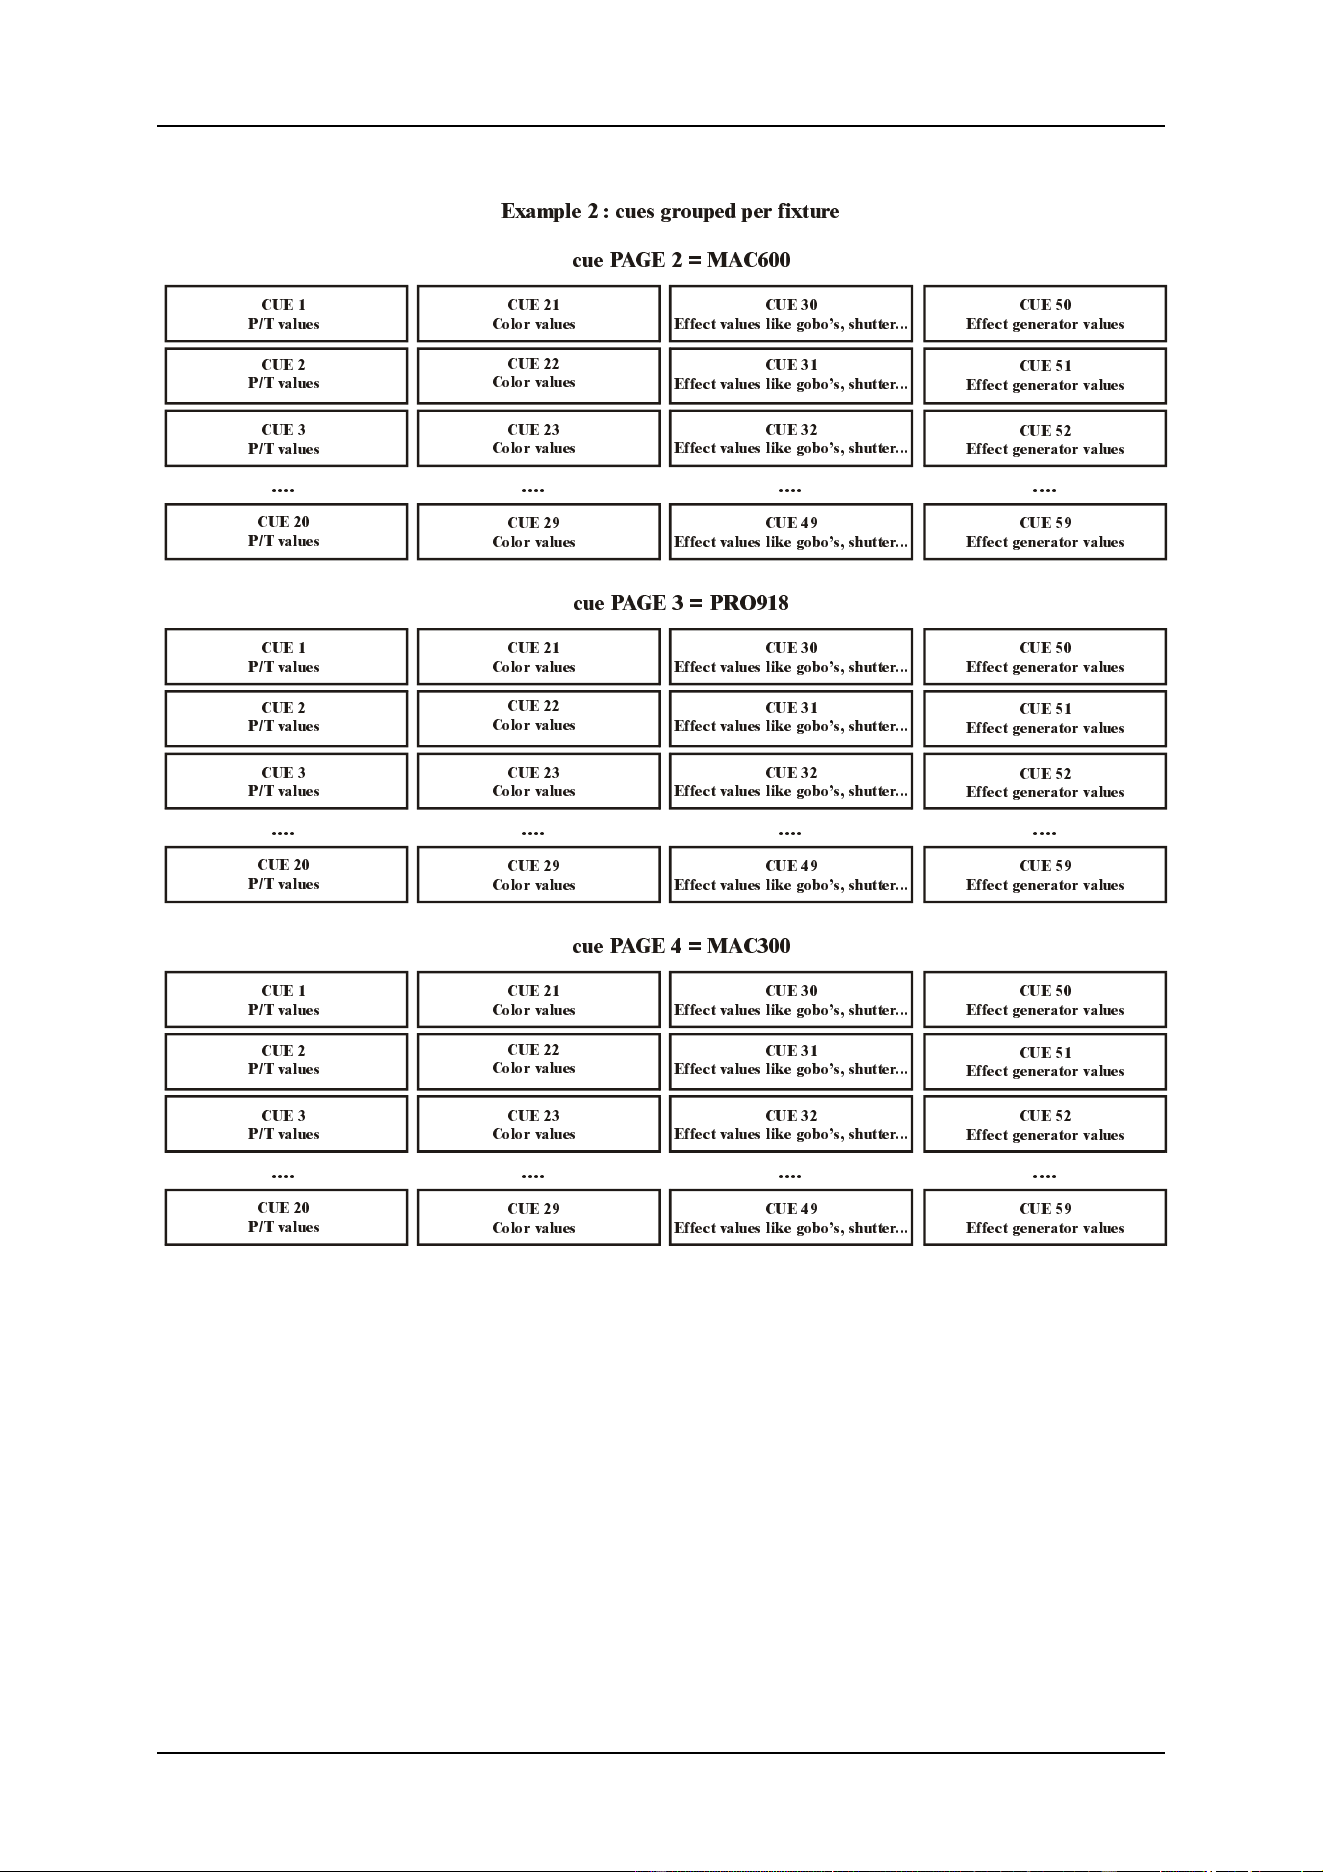
9.6.2 Cue arrangement for shows with no cue sequence order
If the cue sequence has not been defined or if the show has to be used in discotheques, then it
can be useful to select the cues on an effect or fixture base.
It is possible to make combinations of cues, if partly filled cue-memories are used, since
partly filled cue-memories call only the values that are programmed in the cue-memory:
In this example (Example 1) the cues are arranged per effect for all fixtures together. We
start from cue 1 where all fixtures have a value for all channels. This way, we are sure that all
channels have a value somewhere. Then we arrange the cues as follows:
- cue 2 to for example cue 20 hold only pan/tilt values in the cue-memories
- cue 21 to cue 29 hold only color values in the cue-memories
- cue 30 to cue 49 hold only effects like gobos, prisms, strobo …
- cue 50 to cue 59 hold only effects generator values for ex. P/T, or gobo, or
dimmer…
- Then we can also make some cues for dimmers
Remark:
- The best way to start is: assign the default value of the series to every first cue of a
series. For example: the fist cue of the color cue series (cue 21) has to hold the
value for ‘white’. The first cue of the gobo cue series (cue 30) has to hold the
value for ‘no gobo’. The first cue of the effects generator cue series (cue 50) has to
hold the values to stop all possible effects.
- This way of programming makes it possible to combine the cues. We can combine
cue 3 (Pan/Tilt) with cue 25 (a color) with cue 31 (a gobo). Just activate them.
&8(
$OO FKDQQHO YDOXHV IRU DOO IL[WXUHV
&8(
&RORU YDOXHV
&8(
(IIHFW YDOXHV OLNH JRER·V VKXWWHU
([DPSOH
&8(
(IIHFW JHQHUD WRU YDOXHV
&8(
(IIHFW JHQHUD WRU YDOXHV
&8(
(IIHFW JHQHUD WRU YDOXHV
&8(
(IIHFW JHQHUD WRU YDOXHV
&8(
(IIHFW YDOXHV OLNH JRER·V VKXWWHU
&8(
(IIHFW YDOXHV OLNH JRER·V VKXWWHU
&8(
(IIHFW YDOXHV OLNH JRER·V VKXWWHU
&8(
&RORU YDOXHV
&8(
&RORU YDOXHV
&8(
&RORU YDOXHV
&8(
37 YDOXHV
&8(
37 YDOXHV
&8(
37 YDOXHV
04/2000 Martin Case Manual Version 7.20 Cue-memories
R&D International NV for Martin Professional AS
104
&8(
37 YDOXHV
&8(
37 YDOXHV
&8(
37 YDOXHV
&8(
&RORU YDOXHV
&8(
&RORU YDOXHV
&8(
&RORU YDOXHV
&8(
(IIHFW YDOXHV OLNH JRER·V VKXWWHU
&8(
(IIHFW YDOXHV OLNH JRER·V VKXWWHU
&8(
(IIHFW YDOXHV OLNH JRER·V VKXWWHU
([DPSOH FXHV JURXSHG SHU IL[WXUH
FXH 3$*( 0$&
FXH 3$*( 352
FXH 3$*( 0$&
&8(
(IIHFW JHQHUDWRU YDOXHV
&8(
(IIHFW JHQHUDWRU YDOXHV
&8(
(IIHFW JHQHUDWRU YDOXHV
&8(
(IIHFW JHQHUDWRU YDOXHV
&8(
(IIHFW JHQHUDWRU YDOXHV
&8(
(IIHFW JHQHUDWRU YDOXHV
&8(
(IIHFW JHQHUDWRU YDOXHV
&8(
(IIHFW JHQHUDWRU YDOXHV
&8(
(IIHFW JHQHUDWRU YDOXHV
&8(
(IIHFW JHQHUDWRU YDOXHV
&8(
(IIHFW JHQHUDWRU YDOXHV
&8(
(IIHFW JHQHUDWRU YDOXHV
&8(
(IIHFW YDOXHV OLNH JRER·V VKXWWHU
&8(
(IIHFW YDOXHV OLNH JRER·V VKXWWHU
&8(
(IIHFW YDOXHV OLNH JRER·V VKXWWHU
&8(
(IIHFW YDOXHV OLNH JRER·V VKXWWHU
&8(
(IIHFW YDOXHV OLNH JRER·V VKXWWHU
&8(
(IIHFW YDOXHV OLNH JRER·V VKXWWHU
&8(
(IIHFW YDOXHV OLNH JRER·V VKXWWHU
&8(
(IIHFW YDOXHV OLNH JRER·V VKXWWHU
&8(
(IIHFW YDOXHV OLNH JRER·V VKXWWHU
&8(
&RORU YDOXHV
&8(
&RORU YDOXHV
&8(
&RORU YDOXHV
&8(
&RORU YDOXHV
&8(
&RORU YDOXHV
&8(
&RORU YDOXHV
&8(
&RORU YDOXHV
&8(
&RORU YDOXHV
&8(
&RORU YDOXHV
&8(
37 YDOXHV
&8(
37 YDOXHV
&8(
37 YDOXHV
&8(
37 YDOXHV
&8(
37 YDOXHV
&8(
37 YDOXHV
&8(
37 YDOXHV
&8(
37 YDOXHV
&8(
37 YDOXHV

04/2000 Martin Case Manual Version 7.20 Cue-memories
R&D International NV for Martin Professional AS
105
The example (example 2) is programmed using cue-pages. Every cue-page holds cues for
another type of fixture:
- cue page 2: everything for MAC600s
- cue page 3: everything for PRO918s
- cue page 4: everything for MAC300s
- cue page 5: everything for MAC250s
In addition, we use the same arrangement as explained in example 1, but now the cue-
memories hold values for 1 type of fixtures.
Combinations can be made easily. For example:
- cue 3 Page 2 together with cue 20 Page 3 together with cue 51 Page 4….
We can find an example of this in the show ‘MANUAL72’:
- Cue page 2: MAC600s
o cues 1 to 6: P/T positions
o cues 11 to 14: P/T effects on effects generator base
o cues 21 to 35: colors
o cues 60 to 66: dimmer effects
o cue 70: combined effect dimmer and P/T (P/T fall+dimmer)
- Cue page 3: PRO918s
o cues 1 to 6: P/T positions
o cues 11 to 14: P/T effects on effects generator base
o cues 21 to 35: colors
o cues 40 to 49: gobos
o cues 51 to 53: iris
o cues 60 to 66: dimmer effects
o cue 70: combined effect dimmer and P/T (P/T fall+dimmer)
- Cue page 4: MAC300s
- Cue page 5: MAC250s
When running this example, watch the values recorded in the cue-memories (open the
‘digital memory-values’ screen).
Activate now different cues of cue-pages 2, 3, 4 and 5. The fixtures can be controlled
independently.
04/2000 Martin Case Manual Version 7.20 Cue Timing
R&D International NV for Martin Professional AS
106
10 CHAPTER 10: Cue-timing
6HWXS
)L[WXUHV '0; $GGUHVVHV
DQG 6WDJH 3ODQ
$GMXVW
)L[WXUH &RQWURO FKDQQHOV
$GMXVW
(IIHFW *HQHUDWRU FKDQQHOV
0DNH
3DQ7LOW *RER &RORU DQG
(IIHFW *HQHUDWRU 3UHVHWV
0DNH
&XHV ZLWK &XH0HPRULHV
5XQ
WKH 6KRZ
0DNH
7LPH&RGH 6KRZ
0DNH
&XHV ZLWK 3OD\EDFNV
0DNH
&XHV ZLWK 6HTXHQFHV FKDVHUV
0DNH
0HPRULHV
7LPLQJV
04/2000 Martin Case Manual Version 7.20 Cue Timing
R&D International NV for Martin Professional AS
107
In the previous chapter, there was asked to disable the CUEFADING when the examples of
the show ‘MANUAL72’ were tried.
Press [CUE] + [ON] until the red box, behind the ‘CUEFADING ACTIVE’ is enabled.
Activate cues 1 to 7 of cue-page 1.
10.1 The main Cue-fading
In the previous chapter, we have explained that a cue-memory is a light scene. On this light
scene, fade, delay and hold times can be applied.
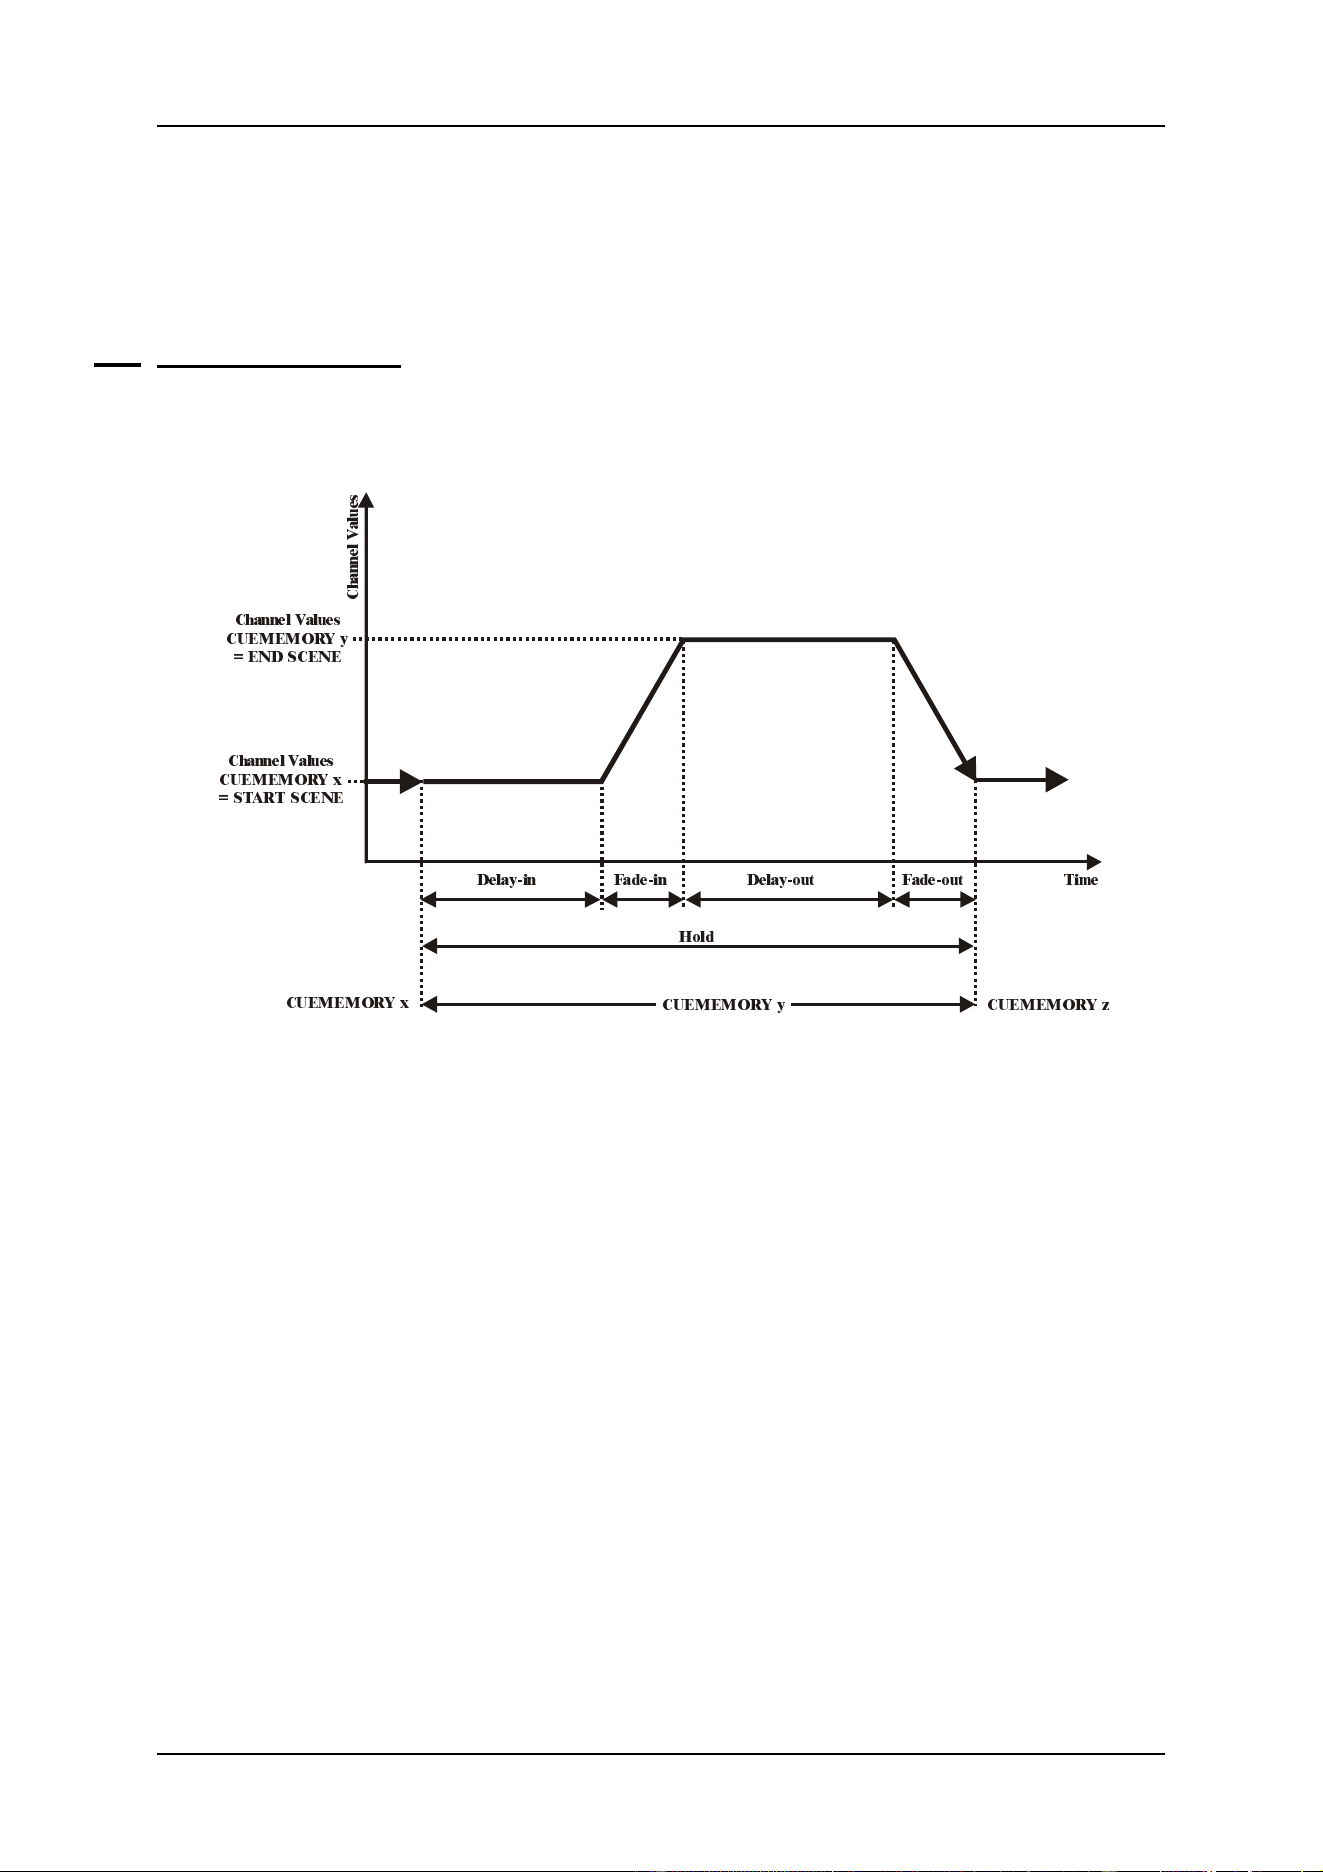
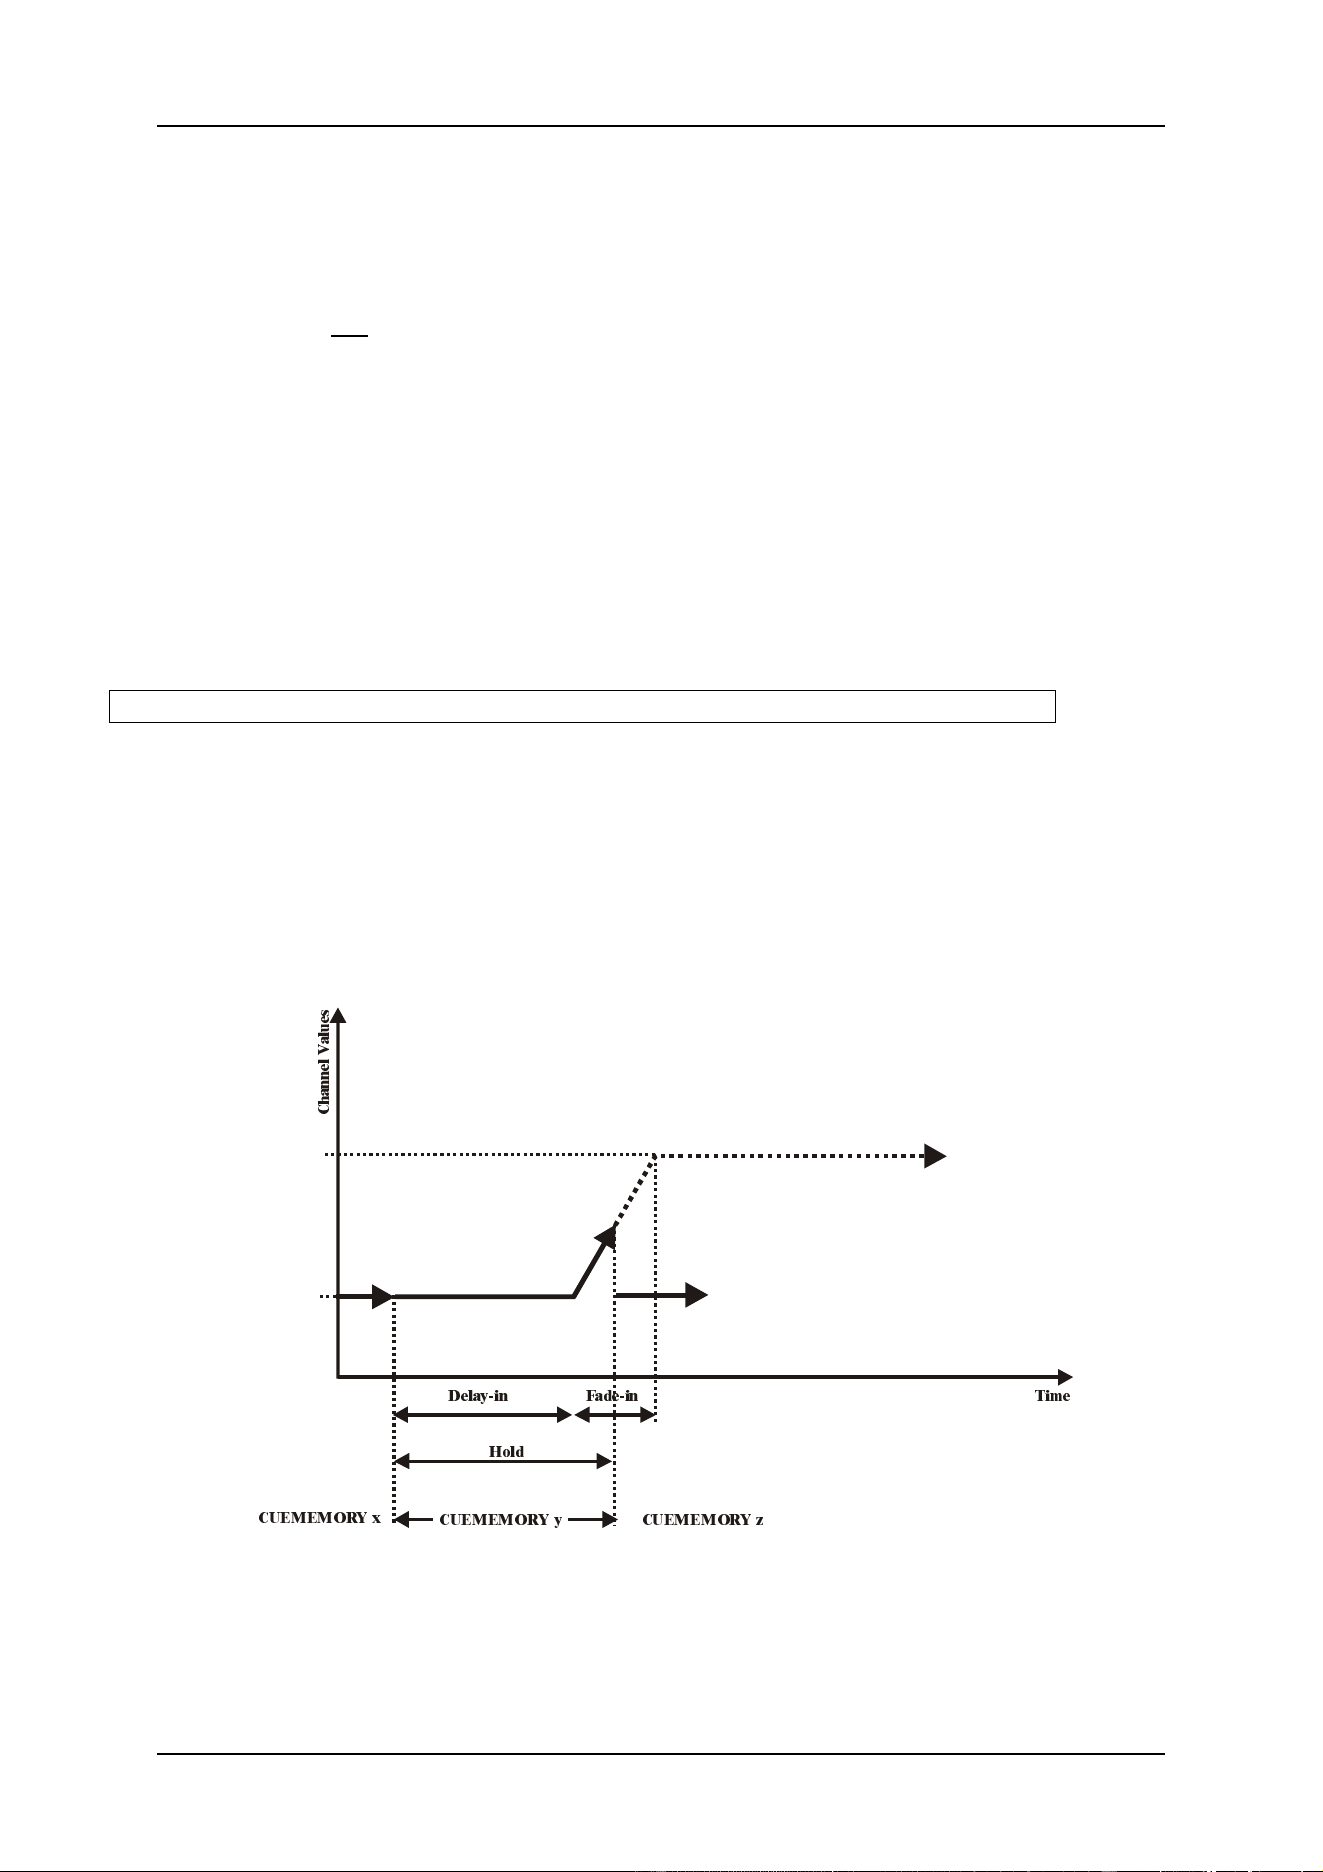
This figure represents the main cue timing on a cue-memory. Suppose, first cue-memory x is
called, and afterwards, cue-memory y.
First, we will explain the items: start-scene and end-scene:
- The start-scene expresses the fixtures channel-values on the moment that the
cue is started. This is the light-scene that we become when the cue is started. In
the figure, the start-scene is in fact the end of a PREVIOUSLY called cue.
- The end-scene expresses the fixtures channel-values, programmed in the cue-
memory. This is the light-scene we become after fading in the cue-memory (in the
figure represented by cue-memory y).
o Delay-in: The activation wait-time. The fixtures channel-values will
wait at the start-scene, as long as indicated in the delay-in
time. This means that they will wait at the previously called
cue-values.
o Fade-in: The activation-time. This is the time, needed to fade from
the start-scene to the end-scene, or the time needed to fade
from the channel-values of cue-memory x to the channel-
values of cue-memory y.
o Delay-out: This is the time, the cue-memory will wait at its end-scene.
By default, this time is infinite, which means that the cue-
&KDQQHO 9DOXHV
&8(0(025< [
67$57 6&(1(
&KDQQHO 9DOXHV
&8(0(025< \
(1' 6&(1(
&8(0(025< [
&8(0(025< \ &8(0(025< ]
7LPH'HOD\LQ )DGHLQ )DGHRXW'HOD\RXW
+ROG
&KDQQHO 9DOXHV
04/2000 Martin Case Manual Version 7.20 Cue Timing
R&D International NV for Martin Professional AS
108
memory will wait for an endless period of time at its
programmed channel-values.
o Fade-out: This is the time, needed to fade back from its end-scene to
its start-scene, or to fade back from the channel-values
programmed in cue-memory y to the start-scene, which is in
this case cue-memory x.
o Hold: The time there will be waited before calling a next cue-
memory, when the cue was linked with another cue. Pay
attention: This timing starts when the cue was activated.
When this timing is less than the sum of the delay-in and
fade-in, the end-scene will never be reached. By default,
this time is set at infinite, meaning that the cue will never be
linked.
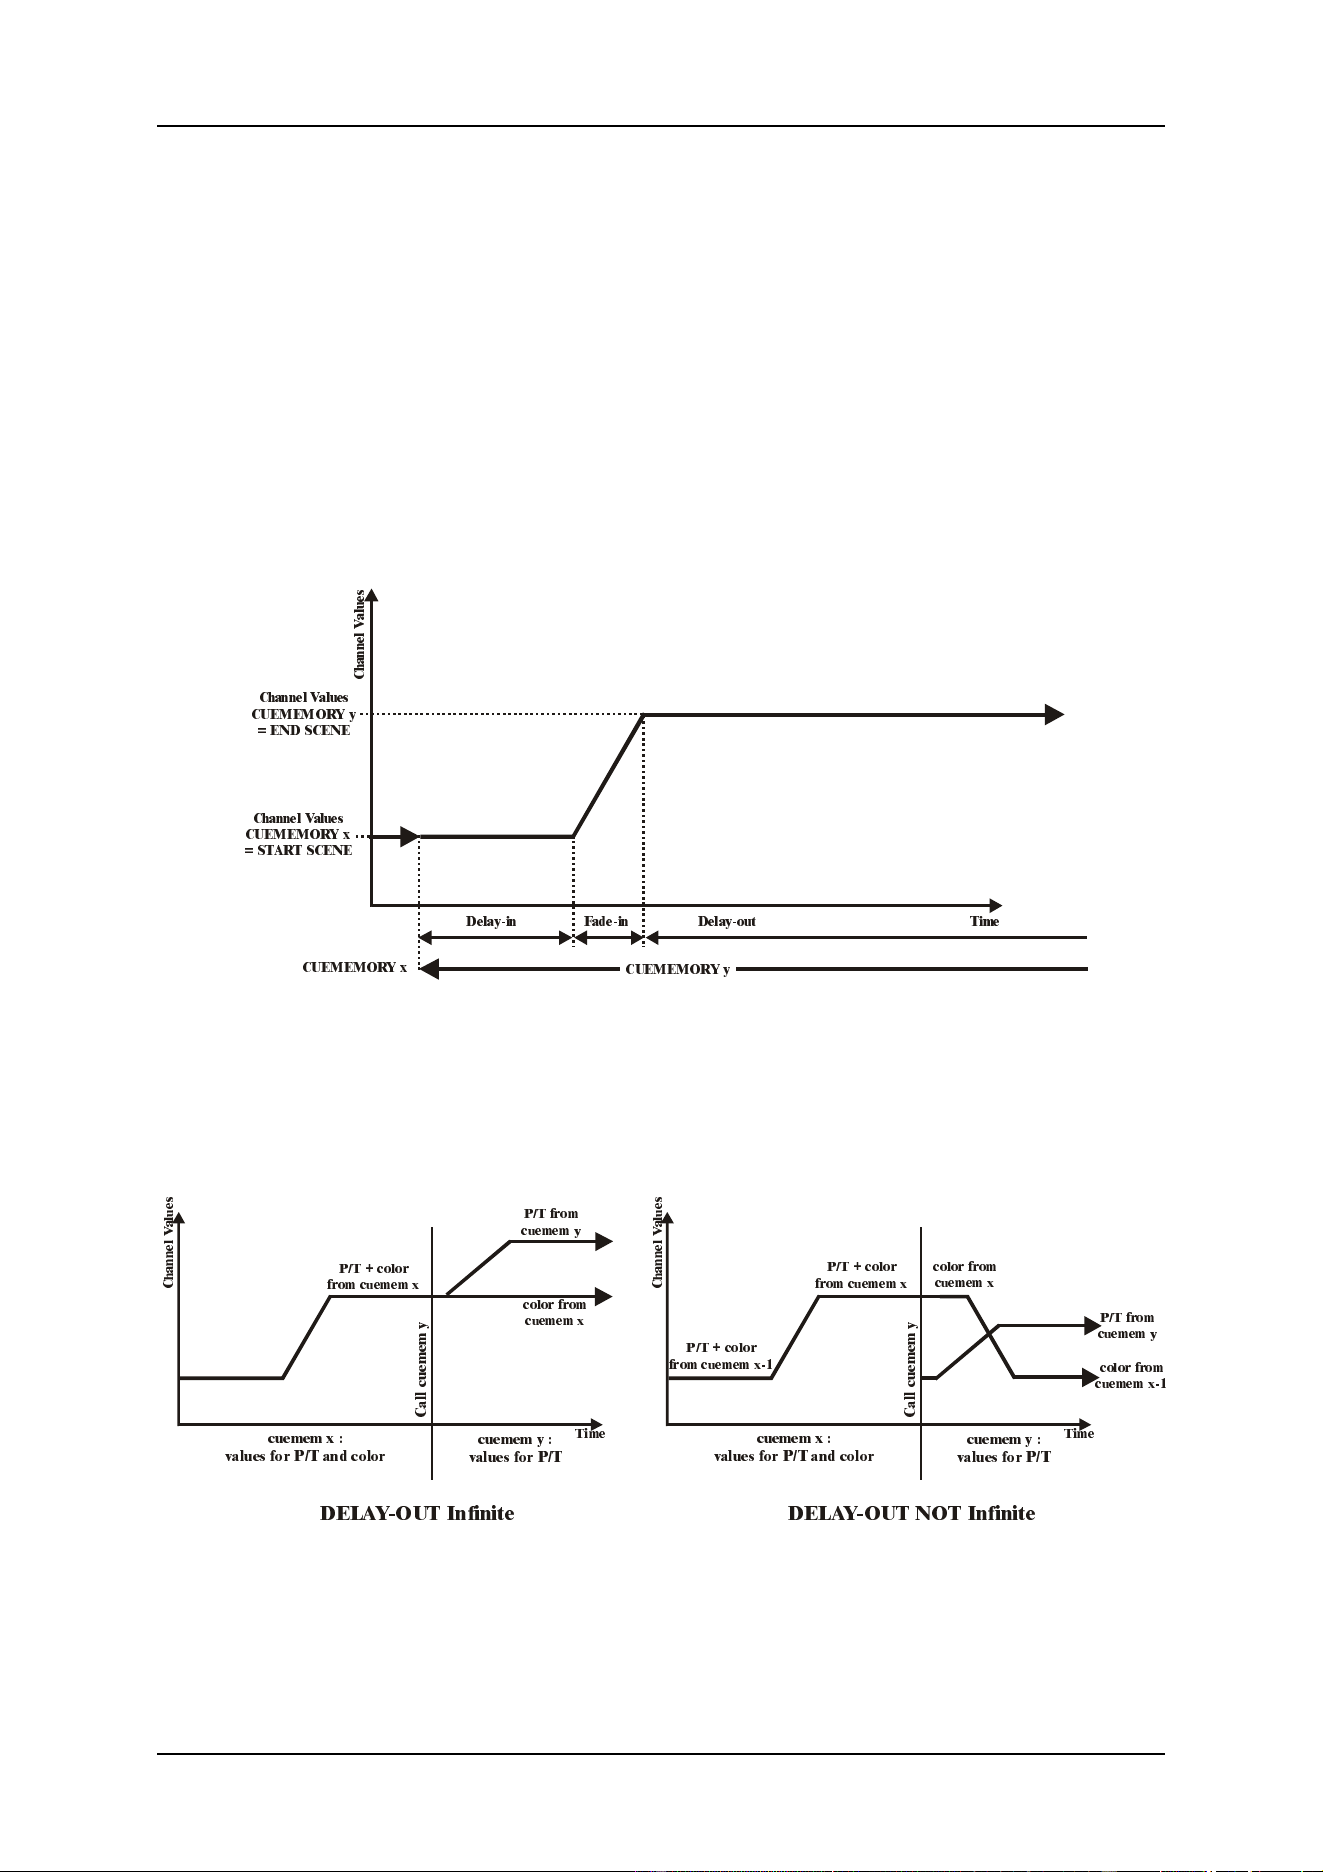
In this figure, the delay-out is set at infinite, which means that the cue-memory will wait an
endless period of time at its end-scene. When a next cue-memory, which uses the same
fixture-channels (but some other values for them), is called, then the delay-out is aborted and
the timers of this next cue-memory will start running.
&KDQQHO 9DOXHV
&8(0(025< [
67$57 6&(1(
&KDQQHO 9DOXHV
&8(0(025< \
(1' 6&(1(
&8(0(025< [
&8(0(025< \
7LPH'HOD\LQ )DGHLQ 'HOD\RXW
&KDQQHO 9DOXHV
7LPH
'(/$<287 ,QILQLWH '(/$<287 127 ,QILQLWH
7LPH
37 FRORU
IURP FXHPHP [
37 FRORU
IURP FXHPHP [
37 FRORU
IURP FXHPHP [
FXHPHP [
YDOXHV IRU 37 DQG FRORU
FXHPHP [
YDOXHV IRU 37 DQG FRORU
FXHPHP \
YDOXHV IRU 37
FXHPHP \
YDOXHV IRU 37
&DOO FXHPHP \
&DOO FXHPHP \
FRORU IURP
FXHPHP [
FRORU IURP
FXHPHP [
FRORU IURP
FXHPHP [
37 IURP
FXHPHP \
37 IURP
FXHPHP \
&KDQQHO 9DOXHV
&KDQQHO 9DOXHV
04/2000 Martin Case Manual Version 7.20 Cue Timing
R&D International NV for Martin Professional AS
109
Important remark:
- (1) The delay-out of the cue-memory will only abort for the common
channels, used in both, the aborted and the next called cue-memory. Suppose,
a cue-memory x holds values for Pan/Tilt and for color of a fixture, and cue-
memory y holds only the Pan/Tilt values for the same fixture, then the delay-out
will only be aborted for the Pan/Tilt value when cue-memory y is called. The color
value will still be that of cue-memory x.
- (2) When cue-memory x holds a finite delay-out, and it is aborted by a next
called cue, then a quick fade-out will happen for the common channels of both
cue-memories. The timers of the non-common channels will not be aborted, they
will keep following the timings specified in cue-memory x.
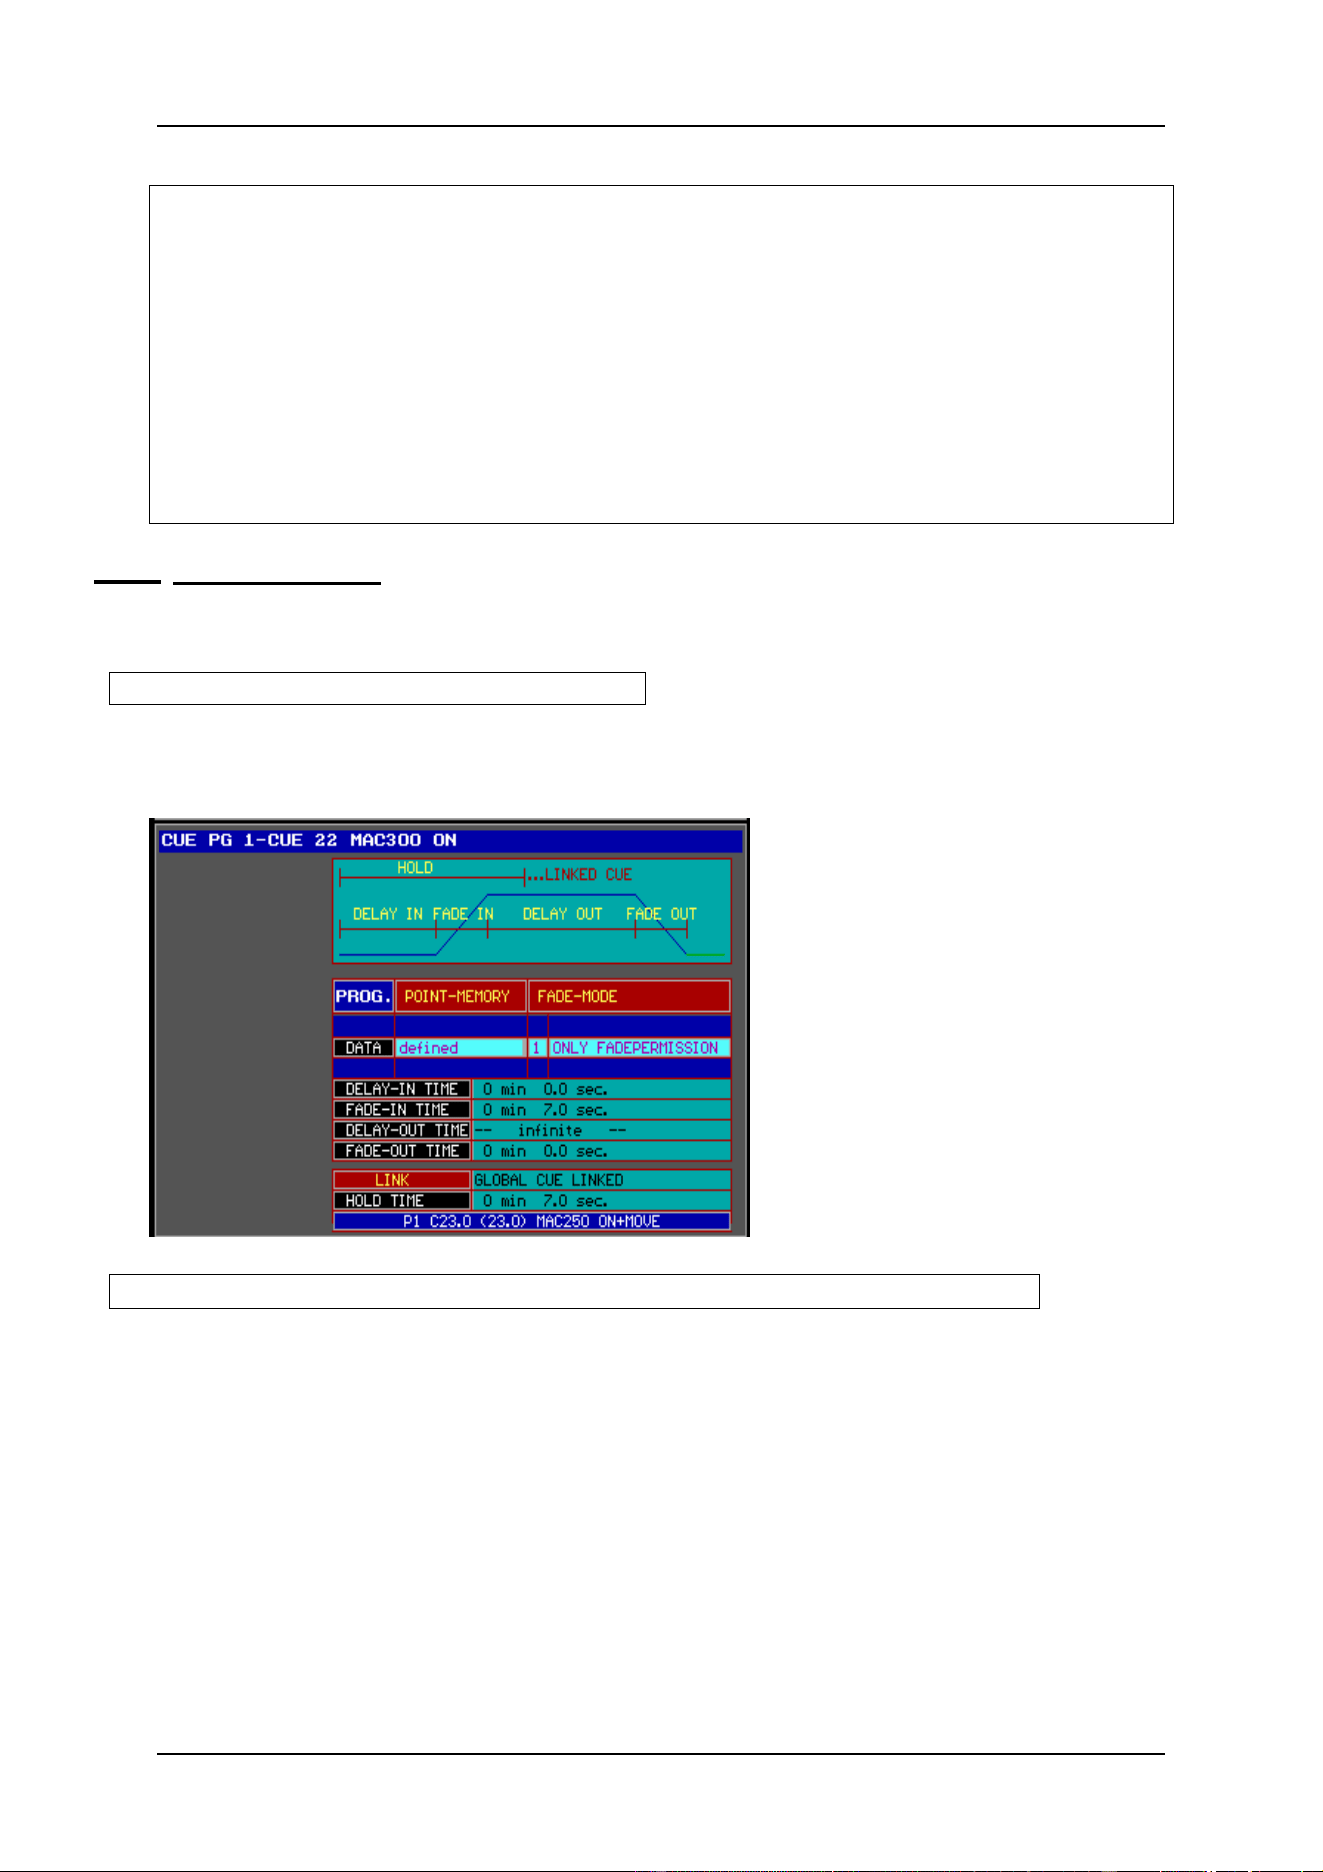
10.1.1 Cue-timing screen
When a cue-memory is saved, after the first [RET], the cue-timing screen will open.
[Select a cue] [EDIT] + [CUE] [RET]
To open the cue-timing window of an already saved cue-memory, first the cue has to be
selected, then the combination [EDIT] + [CUE].
To make changes to one of the
fields, high light the item with the
[2
↓
] or [8
↑
] keys, and select the
[EDIT] key.
[High light the item with 2
↓
or 8
↑
] [EDIT] or [@] [0…9(keypad)] or [@] [RET]
To change for example the fade-in time, high light the fade-in time and select the [EDIT]
or [@] key. A window will open where a new time can be entered using the keypad. If a
value 0 has to be set in one of the fields (min, sec or msec), the field is skipped by hitting
the [@] or [.] key.
If the show default value has to be re-entered for an item, select the [CLR (cue)] key.
If the value infinite should be entered (only for delay-out or hold), enter 99 min.

04/2000 Martin Case Manual Version 7.20 Cue Timing
R&D International NV for Martin Professional AS
110
The other fields:
Point-memory: defined or empty. An already programmed cue-memory will be indicated
as ‘defined’. If a cue without cue-memory is edited, then the indication
will be ’empty’. By hitting the [EDIT] key in this field, changes can be
made to the control channels. Save the changes by selecting [RET].
Fade mode: See next paragraph.
Link: See paragraph ‘linking cue-memories’.
Example 1: Suppose cue-memory 2 at cue-page 1 needs a fade-in time of 15 sec instead of
7 sec.
- Select cue 2 (cue-page 1)
- Open the timing window: [EDIT] + [CUE]
- High light FADE-IN and select [@]
- Since we don’t have to enter minutes, we select [@]
- Use the keypad to enter 15 and [RET]
- Again [RET] to save everything.
When the cue-fading is activated ([CUE] + [ON]) and we go from cue 1 to cue
2, then the light scene of cue 1 (dimmers closed) will go to dimmers open (cue
2) in 15 sec. in stead of 7 sec.
Example 2: Suppose next timings are entered for cue-memory 3 (page 1):
- Delay-in: 0 sec.
- Fade-in: 10 sec.
- Delay-out: 0 sec.
- Fade-out: 5 sec.
Before the changes, the delay-out was set at infinite, or in cue-memory 3 the
dimmers of the MAC250s are opened and Pan/Tilt is fading down. Because of
the infinite value, everything stopped there until another cue was selected.
Since we entered a delay-out of 0 and a fade-out of 5 sec., everything will fade
back to the position it had before the cue was selected. A fade-out will fade
back to the start-scene. When, before selecting cue 3, cue 1 was activated, the
fading will go back to cue 1. If on the other hand, cue 2 was selected before,
everything will fade back to cue 2.
04/2000 Martin Case Manual Version 7.20 Cue Timing
R&D International NV for Martin Professional AS
111
10.1.2 {EXP} Fade modes
Every fixture is defined in a library. The fixture-library holds also the fade-mode of
every channel. A channel can fade or not (bump). On the screen, this is indicated in the
control channel window:
A channel that can fade is marked
with a yellow box. A bump
channel has a gray box.
The dimmer of a MAC600 can fade, the color wheel not. If the (real) color wheel (not the
CMY) should have fading possibilities, all transitions would be seen in a fading from one
color to another. In bump mode however, the fade will be so fast, that the transitions won’t be
seen.
[Open the cue-timing window] [MODE (cue)]
On the cue-memory, the fade-mode can be changed with the [MODE] key. There are 6
possible choices:
- Mode 1: Only fade permission: This is the default mode. Channels that are given
fade-possibilities, will fade, the others will bump.
- Mode 2: Fade all channels: All channels will have fade possibilities. The library is
ignored.
- Mode 3: No fading: All channels will be in bump mode.
- Mode 4: Same as mode 3, only when used in sequences (chapter playbacks and
sequences), this mode differs.
- Mode 5: LTP-dimmers fade. Normally a dimmer is in HTP (highest takes
precedence) mode (see chapter ‘introduction to programming). In mode 5, the
dimmer-channels will act as any other channel.
- Mode 6: LTP-dimmers fade but bump mode for all other channels. This is a
combination of mode 5 and mode 3. Attention, THRESHOLDS react different in
this mode (see chapter playbacks and sequences).
10.1.3 {EXP} Linking cue-memories
Cues can be called automatically by other cues. This is called cue-linking. Cue 1 can call cue
2, cue 2 can call cue 3, and cue 3 can call cue 1 again. In this case, we made a loop.
There are 2 link-modes:
- Link only defined channels:
This mode is used to run series of cues independent. We can easily link
cues with only gobo-channels defined and other cues with only color-
channels defined. Those 2 links can run independent. If we make loops in
those links, we have 2 independent chasers.
This link-mode will link only channels that are defined (have a value) in the
cue-memory. Channel-values that are left blank, will never link.
To understand this, an example:
Suppose, cue-memory 1 holds values for Pan/Tilt and color. Cue-memory 2
holds a value for Pan/Tilt only, and cue-memory 3 holds values for both
04/2000 Martin Case Manual Version 7.20 Cue Timing
R&D International NV for Martin Professional AS
112
Pan/Tilt and color. When those 3 cues are linked, only the Pan/Tilt channel
will be involved in the link, since cue 2 doesn’t hold values for color. 2 cue-
memories that have no common channels will never link in this mode.
.
Cues can hold also sequences and playbacks. Sequences and playbacks will
not change when linking cues in ‘only defined channels’ mode.
- Global cue linked:
All channels will always link in this mode. So the complete next cue-
memory will be executed. If we take back the previous example, the color
will change also. This is the same as selecting another cue.
Sequences and playbacks will be replaced (depends on the transparent
mode) by those of the linked cue (see chapter playbacks and sequences).
To change the mode, highlight the LINK item and press the [EDIT] key.
[Open the cue-timing window] [LINK] + ( [1…16(groups/cuepages)]) + [1…70]
To link a cue-memory to another cue-memory, open the cue-timing window, press and hold
the link key and select a cue-page and cue.
Very important is the setting of the hold-time, when linking cues. The default setting is
infinite, which means that the cue will never link. To make a link possible, the hold time
should be finite. Since the hold-timer starts counting when the cue is started, it should be
greater or equal to the sum of the delay-in and fade-in timings, or fading of the cue-
memory will never happen or partly be finished.
The figure shows a fading that is aborted because the hold-time was selected to short.
There is an example of cue-linking in the show ‘MANUAL72’. Cues 21 to 27 are linked in a
loop. When one of those cues is activated, the loop will start (if cue-fading is set to ON).
&8(0(025< [
&8(0(025< \ &8(0(025< ]
7LPH'HOD\LQ )DGHLQ
+ROG
&KDQQHO 9DOXHV
04/2000 Martin Case Manual Version 7.20 Cue Timing
R&D International NV for Martin Professional AS
113
Don’t pay attention on the special timing-effects, those are explained in the next paragraph.
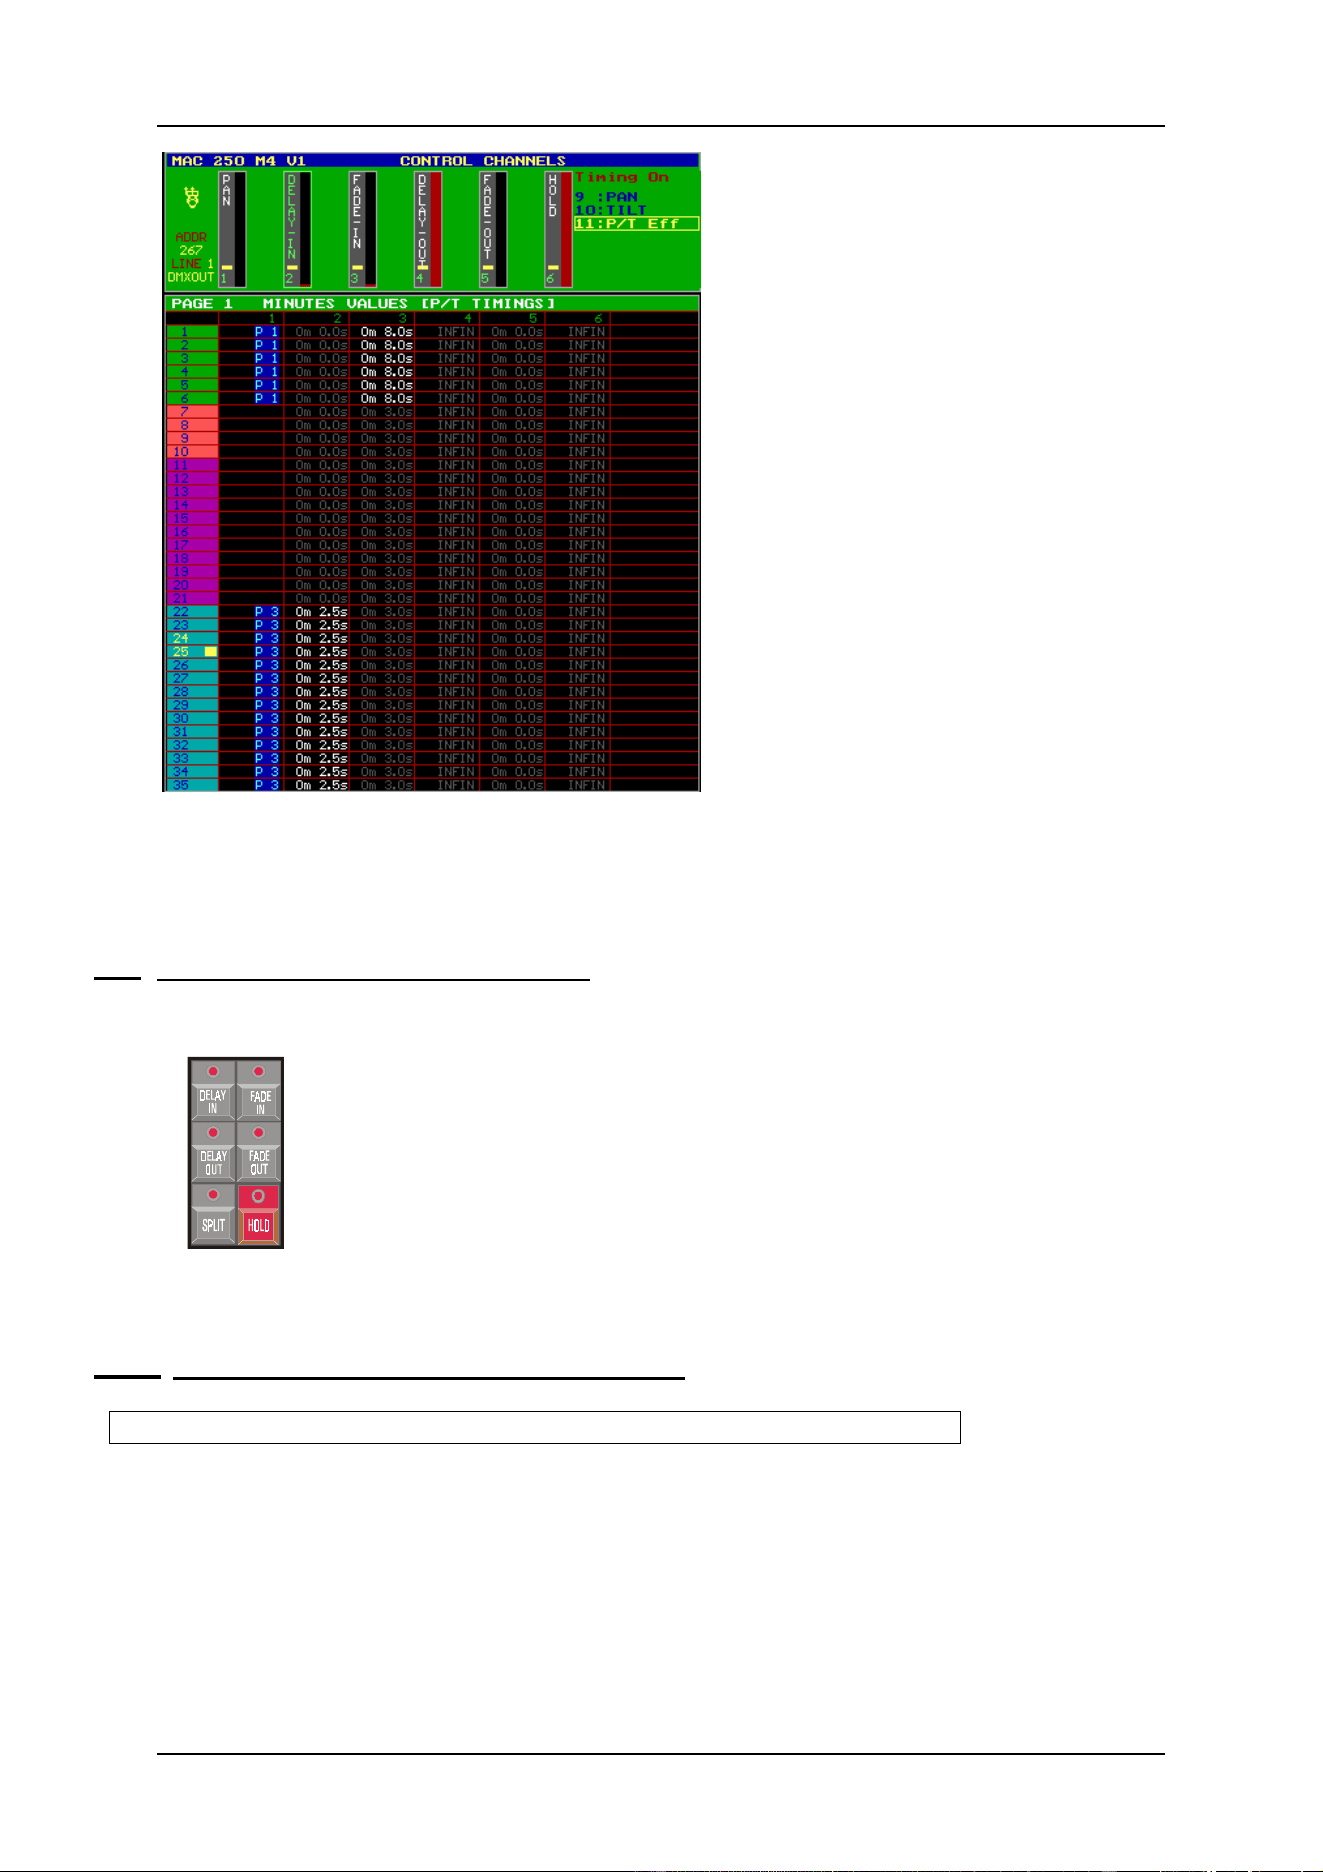
10.2 {EXP} Channel timings
The timings, of the previous paragraphs, were set on the whole cue-memory; they are called
main cue-timings. But, it is also possible to select different timings on the fixture-channels
used in the cue-memory.
[open the ‘digital memory-values’ window] [get a cue-memory] [go to fixture mode] [select
fixtures and a fixture control channel] [TIMING] [select a function (delay-in, fade-in, delay-
out, fade-out)] [adjust value] [TO] [RET] [RET]
To enter different timings to fixture-channels, the ‘digital-memory values’ screen has to be
opened. Then select a cue-memory and go to fixture mode. Select the fixture(s) and select a
control channel. Open the ‘control channel timing’ screen with the [TIMING] key. The
different times can be adjusted like if they were control channel values. Since we have already
selected the cue-memory, the values can be stored using [TO] [RET] [RET].
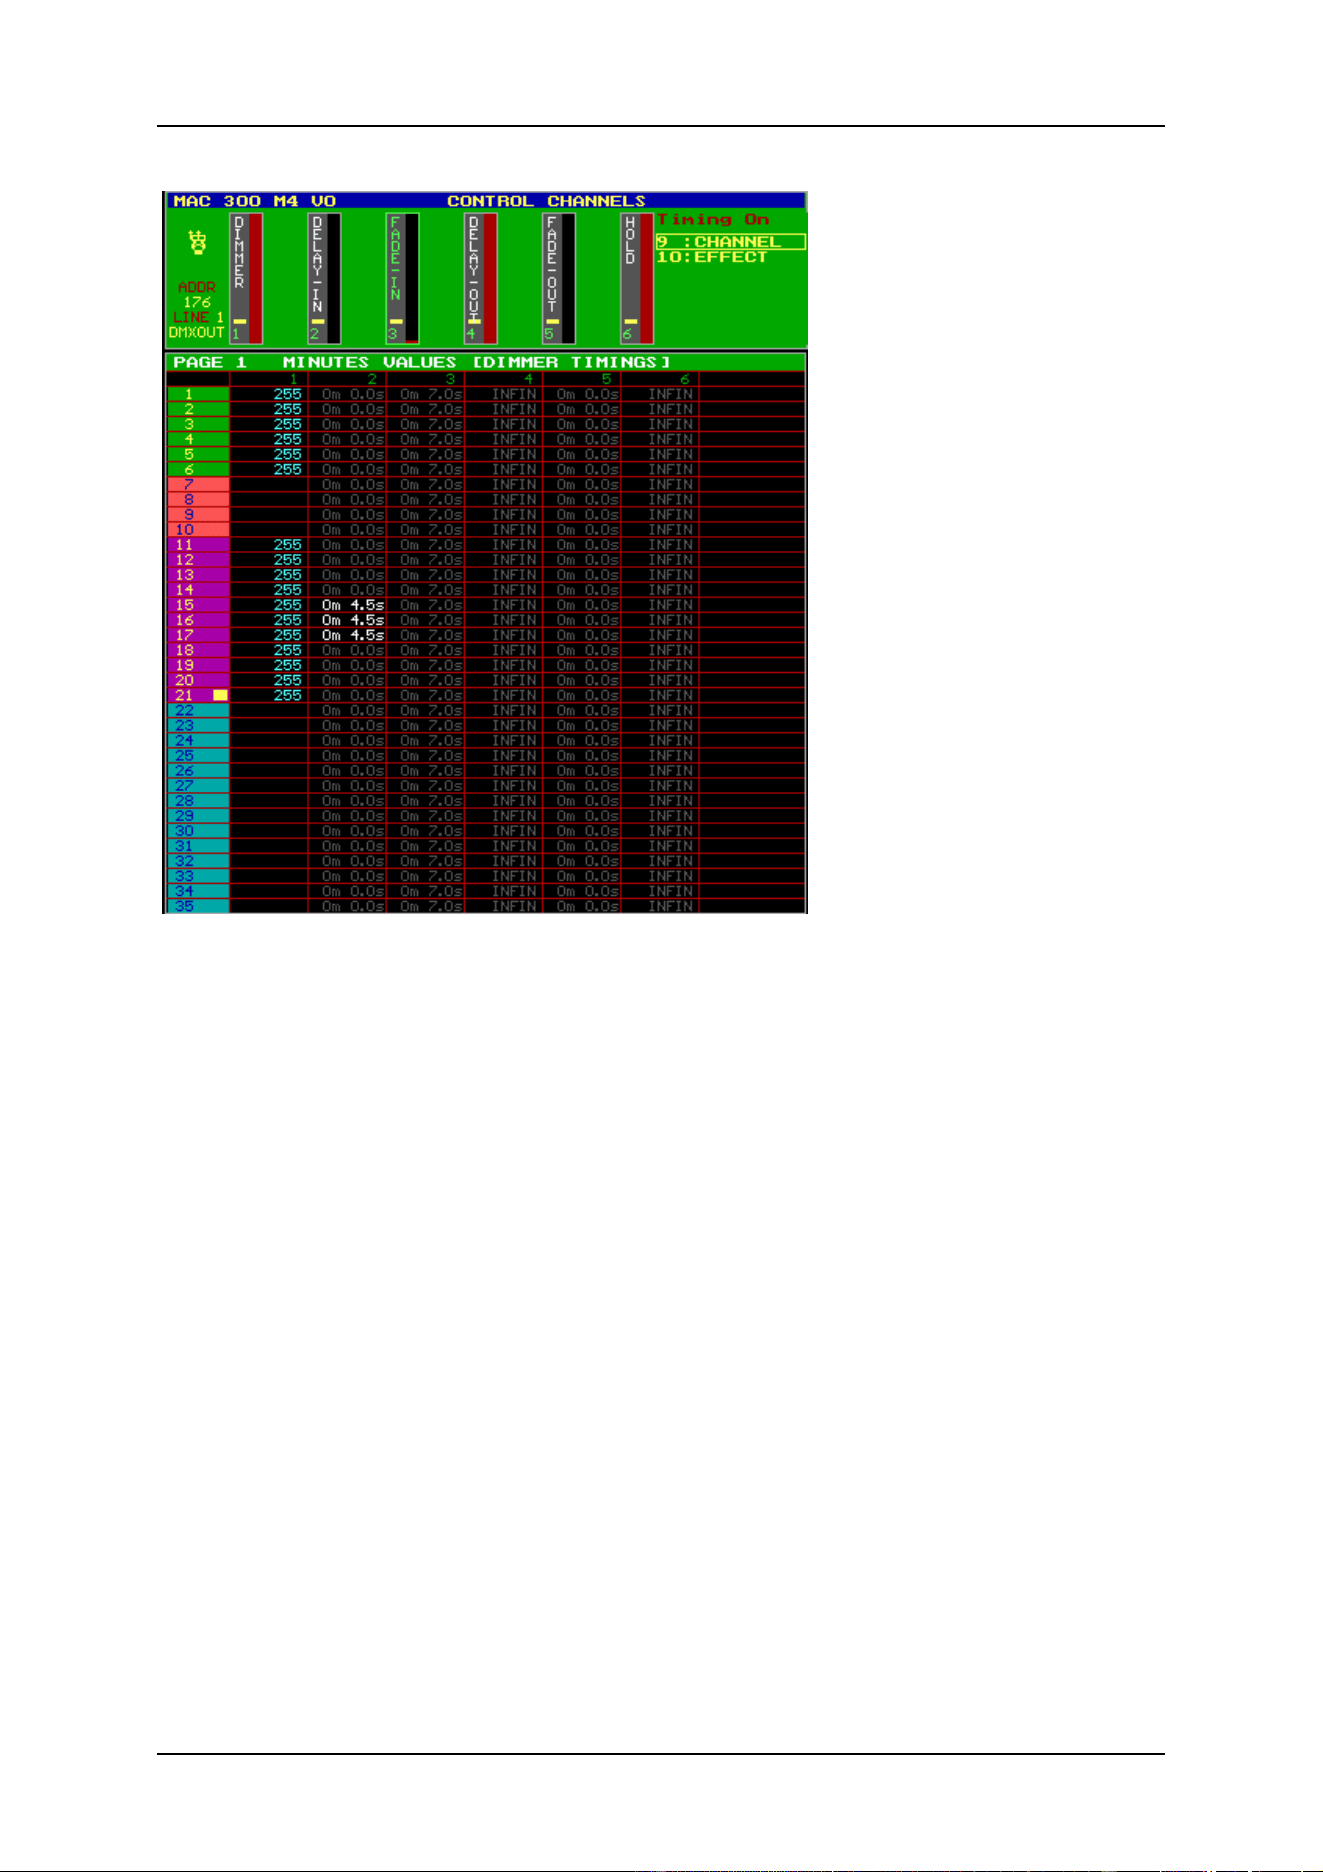
Lets take cue 12 (cue-page 1) of the show ‘MANUAL72’
In ‘autoload cuemem ON’ mode, select cue 12, go to fixture mode and open the ‘digital
memory-values’ screen:
Cue 12 will open the dimmers of the
MAC600s and the MAC300s. Behind
the values of MAC300 15, 16 and 17,
we can notice a T. The T means that the
timings on channel 2 of the 3
MAC300s, differ from the main cue-
timings.
If those 3 MAC300s and their dimmer channel (key [2/18]) are selected, the ‘control channel
timing’ window can be opened when the [TIMING] key is hit:
04/2000 Martin Case Manual Version 7.20 Cue Timing
R&D International NV for Martin Professional AS
114
The ‘control channels’ screen
shows now the ‘control
channels timing’. The timings
(delay-in, fade-in, dalay-out
and fade-out) are selected like
if they were normal control
channels with the
[1/17…16/32] keys or with the
digital fader belts on Pro2 or
Pro2+ controllers.
The screen shows that the
timings work on the selected
channel itself (9: channel), in
this case the dimmer-channel,
and/or on his effect generator
(10:effect). This selection can
be toggled with the [9/25] and
[10/26] keys. Yellow means:
selected; Blue means not
selected.
This makes it possible to put
the different timings on only
the effect generator of the
channel (deselect for this channel 9).
The timing values can have 2 colors:
- GRAY: the value doesn’t differ from the main cue-timing values of the selected
cue.
- WHITE: the timer differs from the main cue-timings of the selected cue, so it
follows its own way.
This example shows that there is a different delay-in time on the dimmer-channel of the
MAC300s number 15, 16 and 17. While the rest of the MAC300s and MAC600s start
immediately with their fading in 7 seconds, MAC300 number 15, 16 and 17 will wait for 4.5
seconds before starting to fade in 7 seconds.
04/2000 Martin Case Manual Version 7.20 Cue Timing
R&D International NV for Martin Professional AS
115
For Pan/Tilt channels, the screen differs a little bit. The timing difference can be set on the
Pan channel, the tilt channel, on its effect generator, or on a combination of those 3. Let’s take
cue 16:
We can see a different timing on the
MAC250s (fixtures 22 – 35) Pan/Tilt
channels.
However, if we open the ‘control channel
timing’ window on Pan/Tilt [P&T]
[TIMING]; we can’t find anything.
04/2000 Martin Case Manual Version 7.20 Cue Timing
R&D International NV for Martin Professional AS
116
If the Pan and the Tilt channels are
deselected (hit keys [9/25] and [10/26])
until the texts (9:PAN and 10:TILT) are
blue, some timing differences will show
up. In this cue-memory, a different
timing was set on the Pan/Tilt effect
generator only.
All cues from 11 to 17 of the show ‘MANUAL72’ have timing differences on the cue-
memory control channels. Cues 11 to 17 are a copy of cues 1 to 7, but with different channel
timings. Also the linked cues of the previous paragraph are a copy.
10.3 Entering times with the playbackwing
We will represent the [DELAY IN], [FADE IN], [DELAY OUT], [FADE
OUT] and [HOLD] keys by [TIMING KEYS WING] in this paragraph.
The cue-timings or the channel timings can be entered very fast with the ‘timing keys wing’
of the Pro + or extra playbackwing controllers.
10.3.1 Entering Cue-timings with the playbackwing
[Select a cue] [TIMING KEYS WING] + [CUE] [enter time] [RET]
The cue-timings can be entered with the playbackwing keys by selecting first a cue, the one
of the ‘timing keys wing’ together with the [CUE] button. Using the keypad, the time can
be entered. Save it by hitting the [RET] key.
3OD\EDFNZLQJ
04/2000 Martin Case Manual Version 7.20 Cue Timing
R&D International NV for Martin Professional AS
117
10.3.2 Entering channel timings with the playbackwing.
[get a cue-memory] [go to fixture mode] [TIMING KEYS WING] + [select fixtures] + [deselect
not-wanted fixture control channels] [enter time] [TO] [RET] [RET]
The channel-timings can be entered with the playbackwing:
- Get a cue-memory
- Go to fixture mode
- Select one of the ‘timing keys wing’ and hold it
- Select the fixtures (or groups or ALL). The LEDs of the selected fixtures will be
lit green, the not selected, orange.
- If the fixtures are selected, all channels will be selected automatically. We must
now deselect the channels that we don’t want to be involved (the LEDs of the
selected channels will be green.)
- Release the timing key. The timing window will open. Enter the time on the
keypad.
- Save all this by hitting [TO] [RET] [RET]
Example: In cue 2 on page 1, we want the delay-in of the dimmers of the MAC300s at 5
seconds. The result will be that the dimmers of the MAC300s will start opening later than
those of the MAC600s.
Following steps have to be taken:
- Get the cue-memory of cue 2:
o [2 (1…70)] (controller in autoload ON)
o or [GET] + [CUE] [2 (1…70] (controller in autoload OFF)
- Go to fixture mode: [FIXTURE PgUp]
- Select the delay-in on the wing and select the MAC300s with fixture group 3.
Deselect all control-channels except the dimmer-channel: [DELAY IN] + [3
(1…16)] + [1/17…16/32 (everything except 2/18 (dimmer))]
- Use the keypad to enter 5 seconds: [@] [5] [RET]
- Save: [TO] [RET] [RET]
10.4 {EXP} Cue-timing options
We have already mentioned some times to switch off and on the cue-fading with the [CUE] +
[ON] keys. If the cue-fading is active, next screen appears:
The timings at the bottom represent the main cue-timings
from the last selected cue.
In shows, rehearsals, theaters etc… the programmed timings can differ sometimes with what
happens on the stage. Therefor it should be possible to slow down or speed up the cue.
04/2000 Martin Case Manual Version 7.20 Cue Timing
R&D International NV for Martin Professional AS
118
10.4.1 {EXP} Stopping the Cue-timing during performance
[CUE] + [FREEZE (cue)]
The cue-fading can be stopped by selecting [CUE] + [FREEZE]. All cue-timings will stop.
To proceed, select [CUE] + [FREEZE] again. When during a stop, another cue is
selected; the cue-timing will start automatically in the new cue.
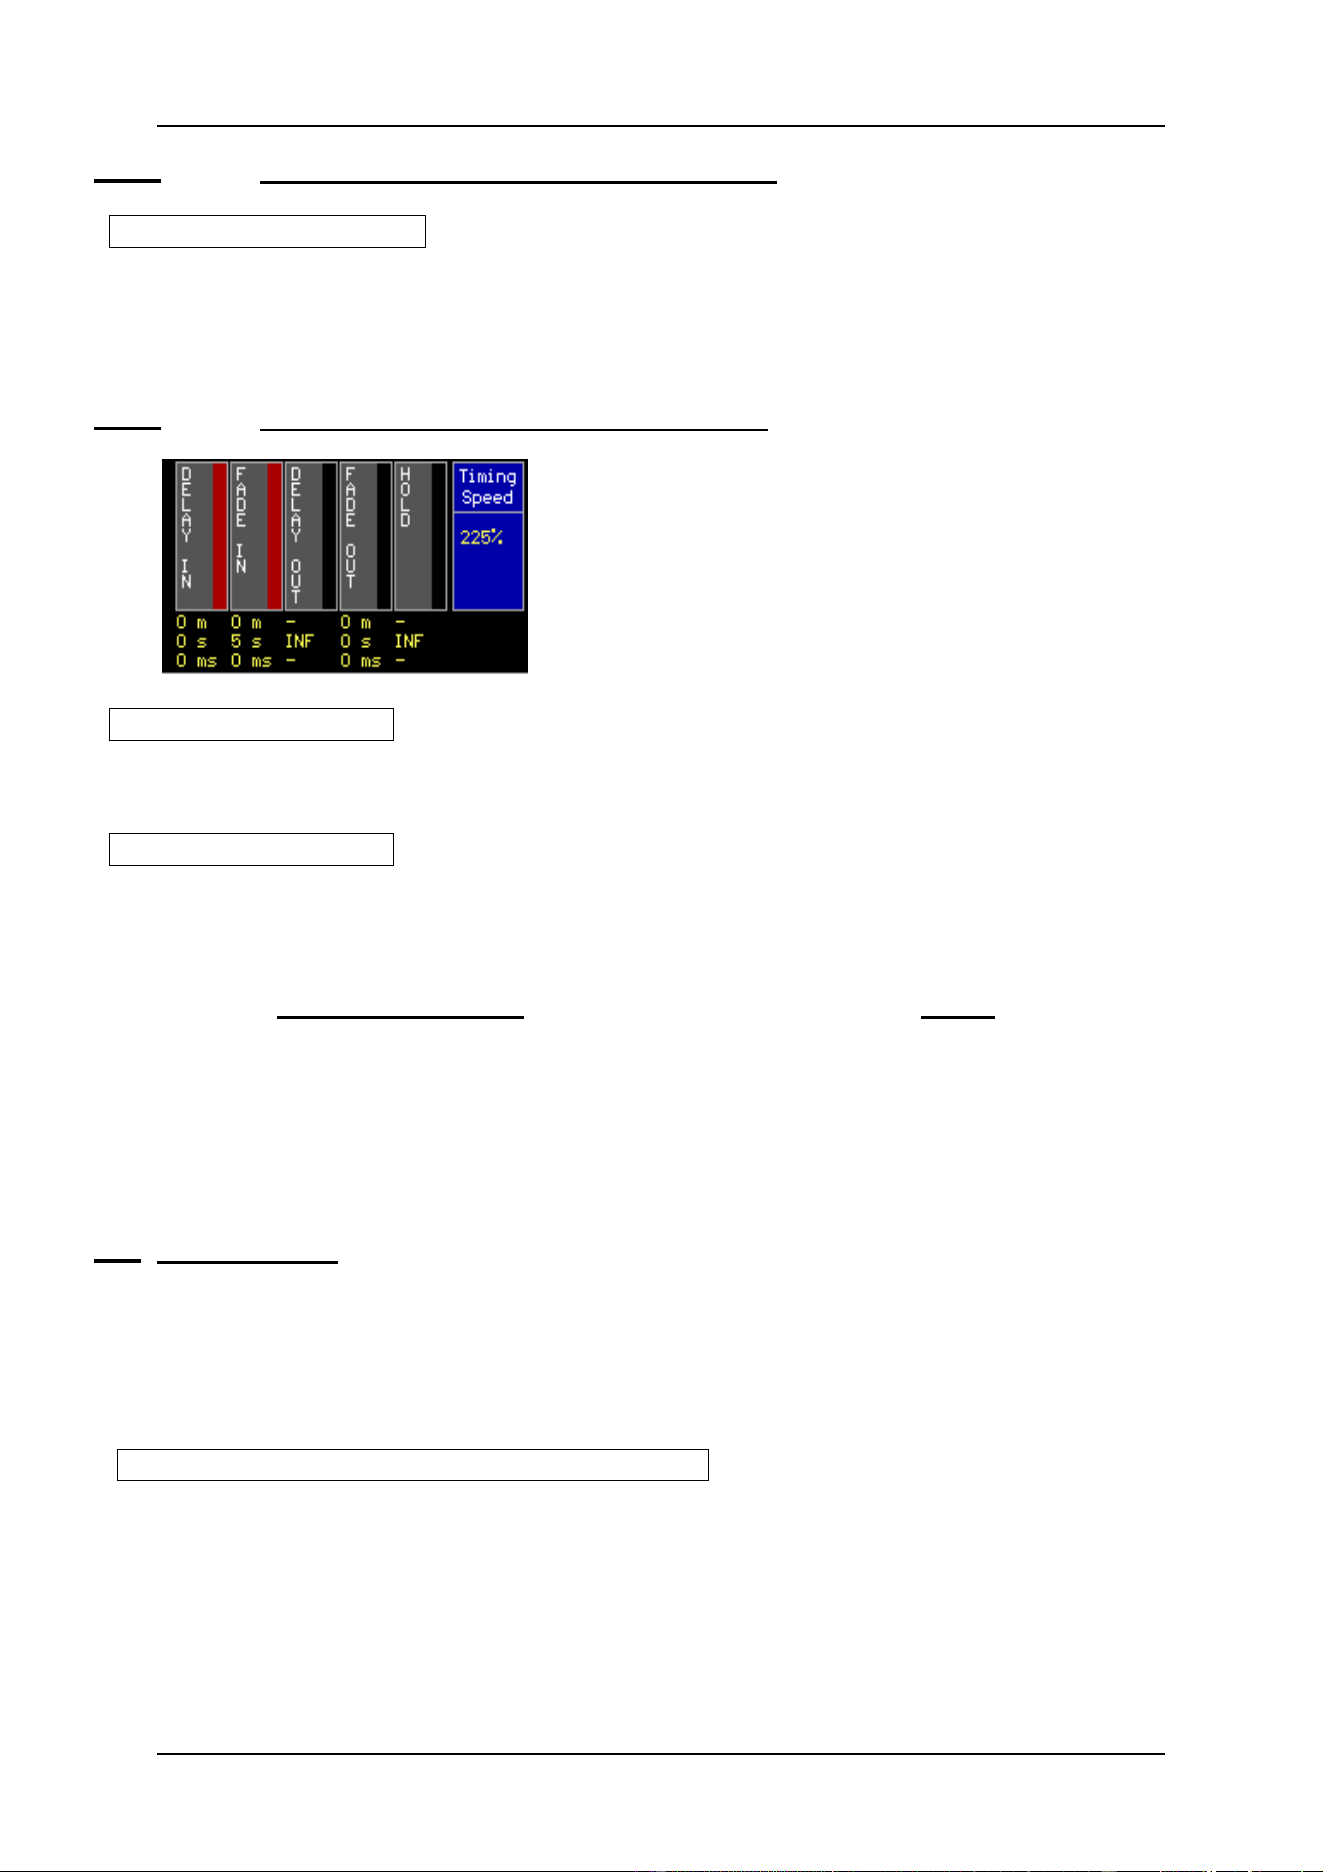
10.4.2 {EXP} Speeding-up or slowing-down the cue-fading
During performance, it is possible to slow-down or
speed-up the cue-fading from 0% to 1,000%. By default
the ‘timing speed’ is set at 100%.
This example shows a cue-fading on 225%.
[CUE] + [Trackerball]
Select the [CUE] key and hold it. Adjust the speed with the trackerball from 0% to 1,000%.
[CUE] + [DEFAULT]
To default the timing speed to 100%.
REMARK:
- During programming, the ‘timing speed’ has to be set at 100%.
- Stopping, slowing-down or speeding-up the timing speed is used only during
performance.
- Once the timing speed is changed, it will stay that way, also when a new cue
was selected. On the other hand, a stopped timing speed (freeze) will restart
when a new cue is selected.
10.5 Multiselect cues
In the previous chapter, we have explained that we can program cues for shows where we
have to improvise. The cues are programmed per effect or per fixture-type.
In the example show, cuepages 2 to 5 are used to group effects per fixture-type. Suppose we
want to launch cues for different fixtures all at the same time.
[CUE] [CUE] (double-click) [Select cues] [RET]
Select the [CUE] key twice until the CUE-LED blinks. Now we can make a selection of cues
over different pages without launching them. If the [RET] key is pressed, all selected cues
will be launched at the same time.
When cues are selected with common programmed channels, then only the last selected
cue will be executed.

04/2000 Martin Case Manual Version 7.20 Cue Timing
R&D International NV for Martin Professional AS
119
10.6 {EXP} Autoprepare cues
Suppose, we make next example on cue-page 16:
Cue 11: All fixtures in their defaults with dimmer opened:
Cue-timings:
Delay-in: 0
Fade-in: 0
Delay-out: infinite
Fade-out: 0
Cue 12: Dimmer closed for all fixtures
Cue-timings:
Delay-in: 0
Fade-in: 5 sec
Delay-out: infinite
Fade-out: 0
Cue 13: Dimmer opened for all fixtures, different color and different Pan/Tilt position
Cue-timings:
Delay-in: 0
Fade-in: 10 sec
Delay-out: infinite
Fade-out: 0
Suppose that we want the different color and the different Pan/Tilt position before the
dimmer opens when we select cue 13, then we have some possibilities:
- We use a point-cue between cue 12 and 13 with only the color and Pan/Tilt
change.
- We use a delay-in on the dimmer-channel in cue 13 of 10 seconds
- We select autoprepare cues mode.
[SETUP] [2 (keypad)] [high light autoprepare cues] [EDIT until ON] [RET]
When the option ‘autoprepare cues’ is active, the controller will execute all cues, starting
from the cue where the dimmer closes (zero value) up to and including the cue where the
dimmer opens again (non-zero value), in successive order without cue-timings. In the
cue where the dimmer opens again, all non-dimmer channels will be executed instantly,
without cue-timings.
In the example:
- Cue 11 is executed normal.
- Cue 12 is executed normal, but when the dimmer reaches zero, the Pan/Tilt and
color of cue 13 are executed without cue-timings.
- If cue 13 is called, then only the dimmer will fade-in according to the cue-timings
of the cue-memory.
Tip: If autoprepare is active, and we want to fade-in the non-dimmer channels too, in
the cue where the dimmer opens again, then we have to make a cue, just before this one,
where the dimmer has a non-zero value, for example value 1. For example if we make a
point-cue 12.9 with the dimmer at 1.

04/2000 Martin Case Manual Version 7.20 Cue Timing
R&D International NV for Martin Professional AS
120
Note: The AUTOPREPARE function looks also at playbacks and sequences (chapter
playbacks and sequences). When the dimmer is opened in one of those functions, the
autoprepare won’t be executed until the dimmers are closed in those functions.
10.7 {EXP} Automatic trace
When we are using shows, that are programmed in successive cue-order, and those cues are
filled with partly filled cue-memories, we have one problem: If we suddenly go back to a cue
somewhere in between, we will never get the correct light scene for that cue.
The reason is this: Partly filled cue-memories just make changes to the previously called
cue.
Let’s take the example of the show: cues 11 to 17. When the automatic trace is disabled, and
we want to launch the light scene for cue 16, we have to activate cues 11 – 12 – 13 – 14 – 15
– 16. If suddenly we want to have the light scene that we had when cue 13 was launched, we
have to go back first to cue 11, then 12 and then 13.
[SETUP] [2 (keypad)] [high light automatic trace] [EDIT until ON] [RET]
The automatic trace function will collect all functions of all fixtures in descending cue
order starting from the called cue, until he found a value for all channels. This ‘picture’
will be sent to the output.
When, in the example, we come from nothing and activate cue 16, the controller will start
collecting the values in cue 16 and then in descending order to cue 11 until all channels have a
value. Cue 16 and cue 13 will now give the correct scene..
This function is often used when programming shows in successive cue-order. If suddenly we
want to change something in a previous cue, we can see the result instantly without activating
all previous cues.
[go to cue-mode] [SHIFT] + [1...16] [change options] [[1...16] or [RET]]
The ‘Autoprepare’ and the ‘Automatic trace’ may be set different for each cue-page. The
controller must be in cue-mode, to change it. Select [SHIFT] + [cue-page (1...16)] and high
light the option with the [2;@ RU >9@ NH\V Like with the transparent mode options, the cue-
page can take the show defaults, or can be set different. Save by selecting the edited cue-page
again, or press [RET].

04/2000 Martin Case Manual Version 7.20 Cue Timing
R&D International NV for Martin Professional AS
121
10.8 {EXP} The combinations Autoload, Cue-fading and Manual
Remember:
- Autoload is a setting, only used when programming. When a cue is selected with
the function active, then the controller executes automatically a [GET] + [CUE].
At the same time, all values are sent to the output. If a [GET] + [CUE] is
manually selected, it will be the same in autoload ON or OFF mode.
- Cuefading activates the cue-memory together with its cue-timings. When the cue-
fading is not active, nothing will be sent to the output when activating a cue. Only
a [GET] + [CUE] will send values to the output but without timings. So, when
autoload is ON (get+cue automatic), the values are sent, without timings.
-
Manual mode has the highest priority. A channel adjusted in manual mode, will
stop in its program. A cue-memory called in manual mode (get+cue) will always
be activated without timings.
AUTOLOAD CUEFADING MANUAL KEY ACTION
Digital Memory-Values screen Stage
(*1)
OFF OFF OFF [GET] + [CUE]
[1…70]
Cue-memory (1…70) Cue-memory (1…70)
without timings
[1…70]
(*2)
Doesn’t change Doesn’t change
OFF OFF ON [GET] + [CUE]
[1…70]
Cue-memory (1...70) Cue-memory (1…70)
without timings
[1…70] Doesn’t change Doesn’t change
OFF ON OFF [GET] + [CUE]
[1…70]
Cue-memory (1…70) Doesn’t change
(*3)
[1…70] Doesn’t change Cue-memory (1…70)
with timings
OFF ON ON [Select fixtures]
[GET] + [CUE]
[1…70]
Cue-memory (1…70) (the
values of the selected fixtures
are yellow, the others blue)
Only the selected
fixtures change.
[1…70] Cue-memory (1…70) Cue-memory (1…70)
with timings
ON OFF OFF [GET] + [CUE]
[1…70]
Cue-memory (1…70) Cue-memory (1…70)
without timings
[1…70] Cue-memory (1…70) Cue-memory (1…70)
without timings
ON OFF ON [GET] + [CUE]
[1…70]
Cue-memory (1...70) Cue-memory (1…70)
without timings
[1…70] Cue-memory (1...70) Cue-memory (1…70)
without timings
ON ON OFF [GET] + [CUE]
[1…70]
Cue-memory (1…70) Doesn’t change
(*4)
[1…70] Cue-memory (1…70) Cue-memory
(1…70) with timings
ON ON ON [Select fixtures]
[GET] + [CUE]
[1…70]
Cue-memory (1…70) (the
values of the selected fixtures
are yellow, the others blue)
Only the selected
fixtures change.
[Select fixtures]
[1…70]
Cue-memory (1…70) (the
values of the selected fixtures
are yellow, the others blue)
Cue-memory
(1…70) with timings
but the selected
fixtures are executed
without timings.
(*1) Stage: this is what will happen on the scene.
(*2) [1…70] means: select a cue.
(*3) OFF ON OFF: This is RUN mode, the mode used during performance. Changes can be made to cue-memories during
performance; this will not be seen on the stage.
(*4) Same as (*3), but with autoload ON. The autoload ON should never be used during performance

04/2000 Martin Case Manual Version 7.20 Memories
R&D International NV for Martin Professional AS
122
11 CHAPTER 11: Memories
6HWXS
)L[WXUHV '0; $GGUHVVHV
DQG 6WDJH 3ODQ
$GMXVW
)L[WXUH &RQWURO FKDQQHOV
$GMXVW
(IIHFW *HQHUDWRU FKDQQHOV
0DNH
3DQ7LOW *RER &RORU DQG
(IIHFW *HQHUDWRU 3UHVHWV
0DNH
&XHV ZLWK &XH0HPRULHV
5XQ
WKH 6KRZ
0DNH
7LPH&RGH 6KRZ
0DNH
&XHV ZLWK 3OD\EDFNV
0DNH
&XHV ZLWK 6HTXHQFHV FKDVHUV
0DNH
0HPRULHV
7LPLQJV
04/2000 Martin Case Manual Version 7.20 Memories
R&D International NV for Martin Professional AS
123
0(025<
0(025<
0(025<
0(025<
0(025<
&OHDU QRW QHHGHG FKDQQHOV
$GMXVW IL[WXUH FRQWURO FKDQQHOV
>72@ >QXPEHU RQ NH\SDG@ >5(7@
0DNLQJDPHPRU\
3/$<%$&.
6(48(1&(
0(025<
:KHUHPHPRULHVDUHXVHG
04/2000 Martin Case Manual Version 7.20 Memories
R&D International NV for Martin Professional AS
124
The controller can hold in each cue, a cue-memory, but also up to 4 sequences and 42
playbacks. Those sequences and playbacks use normal memories; the cue-memories
cannot be used here.
The controller can store up to 4,000 normal memories.
A cue can hold 1 cue-memory, 4 sequences and 42 playbacks.
A sequence is a succession of memories (light scenes), placed in a loop to make a chaser.
Every sequence can hold:
- A number of loop-memories (up to 100)
- A start-memory
- A stop-memory
A playback is 1 memory that can be faded. By opening a playback-fader, a light-scene can
be faded.
11.1 Differences between normal memories and cue-memories
Both memories represent light scenes, and can be called immediately.
Normal memory Cue-memory
Holds fixture control channels Holds fixture control channels
Holds timing parameters, but they can’t be used. Holds timing parameters
Has to be used in a playback or a sequence Is placed automatically in a cue
For those normal memories, we need an additional step before they can be used in a cue. If
they have been made, they have to be put in a sequence or a playback of a cue. Starting from
this software version, the step ‘making memories’ can be skipped.
11.2 Making memories
[MAN (control channels)]
Puts the controller in manual mode.
Remember the use of the [MAN] key. It represents manual mode and takes precedence over
everything, even if sequences, playbacks or a cue-memory are active. If, in manual mode, a
fixture channel is changed, the change is sent to the output, and the value for that channel in
an active sequence, playback or cue-memory is ignored. If the manual mode is disabled again,
the channel will stay in the manual setting as long as it isn’t changed in the sequence,
playback or cue-memory.
04/2000 Martin Case Manual Version 7.20 Memories
R&D International NV for Martin Professional AS
125
In fixture mode [Adjust fixture control channels] [TO] [memory-number on keypad] [RET]
This differs with a cue-memory, first fixture-mode has to be called, and then, instead of [TO]
+ [CUE], just hit [TO] followed by a memory-number (1 to 4,000). Save with the [RET] key.
Note: if the memory number already exists, a second [RET] has to be entered, to confirm.
Like cue-memories, only the changes have to be recorded in the memories. You have to think
a little bit ahead when you program memories. When later, the memories will be used to make
for example a color-chase, and then it doesn’t make sense to save also Pan/Tilt or gobo
channels in those memories.
Example: Suppose we have to make a color-chase, without using the effects-generator.
Suppose also, we have already made some color-presets.
- First we hit the Manual mode, to take precedence over running cue-memories,
sequences and playbacks, or we stop the cue fading and sequences and we close
the active playbacks.
- Select, in fixture mode [Fixture PgUp], some fixtures.
- Double-click [DEFAULT]. All selected fixtures will be in default and the actions
of running cue-memories are stopped.
- If the ‘Digital Memory-Values’ screen is open, we will see that all channels have a
value. Since we only want color values, all the other channels have to be erased.
So, we select double-click [CLR] (to erase all channels of the selected fixtures).
- Select a color-preset [COLOR] + [1…70]. The color-channels will be filled with
the preset number.
- These values must be stored in a memory: [TO] [memory-number using the
keypad (ex. 100)] [RET].

04/2000 Martin Case Manual Version 7.20 Memories
R&D International NV for Martin Professional AS
126
[TO+]
The [TO+] key is used to save the channels to the next memory.
- If the next memory has to hold other color-values, we just select another color-
preset and save this to the next memory using the [TO+] key. Always check the
control channels values on screen, because, depending on the load-selection of
the preset, a preset with more/less load channels can be called (see presets). The
memory will be stored now in memory 101.
[GET] [Memory-number using keypad]
[RET]
To call a previously stored memory.
[LAST] or [NEXT] !!! If the controller is in FIXTURE mode !!!
In fixture mode, we can call the previous or next memory with the [LAST] or [NEXT]
keys. This makes it possible to run through the memories. Empty (not programmed)
memories will be skipped.
Remembrance: In cue mode, the previous or next cue will be called with the [LAST],
[NEXT] keys.
11.3 Viewing memories
Since memories resemble cue-memories, only the timings are unused, the philosophy of
making them is much alike. So, only fill them with the control channels you need.
The ‘Digital Memory-Values’ screen, when getting memories, looks very much the same as
the one you get when calling cue-memories.
[SHIFT] + [VALUES]
Remember, this key-combination converts the digital values to %.
04/2000 Martin Case Manual Version 7.20 Memories
R&D International NV for Martin Professional AS
127
11.4 Naming memories
[Get a memory] [TXT EDIT] + [TO] [enter name on the keyboard] [RETURN]
To give memories a name.
To overview the memory-names, open in fixture mode the text screen [TEXT]. With the
[PgUp] or [PgDn] keys, you can run through the names without calling the memories.
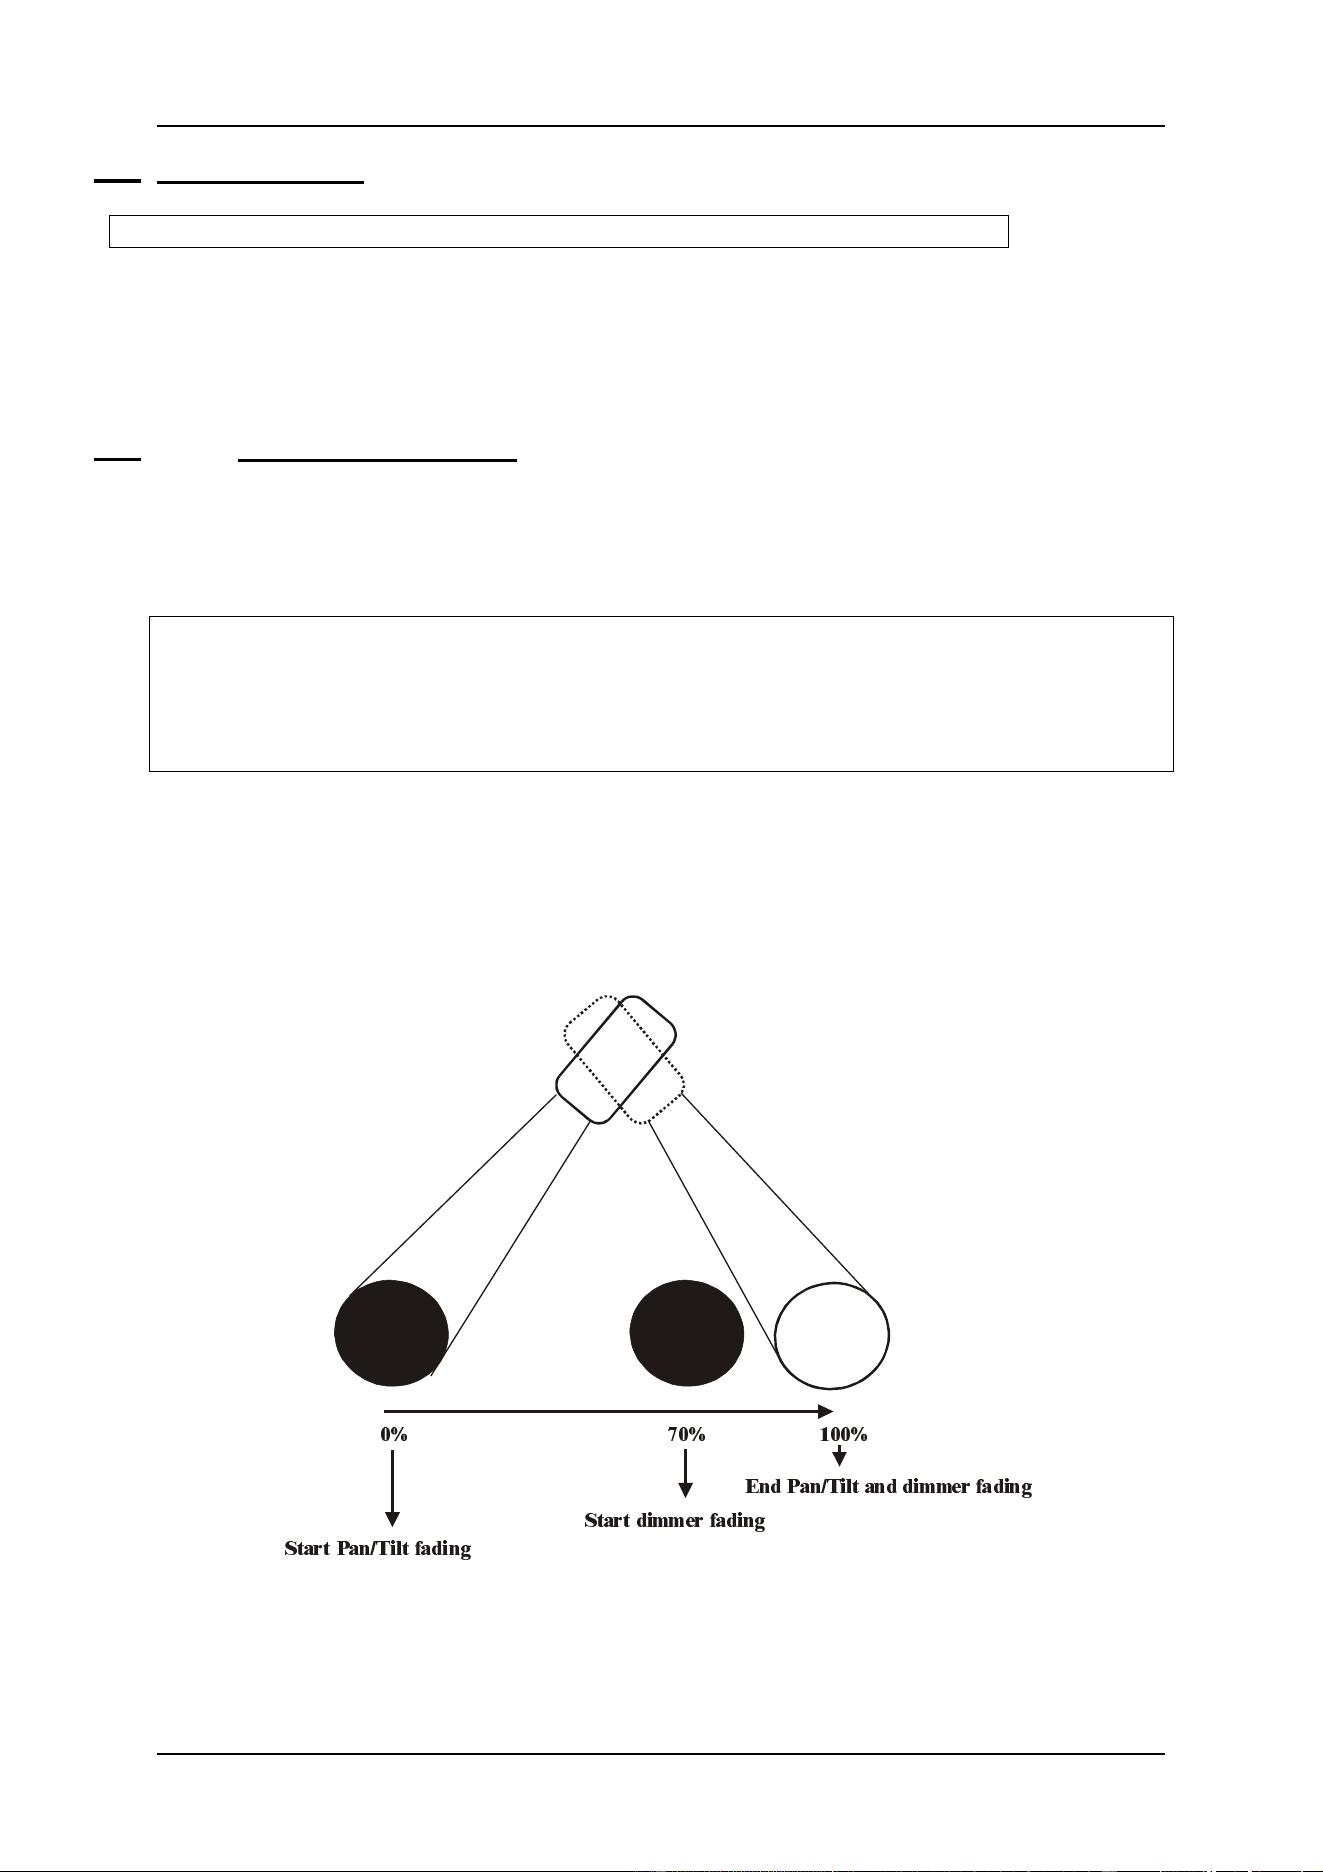
11.5 {EXP} Thresholds on memories
When we fade-in a memory, all fixture control channels, stored in the memory, will start
fading immediately as soon as the fading begins. So there is no control on the start of the
fading. However, with a threshold, we can add a delay to each fixture control channel.
Thresholds indicate the fading percentage per fixture control channel, on which the
fading has to start, when a memory is used in a sequence or playback (chapter playbacks
and sequences). Thresholds cannot be applied on cue-memories, because there, the delay-
in timer simulates a threshold.
Suppose, a memory (with Pan/Tilt and dimmer values) is faded from 0% to 100%, and
suppose that the dimmer has to start opening at 70%; it is impossible to make this with just a
memory, a threshold has to be added to the memory. If the dimmer is set at 70% in this
threshold, and all other channels at 0%, then all other channels will start immediately the
fading, except the dimmer. The dimmer will wait until the fading reaches 70%.
6WDUW 3DQ7LOW IDGLQJ
6WDUW GLPPHU IDGLQJ
(QG 3DQ7LOW DQG GLPPHU IDGLQJ
04/2000 Martin Case Manual Version 7.20 Memories
R&D International NV for Martin Professional AS
128
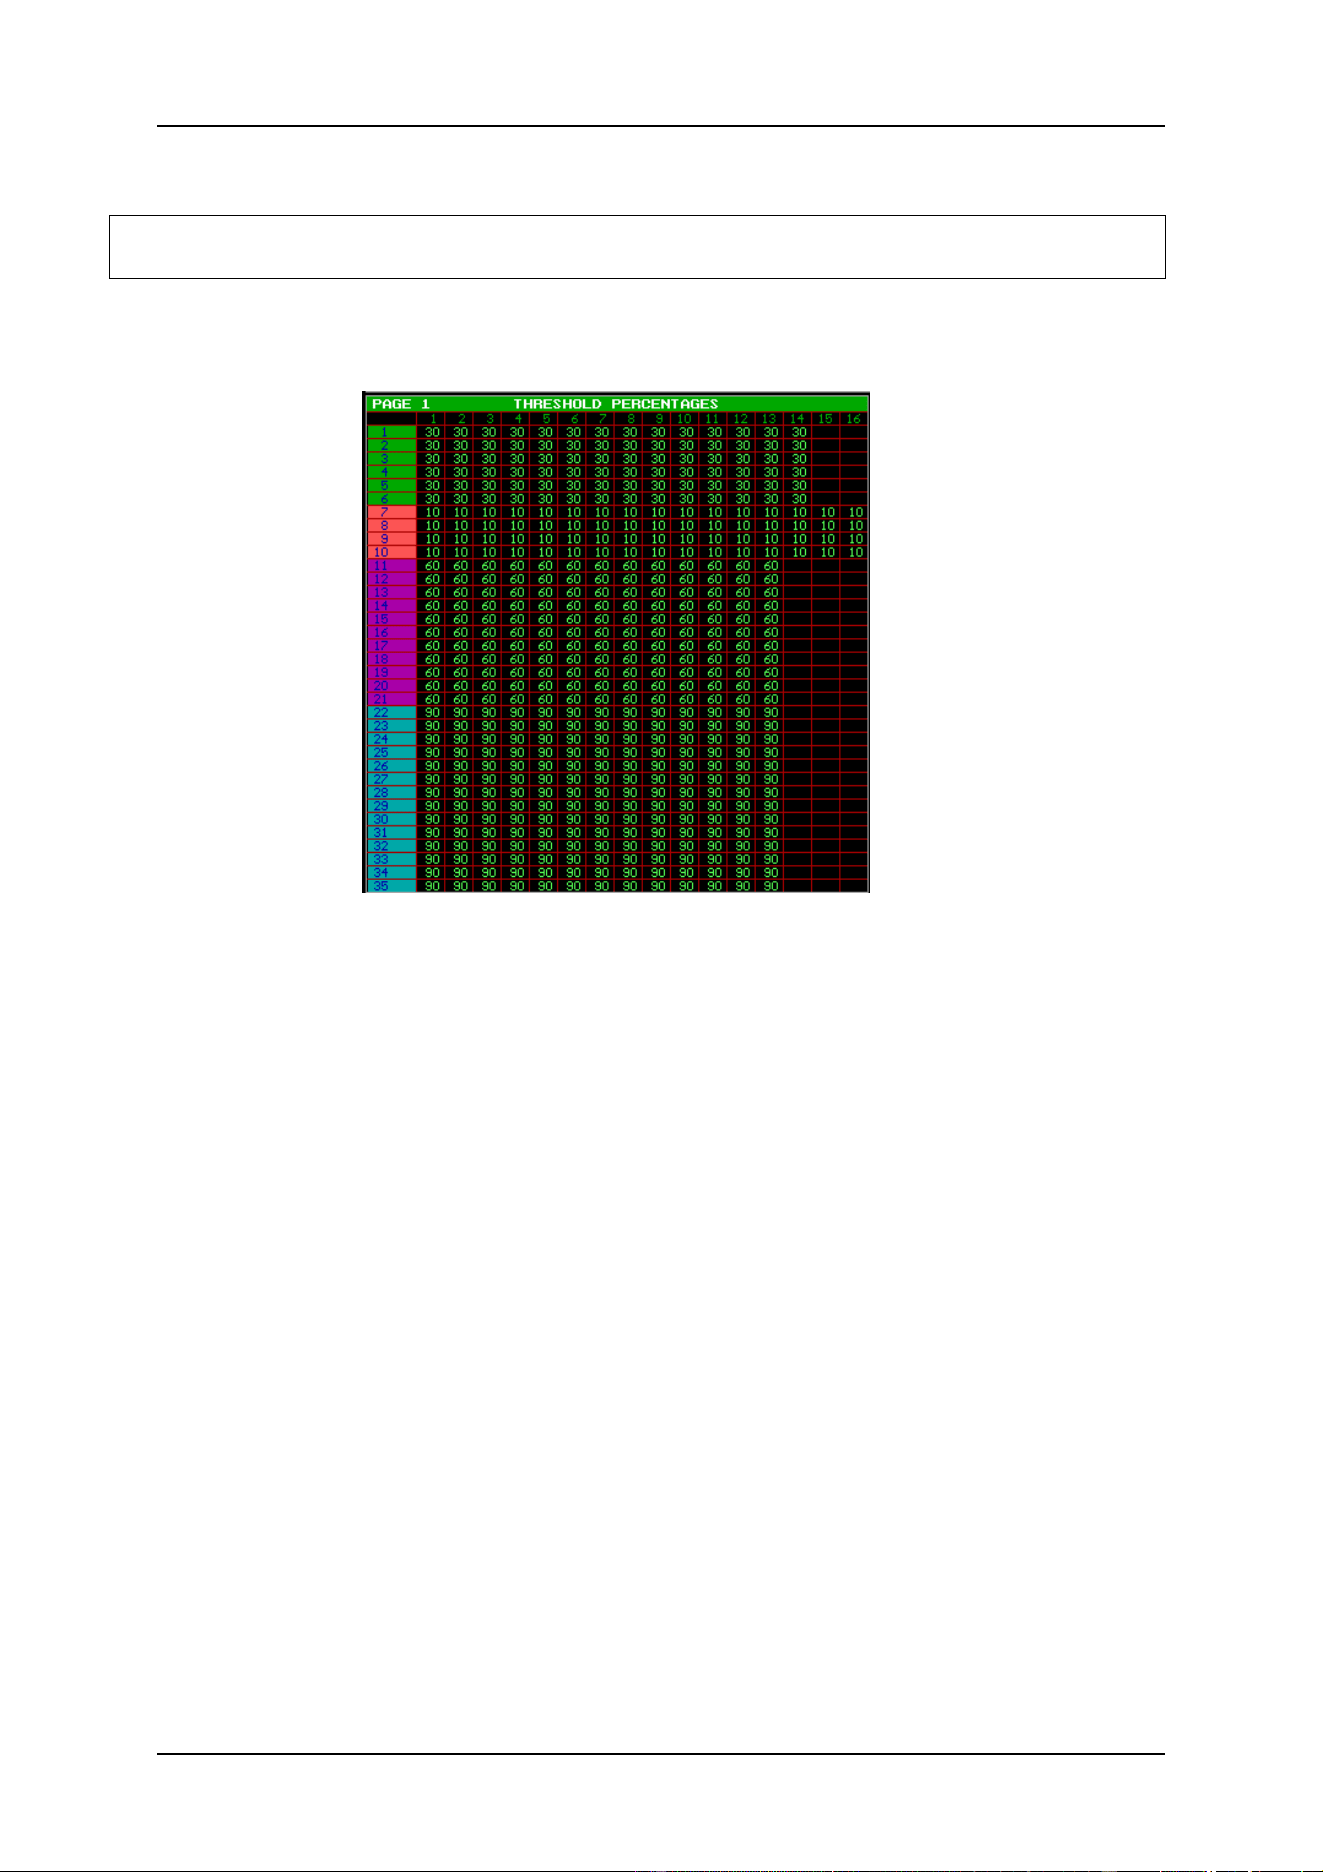
Up to 70 different thresholds can be made per show.
[EDIT (CUE)] + [TRESH LIB (CUE)] [select threshold-number 1…70] [adjust threshold
values] [TRESH LIB]
When the [EDIT] key is selected together with the [TRESH LIB] key, a threshold-number
[1...70], has to be selected. This will open the threshold screen:
The rows represent, like always, the fixtures and the columns represent the control channels.
With the [Pg<] and [Pg>], the control channels can be shifted for fixtures with more than 16
channels. With the [Fixture PgUp] and [Fixture PgDn] keys, fixture pages 1 to 10 are
selected.
This example shows a threshold. Later this threshold will be used in a playback. We can see
that:
- All MAC600 channels will start fading, when the fading has reached 30%.
- All PRO918 channels will start fading, when the fading has reached 10%.
- All MAC300 channels will start fading, when the fading has reached 60%.
- All MAC250 channels will start fading, when the fading has reached 90%.
When this threshold is applied on a memory in a playback, and the playback is activated
(opened) then the channels involved in the fading will start fading if the playback percentage
is identical to the value stored in the threshold for that channel.
The channel percentages can be adjusted like normal control channels, with the trackerball.
When fixtures are selected and a control channel, we can enter the percentage immediately
with [@] [value on keypad] [RET].
To save the threshold, select the [TRESH LIB] key again.
In the chapter playbacks and sequences, we will see how we can apply a threshold on a
memory.
04/2000 Martin Case Manual Version 7.20 Sequences and Playbacks
R&D International NV for Martin Professional AS
129
12 CHAPTER 12: Sequences and Playbacks
6HWXS
)L[WXUHV '0; $GGUHVVHV
DQG 6WDJH 3ODQ
$GMXVW
)L[WXUH &RQWURO FKDQQHOV
$GMXVW
(IIHFW *HQHUDWRU FKDQQHOV
0DNH
3DQ7LOW *RER &RORU DQG
(IIHFW *HQHUDWRU 3UHVHWV
0DNH
&XHV ZLWK &XH0HPRULHV
5XQ
WKH 6KRZ
0DNH
7LPH&RGH 6KRZ
0DNH
&XHV ZLWK 3OD\EDFNV
0DNH
&XHV ZLWK 6HTXHQFHV FKDVHUV
0DNH
0HPRULHV
7LPLQJV
04/2000 Martin Case Manual Version 7.20 Sequences and Playbacks
R&D International NV for Martin Professional AS
130
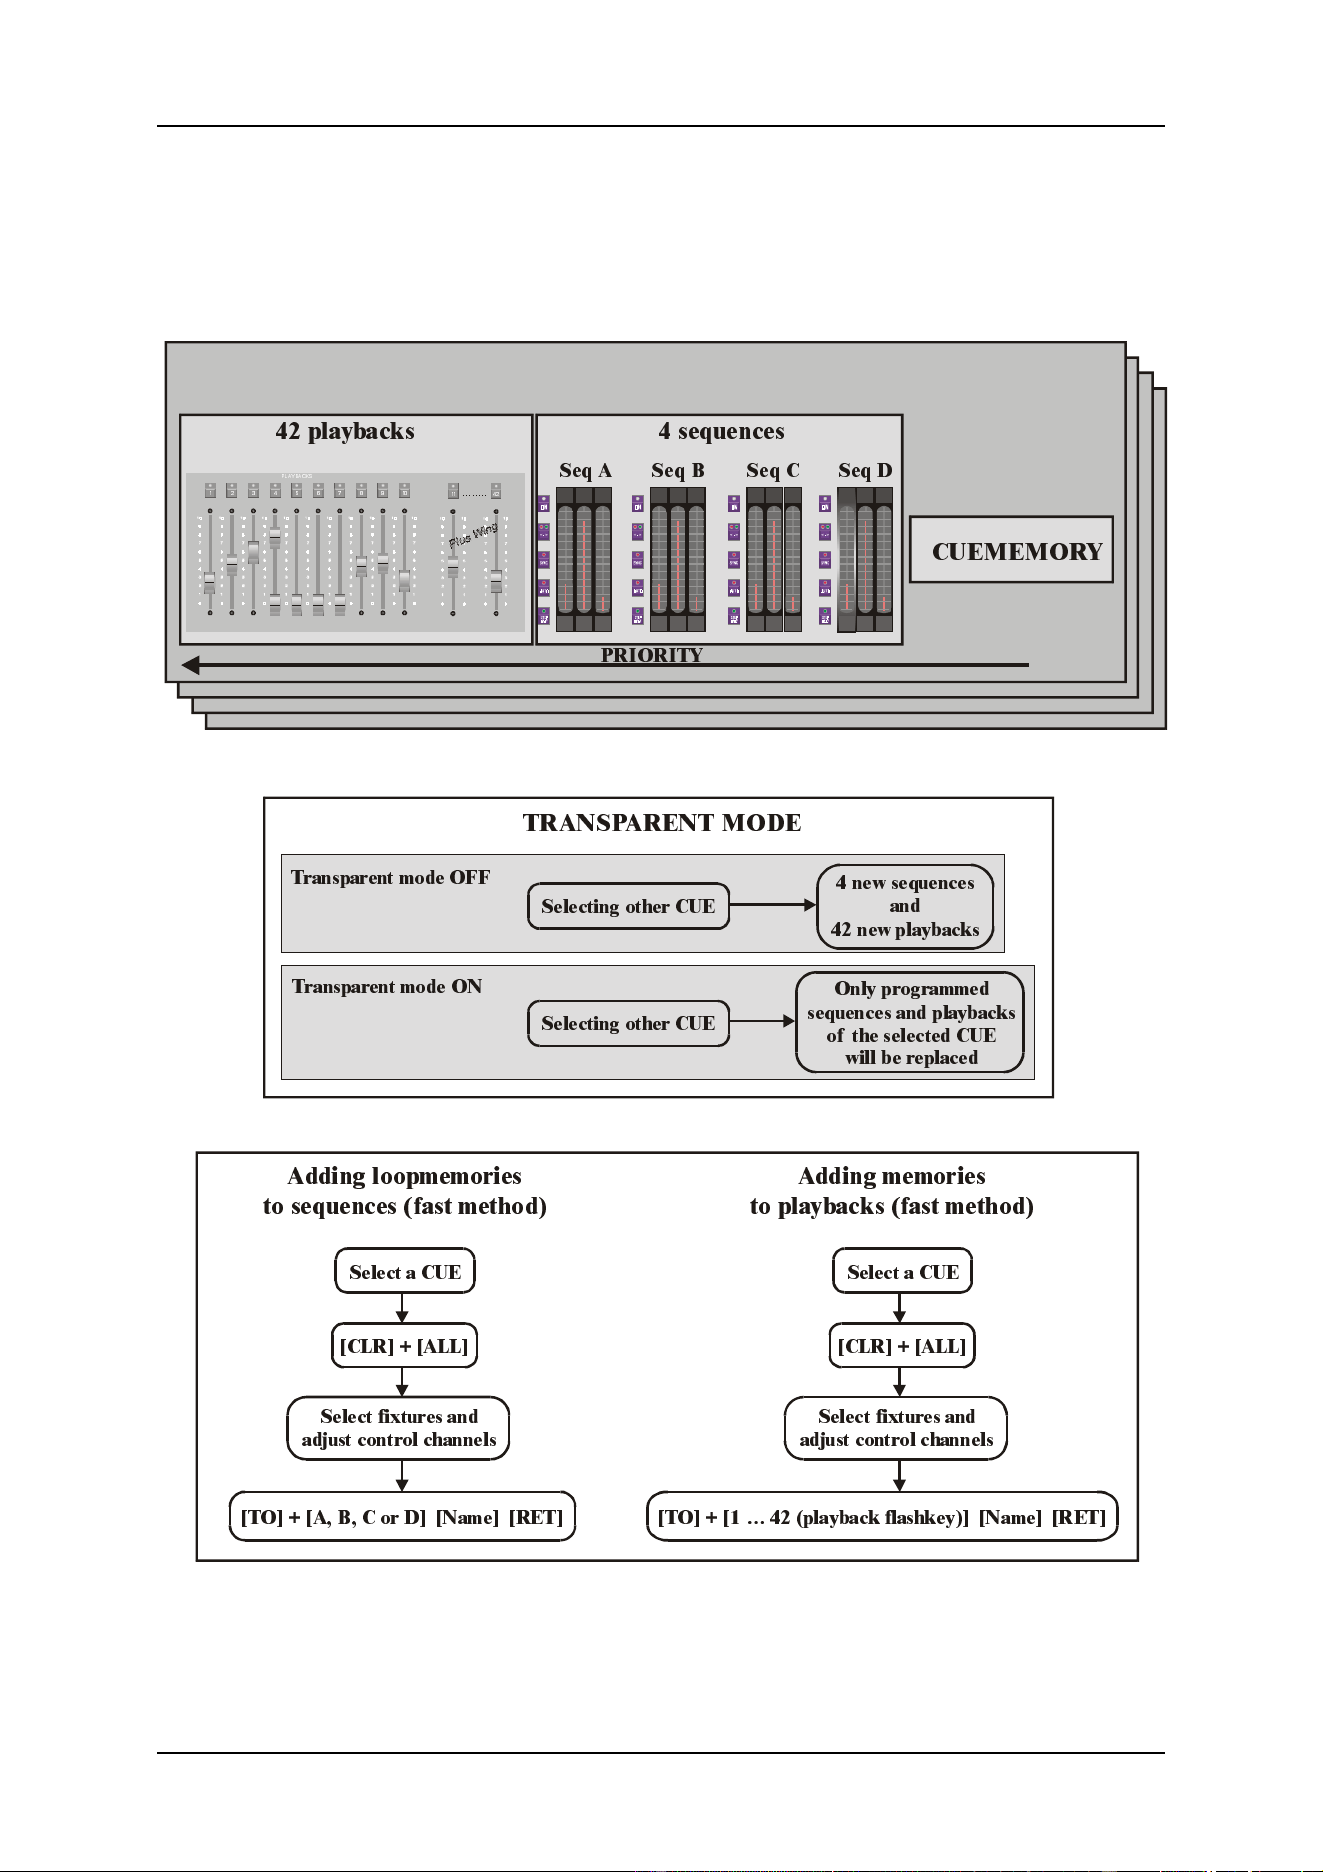
&8([&8(3$*(\
&8(0(025<
@<1I213;C
@
\
e
c
G
Y
^
W
6HT $ 6HT % 6HT & 6HT '
SOD\EDFNV VHTXHQFHV
35,2 5,7<
75$163$5(17 02'(
7UDQVSDUHQ W PRGH 2))
6HOHFWLQJ RWKHU &8(
6HOHFWLQJ RWKHU &8(
2QO\ SURJUDPPHG
VHTXHQFHV DQG SOD\EDFN V
RI WKH VHOHFWHG &8(
ZLOO EH UHS O DFHG
QHZ VHTXHQ FHV
DQG
QHZ SOD\EDFN V
7UDQVSDUHQ W PRGH 21
$GGLQJ ORRSPHPRULHV
WR VHTXHQFHV IDVW PHWKRG
$GGLQJ PHPRULHV
WR SOD\EDFNV IDVW P HWKRG
>&/5@ >$//@ >&/5@ >$//@
6HOHFW IL[WXUHV DQG
DGMXVW F R QWURO FKDQQHOV
6HOHFW IL[WXUHV DQG
DGMXVW F R QWURO FKDQQHOV
>72@ >$ % & R U '@ > 1DPH@ >5(7@ >72@ > « SOD \ED FN IODVKNH\ @ >1DPH@ > 5( 7@
6HOHFW D &8 ( 6HOHFW D &8 (
04/2000 Martin Case Manual Version 7.20 Sequences and Playbacks
R&D International NV for Martin Professional AS
131
12.1 Introduction sequences
Sequences are in fact chasers. Each cue can hold a cue-memory, 4 sequences and 42
playbacks. The sequences are numbered A, B, C and D. Since there are 16 pages of 70 cues +
their point-cues, 44.800 sequences can be programmed.
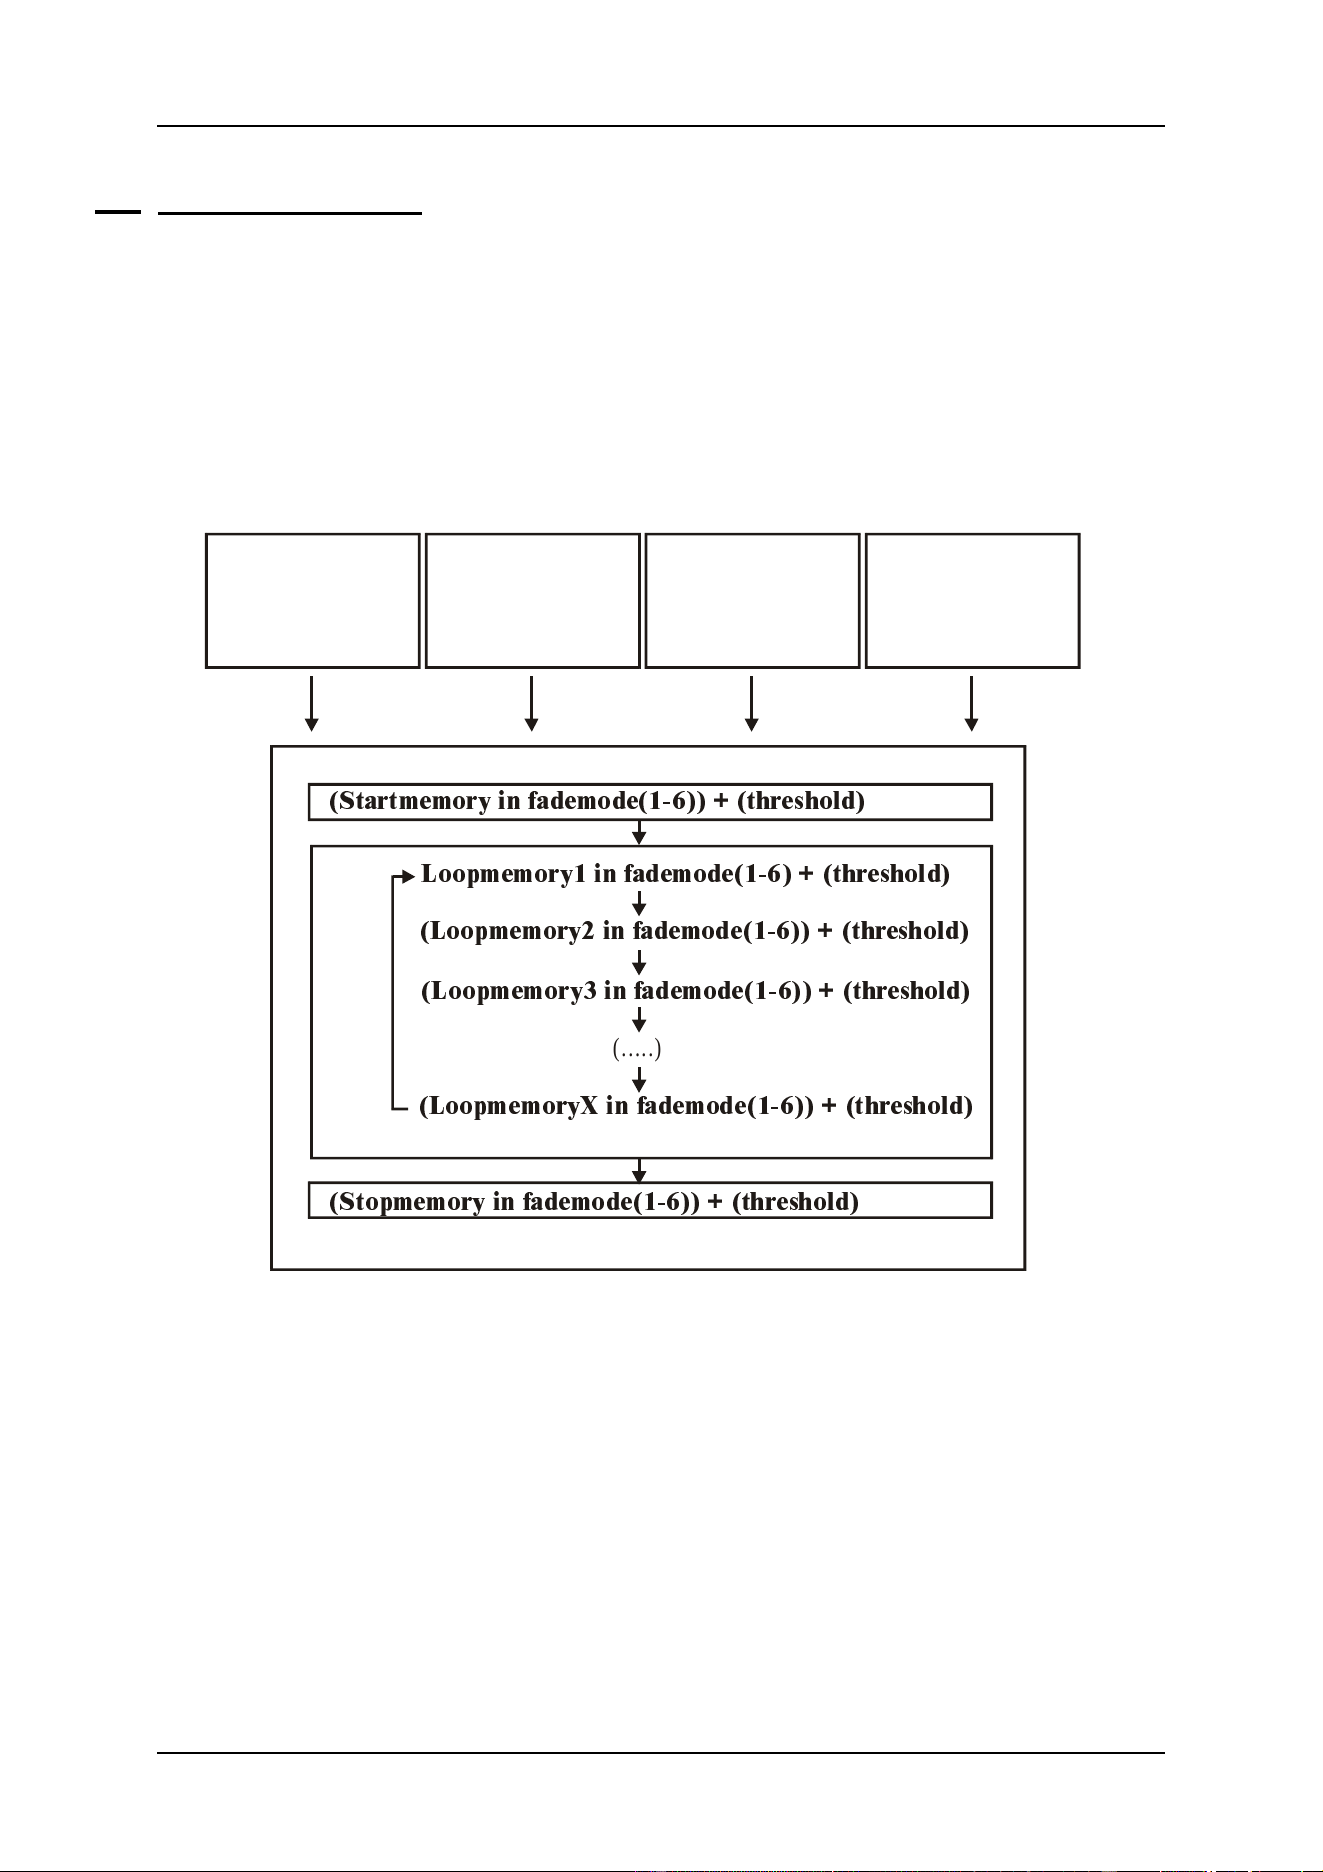
A sequence can hold:
- A start-memory (not essential)
- A number of loop-memories (at least 1, max. 100)
- A stop-memory (not essential)
Sequences can be linked to other cues.
Each sequence has his fade and wait time.
Each sequence has a start/stop button. The loop-memories can run in forward direction, in
backward direction, in bounce (forwards and backwards) or at random.
Sequences can be mutual synchronized.
Sequences can run in automatic, manual trigger or semi-automatic trigger mode.
6HTXHQFH$ 6HTXHQFH% 6HTXHQFH& 6HTXHQFH'
6WDU WPHPRU\ LQ ID GHPRGH WKUHVKROG
6WRSPHPRU\ LQ I DGHPRGH WKUHVKROG
/RRSPHPRU\ LQ I DGHPRGH WKUHVKROG
/RRSPHPRU\ LQ IDGHPRGH WKUHVKROG
/RRSPHPRU\ LQ IDGHPRGH WKUHVKROG
(.....)
/RR SPHPRU\; LQ ID GHPRGH WKUH VK ROG
04/2000 Martin Case Manual Version 7.20 Sequences and Playbacks
R&D International NV for Martin Professional AS
132
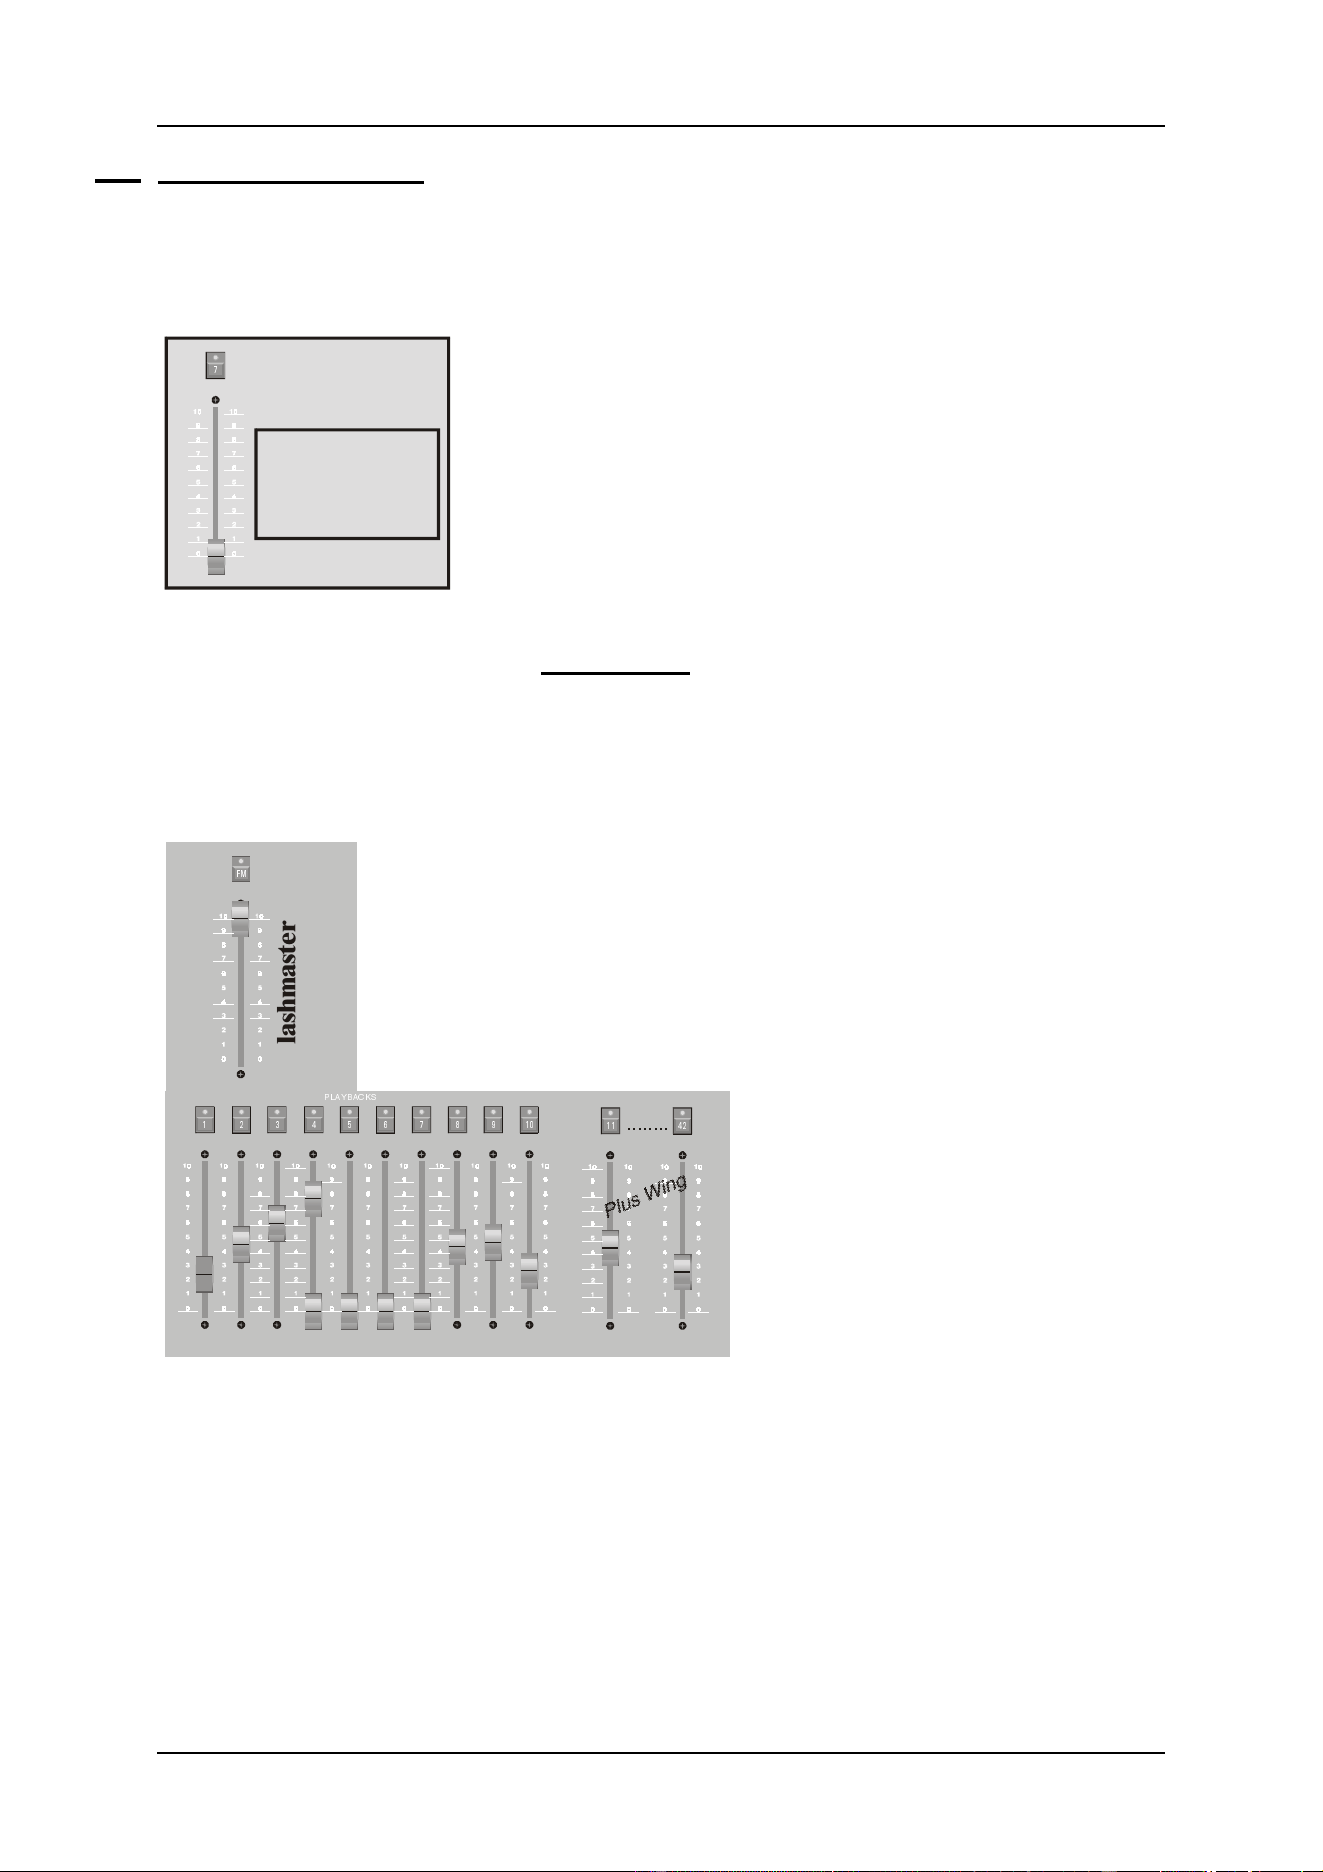
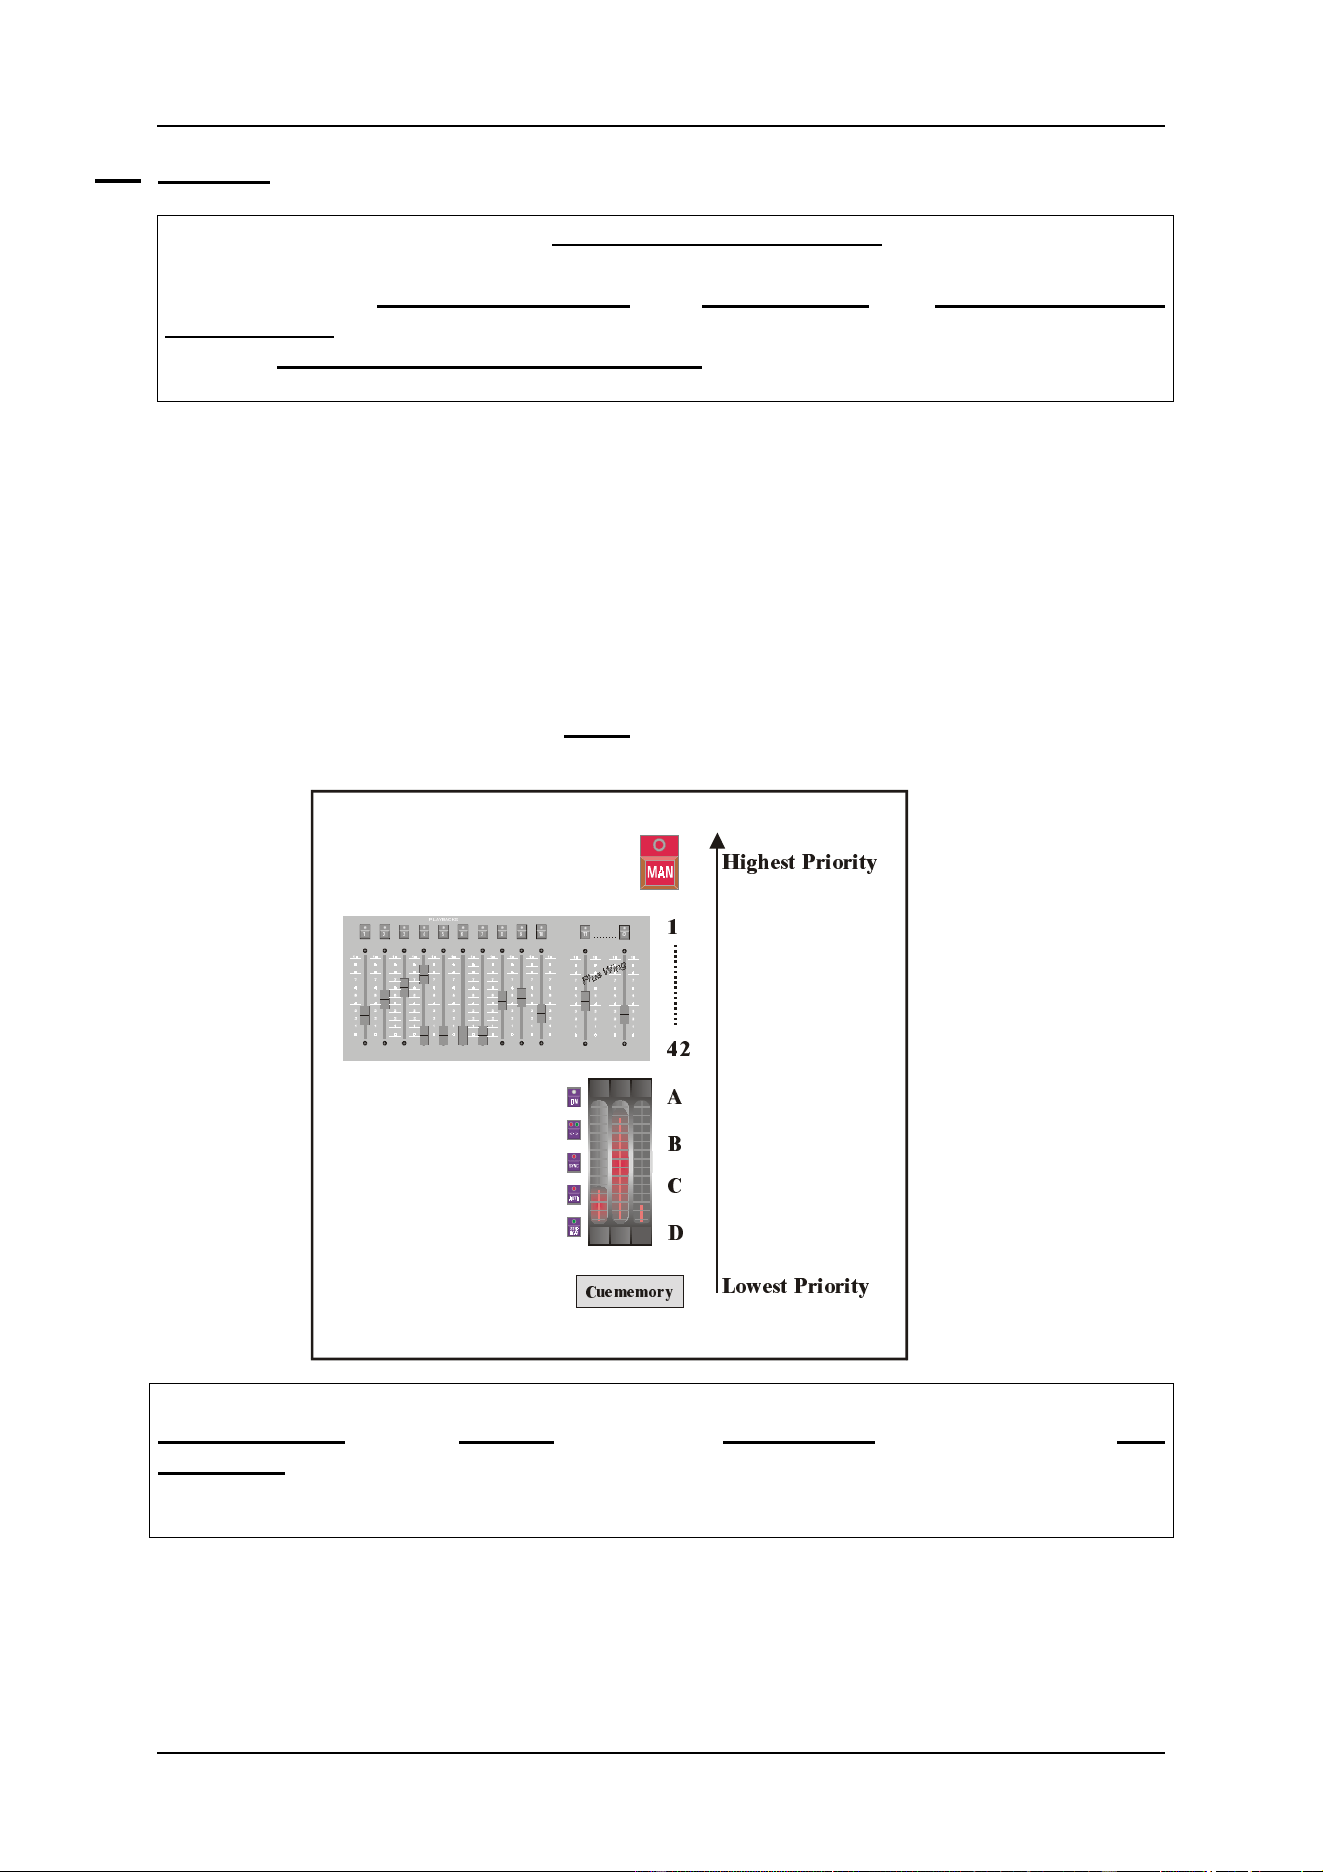
12.2 Introduction playbacks
A playback can hold one memory. This memory can be faded manually with an analogue
fader, or flashed with a playback flash key. Since there are 16 pages of 70 cues + point-cues,
and each cue can hold up to 42 playbacks, 470,000 playbacks can be programmed.
A playback holds 1 memory that can be faded from 0% to 100%
with an analogue fader. On the memory, a threshold can be
applied. There are 6 possible fade-modes that can be applied on
the memory.
Each playback has a flash key to fade-in, or flash, the memory instantly. The maximum flash
value depends on the value of the flash-master.
There are 3 possible flash key-modes:
- Flash: When pressing the
flash key, the playback-
memory is faded in. When
releasing the flash key, it is
faded out.
- Toggle: When pressing the
flash key, the playback-
memory is faded in. To
fade out the memory, the
flash key has to be selected
again.
- Kill: If 2 playbacks of the
same cue are in kill mode,
then the activation of one
flash key will deactivate,
or fade out, the other one.
Both playbacks need to be
of the same cue.
On the flash keys, fade in and fade out timings can be applied
0HPRU\LQ
IDGHPRGH
WKUHVKROG
)0
@<1I213 ;C
@
\
e
c
G
Y
^W
)ODVKPDVWHU
04/2000 Martin Case Manual Version 7.20 Sequences and Playbacks
R&D International NV for Martin Professional AS
133
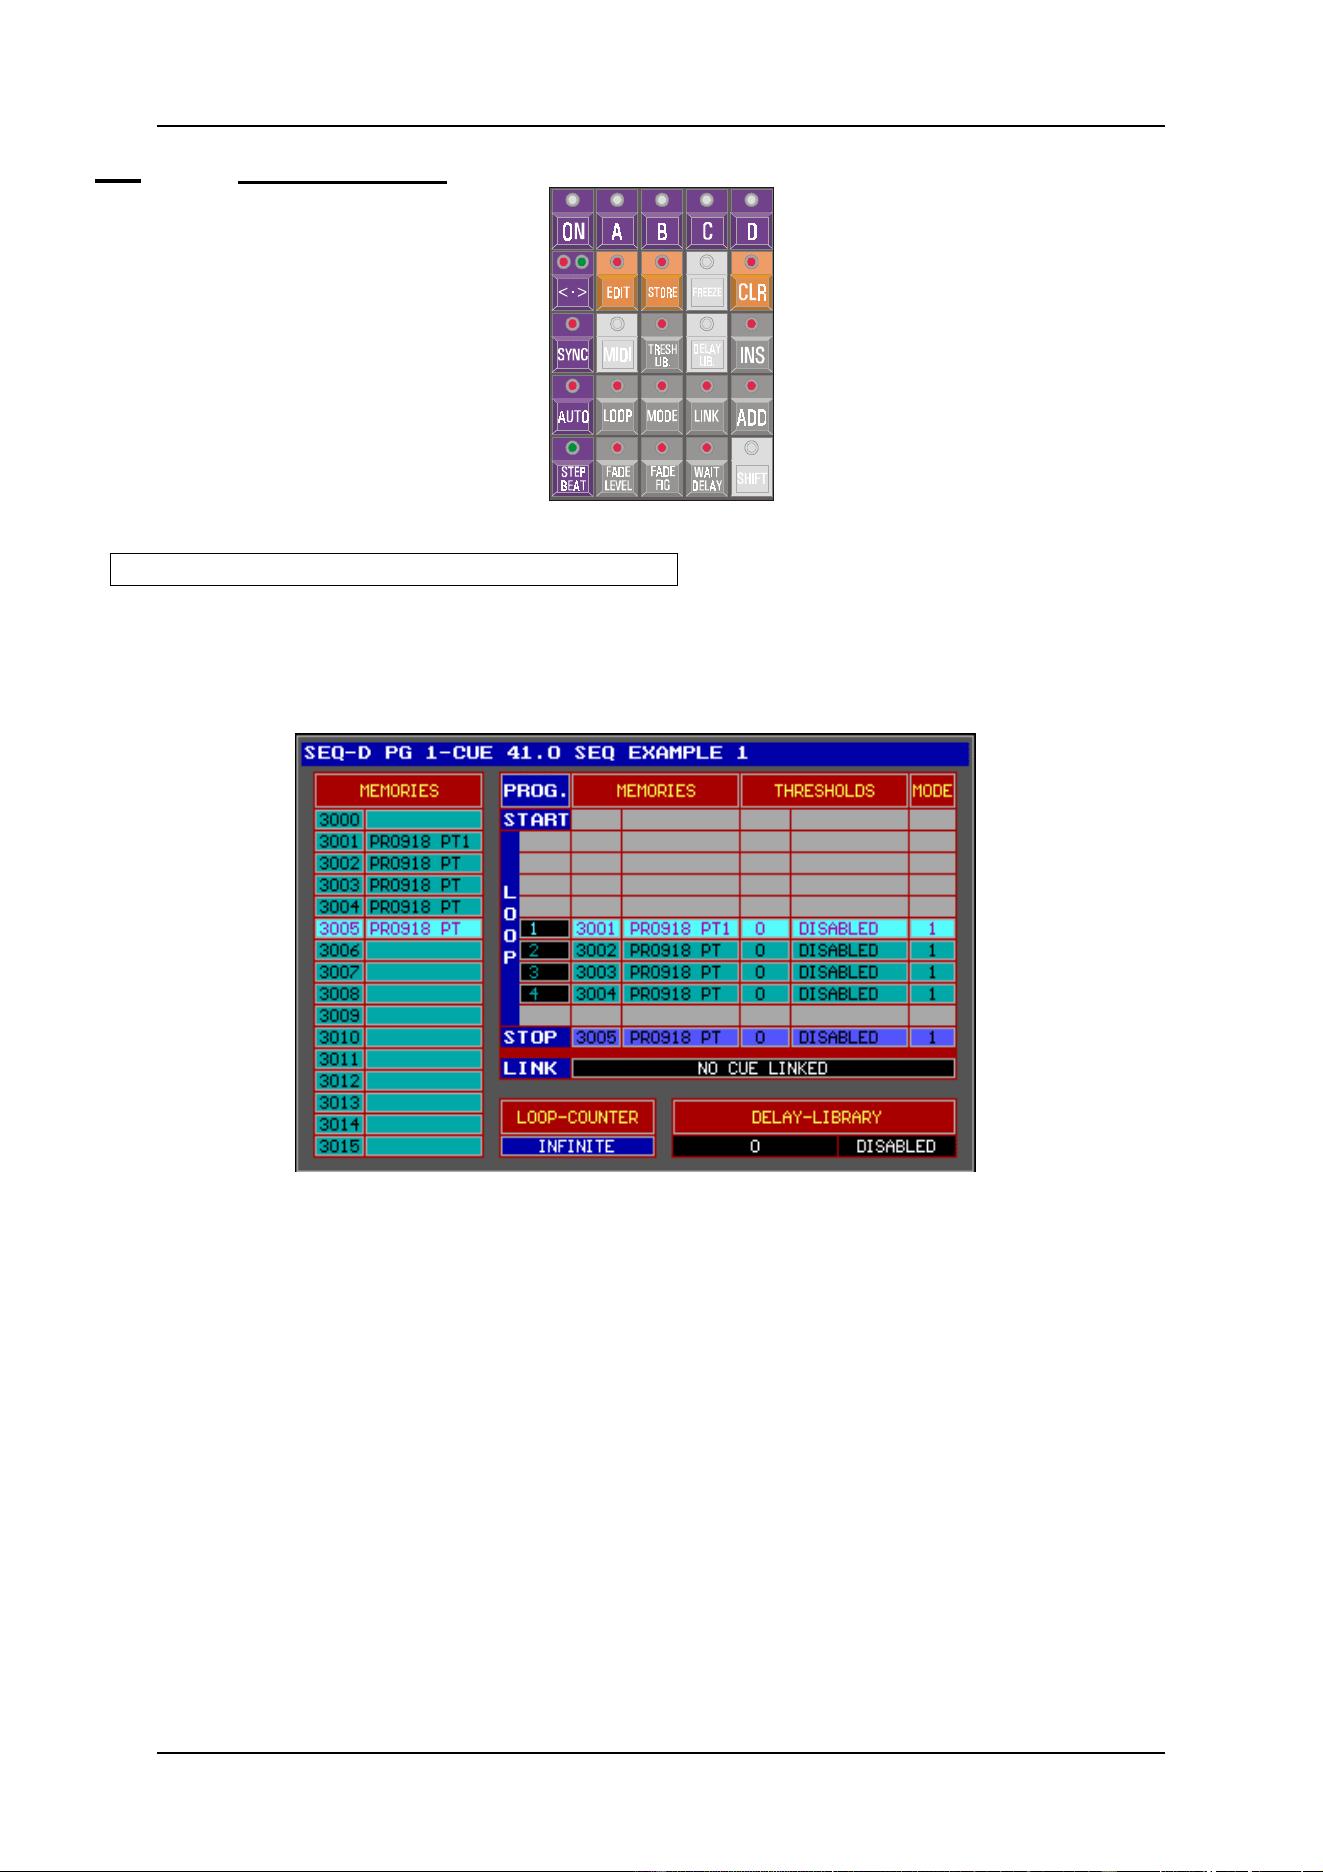
12.3 Priorities
VERY IMPORTANT: When the same fixture control channel is used in an active cue-
memory, active sequences, active playbacks and in manual mode, and the fixture
control channel is not a dimmer-channel, then priorities arise. The cue-memory has the
lowest priority, then sequences D, C, B and A take precedence, then playbacks 42, 41,
..., 1. The manual mode has the highest priority.
An example: Suppose, we use the Pan/Tilt channel of the first MAC600 in a cue-memory,
and in the memories of sequences D, C, B and A. The cue-fading is active,
and all sequences are started. Then the Pan/Tilt channel of the MAC600 will
get its values only from sequence A, because the same control channel is
used and sequence A has the highest active priority.
The priority principle is only active when:
- The same fixture control channel is used.
- The control channel is not a dimmer-channel
- The control channel is active in more functions (cue-memory, sequences,
playbacks, manual)
A dimmer-channel follows the HTP principle, i.e. when the fixture control channel is a
dimmer-channel, then the function that sends the highest value for that channel will take
precedence. If, for example, the cue-memory sets the dimmer-channel at 80% and playback 1
sets the same dimmer-channel at 40%, then 80% will be sent. However, placing the memory
in mode 5 or 6 can change the priority mode of the dimmer-channel.
@<1I213;C
@
\
e
c
G
Y
^
W
&XHPHPRU\
'
/RZHVW 3ULRULW\
+LJKHVW 3ULRULW\
&
%
$

04/2000 Martin Case Manual Version 7.20 Sequences and Playbacks
R&D International NV for Martin Professional AS
134
12.4 Adding memories to sequences (fast programming)
For new users, there is a fast way to make a memory and add it to a sequence:
[Select a cue] [Go to fixture mode] [Adjust fixture control channels and remove not-needed
channels] [TO] + [A or B or C or D] [enter memory-name] [RET]
Step 1: First the cue, in which we will create the sequence, has to be selected.
Step 2: We go to fixture mode. It can be useful to open the ‘digital memory values’ screen.
Step 3: Like on cue-memories, all channels can be erased (double-click [CLEAR]) and the
channels can be adjusted.
Step 4: Select [TO] together with one of the sequence keys [A], [B], [C] or [D]
Step 5: When in the start-options (see chapter SETUP) the item ‘AUTOMATIC
MEMORYNAME’ is active; a memory-name will be asked automatically.
Step 6: Save by pressing [RET].
The memory-numbers will be created automatically, starting from the memory-number
assigned in the start-options (‘AUTOMATIC SEQUENCE-MEMORIES FROM …’).
Note: Memories added to sequences using this fast programming tool, will always be
loop-memories. They will always be added, never inserted. These memories will always
be in fade-mode 1. If on the other hand, start-memories, stop-memories, thresholds or fade-
modes have to be added, then the sequence has to be edited. (See paragraph ‘Editing
sequences’).
12.5 Adding memories to playbacks (fast programming)
For new users, there is a fast way to make a memory and add it to a playback:
[Select a cue] [Go to fixture mode] [Adjust fixture control channels and remove not-needed
channels] [TO] + [playback key (1…42)] [enter memory-name] [RET]
The method used is the same as adding memories to sequences with the exception that a
playback can hold only 1 memory.
The memory-numbers will be created automatically, starting from the memory-number
assigned in the start-options (‘AUTOMATIC PLAYBACK-MEMORIES FROM …’).
Note: A memory added to a playback will always be in fade-mode 1. When another fade-
mode or a threshold is needed, the sequence has to be edited. (See paragraph ‘Editing
Sequences’).
04/2000 Martin Case Manual Version 7.20 Sequences and Playbacks
R&D International NV for Martin Professional AS
135
12.6 {EXP} Editing Sequences
[Select a cue] [EDIT] + [A or B or C or D]
To add memories to a sequence, first a cue has to be selected. To open one of the sequences
of the selected cue, select the [EDIT] key together with a sequence key [A], [B], [C] or [D].
Next screen will open:
The sequence-number, cue-page and cue-number of the edited sequence are marked at the top
(here: Sequence D of cue 1 of cue-page 1). In the left column, we can find the memories with
there names (if a name hasn’t been assigned, it will be marked with a *).
At the right, we see the contents of the sequence:
- START: Represents the start-memory. This start-memory is not essential. It is
activated only once, when the sequence starts.
- LOOP: Up to 100 loop-memories can be added to the sequence. Every memory
can have its own threshold and one of the 6 fade-modes.
- STOP: When linking to another cue, a stop-memory can be executed. The stop-
memory is not essential, and it is only executed once.

04/2000 Martin Case Manual Version 7.20 Sequences and Playbacks
R&D International NV for Martin Professional AS
136
- LINK: When a sequence has run a couple of times through its memories, it can be
linked to another cue. Attention, the link will only happen if a finite number of
loops have been programmed.
- LOOP COUNTER: Represents, the number of times that the loop-memories have
to be executed. By default, this counter is set at infinite, meaning that the loop-
memories are executed as long as no other cue was selected. If a finite value is
assigned, the sequence will execute the stop-memory after having executed the
finite number of loop-memories. After the stop-memory, a memory called
‘memory 0’ will be executed, if no link has been assigned. Memory 0 is an empty
memory, so it doesn’t change anything.
[2
↓
] or [8
↑
]
With those keys, the item (start-memory, loop-memories, stop-memory) in the right window
is high lighted.
[GET] [Number on keypad] [RET] or [LAST] or [NEXT]
This is the same as calling programmed memories. The called memory will be high lighted.
[ADD] or [INS]
To add or insert the high lighted memory of the left column to the right columns start, loop or
stop-memories..
[CLR]
To delete the high lighted memory (at the right) from the sequence. It will not erase the
memory from the controller.
[TRESH. LIB.] + [1…70]
To assign one of the 70 programmed thresholds (see chapter memories) to the highlighted
memory on the right.
Note: There is another method to add loop-memories to a sequence:
[Get a memory [GET] [number on keypad]] [EDIT] [[A, B, C or D] [A, B, C or D] (double-
click)]

04/2000 Martin Case Manual Version 7.20 Sequences and Playbacks
R&D International NV for Martin Professional AS
137
12.6.1 {EXP} Fade modes
In the chapter cue-timing we have already mentioned the fade-modes:
- Mode 1: Only fade-permission: This is the default mode. Channels that are given
fade-possibilities, will fade, the others will bump.
- Mode 2: Fade all channels: All channels will have fade possibilities. The library is
ignored.
- Mode 3: No fading: All channels will be in bump mode.
- Mode 4: Same as mode 3, but the fade time of the sequence will be ignored
(sequence fade time will be taken 0)
- Mode 5: LTP-dimmers fade. Normally a dimmer is in HTP (highest takes
precedence) mode (see paragraph 3). In mode 5, the dimmer-channels will act as
any other channel.
- Mode 6: LTP-dimmers fade but bump mode for all other channels. This is a
combination of mode 5 and mode 3. Attention, THRESHOLDS (see fade-modes
on playbacks) react different in this mode. In this mode, all non-dimmer channels
will bump to their positions as soon as the fading begins, the dimmer will keep
fading.
[MODE]
By selecting the [MODE] key, the fade-mode will change for the highlighted memory on the
right.
12.6.2 {EXP} Linking cues
When a sequence has run through a finite number of loops, this sequence can call another
sequence.
[LINK] [1…16] [1…70] [RET]
To link the sequence to another cue. In fact, a sequence is linked to another sequence, but
since sequences are part of a cue, the link will activated another cue.
The sequence will only link when a finite number of loops have been entered.
[LOOP] + [2
↓↓
] or [8
↑↑
]
To adjust the number of loops. Select the [LOOP] key together with the arrow keys. The
loop-counter can be set between 1 to 1,000 or infinite.
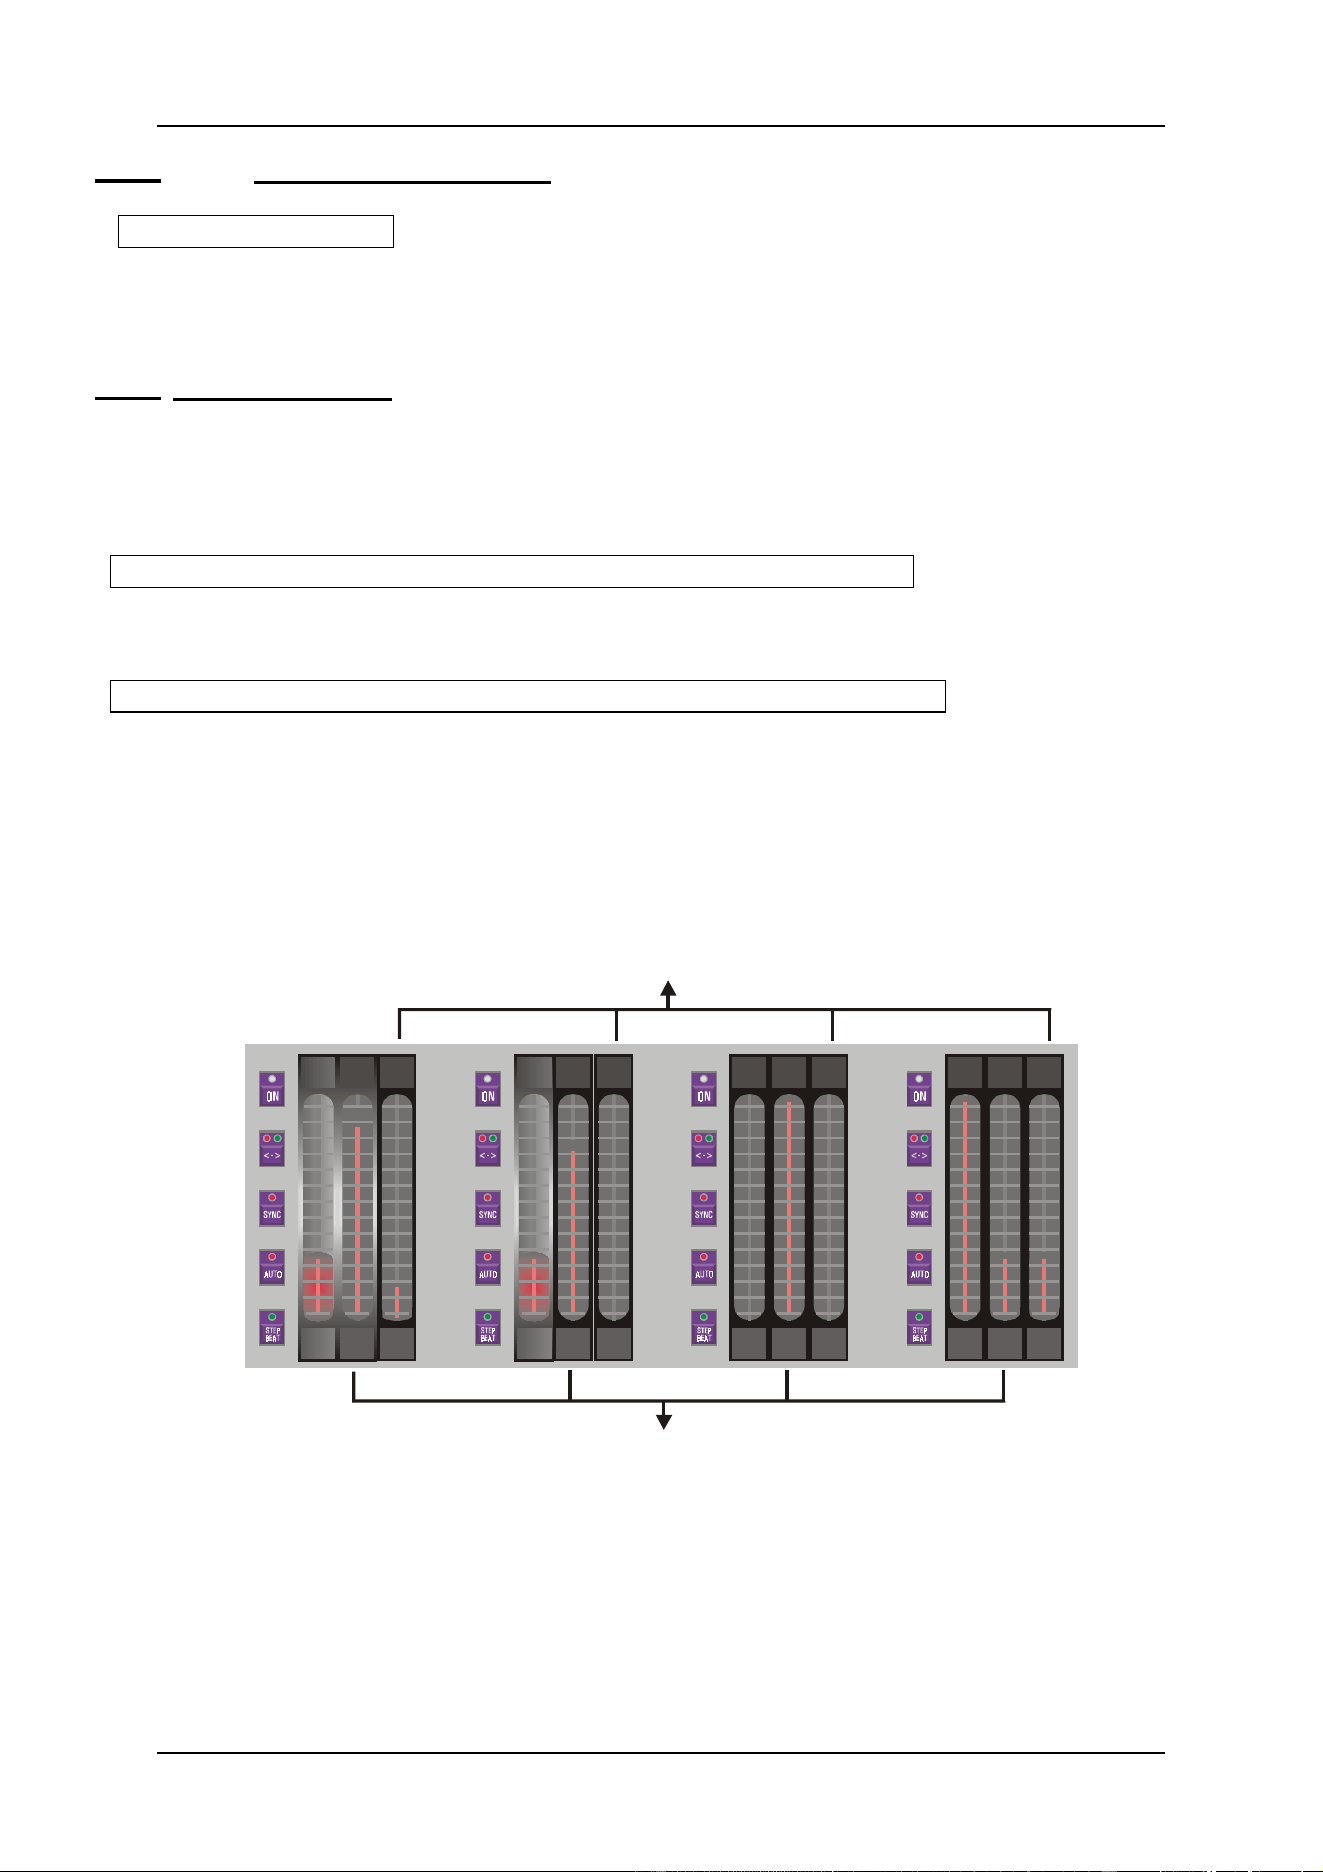
04/2000 Martin Case Manual Version 7.20 Sequences and Playbacks
R&D International NV for Martin Professional AS
138
12.6.3 {EXP} Saving an edited sequence
[A] or [B] or [C] or [D]
When all adjustments to the sequence have been done, select the sequence key that we used to
open the sequence (A, B, C or D), again.
12.6.4 Sequence functions
Sequences have their individual fade and wait timers. They can be started and stopped. They
can be mutual synchronized, and they have their own triggers (automatic, manual and semi-
automatic).
[Select a sequence A, B, C or D] [FADE FIG] [Adjust on trackerball]
This is the overall fade-time for the memories of the sequence.
[Select a sequence A, B, C or D] [WAIT DELAY] [Adjust on trackerball]
This is the overall wait-time for the sequence memories. This is the wait-time between the
fading of two loop-memories.
On Pro 2 or Pro 2+ controllers there is a direct access to the fade en wait-timers of the 4
sequences. With the digital fader belts, wait-times can be adjusted instantly, without selecting
the sequence number first.
)$'(7,0(
:$,77,0(
6HT$ 6HT% 6HT& 6HT'

04/2000 Martin Case Manual Version 7.20 Sequences and Playbacks
R&D International NV for Martin Professional AS
139
[Select a sequence A, B, C or D] [ON]
Only for Pro 2 or Pro 2+ [ON]
The [ON] key starts or stops the sequence. On Pro2 or Pro2+ controllers, there is a direct
access to it.
[Select a sequence A, B, C or D] [
↔↔
]
Only for Pro 2 or Pro 2+ [
↔↔
]
The loop-memories can run:
- Forwards (green LED)
- Backwards (red LED)
- In bounce (both LEDs on)
- At random (both LEDs off)
[Select a sequence A, B, C or D] [SYNC]
Only for Pro 2 or Pro 2+ [SYNC]
Two or more sequences can be synchronized. This is done by activating the [SYNC] key on
all the sequences to synchronize. All synchronized sequences will wait for each other.
[Select a sequence A, B, C or D] [AUTO]
Only for Pro 2 or Pro 2+ [AUTO]
Sequences have their individual trigger button. They can be triggered:
- Automatic (LED on), the memories will run according to the fade and delay
timers.
- Manual (LED off), after a loop-memory has been faded in, the sequence will wait
for a trigger with the [STEP BEAT] key to continue with the next loop-memory.
- Semi-automatic (LED blink). This is a special mode. The controller has to learn
the beat. On the rhythm of the music, the [STEP BEAT] key has to be selected 3
times, to teach the controller the beat. The sequence will now resume
automatically.
Note: When more sequences are in manual trigger mode, and those sequences have to be
triggered at the same time, the [RET] key can be used as trigger key.
[Select a cue] [Adjust sequence(s)] [STORE]
The sequences fade and wait times and their functions (on/off, direction, sync and trigger) can
be saved per cue. Select the cue, adjust the sequences and select the [STORE] button.
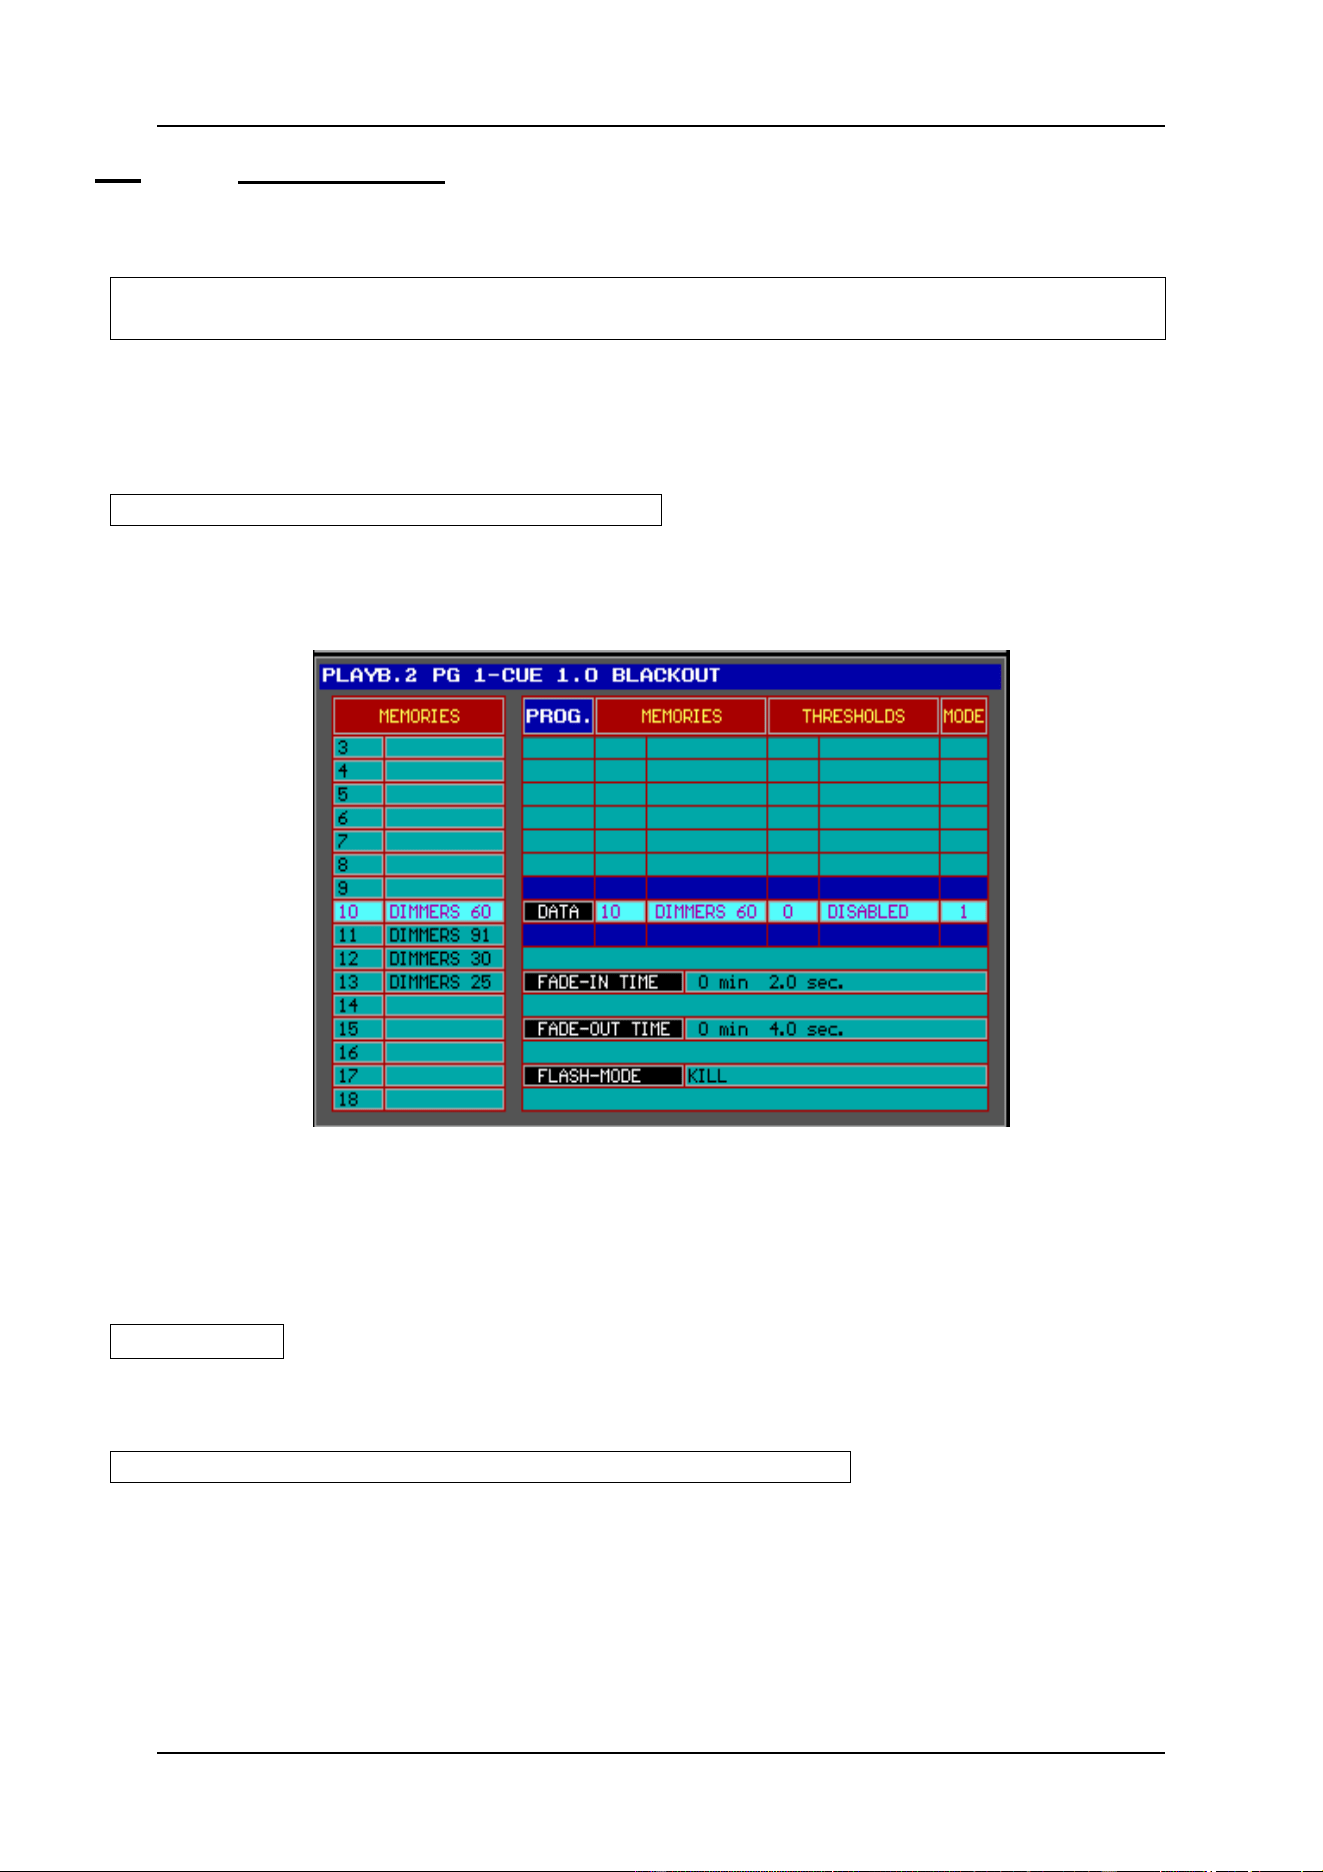
04/2000 Martin Case Manual Version 7.20 Sequences and Playbacks
R&D International NV for Martin Professional AS
140
12.7 {EXP} Editing Playbacks
There are 2 ways to add a memory to a playback:
[Select a cue] [Get a memory] [EDIT] + [[Playback Flash key] [Playback Flash key] (double-
click)]
This is another fast method, but here the memory isn’t created automatically. Because a
playback is part of a cue, the cue must be selected. A memory has to be called to add it to the
playback.
[Select a cue] [EDIT] + [Playback Flash key]
On the other hand, when the playback memory needs a threshold or another fade-mode, the
playback has to be edited. A screen similar to the sequences will open:
By using the [GET] [memory number] [RET] or with the [LAST] and [NEXT] keys a
memory can be called to [ADD] or [INS] it to the playback (right column). Note, the [ADD]
and [INS] key will do the same thing, since only one memory can be assigned to a playback.
[2
↓↓
] or [8
↑↑
]
To high light an item in the right column.
[EDIT] [[0-9] [@] (keypad)] [RET]
We have spoken about the playback flash keys. When activating a playback with the flash
keys, a fade in and fade out time can be selected. In addition, the flash mode (flash, toggle
or kill) can be adapted to the needs. Highlight the timers’ items with the arrow keys and
use the keypad to adjust the time. Highlighting it changes the flash mode; use the [EDIT]
key to change the flash mode.
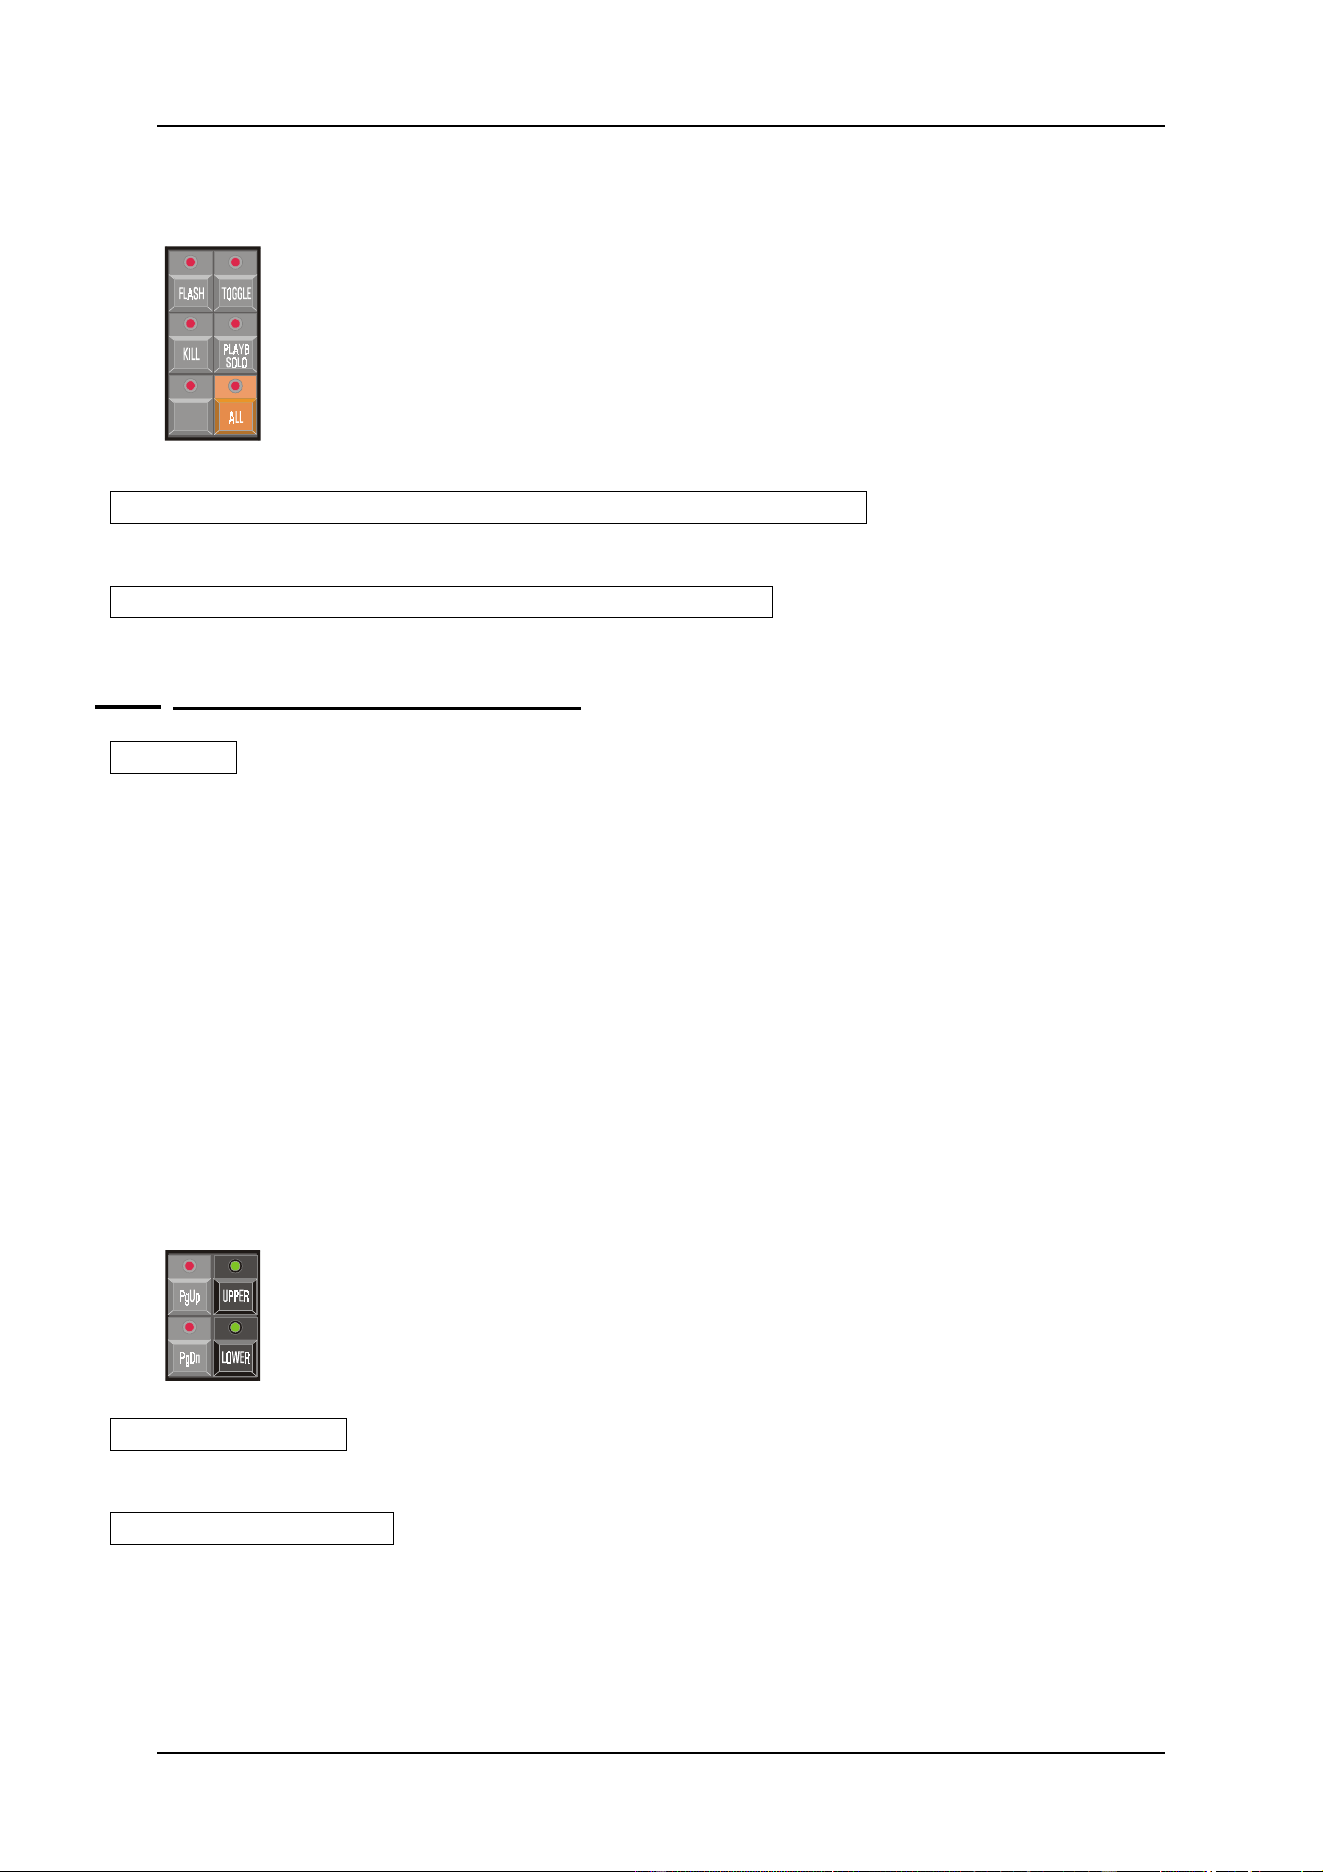
04/2000 Martin Case Manual Version 7.20 Sequences and Playbacks
R&D International NV for Martin Professional AS
141
On a Pro1+, Pro2+ or extra playback wing, there is an easier method to change the timers and
the flash mode:
[FLASH] or [TOGGLE] or [KILL] + [Playback flash key(s)]
Puts the playback(s) instantly in the selected flash mode.
[FLASH] or [TOGGLE] or [KILL] + [ALL (+ wing)]
Puts all playbacks !! of the last selected cue !! in the selected mode.
12.7.1 Playback screen and display modes
[STAGE]
Remembrance: The [STAGE] key toggles between the ‘stage layout’ and the ‘playback
overview’ on the monitor. There are now 3 different view modes (for the monitor and for the
displays on the playback wing):
- Memory number + cue number of the playback memory
- Memory name of the playback memory
- Flash mode of the playback memory
With the playback overview screen opened, the [PgUp] or [PgDn] keys will change the
playback display mode.
Rem: Users who have upgraded to this software version (version 7.20); the playback
screen was opened in older versions with the [values] key.
On the playback wing, the contents of the playback are always displayed in the 4 LCD
displays.
[PgUp] or [PgDn]
To change the different modes.
[UPPER] or [LOWER]
To display the upper or lower 16 playbacks.
04/2000 Martin Case Manual Version 7.20 Sequences and Playbacks
R&D International NV for Martin Professional AS
142
12.7.2 The memories in the playbacks
We already mentioned several times, that there is no need to store all fixture channels in the
memories. When for example only dimmer values are stored in the memories, then it is
possible to use those memories in a playback to create a sub-master.
If the effect generator is used in a memory, then it is possible to store only the speed
parameter of the Pan/Tilt effects generator, or the x-swing or y-swing. If those memories are
used in playbacks, the speed, x-swing and y-swing can always be controlled on the fly. In this
case, you have to make a cue-memory with the speed, x-swing and y-swing at 0. Since a
playback has a higher priority, the values for them programmed in the playbacks will take
over.
If completely filled memories are used in a playback, it is possible to fade in a light scene.
Beware of the priorities.
12.7.3 {EXP} Playback fade-modes
Like with sequences and cue-memories, 6 different fade modes can be set on the memories of
the playbacks (attention here for mode 6):
- Mode 1: Only fade-permission: This is the default mode. Channels that are given
fade-possibilities, will fade, the others will bump.
- Mode 2: Fade all channels: All channels will have fade possibilities. The library is
ignored.
- Mode 3: No fading: All channels will be in bump mode.
- Mode 4: Same as mode 3, but when used in sequences, the fade time of the
sequence will be ignored (sequence fade time will be taken 0)
- Mode 5: LTP-dimmers fade. Normally a dimmer is in HTP (highest takes
precedence) mode (see paragraph 3). In mode 5, the dimmer-channels will act as
any other channel.
- Mode 6: LTP-dimmers fade but bump mode for all other channels. This is a
combination of mode 5 and mode 3. In this mode, all non-dimmer channels will
bump to their positions as soon as the fading begins, the dimmer will keep fading.
When a threshold is applied on the memory, then the threshold will react
inverted for non-dimmer channels. The dimmer channels will start its fading
as indicated in the threshold, but the non-dimmer channels will fade until the
threshold % is reached. This mode will only work if the dimmer-channels of
the indicated fixtures are closed in other playbacks, active sequences or the
cue-memory, or the mode will be switched to mode 1 + mode 5.
&XHPHPRU\ZLWKYDOXHV
IRUHIIHFWJHQHUDWRURQ
3DQ7LOWEXW
3DQ7LOWVSHHGRQ
3OD\EDFNILOOHGZLWK
PHPRU\ZKH UHWKHUHLVRQO\DYDOXH
IRUHIIHFWJHQHUDWRU
3DQ7LOWVSHHG;
3OD\EDFNZLOOVHWWKHVSHHGEHWZ HHQDQG;EHFDXVH
WKHSOD\EDFNKDVDKLJKHUSULRULW\DVWKHFXHPHPRU\
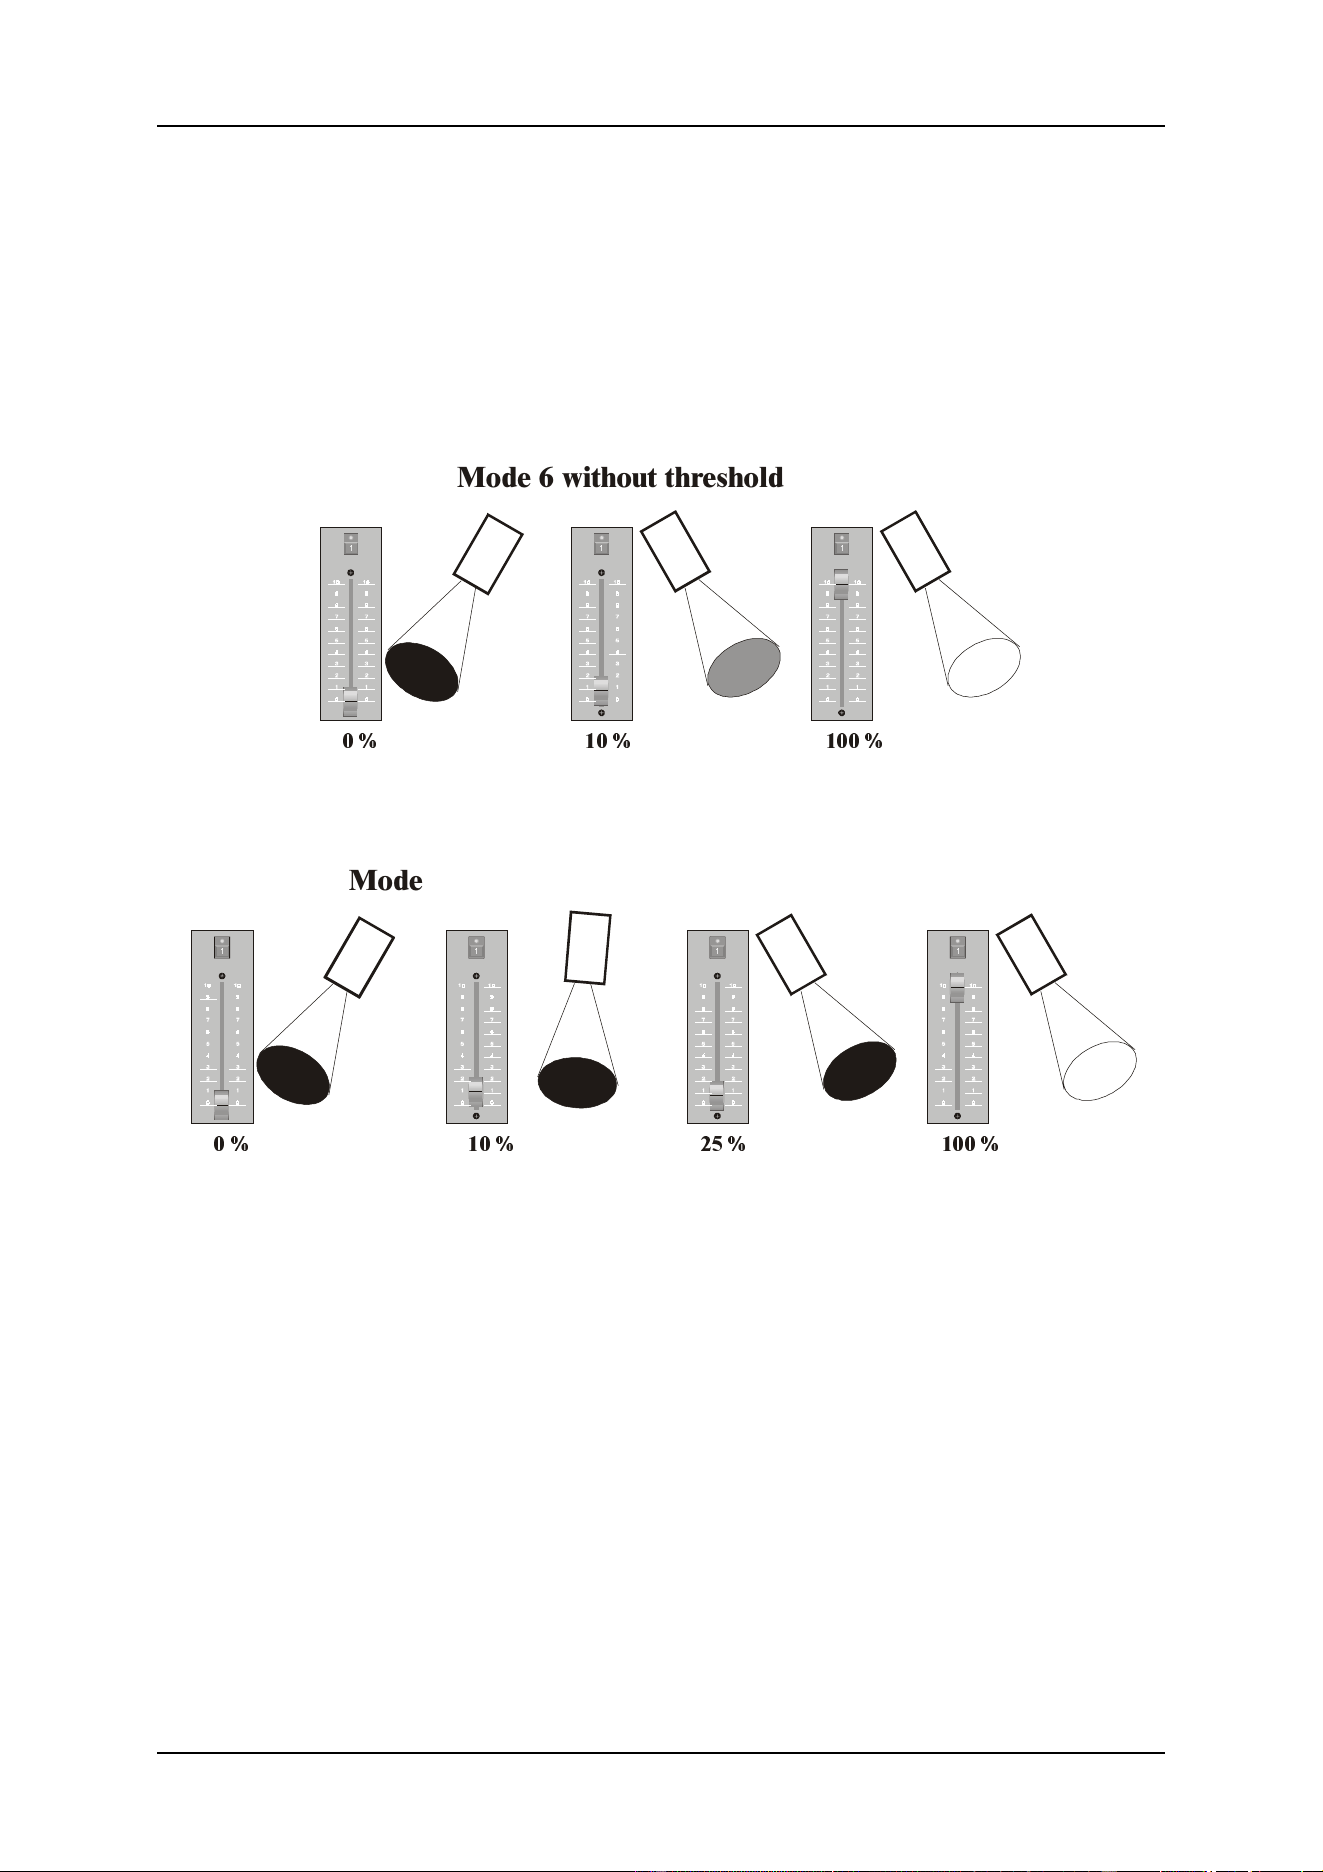
04/2000 Martin Case Manual Version 7.20 Sequences and Playbacks
R&D International NV for Martin Professional AS
143
An example: To fade in a light scene (complete light scene), a completely filled
memory is used with the dimmer on their maximum value. When no threshold
is applied on this playback memory (in mode 6), all fixture channels (except
the dimmer channel) will bump to their new positions (also Pan/Tilt) as soon as
the playback is opened just a little bit. If in this case a threshold of 25% on all
channels is applied on this memory, then all channels will fade to their new
positions until the playback is open at 25%. Now the dimmer will start fading
in at 25% opening (attention, the dimmer may not be open in another function
like another playback, sequence, cue-memory or manual).
0RGHZLWKRXWWKU HVKROG
0RGHZLWKWKUHVKROGRI RQDOOFKDQQHOV
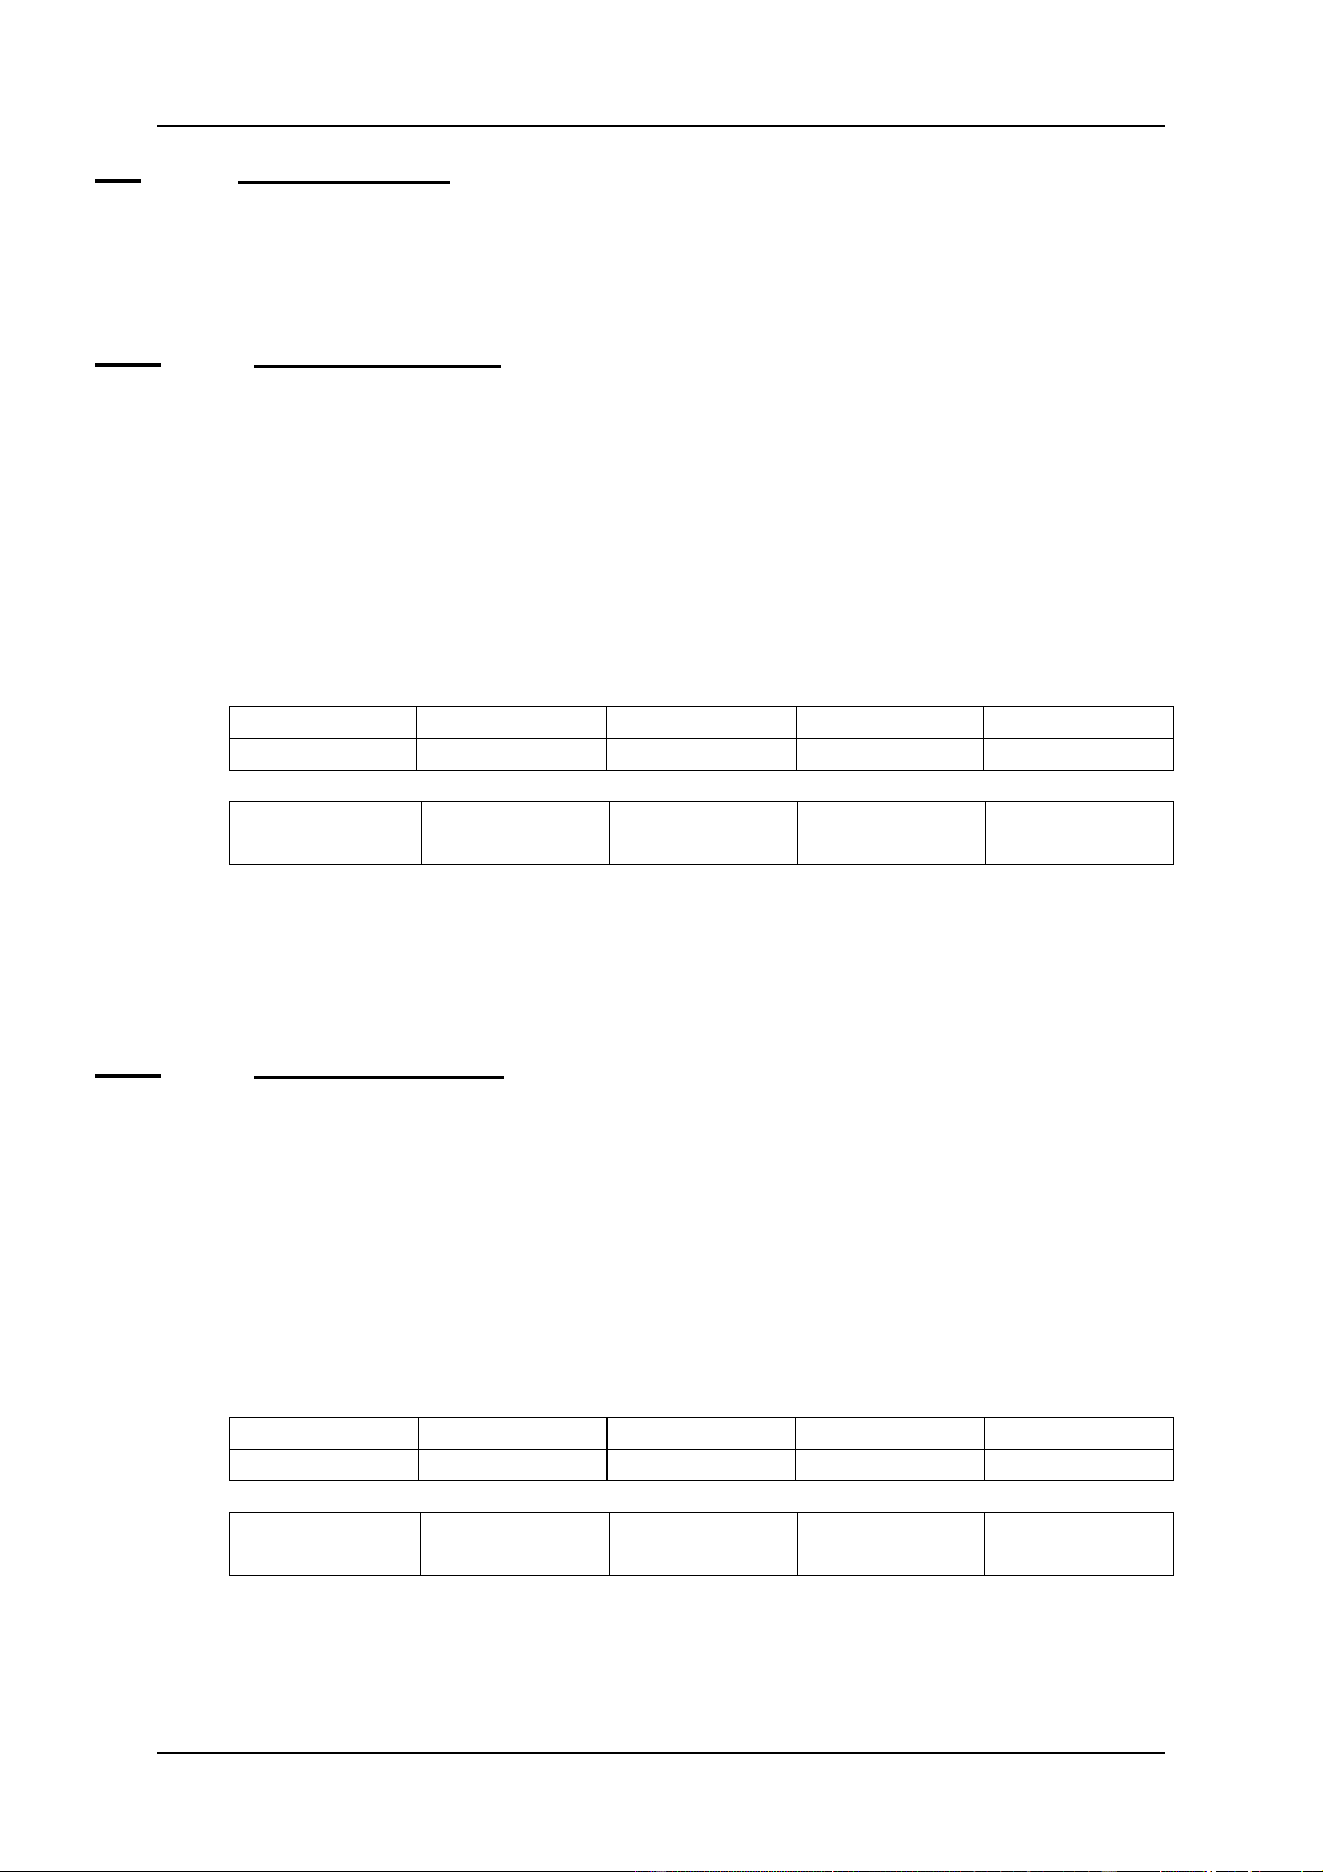
04/2000 Martin Case Manual Version 7.20 Sequences and Playbacks
R&D International NV for Martin Professional AS
144
12.8 {EXP} Transparent mode
When cues are programmed, we can work in 2 different modes:
- Transparent mode on
- Transparent mode off
12.8.1 {EXP} Transparent mode on
Transparent mode on signifies that only the programmed sequences and playbacks of a
selected cue will replace those of previously selected cues, when the cue is activated.
Example:
- In cue 1, sequences A, B, C and D are programmed
- In cue 2, only sequence C is programmed
- When we change from cue 1 to cue 2, only sequence C will be replaced, the others
will still come from cue 1.
We program:
Cue 1 Cue 1 Seq A Cue 1 Seq B Cue 1 Seq C Cue 1 Seq D
Cue 2 Seq A empty Seq B empty Cue 2 Seq C Seq D empty
When we select cue 1 and then cue 2, the result will be:
Change from
cue 1 to cue 2
Cue 1 Seq A Cue 1 Seq B
Cue 2 Seq C
Cue 1 Seq D
Remark: This is also the case with playbacks
Note: In this mode it is possible to program only playbacks in cue 1, and still have them
if another cue is selected.
12.8.2 {EXP} Transparent mode off
Transparent mode on signifies that selecting another cue will replace all sequences and
playbacks.
Example:
- In cue 1, sequences A, B, C and D are programmed
- In cue 2, only sequence C is programmed
- When we change from cue 1 to cue 2, everything is replaced. Since sequences A,
B and D were not programmed in cue 2, they will be empty when cue 2 is called.
We program:
Cue 1 Cue 1 Seq A Cue 1 Seq B Cue 1 Seq C Cue 1 Seq D
Cue 2 Seq A empty Seq B empty Cue 2 Seq C Seq D empty
When we select cue 1 and then cue 2, the result will be:
Change from
cue 1 to cue 2
Seq A empty Seq B empty
Cue 2 Seq C
Seq D empty
Remark: This is also the case with playbacks
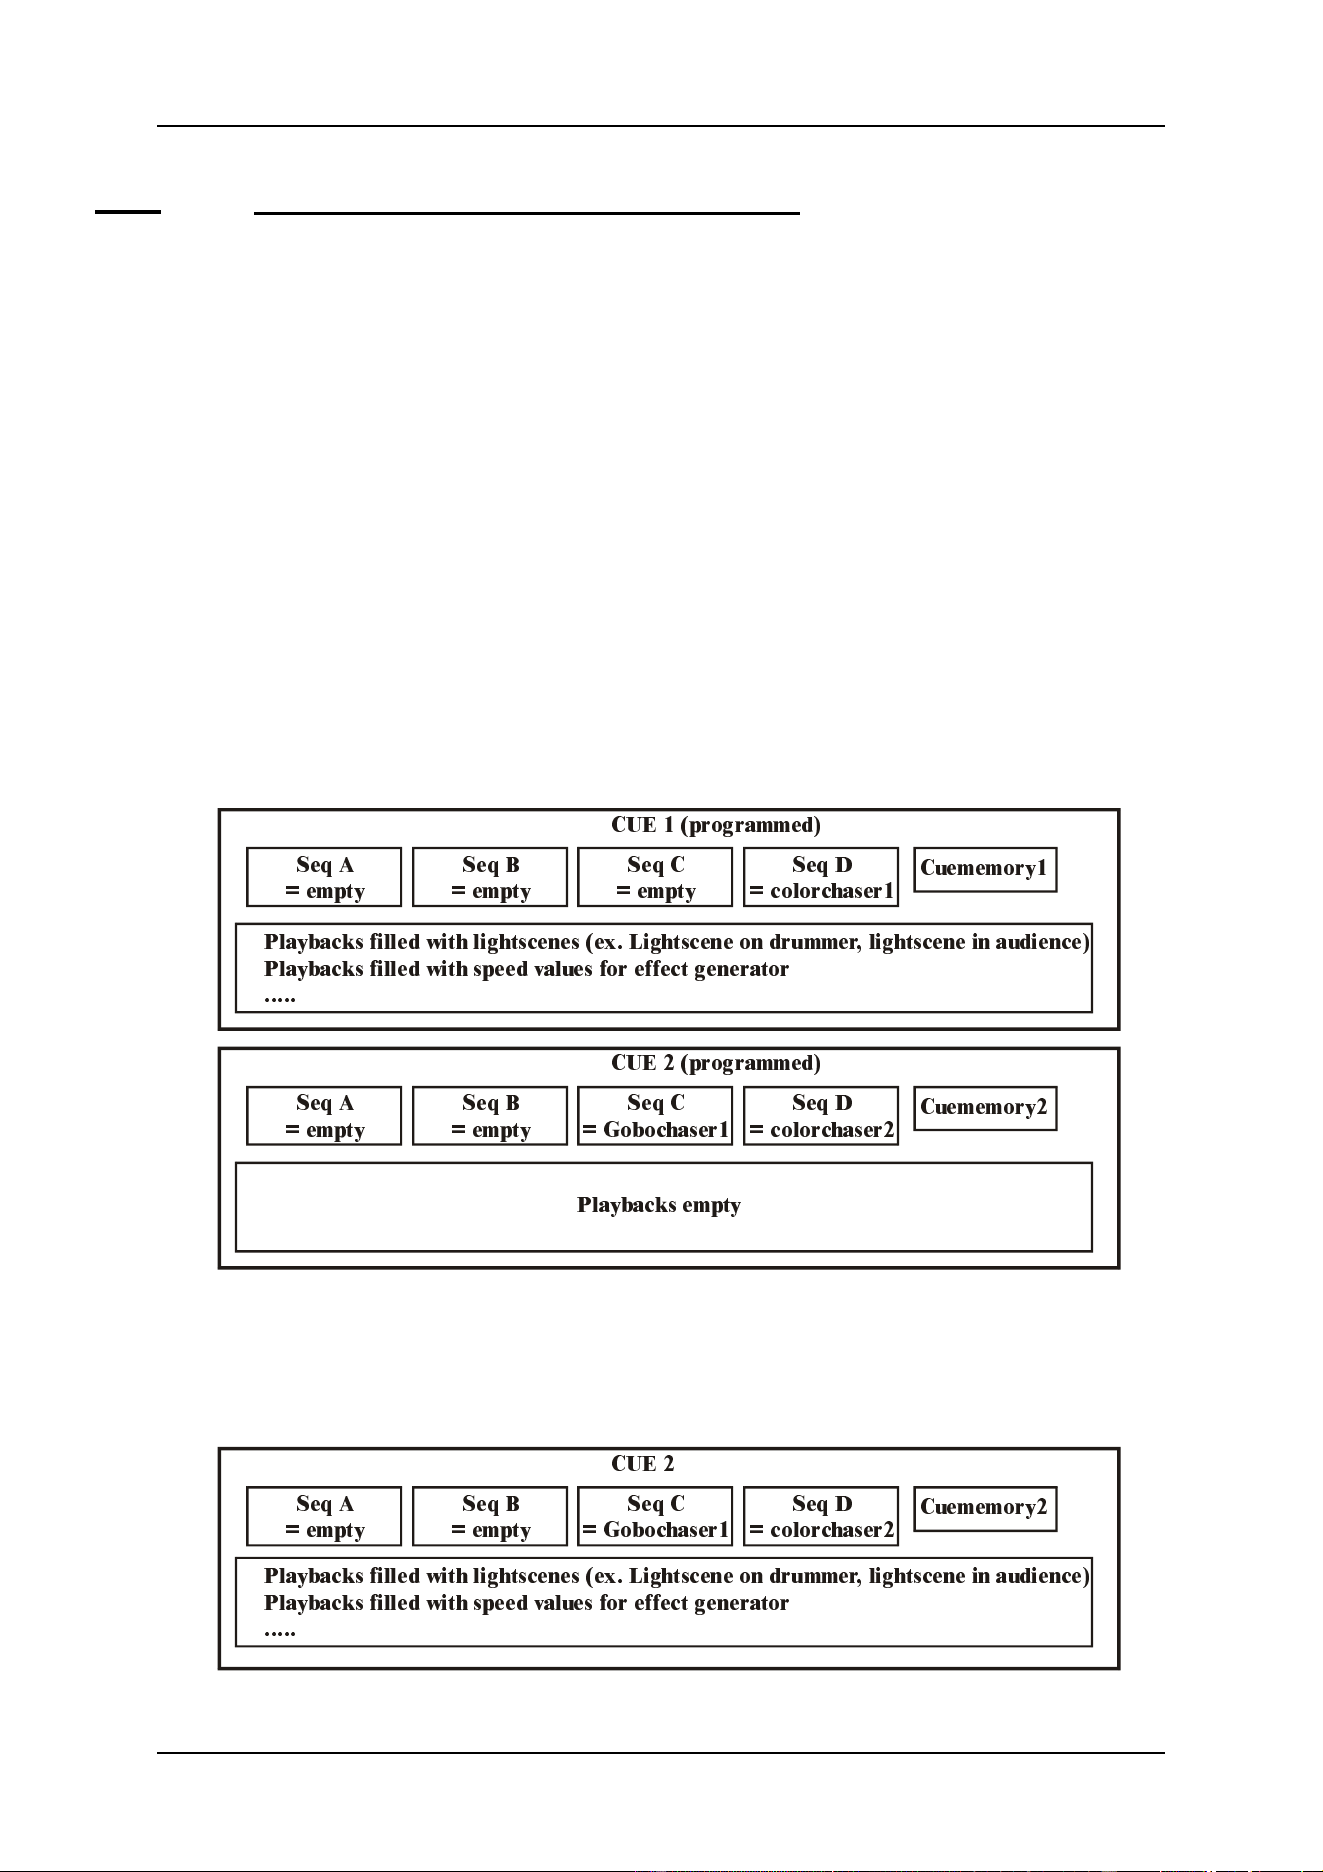
04/2000 Martin Case Manual Version 7.20 Sequences and Playbacks
R&D International NV for Martin Professional AS
145
12.8.3 {EXP} Making the choice: transparent mode on or off?
In earlier software versions, it was only possible to set the transparent mode (old replace all
mode) for an entire show. From version 7.01, it is possible to set the mode per cue, and set
this different for playbacks and sequences.
Suppose, the 42 playbacks, programmed in cue 1, should never change, then the transparent
mode should be enabled or ON for the playbacks.
If, however, every cue represents a complete new scene where the playbacks and sequences
should have new functions every time, then the transparent mode should be off for the entire
show.
Pre-defined shows:
In this kind of shows, cues are programmed in order of succession. Those shows are
programmed per cue. In those shows, the transparent mode for sequences is disabled or
off, and if the playback contents should always remain the same, then the transparent
mode for playbacks should be enabled.
Suppose we have two cues like in above example and the transparent mode is
disabled for sequences and enabled for playbacks, then the result, if we go from cue
1 to cue 2, will be:
&XHPHPRU\
&XHPHPRU\
&8( SURJUDPPHG
&8( SURJUDPPHG
3OD\EDFNV ILOOHG ZLWK OLJKWVFHQHV H[ /LJKWVFHQH RQ GUXPPHU OLJKWVFHQH LQ DXGLHQFH
3OD\EDFNV ILOOHG ZLWK VSHHG YDOXHV IRU HIIHFW JHQHUDWRU
3OD\EDFNV HPSW\
6HT '
FRORUFKDVHU
6HT '
FRORUFKDVHU
6HT &
HPSW\
6HT &
*RERFKDVHU
6HT %
HPSW\
6HT %
HPSW\
6HT $
HPSW\
6HT $
HPSW\
&XHPHPRU\
&8(
3OD\EDFNV ILOOHG ZLWK OLJKWVFHQHV H[ /LJKWVFHQH RQ GUXPPHU OLJKWVFHQH LQ DXGLHQFH
3OD\EDFNV ILOOHG ZLWK VSHHG YDOXHV IRU HIIHFW JHQHUDWRU
6HT '
FRORUFKDVHU
6HT &
*RERFKDVHU
6HT %
HPSW\
6HT $
HPSW\
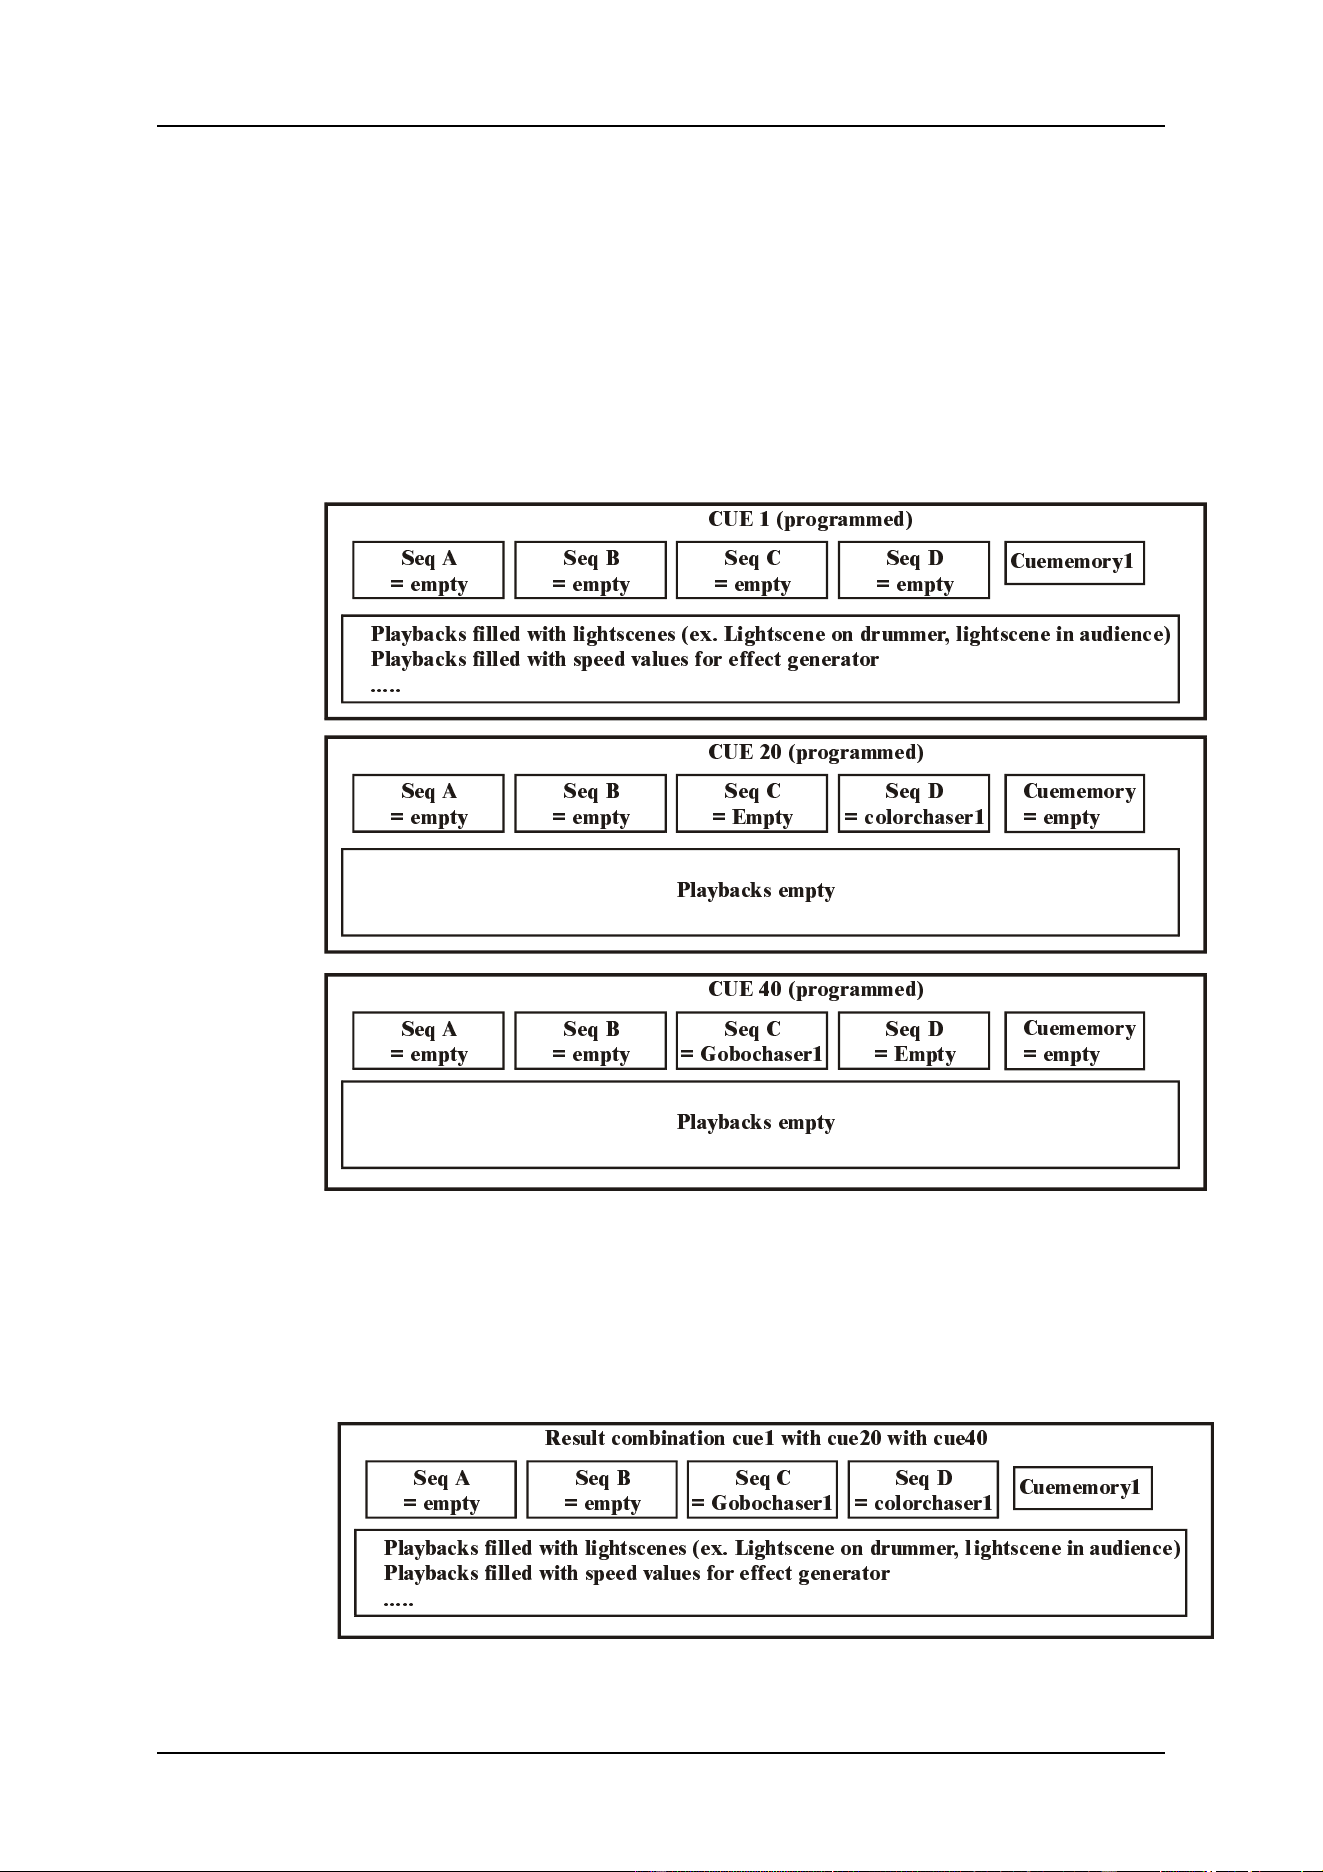
04/2000 Martin Case Manual Version 7.20 Sequences and Playbacks
R&D International NV for Martin Professional AS
146
Disco clubs and shows with improvisation:
If the order of performance is unknown, like in disco clubs, then combination of
different effects must be possible.
Example:
- For Pan/Tilt motions, cue-memories are used in cues 1 to 19
- For color chasers, sequence D is used in cues 20 to 39 (other sequences empty)
- For gobo chasers, sequence C is used in cues 40 to 59 (other sequences empty)
- For sequences and playbacks, the transparent mode is ON.
- Now, we have the possibility to combine Pan/Tilt motions (cues 1 to 19) with
color chasers (cues 20 to 39) with gobo chasers (cues 40 to 59), because we used
for Pan/Tilt, cue-memories, for the color chasers, sequence D and for the gobo
chasers sequence C. Since the transparent mode is active, we can combine the cue-
memories with the sequences D and C of different cues.
&XHPHPRU\
&XHPHPRU\
HPSW\
&XHPHPRU\
HPSW\
&8( SURJUDPPHG
&8( SURJUDPPHG
&8( SURJUDPPHG
3OD\EDFNV ILOOHG ZLWK OLJKWVFHQHV H[ /LJKWVFHQH RQ GUXPPHU OLJKWVFHQH LQ DXGLHQFH
3OD\EDFNV ILOOHG ZLWK VSHHG YDOXHV IRU HIIHFW JHQHUDWRU
3OD\EDFNV HPSW\
3OD\EDFNV HPSW\
6HT '
FRORUFKDVHU
6HT '
(PSW\
6HT &
HPSW\
6HT '
HPSW\
6HT &
(PSW\
6HT &
*RERFKDVHU
6HT %
HPSW\
6HT %
HPSW\
6HT %
HPSW\
6HT $
HPSW\
6HT $
HPSW\
6HT $
HPSW\
&XHPHPRU\
5HVXOW FRPELQDWLRQ FXH ZLWK FXH ZLWK FXH
3OD\EDFNV ILOOHG ZLWK OLJKWVFHQHV H[ /LJKWVFHQH RQ GUXPPHU OLJKWVFHQH LQ DXGLHQFH
3OD\EDFNV ILOOHG ZLWK VSHHG YDOXHV IRU HIIHFW JHQHUDWRU
6HT '
FRORUFKDVHU
6HT &
*RERFKDVHU
6HT %
HPSW\
6HT $
HPSW\
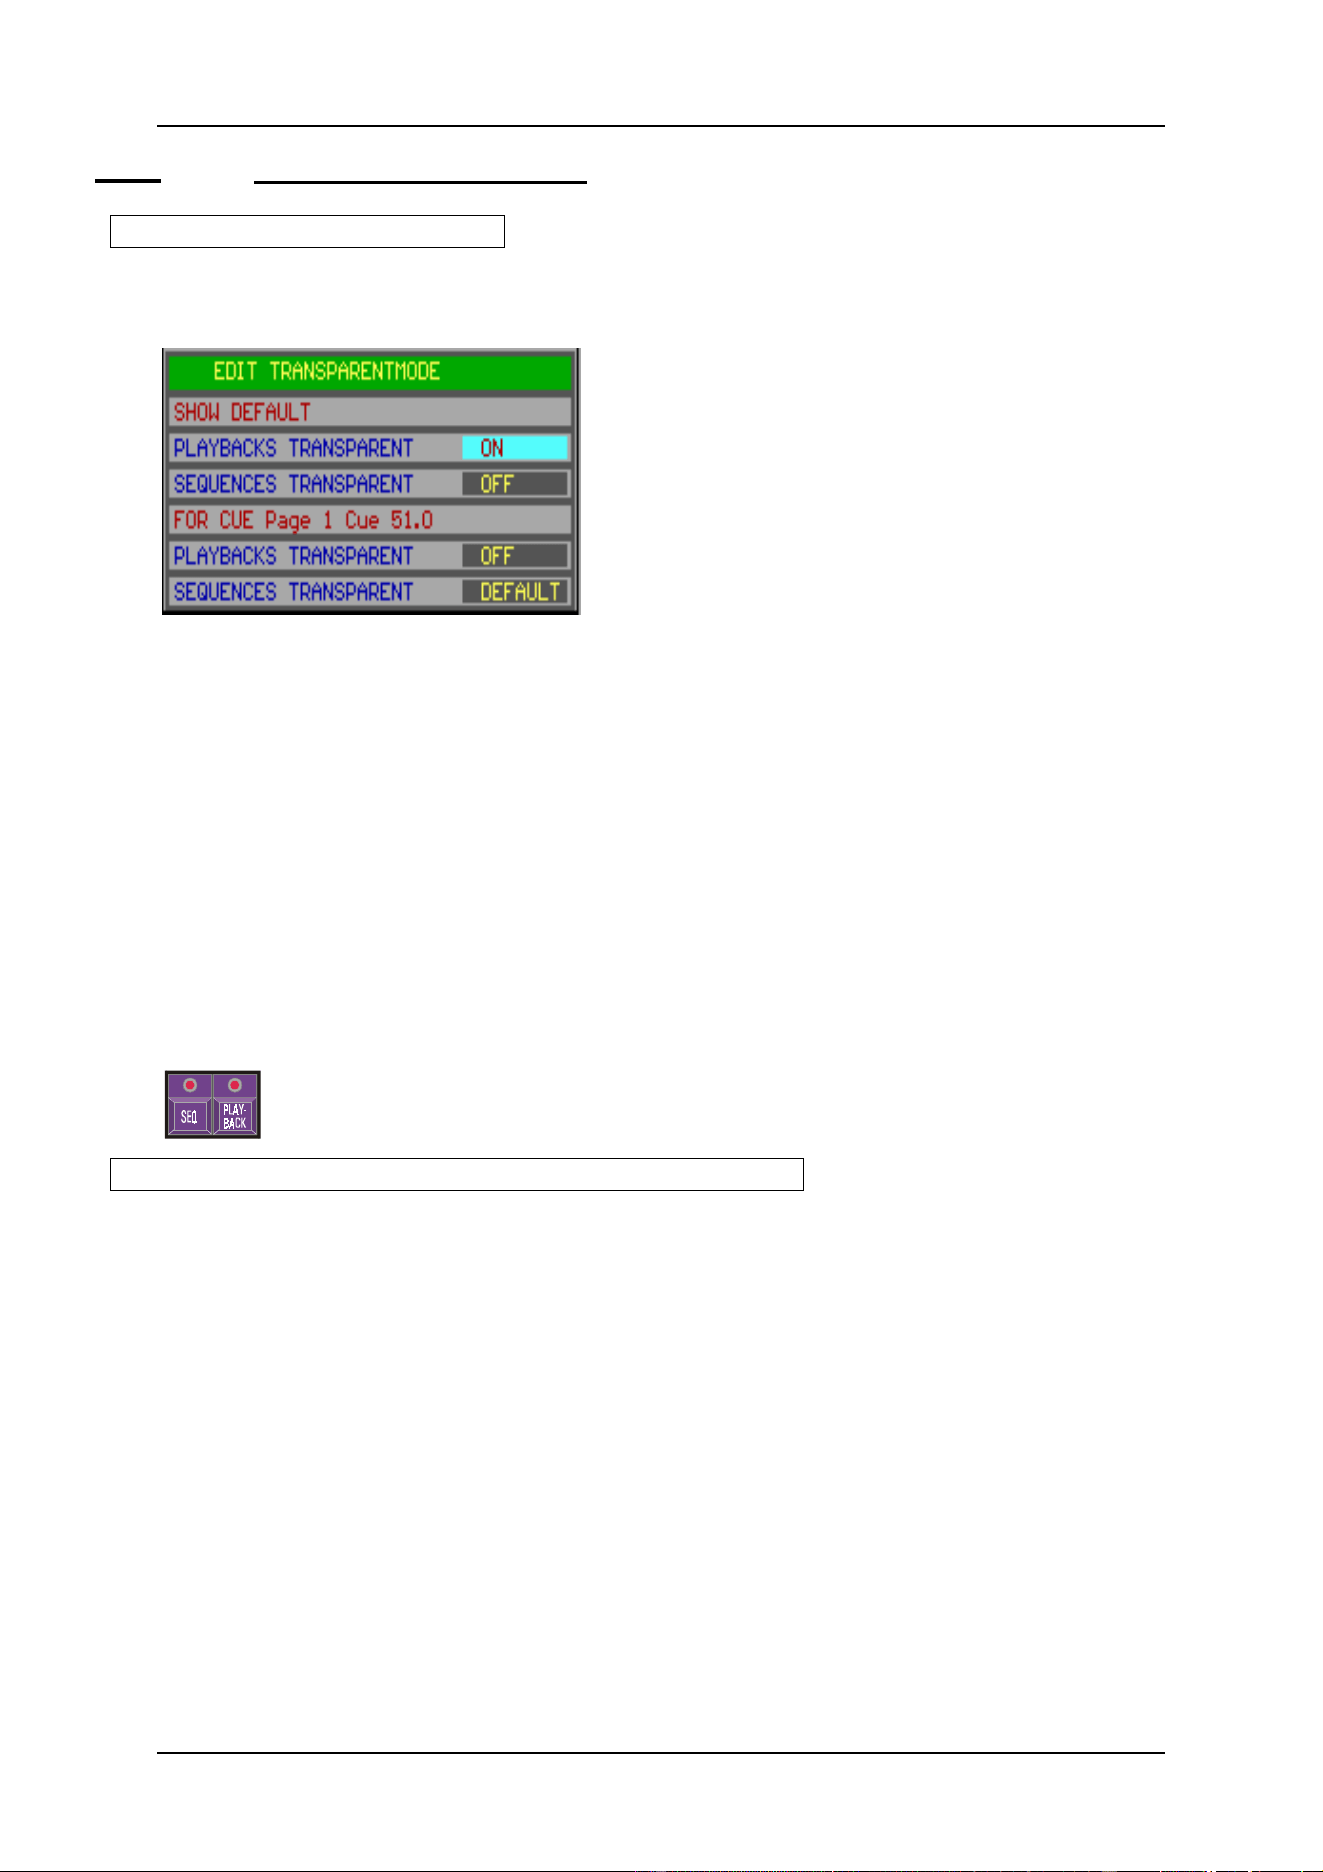
04/2000 Martin Case Manual Version 7.20 Sequences and Playbacks
R&D International NV for Martin Professional AS
147
12.8.4 {EXP} Set up the Transparent mode
[Select a cue] [SHIFT] + [CUE]
The combination of [SHIFT] and [CUE] will open next window:
The SHOW DEFAULT is the common default setting for the controller (options: ON or
OFF). To change it, high light the item with the arrow keys [2
↓
] or [8
↑
] and select the
[EDIT] key.
For each cue, the settings can be different for sequences and playbacks. Possible choices are:
- ON: transparent mode on
- OFF: transparent mode off
- DEFAULT: transparent mode follows the SHOW DEFAULT setting.
In the example here, in cue 51 on page 1, the setting for playbacks is OFF and the sequences
follow to show defaults, which is OFF.
On a playback wing, you have quicker access:
[Select a cue] [SEQ] and/or [PLAYBACK] [STORE]
First, a cue has to be selected. The a combination of the sequence and playback transparent
mode setting is made, followed by [STORE]
The LEDs on the [SEQ] and [PLAYBACK] keys of the playbackwing represent:
- LED ON: transparent mode on
- LED OFF: transparent mode off
- LED blinks: transparent mode = show default mode
04/2000 Martin Case Manual Version 7.20 Sequences and Playbacks
R&D International NV for Martin Professional AS
148
12.9 The example show
Playbacks
The example show holds 9 playbacks in CUE 1 cue-page 1. The memories and functions,
stored in the playbacks are:
Playback Memory
number
Threshold
number
Fade
Mode
Fade-in
time
Fade-out
time
Playback
mode
1 2008 1 1 0 0 Flash
2 10 Non 1 2 sec 4 sec Kill
3 12 Non 1 2 sec 4 sec Kill
4 13 Non 1 2 sec 4 sec Kill
5 11 Non 1 2 sec 4 sec Kill
7 23 Non 1 0 0 Flash
8 22 Non 1 0 0 Flash
9 21 Non 1 0 0 Flash
10 20 Non 1 0 0 Flash
The contents of the memories:
Memory
Number
Contents
2008 Strobe value, dimmers full and color preset 1 for all fixtures
10 Only dimmer full for MAC600s
12 Only dimmer full for MAC300s
13 Only dimmer full for MAC250s
11 Only dimmer full for Pro918s
23 Only wave per type on the dimmers of all fixtures except Pro918s
22 Only Wave per 4 on the dimmers of all fixtures except the Pro918s
21 Speed open on the dimmers of all fixtures, except the Pro918s
20 Only Swing open on the dimmers of all fixtures except the Pro918s
Sequences
4 sequences were programmed in CUE 41:
Sequence
number
Memory numbers
D Loop memories: 3001 to 3004 Stop memory: 3005
C Loop memories: 2002 to 2007 Stop memory: 2001
B Loop memories: 2010 to 2011 Stop memory:
A Loop memories: 2020 to 2022 Stop memory:
Memories 3001 to 3005 hold only Pan/tilt presets for the PRO918s
Memories 2002 to 2007: color preset 2 is applied on the 6 MAC600s separately.
Memories 2010 and 2011: Orange/Peacock color preset alternated on 2 groups of Mac300s
Memories 2020 to 2022: Dimmer chase on the Mac250s

04/2000 Martin Case Manual Version 7.20 Sequences and Playbacks
R&D International NV for Martin Professional AS
149
Select CUE 1, and afterwards CUE 41. The playbacks of CUE 1 will remain unchanged, but
the sequences are all replaced. This is possible because the transparent mode of the sequences
is disabled and of the playbacks is enabled (the transparent mode follows the show defaults).
Using Cue 41
Cue 41 holds also a cue-memory, which closes the dimmers of all fixtures.
Activate the 4 sequences and close all playbacks.
When an MSD (Martin Show Designer) is connected and the show is loaded, we will see:
A Dimmer chase on the Mac250s from sequence A. Open playback fader 4. Since playback
4 opens all dimmers of the MAC250s to full open, the chase will fade out to full because of
the HTP principle of dimmer channels.
Open playback 3. The orange/Peacock chase on the MAC300s will be visible. Sequence B
holds only color changes, but the playback will open the dimmers of the MAC300s
Open playback 2. A color chase on the MAC600s will be visible. The chase runs in sequence
C and the dimmers open in the playback.
Open playback 5. The Pan/Tilt motion from sequence D will be visible on the PRO918s. The
playback opens the dimmers.
Open playback 1. A strobe will be visible on all fixtures. Since playback 1 has a higher
priority then all other playbacks and its priority is higher than the sequences en the cue-
memory, the strobe and the color-preset will be taken from this playback (= memory 2008).
The dimmer in memory 2008 still follows HTP. All other channels not defined in the
playback will be taken from lower playbacks (2-42), sequences (A, B, C, D) and the cue-
memory in this order.
Press alternating playback flash keys 2 to 5. Since playbacks 2 to 5 are in kill mode, and they
are programmed in the same cue, one flash key will disable or fade out the previous one. If
the last selected flash key is selected again, it will fade out.
Open playbacks 9 and 10. A dimmer effect will be visible on all fixtures except the
PRO918s. With playback 9, the speed of the effect is adjusted; playback 10 adjusts the swing
of the effect. The dimmer effect itself is stored in the cue-memory of cue 41. In this cue-
memory, the speed and the swing of the effect is set at 0, so opening the playbacks, will
control the effect because they have a higher priority.
Open playbacks 9 and 10 half and play with playbacks 7 and 8 separately. The delay effect
will come from playbacks 7 or 8, because their priority is higher than the cue-memory.
