
CONCERT
MARIMBA
YM-5104A YM-5100A YM-4900A YM-4600A
YM-5100A
日本語
EnglishEspañol
한국어
Deutsch
Português
繁體中文
Français
简体中文
Рycский
取扱説明書
Owner's Manual
Benutzerhandbuch
Mode d’emploi
Manual de instrucciones
Manual do Proprietário
Руководство пользователя
使用说明书
사용설명서
使用說明書
『安全上のご注意』(2ページ)を必ずお読みください。
Make sure to read the “PRECAUTIONS” on page 1.
Lesen Sie unbedingt die "VORSICHTSMASSNAHMEN" auf Seite 1.
Assurez-vous de lire “PRÉCAUTIONS D'USAGE” à la page 1.
Asegúrese de leer "PRECAUCIONES" en la página 1.
Certifique-se de ler "PRECAUÇÕES" na página 1.
Обязательно прочтите разделы «ПРАВИЛА ТЕХНИКИ БЕЗОПАСНОСТИ» на стр. 1.
务 请阅读 第 1 页 “ 注意事项 ”。
1 페이지의 “안전 주의사항” 을 반드시 읽어 주십시오 .
請務必詳閱第 1 頁的「注意事項」。
ZH-TWPT ZH-CNFRENJA KOES RUDE
YM-5104A YM-5100A YM-4900A YM-4600A
Owner's Manual
• 1
Yamaha is not responsible for damage caused by improper use or modications to the instrument.
DMI-7 1/1
PRECAUTIONS
PLEASE READ CAREFULLY BEFORE PROCEEDING
Please keep this manual in a safe and handy place for future reference.
CAUTION
Always follow the basic precautions listed below to avoid the possibility of physical injury to you or others, or
damage to the instrument or other property. These precautions include but are not limited to the following:
• Never run when moving or transporting the instrument
using the casters. Doing so may result in the instrument
hitting an obstacle or wall and causing serious injury.
• If you are planning to transport the instrument by car,
disassemble it to its original condition at the time of
purchase (see page 4), and pack it securely. Trans-
porting the instrument without packing might result in
damage to it. To disassemble the instrument, follow the
assembly procedure in reverse order.
• Do not go near the instrument during an earthquake.
Strong shaking during an earthquake could cause the
instrument to move or tip over, resulting in damage to
the instrument or its parts, possibly causing injury.
Handling
• Do not place anything on top of the instrument. Doing
so might cause the tone bars or the rails to become
distorted or deformed.
• When the instrument rattles, makes noise or vibrates,
immediately stop using it, and tighten all screws again.
Failure to do so may result in the instrument overturning
and could possibly cause injury.
• Replace any cracked tone bars immediately. The end
of a cracked tone bar can be very sharp, and might cut
your hands.
• Do not use the mallet for any purpose other than playing
the instrument. Otherwise, it might cause injury or other
accidents. Be careful to ensure that children do not use
the mallet to hit other individuals, place the mallet in
their mouth, or do other dangerous things.
• Never insert your hands or feet into moving parts such
as under the casters. Otherwise, they might be caught
and injured.
• Do not play around the instrument. Doing so may cause
you to bump into the instrument, possibly resulting in
injury. It also may cause the instrument to overturn. Do
not allow children to play around the instrument.
• Do not lean, rest your weight, or place heavy objects on
the instrument. Doing so may result in the instrument
overturning, cause damage to the tone bars or frame, or
injury to you or others.
Do not disassemble
• Repairs or part replacement should not be attempted
unless relevant instructions are provided in the manual.
• Do not disassemble the gas spring. Since high-pressure
gas is sealed inside the gas spring, any attempt to disas-
semble it is dangerous and creates a high risk of injury.
Assembly
• Assemble (or disassemble) the instrument on a at,
sturdy surface. If you place it on an unstable surface,
such as on a wobbly platform, or on a tilted or uneven
surface, the instrument might fall.
• Assemble the instrument in the proper sequence by fol-
lowing the assembly instructions in this manual. Also, be
sure to tighten the screws or bolts regularly. Failure to
do so may result in damage to the instrument or cause
the instrument to overturn, possibly causing injury.
• When assembling the instrument, be careful not to get
your ngers pinched. In particular, when assembling
the rails and resonators, two people must work together
while checking each step carefully.
Transportation and Installation
• When assembling or moving the instrument, always
use two or more people. Failure to do so might result in
damage to the instrument or the instrument overturning,
possibly causing injury.
• Do not place the instrument in an unstable position
where it might accidentally fall over.
• Do not carry the assembled instrument up or down
stairs. Doing so is dangerous as parts might fall, or you
might lose your balance and fall. Be sure to transport the
instrument disassembled.
• Lock both left and right casters except when moving or
transporting the instrument. Failure to do so might result
in the instrument moving or overturning, possibly caus-
ing injury.
• The instrument should be moved only across smooth,
at surfaces when using the casters. On a sloped, un-
stable or gravel surface, the instrument may overturn or
run out of control, and possibly cause injury.
2 • YM-5104A YM-5100A YM-4900A YM-4600A
Owner's Manual
NOTICE
To avoid damage to the product, follow the advice below.
n
Handling
• Do not handle this product roughly. Otherwise,
the product may be damaged.
• Use a mallet suitable for playing the marimba.
Playing the instrument with an inappropriate mal-
let might cause dents or scratches on the tone
bars, or cause them to go out of tune.
• Do not use the instrument in locations with poor
ventilation.
• When moving the instrument, make sure all
caster stoppers are released. Lift the instrument
slightly whenever moving it over surfaces that
are not smooth or at.
• When moving the instrument, move it gently
avoiding shocks and impacts. The instrument is
sensitive to shocks and may be damaged.
• If the instrument is moved frequently, screws,
parts, etc., may become loose. After moving the
instrument, check to make sure all screws, parts,
etc., are rmly fastened. Firmly tighten all loose
items.
• Do not apply excessive force to lift the frame end
as it may pull the gas spring o from the leg.
• Do not use or store the instrument in the follow-
ing locations. Doing so might cause the instru-
ment to malfunction.
- Places subject to extremely high temperatures
(places exposed to direct sunlight, near heating
equipment, etc.)
- Places subject to extremely low temperatures
- Near moisture (bathroom, wet oor, etc.) or
places subject to high humidity
- Places exposed to rainwater
- Places with a lot of dust
- Places subject to extensive vibration
n
Maintenance
• To clean the tone bars, use a dry, soft cloth or
silicone cloth. Never use thinner, benzene, or wet
cloth. Doing so might cause damage to the in-
strument, such as corroding the surface coating
of the tone bars.
INFORMATION
n
About this manual
• The illustrations in this manual are for instructional
purposes only, and may appear somewhat dierent
from your instrument.
• Company names and product names in this man-
ual are the trademarks or registered trademarks
of their respective companies.
YM-5104A YM-5100A YM-4900A YM-4600A
Owner's Manual
• 3
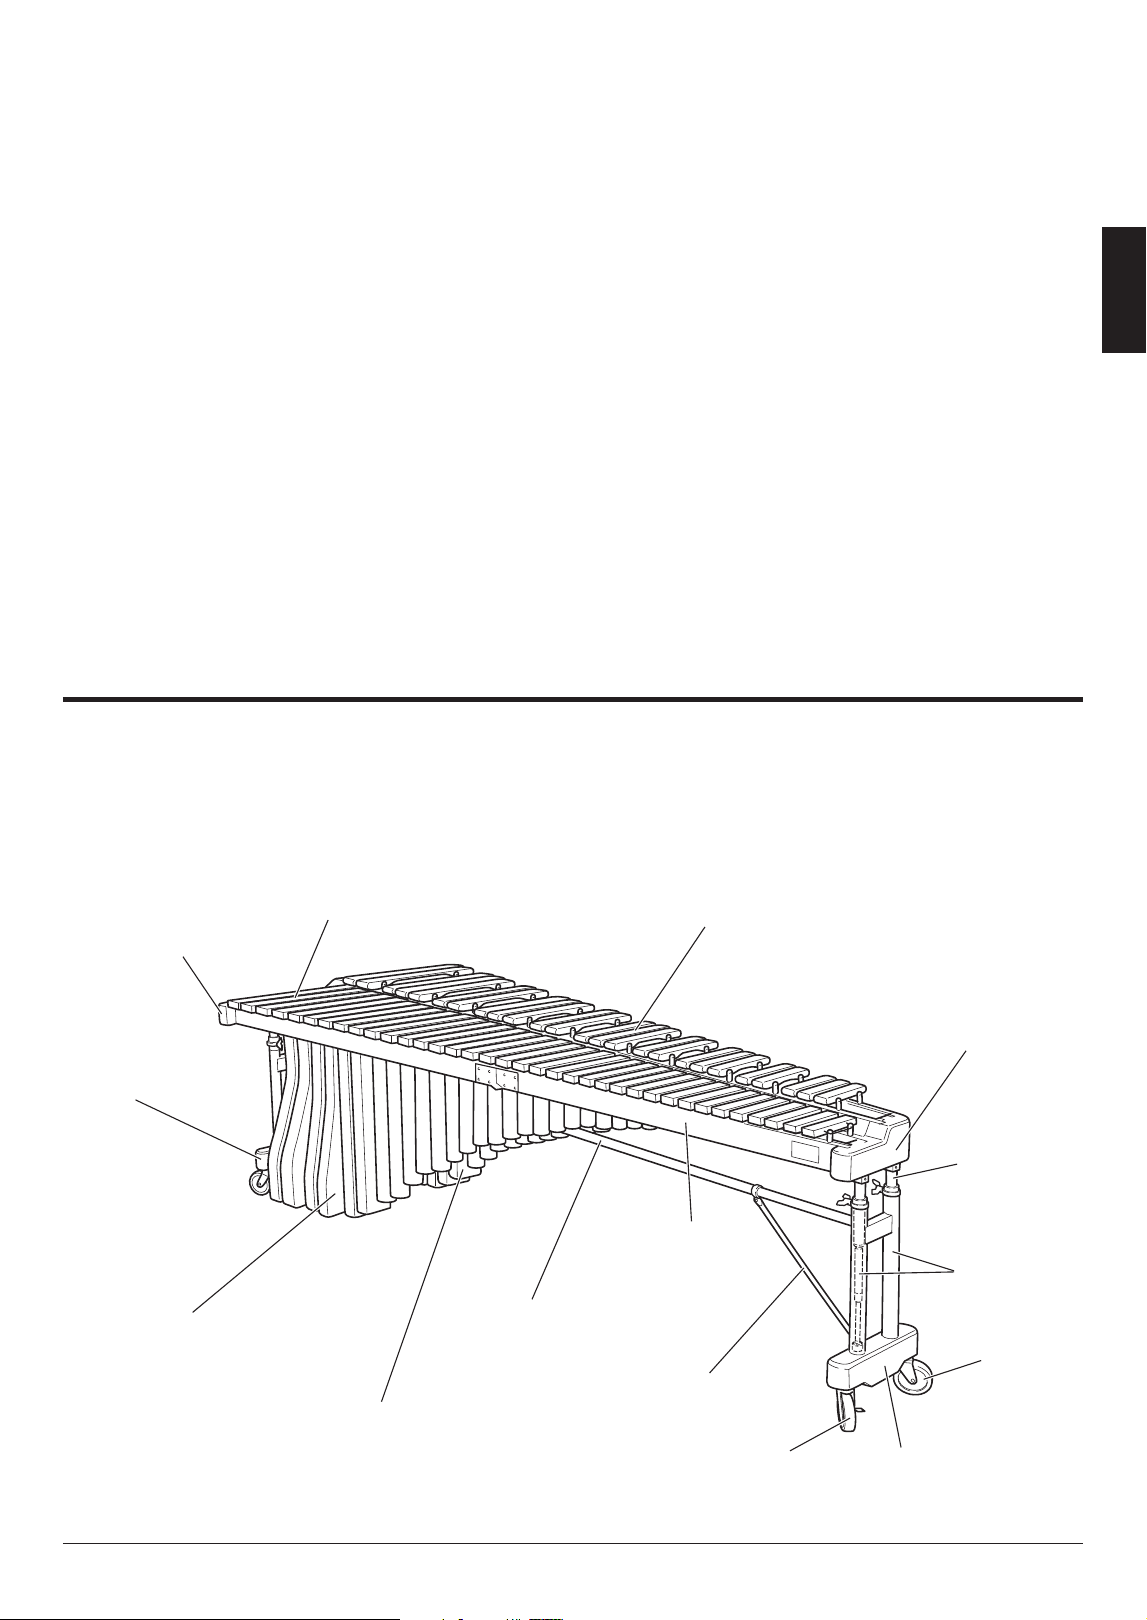
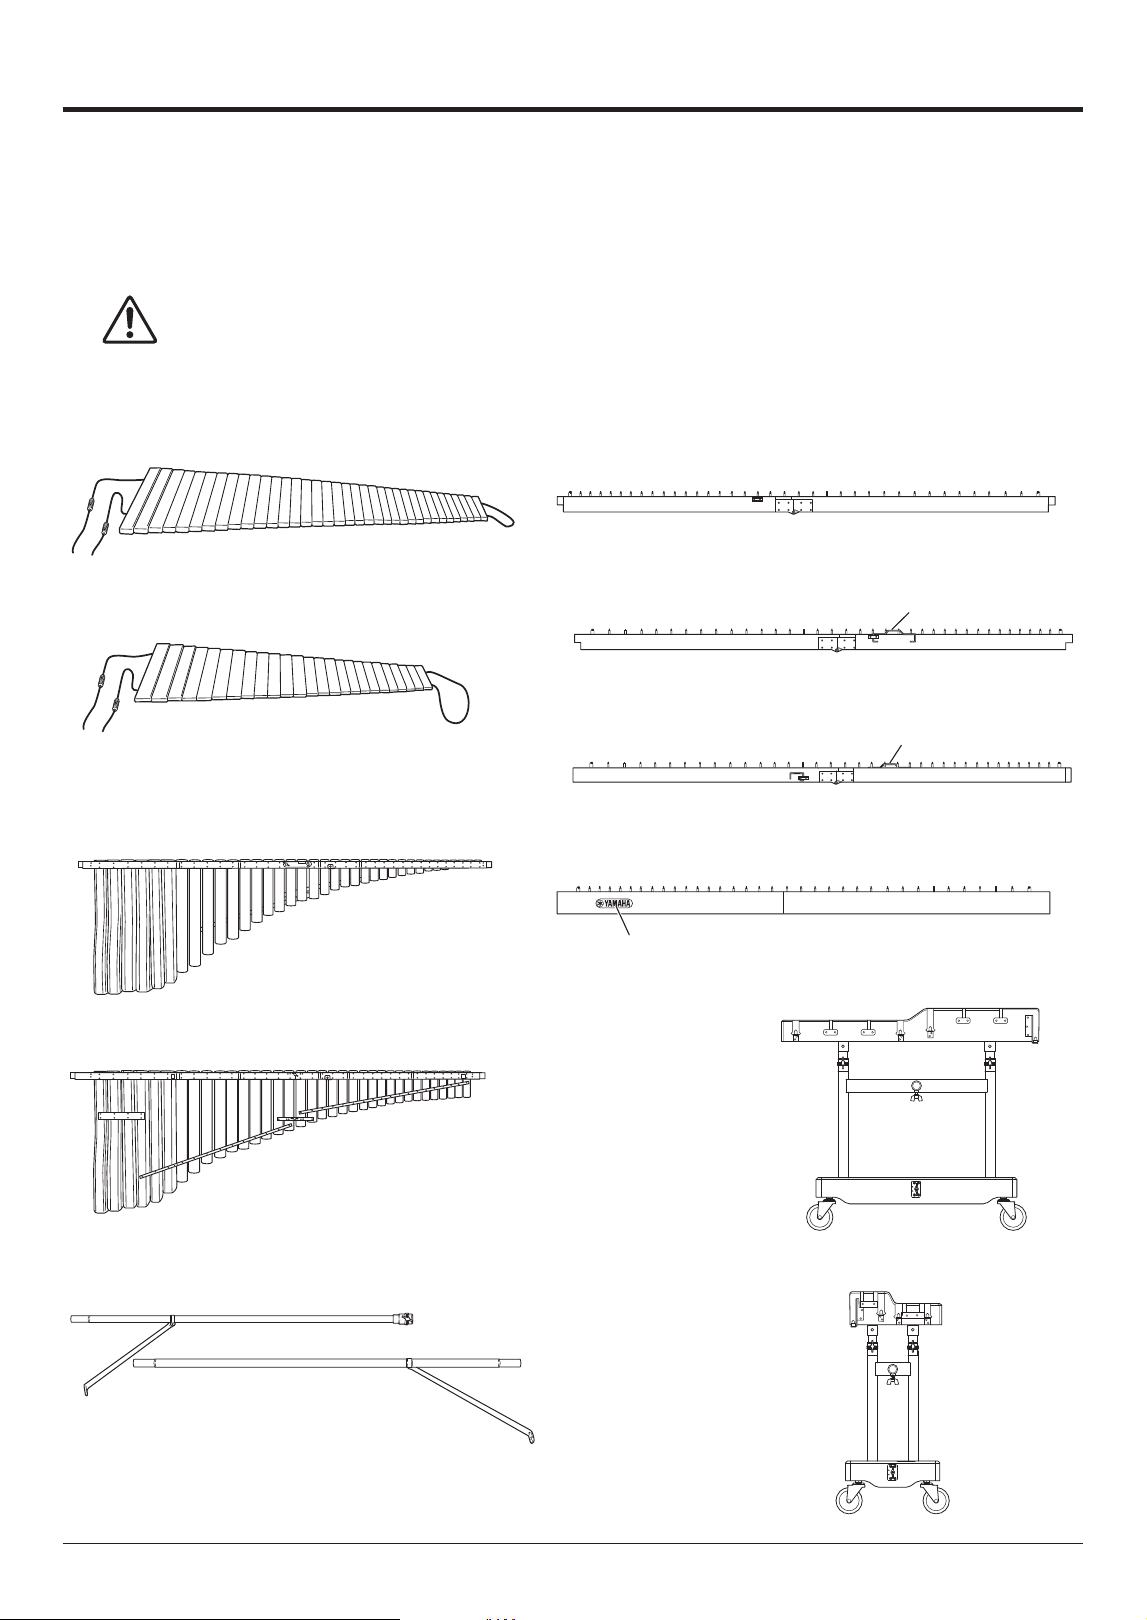
Accidental tone bars
Natural tone bars
Leg (Small end)
Leg (Large end)
Rail
Resonators (Natural tone side)
Resonators (Accidental tone side)
Reinforcement stay
Frame end
(Small end)
Slide guide
Gas spring
Slant shaft
Frame end
(Large end)
Caster
Caster
(with brake)
NOMENCLATURE
■ YM-5104A YM-5100A YM-4900A YM-4600A
* The illustration shows model YM-5100A.
* The YM-5100A is used for illustrative purposes
in this manual. For this reason, the illustrations
may not match with the YM-5104A, YM-4900A,
and YM-4600A.
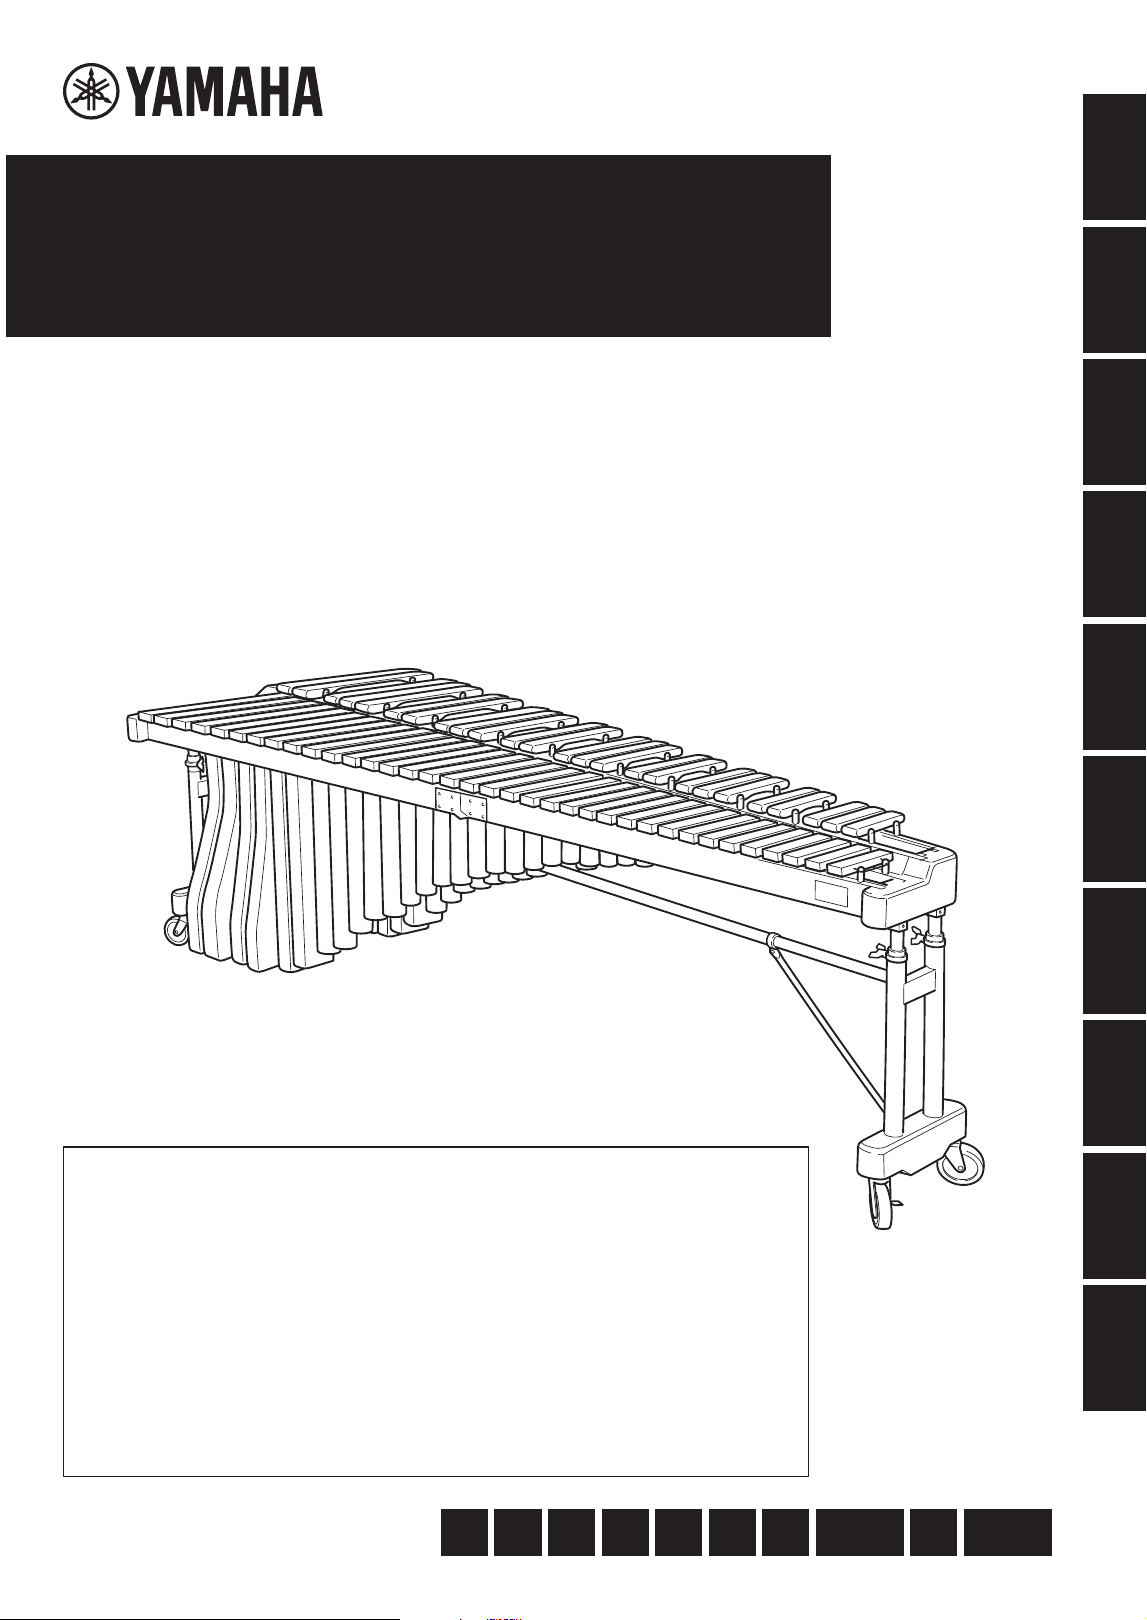
Thank you for purchasing a Yamaha concert marimba.
We at Yamaha are forever striving to create instruments you can
play with ease to produce beautiful sounds. We have made exten-
sive efforts to select high quality materials in the creation of these
outstanding musical instruments. We hope you will enjoy playing
your Yamaha concert marimba, which produces deep, rich sounds
that can project and fill a room with a dynamic range of volume.
This manual explains how to use your Yamaha concert marimba
properly. Please read this manual thoroughly to ensure that your
new instrument will provide you with rich musical enjoyment for
many years to come.
4 • YM-5104A YM-5100A YM-4900A YM-4600A
Owner's Manual
q
Natural tone bars
w
Accidental tone bars
e
Resonators (Natural tone side)
Each resonator for the natural tone side is closed
on the bottom.
r
Resonators (Accidental tone side)
t
Reinforcement stay
For large end side
For small end side
y
Rail (1)
Marking on the end face (A).
A
u
Rail (2)
Marking on the end face (B).
B
Rail clamp
i
Rail (3)
Marking on the end face (C).
C
Rail clamp
o
Rail (4)
Marking on the end face (D).
D
Logo mark
!0
Leg (Large end)
!1
Leg (Small end)
The shipping carton for your marimba should contain the parts shown below.
* The rails and resonators in the packages are folded.
Before assembling the instrument, confirm that all listed parts are included.
* In the event that a part is missing, please contact the shop where the instrument was purchased.
CAUTION
• Be careful not to get your fingers caught when opening the rail and resonator packages.
PACKAGE CONTENTS
YM-5104A YM-5100A YM-4900A YM-4600A
Owner's Manual
• 5
CAUTION
• For safety, assembly should be performed by two or more people in a place that provides suf-
ficient space.
• Be careful not to pinch your fingers when assembling the instrument. In particular, when assem-
bling the rails and resonators, two people must work together while checking each step carefully.
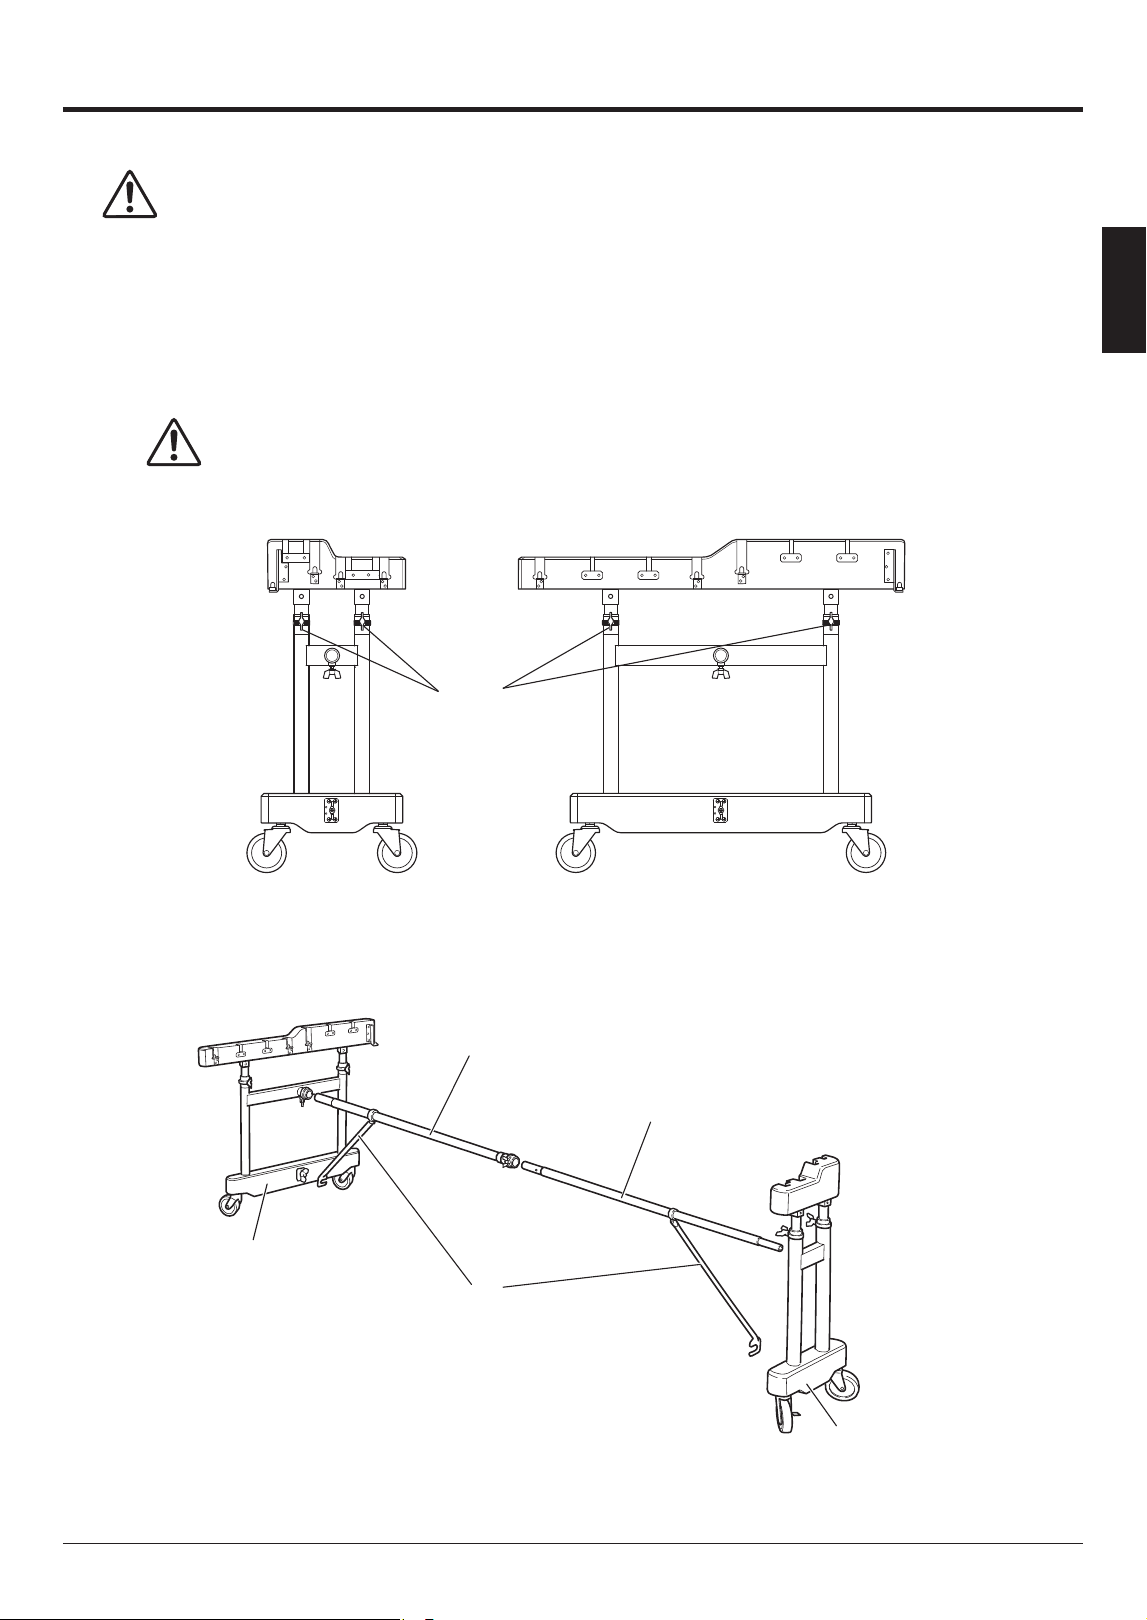
1
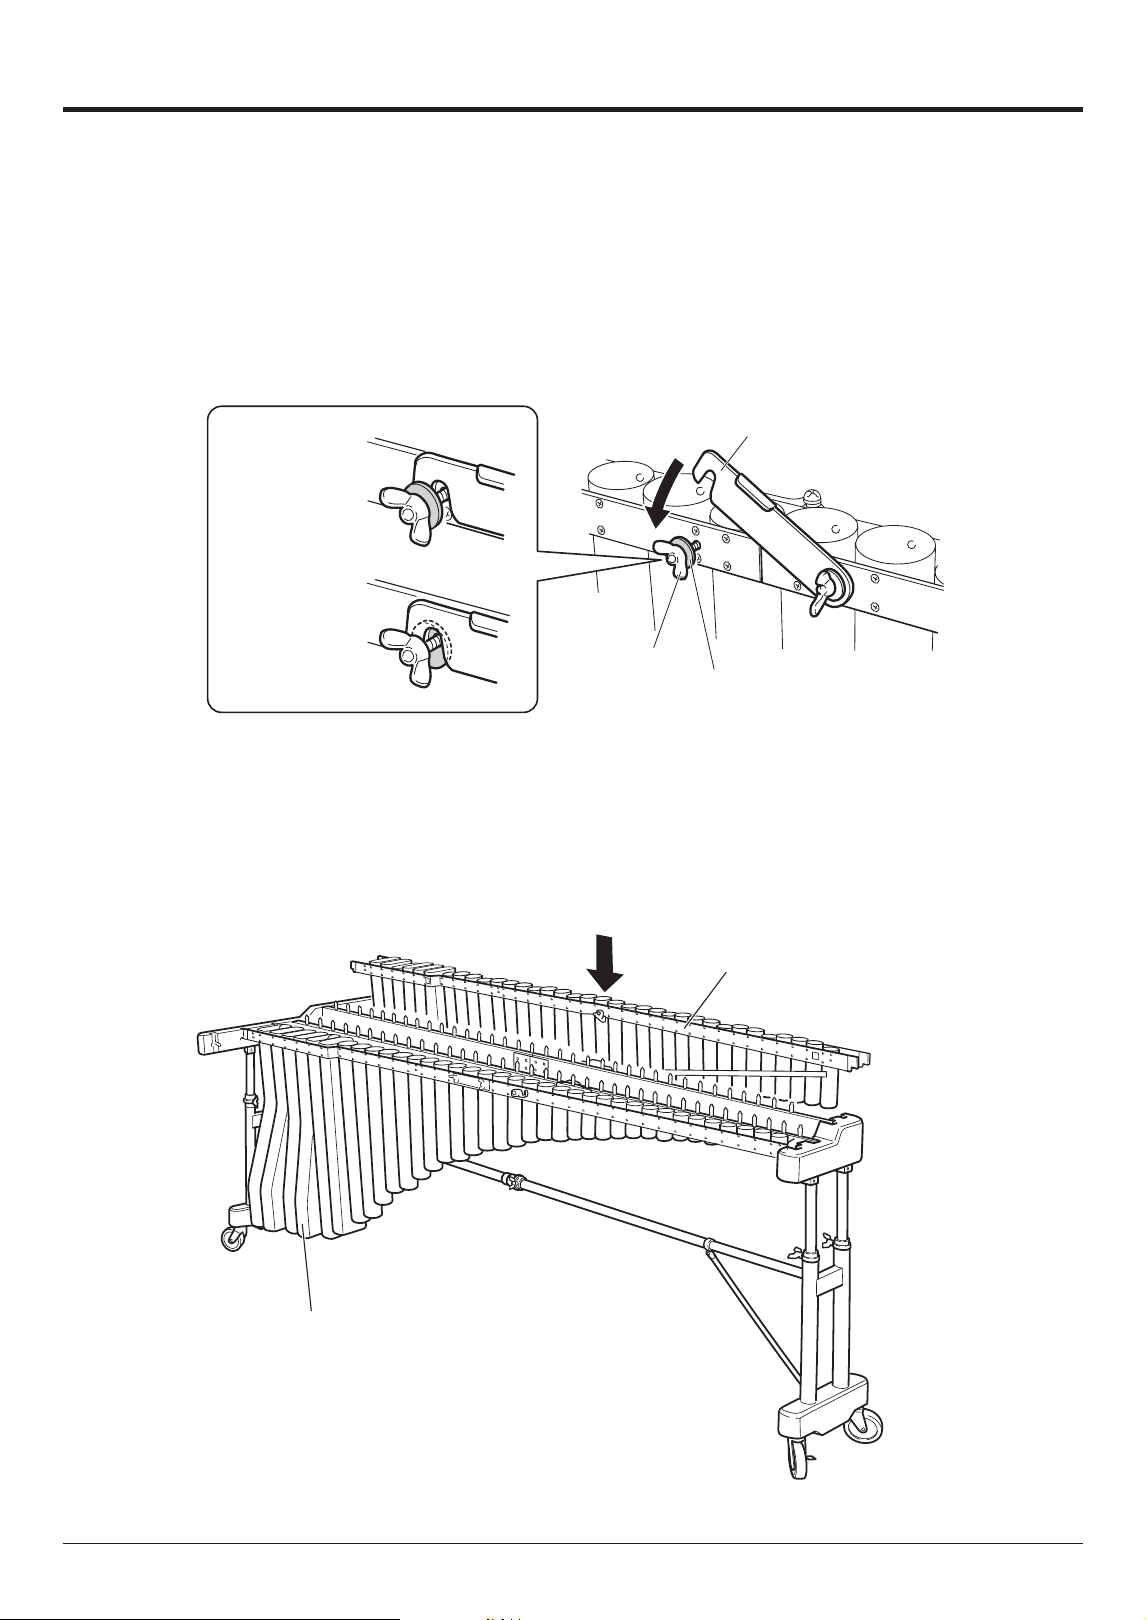
Connect the large and the small end legs using the reinforcement stays.
* Before proceeding to the next step, make sure that the slide guide fixing bolts of the large and small end legs
are securely fastened.
CAUTION
• Do not loosen the side guide fixing bolts at this stage. Loosening them would cause a sud-
den rise of the frame end, which could be very dangerous.
Slide guide fixing bolts
1-1 Place the large and small end legs and reinforcement stays so that they will be positioned as illustrated
below after assembly.
Slant shaft
Reinforcement stay (Small end)
Reinforcement stay (Large end)
Leg (Small end)
Leg (Large end)
ASSEMBLY
6 • YM-5104A YM-5100A YM-4900A YM-4600A
Owner's Manual
ASSEMBLY
1-2 Connect the reinforcement stays at the center. Align the end of the fixing bolt and the holes in the rein-
forcement stays and tighten the fixing bolt securely.
Reinforcement stay
(Large end)
Reinforcement stay
(Small end)
Screw hole
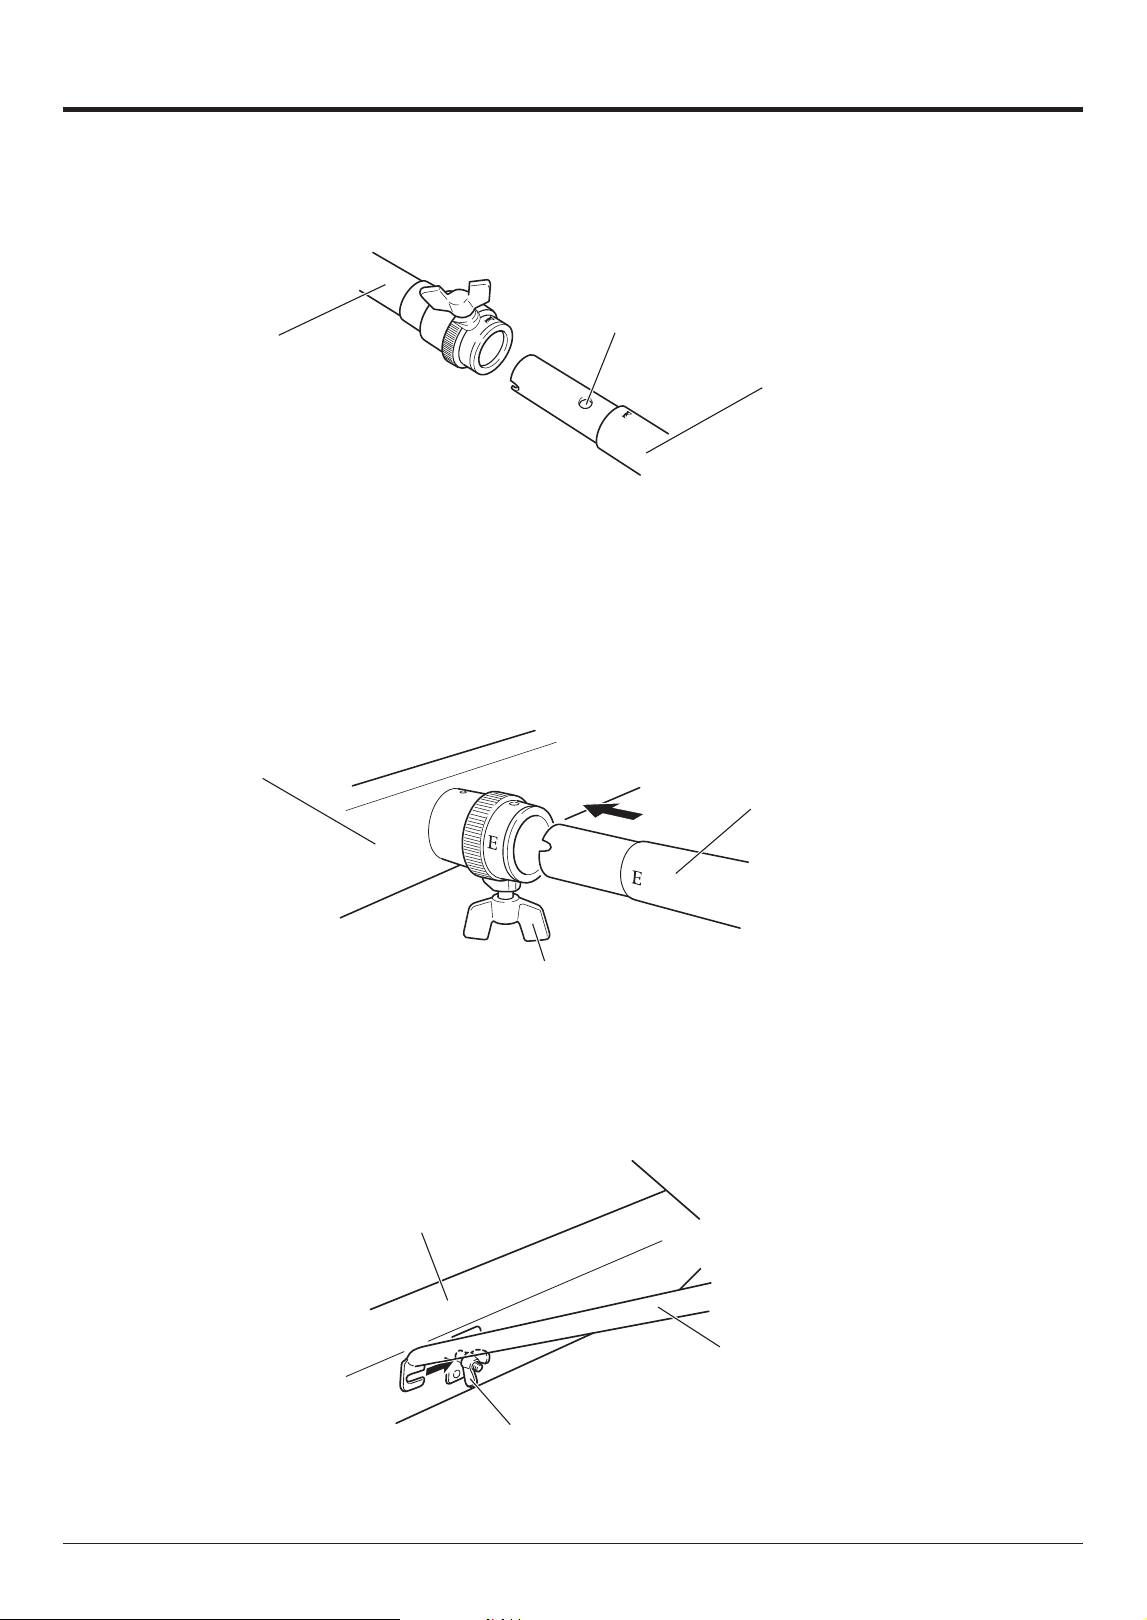
1-3 Connect the reinforcement stay to the large end leg.
Insert the “E” marked end of the reinforcement stay (with its slant shaft facing down) into the joint (marked
with “E”) on the large end leg until it stops, then tighten the fixing bolt securely.
In the same manner, connect the reinforcement stay to the small end leg. (There is no marking on the
small end joint.)
Leg (Large end)
Reinforcement stay (Large end)
Fixing bolt
1-4 After making sure that both legs are perpendicular to the floor, fit the end of each slant shaft to the wing
nut located in the lower part of each leg and tighten it securely.
* Make sure that the slant shaft is securely fitted.
Slant shaft
Leg (Large end)
Wing nut
YM-5104A YM-5100A YM-4900A YM-4600A
Owner's Manual
• 7
ASSEMBLY
2
Insert the rails (2) and (3) into the end frames of the legs.
2-1 First, insert rail (2).
A “B” mark is printed on the big end face of the rail (2) and the grooved section of the end frame of the
large end leg.
* Do not insert one side of the rail fully at first, but push both sides into the grooves alternately little by
little until both sides are fully inserted.
Next, in the same manner, insert rail (3) securely.
A “C” mark is printed on the large end face of rail (3) and the grooved section of the end frame of the
large end leg.
Rail (2)
“B” mark on the rail
and end frame.
Rail (3)
“C” mark on the rail
and end frame.
Large end
Small end
Rail clamp
2-2 Engage the short rail clamp located at the center of rail (3) with rail (2).
* Release the clamp from its holder, lift and move it to rail (2) and push it down fully.
Rail (3)
Rail (2)
Rail clamp
Holder
8 • YM-5104A YM-5100A YM-4900A YM-4600A
Owner's Manual
ASSEMBLY
3
Attach the resonators.
3-1 Unbend the resonators, apply a hook and then tighten the wing nut securely.
When assembling the resonator pipes, make sure that the washer is positioned on the outer side of the
hook as shown in the illustration below.
NOTICE
• When assembling the resonators, be careful not to damage them.
• Positioning the washer on the inner side of the hook can result in noise while playing.
* All of the natural tone resonators are closed at the bottom.
Correct
Incorrect
Flat Washer
Wing nut
Hook
3-2 Insert the resonators into the resonator holders on the end frames in the same way as you did for the
rails.
NOTICE
•
Be sure not to confuse the natural tone resonators and accidental tone resonators.
• Take care not to bump the resonators against the legs, etc.
Resonators (Natureal tone side)
Resonators (Accidental tone side)
YM-5104A YM-5100A YM-4900A YM-4600A
Owner's Manual
• 9
ASSEMBLY
Rail clamp
Hook
Rail (2)
Rail (1)
4
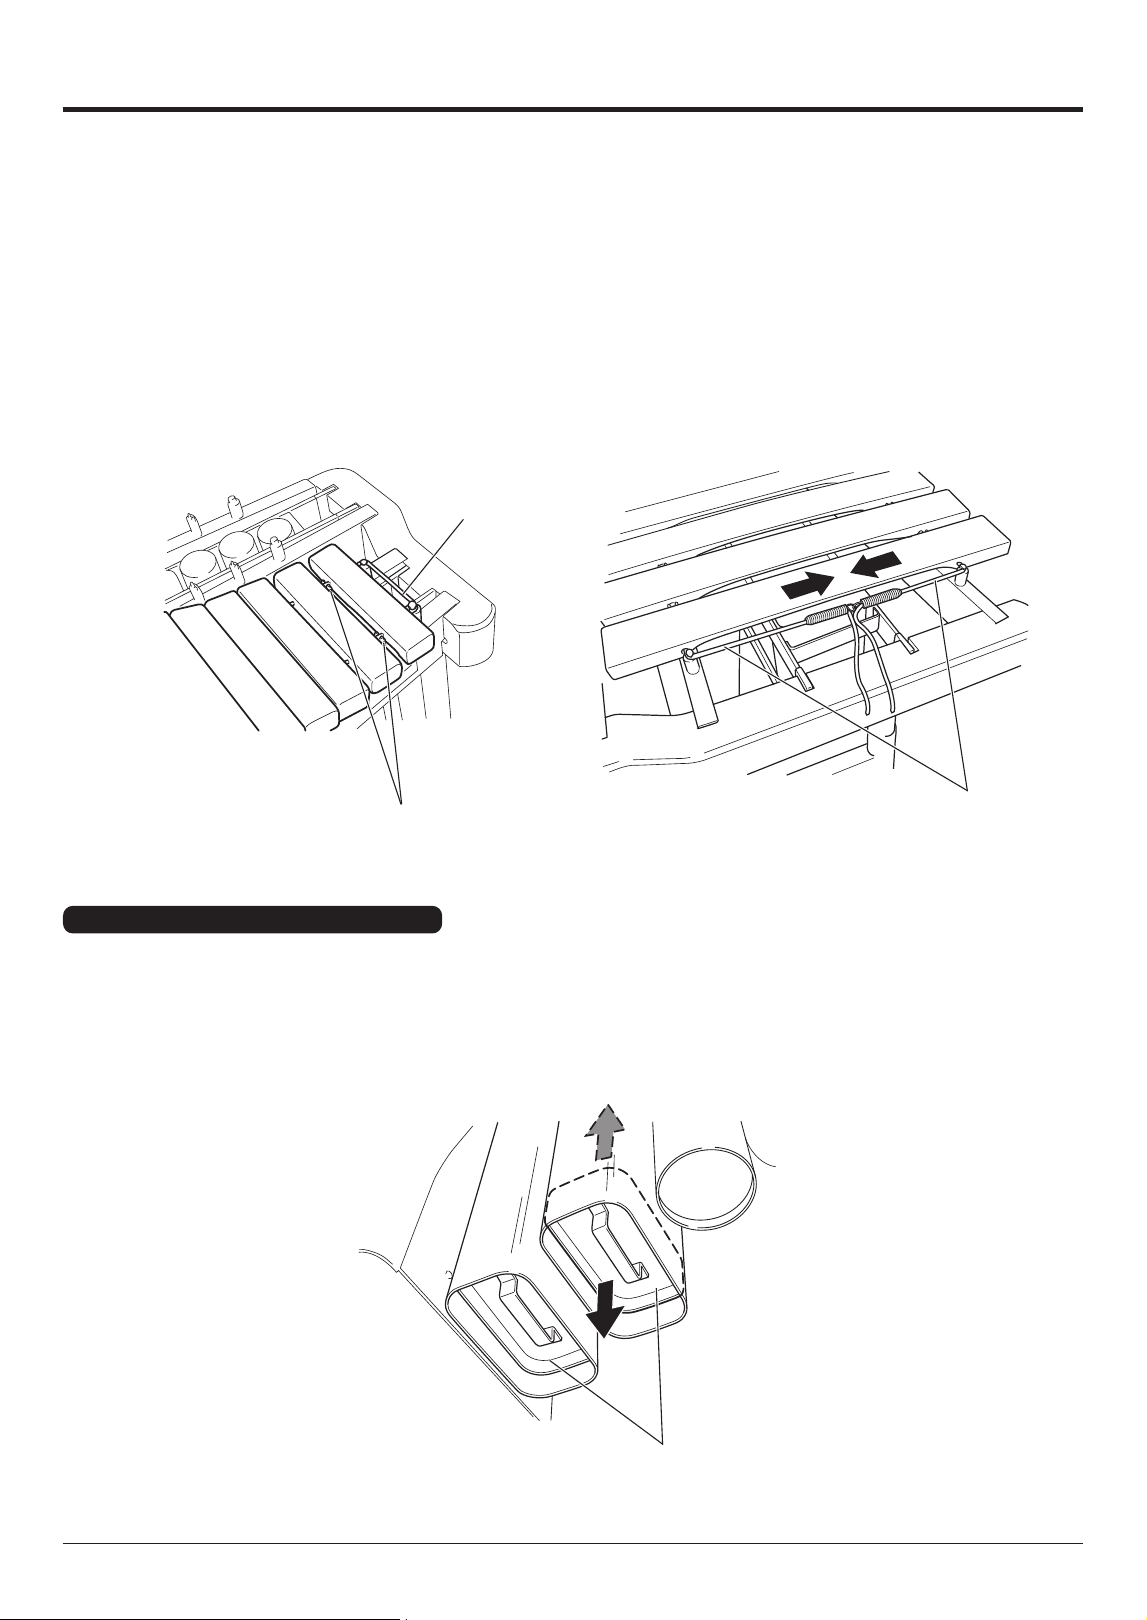
Insert rails (1) and (4) into the end frames of the legs.
4-1 Insert the outer rails (1) and (4) in the same manner as the inner rails (2) and (3).
An “A” mark is printed on the large end face of rail (1) and the grooved section of the end frame of the
large end leg, and a “D” mark for rail (4).
“A” mark on the rail
and end frame.
“D” mark on the rail
and end frame.
Rail (1)
Rail (4)
Large end
Small end
4-2 Engage the rail clamps on rail (2) and rail (3)
with rail (1) and rail (4) respectively.
YM-5104A YM-5100A Only
4-3 Secure the resonators by fitting their hooks to
the rail clamps engaged in Step 4-2.
* Hooks are provided in two locations on both
the natural tone side and the accidental tone
side.
* Make sure that each hook is securely fitted.
10 • YM-5104A YM-5100A YM-4900A YM-4600A
Owner's Manual
ASSEMBLY
5
Set the tone bars.
5-1 Set the natural tone bars first.
With one person holding the suspension cords on the bass side and the other person holding the sus-
pension cords on the treble side securely with both hands, gently place the tone bars on the rails. Align
each tone bar individually and hook its cord onto the corresponding post. After confirming that the cord is
secured to every post, fix the tone bars by pulling the right and left cords forward from the large end side
and hooking the two springs to each other.
NOTICE • When setting the tone bars, be careful not to damage them.
Large end
Suspension cord
Small end
Post
Suspension cord
YM-5104A YM-5100A YM-4900A Only
5-2 Resonators F
#
22
, G
23
, G
#
24,
A
25
and A
#
26
each have a resonance regulator. While tapping each tone bar,
move the resonance regulator to find the position where the best resonance is obtained and affix it there.
NOTICE • When affixing the resonance regulator, check to ensure that it is not installed on a slant.
Resonance regulator
YM-5104A YM-5100A YM-4900A YM-4600A
Owner's Manual
• 11
ASSEMBLY
YM-4600A Only
5-2 Since the YM-4600A does not feature a resonance regulator, insert the resonators into the resonator
holders as shown below.
* The resonators are factory adjusted so that the optimum resonance level is ob-
tained at 23°C (73.4°F). If desirable resonance is not available due to the tempera-
ture being higher or lower than 23°C (73.4°F), adjust the setting of the resonators.
Move the resonators to fit into shorter grooves when the temperature is higher and
into longer grooves when the temperature is lower.
Resonator holder
Temperature Grooves to use
Higher Short groove
(“A” in the figure right)
Around 23°C (73.4°F)
Center groove (“B”)
Lower Long groove (“C”)
A : For a higher temperature
B : For a temperature around 23°C (73.4°F)
C : For a lower temperature
6
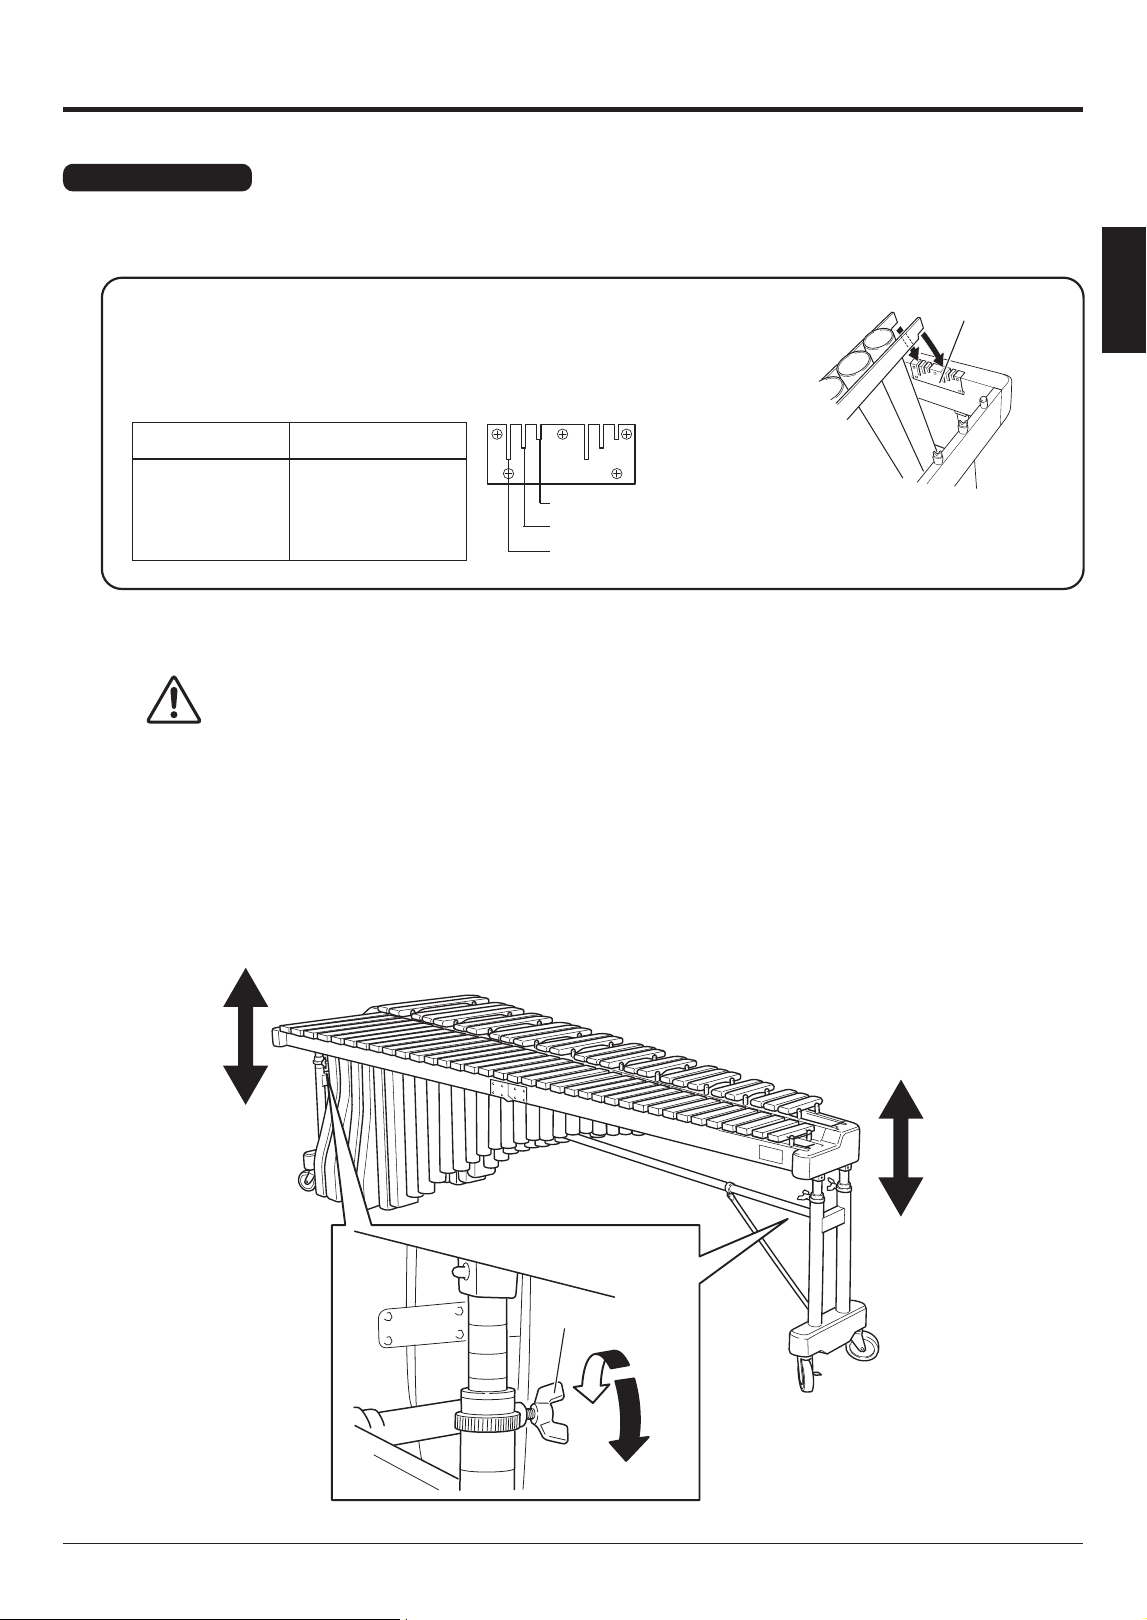
Adjust the height of the tone bars.
CAUTION
• When adjusting the tone bar height, be sure to have two people supporting the frame, one at
each end using both hands.
• Do not place your feet under the resonators. Otherwise, your feet might get caught.
While supporting the frame end of the leg by hand, loosen the fixing bolt of the slide guide on both the large
end and small end sides.
Adjust the height to the desired level and tighten the fixing bolts securely.
When adjusting the height, use the lines on the slide guide for reference and make the tone bars in parallel
with the floor surface.
Upon completion of assembly, check to make sure that each bolt is tightened securely.
Fixing bolt
12 • YM-5104A YM-5100A YM-4900A YM-4600A
Owner's Manual
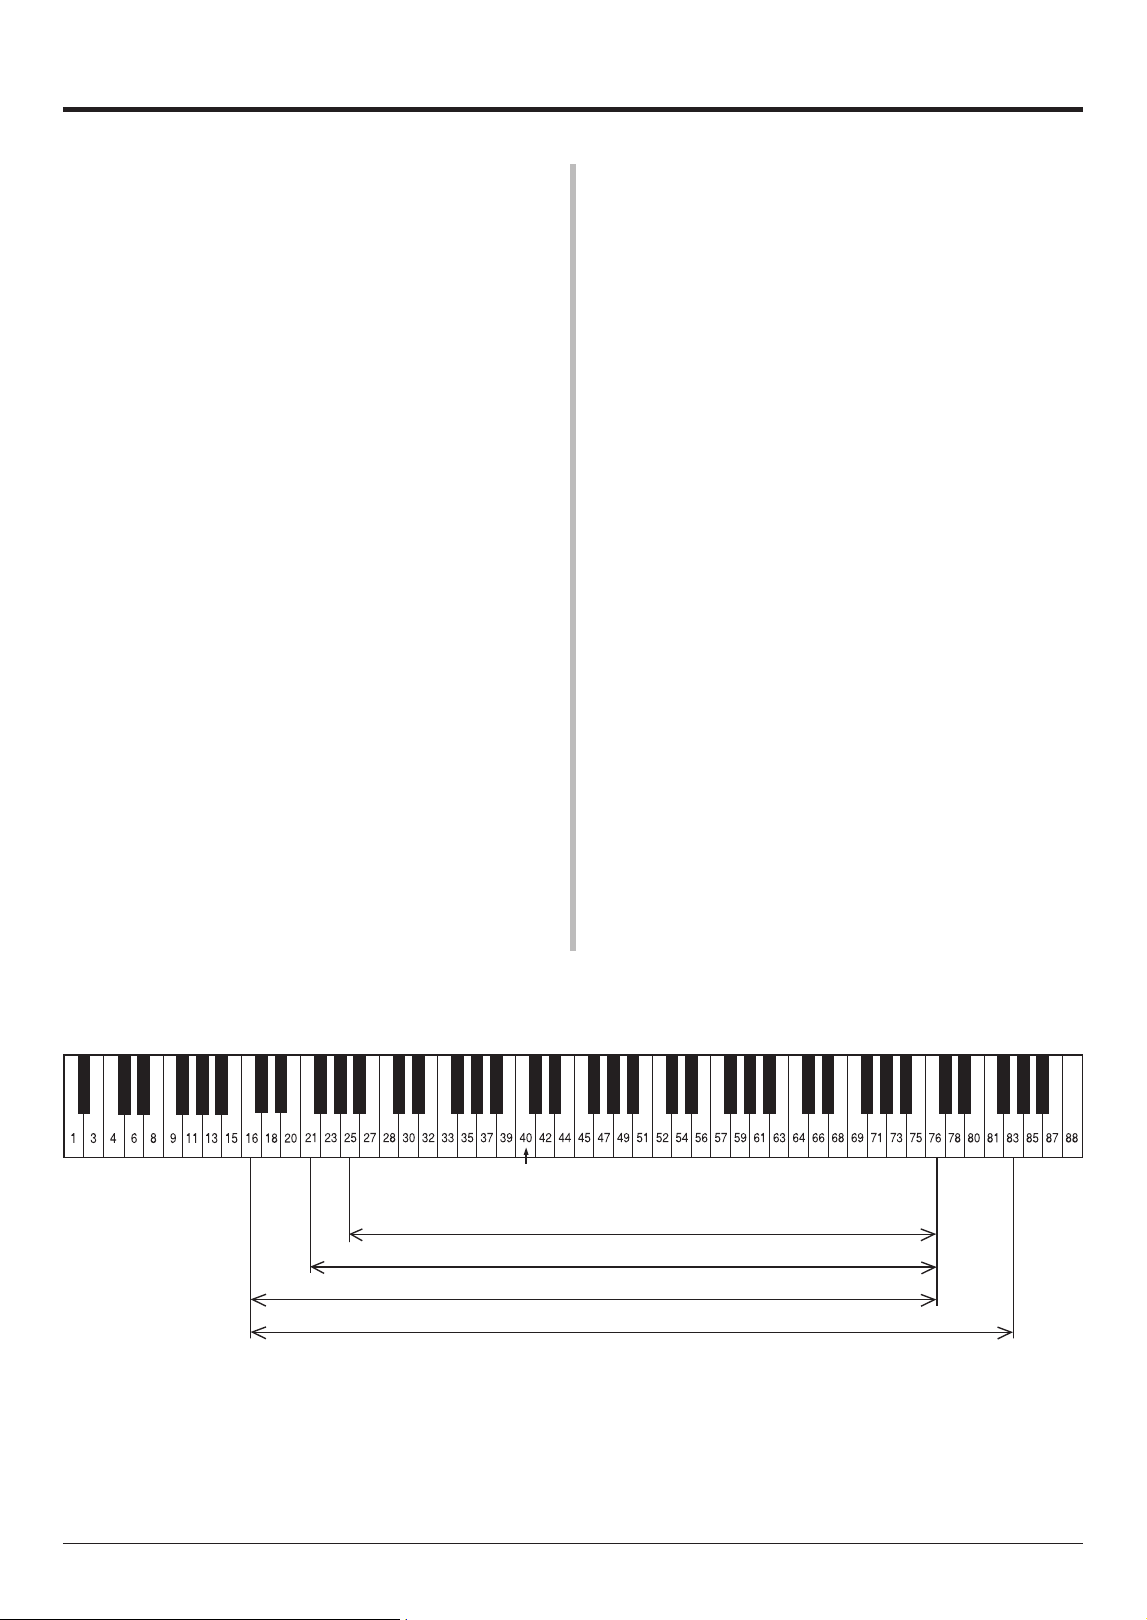
SPECIFICATIONS/SCALE RANGE
■ YM-5104A
●
Range: C16 – G83 (5-1/2 octave)
●
Bars: Rosewood
●
Bar sizes:
72 – 41 mm (2.8” – 1.6”) wide
24 – 20 mm (0.94” – 0.79”) thick
●
Resonator:
Helmholtz, Elliptic low sound resonator
●
Height Adjustment:
Gas spring system
15 cm (86 – 101 cm)
5.9” (33.9” – 39.8”)
●
Dimensions (W x D):
281 x 103 cm (110.6” x 40.6”)
●
Weight:
99 kg (218 lbs 4 oz)
■ YM-5100A
●
Range: C16 – G76 (5 octave)
●
Bars: Rosewood
●
Bar sizes:
72 – 41 mm (2.8” – 1.6”) wide
24 – 20 mm (0.94” – 0.79”) thick
●
Resonator:
Helmholtz, Elliptic low sound resonator
●
Height Adjustment:
Gas spring system
15 cm (86 – 101 cm)
5.9” (33.9” – 39.8”)
●
Dimensions (W x D):
261 x 103 cm (102.8” x 40.6”)
●
Weight:
96 kg (211 lbs 10 oz)
■ YM-4900A
●
Range: F21 – C76 (4-1/2 octave)
●
Bars: Rosewood
●
Bar sizes:
65 – 41 mm (2.5” – 1.6”) wide
24 – 20 mm (0.94” – 0.79”) thick
●
Resonator:
Helmholtz, Elliptic low sound resonator
●
Height Adjustment:
Gas spring system
15 cm (86 – 101 cm)
5.9” (33.9” – 39.8”)
●
Dimensions (W x D):
235 x 96 cm (92.5” x 37.8”)
●
Weight:
78 kg (171 lbs 15 oz)
■ YM-4600A
●
Range: A25 – C76 (4-1/3 octave)
●
Bars: Rosewood
●
Bar sizes:
65 – 41 mm (2.5” – 1.6”) wide
24 – 20 mm (0.94” – 0.79”) thick
●
Resonator:
Circle resonator
●
Height Adjustment:
Gas spring system
15 cm (86 – 101 cm)
5.9” (33.9” – 39.8”)
●
Dimensions (W x D):
219 x 91 cm (86.2” x 35.8”)
●
Weight:
68 kg (149 lbs 14 oz)
● SCALE RANGE
YM-4900A
YM-4600A
YM-5100A
Middle C
YM-5104A
* The contents of this manual apply to the latest specifications as of the publishing date. To obtain the latest
manual, access the Yamaha website then download the manual file.
Since specifications, equipment or separately sold accessories may not be the same in every locale, please
check with your Yamaha dealer.

WU03910
© Yamaha Corporation
Published 03/2024
发行
IP-B0
版次
: 2403 R3