
PHOENIX
HD
QUICK START GUIDE
ATTENTION
For Returns or Support you MUST contact:
DefenderCameras.com/Support

TABLE OF CONTENTS
WHAT’S INCLUDED ..................................................................................................4
WHAT YOU’LL NEED ................................................................................................6
REGULATORY INFORMATION ................................................................................. 6
GET TO KNOW YOUR DEVICE .................................................................................. 7
10.1″TouchscreenMonitor .....................................................................................7
Camera ......................................................................................................................8
LIVE VIEW .................................................................................................................9
MultiviewMode ........................................................................................................9
SingleViewMode ...................................................................................................10
BASIC SYSTEM SETUP.............................................................................................11
ProperCameraInstallationAndPlacement ........................................................12
CameraSettings......................................................................................................13
CameraSetup-Pairing ..........................................................................................13
CameraOn/O ......................................................................................................14
CameraBrightness ................................................................................................15
CameraResolution .................................................................................................16
NightVisionSetup ..................................................................................................17
RecordingSetup .....................................................................................................18
ScheduleRecording................................................................................................19
SettingaSchedule ..................................................................................................19
DeletingaRecordingSchedule .............................................................................20
FileOverwrite ..........................................................................................................21
AudioOn/O ..........................................................................................................22
SYSTEM SETTINGS .................................................................................................. 23
TimeSetup ..............................................................................................................23
Language ................................................................................................................24
DefaultSettings .....................................................................................................25
FormatMemoryCard.............................................................................................26
FirmwareUpgrade .................................................................................................27
MOTION DETECTION SETTINGS ............................................................................ 28
Sensitivity.................................................................................................................28
MaskArea ................................................................................................................29
AdvancedSensitivitySettings................................................................................30
AlertSettings ...........................................................................................................31
MonitorAlert ...........................................................................................................31
CameraAlert ...........................................................................................................33
PLAYBACK ..............................................................................................................34
FREQUENTLY ASKED QUESTIONS ......................................................................... 35

3
ACTIVATE YOUR WARRANTY
EXTEND YOUR WARRANTY
PROTECT
Coveredforthe
unexpected
SUPPORT
Receivevideos,tips&
updatesforyourproduct
VALUE
Exclusiveaccessto
specialoers
Don’tforgettoprotectyourpurchaseandeaseyourmindbyextendingyour
included1yearmanufacturerwarrantyto2or3years.Ifsomethinggoeswrong,
ourteamofSecurityExpertswillgetyoubackupandrunningfast!
ExtendedWarrantiescanbepurchasedupto60daysafteryourproduct’spurchase.
2 YEAR WARRANTY
Extendyourpeaceofmindtotwoyears
◊ Product Defects
◊ Advanced Replacements
◊ Free Return Shipping
3 YEAR WARRANTY
Extendyourpeaceofmindtothreeyears
◊ Product Defects
◊ Advanced Replacements
◊ Free Return Shipping
Openyourcamera&scanthisQRcode,or
visit:DefenderCameras.com/Warranty
Openyourcamera&scanthisQRcode,orvisit:
DefenderCameras.com/pages/extended-warranties
4
WHAT’S INCLUDED
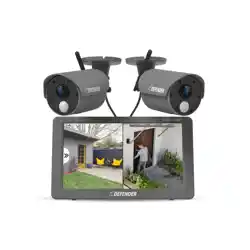
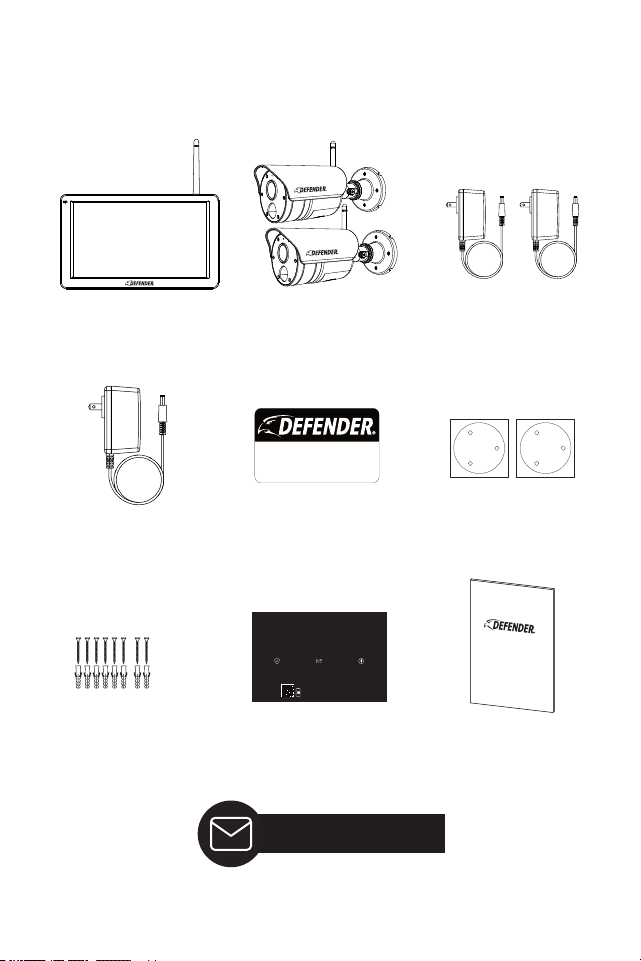
PHOENIXHD2C
1x10.1”FullHDMonitor 2x7.6ftCameraPower
Adapters
1x5.8ftMonitorPower
Adapter
1xWarrantyRegistration
Insert
Camera&Monitor
MountingHardware
1xWindowWarningSticker
1xQuickStartGuide
2xDrillingTemplates
Lifetime Support
2x1080PHDWireless
Cameraswith7ftPower
CableCord&pre-installed
64GBMicroSDCard
ACTIVATE YOUR
WARRANTY
Open camera and scan this QR code or visit:
DefenderCameras.com/Warranty
PROTECT
Covered for the
unexpected
VALUE
Exclusive access to
special offers
SUPPORT
Receive videos, tips & updates
for your product
24/7 VIDEO
SECURITY SYSTEM
DefenderCameras.com
PHOENIX HD
QUICK START GUIDE
5
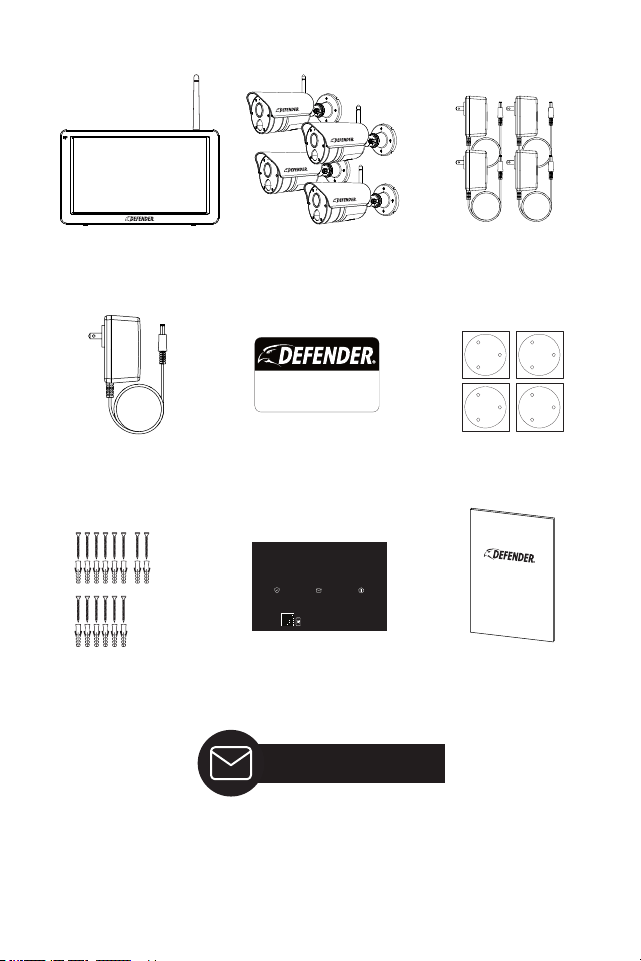
PHOENIXHD4C
1x10.1”FullHDMonitor 4x7.6ftCameraPower
Adapters
1x5.8ftMonitorPower
Adapter
1xWindowWarningSticker 4xDrillingTemplates
4x1080PHDWireless
Cameraswith7ftPower
CableCord&pre-installed
64GBMicroSDCard
24/7 VIDEO
SECURITY SYSTEM
DefenderCameras.com
1xWarrantyRegistration
Insert
Camera&Monitor
MountingHardware
1xQuickStartGuide
Lifetime Support
ACTIVATE YOUR
WARRANTY
Open camera and scan this QR code or visit:
DefenderCameras.com/Warranty
PROTECT
Covered for the
unexpected
VALUE
Exclusive access to
special offers
SUPPORT
Receive videos, tips & updates
for your product
PHOENIX HD
QUICK START GUIDE

6
WHAT YOU’LL NEED
• DrillandorPhillips#2screwdriver
• 1/4”drillbitforpilotholes
• 1/4”drillbitforwallanchors
• 15/64”(6mm)longdrillbit(Choosetherightdrillbitbasedonthe
surfacematerial)
REGULATORY INFORMATION
FCC STATEMENT: Thisdevicecomplieswithpart15oftheFCCRules.Operation
issubjecttothefollowingtwoconditions:(1)Thisdevicemaynotcauseharmful
interference.(2)Thisdevicemustacceptanyinterferencereceived,includinginter-
ferencethatmaycauseundesiredoperation.ThisequipmentcomplieswithFCC
radiationexposurelimitssetforthforanuncontrolledenvironment.Thisequip-
mentshouldbeinstalledandoperatedwithaminimumdistanceof20cmbetween
theradiatorandanypartofyourbody.
FCC WARNING: Thisequipmenthasbeentestedandfoundtocomplywiththelim-
itsforaClassBdigitaldevice,pursuanttoPart15oftheFCCRules.Theselimitsare
designedtoprovidereasonableprotectionagainstharmfulinterferenceinaresi-
dentialinstallation.Thisequipmentgenerates,usesandcanradiateradiofrequency
energyand,ifnotinstalledandusedinaccordancewiththeinstructions,maycause
harmfulinterferencetoradiocommunications.However,thereisnoguaranteethat
interferencewillnotoccurinaparticularinstallation.Ifthisequipmentdoescause
harmfulinterferencetoradioortelevisionreception,whichcanbedetermined
byturningtheequipmentoandon,theuserisencouragedtotrytocorrectthe
interferencebyoneormoreofthefollowingmeasures:
•Reorientorrelocatethereceivingantenna.
•Increasetheseparationbetweentheequipmentandthereceiver.
•Connecttheequipmentintoanoutletdierentfromthattowhichthe
receiverisconnected.
•Consultthedealeroranexperiencedradio/TVtechnicianforhelp.
IC STATEMENT: Thisdevicecontainslicence-exempttransmitter(s)/receiver(s)that
complywithInnovation,ScienceandEconomicDevelopmentCanada’slicence-ex-
emptRSS(s).Operationissubjecttothefollowingtwoconditions:(1)Thisdevicemay
notcauseinterference.(2)Thisdevicemustacceptanyinterference,includinginter-
ferencethatmaycauseundesiredoperationofthedevice.Thisequipmentcomplies
withICRSS-102radiationexposurelimitssetforthforanuncontrolledenvironment.
Thisequipmentshouldbeinstalledandoperatedwithminimumdistance20cm
betweentheradiatorandyourbody.
Changesormodicationsnotexpresslyapprovedbythepartyresponsiblefor
compliancecouldvoidtheuser’sauthoritytooperatetheequipment.
7
GET TO KNOW YOUR DEVICE
ThissystemdoesnotconnecttotheInternetoramobileapp.Withyourprivacyin
mind,footageissavedonthelocalmicroSDcard.
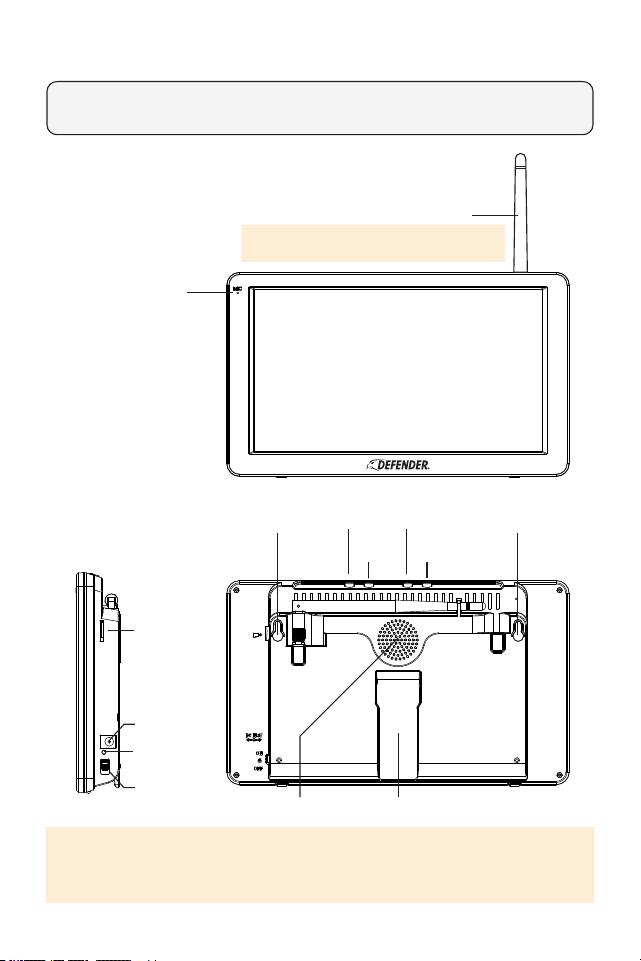
10.1″ TOUCHSCREEN MONITOR
Microphone
Antenna
(For optimal performance and to avoid range and
connection issues, always keep your antenna lifted)
MountingHole MountingHole
Sleep
VolumeUpPlayback
VolumeDown
StandSpeaker
MicroSDor
TFCard
PowerPort
PowerIndicator
Light
PowerSwitch
PLEASE NOTE: When Sleep button is pressed the monitor screen will turn o until
motion is detected in front of the camera(s). Once motion is no longer detected
the monitor will turn back o.
8
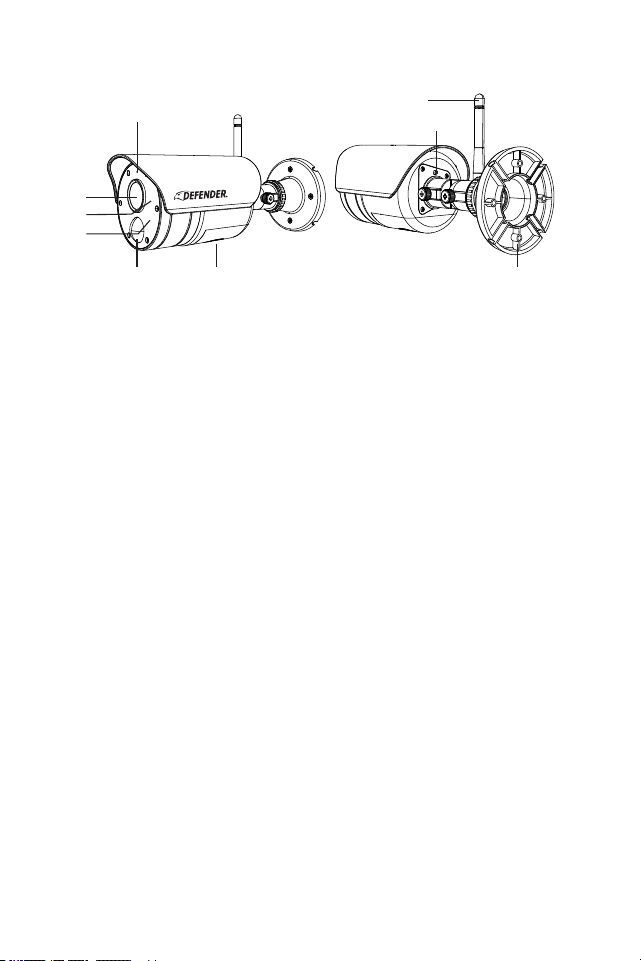
CAMERA
1
5 6 9
2
7
8
3
4
1. Microphone-Capturesthesoundoncamerasideandtransmitsthe
soundfromcameratomonitor.
2. Lens-Capturestheviewinthecameraseldofviewandtransmits
videofromthecameratothemonitor.
3. IR LED-InfraredLEDsprovideviewinginno/lowlightconditions.
4. Deterrent Light-Flasheswhenmotionisdetected.
5. PIR Sensor-Detectsmotionwithinthecamera’seldofview.
6. Speaker-Outputssoundfromthemonitorwhenmanualtalkis
enabled.
7. Camera Antenna-Receives&sendssignalstoorfromthemonitor.
8. Pair Button-Whileinpairingmode,pressandholdthepairing
buttontopairthecameratoasinglemonitor.
9. Camera Base-Usethecamerabasetomountthecameraonawall
orotheratsurfaces.

9
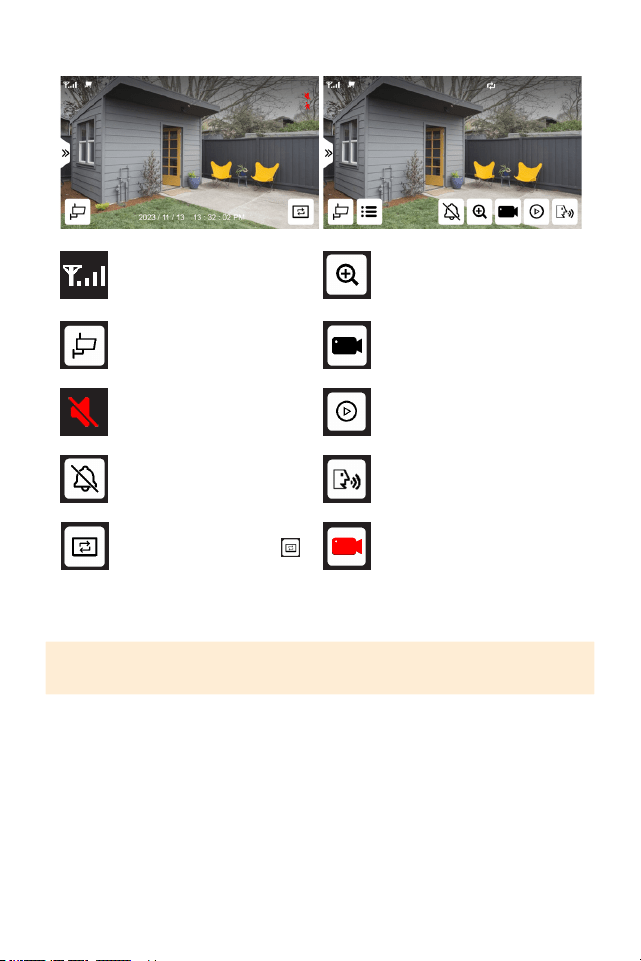
LIVE VIEW
MULTIVIEW MODE
NoMicroSDcardinserted
Camerachannel
Cameravolumemuted
Cameravolumeon
MotionRecordingActivated
Overwriterecordings
Newrecordingssavedto
MicroSDcard.
Cameraisrecording
Entersequencemode(audio
willonlyplayfromtheactive
camera)
OpenQuickAccessMenu
Open Menu
Manuallystartrecording
on all cameras
Manualrecordingonall
camerasin-progress
Enterplaybackmenu
PLEASE NOTE: Cameras can be muted and unmuted in multiview by tapping
When more than one camera is paired, your monitor will only provide sound from
the active camera. All cameras will continue to record audio, even if the camera is
muted in live view mode.
10
SINGLE VIEW MODE
Camerasignalstrengthto
themonitor
Switchcamerachannel
Monitorvolumemuted
Tapandholdtoturnon
sirenonthecamera
Zoominoncameraview
Manuallystartrecording
ontheselectedchannel
Enterplaybackmenu
Pressandholdtotalk
PLEASE NOTE: In single view, to turn the volume on or o, use the volume buttons
at the top of the monitor.
Manualrecordingonthe
selectedchannelin-progress
Toentersequencemode
frommultiviewmodetap
Toexitsequencemodetap
andreturntomultiviewmode,
tapthescreen.
11
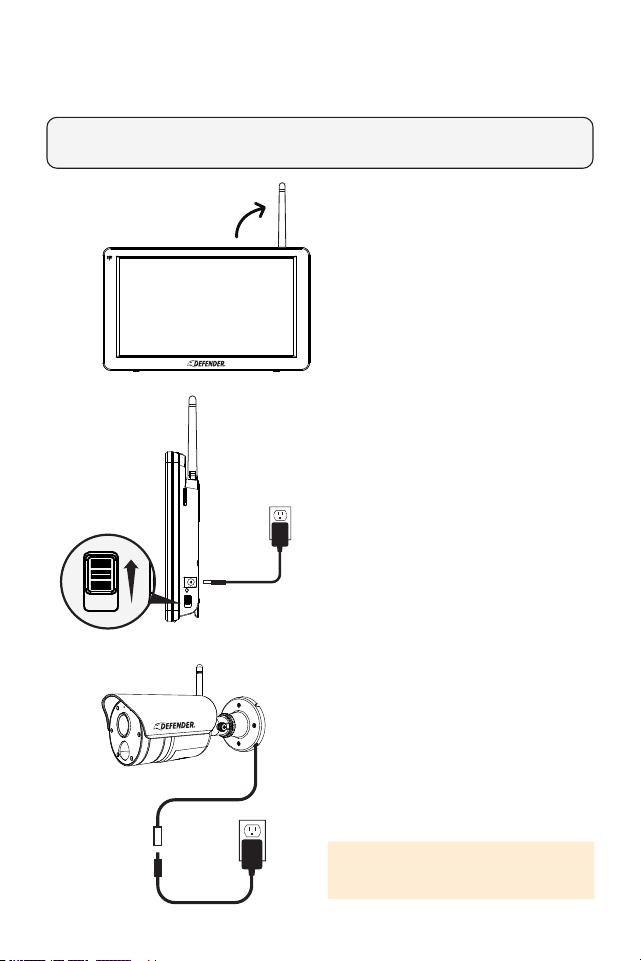
BASIC SYSTEM SETUP
PLEASE READ FIRST!
Verifyallaccessoriesandcompletethemonitorandcamerasetupbeforeinstalling
thecameras.
1. Foroptimalperformanceand
range,lifttheantenna.
2. ConnectthemonitortotheAC
poweradapter,thenconnect
theotherendoftheadapterto
astandardoutletandconrm
thepowerbutton,locatedonthe
right-handsideofthemonitor,is
intheONposition.
3. ConnecteachcameratotheAC
adapter,thenconnecttheother
endoftheadaptertoastandard
outletandextendthecamera’s
antennaintotheuprightposition.
4. Completecameraandmonitor
setup.
IMPOTRANT: The camera power
supply is not waterproof.
12
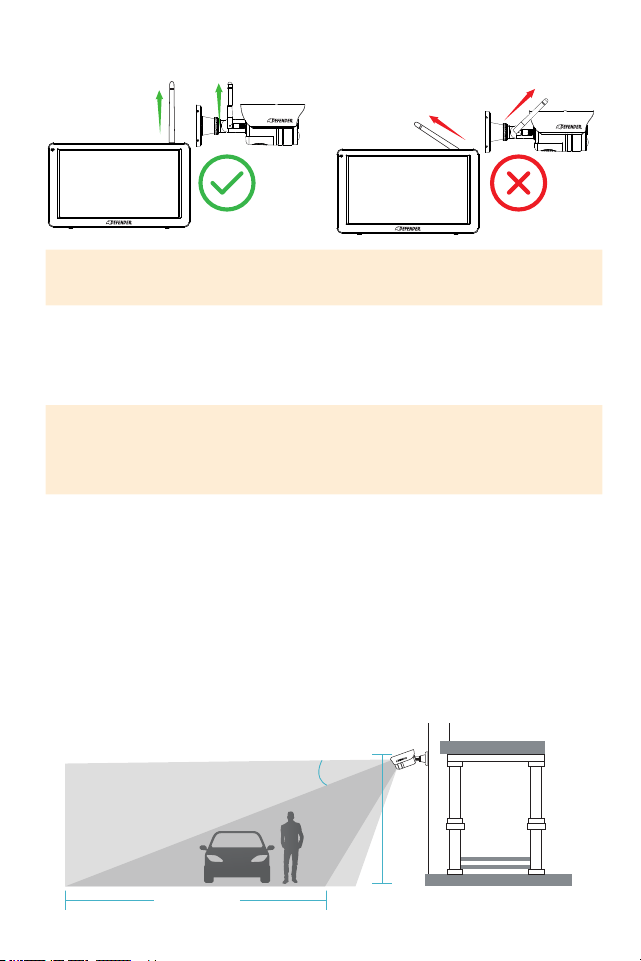
PROPER CAMERA INSTALLATION AND PLACEMENT
PLEASE NOTE: Installing your camera indoors pointing outside through a window,
will result in a glare or reection when “auto” is selected in the night vision
settings. This will also disable the cameras PIR sensor and will not be able to detect
motion outdoors.
IMPORTANT: To achieve the best signal transmission, angle the camera antenna
and the monitor antenna such that they are parallel to each other.
DefenderPhoenixHDsupportsmotiondetection.Motiondetectionisinuencedby
multiplefactorssuchasdistancefromthecamera,thesizeoftheobject,theheight,
angle,anddirectionofthecamera,andyournightvisionsettings.Glasswillalso
disablemotiondetectionaccuracyasthesensorcannotfunctionthroughglass.
1. Anglethecamerasothatobjectsinthecamera’seldofviewappearinthe
bottom2/3ofthecameraimage.
2. Choosealocationwhereobjectsofinterestwillbenofurtherthan33ft(10m)
fromthecamera.
3. Ensurethecameraantennaisplacedinanuprightposition.
8-11 ft
(2.5-3.5 m)
Optimal Motion
Detection Zone
15°
Camera Field
Of View
Up to 33 ft (10 m)
OPTIMAL SIGNAL TRANSMISSION
13
CAMERA SETTINGS
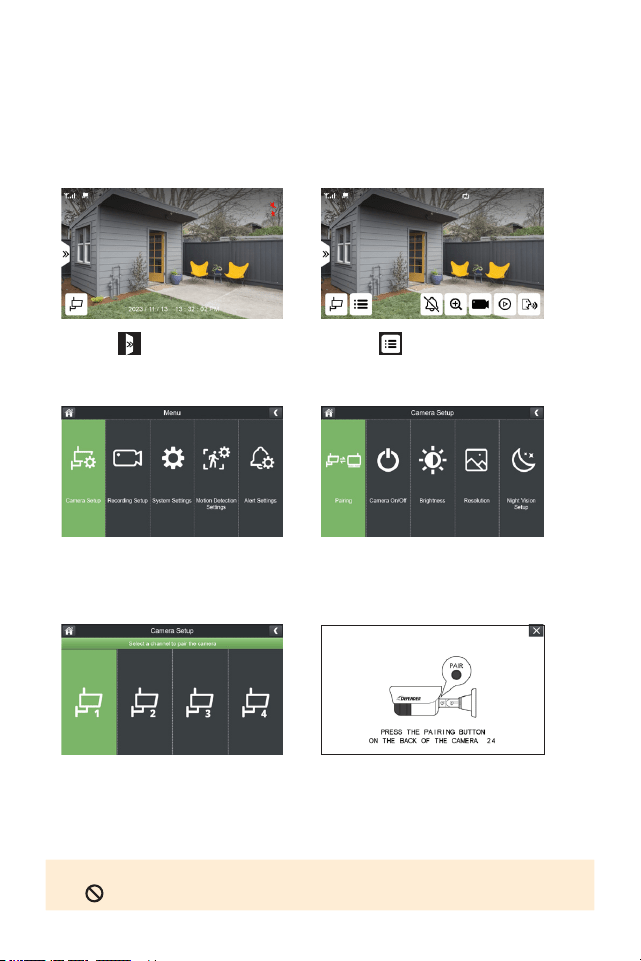
CAMERA SETUP - PAIRING
Yourcamerascomepre-pairedtoyourmonitor.Ifyouhavepurchasedanadditional
cameraorwanttoassignthecamera(s)toadierentchannel,completethefollowing
steps.
1. Select
3. Select Camera Setup
5.Selectachanneltopairthe
camera.
2. Select
4.SelectPairing
6.Pressthepairingbuttonfor3seconds
andrelease.Waitupto1minforyour
camerastosynctoyourmonitorand
displayyourfootage.
TIP: To unpair a camera(s), press and hold the pairing button on the camera until
the appears.
14
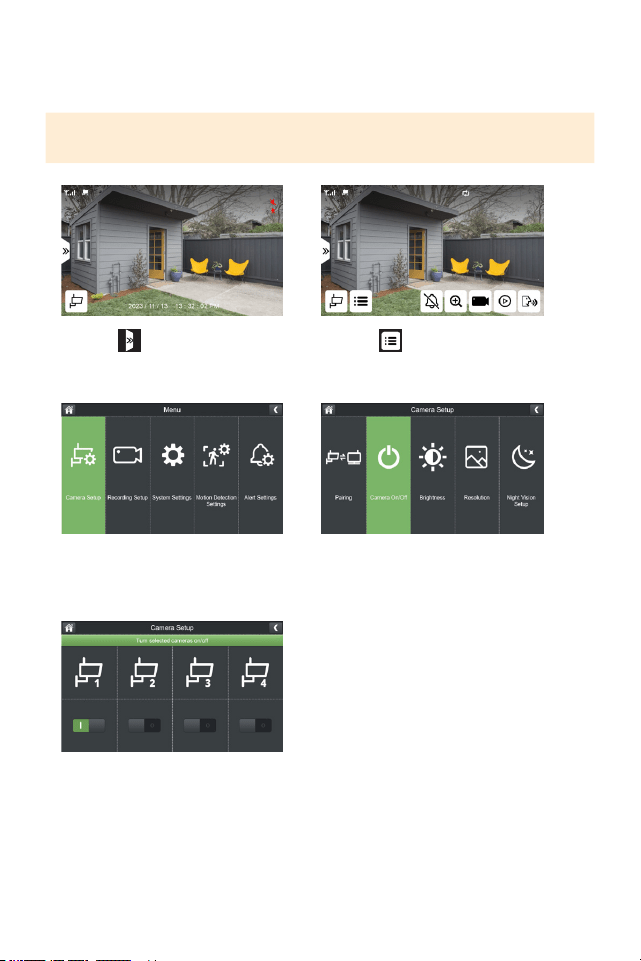
CAMERA ON/OFF
Yoursystemhasaprivacyfeaturebuiltintoallowyoutostoprecordingfromthe
selectedcamerawithoutunpairing.
PLEASE NOTE: If you turn your camera o you will not be able to live view or record
footage until the camera is turned back on.
1. Select
3. Select Camera Setup
5.Toggleonorothecamera(s)
basedonyourpreference.
2. Select
4.SelectCameraOn/O
15
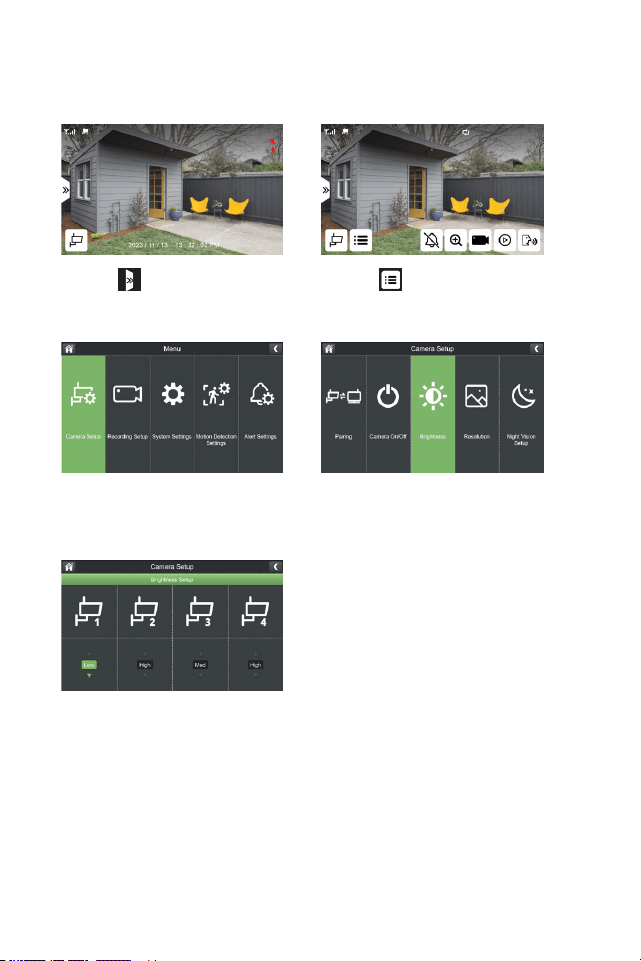
CAMERA BRIGHTNESS
Selectyourcamera’slevelofbrightnessbasedonyourpreference.Testingeach
optionafterinstallingthecameraisrecommended.
1. Select
3. Select Camera Setup
5.SelectyourpreferredBrightness.
Selectlow,med,orhighforeach
camera.
2. Select
4.SelectBrightness
16
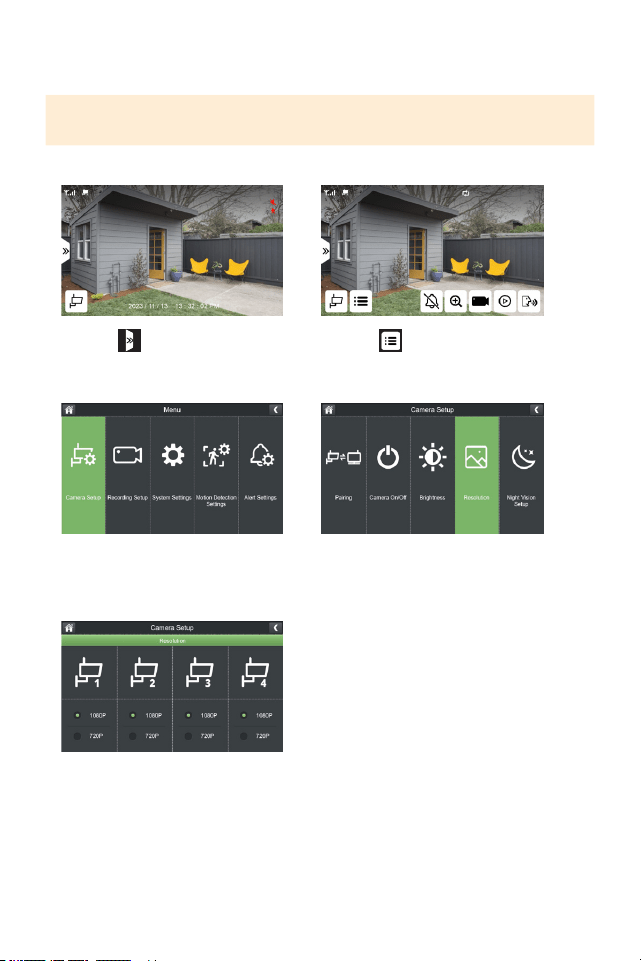
CAMERA RESOLUTION
Thecamera’sdefaultresolutionisHD1080P.
TIP: Reducing the camera’s resolution to 720P, will extend your recording storage
capacity up to 50%.
1. Select
3. Select Camera Setup
5.Selectyourpreferredresolution
foreachcamera.
2. Select
4.SelectResolution

17
NIGHT VISION SETUP
Your camera’s default night vision is set to auto.
Auto:Thecamerawillrecordfullcolorduringthedayandblackandwhiteatnight.
O:Thecamerawillrecordincolorduringtheday.Atnight,thecamera’srecording
colorwillbedependentonambientlighting.
PLEASE NOTE: When Installing your camera indoors pointing outside through a win-
dow, select O to avoid a glare or reection in your live view and recorded footage.
1. Select
3. Select Camera Setup
5.Selectyourpreferrednightvision
settingforeachcamera.
2. Select
4.SelectNightVisionSetup
18
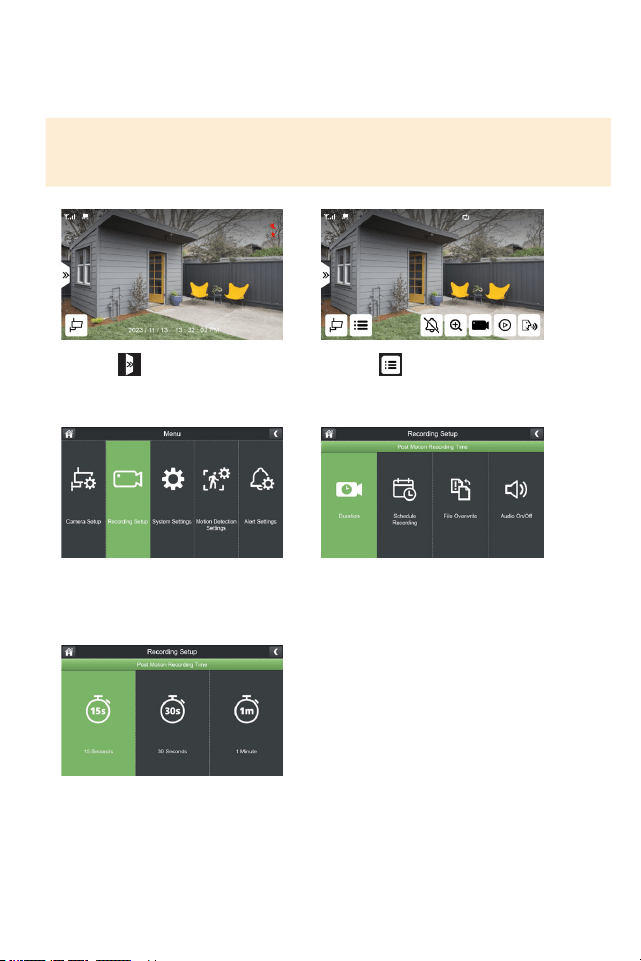
RECORDING SETUP
Duration: Selectthelengthoftimethecamerawillrecordwhenmotionisnolonger
detected.Thedefaultsettingis15seconds.
1. Select
3.SelectRecordingSetup
5.Selectthedurationoftimethe
camerawillrecordwhenmotionis
nolongerdetected.
2. Select
4.SelectDuration
IMPORTANT: By default, the system is set to record on motion only. Make all neces-
sary changes based on your preference. Please note, when setting a manual recording
or scheduled recording, this will override all motion recording settings.
19
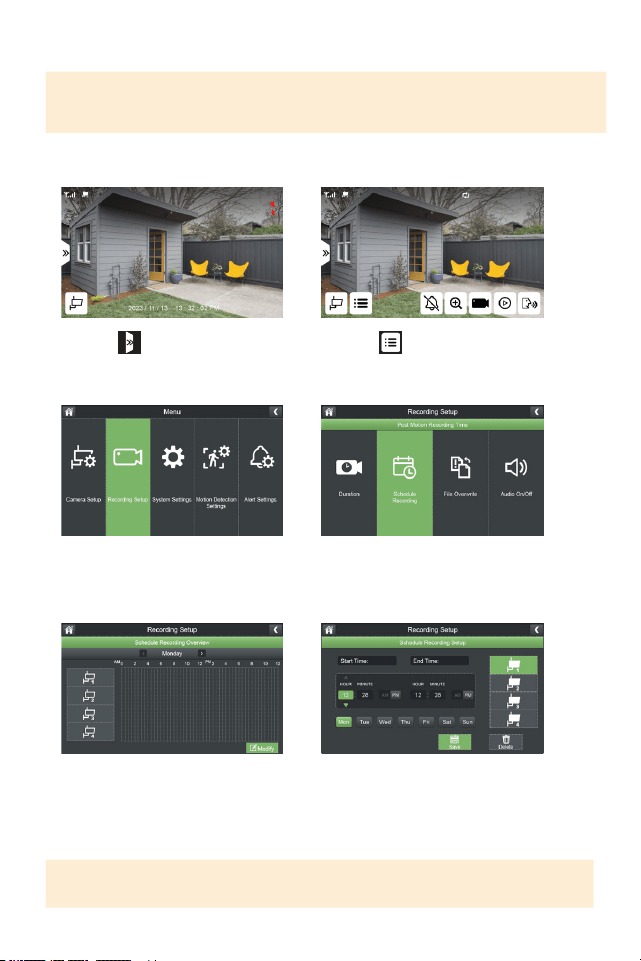
SCHEDULE RECORDING
IMPORTANT: When a recording schedule is set, your camera(s) will record
continuously during that period and override any motion detection settings.
SETTING A SCHEDULE
1. Select
3.SelectRecordingSetup
5.SelectModify 6.Selectthecamera(s)andday(s)
youwanttosetarecordingorand
adjustthestartandendtime.Click
Savetoapplythechanges.
TIP: You can create as many recording schedules as desired. A recording schedule
can be continuous or blocks of time during the day.
2. Select
4.SelectScheduleRecording
20
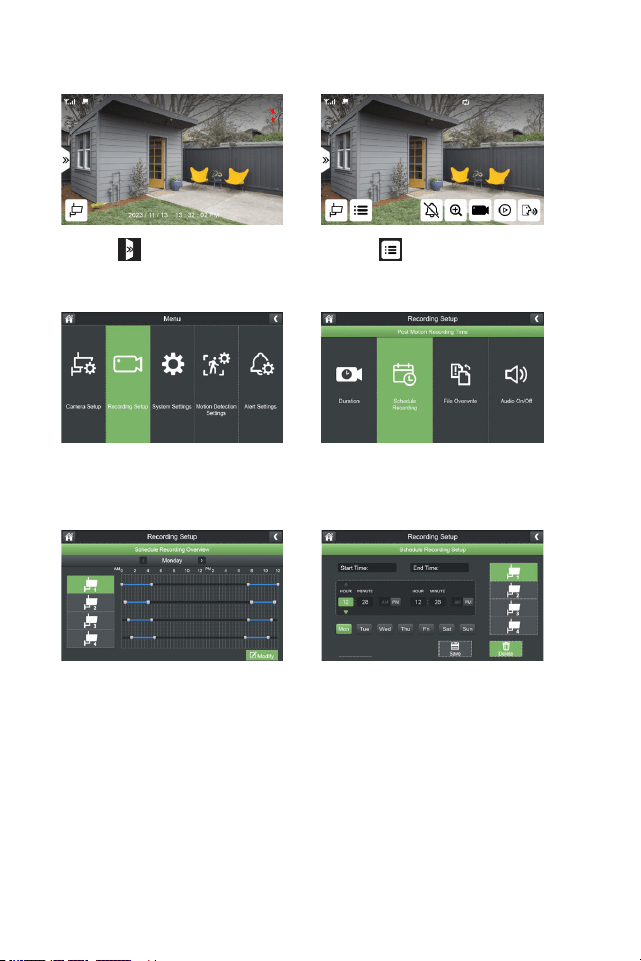
DELETING A RECORDING SCHEDULE
1. Select
3.SelectRecordingSetup
5.SelectModify 6.Selectthecamera(s),day(s)of
theweekandinputthestartand
endtimeofapreviousrecording
schedule.SelectDelete.
*Repeat to delete additional
recording schedules.
2. Select
4.SelectScheduleRecording
21
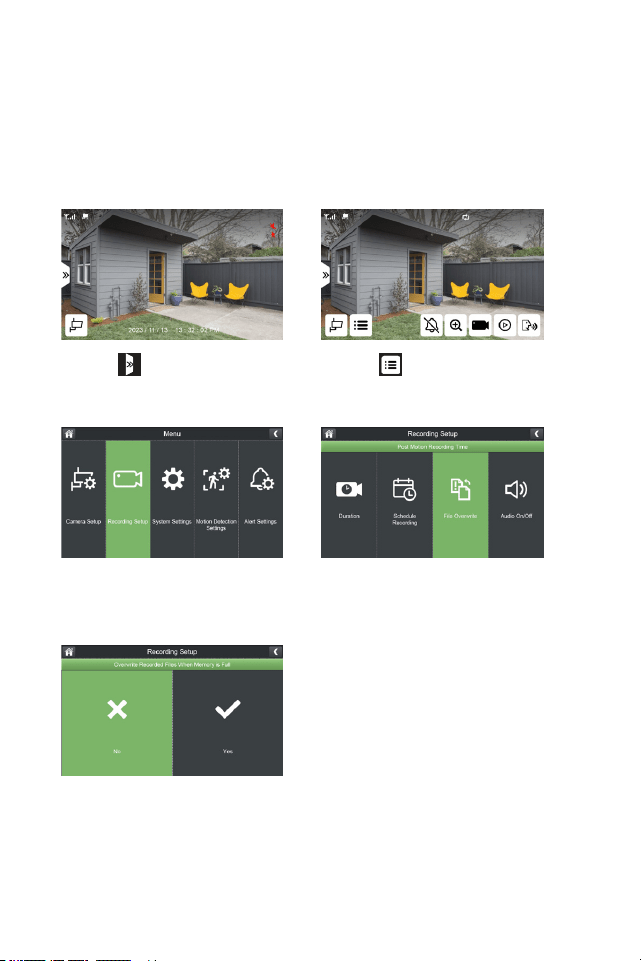
FILE OVERWRITE
RecordingtimevariesdependingonthesizeoftheMicroSDcardinserted.Once
yourcardisfull,oldfootagewillbeoverwrittentoensureyouneverstoprecording.
Thedefaultsettingsaresettooverwrite.Ifyoudonotwishtooverwriteolder
footage,turnothissetting.
1. Select
3.SelectRecordingSetup
5. Select No (X)
2. Select
4.SelectFileOverwrite
22
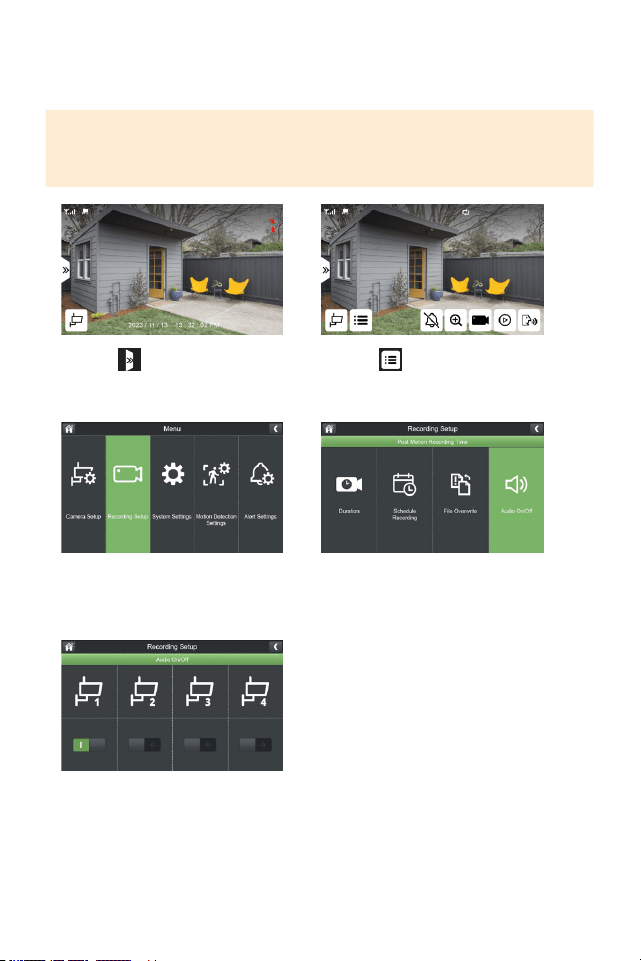
AUDIO ON/OFF
Yourcameraisdefaultedtorecordaudio.Toadjustthissetting,followthesteps
below.
PLEASE NOTE: This function only turns o audio recording only. Audio will be
played in live view. To turn o audio in live view mode, refer to “ LIVE VIEW “ to
turn o monitor audio.
1. Select
3.SelectRecordingSetup
5.Turnon/oaudiorecordingforeach
camerabasedonyourpreference.
2. Select
4.SelectAudioOn/O
23
SYSTEM SETTINGS
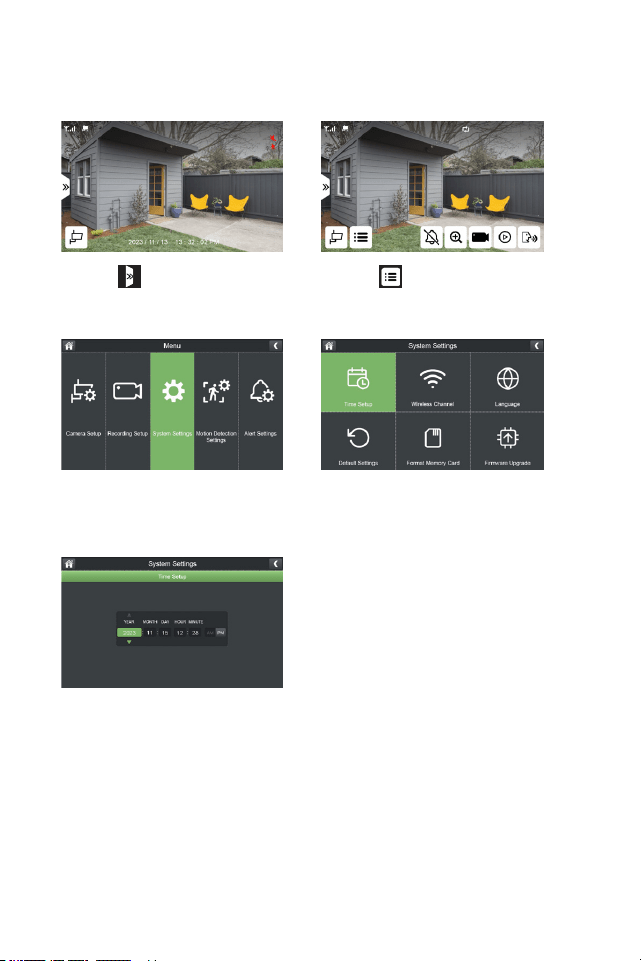
TIME SETUP
1. Select
3.SelectSystemSettings
5.Enteryourcurrentdateandtime.
2. Select
4.SelectTimeSetup
24
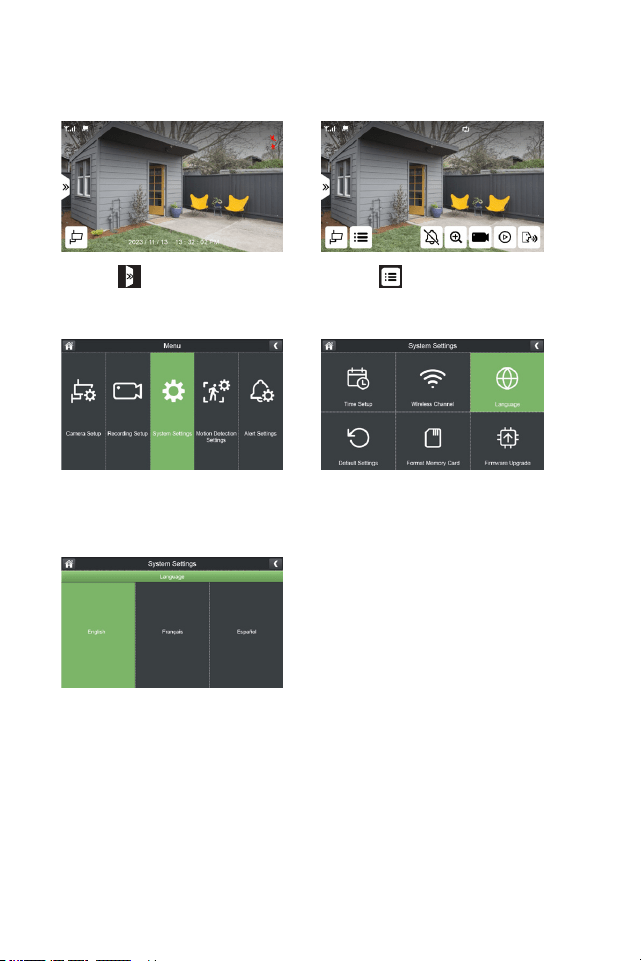
LANGUAGE
Selectyourpreferredmonitorlanguage.DefaultisEnglish.
1. Select
3.SelectSystemSettings
5.Selectyourpreferredlanguage.
2. Select
4.SelectLanguage
25
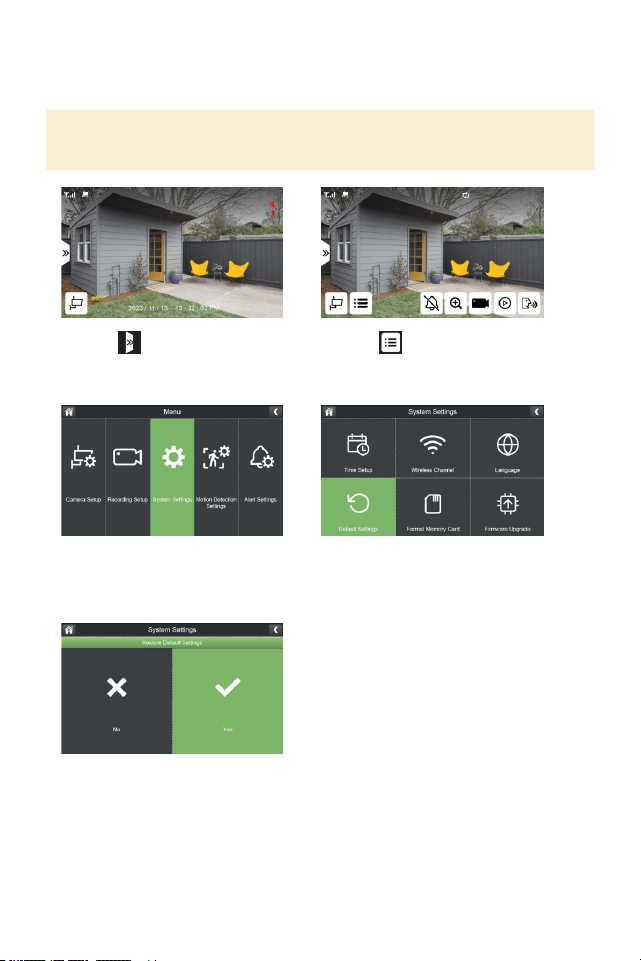
DEFAULT SETTINGS
Toreturnyoursystembacktofactorysettings,restoredefaultsettings.
PLEASE NOTE: All custom settings will be lost however, all previously recorded
footage will remain on the Micro SD card.
1. Select
3.SelectSystemSettings
5. Select Yes
2. Select
4.SelectDefaultSettings
26
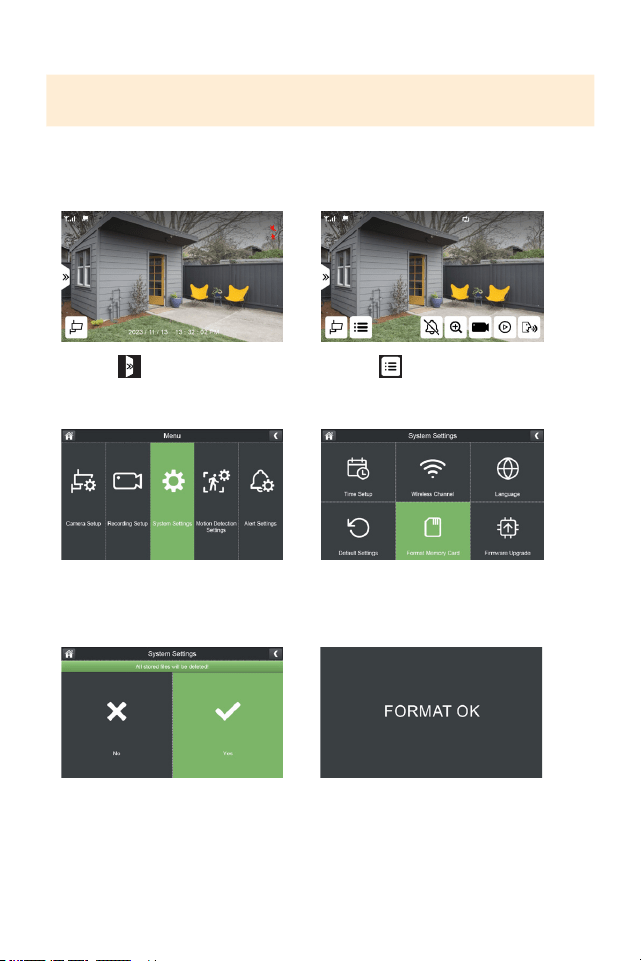
FORMAT MEMORY CARD
IMPORTANT: Formatting your MicroSD card will delete all recordings. This cannot
be reversed.
FormattingyourSDcardmaybenecessarywhenyoureceiveanerrorindicatingthe
SDcardiscorruptedorwhenswappingSDcards.ToformatyourSDcardplease
followthestepsbelow.
1. Select
3.SelectSystemSettings
5. Select Yes 6.Systemwillconrmwhenformatting
iscomplete
2. Select
4.SelectFormatMemoryCard

27
FIRMWARE UPGRADE
PLEASE NOTE: Only complete a rmware upgrade when recommended by Customer
Support. Once completed, your monitor will restart.
1. Select
3.SelectSystemSettings
5.Selectthedevicestoupdate,and
clickYestoconrm.
6.Waitforthesystemtonishupdating.
Oncecompletethemonitorwillreboot.
2. Select
4.SelectFirmwareUpgrade
28
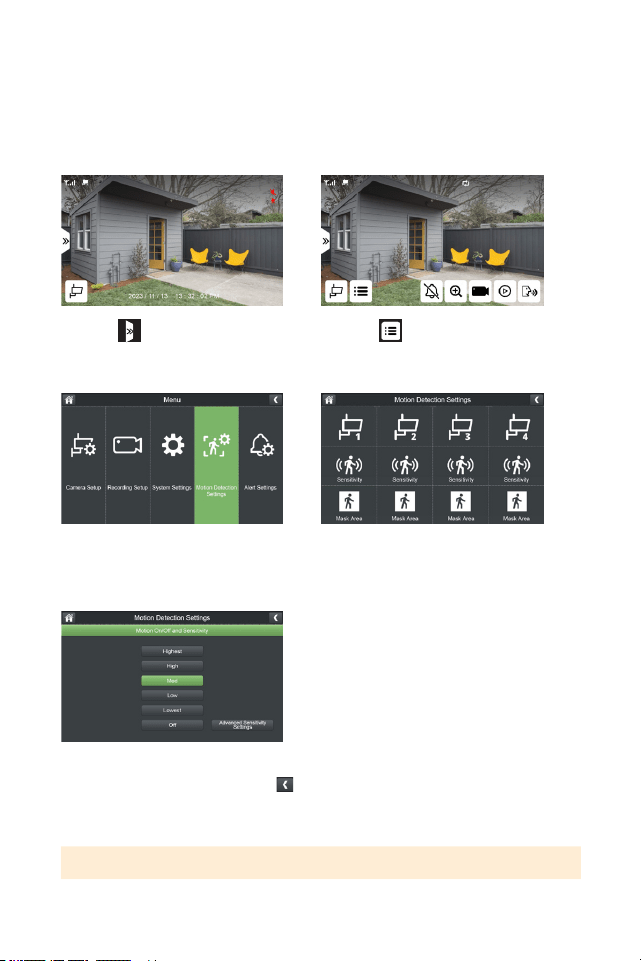
MOTION DETECTION SETTINGS
Customizeyourmotiondetectionsensitivitylevelandmaskareaforeachcamera.
Defaultsensitivityissettomedium.
SENSITIVITY
1. Select
3.SelectMotionDetectionSettings
5.Selectyourpreferredmotion
detectionsensitivitylevelandclick
toreturntothepreviousscreen.
*Repeat for each camera
2. Select
4.SelectSensitivityforthecamera
youwanttoadjustthesettingsfor
TIP: Refer to page 30 for Advanced Sensitivity Settings.
29
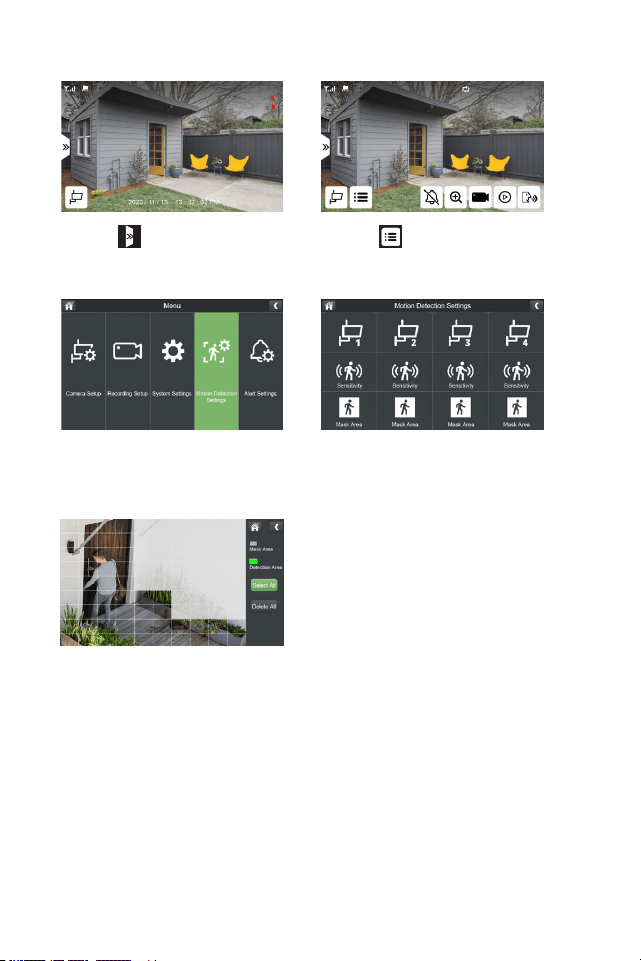
MASK AREA
1. Select
3.SelectMotionDetectionSettings
5.Bydefault,yourcamerawilldetect
motionintheentireeld-of-view.Ifthisis
yourpreferredsetting,skipthisstep.To
lteroutunwantedmotiondetection,tap
thegridtomaskoverareaswhereyoudo
notwishtodetectmotion.Maskedareas
wilappearwhite.
*Repeat for each camera.
2. Select
4.TapMaskArea
30
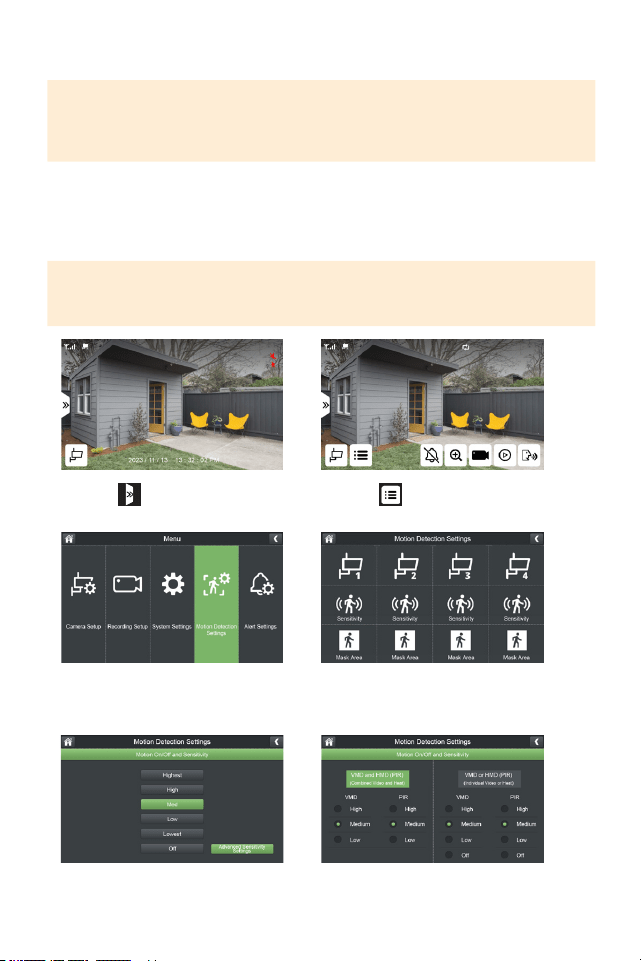
ADVANCED SENSITIVITY SETTINGS
IMPORTANT: These settings are based on the average home and environment.
Typically, no setting change is required. If you are experiencing a signicant
amount of inaccurate motion notications, based on your environment, you can
customize this setting.
VMD:VideoMotionDetectionAlgorithm,optimizesmotiondetectionatawider
rangeandlongerdistances.
HMD/PIR:PassiveInfraredSensor,optimizesmotiondetectioninshortdistances
triggeredbylargeobjectssuchascarsandhumans.
TIP: Shadows will trigger motion alerts if you select VMD or PIR. To avoid alerts
from shadows, select both VMD and PIR. The default setting for medium, is to
reduce false alerts.
1. Select
3.SelectMotionDetectionSettings
5.SelectAdvancedSensitivitySettings 6.Selectyourpreferredsettings.
*Repeat for each camera.
2. Select
4.SelectSensitivityforthecamera
youwanttoadjustthesettingsfor.
31
ALERT SETTINGS
TherearetwotypesofAlerts-MonitorandCamera(s)
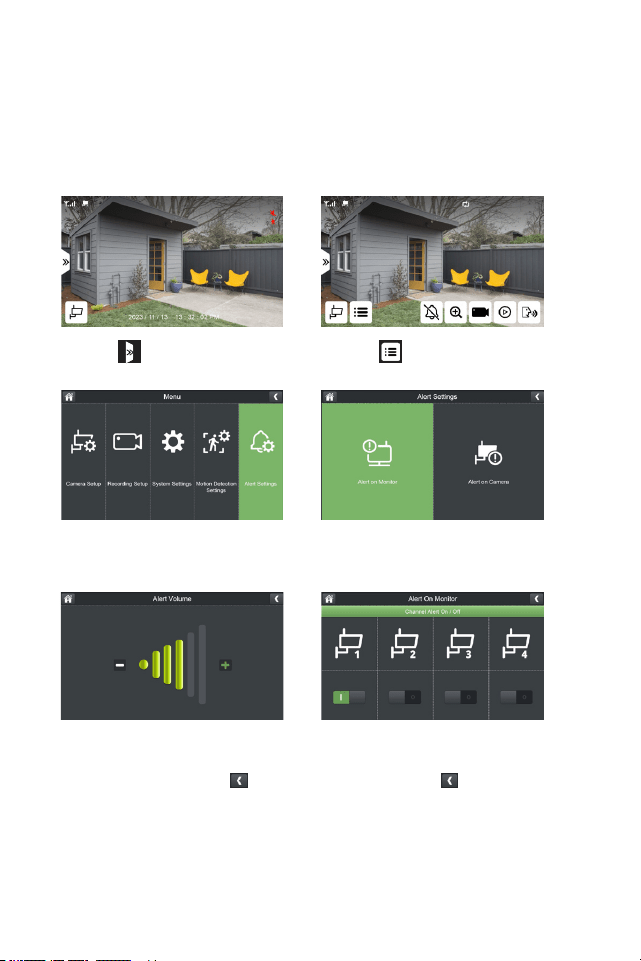
MONITOR ALERT
Whenmotionisdetectedononeormorecameras,themonitorwillbeep.
1. Select
3.SelectAlertSettings
5.SelectAlertVolumetoadjustthe
levelofsoundonyourmonitorusing
the–and+symbols,select once
complete.
6.SelectChannelAlertOn/Otoselect
whichcamera(s)willtriggeranalerton
themonitor,select once complete.
2. Select
4.SelectAlertonMonitor
32
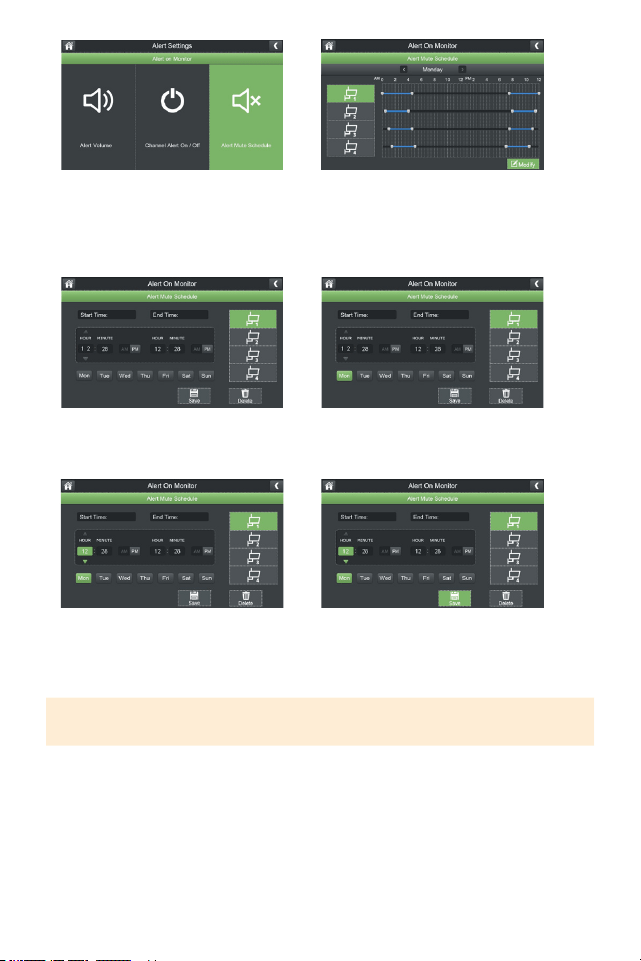
7.SelectAlertMuteScheduletoset
ascheduleofwhenyouDONOT
wantthemonitortoalertyouto
motion.
9.Selectthecamera(s)youwishto
setaschedulefor.
11.Adjustthestartandendtimesto
mutenoticationsformotionalerts.
12.ClickSavetosaveyourschedule.
8.SelectModifytosetaschedule.
10.Selectthedaysoftheweekyou
wishthescheduletoapplyto.
TIP: To remove the schedule, select the camera(s) and dates you wish to delete the
schedule for, put the times you wish to delete and select Delete.
33
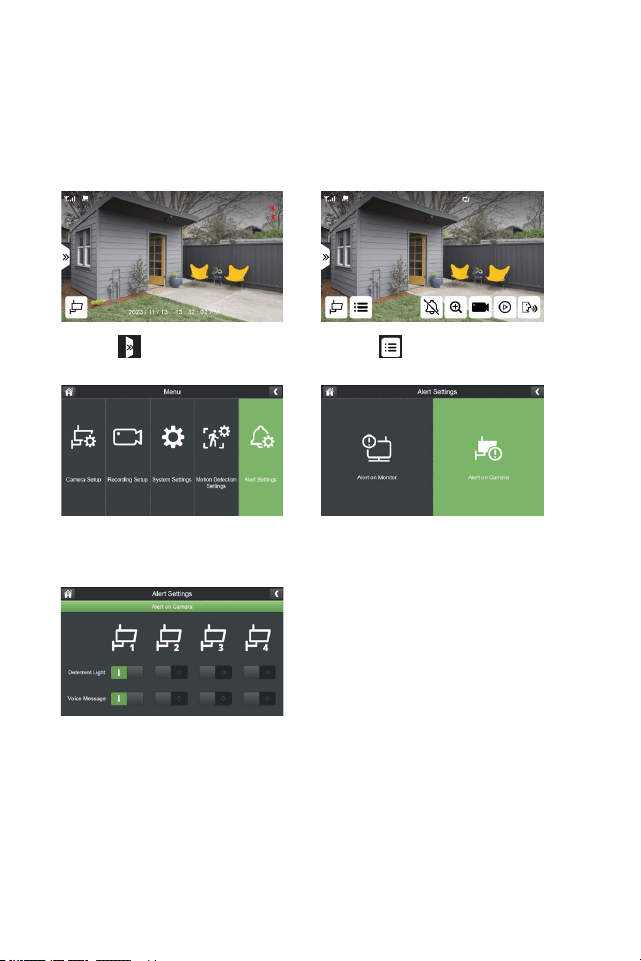
CAMERA ALERT
Therearetwotypesofcameraalerts.
Voice Message:Thecamerawillmakeanannouncement“Thisareaisunder24-hour
surveillance.“
Light: Thedeterrentlightisaredashinglightinfrontofthecamera.
1. Select
3.SelectAlertSettings
5.Selectthecamera(s)youwishto
haveanaudioalertand/ordeterrent
light.
2. Select
4.SelectAlertonCamera
34
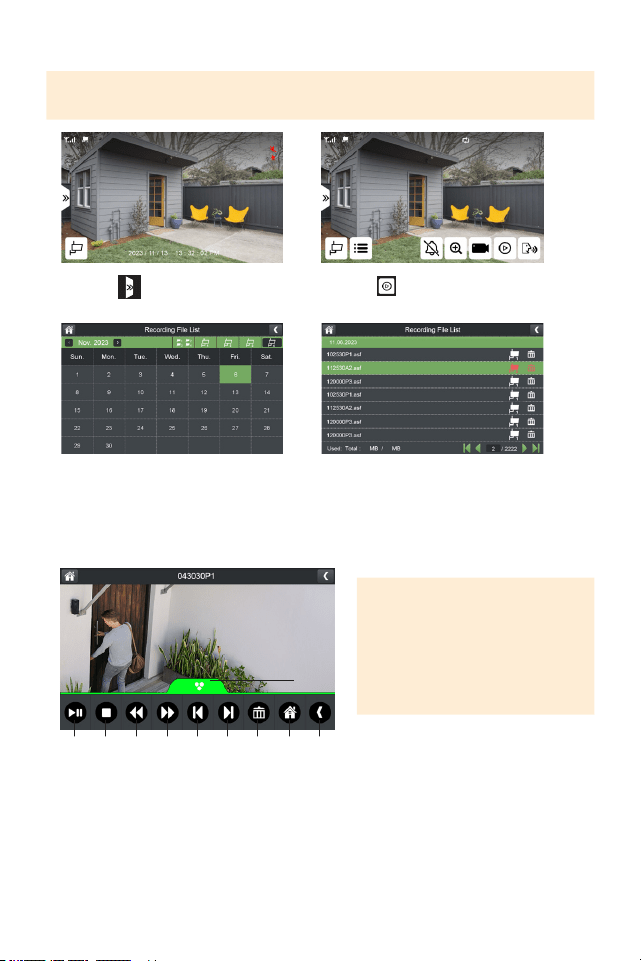
PLAYBACK
1. Select
3.Selectthecameraanddayyou
wishtoplaybackrecordingsfrom.
Dayswithrecordingswillbe
highlightedingreen.
2.Selecttoaccessthe
RecordingFileList.
4.Taptherecordingtoplayback.
1. Playandpauserecording
2. Stopplayback
3. Rewindplaybackupto16x
timesspeed
4. Fast-forwardplaybackup
to16xtimesspeed
5. Gotopreviousrecording
6. Gotonextrecording
7. Deleterecording
8. Returntoliveview
9. Returntorecordinglelist
10. Taptominimizethemenu
1 32 4 5 6 7 8 9
10
TIP: To delete all recordings,
format the SD Card.
TIP: Playback can also be accessed by pressing the Playback button on the top of
the monitor.
PLEASE NOTE: In playback mode,
to turn the volume on or o, use
the volume buttons at the top of
the monitor.

35
FREQUENTLY ASKED QUESTIONS
WHAT TO DO WHEN A CAMERA DOES NOT PAIR SUCCESSFULLY TO THE
PHOENIX HD MONITOR.
Ifyourcamera(s)donotpairautomaticallyafterfollowingthepairingsteps,unplug
yourcamera(s)frompowerforoneminute.Plugthecamera(s)backinandrepeat
thepairingsteps.
WHAT IS THE MAXIMUM SIZE MIRCOSD CARD THAT CAN BE USED IN THE
PHOENIX HD?
ThemaximumsizemircoSDcardis512GB.

NeedHelp?Visit:
DefenderCameras.com/Support
Defenderiscontinuouslyenhancingourproductstobringcustomersthebestuserexperience.Forthemostuptodate
QuickStartGuide,pleasevisitdefendercameras.com.
DEFENDER®doesnotendorseanyDEFENDER®productsforillegalactivities.DEFENDER®isnotresponsibleorliablein
anywayforanydamage,vandalism,theftoranyotheractionthatmayoccurwhileaDEFENDER®productisinusebythe
purchaser.Wereservetherighttochangemodels,conguration,orspecicationswithoutnoticeorliability.Productmaynot
beexactlyasshown.
©2024DEFENDER®.Allrightsreserved.DEFENDER®,theDEFENDER®logoandotherDEFENDER®marksmayberegistered.
AllotherTrademarksarethepropertyoftheirrespectiveowners.
REV0103282024E
